

Page 1

User’s Manual 3
FCC Information
This equipment has been tested and found to comply with limits for a class B digital device,
pursuant to Part 15 of the FCC Rules. These limits are designed to provide reasonable
protection against harmful interference in a residential installation.
This equipment generates, uses, and can radiate radio frequency energy and, if not installed
and used in accordance with the instructions, may cause harmful inteference to radio
Communications. However, there is no guarantee that interference will not occur in a particular
installation.
If this equipment does cause unacceptable interference to radio and television reception, which
can be determined by turning the equipment off and on, the user is encouraged to try to correct
the interference by one or more of the following measures.
Reorient or relocate the receiving antenna.
Increase the separation between the equipment and receiver.
Connect the equipment into an outlet on a circuit different from that to which the
receiver is connected.
Consult the dealer or an experienced Radio/TV technician for help.
FCC ID : MSA 106055
PRODUCT NAME : 19" COLOR MONITOR
MODEL NUMBER : 106055
FCC RULES : TESTED TO COMPLY WITH FCC PART 15, CLASS B
OPERATING ENVIRONMENT : FOR HOME OR OFFICE USE
.
THE PARTY RESPONSIBLE FOR PRODUCT COMPLIANCE
HANSOL MULTITECH, INC.
7001, VILLAGE DRIVE, SUITE 255, BUENA PARK, CA. 90621, USA
TEL : (714)562-5151
User’s Manual2
Introduction
Package 4
Features 5
Safety Information 6
Power Management System 7
Installation
Connection to your computer 7
Pin assignment table D-Sub mini 15 pin connector 8
Controls
Function of controls 8
OSD Menu 9
Troubleshooting
Troubleshooting Guide 13
Specifications
Electrical specifications 14
Mechanical specifications
14
Environmental specifications
14
Appendix
Preset timings
15
English
Page 2

Introduction
User’s Manual4
Caution
Changes or modifications not expressly approved by the party responsible for compliance
could void the user’s authority to operate the equipment.
Warning
If this equipment has more than one interface connector, do not leave cables connected to
unused interfaces.
Canadian Notice
This Class B digital apparatus meets all requirements of the Cannadian Interference Causing
Equipment Regulations.
Avis Canadien
Cet appareil numérique de la classe B respecte toutes les exigences du Règlement sur le
matériel brouilleur du Canada.
Notice
The information contained in this document is subject to change without notice.
Package
First, we would like to thank you for your purchase of this monitor. This monitor is 19inch, high
resolution, color display monitor. This manual covers the use, and points of caution, when
operating this monitor.
Please take the time to read this manual so that you will obtain the best performance and most
use from your monitor. After reading the manual, store it in a safe place for future reference.
This items illustrated below are contained in the carton.
First, be sure that your carton includes the following items.
If any items are missing or damaged, please contact your local dealer or supplier.
106055
- Color Monitor
- AC Power input cable
- User’s Manual (Warranty Registration Card)
- Signal Cable (15pin 3layer D-sub)
Introduction
User’s Manual 5
ENGLISH
Features
19-inch(18 inch visual)high performance display color monitor
Automatically scans frequencies from
- Horizontal frequency: 30 to 96KHz
- Vertical frequency: 47 to 160Hz
Compatible with VGA, SVGA, VESA, MAC Standards and maximum resolution modes up to
1600 1200 and BNC cable is optional.
Supports VESA flicker free modes including 85Hz refresh rate.
On Screen menu fingertip control system to visually select and adjust screen images using
Encode S/W on front panel and on screen menus.
Power supply operates on AC100~240Volt 60/50Hz for use all over the world.
Equipped with DDC 1/2B for Plug & Play capability.
Equipped with an energy-saving feature.
Power management circuit signaled by the computer system, will reduce power consumption
when the computer system is not in use.
Monitors with nonglare/antistatic screens are compliant with MPR
1990 Emissions standards and meets requirements for CE Marking.
TCO : (option)
Page 3
Introduction
User’s Manual6
Safety information
Provided with this monitor is a detachable power supply cord with IEC320 style terminations.
It may be suitable for connection to any UL listed personal computer with similar
configuration. Before making the connection ensure that the voltage rating of the computer
convenience outlet is the same as the monitor and that the ampere rating of the computer
convenience outlet is equal to or exceeds the monitor current rating.
For 120Volt applications use only UL listed detachable power cord with NEMA configuration
5-15P type(parallel blades) plug cap.
For 240Volt applications use only UL listed detachable power cord with NEMA configuration
6-15P type(tandem blades) plug cap.
Use only a power source and connection appropriate for the monitor as indicated on the
marking label.
Slots and openings in the cabinet are provided for ventilation;
these openings must not be blocked or covered. Never push objects of any kind into cabinet
slots or other openings.
Never insert anything metallic into the monitor openings.
Doing so may create a danger of electric shock.
To avoid electric shock, never touch the inside of the monitor.
Only a qualified technician should open the monitor s case.
Unplug the monitor from the wall outlet before cleaning. Do not use liquid cleaners or aerosol
cleaners. Use a damp, lint-free cloth for cleaning.
Install the monitor near an outlet that you can reach easily. Disconnect the product by
grasping the plug firmly and pulling in from the outlet.
Never disconnect it by pulling the cord.
Introduction / Installation
User’s Manual 7
ENGLISH
Power management system
This monitor meets VESA(Video Electronics Standards Association) DPMS(Display Power
Management Signalling)standards. In order for the monitor s power saving feature to function,
the video board or computer must also meet VESA®DPMSTMstandards.
Power management table
Note : The monitor automatically goes through the DPMS steps when it is idle.
To release the monitor from the DPMS condition, press any key on the keyboard.
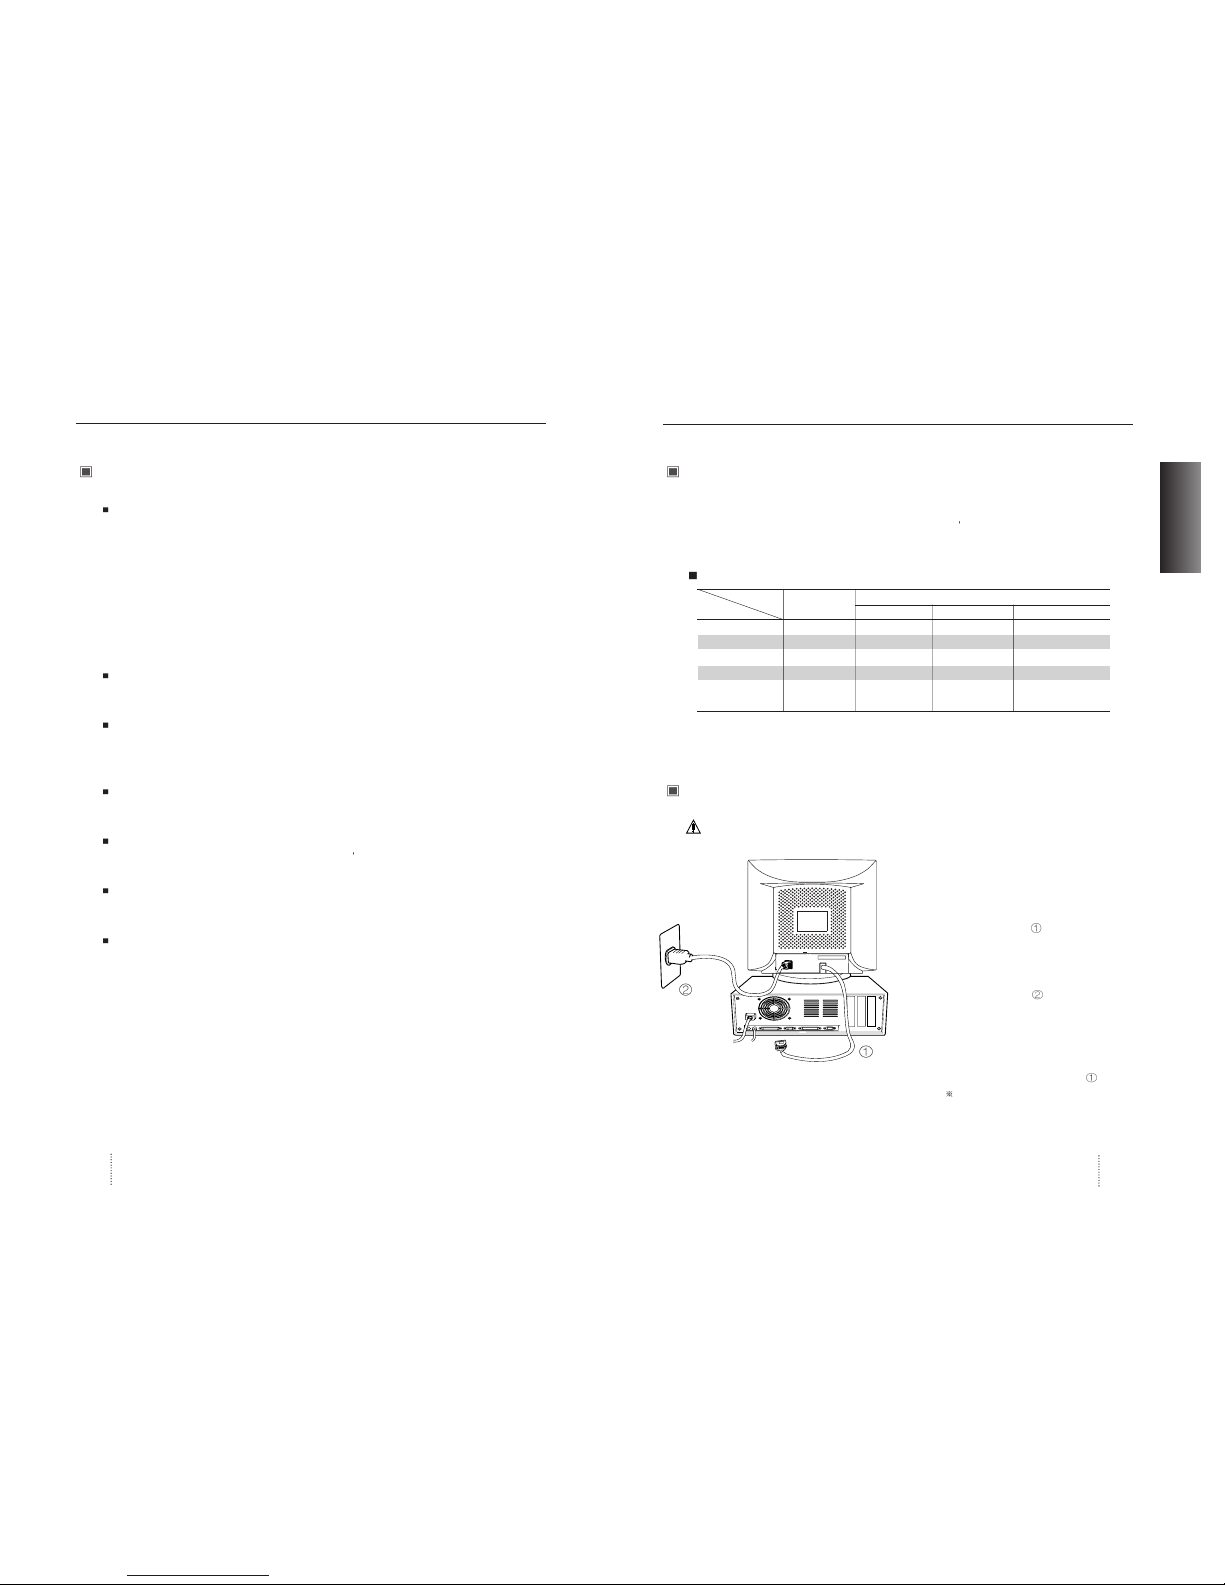
Connection to your computer
CAUTION
Ensure that both the PC and the display monitor are switched off.
To attach the monitor to your system, as shown in
the following illustrations.
1. Connect the signal cable to the 15pin
graphics connector of the system and tighten
the fastening screws.
2. Insert the AC power cord into monitor and
then into an AC power outlet.
3. To turn on the monitor, push the power switch.
Note : To attach the monitor to the Macintosh system, please contact the signal cable to the
2layer 15pin graphics connector of the system. ( The connecting direction of signal
cable is opposite to the IBM compatible system)
Normal
Operation
Standby Suspend Mode Power-Off Mode
Horizontal Active Inactive Active Inactive
Vertical Active Active Inactive Inactive
Video Active Blanked Blanked Blanked
LED Color Green Green/AMBER AMBER AMBER Blinking
Power
110W
Less than Less than Less than
Consumption 80% of MAX 15W 5W
Power saving function mode
State
Sync
Page 4

User’s Manual8
Installation / Controls
Pin assignment table D-Sub Mini 15pin connector
Function of controls
OSD Controls
The OSD apears on the screen when you press MENU ( ) button.
“ON SCREEN MENU” controls include the following extended controls such as Size, Position,
Geometry Distortion, Color temp, Degauss, Moire on & off, Language, OSD-Position, Recall,
Cont & Brt, etc.
Function of OSD buttons on the front of the monitor
Pin No. Assignment
1 Red Video
2 Green Video
3 Blue Video
4 Frame Ground (brown)
5 Ground (blue)
6 Red Video Ground
7 Green Video Ground
8 Blue Video Ground
9 N.C
10 ID (green)
11 N.C
12 SDA (orange)
13 H-Sync (black)
14 V-Sync (yellow)
15 SCL (red)
(15 Pin D-Sub)
15
11 15
6
10
User’s Manual 9
ENGLISH
Additional front controls
Power Switch : Turn the monitor power on or off, When the power is on, the LED is lit.
Accessing OSD
Press MENU( ) Button.
: Direct Brightness access.
: Direct Contrast access.
EXIT from OSD
: Press this ( ) button in the main menu and submenu.
OSD Menus
Main Menu
OSD main menu allows you to adjust user controls.
Use the / : Control buttons to scroll through all of the menus.
Main Menu control guide
: Exits the OSD controls.
/ : Move the function to choose.
: Proceed to the selected menu.
Controls
POSITION
PRESS DO KEY
Position Size Geometry Moire Language
OSD position Color-Temp Degauss Recall Zoom
The 15-Pin D-sub connector (male)
of the signal cable (IBM Systems)
Page 5

User’s Manual10
Controls
Contrast Menu
: Exits the Contrast menu.
/ : Increase or decrease the Contrast.
Brightness Menu
: Exits the Brightness menu.
/ : Increase or decrease the Brightness .
Position Menu
After choosing , Push MENU( ) button.
MEUN( ) : Push this button again & again to change the H/V-position.
: Moves the image vertically up or down.
: Moves the image horizontally left or right.
Size Menu
After choosing , Push MENU( ) button.
MENU ( ) : Push this botton again & agiain to change the H/V-size.
: Increases or Decreases the vertical size of the image.
: Decreases or Increases the horizontal size of the image.
User’s Manual 11
ENGLISH
Controls
Position and size Menu control guide
: Exit to the main menu.
: Refer to
MENU( ) : Toggle position and menu directly.
Geometry Menu
The Geometry controls allow you to adjust the
curvature or angle of displayed image.
Atfer choosing , push MENU( ) button.
Pincushion : Increase or decrease the curvature of the sides either inward or outward.
Parallelogram : Increase or decrease the tilt of the sides either to the left or right.
Trapezoid : Increase or decreases the bottom of the screen to be the same as the top.
Pin Balance : Increase or decrease the curvature of the sides.
Top Corner : Increase or decreases the curvature of the top sides.
Bottom Corner : Increase or decrease the curvature of the bottom sides.
Rotation : Rotate the entire display to clockwise or counterclockwise.
Geometry Menu control guide
: Exit to the main menu.
: Move the function to choose.
MENU( ) : Function to choose.
: Move the bow in the or direction to increase or decrease the adjustment.
Moire Menu
After choosing , Push MENU( ) button.
Select ON or OFF with / key.
Select H.MOIRE or V.MOIRE with / key.
: Adjust the Moire.
CONTRAST
NN
48KHz 60Hz
99%
BRIGHTNESS
PP
50%
31.5KHz 60Hz
H. POSITION
32%
V. POSITION
74%
50%
GEOMETRY
PINCUSHION
PARALLELOGRAM
TRAPEZOID
PINBALANCE
TOP CORNER
BOTTOM CORNER
ROTATION
H. SIZE
43%
V. SIZE
42%
50%
MOIRE CONTROL
H. MOIRE ADJUST
V. MOIRE ADJUST
Page 6

User’s Manual 13
ENGLISH
User’s Manual12
Troubleshooting
Troubleshooting guide
If your monitor is not performing properly, please use the following troubleshooting chart for
quick solutions to common problems.
Controls
Problem
No Picture
Picture is
unstable
The display
image is not
centered, too
small or large.
The color of
image on screen
is abnormal.
Is the power cord connected?
Is the power switch on?
Is the signal cable properly
connected?
Is the monitor in the power save
mode?
Is the signal cable properly
connected?
Are there signals, which are
outside of the required frequency
range?
Is the signal connector pin
assigments correct?
Are there signals, which are
outside of the required frequency
range?
Is the magnetic object nearby?
Is the pin arrangement of the
signal connector correct?
Possible cause
Connect power cord.
Turn on power switch.
Connect signal cable properly
Press any key on the keyboard or
move the mouse.
Connect signal cable properly
Input signals which are within the
range of the monitor.
Use correct signal connector.
Use correct signal which within the
frequency range of the monitor(If
the signal is correct, adjust the
controls to desired image.)
Move object far away.
Use correct signal cable.
Use degauss control.
Remedy
Language Menu
After choosing , Push MENU( )button.
: Select the language.
OSD Position Menu
After choosing , Push MENU( )button.
MENU ( ): Push this button again & again to
change the H/V-position.
: Move the OSD menu Vertical bottom or
Horizontal left.
: Move the OSD menu Vertical top or
Horizontal right.
Color Temp Menu
Presetting Select the desired color setting. The bar is replaced by the color setting choice.
" USER, 6500K, 9300K "
Color adjustment is available only in USER mode.
/ : Move the bar with or key to select the user
MENU( ) : Press MENU button for 5 seconds.
/ : Increcse or decrease the selected coldr adjustment.
: Exit to the main menu.
50%
RB GB BB RG GG BG
USER
COLOR TEMP MENU
USER 6500K 9300K
LANGUAGE
ENGLISH
DEUTSCH
FRANCAIS
ESPAÑOL
PORTUGUÊS
PRESS DO KEY
POSITION
PRESS KEY
Page 7

Appendix
User’s Manual 15
User’s Manual14
Specifications
Preset Timings
This Monitor D19AL has preset modes for the 14 most popular industry standards for Plug and
Play capability.
Video
Sync
Vertical
Video
Sync
Horizontal
Electrical Specifications
Mechanical Specifications
Environmental Specifications
ITEM 106055
CRT Type 19 , 90 deflection
CRT Dot pitch 0.25mm (0.20 in Hor.)
CRT Surface Non-glare, ARASC
H/V Separate, TTL, positive/negative
H/V Composite, TTL, positive/negative
RGB Analog (0.7Vp-p), positive
75 Terminated
30KHz~96KHz (Automatically)
47Hz~160Hz (Automatically)
Maximum Resolution 1600Dots 1200Lines (Non-interlace)
Pixel Clock(Max.) 210 MHz
Display Size (Standard) Horizontal 350mm, Vertical 262mm
Power Consumption 110 W
Power Supply AC 100~240Volt 60/50Hz 3Hz
Input Connector D-Sub, 15Pin Connectors (3layer)
Display Colors Unlimited
ITEM 106055
18.5
(W) 18.4 (D)
18.3 (H)
470mm(W)
466.5mm(D) 466mm(H)
21.1 (W) 24.4 (D) 22.2 (H)
537mm(W)
620mm(D) 564mm(H)
23.3Kg (51.3Ibs)
26.9Kg (52.2Ibs)
ITEM 106055
32
F to 104 F(0C to 40 C)
-4 F to 140 F (-20 C to 60 C)
10% to 85% R.H. Non-condensing
Input
Signal
Dimension
Sync
Video
Carton
Unit
Horizontal
Net
Vertical
Gross
Operating
Storage
Humidity
Scanning
frequency
Weight
Temperature
ENGLISH
VGA/70Hz VGA/60Hz 640/75Hz 640/85Hz 800/75Hz 800/85Hz 1024/75Hz
720
400 640
480 640 480 640
480 800 600 800
600 1024
768
A
sec 31.777 31.777 26.667 23.111 21.333 18.631 16.660
B
sec 3.813 3.813 2.032 1.556 1.616 1.138 1.219
C
sec 1.907 1.907 3.81 2.222 3.232 2.702 2.235
D
sec 25.422 25.422 20.317 17.778 16.162 14.222 13.003
E
sec 0.636 0.636 0.508 1.556 0.323 0.569 0.203
Omsec 14.268 16.684 13.333 11.764 13.333 11.756 13.328
Pmsec 0.064 0.064 0.08 0.069 0.064 0.056 0.050
Qmsec 1.08 1.048 0.427 0.578 0.448 0.503 0.466
Rmsec 12.711 15.253 12.8 11.093 12.8 11.179 12.795
Smsec 0.413 0.318 0.027 0.023 0.021 0.019 0.017
H-Polarity Negative Negative Negative Negative Positive Positive Positive
V-Polarity Positive Negative Negative Negative Positive Positive Positive
Resolution
Timing
H-Freq 31.469 31.469 37.5 43.269 46.875 53.674 60.023
V-Freq 70.09 59.94 75 85.008 75 85.061 75.029
Pixel rate 28.322 25.175 31.500 36 49.5 56.25 78.750
IBM
VESA
1024/85Hz 1280/75Hz 1280/85Hz 1600/75Hz 640/67Hz 832/75Hz 1152/75Hz
1024
768 1280 1024 1280 1024 1600 1200 640 480 832 624 1152 870
A
sec 14.561 12.504 10.971 10.667 28.571 20.11 14.560
B
sec 1.016 1.067 1.016 0.948 2.116 1.117 1.280
C
sec 2.201 1.837 1.422 1.501 3.175 3.91 1.440
D
sec 10.836 9.481 8.127 7.901 21.164 14.524 11.520
E
sec 0.508 0.119 0.406 0.316 2.116 0.559 0.320
Omsec 11.765 13.329 11.761 13.333 15 13.414 13.322
Pmsec 0.044 0.038 0.033 0.032 0.086 0.06 0.044
Qmsec 0.524 0.475 0.579 0.491 1.114 0.784 0.568
Rmsec 11.183 12.804 11.235 12.800 13.714 12.549 12.667
Smsec 0.015 0.013 0.011 0.011 0.086 0.02 0.044
H-Polarity Positive Positive Positive Positive Negative Negative Negative
V-Polarity Positive Positive Positive Positive Negative Negative Negative
VESA
MACINTOSH
H-Freq 68.677 79.976 91.146 93.75 35 49.726 68.681
V-Freq 84.997 75.025 85.024 75.000 66.667 74.551 75.062
Pixel rate 94.5 135 157.5 202.5 30.24 57.284 100
Resolution
Timing
 Loading...