

Page 1

1
Notice to the user
Government
law prohibits the operation of unlicensed radio transmitters within
the territories under government control.
Illegal operation is punishable by fine or imprisonment or both.
THANK
YOU
We are grateful you choose BelF
one series professional radio
communications products!
Since 1989, BelFone has been always engaging in research and exploration of
radio communications technologies, In order to lead intelligent technologies in
the industry. We still make every effort to research and design products
according to modern complicated communications environment, and we offer
complete and customized communication solutions to clients. Our products will
satisfy you because of its excellent performance and outstanding
communications strength. No matter what field you are in. You will be Satisfied
with the radio.
digital transceiver model: B
F-TD511 UHF
Warning!
Any Changes or modifications not expressly approved by the party
responsible for compliance could void the user's authority to operate the
equipment.
This device complies with part 15 of the FCC Rules. Operation is subject to the
following two conditions: (1) This device may not cause harmful interference,
and (2) this device must accept any interference received, including
interference that may cause undesired operation.
Page 2

2
Note:
This equipment has been tested and found to comply with the limits for a
Class B digital device, pursuant to part 15 of the FCC Rules. These limits are
designed to provide reasonable protection against harmful interference in a
residential installation. This equipment generates, uses and can radiate radio
frequency energy and, if not installed and used in accordance with the
instructions, may cause harmful interference to radio communications.
However, there is no guarantee that interference will not occur in a particular
installation. If this equipment does cause harmful interference to radio or
television reception, which can be determined by turning the equipment off and
on, the user is encouraged to try to correct the interference by one or more of
the following measures:
—Reorient or relocate the receiving antenna.
—Increase the separation between the equipment and receiver.
—Connect the equipment into an outlet on a circuit different from that to which
the receiver is connected.
—Consult the dealer or an experienced radio/TV technician for help.
FCC radiation exposure statement
This radio is intended for use in occupational/controlled applications where users
have been made aware of the potential risks for exposure and can exercise control
over their exposure.
This product is not authorised for general population, consumer or similar use.
This transmitter must not be co-located or operated in conjunction with any other
antenna or transmitter. Your radio should be used in its normal operating position
when hand-held, worn on the body or secured within a cradle. Always ensure that the
antenna is pointed away from the body, particularly the eyes. When body-worn, the
radio must be secured using a Sepura approved attachment. Ensure the antenna is at
least 2.5 cm (1 in.) away from the body when transmitting.
IC radiation exposure statement
This radio is intended for use in occupational/controlled applications where users
have been made aware of the potential risks for exposure and can exercise control
over their exposure.
This product is not authorised for general population, consumer or similar use. This
transmitter must not be co-located or operating in conjunction with any other antenna
Page 3

3
or tran
smitter.
This transmitter must not be co-located or operated in conjunction with any other
antenna or transmitter. Your radio should be used in its normal operating position
when hand-held, worn on the body or secured within a cradle. Always ensure that the
antenna is pointed away from the body, particularly the eyes. When body-worn, the
radio must be secured using a Sepura approved attachment. Ensure the antenna is at
least 2.5 cm (1 in.) away from the body when
transmitting.
Cette radio a été conçue pour un usage professionnel dans un environnement contrôlé,
où les utilisateurs sont pleinement conscients du danger potentiel de l’exposition à
laquelle ils sont soumis et peuvent exercer un contrôle sur cette exposition. Ce
dispositif radio N’EST PAS autorisé pour l’ensemble de la population, les
consommateurs en général, ni pour une
utilisation similaire. Cet émetteur ne doit pas être co-localisés ou
fonctionner en conjonction avec une autre antenne ou émetteur.
RSS (Category I Equipment):
This device complies with Industry Canada licence-exempt RSS standard(s).
Operation is subject to the following two conditions:
(1) this device may not cause interference, and
(2) this device must accept any interference, including interference that may
cause undesired operation of the device.
Le présent appareil est conforme aux CNR d'Industrie Canada applicables aux
appareils radio exempts de licence. L'exploitation est autorisée aux deux conditions
suivantes : (1) l'appareil ne
doit pas produire de brouillage, et (2) l'utilisateur de l'appareil doit accepter tout
brouillage radioélectrique subi, même si le brouillage est susceptible d'en
compromettre le fonctionnement
Transmit no more than the rated duty factor of 50% of the time. To transmit(talk), push the
Push-To-Talk(PTT) Bottom. To receive calls, release the PTT button. Transmitting 50% of the
time or less is important because this radio generates measureable RF energy exposure only
when transmitting (in terms of measuring for standards compliance)
Page 4

4
Pr
ecautions
It’s important that the operator is aware of and understands hazards common
to the operation of any radio .Please observe the following safety precautions
to prevent radio damage or personal injury. The following precautions shall be
observed during operation, service and repair of this radio.
◆The recommended usage rate is 1 minute for TX and 4 minutes for RX,
when the radio is used for transmission for many hours continuously, the
radiator and chassis will become hot, allow the rear panel of the radio to
contact surface of low melting point /low Ignition point object;
◆Don’t leave the transceiver in direct sunlight for a long time, don’t place the
transceiver on extremely heat, damp, dusty area, and don’t put it on unstable
surfaces;
◆When restriction or warnings are posted regarding the use of radio devices,
please obey the regulation turn the transceiver power off;
◆Use of the radio while you are driving may be against traffic laws, please
prohibit using it ;
◆If you notice any problems on the radio, please turn off a
t first. Then contact
with local dealer.
Do not modify this radio unless instructed by this manual or
refer service to a qualified licensed or certified technician only;
◆If you want to use the machine for secondary development, please contact
with BelFone’s technical engineer or dealer for technical assistance;
◆Please keep the surface of radio is clean and dry, clean the radio using a
Page 5

5
cloth moistened with clean water and a mild dishwashing liquid.
Content
Supplied Accessories ........................................................................................................ 6
Installation of Accessories ................................................................................................. 7
Getting Acquainted.......................................................................................................... 12
Basic Operation .............................................................................................................. 14
LCD Icons ................................................................................................................ 14
Turning the power on /off ......................................................................................... 14
Adjusting the volume ................................................................................................ 15
Selecting a Channel ................................................................................................. 15
Selecting a Zone ...................................................................................................... 15
Dual Modes Switching ............................................................................................. 16
Call ........................................................................................................................... 16
Button Setting .......................................................................................................... 19
Functions and Operations ............................................................................................... 21
Contacts ................................................................................................................... 21
Scan ......................................................................................................................... 23
Zone ......................................................................................................................... 24
SMS ......................................................................................................................... 24
Call Logs .................................................................................................................. 26
Settings .................................................................................................................... 27
Digital Emergency .................................................................................................... 30
Alone Worker ........................................................................................................... 31
Man Down ................................................................................................................ 32
Voice Encryption ...................................................................................................... 32
Dual Capacity Direct Mode ...................................................................................... 33
Radio Priority-Based Interrupt .................................................................................. 33
Time Out Timer (TOT) ............................................................................................. 34
TX Permission .......................................................................................................... 34
Battery Saver ........................................................................................................... 34
Low Battery Warning ................................................................................................ 35
Specifications .................................................................................................................. 35
Statement ........................................................................................................................ 36
Page 6
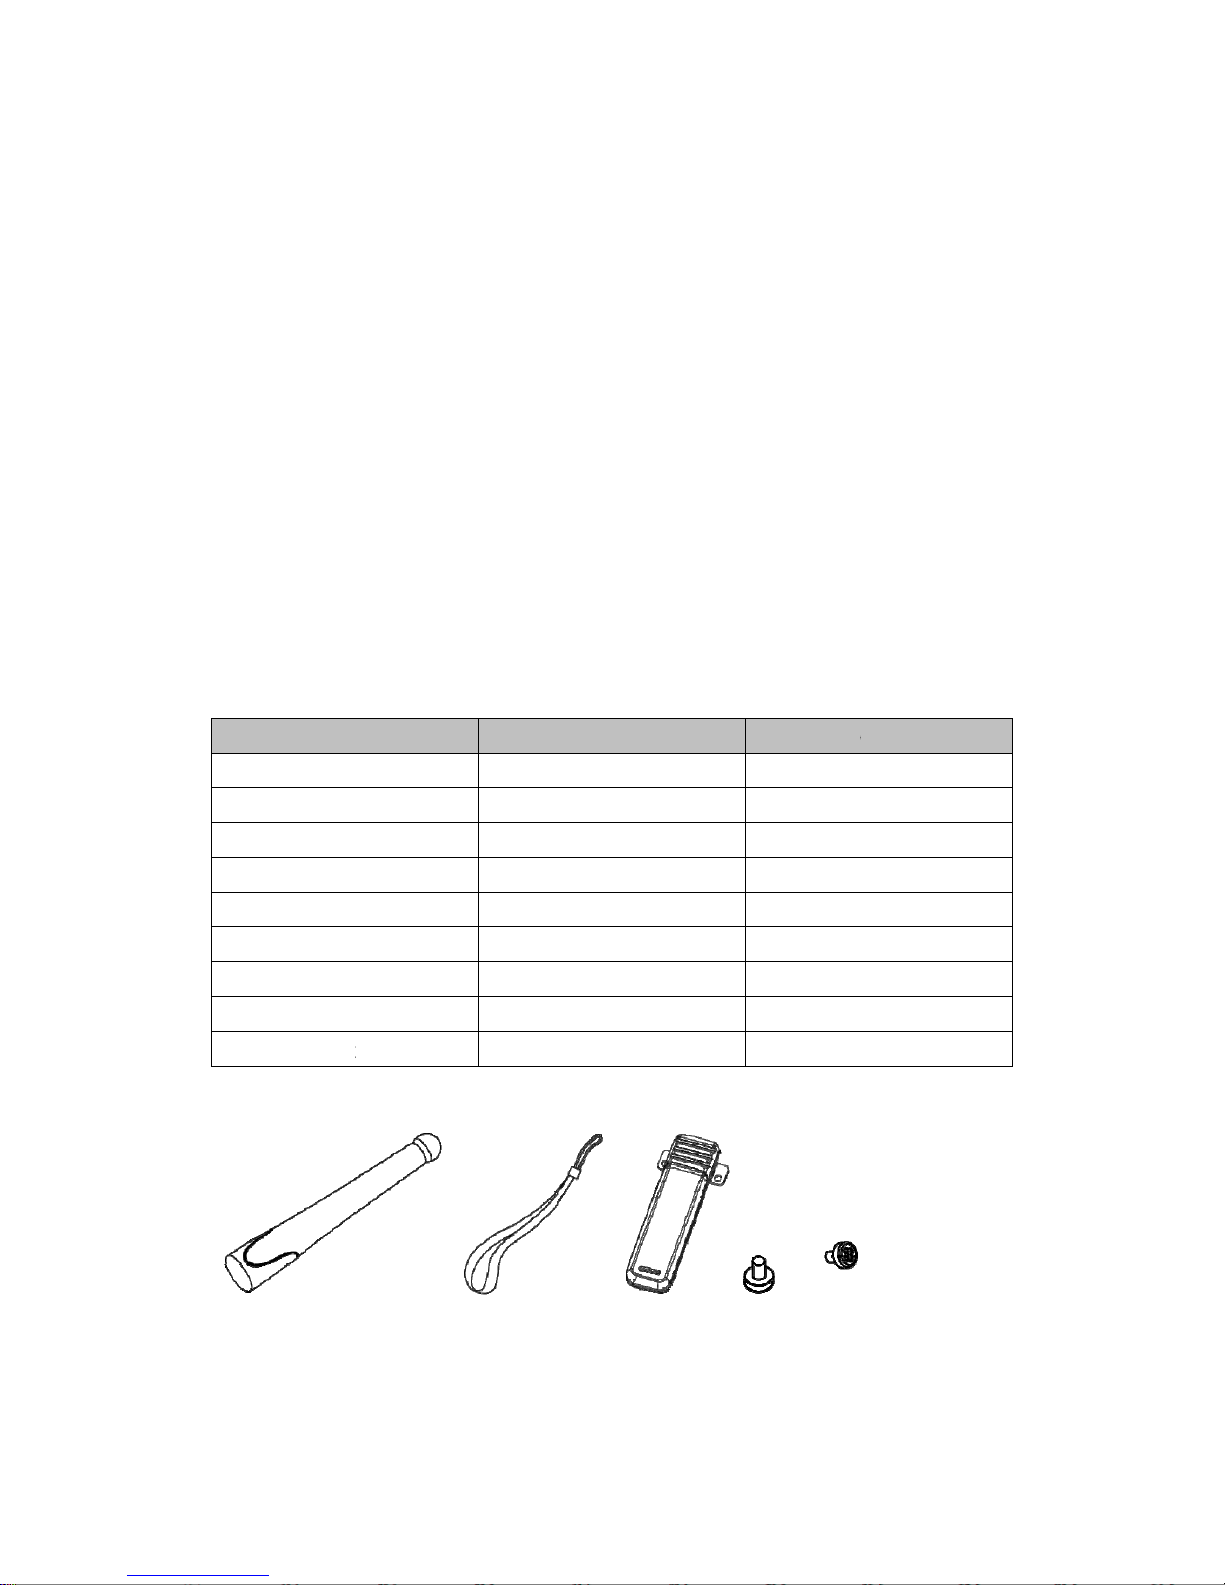
S
u
N
Bel
F
tab
ple
a
A
c
An
tCha
pplie
otes: The
a
one a
gent
s
After
car
e
le
below. I
se cont
a
c
cesso
r
Items
Antenna
Strap
Belt Clip
Charger
Li-ion Ba
Screws
User Ma
n
Warrant
y
Certifica
t
enna
rge
r
d Acc
e
ccessorie
s
or factorie
s
fully
unp
a
f
any item
t with dea
ies
ttery
ual
C
ard
e
ssori
e
li
sted belo
w
.
c
king the
s are mis
s
ler immed
6
s
are cover
e
transceiv
e
ing
or ha
v
iately.
Numb
e
Strap
d by BelFo
r,
identif
y
e
been d
a
r
B
e
Li-io
ne
dealer、
the item
s
maged
d
u
Q
lt Clip
n Battery
aut
horized
listed in
ring
ship
m
Q
uantity
1
1
1
1
1
1
1
1
1
Screws
the
ent
Page 7
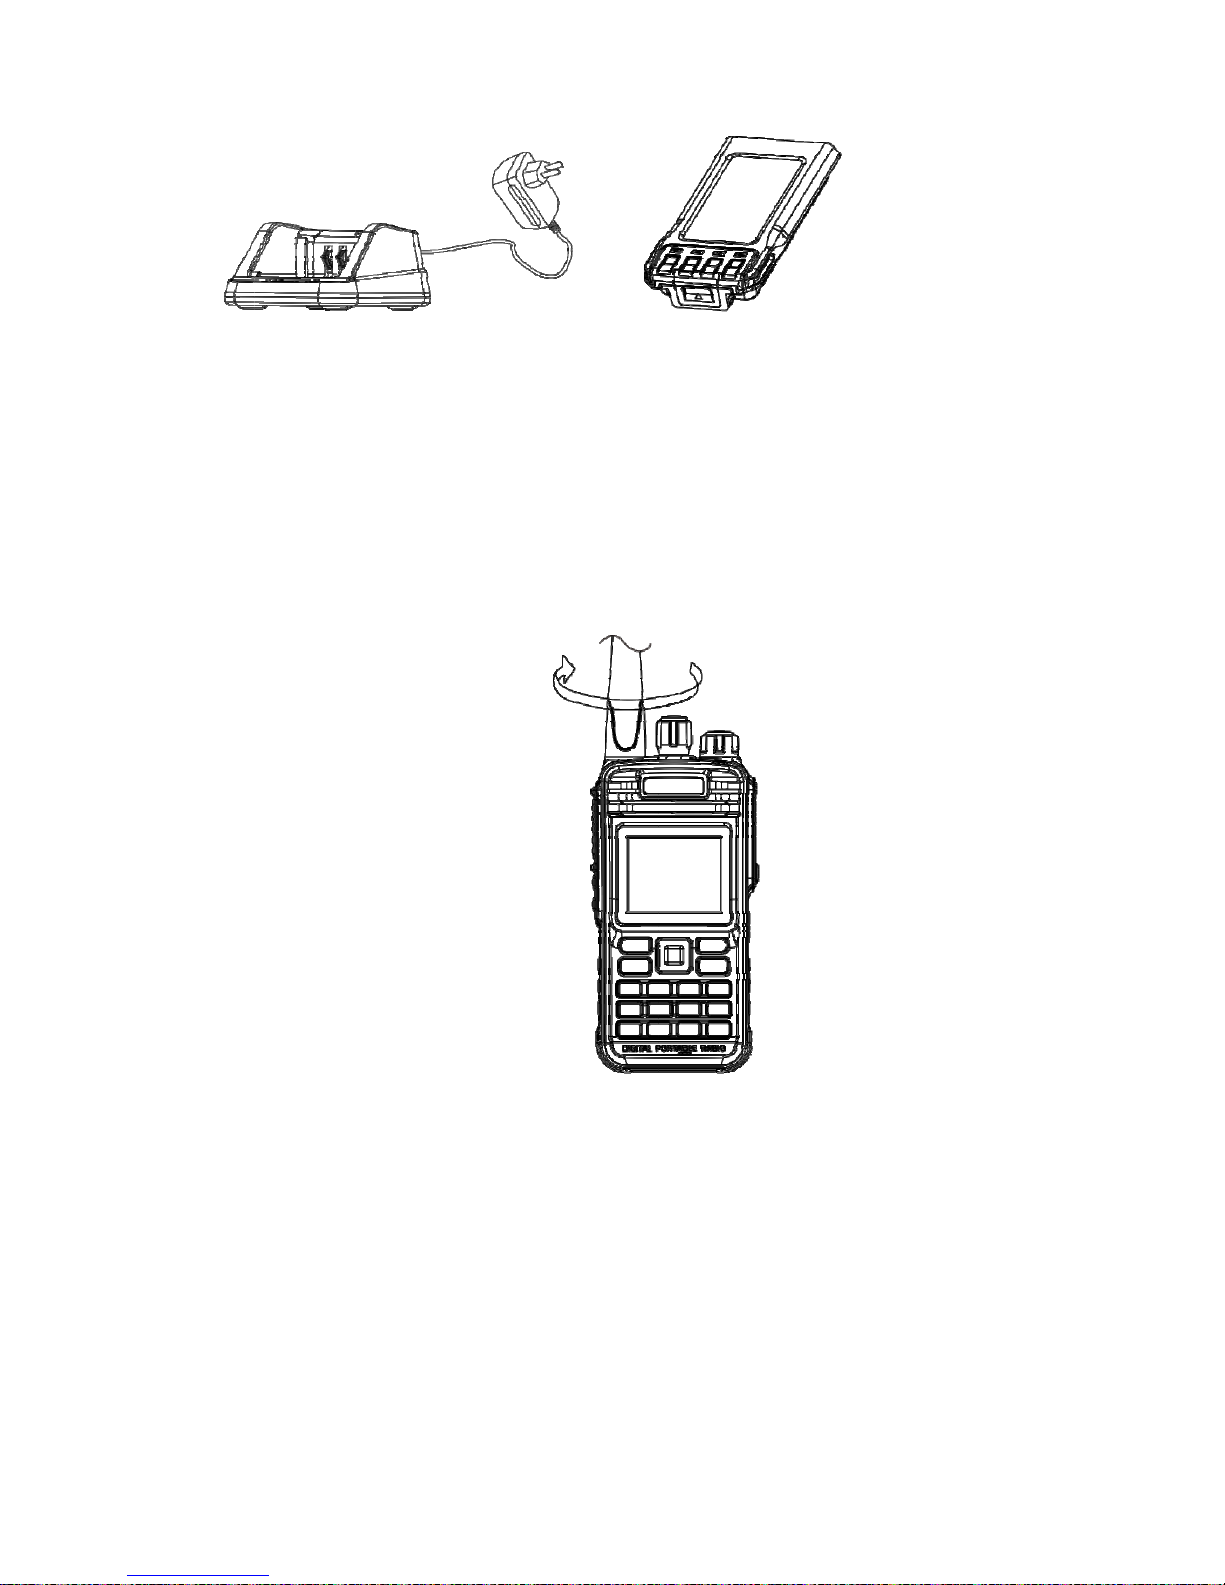
I
n
In
s
Hol
top
Tu
r
In
s
Atta
stalla
tallati
o
d the sup
p
panel of t
h
n the ante
tallati
o
ch the be
tion o
f
n/ rem
o
lied ante
n
e radio u
n
nna anti-c
l
n/ rem
o
lt clip usin
g
Acc
e
ving t
h
na by its
b
til fasten.
ockwise t
o
ving t
h
the two
s
7
ssori
e
e ante
n
ase, then
remove i
t
e belt
c
upplied3*
4
s
na
screw it i
n
.
lip
mm bindi
to the co
n
ng screw
s
nector o
n
.
the
Page 8
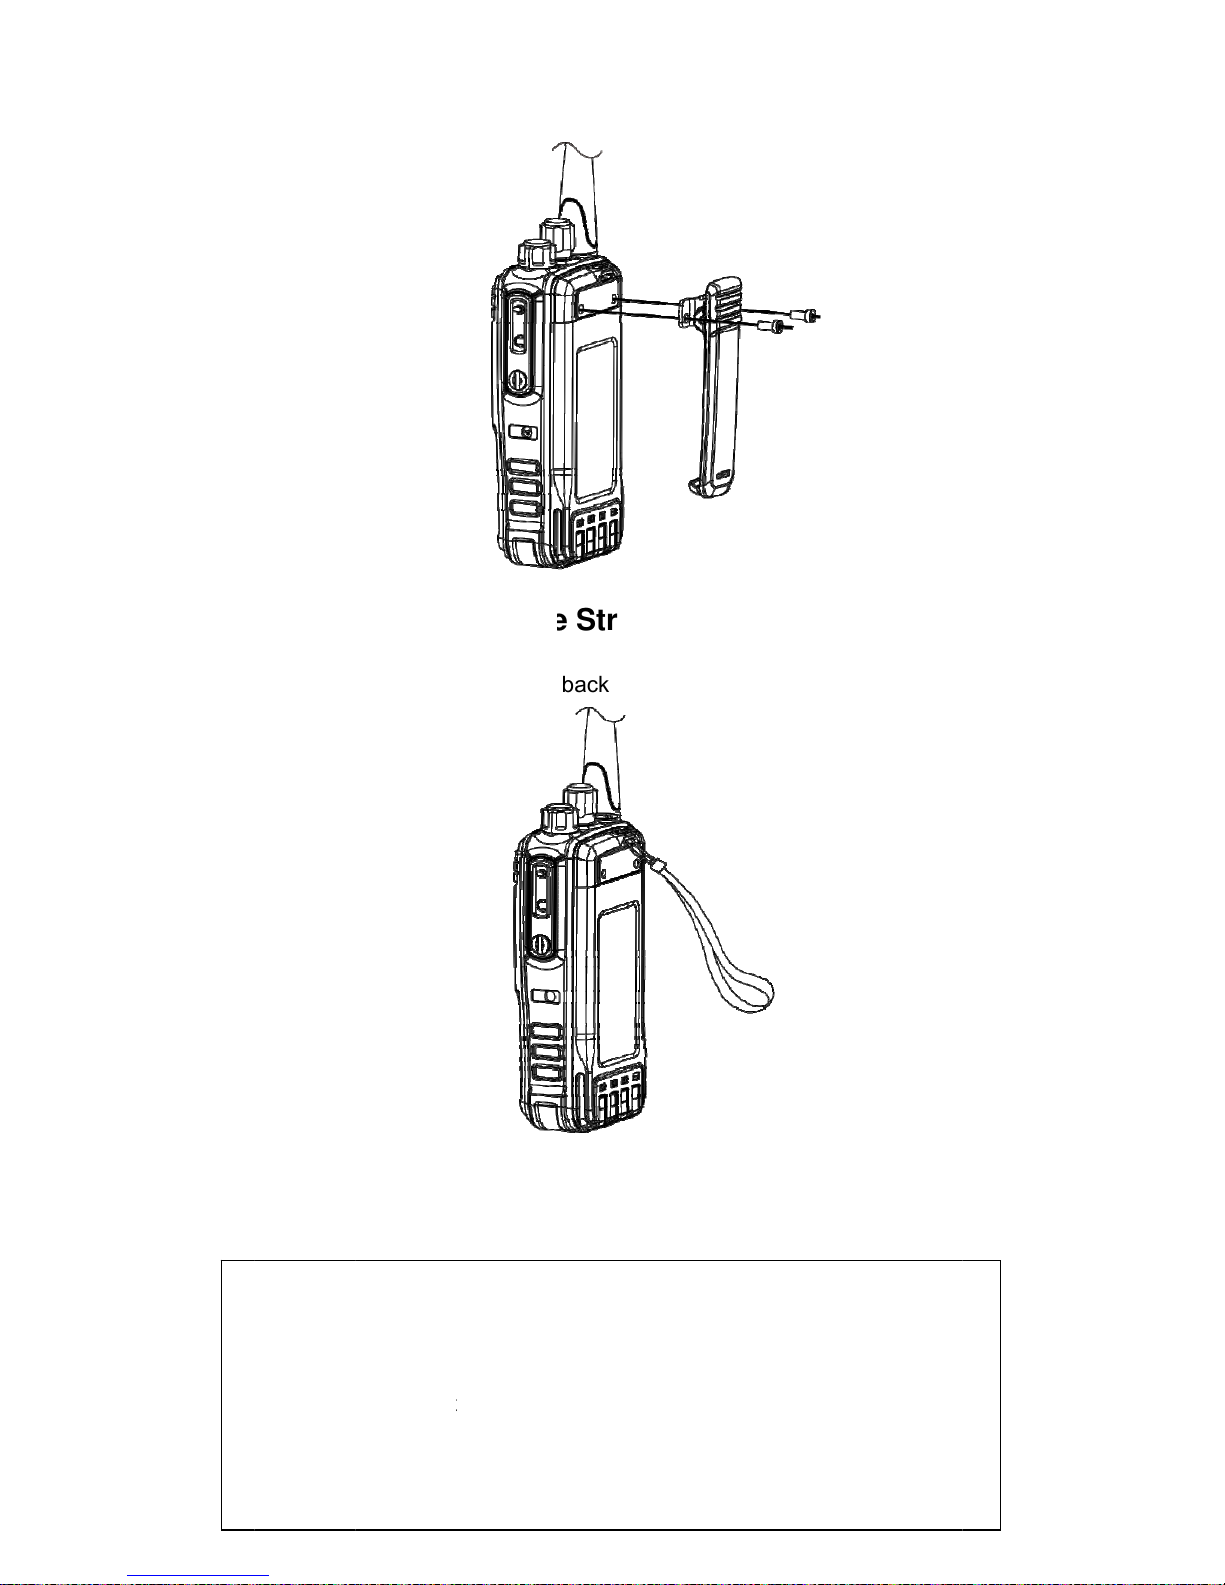
At
t
Th
r
At
t
achin
g
ead the h
a
achin
g
1. Don’t
burst int
2. Neve
r
the batt
e
3. Batte
/Remo
v
nd strap t
/Remo
v
short-circ
o flame;
attempt
t
ry termin
a
ry is flamm
a
ing th
e
o the loop
ing th
e
uit the bat
o remove
l;
ble objects
8
Strap
back of y
o
Batte
r
Warning!
tery, it m
a
the casin
g
, don’t thro
w
ur two-w
a
y
y cause t
h
from batt
it into fire
o
y radio.
e battery
ery, that a
r don’t use
damaged
void to sh
o
it on
or
rt
Page 9
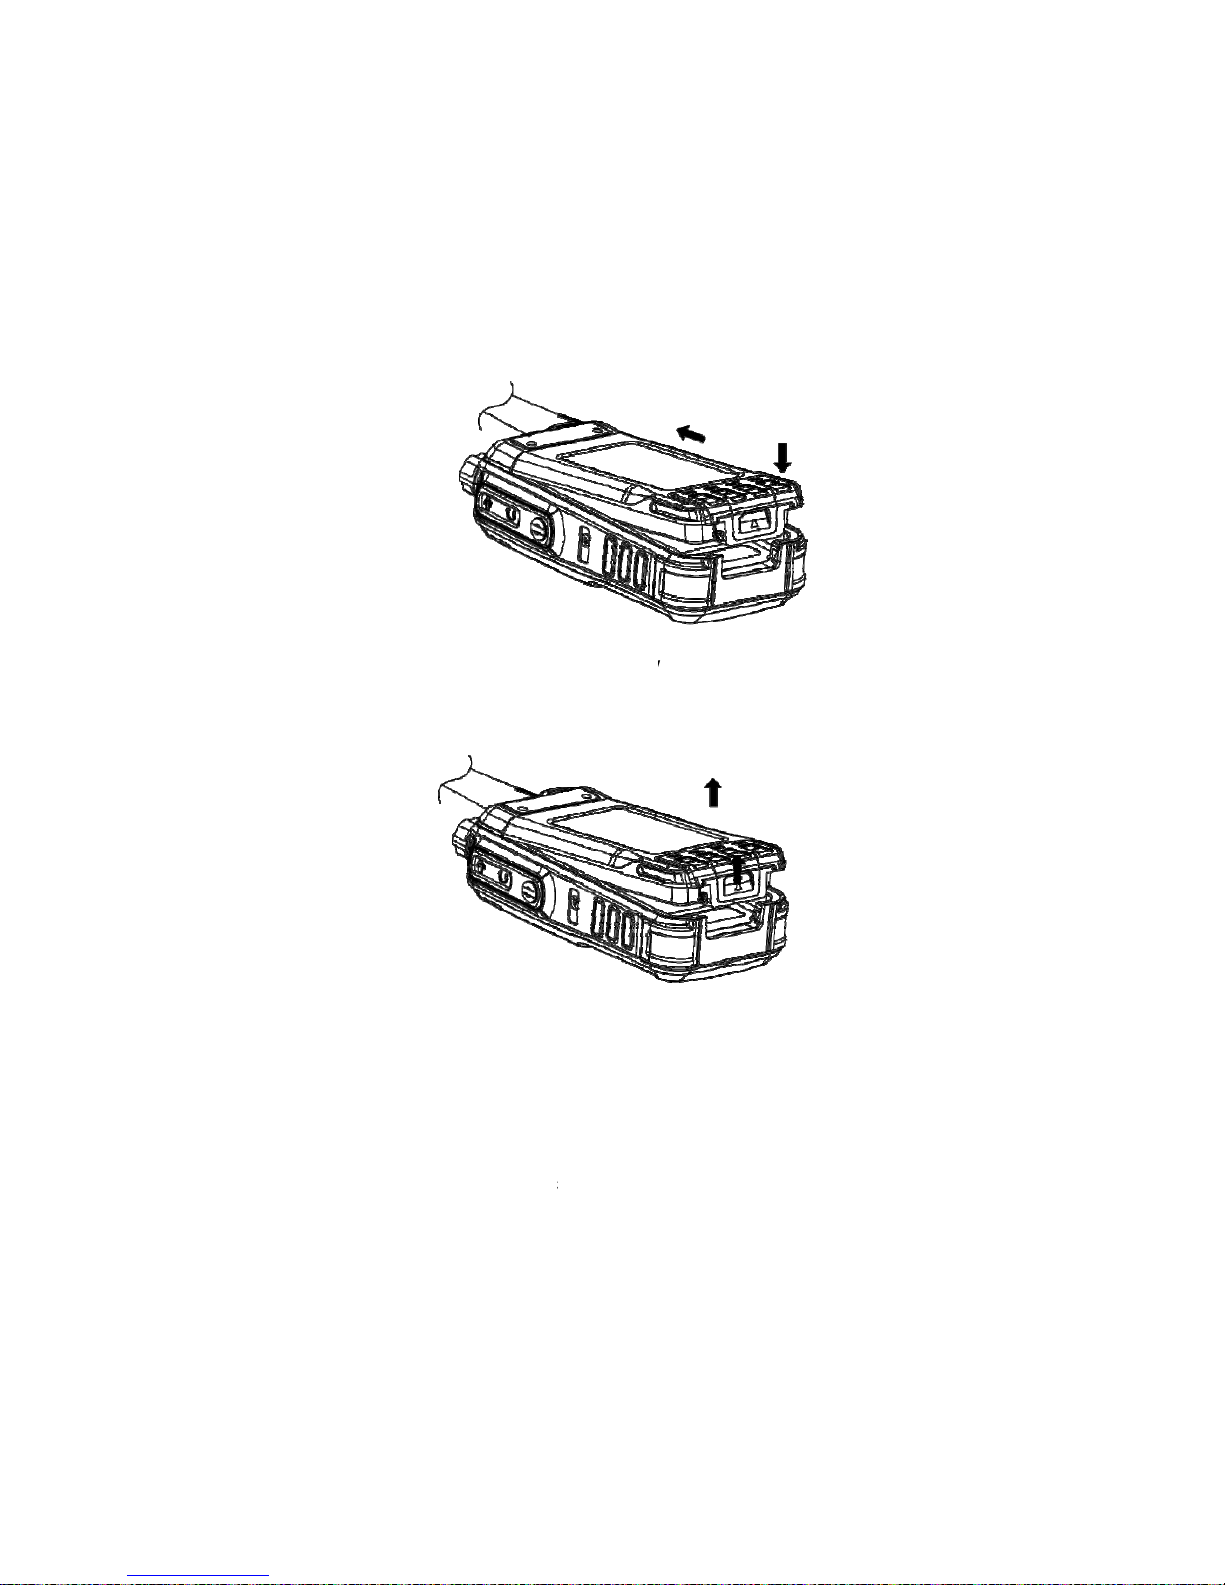
Ma
t
rea
To
to
u
Not
e
B
a
Ne
w
bat
t
Th
e
ch
a
rec
ch the gu
r of the ra
d
remove t
h
nlock the
: Don’t att
a
ttery I
n
battery i
ery befor
e
maximu
m
rge/disch
a
harge the
ides of th
e
io, then p
e battery,
battery pu
ch / remov
e
format
i
s shipped
using it,
battery
rge cycle
battery.
battery
w
ress the b
a
please tu
r
ll the batt
e
the batter
y
on
not fully
c
charging
a
capacity
a
s. If you
n
9
ith the co
ttery until
n the po
w
ry away fr
if the trans
harged fr
o
new ba
t
nd perfor
m
otice the
rrespondi
n
a click is
h
er off the
n
om the ra
d
ceiver turn
e
m the fac
t
tery for 5
ance is
a
battery p
g groove
s
eard to l
o
press th
e
io.
d on.
ory, plea
s
hours bef
o
chieved
a
ower run
s
on the u
p
ck it in pl
a
release l
a
e charge
y
re initial
u
fter thre
e
lows, pl
e
per
ce.
tch
our
se.
full
ase
Page 10

10
Applicable Battery
To reduce the risk of injury, please only use the battery and charger specified
by belfone, other batteries may burst, causing bodily injury and property
damage.
Battery Tips
1. When charging your battery, keep it at a temperature among 5℃—40℃.
Temperature out of the limit may cause battery leakage or damage.
2. When charging a battery attached to a radio, turn the radio off to ensure a
full charge.
3. Do not cut off the power supply or remove the battery when charging a
battery.
4. Never charge a battery that is wet, please dry it with soft cloth prior to
charge.
5. Even if the battery is full charged, the operating time is noticeably shorter
than normal performance; it is time to buy a new battery.
To Prolong Battery Life
1. Battery performance will be greatly decreased at a temperature below 0℃,
a spare battery is necessary in cold weather, the cold battery unable to
work in this situation may work under room temperature, so keep it for later
use.
2. The dust on the battery contact may cause battery breakdown, please use
a clean dry cloth to wipe it before attaching the battery to the radio.
Battery Storage
1. Fully charge a battery before you store it for a long time, to avoid battery
damage due to over-discharge.
2. Recharge a battery after several months’ storage, to avoid battery capacity
Page 11

11
reduction due to over-discharge.(NI-MH batteries:3 months, Li-Ion&
Li-polymer batteries: 6 months)
3. Store your battery in a cool, dry place under room temperature, to reduce
self-discharge.
Charging the battery
Use only the charger specified by the manufacturer, the charge indicator
indicates the charging progress.
Charger Status Charger Indicator
Standby(No-load) Charge Indicator glows green
Battery is charging Charge Indicator glows red
Battery is fully charged Charge Indicator glows green
Charge Steps:
1. Plug the AC connector of the switching power into the AC outlet socket.
2. Place the battery or the radio is attached with a battery in the charger.
3. Making sure the battery is connected to the charger, the charging process
initiates when the charger indicator glows red.
4. The charger indicator glows green when the battery is fully charged, please
remove the battery then.
Note: While charging the temperature out of the limit the LED indicator of charger will flash
red and green; if battery has damaged or battery is not connected to the charger correctly,
The LED indicator of charger also will flash red and green
Attaching the Speaker/Microphone
Open the accessory port cover, then align the plug with the accessory port and
Page 12
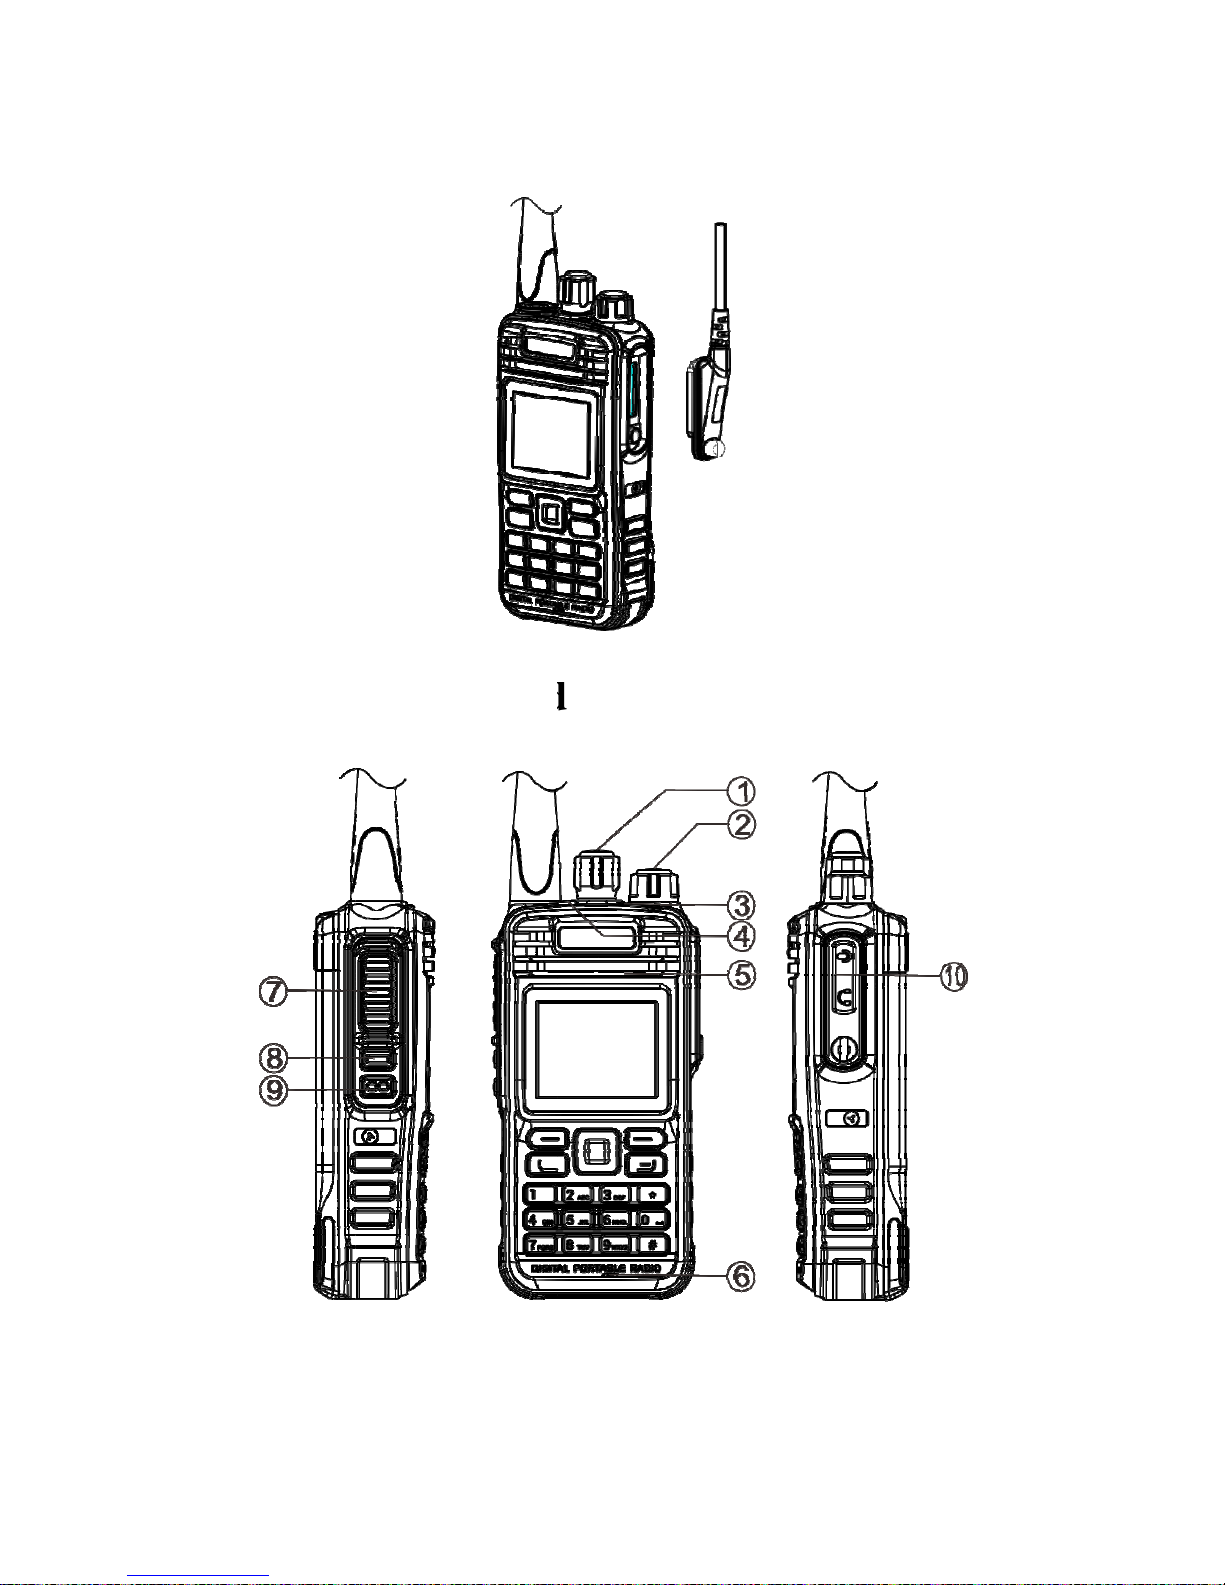
tight
e
G
①
n the scr
e
etting
Channel
S
Turn the
k
w on the
p
Acqu
elector K
n
nob to se
lug.
ainte
d
ob
lect chann
12
el 1-16.
Page 13

13
Power switch/volume adjust keys
Turn clockwise to switch the radio power on, when the radio is turned on,
rotate clockwise to increased volume, counter- clockwise to decrease the
volume. Turn counterclockwise fully to switch the radio off.
LED Indicator
When transmitting LED glows red, when receiving LED glows green; when
un-programmed LED flashes red; when scanning LED flashes red.
Orange Button
Press to activate the programmable function. (The detailed consult to basic
operation)
Speaker
⑥ MIC
⑦ PTT key
Press and hold down the PTT key then speak into the microphone to
transmit.
Button 1
Press to activate the programmable function. (The detailed consult to basic
operation)
Button 2
Press to activate the programmable function. (The detailed consult to basic
operation)
MIC-SP-USB Jack
Connect to optional speaker/MIC and USB programming cable.
Page 14
B
a
L
C
Tu
Ro
tRot
po
w
sic
O
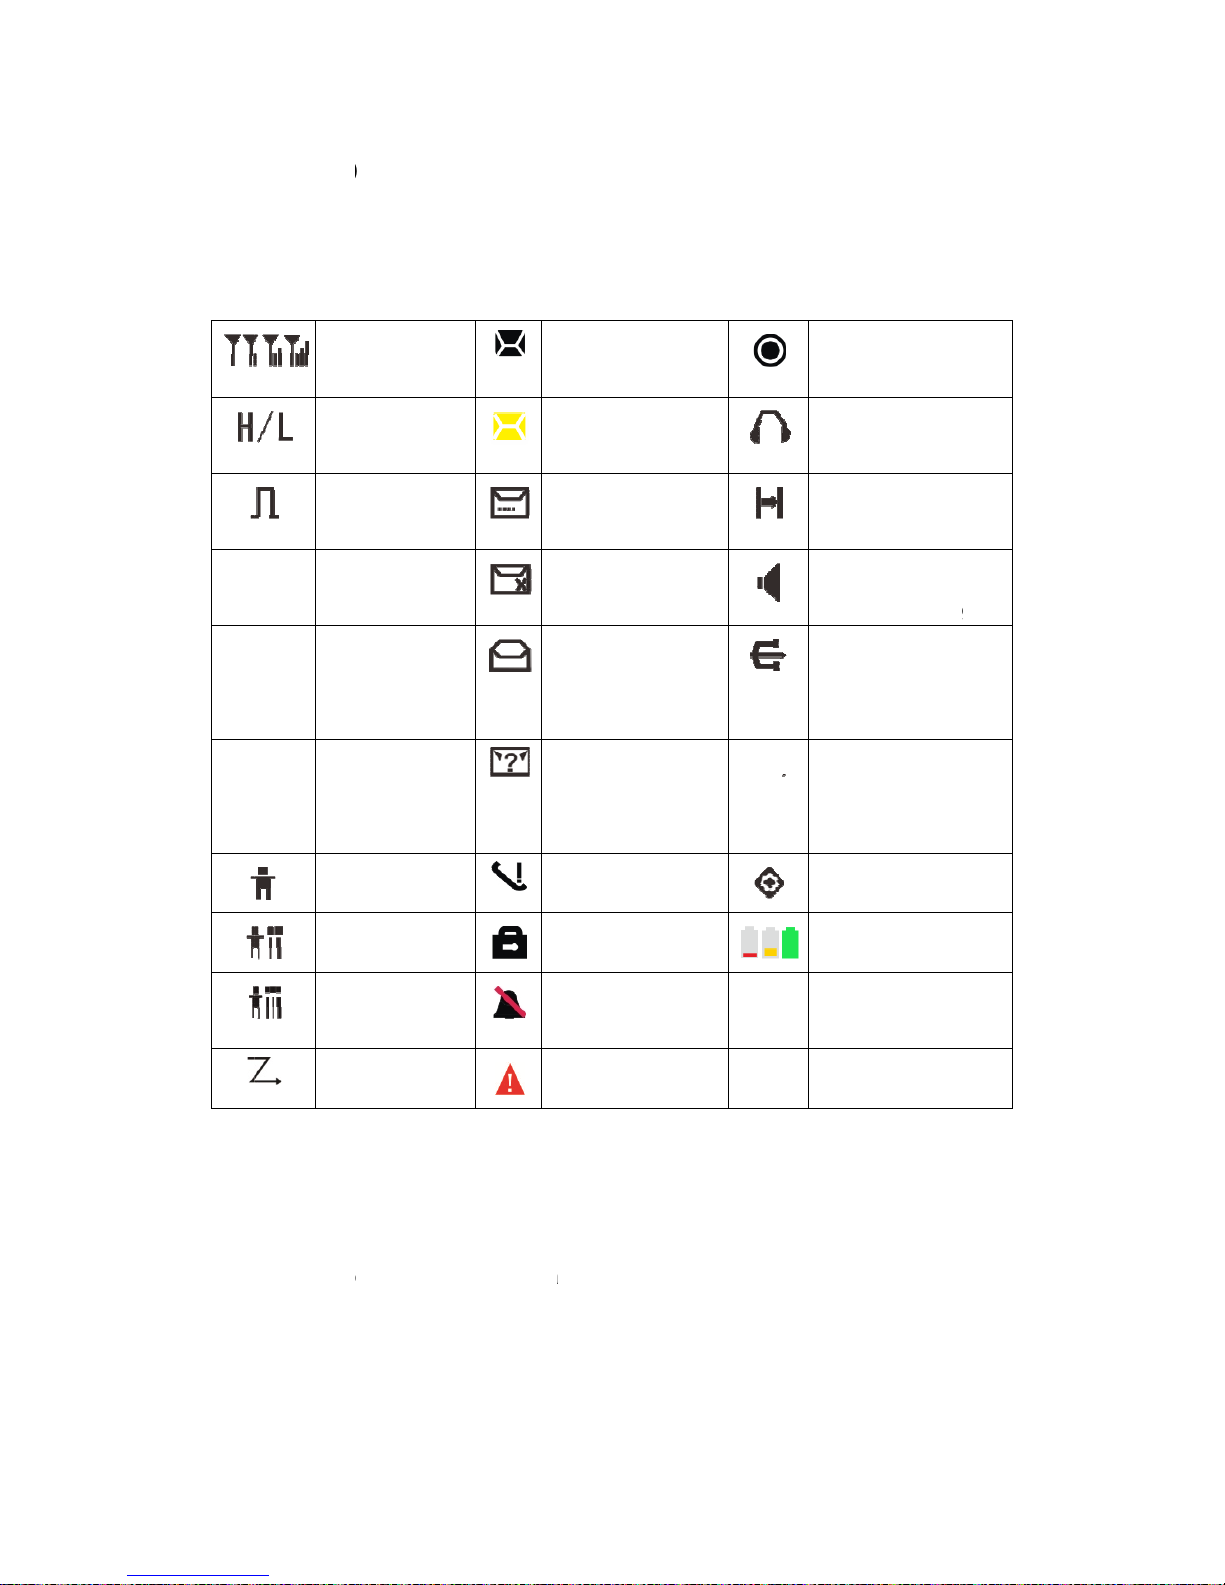
D Icon
s
S
S
Hi
gPow
Di
g
Pri
v
Gr
o
A
ll
Sc
a
rning t
h
ate the p
o
ate the p
o
er off.
perat
i
ignal
trength
h/Low
e
r
ital Mode
ate Call
up Call
Call
nning On
e pow
e
wer switc
h
wer switc
h
on
U
mIFMsMF
RIUMMKD
A E
r on /
o
/volume
a
/volume
a
14
nread
essage
nbox or O
u
ull
essage
s
uccessful
l
essage
s
ailed
ead Mes
s
nbox
nread
essage I
n
issed Ca
eypad Lo
isable All
lert
mergenc
y
ff
djusting k
e
djusting k
e
tbox
end
y
end
age
box
ll
cked
Tone
On
ys clock
w
ys anti-cl
o
VO
X
Plu
g
Dire
c
aro
u
Mon
nen
t
Con
Co
m
Rec
o
Batt
e
ise to turn
ckwise t
o
on
in earph
o
t /Talk
nd Mode
itoring/Pe
r
Monitorin
g
nect
puter
rd On
ry Capac
the powe
r
turn the
ne
ma
to
ity
on.
Page 15

15
Note: If you active power on password function via program software ,each time you turn
on transceiver, must be enter 6 digit password, while occur password error, the
transceiver will restart automatically and then input password again . When 3 times
wrong in input password continuously, after it transceiver must be kill, only reprogram it
then device work normal. Please enable power on password with due care.
Adjusting the volume
After the radio is power on, you can rotate the power switch/volume adjust
keys to adjust the volume level, rotate the knob clockwise to increase the
volume, or rotate the knob anti-clockwise to decrease the volume.
Selecting a Channel
Turn the channel selector knob to select channel 1 to 16, rotate the knob
clockwise to increase the channel number, or rotate the knob anti-clockwise to
decrease the channel number, while enable all tone alert ,handover channel
will hear a channel number.
Note: If a channel is not programmed, the display appears:Un-programmed Channel and
prompt no channel, LED indicator flash red.
Selecting a Zone
The radio supports up to 32 zones, each with a maximum of 16 channels, 32
zones all support up to 512 channels. You may select a desire zone through
enter zone menu or setting zone selection function to orange button, button 1
or button 2, then handover zone. While enable all tone alert, select zone will
Page 16

16
hear a channel number.
Call
Each
digital channel may preset a contact, the preset contact could be a
private call contact, a group call contact or an all call contact;
To transmit press and hold down the PTT key, LED indication glows red, speak
into the microphone, hold the palm microphone approximately 3 to 4
centimeters away from your mouth.
Page 17

17
Note: While enable talk permit indication feature, if the channel available, press PTT key
to transmit will with a tone.
Private Call
If the feature private call ACK is enabled, to transmit a private call need to
confirm whether it is power on or activate on the current channel.
1
If you preset a private call contact for current digital channel. Press PTT
key to transmit a private call;
2 Enter Contacts menu to select the private call number you want to call,
then press PTT key to transmit a private call;
3 Enter Contacts menu and go to manual dial menu or press programmed
Manual Dial key, input a private call number you want to call, then
press PTT key to transmit;
4 Enter Call Log menu to select the private call number you want to call,
then press PTT key to transmit a private call;
5 You can set the One Touch Call key as private call feature, then press
programmed key to transmit a private call.
Group Call
1 If you preset a group call contact for current digital channel. Press PTT
key to transmit a group call;
2 Enter Contacts menu to select the group call number you want to call,
Page 18

18
then press PTT key to transmit a group call;
3 Enter Call Log menu to select the group call number you want to call,
then press PTT key to transmit a group call;
4 You can set the One Touch Call key as group call feature, then press
programmed key to transmit a group call.
All Call
1 If you preset an all call contact for current digital channel. Press PTT
key to transmit an all call;
2 Enter Contacts menu to select the all call number you want to call, then
press PTT key to transmit an all call;
3
Enter Call Log menu to select the all call number you want to call, then
press PTT key to transmit an all call;
Receiving and responding to a call
On digital channel, while a private call is received, you may press the PTT key
within the preset time period to call back. If you do not respond to a received
private call within the preset time period, the radio will display the missed call
icon; while a group call is received, you may press the PTT key within the
preset time period to call back. If you do not respond to a received group call
within the preset time period, the radio will display the missed call icon; while
an all call is received, you can’t respond to an all call.
Page 19

Note
with
Bu
For
and
Pro
func
No.
1
2
3
4
5
6
7
e: While ena
h a tone.
utton Se
r enhanced
d Long pres
ogrammabl
ctions that
S
Unassig
On Tou
Manua
Emerge
Emerge
Monitor
Backlig
able channe
etting
d convenie
ss of a key
le keys are
t are availa
Shortcut Key
gned
uch Call 1-
l Dial For P
ency On
ency Off
r
ght Auto On
el free indica
nce, you m
y can be as
e including
able on
ys
N
6 Q
a
Private Q
T
s
T
o
T
n/Off Q
19
ation feature
may progra
ssigned wi
functions
mode
Not assign
Quick trans
alert or pre
Quick acce
To send em
short press
To exit eme
on orange
To enable
Quick switc
, if the trans
am the key
ith differen
listed belo
.
Des
ed with an
smit group
eset SMS
ess to Man
mergency i
s on orange
ergency m
button
or disable
ch backligh
smitter relea
s button1,
t functions
ow, icon
scription
y function
call/ priva
ual Dial
information
e button
mode, only s
monitor fu
ht mode
se PTT key
button2, s
s.
indicates
te call/call
n, only set
set long pr
unction
will
short
ress
Page 20

8
9
10
11
12
13
14
15
16
17
18
19
20
21
Keypa
d
Scan
O
All A
le
r
Batter
y
Short
M
Zone
T
Priority
Flashli
g
Addre
s
Radio
E
Radio
D
Radio
C
Remot
e
High/L
o
Lock
n/Of
f
t Tones O
Indicatio
n
essage
oggle
Inte
rrupt
ht On/Of
f
s List
nable
isa
ble
heck
Monitor
w P
owe
r
T
T
n/Of
f
T
QQQTf TQQQQ
Q
T
20
o lock or
u
o enable
o enable
uick vie
w
uick acc
e
uick acc
e
o interru
p
orcibly
o enable
uick acc
e
uick acc
e
uick acc
e
uick acc
e
uick acc
e
o switch
nlock the
or disable
or disable
battery c
a
ss to sho
r
ss to Zon
e
t activity
o
or disable
ss to Add
r
ss to Rad
ss to Rad
ss to Rad
ss to Re
m
High/Low
keypad q
u
s
can func
t
all tones
q
pac
ity
t messag
e
Toggle
f current
c
flashlight
q
ess List
io Enable
io Disable
io Check
ote Monit
o
Pow
e
r
qu
ickly
ion quickl
y
uickly
hannel
uickly
ickly
Page 21
22
23
24
25
26
F
u
C
o
On
ma
1.
G
Wh
se
n
2.
P
While
alert
、
or en
a
Repea
t
Vox O
n
Nuisa
n
Recor
d
Perma
n
ncti
o
ntacts
the
cont
a
nual dialin
g
roup Cal
l
ile
the co
n
d messag
rivate C
a
select a c
o
send
me
s
ble、sen
d
er/Talkar
o
/Of
f
ce Delete
On/Off
ent Moni
t
ns an
d
cts,
you
c
.
tacts
type
e.
ll
ntact as
p
sage、edi
t
remote
m
und
T
T
TaT
o
r T
f
Ope
an
searc
h
as
group
c
rivate cal
l
name or
n
onitor.
21
o enable
o enable
o tempor
a
ctivity
o enable
o enable
unction
ratio
n
address
all,
you c
a
, a private
umber
、
d
or disable
or disable
rily ignor
e
or disable
or disable
s
list
mem
b
n
select t
h
call can v
elete、se
n
talk aroun
VOX quic
k
unwante
d
record qui
permane
n
ers,
add
e
menu t
o
iew its det
a
d
device
c
d
quickly
ly
c
hannel
ckly
t monitor
new
cont
a
v
iew its I
il、sen
d
c
heck、dis
a
cts,
D o
r
all
ble
Page 22

22
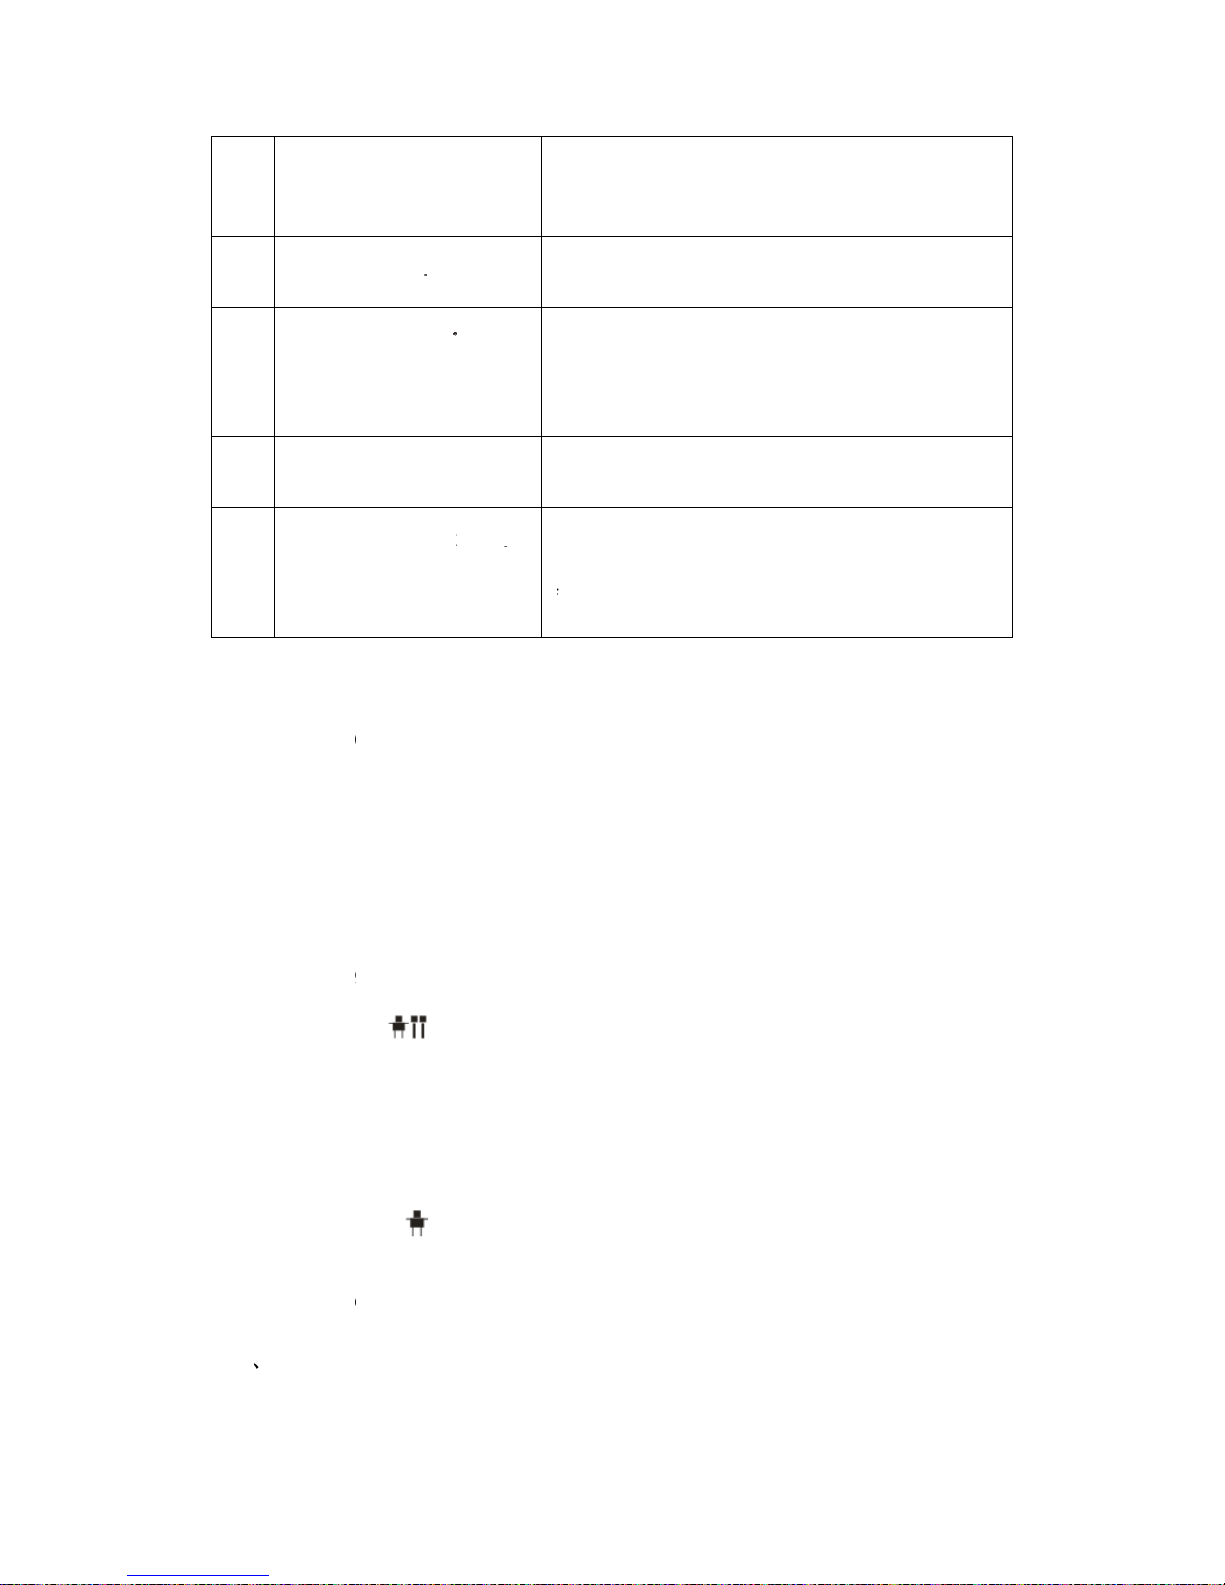
●Call Alert: Call alert is used for prompting the private receiver; ask them respond to
transmitter if communication is available. While receiving call alert command the radio
will generate alert tone.
●Device Check:This function can check if the target radio is active in the system while
don’t send any tone alert to the target radio. When the radio is available, the screen
displays: target radio has replied, while the radio is unavailable, the screen displays:
fail!
●Remote Monitor: Allow a user to send a "Remote Monitor" request to the target
device via menu. If the request is successful, you can enable the microphone of the
target radio, and monitor its activities. Only the target radio is set remote monitor
decode, that enable monitor its activities.
●Device enable : Allow a user to send "Device enable" command to the target killed
device, to allow it to be used normally.
●Device Disable: Allow a user to send "Device Disable" command to the target device
via menu. If the device is lost or stolen, a user can use this function to disable the
device. However, this device will continue monitoring air interface to receive its "Device
Enable" command.
●Edit: Modify the number or name of a private call contact. Press * key to delete,
press # to switch input method, the available number range is 1~16776415, name
input 16 characters at most.
Page 23

23
●
Delete: Delete unwanted contacts from the address list, if private call contact is set as
channel default address or call number on one touch call, its unable to delete.
3.
All Call
While the contacts type as group call, you can select the menu to view its ID or
press PTT to call.
4. Manual Dial
You can manually input the private call number for calling or sending call alert ,
send message ,device check, remote monitor ,device enable ,device disable.
5. New Contact
You can add a private call contact to the contact list. When edit name, press*
key to delete, press # to switch input method, name input 16 characters at most; then
input number, the available number range is 1~16776415. After add a private call
contact successfully, on contacts list will show new contact.
Scan
1. Scan On/Off
While current channel add scan list and the list contain 2 channels at least,
you may enable the feature. Scanning allows the device to search the scan
list connected to the current channel to locate qualified channel for receiving
or voicing. During scanning, the icon flashes, when activities are
detected on a channel, the radio will stay on the channel to receive current
Page 24

24
activities, the icon stop flashes. If you don’t want to receive activities on
the channel, press the programmed Nuisance Delete key to remove the
channel from the scan list temporarily. To exit the scanning process, enter
scan menu、 switch channel or press the programmed Scan key.
Note:
If the channel enables the feature Auto Scan via the programming software, switch to
the channel will enter scanning automatically;
While button 1 or 2 programmed as Scan on/off, press it to enable scan feature.
2.
View/Edit List
Allow a user to view/edit the scan list via menu, "View Member" allows a user
to view the scan member, deleting a member from the scan list; Add Member
allow a user to add a new member to the scan list, the list contain 16 channels at
most. It is not allowed to create a new scan list or delete existing scan lists from
the device. Digital channel will be appear in the same scan list.
Zone
The radio supports up to 32 zones, each of zone supports 16 channels, totally 512
channels supported. Enter Zone menu to select a desired zone.
SMS
1.
New SMS
Page 25

25
You can edit desired text message(140 characters at most) and send it to an
private call contact or group call contact, when editing a message, press # key for
switching input method, press * key for deletion and modification, press up or down
key to switch input cursor. For non-numeric input method, key 1 is a symbol key.
Key 0 is a space key. After the message is edited, you can select a contact from the
address list which the message is sent to or manually dial a number to send to.
2.
Inbox
The Inbox can save up to 30 received messages. Inbox the unread message
displays: , read message displays: . For each message, you can choose
to perform any of these operations: Reply, Forward and Delete.
3.
Preset SMS
Via programming software, user can save 10 entries text messages and each of
a message contains 140 characters at most on preset SMS. You can choose to edit
and send any entry.
Note: Preset text messages also can assign to one touch call, and press the programmed
key to send messages.
4.
Outbox
Enter outbox menu, you can view the message is sent successfully or failed,
outbox can save up 30 sent messages. If sent message is successful displays ,
you can choose to forward or delete it; If sent message is failed displays , you can
choose to resend, forward or delete.
5.
Delete All
Page 26

26
This function is convenient to delete all messages on inbox or outbox, Clear All
will delete all messages on Inbox and Outbox at the same time, but the preset
messages can’t be deleted.
Call Logs
1.
Missed Call
The missed calls list can save up to 10 entries, when the memory for call logs is
full, the oldest entry will be deleted automatically. You can add it to contact list or
delete it.
2.
Answered Calls
The answered calls list can save up to 10 entries, when the memory for call logs
is full, the oldest entry will be deleted automatically. You can add it to contact list or
delete it.
3.
Outgoing Calls
The outgoing calls list can save up to 10 entries, when the memory for call logs is
full, the oldest entry will be deleted automatically. You can add it to contact list or
delete it.
4.
Clear Record
This function is convenient to delete Missed call logs Answered or Outgoing call
logs, Clear All will delete all call logs at the same time.
Page 27

27
Settings
1. Settings
Allow a user to perform basic settings for the radio.
●Talk Around: When your repeater malfunctions, or when radio is out of repeater’s
range, you can continue to communicate in talk around mode. While enable talk around
feature, the screen displays: ,By this time TX frequency the same as to RX
frequency. If switch channel 、 enable scan feature or restart radio will disable the
feature.
Note:
●To enable this function, TX frequency should be different from RX frequency, and the channel
will set as allow talk around on the programming software.
●
Press the programmed Talk Around key to switch DM mode and RM mode.
●Tone/Alerts: To set tones for your radio, tone alerts include settings of all tones,
call alert tone, message tone and keypad tone. If disable all tones, all alerts will be off
except emergency tone.
●TX Power : Allow a user to change the power level, there are two levels available:
high (indicated by H) and lower (indicated by L).
●Backlight: To set the backlight parameters, you can select on or automatic, while
you select automatic on, the light will become dark after 5 second you don't operate
the key, and the light will keep on all the time when the backlight is on.
Page 28

28
●
Boot Interface: Allow a user to enable or disable the boot screen via menu. If the
Intro screen is enabled, while the radio power on, the screen display BF Logo and
device name; While the Intro screen is disable ,the screen only displays device name .
●Keypad Lock: Allow a user to enable or disable keypad lock via menu. While
Keypad locked indicate: , that you can’t operate the keypad except PTT key and
orange button, button 1 or button 2. Press MENU and # key to unlock.
●LED indicator: To set whether to enable LED indication via menu. While disable all
indicator, the screen becomes dark and TX red indicator, Rx green indicator, scan
orange indicator are off. Please use this function with due care.
●VOX: While this function is enabled, you can enjoy hands-free communication.
The radio will automatically begin transmitting when you speaking, and terminate
transmitting when you stop talking with no need of PTT press. Allow user to set the
VOX level (level 1-8) and VOX delay(0.5~10second) via menu.VOX on indicate by :
.
Note: The VOX feature only is used if you are using a supported headphone.
● Power-on Password: If enable power-on password feature via programming
software, you can modify the password by this menu. First you need input old
password correctly, then input a new password twice the same, that will modify the
password successfully.
Note: This menu is effective if power on password is set via programming software.
●Language: The radio supports two languages: Chinese and English.
Page 29

29
●
RTC Configure: This option allows you to set the current date, time.
●
Theme Choose: It allows user to choose the screen displaying style, there are 4
themes available: Default Theme, Light Yellow, Light Blue and Light Green
2. System Info
With this option, you can view the basic information of your radio, including battery
status, my number, firmware version, CP version, hardware version, voice record
version.
●Battery Status: To view the radio’s rest battery capacity, it’s convenient for user to
know battery capacity and charge the battery in time. If the battery shows green
indicates capacity is sufficient, shows yellow indicates the capacity is meddle,
shows red indicates the capacity is low, please recharge in time.
3. Channel Configure
Channel configure function is used to modify the current channel parameters, on
digital channel, it allows you to modify RX/TX frequency, channel name. TOT, TX
contact, CC index, choose slot, RX group list.
Note: While finish the parameters modification, please return to home screen to save the
setting, then all modified data is effective.
Page 30

30
Digital Emergency
In case of an emergency you can enter emergency mode to ask for help, for each
emergency mode, there are three emergency types and three emergency mode
available.
Emergency Type:
Regular: In emergency mode, the radio will give audible and visible indication;
Silent: In emergency mode, the radio won’t give any audible or visible indication;
Silent with Voice: In emergency mode, the radio won’t give any audible or visible
indication, but will receive voice.
Emergency Mode:
Alarm: In this mode, you can send alarm information, while receive ACK or reach
the maximum retries will exit emergency mode.
Alarm with Call: You can press programmed Emergency On/Off key to send
emergency information, then press PTT to transmit an emergency call.
Alarm with voice to follow: You can press programmed Emergency On/Off key to
send emergency information, then you can speak into the microphone, allowing your
voice and background noise be transmitted automatically as you do not to press PTT
key.
1. Send Emergency Alarm
If the current channel adds emergency system and the current channel as the
Page 31

31
emergency revert channel, press the programmed emergency on/off key to send
alarm information, LED indicator glows red, the radio displays icon as regular
type.
2. Exit emergency mode
If choose regular type and emergency alarm mode, after send emergency
information then receive ACK command or the alarm cycles expire, the radio will exit
the emergency mode automatically. And long press the programmed emergency key to
exit the emergency mode; If choose silent or silent with voice type, press PTT key or
long press programmed emergency key to exit the emergency mode.
3. Receive Emergency Information
When the feature emergency alarm indication is enable, if received emergency
information, the radio displays icon , the transmitter’s ID and name, an alarm tone
will sound. To exit the emergency mode, long press the programmed emergency key.
Alone Worker
This function is useful for persons who work lonely and encounter an incident; you
cannot press any keys or transmit audio within the preset period time. The radio will
alarm automatically to ask help. Via the programming software to enable the feature,
and setting work alone response time, work alone warn time, work alone response
operation.
Via programmable software to set it: Signaling Systems folder→Work Alone→Work
Page 32

32
Alone Enable→Work Alone Response Time→Work Alone Warn Time→Work Alone
Response Operation
Note: Alone Worker is an optional feature.
Man Down
When this feature is enabled, the radio automatically sends an alarm for help if it is
positioned aslant or keeps motionless long time. If the trigger type is set as Only Lean,
the radio tilts to a specified gradient30°,45°,60°within a preset period, the radio gives
alerts, you can terminate such alerts by put radio upright otherwise it will enter
Emergency mode; If the trigger type is set as Only Motion Detection, the radio stays
motionless within a preset period, it will enter Emergency mode, via the programming
software to enable this feature and to set parameters.
Via programmable software to set it: Signaling Systems folder→Upend →Upend
Enable→Enter Delay→Exit Delay→Upend Pre Warning Time→Trigger Type→Trigger
Gradient
Note: Man Down is an optional feature.
Voice Encryption
The voice encryption can encrypt your audio signals to guarantee the privacy of
your communication, via the programming software user can select encryption type as
static or dynamic. If the encrypt feature is enabled, the transmitter and receiver will be
set as the same encryption type and same encryption key, otherwise the receiver is
Page 33

33
mute.
Note: This feature is effective on digital channel.
Dual Capacity Direct Mode
If enable TDMA direct mode, the members in the same group call must use the
same slot, one frequency supports calls in two slots synchronously in order to avoid
interfering communications in the other slot.
Via programmable software to set it: Channels folder→Zone→a digital channel or
A/D Channel→TDMA Bypass Mode→Slot Align→Slot→Pseudo Trunk TX Slot
Note: This function is available only in digital operation.
Radio Priority-Based Interrupt
The call priority feature allows you to interrupt the on-going call on current forcibly,
a preemptive call can interrupt other on-going calls with lower priority to release the
channel for itself. There are 5 voice priorities available, level 0 is lower, level 3 is higher,
and emergency call is the highest. To transmit the Priority Interrupt command also can
press the programmed [Priority Interrupt] key, in order to make the channel free for new
call or message transmission.
Via programmable software to set it: Channels folder→Zone→a digital channel or
A/D Channel→Priority Interrupt→Voice Priority
Note: This function is available only in digital operation.
Page 34

34
Time Out Timer (TOT)
The purpose of TOT is to prevent any user occupy a channel for an extended
period. If a channel is busy, the time will be shorter. If the preset time expires, the radio
will generate beep and terminate transmission automatically. Via programming
software, you can set TOT as 15-495 second.
TX Permission
Digital Channel
This feature can restrict the channel if it is already in use you will be unable to
transmit. There are three options available: always, color code free, channel free, if
choose always, whenever press PTT key to transmit directly; If choose color code free,
you will be unable to transmit on the channel if the color code is already in use; If
choose channel free, you will be unable to transmit on the channel if it is already in use.
If the channel is busy, press PTT key a warning tone will sound.
Via programmable software to set it: Channels folder→Zone→a digital channel→TX
Parameters→Admit Criteria
Battery Saver
This function allows an idler radio to automatically enter battery saver mode, the
mode will extend battery service life, but response time may be delayed. You can set
battery saver time ratio as : 1:1、1:2、1:3、1:4, the time rate is smaller, the power saving
more evidently.
Page 35

35
Via programmable software to set it: General Setting folder→Battery Saver
Low Battery W
arning
When your battery gets low, LED indica
tor glows red and with a warning tone:
Please Charge,please replace the battery or charge the battery in time. The radio will
turn off automatically while battery is too low.
Via programmable software to set it: General Setting folder→RX low battery
internal
Specifications
General
Frequency range 400-480 MHz
Channel Capacity 512
Zones 32
Channel Spacing 12.5KHz
Rated
Voltage DC 7.4V
Battery Capacity 2000 mAh
Battery Life5/5/90 Di
gital 22 Hours
Frequency Stability ±1ppm
Antenna Impedance 50Ω
Dimensions (L×W×H) 57L* 32(W)* 119 (H)mm
Weight 239g(Including Battery)
Transmitter
RF Output Power High Powe
r: 4.2W
Low Power:1W
4FSK Modulation 12.5kHz Only data:7K60F1D,F1E
Conducted
Emission -36 dBm1GHz/-30 dBm1GHz
Page 36

36
Adjacent Channel Power
≥
60dB
Receiver
Digital Sensitivity 5% BER:
0.25 uV
Intermodulation
≥
65dB
Adjacent Channel Selectivity ≥60 dB
Spurious Response Rejection ≥70 dB
Conducted
Spurious Emission -57dBm
Environmental Specificat
ions
Working Temperature -20℃—+55℃
Storage Temperature -30℃—+85℃
Humidity MIL-STD-810C/D/E/F Standard
Vibration & Shock MIL-STD-810C/D/E/F Standard
Dustproof & waterproof IP67
Statement
Our
Company endeavors to achieve the accuracy and completeness of this
manual, if you have any question, you can contact with us, we will make a
detailed answer to you in time. All the above specifications and design are
subject to change without prior notice due to continuous development.
 Loading...