

Page 1
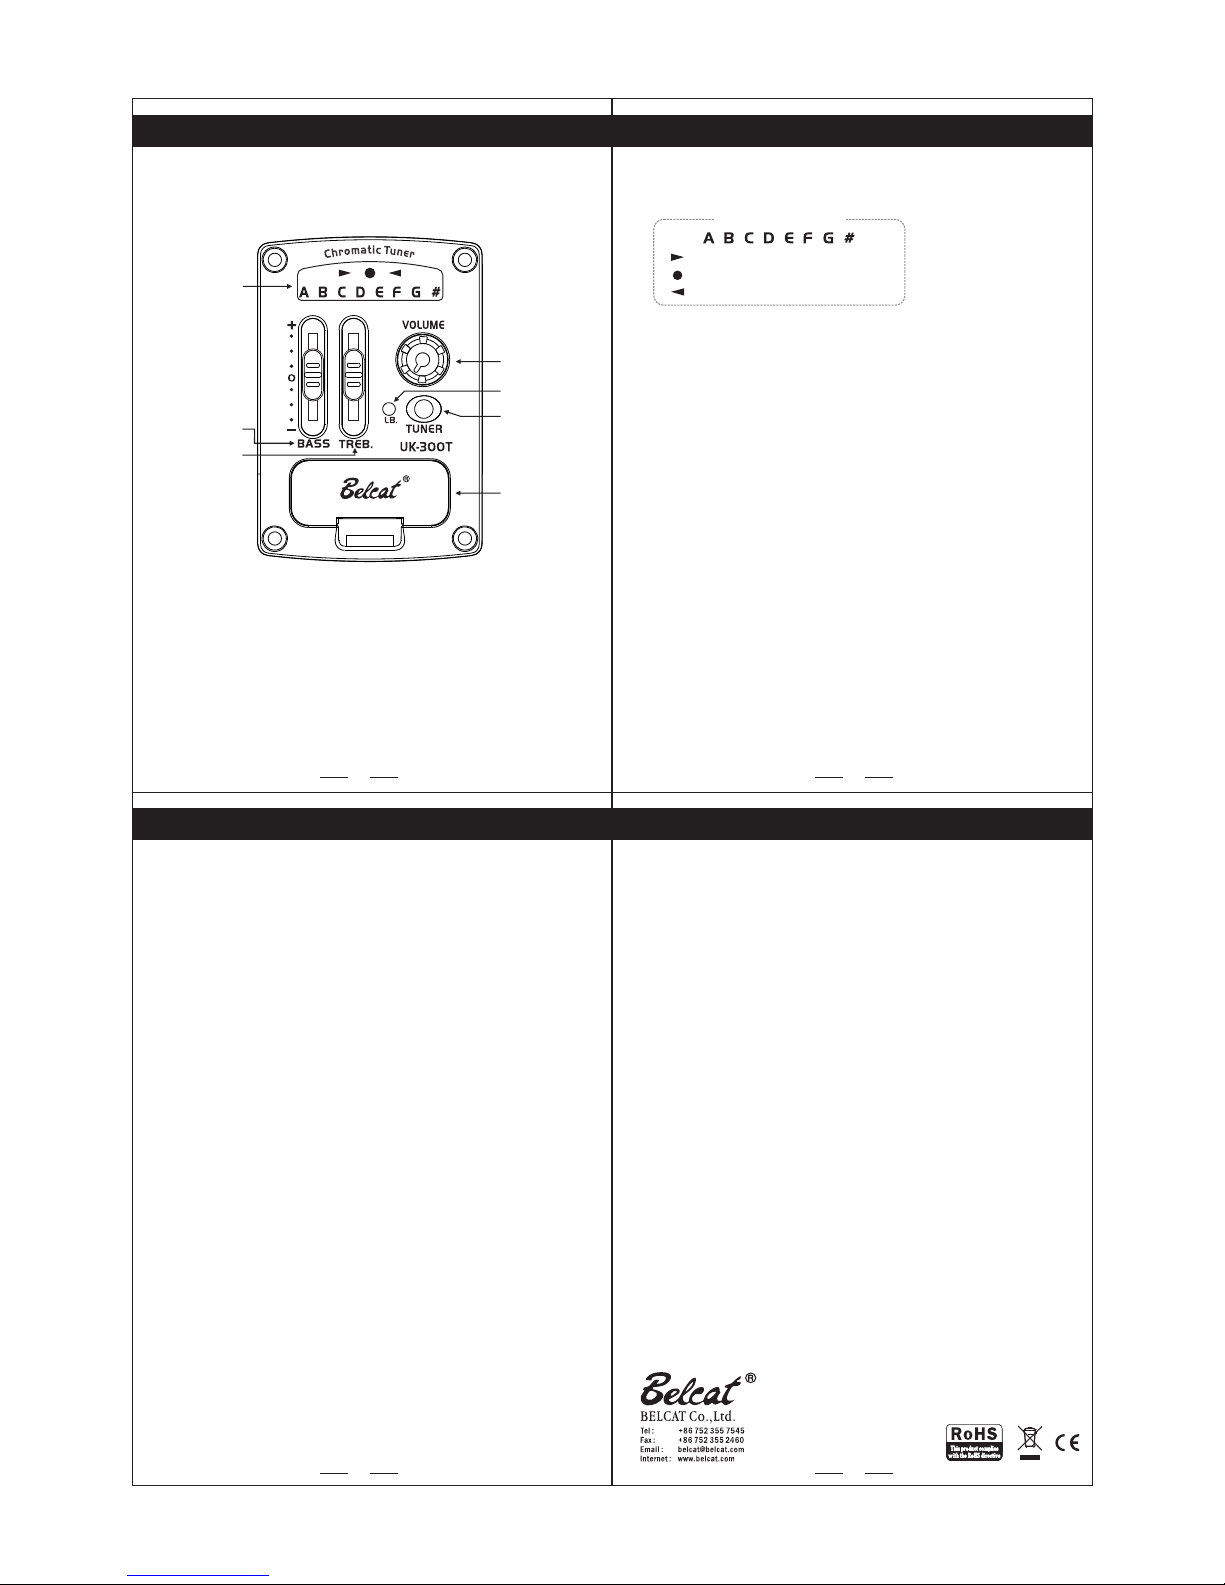
: Tuning Guide LED for Sharp tune
: Tuning Guide LED for right tune
: Tuning Guide LED for flat tune
2Band EQ with Chromatic LED tuner
1. Tuner LED Display
2. Bass
3. Treble
4. Volume Knob
5. Low Batt. (Low Battery LED Light)
6. Tuner on/off Button
7. Battery box
Tuner LED Display
The BASS, TREBLE controls are a 3-band equalizer for controlling
tone.
The center detent on these tone controls yields a flat tone response.
“+12" boosts the tone; “12"cuts the tone.
The LED will light when the battery has lost power. Replace the
battery when this light is on.
This LED light will flash when a cable is connected to the output
jack of the pickup system. This shows the battery is good.
The VOLUME controls the output volume. At “0" it is completely OFF.
At “10" it is loud.
Caution
- The jack should be pluged for proper Preamp working.
(TUNER will works regardless pluging jack)
- There is no output sound, please check if tuner or mute is turned on.
- When LCD screen is dim or no display, please check battery life.
- To prevent battery loss, please unplug jack when preamp is not in use.
- Do not disassemble for repair.
Return to your dealer for service or repair.
- Do not use too much force when operating the control.
Specification
3 4
1
2
1. Tuner LED Display
2. Bass (for bass tones)
3. Treble (for high tones)
4. Volume Knob
5. Low Batt. (Low Battery LED Light)
6. Tuner on/off Button
7. Battery box
Functions
UK-300T USER’S MANUAL
Features : 2Band EQ with Chromatic LED tuner
Input Impedance : 22 MΩ
Frequency Response : 20Hz ~ 20KHz
Control Range
Bass : +/-12dB at 100Hz
Treble : +/-12dB at 10KHz
Battery Status LED
Power Supply : 2 X CR2032 Coin Battery
Battery Life
Only Eq : Over 200Hours
Tuner on : Over 100Hours
Pick-up : Omega II Piezo Cable pick-up
Dimension : W 56mm X H 40mm (2.2" X 1.6")
1
2
3
4
5
6
7
Power switch of built-in Chromatic LED tuner.
Automa ti c po we r off af te r 5 mi nu te s
2 X CR2032 Coin Battery
Page 2
INSTALLATION MANUAL
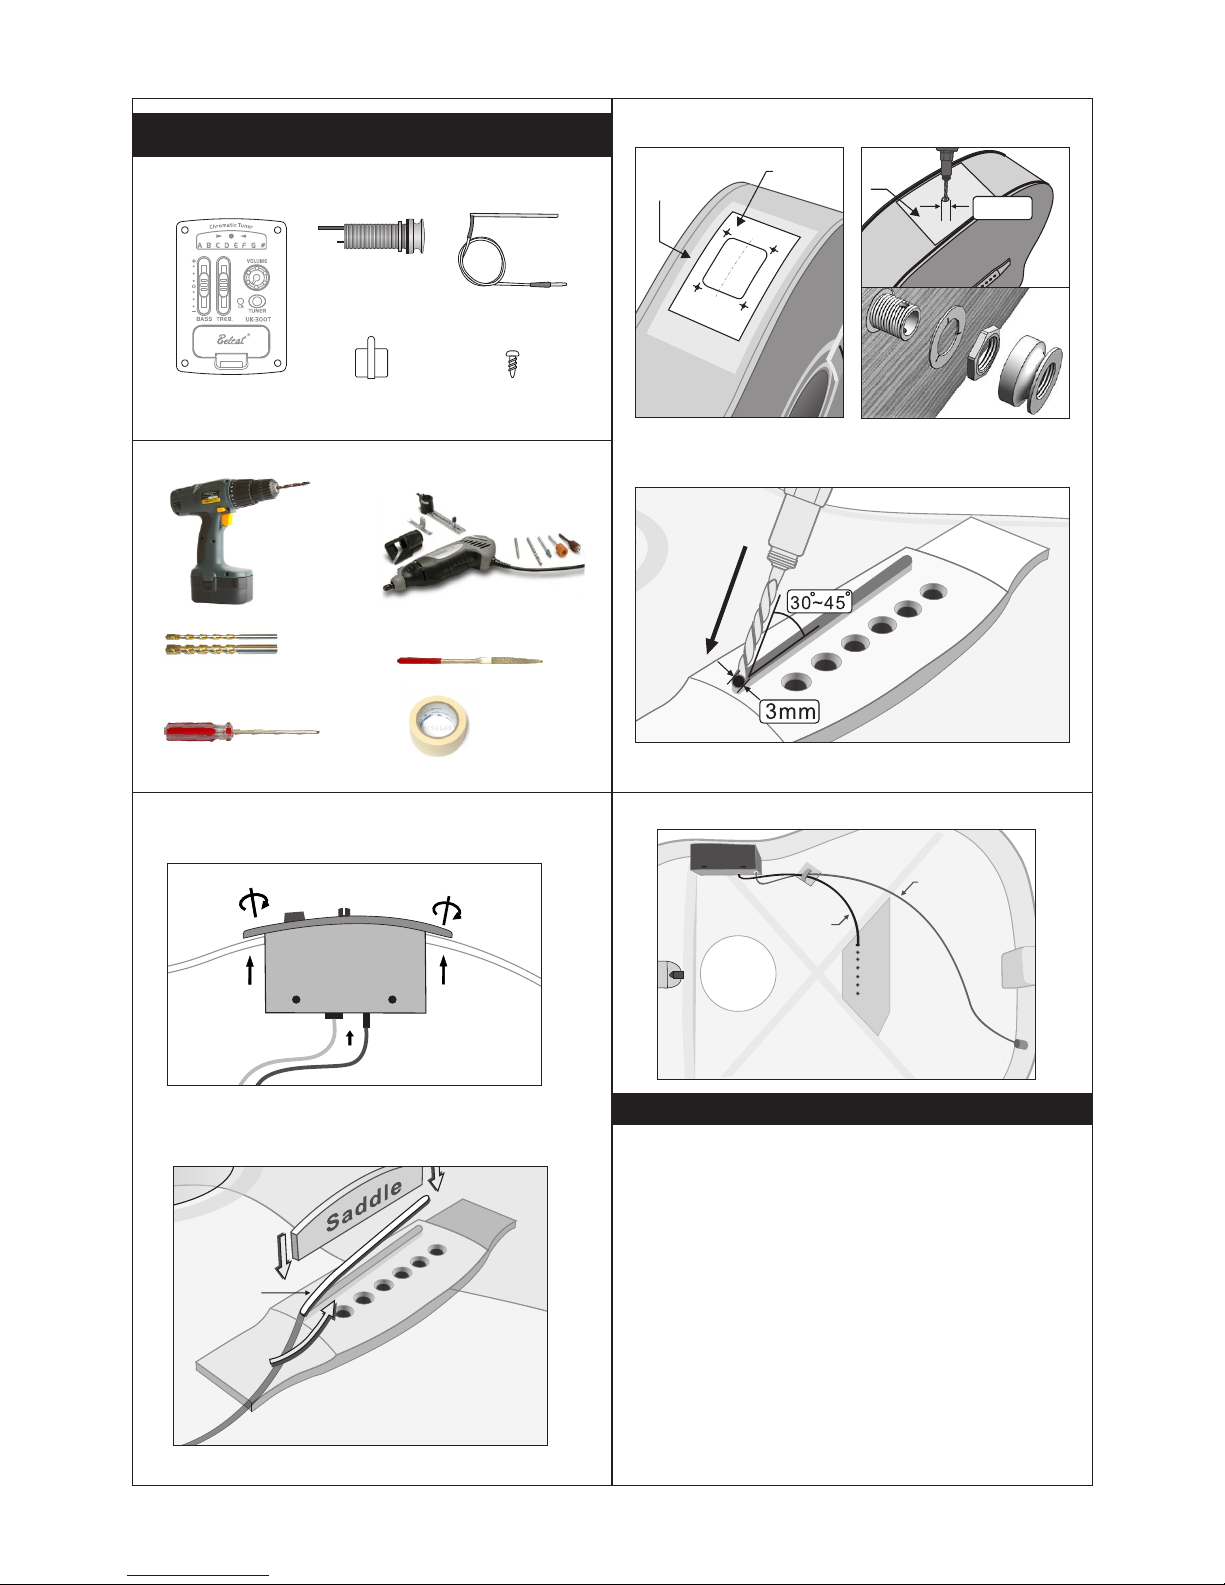
1. Ele ctric D ri ll
2. Dri ll Bit
(2.3 mm or 3mm a nd 1 2mm )
3. Phi llips S cr ewd ri ver
4. Rou ter and G ri nde r
(cut ting- ed ge 3m m)
5. Rou nd File
6. Mas king Tape
Maskin g
apeT
1. Pre amp
3. Pic k-Up
4. Cli p
7. Fix w ire wit h cl ip.
5. Scr ew
1. Contents
2. Tool
2.Dr illin g ho le fo r pi ck-up
1. Cut out the hole with template
Cuttin g
Temp la te
1) When th er e is n o so un d or s ou nd i s st op ped,
- Check gu it ar c ab le , am p or M ix er
- Check if t he re i s ba tt er o r no t. W he n it h ap pens noise or d is to rt io n,
please e xc ha ng e ba tt er y.
- Check if t he p ic ku p an d ba tt er y co nn ector is connec te d co rr ec tl y
or not.
- Check if o ut p ut j ac k is c on ne ct ed c or rectly.
2) When th er e is h um -n oi se ,
- Check th e pi ck up i s co nn ec te d we ll o r not.
- Check if t he c on ne ct or s ar e co nn ec ted to correct po si ti on w el l
or not.
3) Some ca us es o f th e ba la nc e pr ob le m
- When the b ot to m of s ad dl e or t he g ro ov e of saddle is not fl at .
- When sad dl e is i ns ta ll ed t o th e gr oo ve of saddle loos ly.
- When the c on ne ct io n is n ot g oo d be tw een the bottom of s ad dl e
and the gr oo ve o f sa dd le .
- When Sad dl e is v er y sh or t
- When the re i s gr ou nd s on t he g ro ov e of s addle.
- When Sad dl e is d ec li ne d to wa rd f ro nt or back.
- When the t op o f gu it ar i s be nd ed .
- When the p ic ku p is i ns ta ll ed t o on ly a p art of the groove o f sa dd le .
Solution
Pick-u p
Wire
Clip
EQ
Out put ja ck
Cable
Out put
Jack
(back page)
Prea mp
Maskin g
apeT
12mm
3. Insert EQ and battery box into hole of guitar.
4. Fasten screws properly.
5. Put plugs
into jacks.
6.In stall in g the p ic k-up
Pick-u p
wire
Out put Ja ck
2. Out put Jac k
Page 3
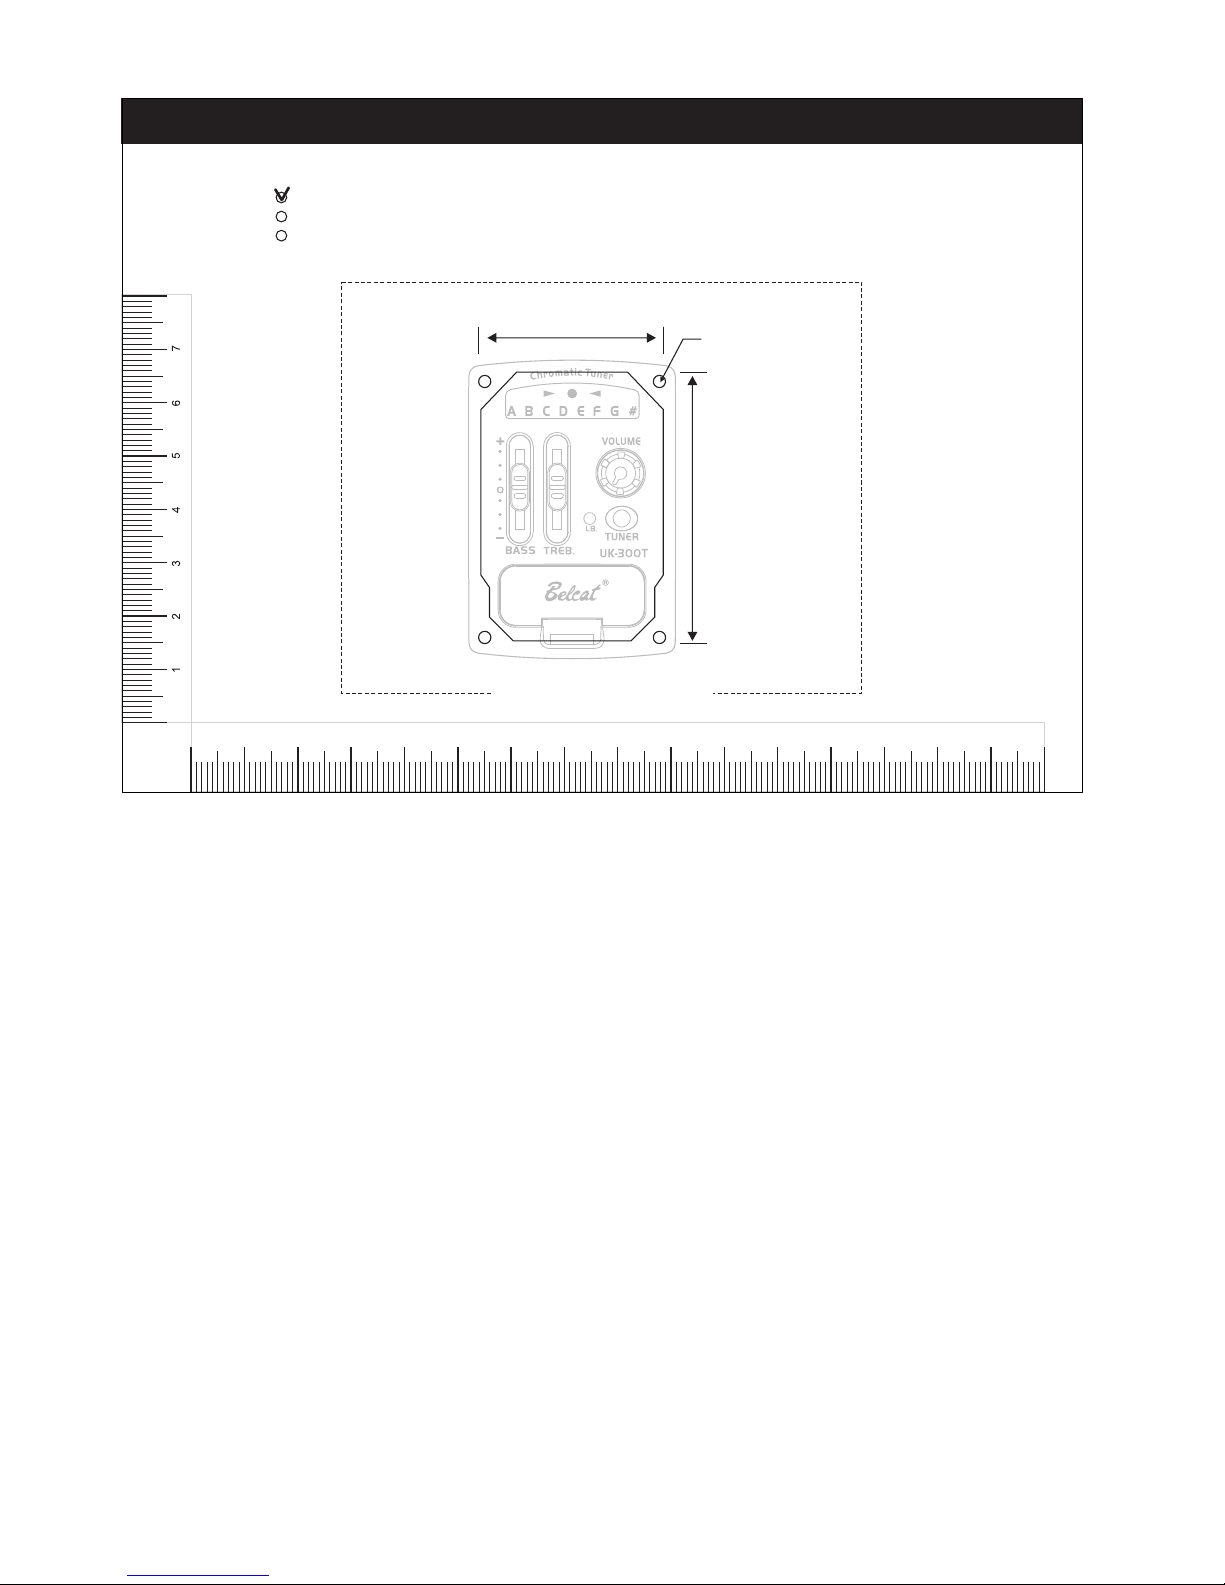
Cutting Template
1.Pr int thi s fi le wi th out sca ling op tion.
2.Ch eck the s iz e wit h ac tual ru ler.
3. Cut o ut the do tt ed li ne o r desir e model .
4. Adhe re to loc at ion u se d oub le s tick ta pe.
5. Cut f ollow s ol id li ne u se cutt er.
Prin t>Pag e Ha ndl in g>Pag e Scali ng
None
Fit to p rint ma rg ins
Redu ce to pri nt m arg in s
1 2 3
4
5
6
7
8 9 10 11 12 13 14 1 5
Preamp Opening
50.9mm
34.6mm
Ø2.0mm
 Loading...