

Page 1
INSTRUCTIONS
Minipet
®
Pipettor
Catalog Numbers
F37900-1010 AQUEOUS 1ml
F37900-1040 AQUEOUS 4ml
F37900-1100 AQUEOUS 10ml
F37900-1300 AQUEOUS 30ml
®
®
®
®
1ml
4ml
10ML
30ML
F37900-0010 TEFLON
F37900-0040 TEFLON
F37900-0100 TEFLON
F37900-0300 TEFLON
CAUTION: The AQUEOUS MINIPET Contains A Natural Rubber Latex Gasket Which May Cause Allergic
Find Quality Products Online at: [email protected]
Reactions If Handled.
www.GlobalTestSupply.com
Page 2

Contents
IMPORTANT NOTE.............................................................1
PRINCIPLE OF OPERATION ..................................................2
SPECIFICATIONS ...............................................................2
DIAGRAMS.........................................................2, 3, 4 & 5
OPERATION ......................................................................5
ELIMINATING AIR .............................................................6
SETTING VOLUME .............................................................6
CLEANING........................................................................6
AUTOCLAVING..................................................................7
ASSEMBLY & DISASSEMBLY ........................................7 & 8
TROUBLESHOOTING.....................................................8 & 9
PARTS ...........................................................................11
IMPORTANT NOTE
®
consult Chemical Resistance Chart before using your MINIPET
to determine
that it is suitable for the chemical to be dispensed.
All parts of the Teflon®Minipet®that come in contact with liquid are glass
and Teflon
®
, thus it is suitable for use with all acids and solvents except HF.
The parts of the Aqueous Minipet®that come in contact with fluid are a
nickel plated luer lock fitting and valve with EPDM
and silicone seal, a stainless steel cannula, silicone tubing and
®
a Teflon
sinker.
Each Minipet®is tested before it is shipped to assure that it performs to the
highest standards of accuracy and reliability. There may be a small amount of
liquid in the barrel which is ordinary tap water used in the testing process.
1
Find Quality Products Online at: [email protected]
www.GlobalTestSupply.com
Page 3
PRINCIPLE OF OPERATION
Minipet®is a variable volume pipette for repetitive dispensing of pre-set
amounts of liquid. The accuracy of repetition of the pipette depends mainly on
the proper operation of the two-way valve and on the proper sealing between
the Teflon®plunger and the glass barrel. The valve consists of two sections,
the intake valve and the dispensing valve.
Depressing the plunger for dispensing opens the dispensing valve and closes
the intake valve.
Releasing the plunger for filling creates a vacuum in the barre
which opens the intake and closes the dispensing valve.
SPECIFICATIONS
Maximum Volume: 1ml 4ml 10ml 30ml
Graduations: 0.01 0.05 0.2 1ml
Accu r a c y : ±0.5% ±0.5% ±0.5% ±1%
ALL MODELS 30ML CAPACITY
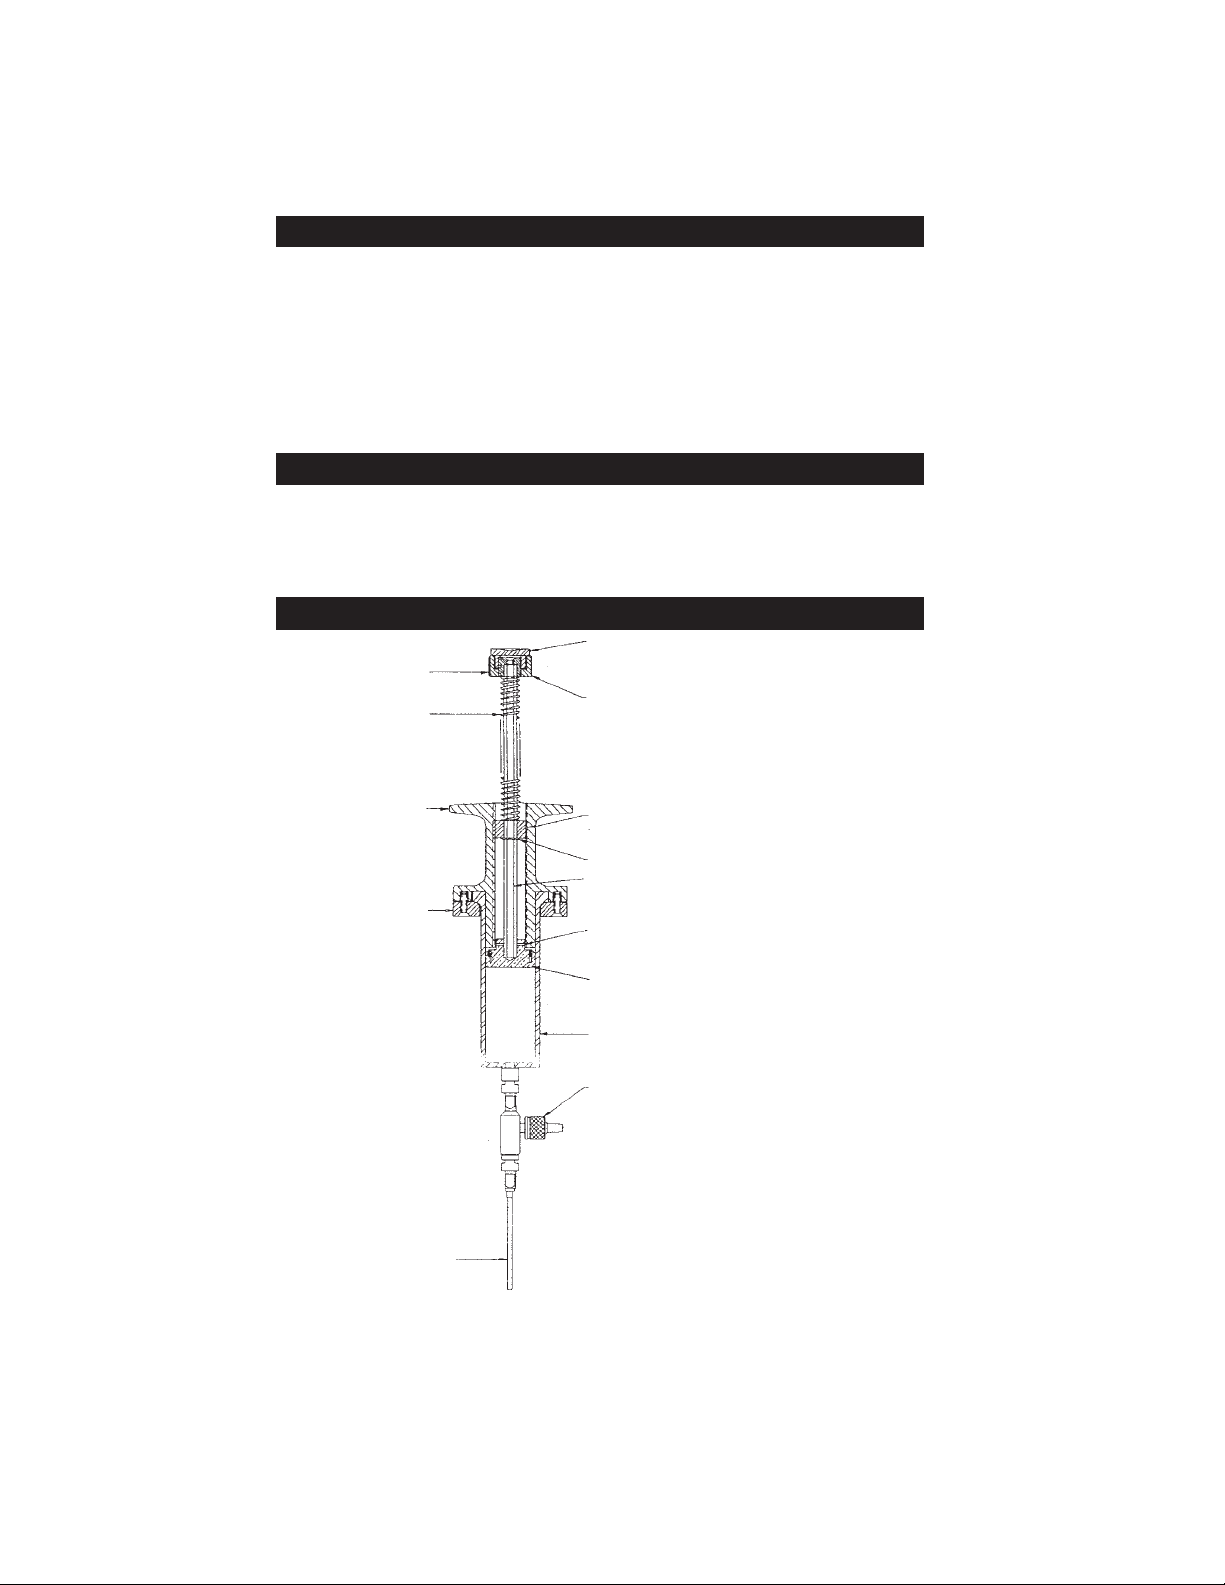
93790-1130
93790-1131
Blue Knob
93790-0145
Main Spring
White Thumb Knob
93790-0140
Bushing
l
93790-0151
Plastic Body
93790-0136
Clamp Flange
93790-0130
Cannula 10 GA
93790-0139
Adjustment Nut
99932-1230
E-Ring
93790-0131
Piston & Rod
99932-1247
S.S. Pin
93790-0144
Piston & Pin
Syringe Barrel*
Valve**
FIGURE 1
*SPECIFY BY CAPACITY AND/OR MODEL - REFER TO
PARTS LIST
**SEE FIGURE 3 FOR CORRECT VALVE
(SHOWN WITH AQUEOUS VALVE)
2
Find Quality Products Online at: [email protected]
www.GlobalTestSupply.com
Page 4
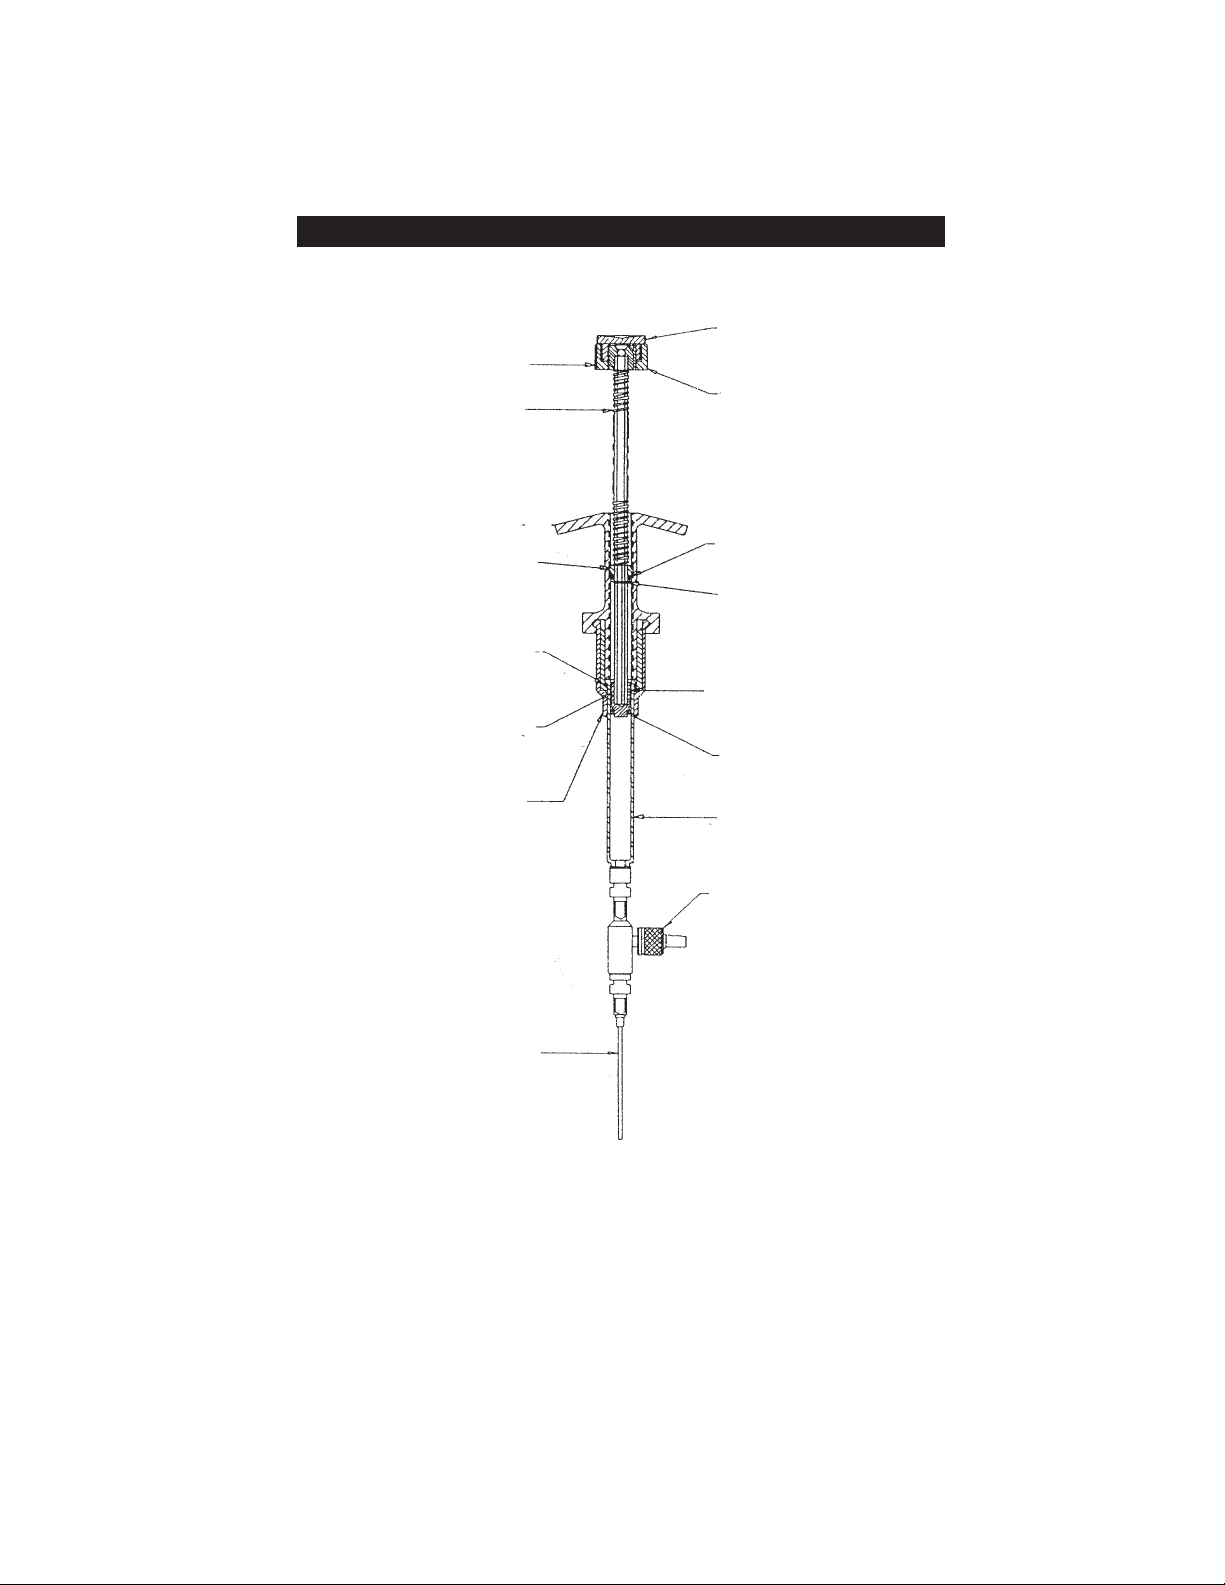
ALL MODELS 1ML, 4ML, 10ML CAPACITY
93790-1130
93790-1131
Blue Knob
White Thumb Knob
93790-1128
Main Spring
93790-1137
Plastic Body
93790-1103
Adjustment Nut
93790-1104
Barrel O-Ring
(1ML&4ML) ONLY
93790-0118
SS PIN (4ML&10ML) PK/2
93790-1125
SS PIN (1ML ONLY) PK/2
Adapter
93790-1109
1ml only
93790-0106
4ml only
93790-0140
Blushing
93790-1105
Friction O-Ring
93790-1126
E-Ring-Pk/2
Piston & Pin*
Piston & Rod*
Syringe Barrel*
Valve**
Cannula
93790-1116 (1ml & 4ml)
93790-0111 (10ml)
FIGURE 2
*SPECIFY BY CAPACITY AND/OR MODEL - REFER TO
**SEE FIGURE 3 FOR CORRECT VALVE
(SHOWN WITH AQUEOUS VALVE)
3
Find Quality Products Online at: [email protected]
www.GlobalTestSupply.com
PARTS LIST
Page 5
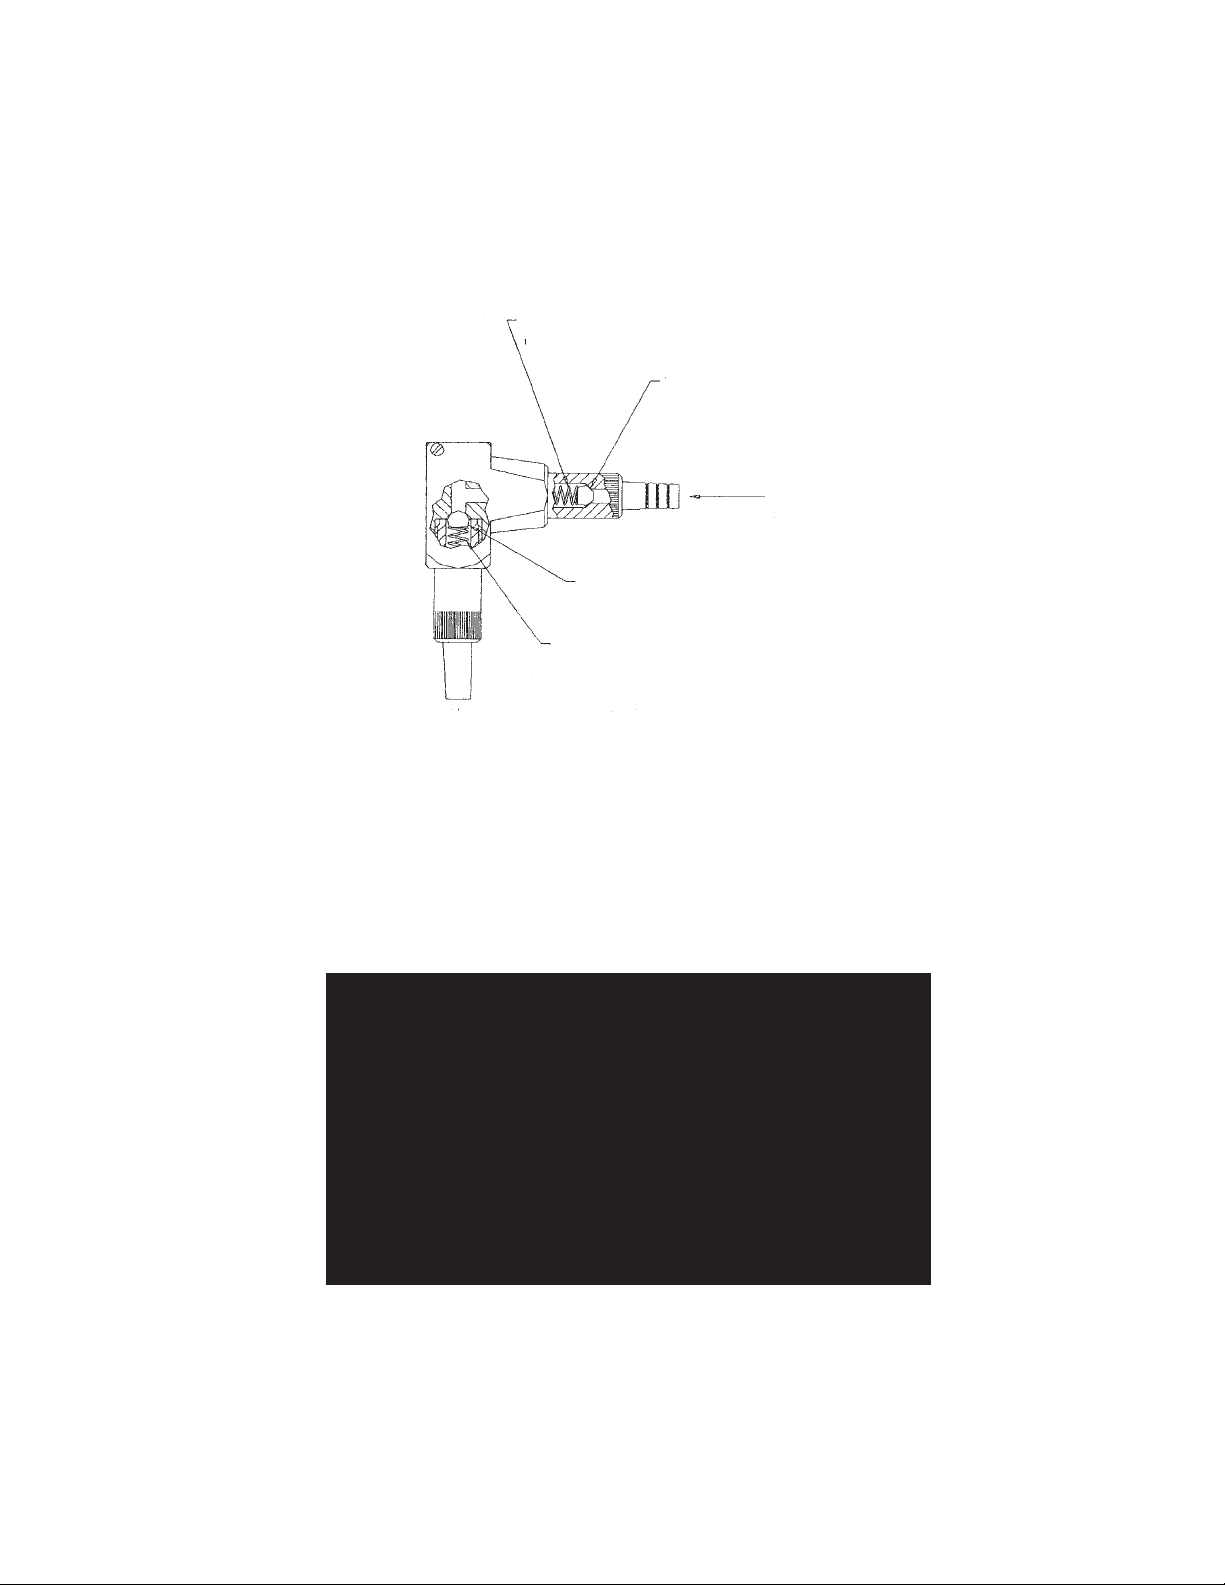
CROSS SECTION VIEW OF VALVE ASSEMBLIES FOR THE TWO MODELS OF MINIPETS
VALVE ASSEMBLY FOR TEFLON®MINIPET
93790-0013
®
Teflon
Coated Valve Spring
93790-0012
3
/16” Valve Float
Intake flow
93790-0012
3
/16” Valve Float
93790-0013
®
Teflon
Coated Valve Spring
Output Flow
SHOULD SYRINGE BARREL BREAK, WE RECOMMEND THE PURCHASE OF A COMPLETE
SYRINGE BARREL AND VALVE ASSEMBLY SEE PARTS LIST FOR ORDERING INFORMATION
®
®
VALVE ASSEMBLY FOR AQUEOUS MINIPET
OLD STYLE – PRIOR T0 8/2001
®
4
Find Quality Products Online at: [email protected]
www.GlobalTestSupply.com
Page 6

VALVE ASSEMBLY FOR AQUEOUS MINIPET
®
NEW STYLE – SINCE 8/2001
93790-1100 VALVE ASSEMBLY
Figure 3
OPERATION
TO PRIME
AQUEOUS MODEL
1. Before attaching the two-way valve to the barrel, turn blue knob counterclockwise to set plunger at maximum volume.
2. Insert the luer tip of the glass barrel (without the valve attached) into liquid
and depress plunger fully and release
to fill barrel.
3. Attach the valve to the glass barrel by inserting into the Luer lock and turning clockwise one quarter turn. Set up the filling tube with sinker and attach
to the valve.
TEFLON®MODEL
1. Turn blue knob counter-clockwise to set the plunger at
maximum volume.
2. Slide the coupling nut over the open end of the tubing to attach the tubing
to the valve.
3. Insert the tubing into the intake hole of the valve and then
push the coupling nut back over the intake, to secure the
tubing in place.
WITH BOTH UNITS, then insert the sinker into reservoir and work plunger up and down
several times until a smooth action of the piston is achieved.
5
Find Quality Products Online at: [email protected]
www.GlobalTestSupply.com
Page 7

TO ELIMINATE AIR BUBBLES
Should air bubbles appear around piston, the following corrective action should be
taken:
1. Make sure the sinker is fully immersed in liquid. Depress plunger quickly and
forcefully several times using short strokes.
2. Turn pipette tip end up and tap glass barrel until air bubbles rise to the top.
Slowly depress plunger until air is expelled. Make sure to place some
absorbent material on the dispensing tip to prevent dripping/spilling.
3. Make sure glass barrel and plunger are free of air bubbles.
TO SET VOLUME
1. Rotate blue knob clockwise to decrease volume; counter-clockwise to increase
volume.
2. Rotate the knob until the bottom edge of the piston is aligned with the
appropriate graduation on the glass barrel.
3. Dispense the set volume in a graduated cylinder or use a balance to check and
readjust if necessary.
REPETITIVE DISPENSING
1. Depress plunger fully each time, release pressure and wait until plunger
completely returns to the set volume position before dispensing again.
2. Dispensing viscous liquids can be facilitated by placing the liquid container
higher than the Minipet
3. Repetitive accuracy can be enhanced by depressing the plunger rapidly and
with uniform force each time.
4. An additional spring is supplied with the AQUEOUS model. The spring may be
inserted in the intake side of the two-way valve to increase accuracy, however
it will slow the refill cycle.
®
itself.
CLEANING
Harsh and corrosive chemicals should not be left in the unit for extended periods of
time. Clean immediately after each use.
For general cleaning, use detergent (such as Bel-Art’s AQUET
Catalog No. F17094-0030).
1. Empty Minipet®by removing sinker and filling tube from reservoir and depress-
ing the plunger a few times until the fluid is expelled from the barrel.
2. Place sinker in cleaning solution. Depress plunger several times to flush and
then empty the unit.
3. Use only chemicals that are compatible with the specific model.
Refer to the AQUEOUS TWO-WAY VALVE section for proper handling and cleaning of
the valve.
®
6
Find Quality Products Online at: [email protected]
www.GlobalTestSupply.com
Page 8

AUTOCLAVING
All parts of the AQUEOUS and TEFLON®MINIPET®are autoclavable. However: it
is necessary to separate the plunger assembly from the glass barrel to prevent
damage to the piston (Refer to Assembly and Disassembly Section for proper handling). Before autoclaving the METAL valve assembly, loosen the two knurled
(rough suface) nuts 1/2 turn to relieve compression of the soft gaskets. After
autoclaving, remember to tighten the knurled nuts. For safety, test the assembly
of Aqueous or Teflon
®
Minipet®for leaks with water before using.
ASSEMBLY AND DISASSEMBLY
TO DISASSEMBLE (1, 4, 10ml; Models)
1. Hold the plastic syringe adapter (93790-1109,
1ml or 93790-0106, 4ml) or the glass
barrel of the 10ml unit in one hand, and the
plastic body in the other hand.
2. Twist one quarter turn to release, and then
pull the plunger assembly completely out of
the glass barrel.
TO REASSEMBLE (1, 4, 10ml; Models)
1. Carefully insert piston into glass barrel at an
angle so as not to damage the piston edges.
Push the piston all the way in the glass barrel.
2. While rotating the plastic syringe adapter
(93790-1109, 1ml or 93790-0106, 4ml) or the
glass barrel of the 10ml push both parts
together until the adapter of the barrel flange
disappears into the plastic body.
3. Once the pieces fit together rotate a quarter
turn to lock into position. A slight rotating
motion of the glass barrel in the locked
position will not affect the operation of the
Minipet
7
®
.
Find Quality Products Online at: [email protected]
www.GlobalTestSupply.com
Page 9

ASSEMBLY AND DISASSEMBLY
TO DISASSEMBLE 30ml MODEL
1. Remove the flange screws that hold the plunger assembly
and the glass barrel together.
3. Separate the plunger assembly from the glass barrel by pulling plunger
assembly all the way out of the barrel.
TO REASSEMBLE 30ml MODEL
1. Carefully insert piston into glass barrel at an angle so as not to damage
piston edges. Push the piston all the way in the glass barrel.
2. Line up the screw holes in the flange and reinsert screws.
HINTS FOR TROUBLESHOOTING
TO CHECK THE TWO-WAY VALVE
When the two-way valve does not work properly, the unit may not prime,
dispense the proper amount, or may fill with air getting into the system through
the dispensing valve side, or liquid passing through the intake valve when
dispensing.
1. Check Intake Valve
a) Fill system.
b) Lift sinker out of container.
c) Dispense while watching sinker. If liquid flows out through the sinker
during downstroke, the intake valve is not
operating properly.
2. Check Dispensing Valve
a) Remove filling tube from valve
b) Depress plunger and keep depressed
c) Place your finger over the intake hole and seal air tight.
8
Find Quality Products Online at: [email protected]
www.GlobalTestSupply.com
Page 10

HINTS FOR TROUBLESHOOTING
d) Release plunger. The plunger should move up a short
distance and stop. If the plunger returns to its original set position, the dispensing valve is not operating properly.
To correct either problem, flush the system to remove any solid particles that
may be lodged under the valve seat. If this doesn’t work, disassemble valve
and clean or replace necessary parts. If there is excessive backflow, the
supplied extra spring may be inserted into the intake valve to force the check
against the intake seal. Note: adding this spring may slow down the fill rate.
Refer to the AQUEOUS MODEL TWO-WAY VALVE section for instructions on
valve removal and disassembly.
TO CORRECT PISTON LEAKS
When liquid passes behind the Teflon
and the glass barrel are no longer forming a proper seal.
FOR 1ML MODELS, F37900-0010 & F37900-1010
1. Disassemble the unit by removing the plunger assembly from the glass
barrel.
2. Insert a blunt object like a ball point pen in the front face groove of the
plunger.
3. Gently force the thin Teflon
entire circumference. If the Teflon
simple operation will restore the sealing ability of the plunger.
®
piston it is because the Teflon®plunger
®
edge outward by circling the pen around the
®
edge is intact and has no nicks, this
FOR ALL OTHER MODELS
1. Disassemble the unit by removing the plunger assembly from the glass
barrel.
2. Closely inspect the plunger; if there is a nick in the plunger, it should be
replaced.
AQUEOUS MODEL TWO WAY VALVE
®
The valve of the AQUEOUS MINIPET
can be removed at the Luer lock by
turning a quarter turn counter-clockwise.
The two-way valve contains a spring and check. To disassemble the valve,
retainers on the intake or outlet can be removed by turning counterclockwise
until free. The spring and valve check can then be removed for proper
cleaning.
9
Find Quality Products Online at: [email protected]
www.GlobalTestSupply.com
Page 11

PARTS LIST
93790-1103 Adjustment nut, 1, 4 & 10ml
93790-1109 Adapter, 1ml
93790-0106 Adapter, 4ml
93790-1104 Barrel “O” ring, 1 & 4ml
93790-1105 Friction “O” ring
93790-1100 Aqueous valve, 1, 4 & 10ml
32903-0102 Teflon
93790-1102 Barrel, 1ml Aqueous
93790-1116 Cannula,16ga, 1 & 4ml
93790-0111 Cannula, 13ga, 10ml
93790-0130 Cannula, 10ga, 30ml
93790-1117 Fill tube, Aqueous, All sizes
93790-0110 Barrel, 10ml Aqueous
93790-0104 Barrel, 4ml Aqueous
93790-1120 Piston & pin, 1ml
93790-1121 Piston & rod assembly, 1ml
93790-0116 Piston & pin, 4ml
93790-0117 Piston & rod assembly, 4ml
93790-0119 Piston & pin, 10ml
93790-0120 Piston & rod assembly, 10ml
93790-0015 Teflon
93790-0004 Teflon
93790-0118 Pin, 4 & 10ml, pk/2
93790-1125 Pin, 1ml, pk/2
93790-1126 “E” Ring, 1,4 & 10ml, pk/2
93790-0016 Teflon
93790-1128 Main spring, 1, 4 & 10ml
93790-0136 Clamp flange, 30ml
93790-0131 Piston & rod assembly, 30ml
93790-0139 Adjustment nut, 30ml
93790-1130 Thumb knob
93790-1131 Knob
93790-0140 Bushing, 30ml
93790-0141 Main spring, 30ml Teflon®
93790-0142 Barrel, Aqueous, 30ml
93790-0144 Piston & pin, 30ml
93790-0145 Main spring, 30ml Aqueous
93790-1132 Bushing
93790-0132 Aqueous valve, 30ml
99932-1230 “E” ring, 30ml
99932-1247 Pin, 30ml
93790-0300 Teflon
93790-0018 Fill tube w/adapter, all Teflon
93790-0151 Plastic Body 30ml
93790-1137 Plastic Body 1ml, 4ml, & 10ml
®
Sinker
®
valve & barrel, 1ml
®
valve & barrel, 4ml
®
valve & barrel, 10ml
®
valve & barrel, 30ml
®
units
937900021 03/07
Find Quality Products Online at: [email protected]
www.GlobalTestSupply.com
 Loading...