

Page 1

Refrigerator
冰箱用户手册
GNE V322 X
Page 2
Please read this manual first!
Recycling
Dear Customer,
We hope that your product, which has been produced in modern plants and
checked under the most meticulous quality control procedures, will provide you
an effective service.
For this, we recommend you to carefully read the entire manual of your product
before using it and keep it at hand for future references.
This manual
• Will help you use your appliance in a fast and safe way.
• Read the manual before installing and operating your product.
• Follow the instructions, especially those for safety.
• Keep the manual in an easily accessible place as you may need it later.
• Besides, read also the other documents provided with your product.
Please note that this manual may be valid for other models as well.
Symbols and their descriptions
This instruction manual contains the following symbols:
C Important information or useful usage tips.
A Warning against dangerous conditions for life and property.
B Warning against electric voltage.
This product is supplied with the selective sorting symbol for waste electrical
and electronic equipment (WEEE).
This means that this product must be handled pursuant to European Directive
2002/96/EC in order to be recycled or dismantled to minimise its impact on
the environment. For further information, please contact your local or regional
authorities.
Electronic products not included in the selective sorting process are potentially
dangerous for the environment and human health due to the presence of
hazardous substances.
Page 3
CONTENTS
1 The refrigerator 3
2 Important Safety Warnings 4
Intended use ........................................ 4
For products with a water dispenser; .... 6
Child safety .......................................... 6
HCA Warning ....................................... 6
Things to be done for energy saving ..... 7
Reccomendations for freshfood
compartment ....................................... 7
3 Installation 8
Points to be considered when re-
transporting your refrigerator ................ 8
Before operating your refrigerator ......... 8
Electric connection............................... 9
Disposing of the packaging .................. 9
Disposing of your old refrigerator .......... 9
Placing and Installation ......................... 9
Floor balance adjustment ................... 10
Adjusting the gap between the upper
door .................................................. 12
Installing Water Filter ......................... 13
Connection of the Water Pipe to the
Refrigerator ........................................ 14
Connection of Water Hose to the Jug 16
Connection of the Water Pipe to the Cold
Water Mains Line .............................. 17
Prior to first use of Ice/Water Dispenser 18
4 Preparation 19
5 Using your refrigerator 20
Setting the fridge compartment
temperature ....................................... 21
Setting the freezer compartment
temperature ....................................... 21
Fresh Freeze Function ........................ 21
Quick Cool Function........................... 22
Vacation Button ................................. 22
Auto Eco Button (Special Economy
function) ............................................ 22
Ioniser ............................................... 22
Key Lock Button ................................ 22
Water Dispenser Illumination .............. 22
Water/Ice Type Selection .................... 22
Ice/Water Dispenser ........................... 22
Using the Ice Dispenser ..................... 22
Ice Off ................................................ 23
Using the water spring ....................... 24
Spillage Tray ...................................... 24
Egg tray ............................................. 24
Sliding Body Shelves .......................... 24
Blue light ........................................... 25
Ion: ................................................... 25
Egg tray ............................................. 25
Fresh Freeze Compartment ................ 25
Crisper humidity control sliders........... 25
Recommendations for preservation of
frozen food ........................................ 26
Defrosting .......................................... 26
Replacing the Interior Light Bulb ......... 26
6 Maintenance and cleaning 28
Protection of plastic surfaces ............ 28
Chiller compartment ........................... 29
Icebox and Water Dispenser .............. 29
7 Recommended solutions for
the problems 30
EN
2
Page 4
1 The refrigerator
2
1
8
9
12
18
7
14
*4
14
3
5
23
20
*19
24
21
22
*6
13
*1517
*11
*16
*10
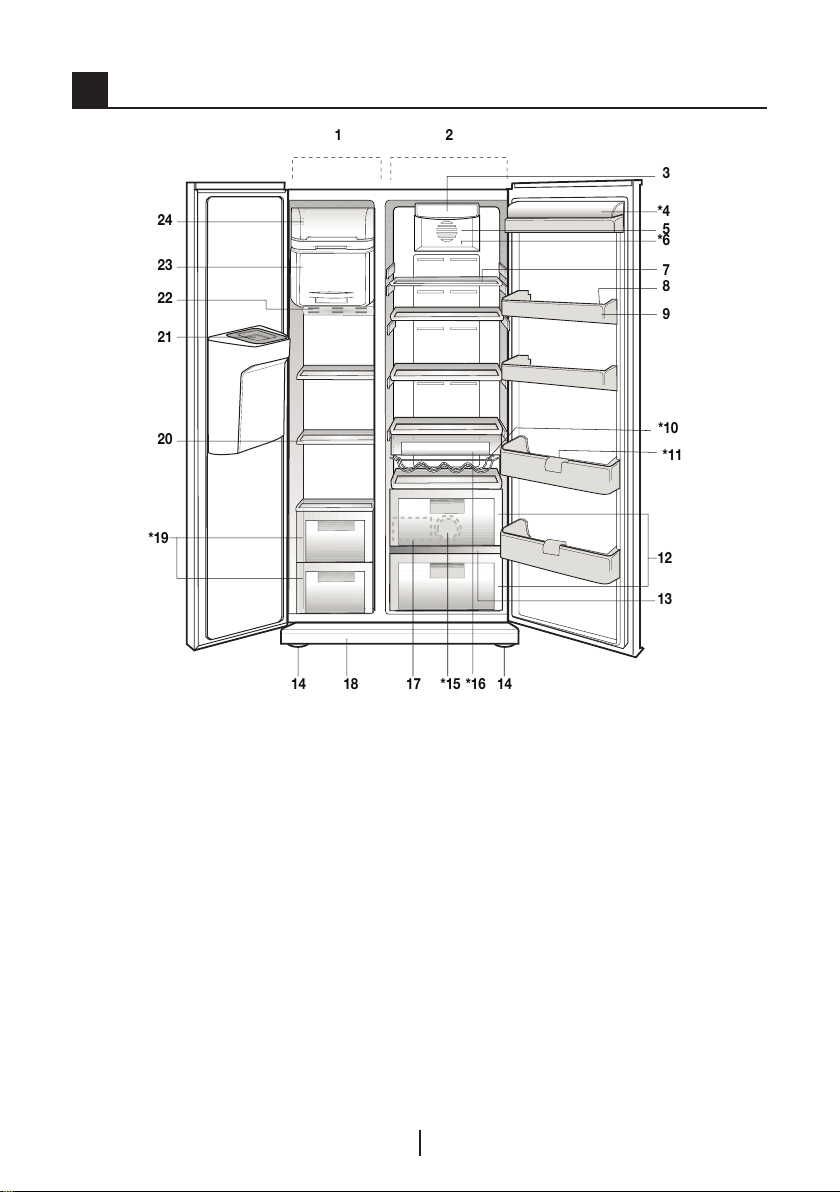
1. Freezer compartment
2. Fridge compartment
3. Fridge compartment interior light
4. Butter and cheese lid
5. Fan
6. Ioniser
7. Fridge compartment glass shelves
8. Egg tray
9. Fridge compartment door racks
10. Wine cellar
11. Bottle holder
12. Crisper compartments
C Figures that take place in this instruction manual are schematic and may not
13 Crisper cover
14. Adjustable front legs
15. Blue light
16.Snack tray
17. Water reservoir
18. Ventilation lid
19. Freezer compartment drawers
20. Freezer Compartment glass shelves
21. Ice duct lid
22. Freezer compartment interior light
23. Fresh Freeze compartment
24. Ice container
* OPTIONAL
correspond exactly with your product. If the subject parts are not included in the
product you have purchased, then it is valid for other models.
EN
3
Page 5

2 Important Safety Warnings
Please review the following
information. Failure to observe this
information may cause injuries or
material damage. Otherwise, all
warranty and reliability commitments
will become invalid.
The usage life of the unit you
purchased is 10 years. This is the
period for keeping the spare parts
required for the unit to operate as
described.
Intended use
This product is intended to be used
– indoors and in closed areas such as
homes;
– in closed working environments such
as stores and offices;
– in closed accommodation areas such
as farm houses, hotels, pensions.
• This product should not be used
outdoors.
General safety
• When you want to dispose/scrap
the product, we recommend you
to consult the authorized service in
order to learn the required information
and authorized bodies.
• Consult your authorized service for
all your questions and problems
related to the refrigerator. Do not
intervene or let someone intervene to
the refrigerator without notifying the
authorised services.
• For products with a freezer
compartment; Do not eat cone ice
cream and ice cubes immediately
after you take them out of the freezer
compartment! (This may cause
frostbite in your mouth.)
• For products with a freezer
compartment; Do not put bottled and
canned liquid beverages in the freezer
compartment. Otherwise, these may
burst.
• Do not touch frozen food by hand;
they may stick to your hand.
• Unplug your refrigerator before
cleaning or defrosting.
• Vapor and vaporized cleaning
materials should never be used in
cleaning and defrosting processes of
your refrigerator. In such cases, the
vapor may get in contact with the
electrical parts and cause short circuit
or electric shock.
• Never use the parts on your
refrigerator such as the door as a
means of support or step.
• Do not use electrical devices inside
the refrigerator.
• Do not damage the parts, where
the refrigerant is circulating, with
drilling or cutting tools. The refrigerant
that might blow out when the gas
channels of the evaporator, pipe
extensions or surface coatings are
punctured causes skin irritations and
eye injuries.
• Do not cover or block the ventilation
holes on your refrigerator with any
material.
• Electrical devices must be repaired
by only authorised persons. Repairs
performed by incompetent persons
create a risk for the user.
• In case of any failure or during
a maintenance or repair work,
disconnect your refrigerator’s mains
supply by either turning off the
relevant fuse or unplugging your
appliance.
• Do not pull by the cable when pulling
off the plug.
EN
4
Page 6
• Place the beverage with higher proofs
tightly closed and vertically.
• Never store spray cans containing
flammable and explosive substances
in the refrigerator.
• Do not use mechanical devices
or other means to accelerate the
defrosting process, other than those
recommended by the manufacturer.
• This product is not intended to be
used by persons with physical,
sensory or mental disorders or
unlearned or inexperienced people
(including children) unless they are
attended by a person who will be
responsible for their safety or who will
instruct them accordingly for use of
the product
• Do not operate a damaged
refrigerator. Consult with the service
agent if you have any concerns.
• Electrical safety of your refrigerator
shall be guaranteed only if the earth
system in your house complies with
standards.
• Exposing the product to rain, snow,
sun and wind is dangerous with
respect to electrical safety.
• Contact authorized service when
there is a power cable damage to
avoid danger.
• Never plug the refrigerator into
the wall outlet during installation.
Otherwise, risk of death or serious
injury may arise.
• This refrigerator is intended for only
storing food items. It must not be
used for any other purpose.
• Label of technical specifications is
located on the left wall inside the
refrigerator.
• Never connect your refrigerator to
electricity-saving systems; they may
damage the refrigerator.
• If there is a blue light on the
refrigerator, do not look at the blue
light with optical tools.
• For manually controlled refrigerators,
wait for at least 5 minutes to start the
refrigerator after power failure.
• This operation manual should be
handed in to the new owner of the
product when it is given to others.
• Avoid causing damage on power
cable when transporting the
refrigerator. Bending cable may cause
fire. Never place heavy objects on
power cable. Do not touch the plug
with wet hands when plugging the
product.
• Do not plug the refrigerator if the wall
outlet is loose.
• Water should not be sprayed directly
on inner or outer parts of the product
for safety purposes.
• Do not spray substances containing
inflammable gases such as propane
gas near the refrigerator to avoid fire
and explosion risk.
• Never place containers filled with
water on top of the refrigerator,
otherwise this may cause electric
shock or fire.
• Do not overload your refrigerator
with excessive amounts of food. If
overloaded, the food items may fall
down and hurt you and damage
refrigerator when you open the door.
Never place objects on top of the
refrigerator; otherwise, these objects
may fall down when you open or
close the refrigerator's door.
• As they require a precise
temperature, vaccines, heat-sensitive
medicine and scientific materials
EN
5
Page 7

and etc. should not be kept in the
refrigerator.
• If not to be used for a long time,
refrigerator should be unplugged. A
possible problem in power cable may
cause fire.
• The plug's tip should be regularly
cleaned; otherwise, it may cause fire.
• The plug’s tip should be cleaned
regularly with a dry cloth; otherwise, it
may cause fire.
• Refrigerator may move if adjustable
legs are not properly secured on the
floor. Properly securing adjustable
legs on the floor can prevent the
refrigerator to move.
• When carrying the refrigerator, do not
hold it from door handle. Otherwise, it
may be snapped.
• When you have to place your product
next to another refrigerator or freezer,
the distance between devices should
be at least 8cm. Otherwise, adjacent
side walls may be humidified.
For products with a water
dispenser;
Pressure of water mains should be
minimum 1 bar. Pressure of water
mains should be maximum 8 bars.
• Use only potable water.
HCA Warning
If your product's cooling system
contains R600a:
This gas is flammable. Therefore, pay
attention to not damaging the cooling
system and piping during usage and
transportation. In the event of damage,
keep your product away from potential
fire sources that can cause the
product catch a fire and ventilate the
room in which the unit is placed.
Ignore this warning if your
product's cooling system contains
R134a.
Type of gas used in the product is
stated in the type plate which is on the
left wall inside the refrigerator.
Never throw the product in fire for
disposal.
Child safety
• If the door has a lock, the key should
be kept away from reach of children.
• Children must be supervised to
prevent them from tampering with the
product.
EN
6
Page 8

Things to be done for energy
temperature
sensor
food
MILK
juice
etc.
temperature
sensor
MILK
juice
etc.
temperature
sensor
saving
• Do not leave the doors of your
refrigerator open for a long time.
• Do not put hot food or drinks in your
refrigerator.
• Do not overload your refrigerator so
that the air circulation inside of it is not
prevented.
• Do not install your refrigerator
under direct sunlight or near heat
emitting appliances such as ovens,
dishwashers or radiators.
• Pay attention to keep your food in
closed containers.
• For products with a freezer
compartment; You can store
maximum amount of food items in
the freezer when you remove the
shelf or drawer of the freezer. Energy
consumption value stated for your
refrigerator has been determined
by removing freezer shelf or drawer
and under maximum load. There
is no harm to use a shelf or drawer
according to the shapes and size of
food to be frozen.
• Thawing frozen food in fridge
compartment will both provide energy
saving and preserve the food quality.
Reccomendations for freshfood
compartment
* OPTIONAL
• Please do not let any foodstuff to come
to contact with the temperature sensor in
freshfood compartment.In order to maintain
freshfood compartment at ideal storage
temperature, the sensor must not be
blocked by fodstuffs.
• Do not place hot foodstuff in your
appliance.
EN
7
Page 9
3 Installation
C Please remember that the
manufacturer shall not be held liable if
the information given in the instruction
manual is not observed.
Points to be considered
when re-transporting your
refrigerator
1. Your refrigerator must be
emptied and cleaned prior to any
transportation.
2. Shelves, accessories, crisper and etc.
in your refrigerator must be fastened
securely by adhesive tape against any
jolt before repackaging.
3. Packaging must be tied with thick
tapes and strong ropes and the
rules of transportation printed on the
package must be followed.
C Always remember...
Every recycled material is an
indispensable source for the nature
and for our national resources.
If you wish to contribute to recycling
the packaging materials, you can
get further information from the
environmental bodies or local
authorities.
Before operating your
refrigerator
Before starting to use your refrigerator
check the following:
1. Is the interior of the refrigerator dry
and can the air circulate freely in the
rear of it?
2. Clean the interior of the refrigerator as
recommended in the “Maintenance
and cleaning” section.
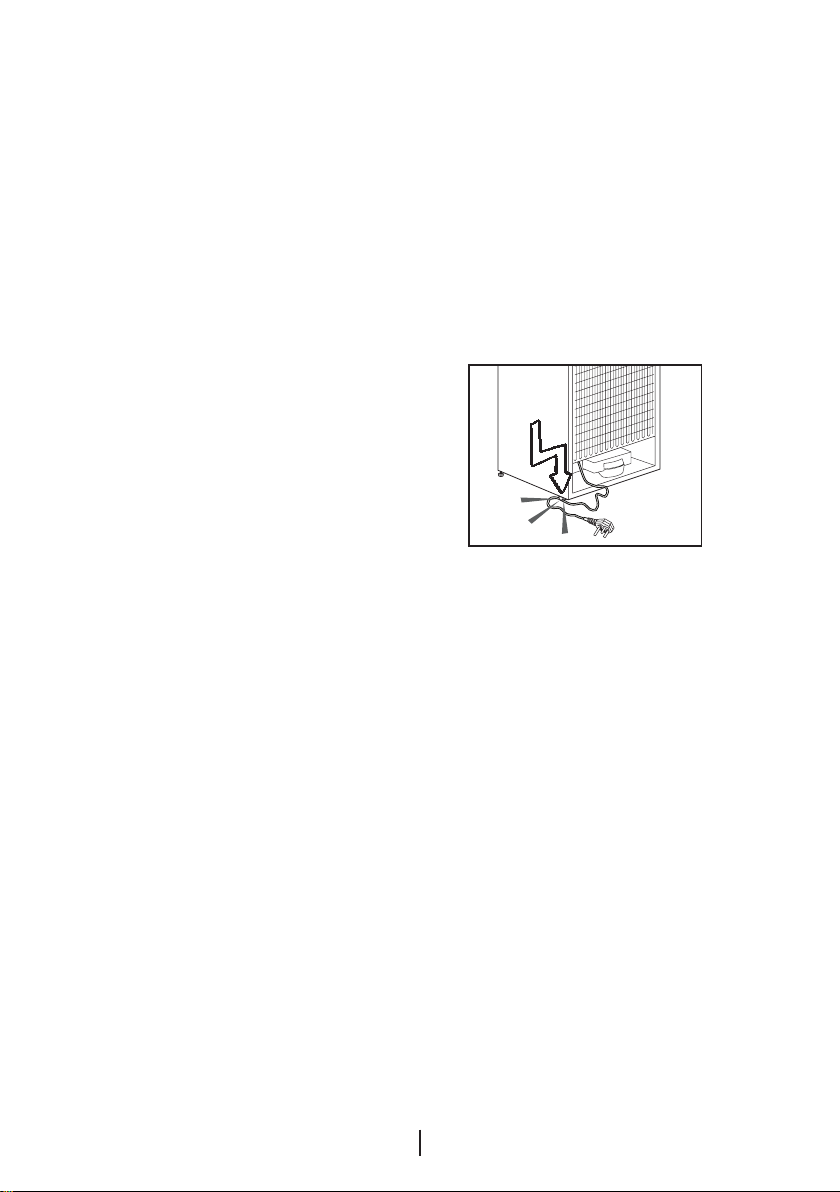
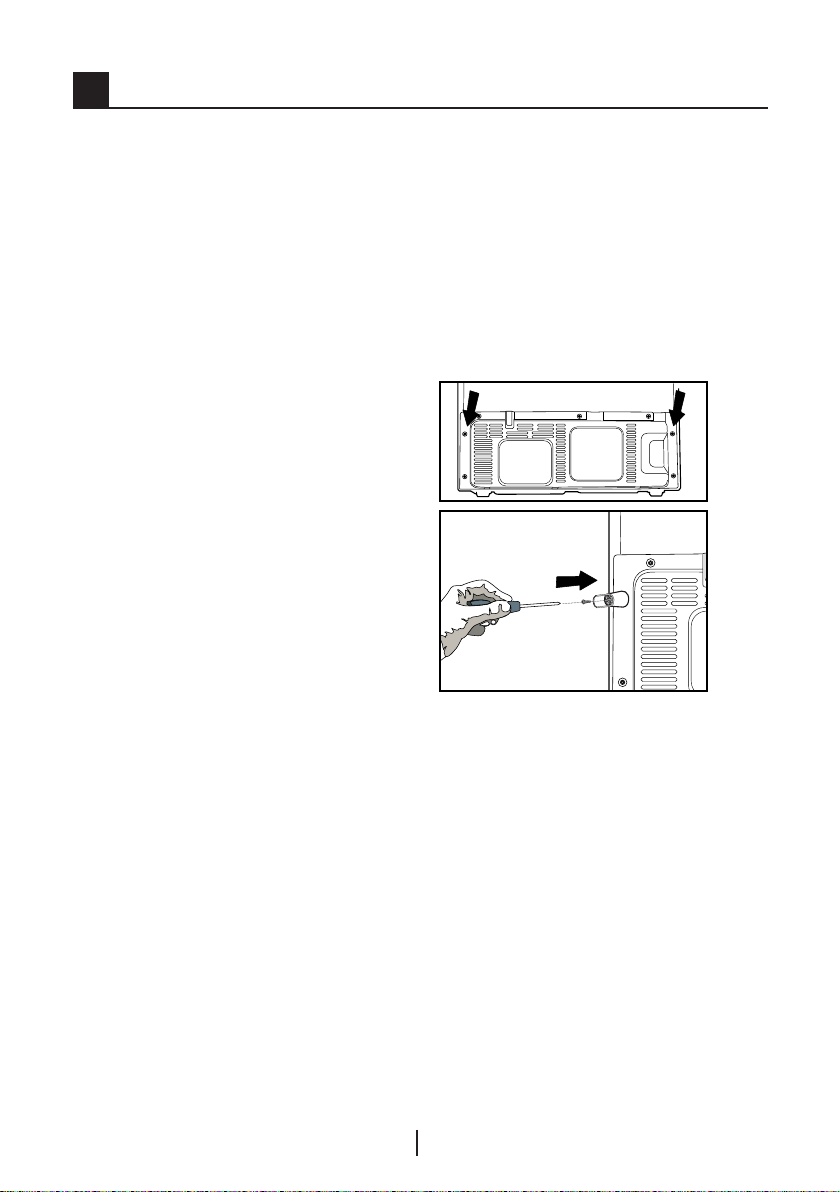
3. Insert the 2 plastic wedges onto the
rear ventilation as illustrated in the
following figure. Unscrew the existing
ones and use the screws given in the
same bag of wedges. Plastic wedges
will provide the required distance
between your refrigerator and the wall
in order to allow the air circulation.
EN
8
Page 10

4. Plug the refrigerator into the wall
outlet. When the door is open the
respective interior light will come on.
5. You will hear a noise as the
compressor starts up. The liquid and
gases sealed within the refrigeration
system may also give rise to noise,
even if the compressor is not running
and this is quite normal.
6. Front edges of the refrigerator may
feel warm. This is normal. These
areas are designed to be warm to
avoid condensation.
Electric connection
Connect your refrigerator to a
grounded socket which is being
protected by a fuse with the
appropriate capacity.
Important:
B The connection must be in
compliance with national regulations.
B The power cable plug must be easily
accessible after installation.
The specified voltage must be equal
B
to your mains voltage.
B Extension cables and multiway plugs
must not be used for connection.
B A damaged power cable must be
replaced by a qualified electrician.
B The appliance must not be operated
before it is repaired! There is danger
of electric shock!
Disposing of the packaging
A
The packing materials may be
dangerous for children. Keep the
packing materials out of the reach
of children or dispose them of by
classifying them in accordance
with the waste instructions. Do not
dispose them of along with the normal
household waste.
The packing of your refrigerator is
produced from recyclable materials.
Disposing of your old
refrigerator
Dispose of your old machine without
giving any harm to the environment.
A You may consult your authorized
dealer or waste collection center of
your municipality about the disposal
of your refrigerator.
Before disposing of your refrigerator,
A
cut out the electric plug and, if there
are any locks on the door, make them
inoperable in order to protect children
against any danger.
Placing and Installation
B
Caution: Never plug the refrigerator
into the wall outlet during installation.
Otherwise, risk of death or serious
injury may arise.
A If the entrance door of the room
where the refrigerator will be installed is
not wide enough for the refrigerator to
pass through, than call the authorised
service to have them remove the
doors of your refrigerator and pass it
sideways through the door.
1. Install your refrigerator to a place
that allows ease of use.
2. Keep your refrigerator away from
heat sources, humid places and direct
sunlight.
3. There must be appropriate air
ventilation around your refrigerator in
order to achieve an efficient operation.
If the refrigerator is to be placed in a
EN
9
Page 11

recess in the wall, there must be at
least 5 cm distance with the ceiling
and at least 5 cm with the wall.
If the floor is covered with a carpet,
your product must be elevated 2.5 cm
from the floor.
4. Place your refrigerator on an even
floor surface to prevent jolts.
5. Do not keep your refrigerator in
ambient temperatures under 10°C.
(A)
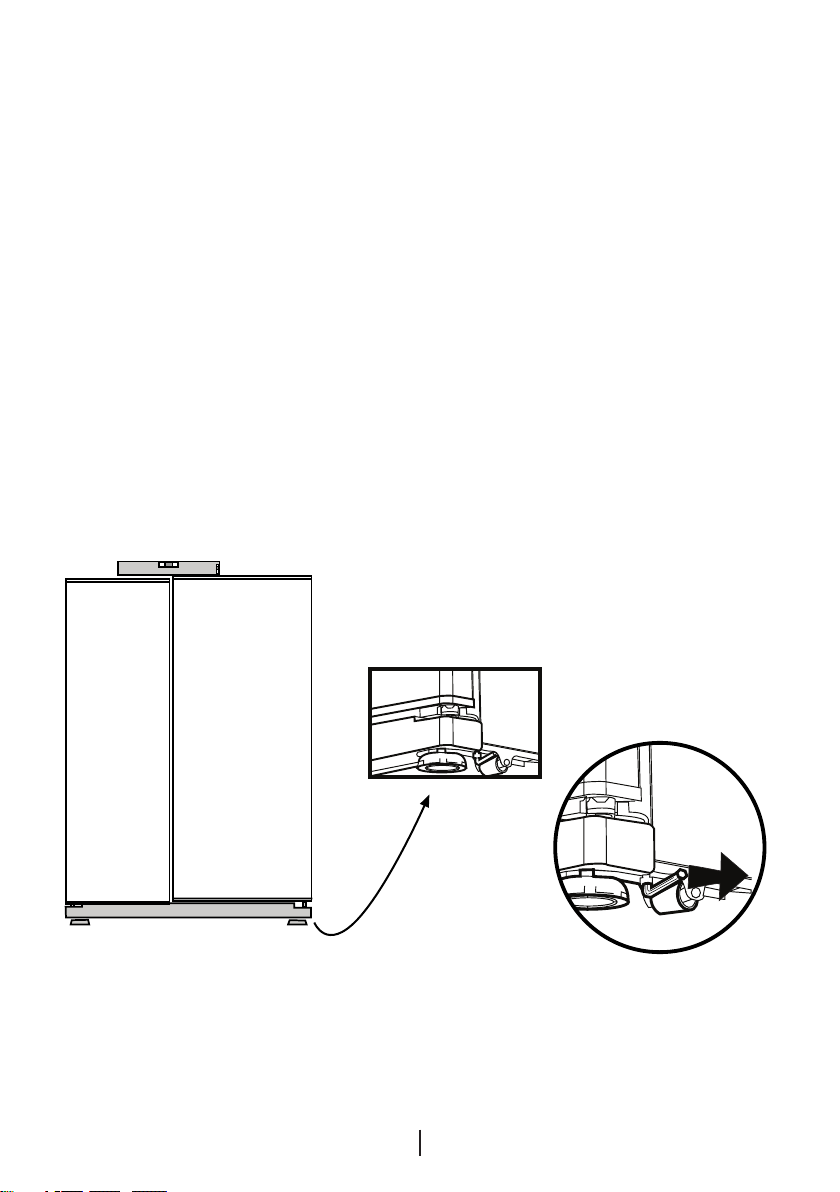
Floor balance adjustment
If your refrigerator is unbalanced;
You can balance your refrigerator by
turning the front legs of it as illustrated
in the figure. (See Figure A) The corner
where the leg exists is lowered when
you turn in the direction of black
arrow and raised when you turn in the
opposite direction. Taking help from
someone to slightly lift the refrigerator
will facilitate this process.
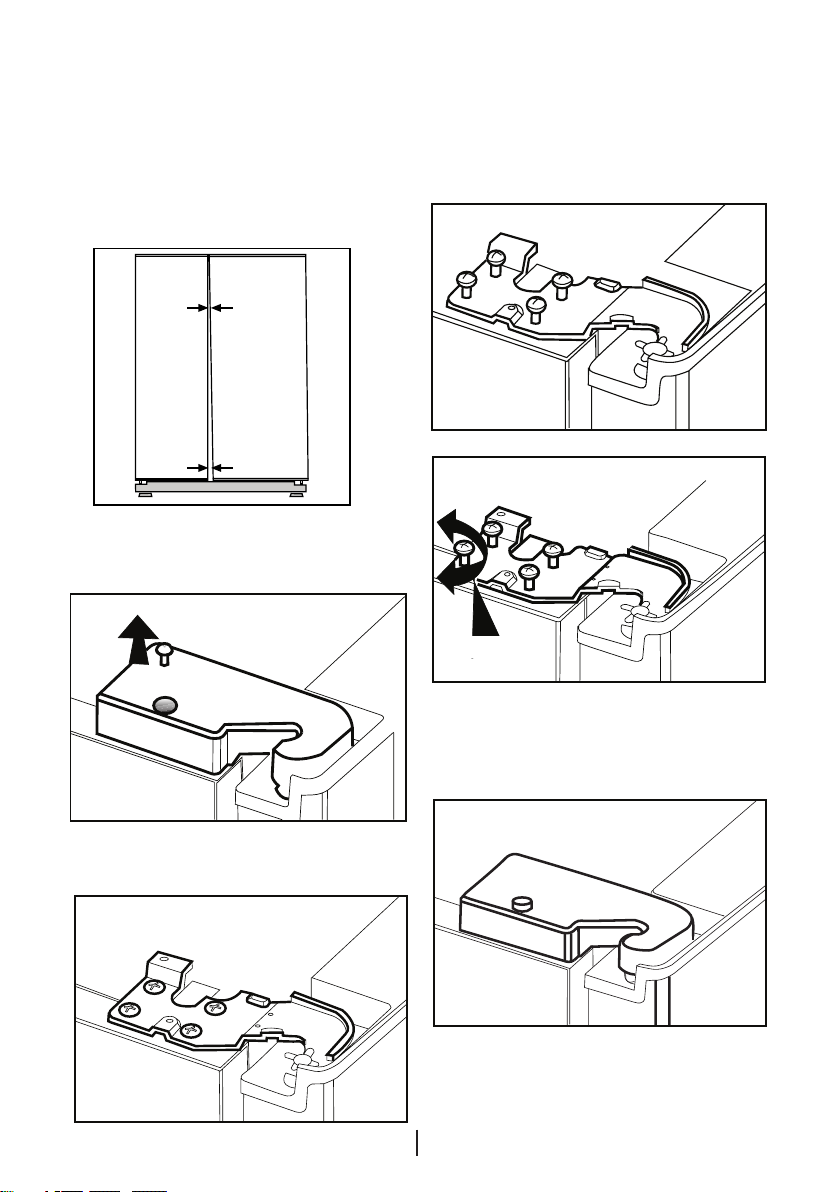
Door height adjustment
In case there is a problem with the
alignment of the doors with respect
to each other, they may be re-aligned
vertically in the order given below.
Ensure that door shelves are empty
when adjusting the door height.
2
(C)
4
1 2 3
(B)
10
2
EN
Page 12
1. Remove the lower ventilation cover
by unscrewing its screws as shown in
the figure below. (See Figure B)
2. Loosen the three screws of the
hinges of the lower door, which you
wish to escalate, with the help of a
screwdriver as shown in the figure
below. (Do not remove completely)
(See Figure C)
• If the freezer compartment door is
lower than the fridge compartment
door, bring them to the same level by
turning the turning the elevation screw
on the freezer compartment side in
the direction of arrow using a M6 Allen
wrench as illustrated in Figure D.
• If the freezer compartment door is
higher than the fridge compartment
door, bring them to the same level
by turning the elevation screw on
the freezer compartment side in the
reverse direction of arrow using a M6
Allen wrench as illustrated in Figure D.
After bringing the doors to the same
level by elevating the front part with
the aid of the elevation screws,ensure
the doors of the refrigerator shall close
properly. If the doors do not close
properly, this might adversely affect the
efficiency of the refrigerator.
11
(D)
EN
Page 13
Adjusting the gap between
the upper door
C
You can adjust the gap between
the fridge compartment doors as
illustrated in the figures.
Door shelves should be empty when
adjusting the door height.
Because of being wires in the
hinge cover of the freezer door,
switch off the refrigerator power
C Using a screwdriver, remove the
screw of upper hinge cover of the door
you want to adjust.
C Adjust the door appropriately as
you desire by loosing the screws.
Center Screw
before removing hinge covers and
this situation should be made to
take care.
12
C Fix the door you have adjusted by
tightening the screws without changing
the position of the door.
C Replace the hinge cover and fix
with the screw.
EN
Page 14
Installing Water Filter
(in some models)
Installation Requirements
Two different water sources may be
connected to the refrigerator for water
supply: the mains cold water supply
and water in a jug.
A pump should be used for jug water
usage.
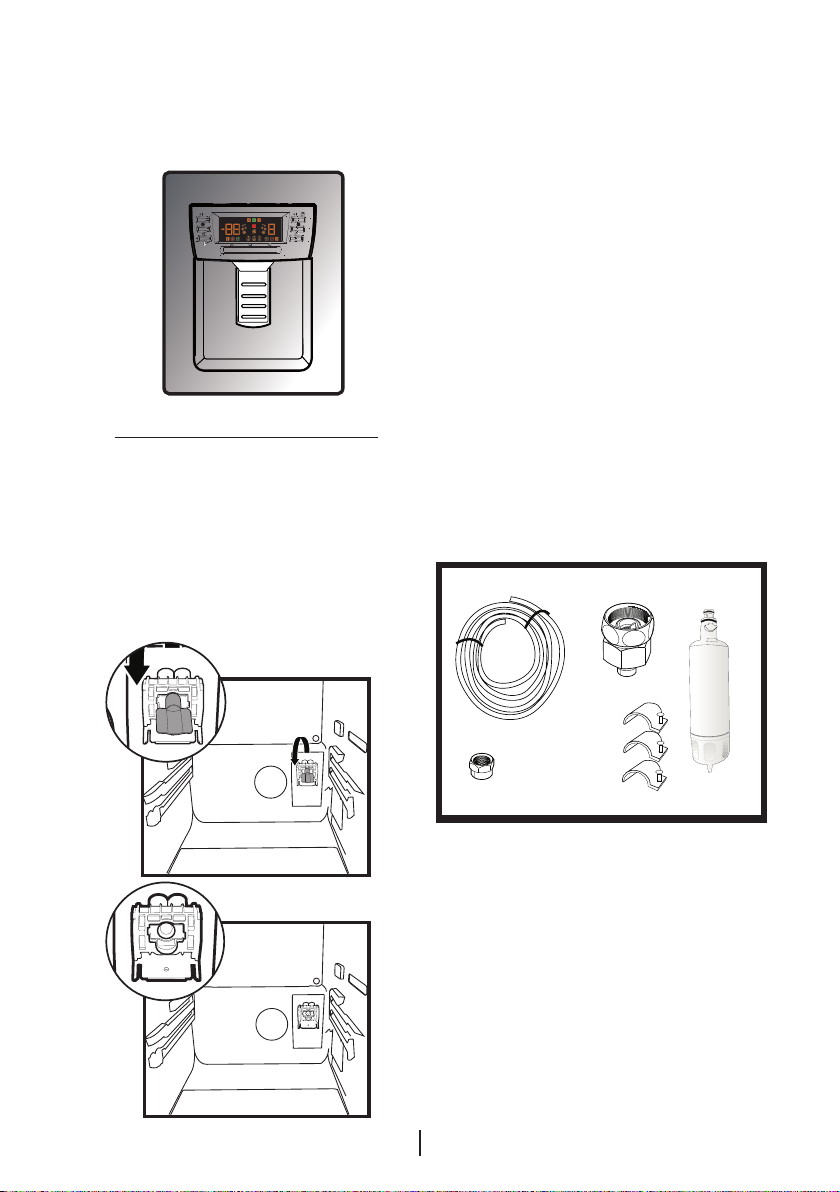
3. 5 meter long water pipe (1/4 inch in
diameter)
4. Cold mains water valve with mesh
filter (Tap Adapter)
5. Water Filter to be fitted to the bracket
inside the fridge compartment.
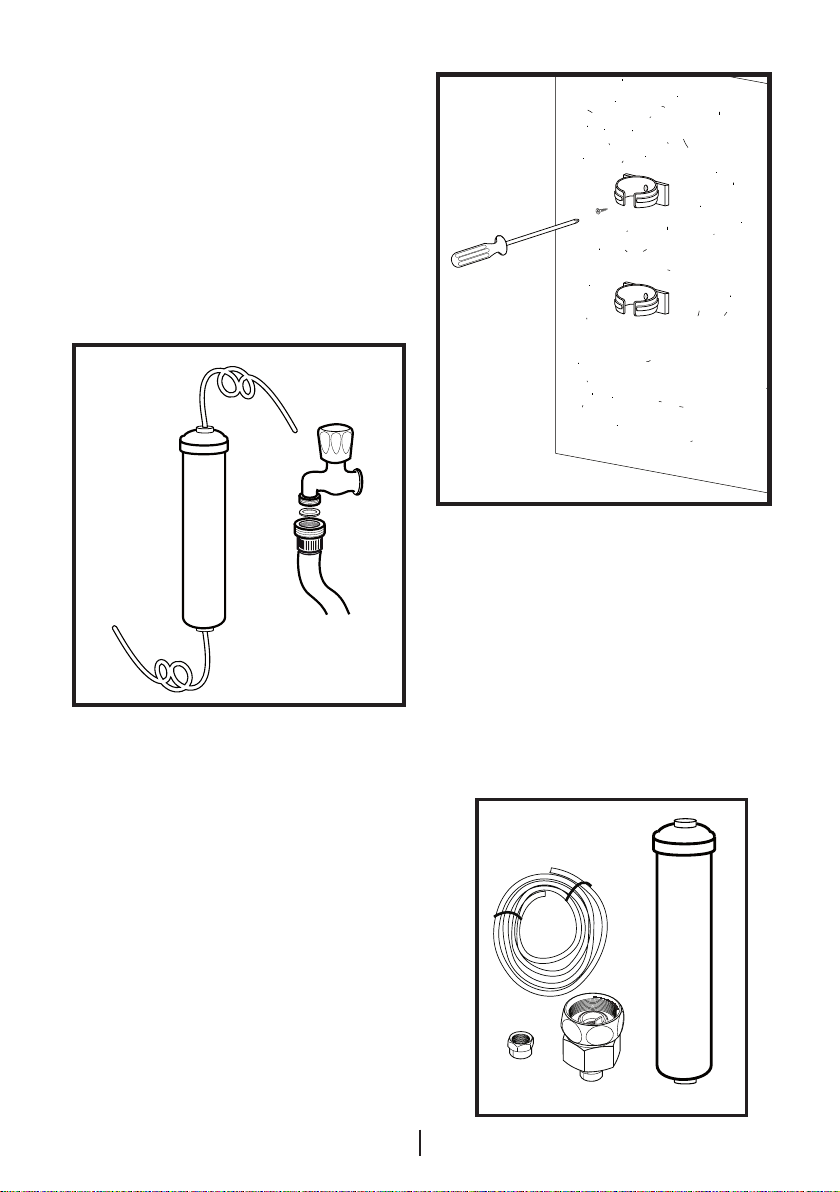
Check that the parts stated below are
supplied with your appliance.
1. Union for connection of the water
pipe to the rear of the appliance
2. 3 pieces of pipe clips (In case
required to secure the water pipe)
C Note: Since the following parts are
not required in use with a jug, they
may not be found in the product you
purchased.
13
EN
2
3
1
4
Page 15
Water connection to the
1
2
refrigerator
Please follow the instructions
below.
Connection of the Water
Pipe to the Refrigerator
a
a
b
c
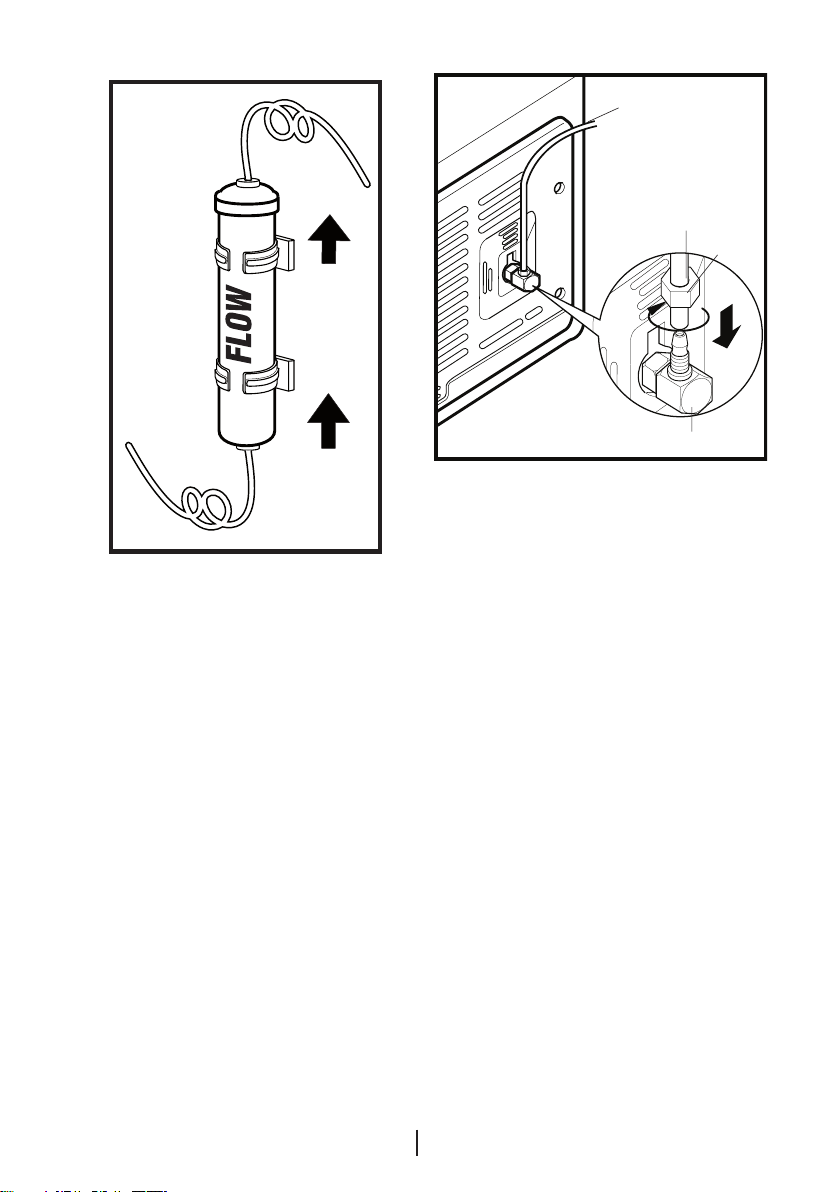
1. After installing the union onto the
water pipe, insert the water pipe to
the refrigerator inlet valve by pressing
downwards firmly.
2. Fix union as seen in the opposite
figure, by squeezing by hand on the
refrigerator inlet valve.
(a- Water Pipe, b-Union, c-Valve)
C Note 1: You should not need to
tighten the union with a tool to achieve
water tight assembly. In case of a leak
use a spanner or a pair of pliers to
tighten the union.
To fit the water filter follow the
instructions below referring to figures
supplied:
EN
14
Page 16
1. Press ice cancel button on the
display. (Figure 1)
2. Remove the filter cover in the fridge
compartment by pulling it forward.
(Figure 2)
3. Take out the water filter by-pass
cover by rotating it downwards.
(Figure 3-4)
A Warning: Make sure that the “Ice
off” mode is active before taking out
the by-pass cover.
Note: It is normal that a few drops of
water drip after the cover has been
taken out.
4. Remove the lid on top of the water
filter to place it as shown in the figure
and turn upwards to lock it. (Figure 5)
5. Press ice cancel button on the
display again to exit from this mode.
Water filter should be replaced every
6 months. The water filter must be
removed as shown in the figure when
it is going to be replaced or when it will
no longer be used and by-pass cover
must be attached. It must be made
sure that Ice Off mode is active before
taking it out.
3
4
5
15
2
1
EN
Page 17
A Warning: Water filter cleans some
foreign particles in the water. It does
not purify water from microorganisms.
A Warning: Ice Off button must
always be pressed during replacement
of the water filter or installing the bypass cover.
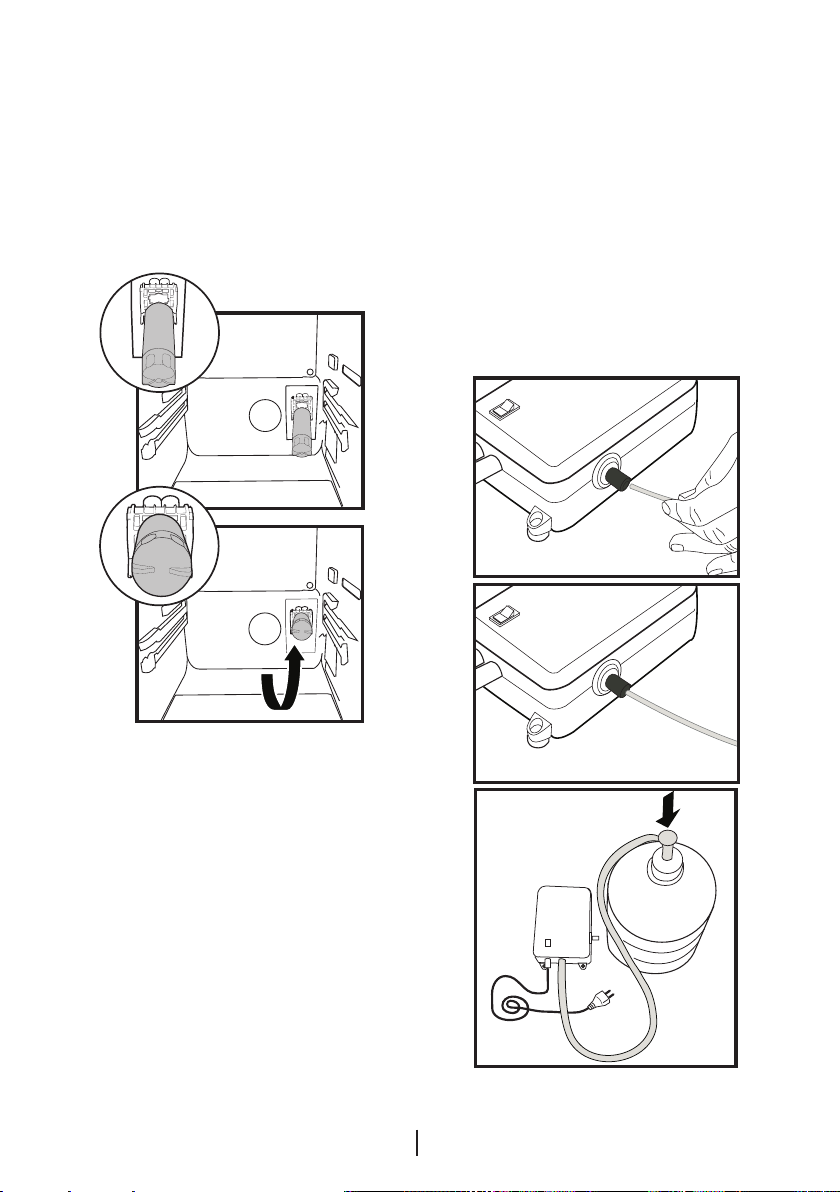
3. After completing the connection, plug
in and run the pump.
To provide an efficient operation of the
pump, wait for 2-3 minutes after
starting the pump.
C Note: You may refer to the user
manual of the pump while making the
water connection.
1a
Connection of Water Hose to
the Jug
(in some models)
To connect water to the refrigerator
from a jug, a pump is needed. Follow
the instructions below after connecting
one end of the water pipe coming
out of the pump to the refrigerator as
described on the previous page.
1. Finish the connection by pushing
the other end of the water pipe into
the water pipe inlet of the pump as
shown in the figure.
2. Put and fix the pump hose into the
jug as shown in the figure.
16
1b
2
EN
Page 18
Connection of the Water
Pipe to the Cold Water Mains
Line
(in some models)
If you want to use your refrigerator by
connecting it to the cold water mains
line,
you will have to connect a standard
1/2” valve connection fitting to the cold
water supply in your house. In case
this valve is not present or in case
you are not sure, consult a qualified
plumber.
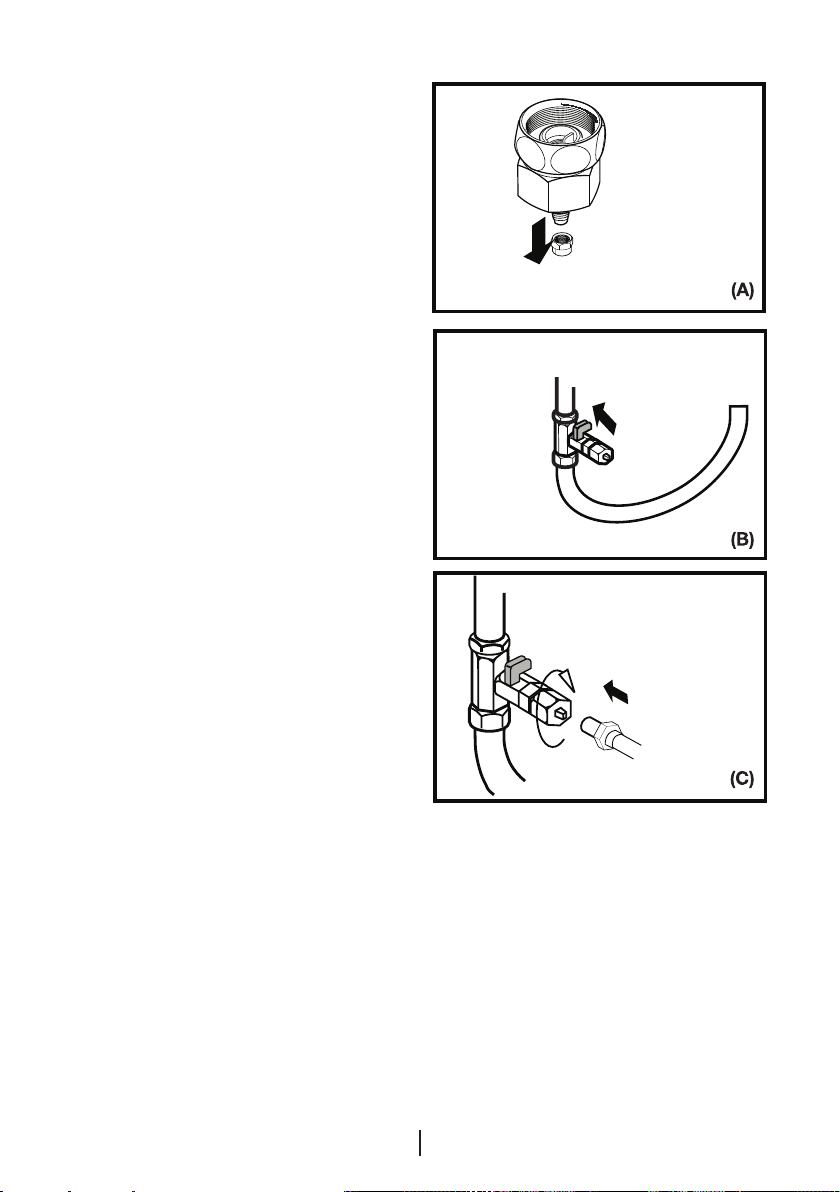
1. Separate the union from the tap
adaptor. (Figure A)
2. Install the tap adaptor to 1/2” valve
fitting as shown in the figure. (Figure
B)
3. After inserting the water pipe to the
union, install it to the tap adaptor
and insert to the tap as shown in the
figure. (Figure C)
4. Tighten the union manually. In case of
a leak use a spanner or a pair of pliers
to tighten the union.
A Warning: Secure the water pipe
to suitable points by means of the
pipe clips supplied to avoid any
damage or displacement or accidental
disconnection.
A Warning: After turning on the water
valve, make sure that there is no
leakage at both connection points of
the water pipe. In case of a leak, turn
off the valve immediately and tighten all
joints again using a spanner or a pair
of pliers.
17
EN
Page 19

A Warning: Make sure that standard
1/2" valve fitting fed by cold mains
water supply is available and is turned
off fully.
Note -1: There is no need to use water
filter in case a jug is used.
Note -2: Pump must be used when jug
will be used.
C Water mains pressure must be
between 1-8 bars for the operation
of Ice/Water Dispenser smoothly. For
this, check that 1 glass of water (100
cc) can be filled in 10 seconds.
C The first 10 glasses of water should
not be consumed.
Prior to first use of Ice/Water
Dispenser
C Water mains pressure must not be
below 1 bar.
C Water mains pressure must not be
over 8 bars.
C Pumps must be used in case the
supply water pressure drops below 1
bar or if a jug is going to be used.
C Water system of the refrigerator
must be connected to the cold water
line. It must not be connected to hot
water line.
C No water may be obtained in the
initial startup of the refrigerator. This
is caused by the air in the system. To
discharge air from the system, press
Dispenser latch for periods of 1 minute
until water comes from the Dispenser.
Water flow may be irregular in the
beginning. Irregular water flow will be
normalized after the air in the system is
discharged.
C 12 hours must pass to obtain ice
from the Ice Dispenser for the first
time. If there is not enough ice in the
ice dispenser, ice may not be obtained
from ice dispenser.
C Approximately the first 30 cubes
of ice to be obtained from the Ice
Dispenser must not be used.
C Always use the water filter when a
jug is not being used.
C At the initial startup of the
refrigerator approx.12 hours must pass
before cold water can be obtained.
18
EN
Page 20

4 Preparation
C Your refrigerator should be installed at
least 30 cm away from heat sources
such as hobs, ovens, central heater
and stoves and at least 5 cm away
from electrical ovens and should not
be located under direct sunlight.
C The ambient temperature of
the room where you install your
refrigerator should at least be 10°C.
Operating your refrigerator under
cooler conditions than this is not
recommended with regard to its
efficiency.
C Please make sure that the interior
of your refrigerator is cleaned
thoroughly.
C If two refrigerators are to be installed
side by side, there should be at least
2 cm distance between them.
C When you operate your refrigerator
for the first time, please observe the
following instructions during the initial
six hours.
- The door should not be opened
frequently.
- It must be operated empty without
any food in it.
- Do not unplug your refrigerator. If
a power failure occurs out of your
control, please see the warnings in
the “Recommended solutions for
the problems” section.
C Original packaging and foam
materials should be kept for future
transportations or moving.
19
EN
Page 21

5 Using your refrigerator
12
11
10
9
8
3
6
*
1
2
3
4
6
7
5
-24 °C
-22 °C
-20 °C
-18 °C
1. Fridge Set button
2. Vacation mode button
3. Quick fridge button
4. Key lock button
5. Ice Off button
6. Water Dispenser Lights
7. Ice / Wate selection button
8. Water Dispenser light button
9. Filter Reset button
10. Auto Eco button
11. Quick freeze button
12. Freezer Set button
13. Economy mode indicator
14. High humidity indicator
15. Quick cool indicator
29 1413
30
26 25 24 23 19
1528
17
20212227
16. Fridge temperature setting indicator
17. High temperature/error warning indicator
18. Fridge door open indicator
19. Key Lock indicator
20. Vacation mode indicator
21. Water indicator
22. No ice indicator
23. Crash Ice indicator
24. Cube Ice indicator
25. Auto Eco indicator
26. Filter reset indicator
27. Freezer door open indicator
28. Freezer Compartment Temperature Setting
indicator
29. Fast Freeze indicator
30. Ioniser indicator
OPTIONAL
EN
20
16
2 °C
4 °C
6 °C
8 °C
18
Page 22

Freezer
Compartment
Adjustment
-15°C 4°C This is the normal recommended
-18,-21 or -24°C 4°C These settings are recommended
Fresh Freeze 4°C Use this when you wish to freeze
-15°C or colder 2°C If you think that your fridge
-15°C or colder Quick Cool You can use it when your fridge
Setting the fridge
compartment temperature
Fridge compartment temperature
can be set at one of the following
temperatures:
8,6,4 and 2°C
Press the Fridge Set button to change.
The temperature will decrease by 2°C.
Every time you press the button, the
temperature will go down and then
return to the highest setting. Release
at the desired temperature and the
new set temperature will be stored.
If you think that your food is colder
than you desire, you can adjust
the temperature setting of fridge
compartment to 6 or 8.
Setting the freezer
compartment temperature
Freezer temperature can be set at one
of the following temperatures : -15 /
-18 / -21 / -24 and -24°C
Fridge
Compartment
Adjustment
Explanations
setting.
when the ambient temperature
exceeds 30°C.
your food or make ice in a short
time. Your refrigerator will return to
its previous mode when the process
is over.
compartment is not cold enough
because of the hot conditions or
frequent opening and closing of the
door.
compartment is overloaded or if you
wish to cool down your food rapidly.
Press the Freezer Set button to
change. The temperature will decrease
by 2°C. Every time you press the
button, the temperature will go down
and then return to the highest setting.
Release at the desired temperature
and the new set temperature will be
stored.
Fresh Freeze Function
When you press “Fresh Freeze”
button, the compressor will run for
about 14 hours. Fresh Freeze indicator
will glow.To cancel this function press
Fresh Freeze button again. Fresh
Freeze indicator will turn off and return
to its normal settings. Fresh Freeze will
cancel itself automatically after about
12 hours if you do not cancel it.
If you want to freeze large amounts
of fresh food, press the Fresh Freeze
button 14 hours before putting the
food into the freezer compartment.
21
EN
Page 23

Quick Cool Function
When you press Quick Cool button,
the temperature of the compartment
will be colder than the adjusted values.
This function can be used for food
placed in the fridge compartment and
required to be cooled down rapidly.
After pressing the Quick Cool button,
Quick Cool indicator will glow.To
cancel this function press Quick Cool
button again. Quick Cool indicator
will turn off and return to its normal
settings. Quick Cool function will
cancel itself automatically in case you
do not cancel it.
Vacation Button
In case the fridge compartment will
not be used for a long time, the usage
of the fridge compartment may be
cancelled by pressing on the Vacation
Button. By this way, the refrigerator
may operate more economically. Press
on Vacation Button for 3 seconds
to activate this function. When this
function is active, the door of the fridge
compartment must be kept closed
and no food must be left in the fridge
compartment.
Auto Eco Button (Special
Economy function)
When “Auto Eco” button is pressed,
Auto Economy Function will be
activated. If the door of the fridge
compartment is kept closed for a long
time when this function is selected,
the fridge compartment will switch to
a more economic operation mode to
save electricity automatically. When the
Auto Eco button is pressed again, this
function is deactivated.
Ioniser
The ioniser helps purify the air in the
fridge and is carried out automatically
22
Key Lock Button
The key lock is activated when this
button is pressed for 3 seconds and
all buttons and the dispenser latch will
not work. If you want to deactivite key
lock press again for 3 seconds.
Water Dispenser Illumination
When the Light button is pressed, the
water dispenser lamp will light up and
it will go off when the button is pressed
again. This illumination will also light
up when the water dispenser latch is
pressed, and it will go off a short while
after the latch is released.
Water/Ice Type Selection
With Dispenser Selection button, either
one of “water”, “ice cube” or “crushed
ice” options is selected.
Ice/Water Dispenser
With its three different functions, the
dispenser efficiently meets your cold
water, cube ice and crushed ice needs
without having to open the door of
the refrigerator. It is a continuous cold
water and ice source without adding
water. User friendly control panel
provides the following dispensing
functions:
Note:
• Water or ice can be dispensed for a
maximum of 90 seconds at each use.
• When the freezer door is open, the
dispenser will not work.
Ice Cube Crushed Ice Cold
Water
Using the Ice Dispenser
C
Please note, first ice cubes will
not be ready before 12 hours after
switching on the appliance.
EN
Page 24

In case you do not need ice, such as
during winter or in case you are on
vacation, select the ice off function.
C Ice device produces approximately
110 cubes of ice in 24 hours and this
amount may change according to
the frequency of opening of doors,
refrigerator settings and power outage.
Produced ice may be obtained from
the dispenser as cube ice or crushed
ice.
It is normal to get crushed ice from
the dispenser in a longer time than in
getting the ice cubes and also flowing
of some crushed ice before the ice
cubes drop if crushed ice option had
been selected before selecting ice
cube option.
C If the ice dispenser hasn’t been
used for a long time or after a power
cut the ice may form clumps or if the
ice has taken on a change in smell or
taste then the ice must be disposed of
and the icebox cleaned thoroughly.
Warnings
C No ice must be added to the ice
dispenser compartment. This may
adversely affect the ice supply or
crushing the ice.
A It is normal to have a couple of ice
cubes stuck together in the icebank.
A Moving parts such as blades in
a housing at the ice outlet of the
dispenser must not be touched to
avoid injury.
A Never use sharp objects to break
the ice in the icebox. This may cause
damage on the icebox.
A Food stuff should never be placed
into the icebox for quick cooling
purposes.
A When the icebox is to be removed for
any reason, first of all Ice Off Button
must be pressed.
Ice Off
C
To stop ice formation, Ice Off
button is pressed. When Ice Off is
selected, no water will be taken into
the Icematic. However, already existing
ice can be taken from the dispenser.
To restart ice formation, Ice Off button
must be pressed again.
Warning: If you do not use the ice
dispenser, do not forget to put ice
duct cover into the ring inside of the
freezer door. (See. Your Refrigerator
section)
FILTER Reset Button:
Water filter should be replaced every
six months. Filter reset indicator lits if
water filter needs to be changed Press
filter Reset Button for 3 seconds to
remove filter reset indicator warning.
23
EN
Page 25

Using the water spring
Warnings
It is normal for the first few glasses of
water taken from the dispenser to be
warm.
In cases where the water dispenser
has not been used frequently, sufficient
amount of water must be drained from
the dispenser to get fresh water.
Spillage Tray
Water drops that drip during use,
accumulates in the spillage tray. You
can remove spillage tray by pulling
it to yourself or pressing on its edge
(depending on the model). You can
remove the water with a sponge or a
soft cloth.
Egg tray
You can install the egg holder to the
desired door or body shelf.
Never store the egg holder in the
freezer compartment
Sliding Body Shelves
Sliding body shelves can be pulled
by slightly lifting up from the front and
moved back and forth. They come to
a stop point when pulled towards front
to allow you reach the foods placed at
the back of the shelf; when it is pulled
after slightly lifted upwards at the
second stop point, the body shelf will
be released.
The shelf should be hold tightly from
the bottom as well in order to prevent
it from tipping over. The body shelf is
placed on the rails at the sides of the
refrigerator body by bringing it to one
lower or one upper level.
The body shelf should be pushed
backwards to seat it completely.
1
2
24
3
4
EN
Page 26

Blue light
Foodstuff stored in the crispers that
are enlightened with a blue light
continue their photosynthesis by
means of the wavelength effect of blue
light and thus, preserve their freshness
and increase their vitamin content.
Ion:
Air is ionized by means of the ionizer
system in the fridge compartment air
duct. Thanks to this system, air-borne
bacteria and particles that cause
odour are removed.
Egg tray
You can install the egg holder to the
desired door or body shelf.
Never store the egg holder in the
freezer compartment
Crisper humidity control
sliders
Crisper of your refrigerator is
designed especially fresh to keep your
vegetables freshly without loosing their
humidity. Cold air circulates basically
around the crisper and the amount of
the cold air passing through the crisper
is controlled by the sliders on the front
side of the crisper cover.
You can adjust the humidity control
sliders to a suitable position according
to the humidity and cooling condition
of your food in the crisper.
If you want your food in the crisper
to cool more, open the holes of the
humidity control sliders and if you
want them to cool less and keep their
humidity for a longer time, close the
holes.
Fresh Freeze Compartment
This compartment freezes your food
quickly and preserves their tastes and
nutritional values.
25
EN
Page 27

Recommendations for
preservation of frozen food
• Prepacked commercially frozen
food should be stored in accordance
with the frozen food manufacturer's
instructions for a
food storage compartment.
• To ensure that the high quality
achieved by the frozen food
manufacturer and the food retailer is
maintained, the following should be
remembered:
1.Put packets in the freezer as quickly
as possible after purchase.
2.Ensure that contents are labelled
and dated.
3.Do not exceed "Use By", "Best
Before" dates on the packaging.
If there is a power failure do not
open the freezer door. Even if the
power failure lasts up to the time
specified on Type Label (inside left of
the refrigerator), frozen food will not
be affected. In case the failure lasts
longer, the food must be checked and
when necessary, must be consumed
immediately or must be frozen after
cooked.
( 4 star) frozen
Defrosting
The fridge and freezer compartments
defrost automatically.
Replacing the Interior Light
Bulb
Should the light fail to work, proceed
as follows:
1. Switch off at the socket outlet and
pull out the mains plug.
Remove all shelves and drawers for
easy access.
2. Illumination covers in freezer and
fridge sections are opened by pressing
by hand; first release one side and
then the other by pressing on the sides
as shown in the figures.
3. First check that the bulb has not
worked loose by ensuring that it
is screwed securely in the holder.
Reinsert the plug and switch on. If the
bulb works, reinstall the light cover by
inserting the rear lug and pushing up
to locate the front two lugs.
4.If the light still fails to work, switch
off at the socket outlet and pull out
the mains plug. Replace the bulb with
a new 15 watt (max) screw cap E14
(SES) bulb.
5.Carefully dispose of the burnt-out
light bulb immediately.
Replacement light bulb can easily be
obtained from a good local electrical or
DIY store.
26
EN
Page 28

EN27EN
Page 29

6 Maintenance and cleaning
A Never use gasoline, benzene or
similar substances for cleaning
purposes.
B We recommend that you unplug the
appliance before cleaning.
B Never use any sharp abrasive
instrument, soap, household
cleaner, detergent and wax polish for
cleaning.
C Use lukewarm water to clean the
cabinet of your refrigerator and wipe it
dry.
C Use a damp cloth wrung out in
a solution of one teaspoon of
bicarbonate of soda to one pint of
water to clean the interior and wipe it
dry.
B Make sure that no water enters the
lamp housing and other electrical
items.
B If your refrigerator is not going to be
used for a long period of time, unplug
the power cable, remove all food,
clean it and leave the door ajar.
C Check door seals regularly to ensure
they are clean and free from food
particles.
A To remove door racks, remove all the
contents and then simply push the
door rack upwards from the base.
Protection of plastic
surfaces
C
Do not put the liquid oils or oil-cooked
meals in your refrigerator in unsealed
containers as they damage the
plastic surfaces of your refrigerator. In
case of spilling or smearing oil on the
plastic surfaces, clean and rinse the
relevant part of the surface at once
with warm water.
28
Page 30

Chiller compartment
If you wish to use the storage
container under the shelf as the Chiller
compartment, the storage container
under the shelf should be placed as
shown in the picture.
Chiller compartments enable the
foods to be frozen become ready
for freezing. You can also use these
compartments to store your food at a
temperature a few degrees below the
fridge compartment.
You can increase the inner volume of
your refrigerator by removing any of
the chiller compartments. To do this,
pull the compartment towards yourself;
the compartment will lean against the
stopper and stop. This compartment
will be released when you lift it about 1
cm and pull it towards yourself.
Icebox and Water Dispenser
C
Follow the procedure and warnings
below to clean the icebox:
A Remove the Icebox by lifting first
and then pulling towards yourself as
shown in the diagram.
A Empty the ice in the Icebox if any.
To take out the stuck ice, use objects
that are not sharp to avoid any
damage on the Icebox.
A Pay attention that the inside of
the Icebox is not wet/damp before
placing it back to its housing.
A If you want to get ice from the ice
dispenser after placing the Icebox
back to its housing and closing the
freezer door, exit from Ice Off mode
by pressing the Ice Off key again.
A Do not touch moving parts like
the knife in the Icebox.
C Leave the Water Reservoir
empty when you are not going to
use for a long time
29
EN
Page 31

7 Recommended solutions for the problems
Please review this list before calling the service. It might save you time and
money. This list includes frequent complaints that are not arising from defective
workmanship or material usage. Some of the features described here may not
exist in your product.
The refrigerator does not operate.
• Is the refrigerator properly plugged in? Insert the plug to the wall socket.
• Is the fuse of the socket which your refrigerator is connected to or the main fuse
blown out? Check the fuse.
Condensation on the side wall of the fridge compartment (MULTIZONE, COOL
CONTROL and FLEXI ZONE).
• Very cold ambient conditions. Frequent opening and closing of the door. Highly
humid ambient conditions. Storage of food containing liquid in open containers.
Leaving the door ajar. Switching the thermostat to a colder degree.
• Decreasing the time the door left open or using it less frequently.
• Covering the food stored in open containers with a suitable material.
• Wipe the condensation using a dry cloth and check if it persists.
Compressor is not running
• Protective thermic of the compressor will blow out during sudden power
failures or plug-out plug-ins as the refrigerant pressure in the cooling system of
the refrigerator has not been balanced yet. Your refrigerator will start running
approximately after 6 minutes. Please call the service if the refrigerator does not
startup at the end of this period.
• The fridge is in defrost cycle. This is normal for a full-automatically defrosting
refrigerator. Defrosting cycle occurs periodically.
• Your refrigerator is not plugged into the socket. Make sure that the plug is
properly fit into the socket.
• Are the temperature adjustments correctly made?
• Power might be cut off.
30
EN
Page 32

The fridge is running frequently or for a long time.
• Your new product may be wider than the previous one. This is quite normal.
Large refrigerators operate for a longer period of time.
• The ambient room temperature may be high. This is quite normal.
• The refrigerator might have been plugged in recently or might have been loaded
with food. Cooling down of the refrigerator completely may last for a couple of
hours longer.
• Large amounts of hot food might have been put in the refrigerator recently. Hot
food causes longer running of the refrigerator until they reach the safe storage
temperature.
• Doors might have been opened frequently or left ajar for a long time. The warm
air that has entered into the refrigerator causes the refrigerator to run for longer
periods. Open the doors less frequently.
• Freezer or fridge compartment door might have been left ajar. Check if the doors
are tightly closed.
• The refrigerator is adjusted to a very low temperature. Adjust the refrigerator
temperature to a warmer degree and wait until the temperature is achieved.
• Door seal of the fridge or freezer may be soiled, worn out, broken or not properly
seated. Clean or replace the seal. Damaged/broken seal causes the refrigerator
to run for a longer period of time in order to maintain the current temperature.
Freezer temperature is very low while the fridge temperature is sufficient.
• The freezer temperature is adjusted to a very low temperature. Adjust the freezer
temperature to a warmer degree and check.
Fridge temperature is very low while the freezer temperature is sufficient.
• The fridge temperature might have been adjusted to a very low temperature.
Adjust the fridge temperature to a warmer degree and check.
Food kept in the fridge compartment drawers are freezing.
• The fridge temperature might have been adjusted to a very low temperature.
Adjust the fridge temperature to a warmer degree and check.
Temperature in the fridge or freezer is very high.
• The fridge temperature might have been adjusted to a very high degree.
Fridge adjustment has an effect on the temperature of the freezer. Change
the temperature of the fridge or freezer until the fridge or freezer temperature
reaches to a sufficient level.
• Doors might have been opened frequently or left ajar for a long time; open them
less frequently.
• Door might have been left ajar; close the door completely.
• Large amount of hot food might have been put in the refrigerator recently. Wait
until the fridge or freezer reaches the desired temperature.
• The refrigerator might have been plugged in recently. Cooling down of the
refrigerator completely takes time.
The operation noise increases when the refrigerator is running.
• The operating performance of the refrigerator may change due to the changes in
the ambient temperature. It is normal and not a fault.
31
EN
Page 33

Vibrations or noise.
• The floor is not even or it is weak. The refrigerator rocks when moved slowly.
Make sure that the floor is strong enough to carry the refrigerator, and level.
• The noise may be caused by the items put onto the refrigerator. Items on top of
the refrigerator should be removed.
There are noises coming from the refrigerator like liquid spilling or spraying.
• Liquid and gas flows happen in accordance with the operating principles of your
refrigerator. It is normal and not a fault.
There is a noise like wind blowing.
• Fans are used in order to cool the refrigerator. It is normal and not a fault.
Condensation on the inner walls of refrigerator.
• Hot and humid weather increases icing and condensation. It is normal and not a
fault.
• Doors might have been left ajar; make sure that the doors are closed fully.
• Doors might have been opened frequently or left ajar for a long time; open them
less frequently.
Humidity occurs on the outside of the refrigerator or between the doors.
• There might be humidity in the air; this is quite normal in humid weather. When
the humidity is less, condensation will disappear.
Bad odour inside the refrigerator.
• Inside of the refrigerator must be cleaned. Clean the inside of the refrigerator with
a sponge, lukewarm water or carbonated water.
• Some containers or package materials might cause the smell. Use a different
container or different brand packaging material.
The door is not closing.
• Food packages may prevent the door's closing. Replace the packages that are
obstructing the door.
• The refrigerator is not completely upright on the floor and rocking when slightly
moved. Adjust the elevation screws.
• The floor is not level or strong. Make sure that the floor is level and capable to
carry the refrigerator.
Crispers are stuck.
• The food might be touching the ceiling of the drawer. Rearrange food in the
drawer.
32
EN
Page 34

请首先阅读本手册!
亲爱的顾客,
我们的产品使用先进设备生产,并通过严格的质量控制步骤检测,希望为您提
供高效的服务。
因此,建议您在使用本产品前仔细阅读本手册,并妥善保管,以备日后参考。
本手册
• 帮助您快速、安全地使用本装置。
• 安装和操作本产品前,阅读本手册。
• 遵循说明,尤其是安全方面。
• 将手册置于触手可及之处,以便随时参考。
• 此外,也请阅读本产品附带的其它文件。
请注意,本手册可能也适用于其它型号。
符号及其说明
本手册包含下列符号:
C 重要信息或者有用的使用提示。
A 防止生命和财产危险的警告。
B 电压警告。
本产品带有报废电子电器设备(WEEE)的选择性分类符号。
这意味着,本产品必须根据欧洲指令 2002/96/EC 进行处置,
以便进行回收或拆解,使其对环境的影响降到最低。欲获取详
细信息,请与当地或地区的权利机构联系。
没有包含在选择分类过程中的电子产品由于危险物质的存在,
可能对环境和人类健康带来威胁。
Page 35

目录
1 关于冰箱 3
2 重要安全警告 4
指定使用 ............................................. 4
对于配备饮水机的产品: ..................... 5
儿童安全 ............................................. 5
HCA 警告 ............................................ 5
节能措施 ............................................. 6
新鲜食物区的建议 ............................... 6
3 安装 7
再次运输冰箱时考虑的事项 ................. 7
操作冰箱前 .......................................... 7
电气连接 ............................................. 8
处置包装 ............................................. 8
处置旧冰箱 .......................................... 8
放置和安装 .......................................... 8
地板平衡调整 ...................................... 9
调整上方门之间的间隙 ...................... 11
安装滤水器 ....................................... 12
将水管连接到冰箱 ............................. 13
A 小心: 更换滤水器或者安装旁路
的盖子时,务必始终按下关闭制冰按
钮。 ............................................ 15
将输水软管连接到水罐 ..................... 15
将水管连接至冷水管线 ..................... 16
(仅限某些型号) ................................ 16
初次使用冰/水机前 ............................ 17
4 准备工作 18
5 使用冰箱 19
设置冷藏室温度 ................................. 20
设置冷冻室温度 ................................. 20
新鲜冷冻功能 .................................... 20
快速制冷功能 .................................... 20
闲置按钮 ........................................... 20
自动经济按钮(特殊经济按钮) ........ 20
离子化 .............................................. 20
键锁按钮 ........................................... 20
饮水机灯 ........................................... 21
水/冰类型选择 ................................... 21
冰/水机 ............................................. 21
使用冰水机 ........................................ 21
结束制冰 ........................................... 21
使用泉水 ........................................... 22
承滴盘 ............................................... 22
蛋托................................................... 22
滑动搁架 ........................................... 22
蓝色光 ............................................... 23
离子: .............................................. 23
蛋托................................................... 23
新鲜冷冻室 ........................................ 23
果蔬盒湿度控制滑块 .......................... 23
冷冻食物储藏建议 ............................. 24
除霜................................................... 24
更换内部的灯泡 ................................. 24
6 维护和清洁 26
保护塑料表面 .................................... 26
6 维护和清洁 27
保护塑料表面 ........................................
制冰盒和饮水机 ................................. 27
制冷室 ............................................... 27
7 问题解决建议 28
ZH
2
Page 36

1 关于冰箱
2
1
8
9
12
18
7
14
*4
14
3
5
23
20
*19
24
21
22
*6
13
*1517
*11
*16
*10
1. 冷冻室
2. 冷藏室
3. 冷藏室内部的照明灯
4. 干酪和黄油盖
5. 风扇
6. 离子发生器
7. 冷藏室玻璃架
8. 蛋托
9. 冷藏室门架
10. 葡萄酒箱
11. 瓶架
12. 果蔬盒
C 本手册中的图片仅为示意性质,可能与您的产品不完全相符。 如果主体零件
13. 果蔬盖
14. 可调整前部支腿
15. 蓝色光
16.快餐托盤
17. 贮水器
18. 通风盖
19. 冷冻室抽屉
20. 冷冻室玻璃架
21. 冰导管盖
22. 冷冻室内部的照明灯
23. 新鲜冷冻室
24. 冰盒
*可選
没有包含在您购买的产品当中,表明其适用于其它型号。
ZH
3
Page 37

2 重要安全警告
请遵循下列信息。 否则,可能导致受
伤或重大损坏。 且所有的保修和可靠
性承诺将失效。
本装置的使用寿命为 10 年。 这是保
留本装置正常操作所需备件的期限。
指定使用
本产品拟用于
– 室内和封闭的区域,例如,家庭环
境;
– 在封闭的工作环境,例如,店铺和
办公室;
– 在封闭的膳宿设施内,例如,农
场,宾馆和膳宿公寓。
• 本产品不得在户外使用。
一般安全性
• 您想要处置/废弃本产品时,我们建
议您咨询授权服务机构,以便了解
必要的信息和授权机构。
• 对于与冰箱有关的所有问题和疑
问,请咨询授权服务机构。 在没有
通知授权服务机构前,请勿自行干
预或者让他人干预冰箱。
• 请勿立即食用从冷冻室中取出的锥
形冰淇淋和方块冰。 (这可能导致
您的口腔冻伤。)
• 对于配备冷冻室的产品:请勿将瓶
装和灌装液体饮料放在冷冻室内。
否则,其可能爆裂。
• 请勿用手接触冷冻食物;其可能粘
到您的手上。
• 清洁或除霜前,请拔下冰箱插头。
• 切勿在冰箱清洁和除霜过程中使用
蒸汽和气化清洁材料。 此类情况
下,蒸汽可能与电气零件接触,导
致短路或触电。
• 请勿使用冰箱上的零件,例如,将
冰箱门作为支撑或梯子。
• 请勿使用冰箱内的电气装置。
• 请勿使用钻孔或切割工具损坏零
件,制冷剂在这里循环。 在蒸发器
的气体通道、管道扩充件或者表面
涂层被刺穿后,制冷剂可能流出,
导致皮肤受到刺激和眼睛受伤。
• 请勿使用任何材料,覆盖或堵塞冰
箱的通风孔。
• 电气设施必须由经授权的人员维
修。 无资质人员实施的维修会给用
户带来危险。
• 如果发生任何故障,或者在实施维
护或维修作业的过程中,应当通过
关闭相关保险丝或者拔下插头,断
开冰箱的电源。
• 拔下插头时,请勿拉拔电缆。
• 放置饮料时,注意盖牢瓶盖,且垂
直放置。
• 切勿在冰箱内存放含有易燃和易爆
物质的喷雾罐。
• 请勿使用机械装置或者其它手段,
加速除霜过程,除非制造商建议这
样做。
• 本装置并非设计供体力、感知力或
脑力下降或经验和知识缺乏的人士
(包括孩子)使用,除非有负责他
们安全的人员给出有关装置之使用
的监督或指导。
• 请勿操作受损的冰箱。 如果有任何
问题,请咨询维修代理。
• 只有您家中的接地系统符合标准
时,才能担保冰箱的电气安全。
• 本产品淋雨、落雪、受到阳光照射
和风吹在电气安全方面是危险的。
• 在电源线损坏时,请致电授权服务
中心,以免发生任何危险。
• 安装过程中,切勿将冰箱的插头插
入壁式插座。 否则,可能出现严重
的人身伤亡。
• 冰箱仅用于存放食物。 其不得用于
任何其它目的。
• 技术规范标签位于冰箱内左壁。
• 请勿将冰箱连接至节能系统,否
则,可能导致冰箱受损。
• 如果冰箱配备有蓝色灯,请勿通过
光学装置查看蓝光。
ZH
4
Page 38

• 对于手动控制的冰箱,在发生电力
故障后,请至少等待 5 分钟,才可
以重新启动冰箱。
• 如果转让本产品,应当连同该操作
手册一同移交给新用户。
• 运输冰箱时,避免导致电源线损
坏。 弯曲电缆可能导致起火。 切勿
在电源线上放置重物。 为本产品插
入插头时,请勿用潮湿的手接触插
头。
• 如果壁式插座松脱,请勿连接冰箱
插头。
• 出于安全的原因,请勿将水直接喷
到本产品内部或外部的零件上。
• 请勿在冰箱附近喷洒含有易燃气体
的物质,例如,丙烷气,以免发生
起火或爆炸之危险。
• 切勿将充满水的容器放在冰箱顶
部,否则,可能导致触电或起火。
• 冰箱不可装入过多的食物。 如果
过度装满,在您打开冰箱门时,食
物可能掉落,导致您受伤和冰箱受
损。 请勿在冰箱顶部放置物体,在
打开或关闭冰箱门时,其容易掉落
下来。
• 请勿在冰箱内存放要求精确温度的
物品(疫苗、对温度敏感的药品,
科学材料等)。
• 如果长时间不使用冰箱,应当拔下
插头。 电源线可能存在的问题会导
致起火。
• 应定期清洁插头尖;否则,可能导
致起火。
• 应定期使用干抹布清洁插头尖;否
则,可能导致起火。
• 如果可调支腿没有适当固定在地面
上,冰箱可能移动。 在地面上适当
固定可调支腿可以防止冰箱移动。
• 移动冰箱时,请勿在门把手上用
力。 否则,其可能折断。
• 必须将该产品与其它冰箱或制冷器
并排放置时,这些装置之间的距离
至少应为 8cm。 否则,相邻的侧壁
可能会出现冷凝水。
对于配备饮水机的产品:
水源的压力应至少为 1 巴。 水源的
压力最高为 8 巴。
• 只能使用饮用水。
儿童安全
• 如果门上有锁,钥匙应置于儿童不
可及之处。
• 必须看管儿童,以免其摆弄本产
品。
HCA 警告
如果本产品的制冷系统含有 R600a:
此气体易燃。 因此,在使用和运输
过程中,注意不要损坏制冷系统和管
道。 如果发生损坏,本产品应远离可
能导致着火的潜在火源,并给其所在
的房间通风。
如果本产品的制冷系统含有 R134a,
可以忽略该警告。
本产品中使用的气体类型在位于冰箱
内部左壁上的铭牌上注明。
废弃该产品时,请勿将其投入火中。
ZH
5
Page 39

节能措施
temperature
sensor
food
MILK
juice
etc.
temperature
sensor
MILK
juice
etc.
temperature
sensor
• 请勿长时间敞开冰箱门。
• 请勿在冰箱内放置灼热的食物或饮
料。
• 冰箱不可过载,以致妨碍内部的空
气循环。
• 请勿在受到阳光直射或者靠近发热
装置(例如,烤箱、洗碗机或暖
气)的位置安装冰箱。
• 注意在封闭的容器内保存食品。
• 对于配备冷冻室的产品;在拆下冷
冻室的搁架或抽屉后,可以在冰箱
的冷冻室放置最大数量的食物。 声
明的冰箱能耗值是在拆卸了冷冻室
搁架或抽屉,并在放入最大数量的
食物后确定的。 根据要冷冻的食物
形状和大小使用搁架或抽屉是安全
的。
• 在冷藏室为冷冻的食物解冻具有节
能的效果,并可以有效保持食品质
量。
新鲜食物区的建议
• 注意任何食物均不得接触新鲜食物
区的温度传感器。为了新鲜食物区保
持理想的贮存温度,食物不可遮挡传
感器。
• 请勿在冰箱内放置灼热的食物。
ZH
6
Page 40

3 安装
C 请注意,如果没有遵循本手册中的
信息,制造商对于发生的损害不承
担任何责任。
再次运输冰箱时考虑的事项
1. 在任何运输前,冰箱必须清空和保
持清洁。
2. 重新包装前,冰箱内的搁板、附
件、新鲜蔬菜保存盒等必须用胶带
牢牢固定,防止摇晃。
3. 包装必须使用厚胶带和粗大的绳子
扎紧,并遵循包装上印刷的运输规
则。
C 请始终牢记......
每种回收材料对于大自然和我们国家
的资源而言都是不可缺少的。
如果您希望对回收包装材料有所作
为,可以从环境机构或者当地权力部
门获取详细信息。
操作冰箱前
开始使用冰箱前,检查下列内容:
1. 冰箱内部是否干燥,和空气能否在
冰箱后面自由流通?
2. 按照“维护和清洁”章节中的建
议,清洁冰箱内部。
3. 将冰箱插头插入壁式插座。 冰箱门
打开时,内部相关的灯会亮起。
4. 在压缩机启动时,您将听到一个声
音。 即使压缩机没有运转,制冷系
统中密封的液体和气体也可能产生
噪声,这是正常的。
5. 可能感觉到冰箱的前边温度升高。
这是正常的。 这些区域设计保持温
暖,以免发生冷凝。
ZH
7
Page 41

电气连接
将冰箱连接至由适当容量之保险丝保
护的接地插座。
重要信息:
B 连接必须符合国家规定。
B 安装后,电源线插头必须触手可
及。
B 电压和允许的保险丝保护在“技术
规格”章节中指定。
B 指定的电压必须等于电源电压。
B 连接时,请勿使用扩充电缆和多路
插头。
B 受损的电源线必须由具备资格的电
工更换。
B 本装置在维修妥当前,切勿操作!
有触电的危险!
处置包装
A
包装材料可能给儿童带来危险。 将
包装材料置于儿童不可及之处,或者
根据垃圾说明进行分类和处置。 请勿
随日常生活垃圾一起处置。
冰箱的包装使用可回收材料制成。
处置旧冰箱
处置旧冰箱时,请不要给环境带来任
何危害。
A 有关冰箱的处置,您可以咨询授权
经销商或者市政部门的垃圾收集中
心。
A 处置冰箱前,请切断电源插头,而
且,如果门上有锁的话,请务必使
之不可用,以免儿童有任何危险。
放置和安装
B
小心: 安装过程中,切勿将冰箱的
插头插入壁式插座。 否则,可能出现
严重的人身伤亡。
A 如果安装冰箱之房间的房门不够
宽,以致冰箱无法通过,可以致电授
权服务机构,请他们拆下冰箱门,并
侧着穿过房门。
1. 将冰箱安装在方便使用的位置。
2. 冰箱应远离热源和潮湿的场所并避
免受到阳光直射。
3. 在冰箱周围必须有适当的通风,以
便获得高效的操作。 如果冰箱放置在
墙壁内的凹口,距离天花板和墙壁必
须至少 5 cm。
如果地板上覆盖有地毯,本产品必须
从地面升高 2.5 cm。
4. 将冰箱放置在平坦的地板表面,防
止晃动。
5. 请勿将冰箱置于低于 10°C 的环境
温度。
ZH
8
Page 42

地板平衡调整
如果冰箱失衡:
您可以如图所示,转动其前部的支
腿,使冰箱平衡。 (参见图 A)在黑
色箭头的方向转动时,支腿所在的一
角降低,在相反的方向转动时,其升
高。 由他人协助您轻微抬高冰箱将方
便这一过程的实施。
2. 如下图所示,使用螺丝刀,松开您
想升高之较低冰箱门铰链上的三个螺
丝。 (请勿完全拆卸下来)
(参见图 C)
2
(A)
冰箱门高度调整
如果冰箱门不能相互对准,可以通过
按照下列顺序,对垂直高度进行调
整。 调整冰箱门高度时,请清空门上
的搁架。
1. 如下图所示,松开螺丝,拆卸下方
的通风盖。 (参见图 B)
4
1 2 3
(B)
(C)
2
ZH
9
Page 43

• 如果冷冻室的门比冷藏室的门低,
使用 M6 内六角扳手,在箭头方向,
转动冷冻室侧的高度螺丝,使两者位
于相同的高度,如图 D 所示。
• 如果冷冻室的门比冷藏室的门高,
使用 M6 内六角扳手,在箭头方向,
转动冷冻室侧的高度螺丝,使两者位
于相同的高度,如图 D 所示。
通过借助高度螺丝升高前部使冰箱门
位于相同的高度后,应当适当关闭冰
箱门。 如果冰箱门没有适当关闭,这
可能对冰箱的效率产生不良影响。
10
(D)
ZH
Page 44

调整上方门之间的间隙
C
您可以如图所示,调整冷藏室门的
间隙。
调整门高度时,门上的搁架应当空
置。
C 使用螺丝刀,拆卸您想要调整之门
上方铰链盖的螺丝。
C 通过上紧螺丝,固定您调整的门,
而不变换门的位置。
中央螺丝
C 通过松开螺丝,根据需要,适当调
整冰箱门。
C 放回铰链盖和使用螺丝固定之。
ZH
11
Page 45

安装滤水器
(仅限某些型号)
安装要求
可以在冰箱连接两个不同的水源,用
于供水: 自来水和水罐中的水。
使用水罐中的水时,应该使用一个水
泵。
检查和确定冰箱配备了下列零件。
2. 5 米长水管(直径 1/4 英寸)
3. 冷水阀及网式过滤器(水龙头转接
件)
4. 滤水器或可在外部连接的过滤器安
装在冷藏室里面的支架上。
1. 用于将水管连接到冰箱后部的管接
头。 (如果其不合适,可以就近从
授权服务部门获得。)
12
ZH
2
3
1
4
Page 46

应当首先决定安装外部过滤器的位
1
2
置。 (适用于在冰箱外部使用的过
滤器。) 之后,确定过滤器与冰箱
之间的距离以及过滤器与冰箱进水
管之间要求的软管长度。
滤水器应当如图所示直立放置。 适当
地将滤水器连接到进水和出水点至关
重要。
连接了滤水器后,请勿使用最初的 3-4
杯水。
a
a
b
c
冰箱水接头
请遵循下列说明。
将水管连接到冰箱
1. 将管接头安装到水管后,用力向下
按水管,将其插入冰箱进水阀。
2. 如对面的插图所示,安装管接头,
方法是,用手挤压水箱的进水阀。
(a- 水管,b-管接头,c-阀门)
C 注意 1: 您不需要使用工具拧紧
管接头,就可以确保装置不漏水。 如
果漏水,使用扳手或者钳子拧紧管接
头。
ZH
13
Page 47

安装滤水器时,请遵循下列说明,并参
照附图:
1. 按下显示屏上的取消冰按钮。
A 小心: 取出旁路的盖子前,确保“
关闭制冰”模式活动。
注意: 取下盖子后,有一些水滴下来
是正常的。
3. 拆下滤水器顶部的盖子,如图所示
放置,并向上转动,锁定之
4. 再次按下显示屏上的取消制冰按
钮,退出该模式。
滤水器应当每 6 个月更换一次。 在打
算更换滤水器,或者不再使用滤水器
时,必须如图所示,进行拆卸,并必
须安装旁路的盖子。 取出滤水器前,
请务必确保关闭制冰模式活动。
2. 向下旋转滤水器旁路的盖子,取出
之。
3
1
4
2
5
14
ZH
Page 48

A 小心: 滤水器可以清洁掉水中的
一些异物。 其不会净化掉水中的微生
物。
A 小心: 更换滤水器或者安装旁路
的盖子时,务必始终按下关闭制冰按
钮。
C 注意: 连接水管时,您需要参照水
泵的用户手册。
1a
1b
将输水软管连接到水罐
(仅限某些型号)
若要将水从水罐连接到冰箱,需要一
台水泵。 将连接泵的水管一端按照前
一页上的说明连接到冰箱后,请遵循
下列说明。
1. 如图所示,将水管的另一端按压到水
泵的进水管中,即可完成连接。
2. 将水泵的软管放入水罐,并固定住,
如图所示。
3. 完成连接后,插入水泵的电源插头,
并运转之。
为了确保水泵高效操作,在启动水泵
后,等待 2-3 分钟。
15
2
ZH
Page 49

将水管连接至冷水管线
(仅限某些型号)
如果您想要将冰箱连接到冷水管线,
需要将标准的 1/2" 阀门配件连接到家
中的自来水。 如果没有这一阀门,亦
或您不确定,可以咨询有经验的水管
工。
1. 从水龙头转接件隔离管接头。(图
A)
2. 如图所示,将水龙头转接件 1/2” 阀
门配件。 (图 B)
3. 将水管插入管接头后,将其安装到水
龙头转接件,并插入水龙头,如图
所示。(图 C)
4. 用手上紧管接头。 如果漏水,使用
扳手或者钳子拧紧管接头。
A 小心: 使用附带的管夹,将水管固
定到适当的点,以免移动或者意外断
开连接。
A 小心: 打开水阀后,确保水管的两
个连接点没有漏水。 如果漏水,立即
关闭阀门,并使用扳手或钳子,再次
上紧所有接头。
A 小心: 确保连接自来水的 1/2" 阀
门配件可用,并完全关闭。
注意 -1:使用水罐时,不需要使用滤
水器。
注意 -2:将要使用水罐时,必须使用
水泵。
16
ZH
Page 50

初次使用冰/水机前
C
总水管压力切勿低于 1 巴。
C 总水管压力切勿超过 8 巴。
C 在给水压力下降低于 1 巴或者将要
使用水罐时,必须使用水泵。
C 冰箱的水系统必须连接到冷水线。
其切勿连接到热水线。
C在初次操作冰箱时,可能无法获得
水。 这是因为系统中存在空气。 若要
排放出系统中的空气,按下饮水机插
销 1 分钟,直至有水从饮水机流出。
开始时,水流可能不规则。 在排空系
统中的空气后,水流将正常。
C 在初次启动冰箱后,需要大约 12
小时的时间,才能获得冷水。
C 若要正常操作冰/水机,总水管压
力必须介于 1-8 巴之间。 对此,检查
和确定可以在 10 秒钟内充满一玻璃杯
(100 cc)水。
C 请勿饮用最初的 10 杯水。
C 初次从出冰机获得冰块需要 12 小
时。 如果出冰机中没有足够的冰,可
能无法从出冰机获得冰块。
C 请勿使用初次从出冰机获得的大约
30 立方冰块。
C 不使用水罐时,请务必始终使用滤
水器。
17
ZH
Page 51

4 准备工作
C 冰箱的安装位置距离热源(例如,
炉圈、烤箱、中央加热器和炉灶)
至少 30 cm,距离电烤箱至少 5
cm,且不得受到阳光直射。
C 安装冰箱的房间温度至少为
10°C。考虑到冰箱的效率,不建
议在比这凉爽的条件下操作冰箱。
C 请务必彻底清洁冰箱的内部。
C 如果并排安装两台冰箱,必须至少
间隔 2 cm。
C 初次操作冰箱时,在最初的六个小
时内,请遵循下列说明。
- 不应经常打开冰箱门。
- 必须在里面没有任何食物时空置操
作。
- 请勿拔下冰箱的插头。 如果发生
的电力故障不在您控制范围内,请
参见“问题解决建议”章节中的警
告。
C 应当妥善保管原始包装和泡沫材
料,以备日后运输或移动。
18
ZH
Page 52

5 使用冰箱
*
1
12
11
10
9
8
3
6
6
7
5
2
3
4
-24 °C
-22 °C
-20 °C
-18 °C
1. 冷藏室设置按钮
2. 闲置模式按钮
3. 快速冷藏按钮
4. 键锁按钮
5. 结束制冰按钮
6. 饮水机灯
7. 冰 / 水选择按钮
8. 饮水机灯按钮
9. 过滤器重置按钮
10. 自动经济按钮
11. 快速冷冻按钮
12. 冷冻室设置按钮
13. 经济模式指示灯
14. 高湿度指示灯
15. 快速制冷指示灯
16. 冷藏温度设置指示灯
29 1413
30
26 25 24 23 19
1528
17
20212227
17. 高温/错误警告指示灯
18. 冷藏室门打开指示灯
19. 键锁指示灯
20. 闲置模式指示灯
21. 水指示灯
22. 无冰指示灯
23. 碎冰指示灯
24. 方块冰指示灯
25. 自动经济指示灯
26. 过滤器重置指示灯
27. 冷冻室门打开指示灯
28. 冷冻室温度设置指示灯
29. 快速冷冻指示灯
30. 离子化指示灯
可选
16
2 °C
4 °C
6 °C
8 °C
18
19
ZH
Page 53

冷冻室调整 冷藏室调整 解释
-15℃ 4°C 这是建议的正常设置。
-18、-21 或 -24℃ 4°C 在环境温度超过 30°C 时,建议使用
这些设置。
新鲜冷冻 4°C 在您希望快速冷冻食物或者制冰时,
使用之。在这一过程结束后,冰箱将
恢复之前的模式。
-15°C 或更低温度 2℃ 如果您认为,由于高温条件或者经常
打开和关闭冰箱门,导致冷藏室不够
冷,可以调整这些数值。
-15°C 或更低温度 快速制冷 在冷藏室过载,或者您希望快速冷却
食物时,可以使用之。
快速制冷功能
设置冷藏室温度
冷藏室温度可以设置为如下温度:
8、6,4 和 2°C。
按下“冷藏室设置按钮”进行修改。
温度每次下降 2°C。每次您按下按
钮时,温度将下降,之后返回最高设
置。在要求的温度释放,将保存新设
置的温度。
如果您感觉食物温度太低,可以将冷
藏室的温度设置调整为 6 或 8。
在您按下“快速制冷”按钮时,这里
的温度比调整的数值要冷。该功能可
以用于放置在冷藏室中的食物,并根
据需要快速制冷。
按下“快速制冷”按钮后,快速制冷
指示灯将亮起。若要取消该功能,再
次按下“快速制冷”按钮。“快速制
冷”指示灯将熄灭,并恢复正常设
置。如果您不取消,“快速制冷”功
能将自动取消。
闲置按钮
设置冷冻室温度
冷冻室温度可以设置为如下温度:-15
/ -18 / -21 / -24 和 -24°C
按下“冷冻室设置按钮”进行修改。
温度每次下降 2°C。每次您按下按
钮时,温度将下降,之后返回最高设
置。在要求的温度释放,将保存新设
置的温度。
新鲜冷冻功能
在您按下 “新鲜冷冻”按钮时,压缩
机将至少运转大约 14 小时。新鲜冷
冻指示灯将亮起。若要取消该功能,
再次按下“新鲜冷冻”功能。“新鲜
冷冻”指示灯将熄灭,并恢复正常设
置。如果没有取消,在大约 12 小时
后,新鲜冷冻功能将自动取消。
如果您想冷冻大量的新鲜食物,将食
物放入冷冻室前 14 小时,按下“新鲜
冷冻”按钮。
如果长时间不使用冷藏室,可以按
下“闲置”按钮,取消使用冷藏室。
通过这种方式,冰箱可以更经济地工
作。按住“闲置按钮” 3 秒钟,激活
该功能。在该功能活动时,冷藏室的
门必须保持关闭,且不得有食物留在
冷藏室内。
自动经济按钮(特殊经济按钮)
“按下自动经济”按钮时,“自动经
济功能”将活动。选择该功能时,如
果冷藏室门长时间保持关闭,冷藏室
将自动切换为更经济的操作模式,以
节约电能。再次按下“自动经济”按
钮时,该功能取消。
离子化
离子化有助于净化冷藏室的空气,并
自动实施。
键锁按钮
20
ZH
Page 54

按下该按钮 3 秒钟时,键锁启动,所
有按钮和饮水机开口将不工作。如果
您希望取消盘锁,再次按下 3 秒钟。
饮水机灯
按下灯按钮时,饮水机灯将亮起,在
再次按下该按钮时,灯熄灭。按下饮
水机开口时,该灯也会亮起,在释放
开口后不久,灯将熄灭。
水/冰类型选择
使用饮水机选择按钮时,可以选择“
水”、“方块冰”或“碎冰”选项。
冰/水机
通过使用三个不同的功能,冰水机可
以有效满足您对冷水、方块冰和碎冰
的需要,而不必打开冰箱门。这是连
续的冷水和冰块供应源,不必加水。
使用友好型控制面板,提供下列配送
功能:
注意:
• 每次使用时,最长可以在 90 秒内配
送水或冰。
• 冷冻室门打开时,冰水机将不工
作。
方块冰 碎冰 冷水
C 如果冰水机长时间未使用,或在断
电后,冰可能形成大块,或冰的气味
发生变化,如果是这样,必须从废弃
冰块,并彻底清洁冰盒。
警告
C 不得在冰水机盒中添加冰。这可能
对冰供应或碎冰造成不利影响。
A 在冰盒中,有一部分方块冰粘在一
起是正常的。
A 请勿接触冰水机冰出口外壳中移动
的零件,例如,刀片,以免受伤。
A 切勿使用锋利的物体敲击冰盒中的
冰。这可能导致冰盒损坏。
A 请勿在冰盒内放置食物,试图快速
制冷。
A 出于任何原因必须拆除冰盒时,首
先,必须按下“结束制冰”按钮。
结束制冰
C
停止制冰时,按下“结束制冰”
按钮。选择“结束制冰”时,将没有
水进入制冰盒。但是,可以从冰水机
取出之前制作的冰。若要重新开始制
冰,必须再次按下“结束制冰”按
钮。
警告: 如果您不使用冰水机,请记得
在冷冻室内的环上放入冰导管盖。(请
参见“您的冰箱部分”。)
使用冰水机
C
请注意,在接通电源后的12 小时,
才可以制备好第一批方块冰。
如果您不需要冰,例如,在冬季或者
您外出度假,可以选择结束制冰功
能。
C 制冰装置在 24 小时大约可以制
备 110 个冰块,根据打开冰箱门的频
率、冰箱设置和功率输出,该数量可
能有所不同。制备的冰可以作为方块
冰或碎冰提供。
从冰水机获得碎冰的时间比获取方块
冰的时间长是正常的,此外,选择方
块冰选项前,如果选择了碎冰选项,
在方块冰落下前,流出一些碎冰也是
正常的。
过滤器重置按钮:
滤水器应当每 6 个月更换一次。如果
滤水器需要更换,过滤器重置指示灯
亮起。按下“过滤器重置”按钮 3 秒
钟,取消滤水器重置指示灯警告。
ZH
21
Page 55

使用泉水
警告
最初从饮水机接出的几杯水没有降温
是正常的。
如果不经常使用饮水机,必须从饮水
机排出足量的水才能得到新鲜的水。
承滴盘
使用过程中滴落的水珠收集在承滴盘
中。 您可以取下承滴盘,方法是,向
外拉或者按压其边缘(取决于型号)
。 可以使用海绵或柔软的抹布清除收
集的水。
蛋托
您可以在冰箱门或者支架上安装蛋
托。
切勿将蛋托置于低温室
滑动搁架
滑动搁架可以略微从前部抬高进行拉
动,和前后移动。 在向前拉动至允
许您触及放在搁架后部的食物时,其
达到一个停止点;在第二个停止点略
微向上抬起进行拉动时,搁架将被释
放。
搁架应当牢牢地从底部固定,并防止
其翻倒。 搁架放置在冰箱侧面的导轨
上,可以前进到上方或下方的不同高
度。
应当向后推搁架,使之完全固定。
22
1
2
3
4
ZH
Page 56

蓝色光
在新鲜蔬菜保存盒中储存的食物使用
蓝色光照射,通过蓝色光的波长效
应,继续它们的光合作用,从而保持
其新鲜度和增加维生素含量。
离子:
空气通过冷藏室空气导管中的离子发
生器系统进行电离。 该系统可以去除
空气中含有的细菌和微粒。
蛋托
您可以在冰箱门或者支架上安装蛋
托。
切勿将蛋托置于低温室
果蔬盒湿度控制滑块
冰箱的新鲜蔬菜保存盒专门设计保持
蔬菜的新鲜度,而不会失去水分。 冷
空气基本在果蔬盒周围循环,穿过果
蔬盒的冷空气数量由果蔬盒盖前侧的
滑块控制。
您可以根据果蔬盒中食物的湿度和冷
却条件,将湿度控制滑块调整到合适
的位置。
如果您希望果蔬盒中的食物进一步冷
却,打开湿度控制滑块的孔;反之,
如果您希望减轻冷却程度,并将湿度
保持较长时间,关闭上面的孔。
新鲜冷冻室
这一格可以快速冷冻食物,并保持食
物的味道和营养价值。
23
ZH
Page 57

冷冻食物储藏建议
• 从市面上购得的包装好的冷冻食物
应当根据冷冻食物制造商的 (4
星)冷冻室说明储藏。
• 为了保持冷冻食物制造商和食品零
售商获得的高品质,应该牢记下列事
项:
1.在购买后,尽快将食物放入冷冻
室。
2.确保贴上食物标签,并注明日期。
3.请勿超出包装上的“使用截止”
和“最佳食用”日期。
如果发生电力故障,请勿打开冰箱
门。 即使断电持续至“型号”标签
(位于冰箱内部的左侧)中指定的时
间,冷冻食物也不会受到影响。 如果
断电时间较长,必须检查食物,并在
必要时,立即食用食物,或者在烹调
后冷冻。
除霜
冷藏室和冷冻室自动除霜。
更换内部的灯泡
如果灯泡不工作,采取下列措施:
1. 关闭插座,并拔下电源插头。
拆下所有搁架和抽屉,以便接近灯
泡。
2. 冷冻室和冷藏室部分的灯罩通过用
手按压的方式打开:首先释放一端,
然后按下两端松开另一端,如图所
示。
3. 首先,通过确保灯泡牢牢旋在灯座
中,确定其没有松脱。 重新插上插
头,并接通电源。 如果灯泡亮起,
通过插入后面的接线片,并向上推,
放置前面的两个接线片,重新安装灯
罩。
4.如果灯泡仍没有亮起,关闭插座,
并拔下电源插头。 更换上新的 15 瓦
(最大)螺旋盖 E14(SES)灯泡。
5.立即仔细处置烧坏的灯泡。
新灯泡可以很容易从当地的设备商店
或者 DIY 店铺购得。
24
ZH
Page 58

25
ZH
Page 59

6 维护和清洁
A 清洁时,切勿使用汽油、苯或类似
物质。
B 我们建议您在清洁前,拔下本装置
的插头。
B 清洁时,切勿使用任何锋利的研磨
器具,肥皂、家用清洁剂、洗涤剂
和蜡光剂。
C 使用温水清洁冰箱的外壳,并擦
干。
C 在一品脱水中放入一茶匙小苏打,
使用这一溶液清洗抹布,用绞干的
抹布清洁冰箱内部,并擦干。
B 确保没有水进入灯罩和其它电气零
件。
B 如果长时间不使用冰箱,拔下电源
线,取出所有食物,清洁之,并使
冰箱门微开。
C 定期检查门密封情况,确保其清
洁,和没有食品颗粒。
A 若要拆卸门架,取出所有内容物,
然后简单地从底部向上推门架即
可。
保护塑料表面
C
请勿将非密封容器中盛放的液体油
或者用油烹饪的食物放入冰箱,这
类食物可能损坏冰箱的塑料表面。
如果食用油喷溅或者涂抹在塑料表
面上,立即用温水,清洁和洗涤表
面的相关部分。
26
ZH
Page 60

6 维护和清洁
A 清洁时,切勿使用汽油、苯或类似
物质。
B 我们建议您在清洁前,拔下本装置
的插头。
B 清洁时,切勿使用任何锋利的研磨
器具,肥皂、家用清洁剂、洗涤剂
和蜡光剂。
制冰盒和饮水机
C
按照下列步骤和警告清洁制冰盒:
A 拆下制冰盒,方法是首先抬高,之
后想外拉,如图所示。
A 清空制冰盒里面的冰(如果有)。
若要取出冻住的冰块,请使用不锋
利的工具,以免给制冰盒造成任何
损坏。
A 放回制冰盒前,确保其内部不潮
湿。
A 在将制冰盒放回机壳并关闭冷冻室
门后,如果您想要从出冰机获得冰
块,再次按下“关闭制冰”按键,
退出“关闭制冰”模式。
A 请勿接触制冰盒内的移动零件,例
如,刀具。
制冷室
如果想要使用支架下面的储藏容器作
为制冷室,可以如图所示,放置支架
下面的储藏容器。
制冷室使食物做好冷冻准备。您也可
以使用这些空间以比冷藏室低的温度
存放食物。
您可以通过拆除制冷室,增大冰箱内
的容量。方法是,向外拉这些隔间;
隔间将在止动器处倾斜,并停止移
动。在您抬高大约 1 cm,就可以释放
之,并向外拉出。
C 长时间不使用时,请清空贮水器。
27
ZH
Page 61

7 问题解决建议
致电服务机构前,请审核该清单。 其可以节约您的时间和资金。 该清单包含经
常出现的、并非工艺和材料使用缺陷导致之投诉。 这里描述的某些特点可能不
会在您的产品中出现。
冰箱不工作。
• 冰箱插头是否适当插入? 在壁式插座插入插头。
• 冰箱连接的插座之保险丝或者主保险丝是否熔断? 检查保险丝。
冷藏室的侧壁出现冷凝水(多功能区、制冷控制和变温区)。
• 环境条件很冷。 经常打开和关闭冰箱门。 环境条件高度潮湿。 在敞开的容
器中存放含有液体的食物。 冰箱门未关严。 将自动调温器切换为更冷的程
度。
• 减少冰箱门打开的时间,或者减少使用频率。
• 使用合适的材料,覆盖保存在开口容器中的食物。
• 使用干抹布擦拭冷凝水,请检查冷凝水是否再次出现。
压缩机不工作
• 在突然断电或者拔下和插入接头时,由于冰箱制冷系统中的冷媒压力尚未平
衡,所以,压缩机的保护热将会吹出。 冰箱大约在 6 分钟后开始运行。 在
该时间结束后,如果冰箱仍未启动,请致电服务机构。
• 冰箱处于除霜循环。 对于全自动除霜冰箱而言,这是正常的。 定期执行除
霜循环。
• 冰箱插头没有插入插座。 确保插头适当插入插座。
• 是否正确调整了温度?
• 可能发生了断电。
28
ZH
Page 62

冰箱经常运行或者运行较长时间。
• 您的冰箱可能比之前的冰箱宽。 这是很正常的。 较大的冰箱需要工作较长
的时间。
• 环境温度可能很高。 这是很正常的。
• 冰箱插头可能插入不久,或者新近装入了食物。 冰箱完全制冷可能需要多花
费数小时时间。
• 最近可能在冰箱中放入了大量灼热食物。 灼热的食物导致冰箱运行较长时
间,直至达到安全的储存温度。
• 冰箱门可能经常打开,或者长时间未关严。 进入冰箱的热空气导致冰箱运行
较长时间。 减少打开冰箱门的次数。
• 冷冻室或者冷藏室的门可能没有关严。 检查门是否牢牢关闭。
• 冰箱调整为很低的温度。 调高冰箱的温度,并等待直至达到这一温度。
• 冷藏室或冷冻室的门密封可能脏污、磨损,断裂或者没有适当固定好。 清洁
或更换密封。 损坏/断裂的密封导致冰箱运行较长的时间,才能保持当前的
温度。
冷冻室温度很低,而冷藏室温度足够。
• 冷冻室调整为很低的温度。 调高冷冻室的温度,并检查。
冷藏室温度很低,而冷冻室温度足够。
• 冷藏室可能被调整为很低的温度。 调高冷藏室的温度,并检查。
在冷藏室保存的食物上冻。
• 冷藏室可能被调整为很低的温度。 调高冷藏室的温度,并检查。
冷藏室或者冷冻室的温度很高。
• 冷藏室可能被调整为很高的温度。 冷藏室调整对冷冻室的温度有影响。 变
更冷藏室或冷冻室的温度,直至冷藏室或冷冻室的温度达到充分的水平。
• 冰箱门可能经常打开,或者长时间未关严;请减少打开冰箱门的次数。
• 冰箱门未关严;完全关闭冰箱门。
• 最近可能在冰箱中放入了大量灼热食物。 等待直至冷藏室或冷冻室达到必要
的温度。
• 冰箱可能插入插头不久。 冰箱完全冷却需要些时间。
冰箱工作时,噪声增加。
• 冰箱的操作性能可能会视环境温度的变化而有所不同。 这是正常的,并非故
障。
振动或噪声。
29
ZH
Page 63

• 地面不平坦或者不牢固。 冰箱在缓慢移动时,会摇晃。 确保地面足够坚
固,能够承载冰箱,且水平。
• 噪声可能是由于放在冰箱上的物品导致的。 应当取下冰箱顶部的物品。
冰箱发出类似液体喷溅或者喷射的噪音。
• 根据冰箱的操作原理,发生了液体和气体流动。 这是正常的,并非故障。
有类似风吹的噪声。
• 为了使冰箱冷却,使用了风扇。 这是正常的,并非故障。
冰箱内壁出现冷凝水。
• 炎热和潮湿的天气增加了结冰和冷凝情况。 这是正常的,并非故障。
• 门可能未关严;确保完全关闭冰箱门。
• 冰箱门可能经常打开,或者长时间未关严;请减少打开冰箱门的次数。
冰箱外面或者冰箱门之间有湿气。
• 空气可能过于潮湿;在潮湿的天气里,这是完全正常的。 在湿度下降时,冷
凝水会消失。
冰箱内出现异味。
• 必须清洁冰箱内部。 用海绵蘸取温水或者苏打水,清洁冰箱内部。
• 某些容器或者包装材料可能导致出现异味。 使用不同的容器或者不同品牌的
包装材料。
冰箱门未关。
• 食品包装可能妨碍关闭冰箱门。 更换妨碍关闭冰箱门的包装。
• 冰箱没有在地面上完全直立,在略微移动时会摇动。 调整升降螺丝。
• 地面不水平或者不够牢固。 确保地面水平,并能够承载冰箱。
新鲜蔬菜保存盒卡住
• 食物可能接触到了抽屉顶板。 重新摆放抽屉中的食物。
30
ZH
Page 64

48 9378 0000/AD
EN-ZH
 Loading...