

Page 1
RCNE720E3VZP
EN
FR DE
Page 2
Please read this manual before using the product!
Dear Valued Customer,
We wish you to get the best results from your product that has been manufactured meticulously at modern plants
and tested with detailed quality control checks.
For this reason, we recommend that you read this user manual thoroughly before starting the product. If you hand
over the product to someone else, please remember to give the user manual as well.
This manual will help you use your appliance in a fast and safe way.
• Please read this user manual carefully before installing and using the product.
• Always follow the applicable safety instructions.
• Keep the user manual in an easily accessible place for further use.
• Please read all the other documents provided with the product.
Please keep in mind that this manual may apply to several product models. This manual expressly indicates the
differences between various models.
C
A
B
Important information and
useful hints.
Risk of injury and property
damage.
Risk of electric shock.
Packaging materials of
this product has been
manufactured from recyclable
materials in accordance with
the National Environment
Regulations.
Page 3
1 Important Instructions Regarding Safety and
Environment 3
1.1. General Safety . . . . . . . . . . . . . . . . . . . . . . . . . . 3
1.1.1 Hydrocarbon (HC) Warning. . . . . . . . . . . . . . . . . 5
1.1.2 For Products with a Water Dispenser/Ice Machine 5
1.2. Intended Use . . . . . . . . . . . . . . . . . . . . . . . . . . . 6
1.3. Children's Safety . . . . . . . . . . . . . . . . . . . . . . . . 6
1.4. Compliance with the WEEE Directive and Disposing
the Waste Product: . . . . . . . . . . . . . . . . . . . . . . 6
1.5. Compliance with the RoHS Directive:. . . . . . . . . . 6
1.6. Packaging Information . . . . . . . . . . . . . . . . . . . . 6
2 Your Refrigerator 7
3 Installation 8
3.1. Appropriate location for installation . . . . . . . . . . . 8
3.2. Installing the plastic wedges . . . . . . . . . . . . . . . . 8
3.3. Adjusting the feet. . . . . . . . . . . . . . . . . . . . . . . . 9
3.4. Electrical connection. . . . . . . . . . . . . . . . . . . . . . 9
4 Preparation 10
4.1. Things to be done for energy saving . . . . . . . . . 10
4.2. Initial use. . . . . . . . . . . . . . . . . . . . . . . . . . . . . 10
5 Operating the product 11
5.1. Indicator panel . . . . . . . . . . . . . . . . . . . . . . . . . 11
5.2. Indicator panel . . . . . . . . . . . . . . . . . . . . . . . . . 12
5.3. Ice machine. . . . . . . . . . . . . . . . . . . . . . . . . . . 15
5.4. Icematic. . . . . . . . . . . . . . . . . . . . . . . . . . . . . . 15
5.5. Ice tray . . . . . . . . . . . . . . . . . . . . . . . . . . . . . . 15
5.6. Blue light . . . . . . . . . . . . . . . . . . . . . . . . . . . . . 16
5.7. Deodoriser Module. . . . . . . . . . . . . . . . . . . . . . 16
(FreshGuard) . . . . . . . . . . . . . . . . . . . . . . . . . . . . . . 16
5.8. Chiller compartment. . . . . . . . . . . . . . . . . . . . . 17
5.9. Crisper. . . . . . . . . . . . . . . . . . . . . . . . . . . . . . . 17
5.10. Using the water dispenser . . . . . . . . . . . . . . . . 18
5.11. Filling the water dispenser's tank . . . . . . . . . . . 18
5.12. Cleaning the water tank . . . . . . . . . . . . . . . . . . 18
5.13. Drip tray. . . . . . . . . . . . . . . . . . . . . . . . . . . . . . 19
5.14. Humidity-controlled crisper (Ever Fresh). . . . . . . 20
5.15. Freezing fresh food. . . . . . . . . . . . . . . . . . . . . . 20
5.16. Recommendations for preserving the frozen food 21
5.17. Deep-freeze information. . . . . . . . . . . . . . . . . . 21
5.18. Placing the food. . . . . . . . . . . . . . . . . . . . . . . . 21
5.19. Door open warning. . . . . . . . . . . . . . . . . . . . . . 21
5.20. Illumination lamp . . . . . . . . . . . . . . . . . . . . . . . 21
6 Care and Cleaning 22
6.1. Avoiding Bad Odours . . . . . . . . . . . . . . . . . . . . 22
6.2. Protection of plastic surfaces . . . . . . . . . . . . . . 22
6.3. Cleaning the Inner Surface . . . . . . . . . . . . . . . . 22
6.4. Stainless Steel Outer Surfaces . . . . . . . . . . . . . 22
6.5. Cleaning Products with Glass Doors . . . . . . . . . 23
6 Care and Cleaning 23
7 Troubleshooting 24
2 /25EN
Refrigerator / User Manual
Page 4
1 Important Instructions Regarding Safety and Environment
This chapter contains safety information
that will help you avoid the risk personal
injury or property damage. Failure to
follow these instructions shall render any
product warranty void.
Intended use
WARNING:
Keep ventilation openings, in
A
the appliance enclosure or in
the built-instructure, clear of
obstruction.
WARNING:
Do not use mechanical
devices or other means to
A
accelerate the defrosting
process, other than those
recommended by the
manufacturer.
WARNING:
A
Do not damage the refrigerant
circuit.
WARNING:
Do not use electrical
appliances inside the food
A
storage compartments of the
appliance, unless they are of
the type recommended by the
manufacturer.
This appliance is intended to be used in
household and similar applications such
as
– staff kitchen areas in shops, offices and
other working environments;
– farm houses and by clients in hotels,
motels and other residential type
environments;
– bed and breakfast type environments;
– catering and similar non-retail
applications.
1.1. General Safety
• This product is not suitable to be
used, approached or entered in by
children, or persons with physical,
sensory or mental disabilities, or by
persons who lack experience and
information. Children should not play
with the product. Cleaning and care
should not be performed by children
unless they are supervised by an adult.
Failure to comply with the instructions
and uncontrolled use may result in
dangerous situations!
• Unplug the product if you encounter a
failure during use.
• If the product malfunctions, it must
not be operated until repaired by the
authorised service provider. Risk of
electric shock!
• Plug the product into a grounded
socket protected by a fuse that
corresponds to the value on its
nameplate. Have a qualified electrician
ground the product. Our company
cannot be held responsible for
damages resulting from the failure to
use the product with a grounded socket
pursuant to local regulations.
• Unplug the product when not in use.
• Never wash the product by spreading
or pouring water onto it! Risk of electric
shock!
• Never touch the plug with wet hands!
• Never unplug the product by pulling the
cable. Always pull the plug by holding
the socket.
Refrigerator / User Manual
3 /25 EN
Page 5

Instructions for safety and environment
• Do not plug the refrigerator if the wall
socket is loose.
• Never connect your refrigerator to
energy saving devices. Such systems
are harmful to your product.
• Unplug the product during
installation, care, cleaning and
repairing procedures.
• Always have the Authorised Service
Provider install the product and
establish its electrical connections.
The manufacturer cannot be held
responsible for damages caused
by procedures performed by
unauthorised persons.
• Do not eat cone ice cream or ice
cubes immediately after you take
them out of the freezer compartment!
This may cause frostbite in your
mouth!
• Do not touch frozen food with wet
hands! They may stick to your hand!
• Do not put bottled or canned
liquid beverages in the freezer
compartment. They may burst!
• Never use steam or steam cleaners
to clean or defrost the refrigerator.
Steam gets into contact with the live
parts in your refrigerator, causing
short circuit or electric shock!
• Do not use mechanical devices
or other means to accelerate the
defrosting process other than those
recommended by the manufacturer.
• Never use the parts in your
refrigerator such as the door and
drawer as a means of support or
step. This may cause the product to
tip over or damage the parts of it.
• Do not damage the parts where the
refrigerant is circulating with drilling
or cutting tools. The refrigerant
4 / 25 EN
that might blow out when the gas
channels of the evaporator, pipe
extensions or surface coatings are
punctured causes skin irritations
and eye injuries.
• Do not cover or block the ventilation
holes in your refrigerator with any
object.
• Place the beverage with higher
proofs tightly closed and vertically.
• Do not use gaseous sprays near the
product since there is the risk or fire
or explosion!
• Flammable items or products that
contain flammable gases (e.g. spray)
as well as explosive materials should
never be kept in the appliance.
• Do not place vessels filled with liquid
onto the product. Splashing water
on an electrical part may cause
electric chock or the risk of fire.
• Do not store items that need precise
temperature adjustment (such as
vaccines, heat-sensitive medication,
science materials etc.) in the
refrigerator.
• If you are not going to use the
product for a long time, unplug it
and remove the food in it.
• If there is a blue light on the
refrigerator, do not look at this light
with optical tools.
• Exposing the product to rain, snow,
sun or wind is dangerous in terms of
electrical safety.
• In products with mechanical control
(thermostat), wait for 5 minutes
to plug in the product again after
unplugging.
• Do not overload the refrigerator.
Objects in the refrigerator may fall
down when the door is opened,
Refrigerator / User Manual
Page 6

Instructions for safety and environment
causing injury or damage. Similar
problems may arise if any object is
placed onto the product.
• If the product has a door handle, do
not pull the handle when re-locating
the product. The handle might be
loose.
• Be careful not to jam your hand or
any other body part in the moving
parts of the refrigerator.
• Do not put your hand or any other
foreign materials into the ice
machine while it is operating.
1.1.1 Hydrocarbon (HC) Warning
• If your product's cooling system
contains R600a:
This gas is flammable. Therefore, pay
attention not to damage the cooling
system or the piping during use and
transportation. If damaged, keep
the product away from potential fire
sources that may cause it to catch
fire and ventilate the room where the
product is placed.
If the product is damaged and
if you see gas leak, please
keep away from the gas. It may
C
cause frostbite when it gets into
contact with the skin.
(including R134)
Ignore this warning if the cooling
system of your product contains
C
R134a.
Type of gas used in the product
is stated on the type plate which
C
is on the left wall inside the
refrigerator.
1.1.2 For Products with a Water
Dispenser/Ice Machine
• Pressure for cold water inlet shall
• If there is a risk of water impact
• Do not make installation on the hot
• Take the necessary measures
WARNING:
Never throw the product into fire
A
for disposal.
be maximum 90 psi (620 kPa).
If your water pressure exceeds
80 psi (550 kPa), use a pressure
limiting valve in your mains
system. If you do not know how to
check your water pressure, ask for
the help of a professional plumber.
in your installation, always use a
water impact protection equipment
in that installation. Please consult
professional plumbers if you are
not sure if there is water impact in
your installation.
water inlet.
against the freezing risk of the
hoses. The water temperature
operating range must be 0.6°C
(33°F) minimum and 38°C
(100°F) maximum.
Refrigerator / User Manual
5 /25EN
Page 7
Instructions for safety and environment
WARNING:
Never connect the product
to a cold water mains with a
A
pressure of 550 kPa (80 psi)
or above.
1.2. Intended Use
• This product has been designed for
domestic use. It is not suitable for
commercial use and it must not be
used out of its intended use.
• It must be used only for storing
food.
• The manufacturer will not take any
responsibility for damages resulting
from improper use or transport.
• Original spare parts will be available
for 10 years after the purchase date
of the product.
1.3. Children's Safety
• If there is a lock on the door of the
product, the key should be kept out
of the reach of children.
• Do not let children play with the
product.
DANGER:
Before disposing your old
refrigerator or freezer:
• Children may get locked
inside.
• Remove the doors.
A
• Leave the shelves to
prevent children from
getting inside the product
easily.
1.4. Compliance with the WEEE Directive
and Disposing the Waste Product:
This product conforms to the EU
WEE Directive (2012/19 EU). This
product bears a classification symbol
for waste electrical and electronic
equipment (WEEE). This product has
been manufactured from high quality
parts and materials which can be
reused and are suitable for recycling. Therefore,
do not dispose the product with normal domestic
waste or other waste at the end of its service life.
Take it to a collection centre for recycling electrical
and electronic equipment. Please consult local
authorities to learn about the locations of such
collection centres.
1.5. Compliance with the RoHS Directive:
The unit you have purchased conforms to the EU
RoHS Directive (2011/65/EU). It does not contain
harmful or prohibited materials specified in the
Directive.
1.6. Packaging Information
• Packaging materials of the product have been
manufactured from recyclable materials in
accordance with our National Environment
Regulations. Do not dispose the packaging
materials with normal domestic waste or other
types of waste. Take these materials to a
recycling point designated by local authorities.
DANGER:
Risk of Fire or Explosion:
• This product uses flammable
refrigerant.
• Do not use mechanical devices to
defrost the refrigerator.
• Do not use chemicals for cleaning.
• Do not pierce the refrigerant pipe.
• If the refrigerant pipe is pierced, it
A
must be repaired only by licensed
service personnel.
• Please consult the repair/user
manual before cleaning the product.
All safety instructions must be
followed.
• Dispose the product according to
federal or local regulations.
6 / 25 EN
Refrigerator / User Manual
Page 8
2 Your Refrigerator
1
10
11
4
12
8
7
6
5
3
2
11
12
3
9
8
7
6
5
2
1
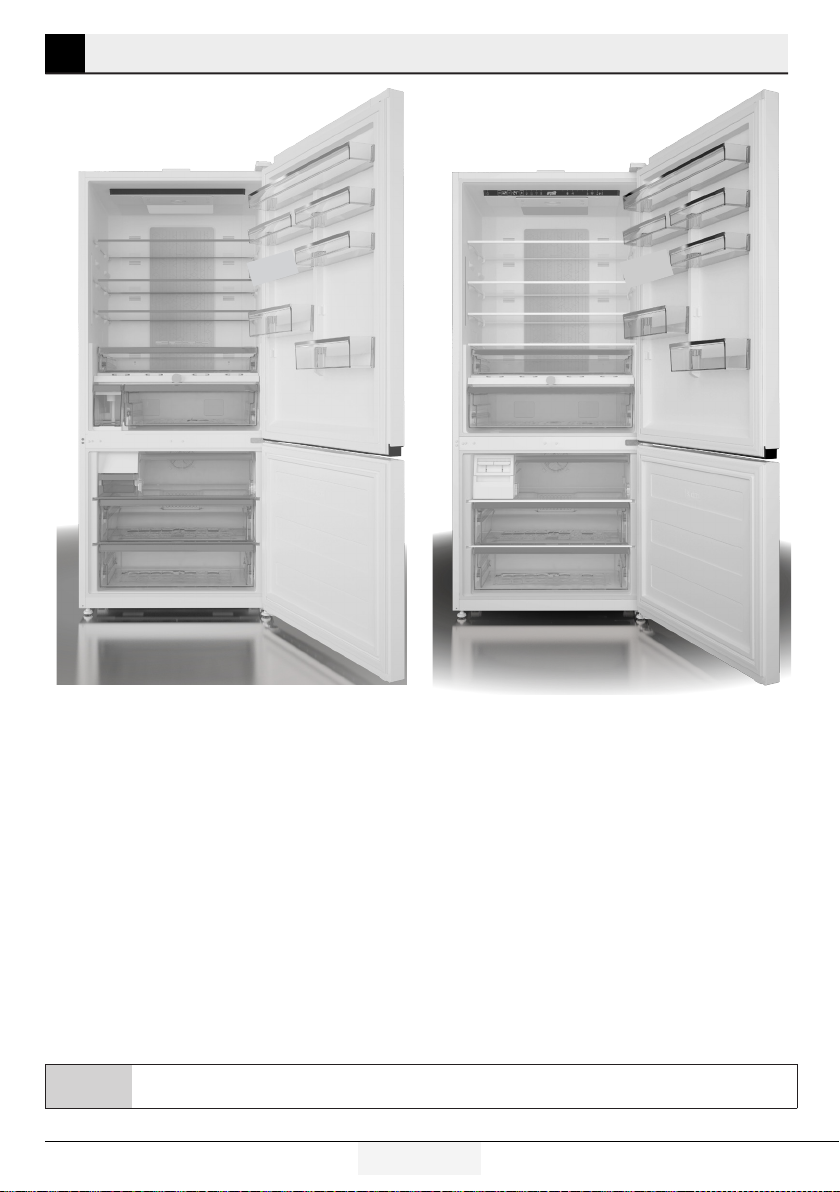
1. Door shelves of fridge compartment
2. Freezer compartment drawers
3. Icematic
4. Water tank
5. Crisper
6. Crisper cover
7. Chiller compartment
8. Glass shelves of fridge compartment
It may not apply to all models
C
Refrigerator / User Manual
Figures in this user manual are given as an example and may not match the product exactly. If the
relevant parts are not available in the product you purchased, the figure applies to other models.
9. Odour filter (violed)
10. Inside display
11. Glass shelves of fridge compartment
12. Freezer compartment
7 /25 EN
Page 9
3 Installation
3.1. Appropriate location for installation
Contact an Authorized Service for the installation of the
product. In order to prepare the product for use, refer the
information in the user manual and ensure that electrical
installation and water installation are appropriate. If not,
call a qualified electrician and technician to have any
necessary arrangements carried out.
WARNING: Manufacturer shall not
B
be held liable for damages that may
arise from procedures carried out by
unauthorized persons.
WARNING: Product must not be plugged
B
in during installation. Otherwise, there is
the risk of death or serious injury!
WARNING: : If the door clearance of the
A
• Placetheproductonalevelfloorsurfacetoprevent
jolts.
•Ifyouaregoingtousetheproductinacabin/furniture,
there must be a clearance of at least 2 cm between
the side walls and the cabin/furniture.
• Installtheproductatleast30cmawayfromheat
sources such as hobs, heater cores and stoves and at
least 5 cm away from electrical ovens.
•Productmustnotbesubjectedtodirectsunlightand
kept in humid places.
• Appropriateairventilationmustbeprovidedaround
your product in order to achieve an efficient operation.
If the product is to be placed in a recess in the wall,
pay attention to leave at least 5 cm distance with the
ceiling and the side walls.
room where the product will be placed is
so tight to prevent passing of the product,
contact the authorised service provider.
• In environments where the room temperature drops
below 10°C, the refrigerator will continue to run to
preserve the food in the freezer. However, fresh food
in the fridge compartment might freeze due to the
cold environment.
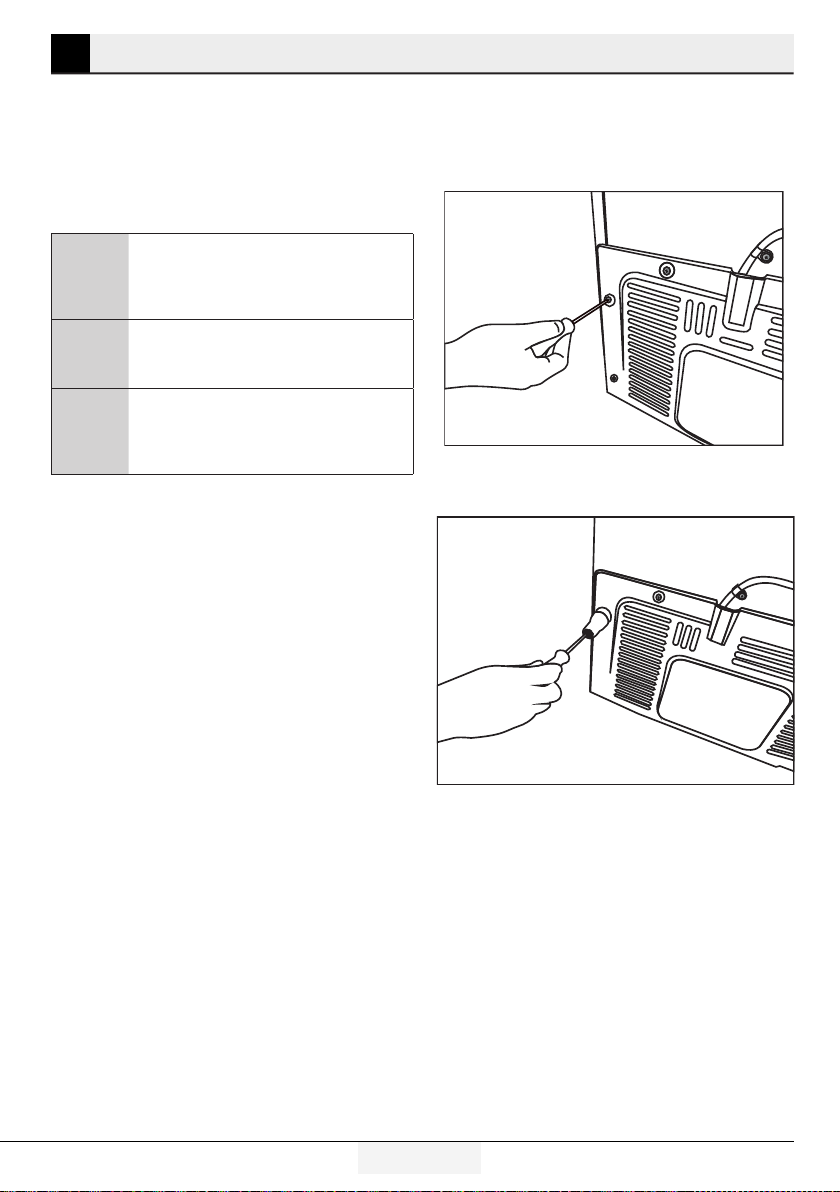
3.2. Installing the plastic wedges
Plastic wedges supplied with the product are used to
create the distance for the air circulation between the
product and the rear wall.
1. To install the wedges, remove the screws on the
product and use the screws supplied together with
the wedges.
2. Insert the 2 plastic wedges onto the rear ventilation
cover as illustrated in the figure.
8 /25EN
Refrigerator / User Manual
Page 10
Installation
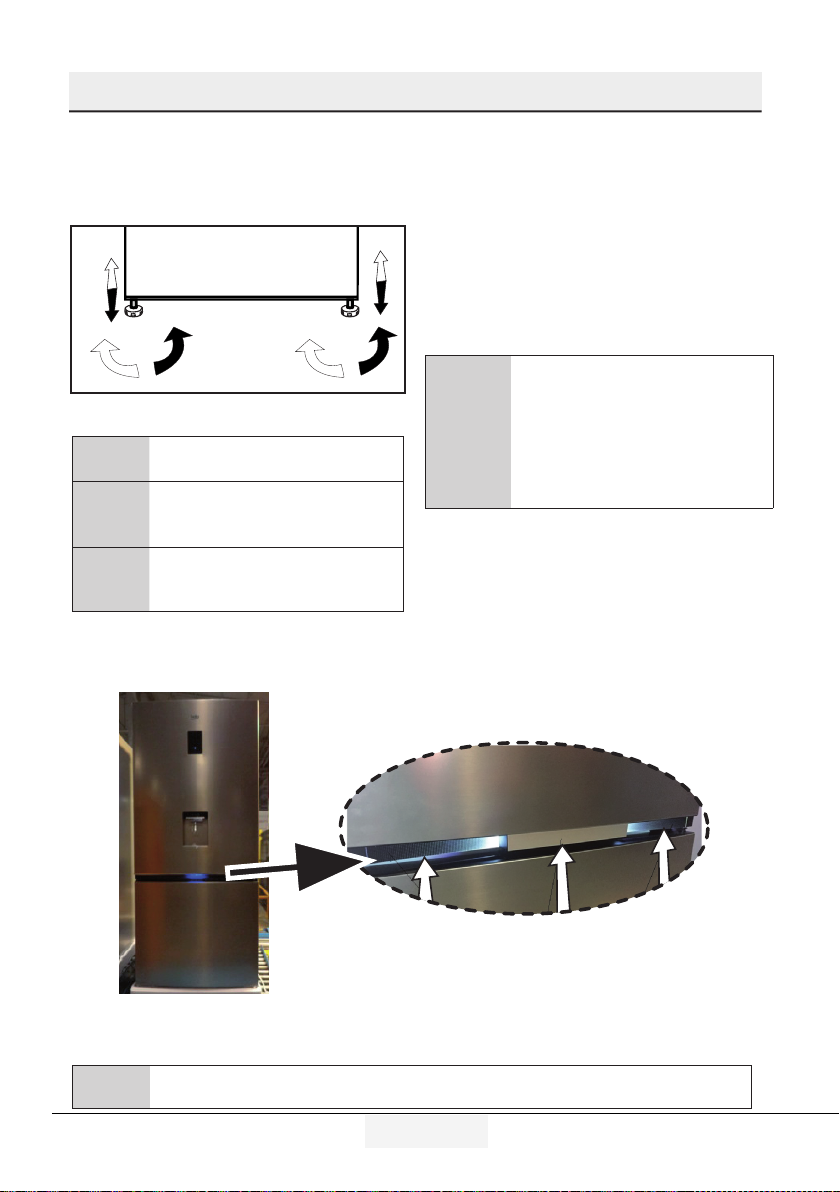
3.3. Adjusting the feet
If the product stands unbalanced after installation,
adjust the feet on the front by rotating them to the
right or left.
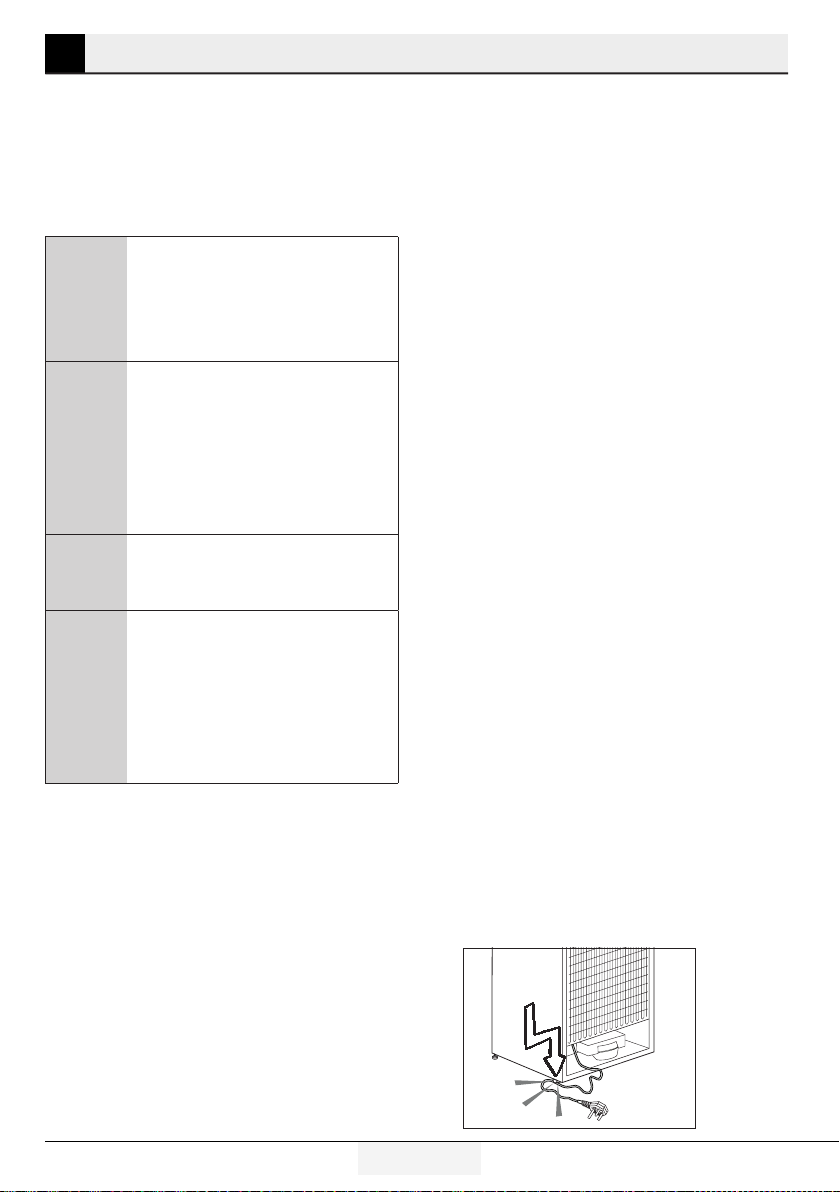
3.4. Electrical connection
WARNING: Do not make connections
A
via extension cables or multi-plugs.
WARNING: Damaged power cable
must be replaced by the Authorized
B
Service Agent.
If two coolers are to be installed side
by side, there should be at least 4 cm
C
distance between them.
• Our company shall not be liable for any
damages that will arise when the product
is used without grounding and electrical
connection in accordance with the national
regulations.
• Power cable plug must be within easy reach
after installation.
• Do not extension cords or cordless multiple
outlets between your product and the wall
outlet.
Hot surface warning!
Your product is equipped with coolant
pipes to improve the cooling system for
the side walls. The hot fluid might flow
C
through these surfaces, causing heat on
the side walls. This is normal and does
not require service maintenance. Be
careful when touching these areas.
A
Refrigerator / User Manual
WARNING: “The protective films on the vertical handle” will be removed.
9 /25EN
Page 11
4 Preparation
4.1. Things to be done for energy saving
mehmet
Connecting the product to electric energy
A
• Do not leave the doors of your refrigerator open for
• Do not put hot food or drinks in your refrigerator.
• Do not overload the refrigerator, cooling capacity will
• To be able store maximum food in the freezer
• Depending on the features of your product, thawing
• Airflow should not be blocked by placing foods in
• The temperature sensor in the freezer compartment
saving systems is risky as it may cause
damage on the product.
a long time.
fall when the air circulation inside is hindered.
compartment of your refrigerator, the upper flap
and drawer must be removed and placed on top of
glass shelves. Power consumption stated for your
refrigerator has been determined after removing the
icebox, ice tray and flap and the middle drawer as
to allow maximum loading. Using the upper flap and
lower drawer while loading is highly recommended.
frozen food in fridge compartment will both provide
energy saving and preserve the food quality.
front of the freezer compartment fan. Foods should
be loaded by leaving minimum 5 cm space in front
of the protective fan grid.
must not directly contact food packages. In case of
contact with the sensor, the power consumption of
the product may increase.
4.2. Initial use
Before starting to use your refrigerator, ensure that
all preparations are made in accordance with the
instructions in sections "Instructions for safety and
environment" and "Installation".
Run the product without putting any food for 6 hours
and do not open its door unless certainly required.
You will hear a noise when the compressor
C
starts up. The liquids and gases sealed
within the refrigeration system may also
give rise to noise, even if the compressor is
not running. This is normal.
It is normal that the front edges of
C
the refrigerator are hot. These areas
are designed to be warm to avoid
condensation.
Inside of your product must be cleaned.
C
If two coolers are to be installed side
C
by side, there should be at least 4 cm
distance between them.
10 /25EN
Refrigerator / User Manual
Page 12
5 Operating the product
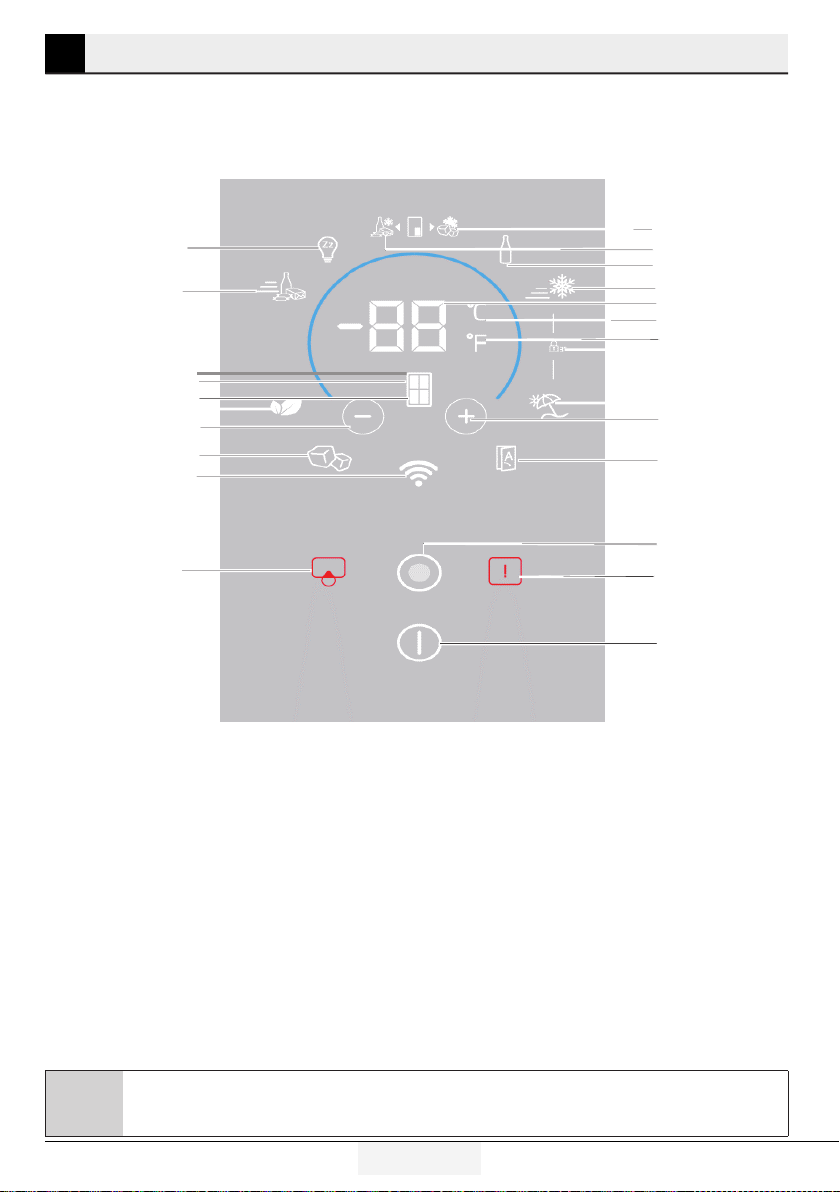
5.1. Indicator panel
Indicator panels may vary according to the product model.
Audio – visual functions on the indicator panel helps you in using your product.
*17
6
22
21
23
8
5
*16
*7
*13
1. Temperature Adjustment / Temperature Increase
2. Temperature Adjustment- Slider / Temperature
value indicator
3. Temperature Unit Selection (°C) Celsius indicator
4. Temperature Unit Selection (°F) Fahrenheit
indicator
5. Temperature Adjustment / Temperature Decrease
6. Quick Fridge function indicator / button
7. * Wireless
8. Eco Mode indicator/button
9. *Joker Freezer indicator/button
10. *Auto Door
11. High Temperature Warning/Error
*9a
*9b
*12
20
2
3
4
19
18
1
*10
14
11
15
12. *Bottle Cooler
13. *Filter Replacement Warning/Button
14. Menu Button
15. Product On/Off indicator/button
16. *Icematic indicator/button
17. *Sabbath Mode
18. Vacation Mode indicator/button
19. Key Lock indicator
20. Quick Freeze function indicator/button
21. Cabin Selection
22. Fridge compartment indicator
23. Freezer compartment indicator
*Optional: Figures in this user manual are given as an example and may not match the product
C
exactly. If the relevant parts are not available in the product you purchased, the figure applies to other
models.
Refrigerator / User Manual
It may not apply to all models
11 /25 EN
Page 13
Operating the product
3
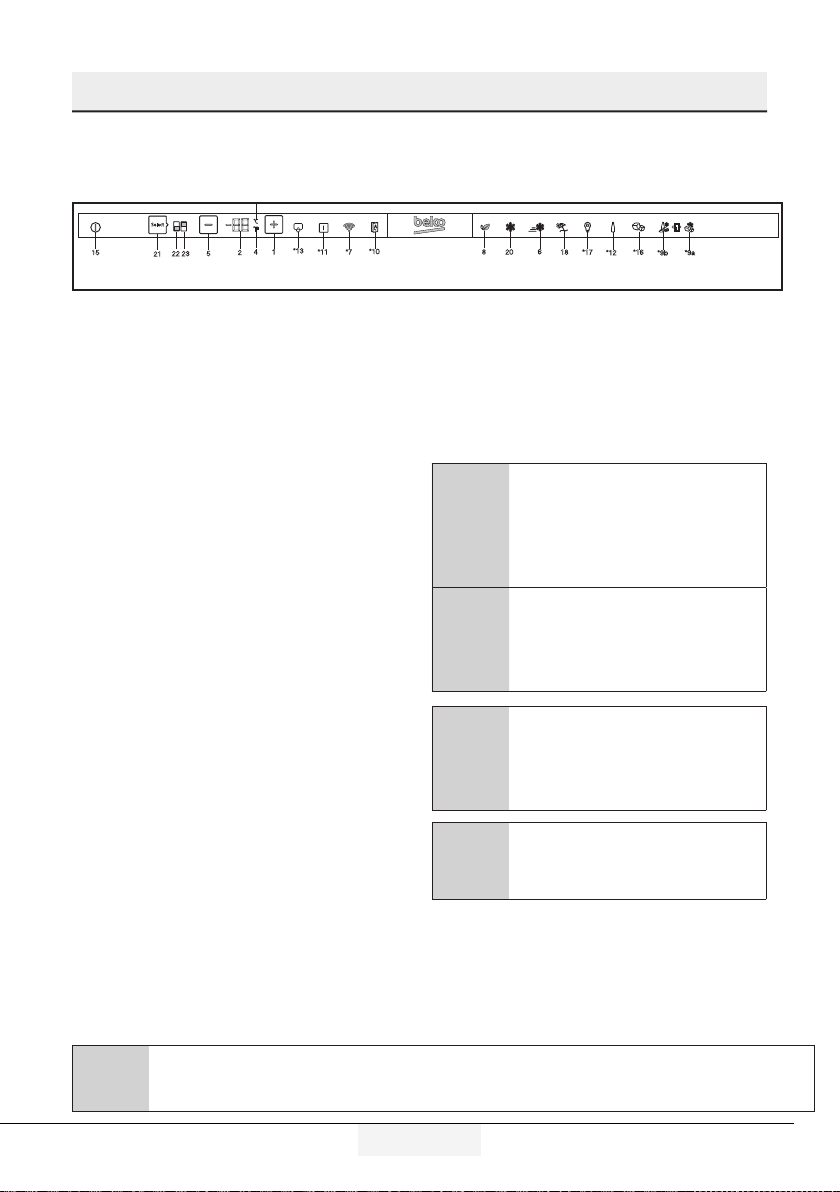
5.2. Indicator panel
Indicator panels may vary according to the product model.
Audio – visual functions on the indicator panel helps you in using your product.
Select
15
22 23
21
4
2
5
!
*13
1
*10
*11
*7
1. Temperature Adjustment / Temperature
Increase
When pressed, increases the temperature of the
selected compartment.
2. Temperature Adjustment- Slider/
Temperature value indicator
Shows the temperature value of the selected
compartment. Plus, you can slide your finger up or
down to increase or decrease the temperature.
3. Temperature Unit Selection (°C)
Celsius indicator
When the button is pressed, the temperature unit is
selected as Celsius.
It is the Celsius indicator. When the Celsius
indication is activated, temperature set values are
shown in Celsius and the relevant icon turns on by
100%.
Fahrenheit icon turns on by 50%.
4. Temperature Unit Selection (°F)
Fahrenheit indicator
When the button is pressed, the temperature unit is
selected as Celsius.
It is the Fahrenheit indicator. When the Fahrenheit
indication is activated, temperature set values are
shown in Fahrenheit and the relevant icon turns on
completely.
Celsius icon turns on by 50%.
5. Temperature Adjustment / Temperature
Decrease
When pressed, decreases the temperature of the
selected compartment.
6. Quick fridge function indicator
6
8
20
18
*17
*16
*12
*9a
*9b
When the quick fridge function is activated, the
indicator turns on by 100%. When the function
is cancelled, the product returns to its normal
settings and the indicator turns on by 50%.
Quick fridge function button
It is used to activate or deactivate the quick fridge
function.
Use quick fridge function when you
C
want to quickly cool the food placed
in the fridge compartment. If you want
to cool large amounts of fresh food,
activate this function before putting the
food into the product.
If you do not cancel it, quick fridge
C
will cancel itself automatically after 8
hours at the most or when the fridge
compartment reaches to the required
temperature.
If you press the quick fridge button
C
repeatedly with short intervals, the
electronic circuit protection will be
activated and the compressor will not
start up immediately.
C
This function is not recalled when
power restores after a power failure.
7. *Wireless
When the button is pressed, the product is
introduced to the home network. When the function
C
It may not apply to all models
*Optional: Figures in this user manual are given as an example and may not match the product
exactly. If the relevant parts are not available in the product you purchased, the figure applies to other
models.
12 / 25EN
Refrigerator / User Manual
Page 14
Operating the product
is activated, the indicator turns on by 100%, when it
is cancelled, the indicator turns on by 50%.
8. Eco mode indicator/button
Press this button to activate and deactivate the Eco
mode.
When the Eco mode is activated, the indicator turns
on by 100%. When the function is active, the freezer
will start to run in the eco mode at least 6 hours
later. When the function is cancelled, the indicator
will turn on by 50%.
9a. *Joker freezer indicator/button
When the button is pressed, the joker
compartment runs as a freezer and the indicator
turns on by 100%. Joker fridge compartment
turns on by 50%.
9b. *Joker fridge indicator/button
When the button is pressed, the joker
compartment runs as a fridge and the indicator
turns on by 100%. Joker freezer compartment
turns on by 50%.
10.* Auto Door
Press this button to activate or deactivate the Auto
Door mode. When the function is activated, the
indicator turns on by 100%. When the function is
cancelled, the indicator will turn on by 50%.
When the function is active, touch the relevant
section on the door handle to make the door open
automatically.
11. High Temperature Warning/Error
This indicator illuminates during power failure, high
temperature failures and error warnings. During
long-term power failures, the highest temperature
value that the freezer compartment reaches will
blink on the digital display. After checking the food
located in the freezer compartment, press the high
temperature button to clear the warning.
12. *Bottle Cooler
Press this button to activate or deactivate the bottle
cooler mode.
When the function is activated, the indicator turns
on by 100%. When the function is cancelled, the
indicator turns on by 50%.
13. *Filter Replacement Warning/Button
This icon turns on when the filter needs to be reset.
When the button is pressed, the filter will be reset
Refrigerator / User Manual
and the reset icon will go off.
14. Menu Button
It is used the activate or deactivate the sleep mode
for the display. If you do not press any button or
open the door in 30 seconds, it switches to sleep
mode automatically.
15. Product On/Off indicator/button
Press and hold the On/Off button for 3 seconds to
switch on or off the product.
When the product is turned off, the product on/off
indicator turns on by 100%, and all the other indicators go off. To turn on the product, press and hold
the button for 3 seconds again. The refrigerator will
turn on and the on/off indicator will turn on by 50%.
16. *Icematic indicator/button
Press this button to activate or deactivate the
Icematic. If the indicator is on by 100%, this means
that the icematic is running. If the indicator is on by
50%, this means that the icematic is off.
Water flow from water tank will stop
C
when this function is not selected.
However, ice made previously can be
taken from the icematic.
17. *Sabbath Mode
Press this button to activate or deactivate the
Sabbath mode. When the function is activated, the
indicator turns on by 100%. When the function is
cancelled, the indicator will turn on by 50%.
18. Vacation Mode indicator/button
Press this button to activate the vacation mode The
vacation mode indicator will turn on by 100%. When
the vacation mode is active, “- -” will be shown
on the Temperature Value Indicator and no active
cooling is performed in the fridge compartment.
It is not suitable to keep the food in the fridge
compartment when this function is activated. Other
compartments will continue to be cooled according
to their set temperatures.
To cancel this function press Vacation function
button again. When the function is cancelled, the
indicator will turn on by 50%.
19. Key Lock indicator
Press and hold the quick fridge and vacation
buttons simultaneously for 3 seconds. When
pressing the button, a countdown will start in the
temperature value indicator. When the key lock
is activated, the key lock indicator will turn on by
13 /25EN
Page 15
Operating the product
100% and the key lock mode will be enabled.
Buttons will not function when the key lock mode is
active. Press and hold the quick fridge and vacation
buttons again simultaneously for 3 seconds. When
pressing the button, a countdown will start in the
temperature value indicator. When the key lock is
cancelled, the key lock indicator will turn on by 50%
and the key lock mode will be disabled.
Activate this function if you want to prevent
changing of the temperature setting of the
refrigerator.
20.Quick freeze function indicator
When the quick freeze function is activated,
the indicator will turn on by 100%. When the
function is cancelled, the product will return to its
normal settings and the indicator will turn on by
50%.
Quick freeze function button
It is used to activate or deactivate the quick freeze
function.
Press this button to activate or deactivate the quick
freeze function. When you activate the function, the
freezer compartment will be cooled to a temperature
lower than the set value.
Use the quick freeze function when you
C
want to quickly freeze the food placed
in freezer compartment. If you want
to freeze large amounts of fresh food,
activate this function before putting the
food into the product.
21. Cabin Selection
Press the cabin selection button to see and change
the temperature value of the fridge or freezer on the
Temperature Value indicator.
22. Fridge compartment indicator
When this indicator is active, the temperate of the
fridge compartment is displayed on the temperature
value indicator.
23 Freezer compartment indicator
When this indicator is active, the temperate of the
freeze compartment is displayed on the temperature
value indicator.
If you do not cancel it, Quick Freeze
C
will cancel itself automatically after 4
hours at the most or when the fridge
compartment reaches to the required
temperature.
C
This function is not recalled when
power restores after a power failure.
14 / 25EN
Refrigerator / User Manual
Page 16
Operating the product
5.3. Ice machine
(This feature is optional)
Ice machine allows you to obtain ice from the
product easily.
Using the ice machine
1. Remove the water tank from the fridge
compartment.
2. Fill the water tank with water.
3. Replace the water tank. First ice cubes will be
ready in approximately four hours in the ice machine
drawer located in the freezer compartment.
While the water tank is completely
C
filled, you will be able to obtain
approximately 60-70 ice cubes.
The water within the tank should be
C
renewed in every 2-3 weeks.
5.4. Icematic
(This feature is optional)
Icematic allows you to obtain ice from the product
easily.
Using the icematic
1. Take out the icematic pulling it out carefully.
2. Fill the Icematic with water.
3. Place Icematic in place. About two hours later, the
ice is ready.
4. To obtain ice, turn the knobs on the ice reservoirs
clockwise by 90˚ degrees. Ice cubes in the reservoirs
will fall down into the ice storage container below.
5. You may take out the ice storage container and
serve the ice cubes.
Do not remove the Icematic from its
C
seating to obtain ice.
If you wish, you may keep the ice
C
cubes in the ice storage container.
The ice storage container is just for
accumulating ice cubes. Do not put
water in it. Otherwise, it will break.
5.5. Ice tray
(This feature is optional)
Ice tray allows you to obtain ice from the product
easily.
Using the ice tray
1. Remove the ice tray from the freezer
compartment.
2. Fill the ice tray with water.
3. Place the ice tray in the freezer compartment.
About two hours later, the ice is ready.
4. Remove the ice tray from the freezer
compartment and bend it over the service plate. Ice
cubes will easily fall down to the service plate.
Refrigerator / User Manual
15 /25EN
Page 17
Operating the product
5.6. Blue light
(This feature is optional)
Crispers of the product are illuminated with a blue
light. Foodstuff stored in the crispers continue their
photosynthesis by means of the wavelength effect of
blue light and thus, preserve their freshness.
5.7. Deodoriser Module
(FreshGuard)
(This feature is optional)
The deodoriser module quickly eliminates the bad
smells in your refrigerator before they permeate the
surfaces. Thanks to this module, which is placed
on the ceiling of the fresh food compartment, the
bad odours dissolve while the air is actively being
passed on the odour filter, then the air that has
been cleaned by the filter is re-emitted to the fresh
food compartment. This way, the unwanted odours
that may emerge during the storage of foods in the
refrigerator are eliminated before they permeate the
surfaces.
This is achieved thanks to the fan, LED and
the odour filter integrated into the module. The
deodoriser module will get activated automatically
on a periodical basis. The sound you will hear
during periodical activation of the module is normal;
it is emitted by the integrated fan. If you open
the door of the fresh food compartment while the
module is active, the fan will pause temporarily and
resume where it has left off when the door is closed
again. In case of a power failure, the deodoriser
module will get activated when the power is back.
Info: It is recommended to store aromatic foods
(such as cheese, olives and delicatessen foods) in
their packaging and sealed to avoid bad odours that
may result when smells of various foods get mixed.
Besides, it is recommended to take spoiled foods
out of the refrigerator quickly to prevent the other
foods from getting spoiled and avoid bad odours.
16 / 25EN
Refrigerator / User Manual
Page 18
Operating the product
5.8. Chiller compartment
(This feature is optional)
Use this compartment to store delicatessen that shall
be stored in a lower temperature or meat products
that you will consume in a short time. Do not store
your vegetables or fruits in this compartment.
You can increase the inner volume of your product by
removing any of the chiller compartments:
To remove, just pull forwards until it stops and then lift
it and pull towards yourself.
5.9. Crisper
Crisper of the refrigerator is designed specially
to keep the vegetables fresh without loosing their
humidity. For this purpose, cool air circulation is
intensified around the crisper in general. Store your
fruits and vegetables in this compartment. Do not
place leafy greens next to fruits to prolong their life.
Refrigerator / User Manual
17 /25EN
Page 19

Operating the product
5.10. Using the water dispenser
(This feature is optional)
It is normal for the first few glasses
C
of water taken from the dispenser to
be warm.
If the water dispenser is not used for
C
a long period of time, dispose of first
few glasses of water to obtain fresh
water.
1. Push in the lever of the water dispenser with your
glass. If you are using a soft plastic cup, pushing
the lever with your hand will be easier.
2. After filling the cup up to the level you want,
release the lever.
5.11. Filling the water dispenser's tank
Water tank filling reservoir is located inside the door
rack.
1. Open the cover of the tank.
2. Fill the tank with fresh drinking water.
3. Close the cover.
Do not fill the water tank with
C
any other liquid except for water
such as fruit juices, carbonated
beverages or alcoholic drinks which
are not suitable to use in the water
dispenser. Water dispenser will be
irreparably damaged if these kinds of
liquids are used. Warranty does not
cover such usages. Some chemical
substances and additives contained
in these kinds of drinks/liquids may
damage the water tank.
Use clean drinking water only.
C
Capacity of the water tank is 3 liters;
C
do not overfill.
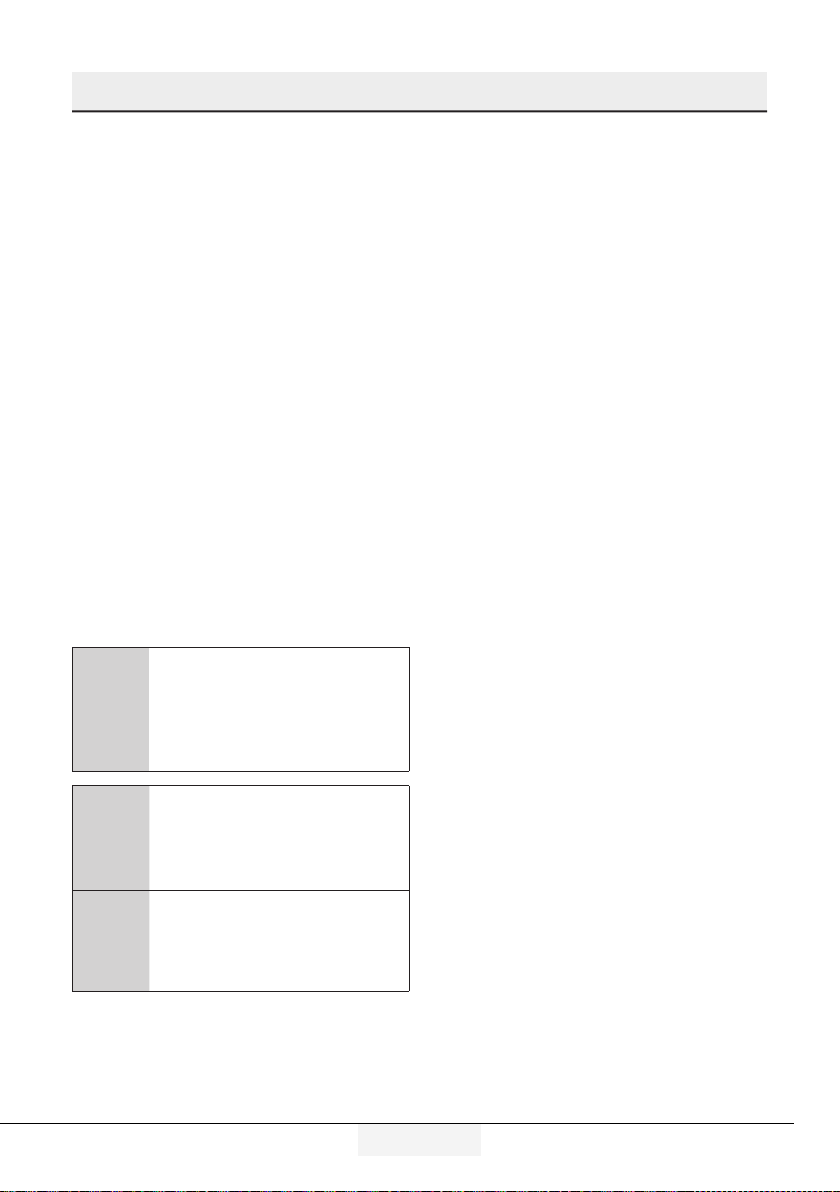
5.12. Cleaning the water tank
1. Remove the water filling reservoir inside the door
rack.
Please note, how much water flows
C
from the dispenser depends on how far
you depress the lever. As the level of
water in your cup / glass rises, gently
reduce the amount of pressure on the
lever to avoid overflow. If you slightly
press the arm, the water will drip; this
is quite normal and not a failure.
18 / 25EN
Refrigerator / User Manual
Page 20
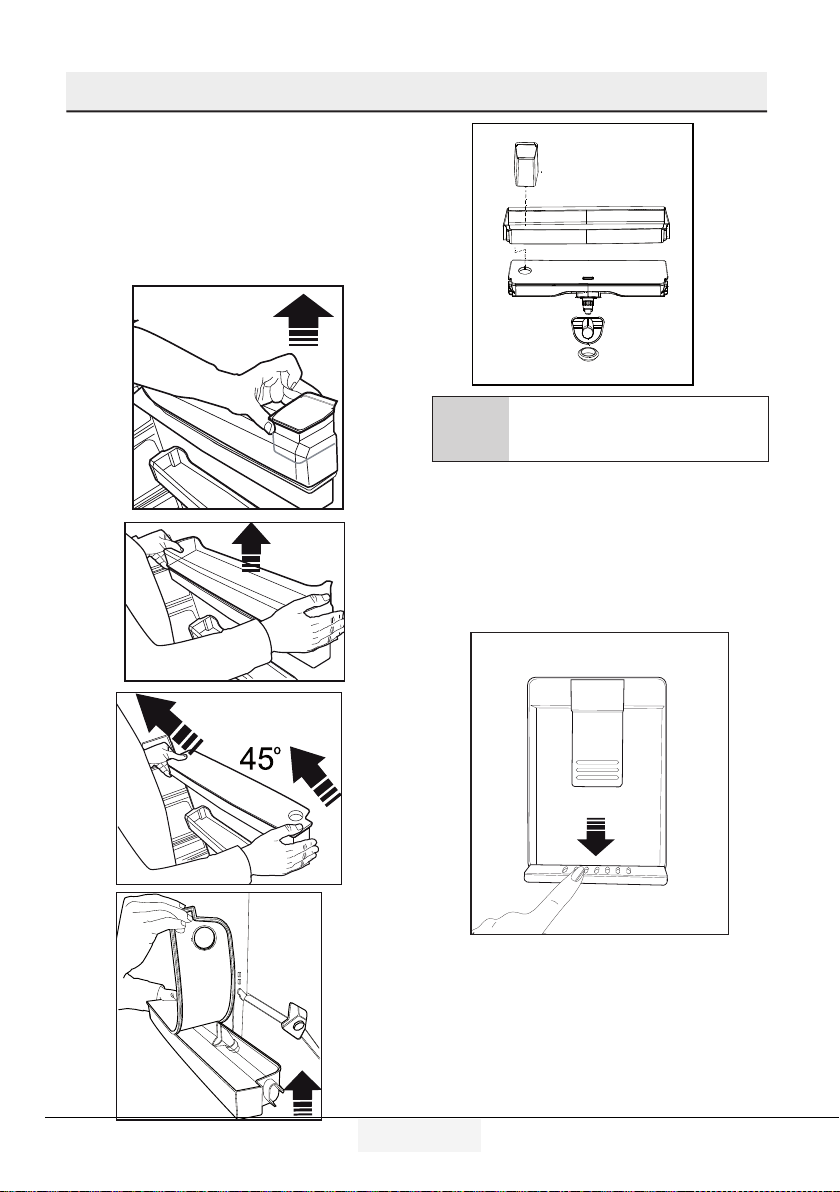
Operating the product
2. Remove the door rack by holding from both sides.
3. Grab the water tank from both sides and remove it
with an angle of 45°C.
4. Remove the cover of the water tank and clean the
tank.
Components of the water tank and
C
water dispenser should not be washed
in dishwasher.
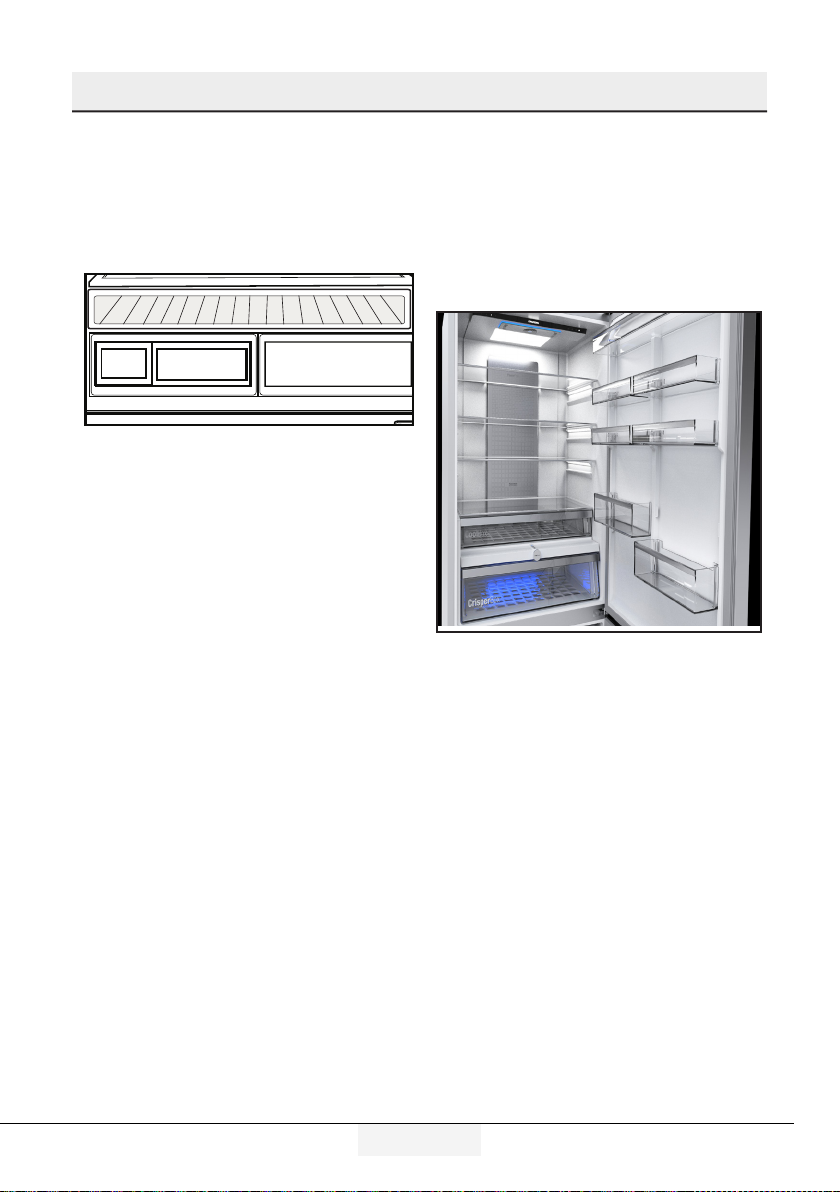
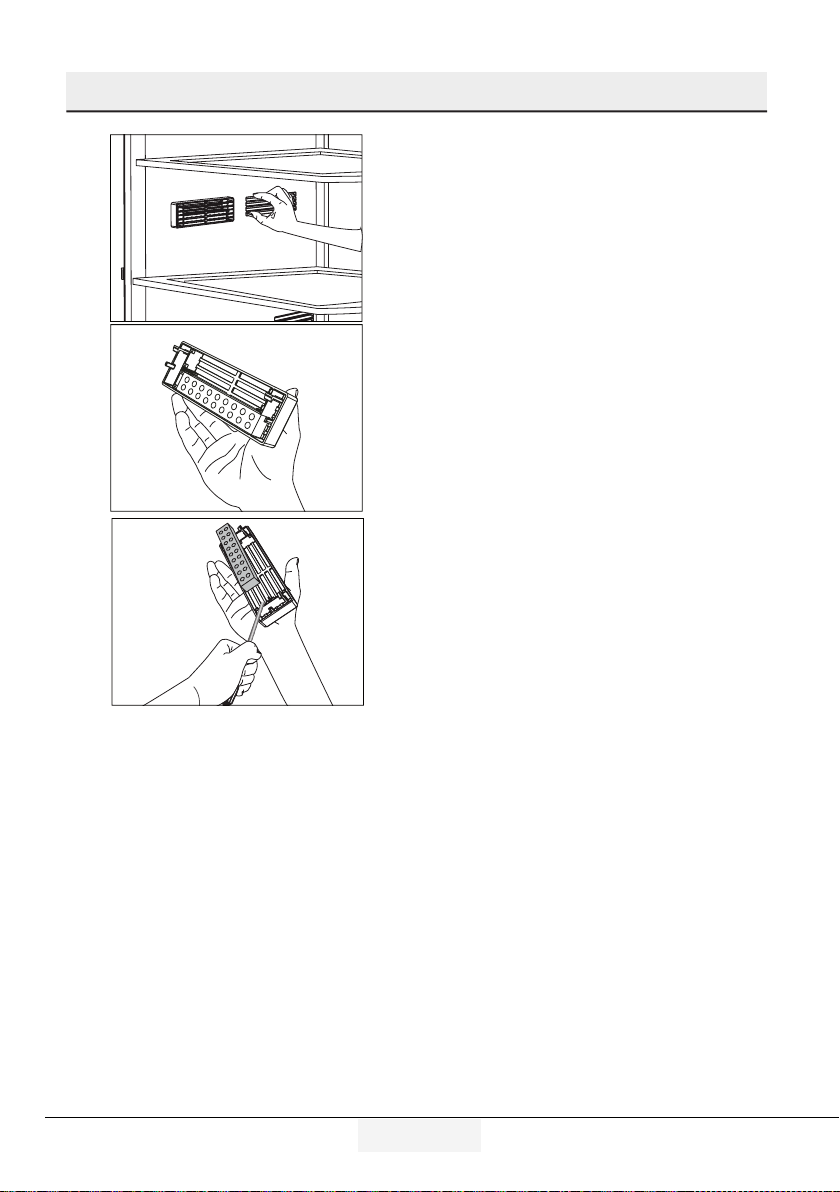
5.13. Drip tray
Water that dripped while using the water dispenser
accumulates in the spillage tray.
Remove the plastic filter as shown in the figure.
With a clean and dry cloth, remove the water that
has accumulated.
Refrigerator / User Manual
19 /25EN
Page 21
Operating the product
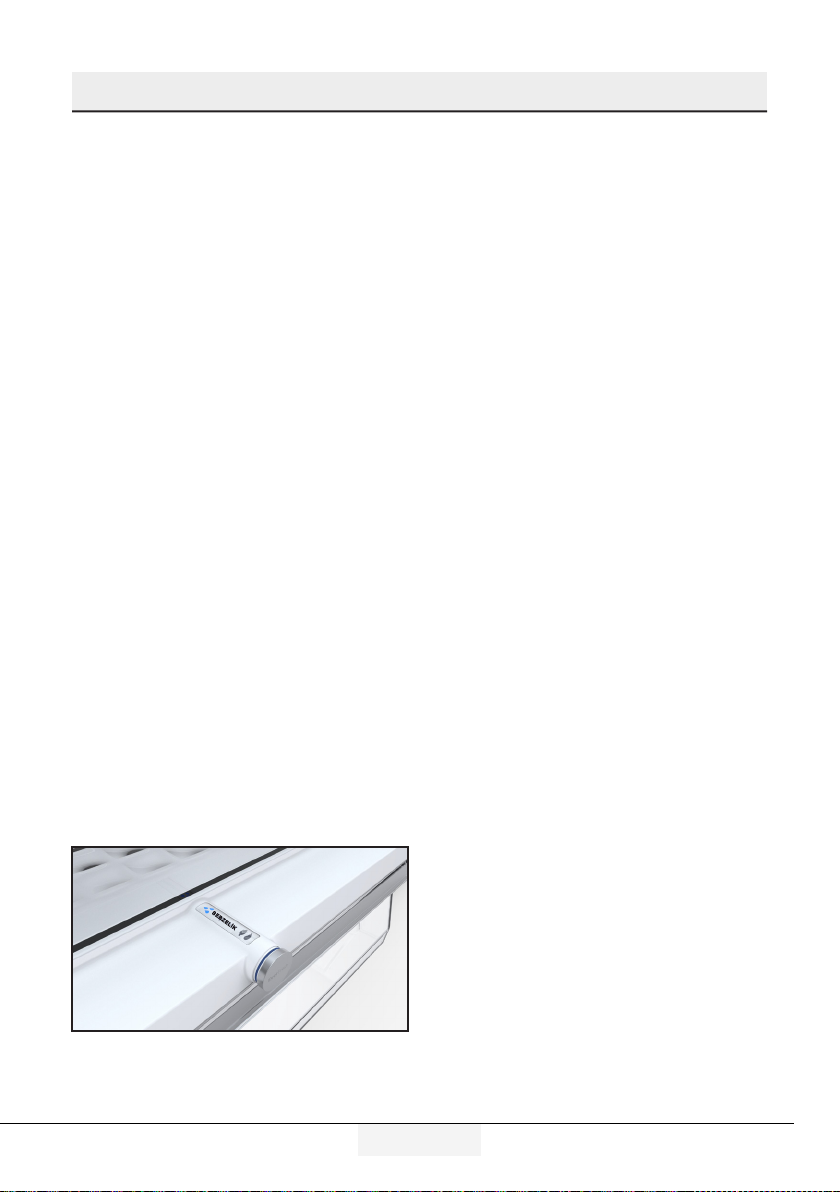
5.14. Humidity-controlled
crisper (Ever Fresh)
(This feature is optional)
Thanks to the humidity-controlled crisper, fruits and
vegetables can be stored for a longer time in an
environment with ideal humidity conditions. With
the humidity adjustment system with 3 options in
front of the crisper, you can control the humidity
level inside depending on the food you store. It is
recommended to select the vegetable option if you
are storing vegetables only, the fruit option if you are
storing fruits only, and mixed option when you are
storing both fruits and vegetables.
To benefit from the humidity control system and
prolong the storage life of foods, it is recommended
not to store fruits and vegetables in plastic bags.
If the vegetables are left inside their bags, this will
cause them to decompose in a short period of time.
In particular, we recommend not to store cucumbers
or broccoli in sealed plastic bags. In case contacting
with other vegetables is not preferred for hygiene
concerns, use a perforated paper bag and other
similar packaging materials instead of a bag.
While the vegetables are being placed, specific
gravity of the vegetables should be taken into
consideration. Heavy and hard vegetables should be
put at the bottom of the crisper and the lightweight
and soft vegetables should be placed over.
Do not place together the pear, apricot, peach, etc.
and apple in particular which have a high level of
generation of ethylene gas in the same crisper with
the other vegetables and fruit. The ethylene gas
which is emitted by these fruit may cause the other
fruit to ripen faster and decompose in a shorter
time.
5.15. Freezing fresh food
• In order to preserve the quality of the food, it
shall be frozen as quickly as possible when it is
placed in the freezer compartment, use the fast
freezing feature for this purpose.
• You may store the food longer in freezer
compartment when you freeze them while they
are fresh.
• Pack the food to be frozen and close the packing
so that it would not allow entrance of air.
• Ensure that you pack your food before putting
them in the freezer. Use freezer containers, foils
and moisture-proof papers, plastic bags and
other packing materials instead of traditional
packing papers.
• Label each pack of food by adding the date
before freezing. You may distinguish the
freshness of each food pack in this way when
you open your freezer each time. Store the food
frozen before in the front side of compartment to
ensure that they are used first.
• Frozen food must be used immediately after
they are thawed and they should not be refrozen.
• Do not freeze too large quantities of food at one
time.
SE B ZE L İK
20 / 25EN
Refrigerator / User Manual
Page 22
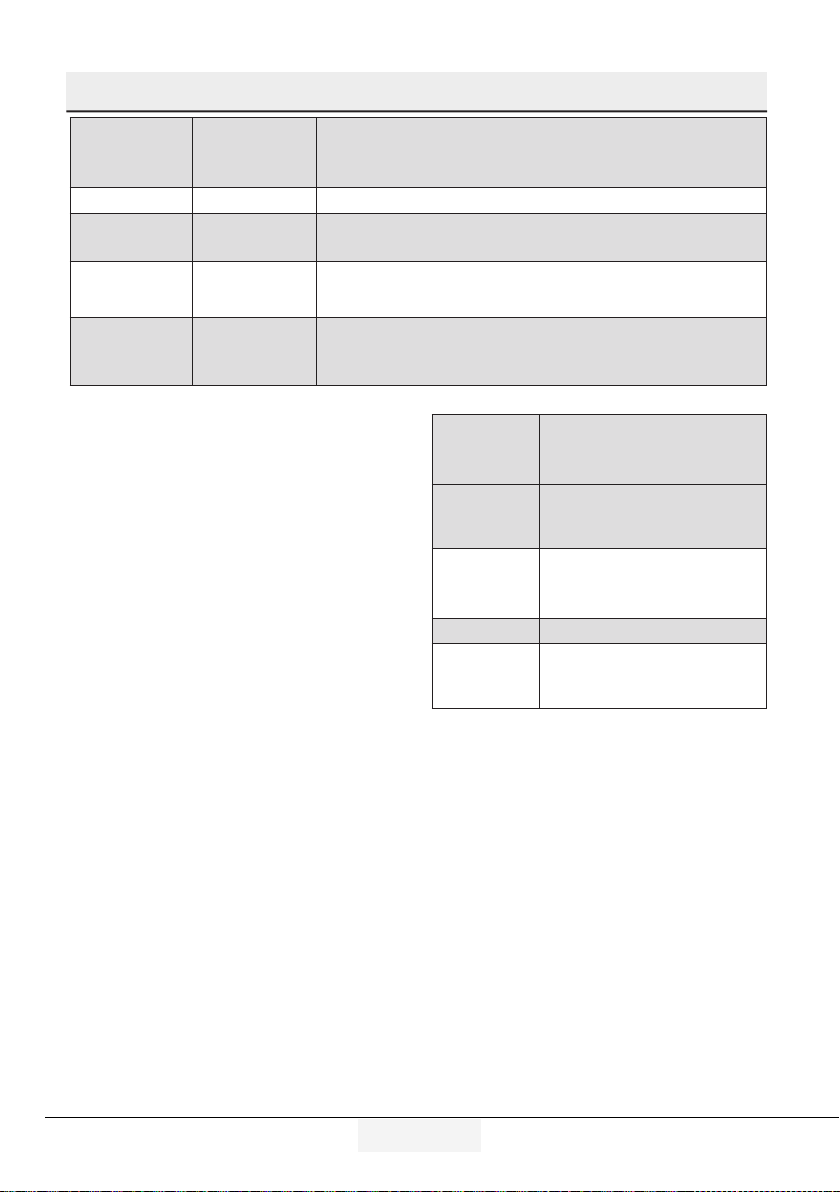
Operating the product
Freezer
Compartment
Setting
-18°C 4°C This is the normal recommended setting.
-20, -22 or
-24°C
Quick Freeze 4°C
-18°C or colder 2°C
5.16. Recommendations for
preserving the frozen food
Compartment shall be set to -18°C at least.
1. Put packages in the freezer as quickly as
possible after purchase without allowing the
to thaw.
2. Check whether the "Use By" and "Best Before"
dates on the packaging are expired or not
before freezing it.
3. Ensure that the package of the food is not
damaged.
5.17. Deep-freeze information
According to IEC 62552 standards, the product
shall freeze at least 4.5 kg of food at 25°C ambient
temperature to -18°C or lower within 24 hours for
every 100-litres of freezer volume.
It is possible to preserve the food for a long time
only at -18°C or lower temperatures.
You can keep the freshness of food for many months
(at -18°C or lower temperatures in the deep freeze).
Foods to be frozen should not be allowed to come in
contact with the previously frozen items to prevent
them from getting thawed partially.
Boil the vegetables and drain their water in order to
store vegetables for a longer time as frozen. After
draining their water, put them in air-proof packages
and place them inside the freezer. Food such as
bananas, tomatoes, lettuce, celery, boiled eggs,
potatoes are not suitable for freezing. When these
foods are frozen, only their nutritional value and
taste shall be affected negatively. They shall not be
spoiled so that they would create a risk for human
health.
Fridge
Compartment
Setting
4°C
Remarks
These settings are recommended when the ambient temperature
exceeds 30°C.
Use when you wish to freeze your food in a short time. Your product
will return to its previous mode when the process is over.
Use these settings if you think that your fridge compartment is not
cold enough because of the hot ambient conditions or frequent
opening and closing of the door.
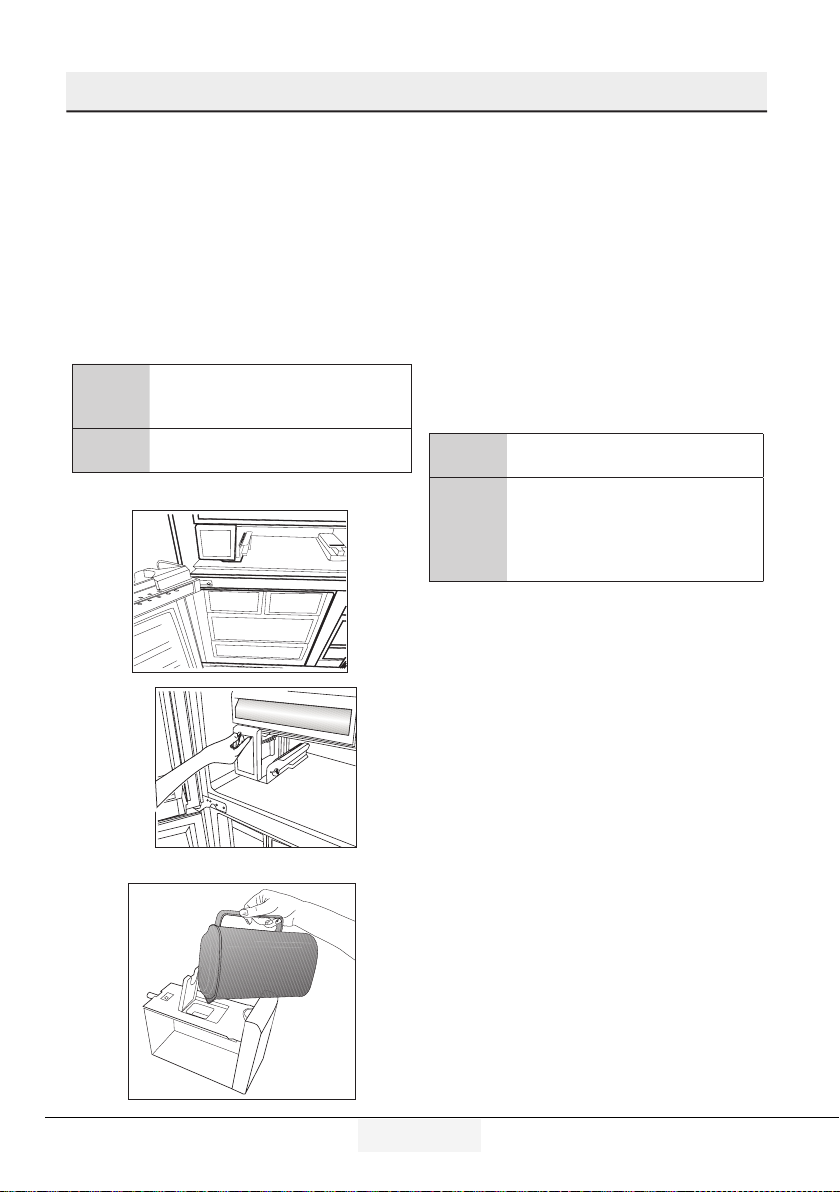
5.18. Placing the food
Freezer
compartment
shelves
Refrigerator
compartment
shelves
Door shelves
of fridge
compartment
Crisper Vegetables and fruits
Fresh zone
compartment
Various frozen food such
as meat, fish, ice cream,
vegetables and etc.
Food in pans, covered plates
and closed containers, eggs (in
closed container)
Small and packaged food or
beverage
Delicatessen (breakfast food,
meat products that shall be
consumed in a short time)
5.19. Door open warning
(This feature is optional)
An audio warning signal will be given when the
door of your product is left open for 1 minute. This
warning will be muted when the door is closed or
any of the display buttons (if any) are pressed.
5.20. Illumination lamp
LED lamps are used as illumination lamps. Contact
authorised service in case of any problem with this
type of light.
Illumination lamps used in product are not designed
for, nor are they suitable for household lighting. The
illumination lamps in your fridge and/or freezer are
aimed to ensure comfortable and safe food loading.
Refrigerator / User Manual
21 /25EN
Page 23
6 Care and Cleaning
Service life of the product will extend and frequently
encountered problems will decrease if the product is
cleaned periodically.
B
WARNING: Switch off the product
before cleaning.
WARNING: It is recommended to
B
clean the condenser every six months
using gloves. You must not use
vacuum cleaners.
• Never use gasoline, benzene or similar substances
for cleaning purposes.
• Never use any sharp abrasive instruments, soap,
household cleaners, detergent or wax polish for
cleaning.
• Dissolve one teaspoon of carbonate in half liter
of water. Soak a cloth in the solution and wring it
thoroughly. Wipe the interior of the refrigerator with
this cloth and the dry thoroughly.
• Make sure that no water enters the lamp housing or
other electrical parts.
• If you will not use the refrigerator for a long time,
unplug it, remove all food inside, clean it and leave
the door ajar.
• Check regularly that the door gaskets are clean. If
not, clean them.
• Take out all items in the product to remove the door
and body shelves.
• Remove the door shelves by pulling them up. Slide
the shelves downwards to re-install them after
cleaning.
• Never use chloric cleaning agents or water to clean
outer surfaces or chrome-coated parts of the product.
Chlorine causes abrasion on such metal surfaces.
• For non-No Frost products, water drops and frosting
up to a fingerbreadth occur on the rear wall of the
Fridge compartment. Do not clean it; never apply oil
or similar agents on it.
• Only use slightly damp microfiber cloths to clean
the outer surface of the product. Sponges and other
types of cleaning cloths may scratch the surface.
6.1. Avoiding Bad Odours
Materials that may cause odour are not used in the
production of our refrigerators. However, odour may be
emitted if foods are stored improperly or if the inner
surface of the product is not cleaned as required. Please
consider the following to avoid this problem:
• It is important that the refrigerator is kept clean.
Food residuals, stains, etc. can cause odour. For
this reason, clean your refrigerator with carbonate
solved in water every 15 days. Never use detergents
or soap.
• Keep your foods in closed vessels. Microorganisms
emitted from vessels without a cover may cause
unpleasant odours.
• Never keep expired or spoiled foods in your
refrigerator.
6.2. Protection of plastic surfaces
Do not put liquid oils or oil-cooked meals in your
refrigerator in unsealed containers as they damage
the plastic surfaces of your refrigerator. If oil is spilled
or smeared onto the plastic surfaces, clean and rinse
the relevant part of the surface with warm water
immediately.
6.3. Cleaning the Inner Surface
To clean the inner surfaces and all removable parts,
wash them with a mild solution comprising soap, water
and carbonate. Rinse and dry thoroughly. Prevent the
water from contacting the lighting means and control
panel.
ATTENTION:
Do not use vinegar, rubbing
alcohol or other alcohol-based
A
cleaning agents on any of the
inner surfaces.
6.4. Stainless Steel Outer Surfaces
Use a stainless steel cleaning agent that is non-abrasive
and apply it with a lint-free, soft cloth. For polishing,
wipe the surface softly with a damp microfiber cloth and
use dry wash-leather. Always follow the strands of the
stainless steel.
22 /25EN
Refrigerator / User Manual
Page 24

6 Care and Cleaning
6.5. Cleaning Products with Glass Doors
Remove the protection foil on the glass.
There is a coating on the surface of the glass. This
coating minimises stain formation and ensures
that stains and dirt are cleaned easily. Glasses
that are not protected by a coating might be exposed
to permanent bonding of organic or inorganic, air or
waterborne pollutants such as limescale, mineral salts,
unburned hydrocarbons, metal oxides an silicons,
which lead to stains and physical damage in a short
time. Despite regular washing, the glass becomes very
hard to keep clean, though not impossible. As a result,
the clarity and good appearance of the glass reduces.
Hard and abrasive cleaning compounds and methods
increase these defects even further and accelerate the
deterioration process.
*Non-alkali, non-abrasive and water-based cleaning
products must be used for routing cleaning procedures.
For the coating to have long service life, alkali or
abrasive substances must not be used during cleaning
processes.
These glasses were subject to a tempering process to
increase their impact and breakage resistance.
As an additional safety measure, there is a safety film on
the back surfaces of the glasses to ensure that they will
not harm the environment in case of breakage.
Refrigerator / User Manual
23 /25 EN
Page 25

7 Troubleshooting
Please review this list before calling the service. This will
save you time and money. This list contains frequently
encountered problems that are not results of faulty
workmanship or material use. Your product may not
have some of the features described here.
The refrigerator is not operating.
• It may not be plugged in properly. >>>Plug in the
product properly.
• The fuse of the socket to which your refrigerator
is connected or the main fuse may have blown.
>>>Check the fuse.
Condensation on the side wall of the fridge
compartment (MULTI ZONE, COOL CONTROL and
FLEXI ZONE).
• The door may have been opened/closed
frequently. >>>Do not open/close the refrigerator
door frequently.
• The environment may be too humid. >>>Do not
install the refrigerator at locations with a very high
level of humidity.
• Foods containing liquid may have been placed
into the refrigerator in vessels without covers.
>>>Do not place foods containing liquid into the
refrigerator in unsealed vessels.
• Door of the refrigerator may have been left ajar.
>>>Do not keep the doors of your refrigerator
open for a long time.
• The thermostat may have been set to a very cold
level. >>>Set the thermostat to an appropriate
level.
The compressor is not operating.
• Protective thermal of the compressor will blow out
during sudden power failures or plug-out plug-ins
as the refrigerant pressure in the cooling system
of the refrigerator has not been balanced yet. The
refrigerator will start running approximately after
6 minutes. Please call the Authorised Service
Provider if the refrigerator does not start at the
end of this period.
• The freezer is in defrosting cycle. >>>This
is normal for a refrigerator that performs
full-automatic defrosting. Defrosting cycle is
performed periodically.
• The refrigerator may not be plugged in. >>>Make
sure that the plug fits the socket.
• Temperature settings may be incorrect.
>>>Select the correct temperature value.
• Possible power failure. >>>The refrigerator will
start to operate normally when power restores.
The operation noise increases when the
refrigerator is running.
24 /25EN
• Operating performance of the refrigerator may
vary based on the ambient temperature changes.
This is normal and not a fault.
The fridge is running frequently or for a long
time.
• Your new product may be bigger than the previous
one. Larger refrigerators operate for a longer
period of time.
• The room temperature may be high. >>> It
is normal that the product operates for longer
periods in hot environments.
• The refrigerator may have just been plugged in or
loaded with food. >>>It takes the product longer
to reach the set temperature when it has just been
plugged in or loaded with food. This is normal.
• Large amounts of hot food may have been placed
into the refrigerator recently. >>>Do not place hot
foods into the refrigerator.
• The doors may have been opened frequently or
left ajar for a long time. >>>The warm air that
enters the refrigerator causes it to operate for
a longer period of time. Do not open the doors
frequently.
• Freezer or fridge compartment door may have
been left ajar. >>> Check if the doors are closed
completely.
• The appliance may be set to a very low
temperature. >>> Set the refrigerator
temperature to a warmer degree and wait until the
product reaches this temperature.
• Door seal of the fridge or freezer compartment
may be soiled, worn out, broken or not properly
seated. >>> Clean or replace the seal. Damaged/
broken seal causes the refrigerator to run for
a longer period of time to maintain the current
temperature.
Fridge temperature is adequate but the freezer
temperature is very low.
• The freezer compartment temperature may be
set to a very low value. >>> Set the freezer
compartment temperature to a higher value and
check.
Freezer temperature is adequate but the fridge
temperature is very low.
• The fridge temperature is adjusted to a very low
value. >>> Adjust the fridge temperature to a
higher value and check.
Food kept in the fridge compartment drawers is
frozen.
Refrigerator / User Manual
Page 26
Troubleshooting
• The fridge compartment temperature may be
set to a very high value. >>> Set the fridge
compartment temperature to a lower value and
check.
Temperature in the fridge or freezer is very high.
• The fridge compartment temperature may
be set to a very high value. >>> Fridge
compartment temperature setting has an effect
on the temperature of the freezer. Change the
temperature of the fridge or freezer compartment
until the fridge or freezer compartment
temperature reaches an adequate level.
• The doors may have been opened frequently or
left ajar for a long time. >>>Do not open the
doors frequently.
• The door may have been left ajar. >>>Close the
door completely.
• The refrigerator may have been just plugged in or
loaded with food. >>>This is normal. It takes the
product longer to reach the set temperature when
it has just been plugged in or loaded with food.
• Large amounts of hot food may have been placed
into the refrigerator recently. >>>Do not place hot
foods into the refrigerator.
Vibration or noise.
• The floor may not be stable or level. >>>If the
refrigerator shakes when moved slightly, adjust the
feed to balance it. Make sure that the floor is level
and capable of carrying the refrigerator.
• Objects placed onto the refrigerator may cause
noise. >>>Remove the objects on the refrigerator.
There are noises coming from the refrigerator
like liquid spilling or spraying.
• Liquid and gas flows occur in accordance with the
operating principles of the refrigerator. >>>This is
normal and not a fault.
Whistle is heard from the refrigerator.
• There are fans that are used to cool the
refrigerator. This is normal and not a fault.
Damp accumulates on the inner walls of
refrigerator.
• Hot and humid weather increases icing and
condensation. This is normal and not a fault.
• The doors may have been opened frequently or
left ajar for a long time. >>>Do not open the
doors frequently. Close the doors, if open.
• The door may have been left ajar. >>>Close the
door completely.
Humidity occurs on the outer surface of the
refrigerator or between the doors.
Refrigerator / User Manual
• Air might be humid. This is quite normal in humid
weathers. >>>Condensation will disappear when
the humidity level decreases.
• There might be external condensation at the
section between two doors of the refrigerator
if you use your product rarely. This is normal.
Condensation will disappear upon frequent use.
There is a bad odour inside the refrigerator.
• No regular cleaning may have been performed.
Clean the inside of the refrigerator with a sponge,
lukewarm water or carbonated water.
• Some vessels or packaging materials may cause
the odour. >>>Use another vessel, or packaging
materials from another brand.
• Foods may have been placed into the refrigerator
in vessels without covers. >>>Store the foods
in closed vessels. Microorganisms emitted from
vessels without a cover may cause unpleasant
odours.
• Take out expired or spoiled foods from the
refrigerator.
The door cannot be closed.
• Food packages may be preventing the door from
closing. >>> Re-locate the packages that are
obstructing the door.
• The refrigerator may be unstable on the floor.
>>>Adjust the refrigerator feet as required to
keep the refrigerator in balance.
• The floor may not be level or solid. >>>Make sure
that the floor is level and capable of carrying the
refrigerator.
Crispers are stuck.
• Foods may be touching the upper wall of the
crisper. >>>Re-organise the foods in the crisper.
If The Surface Of The Product Is Hot.
High temperatures may be observed between the two
doors, on the side panels and at the rear grill while
the product is operating. This is normal and does not
require service maintenance!
Fan keeps running when the door is open.
The fan may keep running when the door of the
freezer is open.
WARNING: If you cannot eliminate
A
the problem although you follow the
instructions in this section, consult your
dealer or the Authorised Service Provider.
Never attempt to repair a malfunctioned
product.
25 /25 EN
Page 27

Réfrigérateur
Manuel d'utilisation
EWWERQWEW
FR
Page 28

Veuillez lire attentivement ce manuel avant d’utiliser l’appareil !
Chère cliente, cher client
Nous espérons que vous tirerez le meilleur parti de votre appareil, qui a été fabriqué méticuleusement dans des
usines modernes et a subi des tests de contrôle de qualité approfondis.
À cet effet, nous vous recommandons de lire attentivement ce manuel d’utilisation avant de mettre l’appareil en
marche. Si vous remettez cet appareil à quelqu’un d’autre, n’oubliez pas de lui remettre également le manuel
d’utilisation.
Ce manuel vous aidera à utiliser votre appareil avec rapidité et sécurité.
• Lisez attentivement ce manuel d’utilisation avant d’installer et d’utiliser l’appareil.
• Respectez toujours les instructions de sécurité en vigueur.
• Conservez ce manuel dans un endroit facilement accessible pour une utilisation ultérieure.
• Veuillez lire tous les autres documents fournis avec l’appareil.
Notez que ce manuel d’utilisation peut se rapporter à plusieurs modèles de cet appareil. Ce manuel indique
expressément les différences entre les différents modèles.
C
A
B
Informations importantes et
conseils utiles.
Risque de blessures et de
dommages matériels.
Risque de choc électrique.
Les matériaux d’emballage
de cet appareil sont fabriqués
à partir de matériaux
recyclables, conformément à
la réglementation nationale en
matière d’environnement.
Page 29

1 Consignes importantes relatives à la sécurité et
à l’environnement 3
1.1. Sécurité générale. . . . . . . . . . . . . . . . . . . . . . . . 3
1.1.1 Mise en garde concernant les hydrocarbures . . . 5
1.1.2 Pour les appareils avec distributeur d’eau/machine
à glaçons . . . . . . . . . . . . . . . . . . . . . . . . . . . . . 6
1.2. Utilisation préconisée . . . . . . . . . . . . . . . . . . . . . 6
1.3. Sécurité des enfants. . . . . . . . . . . . . . . . . . . . . . 6
1.4. Conformité avec la directive DEEE et mise au rebut
de l’appareil usagé : . . . . . . . . . . . . . . . . . . . . . 7
1.5. Conformité avec la directive LdSD :. . . . . . . . . . . 7
1.6. Informations relatives à l’emballage . . . . . . . . . . 7
2 Votre réfrigérateur 8
3 Installation 9
3.1. Lieu d’installation approprié . . . . . . . . . . . . . . . . 9
3.2. Installation des cales en plastique. . . . . . . . . . . . 9
3.3. Réglage des pieds . . . . . . . . . . . . . . . . . . . . . . 10
3.4. Branchement électrique . . . . . . . . . . . . . . . . . . 10
4 Préparation 11
4.1. Mesures d’économie d’énergie. . . . . . . . . . . . . 11
4.2. Première utilisation. . . . . . . . . . . . . . . . . . . . . . 11
5 Utilisation de l’appareil 12
5.1. Bandeau indicateur . . . . . . . . . . . . . . . . . . . . . 12
5.2. Bandeau indicateur . . . . . . . . . . . . . . . . . . . . . 13
5.3. Machine à glace. . . . . . . . . . . . . . . . . . . . . . . . 16
5.4. Distributeur de glaçons. . . . . . . . . . . . . . . . . . . 16
5.5. Bac à glaçons . . . . . . . . . . . . . . . . . . . . . . . . . 16
5.6. Éclairage bleu . . . . . . . . . . . . . . . . . . . . . . . . . 17
5.7. Module de désodorisation. . . . . . . . . . . . . . . . . 17
(FreshGuard) . . . . . . . . . . . . . . . . . . . . . . . . . . . . . . 17
5.8. Compartiment refroidisseur. . . . . . . . . . . . . . . . 18
5.9. Bac à légumes. . . . . . . . . . . . . . . . . . . . . . . . . 18
5.10. Utilisation du distributeur . . . . . . . . . . . . . . . . . 19
5.11. Remplir le réservoir d'eau de la fontaine
frigorifique . . . . . . . . . . . . . . . . . . . . . . . . . . . 19
5.12. Nettoyer le réservoir d’eau . . . . . . . . . . . . . . . . 20
5.13. Bac de dégivrage . . . . . . . . . . . . . . . . . . . . . . . 20
5.14. Bac à humidité contrôlée (Fraîcheur assurée). . . 21
5.15. Congélation des produits frais. . . . . . . . . . . . . . 21
5.16. Recommandations concernant la conservation des
aliments congelés. . . . . . . . . . . . . . . . . . . . . . 22
5.17. Informations concernant la congélation . . . . . . . 22
5.18. Disposition des denrées . . . . . . . . . . . . . . . . . . 22
5.19. Avertissement - Porte ouverte. . . . . . . . . . . . . . 22
5.20. Ampoule . . . . . . . . . . . . . . . . . . . . . . . . . . . . . 23
6 Entretien et nettoyage 24
6.1. Prévention des mauvaises odeurs. . . . . . . . . . . 24
6.2. Protection des surfaces en plastique. . . . . . . . . 24
6.3. Nettoyage de la surface intérieure . . . . . . . . . . 24
6.4. Surfaces extérieures en acier inoxydable. . . . . . 25
6.5. Nettoyage d’appareils avec portes en verre . . . . 25
6 Entretien et nettoyage 25
7 Dépannage 26
2 /28FR
Réfrigérateur / Manuel d’utilisation
Page 30

1 Consignes importantes relatives à la sécurité et à l’environnement
Cette section comporte des informations
de sécurité qui vous aideront à éviter les
risques de blessures ou de dommages
matériels. Le non-respect de ces
instructions entraîne l’annulation de la
garantie des appareils.
Utilisation Préconisée
AVERTISSEMENT:
Assurez-vous que les trous
d’aération ne sont pas
A
fermés quand le dispositif
est dans son boîtier ou est
installé à sa place.
AVERTISSEMENT:
Ne pas utiliser tout
dispositif mécanique ou
A
un autre dispositif hors
des recommandations du
fabricant pour accélérer le
processus de décongeler.
AVERTISSEMENT:
A
Ne pas endommager
le circuit de fluide du
réfrigérateur.
AVERTISSEMENT:
Ne pas utiliser des appareils
A
électriques non prévus
par le fabricant dans
les compartiments de
conservation des aliments.
AVERTISSEMENT:
Ne conservez pas de
A
substances explosives
comme des aérosols avec
un liquide inflammable dans
cet appareil.
Ce dispositif est conçu pour l’usage
domestique ou les applications similaires
suivantes :
Réfrigérateur / Manuel d’utilisation
- Pour être utilisé dans la cuisine de
personnel dans les magasins, bureaux et
autres environnements de travail ;
- Pour être utilisé par les clients dans les
maisons de campagne et hôtels et les
autres environnements d’hébergement ;
- Dans des environnements de type de
pension de famille
- Dans des applications similaires
n’ayant pas de service alimentaire et non
détaillants
1.1. Sécurité générale
• Ce produit ne doit pas être utilisé
ou approché par des enfants, des
personnes ayant un handicap physique,
sensoriel ou mental, ou par des
personnes qui manquent d’expérience
et d’informations. Les enfants ne
doivent pas jouer avec cet appareil. Le
nettoyage et l'entretien ne doivent pas
être exécutés par des enfants, à moins
qu'ils ne soient supervisés par un
adulte. Le non-respect des consignes
énoncées ci-dessus et l’utilisation
non contrôlée peuvent entraîner des
situations dangereuses !
• Débranchez l’appareil si une panne
survient alors qu'il est en cours
d’utilisation.
• En cas de dysfonctionnement, n’utilisez
pas l’appareil jusqu’à ce qu’il soit
réparé par un agent de service agréé.
Risque de choc électrique !
• Branchez l’appareil à une prise mise
à la terre, protégée par un fusible
conforme aux valeurs figurant sur la
plaque signalétique. Faites appel à un
électricien qualifié pour la mise à la
terre de l’appareil. Notre société ne
peut pas être tenue pour responsable
des dommages résultant de la non
utilisation du produit avec une prise
mise à la terre conformément aux
réglementations locales.
3 /28 FR
Page 31

Consignes relatives à la sécurité et à l'environnement
• Débranchez l'appareil lorsque vous ne
l'utilisez pas.
• N'aspergez pas l'appareil et n'y
versez pas de l'eau lorsque vous le
lavez! Risque de choc électrique !
• Ne touchez jamais la prise avec des
mains mouillées !
• Ne débranchez jamais l’appareil en
tirant sur le câble. Débranchez-le
toujours en le tenant par la fiche.
• Évitez de brancher le réfrigérateur
lorsque la prise de courant est mal
fixée.
• Ne branchez jamais votre réfrigérateur
à des systèmes d'économies
d'énergie. Ces systèmes présentent
des risques pour votre appareil.
• Débranchez l’appareil pendant les
procédures d'installation, d'entretien,
du nettoyage et de réparation.
• Contactez toujours un Agent de
service agréé pour l’installation
de l’appareil et la réalisation des
branchements électriques. Le
fabricant décline toute responsabilité
pour les dommages causés par la
réalisation de ces procédures par des
personnes non autorisées.
• Ne mangez pas de cônes de crème
glacée ou des glaçons immédiatement
après les avoir sortis du compartiment
de congélation ! Cela pourrait
provoquer des engelures dans votre
bouche !
• Ne touchez pas les aliments
congelés avec les mains mouillées !
Ils peuvent coller à vos mains !
• Ne posez pas de boissons en
bouteilles ou en cannettes dans
le congélateur. Elles risquent
d'exploser !
• N'utilisez jamais de vapeur ni de
matériel de nettoyage à vapeur
pour nettoyer ou décongeler le
réfrigérateur Tout contact entre
la vapeur et les éléments sous
tension de votre réfrigérateur peut
entraîner un court-circuit ou un choc
électrique !
• Pour accélérer le processus de
décongélation, n’utilisez pas d’outils
mécaniques ou de dispositifs autres
que ceux recommandés par le
fabricant.
• N'utilisez jamais les pièces de votre
réfrigérateur telles que la porte et
le tiroir, comme un support ou une
marche. Une telle utilisation de
l’appareil peut l'emmener à balancer
ou endommager ses parties.
• Évitez d’endommager les pièces où
circule le liquide réfrigérant avec des
outils de perforation ou de coupe.
Le liquide réfrigérant qui pourrait
s’échapper si les canalisations de
gaz de l’évaporateur, les rallonges
de tuyau ou les revêtements de
surface étaient percés, peut irriter
la peau et provoquer des blessures
aux yeux.
• Ne laissez aucun objet couvrir ou
obstruer les orifices de ventilation
du réfrigérateur.
4 / 28 FR
Réfrigérateur / Manuel d’utilisation
Page 32

Consignes relatives à la sécurité et à l'environnement
• Placez les boissons alcoolisées
verticalement, dans des récipients
convenablement fermés.
• N'utilisez pas de pulvérisateur à gaz
à proximité de l'appareil car cela
pourrait causer un incendie ou une
explosion !
• Les articles inflammables ou
les produits contenants des gaz
inflammables (par ex. : aérosols)
ainsi que les matériaux explosifs ne
doivent jamais être conservés dans
l’appareil.
• Ne placez pas de récipient
contenant de liquides au-dessus
de l’appareil. Les projections d'eau
sur les pièces électriques peuvent
causer un choc électrique ou un
risque d'incendie.
• Évitez de ranger les éléments qui
nécessitent un réglage précis de la
température (tels que les vaccins,
les médicaments sensibles à la
chaleur, les outils scientifiques, etc.)
dans le réfrigérateur.
• Si vous n’allez pas utiliser l’appareil
pendant une longue période,
débranchez-le et retirez tous les
aliments l’intérieur.
• Si le réfrigérateur émet une lumière
bleue, ne la regardez pas en
utilisant des outils optiques.
• L’exposition du produit à la pluie, la
neige, le soleil ou le vent présente
des risques en matière de sécurité
électrique.
• Avec des appareils équipés
de commandes mécaniques
(thermostat), patientez 5 minutes
avant de rebrancher l'appareil après
l'avoir débranché.
• Ne surchargez pas le réfrigérateur.
Les objets dans le réfrigérateur
peuvent tomber lorsque vous
ouvrez la porte, causant des
blessures et des dommages. Des
problèmes similaires peuvent
survenir si vous placez des objets
au-dessus de l’appareil.
• Si l’appareil possède une poignée
de porte, ne tirez pas dessus pour
déplacer l’appareil. La poignée
peut se desserrer.
• Soyez prudent pour ne pas coincer
vos doigts ou toute autre partie
de votre corps dans les pièces
mobiles du réfrigérateur.
• Ne placez pas vos doigts ou tout
autre corps étranger dans la
machine à glace lorsqu’elle est en
marche.
1.1.1 Mise en garde concernant
les hydrocarbures
• Si le système de refroidissement
de votre appareil contient du
R600a :
Ce gaz est inflammable. Par
conséquent, veillez à ne pas
endommager le système de
refroidissement ou la tuyauterie
pendant l’utilisation et le transport. En
cas de dommage, tenez l’appareil à
l’écart de potentielles sources de feu,
susceptibles de l’enflammer et aérez
la pièce dans laquelle est installé
l’appareil.
Réfrigérateur / Manuel d’utilisation
5 /28FR
Page 33

Consignes relatives à la sécurité et à l'environnement
Si l’appareil est endommagé
et vous voyez une fuite de gaz,
tenez-vous à l’écart du gaz.
C
Au contact de la peau, il peut
entraîner des engelures.
(notamment le R134)
Ignorez cet avertissement si
le système de refroidissement
C
de votre appareil contient du
R134a.
Le type de gaz utilisé dans
l'appareil est mentionné sur la
plaque signalétique située sur
C
la paroi gauche à l'intérieur du
réfrigérateur.
AVERTISSEMENT :
Ne jetez jamais l'appareil dans
A
du feu pour sa mise au rebut.
1.1.2 Pour les appareils avec
distributeur d’eau/machine à glaçons
• La pression de l’eau froide à
l’entrée ne doit pas excéder 90 psi
(620 kPa). Si votre pression d’eau
dépasse 80 psi 550 kPa), utilisez une
soupape de limitation de pression
sur votre réseau de conduite. Si
vous ne savez pas comment vérifiez
la pression de l’eau, demandez
l’assistance d’un plombier
professionnel.
• En cas de risque d’impact causé
par d’eau dans votre installation,
utilisez toujours un dispositif de
protection anti coup de bélier.
Contactez un plombier professionnel
si vous n’êtes pas certain(e) que
votre installation présente un risque
d’effet coup de bélier.
• Ne procédez pas à l’installation de
l’arrivée d’eau chaude.
• Prenez les mesures nécessaires
contre le risque de gel des tuyaux.
La plage de température de
fonctionnement est de 0.6 °C
(33 °F) au minimum et 38 °C
(100 °F) au maximum.
AVERTISSEMENT :
Ne branchez
jamais l’appareil à un réseau
A
d’eau froide, lorsque la
pression est supérieure ou
égale à 550 kPa (80 psi).
1.2. Utilisation préconisée
• Cet appareil est destiné à un usage
ménager. Il n’est pas indiqué
pour une utilisation à des fins
commerciales et ne doit pas être
utilisé à des fins autres que celles
prévues.
• Il ne doit être utilisé que pour
conserver des aliments.
• Le fabricant n’assume aucune
responsabilité pour les dommages
résultant de l’utilisation et du
transport inappropriés.
• Les pièces de rechange d’origine
seront disponibles jusqu’à 10 ans
après la date d’achat de l’appareil.
1.3. Sécurité des enfants
• En cas de verrou sur la porte de
l’appareil, gardez la clé hors de la
portée des enfants.
• Ne laissez pas les enfants jouer
avec l’appareil.
6 / 28 FR
Réfrigérateur / Manuel d’utilisation
Page 34

Consignes relatives à la sécurité et à l'environnement
DANGER :
Avant de mettre au rebut
votre ancien réfrigérateur ou
congélateur :
• Les enfants peuvent s’y
A
enfermer.
• Retirez les portes.
• Laissez les étagères pour
éviter que les enfants
accèdent facilement à
l’intérieur de l’appareil.
1.4. Conformité avec la directive DEEE
et mise au rebut de l’appareil usagé :
Ce produit est conforme à la
directive européenne concernant les
appareils électriques et électroniques
(2012/19 UE). Il porte un symbole
de classification pour la mise au
rebut des équipements électriques
et électroniques (DEEE). Cet appareil
a été fabriqué avec des pièces et du matériel de
qualité supérieure susceptibles d'être réutilisés et
adaptés au recyclage. Par conséquent, évitez de
mettre l’appareil au rebut aux côtés des ordures
ménagères à la fin de sa durée de vie. Transportezle vers un point de collecte destiné au recyclage
des équipements électriques et électroniques.
Consultez les autorités de votre localité pour plus
d'informations sur ces points de collecte.
1.5. Conformité avec la directive LdSD :
L’appareil que vous avez acheté est conforme à la
Directive LdSD de L’Union européenne (2011/65/
UE). Il ne comporte pas les matières dangereuses et
interdites mentionnées dans la Directive.
1.6. Informations relatives à l’emballage
• Les matériaux d’emballage de cet appareil sont
fabriqués à partir de matériaux recyclables,
conformément à notre réglementation nationale
en matière d’environnement. Ne jetez pas
les matériaux d’emballage avec les ordures
ménagères normales ou d’autres types de
déchets. Transportez ces matériaux vers un
point de collecte prévu par les autorités locales.
DANGER :
Risque d’incendie ou d’explosion :
• Cet appareil utilise un réfrigérant
inflammable.
• N’utilisez pas d’objets mécaniques
pour dégivrer le réfrigérateur.
• N'utilisez pas de produits chimiques
pour le nettoyage.
• Évitez de percer le conduit du
A
réfrigérant.
• Si le conduit du réfrigérant est percé,
faites-le uniquement réparer par un
agent de service agréé.
• Veuillez consulter le Manuel
d’utilisation/de réparation avant de
nettoyer l’appareil. Veuillez respecter
toutes les précautions de sécurité.
• Éliminez votre appareil dans le
respect de la réglementation fédérale
ou locale.
Réfrigérateur / Manuel d’utilisation
7 /28FR
Page 35

2 Votre réfrigérateur
1
10
11
4
12
8
7
6
5
3
2
11
12
3
9
8
7
6
5
2
1
1. Étagères sur la porte du compartiment réfrigérant
2. Tiroirs du compartiment congélateur
3. Distributeur de glaçons
4. Réservoir à eau
5. Bac à légumes
6. Couvercle du bac à légumes
7. Compartiment refroidisseur
8. Étagères en verre du compartiment réfrigérant
Cela peut ne pas s’appliquer à tous les modèles
Les chiffres figurant dans ce manuel sont donnés à titre indicatif et peuvent ne pas correspondre
C
exactement au produit. Si l'accessoire représenté par le chiffre ne se trouve pas dans l’appareil que
vous avez acheté, c'est que le chiffre s'applique à d'autres modèles.
9. Filtre à odeurs (violet)
10. Affichage intérieur
11. Étagères en verre du compartiment réfrigérant
12. Compartiment congélateur
8 /28FR
Réfrigérateur / Manuel d’utilisation
Page 36

3 Installation
3.1. Lieu d’installation approprié
Contactez le service après-vente agréé pour l’installation
du produit. Pour préparer l’appareil à l'utilisation,
reportez-vous aux informations du manuel d'utilisation
et assurez-vous que les branchements électriques
et le système d’alimentation en eau sont appropriés.
Si ce n'est pas le cas, appelez un électricien et un
technicien qualifiés pour qu’ils prennent les dispositions
nécessaires.
AVERTISSEMENT : Le fabriquant ne
B
sera pas tenu responsable des dommages
survenus suite à des activités effectuées
par des personnes non-autorisées.
AVERTISSEMENT : Ne branchez pas
B
l'appareil pendant l’installation. Vous vous
exposeriez à un danger de mort ou à de
blessures graves !
AVERTISSEMENT : Si le dégagement
de la porte de la pièce où l’appareil sera
A
• Posezl’appareilsurunesurfaceplanepouréviterles
secousses.
•Sivousprévoyezd’utiliserl’appareildansunecabine/
un meuble, laissez un dégagement d’au moins 2 cm
entre les parois latérales et la cabine/le meubles.
• Installezl’appareilaumoinsà30cmdessources
de chaleur telles que les plaques de cuisson, les
radiateurs de chauffage et les cuisinières, et au moins
à 5 cm des fours électriques.
•N'exposezpasl’appareilàlalumièredirectedusoleil
et ne le placez pas dans des endroits humides.
• Uneventilationd'airdoitêtreaménagéeautourdu
réfrigérateur pour obtenir un fonctionnement efficace.
Si vous avez l'intention de poser l'appareil dans un
renfoncement, assurez-vous de laisser au moins 5 cm
de distance entre le plafond et les parois latérales.
placé est trop serré pour empêcher le
passage de l’appareil, contactez l’agent de
service agréé.
• Dans les environnements où la température
ambiante est inférieure à 10 °C, le réfrigérateur
continue à fonctionner pour conserver les aliments
placés dans le compartiment congélateur.
Cependant, les aliments frais dans le compartiment
réfrigérateur peuvent geler en raison de
l’environnement froid.
3.2. Installation des cales en plastique
Les cales en plastique fournies avec l’appareil
permettent de créer une distance afin que l'air circule
entre l'appareil et la paroi arrière.
1. Pour installer les cales, retirez les vis de l'appareil et
utilisez celles qui ont été fournies avec les cales.
2. Insérez les 2 cales en plastique sur le couvercle
de la ventilation arrière, comme illustré à la figure
suivante.
Réfrigérateur / Manuel d’utilisation
9 /28 FR
Page 37

Installation
3.3. Réglage des pieds
Si après l'installation l’appareil est en déséquilibre,
réglez les pieds à l’avant en les tournant à droite ou
à gauche
3.4. Branchement électrique
AVERTISSEMENT : N'effectuez
pas de connexion via les câbles
A
d'extension ou les multiprises.
AVERTISSEMENT : Les câbles
d'alimentation endommagés doivent
B
être remplacés par des prestataires
de services agréés.
Si deux réfrigérateurs sont installés
côte à côte, ils doivent être séparés
C
d'au moins 4 cm de distance.
• Notre entreprise ne sera pas tenue pour
responsable de tout dommage survenu si
vous utilisez cet appareil sans le connecter à
une mise à la terre ou le brancher au réseau
électrique conformément aux réglementations
nationales
• La prise du câble d'alimentation doit être
facilement accessible après l'installation.
• N’utilisez pas de rallonges ou de prises
multiples sans fil entre votre appareil et la prise
murale.
Avertissement en cas de contact avec
une surface chaude !
Votre appareil est équipé de tuyaux
de refroidissement qui permettent
d’améliorer le système de
refroidissement des parois latérales.
Le fluide chaud pourrait circuler à
C
travers ces surfaces, provoquant un
dégagement de chaleur sur les parois
latérales. Ce phénomène est normal
et ne nécessite aucune opération
d’entretien. Faites attention lorsque
vous touchez ces zones chaudes.
A
AVERTISSEMENT : « Les films protecteurs disponibles sur la poignée verticale »
seront supprimés.
10 / 28FR
Réfrigérateur / Manuel d’utilisation
Page 38

4 Préparation
4.1. Mesures d’économie d’énergie
mehmet
Le branchement de l’appareil aux
A
• Ne laissez pas les portes du réfrigérateur ouvertes
• Ne mettez pas d'aliments ou des boissons chaud(e)s
• Évitez de surcharger le réfrigérateur, car la capacité
• Pour conserver le maximum d'aliments dans le
• Selon les caractéristiques de votre appareil, la
• La circulation d'air ne doit pas être bloquée
• Le capteur de température dans le compartiment
systèmes d'économie d'énergie électrique
est risquant dans la mesure où il peut
endommager l’appareil.
pendant une durée prolongée.
dans le réfrigérateur.
de refroidissement diminue lorsque la circulation de
l'air à l'intérieur est entravée.
compartiment congélateur de votre réfrigérateur,
enlevez le rabat supérieur et le tiroir et placez-les
au-dessus des étagères en verre. La consommation
en énergie prévue pour votre réfrigérateur a
été déterminée après enlèvement de l'appareil
à glaçons, du bac à glaçons, du rabat et de
l'étagère centrale afin de permettre un chargement
maximum. Il est fortement recommandé d'utiliser
le rabat supérieur et le tiroir inférieur lors du
chargement.
décongélation des aliments dans le compartiment
réfrigérateur permet de faire des économies
d'énergie et de préserver la qualité des aliments.
par les aliments placés devant le ventilateur du
compartiment congélateur. Laissez un espace
minimum de 5cm devant la grille de protection du
ventilateur, lors du chargement des aliments.
congélateur ne doit pas entrer directement en
contact avec les emballages alimentaires. En cas de
contact avec le capteur, la consommation d’énergie
de l’appareil pourrait augmenter.
L’intérieur de votre réfrigérateur doit être
C
nettoyé.
Si deux réfrigérateurs sont installés côte à
C
côte, ils doivent être séparés d'au moins
4 cm de distance.
4.2. Première utilisation
Avant de commencer à utiliser votre réfrigérateur,
assurez-vous que toutes les préparations sont
effectuées conformément aux instructions contenues
dans les sections « Consignes relatives à la sécurité et à
l’environnement » et « Installation ».
Laissez le réfrigérateur en marche sans y mettre
d'aliment, pendant une durée de 6 heures et n'ouvrez
pas ses portes à moins que cela soit vraiment
nécessaire.
Vous remarquerez un bruit lorsque le
C
compresseur se met en marche. Les
liquides et les gaz intégrés au système de
réfrigération peuvent également émettre du
bruit, même si le compresseur n’est pas en
marche. Ce phénomène est normal.
Il est tout à fait normal les bords avant du
C
réfrigérateur chauffent. Ces zones doivent
être chaudes pour éviter tout risque de
condensation.
Réfrigérateur / Manuel d’utilisation
11 /28 FR
Page 39

5 Utilisation de l’appareil
5.1. Bandeau indicateur
Les bandeaux indicateurs peuvent varier en fonction du modèle de l’appareil.
Les fonctions sonores et visuelles sur le panneau indicateur vous aident dans l’utilisation de votre réfrigérateur.
*17
6
22
21
23
8
5
*16
*7
*13
1.
Réglage de la température / Augmentation de la
température
2.
Réglage de la température - Curseur / indicateur de
valeur de la température
3.
Indicateur Celsius (°C) de sélection de l’unité de
température
4.
Indicateur Fahrenheit (°F) de sélection de l’unité de
température
5.
Réglage de la température / Baisse de la température
6.
Bouton / Indicateur de la fonction de réfrigération
rapide
7.
* Sans fil
8.
Bouton / indicateur de Mode éco
9.
*Bouton / indicateur Congélateur Joker
Cela peut ne pas s’appliquer à tous les modèles
*9a
*9b
*12
20
2
3
4
19
18
1
*10
14
11
15
10.
*Porte automatique
11.
Erreur / Alarme de température élevée
12.
*Refroidisseur de bouteille
13.
*Bouton / Alarme de remplacement du filtre
14.
Bouton Menu
15.
Bouton / Indicateur de Marche/Arrêt de l’appareil
16.
*Bouton / indicateur de distributeur de glaçons
17.
*Mode Sabbat
18.
Bouton / indicateur du mode Vacances
19.
Voyant de verrouillage des commandes
20.
Bouton / indicateur de la fonction de congélation rapide
21.
Sélection de la cabine
22.
Indicateur du compartiment réfrigérateur
23.
Indicateur du compartiment congélateur
C
*en option : Les chiffres de ce manuel sont donnés à titre indicatif et peuvent ne pas correspondre
exactement au produit. Si l'accessoire représenté par le chiffre ne se trouve pas dans l’appareil que
vous avez acheté, c'est que le chiffre s'applique à d'autres modèles.
12 /28FR
Réfrigérateur / Manuel d’utilisation
Page 40

Utilisation de l'appareil
3
5.2. Bandeau indicateur
Les bandeaux indicateurs peuvent varier en fonction du modèle de l’appareil.
Les fonctions sonores et visuelles sur le panneau indicateur vous aident dans l’utilisation de votre réfrigérateur.
Select
15
22 23
21
4
2
5
!
*13
1
*10
*11
*7
1. Réglage de la température / Augmentation
de la température
Appuyez sur ce bouton pour augmenter la
température du compartiment sélectionné.
2. Réglage de la température Curseur / indicateur de valeur de la
température
Affiche la valeur de température du compartiment
sélectionné. De plus, vous pouvez faire glisser votre
doigt vers le haut ou le bas pour augmenter ou
diminuer la température.
3. Sélection de l’unité de température (°C)
Indicateur Celsius
Appuyez sur ce bouton pour définir l'unité de
température sur degrés Celsius.
Il s’agit de l’indicateur Celsius. Lorsque l’indicateur
Celsius est activé, les valeurs de réglage de la
température s’affichent en degrés Celsius et l’icône
correspondante s’allume à 100 %.
L’icône Fahrenheit s’allume à 50 %.
4. Sélection de l’unité de température (°F)
Indicateur Fahrenheit
Appuyez sur ce bouton pour définir l'unité de
température sur degrés Fahrenheit.
Il s’agit de l’indicateur Fahrenheit. Lorsque
l’indicateur Fahrenheit est activé, les valeurs de
réglage de la température s’affichent en degrés
Fahrenheit et l’icône correspondante s’allume
entièrement
L’icône Celsius s’allume à 50 %.
5. Réglage de la température / Baisse de la
température
Appuyez sur ce bouton pour baisser la température
du compartiment sélectionné.
Cela peut ne pas s’appliquer à tous les modèles
*en option : Les chiffres de ce manuel sont donnés à titre indicatif et peuvent ne pas correspondre
C
exactement au produit. Si l'accessoire représenté par le chiffre ne se trouve pas dans l’appareil que
vous avez acheté, c'est que le chiffre s'applique à d'autres modèles.
Réfrigérateur / Manuel d’utilisation
6
8
20
18
*17
*16
*12
*9b
6. Indicateur de la fonction réfrigération
rapide
Lorsque la fonction de réfrigération rapide est
activée, l’indicateur s’allume à 100 %. Lorsque
la fonction est annulée, l’appareil retourne à ses
réglages normaux et l’indicateur s’allume à 50 %.
Bouton de la fonction Réfrigération rapide
Il est utilisé pour activer ou désactiver la fonction de
réfrigération rapide.
Utilisez la fonction de réfrigération
C
rapide lorsque vous souhaitez refroidir
rapidement les aliments placés dans
le compartiment réfrigérateur. Si
vous souhaitez refroidir de grandes
quantités d'aliments frais, nous vous
recommandons d'activer cette fonction
au préalable.
Au bout de 8 heures de temps ou
C
lorsque le compartiment réfrigérateur
atteint la température souhaitée, la
fonction de réfrigération rapide se
désactive automatiquement si vous ne
la désactivez pas vous-même.
Si vous appuyez sur le bouton de
C
réfrigération rapide de façon répétée
à intervalles courts, la protection
du circuit électronique s'activera et
le compresseur ne démarrera pas
automatiquement.
13 /28FR
*9a
Page 41

Utilisation de l'appareil
Cette fonction n’est pas réactivée
C
lorsque le courant est rétabli après
une panne de courant.
7. *Sans fil
Appuyez sur ce bouton pour connecter l’appareil au
réseau domestique. Lorsque la fonction est activée,
l’indicateur s’allume à 100 % ; lorsqu’elle est
annulée, l’indicateur s’allume à 50 %.
8. Bouton / indicateur de Mode Eco
Appuyez sur ce bouton pour activer ou désactiver le
mode Eco.
Lorsque le mode Eco est activé, l’indicateur
s’allume à 100 %. Lorsque la fonction est active, le
congélateur commence à fonctionner en mode Eco
au moins 6 heures plus tard. Lorsque la fonction est
annulée, l’indicateur s’allume à 50 %.
9a. *Bouton / indicateur Congélateur
Joker
Lorsque le bouton est enfoncé, le compartiment
joker fonctionne comme un congélateur et
l’indicateur s’allume à 100 %. Le compartiment
réfrigérateur Joker s’allume à 50%.
9b. *Bouton / indicateur Réfrigérateur
Joker
Lorsque le bouton est enfoncé, le compartiment
joker fonctionne comme un réfrigérateur et
l’indicateur s’allume à 100 %. Le compartiment
congélateur joker s’allume à 50%.
10.*Porte automatique
Appuyez sur ce bouton pour activer ou désactiver
le mode Porte automatique. Lorsque la fonction est
activée, l’indicateur s’allume à 100 %. Lorsque la
fonction est annulée, l’indicateur s’allume à 50 %.
Une fois la fonction active, touchez la section correspondante sur la poignée de porte pour que la porte
s'ouvre automatiquement.
11. Erreur / Alarme de température élevée
Cet indicateur s’allume en cas de panne de courant,
de défaut de température élevée et d’avertissements
d’erreur. En cas de panne de courant prolongée, la
température maximale du compartiment congélateur
s’affiche sur l’écran numérique. Après le contrôle
des aliments dans le compartiment congélateur,
appuyez sur le bouton de température élevée pour
annuler l'avertissement.
14 / 28FR
12. *Refroidisseur de bouteille
Appuyez sur ce bouton pour activer ou désactiver le
mode Refroidisseur de bouteille.
Lorsque la fonction est activée, l’indicateur
s’allume à 100 %. Lorsque la fonction est annulée,
l’indicateur s’allume à 50 %.
13. *Bouton / Alarme de remplacement
du filtre
Cette icône s’allume lorsque le filtre doit être
réinitialisé.
Lorsque vous appuyez sur le bouton, le filtre est
réinitialisé et l’icône de réinitialisation s’éteint.
14. Bouton Menu
Il est utilisé pour activer ou désactiver le mode veille
sur l'affichage. Si vous n’appuyez sur aucun bouton
ou n’ouvrez pas la porte dans les 30 secondes, il
passe automatiquement en mode veille.
15. Bouton / Indicateur de Marche/Arrêt
de l’appareil
Maintenez enfoncé bouton Marche/Arrêt pendant
3 secondes pour allumer ou éteindre l’appareil.
Lorsque l’appareil est éteint, l’indicateur de Marche/
Arrêt de l’appareil s’allume à 100% et tous les autres indicateurs s’éteignent. Pour allumer l’appareil,
maintenez à nouveau le bouton enfoncé pendant
3 secondes. Le réfrigérateur s’allume et l’indicateur
de Marche/Arrêt s’allume à 50 %.
16. *Bouton / indicateur de distributeur de
glaçons
Appuyez sur ce bouton pour activer ou désactiver le
distributeur de glaçons. Si l’indicateur est allumé à
100%, cela signifie que le distributeur de glaçons
est en cours d’exécution. Si l’indicateur est allumé à
50%, cela signifie que le distributeur de glaçons est
désactivé.
L’arrivée d’eau du réservoir à eau
C
s’arrête lorsque cette fonction n’est
pas sélectionnée. Toutefois, les glaçons
déjà formés peuvent être retirés du
distributeur.
17. *Mode Sabbat
Appuyez sur ce bouton pour activer ou désactiver
le mode Sabbat. Lorsque la fonction est activée,
l’indicateur s’allume à 100 %. Lorsque la fonction
est annulée, l’indicateur s’allume à 50 %.
Réfrigérateur / Manuel d’utilisation
Page 42

Utilisation de l'appareil
18. Bouton / indicateur du mode Vacances
Appuyez sur ce bouton pour activer le mode
Vacances. L’indicateur du mode Vacances
s’allume à 100 %. Si le mode Vacances est activé,
l'inscription « - - » s’affiche sur l’indicateur de valeur
de température et aucun refroidissement actif
n’est sélectionné sur le compartiment réfrigérateur.
Il n’est pas adapté de conserver les denrées dans
le compartiment réfrigérateur lorsque cette fonction
est activée. Les autres compartiments maintiendront
le niveau de froid paramétré.
Pour désactiver cette fonction, appuyez à nouveau
sur le bouton de la fonction Vacances.
Lorsque la fonction est annulée, l’indicateur s’allume
à 50 %.
19. Voyant de verrouillage des
commandes
Appuyez simultanément sur les boutons
Réfrigération rapide et Vacances et maintenezles enfoncés pendant 3 secondes. Lorsque vous
appuyez sur le bouton, un compte à rebours est
lancé dans l’indicateur de valeur de température.
Lorsque le verrouillage des commandes est activé,
l’indicateur de verrouillage des commandes s’allume
à 100 % et le mode de verrouillage des commandes
est activé. Les boutons ne fonctionneront pas
lorsque le mode de verrouillage des commandes
est actif. Appuyez simultanément sur les boutons
Réfrigération rapide et Vacances et maintenez-les
enfoncés à nouveau pendant 3 secondes. Lorsque
vous appuyez sur le bouton, un compte à rebours
est lancé dans l’indicateur de valeur de température.
Lorsque le verrouillage des commandes est annulé,
l’indicateur de verrouillage des commandes s’allume
à 50 % et le mode de verrouillage des commandes
est désactivé.
Activez cette fonction si vous voulez évitez
de changer le réglage de la température du
réfrigérateur.
20.Indicateur de la fonction de congélation
rapide
Lorsque la fonction de congélation rapide est
activée, l’indicateur s’allume à 100 %. Lorsque
la fonction est annulée, l’appareil retourne à ses
réglages normaux et l’indicateur s’allume à 50 %.
Bouton de la fonction de congélation rapide
Il est utilisé pour activer ou désactiver la fonction de
congélation rapide.
Appuyez sur ce bouton pour activer ou désactiver la
fonction de congélation rapide. Lorsque vous activez
la fonction, le compartiment congélateur refroidi à
une température inférieure à la valeur de consigne.
Utilisez la fonction de congélation
C
rapide lorsque vous souhaitez congeler
rapidement les aliments placés dans
le compartiment congélateur. Si
vous souhaitez congeler de grandes
quantités d'aliments, nous vous
recommandons d'activer cette fonction
au préalable.
Au bout de 4 heures de temps ou
C
lorsque le compartiment congélateur
atteint la température souhaitée, la
fonction de congélation rapide se
désactive automatiquement si vous ne
la désactivez pas vous-même.
C
Cette fonction n’est pas réactivée
lorsque le courant est rétabli après une
panne de courant.
21. Sélection de la cabine
Appuyez sur le bouton de sélection de la cabine
pour afficher et modifier la valeur de température du
réfrigérateur ou du congélateur sur l’indicateur de
valeur de température.
22. Indicateur du compartiment réfrigérateur
Lorsque cet indicateur est actif, la température
du compartiment réfrigérateur est affichée sur
l’indicateur de température.
23 Indicateur du compartiment réfrigérateur
Lorsque cet indicateur est actif, la température
du compartiment congélateur est affichée sur
l’indicateur de température.
Réfrigérateur / Manuel d’utilisation
15 /28FR
Page 43

Utilisation de l'appareil
5.3. Machine à glace
(Cette caractéristique est en option)
La machine à glace vous permet d'obtenir facilement
des glaçons provenant du réfrigérateur.
Utilisation de la machine à glace
1. Retirez le réservoir d'eau du compartiment
réfrigérateur.
2. Remplissez le réservoir d’eau.
3. Replacez le réservoir d’eau. Les premiers glaçons
seront prêts après environ quatre heures dans le
tiroir à glace de la machine à glace situé dans le
compartiment congélateur.
Lorsque le réservoir d’eau est
C
complètement rempli, vous pouvez
obtenir environ 60 à 70 glaçons.
L’eau du réservoir doit être remplacée
C
toutes les 2 à 3 semaines.
5.4. Distributeur de glaçons
(Cette caractéristique est en option)
Le distributeur de glaçons vous permet d'obtenir
facilement des glaçons provenant du réfrigérateur.
Utilisation du distributeur de glaçons
1. Retirez le distributeur de glaçons en le tirant
doucement.
2. Remplissez-le d’eau.
3. Remettez le distributeur en place. Après environ
deux heures, vous obtenez des glaçons.
4. Pour obtenir des glaçons, tournez les molettes des
réservoirs à glaçons dans le sens horaire, de manière
à former un angle de 90 ˚. Les glaçons contenus
dans les réservoirs tomberont dans le récipient de
conservation de glaçons situé en dessous.
5. Vous pouvez alors sortir le récipient de
conservation de glaçons et servir les glaçons.
Ne retirez pas le distributeur de
C
glaçons de son logement pour obtenir
de la glace.
Si vous le désirez, vous pouvez
C
laisser les glaçons dans leur récipient
de conservation. Le récipient de
conservation sert simplement à
accumuler les glaçons. Ne versez pas
d’eau à l’intérieur. Cela peut le casser.
5.5. Bac à glaçons
(Cette caractéristique est en option)
Le bac à glaçons vous permet d’obtenir facilement
des glaçons provenant du réfrigérateur.
Utilisation du bac à glaçons
1. Retirez le bac à glaçons du compartiment
congélateur.
2. Remplissez bac à glaçons d’eau.
3. Remettez le bac à glaçons dans le compartiment
congélateur. Après environ deux heures, vous
obtenez des glaçons.
4. Retirez le bac à glaçons du compartiment
congélateur et tordez-le contre la plaque de service.
Vous pourrez alors enlever facilement les glaçons.
16 / 28FR
Réfrigérateur / Manuel d’utilisation
Page 44

Utilisation de l'appareil
5.6. Éclairage bleu
(Cette caractéristique est en option)
Les bacs à légumes du réfrigérateur sont éclairés
par une lumière bleue. Les denrées conservées dans
les bacs à légumes continuent leur photosynthèse
grâce aux effets de longueur d’onde de la lumière
bleue et conservent ainsi leur fraîcheur.
5.7. Module de désodorisation
(FreshGuard)
(Cette caractéristique est en option)
Le module de désodorisation élimine rapidement
les mauvaises odeurs dans votre réfrigérateur avant
qu’elles ne pénètrent dans les surfaces. Grâce à ce
module placé sur le plafond du compartiment des
aliments frais, les mauvaises odeurs se dissolvent
pendant que l’air circule de manière active sur
le filtre anti-odeurs, puis l’air qui a été nettoyé
par le filtre est réintroduit dans le compartiment
des aliments frais. De cette façon, les odeurs
indésirables qui peuvent apparaître lors de la
conservation des aliments dans le réfrigérateur
sont éliminées avant qu’elles ne pénètrent dans les
surfaces.
Ceci grâce au ventilateur, à la LED et au filtre
anti-odeurs intégré dans le module. Le module de
désodorisation s’active automatiquement sur une
base périodique. Le son que vous entendrez lors
de l’activation périodique du module est normal ; il
est émis par le ventilateur intégré. Si vous ouvrez
la porte du compartiment d’aliments frais pendant
que le module est actif, le ventilateur se met
temporairement en pause et reprend là où il s’était
arrêté lorsque la porte est à nouveau fermée. En cas
de panne de courant, le module de désodorisation
s’active une fois le courant rétabli.
Réfrigérateur / Manuel d’utilisation
Info : Il est recommandé de conserver les aliments
aromatiques (tels que les fromages, les olives et les
plats de charcuterie) dans leur emballage et scellés
pour éviter les mauvaises odeurs qui peuvent se
produire lorsque les odeurs de divers aliments se
mélangent. En outre, il est recommandé de sortir
rapidement les aliments avariés du réfrigérateur
pour éviter que les autres aliments ne se détériorent
et éviter les mauvaises odeurs.
17 /28FR
Page 45

Utilisation de l'appareil
5.8. Compartiment refroidisseur
(Cette caractéristique est en option)
Utilisez ce compartiment pour conserver les produits
délicats qui requièrent une température plus basse ou
les produits à base de viande à consommer dans un
court délai. Ne conservez pas vos légumes ou fruits
dans ce compartiment.
Vous pouvez augmenter le volume interne de votre
appareil en enlevant le compartiment Zone fraîche
souhaité.
Pour l’enlever, tirez juste vers l’avant jusqu’à ce qu’il
s’arrête, puis soulevez-le et tirez-le vers vous.
5.9. Bac à légumes
Le bac à légumes du réfrigérateur a été spécialement
conçu pour vous aider à conserver vos denrées
au frais sans que celles-ci n'aient à perdre de leur
humidité. C'est pourquoi en général, l’air frais circule
davantage tout autour du bac à légumes. Conservez
vos fruits et légumes dans ce compartiment. Ne
placez pas de légumes verts à côté des fruits pour si
vous souhaitez les conserver plus longtemps.
18 / 28FR
Réfrigérateur / Manuel d’utilisation
Page 46

Utilisation de l'appareil
5.10. Utilisation du distributeur
(Cette caractéristique est en option)
Il est tout à fait normal que les
C
premiers verres d'eau obtenus du
distributeur soient chauds.
Si vous n'utilisez pas le distributeur
C
d'eau pendant une période prolongée,
débarrassez-vous des premiers verres
d'eau afin d'obtenir de l'eau fraîche.
1. Appuyez sur le bouton du distributeur avec votre
verre. Si vous utilisez une tasse en plastique
souple, il est préférable d'appuyer sur le bouton
avec vos doigts.
2. Une fois que vous avez rempli la tasse au niveau
souhaité, relâchez le bouton.
5.11. Remplir le réservoir d'eau
de la fontaine frigorifique
Le réservoir d'approvisionnement en eau se trouve
dans le balconnet de la porte.
1. Ouvrez le couvercle du réservoir.
2. Remplissez le réservoir d'eau potable fraîche.
3. Fermez le couvercle.
Ne remplissez pas le réservoir
C
d’eau avec un liquide autre que de
l’eau ; des boissons comme le jus
de fruit, les boissons gazeuses, et
les boissons alcooliques ne sont pas
adaptées pour être utilisées avec le
distributeur d’eau. Si de tels liquides
sont utilisés, le distributeur connaîtra
un dysfonctionnement et peut être
profondément endommagé. La garantie
ne couvre pas de telles utilisations.
Certaines substances chimiques
et additifs contenus dans de telles
boissons / breuvages peuvent également
endommager le réservoir d'eau.
Utilisez uniquement de l'eau potable
C
propre.
La capacité du réservoir est de 3
C
litres ; ne dépassez pas la limite.
Veuillez remarquer que la quantité
C
d’eau qui s’écoule du distributeur
dépend du niveau d’appui du bouton.
À mesure que le niveau d’eau
de votre tasse / verre augmente,
réduisez doucement la quantité de
pression du bouton pour éviter tout
risque de débordement. Si vous
appuyez légèrement sur le bouton,
l'eau s'écoulera ; ce phénomène
est tout à fait normal et n'est pas un
dysfonctionnement.
Réfrigérateur / Manuel d’utilisation
19 /28FR
Page 47

Utilisation de l'appareil
5.12. Nettoyer le réservoir d’eau
1. Retirez le réservoir d'approvisionnement en eau du
balconnet de la porte.
2. Retirez le balconnet de la porte en le tenant par les
deux côtés.
3. Tenez le réservoir par les deux côtés et retirez-le
selon un angle de 45 °C.
4. Enlevez le couvercle du réservoir d’eau et
nettoyez le réservoir.
Le réservoir d’eau et les composantes
C
du distributeur d’eau ne peuvent pas
être passés au lave-vaisselle.
5.13. Bac de dégivrage
L’eau qui s’écoule lors de l’utilisation du distributeur
d’eau s’accumule dans le bac de dégivrage.
Retirez le filtre en plastique comme indiqué sur le
schéma.
Essuyez l’excédent d’eau à l’aide d’un chiffon
propre et sec.
20 / 28FR
Réfrigérateur / Manuel d’utilisation
Page 48

Utilisation de l'appareil
5.14. Bac à humidité contrôlée
(Fraîcheur assurée)
(Cette caractéristique est en option)
Grâce au bac à humidité contrôlée, les fruits et
légumes peuvent être conservés plus longtemps
dans un environnement présentant des conditions
d’humidité idéales. Le système de réglage de
l’humidité à 3 options situé en face du bac à
légumes vous permet de contrôler le niveau
d’humidité à l’intérieur en fonction des aliments que
vous conservez. Il est recommandé de sélectionner
l’option légumes si vous conservez des légumes
seulement, l’option fruits si vous conservez des
fruits seulement, et l’option mixte lorsque vous
conservez des fruits et des légumes.
Pour profiter du système de contrôle de l’humidité
et prolonger la durée de conservation des aliments,
il est recommandé de ne pas conserver les fruits
et légumes dans des sacs en plastique. Si vous
laissez les légumes dans leurs sachets, ils se
décomposeront en très peu de temps. En particulier,
nous recommandons de ne pas conserver les
concombres ou les brocolis dans des sacs en
plastique scellés. Pour des raisons d'hygiène, il vaut
mieux éviter le contact de l'emballage avec d'autres
légumes, préférez un sac en papier perforé ou tout
autre emballage similaire plutôt que le sachet.
Une fois les légumes placés dans le bac, il faut
prendre en considération le poids spécifique des
légumes. Les légumes lourds et durs doivent être
disposés au fond du bac, tandis que les plus légers
et tendres seront placés au-dessus.
Ne rangez pas ensemble dans le même bac, les
poires, les abricots, les pêches, etc. ainsi que
les pommes, en particulier celles générant un
niveau élevé de gaz d'éthylène, avec les autres
fruits et légumes. Le gaz d'éthylène émis par ces
premiers fruits peut accélérer la détérioration et la
décomposition des autres en très peu de temps.
5.15. Congélation des produits frais
• Afin de préserver la qualité des aliments,
ils doivent être congelés le plus rapidement
possible lorsqu’ils sont placés dans le
compartiment congélateur ; utilisez pour cela la
fonction de congélation rapide.
• Vous pouvez conserver les aliments plus
longtemps dans le compartiment congélateur
lorsque vous les congelez frais.
• Emballez les aliments à congeler et fermez
l’emballage de sorte qu’il ne laisse pas entrer
l’air.
• Assurez-vous d’emballer vos aliments avant
de les mettre au congélateur. Utilisez des
contenants de congélation, des feuilles et des
papiers à l’épreuve de l’humidité, des sacs en
plastique et d’autres matériaux d’emballage
plutôt que des papiers d’emballage traditionnels.
• Étiquetez chaque paquet d’aliments en ajoutant
la date avant la congélation. De cette manière,
vous pouvez connaître le degré fraîcheur de
chaque paquet d’aliments chaque fois que vous
ouvrez votre congélateur. Conservez les aliments
congelés dans la partie avant du compartiment
pour vous assurer qu’ils sont utilisés en premier.
• Consommez immédiatement les denrées
congelées après leur décongélation et ne les
congelez plus à nouveau.
• Ne congelez pas une quantité trop importante
à la fois.
SE B ZE L İK
Réfrigérateur / Manuel d’utilisation
21 /28FR
Page 49

Utilisation de l'appareil
Réglage du
compartiment
congélateur
-18 °C 4 °C Voici le réglage normal recommandé.
-20, -22 ou
-24 °C
Congélation
rapide
-18°C ou plus
froid
5.16. Recommandations concernant la
conservation des aliments congelés
Le compartiment doit être réglé à -18 °C en guise
de valeur minimale.
1. Mettez les paquets dans le congélateur aussi
rapidement que possible après l’achat pour
éviter qu’ils ne dégivrent.
2. Vérifiez que les mentions « À consommer avant
le » et « À consommer de préférence avant le »
figurant sur l’emballage sont respectées avant
de congeler les paquets.
3. Assurez-vous que l'emballage des aliments
n’est pas endommagé.
5.17. Informations concernant
la congélation
Selon les normes IEC 62552, le produit congèle
au moins 4,5 kg d’aliments à une température
ambiante de 25 °C jusqu’à -18 °C ou moins
dans les 24 heures pour 100 litres de volume de
congélation.
Il n’est possible de conserver des denrées sur
de longues périodes qu’avec des températures
inférieures ou égales à -18°C.
Vous pouvez conserver la fraîcheur de vos denrées
pendant plusieurs mois (à des températures
inférieures ou égales à -18 °C dans le surgélateur).
Il faut éviter que les denrées à congeler n’entrent
en contact avec des aliments déjà congelés afin
d’empêcher le dégel partiel de ces derniers.
Faites bouillir les légumes et égoutter leur eau pour
conserver les légumes plus longtemps. Après avoir
égoutté leur eau, placez-les dans des emballages
à l’épreuve de l’air et disposez-les à l’intérieur du
congélateur. Les aliments tels que les bananes,
les tomates, la laitue, le céleri, les œufs durs,
Réglage du
compartiment
réfrigérateur
4 °C
4 °C
2 °C
Remarques
Ces réglages sont recommandés lorsque la température ambiante
dépasse 30 °C.
Cet indicateur est utilisé lorsque vous voulez congeler vos denrées
pendant une courte période. Le réfrigérateur retourne à son mode de
fonctionnement précédent lorsque le processus est achevé.
Utilisez ces paramètres si vous estimez que le compartiment
réfrigérateur n’est pas assez froid à cause de la chaleur ou des
ouvertures/fermetures fréquentes de la porte.
les pommes de terre ne sont pas adaptés à la
congélation. Lorsque ces aliments sont congelés,
leur valeur nutritionnelle et leur goût sont affectés
négativement. En outre, ils peuvent se détériorer et
présenter un risque pour la santé humaine.
5.18. Disposition des denrées
Clayettes du
compartiment
congélation
Étagères du
compartiment
réfrigérateur.
Étagères sur
la porte du
compartiment
réfrigérant
Bac à légumes Fruits et légumes
Compartiment
Produits frais
5.19. Avertissement - Porte ouverte
(Cette caractéristique est en option)
Un signal d'avertissement sonore retentit lorsque
la porte du réfrigérateur reste ouverte pendant
1 minute. Le signal sonore s'arrête lorsque vous
fermez la porte ou lorsque vous appuyez sur
n'importe quel bouton d'affichage (le cas échéant).
22 / 28FR
Différentes denrées congelées
comme de la viande, du
poisson, des crèmes glacées,
des légumes, etc.
Aliments dans les casseroles,
les assiettes couvertes et les
récipients fermés, œufs (dans
un contenant fermé)
Produits ou boissons de petite
taille et sous emballage
Charcuterie (aliments pour
le petit déjeuner, produits
de viande qui doivent être
consommés dans un court laps
de temps)
Réfrigérateur / Manuel d’utilisation
Page 50

Utilisation de l'appareil
5.20. Ampoule
Les lampes LED sont utilisées comme ampoules.
Contactez le service agréé en cas de problème avec
ce type d’éclairage.
Les ampoules utilisées dans l’appareil ne sont
pas conçues pour l'éclairage domestique et ne
conviennent pas non plus à un tel usage. Les
ampoules de votre réfrigérateur et/ou congélateur
visent à assurer un chargement d’aliments
confortable et sécuritaire.
Réfrigérateur / Manuel d’utilisation
23 /28FR
Page 51

6 Entretien et nettoyage
Nettoyez régulièrement l’appareil afin de prolonger sa
durée de vie et réduire les problèmes fréquemment
rencontrés.
B
AVERTISSEMENT : Éteignez
l’appareil avant de le nettoyer.
AVERTISSEMENT : Il est
B
recommandé de nettoyer le
condenseur tous les six mois avec
des gants. Vous ne devez pas utiliser
d'aspirateur.
• N’utilisez jamais d’essence, de benzène ou de
matériaux similaires pour le nettoyage.
• N’utilisez jamais d'ustensiles abrasifs tranchants,
de savon, de produit de nettoyage domestique, de
détergent et de cirage pour effectuer le nettoyage.
• Dissolvez une cuillerée à café de carbonate dans
un demi-litre d'eau. Trempez un chiffon dans cette
solution et essorez-le complètement. Nettoyez
soigneusement l'intérieur du réfrigérateur avec ce
chiffon et séchez ensuite à l'aide d'un chiffon sec.
• Ne laissez pas de l’eau pénétrer dans le logement de
lampe ou dans toute autre pièce électrique.
• Si vous n'utilisez pas le réfrigérateur pendant une
période prolongée, débranchez-le, retirez-y tous les
aliments, nettoyez-le et laissez la porte entrouverte.
• Vérifiez régulièrement que les joints des portes sont
propres. Si tel n'est pas le cas, nettoyez-les.
• Retirez tous les aliments de l’appareil avant de retirer
la porte et les étagères.
• Retirez les balconnets en les tirant vers le haut. Faites
glisser les balconnets vers le bas pour les réinstaller
après le nettoyage.
• N'utilisez jamais de produits de nettoyage chlorés ou
d'eau pour nettoyer les surfaces extérieures ou les
parties du produit recouvertes de chrome. Le chlore
entraîne l'abrasion de ces surfaces métalliques.
• Pour des appareils qui ne sont pas de la marque
No Frost, des gouttes d’eau et une couche de givre
pouvant atteindre la largeur d’un doigt se forment
sur la paroi arrière du compartiment réfrigérateur. Ne
les nettoyez pas et évitez d'y utiliser de l’huile ou des
produits similaires.
• Utilisez uniquement des tissus en microfibres
légèrement mouillés pour nettoyer la surface externe
de l’appareil. Les éponges et autres tissus de
nettoyage sont susceptibles de rayer la surface.
6.1. Prévention des mauvaises odeurs
Les matériaux susceptibles d'être à l'origine d'une
odeur ne sont pas utilisés dans la fabrication de nos
réfrigérateurs. Toutefois, des odeurs peuvent se dégager
si les aliments sont mal rangés ou si la surface interne
de l’appareil n'est pas nettoyée comme il se doit.
Veuillez tenir compte des points suivants pour éviter ce
problème :
• Il est important de garder le réfrigérateur propre.
Les résidus d'aliments, les taches, etc. peuvent être
à l'origine des odeurs. Pour cette raison, nettoyez
votre réfrigérateur avec du carbonate dissout dans
de l'eau tous les 15 jours. N'utilisez jamais de
détergent ou de savon.
• Conservez vos aliments dans des récipients fermés.
Les micro-organismes émis par les récipients
sans couvercle peuvent provoquer des odeurs
désagréables.
• Ne gardez jamais les aliments périmés ou abîmés
dans votre réfrigérateur.
6.2. Protection des surfaces en plastique.
Ne placez pas d’huiles ou de plats huileux dans le
réfrigérateur dans des récipients non fermés, car
les graisses peuvent endommager les surfaces en
plastique du réfrigérateur. Si de l'huile est répandue ou
étalée sur les surfaces en plastique, nettoyez et rincez
immédiatement la partie concernée de la surface à l'eau
tiède.
6.3. Nettoyage de la surface intérieure
Pour nettoyer les surfaces intérieures et toutes les
parties amovibles, lavez-les avec une solution douce
contenant du savon, de l'eau et du carbonate. Rincez et
séchez complètement. Empêchez l'eau de toucher les
dispositifs d'éclairage et le panneau de commande.
24 /28FR
Réfrigérateur / Manuel d’utilisation
Page 52

6 Entretien et nettoyage
ATTENTION :
N’utilisez pas de vinaigre, d'alcool
à friction ou d'autres produits de
A
nettoyage à base d'alcool sur les
surfaces intérieures.
6.4. Surfaces extérieures
en acier inoxydable
Utilisez un produit de nettoyage en acier inoxydable
non abrasif et appliquez-le avec un chiffon doux et non
pelucheux. Pour le polissage, essuyez avec douceur la
surface avec un chiffon humide en microfibres et utilisez
du cuir sec. Suivez toujours les fils d'acier inoxydable.
6.5. Nettoyage d’appareils
avec portes en verre
Enlevez le film protecteur qui recouvre la vitre.
Il y a un revêtement sur la surface de la vitre.
Ce revêtement minimise la formation de taches
et garantit un nettoyage facile des taches et
des salissures. Les vitres non protégées par un tel
revêtement peuvent être exposées à un colmatage
persistant de polluants transportés par l’eau ou par
l’air et d'origine organique ou inorganique comme le
calcaire, les sels minéraux, les hydrocarbones non
brûlés, les oxydes métalliques et les silicones qui
peuvent facilement et rapidement former des taches ou
entraîner ainsi des dégâts matériels. Malgré un lavage
régulier, la vitre devient très difficile à nettoyer, mais
reste nettoyable. En conséquence, la clarté et la bonne
apparence du verre en pâtit. Les composés et méthodes
de nettoyage durs et abrasifs augmentent encore ces
défauts et accélèrent le processus de détérioration.
*Les produits de nettoyage non alcalins, non abrasifs et
à base d’eau doivent être utilisés pour les procédures de
nettoyage usuelles.
Pour que le revêtement ait une longue durée de vie, les
substances alcalines ou abrasives ne doivent pas être
utilisées lors des opérations de nettoyage.
Ces vitres ont été soumises à un processus de trempe
pour augmenter leur résistance aux chocs et à la
rupture.
Comme mesure de sécurité supplémentaire, les
surfaces arrière des verres sont recouvertes d’un film
de sécurité pour s’assurer qu’ils ne nuisent pas à
l’environnement en cas de rupture.
Réfrigérateur / Manuel d’utilisation
25 /28 FR
Page 53

7 Dépannage
Vérifiez la liste suivante avant de contacter le service
après-vente. Cela vous permet de gagner du temps
et de l’argent. Cette liste contient les problèmes
fréquemment rencontrés qui ne sont pas le résultat d'un
défaut de fabrication ou d'une mauvaise utilisation des
matériaux. Il se peut que votre appareil ne présente pas
certaines des caractéristiques décrites ici.
Le réfrigérateur ne fonctionne pas.
• Il peut ne pas être branché comme il se doit.
>>>Branchez l’appareil correctement.
• Le fusible de la prise à laquelle votre réfrigérateur
est branché ou le fusible principal a peut-être
sauté. >>>Vérifiez le fusible.
Condensation sur la paroi intérieure du
compartiment réfrigérateur. (MULTI ZONE, COOL
CONTROL et FLEXI ZONE).
•
La porte peut avoir été ouverte/fermée fréquemment.
Évitez d’ouvrir/de fermer la porte du réfrigérateur
fréquemment.
•
L'environnement peut être trop humide.
>>>N'installez pas le réfrigérateur à des endroits très
humides.
•
Les aliments contenant du liquide peuvent avoir été
placés au réfrigérateur dans des récipients sans
couvercle. >>>Assurez-vous que des aliments
contenant du liquide rangés dans des récipients non
fermés ne soient pas placés pas dans le réfrigérateur.
•
La porte du réfrigérateur peut avoir été laissée
entrouverte. >>>Ne gardez pas longtemps les portes
de votre réfrigérateur ouvertes.
•
Le thermostat peut avoir été réglé à un niveau très
froid. >>>Réglez le thermostat à un niveau approprié.
Le compresseur ne fonctionne pas.
•
Le dispositif de protection thermique du compresseur
sautera en cas de coupures soudaines du courant ou
de débranchement intempestif, en effet la pression
du liquide réfrigérant du système de refroidissement
ne sera pas équilibrée. Le réfrigérateur recommence
à fonctionner normalement après 6 minutes environ.
Si le réfrigérateur ne démarre pas à la fin de cette
période, veuillez appeler le prestataire de services
agréé.
•
Le congélateur est en mode dégivrage. >>>Ceci est
normal pour un réfrigérateur qui effectue le dégivrage
entièrement automatique. Le cycle de dégivrage est
effectué périodiquement.
•
Le réfrigérateur ne doit pas être branché.
>>>Assurez-vous que la fiche est bien insérée dans
la prise.
•
Les réglages de température peuvent être incorrects.
>>>Sélectionnez la valeur de température correcte.
•
Panne de courant possible. >>>Le réfrigérateur
commence à fonctionner normalement une fois que
l'alimentation est rétablie.
26 /28FR
Le niveau sonore augmente lorsque le
réfrigérateur est en marche.
• Les performances de fonctionnement du
réfrigérateur peuvent varier en fonction des
variations de température ambiante. Cela est
normal et n’est pas un défaut.
Le réfrigérateur fonctionne fréquemment ou
pendant de longue périodes.
•
Votre nouveau réfrigérateur est peut-être plus grand
que l’ancien. Les grands réfrigérateurs durent plus
longtemps.
•
La température de la pièce est probablement élevée.
>>>Il est normal que l'appareil fonctionne plus
longtemps dans des environnements chauds.
•
Il se peut que le réfrigérateur ait été branché ou
chargé d’aliments. >>>Il faut plus de temps à
l’appareil pour atteindre la température réglée
lorsqu'il vient d'être branché ou chargé. Ce
phénomène est normal.
•
De grandes quantités d'aliments chauds ont peutêtre été mises au réfrigérateur récemment. >>>Ne
placez pas les aliments chauds dans le réfrigérateur.
•
Les portes peuvent avoir été ouvertes fréquemment
ou laissées entrouvertes depuis longtemps.
>>>L'air chaud qui pénètre dans le réfrigérateur
le fait fonctionner plus longtemps. N’ouvrez pas les
portes fréquemment.
•
Les portes des compartiments congélateur
et réfrigérateur ont été laissées entrouvertes.
>>>Assurez-vous que les portes sont bien fermées.
•
L'appareil peut être réglé à une température très
basse. >>> Réglez la température du réfrigérateur
à un degré plus chaud et patientez que l’appareil
atteigne ce niveau de température.
•
Le joint de porte du réfrigérateur ou du
compartiment congélateur peut être sale, usé,
brisé ou mal fixé. >>> Nettoyez ou remplacez le
joint. Tout joint endommagé/brisé fait fonctionner
le réfrigérateur pendant une période de temps plus
longue afin de conserver la température actuelle.
La température du réfrigérateur est adéquate,
mais la température du congélateur est très
basse.
• La température du compartiment congélateur peut
être réglée à une valeur très basse.>>> Réglez la
température du compartiment congélateur à une
valeur supérieure et vérifiez.
La température du congélateur est adéquate,
mais la température du réfrigérateur est très
basse.
Réfrigérateur / Manuel d’utilisation
Page 54

Dépannage
• Le réfrigérateur est réglé à une température
très basse. >>> Réglez la température du
réfrigérateur à un degré supérieur et vérifiez.
Les denrées conservées dans les tiroirs du
compartiment de réfrigération sont congelées.
• La température du compartiment réfrigérateur
peut être réglée à une valeur très élevée.>>>
Réglez la température du compartiment
réfrigérateur à une valeur inférieure et vérifiez.
La température dans le réfrigérateur ou le
congélateur est très élevée.
•
La température du compartiment réfrigérateur peut
être réglée à une température très élevée. >>>Le
réglage du compartiment réfrigérant a un effet sur la
température du congélateur. Modifiez la température
du réfrigérateur ou du compartiment congélateur
jusqu'à ce que la température du réfrigérateur ou
du compartiment congélateur atteigne un niveau
adéquat.
•
Les portes peuvent avoir été ouvertes fréquemment
ou laissées entrouvertes depuis longtemps.
>>>N'ouvrez pas les portes fréquemment.
•
La porte a peut-être été laissée entrouverte.
>>>Fermez complètement la porte.
•
Le réfrigérateur était peut-être tout simplement
branché ou chargé d’aliment. >>>Ce phénomène
est normal. Il faut plus de temps à l’appareil pour
atteindre la température réglée lorsqu'il vient d'être
branché ou chargé.
•
De grandes quantités d'aliments chauds ont peutêtre été mises au réfrigérateur récemment. >>>Ne
placez pas les aliments chauds dans le réfrigérateur.
Vibrations ou bruits.
• Le plancher peut ne pas être stable ou de niveau.
>>>Si le réfrigérateur vibre légèrement, ajustez
l'alimentation pour l'équilibrer. Assurez-vous que
le sol est de niveau et capable de supporter le
poids du réfrigérateur.
• Les objets placés sur le réfrigérateur peuvent
causer du bruit. >>>Retirez tout objet placé sur le
réfrigérateur.
Le réfrigérateur produit des bruits semblables
à de l’eau qui coule ou à la pulvérisation d’un
liquide.
• Les écoulements de liquide et de gaz surviennent
conformément aux principes de fonctionnement
du réfrigérateur. >>>Ce phénomène est normal et
n'est pas considéré comme un défaut.
Le réfrigérateur émet un sifflement.
• Votre appareil est doté de ventilateurs qui servent
à le refroidir. Cela est normal et n’est pas un
défaut.
L'humidité s'accumule sur les parois intérieures
du réfrigérateur.
• Un temps chaud et humide augmente la formation
de givre et de condensation. Cela est normal et
n’est pas un défaut.
• Les portes peuvent avoir été ouvertes
fréquemment ou laissées entrouvertes depuis
longtemps. >>>N'ouvrez pas les portes
fréquemment. Fermez les portes, si elles sont
ouvertes.
• La porte a peut-être été laissée entrouverte.
>>>Fermez complètement la porte.
L'humidité est présente sur la surface extérieure
du réfrigérateur ou entre les portes.
• L'air peut être humide. C'est tout à fait normal par
temps humide. >>>La condensation disparaît une
fois que le taux d'humidité diminue.
• L’espace présent entre deux portes du
réfrigérateur peut présenter de l’humidité si vous
utilisez rarement votre appareil. Ce phénomène
est normal. Cette humidité disparaît en cas
d'utilisation fréquente du réfrigérateur.
L'intérieur du réfrigérateur dégage une
mauvaise odeur.
• L’appareil n’a peut-être pas été nettoyé
régulièrement. Nettoyez l’intérieur du réfrigérateur
avec une éponge, de l’eau tiède ou de l’eau
gazeuse.
• Certains récipients ou matériaux d'emballage
peuvent provoquer des odeurs. >>>Utilisez un
autre récipient ou du matériel d'emballage d'une
autre marque.
• Les aliments peuvent avoir été mis au
réfrigérateur dans des récipients sans couvercle.
>>>Conservez les aliments dans des récipients
fermés. Les micro-organismes émis par les
récipients sans couvercle peuvent provoquer des
odeurs désagréables.
• Sortez les aliments périmés ou abîmés du
réfrigérateur.
Il est impossible de fermer la porte.
Réfrigérateur / Manuel d’utilisation
27 /28 FR
Page 55

Dépannage
• Des récipients peuvent empêcher la porte de
se fermer. >>> Repérez les emballages qui
obstruent la porte.
• Le réfrigérateur peut être instable sur le sol.
>>>Ajustez les pieds du réfrigérateur au besoin
pour le garder en équilibre.
• Le plancher peut ne pas être de niveau ou solide.
>>>Assurez-vous que le plancher est de niveau
et qu'il peut supporter le poids du réfrigérateur..
Les bacs à légumes sont coincés.
• Les aliments peuvent toucher la paroi supérieure
du bac à légumes. >>>Réorganisez les aliments
dans le bac à légumes.
Si la surface de l'appareil est chaude
Vous pouvez observer une élévation de la température
entre les deux portes, sur les panneaux latéraux et au
niveau de la grille arrière pendant le fonctionnement
de l’appareil. Ce phénomène est normal et ne
nécessite aucune opération d’entretien !
Le ventilateur continue de fonctionner lorsque la
porte est ouverte.
Le ventilateur peut continuer de fonctionner lorsque la
porte du congélateur est ouverte.
AVERTISSEMENT : Si vous ne parvenez
A
pas à résoudre le problème même après
avoir suivi les instructions données dans
cette section, contactez votre revendeur ou
le prestataire de services agréé. N'essayez
jamais de réparer un appareil défectueux.
28 /28FR
Réfrigérateur / Manuel d’utilisation
Page 56

Kühlschrank
Bedienungsanleitung
EWWERQWEW
DE
Page 57

Bitte lesen Sie vor Inbetriebnahme des Gerätes diese Anleitung!
Sehr geschätzte Kundin, sehr geschätzter Kunde,
wir hoffen, dass Sie mit Ihrem Produkt, das sorgfältig in modernen Anlagen hergestellt und mit detaillierten
Qualitätsprüfungen getestet wurde, optimale Ergebnisse erzielen.
Daher empfehlen wir Ihnen, diese Bedienungsanleitung vor Inbetriebnahme des Produktes aufmerksam zu lesen.
Falls Sie das Gerät an jemand anderen weitergeben, vergessen Sie nicht, diese Bedienungsanleitung ebenfalls
beizulegen.
Die Anleitung hilft Ihnen, Ihr Gerät schnell und sicher zu bedienen.
• Bitte lesen Sie die Bedienungsanleitung aufmerksam, bevor Sie das Produkt aufstellen und bedienen.
• Halten Sie stets die zutreffenden Sicherheitshinweise ein.
• Bewahren Sie die Bedienungsanleitung zum künftigen Nachschlagen an einem leicht zugänglichen Ort auf.
• Bitte lesen Sie alle anderen mit dem Produkt bereitgestellten Dokumente.
Beachten Sie, dass diese Bedienungsanleitung auf verschiedene Produktmodelle zutreffen kann. Diese Anleitung
weist ausdrücklich auf Unterschiede zwischen verschiedenen Modellen hin.
C
A
B
Wichtige Informationen und
nützliche Hinweise.
Gefahr von Verletzungen und
Sachschäden.
Stromschlaggefahr.
Die Verpackungsmaterialien
des Gerätes wurden
gemäß nationalen
Umweltschutzbestimmungen
aus recyclingfähigen
Materialien hergestellt.
Page 58

1 Wichtige Hinweise zu Sicherheit und Umwelt 3
1.1. Allgemeine Hinweise zu Ihrer Sicherheit . . . . . . . 3
1.1.1 Kohlenwasserstoff-Warnung . . . . . . . . . . . . . . . 5
1.1.2 Bei Produkten mit Wasserspender/Eisbereiter. . . 6
1.2. Bestimmungsgemäßer Einsatz . . . . . . . . . . . . . . 6
1.3. Sicherheit von Kindern . . . . . . . . . . . . . . . . . . . . 6
1.4. Erfüllung der WEEE-Vorgaben zur Entsorgung von
Altgeräten: . . . . . . . . . . . . . . . . . . . . . . . . . . . . 7
1.5. Einhaltung von RoHS-Vorgaben: . . . . . . . . . . . . . 7
1.6. Verpackungsinformationen . . . . . . . . . . . . . . . . . 7
2 Ihr Kühlschrank 8
3 Installation 9
3.1. Der richtige Aufstellungsort. . . . . . . . . . . . . . . . . 9
3.2. Kunststoffkeile anbringen . . . . . . . . . . . . . . . . . . 9
3.3. Füße einstellen. . . . . . . . . . . . . . . . . . . . . . . . . 10
3.4. Elektrischer Anschluss . . . . . . . . . . . . . . . . . . . 10
4 Vorbereitungen 11
4.1. Tipps zum Energiesparen . . . . . . . . . . . . . . . . . 11
4.2. Erste Inbetriebnahme . . . . . . . . . . . . . . . . . . . . 11
5 Gerät bedienen 12
5.1. Anzeigefeld . . . . . . . . . . . . . . . . . . . . . . . . . . . 12
5.2. Anzeigefeld . . . . . . . . . . . . . . . . . . . . . . . . . . . 13
5.3. Eisbereiter . . . . . . . . . . . . . . . . . . . . . . . . . . . . 16
5.4. Eisbereiter . . . . . . . . . . . . . . . . . . . . . . . . . . . . 16
5.5. Eisschale . . . . . . . . . . . . . . . . . . . . . . . . . . . . . 16
5.6. Blaues Licht. . . . . . . . . . . . . . . . . . . . . . . . . . . 17
5.7. Geruchvernichtungsmodul . . . . . . . . . . . . . . . . 17
(FreshGuard) . . . . . . . . . . . . . . . . . . . . . . . . . . . . . . 17
5.8. Kühlfach . . . . . . . . . . . . . . . . . . . . . . . . . . . . . 18
5.9. Gemüsefach. . . . . . . . . . . . . . . . . . . . . . . . . . . 18
5.10. So benutzen Sie den Wasserspender. . . . . . . . . 19
5.11. Wasserspendertank füllen. . . . . . . . . . . . . . . . . 19
5.12. Wassertank reinigen . . . . . . . . . . . . . . . . . . . . 19
5.13. Tropfschale . . . . . . . . . . . . . . . . . . . . . . . . . . . 20
5.14. Gemüsefach mit Feuchtigkeitsregelung (Ever
Fresh). . . . . . . . . . . . . . . . . . . . . . . . . . . . . . . 21
5.15. Frische Lebensmittel tiefkühlen. . . . . . . . . . . . . 21
5.16. Empfehlungen zur optimalen Haltbarkeit gefrorener
Lebensmittel. . . . . . . . . . . . . . . . . . . . . . . . . . 22
5.17. Hinweise zum Tiefkühlen . . . . . . . . . . . . . . . . . 22
5.18. Lebensmittel platzieren. . . . . . . . . . . . . . . . . . . 22
5.19. Tür-offen-Warnung. . . . . . . . . . . . . . . . . . . . . . 23
5.20. Beleuchtung. . . . . . . . . . . . . . . . . . . . . . . . . . . 23
6 Wartung und Reinigung 24
6.1. Unangenehme Gerüche verhindern. . . . . . . . . . 24
6.2. Kunststoffflächen schützen . . . . . . . . . . . . . . . 24
6.3. Innenfläche reinigen . . . . . . . . . . . . . . . . . . . . 24
6.4. Edelstahl-Außenflächen . . . . . . . . . . . . . . . . . . 25
6.5. Produkte mit Glastüren reinigen . . . . . . . . . . . . 25
6 Wartung und Reinigung 25
7 Problemlösung 26
2 /28 DE
Kühlschrank / Bedienungsanleitung
Page 59

1 Wichtige Hinweise zu Sicherheit und Umwelt
Dieses Kapitel enthält Sicherheitshinweise,
die Ihnen dabei helfen, die Gefahr von
Verletzungen oder Sachschäden zu
verhindern. Bei Nichtbeachtung dieser
Anweisungen erlöschen sämtliche
Gewährleistungen.
Bestimmungsgemäßer Einsatz
ACHTUNG:
Stellen Sie sicher, dass die
Entlüftungsöffnungen am
Aufstellort des Gerätes nicht
blockiert sind.
ACHTUNG:
Um den Auftauvorgang zu
beschleunigen, keine
anderen mechanischen
Geräte oder
Geräte verwenden, die nicht
A
vom Hersteller empfohlen
sind.
ACHTUNG:
Dem Kühlmittelkreislauf
keine Schäden zufügen.
ACHTUNG:
In den Lebensmittelaufbewahrungsfächern keine
Geräte
verwenden, die nicht vom
Hersteller empfohlen sind.
Dieses Gerät ist für die private Nutzung
oder für den Gebrauch bei folgenden
ähnliche Anwendungen konzipiert worden
- In Personalküchen in Geschäften, Büros
und anderen Arbeitsumgebungen;
- In Bauernhöfen, Hotels, Motels und
anderen Unterkünften, für den Gebrauch
der Kunden;
- Umgebungen mit Übernachtung und
Frühstück;
- Bei Catering und ähnliche Non-RetailAnwendungen.
1.1. Allgemeine Hinweise zu Ihrer Sicherheit
• Kinder, Personen mit eingeschränkten
körperlichen oder geistigen Fähigkeiten
sowie Personen mit mangelnder
Erfahrung und Wissen dürfen dieses
Produkt nicht benutzen, sich ihm
nähern oder hineinklettern. Kinder
dürfen nicht mit dem Gerät spielen.
Reinigungs- und Wartungsarbeiten
sollten nicht von Kindern ausgeführt
werden, sofern diese nicht aufmerksam
von einem Erwachsenen beaufsichtigt
werden. Eine Nichteinhaltung dieser
Anweisungen sowie eine unkontrollierte
Benutzung können gefährliche
Situationen zur Folge haben!
• Ziehen Sie den Netzstecker, falls
während der Benutzung eine Störung
auftritt.
• Falls das Produkt nicht richtig
funktioniert, darf es erst nach
Reparatur durch einen autorisierten
Serviceanbieter in Betrieb genommen
werden. Stromschlaggefahr!
• Schließen Sie das Gerät an eine
geerdete Steckdose an, die mit einer
Sicherung, die dem Wert auf dem
Typenschild entspricht, ausgestattet
ist. Lassen Sie das Produkt von
einem qualifizierten Elektriker erden.
Unser Unternehmen übernimmt keine
Verantwortung für Schäden aufgrund
einer nicht gemäß den örtlichen
Bestimmungen geerdeten Steckdose.
• Ziehen Sie den Netzstecker, wenn Sie
das Gerät nicht nutzen.
• Lassen Sie niemals Wasser direkt auf
das Gerät gelangen; auch nicht zum
Reinigen! Stromschlaggefahr!
• Berühren Sie den Netzstecker niemals
mit feuchten oder gar nassen Händen!
Kühlschrank / Bedienungsanleitung
3 /28 DE
Page 60

Wichtige Hinweise zu Sicherheit und Umwelt
• Trennen Sie das Gerät niemals durch
Ziehen am Kabel vom Stromnetz.
Greifen Sie beim Ziehen immer am
Stecker.
• Schließen Sie den Kühlschrank nicht
an lose Steckdosen an.
• Verbinden Sie Ihren Kühlschrank nie
mit Energiesparvorrichtungen. Solche
Systeme können dem Gerät schaden.
• Sorgen Sie dafür, dass das Gerät bei
Installation, Pflege, Reinigung und
Reparaturen komplett vom Stromnetz
getrennt wird.
• Überlassen Sie die Produktaufstellung
und den elektrischen Anschluss
immer einem autorisierten
Serviceanbieter. Der Hersteller
übernimmt keine Verantwortung
für Schäden, die durch von nicht
autorisierten Personen ausgeführten
Arbeitsschritten verursacht werden.
• Verzehren Sie Speiseeis und
Eiswürfel nicht unmittelbar nach der
Entnahme aus dem Tiefkühlbereich!
Andernfalls kann es zu Erfrierungen
an den Lippen kommen.
• Berühren Sie gefrorene Lebensmittel
nicht mit feuchten Händen! Die
Lebensmittel können an den Händen
festfrieren!
• Bewahren Sie Getränke in
Flaschen und Dosen niemals im
Tiefkühlbereich auf. Sie können
platzen!
• Verwenden Sie zum Reinigen oder
Abtauen des Kühlschranks niemals
Dampf oder Dampfreiniger. Wenn
Dampf mit spannungsführenden
Teilen in Ihrem Kühlschrank
in Berührung kommt, drohen
Kurzschlüsse und Stromschläge!
• Nutzen Sie keine mechanischen
oder anderen Hilfsmittel, um
das Gerät abzutauen – es sei
denn, solche Hilfsmittel werden
ausdrücklich vom Hersteller
empfohlen.
• Missbrauchen Sie niemals Teile
Ihres Kühlschranks (z. B. Tür oder
Schubladen) als Befestigungen oder
Kletterhilfen. Mit anderen Worten:
Stellen Sie sich niemals auf Teile
Ihres Kühlschranks, hängen Sie
sich nicht daran. Dies gilt natürlich
auch für Kinder. Andernfalls kann
das Gerät umkippen und beschädigt
werden.
• Achten Sie darauf, den
Kühlkreislauf keinesfalls mit
Bohr- oder Schneidwerkzeugen
zu beschädigen. Das Kühlmittel
kann herausspritzen, wenn die
Gaskanäle des Verdunsters,
Rohr- und Schlauchleitungen
oder Oberflächenversiegelungen
beschädigt werden. Dies
kann zu Hautreizungen und
Augenverletzungen führen.
• Decken Sie keinerlei
Belüftungsöffnungen des
Kühlschranks ab.
• Lagern Sie hochprozentige
alkoholische Getränke gut
verschlossen und aufrecht.
• Benutzen Sie keine Sprays
in der Nähe des Gerätes; es
4 /28 DE
Kühlschrank / Bedienungsanleitung
Page 61

Wichtige Hinweise zu Sicherheit und Umwelt
besteht eine gewisse Brand- und
Explosionsgefahr!
• Bewahren Sie in dem Gerät niemals
entflammbare oder explosive
Produkte auf oder solche, die
entflammbare oder explosive Gase
(z. B. Spray) enthalten.
• Stellen Sie keine mit Flüssigkeiten
gefüllten Gegenstände auf dem
Produkt ab. Falls Wasser oder
andere Flüssigkeiten an elektrische
Teile gelangen, kann es zu
Stromschlägen oder Bränden
kommen.
• Bewahren Sie Gegenstände, die
eine präzise Temperatureinstellung
benötigen (wie Impfstoffe,
hitzeempfindliche Medikamente,
wissenschaftliche Materialien usw.)
nicht im Kühlschrank auf.
• Ziehen Sie den Netzstecker und
entnehmen Sie die Lebensmittel,
falls das Produkt voraussichtlich
längere Zeit nicht benutzen.
• Falls der Kühlschrank über ein
blaues Licht verfügt, blicken Sie
nicht mit optischen Werkzeugen in
dieses Licht.
• In Bezug auf die elektrische
Sicherheit besteht Gefahr, wenn das
Produkt Regen, Schnee, direkter
Sonneneinstrahlung und Wind
ausgesetzt wird.
• Bei Geräten mit mechanischer
Temperaturregelung (Thermostat)
warten Sie nach Unterbrechungen
der Stromversorgung grundsätzlich
mindestens 5 Minuten lang ab,
bevor Sie den Netzstecker wieder
einstecken.
• Überladen Sie den Kühlschrank
nicht. Gegenstände im Kühlschrank
Kühlschrank / Bedienungsanleitung
5 /28 DE
könnten herunterfallen und
Verletzungen oder Schäden
verursachen, wenn die Tür geöffnet
wird. Ähnliche Probleme können
auftreten, wenn ein Gegenstand
auf dem Produkt platziert wird.
• Falls das Gerät einen Türgriff
hat, bewegen Sie es nicht durch
Ziehen am Griff. Der Griff könnte
sich lockern.
• Achten Sie darauf, dass Ihre
Hände sowie andere Körperteile
nicht zwischen die beweglichen
Teile des Kühlschranks geraten.
• Stecken Sie weder Ihre Hand noch
irgendwelche Gegenstände in den
Eisbereiter, während er in Betrieb
ist.
1.1.1 Kohlenwasserstoff-Warnung
• Falls das Kühlsystem Ihres
Produktes R600a enthält:
Dieses Gas ist leicht entflammbar.
Achten Sie also darauf, Kühlkreislauf
und Leitungen während Betrieb und
Transport nicht zu beschädigen.
Halten Sie das Produkt bei Schäden
von möglichen Feuerquellen fern und
belüften Sie den Raum, in dem das
Produkt aufgestellt ist.
Halten Sie sich vom Gas fern,
falls das Produkt beschädigt
ist und offensichtlich Gas
C
austritt. Es kann bei Hautkontakt
Erfrierungen verursachen.
(Einschließlich R134)
Ignorieren Sie diese Warnung,
falls das Kühlsystem Ihres
C
Produktes R134a enthält.
Page 62

Wichtige Hinweise zu Sicherheit und Umwelt
Die Art des im Produkt
eingesetzten Gases wird auf
dem Typenschild an der linken
C
Innenwand des Kühlschranks
angegeben.
WARNUNG:
Entsorgen Sie das Produkt
A
keinesfalls durch Verbrennen.
1.1.2 Bei Produkten mit
Wasserspender/Eisbereiter
• Der Druck für die Kaltwasserzufuhr
sollte maximal 90 psi (620 kPa)
betragen. Wenn der Wasserdruck
in Ihrem Haushalt 80 psi (550 kPa)
übersteigt, verwenden Sie bitte
ein Druckbegrenzungsventil in
Ihrem Leitungssystems. Sollten Sie
nicht wissen, wie der Wasserdruck
gemessen wird, ziehen Sie bitte
einen Fachinstallateur hinzu.
• Falls die Gefahr von Wasserschlägen
in Ihrer Installation besteht, nutzen
Sie immer eine WasserschlagPräventionsausrüstung in dieser
Installation. Wenden Sie sich an
einen professionellen Klempner,
wenn Sie nicht sicher sind, ob bei
Ihrer Installation die Gefahr eines
Wasserschlags besteht.
• Nehmen Sie keine Installation am
Warmwasserzulauf vor.
• Schützen Sie die Schläuche mit
geeigneten Maßnahmen vor Frost.
Der Wassertemperaturbereich muss
zwischen 0,6 und 38 °C liegen.
WARNUNG:
Schließen
Sie das Produkt niemals an
A
einen Kaltwasseranschluss
mit einem Druck von 550 kPa
oder mehr an.
1.2. Bestimmungsgemäßer Einsatz
• Dieses Gerät ist zur Nutzung im
Haushalt vorgesehen. Es eignet
sich nicht zum kommerziellen
Einsatz und darf nur für
seinen bestimmungsgemäßen
Einsatzzweck verwendet werden.
• Es darf nur zur Aufbewahrung von
Lebensmitteln genutzt werden.
• Der Hersteller übernimmt keine
Verantwortung für Schäden
aufgrund von unsachgemäßem
Gebrauch oder Transport.
• Originalersatzteile sind ab
Kaufdatum des Produktes 10 Jahre
erhältlich.
1.3. Sicherheit von Kindern
• Wenn Sie ein Schloss an der
Gerätetür haben, sollte der
Schlüssel außerhalb der Reichweite
von Kindern aufbewahrt werden.
• Kinder dürfen nicht mit dem Gerät
spielen.
6 /28 DE
Kühlschrank / Bedienungsanleitung
Page 63

Wichtige Hinweise zu Sicherheit und Umwelt
GEFAHR:
Bevor Sie Ihr Altgerät
entsorgen:
• Kinder könnten sich im
Inneren des Gerätes
A
einsperren.
• Entfernen Sie die Türen.
• Lassen Sie die Ablagen im
Gerät, damit Kinder nicht
so einfach in das Produkt
gelangen.
1.4. Erfüllung der WEEE-Vorgaben
zur Entsorgung von Altgeräten:
Dieses Produkt erfüllt die Vorgaben
der europäischen WEEE-Richtlinie
(2012/19/EU). Das Gerät wurde
mit einem Klassifizierungssymbol
für elektrische und elektronische
Altgeräte (WEEE) gekennzeichnet.
Dieses Gerät wurde aus hochwertigen
Materialien hergestellt, die wiederverwendet und
recycelt werden können. Entsorgen Sie das Gerät
am Ende seiner Einsatzzeit daher nicht mit dem
regulären Hausmüll oder anderen Abfällen. Bringen
Sie das Gerät zu einer Sammelstelle zum Recycling
von elektrischen und elektronischen Geräten. Ihre
Stadtverwaltung informiert Sie gerne über geeignete
Sammelstellen in Ihrer Nähe.
1.5. Einhaltung von RoHS-Vorgaben:
Das von Ihnen erworbene Gerät erfüllt die
Anforderungen der europäischen RoHS-Richtlinie
(2011/65/EU). Es enthält keine in der Direktive
angegebenen gefährlichen oder unzulässigen
Materialien.
1.6. Verpackungsinformationen
• Die Verpackungsmaterialien des Gerätes wurden
gemäß nationalen Umweltschutzbestimmungen
aus recyclingfähigen Materialien hergestellt.
Entsorgen Sie Verpackungsmaterialien nicht mit
dem normalen Hausmüll oder anderen Abfällen.
Bringen Sie diese Materialien zu einer von Ihrer
Stadtverwaltung vorgesehenen Recyclingstelle.
GEFAHR:
Brand- oder Explosionsgefahr:
• Dieses Produkt nutzt ein
entflammbares Kühlmittel.
• Tauen Sie den Kühlschrank nicht mit
mechanischen Geräten ab.
• Verwenden Sie zur Reinigung keine
Chemikalien.
• Durchstechen Sie die
Kühlmittelleitung nicht.
A
• Falls die Kühlmittelleitung
durchstochen wird, darf sie nur
von autorisiertem Servicepersonal
repariert werden.
• Bitte wenden Sie sich vor der
Reinigung des Produktes an die
Reparatur- / Bedienungsanleitung.
Alle Sicherheitshinweise müssen
befolgt werden.
• Entsorgen Sie das Produkt
entsprechend den staatlichen oder
örtlichen Vorschriften.
Kühlschrank / Bedienungsanleitung
7 /28 DE
Page 64

2 Ihr Kühlschrank
1
10
11
4
12
8
7
6
5
3
2
11
12
3
9
8
7
6
5
2
1
1. Kühlbereich-Türablagen
2. Tiefkühlbereichschubladen
3. Eisbereiter
4. Wassertank
5. Gemüsefach
6. Gemüsefachabdeckung
7. Kühlfach
8. Kühlbereich-Glasablagen
Trifft möglicherweise nicht auf alle Modelle zu
Die Abbildungen in dieser Anleitung dienen zur Orientierung und können etwas vom tatsächlichen
C
Aussehen des Gerätes abweichen. Falls bestimmte Teile bei Ihrem Gerät nicht vorhanden sind, gilt die
Abbildung für andere Modelle.
9. Geruchsfilter
10. Innenliegendes Display
11. Kühlbereich-Glasablagen
12. Tiefkühlbereich
8 /28 DE
Kühlschrank / Bedienungsanleitung
Page 65

3 Installation
3.1. Der richtige Aufstellungsort
Wenden Sie sich zur Aufstellung des Gerätes an den
autorisierten Kundendienst. Bereiten Sie das Produkt
auf die Inbetriebnahme vor, indem Sie die Informationen
in der Bedienungsanleitung befolgen und sicherstellen,
dass Elektro- und Wasserinstallation geeignet sind. Falls
noch weitere Vorbereitungen zu treffen sind, lassen Sie
die entsprechenden Arbeiten von einem qualifizierten
Elektriker oder Techniker ausführen.
WARNUNG: Der Hersteller haftet nicht
B
bei Schäden, die durch das Zutun nicht
autorisierter Personen verursacht werden.
WARNUNG: Das Gerät darf während
B
der Installation nicht mit dem Stromnetz
verbunden werden. Andernfalls besteht die
Gefahr schwerer bis tödlicher Unfälle!
WARNUNG: Wenden Sie sich an den
A
• StellenSiedasGerätaufeinerebenenUnterlageauf,
damit es nicht wackelt.
•WennSiedasGerätineinemSchrank/Möbelstück
verwenden, muss zwischen den Seitenwänden
und dem Schrank/Möbelstück ein Abstand von
mindestens 2 cm bestehen.
• StellenSiedasGerätmindestens30cmvon
Wärmequellen wie Herden, Zentralheizungen und
ähnlichen Geräten, und mindestens 5 cm von
elektrischen Öfen entfernt auf.
•DasGerätdarfkeinemdirektenSonnenlichtoder
Feuchtigkeit ausgesetzt werden.
• DamitdasGerätrichtigarbeitenkann,müssenSie
ausreichend Platz um das Gerät herum freilassen,
damit es ausreichend belüftet werden kann. Falls
Sie das Gerät in einer Nische aufstellen, achten Sie
darauf, dass mindestens 5 cm zur Decke und zu den
Wänden frei bleiben.
autorisierten Kundendienst, falls das Gerät
nicht durch die Tür des Raums passt, in
dem es aufgestellt werden soll.
• In Umgebungen, in denen die Raumtemperatur auf
unter 10 °C fällt, läuft der Kühlschrank weiter, um
die Lebensmittel im Tiefkühlbereich entsprechend
kalt zu halten. Frische Lebensmittel im Kühlbereich
könnten aufgrund der kalten Umgebung jedoch
gefrieren.
3.2. Kunststoffkeile anbringen
Die mitgelieferten Kunststoffkeile sorgen für den
richtigen Abstand zwischen Kühlschrank und Wand –
und damit für ausreichende Luftzirkulation.
1. Dazu drehen Sie die Schrauben aus dem Gerät
heraus und drehen stattdessen die mitgelieferten
Schrauben ein. Die Schrauben finden Sie bei den
Keilen.
2. Setzen Sie die beiden Kunststoffkeile wie in der
Abbildung gezeigt an der Abdeckung der hinteren
Belüftungsöffnungen ein.
Kühlschrank / Bedienungsanleitung
9 /28 DE
Page 66

Installation
3.3. Füße einstellen
Falls das Produkt nach der Installation nicht gerade
steht, drehen Sie die Füße an der Vorderseite nach
rechts oder links.
3.4. Elektrischer Anschluss
WARNUNG: Verzichten Sie
auf Verlängerungskabel und
A
Mehrfachsteckdosen.
WARNUNG: Beschädigte
Netzkabel müssen vom autorisierten
B
Kundendienst ausgetauscht werden.
Falls zwei Kühlschränke
nebeneinander aufgestellt werden
sollen, achten Sie darauf, dass
C
mindestens 4 cm Abstand zwischen
den Geräten verbleibt.
• Unser Unternehmen haftet nicht bei
Schäden, die durch Einsatz des Gerätes ohne
ordnungsgemäße Erdung und elektrischen
Anschluss gemäß nationalen Vorschriften
entstehen.
• Der Netzstecker muss auch nach der Installation
stets leicht zugänglich bleiben.
• Verwenden Sie zwischen Ihrem Produkt und
der Steckdose keine Verlängerungskabel oder
Mehrfachsteckdosen.
Warnung vor heißen Oberflächen!
Ihr Produkt ist mit Kühlmittelrohren
ausgestattet, die das Kühlsystem
der Seitenwände verbessern.
Möglicherweise fließt heiße Flüssigkeit
durch diese Oberflächen, wodurch
C
sich die Seitenwände erhitzen. Dies
ist völlig normal und weist nicht auf
eine Fehlfunktion hin. Seien Sie sehr
vorsichtig, wenn Sie diese Bereiche
berühren.
A
WARNUNG: „Die Schutzfolien am vertikalen Griff“ werden entfernt.
10 / 28 DE
Kühlschrank / Bedienungsanleitung
Page 67

4 Vorbereitungen
4.1. Tipps zum Energiesparen
Der Anschluss des Gerätes an
A
• Halten Sie die Kühlschranktüren nur möglichst kurz
• Stellen Sie keine warmen Speisen oder Getränke in
• Überladen Sie den Kühlschrank nicht. Die
• Zur maximalen Beladung des Tiefkühlbereichs
• Je nach den Merkmalen Ihres Produkts ist das
• Die Luftzirkulation sollte nicht durch Einlagern von
• Der Temperatursensor im Tiefkühlbereich darf
Energiesparsysteme birgt Risiken, da
Schäden am Gerät auftreten können.
geöffnet.
den Kühlschrank.
Kühlleistung nimmt ab, wenn die freie Luftzirkulation
im Inneren behindert wird.
Ihres Kühlschranks müssen Sie die obere Klappe
und Schublade entfernen und auf den Glasablagen
platzieren. Der für Ihren Kühlschrank angegebene
Energieverbrauch wurde nach Entfernen von
Eiswürfelbehälter, Eisschale, Klappe und mittlerer
Schublade zur Gewährleistung maximaler Beladung
bestimmt. Bei Beladung wird der Einsatz der
oberen Klappe und der unteren Schublade dringend
empfohlen.
Auftauen von gefrorenen Lebensmitteln im
Kühlbereich energiesparend und bewahrt die
Qualität der Lebensmittel.
Lebensmitteln vor dem Lüfter des Tiefkühlbereichs
blockiert werden. Lebensmittel sollten so eingelagert
werden, dass vor dem Lüfter-Gitterschutz ein
Freiraum von 5 cm bleibt.
Lebensmittelverpackungen nicht direkt berühren.
Bei Kontakt mit dem Sensor könnte sich der
Stromverbrauch des Produkts erhöhen.
Das Innere Ihres Gerätes muss gereinigt
C
werden.
Falls zwei Kühlschränke nebeneinander
C
aufgestellt werden sollen, achten Sie
darauf, dass mindestens 4 cm Abstand
zwischen den Geräten verbleibt.
4.2. Erste Inbetriebnahme
Bevor Sie Ihren Kühlschrank zum ersten Mal benutzen,
vergewissern Sie sich, dass sämtliche Vorkehrungen wie
in den Abschnitten „Wichtige Hinweise zu Sicherheit und
Umwelt“ und „Installation“ getroffen wurden.
Lassen Sie den Kühlschrank etwa 6 Stunden lang
leer arbeiten; verzichten Sie in dieser Zeit möglichst
vollständig auf das Öffnen der Türen.
Sie hören Geräusche, wenn sich der
C
Kompressor einschaltet. Die Flüssigkeiten
und Gase im Kühlsystem können auch
leichte Geräusche erzeugen, wenn der
Kompressor nicht läuft. Dies ist völlig
normal.
Es ist normal, dass sich die Vorderkanten
C
des Kühlgerätes erwärmen können. Diese
Bereiche wärmen sich etwas auf, damit
sich kein Kondenswasser bildet.
Kühlschrank / Bedienungsanleitung
11 /28 DE
Page 68

5 Gerät bedienen
5.1. Anzeigefeld
Die Anzeigefelder können je nach Modell etwas anders ausfallen.
Audiovisuelle Funktionen am Anzeigefeld helfen Ihnen bei der Bedienung Ihres Gerätes.
*17
6
22
21
23
8
5
*16
*7
*13
1. Temperatureinstellung / Temperatur erhöhen
2. Temperatureinstellregler / Temperaturanzeige
3. Temperatureinheit-Auswahl (°C) Celsius-Anzeige
4. Temperatureinheit-Auswahl (°F) Fahrenheit-
Anzeige
5. Temperatureinstellung / Temperatur verringern
6. Anzeige / Taste Schnellkühlen
7. * Drahtlos
8. Anzeige / Taste Energiesparmodus
9. *Anzeige / Taste Joker-Gefrieren
10. *Auto-Tür
11. Warnung / Fehler Hochtemperatur
12. *Flaschenkühler
13. *Warnung / Fehler Filterwechsel
14. Menütaste
15. Betriebsanzeige / Ein-/Austaste
16. *Anzeige / Taste Eisbereiter
17. *Sabbat-Modus
18. Anzeige / Taste Urlaubsmodus
19. Tastensperre-Anzeige
20. Anzeige / Taste Schnellgefrieren
21. Schrankauswahl
22. Kühlbereichanzeige
23. Tiefkühlbereichanzeige
*9a
*9b
*12
20
2
3
4
19
18
1
*10
14
11
15
C
Trifft möglicherweise nicht auf alle Modelle zu
* Optional: Die Abbildungen in dieser Anleitung dienen zur Orientierung und können etwas vom
tatsächlichen Aussehen des Gerätes abweichen. Falls bestimmte Teile bei Ihrem Gerät nicht vorhanden
sind, gilt die Abbildung für andere Modelle.
12 /28 DE
Kühlschrank / Bedienungsanleitung
Page 69

Gerät bedienen
3
5.2. Anzeigefeld
Die Anzeigefelder können je nach Modell etwas anders ausfallen.
Audiovisuelle Funktionen am Anzeigefeld helfen Ihnen bei der Bedienung Ihres Gerätes.
Select
15
22 23
21
4
2
5
!
*13
1
*10
*11
*7
1. Temperatureinstellung / Temperatur erhö-
hen
Erhöht bei Betätigung die Temperatur des
ausgewählten Fachs.
2. Temperatureinstellregler /
Temperaturanzeige
Zeigt den Temperaturwert des ausgewählten Fachs.
Zudem können Sie Ihren Finger zum Erhöhen oder
Verringern der Temperatur nach oben oder unten
ziehen.
3. Temperatureinheit-Auswahl (°C)
Celsius-Anzeige
Wenn die Taste gedrückt wird, ändert sich die
Temperatureinheit in Celsius.
Dies ist die Celsius-Anzeige. Wenn die
Celsius-Anzeige aktiviert ist, werden die
Temperatureinstellwerte in Celsius angezeigt und
das relevante Symbol schaltet sich zu 100 % ein.
Das Fahrenheit-Symbol schaltet sich zu 50 % ein.
4. Temperatureinheit-Auswahl (°F)
Fahrenheit-Anzeige
Wenn die Taste gedrückt wird, ändert sich die
Temperatureinheit in Celsius.
Dies ist die Fahrenheit-Anzeige. Wenn die
Fahrenheit-Anzeige aktiviert ist, werden die
Temperatureinstellwerte in Fahrenheit angezeigt und
das relevante Symbol schaltet sich vollständig ein.
Das Celsius-Symbol schaltet sich zu 50 % ein.
5. Temperatureinstellung / Temperatur
verringern
Verringert bei Betätigung die Temperatur des
ausgewählten Fachs.
6. Schnellkühlanzeige
Trifft möglicherweise nicht auf alle Modelle zu
* Optional: Die Abbildungen in dieser Anleitung dienen zur Orientierung und können etwas vom
C
Kühlschrank / Bedienungsanleitung
tatsächlichen Aussehen des Gerätes abweichen. Falls bestimmte Teile bei Ihrem Gerät nicht vorhanden
sind, gilt die Abbildung für andere Modelle.
6
8
20
18
*17
*16
*12
*9b
Wenn die Schnellkühlfunktion aktiviert ist,
schaltet sich die Anzeige zu 100 % ein. Wenn
die Funktion aufgehoben wird, kehrt das Produkt
zu seinen normalen Einstellungen zurück und die
Anzeige schaltet sich zu 50 % ein.
Schnellkühltaste
Zum Aktivieren oder Deaktivieren der
Schnellkühlfunktion.
Die Schnellkühlfunktion nutzen Sie,
C
wenn Sie Lebensmittel im Kühlbereich
besonders schnell abkühlen möchten.
Wenn Sie große Mengen frischer
Lebensmittel kühlen möchten, sollten
Sie diese Funktion vor dem Einlagern
der Lebensmittel einschalten.
Sofern Sie diese Funktion nicht
C
vorzeitig abschalten, wird das
Schnellgefrieren beendet, sobald
die nötige Temperatur erreicht ist,
spätestens jedoch nach 8 Stunden.
Sollten Sie die Schnellkühltaste
C
mehrmals innerhalb kurzer Zeit
drücken, springt eine elektronische
Schutzschaltung an, die dafür sorgt,
dass der Kompressor nicht sofort
anläuft.
Diese Funktion wird nach einem
C
Stromausfall nicht automatisch wieder
eingeschaltet.
13 /28 DE
*9a
Page 70

Gerät bedienen
7. * Drahtlos
Bei Betätigung der Taste wird das Produkt in das
Heimnetzwerk aufgenommen. Wenn die Funktion
aktiviert ist, schaltet sich die Anzeige zu 100 % ein; bei
Abbruch schaltet sich die Anzeige zu 50 % ein.
8. Anzeige / Taste Energiesparmodus
Drücken Sie diese Taste zum Aktivieren und
Deaktivieren des Energiesparmodus.
Wenn der Energiesparmodus aktiviert ist, schaltet sich
die Anzeige zu 100 % ein. Wenn die Funktion aktiv ist,
arbeitet das Tiefkühlgerät nach mindestens 6 Stunden
im Energiesparmodus. Bei Abbruch der Funktion schaltet sich die Anzeige zu 50 % ein.
9a. *Anzeige / Taste Joker-Gefrieren
Bei Betätigung der Taste fungiert das Joker-Fach
als Tiefkühlbereich und die Anzeige leuchtet zu
100 % auf. Der Joker-Kühlbereich schaltet sich zu
50 % ein.
9b. *Anzeige / Taste Joker-Kühlen
Bei Betätigung der Taste fungiert das Joker-Fach
als Kühlbereich und die Anzeige leuchtet zu 100
% auf. Der Joker-Tiefkühlbereich schaltet sich zu
50 % ein.
10. *Auto-Tür
Mit dieser Taste schalten Sie den Auto-Tür-Modus ein
und aus. Wenn die Funktion aktiviert ist, schaltet sich
die Anzeige zu 100 % ein. Bei Abbruch der Funktion
schaltet sich die Anzeige zu 50 % ein.
Wenn die Funktion aktiv ist, berühren Sie die relevante
Auswahl am Türgriff, damit sich die Tür automatisch
öffnet.
11. Warnung / Fehler Hochtemperatur
Diese Anzeige leuchtet bei einem Stromausfall, zu
hohen Innentemperaturen und sonstigen Fehlern.
Bei längeren Stromausfällen blinkt der höchste
Temperaturwert, den der Tiefkühlbereich erreicht, in
der digitalen Anzeige. Drücken Sie nach Kontrolle der
Lebensmittel im Tiefkühlbereich zum Aufheben der
Warnung die Hochtemperatur-Taste.
12. * Flaschenkühler
Mit dieser Taste schalten Sie den FlaschenkühlerModus ein und aus.
Wenn die Funktion aktiviert ist, schaltet sich die
Anzeige zu 100 % ein. Wenn die Funktion aufgehoben
wird, schaltet sich die Anzeige zu 50 % ein.
14 / 28 DE
13. * Warnung / Fehler Filterwechsel
Dieses Symbol leuchtet auf, sobald der Filter ersetzt
werden muss.
Bei Betätigung der Taste wird der Filter
zurückgesetzt und das Reset-Symbol erlischt.
14. Menütaste
Sie dient dem Aktivieren oder Deaktivieren des
Display-Ruhezustands. Wenn Sie 30 Sekunden
lang keine Taste drücken und die Tür nicht
öffnen, wechselt das Display automatisch in den
Ruhezustand.
15. Betriebsanzeige / Ein-/Austaste
Halten Sie die Ein-/Austaste zum Ein- oder
Ausschalten des Produktes 3 Sekunden lang ged-
rückt.
Wenn das Produkt ausgeschaltet ist, schaltet sich
die Betriebsanzeige zu 100 % ein und alle anderen Anzeigen erlöschen. Halten Sie zum Einschalten
des Produktes erneut 3 Sekunden die Taste gedrückt. Der Kühlschrank schaltet sich ein und die
Betriebsanzeige leuchtet zu 50 % auf.
16. * Anzeige / Taste Eisbereiter
Mit dieser Taste schalten Sie den Eisbereiter ein und
aus. Falls die Anzeige zu 100 % eingeschaltet ist,
bedeutet dies, dass der Eisbereiter läuft. Falls die
Anzeige zu 50 % eingeschaltet ist, bedeutet dies,
dass der Eisbereiter ausgeschaltet ist.
Bei Abwahl dieser Funktion wird kein
C
Wasser mehr aus dem Tank zugeführt.
Bereits bereitetes Eis kann aber
nach wie vor aus dem Eisbereiter
entnommen werden.
17. * Sabbat-Modus
Mit dieser Taste schalten Sie den Sabbat-Modus
ein und aus. Wenn die Funktion aktiviert ist, schaltet
sich die Anzeige zu 100 % ein. Bei Abbruch der
Funktion schaltet sich die Anzeige zu 50 % ein.
18. Anzeige / Taste Urlaubsmodus
Drücken Sie diese Taste zum Aktivieren des
Urlaubsmodus. Die Anzeige des Urlaubsmodus
leuchtet zu 100 % auf. Wenn der Urlaubsmodus
aktiv ist, erscheint „- -“ in der Temperaturanzeige
– der Kühlbereich wird nun nicht mehr aktiv
gekühlt. Während diese Funktion aktiv ist, sollten
keine Lebensmittel im Kühlbereich aufbewahrt
werden. Andere Bereiche werden entsprechend den
eingestellten Temperaturen weiterhin gekühlt.
Kühlschrank / Bedienungsanleitung
Page 71

Gerät bedienen
Zum Aufheben dieser Funktion drücken Sie die
Urlaubsfunktionstaste noch einmal. Bei Abbruch
der Funktion schaltet sich die Anzeige zu 50 % ein.
19. Tastensperre-Anzeige
Halten Sie die Schnellkühl- und die
Urlaubstaste 3 Sekunden gleichzeitig gedrückt.
Bei Betätigung der Taste startet ein Countdown
in der Temperaturanzeige. Wenn die Tastensperre
aktiviert ist, schaltet sich die Tastensperre-Anzeige
zu 100 % ein und der Tastensperre-Modus wird
aktiviert. Bei aktiver Tastensperre reagiert das
Gerät nicht auf Tastenbetätigungen. Halten Sie
Schnellkühl- und Urlaubstaste erneut 3 Sekunden
gleichzeitig gedrückt. Bei Betätigung der Taste
startet ein Countdown in der Temperaturanzeige.
Wenn die Tastensperre aufgehoben wird, schaltet
sich die Tastensperre-Anzeige zu 50 % ein und der
Tastensperre-Modus wird deaktiviert.
Aktivieren Sie diese Funktion, wenn Sie
Änderungen der Temperatureinstellung des
Kühlschranks verhindern möchten.
20.Schnellgefrieranzeige
Wenn die Schnellgefrierfunktion aktiviert ist,
leuchtet die Anzeige zu 100 % auf. Wenn
die Funktion aufgehoben wird, kehrt das Gerät
zu seinen normalen Einstellungen zurück und die
Anzeige schaltet sich zu 50 % ein.
Schnellgefriertaste
Zum Aktivieren oder Deaktivieren der
Schnellgefrierfunktion.
Mit dieser Taste schalten Sie die
Schnellgefrierfunktion ein und aus. Wenn diese
Funktion aktiv ist, wird der Tiefkühlbereich
besonders stark (über die eingestellte Temperatur
hinaus) gekühlt.
Die Schnellgefrierfunktion nutzen
C
Sie, wenn Sie die Lebensmittel im
Tiefkühlbereich besonders schnell
abkühlen möchten. Wenn Sie große
Mengen frischer Lebensmittel kühlen
möchten, sollten Sie diese Funktion
vor dem Einlagern der Lebensmittel
einschalten.
Sofern Sie diese Funktion nicht
C
vorzeitig abschalten, wird das
Schnellgefrieren beendet, sobald
die nötige Temperatur erreicht ist,
spätestens jedoch nach 4 Stunden.
C
Diese Funktion wird nach einem
Stromausfall nicht automatisch wieder
eingeschaltet.
21. Schrankauswahl
Drücken Sie zum Einsehen und Ändern des
Temperaturwertes von Kühl- und Tiefkühlbereich in
der Temperaturanzeige die Schrankauswahltaste.
22. Kühlbereichanzeige
Wenn diese Anzeige aktiv ist, wird die Temperatur
des Kühlbereichs in der Temperaturanzeige
angezeigt.
23. Tiefkühlbereichanzeige
Wenn diese Anzeige aktiv ist, wird die Temperatur
des Tiefkühlbereichs in der Temperaturanzeige
angezeigt.
Kühlschrank / Bedienungsanleitung
15 /28 DE
Page 72

Gerät bedienen
5.3. Eisbereiter
(Diese Funktion gibt es nur bei bestimmten
Geräten.)
Mit dem Eisbereiter bereiten Sie Eiswürfel schnell
und einfach.
Eisbereiter verwenden
1. Nehmen Sie den Wassertank aus dem
Kühlbereich.
2. Füllen Sie den Tank mit Trinkwasser.
3. Setzen Sie den Wassertank wieder ein. Nach
etwa vier Stunden liegen die ersten Eiswürfel in der
Eisbereiter-Schublade im Tiefkühlbereich für Sie
bereit.
Eine Komplettfüllung des Wassertanks
C
reicht für etwa 60 – 70 Eiswürfel.
Das Wasser im Tank sollte alle 2 - 3
C
Wochen erneuert werden.
5.4. Eisbereiter
(Diese Funktion gibt es nur bei bestimmten
Geräten.)
Mit dem Eisbereiter bereiten Sie Eiswürfel schnell und
einfach.
Eisbereiter verwenden
1. Ziehen Sie den Eisbereiter vorsichtig aus dem
Gerät.
2. Füllen Sie den Eisbereiter mit Trinkwasser.
3. Setzen Sie den Eisbereiter wieder an Ort und Stelle.
Nach etwa 2 Stunden liegen die ersten Eiswürfel für
Sie bereit.
4. Zum Entnehmen der Eiswürfel drehen Sie die
Knöpfe am Eisbehälter um 90 ° im Uhrzeigersinn. Die
Eiswürfel fallen in den Eiswürfelbehälter darunter.
5. Sie können den Eisbehälter zum Servieren der
Eiswürfel herausnehmen.
Nehmen Sie den Eisbereiter zum
C
Entnehmen der Eiswürfel nicht heraus.
Wenn Sie möchten, können Sie das
C
Eis auch im Eisbehälter aufbewahren.
Der Eiswürfelbehälter dient nur dazu,
Eiswürfel aufzufangen. Füllen Sie kein
Wasser ein; der Behälter kann sonst
brechen.
5.5. Eisschale
(Diese Funktion gibt es nur bei bestimmten
Geräten.)
Mit der Eisschale bereiten Sie Eiswürfel schnell und
einfach vor.
Eisschale verwenden
1. Nehmen Sie die Eisschale aus dem
Tiefkühlbereich.
2. Füllen Sie die Eisschale mit Trinkwasser.
3. Legen Sie die Eisschale in den Tiefkühlbereich.
Nach etwa 2 Stunden liegen die ersten Eiswürfel für
Sie bereit.
4. Nehmen Sie die Eisschale aus dem
Tiefkühlbereich, biegen Sie sie über einem Teller
etwas durch. Die Eiswürfel fallen auf den Teller.
16 / 28 DE
Kühlschrank / Bedienungsanleitung
Page 73

Gerät bedienen
5.6. Blaues Licht
(Diese Funktion gibt es nur bei bestimmten
Geräten.)
Die Gemüsefächer des Kühlschranks werden
mit blauem Licht beleuchtet. Dadurch wird die
Photosynthese durch die bestimmte Wellenlängen
des blauen Lichtes fortgesetzt, ihre Frische bleibt
erhalten.
5.7. Geruchvernichtungsmodul
(FreshGuard)
(Diese Funktion gibt es nur bei bestimmten
Geräten.)
Das Geruchvernichtungsmodul beseitigt schlechte
Gerüche in Ihrem Kühlschrank schnell, bevor
sie in die Lebensmittel eindringen. Dank dieses
Moduls, das an der Decke des Fachs für frische
Lebensmittel angebracht ist, werden unangenehme
Gerüche abgeführt, indem die Luft aktiv zum
Geruchsfilter geleitet wird. Anschließend wird die
vom Filter gereinigte Luft wieder in das Fach für
frische Lebensmittel zurückgeleitet. Auf diese Weise
werden während der Lagerung von Lebensmitteln
entstehende unerwünschte Gerüche beseitigt, bevor
Sie in die Lebensmittel eindringen.
Dies wird durch das Gebläse, die LED und den
im Modul integrierten Geruchsfilter erzielt. Das
Geruchvernichtungsmodul wird automatisch
regelmäßig aktiviert. Das Geräusch während der
regelmäßigen Aktivierung des Moduls wird vom
integrierten Gebläse abgegeben. Wenn Sie die
Tür des Fachs für frische Lebensmittel öffnen,
während das Modul aktiv ist, stoppt das Gebläse
vorübergehend; beim Schließen der Tür setzt es
den Betrieb fort. Nach einem Stromausfall wird das
Geruchvernichtungsmodul wieder aktiviert.
Info: Sie sollte aromatische Lebensmittel (wie
Käse, Oliven und Feinkost) gut abgedichtet in
ihrer Verpackung aufbewahren, damit keine
unangenehmen Gerüche durch Vermischung der
Gerüche verschiedener Lebensmittel entstehen.
Darüber hinaus sollten Sie verdorbene Lebensmittel
schnell aus dem Kühlschrank entfernen; andernfalls
könnten andere Lebensmittel ebenfalls verderben
und unangenehme Gerüche entstehen.
Kühlschrank / Bedienungsanleitung
17 /28 DE
Page 74

Gerät bedienen
5.8. Kühlfach
(Diese Funktion gibt es nur bei bestimmten
Geräten.)
Bewahren Sie in diesem Fach Lebensmittel auf, die
bei niedrigerer Temperatur gelagert werden sollen,
oder Fleisch, das Sie in Kürze konsumieren werden.
Lagern Sie in diesem Bereich weder Früchte noch
Gemüse.
Durch Herausnehmen von Kühlfächern können Sie
das Stauvolumen Ihres Geräts vergrößern:
Ziehen Sie sie einfach so weit wie möglich nach oben,
dann anheben und zu sich ziehen.
5.9. Gemüsefach
Im Gemüsefach Ihres Kühlgerätes bleibt Gemüse
länger frisch und behält seine natürliche Feuchtigkeit.
Dazu wird ständig reichlich kühle Luft zum
Gemüsefach geleitet. Bewahren Sie in diesem Bereich
Obst und Gemüse auf. Lagern Sie grünes Blattgemüse
für längere Haltbarkeit nicht neben Früchten.
18 / 28 DE
Kühlschrank / Bedienungsanleitung
Page 75

Gerät bedienen
5.10. So benutzen Sie den Wasserspender
(Diese Funktion gibt es nur bei bestimmten
Geräten.)
Das erste Wasser, das aus dem
C
Spender fließt, kann noch etwas warm
sein. Dies ist normal.
Falls der Wasserspender längere Zeit
C
nicht genutzt wurde, gießen Sie die
ersten paar Gläser Wasser weg, bis
frisches Wasser ausgegeben wird.
1. Drücken Sie mit dem Glas gegen den Hebel des
Wasserspenders. Wenn Sie weiche Plastikbecher
benutzen, drücken Sie den Hebel am besten mit
der Hand.
2. Lassen Sie den Hebel wieder los, wenn das Glas
gefüllt ist.
5.11. Wasserspendertank füllen
Der Wassertank befindet sich an der Innenseite der
Türablage.
1. Öffnen Sie den Deckel des Tanks.
2. Füllen Sie den Tank mit Trinkwasser.
3. Schließen Sie den Deckel.
Füllen Sie den Wassertank
C
nur mit frischem Trinkwasser,
nicht mit anderen Flüssigkeiten
gleich welcher Art. Falls andere
Flüssigkeiten eingefüllt werden,
kann der Wasserspender irreparabel
beschädigt werden. Solche
Beschädigungen werden nicht
durch die Garantie abgedeckt. Viele
Flüssigkeiten und Getränke enthalten
Zusätze, die das Material des
Wassertanks schädigen können.
Nutzen Sie ausschließlich reines
C
Trinkwasser.
Der Wassertank fasst maximal 3
C
Liter; füllen Sie nicht mehr ein.
5.12. Wassertank reinigen
1. Nehmen Sie den Füllbehälter an der Innenseite
der Türablage heraus.
Die Wassermenge können Sie nach
C
Wunsch regulieren, indem Sie den
Hebel nur leicht oder ganz betätigen.
Verringern Sie den Druck auf den
Hebel, wenn das Gefäß fast gefüllt ist,
damit nichts überläuft. Das Wasser
tritt nur tropfenweise aus, wenn Sie
den Hebel nur leicht betätigen; dies ist
völlig normal.
Kühlschrank / Bedienungsanleitung
19 /28 DE
Page 76

Gerät bedienen
2. Entfernen Sie die Türablage, indem Sie diese an
beiden Seiten greifen.
3. Fassen Sie den Wassertank an beiden Seiten, nehmen
Sie ihn in einem Winkel von 45 ° heraus.
4. Nehmen Sie den Deckel vom Wassertank ab, reinigen
Sie den Tank gründlich.
Die Komponenten des Wasserspenders
C
und des Wassertanks sollten nicht in
der Spülmaschine gereinigt werden.
5.13. Tropfschale
Wasser, das bei der Nutzung des Wasserspenders
heruntertropft, sammelt sich in der Tropfschale.
Nehmen Sie den Kunststofffilter wie in der Abbildung
gezeigt heraus.
Entfernen Sie angesammeltes Wasser mit einem
sauberen, trockenen Tuch.
20 / 28 DE
Kühlschrank / Bedienungsanleitung
Page 77

Gerät bedienen
5.14. Gemüsefach mit
Feuchtigkeitsregelung (Ever Fresh)
(Diese Funktion gibt es nur bei bestimmten
Geräten.)
Dank des Gemüsefachs mit Feuchtigkeitsregelung
können Gemüse und Früchte in einer Umgebung mit
idealen Feuchtigkeitsbedingungen länger aufbewahrt
werden. Mit dem Feuchtigkeitsregulierungssystem
mit 3 Optionen an der Vorderseite des Gemüsefachs
können Sie den Feuchtigkeitsgehalt im Inneren je
nach Art der Lebensmittel regulieren. Wenn Sie
nur Gemüse lagern, sollten Sie die Gemüseoption
wählen; wenn Sie nur Früchte lagern, sollten Sie die
Fruchtoption wählen; wenn Sie Gemüse und Früchte
lagern, sollten Sie die gemischte Funktion nutzen.
Zur Nutzung des Systems zur
Feuchtigkeitsregulierung und zur Verlängerung der
Haltbarkeit der Lebensmittel sollten Sie Gemüse und
Früchte nicht in Plastikbeuteln aufbewahren. Wenn
Gemüse in seiner Verpackung verbleibt, verdirbt
es in kürzester Zeit. Bewahren Sie insbesondere
Gurken und Brokkoli nicht in dicht verschlossenen
Plastikbeuteln auf. Falls Gemüse aus hygienischen
Gründen nicht mit anderen Lebensmitteln in Kontakt
geraten soll, nutzen Sie perforiertes Papier oder
ähnliche Verpackungsmaterialien statt Tüten oder
Beuteln.
Beim Platzieren von Gemüse im Gemüsefach sollten
Sie das unterschiedliche Gewicht der einzelnen
Gemüsesorten beachten. Schweres, hartes Gemüse
sollte auf dem Boden des Gemüsefaches liegen,
leichtes und weiches Gemüse darüber.
Geben Sie Erbsen, Aprikosen, Pfirsiche und
besonders Äpfel nicht gemeinsam mit anderen
Obst- oder Gemüsesorten in dasselbe Gemüsefach,
da diese Früchte und Gemüse Ethylengas abgeben.
Ethylengas führt dazu, dass andere Früchte
schneller reifen und daher auch schneller verderben.
5.15. Frische Lebensmittel tiefkühlen
• Zur Wahrung der Lebensmittelqualität
sollten die Lebensmittel nach Einlagerung
im Tiefkühlbereich so schnell wie möglich
eingefroren werden; verwenden Sie dazu die
Schnellgefrierfunktion.
• Sie können Lebensmittel im Tiefkühlbereich
länger aufbewahren, wenn Sie sie einfrieren,
solange sie frisch sind.
• Verpacken Sie die einzufrierenden Lebensmittel
und schließen Sie die Verpackung, damit keine
Luft hineingelangt.
• Achten Sie darauf, Ihre Lebensmittel zu
verpacken, bevor Sie sie in den Tiefkühlbereich
geben. Verwenden Sie Gefrierbehälter,
Folien und feuchtigkeitsbeständiges
Papier, Plastikbeutel und andere
Verpackungsmaterialien anstelle von
herkömmlichem Verpackungspapier.
• Beschriften Sie jede Verpackung vor dem
Einfrieren mit dem Datum. Auf diese Weise
können Sie die Frische jeder Verpackung prüfen,
wenn Sie auf den Tiefkühlbereich zugreifen.
Bewahren Sie ältere eingefrorene Lebensmittel
weiter vorne auf, damit sie als erste verzehrt
werden.
• Verbrauchen Sie eingefrorene Lebensmittel
direkt nach dem Auftauen, frieren Sie sie nicht
wieder ein.
• Frieren Sie nicht zu große Mengen auf einmal
ein.
SE B ZE L İK
Kühlschrank / Bedienungsanleitung
21 /28 DE
Page 78

Gerät bedienen
Tiefkühlbereicheinstellung Kühlbereicheinstellung Anmerkungen
-18 °C 4 °C
-20, -22 oder -24 °C 4 °C
Schnellgefrieren 4 °C
-18 °C und kälter 2 °C
5.16. Empfehlungen zur optimalen
Haltbarkeit gefrorener Lebensmittel
Das Fach sollte auf mindestens -18 °C eingestellt
werden.
1. Geben Sie Lebensmittel so schnell wie möglich
nach dem Kauf in den Tiefkühlbereich, damit
sie nicht antauen.
2. Achten Sie vor dem Einfrieren darauf,
dass die an der Verpackung angegebenen
Daten bei „Verfallsdatum“ und
„Mindesthaltbarkeitsdatum“ nicht abgelaufen
sind.
3. Stellen Sie sicher, dass die
Lebensmittelverpackung nicht beschädigt ist.
5.17. Hinweise zum Tiefkühlen
Der Kühlschrank muss gemäß den IEC-62552Standards bei einer Umgebungstemperatur von 25
°C mindestens 4,5 kg Lebensmittel pro 100 Liter
Gefriervolumen in 24 Stunden auf -18 °C abkühlen.
Nur bei Temperaturen von -18 °C oder weniger ist
es möglich, Lebensmittel lange Zeit zu lagern.
Bei einer Tiefkühlbereichtemperatur von maximal
-18 °C können Sie die Frische Ihrer Lebensmittel
viele Monate bewahren.
Einzufrierende Lebensmittel sollten keinen direkten
Kontakt zu bereits gefrorenen Lebensmitteln haben,
damit diese nicht antauen.
Dies ist die allgemein empfohlene
Einstellung.
Diese Einstellungen empfehlen wir bei
Umgebungstemperaturen über 30 °C.
Diese Funktion nutzen Sie zum
Einfrieren von Lebensmitteln in kurzer
Zeit. Nach Abschluss wechselt Ihr
Gerät wieder zur zuvor eingestellten
Betriebsart.
Nutzen Sie diese Einstellungen, falls Sie
meinen, dass der Kühlbereich aufgrund
zu hoher Umgebungstemperatur,
der Nähe zu Wärmequellen oder zu
häufigem Öffnen und Schließen der Tür
nicht kalt genug wird.
Kochen Sie das Gemüse und lassen Sie das
Wasser ab, wenn Sie es längere Zeit einfrieren
möchten. Geben Sie es anschließend in luftdichten
Verpackungen in den Tiefkühlbereich. Lebensmittel
wie Bananen, Tomaten, Kopfsalat, Sellerie, gekochte
Eier und Kartoffeln sind nicht zum Einfrieren
geeignet. Wenn solche Lebensmittel eingefroren
werden, beeinträchtigt dies jedoch lediglich ihren
Nährwert und Geschmack. Achten Sie darauf, dass
die Lebensmittel nicht verdorben sind; andernfalls
stellt dies ein Gesundheitsrisiko dar.
5.18. Lebensmittel platzieren
Unterschiedliche gefrorene
TiefkühlbereichAblagen
Kühlbereichablagen
KühlbereichTürablagen
Gemüsefach Gemüse und Früchte
Lebensmittel wie Fleisch,
Fisch, Speiseeis, Gemüse
usw.
Lebensmittel in Pfannen,
Töpfen, auf abgedeckten
Tellern, in geschlossenen
Behältern, Eier (in
geschlossenem Behälter)
Kleine und verpackte
Lebensmittel oder
Getränke
22 / 28 DE
Kühlschrank / Bedienungsanleitung
Page 79

Gerät bedienen
Feinkost
Frischbereich
5.19. Tür-offen-Warnung
(Diese Funktion gibt es nur bei bestimmten
Geräten.)
Ein Tonsignal erklingt, wenn die Tür länger als eine
Minute offen steht. Die Warnung verstummt, sobald
Sie die Tür schließen oder eine Anzeigetaste (sofern
vorhanden) betätigen.
5.20. Beleuchtung
LED-Lampen dienen der Beleuchtung. Wenden Sie
sich bei Problemen mit dieser Art von Beleuchtung
an den autorisierten Kundendienst.
Die im Produkt verwendeten Lampen sind nicht
zur Haushaltsbeleuchtung vorgesehen oder
dafür geeignet. Die Lampen im Kühl- und/oder
Tiefkühlbereich sollen den Komfort erhöhen und das
Einlagern von Lebensmitteln vereinfachen.
(Frühstücksprodukte,
schnell verderbliche
Fleischprodukte)
Kühlschrank / Bedienungsanleitung
23 /28 DE
Page 80

6 Wartung und Reinigung
Die Einsatzdauer des Produktes verlängert sich und
häufige Probleme lassen nach, wenn das Produkt
regelmäßig gereinigt wird.
B
WARNUNG: Schalten Sie das Gerät
ab, bevor Sie es reinigen.
WARNUNG: Es wird empfohlen, den
B
Kondensator alle sechs Monate mit
Handschuhen zu reinigen. Sie dürfen
keine Staubsauger verwenden.
• Verwenden Sie zu Reinigungszwecken niemals
Benzin oder ähnliche Substanzen.
• Verwenden Sie zur Reinigung niemals scharfe
Gegenstände, Seife, Haushaltsreiniger, Waschmittel
oder Wachspolituren.
• Lösen Sie einen Teelöffel Natron in einem halben
Liter Wasser auf. Tränken Sie ein Tuch mit der
Lösung, wringen Sie das Tuch gut aus. Waschen Sie
die Innenflächen des Kühlschranks gründlich mit
diesem Tuch ab; anschließend gut trocknen.
• Achten Sie darauf, dass kein Wasser in das
Lampengehäuse oder in andere elektrische
Komponenten eindringt.
• Falls Sie den Kühlschrank längere Zeit nicht
benutzen, ziehen Sie den Netzstecker, nehmen
sämtliche Lebensmittel heraus, reinigen das Gerät
und lassen die Tür offen stehen.
• Prüfen Sie die Türdichtungen regelmäßig auf
Sauberkeit. Bei Bedarf reinigen.
• Nehmen Sie zum Entfernen der Tür- und
Gehäuseablagen alle Gegenstände aus dem Produkt
heraus.
• Ziehen Sie die Türablagen nach oben heraus. Setzen
Sie die Ablagen nach der Reinigung wieder ein,
indem Sie sie nach unten schieben.
• Reinigen Sie Außenflächen und verchromte Teile des
Produktes niemals mit chlorhaltigen Reinigern oder
Wasser. Chlor greift Metalloberflächen an.
• Bei Geräten ohne No-Frost-Einrichtung können
Wassertropfen entstehen und sich mit der Zeit bis zu
fingerbreite Eisschichten an Rückwand und Seiten
des Tiefkühlfachs bilden. Niemals reinigen; niemals
Öl oder andere Substanzen aufbringen.
• Verwenden Sie nur ein leicht angefeuchtetes
Mikrofasertuch zum Reinigen der
Geräteaußenflächen. Scheuerschwämme oder
grobe Reinigungstücher könnten die Oberflächen
verkratzen.
6.1. Unangenehme Gerüche verhindern
Bei der Herstellung Ihres Kühlschranks wurde darauf
geachtet, dass keine Materialien verwendet werden,
die unangenehme Gerüche verursachen können.
Allerdings können Gerüche abgesondert werden,
wenn Lebensmittel falsch aufbewahrt werden oder die
Innenseite des Gerätes nicht wie erforderlich gereinigt
wird. Dieses Problem können Sie mit folgenden
Hinweisen vermeiden:
• Es ist wichtig, das Kühlschrank sauber zu halten.
Lebensmittelreste, Verschmutzungen usw.
können Gerüche verursachen. Reinigen Sie den
Kühlschrank daher alle 15 Tage mit etwas in Wasser
aufgelöstem Natron. Verzichten Sie grundsätzlich auf
Reinigungsmittel und Seifen.
• Bewahren Sie Ihre Lebensmittel in geschlossenen
Behältern auf. Mikroorganismen aus Behältern ohne
Deckel können unangenehme Gerüche verursachen.
• Bewahren Sie keine abgelaufenen oder verdorbenen
Lebensmittel in Ihrem Kühlschrank auf.
6.2. Kunststoffflächen schützen
Geben Sie keine Öle oder stark fetthaltige Speisen
offen in Ihren Kühlschrank – dadurch können die
Kunststoffflächen angegriffen werden. Sollten
Kunststoffteile einmal mit Öl in Berührung kommen,
reinigen Sie die entsprechenden Stellen möglichst sofort
mit warmem Wasser.
6.3. Innenfläche reinigen
Reinigen Sie die Innenflächen und alle herausnehmbaren
Teile mit einer milden Lösung aus Seife, Wasser und
Karbonat. Gründlich abspülen und abtrocknen Achten
Sie darauf, dass Wasser nicht mit Leuchtmitteln und
Bedienfeld in Berührung kommt.
24 /28 DE
Kühlschrank / Bedienungsanleitung
Page 81

6 Wartung und Reinigung
ACHTUNG:
Reinigen Sie die Innenflächen
nicht mit Essig, Reinigungsalkohol
A
oder anderen alkoholbasierten
Reinigern.
6.4. Edelstahl-Außenflächen
Verwenden Sie einen nicht scheuernden EdelstahlReiniger und tragen Sie ihn auf ein fusselfreies, weiches
Tuch auf. Zum Polieren wischen Sie die Oberfläche
vorsichtig mit einem feuchten Mikrofasertuch und
einem trockenen Fensterleder ab. Folgen Sie immer den
Strängen des Edelstahls.
6.5. Produkte mit Glastüren reinigen
Entfernen Sie die Schutzfolie von den Scheiben.
Die Oberfläche der Scheiben ist beschichtet. Diese
Beschichtung minimiert Fleckenbildung und sorgt dafür,
dass sich Flecken und Schmutz leicht entfernen lassen
. Auf Scheiben, die nicht durch eine Beschichtung
geschützt sind, können sich dauerhaft organische
oder anorganische in Luft oder Wasser befindliche
Verunreinigungen, wie Kalk, Mineralsalze, unverbrannte
Kohlenwasserstoffe, Metalloxide und Silikone,
ablagern, die innerhalb kurzer Zeit zu Flecken und
Materialschäden führen. Trotz regelmäßiger Reinigung
lässt sich das Glas nur mit großer Mühe sauber halten.
Dadurch lassen Klarheit und Aussehen der Scheiben
nach. Aggressive und scheuernde Reinigungsmittel
und Methoden verstärken diese Mängel weiter und
beschleunigen den Verschleiß.
*Verwenden Sie zur regelmäßigen Reinigung Mittel auf
Wasserbasis, die weder alkalisch noch scheuernd sind.
Damit die Beschichtung lange hält, dürfen während
der Reinigung keine alkalischen oder scheuernden
Substanzen zum Einsatz kommen.
Die Scheiben wurden zur Erhöhung ihrer Stoß- und
Bruchfestigkeit gehärtet.
Als zusätzliche Sicherheitsmaßnahme befindet sich auf
der Rückseite der Scheiben eine Sicherheitsfolie, damit
das Glas keine Schäden im Umfeld anrichtet, falls es
bricht.
Kühlschrank / Bedienungsanleitung
25 /28 DE
Page 82

7 Problemlösung
Bitte arbeiten Sie diese Liste durch, bevor Sie sich
an den Kundendienst wenden. Das kann Ihnen
Zeit und Geld sparen. Diese Liste enthält häufig
aufgetretene Probleme, die nicht auf Material- oder
Verarbeitungsfehler zurückzuführen sind. Nicht alle
hier beschriebenen Funktionen sind bei jedem Modell
verfügbar.
Der Kühlschrank schaltet sich nicht ein.
• Möglicherweise ist er nicht richtig angeschlossen.
>>> Schließen Sie das Gerät richtig an.
• Die entsprechende Haussicherung ist
herausgesprungen oder durchgebrannt. >>>
Prüfen Sie die Sicherung.
Kondensation an den Seitenwänden des
Kühlbereiches (Multizone, Kühlkontrolle und
FlexiZone).
• Die Tür wurde häufig geöffnet/geschlossen. >>>
Verzichten Sie auf häufiges Öffnen/Schließen der
Kühlschranktür.
• Die Umgebung könnte zu feucht sein. >>>
Installieren Sie das Kühlschrank nicht an sehr
feuchten Orten.
• Lebensmittel mit hohem Feuchtigkeitsgehalt
wurden in Behältern ohne Deckel in den
Kühlschrank gegeben. >>> Geben Sie
Lebensmittel mit hohem Feuchtigkeitsgehalt nicht
in offenen Behältern in den Kühlschrank.
• Die Kühlschranktür steht offen. >>> Halten Sie
die Kühlschranktüren nur möglichst kurz geöffnet.
• Das Thermostat wurde auf eine sehr niedrige
Temperatur eingestellt. >>> Stellen Sie das
Thermostat auf einen geeigneten Wert ein.
Der Kompressor arbeitet nicht.
• Eine Schutzschaltung stoppt den Kompressor
bei kurzzeitigen Unterbrechungen der
Stromversorgung und wenn das Gerät zu oft
und schnell ein- und ausgeschaltet wird, um
eine Überdruck des Kühlmittels im System zu
vermeiden. Der Kühlschrank beginnt nach etwa
sechs Minuten wieder zu arbeiten. Bitte wenden
Sie sich an den autorisierten Kundendienst, falls
Ihr Kühlschrank nach Ablauf dieser Zeit nicht
wieder zu arbeiten beginnt.
• Das Kühlgerät wird abgetaut. >>> Dies ist
bei einem Kühlschrank mit vollautomatischem
Abtauen völlig normal. Das Gerät wird regelmäßig
abgetaut.
• Der Kühlschrank ist nicht angeschlossen. >>>
Achten Sie darauf, dass der Stecker in die
Steckdose passt.
• Die Temperatureinstellungen stimmen nicht. >>>
Wählen Sie den richtigen Temperaturwert.
• Es liegt ein Stromausfall vor. >>> Der
Kühlschrank setzt seinen Betrieb fort, wenn die
Stromversorgung wiederhergestellt ist.
Das Betriebsgeräusch nimmt zu, wenn der
Kühlschrank arbeitet.
• Das Leistungsverhalten des Kühlgerätes kann sich
je nach Umgebungstemperatur ändern. Dies ist
völlig normal und keine Fehlfunktion.
Der Kühlschrank arbeitet sehr intensiv oder über
eine sehr lange Zeit.
• Ihr neues Gerät ist vielleicht etwas größer als sein
Vorgänger. Große Kühlgeräte arbeiten oft längere
Zeit.
• Die Umgebungstemperatur ist eventuell sehr hoch.
>>> Bei hohen Umgebungstemperaturen arbeitet
das Gerät etwas länger.
• Der Kühlschrank wurde erst vor Kurzem in Betrieb
genommen oder mit Lebensmitteln gefüllt. >>>
Wenn das Gerät erst vor Kurzem in Betrieb
genommen oder mit Lebensmitteln gefüllt wurde,
dauert es etwas länger, bis die eingestellte
Temperatur erreicht ist. Dies ist völlig normal.
• Kurz zuvor wurden größere Mengen warmer
Speisen in den Kühlschrank gestellt. >>> Geben
Sie keine warmen oder gar heißen Speisen in den
Kühlschrank.
• Die Türen wurden häufig geöffnet oder
längere Zeit nicht richtig geschlossen. >>>
Der Kühlschrank muss länger arbeiten, weil
warme Luft in den Innenraum eingedrungen ist.
Vermeiden Sie häufiges Öffnen der Türen.
• Die Tür des Kühl- oder Tiefkühlbereichs war nur
angelehnt. >>> Vergewissern Sie sich, dass die
Türen richtig geschlossen wurden.
• Die Kühlschranktemperatur ist sehr
niedrig eingestellt. >>> Stellen Sie die
Kühlschranktemperatur höher ein. Warten Sie
dann ab, bis diese Temperatur erreicht ist.
• Die Türdichtungen von Kühl- oder Gefrierbereich
sind verschmutzt, verschlissen, beschädigt oder
sitzen nicht richtig. >>> Reinigen oder ersetzen
Sie die Dichtung. Beschädigte oder defekte
Dichtungen führen dazu, dass der Kühlschrank
länger arbeiten muss, um die Temperatur halten
zu können.
Die Temperatur im Kühlbereich ist angemessen,
während Temperatur im Tiefkühlbereich sehr
niedrig ist.
• Die Tiefkühlbereichtemperatur ist sehr niedrig
eingestellt. >>> Tiefkühlbereichtemperatur höher
einstellen, Temperatur nach einer Weile prüfen.
Die Temperatur im Tiefkühlbereich ist
angemessen, während die Temperatur im
Kühlbereich sehr niedrig ist.
26 /28 DE
Kühlschrank / Bedienungsanleitung
Page 83

Problemlösung
• Die Kühltemperatur ist sehr niedrig eingestellt.
>>> Stellen Sie die Kühltemperatur wärmer ein,
prüfen Sie die Temperatur nach einer Weile.
Im Kühlbereich gelagerte Lebensmittel frieren
ein.
• Die Kühlbereichtemperatur ist sehr hoch
eingestellt. >>> Kühlbereichtemperatur niedriger
einstellen, Temperatur nach einer Weile prüfen.
Die Temperatur im Kühl- oder Tiefkühlbereich ist
sehr hoch.
• Die Kühlbereichtemperatur ist sehr hoch
eingestellt. >>> Die Kühlbereichtemperatur wirkt
sich auf die Temperatur des Tiefkühlbereichs aus.
Stellen Sie den Kühl- oder Tiefkühlbereich auf eine
geeignete Temperatur ein.
• Türen wurden häufig geöffnet oder längere Zeit
nicht richtig geschlossen. >>> Verzichten Sie auf
häufiges Öffnen der Türen.
• Die Tür wurde eventuell nicht richtig geschlossen.
>>> Tür richtig schließen.
• Der Kühlschrank wurde erst vor Kurzem in Betrieb
genommen oder mit Lebensmitteln gefüllt. >>>
Dies ist normal. Wenn das Gerät erst vor Kurzem
in Betrieb genommen oder mit Lebensmitteln
gefüllt wurde, dauert es etwas länger, bis die
eingestellte Temperatur erreicht ist.
• Kurz zuvor wurden größere Mengen warmer
Speisen in den Kühlschrank gestellt. >>> Geben
Sie keine warmen oder gar heißen Speisen in den
Kühlschrank.
Vibrationen oder Betriebsgeräusche.
• Der Boden ist nicht stabil oder gerade. >>> Falls
der Kühlschrank bei Bewegung leicht wackelt,
richten Sie ihn mit den Füßen aus. Achten Sie
darauf, dass der Boden eben ist und das Gewicht
des Kühlschranks problemlos tragen kann.
• Gegenstände, die auf dem Kühlschrank abgestellt
wurden, können Geräusche verursachen. >>>
Nehmen Sie die Gegenstände herunter.
Fließ- oder Spritzgeräusche sind zu hören.
• Aus technischen Gründen bewegen sich
Flüssigkeiten und Gase innerhalb des Gerätes.
>>> Dies ist völlig normal und keine Fehlfunktion.
Der Kühlschrank pfeift.
• Im Inneren befinden sich Gebläse zum Kühlen
des Gerätes. Dies ist völlig normal und keine
Fehlfunktion.
Feuchtigkeit an den Kühlschrankinnenflächen.
• Bei heißen und feuchten Wetterlagen treten
verstärkt Eisbildung und Kondensation auf. Dies ist
völlig normal und keine Fehlfunktion.
• Türen wurden häufig geöffnet oder längere Zeit
nicht richtig geschlossen. >>> Verzichten Sie
auf häufiges Öffnen der Türen. Schließen Sie die
Türen, falls sie offen sind.
• Eine Tür wurde eventuell nicht richtig geschlossen.
>>> Tür richtig schließen.
Feuchtigkeit sammelt sich an der Außenseite
des Kühlschranks oder an den Türen an.
• Hohe Luftfeuchtigkeit. Dies ist bei feuchtem
Wetter völlig normal. >>> Die Kondensation
verschwindet, wenn der Feuchtigkeitsgehalt
abnimmt.
• Externer Feuchtigkeitsniederschlag im Bereich
zwischen den beiden Türen des Kühlschranks,
wenn das Gerät selten benutzt wird. Dies ist
völlig normal. Der Feuchtigkeitsniederschlag
verschwindet bei häufiger Verwendung.
Unangenehmer Geruch im Kühlschrank.
• Das Gerät wurde nicht regelmäßig gereinigt.
Reinigen Sie das Innere des Kühlschranks mit
einem Schwamm, den Sie mit lauwarmem oder
kohlensäurehaltigem Wasser angefeuchtet haben.
• Einige Behälter oder Verpackungsmaterialien
können Gerüche verursachen. >>> Andere
Behälter und Verpackungsmaterialien bzw.
Produkte anderer Hersteller verwenden.
• Lebensmittel wurden in Behältern ohne Deckel
in den Kühlschrank gegeben. >>> Lebensmittel
in geschlossenen Behältern aufbewahren.
Mikroorganismen aus Behältern ohne Deckel
können unangenehme Gerüche verursachen.
• Nehmen Sie abgelaufene oder verdorbene
Lebensmittel aus dem Kühlschrank.
Die Tür kann nicht geschlossen werden.
• Lebensmittelpackungen verhindern ein
vollständiges Schließen der Tür. >>> Entfernen
Sie die Verpackungen, welche die Tür blockieren.
• Der Kühlschrank hat keinen stabilen Stand. >>>
Passen Sie die Kühlschrankfüße so an, dass der
Kühlschrank in Waage ist.
• Der Boden ist nicht eben oder nicht stabil genug.
>>> Achten Sie darauf, dass der Boden eben ist
und das Gewicht des Kühlschranks problemlos
tragen kann.
Das Gemüsefach klemmt.
• Lebensmittel könnten die obere Wand des
Gemüsefachs berühren. >>> Verteilen Sie die
Lebensmittel im Gemüsefach anders.
Kühlschrank / Bedienungsanleitung
27 /28 DE
Page 84

Problemlösung
Wenn die Geräteoberfläche heiß ist.
Die Bereiche zwischen den beiden Türen, an den
Seitenflächen und hinten am Grill können im Betrieb
sehr heiß werden. Dies ist völlig normal und weist
nicht auf eine Fehlfunktion hin.
Gebläse läuft weiter, wenn die Tür geöffnet wird.
Es ist normal, dass das Gebläse weiterläuft, wenn die
Tür des Tiefkühlbereichs geöffnet wird.
WARNUNG: Falls sich ein Problem nicht
A
mit den Hinweisen in diesem Abschnitt
lösen lassen sollte, wenden Sie sich bitte
an Ihren Händler oder an den autorisierten
Kundendienst. Versuchen Sie niemals, ein
fehlerhaftes Produkt selbst zu reparieren.
28 /28 DE
Kühlschrank / Bedienungsanleitung
Page 85

www.beko.com.tr
www.beko.com
58 0506 0000/AB
EN-FR-DE
 Loading...