

Page 1
Mcrowave Oven
User Manual
MGB 25332 BG MGB 25333 BG
MGB 25333 WG MGB 25333 X
EN DE FR IT ES PT
NL PL CZ HR SL LT
ET BG TR
01M-8847913200-4016-13
Page 2
Please read this manual first!
Dear Customer,
Thank you for purchasng a Beko product. We hope that you get the best results from
your product whch has been manufactured wth hgh qualty and state-of-the-art
technology. Therefore, please read ths entre user manual and all other accompanyng
documents carefully before usng the product and keep t as a reference for future
use. If you handover the product to someone else, gve the user manual as well. Follow
all warnngs and nformaton n the user manual.
Meanings of the symbols
Followng symbols are used n the varous secton of ths user manual:
Important nformaton and useful
C
A
hnts about usage.
Warnngs for dangerous stuatons
concernng the safety of lfe and property.
Warnng for hot surfaces.
Ths product has been manufactured n envronmental frendly modern plants wthout gvng any
harm to the nature.
Ths applance conforms to the WEEE
regulaton.
It does not contan PCB.
Page 3
CONTENTS
1 Important safety and
environmental instructions 4
1.1 General safety ..........................................................4
1.2 Intended use ............................................................8
1.3 Children’s safety......................................................9
1.4 Compliance with the WEEE Directive and
disposal of waste products ......................................10
1.5 Package information ............................................10
2 Your microwave oven 11
2.1 Overview ....................................................................11
2.1.1. Controls and parts .............................................11
2.1.2. Technical data .....................................................11
2.1.3 Installing the turntable ....................................12
3 Installation and connection 13
3.1 Installation and connection ...............................13
3.2 Built-in installation ................................................14
3.2.1 Furniture dimensions for built-in
installation .......................................................................14
3.2.2 Preparing the cabinet .......................................15
3.2.3 Fixing the oven....................................................16
3.3 Radio interference .................................................17
3.4 Microwave cooking principles ...........................17
3.5 Grounding instructions........................................17
3.6 Utensil test ...............................................................17
4 Operation 19
4.1 Control panel ............................................................19
4.2 Operating instructions ........................................19
4.2.1 Setting the time ..................................................19
4.2.2 Cooking with microwave oven ......................19
4.2.3 Microwave keypad instructions ...................20
4. 3 Cooking with grill or combination mode ......20
4.3.1 (Grill/Combination) Keypad instructions ..21
4.4 Quick start ................................................................21
4.5 Defrost by weight ..................................................21
4.6 Defrost by time .......................................................21
4.7 Kitchen timer (counter) .......................................21
4.8 Auto menu ................................................................22
4.8.1 Auto cooking menu ...........................................23
4.9 Multi-step cooking ................................................24
4.10 Query function .....................................................24
4.11 Child lock ..................................................................24
4.12 Opening the oven door .....................................24
5 Cleaning and maintenance 25
5.1 Cleaning ......................................................................25
5.2 Storage .......................................................................25
5.3 Handling and transportation ............................25
6 Troubleshooting 26
01M-8847893200-4016-13
01M-8853783200-4016-13
01M-8849973200-4016-13
Microwave Oven / User Manual
3 / 371 EN
Page 4

Important safety and envronmental
1
nstructons
Important Safety
Instructons Read
Carefully And Keep
For Future Reference
Ths secton contans safety nstructons that wll help protect from
rsk of fre, electrc shock, exposure
to leak mcrowave energy, personal
njury or property damage. Falure
to follow these nstructons shall
vod any warranty.
• Bed and Breakfast type environ-
ments.
• Do not attempt to start the oven
when its door is open; otherwise
you may be exposed to harmful
microwave energy. Safety locks
should not be disabled or tampered with.
• Do not place any object between
the front side and the door of the
oven. Do not allow dirt or cleaning
agent remnants built-up on the
closure surfaces.
1.1 General safety
• The microwave oven is intended
for heating food and beverages.
Drying of food or clothing and
heating of warming pads, slippers,
sponges, damp cloth and similar
may lead to risk of injury, ignition
or fire.
Ths applance s ntended to be
used n household and smlar applcatons such as:
• Staff kitchen areas in shops, of-
fices and other working environments;
• Farm houses
• By clients in hotels, motels and
other residential type environments;
• Any service works involving re-
moval of the cover that provides
protection against exposure to
microwave energy must be performed by authorized persons/
service. Any other approach is
dangerous.
• Your product is intended for
cooking, heating and defrost
food at home. It must not be
used for commercial purposes.
Manufacturer shall not be held liable for damages that have arisen
from misuse.
• Do not use this appliance out-
doors, bathrooms, humid environments or in places where the it
can get wet.
4 / 371 EN
Microwave Oven / User Manual
Page 5

Important safety and envronmental
1
nstructons
• No responsibility or warranty claim
shall be assumed for damages
arising from misuse or improper
handling of the appliance.
• Never attempt to dismantle the
appliance. No warranty claims are
accepted for damage caused by
improper handling.
• Only use the original parts or parts
recommended by the manufacturer.
• Do not leave this appliance unat-
tended while it is in use.
• Always use the appliance on a
stable, flat, clean dry, and non-slip
surface.
• The appliance should not be oper-
ated with an external clock timer
or separate remote control system.
• Before using the appliance for the
first time, clean all parts. Please
see the details given in the "Cleaning and Maintenance" section.
• Operate the appliance for its in-
tended purpose only as described
in this manual. Do not use abrasive
chemicals or steam on this appliance. This oven is particularly in-
It is not intended for industrial or
laboratory use.
• Do not use your appliance to dry
clothes or kitchen towels.
• Appliance becomes very hot while
it is in use. Pay attention not to
touch the hot parts inside the
oven.
• Your oven is not designed to dry
any living being.
• Do not operate the oven empty.
• Only use utensils that are suitable
for use in microwave ovens.
• Cooking utensil may get hot due
to the heat transferred from the
heated food to the utensil. You
may need oven gloves to hold the
utensil.
• Utensils shall be checked to en-
sure that they are suitable for use
in microwave ovens.
• Do not place the oven on stoves or
other heat generating appliances.
Otherwise, it may be damaged
and the warranty becomes void.
• Microwave oven must not be
placed in a cabinet that is not in
compliance with the installation
instructions.
tended for heating and cooking
the food.
Microwave Oven / User Manual
5 / 371 EN
Page 6

Important safety and envronmental
1
nstructons
• Steam may come out while open-
ing the covers or the foil after
cooking the food.
• Use gloves while taking any kind
of heated food out.
• The appliance and its accessible
surfaces may be very hot when
the appliance is in use.
• Door and outer glass may be very
hot when the appliance is in use.
1.1.1 Electrcal safety
• If the supply cord is damaged, it
must be replaced by the manufacturer or its service agent or a
similarly qualified person in order
to avoid a hazard.
• Beko Microwave Ovens comply
with the applicable safety standards; therefore, in case of any
damage on the appliance or power
cable, it should be repaired or replaced by the dealer, service center or a specialist and authorized
service alike to avoid any danger.
Faulty or unqualified repair work
may be dangerous and cause risk
to the user.
• Make sure that your mains power
supply complies with the information supplied on the rating plate of
the appliance.
The only way to disconnect the
appliance from the power supply
is to remove the power plug from
the power outlet.
• Use the appliance with a grounded
outlet only.
• Never use the appliance if the
power cable or the appliance itself
is damaged.
• Do not use this appliance with an
extension cord.
• Never touch the appliance or its
plug with damp or wet hands.
• Place the appliance in a way so
that the plug is always accessible.
• Prevent damage to the power
cable by not squeezing, bending,
or rubbing it on sharp edges. Keep
the power cable away from hot
surfaces and naked flame.
• Make sure that there is no danger
that the power cable could be accidentally pulled or that someone
could trip over it when the appliance is in use.
• Unplug the appliance before each
cleaning and when the appliance
is not in use.
6 / 371 EN
Microwave Oven / User Manual
Page 7

Important safety and envronmental
1
nstructons
• Do not pull the power cable of the
appliance to disconnect it from its
power supply and never wrap its
power cable around the appliance.
• Do not immerse the appliance,
power cable, or power plug in
water or any other liquids. Do not
hold it under running water.
• When heating food in plastic or
paper containers, keep an eye on
the oven due to the possibility of
ignition.
• Remove the wire strings and/or
metal handles of paper or plastic
bags before placing bags suitable
for use in microwave oven to the
oven.
• If smoke is observed, switch off
or unplug the appliance and keep
the door closed in order to stifle
any flames.
• Do not use inside of the oven to
store something. Do not leave
paper items, cooking material or
food inside the oven when it is not
being used.
• The contents of feeding bottles
and baby food jars shall be stirred
or shaken and the temperature
shall be checked before consumption, in order to avoid burns.
• This appliance is a Group 2 Class B
ISM equipment. Group 2 contains
all ISM (Industrial, Scientific and
Medical) equipment in which radio-frequency energy is intentionally generated and/or used in the
form of electromagnetic radiation
for the treatment of material, and
spark erosion equipment.
• Class B equipment is suitable for
use in domestic establishments
and establishments directly connected to a low voltage power
supply network.
• Door or outer surface of the appli-
ance may become hot when it is in
use.
1.1.2 Product safety
• Heating the beverages with mi-
crowave may cause them to boil
by splashing around after they
have been taken out of the oven;
so be careful when you are holding the containers.
• Do not roast anything in the oven.
Hot oil may damage the components and materials of the oven,
and it may even cause skin burns.
• Pierce food with thick crust such
as potatoes, zucchinis, apples and
chestnuts.
Microwave Oven / User Manual
7 / 371 EN
Page 8

Important safety and envronmental
1
nstructons
• Appliance must be placed so that
the rear side is facing the wall.
• Before moving the appliance,
please secure the turntable to
prevent damage to it.
• Eggs in their shell and whole hard-
boiled eggs must not be heated in
microwave ovens since they may
explode, even after microwave
heating has ended.
• Never remove the parts at the rear
and sides of the appliance, which
protect the minimum distances
between the cabinet walls and
the appliance in order to allow for
the required air circulation.
1.2 Intended use
• The oven should be cleaned reg-
ularly and any food deposits removed.
• Failure to maintain the oven in a
clean condition could lead to deterioration of the surface that could
adversely affect the life of the
appliance and possibly result in a
hazardous situation.
• Cleaning the door seals and adja-
cent parts: Use hot soapy water.
Clean with a dish cloth, do not
scour. Do not use a metal or glass
scraper for cleaning.
•
WARNING:
If the door or door
seals are damaged, the oven must
not be operated until it has been
repaired by a competent person.
•
WARNING:
It is hazardous for
anyone other than a competent
person to carry out any service or
repair operation which involves
the removal of a cover which gives
protection against exposure to
microwave energy.
•
WARNING:
Liquids and other
foods must not be heated in
sealed containers since they are
liable to explode.
• Microwave oven is intended for
built-in use only.
• Do not use the appliance for any-
thing other than its intended use.
• Do not use the appliance as a heat
source.
• Microwave oven is intended to
thaw, cook and stew food only.
• Do not over-cook foods; other-
wise, you may cause a fire.
• Do not use steam assisted clean-
ers to clean the appliance.
8 / 371 EN
Microwave Oven / User Manual
Page 9

Important safety and envronmental
1
nstructons
1.3 Chldren’s safety
• Extreme caution is advised when
being used near children and persons who are restricted in their
physical, sensory or mental abilities.
• This appliance can be used by the
children who are at the age of 8 or
over and by the people who have
limited physical, sensory or mental capacity or who do not have
knowledge and experience, as
long as they are supervised with
regard to safe use of the product
or they are instructed accordingly
or understand the risks of using
the product. Children should not
play with the appliance. Cleaning
and user maintenance procedures
should not be performed by children unless they are controlled by
their elders.
• Danger of choking! Keep all the
packaging materials away from
children.
• Only allow children to use the
oven without supervision when
adequate instructions have been
given so that the child is able to
use the microwave oven in a safe
way and understands the hazards
of improper use.
• Due to excessive heat that arises
in grill and combination modes,
children should only be allowed to
use these modes under supervision of an adult.
• Keep the product and its power
cable so that they are inaccessible
by children under 8 years old.
• The appliance and its accessible
surfaces may be very hot when
the appliance is in use. Keep children away.
• The appliance is not intended for
use by persons (including children)
with reduced physical, sensory or
mental capabilities, or lack of experience and knowledge, unless
they have been given supervised
or instruction concerning use of
the appliance by a responsible
person for their safely.
• Young children should be super-
vised to ensure that they do not
play with the appliance.
•
WARNING:
Only allow children
to use the oven without supervision when adequate instructions
have been given so that the child
is able to use the oven in a safe
way and understands the hazards
of improper use.
Microwave Oven / User Manual
9 / 371 EN
Page 10
Important safety and envronmental
1
nstructons
1.4 Complance wth the WEEE
Drectve and dsposal of
waste products
Ths product does not nclude harmful
and prohbted materals specfed n
the “Regulaton for Supervson of the
Waste Electrc and Electronc
Applances” ssued by the Mnstry of
Envronment and Urban Plannng. Comples wth
the WEEE Drectve. Ths product has been manufactured wth hgh qualty parts and materals
whch can be reused and are sutable for recyclng.
Therefore, do not dspose the product wth normal domestc waste at the end of ts servce lfe.
Take t to a collecton pont for the recyclng of
electrcal and electronc equpment. Ask the local
authorty n your area for these collecton ponts.
Help protect the envronment and natural resources by recyclng used products.
1.5 Package nformaton
Package of the product s made of
recyclable materals n accordance
wth our Natonal Legslaton. Do not
dspose of the packagng materals together wth the domestc or other wastes. Take
them to the packagng materal collecton ponts
desgnated by the local authortes.
10 / 371 EN
Microwave Oven / User Manual
Page 11
2 Your mcrowave oven
6
7
1
235 4
8
2.1 Overvew
9
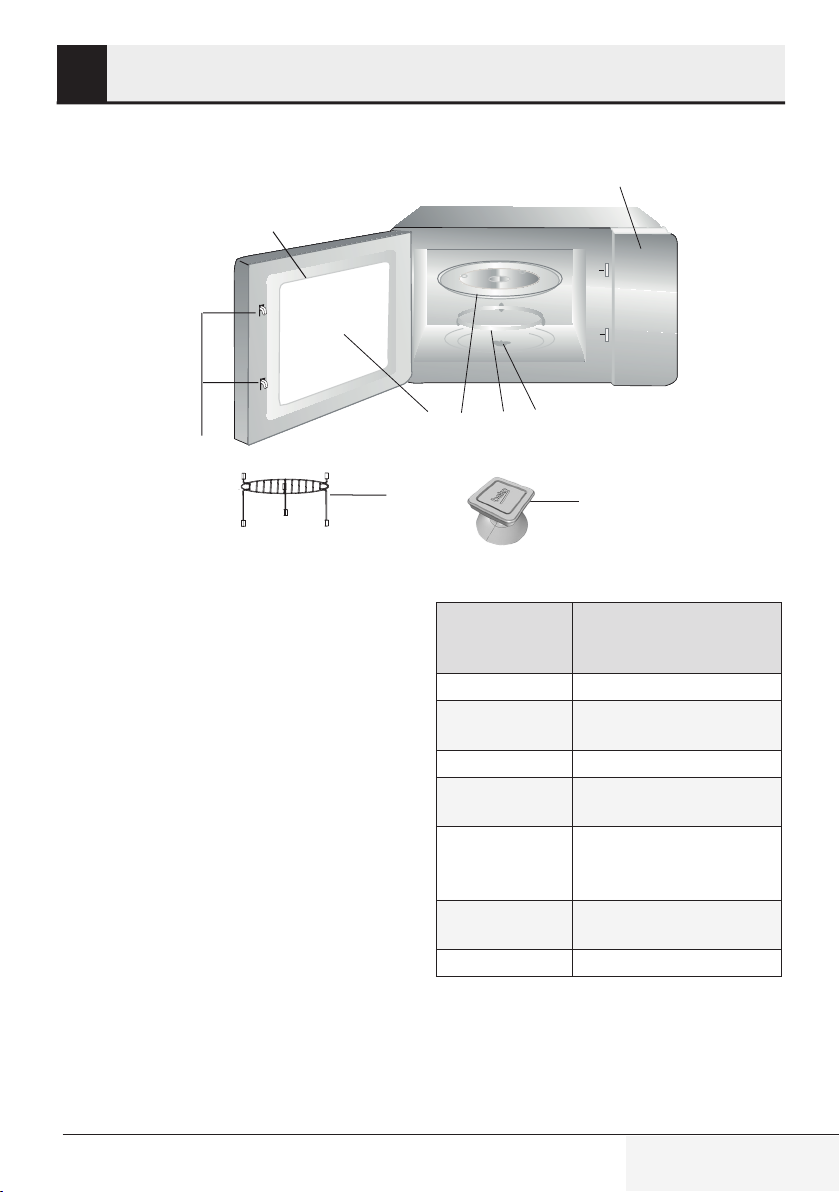
2.1.1. Controls and parts
1. Control panel
2. Turntable shaft
3. Turntable support
4. Glass tray
5. Oven wndow
6. Door group
7. Door safety nterlock system
8. Grll rack (only to be used n grll functon and
placed on the glass tray)
9. Vacuum lfter for manual door openng (appl-
es for model MGB 25333 BG.)
Markngs on the product or the values stated n other documents suppled wth the product are values obtaned under laboratory
condtons as per relevant standards. These values may vary accordng to the usage of the applance and ambent condtons.
Power values are tested at 230V.
Microwave Oven / User Manual
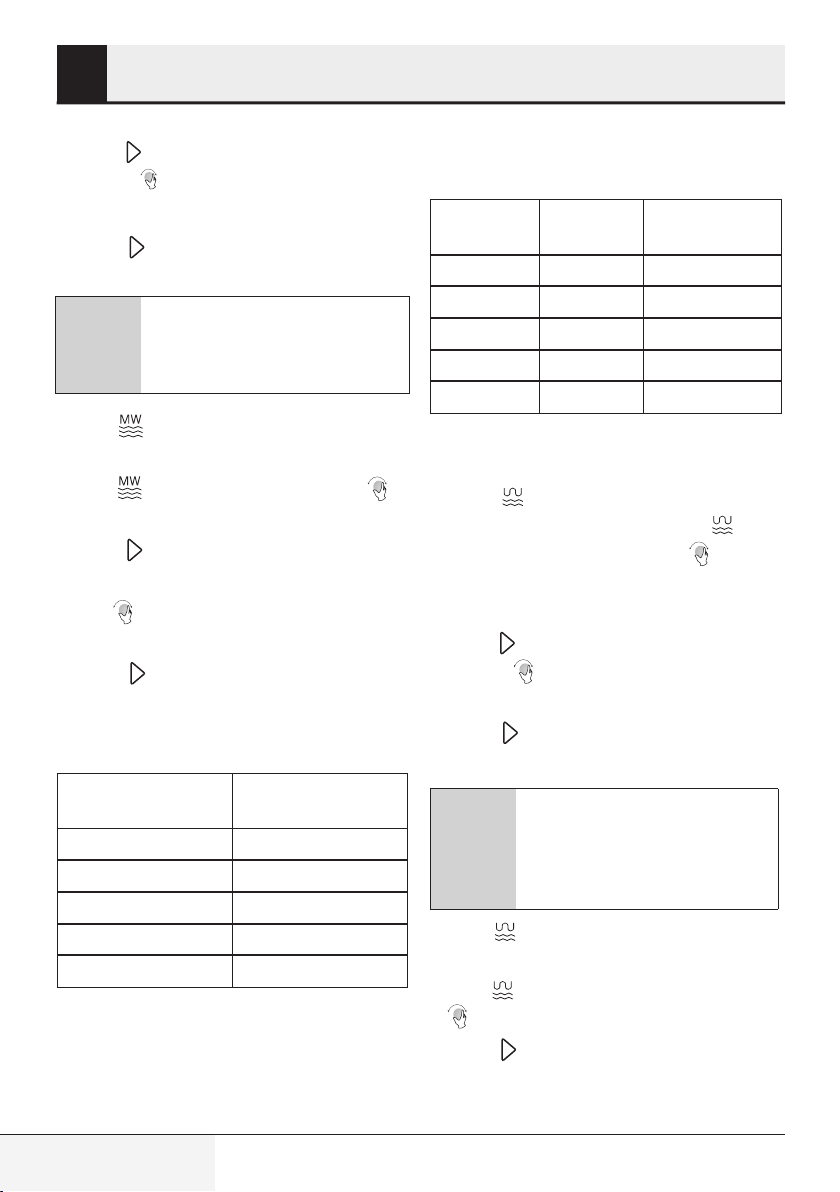
2.1.2. Techncal data
Power consumption
Output
Operating
frequency
Ampere value
External
dimensions
Internal
dimensions of
the oven
Oven
Capacity
Net weight
230 V~50 Hz,
1450 W (Mcrowave)
1000 W (Grll)
900 W
2450 MHz
6.4 A
388 mm (H) / 595 mm (W) /
400 mm (D)
206 mm (H) / 328 mm
(G) / 368 mm (D)
25 ltres
18.5 kg
11 / 371 EN
Page 12
Göbek (alt kısım)
Cam tabla
Döner tabla desteği
Döner tabla mili
2 Your mcrowave oven
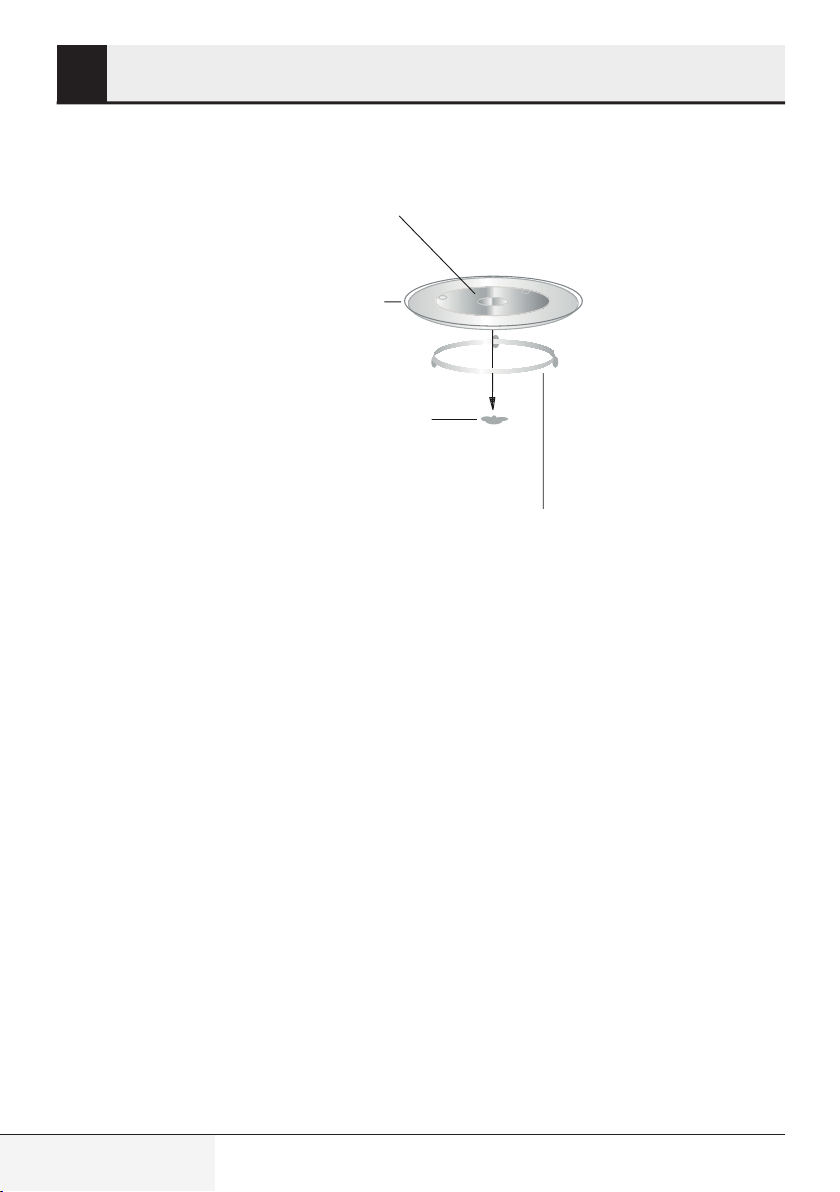
2.1.3 Installng the turntable
Hub (underside)
Glass tray
Turntable shaft
Turntable support
• Never place the glass tray upsde down. The
glass tray should never be restrcted.
• Both glass tray and turntable support must al-
ways be used durng cookng.
• All food and contaners of food must always
place on the glass tray for cookng.
• If glass tray or turntable support crack or break,
contact your nearest authorzed servce center.
12 / 371 EN
Microwave Oven / User Manual
Page 13
3 Installation and connection
3.1 Installaton and
connecton
• Remove all packng materal and accessores.
Examne the oven for any damage such as dents
or broken door. Do not nstall f oven s damaged.
• Remove any protectve flm found on the mcro-
wave oven cabnet surface.
• Do not remove the lght brown Mca cover that
s attached to the oven cavty to protect the
magnetron.
• Ths applance has been desgned for domestc
use only.
• Ths oven s ntended for bult-n use only. It s
not ntended for counter-top use or for use nsde a cabnet.
• Please observe the specal nstallaton nstruc-
tons.
• The applance can be nstalled n a 60cm wde
wall-mounted cabnet (at least 55 cm deep and
85 cm off the floor).
• The applance s ftted wth a plug and must only
be connected to a properly nstalled grounded
socket.
• The mans voltage must correspond to the vol-
tage specfed on the ratng plate.
• If the plug s no longer accessble after nstal-
laton, an all-pole solatng swtch must be present on the nstallaton sde wth a contact gap
of at least 3 mm.
• Adapters, mult-way sockets and extenson
cords must not be used. Overloadng can result
wth a rsk of fre.
The accessble surface may be hot
durng operaton.
Do not trap or bend the power cable.
C
Microwave Oven / User Manual
13 / 371 EN
Page 14
3 Installaton and connecton
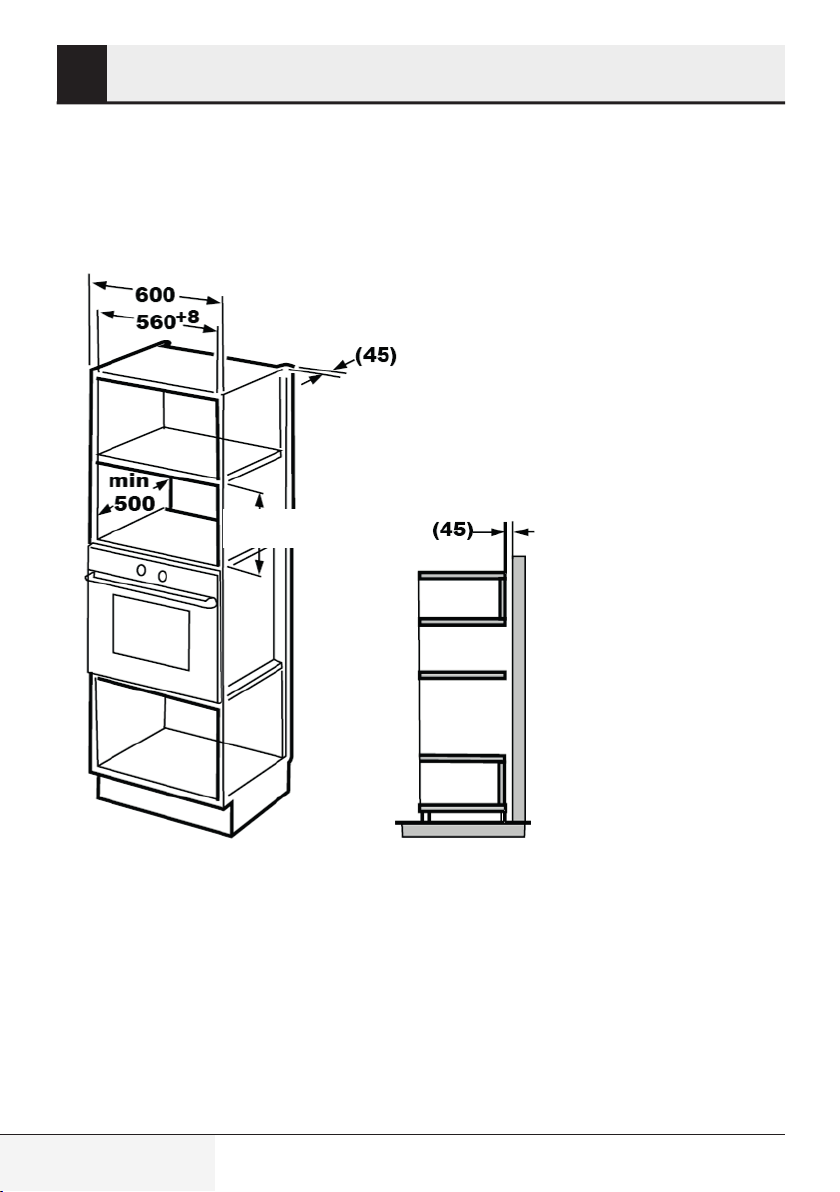
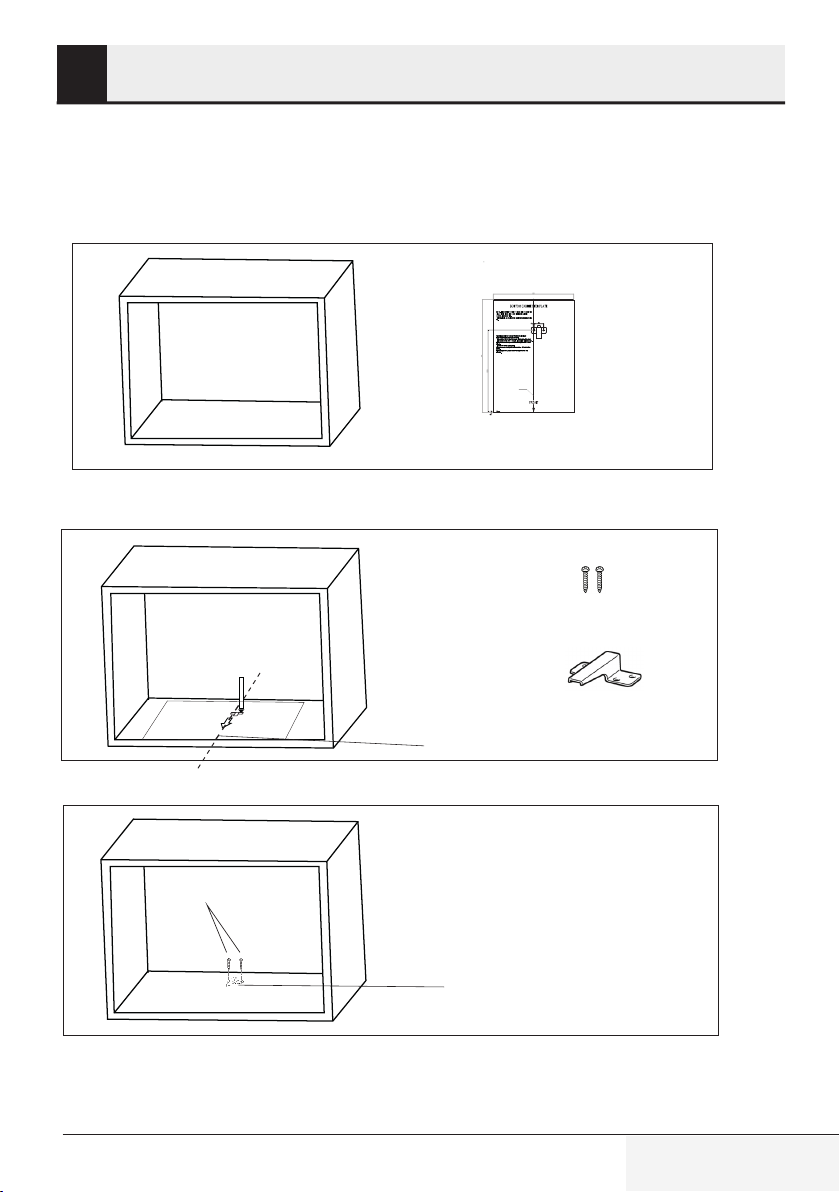
3.2 Bult-n nstallaton
3.2.1 Furnture dmensons for bult-n nstallaton
The Mcrowave oven frame should stand out of the cabnet
380+2
14 / 371 EN
Microwave Oven / User Manual
Page 15
a
a
Vida A
Braket
Merkez çizgi
Braket
Vida A
3 Installaton and connecton
3.2.2 Preparng the cabnet
1. Read the nstructon on the bottom cabnet template and put the template on the bottom plane of
cabnet.
a
a
LEFT EDGE
T EDGE RIGH
CENTER LINE
FRONT EDGE
2. Make the marks on the bottom plane of cabnet accordng to marks "a" of the template.
Screw A
Bracket
Centre line
3. Remove the bottom cabnet template and fx the bracket wth screw A.
Screw A
Microwave Oven / User Manual
Bracket
15 / 371 EN
Page 16
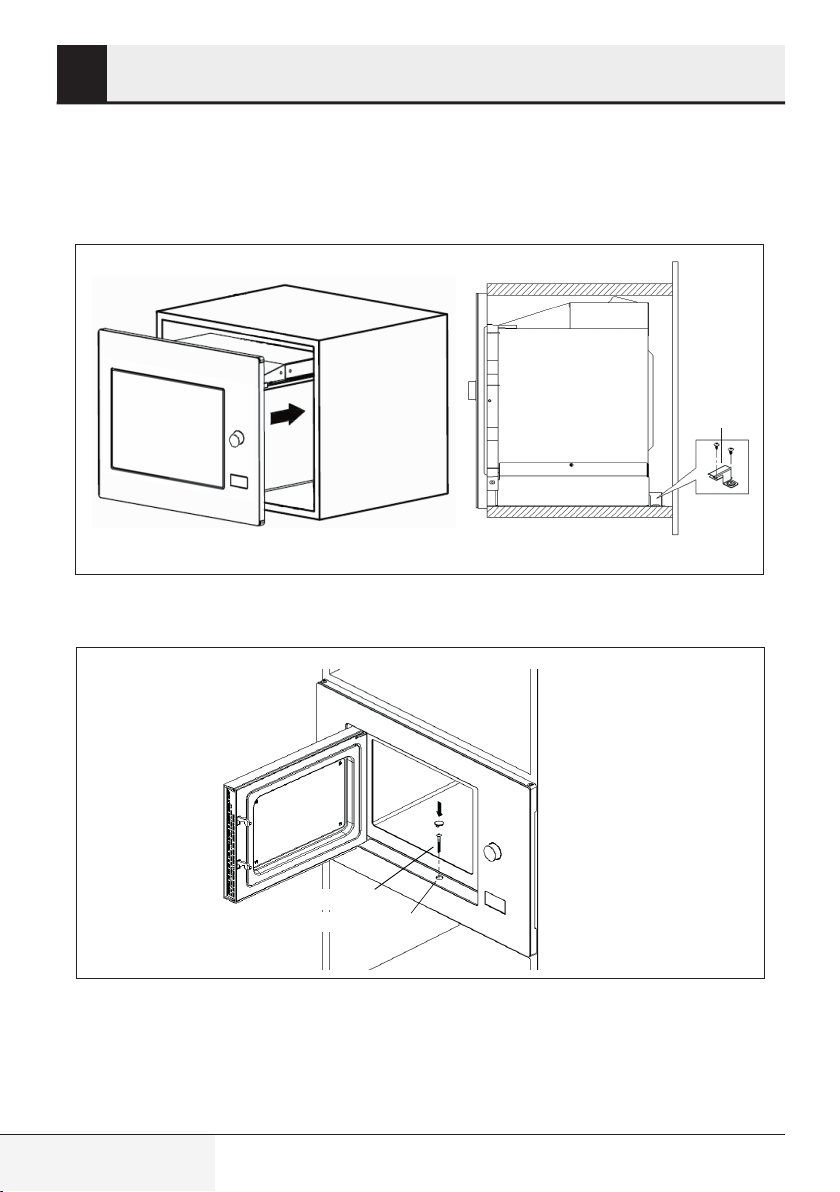
3 Installaton and connecton
3.2.3 Fxng the oven
1. Install the oven nto the cabnet.
- Make sure the back of the oven s locked by bracket.
- Do not trap or bend the power cable.
2. Open the door, fx the oven to the cabnet wth Screw B through the nstallaton hole. Then fx the
trm-kt plastc cover to the nstallaton hole.
bracket
braket
16 / 371 EN
Screw B
Vida B
Installation hole
Montaj deliği
Microwave Oven / User Manual
Page 17
3 Installaton and connecton
3.3 Rado nterference
Operaton of the mcrowave oven
may cause nterference on rados,
C
• Place the oven as far away from rados and
TVs as possble. Operaton of mcrowave oven
may cause nterference to your rado or TV
recepton. 2. Plug your oven nto a standard
household outlet. Be sure the voltage and the
frequency s the same as the voltage and the
frequency on the ratng plate.
• In case of nterference, t may be reduced or el-
mnated by takng the precautons gven below:
• Clean the door and sealng surface of the oven.
• Set the antenna drecton of the rado or TV
agan.
• Reposton the oven based on the locaton of
the recever.
• Place mcrowave oven away from the recever.
• Plug the mcrowave oven to another outlet,
thus mcrowave oven and recever shall be on
dfferent lnes.
TVs and smlar applances.
• Turn food such as meatballs upsde down n the
mddle of the cookng and replace them wth
each other from the center of the dsh to the
outsde.
3.5 Groundng nstructons
Ths applance must be grounded. Ths oven has a
groundng cable wth a grounded plug. Applance
must be plugged to a wall outlet nstalled and grounded correctly. Groundng system allows a leak
wre for the electrcal current n case of a short
crcut and reduces the rsk of electrc shock. We
recommend usng an electrcal crcut dedcated
to the oven. Operatng wth hgh voltage s dangerous and may cause fre or other accdents that
would cause damage to the oven.
A
C
3.4 Mcrowave cookng
prncples
• Prepare the food carefully. Place the remanng
parts to the outsde of the dsh.
• Pay attenton to the cookng tme. Cook n the
shortest tme specfed and add some more tme
f requred. Overcooked food may cause smoke
or may be burnt.
• Cover the food whle cookng. Coverng the food
prevents any splashng and helps to ensure that
food s cooked evenly.
• Turn over food such as poultry and hambur-
gers whle cookng them n a mcrowave oven n
order to accelerate cookng of ths knd of food.
Larger food such as roast must be turned over
at least once.
C
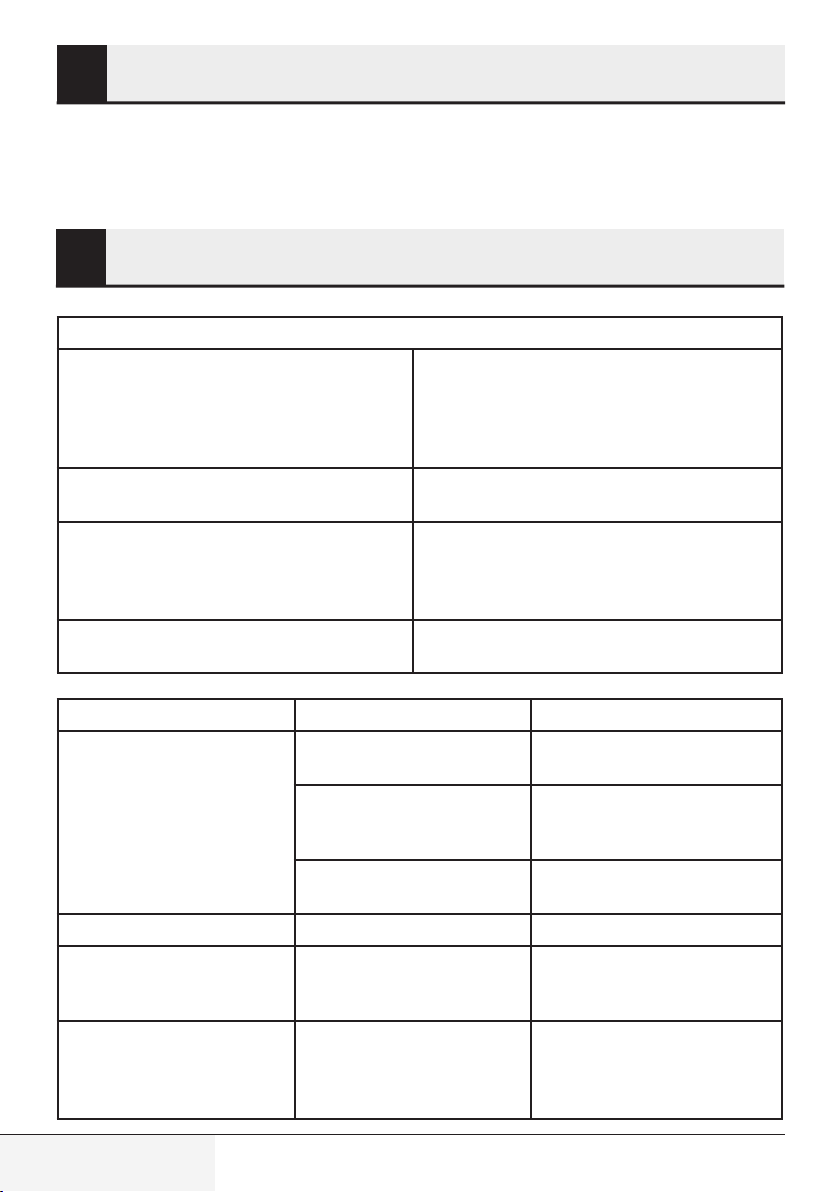
3.6 Utensl test
Never operate the mcrowave oven empty. The
only excepton s the utensl test descrbed n the
followng secton. Some certan non-metal utensls may not be sutable for usng n mcrowave. If
you are not sure whether your utensl s sutable for mcrowave, you can perform the followng
test.
WARNING:
plug may cause electrc shock.
If you have any questons on groundng and electrcal nstructons,
please consult a qualfed electrc
techncan or servce personnel.
Manufacturer and/or dealer would
not accept any responsblty for njures or damages on the oven that
may occur when electrcal connecton procedures are not followed.
Msuse of groundng
Microwave Oven / User Manual
17 / 371 EN
Page 18

3 Installaton and connecton
1. Place the empty utensl to be tested nto the
mcrowave oven together wth a mcrowavecompatble glass flled wth 250 ml water.
2. Operate the mcrowave oven at max power for
1 mnute.
3. Check carefully the temperature of the utensl
beng tested. If t s warmed up, t s not sutable
for use n mcrowave.
4. Never exceed the operatng tme lmt of 1 mnute. If you notce arcng durng 1 mnute of
operaton, stop the mcrowave. Utensls causng arcng are not sutable for use n mcrowave.
Followng lst s a general gude that would help
you n selectng the rght utensl.
Cooking utensil Microwave Grill Combination
Heat-resistant glass Yes Yes Yes
Non-heat-resistant glass No No No
Heat-resistant ceramics Ye s Yes Yes
Plastic dish suitable for microwave oven Yes No No
Paper kitchenware Yes No No
Metal tray No Yes No
Metal rack No Yes No
Aluminum foil and foil covers No Ye s No
Foam materials No No No
18 / 371 EN
Microwave Oven / User Manual
Page 19
4 Operation
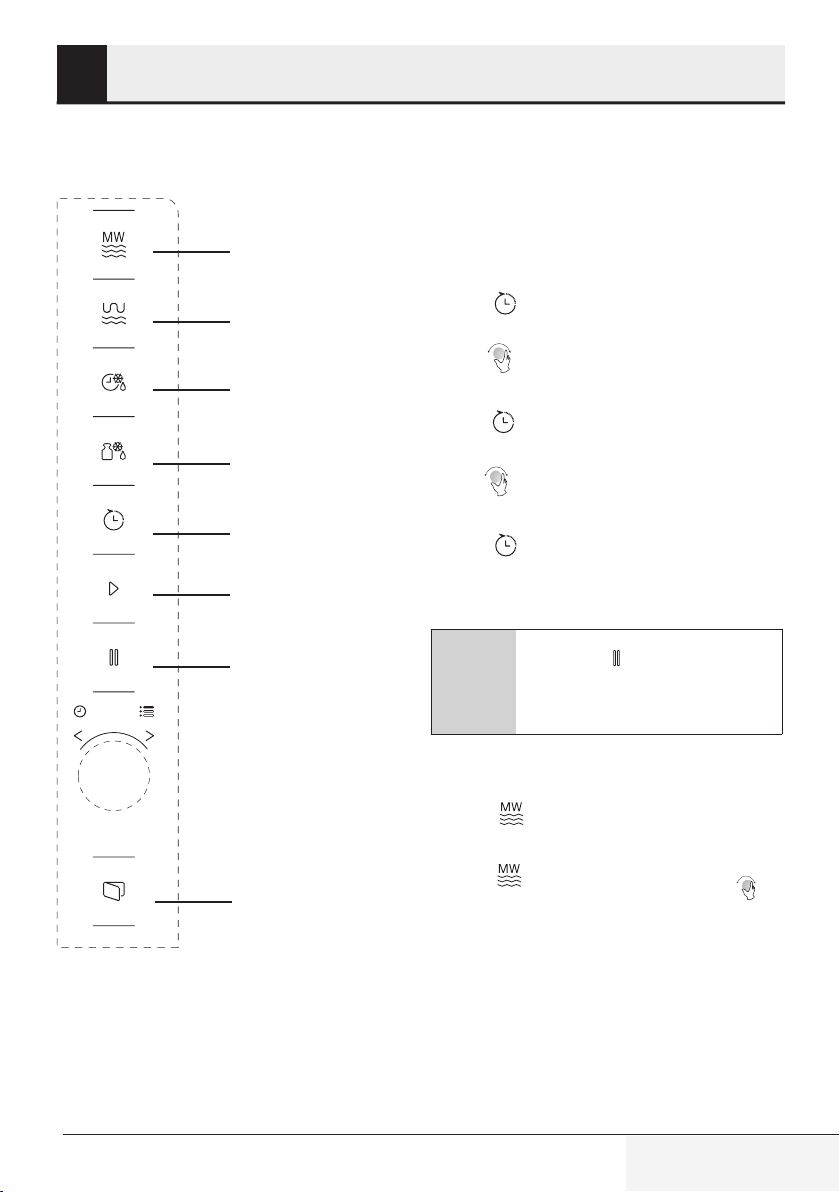
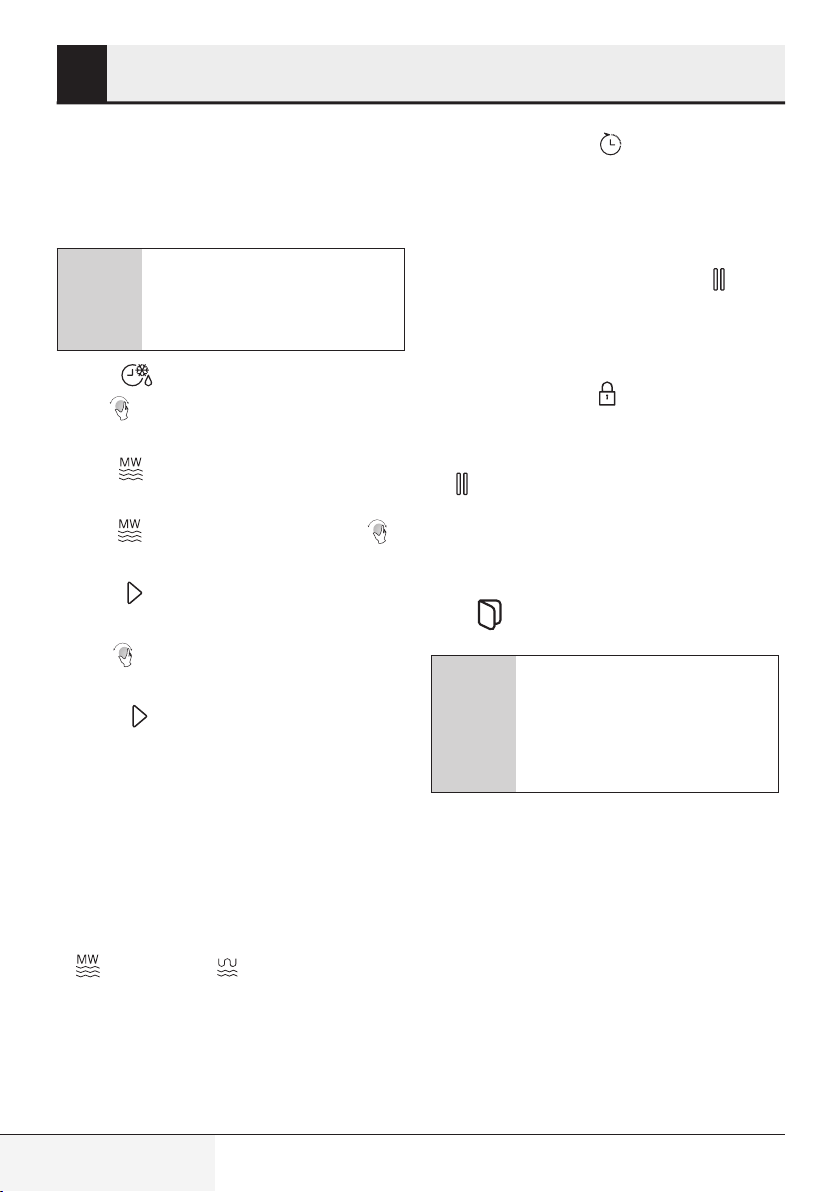
4.1 Control panel
4.2 Operatng nstructons
4.2.1 Settng the tme
Mcrowave
Grll/Combnaton
Defrost
by tme
Defrost
by weght
Ktchen Tmer/Clock
Start/+30 sec./Confrm
Stop/Cancel
When the mcrowave oven s energzed, "0:00”
wll be dsplayed n LED screen and buzzer wll rng
once.
1. Press (Kitchen Timer/Clock) twice and the
2. Turn to adjust the hour; the input value
3. Press (Kitchen Timer/Clock) and the figures
4. Turn to adjust the minutes; the input value
5. Press (Kitchen Timer/Clock) to finish time
figures for hours will start flashing.
should be between 0 and 23.
for minutes will start flashing.
should be between 0 and 59.
setting. ":" symbol will flash, and the time will
light.
If you press (Stop/Cancel) durng
C
tme settng, oven wll automatcally
return back to prevous mode.
Door Open Key
Microwave Oven / User Manual
4.2.2 Cookng wth mcrowave
oven
1. Press (Microwave) and “P100” will be
displayed in LED screen.
2. Press (Microwave) again or turn to
select the desired power. Each time you press
the key, “P100”, “P80”, ”P50”, “P30” or “P10” will
be displayed respectively.
19 / 371 EN
Page 20
4 Operaton
3. Press (Start/+30 Sec./Confirm) to confirm
and turn to set the cooking time to a value
between 0:05 and 95:00.
4. Press (Start/+30 Sec./Confirm) again to
start cooking.
Example:
mcrowave power to cook for 20 m-
C
5. Press (Microwave) once and “P100” will be
displayed in the screen.
6. Press (Microwave) once again or turn to
set 80% microwave power.
7. Press (Start/+30Sec./Confirm) to confirm
and "P 80” will be displayed in the screen.
8. Turn to adjust the cooking time until the
oven displays "20:00".
9. Press (Start/+30 Sec./Confirm) to start
cooking.
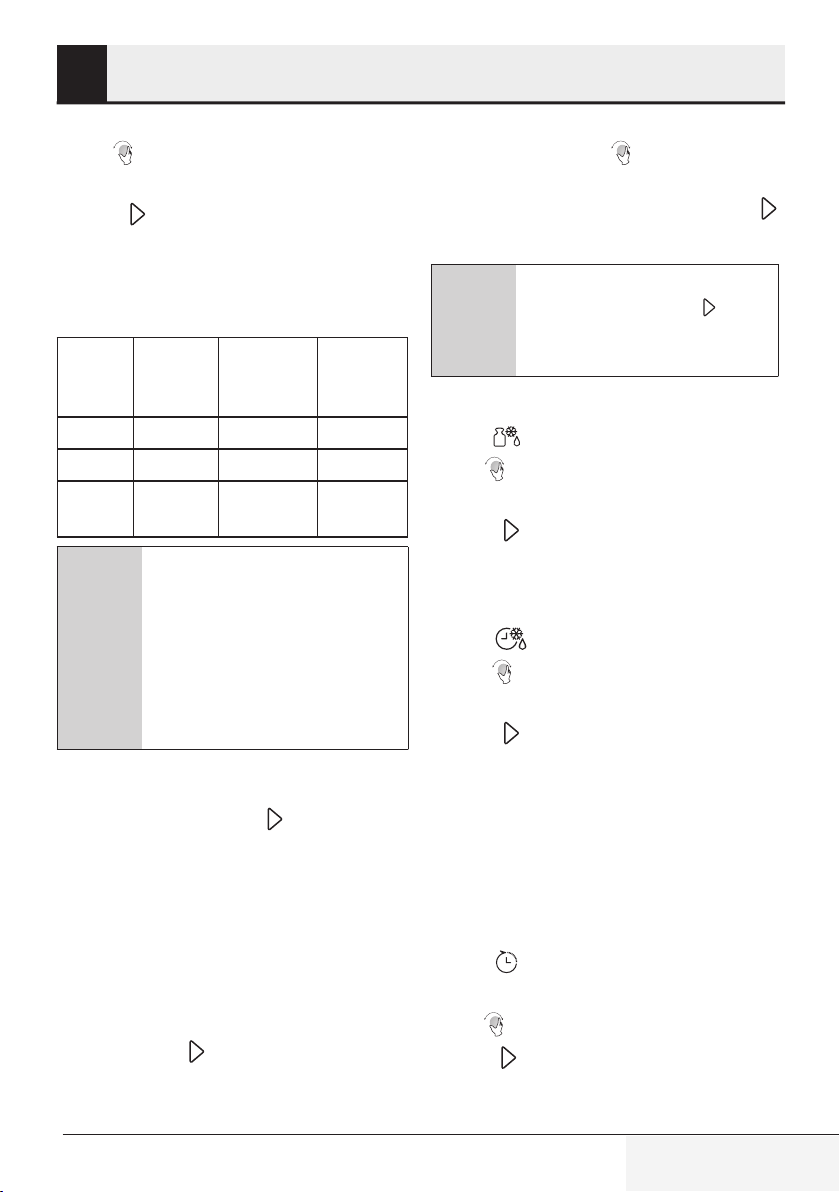
The steps for adjustng the tme n codng button
are as below:
nutes, you can operate the oven
wth the followng steps.
Setting the
duration
0-1 minute 5 seconds
1-5 minutes 10 seconds
5-10 minutes 30 seconds
10-30 minutes 1 minute
30-95 minutes 5 minutes
If you want to use 80%
Increment
amount
4.2.3 Mcrowave keypad
nstructons
Order Screen Microwave
1 P100 100%
2 P80 80%
3 P50 50%
4 P30 30%
5 P10 10%
4. 3 Cookng wth grll or
combnaton mode
1. Press (Grill/Combination) and "G” will
be displayed in LED screen. Press (Grill/
Combination) repeatedly or turn to select
the desired power. Each time you press the key,
“G”, ”C-1” or “C-2” will be displayed respectively.
2. Press (Start/+30 Sec./Confirm) to confirm
and turn to set the cooking time to a value
between 0:05 and 95:00.
3. Press (Start/+30 Sec./Confirm) again to
start cooking.
C
1. Press (Grll/Combnaton) once and "G” wll
be dsplayed n the screen.
2. Press (Grill/Combination) once again or turn
to select the Combination 1 mode.
3. Press (Start/+30Sec./Confirm) to confirm
and “C-1” will be displayed in the screen.
Power
Example:
55% mcrowave power and 45%
grll power (C-1) to cook for 10 mnutes, you can operate the oven
wth the followng steps.
If you want to use
20 / 371 EN
Microwave Oven / User Manual
Page 21
4 Operaton
4. Turn to adjust the cooking time until the
oven displays "10:00".
5. Press (Start/+30 Sec./Confirm) to start
cooking.
4.3.1 (Grll/Combnaton) Keypad
nstructons
Order Screen Micro-
wave
Power
1 G 0% 100%
2 C-1 55% 45%
3 C-2 36% 64%
When half the grll tme passes,
the oven sounds twce, and ths s
normal. In order to have a better
grllng effect, you should turn the
food over, close the door, and then
C
press (Start/+30Sec./Confrm) to
contnue cookng. If no operaton s
performed, the oven wll contnue
cookng.
Grill
Power
4.4 Quck start
1. In standby mode, press (Start/+30Sec./
Confirm) to start cooking with 100% microwave
power. Each time you press the key, cooking
time will increase until 95 minutes with steps of
30 seconds.
2. In microwave oven cooking, grill and combination cooking or defrost by time modes, the
cooking time will increase by 30 seconds each
time you press (Start/+30 Sec/Confirm).
3. In standby mode, turn counterclockwise to
set the cooking time in order to start cooking
with 100% microwave power and press
(Start/+30Sec./Confirm) to start cooking.
In auto menu and defrost by
weght modes, pressng
C
(Start/+30Sec/Confrm) wll not
ncrease the cookng tme.
4.5 Defrost by weght
1. Press (Defrost by weight) for once.
2. Turn to select the weight of food from 100
to 2000 g.
3. Press (Start/+30 Sec./Confirm) to start
defrost.
4.6 Defrost by tme
1. Press (Defrost by time) for once.
2. Turn to select the defrost time. The
maximum time is 95 minutes.
3. Press (Start/+30 Sec./Confirm) to start
defrost. Defrost power is P30 and cannot be
changed.
4.7 Ktchen tmer (counter)
Your oven s equpped wth an automatc counter
whch s not lnked wth the oven functons and
can be used separately at the ktchen ( t can be
set to max. 95 mnutes.)
1. Press (Kitchen Timer/Clock) for once and
00:00 will be displayed in LED screen.
2. Turn to enter the correct time.
3. Press (Start/+30Sec./Confirm) to confirm
the setting.
Microwave Oven / User Manual
21 / 371 EN
Page 22
4 Operaton
4. When the countdown from the entered time
reaches to 00:00, the buzzer will ring for 5
times. If the time is set (24-hour system),
current time will be displayed in LED screen.
Press (Stop/Cancel) to abort the tmer at anytme.
Ktchen tmer functons dfferent
than 24-hours system. Ktchen
C
4.8 Auto menu
1. Turn clockwise to select the desired menu.
Menus between “A-1” and “A-8”, namely pizza,
meat, vegetable, pasta, potato, fish, beverage
and popcorn, will be displayed.
2. Press (Start/+30Sec./Confirm) to confirm.
3. Turn to choose the default weight in
accordance with the menu chart.
4. Press (Start/+30 Sec./Confirm) to start
cooking.
tmer s just a tmer.
Example:
C
1. Turn clockwise until "A-6" is displayed in the
screen.
2. Press (Start/+30Sec./Confirm) to confirm.
3. Turn to select the weight of fish until "350"
is displayed in the screen.
4. Press (Start/+30 Sec./Confirm) to start
cooking.
“Auto Menu" to cook 350 g fsh:
If you want to use
22 / 371 EN
Microwave Oven / User Manual
Page 23
4 Operaton
4.8.1 Auto cookng menu
Menu Weight Screen
A-1
Pizza
A-2
Meat
A-3
Vegetable
A-4
Pasta
A-5
Potato
A-6
Fish
A-7
Beverage
A-8
Popcorn
200 g 200
400 g 400
250 g 250
350 g 350
450 g 450
200 g 200
300 g 300
400 g 400
50 g (with 450 ml cold water) 50
100 g (with 800 ml cold water) 100
200 g 200
400 g 400
600 g 600
250 g 250
350 g 350
450 g 450
1 glass (120 ml) 1
2 glasses (240 ml) 2
3 glasses (360 ml) 3
50 g 50
100 g 100
Microwave Oven / User Manual
23 / 371 EN
Page 24
4 Operaton
4.9 Mult-step cookng
At most 2 steps can be set for cookng. In multstep cookng, f one step s defrostng, then defrostng must be placed n the frst step.
2. While cooking, press (Kitchen Timer/Clock)
and the current time will be displayed for 3
seconds.
4.11 Chld lock
If you want to thaw food for 5 mnutes and then cook wth 80%
C
1. Press (Defrost by time) for once.
2. Turn to select the defrost time until "5:00" is
displayed in the screen.
3. Press (Microwave) once and “P100” will be
displayed in the screen.
4. Press (Microwave) once again or turn to
set 80% microwave power.
5. Press (Start/+30Sec./Confirm) to confirm
and "P 80” will be displayed in the screen.
6. Turn to adjust the cooking time until the
oven displays "7:00".
7. Press (Start/+30Sec./Confirm) to start
cooking. Buzzer will sound once for the first
step and defrost time countdown will start.
Buzzer will sound once again when entering
the second cooking step. Buzzer will sound for
5 times at the end of cooking.
mcrowave power for 7 mnutes,
perform the followng steps:
1.
Locking:
Cancel) for 3 seconds and a buzzer will sound
indicating that the child lock is activated. If the
time is already set, current time will also be
displayed; otherwise will be displayed in the
LED screen.
2.
Unlocking:
(Stop/Cancel) for 3 seconds and a long
”beep” will sound indicating that the child lock
is disabled.
4.12 Openng the oven door
Press (Open door) and the oven door wll be
opened.
C
In standby mode, press (Stop/
To disable the child lock, press
If the door cannot be opened
wth “open door” key n model
MGB 25333 BG (e.g., due to power
falure), you can open the door wth
vacuum lfter for openng the door
manually.
4.10 Query functon
1. In microwave, grill and combination modes, press
(Microwave) or (Grill/Combination) and
the current power level will be displayed for 3
seconds. After 3 seconds, the oven will return
to the previous mode.
24 / 371 EN
Microwave Oven / User Manual
Page 25

5 Cleanng and mantenance
5.1 Cleanng
WARNING:
lne, solvent, abrasve cleanng
A
A
1. Turn the applance off and dsconnect t from
wall socket.
2. Wat for the applance to completely cool down.
3. Keep the nsde of the oven clean. Wpe wth a
damp cloth when splashed food or splled lquds stck on the walls of the oven. A mld detergent may be used f the oven gets very drty.
Avod usng sprays and other harsh cleanng
agents as they may cause stans, marks, and
opaqueness on the door surface.
4. Outer surfaces of the oven must be cleaned
wth a damp cloth. Do not allow water ngress
from ventlaton openngs to prevent damage
to the operatng parts n the oven.
5. Wpe both sdes of the door and the glass, door
gaskets and parts near the gaskets frequently
wth a damp cloth n order to remove the overflowng and splashng stans. Do not use abrasve cleanng agents.
6. Do not allow control panel to get wet. Clean
wth a soft damp cloth. Leave the door of the
oven open to prevent nadvertent operaton
whle cleanng the control panel.
7. If steam accumulates nsde or around the oven
door, wpe wth a soft cloth. Ths may occur
when the mcrowave oven s operated under
hgh humdty condtons. It s normal.
8. In some cases, you may need to remove the
glass tray for cleanng. Wash the tray n warm
soapy water or n a dshwasher.
9. The roller rng and oven floor should be cleaned
regularly to avod excessve nose.
agents, metal objects or hard
brushes to clean the applance.
WARNING:
the applance or ts power cable
n water or n any other lqud.
Never use gaso-
Never mmerse
It would be sufficient to wipe the lower
surface of the oven with a mild detergent.
Roller ring may be washed in warm soapy
water or in a dishwasher. When you remove
the roller ring from oven internal floor for
cleaning, ensure that you install it in the
correct position while replacing it.
10. In order to remove bad odors in your oven, put
a glass of water and juice and peel of a lemon
to a deep bowl suitable for use in microwave
and operate the oven for 5 minutes in
microwave mode. Wipe thoroughly and dry
with a soft cloth.
11. Please contact the authorized service when
the oven lamp needs to be replaced.
12. The oven should be cleaned regularly and
any food deposits should be removed. If the
oven is not kept clean, this may cause surface
defects that would affect the lifecycle of the
appliance negatively and that would possibly
cause risks.
13. Please do not dispose this appliance with
household waste; old ovens shall be disposed
to special waste centers provided by the
municipalities.
14. When the microwave oven is used in grill
function, a small amount of smoke and odor
may occur which will disappear after a certain
time of usage.
5.2 Storage
• If you do not ntend to use the applance for a
long tme, please store t carefully.
• Please make sure that the applance s unplug-
ged, cooled down and totally dry.
• Store the applance n a cool and dry place.
• Keep the applance out of the reach of chldren
5.3 Handlng and transportaton
• Durng handlng and transportaton, carry the
applance n ts orgnal packagng. The packagng of the applance protects t aganst physcal damages.
Microwave Oven / User Manual
25 / 371 EN
Page 26
5 Cleanng and mantenance
• Do not place heavy loads on the applance or the
packagng. The applance may be damaged.
• Droppng the applance wll render t non-
operatonal or cause permanent damage..
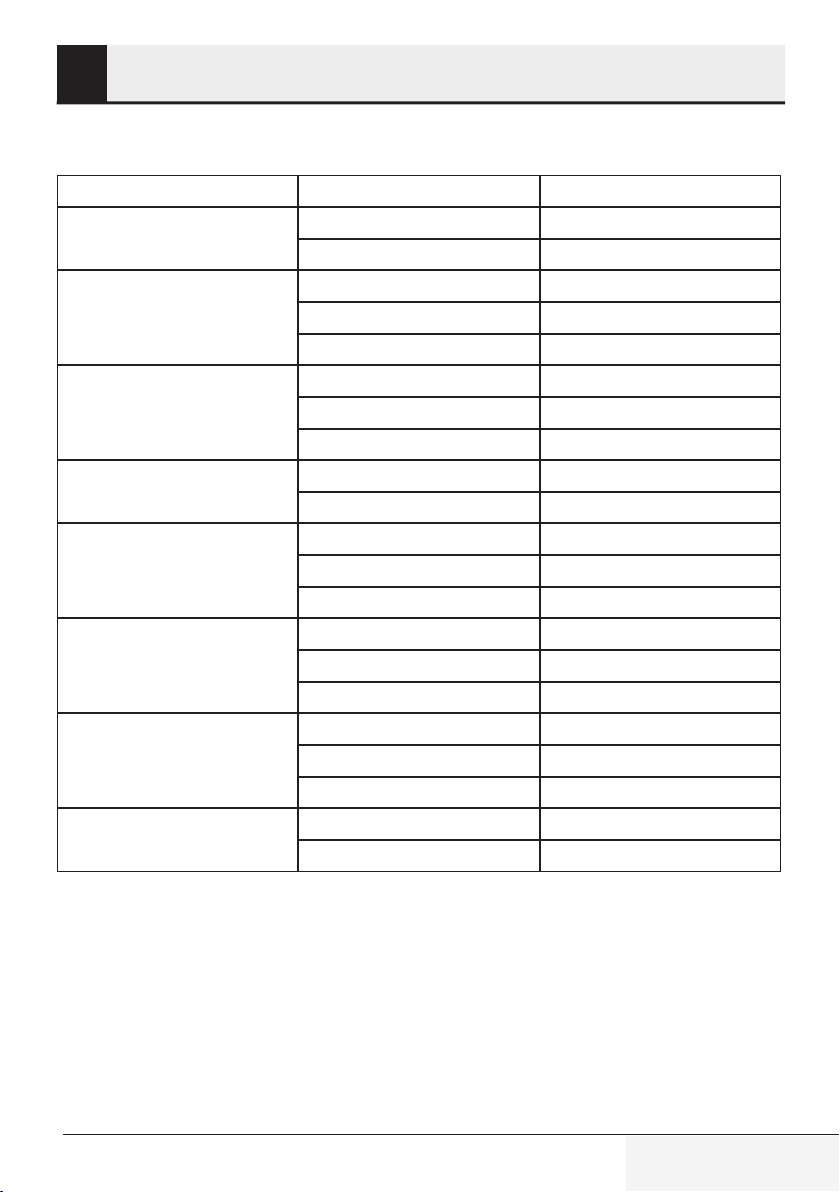
6 Troubleshootng
Normal
Microwave oven interferes with TV reception Radio and TV reception may be interfered when
microwave oven is operating. It is similar to the
interference caused by small electrical appliances,
like mixer, vacuum cleaner, and electric fan. It is
normal.
Oven light is dimmed In low power microwave cooking, oven light may
be dimmed. It is normal.
Steam accumulating on door, hot air coming out
of vents
Oven started accidentally with no food in it. It is not allowed to run the appliance without any
Problem Possible Reason Solution
Oven cannot be started. (1) Power cable is not plugged
in properly.
(2) Fuse is blown or circuit
breaker is activated.
(3) Trouble with outlet. Test the outlet with other
Oven does not heat. (4) Door is not closed properly. Close the door properly.
Glass turntable makes noise
when microwave oven
operates
Oven displays E-3 error and
does not function (for model
MGB 25333 BG)
(5) Turntable and bottom of
the oven is dirty.
(6) Oven door does not open
(due to an obstruction in front
of the door, low voltage and
etc.)
During cooking, steam may arise from the food.
Most of this steam will get out from vents. But
some may accumulate on a cool place like oven
door. It is normal.
food inside. It is very dangerous.
Unplug. Then plug again after 10
seconds.
Replace fuse or reset circuit
breaker (repaired by professional
personnel of our company).
electrical appliances.
Refer to “Cleaning and
Maintenance" section to clean
dirty parts.
Unplug. Then plug again after 10
seconds.
26 / 371 EN
Microwave Oven / User Manual
Page 27
Bitte zunächst diese Anleitung lesen!
Werter Kunde,
Danke, dass Sie sich für ein Produkt der Marke Beko entschieden haben. Wir hoffen,
dass Sie mit diesem Produkt, das mit den höchsten Qualitätsanforderungen und der
modernsten Technologie hergestellt wurde, beste Ergebnisse erzielen. Bitte lesen Sie
die gesamte Bedienungsanleitung und alle anderen Begleitdokumente aufmerksam,
bevor Sie das Produkt verwenden; bewahren Sie sie zum künftigen Nachschlagen sicher auf. Wenn Sie das Produkt an einen Dritten weitergeben, händigen Sie bitte auch
diese Anleitung aus. Befolgen Sie alle Warnhinweise und Informationen in dieser Anleitung.
Bedeutung der Symbole
Folgende Symbole werden in den verschiedenen Abschnitten dieser Bedienungsanleitung verwendet:
Wichtige Informationen und nützliche
C
A
Tipps in Bezug auf die Verwendung.
Warnhinweise zu gefährlichen Situationen im Hinblick auf die Sicherheit
von Leib, Leben und Eigentum.
Warnung vor heißen Flächen.
Dieses Produkt wurde in umweltfreundlichen, modernen Einrichtungen ohne schädliche
Auswirkungen auf die Natur hergestellt.
Deses Gerät stmmt mt der WEEERchtlne überen.
Es enthält ken PCB.
Page 28
INHALT
1 Wichtige Hinweise zu Sicherheit
und Umwelt 29
1.1 Allgemeine Sicherheit ..........................................29
1.2 Zweckmäßiger Gebrauch ....................................33
1.3 Sicherheit von Kindern ........................................33
1.4 Konformität mit der WEEE-Richtlinie und
Entsorgung von Altprodukten ................................34
1.5 Informationen zur Verpackung ........................34
2 Ihr Mikrowellenherd 35
2.1 Übersicht ...................................................................35
2.1.1 Bedienelemente und Teile ............................. 35
2.1.2 Technische Daten ...............................................35
2.1.3 Drehteller installieren .......................................36
3 Installation und Anschluss 37
3.1 Installation und Anschluss .................................37
3.2 Integrierte Installation .........................................38
3.2.1 Möbelabmessungen für die integrierte
Installation .......................................................................38
3.2.2 Schrank vorbereiten .........................................39
3.2.3 Mikrowellenherd befestigen .........................40
3.3 Funkstörungen .......................................................41
3.4 Grundsätzliches zur
Mikrowellenzubereitung ............................................41
3.5 Erdung ........................................................................41
3.6 Utensilientest .........................................................42
4 Bedienung 43
4.1 Bedienfeld .................................................................43
4.2 Bedienungsanweisungen ..................................43
4.2.1 Zeit einstellen ......................................................43
4.2.2 Mit dem Mikrowellenherd garen ..................43
4.2.3 Anweisungen zum Tastenfeld
(Mikrowelle) .....................................................................44
4. 3 Mit Grill- oder Kombimodus garen .................44
4.3.1 Anweisungen zum Tastenfeld
(Grill/Kombination) .......................................................45
4.4 Schnellstart ............................................................45
4.5 Auftauen nach Gewicht ......................................45
4.6 Auftauen nach Zeit ..............................................45
4.7 Küchentimer (Countdown) ................................46
4.8 Automatische Zubereitung ...............................46
4.8.1 Gericht automatisch garen ............................47
4.9 Mehrstufiges Garen .............................................48
4.10 Abfragefunktion ..................................................48
4.11 Kindersicherung ...................................................48
4.12 Gerätetür öffnen .................................................48
5 Reinigung und Wartung 49
5.1 Reinigung ..................................................................49
5.2 Lagerung ...................................................................50
6 Fehlerbehebung 51
28 / 371 DE
Mikrowellenherd / Bedienungsanleitung
Page 29

Wchtge Hnwese zu Scherhet
1
und Umwelt
Dieser Abschnitt enthält
Sicherheitsanweisungen, die
beim Schutz vor Personenund Sachschäden, Bränden,
Stromschlägen und dem Austreten
von Mikrowellenenergie helfen. Bei Nichtbeachtung dieser
Anweisungen erlöschen die gewährten Garantien.
1.1 Allgemene
Scherhet
• Versuchen Sie nicht, das Gerät zu
starten, wenn dessen Tür offen
ist; andernfalls könnten Sie sich
gefährlicher Mikrowellenenergie
aussetzen. Sicherheitssperren
dürfen nicht deaktiviert oder manipuliert werden.
• Stecken Sie nichts zwischen Vor-
derseite und Gerätetür. Achten Sie
darauf, dass sich weder Schmutz
noch Reste von Reinigungsmitteln
am Gehäuse ansammeln.
• Jegliche Wartungsarbeiten in Ver-
bindung mit dem Entfernen von
Abdeckungen, die vor der Aussetzung von Mikrowellenenergie
schützen, müssen von autorisiertem Servicepersonal durchgeführt
werden. Jede andere Herangehensweise ist gefährlich.
• Ihr Produkt dient dem Garen, Er-
hitzen und Auftauen von Lebensmitteln zuhause. Es darf nicht
gewerblich eingesetzt werden.
Der Hersteller haftet nicht für
Schäden, die durch Missbrauch
entstehen.
• Gerät nicht im Freien, in Bade-
zimmern, feuchten Umgebungen
oder an anderen Orten verwenden, an denen es feucht werden
kann.
• Bei Schäden durch Missbrauch
oder falschen Gebrauch des Gerätes erlöschen jegliche Haftungsund Garantieansprüche.
• Niemals versuchen, das Gerät aus-
einanderzubauen. Für Schäden
durch unsachgemäße Handhabung wird keine Haftung übernommen.
• Nur Originalteile und vom Herstel-
ler empfohlene Teile verwenden.
• Dieses Gerät beim Einsatz nicht
unbeaufsichtigt lassen.
• Gerät immer auf einer stabilen,
ebenen, sauberen, trockenen und
rutschfesten Unterlage benutzen.
• Das Gerät sollte nicht mit Zeit-
schaltuhren oder separaten Fernsteuerungssystemen betrieben
werden.
Mikrowellenherd / Bedienungsanleitung
29 / 371 DE
Page 30

Wchtge Hnwese zu Scherhet
1
und Umwelt
• Vor der ersten Inbetriebnahme
des Gerätes alle Komponenten
reinigen. Siehe dazu Abschnitt
„Reinigung und Pflege“.
• Gerät nur für seinen in dieser
Anleitung beschriebenen vorgesehenen Zweck verwenden.
Keine aggressiven Chemikalien
und keine Dampfreiniger verwenden. Dieses Gerät dient speziell
dem Erhitzen und Garen von Lebensmitteln. Es ist nicht für den
gewerblichen oder Laboreinsatz
vorgesehen.
• Gerät nicht zum Trocknen von
Kleidung oder Geschirrtüchern
verwenden.
• Das Gerät wird im Betrieb sehr
heiß. Achten Sie darauf, keine heißen Teile im Inneren des Gerätes
zu berühren.
• Ihr Gerät ist nicht für das Trocknen
von Lebewesen vorgesehen.
• Verwenden Sie das Gerät nicht im
Leerzustand.
• Küchenutensilien können auf-
grund der von den erhitzten Lebensmitteln übertragenen Hitze
heiß werden. Möglicherweise benötigen Sie Küchenhandschuhe
zum Halten von Utensilien.
• Sie sollten prüfen, ob Utensilien
mikrowellengeeignet sind.
• Stellen Sie den Mikrowellen-
herd nicht auf Öfen oder andere
wärmeerzeugende Geräte. Andernfalls können sie beschädigt
werden; zudem erlischt die Garantie.
• Der Mikrowellenherd darf nicht in
einen Schrank gestellt werden,
der nicht den Installationsanweisungen entspricht.
• Nach dem Garen von Lebensmit-
teln kann beim Entfernen von
Abdeckungen und Folien Dampf
entweichen.
• Tragen Sie beim Herausnehmen
von erhitzten Lebensmitteln Küchenhandschuhe.
• Das Gerät und seine zugänglichen
Flächen können im Betrieb sehr
heiß werden.
• Tür und Außenseite der Glasflä-
che können im Betrieb sehr heiß
werden.
30 / 371 DE
Mikrowellenherd / Bedienungsanleitung
Page 31

Wchtge Hnwese zu Scherhet
1
und Umwelt
1.1.1 Elektrsche
Scherhet
• Der Beko-Mikrowellenherd stimmt
mit geltenden Sicherheitsstandards überein; daher sollten Gerät
oder Netzkabel zur Vermeidung
von Gefahren im Falle von Schäden
durch den Händler, ein Kundencenter oder einen spezialisierten,
autorisierten Serviceanbieter
repariert oder ersetzt werden.
Fehlerhafte oder unqualifizierte
Reparaturen können Gefahren
und Risiken für den Benutzer verursachen.
• Sicherstellen, dass Ihre Strom-
versorgung mit den Angaben am
Typenschild des Gerätes übereinstimmt.
Die einzige Möglichkeit, das Gerät
von der Stromversorgung zu trennen, besteht darin, das Netzkabel
aus der Steckdose zu ziehen.
• Verwenden Sie das Gerät nur mit
einer geerdeten Steckdose.
• Gerät niemals benutzen, wenn das
Netzkabel oder das Gerät selbst
beschädigt ist.
• Gerät nicht mit einem Verlänge-
rungskabel verwenden.
• Gerät oder Netzstecker nie mit
feuchten oder nassen Händen
berühren.
• Gerät so aufstellen, dass der Netz-
stecker immer zugänglich ist.
• Schäden am Netzkabel vermei-
den, nicht quetschen, knicken
oder über scharfe Kanten ziehen.
Netzkabel von heißen Oberflächen und offenen Flammen fernhalten.
• Anschlusskabel so verlegen, dass
man daran nicht unbeabsichtigt
ziehen kann und das Gerät nicht
zur Stolperfalle wird.
• Gerät vor jeder Reinigung und bei
Nichtbenutzung von der Stromversorgung trennen.
• Zum Trennen von der Stromver-
sorgung niemals am Netzkabel
des Gerätes ziehen; Netzkabel
niemals um das Gerät wickeln.
• Gerät, Netzkabel sowie Netzstek-
ker nicht in Wasser oder andere
Flüssigkeiten tauchen. Gerät nicht
unter fließendes Wasser halten.
• Gerät beim Erhitzen von Lebens-
mitteln in Kunststoff- oder Papierbehältern regelmäßig prüfen,
da sich der Behälter entzünden
könnte.
Mikrowellenherd / Bedienungsanleitung
31 / 371 DE
Page 32

Wchtge Hnwese zu Scherhet
1
und Umwelt
• Drähte und/oder Metallgriffe von
mikrowellengeeigneten Papieroder Kunststoffbehältern vor dem
Erhitzen im Mikrowellenherd entfernen.
• Bei Rauchentwicklung Gerät ab-
schalten, Netzstecker ziehen und
Tür zur Vermeidung einer Entzündung geschlossen halten.
• Innenraum des Gerätes nicht zu
Aufbewahrungszwecken verwenden. Papiergegenstände,
Kochgeräte oder Lebensmittel bei
Nichtbenutzung nicht im Mikrowellenherd lassen.
• Der Inhalt von Babyfläschchen
und Gläschen muss verrührt bzw.
geschüttelt werden; zur Vermeidung von Verbrennungen vor dem
Füttern die Temperatur prüfen.
• Dieses Gerät ist ein ISM-Gerät
der Gruppe 2, Klasse B. Gruppe 2
beinhaltet alle ISM- (industrielle,
wissenschaftliche und medizinische) Geräte, in denen absichtlich
Hochfrequenzenergie erzeugt
und/oder für die Behandlung
von Materialien und für Funkenerodiermaschinen in Form von
elektromagnetischer Strahlung
verwendet wird.
• Geräte der Klasse B eignen sich
für den Einsatz in Wohnbereichen
sowie Bereichen, die direkt mit
einem Niederspannungs-Stromversorgungsnetz verbunden sind.
• Tür und Außenseite des Gerätes
können im Betrieb heiß werden.
1.1.2 Produktscherhet
• Flüssigkeiten und andere Le-
bensmittel dürfen aufgrund von
Explosionsgefahr nicht in geschlossenen Behältern erhitzt
werden.
• Wenn Getränke beim Erhitzen im
Mikrowellenherd zum Kochen gebracht werden, können sie nach
dem Herausnehmen aus dem
Gerät überlaufen; seien Sie also
beim Greifen des Behälters entsprechend vorsichtig.
• Braten Sie nichts im Mikrowellen-
herd. Heißes Öl kann Komponenten und Materialien des Gerätes
beschädigen und sogar Hautverbrennungen verursachen.
• Durchstechen Sie Lebensmittel
mit einer dicken Haut, wie z. B.
Kartoffeln, Zucchini, Äpfel und
Kastanien.
• Das Gerät muss so aufgestellt
werden, dass die Rückseite zur
Wand zeigt.
32 / 371 DE
Mikrowellenherd / Bedienungsanleitung
Page 33

Wchtge Hnwese zu Scherhet
1
und Umwelt
• Falls die Tür oder Türdichtungen
• Übergaren Sie Lebensmittel nicht;
beschädigt sind, darf der Mikrowellenherd erst nach Reparatur
durch qualifiziertes Personal wie-
• Verwenden Sie keine Dampfreini-
der in Betrieb genommen werden.
• Bitte sichern Sie den Drehteller zur
Vermeidung von Beschädigungen,
bevor Sie das Gerät bewegen.
• Verwenden Sie den Mikrowellen-
1.3 Scherhet von
Kndern
• Besondere Vorsicht gilt bei Ver-
herd nicht zum Garen oder Erhitzen von Eiern; ganz gleich ob mit
oder ohne Schale.
• Entfernen Sie niemals die Teile an
der Rückseite oder den Seiten-
• Dieses Gerät kann von Kindern ab 8
wänden des Gerätes; diese sorgen
für den Mindestabstand zwischen
den Schrankwänden und dem
Gerät zur Gewährleistung der erforderlichen Luftzirkulation.
1.2 Zweckmäßger
Gebrauch
• Mikrowellenherd nur als Einbau-
gerät verwenden.
• Das Gerät nicht für Zwecke benut-
zen, für die es nicht bestimmt ist.
• Gerät nicht als Heizung missbrau-
chen.
• Der Mikrowellenherd ist nur zum
Auftauen, Garen und Schmoren
von Lebensmitteln vorgesehen.
• Verschluckungsgefahr! Alle Ver-
andernfalls können Sie Feuer fangen.
ger zur Reinigung des Gerätes.
wendung in der Nähe von Kindern
oder Personen, deren körperliche,
sensorische oder geistige Fähigkeiten eingeschränkt sind.
Jahren sowie von Personen mit eingeschränkten körperlichen, sensorischen oder geistigen Fähigkeiten
oder einem Mangel an Wissen und
Erfahrung verwendet werden, sofern sie im Hinblick auf eine sichere
Benutzung des Gerätes beaufsichtigt werden oder entsprechend
angeleitet wurden und die damit
verbundenen Gefahren verstehen.
Kinder dürfen nicht mit dem Gerät
spielen. Reinigungs- und Wartungsarbeiten dürfen nicht von Kindern
ausgeführt werden, sofern diese
nicht durch einen Erwachsenen beaufsichtigt werden.
packungsmaterialien von Kindern
fernhalten.
Mikrowellenherd / Bedienungsanleitung
33 / 371 DE
Page 34

Wchtge Hnwese zu Scherhet
1
und Umwelt
• Sie dürfen Kindern die Benutzung
des Mikrowellenherds nur erlauben, wenn sie angemessen im
sicheren Gebrauch des Gerätes
angeleitet wurden und die Gefahren einer unsachgemäßen Benutzung versteht.
• Aufgrund von übermäßiger Hitze
in Grill- und Kombimodus sollten
Deshalb darf das Gerät am Ende seiner Einsatzzeit
nicht mit dem normalen Hausmüll entsorgt werden. Geben Sie das Gerät bei einer Sammelstelle
ab, die für das Recycling von elektrischen und
elektronischen Geräten zuständig ist. Erkundigen
Sie sich bei der örtlichen Behörde in Ihrer Region
nach diesen Sammelstellen. Durch das Recycling
von Altgeräten tragen Sie zum Schutz der Umwelt
und natürlichen Rohstoffe bei.
1.5 Informatonen zur
Verpackung
Sie Kindern die Nutzung dieser
Modi nur unter Aufsicht eines Erwachsenen erlauben.
• Bewahren Sie Produkt und Netz-
kabel so auf, dass Kinder unter 8
Jahren nicht darauf zugreifen kön-
die Verpackungsmaterialien nicht mit dem
Hausmüll oder anderem Müll. Bringen Sie sie zu
einer von der Stadtverwaltung bereitgestellten
Sammelstelle für Verpackungsmaterial.
nen.
• Das Gerät und seine zugänglichen
Flächen können im Betrieb sehr
heiß werden. Kinder fernhalten.
Die Verpackung des Produkts wurde
gemäß unserer nationalen
Gesetzgebung aus recyclingfähigen
Materialien hergestellt. Entsorgen Sie
1.4 Konformtät mt der
WEEE-Rchtlne und
Entsorgung von Altprodukten
Dieses Produkt enthält keine der in der
vom Ministerium für Umwelt und
Städteplanung ausgestellten
„Regulierung zur Überwachung von
elektrischen und elektronischen
Altgeräten“ angegebenen gefährlichen und verbotenen Materialien. Das Gerät erfüllt die
Vorgaben der WEEE-Richtlinie. Dieses Produkt
wurde aus hochwertigen Teilen und Materialien
hergestellt, die wiederverwendet werden können
und zum Recycling geeignet sind.
34 / 371 DE
Mikrowellenherd / Bedienungsanleitung
Page 35

2 Ihr Mkrowellenherd
6
7
1
235 4
8
2.1 Überscht
9
2.1.1 Bedenelemente und Tele
1. Bedienfeld
2. Drehtellerschaft
3. Drehtellerhalterung
4. Glasteller
5. Gerätefenster
6. Türgruppe
7. Türsicherheitssperrsystem
8. Grillrost (nur zur Verwendung mit der
Grillfunktion; immer auf den Glasteller stellen)
9. Vakuumheber zum manuellen Öffnen der Tür
(bei Modell MGB 25333 BG.)
Markerungen am Produkt oder n den mtgeleferten Dokumenten angegebene Werte stellen Werte dar, de unter
Laborbedngungen nach den jewels geltenden Standards ermttelt wurden. Dese Werte können je nach Ensatz- und
Umgebungsbedngungen vareren. Lestungswerte getestet be 230 V.
2.1.2 Technsche Daten
Stromverbrauch
Leistung
Betriebsfre-
quenz
Externe Abmessungen
Innenabmessungen des Mikrowellenherds
Gerätekapazität
Nettogewicht
230 V
Wechselspannung, 50
Hz, 1450 W (Mikrowelle)
1000 W (Grill)
900 W
2450 MHz
388 mm (H) / 595 mm
(B) / 392 mm (T)
206 mm (H) / 328 mm
(B) / 400 mm (T)
25 Liter
18.5 kg
Mikrowellenherd / Bedienungsanleitung
35 / 371 DE
Page 36

Göbek (alt kısım)
Cam tabla
Döner tabla desteği
Döner tabla mili
2 Ihr Mkrowellenherd
2.1.3 Drehteller nstalleren
• Glasteller niemals verkehrt herum aufstellen.
Der Glasteller darf niemals blockiert werden.
• Sowohl Glasteller als auch Drehtellerhalterung
müssen stets während des Garens verwendet
werden.
• Alle Lebensmittel und Lebensmittelbehälter
müssen zum Garen auf dem Glasteller platziert
werden.
• Falls Glasteller oder Drehtellerhalterung Risse
oder Bruchstellen aufweisen, wenden Sie sich
an Ihren autorisiertes Kundencenter vor Ort.
Nabe (Unterseite)
Glasteller
Drehtellerschaft
Drehtellerhalterung
36 / 371 DE
Mikrowellenherd / Bedienungsanleitung
Page 37

3 Installaton und Anschluss
3.1 Installaton und Anschluss
• Entfernen Sie alle Verpackungsmaterialien und
Zubehörteile. Untersuchen Sie das Gerät auf
mögliche Schäden, wie Beulen oder eine defekte Tür. Installieren Sie den Mikrowellenherd
nicht, falls er beschädigt ist.
• Entfernen Sie jegliche Schutzfolien an der
Schrankfläche des Mikrowellenherds.
• Entfernen Sie nicht die hellbraune Mica-Abde-
ckung im Garraum des Mikrowellenherds, da
diese die Magnetfeldröhre schützt.
• Dieses Gerät ist nur für den privaten Gebrauch
bestimmt.
• Der Mikrowellenherd darf nur als Einbauge-
rät verwendet werden. Stellen Sie es zum Betrieb nicht auf eine Arbeitsfläche oder in einen
Schrank.
• Bitte beachten Sie die speziellen Installations-
anweisungen.
• Das Gerät kann in einem 60 cm breiten, an der
Wand montierten Schrank (mindestens 55 cm
tief und 85 cm über dem Boden) installiert werden.
• Das Gerät verfügt über einen Stecker und darf
nur an eine ordnungsgemäß installierte, geerdete Steckdose angeschlossen werden.
• Die Netzspannung muss der am Typenschild an-
gegebenen Spannung entsprechen.
• Die Steckdose muss installiert sein; das An-
schlusskabel darf nur durch autorisiertes Servicepersonal ersetzt werden. Falls der Stecker
nach der Installation nicht mehr zugänglich ist,
muss eine allpolige Trennvorrichtung mit einem
Kontaktabstand von mindestens 3 mm vorhanden sein.
• Adapter, Mehrfachsteckdosen und Verlänge-
rungskabel dürfen nicht verwendet werden. Bei
einer Überlastung besteht Brandgefahr.
C
Zugängliche Flächen können während des Betriebs heiß werden.
Achten Sie darauf, das Netzkabel
nicht einzuklemmen oder zu biegen.
Mikrowellenherd / Bedienungsanleitung
37 / 371 DE
Page 38

3 Installaton und Anschluss
3.2 Integrerte Installaton
3.2.1 Möbelabmessungen für de ntegrerte Installaton
Der Rahmen des Mikrowellenherds sollte aus dem Schrank herausragen
380+2
38 / 371 DE
Mikrowellenherd / Bedienungsanleitung
Page 39

a
a
Vida A
Braket
Merkez çizgi
Braket
Vida A
3 Installaton und Anschluss
3.2.2 Schrank vorbereten
1. Lesen Sie die Anweisungen aufn der Schablone (Schrank/unten) und legen Sie die Schablone auf die
untere Innenseite des Schranks.
a
a
LEFT EDGE
T EDGE RIGH
CENTER LINE
FRONT EDGE
2. Kennzeichnen Sie die Stellen an der unteren Innenseite des Schranks entsprechend den Markierungen
„a“ der Schablone.
Schraube A
Halterung
Mittellinie
3. Entfernen Sie die Schablone (Schrank/unten) und befestigen Sie die Halterung mit Schraube A.
Schraube A
Mikrowellenherd / Bedienungsanleitung
Halterung
39 / 371 DE
Page 40

3 Installaton und Anschluss
3.2.3 Mkrowellenherd befestgen
1. Installieren Sie den Mikrowellenherd im Schrank.
- Stellen Sie sicher, dass die Rückseite des Mikrowellenherds in der Halterung eingerastet ist.
- Achten Sie darauf, das Netzkabel nicht einzuklemmen oder zu biegen.
2. Öffnen Sie die Tür, befestigen Sie das Gerät mit Schraube B durch die Installationsöffnung am Schrank.
Befestigen Sie dann die Einbaurahmen-Kunststoffabdeckung an der Installationsöffnung.
Halterung
braket
40 / 371 DE
Schraube B
Vida B
Installationsöffnung
Montaj deliği
Mikrowellenherd / Bedienungsanleitung
Page 41

3 Installaton und Anschluss
3.3 Funkstörungen
Der Betrieb des Mikrowellenherds
kann Störungen bei Radios, Fernse-
C
• Stellen Sie den Mikrowellenherd so weit wie
möglich von Radios und Fernsehern entfernt
auf. Durch Inbetriebnahme des Mikrowellenherdes können Störungen Ihres Radio- oder Fernsehempfangs verursacht werden. 2. Schließen
Sie Ihr Gerät an eine haushaltsübliche Steckdose an. Achten Sie darauf, dass Spannung und
Frequenz den Angaben am Typenschild entsprechen.
• Störungen lassen sich durch folgende Maßnah-
men reduzieren oder beseitigen:
• Reinigen Sie Tür und Dichtfläche des Gerätes.
• Richten Sie die Antenne des Radios oder Fern-
sehers neu aus.
• Stellen Sie das Gerät basierend auf der Position
des Receivers neu auf.
• Entfernen Sie den Mikrowellenherd vom Recei-
ver.
• Schließen Sie den Mikrowellenherd an eine an-
dere Steckdose an, damit Mikrowellenherd und
Receiver unterschiedliche Leitungen nutzen.
hern und ähnlichen Geräten verursachen.
3.4 Grundsätzlches zur
Mkrowellenzuberetung
• Bereiten Sie die Lebensmittel sorgfältig vor. Be-
wahren Sie den Rest gesondert auf.
• Beachten Sie die Garzeit. Verwenden Sie die
kürzeste angegebene Garzeit; verlängern Sie
das Garen, falls erforderlich. Übergarte Lebensmittel können Rauch verursachen und verbrennen.
• Decken Sie die Lebensmittel während des Ga-
rens ab. Durch Abdecken der Lebensmittel werden Spritzer verhindert und die Lebensmittel
gleichmäßig gegart.
• Wenden Sie Lebensmittel, wie Geflügel und
Hamburger, während des Garens; dadurch lassen sich solche Lebensmittel schneller zubereiten. Größere Lebensmittel, wie Braten, müssen
mindestens einmal gewendet werden.
• Wenden Sie Lebensmittel, wie Frikadellen, nach
der Hälfte der Garzeit; wechseln Sie ihre Position von der Mitte des Tellers an den Rand.
3.5 Erdung
Dieses Gerät muss geerdet sein.
Der Mikrowellenherd besitzt ein Erdungskabel mit
geerdetem Stecker. Das Gerät muss an eine ordnungsgemäß installierte und geerdete Steckdose
angeschlossen werden. Ein Erdungssystem erlaubt einen Schutzleiter für elektrischen Strom
im Falle eines Kurzschlusses und reduziert damit
die Stromschlaggefahr. Wir empfehlen, einen
Stromkreis speziell für den Mikrowellenherd zu
verwenden. Der Betrieb mit hoher Spannung ist
gefährlich und kann Brände und andere Unfälle
verursachen, die den Mikrowellenherd beschädigen.
A
C
C
WARNUNG:
geerdeten Steckers kann Stromschläge verursachen.
Falls Sie Fragen zu Erdung und Anschluss haben, wenden Sie sich bitte an einen qualifizierten Elektriker
oder das Kundendienstpersonal.
Hersteller und/oder Händler haften
nicht für Verletzungen oder Geräteschäden aufgrund von Nichteinhaltung der Anweisungen zum elektrischen Anschluss.
Ein Missbrauch des
Mikrowellenherd / Bedienungsanleitung
41 / 371 DE
Page 42

3 Installaton und Anschluss
3.6 Utenslentest
Betreiben Sie den Mikrowellenherd niemals im
Leerzustand. Die einzige Ausnahme stellt der im
folgenden Abschnitt beschriebene Utensilientest
dar. Einige nicht metallische Utensilien sind
möglicherweise nicht zur Benutzung in einem
Mikrowellenherd geeignet. Falls Sie nicht sicher
sind, ob ein Utensil mikrowellengeeignet ist, können Sie folgenden Test durchführen.
1. Geben Sie das betreffende leere Utensil gemeinsam mit einem mikrowellengeeigneten
Glas mit 250 ml Wasser in den Mikrowellenherd.
2. Betreiben Sie den Mikrowellenherd 1 Minute
lang bei maximaler Leistung.
Folgende Auflistung ist eine allgemeine Anleitung,
die Ihnen bei der Auswahl des richtigen Utensils
helfen soll.
Küchenutensilien Mikrowelle Grill Kombina-
Hitzebeständiges Glas Ja Ja Ja
Nicht hitzebeständiges Glas Nein Nein Nein
Hitzebeständige Keramik Ja Ja Ja
Mikrowellengeeignetes Kunststoffgeschirr Ja Nein Nein
Pappgeschirr Ja Nein Nein
Metallschale Nein Ja Nein
Metallgestell Nein Ja Nein
Alufolie und Folienabdeckungen Nein Ja Nein
Schaumstoffmaterial Nein Nein Nein
3. Prüfen Sie vorsichtig die Temperatur des getesteten Utensils. Falls es sich erwärmt hat,
ist es nicht zum Einsatz in der Mikrowelle geeignet.
4. Übersteigen Sie niemals die maximale
Betriebszeit von 1 Minute. Stoppen Sie den
Betrieb des Mikrowellenherdes, falls Sie
während der Testminute einen Lichtbogen beobachten. Utensilien, die Lichtbögen verursachen, sind nicht zum Einsatz in der Mikrowelle
geeignet.
tion
42 / 371 DE
Mikrowellenherd / Bedienungsanleitung
Page 43

4 Bedenung
4.1 Bedenfeld
Mikrowelle
Grill/Kombination
Auftauen nach Zeit
Auftauen nach
Gewicht
Küchentimer/Uhr
Start/+30 Sek./
Bestätigung
Stopp/Abbruch
4.2 Bedenungsanwesungen
4.2.1 Zet enstellen
Wenn der Mikrowellenherd mit Strom versorgt
wird, erscheint „0:00“ am Bildschirm und der
Summer gibt einen Signalton aus.
1. Drücken Sie zweimal (Küchentimer/Uhr)
und die Stundenanzeige beginnt zu blinken.
2. Passen Sie durch Drehen von den
Stundenwert an; der eingegebene Wert sollte
zwischen 0 und 23 liegen.
3. Drücken Sie (Küchentimer/Uhr) und die
Minutenanzeige beginnt zu blinken.
4. Passen Sie durch Drehen von den
Minutenwert an; der eingegebene Wert sollte
zwischen 0 und 59 liegen.
5. Drücken Sie zum Abschließen der
Zeiteinstellung (Küchentimer/Uhr); das
Symbol „:“ blinkt und die Zeit leuchtet.
Wenn Sie (Stopp/Abbruch)
während der Zeiteinstellung drük-
C
ken, kehrt das Gerät automatisch in
den vorherigen Modus zurück.
4.2.2 Mt dem Mkrowellenherd
garen
Türöffner-Taste
1. Drücken Sie (Mikrowelle) und „P100“ wird
am LCD-Bildschirm angezeigt.
2. Wählen Sie die gewünschte Leistung, indem
Sie erneut (Mikrowelle) drücken oder
drehen. Mit jeder Betätigung der Taste wird
der Reihe nach „P100“, „P80“, „P50“, „P30“ oder
„P10“ angezeigt.
Mikrowellenherd / Bedienungsanleitung
43 / 371 DE
Page 44

4 Bedenung
3. Bestätigen Sie die Einstellung mit
(Start/+30 Sek./Bestätigung) und drehen
Sie zum Einstellen der Garzeit auf einen Wert
zwischen 0:05 bis 95:00 .
4. Drücken Sie zum Starten des Garens erneut
(Start/+30 Sek./Bestätigung).
Beispiel:
lang bei 80 % Mikrowellenleistung
C
5. Drücken Sie einmal (Mikrowelle) und „P100“
wird am Bildschirm angezeigt.
6. Drücken Sie zum Einstellen von 80 %
Mikrowellenleistung noch einmal
(Mikrowelle) oder drehen Sie .
7. Drücken Sie zum Bestätigen (Start/+30
Sek./Bestätigung) und „P80“ wird am Bildschirm
angezeigt.
8. Passen Sie durch Drehen von die Garzeit an,
bis „20:00“ angezeigt wird.
9. Drücken Sie zum Starten des Garens
(Start/+30 Sek./Bestätigung).
Die Schritte zur Anpassung der Zeit in der
Kodiertaste sind wie folgt:
Dauer einstellen Wert je
garen möchten, können Sie das
Gerät wie folgt bedienen.
0 – 1 Minute 5 Sekunden
1 – 5 Minuten 10 Sekunden
5 – 10 Minuten 30 Sekunden
10 – 30 Minuten 1 Minute
30 – 95 Minuten 5 Minuten
Wenn Sie 20 Minuten
Schritt
4.2.3 Anwesungen zum
Tastenfeld (Mkrowelle)
Bestel-
lung
1 P100 100 %
2 P80 80 %
3 P50 50 %
4 P30 30 %
5 P10 10 %
Bild-
schirm
Mik-
rowellen-
leistung
4. 3 Mt Grll- oder
Kombmodus garen
1. Drücken Sie (Grill/Kombination) und „G“
wird am LCD-Bildschirm angezeigt. Wählen Sie
die gewünschte Leistung, indem Sie wiederholt
(Grill/Kombination) drücken oder
drehen. Mit jeder Betätigung der Taste wird der
Reihe nach „G“, „C-1“ oder „C-2“ angezeigt.
2. Bestätigen Sie die Einstellung mit
(Start/+30 Sek./Bestätigung) und drehen
Sie zum Einstellen der Garzeit auf einen Wert
zwischen 0:05 bis 95:00 .
3. Drücken Sie zum Starten des Garens erneut
(Start/+30 Sek./Bestätigung).
Beispiel:
lang bei 55 % Mikrowellenleistung
und 45 % Grillleistung (C-1) garen
C
1. Drücken Sie einmal (Grill/Kombination) und
„G“ wird am Bildschirm angezeigt.
möchten, können Sie das Gerät wie
folgt bedienen.
Wenn Sie 10 Minuten
44 / 371 DE
Mikrowellenherd / Bedienungsanleitung
Page 45

4 Bedenung
2. Wählen Sie Kombimodus 1, indem Sie erneut
(Grill/Kombination) drücken oder
drehen.
3. Drücken Sie zum Bestätigen (Start/+30
Sek./Bestätigung) und „C-1“ wird am Bildschirm
angezeigt.
4. Passen Sie durch Drehen von die Garzeit an,
bis „10:00“ angezeigt wird.
5. Drücken Sie zum Starten des Garens
(Start/+30 Sek./Bestätigung).
2. In den Modi Mikrowellengaren, Grill und
Kombigaren oder Auftauen wird die Garzeit
mit jeder Betätigung der Taste (Start/+30
Sek./Bestätigung) um 30 Sekunden erhöht.
3. Drehen Sie im Bereitschaftsmodus zum
Einstellen der Garzeit beim Garen mit 100 %
Mikrowellenleistung gegen den Uhrzeigersinn;
drücken Sie zum Starten des Garens
(Start/+30 Sek./Bestätigung).
4.3.1 Anwesungen zum
Tastenfeld (Grll/Kombnaton)
Bestellung
C
Bildschirm
1 G 0 % 100 %
2 C-1 55 % 45 %
3 C-2 36 % 64 %
Nach Ablauf der Hälfte der Grillzeit
gibt das Gerät zwei Signaltöne aus;
dies ist normal. Zur Verbesserung
des Grilleffekts sollten Sie die
Lebensmittel wenden, die Tür
schließen und das Garen mit der
Taste (Start/+30 Sek./Bestätigung)
fortsetzen. Falls keine Bedienung erfolgt, setzt das Gerät das Garen fort.
Mikrowellenleistung
Grill
Leistung
4.4 Schnellstart
1. Drücken Sie im Bereitschaftsmodus zum Starten
des Garens mit 100 % Mikrowellenleistung
(Start/+30 Sek./Bestätigung). Mit jeder
Betätigung der Taste erhöht sich die Garzeit in
Schritten von 30 Sekunden bis 95 Minuten.
C
4.5 Auftauen nach Gewcht
1. Drücken Sie einmal (Auftauen nach
Gewicht).
2. Wählen Sie durch Drehen von das Gewicht
des Lebensmittels von 100 bis 2000 g.
3. Drücken Sie zum Starten des Auftauens
(Start/+30 Sek./Bestätigung).
4.6 Auftauen nach Zet
1. Drücken Sie einmal (Auftauen nach Zeit).
2. Wählen Sie durch Drehen von die
gewünschte Auftauzeit. Die maximale Zeit
beträgt 95 Minuten.
3. Drücken Sie zum Starten des Auftauens
(Start/+30 Sek./Bestätigung). Die Leistung
beim Auftauen entspricht P30 und kann nicht
geändert werden.
In den Modi Automatische
Zubereitung und Auftauen
nach Gewicht wird die Garzeit
bei Betätigung der Taste
(Start/+30 Sek./Bestätigung) nicht
erhöht.
Mikrowellenherd / Bedienungsanleitung
45 / 371 DE
Page 46

4 Bedenung
4.7 Küchentmer
(Countdown)
Ihr Mikrowellenherd ist mit einem automatischen Timer ausgestattet, der nicht mit den
Gerätefunktionen verknüpft ist und separat genutzt werden kann (er kann auf bis zu 95 Minuten
eingestellt werden).
1. Drücken Sie einmal (Küchentimer/Uhr)
und 00:00 wird am LCD-Bildschirm angezeigt.
2. Drehen Sie zur Eingabe der richtigen Zeit.
3. Drücken Sie zum Bestätigen der Einstellung
(Start/+30 Sek./Bestätigung).
4. Wenn ab der eingegebenen Zeit auf 00:00
heruntergezählt wurde, gibt der Summer
fünf Signaltöne aus. Falls die Zeit eingestellt
ist (24-Stunden-System), wird die aktuelle
Uhrzeit am LCD-Bildschirm angezeigt.
Sie können den Timer jederzeit mit (Stopp/
Abbruch) abbrechen.
Der Küchentimer funktioniert anders als das 24-Stunden-System.
C
Der Küchentimer ist nur ein Timer.
4. Drücken Sie zum Starten des Garens
(Start/+30 Sek./Bestätigung).
Beispiel:
„Automatische Zubereitung“ zum
C
1. Drehen Sie im Uhrzeigersinn, bis „A-6“ am
Bildschirm angezeigt wird.
2. Drücken Sie zum Bestätigen (Start/+30
Sek./Bestätigung).
3. Drehen Sie zur Auswahl des Gewichts vom
Fisch, bis „350“ angezeigt wird.
4. Drücken Sie zum Starten des Garens
(Start/+30 Sek./Bestätigung).
Garen von 350 g Fisch verwenden
möchten:
Wenn Sie
4.8 Automatsche
Zuberetung
1. Drehen Sie zur Auswahl des gewünschten
Gerichts im Uhrzeigersinn. Die Gerichte
zwischen „A-1“ und „A-8“ werden angezeigt
und zwar Pizza, Fleisch, Gemüse, Nudeln,
Kartoffeln, Fisch, Getränke und Popcorn.
2. Drücken Sie zum Bestätigen (Start/+30
Sek./Bestätigung).
3. Drehen Sie zur Auswahl des
Standardgewichts entsprechend der
Lebensmitteltabelle.
46 / 371 DE
Mikrowellenherd / Bedienungsanleitung
Page 47

4 Bedenung
4.8.1 Gercht automatsch garen
Gericht Gewicht Bildschirm
A-1
Pizza
A-2
Fleisch
A-3
Gemüse
A-4
Nudeln
A-5
Kartoffeln
A-6
Fisch
A-7
Getränke
A-8
Popcorn
50 g (mit 450 ml kaltem
100 g (mit 800 ml kaltem
1 Glas (120 ml) 1
2 Gläser (240 ml) 2
3 Gläser (360 ml) 3
200 g 200
400 g 400
250 g 250
350 g 350
450 g 450
200 g 200
300 g 300
400 g 400
50
Wasser)
100
Wasser)
200 g 200
400 g 400
600 g 600
250 g 250
350 g 350
450 g 450
50 g 50
100 g 100
Mikrowellenherd / Bedienungsanleitung
47 / 371 DE
Page 48

4 Bedenung
4.9 Mehrstufges Garen
Es können maximal 2 Schritte zum Garen eingestellt werden. Falls beim mehrstufigen Garen den
Vorgang Auftauen beinhaltet, muss das Auftauen
der erste Schritt sein.
Befolgen Sie die nachstehenden
Schritte, wenn Sie Lebensmittel
5 Minuten lang auftauen und
C
1. Einmal (Auftauen nach Zeit) drücken.
2. Wählen Sie durch Drehen von die
gewünschte Auftauzeit, bis „5:00“ am
Bildschirm angezeigt wird.
3. Drücken Sie einmal (Mikrowelle) und „P100“
wird am Bildschirm angezeigt.
4. Drücken Sie zum Einstellen von 80 %
Mikrowellenleistung noch einmal
(Mikrowelle) oder drehen Sie .
5. Drücken Sie zum Bestätigen (Start/+30
Sek./Bestätigung) und „P80“ wird am Bildschirm
angezeigt.
6. Passen Sie durch Drehen von die Garzeit an,
bis „7:00“ angezeigt wird.
7. Drücken Sie zum Starten des Garens
(Start/+30 Sek./Bestätigung). Der Summer
gibt beim ersten Schritt einen Signalton aus
und die Auftauzeit beginnt herunterzuzählen.
Der Summer gibt einen weiteren Signalton aus,
sobald der zweite Garschritt beginnt. Am Ende
des Garens gibt der Summer 5 Signaltöne aus.
dann 7 Minuten lang bei 80 %
Mikrowellenleistung garen möchten:
4.10 Abfragefunkton
1. Drücken Sie in den Modi Mikrowelle, Grill und
Kombination (Mikrowelle) oder (Grill/
Kombination) und die aktuelle Leistungsstufe
wird 3 Sekunden lang angezeigt. Nach 3
Sekunden kehrt der Mikrowellenherd zum
vorherigen Modus zurück.
2. Drücken Sie während des Garens
(Küchentimer/Uhr) und die aktuelle Uhrzeit
wird 3 Sekunden lang eingeblendet.
4.11 Knderscherung
1.
Sperren:
3 Sekunden lang (Stopp/Abbruch) gedrückt
und der Summer zeigt durch einen Signalton
an, dass die Kindersicherung aktiviert ist. Falls
die Zeit bereits eingestellt ist, wird zudem
die aktuelle Uhrzeit angezeigt; andernfalls
erscheint am LCD-Bildschirm.
2.
Freigeben:
der Kindersicherung halten Sie im
Bereitschaftsmodus 3 Sekunden lang
(Stopp/Abbruch) gedrückt und ein langer
Signalton zeigt an, dass die Kindersicherung
deaktiviert ist.
Halten Sie im Bereitschaftsmodus
Zum Deaktivieren
4.12 Gerätetür öffnen
Drücken Sie (Türöffner) und die Gerätetür öffnet sich.
Falls sich die Tür bei Modell MGB
C
25333 BG nicht mit der TüröffnerTaste öffnen lässt (z. B. aufgrund
eines Stromausfalls), können Sie
sie mit einem Vakuumheber manuell öffnen.
48 / 371 DE
Mikrowellenherd / Bedienungsanleitung
Page 49

5 Rengung und Wartung
5.1 Rengung
WARNUNG:
das Gerät niemals mit Benzin,
Lösungsmitteln, Scheuermitteln,
A
A
1. Gerät ausschalten und Netzstecker aus der
Steckdose ziehen.
2. Warten, bis das Gerät vollständig abgekühlt ist.
3. Innenseite des Gerätes sauber halten. Mit
einem feuchten Tuch abwischen, falls verschüttete Lebensmittel oder Flüssigkeiten
an den Innenwänden haften. Bei einem
stark verschmutzten Gerät kann ein mildes Reinigungsmittel verwendet werden.
Keine Sprays und anderen aggressiven
Reinigungsmittel verwenden, da diese Flecken
hinterlassen und die Türfläche stumpf werden
lassen können.
4. Die Außenflächen des Gerätes müssen mit
einem feuchten Tuch gereinigt werden.
Dabei darauf achten, dass kein Wasser in die
Belüftungsöffnungen gelangt; andernfalls
können interne Komponenten beschädigt werden.
5. Beide Seiten von Tür und Glas, Türdichtungen
und Teile in der Nähe der Dichtungen zur
Beseitigung von Lebensmittelresten regelmäßig mit einem feuchten Tuch abwischen. Keine
Scheuermittel verwenden.
6. Darauf achten, dass das Bedienfeld nicht
feucht wird. Mit einem weichen, angefeuchteten Tuch reinigen. Gerätetür zur Vermeidung
eines unbeabsichtigten Einschaltens während
der Reinigung des Bedienfeldes offen lassen.
7. Falls sich Dampf in und um die Gerätetür
ansammelt, diese mit einem weichen Tuch
abwischen. Dies kann geschehen, wenn der
Metallgegenständen, harten Bürsten oder ähnlichen
Hilfsmitteln.
WARNUNG:
weder das Gerät noch sein
Netzkabel in Wasser oder andere Flüssigkeiten.
Reinigen Sie
Tauchen Sie
8. In einigen Fällen müssen Sie zur Reinigung
9. Walzenring und Geräteboden sollten zur
10. Zur Beseitigung schlechter Gerüche in
11. Bitte wenden Sie sich an den autorisierten
12. Das Gerät sollte regelmäßig gereinigt und
13. Bitte entsorgen Sie dieses Gerät nicht mit dem
14. Wenn der Mikrowellenherd in der Grillfunktion
Mikrowellenherd bei hoher Luftfeuchtigkeit
verwendet wird. Dies ist normal.
den Glasteller herausnehmen. Teller
in warmem Seifenwasser oder einem
Geschirrspüler reinigen.
Vermeidung übermäßiger Geräuschemission
regelmäßig gereinigt werden. Es genügt, die
Unterseite des Gerätes mit einem milden
Reiniger abzuwischen. Walzenring in warmem
Seifenwasser oder einem Geschirrspüler
reinigen. Wenn Sie den Walzenring zur
Reinigung vom Boden im Geräteinneren entfernen, müssen Sie darauf achten, ihn wieder
an der richtigen Position anzubringen.
Ihrem Gerät eine tiefe mikrowellengeeignete Schüssel mit Wasser und einer aufgeschnittenen Zitrone in das Gerät stellen
und den Mikrowellenherd 5 Minuten lang
im Mikrowellenmodus betreiben. Gründlich
abwischen und mit einem weichen Tuch abtrocknen.
Kundendienst, wenn die Beleuchtung ersetzt
werden muss.
von jeglichen Lebensmittelresten befreit
werden. Falls das Gerät nicht sauber gehalten
wird, können Oberflächendefekte auftreten,
welche die Produktlebenszeit negativ
beeinträchtigen und mögliche Risiken bergen
können.
Hausmüll; Altgeräte müssen bei speziellen
von der Stadtverwaltung bereitgestellten
Sammelstellen abgegeben werden.
genutzt wird, können etwas Rauch und
Gerüche entstehen, die nach einiger Zeit im
Betrieb verschwinden.
Mikrowellenherd / Bedienungsanleitung
49 / 371 DE
Page 50

5 Rengung und Wartung
5.2 Lagerung
• Lagern Sie das Gerät sorgfältig, wenn Sie es län-
gere Zeit nicht benutzen sollten.
• Sorgen Sie dafür, dass das Gerät vom Stromnetz
getrennt, gänzlich abgekühlt und trocken ist.
• Lagern Sie das Gerät an einem kühlen, trocke-
nen Ort.
• Halten Sie das Gerät von Kindern fern.
50 / 371 DE
Mikrowellenherd / Bedienungsanleitung
Page 51

6 Fehlerbehebung
Normal
Mikrowellenherd verursacht Störungen des
Fernsehempfangs
Die Beleuchtung verdunkelt sich Arbeitet der Mikrowellenherd mit geringer
Dampf sammelt sich an der Tür, heiße Luft
kommt aus den Belüftungsöffnungen.
Gerät versehentlich im Leerzustand gestartet. Das Gerät darf nicht im Leerzustand (ohne
Problem Mögliche Ursache Lösung
Das Gerät kann nicht gestartet
werden.
Das Gerät erhitzt sich nicht. (4) Die Tür ist nicht richtig
Glasdrehteller macht
Geräusche, wenn der
Mikrowellenherd in Betrieb ist
Gerät zeigt den Fehler E-3 und
funktioniert nicht (bei Modell
MGB 25333 BG)
(1) Das Netzkabel ist nicht
richtig angeschlossen.
(2) Sicherung ist
durchgebrannt oder
Schutzschalter hat ausgelöst.
(3) Problem mit der Steckdose. Steckdose mit anderen
geschlossen.
(5) Drehteller und Boden des
Gerätes sind verschmutzt.
(6) Gerätetür öffnet sich nicht
(aufgrund einer Blockade vor
der Tür, geringer Spannung
etc.)
Der Radio- und Fernsehempfang kann durch
den Betrieb des Mikrowellenherdes gestört
werden. Dies ähnelt den Störungen, die durch
kleine Elektrogeräte, wie Mixer, Staubsauger und
Ventilatoren, verursacht werden. Dies ist normal.
Leistung, kann sich die Beleuchtung verdunkeln.
Dies ist normal.
Während des Garens kann Dampf von den
Lebensmitteln aufsteigen. Ein Großteil dieses
Dampfs tritt aus den Belüftungsöffnungen aus.
Etwas Dampf kann sich jedoch auch an einer
kühlen Stelle, wie z. B. der Tür, ansammeln. Dies
ist normal.
Lebensmittel) betrieben werden. Das ist sehr
gefährlich.
Netzstecker ziehen. Nach 10
Sekunden wieder anschließen.
Sicherung ersetzen oder
Schutzschalter rücksetzen
(durch professionelles Personal
unseres Unternehmens ersetzen
lassen).
Elektrogeräten testen.
Tür richtig schließen.
Verschmutzte Teile
entsprechend dem Abschnitt
„Reinigung und Pflege“ reinigen.
Netzstecker ziehen. Nach 10
Sekunden wieder anschließen.
Mikrowellenherd / Bedienungsanleitung
51 / 371 DE
Page 52

Avant d'utiliser l'appareil, veuillez lire ce manuel !
Chère cliente, cher client,
Merc d’avor chos les produts Beko. Nous espérons que ce produt, fabrqué dans des
nstallatons modernes et soums à un processus de contrôle qualté rgoureux, vous
offre les melleures performances possbles. C’est pourquo nous vous recommandons,
avant d’utlser ce produt, de lre attentvement ce manuel et tous les autres documents
fourns et de les conserver sogneusement pour toute consultaton future. S vous
confez le produt à quelqu’un d’autre, n’oublez pas de lu remettre également le
manuel d’utlsaton. Vellez à ben respecter les consgnes et les nstructons fgurant
dans le manuel d’utlsaton.
Signification des symboles
Les symboles suivants sont utilisés tout au long de ce manuel :
Informatons mportantes et consels
C
A
utles sur l’utlsaton de l’apparel.
Avertssement sur les stuatons dangereuses concernant la sécurté des
bens et des personnes.
Avertssement en cas de contact avec
une surface brûlante.
Ce produt a été fabrqué dans une usne moderne respectueuse de l'envronnement.
Cet apparel est conforme à la drectve
DEEE
Ne content pas de PCB.
Page 53

TABLE DES MATIÈRES
1 Instructions importantes
en matière de sécurité et
d’environnement 54
1.1 Consignes générales de sécurité .....................54
1.2 Sécurité électrique ................................................56
1.3 Sécurité du produit ................................................57
1.4 Utilisation prévue ...................................................58
1.5 Conformité avec la directive DEEE et mise au
rebut des produits usagés ........................................59
1.6 Information sur l'emballage ..............................59
2 Votre four à micro-ondes 60
2.1 Aperçu .........................................................................60
2.2 Données techniques ............................................60
2.3 Installation du plateau tournant .....................61
3 Installation et raccordement 62
3.1 Installation et raccordement .............................62
3.2 Installation du micro-ondes...............................63
3.2.1 Niche d’encastrement.......................................63
3.2.2 Fixation du support d’encastrement .........64
3.2.3 Fixation du four ...................................................65
3.3 Principes du fonctionnement au
micro-ondes ....................................................................66
3.4 Raccordement électrique ...................................66
3.5 Test des ustensiles ...............................................66
4 Fonctionnement 68
4.1 Bandeau de commande ......................................68
4.2 Réglage de l'heure .................................................68
4.3 Préparation d’une cuisson au
micro-ondes ....................................................................68
4.4 Programmes de cuisson au micro-ondes ....69
4. 5 Préparation d’une cuisson au
gril ou mixte .....................................................................70
4.6 Programme de cuisson au gril ou mixte .......71
4.7 Démarrage rapide ..................................................71
4.8 Décongélation par le poids ................................72
4.9 Décongélation par le temps ..............................72
4.10 Minuterie ................................................................72
4.11 Cuisson automatique .........................................72
4.12 Cuissons enchaînées .........................................74
4.13 Information sur le programme en cours ....74
4.14 Sécurité enfants ..................................................74
4.15 Ouverture de la porte du four ........................74
5 Nettoyage et entretien 75
5.1 Nettoyage..................................................................75
6 Dépannage 76
Four à micro-ondes / Manuel d’instructions
53 / 371 FR
Page 54

Instructons mportantes en matère
1
de sécurté et d’envronnement
Cette section contient les consignes
de sécurité qui aident à se prémunir contre les risques d'incendie,
d'électrocution, d'exposition aux
fuites d'énergie à micro-ondes, de
dommages corporels ou de dégâts
matériels. Le non-respect de ces
consignes annule la garantie.
1.1 Consgnes
générales de sécurté
• N'essayez pas de mettre le four
en marche lorsque la porte est
ouverte ; vous seriez exposés à
l'énergie des micro-ondes. Évitez
de désactiver ou de tripatouiller le
verrouillage de sécurité.
• Ne jouez avec aucun des objets
entre la face avant et la porte du
four. Ne permettez pas l'accumulation de la poussière ou des résidus
d'agent nettoyant sur les surfaces
de fermeture.
• Toutes les opérations de main-
tenance impliquant le retrait du
couvercle de protection contre
l'exposition à l'énergie des microondes doivent être réalisés par
• Votre appareil est conçu pour la
cuisson, le chauffage et la décongélation des aliments à domicile. Il
ne doit pas être utilisé à des fins
commerciales. Le fabricant ne
saurait être tenu responsable des
dommages découlant d'une utilisation inappropriée.
• N'utilisez pas l'appareil à l'exté-
rieur, dans une salle de bain, dans
des environnements humides ou
dans des endroits où il peut se
mouiller.
• Tout dommage résultant d'une
utilisation inappropriée de l'appareil annule la responsabilité du
fabricant ou toute réclamation au
titre de la garantie.
• N'essayez jamais de démonter
l'appareil. Aucune réclamation au
titre de la garantie ne sera acceptée pour les dégâts résultant d'une
manipulation incorrecte.
• Utilisez uniquement des pièces
d’origine ou pièces recommandées
par le fabricant.
• Ne laissez pas l'appareil sans sur-
veillance lorsque vous l'utilisez.
des personnes ou des services
après-vente agréés.
• Utilisez toujours l'appareil sur
une surface stable, plate, propre,
sèche et non glissante.
54 / 371 FR
Four à micro-ondes / Manuel d’instructions
Page 55

Instructons mportantes en matère
1
de sécurté et d’envronnement
• Cet appareil ne doit pas être uti-
lisé avec une minuterie extérieure
ou un système de télécommande
séparé.
• Avant d'utiliser l'appareil pour la
première fois, nettoyez-en toutes
les pièces. Reportez-vous aux renseignements fournis dans la rubrique « Nettoyage et entretien ».
• Utilisez l'appareil uniquement aux
fins pour lesquelles il a été conçu,
conformément aux instructions
du présent manuel. N'utilisez pas
de produits chimiques abrasifs ou
de la vapeur sur l'appareil. Ce four
a été particulièrement conçu pour
chauffer et cuire les aliments. Il
n'est pas destiné à un usage industriel ou en laboratoire.
• N'utilisez pas l'appareil pour sécher
les vêtements ou les torchons.
• L'appareil devient très chaud
lorsqu'il est utilisé. Évitez de toucher les pièces chaudes à l'intérieur du four.
• Votre four n'est pas destiné au
séchage d'un quelconque être
vivant.
• Ne mettez pas l'appareil en marche
lorsqu'il est vide.
• Les récipients de cuisson peuvent
devenir très chauds en raison du
transfert de chaleur des aliments
chauffés au récipient. Vous aurez
besoin des gants de cuisine pour
tenir les récipients.
• Vérifiez que les récipients sont ap-
propriés pour une utilisation dans
des fours à micro-ondes.
• Ne placez pas le four au-dessus
des cuisinières ou de tout autre
appareil produisant de la chaleur.
Sinon, il pourrait être endommagé
et la garantie annulée.
• Ne placez pas le four à micro-
ondes dans une armoire non
conforme aux instructions d'installation.
• De la vapeur pourrait s'échapper
lorsque vous ouvrez les couvercles
ou le papier après la cuisson des
aliments.
• Portez des gants de cuisine
lorsque vous devez sortir des mets
chauds du four.
• L'appareil et ses surfaces ac-
cessibles peuvent devenir très
chauds lorsque l'appareil est en
cours d'utilisation.
• La porte et la vitre externe peuvent
devenir très chaudes lorsque l'appareil est en cours d'utilisation.
Four à micro-ondes / Manuel d’instructions
55 / 371 FR
Page 56

Instructons mportantes en matère
1
de sécurté et d’envronnement
1.2 Sécurté électrque
• Les fours à micro-ondes Beko sont
conformes aux normes de sécurité
applicables. Par conséquent, en
cas de dommage sur l'appareil ou
son câble d'alimentation, faites-le
réparer ou remplacer par le revendeur, le centre de services, un spécialiste ou des services habilités
afin de prévenir tout danger. Des
réparations défectueuses et non
professionnelles peuvent être
sources de danger et de risque
pour l'utilisateur.
• Assurez-vous que votre source
d'alimentation électrique est
conforme aux informations spécifiées sur la plaque signalétique de
votre appareil.
Le seul moyen de déconnecter
l'appareil de l'alimentation électrique consiste à le débrancher de
la prise électrique.
• Ne touchez jamais l’appareil ou sa
prise avec les mains humides ou
mouillées.
• Placez l'appareil de manière à ce
que la prise soit toujours accessible.
• Pour éviter d'endommager le
câble d'alimentation, évitez de
l'aplatir, de le plier ou même de le
frotter contre des bords coupants.
Éloignez le câble d'alimentation
de toute surface brûlante et des
flammes.
• Assurez-vous qu'il n'y ait aucun
risque de traction accidentelle sur
le câble d'alimentation et que personne ne risque de trébucher sur
le câble, lorsque l'appareil est en
marche.
• Débranchez l'appareil avant
chaque nettoyage et lorsque l'appareil n'est pas en cours d'utilisation.
• Utilisez l’appareil uniquement
avec une prise de terre.
• N'utilisez jamais l'appareil si le
câble d'alimentation ou l'appareil
lui-même est endommagé.
• N'utilisez pas de cordon prolonga-
teur avec l'appareil.
56 / 371 FR
• Ne tirez pas sur le câble d’alimen-
tation de l’appareil pour le débrancher de l'alimentation et n’enroulez
jamais le câble d'alimentation tout
autour de l'appareil.
Four à micro-ondes / Manuel d’instructions
Page 57

Instructons mportantes en matère
1
de sécurté et d’envronnement
• N'immergez pas l'appareil, le câble
d'alimentation ou la prise d'alimentation électrique dans de l'eau ou
tout autre liquide. Ne maintenez
pas l'appareil sous l'eau courante.
• Lorsque vous chauffez les ali-
ments dans des récipients en
plastique ou en papier, vérifiez en
permanence le four en raison de la
possibilité d'inflammation.
• Retirez les fils et poignées métal-
liques des sacs en papier ou en
plastique avant de placer les sacs
appropriés pour une utilisation du
four à micro-ondes vers le four.
• Mettez l'appareil hors tension ou
débranchez-le et gardez la porte
fermée pour éviter toute inflammation si vous observez de la
fumée.
• Ne conservez rien à l'intérieur du
four. Ne laissez pas les papiers, le
matériel de cuisine ou les aliments
à l'intérieur du four lorsqu'il n'est
pas utilisé.
• Remuez et agitez le contenu des
biberons et des pots de nourriture
pour bébés et vérifiez la température avant la consommation pour
éviter des brûlures.
• Cet appareil est un équipement
ISM Groupe 2 de Classe B. Le
Groupe 2 comprend tous les équipements ISM (Industriel, Scientifique et Médical) dans lesquels
l'énergie à radio-fréquences est
intentionnellement générée et/
ou utilisée sous forme de radiation
électromagnétique pour le traitement des matériaux et les équipements d'électroérosion.
• Les équipements de Classe B
conviennent aux installations
domestiques et aux installations
directement raccordées au réseau
d'alimentation électrique à basse
tension.
• La porte ou la surface externe
de l'appareil peuvent devenir très
chaudes lorsque l'appareil est utilisé.
1.3 Sécurté du
produt
• Évitez de chauffer les liquides
et autres aliments dans des récipients fermés, car cela présente
des risques d'explosion.
• Le chauffage des boissons au
micro-ondes peut entraîner des
éclaboussures lorsqu'elles sont sorties du four ; soyez donc prudent
lorsque vous tenez les récipients.
Four à micro-ondes / Manuel d’instructions
57 / 371 FR
Page 58

Instructons mportantes en matère
1
de sécurté et d’envronnement
• Ne faites pas de rôtisserie dans le
1.4 Utlsaton prévue
four. De l'huile chaude pourrait endommager les composants et matériaux du four, et même entraîner
des brûlures de la peau.
• Percez les aliments à croute
épaisse tels que les pommes de
terre, les courgettes, les pommes
et les châtaignes.
• Placez l'appareil de sorte que le
côté arrière soit face au mur.
• Si la porte ou les joints de porte
sont endommagés, n'utilisez pas
le four jusqu'à ce qu'il ait été réparé par un technicien spécialisé.
• Avant de déplacer l'appareil, sécu-
risez le plateau tournant pour ne
pas l'endommager.
• N'utilisez pas le four à micro-ondes
pour la préparation ou le chauffage des œufs non brouillés, avec
ou sans coquille.
• Ne retirez jamais les pièces à l'ar-
rière et sur les côtés de l'appareil,
qui garantissent les distances
minimales entre les parois de l'armoire et l'appareil, de sorte à permettre la circulation appropriée de
l'air.
• Cet appareil a été conçu unique-
ment pour une utilisation encastrée.
• N'utilisez pas l'appareil pour un
autre usage que celui pour lequel
il a été prévu.
• N'utilisez pas l'appareil comme
source de chaleur.
• Le four à micro-ondes est destiné
uniquement à la décongélation, à
la cuisson et à la préparation des
aliments.
• Évitez la cuisson excessive des
aliments ; cela peut entraîner un
incendie.
• N'utilisez pas de nettoyants à va-
peur pour le nettoyage de l'appareil.
• Cet appareil peut être utilisé par
les enfants âgés de 8 ans ou plus
et par les personnes à capacités physiques, sensorielles ou
mentales réduites ou qui n'ont
pas les connaissances et l'expérience, tant qu'ils sont surveillés
dans l'utilisation sécuritaire du
produit ou s’ils sont instruits en
conséquence ou comprennent les
risques de l'utilisation du produit.
Les enfants ne doivent pas jouer
avec l’appareil.
58 / 371 FR
Four à micro-ondes / Manuel d’instructions
Page 59

Instructons mportantes en matère
1
de sécurté et d’envronnement
Les procédures de nettoyage et
d’entretien par l’utilisateur ne
doivent pas être exécutées par les
1.5 Conformté avec la
drectve DEEE et mse au
rebut des produts usagés
enfants à moins qu’ils soient surveillés par les adultes.
• Danger d’étranglement ! Ne lais-
sez pas les éléments d'emballage
à proximité des enfants.
• Ne permettez aux enfants d'uti-
liser l'appareil sans supervision
sauf s'ils ont reçu des instructions
appropriées leur permettant d'utiliser le four à micro-ondes de manière sécurisée et de comprendre
les risques liés à une utilisation
inappropriée.
• En raison des excès de chaleur en
mode gril et mixte, les enfants ne
électronques » émanant du Mnstère de
l’Envronnement et de l’Aménagement urban.
Conforme à la Drectve DEEE. Cet apparel a été
fabrqué avec des pèces et du matérel de qualté
supéreure, susceptbles d’être réutlsés aux fns
de recyclage.
Par conséquent, à la fn de sa durée de ve, l ne
dot pas être ms au rebut aux côtés de déchets
domestques ordnares. Au contrare, l dot être
élmné dans un pont de collecte réservé au recyclage d'apparels électrques et électronques.
Consultez les autortés locales de votre régon
pour connaître les ponts de recyclage. Partcpez
à la protecton de l'envronnement et des ressources naturelles grâce au recyclage des produts
usagés.
doivent être autorisés à utiliser
ces modes que s'ils sont supervisés par un adulte.
• Gardez l'appareil et son cordon
1.6 Informaton sur
l'emballage
d'alimentation de sorte qu'ils
soient inaccessibles aux enfants
âgés de moins de 8 ans.
• L'appareil et ses surfaces ac-
cessibles peuvent devenir très
chauds lorsque l'appareil est en
pas les éléments d’emballage avec les déchets
domestques et autres déchets. Déposez-les
dans un des ponts de collecte d’éléments
d’emballage que vous ndquera l’autorté locale
dont vous dépendez.
cours d'utilisation. Tenez-les hors
de la portée des enfants.
Ce produt ne content pas de substances dangereuses et prohbées, telles
que décrtes dans la « Drectve
réglementant les déchets
d’équpements électrques et
L'emballage du produt est composé
de matéraux recyclables,
conformément à notre
réglementaton natonale. Ne jetez
Four à micro-ondes / Manuel d’instructions
59 / 371 FR
Page 60

2 Votre four à mcro-ondes
6
7
1
235 4
8
2.1 Aperçu
Légende
1. Bandeau de commande
2. Entraîneur du plateau tournant
3. Support du plateau tournant
4. Plateau en verre
5. Vtre du four
6. Cadre de porte
7. Dspostf de verroullage de la porte
8. Grlle (à utlser unquement avec la foncton
grl et placer sur le plateau en verre)
Les nscrptons sur le produt ou les valeurs ndquées sur la documentaton fourne avec le produt sont des valeurs obtenues dans
des condtons de laboratore conformément aux normes en vgueur. Ces valeurs peuvent varer selon l’utlsaton de l’apparel et les
condtons envronnantes. Les valeurs d'almentaton électrque sont testées à 230V.
60 / 371 FR
2.2 Données technques
Norme électrique
Puissance
Ampérage
Fréquence
de fonctionnement
Dimensions
externes
Dimensions
internes du four
Capacité du
four
Poids net
230 V~50 Hz,
1 450 W (Mcro-ondes)
1 000 W (Grl)
900 W
6.4 A
2 450 MHz
388 mm (H) / 595 mm
(La) / 392 mm (P)
206 mm (H) / 328 mm
(G) / 400 mm (P)
25 ltres
18.5 kg
Four à micro-ondes / Manuel d’instructions
Page 61

Göbek (alt kısım)
Cam tabla
Döner tabla desteği
Döner tabla mili
2 Votre four à mcro-ondes
2.3 Installaton du plateau tournant
Plateau tournant (dessous)
Plateau en verre
Entraîneur du plateau tournant
Support à roulettes du plateau tournant
• Ne placez jamas le plateau en verre à l'envers. Il
ne dot en aucun cas être bloqué.
• Utlsez toujours le plateau en verre et le support
du plateau tournant pendant la préparaton.
• Placez toujours les alments et les récpents sur
le plateau en verre pour la cusson.
• En cas de fssure ou de cassure du plateau en
verre ou du support du plateau tournant, contactez votre centre de servces autorsé le plus
proche.
Four à micro-ondes / Manuel d’instructions
61 / 371 FR
Page 62

3 Installation et raccordement
3.1 Installaton et
raccordement
• Retrez tous les matéraux d'emballage et les ac-
cessores. Examnez tout sgne de dommage tels
que des creux ou des sgnes de porte cassée.
N'nstallez pas le four s'l est endommagé.
• Retrez le flm de protecton sur la surface de la
carrossere du four à mcro-ondes.
• Ne retrez pas le couvercle de mca marron
clar fxé à la cavté du four pour protéger le
magnétron.
• Le présent apparel a été conçu à des fns do-
mestques unquement.
• Ce four a été conçu unquement pour une ut-
lsaton encastrée. Il ne dot pas être posé ou
utlsé à l'ntéreur d'une armore.
• Veullez respecter les nstructons d'nstallaton.
• L'apparel peut être nstallé dans une armore
murale de 60 cm de largeur (55 cm de profondeur mnmum et 85 cm au-dessus du sol).
• L'apparel est équpé d'une fche et dot unque-
ment être branché à une prse de terre correctement nstallée.
• La tenson du secteur dot correspondre aux va-
leurs spécfées sur la plaque sgnalétque.
• S le cable d’almentaton est endommagé, l
dot être remplacé par une personne ou un
servce après-vente agréé. S la fche n'est plus
accessble après l'nstallaton, un dspostf coupe-crcut agssant sur tous les pôles dot être
dsponble sur le ste d'nstallaton, avec un espace de contact de 3 mm mnmum.
• N'utlsez pas d'adaptateurs, de multprses ou
de rallonges. Toute surcharge expose à des rsques d'ncende.
C
Les surfaces accessbles peuvent
être chaudes pendant l'utlsaton.
Évtez de concer ou de pler le cordon d'almentaton.
62 / 371 FR
Four à micro-ondes / Manuel d’instructions
Page 63

3 Installaton et raccordement
3.2 Installaton du
mcro-ondes
Le four à mcro-ondes est lvré avec son kt
d’encastrement monté en usne afn de smplfer son nstallaton. Vous devez smplement fxer
l’ensemble à votre meuble.
3.2.1 Nche d’encastrement
Le cadre du four à mcro-ondes dot dépasser
l’algnement de l’armore
380+2
Four à micro-ondes / Manuel d’instructions
63 / 371 FR
Page 64

a
a
Vida A
Braket
Merkez çizgi
Braket
Vida A
3 Installaton et raccordement
3.2.2 Fxaton du support d’encastrement
1. Lsez les nstructons sur le gabart nféreur de l'armore et placez le gabart sur le plan nféreur de
l'armore.
a
a
LEFT EDGE
T EDGE RIGH
CENTER LINE
FRONT EDGE
2. Fates des marques sur le plan nféreur de l'armore selon les marques « a » sur le gabart.
Vis A
Support
Ligne du centre
3. Retrez le gabart et fxez le support à l'ade des vs A.
Vis A
64 / 371 FR
Support
Four à micro-ondes / Manuel d’instructions
Page 65

3 Installaton et raccordement
3.2.3 Fxaton du four
1. Installez le four dans la nche.
- Assurez-vous que l'arrère du four est bloqué par le support.
- Évtez de concer ou de pler le cordon d'almentaton.
- Branchez votre four à la prse murale.
2. Ouvrez la porte, fxez le four à l'armore à l'ade de la vs B à travers l'orfce stué au bas du cadre
d’encastrement. Recouvrez la vs avec le cache en plastque fourn.
support
braket
Vis B
Vida B
Orifice de montage
Montaj deliği
Four à micro-ondes / Manuel d’instructions
65 / 371 FR
Page 66

3 Installaton et raccordement
3.3 Prncpes du
fonctonnement au mcroondes
• Préparez sogneusement vos alments. Placez
les partes restantes à l'extéreur de la boîte.
• Prêtez attenton au temps de cusson. Cusnez
dans le mode de temps le plus court spécfé et
ajoutez plus de temps, le cas échéant. Les alments cuts en excès peuvent produre de la
fumée ou brûler.
• Couvrez les alments pendant la cusson. Couvrr
les alments prévent toute éclaboussure et permet d'en garantr la cusson unforme.
• Retournez les alments tels que la volalle et les
hamburgers lorsque vous les cusnez dans un
four à mcro-ondes, afn d'accélérer la cusson
de ce type d'alment. Tournez au mnmum une
fos, les alments plus larges tels que les rôts.
• Retournez les alments tels que les boulettes
de vande au mleu de la cusson et remplacez celles du centre par celles de l'extéreur du
récpent.
3.4 Raccordement électrque
L'apparel dot être ms à la terre. Ce four possède
un câble de mse à la terre avec une fche de
terre. Branchez l'apparel à une prse murale correctement nstallée et mse à la terre. Le
système de mse à la terre permet un fl de fute
électrque en cas de court-crcut et rédut les rsques d'électrocuton. Nous vous recommandons
l'utlsaton d'un crcut électrque dédé exclusvement au four. L'utlsaton du four à haute tenson
est dangereuse et peut entraîner un ncende ou
d'autres accdents susceptbles d'endommager le
four.
A
AVERTISSEMENT :
mauvase utlsaton de la prse
de terre peut provoquer un choc
électrque.
Toute
C
C
3.5 Test des ustensles
Ne fates jamas fonctonner le four à vde. La
seule excepton concerne le test des ustensles,
décrt dans la secton suvante. Certans ustensles non métallques peuvent ne pas convenr
à une utlsaton dans un mcro-ondes. En cas de
doute sur la convenance de vos ustensles par
rapport au mcro-ondes, effectuez le test suvant.
1. Placez l'ustensle vde à tester dans le mcroondes en même temps qu'un verre utlsable au
mcro-ondes, rempl avec 250 ml d'eau.
2. Fates fonctonner le four à la pussance maxmale pendant 1 mnute.
3. Vérfez sogneusement la température
de l'ustensle testé. S'l chauffe, l n'est pas
appropré pour une utlsaton au four à mcroondes.
4. Ne dépassez jamas la lmte de temps de fonctonnement de 1 mnute. S vous remarquez la
formaton d'un arc après 1 mnute de fonctonnement, arrêtez le mcro-ondes. Les ustensles
formant un arc ne sont pas approprés pour une
utlsaton au mcro-ondes.
S vous avez des questons relatves à la mse à la terre et aux nstructons en matère d'électrcté,
consultez un techncen électrque
qualfé ou le personnel de servce.
Le fabrcant et/ou le revendeur
n'assument aucune responsablté
pour les blessures ou les dommages sur le four qu peuvent résulter
du non respect des procédures de
raccordement électrque.
66 / 371 FR
Four à micro-ondes / Manuel d’instructions
Page 67

3 Installaton et raccordement
La lste suvante est un gude général qu pourrat
vous ader à chosr le bon ustensle.
Ustensile de cuisson Micro-
ondes
Verre thermorésistant Oui Oui Oui
Verre non thermorésistant Non Non Non
Céramiques thermorésistantes Oui Oui Oui
Plat en plastique approprié pour le four à
micro-ondes
Ustensiles de cuisine en papier Oui Non Non
Plateau métallique Non Oui Non
Rack métallique Non Oui Non
Papier en aluminium et couvercles en forme
de feuille
Porcelaines Oui Oui Oui
Oui Non Non
Non Oui Non
Gril Mixte
Four à micro-ondes / Manuel d’instructions
67 / 371 FR
Page 68

4 Fonctionnement
4.1 Bandeau de
commande
Mcro-ondes
Grl/Mxte
Décongélaton par le
temps
Décongélaton
par le pods
Mnutere
Départ/+30 sec.
Arrêt/Annulaton
Selecteur de temps,
pussance ou cusson
automatque
Ouverture de porte
4.2 Réglage de l'heure
Lorsque le four à mcro-ondes est sous tenson,
« 0:00 » s'affche sur l'écran et un sgnal sonore
retentt une fos.
1. Appuyez deux fois sur et les heures
commencent à clignoter.
2. Tournez le bouton pour régler l'heure ; de 0
à 23 heures.
3. Appuyez sur et les minutes commencent à
clignoter.
4. Tournez le bouton pour régler les minutes ;
de 0 à 59 minutes.
5. Appuyez sur pour terminer le réglage de
l'heure. Le symbole « : » clignote et l'heure
s'affiche.
S vous appuyez sur (Arrêter/
Annuler) pendant le réglage du
C
temps, le four retourne automatquement au mode précédent.
4.3 Préparaton d’une cusson au
mcro-ondes
1. Appuyez sur et « P100 » s'affiche à l'écran.
2. Appuyez à nouveau sur ou tournez
pour sélectionner la puissance désirée. À
chaque pression de ce bouton, « P100 »,
« P80 », « P50 », « P30 » ou « P10 » s'affichent
respectivement.
3. Appuyez sur (Démarrer/+30 Sec./
Confirmer) pour confirmer et tournez pour
régler le temps de cuisson de 5 secondes à 95
minutes.
68 / 371 FR
Four à micro-ondes / Manuel d’instructions
Page 69

4 Fonctonnement
4. Appuyez à nouveau sur pour démarrer la
cuisson.
Exemple:
réchauffer un plat pendant 20 m-
C
1. Appuyez une fois sur et « P100 » s'affiche
à l'écran.
2. Appuyez une fois de plus sur ou tournez
3. Appuyez sur pour confirmer et « P 80 »
s'affiche à l'écran.
4. Tournez pour ajuster le temps de cuisson
jusqu'à ce que le four affiche « 20:00 ».
5. Appuyez sur pour démarrer la cuisson.
Les étapes de réglage de l'heure en bouton codes
sont les suvantes :
nutes. 20 mnutes, voc comment
fare:
pour définir réchauffer votre plat.
S vous souhatez
4.4 Programmes de cusson au
mcro-ondes
Commande Écran Puissance du
micro-ondes
1 P100 900 W Cuisson des liquides et des soupes
2 P80 700 W Réchauffage des plats
3 P50 450 W Cuisson douce
4 P30 300 W Décongélation forte
5 P10 100 W Décongélation douce
Mode de cuisson
Four à micro-ondes / Manuel d’instructions
69 / 371 FR
Page 70

4 Fonctionnement
4. 5 Préparaton d’une cusson
au grl ou mxte
1. Appuyez sur et « G » s'affiche à l'écran.
Appuyez de manière répétée sur ou
tournez pour sélectionner la puissance
désirée. À chaque pression de ce bouton, « G »,
« C-1 » ou « C-2 » s'affichent respectivement.
2. Appuyez sur pour confirmer et tournez
pour régler le temps de cuisson entre 0:05 et
95:00.
3. Appuyez à nouveau sur pour démarrer la
cuisson.
Exemple :
réchauffer au mcro-ondes et grl-
C
1. Appuyez une fos sur et « G » s'affche à
l'écran.
2. Appuyez une fois de plus sur ou tournez
pour sélectionner le mode Réchauffage + grill.
3. Appuyez sur pour confirmer et « C-1 »
s'affiche à l'écran.
4. Tournez pour régler le temps de cuisson
jusqu'à ce que le four affiche « 10:00 ».
5. Appuyez sur pour démarrer la cuisson.
ler en même temps pendant 10 mnutes, voc comment fare:
S vous souhatez
70 / 371 FR
Four à micro-ondes / Manuel d’instructions
Page 71

4 Fonctionnement
4.6 Programme de cusson au
grl ou mxte
Programme Affichage à l’écran Puissance
micro-ondes
1 - Gril G 0 Forte
2 - Réchauffage
+ Gril
3 - Mijotage + Gril C-2 300 W Moyen
Lorsque la moté du temps du grl
s'est écoulée, le four émet deux
sgnaux sonores. Pour meux grl-
C
ler, Nous vous consellons de retourner les alments, au mleu de la
cusson.
C-1 450 W Douce
Puissance du gril
4.7 Démarrage rapde
1. En mode veille, appuyez sur pour cuire des
liquides au micro-ondes. À chaque pression du
bouton, le temps de cuisson augmente jusqu'à
95 minutes.
2. Pendant la cuisson en mode micro-ondes, gril,
mixte ou décongélation par le temps, le temps
de cuisson augmente de 30 secondes à chaque
pression du bouton .
3. En mode veille, tournez dans le sens
contraire des aiguilles d’une montre pour cuire
des liquides et appuyez sur pour démarrer
la cuisson.
Four à micro-ondes / Manuel d’instructions
71 / 371 FR
Page 72

4 Fonctonnement
Dans les modes cusson automatque et décongélaton par le
pods, l’appu sur la touche
C
n'augmentera pas le temps de cusson.
4.8 Décongélaton par le pods
1. Appuyez une fois sur .
2. Tournez pour sélectionner le poids des
aliments de 100 à 2 000 g.
3. Appuyez sur pour démarrer la décongélation .
4.11 Cusson automatque
1. Tournez dans le sens des aiguilles d’une
montre pour sélectionner le menu désiré.
Les Menus de « A-1 » et « A-8 », notamment
pizza, viande, légumes, pâtes alimentaires,
pommes de terre, poisson, boisson et popcorn,
s'affichent.
2. Appuyez sur pour confirmer.
3. Tournez pour choisir le poids par défaut
selon le tableau du menu.
4. Appuyez sur pour démarrer la cuisson.
4.9 Décongélaton par le
temps
C
1. Appuyez une fois sur .
2. Tournez pour sélectionner le temps de
décongélation. La durée maximale est de 95
minutes.
3. Appuyez sur pour démarrer le dégel.
4.10 Mnutere
Votre four est équpé d’une mnutere
ndépendante qu n'est pas relée aux fonctons
du four et peut être utlsé séparément (elle peut
être réglée sur 95 mnutes au maxmum.)
1. Appuyez une fois sur et 00:00 s'affiche à
l'écran.
2. Tournez pour saisir l'heure exacte.
3. Appuyez sur pour confirmer le réglage.
4. Lorsque le décompte du temps atteint 00:00,
un signal retentit 5 fois. Si l'heure est réglée,
l'heure actuelle s'affiche à l'écran.
Appuyez sur pour arrêter la mnutere à tout
moment.
1. Tournez dans le sens des aiguilles d’une
montre jusqu'à ce que « A-6 » s'affiche à l'écran.
2. Appuyez sur pour confirmer.
3. Tournez pour sélectionner le poids du
poisson jusqu'à ce que « 350 » s'affiche à
l'écran.
Exemple :
sner automatquement 350 g de
posson :
S vous souhatez cu-
72 / 371 FR
Four à micro-ondes / Manuel d’instructions
Page 73

4 Fonctonnement
4. Appuyez sur pour démarrer la cuisson.
Lste des cussons automatques
Cuissons automatiques Poids Affichage à l’écran
A-1
Pizza
A-2
Viande
A-3
Légumes
A-4
Pâtes alimentaires
A-5
Pommes de terre
A-6
Poisson
A-7
Boissons
A-8
Popcorn
50 g (avec 450 ml d'eau froide) 50
100 g (avec 800 ml d'eau
200 g 200
400 g 400
250 g 250
350 g 350
450 g 450
200 g 200
300 g 300
400 g 400
100
froide)
200 g 200
400 g 400
600 g 600
250 g 250
350 g 350
450 g 450
1 verre (120 ml) 1
2 verres (240 ml) 2
3 verres (360 ml) 3
50 g 50
100 g 100
Four à micro-ondes / Manuel d’instructions
73 / 371 FR
Page 74

4 Fonctonnement
4.12 Cussons enchaînées
Il est possble de programmer 2 cussons
enchaînées, s l’une d’elle est une décongélaton,
elle dot être sélectonnée en premer.
S vous souhatez décongeler les
alments pendant 5 mnutes, pus
C
1. Appuyez une fois sur .
2. Tournez pour sélectionner le temps de
dégel jusqu'à ce que « 5:00 » s'affiche à l'écran.
3. Appuyez une fois sur et « P100 » s'affiche
à l'écran.
4. Appuyez une fois de plus sur ou tournez
5. Appuyez sur pour confirmer et « P 80 »
s'affiche à l'écran.
6. Tournez pour ajuster le temps de cuisson
jusqu'à ce que le four affiche « 07:00 ».
7. Appuyez sur pour démarrer la cuisson.
Un signal sonore retentit une fois pour la
première phase et le décompte du temps de
décongélation démarre. Le signal retentit
à nouveau pour indiquer l'entrée dans la
deuxième phase de cuisson. Le signal retentit
5 fois à la fin de la cuisson.
les réchauffer pendant 7 mnutes,
procédez de la manère suvante :
pour sélectionner la fonction réchauffage.
4.13 Informaton sur le
programme en cours
1. Lors d’une cuisson, appuyez sur ou (gril/
mixte) pour afficher pendant 3 secondes
la fonction de cuisson sélectionnée. Après
3 secondes, l’afficheur retourne au mode
précédent.
2. Pendant la préparation, appuyez sur et
l'heure actuelle s'affiche pendant 3 secondes.
4.14 Sécurté enfants
1.
Verrouillage :
pendant 3 secondes et un signal sonore
retentit ensuite pour indiquer que la sécurité
enfants est activée. s'affiche à l'écran.
2.
Déverrouillage :
sécurité enfants, appuyez sur pendant 3
secondes et un long signal sonore retentit pour
indiquer que la sécurité est désactivée.
4.15 Ouverture de la porte du
four
Appuyez sur pour ouvrr la porte du four mcro-ondes.
En mode Veille, appuyez sur
Pour désactiver la
74 / 371 FR
Four à micro-ondes / Manuel d’instructions
Page 75

5 Nettoyage et entreten
5.1 Nettoyage
AVERTISSEMENT :
N’utlsez jamas d'essence, de sol-
A
A
1. Étegnez l’apparel et débranchez le câble
d’almentaton de la prse murale.
2. Patentez jusqu’au refrodssement complet de
l’apparel.
3. Mantenez l’ntéreur du four propre. Essuyez à
l’ade d’un tssu humde en cas d’éclaboussures
d’alments ou d’écoulements de lqudes sur les
paros du four. Utlsez un détergent doux lorsque le four est très sale. Évtez d’utlser des
pulvérsateurs et autres agents nettoyants agressfs, car ls peuvent causer des taches, des
marques, et l’opacté de la surface de la porte.
4. Nettoyez les surfaces externes du four à l’ade
d’un tssu humde. Évtez toute pénétraton
d’eau à partr des orfces d’aératon, pour
prévenr tout dommage des pèces fonctonnelles du four.
5. Essuyez fréquemment les deux côtés de la porte et de la vtre, les jonts de porte et les pèces
à proxmté des jonts à l’ade d’un tssu humde,
de sorte à nettoyer les taches de débordement
et d’éclaboussures. Évtez d’utlser des agents
nettoyants abrasfs.
6. Évtez de mouller le bandeau de commande.
Nettoyez avec un chffon humde et doux.
Lassez la porte du four ouverte, pour évter
toute mse en marche nattendue lors du nettoyage du bandeau de commande.
vants ou de nettoyants abrasfs,
d'objets métallques ou de brosses
dures pour nettoyer l'apparel.
AVERTISSEMENT :
Ne trempez jamas l'apparel ou son
cordon d'almentaton dans de l'eau
ou dans tout autre lqude.
7. En cas d’accumulation de vapeur à l’intérieur
ou autour de la porte du four, nettoyez à l’aide
d’un tissu doux. Cela se produit lorsque le four
à micro-ondes fonctionne dans des conditions
d’extrême humidité. C’est normal.
8. Dans certans cas, vous devrez retrer le plateau en verre pour le nettoyer. Lavez le plateau
dans de l’eau savonneuse tède ou au lave-vasselle.
9. Nettoyez régulèrement le support à roulettes du plateau tournant et le bas du four pour
évter des bruts excessfs. Il sufft de nettoyer la surface nféreure du four à l’ade d’un
détergent doux. l’entraîneur du plateau tournant dans de l’eau savonneuse tède ou au
lave-vasselle. Lorsque vous retrez assurezvous de le replacer correctement.
10. Afin d’éliminer les mauvaises odeurs dans
votre four, placez-y un verre d’eau, du jus et
des zestes d’un citron dans un bol profond
utilisable dans un micro-ondes et faites
fonctionner le four pendant 5 minutes au
mode Micro-ondes. Nettoyez soigneusement
et séchez ensuite en vous servant d’un
chiffon doux.
11. Veuillez contacter le service agréé lorsque
vous devez remplacer l’ampoule du four.
12. Nettoyez régulièrement le four et retirez tous
les dépôts d’aliments. Dans le cas contraire,
des défections de la surface pourraient
survenir, affectant la durée de vie de l’appareil
et vous exposant à des risques.
13. Évitez de mettre l’appareil au rebut avec les
ordures ménagères ; éliminez les fours usagés
dans les centres pour déchets spéciaux, qui
sont mis à disposition par les communes.
14. Lorsque vous utilisez la fonction Gril du four
à micro-ondes, une petite quantité de fumée
et de vapeur s’échappe et se dissipe après un
certain temps de fonctionnement.
Four à micro-ondes / Manuel d’instructions
75 / 371 FR
Page 76

6 Dépannage
Problème Raison éventuelle Solution
Le four ne démarre pas. (1) Le cordon d'alimentation
n'est pas correctement
enfiché.
(2) Fusible grillé ou disjoncteur
activé.
(3) Problème avec la sortie. Testez la sortie avec d'autres
Le four ne chauffe pas. (4) La porte n'est pas
correctement fermée.
Le plateau tournant en verre
fait du bruit lorsque le four est
en marche
Le four affiche l'erreur E-3 et
ne fonctionne pas (pour le
modèle MGB 25333 BG)
(5) Le plateau tournant et le
bas du four sont sales.
(6) La porte du four ne
s'ouvre pas (en raison d'une
obstruction devant la porte,
d'une baisse de tension, etc.)
Débranchez. Branchez ensuite
après 10 secondes.
Remplacez le fusible ou
le disjoncteur (réparé par
un professionnel de notre
entreprise).
appareils électriques.
Fermez correctement la porte.
Reportez-vous à la section
« Nettoyage et Entretien » pour
le nettoyage des pièces sales.
Débranchez. Branchez ensuite
après 10 secondes.
76 / 371 FR
Four à micro-ondes / Manuel d’instructions
Page 77

Leggere per prima cosa questo manuale!
Gentile Cliente,
Graze per aver scelto un prodotto Beko. Speramo che Le resca ad ottenere rsultat
mglor da questo prodotto, realzzato con tecnologa d alta qualtà e all'avanguarda.
Pertanto, legga questo ntero manuale utente e tutt gl altr document allegat con
attenzone prma d utlzzare l prodotto e lo conserv come rfermento per us futur.
Se passa l prodotto ad altre persone, da loro anche questo manuale utente. Segua
tutte le avvertenze e le nformazon del manuale utente.
Significato dei simboli
I seguenti simboli sono utilizzati in diverse sezioni del presente manuale utente:
Informazon mportant e sugger-
C
A
ment utl sull'utlzzo.
Avvertenze d stuazon percolose
relatve alla scurezza della vta e della
propretà.
Avvertenza d superfc calde.
Questo prodotto è stato realzzato n modern mpant rspettos dell’ambente, senza causare
dann alla natura.
L’appareccho è conforme alla
drettva RAEE.
Non contene PCB.
Page 78

INDICE
1 Istruzioni importanti sulla
sicurezza e l’ambiente 79
1.1 Sicurezza generale ..............................................79
1.1.1 Sicurezza elettrica ...........................................81
1.1.2 Sicurezza del prodotto ...................................82
1.2 Uso previsto ...........................................................83
1.3 Sicurezza dei bambini ........................................83
1.4 Conformità con la direttiva RAEE e lo smalti-
mento dei rifiuti .........................................................84
1.5 Informazioni di imballaggio ............................84
2 Il forno a microonde 85
2.1 Panoramica ............................................................85
2.1.1. Comandi e parti ...............................................85
2.1.2. Dati tecnici .........................................................85
2.1.3 Installazione del piatto girevole ................86
3 Installazione e collegamento 87
3.1 Installazione e collegamento .........................87
3.2 Installazione a incasso ......................................88
3.2.1 Dimensione alloggiamento per
l'installazione a incasso............................................88
3.2.2 Preparazione dell'alloggiamento ..............89
3.2.3 Fissaggio del forno .........................................90
3.3 Interferenze radio ...............................................91
3.4 Principi della cottura con le microonde......91
3.5 Istruzioni di messa a terra ...............................91
3.6 Test utensili...........................................................92
4 Funzionamento 93
4.1 Pannello di controllo ..........................................93
4.2 Istruzioni operative ............................................93
4.2.1 Impostazione dell'orario ...............................93
4.2.2 Cucinare con il forno a microonde ............93
4.2.3 Istruzioni tastiera microonde .....................94
4. 3 Cottura con grill o modalità combinata .....94
4.3.1 Istruzioni tastiera
(grill/modalità combinata) ......................................95
4.4 Avvio rapido ..........................................................95
4.5 Scongelamento a peso .....................................95
4.6 Scongelamento a tempo .................................95
4.7 Timer da cucina (contatore) ...........................96
4.8 Menu auto .............................................................96
4.8.1 Menu cottura automatica ............................97
4.9 Cottura multi-fase ..............................................98
4.10 Funzione richiesta ...........................................98
4.11 Blocco bambini ...................................................98
4.12 Apertura sportello del forno ........................98
5 Pulizia e manutenzione 99
5.1 Pulizia .......................................................................99
5.2 Conservazione ......................................................99
6 Ricerca e risoluzione dei
problemi 100
78 / 371 IT
Forno a microonde / Manuale utente
Page 79

Istruzioni importanti sulla sicurezza e
1
l’ambiente
Questa sezione contiene istruzioni
di sicurezza che consentono di prevenire il pericolo di incendio, scossa elettrica, esposizione all'energia
delle microonde, di lesioni personali
o di danni materiali. L’inosservanza
di queste istruzioni invalida le garanzie accordate.
1.1 Sicurezza generale
Non deve essere usato a scopo
commerciale. Il fabbricante non
sarà ritenuto responsabile per
danni provocati da errato utilizzo.
• Non utilizzare questo apparec-
chio all'esterno, in bagno, in ambienti umidi o in luoghi in cui può
bagnarsi.
• Nessuna responsabilità né richie-
sta in garanzia sarà presa in con-
• Non cercare di avviare il forno
quando lo sportello è aperto; altrimenti si potrebbe essere esposti
alle dannose energie delle microonde. I blocchi di sicurezza non
devono essere disattivati né manomessi.
• Non giocare con alcun oggetto tra
il lato anteriore e lo sportello del
forno. Non lasciare che sporco o
residui di agenti di pulizia si formino sulla superficie dell'alloggiamento.
• Qualsiasi lavoro di assistenza che
includa la rimozione della copertura di protezione dall'esposizione
alle energie delle microonde deve
essere effettuato da personale/
assistenza autorizzati. Qualsiasi
altro approccio è pericoloso.
• Il prodotto è concepito per cuci-
nare, riscaldare e scongelare gli
siderazione per danni derivanti da
cattivo utilizzo né gestione non
corretta dell'apparecchio.
• Non provare mai a smontare l’ap-
parecchio. Non saranno accettate
richieste di garanzia per danni provocati da gestione non corretta.
• Usare solo parti originali o quelle
consigliate dal produttore.
• Non lasciare mai questo apparec-
chio privo di supervisione quando
è in uso.
• Usare sempre l'apparecchio su una
superficie stabile, piatta, pulita,
asciutta e anti-scivolo.
• Questo apparecchio non deve
essere usato con timer esterno o
sistema di controllo a distanza separato.
• Prima di usare l'apparecchio per la
prima volta, pulire tutte le parti.
alimenti in casa.
Forno a microonde / Manuale utente
79 / 371 IT
Page 80

Istruzioni importanti sulla sicurezza e
1
l’ambiente
Vedere i dettagli presenti nella sezione "Pulizia e manutenzione".
• Utilizzare l'apparecchio per l'uso
previsto, solo secondo quanto descritto in questo manuale. Non utilizzare sostanze chimiche abrasive
né vapore su questo apparecchio.
Questo forno è concepito soprattutto per riscaldare e cuocere gli
alimenti. Non è destinato uso industriale né di laboratorio.
• Non utilizzare l'apparecchio per
asciugare abiti o strofinacci da cucina.
• L'apparecchio diventa molto caldo
durante l'uso. Prestare attenzione
a non toccare le parti calde all'interno del forno.
• Il forno non è concepito per asciu-
gare esseri viventi.
• Non azionare il forno vuoto.
• Gli utensili da cucina possono di-
ventare caldi a causa del trasferimento di calore dagli alimenti
riscaldati all'utensile stesso. Potrebbe essere necessario indossare guanti da forno per tenere
l'utensile.
• Bisogna controllare gli utensili per
assicurarsi che siano idonei all'utilizzo nei forni a microonde.
• Non mettere il forno su stufe o su
altri apparecchi che generano calore. Altrimenti potrebbe danneggiarsi e la garanzia perderebbe
validità.
• Il forno a microonde non deve es-
sere posto in un alloggiamento
che non sia conforme alle istruzioni per l'installazione.
• Può essere emesso vapore
quando si aprono le coperture o i
fogli di rivestimento dopo la cottura degli alimenti.
• Utilizzare i guanti quando si estrae
qualsiasi alimento caldo.
• L'apparecchio e le sue superfici
accessibili potrebbero diventare
molto caldi quando l'apparecchio
è in uso.
• Sportello e vetro esterno potreb-
bero essere molto caldi quando
l'apparecchio è in uso.
1.1.1 Sicurezza elettrica
• Il forno a microonde Beko è con-
forme agli standard di sicurezza
applicabili; pertanto, in caso di
danni all'apparecchio o al cavo di
alimentazione, esso deve essere
riparato o sostituito dal rivenditore, da un centro assistenza
o da un centro specializzato e
autorizzato per evitare danni.
80 / 371 IT
Forno a microonde / Manuale utente
Page 81

Istruzioni importanti sulla sicurezza e
1
l’ambiente
Lavori di riparazione errati o non
• Assicurarsi che non ci sia il rischio
autorizzati possono provocare
danni e rischi per l'utente.
• Assicurarsi che l’alimentazione
elettrica sia conforme alle informazioni fornite sulla targhetta di
classificazione dell’apparecchio.
• Scollegare l'apparecchio prima di
L'unico modo per scollegare l'apparecchio dall'alimentazione è
• Non tirare il cavo di alimentazione
scollegare la spina elettrica dalla
presa elettrica.
• Usare l'apparecchio solo con una
presa con messa a terra.
• L'apparecchio non deve essere
• Non immergere l'apparecchio, il
usato se questo o il cavo di alimentazione sono danneggiati.
• Non utilizzare l'apparecchio con
• Quando si riscaldano alimenti in
una prolunga.
• Non toccare mai l'apparecchio o la
spina elettrica con mani umide o
bagnate.
• Posizionare l'apparecchio in modo
• Rimuovere strisce metalliche e/o
tale che la spina sia sempre accessibile.
• Per evitare danni al cavo di alimen-
tazione, evitare di schiacciarlo,
piegarlo o strofinarlo su bordi ta-
• Spegnere l'apparecchio o scolle-
glienti. Tenere il cavo di alimentazione lontano da superfici calde e
fiamme libere.
che il cavo di alimentazione possa
essere tirato accidentalmente o
che qualcuno possa passare sullo
stesso quando l'apparecchio è in
uso.
ogni pulizia e quando non è in uso.
dell'apparecchio per scollegarlo
dall'alimentazione e non avvolgere
mai il cavo attorno all'apparecchio.
cavo di alimentazione o la spina
elettrica in acqua o in altri liquidi.
Non tenerlo sotto acqua corrente.
contenitori di plastica o carta, controllare il forno frequentemente
perché esiste la possibilità di incendio.
manici di metallo dai sacchetti di
carta o plastica prima di utilizzare
nel forno sacchetti idonei al forno
a microonde.
garlo e tenere lo sportello chiuso
per evitare incendi se si vede
fumo.
Forno a microonde / Manuale utente
81 / 371 IT
Page 82

Istruzioni importanti sulla sicurezza e
1
l’ambiente
• Non utilizzare la parte interna del
forno per conservare oggetti. Non
lasciare oggetti di carta, materiali
da cucina o alimenti all'interno del
forno quando non è in uso.
• Il contenuto di biberon e barattoli
di alimenti per bambini deve essere mescolato o scosso e la temperatura deve essere controllata
prima del consumo, per evitare
ustioni.
• Questo apparecchio è un dispo-
sitivo di Gruppo 2 Classe B ISM. Il
Gruppo 2 include tutti i dispositivi ISM (industriali, scientifici e
medici) in cui l'energia di radiofrequenza è generata intenzionalmente e/o utilizzata in forma di
radiazioni elettromagnetiche per il
trattamento di materiali e dispositivi per elettroerosione.
• Gli apparecchi di Classe B sono
idonei per essere usati in ambienti
domestici e ambienti direttamente
collegati a una rete di alimentazione elettrica a bassa tensione.
• Lo sportello o la superficie
esterna dell'apparecchio può diventare calda durante l'uso.
1.1.2 Sicurezza del
prodotto
• Liquidi o altri alimenti non devono
essere riscaldati in contenitori
chiudi perché c'è il rischio di esplosione.
• Riscaldare le bevande con le micro-
onde può provocare la loro ebollizione con produzione di schizzi
dopo l'estrazione dal forno; pertanto prestare attenzione quando
si prendono i contenitori.
• Non arrostire nulla nel forno. L'o-
lio caldo può danneggiare i componenti e i materiali del forno e
potrebbe anche provocare ustioni
alla pelle.
• Forare gli alimenti con crosta
spessa come patate, zucchine,
mele e castagne.
• L'apparecchio deve essere posi-
zionato in modo tale che il lato posteriore sia rivolto verso la parete.
• Se lo sportello o le guarnizioni
dello sportello sono danneggiati,
il forno non deve essere utilizzato
finché non sia stato riparato da
una persona qualificata.
• Prima di spostare l'apparecchio,
fissare il piatto girevole per evitare
che si danneggi.
82 / 371 IT
Forno a microonde / Manuale utente
Page 83

Istruzioni importanti sulla sicurezza e
1
l’ambiente
• Non utilizzare il forno a microonde
per cuocere o riscaldare uova in-
1.3 Sicurezza dei
bambini
tere, con o senza guscio.
• Non rimuovere le parti che sono
dietro e ai lati dell'apparecchio,
esse proteggono le distanze
minime tra le pareti dell'alloggiamento e l'apparecchio per consentire l'adeguata circolazione
dell'aria.
1.2 Uso previsto
• Il forno a microonde è concepito
solo per uso a incasso.
• Non usare l'apparecchio per scopi
diversi da quello previsto.
• Non usare l'apparecchio come
fonte di calore.
• Il forno a microonde è concepito
solo per scongelare, cuocere e riscaldare alimenti.
• Non cuocere troppo gli alimenti;
altrimenti si potrebbe provocare
un incendio.
• Non utilizzare dispositivi di pulizia
con vapore per pulire l'apparecchio.
• Si consiglia attenzione estrema
quando viene utilizzato vicino a
bambini e persone che hanno capacità fisiche, sensoriali o mentali
ridotte.
• Il presente apparecchio può es-
sere utilizzato da bambini a partire da 8 anni di età e da persone
con capacità fisiche, sensoriali o
mentali limitate o che non hanno
conoscenze ed esperienza, a
condizione che siano sotto supervisione per un uso sicuro del
prodotto o siano stati istruiti o
comprendano i potenziali pericoli
derivanti dall'uso del prodotto. I
bambini non devono giocare con
l’apparecchio.
Le procedure di pulizia e manutenzione da parte dell'utente non devono essere eseguite da bambini
a meno che non ricevano supervisione da parte di adulti.
• Pericolo di soffocamento! Tenere
tutti i materiali di imballaggio lontani dalla portata dei bambini.
Forno a microonde / Manuale utente
83 / 371 IT
Page 84

Istruzioni importanti sulla sicurezza e
1
l’ambiente
• Consentire ai bambini di utiliz-
zare il forno senza supervisione
solo quando sono state fornite
istruzioni adeguate in modo che
il bambino sia in grado di usare il
forno a microonde in sicurezza e
comprenda i pericoli derivanti da
uso non corretto.
• A causa del calore eccessivo che
deriva dalle modalità grill e combinata, ai bambini deve essere
consentito l'uso di queste modalità solo con la supervisione di un
adulto.
• Tenere prodotto e cavo di alimen-
tazione in modo che siano inaccessibili ai bambini di età inferiore
agli 8 anni.
• L'apparecchio e le sue superfici
accessibili potrebbero diventare
molto caldi quando l'apparecchio
è in uso. Tenere fuori dalla portata
dei bambini.
1.4 Conformità con la direttiva
RAEE e lo smaltimento dei
rifiuti
Questo prodotto non contiene materiali
dannosi e proibiti specificati nel
“Regolamento per la supervisione dei
rifiuti elettrici ed elettronici” emanato
dal Ministero dell’Ambiente e della
Pianificazione urbana. Conforme alla Direttiva
RAEE. Questo prodotto è stato realizzato con parti
e materiali di alta qualità che possono essere riutilizzati e sono adatti ad essere riciclati.
Pertanto, non smaltire il prodotto con normali rifiuti domestici alla fine del suo ciclo di vita.
Portarlo ad un punto di raccolta per il riciclaggio
di apparecchiature elettriche ed elettroniche.
Rivolgersi all’autorità locale per i punti di raccolta.
Si contribuisce a proteggere l'ambiente e le risorse
naturali riciclando i prodotti usati.
1.5 Informazioni di
imballaggio
L’imballaggio del prodotto è fatto di
materiali riciclabili in conformità con la
normativa nazionale. Non smaltire i
materiali di imballaggio con i rifiuti
domestici o altri rifiuti. Portarli ai punti di raccolta
per materiali di imballaggio previsti dalle autorità
locali.
84 / 371 IT
Forno a microonde / Manuale utente
Page 85

2 Il forno a microonde
6
7
1
235 4
8
2.1 Panoramica
9
2.1.1. Comandi e parti
1. Pannello di controllo
2. Asta piatto girevole
3. Supporto piatto girevole
4. Vassoio di vetro
5. Vetro sportello forno
6. Gruppo sportello
7. Sistema di interblocco di sicurezza sportello
8. Rastrelliera grill (da usare solo con la funzione
grill e posizionata sul vassoio di vetro)
9. Dispositivo di sollevamento a vuoto per l'apertura manuale dello sportello (applicabile al modello MGB 25333 BG).
I contrassegni sul prodotto o i valori dichiarati in altri documenti in dotazione con il prodotto sono valori ottenuti
in condizioni di laboratorio secondo gli standard pertinenti. Questi valori possono variare secondo l'utilizzo
dell’apparecchio e le condizioni ambientali. I valori di potenza sono testati a 230V.
Forno a microonde / Manuale utente
2.1.2. Dati tecnici
Consumo
energetico
Uscita
Frequenza
operativa
Dimensioni
esterne
Dimensioni
interne del
forno
Capacità
forno
Peso netto
230 V~50 Hz,
1450 W (microonde)
1000 W (grill)
900 W
2.450 MHz
388 mm (A) / 595 mm (L) /
392 mm (P)
206 mm (A) / 328 mm
(L) / 400 mm (P)
25 litri
18.5 kg
85 / 371 IT
Page 86

Göbek (alt kısım)
Cam tabla
Döner tabla desteği
Döner tabla mili
2 Il forno a microonde
2.1.3 Installazione del piatto girevole
Mozzo (lato inferiore)
Vassoio di vetro
Asta piatto girevole
• Non posizionare mai il vassoio di vetro al
contrario. Il vassoio di vetro non deve mai essere
ridotto.
• Durante la cottura devono essere sempre
utilizzati il vassoio di vetro e il supporto del
piatto girevole.
• Non cuocere direttamente gli alimenti sul
vassoio di vetro. Mettere gli alimenti in/su
utensili appropriati per la cucina prima di
metterli nel forno.
• Se il vassoio di vetro o il supporto del piatto
girevole si lesionano o si rompono, contattare il
centro assistenza autorizzato più vicino.
Supporto piatto girevole
86 / 371 IT
Forno a microonde / Manuale utente
Page 87

3 Installazione e collegamento
3.1 Installazione e
collegamento
• Rimuovere tutti i materiali di imballaggio e
gli accessori. Esaminare il forno per eventuali
danni, come rientranze o sportello rotto. Non
installare se il forno è danneggiato.
• Rimuovere la pellicola protettiva che si trova
sulla superficie dell'alloggiamento del forno a
microonde.
• Non rimuovere la copertura marrone chiaro
montata nella cavità del forno per proteggere il
magnetron.
• Questo apparecchio è destinato solo ad uso
domestico.
• Questo forno a microonde è concepito solo
per uso a incasso. Non è concepito per essere
utilizzato su piano di lavoro o all'interno di un
alloggiamento.
• Osservare le speciali istruzioni per la
installazione.
• L'apparecchio può essere installato in un
alloggiamento montato a parete largo 60 cm
(almeno 55 cm di profondità e 85 cm di distanza
dal pavimento).
• L'apparecchio è dotato di una spina e deve
essere collegato solo a una presa messa a terra
correttamente installata.
• La tensione di rete deve corrispondere a quella
specificata sulla targhetta di classificazione.
• La presa deve essere installata e il cavo di
collegamento deve essere sostituito solo da
personale autorizzato per l'assistenza. Se la
spina non è più accessibile dopo l'installazione,
bisogna prevedere un dispositivo di
scollegamento omnipolare al lato di installazione
con una distanza di contatto di almeno 3 mm.
• Non bisogna utilizzare adattatori, prese multiple
e prolunghe. Il sovraccarico può provocare un
rischio di incendio.
C
La superficie accessibile potrebbe
essere calda durante il funzionamento.
Non intrappolare né piegare il cavo di
alimentazione.
Forno a microonde / Manuale utente
87 / 371 IT
Page 88

3 Installazione e collegamento
3.2 Installazione a incasso
3.2.1 Dimensione alloggiamento per l'installazione a
incasso
La struttura del forno a microonde deve essere fuori dall’alloggiamento.
380+2
88 / 371 IT
Forno a microonde / Manuale utente
Page 89

a
a
Vida A
Braket
Merkez çizgi
Braket
Vida A
3 Installazione e collegamento
3.2.2 Preparazione dell'alloggiamento
1. Leggere le istruzioni sul modello nella parte bassa dell'alloggiamento e mettere il modello sul ripiano
inferiore dell'alloggiamento.
a
a
LEFT EDGE
T EDGE RIGH
CENTER LINE
FRONT EDGE
2. Eseguire i contrassegni sul ripiano inferiore dell'alloggiamento secondo i contrassegni "a" del modello.
Vite A
Staffa
Linea centrale
3. Rimuovere il modello nella parte bassa dell'alloggiamento e fissare la staffa con la vite A.
Vite A
Forno a microonde / Manuale utente
Staffa
89 / 371 IT
Page 90

3 Installazione e collegamento
3.2.3 Fissaggio del forno
1. Installare il forno nell'alloggiamento.
- Assicurarsi che il retro del forno sia bloccato dalla staffa.
- Non intrappolare né piegare il cavo di alimentazione.
2. Aprire lo sportello, fissare il forno all'alloggiamento con la vite B attraverso il foro di installazione. Poi
fissare la copertura in plastica di limitazione al foro di installazione.
staffa
braket
90 / 371 IT
Vite B
Vida B
Foro di installazione
Montaj deliği
Forno a microonde / Manuale utente
Page 91

3 Installazione e collegamento
3.3 Interferenze radio
Il funzionamento del forno a microonde può provocare interferenze a
C
• Installare il microonde quanto più distante
possibile da radio e TV. Il funzionamento del
forno a microonde può provocare interferenze
con la ricezione di radio o TV. 2. Collegare il forno
in una presa elettrica standard. Assicurarsi che
la tensione e la frequenza siano le stesse di
quelle presenti sulla targhetta di classificazione.
• In caso di interferenza, potrebbe essere ridotta
o eliminata prendendo le precauzioni che
seguono:
• Pulire lo sportello e la superficie delle
guarnizioni del forno.
• Impostare la direzione dell'antenna della radio
o della TV.
• Riposizionare il forno sulla base della
collocazione del ricevitore.
• Mettere il forno a microonde lontano dal
ricevitore.
• Collegare il forno a microonde a un'altra presa,
così il forno a microonde e il ricevitore saranno
su linee diverse.
radio, TV e apparecchi simili.
3.4 Principi della cottura con
le microonde
• Preparare gli alimenti con attenzione. Mettere le
parti rimanenti sull'esterno del piatto.
• Prestare attenzione al tempo di cottura. Cuocere
nel tempo più breve specificato e aggiungere
altri minuti, se necessario. Gli alimenti troppo
cotti possono provocare fumo o bruciarsi.
• Coprire gli alimenti durante la cottura. La
copertura degli alimenti previene gli schizzi
e aiuta ad assicurare che siano cotti in modo
uniforme.
• Girare gli alimenti come pollame e hamburger
durante la cottura nel forno a microonde per
accelerare la cottura di questo tipo di alimenti.
Alimenti più grandi, come gli arrosti, devono
essere girati almeno una volta.
• Girare al contrario alimenti come polpette a
metà della cottura e cambiarne la posizione, dal
centro del piatto verso l'esterno e viceversa.
3.5 Istruzioni di messa a terra
Questo apparecchio deve essere messo a terra.
Questo forno ha un cavo di messa a terra con una
spina messa a terra. L'apparecchio deve essere
collegato a una presa elettrica installata e messa a
terra nel modo corretto. Il sistema di messa a terra
consente di evitare perdite dal collegamento della
corrente elettrica in caso di cortocircuito e riduce il
rischio di scosse elettriche. Raccomandiamo l'uso
di un circuito elettrico dedicato al forno. Il funzionamento ad alta tensione è pericoloso e può provocare incendio o altri incidenti che danneggerebbero il forno.
A
C
C
AVVERTENZA:
della spina di messa a terra può
provocare scossa elettrica
In caso di domande sulla messa a
terra e sulle istruzioni elettriche,
consultare un tecnico elettricista
qualificato o il personale di assistenza.
Il fabbricante e/o il rivenditore non
accettano alcuna responsabilità
per lesioni o danni al forno che potrebbero verificarsi quando non si
rispettano le procedure di collegamento.
L'errato utilizzo
Forno a microonde / Manuale utente
91 / 371 IT
Page 92

3 Installazione e collegamento
3.6 Test utensili
Non azionare mai il forno vuoto. L'unica eccezione
è il test utensili descritto nella sezione che segue.
Alcuni utensili non di metallo potrebbero non essere idonei per l'uso nel microonde. Se non si è
sicuri dell'eventuale idoneità di un utensile al microonde, è possibile eseguire questo test.
1. Mettere l'utensile vuoto da testare nel forno a
microonde assieme a un bicchiere compatibile
per le microonde riempito con 250 ml di acqua.
2. Azionare il forno a microonde alla potenza massima per 1 minuto.
L'elenco che segue è una guida generale che aiuta
l'utente a selezionare l'utensile giusto.
Utensile per la cottura Microonde Grill Modalità
Vetro resistente al calore Sì Sì Sì
Vetro non resistente al calore No No No
Ceramica resistente al calore Sì Sì Sì
Piatto di plastica idoneo al forno a microonde Sì No No
Articoli da cucina in carta Sì No No
Vassoio di metallo No Sì No
Rastrelliera metallica No Sì No
Fogli di alluminio e coperture di alluminio No Sì No
Materiali in schiuma No No No
3. Controllare attentamente la temperatura
dell'utensile in corso di test. Se si è riscaldato,
non è idoneo all'uso nel microonde.
4. Non superare mai il limite di funzionamento
massimo di 1 minuto. Se si notano archi elettrici
durante il funzionamento di 1 minuto, spegnere il microonde. Gli utensili che provocano archi
elettrici non sono idonei all'uso nel microonde.
combinata
92 / 371 IT
Forno a microonde / Manuale utente
Page 93

4 Funzionamento
4.1 Pannello di controllo
Microonde
Grill/modalità
combinata
Scongelamento a
tempo
Scongelamento
a peso
Timer da cucina/oro-
logio
Avvio/+30 sec./conferma
Stop/annulla
4.2 Istruzioni operative
4.2.1 Impostazione dell'orario
Quando il forno a microonde viene collegato, si
visualizza "0:00” sullo schermo LED e un cicalino
suona una volta.
1. Premere (timer da cucina/orologio)
due volte e le cifre delle ore cominciano a
lampeggiare.
2. Ruotare per regolare l'ora; il valore
immesso deve essere compreso tra 0 e 23.
3. Premere (timer da cucina/orologio) e le
cifre dei minuti cominciano a lampeggiare.
4. Ruotare per regolare i minuti; il valore
immesso deve essere compreso tra 0 e 59.
5. Premere (timer da cucina/orologio)
per terminare l'impostazione dell'orario. ":"
lampeggia e l'orario si illumina.
Se si preme (stop/annulla) durante l'impostazione del tempo, il
C
forno torna automaticamente alla
modalità precedente.
Pulsante sportello
aperto
Forno a microonde / Manuale utente
4.2.2 Cucinare con il forno a
microonde
1. Premere (microonde) e “P100” si visualizza
sullo schermo LED.
2. Premere di nuovo (microonde) o ruotare
per selezionare la potenza desiderata. Ogni
volta che si preme il pulsante, si visualizzano
rispettivamente “P100”, “P80”, ”P50”, “P30” o
“P10”.
93 / 371 IT
Page 94

4 Funzionamento
3. Premere (avvio/+30 sec./conferma) per
confermare e ruotare per impostare il tempo
di cottura su un valore compreso tra 0:05 e
95:00.
4. Premere (avvio/+30 sec./conferma) di
nuovo per avviare la cottura.
Esempio:
80% di potenza microonde per una
cottura di 20 minuti, è possibile uti-
C
5. Premere (microonde) una volta e “P100” si
visualizza sullo schermo.
6. Premere di nuovo (microonde) o ruotare
per la potenza del forno all'80%.
7. Premere (avvio/+30 sec./conferma) per
confermare e "P 80” si visualizza sullo schermo.
8. Ruotare per regolare il tempo di cottura
finché il forno visualizza "20:00".
9. Premere (avvio/+30 sec./conferma) per
avviare la cottura.
I passi per regolare il tempo con il pulsante sono i
seguenti:
Impostazione
della durata
lizzare il forno secondo i punti che
seguono.
0-1 minuto 5 secondi
1-5 minuti 10 secondi
5-10 minuti 30 secondi
10-30 minuti 1 minuto
30-95 minuti 5 minuti
Se si desidera utilizzare
Ammontare
incremento
4.2.3 Istruzioni tastiera
microonde
Ordine Schermo Potenza
microonde
1 P100 100%
2 P80 80%
3 P50 50%
4 P30 30%
5 P10 10%
4. 3 Cottura con grill o
modalità combinata
1. Premere (grill/modalità combinata) e “G” si
visualizza sullo schermo LED. Premere (grill/
modalità combinata) ripetutamente o ruotare
per selezionare la potenza desiderata. Ogni
volta che si preme il pulsante, si visualizzano
rispettivamente “G”, ”C-1” o “C-2”.
2. Premere (avvio/+30 sec./conferma) per
confermare e ruotare per impostare il
tempo di cottura su un valore compreso tra
0:05 e 95:00.
3. Premere (avvio/+30 sec./conferma) di
nuovo per avviare la cottura.
Esempio:
zare 55% di potenza microonde e
45% di potenza grill (C-1) per una
C
1. Premere (grill/modalità combinata) una
volta e “G” si visualizza sullo schermo.
cottura di 10 minuti, è possibile
utilizzare il forno secondo i punti
che seguono.
Se si desidera utiliz-
94 / 371 IT
Forno a microonde / Manuale utente
Page 95

4 Funzionamento
2. Premere (grill/modalità combinata) ancora
una volta o ruotare per selezionare la
modalità combinata 1.
3. Premere (avvio/+30 sec./conferma) per
confermare e “C-1” si visualizza sullo schermo.
4. Ruotare per regolare il tempo di cottura
finché il forno visualizza "10:00".
5. Premere (avvio/+30 sec./conferma) per
avviare la cottura.
4.3.1 Istruzioni tastiera (grill/
modalità combinata)
Ordi-neScher-moPotenza
micro-
onde
1 G 0% 100%
2 C-1 55% 45%
3 C-2 36% 64%
Quando metà del tempo del grill è
trascorso, il forno suona due volte e
ciò è normale. Per ottenere un effetto grill migliore, bisogna ruotare gli
alimenti, chiudere lo sportello e poi
C
premere (avvio/+30 sec./conferma)
per continuare la cottura. Se non si
esegue alcuna operazione, il forno
continua la cottura.
Grill
Poten-
za
4.4 Avvio rapido
1. In modalità stand-by, premere (avvio/+30
sec./conferma) per avviare la cottura con la
potenza del forno al 100%. Ogni volta che si
preme il pulsante, il tempo di cottura aumenta
fino a 95 minuti a scatti di 30 secondi.
2. Per la cottura nel forno a microonde, la cottura
con grill e modalità combinata o le modalità di
scongelamento a tempo, il tempo di cottura
aumenta di 30 secondi ogni volta che si preme
(avvio/+30 sec./conferma).
3. In modalità stand-by, ruotare in senso
antiorario per impostare il tempo di cottura
in modo da avviare la cottura con il 100%
di potenza e premere (avvio/+30 sec./
conferma) per avviare la cottura.
Nel menu auto e nelle modalità di
scongelamento a peso, la pressione
di (avvio/+30 sec./conferma)
C
non fa aumentare il tempo di cottura.
4.5 Scongelamento a peso
1. Premere (scongelamento a peso) una
volta.
2. Ruotare per selezionare il peso degli alimenti
da 100 a 2000 g.
3. Premere (avvio/+30 sec./conferma) per
avviare lo scongelamento.
4.6 Scongelamento a tempo
1. Premere (scongelamento a tempo) una
volta.
2. Ruotare per selezionare il tempo di
scongelamento. Il tempo massimo è 95 minuti.
3. Premere (avvio/+30 sec./conferma)
per avviare lo scongelamento. La potenza
di scongelamento è P30 e non può essere
modificata.
Forno a microonde / Manuale utente
95 / 371 IT
Page 96

4 Funzionamento
4.7 Timer da cucina
(contatore)
Il forno è dotato di un contatore automatico che
non è collegato alle funzioni del forno e può essere utilizzato separatamente in cucina (può essere
impostato su un massimo di 95 minuti).
1. Premere (timer da cucina/orologio) e 00:00
si visualizza sullo schermo LED.
2. Ruotare per immettere il tempo corretto.
3. Premere (avvio/+30 sec./conferma) per
confermare l'impostazione.
4. Quando il conto alla rovescia del tempo
immesso arriva a 00:00, il cicalino suona 5 volte.
Se il tempo è impostato (sistema a 24 ore), l'ora
corrente viene visualizzata sullo schermo LED.
Premere (stop/annulla) per interrompere il timer in qualsiasi momento.
Le funzione del timer da cucina
sono diverse dal sistema a 24 ore. Il
C
timer da cucina è solo un timer.
Esempio:
“Menu auto" per cucinare 350 g di
C
1. Ruotare in senso orario finché viene
visualizzato sullo schermo "A-6".
2. Premere (avvio/+30 sec./conferma) per
confermare.
3. Ruotare per selezionare il peso del pesce
finché "350" viene visualizzato sullo schermo.
4. Premere (avvio/+30 sec./conferma) per
avviare la cottura.
pesce:
Se si desidera usare
4.8 Menu auto
1. Ruotare per selezionare il menu
indesiderato. Vengono visualizzati i menu tra
“A-1” e “A-8”, cioè pizza, carne, verdure, pasta,
patate, pesce, bevande e popcorn.
2. Premere (avvio/+30 sec./conferma) per
confermare.
3. Ruotare per scegliere il peso predefinito
secondo lo schema del menu.
4. Premere (avvio/+30 sec./conferma) per
avviare la cottura.
96 / 371 IT
Forno a microonde / Manuale utente
Page 97

4 Funzionamento
4.8.1 Menu cottura automatica
Menu Peso Schermo
A-1
Pizza
A-2
Carne
A-3
Verdure
A-4
Pasta
A-5
Patate
A-6
Pesce
A-7
Bevande
A-8
Popcorn
50 g (con 450 ml di acqua
100 g (con 800 ml di acqua
1 bicchiere (120 ml) 1
2 bicchieri (240 ml) 2
3 bicchieri (360 ml) 3
200 g 200
400 g 400
250 g 250
350 g 350
450 g 450
200 g 200
300 g 300
400 g 400
50
fredda)
100
fredda)
200 g 200
400 g 400
600 g 600
250 g 250
350 g 350
450 g 450
50 g 50
100 g 100
Forno a microonde / Manuale utente
97 / 371 IT
Page 98

4 Funzionamento
4.9 Cottura multi-fase
Possono essere impostate massimo 2 fasi per
la cottura. Nella cottura multi-fase se una fase è
sbrinamento, bisogna mettere sbrinamento come
prima fase.
Se si desidera scongelare gli alimenti per 5 minuti e poi cucinarli con
C
1. Premere (scongelamento a tempo) una
volta.
2. Ruotare per selezionare il tempo di
scongelamento finché "5:00" viene visualizzato
sullo schermo.
3. Premere (microonde) una volta e “P100” si
visualizza sullo schermo.
4. Premere di nuovo (microonde) o ruotare
per la potenza del forno all'80%.
5. Premere (avvio/+30 sec./conferma) per
confermare e "P 80” si visualizza sullo schermo.
6. Ruotare per regolare il tempo di cottura
finché il forno visualizza "7:00".
7. Premere (avvio/+30 sec./conferma) per
avviare la cottura. Il cicalino suona una volta per
la prima fase e comincia il conto alla rovescia del
tempo per lo scongelamento. Il cicalino suona
ancora una volta quando si immette la seconda
fase di cottura. Il cicalino suona 5 volte alla fine
della cottura.
l'80% di potenza del microonde per
7 minuti, eseguire i punti sotto:
4.10 Funzione richiesta
1. In modalità microonde, grill e modalità
combinata, premere (microonde) o
(grill/modalità combinata) e il livello corrente di
alimentazione sarà visualizzato per 3 secondi.
Dopo 3 secondi, il forno torna alla modalità
precedente.
2. Durante la cottura, premere (timer
da cucina/orologio) e l'ora corrente viene
visualizzata per 3 secondi.
4.11 Blocco bambini
1.
Blocco:
un cicalino che indica che il blocco bambini
è attivato. Se l'ora è già impostata, viene
visualizzata anche l'ora corrente; altrimenti
viene visualizzato sullo schermo LED.
2.
Sblocco:
premere (stop/annulla) per 3 secondi e
si sente un lungo ”bip” che indica che il blocco
bambini è disattivato.
In modalità stand-by, premere
(stop/annulla) per 3 secondi e si sente
Per disattivare il blocco bambini,
4.12 Apertura sportello del
forno
Premere (apri sportello) e si apre lo sportello
del forno.
Se lo sportello non può essere aperto con il pulsante “apri sportello” nel
modello MGB 25333 BG (per es. a
C
causa di un'interruzione elettrica),
si può aprire lo sportello con il dispositivo di sollevamento a vuoto per
l'apertura manuale dello sportello.
98 / 371 IT
Forno a microonde / Manuale utente
Page 99

5 Pulizia e manutenzione
5.1 Pulizia
AVVERTENZA:
lizzare mai gasolio, solventi,
A
A
1. Spegnere l'apparecchio e scollegare il cavo di
alimentazione dalla presa elettrica.
2. Attendere il completo raffreddamento dell'apparecchio.
3. Mantenere pulita la parte interna del forno.
Pulire con un panno umido quando alimenti
schizzati o liquidi versati si attaccano alle pareti
del forno. Può essere utilizzato un detergente
delicato se il forno si sporca molto. Evitare di
utilizzare agenti di pulizia a spruzzo o aggressivi
perché potrebbero provocare macchie, segni e
opacità sulla superficie dello sportello.
4. Le superfici esterne del forno devono essere
pulite con un panno umido. Non lasciare entrare
acqua dalle aperture di ventilazione per impedire danni alle parti del forno.
5. Pulire di frequente entrambi i lati dello sportello
e il vetro, le guarnizioni dello sportello e le parti
vicine alle guarnizioni con un panno umido per
rimuovere eccessi e macchie da schizzi. Non
usare agenti di pulizia abrasivi.
6. Non lasciar bagnare il pannello di controllo.
Pulire con un panno morbido umido. Lasciare
lo sportello del forno aperto per impedire un
funzionamento accidentale quando si pulisce il
pannello di controllo.
7. Se si accumula vapore all'interno o attorno allo
sportello del forno, pulire con un panno morbido. Questo può verificarsi quando il forno a microonde è utilizzato in condizioni di alta umidità.
Ciò è normale.
agenti di pulizia abrasivi, oggetti metallici o spazzole dure per
pulire l’apparecchio.
AVVERTENZA:
mergere mai l'apparecchio in
acqua o il suo cavo di alimentazione o altro liquido.
Non uti-
Non im-
8. In alcuni casi può essere necessario rimuovere
la parte in vetro per la pulizia. Lavare in acqua
calda saponata o in lavastoviglie.
9. L'anello del rullo e la base del forno devono
essere puliti regolarmente per evitare rumori
eccessivi. Sarà sufficiente pulire la superficie
inferiore del forno con un detergente delicato.
Lavare l'anello del rullo in acqua calda saponata o in lavastoviglie. Quando si rimuove l'anello del rullo dalla base interna del forno per la
pulizia, assicurarsi di installarlo nella posizione
corretta quando lo si rimonta.
10. Per rimuovere i cattivi odori dal forno, mettere
un bicchiere di acqua con succo e buccia di un
limone in una ciotola profonda adatta all'uso in
microonde e azionare il forno per 5 minuti in
modalità microonde. Poi asciugare bene con
un panno morbido.
11. Contattare l'assistenza autorizzata quando la
lampadina del forno deve essere sostituita.
12. Il forno deve essere pulito regolarmente
e tutti i depositi di cibo devono essere
rimossi. Se il forno non è mantenuto pulito,
possono verificarsi difetti alla superficie che
influenzano negativamente il ciclo di vita
dell'apparecchio e potenzialmente provocano
rischi.
13. Non smaltire questo apparecchio con i rifiuti
domestici; i forni vecchi devono essere smaltiti
in centri speciali per rifiuti previsti dai comuni.
14. Quando il forno a microonde è usato in
modalità grill, una piccola quantità di fumo
e odori può essere avvertita: essa scompare
dopo un breve periodo di utilizzo.
5.2 Conservazione
• Se si pensa di non usare l’apparecchio per un
lungo periodo, riporlo con attenzione.
• Assicurarsi che l'apparecchio sia scollegato,
freddo e completamente asciutto.
• Conservare l'apparecchio in un luogo fresco e
asciutto.
• Tenere l'apparecchio lontano dalla portata dei
bambini.
Forno a microonde / Manuale utente
99 / 371 IT
Page 100

6 Ricerca e risoluzione dei problemi
Normale
Il forno a microonde interferisce con la ricezione
TV.
La luce del forno è scura. Con la cottura a microonde a bassa potenza, la
Accumulo di vapore sullo sportello, aria calda
che fuoriesce dalle aperture
Forno avviato in modo accidentale senza
alimenti all'interno.
Problema Possibile causa Soluzione
Il forno non si avvia. (1) Il cavo di alimentazione non
è collegato correttamente.
(2) Il fusibile è bruciato o
è attivato l'interruttore di
circuito.
(3) Problemi con la presa
elettrica.
Il forno non si riscalda. (4) Lo sportello non è chiuso
bene.
Il piatto girevole fa rumore
quando il forno a microonde è
in funzione.
Il forno visualizza errore E-3 e
non funziona (per il modello
MGB 25333 BG)
(5) Il piatto girevole e la parte
bassa del forno sono sporchi.
(6) Lo sportello del forno non si
apre (per un'ostruzione avanti
allo sportello, bassa tensione,
ecc.)
La ricezione radio e TV può essere influenzata dal
funzionamento del forno a microonde. È simile
all'interferenza provocata da piccoli apparecchi
elettrici, come mixer, aspirapolvere e ventilatore
elettrico. Ciò è normale.
luce del forno potrebbe oscurarsi. Ciò è normale.
Durante la cottura, può prodursi vapore
dagli alimenti. La maggior parte di questo
vapore fuoriesce dalle aperture. Ma potrebbe
accumularsene un po' su una parte fredda, come
lo sportello del forno. Ciò è normale.
Non è consentito utilizzare l'apparecchio senza
alimenti dentro. È molto pericoloso.
Scollegare. Poi ricollegare di
nuovo dopo 10 secondi.
Sostituire il fusibile o
reimpostare l'interruttore di
circuito (farlo riparare da un
professionista della nostra
azienda).
Testare la presa con altri
apparecchi elettrici.
Chiudere bene lo sportello.
Vedere la sezione "Pulizia e
manutenzione" per pulire le parti
sporche.
Scollegare. Poi ricollegare di
nuovo dopo 10 secondi.
100 / 371 IT
Forno a microonde / Manuale utente
 Loading...