

Page 1
Asciugatrice
Manuale utente
Dryer
User Manual
DRX923W
IT / EN
2960313022_IT/280521.1229
Page 2
Leggere come prima cosa questo
manuale dell’utente!
Gentile cliente,
grazie per aver scelto di acquistare un prodotto
Beko.Speriamo che il suo prodotto, realizzato
con un alto livello qualitativo tecnologico, le
posso offrire risultati ottimali. Le consigliamo di
leggere questo manuale nella sua interezza oltre
ai documenti allegati, prima di iniziare a utilizzare
il prodotto. Consigliamo inoltre di conservare la
documentazione per poterla consultare in futuro.
Qualora ceda il prodotto a un’altra persona, la
invitiamo a consegnare anche manuale. Prestare
attenzione a tutti i dettagli e le avvertenze
indicate nel manuale dell’utente, e attenersi alle
istruzioni fornite.
Consigliamo di servirsi di questo manuale per il
modello indicato sulla pagina della copertina.
• Leggere le istruzioni
Spiegazione dei simboli
Nel corso del presente manuale verranno
utilizzati i seguenti simboli:
PERICOLO !
B
• Avvertenza scosse elettriche.
A
AVVERTENZA !
• Avvertenza per situazioni di pericolo
relativamente a durata di vita e proprietà.
AVVERTENZA!
• Avvertenza superfici calde.
AVVERTENZA!
• Avvertenza sul rischio di scottatura
NOTA
C
• Informazioni importanti. Suggerimenti utili
relativamente all‘uso.
• I materiali che compongono
l‘imballaggio del prodotto sono
realizzati a partire da materiali
riciclabili in conformità con le nostre
Normative Ambientali Nazionali.
Non smaltire i rifiuti dell’imballaggio con i
normali rifiuti domestici o con altri rifiuti, smaltirli
presso i punti di raccolta dedicati indicati dalle
autorità locali.
PERICOLO !
• Avvertenza pericolo di incendio.
Questo prodotto è stato realizzato servendosi delle ultimissime tecnologie in condizioni rispettose dell’ambiente.
2
Asciugatrice/ Manuale utente
Page 3
1 Istruzioni importanti per
la sicurezza e l’ambiente
NOTA
C
• Questa sezione contiene istruzioni
di sicurezza che vi aiuteranno a
proteggere dalla rischio di lesioni
personali ho da mia proprietà.
Il mancato rispetto di queste
istruzioni invaliderà qualsiasi
garanzia.
1.1 Norme di sicurezza generali
AVVERTENZA !
A
Questa apparecchiatura può
essere usata da bambini a partire
dagli 8 anni di età ed oltre e da
persone con ridotte capacità
fisiche, sensoriali o mentali o con
scarsa esperienza o conoscenza
sull’uso dell’apparecchiatura,
solamente se sorvegliati o se sono
stati istruiti relativamente all’uso
sicuro dell’apparecchiatura stessa
e se ne hanno compreso i rischi. I
bambini non devono giocare con
l’apparecchiatura. La pulizia e gli
interventi di manutenzione non
devono essere eseguiti dai bambini
senza supervisione.
• I bambini di età inferiore agli 3 anni
vanno tenuti a distanza, a meno
che non siano sotto continua
supervisione.
A
AVVERTENZA !
• I piedini regolabili non dovrebbero
essere rimossi. Lo spazio fra
l’asciugatrice e il pavimento non va
ridotto servendosi di materiali quali
ad esempio tappeti, legno e nastro.
Ciò potrebbe causare anomalie di
funzionamento dell’asciugatrice.
• Fare eseguire sempre le procedure
di installazione e riparazione
dal
Servizio Assistenza
Autorizzato.
verrà ritenuto responsabile degli
eventuali danni che potrebbero
derivare da procedure eseguite da
persone non autorizzate.
• Non lavare mai l’asciugatrice
spruzzando o versando acqua al
suo interno! C’è rischio di scossa
elettrica!
Per i prodotti dotati della
funzione vapore:
AVVERTENZA !
Il produttore non
A
• Usare solo acqua distillata o
acqua condensata nel serbatoio
dell’acqua della macchina quando
si usano i programmi a vapore.
Non usare acqua di rubinetto
o additivi. Quando viene usata
acqua condensata nel serbatoio
dell’acqua, l’acqua stessa dovrebbe
essere filtrata e liberata da eventuali
fibre.
Asciugatrice/ Manuale utente
3
Page 4
A
AVVERTENZA !
• Non aprire l’oblò quando sono in
funzione i programmi a vapore.
L’acqua calda potrebbe essere
espulsa.
• Prima di mettere bucato in un
programma a vapore, togliere le
macchie.
• Mettere nel programma vapore solo
bucato non sporco o macchiato
ma con cattivi odori (programma di
rimozione cattivi odori).
• Non usare set per la pulizia a secco
o altre sostanze in un programma
vapore o in altri programmi.
1.1.1Norme di sicurezza generali
PERICOLO !
B
• In fase di realizzazione di un
collegamento elettrico, durante la
procedura
• di installazione, è opportuno
attenersi alle istruzioni per la
sicurezza elettrica.
.
B
PERICOLO !
• Collegare l’asciugatrice a una presa
dotata di messa a terra protetta
da uno fusibile del valore indicato
dall’etichetta. Fare in modo che la
messa a terra venga eseguita da
un elettricista qualificato. La nostra
azienda non sarà responsabile di
eventuali danni che deriveranno
dall’uso del prodotto senza messa a
terra in conformità con le normative
locali.
• La tensione e la protezione del
fusibile consentita sono informazioni
indicate sulla targhetta informativa
• La tensione indicata sulla targhetta
deve corrispondere alla tensione
effettivamente disponibile.
• Scollegare il prodotto se non viene
usato.
• Scollegare l’asciugatrice dalla presa
di corrente durante le operazioni di
installazione, manutenzione, pulizia
e riparazione.
• Non toccare la presa con le mani
umide! Non scollegare mai tirando il
cavo, estrarre sempre la presa.
A
AVVERTENZA !
• L’apparecchiatura non deve essere
alimentata mediante un dispositivo
di switching esterno, ad esempio
un timer, o essere collegata a un
circuito regolarmente acceso o
spento separatamente.
4
Asciugatrice/ Manuale utente
Page 5
B
PERICOLO !
• Non usare prolunghe, ciabatte
o adattatori per collegare
l’asciugatrice alla presa di corrente
al fine di ridurre il rischio di incendio
e scosse elettriche.
• Il cavo di corrente deve essere a
portata dopo l’installazione.
• I cavi di alimentazione danneggiati
vanno sostituite previa notifica alla
Servizio Assistenza Autorizzato.
• Qualora il prodotto abbia un difetto,
non dovrebbe essere usato a meno
che non venga riparato da un
Agente di Servizio Autorizzato. C’è
rischio di scossa elettrica!
1.1.2 Norme di sicurezza generali
AVVERTENZA !
A
• Assicurarsi che l’ingresso dell’aria
dell’asciugatrice sia aperto e ben
ventilato.
• Il prodotto contiene il refrigerante
R290.
• Il R290 è un refrigerante ecologico,
ma infiammabile.
• Tenere il prodotto lontano
da potenziali fonti di calore
che potrebbero causarne la
combustione.
PERICOLO !
• Punti da prendere in considerazione
per limitare il rischio di incendio:
I capi di seguito indicati non vanno
messi in asciugatrice dato che
sussiste un rischio di incendio.
• Capi non lavati
• I capi con macchie di olio,
acetone, alcol, petrolio, cherosene,
smacchiatori, prodotti per la
rimozione della trementina o
della paraffina, vanno lavati in
acqua calda con abbondante
detergente prima di essere messi in
asciugatrice.
Ecco perché i capi contenenti le
tipologie di macchie sopra indicate
vanno lavati con estrema cura; a
tal fine usare il detergente giusto
e scegliere una temperatura di
lavaggio adeguata.
• I seguenti capi/indumenti non vanno
messi in asciugatrice dato che
sussiste il rischio di incendio:
• indumenti o cuscini imbottiti con
schiuma di gomma (schiuma di
lattice), cuffie per la doccia, tessuti
resistenti all’acqua, materiali con
rinforzo in gomma e cuscinetti in
schiuma di gomma.
• Indumenti puliti con sostanze
chimiche industriali.
Asciugatrice/ Manuale utente
5
Page 6
PERICOLO !
Oggetti quali ad esempio accendini,
fiammiferi, monete, parti metalliche,
ago, ecc. possono danneggiare
il cestello o portare a problemi
sul piano funzionale. Controllare
sempre i capi di bucato inseriti in
asciugatrice.
Gli indumenti lavati in modo
inadeguato possono far scoppiare
un incendio e perfino prendere
fuoco dopo il processo di
asciugatura
AVVERTENZA !
A
• Non interrompere mai l’asciugatrice
prima del termine del ciclo. In
questo caso, estrarre rapidamente il
bucato per dissipare il calore.
PERICOLO !
• Fornire un livello di ventilazione
sufficiente per impedire che i
gas fuoriescano dai dispositivi
che funzionano con altri tipi di
carburante, comprese fiamme libere
che si accumulano nella stanza in
seguito all’effetto ritorno di fiamma.
AVVERTENZA !
A
• I capi di biancheria intima che
contengono rinforzi in metallo non
vanno passati in asciugatrice.
L’asciugatrice si potrebbe
danneggiare qualora i rinforzi in
metallo si allentino e si rompano in
fase di asciugatura.
NOTA
C
• Usare ammorbidenti e altri prodotti
in conformità con le istruzioni dei
rispettivi produttori.
Pulire sempre il filtro lanugine prima
o dopo ogni carico. Non usare mai
l’asciugatrice senza il filtro lanugine
installato.
AVVERTENZA !
A
• Non cercare mai di riparare da
soli l’asciugatrice. Non eseguire
procedure di riparazione o
sostituzione sul prodotto nemmeno
se si è in possesso delle nozioni e
delle abilità adeguate per eseguire la
procedura richiesta, a meno che ciò
non sia chiaramente indicato dalle
istruzioni di funzionamento o dal
manuale di assistenza pubblicato.
Il mancato rispetto di questa
indicazione potrebbe mettere in
pericolo la propria vita e la vita di
altre persone.
• Nel luogo dove verrà installata
l’asciugatrice non ci devono essere
porte che possono essere chiuse,
porte scorrevoli o con cerniera che
potrebbero bloccare l’apertura della
porta di carico.
• Installare l’asciugatrice in luoghi
idonei per un uso domestico.
(Bagno, balcone chiuso, garage,
ecc.)
6
Asciugatrice/ Manuale utente
Page 7
A
AVVERTENZA !
• Verificare che gli animali
domestici non entrino all’interno
dell’asciugatrice. Controllare
l’interno dell’asciugatrice prima di
metterla in funzione
• Non appoggiarsi sulla porta di
carico dell’asciugatrice quando è
aperta, dato che l’apparecchiatura
si potrebbe capovolgere.
• Non acconsentire l’accumulo di
lanugine intorno all’asciugatrice.
1.2 Installazione sopra a una lavatrice
• Sarà necessario usare un dispositivo di
fissaggio fra le due macchine, in fase di
installazione dell’asciugatrice sopra alla
lavatrice. Il dispositivo di fissaggio deve
essere installato da un agente di servizio
autorizzato.
• Il peso totale della lavatrice e
dell’asciugatrice, a pieno carico, quando
sono installate una sopra l’altra, raggiunge
all’incirca i 180 kg. Collocare i prodotti
su una superficie solida, dotata di una
capacità di carico sufficiente.
AVVERTENZA !
A
• Non è possibile collocare la lavatrice
sull’asciugatrice. Prestare attenzione alle
seguenti avvertenze in fase di installazione
della lavatrice.
Tavolo di installazione per lavatrice e
asciugatrice
Profondità della lavatrice
Profondità
dell’-
asciugatrice
62 cm
60 cm
54 cm
60 cm
Può essere
installata
Può essere
installata
54 cm
Non può
essere
installata
< 50 cm
Non può
essere
installata
1.3. Impiego conforme allo scopo
previsto
• L’asciugatrice è stata pensata per un
uso domestico. Non è adatta per usi
commerciali e non va usata al di fuori del
suo ambito di utilizzo previsto.
• Servirsi dell’asciugatrice unicamente per
asciugare bucato che è possibile passare
in asciugatrice.
• Il produttore non si assume responsabilità
derivanti da un utilizzo sbagliato o da una
modalità di trasporto non adeguata.
• La vita di servizio dell’asciugatrice
acquistata è pari a 10 anni. Durante
questo periodo, i pezzi di ricambio
originali saranno disponibili per
garantire un corretto funzionamento
dell’asciugatrice.
1.4 Sicurezza bambini
• I materiali di imballaggio sono pericolosi
per i bambini. Tenere i materiali di
imballaggio lontani dai bambini.
• I prodotti elettrici sono pericolosi per
i bambini. Tenere i bambini alla larga
dalla prodotto mentre è in funzione. Non
consentire ai bambini di giocare con
l’apparecchiatura. Servirsi di dispositivi
di blocco a prova di bambino per evitare
che i bambini giochino o manomettano
l’asciugatrice.
NOTA
C
l dispositivo di blocco a prova di bambino si
trova sul pannello di controllo. (Cfr. Blocco
bambini)
• Tenere la porta di caricamento chiusa
anche quando l’asciugatrice non è in uso.
Asciugatrice/ Manuale utente
7
Page 8
1.5 Conformità alla direttiva WEEE e
allo smaltimento dei rifiuti:
Questo apparecchio è conforme alla Direttiva
UE WEEE (2012/19/EU). Questo apparecchio
riporta il simbolo di classificazione per i rifiuti
delle apparecchiature elettriche ed elettroniche
(WEEE).
Questo simbolo indica che questo
prodotto non deve essere smaltito
con altri rifiuti domestici al termine
della sua vita utile. Il dispositivo usato
deve essere portato a un punto di
raccolta ufficiale per il riciclaggio di
dispositivi elettrici ed elettronici. Per individuare
questi punti di raccolta, contattare le proprie
autorità locali oppure il rivenditore presso cui è
stato acquistato il prodotto. Ciascuna famiglia
ha un ruolo importante nel recupero e
riciclaggio di vecchi apparecchi. Lo
smaltimento appropriato degli apparecchi usati
aiuta a prevenire potenziali conseguenze
negative per l’ambiente e la salute umana.
1.8 Specifiche tecniche
IT
Altezza (regolabile) 84,6 cm / 86,6 cm*
Larghezza 59,7 cm
Profondità 59,9 cm
Capacità (max.) 9 kg**
Peso netto (± %10) 44 kg
Tensione
Ingresso
alimentazione
nominale
Codice modello
Vedere etichetta tipo***
PERICOLO !
• Il R290 è un refrigerante infiammabile.
Pertanto, assicurarsi che il sistema e i
tubi non vengano danneggiati durante il
funzionamento e la manutenzione.
• Tenere il prodotto lontano da potenziali
fonti di calore che potrebbero causarne
la combustione in caso di danni.
• Non smaltire il prodotto bruciandolo.
1.6 Conformità alla Direttiva RoHS:
L‘apparecchio acquistato è conforme alla
Direttiva UE RoHS (2011/65/EU). Non contiene
materiali pericolosi o proibiti specificati nella
Direttiva.
1.7 Informazioni di imballaggio
L’imballaggio del prodotto è fatto di materiali
riciclabili in conformità con la normativa
nazionale. Non smaltire i materiali di imballaggio
con i rifiuti domestici o altri rifiuti. Portarli ai punti
di raccolta per materiali di imballaggio previsti
dalle autorità locali.
domestici o ad altri rifiuti. Portarli presso i punti
di raccolta imballaggi indicati dalle autorità
locali.
* Altezza minima: Altezza quando i piedini
regolabili sono chiusi.
Altezza massima: Altezza quando i piedini
regolabili sono aperti al massimo.
** Peso del bucato asciutto prima del lavaggio.
*** L’etichetta si trova dietro alla porta di carico.
NOTA
C
• Le specifiche tecniche dell’asciugatrice
sono soggette a modifica senza
preavviso, al fine di migliorare la qualità
del prodotto.
• I dati contenuti nel presente manuale
sono schematici, che potrebbero non
corrispondere alla perfezione al prodotto.
• I valori indicati sulle tacche
dell’asciugatrice o in altra
documentazione pubblicata fornita
con l’asciugatrice sono ottenuti in
laboratorio in conformità con gli
standard pertinenti. Questi valori
potrebbero variare, a seconda delle
condizioni di funzionamento e ambientali
dell’asciugatrice.
8
Asciugatrice/ Manuale utente
Page 9
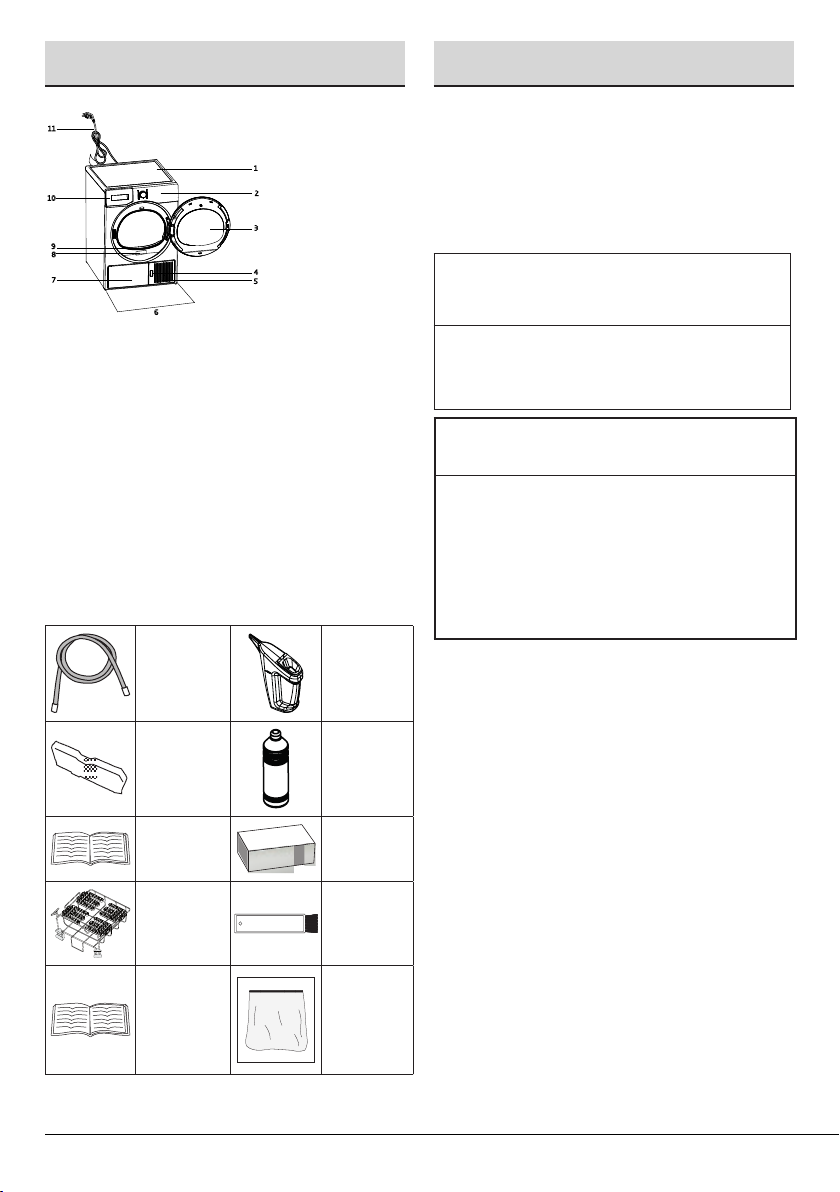
2 La tua asciugatrice
6
3 Installazione
2.1 Panoramica
11
1
10
9
8
7
2
3
4
5
1. Pannello superiore
2. Pannello di controllo
3. Porta di carico
4. Pulsante di apertura piastra calcio
5. Griglie di ventilazione
6. Gambe regolabili
7. Nelle modalità in cui il serbatoio è sotto, il
serbatoio dell’acqua è all’interno della pedana.
8. Etichetta tipo
9. Filtro lanugine
10. Cassetto del serbatoio dell’acqua (nei modelli in
cui il serbatoio è sopra)
11. Cavo di alimentazione
2.2 Informazioni sull’imballaggio
1. Tubo
di scarico
acqua *
2. Spugna
di ricambio
cassetto
filtro*
3. Manuale
dell’Utente
4. Cestello di
asciugatura*
5. Manuale
dell’utente
del
cestello di
asciugatura*
6.
Contenitore
di
riempimento
dell’acqua*
7. Acqua
pura*
8. Gruppo
capsule
fragranza*
9. Spazzola*
10. Filtro
stoffa*
Prima di contattare il Centro Assistenza
Autorizzato più vicino per l’installazione
dell’asciugatrice, verificare che l’impianto
elettrico e lo scarico dell’acqua siano adeguati
consultando il manuale dell’utente.Qualora
risultino idonei, contattare un elettricista e un
tecnico qualificati per prendere gli accordi del
caso.
NOTA
C
• La preparazione della posizione
dell‘asciugatrice, oltre che gli impianti
elettrici e idrici, sono di responsabilità del
cliente.
AVVERTENZA !
A
• Prima dell‘installazione, controllare
visivamente la presenza di eventuali difetti
sull‘asciugatrice. In caso di danni, non
procedere alla sua installazione. I prodotti
danneggiati creano rischi per la sicurezza
dell‘utente.
• Lasciare riposare l‘asciugatrice per altre
12 ore prima di iniziare a usarla.
3.1 Posizione di installazione
adeguata
Installare l’asciugatrice su una superficie stabile
e piana.
L’asciugatrice è pesante. Non spostarla da soli.
• Far funzionare l’asciugatrice in un’area
ben ventilata a senza polvere
• Lo spazio fra l’asciugatrice e la superficie
non va ridotto servendosi di materiali quali
ad esempio tappeti, legno e nastro.
• Non coprire le griglie di ventilazione
dell’asciugatrice.
• Nel luogo dove verrà installata
l’asciugatrice non ci devono essere
porte che possono essere chiuse, porte
scorrevoli o con cerniera che potrebbero
bloccare l’apertura della porta di carico.
*Può essere fornito in dotazione con la
macchina, a seconda del modello.
Asciugatrice/ Manuale utente
9
Page 10
• Dopo aver installato l’asciugatrice,
dovrebbe restare nello stesso luogo in cui
sono stati eseguiti i collegamenti. In fase
di installazione dell’asciugatrice, accertarsi
che la parete posteriore non abbia punti
di contatto con altri oggetti (rubinetto,
presa, ecc.).
• Posizionare l’asciugatrice ad almeno 1 cm
dai bordi di altri mobili.
• L’asciugatrice può essere usata a
temperature comprese fra +5°C e +35°C.
Qualora le condizioni di funzionamento
non rientrino in questa gamma, il
funzionamento dell’asciugatrice ne
risentirà e l’apparecchiatura si potrebbe
danneggiare.
• La superficie posteriore dell’asciugatrice
va collocata contro una parete.
PERICOLO !
B
• Non collocare l‘asciugatrice sul cavo di
alimentazione.
* Ignorare il seguente avviso se il
sistema del proprio prodotto non
contiene R290
PERICOLO !
• L’asciugatrice contiene il refrigerante
R290.*
• R290 è un refrigerante ecologico, ma
infiammabile.*
• Assicurarsi che l’ingresso dell’aria
dell’asciugatrice sia aperto e ben
ventilato.*
• Tenere lontane dall’asciugatrice potenziali
fonti di fiamma viva.*
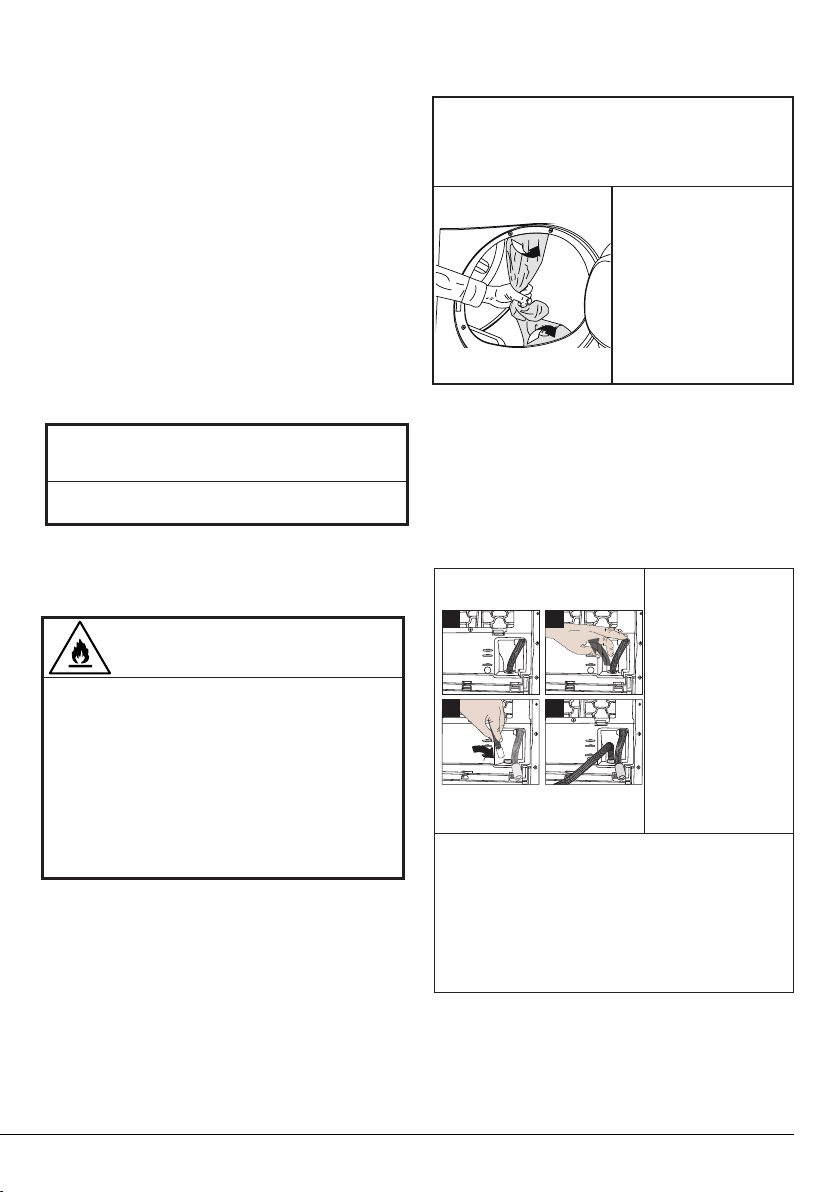
3.2 Rimozione del gruppo di
sicurezza trasporto
AVVERTENZA !
A
Rimuovere il gruppo
di sicurezza trasporto
prima di iniziare a
usare l‘asciugatrice.
Se il lato oscillante
della porta può essere
modificato, consultare
le istruzioni per il
montaggio invertito
della porta.
3.3 Collegamento allo scarico
Sarà possibile scaricare l’acqua accumulata
direttamente tramite il tubo dell’acqua fornito
in dotazione col prodotto anziché scaricare
periodicamente l’acqua raccolta all’interno del
serbatoio.
Collegamento del tubo di scarico dell’acqua
1-2 Tirare il tubo sul
1
3 4
3 Collegare un’estremità del tubo di scarico
fornito in dotazione con l’asciugatrice
al punto di collegamento da cui è stato
rimosso il tubo del prodotto nel passaggio
precedente.
4 Collegare l’altra estremità del tubo di
scarico direttamente al allo scarico
dell’acqua di scarto o al lavandino.
2
lato posteriore
dell’asciugatrice
a mano per
scollegarlo dal
punto in cui
era collegato.
Non usare
strumenti affilati
in fase di pulizia
dell’interno
dell’asciugatrice.
10
Asciugatrice/ Manuale utente
Page 11
C
NOTA
• Il tubo di scarico dell‘acqua va fissato a
un‘altezza massima di 80 cm.
• Accertarsi che il tubo di scarico dell‘acqua
non venga calpestato e non venga
piegato fra lo scarico e la macchina.
• Qualora vi sia un pack di accessori
fornito in dotazione col prodotto, cfr. la
descrizione dettagliata.
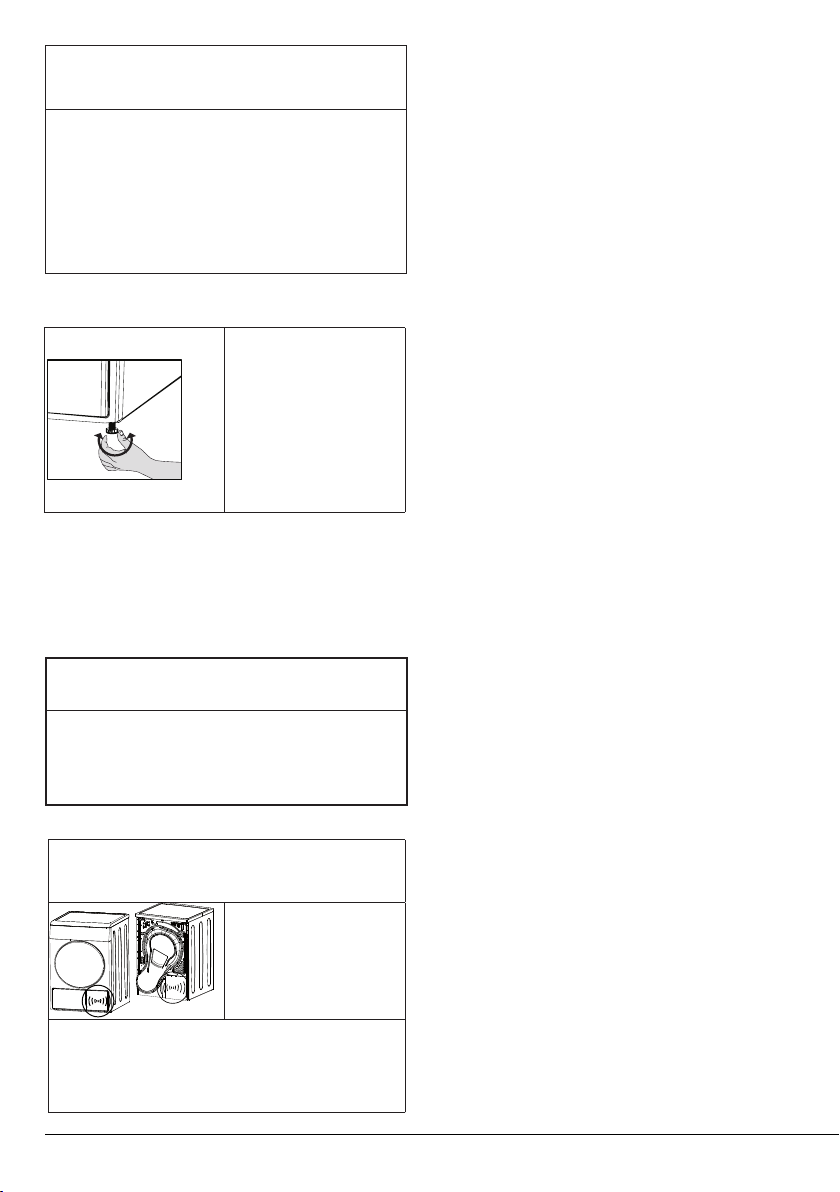
3.4 Regolazione dei piedini.
• Ruotare i piedini
verso sinistra o
destra fino a che
l’asciugatrice non
è saldamente
posizionata a
terra e non si
muove.
3.5 Trasporto dell’asciugatrice.
• Scaricare tutta l’acqua rimasta all’interno
dell’asciugatrice.
• Se viene eseguito un collegamento diretto
allo scarico sarà necessario rimuovere i
collegamenti del tubo.
3.7 Sostituzione della lampadina di
illuminazione
Qualora nell’asciugatrice venga usata una
lampadina da illumianzionePer sostituire
la lampadina/LED usata per l’illuminazione
dell’asciugatrice, contattare il Servizio
Autorizzato.La lampada (le lampade) usate
nell’apparecchiatura non sono adatte per la
normale illuminazione domestica. L’obiettivo
previsto di questa lampada è quello di assistere
l’utente in fase di posizionamento del bucato
nell’asciugatrice di modo che l’operazione
avvenga in modo facile e comodo. Le lampade
usate in questa apparecchiatura devono
resistere a condizioni fisiche estreme, quali ad
esempio vibrazioni e temperature al di sopra
dei 50°C.
A
• Consigliamo di trasportare l‘asciugatrice
3.6 Avvertenze sui suoni
AVVERTENZA !
in posizione verticale. Non è possibile
trasportare l‘apparecchiatura in verticale,
consigliamo di trasportarla inclinando il
lato destro, se osservata da davanti.
NOTA
C
• Sarà normale
sentire un suono
metallico dal
compressore
in fase di
• L‘acqua raccolta in fase di funzionamento
viene pompata all‘interno del serbatoio
dell‘acqua. Sarà normale sentire il rumore
di pompaggio durante l‘esecuzione di
questo processo..
Asciugatrice/ Manuale utente
funzionamento.
11
Page 12
4 Procedimento
4.1 Bucato adatto per essere
messo in asciugatrice
Rispettare sempre le istruzioni fornite
sull’etichetta del capo. Asciugare solo il bucato
recante un‘etichetta che ne affermi l’idoneità
all’asciugatura in asciugatrice.
4.2 Bucato non adatto per
essere messo in asciugatrice
Non asciugare
I capi col presente simbolo
con asciugatrice
non
dovrebbero essere asciugati in asciugatrice.
NOTA
C
• Tessuti delicati ricamai, indumenti in
lana, in seta, tessuti delicati e preziosi,
articoli ermetici e tende in tulle; tutti questi
indumenti non sono adatti per essere
messi in asciugatrice.
4.3 Preparazione del bucato per
essere messo in asciugatrice
• Gli indumenti si possono attorcigliare fra
di loro dopo il lavaggio. Separare il bucato
prima di spostarlo nell’asciugatrice.
• Asciugare al contrario gli indumenti con
accessori in metallo, quali ad esempio
cerniere.
• Serrare le cerniere, i ganci, le fibbie e i
bottoni.
4.4 Cosa fare per risparmiare energia
• Far girare il bucato alla velocità più alta
possibile in fase di lavaggio. Il tempo di
asciugatura viene quindi ridotto, così
come il consumo energetico.
• Ordinare il bucato a seconda del tipo
e dello spessore. Asciugare insieme
tipologie di indumenti simili. Ad esempio
gli asciugapiatti sottili e le tovaglie si
asciugano prima rispetto gli asciugamani
da bagno spessi.
• Attenersi alle istruzioni nel manuale
dell’utente per la selezione programma.
• Non aprire la porta di carico
dell’apparecchiatura a meno che la
cosa non sia necessaria. Qualora sia
necessario aprire la porta di carico, non
tenerla aperta a lungo.
• Non aggiungere bucato bagnato mentre
l’asciugatrice è in funzione
• Per modellPer i mPer i modelli dotati di
unità condensatore: pulire il condensatore
una volta al mese o dopo 30 operazioni.
• Pulire il filtro periodicamente quando c’è
una raccolta di aria visibile o quando si
accende il simbolo, se c’è un simbolo
di avvertenza pulizia cassetto filtro
disponibile.
• Per o modelli con canna fumaria di uscita,
attenersi alle istruzioni di collegamento e
pulire la canna.
• Durante il processo di asciugatura,
aerare bene la stanza dove è installata
l’asciugatrice.
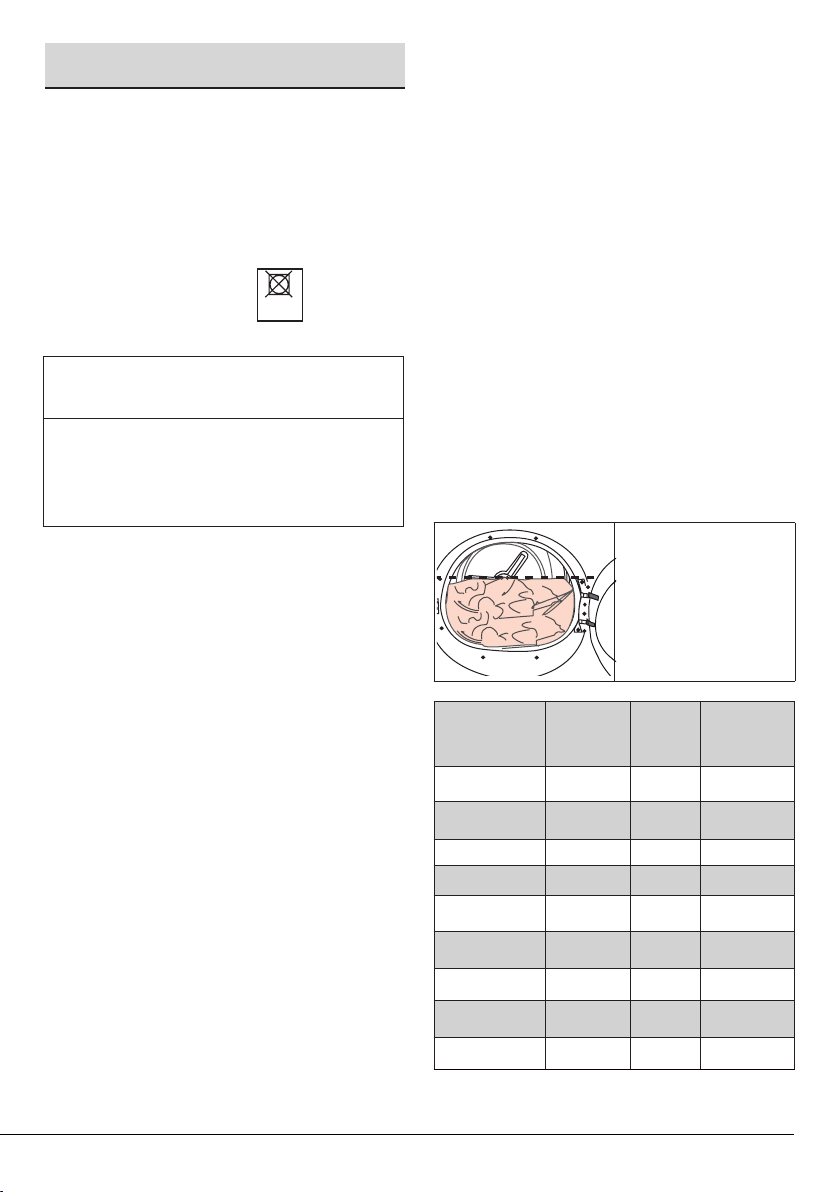
4.5 Capacità di carico corretta
Attenersi alle istruzioni
nella “Tabella di
consumo e selezione
Programma”. Non
caricare più dei valori
di capacità indicati
nella tabella.
I seguenti pesi sono forniti come esempi.
Bucato
Coperte-trapunte in
cotone (doppie)
Coperte-trapunte in
cotone (singola)
Lenzuola (doppie) 500 Camicie 250
Lenzuola (singole) 350
Tovaglie di grandi
dimensioni
Tovaglie di piccole
dimensioni
Tovaglioli 100
Asciugamani da
bagno
Asciugamani 350
Pesi
approssimativi
(g)*
1500 Camicette 150
1000
700 Abiti 350
250 Jeans 700
700 T-Shirt 125
Bucato
Camicie in
cotone
Abiti in
cotone
Fazzoletti
(10 pezzi)
Pesi
approssimativi
(g)*
300
500
100
12
*Peso del bucato asciutto prima del lavaggio.
Asciugatrice/ Manuale utente
Page 13
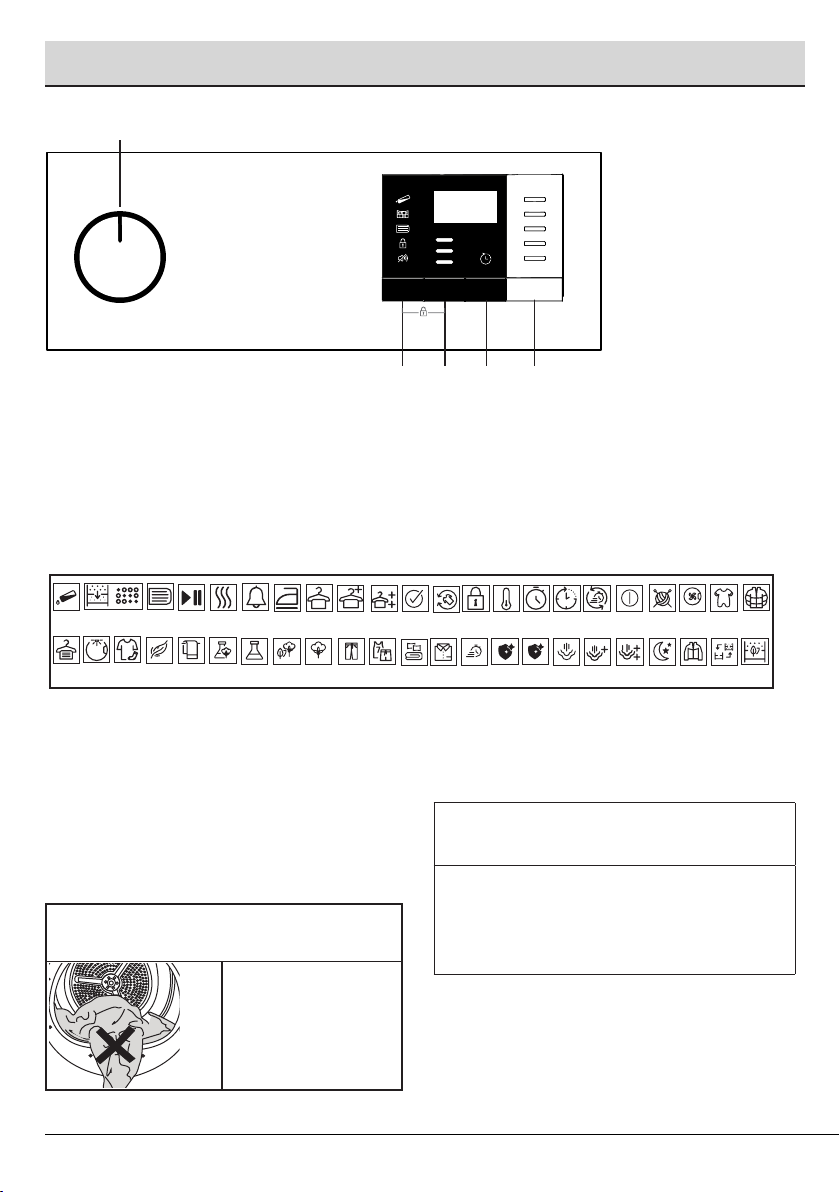
5 Funzionamento del prodotto
1
5.1 Pannello di controllo
3
4
5
2
1. Manopola selezione Acceso/Spento/
Programma
2. Pulsante Start/Stand-by
5.2 Simboli
Pulizia
Luce
cestello
del ltro
Tutti i giorni
Pulizia cassetto
ltro/scambiatore
di calore
Delicati
Avvia
Asciugatura
pausa
annulla
Asciugamani Mix
Cicalino
Sintetici
Stiratura
Armadio a
Cotone Eco Cotone
Armadio a
secco
secco+
Jeans
Sport
Serbatoio
pieno
Livello di
asciugatura
5.3. Preparazione dell’asciugatrice
• Collegare l’asciugatrice
• Aprire l’oblò di caricamento.
• Mettere il bucato nell’asciugatrice senza
esagerare a livello di quantità.
• Premere e chiudere la porta di
caricamento.
AVVERTENZA !
A
• Verificare che
non vi sia bucato
impigliato
nell’oblò.
3. Pulsante tempo fine
4. Pulsante Livello di Asciugatura
5. Pulsante di selezione volume del cicalino /
Programmi a tempo
Extra
secco
Fine
Anti
piega
Camicie Express Asciugatura
Piumini/
coperte
Blocco
bambini
Bassa
temperatura
igienica
Asciugatura
tempo
Rinfresca
igienico
Fine tra
Livello
del vapore
Asciugatura
rapida
Livello
del vapore1
Pulsante
accensione/
spegnimento
Livello
del vapore2
Wool protect
Notte
(silenzioso)
Selezionare il programma desiderato usando la
manopola di selezione On/Off/Programma, la
macchina si accende.
NOTA
C
• Selezionare un programma usando il
pulsante di selezione On/Off/Programma
non significa che il programma è stato
avviato. Premere il pulsante Start / Standby per avviare il programma.
Refresh
Esterno
Igiene
(BabyProtect+)
Filtro ecologico
pieno
Piume
Filtro ecologico
Asciugatrice/ Manuale utente
13
Page 14
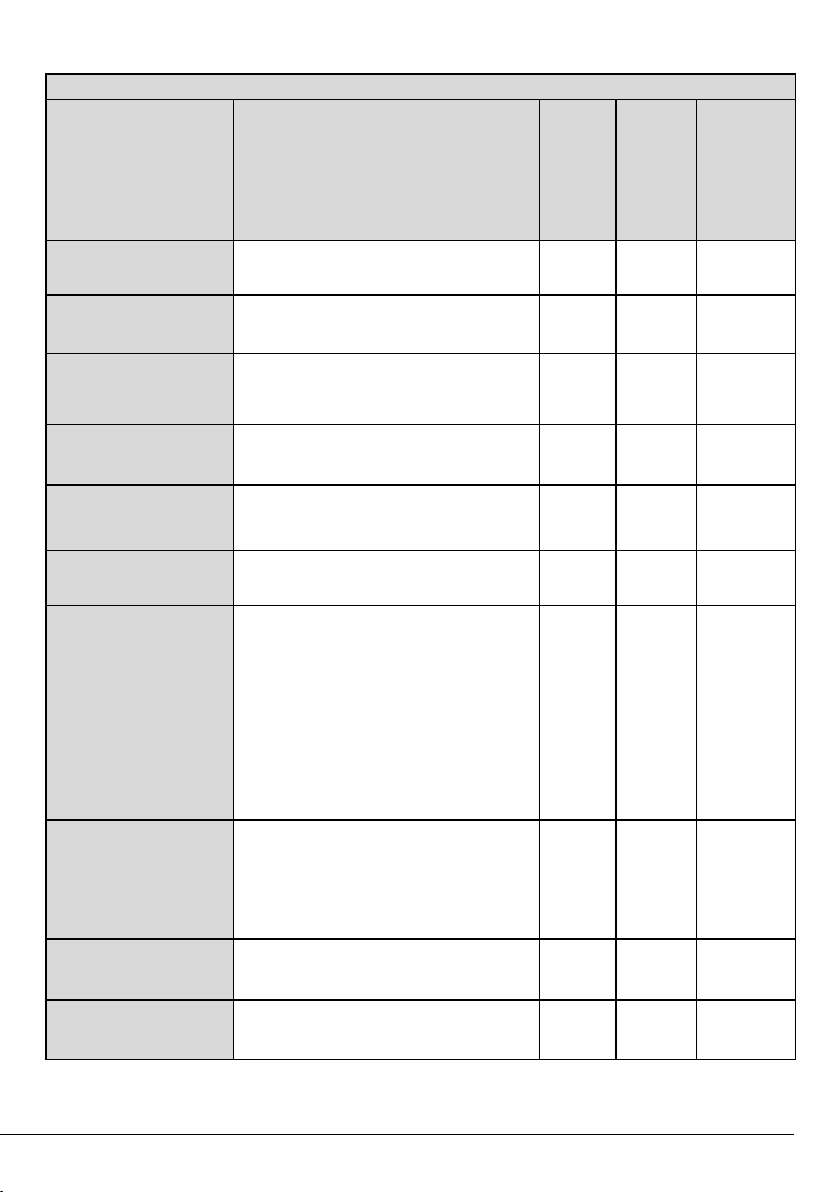
5.4 Selezione programma e tabella di consumo
IT
Programmi Descrizione del programma
Cotone Pronto Stiro
Cotone Eco
Cotone Asciutto Armadio
Cotone Extra Asciutto
Sintetici Pronto Stiro
Sintetici Asciutto Armadio
Programmi a tempo
Refresh
Lana Refresh
Delicati / Camicie
Gentle Care
Jeans
I tessuti di cotone a strato singolo e casual
asciugati un po’ umidi, in modo che siano
pronti per la stiratura.
I tessuti di cotone a strato singolo, casual,
vengono asciugati nel modo più economico
possibile.
Si può utilizzare questo programma per
l’asciugatura extra del bucato pesante, come
pantaloni e tute. Si può riporre il bucato nel
guardaroba senza stirarlo.
Con questo ciclo vengono asciugati tessuti di
cotone multistrato o spessi, resistenti al calore
e difficili da asciugare.
Si possono asciugare i tessuti sintetici da
stirare ancora un po’ umidi, per la comodità di
stiratura con questo ciclo.
Con questo ciclo si possono asciugare tutti i
tessuti sintetici. Si può mettere il bucato nel
guardaroba senza stirarlo.
Sarà possibile selezionare i programmi a tempo
fra 10 e 160 minuti fino a raggiungere il livello
di asciugatura desiderato a bassa temperatura.
In questo programma, il funzionamento
dell’asciugatrice dura per il tempo impostato
a prescindere dal livello di asciugatura del
bucato. Questo prodotto può essere usato con
l’opzione cesto di asciugatura. Per i prodotti
venduti senza cesto è possibile ottenere un
cesto da un rivenditore autorizzato e usare i
programmi di asciugatura sopra indicati. Per
dettagli sull’uso, consultare la guida utente per
il cesto di asciugatura.
Ventila per 10 minuti senza emettere aria calda.
Con questo programma per rimuovere l’odore
è possibile ventilare abiti di cotone e di lino
che sono stati al chiuso per molto tempo. Si
può usare questo programma per ventilare e
ammorbidire tessuti di lana lavabili in lavatrice.
Non usare per l’asciugatura completa.
Asciuga le camicie in modo più delicato,
diminuendo la formazione di pieghe e
facilitando la stiratura.
Con questo programma si possono asciugare
pantaloni, gonne, camicie o giacche in tessuto
denim.
Capacità (kg)
9 1000 160
9 1000 209
9 1000 220
9 1000 230
4 800 60
4 800 80
- - -
- - 10
2 1200 50
4 1200 130
Velocità centrifuga
della lavatrice (rpm)
Tempo di
asciugatura (minuti)
14
Asciugatrice/ Manuale utente
Page 15
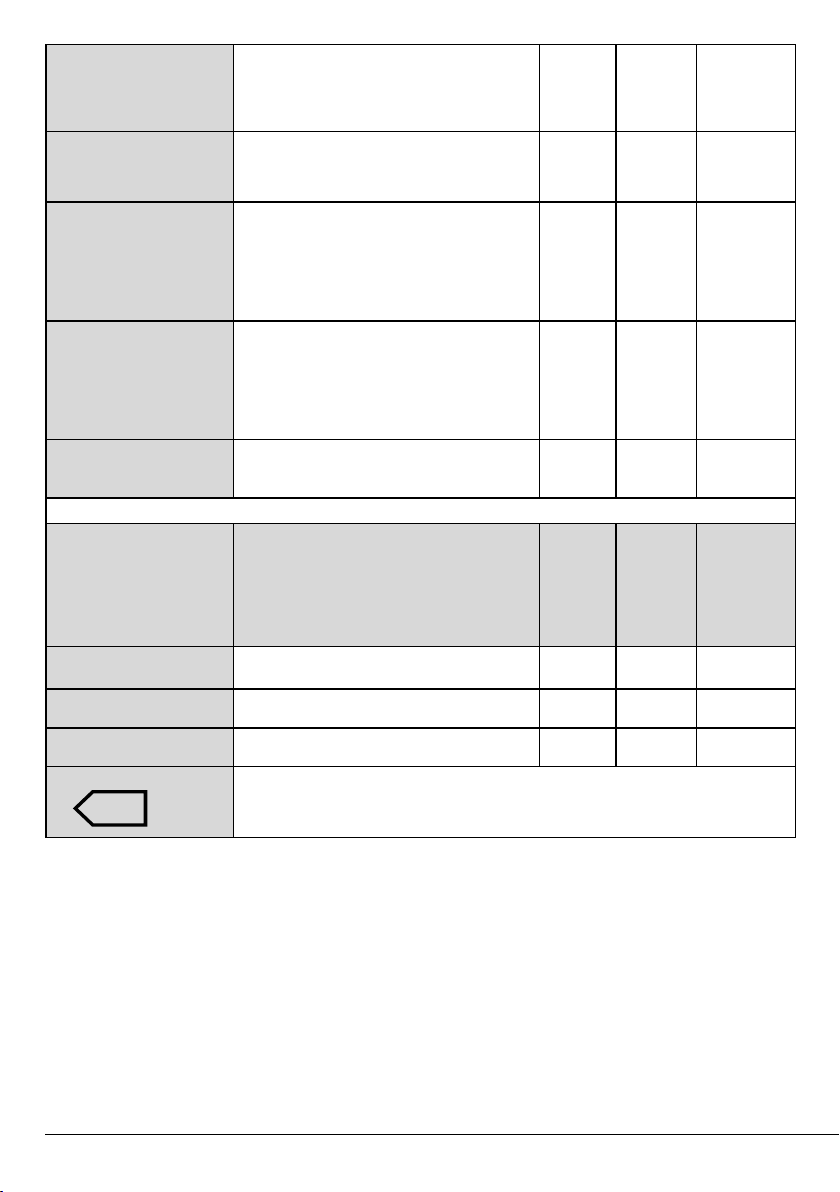
Sport
Mix
Quotidiano
BabyProtect
Hygiene
Piumino
Piumone
Xpress Super Short
Valori consumo elettricità
Utilizzatela per asciugare i capi in materiali
sintetici, cotone, tessuti misti o prodotti
impermeabili come giacche funzionali,
impermeabili, ecc. Rivoltateli prima
dell’asciugatura.
Servendosi di questo programma sarà possibile
asciugare sia bucato in cotone che sintetico.
Questo programma è adatto a capi sportivi e
da fitness.
Si tratta di un programma di lunga durata
che potete utilizzare per i capi (vestiti dei
bambini, asciugamani, intimo, ecc.) che
desiderate igienizzare. L’igiene si ottiene grazie
all’alta temperatura.((Questo programma
è riconosciuto e approvato dalla “British
Foundation” d’Inghilterra (Allergy UK).))
È possibile asciugare tessuti imbottiti di
piume o fibre recanti sull’etichetta la dicitura
asciugabile in asciugatrice come un unico
pezzo di bucato. È possibile asciugare piumoni
king size, cuscini o cappotti come un unico
pezzo di bucato. Asciugare tessuti quali
giacche e cappotti rivoltati.
Utilizzare questo programma per ottenere 2
magliette pronte per essere stirate
2 1000 135
4 1000 120
5 800 185
- 800 100
0,5 1200 30
Programmi Capacità (kg)
Cotone Eco* 9 1000 60% 2,17
Cotone pronto da stirare 9 1000 60% 1,65
Capi sintetici pronti da
indossare
Il “programma Cotone Eco” utilizzato a pieno carico e a carico parziale è il programma
di asciugatura standard cui si riferiscono le informazioni riportate sull’etichetta e
sulla scheda, adatto per asciugare la normale biancheria di cotone bagnato, ed è il
programma più efficiente in termini di consumo energetico per il cotone.
4 800 40% 0,75
Velocità
lavatrice (rpm)
centrifuga della
Quantità
approssimativa di
umidità rimanente
elettricità kWh
Valore consumo
* : Programma standard Etichetta Energetica (EN 61121) Tutti i valori nella tabella sono determinati
conformemente allo Standard EN 61121 I valori di consumo possono variare rispetto ai valori nella
tabella, a seconda del tipo di bucato, velocità di centrifuga, condizioni ambientali e variazioni a
livello di tensione.
Asciugatrice/ Manuale utente
15
Page 16
Allergy UK è il marchio della
British Allergy Foundation. Il
Sigillo di Approvazione è stato
creato per guidare le persone
che chiedono un consiglio in
merito al fatto che il prodotto
riduce significativamente la quantità di
allergeni in un ambiente in cui sono presenti
persone allergiche o che il prodotto limita/
riduce/elimina gli allergeni. Lo scopo è quello
di fornire la prova che i prodotti sono stati
scientificamente testati o analizzati per
ottenere risultati misurabili.
5.5 Funzioni ausiliarie
Cicalino / tempo
L’asciugatrice emette un suono al termine del
programma. Qualora non si desideri sentire
l’emissione di un segnale udibile, premere il
pulsante “Buzzer / Time” (Cicalino/Tempo).
Quando viene premuto il pulsante “Buzzer/
Time” (Cicalino/Tempo), una spia si illumina e
non verrà emesso nessun segnale udibile al
termine del programma.
NOTA
C
• Sarà possibile selezionare questa funzione
prima o dopo l’avvio del programma..
Il pulsante Buzzer/Time (Cicalino/Tempo) viene
usato per regolare la durata del programma
quando sono selezionati i programmi Rack/
Time (Rack/Tempo).
Drying Level (Livello di Asciugatura)
Il pulsante Drying Level (Livello di Asciugatura)
viene usato per regolare il livello di asciugatura
desiderato. La durata del programma può
variare a seconda della selezione.
NOTA
C
• Sarà possibile attivare questa funzione
solo prima dell’avvio del programma.
Tempo di fine
Sarà possibile ritardare la durata di fine del
programma fino a un massimo di 24 ore grazie
alla funzione durata fine.
1. Aprire l’oblò a mettere il bucato all’interno.
2. Selezionare il programma di asciugatura.
3. Premere il pulsante End Time (Tempo
di fine) e impostare il tempo di partenza
ritardata desiderato. Il LED End Time
(Tempo di fine) si accende. (Quando
il pulsante viene premuto e tenuto
premuto, il tempo di fine procede senza
interruzioni).
4. Premere il pulsante Start / Stand-by. Inizia
il conteggio della rovescia del tempo. “:” Il
separatore nella parte centrale del tempo
di tardo di visualizzato lampeggia.
NOTA
C
• Sarà possibile aggiungere o togliere il
bucato entro il tempo di fine. Il tempo
visualizzato è la somma del tempo di
asciugatura normale e del tempo di fine. Il
LED tempo di fine si spegne al termine del
conteggio alla rovescia, l’asciugatura inizia
e il LED di asciugatura si accende.
Modifica del tempo di fine
Per modificare la durata durante il conto alla
rovescia:
Annullare il programma ruotando la manopola
di selezione On/Off/Programma. Selezionare il
programma desiderato e ripetere il processo di
selezione End Time (Tempo di fine).
Disattivare la funzione di end time (tempo di
fine)
Per annullare il conto alla rovescia del tempo di
fine e avviare immediatamente il programma:
Annullare il programma ruotando la manopola
di selezione On/Off/Programma. Selezionare il
programma desiderato e premere il pulsante
Start/Stand-by
5.6 Spie luminose di avvertenza
NOTA
C
• Le spie di avvertenza possono variare a
seconda del modello di asciugatrice che
si possiede.
16
Asciugatrice/ Manuale utente
Page 17

Pulizia del filtro
Al termine del programma la spia per la pulizia
del filtro si accende.
Serbatoio dell’acqua
Al termine del programma la spia che indica la
necessità di svuotare il serbatoio dell’acqua si
accende.
Se il serbatoio dell’acqua si riempie mentre
il programma continua, la spia di avvertenza
inizia a lampeggiare e l’apparecchiatura passa
in modalità stand-by. In questo caso, svuotare
il serbatoio dell’acqua e avviare il programma
premendo il pulsante Start / Stand-by. La
spia di avvertenza si spegne e il programma
riprende.
Cassetto filtro / Pulizia dello scambiatore
di calore
Al termine del programma, il simbolo della
pulizia dello scambiatore di calore oppure del
cassetto filtro si potrebbero illuminare.
5.7 Avvio del programma
Premere il pulsante Start / Stand-by per avviare
il programma.
Le spie Start/Stand-by e Drying (Asciugatura)
si illuminano a indicare che il programma è
iniziato.
5.8 Blocco bambini
L’asciugatrice è dotata di un blocco bambini
che impedisce l’interruzione del flusso
programma quando vengono premuti dei
pulsanti in fase di funzionamento. Quando
il blocco bambini è attivo tutti i pulsanti sul
pannello, eccetto la manopola di selezione On/
Off/Programma sono disattivati.
Premere contemporaneamente i pulsanti
Drying Level (Livello di asciugatura) e Buzzer
(Cicalino) perché i 3 pulsanti attivino il blocco
bambini.
Il blocco bambini deve essere disattivato per
poter avviare un nuovo programma dopo
che il programma attuale finisce o per poter
inferire col programma. Per disattivare il blocco
bambini, tenere premuti gli stessi pulsanti per 3
secondi.
C
NOTA
• Quando il blocco bambini viene attivato,
la spia di avvertenza del blocco bambini
sullo schermo si accende.
• Il Blocco Bambini si disattiva quando
l’asciugatrice viene spenta e riaccesa
servendosi del della manopola On/Off/
Annulla.
Quando il Blocco Bambini è attivato:
Mentre l’asciugatrice è in funzione oppure in
modalità stand-by, i simboli non cambiano se
viene modificata la posizione della manopola di
selezione programma.
NOTA
C
• Quando l’asciugatrice è in funzione e
il blocco bambini è attivo, emette due
bip quando viene ruotata la manopola
di selezione programma. Se il blocco
bambini è disattivato senza riportare la
manopola di selezione programma nella
posizione precedente il programma viene
interrotto data la variazione di posizione
della manopola di selezione programma.
5.9 Modifica del programma dopo
che è stato avviato
Sarà possibile modificare il programma
selezionato per l’asciugatura del bucato con
un programma diverso dopo che l’asciugatrice
inizia a funzionare
• Ad esempio, selezionare il programma
Extra Dry (Extra asciutto) ruotando la
manopola di selezione On/Off/Programma
per selezionare Extra Dry (Extra asciutto)
anziché Iron Dry (Asciutto da stiro).
• Premere il pulsante Start / Stand-by per
avviare il programma.
Aggiungere e togliere indumenti durante
la fase di stand-by.
Per aggiungere o rimuovere indumenti in
asciugatrice/dall’asciugatrice dopo che è
iniziato il programma di asciugatura:
• Premere il pulsante Start/Stand-by per
mettere l’asciugatrice in modalità Standby. La fase di asciugatura si interrompe.
Asciugatrice/ Manuale utente
17
Page 18
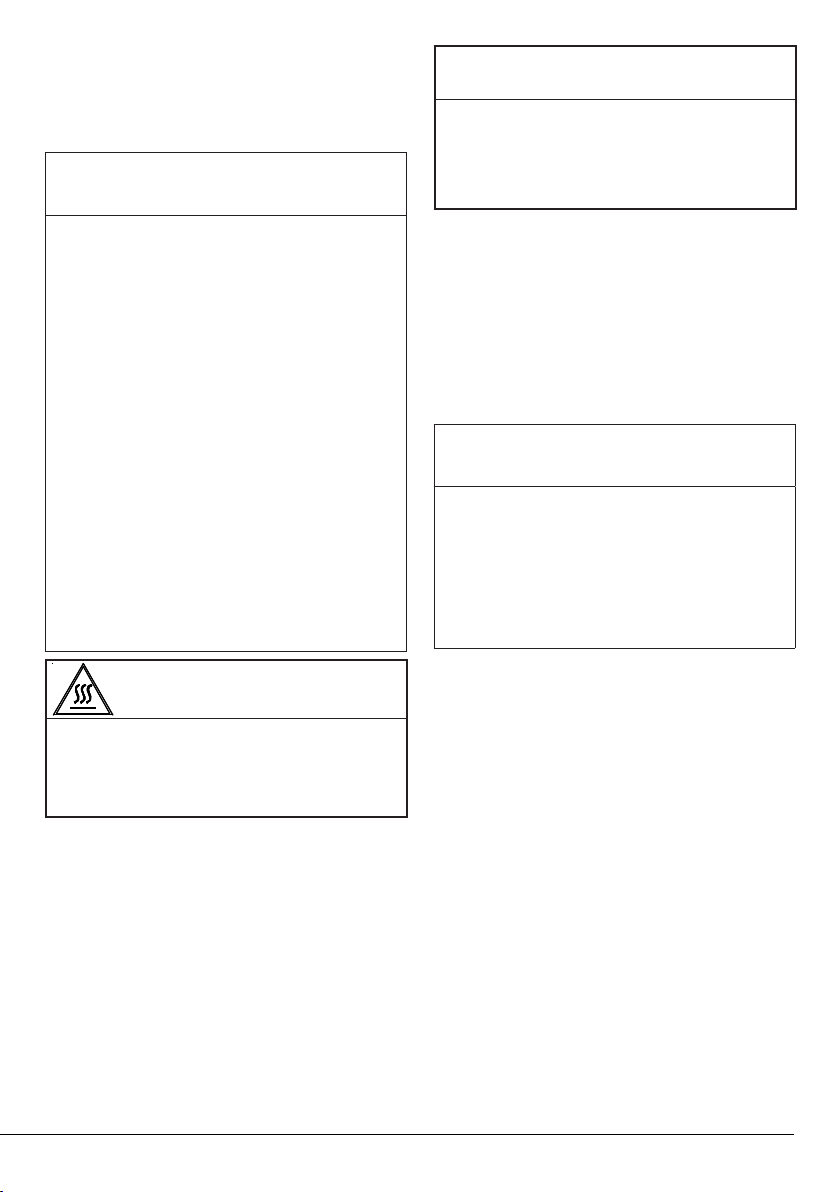
• Aprire l’oblò di caricamento mentre ci si
trova in stato Stand-by, quindi chiudere
l’oblò dopo aver tolto o aggiunto bucato.
• Premere il pulsante Start / Stand-by per
avviare il programma.
NOTA
C
• L’aggiunta di bucato dopo l’inizio
della fase di asciugatura può causare
il mescolamento del bucato asciutto
all’interno della macchina col bucato
umido e lasciare tutto il bucato
leggermente umido al termine della
funzione.
• L’aggiunta o la rimozione di bucato in fase
di asciugatura può essere ripetuta tutte le
volte necessarie, a seconda delle proprie
preferenze. Questa operazione interrompe
tuttavia in modo continuo l’operazione di
asciugatura aumentando così la durata
del programma e il consumo di energia.
Consigliamo quindi di aggiungere il
bucato prima dell’inizio del programma.
• Qualora venga selezionato un nuovo
programma ruotando la manopola di
selezione programma mentre la macchina
è in modalità stand-by, il programma in
corso si interrompe.
A
AVVERTENZA !
• L’interno dell’asciugatrice è molto caldo
quando viene annullato il programma in
fase di funzionamento, quindi avviare il
programma “Refresh” per consentirne il
raffreddamento.
5.11 Fine del programma
Al termine del programma l’avvertenza Fibre
Filter Cleaning (Pulizia filtro fibra) e Water Tank
(Serbatoio dell’acqua) sulla spia di osservazione
programma si accendono. Sarà possibile aprire
l’oblò di carico e l’asciugatrice sarà pronta per
un altro carico.
Portare la manopola di selezione On/Off/
Programma in posizione Off per spegnere
l’asciugatrice.
NOTA
C
• Se il bucato non viene tolto dopo il
completamento del programma la
funzione di prevenzione pieghe si attiva
per 2 ore al fine di evitare che il bucato
all’interno dell’apparecchiatura si
sgualcisca. Il programma muove il bucato
a intervalli di 10 minuti per evitare la
formazione di pieghe.
AVVERTENZA!
• Non toccare la superficie interna del
tamburo in fase di aggiunta o estrazione
degli indumenti mentre un programma è
in fase di esecuzione. La superficie del
tamburo è calda.
5.10 Annullamento del programma
Per annullare il programma e concludere
l’operazione di asciugatura per qualsiasi motivo
dopo che la macchina ha iniziato a funzionare,
ruotare la manopola On/Off/Annulla e il
programma verrà annullato.
18
Asciugatrice/ Manuale utente
Page 19
6 Manutenzione e pulizia
La durata di vita del servizio aumenta e i
problemi saranno ridotti se l’apparecchiatura
viene pulita a intervalli regolari.
6.1 Pulizia dei Filtri Anti-Lanugine /
Superficie Interna dello Sportello di
Carico
I pelucchi e le fibre che si staccano dalla
biancheria e si mescolano nell’aria durante il
processo di asciugatura
vengono raccolti dal Filtro Anti-Lanugine.
NOTA !
C
• I pelucchi di solito si formano quando si
indossano i vestiti e durante il lavaggio.
• Potete pulire la sede del filtro con
l’aspirapolvere..
AVVERTENZA !
A
• Dopo ogni processo di asciugatura pulire
assolutamente il filtro anti-lanugine e le
superfici interne dello sportello di carico.
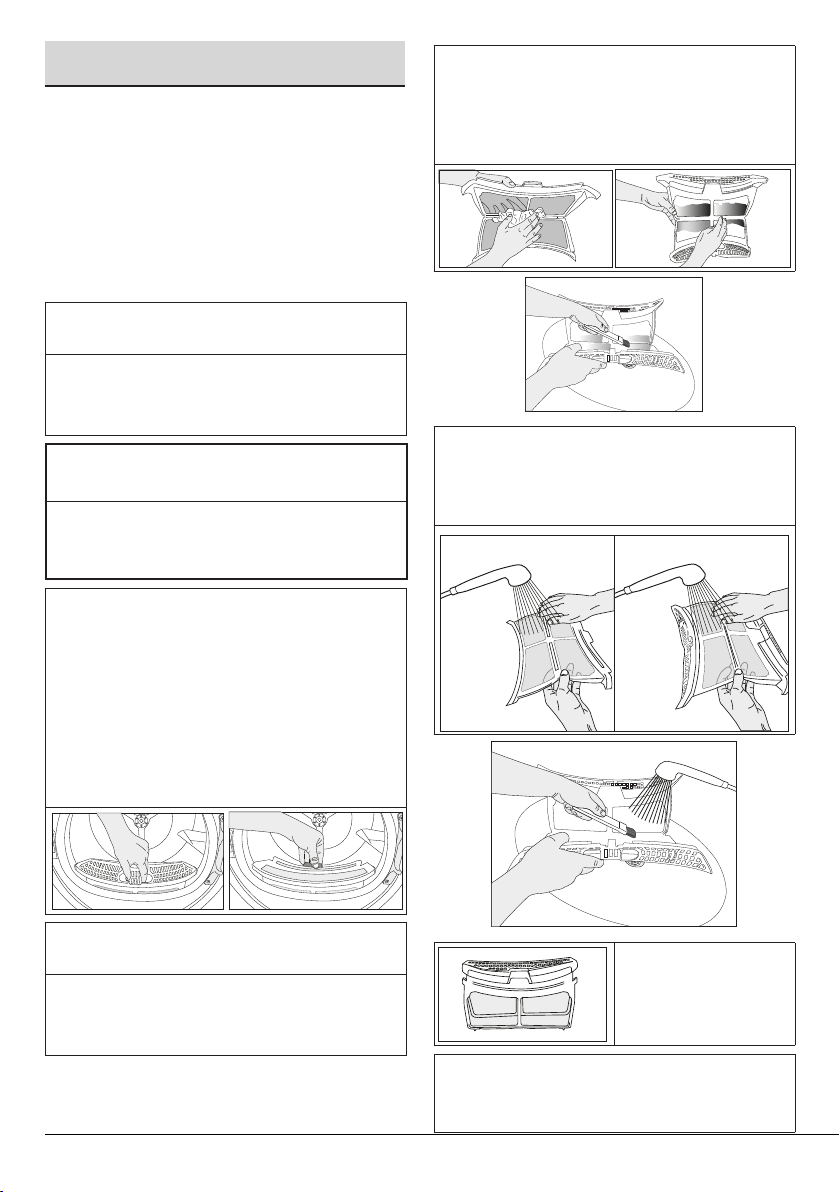
Per pulire il filtro anti-lanugine:
• Aprire lo sportello di carico.
• Togliere il primo pezzo del filtro antilanugine (filtro interno) a due pezzi
tenendolo e tirandolo verso l’alto.
• Pulire i pelucchi, le fibre e i grumi di cotone
a mano o con un panno morbido.
• Togliere anche il secondo pezzo del filtro
anti-lanugine (filtro esterno) a due pezzi
tenendolo e tirandolo verso l’alto.
• Aprire entrambi i filtri (superiore e inferiore)
e rimuovere la lanugine con la mano,
oppure utilizzare la spazzola per la pulizia
del coperchio del percorso dell’aria. E se
necessario, usare un aspirapolvere per
pulire i filtri.
• Pulire entrambi i filtri in senso contrario
all’accumulo di pelucchi con la vostra mano
o con una spazzola morbida. Asciugare il
filtro prima di inserirlo nella sua sede.
NOTA !
C
• Fare attenzione a non far cadere i pelucchi,
le fibre e i grumi di cotone nella sede del
filtro rimasta aperta.
Asciugatrice/ Manuale utente
• Montare i filtri antipelucchi dopo averli
inseriti uno dentro
l’altro.
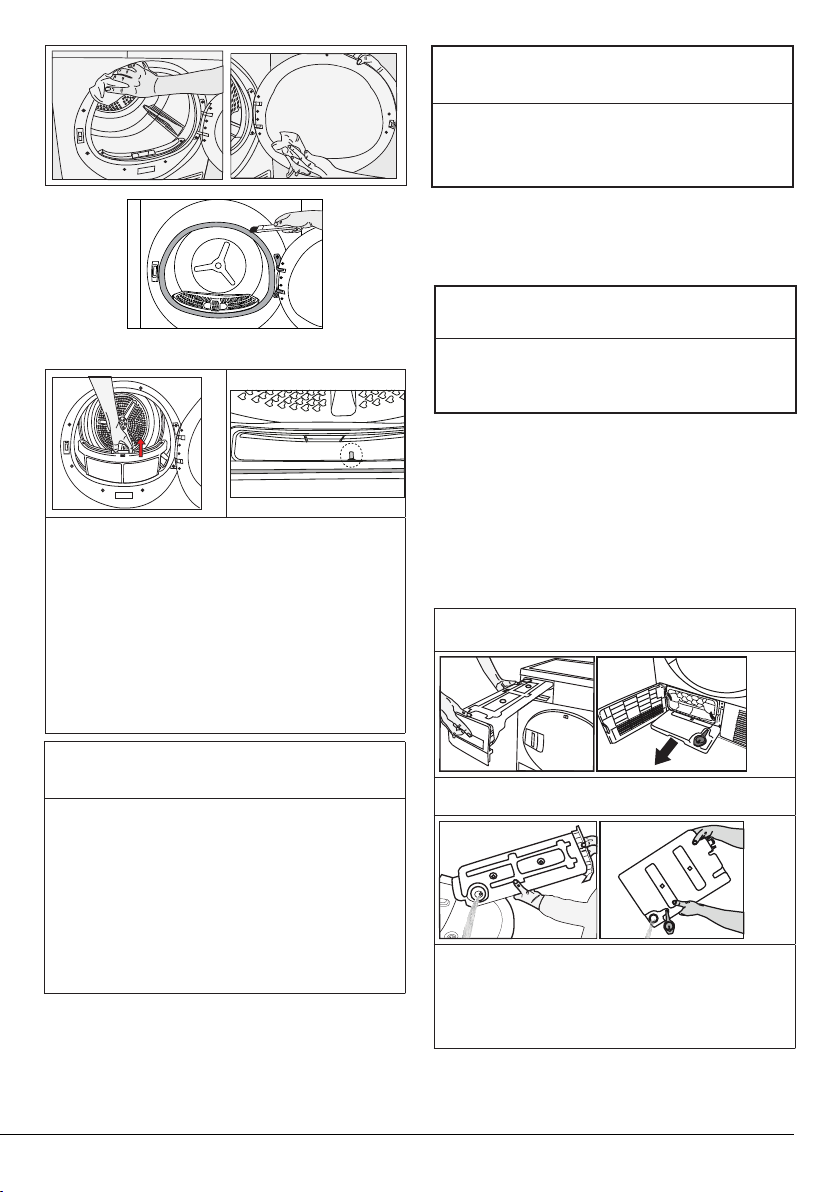
• Pulire la superficie interna dello sportello
anteriore e le sue guarnizioni con un panno
morbido e umido o con la spazzola sul
coperchio del passaggio dell’aria
19
Page 20
A
WARNING!
• Non usare mai solventi, agenti detergenti
o sostanze simili per la pulizia, dato
che sussiste un rischio di incendio ed
esplosione!
6.3 Scarico del serbatoio dell’acqua
Scaricare il serbatoio dell’acqua dopo ogni
ciclo di asciugatura.
6.2 Pulizia dei sensori
• L’asciugatrice è dotata di sensori di
temperatura volti a rilevare se il bucato
sia asciutto o meno.
“Per pulire i sensori:”
• Aprire lo sportello di carico
dell’asciugatrice.
• Rimuovere il filtro della lanugine tirandolo
verso l’alto.
• Pulire il sensore con la mano, in caso di
accumulo di lanugine.
NOTE
C
• Pulire le superfici in metallo dei sensori 4
volte all‘anno.
• Non usare strumenti in metallo in fase
di pulizia delle superfici metalliche dei
sensori.
• Lasciar raffreddare la macchina se è
ancora calda a causa del processo di
asciugatura.
A
AVVERTENZA !
• L‘acqua condensata non è potabile!.
• Non togliere mai il serbatoio dell‘acqua
quando il programma è in funzione!
Qualora si dimentichi di scaricare il serbatoio
dell’acqua, la macchina si bloccherà durante
i cicli di asciugatura successivi quando il
serbatoio è pieno e il simbolo di avvertenza
Serbatoio Acqua lampeggia. Qualora ciò
avvenga, scaricare il serbatoio dell’acqua e
premere il pulsante Start / Pause per riprendere
il ciclo di asciugatura.
Per scaricare il serbatoio dell’acqua:
1.Togliere il serbatoio dell’acqua nel cassetto
o nel contenitore facendo attenzione.
2.Scaricare l’acqua nel serbatoio.
• Qualora vi sia un accumulo di lanugine
nell’imbuto del serbatoio dell’acqua,
pulirlo sotto acqua corrente.
• Collocare il serbatoio dell’acqua nel suo
alloggiamento.
20
Asciugatrice/ Manuale utente
Page 21
NOTA
C
• Se lo scarico diretto dell‘acqua viene
utilizzato, non serve svuotare il serbatoio
dell‘acqua.
6.4 Pulizia del condensatore
Piccole quantità di lanugine possono passare
attraverso il filtro ed essere raccolte sulla
superficie metallica del condensatore.
La superficie metallica del condensatore deve
essere pulita regolarmente.
Se l’icona dell’evaporatore lampeggia sul
display, ispezionare la superficie metallica del
condensatore. Se è sporca, pulirla. Questa
parte deve essere controllata dal momento
almeno una volta ogni 6 mesi.
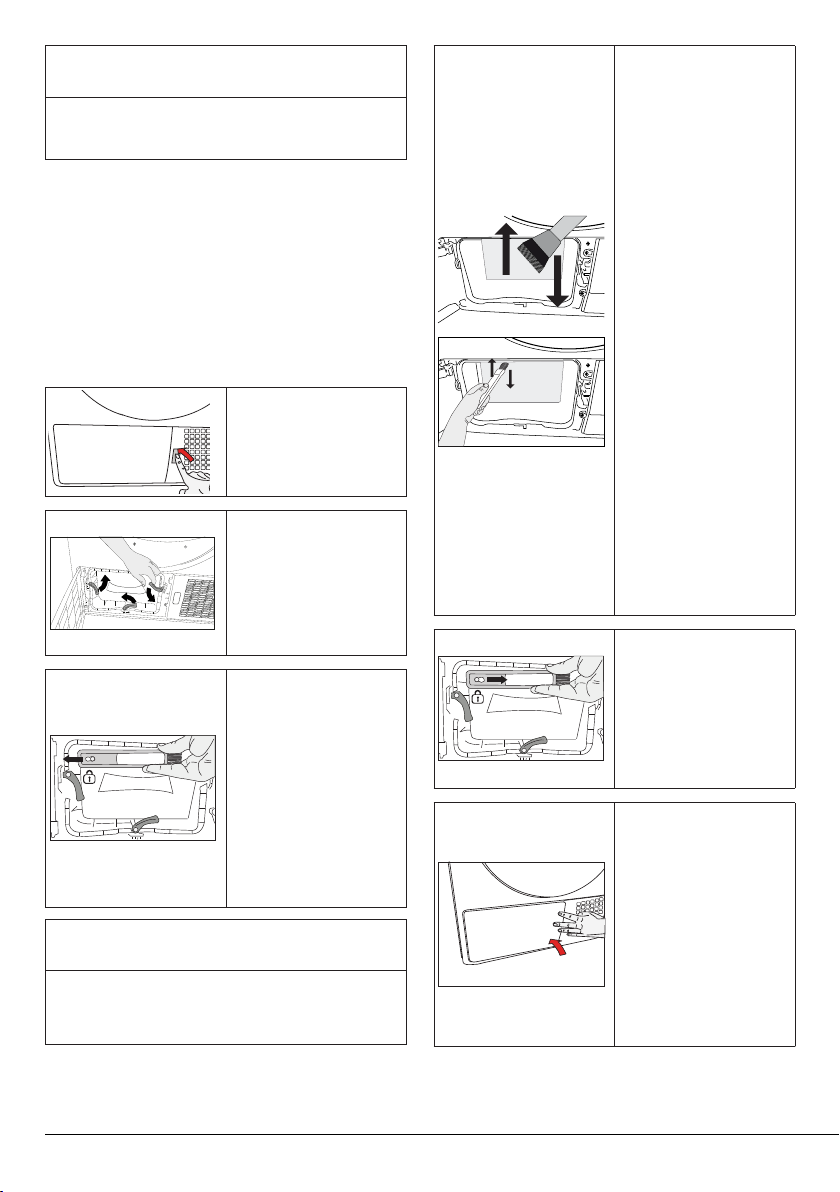
• Aprire lo zoccolo
premendo il suo
pulsante.
• Per aprire il
coperchio del
convogliatore
dell’aria sbloccare
la sua chiusura a
scatto.
• Tirare la
spazzola verso
il lato sinistro e
rimuoverla. È
possibile utilizzare
la spazzola
di pulizia per
rimuovere la
lanugine raccolta
sulla superficie
metallica del
condensatore.
NOTA
C
• La spazzola è all’interno del sacchetto dei
materiali di stampa. È possibile collocarla
nel suo alloggiamento sul coperchio per il
passaggio dell’aria dopo il primo utilizzo.
• La lanugine
raccolta sulla
superficie del
condensatore
deve essere
rimossa con un
panno umido o
strofinando la
spazzola posta
sul coperchio del
percorso dell’aria
su e giù sul
condensatore.
• Non pulire
le alette del
condensatore in
direzione destrasinistra per evitare
danni.
• Per la pulizia si
può usare anche
un’aspirapolvere
con spazzola.
La pulizia del
condensatore
non è consigliata
con aspirapolvere
senza spazzola.
• Insérez la brosse
dans sa fente en
poussant vers
la droite, après
avoir nettoyé le
condenseur, le
couvercle avant et
le filtre à peluche.
• Dopo aver
terminato le
operazioni di
pulizia montare
il coperchio del
convogliatore
dell’aria, chiuderlo
spostando la
sua chiusura
e chiudere lo
zoccolo.
Asciugatrice/ Manuale utente
21
Page 22
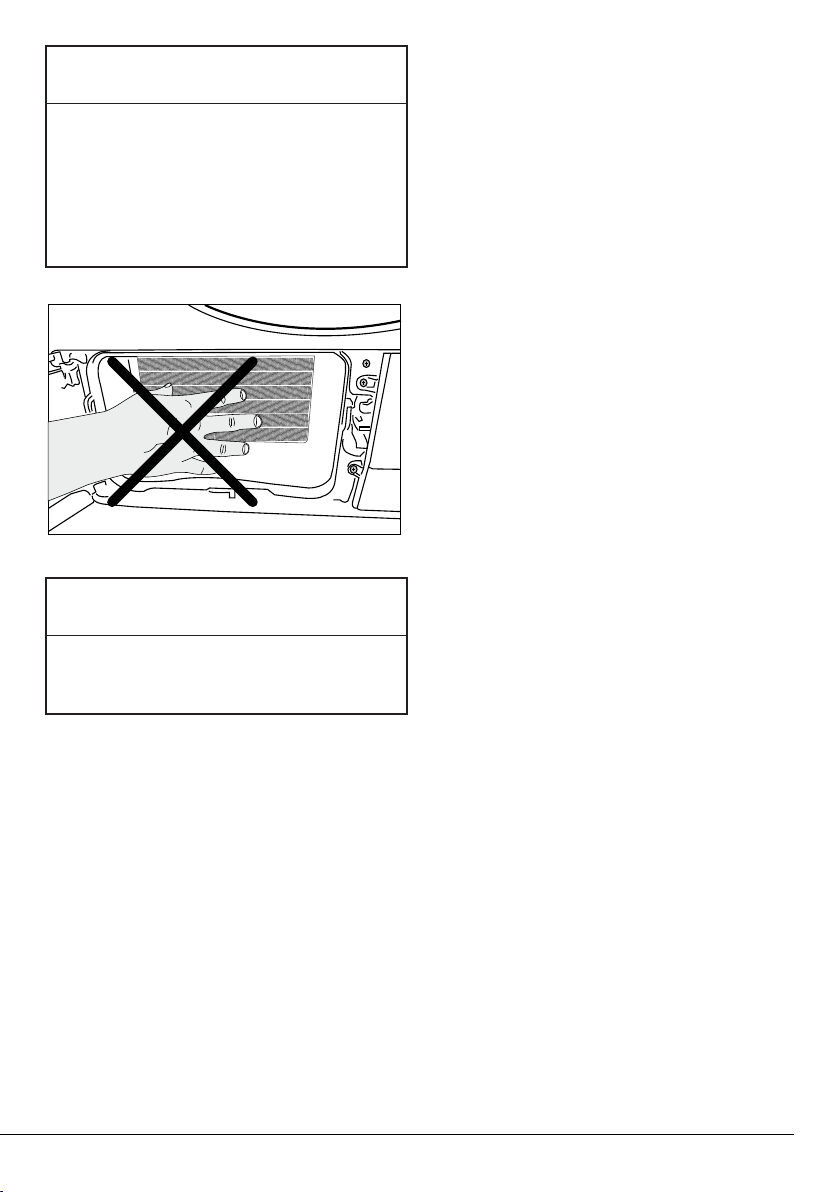
A
AVVERTENZA !
• Si può pulire a mano, purché si indossino
guanti protettivi. Non cercare di pulire a
mani nude. Le alette del condensatore
possono danneggiare le mani. La pulizia
con movimenti da sinistra a destra può
danneggiare le alette del condensatore.
Questo può portare a
• problemi di asciugatura.
A
AVVERTENZA !
• È normale vedere un po’ d’acqua
sulla superficie di plastica davanti al
condensatore quando si apre il coperchio
del percorso dell’aria.
22
Asciugatrice/ Manuale utente
Page 23
7 Guida alla risoluzione dei
problemi
Il processo di asciugamento dura troppo tempo.
Possono essersi otturati i fori del filtro anti-lanugine (filtro
interno ed esterno). >>> Lavare i filtri con acqua tiepida
e asciugarli.
Puo’ essersi otturata la parte anteriore
dell’evaporatore.>>> Pulire la parte anteriore
dell’evaporatore.
Possono essere ostacolate le griglie di aerazione davanti
alla macchina.>>>Togliere eventuali oggetti posti davanti
alle griglie di aerazione che ostacolano l’aerazione.
Puo’ darsi che il luogo dove é stata installata la
macchina sia troppo piccolo in modo da non consentire
un’aerazione aduguata.>>> Aprire porte e finestre per
evitare un aumento di temperatura.
Puo’ essersi formato uno strato di calcare sul sensore
dell’umidita’.>>> Pulire il sensore dell’umidita’.
Puo’ essere stata caricata biancheria in
quantita’eccessiva.>>> Non caricare eccessivamente
l’asciugatrice.
La biancheria puo’ non essere stata centrifugata a
sufficienza.>>> Centrifugare la biancheria nella lavatrice
con un numero di giri piu’ elevato.
Al termine dell’asciugamento la biancheria é ancora
umida.
Puo’ essere stato utilizzato un programma non adatto
al tipo di biancheria.>>> Controllare l’etichetta di
manutenzione del capo e selezionare un programma
adatto al tipo di biancheria e in aggiunta utilizzare i
programmi di tempo.
Possono essersi otturati i fori del filtro anti-lanugine (filtro
interno ed esterno). >>> Lavare i filtri con acqua tiepida
e asciugarli.
Puo’ essersi otturata la parte anteriore
dell’evaporatore.>>> Pulire la parte anteriore
dell’evaporatore.
Puo’ essere stata caricata biancheria in quantita’
eccessiva.>>> Non caricare eccessivamente
l’asciugatrice.
La biancheria puo’ non essere stata centrifugata a
sufficienza.>>> Centrifugare la biancheria nella lavatrice
con un numero di giri piu’ elevato.
L’asciugatrice non si apre o il programma non inizia.
L’asciugatrice non entra in funzione dopo aver effettuato
le regolazioni
Puo’ non essere stata inserita la spina della corrente
elettrica. >>> Assicurarsi che la spina della corrente
elettrica sia inserita.
Puo’ essere stato lasciato aperto lo sportello di carico.
>>> Assicurarsi che lo sportello di carico sia chiuso
correttamente.
Il programma potrebbe non essere stato impostato o
potrebbe non essere stato premuto il pulsante Start /
Pausa / Annulla. >>> Assicurarsi che il programma sia
stato impostato e che non sia nello stato di pausa.
Puo’ essere rimasta inserita la chiusura di sciurezza per
bambini. >>> Disinserire la chiusura di sciurezza per
bambini.
Il programma si é interrotto senza alcuna ragione
Lo sportello di carico puo’ non essere completamente
chiuso. >>> Assicurarsi che lo sportello di carico sio
chiuso correttamente.
Puo’ esserci stata un’interruzione dell’energia elettrica.
>>> Premere il pulsante Start / Pausa / Annulla per
avviare il programma.
Il serbatoio dell’acqua può essere pieno. >>> Svuotare il
serbatoio dell’acqua.
La biancheria si è ristretta, infeltrita o danneggiata.
Puo’ essere stato utilizzato un programma non adatto
al tipo di biancheria. >>> Controllare l’etichetta di
manutenzione del capo e selezionare un programma
adatto al tipo di biancheria.
Fuoriesce dell’acqua dallo sportello di carico.
Possono essrsi accumulate delle fibre sulle superfici
interne dello sportello di carico o sulle guarnizioni dello
sportello di carico. >>> Pulire le superfici interne dello
sportello di carico e le guarnizioni dello sportello di carico.
Lo sportello di carico si apre da sé
Lo sportello di carico potrebbe non essere
completamente chiuso. >>> Spingere lo sportello di
carico fino a sentire il suono di chiusura.
Il simbolo di avvertimento del serbatoio dell’acqua è
acceso / lampeggiante.
Il serbatoio dell’acqua può essere pieno. >>> Svuotare il
serbatoio dell’acqua.
Il tubo di scarico può essersi piegato. >>> Se il prodotto
è collegato direttamente allo scarico dell’acqua controllare
il tubo di scarico.
L’illuminazione all’interno dell’asciugatrice non è accesa
(nei modelli con illuminazione)
L’asciugatrice può non essere stata aperta con il pulsante
On / Off. >>> Verificare che l’asciugatrice sia in posizione
aperta.
La lampadina potrebbe essere difettosa. >>> Si prega
di contattare il Servizio Autorizzato per cambiare la
lampadina.
Il simbolo antipiega è acceso.
Puo’ non essere partito il programma Antipiega che evita
le pieghe della bianchieria rimasta dentro l’asciugatrce.
>>> Spegnere l’asciugatrice e togliere la biancheria.
Il simbolo di pulizia del filtro anti-lanugine é acceso.
Possono non essere stati puliti i filtri anti-lanugine (interno
ed esterno). >>> Lavare i filtri con acqua tiepida e
asciugarli.
Puo’ essersi formato uno strato di calcare sul fori del filtro
anti-lanugine che ha determinato la loro otturazione >>>
Lavare i filtri con acqua tiepida e asciugarli.
I filtri anti-lanugine possono non essere stati montati. >>>
Montare il filtro interno ed esterno.
La macchina emette un segnale sonoro
I filtri anti-lanugine possono non essere stati montati. >>>
Montare il filtro interno ed esterno.
Il simbolo di avvertimento dell’evaporatore lampeggia
Asciugatrice/ Manuale utente
23
Page 24
La parte anteriore dell’evaporatore potrebbe essere
otturata dalle fibre. >>> Pulire la parte anteriore
dell’evaporatore.
I filtri anti-lanugine possono non essere stati montati. >>>
Montare il filtro interno ed esterno.
L’illuminazione all’interno dell’asciugatrice è accesa (nei
modelli con illuminazione)
Se é inserita la spina alla corrente elettrica, il pulsante
On / Off é stato premuto e se lo sportello di carico é
aperto l’illuminazione é accesa. >>> Staccare la spina
dell’asciugatrice o portare il pulsante On / Off in posizione
di spegnimento.
A
AVVERTENZA !
• Se non è possibile risolvere il problema anche
se avete seguito le istruzioni fornite in questa
sezione, contattare il rivenditore da cui è stato
acquistato il prodotto o il Centro di Assistenza
Autorizzato. Non tentare mai di riparare da soli
un prodotto non funzionante.
NOTA !
C
• Qualora si riscontrasse un problema in una
parte dell’apparecchiatura, sarà possibile
chiedere un prodotto sostitutivo contattando
l’assistenza autorizzata col numero di modello
dell’apparecchiatura.
• L’uso dell’apparecchiatura con componenti
non originali potrebbe causare anomalie di
funzionamento dell’apparecchiatura.
• Il produttore e il distributore non sono
responsabili delle anomalie di funzionamento
derivanti dall’uso di componenti non
autentiche.
24
Asciugatrice/ Manuale utente
Page 25
WA
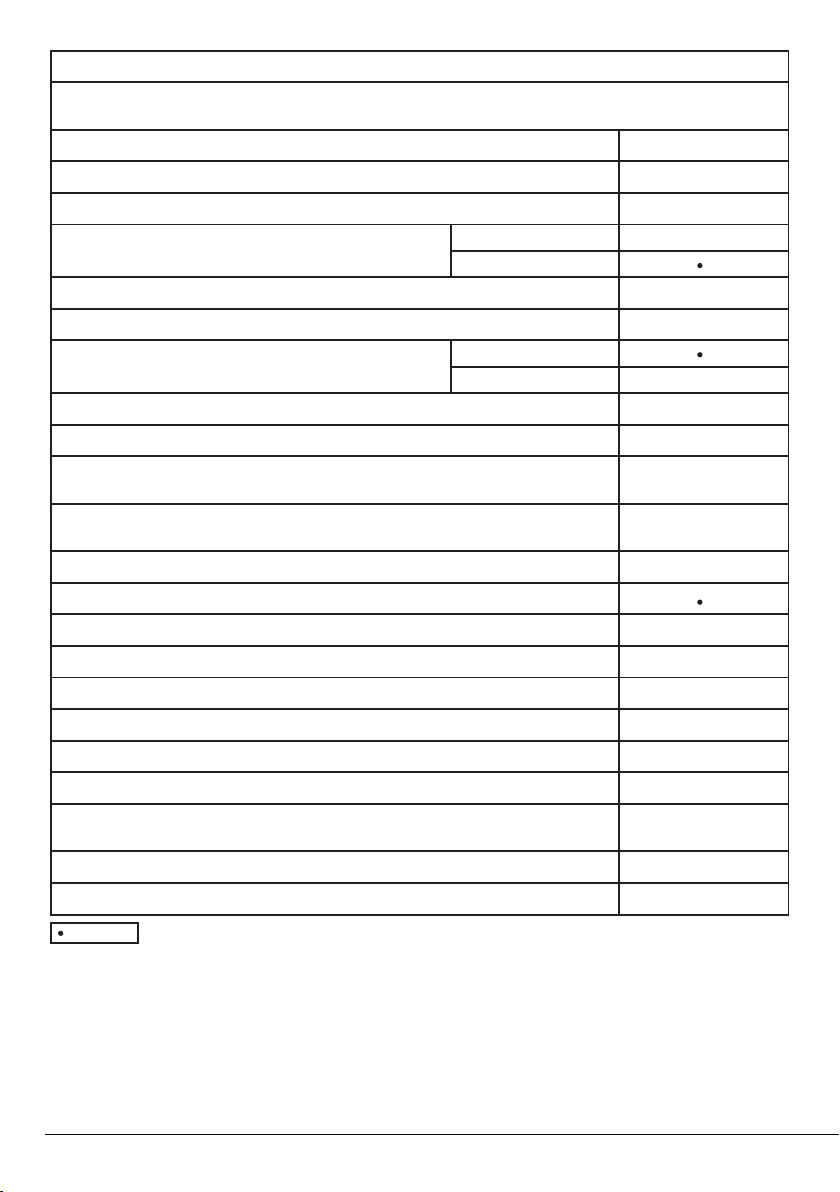
SCHEDA PRODOTTO
Conforme al Regolamento delegato della commissione (UE) N. 392/2012
Nome fornitore o marchio commerciale
Nome modello
Capacità nominale (kg)
Tipo di asciugatrice a tamburo
Classe di efficienza energetica
Consumo energetico annuale (kWh)
(1)
(2)
Tipo di controllo
Consumo energetico del programma cotone standard a pieno carico (kWh)
Consumo energetico del programma cotone standard a carico parziale (kWh)
Consumo energetico della modalità off per il programma cotone standard a pieno carico, P (W)
Consumo energetico della modalità left-on per il programma cotone standard a pieno carico, P (W)
Durata della modalità left-on (min)
Programma cotone standard
Durata del programma per il programma cotone standard a pieno carico, T (min)
Durata del programma per il programma cotone standard a carico parziale, T (min)
Durata prevista del programma per il programma cotone standard a carico pieno e parziale (T )
Classe di efficienza condensa
Efficacia di condensa media del programma cotoni standard a pieno carico, C
Efficienza condensa media del programma cotone standard a carico parziale, C
(3)
asc.
(4)
O
L
asc.1/2
t
asc.
asc.1/2
Ventilato ad aria
Condensatore
Automatico
Non-automatico
Beko
DRX923W
7188236190
9.0
-
A++
258,6
-
2,17
1,16
0,50
1,00
30
209
119
158
B
81%
81%
Efficienza condensa prevista del programma cotone standard a carico pieno e parziale, C
Livello potenza rumore per il programma cotone standard a pieno carico
Incassata
: Sì - : No
(5)
t
81%
65
-
(1) Scala da A+++ (più efficiente) a D (meno efficiente)
(2) Consumo energetico basato su 160 cicli di asciugatura del programma cotone standard a carico pieno e parziale e il consumo nelle modalità a bassa potenza.
Il consumo energetico reale per ciclo dipende dal modo di utilizzo dell'apparecchio.
(3) Il programma per l'asciugatura armadio dei capi in cotone utilizzato a carico pieno e parziale è il programma di asciugatura standard a cui fanno riferimento
l'etichetta e la scheda dati, cioè questo programma è adatto per asciugare il normale bucato in cotone ed è quello più efficiente in termini di consumo
energetico per il cotone.
(4) Scala da G (meno efficiente) a A (più efficiente)
(5) Valore medio previsto — L espresso in dB(A) re 1 pW
Asciugatrice/ Manuale utente
25
Page 26
Please read this user manual first!
Dear Customer,
Thank you for prefering a Beko product.
We hope that your product which has been
manufactured with high quality and technology
will give you the best results. We advise you
to read through this manual and the other
accompanying documentation carefully
before using your product and keep it for
future reference. If you transfer the product
to someone else, give its manual as well. Pay
attention to all details and warnings specified
in the user manual and follow the instructions
given therein.
Use this user manual for the model indicated
on the cover page.
WARNING!
• Warning against hot surfaces.
WARNING!
• Warning against scalding hazard.
Packaging materials of the product
are manufactured from recyclable
materials in accordance with our
National Environment Regulations.
• Read the instructions.
Explanation of symbols
Throughout this user manual the following
symbols are used:
DANGER!
B
• Warning against electric shock.
DANGER!
• Warning against fire hazard.
WARNING!
A
• Warning for hazardous situations with regard
to life and property.
Do not dispose of the packaging wastes with
the domestic waste or other wastes, discard
them to the dedicated collection points
designated by the local authorities.
This product was manufactured using the latest technology in environmentally friendly conditions.
26
Dryer / User Manual
Page 27
1 Important instructions for safety and environment
NOTE
C
• This section contains safety
instructions that will help protect
from risk of personal injury or
property damage. Failure to follow
these instructions shall void any
warranty.
1.1 General safety
WARNING!
A
This appliance can be used by
children aged from 8 years and
above and persons with reduced
physical, sensory or mental
capabilities or lack of experience
and knowledge if they have been
given supervision or instruction
concerning use of the appliance
in a safe way and understand the
hazards involved. Children shall not
play with the appliance. Cleaning
and user maintenance shall not
be made by children without
supervision.
Children of less than 3 years should
be kept away unless continously
supervised.
• Adjustable feet should not be
removed. The gap between the
dryer and the floor should not be
reduced with materials such as
carpet, wood and tape. This will
cause problems with the dryer.
WARNING!
A
Always have the installation and
repairing procedures carried
out by the Authorized Service.
Manufacturer shall not be held
liable for damages that may arise
from procedures carried out by
unauthorized persons.
• Never wash the dryer by spraying
or pouring water onto it! There is
the risk of electric shock!
For the products with a steam
function:
WARNING!
A
• Use only distilled water or water
condensed in the water tank of the
machine in steam programs. Do
not use mains water or additives.
When using condensed water in the
water tank, it should be filtered and
cleared of fibres.
• Do not open the door when steam
programs are running. Hot water
may be expelled.
• Before putting laundry in a steam
program, stains on it should be
removed.
• You may only put laundry that is not
dirty or stained but permeated with
unpleasant odour in steam (odour
removal) program.
• Do not use any dry cleaning sets
or additional materials in a steam
program or in any program.
Dryer / User Manual
27
Page 28
1.1.1 Electrical safety
DANGER!
B
• Electrical safety instructions
should be followed while electrical
connection is made during the
installation.
• Connect the dryer to a grounded
outlet protected by a fuse at the
value specified on the type label.
Have the grounding installation
performed by a qualified electrician.
Our company shall not be liable for
any damages that will arise when
the dryer is used without grounding
in accordance with the local
regulations.
• The voltage and allowed fuse
protection is stated on the type label
plate.
• The voltage specified on the type
label must be equal to your mains
voltage.
• Unplug the dryer when it is not in
use.
• Unplug the dryer from the mains
during installation, maintenance,
cleaning and repair works.
• Do not touch the plug with wet
hands! Never unplug by pulling
on the cable, always pull out by
grabbing the plug.
WARNING!
A
• The appliance must not be
supplied through an external
switching device, such as a timer,or
connected to a circuit that is
regularly switched on and off by
utility.
B
DANGER!
• Do not use extension cords, multiplugs or adaptors to connect the
dryer to power supply in order to
decrease the risk of fire and electric
shock.
• Power cable plug must be easily
accessible after installation.
• Damaged mains cable should be
changed notifying the Authorized
Service.
• If the dryer is faulty, it must not be
operated unless it is repaired by an
authorized service agent! There is
the risk of electric shock!
1.1.2 Product safety
DANGER!
• Superheating of the clothes inside
of the dryer can occur if you cancel
the programme or in the event of
a power failure whilst the dryer is
running, this concentration of heat
can cause self-combustion and fire
so always activate the ventilation
programme to cool down or quickly
remove all laundry from the dryer in
order to hang them up and dissipate
the heat.
WARNING!
A
• Ensure that the air inlet of the dryer
is open and it is well-ventilated.
• Product contains R290 refrigerant.
• R290 is an environment-friendly, but
flammable refrigerant.
• Keep the product away from
potential heat sources that may
cause it to ignite.
28
Dryer / User Manual
Page 29
DANGER!
Points to be taken into
consideration for fire hazard:
Below specified laundry or items
must not be dried in the dryer
considering fire hazard.
• Unwashed laundry items
• Items soiled with oil, acetone,
alcohol, fuel oil, kerosene, stain
removers, turpentine, paraffin,
paraffin removers, petrol, wax or
wax removers must be washed in
hot water with plenty of detergent
before being dried in the dryer.
For this reason especially the items
containing the above specified
stains must be washed very well,
to do this use adequate detergent
and choose a high washing
temperature.
Below specified laundry or
items must not be dried in the
dryer due to the fire hazard:
• Garments or pillows bolstered with
rubber foam (latex foam), shower
bonnets, water resistant textiles,
materials with rubber reinforcement
and rubber foam pads.
Clothing cleaned with industrial
chemicals.
Items such as lighter, match,
coins, metal parts, needle etc. may
damage the drum set or may lead
to functional problems. Therefore
check all the laundry that you will
load into your dryer.
A
WARNING!
Never stop your dryer before the
programme completes. If you must
do this, remove all laundry quickly
and lay them out to dissipate the
heat.
DANGER!
• Clothes that are washed
inadequately may ignite on their
own and even may ignite after
drying ends.
• You must provide enough ventilation
in order to prevent gases exiting
from devices operating with other
types of fuels including the naked
flame from accumulating in the
room due to the back fire effect.
WARNING!
A
• Underwear that contains metal
reinforcements should not be dried
in the dryer. Dryer may be damaged
if metal reinforcements come loose
and break off during drying.
NOTE
C
• Use softeners and similar products
in accordance with the instructions
of their manufacturers.
Always clean the lint filter before or
after each loading. Never operate
the dryer without the lint filter
installed.
Dryer / User Manual
29
Page 30
A
WARNING!
• Never attempt to repair the dryer
by yourself. Do not perform any
repair or replacement procedures
on the product even if you know
or have the ability to perform the
required procedure unless it is
clearly suggested in the operating
instructions or the published service
manual. Otherwise, you will be
putting your life and others’ lives in
danger.
• There must not be a lockable, sliding
or hinged door that may block the
opening of the loading door in the
place where your dryer is to be
installed.
• Install your dryer at places suitable
for home use. (Bathroom, closed
balcony, garage etc.)
• Make sure that pets do not enter the
dryer. Check the inside of the dryer
before operating it.
• Do not lean on the loading door of
your dryer when it is open, otherwise
it may fall over.
• The lint must not be allowed to
accumulate around the tumble dryer
• The tumble dryer is not to be used if
industrial chemicals have been used
for cleaning.
• Fabric softeners, or similar products.
should be used as specified by the
fabric softener instructions.
• Exhaust air must not be discharged
into a flue which is used for
exhausting fumes from appliances
burning gas or other fuels.
1.2 Mounting over a washing machine
• A fixing device should be used between
the two machines when installing the
dryer above a washing machine. The
fitting device must be installed by the
authorized service agent.
• Total weight of the washing machine
and the dryer -with full load- when
they are placed on top of each other
reaches to approx. 180 kilograms. Place
the products on a solid floor that has
sufficient load carrying capacity!
WARNING!
A
• Washing machine cannot be placed on
the dryer. Pay attention to the above
warnings during the installation on your
washing machine.
Installation Table for Washing Machine and Dryer
Washing Machine Depth
Dryer
Depth
62 cm
60 cm
54 cm
54 cm
60 cm
1.3 Intended use
• Dryer has been designed for domestic
• Use the dryer only for drying laundry that
• The manufacturer waives any
• The service life of the dryer that you
1.4 Child safety
• Packaging materials are dangerous for
• Electrical products are dangerous for the
Can be installed Cannot be
installed
Can be
installed Cannot be installed
use. It is not suitable for commercial
use and it must not be used out of its
intended use.
are marked accordingly.
responsibility arisen from incorrect usage
or transportation.
purchased is 10 years. During this period,
original spare parts will be available to
operate the dryer properly.
the children. Keep packaging materials
away from children.
children. Keep children away from the
product when it is operating. Do not let
< 50 cm
30
Dryer / User Manual
Page 31
them tamper with the dryer. Use the childproof lock in order to prevent the children
to tamper with the dryer.
NOTE
C
Child-proof lock is on the control panel.
(See Child lock)
• Keep loading door closed even when the
dryer is not in use.
1.5 Compliance with the WEEE
Directive and Disposing of the Waste
Product:
This product complies with EU WEEE
Directive (2012/19/EU). This product bears a
classification symbol for waste electrical and
electronic equipment (WEEE).
This symbol indicates that this
product shall not be disposed with
other household wastes at the end
of its service life. Used device must
be returned to offical collection
point for recycling of electrical and
electronic devices. To find these collection
systems please contact to your local authorities
or retailer where the product was puchased.
Each household performs important role in
recovering and recycling of old appliance.
Appropriate disposal of used appliance helps
prevent potential negative consequences for
the environment and human health.
.
DANGER!
• R290 is an flammable refrigerant. Thus,
ensure that the system and the pipes
are not harmed during operation and
handling.
• Keep the product away from potential
heat sources that may cause it to ignite in
case of damage.
• Do not dispose of the product by putting
it in fire.
1.6 Compliance with RoHS Directive
The product you have purchased complies
with EU RoHS Directive (2011/65/EU). It does
not contain harmful and prohibited materials
specified in the Directive.
1.7 Package information
Packaging materials of the product are
manufactured from recyclable materials in
accordance with our National Environment
Regulations. Do not dispose of the packaging
materials together with the domestic or other
wastes. Take them to the packaging material
collection points designated by the local
authorities.
1.8 Technical Specifications
EN
Height (Min. / Max.) 84,6 cm / 86,6 cm*
Width 59,7 cm
Depth 59,9 cm
Capacity (max.) 9 kg**
Net weight (± %10) 44 kg
Voltage
See type label***Rated power input
Model code
* Min. height: Height with adjustable feet are
closed.
Max. height: Height with adjustable feet are
opened maximum.
** Dry laundry weight before washing.
*** Type label is located behind the loading
door.
NOTE
C
• Technical specifications of the dryer are
subject to specification without notice to
improve the quality of the product.
• Figures in this manual are schematic and
may not match the product exactly.
• Values stated on markers on the dryer
or in the other published documentation
accompanying with the dryer are
obtained in laboratory in accordance with
the relevant standards. Depending on
operational and environmental conditions
of the dryer, these values may vary.
Dryer / User Manual
31
Page 32
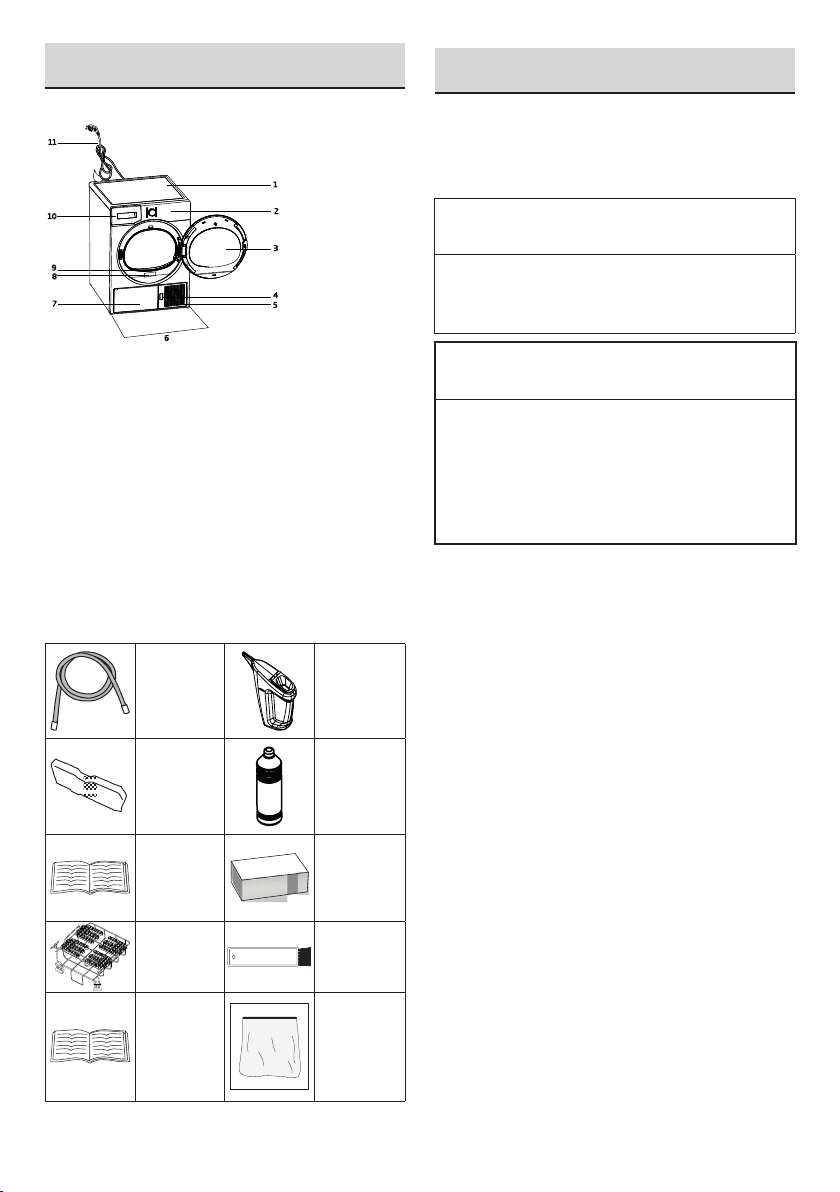
2 Your Dryer
11
10
1
2
3
4
5
6
7
8
9
3 Installation
2.1 Overview
1. Top panel
2. Control panel
3. Loading door
4. Kick plate opening button
5. Ventilation grids
6. Adjustable legs
7. In models where the tank is placed below,
the water tank is inside the toe board
8. Type label
9. Lint filter
10. Water tank drawer (in models where the tank
is placed above)
11. Power cord
2.2 Package Contents
1. Water
drain
hose *
2. Filter
drawer
spare
sponge*
3. User
Manual
4. Drying
*Optional - may not be included, depends on
model.
32
basket*
5. Drying
basket
user
manual*
6. Water
Filling
Container*
7. Pure
Water*
8.
Fragrance
Capsules
Group*
9. Brush*
10. Filter
cloth*
Before installation, ensure that electrical
installation and water drain is appropriate
referring to the user’s manual. If they are not
suitable, contact a qualified electrician and
technician to make necessary arrangements.
NOTE
C
• Preparation of the dryer’s location
as well as the electrical and waste
water installations is under customer’s
responsibility.
WARNING!
A
• Prior to installation, visually check if the
dryer has any defects on it. If the drier
is damaged, do not have it installed.
Damaged products cause risks for your
safety.
• Let your dryer wait for 12 hours before
starting to use it.
3.1 Appropriate installation location
Install the dryer on a stable and level surface.
Dryer is heavy. Do not move it by yourself.
• Operate your dryer in a well ventilated,
dust-free environment.
• The gap between the dryer and the
surface should not be reduced by the
materials such as carpet, wood and tape.
• Do not cover the ventilation grills of the
dryer.
• There must not be a lockable, sliding or
hinged door that may block the opening
of the loading door in the place where
your dryer is to be installed.
• Once the dryer is installed, it should stay
at the same place where its connections
have been made. When installing the
dryer, make sure that its rear wall does
not touch anywhere (tap, socket, etc.).
• Place the dryer at least 1 cm away from
the edges of other furniture.
• Your dryer can be operated at
temperatures between +5°C and
+35°C. If the operating conditions fall
outside of this range, operation of the
dryer will be adversely affected and it can
get damaged.
Dryer / User Manual
Page 33
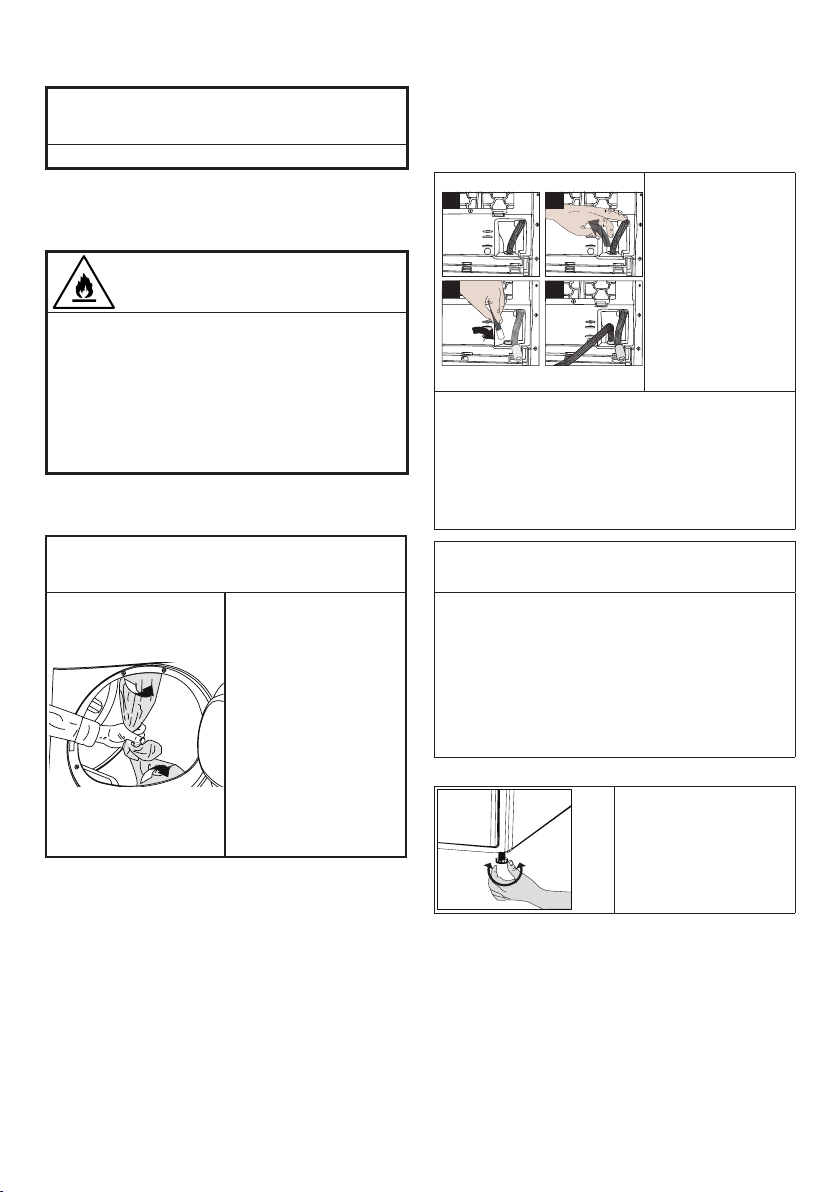
• The rear surface of the tumble dryer shall
be placed against a wall.
DANGER!
B
Do not place the dryer on the power cable.
* Ignore following warning if your
product’s system does not contains
R290.
DANGER!
• Dryer contains R290 refrigerant.*
• R290 is an environment-friendly, but
flammable refrigerant.*
• Ensure that the air inlet of the dryer is
open and it is well-ventilated.*
• Keep potential flame sources away from
the dryer.*
3.2 Removing the transportation
safety assembly
3.3 Connecting to the drain
You can directly drain accumulated water
through the water drain hose supplied with
the product instead of periodically draining the
water collected in the water tank.
Connecting the water drain hose
1
3 4
3 Connect one end of the drain hose
supplied with the dryer to the connection
point from where you removed the hose
of the product in previous step.
4 Connect the other end of the drain hose
directly to the wastewater drain or to the
washbasin.
2
1-2 Pull hose at
the behind of
the dryer by
hand in order
to disconnect
it from where it
is connected.
Do not use
any tools to
remove the
hose.
A
WARNING!
• Remove the
transportation
safety assembly
before using the
dryer for the first
time.
• If the door swing
side of your
appliance can
be modified, see
the reversible
door mounting
instructions.
NOTE
C
• Water drain hose should be attached to a
height of maximum 80 cm.
• Make sure that the water drain hose is not
stepped on and it is not folded between
the drain and the machine.
• If there is an accessories pack supplied
with your product, please see the detailed
description.
3.4 Adjusting the feet
• Turn the feet to
left or right until
the dryer stands
level and firmly.
Dryer / User Manual
33
Page 34
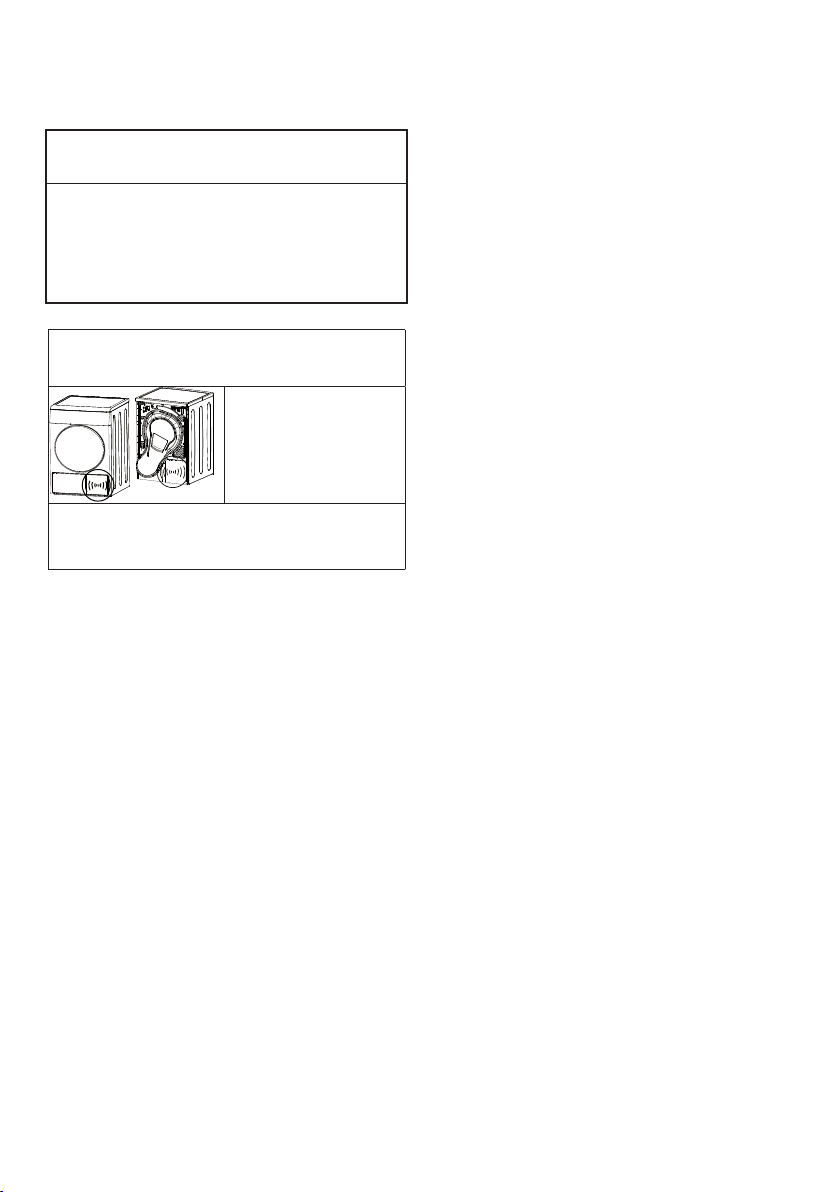
3.5 Transportation of the dryer
Drain all water that has remained in the dryer.
If direct water drain connection is made, then
remove the hose connections.
A
WARNING!
• We recommend carrying the dryer in
upright position. If it is not possible to
carry the machine in the upright position,
we recommend carrying it by tilting
towards the right side when looked from
the front.
3.6 Warnings about sounds
NOTE
C
• Water collected during operation is
pumped to water tank. It is normal to
hear pumping noise during this process.
3.7 Changing the illumination lamp
In case an illumination lamp is used in your
laundry dryer.To change the Bulb/LED used
for illumination of your tumble dryer, call your
Authorised Service Agent.The lamp(s) used
in this appliance is not suitable for household
room illumination. The intended purpose of
this lamp is to assist the user to place laundry
in the tumble dryer in a comfortable way. The
lamps used in this appliance have to withstand
extreme physical conditions such as vibrations
and temperatures above 50 °C
• It is normal to
hear a metallic
noise from the
compressor
sometimes during
operation.
34
Dryer / User Manual
Page 35
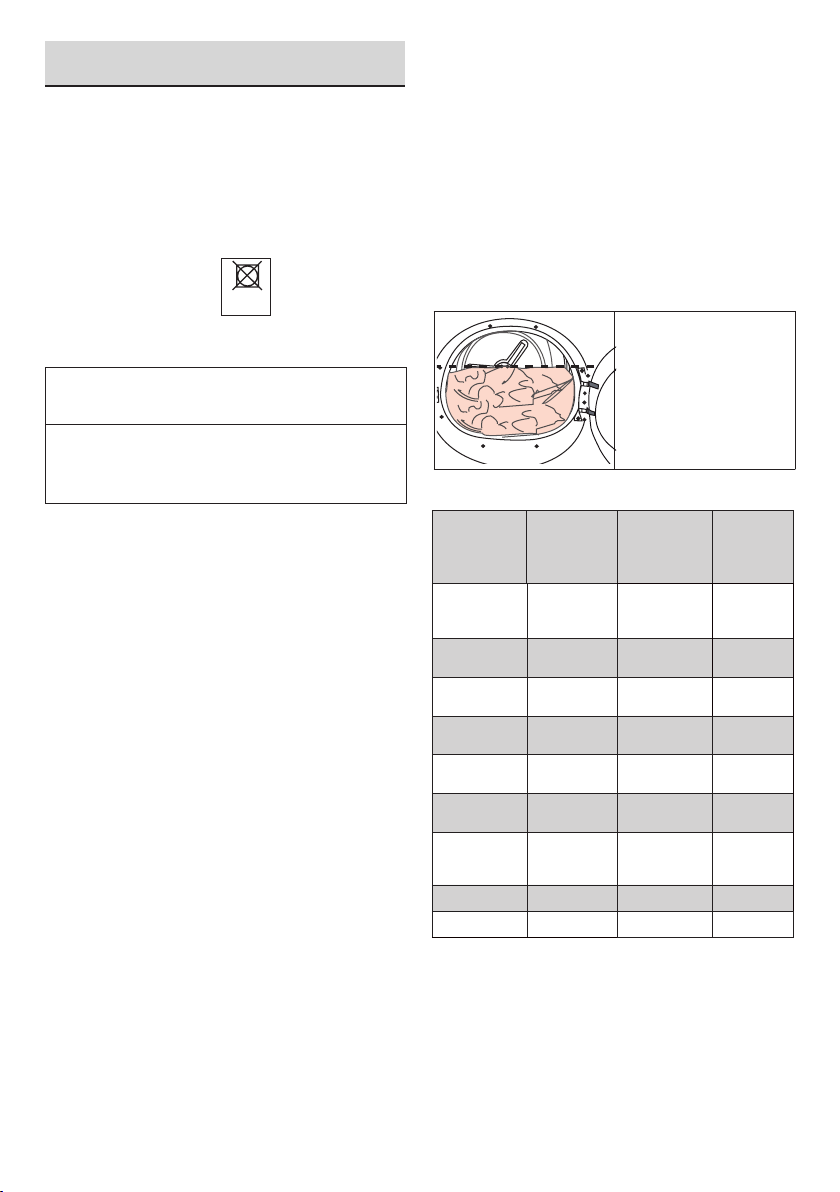
4 Preparation
4.1 Laundry suitable for drying in the
dryer
Always obey the instructions given on the
garment tags. Dry only the laundry having a
label stating that they are suitable for drying in
a dryer.
4.2 Laundry not suitable for drying in
the dryer
Do not dry
Items with this symbol
dried in the dryer.
NOTE
C
• Delicate embroidered fabrics, woollen,
silk garments, delicate and valuable
fabrics, airtight items and tulle curtains
are not suitable for machine drying.
4.3 Preparing laundry for drying
• Laundry may be tangled with each other
after washing. Separate the laundry items
before placing them into the dryer.
• Dry garments having metal accessories
such as zippers, inside out.
• Fasten the zippers, hooks and buckles
and button sheets.
4.4 Things to be done for energy
saving
• Spin your laundry at the highest speed
possible when washing them. Thus,
the drying time is shortened and energy
consumption is reduced.
• Sort out the laundry depending on their
type and thickness. Dry the same type of
laundry together. For example thin kitchen
towels and tableclothes dry quicker than
thick bathroom towels.
• Follow the instructions in the user manual
for programme selection.
• Do not open the loading door of the
machine during drying unless necessary.
If you must open the loading door, do not
keep it open for a long time.
• Do not add wet laundry while the dryer is
in operation
with dryer
should not be
• For models with a condenser unit: clean
the condenser once in a month or after
every 30 operations regularly.
• Clean the filter periodically.Read the
Maintenance and cleaning of filters for
detalied information.
• For models with flue unit: comply with the
flue connection instructions and clean the
flue.
• During the drying process, air the room
well where your tumble dryer is operating.
4.5 Correct load capacity
Follow the instructions
in the “Programme
selection and
consumption table”.
Do not load more than
the capacity values
stated in the table.
Following weights are given as examples.
Laundry
Cotton
quilt covers
(double)
Cotton quilt
covers (single)
Bed sheets
(double)
Bed sheets
(single)
Large
tablecloths
Small
tablecloths
Tea towels 100
Bath towels 700 T-Shirts 125
Hand towels 350
Approximate
weights (g)*
1500 Blouses 150
1000 Cotton shirts 300
500 Shirts 250
350
700 Dresses 350
250 Jeans 700
Laundry
Cotton
dresses
Handkerchiefs
(10 pieces)
*Dry laundry weight before washing.
Approximate
weights (g)*
500
100
Dryer / User Manual
35
Page 36
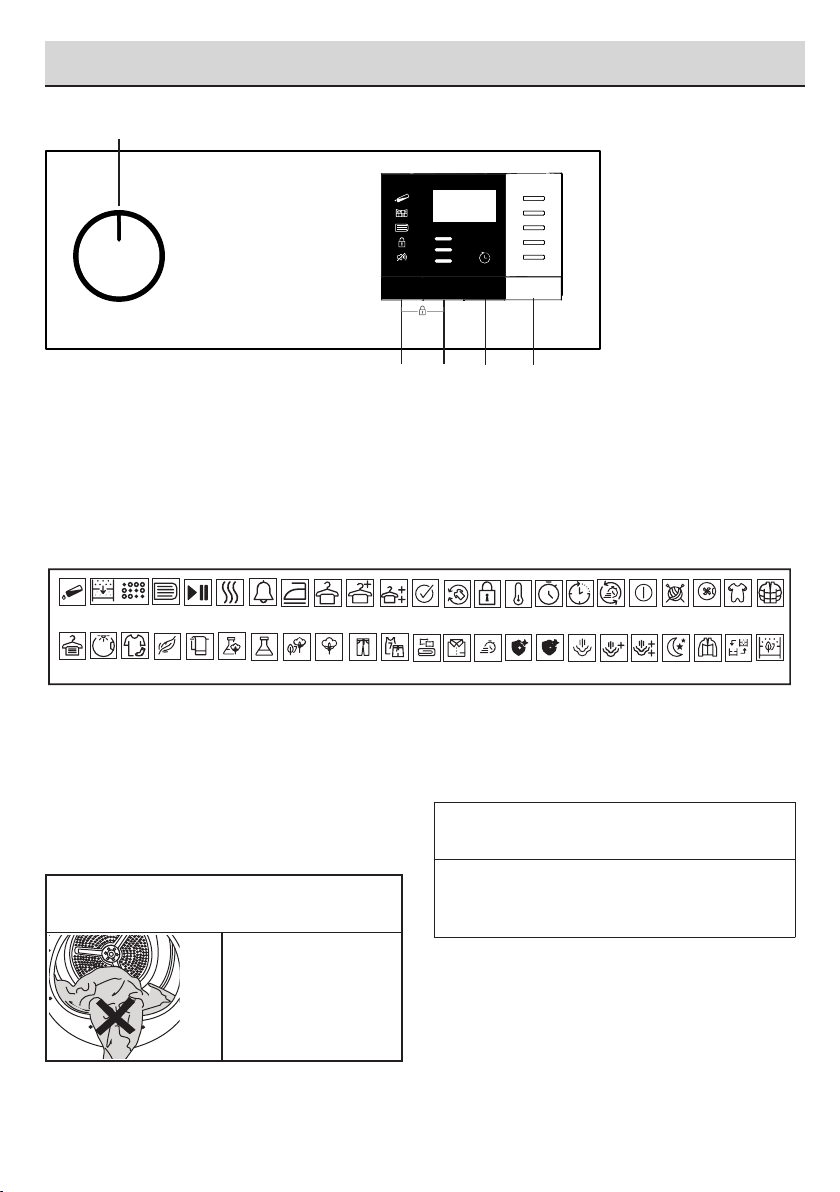
5 Operating the product
1
5.1 Control Panel
3
4
5
2
1. On/Off/Program selection button
2. Start/Stand-by button
3. End Time button
5.2 Symbols
Filter
Tank
full
Dryness
Level
cleaning
Drum
Daily
Light
Filter drawer /
Heat exchanger
cleaning
Delicates
Start
pause
cancel
Towels Mix
Drying
Buzzer
Synthetics
Iron Dry
Cottons
Cupboard
Cupboard
Dry
Dry +
Jeans
Cottons
Eco
5.3. Preparation of drying machine
• Plug the drying machine.
• Open the loading door.
• Place the laundry to the drying machine
without jamming them.
• Push and close the loading door.
WARNING!
A
• Ensure that no
laundry is jammed
to the loading
door.
4. Drying Level Button
5. Buzzer volume/Time programs selection
button
Extra dry
Sport
End
creasing
Shirts Express Hygienic
Bedding/
Duvet
Child-proof
Anti-
TimeDry
Low
lock
temperature
Hygienic
Drying
Refresh
Ending In
Steam Steam
RapiDry
Level1
On / O
Steam
Level2
Wool Protect
Select the desired program using the On/Off/
Program selection knob, the machine will turn
on.
NOTE
C
• Selecting a program using the On/Off/
Program selection button does not mean
that the program started. Press the Start
/ Stand-by button to start the program.
Hygiene
Downwear
Freshen
(Baby Protect+)
Up
Environmentally
Environmentally
Night
Outdoor
friendly lter full
friendly lter
36
Dryer / User Manual
Page 37
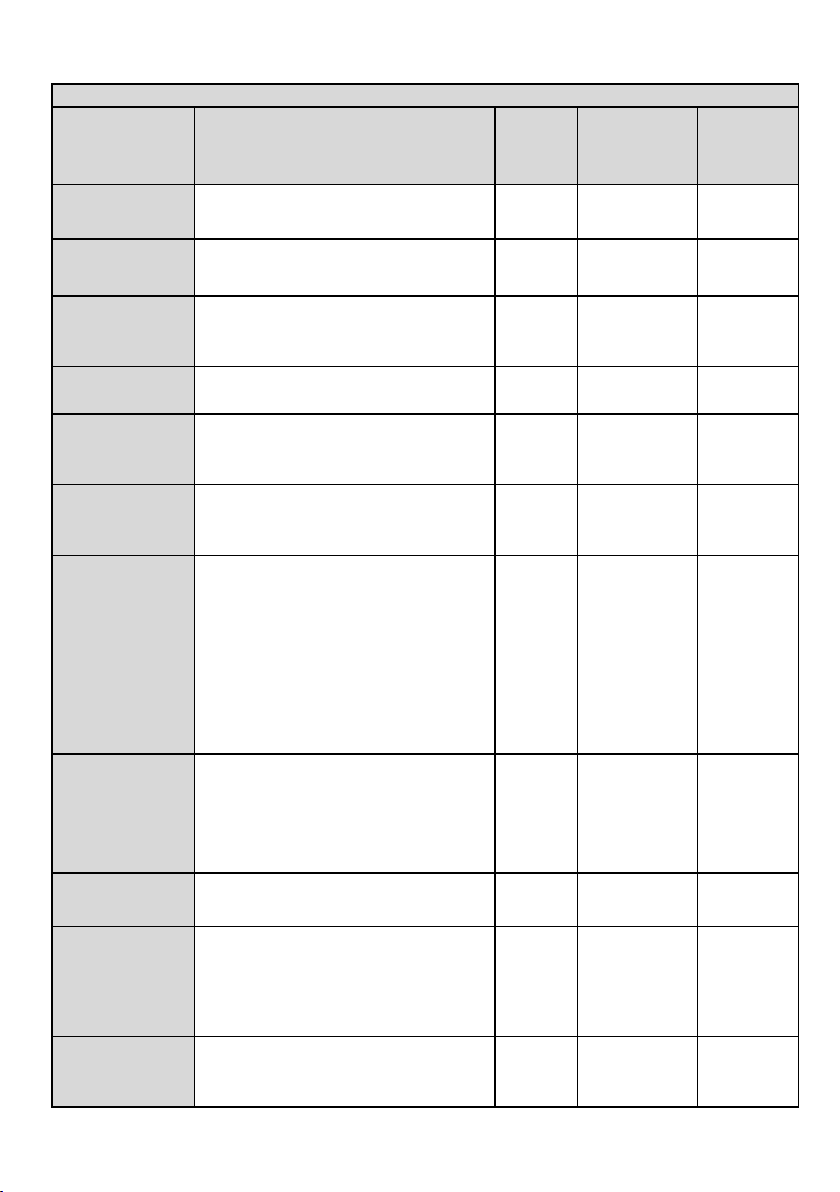
5.4 Program selection and consumption chart
EN
Programmes Programme Description
Cottons Iron Dry
Cottons Eco
Cottons Cupboard
Dry
Cottons Extra Dry
Synthetics Iron Dry
Synthetics Cupboard
Dry
Drying Rack/
TimeDry
Refresh (Wool
Refresh)
Gentle Care / Shirts
You may dry your cotton laundry to be ironed
in this program to have them slightly damp for
ease of ironing. (Shirt, T-shirt, tablecloth, etc.)
It dries single layer, casual cotton textiles in the
most economical way.
You may use this program for extra dryness
in thick laundry such as pants, tracksuit. You
can put your dry laundry that doesn’t require
ironing directly in the wardrobe.
You may dry your thick cotton laundry in this
program such as towels, bathrobe, etc.
You may dry your synthetic laundry to be
ironed in this program to have them slightly
damp for ease of ironing. (Shirt, T-shirt,
tablecloth, etc.)
You may dry all your synthetic laundry in this
program. (Shirt, T-shirt, underwear, tablecloth,
etc.) You can put your dry laundry that doesn’t
require ironing directly in the wardrobe.
You may select from time programmes
between 10 and 160 minutes to achieve the
desired drying level at low temperature. In this
programme, tumble drier’s operation lasts for
the set time independently from the dryness
of laundry. This product is available to be used
with a drying basket as option. For products
that are sold without a basket, you can obtain
a basket from an authorized service and use
the drying programs specified above. For
details of use, see the drying basket user
guide.
Ventilates for 10 minutes without blowing
hot air. You can ventilate the cotton and linen
clothes that have been enclosed for a long
time with this program to remove their odour.
You can use this program to ventilate and
soften wool laundry that can be washed in a
washing machine. Do not use for full drying.
It dries the shirts in a more sensitive manner,
and causes less creasing and easier ironing.
(kg)
Capacity
9 1000 160
9 1000 209
9 1000 220
9 1000 230
4 800 60
4 800 80
- - -
- - 10
2 1200 50
Spin
speed in
(rpm)
washing
machine
Drying
Time
(minutes)
Jeans
Outdoor/Sports
(Goretex)
Dryer / User Manual
You may dry denim pants, skirts, shirts or
jackets in this program.
Use it to dry your clothes made of synthetics,
cotton or mixed fabrics or waterproof products
such as functional jacket, raincoat etc. Turn
them inside out prior to drying.
4 1200 130
2 1000 135
37
Page 38
Mix(Daily)
Hygiene
(BabyProtect+)
Duvet/Downwear
Express Super Short
Energy consumption values
You can dry both cotton and synthetic laundry
with this programme.Sports and fitness
clothes may be dried with this program.
It is a long-term program that you can use for
the clothes (baby clothes, towels, underwear,
etc. cotton) you require hygeine. Hygiene is
provided with high temperature. It is especially
suitable for durable fabrics. ((This program is
identified and approved by England’s “The
British Foundation” (Allergy UK).))
You can dry your feather or fibre filled textile
that bears can be dried in drier label as a
single piece of laundry. You can dry double
duvet, pillow or coats as single piece of
laundry. Dry your cloths such as coats and
jackets turned inside out.
Use this program to have 2 shirts ready for
ironing.
4 1000 120
5 800 185
- 800 100
0,5 1200 30
Programmes Capacity (kg)
humidity
remaining
in washing
Spin speed
machine (rpm)
Cottons Eco * 9 1000 60% 2,17
Cottons Iron dry 9 1000 60% 1,65
Synthetics cupboard
dry
"Cottons Eco programme" used at full and partial load is the standard drying programme to
which the information in the label and the fiche relates, that this programme is suitable for drying
normal wet Cottons laundry and that it is the most efficient programme in terms of energy
consumption for Cottons.
4 800 40% 0,75
amount of
Approximate
Energy
consumption
* : Energy Label standard program (EN 61121) All values in the table are determined according
to EN 61121 standard. Consumption values may vary from the values in the chart depending on
laundry type, wringing speed, ambient conditions and voltage levels.
value kWh
38
Dryer / User Manual
Page 39
Allergy UK is the brand of the
British Allergy Association. Seal
of Approval is created to guide
people that require
recommendation about a
product that the related
product restricts / reduces / eliminates the
allergens or reduces the allergen content
significantly in the ambient where allergy
patients exist. It aims to provide assurance
that the products are tested scientifically or
examined in a way to provide measurable
results.
5.5 Auxiliary functions
Buzzer / time
Drying machine makes an audible warning
when the program is completed. If you don’t
want the machine to make an audible warning,
press the “Buzzer / Time” button. When you
press the Buzzer/Time button, a light will
illuminate and no audible warning will be made
when the program ends.
NOTE
C
• You can select this function before or
after the program starts.
Buzzer/Time button is used to adjust program
duration while the Rack/Time programs are
selected.
Drying Level
Drying Level button is used for adjusting to
desired dryness level. Program duration may
change depending on the selection.
NOTE
C
• You can activate this function only prior
to start of program.
End time
You can delay the end time of the program up
to 24 hours with End time function.
1. Open the loading door and place the
laundry.
2. Select the drying program.
3. Press the End Time selection button and
set the delay time you wish. End Time
LED will illuminate. (When pressed and
hold the button, End Time proceeds nonstop).
4. Press the Start / Stand-by button. End
Time countdown starts. “:” Separator in
the middle of displayed delay time flashes.
NOTE
C
• You can add or remove laundry within
end time. Displayed time is the sum of
normal drying time and end time. End
Time LED will turn off at the end of
countdown, drying starts and drying LED
will illuminate.
Changing the end time
If you want to change the duration during the
countdown:
Cancel the program by turning the On/Off/
Program selection knob. Select the program
you want and repeat the End Time selection
process.
Cancelling the end time function
If you want to cancel the end time countdown
and start the program immediately:
Cancel the program by turning the On/Off/
Program selection knob. Select the program
you want and press the Start/Stand-by button.
5.6 Warning indicators
NOTE
C
• Warning indicators may vary depending
on the model of your dryer.
Filter cleaning
When the program is completed, the warning
indicator for filter cleaning turns on.
Water tank
When the program is completed, the warning
indicator to empty the water tank turns on.
If the water tank fills up while the program
continues, the warning indicator starts flashing
and the machine goes into stand-by. In this
case, empty the water tank and start the
program by pressing the Start / Stand-by
button. Warning indicator turns off and program
resumes.
Filter drawer /Heat exchanger cleaning
When the programme is finished, the cleaning
symbol of the heat exchanger or filter drawer
may light up.
Dryer / User Manual
39
Page 40
5.7 Starting the program
Press the Start/Stand-by button to start the
program.
Start/Stand-by and Drying indicators will
illuminate to indicate that program started.
5.8 Child Lock
The drying machine has a child lock which
prevents the program flow from being
interrupted when the buttons are pressed
during a program. When the child lock is
activated, all buttons on the panel except
the On/Off/Program selection knob are
deactivated.
Press the Drying Level and Buzzer buttons
simultaneously for 3 buttons to activate the
child lock.
The child lock has to be deactivated to be
able to start a new program after the current
program is finished or to be able to interfere
with the program. To deactivate the child lock,
keep the same buttons pressed for 3 seconds.
NOTE
C
• When the child lock is activated, the child
lock warning indicator on the screen
turns on.
• Child lock deactivates when the drying
machine is turned off and on by the On/
Off/Cancel knob.
NOTE
C
• When the drying machine runs and
the child lock is active, it beeps twice
when the program selection knob is
turned. If the child lock is deactivated
without returning the program selection
knob to its previous position, program
will terminate due to the change in the
program selection knob position.
5.9 Changing the program after it is
started
You can change the program you selected to
dry your laundry with a different program after
the drying machine starts running
• For instance, select Extra Dry program
by turning the On/Off/Program selection
knob to select Extra Dry instead of Iron
Dry.
• Press the Start/Stand-by button to start
the program.
Adding and removing clothes during
stand-by
If you want to add or remove clothes to/from
the drying machine after the drying program
starts:
• Press the Start/Stand-by button to put
the drying machine in Stand-by state. The
drying operation stops.
• Open the loading door while in Standby state, and close the door after you
remove or add laundry.
• Press the Start/Stand-by button to start
the program.
NOTE
C
• Adding laundry after the drying operation
starts may cause the dried laundry inside
the machine to mix with wet laundry and
leave the laundry damp at the end of
operation.
• Adding or removing laundry during drying
may be repeated as many times as you
wish. But this operation continuously
interrupts the drying operation, and thus
increases program duration and energy
consumption. So, it is recommended to
add laundry before the program starts.
• If a new program is selected by turning
the program selection knob while the
drying machine is in stand-by, the
running program terminates.
WARNING!
• Do not touch the inner surface of the
drum while adding or removing clothes
during a continuing program. The drum
surface is hot.
5.10 Cancelling the program
If you want to cancel the program and
terminate the drying operation for any reason
after the drying machine starts running, turn
the On/Off/Cancel knob, the program will be
cancelled.
40
Dryer / User Manual
Page 41

A
WARNING!
• The inside of the drying machine shall
be extremely hot when you cancel the
program during machine operation, so
run the refresh program to allow it to cool
down.
5.11 End of program
When the program ends, the Fibre Filter
Cleaning and Water Tank warning symbols
on the program observation indicator turn on.
Loading door may be opened and the dryer
machine becomes ready for another run.
Bring the On/Off/Program selection knob to
On/Off position to turn the drying machine off.
NOTE
C
• If the laundry is not removed after the
program is completed, the wrinkle
prevention function activates for 2 hours
to prevent the laundry inside the machine
to get wrinkled. The program tumbles
the laundry with 10-minute intervals to
prevent them from wrinkling.
Dryer / User Manual
41
Page 42
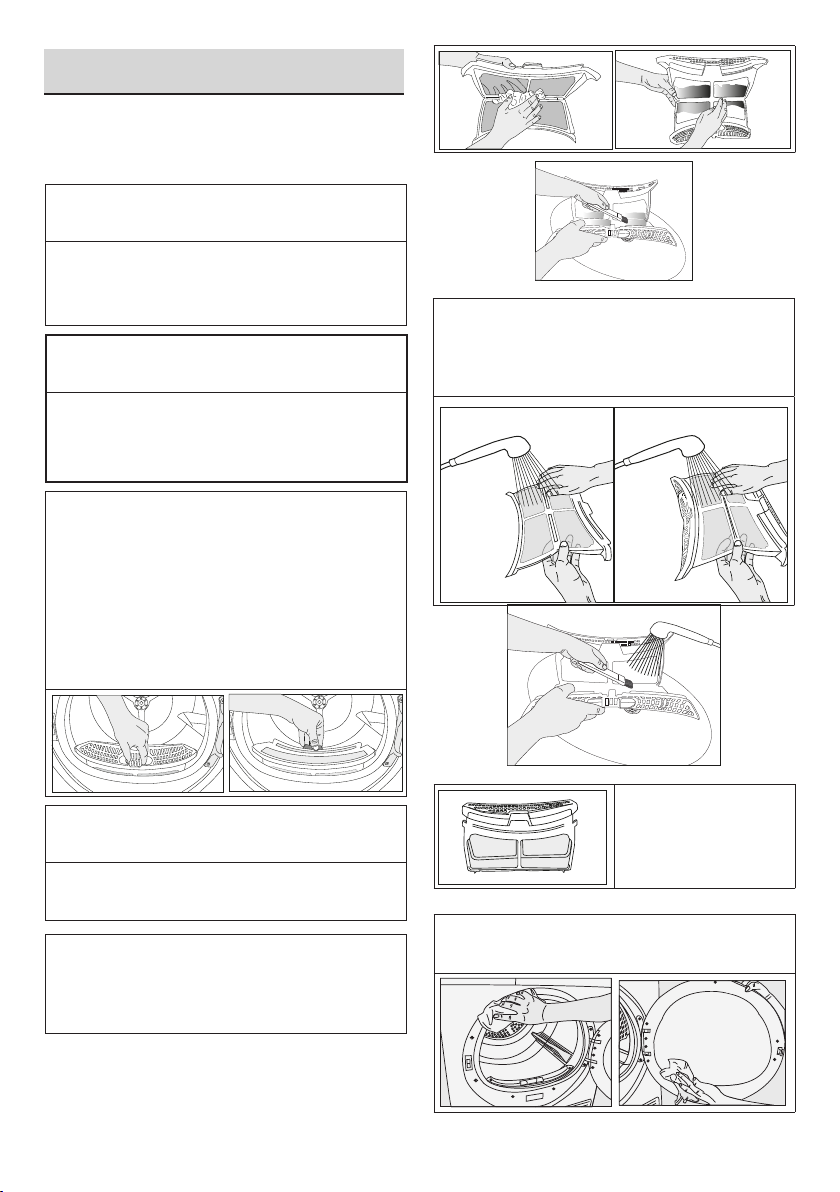
6 Maintenance and cleaning
6.1 Loading Door Inner Surface
The hair and fibres that are separated from the
laundry during drying process is collected by
the Fibre Filter.
NOTE
C
• Fibres are formed during wearing and
washing clothes.
• You can clean the filter slot with a
vacuum cleaner.
WARNING!
A
• After each drying cycle, clean the fibre
filter and the inner surface of the loading
door.
To clean the fibre filter:
• Open the loading door.
• Hold the first part (inner filter) of the two
part fibre filter and remove it by pulling it
upwards.
• Collect the hair, fibres and cotton balls with
hand or with a soft cloth.
• Remove the second part (outer filter) by
pulling it upwards.
• Clean both filters under water running in
reverse direction of fibre accumulation
or with a soft brush. Dry the filter before
placing it back.
NOTE
C
• Ensure that hair, fibre and cotton balls do
not fall into the slot where the filters are
installed.
• Open both filters (top and bottom filters)
and to remove the lint with your hand, or
use cleaning brush at air routing cover. And
if necessary, use a vacuum cleaner to clean
filters.
42
• Insert the fibre filters
on one another and
place it back in its
place.
• Clean the front door interior surface and its
gaskets with a soft damp cloth or with the
brush on air routing cover.
Dryer / User Manual
Page 43
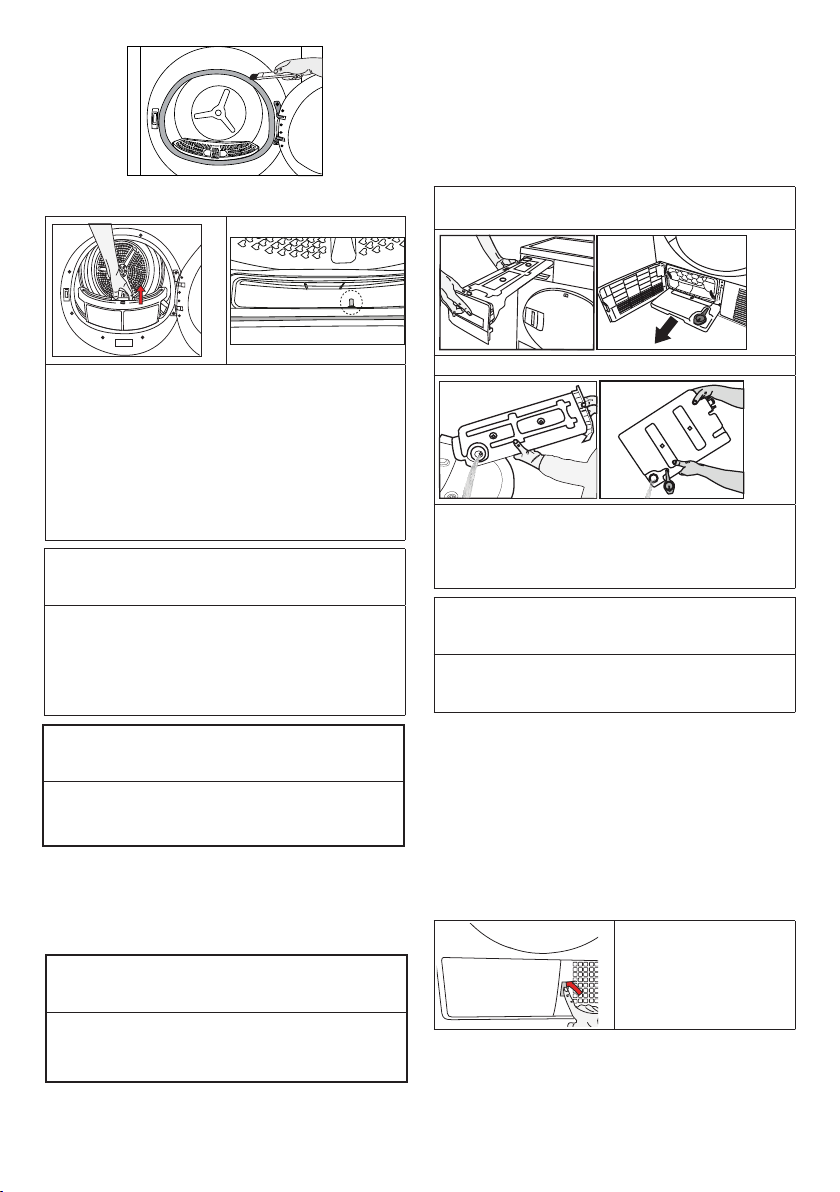
6.2Cleaning the sensors
If you forget to drain the water tank, the
machine will stop during the subsequent drying
cycles when the water tank is full and the Water
Tank warning symbol will flash. If this is the
case, drain the water tank and press Start /
Pause button to resume the drying cycle.
To drain the water tank:
1. Remove the water tank in the drawer
or container carefully.
• There are temperature sensor in the
dryer that detect whether the laundry is
dry or not.
To clean the sensors:
• Open the loading door of the dryer.
• Remove the lint filter by pulling it up.
• Clean the sensor with your hand if any
fluff accumulation on it.
NOTE
C
• Clean the sensor 4 times a year.
• Do not use metal tools when cleaning the
sensor.
• Allow the machine to cool down if it is still
hot due the drying process.
WARNING!
A
• Never use solvents, cleaning agents or
similar substances for cleaning due to the
risk of fire and explosion!
6.3 Draining the water tank
Dampness of the laundry is removed and
condensed during drying process and the
water that arise accumulates in the water tank.
Drain the water tank after each drying cycle.
WARNING!
A
• Condensed water is not drinkable!
• Never remove the water tank when the
program is running!
2. Drain the water in the tank.
• If there is lint accumulation in the funnel
of the water tank, clean it under running
water.
• Place the water tank into its seat.
NOTE
C
• If the direct water draining is used as an
option, there is no need to empty the
water tank.
6.4 Cleaning the Condenser
Small amount of lint may pass through the lint
filter and be collected on the metal surface of
the condenser.
Condenser metal surface needs to be cleaned
regularly.
If the evaporator icon is flashing on the display,
please inspect the metal surface of the
condenser. If it is dirty, clean it. This part should
be checked at lease once every 6 months.
• Open the toe
board by pressing
on it.
Dryer / User Manual
43
Page 44
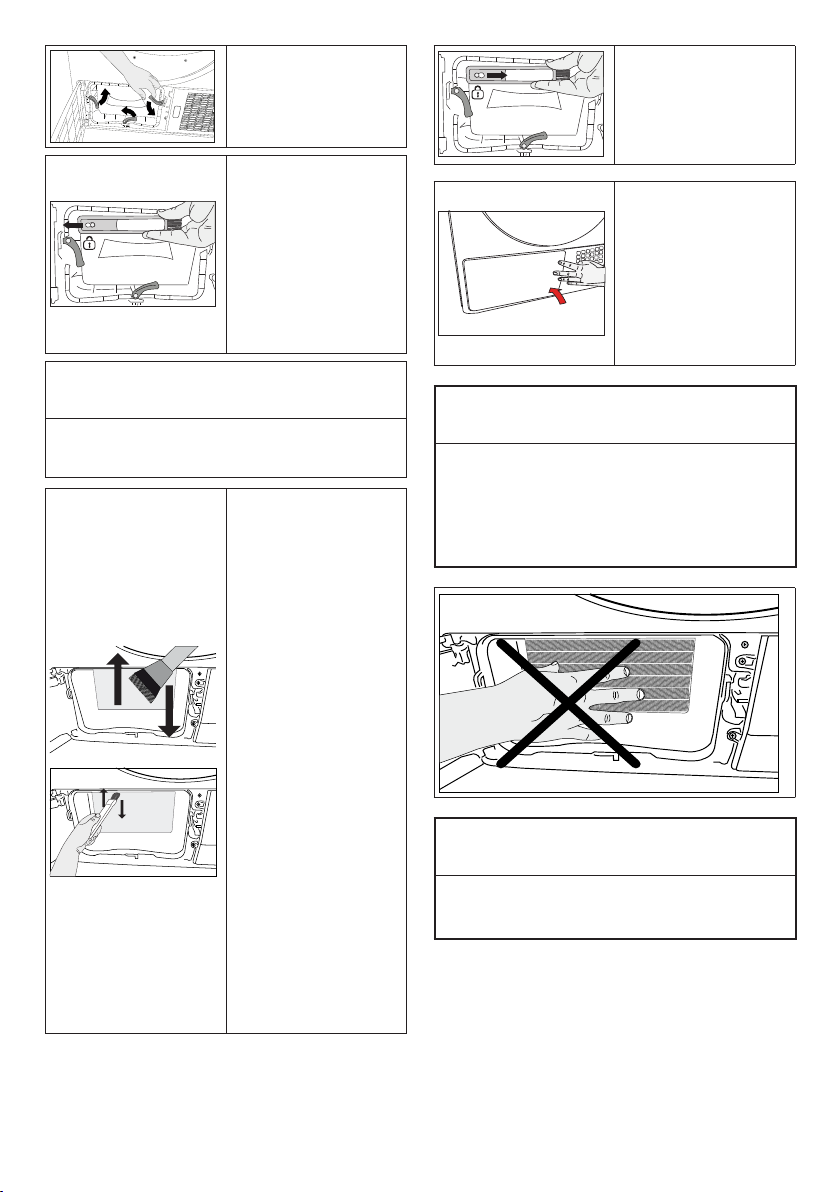
• To open the air
routing door, move
the release latch.
• Pull the brush to
the left side and
remove it. You can
use the cleaning
brush for removing
collected fluff on the
metal surface of the
condenser.
NOTE
C
• Brush is inside the printing materials bag.
You can place it in its housing on the air
routing cover after the first usage.
• Collected fluff
on condenser
surface should
be removed by
a damp cloth or
rubbing the brush
placed on the air
routing cover up
and down on the
condenser.
• Please do not
clean condenser
fins in right-left
direction to avoid
damage.
• You can also use
a vacuum cleaner
with a brush
for cleaning.
Condenser
cleaning is not
recommended
with a brushless
vacuum cleaner.
• Insert the brush
into its slot pushing
to the right, after
cleaning condenser,
front cover and lint
filter.
• After the cleaning
process is
completed, place
the air router door
to its place, move
the latches to close
it and close the toe
board.
WARNING!
A
• You can clean by hand, provided you wear
protective gloves. Do not try to clean with
bare hands. Condenser fins may damage
your hands. Cleaning by the left to right
movements may damage the condenser
fins. This may lead to drying issues.
WARNING!
A
• It is normal to see some water on the
plastic surface in front of the condenser
when you open the air routing cover.
44
Dryer / User Manual
Page 45
7 Troubleshooting
Drying operation takes too long.
Fibre filter (interior and exterior filter) pores may
be clogged. >>> Wash the fibre filters with warm
water and dry.
Evaporator front side may be clogged. >>> Clean
the front side of the evaporator.
The ventilation grills in front of the machine may
be closed. >>> Remove any object in front of the
ventilation grills that blocks air.
Ventilation may be inadequate because the are the
machine is installed in is too small. >>> Open the
door or windows to prevent the room temperature
from rising very high.
A lime layer may have accumulated on the
humidity sensor. >>> Clean the humidity sensor.
Excessive amount of laundry might be loaded.
>>> Do not load the drying machine excessively.
Laundry might not have been wrung adequately.
>>> Perform a higher speed wringing on the
washing machine.
Clothes come out damp after drying.
A program not suitable for the laundry type may
have been used.>>> Check the maintenance
labels on the clothes and select a program
suitable for the clothes’ type or use time programs
as extra.
Fibre filter (interior and exterior filter) pores may be
clogged. >>> Wash the filters with warm water
and dry.
Evaporator front side may be clogged. >>> Clean
the front side of the evaporator.
Excessive amount of laundry might be loaded.
>>> Do not load the drying machine excessively.
Laundry might not have been wrung adequately.
>>> Perform a higher speed wringing on the
washing machine.
Drying machine does not turn on or program
cannot be started. Drying machine does not run
after it is configured.
Power plug might be unplugged. >>> Make sure
the power cord is plugged in.
Loading door might be open. >>> Ensure that the
loading door is properly closed.
A program might not be set or Start / Pause /
Cancel button might not be pressed. >>> Check
that the program is set and it is not in Pause
position..
Child lock may be activated. >>> Turn off the child
lock.
Program terminated prematurely for no reason.
Loading door might be closed completely. >>>
Ensure that the loading door is properly closed.
There might be a power outage. >>> Press the
Start / Pause / Cancel button to start the program.
Water tank may be full. >>> Empty the water tank.
Clothes have shrunk, hardened or spoiled.
A program not suitable with the laundry type might
have been used. >>> Check the maintenance
labels on the clothes and select a program
suitable for the clothes.
Water drips from the loading door.
Fibres might have gathered on the inner sides of
the loading door and the loading door gasket. >>>
Clean the inner surfaces of the loading door and
the loading door gasket surfaces.
Loading door opens by itself.
Loading door might be closed completely. >>>
Push the loading door until the closing sound is
heard.
Water tank warning symbol is on/flashing.
Water tank may be full. >>> Empty the water tank.
Water discharge hose might have collapsed. >>>
If the product is connected directly to the water
drain check the water discharge hose.
The lighting inside the drying machine does not
turn on. (In models with lamp)
The drying machine might not have been turned
on using On/Off button. >>> Check that the
drying machine is turned on.
Lamp might be malfunctioning. >>> Contact
Authorized Service to replace the lamp.
Anti-crease icon is lit.
Anti-Crease mode that prevents the laundry in the
drier to crease may be activated. >>> Turn the
drier off and remove the laundry.
Fibre filter cleaning icon is lit.
Fibre filter (interior and exterior filter) may be
unclean. >>> Wash the filters with warm water
and dry..
A layer may be formed on the fibre filter pores that
leads to clogging. >>> Wash the filters with warm
water and dry.
Dryer / User Manual
45
Page 46
An audible warning is heard from the machine
Fibre filters may not be inserted. >>> Insert the
interior and exterior filters to their places.
Filters of the machine may not have been
installed.>>> Install the fibre filters (internal and
external) or the environmentally-friendly filter to
their housing.
Evaporator warning icon is flashing.
Evaporator front side may be clogged with fibres.
>>> Clean the front side of the evaporator.
Fibre filters may not be inserted. >>> Insert the
interior and exterior filters to their places.
The lighting inside the drying machine turns on. (In
models with lamp)
If the drying machine is plugged to the power
outlet, the On/Off button is pressed and the door
is open; the light turns on. >>> Unplug the drying
machine or bring the On/Off button to Off position.
Steam symbol is flashing.(For the products with a
steam function)
Steam tank may be empty => Fill the steam tank
with distilled or condensed water.
Steam programs do not start (For the products
with a steam function)
Steam tank may be empty, steam tank warning
icon may light up on the screen => Fill the steam
tank until the steam icon goes off.
Wrinkles are not removed with wrinkle removing
program. (For the products with a steam function)
Excess amount of laundry may have been placed
=> Place specified amount of laundry.
Steam application time may be selected in low
level => Choose a program with high amount of
steam.
After completion of the program, the laundry
may have stayed in the machine for a long time
=> Take the laundry out as soon as the program
finishes, and hang it out.
A
WARNING!
• If the problem persists after following the
instructions in this section, contact your
vendor or an Authorized Service. Never try
to repair your product yourself.
C
• In an event that you encounter an issue on
• Operating the appliance with non-
• Manufacturer and distributor are not liable
NOTE
any part on your appliance, you can ask for
a replacement by contacting the authorized
service with the appliance model number.
authentic parts may lead the appliance to
malfunction.
for malfunctions resulting from using nonauthentic parts.
Laundry odour not lessened with the odour
removal program.(For the products with an odour
removal program)
Excess amount of laundry may have been placed
=> Place specified amount of laundry.
Steam application time may be selected in low
level => Choose a program with high amount of
steam.
46
Dryer / User Manual
Page 47
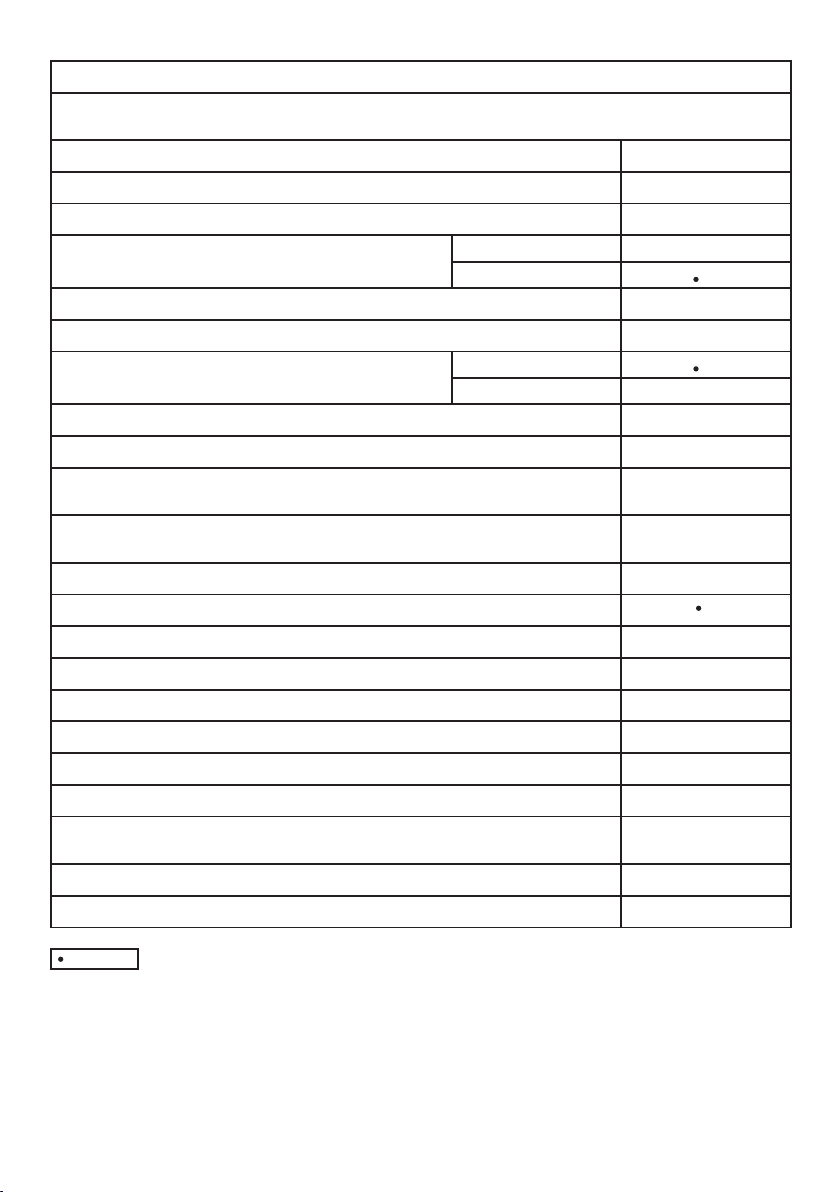
WA
PRODUCT FICHE
Complying Commission Delegated Regulation (EU) No 392/2012
Supplier name or trademark
Model name
Rated capacity (kg)
Type of Tumble Dryer
Energy efficiency class
Annual Energy Consumption (kWh)
(1)
(2)
Type of Control
Energy consumption of the standard cotton programme at full load (kWh)
Energy consumption of the standard cotton programme at partial load (kWh)
Power consumption of the off-mode for the standart cotton programme at full load, P
Power consumption of the left-on mode for the standart cotton programme at full load, P
The duration of the left on mode (min)
Standard cotton programme
Programme time of the standard cotton programme at full load, T
Programme time of the standard
Weighted programme time of the standard cotton programme at full and partial load (T
Condensation efficiency class
Average condensation efficiency of the standard cotton programme at full load, C
Average condensation efficiency of the standard cotton programme at partial load, C
Weighted condensation efficiency of the standard cotton programme at full load and partial load, C
Sound power level for the standard cotton programme at full load
Built-in
(3)
cotton programme at partial load, T
(4)
(min)
dry
(min)
dry1/2
(5)
(W)
O
(W)
L
)
t
dry
dry1/2
t
Air Vented
Condenser
Automatic
Non-automatic
Beko
DRX923W
7188236190
9.0
-
A++
258,6
-
2,17
1,16
0,50
1,00
30
209
119
158
B
81%
81%
81%
65
-
: Yes - : No
(1) Scale from A+++ (most efficient) to D (least efficient)
(2) Energy consumption based on 160 drying cycles of the standard cotton programme at full and partial load, and the consumption of
the low-power modes. Actual energy consumption per cycle will depend on how the appliance is used.
(3) "Cotton cupboard dry programme" used at full and partial load is the standard drying programme to which the information in the
label and the fiche relates, that this programme is suitable for drying normal wet cotton laundry and that it is the most efficient
programme in terms of energy consumption for cotton
(4) Scale from G (lest efficient) to A (most efficient)
(5) Weighted average value — L
expressed in dB(A) re 1 pW
Dryer / User Manual
47
Page 48

 Loading...