

Beko D1 7082 E, D1 7102 E, D1 7081 E, D1 7102 ES, D1 7101 E User Manual
...
Washing Machine
D1 7081 E
D1 7082 E
D1 7101 E
D1 7102 E
D1 7102 ES
D1 7101 EM

Please read this manual first!
Dear Customer,
We hope that your product which has been manufactured in modern facilities and
passed through a strict quality control procedure will give you the best results.
Therefore, we advise you to read through this manual carefully before using your
product and keep it for future reference.
This Operation Manual will…
…help you use your machine in a fast and safe way.
• Please read the Operation Manual before installing and starting your
machine.
• Particularly follow the instructions related to safety.
• Keep this Operating Manual within easy reach. You may need it in the
future.
• Please read all additional documents supplied with this machine.
Please note that this Operating Manual may be applicable for several other models.
Differences between models will be identified in the manual.
Explanation of symbols
Throughout this Operation Manual the following symbols are used:
C Important information or useful hints about usage.
A Warning for hazardous situations with regard to life and property.
B Warning for supply voltage.
This appliance’s packaging material is recyclable. Help recycle it and protect
the environment by dropping it off in the municipal receptacles provided for this
purpose. Your appliance also contains a great amount of recyclable material.
It is marked with this label to indicate the used appliances that should not be
mixed with other waste. This way, the appliance recycling organised by your
manufacturer will be done under the best possible conditions, in compliance with
European Directive 2002/96/EC on Waste Electrical and Electronic Equipment.
Contact your town hall or your retailer for the used appliance collection points
closest to your home. We thank you doing your part to protect the environment.

TABLE OF CONTENTS
1 Your Washing Machine 4
Overview 4
Specifications 5
2 Warnings 6
General Safety 6
First Use 6
Intended use 6
Safety instructions 7
If there are children in your house... 7
3 Installation 8
Removing packaging reinforcement 8
Opening the transportation locks 8
Appropriate installation location 8
Adjusting the feet 8
Connecting to the water supply. 9
Connecting to the drain 9
Electrical connection . 10
Destroying the packaging material 10
Disposing of the old machine 10
4 Initial preparations for
washing 11
Sorting the laundry 11
Preparing clothes for washing 11
Correct load capacity 11
Loading door 12
Detergents and softeners 12
Auxiliary functions 19
Time screen 19
Starting the Program 20
Progress of program. 20
Changing the selections after the
program has started 21
Child-proof lock 21
Ending the program through
canceling 22
Program in rinse hold mode 22
End of program 22
6 Quick instructions for
daily use 23
7 Cleaning and care 25
Detergent drawer 25
The loading door and the drum 25
Body and control panel 25
Inlet water filters 25
Draining any remaining water and
cleaning the pump filter 26
8 Troubleshooting 28
5 Selecting a program and
operating your machine 14
Control panel 14
Display symbols 15
Turning the machine on 15
Program selection 15
Additional programs 16
Special programs 16
Temperature selection 16
Spin Speed selection 17
Program and consumption table 18
1 Your Washing Machine
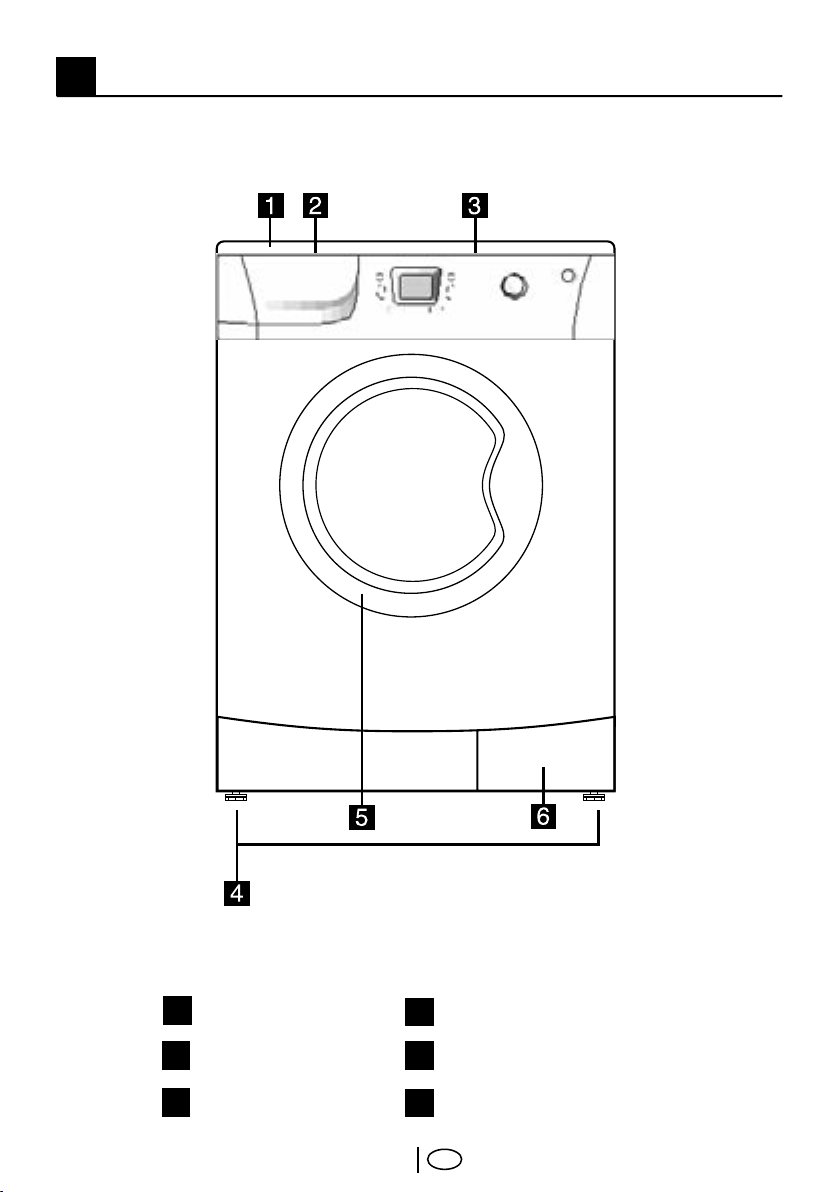
Overview
Figure 1
1
Top Lid
2
Detergent Drawer
3
Control Panel
4
Height-adjustable Feet
5
Loading Door
6
Filter Cap
TR
4
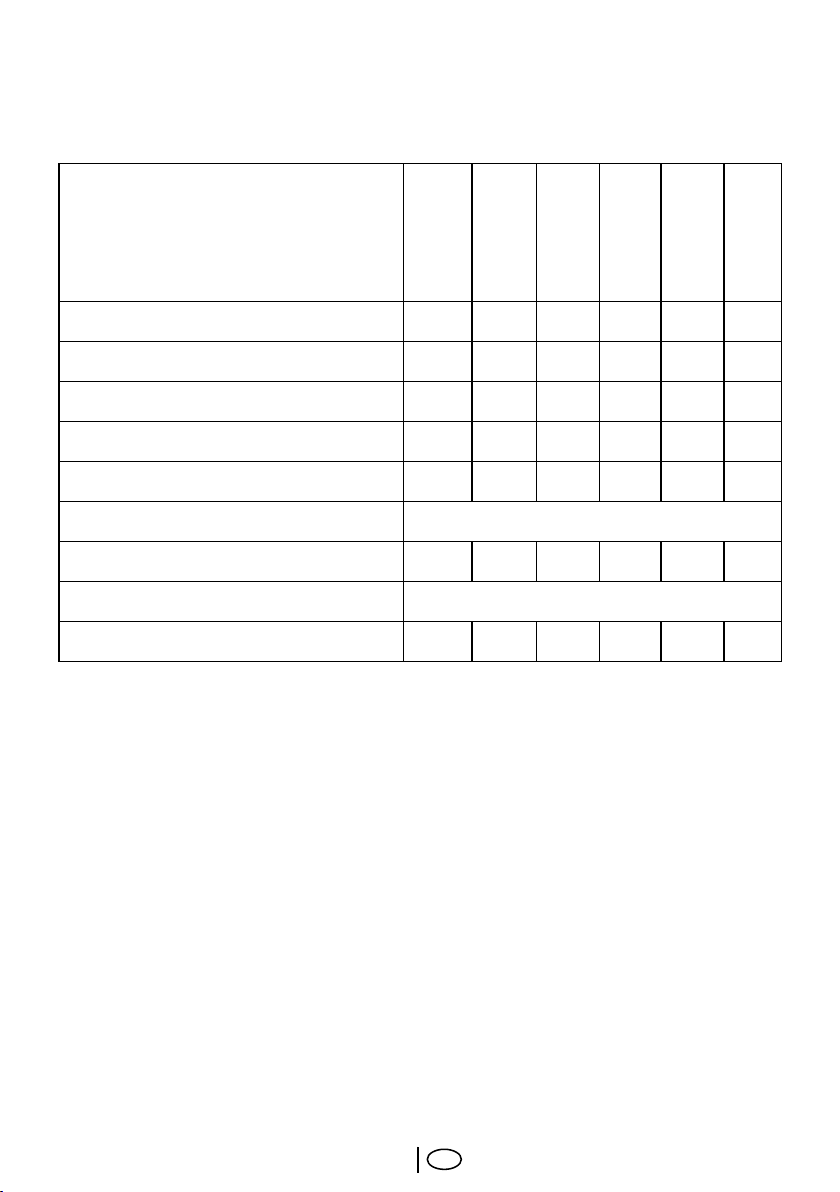
Specifications
Models
Maximum dry laundry capacity (kg)
Height (cm)
Width (cm)
Depth (cm)
Net Weight (kg)
Electricity (V/Hz.)
Total Current (A)
Total Power (W)
Spinning cycle (rpm max.)
D1 7081 E
7 7 7 7 7 7
84 84 84 84 84 84
60 60 60 60 60 60
61 61 61 61 61 61
75 75 75 75 75 75
10 10 10 10 10 10
800 800 1000 1000 1000 1000
D1 7082 E
220-240 V / 50hz
D1 7101 E
2000-2350
D1 7102 E
D1 7102 ES
D1 7101 EM
Specifications of this appliance may change without notice to improve the quality of
the product. Figures in this manual are schematic and may not match your product
exactly.
Values stated on the machine labels or in the documentation accompanying it are
obtained in laboratory in accordance with the relevant standards. Depending on
operational and environmental conditions of the appliance, values may vary.
TR
5

2 Warnings
Please read the following information.
Otherwise, there may be the risk of
personal injury or material damage.
Moreover, any warranty and reliability
commitment will become void.
General Safety
• Never place your machine on a
carpet covered floor. Otherwise,
lack of airflow from below of your
machine may cause electrical
parts to overheat. This may cause
problems with your washing
machine.
• If the power cable or mains plug is
damaged you must call Authorized
Service for repair.
• Check water hoses for wear. Do
not use old/used water inlet hoses.
These may cause stains on your
laundry.
• Fit the drain hose into the discharge
housing securely to prevent any
water leakage and to allow machine
to take in and discharge water as
required. It is very important that the
water intake and drain hoses are not
folded, squeezed, or broken when
the appliance is pushed into place
after it is installed or cleaned.
• Your washing machine is designed
to continue operating in the event
of a power interruption. You cannot
cancel any program by pressing
the “On/Off button.” Your machine
will not resume its program when
the power restores. Press the
“Start/Pause/Cancel” button for
3 seconds to cancel the program
(See, Canceling a Program)
• There may be some water in your
machine when you receive it. This is
from the quality control process and
is normal. It is not harmful to your
machine.
• Some problems you may encounter
may be caused by the infrastructure.
Press “Start/Pause/Cancel” button
for 3 seconds to cancel the program
set in your machine before calling
the authorized service.
First Use
• To prepare your machine for
washing, carry out your first washing
process without loading your
machine and with detergent under
“Cottons 90°C” program.
• Ensure that the cold and hot water
connections are made correctly
when installing your machine.
Otherwise, your laundry may come
out hot at the end of the washing
process and may wear out.
• If the current fuse or circuit breaker
is less than 16 Amperes, please
have a qualified electrician install a
16 Ampere fuse or circuit breaker.
• While using with or without a
transformer, do not neglect to have
the grounding installation laid by a
qualified electrician. Our company
shall not be liable for any damages
that may arise when the machine is
used on a line without grounding.
• To make your machine ready for
use, please be sure that the tap
water supply and water drainage
systems are appropriate before
calling the authorized service. If they
are not, call a qualified plumber to
have any necessary arrangements
carried out.
Intended use
• This product has been designed for
home use.
• The appliance may only be used for
washing and rinsing of textiles that
are marked accordingly.
• Only detergents, softeners and
supplements suitable for washing
machines may be used.
• Observe the care instructions
labeled on textile products and
any other instructions given by
TR
6

companies that produce detergents
for your machine.
Safety instructions
• This appliance must be connected
to an earthed outlet protected by a
fuse of suitable capacity.
• The supply and draining hoses must
always be securely fastened and
remain in an undamaged state.
• Fit the draining hose to a washbasin
or bathtub securely before starting
up your machine. There may be a
risk of being scalded due to high
washing temperatures!
• Never open the loading door or
remove the filter while there is still
water in the drum. Otherwise, there
may be the risk of flooding and
possible injury due to the hot water.
• Never force to open the locked
loading door! The loading door will
be ready to open just a few minutes
after the washing cycle comes to an
end.
• Unplug the machine when it is not in
use.
• Never wash down the appliance
with a water hose! There is the risk
of electric shock! Always disconnect
from the mains by unplugging before
cleaning.
• Never touch the plug with wet
hands. Never unplug by pulling
on the cable, always pull out from
the plug only. Do not operate the
machine if the power cord or plug is
damaged.
• Never attempt to repair the machine
yourself. Otherwise, you may be
putting yours and other’s lives in
danger.
• For malfunctions that cannot
be solved by information in the
operating manual:
Turn off the machine, unplug it, turn
off the water tap and contact an
authorized service agent.
If there are children in your house...
• Electrical appliances may be
dangerous for the children. Keep
children away from the machine
when it is operating. Do not let them
tamper with the machine.
• Close the loading door when you
leave the area where the machine is
located.
• Store all detergents in a safe place
out of reach of the children.
TR
7
3 Installation
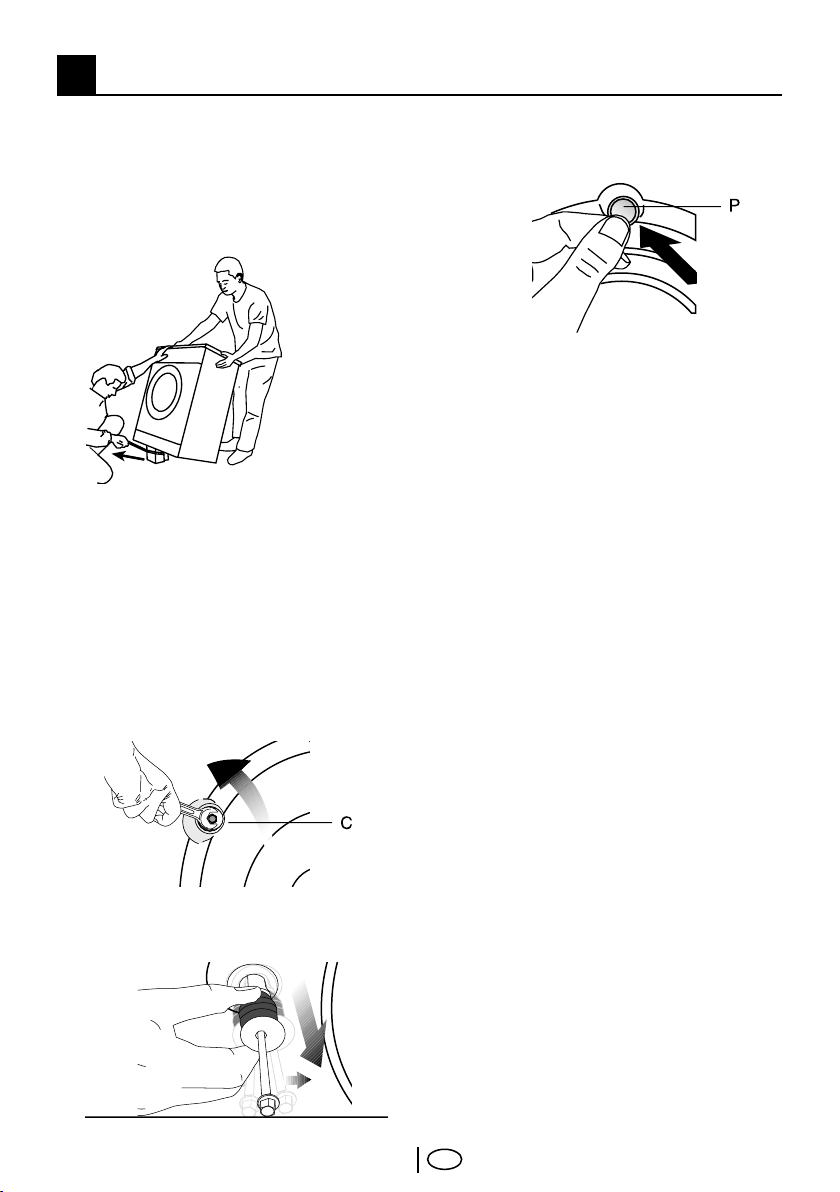
Removing packaging reinforcement
Tilt the machine to remove the
packaging reinforcement. Remove the
packaging reinforcement by pulling the
ribbon.
Opening the transportation locks
C Transportation safety bolts must
be removed before operating the
washing machine! Otherwise, the
machine will be damaged!
1. Loosen all the bolts with a spanner
until they rotate freely (“C”)
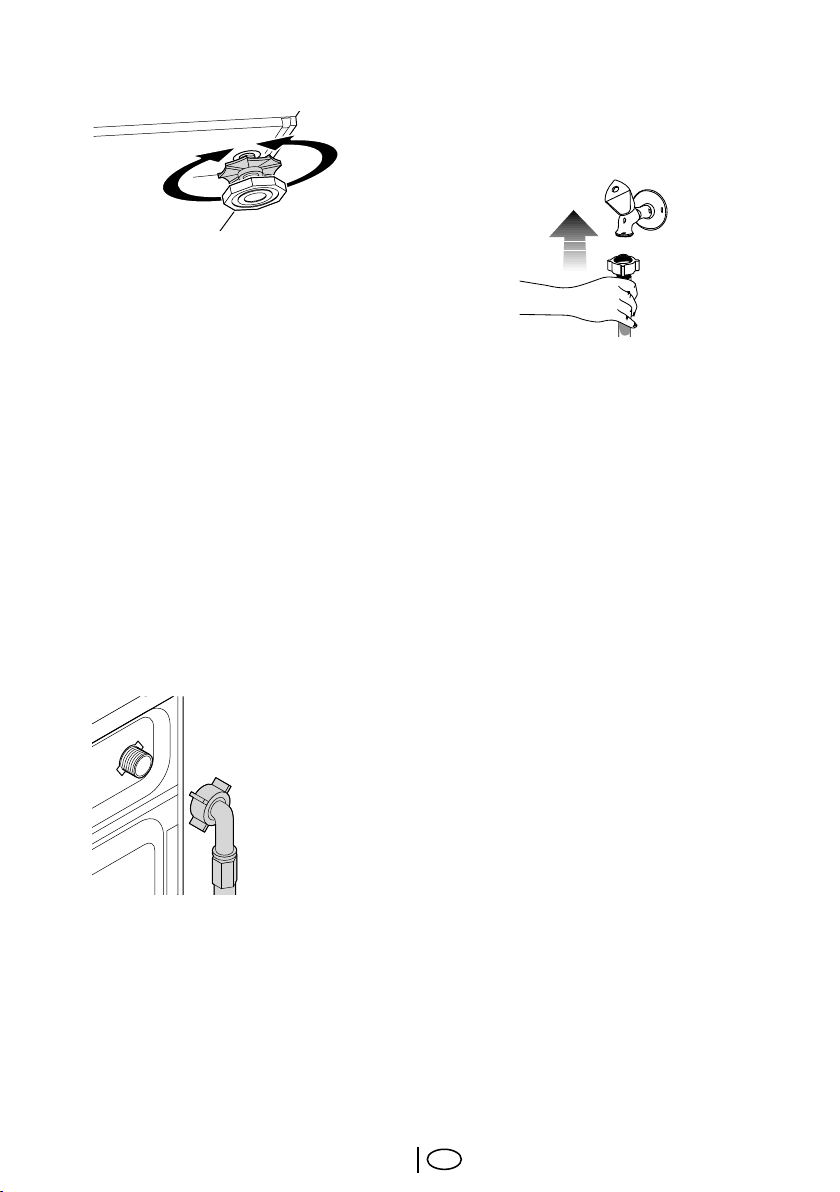
2. Remove transportation safety bolts
by turning them gently.
3. Fit the covers (supplied in the bag
with the Operation Manual) into the
holes on the rear panel. (“P”)
C Keep the transportation safety
bolts in a safe place to reuse when
the washing machine needs to be
moved again in the future.
C Never move the appliance without
the transportation safety bolts
properly fixed in place!
Appropriate installation location
Install the appliance in environments
which have no risk of freezing, in a
stable and level position.
C The floor must be capable of
carrying the load on it!
C If the washing machine and a drier
are placed on top of each other,
their approximate weight together
may reach 180 kg when they are
full.
Important:
• Do not place the appliance on top of
the power cable.
• Keep at least 1cm distance from the
edges of other furniture.
• Place the machine on a firm surface;
do not position it on a long pile rug
or suchlike surfaces.
Adjusting the feet
C Do not use any tools to loosen the
lock nuts. Otherwise, they can be
damaged.
1. Manually (by hand) loosen the lock
nuts on the feet.
2. Adjust them until the machine
stands level and firmly.
TR
8
3. Important: Tighten all lock nuts up
again.
Connecting to the water supply.
Important:
• The water supply pressure required
to run the machine must be 1-10
bar (0,1 – 10 MPa). (Practically, it
is necessary to have 10 – 80 liters
of water flowing from the tap in
one minute to have your machine
run smoothly.) Attach a pressurereducing valve if the water pressure
is higher.
• Connect the special hoses supplied
with the machine to the water intake
valves on the machine. The hose
bearing the “red” sign (90°C max)
is the hot water inlet and the hose
bearing the “blue” sign (25°C max) is
for the cold water inlet.
to the tap and the elbowed end
must be attached to the machine.
Tighten the nuts of the hose well by
hand; never use wrenches to tighten
the nuts.
• Open the taps completely after
making the hose connection to
check if there is any water leakage
at the connection points. Turn off
the tap and remove the nut in case
of any leakage. Retighten the nut
carefully after checking the seal.
To prevent any water leakage and
any other damage to be caused by
it, keep the taps closed when the
machine is not in use.
• Models with a single water inlet
should not be connected to the
hot water tap. Laundry may be
damaged or the appliance may
switch to protection mode and not
work.
• In order to prevent water leakage
that may occur at the connection
points, there are rubber seals (4
seals for the models with double
water inlet and 2 seals for other
models) attached to the hoses.
These seals should be used at the
tap and machine connection ends of
the hoses. The plain end of the hose
fitted with a filter must be attached
When returning the appliance to its
place after maintenance or cleaning,
care should be taken not to fold,
squeeze or block the hoses.
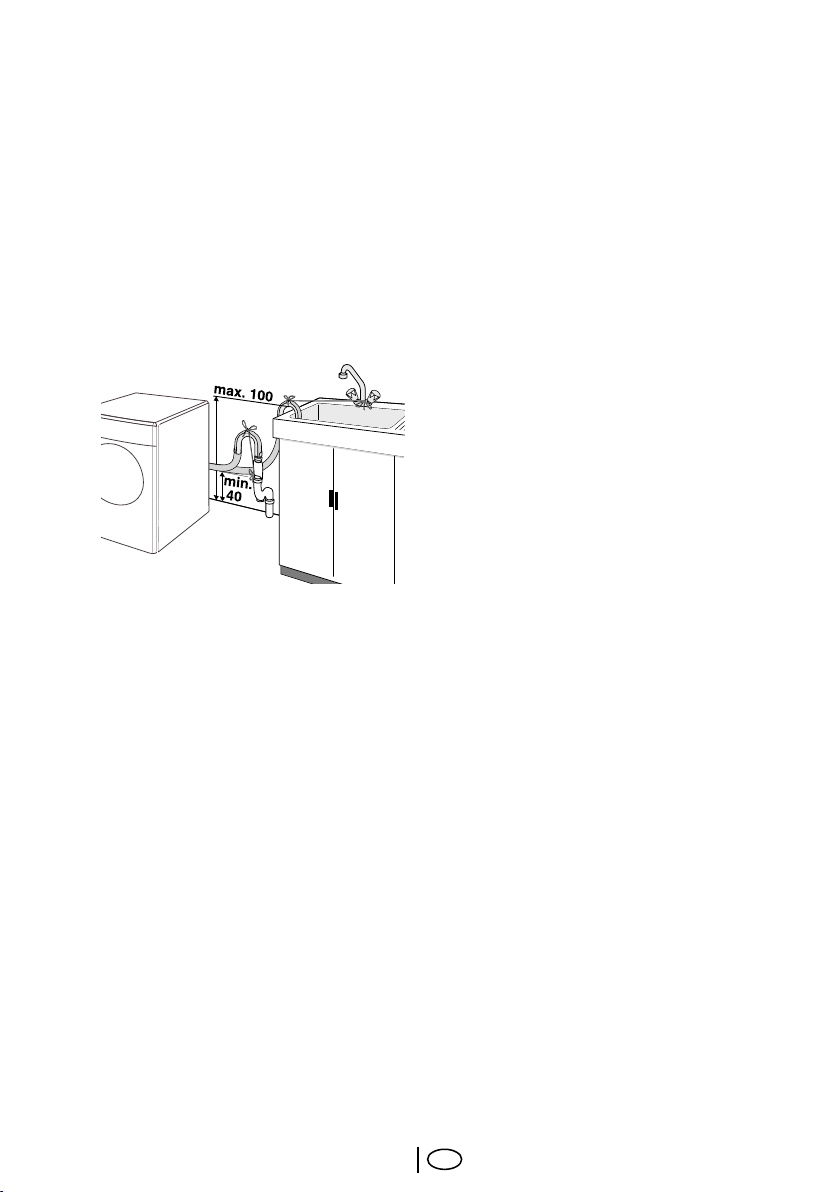
Connecting to the drain
The water discharge hose can be
attached to the edge of a washbasin or
bathtub. The drain hose should be firmly
fitted into the drain as to not get out of
its housing.
Important:
• The end of the drain hose can
be directly connected to the
wastewater drain or to the
washbasin. The fitting must
alwasy be secured in all types of
TR
9
connections. Your house may be
flooded if the hose gets out of its
housing during water discharging.
• The hose should be attached to a
height of at least 40 cm, and 100
cm at most.
• In case the hose is elevated
after laying it on the floor level or
close to the ground (less than
40 cm above the ground), water
discharge becomes more difficult
and the laundry may come out wet.
Therefore, the heights described in
the figure should be followed.
• To prevent dirty water refilling the
machine, and to allow for easy
discharge, the end of the hose
must not be submerged in the drain
water. The end of the hose must be
able to take in air. The hose should
be pushed into the drainage for
more than 15 cm. If it is too long
you may have it shortened.
• The end of the hose should not be
bent, it should not be stepped on
and it must not be folded between
the drain and the machine.
• the length of the hose is too short,
you may add an extension hose
to the original section. The length
of the hose must not be longer
than 3.2 m after coming out of the
machine. To avoid water leakage
failures, the connection between the
extension hose and the drain hose
of the product must be fitted well
with an appropriate clamp as not to
come off and leak.
Electrical connection
Connect the machine to an earthed
outlet protected by a fuse of suitable
capacity.
Important:
• Connection should comply with
national regulations.
• Power cord plug must be within
easy reach after installation.
• The voltage and the allowed fuse
protection are specified in the
section “Technical Specifications”.
• The specified voltage must be equal
to your mains voltage.
• Connection via extension cords or
multi-plugs should not be made.
B A damaged power cable must be
replaced by a qualified electrician.
B The appliance must not be operated
unless it is repaired! There is the risk
of electric shock!
Destroying the packaging material
Packaging material can be dangerous to
children. Keep the packaging materials
out of reach of children or dispose
them by classifying according to
waste directives. Do not dispose them
together with normal domestic wastes.
Packaging materials of your machine are
manufactured from recyclable materials.
Disposing of the old machine
Dispose of your old appliance in an
environmental friendly manner.
• You may refer to your local agent or
solid waste collection center in your
municipality to learn how to dispose
of your machine.
Before disposing of your old washing
machine, cut off the mains plug and
make the door lock unusable.
10
TR
4 Initial preparations for washing
Sorting the laundry
• Sort the laundry according to type
of fabric, color, and degree of soiling
and permissible water temperature.
Always follow the advice on the
garment labels.
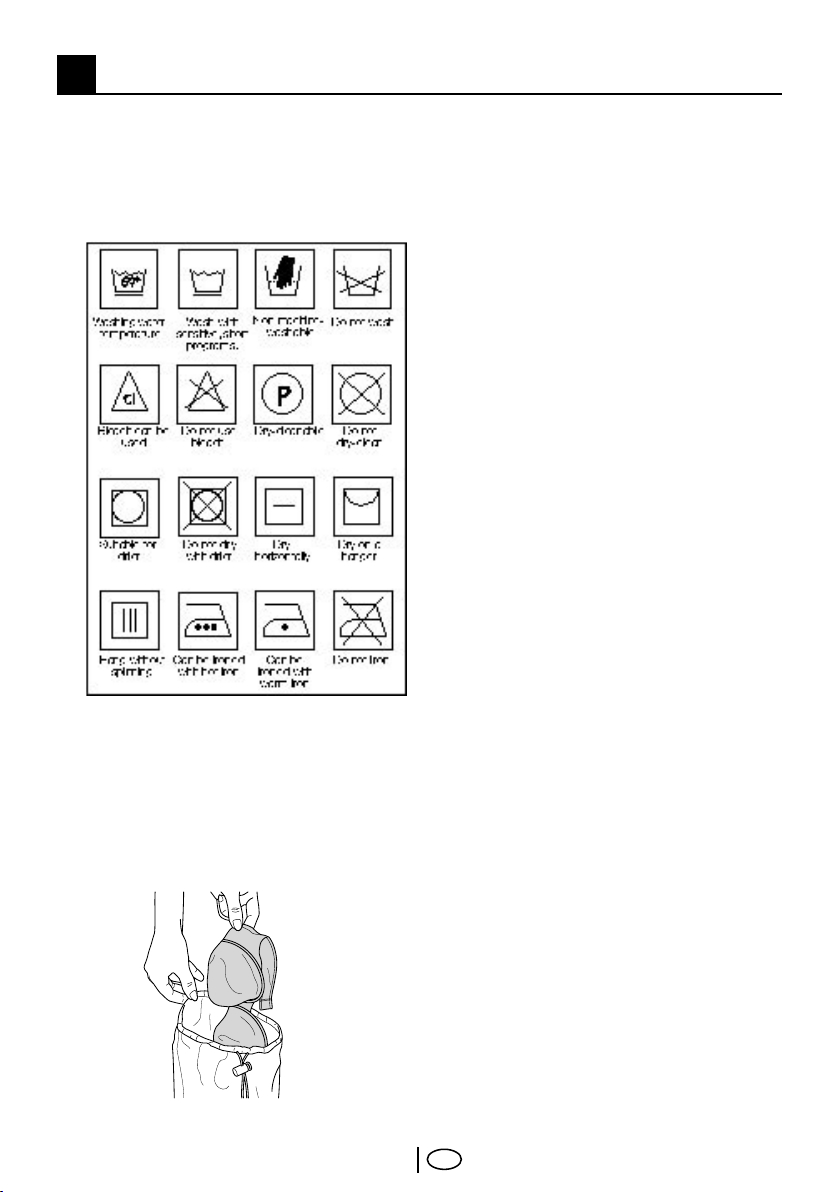
Preparing clothes for washing
Laundry items with metal attachments
such as, bras, belt buckles and metal
buttons will damage the machine.
Remove metal attachments or place the
items in a clothing bag, pillow case, or
something similar.
• Empty pockets and remove all
foreign objects such as coins, pens
and paper clips. If possible, turn
pockets out and brush.
• Place small items like infants’
socks and nylon stockings, etc.
in a laundry bag, pillow case or
something similar. This will also save
your laundry from getting lost.
• Place curtains in the machine with
care. Remove curtain rails and
pullers.
• Fasten zippers, sew loose buttons
and mend rips and tears.
• Wash “machine washable” or “hand
washable” labeled products only
with an appropriate program.
• Do not wash colors and whites
together. New, dark colored cottons
may release a lot of dye. Wash them
separately.
• Tough stains must be treated
properly before washing. If you are
not sure, check with a dry cleaner.
• Use only dyes/color changers and
lime removers suitable for machine
wash. Always follow the instructions
on the packaging.
• Wash trousers and delicate clothes
turned inside out.
• Keep laundry items made of Angora
wool in the freezer for a few hours
before washing. This will reduce
pilling.
Correct load capacity
• The maximum load capacity
depends on the type of laundry, the
degree of soiling and the washing
program you wish to use.
C The machine adjusts the amount of
water according to the amount of
laundry placed inside.
C Please follow the information in the
“Program Selection Table”. Washing
results will degrade when the
machine is overloaded.
11
TR
 Loading...