

Page 1
BEKO plc
Beko House
Caxton Way
Watford
Hertfordshire
WD18 8UF
Tel: 01923 654650
Fax: 01923 819653
e-mail: [email protected]
website: www.beko.co.uk
Printed in Turkey
Part no: 48 1713 00 01
Revision no: 1
CSA4706FF
CSA4706FFX
Page 2
2
Performance Model
CSA4706FF / CSA4706FFX
Energy efficiency class A
Energy consumption Kwh/year 340
Net storage volumes:
fresh food litres (cu.ft.) 162 (5.7)
frozen food litres (cu.ft.) 96 (3.4)
Total litres (cu.ft.) 258 (9.1)
Frozen food compartment rating 4 star
Conservation time from failure 11 hours
Freezing capacity kg (lbs) 6 (13)
Climate class SN
Operating noise level dB(A) 43
Operating temperature range +2 to +32 degrees C
Because we continually strive to improve our products, we may
change our specifications and designs without prior notice.
Important
Do not connect your appliance to the electricity supply until all packing
and transit protectors have been removed.
Leave to stand for at least 4 hours before switching on to allow the system
to settle if transported horizontally.
This appliance must only be used for its intended purpose, ie the storing
and freezing of edible foodstuff.
We do not recommend use of this appliance in an unheated, cold room
e.g. garage, conservatory, annex, shed, out-house, etc., see ‘Location’.
To obtain the best possible performance and trouble free operation from
your appliance, it is very important to carefully read these instructions.
On delivery, check to make sure that the product is not damaged and that
all the parts and accessories are in perfect condition.
We do not recommend the use of extension leads and multi-way adapters.
Failure to observe these instructions may invalidate your right to free service
during the guarantee period. BEKO plc declines to accept any liability should
the instructions not be followed.
Do not dispose of the appliance on a fire. At BEKO, the care and protection
of our environment is an ongoing commitment. This appliance which is
among the latest range introduced is particularly environmentally. Your
appliance contains non CFC / HFC natural substances in the cooling system
(Called R600a) and in the insulation (Called cyclopentane) which are
potentially flammable if exposed to fire. Therefore, take care not to damage,
the cooling circuit / pipes of the appliance in transportation and in use.
In case of a damage do not expose the appliance to fire, potential ignition
source and immediately ventilate the room where the appliance is situated.
We suggest you contact your local authority for disposal information and
facilities available.
Do not use mechanical devices or other means to accelerate the defrosting
process, other than those recommended by the manufacturer.
Do not damage the refrigerant circuit.
Do not use electrical appliances inside the food storage compartments of
the appliance, unless they are of the type recommended by the manufacturer.
We suggest you keep these instructions in a safe place for easy reference.
first of all !
specification
Congratulations on your choice of a Beko quality Combi fridge/freezer,
which has been designed to give you service for many years.
•
•
•
•
•
•
•
•
•
•
•
•
•
•
Page 3
contents
3
Electrical 4
Transportation 5
Location 5
Repositioning the doors 6-7
Installation 6
Temperature display & adjustment 8
Switching on for the first time 9
Short term storage in the fridge compartment 10
Long term storage in the freezer compartment 11
Defrosting 12
Energy saving tips 12
Care & cleaning 13
Stainless steel door cleaning instructions 14
Internal light 15
Trouble shooting 15
Disposal 15
Guarantee 16
Service under guarantee 17
Service out of guarantee 17
Page 4
Electrical requirements
Before you insert the plug into the wall socket make sure that the
voltage and the frequency shown in the rating label, which is on the
left hand side of the fridge inner liner corresponds to your electricity
supply.
We recommend that this appliance be connected to the mains supply
via a suitable switched and fused socket in a readily accessible position.
Should the mains lead of the appliance become damaged or need
replacing at any time, it must be replaced by a special purpose made
mains lead which can only be obtained from a Beko Authorized Service
Agent.
Warning
This appliance must be earthed
If the fitted moulded plug is not suitable for your socket, then the
plug should be cut off and an appropriate plug fitted.
Destroy the old plug, which is cut off as a plug with a bared cord could
cause a shock hazard if inserted into a socket elsewhere in the house.
The moulded plug on this appliance incorporates a 13A fuse. Should
the fuse need to be replaced an ASTA approved BS1362 fuse of the
same rating must be used. Do not forget to refit the fuse cover. In the
event of losing the fuse cover, the plug must not be used until a
replacement fuse cover has been fitted. Colour of the replacement fuse
cover must be the same colour as that visible on the pin face of the
plug. Fuse covers are available from any good electrical store.
Important
Fitting a different plug
As the colours of the wires in the mains lead of this appliance may
not correspond with the coloured markings identifying the terminals
on your plug, proceed as follows:
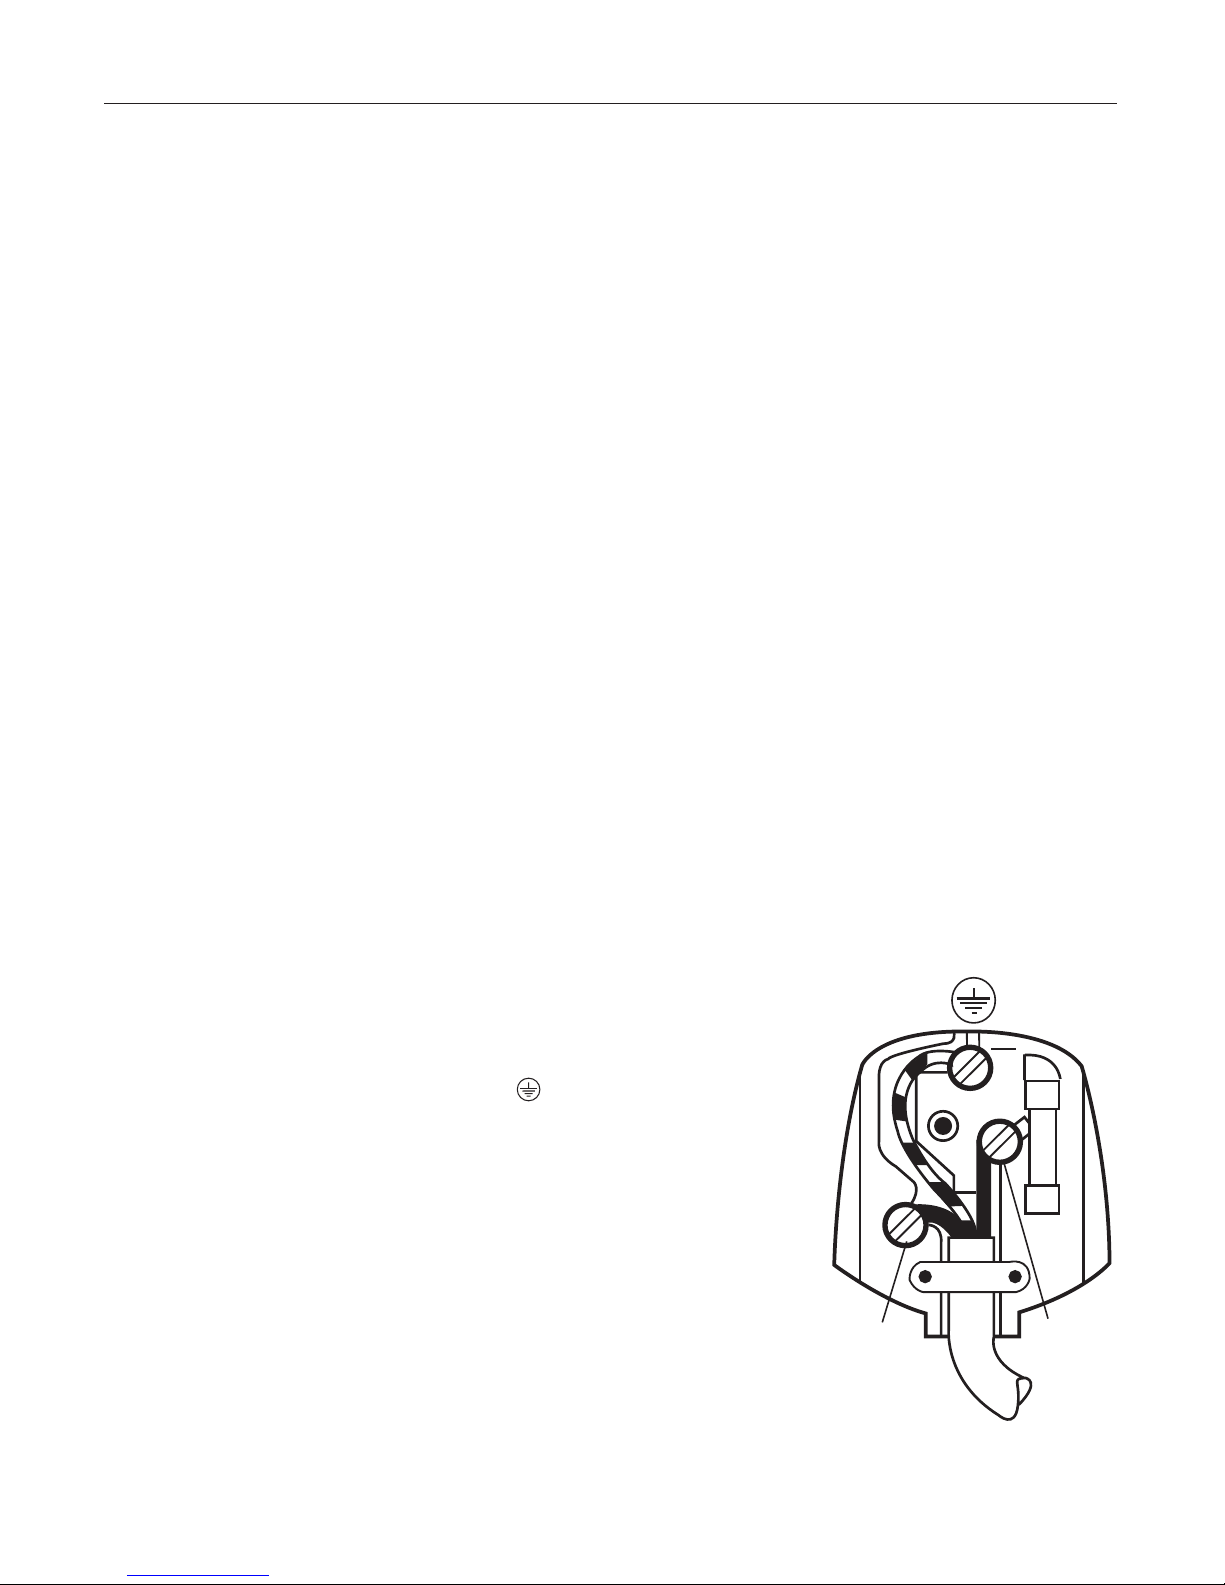
1 Connect the green - yellow or green (earth) wire to the terminal in
the plug marked ‘E’ or with the symbol
or coloured green and
yellow or green.
2 Connect the blue (neutral) wire to the terminal in the plug marked
‘N’ or coloured black.
3 Connect the brown (live) wire to the terminal in the plug marked ‘L’
or coloured red.
With the alternative plugs a 13A fuse must be fitted either in the
plug or adaptor or in the main fuse box. If in doubt contact a qualified
electrician.
electrical
4
N L
Blue or
black
Brown or
red
Green and yellow
or green
Page 5

transportation
5
location
The appliance should be transported only in a vertical upright
position. The packing as supplied must be intact during transportation.
If during the course of transport the appliance has to be
transported horizontally, the product must only be laid on its
right hand side (when facing the door front) and it must not be
operated for at least 4 hours to allow the system to settle after
the appliance is brought back to upright position.
Failure to comply with the instructions could result in damage
occurring to the appliance. The manufacturer will not be held
responsible if these instructions are disregarded.
The appliance must be protected against rain, moisture and
other atmospheric influences.
When positioning your appliance take care not to damage your
flooring, pipes, wall coverings etc. Do not move the appliance by
pulling by the door or handle.
Empty any water in the drain tray before moving. See section
‘Defrosting’ and ‘Care & cleaning’ for further information.
Make sure that the defrost water pipe at the back of the product
is fixed to the plastic evaporating pan on the top of the compressor,
to avoid defrost water spillage on the floor.
Important Care must be taken when carrying the appliance
to avoid touching the bottom of the condenser metal
support/pipework at the back of the appliance as you might injure
your fingers and hands or damage your product.
Important Make sure that mains cable is not caught under the
appliance during and after carrying/moving the appliance, to avoid
the mains cable becoming cut or damaged.
Do not attempt to sit or stand on top of your appliance. You
could injure yourself and damage the appliance.
BEKO plc declines to accept any liability should the instructions not
be followed.
Do not put your appliance in a cold room where the temperature
is likely to go below +2 degrees C (36 degrees F) during night time
and/or especially in winter.
This appliance has been designed to operate in room (ambient)
temperatures between +2 and +32 degrees C (36 and 90 degrees
F). Therefore if it is installed in an unheated/cold room (eg conservatory,
annex, shed, garage, etc.) then it will not operate causing the freezer
compartment to run warmer and as a result the storage time of
frozen food may be reduced.
Do not place the appliance near cookers, radiators, or in direct
sunlight as this will cause it to work harder. If installed next to a
source of heat, maintain the following minimum side clearances:
From cookers 50mm (2")
From radiators 300mm (12")
Make sure that sufficient room is provided around the appliance to
ensure free air circulation. We recommend 20mm ( ") clearance
on both sides. The clearance at the back is ensured when the wall
spacers are fitted, see ‘Installation’.
•
•
•
•
•
•
•
•
•
•
•
•
•
4
/
5
Page 6
6
installation
Adjustable feet
1
2
3
4
5
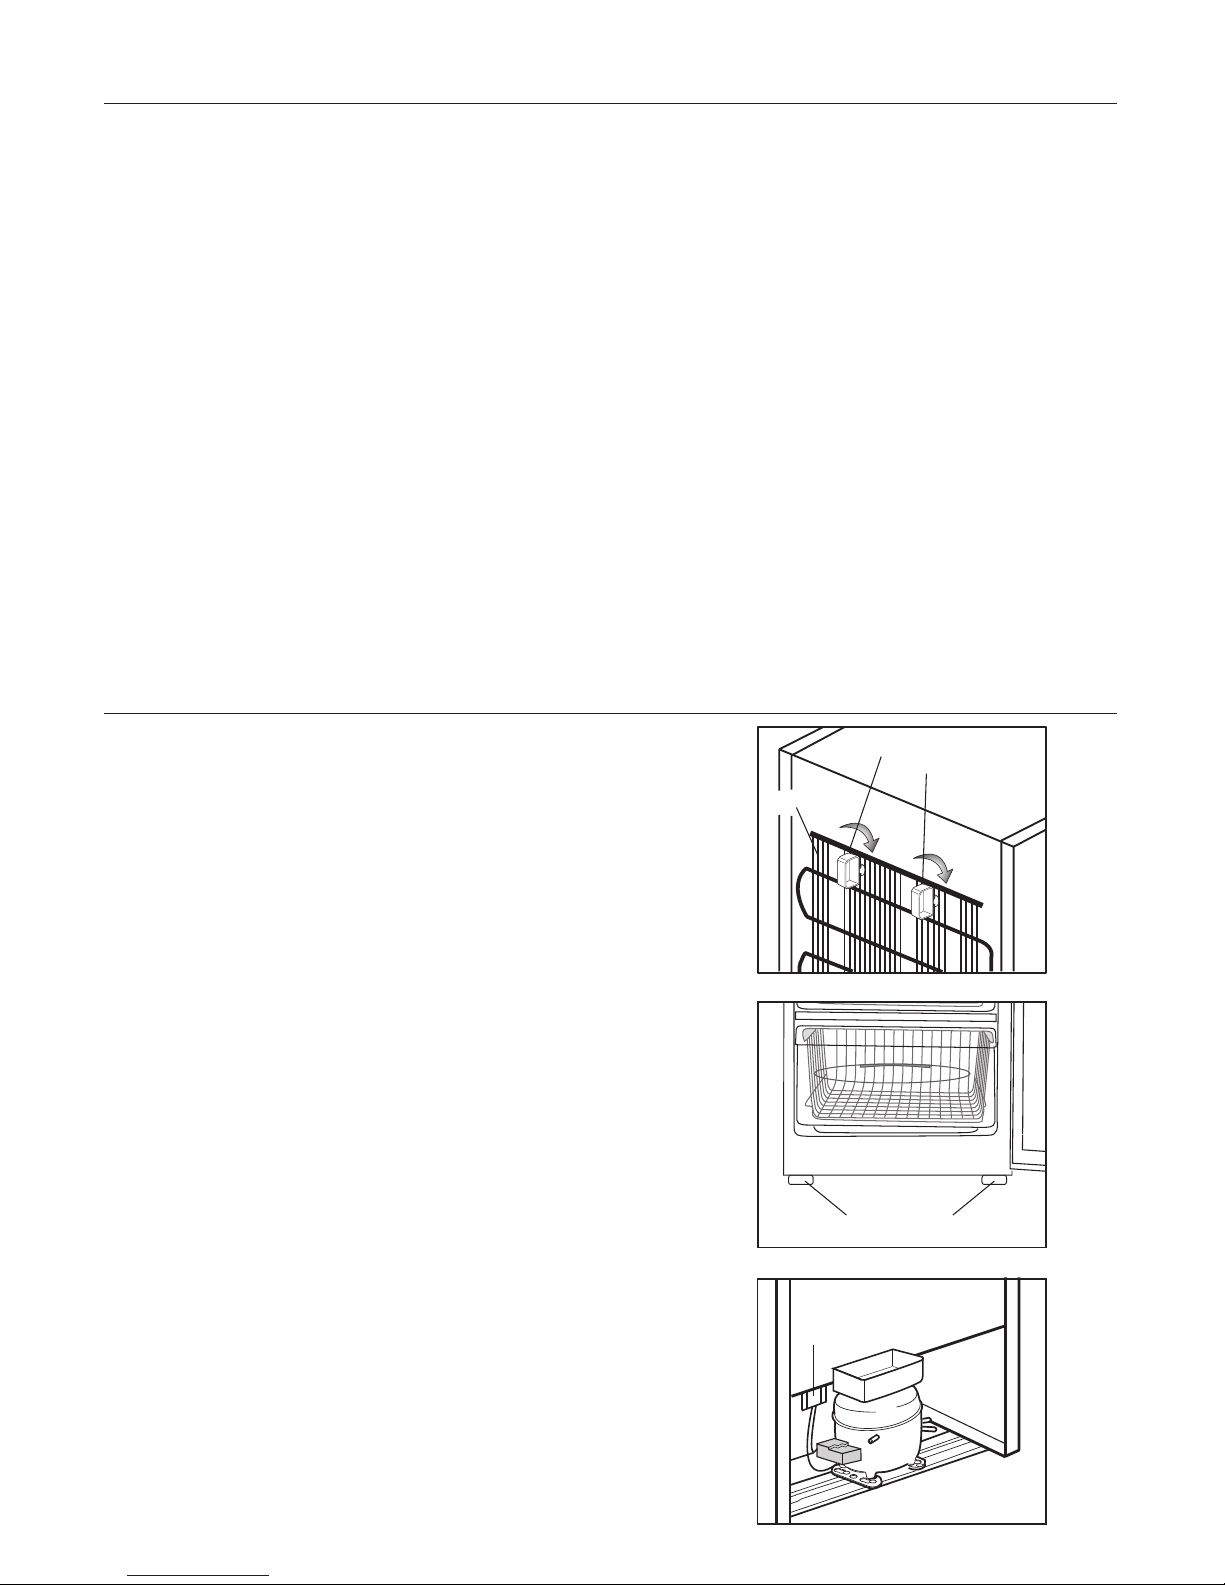
Fit the two plastic wall spacers supplied with the appliance,
rotating turn to the condenser at the back of the appliance.
Locate the appliance on a smooth surface.
To ensure it is standing upright adjust the two front feet by
turning clockwise or anti-clockwise, until it is in firm contact
with the floor. Correct adjustment of feet avoids excessive
vibration and noise.
A special receptacle is supplied to store the mains plug during
transit. The receptacle is fixed at the back of the cabinet on the
side of the compressor. Gently remove the plug from the
receptacle. Never pull the mains cord, you may damage the
appliance. In case of transportation, ensure you locate the
plug in the receptacle provided to avoid transit damage.
The space in the room where the appliance is installed must
not be smaller than 10 cubic metres.
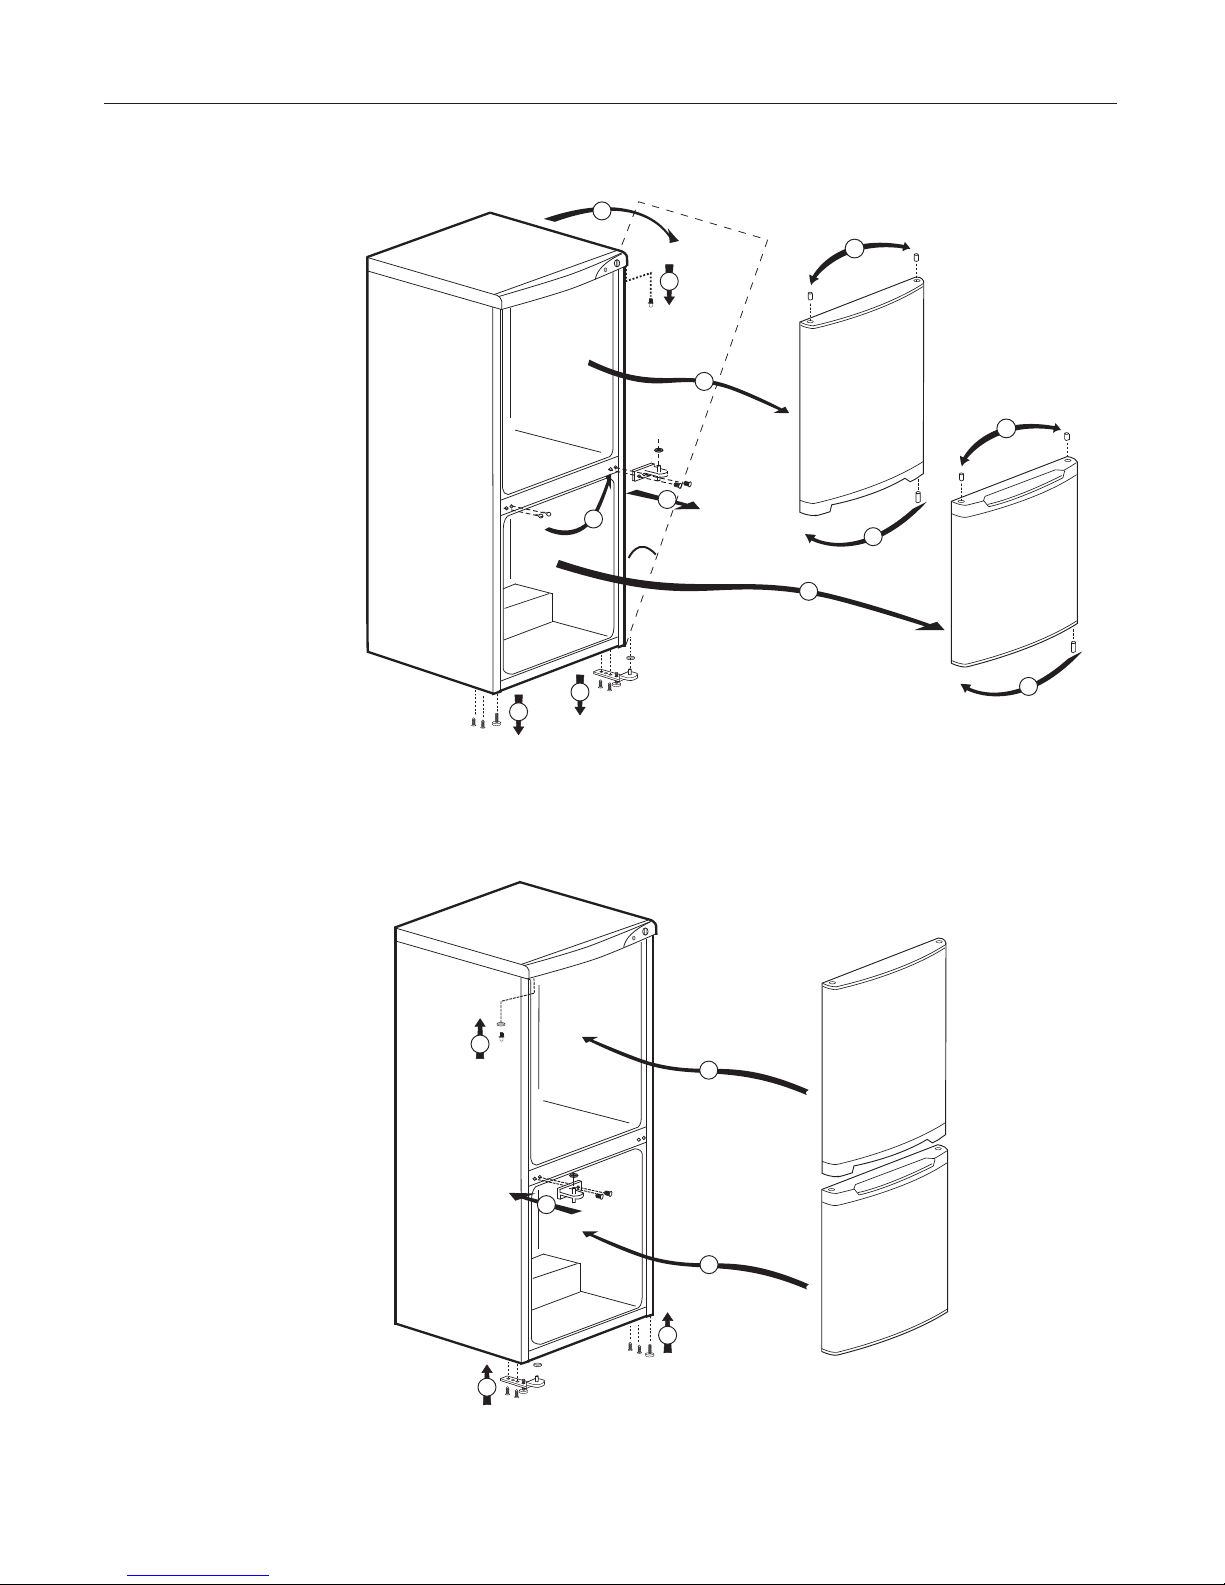
repositioning the doors (see diagram on the opposite page)
Reposition the plugs on the other side.
Remove the top hinge pin and washer
underneath the front top trim.
Refit the top hinge pin and washer on the
other side.
Refit the fridge compartment door.
Locate middle hinge in door and fit to the
cabinet.
Refit the freezer compartment door.
Refit the bottom hinge on the opposite side.
Refit the adjustable feet and screws.
Carefully stand the appliance upright.
Adjust the feet if necessary.
Replace all loose items and fittings.
Wait for at least 4 hours to allow the system
to settle before switching on.
Spare plastic hinge bushing supplied with the
appliance are for your future use.
9
10
11
12
13
14
15
16
17
18
19
20
Switch off at the socket outlet and pull out
the mains plug.
Remove all food, loose items and fittings.
Carefully lay the appliance on its right hand
side. (You may need somebody to help
you.) Take care not to damage the appliance
by laying on some protective material (e.g.
its original packaging). Make sure that you
lay the appliance on its right hand side,
otherwise compressor oil may block the
pipes and you may damage the appliance.
Unscrew and remove the adjustable feet and
screws from the bottom of the cabinet.
Unscrew the bottom hinge and screws.
Remove the freezer door from the cabinet.
Unscrew the middle hinge from the cabinet
while holding the fridge compartment door
and remove the door carefully.
Reposition the plugs and door hinge
bushings on the opposite side. Remove plugs
with the tip of a small screwdriver.
1
2
3
4
5
6
7
8
OFF
Min. • Max.
1
/
4
Wall spacers
Condenser
Plug receptacle
Page 7
7
repositioning the doors
13
14
12
16
15
11
7
6
9
7
4
5
10
8
60°
8
8
8
3
Page 8
temperature display &adjustment
8
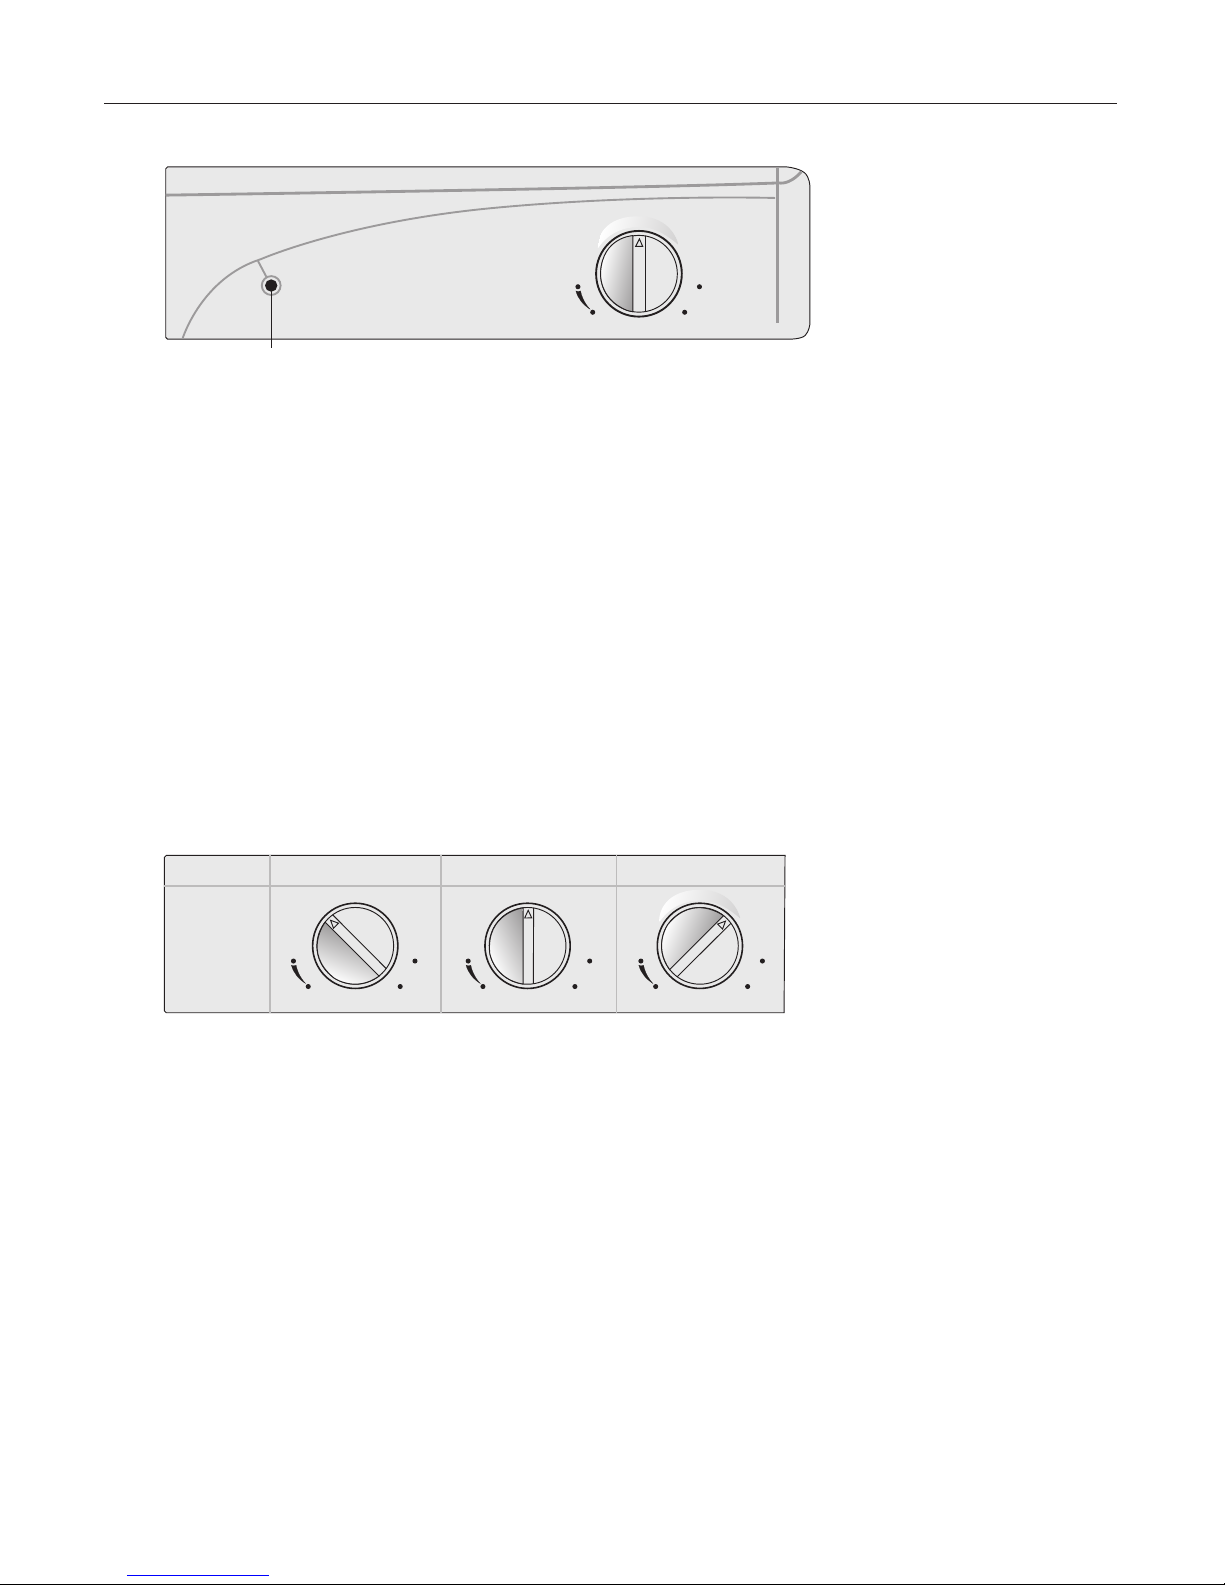
Ambient
temperature
Below 15 °C Between 15 and 20 °C Above 20 °C
Thermostat
setting
MIN MAX
OFF
MIN MAX
OFF
MIN MAX
OFF
The operating temperature is controlled by the thermostat
knob. Settings may be made from MIN to MAX - the coldest.
When the appliance is switched on for the first time, the
thermostat should be adjusted so that after 24 hours, the average
fridge temperature is no higher than +5∞C (+41∞F).
Do this by setting the thermostat half way between the
minimum and maximum setting and monitor to obtain the desired
temperature. Some sections of the fridge may be cooler or
warmer (such as the salad crisper and the top part of the cabinet)
which is quite normal.
The normal storage temperature of the freezer should be -18∞C
(0∞F). Lower temperatures may be obtained by adjusting
thermostat knob towards MAX position.
We recommend you set the thermostat as
explained below and monitor to obtain the desired
temperature. E.g. towards max. you will obtain a
colder fridge temperature and vice versa.
We recommend that you monitor the temperature you
use an accurate thermometer to ensure that the storage
compartments are kept to the desired temperature. Remember
you must take your reading very quickly since the thermometer
temperature will rise very rapidly after you remove it from the
freezer. Please remember each time the door is opened cold air
escapes and the internal temperature rises. Therefore never leave
the door open and ensure it is closed immediately after food is
put in or removed.
In case of a temporary ice build up in the fridge compartment,
reduce the thermostat setting to minimum, monitoring at the same
time that the fridge temperature is maximum +5 degrees C
[41 degrees F]. Once the ice build up disappears and the appliance
starts auto defrosting again as normal, then you may increase the
thermostat setting, if required.
Power indicator light Thermostat knob
POWER
MIN MAX
OFF
Page 9
switching on for the first time
9
Ensure the feet have been adjusted for perfect level.
Ensure the interior is dry and air can circulate freely at the rear.
Ensure the interior is clean as recommended under ‘Care &
cleaning’
Insert the plug in to the wall socket and switch on the electricity
supply.
The green ‘power’ light on the control panel will be on when
the appliance is connected to the mains.
When the door is open the interior light will come on.
You may hear some noise as the compressor and the freezer
fan start up. The liquid and gases may also give rise to noise,
whether the compressor is running or not, which is quite
normal.
“Due to operation of the fan inside the frost free
freezer compartment, overall noise level is slightly
higher in comparison to non-frost free appliances.
This is quite normal and is not a fault.”
Set the thermostat knob half way between MIN and MAX.
Do not load with food immediately. Wait until the
correct storage temperature has been reached. We
recommend that you check the temperature with an accurate
thermometer (see section temperature control and adjustment).
When the freezer reaches the desired temperature the freezer
fan will stop. When the freezer fan is on, the noise will be
louder when the freezer door is opened.
The front edges of the cabinet may feel warm. This is normal.
These areas are designed to be warm to avoid condensation.
Avoid spillage of food particularly small items like
rice, peas, beans through the fan guard as they may
cause the cooling system to block and therefore
operate less efficiently.
1
2
3
4
•
•
•
6
7
8
•
9
Before you start using the appliance check:
Page 10
10
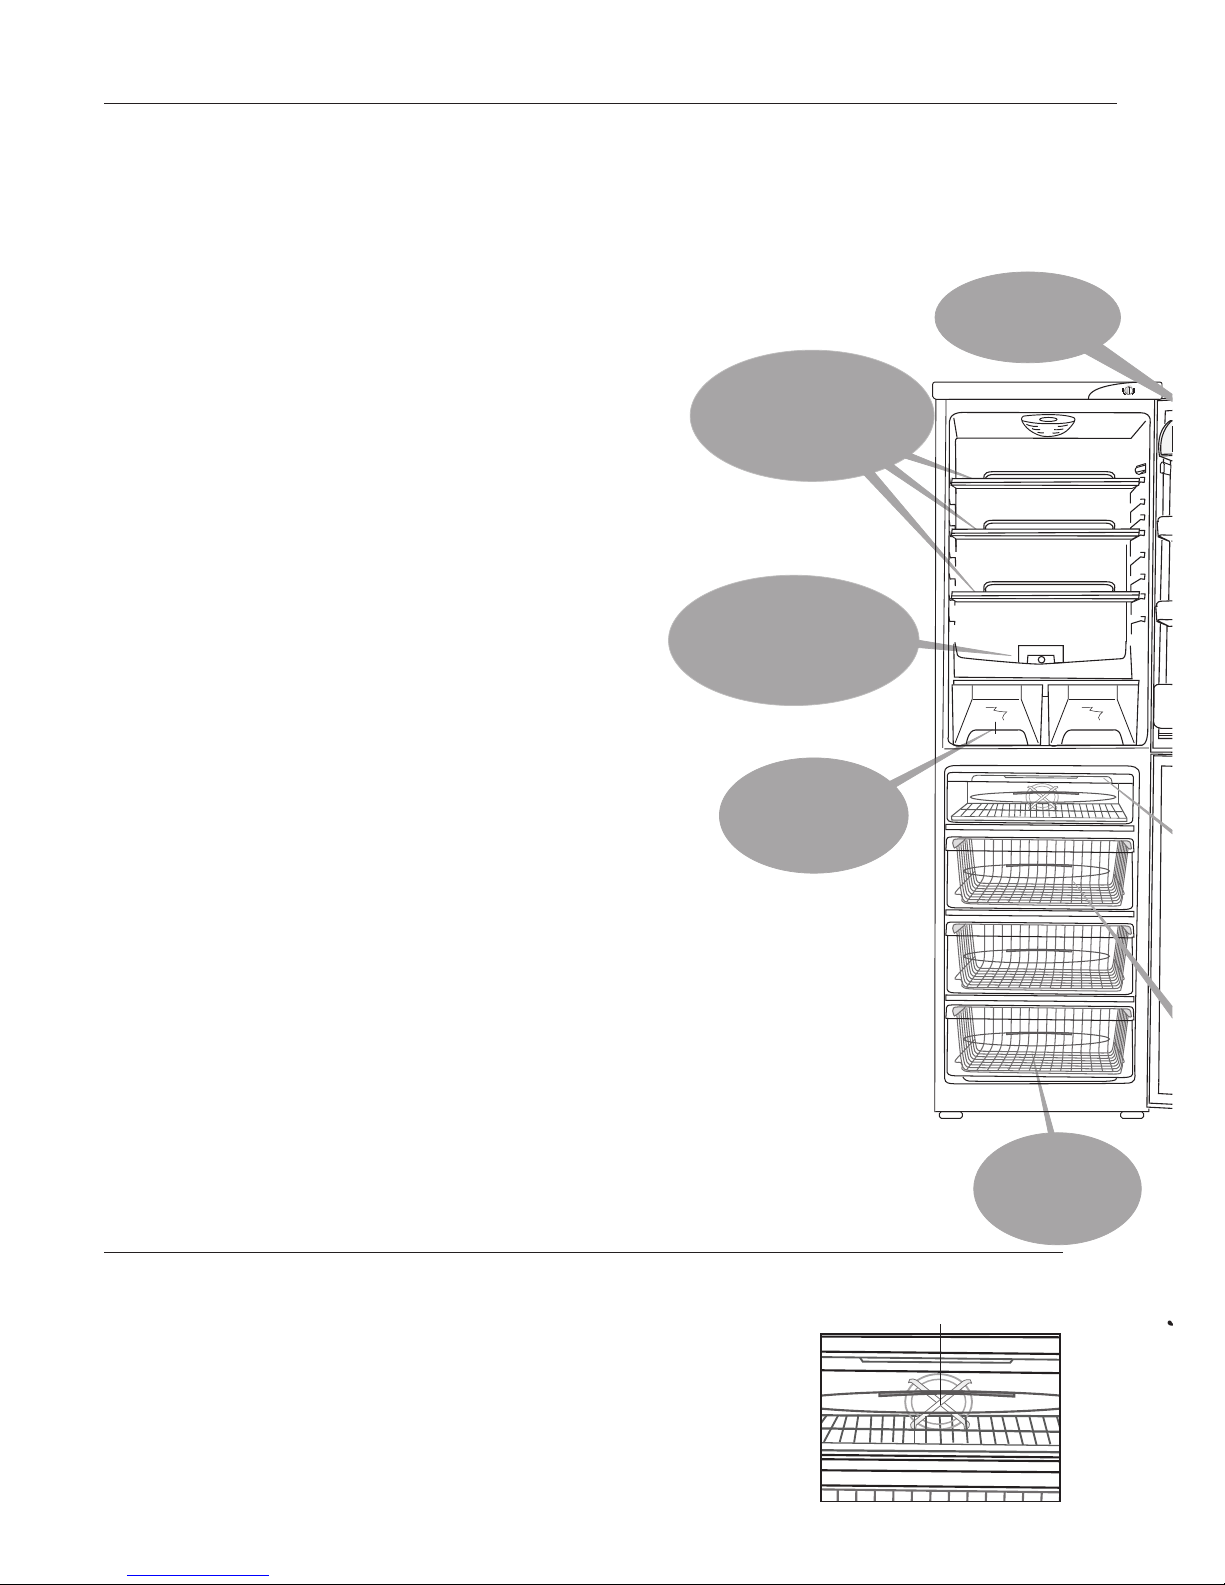
short term storage in the fridge compartment
warnings!
Wrap raw meat and poultry loosely in polythene bags or aluminium foil. This
prevents drying.
Wrap fish and offal in polythene bags and place on the lowest shelf.
Storing fresh food
Dairy
Wrap cheese firstly in greaseproof paper and then in polythene bag
excluding as much air as possible. For best results take out of the fridge
compartment an hour before eating.
Wrap bread well to keep it fresh.
Fruit & vegetables
Take off any unusable leaves on vegetables and wipe off any soil.
Leave lettuce, cabbage, parsley and cauliflower on the stem.
Wrap pineapples, melons, cucumbers, tomatoes and similar produce
in polythene bags as these types of produce may suffer damage if
kept at very low temperatures.
Wrap food, which has a strong odour, or can dry out, in polythene bags,
aluminium foil, or place in an airtight container.
Fridge compartment storage advice
Fruit & vegetables
Don’t store bananas.
Don’t store melon - it can be chilled for short periods as long as it
is wrapped to avoid it flavouring other food.
Wrap food affected by temperatures near 0∞C (pineapples, cucumbers,
tomatoes etc.) in polythene bags.
Meat & poultry
Store raw meat and poultry below cooked food and dairy products.
Do not allow raw meat to come into contact with cooked food to avoid
contamination. For safety, only store raw meat for two to three days.
General
Cooked dishes must be stored in airtight covered containers.
Don’t store cooked and fresh food together in the same container.
Always allow hot food and beverages to cool first.
Leftover canned food should not be stored in the can.
High proof alcohol must be stored upright in tightly closed bottles.
Place chilled cooked food and similar food near the rear of the fridge where
it is coldest.
Keep food for as short a time as possible and adhere to ‘best before’ and ‘use by’ dates.
Don’t let defrosting food or food juices drip onto other food.
The fan inside the freezer compartment circulates cold air. Never insert
any object through the guard. Do not allow children to play with
the freezer fan.
Never store products that contain inflammable propellant gas
(eg dispensers, spray cans etc.) or explosive substances.
Don’t cover the shelves with any protective materials, which may obstruct
air circulation.
Do not allow children to play with the appliance or tamper with the controls.
Do not obstruct the freezer fan guard to ensure that you
obtain the best possible performance from your appliance.
•
•
•
•
•
•
•
•
•
•
•
•
•
•
•
•
•
•
•
•
•
Meat & poultry
Freezer fan
Freezing
and storage
store fresh food
lower down
Lower
storage shelf
Store meet, sausages and
cold cuts on the bottom
shelf
Crisper bins
for fresh fruit and
vegetables
Dairy
Compartments
Butter, cheese
Adjustable
storage shelves
Baked, chilled cooked
food, dairy products,
cans
f
r
i
d
g
e
c
o
m
p
a
r
t
m
e
n
t
f
r
e
e
z
OFF
Min. • Max.
Page 11
11
long term storage in the freezer compartment
Take special care not to mix with fresh food.
The recommendation for storage as stated on the food packaging
must always be followed.
Pre-packed frozen food should be stored in accordance with the food
manufacturer’s instructions for a frozen food storage compartment.
To ensure that the high quality achieved by the food manufacturer and
retailer is maintained:
1 Wrap packets when you buy them.
2 Put packets in the freezer as quickly as possible after purchase.
3 Ensure that contents are labelled and dated.
Do not exceed ‘use by’ and ‘best before’ dates - If there are no
instructions on the packet, refer to the storage life guide on the
inside of the door.
Take special care not to mix with already frozen food.
Always choose high quality fresh food and be sure it is thoroughly clean.
Prepare fresh food in small portions to ensure rapid freezing. Do not
freeze too large a quantity at any one time. The quality is best preserved
when the food is frozen right through to the core as quickly as possible.
Do not exceed the freezing capacity which in a 24 hour period is 6kg
(13lbs).
When freezing the maximum amount, turn the thermostat knob to
maximum.
When freezing average amounts, the thermostat knob can be kept at
medium position.
When freezing small quantities, up to 1/2 kg (1 lb), the thermostat knob
will not need adjusting.
Wrap food in aluminium foil or freezer quality polythene bags.
Wrap fish and offal in polythene bags.
Wrap food which has a strong odour or can dry out, in polythene bags,
aluminium foil, or place in airtight containers.
Make sure all air is excluded from foil wrapping or bags.
Do not leave frozen food at room temperature to thaw; the best way to
defrost food is to put it in the fridge to thaw slowly. Make sure you avoid
defrosting food or food juices drip onto other food.
The freezer compartment is rated and suitable for the freezing
and storage of pre-frozen food.
Don’t freeze filled bottles or sealed cans containing fizzy (carbonated)
drinks as they may burst.
Check contents of the freezer every so often.
Don’t close the freezer door before placing the fast freeze compartment
cover in its place.
Don’t try to keep frozen food which has thawed, it should be eaten within
24 hours or cooked and re-frozen.
If there is a power failure do not open the door. Frozen food should not
be affected if the failure lasts for less than 11 hours. If the failure is longer,
then the food should be checked and either eaten immediately or cooked
and then re-frozen.
Placing warm food into the freezer compartment causes the compressor
to operate continuously until the food is frozen solid. This can temporarily
lead to excessive cooling of the refrigeration compartment.
Do not leave frozen food at room temperature to thaw; the best way to
defrost food is to put it in the fridge to thaw slowly. Make sure you avoid
defrosting food or food juices drip onto other food.
Don’t remove items from the freezer with wet hands.
Don’t give children ice cream and water ices direct from the freezer. The
low temperature may cause ‘freezer burns’ on lips.
Defrost food from the freezer in the fridge compartment.
Products such as flavoured water ices should not be consumed too cold.
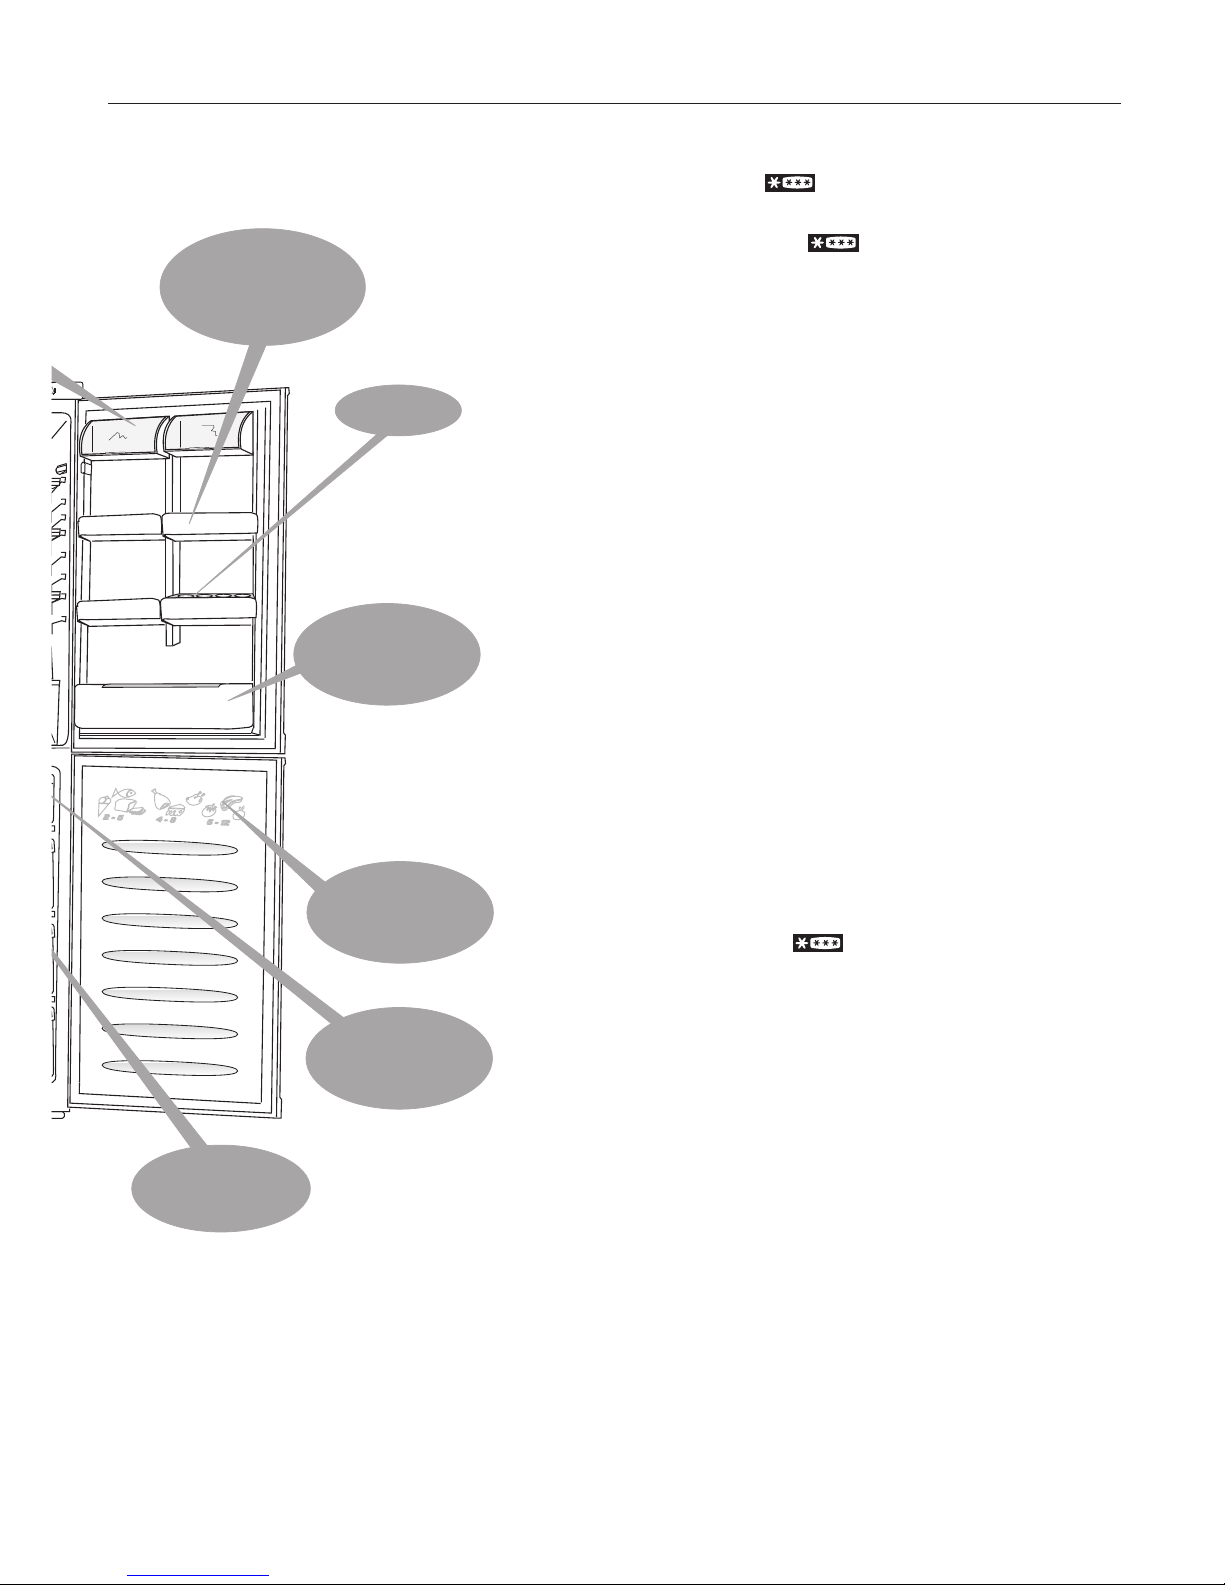
The figures represent the maximum recommended safe storage life of the
foods shown in months.
Freezer compartment storage info/advice
Amounts
Serving
Storing pre-frozen food
Freezing fresh food
•
•
•
•
•
•
•
•
•
•
•
•
•
•
•
•
•
Preparation
Frozen food symbols and freezer calendar
•
•
•
•
•
•
•
•
•
•
•
•
Fast Freeze
Compartment
at the top
Door Shelves
Small bottles,
cans, tubes
Egg Tray
Ice bank
Make end store ice
cubes
Food symbols
Safe storage life in
months
Bottle shelf
With gripper
Tall large bottles
r
t
m
e
n
t
f
r
e
e
z
e
r
c
o
m
p
a
r
t
m
e
n
t
• Max.
Page 12
12
defrosting
Fridge compartment
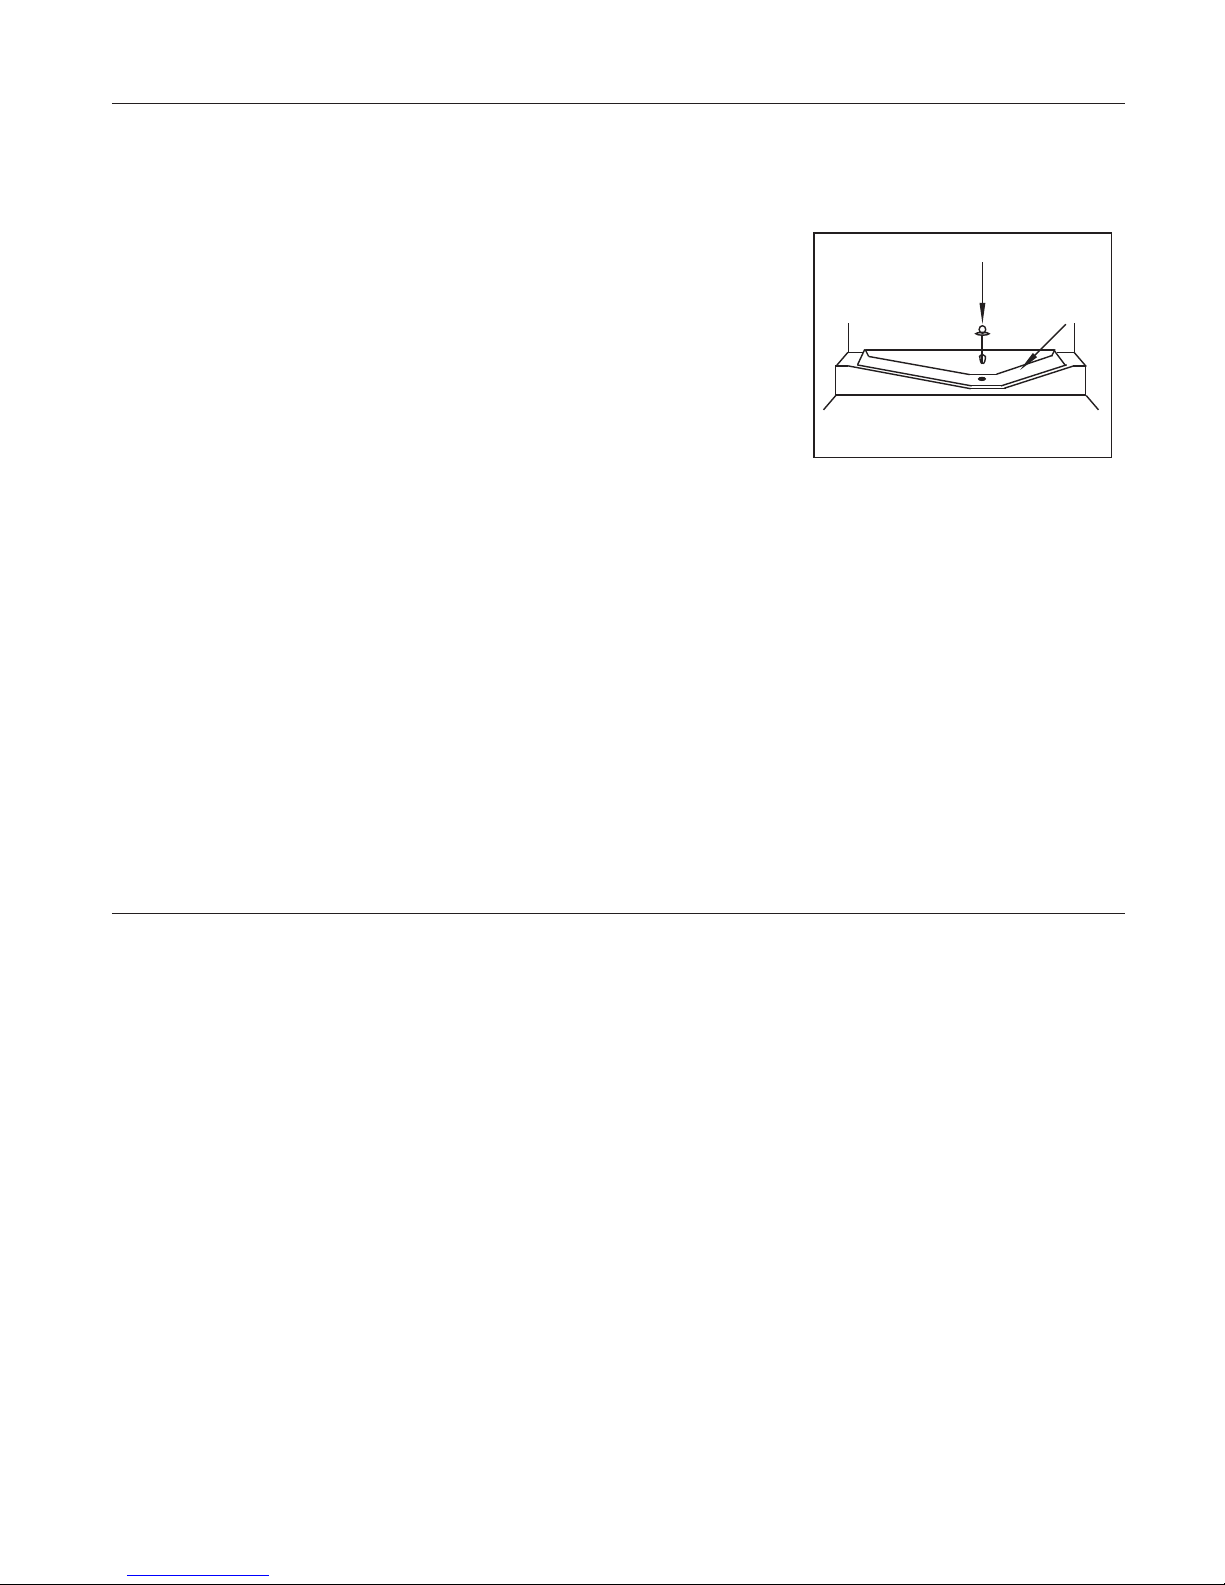
The fridge compartment defrosts automatically. The
defrosting water runs to the drain tray at the back of
the appliance via the collection channel and drain
tube.
During defrosting, water droplets may from at the
back of the fridge compartment where the concealed
evaporator is located. Some droplets may remain on the
liner and re-freeze when defrosting is completed,
this is normal. Do not use pointed or sharp edged
objects, such as knives or forks, to remove the droplets
which have frozen.
If at any time the defrost water does not drain from the
collection channel, check to ensure that no food particles have
blocked the drain channel. The drain tube can be cleared by
pushing the special plastic plunger provided down the drain tube.
If the frost layer reaches about “ (7mm), reduce the setting (ie
from MAX to medium) to restart automatic defrosting.
Freezer compartment
The freezer compartment defrosts automatically.
energy saving tips
Ensure your appliance is installed in a well-ventilated area. Do not
put your appliance in a cold room where the temperature is likely
to go below +2ºC (36ºF) during night time and/or especially in winter.
Ensure the time between buying chilled/frozen food and placing
them in your appliance is kept to a minimum, particularly in summer.
We recommend you use a cool bag or a special carrier bag to carry
frozen food.
Don’t leave the door(s) of your appliance open longer than
necessary and ensure they are closed properly after each
opening.
Don’t leave the door open for a long periods as this will
make the appliance more costly to run and cause excessive
ice formation.
Don’t put hot food into the appliance. Let it cool down first.
For maximum efficiency, the removable shelves should not be
covered with paper or other materials thus allowing free
circulation of cool air.
•
•
•
•
•
•
Collection
channel
Drain tube
1
/
4
Page 13
13
care & cleaning
If the appliance is not going to be used for a long period of time,
switch it off, remove all food, clean it and leave the door ajar.
Don’t use pointed sharp edged objects such as knives and forks
to remove ice.
Clean your appliance regularly.
Never use any sharp abrasive instrument, soap, household cleaner,
detergent or wax polish for cleaning.
Switch off the appliance at the socket outlet and pull out the mains
plug.
Clean the outside with lukewarm water and wipe dry.
Clean the interior with a damp cloth wrung out in a solution of
one teaspoon of bicarbonate of soda to one pint of water and
wipe dry.
Make sure that no water enters internal light housing.
We recommend that you polish the metal parts of the product (ie
door exterior, cabinet sides) with a silicone wax (car polish) to
protect the high quality paint finish.
Any dust that gathers on the condenser, which is located at the
back of appliance, should be removed once a year with a
vacuum cleaner.
Important
Care must be taken when cleaning the appliance to avoid
touching the bottom of the condenser metal support/pipework at
the back of the appliance as you might injure your fingers and
hands or damage your product.
Check door seals regularly to ensure they are clean and free from
food particles.
To remove dairy cover, open the cover and pull the sides off the lugs.
To remove a door tray, remove all the contents and then simply
push the door tray upwards from the base.
To remove a freezer basket, pull it as far as possible, then tilt it
upwards and then pull it out completely.
To remove the freezer flap door, firs open the door by about 2“
and then pull it off. Make sure that the flap is in place before
closing the freezer door.
Make sure that the special plastic container (drain tray) at the
back of the appliance which collects defrost water is clean at all
times. To remove the tray for cleaning:
Switch off at the socket outlet and pull out the mains plug.
Pull off the drain tube.
Gently release pegs off the tubes.
Simply lift the drain tray away.
Clean the drain tray and wipe it dry.
Reassemble by reversing the sequence and operations not
forgetting to fit the drain tube end to the drain tray, replace mains
plug and switch on.
Care
Cleaning
Removing covers, trays, flaps and doors
Drain tray
1
2
3
4
5
6
•
•
•
•
1
2
3
•
•
•
•
•
Page 14
14
STAINLESS STEEL DOOR CLEANING INSTRUCTIONS [ONLY VALID
FOR STAINLESS STEEL MODELS WHICH HAVE “X” SUFFIX IN THE
MODEL NUMBER]
Stainless steel surfaces of your appliance require special cleaning
methods. In order to eliminate marks on doors and to keep your
appliance doors clean, we recommend you the following to clean
and wipe the stainless steel surfaces of doors:
1. You can purchase special cleaning materials suitable for stainless
steel surfaces of kitchen appliances from your local store. Follow the
instructions supplied by the manufacturer of such cleaning materials.
2. You can purchase a special micro-fibre cleaning cloth pack called
“E-cloth” from your local electrical or hardware store, which is
suitable to clean and wipe stainless steel surfaces of kitchen appliances
without the need to use any chemicals or other cleaning materials.
You just need warm water. You need to follow the instructions
supplied inside the packaging of E-cloth.
Never attempt to clean, wipe or treat the stainless steel and other
surfaces of your appliance with unsuitable material, do not clean or
wipe handles and plastic surfaces using stainless steel cleaning
materials, otherwise, your guarantee will be void.
care & cleaning
Page 15
internal light
trouble shooting
15
disposal
If you are discarding an old refrigerator with a lock or latch
fitted to the door, disable the lock/latch; ensure that it is left in a
safe condition to prevent the entrapment of young children.
Do not dispose of any appliance on a fire. Your appliance
contains non-CFC/HFC substances in the insulation and in the cooling
system, which are potentially flammable if exposed to fire. We
suggest you contact your local authority for disposal information
and facilities available.
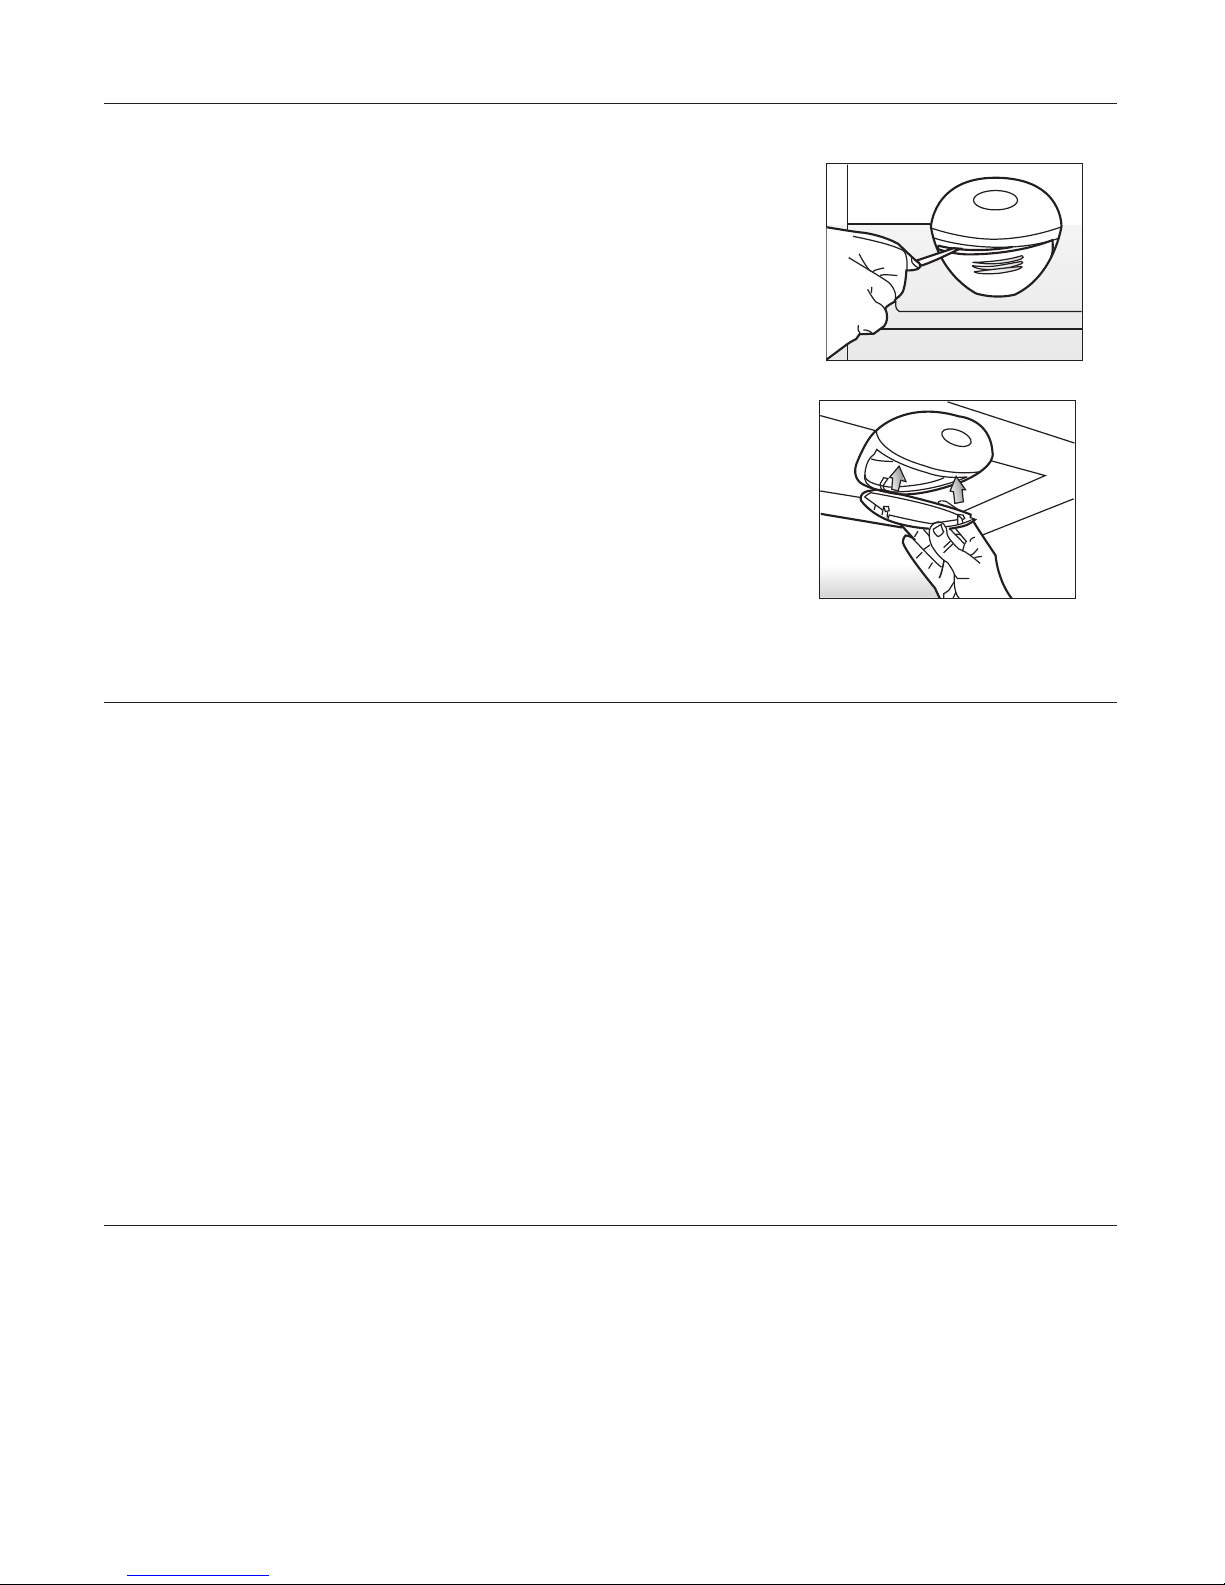
Should the light fail to work, proceed as follows.
Switch off at the socket outlet and pull out the
mains plug.
You may find it useful to remove shelves for easy access.
Use a flat tipped screwdriver to remove the light diffuser cover
by inserting the blade in each of the two recesses to prise off
each side.
First check that the bulb hasn’t worked loose by ensuring it is
screwed securely in the holder. Replace the plug and switch on.
If the bulb works, replace the light cover by inserting the rear
lug and pushing up to locate the front two lugs.
If the light still fails to work, replace the bulb with a new 15
watt (max) screw cap (ES) bulb following the procedure above.
Carefully dispose of the burnt-out light bulb immediately.
Replacement light bulb can easily be obtained from a good
local electrical or DIY store.
1
2
3
4
5
6
If the appliance does not operate when switched
on, check:
The plug is inserted properly in the socket and that the power
supply is on.
The power supply to the socket by plugging in another
appliance.
The fuse has blown/circuit breaker has tripped/main distribution
switch has been turned off.
The temperature control has been set correctly.
If you have changed the fitted moulded plug, ensure the new
plug is wired correctly.
If the appliance is still not operating after the above checks,
please refer to the section on how to obtain service.
Please ensure that the above checks have been
made as a charge will be made if no fault is found.
1
2
3
4
5
•
•
Page 16
16
guarantee
Your new Beko product is guaranteed against the cost of breakdown repairs for
twelve months from the date of the original purchase.
What is covered?
• Repairs necessary as a result of faulty materials, defective components or
manufacturing defect.
• The cost of functional replacement parts, but excluding consumable items.
• The labour costs of a Beko approved repairer to carry out the repair.
What is not covered?
• Transit, delivery or accidental damage or misuse and abuse.
• Cabinet or appearance parts, including knobs, flaps, handles or container
lids.
• Accessories or consumable items including but not limited to, ice trays,
scrapers, cutlery baskets, filters and light bulbs.
• Repairs required as a result of unauthorised repair or inexpert installation that
fails to meet the requirements contained in the user instruction book.
• Repairs to products used on commercial or non-residential household premises.
• Loss of frozen food in freezers or fridge/freezers. (Food loss insurance is often
included within your household contents insurance policy, or may be available
separately from your retailer).
Important notes.
• Your Beko product is designed and built for domestic household use only.
• The guarantee will be void if the product is installed or used in commercial
or non-residential domestic household premises.
• The product must be correctly installed, located and operated in accordance
with the instructions contained in the User Instructions Booklet provided.
• Professional installation by a qualified Electrical Domestic Appliance Installer
is recommended for all Washing Machines, Dishwashers and Electric Cookers
• Gas Cookers must only be installed by a CORGI (or BORD GAIS) registered
Gas Installer.
• The guarantee is given only within the boundaries of the United Kingdom
and the Republic of Ireland.
• The guarantee is applicable only to new products and is not transferable if
the product is resold.
• Beko disclaims any liability for incidental or consequential damages.
The guarantee does not in anyway diminish your statutory or legal rights.
Page 17
17
service
Please keep your purchase receipt or other proof of purchase in a safe
place; you will need to have it should the product require attention under
guarantee.
You should also complete the details below; it will help us assist you when
requesting service. (The model number is printed on the Instruction Booklet and
the serial number is printed on the Rating Label affixed to the appliance)
Model No: Serial No: Retailer: Date of purchase:
For service under guarantee simply telephone the appropriate number
below
UK Mainland & Northern Ireland
Fridges & Freezers 0870 241 0638
Electric Cookers 0870 241 1320
Gas & Dual Fuel Cookers 0870 241 1321
Washing Machines 0870 241 0357
& Dishwashers
Republic of Ireland
All Refrigeration, All Cookers 01 862 3411
Washing Machines & Dishwashers
Before requesting service please check the trouble-shooting guide in the
Operating Instructions as a charge may be levied where no fault is found
even though your product may still be under guarantee.
Service once the manufacturers guarantee has expired.
If you have purchased an extended guarantee please refer to the instructions
contained within the extended guarantee agreement document. Otherwise please
call the appropriate number above where service can be obtained at a charge.
Should you experience any difficulty in obtaining service please contact the Beko
Customer Help-Line. Tel: 0870 774 1050 e-mail: [email protected]
 Loading...