

Page 1

15” LCD TV
15LB450S
Operating Instructions
Page 2

List of contents
Special features ..............................................................2
Safety instructions .........................................................3
Getting started ...............................................................4
Aerial connection.............................................................4
Switching on....................................................................4
Battery fitting..................................................................4
Control unit....................................................................5
Front and rear panel.........................................................5
Remote control ................................................................6
Using the TV ..................................................................7
Tuning the TV .................................................................8
Automatic tuning .............................................................8
Manual tuning..................................................................9
Program organising .......................................................11
TV setup .......................................................................12
Sound menu ...................................................................12
Sound Features ..............................................................13
Picture menu..................................................................14
Features Menu ...............................................................14
Using teletext...........................................................16-17
Connecting external equipment............................18-24
Help and service tips ...................................................25
Technical specifications table .....................................26
1
Guarantee................................................................27-28
Page 3

Television
Thank you for buying this television which is designed to give you many years of
satisfactory service.
You may already be familiar with using a television but do please take time to read these
instructions. They are designed to familiarise you with the unit’s many new features
and to ensure you get the very best out of your purchase.
Special features
• 15” TFT-LCD XGA Panel
• 1024x768 resolution
• 16,722,216 colors (8 bit)
• PAL
2
• 450 cd/
• 400:1 Contrast ratio
• 2x2W Stereo Sound
• 124 page teletext
• Wide viewing angles
• Scart , AV , Audio Out.
• Low Power Consumption
brightness
• AVL
• ATS
• Intelligent programme switch
• On timer
• Off timer
• Graphic equaliser
• On screen display
• Manual fine tuning
• 100 Programme memory
• Full function remote control
• Child Lock
Page 4
Safety is Important
Your safety and the safety of others is important. Please, therefore, ensure you read
the Safety
instructions
before you operate this television.
Safety instructions
Read all the safety instructions before first use of your TV.
!
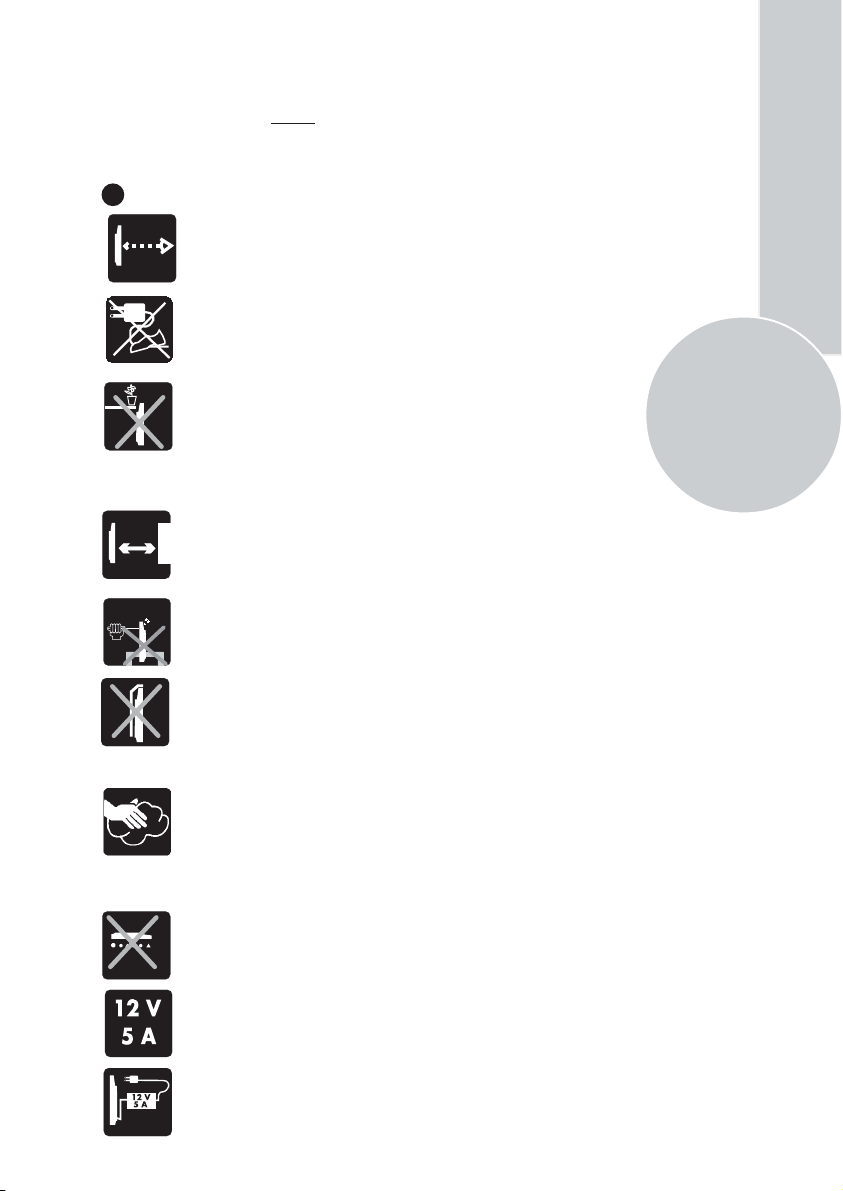
• Position the television so that direct light does not fall on
the screen. Excessive light will cause a washed out effect.
• Position the power supply lead and other leads so that
they are not likely to be walked on or pinched by things
placed on or against them.
1m
• Do not place objects filled with liquid such as vase or
flower pot near the television.
• Do not expose the TV to dripping or splashing of liquids.
• Do not place naked flame sources such as lighted candles
or near the TV set.
• Do not place the television near heat sources such as
radiators, ovens, stoves, etc.
• Do not push, hit or scratch the screen of your product.
• The heat built up in the set escapes through ventilation
holes, so do not cover the set by drapes, clothes etc. that may
block air circulation. Do not place the television on carpet
or soft furnishings.
• NEVER let children push anything into the holes or slots
on the case.
• Clean the TV Screen using a slightly damp cloth or chamois
leather. Never use abrasive cleaning agents like liquid or
aerosol cleaners.
• Remove the mains plug from the socket outlet while cleaning.
• Never apply pressure on the screen when cleaning.
• Never put your screen on hard objects. Your TFT screen
may be damaged.
3
• Your TV set is designed to operate with the adaptor provided
12V DC-5A.
• Use the adaptor supplied with the product. Never connect
any other power sources to the product.
Page 5
Getting started
Remove your Television carefully
from the box. You may wish to
store the packaging for future use.
Carton Contents
Inside the cartoon you should have:
• TV with stand
•Accessories box
• Power cord
• Adaptor
• Remote control
• Batteries
4
Read these instructions before use.
Aerial connection
Plug the aerial lead into the aerial socket
on the rear of the TV.
You can use an outdoor or indoor aerial.
However, if you use an indoor aerial the
quality of the reception may be reduced
and adjustment of the aerial may be
required when changing programs.
Please note
If you live in a poor reception area or use an
indoor aerial you may experience loss or
corruption of teletext and nicam stereo
sound transmissions.
Note 1: Your TV will switch to stand-by mode
in five minutes when there is no broadcast signal.
Note 2: Your TV is equipped to operate with the
panel buttons, “MENU”, “PR+”, “PR-”, “VOL +”,
“VOL -” in case your R/C is broken or you run out
of batteries.
Please Note
When not in use disconnect the plug
from the mains power supply.
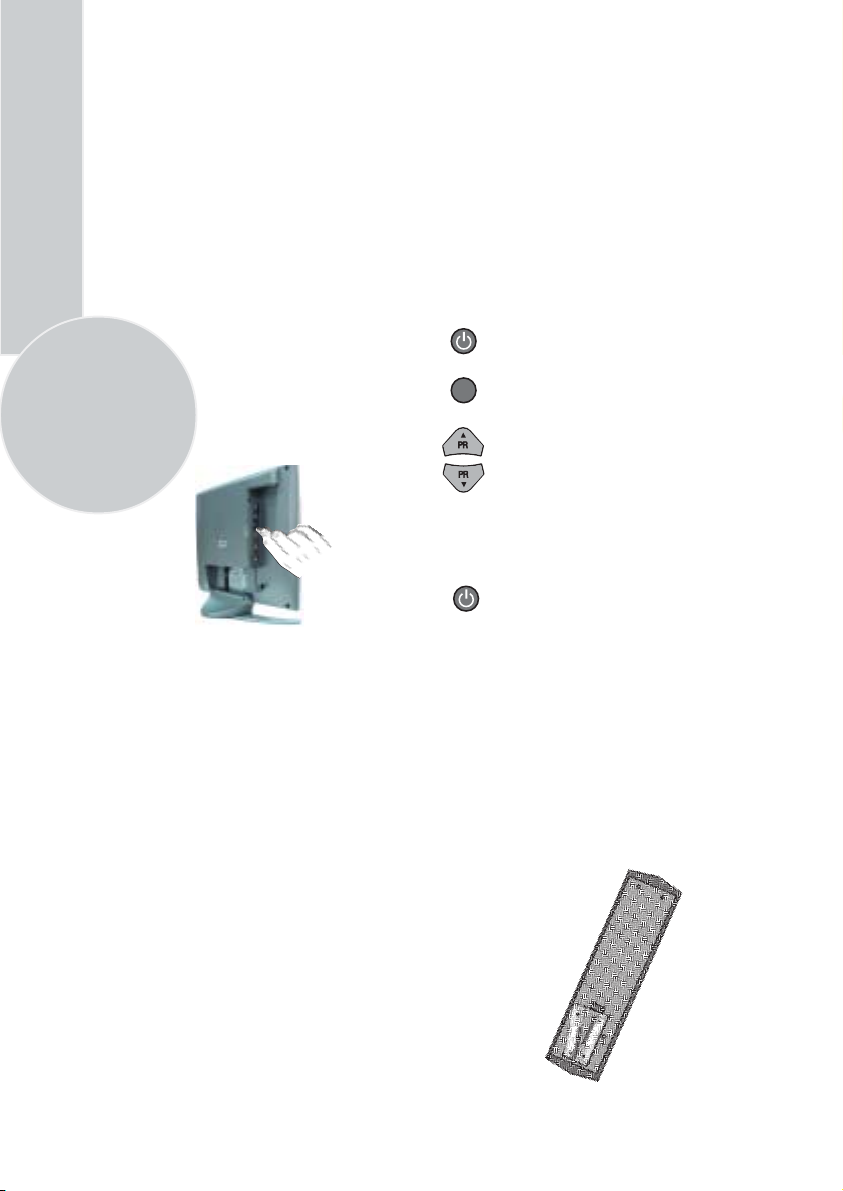
Press the Power button on
the side of the TV. The
standby indicator will
illuminate.
7
Press a Numeric button or the
Program up/down button on the
remote handset or Program up/down
or MENU button on the panel to
switch the TV on.
The standby indicator will dim.
The picture will appear after a
few seconds.
Press the Standby
to switch
indicator will brighten.
Please Note
Do not leave the television in standby
unattended or overnight.
Switching the TV on for the first time
To install your TV, please read the sections
“TV controls” and “ Tuning the television”.
the TV to standby. The standby
button on the remote
Battery fitting
Insert the 2 AAA Batteries supplied into the
compartment on the rear of the remote control, ensure
you follow the polarity diagram inside the
compartment.
Switching on and First Use
1. Connect the power cord to the mains adaptor.
2. Connect the input plug of the adaptor to the
12 V DC socket on the back panel of the LCD TV.
3. Connect adapter mains plug to a suitable
mains socket.
Page 6
Control Unit
7
AV2
AUDIO OUT
L R VIDEOL R S-VHS
AVS
DC 12V VGA
4
3
2
6
5
1
13
15
12
5
14
9
8
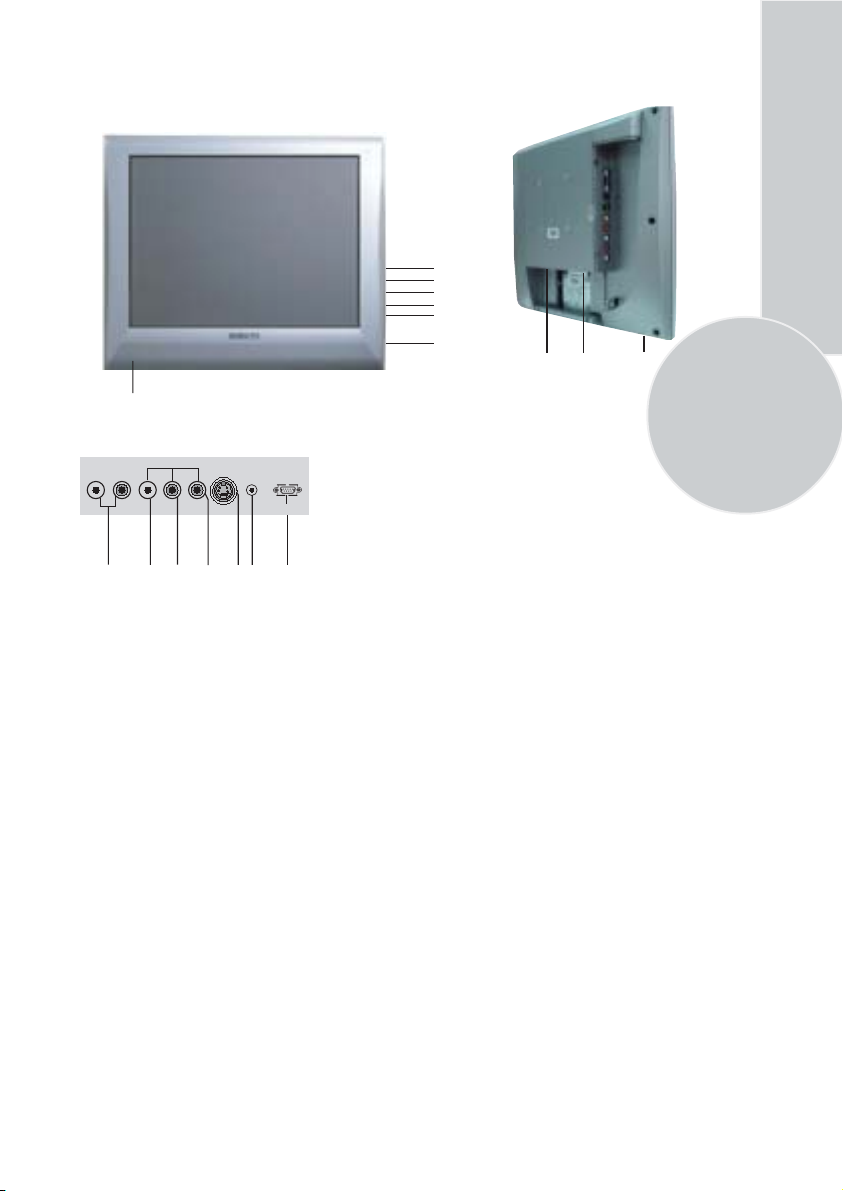
1.
Power on / off
2.
Menu button
3.
Program down
4.
Program up
5.
Volume down
6.
Volume up
7.
Speaker
8.
Audio RCA (R)
16
11
10
17
9.
Audio RCA (L)
10.
Video input CINCH connector
11.
S-VHS
12.
Headphone socket
13.
Aerial input
14.
Audio out (R,L)
Scart socket
15.
DC 12V Power supply input
16.
VGA (PC) input
17.
Please note
• Remove cover to gain acess to connections.
• Do not use Video Phono and S-Video connections at the same time, otherwise they will effect
the picture.
• RGB inputs from scart will give you better picture quality.
Page 7
10
Tuning with channel numbers
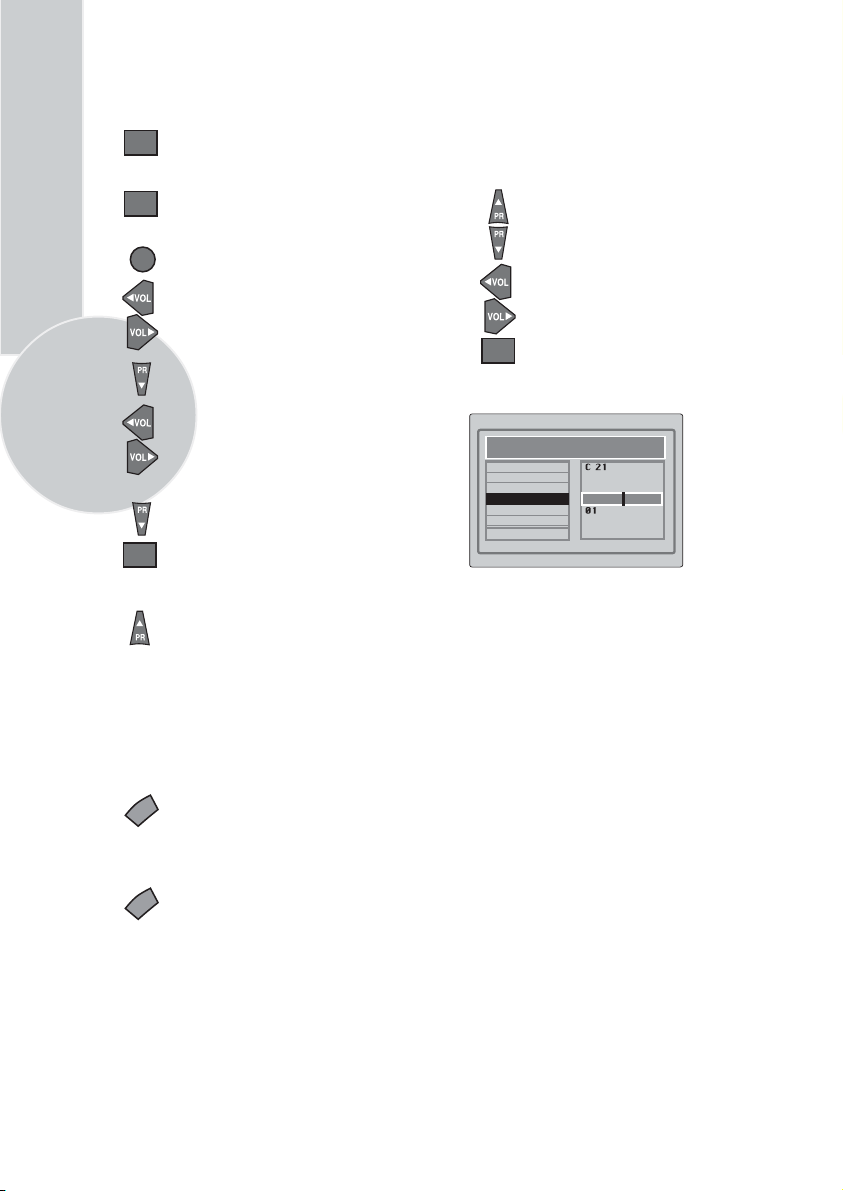
Enter the SETUP menu by pressing
the blue button.
OK
Press OK button when CHANNEL
row is blue.
Use OK button to select “S” for
OK
cable channels and “C” for
terrestrial broadcast.
7
Enter the channel number using the
Numeric buttons or use the
Volume up/down buttons to tune
channels.
Use the Program down button to
select PROGRAM NUMBER.
Use the Volume up/down or
numeric buttons to select the desired
programme number.
Use the Program down button to
select STORE. Press the
and STORED will appear on the
OK
STORE line.
OK button
You have now stored the first
channel.
Use the Program up button to
select CHANNEL again and continue
the tuning procedure until you
have tuned in all the programmes
you want or the television can
receive.
Fine tuning
Although the search and Autoprogram
will automatically try and tune to the
best reception, in areas of poor reception
a bit of fine tuning may be required.
In the SETUP menu use the
Program up/down buttons to
select FINE TUNING. Use the
Volume up/down buttons to fine
tune.
When you have finished use the
Program down button to select
OK
STORE and press the OK button.
STORE will appear on the STORE
line.
CHANNEL
SYSTEM
SEARCH
FINE TUNE
PROGRAM NUMBER
AUTO PROGRAM
STORE
SETUP
I
To exit the SETUP menu press the
TV/TX
TV/TX button.
16:9 Picture format
16:9
Use the 16:9 picture format button
to change from 4:3 to 16:9 picture
ratio.
A black band may be present on the
top or bottom of the picture,
dependant on the broadcast.
This is not a fault, press the 16:9
button to return to a 4:3 format
picture.
Page 8
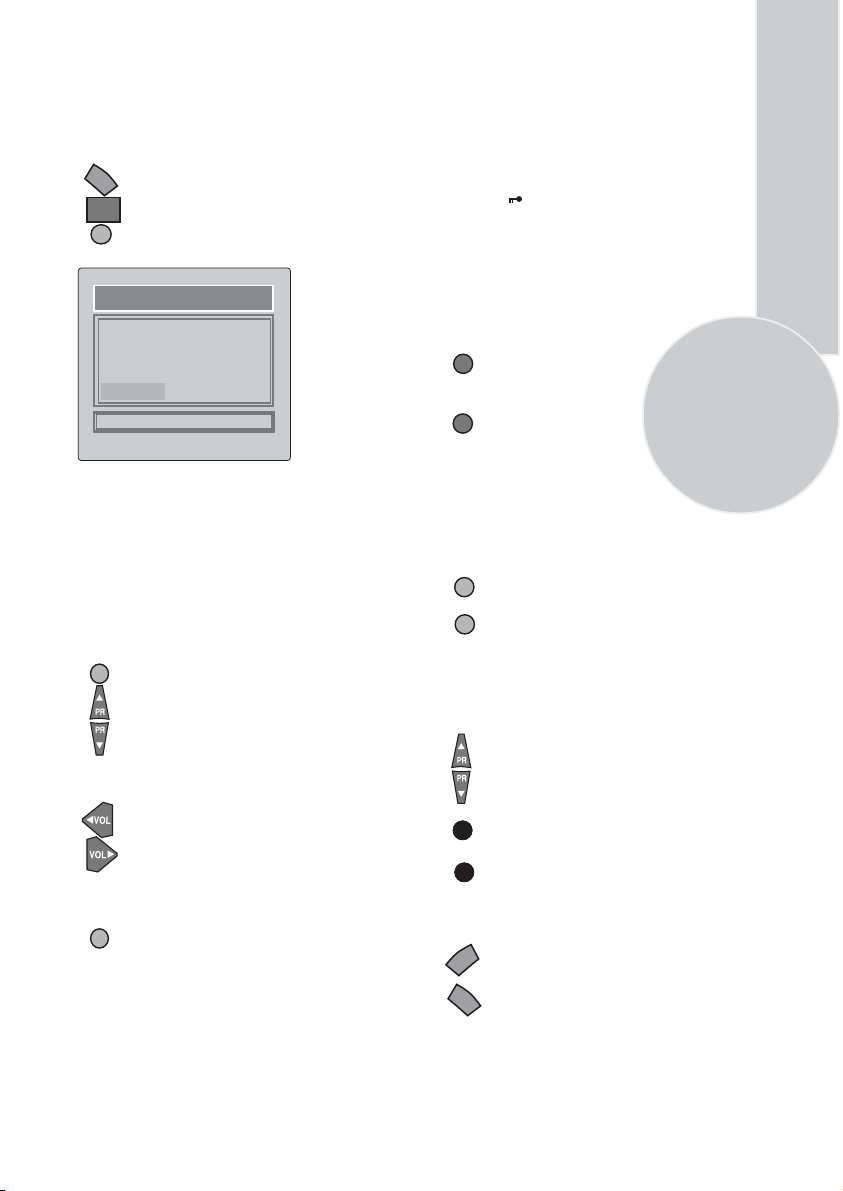
Program organising
Once you have tuned in all the channels you
want, you can change their programme
number, if required, and name them.
To enter the PROGRAM TABLE
MENU
menu press the Menu button and
OK
select PROGRAM TABLE and press
the OK button or press the Yellow
button on the remote handset.
PROGRAM TABLE
05.
00. ----
01.
02. BBC
03.
04.
SKIP
MOVE
The buttons used to edit the programs are
shown at the bottom of the display:
Blue button - Name
Green button - Move
Pink button - Delete
Red button - Skip
06.
07.
08.
09.
NAME
10.
11.
12.
13.
14.
DELETE
Please Note
1. Some TV channels send their names
with teletext transmission. In this case
their names will be automatically shown
on the name line.
1. Child locked programmes will be
shown as
“ “
To move the programmes
Press the Yellow button on the remote hand
set to display program table.
You can move the programmes around the
programme list to the order you want
Select the programme you want to
move and press the
Green button.
The programme will turn to yellow.
Select the number you want to move
and press the Green button
again and the programme will be
moved to that number.
All the following programmes are
shifted down by one place.
To delete a programme
To delete a programme, select it and
press the Pink button.
The programme will be deleted.
11
To name the programmes
You can name the programmes and
AV inputs.
Use program Program up/down
to select program to be named.
Press theBlue button, the selected
programme will be highlighted.
Press the blue button and the first
letter will flash.
Use the Program up/down
buttons to select the letters
and numbers and the Volume up/
Volume down buttons to move
through the name.
Press the Blue button again to store
the name.
Repeat this process to name all the
programmes.
Press menu button to exit.
All the following programmes are
shifted up by one position.
To skip programmes
Skipped programmes will not appear
when you move through the program
list using the Program up/down
buttons.They can still be selected
using the numeric buttons.
Select the programs you want to
skip
and press the Red button. The
program will turn red. To unskip the
program, enter program table.Select
the skipped program and press the
button again.
Red
To exit the PROGRAM EDIT press
TV/TX
the TV/TX button once or the
MENU
Menu button twice.
When you select a programme, the
information you entered in the
PROGRAM EDIT menu will appear
on the top of the screen i.e. P1
BBC1.
This will disappear after
about three seconds.
Page 9
12
TV set up
The TV set up is accessed through a menu
system.
Once you have stored your settings the TV
will default to these levels when you switch
on.
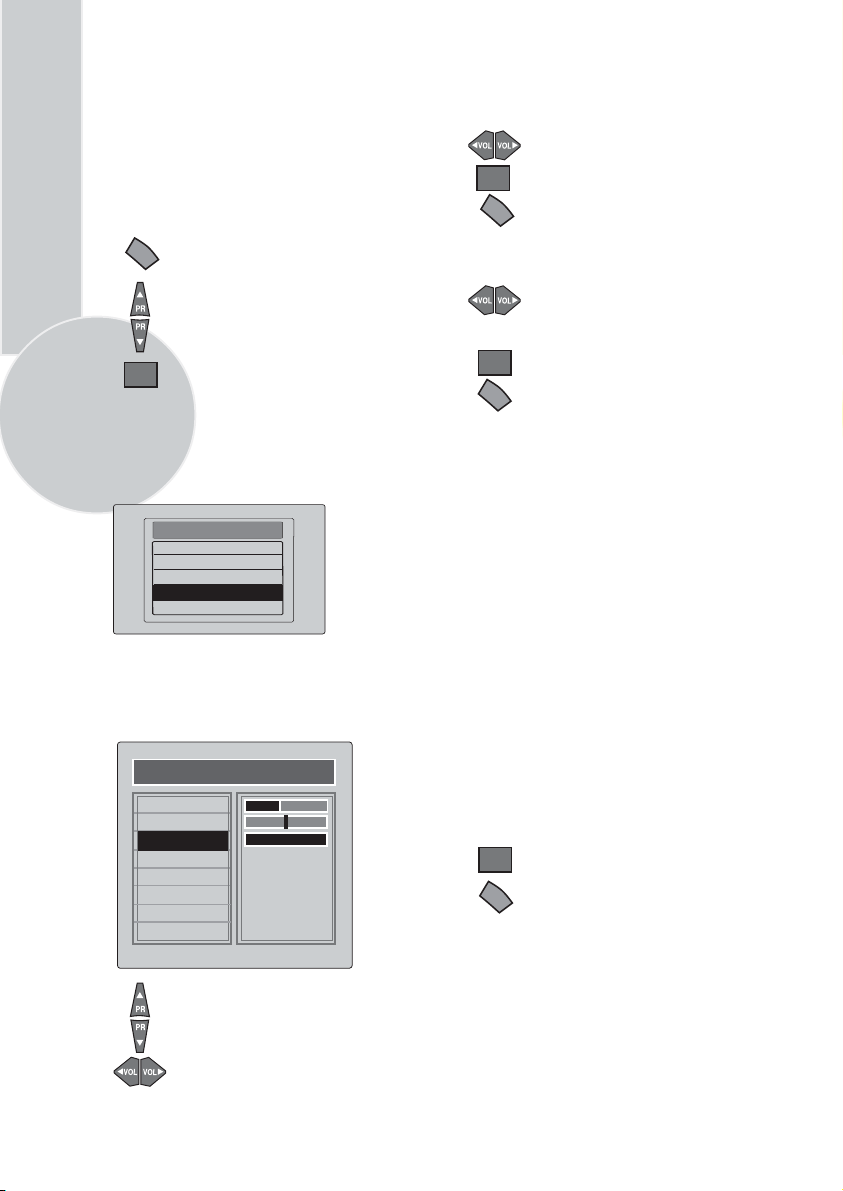
MENU
To enter the MAIN menu press the
Menu button.
Once in the MAIN menu use the
Program up/ down buttons to
select items in the menu and
the OK to access sub menus
OK
or use the coloured fastext buttons
for quick access.
Blue button - TUNING
Red button - SOUND
Green button - PICTURE
Purfle button - FEATURES
MAIN MENU
SOUND
PICTURE
PROGRAM TABLE
SETUP
FEATURE
Please note
If you do not press any buttons for 15 seconds
the TV will exit the menu system.
Sound menu (red button)
SOUND
VOLUME
BALANCE
SOUND TYPE
SOUND MODE
AVL
EQUALISER
HEADPHONE
STORE
MONO
SPATIAL
ON
Volume
Sets default volume using the Volume up/
down buttons.
To save your settings, select
STORE
OK
MENU
and press the OK button.
STORED
will be displayed. Press
the Menu button to go back to
the previous menu.
Balance
Sets the sound balance
mode using the Volume up/down
buttons
To save your settings, select
OK
STORE
MENU
and press the OK button.
STORED
will be displayed. Press
the Menu button to go back to the
previous menu.
Sound type
This item shows STEREO when receiving
stereo
transmission and MONO for mono
transmissions.
If the channel you are watching
Nicam stereo the On
Screen Display
is in
will show NICAM STEREO for a
while.
Please Note
If, while watching a nicam stereo channel,
the signal strength drops and the system
cannot receive nicam stereo the OSD will
show MONO. If the signal strength
increases again and nicam stereo can be
received again, the OSD will show
NICAM STEREO.
To save your settings, select STORE
OK
and press theOK
will be displayed. Press the Menu
MENU
button to go back to the previous
menu.
button. STORED
Select the required item in the menu
using the Program up/down buttons
and make the changes pressing
Volume up/down buttons.
Page 10
Sound mode
Select sound mode using Program up/down
buttons.
You can select NORMAL or SPATIAL
Volume up/down buttons.
SPATIAL sound is an ‘expanded stereo’. It
gives the impression that the two speakers in
the TV are further apart than they really are.
AVL
Select AVL using Program up/down
buttons.
TV transmitters have different sound levels.
AVL (automatic volume limiting) maintains
the same sound level as you switch from
program to program.
To apply this press Volume up or down
button and select ON for AVL in Sound
Features menu.
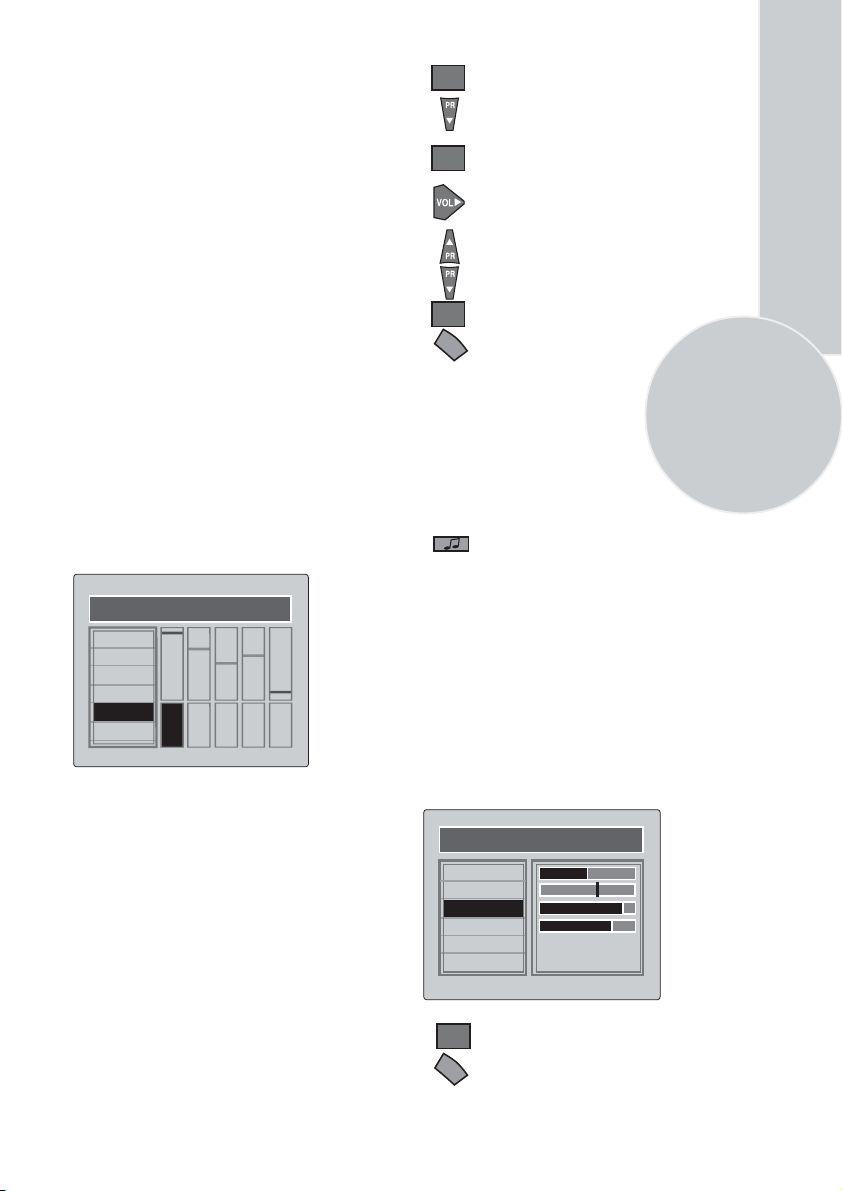
Equalizer
To access the 5 band equalizer menu
press Programme up or down button
and press OK on the Equalizer line.
EQUALIZER
MUSIC
SPORTS
CINEMA
SPEECH
USER1
USER2
120Hz500Hz1,5
KHz5KHz10KHz
In this menu there are a series of preset
equalizer settings for different types
of sound output.
There are four music settings - MUSIC,
SPORTS, CINEMA, SPEECH and
USER1 & USER2 modes.
MUSIC, SPORTS, CINEMA, SPEECH are
factory presets.
Press the OK button to enter the
OK
EQUALIZER menu.
Use the Program down button to
select USER1.
OK
Press OK button to adjust the
frequency band levels.
Use the Volume up button to select
the KHz column you want to
change.
Use the Program up/down
buttons to make the changes.
OK
To save your settings,
MENU
button. Press the Menu button to
press the OK
go back to the previous menu.
You can also adjust the settings of USER2
by the same method.
You can change the equalizer setting
whilst watching the TV using the
sound Smart control.
Press the sound Smart control to
page through the different equalizer
settings and select the one you
want.
Once you have switched the TV off
the equalizer setting will revert to the
stored setting.
Headphone
You can set up the volume, balance, bass
treble and sound type (stereo or mono)
of the headphone output.
Use OK button to enter the HEADPHONE
menu.
HEADPHONE
VOLUME
BALANCE
BASS
TREBLE
SOUND TYPE
STORE
MONO
13
USER modes allow you to set your own
sound outputs as follows:
To save your settings, select STORE
OK
and press theOK button. STORED
MENU
will be displayed. Press theMenu
button to go back to the previous
menu.
Page 11
14
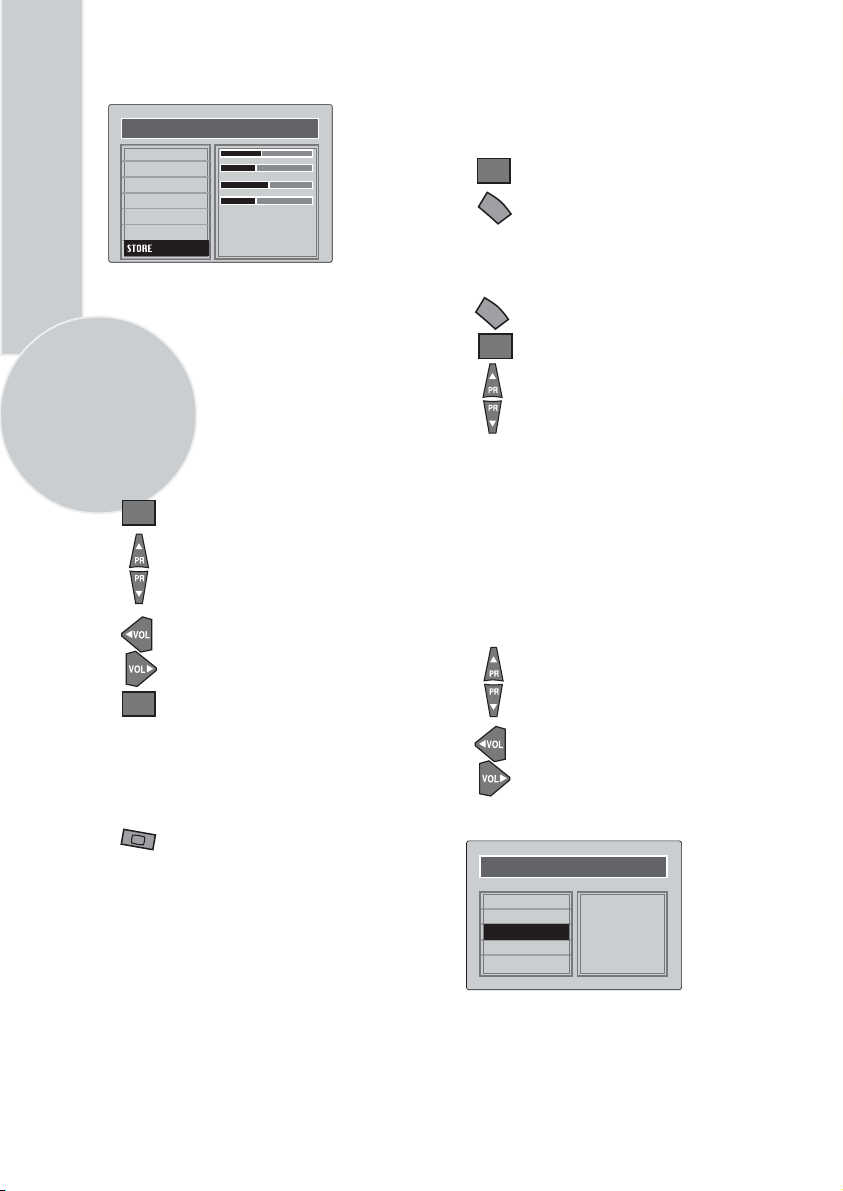
Picture menu (Green button)
PICTURE
BRIGHTNESS
CONTRAST
COLOUR
SHARPNESS
SMART CONTROL
NOISE REDUCTION
The picture menu allows you to set up the
following:
BRIGHTNESS
CONTRAST
COLOUR
SHARPNESS
SMART CONTROL
and NOISE REDUCTION
OK
OK
USER
ON
To change, for example, the colour,
select it using Program up and down
buttons.
Use the Volume up and Volume
down buttons to change the setting.
To save your settings, select STORE
and press the OK button. STORED
will be displayed.
These settings are stored as USER
picture type.
NOISE REDUCTION: You can
reduce the noise effects in the
pictures by selecting ON.
To save your settings, select STORE
OK
and press theOK
will be displayed. Press the Menu
MENU
button to go back to the previous
menu.
button. STORED
Features Menu (Purple button)
MENU
To select Features menu press the
menu button and using the
Program up and down buttons
OK
select Features.
You can also select the Features
menu directly by pressing the
purple button on the remote
control.
The Features menu allows you
to set up the following:
CHILD LOCK
CLOCK
TIMER
BACKGROUND
LANGUAGE
Use the Program up and down
buttons to select the feature you
wish to change and use Volume
up and down buttons to adjust
this feature.
You can change the picture type whilst
watching the TV using the picture Smart
control.
Press the picture Smart control
through the different picture
types and select the one you want:
SOFT, NATURAL, RICH or USER.
CHILD LOCK
CLOCK
T MER
BACKGROUND
LANGUAGE
FEATURES
OFF
03 14
ON
Page 12
Child Lock:
Using the Child Lock,
you can lock any Program you
want so that adult channels can not
be watched by children.
You can cancel child lock any time
you want. To cancel Child Lock,
select Child Lock as OFF when
you are watching that program.
Clock:
Use the numeric buttons to
set the real time.
Note:
If you enter any channel with
teletext transmission, clock will
automatically set to real time.
Background:
You can adjust the
menu background as ON or OFF.
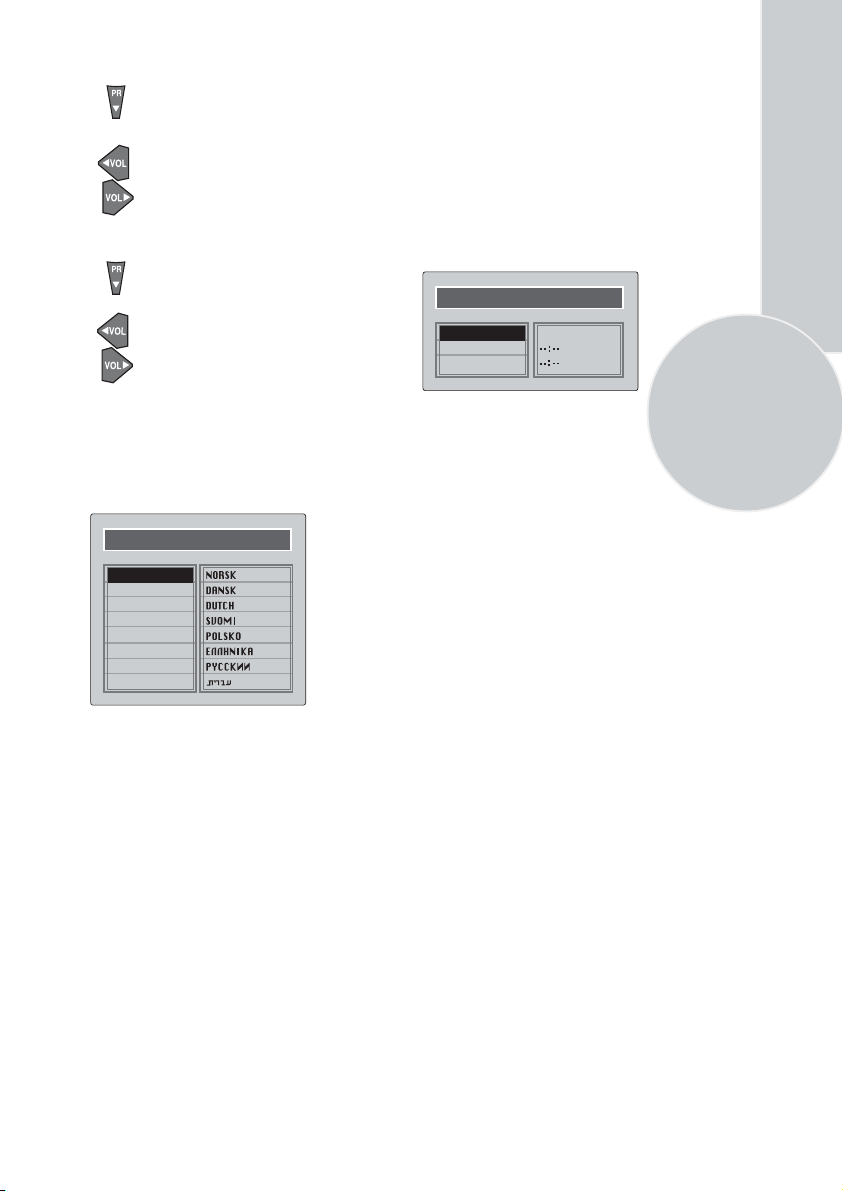
Language:
You can select one of the 16
languages by pressing OK button in the
language selection.
LANGUAGE
ENGLISH
DEUTSCH
FRANCAIS
ITALIANO
ESPANOL
PORTUGESA
TRKE
SVENSKA
Timer:
Use Program up and down buttons
to select Timer in the features menu. Using
the Timer function, you can switch to a
specific programme at a pre-programmed
time or you can turn your TV off at the
time you want.
Press OK to access the Timer menu.
TIMER
ON TIMER
OFF TIMER
On Timer:
P 00PROGRAM NO
Use the numeric buttons to set
the time that you want your TV to be turned
on (TV should be in stand-by mode).
Off Timer:
Use the numeric buttons to set
the time that you want your TV to be turned
off (Stand-by mode).
Program No:
Use the numeric buttons to
set the programme number that will be
shown when you set the On Time.
Note:
It is not possible to switch the TV
On and Off at predetermined times using
the timer.
15
Note:
Only the O.S.D language
will change the sound will be in
the language of the transmission.
Page 13
Using Teletext
16
Teletext is an information system that displays
text on your TV screen. Using the teletext
control buttons you can view pages of
information that are listed in the teletext
index.
Please Note
No on screen display is available in text mode.
The contrast, brightness and colour cannot be
changed but the volume control is still
available.
To enter Text mode
Please Note
Make sure the TV channel you are watching
transmits teletext. If not NO TEXT sign will
be shown on the screen.
Press the button. The text
page will appear, normally the index
TV/TX
page.
TV/TEXT
To exit Text mode
Press the button. The TV
will return to the channel you were
TV/TX
watching.
TV/TXT
To select a page of text
Find the number of the page in the
index and enter it using the
0
Numeric
the page will appear in the top left
9
buttons. The number of
hand corner of the screen.
The page counter will search for your
page. When it finds it, the page will
be displayed.
To move to the next page of text
press the button.
Program up
To move to the previous page press
Program down
the button.
P100
To return to the index page press the
P100
button.
TV/text mix
To view a page of text whilst
MIX
watching a TV programme press
the
MIX
button. The text will be
superimposed over the TV
programme.
MIX
Press the
button again to return
MIX
to the text page.
Page search whilst watching TV
In Text mode press theUpdate
UPDATE
button. The TV will return to TV
mode with the text page number in
the top left hand corner of the
screen.
0
Enter the page number you want
using the buttons.
9
Numeric
The top line of the text page will
appear whilst the text searches for
your page. When the page is found
the number will remain in the top
left hand corner of the screen.
Press the button to view
UPDATE
Update
your selected page of text.
Double height text
If you have difficulty reading the
text on the TV you can double the
height of the text.
Press the button.
Double height
The top half of the page will be
displayed in double height text.
DOUBLE
Press the button
Double height
again. The bottom half of the page
will be displayed in double height
text.
DOUBLE
Press the button
Double height
again to return to the full page.
Page 14

Page Stop
If the page of text you have selected
HOLD
contains sub pages, these sub pages
will automatically be displayed in
order with a delay to allow you to
read the page.
To stop the move to the next sub
page press the HOLD button.STOP
will appear in the top left hand
corner.
HOLD
To continue moving through the sub
pages press the HOLD button again.
To select a sub page
If the page of text you are viewing
contains sub pages, the number of
the sub page you are on and the total
number of sub pages is displayed on
the right of the screen i.e. 1/7.
To select a sub page press the
SUB
SUB button. Press green button
to select next sub-page or prees
red button to select previous
sub-page.
Enter the number of the sub page,
5
using the Numeric buttons in the
format S0001 for sub page 1.
To reveal information
Press the Rev button to reveal
REVEAL
concealed information (quiz
answers etc.).
REVEAL
Press the Rev button again to
conceal the information again.
Clock
Press the Sub button, whilst
SUB
watching a TV program , to
display the time.
Fastext
At the bottom of the teletext screen is a row
of subject headings in red, green yellow and
blue.
The remote control has a row of coloured
buttons corresponding to the row of
coloured subjects on the screen.
Pressing one of the coloured buttons will
take you directly to the page
corresponding to the subject heading.
17
The teletext will search for the sub
page. This may take some time. To
return to the TV whilst the teletext
is searching press the Update
button.
When the page number is found it
will appear in the top left hand
corner of the screen.
UPDATE
Press the Update button again to
view the text page.
Page 15

Connecting external
equipment
You can connect a wide range of audio and
video equipment to your TV.
18
Connecting a video
recorder
Via SCART
Make sure the TV and video recorder are
both switched off.
Plug one end of the SCART lead (not
supplied) into the back of the video recorder
and the other end into the SCART
socket on the back of the TV.
Switch on the video recorder and the TV.
Press the AV button on the remote
AV
control to select AV1.
Please note:
You can connect RGB external equipmen
via Scart. Full specification Scart cable is
required for this purpose.
Select the video outputs of the external device
by refering to it’s operation instructions.
Via PHONO lead (optional)
Make sure the TV and video recorder are
both switched off.
Plug one end of the PHONO lead into the
video and audio out sockets on the back of the
video recorder and plug the other end into
the video and audio in sockets of the TV.
If the sound is in mono use the Audio Input
L. In the SOUND menu select MONO.
Page 16
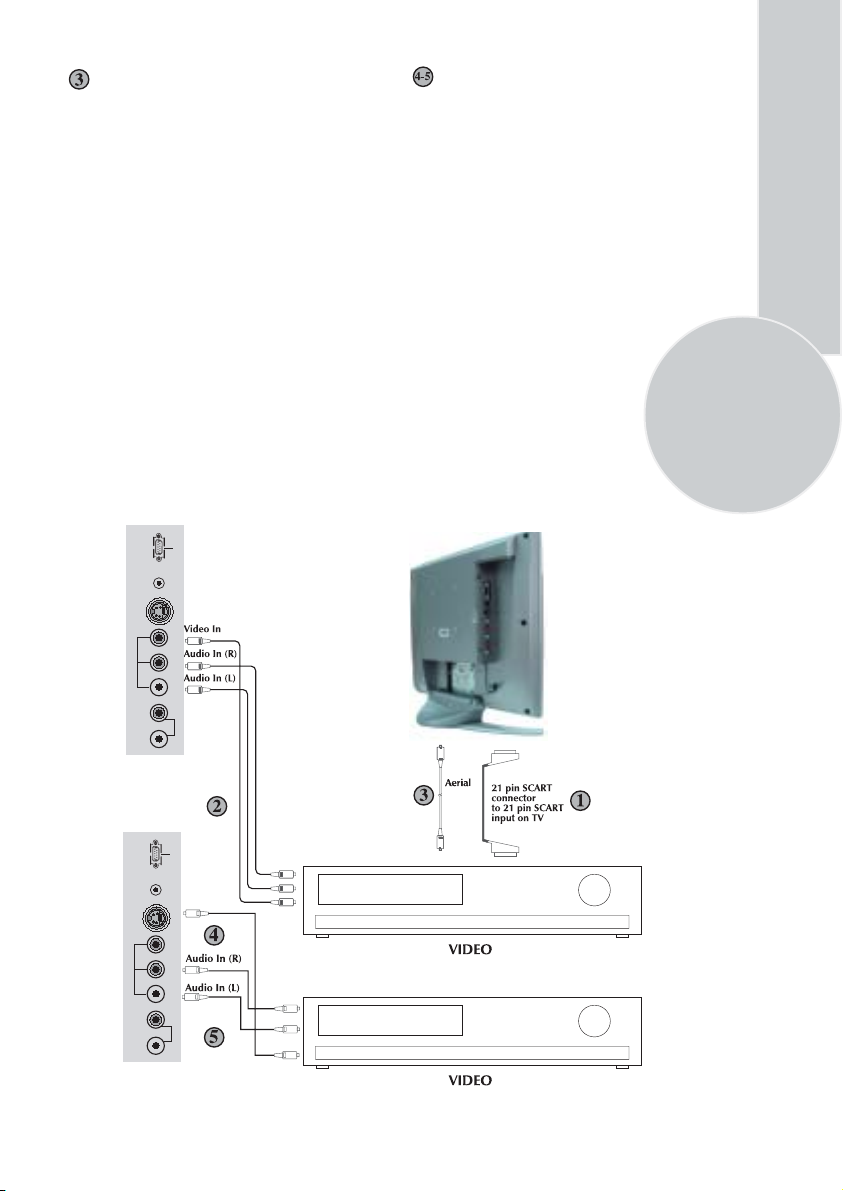
Via aerial socket
Make sure the TV and video recorder are
both switched off.
Unplug the aerial lead form the TV and plug
it into the aerial socket on the video
recorder (if fitted).
Plug a coaxial plug into the RF out socket on
the rear of the video recorder and plug the
other end into the aerial socket of the TV.
Switch on the video recorder and the TV.
If your video recorder has a test signal, switch
it on. (Refer to the video recorder user guide).
See ‘Tuning the TV’ and carry out the tuning
procedure for the video recorder test signal.
Select programme number 0.
DC 12V VGA
AVS
Via PHONO lead and S-Video socket
You can also connect it through the
S-Video socket of the TV.
Plug the S-Video plug into the S-Video
socket and the audio leads into the audio
sockets.
19
AV2
AVS
AV2
AUDIO OUT
AUDIO OUT
L R VIDEOL R S-VHS
DC 12V VGA
S-Video In
L R VIDEOL R S-VHS
Page 17
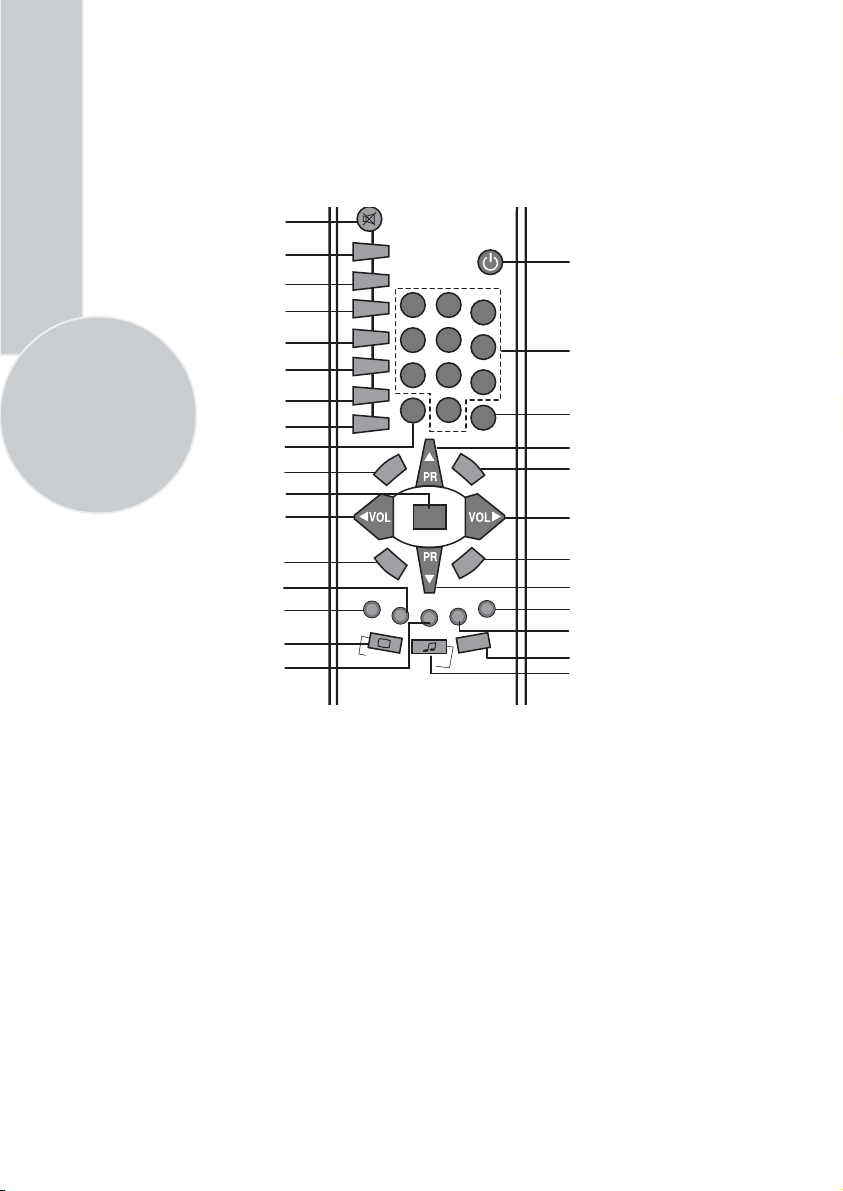
Remote control
Mute
Index page (Text)
Reveal info (Text)
Double height (Text)
Stop (Text) button
6
Sub page button (Text)
TV mode button (Text)
Mix and TV/PC mode button
AV
TV/Teletext
OK
Volume down
P100
REVEAL
DOUBLE
HOLD
SUB
UPDATE
MIX
TV/PC
TV/TX
1
4
7
AV
Standby
2
3
5
6
8
9
0
-/--
MENU
OK
Numeric
Two digit
Program up
Menu
Volume up
Personal preference
Green teletext button
Picture Menu button
Red teletext button
Sound Menu button
Picture smart control
Yellow teletext button
Program table button
PP
SMART CONTROLS
16:9
SWAP
16:9 Picture format
Program down
Features Menu button
Blue teletext button
Setup Menu button
Swap
Sound smart control
Page 18
Using the TV
Turning on for the first time and Tuning
TV controls
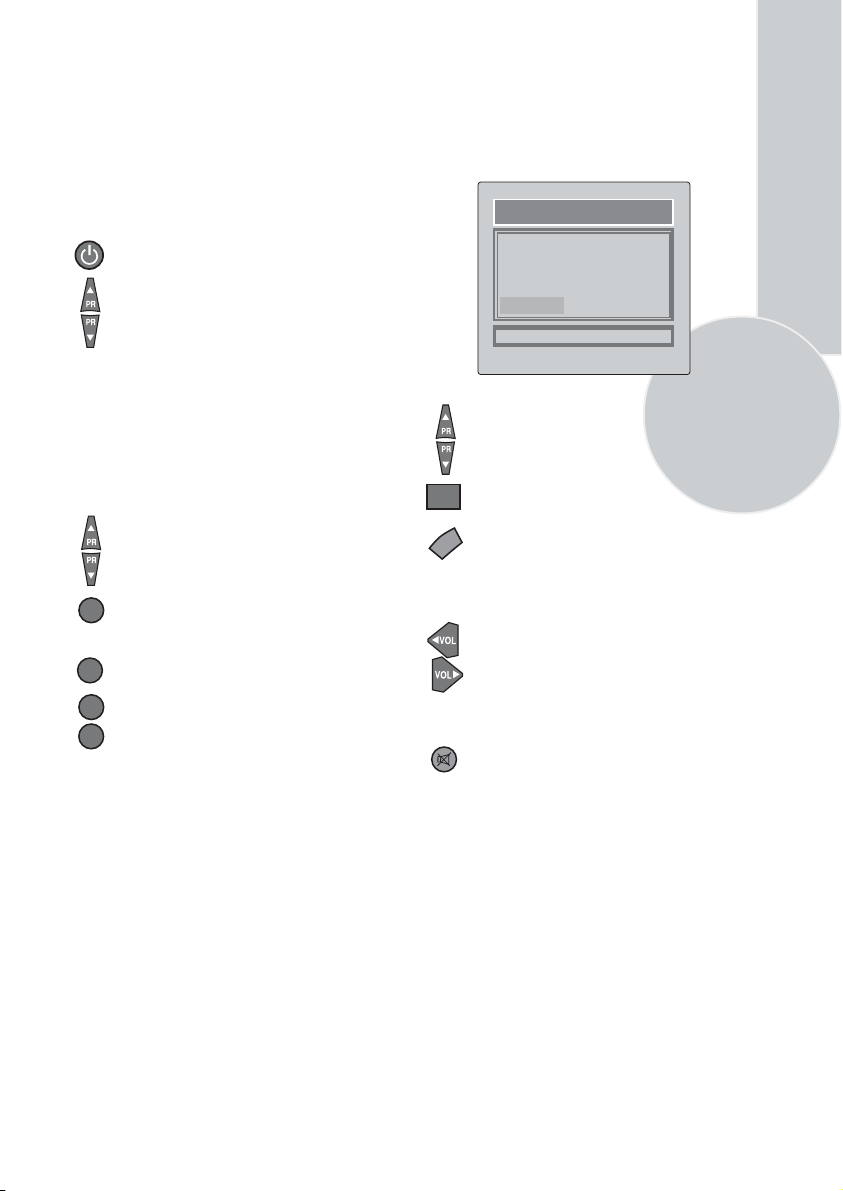
Stand-By mode
When your TV is operating, press the
red “STAND-BY” button on the right
upper corner of your remote control
to switch to standby and the StandBy indicator (Led) will be brighter.
To turn on your TV again, press a
numeric button or (Program up or
Program down).
Please Note: If you will not be using your
TV for a long time, do not leave it in StandBy mode, instead switch it off from the power
button on the front panel of the TV set
and switch off or unplug at the mains plug.
Programme selection
Please refer to the tuning section on
page 8.
Press the Program up or Program
down buttons on the TV or remote
control or press a Numeric button
1
to select a programme.
To select a programme whose
number is greater than 9 using the
-/--
numeric buttons, press the -/--
button first and then press the two
1
Numeric buttons. For example, to
2
button followed by
and then12
-/--select programme 12, press the
.
You can also select a program by
pressing the Yellow button to
display the Program Table.
OK
TV/TX
Volume
Mute
PROGRAM TABLE
00. ----
01.
02. BBC
03.
04.
SKIP
Use the Program up and Program
down buttons to scroll through the
programme numbers. When you
find the program number you want
press theOK button again.
Press theTV/TX button to exit the
Program Table.
Press theVolume + or Volume -
button on the TV or the Vol or
▲
Vol button on the remote control.
A sound level bar will appear on the
screen.
To mute the sound press the Mute
button on the remote control. A
loudspeaker symbol will appear on
the screen.
MOVE
05.
06.
07.
08.
09.
NAME
10.
11.
12.
13.
14.
DELETE
7
▲
Page 19
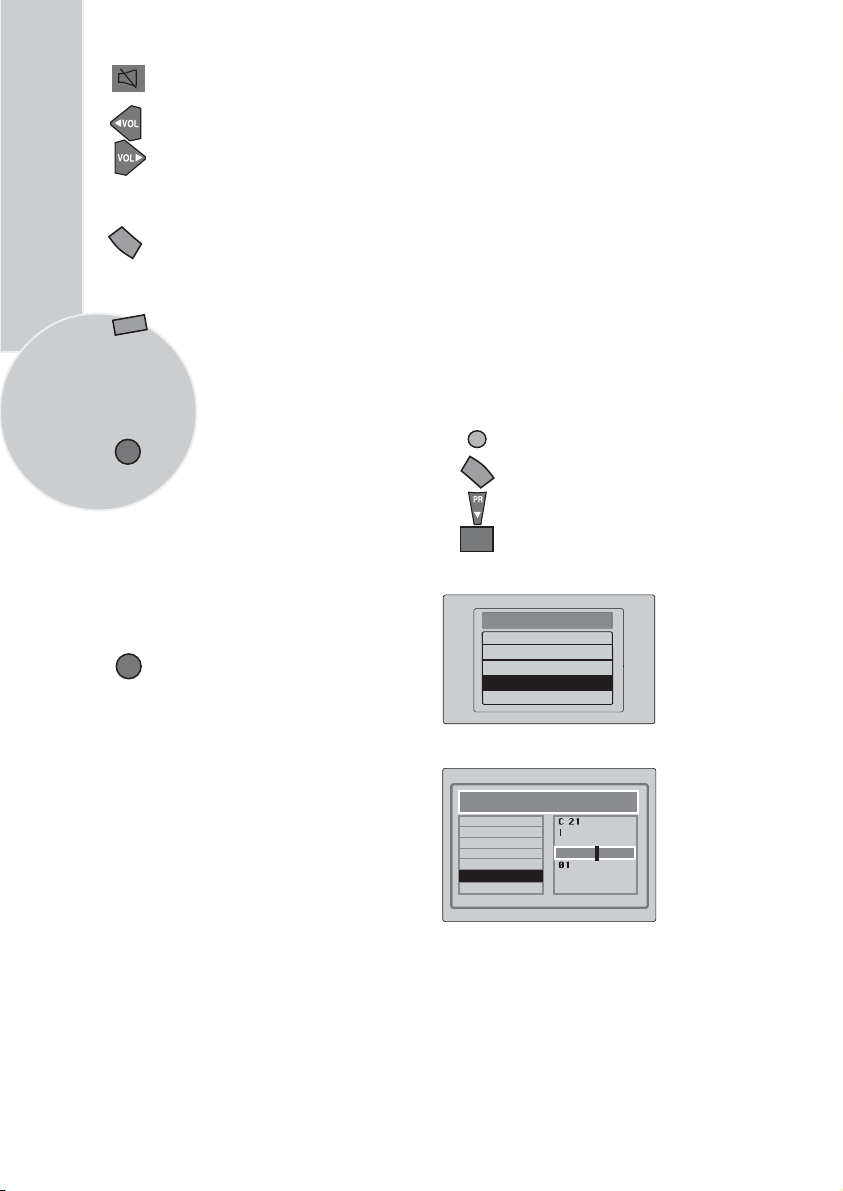
Press the Mute button again to
restore the sound. The symbol
will disappear.
Pressing Volume up buttons
will also restore the sound.
But pressing the Volume down
button will decrease the volume
PP
without restoring.
Personal preference. Press the
PP
PP
button to revert to the
default settings for the TV.
Swap
(See TV setup).
Press the SWAP button on the
SWAP
remote control to select the last
viewed channel.
8
AV
Your TV has 1 scarts so every time
AV
you press your AV button, your input
will change as follows:
1 AV1 when using SCART socket
2 AV2 when using the RCA sockets of the
TV.
3 AVS when using the S-video socket.
Press the AVbutton again to
AV
return to TV.
Tuning the television
There are two ways of tuning your television:
Manual, where you control the tuning process
or Auto programme where the television does it
all automatically.
This function will automatically tune, name and
arrange programmes found in the following
order.
POSITIONS
PROGRAMME NO
1
2
3
4
5
BBC1
BBC2
ITV
CHANNEL4
CHANNEL5
PREPARATION
• Connect your satellite receiver and
VCR as shown on page.
• Select SKY1 or SKY NEWS on your
satellite receiver.
• Playback a known content prerecorded
cassette.
• Do not connect scart cables untill auto
programming is completed.
Please Note
If the TV is set to a channel with no signal the
TV will return to standby in 5 minutes.
The last minute remaining is displayed on
the screen.
Automatic tuning (Autoprogram)
There are two ways to access the SETUP
menu:
Press the blue Setup button.
or
MENU
Press the Menu button and use the
Program down button to select
SETUP. Press theOK button to
enter the SETUP menu.
OK
MAIN MENU
SOUND
PICTURE
PROGRAM TABLE
SETUP
FEATURE
CHANNEL
SYSTEM
SEARCH
FINE TUNE
PROGRAM NUMBER
AUTO PROGRAM
STORE
SETUP
Page 20
Please note
If you do not press any buttons for 15 seconds
the TV will exit the menu system.
Use the Program down button to
select AUTOPROGRAM and
press
OK
the OK button. A list of
countries will appear. Select
the desired country (UK) using
Program and Volume buttons.
Ensure the aerial is connected
OK
properly press the OK button.
Autoprogam will start.
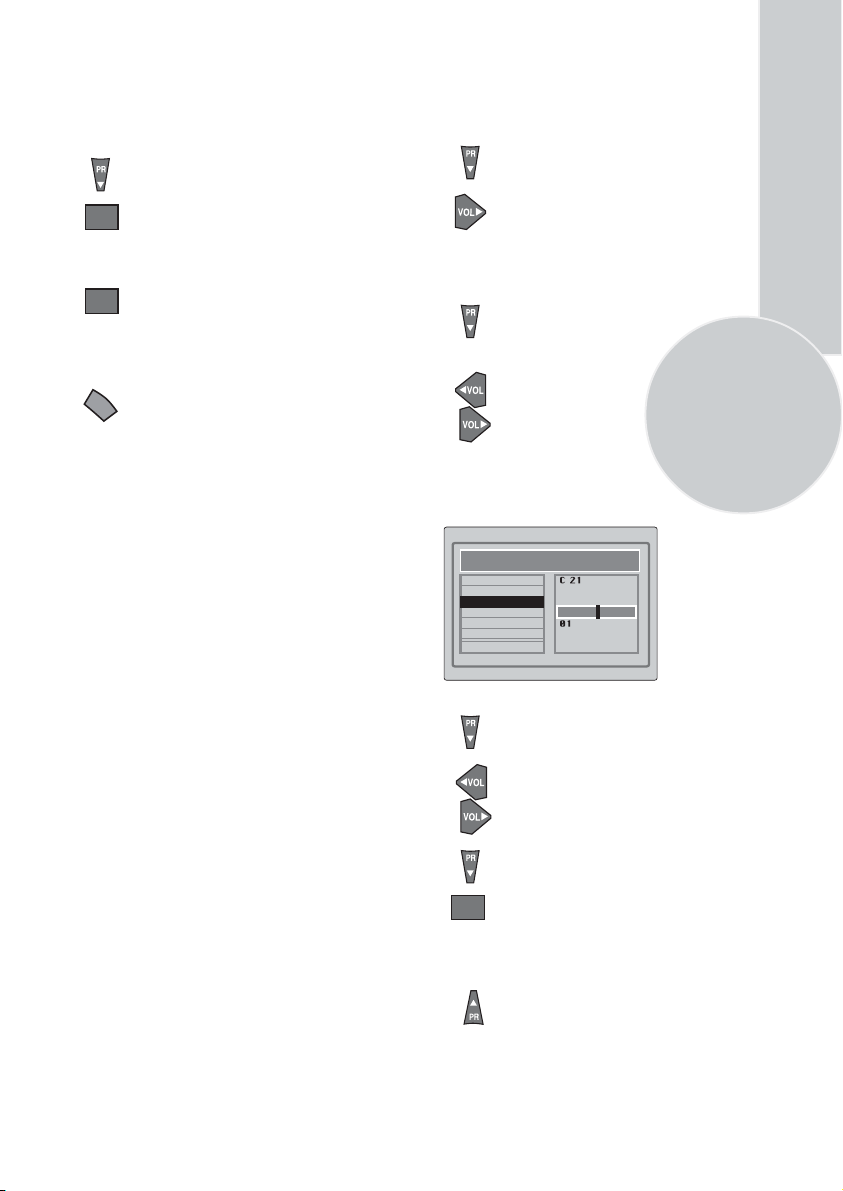
Manual tuning
If you want to tune manually:
In the Setup menu select
PROGRAM NO
using
the Program down button
and use the Volume up
button to change the Program No
to 01.
Starting with Program 01, tune
in the first channel as follows:
Use the Program down button
to select SEARCH.
MENU
To cancel Autoprogram whilst it
working press the Menu button
is
repetitively.
As Autoprogram stores a channel
it will appear briefly on the screen
before the search continues.
Your TV is now tuned and ready to use.
Please note:
If auto sort fails to arrange the programmes
in the required sequence please refer to
programme organising.(PAGE 11)
Press the Volume up or Volume
down button to start the tuning
search.
When the search finds a strong
channel signal it will stop
searching. The picture will appear.
CHANNEL
SYSTEM
SEARCH
FINE TUNE
PROGRAM NUMBER
AUTO PROGRAM
STORE
SETUP
I
Use the Program down
select PROGRAM NO.
Volume up/down
Use the
buttons
to select the desired
programme number.
Use the Program down button to
select STORE. Press theOKbutton
and STORED will appear on the
OK
STORE line.
You have now stored the first
channel.
Use the Program up button to
select SEARCH again and
continue the tuning procedure
until you have tuned in all the
programmes you want or the
television can receive.
button to
or numeric
9
Page 21
20
Connecting a DVD
player
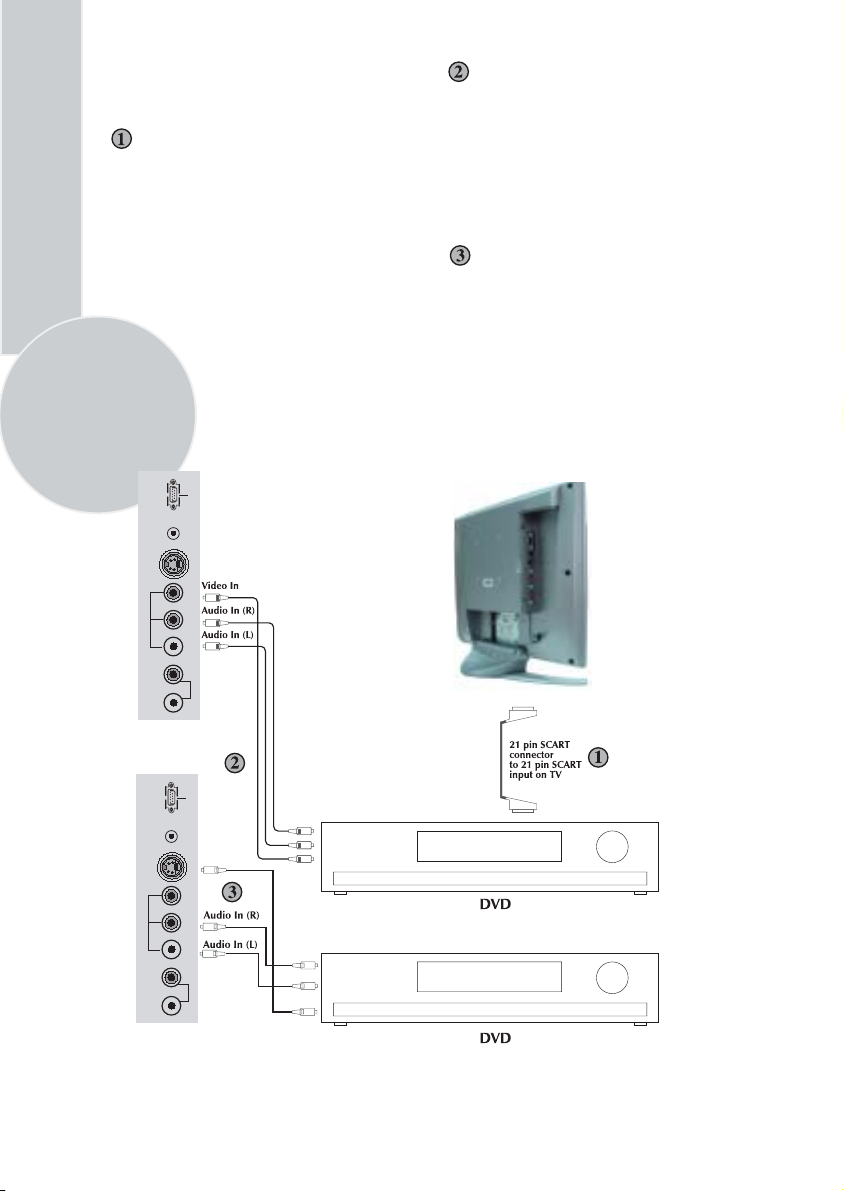
Via SCART
Make sure the TV and DVD player are both
switched off.
Plug one end of the SCART lead (not
supplied) into the back of the DVD player
and the other end into the SCART
socket on the back of the TV.
Switch on the DVD and the TV.
DC 12V VGA
AVS
AV2
L R VIDEOL R S-VHS
Via PHONO lead
Make sure the TV and DVD player are both
switched off.
Plug one end of the PHONO lead into the video
and audio out sockets on the back of the
DVD player and plug the other end into the
video and audio in sockets of the TV.
Via PHONO lead and S-Video socket
You can also connect it through the
S-Video socket of the TV.
Plug the S-Video plug into the S-Video
socket and the audio leads into the audio
sockets.
AVS
AV2
AUDIO OUT
AUDIO OUT
DC 12V VGA
S-Video In
L R VIDEOL R S-VHS
Page 22
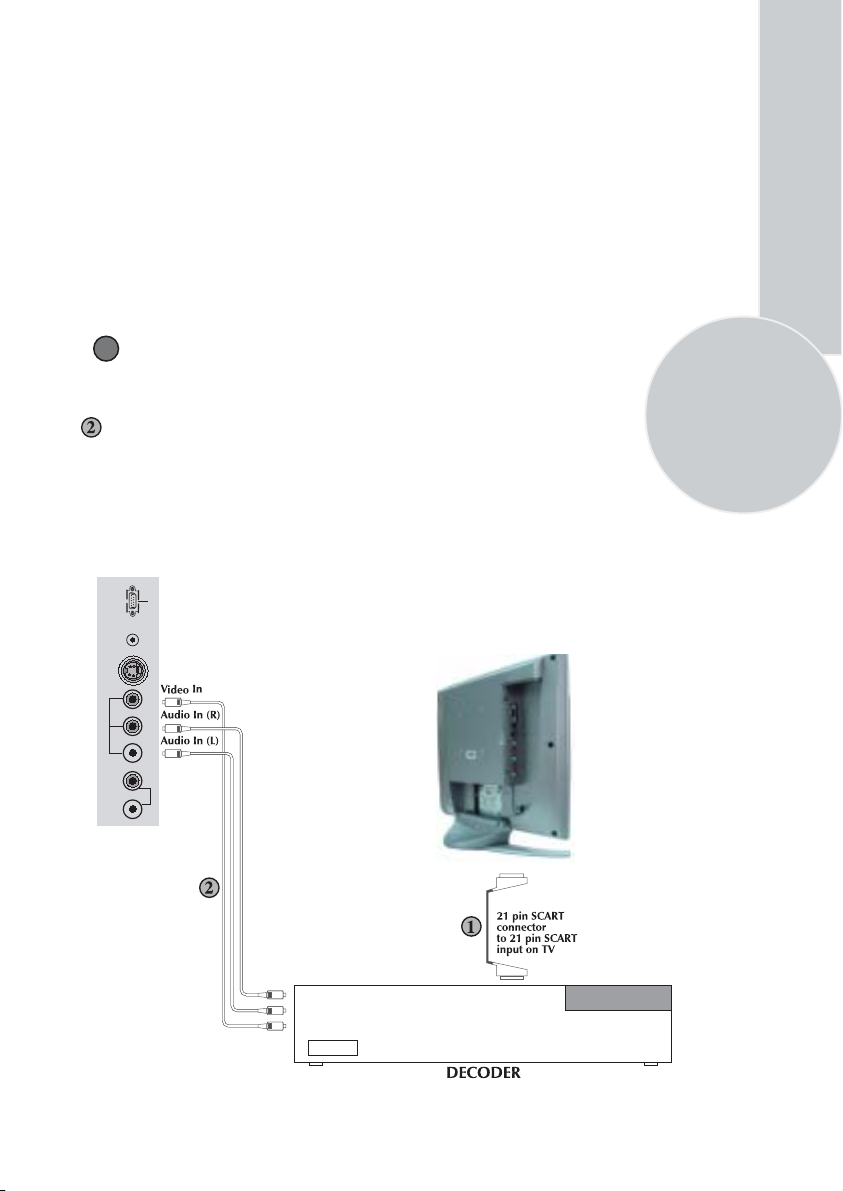
Connecting a decoder
Via SCART
Make sure the TV and decoder are both
switched off.
Plug one end of the SCART lead (not
supplied) into the back of the decoder and the
other end into the SCART
on the back of the TV.
Switch on the decoder and the TV.
Press the AV button on the remote
AV
control to select AV1.
Via PHONO lead
Make sure the TV and decoder are both
switched off.
Note: For Decoder connection Via
PHONO lead your Decoder device should
have the tuner built in.
DC 12V VGA
AVS
Plug one end of the PHONO lead into the video
and audio out sockets on the back of the
decoder and plug the other end into the video
and audio in sockets on
the TV.
21
AV2
L R VIDEOL R S-VHS
AUDIO OUT
Page 23
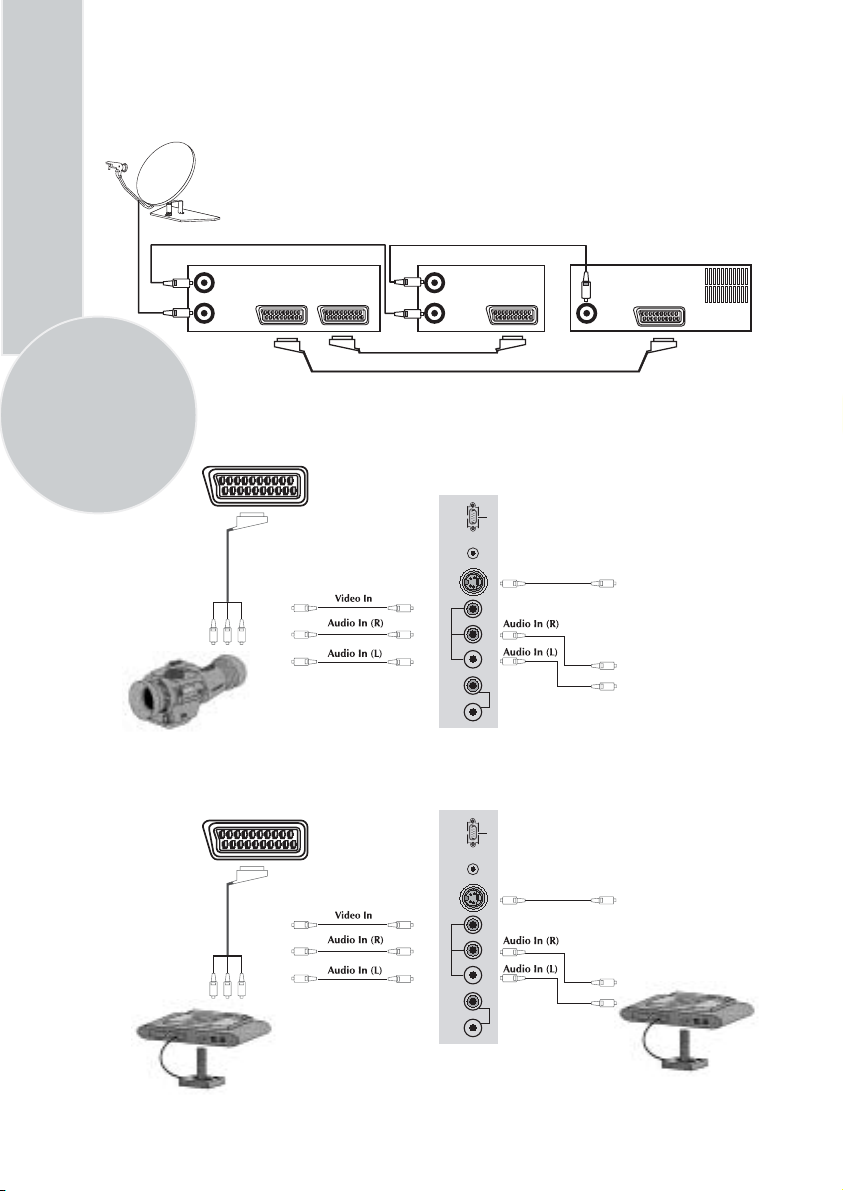
22
Connecting TV with video and satellite/digital
receiver
Satellite/digital receiver Video Rear of TV
Aerial out
Aerial
TV
Scart socket
Video
Scart socket
Aerial out
Aerial in
Scart socket
Aerial
socket
Scart 1
Connecting TV with camcorder
AV1
DC 12V VGA
S-Video In
AVS
AV2
L R VIDEOL R S-VHS
AUDIO OUT
Camcorder
Connecting TV games and computer
AV1
DC 12V VGA
S-Video In
AVS
AV2
L R VIDEOL R S-VHS
AUDIO OUT
S-Video TV Game Player
Page 24
3
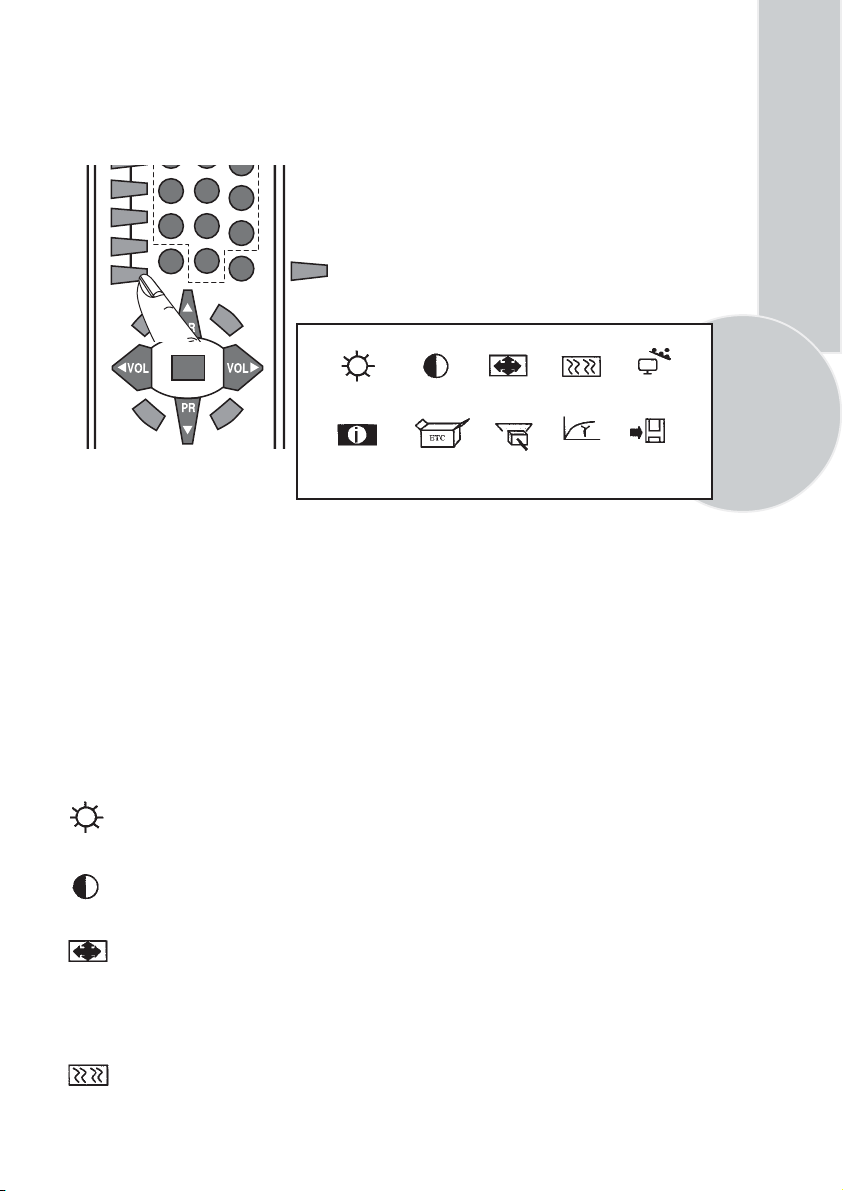
USE AS A PC MONITOR
Your LCD-TV equipment is provided with VGA inputs, it may be used as a PC
monitor as well.(Plug&Play)
A time delay is present during changing from Tv to Pc mode this normal and not
a fault.
HOLD
SUB
UPDATE
MIX
TV/PC
TV/TX
4
7
AV
5
8
0
MENU
Preparation
1 Plug one end of a VGA lead to the computer monitor
6
output and the other end to the VGA input on the back of the
TV.
9
2 To enter “PC” mode from TV mode press mix button
-/--
on remote control.
MIX
TV/PC
To exit "PC" mode press mix button on the remote
control, or select TV mode in the “TV selection” menu.
OK
BRIGHTNESS CONTRAST POSITION IMAGE AUTO CONFIG
PP
16:9
INFO MISC TV SELECT GAMMA SAVE
3 Menu’s
. Press the menu button on the TV.
. To browse the options use PR▲ / PR▼ on the TV.
. To select options use VOL▼ / VOL▲ on the TV.
. To adjust settings use PR▲ / PR▼
. To store settings .
browse to “Save”using PR▲ / PR▼
select using VOL▼ / VOL▲
select “Yes” using PR▲ / PR▼
to exit press “menu” on the TV.
Note 1: When the system is in the monitor mode, the sound from the TV channel selected
may be heard from the speakers.When you enter this mode, the sound control buttons on
the remote control
( VOL▼ / VOL▲ MUTE) become functional.
Note 2: When the system is in the monitor mode, the STANDBY button is operational.Upon
exit from STANDBY,the system starts up in the TV mode again.
BRIGHTNESS
After entering the Brightness Menu using the VOL▼ / VOL▲ buttons, you may set the
brightness value of the monitor to the desired level by using the PR▲ / PR▼ buttons.
CONTRAST
After entering the Contrast Menu using the VOL▼ / VOL▲ buttons, you may set the
contrast value of the monitor to the desired level by using the PR▲ / PR▼ buttons.
POSITION
After entering the Position Menu using the VOL▼ / VOL▲ buttons, you may set the
geometrical adjustment value of the monitor to the desired level by using the PR▲ / PR▼
buttons.
H-POSITION : Horizontal position adjustment
V-POSITION : Vertical position adjustment
IMAGE
After entering the Image Menu using the VOL▼ / VOL▲ buttons, you may set the phase
adjustment value of the monitor to the desired level by using the PR▲ / PR▼ buttons
PHASE : ADC sampling phase adjustment
CLOCK : ADC clock count Per line
23
Page 25
24
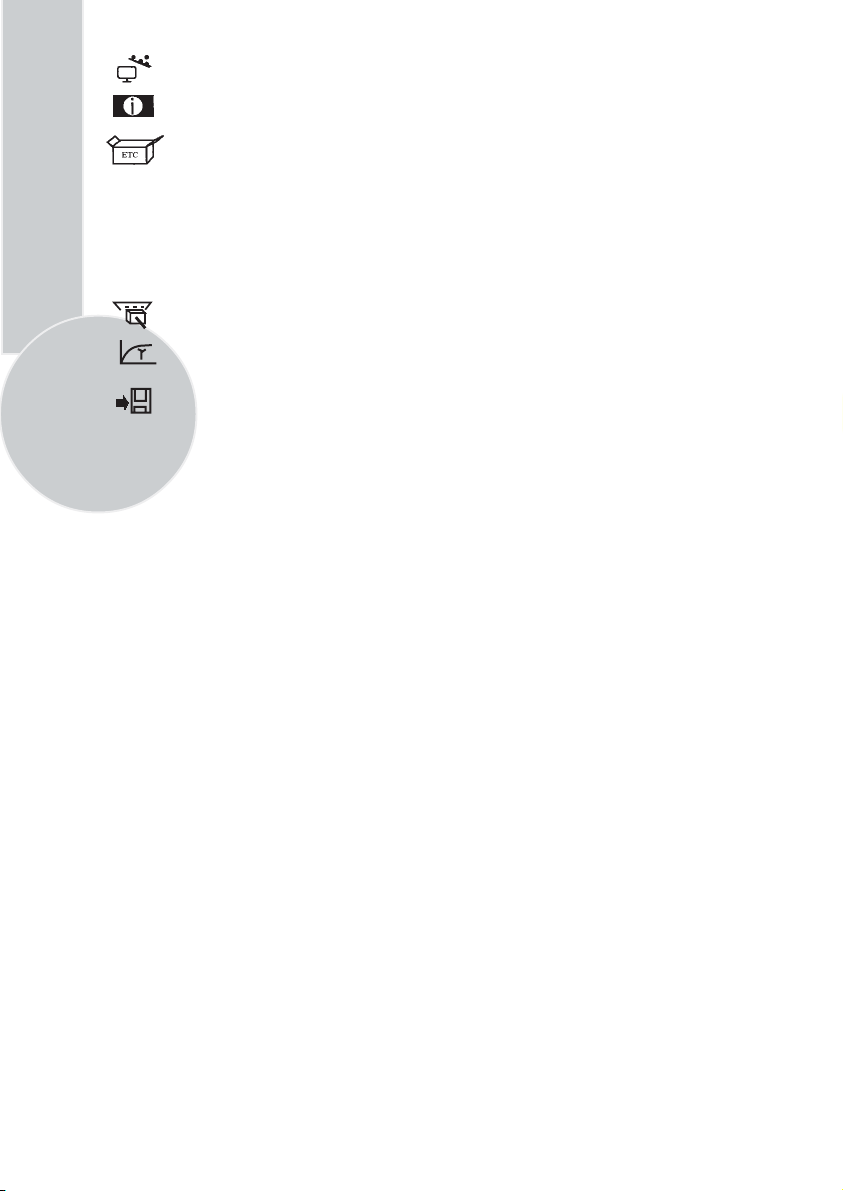
AUTO CONFIG : Allows the entry of optimum geometrical adjustments based on the input
mode
INFORMATION : Displays the input mode information on the screen.
MISCELLANEOUS
You may enter the factory default settings, Menu position and duration on the screen, resolution
settings etc. by selecting the MISCELLANEOUS option.
FACTORY RESET : Loads the factory default settings
OSD TIMEOUT : The on-screen timeout may be adjusted to a value between
5 - 60 seconds.
OSD POSITION : Used for adjusting the OSD Horizontal and Vertical position
NATIVE MODE : Displays the input cursor in its actual resolution
TV SELECTION : To change from Monitor mode to TV mode
GAMMA-MOIRE : Used for rectifying the errors that may occur when changing from a
lower resolution to the XGA mode
SAVE : Stores the settings entered.
NOTE: The user can store the geometrical adjustments (H-Position, V-Position) entered for
6 different input graphic modes. When the Autoconfig is performed, the settings provided for
that mode are stored, therefore, activating the Autoconfig function each time the mode is
changed, is not necessary. When the user stores the settings for a 7th mode, the first mode
stored will be erased
Warning Messages
1. No SYNC: The VGA input code (resolution) is missing. The "NO SYNC" message appears
on the display. The message stays on the screen for 30 seconds and if no other VGA input
signal that is supported by the system is not provided within that period, the system will go
to "POWER SAVING" mode in order to protect the LCD panel. In this mode, the display will
turn off, but the sound from the selected tuner channel will be audible and the standby led will
flash.
2. Input Not Supported: The input code (resolution) is not a supported graphics mode. The
message "INPUT NOT SUPPORTED" appears on the display. The message stays on the screen
until a supported graphic input code is received.
Important Warning:
1. When the system changes from TV mode to PC mode for the first time, the sound from
the speakers is muted, but available through the headphones
2. When a particular VGA mode is displayed for the first time, selecting the
"Autoconfiguration" option may be necessary. The position adjustment as well as the HPosition and V-Position fine adjustments must be entered and the values "saved (stored)"
3. When the signal is cut off, depending on the VGA power-saving standard, the message
"NO SYNC" is displayed on the screen for 30 seconds. At the end of this period, the system
turns off, providing an energy saving of 30 watts.
Page 26
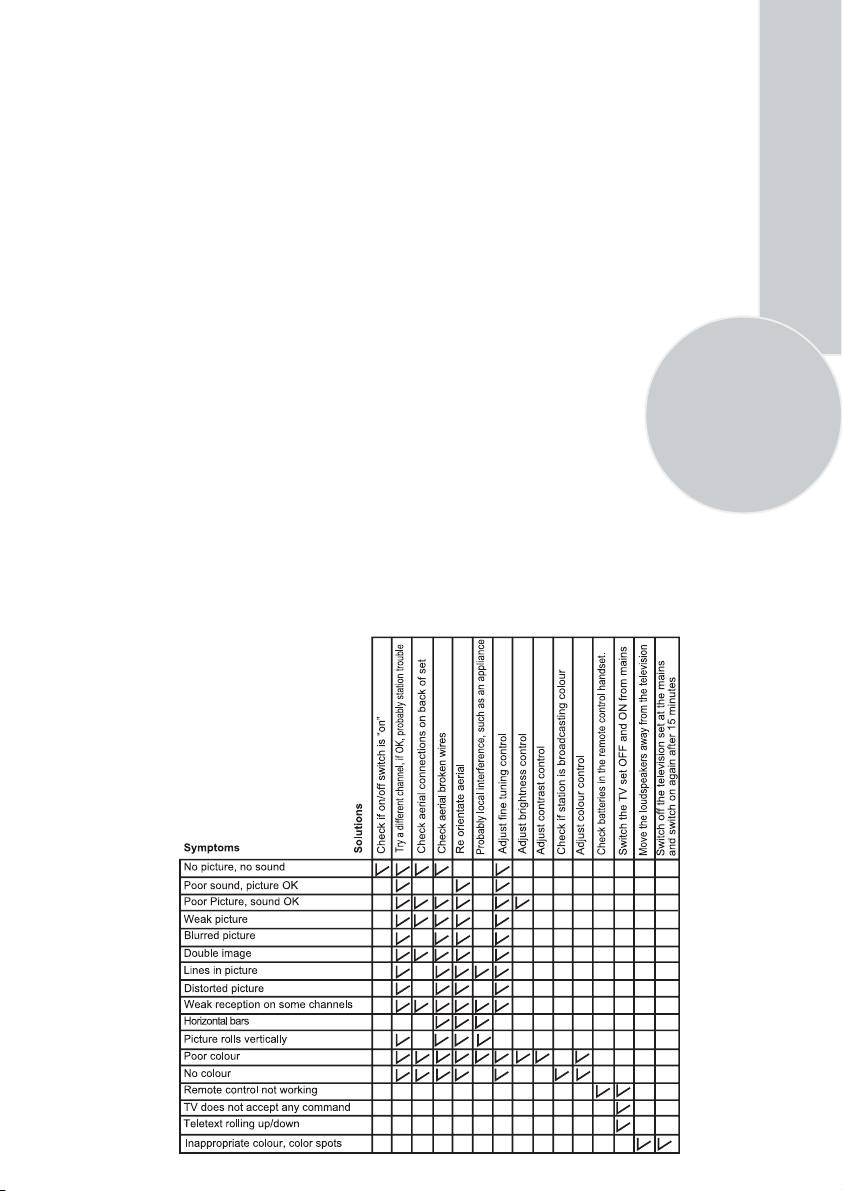
Help and service tips
The TV does not work
Make sure it is plugged into the mains supply
and switched on.
Poor picture
• Is the aerial plugged in?
• If you are using a set top aerial is it
properly aligned for the best signal.
• Make sure the aerial is not to close to
neon lights, loudspeakers etc.
• Try changing the direction of the outdoor
aerial. High buildings and mountains can
cause ghost pictures or double images.
• The picture quality may be reduced by
connecting two external sources at once.
Disconnect one of the sources.
• Adjust the fine tuning.
No picture (TV)
• Is the aerial plugged in properly?
• Is the aerial lead damaged?
• Are all the plugs in the aerial lead fitted
correctly?
• Have you pressed the correct buttons on
the remote control?
No picture (PC)
• Is the VGA lead commected
correctly
• Is the PC switcmed on
No sound
• Is the sound muted? Press the Mute
button.
• Is the volume turned down?
Sound coming from only one
speaker
• Is the balance set to one side? See the
sound menu.
No response to the remote control
• Try changing the batteries.
• Is there an obstruction between the
remote control and the sensor on the TV.
If nothing works
If you have tried the above solutions and none
seem to work, try switching the unit off and
on again.
If this does not work contact your supplier or
TV repair technician. Never attempt to
repair a defective TV yourself.
25
Page 27
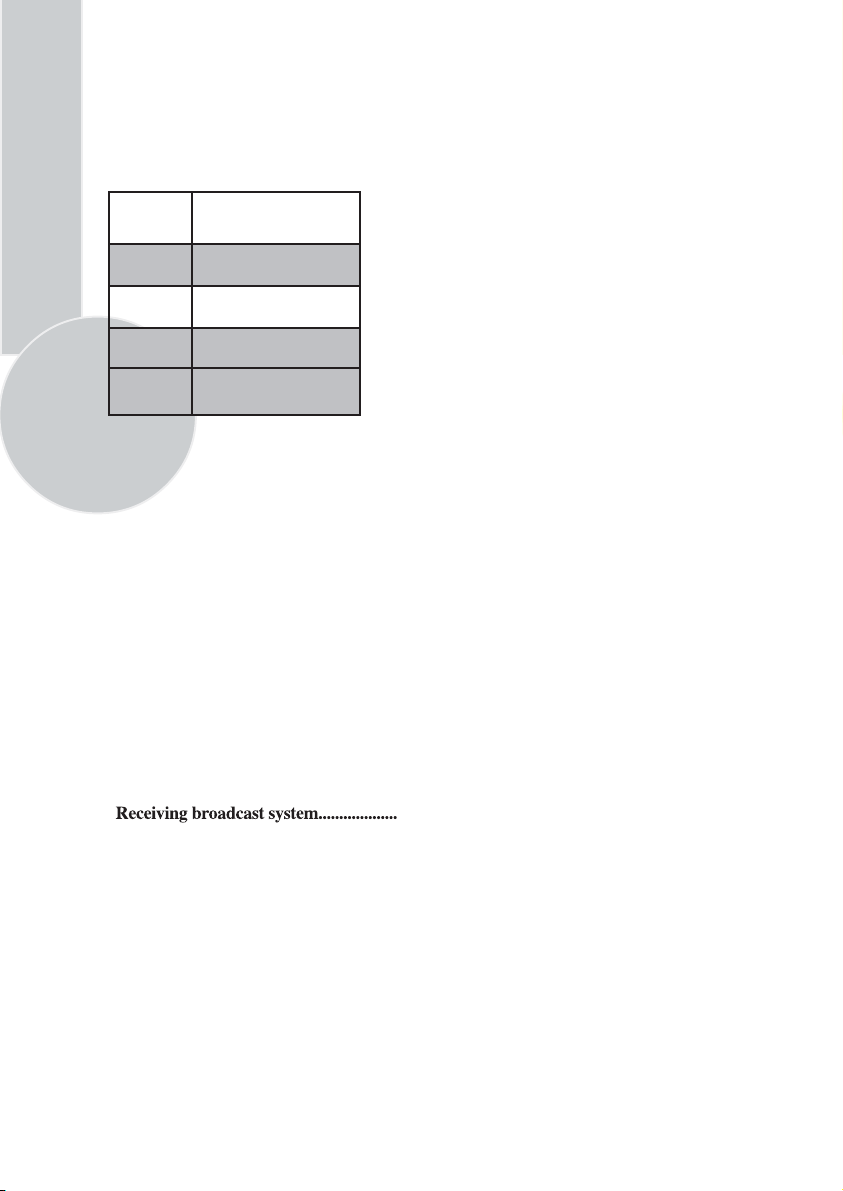
Technical specifications table
26
Picture tube
size/typee
Screen size
Visible
sceen size
Sound Output
(%10 THD)
Power
consumption
304,1 5
60W (max)
15”
4:3
38 cm
(H)x28.1 (V)mm
2x2 W
General technical specifications
Power Supply
DC: ................................................... 12V-5A
Number of preset programmes ......... 100
RF Aerial input .................................... 75
Speaker empedance ...........................
Sound Systems...................................... Mono/Stereo/NICAM
Batteries ............................................ 2x AAA
Receiving channels ............................... VHF (Band I Channels 2-4)
............................................................. VHF (Band III Channels 5-12)
............................................................... UHF (Channels 21-69)
.............................................................. Cable TV (S1-S20/S21-S41)
ohm (unbalanced)
8 ohm
PAL I
Page 28

Plc
Guarantee - Television
Your new television is guaranteed against the cost of breakdown repairs for twelve
months from the date of the original purchase. (* see note below for small screen
sets)
What is covered?
• All repairs necessary as a result of faulty materials, defective components or
manufacturing defect.
• The cost of all functional replacement parts, excluding remote control batteries
• The labour costs of a Beko approved repairer to carry out the repair.
• (*) For TV's with screen sizes of 21 inches or less (measured diagonally corner
to corner) you may be offered a replacement instead of repair under guarantee.
Your dealer will advise you.
What is not covered?
• Transit or delivery damage
• Accidental damage
• Misuse, or abuse.
• Cabinet or appearance parts, including knobs and flaps
• Remote control batteries.
• Repairs or replacements required as a result of unauthorised repairs or inexpert
installation that fails to meet the requirements contained in the user instruction
book.
• Repairs or replacements to product installed or used on commercial or non-
household premises.
Important notes.
• The product is guaranteed for domestic household use only.
• The guarantee will be void if the product is installed or used in commercial or
non-household premises.
• The product must be correctly installed and operated in accordance with the
instructions contained within the Operating Instructions Booklet provided with
the product
• The guarantee is given only within the boundaries of the United Kingdom and
the Republic of Ireland.
• The guarantee is not transferable if the product is resold.
• Beko Plc disclaims any liability for incidental or consequential damages.
• The guarantee does not in anyway diminish your statutory or legal rights.
Beko House, Caxton Way, Watford, Herts, WD18 8UF, Tel: 0870 241 0128
Page 29
Plc
HOW TO OBTAIN SERVICE
Congratulations on your choice of a Beko colour television. Your new television has been
designed and manufactured to the highest quality standards to give you many years of
use. To get the best out of it, please take a few moments to read the instruction book.
Your television is supplied with a full 12 months guarantee, covering parts and labour.
Should you require service under guarantee, simply call the number below (***see note
for small screen sets)
0870 241 0128
Our service receptionist will ask you for your product model number, your retailer's name,
and the date of purchase when you call. It will assist you if you complete the box at the
bottom of this page when you take delivery of your television so that the information is
readily available should you need it. If it is necessary for an engineer to visit your home
he will normally be there within 48hrs of receipt of your call (excluding Bank Holidays)
or at your earliest convenience.
Before telephoning for service please check the trouble shooting guide in the instruction
book as often minor problems are easily identified and resolved by following the instructions
contained therein. Service visits where there is no fault with the product could incur a
charge even though the product is under guarantee.
Service is also available on the above number after the guarantee period has expired.
The cost of any repairs outside of the guarantee period is payable to the engineer at the
time of visit .
Please complete the box below for ease of reference later.
Model Number
Date of Purchase
Please keep your purchase receipt. The engineer will need to see it should
you require service under the 12-month Guarantee.
*** Special Note:
In home repair service is not available on models with a screen size of 21" or under. You
should contact your retailer for advice and assistance on these models.
Serial Number
Place of Purchase
Page 30

BEKO plc, Beko House, Caxton Way, Watford, Hertfordshire, WD18 8UF
Tel: 0870 7741050 Fax: 01923 819653
E-Mail: [email protected] www.beko.co.uk
TN4.801
 Loading...