

Page 1
Issue: 12
1
st
June 2017
BA326C
Intrinsically safe
loop-powered
analogue bargraph and
digital indicator
Issue 12
For instrument with serial
numbers above 071235/01/001
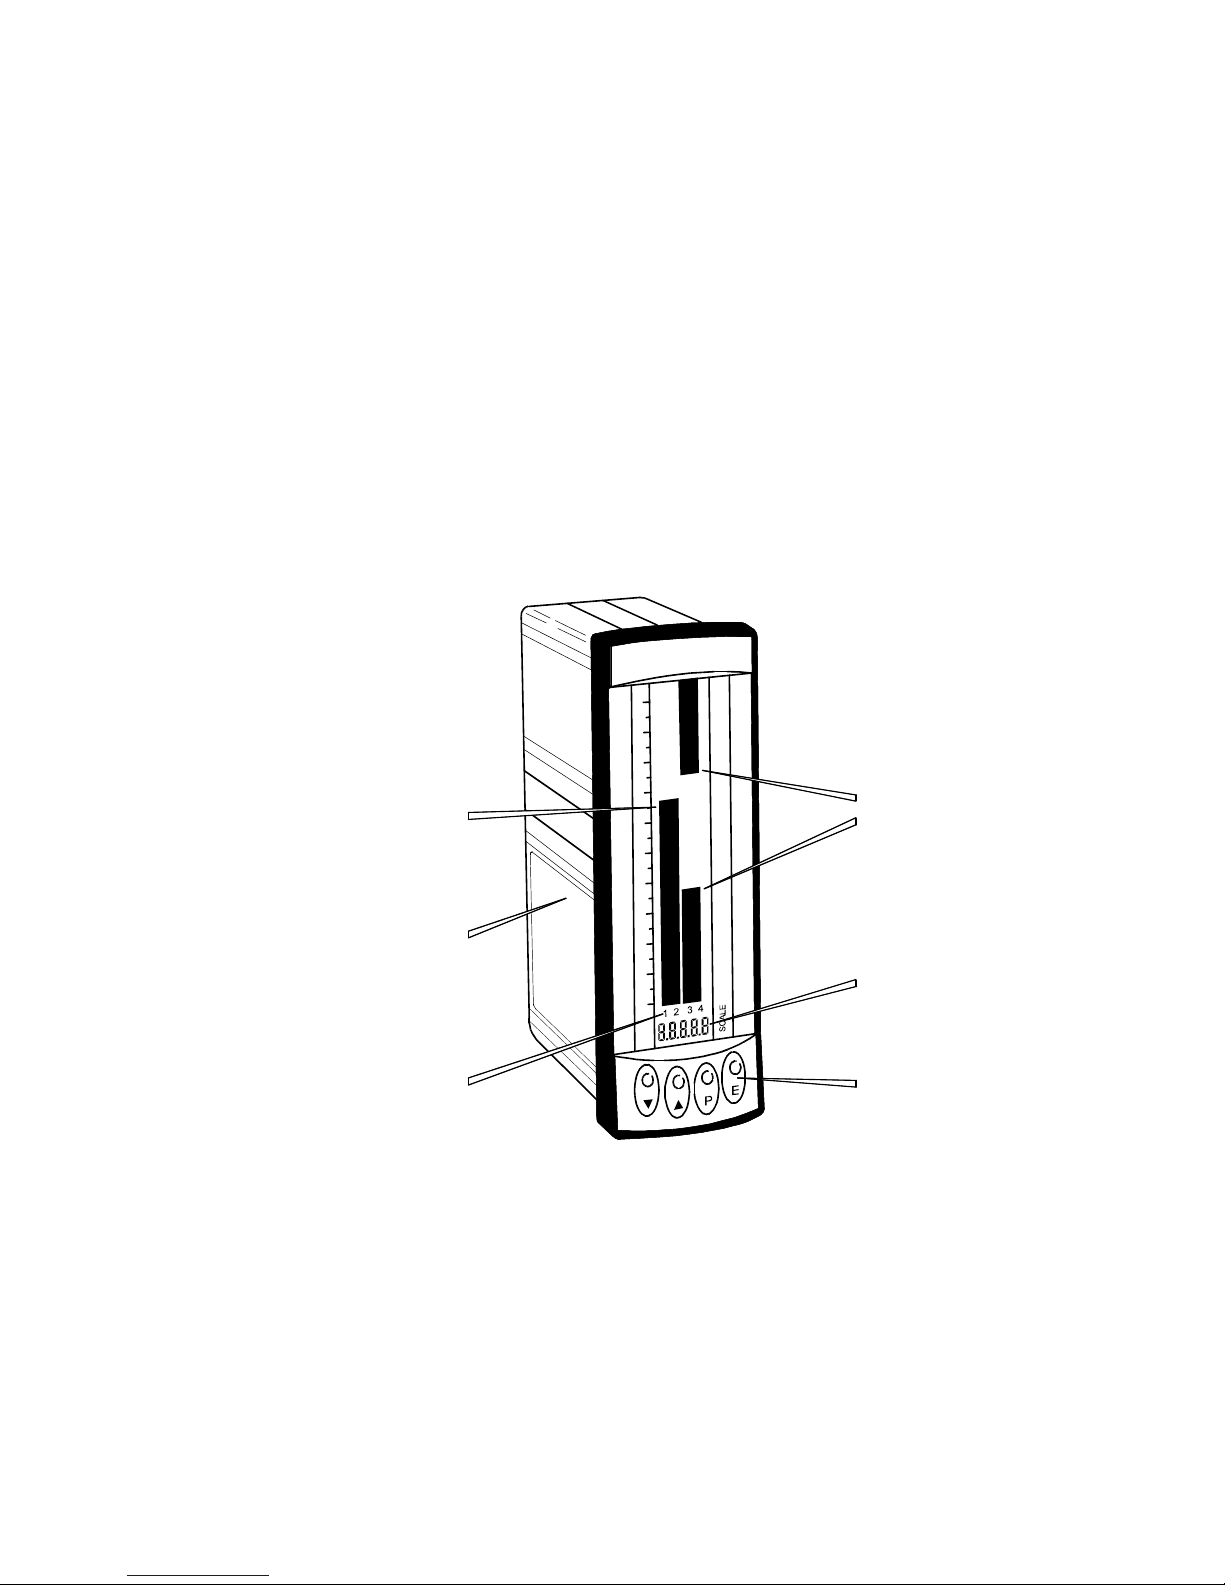
Alarm
setpoints
Digital
display
Certification
label
Alarm
annunciators
Push
buttons
Analogue
display
Page 2

2
1. Description
2. Operation
2.1 Controls
3. Intrinsic Safety Certification
3.1 ATEX certificate
3.2 4/20mA input
3.3 Zones, gas groups & T rating
3.4 Certification label information
4. System Design for Hazardous Areas
ATEX certification
4.1 Transmitter loops
4.2 Remote indication
5. Installation
5.1 Location
5.2 Installation procedure
5.3 EMC
6. Programming and Calibration
6.1 Summary of programmable
functions.
6.2 Root extractor
6.3 Digital display
6.4 Digital resolution
6.5 Dummy trailing zero
6.6 Position of decimal point
6.7 Bargraph display
6.8 Calibration using an external
current source.
6.9 Calibration using internal
references
6.10 Conditioning sub-menu
6.10.1 AC rejection
6.10.2 Calibration of internal
references.
6.11 Function of the P push button
6.12 Null display function
6.13 Security code
6.14 Over and under-range
7. Calibration Examples
7.1 Using an external current source
7.2 Using the internal references
8. Maintenance
8.1 Fault finding during commissioning
8.2 Fault finding after commissioning
8.3 Servicing
8.4 Routine maintenance
8.5 Guarantee
8.6 Customer comments
9. Accessories
9.1 Units of measurement and
instrument identification.
9.2 Alarms
9.2.1 Solid state output
9.2.2 Intrinsic safety
9.2.3 Programming and
adjustment
9.2.4 Alarm enable
9.2.5 Setpoint adjustment
9.2.6 Alarm function
9.2.7 Alarm output status
9.2.8 Hysteresis
9.2.9 Alarm delay
9.2.10 Alarm silence time
9.2.11 Display alarm identification
9.2.12 Access setpoint
9.2.13 Adjusting alarm setpoints
from display mode.
9.3 Lineariser
9.3.1 Calibration using an
external
current source.
9.3.2 Calibration using internal
references.
9.4 Display backlight
Appendix 1
IECEx certification
The BA326C is CE marked to show compliance with the European Explosive Atmospheres
Directive 2014/34/EU and the European EMC Directive 2014/30/EU
Page 3
3
1. DESCRIPTION
The BA326C is an intrinsically safe, panel
mounting, loop powered 4/20mA combined
bargraph and digital indicator. The one
hundred segment bargraph provides a quick
indication of input current magnitude and
trend, supported by an accurate digital display
which may be calibrated in engineering units.
The BA326C is a second generation
instrument which, although having additional
functions, remains compatible with the original
BA326B.
The main application of the BA326C is to
display a measured variable or control signal in
a hazardous process area. The zero and span
of the digital display are independently
adjustable so that the indicator may be
calibrated to display any 4/20mA variable in
engineering units. The analogue display
shows the 4/20mA input on a single or double
100 segment bargraph which may be fitted
with a custom scale to indicate the units of
measurement. Both the bargraph and digital
display may be offset to indicate deviation from
a specified input current.
The BA326C and the optional accessories
have been certified intrinsically safe for use in
gas hazardous areas by Notified Body Intertek
Testing and Certification Ltd. This certification
has been used to confirm compliance with the
European ATEX Directive 2014/34/EU.
The EC-Type Examination Certificate specifies
that under fault conditions the output voltage,
current and power at input terminals 1 and 3
will not exceed those specified for simple
apparatus in Clause 5.7 of EN60079-11.
This instruction manual describes ATEX
certification for BA326C instruments with serial
numbers above 071235/01/001. International
IECEx certification is described in Appendix 1.
BA326C indicators with serial numbers above
071235/01/001 are not FM approved.
The BA326C indicator is housed in a robust
144 x 48 panel mounting DIN enclosure with
an IP65 sealed front.
2. OPERATION
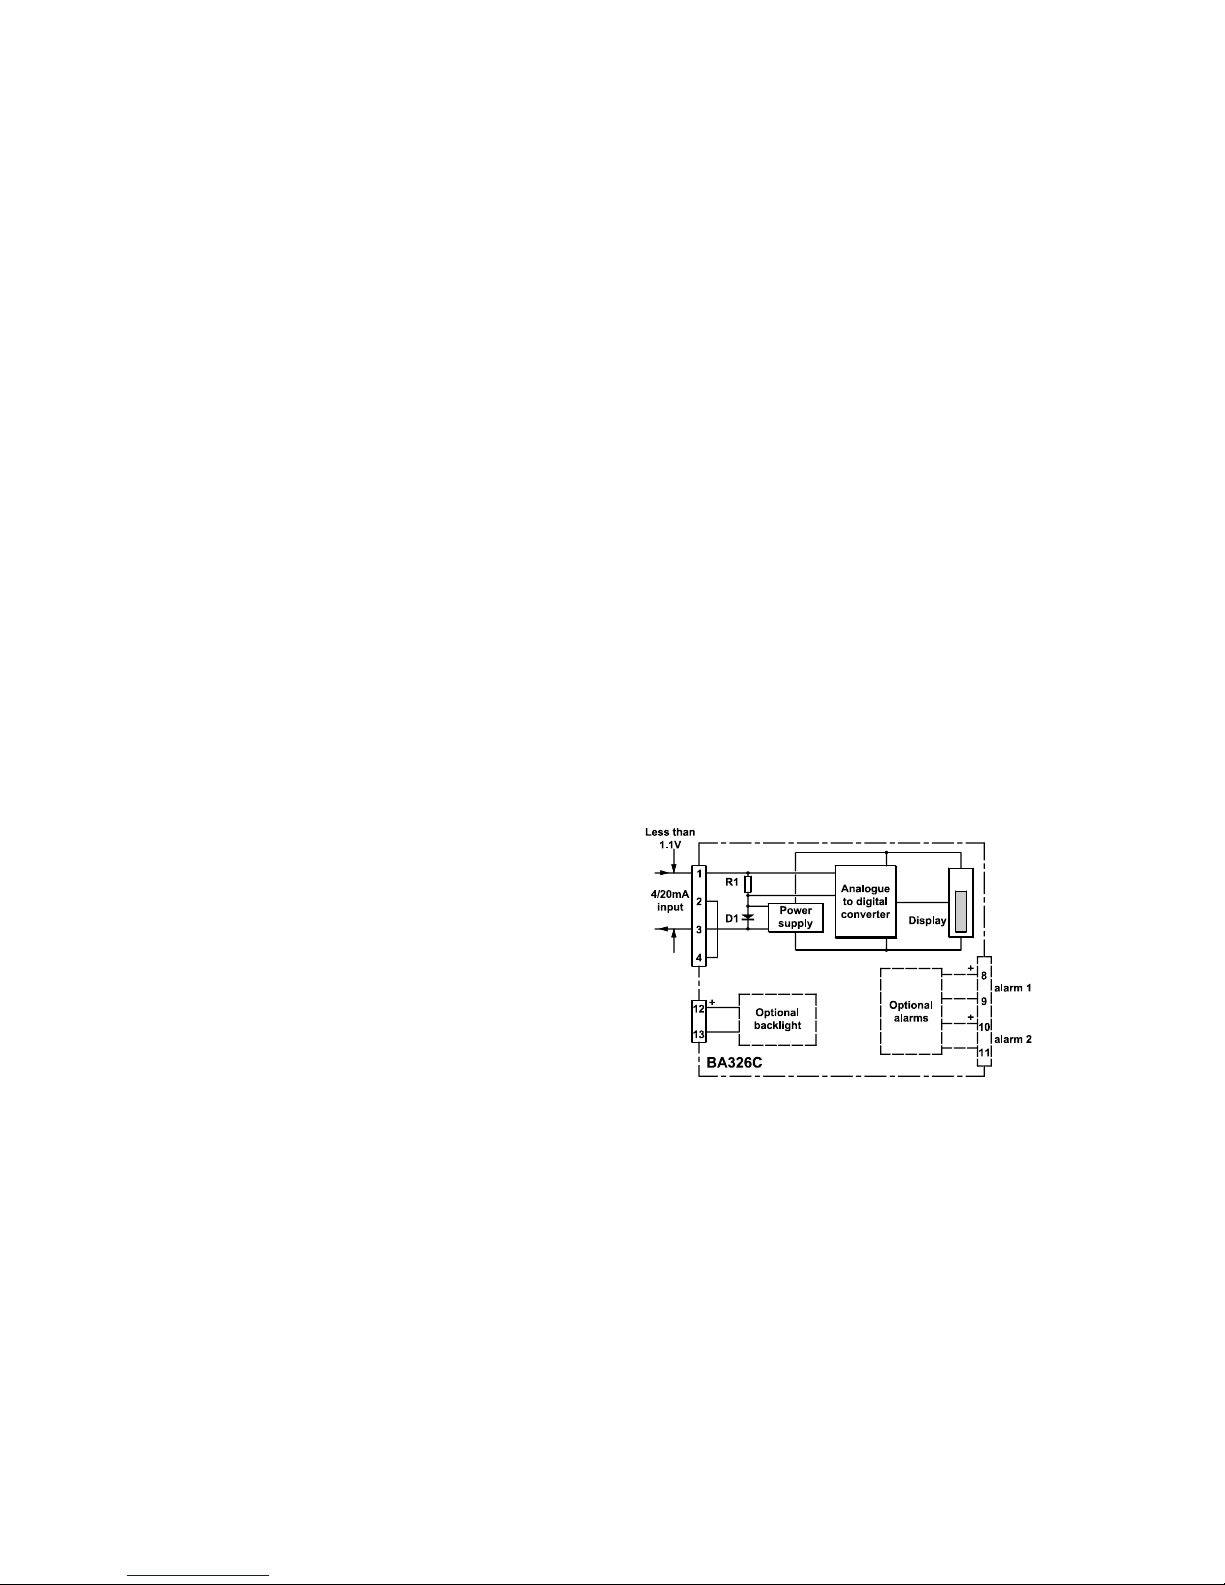
Fig 1 shows a simplified block diagram of a
BA326C. The 4/20mA input current flows
through resistor R1 and forward biased diode
D1. The voltage developed across D1, which
is relatively constant, is multiplied by a switch
mode power supply and used to power the
instrument. The voltage developed across R1,
which is proportional to the 4/20mA input
current, provides the input signal for the
analogue to digital converter.
Each time a 4/20mA current is applied to the
instrument, initialisation is performed. After a
short delay the following display sequence
occurs:
Firmware In form x.xx version
displayed.
-1.8.8.8. Display test in which
all segments of the
display are activated.
Input current Using calibration
display in information stored in
engineering instrument memory.
units.
Fig 1 Simplified block diagram of BA326C
Page 4

4
2.1 Controls
The BA326C is controlled and calibrated via
four front panel push button. In the display
mode i.e. when the instrument is displaying a
4/20mA input current, these buttons have the
following functions:
P While this button is pushed the
digital display will show the input
current in mA, or as a percentage
of the instrument span depending
upon how the instrument has been
programmed. When the button is
released the normal display in
engineering units will return. The
function of this push button is
modified when either alarm is
enabled.
Down While this button is pushed the
digital display will show the
calibration with a 4mA input. When
released the normal display in
engineering units will return.
Up While this button is pushed the
digital display will show the
calibration with a 20mA input.
When released the normal displays
in engineering units will return.
E No function in the display mode.
3. INTRINSIC SAFETY CERTIFICATION
3.1 ATEX certificate
The BA326C has been issued with an ECType Examination Certificate by Intertek
Testing and Certiication Ltd showing
compliance with harmonised European
standards for Group II, Category 1G, gas
atmospheres, Ex ia IIC T5 Ga.
The instrument bears the Community Mark
and, subject to local codes of practice, may be
installed in any of the European Economic
Area (EEA) member countries. ATEX
certificates are also accepted for installations
in Switzerland.
This manual describes installations which
conform with EN60079-14 Electrical
installations design, selection and erection.
When designing systems for installation
outside the UK, the local Code of Practice
should be consulted.
3.2 4/20mA input
In Europe, sources of energy which do not
generate more than 1.5V; 100mA and 25mW
are for intrinsic safety purposes considered to
be simple apparatus.
Although the BA326C indicator does not itself
comply with the requirements for simple
apparatus, the EC-Type Examination
Certificate states that under fault conditions the
output voltage, current and power at the
4/20mA input terminals 1 and 3 will not exceed
those specified for simple apparatus.This
allows the BA326C to be connected into to any
intrinsically safe circuit protected by a Zener
barrier of galvanic isolator providing the output
parameters of the circuit do not exceed:
Uo 28V dc
Io 200mA
Po 0.84W
The BA326C EC-Type Examination Certificate
specifies that the maximum equivalent
capacitance and inductance between the two
4/20mA input terminals is:
Ci = 20nF
Li = 10µH
To determine the maximum permissible cable
parameters these figures must be subtracted
from the maximum cable capacitance and
inductance permitted by the Zener barrier,
galvanic isolator or certified associated
apparatus powering the BA326C indicator.
Page 5
5
3.3 Zones, gas groups and T rating
The BA326C has been certified
Ex ia IIC T5 Ga. When connected to a suitable
system the indicator may be installed in:
Zone 0 explosive gas air mixture
continuously present.
Zone 1 explosive gas air mixture likely
to occur in normal operation.
Zone 2 explosive gas air mixture not
likely to occur, and if it does
will only exist for a short time.
Be used with gases in groups:
Group A propane
Group B ethylene
Group C hydrogen
Having a temperature classification of:
T1 450
o
C
T2 300
o
C
T3 200
o
C
T4 135
o
C
T5 100
o
C
This allows the BA326C to be installed in all
Zones and to be used with most common
industrial gases.
The BA326C ATEX EC-Type Examination
Certificate number has an X suffix indicating
that special conditions for safe use apply when
installed in Zone 0. These are explained
below.
WARNING installation in Zone 0
When installed in a Zone 0 potentially
explosive atmosphere requiring
apparatus of Category 1G, the indicator
shall be installed such that even in the
event of rare incidents, an ignition
source due to impact or friction between
the aluminium enclosure at the rear of
the instrument mounting panel and
iron/steel is excluded.
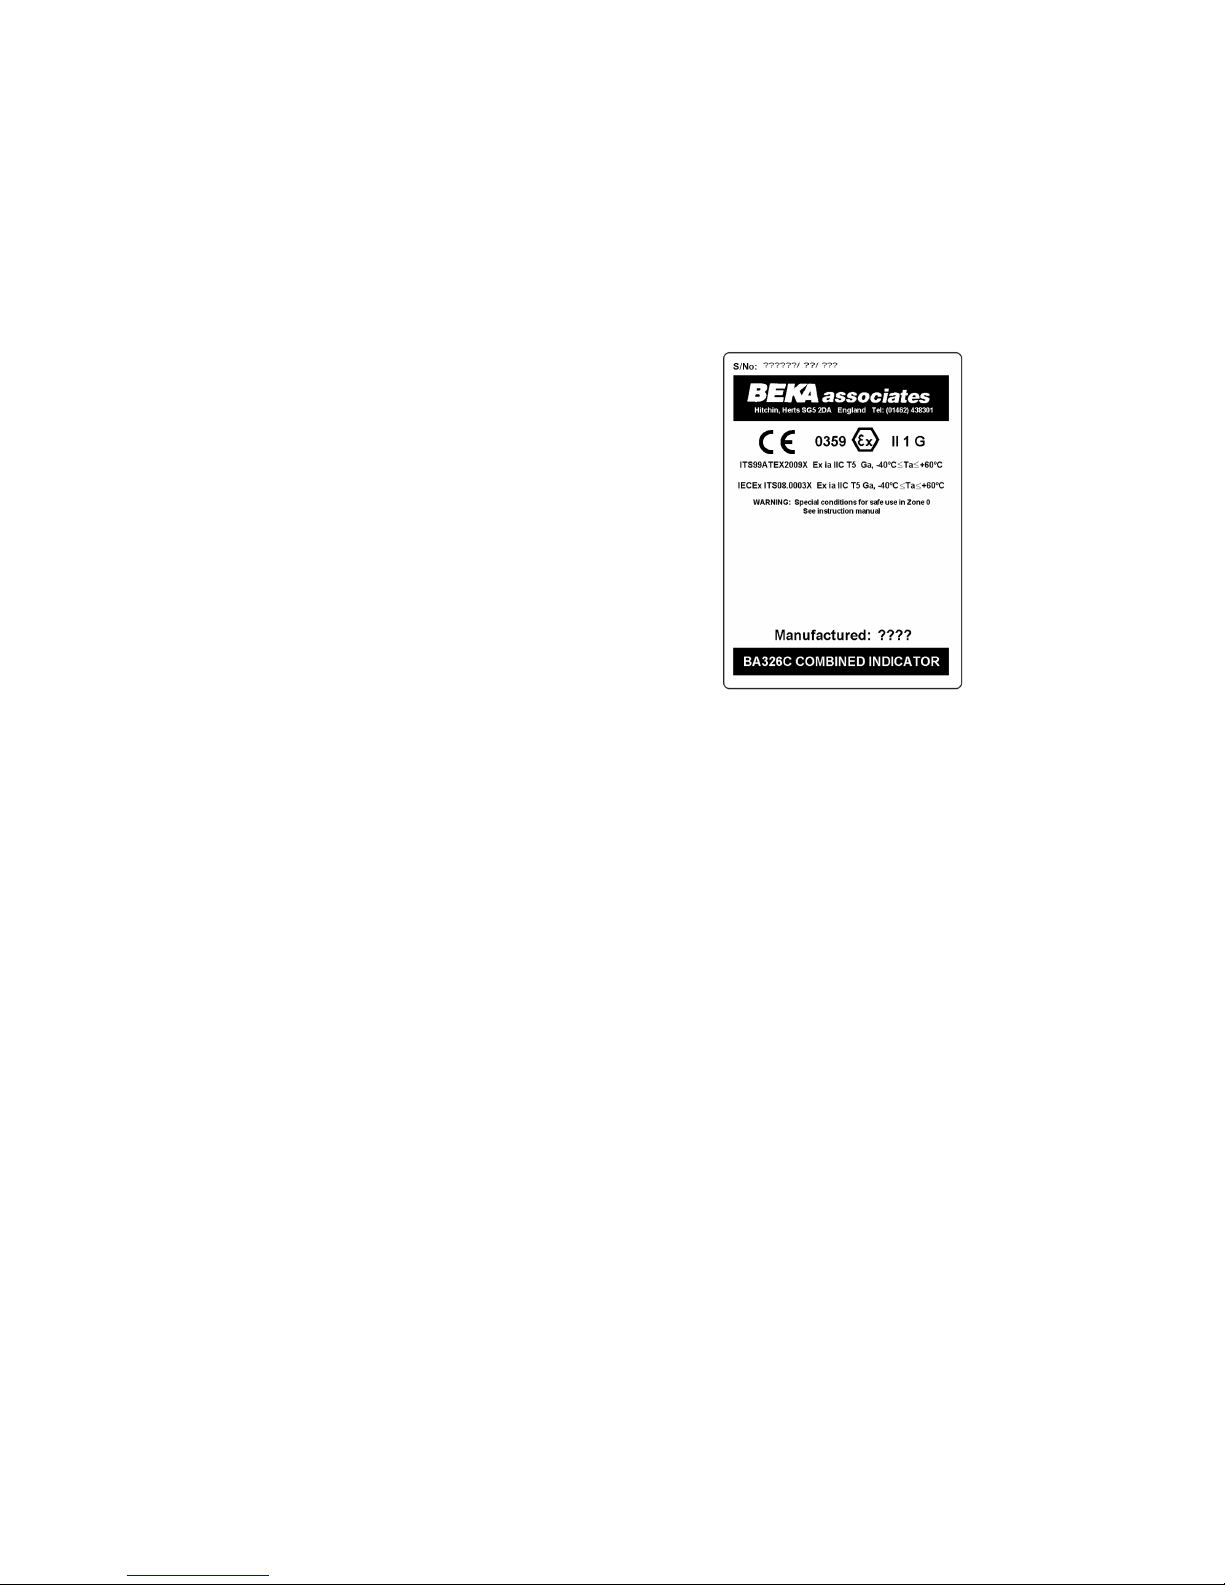
3.4 Certification label information
The certification label is fitted into a recess on
the side of the instrument enclosure. It shows
the ATEX certification information, year of
manufacture and the instrument serial number.
BEKA associates name and address are also
shown. Non European certification information
may also be included.
4. SYSTEM DESIGN FOR HAZARDOUS
AREAS ATEX CERTIFICATION
4.1 Transmitter loops
A BA326C indicator may be connected in
series with almost any intrinsically safe 4/20mA
current loop and calibrated to display the
measured variable or control signal in
engineering units. There are two basic design
requirements:
1. The intrinsic safety output parameters of
the 4/20mA loop, which are defined by
the Zener barrier(s) or galvanic isolator,
must be less than:
Uo 28V dc
Io 200mA
Po 0.84W
2. The loop must be able to tolerate the
additional 1.1V required to operate the
indicator (increases to 1.2V at -20ºC).
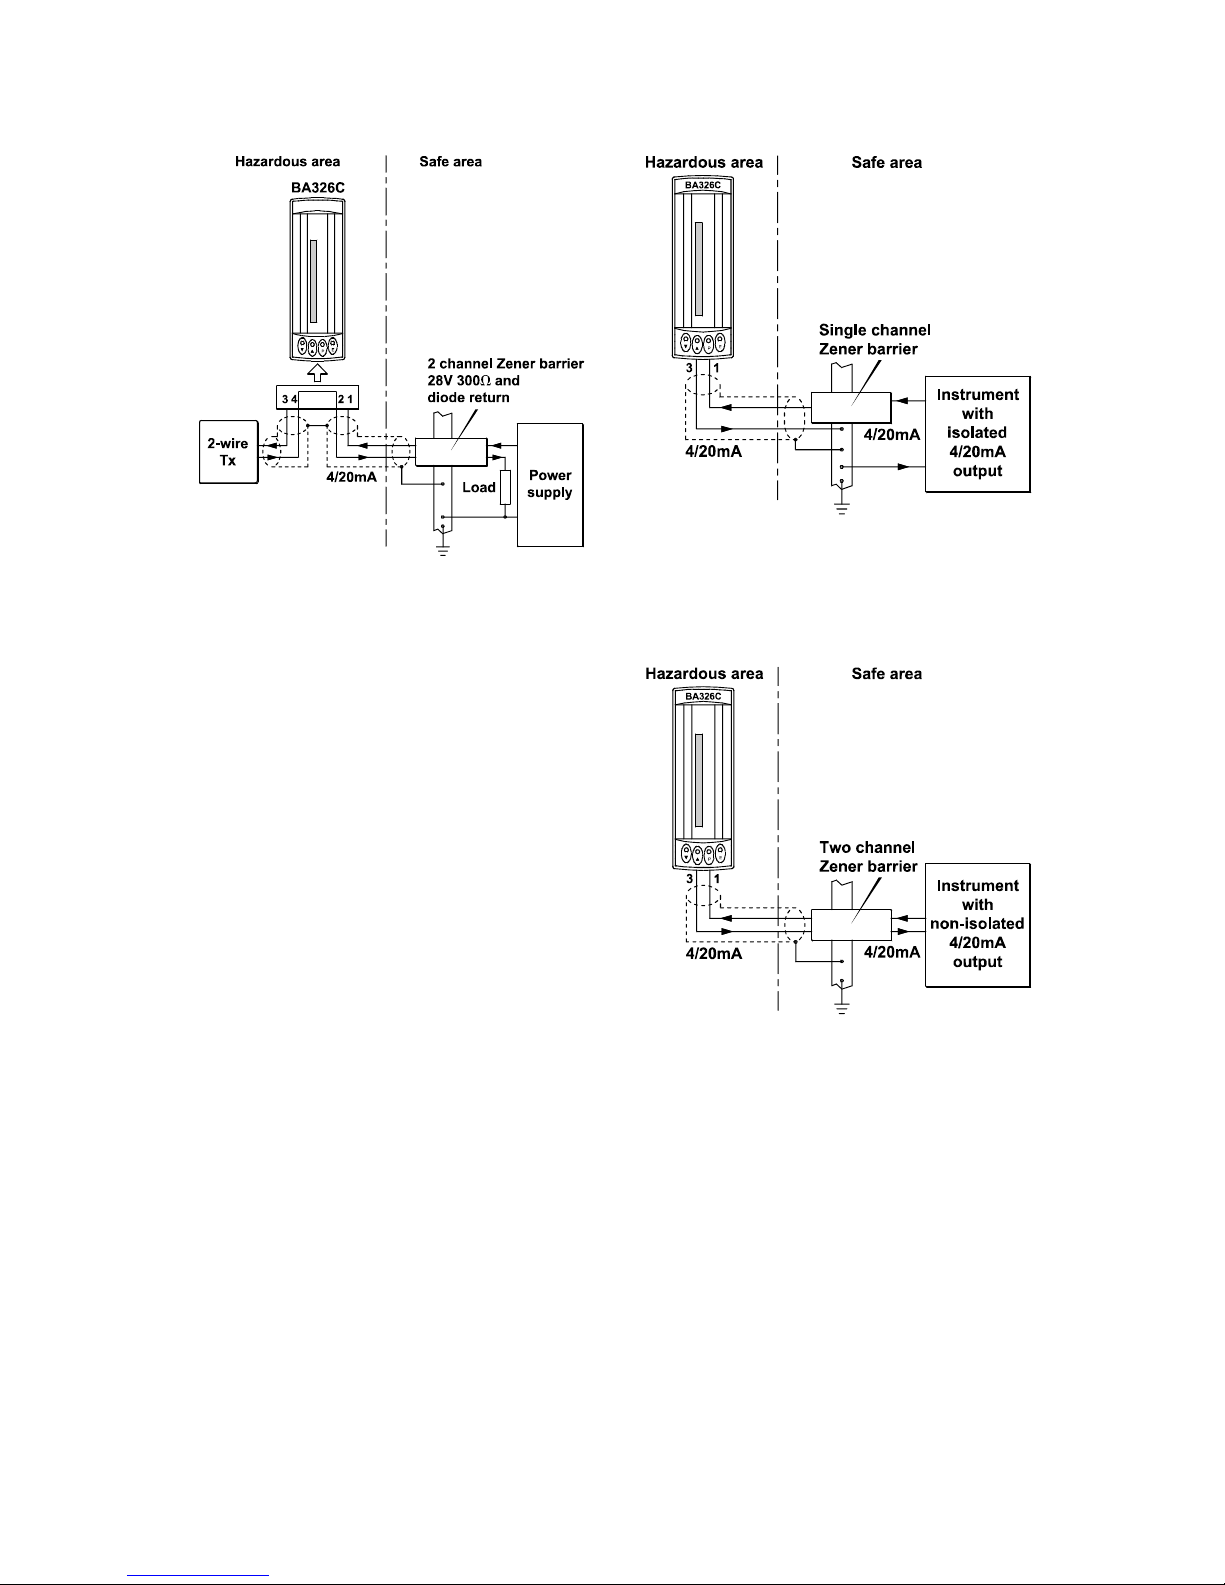
Fig 2 illustrates a typical application in which a
BA326C is connected in series with a 2-wire
transmitter protected by a Zener barrier.
Page 6
6
Fig 2 BA326C in a transmitter loop
4.2 Remote indication
A BA326C may be driven via an intrinsically
safe interface from a 4/20mA safe area signal
to provide a remote indication within a
hazardous area. The type of interface is not
critical, either a Zener barrier or a galvanic
isolator may be used, providing that the
BA326C Ui, Ii and Pi are not exceed.
If one side of the 4/20mA current loop may be
earthed, a single channel Zener barrier
provides the lowest cost protection. If the
4/20mA signal is not isolated, then two Zener
barriers, a two channel Zener barrier or a
galvanic isolator must be used.
When the hazard is a IIC gas, and two single
channel Zener barriers or a two channel Zener
barrier are used, only one barrier or channel
may be a 28V; 93mA; 300ohm device. Again
it is necessary to ensure that the voltage
capability of the 4/20mA signal is sufficient to
drive the indicator plus the voltage drop
introduced by the intrinsically safe interface.
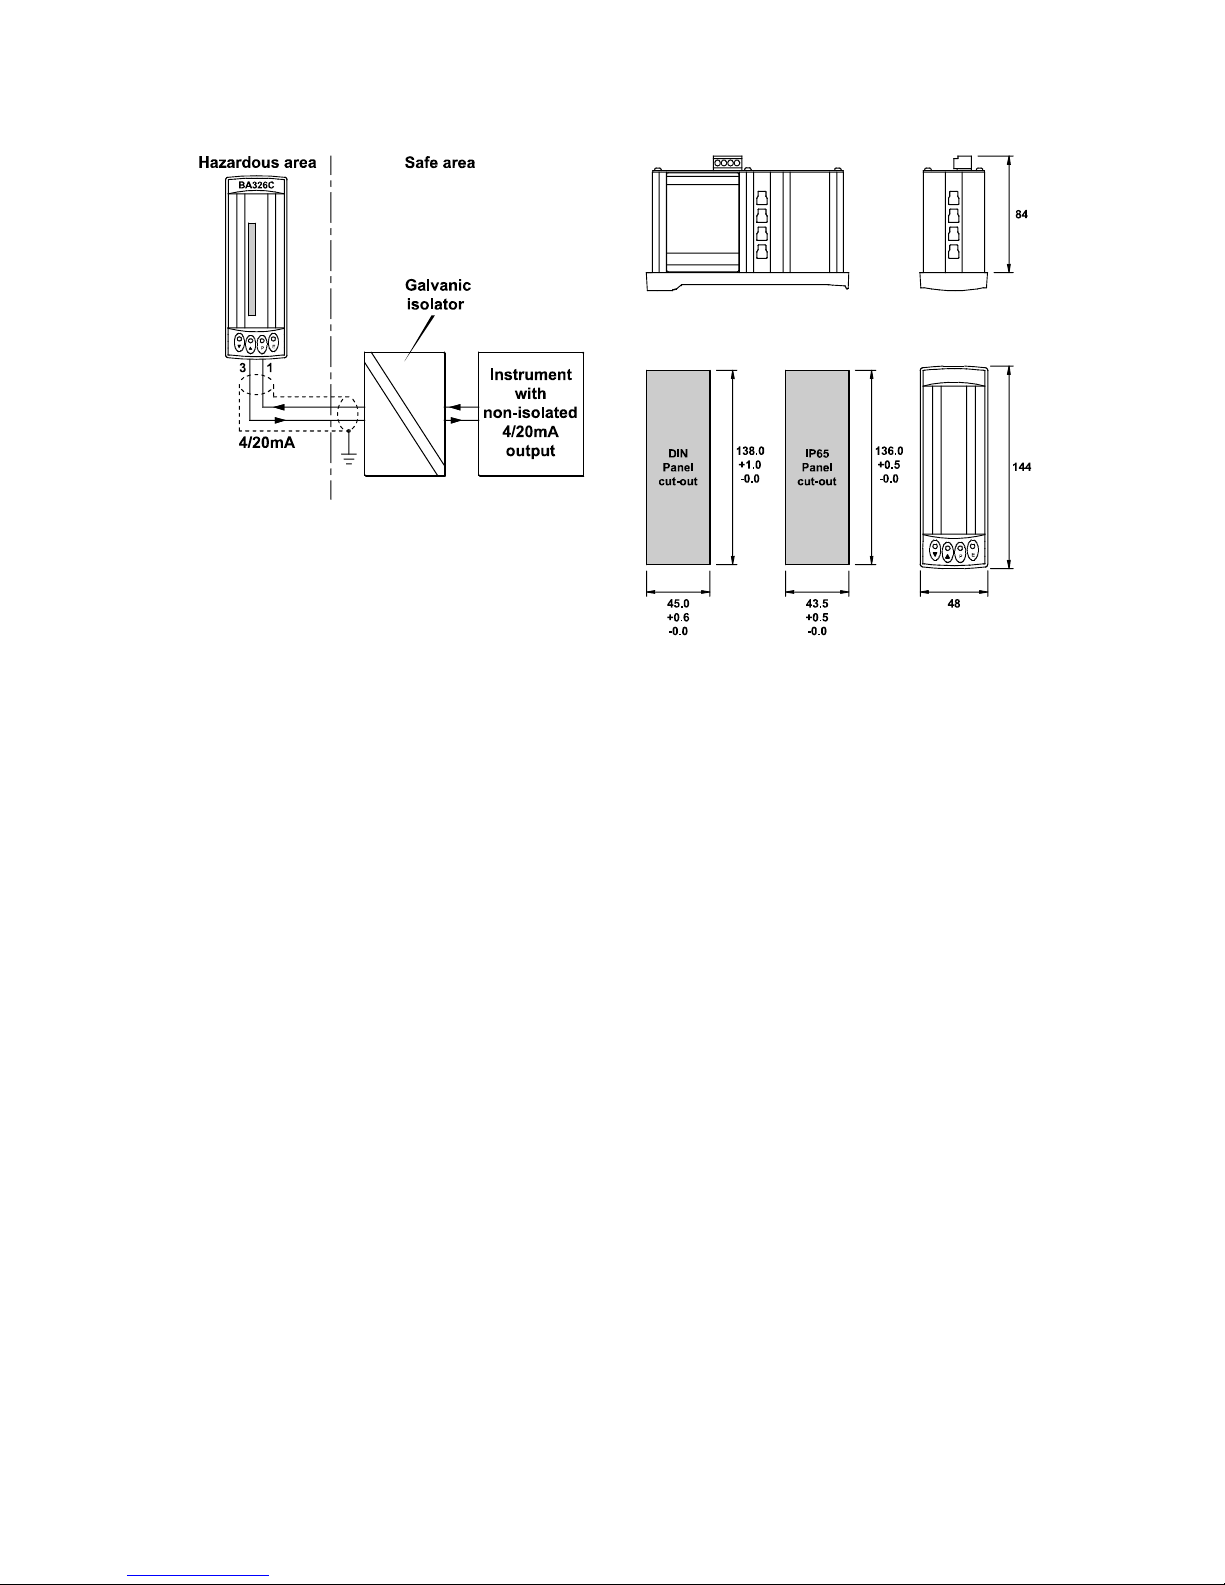
Figs 3A, 3B and 3C show the alternative
circuits which may be used.
Fig 3A Simplest circuit with one side of
4/20mA current loop connected
to earth.
Fig 3B Two Zener barrier channels are
required if the 4/20mA current loop
can not be earthed at the barrier
busbar.
Page 7
7
Fig 3C Galvanic isolator can be used with any
4/20mA current loop.
5. INSTALLATION
5.1 Location
The BA326C indicator is housed in a robust
aluminium enclosure with an armoured glass
window surrounded by a Noryl bezel. The
front of the instrument provides IP65
protection, and a gasket seals the joint
between the instrument enclosure and the
panel. The instrument may be installed in any
panel providing the environmental limits shown
in the specification are not exceeded.
Fig 4 shows the overall dimensions of the
BA326C and panel cut-out. To achieve an
IP65 seal between the instrument enclosure
and the panel the smaller cut-out must be used
and the instrument secured with four mounting
clips.
The BA326C liquid crystal display has
maximum contrast when viewed from directly
ahead and slightly below the centre line of the
instrument. For reflective displays there is
very little degradation of contrast when viewed
from above the centre line, but slight
degradation may be noticeable when the
instrument is fitted with a backlight.
Fig 4 BA326C dimensions
5.2 Installation Procedure
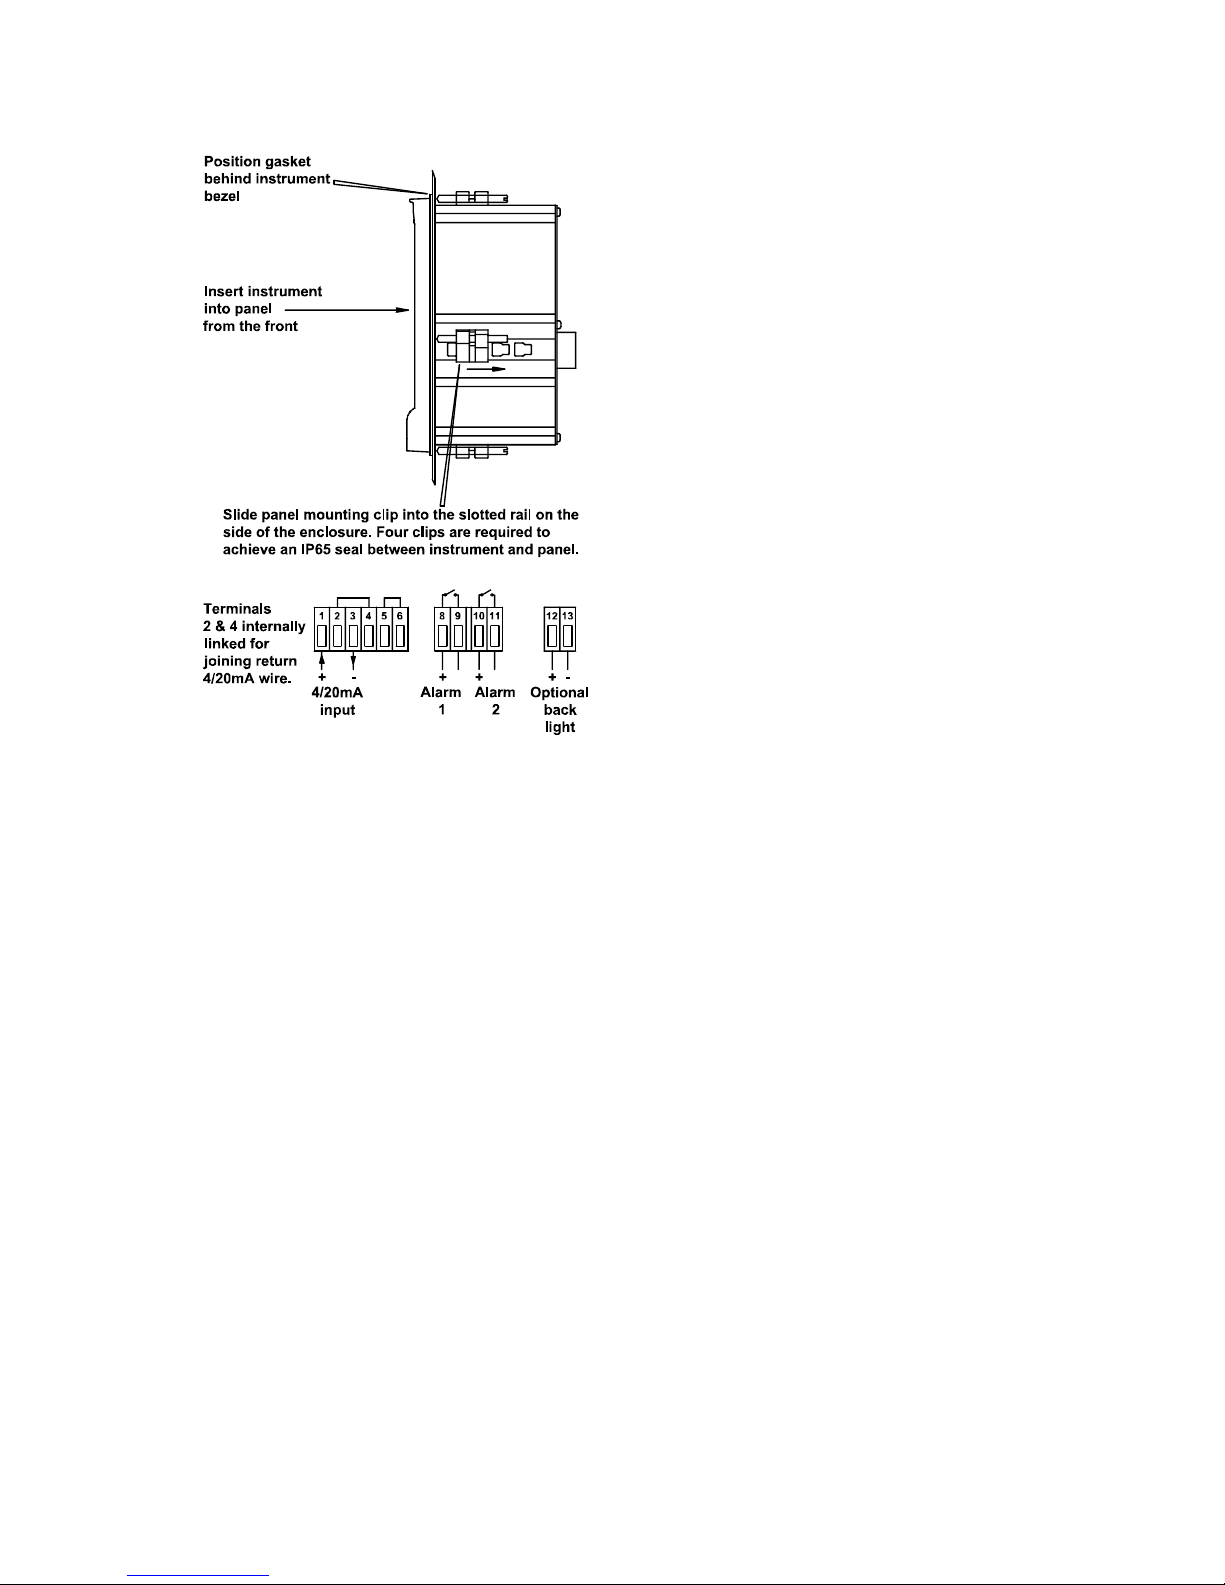
Fig 5 illustrates the instrument installation
procedure.
a. Insert the BA326C into the instrument
panel from the front of the panel.
b. Fix panel mounting clips to the sides of
the BA326C and tighten until the
instrument is secure - see Fig 5.
Recommended torque 22cNm (1.95 lbf
in) Do not over tighten. IfanIP65seal
is required between the enclosure and
the instrument panel, four panel
mounting clips must be used.
c. Connect the panel wiring to the rear
terminal block(s) as shown in Fig 5. To
simplify installation the terminals are
removable so that the wiring can be
completed before the instrument is
installed.
Page 8
8
Fig 5 Installation and terminal connections
5.3 EMC
The BA326C complies with the requirements
of the European EMC Directive 2014/30/EU.
For specified immunity all wiring should be in
screened twisted pairs, with the screens
earthed in the safe area. The indicator
enclosure may be earthed locally by putting a
tag under one of the rear panel fixing screws.
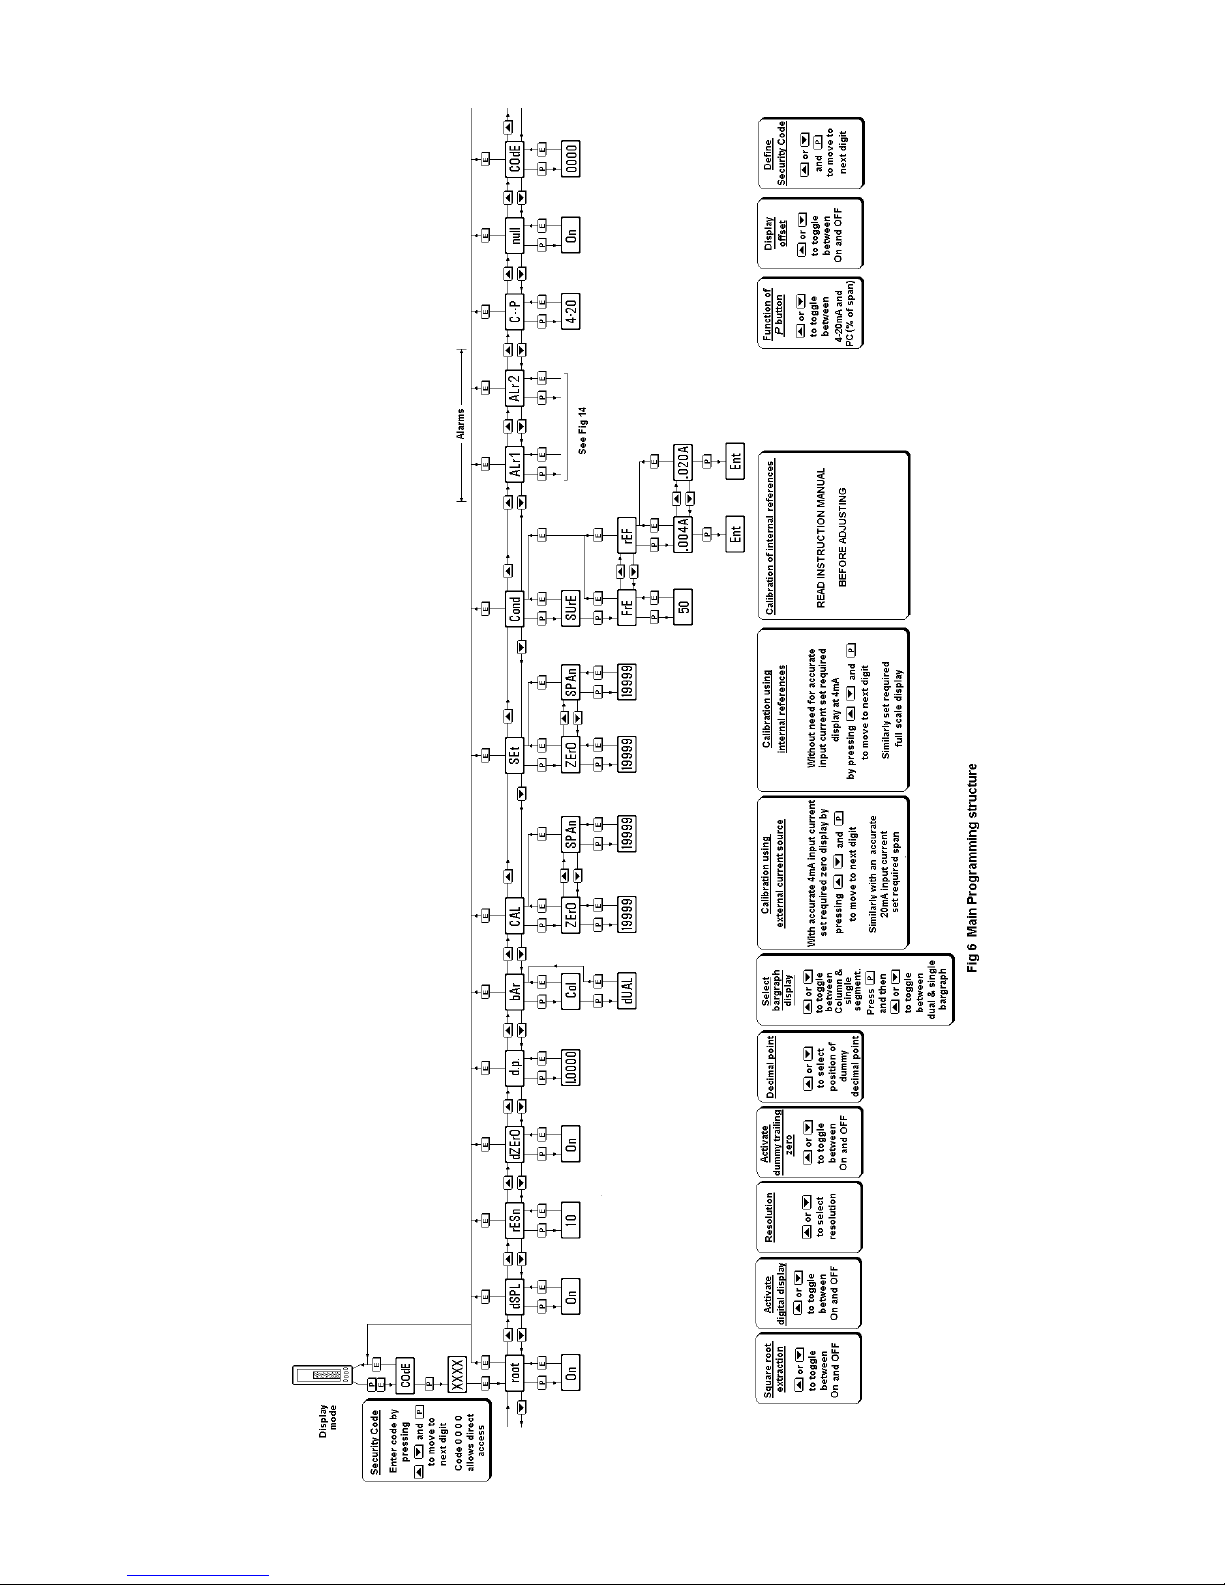
6. PROGRAMMING & CALIBRATION
The BA326C is programmed and calibrated via
four front panel push buttons. All the
programming functions are contained in an
easy to use menu which is shown
diagramatically in Fig 6. Each function is
summarised in section 6.1 which includes
references to more detailed information.
Although this simple menu driven system
enables most adjustments to be made without
repeated reference to this manual, it is
recommend that at least the summary of the
programmable functions in section 6.1 is read
before attempting programming or
recalibration.
When the indicator is fitted with linearisation,
the basic menu is expanded to include
additional functions. All the optional
accessories are described in section 9 of this
manual.
Throughout this manual push buttons are
shown in italics e.g. P or Up push button, and
legends displayed by the indicator are shown
within inverted commas e.g. 'CAL' and ' ALr2'.
Access to the programme menu is obtained by
operating the P and E push buttons
simultaneously. If the instrument is not
protected by a security code the first
parameter 'root' will be displayed. If a security
code other than the default code 0000 has
already been entered, the indicator will display
'COdE'. Press P to clear this prompt and
enter the security code for the instrument using
the Up, Down and P push buttons. If the
correct code has been entered pressing E will
cause the first parameter 'root' to be displayed.
If an incorrect code or no entry is made the
indicator will return to the display mode.
Once within the programme menu the required
parameter can be reached by scrolling through
the main menu using the Up and Down
pushbuttons as shown in Fig 6. When
returning to the display mode following
recalibration or changes to any parameters,
the indicator will display circulating minus signs
for a few seconds while the new information is
stored in permanent memory.
All new BA326C indicators are supplied
calibrated as requested at the time of ordering.
If calibration is not requested, the digital
indicator will be calibrated to display 0.00 to
100.00 for 4 to 20mA input.
6.1 Summary of programmable
functions
This section summarises all of the
programmable functions and when read with
Fig 6 provides sufficient information to
condition and calibrate the indicator. A crossreference to a more detailed description is
given for each function.
Page 9

9
Summary of Programmable Functions
Display Description of function
'root' Square root extractor
Turns the square root extractor for
linearising the output from
differential flowmeters 'On' or 'OFF'.
See section 6.2
'dSPL' Digital display
Turns the 4½ digit display 'On' or
'OFF'.
See section 6.3
'rESn' Display resolution & dummy zero
Selects the resolution of the least
significant display digit. May be set
to 1, 2, 5 or 10 digits.
See section 6.4
'dZErO' Dummy trailing zero
Activates a dummy zero after the
4½ digit display so that larger
number may be displayed.
See section 6.5
'd.P.' Decimal point
Positions a dummy decimal point
between any of the digits or turns it
off.
See section 6.6
'bAr' Bargraph display
Selects a column or single segment
display, and defines whether the
input current is displayed on the left
hand or on both 100 segment
bargraphs. See section 6.7
'CAL' Calibration of displays using
external current source.
Enables the zero and span of the
digital indicator to be adjusted
using an external current source
such as a calibrator. The analogue
bargraph is linked to the digital
display and is automatically
calibrated at the same time.
When performed with an accurate
traceable current source, this is the
preferred method of calibration.
See section 6.8
Display Description of function
'SEt' Calibration of display using
internal references.
Enables the zero and span of the
digital indicator to be adjusted
without the need for an accurate
input current or disconnection from
the 4/20mA loop. The analogue
bargraph is linked to the digital
display and is automatically
calibrated at the same time.
See section 6.9
'Cond' Indicator conditioning
This function provides access to a
password protected sub-menu
enabling the internal references to
be calibrated, and the mains (line)
frequency rejection to be selected.
See section 6.10
CAUTION
Do not attempt to change
the frequency of the mains
(line) filter frequency or
recalibrate the internal
references without reading
section 6.10 of this manual
'FrE' Frequency
rejection
Defines the mains (line) frequency
at which the indicator has
maximum ac rejection. 50 or 60Hz
may be selected. This function
must be set before the instrument
is calibrated as it affects the
indicator display.
See section 6.10.1
'rEF' Calibration of
internal
references
The indicator contains two
references representing 4 and
20mA. These internal references
are used when the indicator display
is calibrated without an external
current calibrator, and when the
input current is displayed in
milliamps. See the SEt and C--P
functions. If either of these
functions is to be used, the internal
references should be periodically
calibrated.
See section 6.10.2
Page 10

10
Display Description of function
'C - - P' Function of P push button
The BA326C digital indicator may
be programmed to display the
input current in milliamps or the
input current as a percentage of the
displayed span when the P push
button is operated.
See section 6.11
'null' Null display function
When activated the null function
enables both displays to be zeroed
at any input current to produce a
deviation display.
See section 6.12
'COdE' Security code
Defines a four digit numeric code
which must be entered to gain
access to programmable functions.
Default code 0000 disables the
security function and allows
unrestricted access to all
programmable functions. See
section 6.13
6.2 Root extractor: root
This function is primarily intended for use with
differential flowmeters which have a square
law output. The root extractor linearises the
input current between 4.04mA and 20mA (5 to
100% flow) so that the flow signal is displayed
in linear units. For inputs below 4.04mA the
BA326C displays zero. To activate the square
root extractor select 'root' from the menu and
press P which will reveal if the function is 'On'
or 'OFF'. If the function is set as required,
press E to return to the menu, or press the Up
or Down button to change the setting, followed
by the E button to return to the main menu.
For reference, the following table shows the
output current from a non-linearised differential
flowmeter.
% of full flow Current output mA
5.0 4.04
10.0 4.16
25.0 5.00
50.0 8.00
75.0 13.00
100.0 20.00
6.3 Digital display: dSPL
When only an analogue display is required or
when the instrument is mounted horizontally
the digital display may be disabled. To change
the status of the digital display select 'dSPL'
from the main menu and press P which will
show if the digital display is 'On' or 'OFF'. If
set as required, press E to return to the menu,
or press the Up or Down button to change the
setting, followed by the E button to return to
the main menu.
6.4 Display resolution: rESn
This function defines the resolution of the
display digit but does not affect the bargraph.
Decreasing the display resolution can improve
the readability of a noisy signal. Select 'rESn'
from the menu and press P which will reveal
the current display resolution. To change the
resolution press the Up or Down button to
select 1, 2, 5 or 10 digits. When the required
resolution is shown press E to return to the
main menu.
6.5 Dummy trailing zero: dZErO
The BA326C digital display can show any
number between -19999 and 19999. If a
larger number is required a trailing dummy
zero can be activated which extends the
display range from -19990 to 99990 The last
digit is a dummy so the maximum resolution is
10 digits i.e. the last digit is always 0.
To change the status of the trailing dummy
zero select 'dZErO' from the main menu and
press P which will reveal if the dummy zero is
'On' or 'OFF'. If the function is set as required,
press E
to return to the main menu, or press
the Up or Down button to change the setting,
followed by the E button to return to the main
menu.
After activating the dummy trailing zero, care
should be taken to ensure that the digital
display does not overrrange.
6.6 Position of the decimal point: d.P.
A dummy decimal point can be positioned
between any of the digits, including the dummy
trailing zero, or may be absent. To position the
decimal point select 'd.P.' from the menu and
press P. The decimal point can then be moved
or turned off by pressing the Up or Down push
button, followed by E to return to the main
menu.
6.7 Bargraph display: bAr
This function enables the 4/20mA input to be
displayed as a column or a single segment on
one or both of the 100 segment bargraphs.
When optional alarms are fitted the right hand
bargraph always displays the alarm setpoints.
Page 11
11
Page 12
12
To change the bargraph display parameters
select 'bAr' from the main menu and press P
which will reveal if the BA326C is programmed
to display a column 'Col' or a single segment
'SEg'. The setting can be changed by pressing
the Up or Down buttons. Pressing P again will
show if the BA326C is programmed to display
the input current on both bargraphs 'dUAL' or
on just the left hand bargraph 'SnGL'. Again
pressing the Up or Down buttons will change
the setting. At any point in the procedure
pressing the E button will return the instrument
to the main programme menu.
6.8 Calibration using an external
current source: CAL
This function enables the zero and span of the
digital display to be adjusted using an external
calibrated current source. When used with an
accurate traceable current source this is the
preferred method of calibration.
The analogue bargraph is automatically
calibrated when the digital display is calibrated,
therefore no separate adjustments are
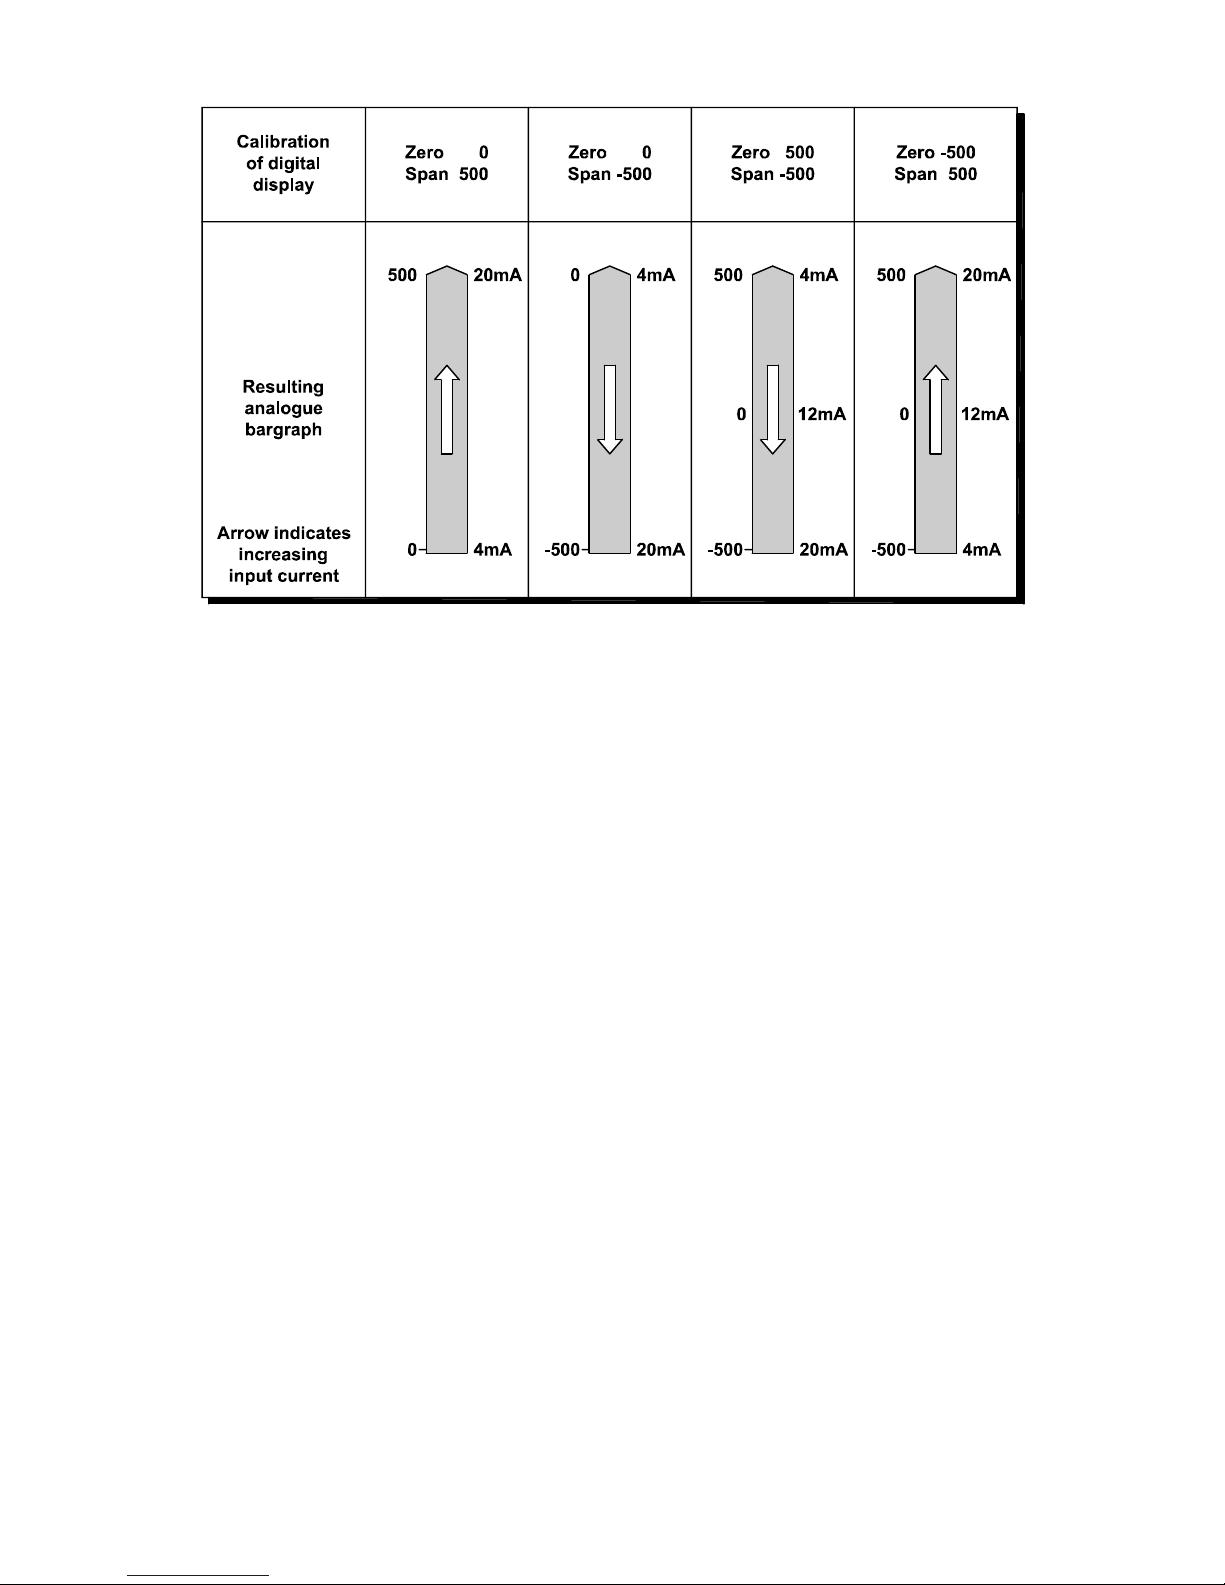
required. Fig 7 shows the analogue display
resulting from various digital display
calibrations.
To calibrate the indicator select 'CAL' from the
main menu and press P. The indicator will
display 'ZErO' which is a request for a 4mA
input current. Adjust the external current
calibrator to 4.000mA and again press P which
will reveal the current zero display. Each digit,
except the dummy zero if activated, of the
indicator display can be changed by pressing
Up or Down buttons. When the first digit is
correct pressing P will transfer control to the
next digit. When all the digits have been
adjusted, press E to enter the new zero. The
indicator will display 'Ent' for a few seconds
while the information is being stored in
memory, and will then return to the 'ZErO'
prompt.
To adjust the digital display at 20mA, press the
Up button which will cause the indicator to
display 'SPAn'. Adjust the external current
calibrator to 20.000mA and again press P
which will reveal the existing full scale display.
Each digit of the indicator display, except the
dummy zero if activated, can be changed by
pressing the Up or Down buttons. When the
first digit is correct pressing P will transfer
control to the next digit. When all the digits
have been adjusted press Eto enter the new
span. The indicator will display 'Ent' for a few
seconds while the information is being stored
in memory, and will then return to the 'SPAn'
prompt. Finally press E again to return to the
main menu.
Fig 7 Configuration of analogue bargraph
Page 13

13
This function may also be used when
calibrating a complete loop from primary
element to indicator display e.g. when the
indicator is displaying the output from a level to
current converter.
6.9 Calibration using internal references:
SEt
This function enables the zero and span of the
digital indicator to be adjusted without the need
for an accurate external current source, or for
disconnection from the 4/20mA loop.
The accuracy of this method depends upon the
accuracy of the internal references which
should be regularly calibrated as described in
section 6.10.2
The analogue bargraph is automatically
calibrated when the digital display is calibrated,
no separate adjustments are required. Fig 7
shows the analogue display resulting from
various digital display calibrations.
To calibrate the indicator select 'SEt' from the
main menu and press P. The indicator will
display 'ZErO', pressing P again will reveal the
current display at 4mA. Each digit, except the
dummy zero if activated, of the indicator
display can be changed by pressing the Up or
Down buttons. When the first digit is correct
pressing P will transfer control to the next digit.
When the least significant digit has been
adjusted, press E to return to the 'ZErO'
prompt which completes the adjustment.
To adjust the display at 20mA, press the Up
button which will cause the indicator to display
'SPAn'. pressing P again will reveal the
indicator display. Each digit of the display,
except the dummy zero when activated, can
be changed by pressing the Up or Down
buttons. When the first digit is correct, pressing
P will transfer control to the next digit. When
the least significant digit has been adjusted
press Eto return to the 'SPAn' prompt followed
by E to return to the menu.
6.10 Conditioning sub-menu: Cond
This is a password protected sub-menu which
allows the mains (line) frequency at which the
indicator has maximum ac rejection to be
selected, and the two internal references to be
calibrated.
To gain access to the sub-menu select 'Cond'
from the main menu and press P.The
indicator will display '0000'. Using the Up and
Down buttons and the P buttontomovetothe
next digit enter the password 'SurE'. (Note that
'S' is entered as '5'). Pressing E will then give
access to the two functions in the sub-menu.
6.10.1 AC rejection: FrE
CAUTION
If the mains filter frequency is changed,
the indicator display and internal
references (if used) must be
recalibrated.
To provide maximum low frequency rejection
the internal digital filter may be set to operate
at 50 or 60Hz to correspond with the local
mains (line) frequency. To change the
frequency select 'FrE' from the 'Cond' submenu and press P which will reveal the current
setting. The setting can be toggled between
the two options by pressing the Up or Down
buttons. When set as required press the E
button to return to the sub-menu.
6.10.2 Calibration of internal references:
rEF
CAUTION
Do not attempt to recalibrate these
references unless you have adequate
test equipment and have read the
following instructions.
The indicator contains two references
representing 4 and 20mA. These references
are used in the 'SEt' function which enables
the indicator displays to be calibrated without
an external current calibrator. They are also
used in the 'C--P' function if the instrument is
programmed to display the input current when
the P push button is operated. If the 'SEt' or
'C--P' functions are not used, it is not
necessary to calibrate these internal
references.
To calibrate the references select 'rEF' from
the sub-menu and press P which will result in a
'.004A' prompt being displayed. Adjust the
external current calibrator to 4.000mA and
again press P . The indicator will display 'Ent'
when the 4mA reference has been updated
and will then return to the '.004A' prompt.
Page 14
14
To re-calibrate the 20mA internal reference,
press the Up button which will cause the
indicator to display '.020A'. Adjust the external
current calibrator to 20.000mA and again press
P.The indicator will display 'Ent' when the
20mA reference has been updated and will
then return to the '.020A' prompt. Two
operations of the E button will return the
indicator display to 'Cond' in the main menu.
The accuracy of the internal references, and
hence the display accuracy, will depend upon
the accuracy of the external current source.
With a maximum span of 19999 the indicator
has a display resolution of 0.8µA, we therefore
recommend that the accuracy of the external
current source used for calibration is greater
than 0.4µA.
6.11 Function of the P push button:
C - - P
This parameter defines the function of the P
push button when the indicator is in the display
mode. While the button is operated the digital
display will show the input current in milliamps,
or the input current as a percentage of the
span. The analogue display continues to
operate normally while the P button is
operated.
To check or change the parameter select
'C - -P' from the main menu and press P to
reveal the current setting. Pressing the Up or
Down button will toggle the setting between '420' the current display and 'PC' the percentage
display. When set as required press E to
return to the main menu.
Accuracy of the current display depends upon
the accuracy of the internal references which
should be periodically calibrated - see section
6.10.2
6.12 Null display function: null
This function enables the BA326C analogue
bargraph to operate as a deviation indicator
displaying the difference between the input
current and a specified reference.
To activate this function select 'null' from the
main menu and press P . Pressing the Up or
Down button will toggle the function between
'OFF' and 'On', when set as required press E
to return to the main menu.
To define the input about which deviation is to
be displayed the BA326C must be returned to
the display mode. With the instrument
displaying the required input reference, press
the Down and E buttons simultaneously. The
BA326C will respond by displaying 'null' for a
few seconds, after which the reference input
will be automatically subtracted from both the
analogue and digital displays.
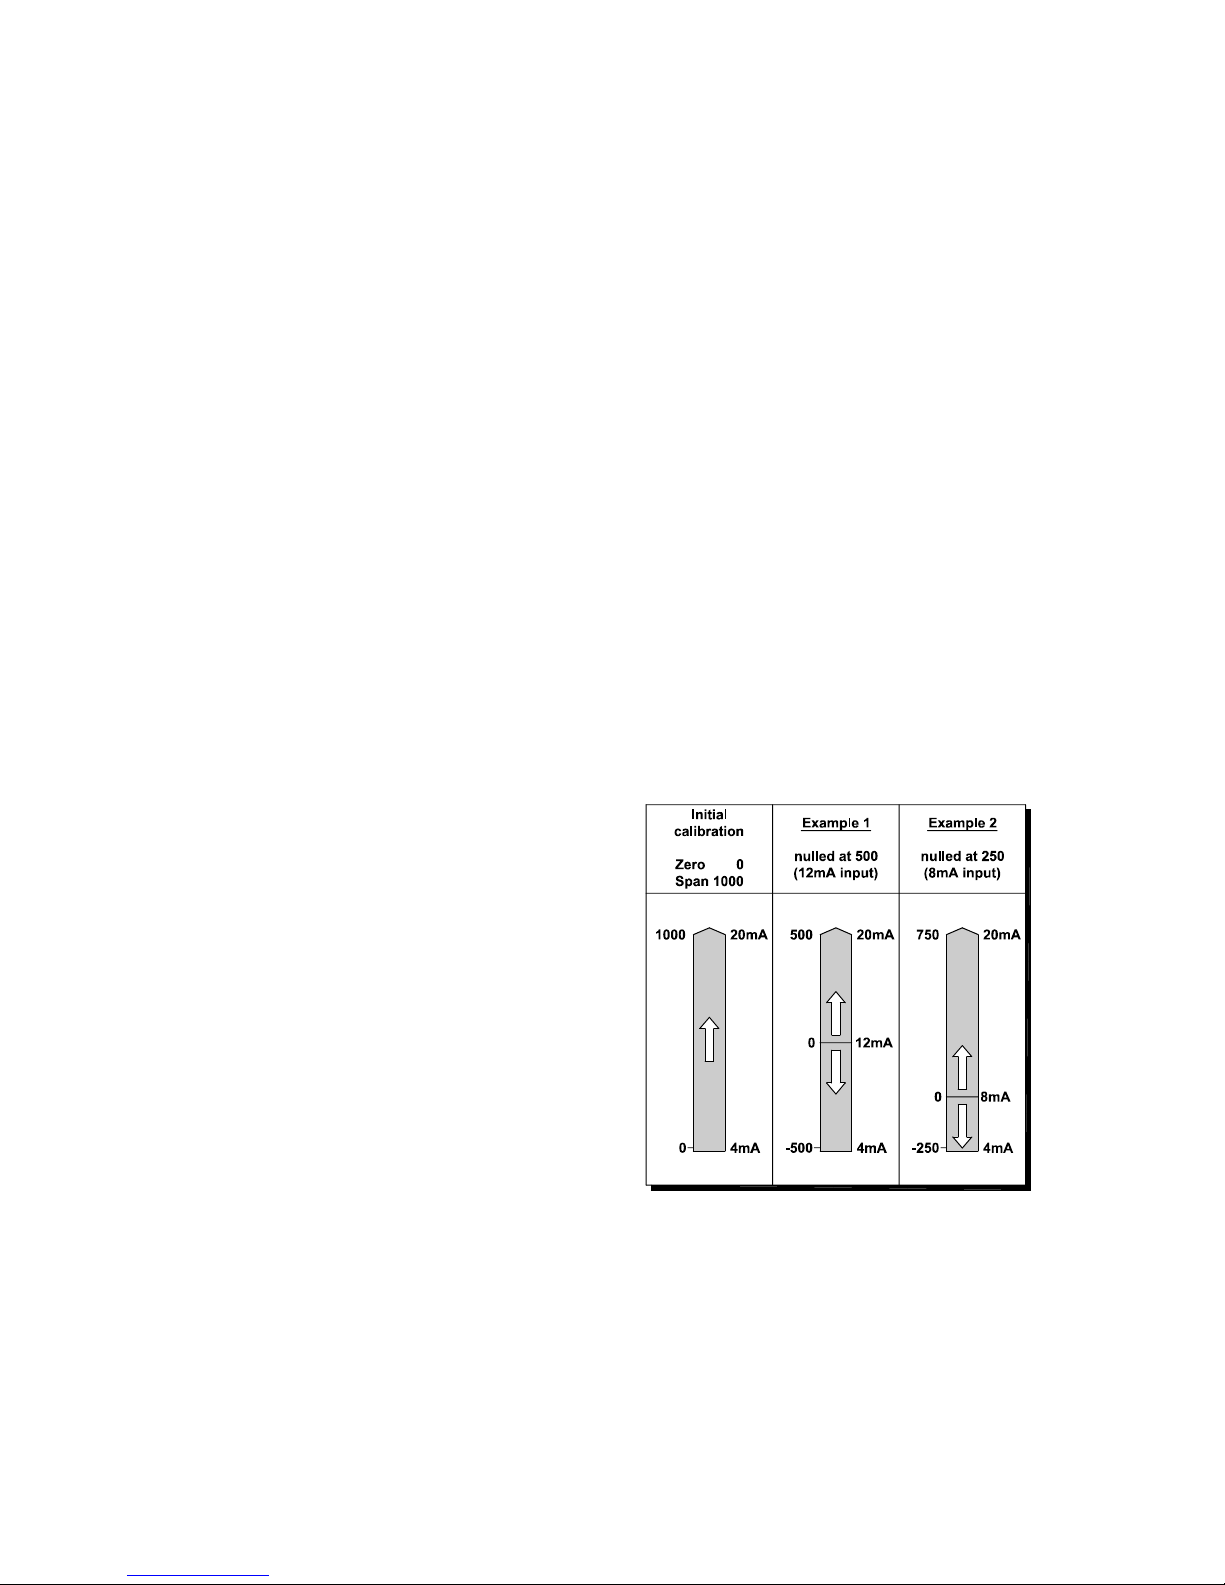
Starting at the reference point, the bargraph
will display a column extending upwards or
downwards to indicate the difference between
the input and the reference. Fig 8 illustrates
the display resulting from a BA326C calibrated
to display 0 to 1000 when nulled at 500
(12mA) and 250 (8mA).
To prevent accidental or unauthorised access
the null function can only be used once. If the
reference point needs to be changed, the null
function must be turned off and then back on
from the main programme menu.
To prevent inadvertent alarm setpoint changes,
the null function can not be operated if either of
the optional alarms are enabled. If alarms
are required, they must be enabled after the
null function has been used.
Fig 8 Effect of nulling at two different inputs
Page 15
15
6.13 Security code: COdE
The calibration and conditioning of the
instrument may be protected by a four digit
security code which must be entered before
access to the programme menu is granted.
New instruments are programmed with the
default security code 0000 which allows
unrestricted access to all programming
functions.
To enter a new security code select 'COdE'
from the menu and press P which will cause
the indicator to display the current security
code. Each digit of the code can be changed
using the Up and Down push buttons, and the
P button to move to the next digit. When the
required code has been entered press E to
return to the main menu. The revised security
code will be activated when the indicator is
returned to the operating mode.
If the security code is lost, access to the
programmable functions can be obtained by
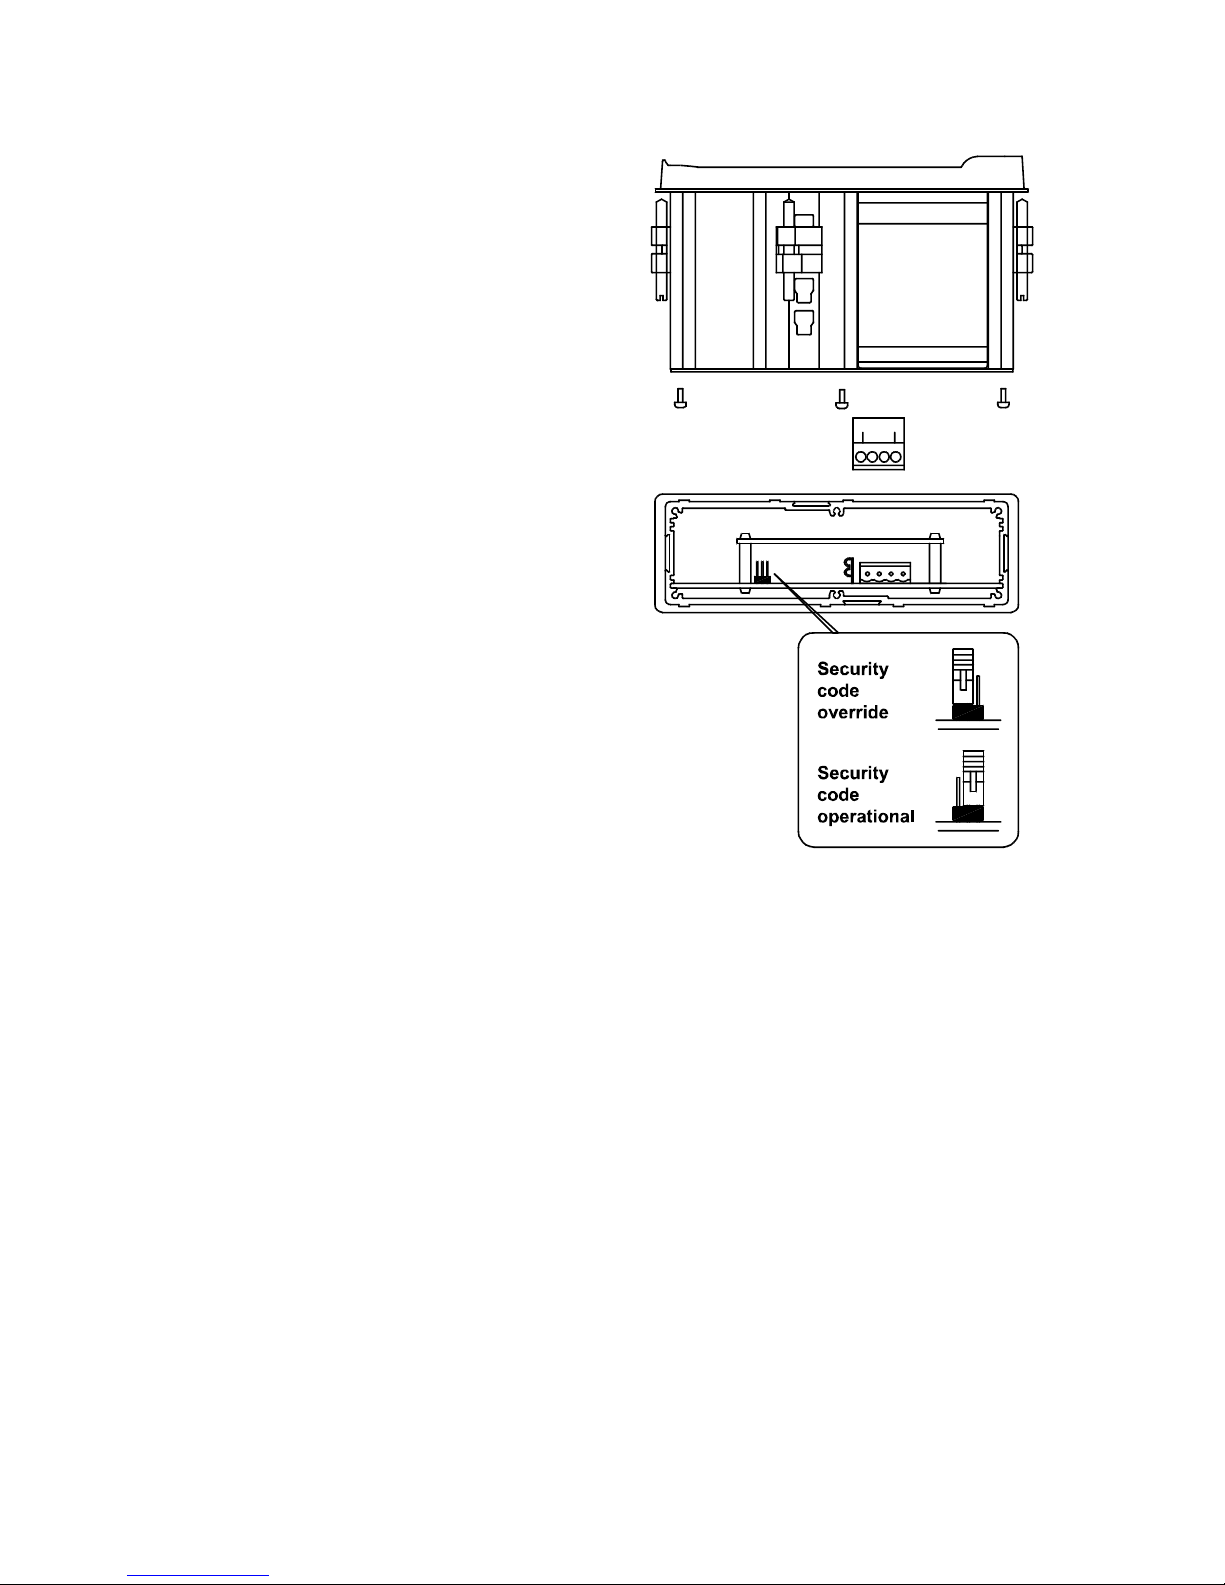
moving the internal security link to the override
position. The original security code can then
be viewed by selecting 'CodE' from the main
menu and pressing P.
To gain access to the security code link,
remove the instrument terminal block(s) by
gently pulling. Unscrew the six screws
securing the rear panel, and lift off the panel
which will reveal the link as shown in Fig 9.
Fig 9 Location of security code override link
6.14 Over and under-range
If the range of the digital display is exceeded,
the four least significant digits will be blanked.
Under-range is indicated by '-1' and over-range
by '1'. Under and over-range are also
indicated if the input current falls below
approximately 3.5mA or rises above
approximately 21mA.
The bargraph displays an upward pointing
arrow when overrange occurs and a single
negative segment and the zero bar for
underrange.
If the instrument input current falls below 3mA
the initialisation sequence is performed as
described in section 2.
Page 16

16
7. CALIBRATION EXAMPLES
The following examples illustrate the two ways
in which a BA326C indicator may be
calibrated.
7.1 Using an external current source
The BA326C indicator is required to display:
0.0 with a 4mA input
1500.0 with a 20mA input
from a linear level transducer. Maximum
display resolution is required, the frequency of
the local mains is 50Hz and the existing
security code is 1209. In the operating mode
the indicator is required to display the input
current as a percentage of span when the P
push button is operated.
Step 1 Connect indicator to calibrator
Connect the indicator to an
accurate external current source.
Terminal 1 positive. The indicator
will automatically perform the
initialisation routine described in
section 2, and then display the
input current using the existing
calibration information.
Step 2 Enter programming mode
With an input current between 4
and 20mA put the indicator in the
programming mode by
simultaneously pressing P and E.
The indicator will respond by
displaying 'COdE'. Press P to
clear this prompt and set the
display to the security code 1209
using the Up, Down and P push
buttons. Pressing E will enter the
code, the first parameter 'root' in
the main menu will then be
displayed.
Step 3 Square root extraction
With 'root' displayed, press P
which will reveal the root extractor
status. The root extractor can be
turned on or off by the Up or Down
buttons. Select 'OFF', and press E
to return to the main menu.
Step 4 Select frequency of max
rejection
Scroll though the main menu until
'Cond' is displayed and press P.
The indicator will display the
prompt 'SurE' which is a warning
that changing the parameters in
this sub-menu will change the
instrument calibration. To enter the
'FrE' sub-menu press P, and then
again to reveal the frequency of
maximum rejection. Select '50' Hz
using the Up or Down buttons, and
finally return to the main menu via
the 'FrE' prompt by pressing E
twice.
Step 5 Define function of P push button
Select 'C--P' from the main menu
and press P to reveal the function
of the P button in the display mode.
Select percentage 'PC' and return
to the main menu by pressing E
Note: Because an input current
display in milliamps is not required,
it is not necessary to calibrate the
two internal references.
Step 6 Position dummy decimal point
Scroll though the main menu until
'd.P.' is displayed and then press P.
Using the Up and Down push
buttons position the dummy
decimal point in front of the least
significant digit.
Press
E to return to the main menu.
Step 7 Calibrate the digital display
Scroll through the main menu until
'CAL' is displayed. Press P and the
indicator will request a 4mA input
by displaying 'ZErO'. Set the input
current to 4.0000 ± 0.0004mA and
press P again which will reveal the
existing zero display. Using the Up,
Down and P push buttons enter the
required zero display of 000.0
Press E to return to the 'ZErO'
prompt. The indicator will display
'Ent' while storing this figure.
Page 17

17
Press the Up push button and the
indicator will request a 20mA input
by displaying 'SPAn'. Set the input
current to 20.0000 ± 0.0004mA and
again press P which will reveal the
existing display at 20mA. Using the
Up, Down and P push buttons enter
the required display of 1500.0
Press E twicetoreturntothemain
menu. The indicator will display
'Ent' while storing this figure.
The analogue bargraph will be
automatically calibrated to display 0
with 4mA input and full scale with
20mA input.
Step 8 Return to the display mode
Following completion of calibration
return to the display mode by
pressing 'E'.
7.2 Using the internal references
As in 7.1 the BA326C is required to display:
0.0 with a 4mA input
1500.0 with a 20mA input
from a linear level transducer. Maximum
display resolution is required, the frequency of
the local mains is 50Hz, and the existing
security code is 1209. In the operating mode
the indicator is required to display the input
current in milliamps when the P push button is
operated.
This example assumes that the internal
references have been routinely calibrated.
Step1 Enter the programming mode
With an input current between 4
and 20mA put the indicator in the
programming mode by
simultaneously pressing P and E.
The indicator will respond by
displaying 'COdE'. Press P to
clear this prompt and set the
display to the security code 1209
using the Up, Down and P
pushbuttons. Pressing E will enter
the code, and the first parameter
'root' in the main menu will be
displayed.
Step 2 Square root extractor
With 'root' displayed, press P
which will reveal the root extractor
status. The root extractor can be
turned on or off by the Up or Down
buttons. Select 'OFF', and press E
to return to the main menu.
Step 3 Select frequency of max
rejection
Scroll though the main menu until
'Cond' is displayed. Enter the submenu by pressing P twice and
select the 'FrE' function. Using the
Up or Down buttons select '50',
and then press E twicetoreturnto
the main menu.
Step 4 Define function of P push button
Select 'C--P' from the main menu
and press P to reveal the function
of the
P button in the display mode.
Select '4-20' and return to the main
menu by pressing E.
Step 5 Position dummy decimal point
Select 'd.P' from the main menu
and then press P.UsingtheUp
and Down push buttons position
the dummy decimal point in front of
the least significant digit.
Press E to return to the main menu.
Step 6 Calibrate digital display
With any input current between 4
and 20mA select 'SEt' from the
main menu and press P. The
indicator will display 'ZErO' in the
sub-menu; press P to reveal the
existing zero display. Using the Up,
Down and P push buttons enter the
required zero display of 000.0
Press E to return to the 'ZErO'
prompt.
Again with any input current
between 4 and 20mA press the Up
push button and the indicator will
display 'SPAn'. Press P to reveal
the existing span display. Using
the Up, Down and P push buttons
enter the required span display of
1500.0 Press E to return to the
'SPAn' prompt. Press E again
to return to the main menu.
Page 18

18
The analogue bargraph will be
automatically calibrated to display 0
with 4mA input and full scale with
20mA input.
Step 7 Return to display mode
Following completion of calibration
return to the display mode by
pressing 'E'.
8. MAINTENANCE
8.1 Fault finding during commissioning
If a BA326C fails to function during
commissioning the following procedure should
be followed:
Symptom Cause Solution
No display Incorrect There should be 1.1V
wiring between terminals 1
& 3 with terminal 1
positive.
No display Incorrect Check that a current
and no volts wiring or is flowing in the
between no power loop.
terminals supply.
1 and 3.
Insufficient Check supply
loop voltage voltage and voltage
to operate drops caused by all
indicator components in the
loop
Indicator Positive The indicator has
displays 1 over-range been incorrectly
calibrated & is trying
to display a number
greater than 19999,
or input current is
greater than
approximately
21mA.
Indicator Negative The indicator has
displays -1 0ver-range been incorrectly
calibrated & is trying
to display a number
less than -19999, or
the input current is
less than
approximately
3.5mA.
Unstable 4/20mA Check loop supply
display input has a voltage.
large ripple
content.
Unable to Incorrect Enter correct
enter the security security code or fit
programme code security link in
mode entered. override position.
See Fig 9.
8.2 Fault finding after commissioning
ENSURE PLANT SAFETY BEFORE
STARTING MAINTENANCE
Live maintenance is permitted on
intrinsically safe equipment installed
in a hazardous area, but only certified
test equipment should be used
unless a gas clearance certificate is
available.
If a BA326C fails after it has been functioning
correctly, the following procedure should be
followed:
Symptom Cause Solution
No display No power Check that a
and no volts supply current is flowing in
between the loop.
terminals
1 and 3.
Unstable 4/20mA input Check loop supply
display has a large voltage.
ripple.
Incorrect Digital filter Recalibrate
calibration FrE has been
changed after
indicator was
calibrated.
If this procedure does not reveal the cause of
the fault, it is recommended that the instrument
is replaced. This can be done without
disconnecting power, but while the indicator is
disconnected the 4/20mA loop will be open
circuit.
8.3 Servicing
All standard BA326C indicators are
interchangeable, and a single spare may be
used to replace any instrument which fails.
We recommend that faulty instruments are
returned to BEKA associates or to our local
agent for repair.
Page 19
19
8.4 Routine maintenance
The mechanical condition of the instrument
and electrical calibration should be regularly
checked. The interval between inspections
should be chosen to suit the environmental
conditions.
8.5 Guarantee
Indicators which fail within the guarantee
period should be returned to BEKA associates
or our local agent. It is helpful if a brief
description of the fault symptoms is provided.
8.6 Customer comments
BEKA associates is always pleased to receive
comments from customers about our products
and services. All communications are
acknowledged and whenever possible,
suggestions are implemented.
9. ACCESSORIES
9.1 Units of measurement and
instrument identification
All BA326C indicators are fitted with a display
label behind the armoured glass window. This
label can be supplied with any analogue scale
graduations, units of measurement and
applicational information specified at the time
of ordering. Replacement printed labels can
be fitted on-site providing the following
precautions are observed, but we strongly
recommend that instruments are returned to
the factory or our local agent for the
replacement label to be fitted.
CAUTION
a. Only open enclosure in a clean
environment.
b. Observe ESD precautions i.e. operator
should be earthed (grounded).
c. Do not operate the BA326C without its
enclosure within a hazardous area, or
with the electronic components touching
a conductive surface.
To gain access to the display label un-plug the
instrument terminal block(s) by gently pulling
and remove the rear panel which is secured by
six screws - see Fig 9. The electronic
assembly may then be pulled out of the
enclosure to reveal the display label. If a
new analogue scale is being fitted, it is
recommended that the instrument is activated
so that the scale can be accurately aligned
with the display.
If specified at the time of ordering, the BA326C
can be supplied with tag or applicational
information printed onto the instrument
certification label which is located on the side
the enclosure. The following can be
accommodated:
1 row of 9 alphanumeric characters 10mm high
or 1 row of 11 alphanumeric characters 7mm high
or 2 rows of 18 alphanumeric characters 5mm high
9.2 Alarms
All BA326C indicators include dual alarm
functions which may be used to show
acceptable operating limits, but alarm outputs
are only fitted when the alarm option is
specified at the time of purchase.
The two solid state single pole alarm outputs
which may be independently programmed as
high or low alarms with normally open or
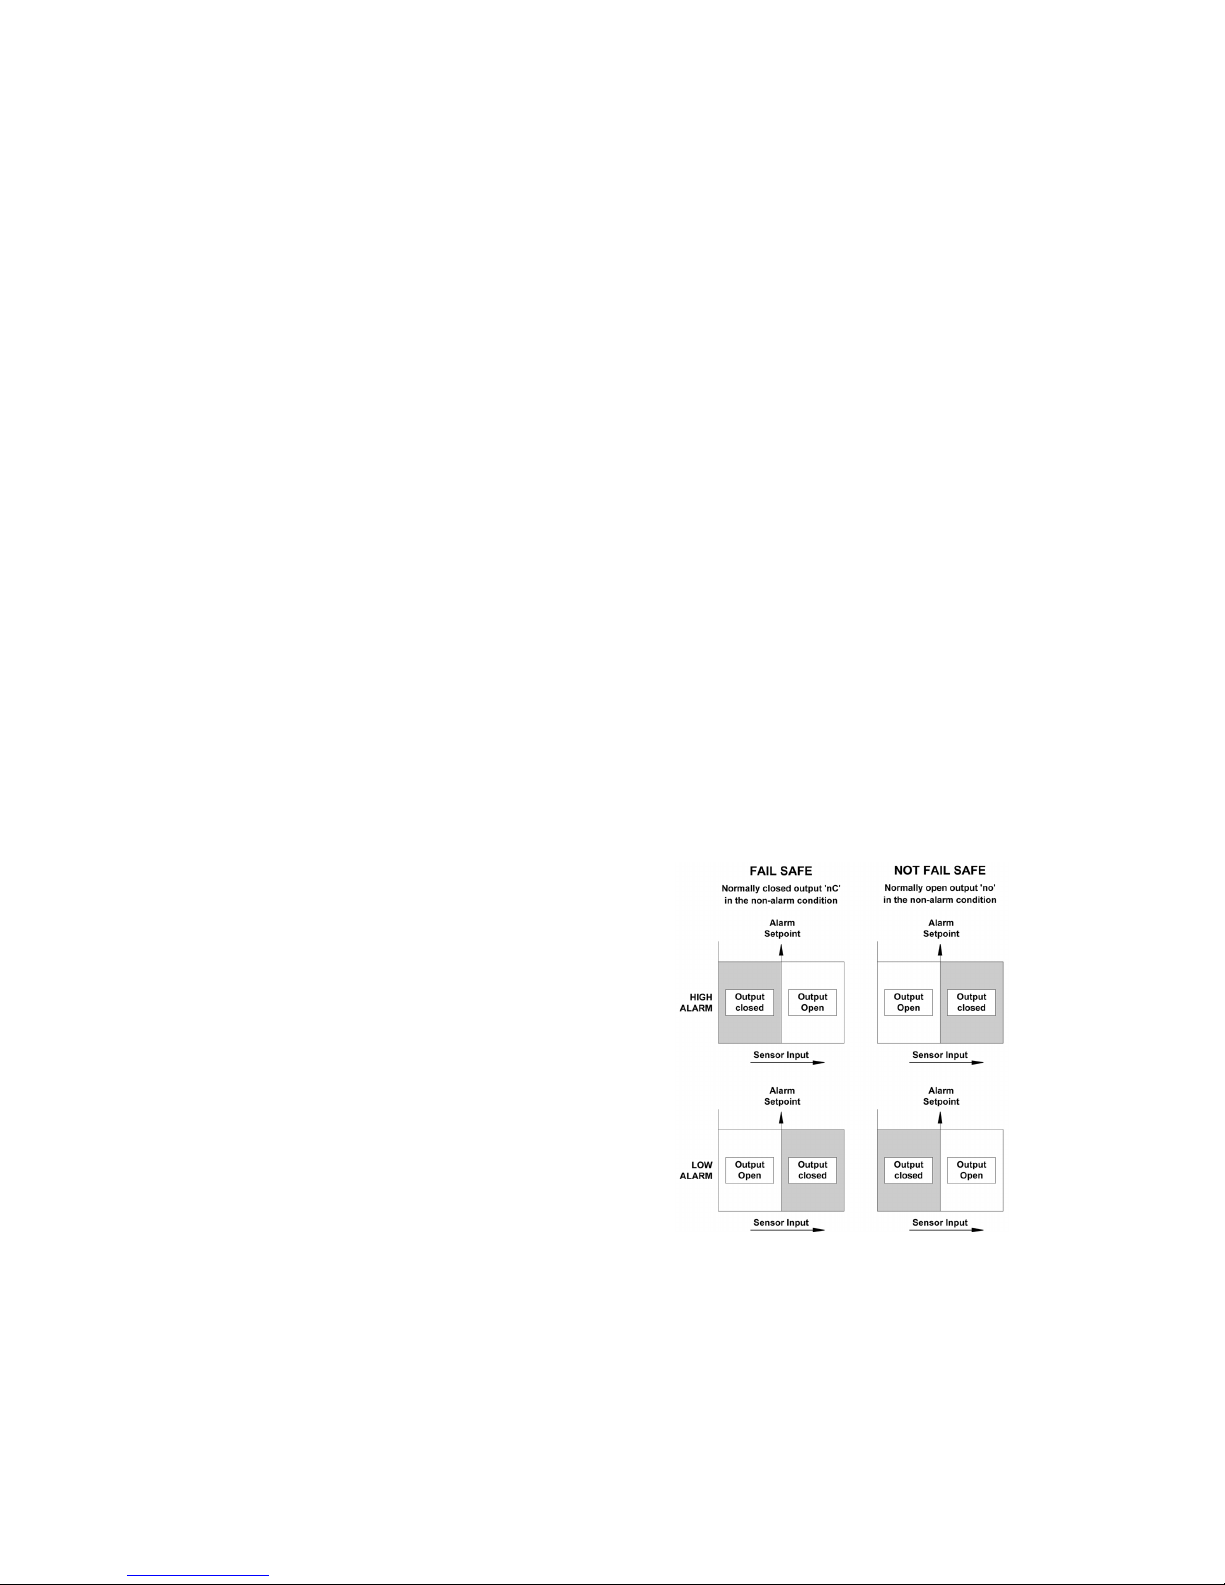
normally closed outputs. Fig 10 illustrates the
conditions available and shows which are fail
safe, i.e. output is in the alarm condition (open)
when the 4/20mA input current is zero.
CAUTION
These alarm outputs should not be
used for critical safety applications
such as shut down systems.
Fig 10 Alarm outputs
When one or both of the alarms is enabled, the
right hand analogue bargraph indicates the
position of the alarm setpoint(s) so they can be
easily compared with the measured value.
The type of setpoint display depends upon
alarm conditioning and the relative values of
the two setpoints.
Page 20
20
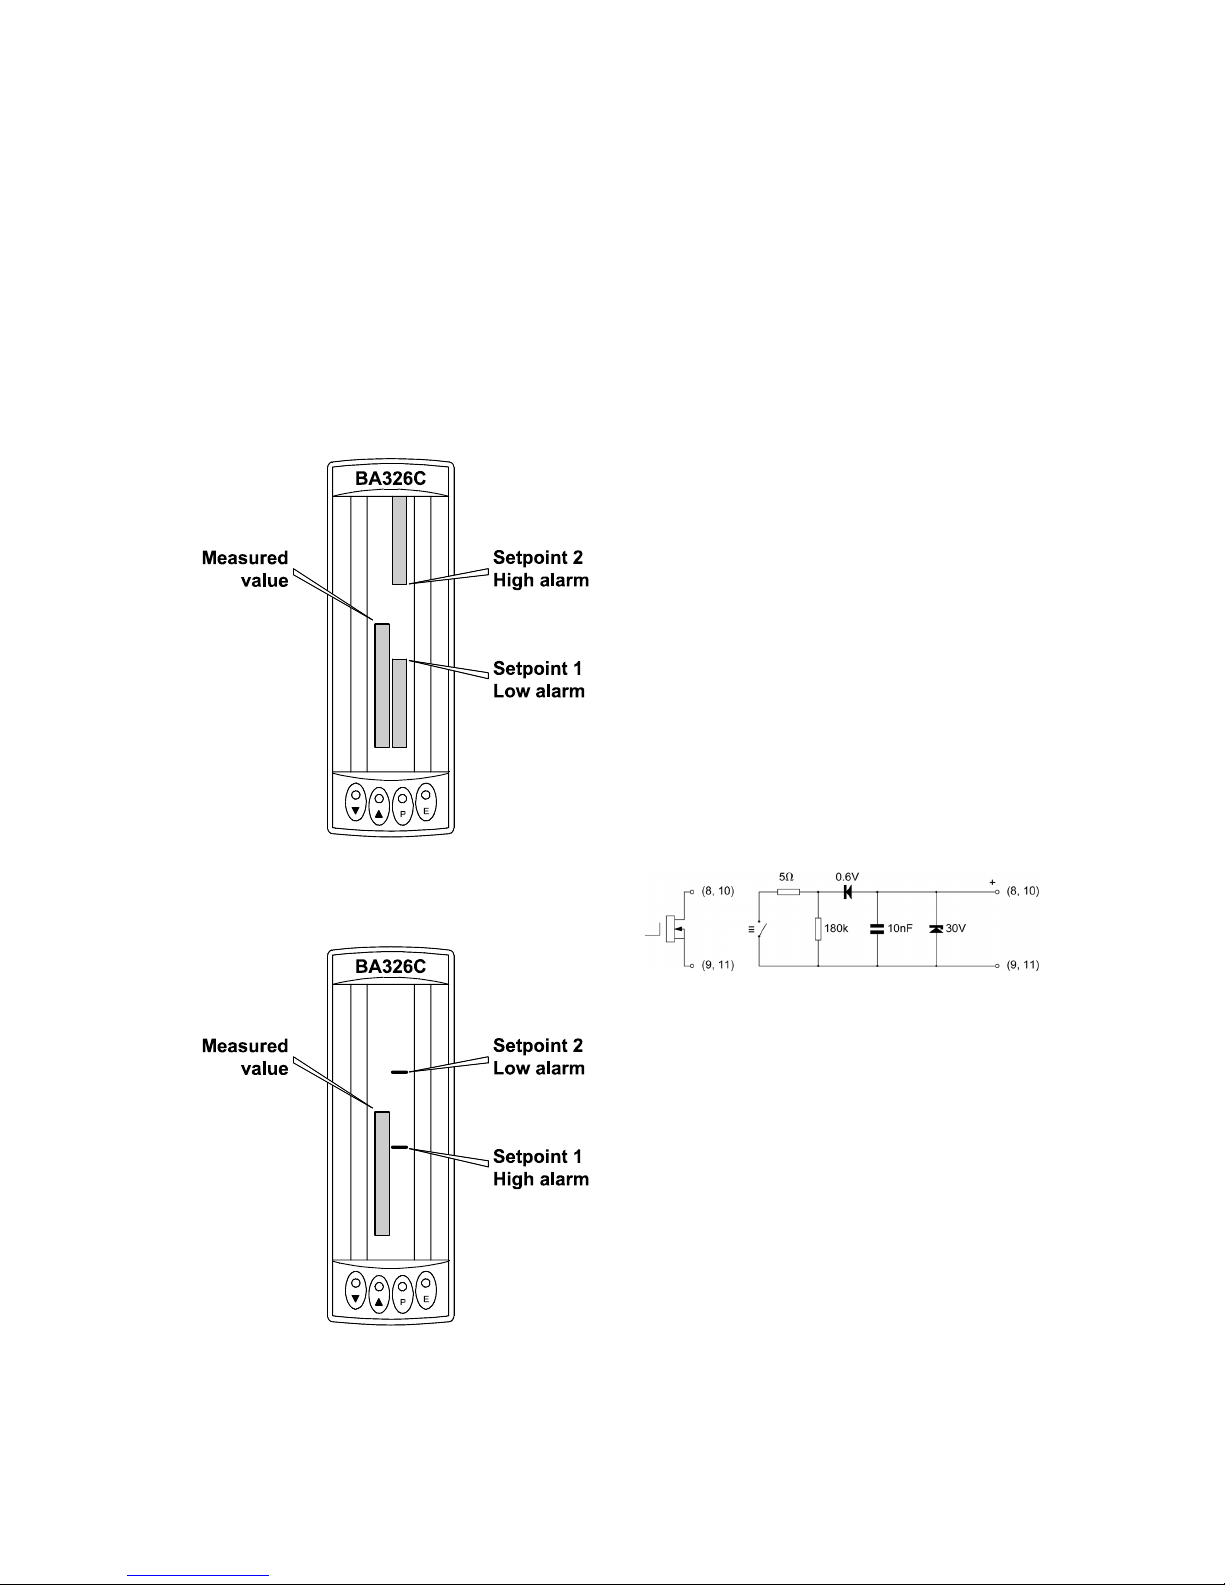
When alarm 1 is programmed as a low alarm
and alarm 2 as a high alarm, the display
shown in Fig 11A will be produced providing
setpoint 1 is less than setpoint 2. If the low
setpoint (1) is greater than the high setpoint
(2), or the function of the alarms is reversed,
the setpoints will be indicated by two single
segments on the right hand bargraph as
shown in Fig 11B.
If only one alarm is enabled the setpoint will be
indicated by a column extending from the
setpoint to the top of the display for a high
alarm, and from the setpoint to the bottom of
the display for a low alarm.
Fig 11A Set point display
Fig 11B Display with set points reversed
Annunciators above the digital display show
the status of both alarms, and the digital
display can be programmed to alternate
between the measured value and an alarm
identification.
Programmable functions for each alarm
include adjustable setpoint, hysteresis, alarm
delay and alarm accept. When frequent
setpoint changes are required, a separate
menu provides direct access to both setpoints
from the display mode without giving the
operator access to the programme and alarm
menus. A different security code may be
included to prevent tampering or accidental
adjustment.
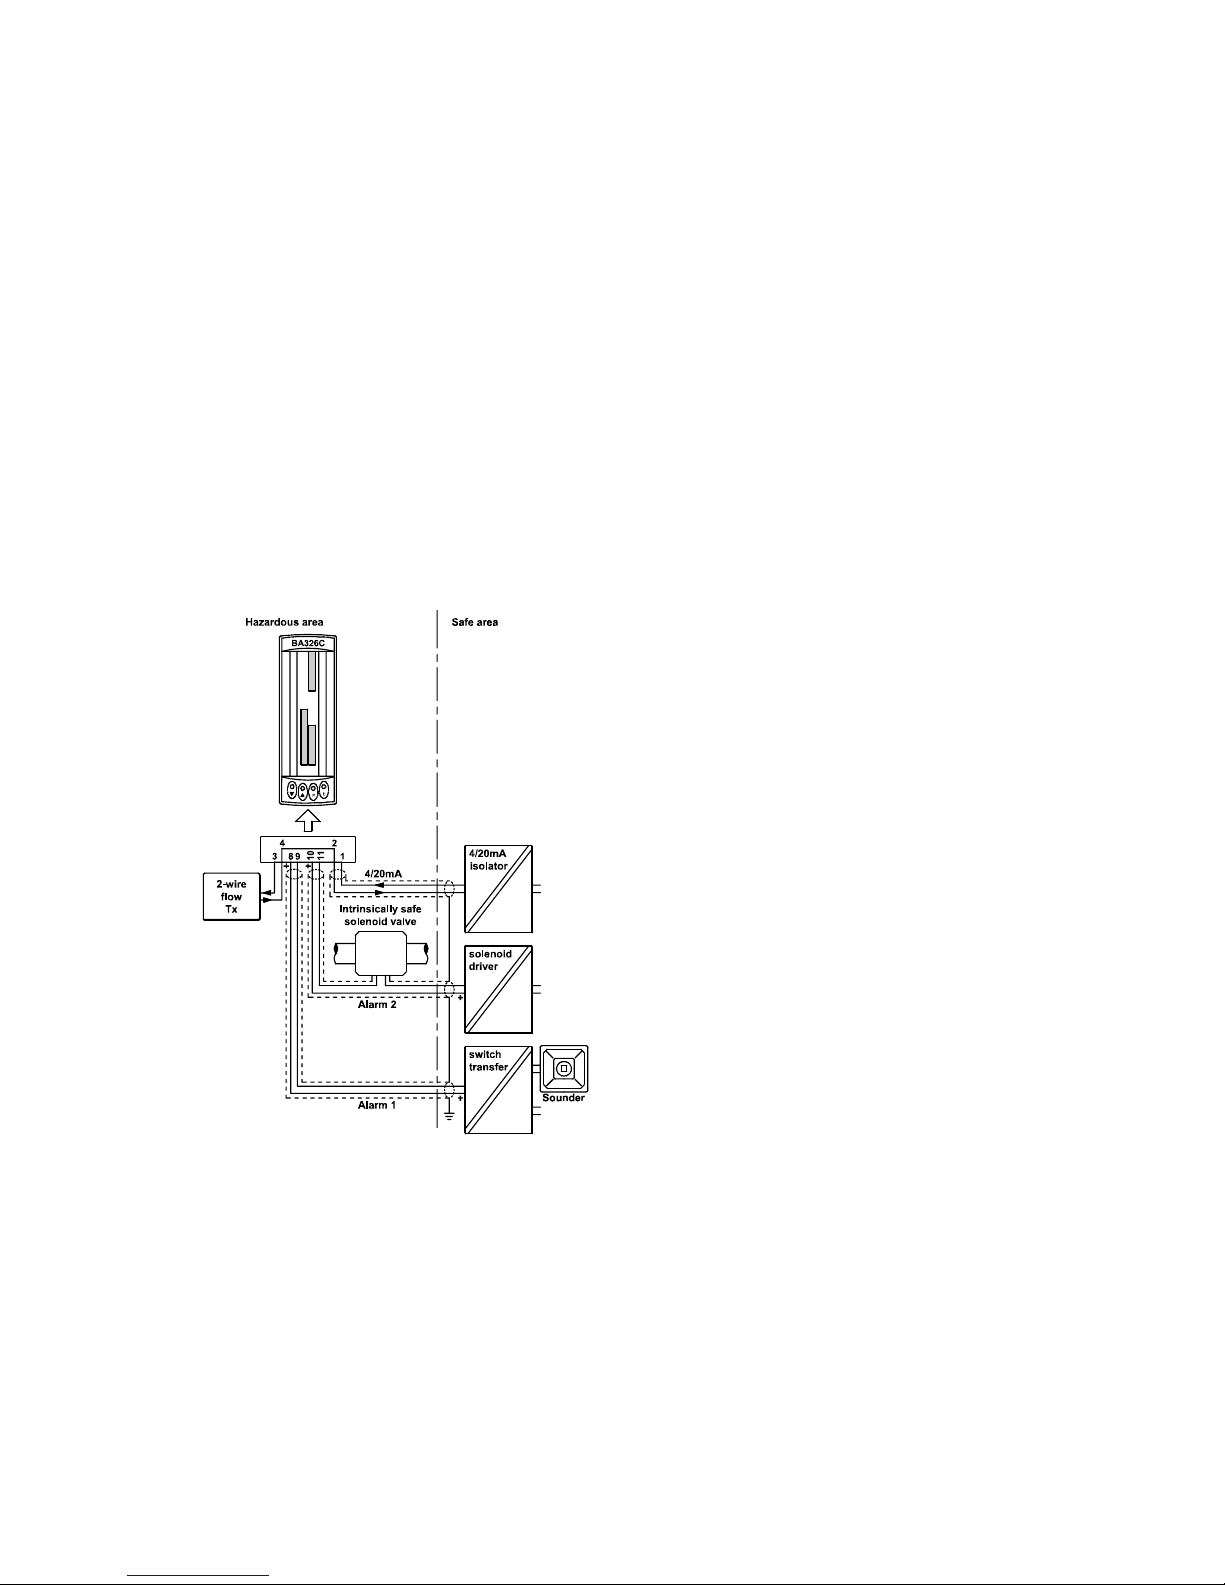
9.2.1 Solid state output
Each alarm has a galvanically isolated single
pole solid state switch output as shown in
Fig 12. The outputs are polarised and current
will only flow in one direction. Terminal 8 and
10 should be connected to the positive side of
the supply.
Ron = 5ohms + 0.6V
Roff = greater than 180k
Note: Because of the series protection diode
some test meters may not detect a closed
alarm output.
Fig 12 Equivalent circuit of each alarm output
9.2.2 Intrinsic safety
Each alarm output is a separate galvanically
isolated solid state switch. The EC-Type
Examination Certificate specifies that under
fault conditions the voltage, current and power
at each alarm output will not exceed those
specified for simple apparatus in Clause 5.7 of
EN60079-11. This allows each of the BA326C
alarm outputs to be connected to any
intrinsically safe circuit protected by a Zener
barrier or galvanic isolator providing that the
output parameters of each circuit do not
exceed:
Page 21
21
Uo 28V dc
Io 200mA
Po 0.84W
No system certificate has been issued for the
BA326C alarm outputs, as the system
certificate for the circuit to which the alarms
are connected remains valid.
The maximum equivalent capacitance and
inductance of each BA326C alarm output is:
Ci = 20nF
Li = 10µH
To determine the maximum permissible cable
parameters, the equivalent alarm output
parameters must be subtracted from the
maximum cable capacitance and inductance
specified by the system certificate of the circuit
connected to each alarm.
Fig 13 Typical alarm application
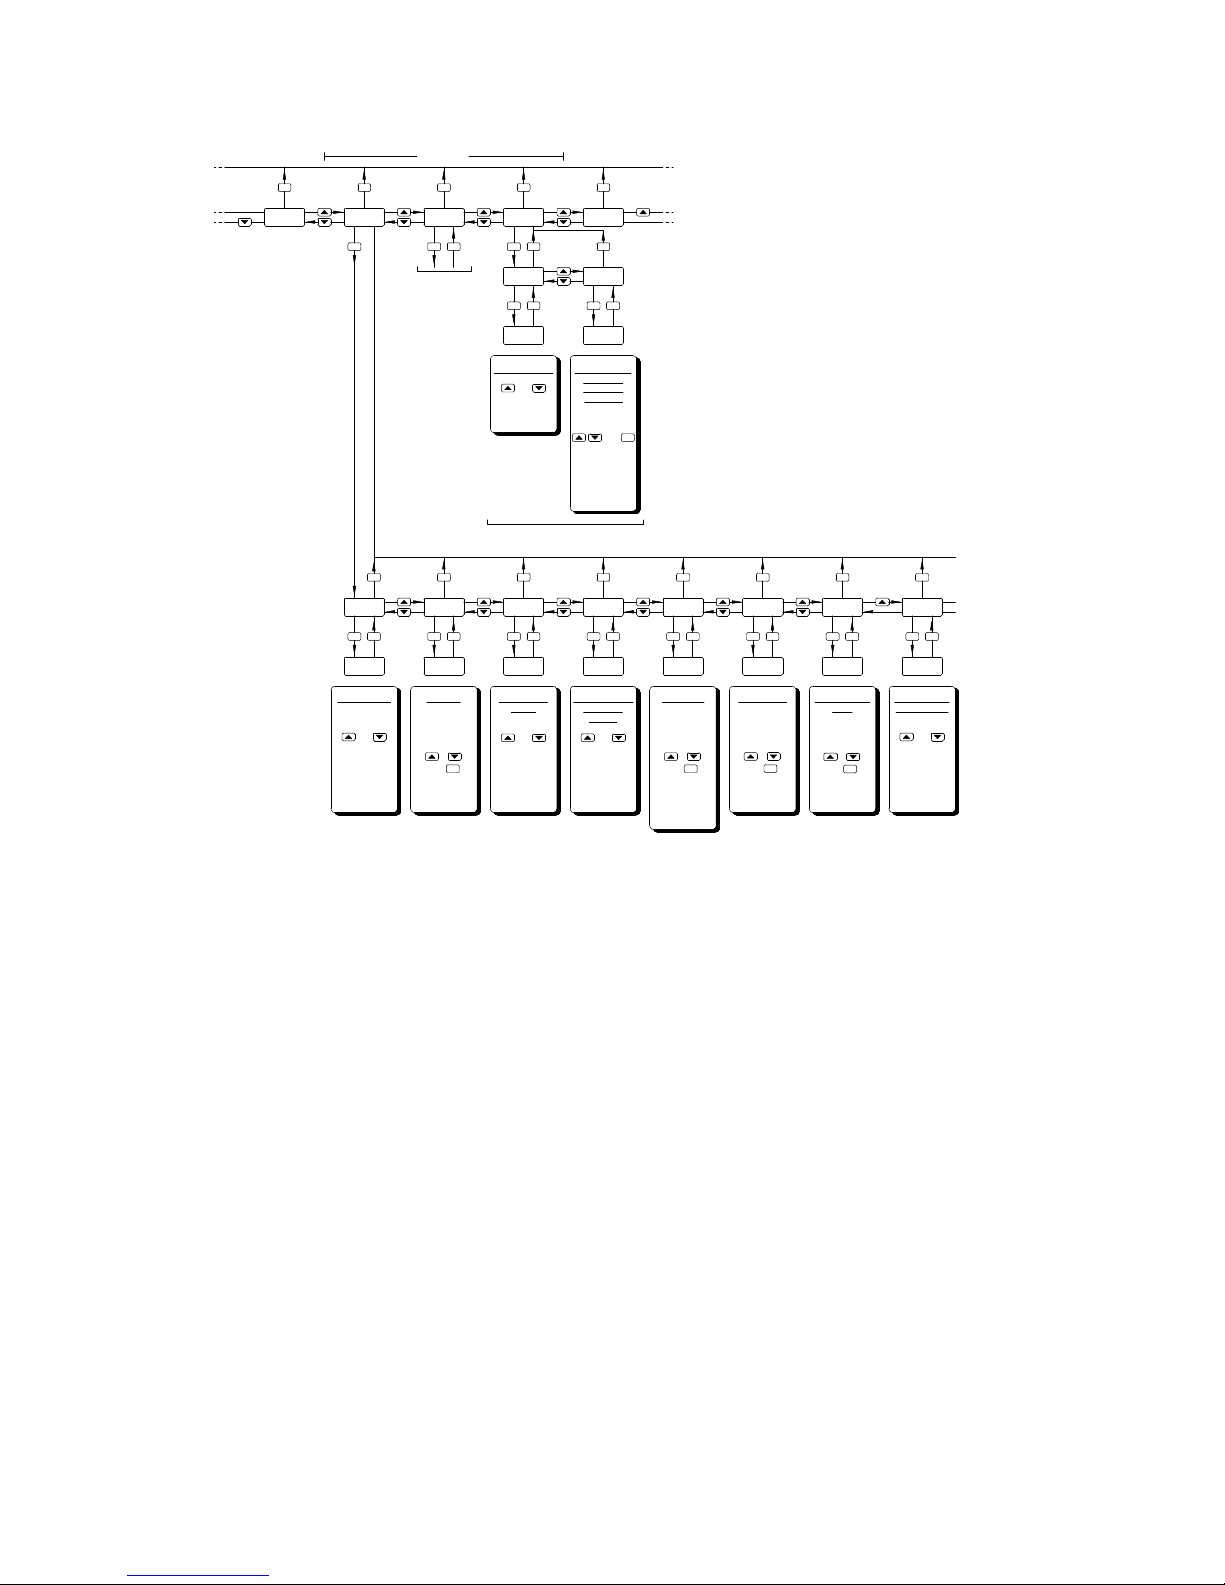
9.2.3 Programming and adjustment
When an alarm card is added to a BA326C the
main programme menu is extended as shown
in Fig 14. The additional functions appear
between 'Cond' and 'C--P' in the main menu.
For simplicity Fig 14 only shows the additional
functions available on alarm 1, but alarm 2 has
identical facilities.
The following table summaries each of the
alarm programme functions and includes a
cross reference to more detailed information.
Again only the functions on alarm 1 are listed,
but alarm 2 has identical facilities
Page 22

22
Summary of programmable alarm functions
Display Description of function
'EnbL' Alarm enable
Enables or disables the alarm
function without changing the alarm
parameters.
See section 9.2.4
'SP1' Alarm setpoint 1
Adjusts the alarm setpoint. The
alarm is activated when the
indicator display equals the
setpoint.
See section 9.2.5
'HI.LO' Alarm function
Defines whether the alarm has a
high or low function
See section 9.2.6
'no.nc' Normally open or normally
closed output
Determines whether the single pole
alarm output is open or closed in
the alarm condition.
See section 9.2.7
'HStr' Hysteresis
Adjusts the alarm hysteresis.
See section 9.2.8
'dELA' Alarm delay time
Adjusts the delay between the
display equalling the setpoint and
the alarm output being activated.
See section 9.2.9
'SIL' Alarm silence time
Defines the time that the alarm
output remains in the non-alarm
condition following acceptance of
an alarm.
See section 9.2.10
'FLASH' Display alarm identification
Defines if the setpoint bargraph
flashes when an alarm is activated.
See section 9.2.11
'AcSP' Access setpoint
Sub-menu which enables direct
access to the alarm setpoints from
the indicator display mode, and
defines a separate security code.
See section 9.2.12
9.2.4 Alarm enable: EnbL
This function allows the alarm to be enabled or
disabled without altering any of the alarm
parameters. To check or change the function
select 'EnbL' from the alarm menu and press P
which will reveal the current setting. The
function can be changed by pressing the Up or
Down button followed by the E button to return
to the alarm menu.
9.2.5 Setpoint adjustment: SP1 and SP2
The setpoint of each alarm may be positioned
anywhere between -19999 and 19999 (-19990
and 99990 with dummy trailing zero) providing
this corresponds to an input current between
3.8 and 20.2mA. e.g. If the indicator has been
calibrated to display 0 with 4mA input and
10000 with 20mA input, the two alarm
setpoints may be positioned anywhere
between -125 and 10125.
To adjust the setpoint select 'SP1' or 'SP2' from
the alarm menu and press P which will reveal
the existing alarm setpoint. Each digit of the
setpoint can be adjusted using the Up and
Down push buttons, and the P button to move
to the next digit. When the required setpoint
has been entered press E to return to the
alarm menu.
9.2.6 Alarm function: HI.LO
Each alarm can be conditioned as a high or
low alarm. To check or change the alarm
function select 'HI.LO' from the alarm menu
and press P to reveal the current setting. The
function can be changed by pressing the Up or
Down buttons followed by the E button to
return to the alarm menu.
Page 23
23
9.2.7 Alarm output status: no.nc
This function allows the alarm output to be
open or closed in the alarm condition. When
deciding which is required, care must be taken
to ensure that the alarm output is fail safe.
See Fig 10.
CAUTION
When the 4/20mA supply is
removed both alarm outputs will
open irrespective of
conditioning. Therefore for fail
safe operation both alarm
outputs should be programmed
to be open in the alarm
condition.
To check or change the alarm output status
select 'no.nc' from the alarm menu and press
P reveal the current setting. The function can
be changed by pressing the Up or Down
button followed by the E button to return to the
alarm menu.
9.2.8 Hysteresis: HStr
During programming hysteresis is shown in the
units the indicator has been calibrated to
display.To adjust the hysteresis, select 'HStr'
from the alarm menu and press P which will
reveal the existing figure. Each digit can be
adjusted using the Up and Down push buttons,
and the P button to move to the next digit.
When the required hysteresis has been
entered, press E to return to the alarm menu.
Fig 14 Alarm Programme Menu
P PE
ALr2
E
As ALr1
AcSP
PEE
EnbL
On
P
E E
P
Cond ALr1
E E
0000
AcCd
C - - P
E
E
AlarmsMain menu Main menu
Access Enable
or
to toggle
between
On and OFF
Security Code
For Direct
Access to
Setpoints
Enter code by
pressing
and
to move to
next digit
Code 0000
allows direct
access
P
Access to setpoints from display mode
OFF
EnbL
P
E
Alarm Enable
or
to toggle
between
On and OFF
E
SP1
00.00
P
E
E
Setpoint
Enter by
pressing
and
to move to
next digit
P
High or Low
Alarm
or
to toggle
between
HI and LO
E
HI.LO
LO
P
E
Normally Open
or Closed
Output
or
to toggle
between
no and nc
E
no.nc
nc
P
E
E
HStr
00.00
P
E
Hysteresis
Enter by
pressing
and
to move to
next digit
Not available
for total alarms
P
E
dELA
0000
P
E
Alarm Delay
Enter by
pressing
to move to
next digit
P
and
E
0000
P
E
SIL
Alarm Silence
Time
next digit
to move to
pressing
Enter by
and
P
Display alarm
identification
0000
P
E
FLASH
E
or
to toggle
between
On and OFF
Page 24

24
e.g. An indicator calibrated to display 0 to
10000, with a high alarm set at 9000 and
hysteresis of 200 will perform as follows:
High alarm will be activated when display
equals or exceeds 9000, but will not reset
until the display falls below 8800.
9.2.9 Alarm delay: dELA
This function enables activation of the alarm
output to be delayed for a fixed time following
the alarm condition occurring. The delay can
be programmed in 1 second increments up to
3600 seconds. If a delay is not required zero
should be entered. To adjust the delay select
'dELA' from the alarm menu and press P which
will reveal the existing delay. Each digit of the
delay can be adjusted using the Up and Down
push buttons, and the P buttontomovetothe
next digit. When the required delay has been
entered, press E to return to the alarm menu.
If the 'FLASH' function is activated the alarm
annunciator will flash until the delay time
expires, after which the alarm bar or column
will flash.
9.2.10 Alarm silence time: SIL
This function is primarily intended for use in
small installations where the alarm output
directly operates an annunciator such as a
sounder. When the alarm silence time is set to
any figure other than zero, the P push button
becomes an alarm accept button. After an
alarm has occurred, operating the P button will
cause the alarm output to revert to the nonalarm condition for the programmed alarm
silence time. The alarm annunciator(s) will
continue to indicate an alarm after it has been
accepted and silenced. The alarm silence time
may be adjusted between 0 and 3600 seconds
in 1 second increments.
To adjust the alarm silence time select 'SIL'
from the alarm menu and press P which will
reveal the existing time. Each digit can be
adjusted using the Up and Down push buttons,
and the P button to move to the next digit.
When the required time has been entered
press E to return to the alarm menu.
If the 'FLASH' function is activated the alarm
bar or column will flash when the alarm occurs.
When the alarm is silenced by pushing the P
button, the alarm bar or column will stop
flashing but the alarm annunciator will flash
until the alarm silence time expires.
9.2.11 Display alarm identification:
FLASH
The status of each alarm is always shown by
an alarm annunciator located above the digital
display. In addition to this annunciator, this
function provides an alarm warning on the
analogue bargraph display. When the function
is enabled and an alarm occurs, the setpoint
bar or column flashes. To check or change the
display alarm identification status select
'FLASH' from the alarm menu and press P to
reveal the current setting. The function can be
changed by pressing the Up or Down button
followed by the E button to return to the alarm
menu.
9.2.12 Access Setpoint: AcSP
This function controls a separate menu which
provides direct access to the alarm setpoints
when the indicator is in the display mode, as
described in section 9.2.13 Thus allowing an
operator to adjust the alarm setpoints without
having access to the programme and alarm
menus. Further protection is provided by a
separate security code.
This direct access menu is enabled and a
separate security code entered from the 'AcSP'
function in the alarm programme menu shown
in Fig 14. To change the menu parameters
select 'AcSP' from the alarm programme menu
and press P which will display the enable
prompt 'EnbL'. Press P again to reveal if the
direct access menu is 'On' or 'OFF'. The Up or
Down buttons will toggle the display between
the two conditions.
If 'OFF' is selected, the operator will not have
access to the setpoints from the display mode.
Return to the 'AcSP' prompt in the main menu
by pressing E twice.
If 'On' is selected, the operator will have direct
access to the alarm setpoints from the display
mode via a separate optional security code.
To define the four digit numerical code press P
to return to the 'Enbl' prompt followed by the
Up or Down button to select the access code
prompt 'AcCd'. Pressing P will reveal the
current security code. Each digit of the code
may be changed by operating the Up and
Down push buttons, and the P button to move
to the next digit. When the required code has
been entered, press E twicetoreturntothe
'AcSP' prompt in the Programme Menu.
Code 0000 will disable the security code
allowing direct access from the display mode
to the setpoints by pressing the P and Up
buttons simultaneously when the AcSP
function is on.
New instruments with alarms are supplied with
this function disabled and the security code set
to 0000.
Page 25
25
9.2.13 Adjusting alarm setpoints from the
display mode
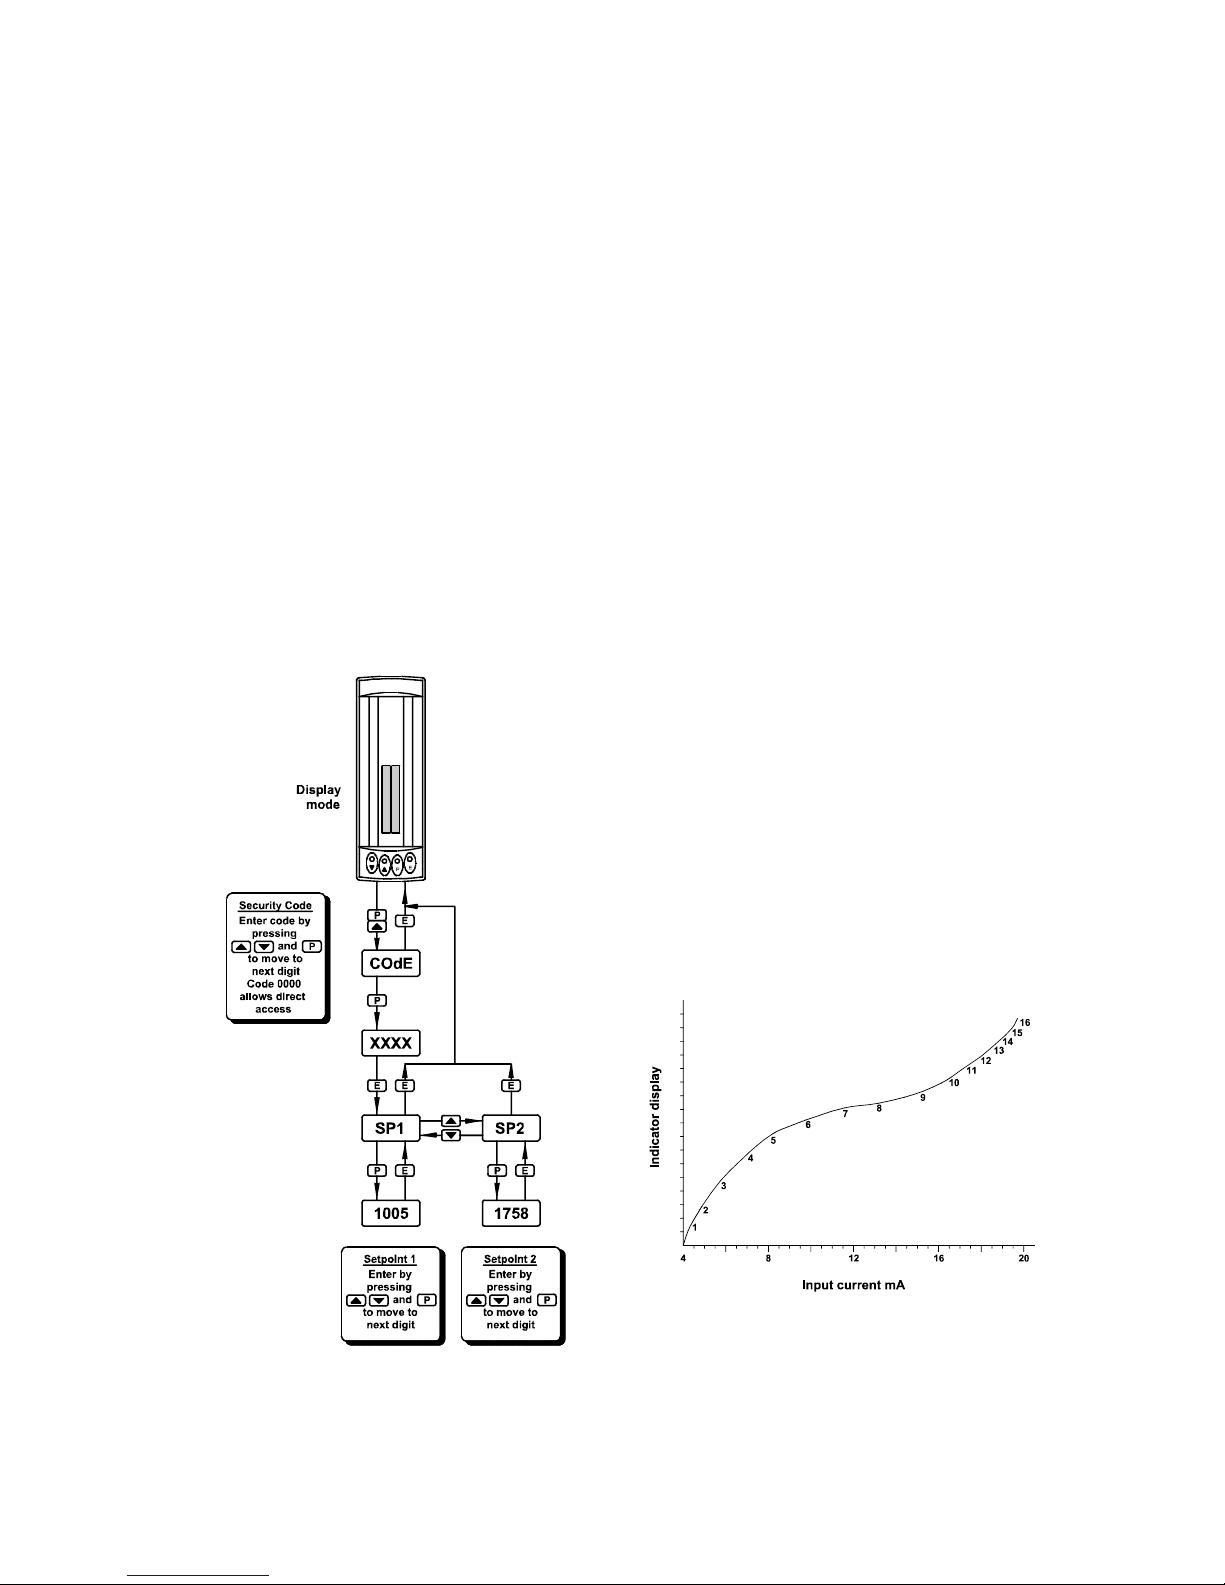
Access to the alarm setpoints from the
indicator display mode is obtained by operating
the P and Up push buttons simultaneously as
shown in Fig 15. If the setpoints are not
protected by a security code the alarm setpoint
prompt 'SP1' will be displayed. If the setpoints
are protected by a security code, 'COde' will be
displayed first. Pressing P again will allow the
alarm security code to be entered digit by digit
using the Up and Down buttons to change the
flashing digit, and the P push button to move to
the next digit. If the correct code is entered
pressing E will cause alarm setpoint prompt
'SP1' to be displayed. Pressing the Up or
Down button will toggle the display between
the two alarm setpoint prompts 'SP1' and
'SP2'.
If an incorrect security code is entered, or a
button is not pressed for ten seconds, the
indicator will automatically return to the display
mode.
Fig15 Setpoint adjustment from the display
mode
To adjust an alarm setpoint select 'SP1' or
'SP2' and press P which will reveal the current
setting. Each digit of the setpoint may be
adjusted using the Up and Down push buttons,
and the P button to move to the next digit.
When the required setpoint has been entered,
pressing E will return the display to the 'SP1' or
'SP2' prompt from which the other setpoint
may be selected, or the indicator may be
returned to the display mode by pressing E
again.
Direct access to the alarm setpoints is only
available when the menu is enabled - see
section 9.2.12
9.3 Lineariser
The indicator can be supplied with a sixteen
point lineariser which may be adjusted to
compensate for almost any non linear variable.
For example, a level signal from a horizontal
cylindrical tank may be linearised by the
indicator to display the tank contents in linear
volumetric units.
The addition of linearising software does not
effect the intrinsic safety of the indicator.
Fig 16 shows a typical linearising
characteristic. Up to sixteen break-points may
be programmed to occur at any input current
between 4 and 20mA. The slope between
adjacent break-points may be set anywhere
between -1250 and +1250 display counts per
milliamp. Greater slopes may be programmed,
but the indicator performance will be degraded.
A linear characteristic can be obtained by
programming just two points, one at 4mA and
the other at 20mA.
Fig 16 Typical indicator characteristic
Page 26

26
Inclusion of the lineariser software extends the
'CAL' and 'SEt' functions as shown in Fig 17,
and the root and null functions are omitted.
from the main menu. As with a linear
indicator, calibration may be performed with an
external calibrator using the 'CAL' function, or
from the internal references using the 'Set'
function.
9.3.1 Calibration using an external current
source: CAL
This method allows direct calibration with a
current source, and is preferred when
traceability is required. If the exact system
non-linearity is unknown, the method also
allows direct calibration from the variable to be
displayed. e.g. The output from a level sensor
in an irregular tank may be displayed in
linear volumetric units by filling the tank with
known incremental volumes and calibrating the
indicator to display the sum of the increments
at each break-point.
The number of break-points required must first
be entered using the Add and dEL functions.
In both these functions the indicator initially
displays the current break-point and the total
number of break-points being used. e.g.
5 13
current total number of
break-point break-points
Display Description of function
'Add' Add a break-point
Adds a new break-point before the
displayed break-point. The
calibration of existing break-points
is not changed, but the
identification number of all
subsequent break-points is
increased by one.
'dEL' Remove a break-point
Removes the displayed break-point
and joins the preceding break-point
to the following break-point with a
straight line. The identification
number of all subsequent breakpoints is decreased by one.
To add a break-point select 'CAL' from the
main menu and press P to enter the 'Add'
function; press P again to reveal the current
and total number of break-points. Each
subsequent operation of the P push button will
introduce an additional break-point. When
adding a break-point to a calibrated indicator,
the insertion position can be selected using the
Up and Down push buttons.
The delete break-point function dEL operates
in a similar manner to the Add function
described above.
When the required number of break-points has
been entered, return to the sub-menu by
pressing E. The indicator will display 'Add' or
'dEL' depending upon the last function used.
Each break-point can now be programmed.
Select 'PtS' from the sub-menu and press P
which will select the first break-point '0 n',
where n is the total number of break-points
entered. The selected break-point can be
changed using the Up and Down buttons.
When the required break-point has been
selected press P. Set the indicator input
current to the exact value at which the breakpoint is to occur, and adjust the indicator
display using the Up and Down buttons and P
to move between digits. When the required
display has been set, press E to enter the
information and return to the sub-menu from
which another break-point can be selected.
Repeat this procedure for each break-point,
and then return to the main menu by pressing
E twice.
9.3.2 Calibration using internal references:
SEt
This function enables the break-points to be
adjusted without the need for an accurate
external current source. Throughout
calibration the indicator input current may be
any value between 4 and 20mA.
The accuracy of this method depends upon the
accuracy of the internal references which
should be calibrated periodically against a
traceable external current source with a
resolution of at least 0.4µA. See section
6.10.2
Page 27

27
The number of break-points required should
first be entered using the Add and dEL
functions. In both these functions the indicator
initially displays the current break-point and the
total number of break-points being used. e.g.
5 13
current total number of
break-point break-points
Display Description of function
'Add' Add a break-point
Adds a new break-point before the
displayed break-point. The
calibration of existing break-points
is not changed, but the
identification number of subsequent
break-points is incremented.
'dEL' Remove a break-point
Removes the displayed break-point
and joins the preceding break-point
to the following break-point with a
straight line. The identification of
subsequent break-points is
decremented.
'inPut' Defines the current at which
break-point occurs
Enables the required current at
each break-point to be defined
without having to input an accurate
input current to the indicator.
'diSP' Defines display at break-point
Enables the indicator display at
each break-point to be defined.
Select 'SEt' from the main menu and press P
once to enter the 'Add' function, and again to
reveal the current and total number of breakpoints. Each subsequent operation of the P
push button will introduce an additional breakpoint. When adding a break-point to a
calibrated indicator, the insertion position can
be selected using the Up and Down push
buttons.
The delete break-point function 'dEL' operates
in a similar manner to the 'Add' function
described above.
When the required number of break-points has
been entered, return to the sub-menu by
pressing E. The indicator will display 'Add' or
'dEL' depending upon the last function used.
The required indicator display at each breakpoint can now be entered, followed by the
input current at which each break-point occurs.
To enter the required display at any breakpoint select 'dISP' from the sub-menu and
press P which will select the first break-point '0
n', where 'n' is the total number of break-points
selected. The selected break-point can be
changed using the Up and Down buttons.
When the required break-point has been
selected press P to reveal the existing
display. Using the Up and Down buttons and
P to move between digits set the revised
display. Press E to return to the sub-menu
from which another break-point can be
selected. Repeat this procedure for all the
break-point displays to be changed, and then
return to the 'diSP' prompt in the sub-menu by
pressing E.
To enter the input current at which each breakpoint occurs select 'InPut' from the sub-menu
and press P which will select the first breakpoint '0 n'. The selected break-point can be
changed using the Up and Down buttons.
When the required break-point has been
selected, press P to reveal the input current at
which the break-point occurs. Using the Up
and Down buttons and P to move between
digits, set the revised input current in mA.
Press E
to return to the sub-menu from which
another break-point can be selected.
Repeat this procedure for all the break-point
input currents to be changed, and then return
to the 'InPut' prompt in the sub-menu by
pressing E.
Page 28
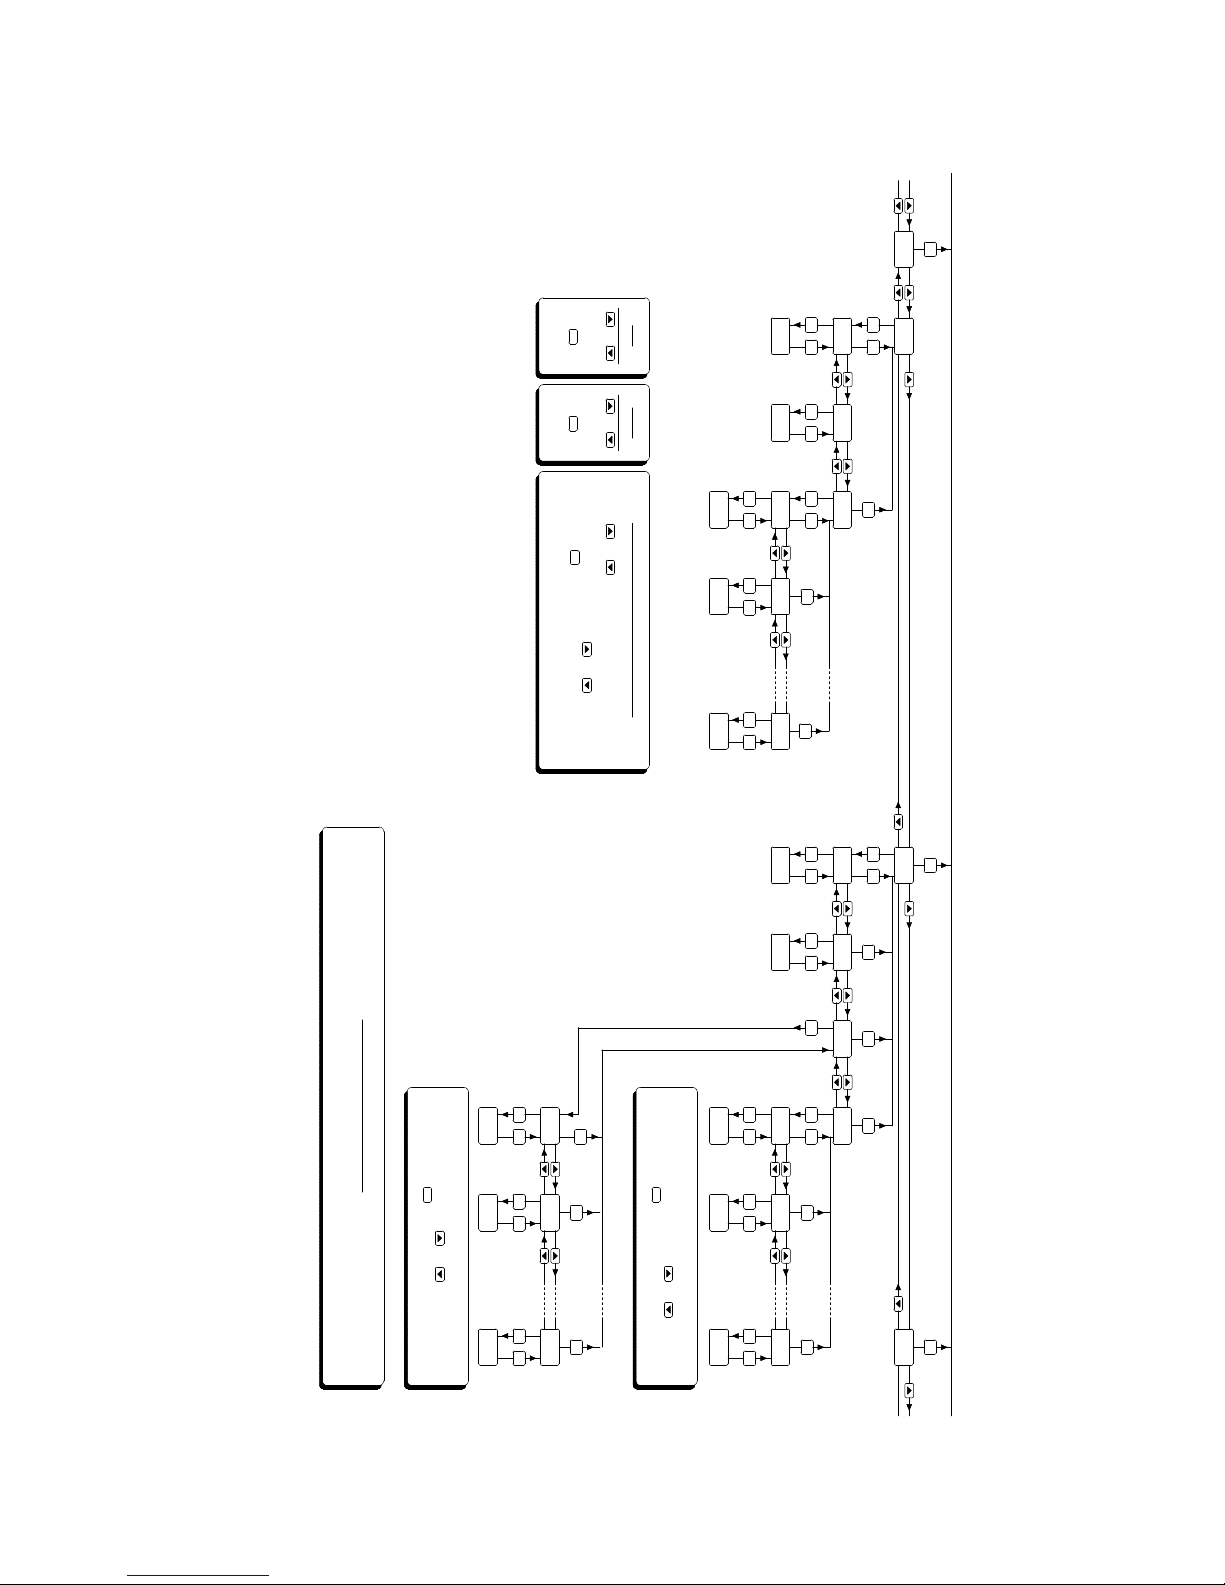
28
E
110.0
1800.0
position
to select
Break-point
Add
or
Fig 17. Lineariser Programme Structure
to enter
P
Break-point
to select
to enter
position
P
or
Delete
With accurate input current set required display at each
break-point by pressing or and
to move to next digit
P
Calibration using external current source
or to select required break-point
is required by pressing or
Enter input current at which each break-point
and to move to next digit
P
Enter requied display at each break-point
by pressing or and
and to move to next digit
P
Calibration using internal references
Without the need for accurate input current
Enter the number of break-points, foll owed by the position and the required display
E
bAr
Add
3 16
P E
P E
CAL
3 16
dEL
PE
0 16
0000
P E
PtS
P E
E
E
1000
1 16
P E
E
1200
16 16
P E
3 16
Add
SEt
P
P
E
E
E
3 16
P E
dEL
E
P
dISP
E
0 16
4.000
P E
P E
InPut
E
1 16
6.700
EP
E
20.000
16 16
PE
E
Cond
E
0.0
EP
0 16
E
1 16
P E
E
16 16
P E
Page 29
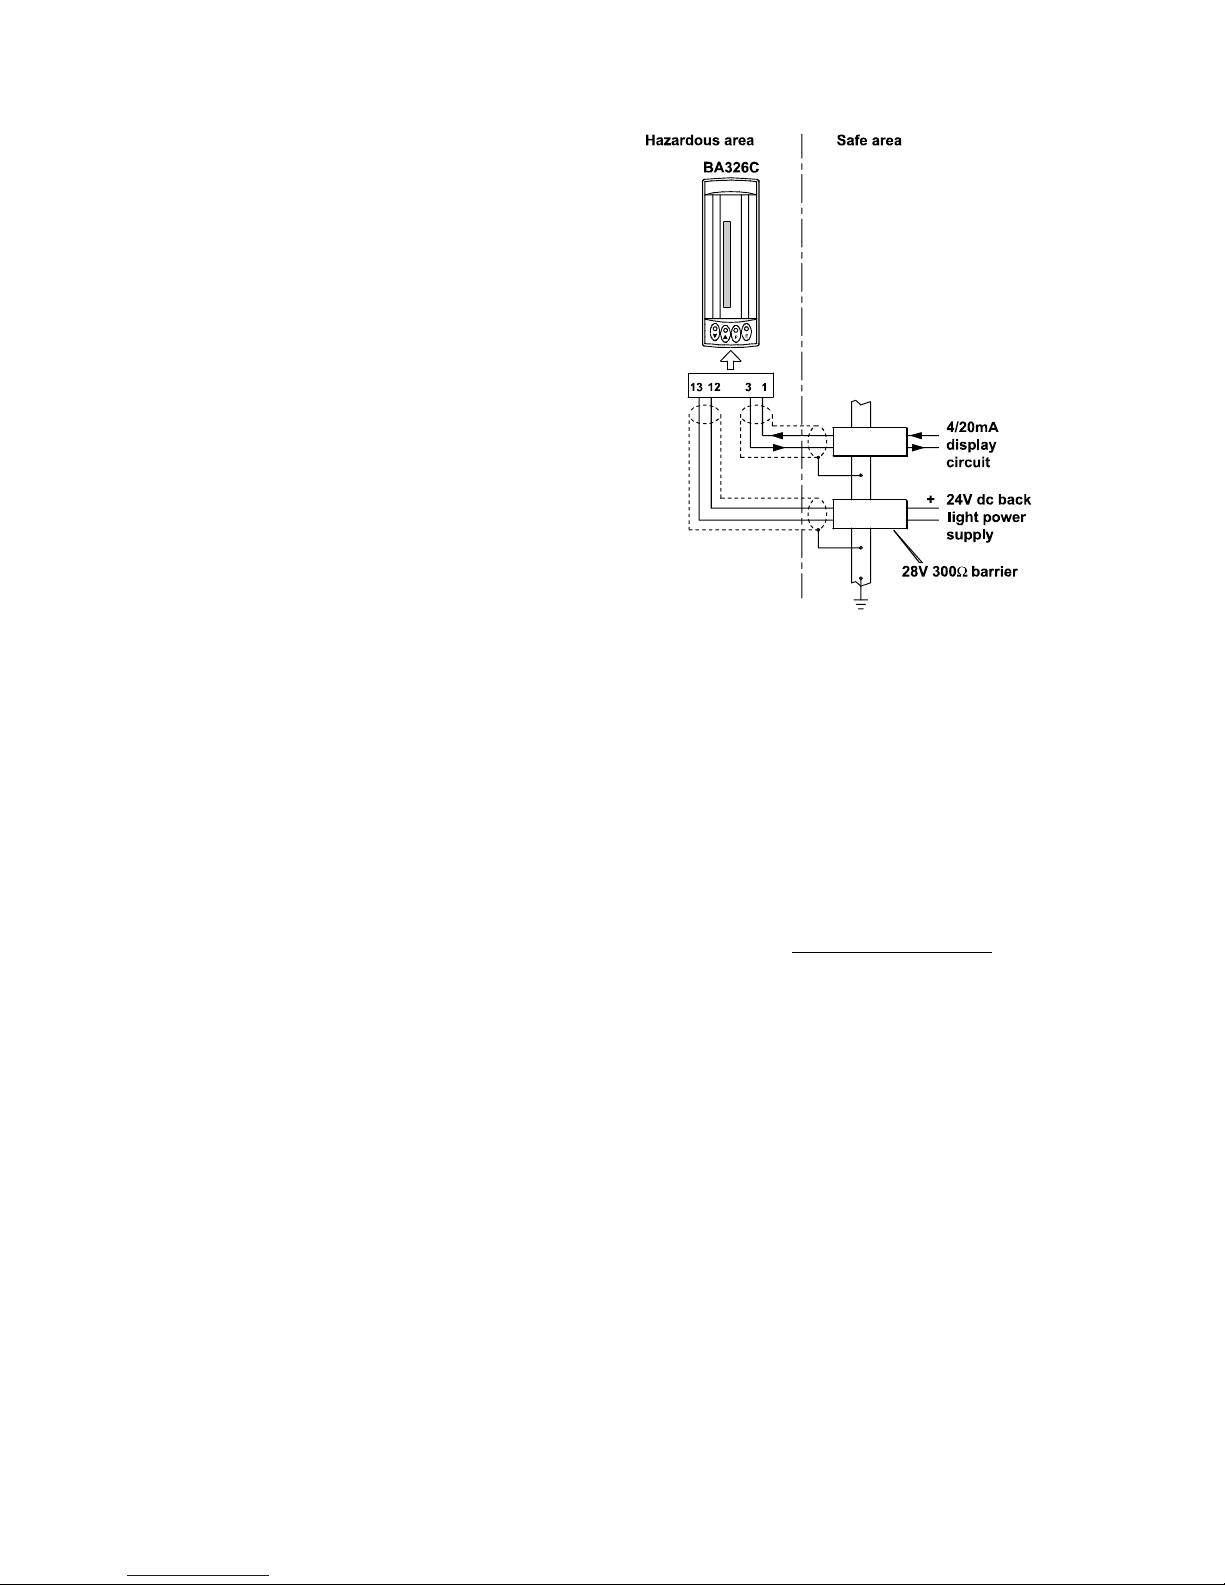
29
9.4 Display backlight
The BA326C can be supplied with LED
backlighting to improve display contrast when
the indicator is installed in poorly illuminated
areas. The backlight is segregated from the
measuring circuit and has been certified as a
separate intrinsically safe circuit.
The backlight must be powered from the safe
area via a Zener barrier or a galvanic isolator
as shown in Fig 18. Any certified Zener
barrier may be used, providing the output
parameters do not exceed:
Uo 28V dc
Io 159mA
Po 0.8W
The maximum equivalent capacitance and
inductance of the display backlight is:
Ci = 30nF
Li = 10µH
To determine the maximum permissible cable
parameters, the equivalent backlight
parameters must be subtracted from the
maximum cable capacitance and inductance
specified by the certificate of the Zener barrier
or galvanic isolator powering the backlight.
Fig 18 Backlight power supply
The display brilliance depends upon the
current flowing through the backlight. This is
determined by the supply voltage and the endto-end resistance of the Zener barrier or output
resistance of the galvanic isolator. Brilliance
will not be significantly reduced until the
current falls below 20mA.
Backlight current = Vsupply –18
End-to-end resistance of
barrier
#
# or output resistance of galvanic isolator
Page 30

30
Appendix 1
IECEx Certification
A1.0 The IECEx Certification Scheme
IECEx is a global certification scheme for
explosion protected products which aims to
harmonise international certification standards.
For additional information about the IECEx
certification scheme and to view the BEKA
associate certificates, please visit
www.iecex.com
A1.1 IECEx Certificate of Conformity
The BA326C loop powered indicator has been
issued with an IECEx Certificate of Conformity
number IECEx ITS 08.0003X which specifies
the following certification code and marking:
Ex ia IIC T5 Ga
Ta = - 40
o
C to 60oC
The IECEx intrinsic safety parameters are the
same as the ATEX safety parameters.
The BA326C IECEx Certificate number has an
X suffix indicating that special conditions for
safe use apply when installed in Zone 0..
These are explained below.
WARNING installation in Zone 0
When installed in a Zone 0 potentially
explosive atmosphere, the indicator
shall be installed such that even in the
event of rare incidents, an ignition
source due to impact or friction between
the aluminium enclosure at the rear of
the instrument mounting panel and
iron/steel is excluded.
The IECEx certificate may be downloaded
from www.beka.co.uk, www.iecex.com or
requested from the BEKA sales office.
A1.2 Installation
The IECEx and ATEX certificates specify the
same safety parameters and installation
requirements. Both are defined by
IEC / EN 60079-14 Electrical installations
design, selection and erection.TheATEX
system design and installation requirements
specified in sections 4 and 5 of this manual
may therefore be used for IECEx installations.
For installations outside of the UK, the local
Code of Practice should always be consulted.
 Loading...