

Behmor 1600 Plus User Manual

1
Behmor 1600 Plus Operations Manual
Part 1: Introduction to the Behmor 1600 Plus
Thank you for purchasing the Behmor 1600 Plus. I am confident that the coffee you roast will be the freshest you have
ever enjoyed. You will quickly come to find, as I did, that roasting coffee is easy, and will provide immeasurable pleasure
along with unparalleled coffee.
This manual is comprised of all the information and advice we can impart for roasting with the Behmor 1600 Plus. By
taking the time to thoroughly read and follow the advice in this manual, you will experience fewer troubles and more
enjoyment from your coffee roasting.
Thank you, Joe Behm- Behmor 1600 Inventor
About The Behmor 1600 Plus:
The Behmor 1600 Plus is the world’s first and only one-pound* capacity home coffee roaster, taking up to a pound of green coffee to
second crack without emitting visible smoke through the use of patent pending smoke suppression technology. It is the only home
roaster in the world manufactured with a variable speed motor to properly agitate beans, allowing for more efficient cooling and chaff
removal.
* The 1 pound capacity is based upon an actual input voltage of 120v. The actual capacity and results may vary according to your
power company’s supply into your home. For Full City+ roasts, we recommend you reduce the quantity of the roast to ½ pound.
The Behmor 1600 is not intended to roast coffee to levels known as
Vienna, French, or Italian.
The Behmor 1600 Plus is designed to provide user options of adjustable roast times, roast profiles, and cooling times, all at your
fingertips, on the easy-to-use control panel. The system will roast according to the roast Profile you have chosen, taking into account
how much you are roasting and any additional time you’ve have added. The roast times can be adjusted by using the + / - buttons or
using the “C” button- details later in the manual. To provide further options, the system has been designed to allow the user to choose
various roast profiles that can alter the nuances of each coffee
Cooling is an equally important aspect of insuring the finest end results when roasting. The Behmor 1600 is pre-programmed to
immediately go into a cooling cycle once the roast cycle has been completed. It can also be controlled manually. Both cooling
features utilize a uniquely designed multi-speed motor, and a fan that cools the beans while separating the chaff by pushing it into the
chaff tray for easy disposal.
The Behmor 1600 Plus is not a set and walk away device, always stay by the roaster when it is in use.
Never leave the roaster unattended when it is in use. User supervision is required to control the roast. Preset times
and programs are merely estimates and a manual cooling button is provided so the user can cease the roast at any
time. It is your responsibility to act and use the Behmor 1600 Plus in a safe manner as described in all sections of
the manual including “Safeguards” and “Warranty”. Like all foods placed close to high heat, coffee beans can
ignite.
V7.4 Plus OP-L

2
Important Safeguards
When using ANY electrical appliance(s), basic safety precautions should always be followed, and are the sole responsibility of the
user/owner, including the following:
1. Never leave the Behmor 1600 Plus unattended when in use. Like all food products coffee beans can ignite. The user must
always insure that the chaff collection tray and roaster roasting drum are properly in place when roasting.
2. Never roast coffee past 10 seconds into 2nd crack. Past this point the beans could ignite. If you see heavy smoke, immediately
cool the roast.
3. If you see a bean fire, turn off and unplug the Behmor 1600 Plus. Do not open the door until it has cooled down. To avoid
risk of electric shock, never put water in it, or on it, to cool it down or stop it.
4. Always operate the Behmor 1600 Plus in a properly ventilated environment with good clearance around the exhaust outlets.
Make sure no objects or obstructions of any kind can impede, obstruct or cover the exhaust outlets. The exhaust outlets
should always have a minimum of 18” inches (46cm) clearance above and around on all sides
5. Do not use any attachments, and/or items or make any modifications that are not explicitly approved by Behmor Inc. in, on or
to the Behmor 1600 Plus. Using such items or making modifications is strictly prohibited and automatically voids all
warranties and relieves Behmor Inc. of any/all liabilities arising from such misuse and tampering.
6. Do not use high chaff green un-roasted coffee. The use of such items may cause the roaster’s functions such as the smoke
suppression feature, safety features and roast times to be negatively impacted. We recommend you use only reputable bean
suppliers or those on our approved bean supplier list.
7. Do not touch hot surfaces. This includes: front door, top, back, exhaust, exhaust covers and sides of the Behmor 1600 Plus.
Always use adequate oven mitts or gloves when handling hot surfaces.
8. ADULT supervision is absolutely necessary. This is the responsibility of the user/owner when the Behmor 1600 is being
operated near children or in households with children present.
9. Unplug the Behmor 1600 Plus from the outlet when not in use or cleaning. NEVER operate the Behmor 1600 with a
damaged cord or plug. Do not immerse cord, plug or the Behmor 1600 itself in water or other liquids. To disconnect the
Behmor 1600 Plus, make sure it is not running, then properly/firmly grip the plug and pull from wall outlet. Do not pull or
tug on the power cord.
10. Do not use outdoors (including garages) and do not use with extension cords. As with any appliance the use of extension
cords could adversely affect roaster functions and dramatically extend roast times. The roaster is an indoor/ kitchen appliance
and not intended for outdoor use.
11. Do not place the Behmor 1600 Plus, on or near hot gas and/or electric burners, in a heated oven or in close proximity to
easily flammable material.
12. Use only on a stable, heat-resistant surface. Place the Behmor 1600 Plus at least 18” inches (46cm) from ALL walls or
cabinets and have at least 18” inches (46cm) clearance above unit, this is to include exhaust cover and vent holes.
13. Use extreme caution when working near the hot surfaces and heating elements. Use care when removing the chaff tray as it
too becomes very hot.
14. It is the user’s responsibility to be 100% sure all connections are secure and that the lid and latch to the roasting drum, and
door to the roasting chamber have all been closed and secured properly before any use.
15. Never open the Behmor 1600 Plus’ front door when roasting elements are on.
16. Do not clean the interior with any metal cleaning pad or any cleaning solvents containing caustic chemicals or abrasives.
Simple Green is our recommended cleaner, however other non-caustic, non-abrasive cleaners can also be used. Always
unplug the roaster and make sure it is fully cooled when cleaning. Never spray the quartz heating elements when hot. Do not
clean the quartz heating elements.
17. Do not use the Behmor 1600 Plus for anything other than its intended use.
18. Never exceed the recommended maximum roast capacity of 1 pound (16 ounces or 454 grams.)
19. Do not allow contact with any objects. A fire may occur if the Behmor 1600 Plus is covered or is touching flammable
material, including curtain, draperies, walls, etc., when in operation.
20. Do not place or store any objects or material other than items supplied by Behmor Inc. such as the roasting roasting drum and
chaff tray on or in the Behmor 1600 Plus.
21. Unplug the Behmor 1600 Plus before changing/replacing the interior light bulb.
22. The Behmor 1600 Plus comes equipped with a polarized plug (one prong is wider then the other) that will fit only one way in
a polarized outlet. If the plug does not fit the outlet properly, turn the plug the other way; if it still does not fit, contact a
qualified electrician for assistance.
V7.4 Plus OP-L

3
DO NOT ATTEMPT TO ALTER ANY SAFETY FEATURE of the Behmor 1600 Plus. To do so voids all explicit and implied
warranties /guarantees and relieves Behmor Inc. of any/all liabilities arising from such misuse and tampering.
Remember: You control the roaster.
Never leave the Behmor 1600 Plus unattended when in use.
The Behmor 1600 Plus is NOT a set and walk away appliance!!
Preset times and programs are merely estimates and manual cool buttons are provided so the user can
cease the roast at any time. It is your responsibility to act and use the Behmor 1600 Plus in a safe manner
as described in all sections of the manual including Safeguards and Warranty.
Online Registration: http://www.behmor.com/customer-support.php
Check Regularly for Manual Updates: http://www.behmor.com/updates-manuals.php
Technical Support: http://www.behmor.com/tech-support.php
IMPORTANT NOTICE: Behmor Inc. reserves the right to make changes to its products or to discontinue any product or
service without notice. Further Behmor Inc. advises its customers, distributors and potential customers that it is their
responsibility and theirs alone, to obtain the latest version of relevant information via our website (www.behmor.com) or
Behmor Inc. agents.
V7.4 Plus OP-L
4
Part 2: Know Your Roaster
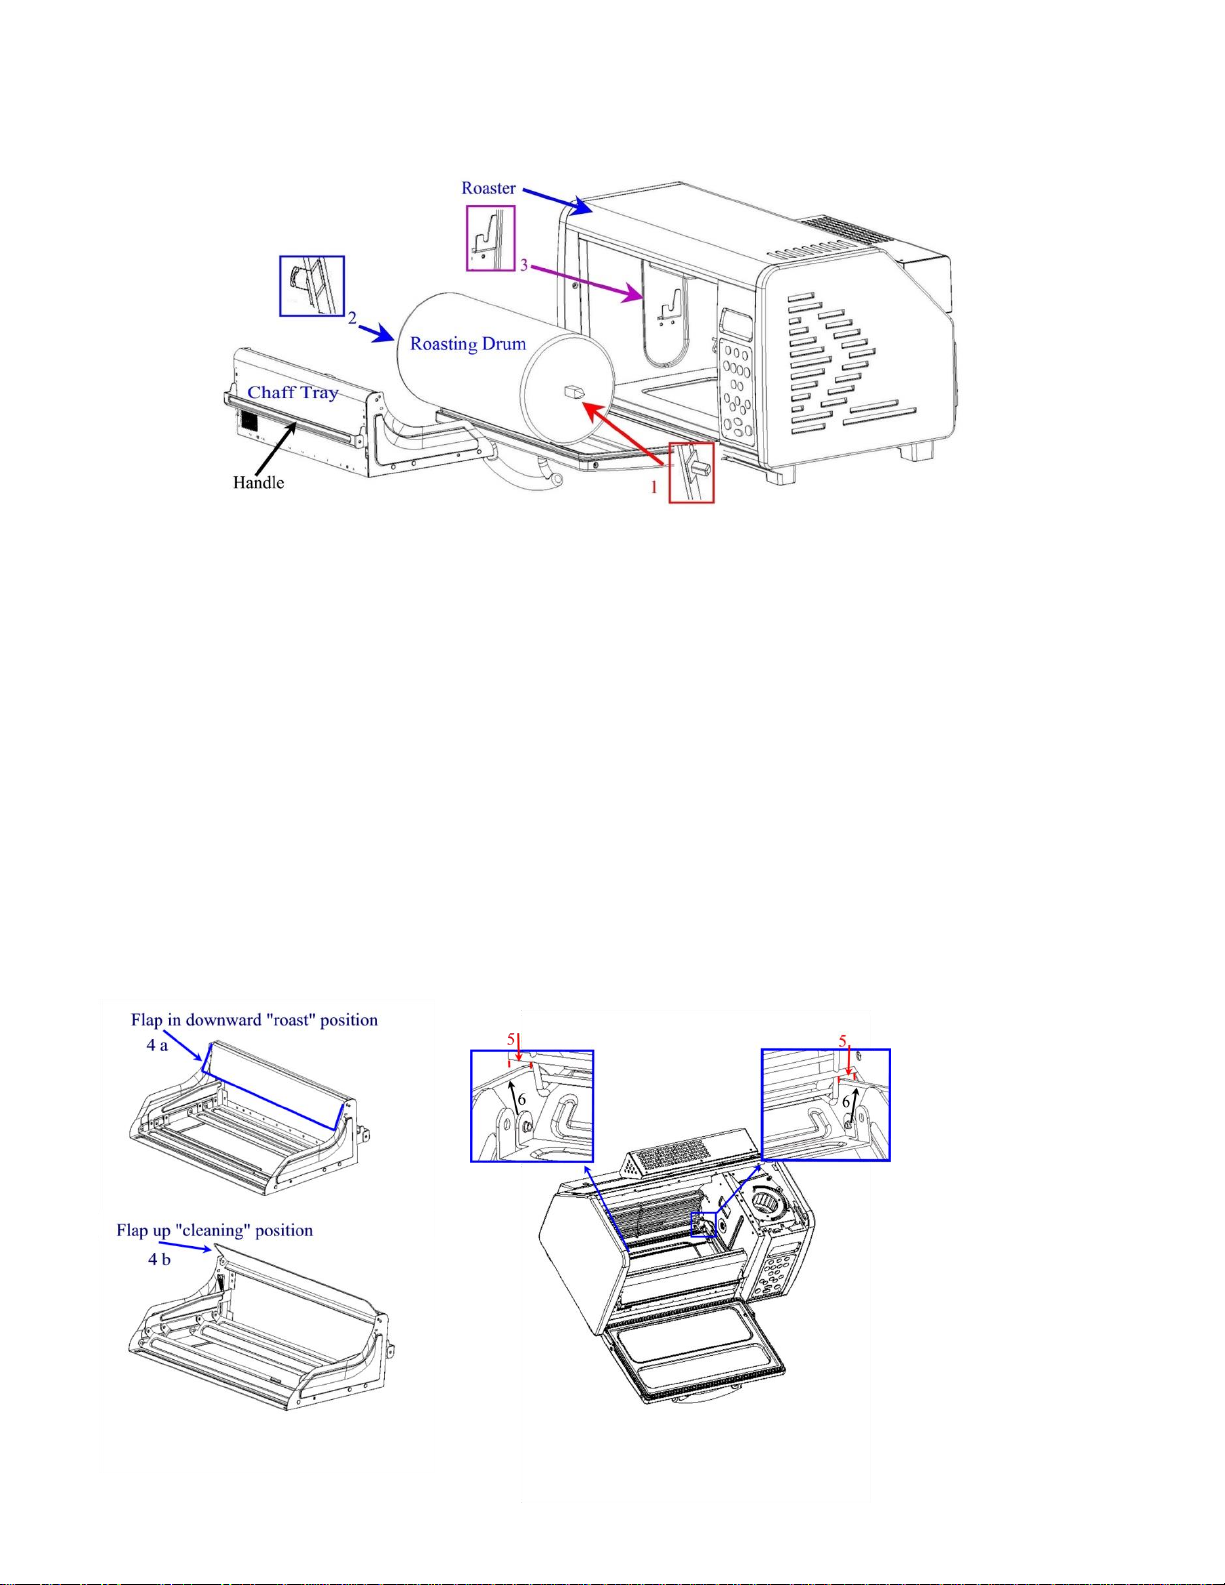
In the box you should receive a roaster, roasting drum, chaff tray, and cleaning brush.
Roasting drum: The roasting drum opens at one end to be filled with green coffee beans. One end has a square peg (red arrow- #1),
which can only fit into the motor drive (inside right-not shown). The other end has a grooved round peg (blue arrow- #2) that fits into
the roasting drum slot (purple arrow- #3).
Chaff Tray: The chaff tray collects chaff that falls from the roasting drum or is pushed into the tray by the cooling fan. The tray can
also be used as a “dust pan”. Remove the tray; remove the roasting drum, then using the brush sweep the remaining chaff into a pile.
Place the tray at the lip of the roasting chamber and using the brush, sweep the remaining chaff into the tray. Before inserting the
chaff tray, check that the flap is in a “roast” position. It should be pointed slightly downward so that as the roasting drum rotates, it
will not catch and jam. Next, depress the spring-loaded handle downward (see below). This allows the vanes to drop flat for roasting
drum clearance. Slide the chaff tray under the roasting drum, releasing the handle after the tray is in place.
Proper Chaff Tray Placement: To ensure the chaff tray does not impede the rotation of the roasting drum, proper placement is
critical. Please take a moment to do the following:
1) Open the roaster door. Note the grill that protects the quartz roasting elements extends across the back except for small gaps
(#5 arrows below) on the left and right sides.
2) Slide the chaff tray into place, making sure the front of its sidewalls (#6 arrows below) slide all the way into the gaps (#5
arrows below).
3) Make a mental note of the tray position (both front and back) for future reference.
Cleaning the Chaff Tray: Remove the chaff tray by depressing the handle to flatten the vanes, and slide the tray out of the chamber.
Swing the flap up (shown below in 4b) from its “roast” position (4a) to allow the tray contents to be dumped. Remember to move the
flap back into a downward “roast” position (4a) in preparation for your next roast.
V7.4 Plus OP-L
5
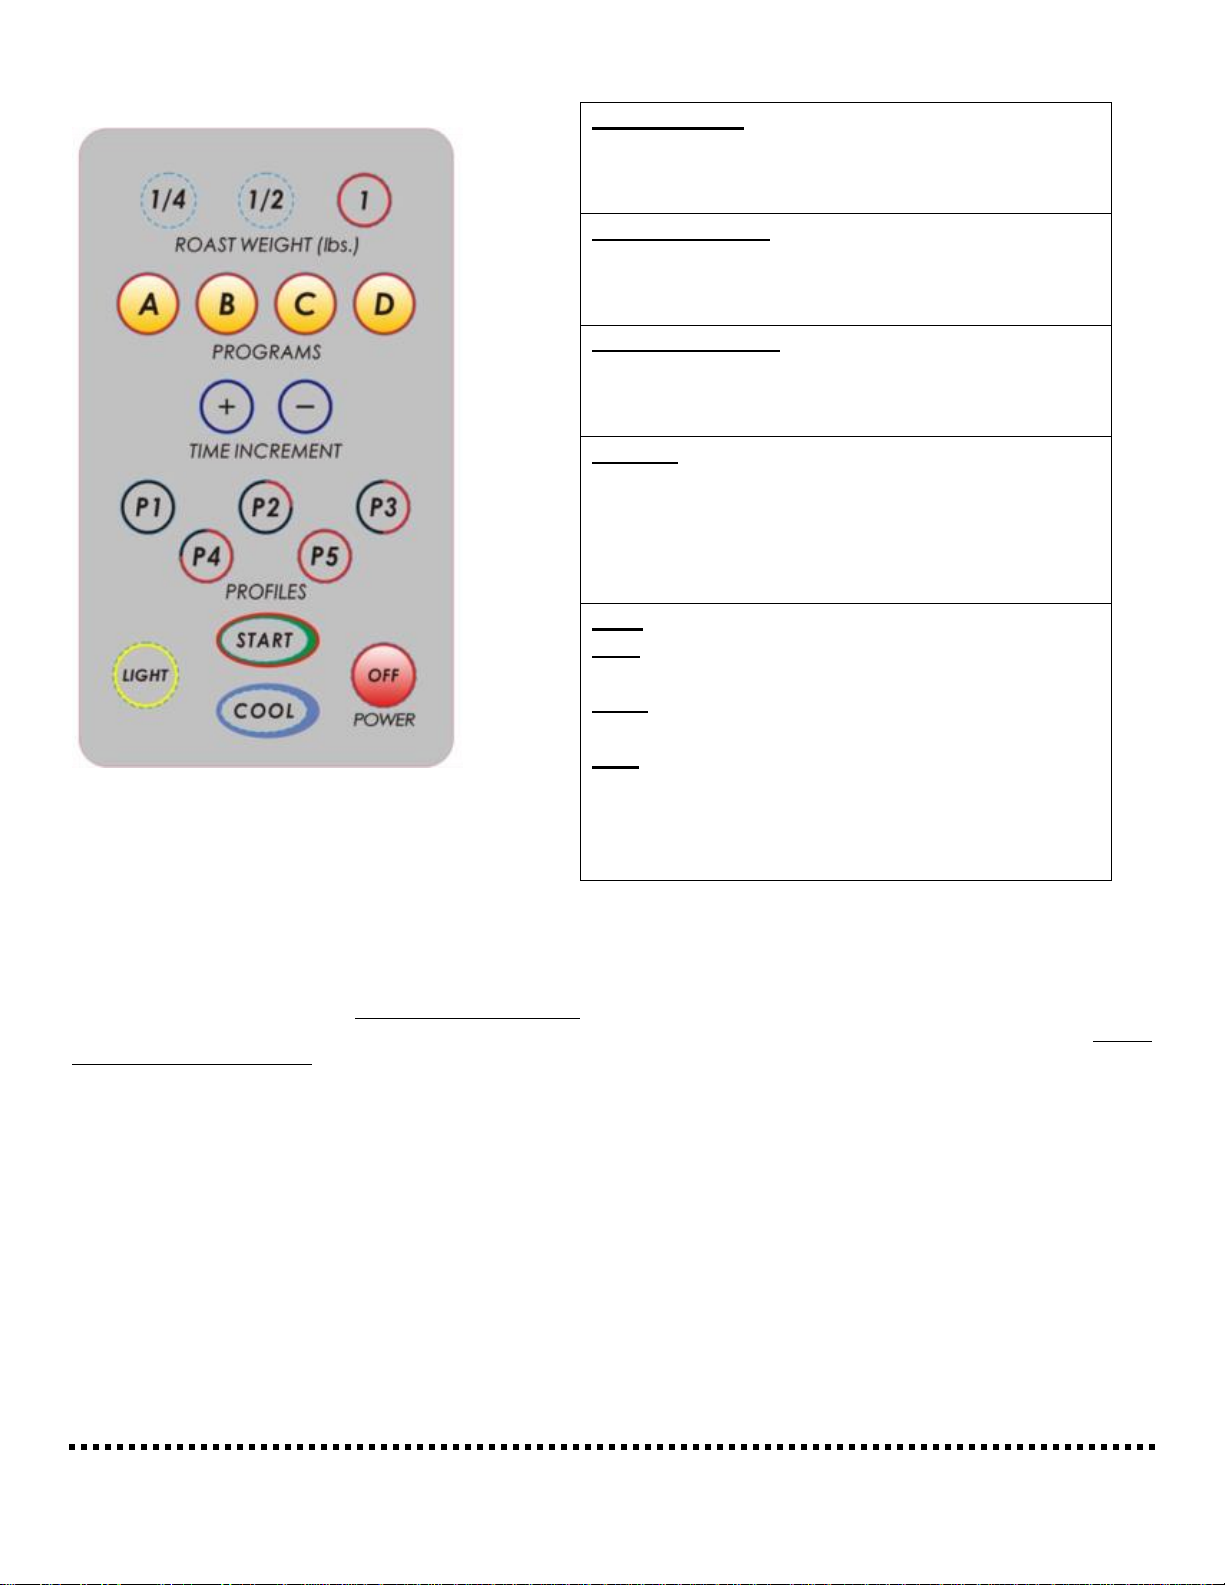
Roast Weights: Enters the weight of green coffee
beans to be roasted. These buttons will also “reset”
the system to the default programs at anytime before
your roast has been started.
Programs/Times: These buttons allow the user to
quickly alter the length of the Profiles. See “Tips”
and “Maintenance” for more complete information
related to these examples.
Time Increments: Add or subtract time on roast
programs prior to Start or at any point during roast
cycle. Pressing “+” adds 15 seconds, “–” subtracts
10 seconds.
Profiles: Denotes how heat is applied to the beans.
P1 is the hottest profile, thus fastest roast time. P5 is
the most delicate of the profiles the slowest roast
time. See “Profiles” chart for details on heat
applications along with “Tips” section for more
details.
Start: Starts the roasting cycle.
Cool: Allows the user to stop a roast at any time and
begin cooling the beans.
Light: The switch to turn the roast chamber light on
and on.
OFF: Shuts off the roaster. Do not press OFF during
the roast cycle except in an emergency situation
(such as a bean fire). Pressing OFF before the roast
cycle is complete could lead to excessive smoke and
create a fire hazard.
Control Panel and Functions:
Roast Cycle: The system will roast according to the Profile
you have chosen, taking into account how much you are
roasting and any additional time you have added. When the roast time has reached 59 seconds remaining, the digital display will blink
on and off. If you desire to add time, you can do so (up to Profile maximums) until the display reads 00:01. If you allow the system to
go to 00:00, it will automatically go into it’s pre-programmed cooling cycle.
Cooling Cycle: The system has two cooling cycle programs, Manual and Automatic. The Automatic cooling cycle starts when the
roasting timer goes to 00:00. When cooling begins, the display will show the countdown time for cooling. There is also a manual
cooling cycle option available. Should you decide at any time to end a roast, simply press the “Cool” button and cooling will begin. As
with automatic cooling, the system timer will reset and show a new countdown for the cooling cycle.
Each system’s function has been designed for a reason. It is imperative you allow the system to perform as
designed for optimal performance and longetivity. This is especially true of the cooling cycle. Failure to comply
with these recommendations or those listed in the Important Safeguards could result in a potential safety hazard.
If you do not understand a function or parts of the system, email us at tech@behmor.com and we will do our best
to answer any questions you might have. Please include a phone number so we can, if necessary, call to better
answer to your question.
V7.4 Plus OP-L
 Loading...