


GPS Bluetooth Receiver
IGO-08A
User’s Guide
Version 1.0
2

FCC GUIDELINES
This equipment has been tested and found to comply with the limits for a Class
B digital device, pursuant to Part 15 of the FCC Rules. These limits are
designed to provide reasonable protection against harmful interference in a
residential installation. This equipment generates, uses and can radiate radio
frequency energy and, if not installed and used in accordance with the
instructions may cause harmful interference to radio communications. However,
there is no guarantee that interference will not occur in a particular installation. If
this equipment does cause harmful interference to radio or television reception,
which can be determined by turning the equipment off and on, the user is
encouraged to try to correct the interference by one or more of the following
measures:
Reorient or relocate the receiving antenna.
Increase the separation between the equipment and receiver.
Connect the equipment into an outlet on a circuit different from that to
which the receiver is connected.
Consult the dealer or an experienced radio/TV technician for help.
Use only shielded cables to connect I/O devices to this equipment.
FCC Warning:
This device complies with Part 15 of the FCC Rules. Operation is subject to the
following two conditions: (1) this device may not cause harmful interference, (2)
this device must accept any interference received, including interference that
may cause undesired operation.
FCC Caution:
Any changes or modifications not expressly approved by the party responsible
for compliance could void the user's authority to operate this equipment.
Information to user:
The users manual or instruction manual for an intentional or unintentional
radiator shall caution the user that changes or modifications not expressly
approved by the party responsible for compliance could void the user’s authority
to operate the equipment.
2
IMPORTANT NOTE:
FCC Radiation Exposure Statement:
This equipment complies with FCC radiation exposure limits set forth for an
uncontrolled environment. End users must follow the specific operating
instructions for satisfying RF exposure compliance.
This transmitter must not be co-located or operating in conjunction with any
other antenna or transmitter.
1

Table of Content
Introduction ................................................1
Features ......................................................1
Package content.........................................2
Hardware Description ................................3
Technology Specification ..........................5
Operation ....................................................7
1

Introduction
IGO-08A is a GPS receiver with Bluetooth interface adopts
advanced ATMEL ANTARIS 4 Super Sense GPS IC, and
built-in active antenna for high sensitivity to tracking signal,
there’s also an external MMCX aerial terminal for users adding
higher MMCX antenna. GPS Heading will be correct in low
speed and stop through built -in Digital compass.
The data logger function is powerful for recording which place
you have been. User can download logger data and transfer to
GOOGLE EARTH format in PC.
The IGO-08A is well suited to system integrations including
PDA, Smart phone, Table PC and Notebook PC with Bluetooth
devices. It satisfies a wide variety of applications that are
purposes in automotive, and outdoor recreation navigation
systems.
Features
Adopts advanced satellite located core ATMEL
ANTARIS 4 Super Sense.
Quick location and 16 satellites tracing ability.
Built in WAAS/EGNOS demodulator, no need extra
hardware to receive WAAS/EGNOS signal.
Built in MMCX connector.
Battery capacity display
1

Digital Compass provides the function of immediate
indication of the North.
Built in Data Logger function
Support NMEA0183 version 2.2 for exporting data.
Easy wireless Bluetooth transmission is available in 10
meters distance.
Flexible design, easy connection with auto-navigation,
motorcade control, AVL, personal navigation, tracking
system and map service industry.
Package content
Please make sure of your package includes the following
items, If any item is damaged or missing, please contact
your dealer at once.
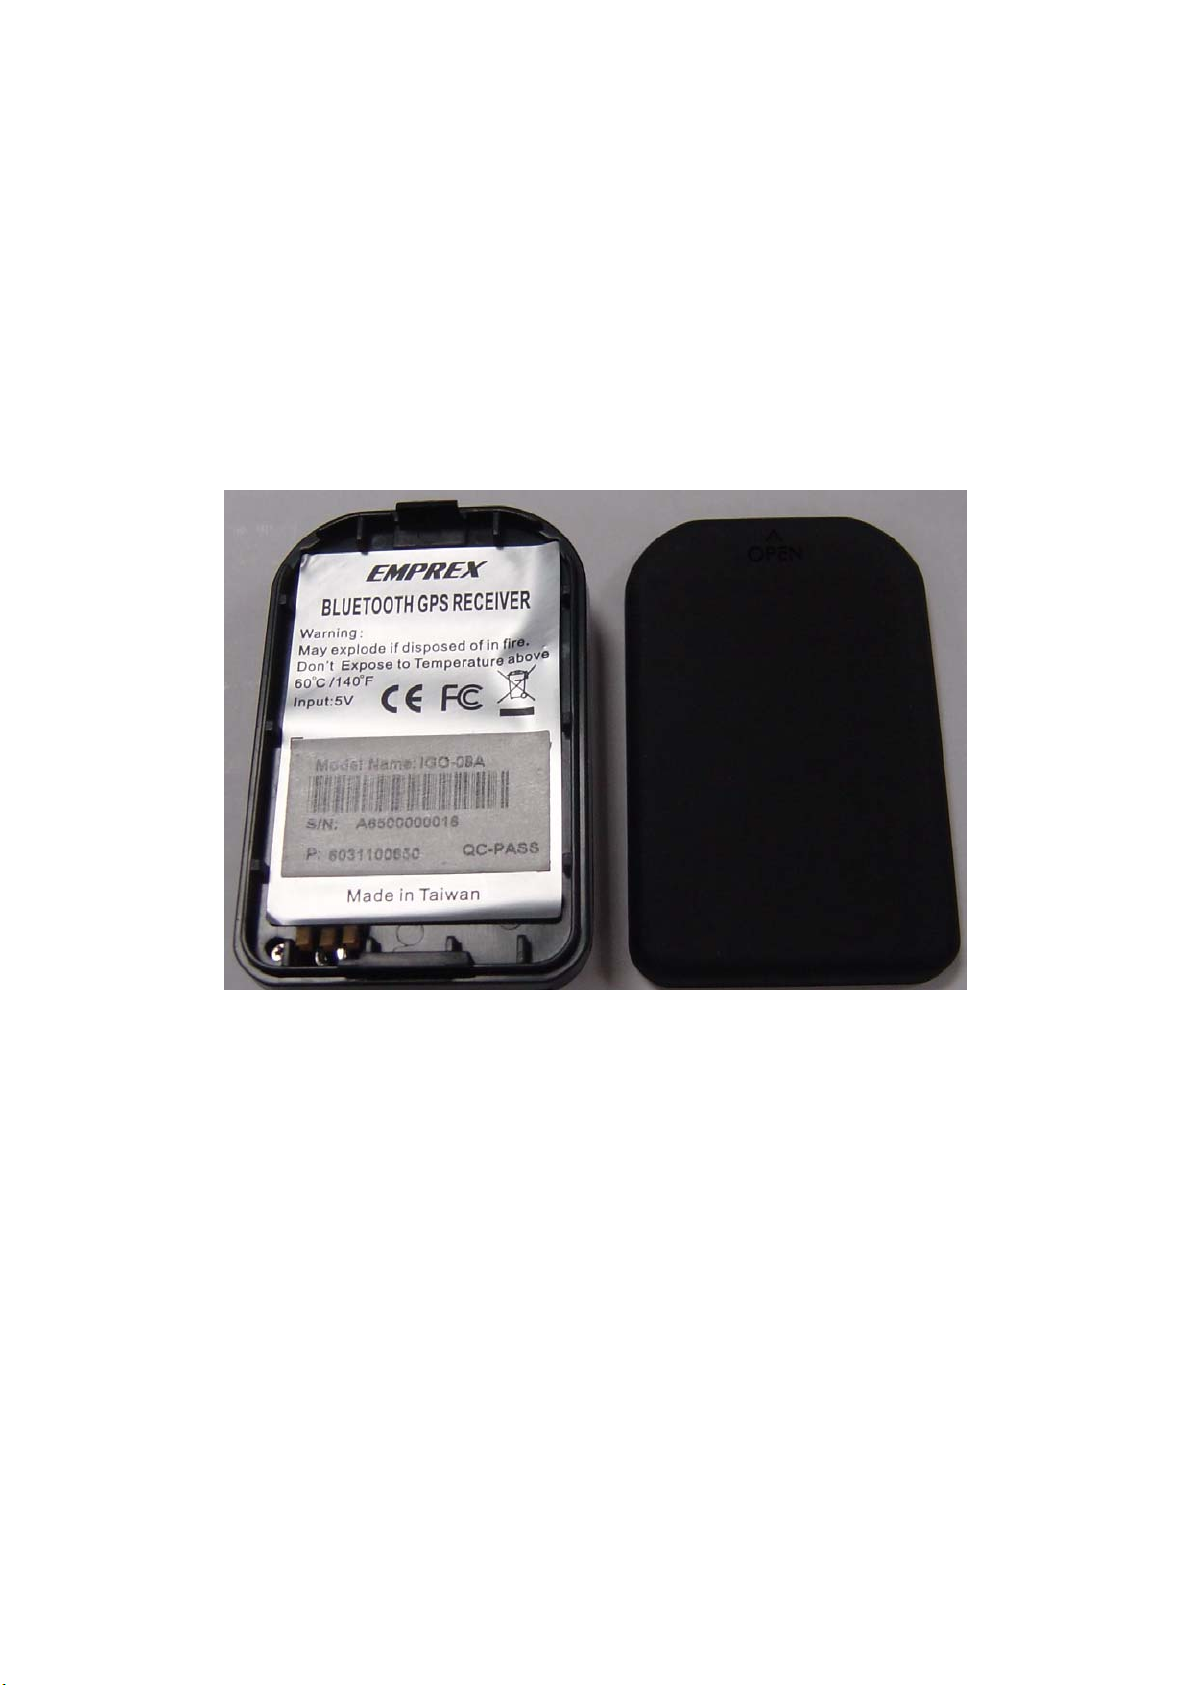
1. Bluetooth GPS receiver IGO-08A x 1
2. Lithium rechargeable battery x 1
3. USB cable x 1
4. Slipperiless pad x 1
5. Car charger x 1
6. Travel charger x 1
7. Application Disc with user’s guide x 1
2
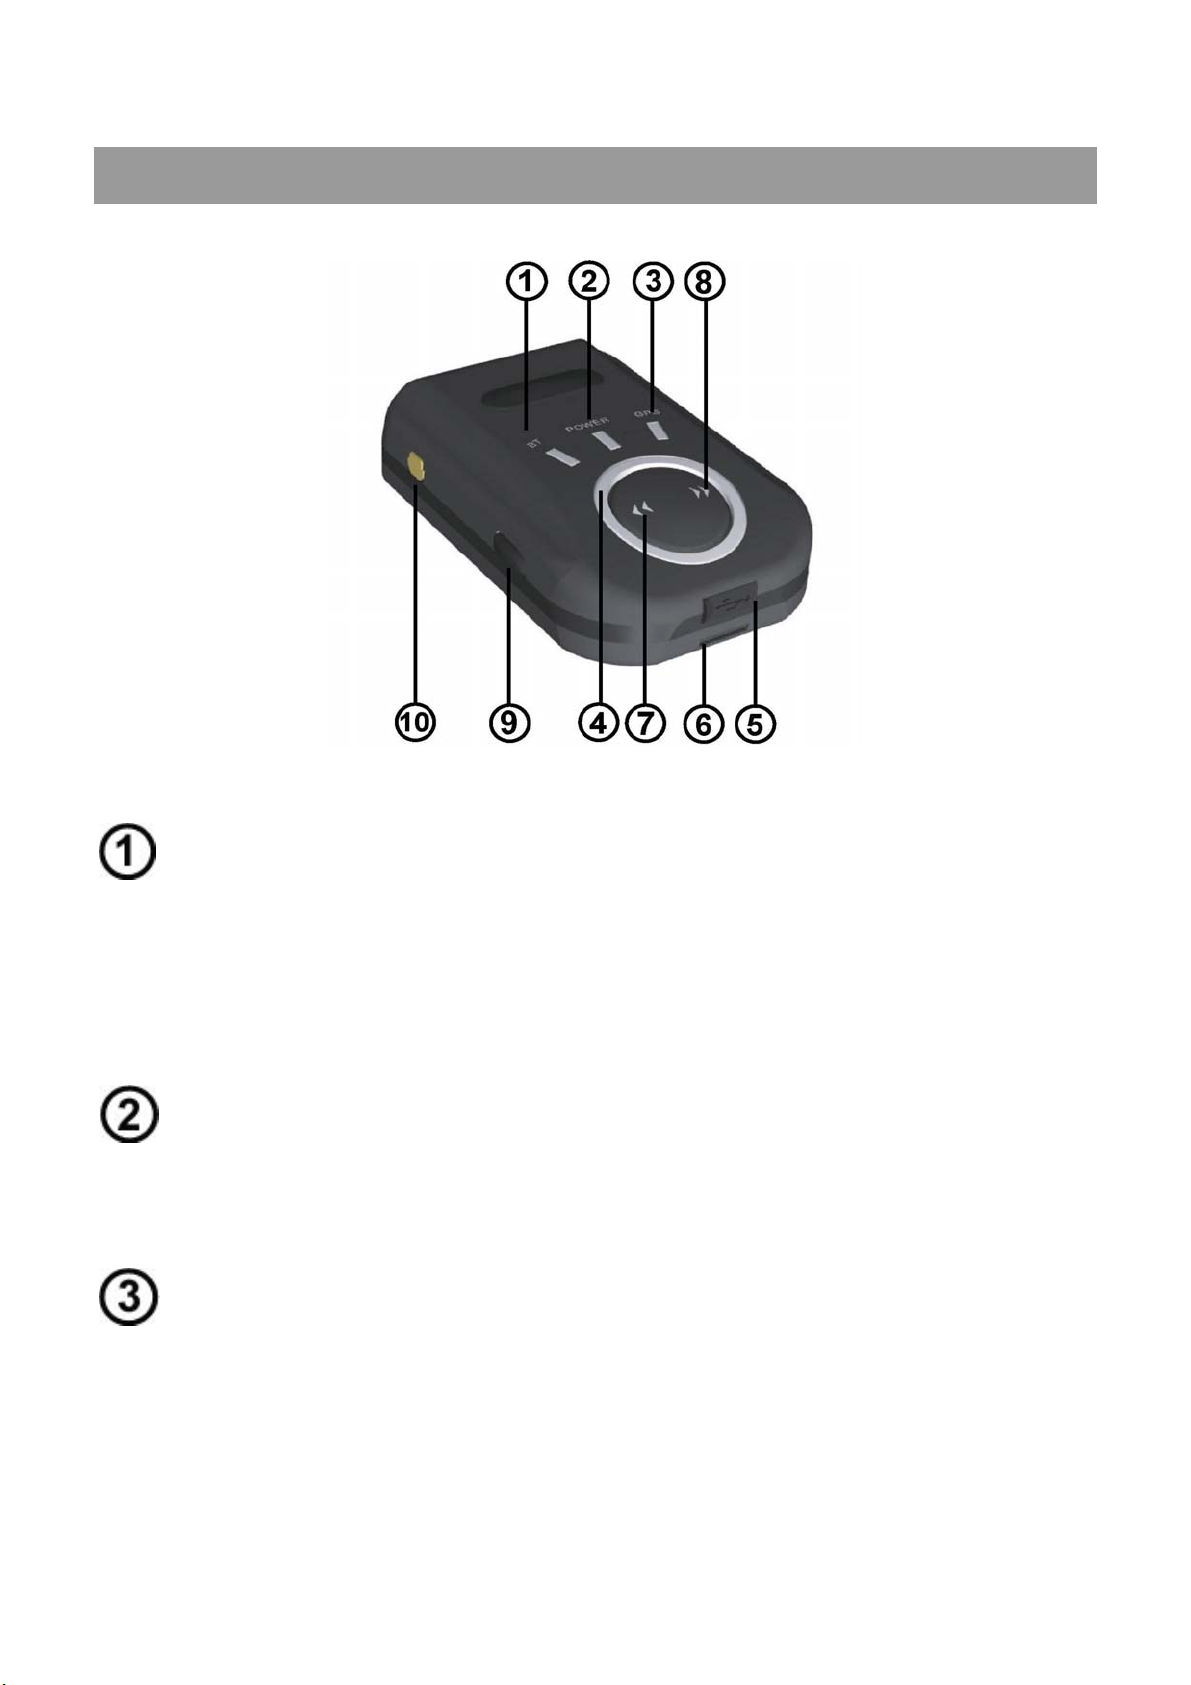
Hardware Description
There are four LEDs to show different status:
Bluetooth(Blue)
Fast blink: Indicates this Bluethooth GPS is waiting for
pairing or master device’ connection.
Slow blink: Indicates this Bluetooth GPS is connecting
successfully.
Power LED(Red)
Lighten: Charging
Darken: Charging complete
GPS
Green)
(
Lighten: GPS power on
Darken: GPS power off
3

Circle LED (Red)
Digital compass & battery capacity display
Charge socket
Battery bolt
Switch 1 ()
Long press: Digital calibration On/ Off
Short press: Digital compass function On/Off
Switch 2 ()
Long press: PC connecting mode On/Off
Short press: BT function On/OFF
Power switch
Long press: Power On/ Off
Short press: Power capacity display on circle LED
MMCX Antenna Socket
4

Technology Specification
Satellite
receiving
Accuracy
(Precision)
Acquisition Cold start: 34 sec (Average)
Sensitivity: -158dBm (Super sense mode)
Receiving and tracking 16 satellites at the
same time
Receiving frequency: 1575.42MHz
Receiving code: L1, C/A code
General positioning: 2.5m CEP
DGPS/SBAS: 2.0m CEP
Warm start: 33 sec (Average)
Hot start: 1 sec (Min)
Dynamics: Altitude: max. 18,000m (Max.)
Velocity: max. 500m/sec (Max.)
Acceleration. Max. +/-4g (Max.)
DGPS WASS/EGNOS
Navigation
update rate:
Baud Rate: 9600bps
GPS protocol NMEA 0183 V2.2, GGA, GSV, GSA, RMC
Bluetooth spec. Blue Tooth V2.0
Once per second
5

Compass Digital compass (2 AXIS)
Data logger 25806 records
Power supply: DC 5.0V 5%
Power
consumption
Operating
Tem p .
Storage Temp. -20°C~ +85°C
Humidity 5%~95%
Size: 64(L) x 41 (W) x 19 (H)mm
Weight 54g (include battery)
77mA (Average)
-10°C~ +60°C
Battery: Nokia 6100 compatible (spec. 3.7V / 700mA )
Operating Hour Up to 9 hours at battery full charge condition
Output connect Mini-USB (TTL Level)
6

Operation
1. How to use battery
1-1 Charging battery more than 8 hours
Before first time using IGO-08A’s battery, user has to
charge the battery more than 8 hours. Connect travel
charger or car charger with this device DC5V charge
socket. The Power LED(Red)lighten indicates charging,
the red LED goes off indicates finish charging.
1-2. Battery capacity check
Press the Power Switch for 1 second when the IGO-08A is
power on; the circle LED shows battery capacity. Each
LED equals 12.5% power. Eight LED lighten shows full
battery. We strongly recommend user to charge while
under three LEDs.
2. Turn on IGO-08A and wait for Bluetooth device’
connection.
LED will show below status:
Bluetooth LED(Blue)will blink quickly if it is used first
time or link switch have been activated by users.
(
waiting for pairing or connecting with other Bluetooth
device)
Bluetooth LED(Blue)will blink slowly if it is connecting
successfully.
The GPS LED
(
Green)will blink slowly two second later
7

after positioning successfully.
3. How to active Bluetooth enabled device
There are many Bluetooth enable devices like PDA or
Bluetooth dangle on the market, which direct connect with
IGO-08A. Each one may have different Bluetooth setup
procedure. Please refer to their user manual for detail
instruction.
Activate Bluetooth search and connect function of Bluetooth
PDA or dangle. A virtual comport will be assigned after
Bluetooth connection is successful.
Every time you want to connect IGO-08A with a new Master
Bluetooth device, which never pair before, user has to push
pairing switch of your master bluetooth device first.
(Bluetooth LED will blink quickly) Second, enable Master
Bluetooth device’ search Bluetooth device function, master
Bluetooth device will take few seconds fo find GPS and ask
for keying pass key. After entering valid PASS KEY,
connection will be setup. (Please refer to Bluetooth PDA or
other master Bluetooth device for details).
The PASS KEY (or PIN CODE) for IGO-08A is “0000”.
4. Running GPS navigation software
Verify and select Bluetooth virtual comport with default baud
rate for navigation software, then start to run navigation
software.
Note: Make sure the comport number of PC is the same as
Bluetooth virtual comport number.
8

5. How does GPS Compass work?
5-1.GPS Compass Calibration
Calibrate the GPS receiver before using.
1. Long press the Switch 1 () for 2 second to enter
Calibration mode, the Circle LED will lighten. Set GPS
receiver on your car and turn around for 360°. Fix the
bottom (Battery bolt) of IGO-08A to the same direction as
your car’s head to run Compass calibration. Long press
Switch 1 ()
Digital Compass function is on now.
2. Do not put magnetic object close to GPS receiver to avoid
of Compass function inefficacy.
3. Set the GPS receiver horizontal during using Compass
function.
4. In order to get the best accuracy, please run Compass
calibration each time you place IGO-08A on different
cars.
again for 2 second to finish calibration.
5-2. GPS Compass setting
1. Short press Switch 1 () to switch Compass On/OFF
2. IGO-08A will check the direction when Digital Compass is
on. When the moving speed is over 20km, GPS
receiver’s direction adopts the satellite’s data; if the
speed is less than 20km, GPS receiver’s direction adopts
the Digital Compass’s data.
3. The GPS get miscarriage and wrong direction easily
9

during low speed. Switch to Digital Compass mode to
increase GPS Navigation efficiency.
4. We recommend user to turn off Digital compass heading
in magnetic field. (Short press Switch 1 ())
6. Data logger
1. GPS Receiver could save 25806 data by build-in flash
memory.
2. When 25806 data is full, it will save from the beginning
and original data will be covered.
3. IGO-08A supports two kinds of recording mode
Driving mode: distance unit
Hiking mode: time unit
4. Before connecting IGO-08A with your PC to run Data
logger setup and download, please shut down the GPS
Receiver. (Long press Switch 2 () for 2 seconds)
5. You could shut down BT function (Short press Switch 2
() key) to extend the battery’s operating hour when
using Data logger but not navigation function.
10

A
A
A1
2
A3
A1. Stop Data logger
A2. Start Driving Mode
A3. Start Hiking Mode
A4
A5
A4. Read the GPS setting
A5. Save the GPS setting
A6. Close the window
A6
Attention
1. Users could choose to start Data logger function or not.
2. Recording mode could divide into driving mode and hiking
mode.
3. Driving mode is recorded by steady distance.
4. Hiking mode is recorded by steady time.
11
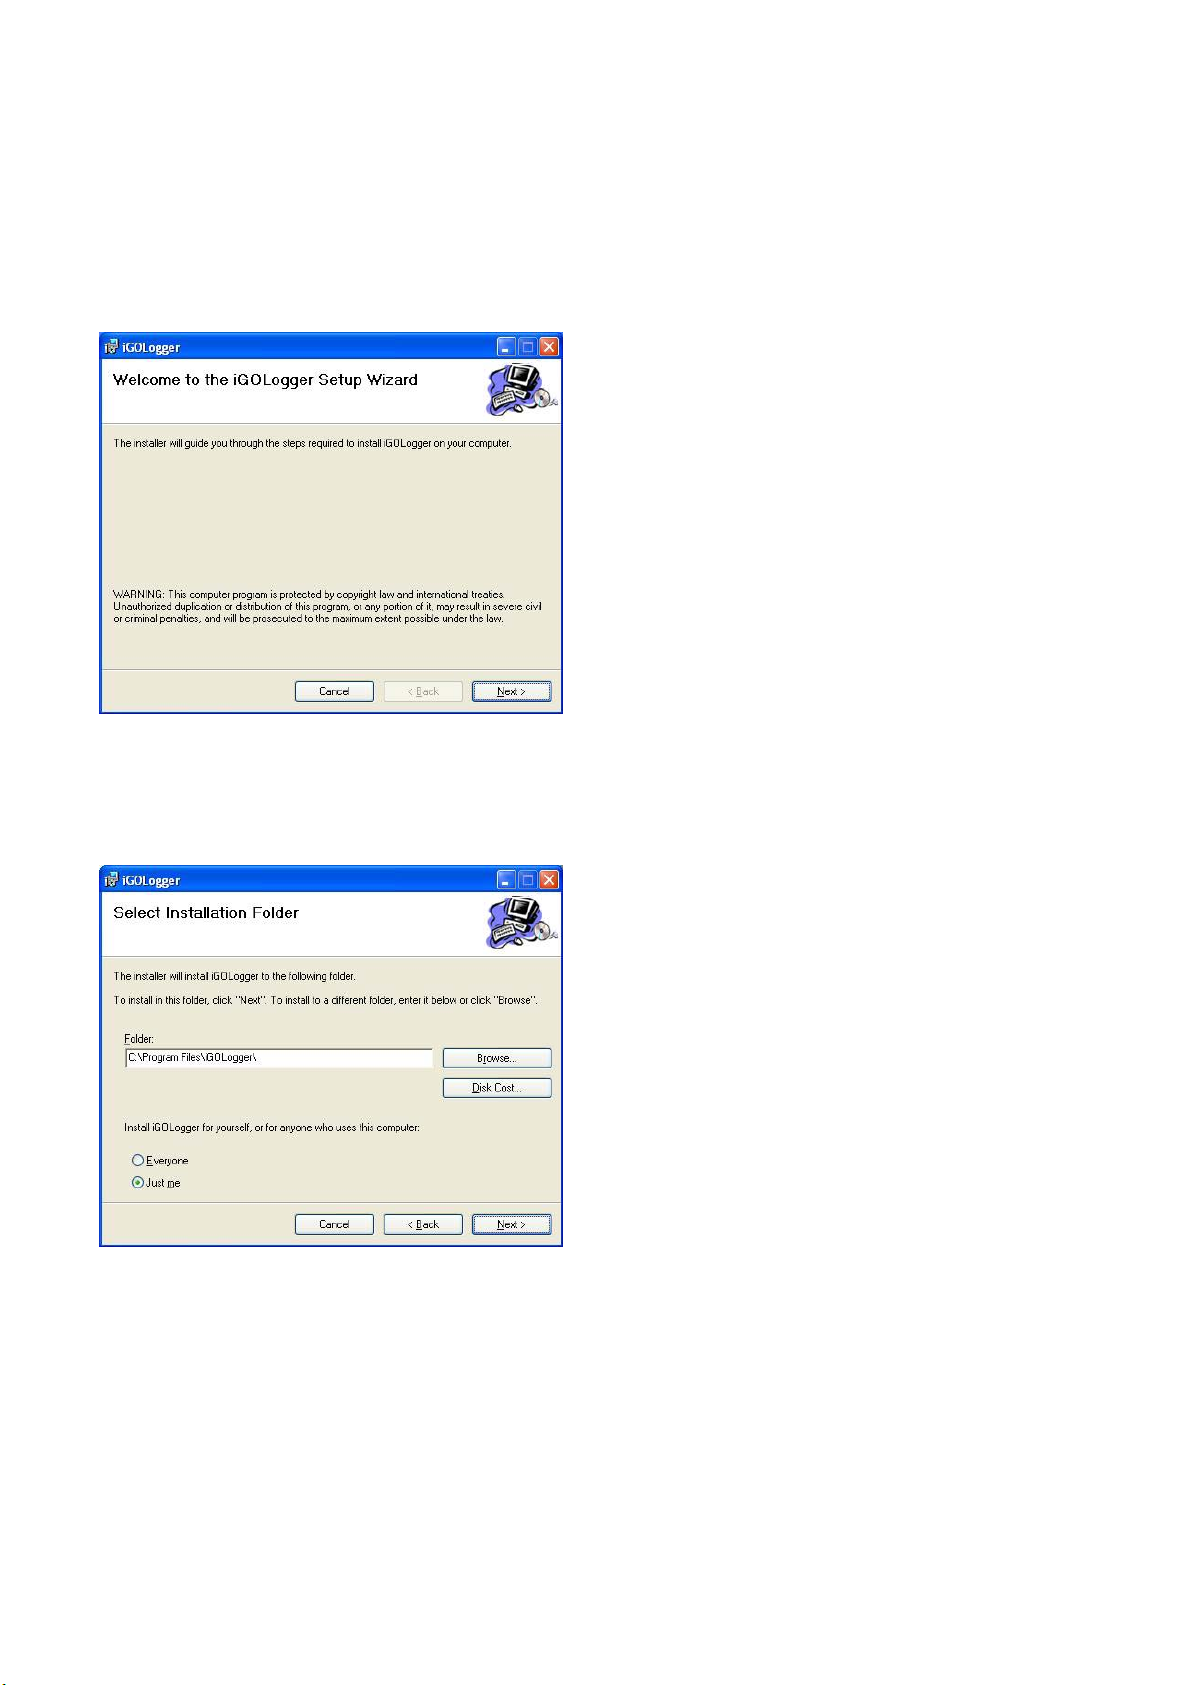
7. IGO-08 Download software
7-1
Install the IGO Logger
7-1-1 Please insert the
application disc. Select
“iGO Logger” file and click
Next to continue
7-1-2 Select “Myself” and click
Next.
12
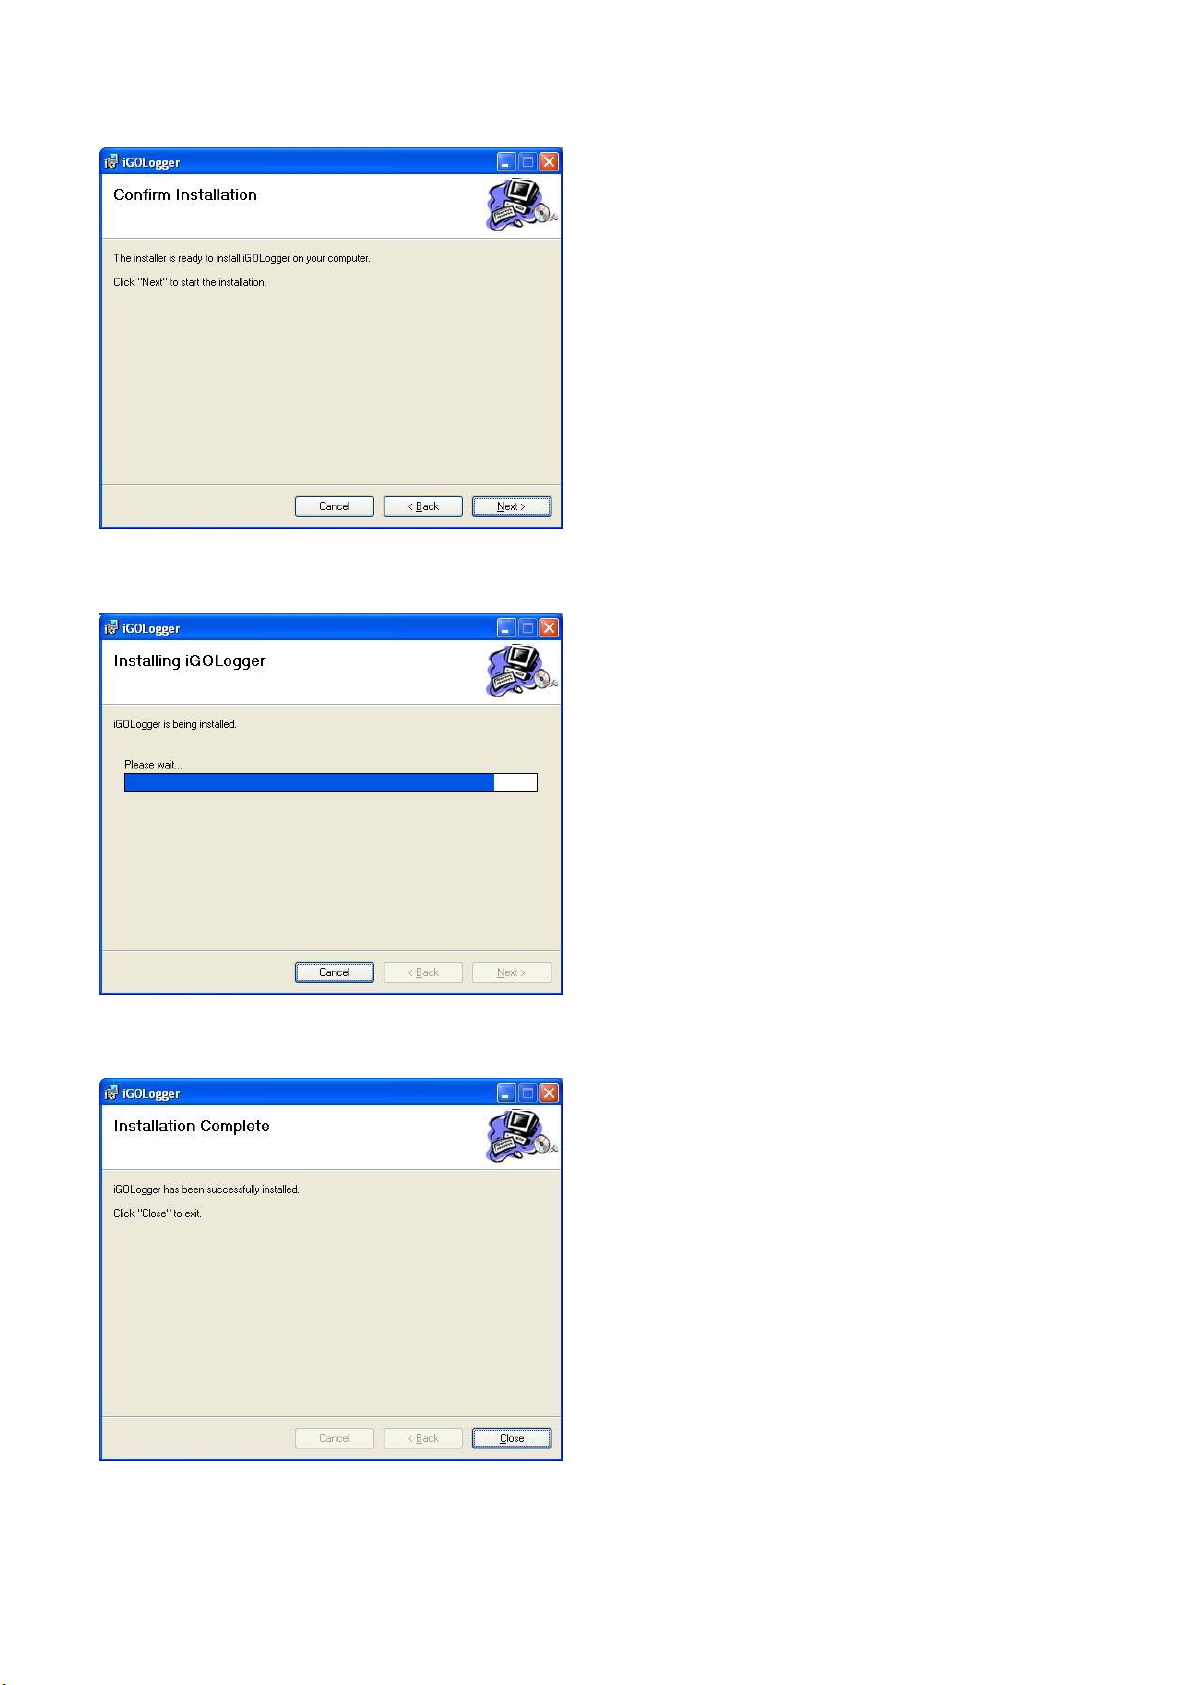
7-1-3 It’s ready to install,
please click Next.
7-1-4 Please wait.
7-1-5 IGO Logger has installed
successfully.
13

7-2 Install the USB Bridge Driver (
7-2-1 Please insert the
application disc. Select
“PL-2303 Driver Installer”
PL-2303)
file and click Next.
7-2-2 USB Bridge Driver has
installed successfully,
please click Finish.
7-3 Connect with USB cable
Plug one end of the USB cable to the USB port on your
computer. Connect the other end of the USB cable to the
USB socket of IGO-08A.
14
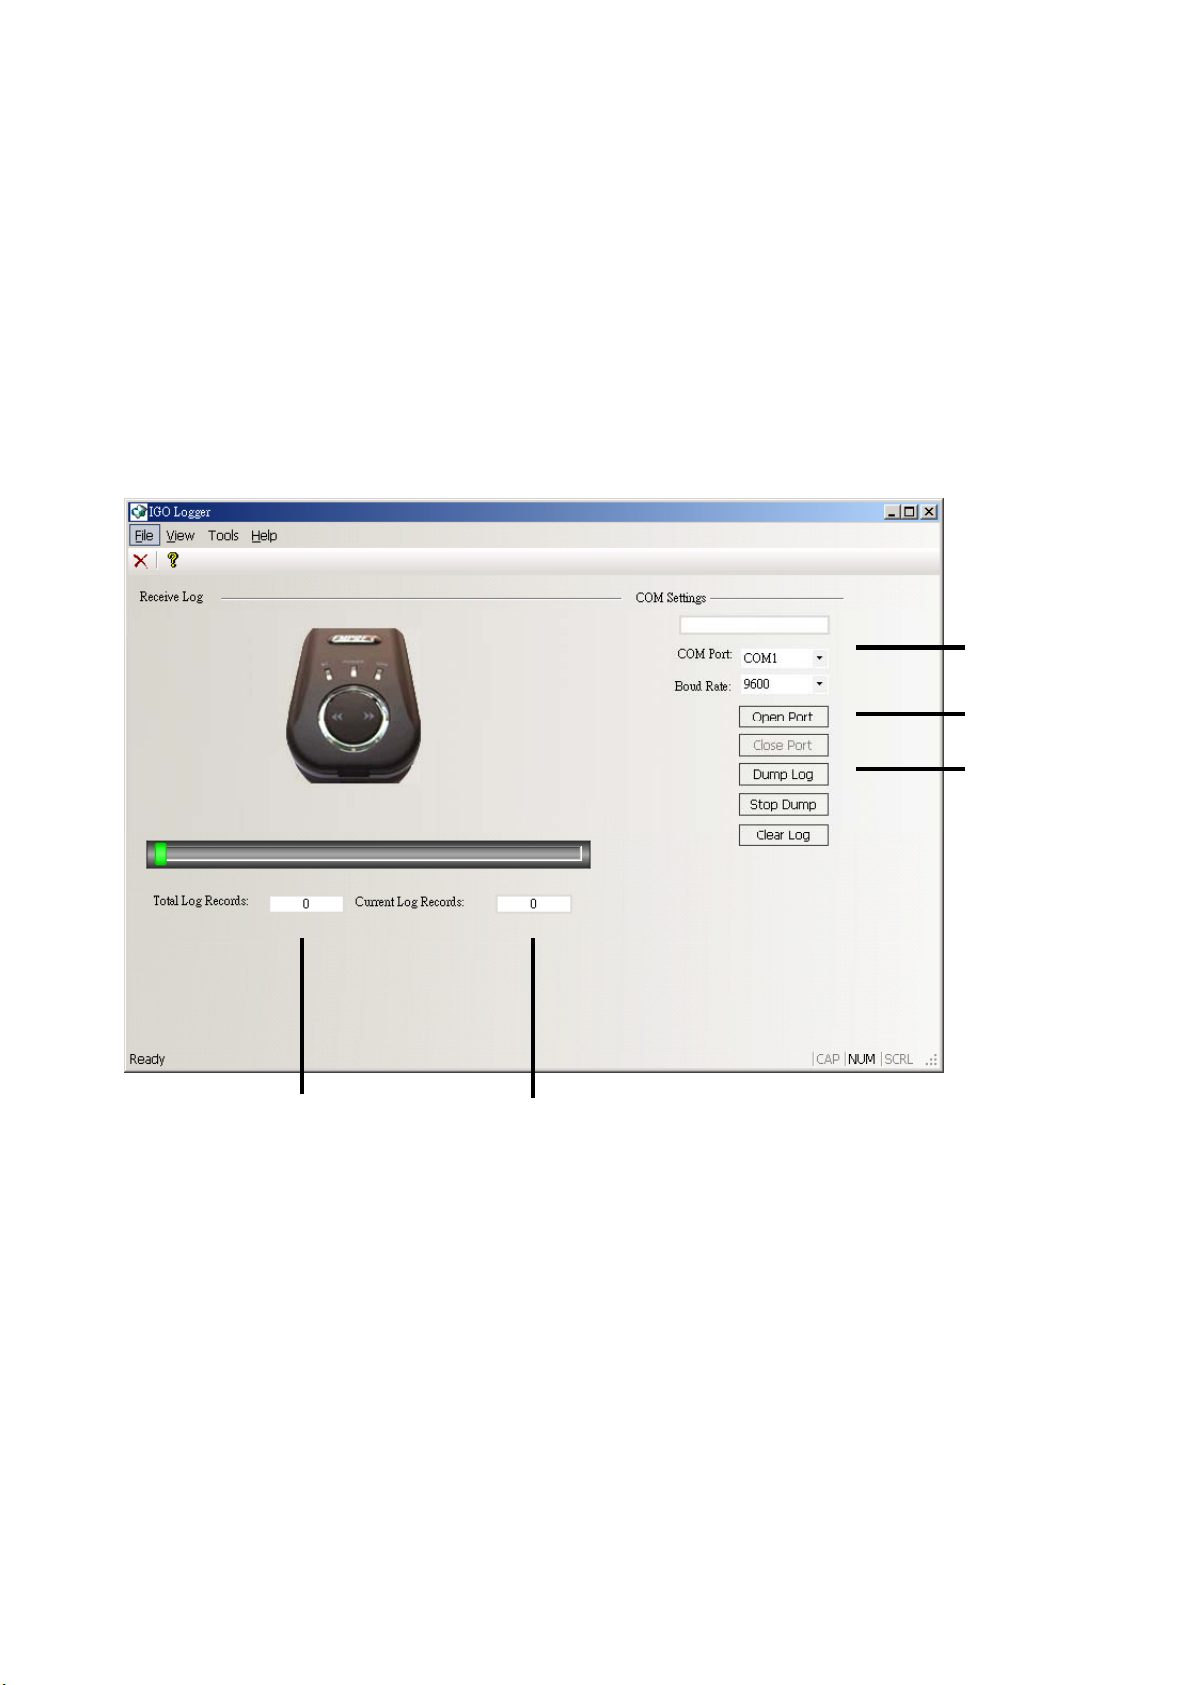
7-4 Check your comport number
1. Move the cursor to My Computer and press the right button
of your mouse. Select “Content
Manager.” Check USB to serial COM port number.
7-4-1 Select the same COM
7-4-2 Click “Open Port”
→
Hardware → Device
7-4-1
7-4-2
7-5
7-6
2. Click Dump log button (7-5) to run Data log download and
check the records. (7-6, 7-7)
7-7
15
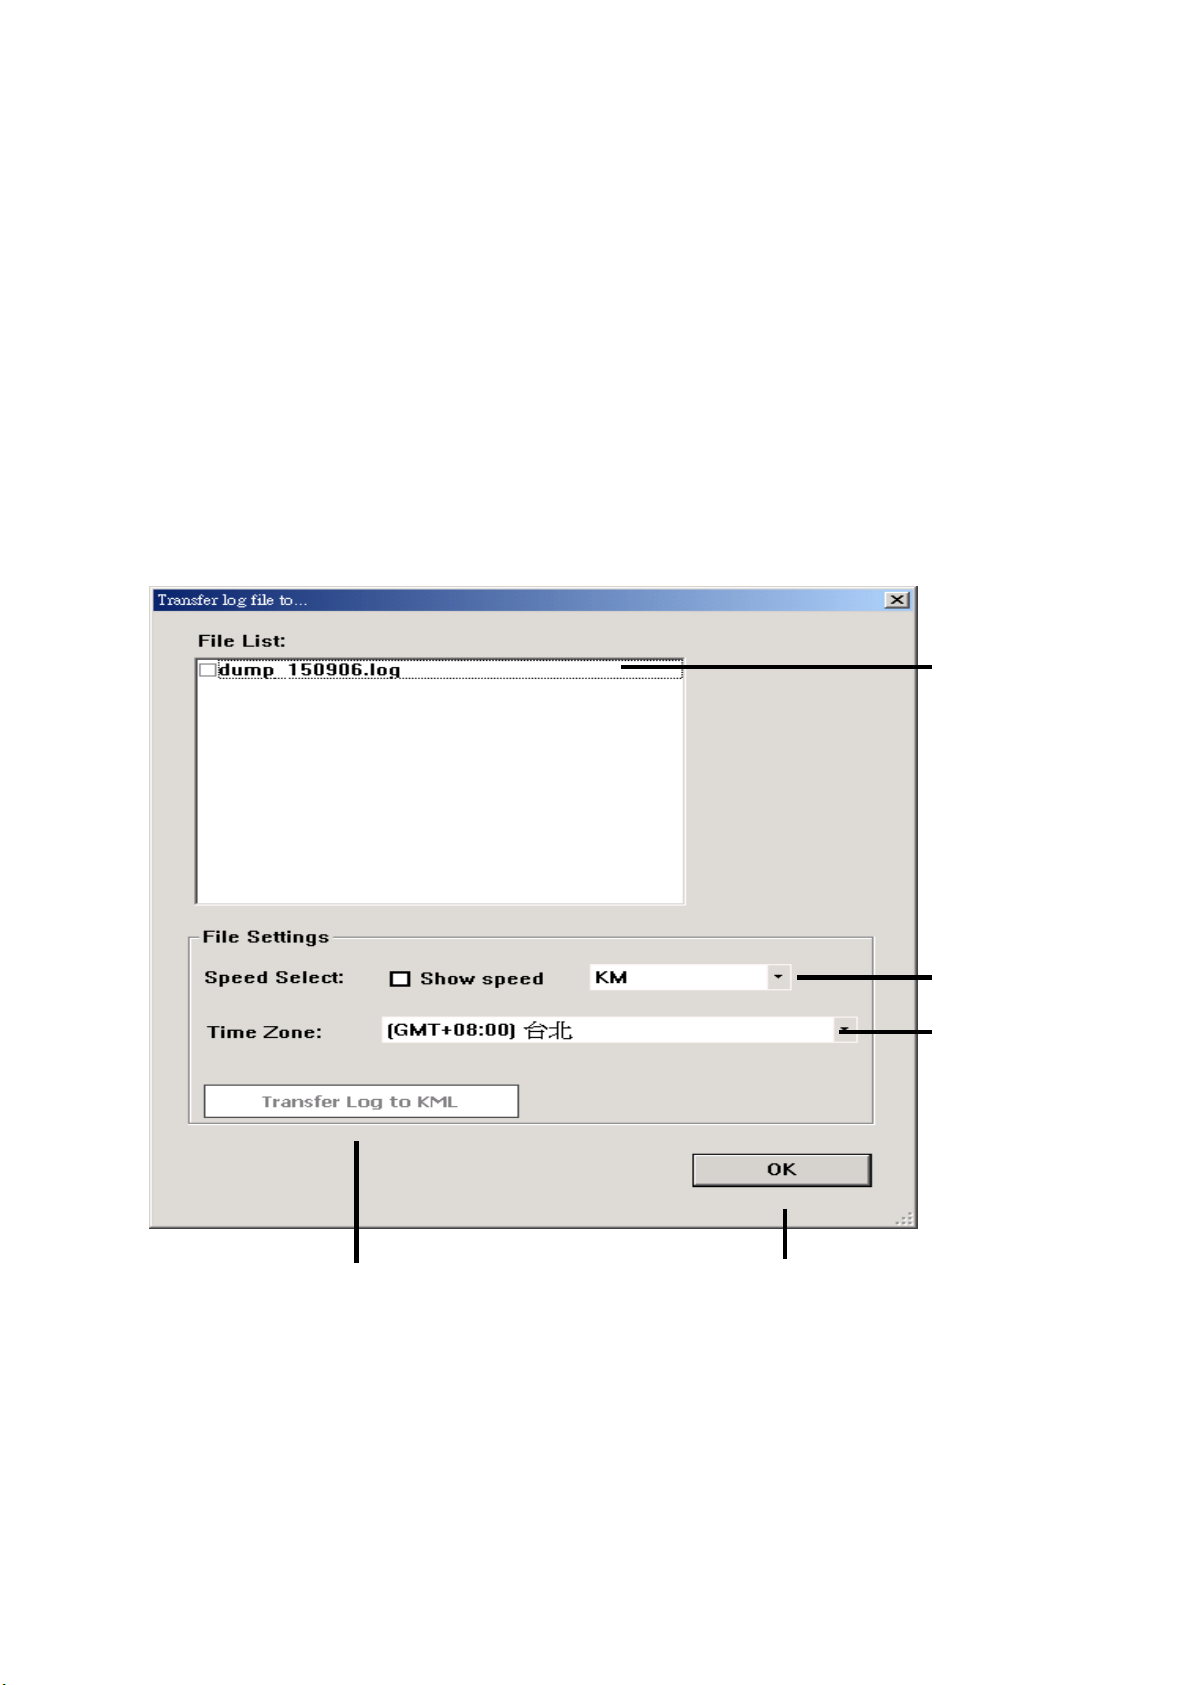
3. File list window will show up after download. (7-8)
Click the file you want to transfer to Google earth, and set
the unit (7-9) and time (7-10). The default recording time is
Greenwich Mean Time, that user could change time in
different district.
4. Click “Transfer log to KML” (7-11) to Transfer log to Google
earth
5. Click “OK” (7-12) to exit the window.
7-8
7-9
7-10
PS: PC needs to install Google earth map firstly before running
data transfer.
7-11
16
7-12

3100553871
Version 1.0
May. 2007
17
 Loading...