

Page 1
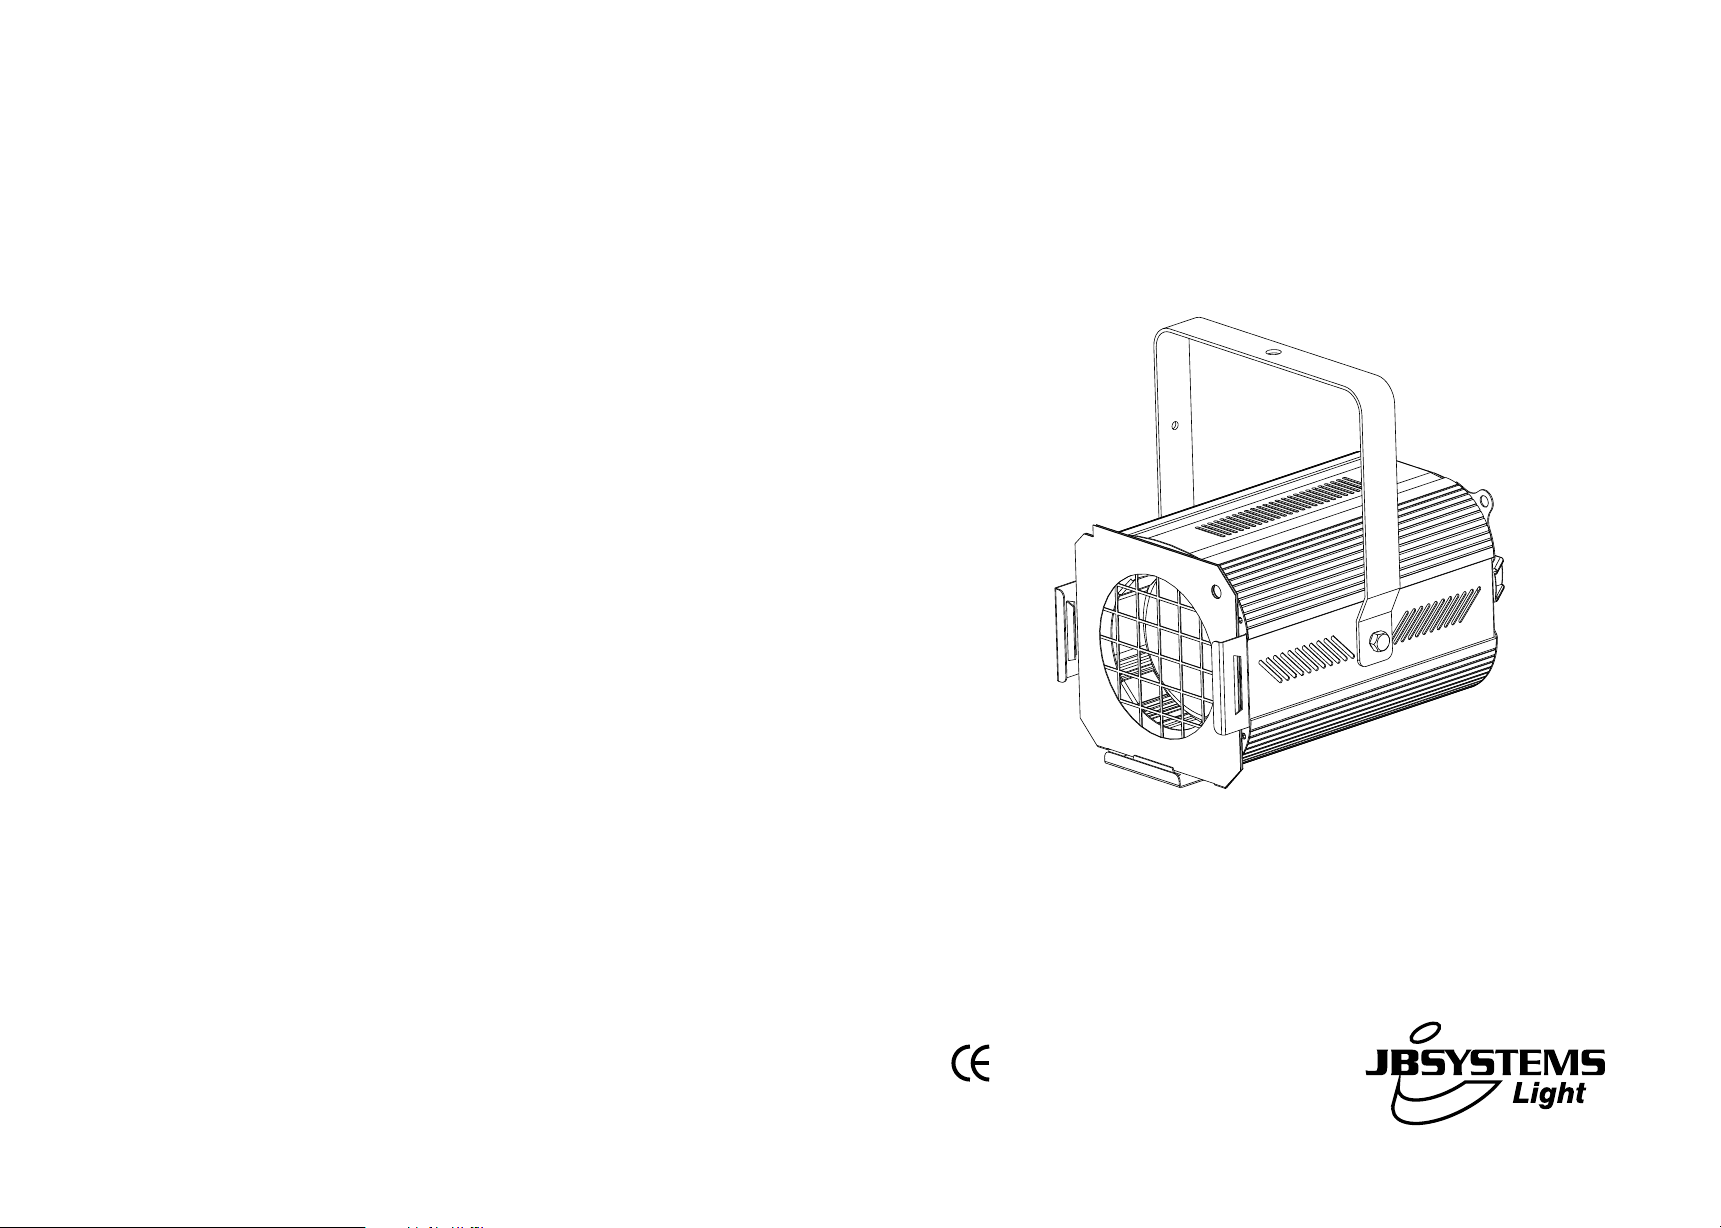
THEATRE SPOT
500W & 1000W
WWW.BEGLEC.COM
Copyright © 2007 by BEGLEC cva.
Reproduction or publication of the content in any manner, without express permission of the publisher, is prohibited.
Version: 1.1
Operation Manual
Mode d'emploi
Gebruiksaanwijzing
Bedienungsanleitung
Manual de instrucciones
Manual do utilizador
EN
FR
NL
DU
ES
PT
Page 2
EN - DISPOSAL OF THE DEVICE
Dispose of the unit and used batteries in an environment friendly manner
according to your country regulations.
FR - DÉCLASSER L’APPAREIL
Débarrassez-vous de l’appareil et des piles usagées de manière écologique
Conformément aux dispositions légales de votre pays.
NL - VERWIJDEREN VAN HET APPARAAT
Verwijder het toestel en de gebruikte batterijen op een milieuvriendelijke
manier conform de in uw land geldende voorschriften.
DU - ENTSORGUNG DES GERÄTS
Entsorgen Sie das Gerät und die Batterien auf umweltfreundliche Art und
Weise gemäß den Vorschriften Ihres Landes.
ES - DESHACERSE DEL APARATO
Reciclar el aparato y pilas usadas de forma ecologica conforme a las
disposiciones legales de su pais.
PT - COMO DESFAZER-SE DA UNIDADE
Tente reciclar a unidade e as pilhas usadas respeitando o ambiente e em
conformidade com as normas vigentes no seu país.
Page 3
ENGLISH OPERATION MANUAL
Thank you for buying this JB Systems®product. To take full advantage of all possibilities and for your own
safety, pleaseread these operating instructions very carefully beforeyou start using this unit.
FEATURES
This unit is radio-interference suppressed.This product meetsthe requirementsofthe current European and
nationalguidelines.Conformityhas been established and the relevantstatements and documents have been
depositedby the manufacturer.
This devicehas beendesigned to produce decorative effect lighting and is used inlight show systems.
Theatrespotlight
500Wversionwith GY 9,5 lamp socket
1000W versionwith GX9,5 lamp socket
Equippedwith PC-Antihalolens
Free Fresnel lensincluded.
Accurate focusing system with endless screwsystem.
BEFORE USE
Before you start using this unit, pleasecheck if there’s no transportation damage. Should there be any, do
not usethe device and consult your dealerfirst.
Important:
for the user to strictly follow the safety instructions and warnings in this user manual. Any damage caused
by mishandling is not subject to warranty. The dealerwill not accept responsibility for any resulting defects
orproblems caused bydisregarding this user manual.
Keep this booklet in a safe place for future consultation. If you sell the fixture, be sure to add this user
manual.
Check the contents:
Check that the carton contains the following items:
Operating instructions
Theater projector
Filter frame
Fresnel lens
This device left our factory in perfect condition and well packaged. It is absolutely necessary
SAFETY INSTRUCTIONS:
CAUT ION
Thelightning flash with arrowhead symbol within the equilateral triangle is intended to alert the use
or the presence of un-insulated “dangerous voltage” within the product’s enclosure that may be of
sufficient magnitude to constitute a risk of electric shock.
The exclamation point within the equilateral triangle is intended to alert the user to the presence of
important operation and maintenance (servicing) instructions in the literature accompanying this
appliance.
This symbol means:indoor use only.
This symbolmeans:Read instructions.
This symbol determines:the minimum distance from lightedobjects. The minimum distancebetween
light-output and the illuminated surface must be more than 1 m for the 500W version and more than
2m forthe 1000W version.
To protect the environment, pleasetry to recycle the packing material as much as possible.
A new light effect sometimes causes some unwanted smoke and/or smell. This is normaland disappears
aftersome minutes.
To preventfire or shock hazard,do not expose thisappliance to rain or moisture.
CAUTION: To reduce the risk of electric shock, do not remove the top cover.
No user-serviceable parts inside. Refer servicing to qualified service
personnelonly.
ENGLISH OPERATION MANUAL
To avoid condensation to be formed inside, allow the unit to adapt to the surrounding temperatures when
bringing it into a warm room after transport. Condense sometimes prevents the unit from working at full
performanceor may even cause damages.
Thisunit is for indoor use only.
Don’t place metalobjects or spill liquid inside the unit. Electric shock or malfunction may result. If a foreign
object enters the unit, immediately disconnect themains power.
Locate the fixture in a well ventilated spot, away from any flammable materials and/or liquids. The fixture
must be fixed at least 50cmfromsurroundingwalls.
Don’tcover any ventilation openings asthis may result in overheating.
Prevent use in dusty environmentsand clean the unitregularly.
Keep the unit away from children.
Inexperienced personsshould not operate thisdevice.
Maximum save ambienttemperature is 40°C. Don’t use this unit at higher ambient temperatures.
The units’ surface temperature may reach up to 125°C for the 500W version and 160°C for the 1000W
version.Don’t touch the housingwith bare hands during its operation.
Make sure the area below the installation place is free from unwanted persons during rigging, de-rigging
andservicing.
Allow the device about 10 minutes to cool down before replacing the bulbor start servicing.
Always unplug the unit when it is not used for a longer timeor before replacingthe bulb or start servicing.
The electricalinstallation should be carried out by qualified personal only, according to the regulations for
electricaland mechanical safetyin your country.
Check that the available voltageis not higher than the one statedon the rear panel of the unit.
The power cord should always be in perfect condition: switch the unit immediately off when the powercord
is squashed or damaged.
Neverlet the power-cord come into contact with other cables!
This fixturemust be earthed toin order comply with safety regulations.
Don’t connect the unit to any dimmerpack.
Always use an appropriateand certified safetycable when installing the unit.
In order to prevent electric shock, do not open the cover. Apart from the lamp and mains fuse there are no
user serviceable partsinside.
Never repair a fuse or bypass the fuse holder. Always replace a damaged fuse with a fuse of the same
type and electricalspecifications!
In the event of serious operating problems, stop using the fixture and contactyour dealer immediately.
Thehousing and the lensesmust be replaced if theyarevisibly damaged.
Pleaseuse the originalpacking when the device is tobe transported.
Due to safety reasonsit is prohibitedto make unauthorized modificationsto the unit.
Important: Never look directly into the light source! Don’t use the effectin the presence of persons suffering
from epilepsy.
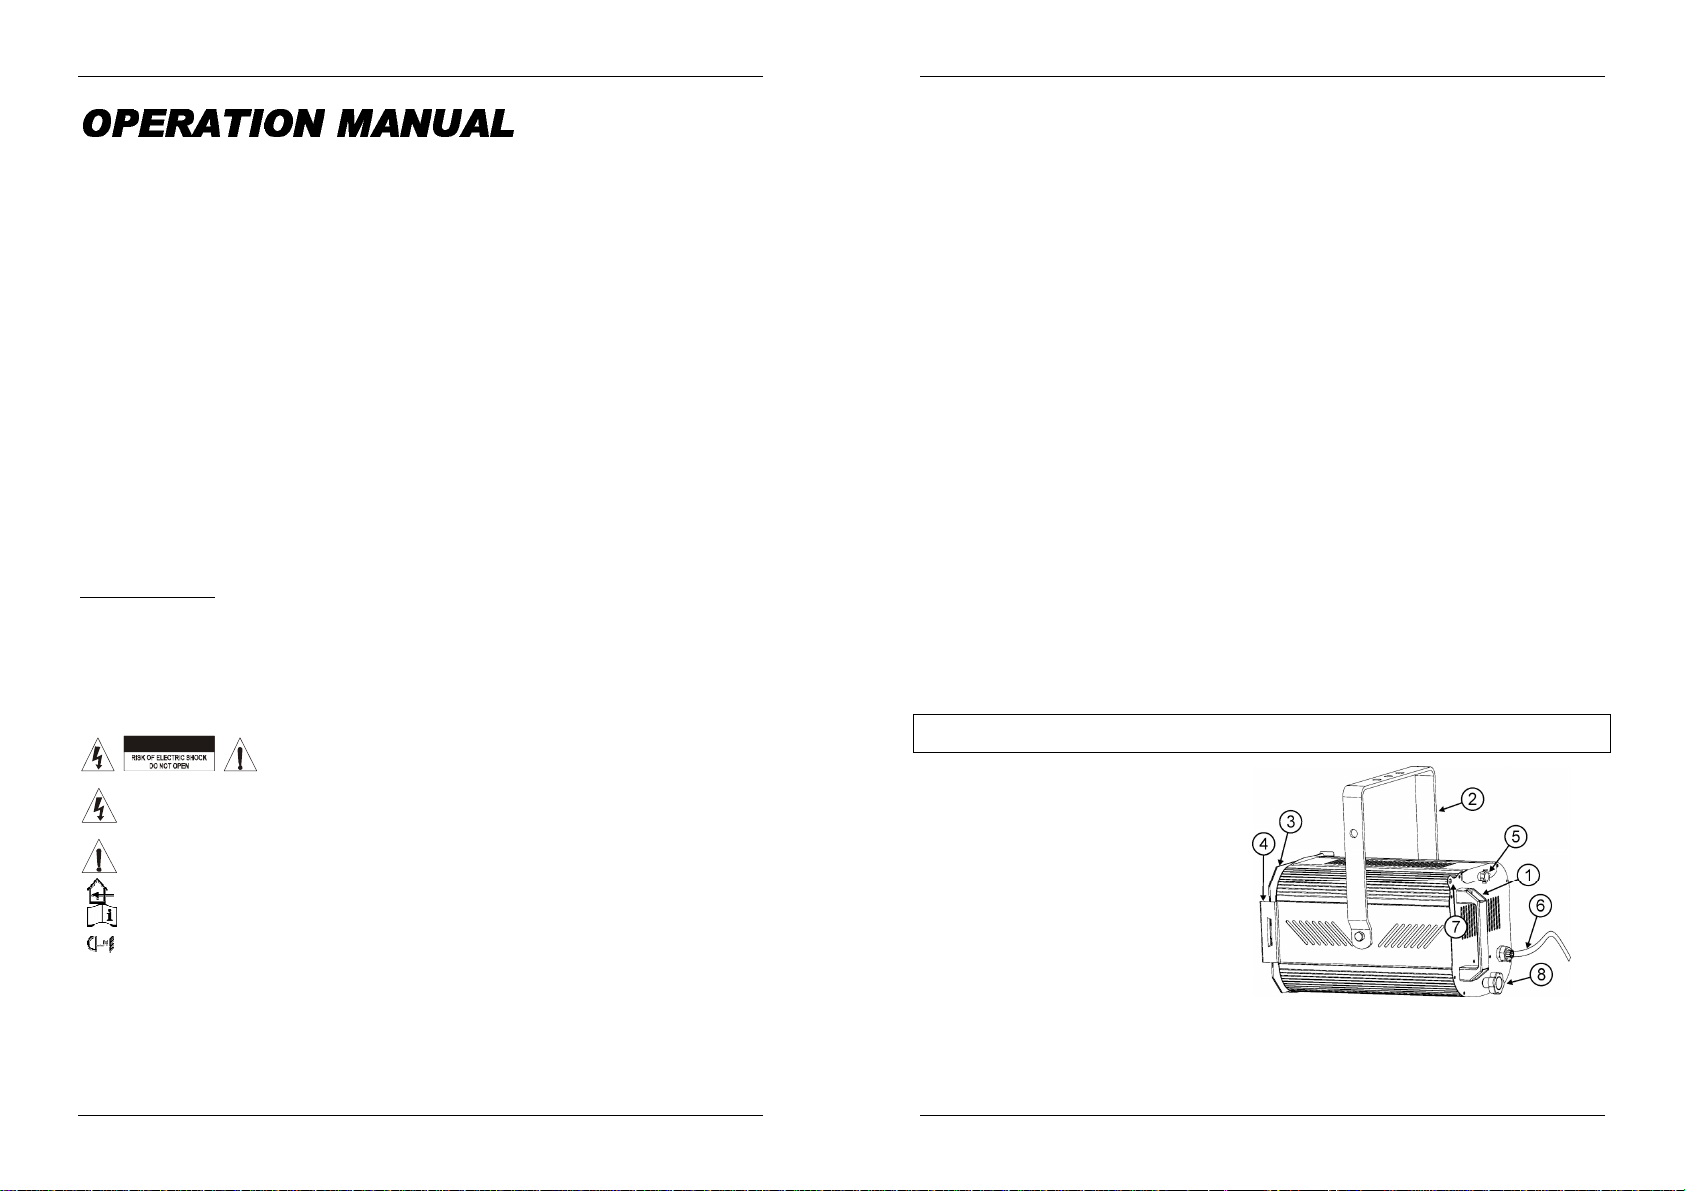
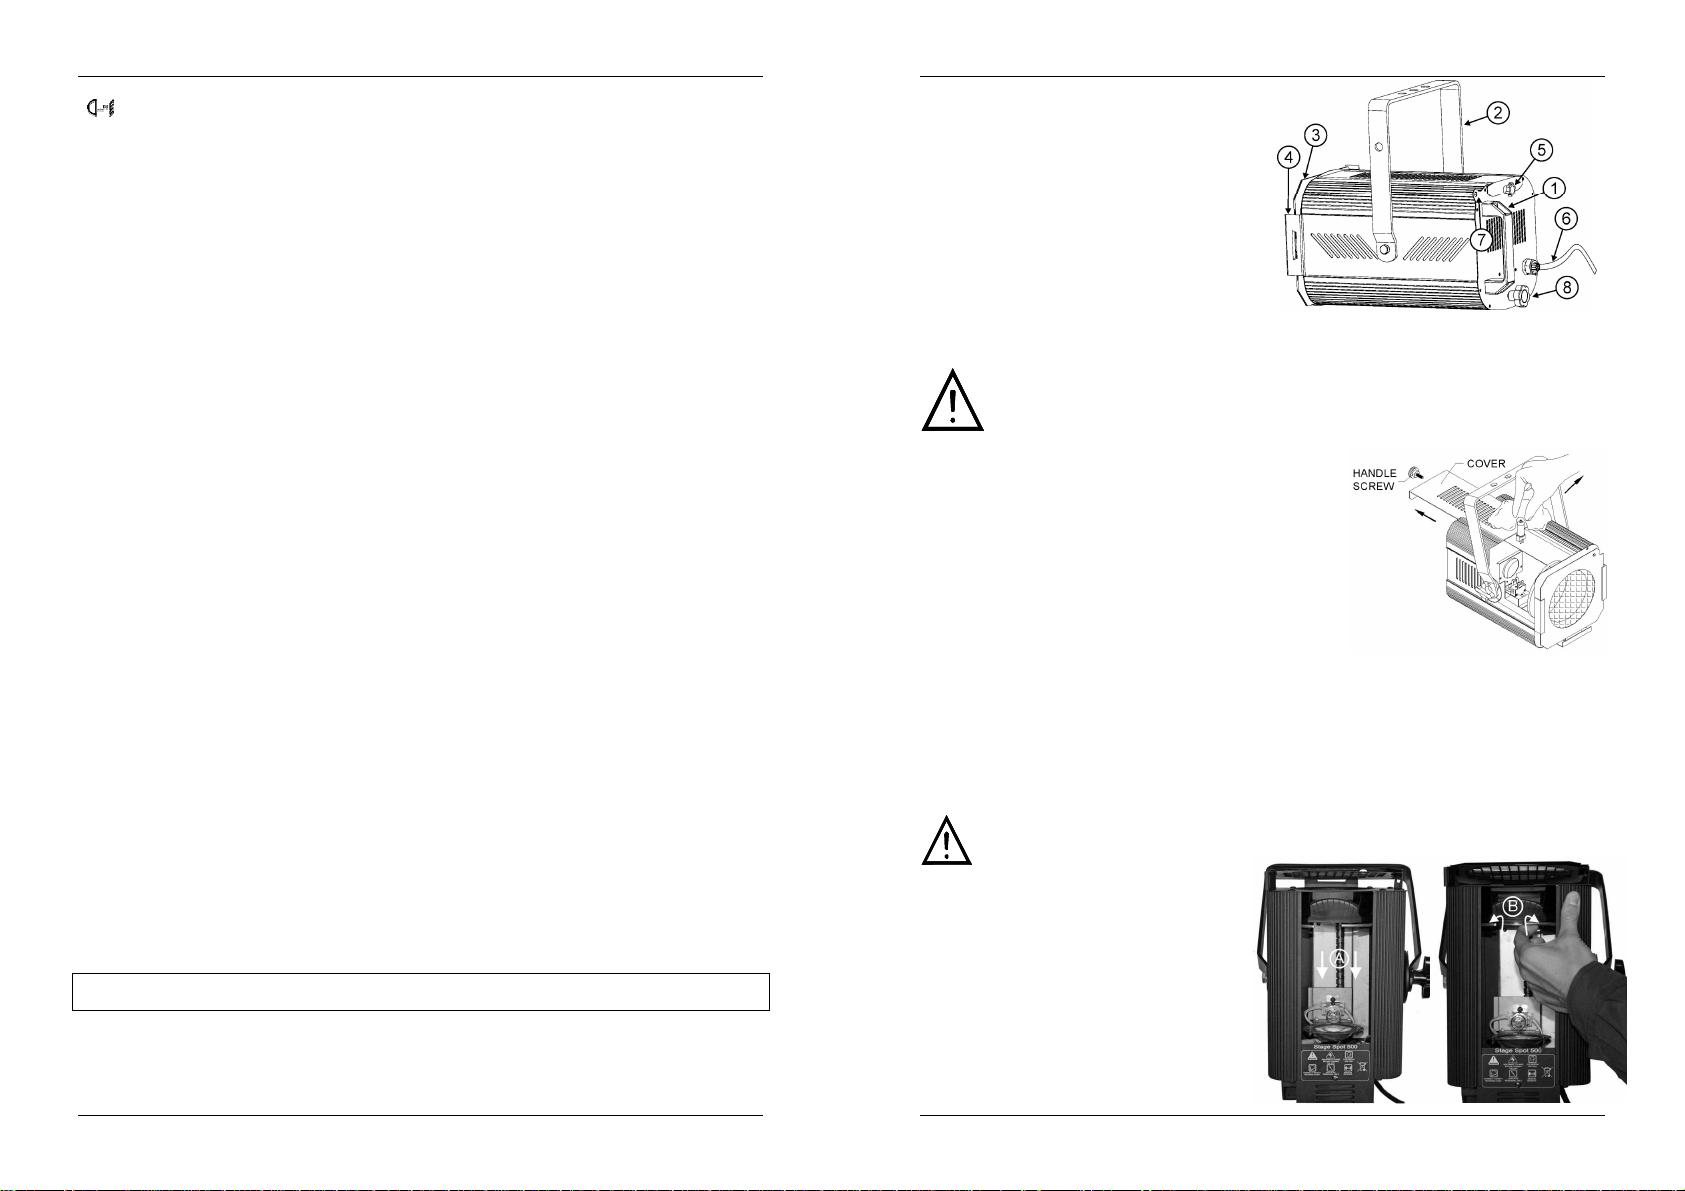
DESCRIPTION:
1. Handle
2. Hangingbracket
3. Filter frame
4. Barn door support
5. Knob to openthe lamp compartment
6. Mainscable
7. fixing point for safety cable
8. Screw for focusing system
JB SYSTEMS
®
1/30 THEATRE SPOT 500W + 1000W
JB SYSTEMS
®
2/30 THEATRE SPOT 500W + 1000W
Page 4
ENGLISH OPERATION MANUAL
ENGLISH OPERATION MANUAL
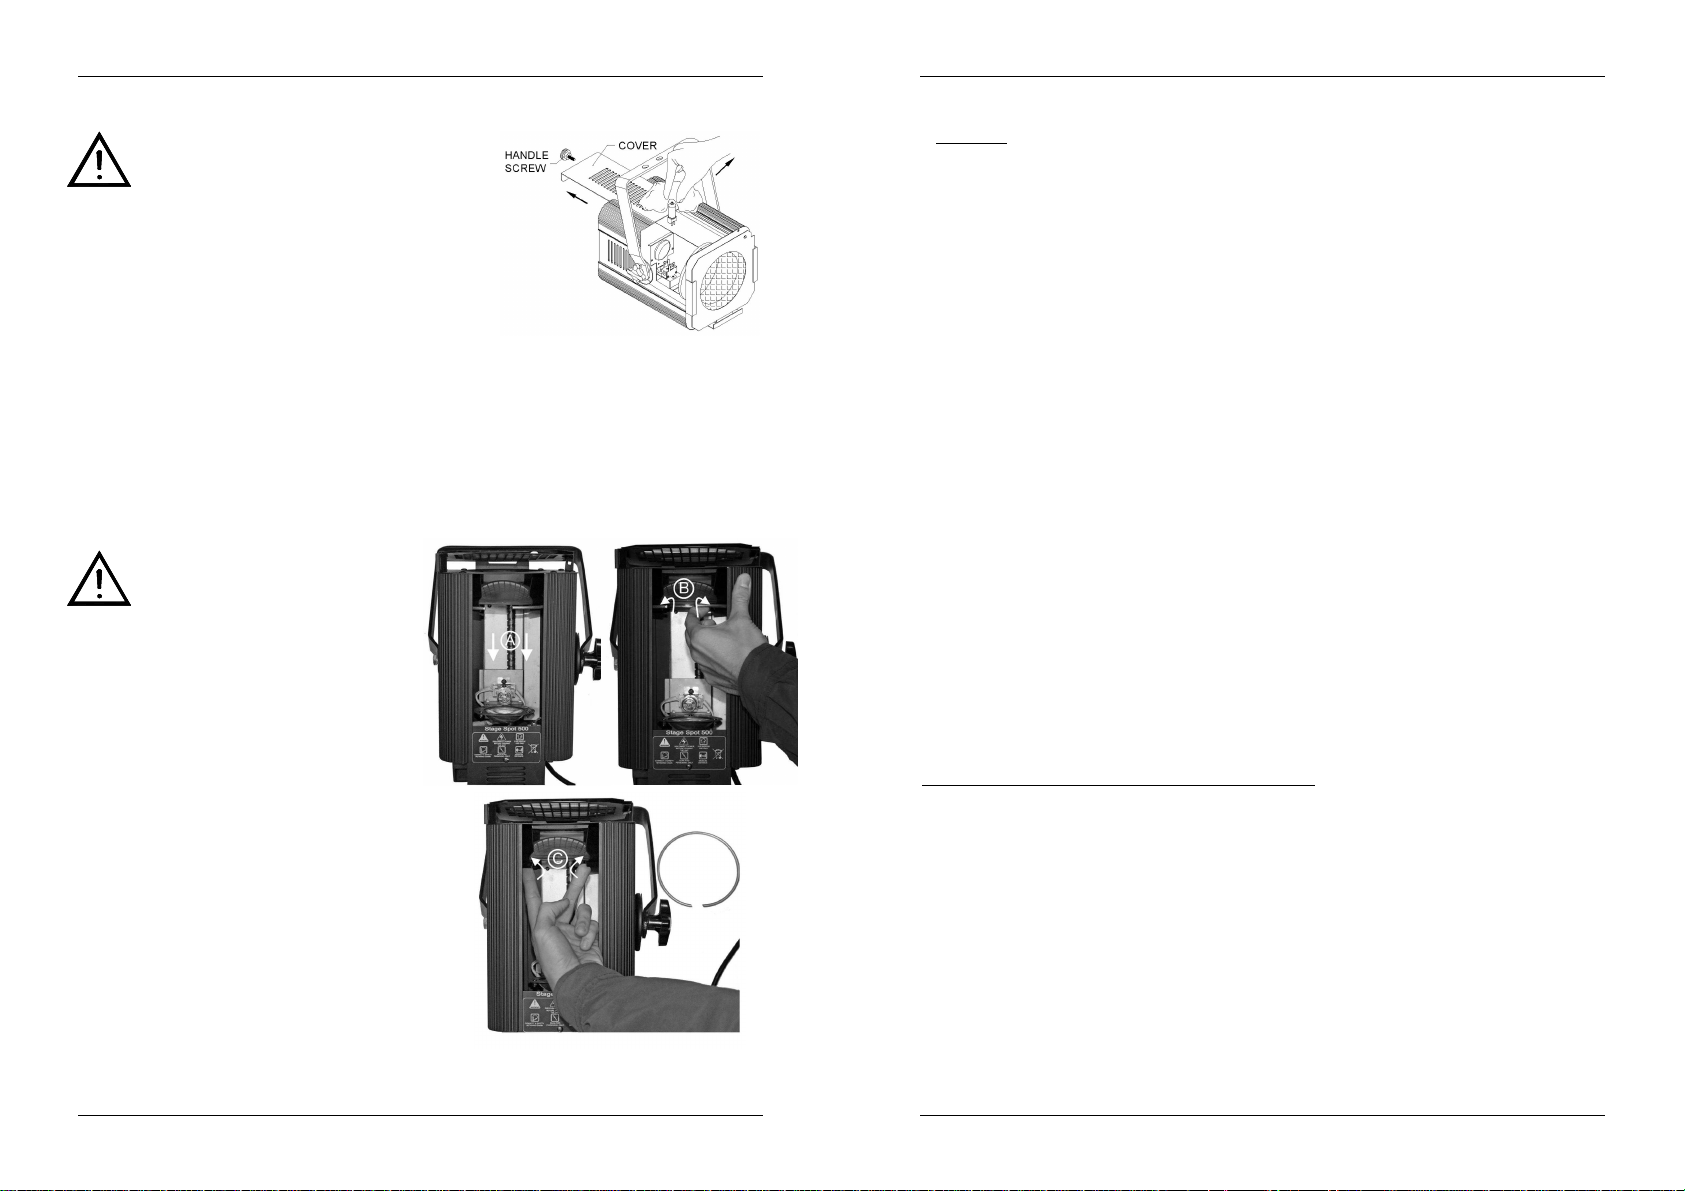
LAMP (RE)PLACEMENT
In case of replacement of the lamp or
maintenance, do not open the fixture within 10
minutes until the unit cools down after switching
off. Always unplug the unit before servicing!
Always use the same type of spare parts (bulbs,
fuses, etc.) When replacing parts, please only
Switch off the unit andunplug the mains cable.
Waitfor about10 minutes until the unithas been cooleddown.
Unscrewthe knob that closes the lamp compartment.
On the inside you will seethe lamp socket.
Unplug the old lamp. Hold the lamp socket while unplugging
Hold the lamp socket while pressing the new lamp gently in the socket.
Don’t touch the bulb with bare hands! This drastically shortens the lifespan of the lamp. If you touched the
Be sure that the wires don’t touch the lamp.
Closethe lamp compartment.
Done!
genuine spare parts.
the lamp!
Attention! Check the label on thebackside of the deviceor see the technical specifications in this manual
toknow which lamp should be used. Never installlamps with a higher wattage!Lamps with higher wattage
generatetemperatures the device was not designedfor.
lamp, clean it with a cloth and a littledenatured alcohol. Wipethe lamp off beforeinstalling.
EXCHANGING THE LENS
In case of replacement of the lens, do
not open the fixture within 10 minutes
until the unit cools down after
switching off. Always unplug the unit
before servicing! Switch off the unit
Wait for about 10 minutes until the unit has been
Unscrew the knob that closes the lamp
Turn the lamp socket backwards, as far as
Remove the safety ring by pressing the ring
Press the 2 upper metal clips (holding the lens) a little
Removethe lens and put the newlens in place.
Press both upper metal clipsinwards.
Put the safety ring back in place.
Move the lamp socket backto it’s original position.
Closethe lamp compartment.
Done!
and unplug the mains cable.
cooleddown.
compartment.
possible, using the focus knob on the back panel.
(see A on the picture)
outwards.(see B on the picture)
outwards, so you can easily remove the lens (See C on
the picture)
OVERHEAD RIGGING
Important: The installation must be carried out by qualified service personal only. Improper
installation can result in serious injuries and/or damage to property. Overhead rigging requires
extensive experience! Working load limits should be respected, certified installation materials
shouldbe used, theinstalled device shouldbe inspected regularlyfor safety.
Make sure the area below the installation place is free from unwanted persons during rigging, de-rigging
andservicing.
Locate the fixture in a well ventilated spot, far away from any flammable materials and/or liquids. The
fixturemust befixed
The deviceshould be installedout of reach of peopleand outside areas where persons may walk by or be
seated.
Before rigging make sure that the installation area can hold a minimum point load of 10times the device’s
weight.
Always use a certified safety cable that can hold 12times the weight of the device when installing the unit.
This secondary safety attachment should be installed in a way that no part of the installation can drop
more than20cm if the main attachment fails.
Thedevice should be well fixed; a free-swinging mountingis dangerous and maynot beconsidered!
Don’tcover any ventilation openings asthis may result in overheating.
The operator has to make sure that the safety-relating and machine-technical installationsare approvedby
an expert before using them forthe first time. The installations should be inspected every year by a skilled
person to be sure that safetyis still optimal.
at least 50cm
fromsurrounding walls.
OPERATING INSTRUCTIONS
Once connected to the mains the devicestartsrunning.
Regular breaks during operation are essential to maximize the life of this device as it is not designed for
continualuse.
Donot switch the unit on and offin short timeintervals as this reduces the lamp life.
The units’ surface temperature may reach up to 125°C for the 500W version and 160°C for the 1000W
version.Don’t touch the housing with bare-handsduring its operation.
Always unplug the unit when it is notused for a longer time or before replacing the bulb or start servicing.
In theevent of serious operating problems, stop using the fixture and contactyour dealer immediately.
Important: Never look directly into the light source! Don’t use the effect in the presence of persons
suffering from epilepsy.
MAINTENANCE
Make surethe area belowthe installationplace is freefrom unwanted persons during servicing.
Switch off the unit, unplug the mains cableand wait until the unit hasbeen cooled down.
During inspection the following points shouldbe checked:
All screws used for installing the device and any of its parts should be tightly fastened and may not be
corroded.
Housings, fixations and installations spots (ceiling, truss, suspensions) should be totally free from any
deformation.
Whenan opticallens is visibly damaged due to cracks or deep scratches, it must be replaced.
The mains cables must be in impeccable condition and should be replaced immediately when even a
small problemis detected.
In order to protect the device from overheat the cooling fans (if any) and ventilation openings should be
cleanedmonthly.
The interiorof the device should be cleaned annuallyusing a vacuum cleaneror air-jet.
The cleaning of internal and external optical lenses and/or mirrors must be carried out periodically to
optimizelight output. Cleaning frequency depends on the environment in which the fixtureoperates: damp,
smoky orparticularly dirty surroundings can cause greater accumulation of dirton the unit’s optics.
Clean witha soft clothusingnormal glass cleaningproducts.
Always dry the parts carefully.
Clean the external optics at least once every 30 days.
Clean the internal optics at least every 90 days.
JB SYSTEMS
®
3/30 THEATRE SPOT 500W + 1000W
JB SYSTEMS
®
4/30 THEATRE SPOT 500W + 1000W
Page 5
ENGLISH OPERATION MANUAL
Attention: We strongly recommend internal cleaningto be carried out by qualified personnel!
FRANÇAIS MODE D’EMPLOI
SPECIFICATIONS
500WVERSION:
Mains Input: AC 230V,50Hz
Power consumption: Max.500W
Lamp Fitting: GY 9,5
Max. ambienttemperature: 40°C
Max. housing temperature: 125°C
Minimumdistance toobject: 1m
Lamp: 300W or500W halogen theaterlamp
Size: 32 x 22 x 32cm
Weight: 3,5kg
1000WVERSION:
Mains Input: AC230V, 50Hz
Power consumption: Max.1000W
Lamp Fitting: GX 9,5
Max. ambienttemperature: 40°C
Max. housing temperature: 160°C
Minimumdistance toobject: 2m
Lamp: 650W or1000Whalogen theaterlamp
Size: 37 x 25 x 37cm
Weight: 5,0kg
You candownload the latest version of this user manualon our website:www.beglec.com
Every information is subject to change without prior notice
Merci d’avoirchoisi ce produit JB Systems®. Pour votresécurité et pour une utilisation optimale de toutes les
possibilités de l’appareil, lisez attentivement cette notice avant utilisation.
EN VOUS INSCRIVANT POUR LA LETTRE D’INFORMATION VOUS SEREZ TOUJOURS
TENU AU COURANT DES DERNIERES NOUVELLES CONCERNANT NOS PRODUITS:
NOUVEAUTES,ACTIONS SPECIALES,JOURNEES PORTES OUVERTES, ETC.
SURFEZ SUR: WWW.BEGLEC.COM
CARACTERISTIQUES
Cet appareil ne produit pas d’interférences radio. Il répond aux exigences nationales et européennes. La
conformité a été établie et les déclarations et documentscorrespondants ont été déposéspar lefabricant.
Cet appareil a été conçu pour la production de jeux de lumières décoratifs et est utilisé dans des
spectacleslumineux.
Spotde théâtre
Version 500W avec douille GY 9,5
Version 1000W avec douilleGX 9,5
Pourvu d’une lentille PC-Antihalo
LentilleFresnel incluse dans leprix.
Système de mise au point précis avecmécanisme de vis sans fin.
AVANT UTILISATION
Avant d’utiliser cet appareil, assurez-vous de l’absence de dommage lié au transport. En cas
d’endommagement,n’utilisezpas l’appareil et contactez le vendeur.
Important:
l’utilisateur suive les instructions de sécurité et avertissements inclus dans ce manuel. La garantie ne
s’applique pas en cas de dommage lié à une utilisation incorrecte. Le vendeur ne prend pas la
responsabilité des défauts ou de tout problème résultant du fait de n’avoir pas tenu compte des mises en
garde dece manuel.
Conservez ce manuel dans un endroit sûr pour toute consultation future. Si vous vendez l’appareil,
assurez-vous d’y joindre ce manuel également.
Vérifiez le contenu:
Vérifiezsi l’emballage contient les articlessuivants:
Mode d'emploi
Spotde théâtre
Support defiltre
LentilleFresnel
Cet appareil a quitté notre usine en parfaite condition et bien emballé. Il est primordial que
JB SYSTEMS
INSTRUCTIONS DE SECURITE:
CAUTION
La flèche dans un triangle met l'utilisateur en garde de la présence de haut voltage sans isolation
dans l'appareilqui peutcauser unrisque d'électrocution.
Un point d'exclamation dans un triangle prévient de laprésence d'instructions de fonctionnement et
de maintenancese trouvant dans le manuel, fourniavec l'appareil.
Ce symbolesignifie:uniquement pour usageà l'intérieur
Ce symbolesignifie: Lirele mode d’emploi.
®
5/30 THEATRE SPOT 500W + 1000W
JB SYSTEMS
®
ATTENTION: afin de réduire le risque d’électrocution, n’enlevez jamais le
couvercle de l’appareil. Il n’y a aucune pièce à l’intérieur de l’appareil que
vous pouvez remplacer vous-même. Confiez l’entretien uniquement aux
techniciensqualifiés.
6/30 THEATRE SPOT 500W + 1000W
Page 6
FRANÇAIS MODE D’EMPLOI
FRANÇAIS MODE D’EMPLOI
Ce symbole détermine: la distance minimum des objets allumés. La distance minimum entre le
projecteur et la surface à éclairer doit être plus de 1 m pour la version 500W et plus de 2m pour la
version1000W.
Afin de protéger l’environnement,merci de recycler les emballagesautant que possible.
Un nouvel effet lumière peut provoquer de la fumée et/ou une odeur non souhaitée, disparaissant après
quelquesminutes.
Afin d’éviter tout risque d’incendie ou de choc électrique, ne pas exposer cet appareil à la pluie ou
l’humidité.
Pour éviterla formation de condensation à l’intérieur de l’appareil, patientezquelques minutes pour laisser
l’appareil s’adapter à la température ambiante lorsqu’il arrive dans une pièce chauffée après le transport.
La condensation empêche l’unité de fonctionner en performance optimale et peut même causer des
dommages.
Cetteunité estdestinée à une utilisationà l’intérieuruniquement.
Ne pas insérer d’objet métallique ou verser un liquide dans l’appareil. Risque de choc électrique ou de
dysfonctionnement. Si un corps étranger est introduit dans l’unité, déconnectez immédiatement de la
sourced’alimentation.
Placez l’appareil dans un endroit bien ventilé, éloigné de tout matériau ou liquide inflammable. L’appareil
doit être fixé à 50cmminimum des murs.
Nepas couvrir les ouverturesde ventilation, un risquede surchauffe en résulterait.
Nepas utiliserdans un environnement poussiéreuxet nettoyez l’unitérégulièrement.
Nepas laisser l’unité à portée desenfants.
Lespersonnes non expérimentéesne doiventpas utiliser cet appareil.
Latempérature ambiante maximumd’utilisationde l’appareil est de 40°C. Ne pas l’utiliser au-delà de cette
température.
La température des parois de l’unité peut atteindre 125°C pour la version 500W et 160°C pour la version
1000W. Ne pas toucherla coque à mains nues en coursde fonctionnement.
Assurez-vous que la zone au-dessous du lieu d’installation ne comporte pas de personnes indésirables
pendant le montage, le démontageet les opérations de maintenance.
Laissezl’appareil refroidir environ 10 minutes avantde remplacer l’ampouleou d’effectuerdes réparations.
Débranchez toujours l’appareil si vous ne l’utilisez pas de manière prolongée avant de changer une
ampouleou d’entreprendre desréparations.
Les installations électriques ne peuvent être faites que par du personnel qualifié et conformément aux
régulations desécuritéélectrique et mécanique envigueurdans votrepays.
Assurez-vous que le voltage de la source d’alimentation de la zone dans laquelle vous vous trouvez ne
dépasse pascelui indiquéà l’arrièrede l’appareil.
Lecordon d’alimentation doit toujours être en condition parfaite. Mettezimmédiatementl’unitéhors tension
si le cordonest écrasé ou endommagé.
Nelaissez jamais le cordon d’alimentationentrer en contactavec d’autres câbles !
L’appareil doitêtre à la masse selon les règles de sécurités.
Nepas connecterl’unité àun variateur de lumière.
Utilisez toujoursles câblesappropriés et certifiés lorsque vous installez l’unité.
Pour éviter toutchoc électrique,ne pas ouvrir l’appareil.En dehors des ampoules et du fusible principal, il
n’y a pasde pièces pouvant être changéespar l’utilisateur à l’intérieur.
Nejamais
fusible de même typeet ayant les mêmesspécifications électriques !
En cas de problèmes de fonctionnement sérieux, arrêtez toute utilisation de l’appareil et contactez votre
revendeurimmédiatement.
Lacoque et les lentilles doivent être remplacées si visiblement endommagées.
Utilisez l’emballage d’originesi l’appareil doit êtretransporté.
Pour des raisons de sécurité, il est interdit d’apporter toute modification à l’unité non spécifiquement
autoriséepar les parties responsables.
Important:
personnessouffrantd’épilepsie.
réparer oucourt-circuiter unfusible.Remplacezsystématiquement un fusible endommagé parun
Ne jamais fixer directement la source de lumière ! Ne pas utiliser d’effets en présence de
DESCRIPTION:
1. Poignée
2. Attelle de fixation
3. Support de filtre
4. Support pour coupe flux
5. Bouton pour ouvrir le compartiment de la lampe
6. Câble secteur
7. Point de fixation pour le câble de sécurité.
8. bouton pour régler le système de focalisation.
MISE EN PLACE / REMPLACEMENT DES AMPOULES
En cas d’opération de maintenance ou de remplacement des ampoules, ne pas ouvrir
l’installation dans les 10 minutes suivant la fin de l’utilisation jusqu’à ce que l’appareil
ait refroidi. Débranchez systématiquement l’unité avant toute opération de
maintenance. Utilisez toujours le même type de pièces (ampoules, fusibles, etc.) Lors
Mettez l’unité hors tension et débranchez le câble
d’alimentation.
Attendez environ10 minutesjusqu’à ce que l’unitéait refroidi.
Dévisser le bouton du compartiment des ampoules de
l’appareil.
A l’intérieur vous pouvezvoir la douille.
Sortez l’ampoule usagée. Tenezla douille pendant l’opération!
Tenez encore la douille lorsque vous mettez en place la
nouvelle ampoule.
Attention! Reportez-vous à l’étiquette à l’arrière de l’appareil
ou aux spécifications techniques de ce manuel pour savoir
quelle ampoule utiliser. Ne jamais installer d’ampoules à
puissance plus élevée! De telles ampoules produisent des
températuressupérieures à celles pourlesquelles l’appareila été conçu.
Ne pas toucher l’ampoule à mains nues! Cela réduirait énormément le cycle de vie de la lampe. Si vous
l’aveztouchée, nettoyez-la avecun linge et un peu d’alcool modifié.Essuyez l’ampoule avantde l’installer.
Insérez la nouvelleampoule à l’intérieur de l’unité.Assurez-vous que lesfils ne touchent pas l’ampoule.
Refermezle compartiment à ampoules.
Voilà!
du remplacement, n’utilisez que des pièces véritables.
REMPLACEMENT DE LA LENTILLE
En cas d’opération de remplacement des lentilles, ne pas ouvrir l’installation dans les 10
minutes suivant la fin de l’utilisation jusqu’à ce que l’appareil ait refroidi. Débranchez
systématiquementl’unité avant toute opérationde maintenance. Mettez l’unité hors tension
et débranchez le câble d’alimentation.
Attendez environ 10 minutes jusqu’à ce que
l’appareil ait refroidi.
Dévissez le bouton du compartiment de
l'ampoule de l’appareil.
Repoussez la douille de la lampe vers l'arrière,
le plus loin possible, en utilisant le bouton de
mise au point situé sur le panneau arrière. ('A'
sur la figure ci-contre).
JB SYSTEMS
®
7/30 THEATRE SPOT 500W + 1000W
JB SYSTEMS
®
8/30 THEATRE SPOT 500W + 1000W
Page 7

FRANÇAIS MODE D’EMPLOI
FRANÇAIS MODE D’EMPLOI
Enlevez l'anneau de sécurité en exerçant une pression vers
l'extérieurpour élargir cet anneau. (B sur la figureci-contre)
Exercez une pression vers l'extérieur sur les deux clips en
métaldu dessus(ceux qui soutiennent la lentille) de manière à
pouvoirenlever facilement la lampe. (C sur la figure ci-contre)
Enlevez l'anciennelentille et mettezla nouvelle en place.
Exercez une pression vers l'intérieur sur les deux clips en
métaldu dessus.
Remettez l'anneaude sécurité en place.
Replacezla douille de la lampe à son emplacementd'origine.
Refermezle compartiment à ampoules.
Voilà!
INSTALLATION EN HAUTEUR
Important: L’installation doit être faite par du personnel qualifié uniquement. Une installation
incorrecte peut causer des blessures sévères et/ou endommager l’appareil. L’installation en
hauteur exige de l’expérience ! Les limites de charge doivent être respectées, du matériel
d’installation certifié doit être utilisé, et l’appareil installé doit subir des inspections de sécurité
régulièrement.
Assurez-vous que la zone au-dessous du lieu d’installation ne comporte pas de personnes indésirables
lors del’installation, la désinstallationou la maintenance.
Placez l’appareil dans un endroit bien ventilé, éloigné de tout matériau ou liquide inflammable. L’appareil
doit être fixé à
L’appareil doit être hors de portée du public et en dehors des zones de passage de personnes ou des
zones où le publicest installé.
Avant l’installationassurez-vous que la zone d’installation supporte un point localisé minimum de 10 fois le
poids del’appareil.
Utilisez systématiquement un câble de sécurité qui peut supporter 12 fois le poids de l’appareil lors de
l’installation. Ce câble de sécurité secondaire doit être installé de manière à ce qu’aucune partie de
l’appareilne puisse descendre de plus de20 cm si le support principal tombe.
L’appareil doit être bien fixé,un montage à balancementest dangereuxet ne devrait pasêtre considéré !
Nepas couvrir les ouverturesde ventilation pour évitertout risque de surchauffe.
L’utilisateur doit s’assurer que les installations techniques et de sécurité sont bien approuvées par un
expert avant la première utilisation. Les installations doivent être inspectées chaque année par du
personnelqualifié pour assurerune sécurité optimale.
50cm minimum
des murssitués à proximité.
INSTRUCTIONS D’UTILISATION
Unefois l’appareilconnecté, l’unité principalefonctionne.
Des pauses régulières dans l’utilisation sont primordiales pour maximiser la durée de vie de l’appareil,
puisqu’il n’est pas conçu pour uneutilisation continue.
Ne pas mettre l’unité sous tension et hors tension à de faibles intervalles, cela réduit la durée de vie des
ampoules.
La température des parois de l’unité peut atteindre 125°C pour la version 500W et 160°C pour la version
1000W. Ne pas toucherla coque à mains nues en cours de fonctionnement.
Débranchez systématiquement l’appareil s’il n’est pas utilisé pour une période prolongée ou avant de
changer uneampoule ou d’effectuerdes opérationsde maintenance.
En cas de problèmes de fonctionnement sérieux, arrêtez toute utilisation de l’appareil et contactez votre
revendeurimmédiatement.
Important: Ne jamais fixer directement la source de lumière ! Ne pas utiliser d’effets en présence de
personnessouffrantd’épilepsie.
MAINTENANCE
Assurez-vous que la zone au-dessous du lieu d’installation ne comporte pas de personnes indésirables
lors de lamaintenance
Mettez l’unité hors tension, débranchez le cordon d’alimentationet attendezque l’appareil ait refroidi.
Pendantl’inspection,les points suivants doivent êtrevérifiés :
Toutes les vis utilisées pour l’installation de l’appareil ou de chacune de ses pièces doivent être bien
fixéeset non corrodées.
Les niches, fixations et structures de support (plafond, poutres, suspensions) doivent être totalement
intactes,sans aucune déformation.
Lorsqu’une lentille optique est visiblement endommagée (fissure ou éraflures profondes), elle doit être
remplacée.
Lescâblesdoivent être en parfaite condition et doivent être remplacésimmédiatement en cas de détection
d’un problème,mêmebénin.
Pour protéger l’appareil de toute surchauffe, les ventilateurs (si applicable) et les ouvertures de ventilation
doiventêtre nettoyées mensuellement.
L’intérieur del’appareil doitêtre nettoyéannuellement à l’aide d’un aspirateurou jet d’air.
Lenettoyagedes lentilles optiques internes et externes et/oudes miroirs doit être effectué périodiquement
pour optimiser la production de lumière. La fréquence de nettoyage dépend de l’environnement dans
lequel l’appareil fonctionne: des environnements humides, enfumés ou particulièrement sales peuvent
entraînerune accumulationde saleté plus importantes sur les optiques de l’appareil.
Nettoyezà l’aide d’unchiffon doux avecdes produits denettoyage pour verresnormaux.
Séchez toujoursles partiessoigneusement.
Nettoyezles optiques externes oumoins unefois tous les 30 jours.
Nettoyezles optiques internes oumoins unefois tous les90 jours.
Attention: Nous vous recommandons fortement de faire exécuter le nettoyage interne par du
personnel qualifié !
SPECIFICATIONS
VERSION500W:
Alimentation: AC 230V,50Hz
Consommation: Max.500W
Douille: GY 9,5
Températureambiante max.: 40°C
Températuremax. du projecteur: 125°C
Distance minimum de l’objet: 1m
Lampe: lampethéâtre 300W ou 500W
Taille: 32 x 22 x 32cm
Poids: 3,5kg
VERSION1000W:
Alimentation: AC 230V,50Hz
Consommation: Max.1000W
Douille: GX 9,5
Températureambiante max.: 40°C
Températuremax. du projecteur: 160°C
Distance minimum de l’objet: 2m
Lampe: lampethéâtre 650W ou1000W
Taille: 37 x 25 x 37cm
Poids: 5,0kg
Chacune de cesinformationspeut être modifiée sans avertissementpréalable. Vous pouvez
télécharger la dernière versionde ce mode d’emploidenotre siteWeb: www.beglec.com
JB SYSTEMS
®
9/30 THEATRE SPOT 500W + 1000W
JB SYSTEMS
®
10/30 THEATRE SPOT 500W + 1000W
Page 8

NEDERLANDS HANDLEIDING
Hartelijk dank voor de aankoop van dit JB Systems®product. Om ten volle te kunnen profiteren van alle
mogelijkheden en voor uw eigen veiligheid, gelieve de aanwijzingen zeer zorgvuldig te lezen voor U begint
het apparaatte gebruiken.
DOOR U OP ONZE MAILINGLIJST IN TE SCHRIJVEN ONTVANGT U STEEDS DE
LAATSTE INFORMATIE OVER ONZE PRODUKTEN: NIEUWIGHEDEN, SPECIALE
ACTIES, OPENDEURDAGEN, ENZ.
SURF NAAR: WWW.BEGLEC.COM
KARAKTERISTIEKEN
In dit apparaat is radio-interferentie onderdrukt. Dit product voldoet aan de gangbare Europese en nationale
voorschriften. Het is vastgesteld dat het apparaat er zich aan houdt en de desbetreffende verklaringen en
documenten zijn door de fabrikant afgegeven.
Het toestel is ontworpen om decoratieve lichteffecten te produceren en kan eventueel worden gebruikt in
lichtshows.
Theaterspot
500Wversievoorzien van GY9,5 lampvoet
1000W versievoorzien van GX 9,5 lampvoet
Uitgerustmet PC-Antihalolens
Gratis Fresnellensinclusief.
Accuraat focussingsysteem met eindeloos schroefsysteem.
VOOR DE IN GEBRUIKNAME
Controleer voor het eerste gebruik van het apparaat of het tijdens het transport beschadigd werd. Mocht er
schade zijn, gebruik het dan niet,maarraadpleeg eerstuw dealer.
Belangrijk: Dit apparaat verliet de fabriek in uitstekende staat en goed verpakt. Het is erg belangrijk dat de
gebruiker de veiligheidsaanwijzingen en raadgevingen in deze gebruiksaanwijzing uiterst nauwkeurig volgt.
Elke schade veroorzaakt door verkeerd gebruik van het apparaat valt niet onder de garantie. De dealer
aanvaardt geen verantwoordelijkheid voor mankementenen problemen die komen door het veronachtzamen
van deze gebruiksaanwijzing.
Bewaardeze brochure op een veilige plaats om hem inde toekomst nogmaals te kunnen raadplegen. Indien
U het apparaatverkoopt, denkt Uer wel aan om de gebruiksaanwijzing bij te voegen.
Controleer deinhoud:
Controleerof de doos volgendeonderdelen bevat:
Handleiding
Theaterspot
Filterhouder
Fresnel lens
VEILIGHEIDSVOORSCHRIFTEN:
CAUTION
De bliksempijl die zich in een gelijkbenige driehoek bevindt is bedoeld om u te wijzen op het gebruik
of de aanwezigheid van niet-geïsoleerde onderdelen met een “gevaarlijke spanning” in het toestel
die voldoende kracht heeftom een risicovan elektrocutiein te houden.
Het uitroeptekenbinnen de gelijkbenige driehoek is bedoeld om de gebruiker erop te wijzen dat er in
de meegeleverde literatuur belangrijke gebruik en onderhoudsinstructies vermeld staan betreffende
dit onderdeel.
WAARSCHUWING: Om het risico op elektrocutie zoveel mogelijk te
vermijden mag u nooit de behuizing verwijderen. Er bevinden zich geen
onderdelen in het toestel die u zelf kan herstellen. Laat de herstellingen
enkeluitvoeren door eenbevoegde technicus.
NEDERLANDS HANDLEIDING
Dit symboolbetekent: het apparaat mag enkelbinnenhuis wordengebruikt.
Dit symboolbetekent: Lees dehandleiding!
Dit symbool bepaalt: de minimumafstand van te belichten voorwerpen. De minimumafstand tussen
projector en het verlichte voorwerp moet voor de 500W versie meer dan 1 m zijn en voor de 1000W
versie meerdan 2m.
Om hetmilieu te beschermen, probeerzoveel mogelijkhet verpakkingsmateriaalte recycleren.
Een nieuw lichteffect kan soms ongewenste rook en/of reuk veroorzaken. Dit is normaal en verdwijnt na
een paarminuten.
Stel dit apparaat niet bloot aan regen of vocht, dit om het risico op brand en elektrische schokken te
voorkomen.
Om de vorming van condensatie binnenin te voorkomen, laat het apparaat aan de omgevingstemperatuur
wennen wanneer het, na het transport, naar een warm vertrek is overgebracht. Condensatie kan het
toestel soms verhinderen perfect te functioneren. Het kan soms zelfs schade aan het apparaat
toebrengen.
Gebruik ditapparaat uitsluitend binnenshuis.
Plaats geen stukken metaal en mors geen vocht binnen in het toestel om elektrische schokken of storing
te vermijden. Indien een vreemd voorwerp in het apparaat geraakt, moet U het direct van het lichtnet
afkoppelen.
Plaats de installatie op een plaats met goede ventilatie, ver van brandbare materialen en/of vloeistoffen.
De installatie moetop minstens 50 cm van de muren rondom geplaatstworden.
Bedek geen enkeleventilatieopening om oververhittingte vermijden.
Zorg dat het toestelniet in een stoffige omgevingwordt gebruikt en maak het regelmatig schoon.
Houdhet apparaatuit de buurt van kinderen.
Dit apparaat mag niet door onervarenpersonen bediend worden.
De maximum veilige omgevingstemperatuur is 40°C. Gebruik het apparaat dus niet bij hogere
temperaturen.
De temperatuur van het oppervlak van het apparaat kan 125°C bereiken voor de 500W versie en 160°C
voor de 1000W versie.Raak de metalen ombouw tijdens hetgebruik niet met blotehanden aan.
Verzeker er U van dat er zich onder de plaats waar het toestel wordt geïnstalleerd geen ongewenste
personen bevindentijdens het bevestigenen losmakenalsook bij hetonderhoud.
Laat het toestel ongeveer 10 minuten afkoelen alvorens de lamp te vervangen of alvorens te starten met
deonderhoudsbeurt.
Trek altijd de stekker uit wanneer het apparaat gedurende langere tijd niet wordt gebruikt of alvorens de
lamp tevervangenofalvorens te beginnenmet de onderhoudsbeurt.
De elektrische installatie behoort uitsluitend uitgevoerd te worden door bevoegd personeel,volgens de in
uw landgeldende regels betreffendeelektrische en mechanischeveiligheid.
Controleer dat de beschikbare spanning niet hoger is dan die aangegeven op de achterzijde van het
toestel.
De elektrische kabel behoort altijd in uitstekende staat te zijn. Zet het apparaat onmiddellijk af als de
elektrischekabel gekneusdof beschadigd is.
Laatde elektrische draad nooit in contact komen met andere draden.
Volgens de veiligheidsvoorschriften moet deze installatie geaard worden.
Sluithet apparaat niet aan op een elektronische dimmer.
Gebruik altijd een geschikte en gekeurde veiligheidskabelbij het installerenvanhet toestel.
Om elektrische schokken te voorkomen, moet U de behuizing niet openen. Afgezien van de lamp en de
zekering zitten er geenonderdelen in die door de gebruikermoeten worden onderhouden.
Repareer
steeds
Ingeval van ernstige problemen met het bedienen van het toestel, stopt U onmiddellijk het gebruik ervan.
Contacteeruw dealer voor een eventuele reparatie.
Debehuizing en de lenzen moeten vervangen worden als ze zichtbaarbeschadigd zijn.
Gebruik best de originele verpakking als het toestel vervoerdmoet worden.
Om veiligheidsredenen is het verboden om ongeautoriseerdemodificatiesaan het toestel aan te brengen.
Belangrijk: Kijk nooit rechtstreeks in de lichtbron. Gebruik het lichteffect niet in de tegenwoordigheid van
personen die lijden aan epilepsie.
nooit
een zekering en overbrug de zekeringhouder nooit. Vervang een beschadigde zekering
door een zekeringvan hetzelfde type en met dezelfde elektrischekenmerken.
JB SYSTEMS
®
11/30 THEATRE SPOT 500W + 1000W
JB SYSTEMS
®
12/30 THEATRE SPOT 500W + 1000W
Page 9

NEDERLANDS HANDLEIDING
NEDERLANDS HANDLEIDING
BESCHRIJVING:
1. Handvat
2. Ophangbeugel
3. Filterhouder
4. Bevestigingsplaatsvoor deoptionele barndoors
5. Schroef om het lampcompartimentte openen.
6. Stroomkabel
7. Bevestigingspunt voorde veiligheids-kabel.
8. Knop om het focussysteem in te stellen.
PLAATSEN OF VERVANGEN VAN DE LAMP
Wacht, in het geval van het vervangen van een lamp of van het geven van een
onderhoudsbeurt, 10 minuten na het uitzetten van de installatie met het openen ervan
totdat het apparaat is afgekoeld. Trek altijdde stekker uit het stopcontact voor U begint
aan het onderhoud. Gebruik altijd hetzelfde type reserveonderdelen (lampen,
zekeringen, e.d.) Gebruik bij het vervangen van onderdelen uitsluitend authentieke
Zet het toestel af en trek de netstekkeruit het stopcontact.
Wacht 10 minuten tothet apparaatis afgekoeld.
Draaide schroef die het lampcompartimentafsluitlos.
Aan de binnenzijde zult U de lampenhouderzien.
Verwijder de oude lamp. Bij het verwijderen van de oude lamp
houdt U de lampenhouderbest vast.
Houd ook de lampenhouder vast terwijl U de nieuwe lamp
rustig in delampenhouderdrukt.
Opgepast!
naar de technische karakteristieken in deze gebruikswijzing
om te weten welke lamp U moet gebruiken. Gebruik nooit een
lamp met een hogere wattage. Lampen met een hogere
wattage produceren temperaturen waarvoor het apparaat niet
ontworpenwas.
Raak de lamp niet met blote handen aan; dit zal de levensduur van de lamp drastisch verkorten. Indien U
de lamp aanraakte, maak hem dan schoon met een lapje en een beetje schoonmaakalcohol. Veeg de
lamp droog alvorens hem te installeren.
Vergewis U ervan dat geendraden de lamp raken.
Sluithet lampcompartimentmet de schroef.
Klaar.
reserveonderdelen.
Controleer het etiket achter op het toestel of kijk
UITWISSELEN VAN DE LENS
Wacht, in het geval van het
vervangen van een lens, 10 minuten
na het uitzetten van de installatiemet
is afgekoeld. Trek altijd de stekker uit het
stopcontact voor U begint aan het onderhoud.
Zet het toestel af en trek de netstekker uit het
stopcontact.
Wacht 10 minuten tothet apparaatis afgekoeld.
Draai de schroef die het lampcompartiment
Draai de lampsokkel naar achter, zo ver als
het openen ervan totdat het apparaat
afsluit los.
mogelijk,met de focus knop op het achterpaneel
(Zie A op de foto)
Verwijder de veiligheidsring door de ring naar buiten te
duwen (Zie B op de foto)
Duw de 2 bovenste metalen klemmen (die de lens
vasthouden) een beetje naar buiten, zodat u de lens
makkelijkkan verwijderen (Zie C op de foto)
Verwijder de lens en plaatsde nieuwe lens
Duw beide bovenste metalenklemmenterug naar binnen.
Plaats deveiligheidsring terug.
Verplaats de lampsokkelterug naar zijn originele positie.
Sluithet lampcompartimentmet de schroef.
Klaar.
OPHANGEN VAN HET APPARAAT
Belangrijk: De installatie van het toestel mag uitsluitend door bekwaam onderhoudspersoneel
uitgevoerd worden. Onjuiste plaatsing kan ernstige letsels en/of schade aan eigendommen tot
gevolg hebben. Het ophangen vergt veel ervaring. U behoort de grenzen te respecteren aan de
werklast; erkende installeringmaterialen moeten worden gebruikt; de veiligheid van het
geïnstalleerdetoestel moetregelmatigworden gecontroleerd.
Overtuig U ervan dat het gebied onder installatieplaats vrij is van ongewenste personen tijdens het
plaatsen,het weghalenen het onderhoud.
Installeer het toestel op een goed geventileerde plaats, ver van brandbare stoffen en/of vloeistoffen. Het
toestelmoet worden bevestigd op
Het toestel moet worden geïnstalleerd buiten het bereikvan iedereen en weg van plaatsen waarmen mag
lopen en zitten.
Alvorens tot plaatsen over te gaan, moet men controleren dat de minimum puntbelasting van de
installatieplaats 10 keer het gewichtvan hettoestel bedraagt.
Gebruik bij het installerenvan het toestel altijd een gewaarmerkte veiligheidskabel die 12 keer het gewicht
van het toestel kan dragen. Deze bijkomende veiligheidsbevestiging moet zo worden aangebracht dat
geen deel van het toestel meerdan 20 cm vallen kan als de hoofdbeveiliging faalt.
Het apparaat moet goed worden vastgezet; aan een vrij zwaaiende montering mag zelfs niet gedacht
worden.
Bedek geen ventilatieopeningen, anderszou dit oververhitting tot gevolg kunnen hebben.
De gebruiker moet er zich van verzekeren dat de installaties met betrekking tot de veiligheid en de
technische mechaniekdoor een expert zijn goedgekeurd alvorens ze voor de eerste keer te gebruiken. Elk
jaar moeten de installatiesworden gekeurd door een vakman om te controleren of de veiligheid nog steeds
perfectis.
minstens 50 cm
van deomringende muren.
BEDIENINGSVOORSCHRIFTEN
Als het apparaat op hetnet is aangesloten begint het te functioneren.
Regelmatige pauzes bij het bedienen zijn noodzakelijk om het apparaat zo lang mogelijk te laten
functioneren,daar het niet bedoeldis om onafgebroken te functioneren.
Zet het toestel niet aan en uit met korte tussenpozen omdat de lamp hetanders eerder begeeft.
De temperatuur van het oppervlak van het apparaat kan 125°C bereiken voor de 500W versie en 160°C
voor de 1000Wversie.Raak demetalen ombouw tijdens het gebruik niet met blotehanden aan.
Trekt U altijd de stekker uit het stopcontact als het apparaat langere tijd geen dienst doet of alvorens een
lamp tevervangen of alvorenseen onderhoudsbeurtte beginnen.
Stop, in geval van serieuze bedieningsproblemen, met het gebruiken van het apparaat en stel U
onmiddellijkin verbinding met uw dealer.
Belangrijk:
die aan epilepsielijden.
Kijk nooit rechtstreeksin de lichtbron. Gebruik het effect nooit in de aanwezigheid van mensen
JB SYSTEMS
®
13/30 THEATRE SPOT 500W + 1000W
JB SYSTEMS
®
14/30 THEATRE SPOT 500W + 1000W
Page 10

NEDERLANDS HANDLEIDING
ONDERHOUD
Overtuig U ervan dat het gebied onder de installatieplaats vrij is van ongewenste personen tijdens het
onderhoud.
Zet het toestel uit, trek de netstekkeruit het stopcontact en wachttot het toestel is afgekoeld.
Bij inspectie moeten de volgende punten worden gecontroleerd.
Alle schroeven gebruikt om het te toestel te installeren en al zijn onderdelen moeten goed vastgedraaid
zijn en mogen niet verroest zijn.
Behuizingen, vastzetstukken, installeringplaatsen (plafond, spanten, schokbrekers) mogen absoluut niet
verwrongenzijn.
Wanneer een optische lens klaarblijkelijk beschadigd is door barsten of diepe krassen, dan moet deze
vervangenworden.
De stroomkabels moeten in perfecte staat zijn en behoren vervangen te worden, wanneer er zelfs maar
een kleinprobleem ontdekt werd.
Om het toestel tegen oververhitting te beschermen, behoren de ventilatoren (als die er zijn) en de
ventilatieopeningenelke maandgereinigd te worden.
Debinnenkantvan het toestelbehoort elk jaar gereinigd te worden meteen stofzuiger ofeen luchtspuit.
Het schoonmaken van inwendige en uitwendige optische lenzen en/of spiegels moet regelmatig worden
uitgevoerd om een zo goed mogelijke lichtuitstraling te verkrijgen. Hoe vaak ze schoon moeten worden
gemaakt hangt af van de omgeving waar het toestel wordt gebruikt: een klamme, rokerige of bijzonder
vuile omgeving kan een grotere opeenhopingvan vuil veroorzakenop deoptische uitrusting.
Reinig met een zachtedoek engebruiknormale glasreinigende producten.
Droog de onderdelenaltijdzorgvuldig af,
Reinig de uitwendigeoptische uitrusting minstens éénkeer permaand.
Reinig deinwendige optische uitrusting minstens om de3 maanden.
Let op: We bevelen sterk aan dat het schoonmaken van de binnenkant wordt uitgevoerd door
vakbekwaampersoneel!!
TECHNISCHE KENMERKEN
500WVERSIE:
Netvoeding: AC 230V, 50Hz
verbruik: Max.500W
Lampvoet: GY 9,5
Max.omgevingstemperatuur: 40°C
Max. temperatuurvan deprojector: 125°C
Minimumafstand tothet object: 1m
Lamp: 300W of 500W halogeentheaterlamp
Afmetingen: 32 x 22 x 32cm
Gewicht: 3,5kg
1000WVERSION:
Netvoeding: AC 230V, 50Hz
Verbruik: Max.1000W
Lampvoet: GX 9,5
Max.omgevingstemperatuur: 40°C
Max. temperatuurvan deprojector: 160°C
Minimumafstand tothet object: 2m
Lamp: 650W of1000W halogeentheaterlamp
Afmetingen: 37 x 25 x 37cm
Gewicht: 5,0kg
U kan delaatste versie van deze handleiding downloaden via Onzewebsite: www.beglec.com
Elke inlichtingkan veranderenzonderwaarschuwingvooraf
DEUTSCH BEDIENUNGSANLEITUNG
Vielen Dank, dass Sie sich für den Erwerb dieses JBSystems®-Produkt entschieden haben. Bitte lesen sie
diese Bedienungsanleitung sorgfältig vor der Inbetriebnahme durch, zur vollen Ausschöpfung der
Möglichkeiten,die dieses Gerät bietetsowie,zu Ihrer eigenen Sicherheit.
EIGENSCHAFTEN
Das Gerät ist funkentstört und erfüllt die Anforderungen der europäischen und nationalen Bestimmungen.
Entsprechende Dokumentationliegt beimHerstellervor.
DasGerät istzur Erzeugung von dekorativemLicht sowieder Benutzung in Lightshowsbestimmt.
Theaterspot
500WVersion mit GY9,5 Lampensockel
1000W Versionmit GX 9,5 Lampensockel
Ausgerüstet mit PC-Antihalo Linse
Fresnel-Linse im Preis einbegriffen.
PräzisesFokuseinstellungssystemdurch Einstellschraube.
VOR DER ERSTBENUTZUNG
Vor der Erstbenutzung bitte das Gerät zuerst auf Transportschäden überprüfen. Sollte das Gerät einen
Schaden aufweisen, Gerät bitte nicht benutzen, sondern unverzüglich mit ihrem Händler in Verbindung
setzen.
Wichtiger Hinweis:
dass der Benutzer sich streng an die Sicherheitshinweise und Warnungen in der Bedienungsanleitung
hält. Schäden durch unsachgemäße Handhabung sind von der Garantie ausgeschlossen. Der Händler
übernimmt keine Verantwortung für Schäden, die durch Nichtbeachtung der Bedienungsanleitung
hervorgerufen wurden.
Die Bedienungsanleitung, für zukünftiges Nachschlagen, bitte aufbewahren. Bei Verkauf oder sonstiger
Weitergabedes Gerätes,bitte Bedienungsanleitung beifügen.
Packungsinhaltprüfen:
Bitte überprüfenSie, dass die Packung folgende Einzelteileenthält:
Bedienungsanleitung
Theaterspot
Farbfilterrahmen
Fresnel-Linse
Das Gerät hat das Werk unbeschädigt und gut verpackt verlassen. Es ist wichtig,
SICHERHEITSHINWEISE
CAUTION
Sie Reparaturen demqualifiziertenKundendienst.
Das Blitzsymbol im Dreieck weist den Benutzer darauf hin, das eine Berührungsgefahr mit nicht
isolierten Teilen im Geräteinneren, welche eine gefährliche Spannung führen, besteht. Die
Spannungist so hoch, das hier dieGefahr eineselektrischen Schlagesbesteht.
Das Ausrufezeichen im Dreieck weist den Benutzer auf wichtige Bedienungs- und
Wartungshinweise inden Dokumenten hin,die dem Gerätbeiliegen.
DiesesSymbol bedeutet:Nur innerhalb von Räumenverwenden.
DiesesSymbol bedeutet:Achtung!Bedienungsanleitung lesen!
Dieses Symbol stellt fest: der minimale Abstand von beleuchteten Gegenständen. Der minimale
Abstand zwischen Projektor und dem belichteten Gegenstand muß mehr als 1 m für die Version
Aus Umweltschutzgründen, Verpackungbitte wiederverwenden,oderrichtig trennen.
500W und mehr als2m für die Version1000W sein.
ACHTUNG: Um sich nicht der Gefahr eines elektrischen Schlags
auszusetzen,entfernen Sie keines der Gehäuseteile. Im Geräte-inneren
befinden sich keine vom Benutzer reparierbaren Teile. Überlassen
JB SYSTEMS
®
15/30 THEATRE SPOT 500W + 1000W
JB SYSTEMS
®
16/30 THEATRE SPOT 500W + 1000W
Page 11

DEUTSCH BEDIENUNGSANLEITUNG
DEUTSCH BEDIENUNGSANLEITUNG
Ein neues Gerät kann Geruch oder Rauch entwickeln. Das ist völlig normal und legt sich nach einigen
Minuten.
Zur Vermeidung von Stromschlagoder Feuer,Gerät bittenicht Regen oder Feuchtigkeitaussetzen.
Zur Vermeidung von Kondensation im Inneren des Geräts, bitte nach Transport in eine warmeUmgebung
einige Zeit zum Temperaturausgleich bringen. Kondensation kann zu Leistungsverlust des Gerätes oder
garBeschädigung führen.
Gerät nicht imFreien und in feuchten Räumenund Umgebungen verwenden.
Keine Metallgegenstände oder Flüssigkeiten ins Innere des Geräts gelangen lassen, Kurzschluß oder
Fehlfunktion können die Folge sein. Falls es doch einmal vorkommen sollte, bitte sofort Netzstecker
ziehen undvom Stromkreis trennen.
Gerät nur in gut belüfteter Position und entfernt von entflammbaren Materialien oder Flüssigkeiten
betreiben. Mindestabstand an allen Seiten soll mindestens50 cm sein.
Ventilationsöffnungennicht abdecken,da Überhitzungsgefahr!
Nichtin staubigerUmgebung verwendenund regelmäßig reinigen.
Für Kinder unerreichbar aufbewahren.
Unerfahrene Personensollen das Gerät nichtbedienen.
Umgebungstemperaturdarf40ºC nicht überschreiten.
Die Oberflächentemperatur kann bis zu 125ºC erreichen für die Version 500W und bis zu 160°C für die
Version1000W. Gerät während des Betriebs nichtmit bloßenHändenanfassen.
Sicherstellen, daß sich während des Auf- und Abbaus keine unbefugten Personen unterhalb des Geräts
befinden.
Vor dem Auswechselndes Leuchtmittels oder sonstigen Eingriffen,10 Minuten Abkühlzeit einhalten.
Stets Netzstecker ziehen,wenn Gerät für längerenZeitraum nicht genutzt, oder es gewartetwird.
ElektrischeAnschlüsse nur durch qualifiziertesFachpersonalüberprüfen lassen.
Sicherstellen, daßNetzspannung mit Geräteaufkleberübereinstimmt.
Gerät nicht mitbeschädigtemNetzkabelbetreiben.
Netzkabel nicht mitanderen Kabelnin Berührung kommenlassen!
Zur Einhaltung der Sicherheitsbestimmungenmußdas Gerät geerdetsein.
Gerät nicht an einen Dimmeranschließen.
Ausschließlich vorschriftsmäßigeKabelzur Installationverwenden.
Gerät nicht öffnen. Abgesehen vom tausch des Leuchtmittels und der Sicherung sind keine zu wartenden
Bauteileim Gerät enthalten.
Sicherung
Bei Fehlfunktion,Gerät nicht benutzenund mit Händlerin Verbindung setzen.
Bei sichtbarenBeschädigungenmüssenGehäuseund Optik ersetztwerden.
Bei Transport bitte Originalverpackung verwenden,um Schäden am Gerät zu vermeiden.
Aus Sicherheitsgründen dürfen andem Gerätkeine unbefugtenVeränderungen vorgenommenwerden.
WichtigerHinweis: Nicht direkt in die Lichtquelle blicken! Gerät nicht verwenden, wenn sich Personen im
Raum befinden,die unter Epilepsieleiden.
niemals
reparieren oder überbrücken, sondern
immer
mit gleichartigerSicherung ersetzen!
BESCHREIBUNG
1. Handgriff
2. Deckenhalterung
3. Farbfilterrahmen
4. Träger für Flügelbegrenzer
5. DrehknopfvomLampenabdeckung
6. Netzkabel
7. Sicherheitsauge
8. Drehknopf fürdas Fokussierensystem
EINSETZEN/AUSTAUSCHEN DER LICHTQUELLE
Bei Austausch oder Ersatz der Lichtquelle Gerät für mindestens 10 Minuten abkühlen
lassen. Stets Netzstecker ziehenund vom Stromkreistrennen!Stets gleichartige Ersatzteile
Gerät abschalten und Netzsteckerziehen.
Etwa 10 Minuten abwarten,bis sich das Gerät abgekühlt hat.
MitDrehknopfLampenabdeckung öffnen.
Auf der Innenseitekönnen Sie die Lampenfassung sehen.
Gebrauchtes Leuchtmittel herausziehen. Hierbei an der
An der Fassung festhalten, wenn ein neues Leuchtmittel
Achtung! Geräteaufkleber auf der Rückseite des Geräts oder
Leuchtmittel nicht mit bloßen Händen berühren! Das verkürzt die Lebenserwartung der Lichtquelle
Sicherstellen, dassdie Lampe nicht vonKabeln berührt wird.
Lampenabdeckung wiederzuschrauben.
Fertig!
(Lichtquelle,Sicherungetc) verwenden. Original-Ersatzteileverwenden.
Fassung festhalten!
eingesetztwird.
technische Einzelheiten in dieser Bedienungsanleitung
beachten, damit stets das richtige Leuchtmittel eingesetzt
wird. Keine Leuchtmittel mit höherer Wattanzahl einsetzen!
Diese Leuchtmittel erzeugen höhere Temperaturen, für die
diesesGerät nicht ausgelegt ist.
erheblich. Falls es doch einmal vorkommen sollte, mit etwas Alkohol reinigen und vor dem Einsetzen gut
abreiben.
AUSTAUSCH DER LINSE
Zum Austausch der Linse das
Gerät abschalten, 10 Minuten
abkühlen lassen und dann erst
die Befestigungen lösen.
Netzstecker ziehen und vom Stromkreis
trennen! Gerät abschalten und
Netzsteckerziehen.
Etwa 10 Minuten abwarten, bis sich das Gerät
abgekühlt hat.
MitDrehknopfLampenabdeckung öffnen.
Drehen Sie die Lampenfassung mit Hilfe des
Fokusknopfs an der Rückseite des Geräts so
weit wie möglich nach hinten. (siehe A auf der
Abbildung)
Entfernen Sie den Sicherheitsring, indem sie
ihn nach außen drücken. (siehe B auf der
Abbildung)
Drücken Sie die oberen Metallklemmen (die die Linse
halten) ein wenig nach außen, bis Sie die Linse leicht
entnehmenkönnen (Siehe C auf der Abbildung)
Entfernen Sie die Linseund setzen Sie die neue Linse ein.
Drücken Sie die beiden oberen Metallklemmen nach
innen.
BringenSie den Sicherheitsringwieder an.
Setzen Sie die Lampenfassung wieder in ihre
Ausgangsposition.
Lampenabdeckung wiederzuschrauben.
Fertig!
Stets
JB SYSTEMS
®
17/30 THEATRE SPOT 500W + 1000W
JB SYSTEMS
®
18/30 THEATRE SPOT 500W + 1000W
Page 12

DEUTSCH BEDIENUNGSANLEITUNG
DEUTSCH BEDIENUNGSANLEITUNG
ÜBERKOPF-MONTAGE
Wichtig: Montage ausschließlich durch qualifiziertes Fachpersonal durchführen lassen.
Unvorschriftsmäßiger Einbau kann erhebliche Verletzungen und/oder Schäden verursachen.
Überkopf-Montage verlangt entsprechende Erfahrung! Belastungsgrenzen müssen beachtet
werden, geeignetes Installationsmaterial muß verwendet werden und das installierte Gerät muß in
regelmäßigenAbständenüberprüftwerden.
Sicherstellen, dass sich keine unbefugtenPersonen unterhalb des Geräts befinden, während es installiert
oder gewartet wird.
Gerät in gut belüfteter Position installieren, weit entfernt von entflammbaren Materialien und/oder
Flüssigkeiten.Einen Seitenabstand von mindestens50cm einhalten.
Gerät außerhalb der Reichweitevon Personen, und nicht in niedrigenDurchgängen oder in der Nähe von
Sitzgelegenheiteninstallieren.
Vor Montage sicherstellen, dass die gewählte Position wenigstens das 10-fache Gerätegewicht
aufnehmenkann.
Zur Aufhängung stets geeignetes Befestigungsmaterial verwenden, das das 12-fache Gerätegewicht
aushalten kann. Eine zweite Sicherungsaufhängung muß angebracht werden, die ein Absacken des
Gerätsvon mehr als 20 cm verhindert,sollte die Befestigung brechen.
Gerät gut befestigen. Eine freischwingende Aufhängung ist gefährlich und sollte auf gar keinen Fall in
Betrachtgezogen werden!
Ventilationsöffnungen nichtabdecken,da Überhitzungsgefahr!
Betreiber muß sicherstellen, dass die sicherheitsrelevanten und technischen Installationen vor Erstbetrieb
fachmännischvorgenommenworden sind.
Installationen sollten jährlich durch qualifiziertes Fachpersonal inspiziert werden, um jederzeit einen
sicherenBetrieb zugewährleisten.
BEDIENUNGSANLEITUNG
Sobald das Gerät an das Stromnetz angeschlossenwird, beginnt es zu arbeiten.
Regelmäßige Betriebspausen sind für eine lange Lebenserwartung des Geräts notwendig. Es ist nicht für
denDauerbetrieb ausgelegt.
Gerät nicht in kurzenAbständen ein- und ausschalten, daes dieLebensdauer des Leuchtmittelsverkürzt.
Die Oberflächentemperatur kann bis zu 125ºC erreichen für die Version 500W und bis zu 160°C für die
Version1000W. Gerät während desBetriebs nichtmit bloßen Händenanfassen.
Stets Netzstecker ziehen,wenn Gerät fürlängerenZeitraum nicht genutzt, oder es gewartetwird.
Bei FehlfunktionGerät nicht benutzenund umgehend mit ihremHändlerin Verbindung setzen.
WichtigerHinweis: Nicht direkt in die Lichtquelle blicken! Gerät nicht verwenden, wenn sich Personen im
Raum befinden,die unter Epilepsieleiden.
hängen stark von der Umgebung ab: feuchte,verrauchte und besonders verschmutzteUmgebung führen
zu größererVerschmutzung aufden Linsen.
Mit weichem Tuch undgewöhnlichem Glasreinigersäubern.
Alle Teilestets gut abtrocknen.
ÄußereOptik mindestensalle 30 Tage säubern.
InnereOptik mindestens alle90 Tage säubern.
Achtung: Wir empfehlen dringend, Reinigung im Innern des Geräts nur von qualifiziertem Personal
durchführen zulassen!
TECHNISCHE EINZELHEITEN
500WVERSION:
Netzspannung: AC230V, 50Hz
Leistungsaufnahme: Max. 500W
Lampensockel: GY9,5
Max. Umgebungstemperatur: 40°C
Max.Oberflächentemperatur: 125°C
Minimaler Abstandzum Gegenstand: 1m
Lampe: 300W oder500W Halogentheater Lampe
Abmessungen: 32 x 22 x 32cm
Gewicht: 3,5kg
1000WVERSION:
Netzspannung: AC230V, 50Hz
Leistungsaufnahme: Max. 1000W
Lampensockel: GX 9,5
Max.Umgebungstemperatur: 40°C
Max.Oberflächentemperatur: 160°C
Minimaler Abstandzum Gegenstand: 2m
Lampe: 650W oder1000W Halogen theaterLampe
Abmessungen: 37 x 25 x 37cm
Gewicht: 5,0kg
TechnischeÄnderungen könnenauch ohne Vorankündigung vorgenommenwerden!
Sie können sichdie neuesteVersion dieses Benutzerhandbuches von unserer Website
herunterladen: www.beglec.com
WARTUNG UND INSTANDHALTUNG
Sicherstellen, dass sich keine unbefugten Personen unterhalb des Geräts befinden,während es gewartet
wird.
Gerät ausschalten, Netzstecker ziehen und warten,bis es sich abgekühlt hat.
Während der Wartungsind folgende Punkte ganz besonderszu beachten:
Sämtliche Schrauben zur Installation und Befestigung jeglicher Teile müssen fest angezogen und rostfrei
sein.
Gehäuse, Befestigungsmaterialienund Aufhängungen (Decke, Balken, abgehängteDecken) dürfen keine
Anzeichenvon Verformungzeigen.
Ist die Optik sichtbar beschädigt (Sprünge oder tiefe Kratzer), dann müssen die entsprechenden Teile
ausgewechseltwerden.
Netzkabel muß stets in einwandfreiem Zustand sein und selbst bei kleinsten Beschädigungen erneuert
werden.
Zur Vermeidung von Überhitzung müssen die Ventilatoren (sofern vorhanden) und Lüftungsschlitze
monatlichgereinigt werden.
Gerät innen mindestens einmal proJahr mit Staubsaugeroder Airjetreinigen.
Reinigung der inneren und äußeren optischen Linsen und/oder Spiegel müssen in regelmäßigen
Abständen zur Beibehaltung einer optimalen Lichtausbeute vorgenommen werden. Reinigungsintervalle
JB SYSTEMS
®
19/30 THEATRE SPOT 500W + 1000W
JB SYSTEMS
®
20/30 THEATRE SPOT 500W + 1000W
Page 13

ESPAÑOL MANUAL DE INSTRUCCIONES
Gracias porla compra de este producto JB Systems®. Para sacar todo el rendimientode las posibilidades de
esteaparato y porsu propia seguridad, por favor lea este manual de instrucciones con muchocuidado antes
de utilizaresta unidad.
CARACTERÍSTICAS
Esta unidad no interfiere con señales de radio. Este producto cumple las exigencias de las directrices
actuales Europeas y nacionales. Se ha establecido conformidad y las declaraciones y documentos
relevantes se han depositado por el fabricante.
Este aparato ha sido diseñado para producir efecto de iluminación decorativa y se usa en sistemas de
iluminaciónde espectáculos.
Proyector de teatro
Versión 500W con zócalo GY 9,5
Versión 1000W con zócalo GX9,5
Equipadocon lente PC-Antihalo
La lente Fresnel incluida.
Sistema de enfoque exacto con rosca de tornillo sin fin .
ANTES DEL USO
Antes de utilizar esta unidad, por favor compruebe que no hay daños causados por el transporte. En caso
contrario,no utilice este aparato y consulte a su vendedor.
Importante:
necesariopor parte del usuarioseguir estrictamente las instrucciones de seguridad y advertencias de este
manual. Cualquier daño causado por manejo inadecuado no estará sujeto a la garantía. El vendedor no
aceptará responsabilidad por ningunos defectos o problemas que resulten de ignorar este manual del
usuario.
Mantenga este folleto en un lugar seguro para consultas futuras. Si vende esta instalación, asegúrese de
añadir estemanual de usuario.
Para proteger el medio ambiente, por favor intente reciclar el material de empaquetado tanto como sea
posible.
Compruebeel contenido:
Compruebeque la caja contiene los siguientesítems:
Instrucciones de manejo
Proyector de teatro
Porta filtros
LenteFresnel
Este aparato salio de la empresa en perfecto estado y bien empaquetado. Es absolutamente
INSTRUCCIONES DE SEGURIDAD:
CAUTION
El simbolo de un rayo en el interior de un triangulo alerta sobre la presencia o el uso de elementos
no isolados donde un voltaje peligroso constituye un riesgo grande para causar una eventual
electrocución.
El punto de exclamaciónen el interior de un triangulo alerta al usuario sobre la presencia de
importantesinstrucciones de operación y de mantenimientotenidas en cuenta en el manualde uso.
Este símbolosignifica: uso para el interiorsolamente.
Estesímbolo significa : Lealas instrucciones.
Este símbolo determina: la distancia mínima de objetos iluminados. La distancia mínima entre el
proyector y el objeto iluminado debe ser superiora 1 m para la versión 500W y más de 2 m para la
versión 1000W. Afín de evitar todo riesgo de incendio o electrocución, no exponer el aparato a la
lluvia o ambientehumedo.
PRECAUCIÓN: Para reducir el riesgo de electrocución, no quite la
cubierta superior . Ninguna pieza usable adentro para el utilizador.
Dirijase unicamentea personal cualificado.
ESPAÑOL MANUAL DE INSTRUCCIONES
Un nuevo efecto de luz algunas veces causa algún olor y/o humo no deseados. Esto es normal y
desaparecedespués de algunosminutos.
Para evitar fuego o riesgos dedescargas noexponga esteaparato a lalluvia o humedad.
Para evitar que se forme condensación en el interior, permitaque la unidad se adapte a las temperaturas
circundantes cuando lalleve a una habitación cálida después de transporte. Condensación algunas veces
impideque la unidad funcione a rendimiento plenoo puede incluso causardaños.
Esta unidad es sólo para uso interior.
No coloque objetos metálicos o derrame líquidos dentro de la unidad. Podría resultar descargaeléctrica o
mal funcionamiento. Si un objeto extraño entrara en la unidad, desconecte inmediatamente la fuente de
alimentación.
Coloque la instalación en un lugar bien ventilado, alejado de cualquier material inflamable y/o líquidos. La
instalación debeser fijada almenos a 50 cm. dedistancia de los muros circundantes.
Nocubra ninguna apertura deventilación ya que estopodría resultar en sobrecalentamiento.
Evite su uso en ambientes polvorientosy limpie la unidad regularmente.
Mantenga la unidad alejadade los niños.
Personas sin experienciano deberían manejareste aparato.
Latemperatura máximade ambientees 40°C. No use esta unidada temperaturas máselevadas.
La temperatura de la superficie de la unidad puede alcanzar los 125°C para la versión de 500W y 160°C
parala versión de 1000W. No toque lacarcasa con las manos sin proteger cuando estéfuncionando.
Asegúrese de que el área por debajo del sitio de instalación está libre de personas ajenas durante el
montaje,desmontaje y reparación.
Dejeal aparatoenfriarsepor unos 10 minutosantes de cambiar la bombillao empezar su reparación.
Siempre desenchufe la unidad cuando no la use por un periodo de tiempo largo o antes de cambiar la
bombillao comenzar una reparación.
Lainstalación eléctrica debería ser llevada a cabo sólo por personalcualificado, acorde a las regulaciones
paraseguridad eléctrica y mecánica desu país.
Compruebeque el voltajedisponibleno es superior al queaparece en elpanel trasero de la unidad.
El cable de alimentación debería estar siempre en perfectas condiciones: apague la unidad
inmediatamentecuando el cable de alimentación esté rotoo dañado.
¡Nunca deje el cable de alimentación entrar en contacto con otros cables!
Esta instalación debe ser conectadaa tierra para cumplircon las regulaciones deseguridad.
Noconecte launidad a ningún paquete dereducción de luz.
Siempreuse un cablede seguridad apropiado y certificadocuando instale la unidad.
Para prevenir descargas eléctricas, no abra la tapa. Aparte de la lámpara y fusibles principales no hay
partesque puedan ser reparadas por el usuarioen su interior.
Nunca
En el caso de problemas serios de manejo, deje de usar la instalación y contacte con su vendedor
Lacarcasa y laslentes deben sercambiadas si hay dañovisible.
Por favor, use el empaquetado originalcuando el aparatodeba ser transportado.
Debidoa motivos de seguridadestá prohibido hacer modificaciones sin autorizara la unidad.
Importante:
sufran de epilepsia.
repare un fusible o haga un bypass al fusible. ¡
del mismo tipo y especificaciones eléctricas!
inmediatamente.
¡Nunca mire directamente a la fuente de luz! No use el efecto en presencia de personas que
Siempre
sustituya el fusible dañado por un fusible
DESCRIPCIÓN:
1. Asa
2. Lira
3. Porta filtros
4. Soporteporta filtros
5. Botón de aperturedel compartimentolámpara
6. Cableprincipal
7. Punto de anclaje para el cable de seguridad
8. Tornillo de focalización
JB SYSTEMS
®
21/30 THEATRE SPOT 500W + 1000W
JB SYSTEMS
®
22/30 THEATRE SPOT 500W + 1000W
Page 14

ESPAÑOL MANUAL DE INSTRUCCIONES
ESPAÑOL MANUAL DE INSTRUCCIONES
(RE)COLOCACIÓN DE LA LÁMPARA
En caso de sustitución de la lámpara o mantenimiento, no abra la instalación en 10
minutos hasta que la unidad se haya enfriado después de apagarla. ¡Siempre
desenchufe la unidad antes de repararla! Siempre use el mismo tipo de partes sueltas
Apague la unidad y desconecte el cable principal.
Espereunos 10 minutos hasta que launidadse haya enfriado.
Destornillar el botón de cierre del compartimentode lámpara.
En el interiorverá la conexión de la lámpara.
Desenchufe la lámpara vieja. ¡Sostenga la conexión de la
lámpara mientrasdesconectela lámpara!
Sostenga la conexión de la lámpara mientraspresiona con tacto
la nuevalámpara en la conexión.
¡Atención! Compruebe la etiqueta de la parte trasera del
aparatoo vea las especificaciones técnicas en este manual para
saber que lámpara debería ser usada. ¡Nunca instale lámparas
de mayor potencia! Lámparas de mayor potencia generarán
temperaturaspara las que el aparatono fue diseñado.
¡No toque la bombilla con las manos sin proteger! Esto reducirá
drásticamente el periodo de vida de la lámpara. Si tocó la lámpara, límpiela con un trapo y un poco de
alcohol desnaturalizado. Frotela lámpara antes de la instalación.
Ponga la nueva lámpara de vueltadentro de launidad.Asegúrese que los cables notocan la lámpara.
Cierreel compartimientode la lámpara.
¡Hecho!
(bombillas, fusibles,etc.) Cuandocambie partes, por favor use sólopiezas genuinas.
CAMBIO DE LA LENTE
En caso del reemplazo de la lente,
deje enfriar la unidad 10 minutos
antes de la abertura.
desenchuar la unidad antes de repararla!
Apague la unidad y desconecte el cable
principal.
Destornillar el botón de cierre del
compartimento de lámpara.
Girar el zocalo de lámpara hacia atrás, en la
medidade lo posible, usando el botón del panel
trasero. (ver A en la foto)
Sacar el tornillo de seguridad pulsando el
tornillo hacia afuera.(ver B en la foto)
Presionar los 2 clips superiores metálicos
(sosteniendo la lente) un poco hacia afuera, la lente sale
ahora facilmente(ver C en la foto)
Sacar la lente y cambiarla por lanueva.
Presionar ambos clips superiores metálicos hacia adentro.
Colocar el tornillo deseguridad en su lugar.
Colocar el zocalo de lámpara en la posición original.
Presioneambos clips superiores metálicoshacia adentro.
Cierreel compartimientode la lámpara.
¡Hecho!
¡Siempre
APAREJADO SUPERIOR
Importante: La instalación debe ser llevada a cabo sólopor personal cualificado. Una instalación
impropiapodría resultar en serias heridas y/o daño a la propiedad. ¡El aparejado superiorrequiere
una larga experiencia! Los límites de las cargas de trabajo deben respetarse, materiales
certificados de instalación deben ser usados, el aparato instalado debería ser inspeccionado
regularmente por seguridad.
Asegúrese de que el área por debajo del sitio de instalación está libre de personas ajenas durante el
montaje,desmontaje y reparación.
Coloque la instalación en un sitio bien ventilado, lejos de cualquier material inflamable y/o líquidos. La
instalacióndebe ser fijada
El aparato debería ser instalado fuera del alcance de la gente y fuera de áreas donde personas puedan
caminar osentarse.
Antes del aparejado asegúrese de que el área de instalación puede soportar un mínimo punto de carga
de 10 veces el peso del aparato.
Siempre use un cable de seguridad certificado que pueda sostener 12 veces el peso del aparato. Este
añadido secundario de seguridad debería ser instalado de una forma que no hubiera parte de la
instalaciónque pudieracaer másde 20cm si el añadido principalfalla.
El aparato debe ser bien fijado, ¡un montaje que se mueva con libertad es peligroso y no debe
considerarse!
Nocubra ningunaapertura de ventilaciónya que estopodría resultar en sobrecalentamiento.
El operador tiene que asegurarse de que las instalaciones relativas a seguridad, maquinaria y técnica
están aprobadas por un experto antes de usarlas la primera vez. Las instalaciones deberían ser
inspeccionadas cada año por una persona con conocimientos paraasegurar que la seguridad es todavía
óptima.
al menosa 50cm
de losmuroscircundantes.
INSTRUCCIONES DE USO
Una vez conectado al principal, el aparato empiezaa funcionar.
Descansos regulares durante su uso son esenciales para maximizar la vida de este aparato ya que no
estádiseñadopara usocontinuo.
Noapague o encienda la unidad en cortos periodos de tiempo ya que esto reduce la vida de la lámpara.
La temperatura dela superficie de la unidad puede alcanzar los 125°C en la versión 500W y 160°C en la
versión1000W. No toque la carcasacon las manos sinproteger cuando estéfuncionando.
Siempre desenchufe la unidad cuando no la use por un periodo de tiempo largo o antes de cambiar la
bombillao comenzar una reparación.
En el caso de problemas serios de manejo, deje de usar la instalación y contacte con su vendedor
inmediatamente.
Importante:
sufran de epilepsia.
¡Nunca mire directamente a la fuente de luz! No use el efecto en presencia de personas que
MANTENIMIENTO
Asegúrese deque el área por debajodel por debajodel sitiode instalación está libre de personas ajenas
durante lareparación.
Apague la unidad, desconecte elcable principal y espere hasta quela unidad se haya enfriado.
Durante la inspección los siguientes puntosdeben ser comprobados:
Todoslos tornillos usados para la instalación del aparato y cualquiera de sus partes deben ser apretados
fuertemente y no pueden estarcorroídos.
Carcasas,fijacionesy puntos de instalación (techos, armaduras, suspensiones) deberán estar totalmente
libres de ningunadeformación.
Cuando una lente óptica esté visiblemente dañada debido a golpes o rayados profundos, debe ser
cambiada.
Los cables principales deben estar en una condición impecable y deben ser cambiados de inmediato
cuando inclusoun pequeñoproblema se detecte.
En orden de proteger al aparato de sobrecalentamiento, los ventiladores de enfriamiento (caso de
haberlos) ylas aperturas de ventilación deberían ser limpiados mensualmente.
El interiordel aparato deberíaser limpiado anualmente usandouna aspiradora o máquina de aire.
JB SYSTEMS
®
23/30 THEATRE SPOT 500W + 1000W
JB SYSTEMS
®
24/30 THEATRE SPOT 500W + 1000W
Page 15

ESPAÑOL MANUAL DE INSTRUCCIONES
La limpieza de lentes y/o espejos internos y externos debe ser llevada a cabo periódicamente para
optimizar la salida de luz. La frecuencia de limpieza depende del ambiente en el cual la instalación está
funcionando: húmedo, con humo o con alrededores particularmente sucios puede causar una mayor
acumulación de polvo en lasópticas de la unidad.
Limpie con un traposuave usando productos limpiadoresnormales decristal.
Seque siemprelas partescuidadosamente.
Limpie las ópticas externasal menos una vezcada 30 días.
Limpie las ópticas internas al menoscasa 90 días.
Atención: ¡Recomendamos con insistencia que la limpieza interna sea llevada a cabo por personal
cualificado!
ESPECIFICACIONES
500WVERSION:
Alimentación: AC 230V, 50Hz
Consumo: Max. 500W
Zocalo: GY 9,5
Temperaturaamb.Max. 40°C
Temperaturamax. delchasis: 125°C
Distanciaminima alobjeto: 1m
Lámpara: Lámparahalogena de teatro300W o 500W
Tamaño: 32x 22 x 32cm
Peso: 3,5kg
1000WVERSION:
Alimentación: AC 230V, 50Hz
Consumo: Max. 1000W
Zocalo: GX 9,5
Temperaturaamb.Max. 40°C
Temperaturamax. delchasis: 160°C
Distanciaminima alobjeto: 2m
Lámpara: Lámparahalogena de teatro650W o 1000W
Tamaño: 37x 25 x 37cm
Peso: 5,0kg
Puede descargar la última versiónde este manual de usuario ennuestro sitio web: www.beglec.com
Toda la informaciónestá sujeta a cambios sinprevio aviso
PORTUGUÊS MANUAL DO UTILIZADOR
Obrigado por ter adquirido este produto da JB Systems®. De modo a tirar total proveito das possibilidades
deste produto, por favor leia este manual com atenção.
CARACTERÍSTICAS
Esta unidade está protegida contra interferências rádio. Este produto cumpre as exigências impostas pelas
presentes directivas nacionais e europeias. A conformidadedeste produto foi comprovada e as declarações
edocumentos relevantes foram efectuados pelo fabricante.
Esta unidade destina-se a produzir efeitos luminosos decorativos e é utilizada em sistemas de
espectáculosde luz.
Projector de teatro
Versão de 500W com suporte de lâmpada GY 9,5
Versão de 1000Wcom suporte de lâmpada GX 9,5
Equipadocom lentesPC-Antihalo
Incluído uma lente de Fresnelgrátis.
Sistemade focagempreciso.
ANTES DE UTILIZAR
Antes de utilizar esta unidade verifique se existem danos provocados durante o transporte. Caso existam
danos aparentes,não utilize a unidade e contacte o seu revendedor.
Importante:
imprescindível que o utilizador siga as instruções de segurança e avisos descritos neste manual.
Quaisquer danos provocados por utilização incorrecta não serão cobertos pela garantia. O revendedor
não será responsável por quaisquer danos ou problemas causados pelo incumprimento das instruções
deste manual.
Guarde este manual num local seguro para consulta futura. Caso venda esta unidade, forneça este
manual.
Verifique o conteúdo:
Certifique-seque a caixacontém os seguintes artigos:
Manual doutilizador
Projector de teatro
Porta Filtros
Lente de Fresnel
Esta unidade deixou a nossa fábrica em perfeitas condições e devidamente embalada. É
JB SYSTEMS
INSTRUÇÕES DE SEGURANÇA:
CAUT ION
O símbolo composto por um triângulo equilátero com um relâmpago no interior alerta para a
presença de voltagem perigosa não isolada no interior do produto que poderá constituir risco de
choque eléctrico.
O símbolo composto por um triângulo equilátero com um ponto de exclamação alerta o utilizador
paraa presença de instruções importantes de utilização e manutenção do produto.
Estesímbolo significa: utilizaçãounicamente em espaçosfechados.
Estesímbolo significa:Leia instruções.
Este símbolo significa: Distância mínima aos objectos iluminados. A distância mínima entre a fonte
luminosa e a superfície iluminada deve ser superior a 1 m para a versão de 500W e superior a 2 m
para a versão de 1000W.
Proteja o ambiente. Recicleo material desta embalagem.
®
25/30 THEATRE SPOT 500W + 1000W
JB SYSTEMS
®
ATENÇÃO: De forma a evitar o risco de choque eléctrico, não remova peças
da unidade. Não tentefazer reparações.Contacte pessoal qualificado.
26/30 THEATRE SPOT 500W + 1000W
Page 16

PORTUGUÊS MANUAL DO UTILIZADOR
PORTUGUÊS MANUAL DO UTILIZADOR
Os efeitos luminosos novos podem por vezes produzir algum fumo e/ou cheiro desagradável. Esta
situação é normale temporária.
Demodo a evitar risco de fogo ou choque eléctrico, não exponha esteproduto a chuva ou humidade.
De forma a evitar a formação de condensação no interior da unidade, ao transportá-la para ambiente
quente aguarde algum tempo de modo a que haja uma ambientação à temperatura. A condensação
poderá afectaro desempenhoda unidade ou até danificá-la.
Esta unidade destina-se unicamentea utilizaçãoem espaços fechados.
Não introduza objectos de metal nem verta líquidos no interior do produto, correrá risco de choque
eléctrico ou poderá danificar o produto. Caso algum objecto estranho entre em contacto com o interior da
unidade,desligue-a de imediato dacorrente.
Coloque esta unidade num local arejado, afastado de materiais inflamáveis e/ou líquidos. Esta unidade
deveráser instalada a pelos menos 50cmde distância de paredes circundantes.
Não cubraos orifícios de ventilação oua unidade poderá sobreaquecer.
Evite locais com poeiras.Limpe a unidade regularmente.
Mantenha esta unidade forado alcance das crianças.
Esta unidadedeverá ser operada unicamenteporpessoas experientes.
Temperatura ambiente de funcionamento máxima é de 40ºC. Não utilize esta unidade a temperaturas
ambientesmais elevadas.
A temperatura da superfície da unidade pode alcançar os 85ºC. Não toque na cobertura da unidade com
mãos descobertas durante o funcionamento.
Certifique-se de que não irão passar pessoas sob a área de instalação da unidadedurantea instalaçãoe
manutenção.
Aguarde cerca de 10 minutospara que a unidade arrefeça antes de substituir a lâmpada ou de efectuar a
manutenção.
Desligue sempre a unidadeda corrente quando não a utilizar durantelongos períodos de tempo, antesde
substituir a lâmpadaou de efectuarmanutenção.
A instalação eléctrica deve ser efectuada unicamente porpessoal qualificado,cumprindo os regulamentos
de segurança em instalações eléctricas e mecânicasdo seu pais.
Certifique-se que a voltagem autilizar não é superior à voltagemindicada no painel traseiroda unidade.
O cabo de alimentação deverá estar sempre em perfeitas condições. Desligue a unidade e substitua
imediatamente o cabo caso este apresente algum dano. Deverá ser substituído pelo fabricante, pelo
agenteautorizado ou pessoal qualificadode modo a evitar um acidente.
Nuncapermita que este cabo entre em contactocom outros cabos!
Esta unidadedeverá estar ligada à Terra de formaa respeitar as regras de segurança.
Nãoligue a unidade a reguladores deintensidade.
Utilize sempre um cabo de segurança aprovado ao instalar a unidade.
De forma a nãocorrer risco de choque eléctrico nãoabra a cobertura da unidade. À excepçãoda lâmpada
e dofusível, não existem peças que possam ser substituídaspelo utilizador.
Nunca
Em caso de problemas sérios de funcionamento, interrompa a utilização da unidade e contacte
A cobertura e as lentesdeverão sersubstituídas caso apresentem danosvisíveis.
Casoseja necessário transportar a unidadeutilize a embalagemoriginal.
Por motivos de segurança,são proibidas quaisquer alterações nãoautorizadasà unidade.
Importante:
epilépticas.
repareum fusível nem tente operar a unidade sem fusível. Substitua
por outro com as mesmascaracterísticas!
imediatamente oseu revendedor.
Nunca olhe directamente para a luz! Não utilize este efeito luminoso na presença de pessoas
sempre
umfusíveldanificado
DESCRIÇÃO:
1. Pega
2. Braçadeiradesuspensão
3. Porta Filtros
4. Suporte paraPalas
5. Parafusopara abrir o compartimento da lâmpada
6. Cabo alimentação
7. Ponto de fixação para cabo de segurança
8. Parafusopara sistema de focagem
COLOCAR/SUBSTITUIR A LÂMPADA
Em casode substituição da lâmpada ou manutenção,aguarde 10 minutos após desligar a
unidade. Desligue sempre a unidade da corrente antes de efectuar a manutenção! Utilize
sempre peças suplentes comas mesmas características (lâmpadas, fusíveis,etc). Utilize
Desligue o cabo de alimentação.
Aguarde cerca de 10 minutos paraque a unidade arrefeça.
Desaperte o parafusoque fecha a divisão da lâmpada
Nointerior irá ver o conectorda lâmpada.
Ao retirar a lâmpada usada, segureo conector.
Segure o conector e insira cuidadosamentea lâmpada.
Atenção! Verifique o rótulo na parte de trás da unidade ou
consulte as especificações descritas neste manual para
saber que lâmpada deve utilizar. Nunca instale lâmpadas
com nível de watts superior ao indicado! Lâmpadas com
nível de watts superior geram temperaturas que a unidade
não está preparada para suportar.
Não toque no interior do reflector da lâmpada com as mãos
descobertas,caso contrário irá diminuir drasticamentea sua
duração! Caso toque na lâmpada com as mãos, limpe-a utilizando um pano e álcool antes de efectuar a
instalação.
Coloquea nova lâmpada no interior da unidade. Certifique-se que os fios não tocamna lâmpada.
Feche o compartimento da lâmpada.
Operaçãoconcluída!
unicamentepeças originais
.
SUBSTITUIR A LENTE
Em caso de substituição ou
manutenção da lente, aguarde 10
minutos após desligar a unidade.
Desligue sempre a unidade da
corrente antes de efectuar a
manutenção! Desligue a unidade e
Aguarde cerca de 10 minutos até que a
Desaperte o parafuso que fecha a divisão da
Afaste o conector da lâmpada o mais possível,
Remova o anel de segurança pressionando-o
Pressione os 2 clips de metal superiores (suportes da
Removaa lente e ponhaa nova no seu lugar.
Pressione os 2 clips de metal superiorespara dentro.
Coloqueo anel de segurançanovamente no seu lugar.
Mova o conector da lâmpada para a sua posição
Feche o compartimento da lâmpada.
Operação concluída!
remova o cabo de alimentação.
unidade tenha arrefecido.
lâmpada.
utilizando o parafuso de focagem no painel
traseiro. (ver A nas imagens)
para fora. (verB nas imagens)
lente) ligeiramente para fora, de modo a conseguir
removera lentefacilmente. (ver C nas imagens)
original.
JB SYSTEMS
®
27/30 THEATRE SPOT 500W + 1000W
JB SYSTEMS
®
28/30 THEATRE SPOT 500W + 1000W
Page 17

PORTUGUÊS MANUAL DO UTILIZADOR
PORTUGUÊS MANUAL DO UTILIZADOR
INSTALAÇÃO EM SUSPENSÃO
Importante: A instalação deve ser efectuada unicamente por pessoal qualificado. Uma instalação
incorrecta pode resultar em ferimentos graves e/ou danos na sua propriedade. Para efectuar uma
instalação em suspensão é necessária muita experiência! Respeite os limites de carga, utilize
materiais de instalação aprovados e inspeccione a unidade instalada regularmente de forma a
assegurar asegurança.
Certifique-se que sob a área de instalação da unidade não irão passar pessoas durante a instalação e
manutenção.
Coloque esta unidade num local arejado, afastada de materiais inflamáveis e/ou líquidos. Esta unidade
deverá serinstalada
A unidade deve ser instalada fora do alcance das pessoas; afastadade áreas onde as pessoas possam
passar ousentar-se.
Antes de proceder à instalação certifique-seque a área seleccionadapode suportar uma carga mínimade
10 vezes o peso da unidade.
Na instalação,utilize sempre um cabo de segurança aprovado com capacidade para suportar 12 vezes o
peso da unidade. Esta medida de segurança secundária deverá ser instalada de forma a que nenhuma
parte da instalaçãopossa cair mais de 20cmcaso o ponto de apoio principal ceda.
A unidade deverá ser fixa firmemente. Uma instalação oscilante pode ser perigosa e não deverá ser
efectuada!
Não cubraos orifíciosde ventilação ou a unidadepoderá sobreaquecer.
O utilizador da unidade deverá certificar-se que a instalação é aprovada em termos de segurança e em
termos técnicos por uma pessoa qualificada antes de efectuar a primeira utilização. A instalação deverá
serinspeccionadatodos os anos por um técnico qualificado de forma a certificar-se que a segurança está
assegurada.
a pelos menos 50cm
de distância deparedes circundantes.
INSTRUÇÕES DE FUNCIONAMENTO
A unidadecomeça a funcionar assim que é ligada à corrente.
Deverá efectuar pausas regulares no funcionamento de forma a prolongar a duração desta unidadevisto
que estanão está preparada parauma utilizaçãocontínua.
Não liguee desligue a unidade em curtos períodos detempo, irá reduzir aduração da lâmpada.
A temperatura da superfície da unidade pode alcançar os 125°C na versão 500W e 160°C na versão
1000W.Não toque na cobertura da unidade com mãosdescobertas durante ofuncionamento.
Desligue sempre a unidade da correntequando não a utilizar durante longosperíodos de tempo,antes de
substituir a lâmpadaou de efectuara manutenção.
Caso a unidade apresente problemas sérios de funcionamento, interrompa a utilização da unidade e
contacteo seu revendedor imediatamente.
Importante:
epilépticas.
Nunca olhe directamentepara a luz! Não utilize este efeitoluminoso na presença depessoas
ambiente húmido, com fumo ou poeirento dará origem a uma maior acumulação de impurezas nas
ópticasda unidade.
Utilize um pano macio e um limpa-vidros normalna limpeza da unidade.
Seque sempre as peçascuidadosamente.
Limpe as ópticasexternas pelomenos umavez em cada 30 dias.
Limpe as ópticasinternas pelo menos umavez em cada 90 dias.
Atenção:Recomendamos vivamente que a limpeza do interior da unidade seja efectuada por pessoal
qualificado!
ESPECIFICAÇÕES
VERSÃO500W:
Alimentação: AC230V, 50Hz
Consumode potência: Max.500W
Suporte lâmpada: GY 9,5
TemperaturaAmbienteMáxima: 40°C
TemperaturaMáxima do projector 125°C
Distância mínima ao objecto: 1m
Lâmpada: Lâmpada dehalogéneo parateatro 300W ou 500W
Tamanho: 32 x 22 x 32cm
Peso: 3,5kg
1000WVERSION:
Alimentação: AC230V, 50Hz
Consumode potência: Max.1000W
Suporte lâmpada: GX 9,5
TemperaturaAmbienteMáxima: 40°C
TemperaturaMáxima do projector 160°C
Distância mínima ao objecto: 2m
Lâmpada: 650W ou 1000W
Tamanho: 37 x 25 x 37cm
Peso: 5,0kg
Pode fazer downloadda versão mais recente deste manualno nossosite: www.beglec.com
Estas informações estão sujeitasa alteraçõessem aviso prévio
MANUTENÇÃO
Certifique-se que sob a área de instalaçãoda unidade não irão passar pessoasdurante a manutenção.
Desligue o cabo de alimentaçãoda correntee aguarde que a unidade arrefeça.
Durante a inspecção deverá verificar os seguintespontos:
Todosos parafusos utilizados nas peças da unidade e na instalação deverão estar apertados firmemente
e não poderãoestar corroídos.
A cobertura da unidade, os pontos de fixaçãoe as áreas de instalação (tecto,armação, etc.) não deverão
apresentarqualquer deformação.
Caso uma lente apresente danos visíveis como fendas ou riscos profundos, deverá ser substituída
imediatamente.
O cabo de alimentação deverá estar em perfeitas condições e deverá ser substituído assim que for
detectadoo mais pequenodano.
As ventoinhas de arrefecimento (caso existam) e os orifícios de ventilação deverão ser limpos todos os
meses demodo a evitar que unidade sobreaqueça.
Utilize um aspirador ou um compressorde ar para limpar o interiorda unidade uma vez por ano.
De forma a optimizar a projecção de luz, limpe as lentes ópticas internas e externas e/ou espelhos
periodicamente.A regularidade das limpezas depende do ambiente em que está instalada a unidade: um
JB SYSTEMS
®
29/30 THEATRE SPOT 500W + 1000W
JB SYSTEMS
®
30/30 THEATRE SPOT 500W + 1000W
 Loading...