

Page 1

WWW.BEGLEC.COM
Operation Manual
Mode d'emploi
Gebruiksaanwijzing
Bedienungsanleitung
Manual de instrucciones
Manual do utilizador
EN
FR
NL
DU
ES
PT
Reproduction or publication of the content in any manner, without express permission of the publisher, is prohibited.
Copyright © 2005-2007 by BEGLEC cva.
Version: 1.2
The Power Source for DJ’s
Page 2
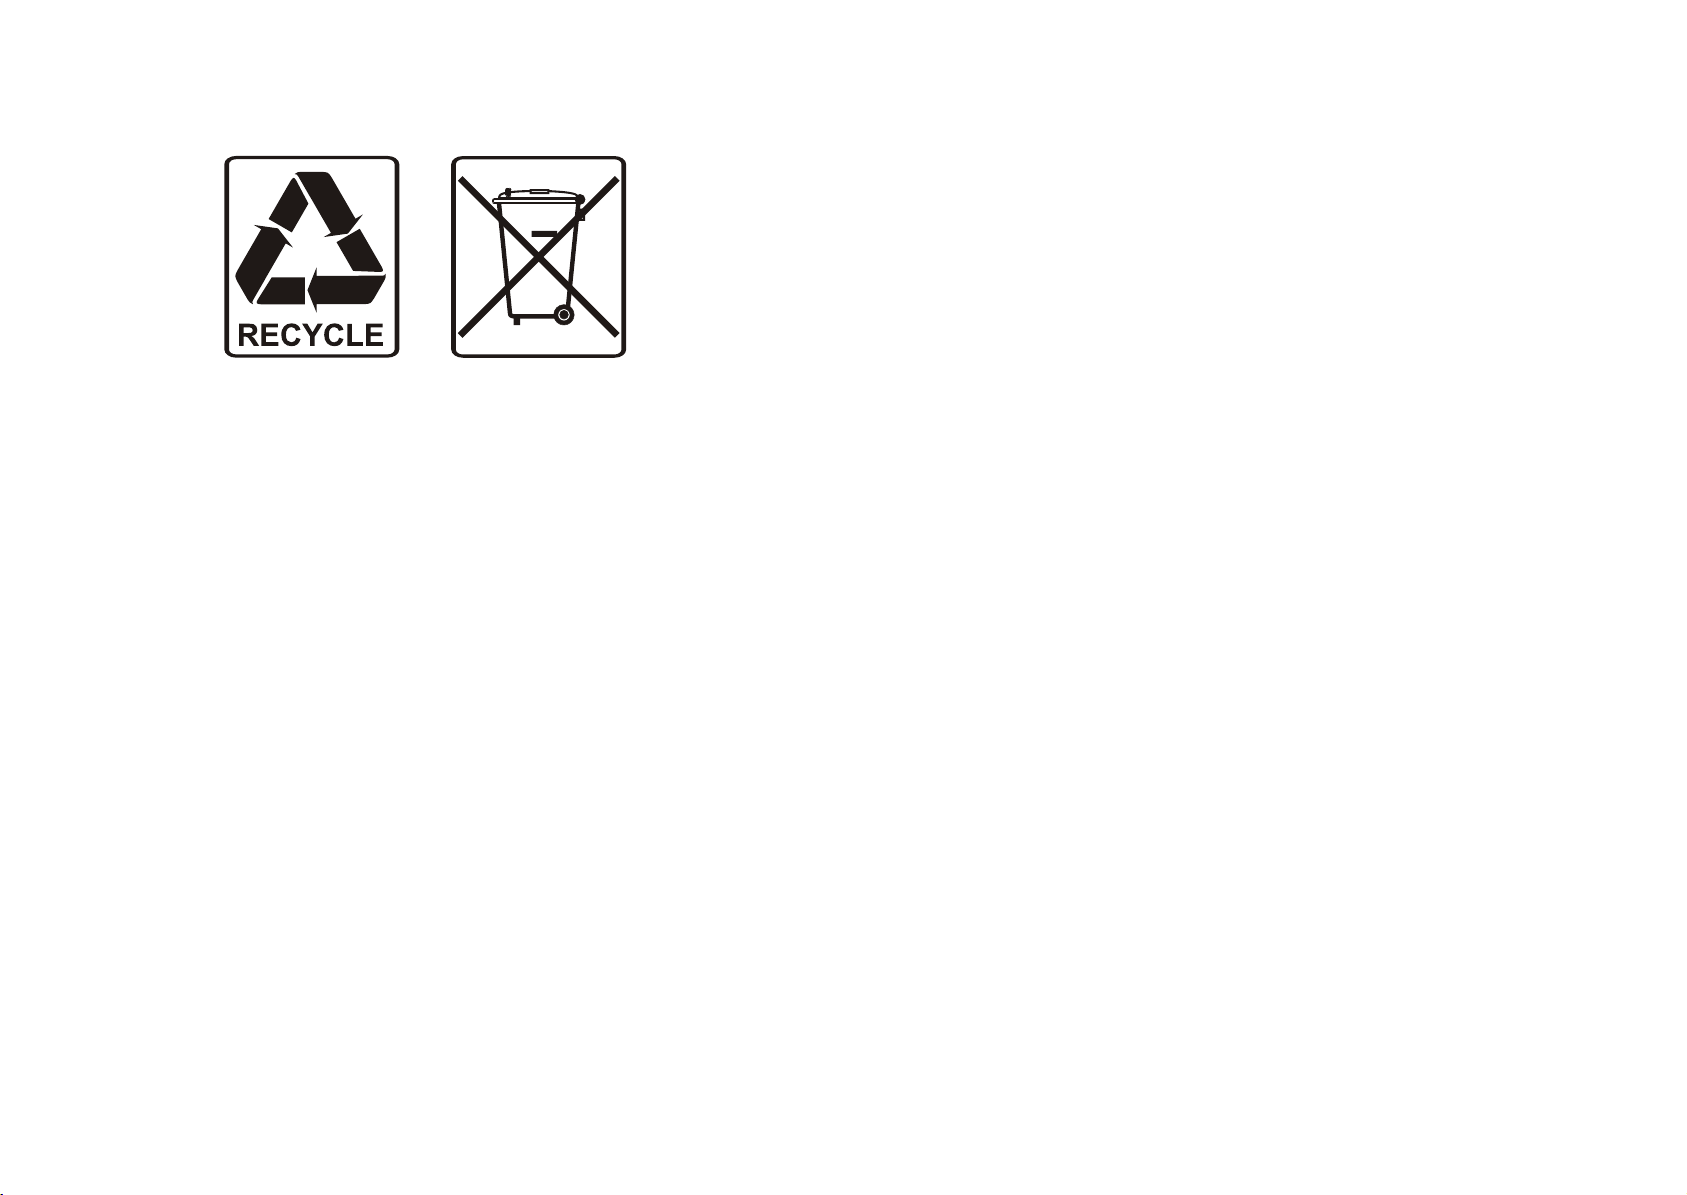
EN - DISPOSAL OF THE DEVICE
Dispose of the unit and used batteries in an environment friendly manner
according to your country regulations.
FR - DÉCLASSER L’APPAREIL
Débarrassez-vous de l’appareil et des piles usagées de manière écologique
Conformément aux dispositions légales de votre pays.
NL - VERWIJDEREN VAN HET APPARAAT
Verwijder het toestel en de gebruikte batterijen op een milieuvriendelijke
manier conform de in uw land geldende voorschriften.
DU - ENTSORGUNG DES GERÄTS
Entsorgen Sie das Gerät und die Batterien auf umweltfreundliche Art und
Weise gemäß den Vorschriften Ihres Landes.
ES - DESHACERSE DEL APARATO
Reciclar el aparato y pilas usadas de forma ecologica conforme a las
disposiciones legales de su pais.
PT - COMO DESFAZER-SE DA UNIDADE
Tente reciclar a unidade e as pilhas usadas respeitando o ambiente e em
conformidade com as normas vigentes no seu país.
Page 3
ENGLISH OPERATION MANUAL
OPERATION MANUAL
Thank you for buying this JBSystems®product. To take full advantage of all possibilities,please read these
operatinginstructionsverycarefully.
FEATURES
High Torque direct drivemotor
Fast start / stop
3 speeds: 33, 45, 78 rpm with quartz lock
3 Pitch adjustment ranges: +/-8% ; +/-12% ; +/-20%
Forward/ reverse play
2 Start / stop buttons for maximum flexibility
Selectablephono/lineoutput
Unbreakablewhite LED targetlight
AudioTechnica cartridgeincluded
All metal S-shapedtone arm assembly with:
Counterweight
Anti-skatingadjustment
Lever lift with height adjustment
Adjustable large feetfor perfect leveling
BEFORE USE
Check the contents:
Check that the carton contains the following items:
Turntable platter
Slip mat
45-rpmadapter
Counterweight
Headshell
Operatinginstructions
Cartridge
Connectingcordcinch/cinch
Mains power cable.
SAFETY INSTRUCTIONS:
CAUTION
The lightning flash with arrowhead symbol within the equilateral triangleis intended to alert the use
or the presence of un-insulated “dangerous voltage” within the product’s enclosure that may be of
sufficient magnitude to constitute a risk of electricshock.
The exclamation point within the equilateral triangle is intended to alert the user to the presence of
important operation and maintenance (servicing) instructions in the literature accompanying this
appliance.
This symbol means: indooruse only.
This symbol means:Read instructions.
To prevent fireor shock hazard, do not expose this appliance to rain or moisture.
JB SYSTEMS
®
CAUTION: To reduce the risk of electric shock, do not remove
the top cover. No user-serviceable parts inside. Refer
servicing toqualified service personnel only.
This symbol means: Safety Class
II appliance
1/30 T3 TURNTABLE
ENGLISH OPERATION MANUAL
To avoid condensation to be formed inside, allowthe unit to adapt to the surrounding temperatures when
bringing it into a warm room after transport. Condense sometimes prevents the unit from working at full
performance or may even cause damages.
This unit is for indoor use only.
Don’t place metal objects or spill liquid inside the unit. No objects filled with liquids, such as vases, shall
be placed on this appliance. Electric shock or malfunction may result. If a foreign object enters the unit,
immediately disconnectthe mains power.
No naked flame sources, such as lighted candles,should be placedon the appliance.
Don’t cover any ventilation openings as this mayresult in overheating.
Prevent use in dusty environmentsand cleanthe unit regularly.
Keep the unit away from children.
Inexperienced persons should not operate this device.
Maximumsave ambient temperature is 40°C. Don’t use this unit at higher ambient temperatures.
Minimum distances around the apparatus for sufficientventilationis 5cm.
Alwaysunplug the unit when it is not used for a longer time or before you start servicing.
The electricalinstallation should be carried out by qualified personal only, according to the regulations for
electricaland mechanical safety in your country.
Check that the availablevoltageis not higher than the one stated on the rear panel of the unit.
The socketinlet shall remain operable for disconnection from the mains.
The power cord should always be in perfect condition. Switch the unit immediately off when the power
cord is squashed or damaged. It must be replaced by the manufacturer, its service agent or similarly
qualified persons in order to avoid a hazard.
Never let the power-cord come into contact with other cables!
When the power switch is in OFF position, this unit is not completely disconnected from the mains!
In order to prevent electric shock, do not open the cover. Apart from the mains fuse there are no user
serviceablepartsinside.
Never repair a fuse or bypass the fuse holder. Always replace a damaged fuse with a fuse of the same
type and electrical specifications!
In the event of serious operating problems,stop using the appliance and contact your dealer immediately.
Please use the original packing when thedevice is tobe transported.
Due to safety reasons it is prohibited to make unauthorized modifications to the unit.
INSTALLATION GUIDELINES:
Install the turntable in a well-ventilated location where it will not be exposed to high temperatures or
humidity.
Placing and using the turntable for long periods near heat-generating sources such as amplifiers,
spotlights, etc. will affect its performance.
When the turntable is used in a loud-sound environment, for example near speakers, sound skip and
feedbackmay occur.
Install the unit on a perfectly horizontal and very stable surface. A concrete or marble surface is perfect.
A wooden surfaceis a bad choice while it amplifies vibrations.
Besure the turntable, including its audio and mains cords, does not touch any vibrating materials. Take
special care when using the unit while it is installed in a carrying case.
Because of its two start/stop buttons the T3 turntable can be used in both traditional and battle style
setups:
Traditional setup: Battle style setup:
Mostlyused in discotheques. Mostlyused forscratching and
Best for allround mixing. other aggressive mixingtechniques
CLEANING THE TURNTABLE:
Clean by wiping with a cloth slightly dipped with water.Avoid getting water inside the unit.
Do not use volatile liquids such as benzeneor thinner which will damage the unit.
JB SYSTEMS
®
2/30 T3 TURNTABLE
Page 4
ENGLISH OPERATION MANUAL
ENGLISH OPERATION MANUAL
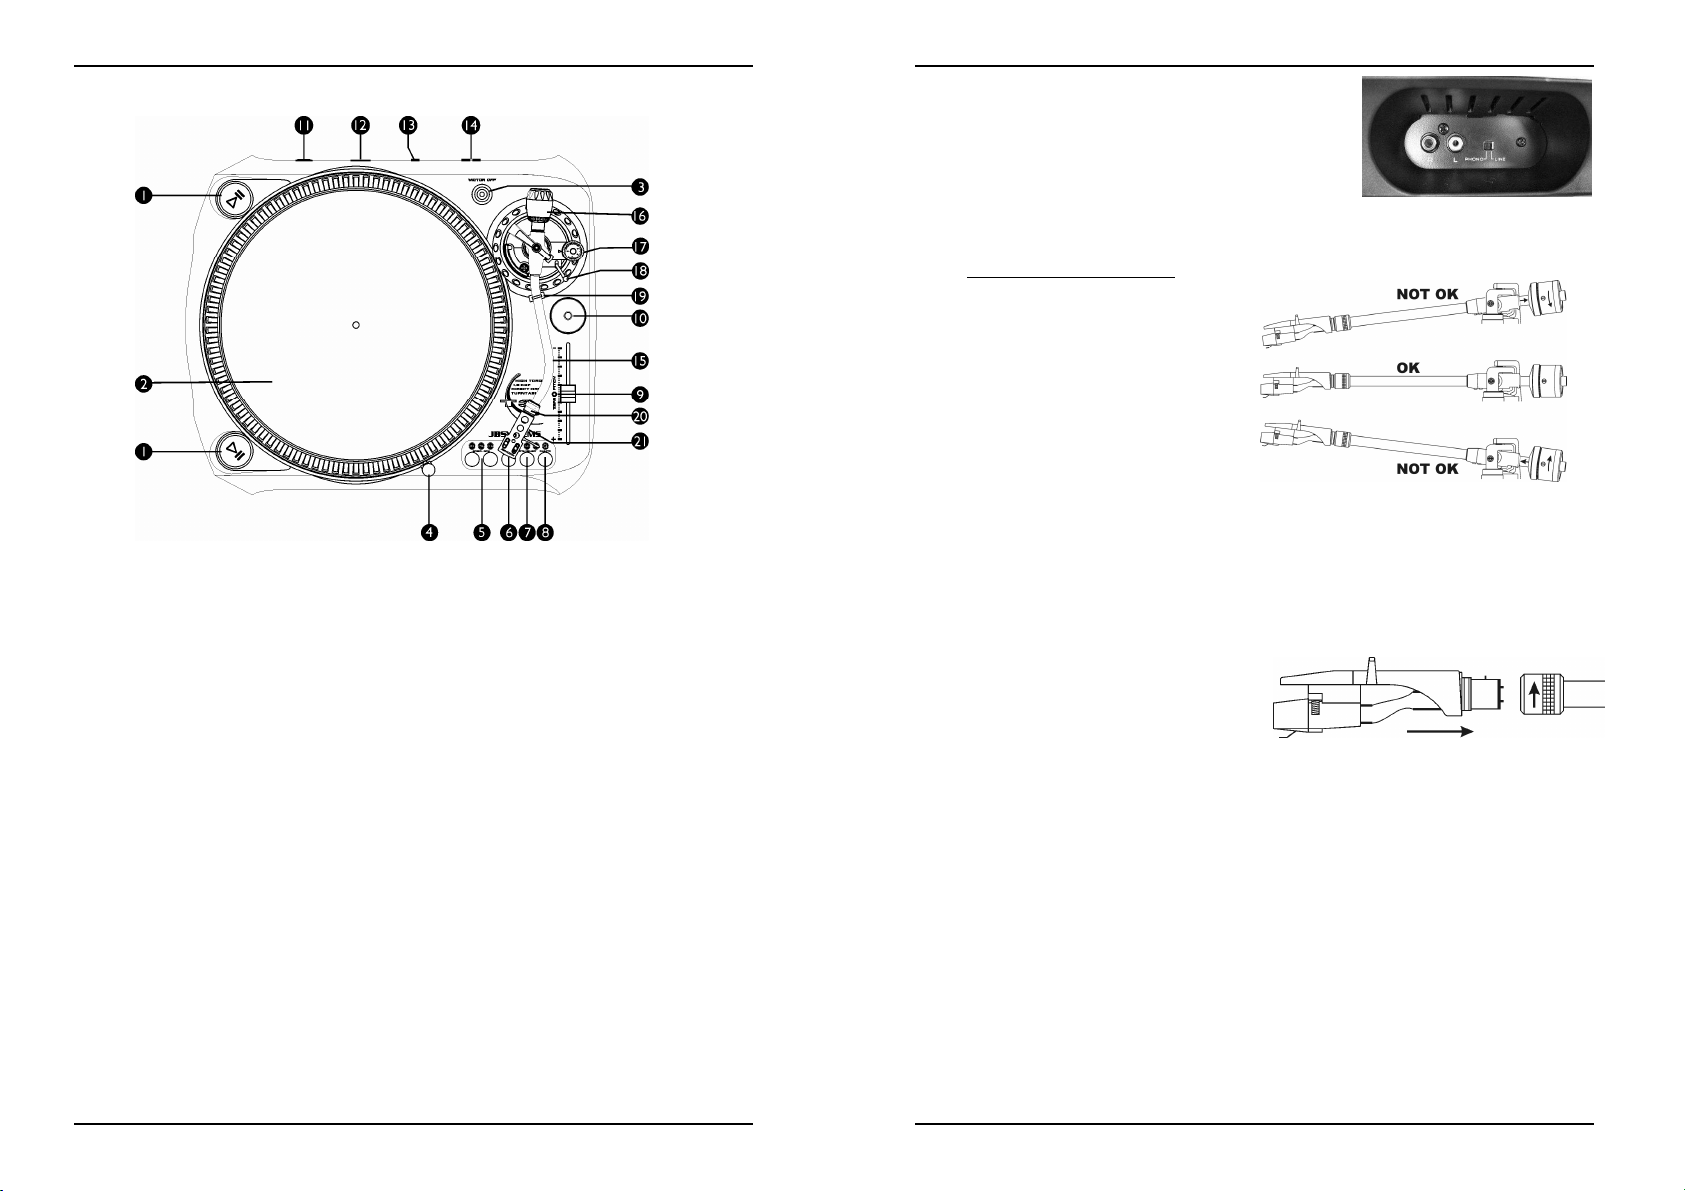
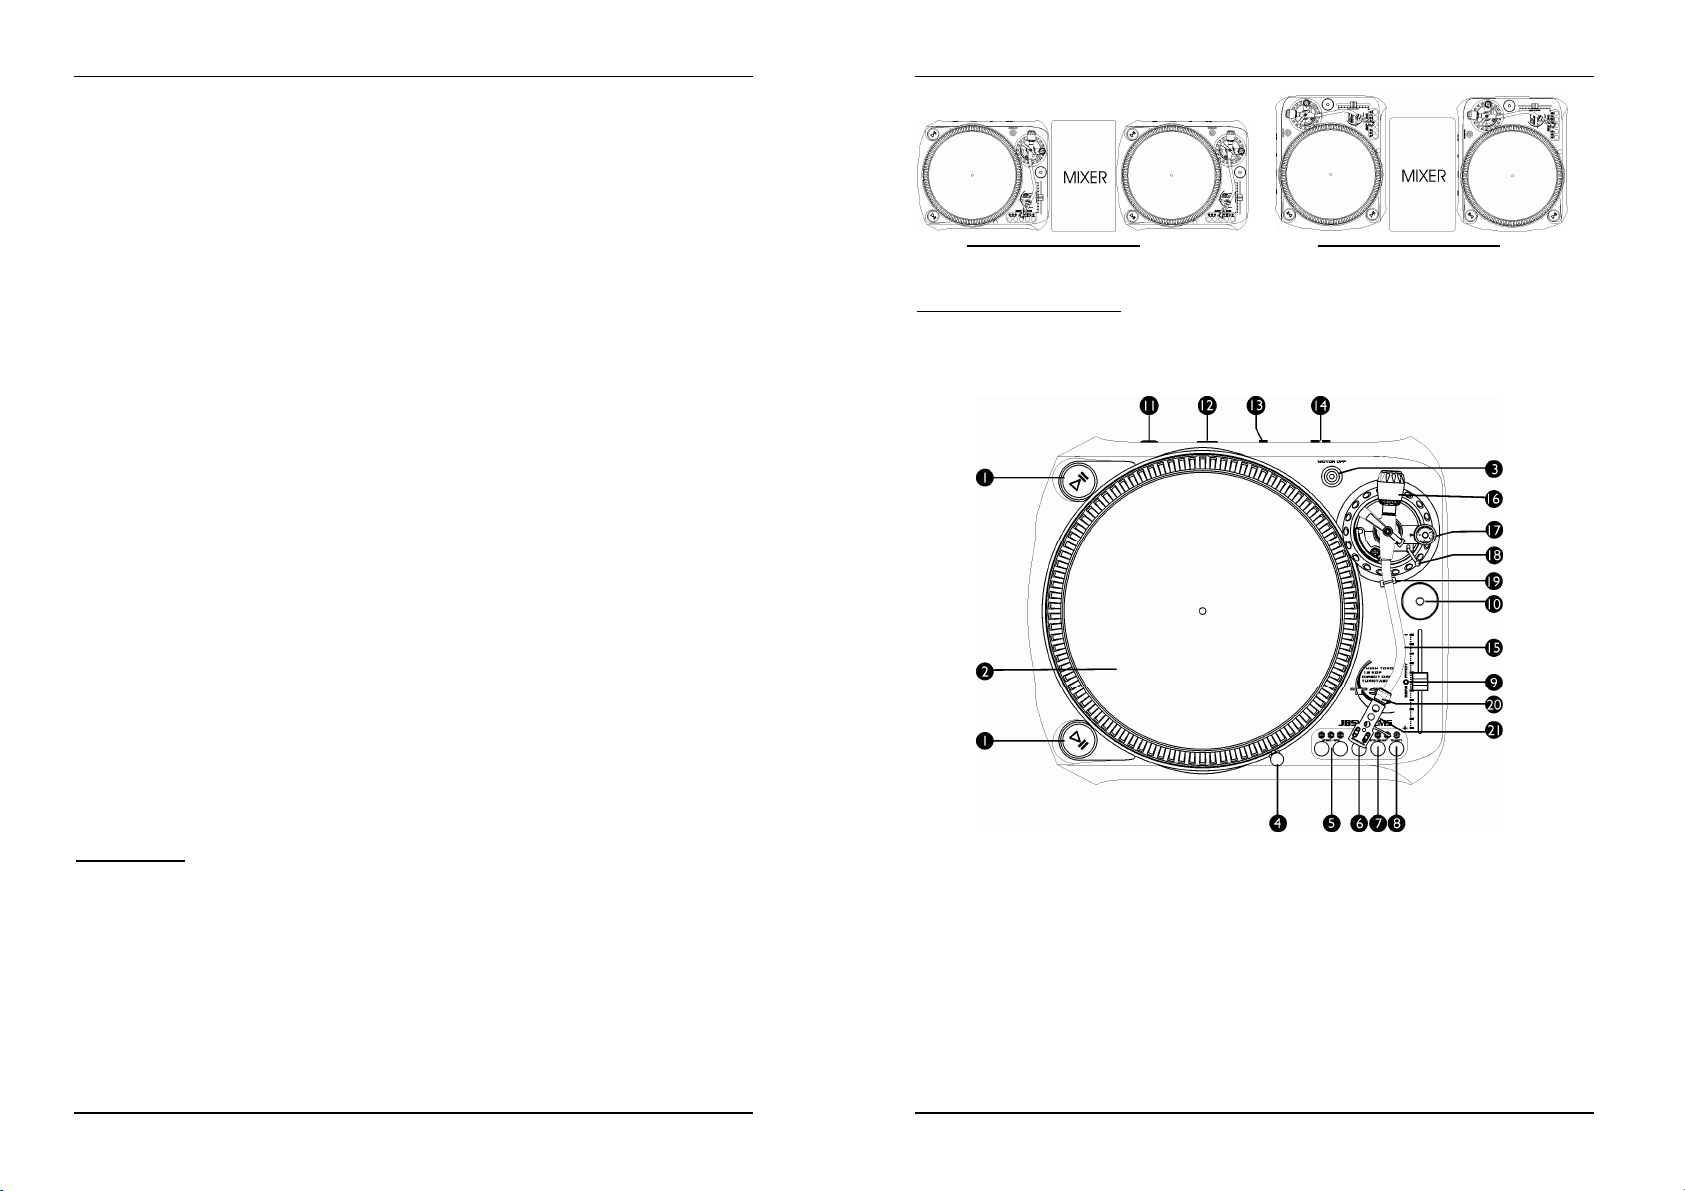
CONTROLS AND FUNCTIONS
1. START / STOP BUTTONS: Press one of these buttons to start or stop the platter.
2. PLATTER: The platter is equipped with a slip mat. This makes it easier to manipulate the record for
scratchperformances.
3. MOTOR OFF BUTTON: Normally the platter stops while you press the start/stopbutton (1). In this case
the platter stops quite fast due to the electronic brake. Press the “motor off” button if you want the
platter to slow down more smoothly. As long as the motor is switched off, the led of the button flashes.
Press the button again to switch the motor back on.
4. TARGET LIGHT: White led target light used to locate the exact place on your record when used in a
dark place.
5. SPEED SELECT BUTTONS: Used to select the desired speed.
Press the “33” button to select the 33rpm speed.
Press the “45” button to select the 45rpm speed.
Press“33” and “45” buttons simultaneously to selectthe78rpm speed.
6. REVERSE BUTTON: Press this button to reverse the platter rotation,press this button again to end the
reverse mode.
7. PITCH RANGE BUTTON: Press this button to adjust the range of the pitch slider.
Press ones for +/-8% speed range. (normallyused for beat mixing)
Press again for +/-12%speed range.
Press again for +/-20%speed range.
The next time you press this button you will switch again to +/-8% etc.
8. QUARTZ LOCK BUTTON: When the QUARTZ Button is pressed, the exact center speed (0%) is
enforced,even when the pitch slider is not in the middle. The blue led in the center of the pitch slider (9)
will be lit.
9. PITCH SLIDER: Use the pitch slider to change the actual speed of the platter.The Range depends on
the Pitch Range button (7). When the slider is in its middle position, the blue led next to the pitch slider
will turn on to indicate that the turntable is locked to the exact center speed. Attention: take care that
the Quartz lock button (8) is switched off.
10. SINGLE ADAPTER: Place this adapter on the platter for playing 7” records with large center holes.
11. POWERON/OFFSWITCH: Used to turn the turntable on an off.
12. POWER CORDCONNECTOR: Used to connect to the mains, using the supplied power cord.
13. PHONO/LINE SWITCH: Depending on the position of the
phono/line switch, you can connect the turntable to any phono or
linelevel input.
14. PHONO/LINE OUTPUT: Connect the turntable to any phono or
line level input, using the supplied cinch/cinch cable. Be sure to
put the phono/lineswitch (13) in the right position.
15. TONE ARM: This is a fully manual S-shaped tone arm. To start
playback, gently place the stylus on the record using the head shell finger support. Do not drop the
stylus onto the record as this may cause damage to the diamond tip and to the record.
16. COUNTERWEIGHT: Use the counterweight to balance the tone arm and to adjust the stylus pressure.
For the correct stylus pressure, please referto the user manual of your cartridge.
Setting up the styluspressure:
Make sure the cartridge is well fitted and its
needle protector is removed. Put a record on
the platter and make sure the anti-skate is
set to zero. Put the tone arm lever in “down”
position. Take the tone arm and turn the
counter- weight until the tone arm is in
perfect balance It floats horizontally
above the record surface, see “OK” picture
at the right. Now set the “stylus pressure
ring” (front section of the counterweight with
markings) to zero by turning the ring while
you take care that the counterweight doesn’t
move. Next, turn the complete counterweight
clockwise until the “stylus pressure ring” indicates the correct needle pressure. Don’t forget to put
the anti-skate back in place.
17. ANTI-SKATE KNOB: When a record is playing, side forces are generated, pushing the stylus towards
the center or the outside of the record. You can use the anti-skate knob to offset this force and keep the
needle centered in the groove. For standard playback simply turn the anti-skate knob to the same
number as the stylus pressure reads in grams. (Stylus pressure = 3gr. anti-skate = 3)
18. TONE ARM LIFT: Controls theup and down action ofthe tone arm.
19. TONE ARM CLAMP & REST: Use this rest for the tone arm while changing a record. Attach the tone
arm to the rest using the clamp when the turntable is not used or when it is transported. This prevents
the tone arm from accidentallyturning towardsthe platter and damaging the needle of the cartridge.
20. HEAD SHELL LOCKING NUT: Attach the head
shell by inserting it into the front end of the tone
armand then turn thelocking nut clockwise.
21. HEAD SHELL: Install the cartridge here. When
installing a cartridge, refer to the installation
instructions supplied by the manufacturer of that
cartridge. During installation, attach the stylus protectorto guard the stylus tip from damage.
Attachwires as follows:
White(L+) Leftchannel +
Blue (L-) Leftchannel Red(R+) Rightchannel +
Green (R-) Rightchannel -
JB SYSTEMS
®
3/30 T3 TURNTABLE
JB SYSTEMS
®
4/30 T3 TURNTABLE
Page 5
ENGLISH OPERATION MANUAL
SPECIFICATIONS
Motor: 8 pole,3phase, brushless DC motor
Driving Method: Direct Drive
StartingTorque: More than 1.8kgf / cm
StartingTime: less than 1sec second
Braking Time: less than 1sec second
Speed selection: 33
Speed adjustment: +/-8% ~ +/-12% ~ +/-20%
Wow &Flutter: less than 0,15% WRMS (JISWTD)
Tone arm type: Static balanced S-shaped tone arm.
Tracking Error angle: Less than 3°
Cartridgeweight: 6~10g.
Anti-skaterange: 0~3g.
Power supply: 230V~50Hz.
Power consumption: 10,5Watts
Dimensions: 450 x 370 x 145mm (WxDxH)
Weight : 8,5kg.
You can download the latest version of thisuser manual on ourwebsite:www.beglec.com
Every informationis subject to change withoutprior notice
1/3
~ 45 ~ 78 RPM
FRANCAIS MODE D’EMPLOI
MODE D’EMPLOI
Nous vous remercions et félicitons pour l'achat de ce produit JB SYSTEMS®. Nous vous prions de lire ce
mode d'emploi afin d'utiliser cet appareil convenablement. Après l'avoir lu gardez-le pour une éventuelle
futureconsultation.
CARACTERISTIQUES
Moteur à entraînement direct sur couple haut
Démarrage/ arrêt rapide
3 vitesses: 33, 45, 78 rpm avec verrou quartz
3 gammes de vitesse possibles:+/-8% ;+/-12% ; +/-20%
Lecturedes disques inversée
2 boutons Start / Stop assurent un maximumde flexibilité
Eclairage blanc de la cellule (led incassable)
CelluleAudioTechnica incluse
Bras métallique en forme de 'S' assemblé avec :
Contrepoids
Contrôle Anti-skating
Lève-bras
Pieds de support réglables pour mettre la platine à niveau
AVANT L’UTILISATION
Vérifierla présence des composants suivants:
Plateau
Feutrine
Adaptateur 45 tours
Contrepoids
Porte cellule
Moded'emploi
Cellule
Câbles de connexioncinch/cinch
Câble secteur
JB SYSTEMS
INSTRUCTIONS DE SECURITE:
ATTENTION: afin de réduire le risque d’électrocution,
CAUTION
qualifiés.
La flèche dans un triangle met l'utilisateur en garde contre la présence de haute tension sans
isolationdans l'appareil,ce qui peut causer un risque d'électrocution.
Un point d'exclamation dans un triangleprévient de la présence d'instructions relativesau
fonctionnement et à la maintenancese trouvant dans le manuel fourniavec l'appareil.
Ce symbole signifie : uniquement pour usageà l'intérieur.
Ce symbole signifie : Lire le mode d’emploi.
Ce symbole signifie:appareil construit selon les normesde sécurité classe II
®
5/30 T3 TURNTABLE
JB SYSTEMS
®
n’enlevez jamais le couvercle de l’appareil. Il n’y a aucune
pièce à l’intérieur de l’appareil que vous puissiez remplacer
vous-même. Confiez l’entretien uniquement à des techniciens
6/30 PRODUCT NAME
Page 6
MODE D'EMPLOI FRANCAIS
Afin d’éviter tout risque d’incendie ou de décharge électrique, ne pas exposer cet appareil à la pluie ou
l’humidité.
Pour éviter la formation de condensation à l’intérieur de l’appareil, patientez quelques minutes pour
laisser l’appareil s’adapter à la température ambiante lorsqu’il arrive dans une pièce chauffée après le
transport. La condensation empêche l'appareil de fonctionner de manière optimale, et elle peut même
causerdes dommages.
Cet appareil est destiné à une utilisation à l’intérieur uniquement.
Ne pas insérer d’objet métallique ou renverser de liquide dans l’appareil. Aucun objet contenant un
liquide, tels que des vases, ne peut être placé sur cet appareil. Cela risquerait de provoquer une
décharge électrique ou un dysfonctionnement. Si un corps étranger est introduit dans l’appareil,
déconnectez immédiatementdela source d’alimentation.
Aucune sourcede flamme nue, telle que des bougiesallumées, ne peut être placéesur l'appareil.
Ne pas couvrir les orificesde ventilation,un risque de surchauffe en résulterait.
Ne pas utiliser l'appareil dans un environnement poussiéreux et le nettoyerrégulièrement.
Ne pas laisser l'appareil à portéedes enfants.
Les personnes non expérimentéesne doiventpas utiliser cet appareil.
La température ambiante maximale d’utilisation de l’appareil est de 45°C. Ne pas l’utiliser au-delà de
cette température.
Rien ne doit se trouver contre l'appareil : la distance minimum pour en permettre une ventilation
suffisante est de 5cm.
Débranchez toujours l’appareil si vous ne l’utilisez pas de manière prolongée ou avant d’entreprendre
desréparations.
Les installations électriques ne peuvent être faites que par du personnel qualifié et conformément aux
règlements de sécurité électrique et mécanique en vigueur dans votre pays.
Assurez-vous que la tension d’alimentation de la source d’alimentation de la zone dans laquelle vous
vous trouvez ne dépasse pas celle indiquée à l’arrièrede l’appareil.
La prise doit toujoursêtre accessible pour que le cordon secteur puisse être enlevé à tout moment.
Le cordon d’alimentation doit toujours être en parfait état. Mettez immédiatementl’unité hors tension si le
cordon devait êtreécrasé ou endommagé. Pour éviter tout risque de choc électrique, le cordon doit être
remplacé par le constructeur, son agent ou un technicien qualifié.
Ne laissez jamais le cordon d’alimentation entrer en contact avec d’autres câbles !
Quand l’interrupteur principal est en position OFF, cet appareil n'est pas complètement isolé du courant
230V !
Utilisez toujours des câbles appropriés et certifiés lorsquevous installezl’appareil.
Pour éviter toute décharge électrique, ne pas ouvrir l’appareil. En dehors du fusible principal, il n’y a pas
de pièces pouvantêtrechangées par l’utilisateur à l’intérieur.
Ne jamais
par un fusible de même type et ayant les mêmes spécifications électriques !
En cas de problèmes de fonctionnement sérieux, arrêtez toute utilisation de l’appareil et contactez votre
revendeurimmédiatement.
Utilisez l’emballage d’origine si l’appareildoit être transporté.
Pour des raisons de sécurité, il est interdit d’apporter une quelconque modification à l’appareil non
spécifiquementautorisée par les parties responsables.
INSTALLATION:
Installerla platine dans un endroit bien ventilé afin de ne pas l'exposerà des températures trop élevées
ou a de l'humidité.
Utiliser la platine pendant une longue période dans un endroit chaud (à coté d'amplificateurs,spots,…)
peut diminuer son rendement.
Evitezles vibrations sonores (haut-parleurs,…) pour ne pas avoir d'effetde feed-back.
Installer la platine sur une surface stable et horizontale. Préférer des surfaces en béton ou en marbre
plutôt que le bois qui amplifierait les vibrations.
S'assurer que ni la platine, ni ses câbles n'entrent en contact avec des sources provocant des
vibrations. Soyez particulièrement prudent lors de l'utilisation avecun flight case.
Grâce à ses 2 boutons de démarrage, la platine T3 peut être utilisée de manière traditionnelle ou lors
de compétitions.
réparer ou court-circuiter un fusible. Remplacez
systématiquement
un fusible endommagé
MODE D'EMPLOI FRANCAIS
Installationtraditionnelle: Installation pour concours:
La plus part du temps en discothèques. Plus aisé pour scratcher et pour les
Convientpour des mixages passifs. Techniques de mix'splus agressifs.
NETTOYAGEDE LA PLATINE:
Nettoyeravecun tissu légèrement humide. Ne pas renverser d'eau à l'intérieur de la platine. Ne pas utiliser
de produits abrasifs (alcool,…) qui puissent endommagerla platine.
CONTROLES ET FONCTIONS
1. BOUTON START / STOP: Pousser pour démarrerou arrêter le plateau.
2. LE PLATEAU: Le plateau est équipé d'une feutrine. Cela facilite la manipulation du disque pour
scratcher.
3. BOUTON MOTEUR OFF: Normalement le plateau s'arrête quand vous appuyez sur start/stop (1).
Dans ce cas-ci le plateau s'arrête très vite grâce au frein électronique. Appuyez sur "motoroff" si vous
désirez que le plateau s'arrête plus doucement. Tant que le moteur est coupé, la lumière du bouton
s'illumine. Appuyez une nouvellefois pour redémarrer le moteur.
4. ECLAIRAGE DE LA CELLULE: Lumière blanche très utile pour localiser un endroit précis sur le
disque dans un environnementsombre.
5. BOUTONS DE SELECTIONDE VITESSE: Sélection de la vitesse souhaitée.
Poussersur le bouton “33” pour sélectionner la vitessede 33 tours.
Poussersur le bouton “45” pour sélectionner la vitessede 45 tours.
Poussersur les boutons “33” et “45” en mêmetemps pour sélectionner la vitessede 78 tours.
JB SYSTEMS® 7/30 T3 TURNTABLE
JB SYSTEMS® 8/30 T3 TURNTABLE
Page 7

MODE D'EMPLOI FRANCAIS
MODE D'EMPLOI FRANCAIS
6. BOUTON DE LECTURE INVERSEE: Pousser pour inverser le sens de rotation du plateau. Pousser
une deuxième fois pour revenir en mode de lecture normal.
7. BOUTON PITCH RANGE: Pousserpour ajuster la gamme de vitessedu curseur:
Appuyez 1x pour sélectionner la gamme de vitesse +/-8% (pour le beatmix)
Appuyez2x pour sélectionner la gamme de vitesse +/-12%
Appuyez3x pour sélectionner la gamme de vitesse +/-20%
8. BOUTON QUARTZ LOCK: Le bouton QUARTZ permet de mettre la platine a vitesse exacte même si
le curseur n'est pas centré.
9. CURSEUR PITCH: Le curseur permet d'ajuster la vitesse du plateau. La gamme dépend du bouton
«pitch range» (7). Quand le curseur est positionné au centre, le LED s'allume pour indiquer que la
vitesse est juste.
10. ADAPTATEUR DE SIMPLES: Placez cet adaptateur sur le plateau pour écouter des disques 7" ayant
de larges trous centraux.
11. INTERRUPTEUR ON/OFF: Allumer / éteindre la platine.
12. CABLESECTEUR: brancher sur du 230V AC avec le câble fourni.
13. INTERRUPTEUR PHONO/LINE: Suivant la position de
l'interrupteur phono/line, vous pouvez connecter la platine sur
un niveau d'entrée phono ou line.
14. SORTIE PHONO: Connecter la platine sur une entrée phono
avec le câble cinch/cinch. Assurez-vous de placer l'interrupteur
phono/line sur la bonne position.
15. BRAS: Bras en forme de 'S', totalement manuel. Pour démarre
la lecture, positionner l'aiguille sur le disque en se servant du
support du porte capsule. Manipuler la cellule prudemment afin
de n'abîmer ni le diamant,ni le disque.
16. CONTREPOIDS: Permet de régler la pression nécessaire à la cellule. Pour connaître la pression
idéale, il faut se référer aux instructions du fabricant de la cellule.
Installationde la cellule:
S'assurer que la cellule est bien installée dans
le bras. Mettre un disque et positionner l'antiskating sur zéro. Abaisser le lève-bras.
Tourner le contrepoids jusqu'à ce que le bras
flotte en équilibre (OK sur le dessin). Mettre
l'anneau gradué en position zéro en faisant
attention de ne pas bouger le contrepoids.
Tourner le contrepoids complet jusqu'à
obtention de la pression adéquate. Ne pas
oublier de remettre l'anti-skating à la
positioncorrespondante.
17. BOUTON ANTI-SKATING: Pendant la lecture
d'un disque, la force centrifuge tend à déporter la
cellule vers le centre du disque. Ce bouton permet d'éliminer ce problème en maintenant l'aiguille au
centre du sillon. Pour les lectures simples, régler ce bouton sur la valeur équivalente a la pression de la
cellule (Pression de la cellule = 3gr. anti-skating = 3).
18. LEVIER LEVE-BRAS: Permet de lever ou descendre le bras.
19. BRAS ET POTENCE DE REPOS: Utiliser cettepotencelors du changement d'un disque. Verrouiller le
bras si la platine n'est pas utilisée ou si elle doit être transportée. Ceci évite d'endommager
accidentellement le plateau ou l'aiguille.
20. VERROU DU PORTE CELLULE: Insérer le
porte cellule dans le bras et tourner le verrou
commeindiqué ci-dessous.
21. PORTE CELLULE: Se référer aux instructions
du fabricantde la capsule. Laisser la protection sur la cellule pendant la manipulation.
Connecterles fils comme suit:
Blanc (L+) Canalgauche+
Bleu (L-) CanalgaucheRouge(R+) Canal droit+
Vert (R-) Canal droit-
SPECIFICATIONS
Moteur: 8 pole, 3phase, brushless DC motor
Driving Method: Direct Drive
Puissance du moteur: Plus de 1,8kgf / cm
Durée de démarrage: moinsd' 1 seconde
Durée de freinage: moinsd'1 seconde
Sélectiondevitesse: 33
Réglagede vitesse: +/-8% ~ +/-12% ~ +/-20%
Wow &Flutter: Moins de 0,15% WRMS(JISWTD)
Type de bras: Static balanced S-shaped tone arm.
Tracking Error angle: Moins de 3°
Poids de la cellule: 6~10g.
Valeur Ant-skating: 0~3g.
Allimentation: 230V~50Hz.
Consommation: 10,5Watts
Dimensions: 450 x 370 x145mm (WxDxH)
Poids: 8,5kg.
Chacune de ces informations peut être modifiéesans avertissement préalable. Vous pouvez
télécharger la dernière versionde ce mode d’emploi denotre site Web: www.beglec.com
1/3
~ 45 ~ 78 tours
JB SYSTEMS® 9/30 T3 TURNTABLE
JB SYSTEMS® 10/30 T3 TURNTABLE
Page 8

NEDERLANDS HANDLEIDING
HANDLEIDING
Hartelijke dank en gefeliciteerd met de aankoop van dit JB SYSTEMS®product. Gelieve deze handleiding
aandachtig te lezen zodat U dit product perfect kan bedienen. Wij raden U aan om deze handleiding nadien
veilig op te bergen zodat U ze later nog kan raadplegen.
KENMERKEN
Motormet hoog aandrijfkoppel
Snelle start en stop.
3 snelheden: 33, 45, 78 rpm met kwartsstabilisatie
3instelschalen voor snelheidsregeling: +/-8% ; +/-12% ; +/-20%
Voorwaarts / achterwaarts afspelen van de plaat
2 start / stopdrukknoppen voor maximale flexibiliteit
Omschakelbarephono/lineuitgang op de achterzijde
Onverslijtbarenaaldverlichting met witte LED
AudioTechnicacelinbegrepen
Metalen S-vormige toonarm met:
Tegengewicht
Anti-skateregeling
Toonarm lift met hendeltje
Grote, regelbare voeten voor een perfecte stabiliteit
VOOR GEBRUIK
Kijk even na of, naast de basis, onderstaandeonderdelen in de verpakking aanwezig zijn:
Draaiplateau
Slipmat
45-toeren adapter
Tegengewicht van de toonarm
Celhouder
Handleiding
BijgeleverdeCel + naald
Cinch/cinchaudiokabel
Stroomkabel
VEILIGHEIDSVOORSCHRIFTEN:
CAUTION
De bliksempijl die zich in een gelijkbenige driehoek bevindt is bedoeld om u te wijzen op het
gebruik of de aanwezigheid van niet-geïsoleerde onderdelen met een “gevaarlijke spanning” in het
toesteldie voldoendekracht heeft om een risico van elektrocutiein te houden.
Het uitroepteken binnen de gelijkbenige driehoek is bedoeld om de gebruiker erop te wijzen dat er
in de meegeleverde literatuur belangrijke gebruik en onderhoudsinstructies vermeld staan
betreffendedit onderdeel.
Dit symbool betekent: het apparaat mag enkel binnenhuis wordengebruikt.
Dit symbool betekent: Lees de
handleiding!
WAARSCHUWING: Om het risico op elektrocutie zoveel
mogelijk te vermijden mag u nooit de behuizing verwijderen.
Er bevinden zich geen onderdelen in het toestel die u zelf kan
herstellen. Laat de herstellingen enkel uitvoeren door een
bevoegdetechnicus.
Dit symbool betekent: Klasse II
apparaten
HANDLEIDING NEDERLANDS
Stel dit apparaat niet bloot aan regen of vocht, dit om het risico op brand en elektrische schokken te
voorkomen.
Om de vorming van condensatie binnenin te voorkomen,laat het apparaataan de omgevingstemperatuur
wennen wanneer het, na het transport, naar een warm vertrek is overgebracht. Condensatie kan het
toestel soms verhinderen perfect te functioneren. Het kan soms zelfs schade aan het apparaat
toebrengen.
Gebruik dit apparaatuitsluitendbinnenshuis.
Plaats geen stukken metaal en mors geen vocht binnen in het toestel om elektrische schokken of storing
te vermijden. Objecten gevuld met water, zoals bvb. Vazen, mogen op dit apparaat worden geplaatst.
Indien er toch een vreemd voorwerp of water in het apparaat geraakt, moet U het direct van het lichtnet
afkoppelen.
Open vuur, zoalsbrandende kaarsen, mogenniet op hetapparaatgeplaatstworden.
Bedek geen enkeleventilatieopening om oververhittingte vermijden.
Zorg dat het toestelniet in een stoffige omgeving wordt gebruikt en maak het regelmatig schoon.
Houd het apparaatuit de buurt van kinderen.
Dit apparaatmag niet door onervaren personen bediend worden.
De maximum veilige omgevingstemperatuur is 40°C. Gebruik het apparaat dus niet bij hogere
temperaturen.
De minimum afstand rondom dit apparaat om een goede koeling toe te laten is 5cm.
Trek altijd de stekker uit wanneer het apparaat gedurende langere tijd niet wordt gebruikt of alvorens met
de onderhoudsbeurt tebeginnen.
De elektrische installatie behoort uitsluitend uitgevoerd te worden door bevoegd personeel, volgens de in
uw land geldende regels betreffendeelektrische en mechanische veiligheid.
Controleer dat de beschikbare spanning niet hoger is dan die aangegeven op de achterzijde van het
toestel.
Het stopcontact zal steeds vrij toegankelijk blijven zodat de stroomkabel op elk moment kan worden
uitgetrokken.
De elektrische kabel behoort altijd in uitstekende staat te zijn. Zet het apparaatonmiddellijk af als de
elektrischekabelgekneusd ofbeschadigd is. De kabel moet vervangen worden door de fabrikant zelf,
zijn dealer of vergelijkbare bekwame personen om een brand te voorkomen.
Laat de elektrische draad nooit in contact komen met andere draden.
Als de netschakelaar zich in OFF (uit) positie bevindt dan is dit apparaat niet volledig van het lichtnet
gescheiden!
Om elektrische schokken te voorkomen, moet U de behuizing niet openen. Afgezien van de zekering
zitten er geen onderdelen in die doorde gebruiker moetenworden onderhouden.
Repareer
steeds
Ingeval van ernstige problemen met het bedienen van het toestel, stopt U onmiddellijk het gebruik ervan.
Contacteeruw dealer voor een eventuele reparatie.
Gebruik bestde originele verpakking als het toestel vervoerd moet worden.
Om veiligheidsredenenis hetverbodenom ongeautoriseerdemodificaties aan het toestel aan te brengen.
INSTALLATIEVOORSCHRIFTEN:
Plaats de draaitafel in een goed geventileerde ruimte waar zij niet blootgesteld is aan hoge
Het plaatsen en het gebruik van de draaitafel gedurende een lange periode in de nabijheid
Wanneer de draaitafel gebruikt wordt in een zeer lawaaierige omgeving, bijvoorbeeld naast
Plaats het toestel op een perfect horizontale en stabiele ondergrond. Een harde of marmeren
Vermijd dat de audiokabels en voedingskabel in contact komen met trillende voorwerpen. In een
Dankzij zijn 2 start/stoptoetsenkan de T3 draaitafelzowel op een traditionele als op een “battle” manier
nooit
een zekering en overbrug de zekeringhouder nooit. Vervang een beschadigde zekering
door een zekering van hetzelfdetype en met dezelfde elektrische kenmerken.
temperaturenof vocht.
warmtebronnenzoalsversterkers,spots, enz. zal zijn werking beïnvloeden.
klankkasten,kan de naald verspringen en kan er terugkoppeling ontstaan.
ondergrond is perfect. Een houten oppervlak is een slechte keuze daar dit de trillingen versterkt.
draagkofferkan de draaitafel best niet direct in contact staan met de wanden van de koffer.
opgesteldworden:
JB SYSTEMS
®
11/30 T3 TURNTABLE
JB SYSTEMS
®
12/30 T3 TURNTABLE
Page 9

HANDLEIDING NEDERLANDS
Traditionele opstelling: Battle opstelling:
Meestaltoegepastin discotheken. Meestal toegepastbij het scratchen
Het beste voor allround mixen. of andere agressieve mixtechnieken
REINIGING VAN DE DRAAITAFEL:
Reinig de draaitafel met een vochtig doek. Vermijd dat er water in het toestel komt. Gebruik nooitvluchtige
vloeistoffen zoals benzeen of thinner welke het toestel kunnen beschadigen.
BEDIENINGEN EN FUNCTIES
1. START / STOP TOETSEN: Druk op één van deze toetsen om het draaien van het draaiplateau te
startenof te stoppen.
2. DRAAIPLATEAU: Deze is voorzien van een slipmat die gemakkelijker maakt om de vinylplaat te
manipulerentijdens het scratchen.
3. MOTOR OFF TOETS: door het gebruik van een magnetische rem zal bij het indrukken van de
start/stop toets (1) het draaiplateau vrij snel stoppen. Door de “motor off” toets in te drukken zal de
plateau echter langzaam tot stilstand komen. Zolang de “motoroff” functie actief is zal de led knipperen.
Druk de toets opnieuw in om de motor terug aan te schakelen.
4. NAALDVERLICHTING: De witte naaldverlichting (led) kan gebruikt worden om de juiste plaats op de
plaat te vinden bij het gebruik in een donkere ruimte.
5. SNELHEIDSKEUZETOETSEN: Gebruik deze toetsenom de snelheid in te stellen.
Druk op “33” om een snelheid van 33tpm in te stellen.
Druk op “45” om een snelheid van 45tpm in te stellen.
Druk gelijktijdig op “33” en “45” om een snelheid van 78tpm in te stellen.
6. REVERSE TOETS: Druk op deze toets om de rotatie van de draaiplateau om te keren, druk nogmaals
op deze toetsom het omgekeerd draaien te annuleren.
HANDLEIDING NEDERLANDS
7. PITCH RANGE TOETS: Druk op deze toets om het bereikvan de Pitch schuifregelaarin te stellen.
Druk 1maalvoor een +/-8% schaal. (gebruikt bij beat mixen)
Druk een 2demaalvoor een +/-12% schaal.
Druk een 3demaalvoor een +/-20%schaal.
Als U de toets nogmaals indrukt dan komt U terug bij +/-8% enz.
8. QUARTZ LOCK TOETS: Bij het indrukken van de QUARTZ LOCK Toets wordt de juiste gemiddelde
snelheid (0%) afgedwongen, zelfs al staat de schuifregelaar niet in zijn middenpositie. De blauwe led
naast de pitch regelaar(9) licht op.
9. PITCH REGELAAR: Gebruik de Pitch schuifregelaar om de snelheid van de draaiplateau in te stellen.
Het bereik hiervan hangt af van de “Pitch Range” toets (7). Wanneer de schuifregelaar in zijn
middenpositie staat licht de led naast de pitch regelaar op om aan te tonen dat de snelheid is
vergrendeld op de juiste gemiddelde snelheid. Opgelet: de Quartz lock toets (8) moet uitgeschakeld
zijn.
10. SINGLE ADAPTER: gebruik dezeadaptervoor het afspelenvan 7” singles.
11. VOEDINGSSCHAKELAAR: Gebruik deze knop om het toestelaan of uit te zetten.
12. VOEDINGSKABELAANSLUITING: gebruik deze om de meegeleverdevoedingskabel aante sluiten.
13. PHONO/LINESCHAKELAAR: Afhankelijk van de stand van de
keuzeschakelaar kan U deze draaitafel op een phono of line
ingang vande mengtafel aansluiten.
14. PHONO/LINE OUTPUT: Sluit de draaitafel aan door middel van
de bijgeleverde cinch/cinch kabel. Let op de stand van de
keuzeschakelaar (13).
15. TOONARM: Dit is een volledig S-vormige toonarm. Om de
weergavete starten: plaats de naald voorzichtig op de plaat door
middel van de vingersteun op de celhouder. Laat de naald niet op de plaat vallen, dit kan zowel de
diamantvan de naald alsookde vinylplaatbeschadigen.
16. TEGENGEWICHT: Gebruik het tegengewicht om de neerwaartse naalddruk in te stellen. Raadpleeg
hiervoorde gebruiksaanwijzingvande naaldconstructeur.
Instellen van de naalddruk:
Controleer of de cel goed vast op de
celhouder staat en dat de naald
beschermingskap verwijderd is. Leg een
vinylplaat op de draaitafel en zorg ervoor
dat de anti-skate op nul staat. Zet de
toonarm hefboom in de benedenstand.
Neem de toonarm en draai aan het tegengewicht tot de toonarm perfectin balans is
Hij zweeft horizontaal boven het
draaiplateau (zie “OK” afbeelding rechts)
Zet nu de drukring (voorkant van het
tegengewicht met markeringen) op de nul
positie terwijl U het tegengewicht goed
vast houdt zodat het niet beweegt. Draai
vervolgens het geheel tegelijkertijd (tegengewicht + ring met markeringen) tot men de gewenste
naalddruk afleest op de ring met markeringen. Vergeet niet de anti-skate knop terug juist in te
stellen.
17. ANTI-SKATE KNOP: Bij het afspelen van een plaat worden er zijdelingse krachten ontwikkeld die de
naald naar de binnenkant of naar de buitenkant drukken. Men kan de anti-skate knop gebruiken om
deze krachten tegen te werken en zo de naald in het midden van de groef houden. Voor een gewone
weergavezet men meestal de anti-skate knop op dezelfde waarde als de neerwaartse druk die men op
de naald geeft(in gr.)vb. (Naalddruk = 3gr. anti-skate = 3)
18. TOONARM HEFBOOM: Hiermee kan men de opwaartse en neerwaartse toonarm bewegingen
controlerenom de naald op de vinylplaat te zetten.
19. TOONARM STEUN: Leg de toonarm telkens op deze steun als U een vinylplaat wil wisselen.
Vergrendel de toonarm op zijn steun als U de draaitafel een tijd niet gebruikt of deze moet
transporteren.Dit verkomt dat de armplotseling uitwijktwaarbij de naald beschadigd wordt.
20. CELHOUDER VERGRENDELING: Breng de
celhouder in de toonarm en draai de ring aan
omde celhouder te vergrendelen.
21. CELHOUDER: Installeer de cel hierop. Let
hiervoor op de aanwijzingen van de
JB SYSTEMS
®
13/30 T3 TURNTABLE
JB SYSTEMS
®
14/30 T3 TURNTABLE
Page 10

HANDLEIDING NEDERLANDS
Celconstructeur. Laat tijdens het monteren de naaldbescherming op de cel, dit om debeschadiging van
de naald te voorkomen.
Verbind de draden als volgt:
Wit (L+)Linkerkanaal+
Blauw(L-) LinkerkanaalRood(R+) Rechterkanaal+
Groen (R-) Rechterkanaal -
EIGENSCHAPPEN
Motor: 8-polige, 3fase, DC motor
Aandrijving: Direct Drive
Aandrijfkoppel: Meer dan 1.8kgf / cm
Starttijd: minder dan 1 seconde
Braking Time: minder dan 1 seconde
Snelheidskeuze: 33
Snelheidsregeling: +/-8% ~ +/-12% ~ +/-20%
Wow &Flutter: minder dan 0,15% WRMS(JIS WTD)
Toonarmtype: StatischgebalanceerdeS-vormige toonarm.
Tracking Error angle: Minder dan3°
Gewicht v/d cel: 6~10g.
Anti-skatedraagwijdte: 0~3g.
Voeding: 230V~50Hz.
Verbruik: 10,5 Watt
Afmetingen: 450 x 370 x145mm (BxDxH)
Gewicht: 8,5kg.
Elke inlichtingkan veranderen zonder waarschuwingvooraf
U kan de laatste versie van deze handleidingdownloadenvia
1/3
~ 45 ~ 78 RPM
Onzewebsite: www.beglec.com
DEUTSCH BEDIENUNGSANLEITUNG
BEDIENUNGSANLEITUNG
Danke, das Sie sich für ein JB SYSTEMS®-Produkt entschieden haben. Bitte lesen Sie sich diese
Bedienungsanleitungdurch, um dieses Produkt richtig bedienen und handhaben zu können.Wenn Sie sich
die Anleitung durchgelesen haben, bewahren Sie diese an einem sicheren Ort auf, um jederzeit
nachschlagenzu können.
FUNKTIONEN
High Torque Direct Drive Motor
Schneller Start und Stop
3 Geschwindigkeiten:33, 45, 78 rpm mit Quartz Lock-Funktion
3 Pitch-Bereiche: +/-8%, +/-12%,+/-20%
Vorwärts/RückwärtsAbspielmöglichkeit
2 Start/Stop Tastenfür hohe Flexibilität
Robustes weisses LED TargetLight
AudioTechnicaTonabnehmersysteminkludiert
Metallischer S-förmigerTonarm mit:
Kontergewicht
Anti-skatingEinstellung
TonarmliftmitHöheneinstellung
EinstellbareTonarmabsenkung für idealeEinpegelung
VOR INBETRIEBNAHME
KontrollierenSie, ob folgende Teileim Karton enthaltensind:
Plattenteller
Slipmat
45-rpmAdapter
Tonarmgewicht
Headshell
Bedienungsanleitung
Tonabnehmersystem
Chinch-ChinchKabel
Stromkabel
JB SYSTEMS
SICHERHEITSHINWEISE
CAUTION
qualifiziertenKundendienst.
Das Blitzsymbol im Dreieck weist den Benutzer darauf hin, das eine Berührungsgefahr mit nicht
isolierten Teilen im Geräteinneren, welche eine gefährliche Spannung führen, besteht. Die
Spannung ist so hoch, das hier die Gefahr eines elektrischen Schlages besteht.
Das Ausrufezeichen im Dreieck weist den Benutzer auf wichtige Bedienungs- und
Wartungshinweiseinden Dokumenten hin, die dem Gerät beiliegen.
DiesesSymbol bedeutet:Nurinnerhalb von Räumen verwenden.
Dieses Symbol bedeutet: Achtung!
Bedienungsanleitunglesen!
®
15/30 T3 TURNTABLE
JB SYSTEMS
®
ACHTUNG: Um sich nicht der Gefahr eines elektrischen
Schlags auszusetzen, entfernen Sie keines der Gehäuseteile.
Im Geräte-inneren befinden sich keine vom Benutzer
reparierbaren Teile. Überlassen Sie Reparaturen dem
Dieses Symbol bedeutet: Klasse II
Klasifizierung
16/30 T3 TURNTABLE
Page 11

BEDIENUNGSANLEITUNG DEUTSCH
Zur Vermeidung von Stromschlag oder Feuer, Gerät bitte nicht Regen oder Feuchtigkeit aussetzen.
Zur Vermeidung von Kondensation im Innerendes Geräts, bitte nach Transport in eine warme Umgebung
einige Zeit zum Temperaturausgleich bringen. Kondensation kann zu Leistungsverlust des Gerätes oder
gar Beschädigungführen.
Gerät nicht im Freienund in feuchten Räumenund Umgebungenverwenden.
Keine Metallgegenstände oder Flüssigkeiten ins Innere des Gerätsgelangen lassen. Keine mit Flüssigkeit
gefüllte Gegenstände z.B. Vasen, auf das Gerät stellen. Kurzschluß oder Fehlfunktion können die Folge
sein. Falls es doch einmal vorkommensollte,bittesofortNetzstecker ziehen und vom Stromkreis trennen.
Offene Brandquellen, wie z.B. brennende Kerzen, sollten nicht auf das Gerätgestellt werden.
Ventilationsöffnungennichtabdecken,da Überhitzungsgefahr!
Nicht in staubiger Umgebung verwenden und regelmäßig reinigen.
Für Kinder unerreichbar aufbewahren.
Unerfahrene Personen sollen das Gerät nicht bedienen.
Umgebungstemperatur darf40ºC nicht überschreiten.
Minimalabstandum das Gerät für ausreichende Kühlung = 5cm.
Stets Netzsteckerziehen,wenn Gerät fürlängeren Zeitraum nicht genutzt, oder es gewartet wird.
Elektrische Anschlüsse nur durch qualifiziertesFachpersonal überprüfen lassen.
Sicherstellen,daß Netzspannung mit Geräteaufkleber übereinstimmt.
Die Netzsteckdose sollteimmer gut erreichbar sein um das Gerät vom Netz zu trennen.
Gerät nicht mit beschädigtem Netzkabel betreiben. Ist die Zugangsleitung beschädigt, muß diese
durchdenHersteller, seinen Vertrieb oder durch eine QualifiziertePerson ersetzt werden.
Netzkabel nicht mit anderen Kabeln in Berührung kommen lassen!
Das Gerät ist nicht vollständig vom Netz getrennt wenn der Netzschalter sich in der AUS-Stellung
befinded.
Gerät nicht öffnen. Abgesehen vom tausch der Sicherung sind keine zu wartenden Bauteile im Gerät
enthalten.
Sicherung
Bei Fehlfunktion, Gerät nicht benutzen und mit Händler in Verbindung setzen.
Bei Transport bitte Originalverpackung verwenden,um Schäden am Gerät zu vermeiden.
Aus Sicherheitsgründendürfen an dem Gerätkeine unbefugtenVeränderungenvorgenommenwerden.
INSTALLATIONSANLEITUNG:
Stellen Sie das Gerät in einem gut belüfteten Raum auf, wo es nicht Feuchtigkeit und hohen
Temperaturenausgesetzt wird.
Plazieren und benutzen Sie das Gerät für eine längere Zeit neben sehr warmen Geräten wie Verstärker,
Lampen,etc., könnte es die Funktion des Gerätes beeinträchtigen.
Das Gerät kann in 19“ Racks eingebaut werden. Benutzen Sie dafür die in der Frontblende
eingelassenenLöcher.
Sollte das Gerät in ein Flightcase eingebautwerden,achten Sie auf eine gute Luftzirkulation.
Wenn das Gerät aus einer kalten Umgebung an einem warmen Ort aufgestellt wird, kann sich
Kondenswasser bilden. Um Fehlfunktionen zu vermeiden, sollten Sie das Gerät für ca. 1 Stunde vom
Stromnetztrennen.
INSTALLATIONSANLEITUNG:
Stellen Sie den Plattenspieler in einem gut belüfteten Raum auf, wo er nicht hohen Temperaturen und
Platzieren und benutzen Sie den Plattenspieler für längere Zeiten neben sehr warmen Geräten wie
Wenn der Plattenspielerin der Nähe von Lautsprechern oder bestimmten anderen Geräten steht, kann
Stellen Sie den Plattenspieler auf einer ebenen und sehr stabilen Oberfläche auf. Eine rein hölzerne
Seien Sie sicher, das der Plattenspieler mit den Netz- und Audioanschlüssen nicht irgendwelche
Da der Plattenspieler zwei Start/Stop Tasten hat, kann er für den herkömmlichen Gebrauch und im
niemals
reparieren oder überbrücken, sondern
Feuchtigkeitausgesetztist.
Verstärker,Lampen, etc.,könnte es die Funktion des Gerätesbeeinträchtigen.
es zu akustischenBeeinträchtigungen kommen(Rückkopplung).
Oberflächeist keine gute Wahl, da hier Vibrationen entstehen können.
vibrierende Oberflächen berührt. Passen Sie besonders auf, wenn das Gerät in einem Plattenspieler-
Case eingebaut ist.
senkrechten Battle-Stylebetrieben werden:
immer
mit gleichartiger Sicherung ersetzen!
BEDIENUNGSANLEITUNG DEUTSCH
TRADITIONELLERSTYLE: BATTLE STYLE:
Meist verwendete Art in Diskotheken. Meist verwendete Art für Scratchen
Geeignetfür Allround-Mixing. und andere aggressive Mixing-Arten
REINIGUNG UND PFLEGE DES GERÄTES:
Reinigen Sie das Gerät mit einem feuchten Tuch. Vermeiden Sie Wassereintritt in das Geräteinnere.
Verwenden Sie keine scharfen Reinigungsmittel wie Reinigungsbenzin oder ähnliches, Sie könnten sonst
das Gerät zerstören.
FUNKTIONEN UND ANZEIGEN
1. START/STOP TASTEN: Drücken Sie diese Taste zum Starten oder Stoppen des Plattentellers.
2. PLATTENTELLER: Der Plattenspieler ist mit einer Slipmat ausgestattet. Diese macht es einfacher die
Plattezu manipulieren.Z.B.: für scratching.
3. MOTOR OFF TASTE: Normalerweise stoppt der Plattenteller wenn man die start/Stopp Taste (1)
betätigt. In diesem Fall stoppt der Plattenteller auf Grund der elektronischen Bremse wesentlich
schneller. Um den Plattentellerlangsam auslaufen zu lassen betätigen sie den „MOTOR OFF“ Schalter.
So lange der Motor abgeschalten ist blinkt der Schalter. Betätigen Sie den Schalter erneut um den
Motorwieder zu aktivieren.
4. TARGET LIGHT: Dieses weisse LED Target Light dient dazu, um einen genauen Punkt auf der
Schallplatteauch an dunklen Orten zu lokalisieren.
5. GESCHWINDIGKEITSAUSWAHL-TASTEN: Wählen Sie aus:
Drücken Sie “33” für Auswahl 33rpm.
Drücken Sie “45” für Auswahl 45rpm.
JB SYSTEMS® 17/30 T3 TURNTABLE
JB SYSTEMS® 18/30 T3 TURNTABLE
Page 12

BEDIENUNGSANLEITUNG DEUTSCH
BEDIENUNGSANLEITUNG DEUTSCH
Drücken Sie “33” und “45” gleichzeitig für Auswahl78rpm.
6. REVERSE TASTE: Drücken Sie diese Taste, um die Abspielrichtung umzudrehen. Durch nochmaliges
Drücken kommen Siewiederin den normalenAbspielmodus zurück.
7. PITCH BEREICH TASTE: Drücken Sie diese Taste, um den Pitch-Bereich einzustellen:
Drücken Sie einmal für +/- 8% Geschwindigkeitsbereich ( Normalerweise verwendet zum
Mixing)
Drücken Sie nochmals für +/- 12%Geschwindigkeitsbereich
Drücken Sie nochmals für +/- 20%Geschwindigkeitsbereich
Das nächstemal wenn Sie diese Taste drücken schalten Sie wieder auf +/- 8%zurück.
8. QUARTZ LOCK TASTE: Wenn die Quartz-Taste gedrückt wird, geht das Gerät wieder auf die exakte
Mittel-Geschwindigkeitzurück, auch wenn sich der Pitch-Fadernicht in der Mittenstellung befindet. Das
blaue LED in der Mitte des Pitch-Faderleuchtet(9).
9. PITCH FADER: Verwenden Sie den Pitch-Fader, um die Geschwindigkeit zu verändern. Der PitchBereich basiert auf die Pitch-Bereich-Taste(7). Wenn der Regler in der Mittelpositionsteht, beginnt das
blaue LED beim Pitchregler zu Leuchten. Das zeigt an das der Plattentellerin Normalgeschwindigkeit
läuft. Vorsicht: Gehen Sie sicher das der Quartzlock Schalter (8) abgeschaltet ist.
10. SINGLE ADAPTER: Platzieren Sie diesen Adapter auf dem Plattenteller wenn Sie eine 7” Platte mit
großemLoch abspielen wollen.
11. POWERON/OFF TASTE: SchaltenSie den Plattenspielerhier ein und aus.
12. POWER CORD ANSCHLUSS: Dieser Anschluss ist der Netzanschluss (Strom), achten Sie auf die
SpannungsangabebeimNetzanschluss.
13. PHONO/LINE SCHALTER: Abhängig von der Position des
Phono/Line Schalters, können Sie den Plattenspieler an jeden
Phonooder Line Eingang anschließen.
14. PHONO Ausgang: Schließen Sie den Plattenspieler an jeden
Phono oder Line Anschluss an. Verwenden Sie hierbei ein
Chinch-Chinch Kabel. Versichern Sie sich das der phono/line
Schalter(13) in der richtigen Position steht.
15. TONARM: Dieser ist ein manueller s-förmiger Tonarm. Um die
Wiedergabe zu starten, platzieren Sie den Tonarm vorsichtig mit dem Finger am Hebearm des
Headshells auf die Schallplatte, andernfalls können Sie die Schallplatte zerkratzen oder die Nadel
beschädigen.
16. KONTERGEWICHT: Benutzen Sie das Kontergewicht (Tonarmgewicht), um die Balancedes Tonarmes
und somit auch den Auflagedruck zu verstellen. Für den korrekten Auflagedruck lesen Sie sich die
Herstellerangaben des Systems durch.
Einstellungdes Auflagedrucks:
Vergewissern Sie sich, das das System in
Ordnung ist und die Schutzabdeckung der Nadel
entfernt wurde. Legen Sie eine Platte auf und
stellen Sie das Anti Skate auf Null. Stellen Sie den
Tonarmhebel hinunter. Jetzt stellen Sie das
Kontergewicht so ein, bis der Tonarm perfekt
balanciert. Nun stellen Sie den Ring auf dem
Kontergewicht auf Null zurück. Jetzt können Sie
das Gewicht des Systems nach Herstellerangabe
einstellen. Vergessen Sie nicht, den Anti-Skate
wieder dementsprechendeinzustellen.
17. ANTI-SKATE RAD: Wenn eine Schallplatte spielt, wirken verschiedene Kräfte auf den Tonarm
Richtung Platteninneres oder Richtung ausserhalb. Das Anti-Skate Rad dient dazu, diese Kräfte
konstant zu halten, egal wo der Tonarm sich gerade auf der Schallplatte bewegt. Stellen Sie einfach
Anti Skate gleich wie den Auflagedruck der Systemnadel ein (zB. Gewicht 3gr – Anti Skate auf 3
stellen).
18. TONARMHEBEL: Kontrolliert die Auf-undAbwärtsbewegung desTonarmes.
19. TONE ARM CLAMP & REST: Benutzen Sie diese Ablage für den Tonarm während Sie die Platte
wechseln. Fixieren Sie den Tonarm mit der Klammer auf seiner Auflage, wenn Sie den Plattenspieler
nicht mehr benötigen oder ihn Transportieren. Somit verhindern Sie das der Tonarm von seiner Ablage
rutscht, auf den Plattenteller fällt und dadurch die Nadel beschädigt wird.
20. HEADSHELL VERSCHLUSS: Montieren Sie
das System, indem Sie es auf das vordere Ende
des Tonarmes stecken und den
Bajonettverschlussim Uhrzeigersinn verriegeln.
21. HEADSHELL: Installieren Sie hier das Tonabnehmersystem, achten Sie aber bei der Installation auf
die Herstellerangaben dieses Tonabnehmersystems. Lassen Sie die Nadelschutzabdeckung während
der Montageaufdem System. Folgende Anschlüsse sind gegeben:
Weiss(L+) Linker Kanal+
Blau (L-) Linker Kanal Rot(R+) Rechter Kanal +
Grün(R-) RechterKanal -
TECHNISCHE DATEN
Motor: 8Pole, 3Phasen, DC Motor
Antriebsmethode: Direktgetrieben
StartDrehmoment: Mehr als 1,8 kgf/cm
Startzeit: weniger als 1 Sekunde
Stopzeit: wenigerals 1 Sekunde
Geschwindigkeiten: 33
Pitch-Bereiche: +/-8% ~ +/-12% ~ +/-20%
Klirrfaktor: Weniger als 0,15% WRMS (JIS WTD)
Tonarmtyp: FesterausbalancierterS-förmiger Tonarm
Tracking Fehler: Wenigerals 3°
Systemgewicht: 6~10g
Anti-SkateBereich: 0~3 g
Netzanspeisung: 230V~50Hz
Leistungsaufnahme: 10,5 Watt
Dimensionen: 450 x 370 x145mm (BxTxH)
Gewicht: 8,5kg
TechnischeÄnderungen können auch ohneVorankündigungvorgenommen werden!
Sie können sich die neueste Version dieses Benutzerhandbuchesvonunserer Website
1/3
~ 45 ~ 78 RPM
herunterladen: www.beglec.com
JB SYSTEMS® 19/30 T3 TURNTABLE
JB SYSTEMS® 20/30 T3 TURNTABLE
Page 13

ESPAÑOL MANUAL DE INSTRUCCIONES
MANUAL DE INSTRUCCIONES
Le felicitamos y le agradecemos por la adquisicion de este producto JB SYSTEMS®. Leá atentamente las
siguientesinstrucciones para saver como utilizar este producto de manera correcta. Recoja este manual en
un sitio seguro para volver a consultarloulteriormente.
CARACTERISTICAS
Motora tracción directa de par alto
Arranquerápido
Frenadorápido
3 velocidades: 33, 45, 78 rpm con cerrojo quartz
3 gamas de velocidad posibles: +/-8% ; +/-12% ; +/-20%
Lectúrainversada
2 botonesde arranque Start / Stop para flexibilidad máxima
Iluminaciónde capsula de color blanco (LED)
CapsulaAudioTechnicaincluida
Brazo metalico en forma de 'S' incorporando:
Contrapeso
Control anti deslizante (Anti-skating)
Elevaciónhydraulica
Pies de soporteregulables para poner la unidad a nivel
ANTES DEL USO
Comprobarquelos componentes siguientesestén presentes:
Platillo
Patinador
Adaptador45 rpm
Contrapeso
Portacapsula
Instruccionesdefuncionamiento
Capsula
Cables de conexión cinch/cinch
Cable de enchufe
PRECAUCIONES DE USO
CAUTION
El simbolo de un rayo en el interior de un triangulo alertasobre la presencia o el uso de elementos
no isolados donde un voltage peligroso constituye un riesgo suficiente para causar una eventual
electrocución.
El punto de exclamación en el interior de un triangulo alerta el usuario sobre la presencia de
importantesinstrucciones y/o del mantenimientoen el manual de uso.
PRECAUCION: Para reducir el riesgo de electrocución no
abra ninguna tapa. No existen piezas en el interior que pueda
cambiar usted mismo. Dirijase unicamente a personal
cualificado.
ESPAÑOL MANUAL DE INSTRUCCIONES
Afín de evitar todo riesgo de incendio o electrocución, no exponer el aparato a la lluvia o ambiente
humedo.
Para evitar que se forme condensación en el interior, permita que la unidad se adapte a las temperaturas
circundantes cuando la lleve a una habitación cálida después de transporte. La condensación algunas
veces impide que la unidad funcione a rendimiento pleno o puede incluso causar daños.
Esta unidad es sólo para uso interior.
No coloque objetos metálicos o derrame líquidos dentro de la unidad. No colocar recipients llenos de
liquidos, como floreros, encima del aparato. Podría resultar descarga eléctrica o mal funcionamiento. Si
un objetoextraño entrara en la unidad, desconecteinmediatamente la fuente de alimentación.
No colocar fuentes de llamas, como velas, encimade la unidad.
No cubra ninguna apertura de ventilación ya que esto podría resultar en sobrecalentamiento.
Evite su uso en ambientes polvorientosy limpie la unidad regularmente.
Mantenga la unidad alejada de los niños.
Personas sin experiencia nodeberían manejar este aparato.
La temperaturamáxima de ambiente es 40°C. No use esta unidad a temperaturasmás elevadas.
Lasdistancias mínimasalrededor del aparato para la suficiente ventilación son los 5cm.
Siempre desenchufe la unidad cuando no la use por un periodo de tiempo largo o antes de cambiar la
bombillao comenzar una reparación.
La instalación eléctrica debería ser llevada a cabo sólo por personal cualificado, acorde a las
regulacionespara seguridad eléctricaymecánica desu país.
Compruebe que el voltajedisponible no es superioral que aparece en el panel traserode la unidad.
Enchufe siempreaccessible para desconectar la alimentación.
El cable de alimentación debería estar siempre en perfectas condiciones: apague el aparato
inmediatamente cuando el cable de alimentación esté roto o dañado. Debe ser substituido por el
fabricante,su serviciotécnico o otra persona cualificada.
¡Nunca deje el cable de alimentación entrar en contactocon otros cables!
¡Cuando el interruptor está en la posición de reposo, esta unidad no se desconecta totalmente de la
alimentación!
Para prevenir descargas eléctricas, no abra la tapa. Aparte de fusibles principales no hay partes que
puedan ser reparadas por el usuario en su interior.
Nunca repare un fusible o haga un bypass al fusible. ¡Siempre sustituya el fusible dañado por un fusible
del mismo tipo y especificaciones eléctricas!
En el caso de problemas serios de manejo, deje de usar la instalación y contacte con su vendedor
inmediatamente.
Por favor, use el empaquetado original cuando el aparato deba ser transportado.
Debido a motivos de seguridad está prohibido hacer modificaciones sin autorizar a la unidad.
INSTALACION:
Instalarla platina en un sitio con buena ventilaciónparano exponerla a altas temperaturaso humedad.
Colocar y utilizar la platina mucho tiempo en sitios calientes (al lado de amplificadores,focos,…) puede
afectar sus prestaciones.
Evitarlas vibracionessonoras, por ejemplode altavoces,porque puede producirse zumbido.
Colocar la platina de manera establey horizontal.Colocar de preferencia sobre un zócalo de hormigón
o de marbol y evitar la madera que amplificará las vibraciones.
Asegurese que ni la platina ni sus cables estén en contacto directo con una fuente de vibraciones.
Tener cuidadoal usar la platinacon un flying case.
Gracias a sus 2 botones de arranque 'start/stop', la platina T3 puede ser utilizadade manera tradicional
opara concursos:
Este símbolo significa : Uso para el interiorsolamente.
Este símbolo significa: Lea las Instrucciones.
Este símbolo significa: Aplicacionesde la clase II
JB SYSTEMS
Uso tradicional: Uso en competición:
Habitualmenteen discotecas . Facilítael 'scratching' y las técnicas
Convienepara mezclas pasivas. de mezclas más agresivas
®
21/30 T3 TURNTABLE
JB SYSTEMS® 22/30 T3 TURNTABLE
Page 14

ESPAÑOL MANUAL DE INSTRUCCIONES
ESPAÑOL MANUAL DE INSTRUCCIONES
LIMPIEZA DE LA PLATINA:
Límpiarcon un trapo lijeramentehumedo. No derramaragua en el interior de la unidad.
No utilizar productos abrasivos(alcohol,…) que puedan dañar la platina.
CONTROLES Y FUNCIONES
1. BOTON START / STOP: Pulsar para arrancar o parar el platillo.
2. PLATO GIRATORIO: Acompañado de un patinador. Estees idoneo para las azañas del "scratch".
3. BOTON DE CORTE MOTOR: Normalmente el plato se para al pulsár start/stop (1). En este caso el
plato se para muy rapidamente gracias al freno electrónico.Pulse "motor off" si quiere que se pare más
suavemente. Mientras el motor esté apagado la luz del botón se ilumina. Pulse otra vez para reactivar
el motor.
4. ILUMINACIÓNDE LA CAPSULA: Luz blanca muy util para utilización de la platina en sitiososcuros.
5. BOTONES DESELECCIÓN DE VELOCIDAD: Selección de le velocidad deseada.
Pulsar el botón“33” paraseleccionár la velocidad33rpm.
Pulsar el botón“45” paraseleccionár la velocidad45rpm.
Pulsár los botones“33” y “45” al miso tiempo para seleccionár la velocidad 78rpm.
6. BOTÓN DE INVERSIÓN: Pulsar para poner el platillo en modo inversado. Pulsar de nuevo para volver
al modo de lectura normal.
7. BOTÓN GAMA PITCH: Presione estebotón para ajustar la gama del potenciometrode velocidad.
Primerapulsación para la gama de velocidad +/-8% (utilizada normalmenteen la mezcla)
Pulsar de nuevo para la gama de velocidad +/-12%.
Pulsar de nuevo para la gama de velocidad +/-20%.
8. BOTÓN QUARTZ: Pulsando el botón QUARTZ, la platina se pone en velocidad exacta mismo si el
deslizante no está centrado.
9. DESLIZANTE PITCH: El deslizante permite cambiar la velocidad del platillo. La gama depende del
botón “pitch range” (7). Con el deslizante en su posición media, un testigose enciende para indicar que
la velocidad está en posición exacta.
10. ADAPTADOR DE SIMPLES: Colocar éstepara discos de 7" con un gran agujero central.
11. INTERRUPTORDE ENCENDIDO ON/OFF: Encender / apagar la platina.
12. CABLE DE ALIMENTACIÓN: conectar a una fuente 230V AC con el cable de alimentacíon.
13. CONMUTADOR PHONO/LINE: Según la posición del interruptor
phono/line se conectara el plato a una entrada de nivel phono o
line.
14. SALIDA PHONO: Conectar la platina sobre una entrada phono
con un cable cinch/cinch. Be sure to put the phono/line switch
(13) in the right position.Asegurese que el interruptor (13) esté
en la posición adecuada.
15. BRAZO: Brazo de forma 'S' totalmente manual. Para empezar la
lectura, colacar la capsula sobre el disco usando el soporte del porta capsula. Colocar la capsula
cuidadosamentede manera a no dañar el diamante y el disco.
16. CONTRA PESO: Permiteajustar la presión necesariaa la capsula. Para saber exactamentela presión
ideal,referirsea las instrucciones de su capsula.
Instalación de la capsula:
Asegurese que la capsula esté bien colocada
sobre el brazo. Poner un disco y asegurarse
quel anti deslizante esté en cero. Poner la
palanca de elevación en posición baja. Girar el
contrapeso hasta quel brazo esté perfectamente
equilibrado el brazo flota como en la posición
“OK” del dibujo. Poner la graduación del anillo
de presión sobre cero cuidando no mover el
contrapeso. Girar el contrapeso completo hasta
que la graduación se quedé sobre la presión
deseada. Volver a poner el anti deslizante en
la posición corespondiente.
17. BOTÓN ANTI DESLIZANTE: Durante la lectura de
un disco, fuerzas centrífugas empuján la aguja hacia el centro del disco. Este boton permite eliminar
esas fuerzas. Para lecturas simples, ajustar este control de equivalente valor a la presión de la capsula
(Pressión de capsula = 3gr. anti deslizante= 3).
18. PALANCA DE ELEVACIÓN DEL BRAZO: Permite subir y bajar el brazo.
19. TONE ARM CLAMP & REST: Se utilizará siempre que se cambie de disco.Se atará siempre el brazo
en caso de transporte o de no utilización del mismo.Evitaremos así que se estropee la aguja o se dañe
el plato.
20. CERROJO DE PORTA CAPSULA: Insertar el
porta capsula en el brazo y girar el cerrojo como
indicado en estedibujo.
21. PORTA CAPSULA: Referirse a las instrucciones
del fabricante de la capsula. Dejar la protección sobre la capsula durante la instalación para evitar
daños.
Conectarlos hilos de esta manera:
Blanco(L+) Canal izquierdo+
Azúl (L-) Canal izquierdoRojo(R+) Canal derecho+
Verde(R-) Canalderecho-
JB SYSTEMS® 23/30 T3 TURNTABLE
JB SYSTEMS® 24/30 T3 TURNTABLE
Page 15

ESPAÑOL MANUAL DE INSTRUCCIONES
ESPECIFICACIONES
Motor: 8 pole, 3phase, brushless DC motor
Driving Method: Direct Drive
StartingTorque: Mas de 1.8kg / cm
Tiempode arranque: menos de 1segundo
Tiempo de freno: menos de 1segundo
Selección de velocidad: 33
Ajuste de velocidad: +/-8% ~ +/-12% ~ +/-20%
Wow &Flutter: Menosde 0,1% WRMS (JISWTD)
Tipo de brazo: Static balanced S-shaped tone arm.
Tracking Error angle: Menosde 3°
Peso de capsula: 6~10g.
Valor Anti deslizante: 0~3g.
Alimentación: 230V~50Hz.
Consumición: 10,5Watts
Dimensiones: 450 x 370 x 145mm (WxDxH)
Peso : 10,5kg
Puede descargar la última versión de este manualde usuarioen nuestro sitio web:
Toda la información está sujeta a cambios sin previo aviso
1/3
~ 45 ~ 78 RPM
www.beglec.com
PORTUGUÊS MANUAL DO UTILIZADOR
MANUAL DO UTILIZADOR
Obrigado por ter adquirido este produto da JB Systems®. De modo a tirar total proveito daspossibilidades
deste produto, por favor leia este manual com atenção.
CARACTERÍSTICAS
Motorde transmissão directa de alta torção
Função Início / paragem rápida
3 velocidades: 33, 45, 78 rpm(rotações por minuto) com trinco de quartzo
3 escalas de ajuste de pitch: +/-8%; +/-12%;+/-20%
Reprodução sentido normal/ inverso
2 botões start / stop para flexibilidademáxima
Saída seleccionávelphono/line
LED alvo inquebrável de luz branca
CabeçaAudioTechnica incluída
Braço de metal em formade S instalado com:
Contrapeso
Ajuste anti-deslizamento
Elevador de alavanca
Pés grandes ajustáveis para nivelamentoperfeito
ANTES DE UTILIZAR
Verifique o conteúdo:
Certifique-seque a caixacontém os seguintes artigos:
Prato gira-discos
Tapetedeslizante
Adaptador45-rpm
Contrapeso
Suporte
Manual do utilizador
Cabeça
Cabo de ligação rca / rca
Cabo de alimentação.
JB SYSTEMS® 25/30 T3 TURNTABLE
INSTRUÇÕES DE SEGURANÇA:
ATENÇÃO: De forma a evitar o risco de choque eléctrico,
CAUTION
O símbolo composto por um triângulo equilátero com um relâmpago no interior alerta para a
presença de voltagem perigosa não isolada no interiordo produto que poderá constituir risco de
choque eléctrico.
O símbolo composto por um triângulo equilátero com um ponto de exclamação alerta o utilizador
paraa presença de instruções importantesde utilização emanutenção do produto.
Estesímbolo significa: utilização unicamenteem espaços fechados.
Estesímbolosignifica:Leia instruções.
Este símbolo significa: Aparelho Classe II
De modo a evitar risco de fogo ou choque eléctrico, não exponha este produto a chuva ou humidade.
JB SYSTEMS
®
não remova peças da unidade. Não tente fazer reparações.
Contactepessoal qualificado.
26/30 T3 TURNTABLE
Page 16

PORTUGUÊS MANUAL DO UTILIZADOR
PORTUGUÊS MANUAL DO UTILIZADOR
De forma a evitar a formação de condensação no interior da unidade, ao transportá-la para ambiente
quente aguarde algum tempo de modo a que haja uma ambientação à temperatura. A condensação
poderá afectaro desempenho da unidade ou até danificá-la.
Esta unidadedestina-se unicamente a utilizaçãoem espaços fechados.
Não introduza objectos de metal nem verta líquidos no interior do produto, correrá risco de choque
eléctricoou poderá danificar o produto. Caso algum objectoestranho entre em contacto com o interiorda
unidade,desligue-a de imediato da corrente.
Não coloque chamas descobertas (tais como velas acesas) sobre a unidade.
Não cubra os orifíciosde ventilação ou a unidade poderá sobreaquecer.
Evite locais com poeiras. Limpe a unidade regularmente.
Mantenha esta unidade fora do alcancedas crianças.
Esta unidade deverá ser operadaunicamente por pessoas experientes.
Temperatura ambiente de funcionamento máxima é de 40ºC. Não utilize esta unidade a temperaturas
ambientesmais elevadas.
As distâncias mínimas para a ventilaçãosuficiente são 5cm.
Desligue sempre a unidade da correntequando não a utilizardurante longos períodos de tempo ou antes
de efectuar manutenção.
A instalação eléctrica deve ser efectuada unicamente por pessoal qualificado, cumprindo os
regulamentosde segurança em instalações eléctricase mecânicas do seu pais.
Certifique-se que a voltagema utilizar não é superior à voltagem indicada no painel traseiro da unidade.
A tomada de corrente deverá permanecer acessívelpara que a unidade possa ser desligada da corrente.
O cabo de alimentação deverá estar sempre em perfeitas condições. Desligue a unidade e substitua
imediatamente o cabo caso este apresente algum dano. Deverá ser substituído pelo fabricante, pelo
agenteautorizado ou pessoal qualificado de modo a evitar um acidente.
Nunca permita que este cabo entre em contactocom outros cabos!
Quando o interruptor de poder está no posição de repouso, esta unidade não está desconectada
completamente dos canos principais!
De formaa não correr risco de choque eléctrico não abra a cobertura da unidade. À excepção do fusível,
não existem peças que possam ser substituídas pelo utilizador.
Nunca repare um fusível nem tente operar a unidade sem fusível. Substitua sempre um fusível
danificadopor outro com as mesmas características!
Em caso de problemas sérios de funcionamento, interrompa a utilização da unidade e contacte
imediatamente o seu revendedor.
Caso seja necessário transportara unidade utilize a embalagem original.
Por motivos de segurança, são proibidas quaisquer alteraçõesnão autorizadas à unidade.
GUIA DE INSTALAÇÃO:
Instale o gira-discos num local bem ventilado onde não esteja exposta a altas temperaturas ou
humidade.
Colocar ou utilizar o gira-discos durante longos períodos de tempo perto de fontes de calor, tais como
amplificadores, holofotes, etc., irá afectar o desempenho da unidade.
Quando o gira-discos é utilizado num ambiente com som elevado, por exemplo perto de colunas,
podem ocorrer falhas de som e feedback.
Instale a unidade numa superfície perfeitamente horizontal e estável. Uma superfície de cimento ou
mármoreserá perfeita. Uma superfíciede madeira será uma má escolha visto que amplificavibrações.
Certifique-se que o gira-discos, bem como os cabos áudio e de alimentação não estão em contacto
com materiais que emitam vibrações. Tenha especial cuidado quando utilizar a unidade instalada
numa mala de transporte.
Uma vez que o gira-discos T3 tem dois botões start / stop, esta unidade pode ter duas configurações,
tradicionale battle:
ConfiguraçãoTradicional: Configuração Battle:
Utilizada geralmenteem discotecas. Indicada
para misturas em geral.
LIMPEZADO GIRA-DISCOS:
Utilize um pano limpo ligeiramente humedecido em água. Evite introduzir água dentro da unidade. Não
utilizelíquidosvoláteis como benzeno ou diluente, irá danificar a unidade.
Utilizadageralmenteparasratching e outras
técnicas agressivas de mistura.
CONTROLOS E FUNÇÕES
1. BOTÕES START / STOP: Pressione um destes botões para ligar ou desligar o prato.
2. PRATO: O prato está equipado com um tapete deslizante. Isto torna mais fácil manipular o disco
durante a execuçãode scratch.
3. BOTÃO MOTOR OFF (motor desligado): Normalmente o prato pára quando se pressiona o botão
start/stop (1). Neste caso prato pára muito rapidamente devido a travagem electrónica. Pressione o
botão “motor off” se quiser que o prato pare mais suavemente. Enquanto o motor estiver desligado o
LED do botão pisca. Pressioneo botão novamentepara voltar a ligar o motor.
4. TARGET LIGHT: LED branco alvo utilizado para situar um ponto preciso no seu disco quando
utilizadonum local escuro.
5. BOTÕESSELECÇÃOVELOCIDADE: Permitem seleccionar a velocidadepretendida.
Pressioneo botão “33” para seleccionar33rpm.
Pressioneo botão “45” para seleccionar45rpm.
Pressione o botão “33” e “45” simultaneamente para seleccionar 78rpm.
6. BOTÃO REVERSE: pressione este botão para inverter a rotação do prato, pressione novamente o
botão para voltarà rotação no sentido normal.
7. BOTÃOPITCH RANGE: Pressione este botão para ajustar a escala do cursor pitch.
Pressione uma vez para escala +/-8% (normalmente utilizadoem mistura de batidas).
Voltea pressionar para uma escala de +/-12%.
Voltea pressionar para uma escala de +/-20%.
Se voltar a pressionar este botão irá voltara +/-8%, etc.
8. BOTÃO QUARTZ: Quando este botão é pressionado, é utilizada a velocidade central exacta (0%),
mesmo que o cursor pitch não se encontre no meio. O LED azul próximo do cursor pitch (9) irá
acender-se.
9. CURSOR PITCH: Utilize este cursor para alterar a velocidade da reprodução. A escala depende do
botãoPitch Range (7). Quando o cursor está na posição central, o LED azul próximo do cursor pitch irá
JB SYSTEMS
®
27/30 T3 TURNTABLE
JB SYSTEMS
®
1/30 T3 TURNTABLE
Page 17

PORTUGUÊS MANUAL DO UTILIZADOR
PORTUGUÊS MANUAL DO UTILIZADOR
acender-se indicando que o gira-discos está fixo na velocidade central. Atenção: certifique-se que o
botão trinco de quartzo (8) está desligado.
10. ADAPTADOR SINGLE: Coloque este adaptador no prato para reproduzir discos de 7” com orifícios
centraismais largos.
11. INTERRUPTOR ON/OFF: Utilizado para ligar e desligar o gira-discos.
12. CONECTOR CABOALIMENTAÇÃO: Utilizadopara ligaro cabo da alimentaçãofornecido.
13. INTERRUPTOR PHONO/LINE: Dependendo da posição deste interruptor, pode ligar o gira-discos a
qualquer entrada do tipo line ou phono.
14. SAÍDA PHONO/LINE: Ligue o gira-discosa qualquer entrada do
tipo line ou phono através do cabo rca / rca fornecido.Certifiquese que colocao interruptor phono / line (13) na posição correcta.
15. BRAÇO: Este é um braço em forma de S totalmente manual.
Para dar inicio à reprodução, coloque com cuidado a agulha no
disco utilizando o suporte para dedos. Não deixe cair a agulha
no disco pois poderádanificar a ponta de diamante eo disco.
16. CONTRAPESO: Utilize o contrapeso para equilibrar o braço e para ajustar a pressão da agulha. Para
ver qual a pressão correcta,consulte o manual da cabeça.
Definir a pressão da agulha:
Certifique-se que o a cabeça está bem
colocada e que o protector da agulha foi
retirado. Coloque um disco no prato e
certifique-se que o anti-deslizamento foi
definido para zero. Coloque a alavanca do
braço na posição “down” (em baixo).
Segure no braço e gire o contrapeso até
que o braço esteja em equilíbrio perfeito
flutua horizontalmente por cima da
superfície do disco, veja a imagem “OK” à
direita. Agora coloque o “stylus pressure
ring” (anel de pressão da agulha situado
na secção da frente do contrapeso com
marcas) na posição zero, girando o anel e
assegurando-se que o contrapeso não se move. Em seguida, gire o contrapeso na sua totalidade
no sentido dos ponteiros do relógio até que o anel indique a pressão certa da agulha. Não se
esqueça de voltar a colocar o anti-deslizamentono lugar.
17. BOTÃO ANTI-DESLIZAMENTO: Quando um disco está a ser reproduzido são produzidas forças
laterais, que empurram a agulha para o centro ou para fora do disco. Pode usar o botão antideslizamento para compensar esta força e manter a agulha no centro da ranhura do disco. Para uma
reprodução normal gire o botão anti-deslizamento para o mesmo número lido em gramas na pressão
da agulha. (pressão do agulha = 3gr. → anti-deslizamento= 3)
18. ELEVADOR DOBRAÇO: Permitefazer subir e descer o braço.
19. GANCHO E APOIO DO BRAÇO: Utilize este apoio para o braço enquanto muda um disco. Prenda o
braço à restanteunidade através do gancho quando o gira-discos não estiver a ser utilizadoou durante
o transporte. Desta forma evita que o braço se vire acidentalmente para o prato e danifique a agulha
da cabeça.
20. CONTRAPORCA DO SUPORTE: Prenda o
suporte introduzindo-o na extremidade do
braço, girando em seguida a contraporca na
direcção dos ponteiros do relógio.
21. SUPORTE: Instale a cabeça aqui. Ao
executar esta operação consulte as instruções
de instalação fornecidas pelo fabricante da cabeça. Durante a instalação, coloque o protector da
agulha para que o diamante não se danifique.
Coloque os fios da seguinte forma:
Branco (L+) CanalEsquerdo +
Azul (L-) CanalEsquerdo Vermelho (R+) CanalDireito +
Verde (R-) Canal Direito -
ESPECIFICAÇÕES
Motor: 8 pólos, 3 fases, motor brushless DC
Transmissão: Transmissãodirecta
Torção inicial: Mais de 1.8kgf / cm
Tempoarranque: Menosde1sec segundo
Tempotravagem: Menosde1sec segundo
Selecçãovelocidade: 33
Ajustevelocidade: +/-8% ~ +/-12% ~ +/-20%
Wow &Flutter: Menosque 0,15% WRMS (JISWTD)
Tipo de braço: Braço estático equilibrado forma de S.
Ânguloerro de tracção: Menosde 3°
PesoCabeça: 6~10g.
Anti-deslizamento: 0~3g.
Fonte de Alimentação: 230V~50Hz.
Consumode energia: 10,5Watts
Dimensões: 450x 370 x 145mm (LxDxA)
Peso: 8,5kg.
Podefazer download da versão mais recente deste manual no nosso site: www.beglec.com
Estas informações estão sujeitas a alterações sem avisoprévio
1/3
~ 45 ~ 78 RPM
JB SYSTEMS
®
28/30 T3 TURNTABLE
JB SYSTEMS
®
29/30 T3 TURNTABLE
 Loading...