

Page 1
DJ MIXER
WWW.SYNQ-AUDIO.COM
Copyright © 2008 by BEGLEC cva.
Reproduction or publication of the content, even portions, in any manner, without express permission of the publisher, is prohibited.
V1.0
Operation Manual
Mode d'emploi
Gebruiksaanwijzing
Bedienungsanleitung
Manual de instrucciones
Manual do utilizador
EN
FR
NL
DE
ES
PT
Page 2
EN - DISPOSAL OF THE DEVICE
Dispose of the unit and used batteries in an environment friendly manner
according to your country regulations.
FR - DÉCLASSER L’APPAREIL
Débarrassez-vous de l’appareil et des piles usagées de manière écologique
Conformément aux dispositions légales de votre pays.
NL - VERWIJDEREN VAN HET APPARAAT
Verwijder het toestel en de gebruikte batterijen op een milieuvriendelijke
manier conform de in uw land geldende voorschriften.
DU - ENTSORGUNG DES GERÄTS
Entsorgen Sie das Gerät und die Batterien auf umweltfreundliche Art und
Weise gemäß den Vorschriften Ihres Landes.
ES - DESHACERSE DEL APARATO
Reciclar el aparato y pilas usadas de forma ecologica conforme a las
disposiciones legales de su pais.
PT - COMO DESFAZER-SE DA UNIDADE
Tente reciclar a unidade e as pilhas usadas respeitando o ambiente e em
conformidade com as normas vigentes no seu país.
Page 3
ENGLISH OPERATION MANUAL
CAUTION:
USER MANUAL
Congratulations and thank you for buying this SYNQ product. Please read these operating
instructions carefully so you will know how to operate this product properly. After you have
finished reading the instructions, put them in a safe place for future reference.
DON’T FORGET TO REGISTER YOUR SMX-3 MIXER. YOU WILL AUTOMATICALLY
RECEIVE A REMINDER WHEN NEW SOFTWARE UPDATES ARE AVAILABLE!
SURF TO: WWW.SYNQ-AUDIO.COM/REGISTER/
FEATURES
This unit is radio-interference suppressed. This appliance meets the requirements of the
current European and national guidelines. Conformity has been established and the
relevant statements and documents have been deposited by the manufacturer.
12 inputs (2mic + 7line + 3phono) on 6 channels (5faders + 1DJ mic)
Special matrix input selector for maximum flexibility: exchange all inputs in a second!
2 Master outputs:
o Master1 with signal trimming adjustment(XLR + cinch/RCA)
o Master2 (cinch/RCA)
Gain and 3-band tone controls with kill function -30dB on all channels
LED level meters with peak memory on all channels + Master
User replaceable, VCA controlled, high quality faders with curve control on all channels
User replaceable, VCA controlled, cross fader with curve control (soft sharp cutoff)
Easy A/B channel selection for cross fader
Versatile MP3-sampler:
o Based on SDHC™-memory cards (several hours audio recording!)
o Max. 99 memory banks with each 5 samples on every SDHC™ Card!
o Stereo samples can be recorded in MP3-format (192kbps)
o Individual speed control for all samples!
o General speed control with master tempo! (pitch lock)
o Polyphony: 2 samples can be played together
o Seamless loops with editable begin and endpoints
o Sampler in/outputs assignable to any channel
Full automatic beat counters
Cross fader start control for compatible CD-players
2 Beat synchronized Cross fader mixing effects
8 Beat synchronized digital effects with user programmable effect presets: Echo,
Autopan, Flanger, Manual filter, Auto filter, Reverb, Trans, Pitch Shifter
Stereo effect send/return to connect external effect processors.
Adjustable DJ microphone talk-over function
High power Phones output with “cue/pgm mixing” possibility
Firmware upgradeable with SD™/SDHC™-cards.
ENGLISH OPERATION MANUAL
BEFORE USE
Before you start using this unit, please check if there’s no transportation damage. Should
there be any, do not use the device and consult your dealer first.
Important: This device left our factory in perfect condition and well packaged. It is
absolutely necessary for the user to strictly follow the safety instructions and warnings in
this user manual. Any damage caused by mishandling is not subject to warranty. The
dealer will not accept responsibility for any resulting defects or problems caused by
disregarding this user manual.
Keep this booklet in a safe place for future consultation. If you sell the fixture, be sure to
add this user manual.
To protect the environment, please try to recycle the packing material as much as
possible.
Check the contents:
Check that the carton contains the following items:
SMX-3 mixer
Mains cable
User manual
SAFETY INSTRUCTIONS:
CAUTI ON
not remove the top cover. No user-serviceable
parts inside. Refer servicing to qualified service
personnel only.
The lightning flash with arrowhead symbol within the equilateral triangle is
intended to alert the use or the presence of un-insulated “dangerous voltage”
within the product’s enclosure that may be of sufficient magnitude to constitute a
risk of electric shock.
The exclamation point within the equilateral triangle is intended to alert the user to
the presence of important operation and maintenance (servicing) instructions in
the literature accompanying this appliance.
This symbol means: indoor use only
This symbol means: Read instructions
This symbol means: Safety Class II appliance
To prevent fire or shock hazard, do not expose this appliance to rain or moisture.
To avoid condensation to be formed inside, allow the unit to adapt to the surrounding
temperatures when bringing it into a warm room after transport. Condense sometimes
prevents the unit from working at full performance or may even cause damages.
This unit is for indoor use only.
Don’t place metal objects or spill liquid inside the unit. No objects filled with liquids, such
as vases, shall be placed on this appliance. Electric shock or malfunction may result. If a
foreign object enters the unit, immediately disconnect the mains power.
No naked flame sources, such as lighted candles, should be placed on the appliance.
Don’t cover any ventilation openings as this may result in overheating.
Prevent use in dusty environments and clean the unit regularly.
Keep the unit away from children.
To reduce the risk of electric shock, do
SYNQ® 1/124 SMX-3
SYNQ® 2/124 SMX-3
Page 4

ENGLISH OPERATION MANUAL
ENGLISH OPERATION MANUAL
Inexperienced persons should not operate this device.
Maximum save ambient temperature is 40°C. Don’t use this unit at higher ambient
temperatures.
Minimum distances around the apparatus for sufficient ventilation is 3cm.
Always unplug the unit when it is not used for a longer time or before you start servicing.
The electrical installation should be carried out by qualified personal only, according to
the regulations for electrical and mechanical safety in your country.
Check that the available voltage is not higher than the one stated on the rear panel of the
unit.
The socket inlet shall remain operable for disconnection from the mains.
The power cord should always be in perfect condition. Switch the unit immediately off
when the power cord is squashed or damaged. It must be replaced by the manufacturer,
its service agent or similarly qualified persons in order to avoid a hazard.
Never let the power-cord come into contact with other cables!
When the power switch is in OFF position, this unit is not completely disconnected from
the mains!
In order to prevent electric shock, do not open the cover. Apart from the mains fuse there
are no user serviceable parts inside.
Never repair a fuse or bypass the fuse holder. Always replace a damaged fuse with a
fuse of the same type and electrical specifications!
In the event of serious operating problems, stop using the appliance and contact your
dealer immediately.
Please use the original packing when the device is to be transported.
Due to safety reasons it is prohibited to make unauthorized modifications to the unit.
INSTALLATION GUIDELINES:
Install the unit in a well-ventilated location where it will not be exposed to high
temperatures or humidity.
Placing and using the unit for long periods near heat-generating sources such as
amplifiers, spotlights, etc. will affect its performance and may even damage the unit.
With optional 19” adapters (see further in this user manual), this unit can be mounted in
19-inch racks. Attach the unit using the 4 screw holes on the front panel. Be sure to use
screws of the appropriate size. (screws not provided) Take care to minimize shocks and
vibrations during transport.
When installed in a booth or flight case, please make sure to have good ventilation to
improve heat evacuation of the unit.
To avoid condensation to be formed inside, allow the unit to adapt to the surrounding
temperatures when bringing it into a warm room after transport. Condense sometimes
prevents the unit from working at full performance.
CONNECTIONS
Except for microphones, headphone and master outputs, all connections are cinch. Use
good quality cinch-cinch cables to prevent bad audio quality.
Be sure to turn off the mixer before you make changes to the different connections.
In this manual we talk about “line inputs”. This is a global name for inputs with a level
between 750mV and 2V. This includes tuners, videos, CD-players, etc.
There are many ways to connect audio equipment to this mixer. Just keep the following
remarks in mind:
Always connect cinch cables in the same way:
o white or black cinch connector left channel
o red cinch connector right channel
3 Inputs on the back panel have the possibility to receive a phono or line input. Make
sure to assign the associated switch correctly:
o When you connect a CD-player, Cassette deck, MD-player, tuner, video
recorder etc. don’t forget to put the associated switch to “LINE”.
o When you connect a turntable don’t forget to put the associated switch to
“PHONO”.
Remark: When you connect the SynQ “X-TRM1” turntable, we suggest to put the
turntable in line output. Of course this means you must connect it to a line input on the
mixer!
Many Turntables have a GND-connection. It is preferable to connect this signal ground
to the SMX-3. Use the GND-connections, close to the signal input connectors.
The record input of an analog recording device can be connected to the record output of
the SMX-3 to make analog recordings.
To ensure the best possible sound quality, short-circuit pins are installed on all unused
phono inputs. When connecting a turntable to the SMX-3, first remove the short-circuit
pins of the input you want to use. Keep these short-circuit pins in a safe place for
eventual later use. NEVER put these short-circuit pins on the outputs (Masters,
send, record, …)
CLEANING THE APPLIANCE:
Clean by wiping with a polished cloth slightly dipped with water. Avoid getting water inside
the unit. Do not use volatile liquids such as benzene or thinner which will damage the unit.
SYNQ® 3/124 SMX-3
SYNQ® 4/124 SMX-3
Page 5
ENGLISH OPERATION MANUAL
ENGLISH OPERATION MANUAL
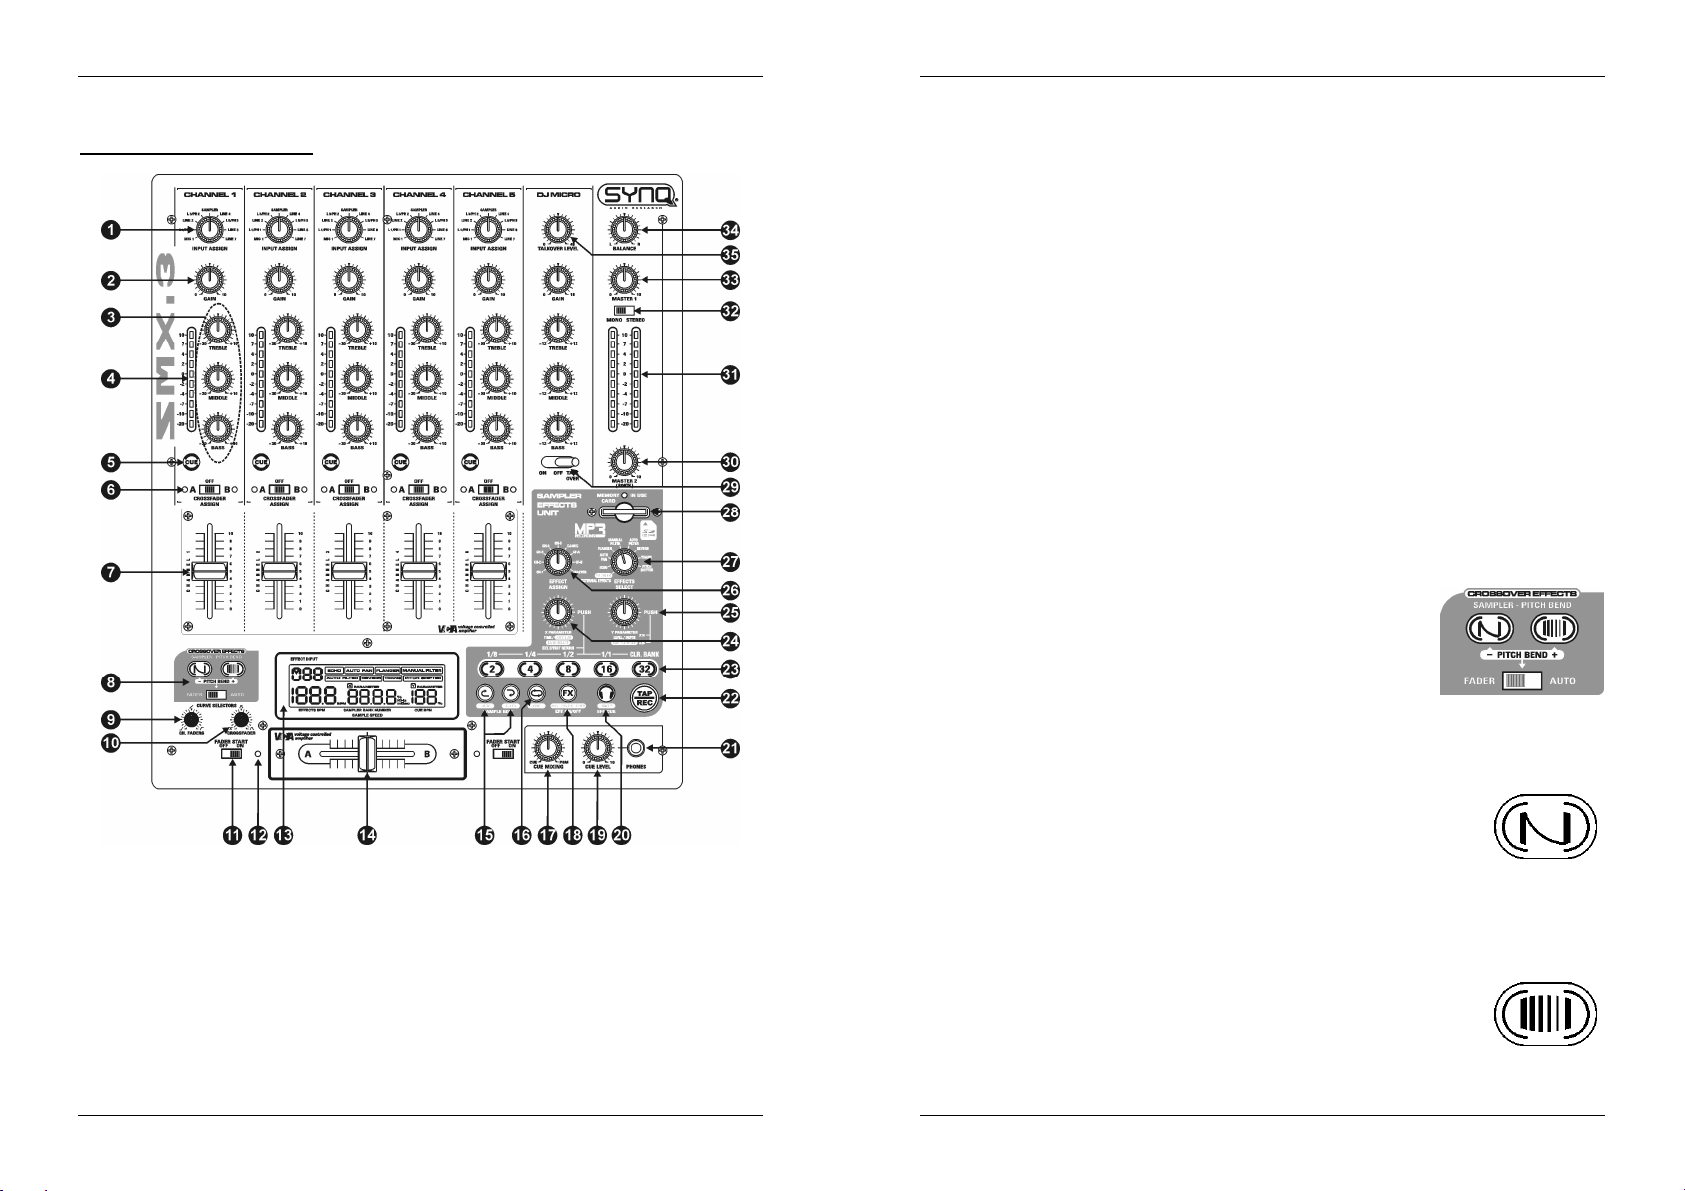
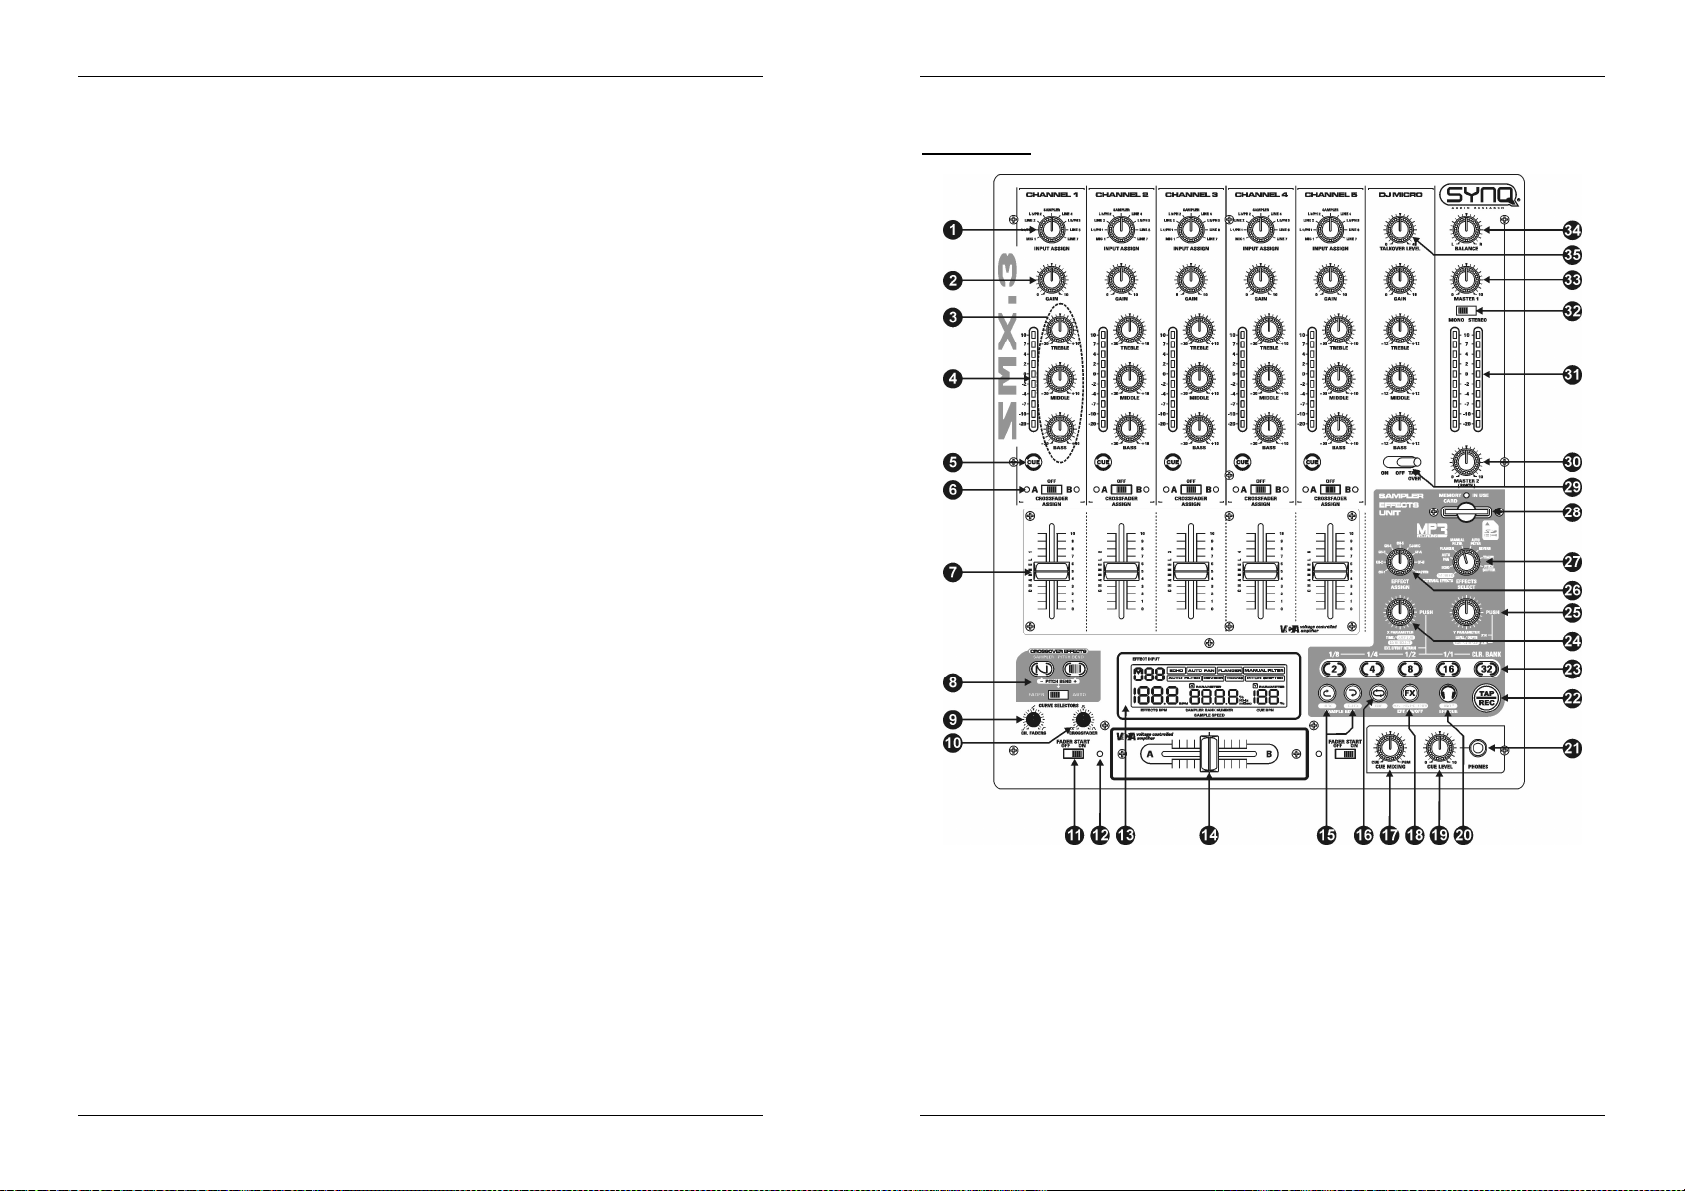
CONTROLS AND FUNCTIONS
CONTROLS ON THE FRONT:
1. INPUT MATRIX: With these matrix input selectors you can root any input to any of the
5 input channels. This makes it very easy to assign your inputs to the different
channels or to swap 2 audio sources without swapping the cables on the inputs. A very
useful feature in discotheques where different DJs each use their own channel
arrangements! Also the built-in sampler can be rooted to any of the 5 channels.
2. GAIN LEVEL: Adjusts the input level on each channel, range goes from zero to
maximum. Use this control to adjust the level on the VU-meters at about 0dB.
3. 3-BAND TONE CONTROLS: The frequency of each channel can be controlled
separately over a range from -30dB to +10dB: Treble@13kHz ~ Middle@1kHz ~
Bass@70Hz. In the center position the tone control is flat. (switched off)
4. CHANNEL LED VU METER: Accurate level meters with peak level memory: peak
levels stay on the display for a short time.
5. CUE / BPM COUNTER SELECTOR: Used to select the source (CH-1 to CH-5) to be
monitored via the headphones output. Pressing multiple Cue-buttons makes it possible
to derive a mixed sound from the selected sources. The BPM of the selected channel
(CH-1 to CH-5) is displayed on the CUE BPM display (13C).
Attention: the BPM will not be displayed correctly if 2 or more channels have been
selected!
6. CROSS FADER ASSIGN SWITCH: The left side of the cross fader is named “A”, the
right side is named “B”. Every input channel has a crossfader assign switch. You can
easily determine if the signal of a certain channel will be routed to the left or right side
of the cross fader, just by putting the assign switch in the correct position:
Middle position: the channel is not assigned to the crossfader.
Left position “A”: the channel is assigned to the left side of the crossfader. The
corresponding red LED is lit.
Right position “B”: the channel is assigned to the right side of the crossfader.
The corresponding blue LED is lit.
7. VCA CHANNEL FADERS: Used to control the level of each channel. SMX-3 uses
voltage controlled amplifier technology which means that not the audio signal but only a
small DC-voltage runs through the faders. This greatly improves the immunity against
cracks in the music due to worn out faders. These high quality faders can be changed
by the user, even when the mixer is working! For instructions, please read the
“Changing the faders” section.
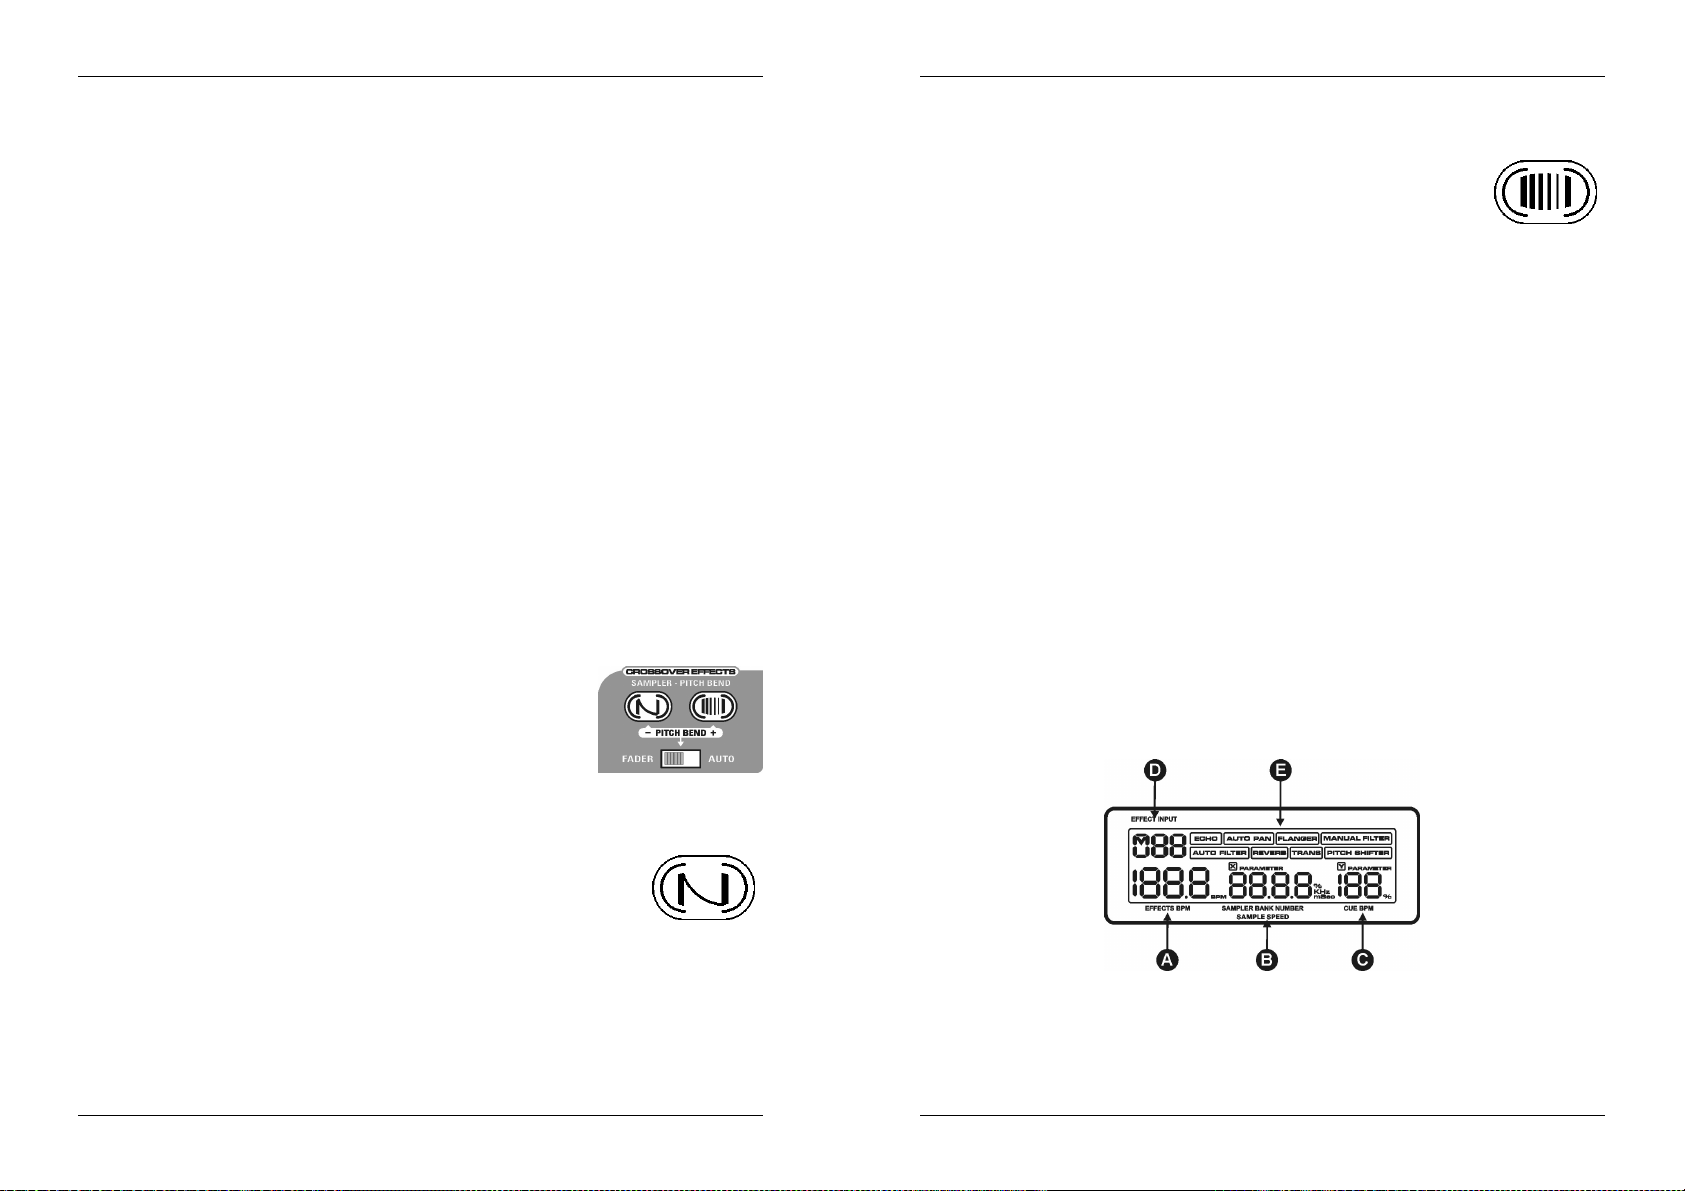
8. CROSSOVER EFFECT / SAMPLER PITCH BEND BUTTONS: in sampler mode used
for pitch bend, in crossover effect mode used to select the type of Effect Mix desired, 2
functions (Zip and Roll) are available:
PITCH BEND FUNCTION: (put the switch in the MIDDLE
position while the mixer is in sampler mode) While a sample
is playing, these two buttons are used for pitch bending so
you can match the beat perfectly with your other music: as
long as you press the left button the sample speed is lowered,
as long as you press the right button the sample speed is increased.
ZIP EFFECT: This effect can be used in FADER and AUTO mode:
FADER MODE: (put the switch in FADER position) Press the Zip effect button
and move the cross fader from one end to the other. The pitch of the music will
lower until it becomes distorted. When the cross fader lever
reaches the other side, the other player starts automatically.
Depending on the position of the cross fader lever, the effects
display shows a number from 0 to 99.
Note that the “X-parameter knob” is not accessible!
AUTO MODE: (put the switch in AUTO position) While the music is playing, press
the “Zip effect” button. The pitch of the music lowers automatically to zero until the
other player starts. The length of the complete fade over is shown on the effects
display. It can be adapted with the “X-parameter knob”(26).
ROLL EFFECT: This effect can be used in FADER and AUTO mode:
FADER MODE: (put the switch in FADER position) Press the Roll
effect button and move the cross fader from one end to the other.
First the music will be looped in 1/1beats (effects display shows
“1”) after this the loop is reduced to ½beats (display shows “2”)
until it finally becomes a loop with a length of 1/8beats (display shows “4”). When
SYNQ® 5/124 SMX-3
SYNQ® 6/124 SMX-3
Page 6

ENGLISH OPERATION MANUAL
ENGLISH OPERATION MANUAL
the cross fader lever reaches the other side, the volume decreases and the other
player starts playing.
Note that the “X-parameter knob” is not accessible!
AUTO MODE: (put the switch in AUTO position) While the music is playing, press
the “Roll effect” button. The music starts playing in a beat synchronized loop until
the other player starts. The length of the complete fade over is shown on the
effects display. It can be adapted with the “X-parameter knob” (26). Depending on
the length of the fade over you selected, the roll pattern will be adapted and
divided in 1/1, ½, ¼ and 1/8 beat loops.
9. CHANNEL FADER CURVE: Adjusts the curve of the channel faders from smooth (left
position) to sharp (right position).
10.CROSS FADER CURVE: Adjusts the curve of the cross fader from smooth (left
position) to sharp (right position).
11.FADER START ON/OFF SWITCH: When you have a compatible CD-player connected
to the fader control connectors, you can control its start/stop (re-cue) functions with the
cross fader of your SMX-3. With this switch you can turn the fader start control on and
off.
12.FADER START INDICATORS: During the crossover effect mix mode the indicators
display the status of the fader start output:
LED off: connected CD-player is in pause.
LED blinking: connected CD-player will shortly switch from play to pause.
LED on: connected CD-player is in play.
13.MULTI PURPOSE DISPLAY: shows information about the status of different functions:
A. EFFECTS BPM DISPLAY: Indicates the BPM (Beats Per Minute) of the effects
unit. When the beat counter is unable to count the beats, the BPM display starts
flashing until the BPM counter is able to continue.
B. TIME (X) PARAMETER:
Effect mode: for certain effects the display shows time information (mSec) for
other effects the display shows percents (%) or cutoff frequencies (kHz). You can
change these parameters with the preset buttons (23) and with the “X- parameter
knob”(24) if you need fine tuning.
Sampler mode: When the sampler is in playback mode, the display shows the
number of the selected memory bank (from 1 to 99). While adjusting the sampler
playback speed, the display shows the speed-%. When the sampler is in record
mode, the display shows the number of free seconds still available in the sampler
memory (“9999” on the display means that you still have more than 9999seconds
[166minutes or 2hr46min!] left for sample recording). When no SD™/SDHC™card is inserted, the display shows “no Card”.
C. CUE BPM / DEPTH (Y) PARAMETER DISPLAY: Displays the BPM value for the
cue signals coming from one of the 5 input channels, (CH-1 to CH-5) selected using
one of the CUE-buttons (5). When you adjust the depth (Y) parameter knob(25), the
new value will be displayed (%).
D. EFFECTS INPUT DISPLAY: Shows which input channel is rooted to the
effects/sampler section using the “input select knob”(26).
E. EFFECTS DISPLAY: Shows which effect you selected.
14.CROSS FADER: Used to mix the signals from the 2 channels assigned to A and B by
the cross fader assign switch.(6)
15.SAMPLE EDIT BUTTONS: used to adjust the individual speed, begin and endpoints of
a sample. See further to learn how to adjust a sample.
16.LOOP BUTTON: used to put a sample in a seamless loop. See further to learn how to
do this.
17.CUE MIXING KNOB: With this control you can mix the master output with the cue
signals from the effect unit and from the different channels. Turn this control complete
to the right if only want to hear the master output. Turn it completely to the left and you
will only hear the cue signals that are selected with the cue buttons (5, 20). At any
position in between you will hear a mix of both signals.
18.EFFECTS ON/OFF BUTTON: This button has different functions:
Effect mode: switches the output of the effects unit or external effect return signal
on and off.
Sampler mode: press this button for about 2seconds to switch the “master
tempo” (pitch lock) function of the sampler on/off.
19.CUE LEVEL: Used to adjust the output level of the Headphones. Note that, due to the
high output power, you can permanently damage your ears! Do not play at high
volume!
20.EFFECTS CUE: This button has different functions:
Effect mode: press this button (button is lit) to check the effect before it is mixed
in your master mix.
Sampler mode: press this button (button is lit) to switch the sampler in “jingle
mode”.
21.HEADPHONES OUTPUT: Used to connect any headphones with ¼” jack plug.
22.TAP/REC BUTTON: This button has 2 different functions:
Effect mode (TAP BUTTON): Almost all effects are beat synchronized. Therefore
the SMX-3 has a full automatic built-in beat counter. In some rare cases the
automatic beat counter doesn’t count as it should do (beats are out of the normal
range or there’s simply no beat to detect). In these cases you can help the beat
counter by manually tapping this button to the rhythm of the beat. When you use
this button it starts flashing to indicate that the automatic beat counter is shut off.
If you want the automatic beat counter to take over again, simply push for some
seconds on the TAP button until it stops flashing.
Sampler mode (REC BUTTON): the button is used to toggle between playback
and record mode. In playback mode the REC-button is lit. Press it once to put the
sampler in record mode: the REC-button starts blinking. Press one of the 5 play
buttons (23) to start the recording of press the REC-button again to return to
playback mode. See further to learn how to make sample recordings.
SYNQ® 7/124 SMX-3
SYNQ® 8/124 SMX-3
Page 7

ENGLISH OPERATION MANUAL
ENGLISH OPERATION MANUAL
23.PRESET/PLAY BUTTONS: These buttons have 2 different functions:
Sampler mode (RED PLAY BUTTONS): The 5 buttons are used as play buttons
for the sampler. You can assign (record) 1 sample to each play button. You can
easily see which play buttons contain a sample: a play button containing a sample
is lit (red light). An empty play button is dark.
Effect mode (GREEN PRESET BUTTONS): These buttons are used as presets
for the different effects. There are 2 different kinds of effects: beat related effects
(echo, auto pan, flanger, auto filter, trans) and non beat related effects (manual
filter, reverb, pitch shifter)
oBeat related effects: Each button has one of the following inscriptions: 2 – 4
– 8 – 16 – 32. These digits are related to the measured beat. Once the
preset is selected, it lights up. You can also select the additional presets by
pushing the “X-parameter knob” (24) while you select the presets 2 - 4 - 8 or
16. In that case the preset button starts flashing to indicate that the indication
above the button (1/8 - 1/4 – ½ or 1/1) is selected. It’s good to know that the
last used preset is preserved when you change to another effect.
Example: if the “echo” effect is selected and you choose for preset “2”,
you will notice that the sound is repeated every 2 beats. If you choose
“4”, the sound repeats every 4 beats. Select the ½-preset if you want
the music to be repeated every half beat.
oNon beat related effects: In this case the inscriptions on the preset buttons
are not important. The SMX-3 comes with standard presets for each of the
non beat related effects. However you can adjust these parameters with the
X and Y parameter knobs (24, 25) to your own taste. To save your adjusted
parameters, simply press the X-parameter knob (24) while you select one of
the 5 preset buttons. The standard parameters will be replaced by your own
settings. You can set 5 custom presets for each effect and adapt these at
any time.
24.X-PARAMETER KNOB: This knob has several functions:
Effect mode: adjusts the X-parameter of the different effects. Pressing this knob
while you press one of the preset buttons adds extra possibilities:
oBeat related effects: you can select extra beat presets.
oNon beat related effects: you can store your own parameters to one of the
preset buttons.
Sampler mode: there are 3 possible functions:
oPlayback/record mode: turn the knob to choose the desired memory bank
and press the knob to select it.
oSample edit mode: turn the knob to search for the exact start or endpoint of
the sample. (see further to learn how to edit samples)
oExternal effect return: when the mixer is in sampler mode, you can connect
an external effect unit. Press and turn the knob to adjust the volume of the
return signal between -50dB and +0dB.
25.Y-PARAMETER KNOB: This button has different functions:
Effect mode: Used to adjust the “Y” parameter of the effects. Please read section
27 since its function is different for each effect.
Sampler mode: there are 2 functions:
oPlayback mode: adjust the overall playback speed from -80% to +20% in 3
different ways:
Adapt in 0,1% steps: simply turn the knob to change the speed.
Adapt in 2% steps: press the knob while turning to change the speed.
Reset speed to 0%: push the knob 2x within one second
oSample edit mode: during “OUTRO EDIT” mode you can adjust the speed
of a sample individually, this setting will be saved together with the
begin/endpoints. You can change the speed from -12% to +12% in 3
different ways:
Adapt in 0,1% steps: simply turn the knob to change the speed.
Adapt in 1% steps: press the knob while turning to change the speed.
Reset speed to 0%: push the knob 2x within one second
26.EFFECT ASSIGN SWITCH: Used to select which signal goes to the “effect send”
output (46) and to the input of the effects/sampler unit. This can be one of the following:
One of the input channels.
One of the channels you selected with the “cross fader assign switch”(6). This can
be the left side “A” (CF-A) or the right side “B” (CF-B) of the cross fader.
If you select master, the effects will be used on the mixed master sound or you
can record the mixed master signal to the sampler.
Remark: if you select “master” the external effect return is switched off to avoid
feedback.
27.EFFECTS SELECTOR: Used to select the desired effect or sampler function:
IMPORTANT!
The sampler can be selected as one of the effects, this means that you cannot
use the sampler together with one of the multi-effects. However it is possible
to use the sampler together with the crossover effects and/or with an external
effect unit, connected to the effect send/return (46+47).
The crossover effects and the multi-effects unit cannot be used together!
Before you can use the multi effects, you have to switch the crossover effects
off (see n°:8 for more information)
SAMPLER: this is not really an effect but with the sampler you can record /
playback up to 495 samples (99 banks with each 5 samples) on one
SD™/SDHC™-card. To learn more about the sampler, please refer to the chapter
called “About the sampler”.
In sampler function you can’t use the internal effects but you can connect any
external effects processor using the effect send/return connectors (46/47).
ECHO: produces repeated sounds. You can easily mix beat synchronized echos
while selecting the desired “preset”(23). These presets can be tuned with the “Xparameter knob”(24) in a range from 2mSec up to 2Sec. With the “Y-parameter
knob”(25) you can change the balance between the original and the delayed
sound.
AUTO PAN: Sweeps the music from left to right and back to the rhythm of the
beat. With the “presets”(23) you can choose how fast the music sweeps from one
side to the other. (example: With preset “2” it will take 2beats to go from left to
right and back) The presets can be tuned with the “X-parameter knob”(24) in a
range from 30mSec up to 16Sec. With the “Y-parameter knob”(25) you can adjust
how quick the music will be panned to the opposite side: you can choose for a
gently pan or an aggressive one.
FLANGER: This effect is best described as “putting a jet engine in the music”. It’s
as if the music turns around due to phase shifting. You can easily change the
flanger time (cycle) with the “presets”(23). These presets can be tuned with the
“X-parameter knob”(24) in a range from 100mSec up to 16Sec. With the “Yparameter knob”(25) you can change the flanger feedback level.
SYNQ® 9/124 SMX-3
SYNQ® 10/124 SMX-3
Page 8
ENGLISH OPERATION MANUAL
ENGLISH OPERATION MANUAL
Hint: Every time you push the same preset button(23) you will restart the flanger cycle. This gives
a nice “extra touch” to the effect.
MANUAL FILTER: This is a very effective digital frequency cutter. The mixer
comes with 5 standard filter presets but you can easily adjust these presets(23)
with the “X-parameter knob”(24) in a range from low pass filter (LPF) @ 50Hz
(display shows: L 0.05kHz) up to high pass filter (HPF) @ 21.1kHz (display
shows: H 21.1kHz). With the “Y-parameter knob”(25) you can change the filter
resonance level. (This is the Q-factor of the filter, it changes the impact of the filter
on a selected frequency).
You can replace the standard presets with your own parameters, simply by
pressing the “X-parameter knob”(24) and one of the 5 preset buttons (23)
together.
AUTO FILTER: This is an automatic low pass filter (LPF). The cutoff frequency
varies in cycles from 20kHz down to 50Hz. With the preset buttons(23) you can
select filter cycles that are beat synchronized. (example: press the preset called
“8” it will take 8beats for the filter to change its cutoff frequency from 20kHz to
50Hz and back) The presets can be tuned with the “X-parameter knob”(24) in a
range from 100mSec up to 16Sec. With the “Y-parameter knob”(25) you can
change the filter resonance level. (This is the Q-factor of the filter, it changes the
impact of the filter on a selected frequency)
REVERB: This effect is best described as the “church effect”. Imagine you play
music in a church or in a very big, empty hall: the reverb you get from all kinds of
reflections against the walls is digitally simulated with this effect. With the preset
buttons(23) you can select 5 predefined reverb times. These reverb times can be
tuned with the “X-parameter knob”(24) in a range from 0% to 100% in steps of
1%. With the “Y-parameter knob”(25) you can change the balance between the
original and the reverb sound.
You can replace the standard presets with your own parameters, simply by
pressing the “X-parameter knob”(24) and one of the 5 preset buttons (23)
together.
TRANS: Automatically cuts the sound to the rhythm of the beat. With the
“presets”(23) you can choose the length of the cutting cycles. (example: With
preset “1/4” (remember to push the “X-parameter knob”(24) while you select the
preset button called “4”) the music will be cut in ¼beat slices) The presets can be
tuned with the “X-parameter knob”(24) in a range from 25mSec up to 16Sec. With
the “Y-parameter knob”(25) you can adjust the “cutting time”. When completely
turned to the left (display reads “0%) cutting time is zero so no cutting effect will
be heard. Turn the “Y-parameter knob”(25) to the right, the cutting time becomes
bigger until you only hear very small slices of the original sound.
Hint: this effect needs some practice! You obtain the best results with constant beats, very small
cutting cycles (1/8, 1/4 and 1/2beats) and larger cutting times of 50% and more.
PITCH SHIFTER: Shifts the pitch of the sound up or down while the beat stays
unchanged. (in fact this is the opposite of what the “master tempo” on certain CDplayers tries to obtain: same pitch with changing speed/beat) With the preset
buttons(23) you can select 5 predefined pitch shifts. With the “X-parameter
knob”(24) you can change the pitch in a range from -100% to +100% in steps of
1%. With the “Y-parameter knob”(25) you can change the balance between the
original and the shifted sound.
You can replace the standard presets with your own parameters, simply by
pressing the “X-parameter knob”(24) and one of the 5 preset buttons (23)
together.
Hint: use the pitch shifter on a micro and you have a voice changer. (with pitch at -100% you
obtain voices from the “dark side of this world”)
28.SD™/SDHC™-MEMORY CARD SLOT: The SMX-3 doesn’t have an internal memory
for sample recording. This means that the internal sampler can only be used when an
SD™/SDHC™-card is inserted. When the sampler is selected and no memory card is
inserted, the display shows “noCArd”.
Attention!: NEVER remove the memory card while the red “in use” light is on! This
may corrupt the data on the memory card with data loss as a result!
29.DJ MIC ON/OFF/TALKOVER SWITCH: Used to switch the DJ-microphone:
OFF: the DJ-microphone is switched off.
ON: the DJ-microphone is switched on.
TALK OVER: the DJ-microphone is switched on. While talking to the DJ-
microphone the level of all other input channels decreases automatically. You can
adjust the 2 parameters for the talkover:
Talkover level (35): muting level for the input channels.
Talkover recovery time (41): time needed for the music to return to its normal
level.
30.MASTER 2 LEVEL: Used to adjust the level of the master2 (49) output on the rear
panel. It is not affected by the master1 volume (33), mono/stereo switch (32) and
master balance (34).
31.LED VU METER: Accurate level meter with peak level memory: peak levels stay on the
display for a short time. Very important: If you want a nice and clean sound, please
pay attention the VU-meters. Most DJs use this important instrument as a “flashy light
effect” . They try to push the meter constantly to its maximum. Let’s be clear: a good
DJ wants a clean, undistorted sound. Levels over 0dB mean “distortion” so please keep
an eye on the meter!
32.MONO/STEREO SWITCH: Used to switch the master1 output in mono or stereo.
33.MASTER OUTPUT KNOB: Adjusts the output level of the master output. (Attention:
the “trim output” (40) on the back of the mixer can reduce the maximum output level of
the master output fader. Check this trimmer if the maximum output level is below
normal.
34.MASTER BALANCE: Adjusts the left-right balance of the master1 output.
35.TALKOVER LEVEL: used to adjust the muting level of the 5 input channels while the
automatic talkover circuit comes in action.
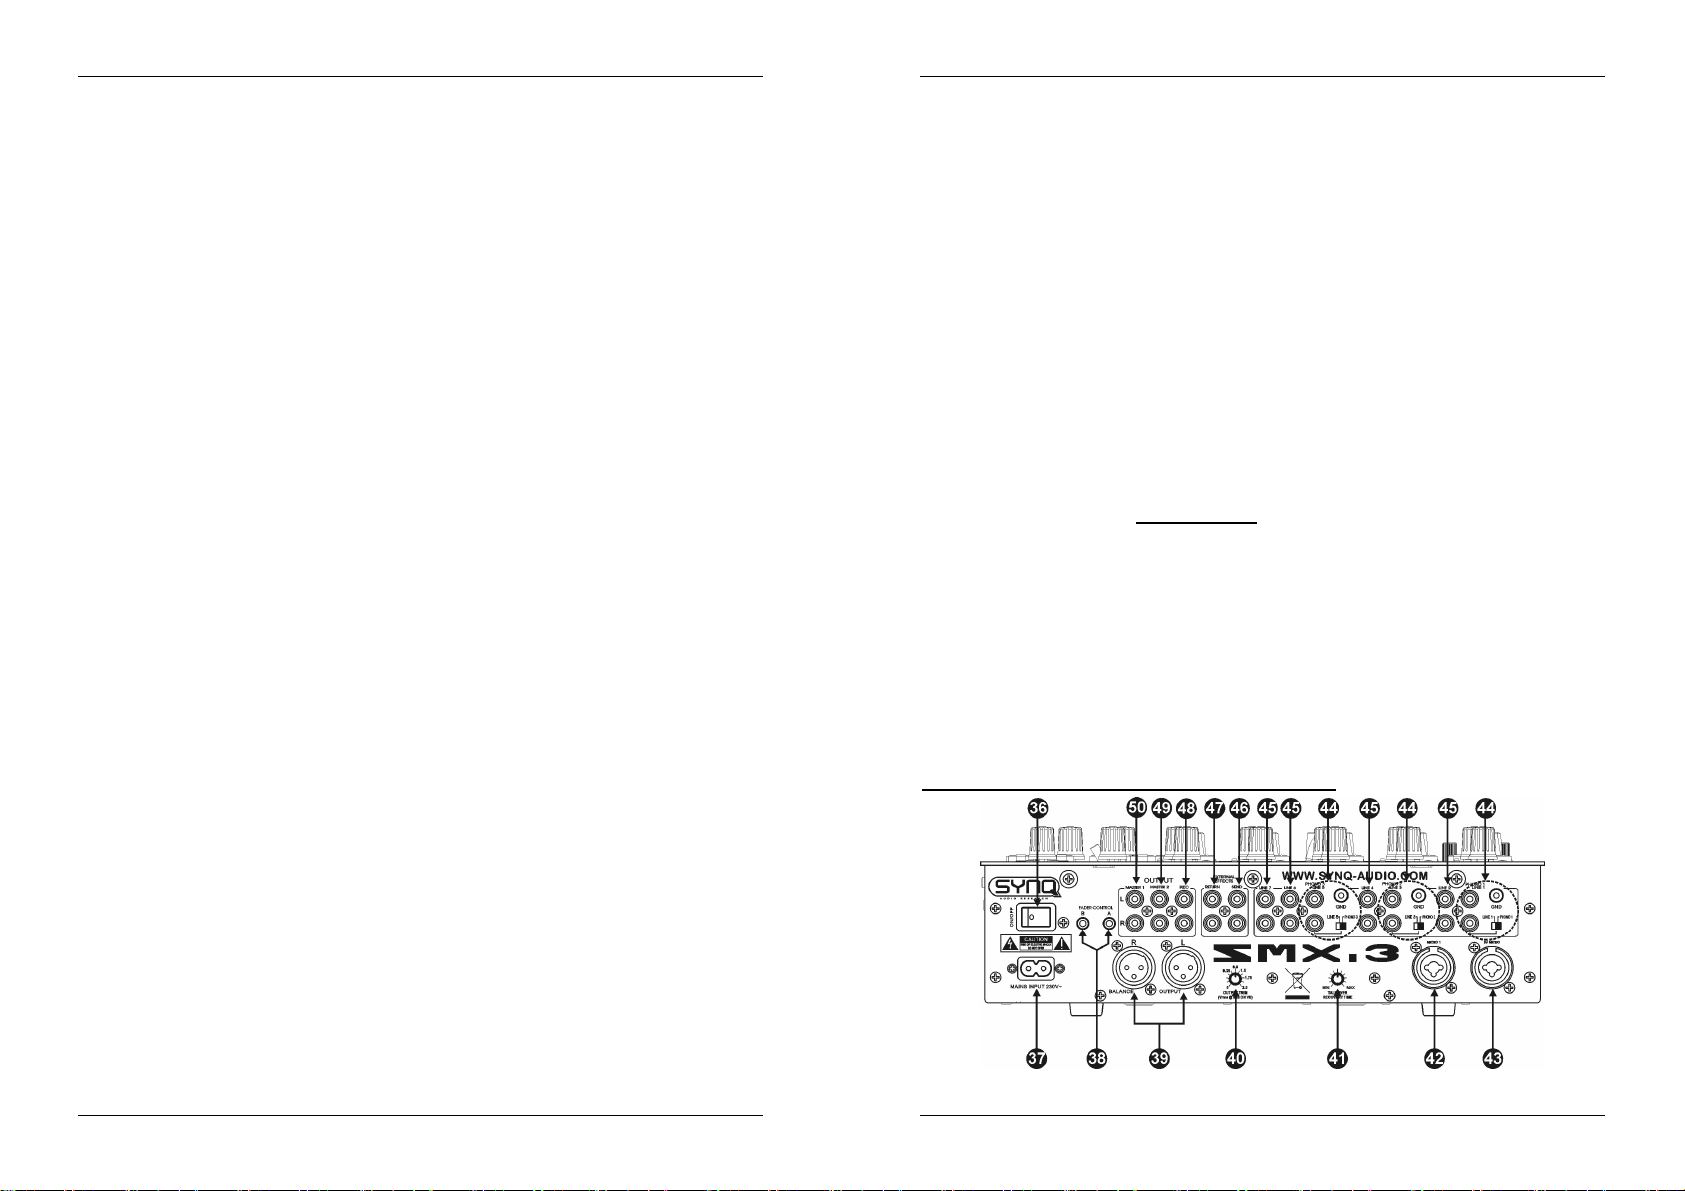
CONTROLS/CONNECTIONS ON THE REAR PANEL:
SYNQ® 11/124 SMX-3
SYNQ® 12/124 SMX-3
Page 9

ENGLISH OPERATION MANUAL
ENGLISH OPERATION MANUAL
36.POWER SWITCH: Used to switch the mixer on and off.
37.MAINS INPUT: Use the supplied mains cable to connect this input to the mains.
38.FADER CONTROL: When connected to these inputs, compatible CD-players can be
controlled by the fader starts and cross fader effects of the SMX-3.
39.MASTER1 BALANCED OUTPUT: The XLR-connectors can be used to connect the
SMX-3 to the power amplifiers, using special balanced signal cables.
40.TRIM OUTPUT: This potentiometer is used to reduce the output level of the mixer to
protect the connected amplifiers and speaker cabinets. (Attention: the output level can
be reduced to zero. If you don’t have any signal on the master output, first check if this
potentiometer is accidentally put to zero.)
41.TALKOVER RECOVERY TIME: used to adjust the time it takes for the music of the
input channels to return to their normal levels, after the DJ stops talking to his DJmicrophone.
42.MICRO1 INPUT: Used to connect an extra microphone.
43.DJ-MIC INPUT: Combo jack. Accepts either a balanced microphone with an XLR
connector or an unbalanced microphone with 1/4” mono jack. This input is mainly used
as DJ-microphone. The talkover (29) does not affect the signal level of this input.
44.PHONO/LINE INPUT: used to connect a turntable or line level unit.
If you connect a CD-player: put the “phono/line” switch in line position. If your
turntable has a line level output than we suggest to use it.
If you connect a turntable: put the “phono/line” switch in phono position. Many
Turntables have a GND-connection. It is preferable to connect this ground wire to
the GND-connector.
45.LINE INPUT: Used to connect any line level unit you have (CD, tuner, MD, …)
46.EFFECT SEND: In addition to the internal effects unit it is also possible to connect an
external effect unit to the SMX-3. The output signal is selected with the “effect assign”
switch(26).
Remark: The effect send/return makes it possible to use the internal sampler together with an external
effects processor.
47.EFFECT RETURN: returns the effect signal from the external processor. The return
signal is mixed with the original signal. The level of the return signal can be adjusted
with the X-parameter knob (24). If you really want total control over the return signal
from the external effect processor (tone control etc.) than you can also connect the
effect processor output to an input channel instead of the return input.
Remark: you can switch the signal from return input on/off with the “effect on/off” switch(18).
48.RECORD OUTPUT: Carries the same signal as the master outputs but is not
influenced by the master levels, balance and mono/stereo controls. Used to connect
analog recording equipment.
49.MASTER2 UNBALANCED OUTPUT: used to connect extra amplifiers.
50.MASTER1 UNBALANCED OUTPUT: The same output signal as on the balanced
master output(39) but unbalanced. Can be used to connect unbalanced amplifiers.
ABOUT THE SAMPLER
Before you can use the sampler you MUST insert a Secure Digital™ card. This can be a
standard SD™/SDHC™-card or a “high capacity” SDHC™-card. You can buy these
memory cards in many specialized shops. Shortly after inserting the memory card, the
display shows “rEAd” followed by “ 1”. This means that memory bank 1 is selected.
HOW TO FORMAT THE SD™/SDHC™-CARD:
You can format the SD™/SDHC™-Card in any PC running Windows®.
Insert the SD™/SDHC™-Card in the memory card reader from your PC.
In your Windows explorer right-click on the Card reader to open the options window.
Select “Format” to open the format utility.
Select the file system that your PC suggests as standard. This will be FAT or FAT32
(Do NOT choose NTFS!)
You can give the SD™/SDHC™-Card a name or leave it open.
Do NOT use the quick format option.
Press “Start“ to start formatting.
This action takes some time. Windows will inform you when the memory card is formatted.
HOW TO RECORD A SAMPLE:
You can only record a sample to an empty play button. Refer to the explanation on how to
delete a sample or an entire memory bank.
Put the mixer in sampler mode with the “effect select” switch (27).
With the “effect assign” switch (26) you must select the input channel you want to
record a sample from.
Press the “TAP/REC” button (22) to put the sampler in record mode.
(TAP/REC button blinks) The display shows the number of seconds still
available for sample recording.
With the “X-parameter” knob (24) you can browse the 99 available memory
banks. To select a memory bank, just press the “X-parameter” knob once.
Hint: While you browse through the memory banks, you can easily see which play buttons are still
empty (full: button = lit * empty: button = dark)
To start the recording, press one of the empty (dark!) play buttons. (at the right
moment!) The display starts the countdown of the seconds still available for the
recording.
To stop the recording, press the same play button again. (at the right moment!)
To play the sample, you just recorded, you simply have to press the same play button
a 3rd time.
HOW TO PLAYBACK A SAMPLE (SAMPLER MODE):
Put the mixer in sampler mode with the “effect select” switch (27).
Use the “input assign” switch (1) on one of the input channels to select the sampler.
With the “X-parameter” knob (24) you can browse the memory banks which contain
samples. (empty memory banks are not accessible) To select a memory bank, just
press the “X-parameter” knob once.
Hint: while you browse through the memory banks, you can easily see which play buttons are still
empty (full: button = lit * empty: button = dark)
To start playback you simply have to press the play buttons that are lit. (red color)
Hint: you can play up to 2 samples together (polyphony) and put 1 sample in loop mode (see further).
You can select another memory bank while you are still playing a sample from the previous memory
bank. This means that you can seamlessly switch between memory banks!
HOW TO PLAY JINGLES (JINGLE MODE ):
Put the mixer in sampler mode with the “effect select” switch (27).
Use the “input assign” switch (1) on one of the input channels to select the sampler.
Press the “EFF. CUE” button (20) so it is lit.
Press one of the play buttons (23) shortly: the corresponding sample is played until the
end. Each time you press the same play button, the sample re-starts with a stutter effect
SYNQ® 13/124 SMX-3
SYNQ® 14/124 SMX-3
Page 10
ENGLISH OPERATION MANUAL
Total length of recorded sample
Total length recorded sample
as a result.
While the sample is playing, you can press another play button: the first sample stops
immediately and the new sample takes over.
You can stop the playing sample by stopping the jingle mode: press the “EFF. CUE”
button (20) and hold it until you want the playing sample to be stopped. (only when you
release the “EFF. CUE” button, the sample stops playing)
IMPORTANT REMARKS:
During jingle mode you can’t record and edit samples or play loops: switch to normal
sampler mode to perform these tasks. When you turn the mixer off or remove the memory
card, the sampler goes automatically back to standard mode.
HOW TO DELETE 1 SAMPLE:
You can delete samples in both playback and record mode.
Press the play button where the sample is stored.
Now press the TAP/REC button (22) at the same time for about 1sec.
After 1 second the display shows “dEL” to indicate that the sample was deleted. (the play
button is dark)
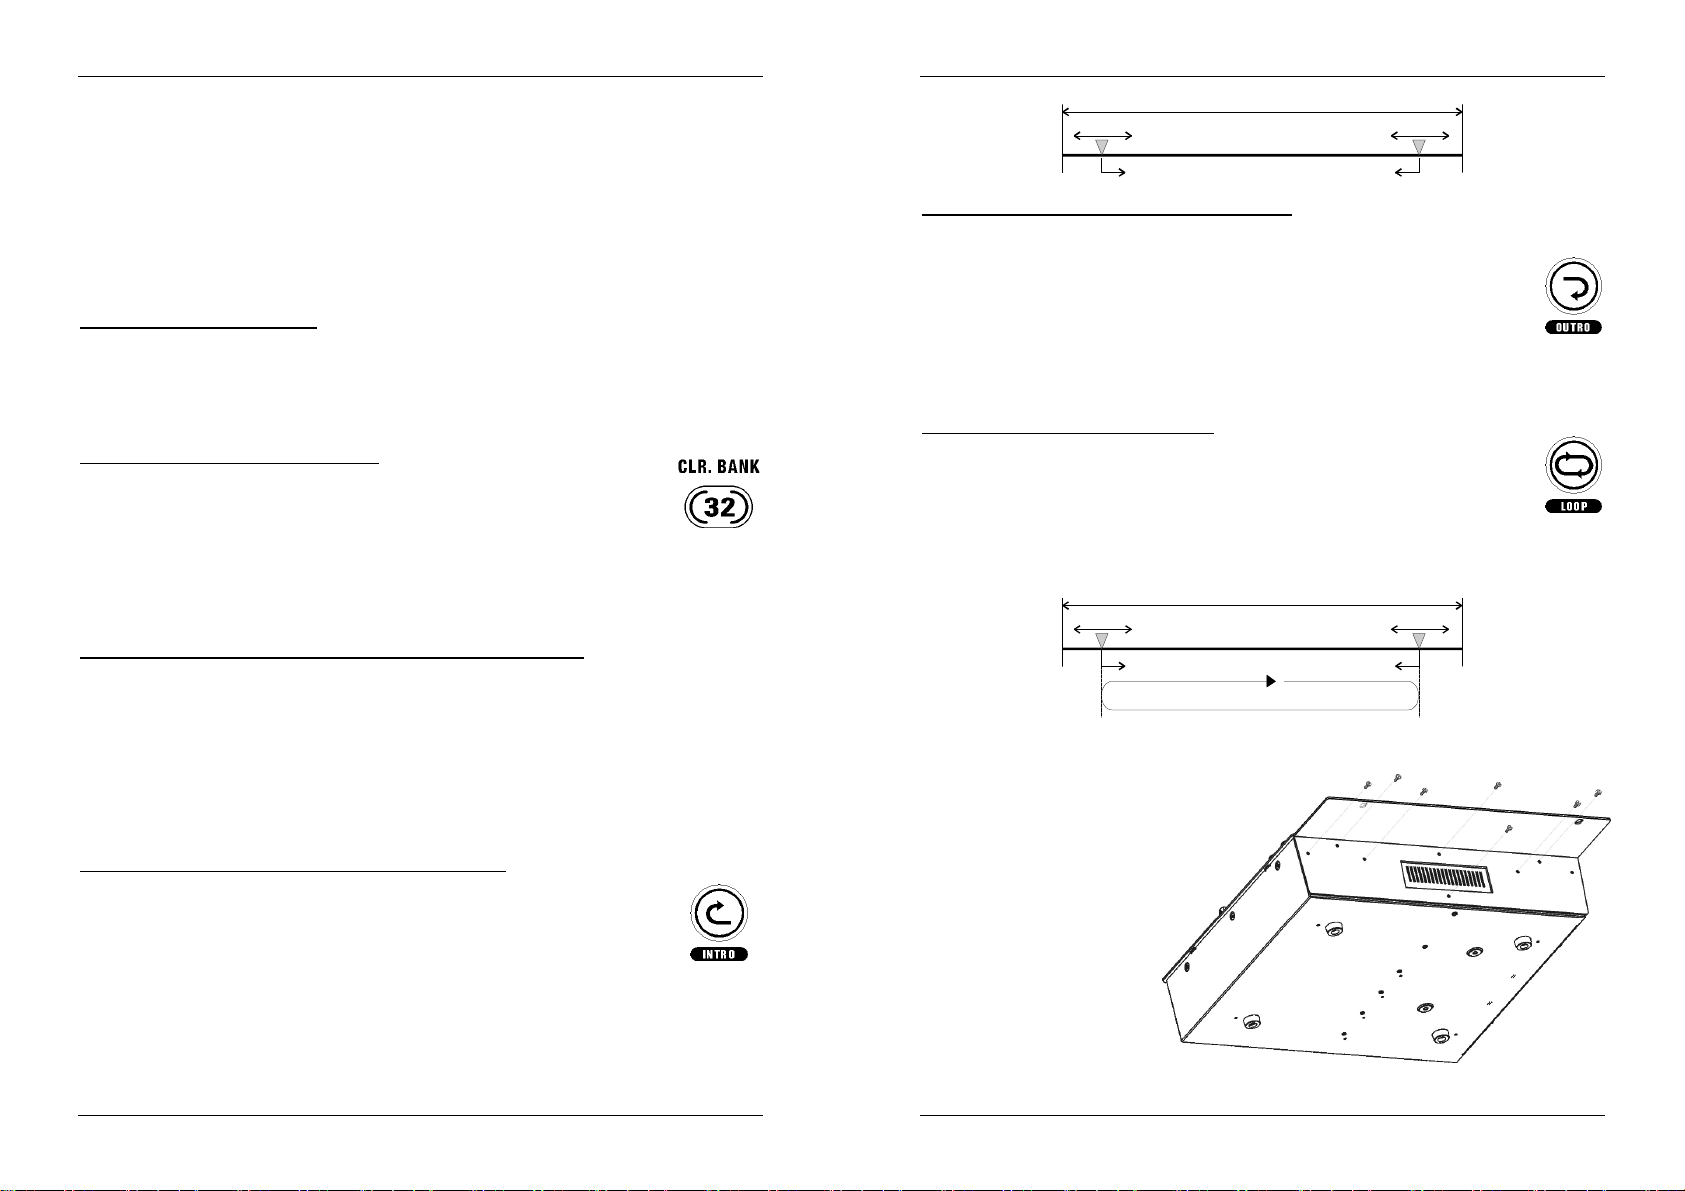
HOW TO DELETE A MEMORY BANK:
You can delete a memory bank in both playback and record mode.
With the “X-parameter” knob (24) you can browse the memory banks
which contain samples. (empty memory banks are not accessible) To
select a memory bank, just press the “X-parameter” knob once.
To delete the selected memory bank, first press the “X-parameter” knob (24) then
press the play button marked “32” and “CLR. BNK” (23) at the same time. After about
2 seconds the display shows “dEL” to indicate that the memory bank was deleted. (all
the play buttons are dark).
DIFFERENCE BETWEEN “INDIVIDUAL” & “OVERALL” SPEED:
Individual speed adjust: you can adjust the speed of each sample individually so you
can synchronize the different samples to each other. You can set the individual speed
during “endpoint editing”. The individual speed setting is saved together with the
sample begin/endpoints. Check the description of the Y-parameter knob (25) for more
information.
Overall speed adjust: is used during playback of 1 or 2 samples. This speed is NOT
saved with the sample(s)! Check the description of the Y-parameter knob (25) for more
information. You can also use the pitch bend buttons (8) to synchronize the samples
with the other music sources.
HOW TO EDIT THE STARTING POINT OF A SAMPLE:
If you started the sample recording too early, you can still adjust the exact
starting point. This process is non-destructive.
Press the play button of the sample you want to play in a loop.
Now press the “loop intro” button (15) at the same time.
Release both buttons: you will hear very small loops, similar to what you
hear when you put a CD-player frame search mode.
With the “X-parameter” knob (24) you can search for a new starting point.
Press the “loop intro” button again to stop the edit mode and store the new starting
point.
You can repeat these actions until you find the exact starting point.
ENGLISH OPERATION MANUAL
Intro Edit
Indexpoint begin Indexpoint end
Outro Edit
HOW TO EDIT THE ENDPOINT OF A SAMPLE:
If you stopped the sample recording not at the right moment, you can still adjust the exact
endpoint. This process is non-destructive.
Press the play button of the sample you want to play in a loop.
Now press the “loop outro” button (15) at the same time.
Release both buttons: the sample plays in a seamless loop.
While the loop is playing, you can search for the new endpoint with the “X-
parameter” knob (24) until the loop sounds perfect.
You can use the “Y-parameter” knob (25) to adjust the individual speed.
Press the “loop outro” button again to stop the edit mode and store the new endpoint.
HOW TO PLAY A SAMPLE IN LOOP:
Press the play button of the sample you want to play in a loop.
Now press the loop button (16) at the same time.
Release both buttons: the two buttons blink together so you can easily see
which sample plays in a loop.
You can easily re-start the loop simple by pushing the play button again.
To stop the loop, press the loop button (loop continues) and release the button at the
right moment. Once the loop button is released, the loop stops.
Intro Edit
Indexpoint begin Indexpoint end
Loop between index points
Outro Edit
INSTALLING OPTIONAL 19” ADAPTERS
If you want to install the SMX3 in a 19” rack, you must
install 2 optional 19” adapters.
Remove the 3 plastic inserts
on both sides of the mixer.
Remove the 4 screws on
both sides of the mixer. You
don’t need these screws
anymore so put them in a
safe place, in case you want
to use the mixer again
without the 19” adapters.
Put one of the 19” adapters
in place and fix it with the 7
screws supplied with the
adapters.
SYNQ® 15/124 SMX-3
SYNQ® 16/124 SMX-3
Page 11
ENGLISH OPERATION MANUAL
ENGLISH OPERATION MANUAL
Repeat this with the second 19” adapter.
The mixer is now ready to be mounted in a 19” rack. The total height is 370mm or about
8.5units. Don’t forget to add a 1U blind panel, needed for the connectors on top of the
SMX-3.
UPGRADING THE FIRMWARE
With this procedure you can upgrade the firmware of both the processor and the DSP.
Upgrading the software is a delicate job so please follow the steps very carefully otherwise
the mixer can be damaged.
VERY IMPORTANT!
DON’T FORGET TO REGISTER YOUR SMX-3 MIXER. YOU WILL AUTOMATICALLY
RECEIVE A REMINDER WHEN NEW SOFTWARE UPDATES ARE AVAILABLE!
SURF TO: WWW.SYNQ-AUDIO.COM/REGISTER/
If you upgrade both the processor and DSP software, you must always upgrade the
processor first! Always check the README-file included with a software update before
you start upgrading. Do NOT turn the mixer off or press any button during the upgrading
process! Wait until the display returns to normal. You can only interrupt the upgrading
process, by switching the mixer off, when the display is still dark after 1minute. In this
case the upgrading failed.
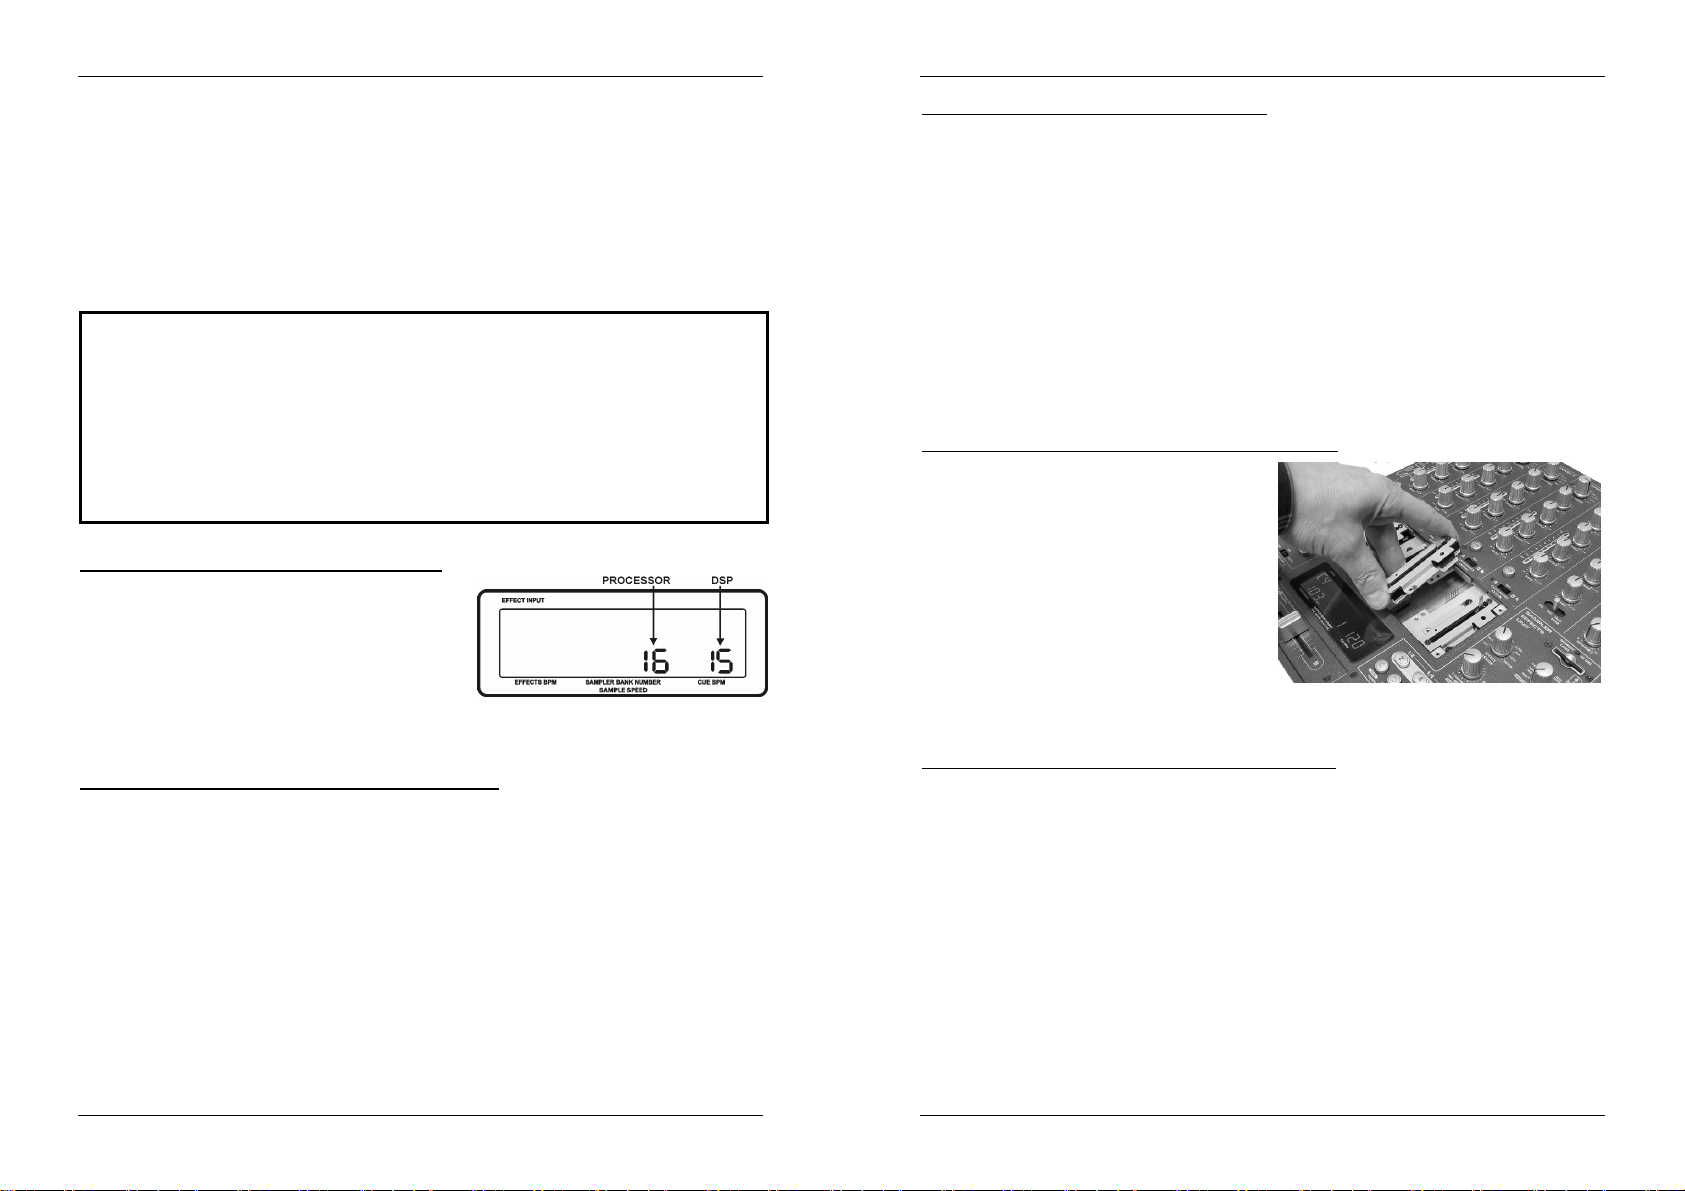
HOW TO CHECK THE SOFTWARE VERSION:
Switch the mixer off.
Press the play buttons (23) marked “16” and “32”
together.
Turn the mixer on while you keep both buttons
pressed.
The display shows the software version for both
the microprocessor and the DSP: check the
drawing for more information. In this example the software versions are: Processor = V1.6
and DSP = V1.5
HOW TO UPGRADE THE PROCESSOR SOFTWARE:
Put the SD™/SDHC™-card in your PC and copy the file called “SMX-3C_xx.bin” to the
memory card. Important! Do NOT rename the file!
Put the SD™/SDHC™-card in the memory slot (28) of the SMX-3.
Switch the mixer off.
Press the 3 play buttons (23) marked “2” + “4” + “8” together.
Turn the mixer on while you keep the 3 buttons pressed.
All CUE buttons (5) flash four times to indicate that the upgrading process has started.
Once all cue buttons flashed 2 times you can release the 3 play buttons.
You will notice that the CUE buttons will lighten one by one (from 1 to 5) while the play
buttons change colors. After about 25seconds the display returns to normal to indicate that
the upgrading process has ended.
Check the software version to see if the upgrading process succeeded.
HOW TO UPGRADE THE DSP SOFTWARE:
Put the SD™/SDHC™-card in your PC and copy the file called “smx-3_xx.bin” (where
“xx” is the version number) to the memory card. Important! Do NOT rename the file!
Put the SD™/SDHC™-card in the memory slot (28) on the SMX-3.
Switch the mixer off.
Press the 3 play buttons (23) marked “8” + “16” + “32” together.
Turn the mixer on while you keep the 3 buttons pressed.
All CUE buttons (5) flash four times to indicate that the upgrading process has started.
Once all cue buttons flashed 2 times you can release the 3 play buttons.
You will notice that the CUE buttons will lighten one by one (from 1 to 3). After about
15seconds the display returns to normal to indicate that the upgrading process has ended.
Check the software version to see if the upgrading process succeeded.
CHANGING THE FADERS
One of the big advantages of this mixer is the possibility to change the channel faders,
even while the mixer is in use.
This is what you must do to change a channel fader:
Remove the fader knobs from the faders.
Remove the 6 screws that hold the small
front panel around the faders.
Remove the 3 screws of the fader you
want to change.
Gently remove the fader from its position.
Put the new fader gently in place. Be sure
to fit the contacts into the connector on
the mixer PCB-board.
Put the 3 screws from the fader back in
place
Put the small front plate back in place
with the 6 screws.
Done!
This is what you must do to change the cross fader:
Remove the fader knob from the cross fader.
Remove the 2 screws that keep the cross fader in place.
Gently remove the fader and the cover plate from their position.
Unplug the cross fader from the cable (unplug the cable by pulling the connector, NOT
the cable!)
Press the new cross fader on the cable.
Put the cross fader back in place with the small cover plate and the 2 screws.
Done!
SYNQ® 17/124 SMX-3
SYNQ® 18/124 SMX-3
Page 12
ENGLISH OPERATION MANUAL
FRANCAIS MODE D’EMPLOI
SPECIFICATIONS
Input/output impedance & sensitivity (EQ flat, max. gain, level meter = 0dB)
Line 2, 4, 6, 7 input: 340mV@ 20kΩ (max = +4dBV)
Line 1, 3, 5 input: 340mV@ 47kΩ (max = +4dBV)
Phono input: 3,4mV @ 47kΩ (max = -36dBV)
Mic inputs: 3,4mV @ 10kΩ (max = -36dBV)
Return: 525mV@ 10kΩ
Send: 525mV@ 2kΩ
Record output: 775mV@ 1kΩ
Masters unbalanced: 1,55V @ 100Ω
Masters balanced: 2,55V @ 200Ω
Headphones: 3,00V @ 33Ω
Maximum output (EQ flat, max. gain, FX off, THD=1%, load is 100kΩ )
Master1: More than +18dBV (8,0V)
Master2: More than +18dBV (8,0V)
Phones: More than + 9,5dBV (3V) @ 32Ω
Frequency response (EQ flat, max. gain, level meter = 0dB, load is 100kΩ )
Line: 25 - 20.000Hz+/-1dB
Phono: 25 - 20.000Hz+1/-1,5dB (RIAA)
Mic : 25 - 20.000Hz+1/-1,5dB
THD + Noise (EQ flat, max. gain, level meter = 0dB, load is 100kΩ )
Line: less than 0,05% (25 – 20.000Hz)
Phono: less than 0,05% (1kHz A-weighted)
Mic: less than 0,1% (1kHz A-weighted)
Channel Crosstalk (EQ flat, max. gain, Master = 0dBV)
Crosstalk: More than 70dB @ 1kHz (between L,R & Channels)
Tone controls:
Mic: -12dB / +12dB@ 70Hz – 1kHz – 13kHz.
Input channels: -30dB / +10dB@ 70Hz – 1kHz – 13kHz.
MP3 Sampler unit:
Sample recording: MPEG1 layer3 44,1kHz sampled @ 192kbps stereo
Sample playback: different bitrates, editing parameters not possible
Polyphony: 2 voices
Memory cards: SD™ and SDHC™ cards.
Max. card capacity: 32GB
File format: FAT (FAT16) or FAT32 (depends on capacity)
General specs:
Power supply: 230V~ 50Hz. (Europe)
Power consumption: 40Watts
Dimensions: 320 x 370 x 109mm (WxDxH)
Weight : 7.0 kg
Every information is subject to change without prior notice
You can download the latest version of the firmware / this user manual on our website:
www.synq-audio.com
MODE D’EMPLOI
Nous vous remercions d’avoir acheté ce produit SYNQ. Veuillez lire ce mode d’emploi très
attentivement afin de pouvoir exploiter toutes les possibilités de cet appareil. Conservez ce
manuel dans un endroit sûr pour toute consultation future..
N'OUBLIEZ PAS D'ENREGISTER VOTRE SMX-3. VOUS RECEVREZ AUTOMATIQUEMENT
UN RAPPEL QUAND LES NOUVELLES MISES À JOUR DE
LOGICIEL SERONT DISPONIBLES!
SURFEZ SUR: WWW.SYNQ-AUDIO.COM/REGISTER/
CARACTERISTIQUES
Cet appareil ne produit pas d’interférences radio. Il répond aux exigences nationales et
européennes. La conformité a été établie et les déclarations et documents correspondants
ont été déposés par le fabricant.
12 entrées (2mic + 7line + 3phono) sur 6 canaux (5curseurs + 1micDJ)
Sélecteur d’entrée matriciel spécial pour un maximum de flexibilité: changez toutes les
entrées en une seconde!
2 sorties Master:
o Master1 symétrique avec réglage de niveau de sortie (XLR + cinch/RCA)
o Master2 (cinch/RCA)
Réglage gain et tonalité à 3 bandes comprenant la fonction kill (-30dB) sur tous les
canaux
Indicateurs de niveau LED avec mémoire des pics sur tous les canaux + Master
Curseurs VCA de haute qualité avec correcteur de courbe sur tous les canaux
Cross Fader avec sélection aisée du canal A/B contrôlé par VCA avec réglage de
courbe (douce coupure nette) facilement remplaçable par l’utilisateur
Sampler MP3 (échantillonneur) très complet
o Fonctionne avec des cartes SDHC™ ( possibilité d’enregistrement de plusieurs
heures de musique)
o Max. 99 banques de mémoire de 5 échantillons chaque par carte SDHC™!
o Enregistrement stéréo des échantillons sous format MP3 (192kbps)
o Réglage individuel de tempo pour chaque échantillon !
o Réglage de vitesse général avec verrouillage de la tonalité (master tempo/pitch lock)
o Polyphonie: 2 échantillons peuvent être lus en même temps
o Boucles sans fin avec édition des points de départ et de fin
o entrées/sorties Sampler assignables à n’importe quel canal
Compteurs de tempo entièrement automatiques
Cross fader start control pour les lecteurs CD compatibles
2 effets de mixage cross fader synchronisés
8 effets digitaux synchronisés comprenant des présélections d’effets adaptables par le
DJ: Echo, Auto Pan, Flanger, Filtre Manuel, Filtre Auto, Reverb, Trans, Pitch Shifter
Effet send/return Stéréo qui permet de connecter un processeur d’effets externe.
Fonction talk-over du micro DJ réglable
Sortie casque à haute puissance avec possibilité de mixage “cue/pgm”
Mise à jour du progiciel de gestion au moyen de cartes SDHC™.
SYNQ® 19/124 SMX-3
SYNQ® 20/124 SMX-3
Page 13

FRANCAIS MODE D’EMPLOI
ATTENTION
:
FRANCAIS MODE D’EMPLOI
AVANT L’UTILISATION
Quelques instructions importantes:
Avant d’utiliser cet appareil, assurez-vous de l’absence de dommage lié au transport. En
cas d’endommagement, n’utilisez pas l’appareil et contactez le vendeur.
Important: Cet appareil a quitté notre usine en parfaite condition et bien emballé. Il est
primordial que l’utilisateur suive les instructions de sécurité et avertissements inclus dans
ce manuel. La garantie ne s’applique pas en cas de dommage lié à une utilisation
incorrecte. Le vendeur ne prend pas la responsabilité des défauts ou de tout problème
résultant du fait de n’avoir pas tenu compte des mises en garde de ce manuel.
Conservez ce manuel dans un endroit sûr pour toute consultation future. Si vous vendez
l’appareil, assurez-vous d’y joindre ce manuel également.
Afin de protéger l’environnement, merci de recycler les emballages autant que possible.
Vérifiez le contenu:
Vérifiez si la boite contient les articles suivants :
Mode d’emploi
SMX-3
Câble secteur.
INSTRUCTIONS DE SECURITE:
CAUTI ON
La flèche dans un triangle met l'utilisateur en garde contre la présence de haute
tension sans isolation dans l'appareil, ce qui peut causer un risque
d'électrocution.
Un point d'exclamation dans un triangle prévient de la présence d'instructions
relatives au fonctionnement et à la maintenance se trouvant dans le manuel
fourni avec l'appareil.
Ce symbole signifie: uniquement pour usage à l'intérieur.
Ce symbole signifie : Lire le mode d’emploi.
Ce symbole signifie: appareil construit selon les normes de sécurité classe I
Afin d’éviter tout risque d’incendie ou de décharge électrique, ne pas exposer cet
appareil à la pluie ou l’humidité.
Pour éviter la formation de condensation à l’intérieur de l’appareil, patientez quelques
minutes pour laisser l’appareil s’adapter à la température ambiante lorsqu’il arrive dans
une pièce chauffée après le transport. La condensation empêche l'appareil de
fonctionner de manière optimale, et elle peut même causer des dommages.
Cet appareil est destiné à une utilisation à l’intérieur uniquement.
Ne pas insérer d’objet métallique ou renverser de liquide dans l’appareil. Aucun objet
contenant un liquide, tels que des vases, ne peut être placé sur cet appareil. Cela
risquerait de provoquer une décharge électrique ou un dysfonctionnement. Si un corps
étranger est introduit dans l’appareil, déconnectez immédiatement de la source
d’électrocution, n’enlevez jamais le couvercle de
l’appareil. Il n’y a aucune pièce à l’intérieur de
l’appareil que vous puissiez remplacer vousmême. Confiez l’entretien uniquement à des
techniciens qualifiés.
afin de réduire le risque
d’alimentation.
Aucune source de flamme nue, telle que des bougies allumées, ne peut être placée sur
l'appareil.
Ne pas couvrir les orifices de ventilation, un risque de surchauffe en résulterait.
Ne pas utiliser l'appareil dans un environnement poussiéreux et le nettoyer
régulièrement.
Ne pas laisser l'appareil à portée des enfants.
Les personnes non expérimentées ne doivent pas utiliser cet appareil.
La température ambiante maximale d’utilisation de l’appareil est de 40°C. Ne pas
l’utiliser au-delà de cette température.
Rien ne doit se trouver contre l'appareil : la distance minimum pour en permettre une
ventilation suffisante est de 3cm.
Débranchez toujours l’appareil si vous ne l’utilisez pas de manière prolongée ou avant
d’entreprendre des réparations.
Les installations électriques ne peuvent être faites que par du personnel qualifié et
conformément aux règlements de sécurité électrique et mécanique en vigueur dans
votre pays.
Assurez-vous que la tension d’alimentation de la source d’alimentation de la zone dans
laquelle vous vous trouvez ne dépasse pas celle indiquée à l’arrière de l’appareil.
La prise doit toujours être accessible pour que le cordon secteur puisse être enlevé à
tout moment.
Le cordon d’alimentation doit toujours être en parfait état. Mettez immédiatement l’unité
hors tension si le cordon devait être écrasé ou endommagé. Pour éviter tout risque de
choc électrique, le cordon doit être remplacé par le constructeur, son agent ou un
technicien qualifié.
Ne laissez jamais le cordon d’alimentation entrer en contact avec d’autres câbles !
Quand l’interrupteur principal est en position OFF, cet appareil n'est pas complètement
isolé du courant 230V !
Utilisez toujours des câbles appropriés et certifiés lorsque vous installez l’appareil.
Pour éviter toute décharge électrique, ne pas ouvrir l’appareil. En dehors du fusible
principal, il n’y a pas de pièces pouvant être changées par l’utilisateur à l’intérieur.
Ne jamais réparer ou court-circuiter un fusible. Remplacez systématiquement un
fusible endommagé par un fusible de même type et ayant les mêmes spécifications
électriques !
En cas de problèmes de fonctionnement sérieux, arrêtez toute utilisation de l’appareil et
contactez votre revendeur immédiatement.
Utilisez l’emballage d’origine si l’appareil doit être transporté.
Pour des raisons de sécurité, il est interdit d’apporter une quelconque modification à
l’appareil non spécifiquement autorisée par les parties responsables.
CONSEILS D'INSTALLATION:
Installer l'appareil dans un lieu bien aéré, à l'abri de l'humidité et des fortes
températures.
Placer et utiliser l'appareil à proximité de sources de chaleur telles que spots, amplis,…
pourrait affecter ses performances et même endommager l'appareil.
A l’aide d’adaptateurs 19”, disponibles en option (voir plus loin dans ce mode d’emploi),
Fixer l'appareil en utilisant les 4 trous pour vis sur la face avant. Assurez-vous d'utiliser
SYNQ® 21/124 SMX-3
SYNQ® 22/124 SMX-3
Page 14
FRANCAIS MODE D’EMPLOI
FRANCAIS MODE D’EMPLOI
des vis de la bonne dimension (vis non fournies). Essayez d'éviter les vibrations et les
coups lors du transport.
En cas d'installation dans un 'flight case', assurer une bonne ventilation afin d'évacuer la
chaleur produite par l'appareil.
Pour éviter la condensation à l'intérieur, laisser l'appareil s'adapter à la nouvelle
température ambiante après le transport. La condensation peut altérer les performances
de l'appareil.
NETTOYAGE:
Nettoyer en frottant à l'aide d'un chiffon doux très légèrement humide. Evitez de verser de
l'eau dans l'appareil. Ne pas utiliser de liquides abrasifs qui pourraient endommager
l'appareil.
CONNEXIONS
A l'exception des micros, du casque et des sorties master, toutes les connexions sont au
standard Cinch. Utilisez des câbles cinch/cinch de bonne qualité afin d'éviter un son de
mauvaise qualité. Pour de plus amples informations sur les connexions, prière de se
reporter au chapitre suivant.
Assurez-vous d'éteindre la table de mixage avant d'effectuer les différentes connexions.
Dans ce mode d'emploi, il est question d'entrée/sortie ligne ou “line inputs/outputs”. Il s'agit
en fait d'un terme générique pour désigner des entrées/sorties avec un niveau compris
entre 750mV et 2V. Ceci inclut les lecteurs de CD, tuners, vidéos, …
On peut connecter des appareils audio à cette table de mixage de plusieurs manières :
Toujours connecter les câbles cinch de la manière suivante:
o Connecteurs cinch blanc ou noir canal gauche
o Connecteur rouge canal droit
3 entrées situées sur le panneau arrière peuvent recevoir des entrées ligne ou phono.
Assurez-vous d’assigner le sélecteur associé de façon correcte:
o Si vous connectez un lecteur CD, Cassette, MD, tuner, magnétoscope, etc.
n’oubliez pas de sélectionner “LINE”.
o Si vous connectez une platine vinyl, sélectionnez “PHONO”.
Remarque: Si vous connectez la platine SynQ “X-TRM1”, nous suggérons de
sélectionner la sortie Line de la platine. Il faut dès lors la connecter sur une entrée Line
de la table de mixage!
Beaucoup de platines possèdent un connecteur de masse GND. Il est préférable de
connecter ce signal à la SMX-3 (à côté des connecteurs d'entrée).
L'entrée Record d'un enregistreur analogique peut être connectée à la sortie Record de
la SMX-3 pour faire des enregistrements analogiques.
Afin d'assurer la meilleure qualité de son possible, des pontets de court-circuit sont
installés sur toutes les entrées phono non utilisées. Pour connecter une platine, retirer
le pontet de l'entrée que vous désirez utiliser. Conservez ce dernier dans un lieu sûr
pour une utilisation future. NE JAMAIS placer ces pontets de court-circuit sur les
sorties (masters, send, record, etc …)
CONTROLES ET FONCTIONS
FACE AVANT
1. ENTREE MATRICIELLE: Avec ces sélecteurs d’entrée matriciels vous pouvez
envoyer n’importe quel appareil connecté vers n’importe quel canal d’entrée des 5
canaux disponibles. Ceci vous facilite l’assignement des entrées vers les différents
canaux et vous permet également d'inverser 2 sources audio sans devoir inverser les
câbles. Une caractéristique très utile pour les discothèques ou les différents DJs qui
ont l’habitude d’utiliser leur propre configuration ! Le sampler incorporé peut également
être envoyé vers n’importe lequel des 5 canaux.
2. NIVEAU DE GAIN: Ajustement du niveau d'entrée de chaque canal. A utiliser pour
ajuster le niveau du VU-Mètre aux alentours de 0dB.
SYNQ® 23/124 SMX-3
SYNQ® 24/124 SMX-3
Page 15
FRANCAIS MODE D’EMPLOI
FRANCAIS MODE D’EMPLOI
3. CONTROLEUR DE TONALITE A 3 BANDES: La fréquence de chaque canal peut être
contrôlée séparément dans une gamme de -30dB à +10dB: Hautes@13kHz ~
Moyennes@1kHz ~ Basses@70Hz. En position centrale, la tonalité est plate (flat).
4. VU METRE A LED PAR CANAL: VU-Mètre précis avec mémorisation du niveau peak:
les niveaux peak restent affichés un court instant.
5. SELECTEUR DE COMPTEUR CUE / BPM: Permet de choisir la source (Canal 1 à 5)
qui passera par la sortie casque. En poussant sur plusieurs boutons Cue, il est
possible de faire provenir un son mixé des sources sélectionnées. Le BPM des canaux
sélectionnés (Canal 1 à 5) apparaît sur l'écran CUE BPM (13C).
Attention: le BPM sera incorrect si 2 canaux ou plus ont été sélectionnés!
6. ASSIGNATION DU CROSSFADER: Le côté gauche du cross est nommé “A”, le droit
“B”. Chaque canal d'entrée possède d’un sélecteur d'assignation qui vous donne le
choix “A”, “B” ou “OFF”. Vous pouvez aisément affecter le signal d'un canal au côté
gauche ou droit du crossfader en mettant le sélecteur d’assignation dans la position
adéquate:
Position du Milieu: Le canal n’est pas assigné au crossfader.
Position Gauche “A”: Le canal est assigné au coté gauche du crossfader. Le
LED rouge est allumé.
Position Droite “B”: Le canal est assigné au coté droit du crossfader. Le LED
bleu est allumé.
7. CURSEURS VCA DES CANAUX: Contrôle le niveau de chaque canal. SMX-3 utilise
la technologie VCA (Voltage Controlled Amplifier) ce qui signifie que ce n’est pas le
signal audio qui passe par les curseurs, mais bien un faible courant DC. Ceci diminue
considérablement le risque de craquements dans la musique au cas ou les curseurs
seraient usés. Ces curseurs de grande qualité peuvent être changés par l'utilisateur,
même lorsque l'appareil est en fonctionnement! Pour plus d'informations, voir la section
“Changement des curseurs”.
8. TOUCHES D'EFFET CROSSOVER / SAMPLER PITCH BEND: en mode 'sampler', la
touche est utilisée pour le pitch bend ; en mode 'crossover effects', elle est utilisée pour
sélectionner le type d'effet de mélange désiré, où deux
fonctions (Zip et Roll) sont disponibles:
FONCTION PITCH BEND : (mettre le switch en position
MEDIANE quand le mixer est en mode sampler) Pendant la
lecture d'un échantillon, ces deux touches sont utilisées pour
modifier le pitch bend, afin de pouvoir harmoniser
parfaitement le rythme avec celui d'une autre source musicale : aussi longtemps que
l'on maintient la touche de gauche, la vitesse de l'échantillon diminue, et aussi
longtemps que l'on maintient la touche de droite, la vitesse de l'échantillon augmente.
EFFET ZIP: Cet effet peut être utilisé en mode FADER et AUTO:
MODE FADER: (mettre le switch en position FADER)Pousser sur
le bouton d'effet Zip et bouger le crossfader d'une extrémité à
l'autre. Le ton (pitch) de la musique diminue jusqu'à distorsion.
Lorsque le crossfader atteint l'autre extrémité, l'autre lecteur CD démarre
automatiquement. Selon la position du crossfader, l'écran d'effets indiquera un
chiffre de 0 à 99. Il est important de noter que le bouton “X-parameter” (26) n’est
pas accessible!
MODE AUTO: (mettre le switch en position AUTO) Pendant que la musique joue,
pousser sur le bouton “Zip effect". Le ton de la musique diminue automatiquement
jusqu'à atteindre zéro, ceci jusqu'à ce que l'autre lecteur démarre. La durée totale
du fondu enchaîné (fade) est indiquée sur l'écran. Elle peut être adaptée à l'aide
du bouton “X-parameter” (26).
EFFET ROLL: Cet effet peut être utilisé en mode FADER et AUTO de:
MODE FADER: (mettre le switch en position FADER) Pousser
sur le bouton d'effet Roll et bouger le crossfader d'une extrémité à
l'autre. Premièrement, la musique est bouclée (loop) à 1/1beat
(l'écran d'effets indique “1”). Ensuite, le loop est réduit à ½beats
(l'écran indique “2”) jusqu'à ce que finalement le loop atteigne une longueur de
1/8beats (l'écran indiquera alors “4”). Quand le crossfader atteint l'autre extrémité,
le volume diminue et l'autre lecteur démarre. Il est important de noter que le
bouton “X-parameter” (26) n’est pas accessible!
MODE AUTO: (mettre le switch en position AUTO) Pendant que la musique joue,
pousser sur le bouton “Roll effect". La musique se met à jouer en loop
synchronisé sur le beat jusqu'à ce que l'autre lecteur démarre. La durée totale du
fondu enchaîné (fade) est indiquée sur l'écran. Elle peut être adaptée à l'aide du
bouton “X- parameter” (26). En fonction de la durée du fondu enchaîné
sélectionnée, l'échantillon roll sera adapté et divisé en loops de 1/1,1/2, 1/4 et 1/8
beats.
9. CANAL FADER CURVE: Règle la courbe des curseurs des canaux : douce = position
gauche, brusque = position droite.
10.CROSS FADER CURVE: Règle la courbe du cross fader : transition douce = position
gauche, transition brusque = position droite.
11.INTERRUPTEUR FADER START ON/OFF: Il est possible de connecter un lecteur CD
compatible au connecteur 'fader control'. Vous pouvez contrôler son démarrage/arrêt
(re-cue) à l'aide du crossfader de votre SMX-3. Grâce à cet interrupteur, vous pouvez
mettre en fonctionnement ou en arrêt la fonction "fader start".
12.INDICATEURS DEMARRAGE PAR LE CURSEUR: Durant le mode "Crossover Effect
mix", ceux-ci indiquent le statut de la sortie fader start:
LED éteint: le lecteur CD connecté est en mode Pause.
LED clignote: le lecteur CD connecté va bientôt passer du mode lecture en
mode pause.
LED allumé: le lecteur CD connecté joue.
13.DISPLAY MULTI FONCTIONS: affiche les informations des différents fonctions:
A. ECRAN D'EFFETS BPM: Indique le BPM (Beats Par Minute) de l'unité d'effets. Cet
écran clignote lorsqu'il est incapable de compter le BPM et s'arrête dés qu'il en est
à nouveau capable.
SYNQ® 25/124 SMX-3
SYNQ® 26/124 SMX-3
Page 16

FRANCAIS MODE D’EMPLOI
FRANCAIS MODE D’EMPLOI
B. ECRAN DE DUREE (X):
Mode effet: Pour certains effets, l'écran indique des informations sur la durée (en
mSec). Pour d'autres effets, celui-ci indique des % ou des fréquences de
coupures (en kHz). Vous pouvez modifier ces paramètres à l'aide des boutons de
présélections (23) et du bouton “X-parameter”(24).
Sampler mode: quand le sampler est en mode de lecture, le cadran affiche le
numéro de la banque mémoire sélectionnée (de 1 à 99). Pendant que l'on ajuste
la vitesse de lecture de l'échantillon, l'écran affiche la vitesse en pourcentage.
Quand le sampler est en mode d’enregistrement, l'écran affiche le nombre de
secondes qui sont encore disponibles dans la mémoire du sampler. (Quand
"9999" est affiché à l'écran, cela signifie que l'on a encore plus de 9999 secondes
[166 minutes ou 2 heures et 46 minutes !] encore libres pour enregistrer des
échantillons.
C. ECRAN DE CUE BPM / PROFONDEUR (Y): Indique la valeur BPM du signal cue
provenant d'un des 5 canaux d'entrée, sélectionné grâce à l'un des boutons CUE
(5). Quand vous ajustez le bouton de paramètre-Y (25), la nouvelle valeur est
indiquée (%).
D. ECRAN D'ENTREE D'EFFETS: indique quel canal d’entrée est dirigé vers la
section effets/sampler à l'aide du bouton “input select”(26).
E. ECRAN D'EFFETS: Indique l'effet sélectionné.
14.CROSSFADER: Permet de mixer 2 sources provenant des canaux assignés à A & B à
l'aide de l’interrupteur d'assignation (6).
15.TOUCHES D’EDITION DE L’ECHANTILLON: sont utilisés pour ajuster la vitesse
individuelle, ainsi que les points de départ et de fin de l’échantillon. Voir plus loin pour
plus d’informations…
16.TOUCHE LOOP: est utilisée pour transformer un échantillon en une boucle sans fin.
Voir plus loin pour plus d’informations.
17.BOUTON CUE MIXING: A l'aide de ce contrôle, vous pouvez mixer la sortie master
avec les signaux cue des différents canaux et de l'unité d'effets. Tourner complètement
ce bouton vers la droite pour entendre uniquement la sortie master. Tournez-le
complètement à gauche pour entendre uniquement les signaux cue sélectionnés à
l'aide des boutons cue (5, 20). Dans les positions intermédiaires, vous entendrez un
mixage des 2 signaux.
18.BOUTON EFFECTS ON/OFF: Cette touche possède plusieurs fonctions:
Effect mode: met en ou hors service la sortie de l'unité des effets ou le signal de
retour des effets externes.
Sampler mode: presser cette touche pendant environ deux secondes pour mettre
en ou hors service la fonction “master tempo” (pitch lock) du sampler.
19.NIVEAU CUE: Ajustement du niveau de sortie des casques. Il est important de noter
qu'à cause de sa grande puissance de sortie, vous pouvez à tout moment
endommager vos oreilles! Ne mettez pas le volume au maximum!
20.EFFETS 'CUE' : Cette touche possède plusieurs fonctions:
Effect mode: appuyer sur cette touche (elle est alors éclairée) pour vérifier l'effet
avant qu'il ne soit mélangé à votre master mix.
Sampler mode: appuyer sur cette touche (elle est alors éclairée) pour faire
basculer l'échantillonneur en mode 'jingle'.
21.SORTIE CASQUE: Connecter des casques pourvu d’un jack ¼”.
22.BOUTON TAP/REC: cette touche possède 2 fonctions différentes:
Mode effet (BOUTON TAP) : Quasi tous les effets sont synchronisés sur le beat.
Pour ce faire, la SMX-3 est équipée d'un compteur de beats totalement
automatique. Dans de rares occasions, le compteur ne compte pas correctement
(les beats sont hors de la gamme habituelle ou simplement aucun beat n'est
détecté). Dans ces cas, il vous est possible d'aider manuellement le compteur en
tapant sur ce bouton au rythme du beat. Quand vous l'utilisez, il clignote pour
vous indiquer que le compteur automatique est éteint. Pour rallumer le compteur
automatique, maintenez simplement le bouton TAP enfoncé durant quelques
secondes jusqu'à ce qu'il s'éteigne.
Mode Sampler (Touche REC): cette touche est utilisée afin de passer du mode
de lecture en mode d’enregistrement et vice-versa. En mode de lecture, la touche
REC est allumée. Appuyez une seule fois dessus afin de mettre le sampler en
mode d’enregistrement: la touche REC commence à clignoter. Appuyez sur l’une
des 5 touches Play (23) pour démarrer l’enregistrement ou appuyez à nouveau
sur la touche REC pour revenir au mode de lecture. Voir plus loin pour plus
d’informations concernant l’enregistrement d’échantillons.
23.TOUCHES PRESET/PLAY: ces touches possèdent 2 fonctions différentes:
Sampler mode (TOUCHES PLAY ROUGES): Les 5 touches font office de
touches de lecture du sampler. Vous pouvez assigner (enregistrer) 1 échantillon
dans chaque touche de lecture. Vous pouvez facilement voir quelles touches
contiennent un échantillon: une touche qui contient un échantillon est allumée
(lumière rouge). Une touche vide est éteinte.
Effect mode (TOUCHES PRESET VERTES): Ces boutons sont utilisés comme
présélections pour les différents effets. Il y a 2 types d’effets: des effets relatifs au
tempo (echo, auto pan, flanger, auto filter, trans) et des effets non relatifs au
tempo (manual filter, reverb, pitch shifter)
Effets liés au rythme: Les chiffres sur les boutons (2 – 4 – 8 – 16 – 32) se
réfèrent à la mesure du beat. Une fois la présélection choisie, cette dernière
est allumée. Il est également possible de sélectionner les présélections
supplémentaires en poussant le bouton "X-parameter” (26) pendant que vous
choisissez les présélections 2 - 4 – 8 ou 16. Dans ce cas, le bouton de
présélection clignote pour indiquer que 1/8, 1/4, 1/2 ou 1/1 est sélectionné. Il
est important de noter que la dernière présélection est préservée lorsque vous
changez vers un autre effet.
Exemple: Si vous avez sélectionné l'effet "Echo" la présélection "2",
vous noterez que le son est répété tous les 2 beats. Si vous choisissez
"4", le son est répété tous les 4 beats. Pour répéter le son tous les
1/2beats, sélectionnez "½".
Effets indépendants du rythme: dans ce cas, les inscriptions sur les touches
preset ne sont pas importantes. Le SMX-3 est livré avec des préréglages
standard pour chacun des effets indépendants du rythme. Vous pouvez
cependant ajuster ces paramètres avec les boutons de paramètres X et Y (24,
25) selon votre propre convenance. Pour sauvegarder vos réglages, appuyez
simplement sur le bouton de paramètre X (24) pendant que vous sélectionnez
l’une des 5 touches preset. Les paramètres standard seront remplacés par vos
propres réglages. Vous pouvez définir 5 presets pour chaque effet et les
adapter à n’importe quel moment.
24.X-PARAMETER KNOB: cette touche possède différentes fonctions:
Effect mode: règle les paramètres X des différents effets. En appuyant sur cette
touche pendant que vous appuyez sur une des touches preset, vous aurez accès
à des possibilités supplémentaires:
SYNQ® 27/124 SMX-3
SYNQ® 28/124 SMX-3
Page 17

FRANCAIS MODE D’EMPLOI
FRANCAIS MODE D’EMPLOI
Effets liés au rythme : vous pouvez sélectionner des presets de rythme
supplémentaires.
Effets indépendants du rythme : vous pouvez enregistrer vos propres
paramètres dans une des touches preset.
Sampler mode: il y a 3 fonctions possibles:
Playback/record mode: tournez le bouton afin de choisir la banque de
mémoire désirée et appuyez sur le bouton pour la sélectionner.
Sample edit mode: tournez le bouton pour rechercher le point de début ou de
fin de l’échantillon. (voir plus loin pour plus d’informations concernant l’édition
des échantillons)
Retour des effets externes : lorsque le mixer est en mode sampler, il vous
est loisible de connecter une unité d'effets externe. Appuyez et tournez le
bouton pour ajuster le volume du signal de retour entre -50dB et +0 dB.
25.BOUTON Y-PARAMETER: Ce bouton possède plusieurs fonctions:
Effect mode: utilisé pour ajuster le paramètre "Y" des effets. Prière de se reporter
à la section 27 étant donné que son rôle est différent pour chaque effet.
Sampler mode: il y a deux fonctions:
oMode Playback : on peut régler la vitesse générale de lecture de -80% à
+20%, et ce, de trois manières différentes:
en adaptant la vitesse par pas de 0,1 % : il suffit de faire tourner le
bouton pour modifier la vitesse.
en adaptant la vitesse par pas de 2 % : il suffit d'appuyer sur le bouton
et de faire tourner pour modifier la vitesse.
Réinitialiser la vitesse à 0 % : appuyez deux fois sur le bouton en
moins d'une seconde
oMode d'édition d'un échantillon : lorsque le mode “OUTRO EDIT” est en
cours, vous pouvez régler individuellement la vitesse d'un échantillon et ce
réglage sera enregistré avec les points de départ et de fin. On peut régler la
vitesse générale de lecture de -12% à +12%, et ce, de trois manières
différentes:
en adaptant la vitesse par pas de 0,1 % : il suffit de faire tourner le
bouton pour modifier la vitesse.
en adaptant la vitesse par pas de 1 % : il suffit d'appuyer sur le bouton
et de faire tourner pour modifier la vitesse.
Réinitialiser la vitesse à 0 % : appuyez deux fois sur le bouton en
moins d'une seconde.
26.TOUCHE D’ASSIGNATION DES EFFETS: Permet de sélectionner le signal qui va
vers la sortie « effect send »(46) et vers l'unité d'effets/sampler. Il peut s'agir de l'un
des suivants:
L'un des canaux d'entrée
L'un des canaux sélectionnés avec l’interrupteur d'assignation du crossfader
(6). Ca peut être le côté (CF-B) droit ou gauche (CF-A) du crossfader.
Si vous sélectionnés le master, les effets seront utilisés sur le son mixé du
master ou ou vous pouvez enregistrer le signal master mixé dans
l’échantillonneur.
Remarque : si vous sélectionnez "master", le retour de l'effet externe est mis
hors service pour éviter la formation de feedback.
27.SELECTEUR D'EFFETS: Permet de sélectionner le sampler ou l'effet désiré:
IMPORTANT!
Le sampler peut être sélectionné comme un des effets, mais dans ce cas il ne
sera PAS possible de l’utiliser en même temps avec un des multi effets. Il est
cependant possible d’utiliser le sampler avec un des effets crossover et/ou
avec une unité d'effets externe connectée aux prises d'effets send et return
(46 + 47).
Les effets crossover et les multi-effets ne peuvent pas être utilisés ensemble!
Pour pouvoir utiliser le multi-effets, il faut d'abord désactiver les effets
crossover (voir n°:8 pour plus d'informations)
SAMPLER: ceci n’est pas vraiment un effet mais avec le sampler
(échantillonneur) vous pouvez enregistrer / lire jusqu’à 495 échantillons (99
banques de 5 échantillons chacune) en utilisant une seule carte
SD™/SDHC™. Afin d’en savoir plus sur l’utilisation du sampler, lisez le
chapitre appelé “A propos du Sampler”.
Dans la fonction sampler, il est impossible d'utiliser les effets internes, mais
vous pouvez raccorder n'importe quel processeur d'effets externe en utilisant
les connecteurs send et return pour les effets (46/47).
ECHO: produit des répétitions sonore. Il vous est aisément possible de mixer
des échos synchronisés sur le beat en choisissant la présélection (23).
Ajustez les présélections avec le "X-Parameter" (24) dans une gamme de
2mSec à 2Sec. A l'aide du "Y-Parameter" (25), modifiez la balance entre le
son original et le son retardé.
AUTO PAN: Envoie la musique de gauche à droite et vice-versa, sur le
rythme du beat. Grâce aux présélections (23), choisissez la rapidité du
balancement (Exemple: Avec la présélection "2", ça prendra 2 beats pour
balancer la musique de gauche à droite et l'inverse). Modifiez les
présélections grâce au bouton "X-Parameter" (24) dans une gamme de
30mSec à 16Sec. Le "Y-Parameter" (25) vous permet d'ajuster la rapidité à
laquelle la musique sera envoyé d'un côté à l'autre. Vous avez donc le choix
entre une balance plus douce ou plus agressive.
FLANGER: Cet effet donne un "son électronique" à la musique. C'est
comme si la musique tournait en rond à cause d'une inversion de phase.
Vous pouvez aisément changer la durée de flanger (cycle) à l'aide des
présélections(23). Ces présélections peuvent être modifiées grâce au “Xparameter ”(24) dans une gamme de 100mSec à 16Sec. Avec le “Yparameter ”(25), changez le niveau de feedback du flanger.
Conseil: Chaque fois que vous pressez la même présélection (23) vous redémarrez le
cycle du flanger. Ceci peut donner une touche supplémentaire à l'effet.
MANUAL FILTER: Il s'agit d'un filtre digital à coupure de fréquences très
efficace. La table est livrée avec 5 fréquences de coupure standards mais
vous pouvez facilement les adapter à l'aide du "X-Parameter" (24) dans une
gamme allant du filtre passe-bande bas (LPF) @ 50Hz (l'écran indique: L
0.05kHz) jusqu'au filtre passe-bande haut (HPF) @ 21.1kHz (l'écran indique:
H 21.1kHz). Grâce au “Y-parameter”(25) vous pouvez modifier le niveau de
résonance du filtre (Il s'agit du facteur Q du filtre, celui-ci modifie l'impact du
filtre sur la fréquence sélectionnée). Vous pouvez remplacer les préréglages
standard par vos propres paramètres, simplement en appuyant sur le bouton
des paramètres “X”(24) en même temps que l’une des 5 touches preset (23).
SYNQ® 29/124 SMX-3
SYNQ® 30/124 SMX-3
Page 18
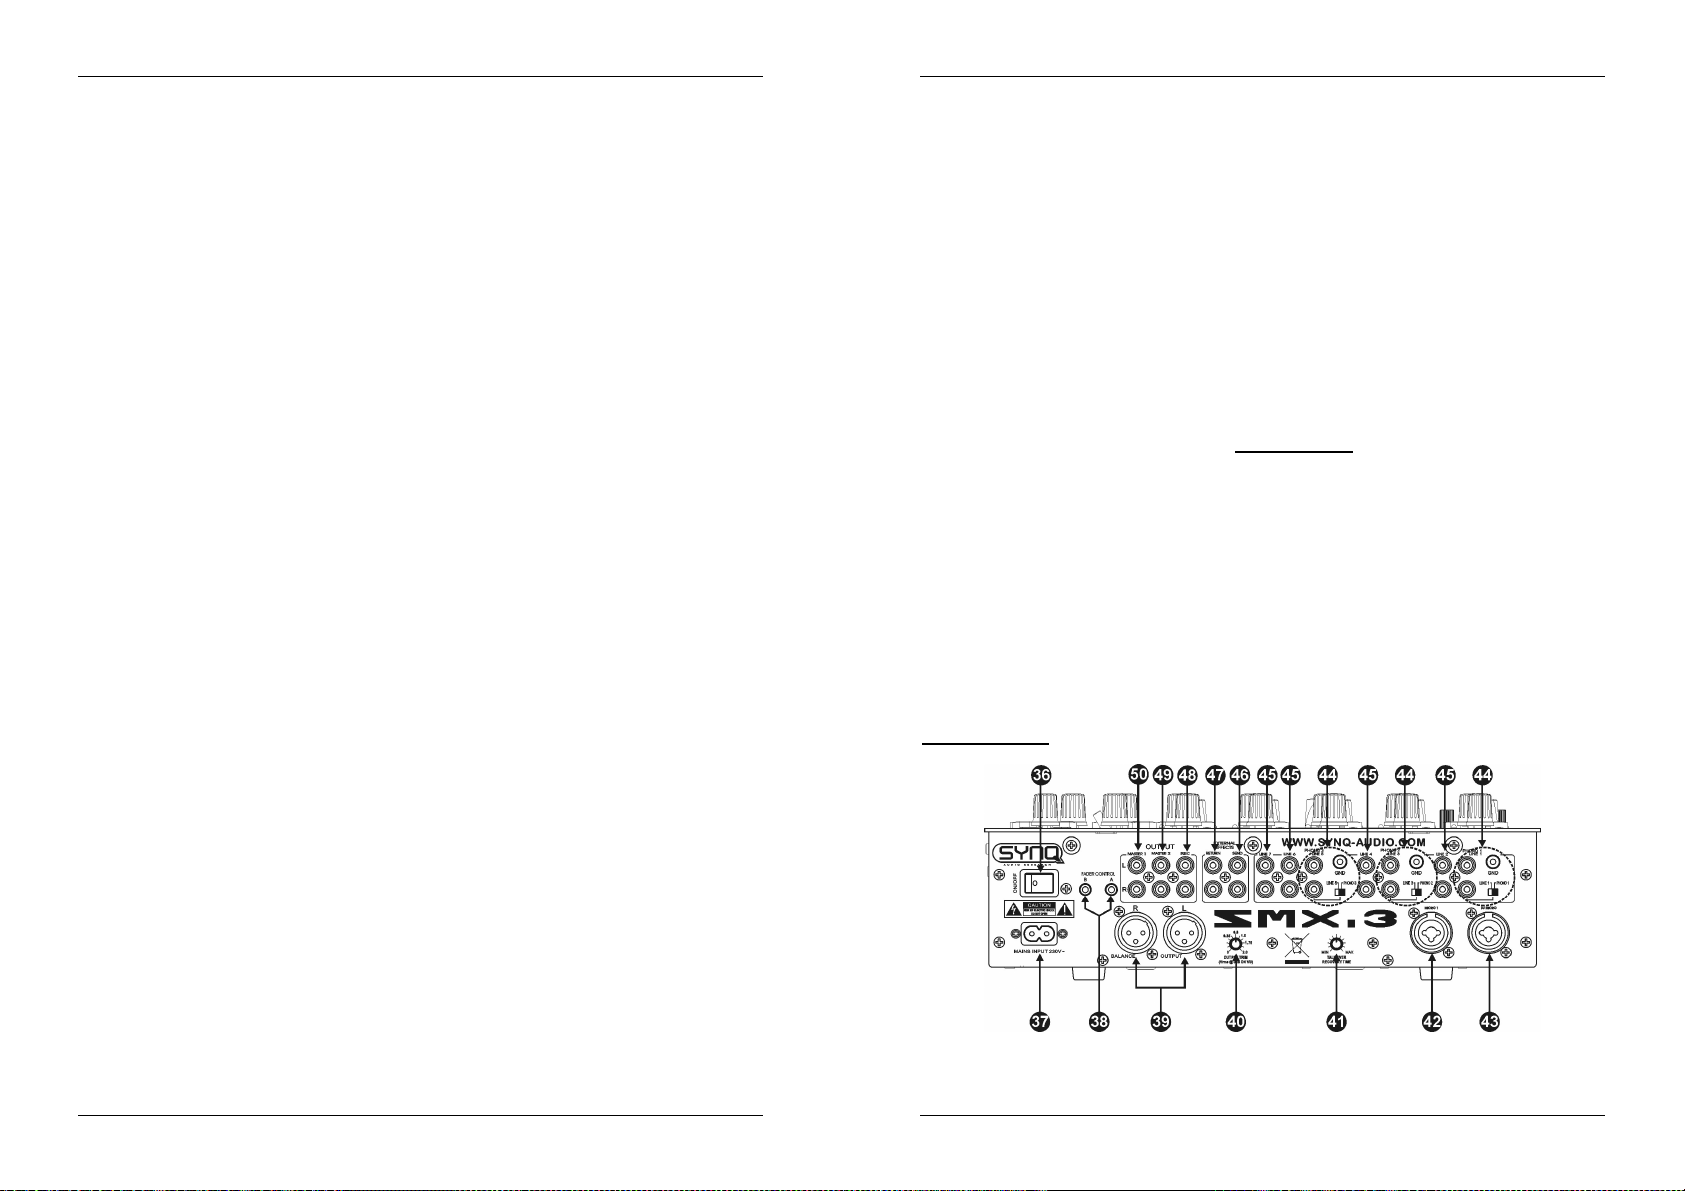
FRANCAIS MODE D’EMPLOI
FRANCAIS MODE D’EMPLOI
AUTO FILTER: Il s'agit d'un filtre passe-bande bas automatique. La
fréquence de coupure varie dans des cycles de 20KHz à 50Hz. Les
présélections (23) permettent de choisir des cycles qui soient synchronisés
sur le beat (exemple: pousser sur la présélection "8" le filtre aura besoin
de la durée de 8 beats pour changer sa fréquence de coupure de 20KHz à
50Hz ou en sens inverse). Modifiez les présélections grâce au "XParameter" (24) dans une gamme de 100mSec à 16Sec. Grâce au “Yparameter”(25) vous pouvez modifier le niveau de résonance du filtre (Il
s'agit du facteur Q du filtre, celui-ci modifie l'impact du filtre sur la fréquence
sélectionnée).
REVERB: Cet effet de réverbération vous donne l'impression de jouer votre
musique dans une église ou dans un grand hall vide: La réverbération
obtenue par réflexion du son sur les différents murs est ici simulée de façon
digitale. Vous avez le choix entre 5 présélections (23) de durées de
réverbération. Celles-ci peuvent être ajustées à l'aide du "X-Parameter" (24)
dans une gamme de 0% à 100% par paliers de 1%. Le "Y-Parameter" (25)
permet de faire la balance entre le son original et la réverbération. Vous
pouvez remplacer les préréglages standard par vos propres paramètres,
simplement en appuyant sur le bouton des paramètres “X”(24) en même
temps que l’une des 5 touches preset (23).
TRANS: Coupure automatique du son sur le rythme du beat. Les
présélections (23) permettent de choisir la longueur des cycles (Exemple:
avec la présélection "1/4" [pousser "X-Parameter" (24) tout en sélectionnant
la présélection "4"], la musique sera coupée par tranches de 1/4beats). Les
présélections peuvent être ajustées à l'aide du "X-Parameter" (24) dans une
gamme de 25mSec à 16Sec. Le "Y-Parameter" (25) permet d'ajuster le
temps de coupure. En position gauche (écran indique 0%), le temps de
coupure est nul. En tournant le bouton "Y-Parameter" (25) vers la droite, le
temps de coupure devient de + en + grand jusqu'à ne plus entendre que de
petits fragments de la musique originale.
Conseil: cet effet nécessite un certain entraînement! Les meilleurs résultats s'obtiennent
avec des beats réguliers, des petits cycles de coupure (1/8, 1/4 & 1/2beats) et des temps de
coupure de 50% et plus.
PITCH SHIFTER: Modifie la hauteur du son vers le haut ou vers le bas
tandis que le tempo reste inchangé. (Il s'agit en fait du contraire de ce que le
"master tempo" de certains lecteurs de CD essaye d'obtenir, à savoir un ton
identique et un tempo différent). Vous pouvez choisir entre 5 présélections
standards (23) de modifications de ton. Le "X-Parameter" (24) permet de
faire varier le ton dans une gamme de -100% à 100% par paliers de 1%. Le
"Y- Parameter" (25) permet de faire la balance entre le son original et le son
modifié. Vous pouvez remplacer les préréglages standard par vos propres
paramètres, simplement en appuyant sur le bouton des paramètres “X”(24)
en même temps que l’une des 5 touches preset (23).
Conseil: utiliser cet effet sur un micro pour modifier le ton de la voix. (avec une modification
à -100%, vous obtenez des voix venant "du côté obscur de ce monde”)
28.ORIFICE DE LA CARTE MEMOIRE SD™/SDHC™: Le SMX-3 ne possède pas de
mémoire interne pour l’enregistrement des échantillons. De ce fait, le sampler intégré
ne peut être utilisé que si une carte SD™/SDHC™ est insérée. Quand le sampler est
sélectionné et qu’aucune carte mémoire n’est insérée, l'écran affichera “noCArd”.
Attention! Ne retirez JAMAIS la carte mémoire pendant que la lumière rouge “in use”
est allumée! Ceci peut corrompre les informations qui se trouvent sur la carte mémoire,
provocant ainsi la perte des données!
29.COMMUTATEUR DJ MIC ON/OFF/TALKOVER: est utilisé pour mettre le canal du
micro DJ en mode:
OFF: le micro DJ est éteint.
ON: le micro DJ est allumé.
TALK OVER: le micro DJ est allumé. Si vous parlez dans le micro DJ, le
niveau de tous les autres canaux d'entrée sera automatiquement atténué.
Vous pouvez ajuster les 2 paramètres du talkover:
Talkover level (35): le niveau d’atténuation des canaux d’entrée.
Talkover recovery time (41): le temps nécessaire pour que la musique
retourne à son niveau initial.
30.NIVEAU MASTER2: Ajustement du niveau de la sortie master2 (49) à l'arrière de la
table. Ce niveau n'est pas influencé par le volume master1 (33) ni par la fonction
« mono/stéréo »(32) et la balance master1 (34).
31.VU METER A LED: VU-Mètre précis avec mémorisation du niveau peak: les niveaux
peak restent affichés un court instant. Très important: Pour avoir un son propre et net,
prêtez attention au VU-Mètre. Beaucoup de DJ's utilisent cet instrument important à
tort en essayant de le pousser au maximum. Soyons clairs: un bon Dj veut avant tout
un son clair et sans distorsion. Les niveaux supérieurs à 0dB produisent de la
distorsion, gardez donc un œil sur le VU-Mètre!
32.INTERRUPTEUR MASTER MONO/STEREO: Permet de mettre la sortie master1 en
mono ou en stéréo.
33.NIVEAU DE SORTIE MASTER1: Ajustement du niveau de la sortie master1.
(Attention: le limiteur “trim" (40) à l'arrière de la table peut réduire le niveau de sortie
maximal du curseur de sortie master1. Vérifiez ce limiteur (trim) si le niveau de sortie
maximal est plus bas que la normale.
34.BALANCE MASTER: Ajustement de la balance gauche/droite de la sortie master.
35.NIVEAU DU TALKOVER: est utilisé pour régler le niveau d’atténuation des 5 canaux
d’entrée pendant que le circuit du talkover automatique est actionné.
FACE ARRIERE
SYNQ® 31/124 SMX-3
SYNQ® 32/124 SMX-3
Page 19

FRANCAIS MODE D’EMPLOI
FRANCAIS MODE D’EMPLOI
36.INTERRUPTEUR D'ALLUMAGE: Permet d'allumer/éteindre la table.
37.ALIMENTATION: Utiliser le câble d'alimentation fourni.
38.CONTROLE FADER: En connectant des lecteurs CD compatibles à cette entrée, le
démarrage de ces derniers peut être contrôlé par le curseur et le crossfader de la
SMX-3.
39.SORTIE MASTER1 SYMETRIQUE : les connecteurs XLR peuvent être utilisés pour
connecter la SMX-3 à l'ampli en utilisant des câbles spécifiques pour les signaux
symétriques.
40.SORTIE TRIM: Ce potentiomètre permet de délimiter et donc de réduire le niveau de
sortie de la table afin d'éviter d'endommager l'ampli ou les haut-parleurs. (Attention: le
niveau de sortie peut descendre jusqu'à zéro. S'il n'y a pas de signal sur la sortie
master, vérifiez que ce potentiomètre n'ait pas été mis accidentellement sur zéro.)
41.TEMPS DE RETABLISSEMENT DU TALKOVER: est utilisé pour régler le temps
nécessaire pour que la musique retourne à son niveau initial quand le DJ arrête de
parler dans le micro DJ.
42.ENTREE MICRO1: est utilisée pour connecter un micro asymétrique supplémentaire.
43.ENTREE MICRO DJ: Combo jack. Accepte aussi bien un micro avec prise XLR
symétrique qu'un micro avec jack 1/4” mono asymétrique. Cette entrée est
principalement utilisée pour les micros DJ. Le talk-over n'affecte pas le niveau du
signal de cette entrée.
44.ENTREE PHONO/LINE: est utilisée pour connecter un appareil audio.
Si vous connectez un lecteur CD: mettez le sélecteur “phono/line” en position
line. Si votre platine vinyle possède une sortie ligne, nous vous conseillons de
l’utiliser.
Si vous connectez une platine vinyle: mettez le sélecteur “phono/line” sur la
position phono.
De nombreuses platines sont équipées d’un connecteur de mise à la terre
(GND). Il est conseillé de relier ce câble de mise à la terre au connecteur de
masse GND.
45.ENTREE LINE: Permet de connecter tout type d'appareil de niveau "ligne" (CD, tuner,
MD, …)
46.EFFECT SEND: En plus des effets intégrés, il est également possible de connecter un
processeur d’effets externe au SMX-3. Le signal de sortie peut être sélectionné à l’aide
du sélecteur “effect assign” (26).
Remarque: Le send/return pour effets vous offre la possibilité d’utiliser le sampler intégré en même
temps qu’un processeur d’effets externe.
47.EFFECT RETURN: renvoie le signal d’effet venant du processeur d’effets externe vers
la table de mixage. Le signal de retour peut être ajusté avec le bouton réglant le
paramètre "X" (24). Si vraiment vous désirez un contrôle total sur le signal de retour du
processeur d'effets externe (contrôle de tonalité, etc …), vous pouvez alors également
connecter la sortie du processeur d'effets externe sur un canal d'entrée au lieu de
l'entrée du retour.
Remarque: vous pouvez éteindre/allumer le signal de l’entrée de retour à l’aide du sélecteur “effect
on/off” (18).
48.SORTIE RECORD: Véhicule le même signal que la sortie master, mais sans être
influencée par le niveau du master, de la balance et du contrôle mono/stéréo. Peut être
connectée à un enregistreur analogique.
49.SORTIE MASTER2 ASYMETRIQUE : Permet de connecter des amplis
supplémentaires.
50.SORTIE MASTER1 ASYMETRIQUE : Idem que la sortie MASTER1 symétrique (39),
mais avec un signal asymétrique. Peut être utilisée pour connecter des amplis
asymétriques.
A PROPOS DU SAMPLER
Avant de pouvoir utiliser le sampler vous DEVEZ insérer une carte Secure Digital™. Cela
peut être une carte standard (SD™/SDHC™) ou une carte à grande capacité SDHC™.
Vous pouvez acheter ces cartes mémoire dans plusieurs magasins spécialisés. Après
avoir inséré la carte mémoire, l'écran affiche “rEAd” suivi par “1”. Ceci signifie que la
banque mémoire 1 est sélectionnée.
COMMENT FORMATTER LA CARTE SD™/SDHC™:
Vous pouvez formater la carte SD™/SDHC™ dans n’importe quel ordinateur qui tourne
sous Windows®.
Insérez la carte SD™/SDHC™ dans le lecteur de carte de mémoire de votre PC.
Dans votre Windows explorer, cliquez à droite sur le lecteur de carte afin d’ouvrir la
fenêtre d’options.
Sélectionnez “Formater” afin d’ouvrir le programme d’utilitaires du formatage.
Sélectionnez le type de fichier que votre PC vous proposera comme standard. Ce sera
soit FAT, soit FAT 32 (NE choisissez PAS NTFS !)
Vous pouvez attribuer un nom à votre carte SD™/SDHC™ ou ne pas utiliser cette
option.
N’utilisez PAS l’option de formatage rapide (quick format).
Appuyez sur “START“ pour démarrer le formatage.
Cette action peut prendre un peu de temps. Windows vous informera quand la carte
mémoire est formatée.
COMMENT ENREGISTRER UN ECHANTILLON (SAMPLE):
Vous pouvez uniquement enregistrer un échantillon dans une touche play vide. Référezvous aux explications expliquant comment effacer un échantillon ou une banque mémoire
complète.
Mettez la table de mixage en mode sampler à l’aide du sélecteur “effect
select” (27).
Avec le sélecteur “effect assign” (26), vous devez sélectionner le canal
d’entrée à partir duquel vous voulez enregistrer votre échantillon.
Appuyez sur la touche “TAP/REC” (22) pour mettre le sampler en mode
d’enregistrement. (la touche TAP/REC clignote). L'écran affiche le nombre de secondes
restant disponibles pour l’enregistrement.
A l’aide du bouton “X-parameter” (24) vous pouvez feuilleter les 99 banques mémoire
disponibles. Appuyez une seule fois sur le bouton “X-parameter” pour sélectionner une
banque mémoire.
Conseil: pendant que vous feuilletez les banques mémoire, vous pouvez facilement voir quelles touches
de lecture sont toujours vides (plein : touche = allumée * vide : touche = éteinte)
Appuyez une seule fois sur une touche vide (éteinte!) pour démarrer l’enregistrement
(au bon moment!) L'écran démarre le compte à rebours des secondes restant
disponibles pour l’enregistrement.
Pour arrêter l’enregistrement il suffit d’appuyer à nouveau sur la même touche (au bon
moment!)
SYNQ® 33/124 SMX-3
SYNQ® 34/124 SMX-3
Page 20
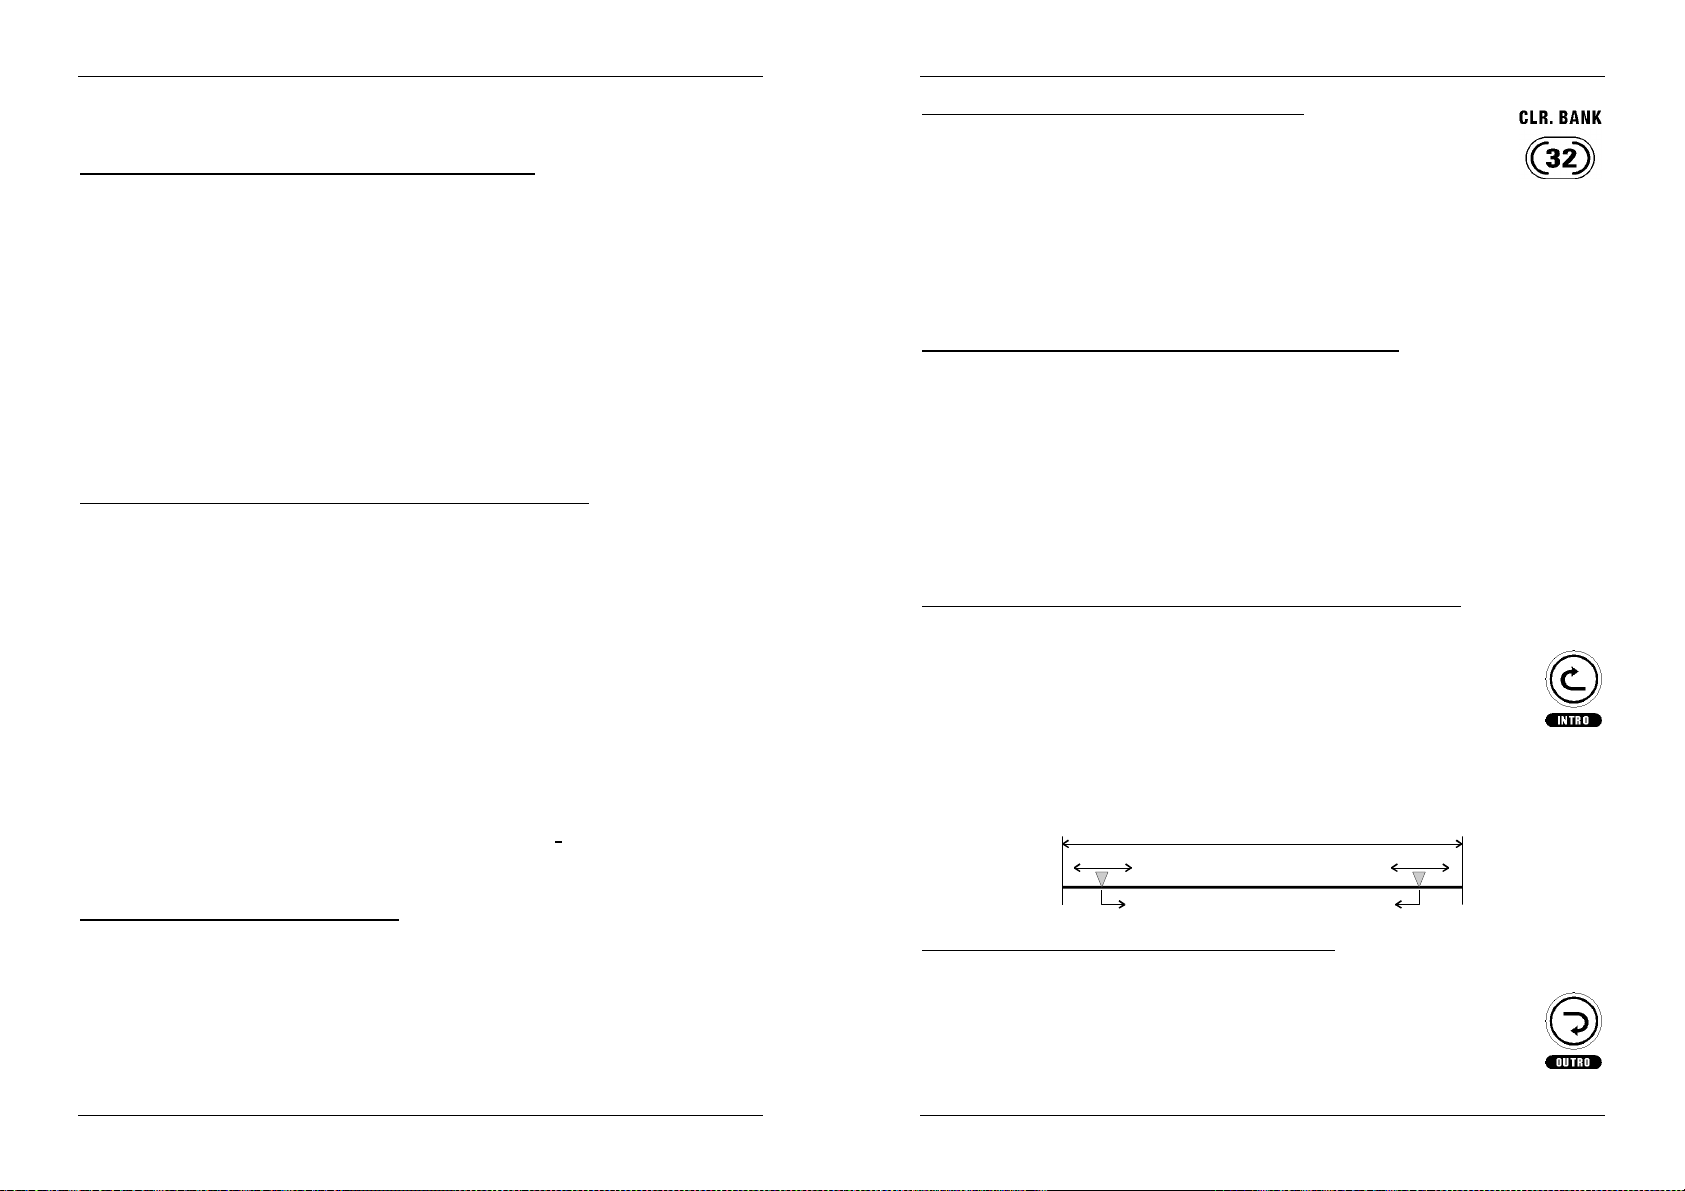
FRANCAIS MODE D’EMPLOI
Total length of recorded sample
FRANCAIS MODE D’EMPLOI
Pour lire l’échantillon que vous venez d’enregistrer il vous suffit d’appuyer une troisième
fois sur la même touche.
COMMENT LIRE UN ECHANTILLON (MODE 'SAMPLER'):
Mettez la table de mixage en mode sampler à l’aide du sélecteur “effect select” (27).
Utilisez le sélecteur “input assign” (1) d’un des canaux d’entrées pour sélectionner le
sampler.
A l’aide du bouton “X-parameter” (24) vous pouvez feuilleter les banques mémoire qui
contiennent des échantillons. (les banques mémoire vides ne sont pas accessible)
appuyez une seule fois sur le bouton “X-parameter” pour sélectionner la banque de
mémoire.
Conseil: pendant que vous feuilletez les banques mémoire, vous pouvez facilement voir quelles touches
de lecture sont toujours vides (plein : touche = allumée * vide : touche = éteinte)
Pour démarrer la lecture vous avez juste à appuyer sur les touches de lecture (play) qui
sont allumées. (couleur rouge)
Conseil: vous pouvez jouer jusqu’à 2 échantillons en même temps (polyphonie) et mettre 1 échantillon en
boucle (voir plus loin).
Vous pouvez sélectionner une autre banque mémoires pendant que vous êtes toujours en train de jouer
un échantillon de la banque mémoire précédente. Ainsi vous pouvez passer d’une banque mémoire à
l’autre sans interruption!
COMMENT FAIRE POUR LIRE DES JINGLES (MODE 'JINGLE') :
Mettez la table de mixage en mode sampler à l’aide du sélecteur “effect select” (27).
Utilisez le sélecteur “input assign” (1) d’un des canaux d’entrées pour sélectionner le
sampler.
Appuyez sur le bouton 'EFF. CUE' (20) afin qu'il soit allumé.
Appuyez brièvement sur l'un des boutons 'play' (23) : l'échantillon enregistré est joué
dans son entièreté. Chaque fois que vous appuyez sur le même bouton 'play',
l'échantillon redémarre avec, comme résultat, un effet de bégaiement.
pendant la lecture d'un échantillon, vous pouvez appuyez sur un autre bouton 'play' : le
premier échantillon s'arrête immédiatement et le "nouvel" échantillon prend le relais.
Vous pouvez arrêter l'échantillon qui est en cours de lecture en arrêtant le mode 'jingle' :
appuyez sur le bouton 'EFF. CUE' (20) et maintenez-le enfoncé jusqu'au moment où
vous voulez arrêter l'échantillon. (c'est seulement au moment où vous relâcherez le
bouton 'EFF. CUE' que la lecture de l'échantillon s'arrêtera.
REMARQUES IMPORTANTES :
Lorsque l'appareil est en mode 'jingle', il est impossible d'enregistrer ou d'éditer des
échantillons, ou encore, de lire des échantillons en boucle: faites passer l'échantillonneur
en mode normal pour avoir de nouveau accès à ces tâches. Lorsqu'on met la table de
mixage hors tension ou que l'on enlève la carte mémoire, l'échantillonneur retourne
automatiquement vers le mode standard.
COMMENT EFFACER 1 ECHANTILLON:
Vous pouvez effacer les samples en mode de lecture ainsi qu’en mode d’enregistrement.
Appuyez sur la touche play ou l’échantillon est stocké.
Appuyez en même temps sur la touche TAP/REC (22) pendant 1 seconde.
Après environ 1 seconde, l'écran affiche “dEL” pour indiquer que l’échantillon a été effacé.
(La touche play est éteinte)
COMMENT EFFACER UNE BANQUE MEMOIRE:
Vous pouvez effacer une banque mémoire en mode de lecture ainsi qu’en
mode d’enregistrement.
A l’aide du bouton “X-parameter” (24) vous pouvez feuilleter les banques
mémoire qui contiennent des échantillons. (les banques mémoire vides ne
sont pas accessibles) Pour sélectionner une banque mémoire il suffit d’appuyer une
seule fois sur le bouton “X-parameter”.
Pour effacer la banque mémoire sélectionnée : appuyez sur le bouton “X-parameter”
(24) puis appuyez sur la touche play “32” et “CLR. BNK” (23) simultanément. Après
environ 2 secondes, l'écran affiche “dEL”, ce qui indique que la banque mémoire a été
effacée (toutes les touches play sont éteintes).
DIFFERENCE ENTRE “INDIVIDUAL” & “OVERALL” SPEED:
Réglage de la vitesse individuelle : vous pouvez régler individuellement la vitesse
de chaque échantillon de manière à synchroniser les différents échantillons les uns
aux autres. Vous pouvez régler cette vitesse individuelle pendant l'étape “endpoint
editing”. Ce réglage de la vitesse individuelle est enregistré en même temps que les
points de départ et de fin de l'échantillon. Prière de se reporter à la description du
bouton 'Y-parameter' (25) pour de plus amples informations.
Réglage de la vitesse générale : elle est utilisée pendant la lecture d'un ou deux
échantillons. Cette vitesse N'est PAS enregistrée en même temps que le ou les
échantillons. Prière de se reporter à la description du bouton 'Y-parameter' (25) pour
de plus amples informations. Vous pouvez aussi utiliser les touches de pitch bend (8)
pour synchroniser les échantillons avec les autres sources de musique.
COMMENT MODIFIER LE POINT DE DEPART D’UN ECHANTILLON:
Si vous avez démarré l’enregistrement de l’échantillon trop tôt, vous pouvez toujours
ajuster le point de départ. Ce procédé est non destructif.
Appuyez sur la touche play de l’échantillon que vous voulez jouer en boucle.
Appuyez en même temps sur la touche “loop intro” (15).
Relâchez les deux touches: vous entendrez de toutes petites boucles, d’une
façon similaire à celle d'un lecteur CD en mode de recherche de Frame.
Vous pouvez chercher un nouveau point de départ avec le bouton “X-parameter” (24).
Appuyez à nouveau sur la touche “loop intro” pour arrêter le mode d’édition de boucle et
pour enregistrer le nouveau point de départ.
Vous pouvez répéter ces actions jusqu’à ce que vous trouviez le bon point de départ.
Intro Edit
Indexpoint begin Indexpoint end
Outro Edit
COMMENT MODIFIER LA FIN D’UN ECHANTILLON:
Si vous n’avez pas arrêté l’enregistrement au bon moment, vous pouvez toujours ajuster
la fin. Ce procédé n’est pas destructif.
Appuyez sur la touche play de l’échantillon que vous voulez jouer en boucle.
Appuyez en même temps sur la touche “loop outro” (15).
Relâchez les deux touches: l’échantillon joue comme une boucle sans fin.
Vous pouvez rechercher une nouvelle fin pendant que la boucle est reproduite
SYNQ® 35/124 SMX-3
SYNQ® 36/124 SMX-3
Page 21

FRANCAIS MODE D’EMPLOI
Total length recorded sample
FRANCAIS MODE D’EMPLOI
avec le bouton “X-parameter” (24) jusqu’à ce que la boucle soit parfaite
Vous pouvez utiliser le bouton “Y-parameter” (25) pour ajuster la vitesse individuelle.
appuyez à nouveau sur la touche “loop outro” pour arrêter le mode d’édition de boucle et
pour enregistrer la nouvelle fin.
COMMENT FAIRE JOUER UN ECHANTILLONNAGE EN BOUCLE (LOOP):
Appuyez sur la touche play de l’échantillon que vous voulez jouer en boucle.
Appuyez en même temps sur la touche loop (16).
Relâchez les deux touches: les deux touches clignotent en même temps de
telle façon que vous pouvez facilement voir quel échantillon est joué en boucle.
Vous pouvez facilement redémarrer la boucle en appuyant à nouveau sur la touche play.
Pour arrêter la boucle : appuyez sur la touche loop (la lecture de la boucle continue) et
relâchez la touche au bon moment. Dès que la touche loop est relâchée, la boucle
s’arrête.
Appuyez à nouveau sur la touche “loop outro” pour arrêter le mode d’édition de boucle
et pour enregistrer la nouvelle fin.
Intro Edit
Indexpoint begin Indexpoint end
Loop between index points
Outro Edit
MONTAGE DES ADAPTATEURS 19”
Si vous voulez installer le SMX-3 dans un rack de 19”, vous devez monter 2 adaptateurs
de 19” qui sont disponibles en option.
Retirez les 3 bouchons en
plastique qui se trouvent
des 2 côtés de la table de
mixage.
Retirez les 4 vis qui se
trouvent des 2 côtés de la
table de mixage. Vous
n’avez plus besoin de ces
vis, dès lors, rangez-les
dans un endroit sûr pour le
cas ou vous voudriez à
nouveau utiliser la table de
mixage sans les
adaptateurs de19”.
Mettez un des adaptateurs
de 19” en place et fixez le
avec les 7 vis qui sont fournies avec les adaptateurs.
Refaites cela avec le deuxième adaptateur 19”.
La table de mixage est prête à être montée dans un rack de 19”. Hauteur totale : 370mm
ou environ 8.5 unités.
MISE A JOUR DU PROGICIEL DE GESTION
En suivant cette procédure vous pouvez mettre à jour le progiciel de gestion du
processeur ainsi que du DSP. La mise à jour du logiciel est une tâche délicate. Veuillez
suivre les diférentes étapes avec attention afin de ne pas endommager la table de mixage.
TRES IMPORTANT!
N'OUBLIEZ PAS D'ENREGISTER VOTRE SMX-3. VOUS RECEVREZ AUTOMATIQUEMENT
UN RAPPEL PAR EMAIL QUAND LES NOUVELLES MISES À JOUR DE LOGICIEL SERONT
DISPONIBLES! SURFEZ SUR: WWW.SYNQ-AUDIO.COM/REGISTER/
En cas d’une mise à jour des deux progiciels (processeur et DSP) en même temps, vous
devez d’abord installer le software du processeur et puis seulement celui du DSP. Avant
de commencer la mise à jour vous devez lire le fichier « README » attentivement!
N’éteignez JAMAIS la table de mixage et n’appuyez sur AUCUNE des touches pendant
le processus de mise à jour ! Attendez que l'écran retourne à son affichage normal.
Vous pouvez interrompre le processus de mise à jour uniquement en éteignant la table
de mixage quand l'écran est toujours éteint après une minute. Dans ce cas, la mise à
jour vient d’échouer.
COMMENT CONTROLER LA VERSION DU PROGICIEL:
éteignez la table de mixage.
Appuyez simultanément sur les touches play
(23) identifiées par les chiffres “16” et “32”.
Allumez la table de mixage pendant que vous
maintenez ces touches enfoncées.
L'écran affiche la version du logiciel du
microprocesseur et du DSP: voir dessin. Dans cet
exemple les versions du logiciel sont: Processeur = V1.6 et DSP = V1.5.
COMMENT METTRE À JOUR LE LOGICIEL DU PROCESSEUR:
Insérez la carte SD™/SDHC™ dans votre PC et copiez le fichier appelé “ SMX-
3C_xx.bin ” dans la carte mémoire.
Important! NE PAS renommer ce fichier!
Mettez la carte SD™/SDHC™ dans l'orifice de la carte mémoire (28) du SMX-3.
Eteignez la table de mixage.
Appuyez simultanément sur les 3 touches play (23) marqués “2” + “4” + “8”.
Allumez la table de mixage pendant que vous tenez ces 3 touches enfoncées.
Toutes les touches CUE (5) clignotent quatre fois pour indiquer que le processus de la
mise à jour vient de démarrer. Dès que toutes les touches cue ont clignoté 2 fois, vous
pouvez relâcher les 3 touches play.
Vous remarquerez que les touches CUE s’allumeront une à une (de 1 à 5) pendant que
les touches play changent de couleur. Après environ 25 secondes, l'écran retournera à
son affichage normal, ce qui indique que le processus de mise à jour est terminé.
Vérifiez la version du logiciel pour voir si le processus de mise à jour a réussi.
SYNQ® 37/124 SMX-3
SYNQ® 38/124 SMX-3
Page 22

FRANCAIS MODE D’EMPLOI
FRANCAIS MODE D’EMPLOI
COMMENT METTRE À JOUR LE LOGICIEL DU DSP:
Insérez la carte SD™/SDHC™ dans votre PC et copiez le fichier appelé “ smx-
3_xx.bin” (où "xx" représente le numéro de la version) dans la carte mémoire.
Important! NE PAS renommer ce fichier!
Mettez la carte SD™/SDHC™ dans l'orifice de la carte mémoire (28) du SMX-3.
Eteignez la table de mixage.
Appuyez simultanément sur les 3 touches play (23) identifiées “8” + “16” + “32”.
Allumez la table de mixage pendant que vous maintenez ces 3 touches enfoncées.
Toutes les touches CUE (5) clignotent quatre fois pour indiquer que le processus de
mise à jour vient de démarrer. Dès que toutes les touches cue ont clignoté 2 fois, vous
pouvez relâcher les 3 touches play.
Vous remarquerez que les touches CUE s’allumeront une à une (de 1 à 3). Après environ
15 secondes, l'écran retournera à son affichage normal, ce qui indique que le processus
de mise à jour est terminé.
Vérifiez la version du logiciel pour vérifier si le processus de mise à jour a réussi.
CHANGEMENT DES CURSEURS
Un grand avantage de cette table est de pouvoir changer les curseurs des canaux, même
durant l'utilisation de la table.
Voici la procédure pour changer les curseurs des canaux:
Retirer les boutons des curseurs.
Retirer les 6 vis du panneau frontal qui
entoure les curseurs.
Retirer les 3 vis du curseur que vous
souhaitez changer.
Retirez délicatement le curseur de son
emplacement.
Mettez délicatement en place le nouveau
curseur. Assurez-vous que les contacts
touchent le connecteur du tableau PCB
de la table.
Mettez les 3 vis du curseur en place.
Remettez le petit panneau frontal en
place à l'aide des 6 vis.
C'est fait!
Voici la procédure pour changer le crossfader:
Retirer les boutons du crossfader.
Retirez les 2 vis qui maintiennent le crossfader.
Retirez délicatement le curseur et le plateau de leur emplacement.
Débranchez le câble du crossfader (tirez sur le connecteur, PAS sur le câble!)
Branchez le nouveau crossfader sur le câble.
Remettre le crossfader et son petit plateau en place à l'aide des 2 vis.
C'est fait!
CARACTERISTIQUES TECHNIQUES
Impédance & sensibilité entrée/sortie (EQ flat, max. gain, level meter = 0dB)
Line 2, 4, 6, 7: 340mV@ 20kΩ (max = +4dBV)
Line 1, 3, 5: 340mV@ 47kΩ (max = +4dBV)
Phono: 3,4mV @ 47kΩ (max = -36dBV)
Mic: 3,4mV @ 10kΩ (max = -36dBV)
Return: 525mV@ 10kΩ
Send: 525mV@ 2kΩ
Record sortie: 775mV@ 1kΩ
Masters symétriques: 1,55V @ 100Ω
Masters asymétriques: 2,55V @ 200Ω
Casques: 3,00V @ 33Ω
Sortie maximum (EQ flat, max. gain, FX off, THD=1%, load is 100kΩ )
Master1: Plus de +18dBV (8,0V)
Master2: Plus de +18dBV (8,0V)
Casques: Plus de + 9,5dBV (3V) @ 32Ω
Réponse en fréquence (EQ flat, max. gain, level meter = 0dB, load is 100kΩ )
Line: 25 - 20.000Hz+/-1dB
Phono: 25 - 20.000Hz+1/-1,5dB (RIAA)
Mic : 25 - 20.000Hz+1/-1,5dB
THD + Bruit (EQ flat, max. gain, level meter = 0dB, load is 100kΩ )
Line: Moins de 0,05% (25 – 20.000Hz)
Phono: Moins de 0,05% (1kHz A-weighted)
Mic: Moins de 0,1% (1kHz A-weighted)
Diaphonie Canaux (EQ flat, max. gain, Master = 0dBV)
Diaphonie: Plus de 70dB @ 1kHz (entre L,R & canaux)
Contrôleur de tonalité:
Mic: -12dB / +12dB@ 70Hz – 1kHz – 13kHz.
Autres canaux : -30dB / +10dB@ 70Hz – 1kHz – 13kHz.
Sampler MP3:
Enregistrement des échantillons: MPEG1 layer3 44,1kHz sampled @ 192kbps stereo
Lecture des échantillons: plusieurs vitesses, l'édition des paramètres n'est pas possible
Polyphonie: 2 voies
Cartes mémoires: cartes SD™ et SDHC™.
Capacité max. des cartes: 32GB
Format des fichiers: FAT (FAT16) ou FAT32 (cela dépend de la capacité mémoire)
Spécifications générales:
Alimentation: 230V~ 50Hz. (Europe)
Consommation: 40Watts
Dimensions: 320 x 370 x 109mm (LxPrxH)
Poids : 7.0 kg
Chacune de ces informations peut être modifiée sans avertissement préalable
Vous pouvez télécharger la dernière version de ce mode d’emploi et du progiciel de gestion
sur notre site Web : www.synq-audio.com
SYNQ® 39/124 SMX-3
SYNQ® 40/124 SMX-3
Page 23

NEDERLANDS HANDLEIDING
GEBRUIKSAANWIJZING
Hartelijk dank voor de aankoop van dit SYNQ product. Om ten volle te kunnen profiteren
van alle mogelijkheden en voor uw eigen veiligheid, gelieve de aanwijzingen zeer
zorgvuldig te lezen voor U begint het apparaat te gebruiken.
VERGEET NIET UW SMX-3 MIXER TE REGISTREREN. ZO ONTVANGT U
AUTOMATISCH EEN BERICHT BIJ NIEUWE SOFTWARE UPDATES!
SURF NAAR: WWW.SYNQ-AUDIO.COM/REGISTER/
KARAKTERISTIEKEN
In dit apparaat is radio-interferentie onderdrukt. Dit product voldoet aan de gangbare
Europese en nationale voorschriften. Het is vastgesteld dat het apparaat er zich aan houdt
en de desbetreffende verklaringen en documenten zijn door de fabrikant afgegeven.
12 ingangen (2mic + 7line + 3phono) op 6 kanalen (5faders + 1DJ mic)
Speciale matrix ingangsschakelaars voor max. flexibiliteit: wissel in 1seconde alle
ingangen om!
2 Master uitgangen:
o Master1 met signaalbegrenzing (XLR + cinch/RCA)
o Master2 (cinch/RCA)
Gain en 3-bands toonregeling met -30dB kill functie op alle kanalen
LED VU-meters met peak memory op alle kanalen + master
Gemakkelijk te vervangen, VCA gestuurde, faders met instelbare curve op alle ingangen
Gemakkelijk te vervangen, VCA gestuurde, crossfader met A/B kanaaltoewijzing en
instelbare curve (soft zeer scherp)
Zeer complete MP3-sampler:
o Werkt met SDHC™-kaarten (meerdere uren muziekopname mogelijk!)
o Max. 99 geheugenbanken met elk 5 samples op iedere SDHC™ kaart!
o Stereo samples worden in MP3-formaat opgenomen (192kbps)
o Individuele snelheidsinstelling voor alle samples!
o Algemene snelheidsregeling met master tempo! (pitch lock)
o Polyfonie: 2 samples kunnen samen worden afgespeeld
o Naadloze loops met instelbare begin- en eindpunten
o Sampler in/uitgangen toewijsbaar aan elk kanaal
Volautomatische beat counters
Cross fader start voor compatibele CD-spelers
2 Beat gesynchroniseerde Crossfader mix effecten
8 Beat gesynchroniseerde digitale effecten met instelbare effect presets: Echo, Autopan,
Flanger, Manual filter, Auto filter, Reverb, Trans, Pitch Shifter
Stereo effect send/return voor het aansluiten van externe effectapparatuur.
LCD display geeft informatie over effecten, sampler en beat counters
Effect Cue functie
Instelbare DJ micro talkover functie
Hoogvermogen voorbeluistering met “cue/pgm mixing”
Firmware via de SDHC™-kaarten aan te passen.
NEDERLANDS HANDLEIDING
EERSTE INGEBRUIKNAME
Controleer voor het eerste gebruik van het apparaat of het tijdens het transport
beschadigd werd. Mocht er schade zijn, gebruik het dan niet, maar raadpleeg eerst uw
dealer.
Belangrijk: Dit apparaat verliet de fabriek in uitstekende staat en goed verpakt. Het is
erg belangrijk dat de gebruiker de veiligheidsaanwijzingen en raadgevingen in deze
gebruiksaanwijzing uiterst nauwkeurig volgt. Elke schade veroorzaakt door verkeerd
gebruik van het apparaat valt niet onder de garantie. De dealer aanvaardt geen
verantwoordelijkheid voor mankementen en problemen die komen door het
veronachtzamen van deze gebruiksaanwijzing.
Bewaar deze brochure op een veilige plaats om hem in de toekomst nogmaals te
kunnen raadplegen. Indien U het apparaat verkoopt, denkt U er wel aan om de
gebruiksaanwijzing bij te voegen.
Om het milieu te beschermen, probeer zoveel mogelijk het verpakkingsmateriaal te
recycleren.
Controleer de inhoud:
Kijk na of de verpakking volgende onderdelen bevat:
Gebruiksaanwijzing
SMX-3 mixer
Netsnoer
VEILIGHEIDSVOORSCHRIFTEN:
WAARSCHUWING: Om het risico op
CAUTI ON
De bliksempijl die zich in een gelijkbenige driehoek bevindt is bedoeld om u te
wijzen op het gebruik of de aanwezigheid van niet-geïsoleerde onderdelen met
een “gevaarlijke spanning” in het toestel die voldoende kracht heeft om een
risico van elektrocutie in te houden.
Het uitroepteken binnen de gelijkbenige driehoek is bedoeld om de gebruiker
erop te wijzen dat er in de meegeleverde literatuur belangrijke gebruik en
onderhoudsinstructies vermeld staan betreffende dit onderdeel.
Dit symbool betekent: het apparaat mag enkel binnenhuis worden gebruikt.
Dit symbool betekent: Lees de handleiding!
Dit symbool betekent: Klasse II apparaten
Stel dit apparaat niet bloot aan regen of vocht, dit om het risico op brand en elektrische
schokken te voorkomen.
Om de vorming van condensatie binnenin te voorkomen, laat het apparaat aan de
omgevingstemperatuur wennen wanneer het, na het transport, naar een warm vertrek is
overgebracht. Condensatie kan het toestel soms verhinderen perfect te functioneren. Het
kan soms zelfs schade aan het apparaat toebrengen.
Gebruik dit apparaat uitsluitend binnenshuis.
Plaats geen stukken metaal en mors geen vocht binnen in het toestel om elektrische
elektrocutie zoveel mogelijk te vermijden mag u
nooit de behuizing verwijderen. Er bevinden zich
geen onderdelen in het toestel die u zelf kan
herstellen. Laat de herstellingen enkel uitvoeren
door een bevoegde technicus.
SYNQ® 41/124 SMX-3
SYNQ® 42/124 SMX-3
Page 24

NEDERLANDS HANDLEIDING
NEDERLANDS HANDLEIDING
schokken of storing te vermijden. Objecten gevuld met water, zoals bvb. Vazen, mogen
nooit op dit apparaat worden geplaatst. Indien er toch een vreemd voorwerp of water in
het apparaat geraakt, moet U het direct van het lichtnet afkoppelen.
Open vuur, zoals brandende kaarsen, mogen niet op het apparaat geplaatst worden.
Bedek geen enkele ventilatieopening om oververhitting te vermijden.
Zorg dat het toestel niet in een stoffige omgeving wordt gebruikt en maak het regelmatig
schoon.
Houd het apparaat uit de buurt van kinderen.
Dit apparaat mag niet door onervaren personen bediend worden.
De maximum veilige omgevingstemperatuur is 40°C. Gebruik het apparaat dus niet bij
hogere temperaturen.
De minimum afstand rondom dit apparaat om een goede koeling toe te laten is 3cm.
Trek altijd de stekker uit wanneer het apparaat gedurende langere tijd niet wordt gebruikt
of alvorens met de onderhoudsbeurt te beginnen.
De elektrische installatie behoort uitsluitend uitgevoerd te worden door bevoegd
personeel, volgens de in uw land geldende regels betreffende elektrische en
mechanische veiligheid.
Controleer dat de beschikbare spanning niet hoger is dan die aangegeven op de
achterzijde van het toestel.
Het stopcontact zal steeds vrij toegankelijk blijven zodat de stroomkabel op elk moment
kan worden uitgetrokken.
De elektrische kabel behoort altijd in uitstekende staat te zijn. Zet het apparaat
onmiddellijk af als de elektrische kabel gekneusd of beschadigd is. De kabel moet
vervangen worden door de fabrikant zelf, zijn dealer of vergelijkbare bekwame personen
om een brand te voorkomen.
Laat de elektrische draad nooit in contact komen met andere draden.
Als de netschakelaar zich in OFF (uit) positie bevindt dan is dit apparaat niet volledig van
het lichtnet gescheiden!
Om elektrische schokken te voorkomen, moet U de behuizing niet openen. Afgezien van
de zekering zitten er geen onderdelen in die door de gebruiker moeten worden
onderhouden.
Repareer nooit een zekering en overbrug de zekeringhouder nooit. Vervang een
beschadigde zekering steeds door een zekering van hetzelfde type en met dezelfde
elektrische kenmerken.
Ingeval van ernstige problemen met het bedienen van het toestel, stopt U onmiddellijk
het gebruik ervan. Contacteer uw dealer voor een eventuele reparatie.
Gebruik best de originele verpakking als het toestel vervoerd moet worden.
Om veiligheidsredenen is het verboden om ongeautoriseerde modificaties aan het
toestel aan te brengen.
INSTALLATIEVOORSCHRIFTEN:
Plaats dit apparaat in een goed geventileerde ruimte waar het niet blootgesteld is aan
hoge temperaturen of vocht.
Het plaatsen en het gebruik van dit apparaat gedurende een lange periode in de
nabijheid warmtebronnen zoals versterkers, spots, enz. zal zijn werking beïnvloeden.
Door gebruik te maken van optionele 19” adapters (zie verder in deze handleiding) kan
dit apparaat in een 19” kast gemonteerd worden. Monteer de behuizing door middel van
de 4 montageopeningen op de frontplaat. Gebruik hiervoor bouten van de juiste dikte!
(deze zijn niet inbegrepen) Probeer sterke schokken en vibraties tijdens het transport zo
veel mogelijk te vermijden.
Zorg, bij inbouw in een vaste installatie of flightcase, voor een goede ventilatie om de
warmte optimaal te kunnen afvoeren.
Zorg ervoor, om inwendige vorming van condensatie te voorkomen, dat de mengtafel
zich na transport kan aanpassen aan de warme binnentemperatuur. Condensatie kan de
goede werking soms verhinderen.
ONDERHOUD
Reinig het toestel met een zacht, lichtjes bevochtigd doek. Vermijd water te morsen in het
toestel. Gebruik nooit vluchtige producten zoals benzeen of thinner, dit kan het toestel
beschadigen.
AANSLUITINGEN
Behalve de microfoon-, hoofdtelefoonaansluitingen en master uitgangen, zijn alle
aansluitingen cinch-aansluitingen. Gebruik cinch-cinch kabels van goede kwaliteit om een
goede geluidskwaliteit te verzekeren. Voor meer informatie over de aansluitingen
verwijzen wij u naar het volgende hoofdstuk. Zet het toestel uit, vooraleer u veranderingen
in de bekabeling aanbrengt. In deze handleiding spreken we over lijn in/uitgangen. Dit is
een globale naam voor in/uitgangen met een niveau tussen 750mV en 2V. Deze uitgangen
vindt u bijvoorbeeld bij radio’s, video’s, cd-spelers, enz.
Er zijn ontelbare manieren om geluidsbronnen op deze mixer aan te sluiten. Hou gewoon
rekening met volgende opmerkingen:
Sluit de cinch kabels altijd op dezelfde manier aan:
o Witte of zwarte cinch connector linker kanaal
o Rode cinch connector rechter kanaal
Bij 3 ingangen op achterzijde is het mogelijk om deze om te schakelen tussen phono en
line. Let er op dat de schakelaar hiervoor in de juiste stand staat.
o Zet de schakelaar in de stand “LINE” als U een CD-speler, MD-speler,
Cassettedeck enz… wenst aan te sluiten.
o Zet de schakelaar in “PHONO” stand bij het aansluiten van een draaitafel.
Opmerking: Als U een Synq “X-TRM1” draaitafel aansluit dan raden we U aan om deze
via de line ingang aan te sluiten. Natuurlijk moet U de X-TRM1 dan wel op line uitgang
schakelen!
Vele draaitafels hebben een GND-aansluiting (aarding). In deze aanwezig is dan sluit U
deze best op aan op de SMX-3. Gebruik hiervoor de GND-aansluiting juist naast de
betreffende audio-ingang.
Analoge opnameapparatuur kan op de recorduitgang van de SMX-3 worden
aangesloten om analoge opnames te maken.
Op de ingangsconnectoren van de ongebruikte phono ingangen staan kleine zwart
topjes. Deze sluiten de ingang kort om zo de best mogelijke geluidskwaliteit te
bekomen. Als U een draaitafel op de SMX-3 aansluit dan dient U eerst dit zwarte topje
te verwijderen. Als U de draaitafel nadien afkoppelt dan zet U deze zwart topjes best
terug. Plaats deze kortsluiting stopjes NOOIT op de uitgangen (Masters, send,
record, …)
SYNQ® 43/124 SMX-3
SYNQ® 44/124 SMX-3
Page 25

NEDERLANDS HANDLEIDING
NEDERLANDS HANDLEIDING
FUNCTIES EN BEDIENINGEN
BEDIENINGEN OP DE VOORZIJDE
1. MATRIX INGANG: Met deze matrix keuzeschakelaars kan U eender welke ingang met
een van de 5 ingangskanalen verbinden. Zo kan U in een handomdraai kanalen
omwisselen zonder dat U kabels moet hersteken. Dit is een erg handige feature voor
discotheken waar meerdere DJ’s de mixer gebruiken. Ze kunnen de kanaalverdeling
van de mixer nu erg gemakkelijk naar hun eigen hand zetten. Ook de interne sampler
kan naar één van de 5 ingangen geschakeld worden.
2. GAIN LEVEL: Regelt de ingangsgevoeligheid op ieder kanaal van nul tot maximum.
Gebruik deze draaiknop om het ingangssignaal op +/-0dB af te regelen.
3. 3-BANDS TOONREGELING: De frequenties kunnen op ieder kanaal afzonderlijk
ingesteld worden over een bereik van -30dB tot +10dB: Treble@13kHz ~
Middle@1kHz ~ Bass@70Hz. In de middenstand is de toonregeling uitgeschakeld.
4. LED KANAAL VU-METER: Precieze niveau meters, voorzien van een piekwaarde
geheugen: piekwaarden blijven gedurende korte tijd op het scherm staan.
5. CUE / BPM COUNTER SELECTIE: Wordt gebruikt om het kanaal (CH-1 tot CH-5) te
selecteren dat via de koptelefoon kan worden voorbeluisterd. Als meerdere CUEtoetsen samen worden ingedrukt dan is het mogelijk om deze kanalen samen voor te
beluisteren. De BPM-waarde van het geselecteerde kanaal (CH-1 tot CH-5) wordt op
de CUE BPM display(13C) weergegeven. Opgelet: de BPM-waarde wordt niet correct
weergegeven als er meer dan 1 ingangskanaal geselecteerd is!
6. CROSSFADER TOEWIJZINGSSCHAKELAARS: De linker zijde van de crossfader
draagt het label “A”, de rechter zijde draagt het label “B”. Ieder kanaal heeft een
toewijzingsschakelaar waarmee U kan bepalen of dit kanaal naar de linker of rechter
zijde van de crossfader geleid wordt:
Middenpositie: het kanaal is niet aan de crossfader toegewezen.
Linker “A” positie: het kanaal is aan de linker zijde van de crossfader
toegewezen. De bijbehorende LED licht nu op.
Rechter “B” positie: het kanaal is aan de rechter zijde van de crossfader
toegewezen. De bijbehorende LED licht nu op.
7. VCA KANAALFADERS: worden gebruikt om het volume van ieder kanaal in te stellen.
De SMX-3 maakt gebruik van de VCA technologie wat betekent dat er, in de plaats van
het geluidssignaal, een kleine gelijkspanning door de faders loopt. Hierdoor wordt de
mixer een stuk minder gevoelig voor het gekraak van versleten faders. De
kwaliteitsfaders kunnen gemakkelijk door de DJ zelf vervangen worden, zelfs terwijl de
mengtafel in gebruik is! Voor de exacte werkwijze verwijzen we U naar het hoofdstuk
“faders vervangen”.
8. CROSSOVER EFFECT / SAMPLER PITCH BEND TOETSEN: in sampler modus
gebruikt als pitch bender, in crossover effect modus als keuzeschakelaar voor het
overgangseffect. Er zijn 2 functies beschikbaar:
PITCH BEND FUNCTIE: (zet de schakelaar in de
MIDDENSTE positie terwijl de mixer is sample modus staat)
wanneer een sample spelt kunnen deze toetsen gebruikt
worden voor “pitch bending” zodat u de beat perfect kunt
laten overeen stemmen met de beat van de andere muziek:
zo lang u de linker toets ingedrukt houdt word de snelheid vermindert, zo lang u de
rechtertoets ingedrukt houdt wordt de samplesnelheid opgedreven.
ZIP EFFECT: Dit effect kan in FADER en AUTO mode gebruikt worden:
FADER MODE: (zet de schakelaar in FADER positie)Selecteer
het Zip effect en beweeg de crossfader van de ene zijde naar de
andere. De toonhoogte van de muziek zal verlagen tot volledige
vervorming. Als de crossfader volledig aan de andere zijde staat
dan start de andere CD-speler automatisch. Afhankelijk van de stand van de
crossfader toont de display een getal van 0 tot 99. De “X-parameter knop” (26)
heeft geen invloed.
AUTO MODE: (zet de schakelaar in AUTO positie) Druk de “Zip effect” toets
terwijl de muziek speelt. De toonhoogte van de muziek verlaagt tot nul terwijl de
andere CD-speler automatisch start. De display toont de lengte van de complete
procedure. De lengte kan met de “X-parameter knop”(26) worden aangepast.
ROLL EFFECT: Dit effect kan in FADER en AUTO mode gebruikt worden:
FADER MODE: (zet de schakelaar in FADER positie) Selecteer
het roll effect en beweeg de crossfader van de ene zijde naar de
andere. Eerst zal de muziek in lussen met een lengte van 1beat
SYNQ® 45/124 SMX-3
SYNQ® 46/124 SMX-3
Page 26

NEDERLANDS HANDLEIDING
NEDERLANDS HANDLEIDING
spelen. (display toont “1”) Nadien wordt de lengte van de lus verkort tot ½beat
(display toont “2”) De lus wordt tenslotte slechts 1/8beat lang (display toont “4”).
Zodra de crossfader aan de andere zijde staat verlaagt het muziekvolume en start
de andere CD-speler automatisch. De “X-parameter knop” (26) heeft geen
invloed.
AUTO MODE: (zet de schakelaar in AUTO positie) Druk de “Roll effect” toets
terwijl de muziek speelt. De muziek speelt in steeds kleinere beat
gesynchroniseerde lussen tot de andere CD-speler automatisch start. De display
toont de lengte van de complete procedure. De lengte kan met de “X-parameter
knop”(26) worden aangepast. Afhankelijk van de gekozen lengte zal het “roll
patroon” worden aangepast in 1/1, ½, ¼ en 1/8 beat lussen.
9. KANAAL FADER CURVE: past de curve van de kanaalfaders aan van zachte (linkse
positie) tot harde (rechtse positie) overgangen.
10.CROSS FADER CURVE: past de curve van de crossfader aan van zachte (linkse
positie) tot harde (rechtse positie) overgangen.
11.FADER START ON/OFF SCHAKELAAR: Met de crossfader van de SMX-3 kan U de
start/stop (re-cue) functies van CD-spelers met compatible faderstarts bedienen. Met
deze schakelaar kan u deze functie aan/uitschakelen.
12.FADER START INDICATORS: bij het gebruik van de crossover effecten geven deze
LEDs de status van de faderstartuitgangen aan:
LED uit: de aangesloten CD-speler staat in pauze.
LED knippert: de aangesloten CD-speler zal bijna van weergave naar pauze
overschakelen.
LED aann: de aangesloten CD-speler staat in weergave stand.
13.MULTIFUNCTIONELE DISPLAY: toont informatie over de verschillende functies:
A. EFFECTS BPM DISPLAY: Toont het ritme (of BPM: Beats Per Minute) van de
muziek aan de ingang van de effect module. Als de beatcounter om een bepaalde
reden de beats niet kan tellen dan zal de display knipperen tot het tellen kan
hernemen.
B. TIME (X) PARAMETER:
Effect modus: afhankelijk van het gekozen effect zal de display tijdsinformatie
(mSec), percenten (%) of filterfrequenties (kHz) tonen. Indien nodig kan U deze
waarden met de preset toetsen (23) en/of met de “X-parameter knop”(26)
bijregelen.
Sampler modus: Als de sampler in weergave mode staat dan geeft het scherm
het nummer van de gekozen geheugenbank (van 1 tot 99) aan. Terwijl u de
weergavesnelheid van de sampler instelt wordt op het scherm het
snelheidspercentage (-%) weergegeven. Als de sampler in opname mode staat
dan toont het scherm het aantal nog beschikbare seconden in het
samplergeheugen. (“9999” op de display betekent dat u nog steeds over meer
dan 9999seconden beschikt [166minuten of 2hr46min!] om samples op te
nemen). Als er geen SD™/SDHC™-kaart aanwezig is dan toont het scherm “no
CArd”
C. CUE BPM / DEPTH (Y) PARAMETER DISPLAY: Toont de BPM-waarde van de
ingangskanalen, (CH-1 to CH-5) die met de CUE-toetsen(5) geselecteerd werden.
Bij het aanpassen van de “depth (Y) parameter” knop(25), zal de nieuwe waarde
(%) op de display getoond worden.
D. EFFECTS INPUT DISPLAY: Toont welk signaal U met de “input select knop”(26)
naar de ingang van de effect/sampler module stuurt.
E. EFFECTS DISPLAY: Toont welk effect U selecteerde.
14.CROSSFADER: Wordt gebruikt om 2 ingangskanalen gemakkelijk met elkaar te
mixen. U moet bij deze kanalen dan wel de A/B toewijzingsschakelaars(6) juist
instellen.
15.SAMPLE EDIT TOETSEN: worden gebruikt om de individuele snelheid + begin en
eindpunten van de samples aan te passen. Zie verder in deze handleiding hoe U dit
moet doen.
16.LOOP TOETS: wordt gebruikt om de sample in een naadloze loop te plaatsen. Zie
verder in deze handleiding hoe U dit moet doen.
17.CUE MIXING KNOP: Wordt gebruikt om in de koptelefoon het uitgangssignaal met de
voorbeluistering van de effect module en van de verschillende kanalen te mengen.
Draai deze knop volledig naar rechts als U enkel het uitgangssignaal wil beluisteren.
Draai de knop volledig naar links en U zal enkel de voorbeluistering horen die
geselecteerd werd met de CUE-toetsen (5, 20). Op elke tussenstand hoort u een mix
van beide signalen.
18.EFFECTS ON/OFF TOETS: deze toets heeft verschillende functies:
Effect modus: schakelt de uitgang van de effect unit of van het extern retour
signal aan of uit.
Sampler modus: druk deze toets gedurende ongeveer 2 seconden in om de
“master tempo” (pitch lock) functie van de sampler aan/uit te zetten.
19.CUE LEVEL: Hiermee wordt het volume van de koptelefoon geregeld. Opgelet, door
het hoge uitgangsvermogen kan, bij slecht gebruik, gehoorbeschadiging optreden!
Matig het uitgangsvermogen!
20.EFFECTS CUE: deze toets heeft verschillende functies:
Effect modus: druk op deze toets (toets is aan) om het effect te controleren
alvorens het in uw master mix gemengd wordt.
Sampler modus: druk op deze toets (toets is aan) om de sampler in “jingle
modus” te zetten
21.KOPTELEFOON UITGANG: Hier kan elke koptelefoon voorzien van een ¼” jack
worden aangesloten.
22.TAP/REC TOETS: Deze toets heeft 2 functies, afhankelijk van de gebruiksmodus:
Effect modus (TAP TOETS): Bijna alle effecten zijn beat gesynchroniseerd.
Daarom is de SMX-3 uitgerust met een volautomatische digitale beatcounter. In
sommige, geïsoleerde gevallen kan het zijn dat de automatische beatcounter niet
correct telt. (beats vallen buiten het bereik van de counter of er is gewoon geen
beat om te tellen) In deze gevallen kan U de beatcounter helpen door manueel in
het ritme van de beat op de TAP-toets te drukken. Zodra U dit doet zal de toets
oplichten om aan te geven dat de automatische beatcounter werd uitgeschakeld.
SYNQ® 47/124 SMX-3
SYNQ® 48/124 SMX-3
Page 27

NEDERLANDS HANDLEIDING
NEDERLANDS HANDLEIDING
De automatische beatcounter wordt terug ingeschakeld door de TAP-toets
gedurende enkele seconden in te drukken.
Sampler mode (REC TOETS): deze toets wordt gebruikt om de sampler tussen
opname en weergave mode om te schakelen. In weergave mode licht de RECtoets op. Druk de toets nu éénmaal in om de sampler in opname mode te
schakelen: de REC-toets zal nu knipperen. Druk één van de 5 weergave toetsen
(23) in om de opname te starten of druk de REC-toets opnieuw in om naar de
weergave modus terug te keren. Kijk verder in deze handleiding om perfect te
leren hoe je een sample moet opnemen.
23.PRESET/WEERGAVE TOETSEN: deze toetsen hebben 2 verschillende functies:
Sampler modus (RODE WEERGAVE TOETSEN): De 5 toetsen worden nu
gebruikt voor het afspelen van de samples. Men kan 1 sample aan elke toets
toewijzen. Het is erg eenvoudig om te zien welke toetsen een sample bevatten:
de toets kleurt rood als hij een sample bevat en licht niet op als hij geen sample
bevat.
Effect modus (GROENE PRESET TOETSEN): De 5 toetsen worden nu gebruikt
voor het oproepen van voorinstellingen van verschillende effecten. Er zijn 2
verschillende soorten effecten: beat gesynchroniseerde effecten (echo, auto pan,
flanger, auto filter, trans) en niet beat gesynchroniseerde effecten (manual filter,
reverb, pitch shifter)
oBeat gesynchroniseerde effecten: Onder deze toetsen zitten per effect
voorinstellingen geprogrammeerd. Afhankelijk van het geselecteerde effect
hebben deze voorinstellingen betrekking op het aantal beats, filter
frequenties, percentages van de toonhoogte, enz… Deze toetsen hebben
één van volgende markeringen: 2 – 4 – 8 – 16 – 32. Deze waarden staan in
verhouding tot de gemeten beat. Bij het indrukken van een preset zal deze
oplichten. Door de “X-parameter knop”(26) ingedrukt te houden terwijl U de
presets 2 - 4 - 8 of 16 selecteert, kan U extra presets oproepen. In dat geval
zal de ingedrukte preset knipperen om aan te geven dat de opdruk boven de
toets (1/8, 1/4 – ½ or 1/1) gekozen werd. Bij het overschakelen naar andere
effecten zal de effect module de laatst gekozen instelling van het vorige
effect blijven onthouden.
Voorbeeld: als het “echo” effect ingeschakeld is en U kiest voor
preset “2” dan zal U merken dat de muziek iedere 2 beats herhaald
wordt. Als U preset “4” kiest dan herhaalt de muziek zich iedere 4
beats. Kies de ½-preset als U de muziek iedere halve beat wenst te
herhalen.
oNiet beat gesynchroniseerde effecten: bij deze effecten is de opdruk van
de toetsen niet van belang. De SMX-3 is reeds voorzien van een aantal
standaard presets. De parameters van deze presets kunnen echter met de X
en Y-parameterknoppen (24, 25) naar believen worden aangepast. Om de
nieuwe instellingen op te slaan houdt U gewoon de X-parameterknop (24)
ingedrukt terwijl U één van de 5 preset toetsen (23) indrukt. De standaard
parameters worden nu vervangen door uw eigen instellingen. Per effect
kunnen er tot 5 eigen voorinstellingen geprogrammeerd worden. U kan deze
instellingen natuurlijk steeds aanpassen en opnieuw opslaan.
24.X-PARAMETER KNOP: deze knop heeft meerdere functies:
Effect modus: aanpassen van de X-parameter van de verschillende effecten. Als
U deze knop samen met één van de 5 preset toetsen indrukt dan bekomt U extra
mogelijkheden:
oBeat gesynchroniseerde effecten: U kan extra voorinstellingen oproepen.
oNiet beat gesynchroniseerde effecten: U kan uw eigen parameters onder
de preset toetsen opslaan.
Sampler modus: er zijn 3 verschillende functies:
oWeergave/opname modus: zoek de geschikte geheugenbank en druk de X-
parameter knop 1maal in om deze te selecteren.
oSample edit modus: wordt gebruikt om het exacte begin/eindpunt van een
sample op te zoeken. (verder in deze handleiding leert U hoe U een sample
moet aanpassen)
oExtern effect return: wanneer de mixer in sampler modus staat kunt u een
extern effect aansluiten. Draai aan de knop terwijl u hem indrukt om het
volume van het retour signaal bussen -50dB en +0dB in te stellen
25.Y-PARAMETER KNOP: deze toets heeft verschillende functies:
Effect modus: wordt gebruikt om de “Y” parameter van de effecten in te stellen.
Gelieve punt 27 te lezen, daar deze functie verschilt voor elk effect.
Sampler modus: er zijn 2 functies:
oWeergavemodus: regel de algemene weergavesnelheid van -80% tot +20%
op 3 verschillende manieren:
Aanpassen in 0,1% stappen: draai gewoon aan de knop om de
snelheid aan te passen.
Aanpassen in 2% stappen: houd de knop ingedrukt terwijl u er aan
draait om de snelheid te veranderen.
Reset de snelheid op 0%: druk 2x op de knop binnen 1 seconde.
oSample editeer modus: tijdens de “OUTRO EDIT” modus kunt u de
snelheid van een sample afzonderlijk instellen, deze instelling zal samen met
het begin en eindpunt bewaard worden. U kunt de snelheid aanpassen van 12% tot +12% op 3 verschillende manieren:
Aanpassen in 0,1% stappen: draai gewoon aan de knop om de
snelheid aan te passen.
Aanpassen in 1% stappen: houd de knop ingedrukt terwijl u er aan
draait om de snelheid te veranderen.
Reset de snelheid op 0%: druk 2x op de knop binnen 1 seconde.
26.EFFECT INPUT SELECTIE: Hiermee kiest u welk signaal er naar de “effect send”
uitgang(46) en naar de effect/sampler module wordt gestuurd. Dit zijn de verschillende
mogelijkheden:
Eén van de ingangskanalen.
Eén van de kanalen die U selecteerde met de “cross fader
toewijzingsschakelaar”(6). Dit kan de linker kant “CF-A” of de rechter kant “CF-B”
van de crossfader zijn.
Als U “master” kiest dan werken de effecten op de uitgang of kan U het
gemengde uitgangssignaal op de sampler opnemen.
Opmerking: wanneer u “master” kiest wordt het externe effect retoursignaal
uitgeschakeld om “feedback” te vermijden.
27.EFFECT KEUZESCHAKELAAR: Hiermee wordt een bepaald effect gekozen:
BELANGRIJK!
De sampler kan als een van de effecten geselecteerd worden. Dit betekent
echter dat de sampler niet samen met de effecten kan werken. Het is wel
mogelijk om de sampler samen met de crossover effecten en/of een extern
effect welke verbonden is met de effect send/return (46+47) te gebruiken.
SYNQ® 49/124 SMX-3
SYNQ® 50/124 SMX-3
Page 28

NEDERLANDS HANDLEIDING
NEDERLANDS HANDLEIDING
De crossover effecten en de multi-effect module kunnen niet samen gebruikt
worden! Om de multi-effecten te kunnen gebruiken moet U de crossover
effecten uitschakelen (zie nr.8 voor meer informatie)
SAMPLER: de sampler is geen echt effect maar U kan hiermee naar believen
samples opnemen en afspelen: tot 495 samples (99 banken met telkens 5
samples) op één SD™/SDHC™-geheugenkaart. Zie hoofdstuk “Gebruik van de
sampler” voor meer info. Tijdens het gebruik van de sampler functie kunt u de
ingebouwde effecten niet gebruiken, maar u kun teen externe effectprocessor
gebruiken door dit aan te sluiten op de effect send/return aansluitingen (46/47)
ECHO: produceert een repeterend geluid. Kies de juiste “preset”(23) om de beat
gesynchroniseerde echo’s gemakkelijk met het originele geluid te mixen. Indien
nodig kan U de voorinstellingen met de “X-parameter knop”(24) over een bereik
van 2mSec tot 2Sec bijregelen. Met de “Y-parameter knop”(25) kan U de
verhouding tussen het effect en het originele geluid instellen.
AUTO PAN: Verplaatst de muziek van links naar rechts en omgekeerd op het
ritme van de beat. Met de “presets”(23) kan U instellen hoe snel dit gebeurt.
(voorbeeld: Met preset “2” zal de muziek zich op 2beats van links naar rechts en
terug bewegen.) Indien nodig kan U de voorinstellingen met de “X-parameter
knop”(24) over een bereik van 30mSec tot 16Sec aanpassen. Met de “Yparameter knop”(25) kan U instellen hoe snel de muziek van zijde verandert: u
kan voor een zachte of agressieve overgang kiezen.
FLANGER: Dit effect kan best omschreven worden als een straaljager die door
de muziek raast. Door faseverschuivingen lijkt het alsof de muziek ronddraait. De
flanger tijd (periode) kan met de “presets”(23) gemakkelijk geselecteerd worden.
Indien nodig kan U de voorinstellingen met de “X-parameter knop”(24) over een
bereik van 100mSec tot 16Sec bijregelen. Met de “Y-parameter knop”(25) kan U
de feedback parameter van de flanger bijregelen.
Tip: Telkens als U dezelfde preset toets(23) opnieuw indrukt zal de flanger cyclus herstarten. Dit
geeft een subtiel extraatje aan het effect.
MANUAL FILTER: Dit is een zeer effectieve digitale frequentie filter. De mixer
heeft 5 standaard filter voorinstellingen maar U kan deze gemakkelijk met de “Xknop”(24) aanpassen. Dit gebeurt in een bereik van laagdoorlaat filter (LPF) @
50Hz (display toont: L 0.05kHz) tot hoogdoorlaat filter (HPF) @ 21.1kHz (display
toont: H 21.1kHz). Met de “Level parameter knop”(32) kan de resonantie van de
filter worden aangepast. (Dit is de Q-factor, die de effectiviteit van de filter bij een
bepaalde frequentie voorstelt)
De standaard waarden van de voorinstellingen kunnen gemakkelijk door uw eigen
parameters vervangen worden door de “X-parameter knop”(24) ingedrukt te
houden terwijl U één van de 5 preset toetsen (23) indrukt.
AUTO FILTER: Dit is een automatische laagdoorlaat filter (LPF). Tijdens de
filtercyclus varieert de filterfrequentie van 20kHz tot 50Hz. Met de preset
toetsen(23) kan de lengte van de filtercyclus worden ingesteld. Deze cyclus staat
in relatie tot het gemeten ritme. (voorbeeld: druk op toets “8” het duurt nu
8beats om de filter zijn volledige cyclus, van 20kHz tot 50Hz en terug, te laten
doorlopen) Indien nodig kan U de voorinstellingen met de “X-parameter knop”(24)
over een bereik van 100mSec tot 16Sec aanpassen. Met de “Y-parameter
knop”(25) kan de resonantie van de filter worden aangepast. (Dit is de Q-factor,
die de effectiviteit van de filter bij een bepaalde frequentie voorstelt)
REVERB: (of galm) kan het best als het “kerk effect” omschreven worden. Stel
dat U muziek in een kerk of in een grote, lege zaal speelt: de galm, die het
resultaat is van allerlei reflecties, wordt hier digitaal gesimuleerd. Met de preset
toetsen(23) kunnen 5 voorgeprogrammeerde reverb tijden gekozen worden. Met
de “X-parameter knop”(24) kan U deze over een bereik van 0% tot 100%
bijregelen. (in 1% stappen). Met de “Y-parameter knop”(25) kan U de verhouding
tussen het effect en het originele geluid instellen.
De standaard waarden van de voorinstellingen kunnen gemakkelijk door uw eigen
parameters vervangen worden door de “X-parameter knop”(24) ingedrukt te
houden terwijl U één van de 5 preset toetsen (23) indrukt.
TRANS: Kapt het geluid automatisch, op het ritme van de beat, in stukken. Met de
“presets”(23) kan U het ritme, waarop de stukjes muziek gekapt worden, bepalen.
(voorbeeld: met preset “1/4” (vergeet niet om de “time parameter knop”(33) in te
drukken terwijl U preset toets “4” indrukt) wordt de muziek in 1/4beats gekapt.) De
presets kunnen met de “X-parameter knop”(24) over een bereik van 25mSec tot
16Sec worden bijgeregeld. Met de “Y-parameter knop”(25) kan de lengte van de
blanco’s bepaald worden. Met de knop volledig naar links (display toont “0%) is de
lengte van de blanco’s gelijk aan nul het effect zal dus niet hoorbaar zijn. Draai
de “Y-parameter knop”(25) naar rechts, om de lengte van de blanco’s te
vergroten. Uiteindelijk zal U nog maar heel kleine stukjes van de originele muziek
horen.
Tip: Dit effect vraagt een beetje oefening! U verkrijgt de beste resultaten met monotone
dansmuziek, kleine kap cyclus (1/8, 1/4 en 1/2beats) en langere blanco’s van 50% en meer.
PITCH SHIFTER: Terwijl het ritme (snelheid) van de muziek ongewijzigd blijft kan
de toonhoogte van de muziek naar boven en/of naar beneden gebracht worden.
(dit is het tegengestelde van wat de “master tempo” op bepaalde CD-spelers
probeert te bereiken: dezelfde toonhoogte behouden bij een wisselende
snelheid/beat) Met de preset toetsen(23) kan één van de 5 vooringestelde “pitch
shifts” gekozen worden. Met de “X-parameter knop”(24) kan de toonhoogte
precies worden ingesteld van -100% tot +100% in stappen van 1%. Met de “Yparameter knop”(25) kan U de verhouding tussen het effect en het originele geluid
instellen. De standaard waarden van de voorinstellingen kunnen gemakkelijk door
uw eigen parameters vervangen worden door de “X-parameter knop”(24)
ingedrukt te houden terwijl U één van de 5 preset toetsen (23) indrukt.
Tip: U verkrijgt een stemvervormer door de pitch shifter op een microfoon te gebruiken. (met de
pitch op -100% hoort U stemmen “uit de duistere onderwereld”)
28.SD™/SDHC™-GEHEUGENKAART LEZER: De SMX-3 heeft geen intern geheugen
voor het opslaan van de samples. Dit betekent dat de sampler enkel werkt als er een
SD™/SDHC™-geheugenkaart in de kaartlezer aanwezig is. Bij het aanschakelen van
de sampler zonder dat er een geheugenkaart aanwezig is zal het scherm “noCArd”
tonen.
Opgelet!: verwijder de geheugenkaart NOOIT als de “in use” LED aan is. Hierdoor kan
de informatie op de geheugenkaart beschadigd geraken zodat U de samples niet meer
kan uitlezen!
29.DJ MICRO ON/OFF/TALKOVER SCHAKELAAR: volgende opties zijn mogelijk:
OFF: de DJ microfoon is uitgeschakeld.
ON: de DJ microfoon is aangeschakeld.
TALK OVER: de DJ microfoon is aangeschakeld. Zodra de DJ in de microfoon
spreekt zullen de andere ingangen automatisch gedempt worden. De talkover
heeft 2 instelbare parameters:
Talkover level (35): demping van de kanalen kan worden ingesteld.
SYNQ® 51/124 SMX-3
SYNQ® 52/124 SMX-3
Page 29

NEDERLANDS HANDLEIDING
NEDERLANDS HANDLEIDING
Talkover recovery time (41): instellen van de tijd nodig om de
ingangskanalen terug op hun normale niveau te brengen.
30.MASTER2 VOLUME: Bepaalt het uitgangsniveau van de MASTER2 uitgang. Wordt
niet beïnvloed door het master1 volume(33), mono/stereo schakelaar(32) en master
balans(34).
31.LED VU METER: Precieze niveau meter, voorzien van een piekwaarde geheugen:
piekwaarden blijven gedurende korte tijd op het scherm staan.
Zeer belangrijk: Als U een perfect geluid wenst, hou dan rekening met de VUmeter! De meeste DJ’s gebruiken dit belangrijke instrument als een “mooi
lichteffect”. Het is een sport om de meter zo ver mogelijk in het rood te jagen. Laat
ons duidelijk zijn: een goede DJ wil een perfect, onvervormd en dynamisch geluid.
Waarden boven 0dB betekenen “vervorming”, hou de meter dus onder controle!
32.MONO/STEREO SCHAKELAAR: schakelt master1 om tussen mono en stereo.
33.MASTER VOLUMEREGELAAR: Bepaalt het uitgangsvolume van Master1. (Opgelet:
de uitgangsbegrenzing(40), aan de achterzijde van de mengtafel, kan het
uitgangsvolume sterk beperken. Kijk even naar de stand van deze potentiometer als
het uitgangsvermogen te laag is. Kijk ook even of de talkover uitgeschakeld is)
34.MASTER BALANS: stelt de links/rechts balans van de master in.
35.TALKOVER LEVEL: wordt gebruikt om de demping van de 5 ingangskanalen in te
stellen tijdens de werking van de automatische talkover.
BEDIENINGEN/AANSLUITINGEN OP DE ACHTERZIJDE
36.NETSCHAKELAAR: dient om de mengtafel in en uit te schakelen.
37.NETSTEKKER: gebruik deze om de meegeleverde voedingskabel aan te sluiten.
38.FADER START: Via deze aansluitingen kunnen de faderstarts en crossfader effecten
de aangesloten (compatible) CD-speler(s) bedienen.
39.MASTER1 GEBALANCEERDE UITGANG: Deze XLR-connectoren worden gebruikt
om de SMX-3, door middel van gebalanceerde audiokabels op de geluidsversterking
(versterkers) aan te sluiten.
40.UITGANGSBEGRENZING: Om de aangesloten versterkers en luidsprekers te
beschermen kan U deze potentiometer gebruiken om de maximum uitgangsspanning
van Master1 te beperken. (Opgelet: De uitgangsspanning kan tot nul beperkt worden.
Als U geen uitgangssignaal op Master1 detecteert, gelieve dan even na te kijken of de
uitgangsbegrenzing per ongeluk op nul staat.)
41.TALKOVER RECOVERY TIME: hiermee stelt U de tijd in die nodig is om de
ingangskanalen terug op hun normale niveau te brengen nadat de DJ ophoudt met
spreken.
42.MICRO1 INGANG: hier kan U een extra microfoon aansluiten.
43.DJ MICRO INGANG: Combo stekker: U kan hier een gebalanceerde (XLR connector)
of ongebalanceerde (1/4” jack) microfoon aansluiten. Deze ingang wordt meestal voor
de DJ-microfoon gebruikt. De talkover(29) heeft geen invloed op deze ingang.
44.PHONO/LINE INGANG: hier kan een draaitafel of eender welk geluidsapparaat met
line niveau worden aangesloten.
Aansluiten van de CD-speler: zet de “phono/line” schakelaar in “line” stand. Als
uw draaitafel over een line uitgang beschikt dan raden we U aan om deze ook te
gebruiken.
Aansluiten van een draaitafel: zet de “phono/line” schakelaar in “phono” stand.
Vele draaitafels hebben een GND-aansluiting (aardingskabeltje) Het is ten
sterkste aan te raden om dit kabeltje aan de “GND” aansluiting vast te maken!
45.LINE INGANG: Hier kan elk audiosignaal met lijnniveau (CD, tuner, MD, …) worden
aangesloten.
46.EFFECT SEND: naast de interne effecten is het ook mogelijk om externe effect
apparatuur op de SMX-3 aan te sluiten. Het “send” signaal naar deze effectapparatuur
wordt met “effect assign” schakelaar(26) gekozen.
Opmerking: De effect send/return maakt het mogelijk om de interne sampler, via externe effect
apparatuur, toch van effecten te voorzien.
47.EFFECT RETURN: hier wordt de uitgang van de effectapparatuur aangesloten. Het
retour signaal wordt nu met het originele signaal gemengd. De sterkte van het return
signaal kan ingesteld worden met de X-parameter knop (24). Indien u de totale controle
wilt over het retoursignaal van de externe effectprocessor (toonregeling enz.) dan kunt
u beter de uitgang van de externe effectprocessor aansluiten op een afzonderlijk
ingangskanaal in plaats van op de return ingang.
Opmerking: het return signaal kan met de “effect on/off” schakelaar(18) worden aan/uitgeschakeld.
48.RECORD UITGANG: Dit signaal is identiek aan dat van de masters maar wordt niet
beïnvloed door de volume en balansregeling van de master en de mono/stereo
schakelaar. Wordt gebruikt om analoge opnameapparatuur aan te sluiten.
49.MASTER2 ONGEBALANCEERDE UITGANG: bezit een afzonderlijke volumeregeling.
Deze uitgang is asymmetrisch en wordt gebruikt om extra versterkers aan te sturen.
50.MASTER1 ONGEBALANCEERDE UITGANG: Dit is exact hetzelfde signaal als op de
gebalanceerde master1 uitgang(39). Het signaal is echter asymmetrisch en kan dus
gebruikt worden om versterkers met ongebalanceerde (cinch) ingangen aan te sturen.
GEBRUIK VAN DE SAMPLER
Voor U de sampler kan gebruiken MOET er een SD™/SDHC™-geheugenkaart aanwezig
zijn. (U vindt deze geheugenkaarten in gespecialiseerde winkels) Na het plaatsen van de
geheugenkaart toont het scherm “rEAd”, gevolgd door “1”. Dit betekent dat geheugenbank
1 geselecteerd werd.
FORMATTEREN VAN DE SD™/SDHC™-GEHEUGENKAART:
De SD™/SDHC™-kaart kan in iedere Windows® PC geformatteerd worden.
Plaats de SD™/SDHC™-kaart in de kaartlezer van uw PC
In de Windows Explorer klikt U de kaartlezer aan met de rechter muisknop om een
optie venstertje te openen.
Kies nu “Formatteren” om het formatteerprogramma te openen.
SYNQ® 53/124 SMX-3
SYNQ® 54/124 SMX-3
Page 30

NEDERLANDS HANDLEIDING
NEDERLANDS HANDLEIDING
Kies het file systeem dat uw PC voorstelt als standaard. Dit is FAT of FAT32 (KIES
NIET voor NTFS!)
U kan de geheugenkaart een naam geven of U laat dit veld blanco.
Kies NIET voor de optie “Snelformatteren”.
Druk op Start om het formatteren te starten.
Het formatteren kan wat tijd in beslag nemen. Windows zal U verwittigen als de kaart
geformatteerd is.
HET OPNEMEN VAN EEN SAMPLE:
U kan enkel een sample opnemen als de gekozen toets nog geen sample
bevat (knop licht niet op). Lees eventueel de tekst over het wissen van samples
en geheugenbanken.
Plaats de mixer met de “effect select” keuzeschakelaar (27) in sampler
mode.
Met de “effect assign” schakelaar (26) kiest U van welk ingangskanaal U een sample
wil opnemen.
Druk nu de “TAP/REC” toets (22) om de sampler in opname modus te zetten.
(TAP/REC toets knippert nu) Het scherm geeft nu het aantal seconden aan dat nog vrij
is voor het opnemen van een nieuwe sample.
Met de “X-parameter” knop (24) kiest U één van de 99 beschikbare geheugenbanken.
Om uw keuze te bevestigen drukt U “X-parameter” knop (24) éénmaal in.
Hint: tijdens het kiezen van een geschikte geheugenbank kan U onmiddellijk zien welke weergave
toetsen (23) reeds samples bevatten en welke nog leeg zijn. (bezet = toets licht rood op * leeg = toets
is donker)
Druk op het juiste moment één van de lege weergavetoetsen (toets is donker!) in om
de opname te starten. Op het scherm zal het aantal nog beschikbare seconden
beginnen aftellen.
Druk op het juiste moment dezelfde weergavetoets opnieuw in om de opname te
stoppen.
Druk de weergavetoets een 3demaal in om de zonet opgenomen sample af te spelen.
AFSPELEN VAN SAMPLES (SAMPLER MODUS):
Plaats de mixer met de “effect select” keuzeschakelaar (27) in sampler mode.
Kies op één van de ingangskanalen de sampler door middel van de “input assign”
schakelaar (1) en zet de fader van dit kanaal open.
Met de “X-parameter” knop (24) kiest U één van de beschikbare geheugenbanken.
(lege geheugenbanken kunnen niet geselecteerd worden) Om uw keuze te bevestigen
drukt U “X-parameter” knop (24) éénmaal in.
Hint: tijdens het kiezen van een geschikte geheugenbank kan U onmiddellijk zien welke weergave
toetsen (23) reeds samples bevatten en welke nog leeg zijn. (bezet = toets licht rood op * leeg = toets
is donker)
U kan nu de (rood oplichtende) weergavetoetsen (23) indrukken om de weergave van
1 of meerdere samples te starten.
Hint: U kan tot 2 samples samen afspelen (polyfonie) en eventueel 1 sample in loop zetten. (zie verder)
U kan een andere geheugenbank kiezen terwijl er nog steeds een sample van de vorige geheugenbank
speelt. U kan dus naadloos van de ene naar de andere geheugenbank overschakelen!
AFSPELEN VAN JINGLES (JINGLE MODUS):
Plaats de mixer met de “effect select” keuzeschakelaar (27) in sampler mode.
Kies op één van de ingangskanalen de sampler door middel van de “input assign”
schakelaar (1) en zet de fader van dit kanaal open.
Druk op de “EFF. CUE” knop (20) zodat deze begint te branden.
Druk kort op één van de play toetsen (23): De corresponderende sample wordt
volledig afgespeeld. Elke keer u dezelfde play toets indrukt, herstart de sample met
een stutter effect als gevolg.
Terwijl de sample wordt afgespeeld kan u een andere play toets indrukken: de eerste
sample stopt onmiddellijk en de nieuwe sample neemt het over.
U kan het afspelen van de sample stoppen door de jingle modus te stoppen: Druk op
de “EFF. CUE” toets (20) en houdt deze ingedrukt tot u wil dat de sample stopt met
afspelen ( enkel als u de “EFF CUE” toets loslaat, zal de sample stoppen met
afspelen)
BELANGRIJK OPMERKINGEN:
Terwijl u in de jingle modus werkt kan u geen samples opnemen en bewerken, noch loops
afspelen: Schakel over naar de normale sampler modus om deze taken uit te voeren.
Wanneer u de mixer uitschakelt of de geheugenkaart uitschakelt, zal de sampler
automatisch naar de standaardmodus terugkeren
HET WISSEN VAN 1 SAMPLE:
Samples kunnen tijdens de weergave en opname modus gewist worden.
Hou de weergavetoets van de sample die U wil wissen ingedrukt.
Druk nu de TAP/REC toets (22) gedurende 1 sec. samen met deze weergavetoets in.
Na ongeveer 1sec. toont het display “dEL” om aan te geven dat de sample gewist werd.
(de weergavetoets is nu gedoofd)
HET WISSEN VAN EEN VOLLEDIGE GEHEUGENBANK:
Geheugenbanken kunnen tijdens de weergave en opname modus gewist
worden.
Met de “X-parameter” knop (24) kiest U één van de beschikbare
geheugenbanken. (lege geheugenbanken kunnen niet geselecteerd worden) Om uw
keuze te bevestigen drukt U “X-parameter” knop (24) éénmaal in.
Om de gekozen geheugenbank te wissen houdt U de “X-parameter” knop (24)
ingedrukt.
Druk nu de weergavetoets (gemarkeerd met “32” en “CLR.BNK”) gedurende 2sec.
samen met de “X-parameter” knop in.
Na ongeveer 2sec. toont het display “dEL” om aan te geven dat de geheugenbank gewist
werd. (alle weergavetoetsen zijn nu gedoofd)
VERSCHIL TUSSEN “INDIVIDUELE” & “ALGEMENE” SNELHEID:
Individuele snelheidsregeling: u kunt de snelheid van elke sample afzonderlijk
instellen zodat u verschillende samples synchroon met elkaar kunt laten lopen. U kunt
de individuele snelheid instellen tijdens het regelen van de “eindpunten”. De
individuele snelheidsinstellingen worden samen met het begin/eindpunt opgeslagen.
Zie de beschrijving van de Y-parameter knop (25) voor meer info.
Algemene snelheidsregeling: wordt gebruikt tijdens de weergave van 1 of 2
samples. Deze snelheid wordt NIET opgeslagen met de sample(s)! zie de beschrijving
van de Y-parameter knop (25) voor meer info. U kunt ook de pitch bend toetsen (8)
gebruiken om de samples synchroon te laten lopen met andere muziekbronnen.
SYNQ® 55/124 SMX-3
SYNQ® 56/124 SMX-3
Page 31

NEDERLANDS HANDLEIDING
Total length recorded sample
Total length of recorded sample
NEDERLANDS HANDLEIDING
HET STARTPUNT VAN EEN SAMPLE AANPASSEN:
Als U de opname van de sample per ongeluk te vroeg startte, dan kan U het startpunt nog
steeds verplaatsen. Deze aanpassing is niet destructief: U kan het startpunt aanpassen tot
het perfect is.
Hou de weergavetoets met de aan te passen sample ingedrukt.
Terwijl U de weergavetoets ingedrukt houdt, drukt U de “loop intro” (15) toets
in.
Laat nu beide toetsen los: U zal kleine loops horen, te vergelijken met wat U
hoort als een CD-speler in frame zoek modus staat.
Met de “X-parameter” knop (24) zoekt U het geschikte nieuwe startpunt.
Zodra U dit hebt gevonden drukt U de “loop intro” toets (15) opnieuw in: de edit modus
wordt afgesloten en het nieuwe startpunt wordt opgeslagen.
U kan de bovenstaande procedure herhalen tot de loop perfect klinkt!
Intro Edit
Indexpoint begin Indexpoint end
Outro Edit
HET EINDPUNT VAN EEN SAMPLE AANPASSEN:
Als U de opname van de sample per ongeluk niet exact op het juiste moment stopte, dan
kan U het eindpunt nog steeds verplaatsen. Deze aanpassing is niet destructief: U kan het
eindpunt aanpassen tot het perfect is.
Hou de weergavetoets met de aan te passen sample ingedrukt.
Terwijl U de weergavetoets ingedrukt houdt, drukt U de “loop outro” (15)
toets in.
Laat nu beide toetsen los: de sample speelt nu in een naadloze loop.
Tijdens het afspelen van de loop kan U met de “X-parameter” knop (24) het
eindpunt continu verplaatsen tot de sample perfect is.
U kunt de “Y-parameter” knop (25) gebruiken om de individuele snelheid in te stellen.
Druk de “loop outro” toets (15) opnieuw in: de edit modus wordt afgesloten en het
nieuwe eindpunt wordt opgeslagen.
EEN SAMPLE IN LOOP AFSPELEN:
Hou één van de weergavetoetsen ingedrukt.
Terwijl U deze weergavetoets ingedrukt houdt, drukt U de “loop” (16) toets in.
Laat nu beide toetsen los: de sample speelt nu in een naadloze loop. De loop
en weergavetoets knipperen beide in hetzelfde ritme zodat U duidelijk kan zien
welke sample in loop speelt.
U kan de naadloze loop op elke moment opnieuw starten door de knipperende
weergavetoets telkens opnieuw in te drukken. (stutter effect)
Om de loop te stoppen drukt U de “loop” toets (16) in. Zolang U de toets ingedrukt houdt
zal de loop blijven verder spelen. Pas als U de “loop” toets loslaat zal de loop stoppen.
Dit laat U toe om de loop op een zeer precies moment te stoppen.
Intro Edit
Outro Edit
INSTALLEREN OPTIONELE 19” ADAPTERS
Als U de SMX-3 in een 19” rack wil plaatsen dan moet U gebruik maken van de optionele
19” adapters.
Verwijder de 3 plastiek
dopjes aan beide kanten
van de mixer.
Verwijder de 4 schroeven
aan beide kanten van de
mixer. U heeft deze
schroeven niet meer nodig.
Hou ze echter bij zodat U
de mixer later nog zonder
19” adapters kan
gebruiken.
Plaats één van de 19”
adapters op de mixer (zie
tekening) zodat de
bevestigingsgaten perfect
samenvallen en gebruik de adapter met de 7 schroeven die samen met de 19”adapters
geleverd werden.
Doe net hetzelfde met de andere 19” adapter.
De mixer kan nu in een 19” rack worden ingebouwd. De totale hoogte is 370mm (of
ongeveer 8,5units). Vergeet niet om een extra 1U blind paneel te tellen voor het aansluiten
van de kabels.
UPGRADEN VAN DE FIRMWARE
Met deze procedure kan U de centrale processor en de DSP van de SMX-3 steeds van de
laatste softwareversies voorzien. Het upgraden van de interne software is een erg delicate
onderneming. Volg de instructies daarom zeer zorgvuldig anders kan de mixer
onbruikbaar worden.
ZEER BELANGRIJK!
VERGEET NIET UW SMX-3 MIXER TE REGISTREREN. ZO ONTVANGT U
AUTOMATISCH EEN BERICHT BIJ NIEUWE SOFTWARE UPDATES!
SURF NAAR: WWW.SYNQ-AUDIO.COM/REGISTER/
Als U de processor en DSP software samen wil upgraden dan moet U steeds eerst de
processor van nieuwe software voorzien en dan pas de DSP! Lees altijd eerste de
README file in de software upgrade voor U het opwaarderen van de software begint!
Schakel de mixer NIET uit of druk niet nodeloos op toetsen tijdens het uitvoeren van de
procedure! Wacht tot de display automatisch terug in zijn normale stand komt. U mag
het upgraden enkel onderbreken (door de mixer uit te schakelen) als de display na
meer dan een minuut nog steeds donker blijft. U zal in dit geval de procedure moeten
herhalen.
SYNQ® 57/124 SMX-3
Indexpoint begin Indexpoint end
Loop between index points
SYNQ® 58/124 SMX-3
Page 32

NEDERLANDS HANDLEIDING
NEDERLANDS HANDLEIDING
DE SOFTWARE VERSIE NAKIJKEN:
Schakel de mixer uit.
Druk de preset toetsen (23) met opschrift “16” en
“32” samen in.
Schakel de mixer aan terwijl U beide toetsen
ingedrukt houdt.
Het scherm toont nu de software versie van de centrale processor en van de DSP.
In het voorbeeld op de tekening ziet U dat de processor V1,6 heeft en de DSP is V1,5.
HET UPGRADEN VAN DE PROCESSOR SOFTWARE:
Plaats de SD™/SDHC™-geheugenkaart in de kaartlezer van uw PC en kopieer het
“SMX-3C_xx.bin” bestand naar de kaart. Zeer belangrijk! U mag de naam van dit
bestand NIET wijzigen!
Plaats de SD™/SDHC™-kaart in de kaartlezer (28) van de SMX-3.
Schakel de SMX-3 uit.
Druk de preset toetsen (23) met opschrift “2” + “4” + “8” samen in.
Schakel de mixer aan terwijl U deze drie toetsen ingedrukt houdt.
Alle CUE toetsen (5) zullen 4maal knipperen om aan te geven dat de procedure gestart
is. Zodra de Cue toetsen 2maal hebben geknipperd, mag U de 3 toetsen loslaten.
U zal merken dat de CUE toetsen nu één voor één (van 1 tot 5) oplichten, terwijl de kleur
van de preset toetsen (23) voortdurend verandert. Na ongeveer 25seconden zal de display
terug oplichten. Dit betekent dat het upgraden voltooid is.
Voor alle zekerheid kan u best even de software versie controleren.
HET UPGRADEN VAN DE DSP SOFTWARE:
Plaats de SD™/SDHC™-geheugenkaart in de kaartlezer van uw PC en kopieer het
“smx-3_xx.bin” (“xx” staat voor het versienummer) bestand naar de kaart. Zeer
belangrijk! U mag de naam van dit bestand NIET wijzigen!
Plaats de SD™/SDHC™-kaart in de kaartlezer (28) van de SMX-3.
Schakel de SMX-3 uit.
Druk de presettoetsen (23) met opschrift “8” + “16” + “32” samen in.
Schakel de mixer aan terwijl U deze drie toetsen ingedrukt houdt.
Alle CUE toetsen (5) zullen 4maal knipperen om aan te geven dat de procedure gestart
is. Zodra de Cue toetsen 2maal hebben geknipperd, mag U de 3 toetsen loslaten.
U zal merken dat de CUE toetsen nu één voor één (van 1 tot 3) oplichten. Na ongeveer
15seconden zal de display terug oplichten. Dit betekent dat het upgraden voltooid is.
Voor alle zekerheid kan u best even de software versie controleren.
FADERS VERVANGEN
Eén van de grote voordelen van deze mengtafel zijn de kanaalfaders die door de
gebruiker zelf kunnen vervangen worden, zelfs als de mengtafel in werking is.
Werkwijze voor het vervangen van een kanaalfader:
Verwijder de plastiek kapjes van alle
kanaalfaders.
Verwijder de kleine, rechthoekige
frontplaat rond de kanaalfaders met de 6
vijsjes.
Verwijder de 3 vijsjes van de kanaalfader
die U wenst te vervangen.
Verwijder de kanaalfader voorzichtig.
Zet de nieuwe kanaalfader in de plaats.
Zorg ervoor dat de contacten van de
fader mooi in de connector op de PCB
passen.
Bevestig de 3 vijsjes van de kanaalfader opnieuw.
Plaats de kleine, rechthoekige frontplaat terug en bevestig ze met de 6 vijsjes.
Plaats de plastiek kapjes terug op de kanaalfaders.
Afgelopen!
Werkwijze voor het vervangen van de crossfader:
Verwijder het plastiek kapje van de crossfader.
Verwijder de 2 vijsjes waarmee de crossfader vastzit.
Verwijder de crossfader en het metalen plaatje voorzichtig.
Maak de crossfader los van het elektrische kabeltje (trek bij het verwijderen aan de
connector, NIET aan het kabeltje!)
Verbind de nieuwe crossfader met het kabeltje.
Bevestig de nieuwe crossfader, samen met het metalen frontplaatje opnieuw met
behulp van de 2 vijsjes.
Afgelopen!
SYNQ® 59/124 SMX-3
SYNQ® 60/124 SMX-3
Page 33

NEDERLANDS HANDLEIDING
EIGENSCHAPPEN
Ingangs/uitgangs impedantie & gevoeligheid (EQ op 0, max. gain, level meter= 0dB)
Line ingang 2, 4, 6, 7: 340mV@ 20kΩ (max = +4dBV)
Line ingang 1, 3, 5: 340mV@ 47kΩ (max = +4dBV)
Phono ingang: 3,4mV @ 47kΩ (max = -36dBV)
Mic ingang: 3,4mV @ 10kΩ (max = -36dBV)
Return: 525mV@ 10kΩ
Send: 525mV@ 2kΩ
Record uitgang: 775mV@ 1kΩ
Master asymmetrisch: 1,55V @ 100Ω
Master symmetrisch: 2,55V @ 200Ω
Koptelefoon: 3,00V @ 33Ω
Maximum uitgang (EQ op 0, max. gain, FX off, THD=1%, belasting = 100kΩ )
Masters: More than +18dBV (8,0V)
Phones: More than + 9,5dBV (3V) @ 32Ω
Frequentie bereik (EQ op 0, max. gain, level meter = 0dB, belasting = 100kΩ )
Line + aux: 25 – 20.000Hz +/-1dB
Phono: 25 – 20.000Hz +1/-1,5dB (RIAA)
Mic : 25 - 20.000Hz +1/-1,5dB
THD + Ruis (EQ = 0, max. gain, level meter = 0dB, belasting = 100kΩ )
Line: minder dan 0,05% (25 – 20.000Hz)
Phono: minder dan 0,05% (1kHz A-gewogen)
Mic: minder dan 0,1% (1kHz A-gewogen)
Kanaal overspraak (EQ = 0, max. gain, Master = 0dBV)
Overspraak Meer dan 70dB @ 1kHz (tussen L, R & kanalen)
Toonregelingen:
Mic: -12dB / +12dB@ 70Hz – 1kHz – 13kHz.
Ingangskanalen: -30dB / +10dB@ 70Hz – 1kHz – 13kHz.
MP3 Sampler gedeelte:
Sample Opnemen: MPEG1 layer 3 44,1kHz sampled @ 192kbps stereo
Sample Opnemen: Verschillende bitrates, het is niet mogelijk de parameters te
wijzigen
Polyfonie: 2 stemmen
Geheugenkaarten: SD™ en SDHC™ kaarten.
Max. kaartcapaciteit: 32GB
File formaat: FAT (FAT16) of FAT32 (hangt af van de capaciteit)
Algemene specificaties:
Voeding: 230V~ 50Hz. (Europe)
Verbruik: 40Watt
Afmetingen: 320 x 370 x 109mm (WxDxH)
Gewicht: 7.0 kg
Elke inlichting kan veranderen zonder waarschuwing vooraf
U kan de laatste versie van deze handleiding, alsook de laatste firmware versie downloaden via onze
website: www.synq-audio.com
DEUTSCH BEDIENUNGSANLEITUNG
BEDIENUNGSANLEITUNG
Vielen Dank das Sie sich für ein SYNQ - Produkt entschieden haben. Bitte lesen Sie sich
diese Bedienungsanleitung aufmerksam durch, um dieses Produkt richtig bedienen und
handhaben zu können. Wenn Sie sich die Anleitung durchgelesen haben, bewahren Sie
diese an einem sicheren Ort auf, um jederzeit nachschlagen zu können.
VERGESSEN SIE NICHT IHRE SMX-3 ZU REGISTRIEREN. SIE BEKOMMEN DANN
AUTOMATISCH EINE NACHRICHT, WENN ES WICHTIGE PRODUKTINFORMATIONEN
GIBT!
REGSITRIEREN UNTER: WWW.SYNQ-AUDIO.COM/REGISTER/
EIGENSCHAFTEN
Das Gerät ist funkentstört und erfüllt die Anforderungen der europäischen und nationalen
Bestimmungen. Entsprechende Dokumentation liegt beim Hersteller vor.
12 Eingänge (2 Mic + 7Line + 3 Phono) bei 6 Kanälen (5 Fader + 1DJ Mic.)
Spezieller Matrix Eingangs Schalter für maximale Flexibilität, wechselt die Eingänge
beliebig zu jedem Kanal!
2 Master Ausgänge:
o Master1: XLR und Cinch
o Master2: Cinch
Gain und 3-Fach Klang Reglung mit Kill Funktion -30dB an allen Kanälen.
LED Level Anzeige mit Peak Speicher an alle Kanälen und am Master.
Schnell tauschbarer, Spannungsgesteuerter VCA, High Quality Fader mit “Curve
Control” pro Kanal.
Schnell tauschbarer, Spannungsgesteuerter VCA, High Quality Crossfader mit “Curve
Control”.
A/B Kanal Wahlschalter für den Crossfader.
Vielseitiger MP3-Sampler:
o Basierend auf SDHC™-Speicher Karten (einige Stunden Audio Aufnahme!)
o Max. 99 Speicher Bänke mit jeweils 5 Samples an jeder SDHC™ Karte!
o Stereo kann im MP3 Format aufgenommen werden (192kbps)
o Individuelle Geschwindigkeitskontrolle für alle Samples!
o Allgemeine Geschwindigkeitskontrolle mit Master Tempo (Pitch Lock)
o Polyphony: 2 Samples können zusammen abgespielt werden.
o Nahtlose Loops mit editierbaren Anfangs- und Endpunkten.
o Sampler Ein/Ausgang zuweisbar zu jedem Kanal
Voll automatischer Beatcounters
Cross fader Start Control für kompatible CD-Player
2 verschiedene Beat synchronisierte Effekte für Crossfader Mixing.
8 verschiedene Beat synchronisierte Effekte: Echo, Autopan, Flanger, Manual filter, Auto
filter, Reverb, Trans, Pitch Shifter
Stereo Effekt send/Return für externe Effekte.
LCD Display mit Hintergrundbeleuchtung für Parameter anzeige von Effekte, Sampler
und Beat Counter.
SYNQ® 61/124 SMX-3
SYNQ® 62/124 SMX-3
Page 34

DEUTSCH BEDIENUNGSANLEITUNG
DEUTSCH BEDIENUNGSANLEITUNG
Cue Effekt Funktion
DJ Mikrofon mit Talk-over Funktion.
High Power Kopfhörer Ausgang mit Cue/PGM Mixing.
DSP und Prozessor Software updatebar über SD™ Karte.
VOR DER ERSTBENUTZUNG
Wichtige Hinweise:
Vor der Erstbenutzung bitte das Gerät zuerst auf Transportschäden überprüfen. Sollte
das Gerät einen Schaden aufweisen, Gerät bitte nicht benutzen, sondern unverzüglich
mit ihrem Händler in Verbindung setzen.
Wichtiger Hinweis: Das Gerät hat das Werk unbeschädigt und gut verpackt verlassen.
Es ist wichtig, dass der Benutzer sich streng an die Sicherheitshinweise und Warnungen
in der Bedienungsanleitung hält. Schäden durch unsachgemäße Handhabung sind von
der Garantie ausgeschlossen. Der Händler übernimmt keine Verantwortung für Schäden,
die durch Nichtbeachtung der Bedienungsanleitung hervorgerufen wurden.
Die Bedienungsanleitung, für zukünftiges Nachschlagen, bitte aufbewahren. Bei Verkauf
oder sonstiger Weitergabe des Gerätes, bitte Bedienungsanleitung beifügen.
Aus Umweltschutzgründen, Verpackung bitte wiederverwenden, oder richtig trennen.
Überprüfen Sie den Inhalt:
Folgende Teile müssen sich in der Geräteverpackung befinden:
Bedienungsanleitung
SMX-3 Mischpult
Netzanschlusskabel
SICHERHEITSHINWEISE
ACHTUNG: Um sich nicht der Gefahr eines
CAUTI ON
Das Blitzsymbol im Dreieck weist den Benutzer darauf hin, dass eine
Berührungsgefahr mit nicht isolierten Teilen im Geräteinneren, die eine
gefährliche Spannung führen, besteht. Die Spannung ist so hoch, das hier die
Gefahr eines elektrischen Schlages besteht.
Das Ausrufezeichen im Dreieck weist den Benutzer auf wichtige Bedienungsund Wartungshinweise in den Dokumenten hin, die dem Gerät beiliegen.
Dieses Symbol bedeutet: Nur innerhalb von Räumen verwenden.
Dieses Symbol bedeutet: Achtung! Bedienungsanleitung lesen!
Dieses Symbol bedeutet: Klasse II Klassifizierung
Zur Vermeidung von Stromschlag oder Feuer, Gerät bitte nicht Regen oder Feuchtigkeit
aussetzen.
Zur Vermeidung von Kondensation im Inneren des Geräts bitte nach dem Transport in
eine warme Umgebung zum Temperaturausgleich einige Zeit ausgeschaltet stehen
elektrischen Schlags auszusetzen, entfernen
Sie keines der Gehäuseteile. Im Geräteinneren
befinden sich keine vom Benutzer
reparierbaren Teile. Überlassen Sie
Reparaturen dem qualifizierten Kundendienst.
lassen. Kondensation kann zu Leistungsverlust des Geräts oder gar Beschädigung
führen.
Gerät nicht im Freien und in feuchten Räumen und Umgebungen verwenden.
Keine Metallgegenstände oder Flüssigkeiten ins Innere des Geräts gelangen lassen.
Keine mit Flüssigkeit gefüllten Gegenstände, z.B. Vasen, auf das Gerät stellen.
Kurzschluss oder Fehlfunktion können die Folge sein. Falls es doch einmal vorkommen
sollte, bitte sofort Netzstecker ziehen und vom Stromkreis trennen.
Offene Brandquellen, wie z.B. brennende Kerzen, sollten nicht auf das Gerät gestellt
werden.
Ventilationsöffnungen nicht abdecken, da Überhitzungsgefahr!
Nicht in staubiger Umgebung verwenden und regelmäßig reinigen.
Für Kinder unerreichbar aufbewahren.
Unerfahrene Personen sollen das Gerät nicht bedienen.
Umgebungstemperatur darf 40ºC nicht überschreiten.
Minimalabstand um das Gerät für ausreichende Kühlung = 3cm.
Stets Netzstecker ziehen, wenn Gerät für längeren Zeitraum nicht genutzt oder es
gewartet wird.
Elektrische Anschlüsse nur durch qualifiziertes Fachpersonal überprüfen lassen.
Sicherstellen, dass Netzspannung mit Geräteaufkleber übereinstimmt.
Die Netzsteckdose sollte immer gut erreichbar sein, um das Gerät vom Netz zu trennen.
Gerät nicht mit beschädigtem Netzkabel betreiben. Ist die Zugangsleitung beschädigt,
muss diese durch den Hersteller, seinen Vertrieb oder durch eine qualifizierte
Person ersetzt werden.
Netzkabel nicht mit anderen Kabeln in Berührung kommen lassen!
Das Gerät ist nicht vollständig vom Netz getrennt, wenn der Netzschalter sich in der
AUS-Stellung befindet.
Gerät nicht öffnen. Abgesehen vom Tausch der Sicherung sind keine zu wartenden
Bauteile im Gerät enthalten.
Sicherung niemals reparieren oder überbrücken, sondern immer mit gleichartiger
Sicherung ersetzen!
Bei Fehlfunktion Gerät nicht benutzen und sich mit dem Händler in Verbindung setzen.
Bei Transport bitte Originalverpackung verwenden, um Schäden am Gerät zu
vermeiden.
Aus Sicherheitsgründen dürfen an dem Gerät keine unbefugten Veränderungen
vorgenommen werden.
INSTALLATIONSANLEITUNG:
Stellen Sie das Gerät in einem gut belüfteten Raum auf, wo es nicht Feuchtigkeit und
hohen Temperaturen ausgesetzt wird.
Plazieren und benutzen Sie das Gerät für eine längere Zeit neben sehr warmen Geräten
wie Verstärker, Lampen, etc., könnte es die Funktion des Gerätes beeinträchtigen.
Mit einem optional erhältlichen 19” Adapter (weiter Informationen in dieser Anleitung),
kann das Gerät in 19“ Racks eingebaut werden. Benutzen Sie dafür die in der
Frontblende eingelassenen Löcher.
Sollte das Gerät in ein Flightcase eingebaut werden, achten Sie auf eine gute
Luftzirkulation.
Wenn das Gerät aus einer kalten Umgebung an einem warmen Ort aufgestellt wird, kann
sich Kondenswasser bilden. Um Fehlfunktionen zu vermeiden, sollten Sie das Gerät für
ca. 1 Stunde vom Stromnetz trennen.
SYNQ® 63/124 SMX-3
SYNQ® 64/124 SMX-3
Page 35

DEUTSCH BEDIENUNGSANLEITUNG
DEUTSCH BEDIENUNGSANLEITUNG
WARTUNG
Die Reinigung der Gerätes erfolgt mit einem leicht mit Wasser angefeuchteten Tuch.
Vermeiden Sie, dass Wasser in das Gerätinnere gelangt. Verwenden Sie keine
brennbaren Flüssigkeiten wie Benzin oder Verdünner, welche das Gerät beschädigen
würden.
ANSCHLÜSSE
Außer für Mikrofon, Kopfhörer und Master1 Ausgängen sind alle Anschlüsse in Chinch
ausgelegt. Verwenden Sie hochwertige Chinch – Chinch Kabel um eine bessere
Klangqualität zu erreichen. Vergewissern Sie sich das dass Gerät ausgeschaltet ist bevor
sie Änderungen an der Verkabelung vornehmen. In dieser Anleitung schreiben wir über „
Line Eingänge“, das sind Eingänge die zwischen 750 mV und 2V liegen. Das beinhaltet
Tuner, Video, CD Player usw.
Viele Verbindungen sind möglich. Bitte beachten Sie folgende Hinweise:
Verbinden Sie CHINCH Kabel immer in die gleiche Richtung:
o Chinch - Stecker weiß oder schwarz -> Linke Seite
o Chinch - Stecker rot -> Rechte Seite
3 Eingänge auf der Rückseite ermöglichen 3 Phono oder Line Signal zu empfangen.
Stellen Sie sicher das Sie die Geräte richtig anschließen:
o Wenn Sie einen CD-Player, Cassette Deck, MD-Player, Tuner, Video
Rekorder etc. anschließen müssen Sie den Eingangswahlschalter auf
“LINE” stellen.
o Wenn Sie einen Plattenspieler anschließen müssen Sie den
Eingangswahlschalter auf “PHONO“ stellen.
Wichtig: Sofern Sie den Synq “X-TRM1” Plattenspieler anschließen, empfehlen wir
den Line Ausgang des Plattenspielers zu nutzen. Sie müssen dann denn Line Eingang
des Mixers nutzen.
Viele Plattenspieler besitzen ein GND-Anschluss. Es ist erforderlich, diesen Masse Anschluss mit dem SMX-3 zu verbinden.
Um analoge Aufnahmen zu erhalten müssen Sie den Record - Eingang eines analogen
Aufnahmegerätes mit dem Record – Ausgang des SMX-3 verbinden.
Um die bestmöglichste Soundqualität zu erhalten, sind auf allen Unbenutzen PHONO -
Eingänge Kurzschlussstecker montiert. Entfernen Sie einen Kurzschlussstecker wenn
Sie den Eingang mit einem Plattenspieler verbinden möchten. Verwahren Sie die
Kurzschlussstecker für einen späteren Gebrauch an einem sicheren Ort. Setzen Sie
diese Kurzschlussstecker NIE auf die Ausgänge (Masters, Send, Record, …)
FUNKTIONEN
BEDIENELEMENTE AUF DER FRONTBLENDE:
SYNQ® 65/124 SMX-3
1. INPUT MATRIX: Mit diesem Wahlschalter kann jeder Eingang frei einem der 5 Kanäle
zugewiesen werden. Dies ermöglicht die Kanäle bzw. Eingangssignale einfach
zuzuweisen, ohne die Kabel am Eingang zu wechseln. Ein sehr nützliches Feature
gerade in Diskotheken mit wechselnden DJs. Der eingebaute Sampler kann ebenso
frei einem der 5 Kanäle zugewiesen werden.
2. GAIN LEVEL: Einstellung der Eingangssignalstärke für jeden Kanal. Benutzen Sie
diesen Einsteller zur Justierung der Aussteuerungsanzeige auf ca. 0dB
3. 3-BAND TON EINSTELLUNG: Die Frequenz jeden Kanals kann separat in einem
Bereich von -30dB bis +10dB eingestellt werden: Höhen@13kHz ~ Mitten@1kHz ~
Bass@70Hz. In der Mittenposition sind die Frequenzeinsteller ausgeschaltet.
SYNQ® 66/124 SMX-3
Page 36

DEUTSCH BEDIENUNGSANLEITUNG
DEUTSCH BEDIENUNGSANLEITUNG
4. LED KANAL VU METER: Exakte Aussteuerungsanzeige mit HOLD – Funktion
(Spitzenpegel leuchten einige Zeit weiter)
5. CUE / BPM COUNTER WAHLSCHALTER: Zur Auswahl der Quelle (Kanal 1 – Kanal
5), die mittels Kopfhörer überwacht werden soll. Das Drücken mehrerer CUE - Tasten
ermöglicht es Ihnen mehrere Quellen gleichzeitig zu überwachen. Der BPM Wert des
gewählten Kanals (Kanal 1 – Kanal 5) erscheint im CUE BPM Display (13C).
Achtung: Wählen Sie mehr als einen Kanal an, wird der BPM Wert nicht korrekt
angezeigt!
6. CROSS FADER WAHLSCHALTER: Die linke Seite des Crossfaders wird “A” und die
rechte Seite “B” genannt. Jedes Eingangskanal hat einen Crossfader Wahlschalter.
Man kann einfach jeden Eingangskanal auf die linke oder rechte Seite des
Crossfaders, durch richtiges einstellen des Wahlschalters zuweisen.
Mittlere Position: Der Kanal ist nicht zugewiesen.
Linke Position “A”: Der Kanal ist der linken Seite des Crossfaders zugewiesen.
Die rote LED leuchtet.
Rechte Position “B”: Der Kanal ist der rechten Seite des Crossfaders zugewiesen.
Die blaue LED leuchtet.
7. VCA KANAL FADER: Fader zur Lautstärkeneinstellung. Der SMX-3 nutzt einen
spannungsgesteuerte Verstärkertechnologie, d.h. nicht das Audio Signal, sondern eine
kleine Gleichspannung läuft über die Fader. Dies schützt vor Aussetzern der Musik bei
verschlissenen Fadern. Diese qualitativ hochwertigen Fader können während des
Betriebes ausgetauscht werden. Mehr unter „FADERTAUSCH“.
8. CROSSOVER EFFEKT / SAMPLER PITCH BEND TASTE: im Sampler Modus zum
Pitch-Bending, im Crossover Effect Modus zum Auswählen der gewünschten
Effektemischung, 2 Funktionen (Zip und Roll) sind verfügbar:
PITCH BEND FUNKTION: (setzen Sie den Schalter in die
MITTLERE Position, während sich der Mischer im Sampler
Modus befindet). Während ein Sample abgespielt wird,
werden diese beiden Knöpfe für das Pitch Bending benutzt,
so dass Sie den Rhythmus perfekt auf Ihre andere Musik
anpassen können: wenn Sie den linken Knopf drücken, wird
die Sample-Geschwindigkeit verringert, wenn Sie den rechten Knopf drücken wird die
Sample-Geschwindigkeit erhöht
ZIP EFFEKT: Dieser Effekt kann im FADER und AUTO Modus genutzt werden:
FADER MODE: (setzen Sie den Schalter in FADER-Position)
Drücken Sie die ZIP Effekt Taste und bewegen Sie den
Crossfader von einem zum anderen Ende. Die Tonhöhe der
Musik wird tiefer. Wenn der Crossfader zum Ende geschoben
wird, beginnt der andere CD-Player automatisch mit seiner Wiedergabe. Je nach
Lage des Crossfaders zeigt das Display eine Zahl von 0 bis 99. Beachten Sie bitte
das der „X-PARAMETER KNOPF“ (26) ohne Funktion ist!
AUTO MODE: (setzen Sie den Schalter in AUTO-Position) Drücken Sie während
der Wiedergabe die „ZIP Effekt“ Taste. Die Tonhöhe der Musik senkt sich
automatisch ab und der andere CD-Player starte automatisch seine Wiedergabe.
Die Länge des kompletten Fades wird im Effekt Display angezeigt. Sie kann durch
dem „X-PARAMETER KNOPF“ (26) beeinflusst werden.
ROLL EFFEKT: Dieser Effekt kann im FADER und AUTO Modus genutzt werden:
FADER MODE: (setzen Sie den Schalter in FADER-Position)
Drücken Sie die ROLL Effekt Taste und bewegen Sie den
Crossfader von einem zum anderen Ende. Zuerst wird die Musik
als ganzer Takt „1/1 Beat“ wiederholt (Effekt Display zeigt „1“), danach als ½ Takt
(Display zeigt „2“, und zum Ende eine Wiederholung mit einer Länge eines 1/8
Takts (Display zeigt „4“). Wenn der Crossfader die andere Seite erreicht hat,
reduziert sich die Lautstärke und der andere CD-Player beginnt automatisch mit
seiner Wiedergabe. Beachten Sie bitte das der „X-PARAMETER KNOPF“ (26)
ohne Funktion ist!
AUTO MODE: (setzen Sie den Schalter in AUTO-Position) Drücken Sie während
der Wiedergabe die „ROLL Effekt“ Taste. Ein taktgenauer Loop wird gestartet und
der andere CD-Player beginnt automatisch mit seiner Wiedergabe. Die Länge des
kompletten Fades wird im Display angezeigt und kann mit dem „X-PARAMETER
KNOPF“ (24) beeinflusst werden.
9. CHANNEL FADER CURVE: Stellt die Kurve der Kanalfader von weich (linke Position)
bis hart (rechte Position) ein.
10.CROSS FADER CURVE: Stellt die Kurve des Crossfaders von weich (linke Position)
bis hart (rechte Position) ein.
11.FADER START ON/OFF SCHALTER: Wenn Sie einen Fader-Start kompatiblen CD-
Player an den FADER START Control Buchsen angeschlossen haben, können Sie mit
dem Crossfader des SMX-3 den CD-Player starten bzw. stoppen. Mit diesem Schalter
können Sie diese Funktion ein- bzw. ausschalten.
12.FADER START INDICATORS: Während des Crossfader Effekt Mix Mode zeigt das
Display den Status des Faderstartes an:
LED aus: Angeschlossener CD-Player ist im Pause Modus.
LED blinkt: Angeschlossener CD-Player will kurzfristig von Play zu Pause
schalten.
LED an: Angeschlossener CD-Player ist im Play Modus.
13.MULTI PURPOSE DISPLAY: Zeigt den Status der verschiedener Funktionen an:
A. EFFEKT BPM DISPLAY: Anzeige der BPM (Beats Per Minute = Takte pro Minute)
der Effekt Einheit. Wenn der BPM Counter keinen Takt erkennen kann, blinkt das
BPM Display bis zum Erkennen eines Taktes.
B. X-PARAMETER ANZEIGE:
Effekt mode: Bei bestimmten Effekten zeigt das Display eine Zeitinformation
(msek), bei anderen Effekten eine Prozentangabe (%) oder eine CUTOFF
Frequenz (kHz) an. Sie können diese Parameter mit einer der PRESET Tasten
(23) ändern und mit dem „X-PARAMETER KNOPF“ (24) eine Feineinstellung
durchführen.
Sampler mode: Wenn der Sampler im Playback Modus ist, zeigt das Display die
gewählte Nummer der gewählten Speicherbank (von 1 bis 99) an. Während der
Anpassung der Sampler-Abspielgeschwindigkeit, werden auf dem Display die
SYNQ® 67/124 SMX-3
SYNQ® 68/124 SMX-3
Page 37

DEUTSCH BEDIENUNGSANLEITUNG
DEUTSCH BEDIENUNGSANLEITUNG
Geschwindigkeit-% angezeigt. Wenn der Sampler sich im Record Mode befindet,
zeigt das Display die Zahl der freien verfügbaren Sekunden im Sampler Speicher
an. (“9999” auf dem Display bedeutet, dass Sie noch über 9999 Sekunden [166
Minuten oder 2 St. 46 Min.!] für die Sample-Aufnahme übrig haben). Sofern keine
SD™/SDHC™ Karte eingesetzt ist, zeigt das Display „No Card“ an.
C. Y-PARAMETER ANZEIGE: Zeigt den ermittelten BPM Wert eines der, mit den
CUE - Tasten ausgewählten, 5 Eingangskanäle, (Kanal 1 bis Kanal 5). Wenn Sie
den Einsteller DEPTH (Y) Parameter (25) betätigen, wir der neue Wert (%) im
Display angezeigt.
D. EFFEKT INPUT DISPLAY: Anzeige des Eingangssignals. Auswahl über
Eingangswahlschalter (26).
E. EFFEKT DISPLAY: Anzeige des gewählten Effekts
14.CROSS FADER: Verbindet die eingestellten Kanäle „A“ und „B“.
15.SAMPLE EDIT Knopf: Wird genutzt zur Anpassung der individuellen Geschwindigkeit,
Beginn und Endpunkt eines Samples. Weiter Informationen über den Sampler am
Ende der Anleitung.
16.LOOP BUTTON: Wird genutzt um den Sample in einen nahtlosen Loop zu wandeln.
Weiter Informationen über den Sampler am Ende der Anleitung.
17. CUE MIXING KNOPF: Mit diesem Knopf bestimmen Sie das auf dem
Kopfhörerausgang anliegende Signal. Drehen Sie den Knopf nach rechts, hören Sie
nur das Ausgangssignal. Drehen Sie den Knopf nach links, hören Sie das, mit den
CUE Tasten (5, 20) eingestellte Signal. Drehen Sie den Knopf in die Mittelstellung
hören Sie einen Mix aus Vorhör- und Ausgangssignal.
18.EFFEKT ON/OFF TASTE: Dieser Knopf hat verschiedene Funktionen:
Effekt Modus: schaltet den Ausgang des Effektgeräts oder externes
Effektrückführungssignal an und aus.
Sampler Modus: Halten Sie diesen Knopf ungefähr 2 Sekunden lang gedrückt,
um die “Master Tempo” (Pitch Lock) Funktion des Samplers an-/auszuschalten.
19.CUE LEVEL: Einstellung der Kopfhörerlautstärke. Beachten Sie, dass zu hohe
Lautstärken Ihr Gehör schädigen kann.
20.EFFECTS CUE: Dieser Knopf hat verschiedene Funktionen:
Effekt Modus: drücken Sie diesen Knopf (Knopf leuchtet), um den Effekt zu
überprüfen, ehe er in Ihrem Master Mix gemischt wird.
Sampler Modus: drücken Sie diesen Knopf (Knopf leuchtet), um den Sampler in
den “Jingle Modus ” zu setzen
21.KOPFHÖRER AUSGANG: Schließen Sie hier Ihren Kopfhörer mit 6,35mm
Klinkenstecker an.
22.TAP/REC TASTE: Dieser Schalter hat 2 verschiedene Funktionen:
Effekt mode (TAP TASTE): Fast alle Effekte sind Taktsyncron. Der SMX-3 hat
einen eingebauten, automatischen BEAT Counter. In einigen Fällen (bei ruhigen
Tracks) kann es sein, das der eingebauter BEAT Counter den Takt nicht
erkennen kann. In diesen Fällen können Sie mit Hilfe der TAP Taste den Takt
manuell eingeben. Wenn Sie die Taste drücken, blinkt die Taste auf und der
eingebaute BEAT Counter ist ausgeschaltet. Soll der automatische, eingebaute
BEAT Counter wieder eingeschaltet werden, halten Sie die Taste einige
Sekunden gedrückt. Die TAP Taste hört auf zu blinken.
Sampler mode (REC TASTE): Diese Taste schaltet zwischen dem Abspielen und
Record Mode um. Im Abspielmodus leuchtet die REC-Taste. Drücken Sie die
Taste nochmals um in den Sampler REC Modus zu gelangen (Die REC Taste
fängt an zu blinken. Drücken Sie einen der 5 Play Taster (23) um die Aufnahme
zu beginnen, drücken Sie die REC-Taste erneutm, kommen Sie wieder in den
Abspiel Modus zurück. Weiter Informationen über den Sampler finden Sie am
Ende der Beschreibung.
23.PRESET/PLAY BUTTONS: Diese Taster haben 2 verschiedene Funktionen:
Sampler Modus (ROTE PLAY TASTEN): Die 5 Taster werden als Abspieltaster
für den Sampler genutzt. Sie können 1 Sample zu jedem Play Taster auswählen.
Sie können leicht erkennen, welche PLAY Tasten einen Sample enthält: Eine
Play Taste mit einem Sample leuchtet rot. Eine leere Play Taste ist dunkel.
Effect Modus (GRÜNE PRESET TASTEN): Diese Knöpfe werden für
voreingestellte Effekte benutzt. Es gibt 2 verschiedene Effekt Arten: Takt
verwandte Effekte (Echo, Auto Pan, Flanger, Auto Filter, Trans) und nicht Takt
verwandte Effekte (manueller Filter, Reverb, Pitch Shifter)
Beat synchronisierte Effekte: Jede Taste hat eine der folgenden
Beschriftung: 2 – 4 – 8 – 16 – 32. Haben Sie eine Taste angewählt, leuchtet
sie auf. Sie können die zusätzlichen Voreinstellungen auch vorwählen, indem
Sie den „X-PARAMETER KNOPF“ (24) drücken, während Sie die
Voreinstellungen 2 - 4 – 8 oder 16 vorwählen. In diesem Fall blinkt die Taste
um anzuzeigen, dass die Anzeige über der Taste (1/8 - 1/4 - ½ oder 1/1)
vorgewählt wird. Die letzte Voreinstellung wird gespeichert, wenn Sie zu einem
anderen Effekt wechseln.
Beispiel: Haben Sie den „ECHO“ Effekt gewählt und haben sich für
PRESET „2“ entschieden, hören Sie das das der Sound sich alle 2 Takte
wiederholt. Wählen Sie PRESET „4“, wiederholt sich der Sound alle 4
Takte. Wählen Sie PRESET „1/2“ hören Sie dass sich der Sound jeden
halben Takt wiederholt.
Keine Takt verwandten Effekte: In diesem Fall sind die Aufschriften auf den
vorher eingestellten Knöpfen nicht wichtig. Das SMX-3 kommt mit Standard
Parameter für jeden der nicht Takt verwandten Effekte. Jedoch können Sie
diese Parameter mit den X und Y Parameter Knöpfen (24, 25) zu Ihrem
eigenen Geschmack einstellen. Um Ihre eingestellten Parameter zu speichern,
drücken Sie den X-Parameter Knopf (24) während Sie einen der 5 vorher
eingestellten Knöpfe wählen. Die Standart Parameter werden durch Ihre
Parameter ersetzt. Sie können 5 eigene Parameter erstellen.
24.X-PARAMETER KNOB: Dieser Knopf hat verschieden Funktionen:
Effect Modus: Stellt den X-Parameter der verschiedenen Effekte ein. Drücken
Sie diesen Knopf während Sie einen der PRESET Knöpfe (23) drücken haben Sie
weitere Möglichkeiten:
o Takt Verwandte Effekte: Sie können zusätzlichen „Takt Presets“ erhalten: 1/8
Beat – ¼ Beat – ½ Beat – 1/1 Beat.
o Keine Takt Verwandten Effekte: Sie können Ihre eigenen Parameter an eine
der fünf PRESET Tasten (23) zuweisen.
Sampler Modus: Es gibt 3 Funktionen:
o Playback/Record Modus: drehen Sie den Knopf, um die gewünschte
Datenbank auszuwählen. Haben Sie die gewünschte Datenbank gefunden,
drücken Sie auf den Knopf.
o Sample Edit Modus: drehen Sie den Knopf um nach dem exakten Start oder
Endpunkt des Samples zu suchen. Weiter Informationen über den Sampler
finden Sie am Ende der Beschreibung.
o Externe Effektrückführung: wenn der Mischer im Sampler Modus ist, können
Sie ein externes Effektgerät anschließen. Drücken und drehen Sie den Knopf,
SYNQ® 69/124 SMX-3
SYNQ® 70/124 SMX-3
Page 38

DEUTSCH BEDIENUNGSANLEITUNG
DEUTSCH BEDIENUNGSANLEITUNG
um die Lautstärke des Rückführungssignal zwischen -50dB und +0dB
einzustellen
25.Y-PARAMETER KNOPF: Dieser Knopf hat verschiedene Funktionen:
Effekt modus: Zum Einstellen der “Y”-Parameter der Effekte. Lesen Sie bitte
Abschnitt 27, da seine Funktion für jeden Effekt verschieden ist.
Sampler Modus: es gibt 2 Funktionen:
oPlayback Modus: Anpassen der Gesamtabspielgeschwindigkeit von -80%
bis +20% auf 3 verschiedene Arten:
Anpassen in 0,1% Schritten: einfach den Knopf drehen, um die
Geschwindigkeit zu verändern.
Anpassen in 2% Schritten: den Knopf gedrückt halten und drehen, um
die Geschwindigkeit zu verändern.
Rückstellen der Geschwindigkeit auf 0%: den Knopf innerhalb einer
Sekunde 2x drücken
oSample Edit Modus: während des “OUTRO EDIT” Modus können Sie die
Geschwindigkeit eines einzelnen Samples anpassen, diese Einstellung wird
gemeinsam mit den Beginn-/Endpunkten gespeichert. Sie können die
Geschwindigkeit von -12% bis +12% auf 3 verschiedene Arten verändern:
Anpassen in 0,1% Schritten: einfach den Knopf drehen, um die
Geschwindigkeit zu verändern.
Anpassen in 1% Schritten: den Knopf gedrückt halten und drehen, um
die Geschwindigkeit zu verändern.
Rückstellen der Geschwindigkeit auf 0%: den Knopf innerhalb einer
Sekunde 2x drücken.
26.EINGANGSWAHLSCHALTER: Mit diesem Drehschalter wählen Sie aus, welches
Eingangssignal zum „Effect Send“ ausgang (46) und zum Eingang der Effekt/Sampler
Einheit geht. Sie können zwischen folgenden Eingangssignalen wählen:
Einen der Eingangskanäle
Eines der Kanäle welches mit dem „CROSSFADER ASSIGN SWITCH“ (6)
zugeordnet wurde. Dies kann die linke Seite „CF-A“ oder die rechte Seite „CFB“ sein.
Wenn Sie „MASTER“ gewählt haben, wird der Effekt auf den Masterausgang
gelegt oder Sie können das gemixte Mastersignal im Sampler aufnehmen.
Anmerkung: Wenn Sie “Master” auswählen, ist die externe Effektrückführung
ausgeschaltet, um eine Rückkopplung zu vermeiden.
27.EFFEKT WAHLSCHALTER: wählt den gewünschten Effekte oder die Sampler
Funktionen aus:
WICHTIG: Der Sampler kann als ein Effekt ausgewählt werden. Das bedeutet,
dass der Sampler nicht zusammen mit einem der Multi Effekte benutzt werden
kann. Jedoch können Sie den Sampler zusammen mit den Crossfader
Effekten und /oder mit einem externen Effektgerät, das an den Effektsender/Rückführung angeschlossen ist (46+47,) benutzen.
Der Crossfader-Effekt und der Multi-Effekt können nicht gemeinsam genutzt
werden! Bevor Sie den Multi-Effekt nutzen können, müssen Sie zuerst den
Schalter des Crossover-Effekts ausschalten (Schauen Sie unter „8“ für
weitere Informationen)
SAMPLER: mit dem Sampler können Sie bis zu 495 Samples aufnehmen
bzw. Abspielen (99 Bänke mit je 5 Samples) auf einer SD™/SDHC™ Karte.
Weiter Informationen über den Sampler am Ende der Bedienungsanleitung.
In der Sampler Funktion können Sie die internen Effekte nicht verwenden,
aber Sie können jeden externen Effektprozessor anschließen, indem Sie die
Effektsende-/Effektrückführungsanschlüsse (46/47) benutzen.
ECHO: Produziert Wiederholungen. Sie können taktgenaue, synchrone Echos
beim Vorwählen der gewünschten "PRESET" Tasten (23) leicht mischen.
Diese Voreinstellungen können mit dem "X-PARAMETER KNOPF"(24) von
2mSek. bis zu 2Sek. Beeinflusst werden. Mit dem „Y-PARAMETER
KNOPF“(25) können Sie die Balance zwischen dem Original und dem
verzögerten Ton ändern.
AUTO PAN: Automatische Überblendung vom linken zum rechten Kanal im
Takt der Musik. Mit den „PRESET“ Tasten (23) können Sie einstellen wie
schnell die Überblendung stattfinden soll. (Beispiel: Mit PRESET „2“ stellen Sie
2 Überblendtakte ein.) Die „PRESETS“ können mit dem „X-PARAMETER
KNOPF“ (24) von 30mSek. Bis 16 Sek. Beeinflusst werden. Mit dem „YPARAMETER Knopf“ (25) können Sie die Überblendgeschwindigkeit
einstellen: Sie haben die Wahl zwischen einem leichtem oder aggressiven
Übergang.
FLANGER: Diesen Effekt kann man mit einem „startenden, musikalischen
Düsentriebwerk“ bezeichnen. Es ist, als ob die Musik sich in der Phase
verschiebt. Mit den „PRESET TASTEN“ (23) können Sie ganz einfach die
Flanger Zeit einstellen. Die Voreinstellung kann mit dem „X-PARAMETER
KNOPF“ (24) von 100mSek. Bis 16 Sek. beeinflusst werden. Mit dem „YPARAMETER KNOPF“ (25) können Sie den FLANGER Feedback Pegel
einstellen.
TIPP: Jedes mal, wenn Sie die gleiche PRESET Taste (23) drücken, startet der FLANGER
Zyklus von vorne. Das gibt einen netten Extra Effekt!
MANUELLER FILTER: Das ist ein sehr effektiver digitaler Frequenz-Cutter.
Der Mixer wird mit 5 voreingestellten Standard Filter ausgeliefert. Die
Voreinstellung auf den PRESET TASTEN (23) können Sie leicht verändern.
Mit dem "X-PARAMETER KNOPF"(24) können Sie die Frequenz von (LPF)
50Hz (Anzeige: L 0.05kHz) bis (HPF) 21.1kHz (Anzeige: H 21.1kHz)
einstellen. Mit dem "Y-PARAMETER KNOPF“ "(25) können Sie das
Filterresonanzniveau ändern. (dieses ist der Q-Faktor des Filters, es ändert die
Auswirkung des Filters auf eine vorgewählte Frequenz) Sie können die
Standart Einstellungen durch Ihre eigenen Einstellungen ersetzen. Drücken
Sie einfach den “X-parameter Knopf”(24) und einen der 5 Preset Knöpfe (23)
zusammen.
AUTO FILTER: Das ist ein automatischer Low Pass Filter (LPF). Die
Grenzfrequenz variiert in Zyklen von 20 kHz bis 50 Hz. Mit den „PRESET
TASTEN“ (23) können Sie ein taktsynchronen Filterzyklus einstellen. (Beispiel:
Drücken Sie die PRESET TASTE „8“ ->Es benötigt 8 Takte zum Ändern der
Grenzfrequenz von 20 KHz bis 50 Hz und zurück.) Die PRESETS können mit
dem „X-PARAMETER KNOPF“ (24) von 100mSek. Bis 16 Sek. eingestellt
werden. Mit dem „Y-PARAMETER KNOPF“ (25) können Sie
Filterresonanzniveau ändern. (dieses ist der Q-Faktor des Filters, es ändert die
Auswirkung des Filters auf eine vorgewählte Frequenz)
REVERB: Dieser Effekt erklärt man am besten mit dem Hall in einer Kirche.
Stellen Sie sich vor, sie spielen Ihre Musik in einer Kirche oder einer sehr
großen, leeren Halle: Der Hall wird durch Reflexionen an den Wänden digital
simuliert. Mit den „PRESET TASTEN“ (23) können Sie aus 5 vordefinierten
Hallzeiten wählen. Die Nachhallzeit können Sie mit dem „X-PARAMETER
KNOPF“ (24) in 1% Schritten von 0% bis 100% einstellen. Mit dem „Y-
SYNQ® 71/124 SMX-3
SYNQ® 72/124 SMX-3
Page 39

DEUTSCH BEDIENUNGSANLEITUNG
DEUTSCH BEDIENUNGSANLEITUNG
PARAMETER KNOPF“ (25) können Sie die Balance zwischen Original und
Effektanteil einstellen. Sie können die Standart Einstellungen durch Ihre
eigenen Einstellungen ersetzen. Drücken Sie einfach den “X-parameter
Knopf”(24) und einen der 5 Preset Knöpfe (23) zusammen.
TRANS: Schneidet automatisch Sounds im Takt der Musik. Mit den „PRESET
TASTEN“(23) können Sie die Länge des Schnittzyklus einstellen. (Beispiel: Mit
Preset ¼ (Drücken Sie den „X-PARAMETER KNOPF (24) während Sie
drehen) erhalten Sie einen ¼ Cut. Die Presets können mit dem „XPARAMETER KNOPF (24) von 25mSek. Bis 16 Sek. eingestellt werden. Mit
dem „Y-PARAMETER KNOPF“ (25) können Sie die „CUT“ Zeit einstellen.
Wenn Sie den Knopf ganz nach links drehen (Display zeigt 0%) ist die „CUT“
Zeit auf 0 und kein Effekt zu hören. Drehen Sie den „Y-PARAMETER
KNOPF“(25) nach rechts, wird die CUT Zeit größer und Sie hören nur kleine
Spitzen der Musik.
TIPP: Dieser Effekt benötigt einige Übung. Sie erreichen die besten Ergebnisse bei
konstanten Rhythmus, sehr kleinen „CUT“ Zeiten (1/8, 1/4 und ½ Takte) und langen CUT
Zeiten von 50% und mehr.
PITCH SHIFTER: Verschiebung der Tonhöhe, während die Geschwindigkeit
gleich bleibt. (Tatsächlich ist das genau das Gegengesetze wie das „MASTER
TEMPO“ bei einigen CD-Playern: Verändern der Geschwindigkeit ohne
Tonhöhenänderung) Mit den PRESET Tasten (23) können Sie aus 5
vordefinierten PITCHs wählen. Mit dem „X-PARAMETER KNOPF“ (24) können
Sie die Tonhöhe in 1% Schritten von -100% bis + 100% beeinflussen. Mit dem
„Y-PARAMETER KNOPF“ (25) können Sie die Balance zwischen Original und
Effektanteil einstellen. Sie können die Standart Einstellungen durch Ihre
eigenen Einstellungen ersetzen. Drücken Sie einfach den “X-parameter
Knopf”(24) und einen der 5 Preset Knöpfe (23) zusammen.
TIPP: Benutzen Sie den Pitch Shifter mit einem Mikrofon haben Sie einen VOICE CHANGER.
(Mit Pitch -100% erreichen Sie eine Stimme „aus der anderen Welt“)
28.SD™/SDHC™-MEMORY CARD Einschub: Das SMX-3 hat keinen internen Speicher
für den Sampler, d.h. Sie können den Sampler nur nutzen, wenn eine SD™/SDHC™Karte im Memory Card Einschub ist (28). Ist keine Karte im Einschub, zeigt das Display
„noCard“ an.
Achtung!: Entfernen Sie niemals die SD™/SDHC™-Memory Card wenn die rote LED
“in use” leuchtet. Dies kann zu einem Datenverlust führen.
29.DJ MIC AN/AUS/TALKOVER SCHALTER:
OFF: Das DJ-Mikrofon ist aus.
ON: Das DJ-Mikrofon ist an.
TALK OVER: Das DJ-Mikrofon ist an. Wenn Sie in das Mikrofon sprechen wird
der Lautstärke Pegel aller Eingangsquellen automatisch abgesenkt. Sie können
zwei Einstellungen für das Talkover vornehmen:
Talkover level (35): Dämpfungs Pegel für die Eingangskanäle.
Talkover recovery time (41): Zeit, welche die Musik benötigt um wieder auf
die normale Lautstärke zurück zu kehren.
30.MASTER2 LEVEL: Lautstärkereinsteller des Master2 Ausgangs. Das Ausgangssignal
ist unabhängig von der Master1 Lautstärke (33), der Mono/Stereo Schalter(32) und der
Master Balance (34).
31.LED VU METER: Exakte Aussteuerungsanzeige mit HOLD – Funktion (Spitzenpegel
leuchten einige Zeit weiter) Sehr wichtig: Möchten Sie einen klaren und sauberen
Klang, achten Sie auf dieses wichtige Anzeigeninstrument. Die meisten DJ’s nutzen
diese Anzeige als „blinkender Lichteffekt“ und steuern diese Anzeige komplett aus.
Klarstellung: Ein guter DJ benötigt einen klaren und sauberen Klang. Pegel über 0dB
neigen zur Übersteuerung. Also: Halten Sie ein Auge auf die Aussteuerungsanzeige.
32.MASTER1 MONO/STEREO SCHALTER: Mit diesem Umschalter schalten Sie den
Master1 Ausgang zwischen MONO und STEREO.
33.MASTER1 AUSGANG KNOPF: Knopf zum Einstellen der Gesamtlautstärke.
(ACHTUNG: Die Lautstärke kann zusätzlich über den „TRIM OUTPUT“ (40) auf der
Rückseite des Gerätes reguliert werden. Überprüfen Sie diesen Einsteller, wenn das
Ausgangssignal zu niedrig ist)
34.MASTER BALANCE: Einstellung der Master1 Balance links - rechts.
35.TALKOVER LEVEL: wird benutzt um das Talk Over Niveau der 5 Eingangskanäle
einzustellen.
ANSCHLÜSSE AUF DER RÜCKSEITE:
36.NETZSCHALTER: Mit diesem Schalter schalten Sie das Gerät ein bzw. aus.
37.NETZANSCHLUSS: Nutzen Sie das beigelegte Netzkabel zum Anschluss des
Mischpultes an das Stromnetz.
38.FADER CONTROL: An diesen Buchsen können Fader-Start kompatible CD-Player
angeschlossen werden, die dann über den SMX-3 gesteuert werden können
39.MASTER1 BALANCED AUSGANG: XLR-Ausgang zum Anschluss des Mischpultes
an einen prof. Verstärker. Nutzen Sie hierfür symmetrisch, abgeschirmte Kabel.
40.TRIM AUSGANG: Dieser Einsteller senkt den Ausgangspegel des Mischpultes, um
angeschlossene Verstärker und Lautsprecher vor hohen Eingangssignalen zu
schützen. (Achtung: Der Ausgangspegel kann bis auf 0 reduziert werden. Sollten Sie
kein Signal auf dem Ausgang anliegen haben, überprüfen Sie zuerst diesen Einsteller!)
41.TALKOVER RECOVERY TIME: Zeit, welche die Musik benötigt um wieder auf die
normale Lautstärke zurück zu kehren, nachdem der DJ aufgehört hat in sein DJ
Mikrofon zu reden.
42.MICRO1 INPUT: Anschluss für ein weiteres Mikrofon.
43.DJ-MIC EINGANG: Kombi-Buchse. Mikrofonbuchse für XLR Anschluss (symmetr.) und
Klinke ¼“ (unsymmetr.). Dieser Eingang kann als Mikrofoneingang für den DJ benutzt
werden. Der Talk Over wirkt sich nicht auf das Eingangssignal aus.
44.PHONO/LINE INPUT: Plattenspieler oder Line Eingang.
Möchten Sie einen CD Spieler anschließen: stellen Sie den “phono/line”
Schalter auf „line“.
SYNQ® 73/124 SMX-3
SYNQ® 74/124 SMX-3
Page 40

DEUTSCH BEDIENUNGSANLEITUNG
DEUTSCH BEDIENUNGSANLEITUNG
Möchten Sie einen Plattenspieler anschließen: stellen Sie den “phono/line”
Schalter auf „phono“. Wenn Ihr Plattenspieler Ein Erdungskabel hat, schließen Sie
es am Ground (GND) des Mixers an.
45.LINE EINGANG: Zum Anschluss von Geräten mit LINE Pegel (CD, Radio, MD…)
46.EFFECT SEND: Zusätzlich zu den Internen Effekten ist es auch möglich einen
externen Effekt an das SMX-3 anzuschließen. Das Ausgangssignal wird mit dem
“Effect Assign” Schalter (26) ausgewählt.
Bemerkung: Der Effect Send/Return macht es möglich den internen Sampler zusammen mit einem
externen Effekt Prozessor zu nutzen.
47.EFFECT RETURN(Effekt-Rückführung): hier kommt das Signal vom externen Effekt-
Gerät zurück. Das zurückkommende Signal ist mit dem Originalsignal gemischt. Die
Lautstärke des Returnsignals kann mit dem X-Parameter Knopf (24) angepasst
werden. Wenn Sie wirklich die totale Kontrolle über das Rückführungssignal des
externen Effektprozessors (Klangregelung usw.) haben möchten, können Sie auch den
Ausgang des Effektprozessors an einen Kanaleingang anschließen anstatt auf den
Rückführungseingang.
Bemerkung: Sie können das Returnsignal mit dem “effect on/off”(18) Schalter ein- bzw. ausschalten.
48.REC AUSGANG: Hier liegt das gleiche Signal wie an MASTER1. Der Ausgangspegel
ist unabhängig vom Master-Fader, Stereo/Mono Schalter und Balance-Regler. Hier
können Sie ein analoges Aufnahmegerät anschließen.
49.MASTER2 UNBALANCED AUSGANG: mit separaten Regler, zum Anschluss eines
zweiten Verstärkers (unsymmetrisch).
50.MASTER1 UNBALANCED AUSGANG: An dieser Buchse liegt das gleiche (allerdings
unsymmetrisch) Ausgangssignal wie an Master1 Ausgang (39) an.
ÜBER DEN SAMPLER
Bevor Sie den Sampler benutzen können müssen Sie eine Karte in den dafür
vorgesehenen Slot einführen. Dabei kann es sich um eine herkömmliche SD™/SDHC™Karte oder eine “high capacity” (Hochleistungs) SDHC™-Karte handeln. Sie können
solche Speicherkarten in vielen Fachgeschäften kaufen. Kurz nach dem einführen der
SD™/SDHC™-Karte zeigt das Display „rEAd“ an, gefolgt von „ 1“. Das bedeutet das die
Speicherbank 1 ausgewählt ist.
FORMATIEREN DER SD™/SDHC™-KARTE:
Sie können diese SD™/SDHC™ Karte in jedem PC mit Windows Betriebsystem
formatieren.
Geben Sie Ihre SD™/SDHC™ Karte in das Kartenlesegerät Ihres PC.
Im Windows Explorer mit der rechten Maustaste auf das Kartenlesegerät drücken
um das Kontextmenü zu öffnen.
Wählen sie „Formatieren“ aus um die Formatierungseinstellungen festlegen zu
können.
Wählen sie das Dateisystem, das Ihr PC vorschlägt als Standard. Dies wird FAT oder
FAT32 sein (NICHT NTFS wählen!)
Sie können der SD™/SDHC™ Karte einen Namen geben oder dieses Feld leer
lassen.
Verwenden Sie NICHT die Schnellformatierungsfunktion.
Starten Sie nun die Formatierung.
Dieser Vorgang benötigt etwas Zeit. Windows wird Sie informieren wenn die Formatierung
abgeschlossen ist.
AUFNAHME EINES SAMPLES:
Sie können ein Sample nur auf einer leeren Abspieltaste aufnehmen.
Beachten Sie auch die Erklärung des Löschens eines Samples aus der
Speicherbank.
Schalten Sie das Mischpult mittels „effect select“ Schalters (27) auf die
Samplefunktion.
Durch den „effect assign“ Schalter (26) müssen Sie den Eingangskanal zum
aufnehmen des Samples wählen.
Durch drücken der „TAP/REC“ Taste (22) schalten Sie den Sampler in den
Aufnahmemodus. (TAP/REC Taste blinkt) Das Display zeigt die verfügbaren
Sekunden für die Aufnahme des Samples an.
Mit dem „X-parameter“ Regler (24) können Sie aus den 99 verfügbaren
Speicherbänken auswählen. Zum Wählen einer Speicherbank drücken sie einmal auf
den „X-parameter“ Regler.
Hinweis: Während des Suchens nach einer Speicherbank können Sie ganz leicht feststellen welche
Abspieltaste noch frei ist. (voll = Taste leuchtet, Leer = Taste Leuchtet nicht)
Um die Aufnahme zu starten drücken Sie auf eine leere (dunkle) Abspieltaste. (Im
richtigen Moment!) Das Display startet mit dem Countdown der für die Aufnahme
verfügbaren Sekunden.
Um die Aufnahme zu stoppen drücken Sie die Abspieltaste noch einmal. (Im richtigen
Moment!)
Um das Sample abzuspielen, dass Sie gerade Aufgenommen haben , drücken Sie
einfach wieder auf die Abspieltaste.
ABSPIELEN EINES SAMPLES (SAMPLER-MODUS) :
Schalten Sie das Mischpult mittels „effect select“ Schalters (27) auf die
Samplefunktion.
Benutzen Sie den „input assign“ Schalter (1) zum auswählen eines Eingangskanals
für den Sampler.
Mit dem „X-parameter“ Regler (24) können Sie die Speicherbank wählen mit dem
beinhaltenden Sample. (Leere Speicherbänke sind nicht zugänglich) Um ein Sample
auszuwählen drücken Sie einmal den „X-parameter“ Regler.
Hinweis: Während des Suchens nach einer Speicherbank können Sie ganz leicht feststellen welche
Abspieltaste noch frei ist. ( voll = Taste leuchtet, Leer = Taste Leuchtet nicht
Um ein Sample abzuspielen brauchen sie lediglich auf die Abspieltasten zu drücken
welche Leuchten. (Rotes Licht)
Hinweis: Sie können 2 Samples gleichzeitig (Polyphon) abspielen und 1 Sample im Loop mode. (siehe
abspielen eines Sample Loops). Sie können einen anderen Speicherplatz auswählen während das
Sample des vorhergehenden Speicherplatzes läuft. Das bedeutet das Sie nahtlos zwischen den
Speicherbänken wechseln können.
WIE WERDEN JINGLES WIEDERGEGEBEN (JINGLE-MODUS):
Schalten Sie das Mischpult mittels „effect select“ Schalters (27) auf die
Samplefunktion.
Benutzen Sie den „input assign“ Schalter (1) zum auswählen eines Eingangskanals
für den Sampler.
Drücken Sie die “EFF. CUE” Taste (20), sie leuchtet auf.
Drücken Sie kurz eine der Wiedergabetasten (23): das entsprechende Sample wird bis
zum Ende abgespielt. Mit jedem Tastendruck auf die gleiche Wiedergabetaste startet
das Sample mit Stuttereffekt von vorn.
Während der Samplewiedergabe können Sie eine weitere Wiedergabetaste drücken:
das erste Sample stoppt und das neue Sample übernimmt.
SYNQ® 75/124 SMX-3
SYNQ® 76/124 SMX-3
Page 41

DEUTSCH BEDIENUNGSANLEITUNG
Total length of recorded sample
Total length recorded sample
DEUTSCH BEDIENUNGSANLEITUNG
Sie können die Wiedergabe des derzeit spielenden Samples durch Aufheben des
Jinglemodus unterbrechen: halten Sie die “EFF. CUE” Taste (20) gedrückt, solange
Sie das Sample wiedergeben wollen (erst beim Loslassen der “EFF. CUE” Taste wird
die Wiedergabe des Samples gestoppt).
WICHTIGE HINWEISE:
Im Jinglemodus können Sie keine Samples aufzeichnen und bearbeiten oder Loops
wiedergeben: schalten Sie zum normalen Samplermodus um, sofern Sie diese Aufgaben
durchführen wollen. Beim Ausschalten des Mixer oder Abziehen der Speicherkarte begibt
sich der Sampler automatisch in Standardmodus zurück.
LÖSCHEN EINES SAMPLES:
Sie können Samples im Abspiel und Aufnahme Modus löschen.
Drücken Sie die Abspieltaste des gespeicherten Samples und die „TAP/REC“ Taste
(22) zur selben Zeit.
Nach ca. 1 Sekunde zeigt das Display „dEL“ an, um zu zeigen dass das Sample gelöscht
wurde. ( Die Abspieltaste leuchtet nicht mehr)
LÖSCHEN VON SPEICHERBÄNKEN
Sie können die Speicherbänke im Abspiel und Aufnahme Modus löschen.
Mit dem „X-parameter“ Regler (24) können Sie die Speicherbänke suchen
(Leere Speicherbänke sind nicht zugänglich) Zum Auswählen einer
Speicherbank drücken Sie einmal auf den „X-parameter“ Regler.
Um die Speicherbank zu löschen drücken sie zuerst den „X-Parameter“ Regler (24)
und dann die Abspieltaste „32“ und „CLR. BANK“ (23) zur selben Zeit. Nach ca. 2
Sekunden erscheint im Display „dEL“, um anzuzeigen dass die Speicherbank gelöscht
ist. ( Keine Abspieltaste Leuchtet mehr)
UNTERSCHIED ZWISCHEN “INDIVIDUELLE” & “GESAMT-”_GESCHWINDIGKEIT:
Individuelle Geschwindigkeitsanpassung: Sie können die Geschwindigkeit jedes
Samples individuell anpassen und somit die verschiedenen Samples miteinander
synchronisieren. Sie können die individuelle Geschwindigkeit während der “Endpunkt-
Editierung” einstellen. Die individuelle Geschwindigkeitseinstellung wird gemeinsam
mit den Sample-Beginn-/Endpunkten gespeichert. Lesen Sie die Beschreibung des Y-
Parameter-Knopfs (25) für weitere Erläuterungen.
Gesamtgeschwindigkeitsanpassung: wird während des Abspielens von 1 oder 2
Sampes verwendet. Diese Geschwindigkeit wird NICHT mit dem/den Sample/s
gespeichert! Lesen Sie die Beschreibung des Y-Parameter-Knopfs (25) für weitere
Erläuterungen. Sie können auch die Pitch-Bend-Knöpfe (8) zur Synchronisierung der
Samples mit den anderen Musikquellen verwenden.
EDITIEREN EINES STARTPUNKTES:
Falls Sie die Aufnahme eines Samples zu früh gestartet haben, können Sie den
exakten Startpunkt einstellen. Dieser Vorgang ist nicht zerstörend.
Drücken Sie die Abspieltaste des Samples welches Sie in einem Loop
spielen möchten.
Nun drücken Sie die „loop intro“ Taste (15) zur selben Zeit.
Lassen Sie nun beide Tasten los: Sie hören einen sehr kurzen Loop, ähnlich dem was
Sie hören wenn Sie einen CD Player im Suchmodus starten.
Mit dem „X-parameter“ Regler (24) können Sie einen neuen Startpunkt suchen.
Drücken Sie die „loop intro“ Taste um den Editiermodus zu beenden und den neuen
Startpunkt zu speichern.
Sie können diesen Vorgang so oft wiederholen bis Sie den exakten Startpunkt gefunden
haben.
Intro Edit
Indexpoint begin Indexpoint end
Outro Edit
EDITIEREN DES SAMPLE ENDPUNKTES:
Falls Sie die Aufnahme eines Samples nicht im richtigen Moment stoppen,
können Sie den exakten Endpunkt einstellen. Dieser Vorgang ist nicht störend.
Drücken Sie die Abspieltaste des Samples welches Sie in einem „Loop“
spielen möchten.
Nun drücken Sie die „loop outro“ Taste (15) zur selben Zeit.
Lassen Sie nun beide Tasten los: Der Sampler spielt nun einen nahtlosen“ Loop“.
Während dieser „Loop“ spielt können Sie den neuen Endpunkt mit dem „X-parameter“
Regler (24) suchen.
Sie können den “Y-Parameter”-Knopf (25) zur Anpassung der individuellen
Geschwindigkeit verwenden.
Wenn der „Loop“ optimal klingt drücken sie auf die „loop outro“ Taste um den
Editiermodus zu beenden und den neuen Endpunkt zu speichern.
ABSPIELEN EINES SAMPLES IN EINEM LOOP:
Drücken Sie die Abspieltaste des Samples welches Sie in einem „Loop“
spielen möchten.
Nun drücken Sie die Loop Taste (16) zur selben Zeit.
Lassen Sie nun beide Tasten los: 2 Tasten blinken damit sie erkennen welches
Sample in einem „Loop“ spielt.
Sie können das Abspielen des Samples ganz einfach wieder starten in dem Sie die
Abspieltaste wieder betätigen.
Um den „Loop“ zu stoppen drücken Sie die Loop Taste („Loop“ Wiederholung) und
lassen Sie die Taste im richtigen Moment wieder los. Sobald die Loop Taste losgelassen
wurde stoppt der „Loop“.
Intro Edit
Indexpoint begin Indexpoint end
Loop between index points
Outro Edit
SYNQ® 77/124 SMX-3
SYNQ® 78/124 SMX-3
Page 42

DEUTSCH BEDIENUNGSANLEITUNG
DEUTSCH BEDIENUNGSANLEITUNG
INSTALLATION OPTIONALEN 19” ADAPTER
Um den SMX-3 in einem 19” Rack montieren zu können, müssen Sie die optional
erhältlichen 19“ Adapter montieren.
Entfernen Sie die 3
Kunststoff-Abdeckungen
auf beiden Seiten den
Mischpultes.
Entfernen Sie die 4
Schrauben auf beiden
Seiten des Mischpultes. Sie
benötigen diese Schrauben
nun nicht mehr. Bewahren
Sie die Schrauben trotzdem
an einen sicherem Ort falls
Sie das Mischpult einmal
ohne Rackschienen
benutzen.
Montieren Sie nun die
beiden Rackwinkel mit den 7 beiligenden Schrauben.
Montieren Sie auch den anderen Rackwinkel.
Das Mischpult kann nun in ein 19“ Rack eingebaut werden. Die Gesamthöhe beträgt
370mm bzw. 8,5 HE. Vergessen Sie nicht eine 1 HE Blindplatte auf der Rückseite zu
montieren! Diese benötigen Sie um die Anschlüsse am SMX-3 herzustellen.
FIRMWARE UPDATE
Mit diesem Prozess können Sie die Firmware des Prozessors sowie des DSP updaten.
Das Updaten der Software ist ein sehr empfindliche Prozess. Bitte halten Sie sich genau
an die nachfolgend beschriebenen Schritte, ansonsten kann Ihr Gerät zerstört werden.
SEHR WICHTIG !
VERGESSEN SIE NICHT IHR SMX-3 MISCHPULT REGISTRIEREN ZU LASSEN, SIE
ERHALTEN DANN AUTOMATISCH EINE BENACHRICHTIGUNG, WENN EINE NEUE
SOFTWARE VERFÜGBAR IST.
SURF TO: WWW.SYNQ-AUDIO.COM/REGISTER
Wenn Sie sowohl den Prozessor als auch die DSP Software aktualisieren, müssen Sie
immer zuerst den Prozessor aktualisieren! Beachten Sie stets den README-File des
Software Updates, bevor Sie mit dem Aktualisieren beginnen.
Schalten Sie den Mixer während des Update Prozesses nicht aus. Drücken Sie keine
Taste. Warten Sie bis das Display wieder den normalen Inhalt anzeigt. Sollte das
Display nach einer Minute immer noch dunkel sein, können Sie den Update Prozess
durch Ausschalten des Gerätes unterbrechen. Der Update Prozess ist nun
fehlgeschlagen.
ÜBERPRÜFUNG DER SOFTWARE VERSION:
Schalten Sie das Mischpult aus.
Drücken Sie die Tasten (23) “16” und “32”
zusammen.
Schalten Sie das Mischpult ein.
Das Display zeigt die Software Version für den
Mikroprozessor und den DSP. Beispiel in der
Zeichnung: Prozessor = V1.6 und DSP = V1.5
WIE SIE DIE PROZESSOR SOFTWARE UPDATEN:
Stecken Sie eine SD™/SDHC™-Karte in Ihren PC und kopieren Sie die Datei “SMX-
3C_xx.bin” auf die Speicherkarte! WICHTIG! Benennen Sie die Datei NICHT um!
Stecken Sie die SD™/SDHC™-Karte in Memory Slot (28) des SMX-3.
Schalten Sie das Mischpult aus.
Drücken Sie die 3 Wiedergabe Tasten (23) “2” + “4” + “8” zusammen.
Schalten Sie das Mischpult ein während Sie die 3 Tasten gedrückt halten.
Alle CUE Tasten (5) blinken vier mal auf. Der Update Vorgang beginnt. Wenn alle CUE
Tasten zwei mal blinken können Sie die 3 Tasten los lassen.
Sie werden feststellen, dass die CUE Tasten nach und nach aufleuchten (von 1 bis 5)
während die Wiedergabe-Tasten die Farbe ändern. Nach 25 Sekunden kehrt das Display
in den Normalzustand zurück und der Update-Prozess ist beendet.
Überprüfen Sie die Software Version um festzustellen, ob der Update-Prozess
erfolgreich war.
WIE SIE DIE DSP SOFTWARE UPDATEN:
Stecken Sie eine SD™/SDHC™-Karte in Ihren PC und kopieren Sie die Datei “smx-
3_xx.bin” (wobei “xx” die Nummer der Version ist) auf die Speicherkarte! WICHTIG!
Benennen Sie die Datei NICHT um!
Stecken Sie die SD™/SDHC™-Karte in Memory Slot (28) des SMX-3.
Schalten Sie das Mischpult aus.
Drücken Sie die 3 Wiedergabe Tasten (23) “8” + “16” + “32” zusammen.
Schalten Sie das Mischpult ein während Sie die 3 Tasten gedrückt halten.
Alle CUE Tasten (5) blinken vier mal auf. Der Update Vorgang beginnt. Wenn alle CUE
Tasten zwei mal blinken können Sie die 3 Tasten los lassen.
Sie warden feststellen das die CUE Tasten nach und nach aufleuchten (von 1 bis 3). Nach
15 Sekunden kehrt das Display in den Normalzustand zurück und der Update Prozess ist
beendet.
Überprüfen Sie die Software Version um festzustellen das der Update Prozess
erfolgreich war.
SYNQ® 79/124 SMX-3
SYNQ® 80/124 SMX-3
Page 43

DEUTSCH BEDIENUNGSANLEITUNG
DEUTSCH BEDIENUNGSANLEITUNG
WECHSELN DER FADER
Der große Vorteil des SMX-3 liegt darin, das Sie während Gebrauch des Mischpultes die
Kanalfader wechseln können.
Das müssen Sie bei Wechsel des Kanalfaders beachten:
Entfernen Sie den Knopf des Faders.
Lösen Sie die 6 Schrauben, mit der die
Faderblende gehalten wird.
Lösen Sie die 3 Schrauben, die den zu
wechselnden Fader halten.
Entfernen Sie den defekten Fader.
Montieren Sie den neuen Fader in die
Halterung. Stellen Sie sicher, dass die
Kontakte fest in die Buchse auf der
Hauptplatine gesteckt werden.
Befestigen Sie den Fader wieder mit den
3 Schrauben.
Befestigen Sie die Faderblende wieder mit den 6 Schrauben.
Fertig!
Das müssen Sie bei Wechsel des Crossfaders beachten:
Entfernen Sie den Knopf des Faders.
Lösen Sie die 2 Schrauben, mit denen der Crossfader befestigt ist.
Entfernen Sie den defekten Fader, sowie die Abdeckung.
Lösen Sie das Kabel durch Ziehen des Steckers vom Crossfader.
(Ziehen Sie am Stecker, nicht am Kabel!)
Stecken Sie den Stecker in den neuen Crossfader.
Montieren Sie den Crossfader wieder mit den 2 Schrauben.
Fertig!
TECHNISCHE DATEN
Eingang/Ausgang Impedanz & Empfindlichkeit (EQ linear, max.Gain, Aussteuerung = 0dB)
Line 2, 4, 6, 7 Eingang: 340mV/20 kΩ (max = + 4dBV)
Line 1, 3, 5 Eingang: 340mV/47 kΩ (max = + 4dBV)
Phono Eingang: 3,4mV/47 kΩ (max = - 36dBV)
Mikrofon Eingang: 3,4mV/10 kΩ (max = - 36dBV)
Return Eingang: 525mV/10kΩ
Send Ausgang: 525mV/2kΩ
Record Ausgang: 775mV/1 kΩ
Master unsymmetrisch: 1,55V/100 Ω
Master symmetrisch: 2,55V/200 Ω
Kopfhörer: 3,00V/33 Ω
Maximaler Ausgang (EQ linear, max. Gain, Effekt aus, THD=1%, Last ist 100kOhm)
Master1: > +18dBV (8,0V)
Master2: > +18dBV (8,0V)
Kopfhörer: > + 9,5dBV (3V) @ 32Ω
Frequenzbereich (EQ linear, max. Gain, Aussteuerung = 0dB, Last ist 100 kOhm)
Line: 25 - 20.000Hz+/-1dB
Phono: 25 - 20.000Hz+1/-1,5dB (RIAA)
Mikrofon: 25 - 20.000Hz+1/-1,5dB
THD + Rauschen (EQ linear, max. Gain, Aussteuerung = 0dB, Last ist 100 kOhm)
Line: < 0,05% (25 – 20.000Hz)
Phono: < 0,05% (1kHz A-weighted)
Mic: < 0,1% (1kHz A-weighted)
Kanal Übersprechen (EQ linear, max. Gain, Aussteuerung = 0dB, Last ist 100 kOhm)
Kanal Übersprechen: > 70dB @ 1kHz
Klangeinstellung:
Mikrofon: - 12 dB / + 12 dB @ 70 Hz – 1 kHz – 13 kHz
Eingangskanäle: - 30 dB / + 10 dB @ 70 Hz – 1 kHz – 13 kHz
SYNQ® 81/124 SMX-3
MP3 Sample Einheit:
Sample Aufnahme: MPEG1 Layer3 44,1kHz getastet @ 192kbps Stereo
Sample Wiedergabe: unterschiedliche Bitraten, Editier-Parameter nicht möglich
Polyphonie: 2-stimmig
Speicherkarten: SD™ und SDHC™ Karten.
Max. Kartenkapazität: 32GB
Dateiformat: FAT (FAT16) oder FAT32 (abhängig von der Kapazität)
Allgemeine Spezifikationen:
Netzspannung: 230V~ 50 Hz (Europe)
Leistungsaufnahme: 40 Watt
Abmessungen: 320 x 370 x 109mm (BxTxH)
Gewicht: 7.0 kg
Technische Änderungen, können auch ohne Vorankündigung vorgenommen werden!
Sie können die aktuellste Version dieser Bedienungsanleitung und DSP/Prozessor Software von
unserer Internetseite runterladen: www.synq-audio.com
SYNQ® 82/124 SMX-3
Page 44

ESPAÑOL MANUAL DE INSTRUCCIONES
ESPAÑOL MANUAL DE INSTRUCCIONES
MANUAL DE INSTRUCCIONES
Gracias por la compra de este producto SYNQ. Para sacar todo el rendimiento de las
posibilidades de este aparato y por su propia seguridad, por favor lea este manual de
instrucciones con mucho cuidado antes de utilizar esta unidad.
NO OLVIDE REGISTRAR SU MEZCLADOR SMX-3. RECIBIRÁ AUTOMÁTICAMENTE
UN AVISO CUANDO SE PUBLIQUEN NUEVAS ACTUALIZACIONES DE SOFTWARE
VISITE: WWW.SYNQ-AUDIO.COM/REGISTER/
CARACTERÍSTICAS
Esta unidad está a prueba de interferencias de radio. Este producto cumple los requisitos
de las directrices nacionales y europeas actuales. Se ha establecido la conformidad y las
instrucciones y documentos correspondientes han sido depositados por el fabricante.
12 entradas (2 de mic + 7 de línea + 3 de phono ) en 6 canales (5 faders + 1 mic DJ)
Selector de entradas matrices especial para máxima flexibilidad: intercambie entradas
en un segundo.
2 salidas maestras:
o Master1 con ajuste fino de señal (XLR + cinch/RCA)
o Master2 (cinch/RCA)
Controles de ganancia y de tono de 3 bandas con amortiguación de sonido de -30dB en
todos los canales.
Indicadores de nivel LED con memoria máxima en todos los canales + Maestra.
Faders de alta calidad reemplazables por el usuario, controlados por VCA con control
de curva en todos los canales.
Cross fader reemplazable por el usuario, controlado por VCA con control de curva (corte
suave brusco).
Fácil selección de canal A/B para el cross fader
Versátil MP3-sampler:
o Basado en tarjetas de memoria SDHC™ (varias horas de grabación de audio).
o Un máximo de 99 bancos de memoria con cada 5 samples en cada tarjeta SDHC™.
o Los samples estéreo se pueden grabar en formato MP3 (192 kbps).
o Control de velocidad individual para todos los samples.
o Control de velocidad general con el master tempo. (pitch lock)
o Polifonía: se pueden reproducir 2 samples juntos
o Seamless loops con puntos de inicio y final editables.
o Se pueden asignar entradas/salidas de samples a cualquier canal.
Contadores de beat totalmente automáticos.
Control de inicio de cross fader para reproductores CD compatibles.
Efectos de mezcla de cross fader sincronizados de 2 beats.
8 efectos digitales sincronizados con la música con efectos preestablecidos
programables por el usuario: Eco, Auto desplazamiento, Flanger, Filtro manual, Filtro
automático, Reverberación, Transitorio, Modificador de tono
Efecto estéreo de ida/vuelta para conexión con procesadores de efectos externos.
Función talk-over ajustable del micrófono DJ
Salida auricular de alta potencia con posibilidad de “mezcla CUE/pgm”
Firmware actualizable con tarjetas SD™/SDHC™
ANTES DEL USO
Antes de utilizar esta unidad, por favor compruebe que no hay daños causados por el
transporte. En caso contrario, no utilice este aparato y consulte a su vendedor.
Importante: Este aparato salio de la empresa en perfecto estado y bien empaquetado.
Es absolutamente necesario por parte del usuario seguir estrictamente las instrucciones
de seguridad y advertencias de este manual. Cualquier daño causado por manejo
inadecuado no estará sujeto a la garantía. El vendedor no aceptará responsabilidad por
ningunos defectos o problemas que resulten de ignorar este manual del usuario.
Mantenga este folleto en un lugar seguro para consultas futuras. Si vende esta
instalación, asegúrese de añadir este manual de usuario.
Para proteger el medio ambiente, por favor intente reciclar el material de empaquetado
tanto como sea posible.
Verificar el contenido:
Verificar la presencia de las partes siguientes:
Manual de instrucciones
Mezclador SMX-3
Cable de alimentación
PRECAUCIONES DE USO
CAUTION
mismo. Dirijase unicamente a personal cualificado.
El simbolo de un rayo en el interior de un triangulo alerta sobre la presencia o el
uso de elementos no isolados donde un voltage peligroso constituye un riesgo
suficiente para causar una eventual electrocución.
El punto de exclamación en el interior de un triangulo alerta el usuario sobre la
presencia de importantes instrucciones y/o del mantenimiento en el manual de
uso.
Este símbolo significa : uso para el interior solamente.
Este símbolo significa : Lea las instrucciones.
Afín de evitar todo riesgo de incendio o electrocución, no exponer el aparato a la lluvia o
ambiente humedo.
Para evitar que se forme condensación en el interior, permita que la unidad se adapte a
las temperaturas circundantes cuando la lleve a una habitación cálida después de
transporte. Condensación algunas veces impide que la unidad funcione a rendimiento
pleno o puede incluso causar daños.
Esta unidad es sólo para uso interior.
No coloque objetos metálicos o derrame líquidos dentro de la unidad. No colocar
recipients llenos de liquidos, tales floreros, encima del aparato. Podría resultar descarga
eléctrica o mal funcionamiento. Si un objeto extraño entrara en la unidad, desconecte
inmediatamente la fuente de alimentación.
No colocar fuentes de llamas, tales velas, encima de la unidad.
No cubra ninguna apertura de ventilación ya que esto podría resultar en
sobrecalentamiento.
PRECAUCION: Para reducir el riesgo de
electrocución no abra ninguna tapa. No existen
piezas en el interior que pueda cambiar usted
SYNQ® 83/124 SMX-3
SYNQ® 84/124 SMX-3
Page 45

ESPAÑOL MANUAL DE INSTRUCCIONES
ESPAÑOL MANUAL DE INSTRUCCIONES
Evite su uso en ambientes polvorientos y limpie la unidad regularmente.
Mantenga la unidad alejada de los niños.
Personas sin experiencia no deberían manejar este aparato.
La temperatura máxima de ambiente es 45°C. No use esta unidad a temperaturas más
elevadas.
Las distancias mínimas alrededor del aparato para la suficiente ventilación son los 5cm.
Siempre desenchufe la unidad cuando no la use por un periodo de tiempo largo o antes
de cambiar la bombilla o comenzar una reparación.
La instalación eléctrica debería ser llevada a cabo sólo por personal cualificado, acorde
a las regulaciones para seguridad eléctrica y mecánica de su país.
Compruebe que el voltaje disponible no es superior al que aparece en el panel trasero
de la unidad.
Enchufe siempre accessible para desconectar la alimentación.
El cable de alimentación debería estar siempre en perfectas condiciones: apague la
unidad inmediatamente cuando el cable de alimentación esté roto o dañado.
¡Nunca deje el cable de alimentación entrar en contacto con otros cables!
¡Cuando el interruptor está en la posición de reposo, esta unidad no se desconecta
totalmente de las alimentación!
Para prevenir descargas eléctricas, no abra la tapa. Aparte de fusibles principales no
hay partes que puedan ser reparadas por el usuario en su interior.
Nunca repare un fusible o haga un bypass al fusible. ¡Siempre sustituya el fusible
dañado por un fusible del mismo tipo y especificaciones eléctricas!
En el caso de problemas serios de manejo, deje de usar la instalación y contacte con su
vendedor inmediatamente.
Por favor, use el empaquetado original cuando el aparato deba ser transportado.
Debido a motivos de seguridad está prohibido hacer modificaciones sin autorizar a la
unidad.
RECOMENDACIONES DE INSTALACIÓN:
Instale la unidad en un lugar bien ventilado en el que no esté expuesto a altas
temperaturas ni humedad.
Colocar y usar la unidad durante largos periodos de tiempo cerca de fuentes
generadoras de calor, como amplificadores, focos, etc. afectarán a su rendimiento y
pueden incluso dañar la unidad.
Con adaptadores opcionales de 19” (ver más información en este manual), esta unidad
puede montarse en columnas de 19 pulgadas. Fijar la unidad mediante los 4 agujeros
del panel frontal. Asegúrese de usar tornillos del tamaño apropiado. (tornillos no
incluidos) Evitár los golpes y las vibraciones durante el transporte.
Al instalarlo en una cabina o maleta, asegúrese de tener una buena ventilación para
mejorar el enfriamiento de la unidad.
Para evitar que se forme condensación en el interior, deje que la unidad se adapte a la
temperatura ambiente al introducirla en una sala caliente tras el transporte. La
condensación puede alterar el rendimiento de la mesa.
LIMPIEZA:
Límpiar con un trapo lijeramente humedo. No dejar caerse agua en el interior de la unidad.
No utilizar productos abrasivos (alcohol,…) que puedan dañar la mesa.
CONEXIONES
Excepto los micrófonos, el auricular y las salidas maestras, todas las conexiones son de
RCA. Use cables RCA-RCA de buena calidad para evitar una mala calidad de sonido.
Asegúrese de apagar el mezclador antes de realizar cambios a las distintas conexiones.
En este manual hablamos de “entradas de línea”. Es un nombre genérico para entradas
con un nivel entre 750mV y 2V. Esto incluye radios, videos, reproductores CD, etc.
Hay muchas formas de conectar el equipo audio a este mezclador. Tenga en mente las
siguientes observaciones:
Conecte siempre los cables RCA del mismo modo:
o Conector RCA blanco o negro canal izquierdo
o Conector RCA rojo canal derecho
3 entradas del panel trasero pueden recibir una entrada phono o línea. Asegúrese de
asignar el interruptor asociado correctamente:
o Cuando conecte un reproductor CD, platina de cinta, reproductor MD, radio,
videograbadora, etc. no olvide poner el interruptor asociado en “LÍNEA”.
o Cuando conecte un plato no olvide poner el interruptor asociado a
“PHONO”.
Observación: Cuando conecte el plato SynQ “X-TRM1”, sugerimos que ponga el plato
en salida línea. Obviamente esto implica que debe conectarlo a una entrada línea del
mezclador
Muchos platos tienen conexión GND. Es preferible conectar esta señal de tierra al
SMX-3. Use las conexiones GND cercanas a los conectores de entrada de señal.
La entrada de grabación de un dispositivo de grabación analógico puede conectarse a
la salida de grabación del SMX-3 para realizar grabaciones analógicas.
Para garantizar la mejor calidad de sonido posible, hay patillas de cortocircuito
instaladas en todas las entradas phono sin usar. Cuando conecte un plato al SMX-3,
saque primero las patillas de cortocircuito de la entrada que desee utilizár. Conserve
estas patillas de cortocircuito en un lugar seguro para un eventual uso posterior.
NUNCA coloque estas patillas de cortocircuito en las salidas (Maestras, envío,
grabación, …)
SYNQ® 85/124 SMX-3
SYNQ® 86/124 SMX-3
Page 46

ESPAÑOL MANUAL DE INSTRUCCIONES
ESPAÑOL MANUAL DE INSTRUCCIONES
CONTROLES Y FUNCIONES
CONTROLES FRONTALES:
1. MATRIZ DE ENTRADA: mediante estos selectores de entrada de matriz se puede
radicar cualquier entrada en los 5 canales de entrada. Esto facilita la asignación de
entradas en diferentes canales o cambiar 2 fuentes de audio sin cambiar los cables en
las entradas. Una característica muy útil en discotecas donde cada DJ utiliza sus
propias disposiciones de canal. El sampler integrado también puede radicarse en
cualquiera de los 5 canales.
2. NIVEL DE GANANCIA: ajusta el nivel de entrada en cada canal, el rango va de cero a
máximo. Utilice este control para ajustar el nivel en el medidor VU en
aproximadamente 0 dB.
3. CONTROLES DE TONOS DE 3 BANDAS: la frecuencia de cada canal puede
controlarse separadamente sobre un rango desde -30 dB a +10 dB. Agudos@13kHz ~
Medios@1kHz ~ Bajos@70Hz. En la posición central el control de tono está
desafinado. (apagado)
4. MEDIDOR VU DE LED DE CANAL: medidores de nivel precisos con memoria de nivel
máximo: los niveles máximos permanecen en pantalla durante un breve espacio de
tiempo.
5. SELECTOR DE CONTEO CUE / BPM: se utiliza para seleccionar la fuente (C-1 a C-5)
que se va a monitorear a través de la salida de los audífonos. Al pulsar los botones
múltiples de CUE es posible obtener un sonido mezclado desde las fuentes
seleccionadas. El BPM del canal seleccionado (CH-1 a CH-5) se muestra en la
pantalla CUE BPM (13C).
Atención: el BPM no se mostrará correctamente si se han seleccionado 2 o más
canales.
6. INTERRUPTOR DE ASIGNACIÓN CROSS FADER: el lado izquierdo del cross fader
se denomina “A”, el lado derecho se denomina “B”. Cada canal de entrada dispone de
un interruptor de asignación de crossfader. Puede determinar fácilmente si la entrada
de cierto canal se enrutará a la izquierda o derecha del cross fader, ajustando
simplemente el interruptor de asignación en la posición correcta:
Posición media: el canal no se asigna al crossfader.
Posición izquierda “A”: el canal se asigna al lado izquierdo del crossfader. El
LED rojo correspondiente se enciende LED.
Posición derecha “B”: el canal se asigna al lado derecho del crossfader. El LED
azul correspondiente se enciende LED.
7. FADERS DE CANAL VCA: Se utilizan para controlar el nivel de cada canal. La unidad
SMX-3 utiliza tecnología de amplificador controlada por tensión lo que significa que
sólo una pequeña cantidad de tensión CC pasa por los faders y no la señal. Esto
mejora enormemente la inmunidad contra grietas en la música debido al desgaste de
los faders. El usuario puede cambiar estos faders de alta calidad, incluso cuando el
mezclador está en funcionamiento. Para obtener más detalles, lea la sección “Cambio
de faders”.
8. EFECTO CROSSOVER / BOTONES PITCH BEND DEL SAMPLER: en el modo de
sampler utilizado para el pitch bend, en el modo de efecto crossover empleado para
seleccionar el tipo de mezcla de efecto deseado, hay
disponibles 2 funciones (Zip y Roll):
FUNCIÓN PITCH BEND: (coloque el interruptor en la
posición MIDDLE mientras el mezclador esté en modo de
sampler). Mientras el sample se está reproduciendo, estos
dos botones se utilizan para pitch bending, por lo que puede
hacer coincidir el beat con la otra música perfectamente: siempre que pulse el botón
izquierdo la velocidad del sample se reducirá, siempre que pulse el botón de la
derecha la velocidad de sample aumentará.
EFECTO ZIP: este efecto puede utilizarse en los modos FADER y AUTO:
MODO FADER: (coloque el interruptor en la posición FADER). Pulse el botón de
efecto Zip y mueva el cross fader de un extremo al otro. El pitch de la música se
reducirá hasta que se distorsione. Cuando la palanca del cross
fader alcanza el otro lado, el otro reproductor comienza
automáticamente. Dependiendo de la posición de la palanca del
cross fader, la pantalla de efectos mostrará un número de 0 a 99.
Tenga en cuenta que el “mando de parámetro X” no es accesible.
MODO AUTOMÁTICO: (coloque el interruptor en al posición AUTO). Mientras la
música se está reproduciendo, pulse el botón “efecto Zip”. El pitch de la música
SYNQ® 87/124 SMX-3
SYNQ® 88/124 SMX-3
Page 47
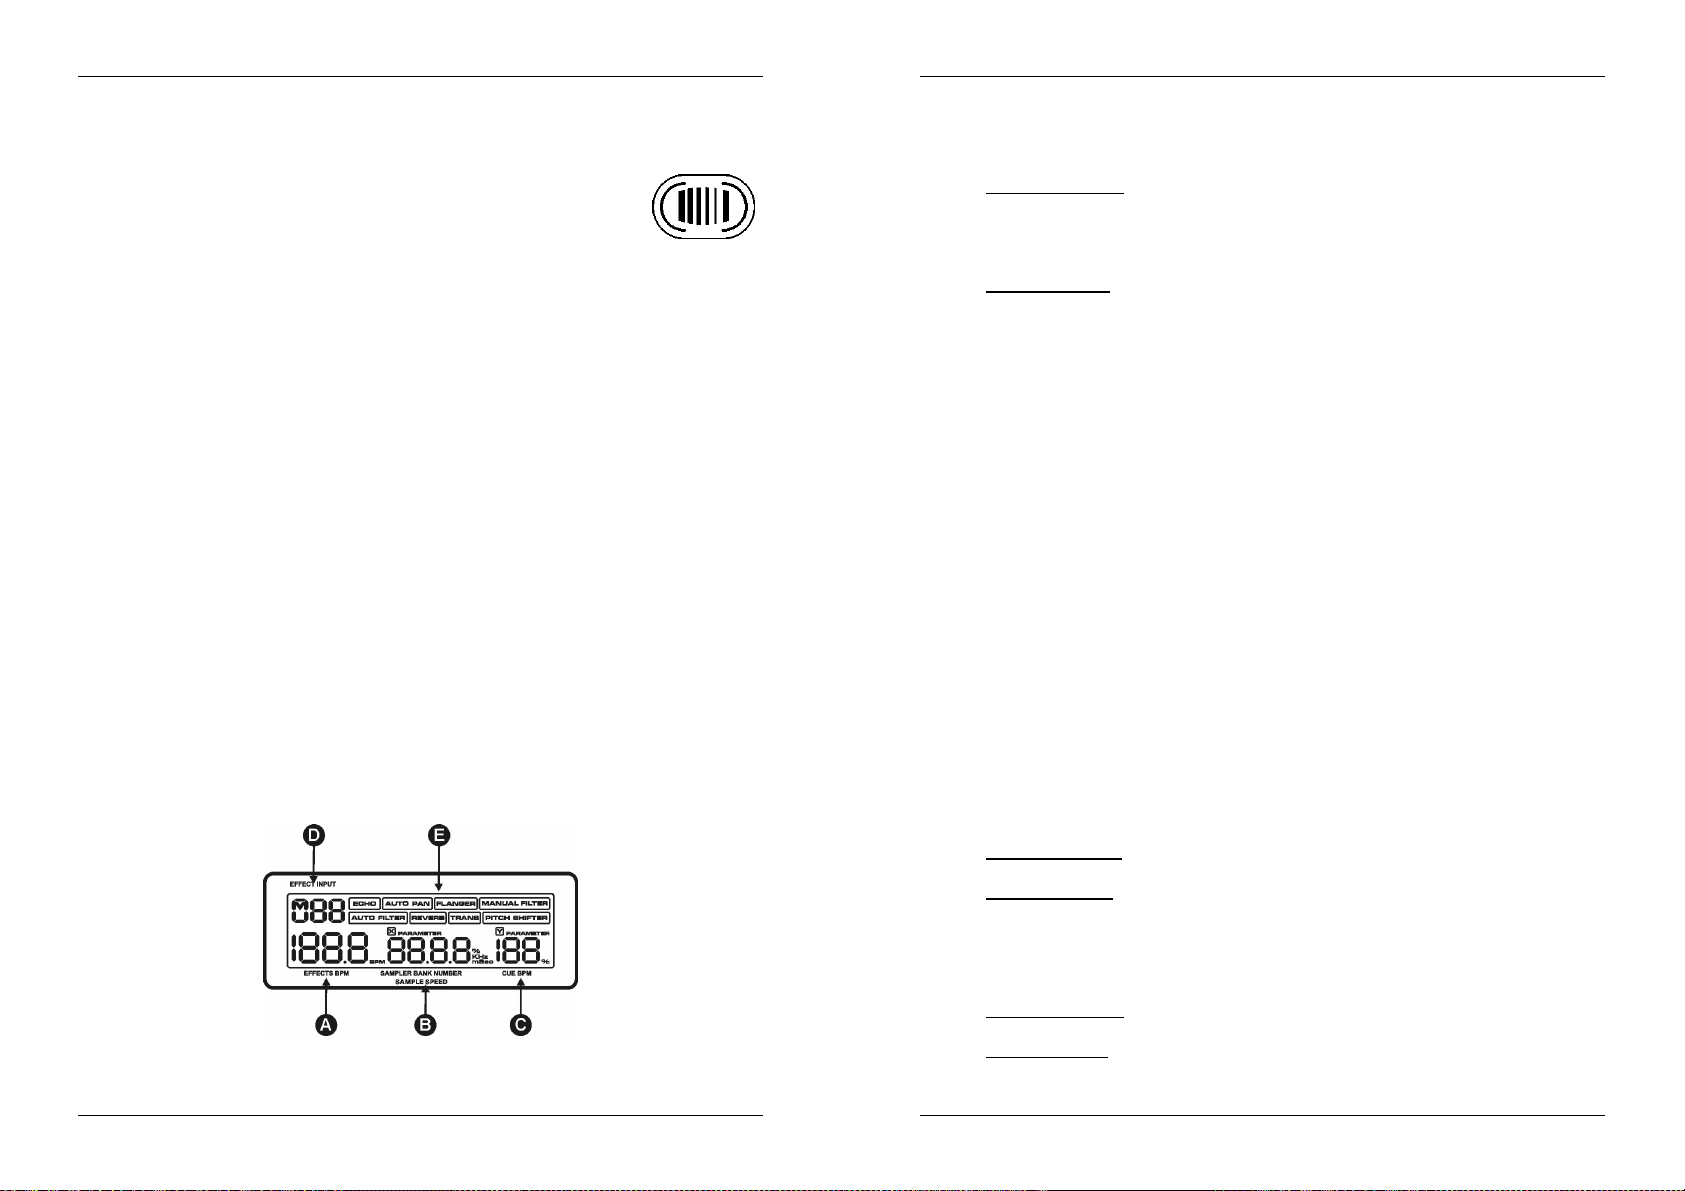
ESPAÑOL MANUAL DE INSTRUCCIONES
ESPAÑOL MANUAL DE INSTRUCCIONES
se reduce automáticamente desde cero hasta que el otro reproductor comienza.
La duración del fade over completo se muestra en la pantalla. Puede adaptarse
con el “mando de parámetro X” (26).
EFECTO ROLL: este efecto puede utilizarse en los modos
FADER y AUTO:
MODO FADER: (coloque el interruptor en la posición FADER).
Pulse el botón de efecto Roll y mueva el cross fader de un
extremo al otro. Primero la música se entrelazará en 1/1 beats (la
pantalla de efectos muestra “1”) después de esto, el bucle se reducirá a ½ beats
(la pantalla muestra “2”) hasta que finalmente se convierta en un bucle con una
duración de 1/8 beats (la pantalla muestra “4”). Cuando la palanca del cross fader
alcance el otro lado, el volumen disminuirá y el otro reproductor comenzará a
reproducir.
Tenga en cuenta que el “mando de parámetro X” no es accesible.
MODO AUTOMÁTICO: (coloque el interruptor en al posición AUTO). Mientras la
música se está reproduciendo, pulse el botón “efecto Roll”. La música comienza a
reproducirse el bucle sincronizado de beat hasta que el otro reproductor
comienza. La duración del fade over completo se muestra en la pantalla. Puede
adaptarse con el “mando de parámetro X” (26). Dependiendo de la duración del
fade over que haya seleccionado, el patrón de roll se adaptará y dividirá en
bucles de 1/1, ½, ¼ y 1/8 beats.
9. CURVA DE FADER DE CANAL: ajusta la curva de los faders de canal desde lo suave
(posición izquierda) hasta lo desafinado (posición derecha).
10.CURVA DE CROSS FADER: ajusta la curva del cross fader desde lo suave (posición
izquierda) hasta lo desafinado (posición derecha).
11.INTERRUPTOR DE ACTIVACIÓN/DESACTIVACIÓN DE INICIO DE FADER: al tener
un reproductor de CD compatible conectado en los conectores del control de fader,
puede controlar las funciones de inicio/parada (re-cue) con el cross fader de su SMX-
3. Con este interruptor puede activar o desactivar el control de inicio de fader.
12.INDICADORES DE INICIO DE FADER: en el modo de mezcla de efecto crossover, los
indicadores muestran el estado de la salida de inicio de fader:
LED apagado: el reproductor de CD conectado está en pausa.
LED parpadeando: el reproductor de CD conectado cambiará brevemente de
reproducción a pausa.
LED encendido: el reproductor de CD conectado está en reproducción.
13. PANTALLA PARA USOS MÚLTIPLES: muestra información sobre el estado de las
diferentes funciones:
A. PANTALLA BPM DE EFECTOS: indica los BPM (Beats Por Minuto) de una unidad
de efectos. Cuando el contador de beats no puede contar los beats, la pantalla
BPM comienza a parpadear hasta que el contador BPM puede continuar.
B. PARÁMETRO (X) DE TIEMPO:
Modo de efecto: para algunos efectos la pantalla muestra la información de
tiempo (mSeg) para otros efectos la pantalla muestra porcentajes (%) o las
frecuencias de corte (kHz). Puede cambiar estos parámetros con los botones de
ajustes preestablecidos (23) y el “mando de parámetro X” (24) si necesita un
ajuste fino.
Modo sampler: cuando el sampler está en modo de reproducción, la pantalla
muestra el número de bloque de memoria seleccionado (de 1 a 99). Mientras se
ajusta la velocidad de reproducción del sampler, la pantalla muestra la velocidad
en porcentaje. Cuando el sampler está en modo de grabación, la pantalla
muestra el número de segundos libres que hay aún disponibles en la memoria del
sampler (“9999” en la pantalla significa que todavía quedan más de 9999
segundos [166 minutos o 2 hr 46 min] para grabar samples). Cuando no se ha
insertado ninguna tarjeta SD™/SDHC™, la pantalla “no Card” (no hay tarjeta).
C. PANTALLA DE PARÁMETRO CUE BPM / PROFUNDIDAD (Y): muestra el valor
BPM para las señales cue que vienen de uno de los 5 canales de entrada, (CH-1 a
CH-5) seleccionados mediante uno de los botones CUE (5). Cuando ajusta el
mando de parámetro (Y) de profundidad (25), se mostrará el nuevo valor (%).
D. PANTALLA DE ENTRADA DE EFECTOS: muestra qué canal de entrada radica
en la sección efectos/sampler mediante el “mando de selección de entrada” (26).
E. PANTALLA EFECTOS: muestra el efecto que ha seleccionado.
14.CROSS FADER: se utiliza para mezclar las señales de 2 canales asignado a A y B por
el interruptor de asignación del cross fader. (6)
15.BOTONES DE EDICIÓN DE SAMPLE: se utiliza para ajustar la velocidad individual,
puntos de inicio y fin de un sample. Consulte más abajo para obtener detalles sobre
cómo ajustar un sample.
16.BOTÓN LOOP: se utiliza para establecer un sample en seamless loop. Consulte más
abajo para obtener información sobre cómo hacerlo.
17.MANDO DE MEZCLA DE CUE: mediante este control puede mezclar la salida
maestra con las señales cue desde la unidad de efectos y desde diferentes canales.
Gire este control completamente a la derecha si sólo desea oír la salida maestra.
Gírelo completamente a la izquierda y sólo oirá las señales cue que se han
seleccionado con los botones cue (5, 20). En cualquier posición intermedia, oirá una
mezcla de ambas señales.
18.BOTÓN EFECTOS ON/OFF: este botón consta de distintas funciones:
Modo de efecto: activa o desactiva la señal de retorno de efectos externos o
unidad de efectos.
Modo sampler: pulse este botón durante unos 2 segundos para activar o
desactivar la función “master tempo” (pitch lock) del sampler.
19.NIVEL DE CUE: Se utiliza para ajustar el nivel de salida de los reproductores. Tenga
en cuenta que, debido al alta potencia de salida, sus oídos pueden resultar dañados
de forma permanente. No reproduzca a volumen alto.
20.CUE DE EFECTOS: este botón consta de distintas funciones:
Modo de efecto: pulse este botón (el botón se enciende) para comprobar el
efecto antes de que se mezcle con la mezcla maestra.
Modo sampler: pulse este botón (el botón se enciende) para cambiar el sampler
en “modo jingle”.
SYNQ® 89/124 SMX-3
SYNQ® 90/124 SMX-3
Page 48

ESPAÑOL MANUAL DE INSTRUCCIONES
ESPAÑOL MANUAL DE INSTRUCCIONES
21.SALIDA HEADPHONES: se utiliza para conectar cualquier auricular en una toma jack
de ¼”.
22.BOTÓN TAP/REC: este botón consta de 2 funciones diferentes:
Modo de efecto (BOTÓN TAP): casi todos los efectos se sincronizan con el
beat. Por lo tanto, el SMX-3 cuenta con un contador de beats integrado
totalmente automático. En algunos casos excepcionales el contador de beats
automático no cuenta como lo debería hacer (los beats están fuera del rango
normal o simplemente no hay ningún beat para detectar). En algunos casos
puede ayudar al contador de beats golpeando manualmente y con suavidad esté
botón al ritmo del beat. Cuando utiliza este botón comienza a parpadear para
indicar que el contador de beats automático está apagado. Si desea que el
contador de beats se ponga en marcha de nuevo, pulse el botón TAP durante
algunos segundos hasta que deje de parpadear.
Modo sampler (BOTÓN REC): este botón se utiliza para cambiar entre los
modos de reproducción y grabación. En el modo de reproducción el botón REC
está encendido. Púlselo una vez para establecer el sampler en modo de
grabación: el botón REC comienza a parpadear. Pulse uno de los 5 botones de
reproducción (23) para comenzar a grabar o pulse el botón REC de nuevo para
volver al modo de reproducción. Consulte más abajo para obtener detalles sobre
cómo realizar grabaciones de samples.
23.BOTONES DE AJUSTES PREESTABLECIDOS/REPRODUCIÓN: estos botones
constan de 2 funciones diferentes:
Modo sampler (BOTONES DE REPRODUCCIÓN ROJOS): los 5 botones se
utilizan como botones de reproducción para el sampler. Puede asignar (grabar) 1
sample para cada botón de reproducción. Puede ver fácilmente qué botones de
reproducción contienen un sample: el botón de reproducción que contiene un
sample se enciende (luz roja). Un botón de reproducción vacío está oscuro.
Modo de efecto (BOTONES DE AJUSTES PREESTABLECIDOS VERDES):
estos botones se utilizan como botones de ajustes preestablecidos para los
diferentes efectos. Hay 2 tipos diferentes de efectos: efectos relacionados con
los beats (echo, auto pan, flanger, auto filter, trans) y efectos no relacionados con
los beats (manual filter, reverb, pitch shifter)
oEfectos relacionados con los beats: cada botón consta de una de las
siguientes inscripciones: 2 – 4 – 8 – 16 – 32. Estos dígitos están
relacionados con el beat medido. Una vez que se ha seleccionado el botón
de ajuste preestablecido, se enciende. También puede seleccionar los
botones de ajustes preestablecidos pulsando el “mando de parámetro X”
(24) mientras selecciona los botones de ajustes preestablecidos 2 - 4 - 8 ó
16. En dicho caso, el botón de ajuste preestablecido comienza a parpadear
para indicar que la indicación encima del botón (1/8 - 1/4 – ½ ó 1/1) está
seleccionada. Es bueno saber que el último botón de ajuste preestablecido
seleccionado se conserva cuando se cambia a otro efecto.
Ejemplo: si se selecciona el efecto “echo” y selecciona como ajuste
preestablecido “2”, observará que el sonido se repite cada 2 beats. Si
elige “4”, el sonido se repite cada 4 beats. Seleccione el ajuste
preestablecido ½ si desea que la música se repita cada medio beat.
oEfectos no relacionados con los beats: en este caso las inscripciones en
los botones de ajustes preestablecidos no son importantes. El SMX-3 viene
con ajustes preestablecidos estándar para cada uno de los efectos no
relacionados con los beats. Sin embargo, puede ajustar estos parámetros,
con los mandos de parámetros X e Y (24, 25) como desee. Para guardar los
parámetros ajustados, pulse el mando de parámetro X (24) mientras
selecciona uno de los 5 botones preestablecidos. Los parámetros estándar
se sustituirán según sus propios ajustes. Puede establecer 5 ajustes
preestablecidos personalizados para cualquier efecto y adaptarlos en
cualquier momento.
24.MANDO X-PARAMETER: este mando dispone de varias funciones:
Modo de efecto: ajuste el parámetro X de los diferentes efectos. Pulsar este
mando mientras se pulsa alguno de los botones de ajustes preestablecidos suma
posibilidades adicionales:
oEfectos relacionados con los beats: puede seleccionar ajustes
preestablecidos de beat adicionales.
oEfectos no relacionados con los beats: puede guardar sus propios
parámetros en uno de los botones preestablecidos.
Modo sampler: existen 3 funciones posibles:
oModo reproducción/grabación: gire el mando para seleccionar el bloque
de memoria deseado y pulse el mando para seleccionarlo.
oModo de edición de sample: gire el mando para buscar el punto de inicio
fin exacto del sample. Consulte más abajo para obtener información sobre
cómo editar samples.
oRetorno de efecto externo: cuando el mezclado está en modo sampler,
puede conectar una unidad de efecto externo. Pulse y gire el mando para
ajustar el volumen de la señal de retorno entre -50dB y +0dB.
25.MANDO Y-PARAMETER: este botón consta de distintas funciones:
Modo de efecto: se utiliza para ajustar el parámetro “Y” de los efectos. Lea la
sección 27 puesto que su función es diferente para cada efecto.
Modo sampler: existen 2 funciones:
oModo de reproducción: ajuste la velocidad de reproducción general de -
80% a +20% de 3 maneras diferentes:
Adaptar en pasos de 0,1%: simplemente gire el mando para cambiar la
velocidad.
Adaptar en pasos de 2%: pulse el mando mientras gira para cambiar la
velocidad.
Restablecer velocidad a 0%: pulse el mando 2x en un segundo.
oModo de edición de sample: durante el modo “OUTRO EDIT” puede
ajustar la velocidad de un sample de forma individual, este ajuste se
guardará junto con los puntos de inicio y fin. Puede cambiar la velocidad de 12% a +12% de 3 maneras diferentes:
Adaptar en pasos de 0,1%: simplemente gire el mando para cambiar la
velocidad.
Adaptar en pasos de 1%: pulse el mando mientras gira para cambiar la
velocidad.
Restablecer velocidad a 0%: pulse el mando 2x en un segundo.
26.INTERRUPTOR DE ASIGNACIÓN DE EFECTO: se utiliza para seleccionar qué señal
va a la salida “envío de efecto” (46) y a la entrada de la unidad de efectos/sampler.
Puede ser lo siguiente:
Uno de los canales de entrada.
Uno de los canales que ha seleccionado con el “interruptor de asignación cross
fader” (6). Esto puede ser el lado izquierdo “A” (CF-A) o el lado derecho “B” (CFB) del cross fader.
SYNQ® 91/124 SMX-3
SYNQ® 92/124 SMX-3
Page 49

ESPAÑOL MANUAL DE INSTRUCCIONES
ESPAÑOL MANUAL DE INSTRUCCIONES
Si selecciona maestra, los efectos se utilizarán en el sonido maestro mezclado o
puede grabar la señal maestra mezclada en el sampler.
Observación: si selecciona “maestra” el retorno de efecto externo se desactiva
para evitar el feedback.
27.SELECTOR DE EFECTOS: se utiliza para seleccionar el efecto deseado o la función
sampler:
¡Importante!
El sampler puede seleccionarse como uno de los efectos, esto significa que
no puede utilizar el sampler junto con uno de los efectos múltiples. No
obstante, es posible utilizar el sampler junto con los efectos de crossover y/o
con una unidad de efectos externa, conectada al envío/retorno de efecto
(46+47).
Los efectos de crossover y la unidad de efectos múltiples no pueden usarse
juntas. Antes de que pueda utilizar los efectos múltiples, debe desactivar los
efectos crossover (consulte n°:8 para más información)
SAMPLER: no es realmente un efecto, pero con el sampler puede grabar /
reproducir hasta 495 samples (99 bloques con cada 5 samples) en una tarjeta
SD™/SDHC™. Para aprender más sobre el sampler, consulte el capítulo llamado
“Acerca del sampler”.
En la función sampler no puede utilizar los efectos internos, pero puede utilizar
cualquier procesador de efectos externo mediante los conectores de
envío/retorno (46/47).
ECHO: produce sonidos repetidos. Puede mezclar fácilmente ecos sincronizados
de beats mientras selecciona el “ajuste preestablecido” (23) deseado. Estos
ajustes preestablecidos pueden ajustarse con el “mando de parámetro X” (24) en
un rango que va de 2mSeg hasta 2Seg. Con el “mando de parámetro Y” (25)
puede cambiar el equilibrio entre el sonido original y el retardado.
AUTO PAN: arrastra la música de izquierda y derecha y de vuelta al ritmo de la
música. Con los “ajustes preestablecidos” (23) puede elegir cómo de rápido se
arrastra la música de un lado a otro. (ejemplo: con el ajuste preestablecido “2”
llevará 2 beats desplazarse de izquierda a derecha y de vuelta) Los ajustes
preestablecidos pueden ajustarse con el “mando de parámetro X” (24) en un
rango de 30mSeg hasta 16Seg. Mediante el “mando de parámetro Y” (25) puede
ajustar la rapidez con que la música se trasladará al lado opuesto: puede
seleccionar un movimiento suave o uno más brusco.
FLANGER: este efecto se describe mejor como “poner un motor a reacción en la
música”. Es como si la música girase alrededor debido a un cambio de fase.
Puede cambiar fácilmente el tiempo del flanger (ciclo) con los “ajustes
preestablecidos” (23). Estos ajustes preestablecidos pueden ajustarse con el
“mando de parámetro X” (24) en un rango que va de 100mSeg hasta 16Seg.
Mediante el “mando de parámetro Y” (25) puede cambiar el nivel de feedback del
flanger.
Consejo: siempre que pulse el mismo botón de ajuste preestablecido (23) volverá a comenzar el
ciclo del flanger. Esto proporciona un buen “toque adicional” al efecto.
MANUAL FILTER: se trata de un cortador de frecuencia muy eficaz. El
mezclador viene con 5 ajustes preestablecidos estándar, pero puede ajustar
fácilmente estos ajustes preestablecidos (23) con el “mando de parámetro X” (24)
en un rango que va desde un filtro de paso bajo (LPF) @ 50Hz (la pantalla
muestra: L 0,05kHz) hasta un filtro de paso alto (HPF) @ 21,1kHz (la pantalla
muestra: H 21,1 kHz). Mediante el “mando de parámetro Y” (25) puede cambiar el
nivel de resonancia del filtro. (Este es el factor Q del filtro, cambia el impacto del
filtro en una frecuencia seleccionada).
Puede reemplazar los ajustes preestablecidos estándar por sus propios
parámetros, pulsando simplemente el “mando de parámetro” (24) y uno de los 5
botones de ajustes preestablecidos (23).
AUTO FILTER: se trata del paso de filtro bajo (LPF). La frecuencia de corte varía
en ciclos de 20kHz hasta 50Hz. Con los botones de ajustes preestablecidos (23)
puede seleccionar los ciclos de filtro que tienen sincronización de beats. (ejemplo:
pulse el ajuste preestablecido “8” al filtro le llevará 8 beats cambiar su
frecuencia de corte de 20kHz a 50Hz y de vuelta) Los ajustes preestablecidos
pueden ajustarse con el “mando de parámetro X” (24) en un rango de 100mSeg
hasta 16Seg. Mediante el “mando de parámetro Y” (25) puede cambiar el nivel de
resonancia del filtro. (Este es el factor Q del filtro, cambia el impacto del filtro en
una frecuencia seleccionada).
REVERB: este efecto se describe mejor como el “efecto iglesia”. Imagínese que
está tocan música dentro de una iglesia o en una sala muy grande y vacía: el
sonido retumbante que obtiene de todos los reflejos contra las paredes se simula
digitalmente con este efecto. Mediante los botones de ajustes preestablecido (23)
puede seleccionar 5 tiempos de reverb predefinidos. Estos tiempos de reverb
pueden ajustarse con el “mando de parámetro X” (24) en un rango de 0% a 100%
en pasos de 1%. Con el “mando de parámetro Y” (25) puede cambiar el equilibrio
entre el sonido original y el sonido retumbante.
Puede reemplazar los ajustes preestablecidos estándar por sus propios
parámetros, pulsando simplemente el “mando de parámetro” (24) y uno de los 5
botones de ajustes preestablecidos (23).
TRANS: corta automáticamente el sonido al ritmo del beat. Mediante los “ajustes
predeterminados” (23) puede elegir la duración de los ciclos de corte. (ejemplo:
con el ajuste preestablecido “1/4” (recuerde pulsar el “mando de parámetro X”
(24) mientras selecciona el botón de ajuste preestablecido “4”) la música se
cortará en beats de ¼). Estos ajustes preestablecidos pueden ajustarse con el
“mando de parámetro X” (24) en un rango de 25mSeg hasta 16Seg. Con el
“mando de parámetro Y” (25) puede ajustar el “tiempo de corte”. Cuando está
totalmente girado a la izquierda (la pantalla muestra “0%) el tiempo de corte es
cero por lo que no se oirá ningún efecto de corte. Gire el “mando de parámetro Y”
(25) a la derecha, el tiempo de corte aumentará hasta que sólo oiga partes muy
pequeñas del sonido original.
Consejo: este efecto necesita algo de práctica. Obtendrá los mejores resultados con beats
constantes, ciclos de corte muy pequeños (1/8, 1/4 y 1/2) y tiempos de corte mayores del 50% y
más.
PITCH SHIFTER: desplaza el pitch del sonido arriba o abajo mientras el beat
permanece sin cambios. (De hecho esto es lo opuesto a lo que “master tempo” en
ciertos reproductores de CD intenta obtener: el mismo pitch con velocidad/beat
cambiante). Con los botones de ajustes preestablecidos (23) puede seleccionar 5
cambios de pitch predefinidos. Mediante el “mando de parámetro X” (24) puede
cambiar el pitch en un rango de -100% a +100% en pasos de 1%. Con el “mando
de parámetro Y” (25) puede cambiar el equilibrio entre el sonido original y el
sonido cambiado.
Puede reemplazar los ajustes preestablecidos estándar por sus propios
parámetros, pulsando simplemente el “mando de parámetro” (24) y uno de los 5
botones de ajustes preestablecidos (23).
SYNQ® 93/124 SMX-3
SYNQ® 94/124 SMX-3
Page 50

ESPAÑOL MANUAL DE INSTRUCCIONES
ESPAÑOL MANUAL DE INSTRUCCIONES
Consejo: use el pitch shifter en un micrófono y obtendrá un cambiador de voz. (Si realiza un pitch
del -100% obtendrá voces del “lado oscuro del mundo”)
28.RANURA PARA TARJETA DE MEMORIA SD™/SDHC™: el SMX-3 no dispone de
una memoria interna para la grabación de samples. Esto significa que el sampler
interno sólo puede utilizarse cuando hay insertada una tarjeta SD™/SDHC™. Cuando
se selecciona el sampler y no se ha insertado ninguna tarjeta de memoria, la pantalla
muestra “noCArd”.
¡Atención!: NUNCA retire la tarjeta de memoria mientras la luz roja “in use” esté
encendida. Esto puede corromper los datos en la tarjeta de memoria con perdida de
datos como resultado.
29.INTERRUPTOR ON/OFF DE HABLA SUPUERPUESTA PARA DJ: se utiliza para
cambiar el micrófono del DJ:
OFF: el micrófono del DJ se apaga.
ON: el micrófono del DJ se enciende.
TALK OVER (HABLA SUPERPUESTA): el micrófono del DJ se enciende.
Cuando habla al micrófono de DJ el nivel de todos los demás canales de entrada
disminuye automáticamente. Puede utilizar los 2 parámetros para el habla
superpuesta:
Nivel de habla superpuesta (35): nivel de silencio para los canales de
entrada.
Tiempo de recuperación de habla superpuesta (41): el tiempo necesario
para que la música vuelva a su nivel normal.
30.NIVEL MASTER 2: Se utiliza para ajustar el nivel de la salida2 (49) en el panel
posterior. No se ve afectado por el volumen salida1 (33), ni el interruptor mono/estéreo
(32) ni el equilibrio (34).
31.LED VU-METER (LED DE INDICADOR VU): medidor de nivel preciso con memoria de
nivel máximo: los niveles máximos permanecen en pantalla durante un breve espacio
de tiempo. Muy importante: si desea un buen sonido limpio, preste atención a los
medidores o indicadores VU. Muchos DJs utilizan este importante instrumento como
un “efecto de luz parpadeante” . Intentan pulsar el medidor constantemente hasta el
máximo. En otras palabras: un buen DJ quiere un sonido limpio y sin distorsiones. Los
niveles por encima de 0dB suponen “distorsión” por lo que vigile el medidor.
32.INTERRUPTOR MONO/ESTÉREO: se utiliza para cambiar la salida master1 en el
modo mono o estéreo.
33.MANDO DE SALIDA MAESTRA: ajusta el nivel de salida de la salida maestra.
(Atención: la “salida de recorte” (40) en la parte trasera del mezclador puede reducir
el nivel de salida máximo del fader de salida maestro. Cheque este recortador si el
nivel de salida máximo está por debajo de lo normal.
34.EQUILIBRIO DE SALIDA MAESTRA: ajusta el equilibrio izquierdo y derecho de la
salida master1.
35.NIVEL DE HABLA SUPERPUESTA: se utiliza para ajustar el nivel de silencio de los 5
canales de entrada mientras el circuito automático de habla superpuesta entra en
acción.
CONTROLES/CONEXIONES EN EL PANEL TRASERO:
36.INTERRUPTOR DE ALIMENTACIÓN: se utiliza para encender o apagar el mezclador.
37.ENTRADA DE RED: utilice el cable de red suministrado para conectar esta entrada a
la red.
38.CONTROL DE FADER: cuando se conectan a estas entradas, los reproductores de
CD compatibles pueden controlarse mediante los efectos de cross fader y faders del
SMX-3.
39.SALIDA BALANCEADA DEL MASTER1: los conectores XLR pueden utilizarse para
conectar el SMX-3 a los amplificadores de potencia, utilizando cables de señal
equilibrados especiales.
40.SALIDA TRIM: Este potenciómetro se utiliza para reducir el nivel de salida del
mezclador para proteger los amplificadores conectados y los gabinetes del altavoz.
(Atención: el nivel de salida puede reducirse a cero. Si no tiene ninguna señal en la
salida master, primero verifique si el potenciómetro fue puesto accidentalmente en
cero).
41.TIEMPO DE RECUPERACIÓN DE HABLA SUPERPUESTA: se utiliza para ajustar el
tiempo que le lleva a la música de lo canales de entrada volver a sus niveles normales,
después de que el DJ deja de hablar a su micrófono DJ.
42.ENTRADA MICRO1: se utiliza para conectar un micrófono adicional.
43.ENTRADA DJ-MIC: Jack Combo. Acepta tanto un micrófono balanceado con un
conector XLR o un micrófono desbalanceado con un mono jack de 1/4”. Esta entrada
es utilizada principalmente como micrófono de DJ. El habla superpuesta (29) no afecta
al nivel de señal de esta entrada.
44.ENTRADA PHONO/LINE: se utiliza para conectar una tornamesa o una unidad de
nivel de línea.
Si conecta un reproductor de CD: coloque el interruptor “phono/line” en la
posición de línea. Si su tornamesa dispone de una salida de nivel de línea, le
recomendamos utilizarla.
Si conecta una tornamesa: coloque el interruptor “phono/line” en la posición
phono. Muchas tornamesas tienen una conexión GND. Es preferible conectar
esta señal de tierra al conector GND.
45.ENTRADA DE LÍNEA: se utiliza para conectar cualquier unidad de nivel de línea que
tenga (CD, radio, MD, …)
SYNQ® 95/124 SMX-3
SYNQ® 96/124 SMX-3
Page 51

ESPAÑOL MANUAL DE INSTRUCCIONES
ESPAÑOL MANUAL DE INSTRUCCIONES
46.ENVÍO DE EFECTO: además de la unidad de efectos interna también es posible
conectar una unidad de efectos externa al SMX-3. La señal de salida se selecciona
con el interruptor de “asignación de efectos” (26).
Observación: el envío/retorno de efectos hace posible utilizar el sampler interno junto con el
procesador de efectos externo.
47.RETORNO DE EFECTO: devuelve la señal de efecto del procesador externo. La señal
de retorno se mezcla con la señal original. El nivel de señal de retorno puede ajustarse
con el mando de parámetro X (24). Si desea un control total sobre la señal de retorno
del procesador de efectos externo (control de tono etc.) también puede conectar la
salida del procesador de efectos a un canal de entrada en vez de la entrada de
retorno.
Observación: puede activar o desactivar la señal de la entrada de retorno mediante el interruptor “effect
on/off” (18).
48.SALIDA DE GRABACIÓN: Tiene la misma señal de salida como la que tienen las
salidas maestras pero no es influenciada por el nivel maestro, balance y los controles
mono/estéreo. Se utiliza para conectar equipos de grabación analógicos.
49.SALIDA DESEQUILIBRADA MASTER2: se utiliza para conectar amplificadores
adicionales.
50.SALIDA DESEQUILIBRADA MASTER1: la misma señal de salida que en la salida
maestra equilibrada (39) pero desequilibrada. Puede utilizarse para conectar
amplificadores desequilibrados.
ACERCA DEL SAMPLER
Antes e que pueda utilizar el sampler DEBE insertar una tarjeta Secure Digital™. Esta
puede ser una tarjeta SD™/SDHC™ estándar o una tarjeta SDHC™ de gran capacidad.
Puede comprar estas tarjetas en numerosas tiendas especializadas. Justo después de
insertar la tarjeta de memoria, la pantalla muestra “rEAd” seguido de “1”. Esto significa
que el bloque de memoria 1 está seleccionado.
CÓMO FORMATEAR LA TARJETA SD™/SDHC™:
Puede formatear la tarjeta SD™/SDHC™ en cualquier PC en el que se ejecute Windows®.
Inserte la tarjeta SD™/SDHC™ en el lector de tarjetas de memoria de su PC.
En el explorador de Windows haga clic con el botón derecho del ratón para abrir la
ventana de opciones.
Seleccione “Format” para abrir la función de formateo.
Seleccione el sistema de archivos que su PC sugiera como estándar. Este será FAT o
FAT32 (No elija NTFS).
Puede dar un nombre a la tarjeta SD™/SDHC™ o dejarla abierta.
NO utilice la opción de formateo rápido.
Pulse “Start“ para iniciar el formateo.
Esta acción lleva algo de tiempo. Windows le informará cuando la tarjeta de memoria esté
formateada.
CÓMO GRABAR UN SAMPLE:
Sólo puede grabar un sample en un botón de reproducción vacío. Consulte la explicación
sobre cómo borrar un sample o un bloque de memoria entero.
Establezca el mezclador en modo sampler con el interruptor de “selección
de efectos” (27).
Mediante el interruptor de “asignación de efectos” (26) debe seleccionar el
canal de entrada desde el que desee grabar un sample.
Pulse el botón “TAP/REC” (22) para establecer el sampler en el modo de grabación.
(el botón TAP/REC parpadea) La pantalla muestra el número de segundos disponibles
para la grabación del sample.
Con el “mando de parámetro X” (24) puede explorar los 99 bloques de memoria
disponibles. para seleccionar un bloque de memoria, pulse el “mando de parámetro X”
una vez más.
Consejo: mientras explore a través de los bancos de memoria, puede ver fácilmente qué botones de
reproducción están todavía vacíos (lleno: botón = encendido * vacío: botón = apagado)
Para comenzar la grabación, pulse alguno de los botones de reproducción vacíos
(apagados). (En el momento adecuado) La pantalla muestra la cuenta atrás de los
segundos disponibles para la grabación.
Para detener la grabación, pulse el mismo botón de reproducción de nuevo. (En el
momento adecuado)
Para reproducir un sample, que haya acabado de grabar, simplemente debe pulsar el
mismo botón de reproducción una tercera vez.
CÓMO REPRODUCIR UN SAMPLE (MODO SAMPLER):
Establezca el mezclador en modo sampler con el interruptor de “selección de efectos”
(27).
Utilice el interruptor de “asignación de entrada” (1) en uno de los canales de entrada
para seleccionar el sampler.
Con el “mando de parámetro X” (24) puede explorar los bloques de memoria que
contengan samples. (los bloques de memoria vacíos no son accesibles) Para
seleccionar un bloque de memoria, pulse el “mando de parámetro X” una vez.
Consejo: mientras explore a través de los bancos de memoria, puede ver fácilmente qué botones de
reproducción están todavía vacíos (lleno: botón = encendido * vacío: botón = apagado)
Para comenzar la reproducción, simplemente tiene que pulsar los botones de
reproducción que estén vacíos. (color rojo)
Consejo: puede reproducir hasta 2 samples juntos (polifonía) y establecer un sample en el modo de
loop (bucle) (consulte más adelante).
Puede seleccionar otro bloque de memoria mientras está reproduciendo un sample desde el bloque de
memoria anterior. Esto significa que puede saltar entre bloques de memoria sin cortes.
CÓMO REPRODUCIR JINGLES (MODO JINGLE):
Establezca el mezclador en modo sampler con el interruptor de “selección de efectos”
(27).
Utilice el interruptor de “asignación de entrada” (1) en uno de los canales de entrada
para seleccionar el sampler.
Pulse el botón “EFF. CUE” (20) para que se encienda.
Pulse brevemente uno de los botones de reproducción (23): el sample correspondiente
se reproducirá hasta el final. Cada vez que pulse el mismo botón, el sample volverá a
comenzar con un efecto stutter (tartamudeo) como resultado.
Mientras se está reproduciendo el sample, puede pulsar otro botón de reproducción: el
primer sample se detendrá inmediatamente y el nuevo sample se reproducirá.
Puede parar el sample en reproducción, deteniendo la modalidad jingle: Pulse el botón
“EFF. CUE” (20) y manténgalo pulsado hasta que desee detener el sample en
reproducción. (sólo cuando suelte el botón “EFF. CUE”, el sample dejará de
reproducirse).
OBSERVACIONES IMPORTANTES:
Durante la modalidad jingle no podrá grabar ni editar samples ni reproducir loops: cambie
a la modalidad de sampler normal para realizar estas tareas. Cuando apague la unidad de
SYNQ® 97/124 SMX-3
SYNQ® 98/124 SMX-3
Page 52

ESPAÑOL MANUAL DE INSTRUCCIONES
Total length of recorded sample
Total length recorded sample
ESPAÑOL MANUAL DE INSTRUCCIONES
mezclas o retire la tarjeta de memoria, el sampler regresará automáticamente a la
modalidad normal.
CÓMO BORRAR 1 SAMPLE:
Puede borrar samples tanto en el modo de reproducción como en el de grabación.
Pulse el botón de reproducción donde esté almacenado el sample.
Ahora pulse el botón TAP/REC (22) al mismo tiempo durante aproximadamente 1seg.
Tras 1 segundo la pantalla muestra “dEL” para indicar que el sample ha sido borrado. (El
botón de reproducción está apagado).
CÓMO BORRAR UN BLOQUE DE MEMORIA:
Puede borrar bloques de memoria tanto en el modo de reproducción como en
el de grabación.
Con el “mando de parámetro X” (24) puede explorar los bloques de
memoria que contengan samples. (los bloques de memoria vacíos no son
accesibles) Para seleccionar un bloque de memoria, pulse el “mando de parámetro X”
una vez.
para borrar el bloque de memoria seleccionado, primero pulse el “mando de
parámetro X” (24) y a continuación, pulse el botón marcado con “32” y “CLR. BNK”
(23) al mismo tiempo. Después de 2 segundos la pantalla muestra “dEL” para indicar
que el bloque de memoria ha sido borrado. (Todos los botones de reproducción están
apagados).
DIFERENCIA ENTRE VELOCIDAD “INDIVIDUAL” & “GENERAL”:
Ajuste de velocidad individual: puede ajustar la velocidad de cada sample de forma
individual para que peda sincronizar los diferentes samples entre sí. Puede establecer
la velocidad individual durante la “edición de punto final”. El ajuste de velocidad
individual se guarda junto con los puntos de inicio/fin del sample. Compruebe la
descripción del mando de parámetro Y (25) para obtener más información.
Ajuste de velocidad general: se utiliza durante la reproducción de 1 ó 2 samples.
Esta velocidad NO se guarda con el sample(s)! Compruebe la descripción del mando
de parámetro Y (25) para obtener más información. También puede utilizar los
botones pitch bend (8) para sincronizar los samples con otras fuentes de música.
CÓMO EDITAR EL PUNTO DE INICIO DE UN SAMPLE:
Si comenzó la grabación del sample demasiado pronto, puede ajustar todavía
el punto de inicio exacto. Este proceso no es negativo.
Pulse el botón de reproducción del sample en el que desee reproducir un
loop.
Ahora pulse el botón “loop intro” (15) al mismo tiempo.
Deje de pulsar ambos botones: oirá loops muy pequeños, similares a los que oye
cuando establece un modo de búsqueda de frames en un reproductor de CD.
Mediante el “mando de parámetro X” (24) puede buscar un nuevo punto de inicio.
Pulse el botón “loop intro” de nuevo para detener el modo de edición y almacenar el
nuevo punto de inicio.
Puede repetir estas acciones hasta que encuentre el punto de inicio exacto.
Intro Edit
Indexpoint begin Indexpoint end
Outro Edit
CÓMO EDITAR EL PUNTO DE FIN DE UN SAMPLE:
Si detuvo la grabación de sample en el momento incorrecto, todavía puede ajustar el
punto de fin exacto. Este proceso no es negativo.
Pulse el botón de reproducción del sample en el que desee reproducir un
loop.
Ahora pulse el botón “loop outro” (15) al mismo tiempo.
Deje de pulsar ambos botones: el sample se reproduce en seamless loop.
Mientras el loop se está reproduciendo, puede buscar el nuevo punto de fin con el
“mando parámetro X” (24) hasta que el loop suene perfecto.
Puede utilizar el “mando de parámetro Y” (25) para ajustar la velocidad individual.
Pulse el botón “loop outro” de nuevo para detener el modo de edición y almacenar el
nuevo punto de fin.
CÓMO REPRODUCIR UN SAMPLE EN LOOP:
Pulse el botón de reproducción del sample en el que desee reproducir un loop.
Ahora pulse el botón loop (16) al mismo tiempo.
Deje de pulsar ambos botones: los dos botones parpadean, por lo que puede
ver fácilmente qué sample se reproduce en loop.
Puede volver a reiniciar el sample en loop loop pulsando el botón de reproducción de
nuevo.
Para detener el loop, pulse el botón loop (el loop continúa) y suelte el botón en el
momento adecuado. Una vez que el botón de loop se haya soltado, el loop se detendrá.
Intro Edit
Indexpoint begin Indexpoint end
Loop between index points
Outro Edit
INSTALACIÓN DE ADAPTADORES DE 19”
OPCIONALES
Si desea instalar el SMX-3 en un soporte de 19”, debe instalar 2 adaptadores opcionales
de 19”.
Saque los 3 tacos de
plástico en ambos lados del
mezclador.
Saque los 4 tornillos en
ambos lados del
mezclador. No necesita los
tornillos, guárdelos en un
lugar seguro por si desea
utilizar el mezclador de
nuevo sin los adaptadores
de 19”.
Ponga uno de los
adaptadores de 19” y fíjelo
SYNQ® 99/124 SMX-3
SYNQ® 100/124 SMX-3
Page 53

ESPAÑOL MANUAL DE INSTRUCCIONES
ESPAÑOL MANUAL DE INSTRUCCIONES
con los 7 tornillos incluidos con los adaptadores.
Repítalo con el segundo adaptador de 19”.
El mezclador está listo para montarse en un soporte de 19”. La altura total es de 370mm,
o unas 8.5 unidades. No olvide añadir un panel ciego de 1U, necesario para los
conectores sobre el SMX-3.
ACTUALIZAR EL FIRMWARE
Con este procedimiento puede actualizar el firmware tanto del procesador y el DSP.
Actualizar el software es un trabajo delicado, por lo que debe seguir los pasos muy
atentamente o podría dañar el mezclador.
¡MUY IMPORTANTE!
NO OLVIDE REGISTRAR SU MEZCLADOR SMX-3. RECIBIRÁ AUTOMÁTICAMENTE UN
RECORDATORIO CUANDO HAYA DISPONIBLES NUEVAS ACTUALIZACIONES DE
SOFTWARE VISITE: WWW.SYNQ-AUDIO.COM/REGISTER/
Si actualiza el procesador y el software DSP, debe actualizar primero el procesador.
Compruebe siempre el archivo README incluido con una actualización antes de
empezar a actualizar. NO apague el mezclador ni pulse ningún botón durante el
proceso de actualización. Espere hasta que la pantalla vuelva a la normalidad. Sólo
puede interrumpir el proceso de actualización apagando el mezclador cuando la
pantalla esté aún apagada pasado 1 minuto. En este caso, la actualización habrá
fallado.
CÓMO COMPROBAR LA VERSIÓN DE SOFTWARE:
Apague el mezclador.
Pulse los botones de reproducción (23)
marcados con “16” y “32”.
Encienda el mezclador mientras mantiene
ambos botones pulsados.
La pantalla muestra la versión de software para el
microprocesador y el DSP: consulte el gráfico par
obtener más información. En este ejemplo las versiones de software son: Procesador =
V1.6 y DSP = V1.5
CÓMO ACTUALIZAR EL SOFTWARE DEL PROCESADOR:
Coloque la tarjeta SD™/SDHC™ en su PC y copie el archivo llamado “SMX-3C_xx.bin”
en la tarjeta de memoria. ¡Importante! NO renombre el archivo.
Coloque la tarjeta SD™/SDHC™ en la ranura de memoria (28) del SMX-3.
Apague el mezclador.
Pulse los 3 botones de reproducción (23) marcados con “2” + “4” + “8” conjuntamente.
Encienda el mezclador mientras mantiene los 3 botones pulsados.
Todos los botones CUE (5) parpadean cuatro veces para indicar que el proceso de
actualización ha comenzado. Una vez que todos los botones cue hayan parpadeado 2
veces puede soltar los 3 botones de reproducción.
Observará que los botones CUE se encenderán uno por uno (del 1 a 5) mientras los
botones de reproducción cambian de color. Después de unos 25 segundos la pantalla
vuelve a normal para indicar que el proceso de actualización ha concluido.
Compruebe la versión de software para verificar si el proceso de actualización ha tenido
éxito.
CÓMO ACTUALIZAR EL SOFTWARE DEL DSP:
Coloque la tarjeta SD™/SDHC™ en su PC y copie el archivo llamado “smx-3_xx.bin”
(donde “xx” es el número de versión) en la tarjeta de memoria. ¡Importante! NO
renombre el archivo.
Coloque la tarjeta SD™/SDHC™ en la ranura de memoria (28) del SMX-3.
Apague el mezclador.
Pulse los 3 botones de reproducción (23) marcados con “8” + “16” + “32”
conjuntamente.
Encienda el mezclador mientras mantiene los 3 botones pulsados.
Todos los botones CUE (5) parpadean cuatro veces para indicar que el proceso de
actualización ha comenzado. Una vez que todos los botones cue hayan parpadeado 2
veces puede soltar los 3 botones de reproducción.
Observará que los botones CUE se encenderán uno por uno (del 1 al 3). Después de
unos 15 segundos la pantalla vuelve a normal para indicar que el proceso de actualización
ha concluido.
Compruebe la versión de software para verificar si el proceso de actualización ha tenido
éxito.
CAMBIO DE LOS FADERS
Una de las grandes ventajas de este mezclador es la posibilidad de cambiar los faders de
canal, incluso cuando el mezclador está siendo utilizado.
Tiene que llevar a cabo lo siguiente para cambiar un fader de canal:
Retire los botones del fader.
Retire los 6 tornillos que sostienen el
pequeño panel frontal alrededor de los
faders.
Retire los 3 tornillos del fader que desea
cambiar.
Retire suavemente el fader de su
posición.
Coloque el nuevo fader con cuidado en
su lugar. Asegúrese de conectar los
conectores en la base del conector en la
tarjeta PCB del mezclador.
Coloque los 3 tornillos del fader otra vez en su lugar
Coloque la pequeña placa delantera en su lugar con los 6 tornillos.
¡Ya está!
Tiene que llevar a cabo lo siguiente para cambiar el cross fader:
Retire el botón del fader del cross fader.
Retire los 2 tornillos que sostienen el cross fader en su lugar.
Con cuidado retire el fader y la placa de la cubierta de sus posiciones.
Desconecte el cross fader del cable (¡desconecte el cable tirando del conector, NO del
cable!)
Presione el nuevo cross fader en el cable.
Coloque el cross fader de regreso en su lugar con la pequeña placa de cubierta y los
2 tornillos.
¡Ya está!
SYNQ® 101/124 SMX-3
SYNQ® 102/124 SMX-3
Page 54

ESPAÑOL MANUAL DE INSTRUCCIONES
ESPECIFICACIONES
Resistencia y sensibilidad de entrada/salida (EQ plano, rendimiento máx., medidor de
volumen = 0dB)
Entrada línea 2, 4, 6, 7: 340mVa 20kΩ(máx. = +4dBV)
Entrada línea 1, 3, 5: 340mVa 47kΩ(máx. = +4dBV)
Entrada phono: 3,4mV a 47kΩ(máx. = -36dBV)
Entradas mic: 3,4mV a 10kΩ(máx. = -36dBV)
Retorno: 525mVa 10kΩ
Enviar: 525mVa 2kΩ
Salida de grabación: 775mVa 1kΩ
Masters no balanceados: 1,55V a 100Ω
Masters balanceados: 2,55V a 200Ω
Auriculares: 3,00V a 33Ω
PORTUGUÊS MANUAL DO UTILIZADOR
MANUAL DO UTILIZADOR
Parabéns e obrigado por ter adquirido este produto SYNQ. Por favor leia atentamente
este manual do utilizador de forma a saber como utilizar esta unidade correctamente.
Após ler este manual, guarde-o num lugar seguro de forma a poder consultá-lo no futuro.
NÃO SE ESQUEÇA DE REGISTAR O SEU SMX-3. RECEBERÁ AUTOMATICAMENTE
UM AVISO QUANDO ESTIVEREM DISPONÍVEIS NOVAS ACTUALIZAÇÕES DO SOFTWARE!
VISITE: WWW.SYNQ-AUDIO.COM/REGISTER/
Salida máxima (EQ plano, rendimiento máx., FX apagado, THD=1%, carga de 100kΩ )
Master1: Más de +18dBV (8,0V)
Master2: Más de +18dBV (8,0V)
Auriculares: Más de + 9,5dBV (3V) a 32Ω
Respuesta de frecuencia (EQ plano, rendimiento máx., indicador de nivel = 0dB, carga de
100kΩ )
Línea: 25 - 20.000Hz+/-1dB
Phono: 25 - 20.000Hz+1/-1,5dB (RIAA)
Mic : 25 - 20.000Hz+1/-1,5dB
THD + Ruido (EQ plano, rendimiento máx., indicador de nivel = 0dB, carga de 100kΩ )
Line: menos de 0,05% (25 – 20.000Hz)
Phono: menos de 0,05% (1kHz A-cargado)
Mic: menos de 0,1% (1kHz A-cargado)
Cruce de canales (EQ plano, rendimiento máx., Master = 0dBV)
Cruce: Más de 70dB a 1kHz (entre I,D y canales)
Controles de tono:
Mic: -12dB / +12dB a 70Hz – 1kHz – 13kHz.
Canales de entrada: -30dB / +10dB a 70Hz – 1kHz – 13kHz.
Unidad de muestreo:
Grabación de sample: MPEG1 layer3 44,1kHz muestreados @ 192kbps
Reproducción de sample: diferentes bitrates, edición de parámetros no posible
Polifonía: 2 voces
Tarjetas de memoria: SD™ y SDHC™.
Capacidad máxima de la tarjeta: 32GB
Formato de archivo: FAT (FAT16) o FAT32 (depende de la capacidad)
Especificaciones generales:
Alimentación: 230V~ 50Hz. (Europe)
Consumo: 40 vatios
Dimensiones: 320 x 370 x 109mm (Al x An x P)
Peso : 7.0 kg
Puede descargar la última versión del firmware/este manual de usuario de nuestro sitio web:
Toda la información está sujeta a cambios sin previo aviso
estéreo
www.synq-audio.com
CARACTERÍSTICAS
Esta unidade está protegida contra interferências rádio. Este produto cumpre as
exigências impostas pelas presentes directivas nacionais e europeias. A conformidade
deste produto foi comprovada e as declarações e documentos relevantes foram
efectuados pelo fabricante.
12 entradas (2 microfones + 7 line + 3 phono) em 6 canais (5 faders + 1 micro DJ)
Selector de entrada matriz para flexibilidade máxima: mude todas as entradas num
segundo!
2 saídas Master:
o Master 1 balanceada com controlo de nível, balanço, mono/estéreo e ajuste de sinal
o Master 2 sem balanço com ajuste de nível independente
Ganho e controlo de frequência de 3 bandas com função “Kill” – 30DB em todos os
canais
LEDs indicadores de nível com memória “peak” em todos os canais + Master
Faders com controlo VCA de alta qualidade e fácil substituição com controlo de curva
em todos os canais
Crossfader de controlo VCA e fácil substituição com controlo de curva (suave corte
rápido)
Selecção fácil de canal A/B para Crossfader
Sampler MP3 versátil:
o Baseado nos cartões de memória SDHC™ (várias horas de gravação áudio)
o Máx: 99 bancos de memória com 5 samples cada num cartão SDHC™!
o Sinal estéreo pode ser gravado em formato MP3 (192kbps)
o Controlo de velocidade individual para todas as amostras!
o Controlo geral de velocidade com master tempo! (pitch lock)
o Polifonia: 2 samples podem ser reproduzidas em conjunto
o Loops perfeitos com edição de pontos iniciais e finais
o Saídas/entradas de sampler atribuíveis a qualquer canal
Contadores de batidas automáticos
Função “Crossfader start” para leitores de CD compatíveis
Efeitos de mistura de crossfader sincronizados de 2 batidas
Efeitos digitais sincronizados de 8 batidas com predefinições de efeitos programáveis:
Echo, Autopan, Flanger, Manual filter, Auto filter, Reverb, Trans, Pitch Shifter
Função Send/Return estéreo para processadores de efeitos externos.
Função micro DJ Talk over ajustável
SYNQ® 103/124 SMX-3
SYNQ® 104/124 SMX-3
Page 55

PORTUGUÊS MANUAL DO UTILIZADOR
ATENÇÃO:
PORTUGUÊS MANUAL DO UTILIZADOR
Saída de alta potência para auscultadores com possibilidade de “mistura cue/pgm”
Actualização de “Firmware” através de cartões SD™.
ANTES DE UTILIZAR
Antes de utilizar esta unidade verifique se existem danos provocados durante o
transporte. Caso existam danos aparentes, não utilize a unidade e contacte o seu
revendedor.
Importante: Esta unidade deixou a nossa fábrica em perfeitas condições e devidamente
embalada. É imprescindível que o utilizador siga as instruções de segurança e avisos
descritos neste manual. Quaisquer danos provocados por utilização incorrecta não
serão cobertos pela garantia. O revendedor não será responsável por quaisquer danos
ou problemas causados pelo incumprimento das instruções deste manual.
Guarde este manual num local seguro para consulta futura. Caso venda esta unidade,
forneça este manual.
Proteja o ambiente. Recicle o material desta embalagem.
Verifique o conteúdo:
Certifique-se que a caixa contém os seguintes artigos:
Mesa de mistura SMX-3
Cabo de alimentação
Manual do utilizador
INSTRUÇÕES DE SEGURANÇA:
CAUTI ON
O símbolo composto por um triângulo equilátero com um relâmpago no interior
alerta para a presença de voltagem perigosa não isolada no interior do produto
que poderá constituir risco de choque eléctrico.
O símbolo composto por um triângulo equilátero com um ponto de exclamação
alerta o utilizador para a presença de instruções importantes de utilização e
manutenção do produto.
Este símbolo significa: utilização unicamente em espaços fechados
Este símbolo significa: Leia instruções
Este símbolo significa: Aparelho Classe II
De modo a evitar risco de fogo ou choque eléctrico, não exponha este produto a chuva
ou humidade.
De forma a evitar a formação de condensação no interior da unidade, ao transportá-la
para ambiente quente aguarde algum tempo de modo a que haja uma ambientação à
temperatura. A condensação poderá afectar o desempenho da unidade ou até danificála.
Esta unidade destina-se unicamente a utilização em espaços fechados.
Não introduza objectos de metal nem verta líquidos no interior do produto, correrá risco
de choque eléctrico ou poderá danificar o produto. Caso algum objecto estranho entre
em contacto com o interior da unidade, desligue-a de imediato da corrente.
eléctrico, não remova peças da unidade. Não
tente fazer reparações. Contacte pessoal
qualificado
De forma a evitar o risco de choque
Não coloque chamas descobertas (tais como velas acesas) sobre a unidade.
Não cubra os orifícios de ventilação ou a unidade poderá sobreaquecer.
Evite locais com poeiras. Limpe a unidade regularmente.
Mantenha esta unidade fora do alcance das crianças.
Esta unidade deverá ser operada unicamente por pessoas experientes.
Temperatura ambiente de funcionamento máxima é de 40ºC. Não utilize esta unidade a
temperaturas ambientes mais elevadas.
As distâncias mínimas para a ventilação suficiente são 3cm.
Desligue sempre a unidade da corrente quando não a utilizar durante longos períodos
de tempo ou antes de efectuar manutenção.
A instalação eléctrica deve ser efectuada unicamente por pessoal qualificado,
cumprindo os regulamentos de segurança em instalações eléctricas e mecânicas do seu
pais.
Certifique-se que a voltagem a utilizar não é superior à voltagem indicada no painel
traseiro da unidade.
A tomada de corrente deverá permanecer acessível para que a unidade possa ser
desligada da corrente.
O cabo de alimentação deverá estar sempre em perfeitas condições. Desligue a
unidade e substitua imediatamente o cabo caso este apresente algum dano. Deverá ser
substituído pelo fabricante, pelo agente autorizado ou pessoal qualificado de modo a
evitar um acidente.
Nunca permita que este cabo entre em contacto com outros cabos!
Quando o interruptor de poder está no posição de repouso, esta unidade não está
desconectada completamente dos canos principais!
De forma a não correr risco de choque eléctrico não abra a cobertura da unidade. À
excepção do fusível, não existem peças que possam ser substituídas pelo utilizador.
Nunca repare um fusível nem tente operar a unidade sem fusível. Substitua sempre um
fusível danificado por outro com as mesmas características!
Em caso de problemas sérios de funcionamento, interrompa a utilização da unidade e
contacte imediatamente o seu revendedor.
Caso seja necessário transportar a unidade utilize a embalagem original.
Por motivos de segurança, são proibidas quaisquer alterações não autorizadas à
unidade.
GUIA DE INSTALAÇÃO:
Instale a unidade num local bem ventilado onde não exista exposição a altas
temperaturas ou humidade.
Colocar ou utilizar a unidade durante longos períodos de tempo perto de fontes de calor,
tais como amplificadores, holofotes, etc., irá afectar o desempenho da unidade e poderá
até danificá-la.
Com adaptadores opcionais de 19” (informações adicionais mais adiante neste manual),
esta unidade pode ser montada em racks de 19”. Fixe a unidade utilizando os 4 orifícios
do painel frontal. Certifique-se que utiliza parafusos com a medida certa (os parafusos
não são fornecidos). Evite pancadas e vibrações durante o transporte.
Quando colocar a unidade numa cabine ou numa mala, certifique-se que há ventilação
de modo a permitir a evacuação do calor produzido pela unidade.
SYNQ® 105/124 SMX-3
SYNQ® 106/124 SMX-3
Page 56

PORTUGUÊS MANUAL DO UTILIZADOR
PORTUGUÊS MANUAL DO UTILIZADOR
De forma a evitar a formação de condensação no interior da unidade, ao transportá-la
para ambiente quente aguarde algum tempo de modo a que haja uma ambientação à
temperatura. A condensação poderá afectar o desempenho da unidade.
LIMPEZA DA MESA DE MISTURA:
Utilize um pano limpo ligeiramente humedecido em água. Evite introduzir água dentro da
unidade. Não utilize líquidos voláteis como benzeno ou diluente, irá danificar a unidade.
LIGAÇÕES
À excepção das saídas dos microfones, do auscultador e a master, todas as ligações são
rca. Utilize cabos rca-rca de boa qualidade de modo a evitar má qualidade áudio.
Desligue a mesa de mistura antes de efectuar alterações nas diferentes ligações.
Neste manual referimos “line inputs” (entradas line). Esta é uma denominação global para
aparelhos de entrada com um nível de voltagem compreendido entre 750mV e 2V. Isto
inclui sintonizadores, vídeos, leitores de CD, etc.
Existem várias formas de ligar equipamento áudio a esta mesa de mistura. Tenha em
atenção as seguintes observações:
Ligue sempre os cabos rca da mesma forma:
o Conector rca branco ou preto canal esquerdo
o Conector rca vermelho canal direito
3 entradas no painel traseiro podem receber um sinal “phono” ou “line”. Certifique-se
que o selector correspondente está na posição correcta:
o Ao ligar o leitor de CD, deck de cassetes, minidisc, sintonizador, gravador
de vídeo, etc, a uma das entradas, não se esqueça de colocar o selector de
entrada do respectivo canal na posição “LINE”.
o Ao ligar um gira-discos a uma das entradas, não se esqueça de colocar o
selector de entrada do respectivo canal na posição “PHONO”.
Observação: Ao utilizar o gira-discos “X-TRM1” da SynQ, sugerimos que coloque o
selector da unidade na saída “line”. Consequentemente terá de ligar o gira-discos a
uma entrada “line” da mesa!
A maioria dos gira-discos contém uma ligação Terra (GND). Recomendamos que ligue
este sinal GND à SMX-3. Utilize os conectores GND que se encontram perto dos
conectores de sinal de entrada.
Poderá ligar a entrada de uma unidade de gravação analógica à saída de gravação
(Record) da SMX-3 de forma a efectuar gravações analógicas.
De forma a garantir a melhor qualidade de som possível, a SMX-3 contém pins de
curto-circuito em todas as entradas phono não utilizadas. Antes de ligar um gira-discos
à SMX-3, retire os pins de curto-circuito da entrada que pretende utilizar. Mantenha
estes pins num lugar seguro para eventual utilização futura. NUNCA coloque estes
pinos de curto circuito nas saída (Master, Send, Record, …)
CONTROLOS E FUNÇÕES
CONTROLOS NO PAINEL FRONTAL:
1. SELECTORES DE ENTRADA: Estes selectores matriz permitem encaminhar
qualquer sinal de entrada para qualquer um dos 5 canais de entrada. Desta forma é
muito simples atribuir os sinais de entrada aos diferentes canais ou trocar dois sinais
áudio sem ter que trocar os cabos nas entradas. Esta característica é muito útil em
discotecas onde cada DJ usa uma configuração diferente de canais! O “sampler”
incorporado também pode ser atribuído a qualquer um dos 5 canais.
2. CONTROLO DE GANHO (GAIN): Este controlo permite ajustar o nível de entrada de
cada canal. A escala vai de zero ao máximo. Utilize este controlo para ajustar o nível
no indicador VU a cerca de 0DB.
SYNQ® 107/124 SMX-3
SYNQ® 108/124 SMX-3
Page 57

PORTUGUÊS MANUAL DO UTILIZADOR
PORTUGUÊS MANUAL DO UTILIZADOR
3. CONTROLO DE TOM DE 3 BANDAS: A frequência de cada canal pode ser
controlada separadamente numa escala de –30DB a +10DB: (Altos) Treble@13KHz ~
(Médios) Middle@1KHz ~ (Baixos) Bass@70Hz. Na posição central o controlo de tom
encontra-se desligado.
4. LEDS INDICADORES VU DE CANAIS: Indicadores de nível precisos com memória
“Peak Level”: os níveis Peak (máximos) permanecem no display por algum tempo.
5. SELECTOR CUE/BPM COUNTER: Permite seleccionar a fonte (CH-1 a CH-5) a
monitorizar na saída dos auscultadores. Se pressionar vários botões Cue poderá obter
um som misturado das fontes seleccionadas. As BPMs do canal seleccionado (CH-1 a
CH-5) serão mostradas no display CUE BPM (13C).
Atenção: As BPMs não serão mostradas correctamente se 2 ou mais canais tiverem
sido seleccionados!
6. SELECTORES DE CROSSFADER: O lado esquerdo do crossfader corresponde a “A”,
o lado direito do crossfader corresponde a “B”. Cada canal tem um selector de
crossfader. Pode determinar facilmente se o sinal de um certo canal deve ser
encaminhado para o lado esquerdo ou para o lado direito do crossfader, tendo apenas
que colocar o selector de crossfader na posição correcta:
Posição intermédia: O canal não é atribuído ao crossfader.
Posição à esquerda “A”: O canal é atribuído ao lado esquerdo do crossfader. O
LED correspondente acende-se.
Posição à direita “B”: O canal é atribuído ao lado direito do crossfader. O LED
correspondente acende-se.
7. FADERS DE CANAL VCA: Permitem determinar o nível de cada canal. A SMX-3
utiliza tecnologia de amplificação por voltagem controlada, ou seja, não é o sinal áudio
que passa pelos faders mas sim uma reduzida voltagem DC. Este sistema aumenta
consideravelmente a protecção contra ruídos provocados por faders gastos. Estes
faders de alta qualidade podem ser substituídos pelo o utilizador, inclusivamente
durante o funcionamento! Para mais informações, consulte a secção “Substituição de
faders”.
8. BOTÕES CROSSOVER EFFECT / SAMPLER PITCH BEND: no modo sampler usado
para alterar o pitch, no modo efeito crossover usado pra escolher o tipo de Effect Mix
desejado, 2 funções (Zip and Roll) estão disponiveis:
FUNÇÃO PITCH BEND: (coloque o interruptor na posição
central quando a mesa está em modo sampler) Enquanto
uma amostra está a tocar, estes 2 botões são usados para
alterar a velocidade para que possa igualar perfeitamente a
batida com a outra música: desde que pressione o botão
esquerdo a velocidade da amostra é diminuída, e desde que pressione o botão
direito a velocidade da amostra é aumentada
EFEITO ZIP: Pode ser utilizado nos modos FADER e AUTO:
MODO FADER: (coloque o interruptor na posição FADER) Pressione o botão
efeito “Zip” e desloque o crossfader de uma extremidade para a outra. O pitch da
música irá baixar até que esta fique distorcida. Quando o
crossfader é deslocado para o outro lado, o outro leitor inicia a
reprodução automaticamente. Dependendo da posição do
crossfader, o display de efeitos mostra um número de 0 a 99.
Nota: o controlo “X-parameter” não estão disponíveis!
MODO AUTO: (coloque o interruptor na posição AUTO) Enquanto a música está
a ser reproduzida, pressione o botão efeito “Zip”. O pitch da música é diminuído
automaticamente a 0 até que o outro leitor inicie a reprodução. A duração da
passagem completa é mostrada no display de efeitos e pode ser adaptada com
controlo “X-parameter” (24).
EFEITO ROLL: Pode ser utilizado nos modos FADER e AUTO:
MODE FADER: (coloque o interruptor na posição FADER)
Pressione o botão efeito “Roll” e desloque o crossfader de uma
extremidade para a outra. Inicialmente a música será reproduzida
em loop com 1/1 batida (display de efeitos mostra “1”), em
seguida o loop é reduzido para ½ batida (display de efeitos mostra “2”) e tornase finalmente um loop com a duração de 1/8 batida (display de efeitos mostra
“4”). Quando o crossfader chega ao outro lado, o nível é diminuído e o outro leitor
inicia a reprodução.
Nota: o controlo “X-parameter” não estão disponíveis!
MODO AUTO: (coloque o interruptor na posição AUTO) Enquanto a música está
a ser reproduzida, pressione o botão efeito “Roll”. A música começa a ser
reproduzida em loop com batidas sincronizadas até o outro leitor iniciar a
reprodução. A duração da passagem completa é mostrada no display de efeitos e
pode ser adaptada com controlo “X-parameter” (26). Dependendo da duração da
passagem que tiver seleccionado, o padrão “Roll” será adaptado e dividido em
loops com 1/1, ½, ¼, e 1/8 batidas.
9. CHANNEL FADER CURVE: Permite ajustar a curva dos faders de canal entre suave
(posição à esquerda) e rápida (posição à direita).
10.CROSS FADER CURVE: Permite ajustar a curva do crossfader entre suave (posição
à esquerda) e rápida (posição à direita).
11.INTERRUPTOR FADER START ON/OFF: Após ter um leitor de CD compatível ligado
aos conectores do fader start, pode controlar as suas funções start/stop (re-cue)
através do crossfader da SMX-3. Com este botão pode ligar e desligar o controlo fader
start.
12.FADER START INDICATORS: Durante o modo “crossover effect mix”, os indicadores
mostram o estado da saída fader start:
LED apagado: o leitor ligado está em modo pausa.
LED a piscar: o leitor ligado prestes a mudar de reprodução para pausa.
LED aceso: o leitor ligado está em reprodução.
13.DISPLAY MULTIFUNÇÕES: Mostra informação relativa às diferentes funções:
A. DISPLAY EFFECTS BPM: Indica as BPM (Batidas Por Minuto) da unidade de
efeitos. Quando o contador de batidas não consegue contar as batidas, o display
BPM começa a piscar até o contador de batidas conseguir continuar.
SYNQ® 109/124 SMX-3
SYNQ® 110/124 SMX-3
Page 58

PORTUGUÊS MANUAL DO UTILIZADOR
PORTUGUÊS MANUAL DO UTILIZADOR
B. TIME (X) PARAMETER:
Modo Efeitos: Em certos efeitos o display mostra informação sobre o tempo
(mSec), para outros efeitos o display mostra percentagem (%) ou as frequências
de corte (KHz). Poderá alterar este parâmetros com os botões “Preset” (23) e
com o controlo “X-parameter” (24) caso pretenda um ajuste mais apurado.
Modo Sampler: Quando o “sampler” está em modo reprodução o display mostra
o número do banco de memória seleccionado (de 1 a 99). Enquanto ajusta a
velocidade de reprodução do sampler, o visor mostra a percentagem da
velocidade. Quando o “sampler” está a em modo de gravação, o display mostra o
número de segundos ainda disponíveis na memória “sampler” (“9999” no visor
significa que ainda tem mais que 9999 segundos [166 minutos ou 2hr46min!] livres
para gravação de amostras). Caso nenhum cartão SD™/SDHC™ esteja inserido,
o display mostra “no Card”.
C. DISPLAY CUE BPM/DEPTH (Y) PARAMETER: Mostra o valor BPM dos sinais cue
provenientes de um dos 5 canais de entrada (CH-1 a CH-5), seleccionados através
de um dos botões CUE (5). Ao ajustar o Parâmetro Depth (Y) (25), o novo valor
será mostrado (%).
D. DISPLAY EFFECTS INPUT: Mostra que canal de entrada foi encaminhado para a
secção “sampler/effects” através do selector “effect assign” (26).
E. DISPLAY EFEITOS: Mostra qual o efeito seleccionado.
14.CROSSFADER: Utilizado para misturar os sinais emitidos pelos dois canais atribuídos
a “A” e a “B” através dos selectores de crossfader (6).
15.BOTÕES SAMPLE EDIT: Permitem ajustar a velocidade individual, o início e o fim de
um “sample”. Veja informações adicionais sobre esta função mais adiante.
16.BOTÃO LOOP: Permite introduzir um “sample” num “loop” perfeito. Veja informações
adicionais sobre esta função mais adiante.
17.CUE MIXING KNOB: Com este controlo é possível misturar a saída Master com os
sinais cue de diferentes canais e a unidade de efeitos. Gire este controlo totalmente
para a direita se pretender ouvir apenas a saída Master. Gire este controlo totalmente
para a esquerda se pretender ouvir apenas os sinais cue que são seleccionados com
os botões CUE (5, 20). Coloque este controlo em qualquer outra posição e poderá
ouvir uma mistura de ambos os sinais.
18.BOTÃO EFFECTS ON/OFF: Este botão tem diferentes funções:
Modo Effect: altera a saída da unidade de efeitos ou sinal de retorno do
processador de efeitos externo para ligado/desligado.
Modo Sampler: Pressione este botão cerca de 2 segundos para alterar a função
“master tempo” (pitch lock) para ligado/desligado.
19.NÍVEL CUE: Permite controlar o nível da saída dos auscultadores. Tenha em atenção
que devido à elevada potência de saída, poderá provocar danos permanentes nos
seus ouvidos! Não utilize um nível demasiado elevado!
20.EFFECTS CUE: Este botão tem diferentes funções:
Modo Effect: Pressione este botão (botão está aceso) para verificar o efeito
antes de ser misturado na mistura principal (master mix)
Modo Sampler: Pressione este botão (botão está aceso) para alterar o sampler
para “jingle mode”
21.ENTRADA AUSCULTADORES: Permite ligar auscultadores estéreo tipo jack ¼”.
22.TAP/REC BUTTON: Este botão tem 2 funções diferentes:
Modo Efeitos (BOTÃO TAP): Quase todos os efeitos são sincronizados com as
batidas. A SMX-3 contém um contador de batidas completamente automático
incorporado. Em alguns casos muito raros, o contador de batidas automático não
faz a contagem correctamente (as batidas estão fora do alcance normal ou
simplesmente não existem batidas detectáveis). Nestes casos, poderá auxiliar o
contador de batidas pressionando este botão ao ritmo das batidas. Ao utilizar o
botão TAP, este começa a piscar de forma a indicar que o contador de batidas
automático está desligado. Se pretender que o contador de batidas automático
volte a ser activado, pressione o botão TAP durante alguns segundos até que
este pare de piscar.
Modo Sampler (BOTÃO REC): O botão é utilizado para alternar entre o modo de
reprodução e modo de gravação (REC). No modo de reprodução o botão REC
acende-se. Pressione o botão uma vez para colocar o “sampler” em modo
gravação: o botão REC começa a piscar. Pressione um dos 5 botões
“Preset/Play” (23) para começar a gravação ou pressione o botão REC
novamente para voltar à reprodução. Veja informações adicionais sobre esta
função mais adiante.
23.PRESET/PLAY BUTTONS: Estes botões têm 2 funções diferentes:
Modo Sampler (BOTÕES PLAY VERMELHOS): Os 5 botões são utilizados
como botões “play” (reprodução) para o “sampler”. É possível atribuir (gravar) 1
“sample” a cada botão “play”. É fácil perceber que botões “play” contêm
“samples”. Botões com “samples” acendem-se (luz vermelha), botões sem
“samples” permanecem apagados.
Modo efeitos (BOTÕES PLAY VERDES): Estes botões são utilizados como
predefinições (Preset) para os diferentes efeitos. Existem 2 tipos de efeitos
diferentes: efeitos relacionados com as batidas (echo, auto pan, flanger, auto
filter, trans) e não relacionados com batidas (manual filter, reverb, pitch shifter).
oEfeitos relacionados com batidas: Cada botão tem uma das seguintes
inscrições: 2 – 4 – 8 – 16 – 32. Estes dígitos estão relacionados com a
medição das batidas. Após a predefinição ser seleccionada, o botão
correspondente acende-se. Também pode seleccionar as predefinições
adicionais pressionando o controlo “X-parameter” (24) enquanto selecciona
as predefinições 2 – 4 – 8 – ou 16. Neste caso, o botão da predefinição
começa a piscar de modo a indicar que a indicação acima do botão (1/8 –
1/4 – ½ ou 1/1) está seleccionada. É bom saber que a última predefinição é
mantida ao mudar para outro efeito.
Exemplo: Se o efeito “echo” está seleccionado e em seguida a
predefinição “2” é seleccionada, irá reparar que o som é repetido a
cada 2 batidas. Se “4” for seleccionada, o som é repetido a cada 4
batidas. Seleccione a predefinição ½ se pretender que a música seja
repetida a cada meia batida.
oEfeitos não relacionados com batidas: Neste caso as indicações nos
botões “Preset” não são importantes. A SMX-3 contém predefinições padrão
para cada um dos efeitos não relacionados com batidas. Contudo, é
possível ajustar estes parâmetros com os controlos “Parameter X e Y” (24,
25). Para guardar os parâmetros alterados, pressione o controlo “Xparameter” (24) enquanto selecciona um dos 5 botões “Preset”. Os
parâmetros padrão serão substituídos pelas suas configurações. É possível
definir 5 predefinições para cada efeito e adaptá-los em qualquer altura.
SYNQ® 111/124 SMX-3
SYNQ® 112/124 SMX-3
Page 59

PORTUGUÊS MANUAL DO UTILIZADOR
PORTUGUÊS MANUAL DO UTILIZADOR
24.CONTROLO X-PARAMETER: Este controlo tem várias funções:
Modo efeitos: Ajusta o parâmetro “X” dos diferentes efeito. Pressione este botão
enquanto pressiona um dos botões “Preset” para obter possibilidades adicionais:
oEfeitos relacionados com batidas: poderá seleccionar predefinições de
batidas adicionais.
oEfeitos não relacionados com batidas: poderá guardar os seus
parâmetros num dos botões “Preset”.
Mode Sampler: Existem 3 funções possíveis:
oModo reprodução/gravação: gire o controlo para seleccionar o banco de
memória pretendido e pressione o controlo para confirmar.
oModo edição de sample: gire o controlo para procurar com precisão o
ponto inicial ou final do “sample”. (Informações adicionais mais adiante.)
oRetorno do efeito externo: quando a mesa está em modo sampler, pode
conectar uma unidade de efeitos externa. Pressione e rode o controlo para
ajustar o volume do sinal de retorno entre -50dB and +0dB.
25.CONTROLO Y-PARAMETER: Este botão tem diferentes funções:
Modo Effect: Usado para ajustar o parâmetro “Y” dos efeitos. Por favor leia a
secção 27 dado que esta função é diferente para cada efeito.
Modo Sampler: existem 2 funções:
oModo Playback: Ajusta a velocidade geral da reprodução desde -80% até
20% de 3 maneiras diferentes:
Adapta em passos 0,1%: Rode o botão para mudar a velocidade:
Adapta em passos 2%: Pressione e rode o botão para mudar a
velocidade
Reinicie a velocidade para 0%: Pressione o botão 2x em menos de um
segundo.
oModo Sample Edit: Durante o modo “OUTRO EDIT” pode ajustar a
velocidade de uma amostra individualmente, esta configuração irá ser
guardada em conjunto com os pontos de início/fim. Pode mudar a
velocidade desde -12% até + 12% de 3 maneiras diferentes:
Adapta em passos 0,1%: Rode o botão para mudar a velocidade:
Adapta em passos 2%: Pressione e rode o botão para mudar a
velocidade
Reinicie a velocidade para 0%: Pressione o botão 2x em menos de um
segundo.
26.SELECTOR EFFECT ASSIGN: Permite seleccionar que sinal é encaminhado para a
saída “send” (46) e para a entrada da unidade de efeitos/”sampler”. O sinal pode ser
um dos seguintes:
Um dos canais de entrada.
Um dos canais seleccionados com o “selector crossfader” (6). Pode ser o lado
esquerdo “A” (CF-A) ou o lado direito “B” (CF-B) do crossfader.
Caso seleccione Master, os efeitos serão utilizados na saída de som misturado
Master ou poderá gravar o sinal misturado Master no “sampler”.
Nota: Se escolher “master” o retorno do efeito externo é desligado para evitar
feedback.
27.SELECTOR EFFECTS: Permite seleccionar o efeito pretendido ou a função “sampler”:
IMPORTANTE!
O “sampler” pode ser seleccionado como um dos efeitos, o que significa que
não poderá utilizar o “sampler” em conjunto com um dos multi-efeitos.
Contudo é possível utilizar o “sampler” em conjunto com os efeitos
crossover e/ou com uma unidade de efeito externo conectado ao send/return
do efeito (46+47).
Os efeitos crossover e a unidade multi-efeitos não podem ser utilizados em
conjunto! Para poder utilizar os multi-efeitos, terá de desligar os efeitos
crossover. (Veja nº8 para mais informação.)
SAMPLER: O sampler não é na realidade um efeito mas com o sampler é
possível gravar/reproduzir até 495 samples (amostras) (99 bancos com 5
samples cada) num cartão de memória SD™/SDHC™. Para saber mais sobre
esta função consulte a secção “Acerca do sampler”. Na função sampler não pode
usar os efeitos internos mas pode conectar qualquer processador de efeitos
externos usando os conectores send/return do efeito (46/47).
ECHO: Produz repetição de sons. Poderá facilmente misturar ecos sincronizados
com as batidas enquanto selecciona a “Preset” (23) pretendida. Estas “Presets”
podem ser ajustadas com o controlo “X-parameter” (24) numa escala de
2mSegundos a 2Segundos. Com o controlo “Y Parameter” (25), poderá alterar o
balanço entre o som original e a repetição.
AUTO PAN: Desloca a música entre a esquerda e a direita ao ritmo da batida.
Utilize as “Presets” (23) para definir a velocidade da deslocação entre um lado e
outro. (Exemplo: Com a “Preset” “2” a música irá demorar duas batidas a
deslocar-se entre a esquerda e direita.) As “Presets” podem ser ajustadas com o
controlo “X-parameter” (24) numa escala de 30mSeg a 16Seg. Com o controlo “Y
Parameter” (25) poderá ajustar a velocidade a que a música será deslocada para
o lado oposto: pode escolher entre uma deslocação suave ou agressiva.
FLANGER: Este efeito pode ser descrito como “colocar um motor a jacto na
música”. É como se a música fosse virada ao contrário devido à deslocação da
fase. Poderá alterar facilmente o tempo (ciclo) do Flanger com as “Presets” (23).
Estas “Presets” podem ser ajustadas com o controlo “X-parameter” (24) numa
escala de 100mSeg a 16Seg. Com o controlo “Y Parameter” (25) poderá alterar o
nível de feedback do Flanger.
Sugestão: Sempre que pressionar o mesmo botão “Preset” (24) irá reiniciar o ciclo do Flanger.
Esta característica confere um “toque especial” ao efeito.
MANUAL FILTER: Esta é uma ferramenta digital de corte de frequências muito
eficaz. A mesa de mistura contém 5 filtros padrão nas “Presets” (23) mas poderá
ajustar facilmente as definições com o controlo “X-parameter” (24) numa escala
de filtro de passagem baixa (LPF) @ 50Hz (display mostra: L 0.05KHz) a filtro de
passagem alta (HPF) @ 21.1 KHz (display mostra: H 21.1KHz). Com o controlo
“Y Parameter” (25) poderá alterar o nível de ressonância do filtro. (Isto é o QFactor do filtro e altera o impacto do filtro numa frequência seleccionada.)
É possível substituir as “Presets” padrão pelos seus parâmetros. Pressione o
controlo “X-parameter” (24) e um dos 5 botões “Presets” (23) em simultâneo.
SYNQ® 113/124 SMX-3
SYNQ® 114/124 SMX-3
Page 60

PORTUGUÊS MANUAL DO UTILIZADOR
PORTUGUÊS MANUAL DO UTILIZADOR
AUTO FILTER: Este é um filtro automático de passagem baixa (LPF). A
frequência de corte varia em ciclos de 20KHz até 50Hz. Com os botões “Preset”
(23) poderá seleccionar ciclos de filtro sincronizados por batida. (Exemplo:
Pressione a Preset “8” o filtro irá demorar 8 batidas a alterar a frequência de
corte de 20KHz a 50Hz e a retroceder.) As “Presets” podem ser ajustadas com o
controlo “X-parameter” (24) numa escala de 100mSeg a 16Seg. Com o controlo
“Y Parameter” (25) poderá mudar o nível de ressonância do filtro. (Isto é o QFactor do filtro e altera o impacto do filtro numa frequência seleccionada.)
REVERB: Este efeito é descrito da melhor forma como o “efeito igreja”. Imagine
que a música está a ser reproduzida numa igreja ou num auditório grande e
vazio: a ressonância (Reverb) obtida através da repercussão do som nas paredes
é simulada digitalmente com este efeito. Com os botões “Preset” (23) poderá
seleccionar 5 tempos de Reverb predefinidos. Estes tempos de Reverb podem
ser ajustados com o controlo “X-parameter” (24) numa escala de 0% a 100% em
passos de 1%. Com o controlo “Y Parameter” (25) poderá alterar o balanço entre
o som original e o som alterado pelo Reverb.
É possível substituir as “Presets” padrão pelos seus parâmetros. Pressione o
controlo “X-parameter” (24) e um dos 5 botões “Presets” (23) em simultâneo.
TRANS: Corta automaticamente o som ao ritmo das batidas. Com as “Presets”
(23) poderá seleccionar a duração dos ciclos de corte. (Exemplo: Com a Preset
“1/4” – não se esqueça de pressionar o controlo “X-parameter” (24) enquanto
selecciona a Preset “4” – a música será cortada em partes de ¼ batidas.) As
“Presets” podem ser ajustadas com o controlo “X-parameter” (24) numa escala de
25mSeg a 16Seg. Com o controlo “Y Parameter” (25) poderá ajustar o tempo de
corte (“cutting time”). Se o controlo for totalmente girado para a esquerda (o
display mostra “0%”), o tempo de corte é zero e não será ouvido qualquer efeito
de corte. Gire o controlo para a direita, o tempo de corte irá aumentar até que se
ouçam apenas pequenas partes do som original.
Sugestão: É necessário praticar para dominar este efeito! Serão obtidos melhores resultados
com batidas constantes, ciclos de corte pequenos (1/8, 1/4 e ½ batidas) e tempos de corte de
50% ou mais.
PITCH SHIFTER: Aumenta ou diminui o pitch (velocidade) do som enquanto a
batida se mantém inalterada. (Na verdade, esta função é o contrário daquilo que
o “master tempo” tenta obter em alguns leitores de CD: mesmo pitch com
alteração de batida.) Com os botões “Preset” (23) poderá seleccionar 5
alterações de pitch predefinidas. Com o controlo “X-Parameter” (24) poderá
alterar o pitch numa escala de –100% a + 100% em passos de 1%. Com o
controlo “Y-Parameter” (25) poderá alterar o balanço entre o som original e o som
alterado.
É possível substituir as “Presets” padrão pelos seus parâmetros. Pressione o
controlo “X-parameter” (24) e um dos 5 botões “Presets” (23) em simultâneo.
Sugestão: Se utilizar o Pitch Shifter num microfone terá um modulador de voz.
(Com o pitch a –100% irá obter “vozes do outro mundo”)
28.ENTRADA CARTÃO DE MEMÓRIA SD™/SDHC™: A SMX-3 não contem memória
interna para gravação de “samples”. Isto significa que o “sampler” só pode ser utilizado
quando um cartão de memória SD™/SDHC™ estiver inserido na unidade. Caso
nenhum cartão esteja inserido, o display mostra “noCArd”.
Atenção! NUNCA retire o cartão de memória enquanto a luz vermelha de utilização
(“in use”) estiver acesa! Poderá danificar ou inclusivamente perder informação
constante no cartão de memória!
29.SELECTOR MIC ON/OFF/TALK OVER: Utilizado para ligar/desligar o microfone:
OFF: Microfone DJ está desligado.
ON: Microfone DJ está ligado.
TALK OVER: O Microfone DJ está ligado. Enquanto o micro estiver a ser
utilizado o nível de todos os outros canais de entrada diminui automaticamente. É
possível ajustar os parâmetros para esta função:
Talkover level (35): nível de supressão para os canais de entrada.
Talkover recovery time (41): tempo necessário para a musica voltar ao nível
normal.
30.MASTER 2: Utilizada para ajustar o nível da saída Master 2 (49) situada no painel
traseiro. Não é afectada pelo nível Master 1 (33), nem pelo selector mono/estéreo (32)
ou pelo Master Balance (34).
31.INDICADOR VU DE LEDS: Indicador de nível preciso com memória “Peak Level”: os
níveis Peak (máximos) permanecem no display por algum tempo. Muito importante:
Se pretende um som cristalino, por favor preste atenção ao indicador VU. Muitos DJs
utilizam este instrumento muito importante como um “efeito luminoso engraçado” .
Tentam levar constantemente o indicador ao nível máximo. Sejamos claros: um bom
DJ procura um som cristalino e sem distorções. Níveis acima de 0DB significam
“distorção”, fique atento ao indicador VU!
32.SELECTOR MONO/STEREO: Utilizado para definir o sinal da saída Master 1 como
mono ou estéreo.
33.CONTROLO SAÍDA MASTER: Permite ajustar o nível da saída master. Atenção: O
controlo “Trim Output” (40) situado na parte de trás da mesa de mistura pode reduzir o
nível máximo de saída do fader da saída master. Verifique este controlo caso o nível
de saída máximo esteja abaixo do normal.
34.MASTER BALANCE: Permite ajustar o balanço esquerda-direita da saída Master 1.
35.TALKOVER LEVEL: Permite ajustar o nível de supressão dos 5 canais de entrada
quando o circuito automático “talkover” é activado.
CONTROLOS/LIGAÇÕES NO PAINEL TRASEIRO:
36.INTERRUPTOR ON/OFF: Liga e desliga a mesa de mistura.
37.FONTE ALIMENTAÇÃO: Ligue o cabo fornecido à unidade e à corrente.
SYNQ® 115/124 SMX-3
SYNQ® 116/124 SMX-3
Page 61

PORTUGUÊS MANUAL DO UTILIZADOR
PORTUGUÊS MANUAL DO UTILIZADOR
38.FADER CONTROL: Quando ligados a estas entradas, os leitores de CD compatíveis
podem ser controlados através das funções “fader start” e “crossfader effects” da
SMX-3.
39.SAÍDA MASTER1 BALANCEADA: Os conectores XLR podem ser utilizados para
ligar esta mesa de mistura a amplificadores através de cabos especiais de sinal
balanceado.
40.TRIM OUTPUT: Este potenciómetro é utilizado para reduzir o nível de saída da mesa
de mistura de forma a proteger os amplificadores e colunas que estejam ligados.
(Atenção: o nível de saída pode ser reduzido a zero. Caso não tenha qualquer sinal na
saída Master, comece por verificar se este controlo não está definido para zero.)
41.TALKOVER RECOVERY TIME: Permite ajustar o tempo que a música dos canais de
entrada leva a voltar ao nível normal após o DJ parar de falar no micro DJ.
42.ENTRADA MICRO1: Permite ligar um microfone sem balanço adicional.
43.ENTRADA DJ-MIC: Combo jack. Aceita microfones balanceados com conector XLR
bem como microfones mono sem balanço tipo jack ¼”. Entrada geralmente utilizada
para micro DJ. A função “talkover” (29) não afecta o nível do sinal desta entrada.
44.ENTRADA PHONO/LINE: Permite ligar um gira-discos ou uma unidade do tipo “line”.
Caso ligue um leitor de CD: coloque o selector “phono/line” na posição “line”. Se
o seu gira-discos tiver uma saída tipo “line” sugerimos que o utilize.
Caso ligue um gira-discos: coloque o selector “phono/line” na posição “phono”.
A maioria dos gira-discos tem uma ligação terra (GND). Ligue o conector terra do
gira-discos ao conector terra da mesa de mistura.
45.ENTRADA LINE: Permite ligar unidades do tipo line (CD, sintonizador, Minidisc...)
46.SAÍDA SEND: Alem da unidade de efeitos interna também é possível ligar uma
unidade de efeitos externa à SMX-3. O sinal de saída é seleccionado com selector
“effect assign” (26).
Observação: a função “send/return” permite utilizar o “sampler” interno em conjunto com um
processador de efeitos externo.
47.ENTRADA RETURN: faz o retorno do sinal do processador de efeitos externo. O sinal
de retorno é misturado com o sinal original. O nível do sinal de retorno pode ser
ajustado com o controlo de parâmetro X (24). Se deseja realmente controlo total sobre
o sinal de retorno do processador de efeitos externo (controlo de tom, etc.) poderá
conectar a saída do processador de efeitos a um canal de entrada em vez da entrada
de return.
Observação: é possível desligar o sinal da entrada “return” com o botão “effects on/off” (18).
48.SAÍDA PARA GRAVAÇÃO (REC): Esta saída transporta o mesmo sinal que as
saídas master mas não é influenciada pelos controlos de nível, balanço, e
mono/estéreo da saída master. Destina-se à ligação de equipamento analógico de
gravação.
49.SAÍDA MASTER2 SEM BALANÇO: Utilizada para ligar amplificadores adicionais.
50.SAÍDA MASTER1 SEM BALANÇO: Tem o mesmo sinal de saída que a saída Master
balanceada (39) mas sem balanço. Pode ser utilizada para ligar amplificadores sem
balanço.
ACERCA DO SAMPLER
Antes de poder utilizar o “sampler” TERÁ de introduzir um cartão Secure Digital™ Isto po
de ser um cartão standard SD™/SDHC™ ou um cartão de alta capacidade SDHC™.
Pode comprar estes cartões de memória em lojas da especialidade. Após introduzir o
cartão de memória, o display mostra “rEAd” seguido de “ 1”. Isto significa que o banco de
memória 1 está seleccionado.
COMO FORMATAR O CARTÃO SD™/SDHC™:
Pode formatar o cartão em qualquer PC com o sistema Windows®.
Introduza o cartão SD™/SDHC™ no leitor de cartões de memória do PC.
No explorador do “Windows” pressione com o botão direito do rato no ícone do leitor
de cartões para abrir a janela de opções.
Seleccione “Formatar” para abrir a opção.
Escolha o sistema de ficheiros que o seu PC sugere como standard. Irá ser FAT ou
FAT32 (NÂO ESCOLHA NTFS!)
É possível atribuir um nome ao cartão SD™/SDHC™ ou manter o de origem.
NÃO utilize a opção de formatação rápida.
Pressione “Iniciar” para iniciar a formatação.
Esta operação demora algum tempo. O Windows irá informá-lo quando a operação estiver
concluída.
COMO GRAVAR UM SAMPLE:
Só é possível gravar um “sample” para um botão “play” vazio. Veja a explicação sobre
como apagar um “sample” ou um banco de memória por completo.
Coloque a SMX-3 no modo “sampler” com o selector “effects” (27).
Utilize o selector “effect assign” (26) para seleccionar o canal de entrada de
onde pretende gravar a “sample”.
Pressione o botão “TAP/REC” (22) para colocar o “sampler” no modo
gravação (o botão “TAP/REC” pisca.) O display mostra o número de segundos para
gravação de “samples”.
Com o controlo “X-parameter” (24) poderá percorrer os 99 bancos de memória
disponíveis. Para seleccionar um banco de memória pressione o controlo “Xparameter” uma vez.
Sugestão: Enquanto percorre os bancos de memória poderá ver quais os botões “play” que ainda
estão vazios. (Cheios = acesos * Vazios = apagados)
Para começar a gravação, pressione um dos botões “play” vazios (apagados!) no
momento certo! O display começa a contagem decrescente de segundos disponíveis
para gravação.
Para parar a gravação pressione o mesmo botão “play” novamente no momento certo!
Para reproduzir a “sample” gravada pressione simplesmente o mesmo botão “play”
uma terceira vez.
COMO REPRODUZIR UM SAMPLE (MODO SAMPLER ):
Coloque a SMX-3 no modo “sampler” com o selector “effects” (27).
Utilize o selector de entrada (1) de um dos canais para seleccionar o “sampler”.
Com o controlo “X-parameter” (24) poderá percorrer os bancos de memória que
contêm “samples” (os bancos de memória vazios não estão disponíveis). Para
seleccionar um banco de memória pressione o controlo “X-parameter” uma vez.
Sugestão: Enquanto percorre os bancos de memória poderá ver quais os botões “play” que ainda
estão vazios. (Cheios = acesos * Vazios = apagados)
Para iniciar a reprodução terá apenas que pressionar os botões “play” que estão
acesos (luz vermelha)
Sugestão: É possível reproduzir até 2 “samples” em conjunto (polifonia) e colocar 1 “sample” em modo
loop (mais informação adiante).
Poderá seleccionar outro banco de memória enquanto um “sample” do banco de memória anterior
continua a ser reproduzido. Isto significa que pode mudar de bancos de memória sem interrupções!
SYNQ® 117/124 SMX-3
SYNQ® 118/124 SMX-3
Page 62

PORTUGUÊS MANUAL DO UTILIZADOR
Total length of recorded sample
Total length recorded sample
PORTUGUÊS MANUAL DO UTILIZADOR
COMO REPRODUZIR JINGLES (MODO JINGLE):
Coloque a SMX-3 no modo “sampler” com o selector “effects” (27).
Utilize o selector de entrada (1) de um dos canais para seleccionar o “sampler”.
Pressione o botão “EFF. CUE” para que este acenda.
Pressione um dos botões play (23) por breves instantes: a amostra correspondente é
reproduzida até ao final. Cada vez que pressiona o mesmo botão play, a amostra
recomeça com o efeito stutter como resultado.
Enquanto a amostra está a reproduzir, pode pressionar outro botão play: a primeira
amostra pára imediatamente e a nova amostra começa a reproduzir.
Pode parar a amostra que está a ser reproduzida parando o modo jingle: pressione o
botão “EFF. CUE” (20) até quando desejar que a amostra que está a tocar esteja
parada. (apenas quando largar o botão “EFF. CUE”, a amostra pára de tocar).
NOTAS IMPORTANTES:
Durante o modo jingle não poderá gravar e editar amostras ou reproduzir loops:
mude para o modo sampler normal para efectuar estas tarefas. Quando desliga a mesa
de mistura ou retira o cartão de memória, o sampler regressa automaticamente ao modo
standard.
COMO APAGAR 1 SAMPLE:
É possível apagar “samples” no modo reprodução e no modo gravação.
Pressione o botão “play” onde está guardada o “sample”.
Em seguida pressione o botão “TAP/REC” (22) em simultâneo.
Após 2 segundos o display mostra “dEL” de forma a indicar que o “sample” foi apagada (o
botão “play” apaga-se).
COMO APAGAR UM BANCO DE MEMÓRIA:
É possível apagar um banco de memória no modo reprodução e no modo
gravação.
Com o controlo “X-parameter” (24) poderá percorrer os bancos de
memória que contêm “samples” (os bancos de memória vazios não estão
disponíveis). Para seleccionar um banco de memória pressione o
controlo “X-parameter” uma vez.
Para apagar o banco de memória seleccionado, pressione e mantenha pressionado o
controlo “X-parameter” (24) e em seguida pressione o botão “play” marcado como “32”
e “CLR. BNK” (23). Após 2 segundos o display mostra “dEL” de forma a indicar que o
“sample” foi apagado (todos os botões “play” se apagam).
COMO EDITAR O PONTO INICIAL DE UM SAMPLE:
Caso tenha começado a gravar o “sample” demasiado cedo, é possível ajustar com
precisão o ponto inicial. Este processo não é destrutivo.
Pressione o botão “play” do “sample” que pretende reproduzir em “loop”.
Em seguida pressione o botão “loop intro” (15) em simultâneo.
Solte ambos os botões: irá ouvir “loops” muito pequenos, semelhantes ao
que se ouve quando um leitor de CD faz busca por frame.
Utilize o controlo “X-parameter” (24) para procurar um novo ponto inicial.
Pressione o botão “loop intro” novamente para parar o modo de edição e guardar o
novo ponto inicial.
Pode repetir estas operações até encontrar o ponto inicial exacto.
Intro Edit
Indexpoint begin Indexpoint end
Outro Edit
COMO EDITAR O PONTO FINAL DE UM SAMPLE:
Caso tenha parado de gravar o “sample” sem ser no momento que desejava, é
possível ajustar com precisão o ponto final. Este processo não é destrutivo.
Pressione o botão “play” do “sample” que pretende reproduzir em “loop”.
Em seguida pressione o botão “loop outro” (15) em simultâneo.
Solte ambos os botões: o “sample” é reproduzido em “loop”.
Pode usar o controlo do parâmetro Y (25) para ajustar a velocidade individual.
Pressione o botão “loop outro” novamente para parar o modo de edição e guardar o
novo ponto final.
COMO REPRODUZIR UM SAMPLE EM LOOP:
Pressione o botão “play” do “sample” que pretende reproduzir em “loop”.
Em seguida pressione o botão “loop” (16) em simultâneo.
Solte ambos os botões: ambos os botões piscam em conjunto de forma a
indicar qual o “sample” que está a ser reproduzido em “loop”.
Para reiniciar o “loop” terá apenas que pressionar novamente o botão “play.
Para parar o “loop” pressione o botão “loop” (o “loop” continua) e solte o botão no
momento certo. Assim que o botão “loop” é solto, o “loop” pára.
DIFERENÇA ENTRE VELOCIDADE “INDIVIDUAL” & “GERAL”:
Ajuste velocidade individual: Pode ajustar a velocidade de cada amostra
individualmente para que possa sincronizar as amostras diferentes a cada outras.
Pode definir a velocidade individual durante a edição do “ponto final” da amostra. A
definição de velocidade individual é guardada em conjunto com os pontos de início/fim
da amostra. Verifique a descrição do botão do parâmetro Y (25) para mais informação
Ajuste velocidade geral: é usada durante a reprodução de 1 ou 2 amostras. Esta
velocidade NÃO é guardada com as amostras! Verifique a descrição do controlo do
parâmetro. Também pode usar os botões da velocidade (8) para sincronizar as
amostras com as outras origens de música.
SYNQ® 119/124 SMX-3
Intro Edit
Indexpoint begin Indexpoint end
Loop between index points
Outro Edit
SYNQ® 120/124 SMX-3
Page 63

PORTUGUÊS MANUAL DO UTILIZADOR
PORTUGUÊS MANUAL DO UTILIZADOR
INSTALAR ADAPTADORES OPCIONAIS 19”
Caso pretenda montar a SMX-3 numa rack de 19” terá de instalar 2 adaptadores de 19”.
Retire as 3 protecções de
plástico em ambos os lados da
mesa de mistura.
Retire os 4 parafusos em
ambos os lados da mesa de
mistura. Guarde estes
parafusos em lugar seguro
para futura utilização caso
pretenda voltar a utilizar a
mesa sem os adaptadores de
19”.
Coloque e fixe um dos
adaptadores no lugar indicado
com os 7 parafusos fornecidos.
Repita a operação com o
adaptador restante.
A mesa de mistura está agora pronta a ser montada numa rack de 19”. A altura total é
370mm ou cerca de 8.5 unidades. Não se esqueça montar um painel de 1U, necessário
para os conectores no topo da SMX-3.
ACTUALIZAR O FIRMWARE
Através deste processo pode actualizar o “firmware” do processador e do DSP. Esta
operação de actualização de “software” é delicada, siga os procedimentos com atenção,
caso contrário poderá danificar a unidade.
MUITO IMPORTANTE!
NÃO SE ESQUEÇA DE REGISTAR O SEU SMX-3. RECEBERÁ AUTOMATICAMENTE UM AVISO
QUANDO ESTIVEREM DISPONÍVEIS NOVAS ACTUALIZAÇÕES DO SOFTWARE!
VISITE: WWW.SYNQ-AUDIO.COM/REGISTER/
Se fizer a actualização do processador e do software DSP, tem de actualizar sempre o
processador primeiro! Leia sempre o ficheiro README incluído na actualização de
software antes de começar a actualização. NÃO desligue a unidade nem pressione
qualquer botão durante o processo de actualização! Aguarde que o display volte ao
normal. Só poderá interromper o processo de actualização, desligando a mesa de
mistura, caso o display se mantenha apagado após um minuto. Neste caso a
actualização terá falhado.
COMO VERIFICAR A VERSÃO DE SOFTWARE:
Desligue a mesa de mistura.
Pressione os botões “play” (23) “16” e “32” em
simultâneo.
Ligue a mesa enquanto mantém ambos os
botões pressionados.
O display mostra a versão do “software” do microprocessador e do DSP: veja a imagem.
Neste exemplo as versões de “software” são: Processador (Processor) = V1.6 e DSP =
V1.5
COMO ACTUALIZAR O SOFTWARE DO PROCESSADOR:
Introduza o cartão SD™/SDHC™ no seu PC e copie o ficheiro “SMX-3C_xx.bin” para o
cartão de memoria. Importante! NÃO mude o nome do ficheiro!
Introduza o cartão SD™/SDHC™ na entrada “cartão SD™/SDHC™” (28) da SMX-3.
Desligue a mesa de mistura.
Pressione os três botões “play” (23) “2” + “4” + “8” em simultâneo.
Ligue a mesa enquanto mantém os três botões pressionados.
Todos os botões “cue” (5) piscam quatro vezes indicando que o processo de
actualização foi iniciado. Após todos os botões “cue” terem piscado 2 vezes pode soltar
os 3 botões “play”.
Irá reparar que todos os botões “cue” se irão acender um a um (de 1 a 5) enquanto os
botões “play” mudam de cor. Após cerca de 25 segundos o display volta ao normal de
forma a indicar que o processo de actualização terminou.
Verifique a versão do “software” para confirmar se a actualização foi efectuada.
COMO ACTUALIZAR O SOFTWARE DO DSP:
Introduza o cartão SD™/SDHC™ no seu PC e copie o ficheiro “smx-3_xx.bin” (onde
“xx” é o numero da versão) para o cartão de memória.
Importante! NÃO mude o nome do ficheiro!
Introduza o cartão SD™/SDHC™ na entrada “cartão SD™/SDHC™” (28) da SMX-3.
Desligue a mesa de mistura.
Pressione os três botões “play” (23) “8” + “16” + “32” em simultâneo.
Ligue a mesa enquanto mantém os três botões pressionados.
Todos os botões “cue” (5) piscam quatro vezes indicando que o processo de
actualização foi iniciado. Após todos os botões “cue” terem piscado 2 vezes pode soltar
os 3 botões “play”.
Irá reparar que todos os botões “cue” se irão acender um a um (de 1 a 3). Após cerca de
15 segundos o display volta ao normal de forma a indicar que o processo de actualização
terminou.
Verifique a versão do “software” para confirmar se a actualização foi efectuada.
SUBSTITUIÇÃO DOS FADERS
Uma das grandes vantagens desta mesa de mistura é a possibilidade de substituir os
faders dos canais inclusivamente durante o funcionamento.
O que tem de fazer para substituir um fader de canal é o seguinte:
Retire os cursores dos faders.
Retire os 6 parafusos que fixam o painel
frontal que cobre os faders.
Retire os 3 parafusos do fader que
pretende substituir.
Retire com cuidado o fader do encaixe.
Coloque o novo fader no encaixe.
Certifique-se que os contactos são
inseridos nos conectores da placa PCB
da mesa de mistura.
Volte a colocar os 3 parafusos que fixam
o fader no encaixe
Volte a colocar o painel frontal e fixe com os 6 parafusos.
A operação está terminada!
SYNQ® 121/124 SMX-3
SYNQ® 122/124 SMX-3
Page 64

PORTUGUÊS MANUAL DO UTILIZADOR
PORTUGUÊS MANUAL DO UTILIZADOR
O que tem de fazer para substituir o crossfader é o seguinte:
Retire o cursor do crossfader.
Retire os 2 parafusos que fixam o crossfader.
Retire com cuidado o painel frontal e o crossfader do encaixe.
Desligue o crossfader do cabo (Desligue o cabo puxando o conector, NÃO o cabo!)
Ligue o novo crossfader ao cabo.
Volte a colocar o crossfader no encaixe, aplique o painel frontal e fixe com os dois
parafusos.
A operação está terminada!
ESPECIFICAÇÕES
Entrada/saída impedância & sensibilidade (EQ flat, max. gain, level meter = 0dB)
Line 2, 4, 6, 7 entrada: 340mV@ 20kΩ (max = +4dBV)
Line 1, 3, 5 entrada: 340mV@ 47kΩ (max = +4dBV)
Entrada Phono: 3,4mV @ 47kΩ (max = -36dBV)
Entradas Micro: 3,4mV @ 10kΩ (max = -36dBV)
Return: 525mV@ 10kΩ
Send: 525mV@ 2kΩ
Saída Gravação (Rec): 775mV@ 1kΩ
Master sem balanço: 1,55V @ 100Ω
Master balanceado: 2,55V @ 200Ω
Auscultadores: 3,00V @ 33Ω
Saída Máxima (EQ flat, max. gain, FX off, THD=1%, carga é 100kΩ )
Master1: Mais de +18dBV (8,0V)
Master2: Mais de +18dBV (8,0V)
Auscultadores: Mais de + 9,5dBV (3V) @ 32Ω
Resposta em Frequência (EQ flat, max. gain, level meter = 0dB, carga é 100kΩ )
Line: 25 – 20.000Hz +/-1dB
Phono: 25 – 20.000Hz +1/-1,5dB (RIAA)
Micro: 25 - 20.000Hz +1/-1,5dB
Especificações Gerais:
Fonte de Alimentação: 230V~ 50Hz. (Europe)
Consumo de Energia: 40Watts
Dimensões: 320 x 370 x 109mm (LxDxA)
Peso: 7.0 kg
Estas informações estão sujeitas a alterações sem aviso prévio
Pode fazer download da versão mais recente deste manual no nosso site:
www.synq-audio.com
THD + Noise (EQ flat, max. gain, level meter = 0dB, carga é 100kΩ )
Line: Menos de 0,05% (25 – 20.000Hz)
Phono: Menos de 0,05% (1kHz A-weighted)
Micro: Menos de 0,1% (1kHz A-weighted)
Channel Crosstalk (EQ flat, max. gain, Master = 0dBV)
Crosstalk: Mais de 70dB @ 1kHz (entre esquerda,direita & canais)
Controlos de Frequência:
Micro: -12dB / +12dB@ 70Hz – 1kHz – 13kHz.
Canais de Entrada: -30dB / +10dB@ 70Hz – 1kHz – 13kHz.
Unidade Sampler MP3:
Gravação de amostra: MPEG1 layer3 44,1kHz taxa @ 192kbps estéreo
Leitura Amostra: taxas diferentes, parâmetros de edição não possíveis
Polifonia: 2 vozes
Cartões de memória: cartões SD™ e SDHC™
Capacidade Max. Cartão: 32GB
Formato de ficheiros: FAT (FAT16) ou FAT32 (depende da capacidade)
SYNQ® 123/124 SMX-3
SYNQ® 124/124 SMX-3
 Loading...