

Page 1
WWW.BEGLEC.COM
Operation Manual
Mode d'emploi
Gebruiksaanwijzing
Bedienungsanleitung
Manual de instrucciones
EN
FR
NL
DU
ES
Reproduction or publication of the content in any manner, without express permission of the publisher, is prohibited.
Copyright © 2007 by BEGLEC cva.
Version: 1.0
Page 2
EN - DISPOSAL OF THE DEVICE
Dispose of the unit and used batteries in an environment friendly manner
according to your country regulations.
FR - DÉCLASSER L’APPAREIL
Débarrassez-vous de l’appareil et des piles usagées de manière écologique
Conformément aux dispositions légales de votre pays.
NL - VERWIJDEREN VAN HET APPARAAT
Verwijder het toestel en de gebruikte batterijen op een milieuvriendelijke
manier conform de in uw land geldende voorschriften.
DU - ENTSORGUNG DES GERÄTS
Entsorgen Sie das Gerät und die Batterien auf umweltfreundliche Art und
Weise gemäß den Vorschriften Ihres Landes.
ES - DESHACERSE DEL APARATO
Reciclar el aparato y pilas usadas de forma ecologica conforme a las
disposiciones legales de su pais.
PT - COMO DESFAZER-SE DA UNIDADE
Tente reciclar a unidade e as pilhas usadas respeitando o ambiente e em
conformidade com as normas vigentes no seu país.
Page 3
ENGLISH OPERATION MANUAL
Thank you for buying this JB Systems®product. To take full advantage of all possibilities and for your own
safety, pleaseread these operatinginstructions very carefully before youstartusing this unit.
FEATURES
This unit is radio-interference suppressed. This product meets the requirementsof the current European and
nationalguidelines.Conformityhas been established and the relevantstatements and documentshavebeen
depositedbythe manufacturer.
This device hasbeen designed to producedecorative effect lighting and is used in light showsystems.
Panther:
Intelligent Gobo-flower equipped with scan mirror
Built-in programs for great pre-programmedlightshows!
Master/slave or stand alone mode with built-in micro or easily controlled by Scanmaster SM1612 or any
other DMX controller
Gobo/colour wheelwith15 single and multi colouredgobos
A small optional CA-8 controller is available for easy operation
Perfect for discos,clubs, bars, mobile DJ
Jaguar:
Same characteristics as Panther
With barrelreflector instead ofregularscanmirror
This barrel spins in alldirections and fills thevenue with multiple sweeping,colourful beams
BEFORE USE
Before you start using this unit, please check if there’s no transportation damage.Should there be any, do
not usethedevice and consult your dealer first.
Important: This device left our factory in perfect condition and well packaged. It is absolutely necessary
for the user to strictly follow the safety instructions and warnings in this user manual. Any damage caused
by mishandling is not subject to warranty. The dealer will not accept responsibility forany resulting defects
orproblemscaused by disregarding this usermanual.
Keep this booklet in a safe place for future consultation. If you sell the fixture, be sure to add this user
manual.
Check the contents:
Check that the cartoncontains the following items:
Operatinginstructions
Panther/Jaguar
1 ELC 250W/24V lamp
SAFETY INSTRUCTIONS:
CAUT ION
The lightning flash with arrowhead symbol within the equilateral triangle is intended to alert the use
or the presence of un-insulated “dangerous voltage” within the product’s enclosure that may be of
sufficient magnitudeto constitute a risk of electricshock.
The exclamation point within the equilateral triangle is intended to alert the user to the presence of
important operation and maintenance (servicing) instructions in the literature accompanying this
appliance.
This symbol means:indooruseonly.
This symbol means:Readinstructions.
CAUTION: To reduce the risk of electric shock, do not remove the top cover.
No user-serviceable parts inside. Refer servicing to qualified service
personnelonly.
ENGLISH OPERATION MANUAL
This symbol determines:the minimum distance fromlighted objects.The minimum distance between
light-output andtheilluminated surfacemustbe more than 1 meters.
To protecttheenvironment,please try to recyclethe packing materialasmuch as possible.
A new light effect sometimes causes some unwanted smoke and/or smell. This is normal anddisappears
aftersomeminutes.
To prevent fireor shock hazard, do not exposethis appliance torain or moisture.
To avoid condensation to be formed inside, allow the unit to adapt to the surrounding temperatures when
bringing it into a warm room after transport. Condense sometimes prevents the unit from working at full
performance or may even causedamages.
This unit is forindoor useonly.
Don’t place metalobjects or spill liquid inside the unit. Electric shock or malfunction may result. If a foreign
object enterstheunit, immediatelydisconnectthe mains power.
Locate the fixture in a well ventilated spot, away from any flammable materials and/or liquids. The fixture
must be fixed at least 50cmfrom surrounding walls.
Don’t coverany ventilation openings as this mayresult in overheating.
Prevent use in dusty environmentsand clean the unit regularly.
Keep the unit away from children.
Inexperienced personsshouldnotoperatethis device.
Maximum save ambienttemperature is 40°C. Don’tusethisunit at higher ambienttemperatures.
The units’ surface temperature may reach up to 85°C. Don’t touch the housing with bare hands during its
operation.
Make sure the area below the installation place is free from unwanted persons during rigging, de-rigging
and servicing.
Allow the device about 10 minutes to cooldown before replacing the bulb or startservicing.
Always unplug the unit when it is not used for a longer timeorbeforereplacing the bulb or start servicing.
The electrical installation should be carried out by qualified personal only, according to the regulations for
electricaland mechanicalsafety in your country.
Check that the available voltage is not higher than the onestated on the rear panel oftheunit.
The powercord should always be in perfectcondition. Switch the unit immediately off when thepowercord
is squashed or damaged. It must be replaced by the manufacturer,its service agent or similarly qualified
persons in order toavoida hazard.
Never letthepower-cordcome into contact with other cables!
This fixture must be earthed to in ordercomply with safety regulations.
Don’t connect the unitto any dimmer pack.
Always use an appropriateand certifiedsafety cable wheninstalling theunit.
In order to prevent electric shock, do not open the cover. Apart from the lamp and mains fuse there are no
user serviceable parts inside.
Never
repair a fuse or bypass the fuse holder.
type and electricalspecifications!
In the event of serious operating problems,stop using the fixtureand contact your dealerimmediately.
Thehousing and the lenses must be replaced if theyare visibly damaged.
Pleaseusetheoriginal packingwhen the device is to be transported.
Due to safety reasonsit is prohibited to makeunauthorized modifications to theunit.
Important:
from epilepsy.
Never look directlyinto the light source! Don’t use the effectin the presence of persons suffering
Always
replace a damaged fuse with a fuse of the same
JB SYSTEMS
®
1/33 PANTHER/JAGUAR
JB SYSTEMS
®
2/33 PANTHER/JAGUAR
Page 4
ENGLISH OPERATION MANUAL
ENGLISH OPERATION MANUAL
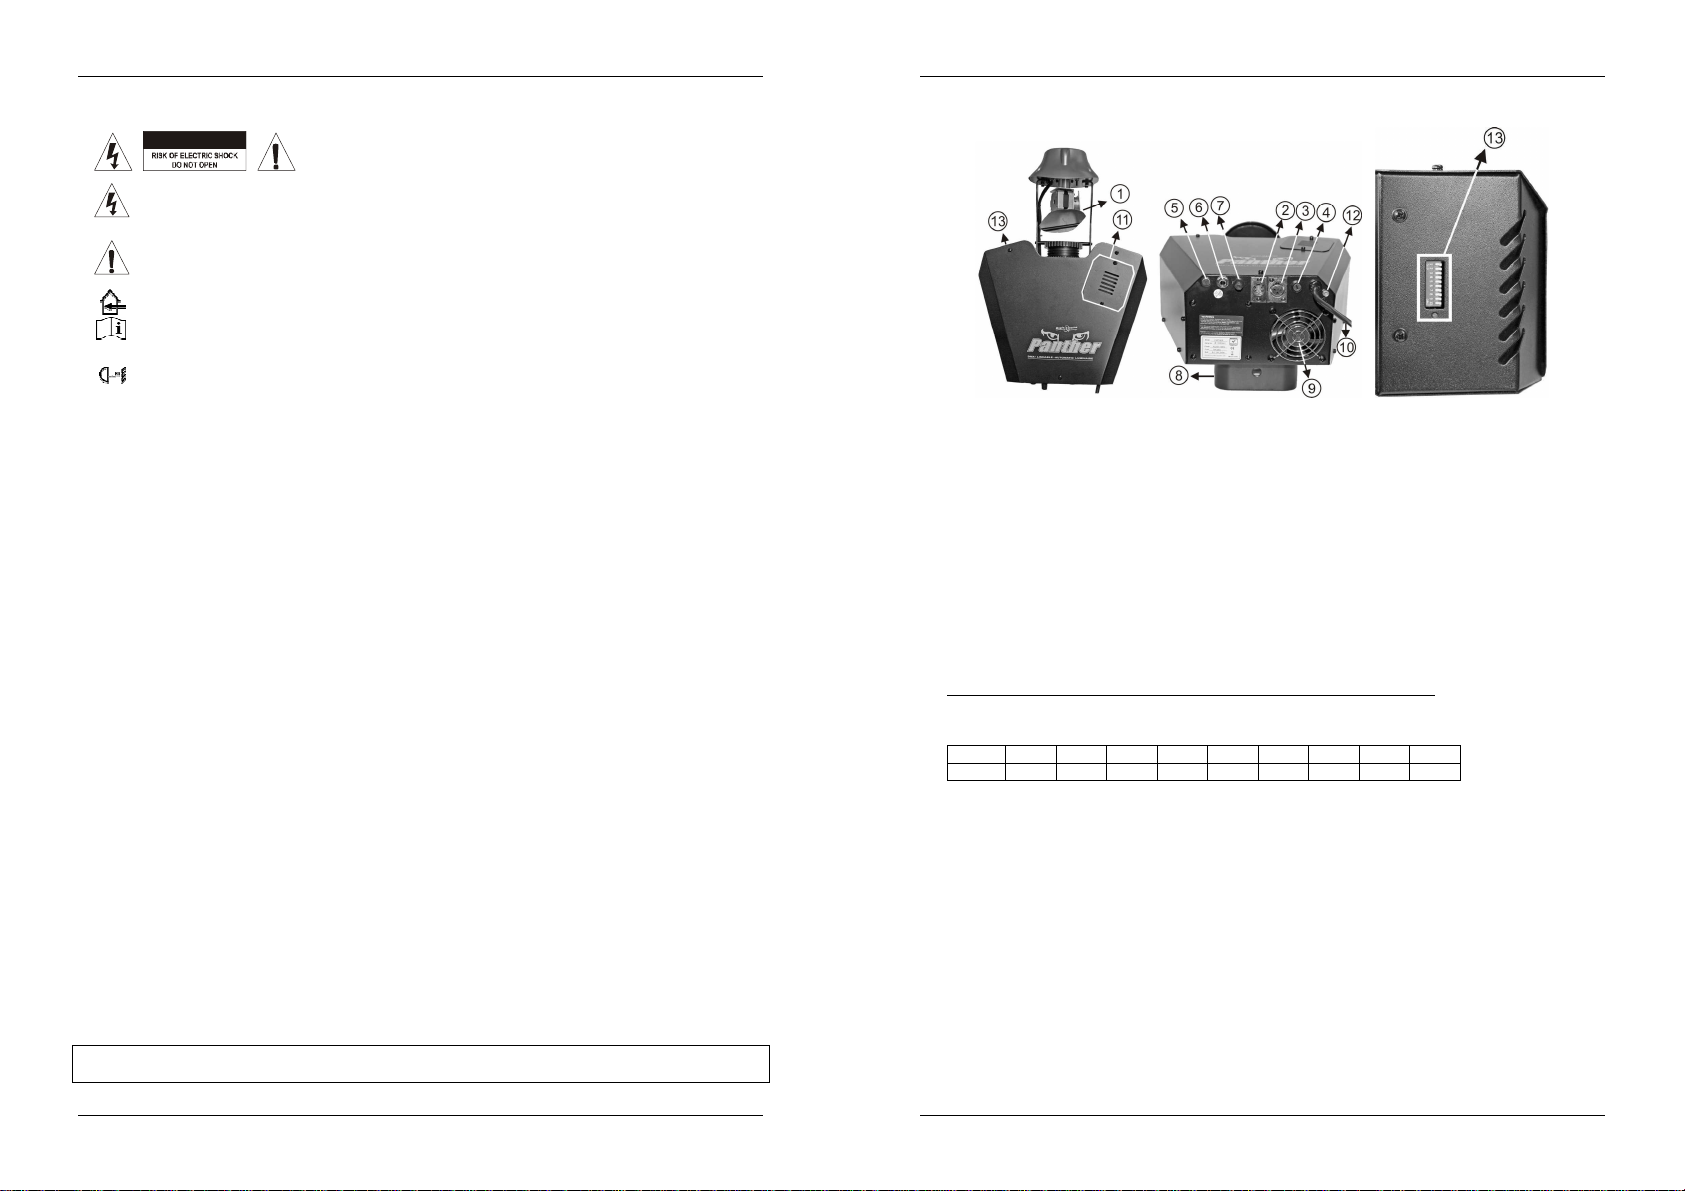
DESCRIPTION:
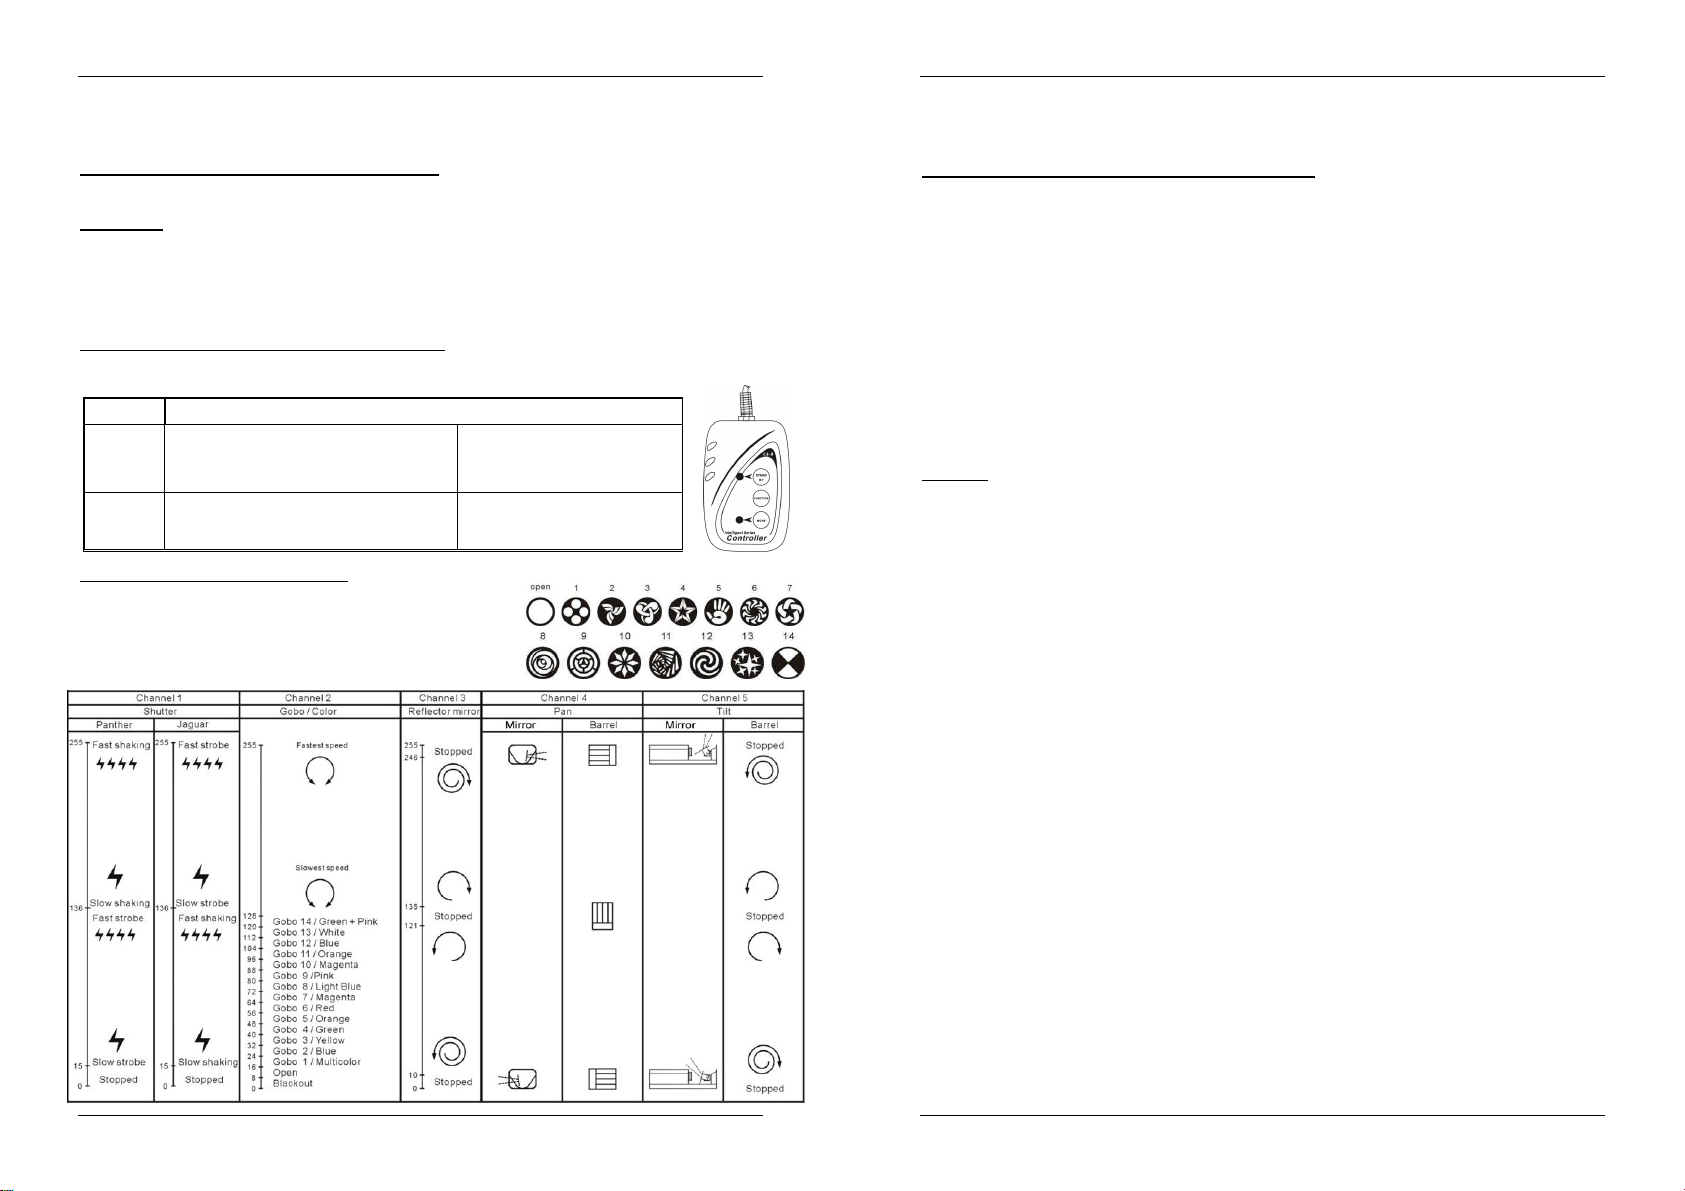
1. SCANNINGMIRROR ( for Panther ) or BARREL ( forJaguar )
2. DMX INPUT: 3pinmale XLR-connector.For receiving DMXsignals.
3. DMX OUTPUT: 3pin female XLR-connector. Used to connect the Panther/Jaguar with the next unit in
the DMXchain
4. MAINFUSE
5. INTERNALMICROPHONE
6. 1/4”JACK used to connect the optionalCA-8controller
7. KNOB used tocontrol the music sensitivity
8. HANGING BRACKET with 2 knobs on both sides to fasten the unit and a mounting hole to fix a
mounting hook
9. COOLINGFAN
10. MAINS CABLE
11. LAMP COMPARTMENT
12. EARTHCONNECTION
13. DIP-SWITCHES,used to set the DMX-startingaddress of the unit.
How to set the DIP-switches toobtain theright startingaddress:
Each of the first 9 DIP-switchescorresponds toacertain DMX-value(DIP-switch 10 is notused):
Dip #1 #2 #3 #4 #5 #6 #7 #8 #9
Value 1 2 4 8 16 32 64 128 256
You can combine thevalues ofthese switches to obtainany starting address between 1 and 512:
Begin address= 01 switch1=ON values:1
Begin address= 05 switch1+3=ON values: 1+4 =5
Begin address= 09 switch1+4=ON values: 1+8 =9
Begin address= 13 switch1+3+4=ON values: 1+4+8= 13
…
Begin address= 62 switch2+3+4+5+6=ON values:2+4+8+16+32 =62
LAMP (RE)PLACEMENT
In case of replacement of the lamp or maintenance, do
not open the fixture within 10 minutes until the unit cools
down after switching off. Always unplug the unit before
(bulbs, fuses, etc.) When replacing parts, please only genuine spare
parts.
Switch off the unit andunplug the mains cable.
Wait forabout 10 minutes until the unit has beencooleddown.
Use a screwdriver to unscrew the 2 screws that close the lamp
compartment of the fixture. ( A on the picture )
On the inside you will see the lamp socket. Tear the lamp socket gently
out of the lamp compartment. ( A on the picture )
Unplug the old lamp. Hold the lamp socket while unplugging the lamp
instead of pulling the cable!
Hold the lamp socket while pressing the new lamp gently in the
socket.
Attention! Check the label on the backside of the device or see
the technical specifications in this manual to know which lamp
should be used. Never install lamps with a higher wattage! Lamps
with higher wattage generate temperatures the device was not
designed for. If thedeviceuses a lamp transformer, it will burn due
to current overload.
Don’t touch the bulb with bare hands!This drastically shortensthe
lifespan of the lamp. If you touched the lamp, clean it with a cloth
and a little denaturedalcohol. Wipe thelamp offbefore installing.
Put the new lamp back inside the unit. Be sure that the wires don’t
touch thelamp. (B onthe picture)
Close thelamp compartment with thescrews.
Done!
servicing! Always use the same type of spare parts
OVERHEAD RIGGING
Important: The installation must be carried out by qualified service personal only. Improper
installation can result in serious injuries and/or damage to property. Overhead rigging requires
extensive experience! Working load limits should be respected, certified installation materials
shouldbe used, the installeddevice should beinspected regularly for safety.
Make sure the area below the installation place is free from unwanted persons during rigging, de-rigging
andservicing.
Locate the fixture in a well ventilated spot, far away from any flammable materials and/or liquids. The
fixturemust be fixed
The deviceshould be installed out of reach ofpeopleand outside areas where persons may walk by or be
seated.
Before rigging make sure that the installation area can hold a minimum point load of 10times the device’s
weight.
Always use a certified safety cable that can hold 12timesthe weight of the device when installing the unit.
This secondary safety attachment should be installed in a way that no part of the installation can drop
more than 20cmifthe main attachment fails.
Thedevice shouldbe well fixed; a free-swinging mountingis dangerousand may notbe considered!
Don’tcoverany ventilation openingsas this may result in overheating.
The operatorhas to make sure thatthesafety-relatingandmachine-technical installationsare approved by
an expert beforeusing them forthe first time. The installations should be inspected every year by a skilled
person to be sure that safetyis stilloptimal.
at least50cm
fromsurrounding walls.
JB SYSTEMS
®
3/33 PANTHER/JAGUAR
JB SYSTEMS
®
4/33 PANTHER/JAGUAR
Page 5
ENGLISH OPERATION MANUAL
ENGLISH OPERATION MANUAL
OPERATING INSTRUCTIONS
PANTHER / JAGUAR units can be linked together as master/slave in a daisy chain and use the built-in
chase sequences automatically orby sound activation.
No needto set the dipswitchesin master/slave mode.
When linking the PANTHER and the JAGUAR in stand-alone mode, the JAGUAR must be used as the
master unit.
2-lightshow
Dipswitch 10 “off”means the unit works normally.
Dipswitch 10 “on”means inversion.
In order to create a light show, you can set the dip switch 10 “on” on any unit that is linked to the master unit
to get inversed movement, even ifyou have only twounits.
Dipswitch 10 is not used on the first unit of the Daisy chain, as it is the master unit that operates the light
show.
Connect theoptional CA-8 controller formore control:
The CA-8 controller can only be used in standalone or master/slave mode. Connect the controller to the CA8input of the first unit (master). Now you can control allthe connected units:
Stand by Blackout theunit
1. Hold on for gobo strobe effect
Function
Mode
Controlled byuniversal DMX-controller:
Connect all units together. (don’t forget to address all units
Connect all units to themainsand turn on the DMX controller.
Since each unit has its own DMX-address, you can control them
individually. Remember that each unit uses 4 DMX-channels as
shown in the DMX chartbelow:
2. Pressshortly for gobo change
Fast mode: Sound activated
(LED off )
properly!)
1. Press shortlyforgobochange
Slow mode: Not sound activated
(LED on)
MAINTENANCE
Make sure the areabelowthe installation place isfreefrom unwanted persons during servicing.
Switch off the unit, unplug the mains cable and waituntil the unit has been cooleddown.
During inspection the following points shouldbe checked:
All screws used for installing the device and any of its parts should be tightly fastened and may not be
corroded.
Housings, fixations and installations spots (ceiling, truss, suspensions) should be totally free from any
deformation.
When an opticallens is visibly damaged due to cracks ordeepscratches, it must be replaced.
The mains cables must be in impeccable condition and should be replaced immediately when even a
small problemis detected.
In order to protect the device from overheat the cooling fans (if any) and ventilation openings should be
cleanedmonthly.
The interiorof the device should be cleaned annually using a vacuumcleaner or air-jet.
The cleaning of internal and external optical lenses and/or mirrors must be carried out periodically to
optimizelightoutput. Cleaning frequencydependson the environment in which the fixtureoperates:damp,
smoky orparticularly dirtysurroundings can causegreateraccumulation ofdirt on theunit’s optics.
Clean withasoft cloth using normalglasscleaningproducts.
Always dry the parts carefully.
Clean the external opticsat least once every 30 days.
Clean the internaloptics at least every 90 days.
Attention: We strongly recommend internalcleaning tobe carried out by qualified personnel!
SPECIFICATIONS
Mains Input: AC 230V,50Hz
Fuse: 20mm Glass 5A FastBlow(20mmglass)
SoundControl: Internal microphone
DMXconnections: 3pin XLR male / female
Lamp: ELC250W/24V
Size: 470 x 314 x 245 mm
Weight: 10 kg
You can downloadthe latest version of thisuser manual on ourwebsite: www.beglec.com
Every information is subject to change withoutprior notice
JB SYSTEMS
®
5/33 PANTHER/JAGUAR
JB SYSTEMS
®
6/33 PANTHER/JAGUAR
Page 6
FRANÇAIS MODE D’EMPLOI
FRANÇAIS MODE D’EMPLOI
Merci d’avoir choisi ceproduit JB Systems®. Pour votre sécurité et pour une utilisation optimalede toutes les
possibilités de l’appareil, lisez attentivement cettenotice avant utilisation.
EN VOUS INSCRIVANT POUR LA LETTRE D’INFORMATION VOUS SEREZ TOUJOURS
TENU AU COURANT DES DERNIERESNOUVELLES CONCERNANT NOS PRODUITS:
NOUVEAUTES,ACTIONS SPECIALES,JOURNEES PORTES OUVERTES, ETC.
SURFEZ SUR: WWW.BEGLEC.COM
CARACTERISTIQUES
Cet appareil ne produit pas d’interférences radio. Il répond aux exigences nationales et européennes. La
conformité a été établieet les déclarations et documentscorrespondants ont été déposés par le fabricant.
Cet appareil a été conçu pour la production d’effets lumière décoratifs et est utilisé dans des spectacles
lumineux.
Panther :
Gobo-flowerintelligent équipé d’un miroir plat
Programmes incorporés pour desuperbes shows lumineux!
Fonctionnement autonome ou en maître/esclave grâce au micro incorporé ; peut également être piloté par
notre Scanmaster (maniementtrèsfacile), ou encore,par d'autres consoles DMX
Rouedegobos/couleursde 15 gobos unis oumulticolores
Un petit contrôleur CA-8 estdisponible en option ;son maniement est très facile
Convientparfaitementaux discothèques,clubs et disco barsmobiles
Jaguar :
Mêmescaractéristiques quelePanther
Equipé d’un miroir cylindriquerotatifaulieu d’un miroir plat
Le cylindre pivotedans tous les sens et emplitl’espaceparde multiples faisceaux
AVANT UTILISATION
Avant d’utiliser cet appareil, assurez-vous de l’absence de dommage lié au transport. En cas
d’endommagement,n’utilisez pas l’appareiletcontactezlevendeur.
Important: Cet appareil a quitté notre usine en parfaite condition et bien emballé. Il est primordial que
l’utilisateur suive les instructions de sécurité et avertissements inclus dans ce manuel. La garantie ne
s’applique pas en cas de dommage lié à une utilisation incorrecte. Le vendeur ne prend pas la
responsabilité des défauts ou de tout problème résultant du fait de n’avoir pas tenu compte des mises en
garde decemanuel.
Conservez ce manuel dans un endroit sûr pour toute consultation future. Si vous vendez l’appareil,
assurez-vous d’y joindre ce manuelégalement.
Vérifiez lecontenu:
Vérifiezsi l’emballagecontient les articles suivants:
Mode d'emploi
Panther/Jaguar
Uneampoule ELC 250W/24V
INSTRUCTIONS DE SECURITE:
CAUTION
La flèche dans un triangle met l'utilisateur en garde contre la présence de haute tension sans
isolationdans l'appareil qui peutcauser un risque d'électrocution.
Un point d'exclamation dans un triangle prévient de la présence d'instructions de fonctionnement et
de maintenancese trouvant dans le manuel, fourniavec l'appareil.
Ce symbole signifie:uniquementpourusage à l'intérieur
Ce symbole signifie: Lire le mode
d’emploi.
Ce symbole détermine: la distance minimum des objets allumés. La distance minimum entre le
projecteur etlasurfaceà éclairer doitêtre de plus d'1 mètre.
Afin de protéger l’environnement, mercide recyclerles emballages autantque possible.
Un nouvel effet lumière peut provoquer de la fumée et/ou une odeur non souhaitée, disparaissant après
quelquesminutes.
Afin d’éviter tout risque d’incendie ou de choc électrique, ne pas exposer cet appareil à la pluie ou
l’humidité.
Pour éviterlaformation de condensation à l’intérieur de l’appareil,patientez quelques minutes pour laisser
l’appareil s’adapter à la température ambiante lorsqu’il arrive dans une pièce chauffée après le transport.
La condensation empêche l’unité de fonctionner en performance optimale et peut même causer des
dommages.
Cetteunité est destinée à une utilisation à l’intérieur uniquement.
Ne pas insérer d’objet métallique ou verser un liquide dans l’appareil. Aucun objet rempli de liquides, tels
que des vases, ne peut êtreplacé sur cet appareil. Risquede choc électrique ou de dysfonctionnement. Si
un corps étrangerestintroduit dans l’unité, déconnectezimmédiatement de lasource d’alimentation.
Aucune source de flamme nue, telleque les bougies allumées,ne peut être placée sur l'appareil.
Placez l’appareil dans un endroit bien ventilé, éloigné de tout matériau ou liquide inflammable. L’appareil
doit êtrefixé à 50cm minimumdes murs.
Nepascouvrirles ouvertures de ventilation,un risque de surchauffe enrésulterait.
Nepasutiliser dans un environnementpoussiéreuxet nettoyezl’unité régulièrement.
Nepaslaisserl’unité à portéedesenfants.
Lespersonnes non expérimentées ne doivent pasutiliser cet appareil.
La température ambiantemaximumd’utilisationde l’appareil est de40°C. Ne pas l’utiliser au-delà de cette
température.
La température des parois de l’unité peut atteindre 85°C. Ne pas toucher la coque à mains nues en cours
de fonctionnement.
Assurez-vous que la zone au-dessous du lieu d’installation ne comporte pas de personnes indésirables
pendant le montage,le démontage et les opérationsde maintenance.
Laissezl’appareil refroidirenviron 10 minutes avantderemplacer l’ampoule oud’effectuerdes réparations.
Débranchez toujours l’appareil si vous ne l’utilisez pas de manière prolongée avant de changer une
ampouleoud’entreprendre desréparations.
Les installations électriques ne peuvent être faites que par du personnel qualifié et conformément aux
régulationsde sécurité électrique etmécanique envigueur dans votrepays.
Assurez-vous que la tension d’alimentationdelasourced’alimentation de la zone dans laquelle vous vous
trouvezne dépassepascelui indiqué à l’arrière de l’appareil.
Le cordon d’alimentation doit toujours être en parfait état. Mettez immédiatement l’unité hors tension si le
cordon devait être écrasé ou endommagé. Pour éviter tout risque de choc électrique, le cordon doit être
remplacé parle constructeur,son agent ou un technicien qualifié.
Ne laissez jamaisle cordon d’alimentation entrer en contactavec d’autres câbles !
L’appareil doitêtre à la masseselonles règles de sécurités.
Nepasconnecter l’unité à un variateur delumière.
Utiliseztoujours les câbles appropriés et certifiés lorsque vousinstallez l’unité.
Pour éviter tout choc électrique, ne pas ouvrir l’appareil. En dehors des ampoules et du fusible principal, il
n’y a pasdepièces pouvantêtre changées par l’utilisateuràl’intérieur.
ATTENTION: afin de réduire le risque d’électrocution,n’enlevezjamais le
couvercle de l’appareil. Il n’y a aucune pièce à l’intérieur de l’appareil que
vous pouvez remplacervous-même. Confiezl’entretien uniquement à des
techniciensqualifiés.
JB SYSTEMS
®
7/33 PANTHER/JAGUAR
JB SYSTEMS
®
8/33 PANTHER/JAGUAR
Page 7

FRANÇAIS MODE D’EMPLOI
FRANÇAIS MODE D’EMPLOI
Nejamais
un fusible de mêmetypeet ayant lesmêmes spécificationsélectriques !
En cas de problèmes de fonctionnement sérieux, arrêtez toute utilisation de l’appareil et contactez votre
revendeurimmédiatement.
La coqueet les lentilles doiventêtre remplacéessi visiblementendommagées.
Utilisezl’emballage d’origine si l’appareildoitêtre transporté.
Pour des raisons de sécurité, il est interdit d’apporter toute modification à l’unité non spécifiquement
autoriséepar les parties responsables.
Important:
personnessouffrantd’épilepsie.
réparer oucourt-circuiterun fusible. Remplacez
Ne jamais fixer directement la source de lumière ! Ne pas utiliser d’effets en présence de
systématiquement
un fusibleendommagépar
DESCRIPTION:
1. MIROIR PLAT (Panther)ou MIROIR CYLINDRIQUE (Jaguar)
2. ENTRÉE DMX : connecteur XLR mâle à 3 broches destiné àrecevoir les signauxDMX.
3. SORTIE DMX: connecteur XLR femelle à 3 broches destiné à raccorder le Panther/Jaguar avec
l'appareilsuivant dans la chaîneDMX.
4. PORTE FUSIBLE
5. MICRO INTÉGRÉ
6. CONNECTEUR¼” JACK stereopour relier le contrôleur CA-8 optionnel avecl’appareil.
7. REGLAGE delasensibilité musicale.
8. SUPPORT DE FIXATION, pourvu de 2 leviers de serrage( un de chaque côté de l’appareil)et d’un trou
pouvantrecevoiruncrochetdefixation.
9. VENTILATEUR DE REFROIDISSEMENT
10. CÂBLE D’ALIMENTATION
11. COMPARTIMENTDELA LAMPE
12. MISE Â LATERRE
13. INTERRUPTEURSDIP : permet d’attribuer l’adresse dedémarrageDMX de l’unité.
Configurerles interrupteurs DIPpour obtenir l'adressede démarrage correcte:
Vous verrez les interrupteurs DIP. Référez-vous au tableau ci-dessous pour comprendre la manière de
programmerles adresses DMX :
DIP #1 #2 #3 #4 #5 #6 #7 #8 #9
Valeur 1 2 4 8 16 32 64 128 256
Combinez cesvaleurs pour obtenir des adresses de démarragecomprises entre 1 et 512:
Adresse= 01 DIP1=ON valeurs: 1
Adresse= 05 DIP1+3=ON valeurs:1+4 = 5
Adresse= 09 DIP1+4=ON valeurs:1+8 = 9
Adresse= 13 DIP1+3+4=ON valeurs:1+4+8 =13
…
Adresse= 62 DIP2+3+4+5+6=ON valeurs: 2+4+8+16+32=62
MISE EN PLACE / REMPLACEMENT DES AMPOULES
En cas d’opération de maintenance ou de remplacement
des ampoules, ne pas ouvrir l’installation dans les 10
minutes suivant la fin de l’utilisation jusqu’à ce que
l’appareil ait refroidi. Débranchez systématiquement
toujours le même type de pièces (ampoules, fusibles, etc.) Lors du
remplacement, n’utilisez que des pièces véritables.
Mettez l’unité hors tensionetdébranchez le câbled’alimentation.
Attendez environ10minutes jusqu’à ce que l’unité aitrefroidi.
Utilisez un tournevis pour dévisser les 2 vis du compartiment des
l’unité avant toute opération de maintenance. Utilisez
ampoules del’appareil.
A l’intérieur, la douille est à présent accessible. Retirez-la délicatement de
son compartiment.(A sur la figure ci-contre)
Sortez l’ampoule usagée. Tenez la douille pendant l’opération, plutôt que
de tirersur le câble! (Asur lafigure ci-contre)
Maintenez également la douille lorsque vous mettez la nouvelle
ampoule enplace.
Attention! Reportez-vous à l’étiquette à l’arrière de l’appareil ou
aux spécifications techniques de ce manuel pour savoir quelle
ampoule utiliser. Ne jamais installer d’ampoules à puissance plus
élevée! De telles ampoules produisent des températures
supérieures à celles pour lesquelles l’appareil a été conçu. Si
l’appareil utilise un transformateur, il brûlera en raison de la
surchargeinduite.
Ne pas toucher l’ampoule à mains nues! Cela réduirait
énormément le cycle de vie de la lampe. Si vous l’avez touchée,
nettoyez-la avec un linge et un peu d’alcool dénaturé. Essuyez
l’ampoule avant del’installer.
Insérez la nouvelle ampoule à l’intérieur de l’unité. Assurez-vous
que les filsnetouchentpasl’ampoule. (Bsur lafigure ci-contre)
Refermez le compartiment à ampoulesà l’aidedesvis.
Voilà!
INSTALLATION EN HAUTEUR
Important: L’installation doit être faite par du personnel qualifié uniquement. Une installation
incorrecte peut causer des blessures sévères et/ou endommager l’appareil. L’installation en
hauteur exige de l’expérience ! Les limites de charge doivent être respectées, du matériel
d’installation certifié doit être utilisé, et l’appareil installé doit subir des inspections de sécurité
régulièrement.
Assurez-vous que la zone au-dessous du lieu d’installation ne comporte pas de personnes indésirables
lors de l’installation,la désinstallation ou la maintenance.
Placez l’appareil dans un endroit bien ventilé, éloigné de tout matériau ou liquide inflammable. L’appareil
doit être fixé à 50cm minimumdesmurssituésàproximité.
L’appareil doit être hors de portée du public et en dehors des zones de passage de personnes ou des
zones oùlepublicest installé.
Avant l’installationassurez-vous que la zone d’installationsupporteun point localiséminimumde 10 fois le
poids del’appareil.
Utilisez systématiquement un câble de sécurité qui peut supporter 12 fois le poids de l’appareil lors de
l’installation. Ce câble de sécurité secondaire doit être installé de manière à ce qu’aucune partie de
l’appareilnepuissedescendrede plus de20 cm sile support principaltombe.
L’appareil doitêtre bien fixé, un montageà balancement est dangereuxet ne devrait pas êtreconsidéré !
Ne pascouvrir lesouvertures de ventilationpour évitertout risque de surchauffe.
L’utilisateur doit s’assurer que les installations techniques et de sécurité sont bien approuvées par un
expert avant la première utilisation. Les installations doivent être inspectées chaque année par du
personnelqualifiépour assurerune sécurité optimale.
JB SYSTEMS
®
9/33 PANTHER/JAGUAR
JB SYSTEMS
®
10/33 PANTHER/JAGUAR
Page 8

FRANÇAIS MODE D’EMPLOI
INSTRUCTIONS D’UTILISATION
Les appareils PANTHER / JAGUAR peuvent être raccordés l'un à l'autre en fonctionnement maître/esclave
dans une 'daisy chain' (connexions en guirlandes) et peuvent alors utiliser les séquences de poursuites
selon le mode automatique ou le mode piloté par le son.
Il n'estpas nécessaire deprogrammer lesswitchsDIP en modemaître/esclave.
Lors du raccordement entre le PANTHER et le JAGUAR en mode autonome, c'est le JAGUAR qui doit être
utilisé en tantqu'appareil maître.
2-lightshow
Lorsque le switch DIP10 est en positon 'off', celasignifieque l'appareil fonctionne normalement.
Lorsque le switch DIP10 est enpositon 'on', celasignifieque l'appareil fonctionne en mode inverse.
Lorsque l'on veut créerun light show, on peut régler le switch DIP 10 en position'on' surchaque appareilqui
est raccordé à l'appareil maître, ceci afin de créer des mouvements inverses, même s'il n'y a que deux
appareilsen présence.
Le switch DIP 10 n'est pas utilisé sur le premier appareil de la 'daisy chain', étant donné que c'est l'appareil
maîtrequiorchestrele light show.
Brancher le contrôleur CA-8 en option pourplus de contrôle:
Le contrôleur CA-8 peut uniquement être utilisé en fonctionnement autonome ou en mode maître/esclave.
Branchez le contrôleur sur l’entrée CA-8 du premier appareil (maître). Vous pouvez maintenant contrôler
tousles appareils branchés:
Stand by Pourmettre toutes les fonctions enblackout
1. Maintenezlapressionpourobtenir un
Fonction
Mode
par un contrôleurDMX universel:
Branchez tous les appareils ensemble. Référez-vous au
chapitre “installation électrique pour deux ou plusieurs
appareils en mode DMX” pour apprendre à le faire (n’oubliez
pas d’adressertouslesappareils correctement!)
Branchez tous les appareils sur le secteur et allumez le
contrôleurDMX.
Etant donné que chaque appareil à sa propre adresse DMX,
vous pouvez les contrôler individuellement. Souvenez-vous que chaque appareil utilise 4 canaux DMX
commeindiqué dans le tableauDMXci-dessous:
effetgobostroboscopique
2. Appuyez brièvementpour obtenir
changementdegobo.
Mode rapide : activation par le son
(la LED est éteinte)
1. Appuyezbrièvementpour
obtenirchangementde gobo.
Mode lent : pasd'activation par le
son
(la LED est allumée)
Contrôlé
FRANÇAIS MODE D’EMPLOI
MAINTENANCE
Assurez-vous que la zone au-dessous du lieu d’installation ne comporte pas de personnes indésirables
lors de la maintenance
Mettez l’unité hors tension, débranchez le cordond’alimentationetattendez que l’appareilait refroidi.
Pendant l’inspection, les pointssuivants doiventêtre vérifiés :
Toutes les vis utilisées pour l’installation de l’appareil ou de chacune de ses pièces doivent être bien
fixéeset non corrodées.
Les niches, fixations et structures de support (plafond, poutres, suspensions) doivent être totalement
intactes,sansaucune déformation.
Lorsqu’une lentille optique est visiblement endommagée (fissure ou éraflures profondes), elle doit être
remplacée.
Les câbles doiventêtre en parfaitecondition et doivent être remplacés immédiatementen cas de détection
d’un problème,même bénin.
Pour protéger l’appareil de toute surchauffe,les ventilateurs (si applicable) et les ouvertures de ventilation
doiventêtre nettoyées mensuellement.
L’intérieur de l’appareildoitêtre nettoyé annuellement à l’aide d’un aspirateuroujet d’air.
Le nettoyage des lentilles optiques internes et externes et/ou des miroirs doit être effectué périodiquement
pour optimiser la production de lumière. La fréquence de nettoyage dépend de l’environnement dans
lequel l’appareil fonctionne: des environnements humides, enfumés ou particulièrement sales peuvent
entraîneruneaccumulation de saletésplus importante sur les partiesoptiques de l’appareil.
Nettoyezà l’aide d’un chiffon doux avec desproduits de nettoyage pour verres normaux.
Séchez toujourslesparties soigneusement.
Nettoyez lesoptiques externesau moins une fois tous les30 jours.
Nettoyezles optiques internes au moins une fois tousles 90 jours.
Attention: Nous vous recommandons fortement de faire exécuter le nettoyage interne par du
personnel qualifié !
JB SYSTEMS
®
11/33 PANTHER/JAGUAR
JB SYSTEMS
®
12/33 PANTHER/JAGUAR
Page 9

FRANÇAIS MODE D’EMPLOI
SPECIFICATIONS
Alimentation: CA230V,50Hz
Fusible: 20mm Glass 5AFastBlow (20mm glass)
Contrôle de son: Microphoneinterne
ConnexionsDMX: connecteur XLR mâle /femelle à 3 broches
Ampoules: ELC250W/24V
Taille: 470 x 314 x 245 mm
Poids: 10kg
Chacune deces informations peutêtre modifiéesans avertissement préalable. Vous pouvez
télécharger la dernière version dece mode d’emploide notre siteWeb: www.beglec.com
NEDERLANDS HANDLEIDING
Hartelijk dank voor de aankoop van dit JB Systems®product. Om ten volle te kunnen profiteren van alle
mogelijkheden en voor uw eigen veiligheid, gelieve de aanwijzingen zeer zorgvuldig te lezen voor U begint
het apparaatte gebruiken.
DOOR U OP ONZE MAILINGLIJST IN TE SCHRIJVEN ONTVANGT U STEEDS DE
LAATSTE INFORMATIE OVER ONZE PRODUKTEN: NIEUWIGHEDEN,SPECIALE
ACTIES, OPENDEURDAGEN, ENZ.
SURF NAAR: WWW.BEGLEC.COM EN SCHRIJF U IN
KARAKTERISTIEKEN
In dit apparaat is radio-interferentie onderdrukt. Dit product voldoet aan de gangbare Europese en nationale
voorschriften. Het is vastgesteld dat het apparaat er zich aan houdt en de desbetreffende verklaringen en
documenten zijndoorde fabrikant afgegeven.
Het toestel is ontworpen om decoratieve lichteffecten te produceren en kan eventueel worden gebruikt in
lichtshows.
Panther:
Intelligente gobo-flower voorzienvan eenscanspiegel
Interne programma’s vooreen prachtige lightshow
Master/slave of “stand alone” mode met interne micro of kan bestuurd worden met onze Scanmaster of
met om hetevenwelke andere DMX controller
Gobo/kleuren wielmet15 veelkleurigegobos
Een kleineoptionele CA-8 controllerleverbaar voor eeneenvoudige bediening
Perfect voordisco’s, clubs, bars en mobiele DJ’s
Jaguar:
Dezelfdekarakteristieken als Panther
Optischecilinderipv gewonescanspiegel
Deze optischecylinder draait in allerichtingen en vult zode ruimte met veelkleurigelichtstralen
JB SYSTEMS
VOOR DE IN GEBRUIKNAME
Controleer voor het eerste gebruik van het apparaat of het tijdens het transport beschadigd werd. Mocht er
schade zijn, gebruik het dan niet,maar raadpleeg eerstuw dealer.
Belangrijk: Dit apparaat verlietde fabriek in uitstekende staat en goed verpakt. Het is erg belangrijk dat de
gebruiker de veiligheidsaanwijzingen en raadgevingen in deze gebruiksaanwijzing uiterst nauwkeurig volgt.
Elke schade veroorzaakt door verkeerd gebruik van het apparaat valt niet onder de garantie. De dealer
aanvaardt geen verantwoordelijkheid voor mankementen en problemen die komen doorhetveronachtzamen
van dezegebruiksaanwijzing.
Bewaardezebrochure op een veiligeplaatsomhem in de toekomstnogmaals te kunnen raadplegen. Indien
U het apparaatverkoopt,denkt U er welaan om de gebruiksaanwijzing bij te voegen.
Controleer deinhoud:
Controleerofde doos volgende onderdelenbevat:
Handleiding
Panther/Jaguar
1 ELC 250W/24V lamp
®
13/33 PANTHER/JAGUAR
JB SYSTEMS
®
14/33 PANTHER/JAGUAR
Page 10

NEDERLANDS HANDLEIDING
NEDERLANDS HANDLEIDING
VEILIGHEIDSVOORSCHRIFTEN:
CAUTION
De bliksempijl die zich in een gelijkbenige driehoek bevindtis bedoeld om u te wijzen op het gebruik
of de aanwezigheid van niet-geïsoleerde onderdelen met een “gevaarlijke spanning” in het toestel
die voldoende kracht heeftomeen risico vanelektrocutie in te houden.
Het uitroeptekenbinnen de gelijkbenige driehoekis bedoeld omdegebruikereropte wijzen dat er in
de meegeleverde literatuur belangrijke gebruik en onderhoudsinstructies vermeld staan betreffende
dit onderdeel.
Dit symboolbetekent: hetapparaat magenkel binnenhuis worden gebruikt.
Dit symbool betekent: Lees de
handleiding!
Dit symbool bepaalt: de minimumafstand van te belichten voorwerpen. De minimumafstand tussen
projectorenhetverlichte voorwerp moetmeer dan 1 meters zijn.
Om het milieu tebeschermen, probeer zoveelmogelijk het verpakkingsmateriaal te recycleren.
Een nieuw lichteffect kan soms ongewenste rook en/of reuk veroorzaken. Dit is normaal en verdwijnt na
een paarminuten.
Stel dit apparaat niet bloot aan regen of vocht, dit om het risico op brand en elektrische schokken te
voorkomen.
Om de vorming van condensatie binnenin te voorkomen,laathet apparaat aan de omgevingstemperatuur
wennen wanneer het, na het transport, naar een warm vertrek is overgebracht. Condensatie kan het
toestel soms verhinderen perfect te functioneren. Het kan soms zelfs schade aan het apparaat
toebrengen.
Gebruik ditapparaat uitsluitendbinnenshuis.
Plaats geen stukken metaal en mors geen vocht binnen in het toestel om elektrische schokken of storing
te vermijden. Indien een vreemd voorwerp in het apparaat geraakt, moet U het direct van het lichtnet
afkoppelen.
Plaats de installatie op een plaats met goede ventilatie, ver van brandbare materialen en/of vloeistoffen.
De installatiemoet opminstens 50 cmvan de muren rondomgeplaatst worden.
Bedek geen enkeleventilatieopening om oververhittingte vermijden.
Zorg dat het toestelnietin een stoffige omgeving wordt gebruikt en maakhet regelmatig schoon.
Houd het apparaat uit debuurt van kinderen.
Dit apparaat mag nietdooronervaren personen bediend worden.
De maximum veilige omgevingstemperatuur is 40°C. Gebruik het apparaat dus niet bij hogere
temperaturen.
De temperatuurvan het oppervlak van het apparaat kan 85°C bereiken. Raak de metalen ombouw tijdens
het gebruik nietmetblote handen aan.
Verzeker er U van dat er zich onder de plaats waar het toestel wordt geïnstalleerd geen ongewenste
personenbevinden tijdenshet bevestigen en losmaken alsookbij het onderhoud.
Laat het toestel ongeveer 10 minuten afkoelen alvorens de lamp te vervangen of alvorens te starten met
deonderhoudsbeurt.
Trek altijd de stekker uit wanneer het apparaat gedurende langere tijd niet wordt gebruikt of alvorens de
lamp tevervangenof alvorens tebeginnen met de onderhoudsbeurt.
De elektrische installatie behoort uitsluitend uitgevoerd te worden door bevoegd personeel,volgens de in
uw landgeldenderegels betreffendeelektrische en mechanischeveiligheid.
Controleer dat de beschikbare spanning niet hoger is dan die aangegeven op de achterzijde van het
toestel.
De elektrische kabel behoortaltijd in uitstekende staatte zijn. Zet het apparaat onmiddellijk af als de
elektrischekabel gekneusd of beschadigd is. De kabel moetvervangen wordendoor de fabrikantzelf, zijn
dealer ofvergelijkbarebekwame personen omeen brand te voorkomen.
Laatdeelektrische draad nooit in contactkomen met andere draden.
Volgens de veiligheidsvoorschriften moet deze installatie geaardworden.
Sluit het apparaat niet aan op een elektronische dimmer.
Gebruik altijd een geschikteengekeurdeveiligheidskabel bij hetinstallerenvan het toestel.
WAARSCHUWING: Om het risico op elektrocutie zoveel mogelijk te
vermijden mag u nooit de behuizing verwijderen. Er bevinden zich geen
onderdelen in het toestel die u zelf kan herstellen. Laat de herstellingen
enkeluitvoeren door eenbevoegdetechnicus.
Om elektrische schokken te voorkomen, moet U de behuizing niet openen. Afgezien van de lamp en de
zekering zitten er geenonderdelen in die door de gebruikermoeten wordenonderhouden.
Repareer
steeds
Ingeval van ernstige problemen met het bedienen van het toestel, stopt U onmiddellijk het gebruik ervan.
Contacteeruw dealer vooreen eventuele reparatie.
Debehuizing endelenzen moetenvervangen worden alsze zichtbaarbeschadigdzijn.
Gebruik best de originele verpakking als hettoestel vervoerdmoet worden.
Om veiligheidsredenenis hetverboden om ongeautoriseerde modificaties aan het toestel aan te brengen.
Belangrijk: Kijk nooit rechtstreeks in de lichtbron. Gebruik het lichteffect niet in de tegenwoordigheid van
personen die lijdenaan epilepsie.
nooit
een zekering en overbrug de zekeringhouder nooit. Vervang een beschadigde zekering
door een zekeringvanhetzelfde type en met dezelfde elektrischekenmerken.
BESCHRIJVING:
1. SCANSPIEGEL( voor Panter ) OF CYLINDERVORMIGE SPIEGEL (voor Jaguar )
2. DMX INGANG: Deze3pin mannelijke XLR-aansluiting ontvangtDMX-signalen
3. DMX UITGANG: Deze 3pin vrouwelijke XLR-connector wordt gebruikt om de Panther/Jaguar aan te
sluiten aan hetvolgende toestel in de DMXketting
4. HOOFDZEKERING
5. INGEBOUWDE MICROFOON
6. ¼”JACK voor de in optie verkrijgbareCA-8 controller
7. KNOP voorhet afregelen van demicrofoongevoeligheid
8. OPHANGBEUGEL met 2 knoppen aan beide zijden om het toestel vast te zetten. Tevens voorzien van
een gat vooreen bevestigingshaak.
9. VENTILATOR
10. NETSNOER
11. LAMP COMPARTIMENT
12. AARDINGSAANSLUITING
13. DIP-SCHAKELAARS: wordengebruikt om hetDMX-startadres van het toestel in te stellen.
Het startadres instellenmet de DIP-switches:
Op de achterzijde van het toestel zult u zien dat elke van de eerste 9 DIP-switches correspondeert met
een zekereDMX-waarde ( DIP-switch 10 wordtniet gebruikt )
Dip #1 #2 #3 #4 #5 #6 #7 #8 #9
Waarde 1 2 4 8 16 32 64 128 256
U kan deze waarden combineren om eenstartadres te bekomentussen 1 en 512:
Beginadres=01 switch 1=ON waarden: 1
Beginadres=05 switch 1+3=ON waarden: 1+4 = 5
Beginadres=09 switch 1+4=ON waarden: 1+8 = 9
Beginadres=13 switch1+3+4=ON waarden: 1+4+8 = 13
…
Beginadres=62 switch2+3+4+5+6=ON waarden:2+4+8+16+32=62
JB SYSTEMS
®
15/33 PANTHER/JAGUAR
JB SYSTEMS
®
16/33 PANTHER/JAGUAR
Page 11

NEDERLANDS HANDLEIDING
NEDERLANDS HANDLEIDING
PLAATSEN OF VERVANGEN VAN DE LAMP
Wacht, in het geval van het vervangen van een lamp of van het geven van een
onderhoudsbeurt, 10 minuten na het uitzetten van de installatie met het openen ervan totdat
het apparaat is afgekoeld. Trek altijd de stekker uit het stopcontact voor U begint aan het
onderhoud. Gebruik altijd hetzelfde type reserveonderdelen (lampen, zekeringen, e.d.)
Gebruik bij het vervangen van onderdelen uitsluitend authentieke
reserveonderdelen.
Zet het toestel af en trek de netstekkeruit het stopcontact.
Wacht 10 minuten tothetapparaat is afgekoeld.
Gebruik een schroevendraaier om de 2 schroeven los te schroevendie het
lampcompartimentafsluiten. ( A op de foto )
Aan de binnenzijde zult U de lampenhouder zien. Trek de lampenhouder
voorzichtig uithetlampcompartiment. ( A op de foto )
Verwijder de oude lamp. Bij het verwijderen van de oude lamp houdt U de
lampenhouder vast entrekt U niet aan de draad.
Houd de lampenhouder vast terwijl U de nieuwe lamp rustig in de
lampenhouder drukt.
Opgepast!
technische karakteristieken in deze gebruikswijzing om te weten welke
lamp U moet gebruiken. Gebruik nooit een lamp met een hogere
wattage. Lampen met een hogere wattage produceren temperaturen
waarvoor het apparaat niet ontworpen was. Als het apparaat een
lampentransformator gebruikt, zal hij verbranden wegens de te grote
belasting.
Raak de lamp niet met blote handen aan; dit zal de levensduur van
de lamp drastisch verkorten.Indien U de lamp aanraakte, maak hem
dan schoon met een lapje en een beetje schoonmaakalcohol. Veeg
de lamp droog alvorenshemteinstalleren.
Plaats de nieuwe lamp terug in het apparaat. Vergewis U ervan dat
geen draden delampraken. ( B op de foto )
Sluit hetlampcompartiment met de schroeven.
Klaar.
Controleer het etiket achter op het toestel of kijk naar de
OPHANGEN VAN HET APPARAAT
Belangrijk: De installatie van het toestel mag uitsluitend door bekwaam onderhoudspersoneel
uitgevoerd worden. Onjuiste plaatsing kan ernstige letsels en/of schade aan eigendommen tot
gevolg hebben. Het ophangen vergt veel ervaring. U behoort de grenzen te respecteren aan de
werklast; erkende installeringmaterialen moeten worden gebruikt; de veiligheid van het
geïnstalleerde toestelmoet regelmatig worden gecontroleerd.
Overtuig U ervan dat het gebied onder installatieplaats vrij is van ongewenste personen tijdens het
plaatsen,het weghalen en hetonderhoud.
Installeer het toestel op een goed geventileerde plaats, ver van brandbare stoffen en/of vloeistoffen. Het
toestelmoet worden bevestigd op
Het toestelmoet worden geïnstalleerd buiten het bereik van iedereen en weg van plaatsen waar men mag
lopen en zitten.
Alvorens tot plaatsen over te gaan, moet men controleren dat de minimum puntbelasting van de
installatieplaats 10 keer het gewichtvanhet toestel bedraagt.
Gebruik bij het installerenvan het toestel altijd een gewaarmerkte veiligheidskabel die 12 keer het gewicht
van het toestel kan dragen. Deze bijkomende veiligheidsbevestiging moet zo worden aangebracht dat
geendeelvanhet toestel meerdan 20 cm vallen kan alsde hoofdbeveiliging faalt.
Het apparaat moet goed worden vastgezet; aan een vrij zwaaiende montage mag zelfs niet gedacht
worden.
Bedek geen ventilatieopeningen, anderszou dit oververhitting totgevolg kunnenhebben.
De gebruiker moet er zich van verzekeren dat de installaties met betrekking tot de veiligheid en de
technische mechaniek door een expert zijn goedgekeurd alvorens ze voor de eerstekeer te gebruiken. Elk
jaar moeten de installatiesworden gekeurd dooreen vakman om te controlerenofde veiligheid nog steeds
perfectis.
minstens 50 cm
van deomringendemuren.
BEDIENINGSVOORSCHRIFTEN
PANTHER / JAGUAR toestellen kunnen samen gelinkt worden als master/slave in een daisy chain en
kunnen de ingebouwdechasesautomatisch ofviamuziek afspelen.
De dipswitches dienen nietingesteld te worden inmaster/slave mode
WanneerdePANTHERen de JAGUAR in stand-alone mode aan elkaargelinktworden , dient de JAGUAR
als mastertoestel te wordengebruikt.
2-lightshow
Dipswitch 10 “off” betekent dat het toestel normaal werkt.
Dipswitch 10 “on”betekentinversie
Om een lichtshowtecreëren, kan u dip switch 10 op “on” zetten op elktoestel dat aan het mastertoestel om
omgekeerdebeweging te verkrijgen, ookindien u slechts2 toestellen gebruikt.
Dipswitch10 wordt niet gebruikt op het eerste toestelindeDaisychain,wegens het feit dat dit hetmaster
toestelis datdelichtshow bestuurt.
Gebruik van deeenvoudigeoptionele CA-8Controller:
Wanneer de toestellen in Master/slave configuratie gebruikt worden raden wij u ten sterkste aan de CA-8
“Easy controller”tegebruiken. Sluit deze kleine controller aan op de 1/4” jack van de master.Zokunt
u devolgendefuncties van op afstand bedienen:
Stand by Blackouthet toestel
Functie
Modus
Bedienddoor een universele DMX-bediening:
Sluit alle units op elkaar aan.Zie het hoofdstuk“elektrische installatievoor
twee of meer units in DMX-modus” om te leren hoe dit te doen (vergeet
niet omalle unitsgoed te adresseren!)
Sluit alle units ophet lichtnetaan en zet de DMX-bedieningaan.
Omdat elke unit z’n eigenDMX-adres heeft kan uze individueelbedienen.
Denk eraan dat elke unit zoals in de DMX tabel hieronder te zien is, vier
DMX-kanalengebruikt:
1. Aanhoudenvoor een gobo strobo effect
2. kortdrukken voorgobo verandering
Fastmodus: muziekgestuurd (LED uit ) Slow modus: Nietmuziekgestuurd
1. kortdrukken voorgobo
verandering
(LED aan)
JB SYSTEMS
®
17/33 PANTHER/JAGUAR
JB SYSTEMS
®
18/33 PANTHER/JAGUAR
Page 12

NEDERLANDS HANDLEIDING
ONDERHOUD
Overtuig U ervan dat het gebied onder de installatieplaats vrij is van ongewenste personen tijdens het
onderhoud.
Zet het toestel uit, trek de netstekkeruit het stopcontact en wacht tot het toestel is afgekoeld.
Bij inspectiemoeten de volgendepunten wordengecontroleerd.
Alle schroeven gebruikt om het te toestel te installeren en al zijn onderdelen moeten goed vastgedraaid
zijn en mogen niet verroest zijn.
Behuizingen, vastzetstukken, installeringplaatsen (plafond, spanten, schokbrekers) mogen absoluut niet
verwrongenzijn.
Wanneer een optische lens klaarblijkelijk beschadigd is door barsten of diepe krassen, dan moet deze
vervangenworden.
De stroomkabels moeten in perfecte staat zijn en behoren vervangen te worden, wanneer er zelfs maar
een klein probleemontdekt werd.
Om het toestel tegen oververhitting te beschermen, behoren de ventilatoren (als die er zijn) en de
ventilatieopeningenelke maandgereinigdteworden.
De binnenkant van het toestel behoort elkjaar gereinigd te worden meteen stofzuiger of eenluchtspuit.
Het schoonmaken van inwendige en uitwendige optische lenzen en/of spiegels moet regelmatig worden
uitgevoerd om een zo goed mogelijke lichtuitstraling te verkrijgen. Hoe vaak ze schoon moeten worden
gemaakt hangt af van de omgeving waar het toestel wordt gebruikt: een klamme, rokerige of bijzonder
vuile omgeving kan eengrotere opeenhoping van vuilveroorzaken opde optische uitrusting.
Reinig met een zachtedoek en gebruik normaleglasreinigende producten.
Droog de onderdelenaltijdzorgvuldig af,
Reinig de uitwendigeoptische uitrusting minstens één keerper maand.
Reinig deinwendige optischeuitrusting minstensomde3maanden.
Let op: We bevelen sterk aan dat het schoonmaken van de binnenkant wordt uitgevoerd door
vakbekwaampersoneel!!
TECHNISCHE KENMERKEN
Netvoeding: wisselstroom230 V,50 Hz
Zekering: 250 V/5Asnellezekering (20 mm)
Geluidscontrole: Inwendigemicrofoon
DMX verbinding: 3 pins XLR mannelijk/vrouwelijk
Lamp: ELC250W/24V
Afmetingen: 470 x 314 x 245 mm
Gewicht: 10 kg
Elkeinlichtingkanveranderenzonder waarschuwingvooraf
U kan delaatste versie van deze handleiding downloaden viaOnze website:www.beglec.com
DEUTSCH BEDIENUNGSANLEITUNG
Vielen Dank, dass Sie sich für den Erwerb dieses JBSystems®-Produkt entschieden haben. Bitte lesen sie
diese Bedienungsanleitung sorgfältig vor der Inbetriebnahme durch, zur vollen Ausschöpfung der
Möglichkeiten,diedieses Gerät bietetsowie, zu Ihrer eigenenSicherheit.
EIGENSCHAFTEN
Das Gerät ist funkentstört und erfüllt die Anforderungen der europäischen und nationalen Bestimmungen.
Entsprechende Dokumentationliegtbeim Herstellervor.
DasGerätist zur Erzeugung von dekorativemLicht sowieder Benutzung in Lightshows bestimmt.
Panther:
Intelligenter Gobo-Flower mit beweglichemSpiegel
VorprorammierteLightshows!
Steuerbar im Master-/Slave- oder Stand alone-Modus über eingebautes Mikrofon. Ebenfalls steuerbar
über ScanmasterSM1612 oder andereDMXController
Gobo/Farbrad mit 15 ein- und mehrfarbigenGobos
Optional ist ein kleiner CA-8 Handcontrollererhältlich
Optimal fürDiscos,Clubs, Bars und MobileDJ´s
Jaguar:
Gleiche Ausstattung undDesign wie Panther
Mit Siegelwalze anstelle des herkömmlichenSpiegels
DieWalze bewegtsich in alle Richtungen und füllt den Raum mitzahlreichen vielfarbigenStrahlen
VOR DER ERSTBENUTZUNG
Vor der Erstbenutzung bitte das Gerät zuerst auf Transportschäden überprüfen. Sollte das Gerät einen
Schaden aufweisen, Gerät bitte nicht benutzen, sondern unverzüglich mit ihrem Händler in Verbindung
setzen.
Wichtiger Hinweis:
dass der Benutzer sich streng an die Sicherheitshinweise und Warnungen in der Bedienungsanleitung
hält. Schäden durch unsachgemäße Handhabung sind von der Garantie ausgeschlossen. Der Händler
übernimmt keine Verantwortung für Schäden, die durch Nichtbeachtung der Bedienungsanleitung
hervorgerufen wurden.
Die Bedienungsanleitung, für zukünftiges Nachschlagen, bitte aufbewahren. Bei Verkauf oder sonstiger
Weitergabedes Gerätes,bitte Bedienungsanleitung beifügen.
Packungsinhaltprüfen:
Bitte überprüfenSie,dass die Packung folgende Einzelteile enthält:
Bedienungsanleitung
Panther/Jaguar
1 ELC 250W/24V Lichtquelle
Das Gerät hat das Werk unbeschädigt und gut verpackt verlassen. Es ist wichtig,
JB SYSTEMS
®
19/33 PANTHER/JAGUAR
JB SYSTEMS
®
20/33 PANTHER/JAGUAR
Page 13
DEUTSCH BEDIENUNGSANLEITUNG
DEUTSCH BEDIENUNGSANLEITUNG
SICHERHEITSHINWEISE
CAUTION
Sie Reparaturen demqualifizierten Kundendienst.
Das Blitzsymbol im Dreieck weist den Benutzer darauf hin, das eine Berührungsgefahr mit nicht
isolierten Teilen im Geräteinneren, welche eine gefährliche Spannung führen, besteht. Die
Spannung ist so hoch,dashier dieGefahr eineselektrischen Schlagesbesteht.
Das Ausrufezeichen im Dreieck weist den Benutzer auf wichtige Bedienungs- und
Wartungshinweise in den Dokumenten hin,die dem Gerät beiliegen.
DiesesSymbolbedeutet: Nurinnerhalbvon Räumenverwenden.
Dieses Symbol bedeutet: Achtung!
Bedienungsanleitunglesen!
Dieses Symbol stellt fest: der minimale Abstand von beleuchteten Gegenständen. Der minimale
AbstandzwischenProjektor und dem belichteten Gegenstandmußmehr als 1 Meter sein.
Aus Umweltschutzgründen, Verpackung bitte wiederverwenden, oderrichtig trennen.
Ein neues Gerät kann Geruch oder Rauch entwickeln. Das ist völlig normalund legtsich nach einigen Minuten.
Zur Vermeidung von Stromschlag oder Feuer, Gerätbitte nicht Regen oder Feuchtigkeit aussetzen.
Zur Vermeidung von Kondensation im Inneren des Geräts, bitte nach Transport in einewarme Umgebung einige
Zeit zum Temperaturausgleich bringen. Kondensation kann zu Leistungsverlust des Gerätes oder gar
Beschädigungführen.
Gerät nicht im Freien und infeuchten Räumen und Umgebungen verwenden.
Keine Metallgegenstände oder Flüssigkeiten ins Innere des Geräts gelangen lassen, Kurzschluß oder
Fehlfunktion können die Folge sein. Falls es doch einmal vorkommen sollte, bitte sofort Netzstecker ziehen und
vom Stromkreistrennen.
Gerät nur in gut belüfteter Position und entfernt von entflammbaren Materialien oder Flüssigkeiten betreiben.
Mindestabstand an allen Seiten soll mindestens 50 cm sein.
Ventilationsöffnungen nicht abdecken, daÜberhitzungsgefahr!
Nicht in staubiger Umgebung verwenden und regelmäßig reinigen.
Für Kinder unerreichbar aufbewahren.
UnerfahrenePersonen sollen das Gerätnicht bedienen.
Umgebungstemperatur darf40ºC nicht überschreiten.
Die Oberflächentemperatur kann bis zu 85ºC erreichen, Gerät während des Betriebs nicht mit bloßen Händen
anfassen.
Sicherstellen, daß sich während des Auf- und Abbaus keine unbefugten Personen unterhalb des Geräts
befinden.
Vor dem Auswechseln des Leuchtmittels odersonstigen Eingriffen,10 Minuten Abkühlzeiteinhalten.
Stets Netzstecker ziehen, wenn Gerät fürlängeren Zeitraum nicht genutzt, oder es gewartet wird.
Elektrische Anschlüsse nur durch qualifiziertes Fachpersonal überprüfen lassen.
Sicherstellen, daß Netzspannung mit Geräteaufkleber übereinstimmt.
Gerät nicht mit beschädigtem Netzkabel betreiben. Ist die Zugangsleitung beschädigt, muß diese durch den
Hersteller,seinen Vertrieb oder durch eine QualifiziertePerson ersetzt werden.
Netzkabel nicht mit anderen Kabeln in Berührung kommen lassen!
Zur Einhaltung der Sicherheitsbestimmungen muß das Gerät geerdetsein.
Gerät nicht an einen Dimmer anschließen.
Ausschließlich vorschriftsmäßigeKabel zurInstallation verwenden.
Gerät nicht öffnen. Abgesehen vom tausch des Leuchtmittels und der Sicherung sind keine zu wartenden
Bauteileim Gerät enthalten.
Sicherung niemals reparieren oder überbrücken,sondern immer mit gleichartiger Sicherung ersetzen!
Bei Fehlfunktion, Gerät nichtbenutzen und mit Händler inVerbindung setzen.
Bei sichtbaren Beschädigungen müssen Gehäuseund Optik ersetztwerden.
Bei Transport bitte Originalverpackung verwenden, um Schäden am Gerät zu vermeiden.
Aus Sicherheitsgründen dürfen an dem Gerätkeine unbefugten Veränderungen vorgenommen werden.
Wichtiger Hinweis: Nicht direkt in die Lichtquelle blicken! Gerät nicht verwenden, wenn sich Personen im Raum
befinden, die unter Epilepsie leiden.
ACHTUNG: Um sich nicht der Gefahr eines elektrischen Schlags
auszusetzen,entfernen Sie keinesder Gehäuseteile. Im Geräte-inneren
befinden sich keine vom Benutzer reparierbaren Teile. Überlassen
BESCHREIBUNG
1. BEWEGLICHER SPIEGEL ( fürPanther)oder SPIEGELWALZE(für Jaguar)
2. DMX EINGANG: 3pin XLR-Stecker. UmDMX Signale zu empfangen.
3. DMX AUSGANG: 3pin XLR-Steckbuchse. Um den Panther/Jaguar an das nächste Gerät in der DMX
Ketteanzuschließen
4. SICHERUNG
5. EINGEBAUTES MICROFON
6. 1/4”KLINKENBUCHSE zum AnschlussdeswahlweisenCA-8Controllers
7. MUSIKEMPFINDLICHKEITSREGLER
8. DECKENHALTERUNG mit 2 Drehknöpfen zum Festschrauben und zum befestigen an einen
Montagehaken
9. KÜHLVENTILATOR
10. NETZKABEL
11. KAMMER FÜRLAMPE
12. ERDUNG
13. DIP-SWITCHES:Legt die DMXstart Adresse des Gerätesfest.
Wie man die DIP-Schalter setzt, umdie richtigeStartadresse zu erhalten:
Das istdieüblicheVorgehensweise:viel langsamer…
Auf der Rückseite des LED PAR finden sie die DIP Schalter. Mit den ersten 9 Schaltern wird die DMX
Adresseeingestellt (DIP-Schalter10 ist nicht belegt):
Dip #1 #2 #3 #4 #5 #6 #7 #8 #9
Wert 1 2 4 8 16 32 64 128 256
Sie können die Werte dieser Schalter kombinieren um jede Startadresse zwischen 1 und 512 zu
erhalten:
Anfangsadresse= 01 Schalter1=ON Werte: 1
Anfangsadresse= 05 Schalter1+3=ON Werte: 1+4=5
Anfangsadresse= 09 Schalter1+4=ON Werte: 1+8=9
Anfangsadresse= 13 Schalter1+3+4=ON Werte:1+4+8=13
...
Anfangsadresse= 62 Schalter2+3+4+5+6=ON Werte:2+4+8+16+32 = 62
JB SYSTEMS
®
21/33 PANTHER/JAGUAR
JB SYSTEMS
®
22/33 PANTHER/JAGUAR
Page 14

DEUTSCH BEDIENUNGSANLEITUNG
DEUTSCH BEDIENUNGSANLEITUNG
EINSETZEN/AUSTAUSCHEN DER LICHTQUELLE
Bei Austausch oder Ersatz der Lichtquelle Gerät für
mindestens 10 Minuten abkühlen lassen. Stets Netzstecker
ziehen und vom Stromkreis trennen! Stets gleichartige
Ersatzteile (Lichtquelle, Sicherung etc) verwenden. OriginalErsatzteileverwenden.
Gerät abschaltenund Netzstecker ziehen.
Etwa 10 Minuten abwarten,bis sich das Gerät abgekühlt hat.
Lösen Sie mit Hilfe eines Schraubendrehers die 2 Schrauben am
LampenfachdesGeräts. (A auf der Abbildung)
Auf der Innenseite können Sie die Lampenfassung sehen. Vorsichtig aus
dem Fachherausziehen. ( A auf derAbbildung)
Gebrauchtes Leuchtmittel herausziehen. Hierbei an der Fassung
festhalten und nichtam Kabel!
An der Fassung festhalten,wennein neues Leuchtmittel eingesetztwird.
Achtung! Geräteaufkleber auf der Rückseite des Geräts oder technische
Einzelheiten in dieser Bedienungsanleitung beachten, damit stets
das richtige Leuchtmittel eingesetzt wird. Keine Leuchtmittel mit
höherer Wattanzahl einsetzen! Diese Leuchtmittel erzeugen höhere
Temperaturen, für die dieses Gerät nicht ausgelegt ist. Hat das
Gerät einen Transformator, kann dieser wegen Überlastung
durchbrennen.
Leuchtmittel nicht mit bloßen Händen berühren! Das verkürzt die
Lebenserwartung der Lichtquelle erheblich. Falls es doch einmal
vorkommen sollte, mit etwas Alkohol reinigen und vor dem
Einsetzengut
abreiben.
Neues Leuchtmittel einsetzen und sicherstellen, dass sie nicht von
Kabeln berührtwird. (B aufderAbbildung)
Fach wiederzuschrauben.
Fertig!
ÜBERKOPF-MONTAGE
Wichtig: Montage ausschließlich durch qualifiziertes Fachpersonal durchführen lassen.
Unvorschriftsmäßiger Einbau kann erhebliche Verletzungen und/oder Schäden verursachen.
Überkopf-Montage verlangt entsprechende Erfahrung! Belastungsgrenzen müssen beachtet
werden, geeignetes Installationsmaterial mußverwendet werden und das installierte Gerät muß in
regelmäßigenAbständenüberprüft werden.
Sicherstellen,dass sich keine unbefugten Personen unterhalb des Geräts befinden, während es installiert
oder gewartet wird.
Gerät in gut belüfteter Position installieren, weit entfernt von entflammbaren Materialien und/oder
Flüssigkeiten. EinenSeitenabstandvon mindestens50cm einhalten.
Gerät außerhalb der Reichweitevon Personen, und nicht in niedrigenDurchgängen oder in der Nähe von
Sitzgelegenheiteninstallieren.
Vor Montage sicherstellen, dass die gewählte Position wenigstens das 10-fache Gerätegewicht
aufnehmenkann.
Zur Aufhängung stets geeignetes Befestigungsmaterial verwenden, das das 12-fache Gerätegewicht
aushalten kann. Eine zweite Sicherungsaufhängung muß angebracht werden, die ein Absacken des
Geräts vonmehr als 20 cm verhindert, solltedie Befestigung brechen.
Gerät gut befestigen. Eine freischwingende Aufhängung ist gefährlich und sollte auf gar keinen Fall in
Betrachtgezogenwerden!
Ventilationsöffnungen nichtabdecken, daÜberhitzungsgefahr!
Betreiber muß sicherstellen, dass die sicherheitsrelevanten und technischen Installationen vor Erstbetrieb
fachmännischvorgenommenworden sind.
Installationen sollten jährlich durch qualifiziertes Fachpersonal inspiziert werden, um jederzeit einen
sicherenBetrieb zu gewährleisten.
BEDIENUNGSANLEITUNG
Die PANTHER / JAGUAR Geräte können im Master/Slave-Modus in einer Daisy Chain mit einander
verbunden werden und können die eingebauten Abfolgesequenzen automatisch oder musikgesteuert
benutzen.
Die DIP-Schalter brauchennicht inden Master/Slave-Modus umgestelltzu werden.
Wenn PANTHER und JAGUAR im Stand-alone-Modusmiteinanderverbunden werden,muss JAGUAR als
Master-Gerät benutztwerden.
2-lightshow
DIP-Schalter 10 in “off”-Stellung bedeutet,das Gerätläuft im Normalbetrieb.
DIP-Schalter 10 in “on”-Stellung bedeutet, das Gerät läuftim Umkehrbetrieb.
Um eine Lightshow zu schaffen können Sie den DIP-Schalter 10 gleich welchen mit dem Master
verbundenen Geräts auf “on” setzen, um eine Umkehrungsbewegung zu erhalten, auch wenn nur zwei
Gerätevorhanden sind.
Der DIP-Schalter 10 wird nicht auf dem ersten Gerät der Daisy chain benutzt, da das Master-Gerät die
Lightshowsteuert.
Anschließendes optionalenFernbedienungscontroller CA-8 für mehrSteuerungsmöglichkeiten:
Der Fernbedienungs-Controller CA-8 kann nur im Stand alone- oder Master/Slavemodus benutzt werden.
Schließen Sieden Controller an denEingang des CA-8 des ersten Geräts an (Master). Jetztkönnen Sie alle
angeschlossenenGeräte steuern:
EREITSCHAF Blackout aller Geräte
1. Taste gedrückt haltenfür Gobo-
FUNKTION
MODUS
Steuerung mit einemuniversellen DMX-Controller:
Schließen Sie alle Geräte an. Lesen Sie den Abschnitt
„Elektrische Installation von zwei oder mehreren Geräten im
DMX-Modus“, um zu erfahren, wie man die Geräte anschließt
(Vergessennicht, alleGeräterichtig zu adressieren!)
Schließen Sie alle Geräte an die Netzleitung an und schalten
denDMX-Controller ein.
Da jedes Gerät seine eigene DMX-Adresse hat, kann es einzeln gesteuert werden. Vergessen Sie nicht,
dass jedesGerät4 DMX-Kanäle besitzt, s. DMX-Diagramm:
Strobe-Effekt
2. Kurz drücken fürGobo-Wechsel
Schnellbetrieb: musikgesteuert (LED
aus )
1. Kurz drücken fürGobo-Wechsel
Langsambetrieb: nicht musikgesteuert
(LED an)
JB SYSTEMS
®
23/33 PANTHER/JAGUAR
JB SYSTEMS
®
24/33 PANTHER/JAGUAR
Page 15

DEUTSCH BEDIENUNGSANLEITUNG
WARTUNG UND INSTANDHALTUNG
Sicherstellen,dass sich keine unbefugten Personenunterhalb des Geräts befinden, während es gewartet
wird.
Gerät ausschalten, Netzsteckerziehen und warten,bis es sich abgekühlt hat.
Während der Wartung sind folgendePunkte ganzbesonders zu beachten:
Sämtliche Schrauben zur Installation und Befestigung jeglicher Teile müssen fest angezogen und rostfrei
sein.
Gehäuse, Befestigungsmaterialien und Aufhängungen (Decke, Balken, abgehängte Decken) dürfen keine
Anzeichenvon Verformungzeigen.
Ist die Optik sichtbar beschädigt (Sprünge oder tiefe Kratzer), dann müssen die entsprechenden Teile
ausgewechseltwerden.
Netzkabel muß stets in einwandfreiem Zustand sein und selbst bei kleinsten Beschädigungen erneuert
werden.
Zur Vermeidung von Überhitzung müssen die Ventilatoren (sofern vorhanden) und Lüftungsschlitze
monatlichgereinigtwerden.
Gerät innen mindestenseinmal pro Jahr mitStaubsaugeroder Airjetreinigen.
Reinigung der inneren und äußeren optischen Linsen und/oder Spiegel müssen in regelmäßigen
Abständen zur Beibehaltung einer optimalen Lichtausbeute vorgenommen werden. Reinigungsintervalle
hängen stark von der Umgebung ab: feuchte, verrauchte und besonders verschmutzte Umgebung führen
zu größererVerschmutzung aufden Linsen.
Mit weichemTuch und gewöhnlichemGlasreiniger säubern.
Alle Teilestets gut abtrocknen.
ÄußereOptik mindestensalle30 Tage säubern.
InnereOptik mindestens alle 90Tagesäubern.
Achtung: Wir empfehlen dringend, Reinigung im Innern des Geräts nur von qualifiziertem Personal
durchführen zulassen!
DEUTSCH BEDIENUNGSANLEITUNG
TECHNISCHE EINZELHEITEN
Netzspannung: ≈ 230V,50Hz
Sicherung: 250V/5 A flinke Sicherung(20mmGlas)
Klangregler: EingebautesMikrofon
DMXAnschlüsse: 3-pinXLRStecker/Buchse
Lichtquelle: ELC250W/24V
Abmessungen: 470 x 314 x 245 mm
Gewicht: 10 kg
TechnischeÄnderungen könnenauch ohne Vorankündigung vorgenommen werden!
Sie können sichdie neueste Versiondieses Benutzerhandbuches vonunserer Website
herunterladen: www.beglec.com
JB SYSTEMS
®
25/33 PANTHER/JAGUAR
JB SYSTEMS
®
26/33 PANTHER/JAGUAR
Page 16

MANUAL DE FUNCIONAMIENTO ESPAÑOL
Gracias por comprar este producto JB Systems®. Para sacar el máximo rendimiento a sus posibilidades y
por su propia seguridad, lea estas instrucciones de funcionamiento detenidamente antes de comenzar a
utilizarestaunidad.
CARACTERÍSTICAS
Esta unidad está a prueba de interferencias de radio. Este producto cumple los requisitos de las directrices
nacionales y europeas actuales. Se ha establecido la conformidad y las instrucciones y documentos
correspondienteshan sidodepositadospor el fabricante.
Este dispositivo ha sido diseñado para producir efectos luminosos decorativos y se utiliza en sistemas de
espectáculosdeluces.
Panther:
Gobo tipo flor inteligenteequipado con espejodeexploración
Programas incorporadospara grandes espectáculosde luces
Modalidad maestra/esclavaoindependiente con micrófono incorporado o fácilmente controlable mediante
ScanmasterSM1612 o cualquier otrocontrolador DMX
Rueda Gobo/color con15gobossencillos odevarios colores
Conecteel pequeño controlador opcionalCA-8parafacilitarel funcionamiento
Ideal para discos,clubs, bares,DJsmóviles
Jaguar:
Las mismas características que Panther
Con reflector de barril en lugar de espejodeexploración
Este barril gira en todas direccionesy llena el ambientedemúltiples haces coloreados
ANTES DE UTILIZAR EL APARATO
Antes de comenzar a utilizar esta unidad, compruebeque no haya habido daños durante el transporte.Si
observaalgúndaño,no utilice el dispositivosy consulte primeroasu distribuidor.
Importante:
absolutamente necesario que el usuario siga estrictamente estas instrucciones y advertencias de
seguridad que aparecen en este manual de usuario. Cualquier daño producido por un manejo innecesario
queda excluido de la garantía. El distribuidor no asumirá ninguna responsabilidad por cualquier defectoo
problemaquesurja pornohaber seguido el manual de usuario.
Guarde este folleto en un lugar seguro para consultarlo en el futuro. Si vende este aparato más adelante,
asegúresedeincluirestemanual de usuario.
Compruebeel contenido:
Compruebeque lacaja contiene los siguientes elementos:
Instrucciones de funcionamiento
Panther/Jaguar
1 lámpara ELC 250W/24V
Este dispositivo ha salido de nuestras instalaciones en perfecto estado y bien embalado. Es
INSTRUCCIONES DE SEGURIDAD:
CAUT ION
cualificado.
El símbolo en forma de rayo con cabeza de flecha dentro de un triángulo equilátero se empleapara
alertar sobre el uso o presencia de "voltaje peligroso" no aislado dentro de la carcasa del producto
con la magnitud suficiente paraconstituir un riesgo de descargaeléctrica.
El signo de exclamación dentro del triángulo equilátero se emplea para alertar al usuario de la
presencia de instrucciones de funcionamiento y mantenimiento importantes en el texto que
acompaña a este aparato.
PRECAUCIÓN: Para reducir el riesgo de descarga eléctrica, no quite la
cubierta superior. No existen piezas en el interior que pueda mantener o
reparar el usuario. Asigne el mantenimiento y las reparaciones a personal
MANUAL DE FUNCIONAMIENTO ESPAÑOL
Este símboloindica:Usar sólo en el interior.
Este símboloindica:Leer lasinstrucciones.
Este símbolo indica: La distancia mínima de objetos iluminados. La distancia mínima entre la
emisión luminosa ylasuperficieiluminada tienequeser más de 1 metro.
Para proteger el medio ambiente, recicle elmaterial de embalaje en la medidade lo posible.
Un nuevo efecto luminoso provoca a veces humo y/u olor no deseados. Esto es normal y desaparece
después dealgunos minutos.
Para evitar incendios o riesgos de descarga,no expongala unidad a la lluvia o a la humedad.
Para evitar que se forme condensación en el interior, deje que la unidad se adapte a la temperatura
exterior cuando la lleve a una habitación cálida después del transporte. A veces la condensación impide
que la unidad funcioneapleno rendimientoy puedeincluso provocardaños.
Esta unidad sólo sepuede usar en elinterior.
No coloqueobjetos metálicos ni derramelíquidos dentro del reproductorde la unidad. Se pueden producir
descargas eléctricas o fallos de funcionamiento. Si algún objeto extraño entra en la unidad, desconecte
inmediatamenteel suministro eléctrico.
Coloque el aparato en un lugar bien ventilado, lejos de materiales y/o líquidos inflamables. El aparato
debe colocarsea al menos 50 cm de las paredes.
No cubra ninguna abertura de ventilación puesto que podría producirse un sobrecalentamiento de la
unidad.
Evite el uso en ambientescon polvo y limpie la unidad regularmente.
Mantenga la unidad lejosdelosniños.
Las personas sin experienciano deben utilizar esteaparato.
La máxima temperatura ambiente para un funcionamiento seguro es de 40°C. No utilice la unidad a
temperaturasambientesuperiores.
La temperatura de la superficie de la unidad puede alcanzar hasta 85°C. No toque la carcasa sin
protección duranteel funcionamiento.
Asegúrese de que debajo del área del lugar de instalación no hay personas durante el montaje,
desmontajeo mantenimiento.
Deje que el aparatose enfríe durantealmenos10 minutos antes de reemplazar la bombillao comenzar el
mantenimiento.
Desenchufe siemprela unidad cuando novayaa ser utilizada duranteun largo periodo de tiempo o antes
de reemplazar la bombilla o comenzar el mantenimiento.
La instalación eléctrica sólo debe ser llevada a cabo por personal cualificado, de acuerdo con la
regulacionessobre seguridad eléctricay mecánica de su país.
Compruebe queelvoltajedisponible no supera el que se indica en el paneltrasero de la unidad.
El cable de alimentación siempre debe estar en perfecto estado. Apague la unidad inmediatamente
cuando observe daños o desperfectos en el cable de alimentación. Debe ser reemplazado por el
fabricante,su agente de servicio opersonas cualificadas para evitarcualquier peligro.
¡Nunca deje que el cable de alimentación entreen contacto con otros cables!
Este aparato debe conectarseatierra para cumplircon las regulacionessobreseguridad.
Noconecte la unidad aningún regulador devoltaje.
Utilicesiempre un cable de seguridad apropiadoy homologadocuando instale la unidad.
Para evitar descargas eléctricas, no abra la cubierta. Además de la lámpara y el fusible de red no hay
piezas en el interiordeesteaparato que pueda mantener el usuario.
Nunca
En caso de que ocurran problemas de funcionamiento serios, deje de utilizar el aparato y póngase en
La carcasay la lente deben reemplazarsesi presentan daños visibles.
Utiliceel embalaje originalcuando tenga que transportarel dispositivo.
Por razones de seguridad se prohibe realizar modificaciones no autorizadasen la unidad.
Importante:
epilépticas.
repare un fusible ni derive el soporte del fusible. ¡Reemplace
fusible del mismotipo y especificación eléctrica!
contactocon su distribuidorinmediatamente.
¡Nunca mire directamente a la fuente de luz! No utilice el efecto en presencia de personas
siempre
el fusible dañado por un
JB SYSTEMS
®
27/33 PANTHER/JAGUAR
JB SYSTEMS
®
28/33 PANTHER/JAGUAR
Page 17

ESPAÑOL MANUAL DE INSTRUCCIONES
ESPAÑOL MANUAL DE INSTRUCCIONES
DESCRIPCIÓN:
1. ESPEJODEEXPLORACIÓN ( para Panther ) o BARRIL( para Jaguar)
2. ENTRADADMX: conector macho XLR de3 clavijas. Pararecibir señales DMX.
3. SALIDA DMX: conector hembra XLR de 3 clavijas. Se utiliza para conectar el Panther/Jaguar con la
siguienteunidad en la cadenaDMX
4. FUSIBLEPRINCIPAL
5. MICRÓFONO INTERNO
6. JACK1/4” se utiliza para conectarel controlador CA-8opcional
7. PERILLAse utiliza para controlarlasensibilidadde lamúsica
8. SOPORTE COLGANTE dos perillas a amboslados para sujetar la unidad y un agujero de montaje para
instalar el ganchode montaje
9. VENTILADOR DEREFRIGERACIÓN
10. CABLE DERED
11. COMPARTIMENTOPARA LALÁMPARA
12. CONEXIÓN ATIERRA
13. INTERRUPTORES DIP se utilizanparaestablecer la direccióndeinicio DMX de la unidad.
Ajuste de los interruptores DIP para quepuedan obtener ladirecciónde inicio correcta:
Cada uno de los primeros 9 interruptores DIP se correspondena ciertovalor DMX (el interruptor DIP10
no se utiliza):
DIP #1 #2 #3 #4 #5 #6 #7 #8 #9
Valor 1 2 4 8 16 32 64 128 256
Puede combinarlos valores de estosinterruptores para obtenerunadirección de inicioentre 1 y 512:
Dirección deinicio= 01 interruptor1=ON valores: 1
Dirección deinicio= 05 interruptor1+3=ON valores:1+4 =5
Dirección deinicio= 09 interruptor1+4=ON valores:1+8 =9
Dirección deinicio= 13 interruptor1+3+4=ON valores: 1+4+8 =13
…
Dirección deinicio= 62 interruptor2+3+4+5+6=ON valores:2+4+8+16+32 =62
REEMPLAZO Y COLOCACIÓN DE LA LÁMPARA
Cuando tenga que reemplazar la lámpara o realizar el
mantenimiento de ésta, no abra el aparato hasta 10
minutos después de haberla apagado para que se enfríe.
mantenimiento! Utilice siempre el mismo tipo de piezas de repuesto
(bombillas, fusibles, etc.) Cuando reemplace piezas, utilice sólo
piezas de repuesto originales.
Apague la unidadydesenchufeelcable de red.
Espereunos 10 minutos hastaquela unidad se hayaenfriado.
Utilice un destornillador para desatornillar los 2 tornillos que cierran el
compartimiento de la lámpara en el aparato. ( A en el gráfico )
En el interior verá el casquillo de la lámpara. Desprenda suavemente el
casquillo de la lámpara del compartimentode la lámpara. ( A en el
gráfico )
Desconecte la lámpara vieja. Sujete el casquillo de la lámpara mientras
desconectala lámpara envez de tirar del cable!
Sujete el casquillo de la lámpara mientras empuja suavemente la
nueva lámparaenelcasquillo.
¡Atención! Compruebe la etiqueta en el lado posterior del
dispositivo o lea las especificaciones técnicas en este manual
para saber qué lámpara utilizar. ¡Nunca instale lámparas con un
vatiaje superior! Las lámparas con un vatiaje superior generan
temperaturas para las que el dispositivo no ha sido diseñado. Si
utiliza un transformador de lámpara, se quemará debido a la
sobrecargadecorriente.
¡No toque la bombilla sin protegerse las manos! Esto reduce
drásticamente la vida útil de la lámpara. Si ha tocado la lámpara,
límpiela con un paño y alcohol de quemar. Limpie la lámpara
antes de instalarla.
Vuelva a colocarlanuevalámparadentro de la unidad. Asegúrese
de que los cables no toquenla lámpara. ( B en el gráfico )
Cierre el compartimentode la lámpara con los tornillos.
¡Ya está!
¡Desconecte siempre la unidad antes de realizar el
MONTAJE SUPERIOR
Importante: La instalación sólo debe llevarse a cabo por personal técnico cualificado. Una
instalación incorrecta puede provocar lesiones graves y/o daños en la propiedad. ¡El montaje
superior requiere mucha experiencia! Deben respetarse los límites de carga de funcionamiento,
deben utilizarse materiales de instalación homologados, el dispositivo instalado debe
inspeccionarse regularmentepor suseguridad.
Asegúrese de que debajo del área del lugar de instalación no hay personas durante el montaje,
desmontajeo mantenimiento.
Coloque el aparato en un lugar bien ventilado, lejos de materiales y/o líquidos inflamables. El aparato
debecolocarse a al menos 50 cm de las paredes.
El dispositivo debe instalarse lejos del alcance de las personas y de las áreas exteriores donde éstas
puedan andaro sentarse.
Antes del montaje asegúrese de que el área de la instalación puede soportar una carga mínima de 10
veces el pesode la unidad.
Utilice siempre un cable de seguridad homologado que pueda soportar 12 veces el peso del dispositivo
cuando instale la unidad. Este accesorio de seguridad secundario debe instalarse de forma que ninguna
pieza delainstalaciónpuedacaerse más 20 cm si falla el accesorio principal.
El dispositivo debe fijarsecorrectamente;¡unmontaje congiro libreespeligrosoy no debe considerarse!
No cubra ninguna abertura de ventilación puesto que podría producirse un sobrecalentamiento de la
unidad.
JB SYSTEMS
®
29/33 PANTHER/JAGUAR
JB SYSTEMS
®
30/33 PANTHER/JAGUAR
Page 18

ESPAÑOL MANUAL DE INSTRUCCIONES
ESPAÑOL MANUAL DE INSTRUCCIONES
El operario debeasegurarse de que las instalacionesrelacionadas con laseguridad sonaprobadas por un
experto antes de utilizarlas por primera vez. Las instalaciones deberán inspeccionarse anualmente por
una personacualificadapara asegurar que laseguridad esóptima.
INSTRUCCIONES DE FUNCIONAMIENTO
Lasunidades PANTHER / JAGUAR pueden unirse en modalidadmaestra/esclava en cadena tipo margarita
y utilizarlas secuenciastipooruga incorporadaso mediante activación por sonido.
No esnecesarioestablecer losinterruptores DIPen modalidad maestra/esclava.
Cuando una el PANTHER y el JAGUAR en modalidad independiente, el JAGUAR deberá utilizarse como
unidad maestra.
Espectáculo de2 luces
InterruptorDIP 10 “off”significa quelaunidadfunciona con normalidad.
InterruptorDIP 10 “on”significa inversión.
Para crear un espectáculo de luces, puede establecer el interruptor DIP 10 en “on” en cualquier unidad que
esté unida a la unidad maestra para obtener un movimiento invertido, incluso si sólo dispone de dos
unidades.
El interruptor DIP 10 no se utiliza en la primera unidad de la cadena tipo margarita, puesto que es la unidad
maestraque hace funcionar el espectáculodeluces.
Conexióndel controlador CA-8 para obtener más control:
El controlador CA-8 sólo puede utilizarse en modalidad independiente, maestra/esclava. Conecte el
controlador a la entrada CA-8 de la primera unidad (maestra). Ahora puede controlar todas las unidades
conectadas:
Stand by Oscurece la unidad
Función
Modalidad
1. Mantenerpulsada paraefecto
estroboscópicodegobo
2. Pulse brevementepara cambiarel gobo
Modalidad rápida: Sonidoactivado
(LED apagado)
1. Pulse brevementepara
cambiarelgobo
Modalidad lenta: Sin sonido
activado
(LEDencendido)
Control mediante controlador DMXuniversal:
Conecte todas las unidades juntas. (¡No olvide direccionar las
unidadescorrectamente!)
Conecte todas las unidades a la red eléctrica y encienda el
controladorDMX.
Puesto que cada unidad consta de su propia dirección DMX, puede
controlarlas individualmente. Recuerde que cada unidad utiliza 4
canales DMXtalcomose muestra en la tabla DMX.
JB SYSTEMS
®
31/33 PANTHER/JAGUAR
JB SYSTEMS
®
32/33 PANTHER/JAGUAR
Page 19

ESPAÑOL MANUAL DE INSTRUCCIONES
MANTENIMIENTO
Asegúrese de que debajo de la zonadellugar de instalación no haya personas duranteel mantenimiento.
Apague la unidad,desenchufe elcable de red y espere hastaque la unidad se haya enfriado.
Durante la inspeccióndeberá comprobar los siguientes puntos:
Todos los tornillos utilizados para instalar el dispositivo y cualquiera de sus piezas deberán apretarse
firmementeyno corroerse.
Las carcasas, las fijaciones y los puntos de instalación (techo, suspensiones) no deberán presentar
ninguna deformidad.
Cuando una lente óptica esté visiblemente dañada por grietas o rasguños profundos, deberá ser
reemplazada.
Los cables de red deberán estar en perfectoestado y deberán reemplazarse inmediatamente incluso si el
problema detectadoespequeño.
Para protegeral aparatodelsobrecalentamiento,lasaletas de refrigeración (si las hubiera)y las aberturas
de ventilacióndeberánlimpiarse mensualmente.
El interiordel dispositivo deberá limpiarse anualmentemediante una aspiradoraochorrode aire.
La limpieza de las lentes internas y externas y/o espejos deberá llevarse a cabo periódicamente para
optimizar la emisión luminosa. La frecuencia de limpieza depende del entorno en el que funcione el
aparato: los ambientes húmedos, con humo o especialmente sucios pueden provocar una mayor
acumulación desuciedad enloselementos ópticos del aparato.
Limpie con un paño suave utilizandoproductos de limpiezadecristales normales.
Seque siemprelas piezascon cuidado.
Limpie los elementos ópticos externosal menos una vez cada 30 días.
Limpie los elementos ópticos internos al menosuna vez cada 90 días.
Atención:¡Le recomendamos encarecidamente que la limpieza interna sea llevada a cabo por
personal cualificado!
ESPECIFICACIONES
Entrada dered:CA230V, 50Hz
Fusible:20 mmcristal5A rápido (20 mm cristal)
Control de sonido: Micrófonointerno
Conexiones DMX: 3 clavijas XLR macho / hembra
Lámpara: ELC250W/24V
Tamaño: 470 x 314 x 245 mm
Peso: 10kg
Puededescargar la última versiónde este manual deusuario en nuestra páginaWeb:
Toda lainformación está sujeta a cambios sinprevio aviso
www.beglec.com
JB SYSTEMS
®
33/33 PANTHER/JAGUAR
 Loading...