

Page 1
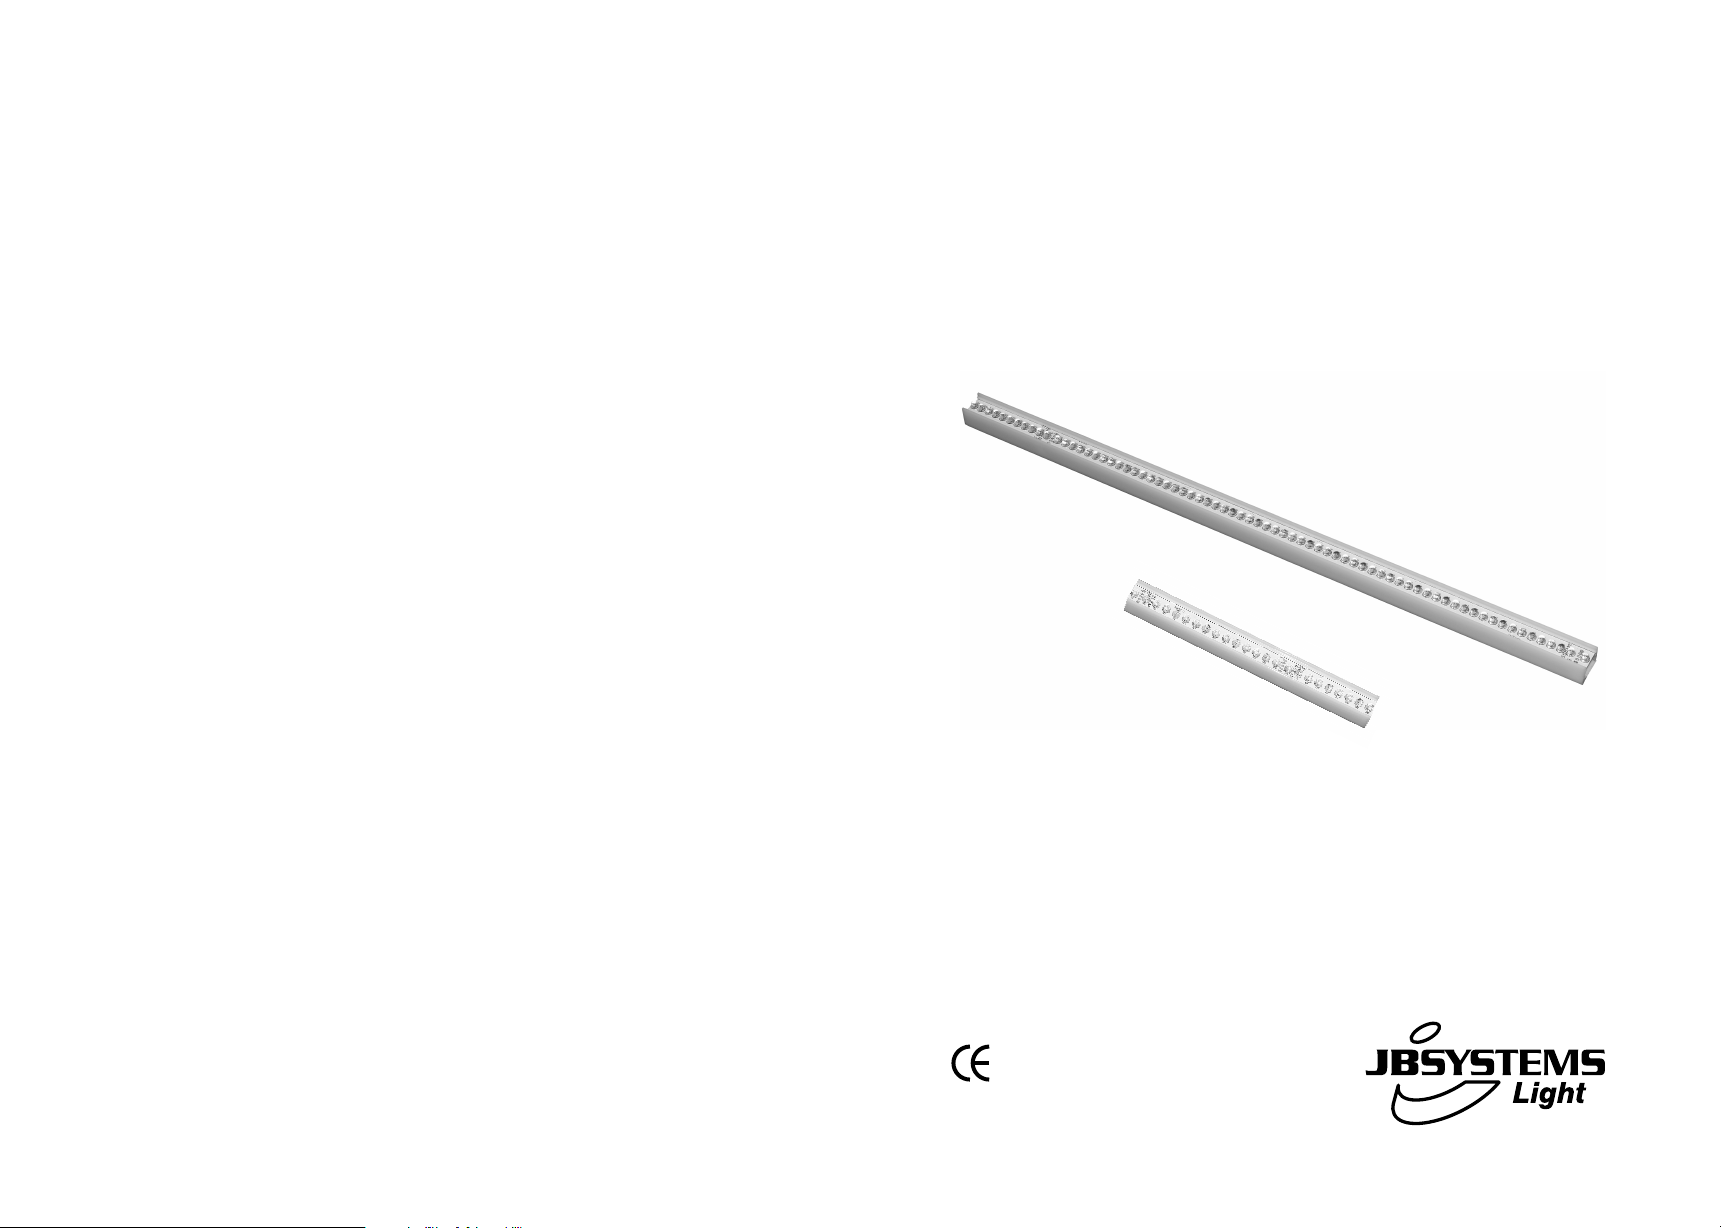
MLS-20/MLS-50
Mini LED Strip
WWW.BEGLEC.COM
Copyright © 2007 by BEGLEC cva.
Reproduction or publication of the content in any manner, without express permission of the publisher, is prohibited.
Version: 1.1
Operation Manual
Mode d'emploi
Gebruiksaanwijzing
Bedienungsanleitung
Manual de instrucciones
EN
FR
NL
DU
ES
Page 2

EN - DISPOSAL OF THE DEVICE
Dispose of the unit and used batteries in an environment friendly manner
according to your country regulations.
FR - DÉCLASSER L’APPAREIL
Débarrassez-vous de l’appareil et des piles usagées de manière écologique
Conformément aux dispositions légales de votre pays.
NL - VERWIJDEREN VAN HET APPARAAT
Verwijder het toestel en de gebruikte batterijen op een milieuvriendelijke
manier conform de in uw land geldende voorschriften.
DU - ENTSORGUNG DES GERÄTS
Entsorgen Sie das Gerät und die Batterien auf umweltfreundliche Art und
Weise gemäß den Vorschriften Ihres Landes.
ES - DESHACERSE DEL APARATO
Reciclar el aparato y pilas usadas de forma ecologica conforme a las
disposiciones legales de su pais.
PT - COMO DESFAZER-SE DA UNIDADE
Tente reciclar a unidade e as pilhas usadas respeitando o ambiente e em
conformidade com as normas vigentes no seu país.
Page 3
ENGLISH OPERATION MANUAL
Thank you for buying this JB Systems®product. To take full advantage of all possibilities and for your own
safety, pleaseread these operating instructions very carefully beforeyou start using this unit.
FEATURES
This unit is radio-interference suppressed. This product meets the requirements ofthe current European and
nationalguidelines.Conformity has beenestablished and the relevantstatements and documents havebeen
depositedby the manufacturer.
Thisdevice has been designed to producedecorativeeffectlighting and is used in light showsystems.
Multicolor plastic tubes with RGB LEDs, used to change the color of walls, ceilings, etc. in all kinds of
venues: bars, discotheques,taverns, shops, …
Infinite applications possible: fix the strips in cabinets, behind translucent plexi panels to create slowly
changing coloredsurfaces,ceilings and walls, …
Two-side adhesive tape for easy fixing included
Canbe fixed on any surface using small screws
Elegant “slimline” design!
Strips can be fixedwithout gaps between the units: nointerruptions inthe light output!
Novisible connection cables, they are completely hiddeninside the units
Available in 2 lengths:20cm and 50cm
Tobe used with our LED-MANAGER (DMX powersupply)
Longlife LEDTechnology!
BEFORE USE
Before you start using this unit, please check if there’s no transportation damage. Should there be any, do
not usethedevice and consult your dealerfirst.
Important: This device left our factory in perfect condition and well packaged. It is absolutely necessary
for the user to strictly follow the safety instructions and warnings in this user manual. Any damage caused
by mishandling is not subject to warranty. The dealer will not accept responsibility for any resulting defects
orproblems caused by disregarding this user manual.
Keep this booklet in a safe place for future consultation. If you sell the fixture, be sure to add this user
manual.
Check the contents:
Check that the carton contains the following items:
Operating instructions
MLS-20 (20cm) or MLS-50 (50cm)
Two-side adhesive tape for easy fixing included
Connection cablewith 2 connectors (L=10cm)
SAFETY INSTRUCTIONS:
This symbol means:indoor useonly.
This symbolmeans:Readinstructions.
To protect the environment, pleasetry to recycle the packing materialas much as possible.
Do not expose this appliancetorain or moisture.
To avoid condensation to be formed inside, allow the unit to adapt to the surrounding temperatures when
bringing it into a warm room after transport. Condense sometimes prevents the unit from working at full
performance or may even cause damages.
Thisunit is forindoor use only.
Don’t place metal objects or spill liquid inside the unit. If a foreign object enters the unit, immediately
disconnectthe installation setupfrom the mains power.
Prevent use in dusty environmentsand clean the unitregularly.
Keep the unit away from children.
ENGLISH OPERATION MANUAL
Inexperienced persons should not operate this device.
Maximum save ambienttemperature is 40°C.Don’t use this unit athigher ambient temperatures.
Make sure the area below the installation place is free from unwanted persons during rigging, de-rigging
andservicing.
The electrical installation should be carried out by qualified personal only, according to the regulations for
electricaland mechanical safety in your country.
The cables should always be in perfect condition: switch the LED Manager immediately off when the
cables are squashedordamaged.
This appliance must be used with the LED Manager: don’t connect the unit to any dimmer pack or other
powersupply.
In the event of serious operating problems, stop usingthe fixture and contactyour dealer immediately.
Thehousing must be replaced if it is visiblydamaged.
Please use the original packing when the deviceis to be transported.
Dueto safetyreasons it is prohibited to make unauthorizedmodifications to the unit.
Important: Don’t use the effectin the presenceof persons suffering from epilepsy.
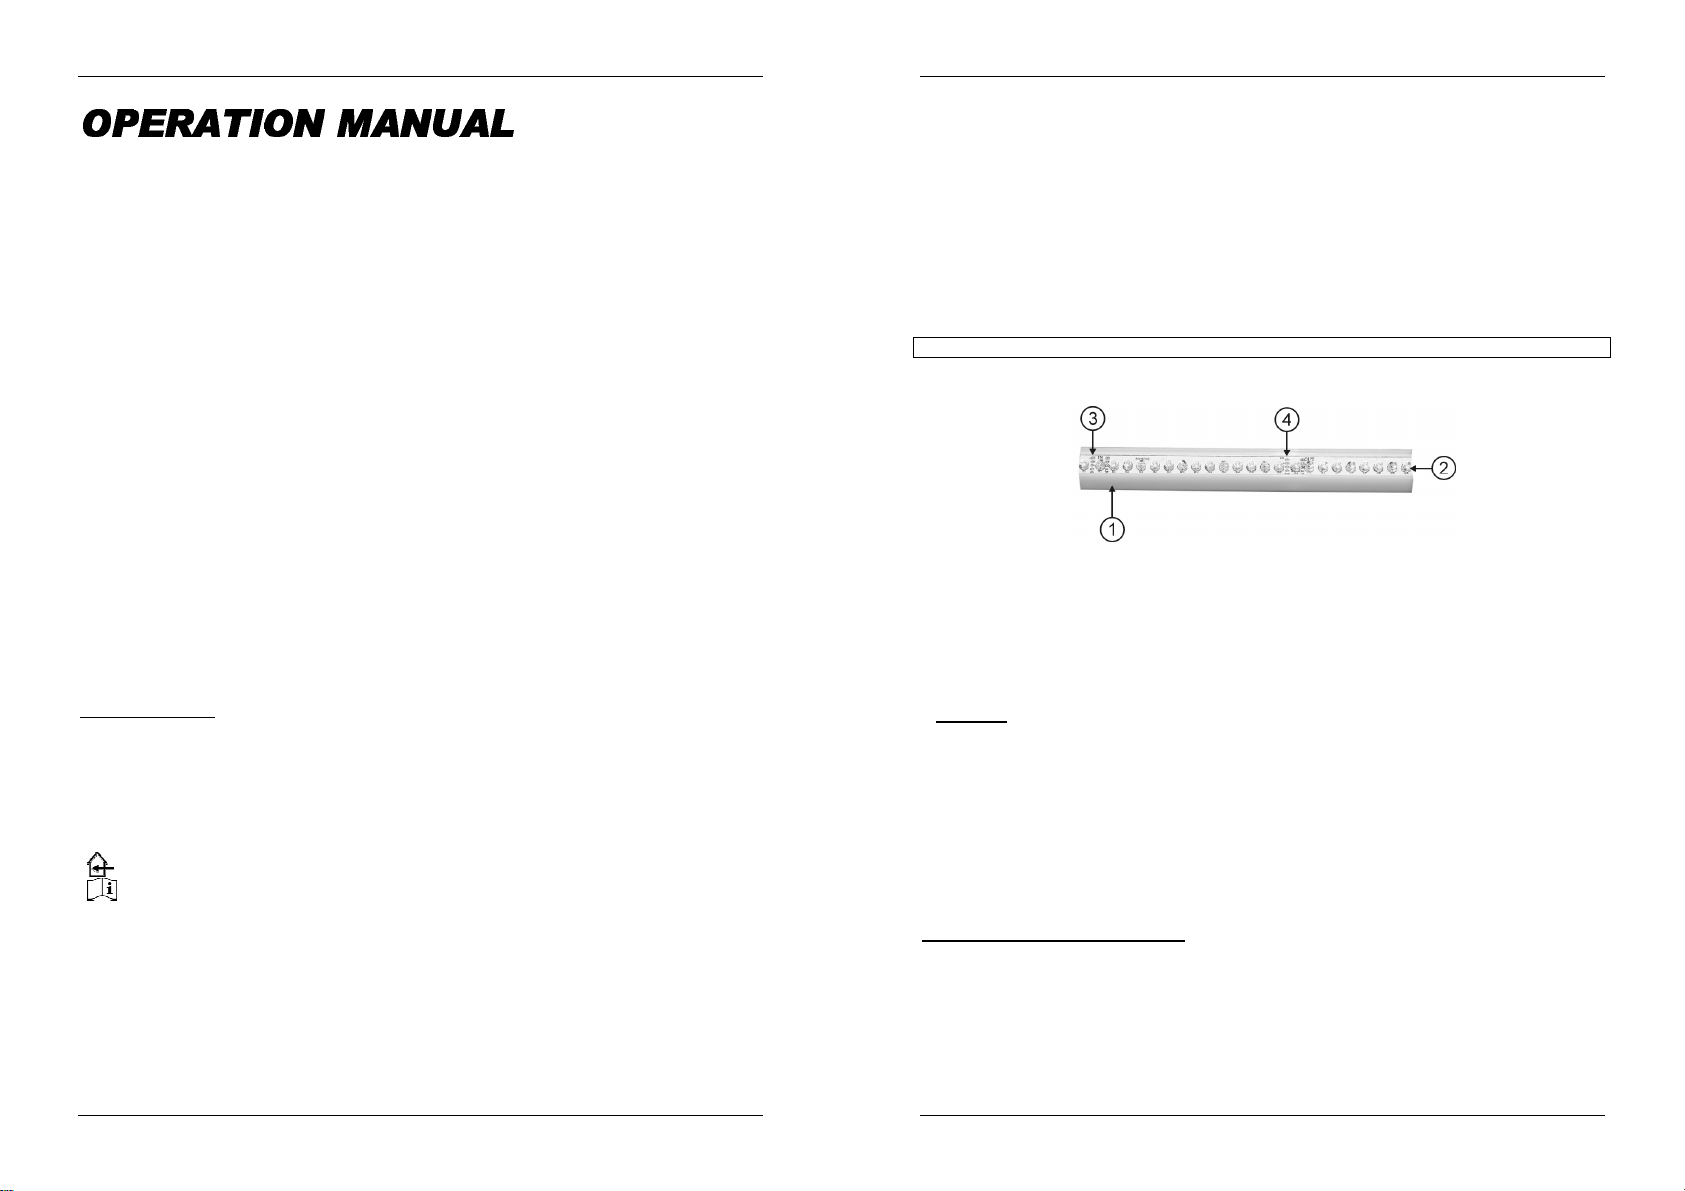
DESCRIPTION:
1. LED Stripenclosure
2. PCB with high power LEDs: can bepulled out of the U-shaped base to make installation easier.
3. Input connector (mounted on the bottom side): to be linked with the LED manager or with the output of a
previous LED strip in the chain.
4. Output connector (mounted on the bottom side): to be linked with the input of a next LED strip in the
chain.
MECHANICAL INSTALLATION
Important: The installation must be carried out by qualified service personal only. Improper
installation can result in serious injuries and/or damage to property. Overhead rigging requires
extensive experience! Working load limits should be respected, certified installation materials
shouldbe used, the installed device shouldbe inspected regularly for safety.
Make sure the area below the installation place is free from unwanted persons during installation and
servicing.
Before installation make sure that the installation area can hold a minimum point load of 10times the
device’sweight.
Thedevice should be well fixed;a free-swinging mounting isdangerousand maynot be considered!
Theoperator has to make sure that the safety-relatingand machine-technical installations are approved by
an expert before using them for the first time. The installations should be inspected every year by a skilled
person to be sure that safety is still optimal.
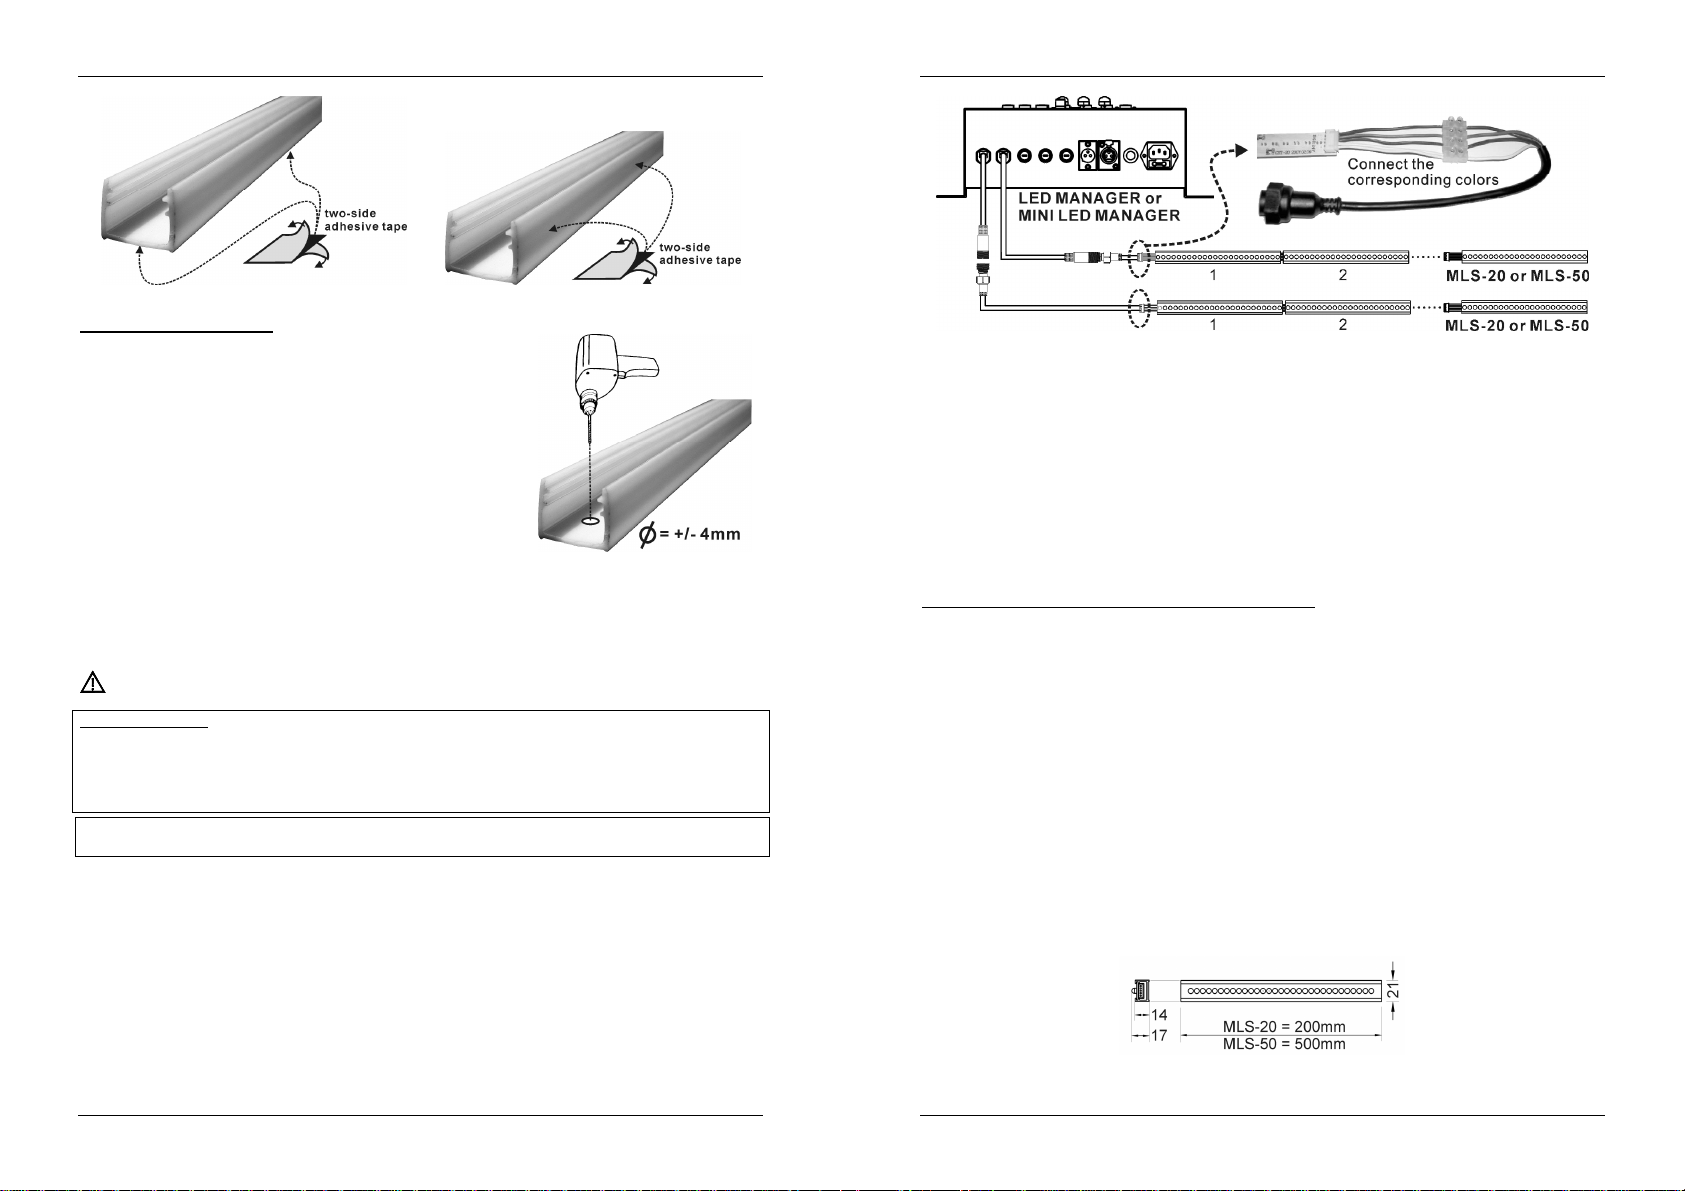
Mountingwith Two-sideadhesive tape:
This is the easiest and fastest way but only possibleona smooth surface!
Cutthe tape at the right size.
Putit on the bottom or side of the U-shaped enclosure as shown on the drawings.
JB SYSTEMS
®
1/24 MLS-20 + MLS-50 MINI LED STRIP
JB SYSTEMS
®
2/24 MLS-20 + MLS-50 MINI LED STRIP
Page 4
ENGLISH OPERATION MANUAL
Tape mounted on the bottom Tape mounted on the side
Mountingwithsmallscrews:
This takes a little more time but the mounting surface doesn’t have to
be so smooth, you can even fix the LED strip on a surface covered
with carpet.
Remove the PCB from the U-shaped plastic rail just by sliding it to
oneside.
Important: do NOT touch the electrical contacts on the bottom
of the PCB, electrostatic discharges can destroy the LEDs!!!
Now you can easily drill small holes in the plastic rail. (see picture)
Fix the plastic rail on the surfaceusing adapted small screws.
Slide the PCB back in place (don’t forget to first put the supplied
small connection cable to the output connector on the bottom)
Hint: You can install the LED STRIP(s)also behind translucent plasticpanelstocreate colorchanging walls
and ceilings or in a bar you can install the strips under a translucent shelf to lighten bottles and drinking
glasses from the bottom.
ELECTRICAL INSTALLATION
The electrical installation should be carried out by qualified personal only, according to the
regulationsfor electricaland mechanical safety in your country.
VERY IMPORTANT: Check the user manual of the LED Manager for the maximum allowed power on
its outputs! The maximumcurrent supportedby each LED STRIP = 4A or +/100W. Since the 1stunit in
a chain must be able to support this current, each chain will have a maximumallowable length(max.
100W). To know the total power consumption of all LED products in a chain you simply have to add
up the power consumption of all units in the chain. Check the chapter “specifications” at the end of
this manualtosee the powerconsumption of the differentLED STRIPS!
!!This MLS-20 + MLS-50MINILED STRIPcan only beused together withthe JBSYSTEMS®LED MANAGER !!
After installing the units just daisy chain the in/output cables of all LED STRIP units up to the maximum
allowedload.
After checking that the maximum allowed power is not exceeded, you can connect the chain to one of the
outputs of the LED Manager.
Toconnect the first LEDSTRIPin the chain to the LED MANAGER, please do the following:
!!!DON’T CONNECT DIRECTLYTO230Vacoranyordinary 24Vdc power supply !!!
Cut off oneend of the connection cable that was suppliedwith the LEDSTRIP
Use a simple 4-pin contact terminal to connect the open ends of the cable to the special cable
supplied with the LED MANAGER: the corresponding colors should be connected to each other.
Attention: you must take the two white colored wires of the small connection cable together.
ENGLISH OPERATION MANUAL
Example: You have to install 33x MLS-50 and 6x MLS-20 15x 7,2W + 6x 2,4W = 122,4Watt. This chain
can be connected to one of the LED Manager outputs since it does notexceed the allowed 150W BUTyou
can’t put all units in one chain since the total power exceeds 100Watt! You will have to dividethe chain in
2 separate chains, connected in parallel on the LED Manager output.
(Attention:maximum output forMini LED Manager is 100W!)
OPERATING INSTRUCTIONS
Since the MINI LED STRIPS are controlled by the LED Manager, we strongly advice to read the operation
instructions in the LED Manager user manual.
MAINTENANCE
Make sure the areabelow the installation place is free from unwanted persons during servicing.
Switch off the LED Managerand unplug the mains cable.
During inspection the following points should be checked:
All screws used for installing the device and any of its parts should be tightly fastened and may not be
corroded.
Housings, fixations and installations spots (ceiling, truss, suspensions) should be totally free from any
deformation.
When an enclosure is visibly damaged due to cracks or deep scratches,it must be replaced.
The cables must be in impeccable condition and should be replaced immediately when even a small
problem is detected.
The cleaning of the plastic enclosure must be carried out periodically to optimize light output. Cleaning
frequency depends on the environment in which the fixture operates: damp, smoky or particularly dirty
surroundingscan causegreater accumulation of dirt on the unit’soptics.
Clean with a soft cloth using normal glass cleaning products.
Always dry the parts carefully.
SPECIFICATIONS
Connections: Specialflat cables
Operationvoltage : 24Vdc common anode
Power consumption: MLS-20 (20cm) = 2,4Watt
Size/Weight: MLS-20 (20cm) = 43 g
MLS-50 (50cm) = 7,2Watt
MLS-50 (50cm) = 93 g
JB SYSTEMS
You can download the latest versionof this user manual on our website: www.beglec.com
®
3/24 MLS-20 + MLS-50 MINI LED STRIP
JB SYSTEMS
Every information is subject to change without prior notice
®
4/24 MLS-20 + MLS-50 MINI LED STRIP
Page 5
FRANÇAIS MODE D’EMPLOI
Merci d’avoir choisi ce produit JB Systems®. Pour votre sécurité et pour une utilisation optimalede toutes les
possibilités de l’appareil, lisezattentivement cette notice avant utilisation.
EN VOUS INSCRIVANT POUR LA LETTRE D’INFORMATION VOUS SEREZ TOUJOURS
TENU AU COURANT DES DERNIERES NOUVELLES CONCERNANT NOS PRODUITS:
NOUVEAUTES,ACTIONS SPECIALES,JOURNEES PORTES OUVERTES, ETC.
SURFEZ SUR: WWW.BEGLEC.COM
CARACTERISTIQUES
Cet appareil ne produit pas d’interférences radio. Il répond aux exigences nationales et européennes. La
conformité a été établie et les déclarations et documentscorrespondants ont été déposéspar le fabricant.
Cet appareil a été conçu pour la production d’effets lumière décoratifs et est utilisé dans des spectacles
lumineux.
Tubes multicolores en plastiquecontenant des LED RGB, utilisés pour changer les couleurs des murs et
des plafonds dans tous les types de lieux festifs: bars, discothèques, tavernes,magasins,…
Plusieursapplicationssontpossibles: fixez les LED strips dansdes meubles, derrière des panneaux plexi
translucides pour créer des changements de couleurs des surfaces, murs et plafonds.
Dupapier adhésif double face est inclus pour permettreun placement aisé.
Cestubes peuvent également être fixés sur n'importe quelle surfaceà l'aide de petites vis.
Esthétiquetrès réussie,de type 'slim line'.
Un ensemble de strips peut être mis en place sans qu'il y ait d'espaces entre les éléments : donc, pas
d'interruptions dans la"ligne" lumineuse !
Aucun câble et/ou connexionn'est visible, toutest totalement dissimulé dans les éléments.
Disponibleen 2 longueurs : 20 cm et 50 cm.
A utiliser EXCLUSIVEMENT avecnotreLED MANAGER (alimentationLED spéciale, vendueséparément)
Latechnologie utiliséegarantit une très longue duréede vieaux LED !
FRANÇAIS MODE D’EMPLOI
Nepas exposercet appareil à la pluie ou l’humidité.
Pour éviter la formation de condensation à l’intérieur de l’appareil, patientez quelques minutes pourlaisser
l’appareil s’adapter à la température ambiante lorsqu’il arrive dans une pièce chauffée après le transport.
La condensation empêche l’unité de fonctionner en performance optimale et peut même causer des
dommages.
Cette unité est destinée à une utilisation à l’intérieur uniquement.
Ne placez pas d’objets en métal ou ne renversez pas de liquide à l’intérieur de l’appareil. Si un corps
étrangerentre dans l’appareil, débranchez immédiatementla configurationde l’alimentationsecteur.
Nepasutiliser dans un environnement poussiéreux etnettoyezl’unitérégulièrement.
Nepaslaisser l’unité à portée des enfants.
Lespersonnes non expérimentéesne doivent pas utiliser cet appareil.
Latempérature ambiante maximum d’utilisationde l’appareil est de 40°C. Ne pas l’utiliserau-delà decette
température.
Assurez-vous que la zone au-dessous du lieu d’installation ne comporte pas de personnes indésirables
pendant lemontage,le démontageet les opérations de maintenance.
Les installations électriques ne peuvent être faites que par du personnel qualifié et conformément aux
régulationsde sécurité électriqueet mécaniqueen vigueur dans votre pays.
Les câbles doivent toujours être en parfaite condition: allumez le LED MANAGER immédiatement si les
câbles sont écrasés ou endommagés.
Cetappareil doit être utilisé avec le LED MANAGER : ne branchez pas l’appareil sur un variateur (dimmer)
normal ou sur uneautrealimentation secteur.
En cas de problèmes de fonctionnement sérieux, arrêtez toute utilisation de l’appareil et contactez votre
revendeurimmédiatement.
Leboîtierdoit être remplacé s’il est visiblement endommagé.
Utilisez l’emballage d’origine si l’appareildoit être transporté.
Pour des raisons de sécurité, il est interdit d’apporter toute modification à l’unité non spécifiquement
autoriséepar lesparties responsables.
Important: Ne pas utiliser d’effets en présence de personnes souffrant d’épilepsie.
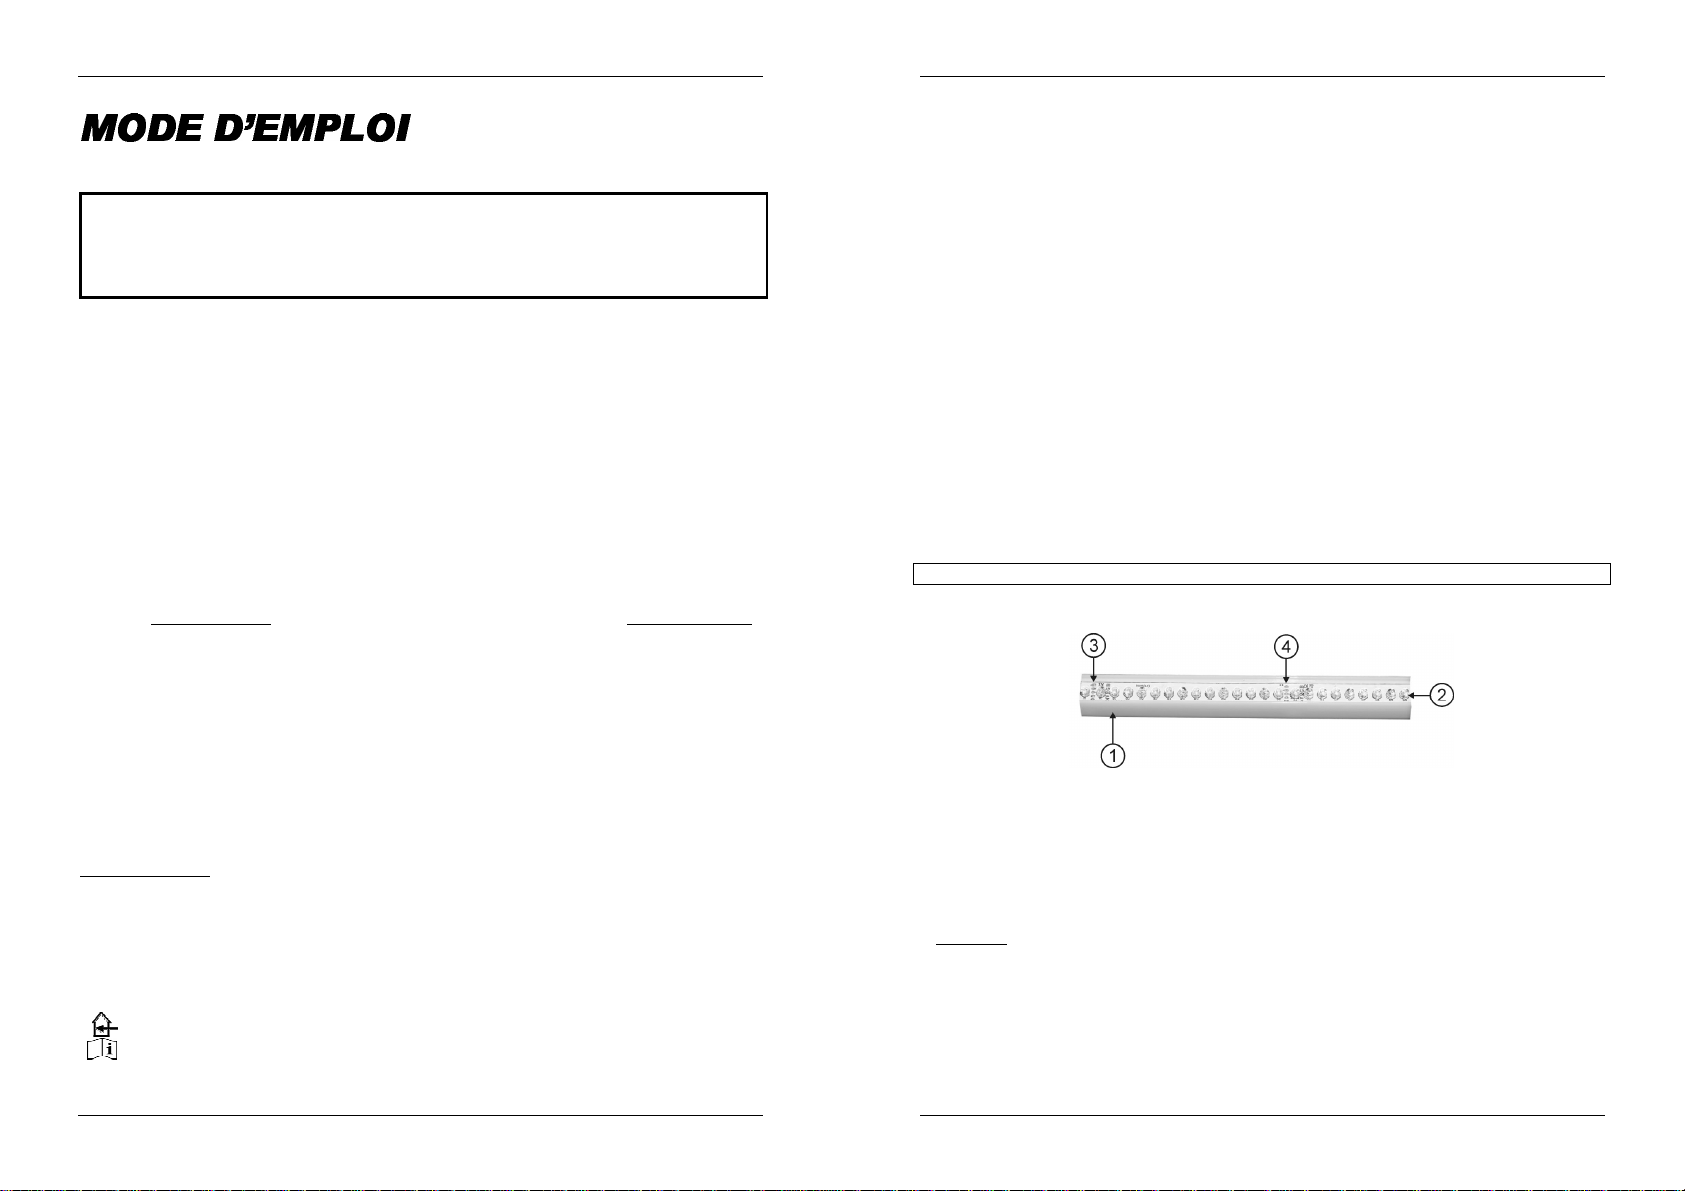
DESCRIPTION:
AVANT UTILISATION
Avant d’utiliser cet appareil, assurez-vous de l’absence de dommage lié au transport. En cas
d’endommagement,n’utilisez pas l’appareil et contactezle vendeur.
Important: Cet appareil a quitté notre usine en parfaite condition et bien emballé. Il est primordial que
l’utilisateur suive les instructions de sécurité et avertissements inclus dans ce manuel. La garantie ne
s’applique pas en cas de dommage lié à une utilisation incorrecte. Le vendeur ne prend pas la
responsabilité des défauts ou de tout problème résultant du fait de n’avoir pas tenu compte des mises en
garde de ce manuel.
Conservez ce manuel dans un endroit sûr pour toute consultation future. Si vous vendez l’appareil,
assurez-vous d’yjoindre ce manuel également.
Vérifiez le contenu:
Vérifiezsi l’emballage contient les articles suivants:
Mode d'emploi
MLS-20 (20cm) ou MLS-50(50cm)
Dupapier adhésif double face est inclus pour permettreun placement aisé.
Câblede connexion muni de 2 connecteurs (L = 10 cm).
INSTRUCTIONS DE SECURITE:
Ce symbole signifie: uniquementpourusage à l'intérieur.
Ce symbolesignifie : Lire le mode d’emploi.
Afin de protéger l’environnement, merci de recycler les emballages autant que possible.
JB SYSTEMS
®
5/24 MLS-20 + MLS-50 MINI LED STRIP
1. Boîtierdu LED strip.
2. Circuit imprimé sur lequel sont fixées les LED à haute puissance. Lestrip peut être retiré de son boîtier
en formede U pour permettreune installation plus aisée.
3. Connecteur d'entrée (monté sur la face arrière) : ce dernier doit être raccordé au LED manager ou à la
connexionde sortie du LED strip qui précède dans la chaîne.
4. Connecteur de sortie (monté sur la facearrière) : ce dernierdoit être raccordé à la connexion d'entrée du
LED strip quisuit dans lachaîne.
INSTALLATION MECANIQUE
Important: L’installation doit être faite par du personnel qualifié uniquement. Une installation
incorrecte peut causer des blessures sévères et/ou endommager l’appareil. L’installation en
hauteur exige de l’expérience ! Les limites de charge doivent être respectées, du matériel
d’installation certifié doit être utilisé, et l’appareil installé doit subir des inspections de sécurité
régulièrement.
Assurez-vous que la zone au-dessous du lieu d’installation ne comporte pas de personnes indésirables
lors de l’installationet la maintenance.
Avant l’installationassurez-vous quela zone d’installation supporte un point localiséminimum de 10 fois le
poids del’appareil.
JB SYSTEMS
®
6/24 MLS-20 + MLS-50 MINI LED STRIP
Page 6

FRANÇAIS MODE D’EMPLOI
FRANÇAIS MODE D’EMPLOI
L’appareil doit être bien fixé, un montageà balancementest dangereux et ne devrait pas être considéré !
L’utilisateur doit s’assurer que les installations techniques et de sécurité sont bien approuvées par un
expert avant la première utilisation. Les installations doivent être inspectées chaque année par du
personnelqualifié pourassurerune sécurité optimale.
Montage utilisant du papier adhésif double face :
Ils'agit du moyen le plus facileet le plus rapide, mais il n'est possible quesur des surfaces planes !
Coupezle papier adhésif à la taillevoulue.
Collez-le sur la face arrière ou sur une des faces latérales du boîtier en forme de U, comme le montrent
les figures ci-dessous.
Papier adhésifmonté sur la face arrière Papier adhésifmontésurune des faces latérales
Montage utilisantde petites vis :
Cette technique prend un peu plus de temps, mais la surface de pose
ne doit pas être nécessairement plane, on peut même fixer ainsi des
LED strips sur une surface recouvertepar du tapis plain.
Enlever le circuit imprimé de son rail en plastique en forme de U,
simplement en lefaisant coulisser vers une des deux extrémités.
Important : NE touchez PAS les contacts électriques à l'arrière
du circuit imprimé, des décharges électrostatiques pourraient
détruire les LED !
A présent, il est très facile de forer de petits trous dans le rail en
plastique. (se reporter à la figure ci-contre)
Fixez le rail en plastique sur la surface choisie en utilisant de petites
visadéquates.
En le faisant coulisser, remettez le circuit imprimé en place
(n'oubliez pas de d'abord raccorder, sur la face arrière, le petit câble
de connexion(fourni) au connecteur de sortie).
Astuce: vous pouvez installer les LED STRIPs derrière des panneaux plexi translucides pour créer des
changements de couleursdes murs et plafondsoudans un bar,vouspouvez installer les bandesLEDs sous
une étagèretranslucide pourilluminer les bouteillesetlesverres parle dessous.
INSTALLATION ELECTRIQUE
L’installation électrique doit uniquement être effectué par du personnel qualifié, selon la
législation concernant les mesures de sécurité électriques et mécaniques en vigueur dans
votre pays.
TRES IMPORTANT: Vérifiez le manuel de l’utilisateur du LED MANAGER pour voir la charge
maximale permise sur les sorties! Le courant maximum supporté par chaque LED STRIP = 4A ou +/100 W. Etant donné que le premier élément d'une chaîne doit être capable de supporter ce courant,
chaque chaîne devra se limiter à une longueur maximale autorisée (correspondant à 100 watts
maximum). Pour connaître la consommation totale de toutes les LED dans une chaîne, vous pouvez
simplementcompter la consommation électrique de tous les appareils dans la chaîne. Se reporter au
chapitre “caractéristiques techniques” à la fin de ce manuel pour connaître la consommation totale
desdifférents projecteursà LED !
!! Ce MLS-20 + MLS-50MINILED STRIPnepeut être utilisé qu'avec le JB SYSTEMS®LEDMANAGER
!!!NE PAS SE CONNECTER DIRECTEMENTAUSECTEUR220/230VOLTS,
NI VIA UN QUELCONQUE AUTREADAPTATEUR DE CCDE24VOLTS.
Après avoir installé tous les éléments, il vous suffit de raccorder entre elles les entrées et les sorties de
tous les LED strips, suivant la technique de connexion en guirlande (daisy chain), et en tenant compte de
la charge maximale autorisée.
Après avoir vérifié que la charge maximale permise n’est pas excédée, vous pouvez brancher la chaîne
sur l’unedes sortiesdu LED MANAGER.
Afin de connecter le premier LED strip de la chaîne au LED Manager, veuillez s'il vous plaît faire comme
suit :
Mettez à nu les conducteurs d'une des extrémitésdu câble deconnexion fourni avec le LED strip ;
Utilisez un simple bloc de raccord à 4 contacts pour connecter les conducteurs mis à nu au câble
spécial fourni avec le LED Manager : reliez simplement les couleurs correspondantes.
Attention:vous devez prendre les 2 fils blancs, du petit câble deconnexion, ensemble.
Exemple: vous devez installer 15x MLS-50 et 6x MLS-20 15x 7,2 W + 6x 1,7W = 122,4 Watt. Cette
chaîne peut être connectée sur l’une des sorties du LED MANAGER étant donné que la charge totale
n’excède pas les 150W permis. MAIS il est interdit de raccorder tous les éléments pour former une seule
chaîne, étantdonné que la consommation totale dépasse les 150 watts autorisés ! Il est donc obligatoire
de diviser cette chaîne en deux chaînes séparées, connectées en parallèle à la sortie du LED MANAGER.
Attention : le rendement maximum pour le Mini LED MANAGER est de 100 watts !)
exclusivement!!
INSTRUCTIONS D’UTILISATION
Etant donné que les Mini LED STRIPS sont contrôlées par le LED MANAGER, nous vous recommandons
fortement de lire les instructions de fonctionnementdans le mode d’emploi du LED MANAGER.
MAINTENANCE
Assurez-vous que la zone au-dessous du lieu d’installation ne comporte pas de personnes indésirables
lors de la maintenance
Eteignez le LED MANAGER et débranchez le câble secteur.
Pendantl’inspection,les points suivants doivent êtrevérifiés :
Toutes les vis utilisées pour l’installation de l’appareil ou de chacune de ses pièces doivent être bien
fixéeset non corrodées.
Les niches, fixations et structures de support (plafond, poutres, suspensions) doivent être totalement
intactes,sans aucune déformation.
Lorsqu’une lentille optique est visiblement endommagée (fissure ou éraflures profondes), elle doit être
remplacée.
Lescâbles doivent être en parfaitecondition et doivent être remplacés immédiatement en cas de détection
d’un problème,mêmebénin.
Le nettoyage doit être effectué périodiquement pour optimiser la production de lumière. La fréquence de
nettoyage dépend de l’environnement dans lequel l’appareil fonctionne: des environnements humides,
JB SYSTEMS
®
7/24 MLS-20 + MLS-50 MINI LED STRIP
JB SYSTEMS
®
8/24 MLS-20 + MLS-50 MINI LED STRIP
Page 7

FRANÇAIS MODE D’EMPLOI
enfumés ou particulièrement sales peuvent entraîner une accumulation de saleté plus importantes surles
optiques de l’appareil.
Nettoyezà l’aide d’un chiffon doux avec des produits de nettoyagepour verres normaux.
Séchez toujours les partiessoigneusement.
SPECIFICATIONS
Connexions: Câblesplatsspécifiques
Tensionde service : 24V,CC, anode commune
Consommation électrique: MLS-20 (20cm) = 2,4 watt
Dimensions / Poids : MLS-20 (20cm) = 43g
Vouspouvez téléchargerla dernière versionde mode d’emploi sur notre site web: www.beglec.com
Toute informationest sujetteaux changements sansnotice préalable
MLS-50 (50cm) = 7,2 watt
MLS-50 (50cm) = 93g
NEDERLANDS HANDLEIDING
Hartelijk dank voor de aankoop van dit JB Systems®product. Om ten volle te kunnen profiteren van alle
mogelijkheden en voor uw eigen veiligheid, gelieve de aanwijzingen zeer zorgvuldig te lezen voor U begint
het apparaat te gebruiken.
DOOR U OP ONZE MAILINGLIJST IN TE SCHRIJVEN ONTVANGT U STEEDSDE
LAATSTE INFORMATIE OVER ONZE PRODUCTEN: NIEUWIGHEDEN,SPECIALE
ACTIES, OPENDEURDAGEN, ENZ.
SURF NAAR: WWW.BEGLEC.COM
KARAKTERISTIEKEN
In dit apparaat is radio-interferentieonderdrukt. Dit product voldoet aan de gangbare Europese en nationale
voorschriften. Het is vastgesteld dat het apparaat er zich aan houdt en de desbetreffende verklaringen en
documenten zijn door de fabrikant afgegeven.
Het toestel is ontworpen om decoratieve lichteffecten te produceren en kan eventueel worden gebruikt in
lichtshows.
Meerkleuren plastic buizen met RGB LED’s. Ze worden gebruikt om de kleur van muren, plafonds, etc. te
veranderen in allerleitoepassingen:bars, discotheken, cafés, winkels, …
Oneindig veel toepassingen mogelijk: bevestig de strips in kasten, achter transparante plexiglazen
panelenom langzaamveranderendegekleurde oppervlakkente creëren, belicht plafonds en muren …
Tweezijdige klevende tapevoormakkelijkebevestiging inclusief
Kan op elk oppervlak bevestigdworden met kleine schroeven
Elegant “slim line” design
Strips kunnen bevestigd worden zonder gaten tussen de toestellen: Geen onderbrekingen in de
lichtproductie
Geen zichtbareconnectiekabels, deze zijnvolledig verborgen aande binnenzijde van de toestellen.
Verkrijgbaar in 2 lengtes: 20 cm en 50 cm
Wordtaangestuurddoor onze LEDMANAGER(DMX LED-voeding)
LEDTechnologievoor een lange levensduur!
JB SYSTEMS
VOOR DE IN GEBRUIKNAME
Controleer voor het eerste gebruik van het apparaat of het tijdens het transport beschadigd werd. Mocht er
schade zijn,gebruik het dan niet, maar raadpleeg eerst uw dealer.
Belangrijk: Dit apparaat verliet de fabriek in uitstekende staat en goed verpakt. Het is erg belangrijk dat de
gebruiker de veiligheidsaanwijzingen en raadgevingen in deze gebruiksaanwijzing uiterstnauwkeurig volgt.
Elke schade veroorzaakt door verkeerd gebruik van het apparaat valt niet onder de garantie. De dealer
aanvaardt geen verantwoordelijkheid voor mankementenen problemen die komen door het veronachtzamen
van deze gebruiksaanwijzing.
Bewaardeze brochure op een veilige plaats om hem in de toekomstnogmaals te kunnenraadplegen. Indien
U het apparaatverkoopt, denkt U er wel aan om de gebruiksaanwijzing bij te voegen.
Controleer de inhoud:
Controleer of de doosvolgende onderdelen bevat:
Handleiding
MLS-20 (20cm) of MLS-50 (50cm)
Tweezijdige klevende tapevoormakkelijkebevestiging inclusief
Aansluitingskabelmet 2 connectoren(L=10cm)
®
9/24 MLS-20 + MLS-50 MINI LED STRIP
JB SYSTEMS
®
10/24 MLS-20 + MLS-50 MINI LED STRIP
Page 8

NEDERLANDS HANDLEIDING
NEDERLANDS HANDLEIDING
VEILIGHEIDSVOORSCHRIFTEN:
Dit symbool betekent: het apparaatmag enkelbinnenhuis worden gebruikt.
Dit symbool betekent: Lees de handleiding!
Om hetmilieu te beschermen, probeer zoveel mogelijkhet verpakkingsmateriaal te recycleren.
Stel dit apparaat niet bloot aan regen of vocht.
Om de vorming van condensatie binnenin te voorkomen, laat het apparaat aan de omgevingstemperatuur
wennen wanneer het, na het transport, naar een warm vertrek is overgebracht. Condensatie kan het
toestel soms verhinderen perfect te functioneren. Het kan soms zelfs schade aan het apparaat
toebrengen.
Gebruik ditapparaatuitsluitendbinnenshuis.
Plaats geen metalen voorwerpen binnenin deunit. Mors ook geen vloeistofbinnenin de unit. Haal direct de
stekkervan de installatie uit het stopcontact als een vreemd voorwerpde unit binnengaat.
Zorg dat het toestelniet in een stoffige omgeving wordt gebruikt en maak het regelmatig schoon.
Houdhet apparaat uitde buurtvan kinderen.
Ditapparaatmag niet door onervaren personen bediend worden.
De maximum veilige omgevingstemperatuur is 40°C. Gebruik het apparaat dus niet bij hogere
temperaturen.
Verzeker er U van dat er zich onder de plaats waar het toestel wordt geïnstalleerd geen ongewenste
personenbevinden tijdens het bevestigenen losmaken alsookbij het onderhoud.
De elektrische installatie behoort uitsluitend uitgevoerd te worden door bevoegd personeel, volgens de in
uw land geldende regels betreffendeelektrische en mechanische veiligheid.
De kabels moeten altijd in perfecte conditie zijn: schakel de LED MANAGER direct uit als de kabels
gekneusd of beschadigd zijn.
Ditapparaat moet met deLED MANAGER worden gebruikt:sluit de unit niet op een gewone dimmer pack
of een andere vermogenvoorziening aan.
Ingeval van ernstige problemen met het bedienen van het toestel, stopt U onmiddellijk het gebruik ervan.
Contacteeruw dealer vooreen eventuele reparatie.
Debehuizing moetvervangen worden als zezichtbaarbeschadigd is.
Gebruik best de originele verpakking als het toestelvervoerdmoet worden.
Om veiligheidsredenen is het verboden om ongeautoriseerde modificaties aan het toestel aan te brengen.
Belangrijk:Gebruikhet lichteffectniet in de tegenwoordigheid van personen die lijden aan epilepsie.
BESCHRIJVING:
1. LED Strip behuizing
2. PCB met hoogintensiteit LEDs: kan uit de U-vormige basis getrokken worden om de installatie te
vergemakkelijken.
3. Ingangsaansluiting (bevindt zich aan de onderzijde van de print): wordt gelinked met de LED managerof
metde uitgang van een vorige LEDStrip in de ketting.
4. Uitgangsaansluiting(bevindtzich aan deonderzijdevan de print):Wordt gelinked met de ingang vaneen
volgende LED strip in de ketting.
werklast; erkende installeringmaterialen moeten worden gebruikt; de veiligheid van het
geïnstalleerde toestel moetregelmatigworden gecontroleerd.
Overtuig U ervan dat het gebied onder installatieplaats vrij is van ongewenste personen tijdens het
plaatsenen hetonderhoud.
Alvorens tot plaatsen over te gaan, moet men controleren dat de minimum puntbelasting van de
installatieplaats 10 keer het gewichtvan het toestel bedraagt.
Het apparaat moet goed worden vastgezet; aan een vrij zwaaiende montering mag zelfs niet gedacht
worden.
De gebruiker moet er zich van verzekeren dat de installaties met betrekking tot de veiligheid en de
technische mechaniek door een expert zijn goedgekeurd alvorens ze voor de eerstekeer te gebruiken. Elk
jaar moeten de installaties worden gekeurd door een vakman om te controleren of de veiligheidnog steeds
perfectis.
Bevestigingmetde Tweezijdig klevende tape:
Dit is de makkelijksteen de snelste weg, doch enkel mogelijk op een glad oppervlak!
Snijde tape op dejuiste lengte.
Plaats deze op de onder- en zijkant van deU-vormige behuizing zoals getoondop de tekeningen
Tape bevestigd op de onderkant Tape bevestigd op de zijkant
Bevestigingmetkleine schroeven:
Dit neemt wat meer tijd in beslag, doch dienthetbevestigingsoppervlak
niet zo effen te zijn. U kan de LED Strip zelfs bevestigen op een oppervlak
bedekt met tapijt.
Verwijder de PCB uit de U-vormige plastic rail enkel door het naar 1
zijde te doen schuiven.
Belangrijk: raak de elektrische contacten op de bodem van de PCB
NIETaan, elektrostatische ontladingen kunnen de LEDs vernietigen
!!!
Nu kan u makkelijkkleine gaten boren in de plastic rail. (zie foto)
Bevestig de plastic rail op de ondergrond, gebruik makend van de
bewerktekleine schroeven.
Schuif de PCB terug op zijn plaats (vergeet niet om de bijgeleverde
kleine aansluitingskabel eerst te plaatsen aan deuitgangsaansluiting op
de onderzijde)
Hint: u kan de LED STRIP(s) ook achter transparante plastic panelen installeren om kleurveranderende
muren en plafonds te creëren. In een bar kan u de strips onder een transparante legplank installeren om
flessenen drinkglazen vanaf de bodemteverlichten.
MECHANISCHE INSTALLATIE
Belangrijk: De installatie van het toestel mag uitsluitend door bekwaam onderhoudspersoneel
uitgevoerd worden. Onjuiste plaatsing kan ernstige letsels en/of schade aan eigendommen tot
gevolg hebben. Het ophangen vergt veel ervaring. U behoort de grenzen te respecteren aan de
JB SYSTEMS
®
11/24 MLS-20 + MLS-50 MINI LED STRIP
JB SYSTEMS
®
12/24 MLS-20 + MLS-50 MINI LED STRIP
Page 9

NEDERLANDS HANDLEIDING
NEDERLANDS HANDLEIDING
ELEKTRISCHE INSTALLATIE
De elektrische installatie zou alleen moeten worden uitgevoerd door een bekwaam persoon,
overeenkomstig met de voorschriften voor elektrische en mechanischeveiligheid in uw land.
ERG BELANGRIJK: Controleer de gebruikershandleiding van de LED MANAGER voor het maximale
toegestane vermogen op z’n uitgangen!De maximumstroom die eenLED STRIP kan verdragenis 4A
of+/-100W. Vermits het eerste toestel in de ketting deze stroom moet kunnen verdragenzal de lengte
van elke ketting moeten beperkt worden (max. 100W) Om de totale vermogenconsumptie van alle
LED producten in een keten te weten moet u eenvoudig de vermogenconsumptie van alle units in
keten bij elkaar optellen. Controleer het hoofdstuk “specificaties” aan het eind van de handleiding
om de vermogenconsumptievan de verschillende LED REEKSEN te zien!
!!Deze MLS-20 + MLS-50MINILED STRIP kan enkel tezamen met de JB SYSTEMS®LEDMANAGERgebruikt
!!!SLUITHET TOESTEL NOOIT RECHTSTREEKS OP 230Vac AAN of op elkegewone 24Vdc stroombron!!!
Nahet installeren van de units gewoon de in/uitvoerkabels van alle LED STRIP units aan elkaar schakelen
totdatu het maximaal toegestanevermogen bereikt.
Na controle dat het maximale vermogen niet overschreden is kan u de keten aansluiten op één van de
uitgangen van de LED MANAGER.
Om deeerst LED STRIP in de ketting aan te sluiten aan de LED MANAGERdient u het volgende te doen:
Snij heteindevan 1 zijde van een aansluitkabel af die bij deLED STRIP bijgeleverd was.
Gebruik een simpel 4-pin aansluitcontact om de open eindes van de kabel en de speciale
kabel bijgeleverd bij de LED MANAGER aan elkaar te sluiten. De corresponderendekleuren
zouden met elkaar verbonden moeten worden. Belangrijk: u dient de 2 witgekleurde draden
van de kleine connectiesamen tenemen.
worden !!
Alle schroeven gebruikt om het te toestel te installeren en al zijn onderdelen moeten goed vastgedraaid
zijn en mogen niet verroestzijn.
Behuizingen, vastzetstukken, installeringplaatsen (plafond, spanten, schokbrekers) mogen absoluut niet
verwrongenzijn.
Wanneer de behuizing klaarblijkelijk beschadigd is door barsten of diepe krassen, dan moet deze
vervangenworden.
Dekabels moeten in perfectestaat zijn en behoren vervangen te worden, wanneer er zelfs maar een klein
probleemontdekt werd.
Het schoonmaken moet regelmatig worden uitgevoerd om een zo goed mogelijke lichtuitstraling te
verkrijgen. Hoe vaak ze schoon moeten worden gemaakt hangt af van de omgeving waar het toestel wordt
gebruikt: een klamme, rokerige of bijzonder vuile omgeving kan een grotere opeenhoping van vuil
veroorzakenop de optische uitrusting.
Reinig met een zachte doek en gebruik normaleglasreinigende producten.
Droog de onderdelen altijd zorgvuldig af,
TECHNISCHE KENMERKEN
Aansluitingen: Specialeplatte kabels
Werkingsvoltage: Gelijkstroom 24 Vgemeenschappelijke anode
Vermogenconsumptie: MLS-20 (20cm) = 2,4Watt
Afmetingen/Gewicht: MLS-20 (20cm) = 43g
Elkeinlichtingkanveranderen zonderwaarschuwingvooraf
U kande laatste versievan deze handleidingdownloaden via Onze website: www.beglec.com
MLS-50 (50cm) = 7,2Watt
MLS-50 (50cm) = 93g
Voorbeeld: u heeft 15x MLS-50 en 6x MLS-20 15x 7,2W + 6x 2,4W = 122,4 Watt te installeren. Deze
keten kan aangesloten worden op één van de uitgangen van de LED MANAGER omdat het niet de
toegestane 150 W overschrijdt. U kunt echter al deze toestellen niet in 1 ketting plaatsen aangezien het
totale vermogen 100Watt overschrijdt! U zal de ketting in 2 aparte kettingen moeten splitsen en deze in
parallel op de uitgang van de LED Manager moeten aansluiten. (Belangrijk:maximum capaciteit van de Mini
LED Manageris 100W! )
BEDIENINGSVOORSCHRIFTEN
Omdat de mini LED STRIPS bediend worden door de LED MANAGER, adviseren we u om de
gebruiksinstructiesindegebruikershandleiding van de LED MANAGER te lezen.
ONDERHOUD
Overtuig U ervan dat het gebied onder de installatieplaats vrij is van ongewenste personen tijdens het
onderhoud.
Zet de LEDManageruit en trek de netstekkeruit het stopcontact.
Bij inspectie moeten de volgende puntenwordengecontroleerd.
JB SYSTEMS
®
13/24 MLS-20 + MLS-50 MINI LED STRIP
JB SYSTEMS
®
14/24 MLS-20 + MLS-50 MINI LED STRIP
Page 10

DEUTSCH BEDIENUNGSANLEITUNG
Vielen Dank, dass Sie sich für den Erwerb dieses JBSystems®-Produkt entschieden haben. Bitte lesen sie
diese Bedienungsanleitung sorgfältig vor der Inbetriebnahme durch, zur vollen Ausschöpfung der
Möglichkeiten,die dieses Gerät bietetsowie, zu Ihrer eigenen Sicherheit.
EIGENSCHAFTEN
Das Gerät ist funkentstört und erfüllt die Anforderungen der europäischen und nationalen Bestimmungen.
Entsprechende Dokumentationliegtbeim Herstellervor.
DasGerätist zur Erzeugungvon dekorativemLichtsowie der Benutzung in Lightshows bestimmt.
Mehrfarbige Kunststoffschläuche mit RGB-LEDs, zum Verändern der Farbe vonWänden,Decken, usw. an
Orten wie z.B.: Bars, Diskotheken, Gaststätten, Geschäfte,usw.
Unzählige Anwendungen sind möglich: Befestigen Sie die Leisten (Strips) in Schränken, hinter
lichtdurchlässigenPlexiglas-Verkleidungen um die Farbe von Oberflächen, Decken und Wände langsam
zuverändern.
EinschließlichdoppelseitigesKlebeband für eineeinfacheBefestigung
Kann auf gleich welchen Oberflächen mit Hilfe von kleinen Schraubenbefestigt werden
Elegantes “Slim Line” Design!
Die einzelnen Leisten (Strips) können nahtlos aneinandergefügt werden: keine Unterbrechungen in der
Lichtintensität!
Keine sichtbaren Anschlusskabel, sie liegen vollständig versteckt im Inneren der Einheiten
Verfügbar in 2 Längen:20cmund 50cm
Kann mit dem LED-MANAGER (DMX-Netzteil) verwendetwerden
LanglebigeLEDTechnologie!
VOR DER ERSTBENUTZUNG
Vor der Erstbenutzung bitte das Gerät zuerst auf Transportschäden überprüfen. Sollte das Gerät einen
Schaden aufweisen, Gerät bitte nicht benutzen, sondern unverzüglich mit ihrem Händler in Verbindung
setzen.
Wichtiger Hinweis: Das Gerät hat das Werk unbeschädigt und gut verpackt verlassen. Es ist wichtig,
dass der Benutzer sich streng an die Sicherheitshinweise und Warnungen in der Bedienungsanleitung
hält. Schäden durch unsachgemäße Handhabung sind von der Garantie ausgeschlossen. Der Händler
übernimmt keine Verantwortung für Schäden, die durch Nichtbeachtung der Bedienungsanleitung
hervorgerufen wurden.
Die Bedienungsanleitung, für zukünftiges Nachschlagen, bitte aufbewahren. Bei Verkauf oder sonstiger
Weitergabe des Gerätes,bitteBedienungsanleitung beifügen.
Packungsinhaltprüfen:
Bitte überprüfenSie, dass die Packung folgende Einzelteileenthält:
Bedienungsanleitung
MLS-20 (20cm) oderMLS-50 (50cm)
EinschließlichdoppelseitigesKlebebandzureinfachenBefestigung
Anschlusskabel mit2Anschlussteilen (L=10cm)
SICHERHEITSHINWEISE
DiesesSymbol bedeutet:Nur innerhalbvon Räumen verwenden.
Aus Umweltschutzgründen, Verpackungbitte wiederverwenden,oderrichtigtrennen.
Gerät bitte nicht in Regen oder Feuchtigkeit aussetzen.
Zur Vermeidung von Kondensation im Inneren des Geräts, bittenach Transport in eine warme Umgebung
DiesesSymbol bedeutet: Achtung! Bedienungsanleitung lesen!
einige Zeit zum Temperaturausgleich bringen. Kondensation kann zu Leistungsverlust des Gerätes oder
garBeschädigung führen.
DEUTSCH BEDIENUNGSANLEITUNG
Gerät nicht im Freien undin feuchten Räumen und Umgebungen verwenden.
Keine Metallgegenstände oder Flüssigkeiten ins Innere des Geräts gelangen lassen, Kurzschluss oder
Fehlfunktion können die Folge sein. Falls es doch einmal vorkommen sollte, bitte sofort Netzstecker
ziehen.
Nichtinstaubiger Umgebung verwendenund regelmäßig reinigen.
Für Kinder unerreichbar aufbewahren.
Unerfahrene Personen sollen dasGerät nicht bedienen.
Umgebungstemperatur darf 40ºCnichtüberschreiten.
Sicherstellen, dass sich während des Auf- und Abbaus keine unbefugten Personen unterhalb des Geräts
befinden.
Die Kabel sollten sich in gutemZustand befinden: Schalten Sie den LED-MANAGER sofort aus, wenn die
Kabelgequetscht oder beschädigtwurden.
Dieses Gerät muss mit dem LED-MANAGER benutzt werden: Schließen Sie das Gerät nicht an andere
Dimmer oder Netzteile an.
Elektrische Anschlüsse nur durchqualifiziertesFachpersonalüberprüfen lassen.
Bei Fehlfunktion,Gerät nicht benutzen und mit Händlerin Verbindungsetzen.
Das Gehäuse muss ersetzt werden, wenn es sichtbar beschädigt wurde.
Bei Transport bitte Originalverpackung verwenden,um Schäden am Gerätzu vermeiden.
Aus Sicherheitsgründen dürfen an dem Gerätkeineunbefugten Veränderungen vorgenommenwerden.
Wichtiger Hinweis:
leiden.
Gerät nicht verwenden, wenn sich Personen im Raum befinden, die unter Epilepsie
BESCHREIBUNG
1. LED-Leisten-Profil.
2. Leiterplatte (PCB) mit leistungsstarken LEDs: kann aus der U-förmigen Trägerleiste herausgezogen
werden, um die Installationzu erleichtern.
3. Eingangsanschluss (an der Unterseite angebracht): wird mit dem LED-Manager oder dem Ausgang
einervorangehenden LED Leistein derKetteverbunden.
4. Ausgangsanschluss (an der Unterseite angebracht): wird mit dem Eingang einer nachfolgenden LED
Leistein der Ketteverbunden.
MECHANISCHE INSTALLATION
Wichtig: Montage ausschließlich durch qualifiziertes Fachpersonal durchführen lassen.
Unvorschriftsmäßiger Einbau kann erhebliche Verletzungen und/oder Schäden verursachen.
Überkopf-Montage verlangt entsprechende Erfahrung! Belastungsgrenzen müssen beachtet
werden, geeignetes Installationsmaterial muss verwendet werden und das installierte Gerät muss
in regelmäßigenAbständen überprüft werden.
Sicherstellen, dass sich keine unbefugten Personen unterhalb des Geräts befinden, während es installiert
oder gewartet wird.
Vor Montage sicherstellen, dass die gewählte Position wenigstens das 10-fache Gerätegewicht
aufnehmenkann.
Gerät gut befestigen. Eine freischwingende Aufhängung ist gefährlich und sollte auf gar keinen Fall in
Betrachtgezogen werden!
Betreiber muss sicherstellen,dass die sicherheitsrelevantenund technischen Installationenvor Erstbetrieb
fachmännischvorgenommenwordensind.
Installationen sollten jährlich durch qualifiziertes Fachpersonal inspiziert werden, um jederzeit einen
sicherenBetrieb zu gewährleisten.
JB SYSTEMS
®
15/24 MLS-20 + MLS-50 MINI LED STRIP
JB SYSTEMS
®
16/24 MLS-20 + MLS-50 MINI LED STRIP
Page 11

DEUTSCH BEDIENUNGSANLEITUNG
DEUTSCH BEDIENUNGSANLEITUNG
Installation mit doppelseitigemKlebeband:
Dies ist dieeinfachsteund schnellste Art, aber nur auf glatten Oberflächen möglich!
SchneidenSiedas Band auf die passende Länge.
Bringen Sie es an der Unterseite des U-förmigen Profils entsprechend den nachfolgenden Abbildungen
an.
Anbringendes Klebebands an der Unterseite Anbringendes Klebebands an der Seite
Installationmit kleinenSchrauben:
Dies erfordert etwas mehr Zeitaufwand, aber die Montageoberfläche
muss nicht ganz glatt sein, Sie können die LED-Leiste sogar auf mit
Teppich belegtenOberflächenanbringen.
Entfernen Sie die Leiterplatte aus dem U-förmigen Kunststoffprofil
durch einfachesHerausziehen.
Wichtig: berühren Sie auf keinen Fall die elektrischen Kontakte
an der Unterseite der Leiterplatte, elektrostatische Entladungen
können die LEDs zerstören!!!
Jetzt können Sie leicht kleine Löcher in das Kunststoffprofil bohren.
(sieheAbbildung)
Befestigen Sie das Kunststoffprofil mit Hilfe von entsprechenden
kleinen Schrauben auf der Oberfläche.
Schieben Sie die Leiterplatte zurück an ihren Platz (vergessen Sie
nicht zunächst das mitgelieferte kleine Anschlusskabel mit dem
Ausgangsanschluss an der Unterseitezu verbinden)
Tipp: Sie können die LED-STRIPS auch hinter lichtdurchlässige Kunststoffverkleidungen anbringen und
damit die Farben von Wänden und Decken ändern. In einer Bar können Sie die Strips unter einem
lichtdurchlässigesRegal anbringenund damitFlaschenund Gläservonunten beleuchten.
ELEKTRISCHE INSTALLATION
Wichtig: Die elektrische Installation sollte nur von qualifiziertem Personal durchgeführt
werden, entsprechend den Vorschriften zur elektrischen und mechanischen Sicherheit in
Ihrem Land.
SEHR WICHTIG: Überprüfen Sie anhand des Benutzerhandbuchs des LED-Managers die maximal
erlaubte Leistung an seinen Ausgängen! Der maximal zulässige Strom auf jedem LED STRIP = 4A
oder +/- 100W. Da das erste Gerät in einer Kette in der Lage seinmuss, diesen Strom aufzunehmen,
hat jede Kette eine maximal zulässige Länge (max.100W). Um die Gesamt-Leistungsaufnahme aller
LED Produkte in einer Ketteherauszufinden, addieren Sie die Leistungsaufnahme aller Geräte. Lesen
Sie das Kapitel „Spezifikationen“ am Ende dieses Handbuches, um die Leistungsaufnahme der
unterschiedlichenLED-STRIPS herauszufinden!
!!VorliegenderMLS-20 + MLS-50 MINI LED STRIP darf nur mit dem JB SYSTEMS®LEDMANAGERverwendet
!!!NICHT DIREKT AN230VAC oder irgendeinherkömmliches24VDCNetzteilanschließen!!!
werden!!
Nach der Installation der Geräte verketteten Sie die Ein-/Ausgangs-Kabel aller LED-STRIPS, bis Sie die
maximaleerlaubteLeistung erreicht haben.
Nachdem Sie überprüft haben, dass die max. erlaubte Leistung nicht überschritten wurde,können Sie die
Kettean einem der Ausgängedes LED-Managersanschließen.
Zum Anschließen der ersten LED-Leiste in der Kette an den LED-Manager gehen Sie bitte
folgendermaßen vor:
Schneiden Sie einEnde des gemeinsam mit der LED-LeistegeliefertenAnschlusskabels ab
Verwenden Sie eine einfache 4-polige Anschlussklemme, um die offenen Enden des Kabels an den
speziellen gemeinsam mit dem LED-Manager geliefertenKabel anzuschließen. Dieentsprechenden
Farben sollten miteinander verbunden sein. Achtung: Sie müssen die zwei weißen Leitungen von
dem kleinenVerbindungskabelzusammen nehmen.
Beispiel: Sie wollen 15x MLS-50 und 6x MLS-20 anschließen 15x 7,2W + 6x 2,4W = 122,4 Watt. Diese
Kette kann an einem der LED-Managerausgänge angeschlossen werden, da die erlaubten 150W nicht
überschritten werden. ABER Sie können nicht alle Geräte in eine Kette schalten, da der Gesamtstrom
100Watt überschreitet! Sie müssen die Kette in 2 getrennte Ketten aufteilen, die parallel an den LEDManager-Ausgang angeschlossen werden. (Achtung: Maximum Ausgangsleistung für den Mini LED
Managerist 100W!)
BEDIENUNGSANLEITUNG
Da die MINI LED STRIPS vom LED-Manager gesteuert werden, empfehlen wir sehr, die
Bedienungsanleitungen imLEDManagerBedienungshandbuch zulesen.
WARTUNG UND INSTANDHALTUNG
Sicherstellen, dass sich keine unbefugten Personen unterhalb des Geräts befinden, während es gewartet
wird.
LEDManagerausschalten undNetzsteckerziehen.
Während der WartungsindfolgendePunkte ganz besonders zubeachten:
SämtlicheSchrauben zur Installation und Befestigung jeglicher Teilemüssen fest angezogen und rostfrei
sein.
Gehäuse, Befestigungsmaterialien und Aufhängungen (Decke, Balken, abgehängteDecken) dürfen keine
Anzeichenvon Verformungzeigen.
Ist die Optik sichtbar beschädigt (Sprünge oder tiefe Kratzer), dann müssen die entsprechenden Teile
ausgewechseltwerden.
Kabel müssen stets in einwandfreiem Zustand sein und selbst bei kleinsten Beschädigungen erneuert
werden.
Reinigung müssen in regelmäßigen Abständen zur Beibehaltung einer optimalen Lichtausbeute
vorgenommen werden. Reinigungsintervalle hängenstark von der Umgebung ab: feuchte,verrauchte und
besonders verschmutzteUmgebung führen zu größerer Verschmutzung aufden Linsen.
Mit weichem Tuch und gewöhnlichem Glasreiniger säubern.
Alle Teile stets gut abtrocknen.
JB SYSTEMS
®
17/24 MLS-20 + MLS-50 MINI LED STRIP
JB SYSTEMS
®
18/24 MLS-20 + MLS-50 MINI LED STRIP
Page 12

DEUTSCH BEDIENUNGSANLEITUNG
SPEZIFIKATIONEN
Anschlüsse: SpezielleFlachbandkabel
Betriebsspannung: 24VDC, gemeinsame Anode
Leistungsaufnahme: MLS-20 (20cm) = 2,4Watt
MLS-50 (50cm) = 7,2Watt
Abmessungen/Gewicht: MLS-20 (20cm) = 43g
MLS-50 (50cm) = 93g
TechnischeÄnderungen können auch ohneVorankündigung vorgenommenwerden!
Sie können sich die neueste Versiondieses Benutzerhandbuchesvon unsererWebsite
herunterladen: www.beglec.com
ESPAÑOL MANUAL DE INSTRUCCIONES
Gracias por comprar este producto JB Systems®. Para sacar el máximo rendimiento a sus posibilidades y
por su propia seguridad, lea estas instrucciones de funcionamiento detenidamente antes de comenzar a
utilizaresta unidad.
CARACTERÍSTICAS
Esta unidad está a prueba de interferencias de radio. Este productocumple los requisitos de las directrices
nacionales y europeas actuales. Se ha establecido la conformidad y las instrucciones y documentos
correspondienteshansido depositados por el fabricante.
Este dispositivo ha sido diseñado para producir efectos luminosos decorativos y se utiliza en sistemas de
espectáculosde luces.
Tubos de plástico multicolor con LEDs RGB i, utilizados para cambiar el color de muros, techos, etc. en
todo tipo de lugares: bares,discotecas, tabernas,tiendas, ...
Se puede utilizar en un sin fin de aplicaciones: fijar las tiras en cabinas, atrás de los paneles plexi
translúcidos para crear lentamentecambios en las superficies coloreadas, techos y muros, …
Se incluye cinta adhesivapor los dos lados parauna fácil montaje
Puedemontarseen cualquier superficie utilizando pequeños tornillos
¡Diseño elegante tipo “línea delgada”!
Lastiras pueden montarsesin espacios entrelas unidades:¡sin interrupciones en la salida de la luz!
Sincablesde conexión visibles, se encuentran escondidos completamente dentrode las unidades
Disponibleen 2 longitudes: 20cm y 50 cm
Se puede utilizar con nuestroLED-MANAGER(suministro eléctrico DMX)
Tecnología LEDde larga duración!
ANTES DE UTILIZAR EL APARATO
Antes de comenzar a utilizar esta unidad, compruebeque no haya habido daños durante el transporte. Si
observaalgún daño, no utilice el dispositivo y consulte primero a su distribuidor.
Importante:
absolutamente necesario que el usuario siga estrictamente estas instrucciones y advertencias de
seguridad que aparecen en este manual de usuario.Cualquier daño producido por un manejo innecesario
queda excluido de la garantía. El distribuidor noasumirá ninguna responsabilidad por cualquier defecto o
problemaque surja por nohaber seguido el manual de usuario.
Guarde este folleto en un lugar seguro para consultarloen el futuro. Si vendeeste aparato más adelante,
asegúresede incluir este manual de usuario.
Compruebeel contenido:
Compruebeque la caja contienelos siguientes elementos:
Instrucciones de funcionamiento
MLS-20 (20 cm)o MLS-50(50 cm)
Se incluye cinta adhesivapor los dos lados para una fácil montaje
Cablede conexión con 2 conectores (L= 10 cm)
Este dispositivoha salido de nuestras instalaciones en perfecto estado y bien embalado. Es
JB SYSTEMS
®
19/24 MLS-20 + MLS-50 MINI LED STRIP
JB SYSTEMS
®
20/24 MLS-20 + MLS-50 MINI LED STRIP
Page 13

ESPAÑOL MANUAL DE INSTRUCCIONES
ESPAÑOL MANUAL DE INSTRUCCIONES
INSTRUCCIONES DE SEGURIDAD:
Este símbolo indica: Usar sólo en el interior.
Estesímbolo indica: Leer las instrucciones.
Para proteger el medio ambiente, recicle el material de embalaje en la medida de lo posible.
Noexponga este aparato a lalluvia o a la humedad.
Para evitar que se forme condensación en el interior, deje que la unidad se adapte a la temperatura
exterior cuando la lleve a una habitación cálida después del transporte. A veces la condensación impide
que la unidadfuncionea pleno rendimiento y puedeincluso provocar daños.
Esta unidadsólo se puedeusar en el interior.
No coloque objetos metálicos ni derrame líquidos dentro del reproductor de la unidad. Si algún objeto
extrañoentra en la unidad, desconecte inmediatamenteel montajede instalación del suministro eléctrico.
Evite el uso en ambientescon polvo y limpie la unidadregularmente.
Mantenga la unidad lejos de los niños.
Laspersonas sin experiencia no deben utilizar este aparato.
La máxima temperatura ambiente para un funcionamiento seguro es de 40°C. No utilice la unidad a
temperaturasambientesuperiores.
Asegúrese de que debajo del área del lugar de instalación no hay personas durante el montaje,
desmontajeo mantenimiento.
La instalación eléctrica sólo debe ser llevada a cabo por personal cualificado, de acuerdo con la
regulacionessobre seguridad eléctricay mecánica de su país.
Los cables siempre deben estar en perfecto estado: apague el LED Manager inmediatamente cuando
observedaños o desperfectosen los cables.
Este aparato debe utilizarse con el LED Manager: noconecte la unidad a ningún regulador devoltaje o a
otrosuministro eléctrico.
En caso de que ocurran problemas de funcionamiento serios, deje de utilizar el aparato y póngase en
contactocon su distribuidor inmediatamente.
Lacarcasadeberá reemplazarse si está visiblementedañada.
Utilice el embalaje original cuando tenga que transportar el dispositivo.
Por razones deseguridad se prohiberealizarmodificaciones no autorizadas en la unidad.
Importante: No utilice el efecto en presencia de personas epilépticas.
DESCRIPCIÓN:
1. Recinto dela tira de LED
2. PCB con LEDs de alta potencia: puede sacarse de la base en formade U parahacer la instalación más
fácil.
3. Conector de entrada (montado en el lado inferior): para conectar con el LED manager o con cualquier
otrasalida de una tira de LED anterior en la cadena.
4. Conector de salida (montado en el lado inferior): para conectar con la entrada de una siguiente tira de
LED en la cadena.
INSTALACIÓN MECÁNICA
Importante: La instalación sólo debe llevarse a cabo por personal técnico cualificado. Una
instalación incorrecta puede provocar lesiones graves y/o daños en la propiedad. ¡El montaje
superior requiere mucha experiencia! Deben respetarse los límites de carga de funcionamiento,
deben utilizarse materiales de instalación homologados, el dispositivo instalado debe
inspeccionarse regularmente porsu seguridad.
Asegúrese de que debajo del área del lugar de instalación no hay personas durante la instalación o
mantenimiento.
Antes de la instalación asegúresede que el área de la instalación puede soportaruna carga mínimade 10
veces el peso de la unidad.
El dispositivo debe fijarse correctamente; ¡un montaje con giro libre es peligroso y no debeconsiderarse!
El operario debe asegurarse de que las instalacionesrelacionadascon la seguridad son aprobadas por un
experto antes de utilizarlas por primera vez. Las instalaciones deberán inspeccionarse anualmente por
una persona cualificada para asegurar que la seguridad es óptima.
Montaje con la cinta adhesiva por los dos lados:
¡Estaes lamanera más fácil y rápida pero solamentees posible sobre una superficie lisa!
Corte la cinta de acuerdo al tamaño adecuado.
Colóquelaen la parte inferior o en el lado del recinto en formade U como se muestra en los dibujos.
Cinta montada en la parte inferior Cinta montada al lado
Montaje conpequeños tornillos:
Esto toma más tiempo pero la superficie de montaje no tiene que ser
lisa, puede incluso fijar la tira de LED en una superficie cubierta con
alfombra.
Quite el PCB del riel de plástico en forma de U deslizándolo hacia
un lado.
Importante: ¡¡¡NO toque los contactos eléctricos en la parte
inferior del PCB, las descargas eléctricas pueden destruir los
LEDs!!!
Ahora puede fácilmente realizar pequeños orificios en el riel de
plástico. (Consulteelgráfico)
Fije el riel de plástico en la superficie utilizando pequeños tornillos
adaptados.
Deslice de regreso el PCB en su lugar (no olvide de poner primero
el cable pequeño de conexión suministrado al conector de salida en
la parte inferior)
JB SYSTEMS
Consejo: Puede instalar la(s) TIRA(S) DELED también atrásde paneles translúcidospara crear cambios
de color en muros y techos o en un bar puede instalar las tiras abajo de las repisas translúcidas para
iluminar lasbotellasylosvasos desdeabajo.
®
21/24 MLS-20 + MLS-50 MINI LED STRIP
JB SYSTEMS
®
22/24 MLS-20 + MLS-50 MINI LED STRIP
Page 14

ESPAÑOL MANUAL DE INSTRUCCIONES
ESPAÑOL MANUAL DE INSTRUCCIONES
INSTALACIÓN ELÉCTRICA
La instalación eléctrica sólo debe ser llevada a cabopor personal cualificado, de acuerdo con
la regulaciones sobre seguridad eléctrica y mecánica de su país.
MUY IMPORTANTE: ¡Verifique el manual del usuario del LED Manager para conocer la energía
máxima permitida en la salida! . !La corriente máxima soportada por cada LED STRIP = 4A o +/100w.
Ya que la 1a unidad en una cadena debe ser capaz de soportar esta corriente, cada cadena tendrá
una longitud máxima aceptable (máximo 100W).!Para conocer el consumo total de energía de todos
los productos LED en una cadena, simplemente tiene que sumar el consumo de todas las
unidades de la cadena. ¡Consulte el capítulo “especificaciones” al final de este manual para ver el
consumode energía de las diferentes TIRAS DE LED!
¡¡ Este MLS-20 + MLS-50MINI LED STRIP sólo puedeutilizarsejunto con el LED MANAGER de JB SYSTEMS®!!
¡¡¡NO LO CONECTE DIRECTAMENTE A LA TOMA DE 230V de CA o a cualquiera ordinariade 24V de CC !!!
Después de instalar las unidades encadene tipo margarita los cables de entrada/salida de todas las
unidades de TIRAS DE LED hasta la carga máxima permitida.
Después de verificar que la energía máxima permitida no se ha excedido, puede conectar la cadena a
una de las salidas del LED Manager.
Para conectar laprimeraTIRA DE LED en la cadena al LED MANAGER, haga lo siguiente:
Corte unode losextremos del cable de conexión que fue suministrado con la TIRA DE LED
Utilice un terminal de contacto simple de 4 pines para conectar los extremos abiertos del cable al
cable especial suministrado con el LED MANAGER. los colores correspondientes deberan ser
conectadosel uno al otro. Atención: juntar los 2 cables blancos del pequeño cable de conexión
MANTENIMIENTO
Asegúrese de que debajo de la zona del lugar de instalación nohaya personas durante el mantenimiento.
Apague el LED Manager y desenchufe el cable de red.
Durante la inspección deberácomprobarlos siguientes puntos:
Todos los tornillos utilizados para instalar el dispositivo y cualquiera de sus piezas deberán apretarse
firmementey no corroerse.
Las carcasas, las fijaciones y los puntos de instalación (techo, suspensiones) no deberán presentar
ningunadeformidad.
Cuandoun recinto esté visiblemente dañado por grietas o rasguños profundos,deberá ser reemplazado.
Los cables deberán estar en perfecto estado y deberán reemplazarse inmediatamente incluso si el
problema detectadoes pequeño.
La limpieza del recinto de plástico deberá realizarse periódicamente para optimizar la emisión luminosa.
La frecuencia de limpieza depende del entorno en el que funcione el aparato: los ambientes húmedos,
con humo o especialmente sucios pueden provocar una mayor acumulación de suciedad en los
elementosópticos del aparato.
Limpie con un paño suave utilizando productos de limpiezade cristalesnormales.
Seque siempre las piezas con cuidado.
ESPECIFICACIONES
Conexiones: Cables planosespeciales
Voltaje de operación: 24 V cc ánodo común
Consumode energía: MLS-20 (20 cm) = 2,4 Watt
Tamaño/Peso: MLS-20 (20 cm) = 43 g
Puede descargarla últimaversión de este manual de usuario en nuestra página Web:
Toda la información está sujeta a cambiossin previo aviso
MLS-50 (50 cm) = 7,2 Watt
MLS-50 (50 cm) = 93 g
www.beglec.com
Ejemplo: Tiene que instalar 15x MLS-50 y 6x MLS-20 15x 7,2W + 6x 2,4W = 122,4 Watts. Esta cadena
puede conectarse a una de las salidas del LED Manager ya que no excede los 150 W permitidos. ¡PERO
usted no puede poner todas las unidades en una cadena puesto que la potencia total excede 100W! Tendrá
que dividir la cadena en 2 cadenas separadas, conectadas en paralelo sobre la salida del LED Manager.
(Atención;la potencia de salida máxima del Mini LED Manager es 100 W !)
INSTRUCCIONES DE FUNCIONAMIENTO
Debido a que las TIRAS DE LED MINI son controladas por medio del LED Manager, le aconsejamos que
lealas instrucciones de funcionamiento del manual de usuario del LED Manager.
JB SYSTEMS
®
23/24 MLS-20 + MLS-50 MINI LED STRIP
JB SYSTEMS
®
24/24 MLS-20 + MLS-50 MINI LED STRIP
 Loading...