

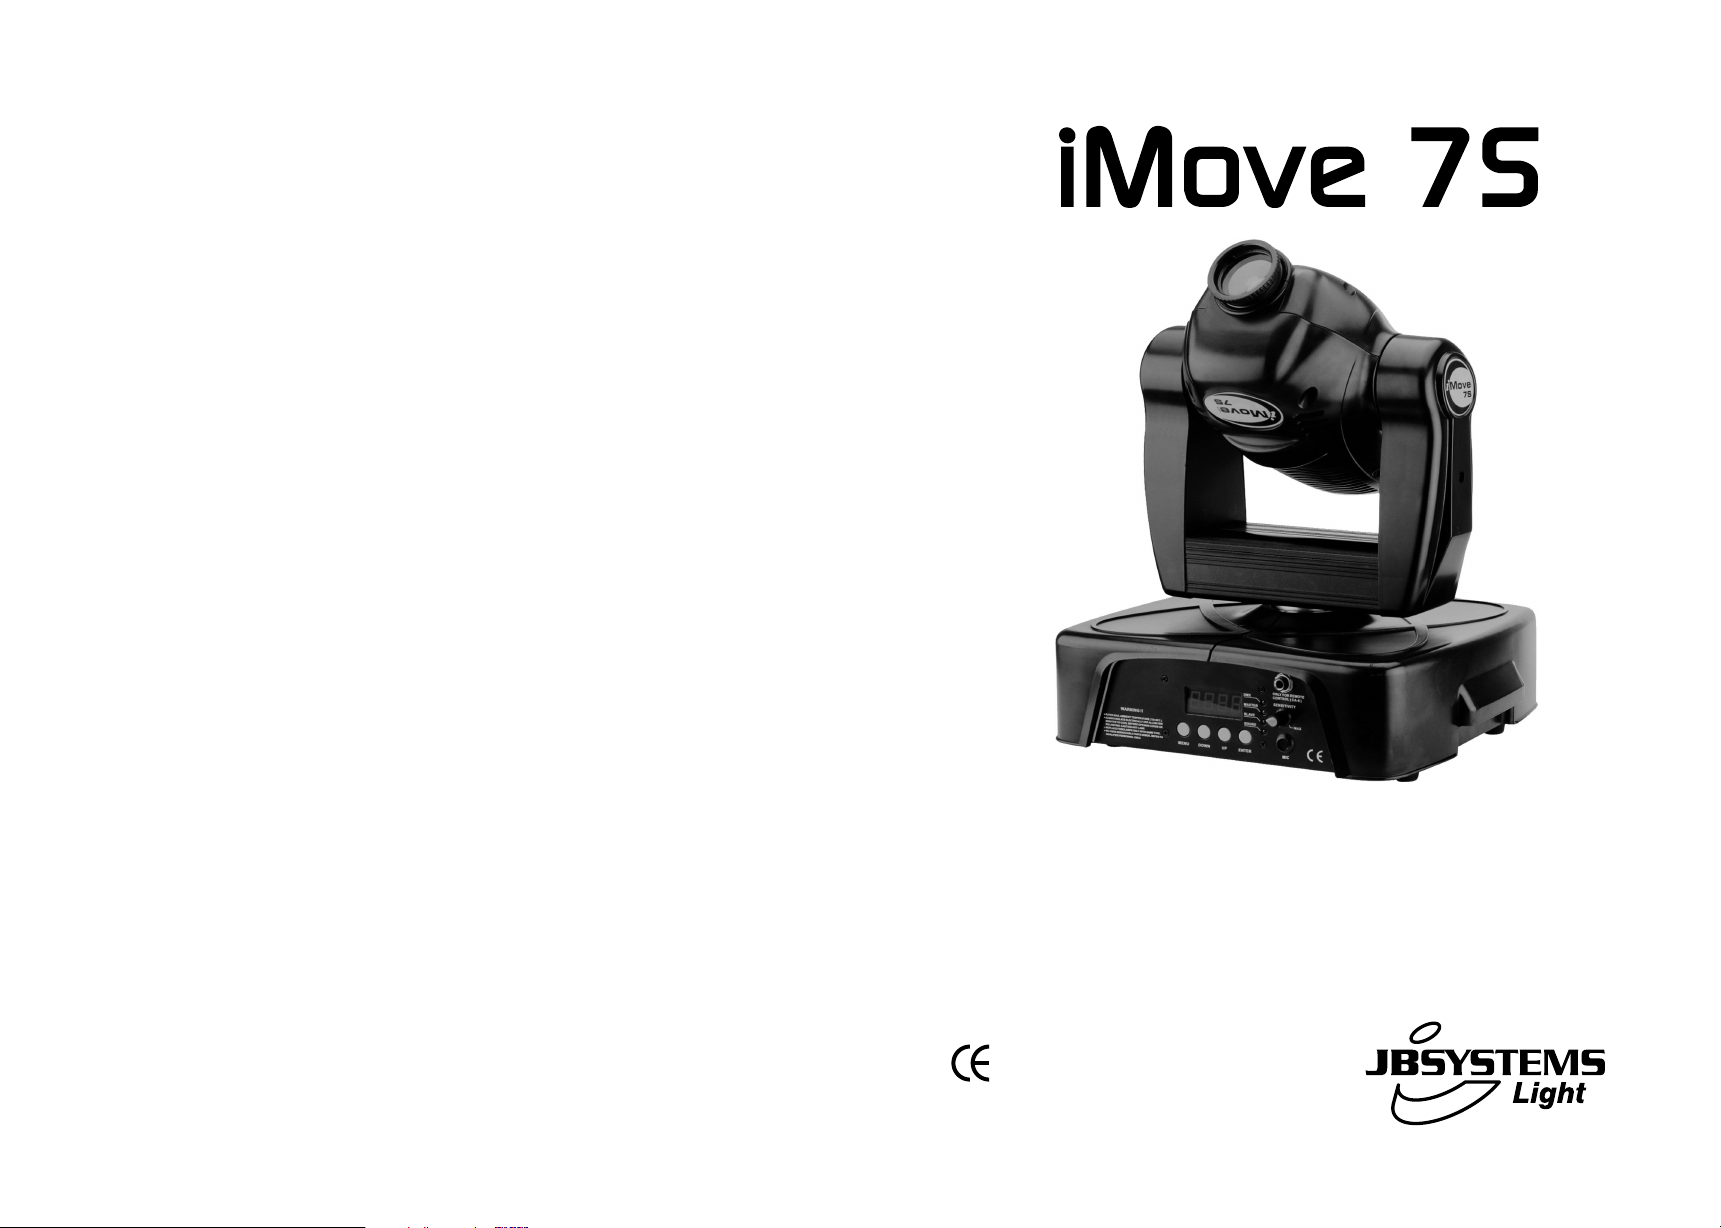
Page 1
WWW.BEGLEC.COM
Operation Manual
Mode d'emploi
Gebruiksaanwijzing
Bedienungsanleitung
Manual de instrucciones
EN
FR
NL
DU
ES
Reproduction or publication of the content in any manner, without express permission of the publisher, is prohibited.
Copyright © 2007 by BEGLEC cva.
Version: 1.0
Page 2
EN - DISPOSAL OF THE DEVICE
Dispose of the unit and used batteries in an environment friendly manner
according to your country regulations.
FR - DÉCLASSER L’APPAREIL
Débarrassez-vous de l’appareil et des piles usagées de manière écologique
Conformément aux dispositions légales de votre pays.
NL - VERWIJDEREN VAN HET APPARAAT
Verwijder het toestel en de gebruikte batterijen op een milieuvriendelijke
manier conform de in uw land geldende voorschriften.
DU - ENTSORGUNG DES GERÄTS
Entsorgen Sie das Gerät und die Batterien auf umweltfreundliche Art und
Weise gemäß den Vorschriften Ihres Landes.
ES - DESHACERSE DEL APARATO
Reciclar el aparato y pilas usadas de forma ecologica conforme a las
disposiciones legales de su pais.
PT - COMO DESFAZER-SE DA UNIDADE
Tente reciclar a unidade e as pilhas usadas respeitando o ambiente e em
conformidade com as normas vigentes no seu país.
Page 3
ENGLISH OPERATION MANUAL
ENGLISH OPERATION MANUAL
Thank you for buying this JB Systems®product. To take full advantage of all possibilities and for your own
safety, pleaseread these operating instructions very carefully beforeyou start using this unit.
FEATURES
This unit is radio-interference suppressed. This product meets the requirementsofthe current European and
nationalguidelines.Conformityhas been established and the relevantstatements and documents have been
depositedby the manufacturer.
Thisdevice hasbeen designed to produce decorativeeffect lighting and is used in light show systems.
Powerful Moving Headfor Pro DJ,renting companiesand discotheques
7 DMX channels (pan - tilt - colour - gobo - gobo rotation - shutter/shaking - dimmer)
Excellent optics for sharpgobos and big light output
9 trapezoiddichroic colours + white, rainbow effect
7+1 interchangeable rotating gobos(also glassgobos)
Blackout,0-100% dimmer and high speed variablestrobe
Builtin programs and micro for stand alone“Master/slave”mode!
Easily controlled by our ScanmasterSM1216, iLEADcontrolleror any other DMX controller
BEFORE USE
Before you start using this unit, pleasecheck if there’s no transportation damage. Should there be any, do
not usethe device and consultyour dealer first.
Important: This device left our factory in perfect condition and well packaged. It is absolutely necessary
for the user to strictly follow the safety instructionsand warnings in this user manual. Any damage caused
by mishandling is not subject to warranty. The dealer will not accept responsibility for any resulting defects
orproblems caused bydisregarding this user manual.
Keep this booklet in a safe place for future consultation. If you sell the fixture, be sure to add this user
manual.
Check the contents:
Check that the cartoncontains the following items:
iMove 7S unit
Mains cable
Operatinginstructions
SAFETY INSTRUCTIONS:
CAUT ION
The lightning flash with arrowhead symbol within the equilateral triangle is intended to alert the use
or the presence of un-insulated “dangerous voltage” within the product’s enclosure that may be of
sufficientmagnitude to constitute a risk of electric shock.
The exclamation point within the equilateral triangle is intended to alert the user to the presence of
important operation and maintenance (servicing) instructions in the literature accompanying this
appliance.
This symbol means:indoor use only.
This symbol means: Readinstructions.
This symbol determines:the minimum distance from lightedobjects. The minimum distancebetween
light-output and the illuminatedsurface must be morethan 1 meters.
To protectthe environment, please tryto recycle the packing material as much as possible.
A new light effect sometimes causes some unwanted smoke and/or smell. This is normal and disappears after
someminutes.
To prevent fire or shock hazard, do not expose this applianceto rain or moisture.
To avoid condensation to be formed inside, allow the unit to adapt to the surrounding temperatures when
bringing it into a warm room after transport. Condense sometimes prevents the unit from working at full
performance or may even cause damages.
This unit is for indoor use only.
Don’t place metal objects or spill liquid inside the unit. Electric shock or malfunction may result. If a foreign
object enters the unit, immediately disconnect the mains power.
Locate the fixture in a well ventilated spot, away from any flammable materials and/or liquids. The fixture must
be fixed at least 50cm from surrounding walls.
Don’t cover anyventilation openings as this may result in overheating.
Prevent use in dustyenvironments and clean the unit regularly.
Keep the unit away from children.
Inexperienced persons should not operatethis device.
Maximum save ambient temperature is 40°C. Don’t use this unit at higher ambient temperatures.
The units’ surface temperature may reach up to 85°C. Don’t touch the housing with bare hands during its
operation.
Make sure the area below the installation place is free from unwanted persons during rigging, de-rigging and
servicing.
Allow the device about 10 minutesto cool down before replacing the bulb or start servicing.
Alwaysunplug the unit when it is not used for a longer time or before replacing the bulb or start servicing.
The electrical installation should be carried out by qualified personal only, according to the regulations for
electrical and mechanical safetyin your country.
Check that the available voltageis not higherthan the one stated on the rear panel ofthe unit.
The power cord should always be in perfect condition: switch the unit immediately off when the power cord is
squashed or damaged.
Never let the power-cord come into contact with other cables!
This fixturemust be earthed to in order comply with safety regulations.
Don’t connect the unit to any dimmer pack.
Always use an appropriateand certified safety cable when installing the unit.
In order to prevent electric shock, do not open the cover. Apart from the lamp and mains fuse there are no user
serviceable parts inside.
Never repair a fuse or bypass the fuse holder. Always replace a damaged fuse with a fuse of the same type
and electrical specifications!
In the event of serious operating problems, stop using the fixtureand contact your dealer immediately.
The housing and the lenses must be replaced if they are visibly damaged.
Please use the original packing when the device is tobe transported.
Due to safetyreasons it is prohibited to makeunauthorized modifications to the unit.
Important: Never look directly into the light source! Don’t use the effect in the presence of persons suffering from
epilepsy.
CAUTION: To reduce the risk of electric shock, do not remove the top cover.
No user-serviceable parts inside. Refer servicing to qualified service
personnelonly.
JB SYSTEMS® 1/62 iMove 7S
JB SYSTEMS® 2/62 iMove 7S
Page 4
ENGLISH OPERATION MANUAL
ENGLISH OPERATION MANUAL
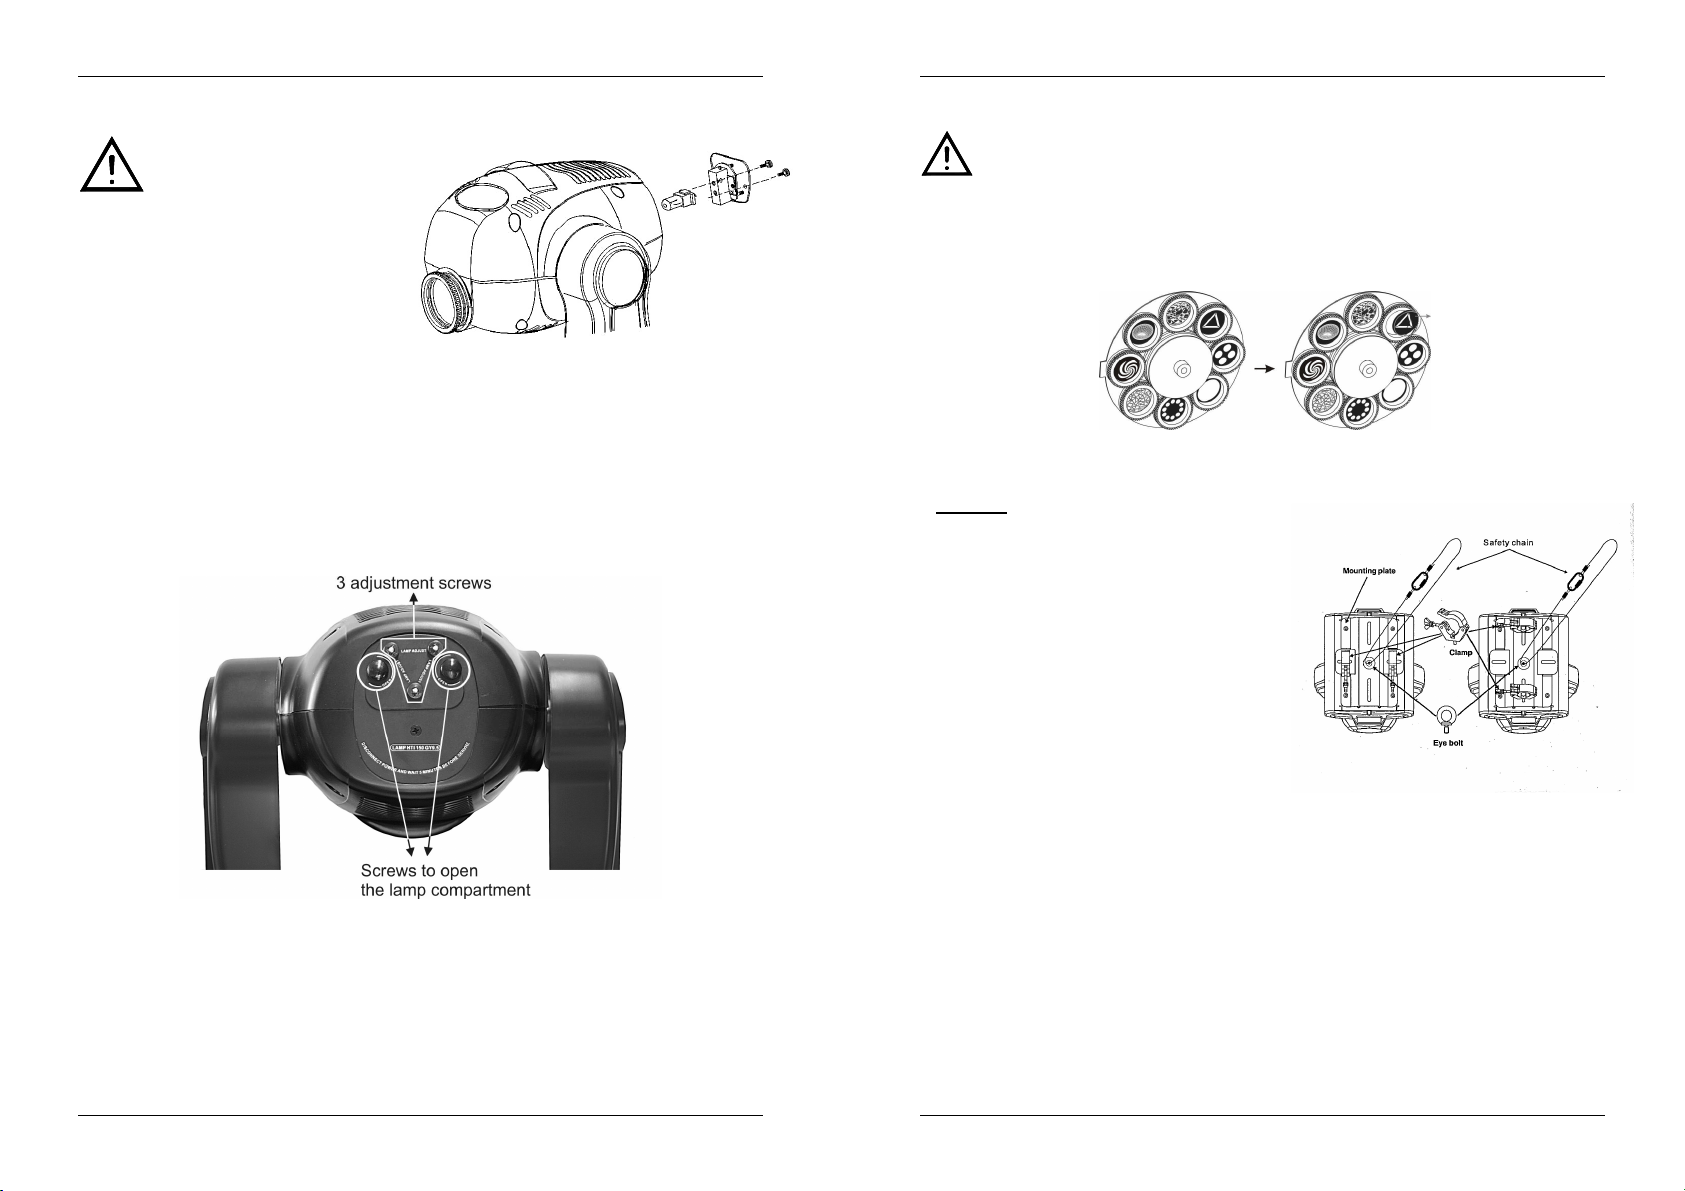
LAMP (RE)PLACEMENT
In case of replacement of the lamp
or maintenance, do not open the
fixture within 10 minutes until the
off. Always unplug the unit before servicing!
Always use the same type of spare parts
(bulbs, fuses, etc.) When replacing parts,
please only genuine spare parts.
Switch off the unit andunplug the mains cable.
Waitfor about10 minutes until the unithas been
cooleddown.
Unscrew the two screws on the back of the Unit
wherethe sign “open” is written.
Tear the lamp socket gently out of the lamp
compartment.
Unplug the oldlamp. Hold thelamp socket whileunpluggingthe lamp instead ofpulling the cable!
Hold the lamp socket whilepressing the newlamp gently in the socket.
Attention! Check the label on the backside of the device or see the technical specifications in this manual
toknow which lamp should be used. Never install lampswith a higher wattage!
Don’t touch the bulb with bare hands! This drastically shortens the lifespan of the lamp. If you touched the
lamp, clean it with a cloth and a little denaturedalcohol. Wipe the lamp off before installing.
Put the newlamp back inside the unit. Be sure thatthe wires don’t touch the lamp.
Closethe lamp compartment with the screws
Turn on the unit and point the beam to a white surface. Use the three adjustment screws indicated by
“lamp adjust”.Gently turn these three screws until you obtain maximum light output.
Done!
unit cools down after switching
EXCHANGING/ROTATING GOBOS
ATTENTION: Install the gobos only when the unit is switched off!
Never unscrew the screws of the rotatinggobo as theball bearingwill be opened.Repairing
Switch off the mainsupplyand unplugthe unit.
Open the plastic topcover (4screws)
Locate the gobo wheel and remove the fixation ring of the gobo you want to change with an appropriate
Removethe gobo and insert the newgobo.
Press the fixation-ring together and insert it inthe front of the gobo.
Done!
this is very difficult!
tool.
OVERHEAD RIGGING
Important: The installation must be carried out by
qualified service personal only. Improper
installation can result in serious injuries and/or
damage to property. Overhead rigging requires
extensive experience! Working load limits should
be respected, certified installation materials
should be used, the installed device should be
inspected regularly for safety.
Make sure the area below the installation place is free
from unwanted persons during rigging, de-rigging and
servicing.
Locate the fixture in a well ventilated spot, far away
from any flammable materials and/or liquids. The
fixture must be fixed at least 50cm from surrounding
walls.
The device should be installed out of reach of people
and outside areas where persons may walk by or be
seated.
Before rigging make sure that the installation area can hold a minimum point load of 10times the device’s
weight.
Always use a certified safety cable that can hold 12times the weight of the device when installing the unit.
This secondary safety attachment should be installed in a way that no part of the installation can drop
more than20cm if the main attachmentfails.
Thedevice should be well fixed; a free-swinging mountingis dangerous and maynot beconsidered!
Don’tcover anyventilation openings as this may result in overheating.
The operator has to makesure that the safety-relating and machine-technical installationsare approvedby
an expert before using them forthe first time. The installations should be inspectedevery year by a skilled
person to besure that safety is still optimal.
JB SYSTEMS® 3/62 iMove 7S
JB SYSTEMS® 4/62 iMove 7S
Page 5
ENGLISH OPERATION MANUAL
ENGLISH OPERATION MANUAL
HOW TO SET UP THE UNIT
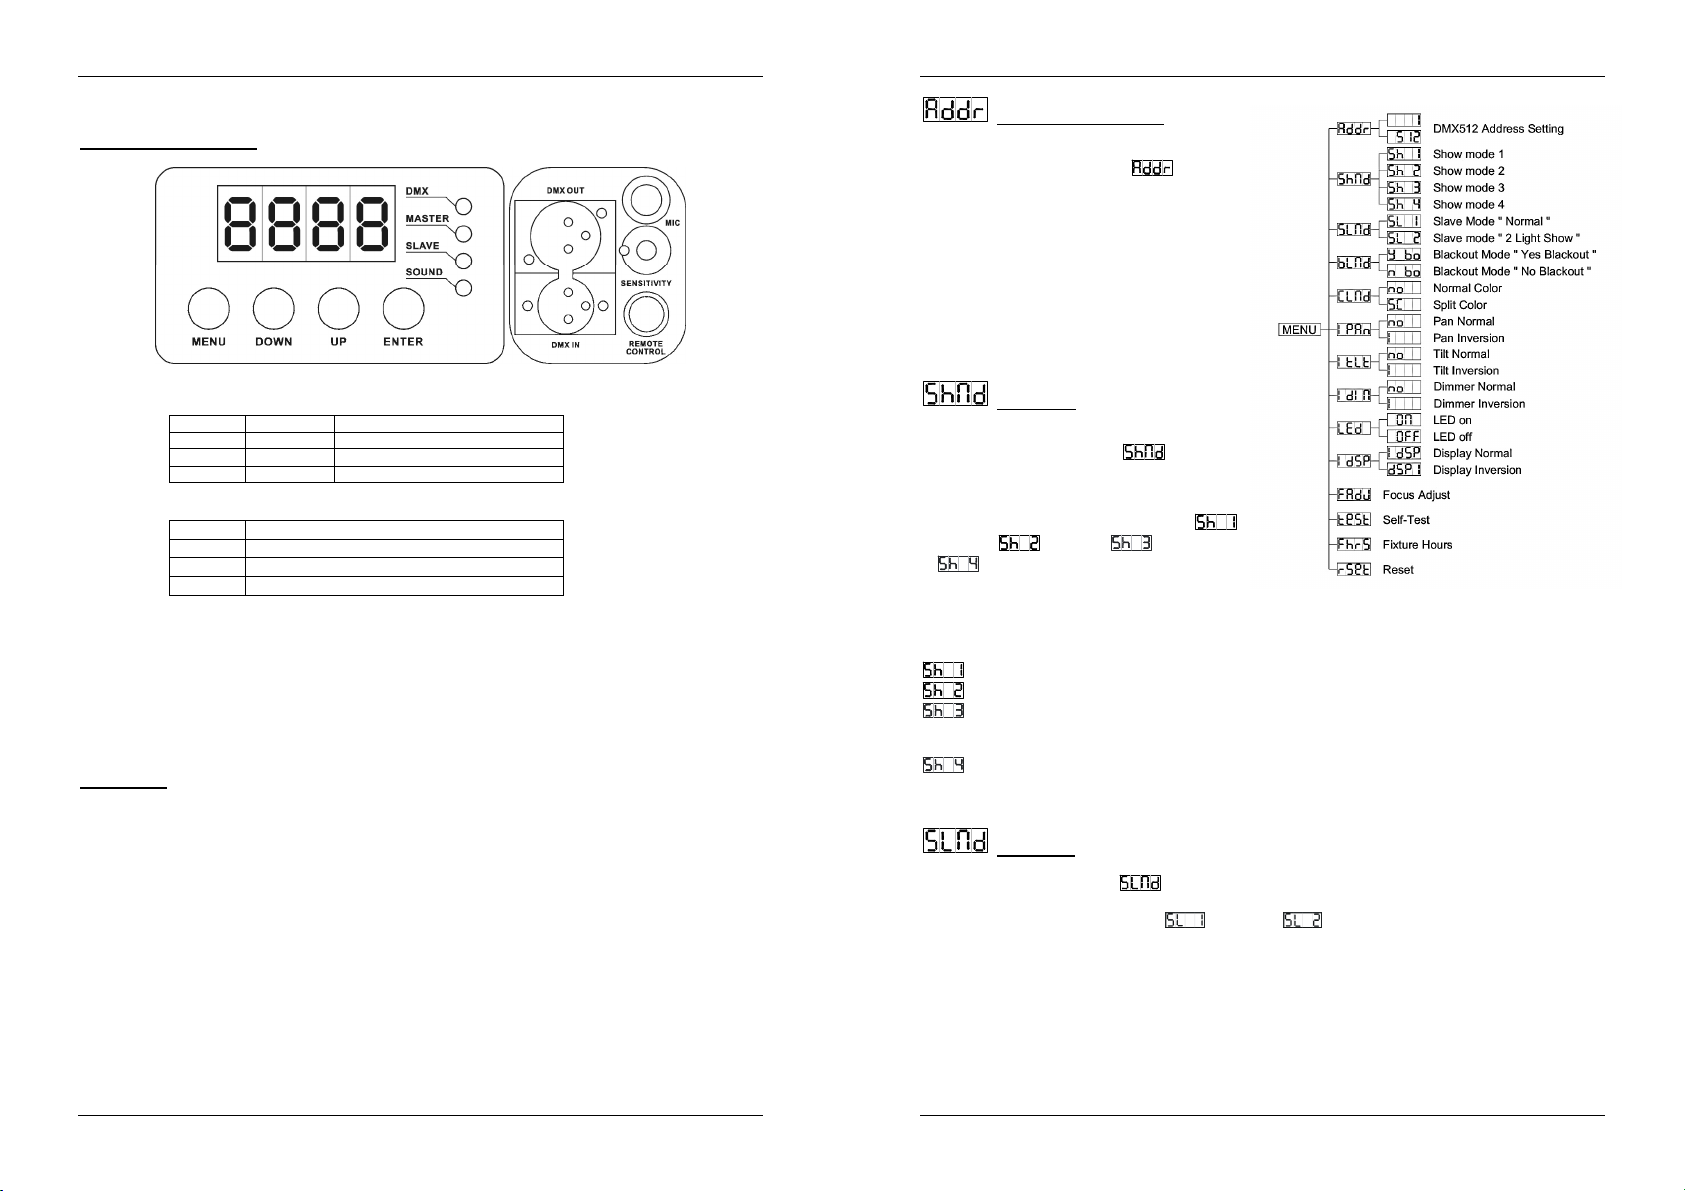
CONTROL PANEL:
DISPLAY shows the variousmenus and the selectedfunctions.
LEDS
DMX On DMXinputpresent
MASTER On Master mode
SLAVE On Slavemode
SOUND Flashing Soundactivation
BUTTONS
MENU Toselectthe programming functions
DOWN To go backward inthe selected functions
UP To go forward in the selectedfunctions
ENTER To confirmthe selected functions
REMOTE CONTROL INPUT: Used to connect an optional CA-8 hand controller while the unit is used in
standalone ormaster/slave mode.
SENSITIVITY: Used to adjust the sensitivity of the micro when the unit is used in standalone or
master/slavemode.
MICROPHONE: used to trigger the internal programsto the rhythm of the music.
DMX INPUT/OUTPUT: used for DMX512 linking. Use good quality 3pin XLR M/F balanced cable to link
the units together.
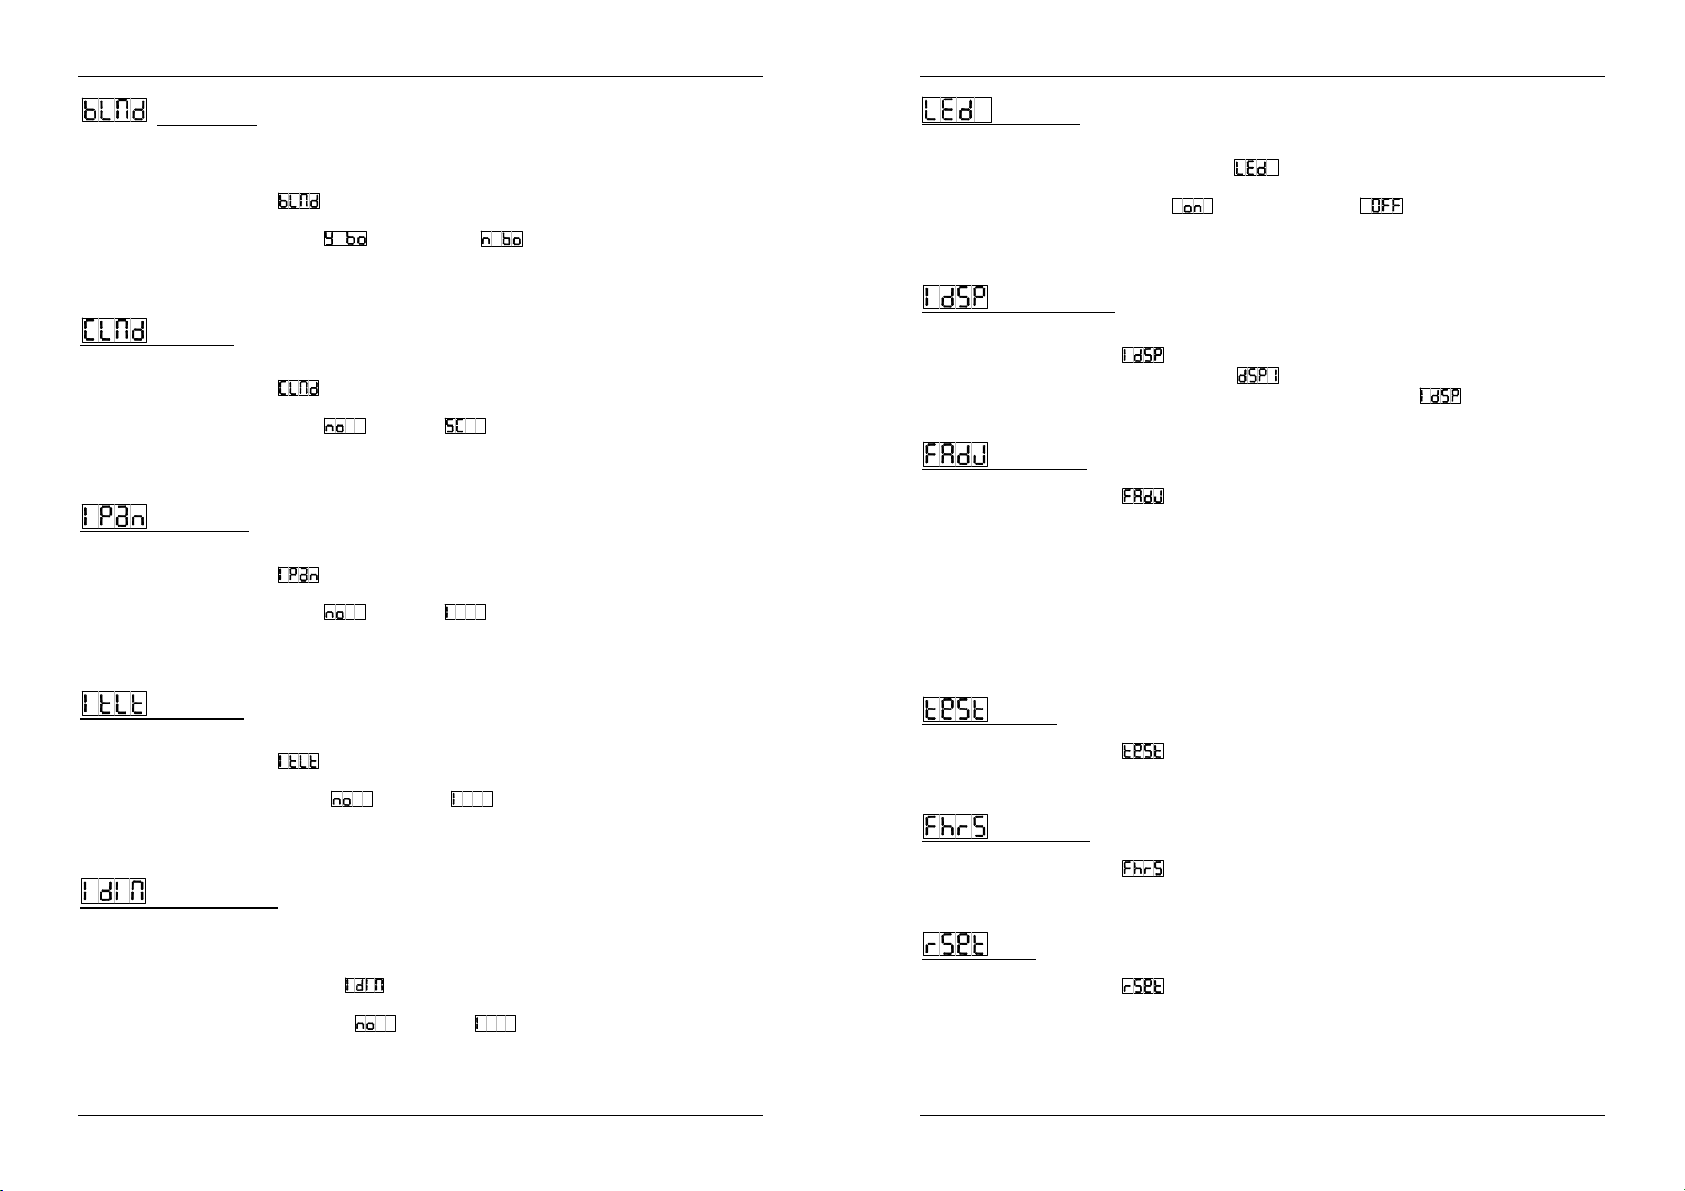
MAINMENU:
To select any of the pre-set functions, press the MENU button up to when the required one is shown on
thedisplay.
Select the function with the ENTER button.The display will blink.
UseDOWN and UP button to change the mode.
Once the required mode hasbeen selected, pressthe ENTER button toselect. After8 seconds the display
will automaticallyreturn to the main functions without any change. Togo back to the functions without any
change pressthe MENU button. The main functions are shown on the right.
Used to set the starting address in a DMX
setup.
Press the MENU button until is shown
on thedisplay.
Press the ENTER button, the display starts
blinking.
Use DOWN and UP buttons to change the
DMX512address.
Once the correct address showson the display,
press the ENTERbuttonto save it.
(or automatically return to the main functions
withoutany change after 8 seconds)
To go back to the functions without any change
press the MENU button again.
Used to choose the Showmode when used in
standaloneor master/slave mode.
Press the MENU button until isshowing
on thedisplay.
Press the ENTER button, the display starts
blinking.
Use DOWN and UP buttons to select
(show 1), (show 2), (show 3) or
Once the right mode shows on the display,
press the ENTERbuttonto save it.
(or automatically return to the main functions without any changeafter 8 seconds)
To go backto the functions without any change press the MENU button again.
Used to make the slave unitwork in opposite tothe master or towork incomplete sync.
Press the MENU buttonuntil isshown on the display.
Press the ENTER button, the displaystarts blinking.
UseDOWN and UP button to select (normal)or (2 light show) mode.
Once the mode has been selected,press the ENTER button save it.
(or automatically return to the main functions without any changeafter 8 seconds)
To go backto the functions without any change press the MENU button again.
DMX512Address Setting
Show Mode
(show 4) mode.
Show 1mode- Fixture is placed on the floor. Tilt movement angle210°.
Show 2mode-Fixture is fixed under ceiling. Tilt movement angle 90°.
Show 3mode - Fixture is placed on a podium, in front of the audience
The spot is alwaysprojecting to the audience’s direction; i.e in front of the stage.Pan movement
angel (leftto right to left ): 160°. Tiltmovement angel: 90° ( 60° above horizon;30° belowhorizon.)
Show 4mode - Fixture is fixed under ceiling.
The spot is mainly projecting in front of the stage. Pan movement angel ( left to right to left ) :160°.
Tilt movementangel: 90° ( vertically, front 75°; back 15° )
SlaveMode
JB SYSTEMS® 5/62 iMove 7S
JB SYSTEMS® 6/62 iMove 7S
Page 6
ENGLISH OPERATION MANUAL
ENGLISH OPERATION MANUAL
Blackout mode: when no DMX-signal is detected, the unit goes in blackout and waits for the DMXsignal.
No blackout mode: when no DMX-signal is detected, the unit automatically switches to standalone
mode.
Press the MENU buttonuntil is shown on the display.
Press the ENTER button, thedisplay startsblinking.
UseDOWN and UP button to select (yes blackout) or (no blackout) mode.
Once the mode has been selected, press the ENTER button to saveit.
(or automaticallyreturn to the main functions withoutany change after 8 seconds)
To go backto the functions without any change press the MENU button again.
Normal: only full colorscan be selected.
Split colors:you can select full colors and 2 colors that are next to each other on the color wheel.
Press the MENU button unitl is shown on thedisplay.
Press the ENTER button, the displaystarts blinking.
UseDOWN and UP button to select (normal) or (splitcolor) mode.
Once the mode has been selected, press the ENTER button to saveit.
(or automaticallyreturn to the main functions withoutany change after 8 seconds)
To go back to the functions without any change press the MENU buttonagain.
Normal: Panning movement is not inversed.
Pan inversion: Panning movementis inversed
Press the MENU buttonuntil isshown on the display.
Press the ENTER button, the displaystarts blinking.
UseDOWN and UP button to select (normal) or (pan inversion) mode.
Once the mode has been selected, press the ENTER button to saveit.
(or automaticallyreturn to the main functions withoutany change after 8 seconds)
To go back to thefunctions without any change press the MENU buttonagain.
BlackoutMode
ColorMode
PanInversion
Display on: display is always on.
Display off:display is off when not used.
Press the MENU button untilthe display shows .
Press the ENTER button, thedisplay startsblinking.
UseDOWN and UP buttons to select (displayalways on) or (display offwhen not used).
Once the mode has been selected, press the ENTER button to saveit.
(or automaticallyreturn to the main functions withoutany change after 8 seconds)
To go backto the functions without any change press the MENU button again.
Display normal: display is readable when the unit is on the floor.
Display inversion: display is readable whenthe unitis mountedupside down.
Press the MENU button untill is blinking on the display. (normaldisplay)
Use the ENTER button to change to the mode (display inversion), the option will be automatically
stored after 8 seconds.Or press the ENTER button again return to the mode (normal display).
Togo back tothe functionspress the MENU button.
Used to help youadjusting the focus of the lightbeam and gobos.
Press the MENU button untill is blinking on the display.
Press the ENTER buttonso the unit goesto the “tilt 90°” position.
Press the ENTER buttonso the unit goesto the “pan 0°” position.
Press the ENTER button so the unit goes tothe “pan 90°” position.
Press the ENTER buttonso the unit goesto the “pan 180°” position.
Press the ENTER buttonso the unit goesto the “pan 270°” position.
In the Previous 5 steps you are able to adjust the focus with the UP/DOWN buttons on the unit (the display
shows thecurrent focus status).
Attention: pleasenote that you can only set an “average focus” for all 5 positions,so it is notpossibleto set
the focus perfectly sharp for all directions.
Togo back tothe functions press the MENU button.
Led Display
DisplayInversion
FocusAdjust
Normal: Tilt movement is not inversed.
Tilt inversion: tilt movementis inversed
Press the MENU buttonuntil isshown on the display.
Press the ENTER button, the displaystarts blinking.
UseDOWN and UP buttons to select (normal) or (tilt inversion) mode.
Once the mode has been selected, press the ENTER button to saveit.
(or automaticallyreturn to the main functions withoutany change after 8 seconds)
To go back to thefunctions without any change press the MENU buttonagain.
Standard dimming: fader closed ( DMX value 000 ) full light output
Inversed dimming: fader closed( DMX value000 ) blackout
Press the MENU button up to whenthe isshownon the display.
Press the ENTER button so the displaystarts blinking.
UseDOWN and UP buttons to selectthe (normal) or (dimmer inversion) mode.
Once the mode has been selected, press the ENTER button to save it. ( or automatically return to the
main functionswithout any change after8 seconds )
To go backto the functions without any change press the MENU button again.
Tilt Inversion
DimmerInversion
fader open ( DMXvalue 255 ) blackout
fader open ( DMXvalue 255 ) full light output
JB SYSTEMS® 7/62 iMove 7S
Used toactivate the internal “self-test” program which shows all possibilities of the unit.
Press the MENU button untill is blinking on the display.
Press the ENTERbutton to start the internalself-test program.
To go back to the functions press the MENU button.
Used to show the number of working hours of the unit.
Press the MENU button untill is blinking on the display.
Press the ENTER button to showthe number of workinghours in the display.
To go backto the functions press the MENUbutton.
Used to force a reset of the unit.
Press the MENU button untill is blinking on the display.
Press the ENTER to reset all channelsto theirstandard position.
To go back to the functions press theMENUbutton.
Pleasealso check the chapter about the DMX-channel configuration of the unit to find out howyou can force
a resetby DMX.
Self-Test
Fixture Hours
Reset
JB SYSTEMS® 8/62 iMove 7S
Page 7
ENGLISH OPERATION MANUAL
ENGLISH OPERATION MANUAL
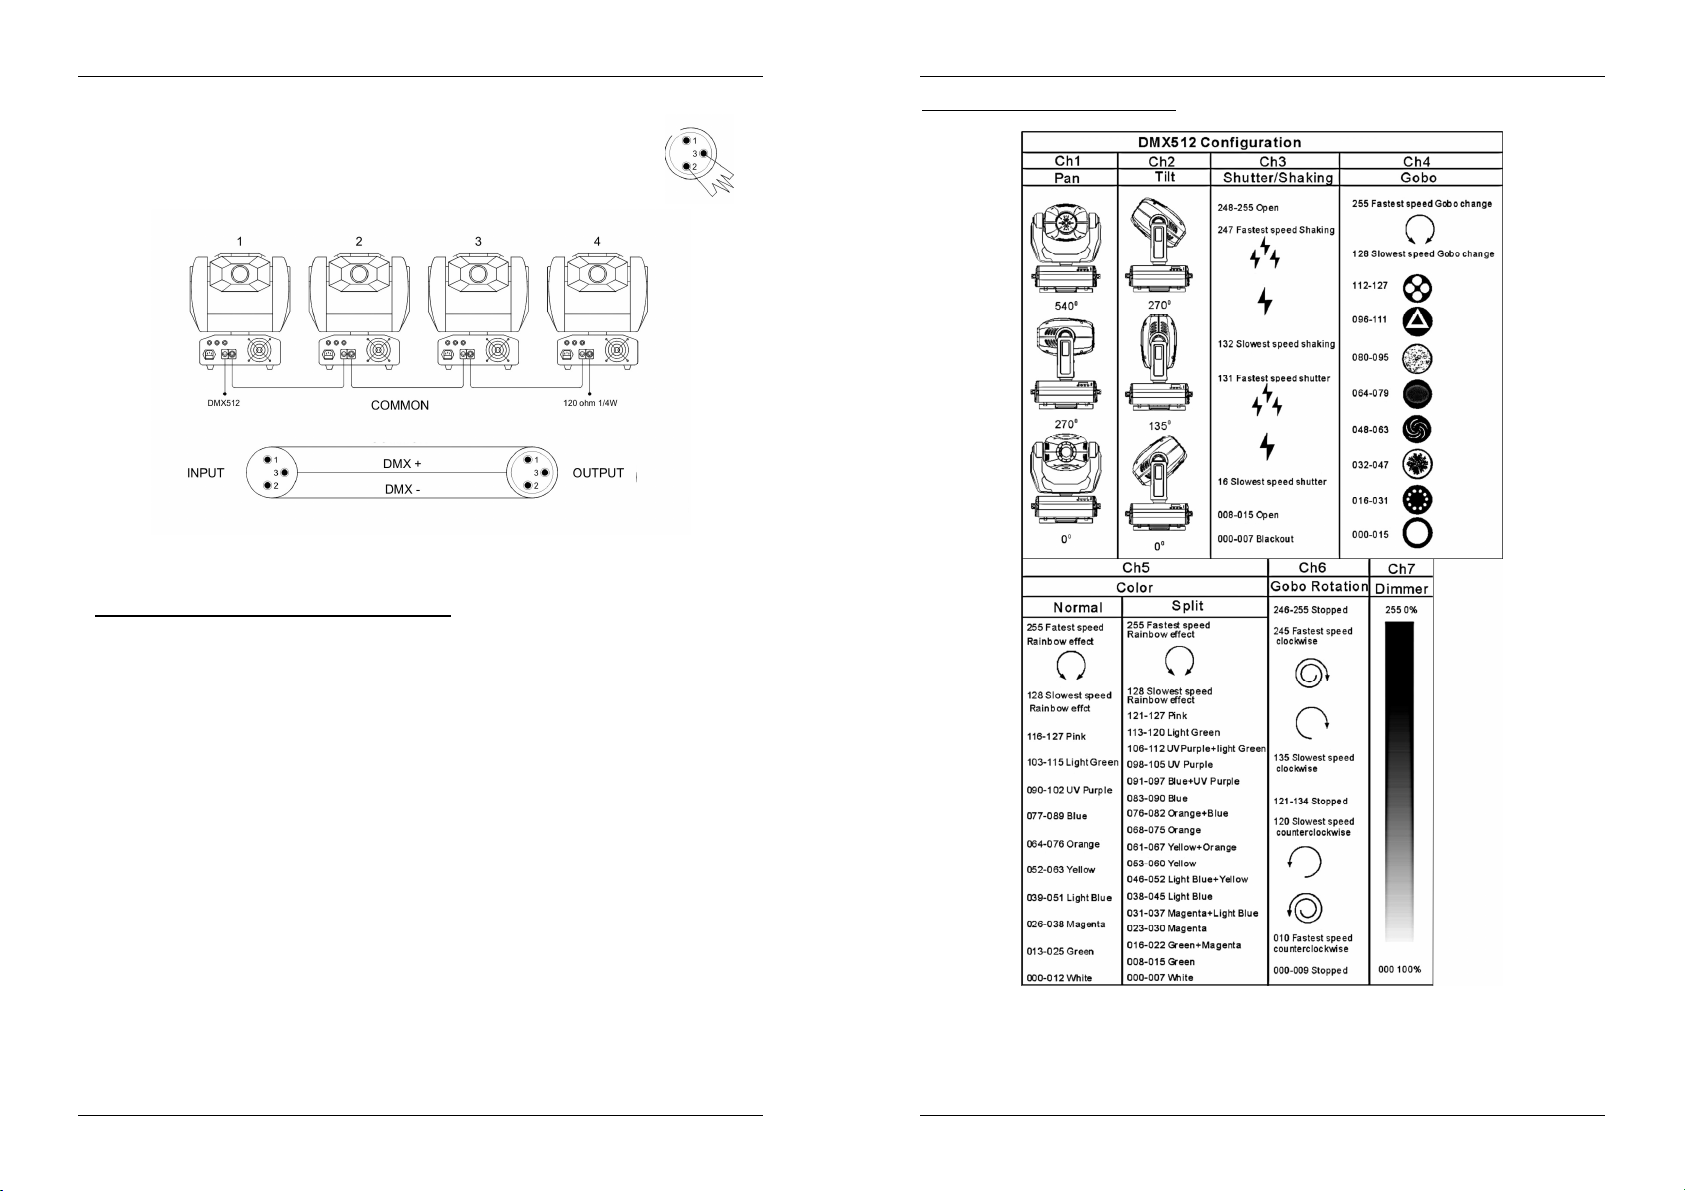
HOW TO CONNECT THE UNIT BY DMX
The DMX-protocol is a widely used high speed signal to control intelligent light equipment.
You need to “daisy chain” your DMX controller and all the connected light effects with a
goodquality XLR M/F balanced cable. To preventstrange behavior of the light effects, due
to interferences, you must use a 90Ω to 120Ω terminator at the end of the chain. Never
use Y-splitter cables, this simply won’t work!
Each light effectin the chain needs to haveits proper starting address so it knows which commandsfrom the
controllerit has to decode.
HOW TO SET THE THE RIGHT STARTING ADDRESS:
Refer to the previous chapter (DMX-512 address setting) to learnhow to set the starting address on this unit.
The starting address of each unit is very important. Unfortunately it is impossible to tell you in this user
manual which starting addresses you have to set because this completely depends on the controller you will
use… So please refer to the user manual of your DMX-controller to find out which starting addresses you
must set.
DMX-CONFIGURATION OF IMOVE 7S:
JB SYSTEMS® 9/62 iMove 7S
JB SYSTEMS® 10/62 iMove 7S
Page 8
ENGLISH OPERATION MANUAL
ENGLISH OPERATION MANUAL
HOW TO OPERATE THE UNIT
Every time you turn the unit on, it will show IM7S on the display and move all the motors to their ‘home’
position and you may hear some noises for about 20 seconds. After that the unit will be ready to receive
DMXsignalor run the built-in programs.
You can operate the unitin three ways:
BY MASTER/SLAVE BUILT-INPREPROGRAM FUNCTION:
Select thisfunction when you want an instantshow. By linking the units in master/slave
connection, the first unit will control the other units to give an automatic, sound
activated,synchronized light show. ItsDMX input will have nothing plugged into it,and
its master-LED will be constantlyon and sound-LED will flash to the music.
Important!This function only works when the blackout mode in the menu of the
master is set to OFF, otherwise nothing will happen! Read more about this
optionin the“Main Menu” paragraph.
BY EASY CONTROLLER:
When used in Master/slave mode we strongly advice you to use the CA-8 “Easy controller” Just connect
this small controller to the 1/4” jack of the master unit, and you will be able to control the following
FUNCTIONS:
Stand by
Function
Mode
o By master/slavebuilt-in preprogramfunction
o By CA-8 easycontroller
o By universalDMX controller
MASTER has 4 built-inshows: You can select (show1), (show2),
(show3) or (show4) directly in the menu of the master.
SLAVES have 2 working options: The other units are set to slave mode (slave-
LED is constantly on). In order to create a great light show you can introduce
contrast movements (pan/tilt of slave is inversed) In the menu of the slave units
you can go to option and select:
o Normalslave: slave works in sync with themaster.
o 2 lightshow: slave worksin oppositewith the master.
Blackout the unit
Strobe
1.Gobo/Color
sync. strobe
2.Sync. strobe
3.Two-light
strobe
Sound1
(LED off )
X/Ymoving
showmode
selection
( Show 1~ Show
4 )
Sound2
(LED normal
blinking)
Color/Gobo
selection
1. Hold on for
gobochange.
2. Press shortly
for color
change.
Slow/Sound3
(LED on)
X/Ymoving setting
1.Pan position
2.Tiltposition
3.Dimmer
First setMaster unit, then setSlave units’
position.
Position/Latch
(LED fastblinking)
MAINTENANCE
Make sure the areabelow the installationplace is free from unwanted persons during servicing.
Switch off the unit, unplug the mains cableand wait until the unithas been cooleddown.
During inspectionthe following points should be checked:
All screws used for installing the device and any of its parts should be tightly fastened and may not be
corroded.
Housings, fixations and installations spots (ceiling, truss, suspensions) should be totally free from any
deformation.
Whenan optical lens is visibly damaged due to cracksor deep scratches, it must be replaced.
The mains cables must be in impeccable condition and should be replaced immediately when even a
small problemis detected.
In order to protect the device from overheat the cooling fans (if any) and ventilation openings should be
cleanedmonthly.
The interior of the device should be cleaned annuallyusing a vacuum cleaneror air-jet.
The cleaning of internal and external optical lenses and/or mirrors must be carried out periodically to
optimizelight output. Cleaning frequency depends on the environment in which the fixtureoperates:damp,
smoky orparticularly dirty surroundings can cause greater accumulation of dirton the unit’s optics.
Clean with a soft cloth using normal glasscleaningproducts.
Always dry the parts carefully.
Clean the externaloptics at least onceevery 30 days.
Clean the internaloptics at least every90 days.
Attention: We strongly recommend internalcleaning to be carried out by qualifiedpersonnel!
SPECIFICATIONS
Mains Input: AC230V, 50Hz
Fuse: 6,3 A/250V
SoundControl: Internalmicrophone
DMXconnections: 3pin XLR male / female
Lamp: HTI: 150 W
Size: 373 x 295 x 451 mm
Weight: 13 kg
JB SYSTEMS® 11/62 iMove 7S
You can download the latestversionof thisuser manual on our website: www.beglec.com
Every information is subject to change withoutpriornotice
JB SYSTEMS® 12/62 iMove 7S
Page 9
FRANÇAIS MODE D’EMPLOI
Merci d’avoirchoisi ce produit JB Systems®. Pour votre sécurité et pour une utilisation optimalede toutes les
possibilités del’appareil,lisez attentivement cettenotice avant utilisation.
CARACTERISTIQUES
Cet appareil ne produit pas d’interférences radio. Il répond aux exigences nationales et européennes. La
conformité a été établieet les déclarationset documents correspondants ont été déposés par le fabricant.
Cet appareil a été conçu pour produire des effets lumineux à caractère décoratif, et son utilisation
principale s'inscrit dans lecadre de systèmes dédiés auxspectaclesqui recourent à des jeux de lumière.
Moving Head puissante, destinée aux DJ professionnels, aux compagnies de location et aux
discothèques.
7 canaux DMX(mouvements 'pan' et 'tilt'- couleur - gobo - gobo rotatif - 'shutter/shaking' - gradateur).
Optiquede grande qualité pour des effets degobos saisissants etunepuissance de sortie remarquable.
9 couleurs dichroïques trapézoïdales + blanc, effetd'arc en ciel.
Gobos rotatifs interchangeables (7 + 1, gobos en verre également).
Blackout,gradateur de 0 à 100 %, et effetsstroboscopiques à haute vitesse variable.
Programmes etmicro intégrés pour fonctionnement 'Master/slave'indépendant.
Peut être piloté facilement par notre Scanmaster SM1216, par notre contrôleur iLEAD ou par tout autre
contrôleurDMX.
AVANT UTILISATION
Avant d’utiliser cet appareil, assurez-vous de l’absence de dommage lié au transport. En cas
d’endommagement,n’utilisez pas l’appareiletcontactez levendeur.
Important: Cet appareil a quitté notre usine en parfaite condition et bien emballé. Il est primordial que
l’utilisateur suive les instructions de sécurité et avertissements inclus dans ce manuel. La garantie ne
s’applique pas en cas de dommage lié à une utilisation incorrecte. Le vendeur ne prend pas la
responsabilité des défauts ou de tout problème résultant du fait de n’avoir pas tenu compte des mises en
garde dece manuel.
Conservez ce manuel dans un endroit sûr pour toute consultation future. Si vous vendez l’appareil,
assurez-vous d’y joindre ce manuel également.
Vérifiez le contenu:
Vérifiezsi l’emballage contient les articlessuivants:
Mode d'emploi
Appareil iMove 7S
Câbled'alimentationsecteur
INSTRUCTIONS DE SECURITE:
CAUTION
qualifiés.
La flèche dans un triangle met l'utilisateur en garde contre la présence de haute tension sans isolation dans
l'appareil qui peut causerun risque d'électrocution.
Un point d'exclamation dans un triangle prévient de la présence d'instructions de fonctionnement et de
maintenance se trouvantdansle manuel, fourni avec l'appareil.
Ce symbolesignifie: uniquement pour usage à l'intérieur
ATTENTION: afin de réduire le risque d’électrocution, n’enlevez jamais le
couvercle de l’appareil. Il n’y a aucune pièce à l’intérieur de l’appareil que vous
pouvez remplacer vous-même. Confiez l’entretien uniquement à des techniciens
FRANÇAIS MODE D’EMPLOI
Ce symbolesignifie: Lire le mode d’emploi.
Ce symbole détermine: la distance minimum des objets allumés. La distance minimum entre le projecteur et la
surface à éclairer doit être plusde 1 mètre.
Afin de protéger l’environnement, mercide recycler les emballages autantque possible.
Un nouvel effet lumière peut provoquer de la fumée et/ou une odeur non souhaitée, disparaissant après quelques
minutes.
Afin d’éviter tout risque d’incendie ou de choc électrique, ne pas exposer cet appareil à la pluie ou l’humidité.
Pour éviter la formation de condensation à l’intérieur de l’appareil, patientez quelques minutes pour laisser l’appareil
s’adapter à la température ambiante lorsqu’il arrive dans une pièce chauffée après le transport. La condensation
empêche l’unité de fonctionner en performance optimale et peut mêmecauserdes dommages.
Cette unité est destinée à une utilisation àl’intérieur uniquement.
Ne pas insérer d’objet métallique ou verser un liquide dans l’appareil. Aucun objet rempli de liquides, tels que des
vases, ne peut être placé sur cet appareil. Risque de choc électrique ou de dysfonctionnement. Si un corps étranger
est introduitdansl’unité, déconnectezimmédiatement de la source d’alimentation.
Aucune source de flammenue, telle que les bougies allumées, ne peut être placée sur l'appareil.
Placez l’appareil dans un endroit bien ventilé, éloigné de tout matériau ou liquide inflammable. L’appareil doit être fixé
à 50cm minimum desmurs.
Ne pas couvrirles ouvertures de ventilation, un risque de surchauffe en résulterait.
Ne pas utiliserdans un environnementpoussiéreux et nettoyez l’unité régulièrement.
Ne pas laisserl’unité à portée des enfants.
Les personnes non expérimentées ne doiventpas utilisercet appareil.
La température ambiante maximum d’utilisation de l’appareil est de 40°C. Ne pas l’utiliser au-delà de cette
température.
La température des parois de l’unité peut atteindre 85°C. Ne pas toucher la coque à mains nues en cours de
fonctionnement.
Assurez-vous que la zone au-dessous du lieu d’installation ne comporte pas de personnes indésirables pendant le
montage,le démontageet les opérations de maintenance.
Laissez l’appareil refroidir environ10minutes avantde remplacer l’ampouleou d’effectuer des réparations.
Débranchez toujours l’appareil si vous ne l’utilisez pas de manière prolongée avant de changer une ampoule ou
d’entreprendredes réparations.
Les installations électriques ne peuvent être faites que par du personnel qualifié et conformément aux régulations de
sécurité électrique etmécanique en vigueur dansvotre pays.
Assurez-vous que la tensiond’alimentation de la source d’alimentation de la zone dans laquelle vous vous trouvez ne
dépasse pas celuiindiqué à l’arrière de l’appareil.
Le cordon d’alimentation doit toujours être en condition parfaite. Mettez immédiatement l’unité hors tension si le
cordon estécrasé ou endommagé.
Ne laissez jamaisle cordon d’alimentation entrer en contact avec d’autres câbles !
L’appareil doit être à la masse selon les règlesde sécurités.
Ne pas connecter l’unité à unvariateurde lumière.
Utilisez toujoursles câbles appropriés et certifiés lorsquevous installez l’unité.
Pour éviter tout choc électrique, ne pas ouvrir l’appareil. En dehors des ampoules et du fusible principal, il n’y a pas de
pièces pouvantêtre changéespar l’utilisateur àl’intérieur.
Ne jamais réparer ou court-circuiter un fusible. Remplacez systématiquement un fusible endommagé par un fusible
de mêmestype et spécificationsélectriques !
En cas de problèmes de fonctionnement sérieux, arrêtez toute utilisation de l’appareil et contactez votre revendeur
immédiatement.
La coque et les lentilles doiventêtre remplacées sivisiblementendommagées.
Utilisez l’emballaged’originesi l’appareil doit être transporté.
Pour des raisons de sécurité, il est interdit d’apporter toute modification à l’unité non spécifiquement autorisée par les
partiesresponsables.
Important: Ne jamais fixer directement la source de lumière ! Ne pas utiliser d’effets en présence de personnes
souffrant d’épilepsie.
JB SYSTEMS® 13/62 iMove 7S
JB SYSTEMS® 14/62 iMove 7S
Page 10

FRANÇAIS MODE D’EMPLOI
FRANÇAIS MODE D’EMPLOI
MISE EN PLACE / REMPLACEMENT DES AMPOULES
En cas d’opération de
maintenance ou de remplacement
des ampoules, ne pas ouvrir
l’installation dans les 10 minutes
jusqu’à ce que l’appareil ait refroidi.
Débranchez systématiquement l’unité avant
toute opération de maintenance. Utilisez
toujours le même type de pièces (ampoules,
fusibles, etc.) Lors du remplacement,
n’utilisez que des pièces d'origine.
Mettez l’unité hors tension et débranchez le
câble d’alimentation.
Attendez environ 10 minutes jusqu’à ce que
l’unité ait refroidi.
Dévissez les deux vis à l'arrière de l'appareil, là
où se trouveécrit le mot 'open'.
Retirezdélicatementla lampe de son compartiment.
Sortez l’ampouleusagée. Tenez la douille pendant l’opération, plutôt que de tirer sur lecâble!
Tenezencore la douille lorsque vous mettez en placela nouvelleampoule.
Attention! Reportez-vous à l’étiquette à l’arrière de l’appareil ou aux spécifications techniques de ce
manuel poursavoir quelle ampouleutiliser. Ne jamaisinstaller d’ampoulesà puissance plus élevée!
Ne pas toucher l’ampoule à mains nues! Cela réduirait énormément le cycle devie de la lampe. Si vous
l’aveztouchée, nettoyez-la avecun linge etun peu d’alcool modifié. Essuyezl’ampoule avant del’installer.
Insérez la nouvelleampoule à l’intérieur de l’unité. Assurez-vous que les fils ne touchentpas l’ampoule.
Refermezle compartimentà ampoulesà l’aidedes vis.
Mettez l'appareil sous tension et dirigez le faisceau lumineux vers une surface blanche. Utilisez les trois
vis de réglage identifiées par les mots 'lamp adjust'. Faites tourner doucement ces trois vis jusqu'à ce que
vous ayez obtenu une luminosité maximale.
Voilà!
suivant la fin de l’utilisation
CHANGER LES GOBOS ROTATIFS
ATTENTION: N’installez les gobos que si l’appareil est éteint!
Ne desserrez jamais les vis des gobos rotatifs car vous ouvririez ainsi le roulement à billes.
Réparer cela est trèsdifficile!
Coupez l’alimentation et débranchez
l’appareil.
Ouvrez le couvercleen plastique (4 vis)
Repérez la roue à gobos et retirez
l’anneau de fixation du gobo que vous
voulez remplacer à l’aide d’un outil
approprié.
Retirez le gobo et insérez le nouveau
gobo.
Comprimez l’anneau de fixation et
insérez-ledevant le gobo.
Prêt!
INSTALLATION EN HAUTEUR
Important: L’installation doit être faite par du
personnel qualifié uniquement. Une installation
incorrecte peut causer des blessures sévères
et/ou endommager l’appareil. L’installation en
hauteur exige de l’expérience! Les limites de
charge doivent être respectées, du matériel
d’installation certifié doit être utilisé, et l’appareil
installé doit subir des inspections de sécurité
régulièrement.
Assurez-vous que la zone au-dessous du lieu
d’installation ne comporte pas de personnes
indésirables lors de l’installation, la désinstallation ou
la maintenance.
Placez l’appareil dans un endroit bien ventilé, éloigné
de tout matériau ou liquide inflammable. L’appareil
doit être fixé à
L’appareil doit être hors de portée du public et en
dehors des zones de passage de personnes ou des
zones oùle publicest installé.
Avant l’installationassurez-vous que la zone d’installationsupporte un point localiséminimum de 10 fois le
poidsde l’appareil.
Utilisez systématiquement un câble de sécurité qui peut supporter 12 fois le poids de l’appareil lors de
l’installation. Ce câble de sécurité secondaire doit être installé de manière à ce qu’aucune partie de
l’appareilne puisse descendre deplus de 20 cm si le support principaltombe.
L’appareil doit être bien fixé,un montage à balancementest dangereuxet ne devrait pasêtre considéré !
Nepas couvrir les ouverturesde ventilation pour évitertout risque de surchauffe.
L’utilisateur doit s’assurer que les installations techniques et de sécurité sont bien approuvées par un
expert avant la première utilisation. Les installations doivent être inspectées chaque année par du
personnelqualifié pour assurerune sécurité optimale.
50cm minimum
des mursà l’entour.
JB SYSTEMS® 15/62 iMove 7S
JB SYSTEMS® 16/62 iMove 7S
Page 11

FRANÇAIS MODE D’EMPLOI
FRANÇAIS MODE D’EMPLOI
COMMENT REGLER L’APPAREIL
PANNEAU DE CONTRÔLE:
1. ECRAN affiche les différents menus et les fonctions sélectionnées.
2. LEDS
DMX Allumé Présence d’unsignalDMX
MASTER Allumé Mode maître
SLAVE Allumé Mode esclave
SOUND Clignote Activationmusicale
3. TOUCHES
MENU Poursélectionner les fonctionsde programmation
DOWN Pour reculerdans les fonctions sélectionnées
UP Pouravancer dansles fonctions sélectionnées
ENTER Pour confirmer lafonction sélectionnée
4. ENTREE POUR LE CONTROLEUR A DISTANCE : connectez le contrôleur à distance optionnel(CA-8)
via l'entrée jack ¼" afin de contrôler l'appareil au niveau du stand by, de la fonction et du mode.
5. SENSITIVITY:vous pouvezrégler la sensibilitédu microsi vous utilisez cet appareil defaçon autonome
ou en mode maître/esclave.
6. MICRO: est utilisé pour commanderles programmes internesau rythme de la musique.
7. DMX IN/OUT: est utilisé pour les configurations en DMX512. Utilisez des câbles symétriquesXLR M/F
à 3 broches debonne qualité pour relierles appareils entre eux.
MENU PRINCIPAL:
Pour sélectionner une des fonctions pre-set,
appuyez sur la touche MENU jusqu’à ce que la
fonctionque vous désirezapparaisse à l’écran.
Sélectionnez la fonction à l’aide de la touche
ENTER. L’écranclignotera.
Utilisez les touches DOWN et UP pour changerde
mode.
Dès que vous avez sélectionné le mode requis,
appuyez sur la touche ENTER pour confirmer.
Après 8 secondes l’écran retournera
automatiquement aux fonctions principales sans
avoir modifié quoi que ce soit. Pour retourner aux
fonctions sans effectuer de changements,
appuyez sur la touche MENU. Les fonctions
principales sont affichéesà droite.
Est utilisépour régler l’adresse de départ dans
une configuration DMX.
Appuyez sur la touche MENU jusqu’à ce que
Appuyez sur la touche ENTER, l’écran commence
à clignoter.
Utilisez les touches DOWN et UP pour changer
l’adresseDMX512.
Quand l’adresse désirée est affiché à l’écran,
appuyez sur la touche ENTER pour confirmervotrechoix.
(Où ilretournera automatiquement aux fonctions principalessans aucune modificationaprès 8 secondes)
Pour retourneraux fonctions sans effectuerde changements, appuyez à nouveausur la touche MENU.
Est utilisé pour choisir le Show quandl’appareil fonctionnedefaçon autonome ou en maître/esclave.
Appuyez sur la toucheMENU jusqu’à ce que estaffiché à l’écran.
Appuyez sur la touche ENTER,l’écran commence à clignoter.
Utilisez les touches DOWN etUP pour sélectionner (show1) ou (show 2) ou (show
3) ou ( show4 ).
Dès que le mode de fonctionnement est affiché à l’écran, appuyez sur la touche ENTER pour confirmer
votre choix.
(Où il retourneraautomatiquementaux fonctionsprincipales sans aucunemodificationaprès 8 secondes)
Pour retourneraux fonctions sans effectuerde changements, appuyez à nouveausur la touche MENU.
Reglagede l’adresse DMX512
soitaffiché à l’écran.
Show Mode
JB SYSTEMS® 17/62 iMove 7S
Show 1mode- l’appareil est placé parterre. Angle du mouvement tilt: 210°.
Show 2mode- l’appareil est fixé au plafond. Angle du mouvement tilt : 90°.
Mode show3 : l'appareil estplacé sur le haut-parleur.
Le projecteur restecontinuellement dirigéversle public, donc,devant la scène. Angledu
mouvementpan (de gauche à droite à gauche): 160°. Angle du mouvement tilt : 90°(60° audessus
de l'horizontale; 30° en dessous de l'horizontale).
Mode show4 : l'appareil est fixéau plafond.
La plupart du temps, le spot projette son faisceau devant la scène. Angle du mouvement pan (de
gauche à droite à gauche) : 160°. Angle du mouvement tilt : 90° (verticalement, devant 75°; derrière
15 °).
JB SYSTEMS® 18/62 iMove 7S
Page 12

FRANÇAIS MODE D’EMPLOI
FRANÇAIS MODE D’EMPLOI
Est utilisé pour que l’appareil esclave fonctionnede façon opposée au maître ou pour fonctionnerde
façon complètementsynchronisé.
Appuyez sur la toucheMENU jusqu’à ce que estaffiché à l’écran.
Appuyez sur la touche ENTER,l’écran commence à clignoter.
Utilisez les touches DOWN etUP pour sélectionner (normal)ou (2 light show).
Dès que le mode de fonctionnement est affiché à l’écran, appuyez sur la touche ENTER pour confirmer
votre choix.
(Où ilretournera automatiquement aux fonctions principalessans aucune modificationaprès 8 secondes)
Pour retourneraux fonctions sans effectuer dechangements, appuyez ànouveau sur la touche MENU.
Black-out mode: quand aucun signal DMX est détecté, l’appareil se met en black-out et attends un
signal DMX.
Mode « pas de black-out »: quand aucun signal DMX est détecté, l’appareil se met automatiquement
à fonctionnerde façon autonome.
Appuyez sur la toucheMENU jusqu’à ce que est affiché à l’écran.
Appuyez sur la touche ENTER,l’écran commence à clignoter.
Utilisez les touches DOWN etUP pour sélectionner (yesblack-out) ou (no black-out).
Dès que le mode de fonctionnement est affiché à l’écran, appuyez sur la touche ENTER pour confirmer
votre choix.
(Où ilretournera automatiquement aux fonctions principalessans aucune modificationaprès 8 secondes)
Pour retourner aux fonctions sans effectuerde changements, appuyez à nouveau sur la touche MENU.
Normal:on peut uniquementsélectionner des couleurs pleines.
Split colors: vous pouvez sélectionner des couleurspleines et 2 couleurs qui se trouvent l’une à coté
de l’autre sur la roueà gobos.
Appuyez sur la toucheMENU jusqu’à ce que estaffiché à l’écran.
Appuyez sur la touche ENTER,l’écran commence à clignoter.
Utilisez les touches DOWN etUP pour sélectionner (normal) ou (split color).
Dès que le mode de fonctionnement est affiché à l’écran, appuyez sur la touche ENTER pour confirmer
votre choix.
(Où ilretournera automatiquement aux fonctions principalessans aucune modificationaprès 8 secondes)
Pour retourneraux fonctions sans effectuerde changements,appuyez à nouveausur la touche MENU.
Normal: le mouvement pan n’est pas inversé.
Pan inversion: le mouvementpan estinversé
Appuyez sur la toucheMENU jusqu’à ce que estaffiché à l’écran.
Appuyez sur la touche ENTER, l’écran commenceà clignoter.
Utilisez les touches DOWN etUP pour sélectionner (normal) ou (pan inversion).
Dès que le mode de fonctionnement est affiché à l’écran, appuyez sur la touche ENTER pour confirmer
votre choix.
(Où il retourneraautomatiquement aux fonctions principalessans aucunemodificationaprès 8 secondes)
Pour retourneraux fonctions sans effectuerde changements, appuyez à nouveausur la touche MENU.
SlaveMode
ModeBlack-out
ColorMode
InversionPan
Normal: le mouvement tilt n’est pas inversé.
Tilt inversion:le mouvementtilt est inversé
Appuyez sur la toucheMENU jusqu’à ce que estaffiché à l’écran.
Appuyez sur la touche ENTER,l’écran commence à clignoter.
Utilisez les touches DOWN etUP pour sélectionner (normal) ou (tilt inversion).
Dès que le mode de fonctionnement est affiché à l’écran, appuyez sur la touche ENTER pour confirmer
votre choix.
(Où ilretournera automatiquement aux fonctions principalessans aucune modificationaprès 8 secondes)
Pour retourneraux fonctions sans effectuer de changements, appuyez à nouveau sur la toucheMENU.
Gradateur en mode standard :curseur fermé (valeur DMX 000) puissance lumineusemaximale ;
Gradateur en mode inversé : curseur fermé (valeur DMX000) blackout ;
Appuyez sur le bouton MENUjusqu'à ce que les lettres s'affichent sur l'écran.
Appuyez sur le bouton ENTER,ce qui a pourconséquence que l'écran commence à clignoter.
Utilisez les boutons DOWN et UP pour sélectionner l'un des deux modes : (normal) ou
(inversiondu gradateur).
Une fois que le mode est sélectionné, appuyez sur le bouton ENTER pour l'enregistrer (ou vous
retournerez vers les fonctions principales si aucune activité n'est détectée par l'appareil pendant 8
secondes).
Pour retourner vers les fonctions sans effectuerde changements,appuyez de nouveau sur le boutonMENU.
Display on: l’écran est toujours allumé.
Display off: l’écranest éteint quand il n’est pas utilisé.
Appuyez sur la toucheMENU jusqu’à ce que l’écran affiche .
Appuyez sur la touche ENTER,l’écran commence à clignoter.
Utilisez les touches DOWN et UPpour sélectionner (écran toujours allumé) ou (écran éteint
si pasutilisé).
Dès que le mode de fonctionnement est affiché à l’écran, appuyez sur la touche ENTER pour confirmer
votre choix.
(Où ilretournera automatiquement aux fonctions principalessans aucune modificationaprès 8 secondes)
Pour retourner aux fonctions sans effectuerde changements, appuyez à nouveausur la touche MENU.
Display normal: possibilité de lire ce qui est affichéà l’écran quandl’appareil est posé par terre.
Displayinversion: possibilité de lire ce qui est affiché à l’écran quandl’appareil est suspendu.
Appuyez sur la toucheMENU jusqu’à ce que clignotesurl’écran. (affichage normal)
Utilisez la touche ENTER pour changer l’affichage (affichage inversé), l’option sera
automatiquement enregistrée après 8 secondes. Ou appuyez à nouveau sur la touche ENTER pour
retournerà l’affichagenormal
Pour retourner vers les fonctions, appuyez sur la touche MENU.
InversionTilt
DimmerInversion
curseur ouvert(valeur DMX 255) blackout;
curseur ouvert(valeur DMX 255) puissance lumineusemaximale.
Led Display
InversionDisplay
JB SYSTEMS® 19/62 iMove 7S
JB SYSTEMS® 20/62 iMove 7S
Page 13

FRANÇAIS MODE D’EMPLOI
FRANÇAIS MODE D’EMPLOI
Est utilisépour vousaider à régler le focus des faisceaux etdes gobos.
Appuyezsur la toucheMENU jusqu’à ce que clignote à l’écran.
Appuyez sur la touche ENTER pour que l’appareiladopte la position“tilt 90°”.
Appuyez sur la touche ENTER pourquel’appareil adopte la position “pan 0°”.
Appuyez sur la toucheENTER pour que l’appareil adoptela position “pan 90°”.
Appuyez sur la touche ENTER pourque l’appareil adopte la position “pan 180°”.
Appuyez sur la touche ENTER pour que l’appareiladopte la position “pan 270°”.
Dans les 5 pas précédents vous pouvez ajuster le focus a l’aide des touches UP/DOWN de l’appareil
(l’écran affichela valeur du focus).
Attention: vous pouvezuniquement effectuer un réglage “général” du focus couvrantles 5 positions, il n’est
donc pas possible régler parfaitement lefocus pour toutesles directionsindividuellement.
Pour retourner auxfonctions, appuyez sur la touche MENU.
Est utilisépour activer le programme interne “self-test”qui passera en revue toutesles possibilités
de l’appareil.
Appuyez sur la toucheMENU jusqu’à ceque clignote à l’écran.
Appuyez sur la touche ENTER pourdémarrerle programmeintégré« self-test ».
Pour retourner auxfonctions, appuyez sur la touche MENU.
Vouscommuniquele nombre d’heures de service de l’appareil.
Appuyez sur la touche MENUjusqu’àce que clignote à l’écran.
Appuyez sur la touche ENTER pourque l’appareil affiche le nombred’heures de service à l’écran.
Pour retourner auxfonctions, appuyez sur la touche MENU.
Poureffectuer une mise à zéro del’appareil.
Appuyez sur la toucheMENU jusqu’à ce que clignoteà l’écran.
Appuyez sur ENTERpour renvoyer tous lescanaux à leur position d’origine.
Pour retourner auxfonctions, appuyez sur la touche MENU.
Veuillez également consulter le chapitre concernant la configuration des canaux DMX pour découvrir
commenteffectuerune mise à zéro (reset) par commandeDMX.
FocusAdjust
Self-Test
Fixture Hours
Reset
COMMENT BRANCHER LES APPAREILS EN DMX
Le protocole DMX est un signal à haute vitesse qui sert à contrôler les projecteurs dits
« intelligents». Vous devezrelier le contrôleur DMXet tous lesappareils “en chaîne” à l’aide d’un
câble symétrique XLR M/F de très bonne qualité. Pour éviter un comportement étrange des
appareils, suite aux interférences, vous devez utiliser un « terminal» de 90Ω à 120Ω à la fin de la
chaîne. N’utilisezjamaisdes câbles répartiteurs-Y,ceci ne fonctionnera tout simplement pas!
Chaque appareil dans la chaîne doit avoir sa propre adresse de départ afin de savoir quelles commandes,
venant du contrôleur,il doit décoder.
COMMENT REGLERL’ADRESSE DEDEMARRAGE EXACTE:
Référez-vous au chapitre précédent (réglage de l’adresse DMX-512) pour apprendre à régler l’adresse de
départ sur cet appareil. L’adresse de départ de chaque appareil est très importante. Malheureusementil est
impossible de vous expliquer dans ce mode d’emploi quel adresse de démarrage vous devez introduire car
cela dépends entièrement du contrôleur que vous utiliserez … veuillez donc vous référer au mode d’emploi
de votrecontrôleur DMX pour savoir quelle adresse vous devezutiliser.
JB SYSTEMS® 21/62 iMove 7S
JB SYSTEMS® 22/62 iMove 7S
Page 14

FRANÇAIS MODE D’EMPLOI
ourte
FRANÇAIS MODE D’EMPLOI
CONFIGURATION DMXDU iMOVE 7S:
COMMENT UTILISER L’APPAREIL
Chaque fois que vous allumerez l’appareil, l’écran affichera IM7S et tous les moteurs retourneront à leur
position ‘initiale’ ce qui fait que vous entendrez des bruits pendant environ 20 secondes. Après cela,
l’appareil seraprêt à recevoir des signaux DMXou à parcourir sesprogrammes.
Vous pouvezutiliser l’appareil selon 3 façons:
EN UTILISANT LES PROGRAMMES INTÉGRÉS MAÎTRE/ESCLAVE:
Sélectionnez cette fonction si vous voulez un show instantané. En reliant tous les
appareils selon le principe maître/esclave, le premier appareil contrôlera tous les autres
appareils en effectuant un show automatique et synchronisé au rythme de la musique.
Rien ne sera branché à son entrée DMX et son Led « master » sera constamment
allumé,leLed « sound» clignotera au rythmede la musique.
EN UTILISANT LE CONTRÔLEUR CA-8:
Si vous utilisez l’appareil en mode maître/esclave nous vous recommandons d’utiliser le contrôleur CA-8.
Connectez ce petit contrôleur à l’entréejack 1/4” de l’appareil maître. Ceci vous permettra decontrôler les
fonctions suivantes:
o En utilisantles programmes intégrés maître/esclave
o En utilisant le petitcontrôleur
o En utilisantun contrôleur DMX universel
L’appareil Maître possède 2 shows préprogrammés: vous pouvez sélectionner
(show 1), (show 2), (show 3) ou (show 4)
immédiatement dans le menu du master (maître).
Les appareils Esclaves possèdent 2 options: les autres appareils sont réglés en
mode esclave (le Led « slave » est constamment allumé). Afin de créer un
magnifique show vous pouvez introduire des mouvements contrastés (pan/tilt de
l’appareil esclave est inversé) dans le menu des appareils esclaves vous pouvez
allerà l’option et sélectionner:
o Normalslave: l’appareil esclave fonctionnede façonsynchronisé
par rapport à l’appareilmaître.
o 2 light show: l’appareilesclave fonctionne à l’opposéde l’appareil maître.
Stand by
Fonction
Mode
L'appareil esttotalement éteint.
Strobe
1.Gobo / Color
sync.
strobe
2.Sync. strobe
3.Two-lightstrobe
Son 1
(la LED est
éteinte)
Sélectiondu mode
moving show X/Y
(Show1 - Show4)
Son 2
(la LED clignote
normalement)
Sélection
Color/Gobo
1. Pression
longuepour
changementde
gobo.
2. Pression c
pourchangement
de couleur.
Lent/son3
(la LED est
allumée)
Réglage du mouvementX/Y.
1. Positionpan.
2. Position tilt.
D'abord régler l'appareil Master,
ensuiteréglerles appareils
Slave.
Position/Latch
(la LED clignoterapidement)
JB SYSTEMS® 23/62 iMove 7S
JB SYSTEMS® 24/62 iMove 7S
Page 15

FRANÇAIS MODE D’EMPLOI
MAINTENANCE
Assurez-vous que la zone au-dessous du lieu d’installation ne comporte pas de personnes indésirables
lors de lamaintenance
Mettez l’unité hors tension, débranchez lecordon d’alimentation et attendez que l’appareil ait refroidi.
Pendantl’inspection,les points suivantsdoivent êtrevérifiés :
Toutes les vis utilisées pour l’installation de l’appareil ou de chacune de ses pièces doivent être bien
fixéeset non corrodées.
Les niches, fixations et structures de support (plafond, poutres, suspensions) doivent être totalement
intactes,sans aucune déformation.
Lorsqu’une lentille optique est visiblement endommagée (fissure ou éraflures profondes), elle doit être
remplacée.
Lescâbles doivent êtreen parfaite condition et doivent être remplacés immédiatementen cas de détection
d’un problème,mêmebénin.
Pour protéger l’appareil de toute surchauffe, les ventilateurs (si applicable) et les ouvertures de ventilation
doiventêtre nettoyéesmensuellement.
L’intérieur del’appareil doit êtrenettoyé annuellementà l’aide d’un aspirateur ou jet d’air.
Lenettoyage des lentilles optiques internes et externes et/oudes miroirs doit être effectué périodiquement
pour optimiser la production de lumière. La fréquence de nettoyage dépend de l’environnement dans
lequel l’appareil fonctionne: des environnements humides, enfumés ou particulièrement sales peuvent
entraînerune accumulationde saleté plus importantes sur les optiques de l’appareil.
Nettoyezà l’aide d’unchiffon doux avec desproduits de nettoyage pour verres normaux.
Séchez toujoursles partiessoigneusement.
Nettoyezles optiques externesou moins une fois tous les30 jours.
Nettoyezles optiques internesou moins une fois tous les 90 jours.
Attention: Nous vous recommandons fortement de faire exécuter le nettoyage interne par du
personnel qualifié !
SPECIFICATIONS
Alimentation: AC230V, 50Hz
Fusible: 6,3 A/250V
Contrôle de son: Microphoneinterne
ConnexionsDMX: connecteurXLR mâle / femelleà 3 broches
Ampoule HTI 150W
Taille: 373 x 295 x 451 mm
Poids: 13 kg
NEDERLANDS HANDLEIDING
Hartelijk dank voor de aankoop van dit JB Systems®product. Om ten volle te kunnen profiteren van alle
mogelijkheden en voor uw eigen veiligheid, gelieve de aanwijzingen zeer zorgvuldig te lezen voor U begint
het apparaat te gebruiken.
KARAKTERISTIEKEN
In dit apparaat is radio-interferentie onderdrukt. Dit product voldoet aan de gangbare Europese en nationale
voorschriften. Het is vastgesteld dat het apparaat er zich aan houdt en de desbetreffende verklaringen en
documentenzijn door de fabrikant afgegeven.
Dit toestelis ontworpen om decoratieve lichteffecten te produceren en wordt gebruikt in lichtshows
Krachtigemoving head voor proDJs, verhuurbedrijven en discotheken
7 DMX kanalen ( pan – tilt – kleur – gobo – goborotatie – sluiter/schudden – dimmer)
Excellenteoptiek voorscherpe gobo’s en een grote lichtopbrengst.
9 trapezoïdedichroïde kleuren + wit, regenboogeffect
7 + 1 uitwisselbare roterendegobo’s ( ook glasgobo’s)
Blackout,0-100 % dimmeren een hoge snelheid variabelestrobo
Ingebouwdeprogramma’s en een microvoor een makkelijke alleenstaande “Master/slave”modus !
Makkelijk bruikbaar met de Scanmaster SM1216, iLEADof elke DMX controller
VOOR DE IN GEBRUIKNAME
Controleer voor het eerste gebruik van het apparaat of het tijdens het transport beschadigd werd. Mocht er
schade zijn, gebruik het dan niet,maar raadpleeg eerst uw dealer.
Belangrijk: Dit apparaat verliet de fabriek in uitstekende staat en goed verpakt. Het is erg belangrijk dat de
gebruiker de veiligheidsaanwijzingen en raadgevingen in deze gebruiksaanwijzing uiterst nauwkeurig volgt.
Elke schade veroorzaakt door verkeerd gebruik van het apparaat valt niet onder de garantie. De dealer
aanvaardt geen verantwoordelijkheid voor mankementen en problemen die komen door hetveronachtzamen
van dezegebruiksaanwijzing.
Bewaardeze brochure op een veilige plaats om hem inde toekomst nogmaals te kunnen raadplegen. Indien
U het apparaatverkoopt, denktU er wel aan om de gebruiksaanwijzing bij te voegen.
Controleer deinhoud:
Controleerof de doos volgendeonderdelen bevat:
Handleiding
iMove 7S toestel
Netsnoer
Chacune deces informationspeut êtremodifiéesans avertissement préalable. Vous pouvez
télécharger la dernière version dece mode d’emploi denotre site Web: www.beglec.com
JB SYSTEMS® 25/62 iMove 7S
VEILIGHEIDSVOORSCHRIFTEN:
CAUTION
De bliksempijl die zich in een gelijkbenige driehoek bevindtis bedoeld om u te wijzen op het gebruik
of de aanwezigheid van niet-geïsoleerde onderdelen met een “gevaarlijke spanning” in het toestel
die voldoende kracht heeftom een risicovan elektrocutiein te houden.
Het uitroeptekenbinnen de gelijkbenige driehoek is bedoeld om de gebruiker eropte wijzen dat er in
de meegeleverdeliteratuur belangrijke gebruik en onderhoudsinstructies vermeld staan betreffende
dit onderdeel.
Dit symboolbetekent: het apparaat mag enkelbinnenhuis wordengebruikt.
Dit symboolbetekent: Leesde handleiding!
JB SYSTEMS® 26/62 iMove 7S
WAARSCHUWING: Om het risico op elektrocutie zoveel mogelijk te
vermijden mag u nooit de behuizing verwijderen. Er bevinden zich geen
onderdelen in het toestel die u zelf kan herstellen. Laat de herstellingen
enkeluitvoeren door eenbevoegde technicus.
Page 16

NEDERLANDS HANDLEIDING
Dit symbool bepaalt: de minimumafstand van te belichten voorwerpen. De minimumafstand tussen
projectoren het verlichte voorwerp moet meer dan 1 meterszijn.
Om hetmilieu te beschermen, probeerzoveel mogelijk het verpakkingsmateriaal te recycleren.
Een nieuw lichteffect kan soms ongewenste rook en/of reuk veroorzaken. Dit is normaal en verdwijnt na
een paarminuten.
Stel dit apparaat niet bloot aan regen of vocht, dit om het risico op brand en elektrische schokken te
voorkomen.
Om de vorming van condensatie binnenin te voorkomen, laat het apparaataan de omgevingstemperatuur
wennen wanneer het, na het transport, naar een warm vertrek is overgebracht. Condensatie kan het
toestel soms verhinderen perfect te functioneren. Het kan soms zelfs schade aan het apparaat
toebrengen.
Gebruik ditapparaat uitsluitend binnenshuis.
Plaats geen stukken metaal en mors geen vocht binnen in het toestel om elektrische schokken of storing
te vermijden. Indien een vreemd voorwerp in het apparaat geraakt, moet U het direct van het lichtnet
afkoppelen.
Plaats de installatie op een plaats met goede ventilatie, ver van brandbare materialen en/of vloeistoffen.
De installatie moetop minstens 50 cm van de muren rondom geplaatst worden.
Bedek geen enkeleventilatieopening om oververhittingte vermijden.
Zorg dat het toestelniet in een stoffige omgevingwordt gebruikt en maak het regelmatig schoon.
Houdhet apparaatuit de buurt van kinderen.
Ditapparaat magniet door onervaren personen bediend worden.
De maximum veilige omgevingstemperatuur is 40°C. Gebruik het apparaat dus niet bij hogere
temperaturen.
De temperatuur van hetoppervlak van het apparaat kan 85°C bereiken. Raak de metalenombouw tijdens
het gebruik nietmet blote handen aan.
Verzeker er U van dat er zich onder de plaats waar het toestel wordt geïnstalleerd geen ongewenste
personenbevinden tijdens het bevestigen en losmakenalsook bij hetonderhoud.
Laat het toestel ongeveer 10 minuten afkoelen alvorens de lamp te vervangen of alvorens te starten met
deonderhoudsbeurt.
Trek altijd de stekker uit wanneer het apparaat gedurende langere tijd niet wordt gebruikt of alvorens de
lamp tevervangenof alvorens te beginnenmet de onderhoudsbeurt.
De elektrische installatie behoort uitsluitend uitgevoerd te worden door bevoegd personeel, volgens de in
uw landgeldende regels betreffendeelektrischeen mechanischeveiligheid.
Controleer dat de beschikbare spanning niet hoger is dan die aangegeven op de achterzijde van het
toestel.
De elektrische kabel behoort altijd in uitstekende staat te zijn. Zet het apparaat onmiddellijk af als de
elektrischekabel gekneusdof beschadigd is.
Laatde elektrische draad nooit in contact komen metandere draden.
Volgens de veiligheidsvoorschriften moet deze installatie geaard worden.
Sluithet apparaat niet aan op een elektronischedimmer.
Gebruik altijd een geschikte en gekeurde veiligheidskabel bijhet installeren van het toestel.
Om elektrische schokken te voorkomen, moet U de behuizing niet openen. Afgezien van de lamp en de
zekering zitten er geen onderdelenin die doorde gebruikermoeten wordenonderhouden.
Repareer
steeds
Ingeval van ernstige problemen met het bedienen van het toestel, stopt U onmiddellijk het gebruik ervan.
Contacteeruw dealer voor een eventuele reparatie.
Debehuizing en de lenzen moeten vervangen worden als ze zichtbaarbeschadigd zijn.
Gebruik best de origineleverpakking als het toestelvervoerd moetworden.
Om veiligheidsredenen is het verboden om ongeautoriseerdemodificatiesaan het toestelaan te brengen.
Belangrijk: Kijk nooit rechtstreeks in de lichtbron. Gebruik het lichteffect niet in de tegenwoordigheid van
personen die lijdenaan epilepsie.
nooit
een zekering en overbrug de zekeringhouder nooit. Vervang een beschadigde zekering
door een zekeringvan hetzelfde type en met dezelfde elektrischekenmerken.
NEDERLANDS HANDLEIDING
PLAATSEN OF VERVANGEN VAN DE LAMP
Wacht, in het geval van het
vervangen van een lamp of van het
geven van een onderhoudsbeurt, 10
minuten na het uitzetten van de
installatie met het openen ervan
altijd de stekker uit het stopcontact voor U begint
aan het onderhoud. Gebruik altijd hetzelfde type
reserveonderdelen (lampen, zekeringen, e.d.)
Gebruik bij het vervangen van onderdelen
uitsluitendauthentieke reserveonderdelen.
Zet het toestel af en trek de netstekker uit het
stopcontact.
Wacht 10 minuten tothet apparaatis afgekoeld.
Schroef de 2 schroeven aan de achterzijde van het
toestellos waar “open” staat.( zie de “screws to open the lamp compartment”op de foto hieronder )
Trekde lampenhouder zachtjes uit het lampcompartiment
Verwijder de oude lamp. Bij hetverwijderen van de oude lamp houdt U de lampenhouder vast en trekt U
niet aan de draad.
Houd de lampenhouder vast terwijl U de nieuwe lamp rustig in de lampenhouder drukt.
Opgepast!
gebruikswijzing om te weten welke lamp U moet gebruiken. Gebruik nooit een lamp met een hogere
wattage.
Raak de lamp niet met blote handen aan; dit zal de levensduur van de lamp drastisch verkorten. Indien U
de lamp aanraakte, maak hem dan schoon met een lapje en een beetje schoonmaakalcohol. Veeg de
lamp droog alvorens hem te installeren.
Plaats de nieuwe lamp terug inhet apparaat. Vergewis U ervan dat geen draden de lamp raken.
Sluithet lampcompartimentmet de schroeven.
Zet het toestel aan en wijs de straal op een wit oppervlak. Gebruik de drie “adjustment screws” ( zie foto
hieronder ) aangeduid door “lamp adjust” op het toestel. Draai deze 3 schroeven zachtjes tot wanneer u
een maximalelichtuitstoot verkrijgt.
Klaar!
totdat het apparaat is afgekoeld. Trek
Controleer het etiket achter op het toestel of kijk naar de technische karakteristieken in deze
JB SYSTEMS® 27/62 iMove 7S
JB SYSTEMS® 28/62 iMove 7S
Page 17

NEDERLANDS HANDLEIDING
NEDERLANDS HANDLEIDING
ROTERENDE GOBOS VERVANGEN
OPGELET: Installeer de gobo’s alleen als het toestel uit staat!
Maak nooit de schroeven van de roterende gobo’s los. Zo opent u het rollager. Dit herstellen is
uiterst moeilijk!
Schakelhet toestel uit en trek de stekkeruit het stopcontact.
Open het plastiekendeksel (4 schroeven)
Lokaliseer het gobowiel en verwijder de
bevestigingsring van de gobo die u wilt
vervangen metgepast gereedschap.
Verwijder de gobo en installeer de nieuwe
gobo.
Druk de bevestigingsring samen en plaats
hem voorde gobo.
Klaar!
OPHANGEN VAN HET APPARAAT
Belangrijk: De installatie van het toestel mag
uitsluitend door bekwaam onderhoudspersoneel
uitgevoerdworden. Onjuiste plaatsing kan ernstige
letsels en/of schade aan eigendommen tot gevolg
hebben. Het ophangen vergt veel ervaring. U
behoort de grenzen te respecteren aan de
werklast; erkende installeringmaterialen moeten
worden gebruikt; de veiligheid van het
geïnstalleerde toestel moet regelmatig worden
gecontroleerd.
OvertuigU ervan dat het gebied onder installatieplaats
vrij is van ongewenste personen tijdens het plaatsen,
hetweghalen en het onderhoud.
Installeer het toestel op een goedgeventileerde plaats,
ver van brandbare stoffen en/of vloeistoffen. Het
toestel moet worden bevestigd op
van deomringende muren.
Het toestel moet worden geïnstalleerd buiten het
bereik van iedereen enweg van plaatsen waar men maglopen en zitten.
Alvorens tot plaatsen over te gaan, moet men controleren dat de minimum puntbelasting van de
installatieplaats 10 keer het gewichtvan hettoestel bedraagt.
Gebruik bij het installerenvan het toestel altijd een gewaarmerkteveiligheidskabel die 12 keer het gewicht
van het toestel kan dragen. Deze bijkomende veiligheidsbevestiging moet zo worden aangebracht dat
geen deel vanhet toestel meerdan 20 cm vallen kan als de hoofdbeveiliging faalt.
Het apparaat moet goed worden vastgezet; aan een vrij zwaaiende montage mag zelfs niet gedacht
worden.
Bedek geen ventilatieopeningen, anderszou dit oververhitting tot gevolg kunnen hebben.
De gebruiker moet er zich van verzekeren dat de installaties met betrekking tot de veiligheid en de
technische mechaniek dooreen expert zijn goedgekeurd alvorens ze voor de eerstekeer te gebruiken. Elk
jaar moeten de installatiesworden gekeurd door een vakman om te controleren of de veiligheid nog steeds
perfectis.
minstens 50 cm
INSTELLEN VAN HET TOESTEL
Bedieningspaneel:
1. DISPLAY geeft de verschillende menu’sen de gekozen functies weer.
2. LEDS
3. TOETSEN
4. REMOTE CONTROL INGANG: sluit de optionele CA-8 afstandsbediening aan op de ¼” microfoon jack
om zo het toestel te controleren voorstand by, functie en modus
5. SENSITIVITY: wordt gebruikt om de gevoeligheid van de microfoon in te stellen wanneer het toestel
gebruikt wordtin standalone of master/slavemode.
6. MICROFOON: wordt gebruikt om de ingebouwde programma’s aan te sturen op het ritme van de
muziek.
7. DMX INPUT/OUTPUT: wordt gebruikt voor DMX512 verbinding. Gebruik symmetrische 3pins XLR M/V
kabels van goedekwaliteit om de toestellenmet elkaarte verbinden.
DMX Aan DMXsignaalaanwezig
MASTER Aan Master mode
SLAVE Aan Slavemode
SOUND Knippert Geluidsactivering
MENU Omprogrammeringfunctieste selecteren
DOWN Om terug te gaan in de geselecteerdefuncties
UP Om verder tegaan in de geselecteerde functies
ENTER Om degeselecteerdefuncties te bevestigen
JB SYSTEMS® 29/62 iMove 7S
JB SYSTEMS® 30/62 iMove 7S
Page 18

NEDERLANDS HANDLEIDING
NEDERLANDS HANDLEIDING
HOOFDMENU:
Druk op de MENU toets om een van de pre-set
functies te kiezen. Druk op de toets tot de
gewenstefunctie op dedisplay verschijnt.
Selecteer de functie met de ENTER toets. De
display zalknipperen.
Gebruik de DOWN en UP toetsen om de modus
te wijzigen.
Eens u de gewenste modus geselecteerd hebt
moet u op de ENTER toets drukken om uw keuze
te bevestigen. Na 8 seconden zal de display
automatisch naar de hoofdfuncties terugkeren
zonder iets veranderd te hebben. Om naar de
functies terug te keren zonder iets te wijzigen
moet u weer op de MENU toets drukken. De
hoofdfunctiesworden hier rechts weergegeven.
Wordt gebruiktom hetstartadres van het toestel
in te stellen in een DMX configuratie.
Druk op de MENU toets tot op de display
weergegeven wordt.
Druk op de ENTER toets, de display begint te
knipperen.
Gebruik de DOWN en UP toetsen om het
DMX512 adres te wijzigen.
Wanneer het juiste adres op de display wordt
weergegeven, druk dan op de ENTER toetsom uw keuze te bevestigen.
(anders keerthij na 8 seconden automatischweer naar de hoofdfuncties zonder iets gewijzigd te hebben)
Om naar de functies terug tekeren zonder iets te wijzigen moet u weer op de MENU toets drukken.
Wordt gebruiktom deShow werkmoduste kiezen wanneer het toestel standalone of in master/slave
configuratiegebruikt wordt.
Druk op deMENU toetstot op de display weergegevenwordt.
Drukop de ENTER toets, de display begint te knipperen.
Gebruik de DOWN en UP toetsen om (show 1), (show 2), (show 3) of (show
4) te selecteren.
Wanneer de gewenste modus op de display wordt weergegeven, druk dan op de ENTER toets om uw
keuze tebevestigen.
(anderskeert hij na 8 seconden automatisch weernaar de hoofdfuncties zonder ietsgewijzigd te hebben)
Om naarde functies terug te keren zonder iets te wijzigen moet u weerop de MENU toetsdrukken.
DMX512Adresinstelling
Show Mode
Show 1mode- Het toestel staat op de grond. Tiltbewegingshoek210°.
Show 2mode- Het toestel hangtonder het plafond.Tilt bewegingshoek 90°.
Show 3mode – Het toestel staat op een podium,tegenover het publiek
De spot projecteertsteeds in de richtingvan het publiek en staatdus aan de voorkant van het
podium. Panbewegingshoek ( links naarrechts naar rechts): 160°.Tilt bewegingshoek:90° ( 60°
boven dehorizon;30° onder dehorizon.)
Show 4mode – Het toestel hangt onder het plafond.
De spot projecteert vooral aan de voorzijdevan het podium. Pan bewegingshoek ( links naar rechts
naar links): 160°. Tilt bewegingshoek:90° ( verticaal, voorzijde75°; achterzijde 15° )
Wordt gebruiktom het slave toestel synchroonof tegenovergesteldte laten werken ten opzichte van
de master.
Druk op deMENU toetstot op de displayweergegevenwordt.
Drukop de ENTER toets, de display begint te knipperen.
Gebruik de DOWN en UP toetsen om (normal) of (2 light show) te selecteren.
Wanneer de gewenste modus op de display wordt weergegeven, druk dan op de ENTER toets om uw
keuze tebevestigen.
(anderskeert hij na 8 seconden automatisch weernaar de hoofdfuncties zonder ietsgewijzigd te hebben)
Om naar de functies terug tekeren zonder iets te wijzigen moet u weer op de MENU toetsdrukken.
Black-outmode:wanneer geen enkel DMX signaal gedetecteerd wordt, dangaat het toestel over naar
de black-out modus en wacht op het volgende DMX signaal.
No blackout mode: wanneer geen enkel DMX signaal gedetecteerd wordt, dan schakelt het toestel
automatischover naarstandalonewerking.
Druk op deMENU toetstot opde display weergegevenwordt.
Drukop de ENTER toets, de display begint te knipperen.
Gebruik de DOWN en UP toetsen om (yes blackout) of (no blackout) te selecteren.
Wanneer de gewenste modus op de display wordt weergegeven, druk dan op de ENTER toets om uw
keuze tebevestigen.
(anderskeert hij na 8 seconden automatisch weernaar de hoofdfuncties zonder ietsgewijzigd te hebben)
Om naar de functies terug te keren zonder iets te wijzigenmoet u weer op de MENU toets drukken.
Normal: u kunt alleenvolle kleurenselecteren.
Split colors: u kunt zowelvolle kleurenals 2 naast elkaar liggende kleurenvan het kleurenwiel
selecteren.
Druk op deMENU toetstot op de display weergegevenwordt.
Drukop de ENTER toets, de display begint te knipperen.
Gebruik de DOWN en UP toetsen om (normal) of (split color) te selecteren.
Wanneer de gewenste modus op de display wordt weergegeven, druk dan op de ENTER toets om uw
keuze tebevestigen.
(anderskeert hij na 8 seconden automatisch weernaar de hoofdfuncties zonder ietsgewijzigd te hebben)
Om naar de functies terug tekeren zonder iets te wijzigen moet u weer op de MENU toets drukken.
Normal: Pan bewegingwordt niet omgekeerd.
Paninversion: Pan bewegingwerkttegenovergesteld
Druk op deMENU toetstot op de display weergegevenwordt.
Drukop de ENTER toets, de display begint te knipperen.
Gebruik de DOWN en UP toetsen om (normal) of (pan inversion)te selecteren.
Wanneer de gewenste modus op de display wordt weergegeven, druk dan op de ENTER toets om uw
keuze tebevestigen.
(anders keerthij na 8 seconden automatisch weer naar de hoofdfunctieszonder iets gewijzigd te hebben)
Om naar de functies terug tekeren zonder iets te wijzigen moet u weer op de MENU toets drukken.
SlaveMode
BlackoutMode
ColorMode
PanInversion
JB SYSTEMS® 31/62 iMove 7S
JB SYSTEMS® 32/62 iMove 7S
Page 19

NEDERLANDS HANDLEIDING
NEDERLANDS HANDLEIDING
Normal: Tilt bewegingwordtniet omgekeerd.
Tiltinversion: tilt bewegingwerkt tegenovergesteld
Drukop de MENU toets tot op de display weergegevenwordt.
Drukop de ENTER toets, de display begint te knipperen.
Gebruik de DOWN en UP toetsen om (normal) of (tilt inversion) te selecteren.
Wanneer de gewenste modus op de display wordt weergegeven, druk dan op de ENTER toets om uw
keuze tebevestigen.
(anderskeert hij na 8 seconden automatisch weernaar de hoofdfuncties zonder ietsgewijzigd te hebben)
Om naar de functies terug tekeren zonder iets te wijzigen moet u weer op de MENU toets drukken.
Standaard dimming: fadergesloten ( DMX waarden 000 ) volledige lichtuitstoot
Inversed dimming: fadergesloten ( DMX waarden 000 ) blackout
Druk op deMENU toetstot op de display weergegevenwordt.
Drukop de ENTER toets, de display begint te knipperen.
Gebruik de DOWN en UP toetsen om (normal) of (dimmer inversion) te selecteren.
Wanneer de gewenste modus op de display wordt weergegeven, druk dan op de ENTER toets om uw
keuze tebevestigen.
(anderskeert hij na 8 seconden automatisch weernaar de hoofdfuncties zonder ietsgewijzigd te hebben)
Om naar de functies terug tekeren zonder iets te wijzigen moet u weer op de MENU toets drukken.
Display on: display is steedsaan.
Display off:display is uitwanneerdeze niet gebruikt wordt.
Druk op deMENU toetstot op dedisplay weergegevenwordt.
Drukop de ENTER toets, de display begint te knipperen.
Gebruik de DOWN en UP toetsen om (display steeds aan) of (display uit wanneer niet in
gebruik).
Wanneer de gewenste modus op de display wordt weergegeven, druk dan op de ENTER toets om uw
keuze tebevestigen.
(anders keerthij na 8 seconden automatischweer naar de hoofdfunctieszonder iets gewijzigd te hebben)
Om naar de functies terug tekeren zonder iets te wijzigen moet u weer op de MENU toets drukken.
Tilt Inversion
DimmerInversion
fader open ( DMX waarden 255 ) blackout
fader open ( DMX waarde 255 ) volledige lichtuitstoot
Led Display
Deze functie helpt u bij het afstellen vande focus van de lichtstralen en gobo’s.
Druk op deMENU toetstot knippertop de display.
Druk op de ENTER toets zodat het toestel de “tilt90°” positie inneemt.
Druk op deENTER toets zodat hettoestel de “pan 0°” positieinneemt.
Druk op deENTER toets zodat het toestel de“pan 90°” positieinneemt.
Druk opde ENTER toets zodat hettoestelde “pan 180°” positie inneemt.
Druk opde ENTER toets zodat eht toestelde “pan 270°” positie inneemt
In de vorige 5 stappen kunt u de focus instellen met de UP/DOWN toetsen (op de display wordt de
focuswaardeweergegeven).
Opgelet: u kunt slechts een “algemene” focusinstelling maken voor de 5 posities samen, hetis nietmogelijk
om de focus perfectin te stellen voor elke positie.
Druk op de MENU toets om naar de functiesweer te keren.
Wordt gebruikt omhet interne “zelftest” programma in te schakelen.Alle mogelijkhedenvan het
toestel zullendan automatisch overlopenworden.
Druk op deMENU toetstot knippertop de display.
Druk op de ENTER toetsom het interne self-test programma te starten.
Druk op de MENU toets om naar de functiesweer te keren.
Wordt gebruiktom hetaantal werkurenvan hettoestel weer te geven.
Druk op deMENU toetstot knippertop de display.
Druk opde ENTER toets om hetaantal werkuren van het toestelweer te geven op de display.
Druk op de MENU toets om naar de functiesweer te keren.
Wordt gebruikt om een algemenereset van het toestel uit te voeren.
Druk op deMENU toetstot knippertop de display.
Druk opde ENTER toets om alle kanalen terug in te stellen volgens hun standaardwaarde.
Druk op de MENU toets om naar de functiesweer te keren.
Gelieve ook het hoofdstuk over de DMX kanaalconfiguratie van het toestel om een reset via DMX uit te
voeren.
FocusAdjust
Self-Test
Fixture Hours
Reset
Display normal: displaykan afgelezenwordenwanneer het toestel op de grond staat.
Display inversion: displaykan afgelezenworden wanneer het toestel ondersteboven opgehangen is.
Druk op deMENU toetstot knippertop de display. (gewone weergave)
Gebruik de ENTER toets om over te gaan naar (omgekeerde weergave), deze optie zal
automatisch behouden worden na8 seconden. Of druk weerop de ENTER om terug te gaan naar
(gewone weergave).
Druk op de MENU toets om naar de functiesweer te keren.
DisplayInversie
JB SYSTEMS® 33/62 iMove 7S
JB SYSTEMS® 34/62 iMove 7S
Page 20

NEDERLANDS HANDLEIDING
NEDERLANDS HANDLEIDING
DMX AANSLUITINGEN
Het DMX protocol is een veelgebruikt hoge snelheidssignaal voor het besturen van
“intelligente”lichteffecten. U moet een “kettingverbinding” maken tussen uwDMX controller en
alle andere lichteffecten door middel van symmetrische XLR M/V kabels van goede
kwaliteit.Om vreemde reacties van uw lichteffecten te voorkomen, die te wijten zijn aan allerlei
storingen, moet u een signaalbegrenzer van 90Ω tot 120Ω plaatsen aan het einde van de
ketting. Gebruik nooitY- splitsingskabels, ditzal eenvoudigweg niet werken!
Elk lichteffectin de ketting moet haar eigen startadres hebben zodat het toestel weet welke instructies er van
de controllermoeten opgevolgd worden en welke niet.
HOE HET JUISTESTARTADRESINSTELLEN:
Zie het vorige hoofdstuk (DMX-512 adresinstelling) om te leren hoe u het startadres in dit toestel moet
instellen. Het startadres van elk toestel is zeer belangrijk. Het is echter onmogelijk om u in deze handleiding
uit te leggen welk startadres u moet instellen, aangezien dit volledig afhangt van de controller die u gaat
gebruiken… gelieve dus de handleiding van uw DMX controller te raadplegen om uit te zoeken welk
startadresu moet instellen.
DMX-CONFIGURATE VAN DE iMOVE 7S:
JB SYSTEMS® 35/62 iMove 7S
JB SYSTEMS® 36/62 iMove 7S
Page 21

NEDERLANDS HANDLEIDING
NEDERLANDS HANDLEIDING
HOE DIT TOESTEL BEDIENEN
Telkens u het toestel aan zet zal er IM7S op de display verschijnen en zullen alle motoren naar hun
basispositieterugkeren. Misschien zultu wat geluiden horen gedurende 20 seconden.Daarna zal het toestel
klaar zijnom DMX signalen te ontvangen of om deingebouwdeprogramma’s uit te voeren.
U kunt dit toestelop 3 manieren gebruiken:
VIA DE INGEBOUWDEMASTER/SLAVEPROGRAMMA’S:
Kies deze functie wanneer u onmiddellijk een kant-en-klare show wilt. Wanneer de toestellen via
master/slave met elkaar te verbonden zijn, dan zal het eerste toestel alle andere toestellen sturen en zo
een automatische, muziekgestuurdeen gesynchroniseerde show uitvoeren.Er mag niets aangesloten zijn
op de DMX ingang van het eerste toestel, zijn master LED zal continu aan zijn en de
sound LED zal knipperen op het ritmevan demuziek.
VIA DE EENVOUDIGE CA-8 CONTROLLER:
Wanneer de toestellen in Master/slave configuratie gebruikt worden raden wij u ten sterkste aan de CA-8
“Easy controller”te gebruiken. Sluit deze kleine controlleraan op de 1/4” jack van de master.Zo kunt u de
volgende functiesvan op afstand bedienen:
Stand by Blackout het toestel
Functie
Modus
o Via deingebouwde master/slaveprogramma’s
o Via deeenvoudige CA-8 controller
o Via een universele DMX controller
De MASTER beschikt over 2 ingebouwde shows: u kunt (show 1),
(show 2), (show 3) of (show 4) onmiddellijk in het menu van
de master kiezen.
De SLAVES beschikken over 2 opties: de andere toestellen staan als slave
ingesteld (slave-LEDis continu aan). Om een prachtige lichtshow te creëren kunt u
gecontrasteerde bewegingen invoeren (pan/tilt van het slave toestel werkt
omgekeerd) In the menu van het slave toestel kunt u naar optie gaan en
de volgendeselectie maken:
o Normalslave: slave werkt synchroon met demaster.
o 2 light show: slave werkt tegenovergesteld ten opzichte van
de master.
Strobo
1.Gobo / kleur
sync. strobo
2.Sync. strobo
3.”Two-light”
strobo
geluid 1
(LED uit )
X/Ybewegings
showmodus
selectie
( Show 1 ~ Show4 )
geluid 2
(LEDknippert
normaal)
Color/Gobo
selectie
1. Blijfduwen
voor gobo
2. Duw kort voor
kleurverandering
Traag/geluid3
(LED aan)
X/Ybeweging instelling
1.Pan positie
2.Tiltpositie
Stel eerst het Master toestel in,
stel daarnade de positie van de
Slave toestellenin.
Positie/vergrendelenin een
positie
(LED knippertsnel)
ONDERHOUD
Overtuig U ervan dat het gebied onder de installatieplaats vrij is van ongewenste personen tijdens het
onderhoud.
Zet hettoestel uit, trek denetstekker uit het stopcontact en wacht tot het toestel is afgekoeld.
Bij inspectie moeten de volgende punten worden gecontroleerd.
Alle schroeven gebruikt om het te toestel te installeren en al zijn onderdelen moeten goed vastgedraaid
zijn en mogen niet verroest zijn.
Behuizingen, vastzetstukken, installeringplaatsen (plafond, spanten, schokbrekers) mogen absoluut niet
verwrongenzijn.
Wanneer een optische lens klaarblijkelijk beschadigd is door barsten of diepe krassen, dan moet deze
vervangenworden.
De stroomkabels moeten in perfecte staat zijn en behoren vervangen te worden, wanneer er zelfs maar
een klein probleemontdekt werd.
Om het toestel tegen oververhitting te beschermen, behoren de ventilatoren (als die er zijn) en de
ventilatieopeningenelkemaand gereinigd te worden.
Debinnenkantvan het toestelbehoort elk jaar gereinigdte worden met een stofzuiger ofeen luchtspuit.
Het schoonmaken van inwendige en uitwendige optische lenzen en/of spiegels moet regelmatig worden
uitgevoerd om een zo goed mogelijke lichtuitstraling te verkrijgen. Hoe vaak ze schoon moeten worden
gemaakt hangt af van de omgeving waar het toestel wordt gebruikt: een klamme, rokerige of bijzonder
vuile omgeving kan een grotereopeenhoping van vuil veroorzaken op de optische uitrusting.
Reinig met een zachtedoek engebruik normale glasreinigende producten.
Droog de onderdelenaltijdzorgvuldig af,
Reinig de uitwendigeoptische uitrusting minstens éénkeer permaand.
Reinig de inwendige optischeuitrusting minstens omde 3 maanden.
Let op: We bevelen sterk aan dat het schoonmaken van de binnenkant wordt uitgevoerd door
vakbekwaampersoneel!!
TECHNISCHE KENMERKEN
Netvoeding: AC 230 V, 50Hz
Zekering: 6,3 A/250V
Geluidscontrole: Inwendigemicrofoon
DMX verbinding: 3 pins XLR mannelijk/ vrouwelijk
Lamp: HTI 150W
Afmetingen: 373 x 295 x451 mm
Gewicht: 13 kg
JB SYSTEMS® 37/62 iMove 7S
U kan delaatste versievan deze handleiding downloadenvia Onze website: www.beglec.com
Elkeinlichtingkan veranderenzonderwaarschuwingvooraf
JB SYSTEMS® 38/62 iMove 7S
Page 22

DEUTSCH BEDIENUNGSANLEITUNG
DEUTSCH BEDIENUNGSANLEITUNG
Vielen Dank, dass Sie sich für den Erwerb dieses JBSystems®-Produkt entschieden haben. Bitte lesen sie
diese Bedienungsanleitung sorgfältig vor der Inbetriebnahme durch, zur vollen Ausschöpfung der
Möglichkeiten,die dieses Gerät bietetsowie, zu Ihrer eigenenSicherheit.
EIGENSCHAFTEN
Das Gerät ist funkentstört und erfüllt die Anforderungen der europäischen und nationalen Bestimmungen.
Entsprechende Dokumentationliegt beimHerstellervor.
LeistungsstarkerMoving Head fürDJ´s, Verleihfirmen und Discotheken
7 DMX Kanäle (pan - tilt - Farbe - gobo - gobo Rotation - Shutter/Shaking - Dimmer)
Excellente Optik für Randscharfe Gobosund einem hohenLichtaustritt
9 DicroitischeFarben + weiß, Regenbogen Effekt
7+1 auswechselbares, rotierendesGobo ( Glas Gobos)
Blackout,0-100% Dimmerund regelbaresHigh Speed Stoboskop
EingebauteProgramme und Mikrofon für Stand Alone “Master/Slave”Modus !
Einfach anzusteuern über den Scanmaster SM1216, iLEAD Controller oder über jeden anderen DMX
Controller.
VOR DER ERSTBENUTZUNG
Vor der Erstbenutzung bitte das Gerät zuerst auf Transportschäden überprüfen. Sollte das Gerät einen
Schaden aufweisen, Gerät bitte nicht benutzen, sondern unverzüglich mit ihrem Händler in Verbindung
setzen.
Wichtiger Hinweis:
dass der Benutzer sich streng an die Sicherheitshinweise und Warnungen in der Bedienungsanleitung
hält. Schäden durch unsachgemäße Handhabung sind von der Garantie ausgeschlossen. Der Händler
übernimmt keine Verantwortung für Schäden, die durch Nichtbeachtung der Bedienungsanleitung
hervorgerufen wurden.
Die Bedienungsanleitung, für zukünftiges Nachschlagen, bitte aufbewahren. Bei Verkauf oder sonstiger
Weitergabedes Gerätes, bitte Bedienungsanleitungbeifügen.
Packungsinhaltprüfen:
Bitte überprüfenSie, dass die Packung folgende Einzelteileenthält:
Bedienungsanleitung
iMove7S
Stromkabel
Das Gerät hat das Werk unbeschädigt und gut verpackt verlassen. Es ist wichtig,
SICHERHEITSHINWEISE
CAUTION
Sie Reparaturen demqualifiziertenKundendienst.
Das Blitzsymbol im Dreieck weist den Benutzer darauf hin, das eine Berührungsgefahr mit nicht
isolierten Teilen im Geräteinneren, welche eine gefährliche Spannung führen, besteht. Die
Spannung ist so hoch,das hier die Gefahreines elektrischen Schlages besteht.
Das Ausrufezeichen im Dreieck weist den Benutzer auf wichtige Bedienungs- und
Wartungshinweise in denDokumenten hin, diedem Gerätbeiliegen.
DiesesSymbol bedeutet:Nur innerhalb vonRäumen verwenden.
DiesesSymbol bedeutet:Achtung!Bedienungsanleitung lesen!
Dieses Symbol stellt fest: der minimale Abstand von beleuchteten Gegenständen. Der minimale
Aus Umweltschutzgründen, Verpackungbitte wiederverwenden,oderrichtig trennen.
Ein neues Gerät kann Geruch oder Rauch entwickeln. Das ist völlig normal und legt sich nach einigen
Zur Vermeidung von Stromschlag oder Feuer, Gerätbitte nicht Regen oder Feuchtigkeit aussetzen.
Zur Vermeidungvon Kondensation im Inneren des Geräts, bitte nach Transport in eine warme Umgebung
Gerät nicht imFreien und in feuchten Räumenund Umgebungen verwenden.
Keine Metallgegenstände oder Flüssigkeiten ins Innere des Geräts gelangen lassen, Kurzschluß oder
Gerät nur in gut belüfteter Position und entfernt von entflammbaren Materialien oder Flüssigkeiten
Ventilationsöffnungennicht abdecken,da Überhitzungsgefahr!
Nichtin staubigerUmgebung verwendenund regelmäßig reinigen.
Für Kinder unerreichbar aufbewahren.
Unerfahrene Personensollen das Gerät nichtbedienen.
Umgebungstemperaturdarf40ºC nichtüberschreiten.
Die Oberflächentemperatur kann bis zu 85ºC erreichen, Gerät während des Betriebs nicht mit bloßen
Sicherstellen, daß sich während des Auf- und Abbaus keine unbefugten Personen unterhalb des Geräts
Vor dem Auswechselndes Leuchtmittels oder sonstigen Eingriffen,10 Minuten Abkühlzeit einhalten.
Stets Netzstecker ziehen,wenn Gerät für längerenZeitraum nicht genutzt, oder es gewartetwird.
ElektrischeAnschlüssenur durch qualifiziertesFachpersonal überprüfenlassen.
Sicherstellen,daß Netzspannung mit Geräteaufkleber übereinstimmt.
Gerät nicht mitbeschädigtemNetzkabel betreiben.
Netzkabel nicht mitanderen Kabelnin Berührung kommenlassen!
Zur Einhaltung der Sicherheitsbestimmungen muß das Gerät geerdetsein.
Gerät nicht an einen Dimmeranschließen.
Ausschließlich vorschriftsmäßigeKabelzur Installationverwenden.
Gerät nicht öffnen. Abgesehenvom tausch des Leuchtmittels und der Sicherung sind keine zu wartenden
Sicherung
Bei Fehlfunktion,Gerät nicht benutzenund mit Händler in Verbindung setzen.
Bei sichtbarenBeschädigungenmüssen Gehäuseund Optik ersetztwerden.
Bei Transport bitteOriginalverpackung verwenden,um Schäden am Gerätzu vermeiden.
Aus Sicherheitsgründen dürfen andem Gerätkeine unbefugten Veränderungen vorgenommenwerden.
WichtigerHinweis: Nicht direkt in die Lichtquelle blicken! Gerät nicht verwenden, wenn sich Personen im
Raum befinden,die unter Epilepsieleiden.
Abstandzwischen Projektor und dem belichteten Gegenstandmuß mehr als 1 Metersein.
Minuten.
einige Zeit zum Temperaturausgleich bringen. Kondensation kann zu Leistungsverlust des Gerätes oder
garBeschädigung führen.
Fehlfunktion können die Folge sein. Falls es doch einmal vorkommen sollte, bitte sofort Netzstecker
ziehen undvom Stromkreis trennen.
betreiben. Mindestabstand an allen Seiten soll mindestens50 cm sein.
Händenanfassen.
befinden.
Bauteileim Gerät enthalten.
niemals
reparieren oderüberbrücken, sondern
ACHTUNG: Um sich nicht der Gefahr eines elektrischen Schlags
auszusetzen, entfernen Sie keines der Gehäuseteile. Im Geräte-inneren
befinden sich keine vom Benutzer reparierbaren Teile.Überlassen
immer
mit gleichartigerSicherung ersetzen!
JB SYSTEMS® 39/62 iMove 7S
JB SYSTEMS® 40/62 iMove 7S
Page 23

DEUTSCH BEDIENUNGSANLEITUNG
DEUTSCH BEDIENUNGSANLEITUNG
EINSETZEN/AUSTAUSCHEN DER LICHTQUELLE
Bei Austausch oder Ersatz der
Lichtquelle Gerät für mindestens 10
Minuten abkühlen lassen. Stets
Netzstecker ziehen und vom Stromkreis
trennen! Stets gleichartige Ersatzteile
(Lichtquelle, Sicherung etc) verwenden.
Original-Ersatzteileverwenden.
Gerät abschalten und Netzsteckerziehen.
Etwa 10 Minuten abwarten, bis sich das Gerät
abgekühlt hat.
Schrauben sie die beiden Schrauben auf der
Rückseite(Beschriftung OPEN) desGerätesraus.
Jetzt können sie den Lampensockel aus dem
Gerät ziehen.
Gebrauchtes Leuchtmittel herausziehen. Hierbei
an derFassung festhalten und nicht am Kabel!
An der Fassung festhalten, wenn ein neues Leuchtmitteleingesetzt wird.
Achtung! Geräteaufkleber auf der Rückseite des Geräts oder technische Einzelheiten in dieser
Bedienungsanleitung beachten, damit stets das richtige Leuchtmittel eingesetzt wird. Keine Leuchtmittel
mit höherer Wattanzahleinsetzen!
Leuchtmittel nicht mit bloßen Händen berühren! Das verkürzt die Lebenserwartung der Lichtquelle
erheblich. Falls es doch einmal vorkommen sollte, mit etwas Alkohol reinigen und vor dem Einsetzen gut
abreiben.
Neues Leuchtmittel einsetzenund sicherstellen, dass sienicht von Kabeln berührt wird.
Fach wiederzuschrauben.
Schalten Sieden Moving Head ein und richten Sie den Strahl auf eine weiße Oberfläche. Verwenden Sie
die drei Einstellschrauben, um die Lampe zu justieren. Drehen sie solange, bis die maximale Helligkeit
erreicht ist.
Fertig!
AUSTAUSCH DER ROTIERENDEN GOBOS
ACHTUNG: Einsetzen der Gobos nur, wenn das Gerät ausgeschaltet ist!
Keinesfalls Schrauben der rotierenden Gobos lösen, da dieses auch die Kugellager öffnet.
Gerät ausschalten und Netzsteckerziehen.
Obere Kunststoffabdeckung abnehmen (4
Gobopalette lokalisieren und
Altes Gobo entfernen und neues Gobo
Befestigungsring zusammendrücken und
Fertig!
Eine Reparaturist ausgesprochenschwierig!
Schrauben).
Befestigungsring des Gobos, das Sie
auswechseln wollen, mit geeignetem
Werkzeug entfernen.
einsetzen.
auf der Vorderseite des Goboseinsetzen.
ÜBERKOPF-MONTAGE
Wichtig: Montage ausschließlich durch
qualifiziertes Fachpersonal durchführen
lassen. Unvorschriftsmäßiger Einbau kann
erhebliche Verletzungen und/oder Schäden
verursachen. Überkopf-Montage verlangt
entsprechende Erfahrung!
Belastungsgrenzen müssen beachtet
werden, geeignetes Installationsmaterial
muß verwendet werden und das installierte
Gerät muß in regelmäßigen Abständen
überprüftwerden.
Sicherstellen, dass sich keine unbefugten
Personen unterhalb des Geräts befinden,
während es installiert oder gewartetwird.
Gerät in gut belüfteter Position installieren, weit
entfernt von entflammbaren Materialien
und/oder Flüssigkeiten. Einen Seitenabstand
von mindestens50cm einhalten.
Gerät außerhalb der Reichweite von Personen,
und nicht in niedrigenDurchgängenoder inder Nähe vonSitzgelegenheiten installieren.
Vor Montage sicherstellen, dass die gewählte Position wenigstens das 10-fache Gerätegewicht
aufnehmenkann.
Zur Aufhängung stets geeignetes Befestigungsmaterial verwenden, das das 12-fache Gerätegewicht
aushalten kann. Eine zweite Sicherungsaufhängung muß angebracht werden, die ein Absacken des
Geräts vonmehr als 20 cm verhindert,sollte die Befestigung brechen.
Gerät gut befestigen. Eine freischwingende Aufhängung ist gefährlich und sollte auf gar keinen Fall in
Betrachtgezogen werden!
Ventilationsöffnungen nichtabdecken, daÜberhitzungsgefahr!
Betreiber muß sicherstellen, dass die sicherheitsrelevanten und technischen Installationen vor Erstbetrieb
fachmännischvorgenommenworden sind.
Installationen sollten jährlich durch qualifiziertes Fachpersonal inspiziert werden, um jederzeit einen
sicherenBetrieb zugewährleisten.
JB SYSTEMS® 41/62 iMove 7S
JB SYSTEMS® 42/62 iMove 7S
Page 24

DEUTSCH BEDIENUNGSANLEITUNG
DEUTSCH BEDIENUNGSANLEITUNG
EINSTELLEN DES GERÄTS
BEDIENFELD:
1. DISPLAY zeigt dieverschiedenenMenüssowie ausgewählteFunktionen.
2. LEDs
DMX An GegenwärtigDMXEingang
HAUPTGERÄT An Hauptgerätin Betrieb
UNTERGERÄT An Untergerät inBetrieb
TON Blinkt Tonsteuerung
3. TASTEN
MENÜ Zur Auswahlder Programmfunktionen
ABWÄRTS Zurück in dengewählten Funktionen
AUFWÄRTS Vorwärts inden gewählten Funktionen
EINGABE Bestätigung dergewähltenFunktionen
4. EingangFernsteuerung: SchließenSie die wahlweise CA-8Fernsteuerungan der 1/4”Mikrofonbuchse
zur Steuerungvon Stand-by, Funktionund Modus an.
5. EMPFINDLICHKEIT: Zur Einstellung der Empfindlichkeitdes Mikrofons im Einzel- oder Reihenbetrieb.
6. MIKROFON: Zum Einsetzendes eingebauten Programmszum Rhytmus der Musik.
7. DMX AUSGANG/EINGANG: Zur DMX512 Verbindung der Geräte wird Verwendung qualitativ
hochwertiger3-StiftXLR M/F abgeglichener Kabel empfohlen.
HAUPTMENÜ:
Zur Auswahl jeglicher voreingestellter
Funktion MENÜ-Taste so lange drücken, bis
das gewünschteDisplay angezeigt wird.
Auswahl der Funktion mit EINGABE
(ENTER), dasDisplayblinkt.
Mit ABWÄRTS und AUFWÄRTS Betriebsart
wählen.
Sobald die gewünschte Betriebsart
ausgewählt wurde, mit EINGABE (ENTER)
bestätigen. Nach 8 Sekunden kehrt das
Display automatisch ohne Veränderung zu
den Hauptfunktionen zurück. Zurück zu den
Funktionen ohne Veränderung mit MENÜ-
Taste. Die Hauptfunktionen sind rechts
abgebildet.
ZumEinstellen der Startadresse in DMX
Einstellung.
MENU-Taste drücken bis im Display
angezeigtwird.
EINGABE (ENTER) drücken und das Display
beginnt zublinken.
Mit ABWÄRTS und AUFWÄRTS die DMX512
Adresseverändern.
Sobald die richtige Adresse im Display
angezeigt wird, mit EINGABE (ENTER) speichern (anderenfalls nach 8 Sekunden Rückkehr zu den
HauptfunktionenohneÄnderung).
Zur Rückkehrzu den FunktionenohneVeränderung MENÜ-Taste erneutdrücken.
Zur Auswahldes Showbetriebsin Einzel- oderReihenbetrieb.
MENU-Taste drückenbis imDisplay erscheint.
DannEINGABE(ENTER) drückenund Display beginntzu blinken.
Mit AUFWÄRTSund ABWÄRTS (Show 1), (Show2), (show 3) oder (show4)
auswählen.
Sobald die richtige Adresse im Display angezeigt wird, mit EINGABE (ENTER) speichern (anderenfalls
nach8 Sekunden Rückkehr zuden Hauptfunktionen ohneÄnderung).
Zur Rückkehrzu den FunktionenohneVeränderung MENÜ-Taste erneutdrücken.
DMX512 EinstellungAdresse
Showbetrieb
JB SYSTEMS® 43/62 iMove 7S
Show1 – Bodenmontage, Neigungswinkel210°.
Show2 – Deckenmontage,Neigungswinkel 90°.
Show3 – Montage aufdemLautsprecher,
Der Scheinwerferist stets auf das Publikumausgerichtet, beispielsweise vorder Bühne.
Schwenkwinkel(von links nachrechts): 160°. Neigungswinkel: 90° (60° oberhalbdes Horizonts,
30° unterhalbdes Horizonts).
Show4 - Montage unter der Decke.
Der Scheinwerfer projeziert hauptsächlich vor der Bühne. Schwenkwinkel (von links nach rechts):
160°. Neigungswinkel: 90° (vertikal,vorn 75°, hinten 15°).
JB SYSTEMS® 44/62 iMove 7S
Page 25

DEUTSCH BEDIENUNGSANLEITUNG
DEUTSCH BEDIENUNGSANLEITUNG
Untergerät arbeitet entgegengesetzt oder synchronmit demHauptgerät.
MENÜ-Taste drückenbis imDisplay angezeigtwird.
DannEINGABE(ENTER) drückenund Displaybeginnt zu blinken.
Mit AUFWÄRTSund ABWÄRTS (Normal)oder (2Lightshow) auswählen.
Sobald die richtige Adresse im Display angezeigt wird, mit EINGABE (ENTER) speichern (anderenfalls
nach 8Sekunden Rückkehrzu den HauptfunktionenohneÄnderung).
Zur Rückkehrzu den FunktionenohneVeränderung MENÜ-Taste erneutdrücken.
Blackout:Wird kein DMX-Signalerkannt, gehtdas Gerät in Blackout und wartet auf das DMX-Signal.
Kein Blackout:Wird kein DMX-Signal erkannt, schaltet dasGerät automatischauf Einzelbetriebum.
MENÜ-Taste drückenbis im Displayerscheint.
DannEINGABE(ENTER) drückenund Display beginntzu blinken.
Mit AUFWÄRTSund ABWÄRTS (Blackout ein) oder (kein Blackout)auswählen.
Sobald die richtige Adresse im Display angezeigt wird, mit EINGABE (ENTER) speichern (anderenfalls
nach8 Sekunden Rückkehr zuden Hauptfunktionen ohneÄnderung).
Zur Rückkehrzu den FunktionenohneVeränderung MENÜ-Taste erneutdrücken.
Normal: Nurvolle Farben könnenausgewählt werden.
Farbspaltung:Volle Farben sowie 2 auf der Farbenpalettenebeneinanderliegende Farbenkönnen
ausgewähltwerden.
MENÜ-Taste drückenbis imDisplay erscheint.
DannEINGABE(ENTER) drücken und Display beginntzu blinken.
Mit AUFWÄRTSund ABWÄRTS (Normal) oder (Farbspaltung)auswählen.
Sobald die richtige Adresse im Display angezeigt wird, mit EINGABE (ENTER) speichern (anderenfalls
nach 8Sekunden Rückkehr zu denHauptfunktionen ohne Änderung).
Zur Rückkehrzu den FunktionenohneVeränderung MENÜ-Taste erneutdrücken.
Normal: Schwenkbewegungist nicht umgekehrt.
Schwenk Umkehrung:Schwenkbewegungistumgekehrt.
MENÜ-Taste drückenbis imDisplay angezeigtwird.
DannEINGABE(ENTER) drückenund Display beginnt zu blinken.
Mit AUFWÄRTSund ABWÄRTS (Normal) oder (SchwenkUmkehrung)auswählen.
Sobald die richtige Adresse im Display angezeigt wird, mit EINGABE (ENTER) speichern (anderenfalls
nach8 Sekunden Rückkehr zu den Hauptfunktionenohne Änderung).
. Zur Rückkehr zu denFunktionen ohneVeränderung MENÜ-Tasteerneutdrücken.
Normal: Neigungsbewegung istnicht umgekehrt.
NeigungUmkehrung:Neigungsbewegung ist umgekehrt.
MENÜ-Taste drücken bis im Display erscheint.
DannEINGABE(ENTER) drückenund Display beginntzu blinken.
Mit AUFWÄRTSund ABWÄRTS (Normal) oder (Neigung Umkehrung)einstellen.
Sobald die richtige Adresse im Display angezeigt wird, mit EINGABE (ENTER) speichern (anderenfalls
nach8 Sekunden Rückkehr zuden Hauptfunktionen ohneÄnderung).
Zur Rückkehrzu den FunktionenohneVeränderung MENÜ-Taste erneutdrücken.
Reihenbetrieb
Blackout
Farben
SchwenkUmkehrung
NeigungUmkehrung
Standard dimmen: Fader geschlossen (DMX Wert 000 ) 100%Licht
Invertiertdimmen: Fader geschlossen( DMX Wert 000 ) Blackout
Drückensie den MENUKnopf bis im Display angezeigt wird.
Drückensie den ENTER Knopfbis das Displayanfängt zu blinken.
Benutzen Sie den DOWN und UP Knopf um den (normalen) oder (invertierten) Modus
auszuwählen.
Wenn sie den Modus ausgewählt haben, drücken sie die ENTER Taste zum sichern. (Drücken sie nicht
innerhalb 8 Sekunden die ENTER Tastewird dies Funktionnicht gespeichert)
Umzu den Funktionen ohnespeichern zurückzukehren,drücken siewieder dieMENU Taste.
Display an: Displayist ständigeingeschaltet.
Display aus: Display ist ausgeschaltet,wennnicht in Benutzung.
MENÜ-Taste drückenbis im Displayerscheint.
DannEINGABE(ENTER) drückenund Display beginntzu blinken.
Mit ABWÄRTS und AUFWÄRTS (Display ständig eingeschaltet) oder (Display
ausgeschaltet,wennnicht in Benutzung)auswählen.
Sobald die richtige Adresse im Display angezeigt wird, mit EINGABE (ENTER) speichern (anderenfalls
nach8 Sekunden Rückkehr zuden Hauptfunktionen ohneÄnderung).
Zur Rückkehrzu den FunktionenohneVeränderung MENÜ-Taste erneutdrücken.
Display Normal: Display ist lesbar, wenn Gerät aufdem Boden installiert ist.
Display Umkehrung: Displayist lesbar, wenn Gerät auf dem Kopf stehend installiert ist.
MENÜ-Taste drückenbis imDisplay blinkt (Normal Display).
Mit EINGABE (ENTER) zu Betriebsart (DisplayUmkehrung) umschalten, die Einstellung wird nach
8 Sekunden automatisch gespeichert oder EINGABE(ENTER) erneut drücken und so zu (Normal
Display)zurückkehren.
Zur Rückkehr zu den Funktionen MENÜ-Taste drücken.
Zur Einstellung de Brennweite desRichtstrahls und der Gobos.
MENÜ-Taste drückenbis imDisplay blinkt.
EINGABE (ENTER)drücken, dasGerät begibtsich in 90°Neigungswinkel.
EINGABE (ENTER)drücken, das Gerät begibtsich in Position Schwenk0°.
EINGABE (ENTER) drücken,das Gerät begibt sich in PositionSchwenk90°.
EINGABE (ENTER)drücken, das Gerätbegibt sich in Position Schwenk180°.
EINGABE (ENTER)drücken, das Gerätbegibt sich in Position Schwenk270°.
Während der vorangegangenen 5 Schritte waren Sie in der Lage, die Brennweite mit
AUFWÄRTS/ABWÄRTS auf dem Gerät einzustellen (Display zeigt die gegenwärtige BrennweitenEinstellung).
Achtung: Bitte beachten sie,dass Sie nureine „durchschnittlicheBrennweite” für alle5 Positionen einstellen
können, eine perfekte Einstellungfür jedeeinzelne Position ist also nichtmöglich.
Zur Rückkehr zu den Funktionen MENÜ-Taste drücken.
DimmerInvertieren
Fader geöffnet( DMXWert255 ) Blackout
Fader geöffnet( DMXWert255 ) 100%Licht
LED Display
DisplayUmkehrung
Brennweiteeinstellen
JB SYSTEMS® 45/62 iMove 7S
JB SYSTEMS® 46/62 iMove 7S
Page 26

DEUTSCH BEDIENUNGSANLEITUNG
DEUTSCH BEDIENUNGSANLEITUNG
Zur Aktivierung des eingebautenSelbsttest-Programms, das alle Möglichkeiten des Geräts anzeigt.
MENÜ-Taste drückenbis imDisplay blinkt.
Mit EINGABE(ENTER) Selbsttest starten.
Zur Rückkehr zu den Funktionen MENÜ-Taste drücken.
ZurAnzeige der Arbeitsstunden des Geräts.
MENÜ-Taste drückenbis imDisplay blinkt.
Mit EINGABE(ENTER) die Arbeitsstunden im Display anzeigen.
Zur Rückkehr zu den Funktionen MENÜ-Taste drücken.
Zurerzwungenen Rückstellungdes Geräts.
MENÜ-Taste drückenbis imdisplay blinkt.
MitEINGABE (ENTER)alle Einstellungenin die Standardeinstellungen zurücksetzen.
Zur Rückkehr zu den Funktionen MENÜ-Taste drücken.
Bitte lesen Sieauch im Kapitel DMX-Kanal-Konfigurationüber Rückstellung in DMXnach.
Selbsttest
Stundenzähler
Zurückstellung
ANSCHLUSS DES GERÄTS MIT DMX
Das DMX-Protocoll ist ein weit verbreitetes Hochgeschwindigkeits-Signal zur Steuerung von
intelligenten Beleuchtungsanlagen. DMX Controller und sämtliche Lichteffekte müssen mit
einem hochwertigen XLR M/F abgeglichenen Kabel (z.B. JB Systems ref. 7-0063)in Reihe
geschaltet sein. Zur Verhinderung von unerwünschten Effekten durch Störungen muss ein
90Ω bis 120Ω Endwiderstand verwandt werden. Niemals Y-Splitter-Kabel verwenden, das
funktionierteinfach nicht!
DMX-KONFIGURATION iMOVE 7S:
Jeder Lichteffekt in der Reihenschaltung benötigt seine eigene Startadresse, so dass ihn Kommandos vom
Controllerauch erreichenund dekodiert werden können.
EINSTELLEN DER RICHTIGENSTARTADRESSE:
Bitte im vorherigen Kapitel (DMX-512 Adresse einstellen) nachlesen, wie die Startadresse eingestellt wird.
Die Startadresse jedes einzelnen Geräts ist ausgesprochen wichtig. Unglücklicherweise ist es unmöglich,
Ihnen in dieser Bedienungsanleitung zu erklären, welche Startadresse Sie einzustellen haben. Das hängt
vollständig von demverwandten Controllerab… Also, bitte lesen Sie in der Bedienungsanleitung Ihres DMX
Controllers nach, wiedieStartadresseeinzustellenist.
JB SYSTEMS® 47/62 iMove 7S
JB SYSTEMS® 48/62 iMove 7S
Page 27

DEUTSCH BEDIENUNGSANLEITUNG
DEUTSCH BEDIENUNGSANLEITUNG
BEDIENUNG DES GERÄTS
Bei jedem Einschalten wird auf dem Display IM7S angezeigt und sämtliche Motoren begeben sich in
Ausgangsstellung. Für etwa 20 Sekunden hören Sie einige Betriebsgeräusche. Danach ist das Gerät
betriebsbereitund kann DMX-Signaleempfangenoder die eingebauten Programmeabspielen.
Sie könnendas Gerät auf 3 verschiedeneWeisenbedienen:
ALS HAUPT-/UNTERGERÄTMIT EINGEBAUTEN,VORPROGRAMMIERTENFUNKTIONEN:
Auswahl dieser Funktion, falls Sie eine unverzügliche Show ablaufen lassen wollen.
Durch Verbindung der Geräte in Haupt-/Untergeräte steuert das erste Gerät die
nachfolgenden Geräte und erzeugt eine automatische, tongesteuerte, synchronisierte
Lightshow. Am DMX Eingang ist nichts angeschlossen, die Master-LED ist ständig an
und dieSound-LED blinkt synchron mitder Musik.
Wichtiger Hinweis! Diese Funktion arbeitet nur, wenn Betriebsart Blackout im
Menü des Hauptgeräts AUSgeschaltet ist, anderenfalls passiert gar nichts! Mehr
dazu bitte imKapitel „Hauptmenü” nachlesen.
MIT EASY CONTROLLER:
Bei Verwendung in Betriebsart Haupt-/Untergerät empfehlen wir dringend die Verwendung unseres CA-8
„Easy Controller”. Diesen kleinen Controller einfachan der 1/4” Buchse des Hauptgeräts anschließen und
dannfolgende Funktionen steuern:
o AlsHaupt-/Untergerät miteingebauten,vorprogrammiertenFunktionen
o Mit Easy Controller
o Mit Universal DMX Controller
HAUPTGERÄT hat 2 eingebaute Shows: Sie können (Show 1),
(Show 2), (show 3) oder (show 4) direkt im Menü des Hauptgeräts
auswählen.
UNTERGERÄTE haben 2 Betriebsoptionen: Die weiteren Geräte sind auf Betriebsart Untergerät
eingestellt (Untergerät-LED ist ständig an). Um eine großartige Lightshow zu kreieren, können Sie
Kontrastbewegungen einführen (Schwenk/Neigung des Untergeräts ist umgekehrt) im Menü der
Untergerätezu Option gehen undauswählen:
o NormalUntergerät: Untergerätarbeitetsynchron mit Hauptgerät.
o 2 Lightshow: Untergerät arbeitetumgekehrt vom Hauptgerät.
Stand-by Blackout desGeräts
Funktion
Modus
Strobe
1.Gobo / Color
sync.
strobe
2.Sync. strobe
3.Two-lightstrobe
Sound1
(LED off )
X/Ybewegte Show
Modusauswahl
( Show 1 ~ Show4
)
Sound2
(LED blinkt normal)
Color/Gobo
Auswahl
1. Für
Gobowechsel
gedrückt halten.
2. Für
Colorwechsel
kurzdrücken.
Langsam/Sound
3
(LED on)
X/YBewegungseinstellung
1.Panposition
2.Tiltposition
Erst Mastereinstellen,dann
Slavepositioneinstellen.
Position/Latch
(LED blinktschnell)
WARTUNG UND INSTANDHALTUNG
Sicherstellen, dass sich keine unbefugten Personen unterhalb des Geräts befinden,während es gewartet
wird.
Gerät ausschalten, Netzstecker ziehen und warten,bis es sich abgekühlt hat.
Während der Wartungsind folgende Punkte ganz besonderszu beachten:
Sämtliche Schrauben zur Installation und Befestigung jeglicher Teile müssen fest angezogen und rostfrei
sein.
Gehäuse, Befestigungsmaterialienund Aufhängungen (Decke, Balken, abgehängteDecken) dürfen keine
AnzeichenvonVerformungzeigen.
Ist die Optik sichtbar beschädigt (Sprünge oder tiefe Kratzer), dann müssen die entsprechenden Teile
ausgewechseltwerden.
Netzkabel muß stets in einwandfreiem Zustand sein und selbst bei kleinsten Beschädigungen erneuert
werden.
Zur Vermeidung von Überhitzung müssen die Ventilatoren (sofern vorhanden) und Lüftungsschlitze
monatlichgereinigt werden.
Gerät innen mindestens einmal proJahr mit Staubsauger oderAirjet reinigen.
Reinigung der inneren und äußeren optischen Linsen und/oder Spiegel müssen in regelmäßigen
Abständen zur Beibehaltung einer optimalen Lichtausbeute vorgenommen werden. Reinigungsintervalle
hängen stark von der Umgebung ab: feuchte,verrauchte und besonders verschmutzte Umgebung führen
zu größererVerschmutzung aufden Linsen.
Mit weichem Tuch undgewöhnlichem Glasreinigersäubern.
Alle Teilestets gut abtrocknen.
ÄußereOptik mindestensalle 30 Tage säubern.
InnereOptik mindestens alle 90 Tagesäubern.
Achtung: Wir empfehlen dringend, Reinigung im Innern des Geräts nur von qualifiziertem Personal
durchführen zulassen!
TECHNISCHE EINZELHEITEN
Netzspannung: AC230V, 50Hz
Sicherung: 6,3 A/250V
Klangregler: EingebautesMikrofon
DMXAnschlüsse: 3-pinXLR Stecker/Buchse
Lichtquelle HTI150W
Abmessungen: 373 x 295 x 451 mm
Gewicht: 13 kg
JB SYSTEMS® 49/62 iMove 7S
TechnischeÄnderungen könnenauch ohne Vorankündigungvorgenommenwerden!
Sie könnensichdie neueste Versiondieses Benutzerhandbuchesvon unsererWebsite
herunterladen: www.beglec.com
JB SYSTEMS® 50/62 iMove 7S
Page 28

ESPAÑOL MANUAL DE INSTRUCCIONES
Gracias por comprar este producto JB Systems®. Para sacar el máximo rendimiento a sus posibilidades y
por su propia seguridad, le estas instrucciones de funcionamiento detenidamente antes de comenzar a
utilizaresta unidad.
CARACTERÍSTICAS
Esta unidad está a prueba de interferencias de radio. Este producto cumple los requisitos de las directrices
nacionales y europeas actuales. Se ha establecido la conformidad y las instrucciones y documentos
correspondienteshan sido depositadospor el fabricante.
Este dispositivo ha sido diseñado para producir efectos luminosos decorativos y se utiliza en sistemas
paraespectáculosluminosos.
Potente cabezalmóvil para DJs profesionales,compañíasde alquiler y discotecas
7 canales DMX (panorámica - inclinación- color - gobo - rotación de gobo - obturador/sacudida - regulador
deintensidad luminosa)
Óptica excelentepara gobosbiendefinidos y gran emisión luminosa
9 colores dicroicos trapezoidales + blanco, efectoarco iris
7+1 gobos giratorios intercambiables (tambiéngobos de cristal)
Oscurecimiento, reguladordeintensidad luminosa 0-100% y estroboscópicavariable de alta velocidad
¡Programas y micrófonoincorporados paramodalidad "maestra/esclava"independiente!
Fácilmente controlable por el controlador Scanmaster SM1216, controlador iLEAD y cualquier otro
controladorDMX
ANTES DE UTILIZAR EL APARATO
Antes de comenzar a utilizar esta unidad, compruebe que no haya habido daños durante el transporte. Si
observaalgún daño, no utilice el dispositivos y consulteprimero a su distribuidor.
Importante: Este dispositivo a salido de nuestras instalaciones en perfecto estado y bien embalado. Es
absolutamente necesario que el usuario siga estrictamente estas instrucciones y advertencias de
seguridad que aparecen en este manual de usuario. Cualquier daño producido por un manejo innecesario
queda excluido de la garantía.El distribuidor no asumirá ninguna responsabilidad por cualquier defecto o
problemaque surja por no haber seguidoel manual de usuario.
Guarde este folleto en un lugar seguro para consultarloen el futuro. Si vende este aparato más adelante,
asegúresede incluir este manualde usuario.
Compruebeel contenido:
Compruebeque lacaja contienelos siguienteselementos:
UnidadiMove 7S
Cablede red
Instrucciones de funcionamiento
INSTRUCCIONES DE SEGURIDAD:
CAUT ION
El símbolo en forma de rayo con cabeza de flecha dentro de un triángulo equilátero se emplea para
alertar sobre el uso o presencia de "voltaje peligroso" no aislado dentro de la carcasa del producto
con la magnitud suficiente paraconstituir un riesgo dedescarga eléctrica.
El signo de exclamación dentro del triángulo equilátero se emplea para alertar al usuario de la
presencia de instrucciones de funcionamiento y mantenimiento importantes en el texto que
acompaña a este aparato.
Este símboloindica:Usar sólo en el interior.
PRECAUCIÓN: Para reducir el riesgo de descarga eléctrica, no quite la
cubierta superior. No existen piezas en el interior que pueda mantener o
reparar el usuario. Asigne el mantenimiento y las reparaciones a personal
cualificado.
ESPAÑOL MANUAL DE INSTRUCCIONES
Estesímbolo indica: Leerlas instrucciones.
Este símbolo indica: La distancia mínima de objetos iluminados. La distancia mínima entre la
emisión luminosa yla superficie iluminadatiene que ser más de 1 metro.
Para proteger el medio ambiente, recicle el material de embalaje en la medida de lo posible.
Un nuevo efecto luminoso provoca a veces humo y/u olor no deseados. Esto es normal y desaparece después
dealgunos minutos.
Para evitarincendios o riesgos de descarga, no exponga la unidad a la lluvia o a la humedad.
Para evitar que se forme condensación en el interior, deje que la unidad se adapte a la temperatura exterior
cuando la lleve a una habitación cálida después del transporte. A veces la condensación impide que la unidad
funcione a pleno rendimientoy puede incluso provocardaños.
Esta unidad sólo se puede usar en el interior.
No coloque objetos metálicos ni derrame líquidos dentro del reproductor de la unidad. Se pueden producir
descargas eléctricas o fallos de funcionamiento. i algún objeto extraño entra en la unidad, desconecte
inmediatamente el suministro eléctrico.
Coloque el aparato en un lugar bien ventilado, lejos de materiales y/o líquidos inflamables. El aparato debe
colocarsea al menos 50 cm de las paredes.
No cubra ninguna aberturade ventilación puesto quepodría producirse un sobrecalentamiento de la unidad.
Evite el uso en ambientes con polvo y limpiela unidad regularmente.
Mantenga la unidad lejos de los niños.
Las personas sin experiencia no deben utilizar este aparato.
La máxima temperatura ambiente para un funcionamiento seguro es de 40°C. No utilice la unidad a
temperaturas ambiente superiores.
La temperatura de la superficie de la unidad puede alcanzar hasta 85°C. No toque la carcasa sin protección
durante elfuncionamiento.
Asegúrese de que debajo del área del lugar de instalación no hay personas durante el montaje, desmontaje o
mantenimiento.
Deje que el aparato se enfríe durante al menos 10 minutos antes de reemplazar la bombilla o comenzar el
mantenimiento.
Desenchufe siempre la unidad cuando no vaya a ser utilizada durante un largo periodo de tiempo o antes de
reemplazar la bombilla o comenzar el mantenimiento.
La instalación eléctrica sólo debe ser llevada a cabo por personal cualificad, de acuerdo con la regulaciones
sobre seguridad eléctrica y mecánica desu país.
Compruebe que el voltaje disponible no supera el quese indica en el panel traserode la unidad.
El cable de alimentación siempre debe estar en perfecto estado: Apague la unidad inmediatamente cuando
observe daños o desperfectos en el cable de alimentación.
¡Nunca deje que el cable de alimentación entre en contactocon otros cables!
Este aparato debe conectarse a tierra para cumplir con las regulaciones sobre seguridad.
No conecte la unidad a ningún regulador de voltaje.
Utilice siempre un cable de seguridad apropiado y homologado cuando instale la unidad.
Para evitar descargas eléctricas, no abra la cubierta. Además de la lámpara y el fusible de red no hay piezas en
el interior de este aparatoque pueda mantener el usuario.
Nunca repare un fusible ni derive el soporte del fusible. ¡Reemplace siempre el fusible dañado por un fusible
del mismo tipo y especificación eléctrica!
En caso de que ocurran problemas de funcionamiento serios, deje de utilizar el aparato y póngase en contacto
con su distribuidor inmediatamente.
La carcasa y la lente deben reemplazarse si presentan daños visibles.
Utilice el embalajeoriginal cuando tenga que transportar el dispositivo.
Por razones de seguridad se prohibe realizarmodificaciones no autorizadas en la unidad.
Importante: ¡Nunca mire directamente a la fuente de luz! No utilice el efecto en presencia de personas
epilépticas.
JB SYSTEMS® 51/62 iMove 7S
JB SYSTEMS® 52/62 iMove 7S
Page 29

ESPAÑOL MANUAL DE INSTRUCCIONES
ESPAÑOL MANUAL DE INSTRUCCIONES
REEMPLAZO Y COLOCACIÓN DE LA LÁMPARA
Cuando tenga que reemplazar la
lámpara o realizar el
mantenimiento de ésta, no abra el
de haberla apagado para que se enfríe.
¡Desconecte siempre la unidad antes de
realizar el mantenimiento! Utilice siempre el
mismo tipo de piezas de repuesto (bombillas,
fusibles, etc.) Cuando reemplace piezas,
utilice sólo piezas de repuesto originales.
Apague la unidad y desenchufeel cable de red.
Espere unos 10 minutos hasta que la unidad se
haya enfriado.
Desenrosque los dos tornillos de la parte
trasera de la unidad dondeesté escrito el signo
“abierto”.
Desprendasuavementeel casquillo de la lámpara del compartimento dela lámpara.
Desconecte la lámparavieja. Sujete el casquillo de la lámpara mientras desconecta la lámpara en vez de
tirardel cable!
Sujeteel casquillo dela lámpara mientrasempuja suavementela nueva lámpara en el casquillo.
¡Atención! Compruebe la etiqueta en el lado posterior del dispositivo o lealas especificaciones técnicas
en este manual para saber qué lámpara utilizar. ¡Nunca instale lámparas con un vatiaje superior! Las
lámparas con un vatiaje superior generan temperaturas para lasque el dispositivo no ha sidodiseñado.Si
utilizaun transformador de lámpara, se quemará debido a la sobrecarga de corriente.
¡No toque la bombilla sin protegerse las manos! Esto reduce drásticamente la vida útil de la lámpara. Si
ha tocadola lámpara, límpielacon un paño y alcohol de quemar. Limpie la lámpara antesde instalarla.
Vuelva a colocar la nueva lámpara dentro de la unidad. Asegúrese de que los cables no toquen la
lámpara.
Cierreel compartimento de la lámpara con los tornillos
Encienda la unidad y dirija el haz hacia una superficie blanca. Utilice los tres tornillos de ajuste que se
indican en “Ajuste de lámpara”. Gire suavemente estos tres tornillos hasta que obtenga la máxima
emisiónluminosa.
¡Ya está!
aparato hasta 10 minutos después
INTERCAMBIO/ROTACIÓN DE GOBOS
Atención: ¡Instale los gobos sólo cuando la unidad esté apagada!
Nunca desatornille los tornillos del gobo giratorio puesto que el cojinete de bola se abrirá.
Desconecte la alimentación y desenchufe la unidad.
Abra la cubierta superior de plástico (4tornillos)
Localice la rueda de gobo y retire el anillo de fijación del gobo que desee cambiar con una herramienta
Retireel gobo e inserte el nuevogobo.
Presione el anillo de fijación conjuntamente e insérteloen la parte frontal del gobo.
¡Ya está!
¡Reparar esto es muy difícil!
adecuada.
MONTAJE SUPERIOR
Importante: La instalación sólo debe llevarse a
cabo por personal técnico cualificado. Una
instalación incorrecta puede provocar lesiones
graves y/o daños en la propiedad. ¡El montaje
superior requiere mucha experiencia! Deben
respetarse los límites de carga de funcionamiento,
deben utilizarse materiales de instalación
homologados, el dispositivo instalado debe
inspeccionarse regularmenteporsu seguridad.
Asegúrese de que debajo del área del lugar de
instalación no hay personas durante el montaje,
desmontajeo mantenimiento.
Coloqueel aparatoen un lugarbien ventilado, lejos de
materiales y/o líquidos inflamables. El aparato debe
colocarse
El dispositivo debe instalarse lejos del alcance de las
personas y de las áreas exteriores donde éstas
puedan andar o sentarse.
Antes del montaje asegúrese de que el área de la instalación puede soportar una carga mínima de 10
veces el pesode la unidad.
Utilice siempre un cable de seguridad homologado que pueda soportar 12 veces el peso del dispositivo
cuando instale la unidad. Este accesorio de seguridad secundario debe instalarse deforma que ninguna
pieza dela instalaciónpueda caerse más 20 cm si falla el accesorioprincipal.
El dispositivodebe fijarse correctamente; ¡un montaje congirolibre es peligroso y no debe considerarse!
No cubra ninguna abertura de ventilación puesto que podría producirse un sobrecalentamiento de la
unidad.
El operariodebe asegurarsede que las instalaciones relacionadas con la seguridadson aprobadas por un
experto antes de utilizarlas por primera vez. Las instalaciones deberán inspeccionarse anualmente por
una personacualificada para asegurar que la seguridad es óptima.
a al menos 50 cm
de las paredes.
JB SYSTEMS® 53/62 iMove 7S
JB SYSTEMS® 54/62 iMove 7S
Page 30

ESPAÑOL MANUAL DE INSTRUCCIONES
ESPAÑOL MANUAL DE INSTRUCCIONES
CONFIGURACIÓN DE LA UNIDAD
PANEL DE CONTROL:
DISPLAY muestralos varios menús y las funcionesseleccionadas.
LEDs
DMX Fijo EntradaDMX presente
MASTER Fijo Modalidad maestra
SLAVE Fijo Modalidad esclava
SOUND arpadeando Activación desonido
BOTONES
MENU Para seleccionarlas funciones deprogramación
DOWN Para ir hacia atrás en las funciones seleccionadas
UP Para irhacia delanteen las funciones seleccionadas
ENTER Para confirmar las funciones seleccionadas
ENTRADA DEL MANDO A DISTANCIA: Se utiliza para conectar un controlador manual CA-8 sencillo
mientrasla unidadse utiliza en modalidad independiente o maestra/esclava.
SENSIBILIDAD: Se utiliza para ajustar la sensibilidad del micrófono cuando la unidad se utiliza en
modalidad independienteomaestra/esclava.
MICRÓFONO: Se utiliza paraactivar los programas internosal ritmo dela música.
ENTRADA/SALIDADMX: Se utiliza para la unión DMX512. Utilice un cable equilibrado de 3 clavijas XLR
M/H debuena calidad paraunir las unidades.
MENÚ PRINCIPAL:
Para seleccionar cualquiera de las funciones preestablecidas, pulse el botón MENU hasta que aparezca
en pantallala opción que desee.
Seleccione la función con el botón ENTER. La pantallaparpadeará.
Utilicelos botones DOWN y UP para cambiar la modalidad.
Una vez que haya seleccionado la modalidad necesaria, pulse el botón ENTER para seleccionar.
Después de 8 segundos la pantalla volverá automáticamente a las funciones principales sin ningún
cambio.Para volver a las funciones sinhacer cambios pulse el botón MENU. Las funciones principalesse
muestran a laderecha.
Se utilizapara ajustar la dirección de inicio en
una configuración DMX.
Pulse el botón MENU hasta que se
muestre en la pantalla.
Pulse el botón ENTER, la pantalla comienza a
parpadear.
Utilice los botones DOWN y UP para cambiar la
direcciónDMX512.
Una vez que se muestre la dirección correcta en
pantalla,pulse el botón ENTER paraguardarla.
(o volver automáticamente a las funciones
principales sin hacer ningún cambio tras 8
segundos)
Para volver a las funciones sin hacer cambios pulse
el botón MENUotra vez.
Se utilizapara seleccionar la modalidad
Espectáculo cuandose utiliza de forma
independienteo en modalidadmaestra/esclava.
Pulse el botón MENU hasta que se
muestre en la pantalla.
Pulse el botón ENTER, la pantalla comienza a
parpadear.
Utilice el botón DOWN y UP para seleccionar las
modalidades (Espectáculo 1) o (Espectáculo 2) o (Espectáculo 3) o
(Espectáculo4).
Una vez que se muestre lamodalidad correcta en pantalla,pulseel botón ENTER para guardarla.
(ovolver automáticamente a lasfunciones principalessin hacer ningún cambiotras 8 segundos)
Para volver a las funciones sin hacer cambios pulse el botón MENU otravez.
Se utilizapara hacer que la unidad esclava funcione de manera opuesta a la maestra o en total
sincronización.
Pulseel botónMENU hasta que se muestre en la pantalla.
Pulse el botón ENTER, la pantallacomienza a parpadear.
Utilice el botón DOWN y UP para seleccionar entre las modalidades (normal) o
(Espectáculode 2 luces) .
Una vez que hayaseleccionado la modalidad,pulse el botón ENTER para guardarla.
(o volverautomáticamente a las funcionesprincipales sin hacerningún cambio tras 8 segundos)
Para volver a lasfunciones sin hacer cambios pulse elbotón MENUotra vez.
Ajuste de la direcciónDMX512
Modalidad Espectáculo
Modalidad Espectáculo1 - El aparato se coloca en el suelo. Ángulo de movimiento de inclinación
210°.
ModalidadEspectáculo 2 - El aparato se fija debajo del techo. Ángulo de movimiento de inclinación
90°.
ModalidadEspectáculo3 - El aparato se coloca sobre un podio, delante de los espectadores
El foco siemprese proyecta en dirección en la dirección de la audiencia; p.ej.delante del escenario.
Ángulode movimientopanorámico (de izquierda a derecha aizquierda):160°. Ángulode
movimientode inclinación: 90°( 60° por encimadel horizonte;30° por debajodel horizonte.)
ModalidadEspectáculo4 - El aparato se fija debajodel techo.
El foco se proyecta principalmente delante del escenario. Ángulo de movimiento panorámico
(izquierda a derecha a izquierda) :160°. Ángulo de movimiento de inclinación: 90° ( vertical,frontal
75°; trasero15° )
Modalidadesclava
JB SYSTEMS® 55/62 iMove 7S
JB SYSTEMS® 56/62 iMove 7S
Page 31

ESPAÑOL MANUAL DE INSTRUCCIONES
ESPAÑOL MANUAL DE INSTRUCCIONES
ModalidadOscurecimiento: cuando no se detecta ninguna señal DMX, la unidad entra en modalidad
Oscurecimiento y espera a la señal DMX.
Sin modalidad Oscurecimiento: cuando no se detecta ninguna señal DMX, la unidad pasa
automáticamente a modalidadindependiente.
Pulseel botónMENU hasta que se muestreen la pantalla.
Pulseel botón ENTER, la pantallacomienza a parpadear.
Utilice el botón DOWN y UP para seleccionar la modalidad (oscurecimiento sí) o
(oscurecimientono).
Una vez que hayaseleccionado la modalidad,pulse el botón ENTER para guardarla.
(o volverautomáticamente a las funcionesprincipales sin hacerningún cambio tras 8 segundos)
Para volver a lasfunciones sin hacer cambios pulse elbotón MENUotra vez.
Normal: sólose puedenseleccionar colores totales.
Colores divididos: puedeseleccionar colores totalesy 2 colores contiguos en la rueda de colores.
Pulseel botónMENU hasta que se muestre en la pantalla.
Pulse el botón ENTER, la pantallacomienza a parpadear.
Utiliceel botón DOWNy UP paraseleccionar la modalidad (normal) o (colordividido).
Una vez que hayaseleccionado la modalidad,pulse el botón ENTER para guardarla.
(ovolver automáticamente a lasfunciones principalessin hacer ningún cambiotras 8 segundos)
Para volver a lasfunciones sin hacer cambios pulse elbotón MENUotra vez.
Normal: El movimiento panorámicono se invierte.
Inversión panorámica: El movimiento panorámico se invierte.
Pulseel botónMENU hasta que se muestre en la pantalla.
Pulse el botón ENTER, la pantallacomienza a parpadear.
Utilice el botón DOWN y UP para seleccionar la modalidad (normal) o (inversión
panorámica).
Una vez que hayaseleccionado la modalidad,pulse el botón ENTER para guardarla.
(ovolver automáticamentea lasfunciones principales sin hacer ningún cambio tras8 segundos)
Para volver a lasfunciones sin hacer cambios pulse elbotón MENUotra vez.
Normal: El movimiento de inclinaciónno se invierte.
Inversión de inclinación:El movimiento de inclinación se invierte.
Pulseel botón MENU hasta que se muestreen la pantalla.
Pulse el botón ENTER, la pantallacomienza a parpadear.
Utilice el botón DOWN y UP para seleccionar la modalidad (normal) o (inversión de
inclinación).
Una vez que haya seleccionadola modalidad, pulseel botón ENTER para guardarla.
(ovolver automáticamente a lasfunciones principalessin hacer ningún cambiotras 8 segundos)
Para volver a lasfunciones sin hacer cambios pulse elbotón MENUotra vez.
Modalidad Oscurecimiento
Modalidad Color
Inversiónpanorámica
Inversiónde inclinación
Regulaciónde intensidad luminosa estándar: fader cerrado (valor DMX 000) emisión
luminosa total
Regulación de intensidad luminosa invertida: fader cerrado ( valor DMX 000 )
oscurecimiento
luminosa total
Pulseel botónMENU hasta que se muestre en la pantalla.
Pulse el botón ENTER, la pantallacomienza a parpadear.
Utilice el botón DOWN y UP para seleccionar la modalidad (normal) o (inversión de
regulación deintensidadluminosa).
Una vez que haya seleccionado la modalidad, pulse el botón ENTER para guardarla. (o volver
automáticamente a las funcionesprincipales sin hacerningún cambio tras8 segundos)
Para volver a las funciones sin hacer cambiospulse el botón MENU otravez.
Pantallaencendida: la pantalla siempre estáencendida.
Pantallaapagada: la pantalla está apagada cuandono se utiliza.
Pulse el botón MENU hasta que lapantalla muestre .
Pulseel botón ENTER, la pantallacomienza a parpadear.
Utilicelos botones DOWN y UP para seleccionar (pantalla siempre encendida) o (pantalla
apagadacuando no se utiliza).
Una vez que hayaseleccionado la modalidad,pulse el botón ENTER para guardarla.
(o volverautomáticamentea las funcionesprincipales sin hacerningún cambio tras8 segundos)
Para volver a lasfunciones sin hacer cambios pulse elbotón MENUotra vez.
Pantallanormal: la pantalla se puede leer cuandola unidad está en el suelo.
Inversión de pantalla lapantallase puede leer cuando la unidad está montada al revés.
Pulseel botónMENU hasta que parpadee en la pantalla. (pantallanormal)
Utilice el botón ENTER para cambiar a la modalidad (inversión de pantalla), la opción se
almacenaráautomáticamentedespués de 8 segundos.O pulseel botón ENTERde nuevo paravolver a la
modalidad (pantalla normal).
Para volver a las funciones pulse el botón MENU.
Se utilizapara ayudarlea ajustar el enfoque del haz de luz y gobos.
Pulseel botónMENU hasta que parpadee en la pantalla.
Pulseel botón ENTER paraque la unidad vaya a laposición “inclinación 90°”.
Pulseel botón ENTER paraquela unidad vaya a la posición “panorámica0°”.
Pulseel botón ENTER paraque la unidad vaya a la posición “panorámica 90°”.
Pulseel botón ENTER paraque la unidad vaya ala posición “panorámica 180°”.
Pulseel botón ENTER paraque la unidad vaya ala posición “panorámica 270°”.
En los 5 pasos anteriores podrá ajustar el enfoque con los botones UP/DOWN en la unidad (la pantalla
muestra el estado en enfoque actual).
Atención: tenga en cuenta que sólo puede ajustar un “enfoque medio” para las 5 posiciones, porlo que no
es posible ajustar el enfoqueperfectamentenítido para todas las direcciones.
Para volver a las funciones pulse el botón MENU.
Inversión de regulador de intensidadluminosa
fader abierto ( valorDMX 255 ) oscurecimiento
fader abierto(valor DMX 255 ) emisión
Pantallade LED
Inversiónde pantalla
Ajuste deenfoque
JB SYSTEMS® 57/62 iMove 7S
Se utilizapara activar un programa de “autodiagnóstico”que muestra todas las posibilidades de la
unidad.
Pulseel botónMENU hasta que parpadee en la pantalla.
Autodiagnóstico
JB SYSTEMS® 58/62 iMove 7S
Page 32

ESPAÑOL MANUAL DE INSTRUCCIONES
ESPAÑOL MANUAL DE INSTRUCCIONES
Pulse el botón ENTERpara iniciarel programa deautodiagnóstico interno.
Para volver a las funciones pulse el botón MENU.
Se utilizapara mostrar el número de horas de funcionamientode la unidad.
Pulseel botónMENU hasta queparpadee en lapantalla.
Pulse el botón ENTERpara mostrar el número de horas defuncionamiento en lapantalla.
Para volver a las funciones pulse el botón MENU.
Se utilizapara restaurar la unidad.
Pulseel botónMENU hasta que parpadee en la pantalla.
PulseENTER para restaurartodoslos canales a su posición estándar.
Para volver a las funciones pulse el botón MENU.
Compruebe también el capítulo sobre la configuración del canal DMX de la unidad para saber cómo forzar
una restauraciónmediante DMX.
Horas delaparato
Restaurar
CONEXIÓN DE LA UNIDAD MEDIANTE DMX
El protocolo DMX es una señal de alta velocidad muy utilizada para controlar equipo de
iluminación inteligente. Necesitaconectar en cadena tipo margarita su controlador DMX y
todos los efectos luminosos conectados con un cable XLR M/F equilibrado de buena
calidad. Para evitar un comportamiento anómalo de los efectos luminosos, debido a
interferencias, debe utilizar un terminador de 90Ω a 120Ω al final de la cadena. Nunca
utilicecables divisoresen Y, ¡No funcionarán!
CONFIGURACIÓNDMXDE IMOVE 7S:
Cada efecto luminoso en la cadena necesita disponer de su propia dirección de inicio de forma que sepa
qué comando delcontrolador debedescodificar.
AJUSTE DE LA DIRECCIÓN DE INICIO CORRECTA:
Consulte el capítulo anterior (ajuste de dirección DMX-512)para saber cómo ajustar la dirección de inicio en
esta unidad. La dirección de inicio de cada unidad es muy importante. Lamentablemente es imposible
decirle en este manual de usuario qué dirección de inicio debe ajustar porque esto dependerá
completamente del controlador que utilice… Consulte el manual de usuario de su controlador DMX para
saberque direccionesde iniciodebe ajustar.
JB SYSTEMS® 59/62 iMove 7S
JB SYSTEMS® 60/62 iMove 7S
Page 33

ESPAÑOL MANUAL DE INSTRUCCIONES
ESPAÑOL MANUAL DE INSTRUCCIONES
MANEJO DE LA UNIDAD
Cada vez que encienda la unidad,se mostrará IM75 en la pantalla,todos los motores volverán a su posición
original y puede que oiga algunos ruidos durante 20 segundos. Después deesto, la unidad estará lista para
recibir la señal DMX o ejecutar los programas incorporados.
Puede manejarla unidad de tres formas:
MEDIANTELAFUNCIÓN PREPROGRAMADAINCORPORADAMAESTRA/ESCLAVA
Seleccioneesta unidad cuando desee un espectáculo luminoso instantáneo.Uniendo
las unidades en conexión maestra/esclava, la primera unidad controlará el resto de
unidades para proporcionar un espectáculo luminoso automático, sonoro y
sincronizado. Su entrada DMX no tendrá nada conectado y su LED de maestraestará
encendidoconstantementey el LED de sonido parpadearácon la música.
¡Importante!¡Esta función sólo funciona cuando la modalidadde oscurecimiento
en el menú de la unidad maestra esté desactivada, en caso contrario, no ocurrirá
nada!Lea más sobre esta opción en el párrafo “Menú principal”.
MEDIANTECONTROLADOR FÁCIL:
Cuando se utiliza en modalidad maestra/esclava, le recomendamos encarecidamente que utilice el
"controlador fácil" CA-8. Conecte este pequeño controlador al jack de 1/4” de la unidad maestra y podrá
controlarlas siguientes FUNCIONES:
o Mediante la función preprogramadaincorporada maestra/esclava
o Mediante el controladorfácil CA-8
o Medianteel controlador DMX universal
MAESTRA disponede 4 espectáculos incorporados: Puede seleccionar
(espectáculo 1), (espectáculo 2), (espectáculo 3) o
(espectáculo 4) directamenteen elmenú de la unidad maestra.
ESCLAVA dispone de 2 opciones de funcionamiento: Las otras unidades se
ajustan enmodalidad esclava (el LED de esclava está constantementeencendido).
Para crear un gran espectáculo luminoso, puede introducir movimientos de
contraste (panorámica/inclinación de la unidad esclava se invierte) En el menú de las unidades
esclavaspuedeir a al opción y seleccionar:
o Esclavanormal: la unidad esclavafunciona en sincronización con la maestra.
o Espectáculo de2 luces: la unidad esclavafunciona en oposición a la maestra.
MANTENIMIENTO
Asegúrese de que debajo de lazona del lugar de instalación no hayapersonas durante el mantenimiento.
Apague la unidad,desenchufe el cable de red y espere hastaque la unidad sehaya enfriado.
Durante la inspección deberá comprobar los siguientes puntos:
Todos los tornillos utilizados para instalar el dispositivo y cualquiera de sus piezas deberán apretarse
firmementey no corroerse.
Las carcasas, las fijaciones y los puntos de instalación (techo, suspensiones) no deberán presentar
ningunadeformidad.
Cuando una lente óptica esté visiblemente dañada por grietas o rasguños profundos, deberá ser
reemplazada.
Los cables de red deberán estar en perfectoestado y deberán reemplazarse inmediatamente incluso si el
problema detectadoes pequeño.
Para proteger al aparato del sobrecalentamiento,las aletasde refrigeración (si las hubiera) y lasaberturas
de ventilacióndeberán limpiarsemensualmente.
El interiordel dispositivo deberá limpiarse anualmentemedianteuna aspiradora o chorrode aire.
La limpieza de las lentes internas y externas y/o espejos deberá llevarse a cabo periódicamente para
optimizar la emisión luminosa. La frecuencia de limpieza depende del entorno en el que funcione el
aparato: los ambientes húmedos, con humo o especialmente sucios pueden provocar una mayor
acumulación desuciedad en los elementos ópticos del aparato.
Limpie con un paño suave utilizandoproductos de limpiezade cristalesnormales.
Seque siemprelas piezas concuidado.
Limpie los elementos ópticos externosal menos una vez cada 30 días.
Limpie los elementos ópticos internos al menos una vez cada 90 días.
Atención: ¡Le recomendamos encarecidamente que la limpieza interna sea llevada a cabo por
personal cualificado!
ESPECIFICACIONES
Entrada dered: CA230V, 50Hz
Fusible: 6,3 A/250V
Control de sonido: Micrófono interno
Conexiones DMX: 3clavijas XLR macho / hembra
Lámpara: HTI: 150W
Tamaño: 373 x 295 x 451 mm
Peso: 13kg
Stand by
Función
Modalidad
Oscurece la unidad
Estroboscópica
1.Estroboscópica
sinc. Gobo /
Color
2.Estroboscópica
sinc.
3.Estroboscópica
2 luces
Sonido1
(LED apagado)
Selecciónde
modo de
espectáculode
movimiento X/Y
(Espectáculo 1
~ Espectáculo4
)
Sonido2
(LED
parpadeando
normalmente)
Selección
Color/Gobo
1. Mantenga
pulsadopara
cambiargobo.
2. Pulse
brevemente
para cambiar
el color
Lento/Sonido 3
(LEDencendido)
Ajuste de movimiento X/Y
1.Posición depanorámica
2.Posición deinclinación
3.Reguladorde intensidadluminosa
Primero,ajuste la unidad maestra,
luego,ajuste la posición de la unidad
esclava
Posición/Enganche
(LED parpadeandorápidamente)
JB SYSTEMS® 61/62 iMove 7S
Puede descargar la última versiónde este manual de usuario en nuestra página Web:
Toda la informaciónestá sujeta a cambios sin previo aviso
www.beglec.com
JB SYSTEMS® 62/62 iMove 7S
 Loading...