

Page 1

High Q10
User’s Guide
Mode d’emploi
Gebruiksaanwijzing
Bedienungsanleitung
Manual de instrucciones
Manual do utilizador
Page 2
ENGLISH
High Q10 2
Page 3

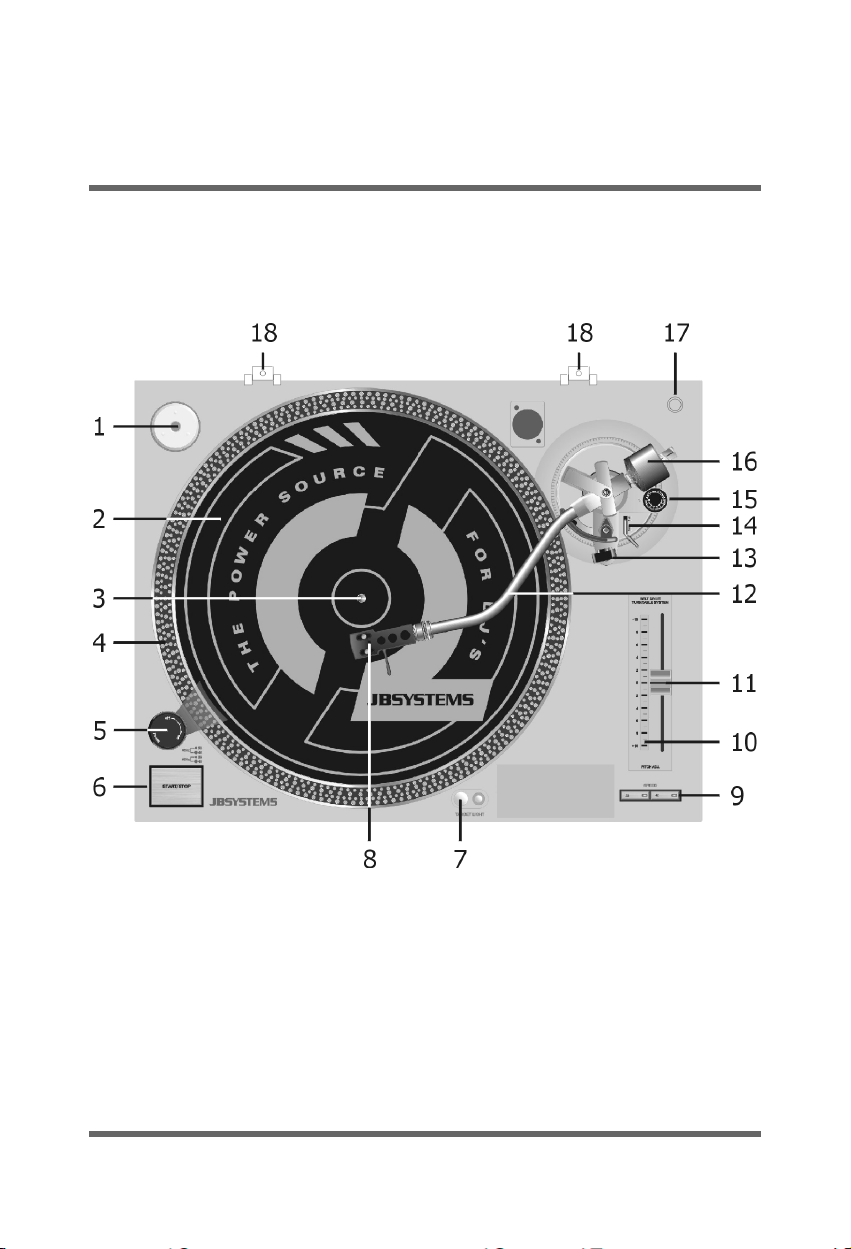
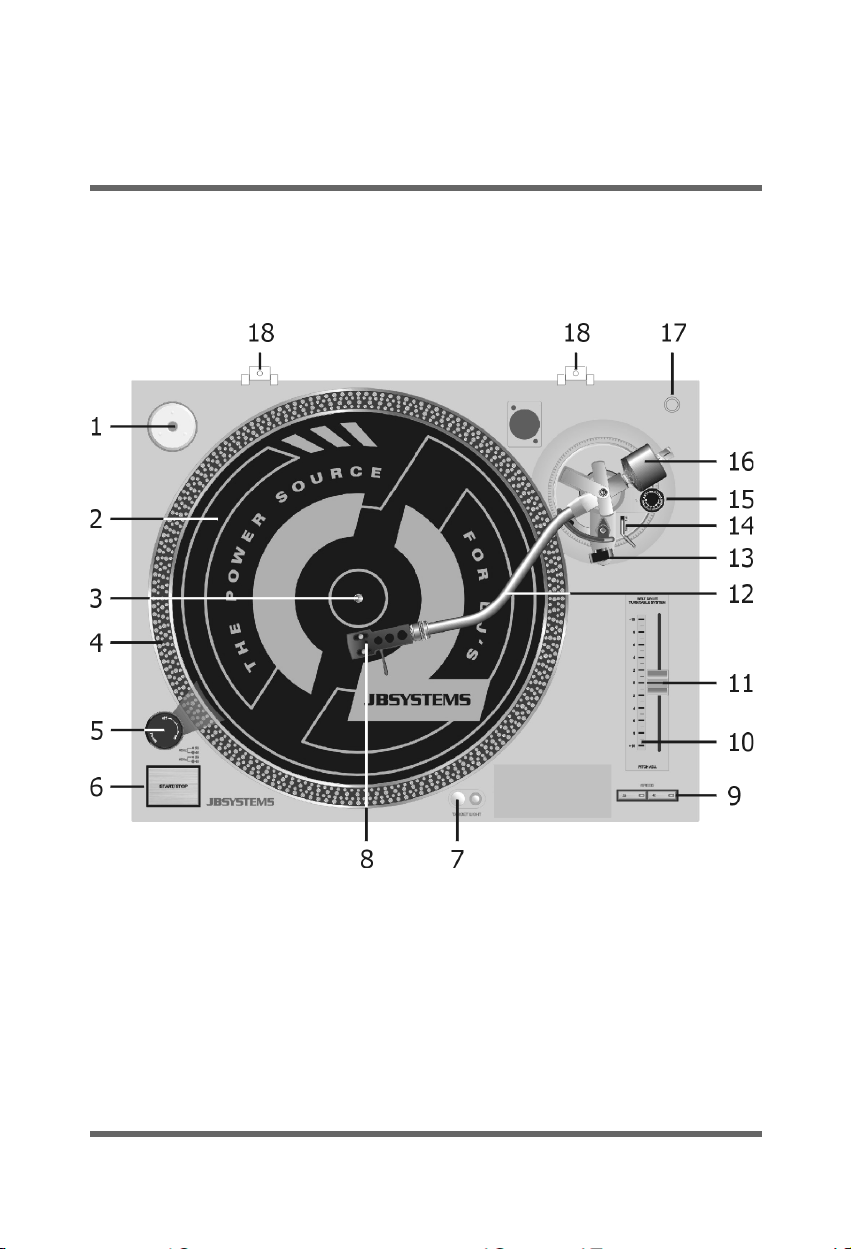
NAME OF PARTS
1. 45-rpm Adaptor
2. Slipmat
3. Center Spindle
4. Strobe Dots
5. Power Button
6. Start/Stop Button
7. Target Light
8. Headshell
9. Speed Select Button
10. Trim Control for changing the range of the Pitch Control
11. Pitch Control Slider
12. Tone arm
13. Arm Rest
14. Cueing Lever
15. Anti-skating Knob
16. Counterweight
17. Position for preparing Cartridge
18. Hinge for Dust Cover
19. Remote Control
This jack can be connected with an external switch to
perform the Start/Stop operation.
High Q10 3
Page 4

BEFORE USE
Check if the following parts are included in the package of the main
unit:
• Turntable platter
• Slipmat
• Counterweight
• 45-rpm adaptor
• Headshell
• Dust cover
• Operating instructions
ASSEMBLY
• Take the main unit out of the box and remove the packing.
• Set the 45-rpm adaptor on the main unit.
• Put the turntable on the central shaft.
• Put the driving belt around the shaft.
• Put the slipmat on the turntable.
• Connect the headshell.
• Connect the lead wires to the cartridge terminals. Connect
each lead wire to the terminal of the same color:
White (L+) = Left channel
Blue (L-) = Left channel
Red (R+) = Right channel
Green (R-) = Right channel
• Install the cartridge to the headshell and tighten it with the
screws provided with the cartridge.
• Insert the headshell into the front of the tone arm, turn the
locking nut clockwise with the headshell firmly held
horizontally.
• Slide the counterweight onto the tone arm.
• Set the anti-skating control knob to the same value as the sty-
lus pressure for replay purpose and set it between 0 and 1 for
scratch and back-cue application.
• Install the dust cover on the main unit.
High Q10 4
Page 5

CONNECTIONS
• Connect the power cord to a wall AC outlet.
• Connect the unit’s output terminals to the PHONO jack of your
mixer our amplifier (do not use a line input as this leads to
insufficient signal level and non-linear frequency response).
• Connect the GND lead firmly to the GND screw on the mixer or
amplifier. When this connection is not made, unnecessary hum
or noise will occur.
OPERATION
• Select the speed required for the record that you want to play.
• Put the record on the turntable. Use the puck if needed
(e.g. for 45").
• Remove the stylus cover and release the tone arm.
• Set the tone arm lift to the up position and move the tone arm
to the desired starting position. When there is not enough
light, use the target light for spotting the exact starting
position.
• Set the tone arm lift to the down position; the tone arml slowly
lowers to the record.
• When the record has finished playing, move the tone arm lift
to the up position and put the tone arm in rest position
(down).
High Q10 5
Page 6

ADJUSTMENT
• Pitch Control
The pitch control is variable in a range of ±10%.
• During play, observe the strobe dots. When the strobe dots
appear to flow to the right, the speed is slower that the rated
speed. When they appear to flow to the left, the speed is faster
than the rated speed. When they appear stationary, it means
the turntable is in normal speed.
• Move the pitch control slider up or down to adjust the speed.
MAINTENANCE
• Clean the stylus periodically with a soft brush to prevent the
accumulation of dust.
• When the sound becomes distorted or noisy, check the stylus.
If worn out, replace it with a new one.
• From time to time, the dust cover and turntable cabinet should
be wiped with a soft, dry cloth. Do not use any volatile
materials as alcohol, thinner, benzine, etc… they may remove
the paint or damage the lustre.
High Q10 6
Page 7
FRANÇAIS
High Q10 7
Page 8

DÉNOMINATION DES COMPOSANTS
1. Adaptateur 45 tours
2. Feutrine
3. Axe central
4. Points stroboscopiques
5. Bouton ON/OFF
6. Interrupteur marche/arrêt
7. Éclairage de l’aiguille
8. Porte cellule avec cellule et aiguille
9. Sélecteur de vitesse
10. Uniquement sur modèle ‘direct drive’
11. Curseur pour réglage de vitesse
12. Bras
13. Porte-bras
14. Lève-bras
15. Bouton anti-skating
16. Contre-poids
17. Aide à l’assemblage de l’aiguille
18. Charnière pour couvercle
19. Commande à distance
Ce jack mono peut être relié à un interrupteur externe pour
faire l’opération marche/arrêt.
High Q10 8
Page 9

AVANT L’UTILISATION
Les pièces suivantes doivent être présentes dans l’emballage:
• Plateau
• Feutrine
• Contre-poids
• Adaptateur 45 tours
• Porte cellule avec cellule et aiguille
• Couvercle
• Mode d’emploi
MONTAGE
• Déballez tous les composants.
• Placez l’adaptateur 45 tours à sa propre place.
• Placez le plateau sur l’axe central.
• Placez la courroie autour du plateau et la poulie du moteur.
• Placez la feutrine sur le plateau.
• Montez la cellule sur le porte cellule (si pas fait d’origine).
Faites attention de faire un raccordement correct. La pluspart
des cellules est codée en couleur:
Fil blanc = Canal gauche +
Fil bleu = Canal gauche Fil rouge = Canal droit +
Fil vert = Canal droit -
• Pour le montage de la tête complète, vous glissez la porte cel-
lule dans l’avant partie du bras et vous serrez la fixation en faisant attention de tenir la porte cellule bien droite.
• Placez le contre-poids sur la partie arrière du bras (tourner le
contre-poids et pousser légèrement).
• Maintenant, il faut ajuster le contre-poids à zéro-pression sur
l’aiguille. A ce but, vous libérez le bras et vous ajustez le
contre-poids jusque le bras flotte en balance parfaite (la cache
de protection de l’aiguille doit être enlevée). Quand cela est
fait, vous fixez le bras de nouveau dans la porte-bras et vous
tournez uniquement la pastille du contre-poids jusqu’au point
High Q10 9
Page 10

‘0’ se met devant la ligne centrale qui est marqué sur le bras.
Ensuite vous tournez le contre-poids complet jusqu’à la valeur
sur la pastille correspond à la pression nécessaire pour votre
aiguille. Pour l’aiguille d’origine, la valeur est 2 grams.
• Ajustez le anti-skating sur la même valeur que le contre-poids.
• Installez le plexi.
RACCORDEMENTS
• Raccordez le câble d’alimentation sur le réseau 230V.
• Connectez les fiches RCA Cinch sur une entrée phono de la
table de mixage ou d’un pré-ampli.
• Connectez le fil de masse sur la vis de masse de la platine et la
vis de masse de votre table ou pré-ampli. Si vous ne faites pas
bien cette connections, vous aurez un ronflement.
MANIPULATION
• Mettez un disque sur le feutre. Si nécessaire, utilisez l’adapta-
teur 45 tours.
• Choisissez la vitesse correcte (33 ou 45).
• Enlève la fixation de la porte-bras et montez le lève-bras.
• Dirigez le bras vers la position voulue sur le disque.
• Baissez le lève-bras. Le bras va descendre doucement et le dis-
que va commencer à jouer.
• Quand le disque est fini, vous remontez le bras avec le lève-
bras et vous mettez le bras de nouveau dans sa porte-bras.
• Pour activer l’éclairage de l’aiguille, vous enfoncez le bouton
juste à côté.
High Q10 10
Page 11

RÉGLAGE DE VITESSE
Quand le curseur se trouve dans la position milieu, la platine tourne
à vitesse normale. En bougeant le curseur, vous pouvez ajuster la
vitesse de ±10%.
Avec les points stroboscopiques, vous pouvez toujours vérifier si la
vitesse est réglée correctement. Pour cela, vous mettez le curseur
dans la position milieu et vous vérifiez la ligne de points stroboscopiques (50Hz—33 ou 45 tours selon votre choix). Quand la vitesse
est correcte les points semblent rester sur place.
Vous pouvez toujours corriger avec les deux trimmers qui se
trouvent en bas de la platine.
ENTRETIEN
• Nettoyez fréquemment l’aiguille avec une brosse douce pour
éviter trop de poussière sur la pointe.
• Si le son est déformé ou s’il y a trop de bruit dans le son,
changez l’aiguille.
• Si la vitesse n’est plus stable ou difficile à régler, changez la
courroie.
DÉMARRAGE À DISTANCE
• Général: pour faire démarrer la platine, il suffit de mettre un
jack mono 6,3 mm et de courtcircuiter les deux points sur le
jack (voir fiche jack femelle chassis à l’arrière de la platine).
• Tables de mixage JB Systems: il suffit de prendre un câble jack
mono - jack mono, que vous trouverez standard dans le
commerce et de raccorder la fiche de démarrage de la platine
et de la table de mixage.
High Q10 11
Page 12

NEDERLANDS
High Q10 12
Page 13

BENAMING VAN DE ONDERDELEN
1. 45-toeren Adaptor
2. Slipmat
3. Centrale as
4. Strobopunten
5. Aan/uit schakelaar
6. Start/Stop toets
7. Naaldverlichting
8. Celhouder met cel en naald
9. Snelheidskeuzeschakelaar
10. Enkel op direct drive model
11. Fader voor snelheidsregeling
12. Toonarm
13. Armsteun
14. Cueing hendel
15. Anti-skating knop
16. Tegengewicht
17. Hulp bij montage van naald
18. Scharnier voor montage stofkap
19. Afstandsbediening
Deze uitgang kan verbonden worden met een externe
schakelaar om het toestel aan- of uit te zetten.
High Q10 13
Page 14

VOOR GEBRUIK
Kijk na of volgende onderdelen in de verpakking aanwezig zijn:
• Draaitafel plateau
• Slipmat
• Tegengewicht
• 45-toeren adaptor
• Celhouder met cel en naald
• Stofkap
• Handleiding
MONTAGE
• Neem alle delen uit de doos.
• Plaats de 45-toeren adaptor op de daartoe voorziene plaats.
• Plaats de draaiplateau op de centrale as.
• Leg de riem over de aandrijfas van de motor.
• Plaats de slipmat op de plateau.
• Plaats de celhouder en de cel op de arm.
Let bij montage van de cel op de correcte aansluiting. De
meeste cellen zijn gecodeerd met een kleur:
Witte draad = Links kanaal +
Blauwe draad = Links kanaal Rode draad = Rechts kanaal +
Groene draad = Rechts kanaal -
• Bij de montage van de celhouder op de arm schuift u de cel-
houder vooraan op de arm en spant u de spanschroef aan.
Zorg ervoor dat de celhouder goed recht zit.
• Plaats het tegengewicht op de toonarm en schroef het over de
achterste schacht van de arm.
• Regel het tegengewicht af op nuldruk op de naald. Hierbij
regelt u het tegengewicht zodanig dat de arm vrij in balans
zweeft (de naaldbescherming dient verwijderd te worden).
Wanneer dit gedaan is legt u de arm weer in de houder. U
draait nu enkel de afregelring van het tegengewicht tot de
High Q10 14
Page 15

Nulpositie overeenkomt met de middellijn op de achteras van
de arm. Vervolgens draait u het volledige tegengewicht tot de
waarde op de afregelring overeenkomt met de druk nodig voor
uw naald. Voor de bijgeleverde naald is deze waarde 2 gram.
• Regel de anti-skating knop af op dezelfde waarde als het
tegengewicht.
• Installeer de stofkap.
AANSLUITINGEN
• Sluit de voedingskabel aan op het net.
• Sluit de RCA Cinch fiches aan op de phono ingang van uw
mengtafel of voorversterker.
• Sluit de aardingdraad aan op de aardingschroef van de platen-
speler en van het mengpaneel of voorversterker. Indien u deze
aansluiting niet maakt zal er voedingsruis ontstaan.
BEDIENING
• Leg een plaat op de slipmat. Gebruik indien nodig de 45-toeren
adaptor.
• Selecteer de snelheid (33 of 45 toeren).
• Los de armklem en breng de cueing hendel in opstaande
positie.
• Breng de arm naar de gewenste locatie op de plaat.
• Breng de cueing hendel naar beneden. De arm zal zacht zak-
ken en de plaat begint te spelen.
• Wanneer de plaat afgelopen is, brengt u de hendel weer naar
boven en daarna brengt u de arm weer in rustpositie.
• Om de naaldverlichting te activeren drukt u op de toets
ernaast.
High Q10 15
Page 16

SNELHEIDSREGELING
Wanneer de schuiver in de centerpositie staat, draait de plaat op
normale snelheid. Door de schuiver te verplaatsen, kan u de snelheid binnen een bereik van ±10% regelen.
Met de strobopunten kan u steeds nakijken of de snelheid correct is
afgesteld. Hierbij stelt u de schuiver in de middenpositie en
verifieert u de lijn strobopunten (50Hz—33 of 45 toeren naargelang
de keuze). Deze punten lijken stil te staan indien de snelheid
correct is afgesteld.
Correctie kan eventueel gebeuren met de trimmers die zich
onderaan het toestel bevinden.
ONDERHOUD
• Reinig de naald regelmatig met een zacht borsteltje om stof-
vorming te vermijden.
• Indien de klank vervormt of veel ruis meebrengt, gelieve de
naald te vervangen.
• Indien de snelheid verloopt of niet correct meer kan worden
afgeregeld, gelieve de riem te vervangen.
REMOTE START/STOP
• Algemeen: op de platenspeler is een monojack chassis voor-
zien. Om een startaansluiting te maken, neemt u een monojack 6,3 mm. Het volstaat om beide punten van de mono-jack
met elkaar te verbinden om de platenspeler te doen starten.
• JB Systems mengpanelen: u neemt een standaardkabel mono-
jack naar mono-jack, welke u verbindt tussen startfiche van de
platenspeler en het gewenste startkanaal van de mengtafel.
High Q10 16
Page 17

DEUTSCH
High Q10 17
Page 18

BEDIENELEMENTE
1. Plattenpuck (Single adapter)
2. Slipmat
3. Plattentellerachse
4. Stroboskopanzeige
5. Ein/Aus Schalter
6. Start/Stop Taste
7. Nadelbeleuchtung
8. Tonabnehmerschlitten mit Tonagnehmersystem und Nadel
9. Geschwindigkeitswahlschalter
10. Nur bei Direktantriebsmodell
11. Pitchfader zur Geschwindigkeitsanpassung
12. Tonarm
13. Tonarmauflage
14. Tonarmlift
15. Anti-Skatingregler
16. Kontergewicht
17. Montagehilfe für die Nadel
18. Deckelscharnier
19. Fernstartanschluβ
High Q10 18
Page 19

VOR GEBRAUCH
Folgende Zubehörteile müssen sich in der Geräteverpackung
befinden:
• Plattenteller
• Slipmat
• Abdeckhaube
• Singlepuck
• Kontergewicht
• Tonabnehmerschitten mit System und Nadel
• Bedienungsanleitung
MONTAGE
• Entnehmen Sie alle Teile aus der Verpackung.
• Plazieren Sie den Plattenpuck in die dafür vorgesehene
Halterung.
• Drücken Sie den Plattenteller auf die Tellerachse.
• Legen Sie den Antriebsriemen um die Antriebsachse des
Motors.
• Legen Sie die Slipmat auf den Plattenteller.
• Montieren Sie den Tonabnehmerschlitten samt System an dem
Tonarm auf korrekte Montage des Tonabnehmersystems
achten. Die meisten Systeme sind farblich kodiert:
Weiβes Kabel = Linker Kanal +
Blaues Kabel = Linker Kanal Rotes Kabel = Rechter Kanal +
Grünes Kabel = Rechter Kanal Das Tonabnehmersystem kann im Systemschlitten nach vorne
geschoben werden. Wenn Sie die optimale Postion gefunden
haben, mittels der Schrauben festziehen.
• Schieben Sie nun Ihr Kontergewicht auf das hintere Ende des
Tonarms. Nach vorne drehen bis Ihr Tonarm inkl. System frei
schwebt. Achtung, der Tonarm darf sich nicht in der
Arretierung befinden. Drehen Sie nun den Skalenring des
High Q10 19
Page 20

Gewichtes auf die Nullstellung. Anschlieβend drehen Sie das
gesamte Gewicht samt Skalenring auf das für Ihr Tonabnehmersystem nötige Auflagegewicht. Für das beigepackte
System ist das optimal Auflagegewicht 2 Gramm.
• Regeln Sie nun am Anti-Skating den Gegendrift für Ihr System.
• Montieren Sie nun Ihre Abdeckhaube.
ANSCHLUβ DES GERÄTES
• Verbinden Sie Ihr Netzkabel mit Ihrer Netzsteckdose 230-240V.
• Verbinden Sie die Cinchkabel des Plattenspielers mit den
Phono-Eingängen Ihres Mischpultes oder Ihres Verstärkers.
• Verbinden Sie das Massekabel des Plattenspielers mit dem
Masseanschluβ Ihres Mischpultes oder Ihres Verstärkers.
Ohne Massekabel kann ein störendes Brummen im Audiosignal
auftreten.
BEDIENUNG
• Legen Sie eine Schallplatte auf die Slipmat des Plattentellers.
Für Singles benutzen Sie bitte den Adapter Puck.
• Wählen Sie bitte die entsprechende Geschwindigkeit: 33 oder
45 Umdrehungen/Minute.
• Losen Sie die Tonarmarretierung und heben den Tonarm
mittels des Tonarmliftes in dei höchste Position.
• Schieben Sie nun den Tonarm an die gewünschte Position über
Ihrer Schallplatte.
• Drücken Sie nun den Tonarmlifthebel nach unten, der Tonarm
wird sich langsam senken.
• Wenn die Wiedergabe der Platte zu Ende ist, drücken Sie den
Tonarmlift wieder nach oben und schwenken den Tonarm
wieder zu seiner Auflage zurück.
• Um dei Nadelbeleuchtung zu aktivieren drücken Sie bitte auf
den nebenstehenden Knopf.
High Q10 20
Page 21

GESCHWINDIGKEITSREGELUNG
Wenn der Pitchfader in der Mittelstellung einrastet, dreht Ihr
Plattenteller mit Standardgeschwindigkeit.
Durch schieben des Faders in die Plu-oder Minusposition verändern
Sie die Geschwindigkeit des Plattentellers um maximal ±10% der
Standardgeschwindigkeit.
Mittels der Geschwindigkeitsmarkierung (Punkte) auf Ihrem Plattentellerrand und der Stroboskoplampe können Sie in der Mittelstellung kontrolieren ob Ihre Standardgeschwindigkeit korrekt abgestimmt ist. Die Punkte müssen optisch vor Ihrem Auge stillstehen
(50 Hz—33/45 rpm).
WARTUNG
• Reinigen Sie reglemäβig die Tonabnehmernadel mit einer
speziellen Bürste um Staubansammlungen zu entfernen.
• Sollte sich Ihr gewohntes Klangbild verändern, sollten Sie die
Nadel durch eine neue ersetzen.
• Sollte sich die Wiedergabe leiernd anhören empfiehlt es sich
den Antriebsriemen zu ersetzen.
FERNSTART
Auf der Rückseite Ihres Plattenspielers befindet sich eine 6,3 mm
Klinkenbuchse. Verbinden Sie diese Mittels eines Standardkabels
mit der Klinkenbuchse Ihres JB Systems Mischpultes.
High Q10 21
Page 22

ESPAGŇOL
High Q10 22
Page 23

DENOMINACIÓN DE LOS COMPONENTES
1. Adaptador 45 RPM
2. Patinador
3. Eje central
4. Indicación estroboscopica
5. Interruptor principal de encendido
6. Botón START/ STOP
7. Alumbrado de la capsula
8. Porta capsula con capsula y aguja
9. Selector de velocidad
10. Unicamente sobre modelo ‘direct drive’
11. Deslizante de control de velocidad
12. Brazo
13. Soporte del brazo
14. Elevacíon del brazo
15. Control anti deslizante (Anti-skating)
16. Contra peso
17. Emplazamiento para capsula
18. Bisagra para tapa
19. Mando a distancia
Este jack mono puede ser conectado a un interruptor externo
de puesta en marcha (START/ STOP).
High Q10 23
Page 24

ANTES DEL USO
Comprobar que los componentes siguientes estén incluidos :
• Platillo
• Patinador
• Tapa anti-polvo
• Adaptador 45 RPM
• Contra peso
• Porta capsula con capsula y aguja
• Instrucciones de funcionamiento
INSTALACIÓN
• Desembalar todos los elementos.
• Colocar el adaptador 45 rpm.
• Colocar el platillo en el eje central.
• Colocar la correa al rededor del platillo y de la polea del motor.
• Colocar el patinador sobre el platillo.
• Fijar la capsula en el porta capsula.
Referirse a las instrucciones de la capsula. Dejar la protección
sobre la capsula durante la instalación para evitar daños.
Seguir los colores para conectar los hilos:
BLANCO = Canal izquierdo +
AZUL = Canal izquierdo ROJO = Canal derecho +
VERDE = Canal derecho -
• Fijar el porta capsula al brazo manteniendolo horizontal.
• Instalar el contra peso en la parte trasera (girar el contra peso
y pulsar despacio).
• Ajustar el equilibrio y la presión de la capsula:
• Quitar la protección. Bajar el brazo. Soltár el cerrojo de fijación
del brazo. Posicionár el contra peso para un equilibrio perfecto.
Volver a colocár el brazo en su soporte. Con una mano,
bloquear la parte trasera del contra peso, con la otra mano
ajustar la parte cifrada para alinear el ‘0’ en el eje del brazo.
High Q10 24
Page 25

Girar todo el contra peso para obtener el peso correspondiente
a capsula (referirse a sus instrucciones). La presión de la
capsula de origen es de 2 gramos.
• Ajustar el control anti deslizante de equivalente valor al peso
de la capsula.
• Colocár la tapa anti-polvo.
CONEXIONES
• Enchufar la platina a la red.
• Conectar las clavijas RCA (Cinch) a una entrada PHONO de la
mezcladora.
• Conectar el tornillo de masa de la platina con el de la mesa.
Si la conexión no es correcta, puede aparecer zumbido.
FUNCIONAMIENTO
• Placese un disco sobre el patinador. Para utilizar un disco
45 rpm, coloquese el adaptador el el eje central.
• Elijase la velocidad (33 o 45).
• Soltar el cerrojo del brazo.
• Quitar el cerrojo del porta brazo. Poner la palanca del eleva
brazo en posición alta.
• Disponga el brazo sobre la posicion deseada sobre el disco.
• Poner la palanca del eleva brazo en posición baja, el brazo
bajará despacio sobre el disco.
• Esta unidad está equipada de una luz de capsula. Pulsar el
botón para encederla.
High Q10 25
Page 26

CÁMBIO DE VELOCIDAD
La velocidad puede ser modificada de ±10%.
Deslizante en poición central = velocidad normal.
La visualización estroboscopica permite controlar si la velocidad
está correctamente ajustada. Lo siguiente se hace poniendo el
deslizante en posición central y controlando los puntos estroboscopicos (50 Hz – 33 o 45 rpm). Los puntos tienen que parecer
imóbiles. Si no es el caso, correjir con los 2 Trimmers situados en la
parte inferior de la platina.
MANTENIMIENTO
• Con un cepillo suave, limpiar la capsula para quitar el polvo
• Controlar y remplazar la aguja si ruido o distorsión
• Si la velocidad no es estable o difícil de ajustar, cambiar la
correa.
ARRANQUE A DISTANCIA
• General: conectar un cable jack mono 6,3mm en la parte
trasera y hacer un cortocircuito.
• Mesas JB Systems: Conectar un cable jack mono-jack mono
(disponible en el comércio) entre la platina y la mesa.
High Q10 26
Page 27

PORTUGUÊS
High Q10 27
Page 28

DESCRIÇÃO DE PARTES
1. Adaptador 45 RPM
2. Slipmat
3. Fuso Central
4. Pontos Estroboscópicos
5. Botão De Energia
6. Botão Start/Stop
7. Luz
8. Cabeça De Leitura
9. Botão De Selecção De Velocidade
10. Indicação Do Valor De Pitch
11. Slider De Controlo De Pitch
12. Braço
13. Apoio Do Braço
14. Alavanca De Cueing
15. Botão Anti-Deslizante
16. Contra Peso
17. Posição De Preparação Do Cartucho
18. Dobradiça Para A Tampa Anti Pó.
19. Controlo Remoto
Este jack pode ser conectado a um interruptor externo para
realizar a função Start/Stop
High Q10 28
Page 29

ANTES DE USAR
Verifique se as seguintes partes se encontram dentro da
embalagem:
• Prato do Gira-discos
• Slipmat
• Contra Peso
• Adaptador 45 RPM
• Cabeça de Leitura
• Tampa
• Manual de Instruções
MONTAGEM
• Retirar a unidade principal embalada da caixa e desembale-a.
• Encaixe o adaptador de 45 RPM na unidade principal.
• Verifique se a correia já se encontra colocada na engrenagem
motriz que se encontra na parte de baixo da plataforma.
Se não, coloque-a. Coloque o prato do gira-discos no fuso
central sem incliná-lo e rode-o até que um dos buracos
rectangulares do prato mostre o eixo do motor.
Coloque o correia á volta do eixo do motor.
• Coloque o slipmat no gira-discos.
• Conecte os fios frontais aos terminais do cabeça de leitura.
Os terminais são coloridos. Conecte os fios ao terminal da
mesma cor.
• Instale a cabeça de leitura no respectivo suporte e aperte-a
usando os parafusos fornecidos.
• Instale o suporte no braço do gira-discos, depois gire o trinco
no sentido inverso ao dos ponteiros do relógio com o suporte
firme na horizontal.
• Deslize o contra peso sobre o braço.
• Regule o controlo anti-deslizante para o mesmo valor que o de
pressão na agulha apenas quando desejar reproduzir discos
defina-o entre 0 e 1 para fazer scratch e back-cue.
High Q10 29
Page 30

• Instale a tampa protectora de pó.
LIGAÇÕES
• Conectar o cabo de alimentação a uma tomada.
• Conectar os terminais de saída da unidade ás entradas phono
da mesa de mistura ou do amplificador (Não use uma entrada
de linha porque não terá sinal suficiente nem resposta de
frequência linear).
• Conectar o fio GND firmemente ao parafuso GND na mesa de
mistura ou no amplificador. Se esta ligação não for efectuada,
haverá distorção e o efeito de “hum”.
OPERAÇÃO
• Seleccione a velocidade desejada para o disco que pretende
reproduzir.
• Coloque o disco no prato do gira-discos.
• Remova a protecção da agulha e liberte o braço do gira-discos.
• Coloque o elevador do braço na posição para cima e desloque
o braço até á posição de início desejada. Se não existir
iluminação suficiente utilize a luz (n. 7).
• Coloque o elevador do braço na posição para baixo e o braço
irá baixar lentamente até ao disco.
• Caso deseje interromper a reprodução por um curto período de
tempo, coloque o braço na posição para cima. Quando desejar
retomar a reprodução coloque novamente o braço na posição
para baixo.
• Quando não precisar de usar o elevador do braço, deixe-o na
posição para baixo.
High Q10 30
Page 31

AJUSTES
Controlo de Pitch:
O controlo de pitch é variável entre ± 10%.
Durante a reprodução, observe os pontos estroboscópicos, se os
pontos parecerem mover-se para a direita, isto significa que a
velocidade é inferior á velocidade ideal, se os pontos parecerem
mover-se para a esquerda significa que a velocidade é superior á
velocidade ideal, se os pontos parecerem estar parados, isto
significa que o prato está na velocidade ideal.
Mova o controlo de pitch para cima e para baixo para ajustar a
velocidade.
MANUTENÇÃO
• Limpe a agulha periodicamente com uma escova suave para
evitar a acumulação de pó.
• Quando o som se tornar distorcido ou barulhento, verifique a
agulha. Se esta se encontrar gasta, substitua-a.
• De tempos a tempos, limpe o gira-discos e a tampa de
protecção com um pano seco. Não deverão ser usados
produtos voláteis tais como álcool, benzina, etc. pois estes
produtos poderão remover a pintura ou danificar o lustre.
High Q10 31
 Loading...