

Page 1

DIGIT 2K2
DIGIT 3K6
WWW.SYNQ-AUDIO.COM
Copyright © 2008 by BEGLEC cva.
Reproduction or publication of the content, even portions, in any manner, without express permission of the publisher, is prohibited.
CLASS-D AMPLIFIERS
V1.0
Operation Manual
Mode d'emploi
Gebruiksaanwijzing
Bedienungsanleitung
Manual de instrucciones
Manual do utilizador
EN
FR
NL
DU
ES
PT
Page 2
EN - DISPOSAL OF THE DEVICE
Dispose of the unit and used batteries in an environment friendly manner
according to your country regulations.
FR - DÉCLASSER L’APPAREIL
Débarrassez-vous de l’appareil et des piles usagées de manière écologique
Conformément aux dispositions légales de votre pays.
NL - VERWIJDEREN VAN HET APPARAAT
Verwijder het toestel en de gebruikte batterijen op een milieuvriendelijke
manier conform de in uw land geldende voorschriften.
DU - ENTSORGUNG DES GERÄTS
Entsorgen Sie das Gerät und die Batterien auf umweltfreundliche Art und
Weise gemäß den Vorschriften Ihres Landes.
ES - DESHACERSE DEL APARATO
Reciclar el aparato y pilas usadas de forma ecologica conforme a las
disposiciones legales de su pais.
PT - COMO DESFAZER-SE DA UNIDADE
Tente reciclar a unidade e as pilhas usadas respeitando o ambiente e em
conformidade com as normas vigentes no seu país.
Page 3
ENGLISH OPERATION MANUAL
CAUTION:
To reduce the risk of electric shock, do not
Thank you for buying this SYNQ®product. To take full advantage of all possibilities, please read these
operatinginstructions verycarefully.
FEATURES
This unit is radio-interference suppressed. This appliance meets the requirements of the current European
and national guidelines. Conformity has been established and the relevant statements and documents have
been deposited by the manufacturer.
A realbreakthrough in professionalamplifiertechnology: Synq introduces a newrange of CLASS-D
AMPLIFIERSwith exceptionalpower and competitivepricing!
Theextremely high efficiency,reducedpower waste and very low heatdissipation are the main
advantages of these PWM-amplifiers!
Incredible space savingsfor mobile applications: enclosure only1unit high!
Incredible low weight: Digit 2K2 = 5,5kg,Digit3K6 = 5,6kg!
Extremely high poweroutput:
Output in bridge mode:
All the protections you can think of forprofessional use:
Very powerful bass response, alsoperfect for subwoofers!
Switchable30Hz lowcut filtereliminatesunwanted,power consuming, subsonicfrequencies.
3 differentworking modes: stereo, bridgemode,mono mode (inputslinked)
Balanced in/outputs on XLR+ 6.3mm jack
2 Speakonconnectors(left and rightoutputs)
1 separate Speakon output for bridge mode
o Digit 2K2: 2x1100Wrms @ 4ohms
o Digit 3K6: 2x1800Wrms @ 4ohms
o Digit 2K2: 2200Wrms@8ohms
o Digit 3K6: 3600Wrms@8ohms
o Signal + current limiters
o Overloadprotection
o Short circuit current protection
o DC protection
o Thermalprotection
o AC, VHF protection
o Soft start
o …
BEFORE USE
Beforeyou startusing this unit, please check ifthere’s no transportation damage.Should therebe any, do
not use thedevice and consult yourdealerfirst.
Important:
for the user to strictly followthe safety instructions and warnings in this usermanual. Any damage caused
bymishandling is not subject to warranty. The dealerwill not acceptresponsibility forany resultingdefects
orproblems caused bydisregarding this usermanual.
Keep this booklet in a safe place for future consultation. If you sell the fixture, be sure to add this user
manual.
Toprotect the environment,please try to recycle the packing material as much as possible.
Check the contents:
Check that the carton contains the following items:
Usermanual
Digit Amplifier
Power cable
This device left our factory in perfect condition and well packaged. It is absolutely necessary
ENGLISH OPERATION MANUAL
SAFETY INSTRUCTIONS:
CAUTION
The lightning flash with arrowhead symbol within the equilateral triangle is intended to alert the
use or the presence of un-insulated “dangerousvoltage” within the product’s enclosure that may
be of sufficientmagnitude to constitutea risk of electric shock.
The exclamation point within the equilateral triangle is intended to alert the user to the presence of
important operation and maintenance (servicing) instructions in the literature accompanying this
appliance.
This symbolmeans:indooruse only
This symbol means:Readinstructions
Toprevent fireor shock hazard,do not exposethis appliancetorain ormoisture.
To avoid condensation to be formed inside, allow the unit to adapt to the surrounding temperatures when
bringing it into a warm room after transport. Condense sometimes prevents the unit from working at full
performanceor may evencause damages.
Thisunit isfor indoor useonly.
Don’tplace metal objectsor spillliquid inside the unit. No objectsfilled with liquids, such as vases, shall be
placed on this appliance. Electric shock or malfunction may result. If a foreign object enters the unit,
immediately disconnect the mains power.
Nonaked flame sources, suchas lighted candles, should be placed on theappliance.
Don’tcoverany ventilation openings as this may result in overheating.
Prevent use industy environments and cleantheunit regularly.
Keep the unit away fromchildren.
Inexperienced persons should notoperatethis device.
Maximum save ambienttemperatureis 40°C. Don’t use this unitat higherambienttemperatures.
Minimumdistancesaround the apparatus forsufficientventilation is 10cm.
Always unplugthe unit when it is notused for alonger time orbeforeyou start servicing.
The electrical installation should be carried out by qualified personal only, according to the regulations for
electricaland mechanical safety in your country.
Checkthat the availablevoltageis not higher than the onestated on therear panel ofthe unit.
Thesocketinlet shall remain operable for disconnection fromthe mains.
Thepowercord should always bein perfect condition. Switchthe unitimmediatelyoffwhen the power cord
is squashedordamaged.
Never let the power-cord comeinto contact with other cables!
Whenthe power switch is in OFF position, this unit is notcompletelydisconnected from the mains!
Thisappliancemust beearthed to in order comply with safety regulations.
In order to prevent electric shock,do not open thecover. There areno userserviceable parts inside.
Never
repair a fuse or bypass the fuse holder.
type andelectricalspecifications!
In the eventof serious operatingproblems, stop using theappliance and contactyourdealer immediately.
Please use theoriginal packing whenthe deviceis to betransported.
Dueto safety reasonsit isprohibited tomake unauthorized modifications tothe unit.
INSTALLATION GUIDELINES:
Installthe unit in a well-ventilated location whereit will not be exposed to high temperatures or humidity.
Placing andusing theunit forlong periods nearheat-generatingsources such as amplifiers,spotlights, etc.
will affect its performanceand may even damagethe unit.
The unit can be mounted in 19-inch racks. Attach the unit using the 4 screw holes on the front panel. Be
sure to use screws ofthe appropriatesize. (screws notprovided)
Takecaretominimizeshocks and vibrations duringtransport.
When installed in a booth or flight case, please make sure to have good ventilation to improve heat
evacuationof theunit.
remove the top cover. No user-serviceable parts inside.
Referservicing to qualifiedservice personnelonly.
Always
replace a damaged fuse with a fuse of the same
®
SYNQ
1/36 DIGIT amplifiers
SYNQ
®
2/36 DIGIT amplifiers
Page 4
ENGLISH OPERATION MANUAL
ENGLISH OPERATION MANUAL
To avoid condensation to be formed inside, allow the unit to adapt to the surrounding temperatures when
bringing it into a warm room after transport. Condense sometimes prevents the unit from working at full
performance.
CLEANING THEAPPLIANCE:
Clean by wiping with a polished cloth slightly dipped with water. Avoid getting water inside the unit. Do not
use volatile liquids such asbenzene or thinnerwhich willdamagetheunit.
Clean the ventilation holes regularly with a vacuum cleaner. This increases the cooling capacity of the
amplifierfans and helps preventing temperatureoverheat.
CONNECTIONS
Be sure to turn off the unit before you make changes to the wiring. For the signal inputs we recommend
using the XLR-connections. Use good quality signal cables to ensure excellent audio quality. For the
speakersyou must use the Speakon®outputs. In the description of the unit you will find moreinformation on
how to connect the amplifier.
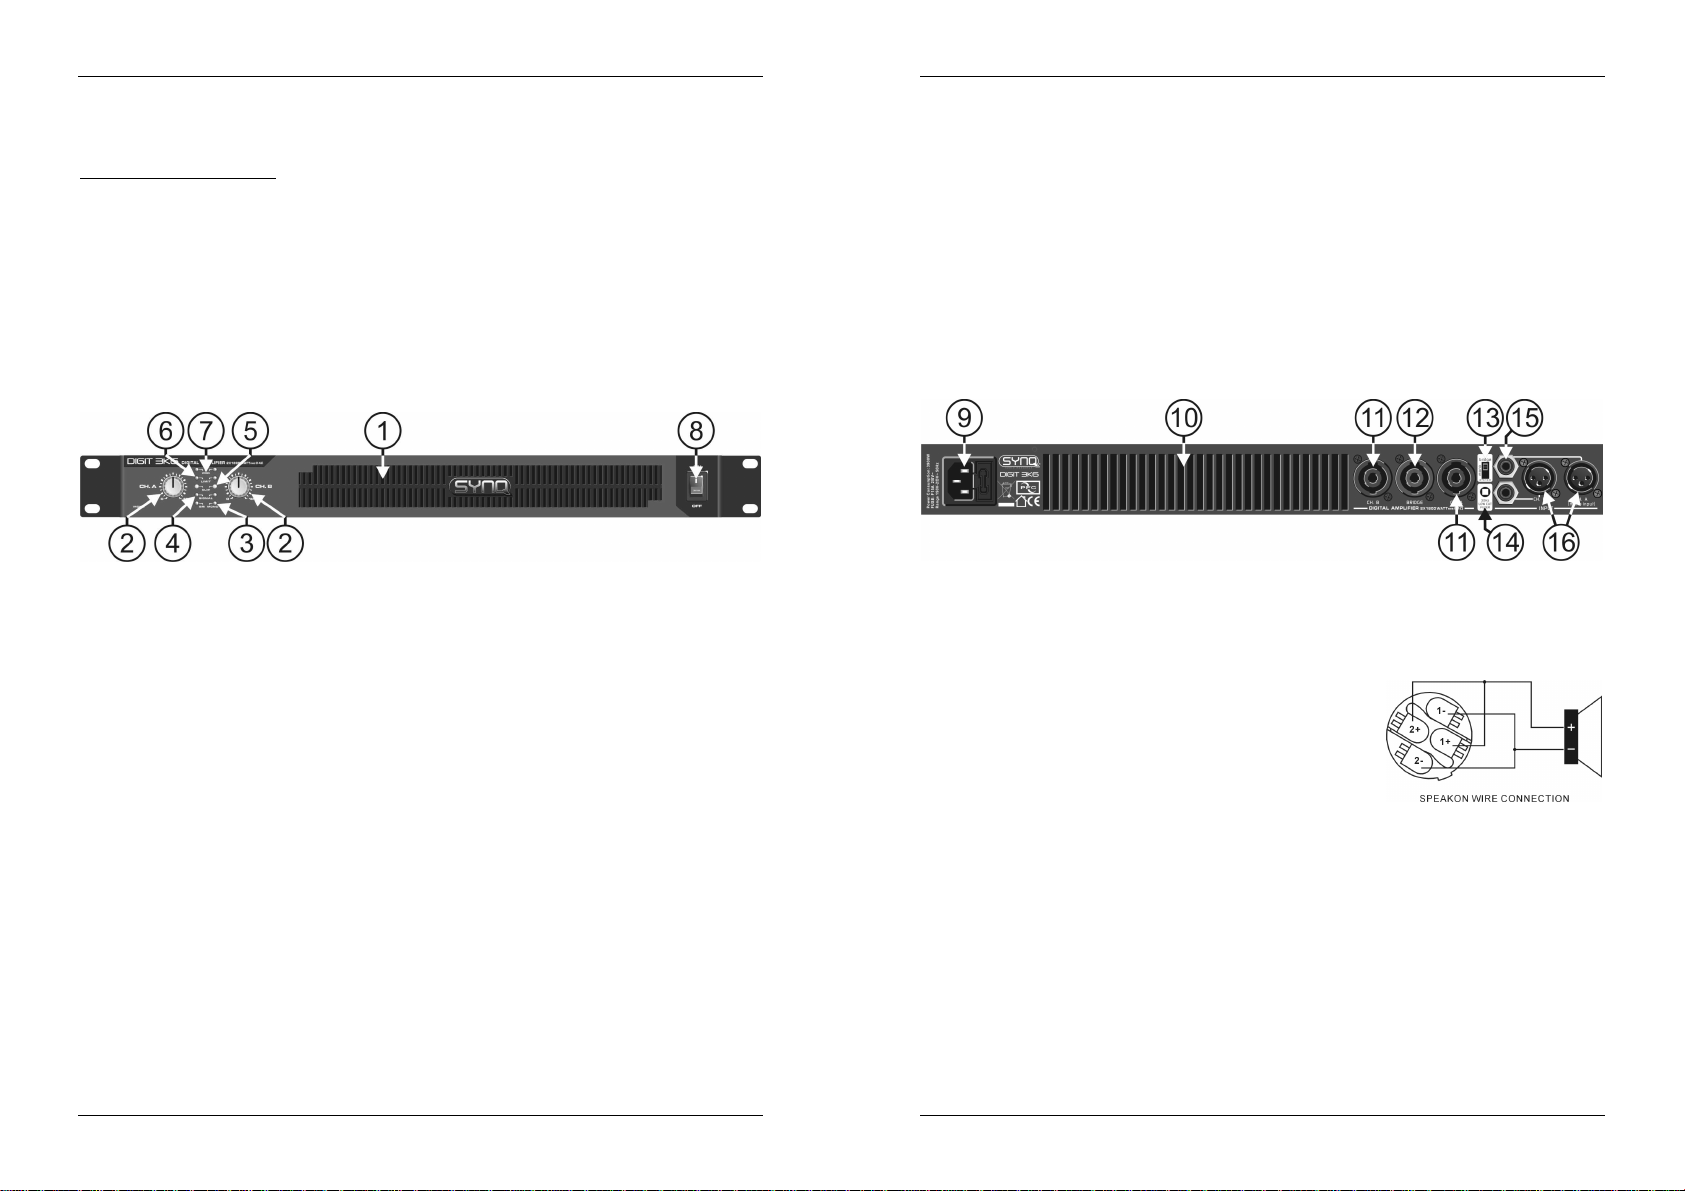
FUNCTIONS (FRONT)
1. VENTILLATION HOLES: during its operation the amplifier produces heat that needs to be dissipated.
The fans inside the amplifier must be able to evacuate the heat in the most effective way. Therefore is it
very important not to cover any of the ventilation openings as this may result in overheating. Clean the
ventilation holes regularly with a vacuum cleaner. This increases the cooling capacity of the amplifier
fansand helps preventingtemperatureoverheat.
2. GAIN CONTROLS: These potentiometers are used to control the input sensitivity of the amplifier. Each
channel has its owncontrol.
You can usethese controls toset the maximumsound level of your setup:
Turnboth controls on the amplifier to theleft.
Put on some music on and make sure the VU meters on your mixer areat 0dB. (from timeto time
the red zone is lit)
Set the Master output from your mixerto maximum.
Open theGain controls from theamplifieruntil the maximum desired sound levelis reached.
Make surenobody canreach the Gain controls ofthe amplifier.
You have just set themaximumlevel theDJ is able toproduce. Your neighbors will be glad… (in some
cases the DJis not )
Note: In Mono and Bridge mode, only the gain control of the left channel is used to adjust the input
sensitivity.
3. OPERATION MODE LEDS: These LEDs indicates the operation mode. Switch (13) on the rear panel is
used to chooseone of these3 possiblemodes:
STEREO MODE: Both LEDs are off. This is the most commonmode, both channels are working
separately.
MONO MODE: ‘MONO’LED is lit. Basically this is identical to stereo mode but the inputs of both
channels are linked so the output will be mono. In this case you only need to use the input of the
left channel todrive both output channels.
BRIDGE MODE: ‘BRI’ LED is lit. Both channels are linked in “bridge mode” to obtain a mono
4. SIGNALLEDS: these LEDsindicatethat a music signal is present at theinputs.
5. CLIP LEDS: TheLEDs willlight up in thefollowing situations:
output with muchhigherpower.
When the output signal has reached a high level which can result in distortion (clipping).
Meanwhile the signallimitersare working to keep the distortionlow.
While short-circuit happened in the output section. Turn-off the amplifier, check the speaker and
6. LIMIT LEDS: TheLEDs will lightup inthe following situations:
7. PROTECTLEDS: Theprotection LEDis on inthe following situations:
8. MAINSSWITCH: Used toturn the amplifier on and off. A few seconds after switching on the amplifier it
output wiring tofind the problem(s).
When the output power exceeds the safe working range of the amplifier, the LIMIT LEDs are lit
while the current limiters come in action to reduce the dynamic range (current) of the output and
bring the amplifierback to itssafe working range. In this caseyou are urged lowerthe input!
While short-circuit happened in the outputsection and the amplifieris in protect mode. Turn-off the
amplifier,check the speaker and outputwiring tofind theproblem(s).
Duringthefirst seconds afterswitching on the amplifier.
When the temperature of thepower stage becomes too high.
In case of a technical defect:DC protection!
While switching the amplifieroff,the “protect led”turns on for ashort time.
is ready foroperation.
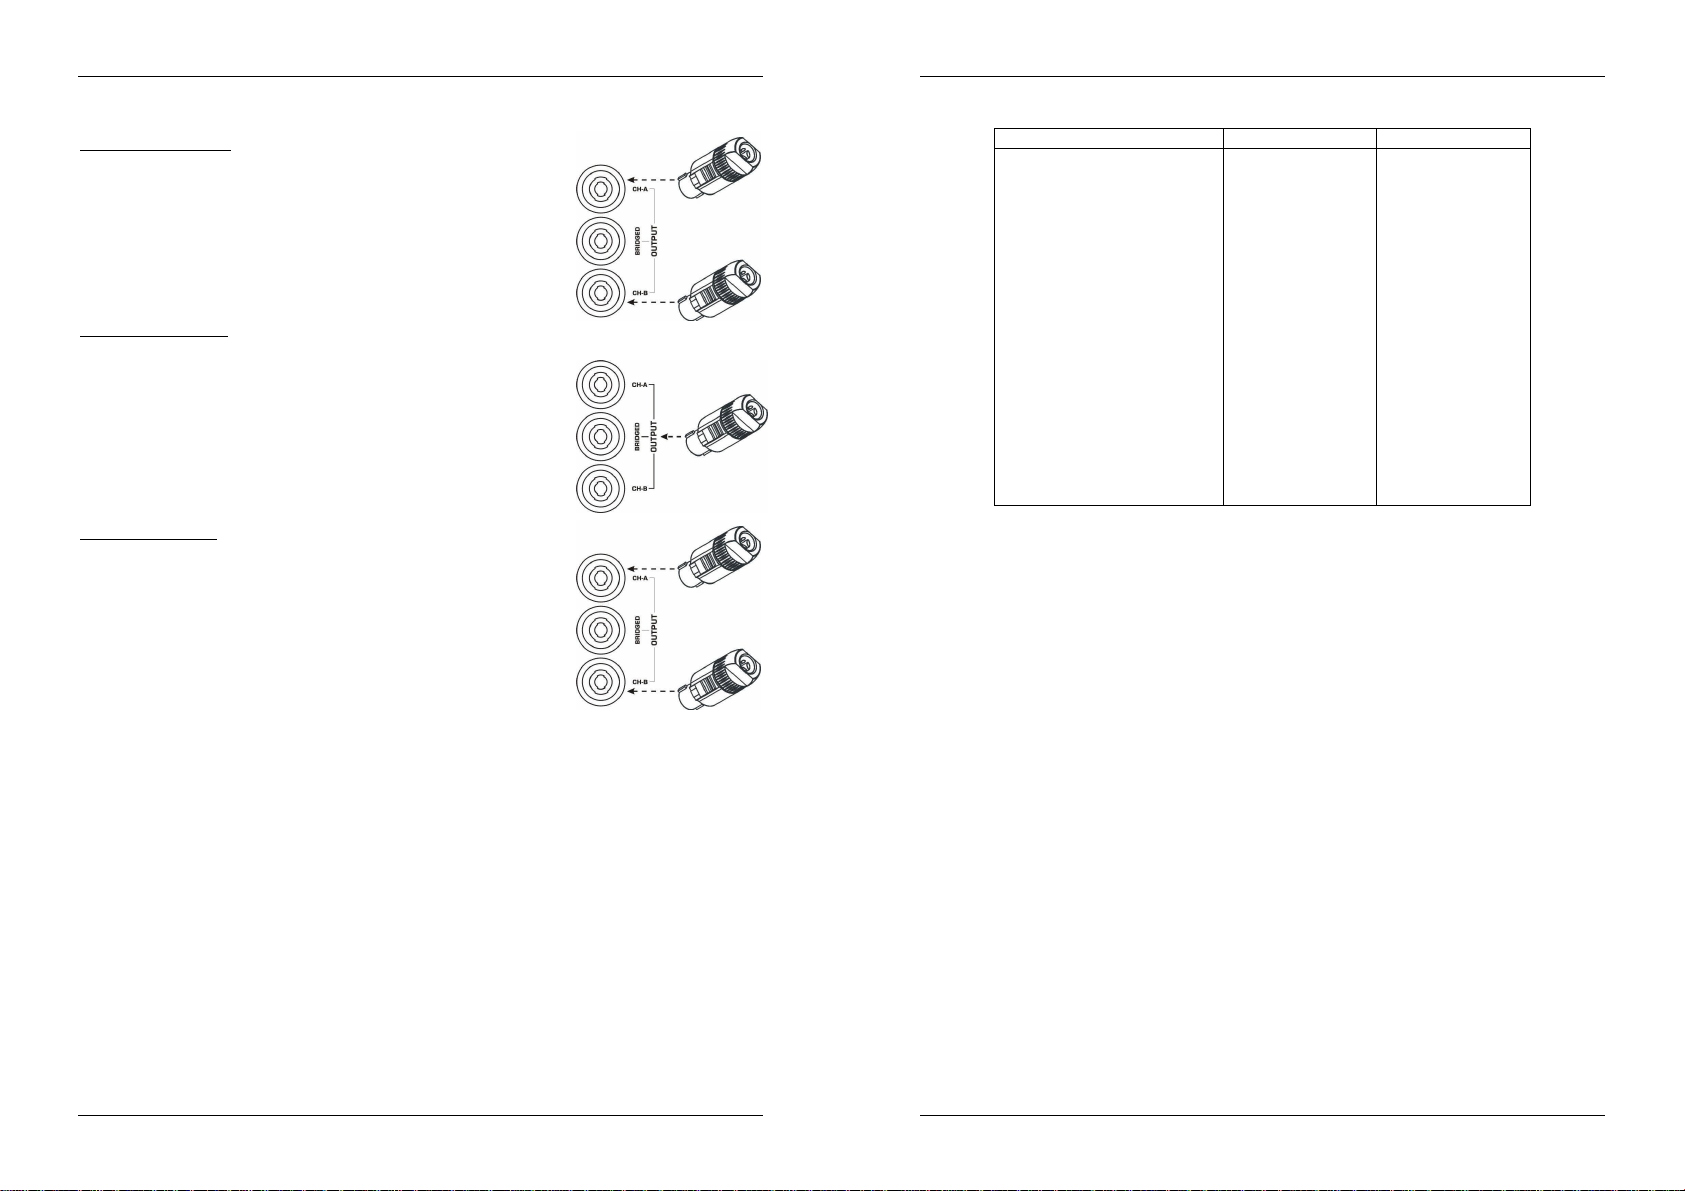
FUNCTIONS (rear)
9. MAINS INPUT withIEC socket and integratedfuse holder,connectthe suppliedmains cablehere.
10. FAN & VENTILLATION HOLES: during its operation the amplifier produces heat that must be
dissipated. The fans inside the amplifier must be able to evacuate the heat in the most effective way.
Therefore is it very important not to cover any of the ventilation openings as this may result in
overheating.
11. L+R SPEAKON OUTPUTS: use these Speakon®connectors to connect your speaker cabinets
(impedance >4ohm) in stereo or mono mode. Wiring of these
connectorsis as follows:
POS(+) = Speakon connector PIN1+ andPIN2+
NEG(-) = Speakon connector PIN1- and PIN2-
12. BRIDGE SPEAKON OUTPUT: use this Speakon®connector to
connect your speaker cabinet (impedance >8ohm) in bridge mode.
Wiring of this connector is as follows:
POS(+) = Speakon connector PIN1+ andPIN2+
NEG(-) = Speakon connector PIN1- and PIN2-
13. OPERATION MODE switch: Used to set the operation mode of the amplifier. The most common
operation mode is “stereo”. If you need more power, you can operate the amplifier in bridge mode. In
mono mode you only have to connect the left input to drive both outputs. Refer also to n° 3 for more
information.
14. 30Hz LOW CUT FILTER: eliminatesunwanted subsonicfrequencies under 30Hz. In most cases these
frequencies only consumea lot of energy without any added value to the music.
15. JACK INPUTS: TIP:signal+ : RING:signal- : SLEEVE: signal ground
16. XLR INPUTS:Pin1:signal ground, Pin2: signal+, Pin3:signal -
SYNQ
®
3/36 DIGIT amplifiers
SYNQ
®
4/36 DIGIT amplifiers
Page 5
ENGLISH OPERATION MANUAL
ENGLISH OPERATION MANUAL
HOW TO USE
STEREOOPERATION:
Connect the audiosignal totheinputs (15 or 16)
Set the operationmode switch (13) to“stereo”
Connect thematching speakers to theL+R Speakon®outputs(11)
Make sure the mains voltage matches 230Vac before connecting the
mains cable to the earthed wall socket.
Set both input gains (2) to zero
Make sure there’sa music signal at theinput
Turn the amplifier on (8)
Adjust the inputgains (2)tothe desiredlevel
BRIDGEOPERATION:
Connect theaudio signal tothe left input(15 or16)
Set the operationmode switch (13) to“bridge”
Connect the matchingspeaker(s) to the BridgeSpeakon®output (12)
Make sure the mains voltage matches 230Vac before connecting the
mains cable to the earthed wall socket
Set both input gains (2) to zero
Make sure there’sa music signal at theleft input
Turn the amplifier on (8)
Adjust the left input gain (2) to the desired level, leave the right channel
gain tozero.
MONO OPERATION:
Connect theaudio signal tothe inputof the leftchannel (15 or 16)
Set the operationmode switch (13) to“mono”
Connect thematching speakers to theL+RSpeakon®outputs(11)
Make sure the mains voltage matches 230Vac before connecting the
mains cable to the earthed wall socket
Set both input gains (2) to zero
Make sure there’sa music signal at theinput
Turn the amplifier on (8)
Adjust the left input gain (2) to the desired level, leave the right channel
gain tozero.
SPECIFICATIONS
Power stereo8Ω (1kHz, THD+N<0,1%)
Power stereo4Ω (1kHz, THD+N<0,1%)
Power bridge8Ω (1kHz, THD+N<0,1%)
Power mono 8Ω (1kHz, THD+N<0,1%)
Power mono 4Ω (1kHz, THD+N<0,1%) 2x1100Wrms 2x1800Wrms
Power efficiency >90% >90%
Freq.Resp. (+/-1dB) 5 –36.000Hz 5 –36.000Hz
InputSensitivity
Input impedance unbalanced
Inputimpedance balanced
S/R ratio (A-Weighted)
Dampingfactor (5Hz-1kHz)
SlewRate 29V/uS 29V/uS
Cooling variable speed fan variable speed fan
Signal inputs
Speakeroutputs
Power supply
Dimensions(WxHxD mm)
Weight (kg)
Every information is subjectto change withoutpriornotice
You can downloadthe latest version of this user manualon our website: www.beglec.com
Digit-2K2 Digit-3K6
2x 650Wrms 2x 1050Wrms
2x1100Wrms 2x1800Wrms
1x2200Wrms 1x3600Wrms
2x 650Wrms 2x1050Wrms
1000mV 1000mV
10 kΩ 10 kΩ
20 kΩ 20 kΩ
>100dB >100dB
280 280
BalancedXLR/Jack BalancedXLR/Jack
AC230V/ 50Hz AC230V/ 50Hz
482x44x301(19"/1U) 482x44x301(19"/1U)
®
Speakon
5,5kg 5,6kg
Speakon
®
SYNQ
®
5/36 DIGIT amplifiers
SYNQ
®
6/36 DIGIT amplifiers
Page 6
FRANCAIS MODE D’EMPLOI
ATTENTION
:
afin de réduire le risque d’électrocution,
Nous vous remercions d’avoir acheté ce produit SYNQ®. Veuillez lire ce mode d’emploi très attentivement
afin de pouvoir exploitertoutesles possibilités de cet appareil.
EN VOUS INSCRIVANT POUR LA LETTRE D’INFORMATION VOUS SEREZ TOUJOURS
TENU AU COURANT DES DERNIERES NOUVELLES CONCERNANT NOS PRODUITS:
NOUVEAUTES,ACTIONS SPECIALES,JOURNEES PORTES OUVERTES, ETC.
SURFEZ SUR: WWW.BEGLEC.COM
CARACTERISTIQUES
Cet appareil ne produit pas d’interférences radio. Il répond aux exigences nationales et européennes. La
conformité a étéétablie et les déclarationset documentscorrespondants ont été déposés par le fabricant.
Une vraierévolution dans latechnologiede l’amplificationprofessionnelle:Synq introduitunenouvelle
gammed’amplificateurs CLASSE-D : une puissance exceptionnelle pour un prixcompétitif!
L’extrême efficacité,la perte d’énergie réduite et une trais faible dissipationde chaleur sontles principaux
atoutsde ces amplificateurs PWM!
Un gain de place considérablepour les applications mobiles:hauteur de seulement1unité!
Poids-plume: Digit 2K2 =5,5kg, Digit 3K6 = 5,6kg!
Extrêmement puissant:
Sortie enmode Bridge:
Possède toutes les protectionsimaginablespour uneutilisationprofessionnelle:
Réponsedes basses très puissante, également pour les subwoofers!
Filtre coupe-bas30Hzqui éliminelesfréquences subsoniques inutilesetgourmandsen énergie.
3 différentmodes de fonctionnement:stéréo, bridgemode,mono mode (entrées reliésensemble)
Entrées /sorties symétriques (XLR + 6.3mmjack)
2 connecteursSpeakon (sortie gaucheet droite)
1 sortieSpeakonsupplémentaire pour lemode de fonctionnement‘bridge’
o Digit 2K2: 2x1100Wrms @ 4ohms
o Digit 3K6:2x1800Wrms @ 4ohms!
o Digit 2K2: 2200Wrms@8ohms
o Digit 3K6: 3600Wrms@8ohms
o Limiteurs Signal +courant
o Protectionsurcharge
o Protectioncourt-circuit(courant)
o ProtectionCC
o Protectionthermique
o Protection CA, VHF
o Soft start
AVANT L’UTILISATION
Quelquesinstructionsimportantes:
Avant d’utiliser cet appareil, assurez-vous de l’absence de dommages liés au transport. En cas de
dommages,n’utilisez pas l’appareil et contactez le vendeur.
Important:
l’utilisateur suive les instructions de sécurité et avertissements inclus dans ce manuel. La garantie ne
s’applique pas en cas de dommage lié à une utilisation incorrecte. Le vendeur ne prend pas la
responsabilité des défauts ou de tout problème résultant du fait de n’avoir pas tenu compte des mises en
gardede cemanuel.
Conservez ce manuel dans un endroit sûr pour toute consultation future. Si vous vendez l’appareil,
assurez-vous d’y joindre ce manuel également.
Afinde protégerl’environnement,merci de recycler les emballagesautantque possible.
Cet appareil a quitté notre usine en parfaite condition et bien emballé. Il est primordial que
FRANCAIS MODE D’EMPLOI
Vérifiez le contenu:
Vérifiezsi l'emballage contient bien les articles suivants :
Moded'emploi
Amplificateur DIGIT
Câbled’alimentation
INSTRUCTIONS DE SECURITE:
CAUTION
La flèche dans un triangle met l'utilisateur en garde contre la présence de haute tension sans
isolationdans l'appareil, ce quipeut causer un risque d'électrocution.
Un point d'exclamation dans un triangle prévient de la présence d'instructions relatives au
fonctionnement et à la maintenance se trouvant dans le manuel fourni avecl'appareil.
Ce symbole signifie:uniquement pour usage à l'intérieur.
Ce symbole signifie : Lire le mode d’emploi.
Afin d’éviter tout risque d’incendie ou de décharge électrique, ne pas exposer cet appareil à la pluie ou
l’humidité.
Pour éviter laformation de condensation à l’intérieur de l’appareil,patientez quelques minutes pour laisser
l’appareil s’adapter à la température ambiante lorsqu’il arrive dans une pièce chauffée après le transport.
La condensation empêche l'appareil de fonctionner de manière optimale, et elle peut même causer des
dommages.
Cetappareilestdestiné à une utilisationà l’intérieuruniquement.
Nepas insérerd’objet métallique ou renverserde liquidedans l’appareil.Aucun objet contenant unliquide,
tels que des vases, ne peut être placé sur cet appareil. Cela risquerait de provoquer une décharge
électrique ou un dysfonctionnement. Si un corps étranger est introduit dans l’appareil, déconnectez
immédiatement de la source d’alimentation.
Aucune source deflamme nue, telleque des bougiesallumées, ne peutêtre placéesur l'appareil.
Nepas couvrir lesorifices de ventilation,un risque desurchauffe en résulterait.
Nepas utiliser l'appareildansun environnementpoussiéreuxet le nettoyerrégulièrement.
Nepas laisser l'appareilà portéedes enfants.
Lespersonnes nonexpérimentées ne doivent pas utiliser cet appareil.
La température ambiante maximale d’utilisation de l’appareil est de 40°C. Ne pas l’utiliser au-delà de cette
température.
Rien ne doit se trouver contrel'appareil : la distanceminimum pour en permettreune ventilation suffisante
est de 10cm.
Débrancheztoujours l’appareil si vous nel’utilisez pas de manière prolongée ouavant d’entreprendredes
réparations.
Les installations électriques ne peuvent être faites que par du personnel qualifié et conformément aux
règlements de sécuritéélectriqueet mécanique envigueur dans votrepays.
Assurez-vous quela tension d’alimentation de la source d’alimentation de la zone dans laquelle vous vous
trouveznedépasse pas celleindiquée à l’arrière del’appareil.
Laprise doit toujoursêtre accessible pour que lecordon secteur puisseêtre enlevé àtout moment.
Le cordon d’alimentation doit toujours être en parfait état. Mettez immédiatement l’unité hors tension si le
cordon devait être écrasé ou endommagé.
Nelaissez jamais lecordon d’alimentationentreren contact avec d’autres câbles !
Quand l’interrupteur principal est en position OFF, cet appareil n'est pas complètement isolé du courant
230V !
L’appareil doit êtreà lamasseselon les règles de sécurité.
Utiliseztoujours des câbles appropriés et certifiés lorsque vousinstallez l’appareil.
n’enlevez jamais le couvercle de l’appareil.Il n’y a aucune
pièce à l’intérieur de l’appareil que vous puissiez
remplacer vous-même. Confiez l’entretien uniquement à
destechniciensqualifiés.
®
SYNQ
7/36 Amplificateurs DIGIT
SYNQ
®
8/36 Amplificateurs DIGIT
Page 7

FRANCAIS MODE D’EMPLOI
FRANCAIS MODE D’EMPLOI
Pour éviter toute décharge électrique, ne pas ouvrir l’appareil. Il n’y a pas de pièces pouvant être
changées parl’utilisateurà l’intérieur.
Nejamais réparer oucourt-circuiterun fusible.Remplacez systématiquement unfusibleendommagépar
un fusiblede mêmetypeet ayant lesmêmes spécificationsélectriques !
En cas de problèmes de fonctionnement sérieux, arrêtez toute utilisation de l’appareil et contactez votre
revendeurimmédiatement.
Utilisezl’emballage d’origine si l’appareil doit êtretransporté.
Pour des raisons de sécurité, il est interdit d’apporter une quelconque modification à l’appareil non
spécifiquement autoriséepar les parties responsables.
CONSEILS D'INSTALLATION:
Installerl'appareildans unlieu bien aéré, à l'abri de l'humidité et desfortestempératures.
Placer et utiliser l'appareil à proximité de sources de chaleur telles que spots, amplis,… pourrait affecter
ses performanceset même endommager l'appareil.
L'appareil peutêtre installé dans un rack de19''. Fixez l'appareil en utilisant les 4 trous pour vis sur la face
avant. Assurez-vous d'utiliser des vis aux dimensions adaptées (vis non fournies). Essayez d'éviter les
vibrations et les coups lors dutransport.
En cas d'installation dans un 'flight case', assurer une bonne ventilation afin d'évacuer la chaleur produite
par l'appareil.
Pour résorber la condensation à l'intérieur de l'appareil, le laisser s'adapter à la nouvelle température
ambianteaprès letransport. La condensationpeut altérer les performancesde l'appareil.
NETTOYAGE:
Nettoyez l’appareil à l’aide d’un chiffon doux, légèrement humide.Evitez d’introduire de l’eau àl’intérieur de
l’appareil. N’utilisez pas de produits volatiles tels que le benzène ou le thinner qui peuvent endommager
l’appareil.
Nettoyez régulièrement les orifices de ventilation à l’aide d’un aspirateur. Ceci augmente la capacité de
refroidissement des ventilateurset aide à éviter uneéventuellesurchauffe de l’amplificateur.
CONNEXIONS
Eteignez toujours l’appareil avant de faire un quelconque changement de câblage. Pour le signald’entrée
nous vous recommandonsd’utiliserles connecteurs XLR. Utilisez descâbles designal de bonne qualitéafin
d’assurer une excellente qualité audio. Pour les haut-parleurs vous utilisez les sorties Speakon®. Dans le
chapitresuivant voustrouverez plus d’informations sur les connexionsde cet ampli.
FONCTIONS (FACE AVANT)
Réglez leniveaude sortieprincipal devotretable de mixage(Master) sur maximum.
Ouvrez les potentiomètres de Gain de l’amplificateur jusqu’à ce que le niveau sonore que vous
désirezsoit atteint.
Assurez-vousque personne ne peuttoucher les potentiomètres de gain de votreamplificateur.
Vous venez de régler le niveau maximal que le DJ peut produire. Vos voisins seront contents… (dans
quelques cas le DJ nele sera pas)
Remarque: En mode Mono et Bridge, seul le contrôle du canal gauche est utilisé pour régler la
sensibilitéd’entrée.
3. LED MODE D'OPÉRATION: Ces LED indiquent le mode d'opération. Le commutateur (13) sur le
panneauarrière est utilisépour choisir 1de ces 3 modes possibles :
MODE STÉRÉO: Les deux LED sont éteints. C'est le mode le plus commun, les deux canaux
travaillent séparément.
MODE MONO: la LED ‘MONO’ est allumée. Fondamentalement ce mode est identique au mode
stéréo mais les entrées des deux canauxsont reliées, ainsi le son sera en mono. Dans ce cas-ci
vous devez seulement employer l'entrée du canal gauche pour alimenter les deux canaux de
sortie.
MODE BRIDGE: la LED ‘BRI’ est allumée. Les deux canaux sont reliés pour obtenir une sortie
4. SIGNALLED: Laled verte indiquelaprésence d’unsignal audioàl’entréedu canal.
5. CLIP LED : Les LEDs’allumerontdansles situations suivantes :
6. LIMIT LED: LesLED s’allumeront dans lessituationssuivantes :
7. PROTECTLED: la LED de protectionestallumédans lescas suivants:
8. INTERRUPTEUR GÉNÉRAL: est utilisé pour allumer ou éteindre l’amplificateur. Quelques secondes
monoavecune puissancebeaucoup plus élevée.
Quand le signal de sortie a atteint un niveau tellement élevé qu’il pourrait provoquer de la
distorsion (clip). Néanmoins, les limiteurs minimisent la distorsion.
Quand il y a eu un court-circuit dans la section « sortie ». Eteignez l’amplificateur, contrôlez les
enceintes et lecâblage afinde trouver le problème.
Quand le niveau de puissance de sortie excède de plage de fonctionnement normale (ou il n’y a
pas de danger pour l’amplificateur)les LED LIMITs’allument pendantque les limiteurs de courant
sont actives afin de reduire la plage dynamique (courant) de la sortie et de ramener l’amplificateur
dans une plage de fonctionnement sans danger. Dans ce cas, vous devez diminuer le niveau
d’entréDE TOUTEURGENCE!
Quand il y a eu un court-circuit dans la section « sortie » et quel’amplificateur c’est mis en mode
‘protection’. Eteignez l’amplificateur, contrôlez les enceintes et le câblage afin de trouver le
problème
Pendant lapremière seconde après avoirallumé l’amplificateur.
Quand latempératuredu module d’amplification final devienttropélevée.
Dans le cas d’unepanne technique: protectionDC!
Quand vous éteignez l’amplificateur, le “protectled” s’allume pendantun brefinstant.
après avoir allumé l’amplificateuril sera prêt à êtreutilisé.
1. OUVERTURES DE VENTILATION: pendant son fonctionnementl’amplificateur produit de la chaleur qui
doit être dissipée. Les ventilateurs à l’intérieur de l’amplificateur doivent pouvoir évacuer la chaleur le
plus efficacement possible. Pour cela il est très important de ne couvrir aucun orifice deventilation car
ceci peut provoquer une surchauffe. Nettoyez régulièrement les orifices de ventilation à l’aide d’un
aspirateur.Ceci augmentela capacité de refroidissement des ventilateurset aide à éviter une éventuelle
surchauffe de l’amplificateur.
2. CONTRÔLES DE GAIN: ces potentiomètres sont utilisés pour contrôler la sensibilité d’entrée de
l’amplificateur. Chaque canalpossèdeson propre réglage.
Vous pouvez utiliser cespotentiomètrespour réglerle niveau sonoremaximalde votre installation:
Tournez les deux potentiomètres de votreamplificateur vers lagauche.
Mettez de la musique et vérifiez si les VU mètres de votre table de mixage sont à 0dB. (la zone
rouges’allume detempsen temps)
®
SYNQ
9/36 Amplificateurs DIGIT
FONCTIONS (FACE ARRIERE)
9. Entrée de l'alimentation secteur, avec prise IEC et fusible incorporé. Connectez les câbles
d’alimentation fournis à cette prise.
10. VENTILATION: pendant son fonctionnement l’amplificateur produit de la chaleur qui doit être dissipée.
Les ventilateurs à l’intérieur de l’amplificateur doivent pouvoir évacuer la chaleur le plus efficacement
possible. Pour celail esttrès importantde necouvrir aucun orifice deventilation car cecipeut provoquer
une surchauffe.
®
SYNQ
10/36 Amplificateurs DIGIT
Page 8

FRANCAIS MODE D’EMPLOI
FRANCAIS MODE D’EMPLOI
11. SORTIES SPEAKON L+R: utilisez ces connecteurs Speakon®pour connecter vos haut-parleurs
(impedance >4ohm) en mode d’opération « stéréo » ou
« mono ». Voici le câblagede ces connecteurs:
POS (+) = PIN1+ etPIN2+du connecteur Speakon
NEG (-) = PIN1- et PIN2- du connecteurSpeakon
12. SORTIES SPEAKON BRIDGE: utilisez ce connecteur
®
®
Speakon®pour connecter vos haut-parleurs (impedance
>8ohm) en moded’opération« bridge ». Voicile câblagede ce
connecteur:
POS (+) = PIN1+ etPIN2+du connecteur Speakon
NEG (-) = PIN1- et PIN2- du connecteurSpeakon
13. sélecteur MODE D'OPÉRATION: est utilisé pour choisir le mode defonctionnement de l’amplificateur.
®
®
Le mode d’utilisation le plus courant est le mode “stéréo”. Si vous avez besoin de plus de puissance,
vous pouvez utiliser l’amplificateur en mode bridge. En mode mono vous devez uniquementenvoyerun
signal dans l’entrée gauche pour piloter les 2 canaux. Référez-vous également au point (3) pour plus
d’informations.
14. LOW CUT FILTER 30Hz : élimine les fréquences subsoniques inutiles en dessous de 30Hz. Dans la
plupart des cas, ces fréquences ne font que consommer beaucoup d’énergie, sans apporter un plus à
votre son.
15. ENTRÉESJACK : Pointe: signal+ : Anneau:signal- : Châssis:masse
16. ENTRÉES XLR : Pointe 1:masse, Pointe2: signal+, Pointe3:signal -
COMMENT UTILISER
OPERATIONSTEREO:
Reliez le signal audio aux2 entrées (15ou 16)
Mettez le commutateurdemode d'opération (13)sur la position"stéréo"
Reliez les haut-parleurs aux sorties L+RSpeakon®(11)
Assurez vous une prise 230Vac avec terre avant de mettre le câble
secteur.
Mettezles gainsd'entrée (2) à zéro
Mettezde lamusique sur les 2 entrées del'amplificateur
Allumezl’ampli (8)
Mettezles gains d'entrée (2) surle niveaudésiré
OPÉRATIONBRIDGE:
Reliez le signal audio à l’entrée gauche (15 ou 16) de l’ampli.
Mettezle commutateur demoded'opération(13) surla position "bridge"
Reliez le(s)haut-parleur(s)à lasortieSpeakon®Bridge(12)
Assurez vous une prise 230Vac avec terre avant de mettre le câble
secteur.
Mettezles gainsd'entrée (2) à zéro
Mettezde lamusique surl’entrée gauche del'amplificateur
Allumezl’ampli (8)
Mettez le gain du canalgauche (2) sur le niveau désiré, laissez le gain du
canal droite fermé.
OPÉRATIONEN MONO:
Reliez le signal audio à l’entrée gauche (15 ou 16) de l’ampli.
Mettezle commutateurde moded'opération(13) surla position"mono"
Reliez les haut-parleurs aux sorties L+RSpeakon®(11)
Assurez vous une prise 230Vac avec terre avant de mettre le câble
secteur.
Mettezles gainsd'entrée (2) à zéro
Mettezde lamusique surl’entrée gauche l'amplificateur
Allumezl’ampli (8)
Mettez le gain du canal gauche (2) sur le niveau désiré, laissezle gain du
canal droit fermé.
CARACTERISTIQUES TECHNIQUES
Puissancestéréo 8Ω (1kHz, THD+N<0,1%) 2x 650Wrms 2x1050Wrms
Puissancestéréo 4Ω (1kHz, THD+N<0,1%)
Puissance bridge 8Ω (1kHz, THD+N<0,1%)
Puissance mono 8Ω (1kHz, THD+N<0,1%)
Puissance mono 4Ω (1kHz, THD+N<0,1%)
Rendement
Rép. Fréq. (+/-1dB)
Sensibilitéd’entrée 1000mV 1000mV
Impédanced’entréeasymétrique 10 kΩ 10 kΩ
Impédanced’entréesymétrique
Rapport S/B (A-Weighted)
Facteur d’amortissement (5Hz-1kHz)
Vitesse de balayagede tension
Ventilation
Entrées signal BalancedXLR/Jack BalancedXLR/Jack
Sortiesenceintes Speakon
Alimentation
Dimensions(WxHxD mm)
Poids (kg) 5,5kg 5,6kg
Chacune de ces informationspeutêtre modifiée sans avertissement préalable. Vouspouvez
télécharger ladernière version de ce mode d’emploi de notre siteWeb: www.beglec.com
Digit-2K2 Digit-3K6
2x1100Wrms 2x1800Wrms
1x2200Wrms 1x3600Wrms
2x650Wrms 2x1050Wrms
2x1100Wrms 2x1800Wrms
>90% >90%
5 - 36000Hz 5 - 36000Hz
20 kΩ 20 kΩ
>100dB >100dB
>300 >300
29V/uS 29V/uS
Ventilateur à vitesse
variable
®
Ventilateur à vitesse
variable
Speakon
AC230V/ 50Hz AC230V/ 50Hz
482x44x301(19"/1U) 482x44x301(19"/1U)
®
SYNQ
®
11/36 Amplificateurs DIGIT
SYNQ
®
12/36 Amplificateurs DIGIT
Page 9

NEDERLANDS HANDLEIDING
WAARSCHUWING:
Om het risico op elektrocutie zoveel
Hartelijk dank voor de aankoop van dit SYNQ®product. Om ten volle te kunnen profiteren van alle
mogelijkheden en voor uw eigen veiligheid is het aangeraden de aanwijzingen zeer zorgvuldig te lezen voor
U hetapparaatbegint te gebruiken.
DOOR U OP ONZE MAILINGLIJST IN TE SCHRIJVEN ONTVANGT U STEEDS DE
LAATSTE INFORMATIE OVER ONZE PRODUKTEN: NIEUWIGHEDEN, SPECIALE
ACTIES, OPENDEURDAGEN, ENZ.
SURF NAAR: WWW.BEGLEC.COM
KARAKTERISTIEKEN
In dit apparaat is radio-interferentieonderdrukt. Dit product voldoetaan de gangbare Europese en nationale
voorschriften. Het is vastgesteld dat het apparaat er zich aan houdt en de desbetreffende verklaringen en
documenten zijn door de fabrikant afgegeven.
Een echte doorbraak in de professionele versterkertechnologie: Synq introduceert een nieuw gamma
CLASS-DVERSTERKERS met eenuitzonderlijkvermogen en een competitieve prijs!
Het extreem hoge rendement en de zeer lage warmteontwikkeling zijn de voornaamste troeven van deze
PWM versterkers!
Een ongelooflijkeruimtebesparingbij mobielgebruik: het toestel is slechts 1unit hoog!
Extreem laaggewicht:slechts = 5,5kg voorde Digit 2K2 en 5,6kg voor de Digit 3K6!
Extreem hooguitgangsvermogen:
Vermogen in bridge mode:
Uitgerust metallemogelijke beveiligingen vooreen professioneelgebruik:
Zeer krachtigebasweergave, ook geschiktvoor subwoofers!
Omschakelbare 30Hz Low cut filterverwijdert ongewenste energieverslindendesubsonischefrequenties.
3 verschillendewerkmodi:stereo,bridge mode, mono mode(ingangen met elkaar verbonden)
GebalanceerdeXLR in/uitgangen + 6.3mmjack
2 Speakonaansluitingen (linker en rechter uitgangen)
1 aparteSpeakon uitgang voorbridge mode
o Digit 2K2: 2x1100Wrms @ 4ohms
o Digit 3K6:2x1800Wrms @ 4ohms!
o Digit 2K2: 2200Wrms@8ohms
o Digit 3K6: 3600Wrms@8ohms
o Signaal + stroombegrenzers
o Beveiligdtegenoverbelasting
o Beveiligingtegen kortsluiting
o DCbeveiliging
o Thermischebeveiliging
o AC, VHF beveiliging
o Soft start
o …
NEDERLANDS HANDLEIDING
EERSTE INGEBRUIKNAME
Belangrijkeinstructies:
Controleer voor het eerste gebruikvan het apparaat of hettijdens het transportbeschadigd werd. Mocht er
schade zijn,gebruik het dan niet, maar raadpleeg eerstuw dealer.
Belangrijk:
de gebruiker de veiligheidsaanwijzingen en raadgevingen in deze gebruiksaanwijzing uiterst nauwkeurig
volgt. Elke schade veroorzaakt door verkeerd gebruik van het apparaat valt niet onder de garantie. De
dealer aanvaardt geen verantwoordelijkheid voor mankementen en problemen die komen door het
veronachtzamenvandezegebruiksaanwijzing.
Bewaar deze brochure op een veilige plaats om hem in de toekomst nogmaals te kunnen raadplegen.
Indien U ooithet apparaat verkooptmag u niet vergeten om degebruiksaanwijzing bijte voegen.
Omhet milieu te beschermen, probeer zoveel mogelijk het verpakkingsmateriaal te recycleren.
Controleer de inhoud:
Kijk na of deverpakking volgendeonderdelen bevat:
Gebruiksaanwijzing
Digitversterker
Voedingskabel
Dit apparaat verliet de fabriek in uitstekende staat en goed verpakt. Het is erg belangrijk dat
VEILIGHEIDSVOORSCHRIFTEN:
CAUTION
De bliksempijl die zich in een gelijkbenige driehoek bevindt is bedoeld om u te wijzen op het
gebruik of de aanwezigheid van niet-geïsoleerde onderdelen met een “gevaarlijke spanning” in
het toestel die voldoendekracht heeftom een risicovan elektrocutiein tehouden.
Het uitroepteken binnen de gelijkbenige driehoek is bedoeld omde gebruikererop tewijzen dat
er in de meegeleverde literatuur belangrijke gebruik en onderhoudsinstructies vermeld staan
betreffendedit onderdeel.
Dit symbool betekent:het apparaat mag enkel binnenhuis worden gebruikt.
Dit symbool betekent:Lees de handleiding!
Stel dit apparaat niet bloot aan regen of vocht, dit om het risico op brand en elektrische schokken te
voorkomen.
Om de vormingvan condensatiebinnenin te voorkomen, laat het apparaat aan de omgevingstemperatuur
wennen wanneer het, na het transport, naar een warm vertrek is overgebracht. Condensatie kan het
toestel soms verhinderen perfect te functioneren. Het kan soms zelfs schade aan het apparaat
toebrengen.
Gebruik dit apparaatuitsluitendbinnenshuis.
Plaats geen stukken metaal en mors geen vocht binnen in het toestel om elektrische schokken of storing
te vermijden. Objecten gevuld met water, zoals bvb. Vazen,mogen nooit op dit apparaat worden geplaatst.
Indien er toch een vreemd voorwerp of water in het apparaat geraakt, moet U het direct van het lichtnet
afkoppelen.
Open vuur,zoals brandende kaarsen, mogenniet ophetapparaatgeplaatstworden.
Bedek geen enkeleventilatieopeningom oververhitting te vermijden.
Zorg dat het toestel niet in een stoffige omgevingwordt gebruikt en maak hetregelmatigschoon.
Houdhet apparaat uit debuurt vankinderen.
Ditapparaatmag niet door onervaren personenbediend worden.
De maximum veilige omgevingstemperatuur is 40°C. Gebruik het apparaat dus niet bij hogere
temperaturen.
Deminimum afstand rondom dit apparaat om eengoede koeling toete laten is10cm.
Trek altijd de stekker uit wanneer het apparaat gedurende langere tijd niet wordt gebruikt of alvorens met
deonderhoudsbeurt tebeginnen.
mogelijk te vermijden mag u nooit de behuizing
verwijderen. Er bevinden zich geen onderdelen in het
toestel die u zelf kan herstellen. Laat de herstellingen
enkeluitvoeren door een bevoegde technicus.
®
SYNQ
13/36 DIGIT Versterkers
SYNQ
®
14/36 DIGIT Versterkers
Page 10

NEDERLANDS HANDLEIDING
NEDERLANDS HANDLEIDING
De elektrische installatie behoort uitsluitend uitgevoerd te worden door bevoegd personeel, volgens de in
uw land geldenderegelsbetreffendeelektrische en mechanische veiligheid.
Controleer dat de beschikbare spanning niet hoger is dan die aangegeven op de achterzijde van het
toestel.
Het stopcontact zal steeds vrij toegankelijk blijven zodat de stroomkabel op elk moment kan worden
uitgetrokken.
De elektrische kabel behoortaltijd in uitstekende staat te zijn. Zethet apparaat onmiddellijk af als de
elektrischekabelgekneusd of beschadigd is.
Laat de elektrischedraad nooit in contact komen metandere draden.
Als de netschakelaar zich in OFF (uit) positie bevindt dan is dit apparaat niet volledig van het lichtnet
gescheiden!
Volgens de veiligheidsvoorschriftenmoet deze installatiegeaard worden.
Om elektrische schokken te voorkomen, moet U de behuizing niet openen. Er zitten geen onderdelen in
het toestel die doorde gebruiker moeten worden onderhouden.
Repareer nooit een zekering en overbrug de zekeringhouder nooit. Vervang een beschadigdezekering
steeds door een zekering van hetzelfde type enmet dezelfde elektrische kenmerken.
Ingeval van ernstige problemen met het bedienen van het toestel, stopt U onmiddellijk het gebruik ervan.
Contacteeruw dealervooreen eventuelereparatie.
Gebruik best deoriginele verpakking als het toestelvervoerd moet worden.
Omveiligheidsredenenis het verboden om modificaties aan hettoestelaan te brengen.
INSTALLATIEVOORSCHRIFTEN:
Plaats dit apparaat in een goed geventileerde ruimte waar het niet blootgesteld is aan hoge temperaturen
of vocht.
Hetplaatsenen het gebruik van dit apparaatgedurende een langeperiode in de nabijheid warmtebronnen
zoals versterkers,spots, enz. zal zijn werking beïnvloeden.
Dit apparaat kan in een 19” kast gemonteerd worden. Monteer de behuizing door middel van de 4
montageopeningen op de frontplaat. Gebruik hiervoor bouten van de juiste dikte! (deze zijn niet
inbegrepen) Probeer sterke schokken en vibraties tijdens het transport zo veelmogelijk te vermijden.
Zorg, bij inbouw in een vaste installatie of flightcase, voor een goede ventilatie om de warmte optimaal te
kunnen afvoeren.
Zorg ervoor,om inwendigevorming van condensatie te voorkomen, dat de mengtafel zichna transportkan
aanpassenaan dewarmebinnentemperatuur.Condensatiekan de goedewerkingsoms verhinderen.
ONDERHOUD
Reinig het toestel met een zacht, lichtjes bevochtigd doek. Vermijd water te morsen in het toestel. Gebruik
nooitvluchtige productenzoals benzeen ofthinner,dit kan het toestelbeschadigen.
Reinig regelmatig de ventilatieopeningen door middel van een stofzuiger. Dit verhoogt de koelingcapaciteit
van deventilatoren in de versterker en vermindert de kanstot oververhitting.
AANSLUITINGEN
Zet steeds de versterker uit alvorens de bekabeling te veranderen. Voorde signaalingangen raden wij u aan
de XLR aansluitingen te gebruiken. Gebruik signaalkabels van goede kwaliteit om een uitstekende
geluidskwaliteit te verzekeren. Voor de klankkasten gebruikt U de Speakon®uitgangen. In de omschrijving
van deverschillendeonderdelen vindtU meerinformatieoverhoe de versterkerwordt aangesloten.
FUNCTIES (VOORZIJDE)
1. VENTILATIEOPENINGEN: tijdens zijn werking produceert de versterker hitte die moet worden
afgevoerd. De ventilatoren in de versterker moeten de warmte op een zo efficiënt mogelijke manier
kunnen evacueren. Daarom is het zeer belangrijk om geen enkele ventilatieopening af te dekken
aangezien diteen oververhitting kanveroorzaken.Reinig regelmatig deventilatieopeningen door middel
van een stofzuiger. Dit verhoogt de koelingcapaciteit van de ventilatoren in de versterker en vermindert
de kans tot oververhitting.
2. GAIN REGELING: deze potentiometers worden gebruikt om de ingangsgevoeligheid van de versterker
te regelen. Elk kanaal heeft zijn eigenregeling.
U kuntdeze potentiometers gebruiken omhet maximum geluidsniveauvan uw installatie in te stellen:
Draai beideknoppen op de versterker naarlinks.
Zet wat muziek op en controleer of de VUmeters van uw mengtafel op 0dB staan. (de rode zone
gaat af en toe aan)
Zet deMasteruitgang van uw mengtafelop maximum.
Open de Gain potentiometers van de versterker tot wanneer u het maximaal gewenste
geluidsniveaubereikt.
Let er op datniemand aan deGain regelingen van de versterker kan komen.
U hebt net het maximum geluidsniveau ingesteld dat de DJ kan behalen. Uw buren zullen blij zijn…
(de DJ insommigegevallen misschien niet )
Opmerking: In MonoenBridge mode wordtenkel degain regeling van het linkerkanaal gebruikt om de
ingangsgevoeligheid in testellen.
3. OPERATION MODE LEDS: Deze LEDs tonen in welke werkingsmodus de versterker staat. U kunt 1
van de3 modi instellenmet schakelaar (13)op de achterzijde:
STEREO MODE: Beide LEDs zijn uit. Dit is de meest gebruikte modus, beide kanalen werken
onafhankelijk (in stereo).
MONO MODE: De‘MONO’ LED is aan. Eigenlijkis dit deze modus identiek aan de stereomodus
maar nu worden de ingangen van beide kanalen aan elkaar gekoppeld zodat de uitgang in mono
staat.In dezemodus hoeft U dus maar 1 signaalkabel op het linker kanaal aan tesluiten om beide
uitgangen in mono aan testuren.
BRIDGE MODE: De ‘BRI’ LED is aan. Beide kanalen worden aan elkaar gekoppeld om zo een
4. SIGNALLEDS: dezeLEDs tonen dat ereen muzieksignaal aanwezig is.
5. CLIP LEDS: deleds gaanaan in de volgende situaties:
6. LIMIT LEDS: dezeLEDs gaan aan in de volgendesituaties:
7. PROTECTLEDS: de protectLEDs zijn in devolgende gevallen aan:
8. NETSCHAKELAAR: wordt gebruikt om de versterkeraan en uit te zetten. Enkele seconden nadat u de
mono uitgang metveel groter uitgangsvermogente creëren.
Wanneer het uitgangssignaal eenzodanig hoog niveau bereikt welke kan resulteren invervoming
(clipping). Designaalbegrenzers treden in werkingom de vervormingte beperken.
Wanneer er zich een kortsluiting heeft voorgedaan in de uitgangssectie. Schakel de versterker uit
en tracht hetprobleem op tesporen door deklankkastenen debedrading tecontroleren.
Wanneer het uitgangsvermogen de veilige werkingsmarge van de versterker overschrijdt gaan
deze leds aan,terwijl de stroombegrenzers in actie treden om hetdynamische (stroom) bereik van
de uitgang te reduceren zodat de versterker terug binnen een veilige werkingsmarge werkt. In dit
gevalmoet u DRINGENDhetuitgangsniveau verlagen!
Wanneer er zich een kortsluiting heeft voorgedaan in de uitgangssectie en wanneer deversterker
in ‘protect mode’ staat. Schakel de versterker uit en tracht het probleem op te sporen door de
klankkastenen debedrading te controleren.
Gedurende de eerste seconden nadatu deversterker heeft aangezet.
Wanneer de temperatuur van de eindtrap tehoogwordt.
In hetgeval vaneen technisch defect: DC beveiliging!
Terwijl u de versterker uit zet gaat de“protect led” tijdens een korteperiode aan.
versterkerhebt aangezet is hij klaar voor gebruik.
SYNQ
®
15/36 DIGIT Versterkers
SYNQ
®
16/36 DIGIT Versterkers
Page 11

NEDERLANDS HANDLEIDING
NEDERLANDS HANDLEIDING
FUNCTIES (ACHTERZIJDE)
9. VOEDINGSAANSLUITING met IEC stekker en geïntegreerde zekeringhouder. Sluit hier de
meegeleverdestroomkabelaan.
10. VENTILATOR & VENTILATIEOPENINGEN: tijdens zijn werking produceert de versterker hitte die moet
worden afgevoerd. De ventilatoren in de versterker moeten de warmte op een zo efficiënt mogelijke
manierkunnen evacueren. Daarom is het zeer belangrijk om geen enkele ventilatieopening af te dekken
aangezien dit eenoververhitting kan veroorzaken.
11. L+R SPEAKON UITGANGEN: gebruik deze Speakon®aansluitingen om uw klankkasten (impedantie
>4ohm) aan tesluiten bij gebruik vande versterker inmono of stereo
modus. De bedrading vandezeaansluitingenis als volgt:
POS(+) = Speakonaansluiting PIN1+ and PIN2+
NEG(-) = Speakonaansluiting PIN1- and PIN2-
12. BRIDGE SPEAKON UITGANG: gebruik deze Speakon®aansluiting
om uw klankkast(en) (impedantie >8ohm) aan te sluiten in bridge
modus. De bedrading vandezeaansluitingis als volgt:
POS(+) = Speakonaansluiting PIN1+ andPIN2+
NEG(-) = Speakonaansluiting PIN1- and PIN2-
13. OPERATIONMODEschakelaar: wordt gebruikt om de werkingsmodus van de versterker te kiezen. De
meest gebruikte is “stereo”. Indien u meer vermogen nodig hebt, kunt u de versterker in bridge modus
laten werken. In monomodus moet u alleen het linkeringangskanaal aansluiten om beide uitgangenaan
te sturen. Zie ookpunt (3) voor meer inlichtingen.
14. LOW CUT FILTER 30Hz: verwijdert ongewenste subsonischefrequenties onder de 30Hz. Inde meeste
gevallen verbruiken dezefrequenties heel wat energie zonder echt een meerwaarde aan uw muziek toe
te voegen.
15. JACKINGANGEN: TIP: signal+ : RING:signal- : SLEEVE:signalground
16. XLR INGANGEN: Pin1:signal ground, Pin2: signal+, Pin3: signal -
HOE GEBRUIKEN
STEREOMODUS:
Sluit de audiobronop de ingangen (15of16)aan
Zet de “operation mode” schakelaar(13) in de “stereo” positie
Sluit degeschikteluidsprekers aan opde L+R Speakon®uitgangen(11)
Verzeker U ervan dat U een 230Vac geaard stopcontact ter beschikking
heeftvoor U de netstekker inplugt.
Zet beide gain potentiometers(2) dicht
VerzekerU ervandat er een muziek signaal aanwezig is.
Zet de versterkeraan (8)
Stel de gain regelingen (2)inop hetgewensteniveau.
BRIDGEMODUS:
Sluit deaudiobron op delinkeringang (15 of 16) aan
Zet de “operation mode” schakelaar(13) in de “bridge”positie
Sluit de geschikteluidspreker(s) aanop de Bridge Speakon®uitgang(12)
Verzekert U ervan dat U een 230Vac geaard stopcontact ter beschikking
heeftvoor U de netstekker inplugt.
Zet beide gain potentiometers(2) dicht
VerzekertU ervan dat er een muziek signaal aanwezig is.
Zet de versterker aan (8)
Stel de gain regeling van het linkse kanaal (2) in op het gewenste niveau en laat het rechtse kanaal dicht
staan.
MONOMODUS:
Sluit deaudiobron op delinkeringang (15 of 16) aan
Zet de “operation mode” schakelaar(13) in de “mono” positie
Sluit de geschikteluidsprekers aan op de L+R Speakon®uitgangen(11)
Verzekert U ervan dat U een 230Vac geaard stopcontact ter beschikking
heeftvoor U de netstekker inplugt.
Zet beide gain potentiometers(2) dicht
Verzekert U ervan dat ereen muziek signaal aanwezigis.
Zet de versterkeraan (8)
Stel de gain regeling van het linkse kanaal (2) in op het gewenste niveau
en laat hetrechtse kanaal dicht staan.
EIGENSCHAPPEN
Vermogenstereo 8Ω (1kHz, THD+N<0,1%)
Vermogenstereo 4Ω (1kHz, THD+N<0,1%)
Vermogen bridge 8Ω (1kHz, THD+N<0,1%)
Vermogen mono 8Ω (1kHz, THD+N<0,1%)
Vermogenmono 4Ω (1kHz, THD+N<0,1%)
Frequentiebereik (+/-1dB) 5 - 36000Hz 5 – 36000Hz
Rendement >90% >90%
Ingangsgevoeligheid
Ingangsimpedantie ongebalanceerd
Ingangsimpedantie gebalanceerd
S/R verhouding
Dempingsfactor (5Hz-1kHz)
Stijgtijd 29V/uS 29V/uS
Ventilatorkoeling variabelesnelheid variabelesnelheid
Signaalingangen
Luidsprekeruitgangen
Voeding
Afmetingen(WxHxD mm)
Gewicht (kg)
Elkeinlichtingkanveranderenzonderwaarschuwingvooraf
U kunt de laatste versie van deze handleidingdownloadenvia
Onzewebsite: www.beglec.com
Digit-2K2 Digit-3K6
2x650Wrms 2x1050Wrms
2x1100Wrms 2x1800Wrms
1x2200Wrms 1x3600Wrms
2x650Wrms 2x1050Wrms
2x1100Wrms 2x1800Wrms
1000mV 1000mV
10 kΩ 10kΩ
20 kΩ 20kΩ
>100dB >100dB
>300 >300
gebalanceerdeXLR/Jack gebalanceerdeXLR/Jack
AC230V/ 50Hz AC230V / 50Hz
482x44x301(19"/1U) 482x44x301(19"/1U)
®
Speakon
5,5kg 5,6kg
Speakon
®
SYNQ
®
17/36 DIGIT Versterkers
SYNQ
®
18/36 DIGIT Versterkers
Page 12

DEUTSCH BEDIENUNGSANLEITUNG
ACHTUNG:
Um sich nicht der Gefahr eines elektrischen
Vielen Dank, dass Sie sich für den Erwerb dieses SYNQ®-Produkt entschieden haben. Bitte lesen Sie diese
Bedienungsanleitung sorgfältig vor der Inbetriebnahme durch, zur vollen Ausschöpfung der Möglichkeiten,
diedieses Gerät bietet, sowie zu Ihrer eigenen Sicherheit.
EIGENSCHAFTEN
Das Gerät ist funkentstört und erfüllt die Anforderungen der europäischen und nationalen Bestimmungen.
EntsprechendeDokumentationliegt beim Hersteller vor.
Ein wirklicherDurchbruch in professionellerVerstärkertechnik:Synq führtein neues Modell vonKLASSE-
DVERSTÄRKERN mit außergewöhnlicherLeistung undkonkurrenzfähigerPreisgestaltung ein!
Die äußersthohe Effizienz,der reduzierte Leistungsverlustund diesehr niedrige Hitzeentwicklung sinddie
Hauptvorteiledieser PWM-Verstärker!
Unglaublich Platz sparend fürmobileAnwendungen:Gehäuse ist nur eine Einheithoch!
Unglaublich niedrigesGewicht: Digit2K2 = 5,5kg, Digit 3K6= 5,7kg!
AußergewöhnlichhoheAusgangsleistung:
Ausgangsleistung in Brückenmodus:
Alle für den professionellen Gebrauch üblichenSicherungen:
Sehr kraftvolle Bassleistung, auchideal geeignet fürSubwoofers!
Schaltbarer 30HzLowCut Filter blendet unerwünschten Stromverbrauchenden Infraschallaus.
3 verschiedeneBetriebsmodi:Stereo,Brückenmodus,Monomodus (angeschlossene Eingänge)
SymmetrischeEin-/Ausgänge an XLR+6,3mmBuchse
2 SpeakonAnschlüsse(linkeund rechteAusgänge)
1 separater SpeakonAusgang für Brückenmodus
o Digit 2K2:2x1100Wrms @ 4ohm
o Digit 3K6: 2x1800Wrms @ 4ohm
o Digit 2K2: 2200Wrms@ 8ohm
o Digit 3K6: 3600Wrms@ 8ohm
o Signal- + Strombegrenzer
o Überlastungsschutz
o Kurzschlusssicherung
o Gleichstrom-Störschutz
o Überhitzungsschutz
o Wechselstrom-, VHF-Sicherung
o Soft-Start
o …
VOR DER ERSTBENUTZUNG
Wichtige Hinweise:
Vor der Erstbenutzung bitte das Gerät zuerst auf Transportschäden überprüfen. Sollte das Gerät einen
Schaden aufweisen, Gerät bitte nicht benutzen,sondern setzen Sie sich unverzüglichmit Ihrem Händler in
Verbindung.
Wichtiger Hinweis:
dass der Benutzer sich streng an die Sicherheitshinweise und Warnungen in der Bedienungsanleitung
hält. Schäden durch unsachgemäße Handhabung sind von der Garantie ausgeschlossen. Der Händler
übernimmt keine Verantwortung für Schäden, die durch Nichtbeachtung der Bedienungsanleitung
hervorgerufenwurden.
Die Bedienungsanleitung zum zukünftigen Nachschlagen bitte aufbewahren. Bei Verkauf oder sonstiger
WeitergabedesGeräts bitte Bedienungsanleitung beifügen.
Aus Umweltschutzgründen Verpackung bitte wieder verwenden oder richtig trennen.
Das Gerät hat das Werk unbeschädigt und gut verpackt verlassen. Es ist wichtig,
DEUTSCH BEDIENUNGSANLEITUNG
Überprüfen Sie denInhalt:
FolgendeTeilemüssensich inder Geräteverpackung befinden:
Bedienungsanleitung
KlasseD Verstärker
Netzkabel
SICHERHEITSHINWEISE
CAUTION
Das Blitzsymbol im Dreieck weist den Benutzer darauf hin, dass eine Berührungsgefahr mit
nicht isolierten Teilen im Geräteinneren, die eine gefährliche Spannung führen, besteht. Die
Spannung ist so hoch, das hier die Gefahr eines elektrischen Schlages besteht.
Das Ausrufezeichen im Dreieck weist den Benutzer auf wichtige Bedienungs- und
Wartungshinweise in denDokumenten hin, diedemGerätbeiliegen.
DiesesSymbol bedeutet: Nur innerhalb von Räumenverwenden.
DiesesSymbolbedeutet:Achtung!Bedienungsanleitung lesen!
ZurVermeidungvon Stromschlag oder Feuer,Gerät bitte nicht Regen oderFeuchtigkeit aussetzen.
Zur Vermeidung von Kondensation im Inneren des Geräts bitte nach dem Transport in eine warme
Umgebung zum Temperaturausgleich einige Zeit ausgeschaltet stehen lassen. Kondensation kann zu
Leistungsverlustdes Geräts odergar Beschädigungführen.
Gerät nicht im Freienund in feuchten Räumen undUmgebungenverwenden.
Keine Metallgegenstände oderFlüssigkeiten ins Innere des Geräts gelangen lassen. Keinemit Flüssigkeit
gefülltenGegenstände,z.B. Vasen, aufdas Gerät stellen. Kurzschlussoder Fehlfunktion könnendie Folge
sein. Falls esdoch einmal vorkommensollte, bitte sofortNetzsteckerziehen undvom Stromkreis trennen.
Offene Brandquellen, wiez.B.brennende Kerzen, sollten nichtaufdas Gerätgestelltwerden.
Ventilationsöffnungennichtabdecken,daÜberhitzungsgefahr!
Nichtinstaubiger Umgebung verwenden und regelmäßig reinigen.
FürKinderunerreichbar aufbewahren.
UnerfahrenePersonen sollen dasGerät nicht bedienen.
Umgebungstemperaturdarf40ºC nicht überschreiten.
Minimalabstandum das Gerät fürausreichendeKühlung = 10cm.
Stets Netzstecker ziehen, wenn Gerät für längeren Zeitraum nichtgenutzt oder esgewartet wird.
ElektrischeAnschlüsse nur durch qualifiziertesFachpersonalüberprüfenlassen.
Sicherstellen,dass Netzspannung mitGeräteaufkleberübereinstimmt.
DieNetzsteckdose sollte immer gut erreichbar sein, um das Gerät vom Netz zu trennen.
Gerät nicht mitbeschädigtemNetzkabelbetreiben.
Netzkabelnicht mit anderenKabelnin Berührung kommenlassen!
Das Gerät ist nicht vollständig vom Netz getrennt, wenn der Netzschalter sich in der AUS-Stellung
befindet.
Umdengesetzlichen Sicherheitsbestimmungenzu entsprechen, mussdiesesGerätgeerdetwerden.
Gerät nicht öffnen. Das Gerät ist wartungsfrei.
Sicherungniemals reparieren oder überbrücken,sondern immer mit gleichartiger Sicherung ersetzen!
Bei Fehlfunktion Gerät nicht benutzenund sichmitdem Händler in Verbindung setzen.
Bei Transport bitteOriginalverpackungverwenden,umSchäden amGerätzu vermeiden.
Aus Sicherheitsgründen dürfenan dem Gerät keine unbefugten Veränderungenvorgenommenwerden.
Schlags auszusetzen, entfernen Sie keines der
Gehäuseteile. Im Geräteinneren befinden sich keine vom
Benutzer reparierbaren Teile. Überlassen Sie
Reparaturen dem qualifizierten Kundendienst.
®
SYNQ
19/36 DIGIT Verstärkern
SYNQ
®
20/36 DIGIT Verstärkern
Page 13

DEUTSCH BEDIENUNGSANLEITUNG
DEUTSCH BEDIENUNGSANLEITUNG
INSTALLATIONSANLEITUNG:
Stellen Sie das Gerät in einem gut belüfteten Raum auf, wo esnicht Feuchtigkeit und hohen Temperaturen
ausgesetztwird.
Plazieren und benutzen Sie das Gerät für eine längere Zeit neben sehr warmen Geräten wie Verstärker,
Lampen,etc.,könnte es die Funktion desGerätsbeeinträchtigen.
DasGerät kann in 19“ Racks eingebaut werden. Benutzen Sie dafür diein derFrontblende eingelassenen
Löcher.
Sollte das Gerätin einFlightcase eingebaut werden,achten Sie auf eine gute Luftzirkulation.
Wenn das Gerät aus einer kalten Umgebung an einem warmen Ort aufgestellt wird, kann sich
Kondenswasser bilden. Um Fehlfunktionen zu vermeiden, sollten Sie das Gerät für ca. 1 Stunde vom
Stromnetztrennen.
WARTUNG
Die Reinigung des Geräts erfolgt mit einem leicht mit Wasser angefeuchteten Tuch. Vermeiden Sie, dass
Wasser in das Gerätinnere gelangt. Verwenden Sie keine brennbaren Flüssigkeiten wie Benzin oder
Verdünner,diedas Gerätbeschädigen würden.
Säubern Sie regelmäßig die Ventilationsöffnungen mit einem Staubsauger. Dies hilft den Ventilatoren im
Verstärkerdie Kühlung aufrechtzuerhalten,damit das Gerätnicht überhitzt.
ANSCHLÜSSE
Seien Sie sich sicher das Sie dass Gerät abgeschaltet haben, bevorSie Veränderungen an der Verkabelung
vornehmen. Für die Signal Eingänge empfehlen wir die XLR Verbindungen zu verwenden. Um Ihnen gute
Audio Qualität zu Gewährleisten verwenden Sie ausschließlich gute Kabel.Für die Lautsprecher empfehlen
wir die Speakon® Ausgänge zu verwenden. In der Gerätebeschreibung finden Sie weitere Hinweise zum
Anschlussdes Verstärkers.
FUNKTIONEN (VORDERSEITE)
3. BETRIEBS-LEDS: Diese LED’s zeigen den Betriebsmodus an. Schalter (13) auf der Geräterückseite
dient der Einstellung auf einen der 3 möglichen Modi:
STEREO MODUS: Beide LED’s leuchten. Das ist der herkömmlichste Modus, beide Kanäle
arbeiten getrennt.
MONO MODUS: das ‘MONO’ LED leuchtet. Dies ist im Grunde identisch mit dem Stereomodus,
jedoch sind die Eingänge beider Kanäle zusammen geschaltet, so dass der Ausgang in Mono
erfolgt. In diesem Fall benutzen Sie nur den Eingang des linken Kanals, um beide
Ausgangskanälezubetreiben.
BRIDGE MODUS: das ‘BRI’ LED leuchtet. Beide Kanäle sind in „Bridge-modus” verbunden, um
4. SIGNAL-LEDS: Diese LED’s zeigenan, dass anden EingängeneinMusiksignal anliegt.
5. CLIP-LEDS:Die LEDs leuchtenauf, wenn:
6. LIMIT LEDS: Die LEDsleuchten auf, wenn:
7. PROTECTLEDS: DieProtection LED leuchtetin folgenden Situationenauf:
8. Hauptschalter: Verwenden Sie diesen Schalter um das Gerät Ein- und Auszuschalten. Ein paar
einen Monoausgangmit höhererLeistung zu erreichen.
das Ausgangssignal solche Spitzen erreicht, dass Verzerrungen auftreten können (Clipping). die
Signalbegrenzer in Aktiontreten, um dieVerzerrungengering zuhalten.
wenn es einen Kurzschluss im Ausgangsbereich gab. Schalten Sie den Verstärker aus,
überprüfen Sie den Lautsprecherund dieAusgangskabelum das/die Problemezufinden.
die Ausgangsleistung über den sicheren Arbeitsbereich des Verstärkers hinausgeht. Die LIMIT
LEDs leuchten,solange die Strombegrenzer aktiv sind, um den dynamischen Bereich(Strom) des
Ausgangs zu verringern und den Verstärkerauf seinen sicheren Arbeitsbereich zurückzubringen.
Indiesem Fall müssen Siedie Eingangsleistung herunterfahren!
wenn es einen Kurzschluss im Ausgangsbereich gab und der Verstärker im Schutzmodus ist.
Schalten Sie den Verstärker aus, überprüfen Sie den Lautsprecher und die Ausgangskabel um
das/dieProbleme zu finden.
Während der ersten Sekundennacheinschalten der Endstufe.
Wenn die Temperaturdes Leistungsverstärkers zu hoch geworden ist.
In Folgeeines technischen defektes:Wechselstromschutz!
Während des Ausschaltens des Verstärkers kann es vorkommen, dass die “protect led” für eine
kurze Zeit aufleuchten.
Sekunden nach einschaltendes Gerätes ist es Einsatzbereit.
FUNKTIONEN (RÜCKSEITE)
1. VENTILLATIONS LÖCHER: Während des Betriebes entwickelt der Verstärker Hitze die abzuführen ist.
Die Lüfter im Inneren des Verstärkers müssen im Stande sein die Hitze abzuführen Dafür ist es sehr
wichtig die Lüftungsöffnungen nicht zu verdecken, ansonsten überhitzt der Verstärker. Saugen Sie die
Lüftungsöffnungen regelmäßig mit einem Staubsauger ab. Das vermindert die Kühlleistung des
Verstärker-Ventilatorsund hilft, Überhitzungzu vermeiden.
2. LAUTSTÄRKEREGLER: Mit diesen Potentiometern regeln Sie die Lautstärke des Verstärkers. Jeder
Kanal ist getrennt regelbar. Sie können diese Controller benützen um ein Maximum an Lautstärke zu
erreichen.
Drehen Sie beide Regler(3) an derEndstufe nach links.
Legen Sie Musik auf und vergewissern Sie sich das die VU Anzeige an Ihrem Mixer auf 0dB steht.
(Von Zeit zu Zeit kann es vorkommen dass die rote Zone aufleuchtet).
Stellen Sie den Master Regler amMischpult aufmaximale Lautstärke.
Betätigen Sie am Verstärker so lange die Lautstärkenregler(3), bis Sie die gewünschte Lautstärke
erreichthaben.
Sorgen Sie dafür, dass niemand die Lautstärkenregler der Endstufe erreichen kann. Stellen Sie die
Lautstärkeauf Ihrenpersönlichen maximalen Pegel ein.Ihre Nachbarn werden froh darüber sein …
(in den meistenFällender DJnicht…)
Hinweis: Im Mono und Bridge Modus, dientnur der linke Lautstärkenregler am Verstärker zum Regeln
derLautstärke.
®
SYNQ
21/36 DIGIT Verstärkern
9. Netanschluss Mit Hilfe des IEC Steckers und eingebauter Sicherung, verbinden sie hier den
Netzstecker.
10. VENTILATORUNDLÜFTUNGSÖFFNUNGEN: Währenddes Betriebes erzeugt derVerstärkerHitze die
abgeführt werden muss. Die Lüfter im Inneren des Verstärkers müssen in der Lage sein die Hitze am
effektivsten abzuführen. Dafür ist es absolut wichtig die Lüftungsöffnungen nicht zu verdecken, da der
Verstärkersonst überhitzt wird.
11. CH.A+CH.B SPEAKON AUSGÄNGE: Verwenden Sie diese Speakon®Anschlüsse um Ihre
Lautsprecher(Impedanz>4ohm)anzuschließen.Sieverkabeln die Verbindungen wie folgend:
POS(+) = SpeakonAnschluss PIN1+ und PIN2+
NEG(-) = Speakon Anschluss PIN1- undPIN2-
12. BRIDGE SPEAKON AUSGANG:
Mit diesem Speakon®Anschluss schließen Sie Ihren Lautsprecher
(Impedanz >8ohm)in Bridge Modus an. DieBelegung des Speakon
Anschlusses ist wiefolgt:
POS(+) = Speakon®AnschlussPIN1+ und PIN2+
NEG(-) = Speakon®AnschlussPIN1- und PIN2-
®
SYNQ
22/36 DIGIT Verstärkern
®
Page 14

DEUTSCH BEDIENUNGSANLEITUNG
DEUTSCH BEDIENUNGSANLEITUNG
13. BETRIEBSMODUSSchalter:Wird verwendetum dieBetriebsart einzustellen. Ammeistenüblich ist der
“Stereo” Modus. Wenn Sie mehr Leistung benötigen, können Sie den Verstärker im Bridge Modus
verwenden. Im Monomodus brauchen Sie nur den linken Eingang anzuschließen, um beide Ausgänge
zu treiben.WeitereInformationenunter Punkt3.
14. LOW CUT FILTER 30Hz: blendet unerwünschten Strom verbrauchenden Infraschall unter 30Hz aus.
DieseFrequenzen konsumieren meist nur viel Energieund haben keinen Einflussauf die Klangqualität
15. JACKEINGÄNGE: TIP:Signal+ RING: Signal- SLEEVE Betriebserde
16. XLR EINGÄNGE: Pin1:Betriebserde, Pin2: Signal+, Pin3:Signal -
BEDIENUNGSHINWEISE
STEREOBETRIEB:
Schließen Sie das Audiosignalan den Eingängen(15 oder16) an.
Stellen Sie den Betriebsmodusschalter (13) auf „Stereo”ein.
Schließen Sie die entsprechenden Lautsprecher an den L+R Speakon
Ausgängen(11) an.
Vergewissern Sie sich, dass die Netzspannung 230V~ beträgt, bevor Sie
den Stecker in die geerdeteSteckdosestecken.
Stellen Sie beideLautstärkeregler (2) aufNull.
VergewissernSie sich, dassamEingang ein Musiksignal anliegt.
Schalten Sieden Verstärker ein (8).
Regeln Siedie Lautstärkeregler(2) auf das gewünschteNiveau.
BRIDGE MODUS BETRIEB:
Schließen Sie das Audiosignalam linken Eingang(15 oder16) an.
StellenSie den Betriebsmodusschalter(13) auf „Überbrückung“ein.
Schließen Sie den/die entsprechenden Lautsprecher an den Speakon
Überbrückungs-Ausgänge(12) an.
Vergewissern Sie sich, dass die Netzspannung 230V~ beträgt, bevor Sie
den Stecker indie geerdeteSteckdose stecken.
Stellen Sie beideLautstärkeregler (2) aufNull.
VergewissernSie sich, dassam linkenEingang ein Musiksignal anliegt.
Schalten Sieden Verstärker ein (8).
Regeln Sie die linken Lautstärkeregler (2) auf das gewünschte Niveau und
lassenSie denrechtenLautstärkeregler auf Null.
MONOBETRIEB:
Schließen Sie das Audiosignal am linkenEingang (15 oder 16) an.
Stellen Sie den Betriebsmodusschalter (13) auf „Mono“ ein.
Schließen Sie die entsprechenden Lautsprecher an den L+R Speakon
Ausgängen(11) an.
Vergewissern Sie sich, dass die Netzspannung 230V~ beträgt, bevor Sie
den Stecker in die geerdeteSteckdosestecken.
Stellen Sie beideLautstärkeregler (2) aufNull.
VergewissernSie sich, dassamEingang ein Musiksignal anliegt.
Schalten Sie den Verstärker ein (8).
Regeln Sie die linken Lautstärkeregler (2) auf das gewünschte Niveau und
lassenden rechtenLautstärkeregler auf Null.
®
®
®
TECHNISCHE DATEN
Power stereo8Ω (1kHz, THD+N<0,1%) 2x 650Wrms 2x 1050Wrms
Power stereo 4Ω (1kHz, THD+N<0,1%)
Power bridge 8Ω (1kHz, THD+N<0,1%)
Power mono 8Ω (1kHz, THD+N<0,1%)
Power mono 4Ω (1kHz, THD+N<0,1%)
Wirkungsgrad
Frequenzbereich(+/-1dB)
Eingangsempfindlichkeit 1000mV 1000mV
Eingangsimpedanz unsymmetrisch 10 kΩ 10 kΩ
Eingangsimpedanz symmetrisch
Rauschabstand (A-Weighted)
Dämpfungsfaktor (8Ω/1kHz)
Zuwachsrate
Kühlung
Signaleingänge
Lautsprecherausgänge Speakon
Stromversorgung
Abmessungen(BxHxT mm)
Gewicht (kg) 5,5kg 5,6kg
TechnischeÄnderungen können auch ohneVorankündigungvorgenommen werden!
Sie können sichdie neueste Versiondieses Benutzerhandbuchesvon unserer Website
herunterladen: www.beglec.com
Digit-2K2 Digit-3K6
2x1100Wrms 2x1800Wrms
1x2200Wrms 1x3600Wrms
2x650Wrms 2x1050Wrms
2x1100Wrms 2x1800Wrms
>90% >90%
5 - 36000Hz 5 - 36000Hz
20 kΩ 20 kΩ
>100dB >100dB
>300 >300
29V/uS 29V/uS
regelbarerLüfter regelbarer Lüfter
Symmetrische
XLR/Buchse
®
Symmetrische
AC230V/ 50Hz AC230V/ 50Hz
482x44x301(19"/1U) 482x44x301(19"/1U)
XLR/Buchse
Speakon
®
SYNQ
®
23/36 DIGIT Verstärkern
SYNQ
®
24/36 DIGIT Verstärkern
Page 15

ESPAÑOL MANUAL DE INSTRUCCIONES
PRECAUCI
Ó
N:
Para reducir el riesgo de electrocución
,
Gracias por la compra de este producto SYNQ®. Para sacartodo el rendimiento de las posibilidades de este
aparatoy por su propia seguridad, por favor lea este manualde instrucciones conmucho cuidado antes de
utilizaresta unidad.
CARACTERÍSTICAS
Esta unidad no interfiere con señales de radio. Este producto cumple las exigencias de las directrices
actuales Europeas y nacionales. Se ha establecido conformidad y las declaraciones y documentos
relevantesse han depositadopor el fabricante.
Una verdaderabrecha en tecnología de amplificadoresprofesionales:¡Synq introduceuna nuevagama de
AMPLIFICADORESDE CLASE D con una potenciaexcepcional y preciocompetitivo!
La sumamente alta eficacia, el soplo o ruidos minimosy unadisipación dela temperaturamaximason
las ventajas principales de estos PWM-AMPLIFICADORES!
Ahorros Increíbles de espacioparausos móviles: ¡sólo 1unidadde altura!
Muy ligeros:El dígit 2K2 =5,5kg, el Dígit3K6 = 5,6kg!
Muy potentes:
Potencia enmodo puenteado:
Todas lasprotecciones que ustedpueda imaginarpara el empleo profesional:
La respuesta de los graves esmuy potente, perfectotambién para subwoofers!
Filtro de corte 30Hz que elimina las frecuenciassubacústicas responsables deuna perdida depotencia.
3 modosdiferentes:estéreo,modo puente, modo mono (entradas unidas)
Entradas/salidas balanceadas en XLR + jack 6.3mm
2 conectoresSpeakon(salidas izquierdayderecha)
1 salida separada Speakon parael modo de puente
o Digit 2K2: 2x1100Wrms @ 4ohms
o Digit 3K6:2x1800Wrms @ 4ohms!
o Digit 2K2: 2200Wrms@8ohms
o Digit 3K6: 3600Wrms@8ohms
o Limitadoresdeseñal+ corriente
o Protecciónde sobrecarga
o Protecciónde cortocircuito
o Protecciónde corriente continua
o Proteccióntermica
o Proteccióncorrientealterna ,altasfrecuencias
o Arranquetemporizado
o …
ANTES DEL USO
Instruccionesimportantes:
Antes de utilizar esta unidad, por favor compruebe queno hay daños causados por el transporte. En caso
contrario,no utiliceeste aparato y consultea su vendedor.
Importante:
necesariopor parte delusuario seguirestrictamentelas instrucciones de seguridad yadvertencias deeste
manual.Cualquier daño causado por manejo inadecuado no estará sujeto a la garantía. El vendedor no
aceptaráresponsabilidad por ningún defectooproblemas que resultende ignorar este manual delusuario.
Mantenga estefolleto en un lugar seguro para consultas futuras. Si vende estainstalación, asegúrese de
añadir este manual de usuario.
Para proteger el medio ambiente, por favor intente reciclar el material de empaquetado tanto como sea
posible.
Este aparato salio de la empresaen perfectoestado y bien empaquetado. Es absolutamente
ESPAÑOL MANUAL DE INSTRUCCIONES
Verificar elcontenido:
Verificar la presenciade las partes siguientes:
Manualdeinstrucciones
Amplificador Digit
Cablede red
PRECAUCIONES DE USO
CAUTION
El simbolo de un rayo en el interior de un triangulo alerta sobre la presencia o el uso de
elementos no isolados dondeun voltajepeligroso constituye unriesgo grande paracausar una
eventual electrocución.
El punto de exclamación en el interior de un triangulo alerta al usuario sobre la presencia de
importantesinstrucciones de operación y de mantenimiento tenidas en cuenta en el manual de
uso.
Este símbolo significa : uso para elinteriorsolamente.
Estesímbolo significa : Lea lasinstrucciones.
Afín de evitar todo riesgo de incendio o electrocución, no exponer el aparato a la lluvia o ambiente
humedo.
Para evitar quese formecondensación en el interior, permita que la unidad se adapte a las temperaturas
circundantes cuando la lleve a una habitación cálida después de transporte. La condensación algunas
veces impide quela unidad funcionearendimientoplenoo puedeincluso causar daños.
Estaunidad es sólopara uso interior.
No coloque objetos metálicos o derrame líquidos dentro de la unidad. No colocar recipients llenos de
liquidos, como floreros, encima del aparato. Podría resultar descarga eléctrica o mal funcionamiento. Si
un objetoextraño entraraen la unidad, desconecteinmediatamente la fuentede alimentación.
Nocolocar fuentesde llamas, comovelas, encima delaunidad.
Nocubra ningunaaperturade ventilación yaque esto podríaresultar en sobrecalentamiento.
Evite su uso en ambientespolvorientosy limpiela unidad regularmente.
Mantengala unidadalejada de losniños.
Personas sinexperienciano deberían manejareste aparato.
Latemperaturamáximade ambiente es40°C. Nouse esta unidada temperaturas más elevadas.
Lasdistanciasmínimas alrededor del aparato para lasuficienteventilación son los 10cm.
Siempre desenchufe la unidad cuando no la use por un periodo de tiempo largo o antes de cambiar la
bombillao comenzar una reparación.
Lainstalación eléctrica debería serllevada a cabo sólopor personal cualificado,acordea las regulaciones
paraseguridad eléctrica y mecánica desu país.
Compruebeque el voltaje disponible no es superior al que aparece en elpanel trasero de launidad.
Enchufesiempreaccessible para desconectarla alimentación.
El cable de alimentación debería estar siempre en perfectas condiciones: apague el aparato
inmediatamentecuando el cablede alimentación esté roto o dañado
¡Nunca deje elcable de alimentación entrar en contactocon otroscables!
¡Cuando el interruptor está en la posición de reposo, esta unidad no se desconecta totalmente de la
alimentación!
Estainstalacióndebe ser conectadaa tierra para cumplir con las regulacionesde seguridad.
Para prevenir descargas eléctricas, no abra la tapa. No hay partes que puedan ser reparadas por el
usuario en suinterior.
Nunca repare un fusible o haga un bypass al fusible. ¡Siempre sustituya elfusible dañado por un fusible
del mismotipo y especificaciones eléctricas!
En el caso de problemas serios de manejo, deje de usar la instalación y contacte con su vendedor
inmediatamente.
Por favor, use el empaquetadooriginalcuando el aparato deba ser transportado.
Debidoa motivos de seguridad está prohibido hacermodificaciones sin autorizara la unidad.
no quite la cubierta superior . Ninguna pieza usable
adentro para el utilizador. Dirijase unicamente a personal
cualificado.
®
SYNQ
25/36 Amplificadores DIGIT
SYNQ
®
26/36 Amplificadores DIGIT
Page 16

ESPAÑOL MANUAL DE INSTRUCCIONES
ESPAÑOL MANUAL DE INSTRUCCIONES
CONSEJOSDE INSTALACION:
Instalarel aparato enun sitio con buena ventilación para no exponerla a altastemperaturaso humedad.
No colocar y utilizar el aparato mucho tiempo en sitios calientes (al lado de amplificadores, focos,…)
puede afectarsus prestaciones.
El aparato puede ser colocado en un rack de 19”. Fijar el aparato gracias a los 4 agujeros para tornillos
del panel frontal. Asegurarse dela dimension correctadelos tornillos(no provistos). Evitar lasvibraciones
y los golpes durante eltransporte.
Para evitar la condensación en el aparato, dejarlo adaptarse a la nueva temperatura despues del
transporte.La condensación puede alterar las prestaciones de esteaparato.
LIMPIEZA:
Límpiar con un trapo lijeramente humedo. No dejar caerse agua en el interior de la unidad. No utilizar
productosabrasivos (alcohol,…) que puedan dañar la platina.
Limpie las ranuras de ventilación regularmente con una aspiradora. Esto aumenta la capacidad de
refrigeraciónde losventiladoresdel amplificadory ayudaa prevenir elsobrecalentamiento.
CONEXIONES
Asegúrese de apagar la unidad antes de realizar cambios en el cableado. Para las entradas de señal,
recomendamosusar conexiones XLR. Usecables de señalde buena calidad para garantizar unacalidad de
sonido excelente. Para los altavoces debe usar las salidas Speakon®. En la descripción de la unidad
encontrará más información sobre cómoconectar el amplificador.
FUNCIONES (PANEL FRONTAL)
1. ABERTURAS DE VENTILACION: Durante su funcionamiento el amplificador produce calor. Los
ventiladores en el interior del amplificador tienen que poder evacuarlo lo mejor posible. Por eso es muy
importanteno tapar el orificiode ventilación ya queésto puede provocar un sobrecalentamiento. Limpie
las ranuras de ventilación con regularidad mediante una aspiradora. Esto aumenta la capacidad de
refrigeraciónde losventiladoresdel amplificadory ayudaa prevenir elsobrecalentamiento.
2. CONTROLES DE GAIN: éstos potenciometros se utilizan para controlar la sensibilidad de entrada del
amplificador.Se puedecontrolarcada canal separadamente.
Puede utilizar éstospotenciometros para ajustar el nivel sonoromáximode su instalación:
Gire losdos potenciometros de su amplificadorhacia la izquierda(3)
Ponga músicay averigue si los VUmetros de su mesa demezcla están a 0dB (la zonaroja seilumina
de vez en cuando)
Ajuste el nivel de salidaprincipal de su mesa de mezcla (Master) al máximo
Encienda lospotenciometros de Gaindel amplificador hasta quetengael nivelsonoro deseado
Asegurese de quenadie pueda tocar lospotenciometros de Gain de su amplificador.
Acaba de ajustar el nivel máximo que puede producir el DJ. Sus vecinos estarán contentos… (en
algunos casos elDJ noloserá )
Nota: En modo Mono y Bridge sólo el controlador del canal izquierdo es utilizado para ajustar la
sensibilidaddeentrada
3. LEDS OPERATION MODE: Estos LED indicanel modo de funcionamiento. El interruptor (13) del panel
traserosirve para seleccionar uno de estos 3 modos:
STEREO MODE: Ambos LED encendidos. Es el modo más habitual, con ambos canales
funcionandopor separado.
MONO MODE: Sólo seenciende el LED ‘MONO’. Es fundamentalmenteidéntico almodo estéreo,
pero las entradas de ambos canales están unidas, de modo quela salida será en mono. En este
caso sólo tendráque usar la entradadel canal izquierdo para llevar amboscanales de salida.
BRIDGE MODE: Sólo se enciende el LED ‘BRI’. Ambos canales están unidos en “modo puente”
4. LED DESEÑAL: Estos LEDindican quehay señal de música enlas entradas.
5. LED CLIP:Los LEDs se encenderán en lassituacionessiguientes:
6. LIMIT LED: LosLEDS se encenderán enlassituaciones siguientes:
7. PROTECTLED: el LEDde protección se iluminaenlos casossiguientes:
8. MAINS SWITCH: se utiliza para encender o apagar el amplificador. El amplificador se puede utilizar
para obtener una salida mono con una potencia superior.
Cuando la señal de salida ha alcanzado un nivel alto que puede causarla distorsión (el recorte).
Cuando los limitadores de señal trabajan para atenuar ladistorsión .
Mientras existe un cortocircuito en la sección de salida. Apagar el amplificador, comprobar el
altavoz y el cableado para remediar este(os)problema(s)
Cuando la potencia de salida excede los limites del amplificador, el LÍMIT LED se enciende
mientras que los limitadores de corrientes reducen la margen dinámica (corriente) de la salida y
restablecenun funcionamientoidoneo.¡En este caso tendraque disminuir laentrada!
Mientras existe un cortocircuito en la sección de salida. Apagar el amplificador, comprobar el
altavoz y el cableadopara remediar este(os) problema(s)
Durante elprimersegundo trashaberencendido el amplificador
Cuando la temperatura del modulode amplificación finalestá muy alta
En caso de averíatécnica:protección DC!
Cuando apagael amplificadorel "protectled" se ilumina durante un breve momento.
unossegundosdespues.
FUNCIONES (PARTE TRASERA)
9. Entrada de red eléctrica con la toma IEC y el soporte de fusible integrado, conecte el cable de red
suministradoaquí.
10. ABERTURAS DE VENTILACION: Durante su funcionamento el amplificador produce calor. Los
ventiladores en el interior del amplificador tienen que poder evacuarlo lo mejor posible. Por eso es muy
importanteno tapar el orificiode ventilaciónya que ésto puede provocarun sobrecalentamiento.
11. SALIDAS SPEAKON CH.A + CH.B: : utilice éstos conectores Speakon® para enchufar sus altavoces
(impedancia) >4ohm) in modo estéreo o mono. La conexión de
estos conectoreses éste:
POS (+) = PIN1+ et PIN2+ del conector Speakon
NEG (-) = PIN1- et PIN2- del conector Speakon
12. BRIDGE SPEAKON OUTPUT: use este conector Speakon® para
conectar su altavoz (impedancia >8ohm) en modo puente. El
cableadode esteconectores el siguiente:
POS(+) = Conector Speakon PIN1+y PIN2+
NEG(-) = Conector Speakon PIN1- y PIN2-
13. Interruptor OPERATION MODE: Sirve para establecer el modo de funcionamiento del amplificador.El
modo de funcionamiento más habitual es “estéreo”. Si necesita más potencia, puede usar el
amplificador en modo puente. En modo mono solamente se utilizará laentrada izquierda para pilotar las
dossalidas. Consultetambién el punto3para más información.
14. LOW CUT FILTER 30Hz: elimina las frecuencias subacústicas por debajo de los 30 Hz., estas son
solamenteresponsables de un consumo deenergia que noañadenada a lamusica.
15. JACK INPUTS: PUNTA:señal+ : ANILLA : señal - : CUERPO:senãl de tierrao massa
16. XLR INPUTS:Pin1: señal de tierra, Pin2: señal +, Pin3:señal -
SYNQ
®
27/36 Amplificadores DIGIT
SYNQ
®
28/36 Amplificadores DIGIT
Page 17

ESPAÑOL MANUAL DE INSTRUCCIONES
ESPAÑOL MANUAL DE INSTRUCCIONES
MODO DE USO
FUNCIONAMIENTOESTÉREO:
Conecte la señal audio a las entradas (15 o 16)
Ponga elinterruptorde modo de funcionamiento(13) en “estéreo”
Conecte los altavoces correspondientes a las salidas Speakon® L + R
(11)
Asegúrese de que la potencia sea de 230Vca antes de conectar el cable
de potencia a la rez con toma de tierra.
Ponga losdos gains(2) a cero
Asegúrese de que haya señal de músicaenla entrada
Encienda elamplificador(8)
Ajuste el gain deentrada(2) alvolumen deseado
FUNCIONAMIENTOENPUENTE:
Conecte la señalaudio ala entrada izquierda(15 o16)
Ponga elinterruptorde modo de funcionamiento (13)en “puente”
Conecte el/los altavoz/ces correspondiente/s a la salida Speakon® de
puente(12)
Asegúrese de que la potencia sea de 230Vca antes de conectar el cable
de potencia a la rezcon tomade tierra
Ponga losdos gains(2) a cero
Asegúrese de quehaya señal demúsica enla entradaizquierda
Encienda elamplificador(8)
Ajuste el gain de la entrada izquierda (2) al volumen deseado, deje el
canal derecho a cero.
FUNCIONAMIENTOMONO:
Conecte la señal audio a la entrada delcanal izquierdo (15 o16)
Establezca el interruptorde modo defuncionamiento(13) en “mono”
Conecte los altavoces correspondientes a las entradas Speakon®L+R
(11)
Asegúrese de que la potencia sea de 230Vca antes de conectar el cable
de potencia a la rezcon tomade tierra
Ponga losdos gains (2) a cero
Asegúrese de que haya señal de música en la entrada
Encienda elamplificador(8)
Ajuste el gain de la entrada izquierda (2) al nivel deseado, deje el canal
derecho a cero.
CARACTERISTICAS TECNICAS
Potenciaestéreo 8Ω (1kHz, THD+N<0,1%)
Potenciaestéreo 4Ω (1kHz, THD+N<0,1%)
Potenciapuente 8Ω (1kHz, THD+N<0,1%)
Potencia mono 8Ω (1kHz, THD+N<0,1%)
Potencia mono 4Ω (1kHz, THD+N<0,1%) 2x1100Wrms 2x1800Wrms
Eficacia de lapotencia >90% >90%
Resp.Frec. (+/-1dB) 5 - 36000Hz 5 - 36000Hz
Sensibilidaddeentrada
Resistencia de entradanobalanceada
Resistencia deentrada balanceada
Valor S/R (Carga en A)
Factoratenuante (8Ω/1kHz)
Tasa de virado 29V/uS 29V/uS
Refrigeración
Entradas de señal
Salidasde altavoz
Potencia
Dimensiones (LxHxP mm)
Peso (kg)
Toda la información está sujeta a cambios sin previo aviso
Puede descargarla últimaversión de este manual de usuarioennuestro sitio web:www.beglec.com
Digit-2K2 Digit-3K6
2x650Wrms 2x1050Wrms
2x1100Wrms 2x1800Wrms
1x2200Wrms 1x3600Wrms
2x650Wrms 2x1050Wrms
1000mV 1000mV
10 kΩ 10 kΩ
20 kΩ 20 kΩ
>100dB >100dB
>300 >300
Ventilador de
velocidadvariable
Jack/ XLR balanceado
AC230V/ 50Hz AC230V/ 50Hz
482x44x301(19"/1U) 482x44x301(19"/1U)
®
Speakon
5,5kg 5,6kg
Ventilador de
velocidadvariable
Jack/ XLR balanceado
Speakon
®
SYNQ
®
29/36 Amplificadores DIGIT
SYNQ
®
30/36 Amplificadores DIGIT
Page 18

PORTUGUÊS MANUAL DO UTILIZADOR
MANUAL DO UTILIZADOR
Parabéns e obrigado por ter adquirido este produto SYNQ®. Por favor leia atentamente este manual do
utilizador de forma a saber como utilizar esta unidade correctamente. Após ler estemanual, guarde-o num
lugar segurode formaa poder consultá-lo no futuro.
CARACTERÍSTICAS
Esta unidade está protegida contrainterferências rádio. Este produto cumpreas exigências impostas pelas
presentes directivasnacionais e europeias. A conformidadedeste produto foi comprovadae asdeclarações
e documentos relevantes foram efectuados pelo fabricante.
Uma verdadeirarevolução na tecnologia deamplificadores profissionais: aSynq apresenta umanova
gama de AMPLIFICADORES CLASSE D com potência excepcional e preçocompetitivo!
A extremamente alta eficiência, o reduzido desperdício de energia emuitopouca dissipaçãode calor são
asprincipais vantagens desta nova gama de amplificadores!
Poupanças incríveis deespaçoparaaplicações móveis: estrutura comapenas 1U de altura!
Peso extremamentemuito baixo: Digit 2K2 = 5,5kg, Digit 3K6 = 5,6kg!
Saída depotência extremamenteelevada:
Saída depotência em modobridge:
Todas asprotecçõesque possaimaginarpara uso profissional:
Resposta muito potente de baixos, perfeitos também parasubwoofers!
Filtros de cortedebaixos30Hz eliminamasfrequências subsónicas que consumemmuitaenergia.
3 Modosdiferentesde funcionamento:estéreo,modo bridge, modomono(entradas ligadas)
Entradas e saídasbalanceadas através de XLR + jacks6.3mm
2 ConectoresSpeakon(saída esquerda edireita)
1 SaídaSpeakon separada para modobridge.
ANTES DE UTILIZAR
Antes de utilizar esta unidadeverifique se existem danos provocados durante o transporte. Caso existam
danos aparentes, não utilize a unidade e contacteo seurevendedor.
Importante:
imprescindível que o utilizador siga as instruções de segurança e avisos descritos neste manual.
Quaisquer danos provocados por utilização incorrecta não serão cobertos pela garantia. O revendedor
não será responsável por quaisquer danos ou problemas causados pelo incumprimento das instruções
destemanual.
Guarde este manual num local seguro para consulta futura. Caso venda esta unidade, forneça este
manual.
Proteja o ambiente.Recicleo material destaembalagem.
o Digit 2K2:2x1100Wrms @ 4ohms!
o Digit 3K6:2x1800Wrms @ 4ohms!
o Digit2K2:2200Wrms @ 8ohms
o Digit 3K6: 3600Wrms@8ohms
o Limitadoresde sinal e de corrente
o Protecçãode sobrecarga
o Protecçãocontra curto-circuito
o ProtecçãoDC
o Protecçãotérmica
o Protecção AC, VHF
o Início suave
o …
Esta unidade deixou a nossa fábrica em perfeitas condições e devidamente embalada. É
PORTUGUÊS MANUAL DO UTILIZADOR
Verifique o conteúdo:
Certifique-seque a caixacontém os seguintes artigos:
Manual doutilizador
Amplificador Digit
Cabode alimentação
INSTRUÇÕES DE SEGURANÇA:
CAUTION
O símbolo composto por um triângulo equilátero com um relâmpago no interior alerta para a
presença de voltagem perigosa não isolada no interior do produto que poderá constituir risco
de choque eléctrico.
O símbolo composto por um triângulo equilátero com um ponto de exclamação alerta o
utilizadorpara a presençade instruções importantes de utilizaçãoe manutenção do produto.
Estesímbolo significa:utilizaçãounicamenteem espaços fechados
Este símbolo significa: Leiainstruções
Demodo a evitar risco de fogo ou choque eléctrico, nãoexponhaeste produto achuva ou humidade.
De forma a evitar a formação de condensação no interior da unidade, ao transportá-la para ambiente
quente aguarde algum tempo de modo a que haja uma ambientação à temperatura. A condensação
poderá afectar o desempenhodaunidade ouaté danificá-la.
Estaunidadedestina-se unicamente a utilizaçãoem espaços fechados.
Não introduza objectos de metal nem verta líquidos no interior do produto, correrá risco de choque
eléctrico ou poderá danificar o produto. Caso algum objecto estranho entre em contacto com o interior da
unidade,desligue-a de imediatoda corrente.
Nãocoloquechamas descobertas (tais comovelasacesas) sobre a unidade.
Nãocubra os orifíciosde ventilação ou a unidade poderásobreaquecer.
Evite locais com poeiras. Limpe aunidade regularmente.
Mantenhaesta unidadeforado alcance dascrianças.
Estaunidade deverá seroperadaunicamente por pessoas experientes.
Temperatura ambiente de funcionamento máxima é de 40ºC. Não utilize esta unidade a temperaturas
ambientesmaiselevadas.
As distânciasmínimaspara a ventilação suficiente são 10cm.
Desliguesempre aunidade da corrente quando nãoa utilizar durantelongos períodos de tempo ou antes
de efectuar manutenção.
Ainstalação eléctrica deve ser efectuada unicamente por pessoal qualificado,cumprindo os regulamentos
de segurança eminstalaçõeseléctricas e mecânicas do seu país.
Certifique-seque avoltagema utilizar nãoé superior à voltagem indicadano painel traseiro da unidade.
Atomadade corrente deverá permaneceracessívelpara quea unidade possa serdesligada da corrente.
O cabo de alimentação deverá estar sempre em perfeitas condições. Desligue a unidade e substitua
imediatamente o cabocaso este apresente algum dano.
Nuncapermita queestecabo entre em contactocomoutros cabos!
Quando o interruptor de potência está na posição de repouso, esta unidade não está desconectada
completamente da alimentação!
Estedispositivodeve ser ligadoà terraem ordem a cumprir com osregulamentosde segurança.
Deformaa nãocorrerrisco de choque eléctrico não abra acobertura da unidade. Não existem peças que
possamser substituídaspeloutilizador.
Nunca
Em caso de problemas sérios de funcionamento, interrompa a utilização da unidade e contacte
Casoseja necessário transportara unidadeutilize a embalagem original.
Por motivos desegurança, são proibidas quaisqueralteraçõesnãoautorizadasà unidade.
repareum fusível nem tenteoperaraunidade semfusível. Substitua
por outro com as mesmas características!
imediatamente o seu revendedor.
ATENÇÃO: De forma a evitar orisco dechoque eléctrico,
não remova peças da unidade. Não tente fazer
reparações.Contactepessoal qualificado
sempre
umfusível danificado
SYNQ
®
31/36 Amplificadores DIGIT
SYNQ
®
32/36 Amplificadores DIGIT
Page 19

PORTUGUÊS MANUAL DO UTILIZADOR
PORTUGUÊS MANUAL DO UTILIZADOR
GUIA DE INSTALAÇÃO:
Instalea unidadenumlocal bemventilado onde não exista exposição aaltas temperaturas ou humidade.
Colocar ou utilizar a unidade durante longos períodos de tempo perto de fontes de calor, tais como
amplificadores,holofotes,etc., irá afectaro desempenho daunidade e poderá até danificá-la.
Com adaptadores opcionais de 19” (informações adicionais mais adiante neste manual), esta unidade
pode ser montada em racks de 19”. Fixea unidadeutilizando os 4 orifícios do painel frontal.Certifique-se
que utiliza parafusos com a medida certa (os parafusos não são fornecidos). Evite pancadas e vibrações
durante o transporte.
Quando colocar aunidade numacabine ounuma mala, certifique-seque há ventilação demodo a permitir
aevacuação do calorproduzido pela unidade.
De forma a evitar a formação de condensação no interior da unidade, ao transportá-la para ambiente
quente aguarde algum tempo de modo a que haja uma ambientação à temperatura. A condensação
poderá afectaro desempenho daunidade.
LIMPEZA DA MESA DE MISTURA:
Utilize um pano limpo ligeiramente humedecido em água. Evite introduzir água dentro da unidade. Não
utilizelíquidos voláteiscomobenzeno ou diluente,irá danificar a unidade.
Limpe os orifícios de ventilação regularmente com um aspirador. Isto aumenta a capacidade de
arrefecimentodas ventoinhasdo amplificador e permiteevitar o sobreaquecimento.
LIGAÇÕES
Certifique-se que desliga a unidade antes de efectuar alterações nas ligações. Para as entradas de sinal
recomendamos que utilize ligações XLR. Utilize cabos de sinal de boa qualidade para garantir uma
excelente qualidade áudio. Para as colunas tem de utilizar as saídas Speakon®. Na descrição da unidade
irá encontrarmais informaçãocomo conectar o amplificador.
CONTROLOS E FUNÇÕES (Frente)
3. LEDS DE MODO DE OPERAÇÃO: Estes leds indicam o modo de operação. O Interruptor (13) no
painel traseiro é usado para escolher um desses 3 modospossíveis:
MODO ESTÉREO: Ambos os leds estão apagados. Este é o modo mais comum, ambos os
canais estão a trabalharindividualmente.
MODO MONO: o LED ‘MONO’ está aceso. Basicamente é idêntico ao modo estéreo mas as
entradas de ambos os canais estão unidas portanto a saída será mono. Neste caso precisa
apenas de usar a entrada docanal esquerdopara utilizar a saídados dois canais.
MODO BRIDGE: o LED ‘BRI’ está aceso. Ambos os canais estão ligados em “modo bridge” para
4. LEDS SIGNAL: Estes LEDs indicam que umsinal musical estápresentenas entradas.
5. LEDS CLIP: Os LEDsirão acendernas seguintes situações:
6. LEDS LIMIT: Os LEDs irão acendernas seguintes situações:
7. LEDS PROTECT: O LED de protecçãoestá ligado nas seguintes situações:
8. INTERRUPTOR ENERGIA: Usado para ligar / desligar o amplificador. Alguns segundos após ligar o
obter uma saída monocom potênciamuitomais elevada.
Quando osinal desaída tenha atingido umnível altoque possa resultar em distorção. (clipping).
Enquanto os limitadores de sinal estãoa funcionar para manter adistorção baixa.
Quando acorreuum curto-circuito na secção de saída. Desligue o amplificador,verifique a coluna
e cabos de ligação paraencontraro problema.
Quando a potência de saída excede o nível de segurança de funcionamento do amplificador, os
LEDs LIMIT estão acesos os limitadores de corrente entram em acção para reduzir o alcance
dinâmico (corrente) da saída e trazem de volta o amplificador para o seu nível de segurança de
funcionamento.Nestecaso é aconselhado que baixe o nível de entrada!
Quando acorreu um curto-circuito na secção de saída e o amplificador está no modo de
protecção. Desligue o amplificador verifique a coluna e cabos de ligação para encontrar o
problema.
Durante osprimeirossegundos apósligar oamplificador.
Quando a temperatura do aparelho se tornar demasiado alta.
Em casode defeitotécnico: Protecção DC!
Ao desligaro amplificador, o led “protect” liga-se por breves momentos.
amplificador este estarápronto afuncionar.
CONTROLOS E FUNÇÕES (Traseira)
1. ORIFÍCIOS DE VENTILAÇÃO: Durante o funcionamento é produzido calor que deveser dissipado. As
ventoinhas no interior do amplificador têmde poder evacuar o calor damaneiramais eficiente. Portanto,
de modo a evitar o sobreaquecimento, é muito importante que não cubra os orifícios de ventilação.
Limpe os orifícios de ventilação regularmente com um aspirador. Isto aumenta a capacidade de
arrefecimentodas ventoinhas do amplificador e permiteevitar o sobreaquecimento.
2. CONTROLOS DE GANHO: Estes potenciómetros permitem controlar a sensibilidade do amplificador.
Cada canal temo seu controlopróprio.
Pode utilizar estes controlospara definir o nível máximo desom dasua instalação:
Gire ambosos controlos no amplificador para aesquerda.
Reproduza alguma música e certifique-se que os indicadores VU na sua mesa de mistura se
encontrama 0dB. (De tempos a tempos azona vermelha acende-se)
Coloque a saída Master dasua mesa de mistura no nível máximo.
Abra os controlos de ganho do amplificador até que o nível máximo de som desejado seja
alcançado.
Certifique-seque ninguémconsegue aceder aos controlos deganho doamplificador.
Acabou de definir o nível máximo de som que o DJ poderá produzir. Os seus vizinhos ficarão
agradecidos... (em algunscasos o DJ nem porisso )
Nota:Nos modosMonoe Bridge, apenaso controlo deganho do canalesquerdo é utilizadopara ajustar
asensibilidade de entrada.
®
SYNQ
33/36 Amplificadores DIGIT
9. ALIMENTAÇÃO com encaixeIEC e suporte fusível integrado, conecte aqui o cabode alimentação.
10. VENTOINHA E ORIFÍCIOS DE VENTILAÇÃO: Durante o funcionamento é produzido calor que deve
ser dissipado. As ventoinhas no interior do amplificador têm de poder evacuar o calor da maneira mais
eficiente.Portanto, demodo a evitar o sobreaquecimento,é muito importante que não cubra os orifícios
de ventilação.
11. SAÍDAS SPEAKON CH.A + CH.B: Use estes conectores Speakon®para conectar as suas colunas
(impedância>4ohm) em modomono ou estéreo. As ligaçõessão daseguinte forma:
POS(+) = Conector Speakon PIN1+ e PIN2+
NEG(-) = Conector Speakon PIN1- e PIN2-
12. SAÍDA SPEAKON BRIDGE: Utilize este conector Speakon®para
conectara suacoluna (impedância> 8ohm) em modo bridge.
As ligações sãoda seguinteforma:
POS(+) = Conector Speakon PIN1+ e PIN2+
NEG(-) = Conector Speakon PIN1- e PIN2-
13. Interruptor OPERATION MODE: Permite definir o modo de
funcionamento do amplificador. O modo mais comum é o estéreo.
Se necessitar de mais potência pode utilizar o amplificador em
®
SYNQ
34/36 Amplificadores DIGIT
Page 20

PORTUGUÊS MANUAL DO UTILIZADOR
PORTUGUÊS MANUAL DO UTILIZADOR
modo bridge. Paramais informações consulte oponto 3.
14. FILTRO DE CORTE DE BAIXOS 30 Hz: Eliminaas frequências subsónicasindesejadas abaixo do 30
Hz. Na maioriadoscabosestas frequênciasapenasconsomem muiuta energia sem adiçãode qualquer
valor á música.
15. ENTRADASJACK: TIP: sinal+, Anel: sinal -, Manga: sinal Terra
16. ENTRADASXLR: Pino1: sinalTerra, Pino 2:sinal+, Pino 3: sinal -
COMO UTILIZAR
OPERAÇÃOEM ESTÉREO:
Conecte o sinaláudio ás entradas (15 ou 16)
Coloque ointerruptorde modo de operação (13) para “stereo”
Conecteas respectivas colunas ás saídas Speakon E+D (11)
Verifique se avoltagem corresponde a 230Vac antes deconectar o cabo á
tomadade corrente(com terra)
Coloqueos controlosde ganho (2) a zero
Verifique se existeumsinal musicalnas entradas.
Ligue oamplificador (8)
Ajuste os ganhos de entrada (2) para o níveldesejado
OPERAÇÃOEMBRIDGE:
Conecte o sinal áudio á entrada do canalesquerdo (15 ou 16)
Coloque ointerruptorde modo de operação(13) para“bridge”
Conectea(s) respectiva(s)coluna(s) á saídaSpeakon®Bridge(12)
Verifique se avoltagem corresponde a 230Vac antes deconectar o cabo á
tomadade corrente(com terra)
Coloque oscontrolosde ganho (2) a zero
Verifique se existe umsinal musicalna entrada esquerda
Ligue oamplificador (8)
Ajuste o ganho da entrada esquerda (2) para o nível desejado, deixe o
ganho do canaldireito azero
OPERAÇÃO EM MONO:
Conecteo sinaláudio áentrada do canalesquerdo (15 ou 16)
Coloque ointerruptorde modo de operação (13) para “mono”
Conecteas respectivas colunas ás saídasSpeakon®E+D(11)
Verifique se avoltagem corresponde a 230Vac antes deconectar o cabo á
tomadade corrente(com terra)
Coloque oscontrolosde ganho (2) a zero
Verifique se existeum sinal musical na entrada
Ligue oamplificador (8)
Ajuste o ganho da entrada esquerda (2) para o nível desejado, deixe o
ganho do canaldireito azero
ESPECIFICAÇÕES
Pot,estéreo 8Ω (1kHz, THD+N<0,1%)
Pot,estéreo 4Ω (1kHz, THD+N<0,1%)
Pot. bridge 8Ω (1kHz, THD+N<0,1%)
Pot. mono 8Ω (1kHz, THD+N<0,1%)
Pot. mono 4Ω (1kHz, THD+N<0,1%) 2x1100Wrms 2x 1800Wrms
Eficácia eléctrica >90% >90%
Resp. Freq. (+/-1dB)
Sensibilidadedeentrada
Impedânciadeentrada sembalanço
Impedânciadeentradabalanceado
Rácio S/R (A-Weighted)
Dampingfactor (8Ω/1kHz) >300 >300
SlewRate 29V/uS 29V/uS
Arrefecimento Vent. Veloc. Variável Vent. Veloc. Variável
Entradas de sinal
Saídas de coluna
Alimentação
Dimensões LxHxD mm)
Peso (kg)
Podefazer downloaddaversão maisrecente deste manual no nosso site: www.beglec.com
Estas informações estão sujeitas a alteraçõessemavisoprévio
Digit-2K2 Digit-3K6
2x650Wrms 2x1050Wrms
2x1100Wrms 2x1800Wrms
1x2200Wrms 1x3600Wrms
2x650Wrms 2x1050Wrms
5 - 36000Hz 5 - 36000Hz
1000mV 1000mV
10 kΩ 10 kΩ
20 kΩ 20 kΩ
>100dB >100dB
XLR/JackBalanceado XLR/Jack Balanceado
AC230V/ 50Hz AC230V/ 50Hz
482x44x301(19"/1U) 482x44x301(19"/1U)
®
Speakon
5,5kg 5,6kg
Speakon
®
SYNQ
®
35/36 Amplificadores DIGIT
SYNQ
®
36/36 Amplificadores DIGIT
 Loading...