

Page 1
WWW.BRITEQ-LIGHTING.COM
Operation Manual
Mode d'emploi
Gebruiksaanwijzing
Bedienungsanleitung
Manual de instrucciones
EN
FR
NL
DU
ES
Reproduction or publication of the content, even portions, in any manner, without express permission of the publisher, is prohibited.
Copyright © 2008 by BEGLEC cva.
V1.0
Page 2

EN - DISPOSAL OF THE DEVICE
Dispose of the unit and used batteries in an environment friendly manner
according to your country regulations.
FR - DÉCLASSER L’APPAREIL
Débarrassez-vous de l’appareil et des piles usagées de manière écologique
Conformément aux dispositions légales de votre pays.
NL - VERWIJDEREN VAN HET APPARAAT
Verwijder het toestel en de gebruikte batterijen op een milieuvriendelijke
manier conform de in uw land geldende voorschriften.
DU - ENTSORGUNG DES GERÄTS
Entsorgen Sie das Gerät und die Batterien auf umweltfreundliche Art und
Weise gemäß den Vorschriften Ihres Landes.
ES - DESHACERSE DEL APARATO
Reciclar el aparato y pilas usadas de forma ecologica conforme a las
disposiciones legales de su pais.
PT - COMO DESFAZER-SE DA UNIDADE
Tente reciclar a unidade e as pilhas usadas respeitando o ambiente e em
conformidade com as normas vigentes no seu país.
Page 3
ENGLISH OPERATION MANUAL
OPERATION MANUAL
Thank you for buying this BRITEQ®product. To take full advantage of all possibilities, please read these
operating instructions very carefully.
FEATURES
This unit is radio-interference suppressed. This product meets the requirements of the current European and
national guidelines. Conformity has been established and the relevant statements and documents have been
deposited by the manufacturer.
Professional aluminium Powered 4-bar: 4x 2kW (Max
Sliding mechanism: you can distribute your projectors evenly over the bar.
Locking DMX in/outputs with POWER/DMX-present indicator
4 Digit LED display with 4 buttons for easy menu navigation:
DMX address setting: each channel can have its own address
Each channel can be separately switched in dimmer or switch mode
Separate dimmer presets with memory function for each channel (no controller needed)
4 High quality mains sockets (schuko)
Standard 35mm top section adapter included (28mm TV-spigot optionally available)
Mains power input with Neutrik Powercon and automatic fuse
Individual channel fuses with “blown fuse” detectors
All channels equipped with 40A triacs for increased reliability
BEFORE USE
Check the contents:
Check that the carton contains the following items:
DB-150 powered bar
4 sets of bolts and nuts used to install projectors
1 Stand adapter 35mm
1 Power cable
1 Lifting eye bold
User manual
Some important instructions:
Before you start using this unit, please check if there’s no transportation damage. Should there be any, do
not use the device and consult your dealer first.
Important: This device left our factory in perfect condition and well packaged. It is absolutely necessary
for the user to strictly follow the safety instructions and warnings in this user manual. Any damage caused
by mishandling is not subject to warranty. The dealer will not accept responsibility for any resulting defects
or problems caused by disregarding this user manual.
Keep this booklet in a safe place for future consultation. If you sell the fixture, be sure to add this user
manual.
To protect the environment, please try to recycle the packing material as much as possible.
= 4,6kW/20A)
tot
ENGLISH OPERATION MANUAL
The exclamation point within the equilateral triangle is intended to alert the user to the presence
of important operation and maintenance (servicing) instructions in the literature accompanying
this appliance.
This symbol means: indoor use only
This symbol means: Read instructions
This symbol means: Safety Class II appliance
This symbol means: Lamp Control Gear
The device is suitable for mounting on standard flammable surfaces. Standard flammable
surfaces include building materials such as wood and wood-based materials more than 2mm
thick.
To prevent fire or shock hazard, do not expose this appliance to rain or moisture.
To avoid condensation to be formed inside, allow the unit to adapt to the surrounding temperatures when
bringing it into a warm room after transport. Condense sometimes prevents the unit from working at full
performance or may even cause damages.
This unit is for indoor use only.
Don’t place metal objects or spill liquid inside the unit. No objects filled with liquids, such as vases, shall be
placed on this appliance. Electric shock or malfunction may result. If a foreign object enters the unit,
immediately disconnect the mains power.
No naked flame sources, such as lighted candles, should be placed on the appliance.
Prevent use in dusty environments and clean the unit regularly.
Keep the unit away from children.
Inexperienced persons should not operate this device.
Maximum save ambient temperature is 40°C. Don’t use this unit at higher ambient temperatures.
Always unplug the unit when it is not used for a longer time or before you start servicing.
The electrical installation should be carried out by qualified personal only, according to the regulations for
electrical and mechanical safety in your country.
Check that the available voltage is not higher than the one stated on the rear panel of the unit.
The socket inlet shall remain operable for disconnection from the mains.
The power cord should always be in perfect condition: switch the unit immediately off when the power cord
is squashed or damaged. It must be replaced by the manufacturer, its service agent or similarly qualified
persons in order to avoid a hazard
Never let the power-cord come into contact with other cables!
This appliance must be earthed to in order comply with safety regulations.
In order to prevent electric shock, do not open the cover. There are no user serviceable parts inside.
Never repair a fuse or bypass the fuse holder. Always replace a damaged fuse with a fuse of the same
type and electrical specifications!
In the event of serious operating problems, stop using the appliance and contact your dealer immediately.
Please use the original packing when the device is to be transported.
Due to safety reasons it is prohibited to make unauthorized modifications to the unit.
MAINTENANCE
Clean by wiping with a polished cloth slightly dipped with water. Avoid getting water inside the unit. Do not
use volatile liquids such as benzene or thinner which will damage the unit.
SAFETY INSTRUCTIONS:
CAUTION
The lightning flash with arrowhead symbol within the equilateral triangle is intended to alert the
use or the presence of un-insulated “dangerous voltage” within the product’s enclosure that may
be of sufficient magnitude to constitute a risk of electric shock.
BRITEQ
®
CAUTION: To reduce the risk of electric shock, do not
remove the top cover. No user-serviceable parts inside.
Refer servicing to qualified service personnel only.
1/31 DB-150
OVERHEAD RIGGING
Important: The installation must be carried out by qualified service personal only. Improper
installation can result in serious injuries and/or damage to property. Overhead rigging requires
extensive experience! Working load limits should be respected, certified installation materials
should be used, the installed device should be inspected regularly for safety.
Make sure the area below the installation place is free from unwanted persons during rigging, de-rigging
and servicing.
Locate the fixture in a well ventilated spot, far away from any flammable materials and/or liquids. The
fixture must be fixed at least 50cm from surrounding walls.
BRITEQ
®
2/31 DB-150
Page 4
ENGLISH OPERATION MANUAL
IMPORTANT NOTE:
2000
ENGLISH OPERATION MANUAL
The device should be installed out of reach of people and outside areas where persons may walk by or be
seated.
Before rigging make sure that the installation area can hold a minimum point load of 10times the device’s
weight.
Always use a certified safety cable that can hold 12times the weight of the device when installing the unit.
This secondary safety attachment should be installed in a way that no part of the installation can drop
more than 20cm if the main attachment fails.
The device should be well fixed; a free-swinging mounting is dangerous and may not be considered!
Don’t cover any ventilation openings as this may result in overheating.
The operator has to make sure that the safety-relating and machine-technical installations are approved by
an expert before using them for the first time. The installations should be inspected every year by a skilled
person to be sure that safety is still optimal.
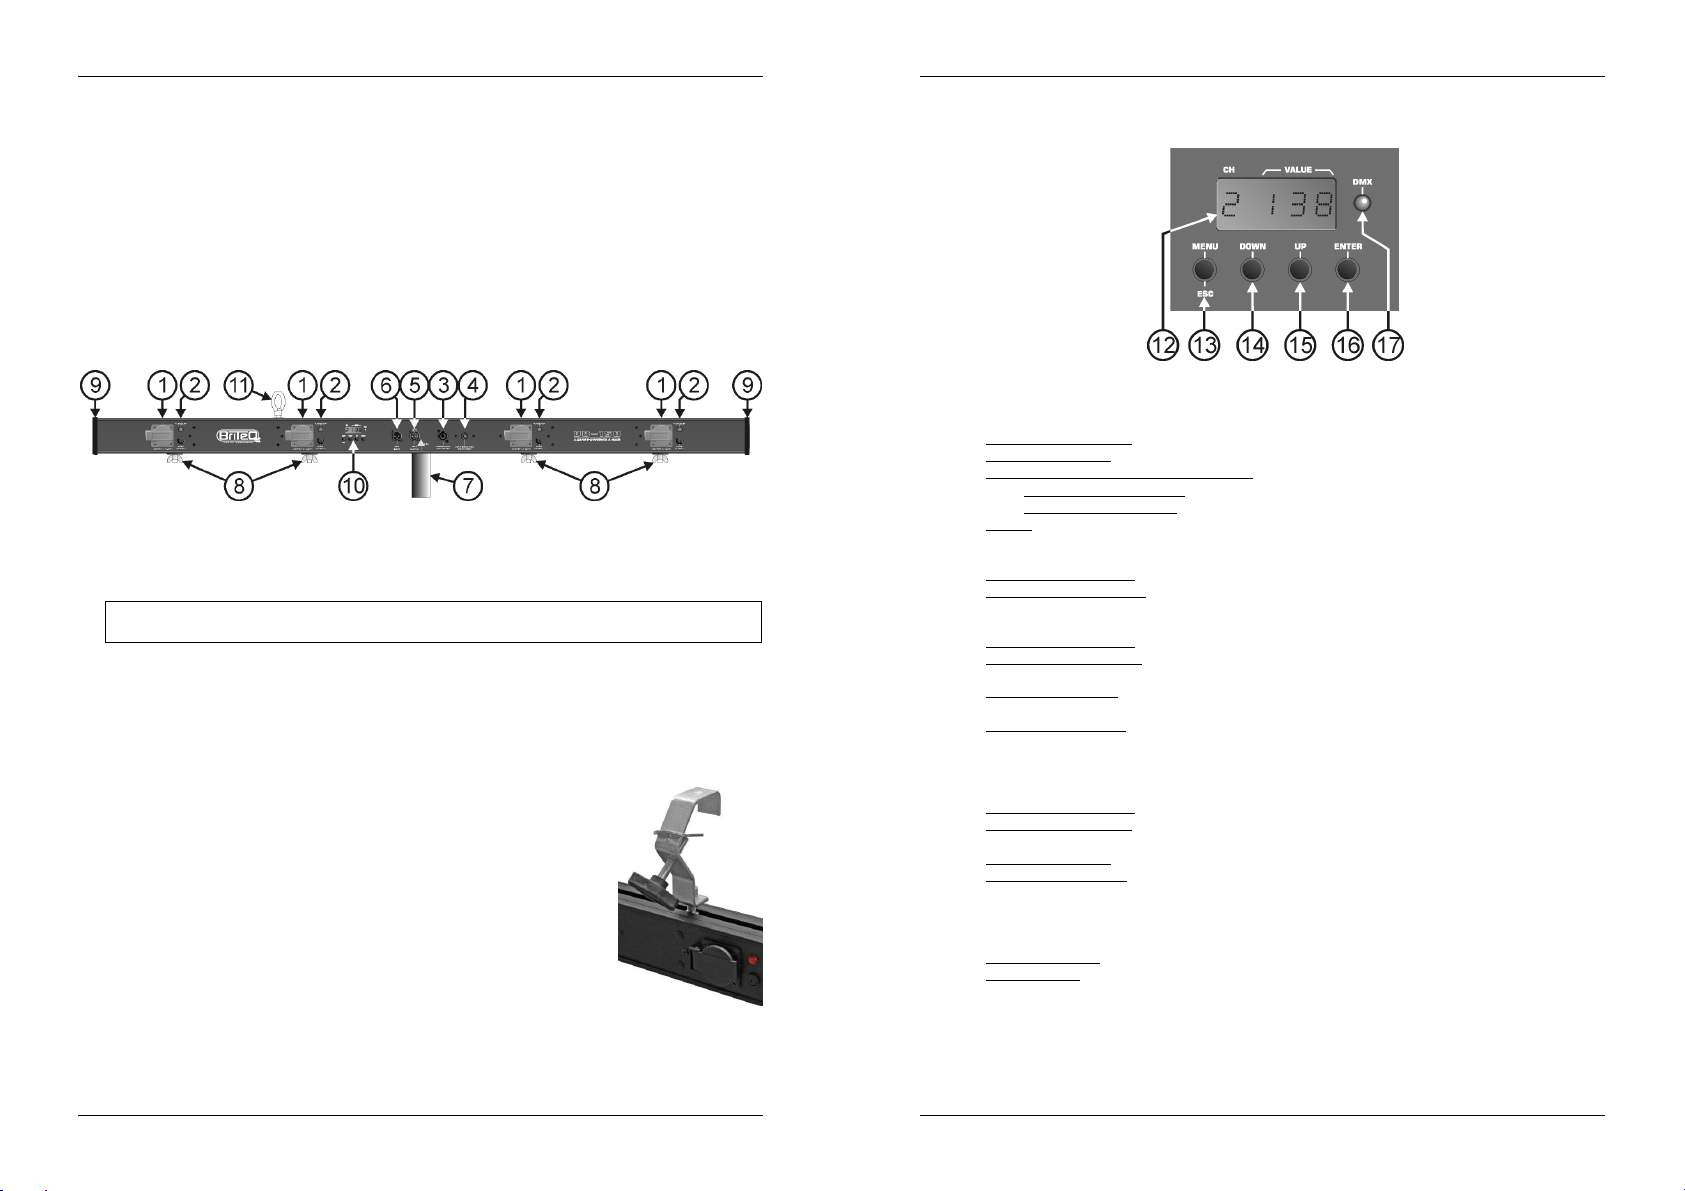
FUNCTIONS
1. CHANNEL OUTPUTS: Each channel output has its own output socket to connect any resistive and/or
inductive projector(s) or small light effects.
2. CHANNEL FUSES: Each channel is equipped with a fuse and “blown fuse” detector. The detector lights
up when the channel fuse is blown. Always replace the blown fuse with a fuse that has the same
characteristics! (250V/8A).
It’s very important to know that the maximum load for each channel is rated at
Watts. However the total load for all 4 channels may not exceed 20A or 4600Watts!
3. POWER INPUT: mains input, equipped with a Neutrik Powercon®, make sure the local voltage is 230Vac
and the projectors (and/or light effects) are properly connected to the channel output sockets (1) before
you connect an earthed mains cable to this input. The maximum total load is 20A or 4600Watts.
4. INPUT FUSE: This is an automatic circuit breaker. When the fuse is blown, first locate and solve the
problem that caused the fuse to blow. When the problem is solved, simply push the button to reset the
circuit breaker.
5. DMX OUTPUT: 3pin female XLR-connector used to connect the DB-150 with the next unit in the DMX
chain.
6. DMX INPUT: 3pin male XLR-connector used to connect universal DMX-cables.
This input receives instructions from a DMX-controller.
7. STAND ADAPTER: used to put the DB-150 easily on top of a light stand. Two
different stand adapters can be used:
35mm adapter: (included) to be used on stands with a standard 35mm
top section.
28mm TV-Spigot: (optional) to be used on stands equipped with a TV-
spigot adapter on top.
8. SLIDING MECHANISM: used to distribute your projectors evenly over the DB-
150. On the top rail you can install 2 clamps to fix the DB-150 easily under any
ALU-truss. Also see number 9 for more information.
9. END CAP: To install the bolts/nuts (needed to fix the projectors) and stand
adapter you have to remove this end cap on one side of the unit: simply
unscrew the 4 screws remove the cap put the nuts/bolts and/or stand
adapter in the sliding rail put the cap back in place fix the 4 screws
done!
10. CONTROL PANEL: multifunctional display + 4 buttons to navigate the setup menu. See the numbers
below.
11. SAFETY EYE: used to attach an optional safety cable when the DB-150 is fixed under ALU-truss (using
clamps, also see n°8)
12. DISPLAY: Shows the software version shortly after switching on the unit. Further shows the information
related to the selected function or working mode. The left digit shows the channel number, the 3 other
digits show the channel status:
In the ADDRess menu: channel + DMX address is shown, ranging from 001 to 512
In the MODE menu: working mode is shown. (“DIM” = dimmer mode * “SW” = switch mode)
In the ALONE menu and standard display: channel output status is shown.
Channel in dimmer mode: dimmer percentage, ranging from 0% to 100%
Channel in switch mode: “ON” = output 100% * “OFF” = output 0%
Curve : shows the dimming curve that is used
13. MENU BUTTON: Please refer to the menu structure to understand the different menus. These are the
different possibilities:
Browse the main menu: Press the MENU button together with the UP/DOWN buttons.
Return to the main menu: Press the MENU button to return to the main menu. (escape function)
14. DOWN BUTTON: Please refer to the menu structure to understand the different menus. These are the
different possibilities:
Browse the main menu: Press the MENU button together with the UP/DOWN buttons.
In the ADDRess menu: Press the DOWN button to lower the DMX address of the selected
channel. (press the button for a longer time to increase the speed)
In the MODE menu: Press the DOWN button to put the selected channel in switch or dimmer
mode.
In the ALONE menu: Press the DOWN button to lower the dimmer value (0~100%) when the
selected channel is in dimmer mode. (press the button for a longer time to increase the speed).
15. UP BUTTON: Please refer to the menu structure to understand the different menus. These are the
16. ENTER BUTTON: Please refer to the menu structure to understand the different menus. These are the
17. DMX PRESENT LED: this LED indicates if the unit receives a DMX-signal on the DMX-input(n°2):
When the selected channel is set to switch mode, you can turn the output on or off.
different possibilities:
Browse the main menu: Press the MENU button together with the UP/DOWN buttons.
In the ADDRess menu: Press the UP button to increase the DMX address of the selected channel.
(press the button for a longer time to increase the speed)
In the MODE menu: Press the UP button to put the selected channel in dimmer or switch mode.
In the ALONE menu: Press the UP button to increase the dimmer value (0~100%) when the
selected channel is in dimmer mode. (press the button for a longer time to increase the speed).
When the selected channel is set to switch mode, you can turn the output on or off.
different possibilities:
In the main menu: Press the ENTER button to select the desired sub menu.
In a sub menu: Press the ENTER button to browse through the 4 channels.
LED is on: no DMX-signal detected on the input.
LED is blinking: DMX-signal detected on the input
BRITEQ
®
3/31 DB-150
BRITEQ
®
4/31 DB-150
Page 5
ENGLISH OPERATION MANUAL
ENGLISH OPERATION MANUAL
MENU STRUCTURE…
MAIN MENU:
This menu is used to select one of the 4 sub menus.
Press the MENU button together with the UP/DOWN buttons to browse the menu.
Press the ENTER button to select the desired submenu.
ADDRESS SUBMENU:
This menu is used to set the DMX address of the 4 output channels. Each channel can be set to a unique
DMX-address. You can even give 2 or more channels the same DMX address.
Press the ENTER button to browse through the submenu.
Once you selected the desired channel, press the UP/DOWN buttons to set the address
Press the MENU button to return to the main menu.
MODE SUBMENU:
This menu is used to set the working mode of the 4 output channels.
DIM mode: use this mode when you connect lamps (projectors) to this output channel. You will be able to
dim the output smoothly between 0% and 100%.
SWITCH mode: use this mode when you connect small light effects to this output channel. You can toggle
the output between ON (100% output) and OFF (0% output). Now you can switch small light effects on/off
with your DMX-controller.
Press the ENTER button to browse through the menu.
Once you selected the desired channel, press the UP/DOWN buttons to set the working mode.
Press the MENU button to return to the main menu.
ALONE SUBMENU:
This is the standalone mode; all output levels can be set directly on the control panel so you don’t need a
controller. It’s important to know that the output settings are preserved when the unit is disconnected from
the mains. This makes the DB-150 very useful to illuminate exhibition booths etc.
Press the ENTER button to browse through the menu.
Once you selected the desired channel, press the UP/DOWN buttons to set the output level.
Press the MENU button to return to the main menu.
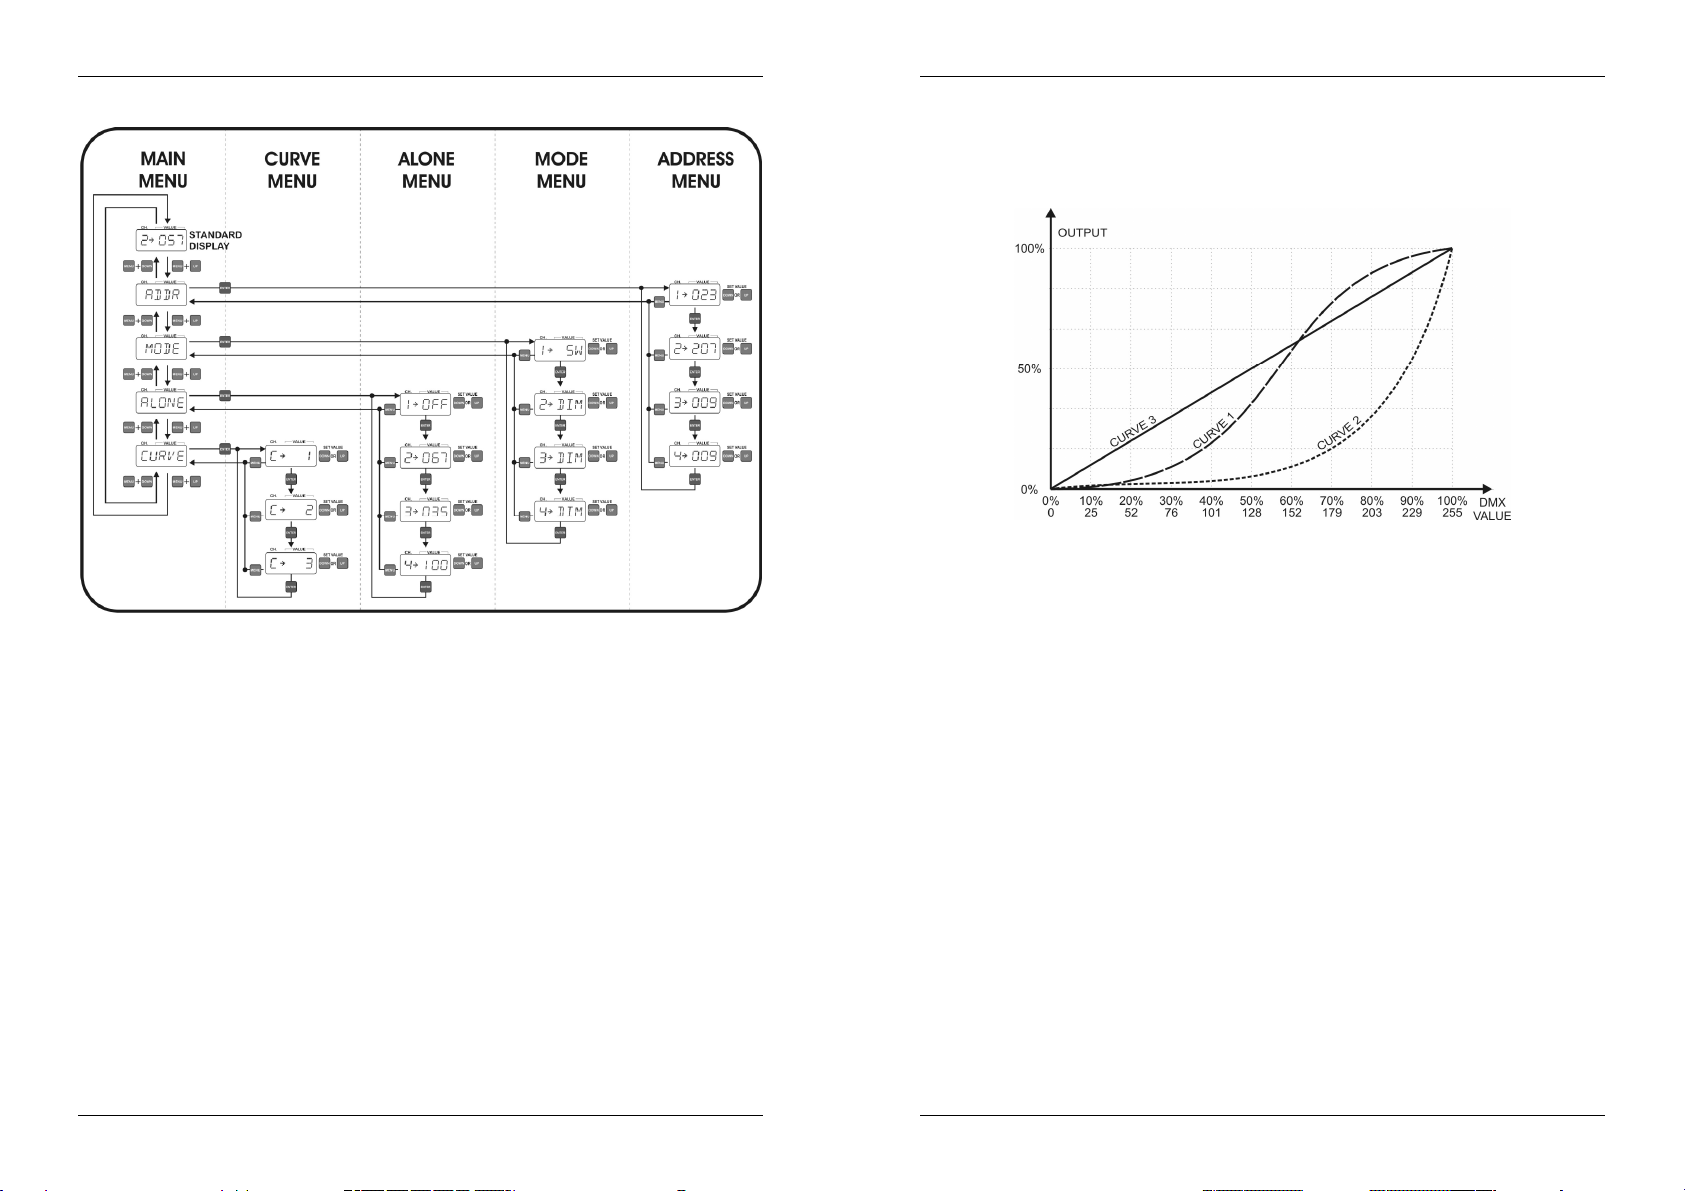
CURVE SUBMENU:
This menu is used to choose one of the 3 preprogrammed dimming curves. Please check the diagram with
the dimming curves to see which curve suits most for your needs. Of course you can also simply try the
dimmer curves… .
SPECIFICATIONS
Power Input: 230Vac / 20A maximum (4600Watts)
Power outputs: 4x 230Vac / 2000Watts
Channel Fuses: 250V/8A (size 20x5mm)
Input fuse: 20A “auto reset” thermal circuit breaker
DMX input: 3pin XLR male
DMX output: 3pin XLR female
Size: 150 x 9 x 7 cm
Weight: 5,0 kg
Every information is subject to change without prior notice
You can download the latest version of this user manual on our website: www.beglec.com
BRITEQ
®
5/31 DB-150
BRITEQ
®
6/31 DB-150
Page 6
FRANCAIS MODE D’EMPLOI
MODE D’EMPLOI
Nous vous remercions d’avoir acheté ce produit BRITEQ®. Veuillez lire ce mode d’emploi très attentivement
afin de pouvoir exploiter toutes les possibilités de cet appareil.
EN VOUS INSCRIVANT POUR LA LETTRE D’INFORMATION VOUS SEREZ TOUJOURS
TENU AU COURANT DES DERNIERES NOUVELLES CONCERNANT NOS PRODUITS:
NOUVEAUTES, ACTIONS SPECIALES, JOURNEES PORTES OUVERTES, ETC.
SURFEZ SUR: WWW.BEGLEC.COM ET INSCRIVEZ-VOUS
FRANCAIS MODE D’EMPLOI
INSTRUCTIONS DE SECURITE:
ATTENTION:afin de réduire le risque d’électrocution,
CAUTION
La flèche dans un triangle met l'utilisateur en garde contre la présence de haute tension sans
isolation dans l'appareil, ce qui peut causer un risque d'électrocution.
Un point d'exclamation dans un triangle prévient de la présence d'instructions relatives au
fonctionnement et à la maintenance se trouvant dans le manuel fourni avec l'appareil.
n’enlevez jamais le couvercle de l’appareil. Il n’y a aucune
pièce à l’intérieur de l’appareil que vous puissiez
remplacer vous-même. Confiez l’entretien uniquement à
des techniciens qualifiés.
CARACTERISTIQUES
Cet appareil ne produit pas d’interférences radio. Il répond aux exigences nationales et européennes. La
conformité a été établie et les déclarations et documents correspondants ont été déposés par le fabricant.
Barre d'alimentation professionnelle en aluminium, à 4 sorties : 4 x 2kW (Maxtot = 4,6 kW/20A)
Mécanisme coulissant : vous pouvez répartir vos projecteurs sur toute la longueur de la barre.
Entrées/sorties DMX avec verrouillage et indicateurs de présence de tension secteur et de signaux DMX.
Affichage LED avec 4 boutons pour une navigation facile dans le menu:
Adressage DMX : chaque canal peut avoir sa propre adresse
Chaque canal peut être commuté séparément en mode gradateur ou interrupteur on/off.
Préréglage du gradateur pour chaque canal avec fonction mémoire (un contrôleur externe n'est pas
nécessaire)
4 prises de haute qualité (schuko)
Adaptateur pour haut de statif de 35mm inclus. (Ergot TV standard de 28 mm disponible en option)
Alimentation équipée d’un connecteur Neutrik Powercon et d'un fusible automatique.
Un fusible pour chaque canal, avec détecteurs de fusibles ayant disjoncté.
Tous les canaux sont équipés de triacs de 40A afin d'améliorer la fiabilité.
AVANT L’UTILISATION
Vérifiez le contenu:
Vérifiez si l’emballage contient bien les articles suivants:
La barre DB-150
4 jeux de boulons/écrous pour installer les projecteurs
1 adaptateur de haut de mât 35mm
1 câble d’alimentation
1 boulon à oeil
Mode d’emploi
Quelques instructions importantes:
Avant d’utiliser cet appareil, assurez-vous de l’absence de dommages liés au transport. En cas de
dommages, n’utilisez pas l’appareil et contactez le vendeur.
Important: Cet appareil a quitté notre usine en parfaite condition et bien emballé. Il est primordial que
l’utilisateur suive les instructions de sécurité et avertissements inclus dans ce manuel. La garantie ne
s’applique pas en cas de dommage lié à une utilisation incorrecte. Le vendeur ne prend pas la
responsabilité des défauts ou de tout problème résultant du fait de n’avoir pas tenu compte des mises en
garde de ce manuel.
Conservez ce manuel dans un endroit sûr pour toute consultation future. Si vous vendez l’appareil,
assurez-vous d’y joindre ce manuel également.
Afin de protéger l’environnement, merci de recycler les emballages autant que possible.
Ce symbole signifie: uniquement pour usage à l'intérieur.
Ce symbole signifie : Lire le mode d’emploi.
Ce symbole signifie: appareil construit selon les normes de sécurité classe II
Cet appareil peut être monté sur des surfaces inflammables courantes. Font partie de ces
surfaces inflammables courantes, les matériaux de construction tels que le bois et des
matériaux à base de bois d'une épaisseur supérieure à 2 mm.
Afin d’éviter tout risque d’incendie ou de décharge électrique, ne pas exposer cet appareil à la pluie ou
l’humidité.
Pour éviter la formation de condensation à l’intérieur de l’appareil, patientez quelques minutes pour laisser
l’appareil s’adapter à la température ambiante lorsqu’il arrive dans une pièce chauffée après le transport.
La condensation empêche l'appareil de fonctionner manière optimale et peut même l’endommager.
Cet appareil est destiné à une utilisation à l’intérieur uniquement.
Ne pas insérer d’objet métallique ou renverser de liquide dans l’appareil. Aucun objet contenant un liquide,
tels que des vases, ne peut être placé sur cet appareil. Cela risquerait de provoquer une décharge
électrique ou un dysfonctionnement. Si un corps étranger est introduit dans l’appareil, déconnectez
immédiatement de la source d’alimentation.
Aucune source de flamme nue, telle que des bougies allumées, ne peut être placée sur l'appareil.
Ne pas utiliser l'appareil dans un environnement poussiéreux et le nettoyer régulièrement.
Ne pas laisser l'appareil à portée des enfants.
Les personnes non expérimentées ne doivent pas utiliser cet appareil.
La température ambiante maximale d’utilisation de l’appareil est de 45°C. Ne pas l’utiliser au-delà de cette
température.
Débranchez toujours l’appareil si vous ne l’utilisez pas de manière prolongée ou avant d’entreprendre des
réparations.
Les installations électriques ne peuvent être faites que par du personnel qualifié et conformément aux
règlements de sécurité électrique et mécanique en vigueur dans votre pays.
Assurez-vous que la tension d’alimentation de la source d’alimentation de la zone dans laquelle vous vous
trouvez ne dépasse pas celle indiquée à l’arrière de l’appareil.
La prise sera toujours accessible pour que le cordon secteur puisse être enlevé à chaque moment.
Le cordon d’alimentation doit toujours être en condition parfaite. Mettez immédiatement l’unité hors tension
si le cordon est écrasé ou endommagé. Pour éviter tout risque de choc électrique, le cordon doit être
remplacé par le constructeur, son agent ou un technicien qualifié.
Ne laissez jamais le cordon d’alimentation entrer en contact avec d’autres câbles !
L’appareil doit être à la masse selon les règles de sécurité.
Utilisez toujours des câbles appropriés et certifiés lorsque vous installez l'appareil.
Pour éviter toute décharge électrique, ne pas ouvrir l’appareil. En dehors des ampoules et du fusible
principal, il n’y a pas de pièces pouvant être changées par l’utilisateur à l’intérieur.
Ne jamais réparer ou court-circuiter un fusible. Remplacez systématiquement un fusible endommagé par
un fusible de même type et ayant les mêmes spécifications électriques !
En cas de problèmes de fonctionnement sérieux, arrêtez toute utilisation de l’appareil et contactez votre
revendeur immédiatement.
Utilisez l’emballage d’origine si l’appareil doit être transporté.
BRITEQ
®
7/31 DB-150
BRITEQ
®
8/31 DB-150
Page 7

FRANCAIS MODE D’EMPLOI
FRANCAIS MODE D’EMPLOI
Pour des raisons de sécurité, il est interdit d’apporter une quelconque modification à l’unité non
spécifiquement autorisée par les parties responsables.
ENTRETIEN
Nettoyez l’appareil à l’aide d’un chiffon doux, légèrement humide. Evitez d’introduire de l’eau à l’intérieur de
l’appareil. N’utilisez pas de produits volatils tels que le benzène ou le 'thinner' qui peuvent endommager
l’appareil.
INSTALLATION EN HAUTEUR
Important: L’installation doit être faite par du personnel qualifié uniquement. Une installation
incorrecte peut causer des blessures sévères et/ou endommager l’appareil. L’installation en
hauteur exige de l’expérience ! Les limites de charge doivent être scrupuleusement respectées, du
matériel d’installation certifié doit être utilisé, et l’appareil installé doit subir des inspections de
sécurité régulièrement.
Assurez-vous que la zone au-dessous du lieu d’installation ne comporte pas de personnes non
concernées lors de l’installation, la désinstallation ou la maintenance.
Placez l’appareil dans un endroit bien ventilé, éloigné de tout matériau ou liquide inflammable. L’appareil
doit être fixé à 50cm minimum des murs situés à proximité.
L’appareil doit être hors de portée du public et en dehors des zones de passage de personnes ou des
zones où le public est installé.
Avant l’installation, assurez-vous que la zone d’installation pourra supporter, en son point de fixation, un
minimum de 10 fois le poids de l’appareil.
Utilisez systématiquement un câble de sécurité qui peut supporter 12 fois le poids de l’appareil lors de
l’installation. Ce câble de sécurité secondaire doit être installé de manière à ce qu’aucune partie de
l’appareil ne puisse descendre de plus de 20 cm si le support principal tombe.
L’appareil doit être bien fixé, un montage à balancement est dangereux et ne devrait pas être pris en
considération !
Ne pas couvrir les orifices de ventilation pour éviter tout risque de surchauffe.
L’utilisateur doit s’assurer que les installations techniques et de sécurité sont bien approuvées par un
expert avant la première utilisation. Les installations doivent être inspectées chaque année par du
personnel qualifié pour assurer une sécurité optimale.
FONCTIONS
1. SORTIES DES CANAUX : Chaque sortie de canal a sa propre prise de sortie, à laquelle on peut
raccorder n'importe quel projecteur ou de petits effets lumineux, qu'il soit de type inductif et/ou résistif.
2. FUSIBLES DE CANAL: chaque canal est équipé d'un fusible et d'un détecteur de fusible ayant
disjoncté. Le détecteur s'allume lorsque le fusible du canal concerné a disjoncté. Il faut toujours
remplacer le fusible qui a sauté par un fusible qui possède les mêmes caractéristiques ! (250V/8A
rapide)
Remarque : Il est très important de savoir que la charge maximale pour chaque canal est limitée à 2000
Watt. Cependant, la charge totale pour l'ensemble des 4 canaux ne peut pas dépasser 20A ou 4600
Watt !
3. ALIMENTATION : arrivée générale de l'alimentation secteur, équipée d'une prise Neutrik Powercon®, il
est impératif de s'assurer que la tension de service locale est de 230 V (CA) et que les projecteurs (et/ou
les petits effets lumineux) sont correctement raccordés aux prises de sortie des canaux (1) avant de
raccorder un cordon d'alimentation secteur avec prise de terre à cette entrée. La charge totale maximum
est de 20A ou 4600 watts.
4. FUSIBLE PRINCIPAL : il s'agit d'un coupe-circuit automatique. Quand le fusible a disjoncté, il faut
d'abord localiser le problème et apporter une solution à ce qui a provoqué le déclenchement du fusible.
Quand ce problème a trouvé sa solution, poussez simplement sur le bouton pour remettre le coupecircuit en fonction.
5. SORTIE DMX: connecteur XLR mâle à 3 broches qui permet de connecter une barre d'alimentation DB-
150 à l'unité suivante de la chaîne DMX.
6. ENTREE DMX: connecteur XLR mâle à 3 broches qui permet de connecter des câbles XLR universels.
Cette entrée reçoit des instructions provenant d'un contrôleur DMX.
7. ADAPTATEUR DE STATIF : est utilisé pour fixer facilement la barre d'alimentation DB-150 en haut d'un
statif pour projecteurs. Deux adaptateurs de statif peuvent être utilisés:
adaptateur de 35mm (inclus): doit être utilisé avec des statifs dont le sommet est équipé au
standard 35 mm ;
Ergot TV de 28 mm : doit être utilisé avec des statifs dont le sommet est
8. MECANISME COULISSANT : ce mécanisme vous permet de répartir au mieux
9. COUVERCLES LATERAUX : Pour installer les boulons et les écrous
10. PANNEAU DE CONTROLE : écran à fonctions multiples + 4 boutons pour
11. BOULON DE SECURITE: est utilisé pour y attacher un câble de sécurité optionnel quand le DB-150 est
12. ECRAN : il affiche brièvement la version du software après
équipé d'un ergot TV.
vos projecteurs sur toute la longueur de la barre d'alimentation DB-150. Sur la
partie du dessus vous pouvez installer 2 crochets pour suspendre le DB-150 à
une structure de pont. Se reporter aussi au numéro 9 pour plus d'informations.
(nécessaires pour fixer les projecteurs), ainsi que l'adaptateur de statif, vous
devez enlever un couvercle latéral de l'un des deux côtés de l'appareil :
dévissez simplement les 4 vis enlevez le couvercle latéral introduisez les
écrous et le boulons et/ou l'adaptateur de statif dans le rail en les faisant
coulisser remettez le couvercle latéral en place remettez les 4 vis c'est
terminé !
naviguer dans le menu de configuration. Se reporter aux numéros ci-dessous.
fixé en-dessous d’une structure de pont.
que l'on ait mis l'appareil sous tension, puis il affiche les
informations relatives à la fonction sélectionnée ou au mode
actif. Le caractère de gauche affiche le numéro de canal, les 3
autres affichent le statut du canal :
dans le menu ADDR : l'adresse du canal est affichée, la
plage de chiffres pouvant aller de 001 à 512 ;
dans le menu MODE : le mode actif est affiché. (“DIM” =
mode gradateur * “SW” = mode switch) ;
dans le menu ALONE et dans l'écran standard : le statut
du canal de sortie est affiché :
si le canal est en mode gradateur : affichage du
pourcentage de puissance du gradateur allant de
0% à 100% ;
si le canal est en mode switch : “oN” = sortie 100% * “oFF” = sortie 0%.
dans le menu CURVE : affiche le type de courbe de gradation que vous avez sélectionné
13. BOUTON MENU : s'il vous plaît, se référer à la structure du menu pour comprendre les différents
menus. Voici les différentes possibilités :
si l'on parcourt le menu principal : appuyez sur le bouton du MENU en même temps que sur les
boutons UP/DOWN ;
pour retourner au menu principal : appuyez sur le bouton du MENU pour retourner vers le menu
14. BOUTON DOWN : s'il vous plaît, se référer à la structure du menu pour comprendre les différents
principal (fonction escape) ;
menus. Voici les différentes possibilités :
si l'on parcourt le menu principal : appuyez sur le bouton du MENU en même temps que sur les
boutons UP/DOWN ;
dans le menu d'adressage : appuyez sur le bouton DOWN pour donner au canal une adresse
DMX qui correspond à un nombre plus petit (appuyez plus longtemps sur le bouton pour
augmenter la vitesse de défilement) ;
BRITEQ
®
9/31 DB-150
BRITEQ
®
10/31 DB-150
Page 8

FRANCAIS MODE D’EMPLOI
FRANCAIS MODE D’EMPLOI
dans le menu mode : appuyez sur le bouton DOWN pour faire passer le canal sélectionné en
mode switch ou dimmer ;
dans le menu ALONE : appuyez sur le bouton DOWN pour diminuer la valeur du gradateur
(0~100%) quand le canal sélectionné est en mode gradateur (appuyez plus longtemps sur le
bouton pour augmenter la vitesse de défilement) ; quand le canal sélectionné est en mode switch,
15. BOUTON UP : s'il vous plaît, se référer à la structure du menu pour comprendre les différents menus.
vous pouvez l'éteindre ou allumer.
Voici les différentes possibilités :
si l'on parcourt le menu principal : appuyez sur le bouton du MENU en même temps que sur les
boutons UP/DOWN ;
dans le menu d'adressage : appuyez sur le bouton UP pour donner au canal une adresse DMX
qui correspond à un nombre plus élevé (appuyez plus longtemps sur le bouton pour augmenter la
vitesse de défilement) ;
dans le menu mode : appuyez sur le bouton UP pour faire passer le canal sélectionné en mode
gradateur ou interrupteur;
dans le menu ALONE : appuyez sur le bouton UP pour augmenter la valeur du gradateur
(0~100%) quand le canal sélectionné est en mode gradateur (appuyez plus longtemps sur le
bouton pour augmenter la vitesse de défilement) ; quand le canal sélectionné est en mode switch,
16. BOUTON ENTER : s'il vous plaît, se référer à la structure du menu pour comprendre les différents
vous pouvez l'allumer/éteindre.
menus. Voici les différentes possibilités :
dans le menu principal : appuyez sur le bouton ENTER pour sélectionner le sous-menu désiré ;
dans un sous-menu : appuyez sur le bouton ENTER pour naviguer entre les 4 canaux ;
17. LED DETECTRICE DE SIGNAL DMX : cette LED indique si l'appareil reçoit bien un signal DMX sur
l'entrée DMX (n°2) :
si la LED est éclairée : aucun signal DMX n'est décelé sur l'entrée.
si la LED clignote : un signal DMX est bien décelé sur l'entrée.
STRUCTURE DU MENU …
MENU PRINCIPAL :
ce menu est utilisé pour sélectionner l'un des 4 sous-menus :
appuyez sur le bouton du MENU en même temps que sur les boutons UP/DOWN pour parcourir le
menu ;
appuyez sur le bouton ENTER pour sélectionner le sous-menu désiré.
SOUS-MENU D'ADRESSAGE :
ce menu est utilisé pour fixer l'adresse DMX des 4 canaux de sortie. Chaque canal peut être réglé sur une
adresse DMX unique. Vous pouvez même attribuer la même adresse DMX à 2 canaux ou plus.
appuyez sur le bouton ENTER pour naviguer dans le menu ;
une fois que vous avez sélectionné le canal désiré, appuyez sur les boutons UP/DOW N pour en fixer
l'adresse ;
appuyez sur le bouton MENU pour retourner vers le menu principal.
SOUS-MENU MODE :
ce menu est utilisé pour fixer le mode de fonctionnement des 4 canaux de sortie :
mode DIM : ce mode est à utiliser quand vous connectez des lampes (projecteurs) à ce canal de sortie.
Vous serez en mesure de tamiser la puissance de sortie en continu, de 0 % à 100 %.
mode SWITCH : ce mode est à utiliser quand vous connectez de petits effets lumineux à ce canal de
sortie. Vous pourrez ainsi inverser la sortie entre ON (100 % de la puissance) et OFF (0 % de la
puissance). Vous serez ainsi en mesure de mettre en ou hors service de petits effets lumineux via votre
contrôleur DMX.
appuyez sur le bouton ENTER pour naviguer dans le menu ;
une fois que vous avez sélectionné le canal désiré, appuyez sur les boutons UP/DOW N pour en fixer
le mode de fonctionnement ;
appuyez sur le bouton MENU pour retourner vers le menu principal.
SOUS-MENU ALONE :
il s'agit du mode indépendant ('stand alone') : tous les niveaux de sortie peuvent être réglés à même le
panneau de contrôle, de sorte que l'on n'a pas besoin d'un contrôleur externe. Il est important de savoir que
ces réglages des niveaux de sortie sont gardés en mémoire même quand l'appareil est déconnecté du
réseau. Cette caractéristique fait de la barre d'alimentation DB-150 un outil très utile pour éclairer des stands
d'expositions, etc …
appuyez sur le bouton ENTER pour naviguer dans le menu ;
une fois que vous avez sélectionné le canal désiré, appuyez sur les boutons UP/DOW N pour en fixer
le niveau de sortie ;
appuyez sur le bouton MENU pour retourner vers le menu principal.
SOUS-MENU CURVE: Ce menu est utilisé pour sélectionner l'une des 3 courbes préprogrammées affectant
l'effet de gradation (dimmer). Veuillez s'il vous plaît vous reporter au diagramme montrant les courbes de
gradation afin de choisir la courbe qui répond le mieux à vos besoins. Bien entendu, vous pouvez tout aussi
bien essayer les différentes courbes de gradations …
BRITEQ
®
11/31 DB-150
BRITEQ
®
12/31 DB-150
Page 9

FRANCAIS MODE D’EMPLOI
SPÉCIFICATIONS
Alimentation: 230Vac / 20A maximum (4600Watts).
Sorties: 4x 230Vac / 2000Watts
Fusibles/canal: 250V/8A (20x5mm)
Fusible d’entré: 20A thermique automatique
Entrée DMX: connecteur XLR mâle à 3 broches
Sortie DMX: connecteur XLR femelle à 3 broches
Dimensions: 150 x 9 x 7 cm
Poids: 5kg
Chacune de ces informations peut être modifiée sans avertissement préalable. Vous pouvez
télécharger la dernière version de ce mode d’emploi de notre site Web: www.beglec.com
NEDERLANDS HANDLEIDING
GEBRUIKSAANWIJZING
Hartelijk dank voor de aankoop van dit BRITEQ®product. Om ten volle te kunnen profiteren van alle
mogelijkheden en voor uw eigen veiligheid, gelieve de aanwijzingen zeer zorgvuldig te lezen voor U begint
het apparaat te gebruiken.
DOOR U OP ONZE MAILINGLIJST IN TE SCHRIJVEN ONTVANGT U STEEDS DE
LAATSTE INFORMATIE OVER ONZE PRODUKTEN: NIEUWIGHEDEN, SPECIALE
KARAKTERISTIEKEN
In dit apparaat is radio-interferentie onderdrukt. Dit product voldoet aan de gangbare Europese en nationale
voorschriften. Het is vastgesteld dat het apparaat er zich aan houdt en de desbetreffende verklaringen en
documenten zijn door de fabrikant afgegeven.
Professionele aluminium 4-bar voorzien van interne dimmerpacks: 4x 2kW (Max
Schuifmechanisme zorgt steeds voor een perfecte verdeling van de projectoren op de bar.
DMX in/uitgangen voorzien van vergrendeling en POWER/DMX-present indicator.
4 Digit LED display met 4 toetsen voor gemakkelijke menu navigatie:
DMX adres instellingen: individueel DMX adres voor elk kanaal mogelijk!
Elk kanaal kan afzonderlijk als dimmer of switchpack worden ingesteld
Dimmer niveaus instelbaar per kanaal met geheugenfunctie (geen externe controller nodig)
Voorzien van 4 degelijke stopcontacten.
Standaard 35mm adapter inbegrepen (28mm TV-spigot in optie verkrijgbaar)
Stroomvoorziening dmv Neutrik Powercon en automatische zekering.
Individuele kanaalzekeringen met “blown fuse” detectie.
Alle kanalen zijn uitgerust met 40A triacs voor verhoogde betrouwbaarheid.
ACTIES, OPENDEURDAGEN, ENZ.
SURF NAAR: WWW.BEGLEC.COM
= 4,6kW/20A)
tot
BRITEQ
EERSTE INGEBRUIKNAME
Controleer de inhoud:
Kijk na of de verpakking volgende onderdelen bevat:
DB-150 power bar
4 sets bouten en moeren om projectoren te installeren
Een 35mm lichtstatief adapter
1 stroomkabel met Neutrik Powercon®aansluiting
1 oogbout
Gebruiksaanwijzing
Belangrijke instructies:
Controleer voor het eerste gebruik van het apparaat of het tijdens het transport beschadigd werd. Mocht er
schade zijn, gebruik het dan niet, maar raadpleeg eerst uw dealer.
Belangrijk: Dit apparaat verliet de fabriek in uitstekende staat en goed verpakt. Het is erg belangrijk dat
de gebruiker de veiligheidsaanwijzingen en raadgevingen in deze gebruiksaanwijzing uiterst nauwkeurig
volgt. Elke schade veroorzaakt door verkeerd gebruik van het apparaat valt niet onder de garantie. De
dealer aanvaardt geen verantwoordelijkheid voor mankementen en problemen die komen door het
veronachtzamen van deze gebruiksaanwijzing.
Bewaar deze brochure op een veilige plaats om hem in de toekomst nogmaals te kunnen raadplegen.
Indien U het apparaat verkoopt, denkt U er wel aan om de gebruiksaanwijzing bij te voegen.
Om het milieu te beschermen, probeer zoveel mogelijk het verpakkingsmateriaal te recycleren.
®
13/31 DB-150
BRITEQ
®
14/31 DB-150
Page 10

NEDERLANDS HANDLEIDING
WAARSCHUWING:
NEDERLANDS HANDLEIDING
VEILIGHEIDSVOORSCHRIFTEN:
CAUTION
De bliksempijl die zich in een gelijkbenige driehoek bevindt is bedoeld om u te wijzen op het
gebruik of de aanwezigheid van niet-geïsoleerde onderdelen met een “gevaarlijke spanning” in
het toestel die voldoende kracht heeft om een risico van elektrocutie in te houden.
Het uitroepteken binnen de gelijkbenige driehoek is bedoeld om de gebruiker erop te wijzen dat
er in de meegeleverde literatuur belangrijke gebruik en onderhoudsinstructies vermeld staan
betreffende dit onderdeel.
Dit symbool betekent: het apparaat mag enkel binnenhuis worden gebruikt.
Dit symbool betekent: Lees de handleiding!
Dit symbool betekent: Klasse II apparaten
Dit symbool betekent: Controletoestel voor lamp
Het toestel is geschikt om gemonteerd te worden op standaard ontvlambare oppervlakten.
Standaard ontvlambare oppervlakten omvatten bouwmaterialen zoals hout en houtbevattende
materialen van meer dan 2mm dik
Stel dit apparaat niet bloot aan regen of vocht, dit om het risico op brand en elektrische schokken te
voorkomen.
Om de vorming van condensatie binnenin te voorkomen, laat het apparaat aan de omgevingstemperatuur
wennen wanneer het, na het transport, naar een warm vertrek is overgebracht. Condensatie kan het
toestel soms verhinderen perfect te functioneren. Het kan soms zelfs schade aan het apparaat
toebrengen.
Gebruik dit apparaat uitsluitend binnenshuis.
Plaats geen stukken metaal en mors geen vocht binnen in het toestel om elektrische schokken of storing
te vermijden. Objecten gevuld met water, zoals bvb. Vazen, mogen op dit apparaat worden geplaatst.
Indien er toch een vreemd voorwerp of water in het apparaat geraakt, moet U het direct van het lichtnet
afkoppelen.
Open vuur, zoals brandende kaarsen, mogen niet op het apparaat geplaatst worden.
Zorg dat het toestel niet in een stoffige omgeving wordt gebruikt en maak het regelmatig schoon.
Houd het apparaat uit de buurt van kinderen.
Dit apparaat mag niet door onervaren personen bediend worden.
De maximum veilige omgevingstemperatuur is 40°C. Gebruik het apparaat dus niet bij hogere
temperaturen.
Trek altijd de stekker uit wanneer het apparaat gedurende langere tijd niet wordt gebruikt of alvorens met
de onderhoudsbeurt te beginnen.
De elektrische installatie behoort uitsluitend uitgevoerd te worden door bevoegd personeel, volgens de in
uw land geldende regels betreffende elektrische en mechanische veiligheid.
Controleer dat de beschikbare spanning niet hoger is dan die aangegeven op de achterzijde van het
toestel.
Het stopcontact zal steeds vrij toegankelijk blijven zodat de stroomkabel op elk moment kan worden
uitgetrokken.
De elektrische kabel behoort altijd in uitstekende staat te zijn. Zet het apparaat onmiddellijk af als de
elektrische kabel gekneusd of beschadigd is. De kabel moet vervangen worden door de fabrikant zelf, zijn
dealer of vergelijkbare bekwame personen om een brand te voorkomen.
Laat de elektrische draad nooit in contact komen met andere draden.
Volgens de veiligheidsvoorschriften moet deze installatie geaard worden.
Om elektrische schokken te voorkomen, moet U de behuizing niet openen. Er zitten geen onderdelen in
die door de gebruiker moeten worden onderhouden.
Repareer nooit een zekering en overbrug de zekeringhouder nooit. Vervang een beschadigde zekering
steeds door een zekering van hetzelfde type en met dezelfde elektrische kenmerken.
Ingeval van ernstige problemen met het bedienen van het toestel, stopt U onmiddellijk het gebruik ervan.
Contacteer uw dealer voor een eventuele reparatie.
mogelijk te vermijden mag u nooit de behuizing
verwijderen. Er bevinden zich geen onderdelen in het
toestel die u zelf kan herstellen. Laat de herstellingen
enkel uitvoeren door een bevoegde technicus.
Om het risico op elektrocutie zoveel
Gebruik best de originele verpakking als het toestel vervoerd moet worden.
Om veiligheidsredenen is het verboden om ongeautoriseerde modificaties aan het toestel aan te brengen.
ONDERHOUD
Reinig het toestel met een zacht, lichtjes bevochtigd doek. Vermijd water te morsen in het toestel. Gebruik
nooit vluchtige producten zoals benzeen of thinner, dit kan het toestel beschadigen.
OPHANGEN VAN HET APPARAAT
Belangrijk: De installatie van het toestel mag uitsluitend door bekwaam onderhoudspersoneel
uitgevoerd worden. Onjuiste plaatsing kan ernstige letsels en/of schade aan eigendommen tot
gevolg hebben. Het ophangen vergt veel ervaring. U behoort de grenzen te respecteren aan de
werklast; erkende installeringmaterialen moeten worden gebruikt; de veiligheid van het
geïnstalleerde toestel moet regelmatig worden gecontroleerd.
Overtuig U ervan dat het gebied onder installatieplaats vrij is van ongewenste personen tijdens het
plaatsen, het weghalen en het onderhoud.
Installeer het toestel op een goed geventileerde plaats, ver van brandbare stoffen en/of vloeistoffen. Het
toestel moet worden bevestigd op minstens 50 cm van de omringende muren.
Het toestel moet worden geïnstalleerd buiten het bereik van iedereen en weg van plaatsen waar men mag
lopen en zitten.
Alvorens tot plaatsen over te gaan, moet men controleren dat de minimum puntbelasting van de
installatieplaats 10 keer het gewicht van het toestel bedraagt.
Gebruik bij het installeren van het toestel altijd een gewaarmerkte veiligheidskabel die 12 keer het gewicht
van het toestel kan dragen. Deze bijkomende veiligheidsbevestiging moet zo worden aangebracht dat
geen deel van het toestel meer dan 20 cm vallen kan als de hoofdbeveiliging faalt.
Het apparaat moet goed worden vastgezet; aan een vrij zwaaiende montage mag zelfs niet gedacht
worden.
Bedek geen ventilatieopeningen, anders zou dit oververhitting tot gevolg kunnen hebben.
De gebruiker moet er zich van verzekeren dat de installaties met betrekking tot de veiligheid en de
technische mechaniek door een expert zijn goedgekeurd alvorens ze voor de eerste keer te gebruiken. Elk
jaar moeten de installaties worden gekeurd door een vakman om te controleren of de veiligheid nog steeds
perfect is.
FUNCTIES
1. KANAALUITGANGEN: Elk kanaal heeft zijn eigen stopcontact waarop U resistieve of inductieve
projectoren of kleine lichteffecten kan aansluiten.
2. KANAALZEKERINGEN : Elk kanaal heeft tevens zijn eigen zekering en een “blown fuse” detector.
Deze detector licht op wanneer de kanaalzekering is gesprongen. Vervang deze gesprongen zekering
steeds door een exemplaar met dezelfde elektrische eigenschappen! (250V/8A snel)
Opmerking: Het is erg belangrijk te weten dat elk kanaal een maximaal vermogen van 2000W kan
3. POWER INGANG: netsnoer, uitgerust met een Neutrik Powercon®, verzeker U ervan dat het
beschikbare stopcontact 230Vac levert en de projectoren (en/of lichteffecten ) correct op de uitgangen
(1) werden aangesloten voor U de geaarde netsnoer aan deze ingang verbindt. Het maximaal toegelaten
totale vermogen is 20A of 4600Watt.
4. HOOFDZEKERING: Dit is een automatische zekering. W anneer de zekering is gesprongen, lokaliseer
en los dan eerst het probleem op dat ervoor gezorgd heeft dat de zekering gesprongen is. Wanneer het
probleem opgelost is, druk dan simpelweg op de knop om de zekering te resetten.
5. DMX UITGANG: deze 3pin vrouwelijke XLR-aansluiting wordt gebruikt om de DB-150 met het volgende
DMX-apparaat in de keten te verbinden.
leveren. Het totale vermogen mag 20A of 4600Watts nooit overschrijden!
BRITEQ
®
15/31 DB-150
BRITEQ
®
16/31 DB-150
Page 11

NEDERLANDS HANDLEIDING
NEDERLANDS HANDLEIDING
6. DMX INGANG: deze 3pin mannelijke XLR-aansluiting wordt gebruikt voor het aansluiten van universele
DMX-kabels. Deze ingang ontvangt zijn instructies van een DMX-controller.
7. STATIEF ADAPTER: wordt gebruikt om de DB-150 gemakkelijk te plaatsen op de top van een
lichtstatief. 2 verschillende statief adapters kunnen gebruikt worden:
35mm adapter (meegeleverd): wordt gebruikt bij statieven met een
standaard 35mm Topsectie
28mm TV-Spigot(optie): wordt gebruikt bij statieven die uitgerust zijn
8. GLIJMECHANISME: wordt gebruikt om uw projectoren gelijk te verdelen over
9. AFSLUITKAP: Om de bouten/moeren (noodzakelijk om de projectoren te
10. CONTROLEPANEEL: Multifunctionele display + 4 toetsen om te navigeren in het setup menu. Bekijk de
11. VEILIGHEIDSOOG: wordt gebruikt om een optionele veiligheidskabel te bevestigen wanneer de DB-150
12. DISPLAY: bij het aanzetten van het toestel wordt even de
13. MENU TOETS: Bekijk de structuur van het menu om de verschillende menu’s te begrijpen. Dit zijn de
14. DOWN TOETS: Bekijk de structuur van het menu om de verschillende menu’s te begrijpen. Dit zijn de
15. UP TOETS: Bekijk de structuur van het menu om de verschillende menu’s te begrijpen. Dit zijn de
met een TV-Spigot adapter op de top.
de DB-150. Aan de bovenkant van de rail kunt 2 bevestigingshaken installeren
zodat u de DB-150 gemakkelijk aan een brugstructuur kunt hangen. Kijk ook
naar n°9 voor meer informatie.
bevestigen) en de statief adapter te installeren dient u deze afsluitkap te
verwijderen aan één zijde van het toestel: schroef simpelweg de 4 schroeven
weg verwijder de afsluitkap plaats de bouten/moeren en/of statief adapter
in het glijprofiel plaats de afsluitkap terug op zijn plaats bevestig de 4
schroeven klaar!
nummers hieronder
in een brugstructuur wordt opgehangen (zie ook N° 8 voor het gebruik met haken)
softwareversie weergegeven, daarna toont het de informatie
betreffende de geselecteerde functie of werkingmodus. Het
linkse cijfer toont het kanaalnummer, de 3 andere cijfers tonen
de status van dit kanaal:
In het ADDRess menu: Het adres van het kanaal +
DMX wordt getoond, gaande van 001 tot 512
In het MODE menu: Werking modus wordt getoond
(“DIM”= dimmer modus * ”SW”=switch modus)
In het ALONE menu en standaard display:
Kanaaluitgang wordt getoond.
Kanaal in dimmer modus: Dimmer
percentage, gaande van 0% tot 100%
Kanaal in switch modus: “ON”= output
100% * “OFF”= output 0%
In het CURVE menu: wordt de dimmercurve getoond welke u geselecteerd heeft
volgende mogelijkheden
Het main menu doornemen: Druk op de MENU toets tezamen met de UP/DOWN toetsen.
Teruggaan naar het main menu: Druk op de MENU toets om terug te keren naar het main menu
(escape functie)
volgende mogelijkheden:
Het main menu doornemen: Druk op de MENU toets tezamen met de UP/DOWN toetsen.
In het address menu: Druk op de DOWN toets om het DMX adres van het geselecteerde kanaal
te verlagen. (druk de toets in voor een langere tijd om de snelheid te verhogen)
In het mode menu: Druk op de DOWN toets om het geselecteerde kanaal in switch of dimmer
modus te plaatsen.
In het Alone menu: Druk op de DOWN toets om de dimmer waarde te verlagen (0-100%)
wanneer het geselecteerde kanaal in dimmer modus is geplaatst. (druk de toets voor een
langere tijd in om de snelheid te verhogen). Wanneer het geselecteerde kanaal geplaatst is in
switch modus, kunt u het uitgangskanaal UIT of AAN zetten.
volgende mogelijkheden:
Het main menu doornemen: Druk op de MENU toets tezamen met de UP/DOWN toetsen.
In het address menu: Druk op de UP toets om het DMX adres van het geselecteerde kanaal te
verhogen. (druk de toets in voor een langere tijd om de snelheid te verhogen)
In het mode menu: Druk op de UP toets om het geselecteerde kanaal in dimmer of switch
modus te plaatsen.
In het Alone menu: Druk op de UP toets om de dimmer waarde te verhogen (0-100%) wanneer
het geselecteerde kanaal in dimmer modus is geplaatst. (druk de toets voor een langere tijd in
om de snelheid te verhogen). Wanneer het geselecteerde kanaal geplaatst is in switch modus,
kunt u de uitgangskanaal AAN of UIT zetten.
16. ENTER TOETS: Bekijk de structuur van het menu om de verschillende menu’s te begrijpen. Dit zijn de
volgende mogelijkheden:
In het main menu: Druk op de ENTER toets om het verlangde sub menu te selecteren.
In het sub menu: Druk op de ENTER toets om de 4 kanalen door te nemen.
17. DMX DETECTIE LED: deze LED geeft aan of het toestel een DMX-signaal ontvangt aan de DMX-
input(n°2).
LED aan: geen DMX-signaal gedetecteerd aan de input
LED knippert: DMX-signaal gedetecteerd aan de input
MENUSTRUCTUUR…
MAIN MENU:
Dit menu wordt gebruikt om één van de 4 submenu’s te selecteren.
Druk op de MENU toets samen met de UP/DOW N toetsen om het menu door te nemen.
Druk op de ENTER toets om het verlangde sub menu te selecteren.
ADDRESS SUBMENU:
Dit menu wordt gebruikt om het DMX adres van de 4 kanaaluitgangen in te stellen. Elke kanaal kan ingesteld
worden op een uniek DMX adres. U kunt ook 2 of meerdere kanalen hetzelfde DMX adres geven.
Druk de MENU toets samen met de UP of DOWN toets in om het menu te doorlopen
Druk op de ENTER toets om het gewenste submenu te selecteren
BRITEQ
®
17/31 DB-150
BRITEQ
®
18/31 DB-150
Page 12

NEDERLANDS HANDLEIDING
MODE SUBMENU:
Dit menu wordt gebruikt om de werking modus van de 4 kanaaluitgangen in te stellen.
DIM modus: gebruik deze modus wanneer je lampen (projectoren) aansluit aan dit output kanaal. Je
zal in staat zijn om de output vloeiend te dimmen tussen 0% en 100%.
SWITCH modus: gebruik deze modus wanneer je kleine ligt effecten verbindt met dit output kanaal.
Je kunt de output tussen AAN (100% output) en UIT (0% output) omschakelen. Nu kun je kleine licht
effecten aan- en uitschakelen met uw DMX-controller .
Druk op de ENTER toets om het menu door te nemen.
Wanneer u het verlangde kanaal heeft geselecteerd, druk dan op de UP/DOWN toetsen om de
werkingmodus in te stellen
Druk op de MENU toets om terug te keren naar het main menu
ALONE SUBMENU
Dit is een standalone modus, alle uitgangniveaus kunnen dan direct op het controlepaneel ingesteld worden
zodat u geen controller hoeft te hebben. Het is belangrijk te weten dat de instellingen van de uitgangen
opgeslagen worden wanneer het toestel losgekoppeld wordt van het net. Dit maakt dat de DB-150 zeer
bruikbaar is om tentoonstellingsruimten te verlichten, etc.
Druk op de ENTER toets om het menu door te nemen
Wanneer u het verlangde kanaal heeft geselecteerd, druk dan op de UP/DOWN toetsen om het
niveau van de uitgang in te stellen
Druk op de MENU toets om terug te keren naar het main menu.
CURVE SUBMENU: dit menu wordt gebruikt om één van de 3 dimmercurven te selecteren. Kies uit
onderstaand diagram de curve die het best voldoet aan uw behoeften. U kunt ze natuurlijk ook gewoon
uitproberen…
EIGENSCHAPPEN
Voeding: 230Vac / 20A maximum (4600Watt)
Max. Belasting van de uitgang 4x 230Vac / 2000Watts
Kanaalzekeringen: 250V/8A (20x5mm)
Hoofdzekering: 20A (automatische thermische zekering)
DMX ingang: 3pin XLR mannelijk
DMX uitgang: 3pin XLR vrouwelijk
Afmetingen: 150 x 9 x 7 cm
Gewicht: 5kg
Elke inlichting kan veranderen zonder waarschuwing vooraf.
U kan de laatste versie van deze handleiding downloaden via onze website: www.beglec.com
DEUTSCH BEDIENUNGSANLEITUNG
BEDIENUNGSANLEITUNG
Vielen Dank, dass Sie sich für den Erwerb dieses BRITEQ®-Produkt entschieden haben. Bitte lesen Sie
diese Bedienungsanleitung sorgfältig vor der Inbetriebnahme durch, zur vollen Ausschöpfung der
Möglichkeiten, die dieses Gerät bietet, sowie zu Ihrer eigenen Sicherheit.
EIGENSCHAFTEN
Das Gerät ist funkentstört und erfüllt die Anforderungen der europäischen und nationalen Bestimmungen.
Entsprechende Dokumentation liegt beim Hersteller vor.
Professionelle 4-fach Aluminium T-Bar: 4x 2kW (max. Leistung = 4,6kW /20A)
Schiebemechanismus: Sie können Ihre Projektoren gleichmäßig über die T-Bar verteilen.
Verriegelung der DMX-Ein-/Ausgänge und POWER/DMX „present“ Anzeige
4-stelliges LED-Display mit 4 Tasten für die einfache Menünavigation:
DMX-Adresseinstellung: Jeder Kanal kann seine eigene Adresse haben
Jeder Kanal kann separat im Dimmer- oder Schaltermodus geschaltet werden
Verschiedene Dimmer-Voreinstellungen für jeden Kanal mit Speicherfunktion (kein externer
Controller nötigt)
4 qualitativ hochwertige Netzsteckdosen (Schuko)
Einschließlich Standard 35mm Adapter (Wahlweise 28mm TV-Spigot erhältlich)
Netzspannungseingang mit Neutrik Powercon und Sicherungsautomat.
Einzelne Kanalsicherungen mit “blown fuse” Erkennung
Alle Kanäle sind mit 40A Zweirichtungsthyristoren für erhöhte Zuverlässigkeit bestückt
VOR DER ERSTBENUTZUNG
Überprüfen Sie den Inhalt:
Folgende Teile müssen sich in der Geräteverpackung befinden:
DB-150
4 Set´s Schrauben und Muttern zur Installation des Projektors
1 Standard adapter 35mm
1 Netzkabel
1 Ringschraube
Bedienungsanleitung
Wichtige Hinweise:
Vor der Erstbenutzung bitte das Gerät zuerst auf Transportschäden überprüfen. Sollte das Gerät einen
Schaden aufweisen, Gerät bitte nicht benutzen, sondern setzen Sie sich unverzüglich mit ihrem Händler in
Verbindung.
Wichtiger Hinweis: Das Gerät hat das W erk unbeschädigt und gut verpackt verlassen. Es ist wichtig,
dass der Benutzer sich streng an die Sicherheitshinweise und W arnungen in der Bedienungsanleitung
hält. Schäden durch unsachgemäße Handhabung sind von der Garantie ausgeschlossen. Der Händler
übernimmt keine Verantwortung für Schäden, die durch Nichtbeachtung der Bedienungsanleitung
hervorgerufen wurden.
Die Bedienungsanleitung zum zukünftigen Nachschlagen bitte aufbewahren. Bei Verkauf oder sonstiger
Weitergabe des Geräts bitte Bedienungsanleitung beifügen.
Aus Umweltschutzgründen Verpackung bitte wiederverwenden oder richtig trennen.
BRITEQ
®
19/31 DB-150
BRITEQ
®
20/31 DB-150
Page 13

DEUTSCH BEDIENUNGSANLEITUNG
DEUTSCH BEDIENUNGSANLEITUNG
SICHERHEITSHINWEISE
CAUTION
Das Blitzsymbol im Dreieck weist den Benutzer darauf hin, dass eine Berührungsgefahr mit nicht
isolierten Teilen im Geräteinneren, die eine gefährliche Spannung führen, besteht. Die Spannung
ist so hoch, das hier die Gefahr eines elektrischen Schlages besteht.
Das Ausrufezeichen im Dreieck weist den Benutzer auf wichtige Bedienungs- und
Wartungshinweise in den Dokumenten hin, die dem Gerät beiliegen.
Dieses Symbol bedeutet: Nur innerhalb von Räumen verwenden.
Dieses Symbol bedeutet: Achtung! Bedienungsanleitung lesen!
Dieses Symbol bedeutet: Klasse II Klassifizierung
Dieses Symbol bedeutet: Lampenvorschaltgerät
Die Vorrichtung ist geeignet zur Installation auf gängigen entflammbaren Oberflächen. Gängige
entflammbare Oberflächen umfassen Baumaterialien wie Holz oder holzhaltige Baustoffe mit
einer Dicke von über 2mm.
Zur Vermeidung von Stromschlag oder Feuer, Gerät bitte nicht Regen oder Feuchtigkeit aussetzen.
Zur Vermeidung von Kondensation lassen sie das Gerät bitte nach dem Transport in einer warmen
Umgebung einige Zeit zum Temperaturausgleich stehen. Kondensation kann zu Leistungsverlust des
Gerätes oder gar Beschädigung führen.
Gerät nicht im Freien und in feuchten Räumen und Umgebungen verwenden.
Keine Metallgegenstände oder Flüssigkeiten ins Innere des Geräts gelangen lassen. Keine mit Flüssigkeit
gefüllten Gegenstände, z.B. Vasen, auf das Gerät stellen. Kurzschluss oder Fehlfunktion können die Folge
sein. Falls es doch einmal vorkommen sollte, bitte sofort Netzstecker ziehen und vom Stromkreis trennen.
Offene Brandquellen, wie z.B. brennende Kerzen, sollten nicht auf das Gerät gestellt werden.
Nicht in staubiger Umgebung verwenden und regelmäßig reinigen.
Für Kinder unerreichbar aufbewahren.
Unerfahrene Personen sollen das Gerät nicht bedienen.
Umgebungstemperatur darf 40ºC nicht überschreiten.
Stets Netzstecker ziehen, wenn Gerät für längeren Zeitraum nicht genutzt oder es gewartet wird.
Elektrische Anschlüsse nur durch qualifiziertes Fachpersonal überprüfen lassen.
Sicherstellen, dass Netzspannung mit Geräteaufkleber übereinstimmt.
Die Netzsteckdose sollte immer gut erreichbar sein, um das Gerät vom Netz zu trennen.
Gerät nicht mit beschädigtem Netzkabel betreiben. Ist die Zugangsleitung beschädigt, muss diese durch
den Hersteller, seinen Vertrieb oder durch eine qualifizierte Person ersetzt werden.
Netzkabel nicht mit anderen Kabeln in Berührung kommen lassen!
Ausschließlich vorschriftsmäßige Kabel zur Installation verwenden.
Gerät nicht öffnen. Der sind keine zu wartenden Bauteile im Gerät enthalten.
Sicherung niemals reparieren oder überbrücken, sondern immer mit gleichartiger Sicherung ersetzen!
Bei Fehlfunktion Gerät nicht benutzen und sich mit dem Händler in Verbindung setzen.
Bei Transport bitte Originalverpackung verwenden, um Schäden am Gerät zu vermeiden.
Aus Sicherheitsgründen dürfen an dem Gerät keine unbefugten Veränderungen vorgenommen werden.
ACHTUNG: Um sich nicht der Gefahr eines elektrischen Schlags
auszusetzen, entfernen Sie keines der Gehäuseteile. Im
Geräteinneren befinden sich keine vom Benutzer reparierbaren
Teile. Überlassen Sie Reparaturen dem qualifizierten Kundendienst.
WARTUNG
Die Reinigung des Geräts erfolgt mit einem leicht mit Wasser angefeuchteten Tuch. Vermeiden Sie, dass
Wasser in das Gerätinnere gelangt. Verwenden Sie keine brennbaren Flüssigkeiten wie Benzin oder
Verdünner, die das Gerät beschädigen würden.
ÜBERKOPF-MONTAGE
Wichtig: Montage ausschließlich durch qualifiziertes Fachpersonal durchführen lassen.
Unvorschriftsmäßiger Einbau kann erhebliche Verletzungen und/oder Schäden verursachen.
Überkopf-Montage verlangt entsprechende Erfahrung! Belastungsgrenzen müssen beachtet
werden, geeignetes Installationsmaterial muss verwendet werden und das installierte Gerät muss
in regelmäßigen Abständen überprüft werden.
Sicherstellen, dass sich keine unbefugten Personen unterhalb des Geräts befinden, während es installiert
oder gewartet wird.
Gerät in gut belüfteter Position installieren, weit entfernt von entflammbaren Materialien und/oder
Flüssigkeiten. Einen Seitenabstand von mindestens 50cm einhalten.
Gerät außerhalb der Reichweite von Personen und nicht in niedrigen Durchgängen oder in der Nähe von
Sitzgelegenheiten installieren.
Vor Montage sicherstellen, dass die gewählte Position wenigstens das 10-fache Gerätegewicht
aufnehmen kann.
Zur Aufhängung stets geeignetes Befestigungsmaterial verwenden, das das 12-fache Gerätegewicht
aushalten kann. Eine zweite Sicherungsaufhängung muss angebracht werden, die ein Absacken des
Geräts von mehr als 20 cm verhindert, sollte die Befestigung brechen.
Gerät gut befestigen. Eine freischwingende Aufhängung ist gefährlich und sollte auf gar keinen Fall in
Betracht gezogen werden!
Ventilationsöffnungen nicht abdecken, da Überhitzungsgefahr!
Betreiber muss sicherstellen, dass die sicherheitsrelevanten und technischen Installationen vor Erstbetrieb
fachmännisch vorgenommen worden sind.
Installationen sollten jährlich durch qualifiziertes Fachpersonal inspiziert werden, um jederzeit einen
sicheren Betrieb zu gewährleisten.
FUNKTIONEN
1. KANALAUSGÄNGE: Jeder Kanalausgang hat seine eigene Ausgangsbuchse zum Anschluss jeglicher
resistiver und/oder induktiver Projektoren oder kleine Lichteffekte.
2. SICHERUNG: Jeder Kanal ist mit einer Sicherung und “blown fuse” Erkennung bestückt, Die Anzeige
leuchtet auf, wenn die Kanalsicherung durchgebrannt ist. Beim Auswechseln der durchgebrannten
Sicherung achten Sie bitte darauf, dass sie die gleichen Eigenschaften (250V/8A flink) hat.
Hinweis: Es ist von größter Wichtigkeit zu wissen, dass die Höchstbelastung pro Kanal 2000 Watt ist.
3. NETZEINGANG: Ausgestattet mit Neutrik Powercon®, vergewissern Sie sich davon, dass Ihre
4. EINGANGSSICHERUNG: Sicherungsautomat. Bei durchgebrannter Sicherung finden Sie bitte zunächst
5. DMX OUTPUT: Der 3pin female XLR-Stecker verbindet den DB-150 mit der nächsten Einheit der DMX-
6. DMX INPUT: Der 3pin male XLR-Stecker verbindet das Gerät mit universalen DMX-Kabeln. Dieser
7. STATIVADAPTER: Einfache Montage des DB-150 oben auf einem Beleuchtungsstativ. Zwei
Die Gesamtbelastung aller 4 Kanäle darf jedoch 20A oder 4600 Watt nicht überschreiten!
Netzspannung 230V~ ist und die Projektoren (und/oder kleine Lichteffekte) korrekt an den
Kanalausgangsbuchsen (1) angeschlossen sind, bevor Sie ein geerdetes Netzkabel anschließen. Die
Höchstbelastung ist 20A oder 4600 Watt.
das Problem, das zum Durchbrennen der Sicherung geführt hat. Anschließend drücken Sie den
Rückstellknopf des Sicherungsautomaten.
Kette.
Eingang empfängt die Signale eines DMX-Contollers.
unterschiedliche Stativadapter können benutzt werden:
35mm Adapter(mitgeliefert): Benutzung auf Stativen mit Standard 35mm Oberteil.
28mm TV-Zapfenadapter (Option): Benutzung auf Stativen mit TV-Zapfenadapter Oberteil.
BRITEQ
®
21/31 DB-150
BRITEQ
®
22/31 DB-150
Page 14

DEUTSCH BEDIENUNGSANLEITUNG
DEUTSCH BEDIENUNGSANLEITUNG
8. SCHIEBE MECHANISMUS: Wird benutzt um die Scheinwerfer auf der Bar zu
positionieren. An der oberen Montageschiene kann man mit zwei Haken die
DB-150 einfach an der Alutraverse befestigen.
9. ENDABDECKUNG: Zur Installation der Schrauben/Muttern (zur Montage des
Projektors) und des Stativadapters muss diese Endabdeckung auf einer Seite
des Geräts abgenommen werden: lösen Sie die 4 Schrauben nehmen Sie
die Endabdeckung ab setzen Sie die Schrauben/Muttern und/oder
Stativadapter in die Schiene ein setzen Sie die Endabdeckung zurück
schrauben Sie die 4 Schrauben wieder an fertig!
10. BEDIENFELD: Multifunktions-Display + 4 Tasten zur Navigation im Setup-
Menü. Siehe nachstehende Ausführungen.
11. RINGSCHRAUBE: Wird verwendet um ein Sicherheitskabel anzuschließen
wenn das Gerät Überkopf angeschlossen wurde.
12. DISPLAY: Zeigt die Softwareversion kurz nach Anschalten des Geräts an. Darüber hinaus Anzeige der
Informationen zur ausgewählten Funktion oder zum Betriebsmodus. Die linke Ziffer zeigt die
Kanalnummer, die 3 anderen Ziffern zeigen den Kanalstatus
an:
Im Addressmenü: Anzeige der Kanal + DMX Adresse
von 001 bis 512
Im Modemenü: Anzeige des Betriebsmodus. (“DIM” =
Dimmermodus * “SW” = Schaltmodus)
Im ALONE Menü und Standard-Display: Anzeige des
Kanal-Ausgangsstatus.
Kanal in Dimmermodus: Dimmerprozentzahl von
0% bis 100%
Kanal in Switchmodus: “oN” = Ausgang 100% *
“oFF” = Ausgang 0%
Curve : zeigt die benutzte Dimmerkurve an
13. MENU TASTE: Bitte lesen Sie Einzelheiten zur Menüstruktur nach, nachstehend die Optionen:
Browsen des Mainmenüs: Drücken Sie gleichzeitig MENU und UP/DOWN.
Rückkehr ins Mainmenü: Drücken Sie MENU zur Rückkehr ins Hauptmenü (Escapefunktion).
14. DOWN TASTE: Bitte lesen Sie Einzelheiten zur Menüstruktur nach, nachstehend die Optionen:
Browsen des Mainmenüs: Drücken Sie gleichzeitig MENU und UP/DOWN.
Im Addressmenü: Drücken Sie DOWN zur Herabsetzung der DMX-Adresse des ausgewählten
Kanals (mit längerem Tastendruck Erhöhung der Geschwindigkeit).
Im Modemenü: Drücken Sie DOWN zum Umschalten des gewählten Kanals in Dimmermodus
oder Switchmodus.
Im Alonemenü: Drücken Sie DOWN zur Verringerung des Dimmerwerts (0~100%), sofern sich der
gewählte Kanal in Dimmermodus befindet (mit längerem Tastendruck Erhöhung der
Geschwindigkeit). Ist der gewählte Kanal auf Schaltmodus eingestellt, dann kann der Ausgang auf
15. UP TASTE: Bitte lesen Sie Einzelheiten zur Menüstruktur nach, nachstehend die Optionen:
16. ENTER TASTE: Bitte lesen Sie Einzelheiten zur Menüstruktur nach, nachstehend die Optionen:
17. DMX PRESENT LED: Die LED zeigt den DMX Status am Eingang (n°2) an:
off oder on eingestellt werden.
Browsen des Mainmenüs: Drücken Sie gleichzeitig MENU und UP/DOWN.
Im Addressmenü: Drücken Sie UP zur Erhöhung der DMX-Adresse des ausgewählten Kanals (mit
längerem Tastendruck Erhöhung der Geschwindigkeit).
Im Modemenü: Drücken Sie UP zum Umschalten des gewählten Kanals in Switchmodus oder
Dimmermodus.
Im Alonemenü: Drücken Sie UP zur Erhöhung des Dimmerwerts (0~100%), sofern sich der
gewählte Kanal in Dimmermodus befindet (mit längerem Tastendruck Erhöhung der
Geschwindigkeit). Ist der gewählte Kanal auf Switchmodus eingestellt, dann kann der Ausgang auf
on oder off eingestellt werden.
Im Mainmenü: Drücken Sie ENTER zur Auswahl des gewünschten Untermenüs.
Im Untermenü: Drücken Sie ENTER zum Browsen durch die 4 Kanäle.
LED ist an: es liegt kein DMX Signal am Eingang an.
LED blinkt: es liegt ein DMX Signal am Eingang an.
MENÜSTRUKTUR
MAINMENÜ:
Menü zur Auswahl eines der 4 Untermenüs.
Drücken Sie gleichzeitig MENU und UP/DOW N zum Browsen des Menüs.
Drücken Sie ENTER zur Auswahl eines gewünschten Untermenüs.
ADDRESS UNTERMENÜ:
Menü zum Einstellen der DMX-Adresse der 4 Ausgangskanäle. Jeder Kanal kann auf eine spezifische DMXAdresse eingestellt werden. Sie können ebenfalls 2 oder mehr Kanälen die gleiche DMX-Adresse zuteilen.
Drücken Sie ENTER zum Browsen des Menüs.
Nach Auswahl des gewünschten Kanals drücken Sie UP/DOWN zum Einstellen der Adresse.
Drücken Sie MENU zur Rückkehr ins Hauptmenü.
MODE UNTERMENÜ:
Menü zum Einstellen des Betriebsmodus der 4 Ausgangskanäle.
DIM Modus: Nutzen sie diesen Modus, wenn sie z.B. Scheinwerfer an diesem Ausgangs Kanal
anschließen möchten. Sie können diesen Kanal von 0% - 100% dimmen.
SWITCH Modus: Nutzen sie diesen Modus, wenn sie z.B. Lichteffekte an diesen Ausgangskanal
anschließen möchten. Sie können nun diesen Ausgang zwischen AN und AUS schalten. Nun können sie
über ihr DMX Steuergerät Lichteffekte an und ausschalten.
Drücken Sie ENTER zum Browsen des Menüs.
Nach Auswahl des gewünschten Kanals drücken Sie UP/DOWN zum Einstellen des Betriebsmodus.
Drücken Sie MENU zur Rückkehr ins Hauptmenü.
ALONE UNTERMENÜ:
Unabhängiger Modus, alle Ausgangspegel können direkt im Bedienfeld eingestellt werden, es wird also kein
Controller benötigt. Die Ausgangseinstellungen bleiben nach dem Ziehen des Netzsteckers erhalten.
Hierdurch ist der DB-150 bei der Beleuchtung von Ausstellungsständen usw. besonders hilfreich.
Drücken Sie ENTER zum Browsen des Menüs.
BRITEQ
®
23/31 DB-150
BRITEQ
®
24/31 DB-150
Page 15

DEUTSCH BEDIENUNGSANLEITUNG
Nach Auswahl des gewünschten Kanals drücken Sie UP/DOWN zum Einstellen des
Ausgangspegels.
Drücken Sie MENU zur Rückkehr ins Hauptmenü.
CURVE UNTERMENÜ: Menü dient zum Auswählen einer der 3 voreingestellten Dimmerkurven. Beachten
Sie bitte das Dimmerkurven-Diagramm, um die für Ihre Zwecke geeignetste Dimmerkurve zu finden.
Natürlich können Sie die verschiedenen Dimmerkurven auch einfach ausprobieren… .
TECHNISCHE EINZELHEITEN
Netzspannung: 230Vac / 20A max. (4600Watts)
Schaltleistung: 4x 230Vac / max. 8A (2000Watts)
Kanalsicherungen: 250V/8A (Größe 20x5mm)
Eingangssicherung: 20A “auto reset” Sicherungsautomat
DMX Eingang: 3pin XLR Stecker
DMX Ausgang: 3pin XLR Buchse
Abmessungen: 150 x 9 x 7 cm
Gewicht: 5kg
Technische Änderungen können auch ohne Vorankündigung vorgenommen werden!
Sie können sich die neueste Version dieses Benutzerhandbuches von unserer Website
herunterladen: www.beglec.com
ESPAÑOL MANUAL DE INSTRUCCIONES
MANUAL DE INSTRUCCIONES
Gracias por la compra de este producto BRITEQ®. Para sacar todo el rendimiento de las posibilidades de
este aparato y por su propia seguridad, por favor lea este manual de instrucciones con mucho cuidado antes
de utilizar este producto.
CARACTERÍSTICAS
Este producto interfiere con señales de radio. Este aparato cumple las exigencias Europeas y nacionales de
las normas actuales. Se ha establecido conformidad y las declaraciones y documentos relevantes se han
depositado por el fabricante.
Barra 4 de potencia en aluminio profesional: 4x2kW (Max
Railes de desplazamiento: puede distribuir homogéneamente sus proyectores por la barra.
Entradas/salidas DMX de bloqueo con indicador de presencia de POWER/DMX
Pantalla LED de 4 dígitos con 4 botones para facilitar la navegación a través de los menús
Ajuste de dirección DMX: cada canal puede tener su propia dirección
Cada canal puede activarse por separado en modalidad de regulación de intensidad luminosa (dimmer) o
switch
Preajustes separados para el regulador de intensidad luminosa con función de memoria para cada canal
(no es necesario un controlador)
4 tomas de red eléctrica de alta calidad (schuko)
Se incluye adaptador de sección de 35 mm (28mm TV-spigeot opcional disponible)
Entrada de alimentación de red eléctrica con Neutrik Powercon y fusible automático
Fusibles de canal individuales con detectores de “fusible fundido”
Todos los canales están equipados con triacs de 40A para optimizar la fiabilidad
ANTES DEL USO
Verificar el contenido:
Verificar la presencia de las partes siguientes:
DB-150
4 sistemas de tornillos y tuercas que permiten la instalación de los proyectores
1 adaptador de sección superior de 35 mm
Cable de red
1 Cáncamo
Manual de instrucciones
Instrucciones importantes:
Antes de utilizar este producto, por favor compruebe que no hay daños causados por el transporte. En
caso contrario, no utilice este aparato y consulte a su vendedor.
Importante: Este aparato salio de la empresa en perfecto estado y bien empaquetado. Es absolutamente
necesario por parte del usuario de seguir estrictamente las instrucciones de seguridad y las advertencias
de este manual. Cualquier daño causado por manejo inadecuado no estará sujeto a la garantía. El
vendedor no aceptará responsabilidad por ningun defecto o problemas causados por negligencia de este
manual del usuario.
Mantenga este librito en un lugar seguro para consultas futuras. Si vende este aparato, asegúrese de
añadir este manual de usuario.
Para proteger el medio ambiente, intente por favor de reciclar el embalaje lo mas posible.
= 4,6kW/20A)
tot
BRITEQ
®
25/31 DB-150
BRITEQ
®
26/31 DB-150
Page 16

ESPAÑOL MANUAL DE INSTRUCCIONES
ESPAÑOL MANUAL DE INSTRUCCIONES
PRECAUCIONES DE USO
CAUTION
El simbolo de un rayo en el interior de un triangulo alerta sobre la presencia o el uso de
elementos no isolados donde un voltaje peligroso constituye un riesgo grande para causar una
eventual electrocución
El punto de exclamación en el interior de un triangulo alerta al usuario sobre la presencia de
importantes instrucciones de operación y de mantenimiento tenidas en cuenta en el manual de
uso.
Este símbolo significa : uso para el interior solamente
Este símbolo significa : Lea las instrucciones
Este símbolo significa: Aplicaciones de la clase II
Este símbolo significa: aparato controla una lámpara
Para evitar riesgos de incendio o electrocución, no exponer el aparato a la lluvia o a la humedad.
Para evitar que se forme condensación en el interior, permita que el aparato se adapte a las temperaturas
circundantes cuando lo lleve a una habitación caliente después de transporte. Condensar algunas veces
impide que el aparato funcione a rendimiento pleno o incluso puede causar daños.
Este aparato es sólo para uso interior.
No coloque objetos metálicos o derrame líquidos dentro del producto. No colocar objectos llenos de
liquidos, como jarrónes, encima del aparato. Una descarga eléctrica o mal funcionamiento puede resultar.
Si un objeto extraño entrara en el aparato, desconecte inmediatamente la alimentación.
No colocar fuentes desnudas de llamas, como velas encendidas, sobre el aparato.
Evite su uso en ambientes polvorientos y limpie la unidad regularmente.
Mantenga la unidad alejada de los niños.
Personas sin experiencia no deberían manejar este aparato.
La temperatura máxima del aparato es 40°C. No use este producto a temperaturas más elevadas.
Siempre desenchufe el aparato cuando no lo use por un periodo largo o antes de cambiar la bombilla o de
comenzar una reparación.
La instalación eléctrica se debe realizar solamente por personal cualificado, según las regulaciones para
la seguridad eléctrica y mecánica en su país.
Compruebe que el voltaje disponible no es superior al que aparece en el panel trasero del producto.
El enchufe tiene que estar siempre accessible para desconectar la alimentación.
El cable de alimentación debería estar siempre en perfectas condiciones: apague el aparato
inmediatamente cuando el cable de alimentación esté roto o dañado. Debe ser substituido por el
fabricante, su servicio técnico o otra persona cualificada.
¡Nunca deje el cable de alimentación entrar en contacto con otros cables!
Esta instalación debe ser conectada a tierra para cumplir con las regulaciones de seguridad.
Para prevenir descargas eléctricas, no abra la tapa. No hay nada que pueda ser reparado por el usuario
en el interior el aparato.
Nunca repare un fusible o haga un desvio al fusible. ¡Siempre sustituya el fusible dañado por un fusible
del mismo tipo y con las mismas especificaciones eléctricas!
En caso de problemas serios de manejo, deje de usar el aparato y contacte su vendedor inmediatamente.
Por favor, use el embalaje original cuando el aparato deba ser transportado.
Debido a motivos de seguridad está prohibido de hacer modificaciones al aparato sin autorización.
PRECAUCIÓN: Para reducir el riesgo de electrocución,
no quite la cubierta superior . Ninguna pieza usable
adentro para el utilizador. Dirijase unicamente a personal
cualificado
MANTENIMIENTO
Limpiar regularmente el aparato con un trapo ligeramente humedo. Recomendamos que la limpieza interna
sea efectuada por profesionales.
APAREJADO SUPERIOR
Importante: La instalación debe ser llevada a cabo sólo por personal cualificado. Una instalación
impropia podría resultar en serias heridas y/o daño a la propiedad. ¡El aparejado superior requiere
una larga experiencia! Los límites de las cargas de trabajo deben respetarse, materiales
certificados de instalación deben ser usados, el aparato instalado debería ser inspeccionado
regularmente por seguridad.
Asegúrese de que el área por debajo del sitio de instalación está libre de personas ajenas durante el
montaje, desmontaje y reparación.
Coloque la instalación en un sitio bien ventilado, lejos de cualquier material inflamable y/o líquidos. La
instalación debe ser fijada al menos a 50cm de los muros circundantes.
El aparato debería ser instalado fuera del alcance de la gente y fuera de áreas donde personas puedan
caminar o sentarse.
Antes del aparejado asegúrese de que el área de instalación puede soportar un mínimo punto de carga
de 10 veces el peso del aparato.
Siempre use un cable de seguridad certificado que pueda sostener 12 veces el peso del aparato. Este
añadido secundario de seguridad debería ser instalado de una forma que no hubiera parte de la
instalación que pudiera caer más de 20cm si el añadido principal falla.
El aparato debe ser bien fijado, ¡un montaje que se mueva con libertad es peligroso y no debe
considerarse!
No cubra ninguna apertura de ventilación ya que esto podría resultar en sobrecalentamiento.
El operador tiene que asegurarse de que las instalaciones relativas a seguridad, maquinaria y técnica
están aprobadas por un experto antes de usarlas la primera vez. Las instalaciones deberían ser
inspeccionadas cada año por una persona con conocimientos para asegurar que la seguridad es todavía
óptima.
FUNCIONES
1. SALIDAS DE CANAL: Cada salida de canal tiene su propio enchufe de potencia para conectar
cualquier proyector o pequeño efecto de luces .
2. FUSIBLES DE CANAL: Cada canal incorpora un fusible. Reemplace siempre los fusibles fundidos con
un fusible que tenga las mismas características (250V/5A rápido)
NOTA MUY IMPORTANTE
Es muy importante saber que la carga máxima de cada canal se establece en 2000 vatios. Sin embargo,
la carga total de los 4 canales no puede exceder los 20A o 4600 vatios.
3. ENTRADA DE CORRIENTE: cable de entrada de corriente, asegúrese de que el voltaje local sea
230VAC y los proyectores (o pequeños efectos de luces) estén conectados correctamente a los
enchufes de salida del canal (1) antes de conectar este cable a la corriente. La carga máxima total es de
20A o 4600 vatios.
4. FUSIBLE DE ENTRADA: Reemplace siempre este fusible con un fusible con las misma características
(250V/15A lento)
5. SALIDA DMX: Conectador XLR 3pin macho permite conectar el DB-150 a la siguiente unidad de la
cadena DMX.
6. ENTRADA DMX: Conectador XLR 3pin macho para cables XLR universales. Esta entrada recibe
instrucciones del controlador DMX.
7. ADAPTADOR DE SOPORTE: Se utiliza para colocar fácilmente la unidad DB-150 en un soporte de luz.
Puede utilizar dos adaptadores de soporte diferentes (consulte también el número 9 para más
información):
Adaptador de 35 mm: (incluido)Se utiliza en soportes con una sección estándar de 35 mm.
BRITEQ
®
27/31 DB-150
BRITEQ
®
28/31 DB-150
Page 17

ESPAÑOL MANUAL DE INSTRUCCIONES
ESPAÑOL MANUAL DE INSTRUCCIONES
Soporte macho de TV de 28 mm: (opcional) Se utiliza en soportes
8. MECANISMO DESLIZANTE: Se utiliza para distribuir uniformemente los
9. TAPA DE EXTREMO: Para instalar los pernos/tuercas (necesarios para
10. PANEL DE CONTROL: Pantalla multifuncional + 4 botones para navegar por
11. CÁNCAMO: usado para unir un cable de seguridad cuando la unidad esté
12. PANTALLA: Muestra la versión de software un poco después del encendimiento de la unidad. Despues
13. BOTÓN MENU: Consulte la estructura del menú para conocer los diferentes menús. Estas son las
14. BOTÓN DOWN: Consulte la estructura del menú para conocer los diferentes menús. Estas son las
15. BOTÓN UP: Consulte la estructura del menú para conocer los diferentes menús. Estas son las distintas
equipados con un adaptador macho de TV en la parte superior.
proyectores en el DB-150. Sobre el carril superior usted puede instalar 2 garras
para colgar facilmente en cualquier entramado el DB-150.
instalar los proyectores) y el adaptador de soporte, debe retirar esta tapa de
extremo en un lado de la unidad: desenrosque simplemente los 4 tornillos
retire la tapa coloque las tuercas/pernos y/o adaptador de soporte en el raíl
deslizante vuelva a colocar la tapa en su sitio instale los 4 tornillo ¡ya
está!
el menú de configuración. Consulte los números abajo.
colgada.
muestra la información relacionada con la función o modalidad de trabajo seleccionadas. El dígito a la
izquierda muestra el número de canal, los 3 otros dígitos muestran el estado de canal::
En el menú ADDR: Se muestra la dirección de canal +
DMX que va de 001 a 512
En el menú MODE: Se muestra la modalidad de trabajo.
(“DIM” = modalidad dimmer (regulador de intensidad
luminosa) * “SW” = modalidad switch (interruptor)).
En el menú ALONE: Se muestra el estado de la salida
de canal.
Canal en modalidad dimmer: porcentaje del
regulador de intensidad luminosa, que va de 0% a
100%
Canal en modalidad switch: “oN” = salida 100% *
“oFF” = salida 0%
En el menú CURVE : Indica la curva utilizada en
dimerización.
distintas posibilidades:
Explorar el menú principal: Pulse el botón MENU junto con los botones UP/DOWN.
Volver al menú principal: Para volver al menú principal, pulse el botón MENÚ. (Función escape)
distintas posibilidades:
Explorar el menú principal: Pulse el botón MENU junto con los botones UP/DOWN.
En el menú de dirección: Pulse el botón DOWN para reducir la dirección DMX del canal
seleccionado. (Pulse el botón durante más tiempo para aumentar la velocidad).
En el menú de modalidad: Pulse el botón DOWN para establecer el canal deseado en modalidad
switch o dimmer.
En el menú Alone: Pulse el botón DOWN para reducir el valor del regulador de intensidad
luminosa (0~100%) cuando el canal seleccionado esté en modalidad dimmer. (Pulse el botón
durante más tiempo para aumentar la velocidad). Cuando establezca el canal deseado en
modalidad switch, puede desactivar o activar la emisión.
posibilidades:
Explorar el menú principal: Pulse el botón MENU junto con los botones UP/DOWN.
En el menú de dirección: Pulse el botón UP para aumentar la dirección DMX del canal
seleccionado. (Pulse el botón durante más tiempo para aumentar la velocidad).
En el menú de modalidad: Pulse el botón UP para establecer el canal deseado en modalidad
dimmer o switch.
En el menú Alone: Pulse el botón UP para aumentar el valor del regulador de intensidad luminosa
(0~100%) cuando el canal seleccionado esté en modalidad dimmer. (Pulse el botón durante más
tiempo para aumentar la velocidad). Cuando establezca el canal deseado en modalidad switch,
puede activar o desactivar la emisión.
16. BOTÓN ENTER: Consulte la estructura del menú para conocer los diferentes menús. Estas son las
distintas posibilidades:
En el menú principal: Pulse el botón ENTER para seleccionar el submenú que desee.
En un submenú: Pulse el botón ENTER para explorar a través de los 4 canales.
17. LED DE DMX PRESENTE: Este LED indica si la unidad recibe señal DMX en la entrada DMX (n°2):
LED encendido: No se detecta señal DMX en la entrada.
LED parpadeando: Se detecta señal DMX en la entrada.
ESTRUCTURA DE MENÚ…
MENÚ PRINCIPAL:
Este menú se utiliza para seleccionar uno de los 4 submenús.
Pulse el botón MENU junto con los botones UP/DOWN para explorar el menú.
Pulse el botón ENTER para seleccionar el submenú que desee.
SUBMENÚ DE DIRECCIÓN:
Este menú se utiliza para establecer la dirección DMX de los 4 canales de salida. Cada canal puede
establecerse en una dirección DMX única. Puede incluso proporcionar 2 o más canales a la misma dirección
DMX.
Pulse el botón ENTER para explorar a través del menú.
Una vez que haya seleccionado el canal deseado, pulse los botones UP/DOWN para establecer una
dirección.
Para volver al menú principal, pulse el botón MENU.
SUBMENÚ DE MODALIDAD :
Este menú se utiliza para establecer la modalidad de trabajo de los 4 canales de salida.
Modalidad DIM: Utilice esta modalidad cuando conecte lámparas (proyectores) en este canal de salida.
Podrá regular suavemente la intensidad luminosa entre 0% y 100%.
BRITEQ
®
29/31 DB-150
BRITEQ
®
30/31 DB-150
Page 18

ESPAÑOL MANUAL DE INSTRUCCIONES
Modalidad SWITCH: Utilice esta modalidad cuando conecte pequeños efectos luminosos en este canal
de salida. Puede cambiar la salida entre ON (100% salida) y OFF (0% salida). Ahora puede activar o
desactivar pequeños efectos luminosos con su controlador DMX.
Pulse el botón ENTER para explorar a través del menú.
Una vez que haya seleccionado el canal deseado, pulse los botones UP/DOWN para establecer una
modalidad de trabajo.
Para volver al menú principal, pulse el botón MENU.
SUBMENÚ ALONE:
Esta es la modalidad independiente, todos los niveles de salida pueden establecerse directamente en el
panel de control por lo que no es necesario un controlador. Es importante saber que los ajustes de salida se
conservan cuando la unidad se desconecta de la red eléctrica. Esto hace que la unidad DB-150 sea muy útil
para iluminar puestos de exhibición.
Pulse el botón ENTER para explorar a través del menú.
Una vez que haya seleccionado el canal deseado, pulse los botones UP/DOWN para establecer un
nivel de salida.
Para volver al menú principal, pulse el botón MENU.
SUBMENÚ CURVE:
Este menú se utiliza para escoger una de las 3 curvas preprogramadas del dimerizador. Por favor
compruebe el diagrama con las curvas para escoger la deseada.
ESPECIFICACIONES
Alimentación: 230Vac / 20A maximum (4600Watts)
Carga máxima por canal: 4x 230Vac / 2000Watts
Fusibles de canal: 250V/8A (20x5mm)
Fusible principal: 20A “ auto reset” thermal circuit breaker
Entrada DMX: 3pin XLR macho
Conexiones DMX : 3pin XLR hembra
Tamaño: 150 x 9 x 7 cm
Peso: 5kg
Puede descargar la última versión de este manual desde nuestro sitio web: www.beglec.com
BRITEQ
®
Toda la información está sujeta a cambios sin previo aviso
31/31 DB-150
 Loading...