

Page 1
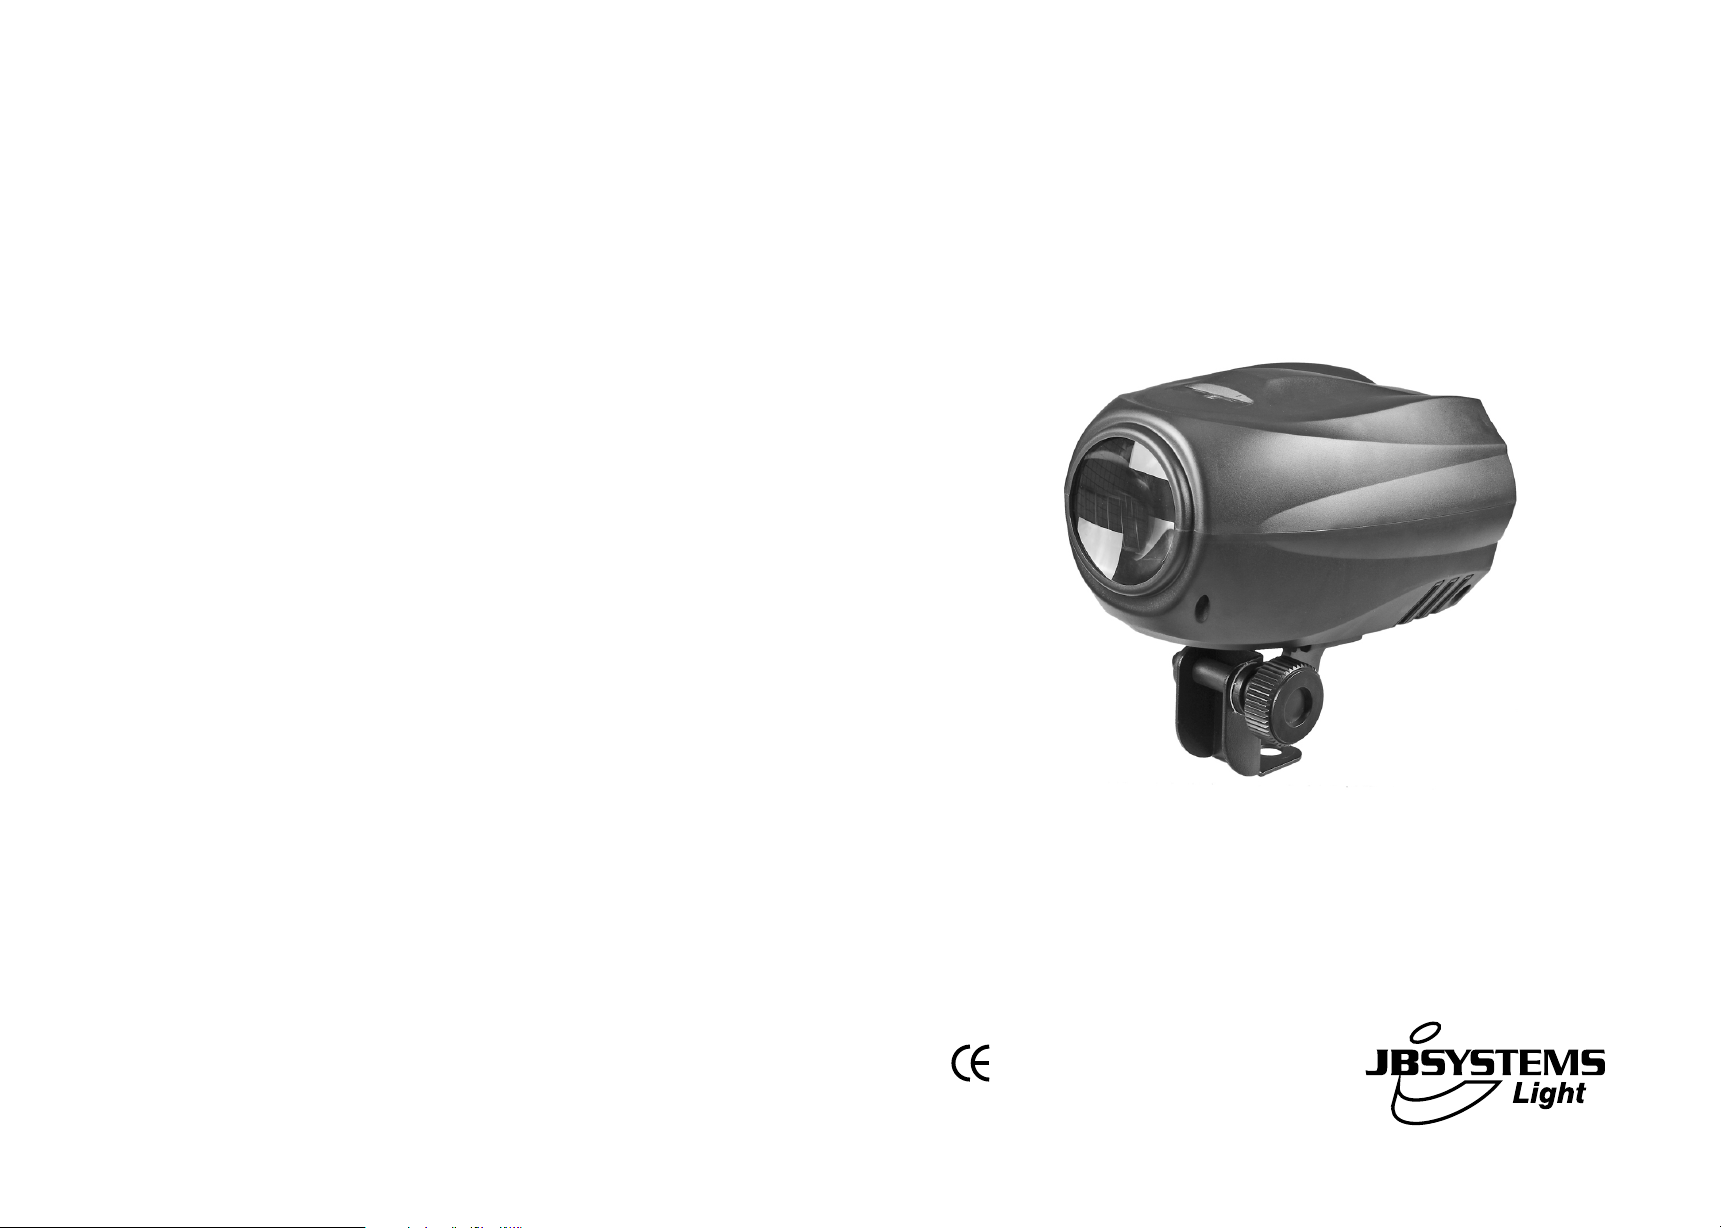
ASTRO
White - Color
WWW.BEGLEC.COM
Copyright © 2007 by BEGLEC cva.
Reproduction or publication of the content in any manner, without express permission of the publisher, is prohibited.
Version: 1.1
Operation Manual
Mode d'emploi
Gebruiksaanwijzing
Bedienungsanleitung
Manual de instrucciones
Manual do utilizador
EN
FR
NL
DU
ES
PT
Page 2
EN - DISPOSAL OF THE DEVICE
Dispose of the unit and used batteries in an environment friendly manner
according to your country regulations.
FR - DÉCLASSER L’APPAREIL
Débarrassez-vous de l’appareil et des piles usagées de manière écologique
Conformément aux dispositions légales de votre pays.
NL - VERWIJDEREN VAN HET APPARAAT
Verwijder het toestel en de gebruikte batterijen op een milieuvriendelijke
manier conform de in uw land geldende voorschriften.
DU - ENTSORGUNG DES GERÄTS
Entsorgen Sie das Gerät und die Batterien auf umweltfreundliche Art und
Weise gemäß den Vorschriften Ihres Landes.
ES - DESHACERSE DEL APARATO
Reciclar el aparato y pilas usadas de forma ecologica conforme a las
disposiciones legales de su pais.
PT - COMO DESFAZER-SE DA UNIDADE
Tente reciclar a unidade e as pilhas usadas respeitando o ambiente e em
conformidade com as normas vigentes no seu país.
Page 3
ENGLISH OPERATION MANUAL
Thank you for buying this JB Systems®product. To take full advantage of all possibilities and for your own
safety, pleaseread these operating instructions very carefully beforeyou start using this unit.
FEATURES
This unit is radio-interference suppressed. This product meets the requirements ofthe current European and
nationalguidelines.Conformity has beenestablished and the relevantstatements and documents havebeen
depositedby the manufacturer.
Thisdevice has been designed to producedecorativeeffectlighting and is used in light showsystems.
Powerful, DMX-controlled LED moonflower.
Based on a very powerful white 3 wattLED:
Extremely powerful white beams (AstroWhite) or colorful beams (Astro Color),
Lightoutput comparable to discharge lamps
Nolamp replacements!
Extremely long lifespan!
Virtually no heat production
Very low power consumption
Lightweight(no lamp transformers needed)
0-100%dimming and ultra fast strobe function
Excellent built-in programs for wonderful, lightshows:
DMX-control: 2 channels
Standalone: sound activated with internalmicrophone
Master/slave:wonderful synchronized shows
Optional CA-8 remote controller available
Equipped with big opticallens formaximum lightoutput
BEFORE USE
Before you start using this unit, please check if there’s no transportation damage. Should there be any, do
not usethedevice and consult your dealerfirst.
Important: This device left our factory in perfect condition and well packaged. It is absolutely necessary
for the user to strictly follow the safety instructionsand warnings inthis user manual. Any damage caused
by mishandling is not subject to warranty. The dealer will not accept responsibility for any resulting defects
orproblems caused by disregardingthis user manual.
Keep this booklet in a safe place for future consultation. If you sell the fixture, be sure to add this user
manual.
Check the contents:
Check that the carton contains the following items:
Operatinginstructions
Astro White or Astro Color
Hanging bracket withknobs
SAFETY INSTRUCTIONS:
CAUTION
The lightning flash with arrowhead symbol within the equilateral triangle is intended to alert the
use or the presence of un-insulated “dangerous voltage” within the product’senclosure that may
be of sufficient magnitude to constitute a risk of electric shock.
The exclamation point within the equilateral triangle is intended to alert the user to the presence
of important operation and maintenance (servicing) instructions in the literature accompanying
this appliance.
CAUTION: To reduce the risk of electric shock, do not
remove the top cover. No user-serviceable parts inside.
Referservicing to qualifiedservice personnel only.
ENGLISH OPERATION MANUAL
This symbol means:indoor use only
This symbolmeans:Readinstructions
Toprotect the environment,please try to recycle the packing material as much as possible.
Toprevent fire or shock hazard, donot exposethis appliance to rain or moisture.
To avoid condensation to be formed inside, allow the unit to adapt to the surrounding temperatures when
bringing it into a warm room after transport. Condense sometimes prevents the unit from working at full
performance or may even cause damages.
Thisunit is forindoor use only.
Don’t place metal objects or spill liquid inside the unit. Electric shock or malfunction may result. If a foreign
object enters the unit,immediately disconnect the mains power.
Locate the fixture in a well ventilated spot, away from any flammable materials and/or liquids. The fixture
must be fixed at least 50cm from surrounding walls.
Don’tcoverany ventilation openings as this may result in overheating.
Prevent use in dusty environments and clean the unit regularly.
Keep the unit away from children.
Inexperienced persons should not operate this device.
Maximum save ambienttemperature is 40°C.Don’t use this unit at higherambient temperatures.
Make sure the area below the installation place is free from unwanted persons during rigging, de-rigging
andservicing.
Always unplug the unit when it is not used for a longer time or before you start servicing.
The electrical installation should be carried out by qualified personal only, according to the regulations for
electricaland mechanical safety in your country.
Checkthat the available voltage isnot higher than the one stated on the rear panel of the unit.
Thepower cord should always be in perfect condition. Switch the unitimmediately off when the power cord
is squashed or damaged. It must be replaced by the manufacturer, its service agent or similarly qualified
persons inorder to avoid a hazard.
Never let the power-cord come into contact with other cables!
This fixture mustbe earthedto inorder comply with safety regulations.
Don’tconnect the unitto any dimmer pack.
Always use an appropriateand certified safety cable when installing the unit.
In order to prevent electric shock, do not open the cover.
Never
repair a fuse or bypass the fuse holder.
type and electricalspecifications!
In the event of serious operating problems, stop usingthe fixture and contactyour dealer immediately.
Thehousing and the lenses must be replaced if they are visibly damaged.
Please use the original packing when the device is to be transported.
Dueto safetyreasons it is prohibited to make unauthorizedmodifications to the unit.
Important:
from epilepsy.
Never look directlyinto the light source! Don’t use the effectin the presence of personssuffering
Always
replace a damaged fuse with a fuse of the same
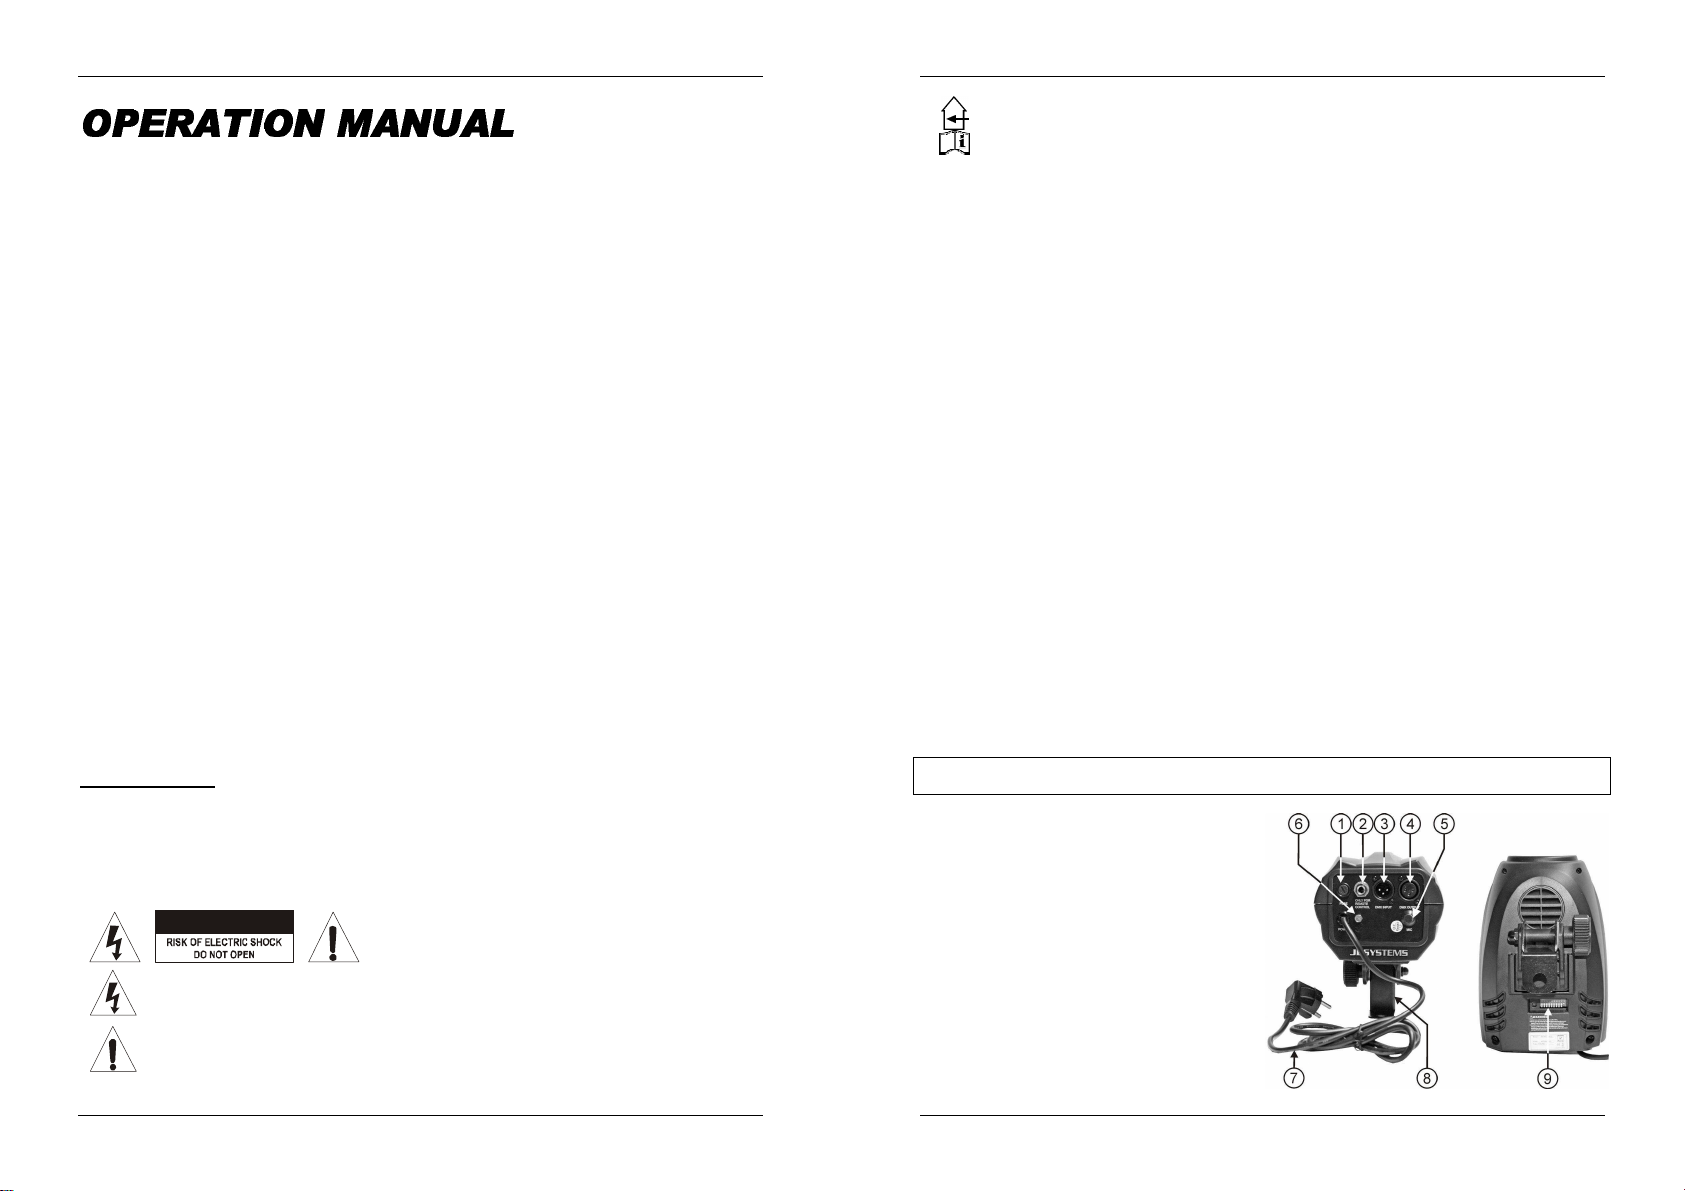
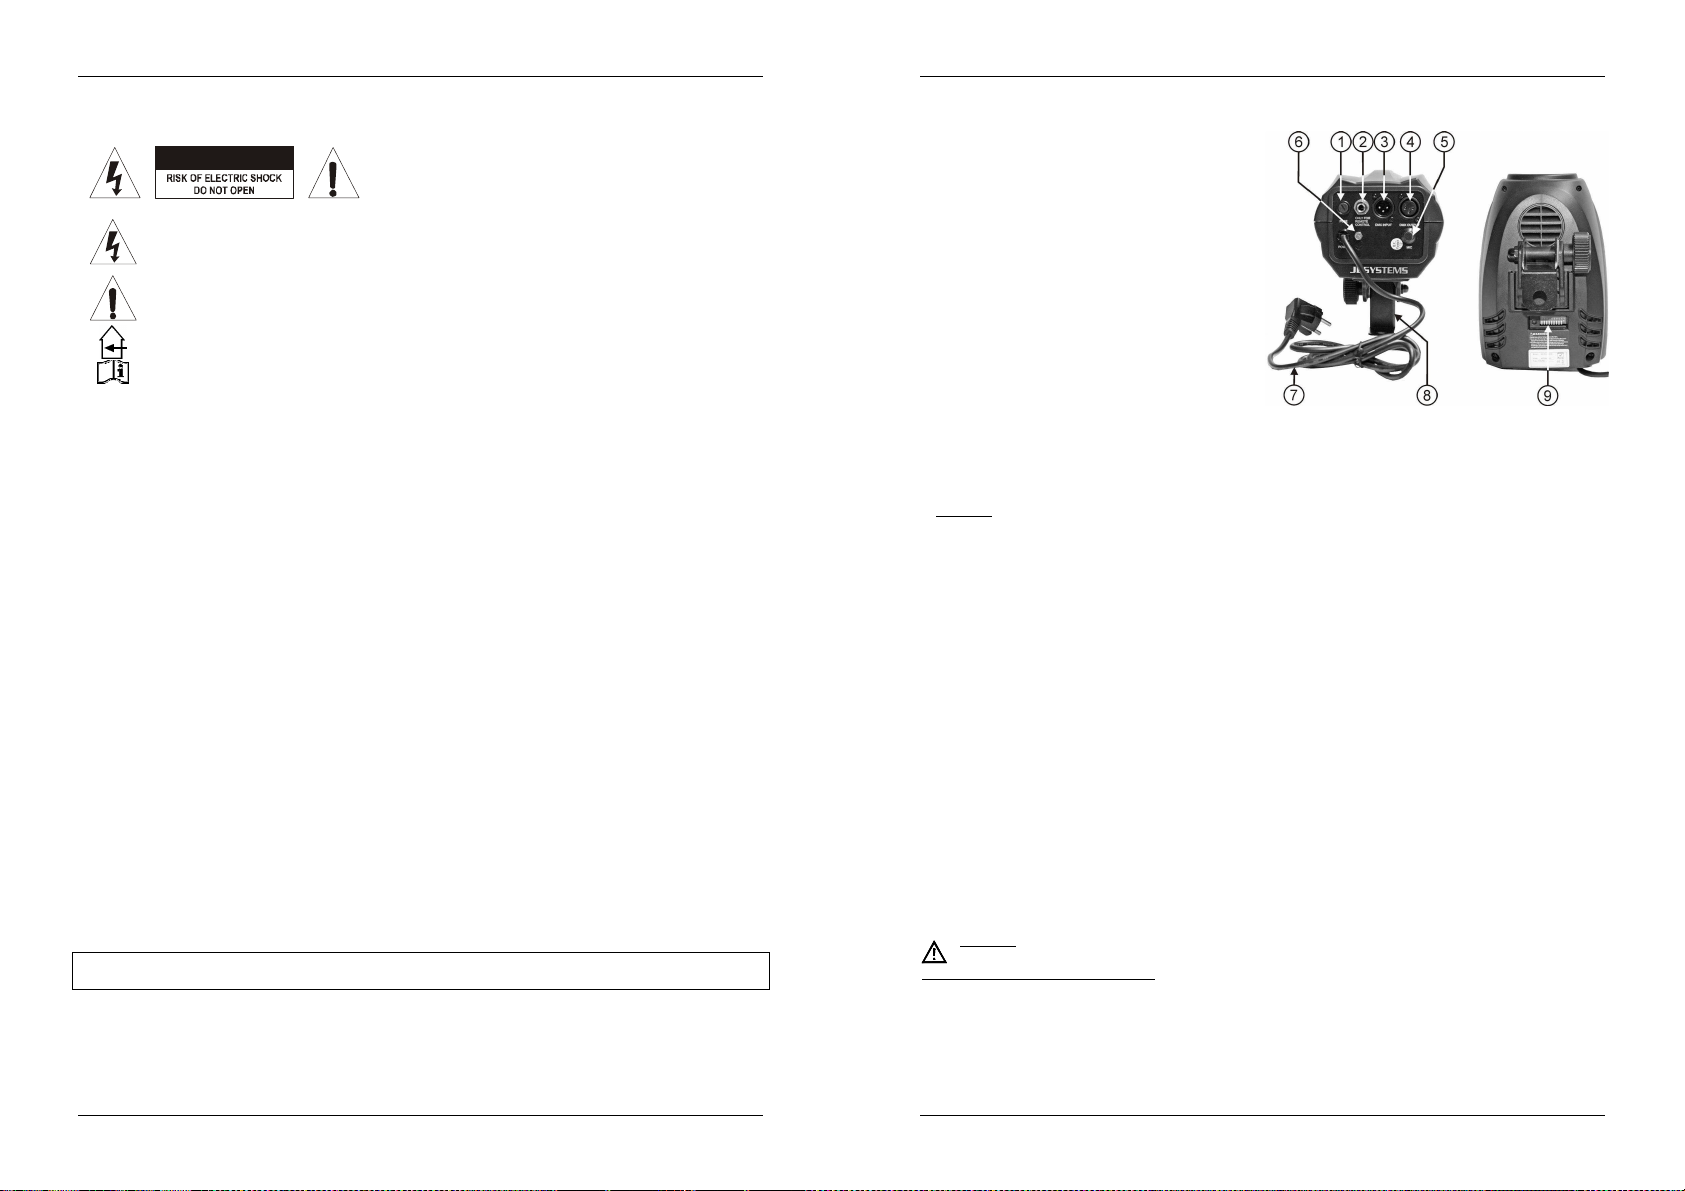
DESCRIPTION:
1. Fuseholder
2. ¼” jack to connect the optional CA-8 controller.
3. DMX input: 3pin male XLR-connector used to
connect universal DMX-cables. This input
receives instructions from a DMX-controller or
from another Astro in master/slave mode.
4. DMX output: 3pin femaleXLR-connector used to
connect the Astro White/Color with the next unit
in the DMX chain or with another Astro
white/colorwhen used inmaster/slavemode.
5. Internalmicrophone
6. Earthconnection
7. Mainscable
8. Hanging bracket with 1 knob to fasten the unit
and a mounting holeto fix a mounting hook.
9. DIP switches, to set the DMX-startingaddress.
JB SYSTEMS
®
1/35 ASTRO WHITE/COLOR
JB SYSTEMS
®
2/35 ASTRO WHITE/COLOR
Page 4
ENGLISH OPERATION MANUAL
ENGLISH OPERATION MANUAL
OVERHEAD RIGGING
Important: The installation must be carried out by qualified service personal only. Improper
installation can result in serious injuries and/or damage to property. Overhead rigging requires
extensive experience! Working load limits should be respected, certified installation materials
shouldbe used, the installed device should be inspected regularly for safety.
Make sure the area below the installation place is free from unwanted persons during rigging, de-rigging
andservicing.
Locate the fixture in a well ventilated spot, far away from any flammable materials and/or liquids. The
fixturemust be fixed
Thedevice should be installedout of reach of people and outside areas where personsmay walk by or be
seated.
Before rigging make sure that the installation area can hold a minimum point load of 10times the device’s
weight.
Always use a certified safety cable that can hold 12times the weight of the device when installingthe unit.
This secondary safety attachment should be installed in a way that no part of the installation can drop
more than 20cm if the main attachment fails.
Thedevice shouldbewell fixed; a free-swinging mounting is dangerous and may notbeconsidered!
Don’tcoverany ventilation openings as this may result in overheating.
Theoperator has to make sure that the safety-relatingand machine-technicalinstallations areapproved by
an expert before using them for the first time. The installations should be inspected every year by a skilled
person to be sure that safety is still optimal.
at least 50cm
fromsurrounding walls.
ELECTRICAL INSTALLATION + ADDRESSING
Important: The electrical installation should be carried out by qualified personal only,
according to the regulationsfor electrical and mechanical safety in your country.
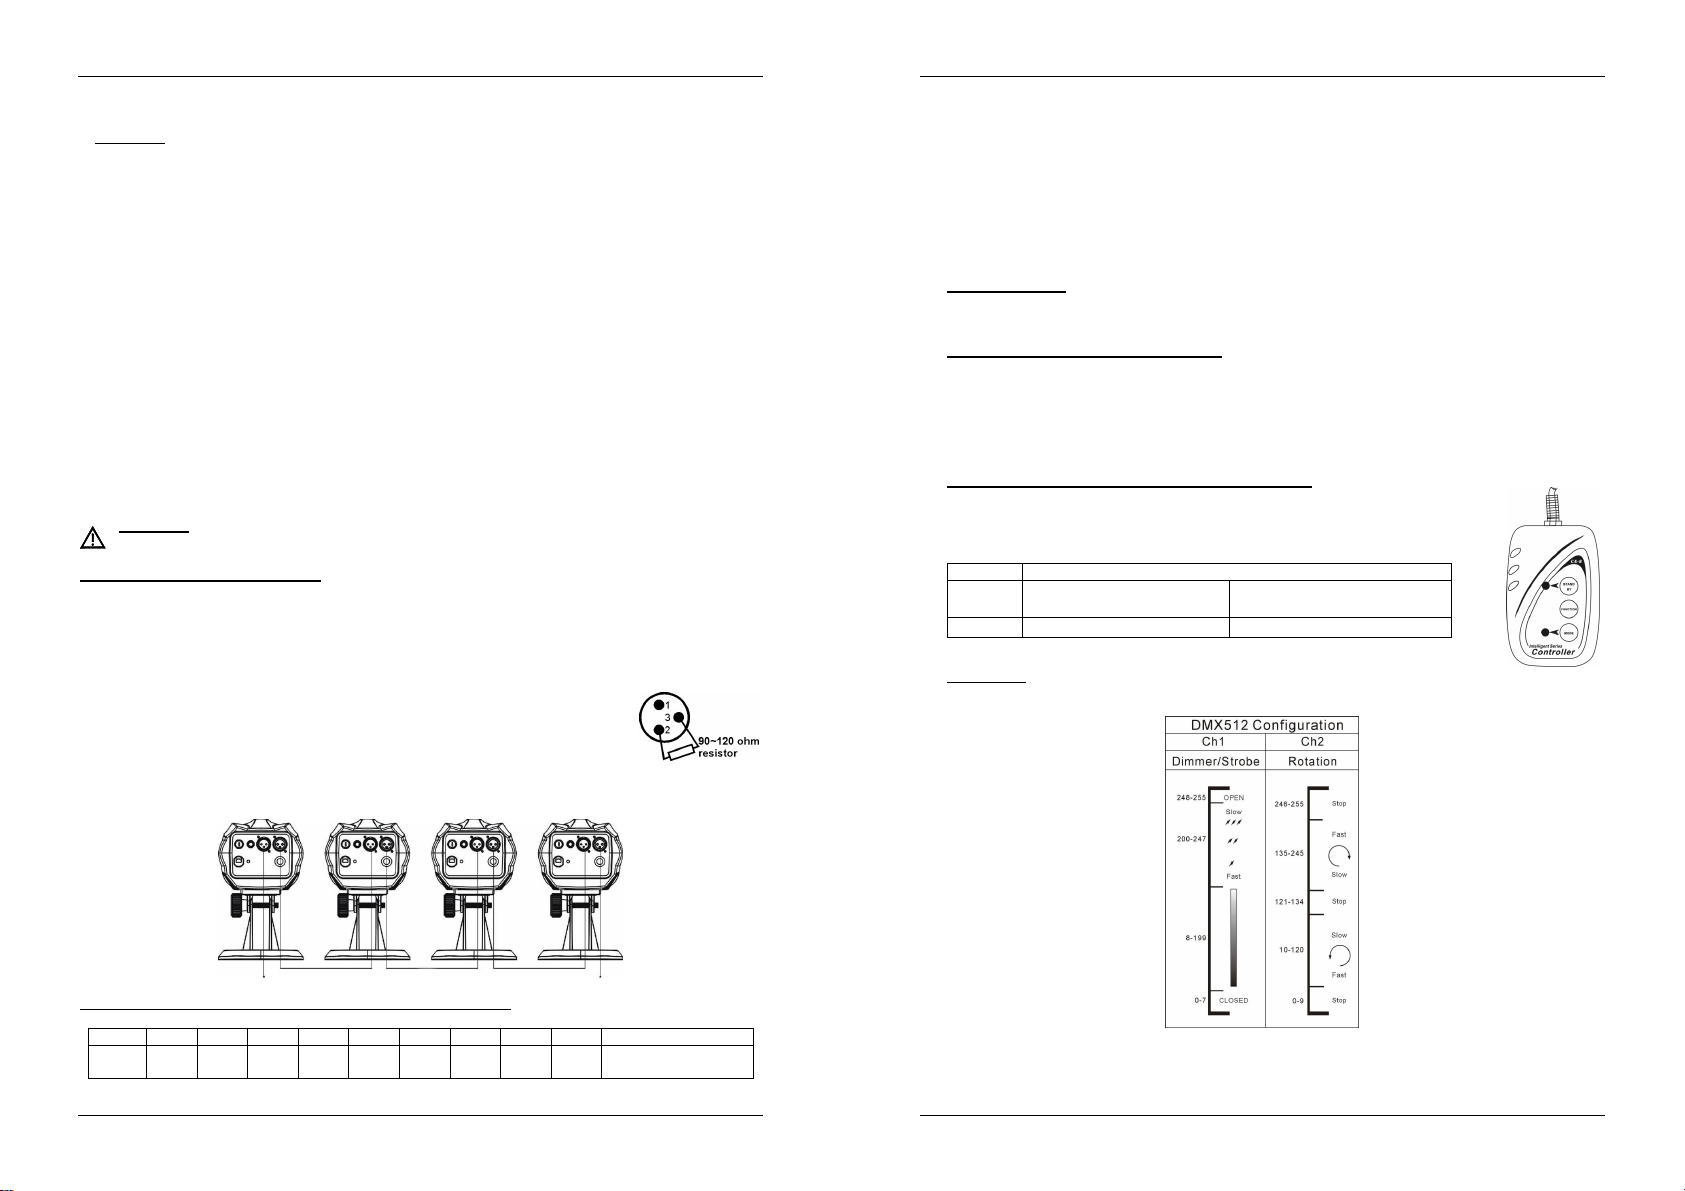
Electrical installation in DMX-mode:
The DMX-protocol is a widely used high speed signal to control intelligent light equipment. You need to
“daisy chain” your DMX controllerand all the connected unitswith a good quality balanced cable.
Both XLR-3pin and XLR-5pin connectors are used, however XLR-3pin is more popular because these
cables are compatiblewith balanced audiocables.
Pin layoutXLR-3pin: Pin1 = GND ~ Pin2 = Negative signal (-) ~ Pin3 = Positivesignal (+)
Pin layoutXLR-5pin: Pin1 = GND ~ Pin2 = Negative signal (-) ~ Pin3 = Positive signal(+) ~ Pins4+5 not used.
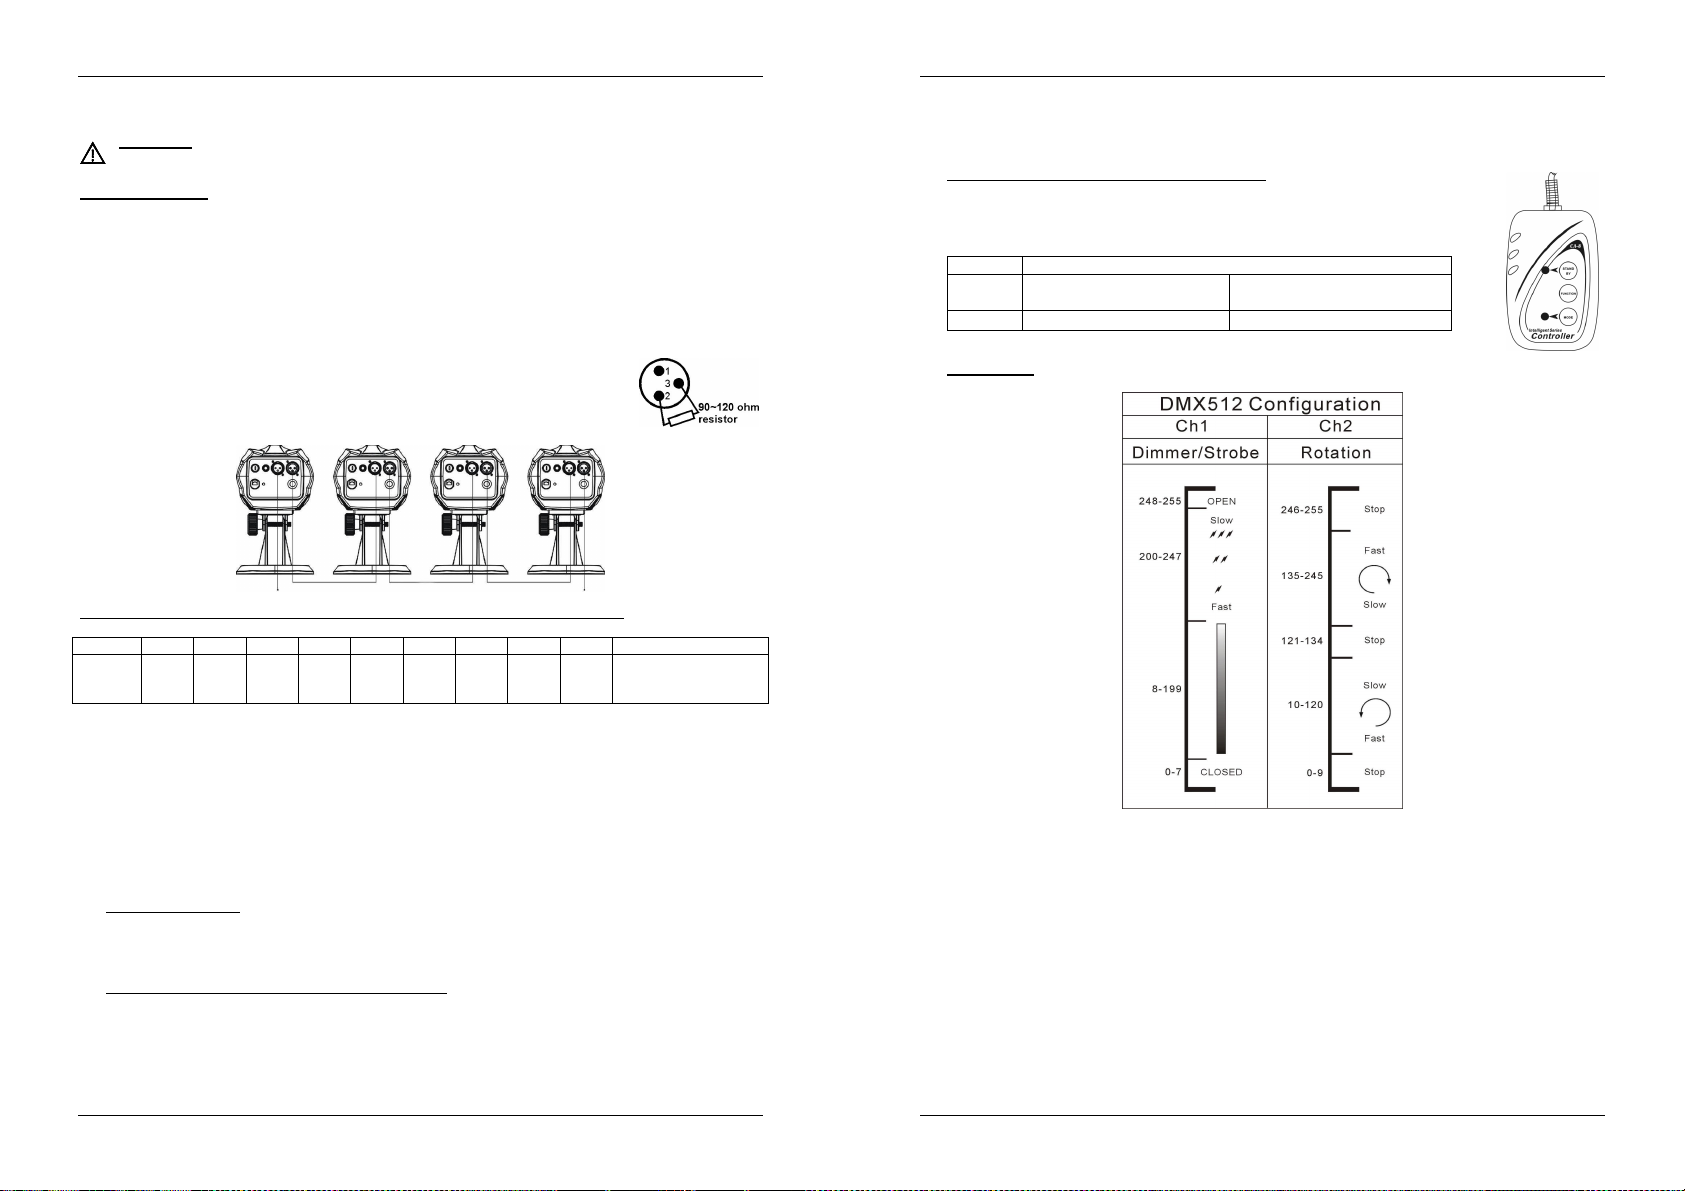
To prevent strange behavior of the light effects, due to interferences, you must use
a 90Ω to 120Ω terminator at the end of the chain. Never use Y-splitter cables, this
simply won’t work!
Make sure that all units are connected to the mains.
Each light effect in the chain needs to have its proper starting address so it knows
which commands from the controller it has to decode. In the next section you will learn how to set the
DMXaddresses.
You can combine the valuesof these switches to become any starting address between1 and 512:
Beginaddress = 01 switch1=ON values:1
Begin address = 05 switch1+3=ON values: 1+4= 5
Begin address = 09 switch1+4=ON values: 1+8= 9
Begin address = 13 switch1+3+4=ON values: 1+4+8 = 13
…
Begin address = 62 switch2+3+4+5+6=ON values: 2+4+8+16+32= 62
HOW TO OPERATE THE UNIT
1. Standalone 1unit:
Important:The DMX addressMUST be set to 001. (first DIP switch = ON, all other are OFF)
Just connect the unit to the mains and put on some music. The unit will start working automatically to the
rhythm of the music.
2. Two or more units in master/slave setup:
Connect 2 or more units together using good quality balanced XLR microphone cables. The unit that has no
cable connected to its input will react as master, the others are the slave units.
Important:On the master unit the DMX address MUST be set to 001. (first DIP switch = ON, all other are
OFF) The slave units can have any DMXaddress value but NOT 001!
You can inverse the behavior of one or more slave units by changing the position of DIP-switch n°10 on
these slaves. Just try it and see if the effect becomes better. Changing DIP-switch n°10 on the master has
no effect.
3. Connect theoptionalCA-8 controller formore control:
The CA-8 controller can only be used in standalone or master/slave mode. Connect the
controller to the jack input of the first unit (master). Now you can control all the connected
units:
Stand by
Function
Mode
4. DMX-mode:
When theunits are connected in DMX-mode, they can be controlled using the followingDMX-chart:
Blackout the unit
1. Synchronous Strobe
2. Alternating Strobe
Sound (LED OFF)
1. ClockwiseRotation
2. CounterclockwiseRotation
Slow ~ nosound (LED ON)
How to set the DIP-switches to obtain the right starting address:
DIP #1 #2 #3 #4 #5 #6 #7 #8 #9 #10
Value 1 2 4 8 16 32 64 128 256
JB SYSTEMS
Each of the first 9 DIP-switches correspond to a certain DMX-value:
®
3/35 ASTRO WHITE/COLOR
Slave inversion not
used in DMX-mode
JB SYSTEMS
®
4/35 ASTRO WHITE/COLOR
Page 5
ENGLISH OPERATION MANUAL
MAINTENANCE
Make sure the areabelow the installation place is free from unwanted persons during servicing.
Switch off theunit, unplugthe mains cableand wait untilthe unit has been cooleddown.
During inspection the following points should be checked:
All screws used for installing the device and any of its parts should be tightly fastened and may not be
corroded.
Housings, fixations and installations spots (ceiling, truss, suspensions) should be totally free from any
deformation.
Whenan opticallens is visibly damaged dueto cracks or deepscratches, it must bereplaced.
The mains cables must be in impeccable condition and should be replaced immediately when even a
small problem is detected.
In order to protect the device from overheat the cooling fans (if any) and ventilation openings should be
cleanedmonthly.
Theinteriorof the device should be cleaned annually using a vacuum cleaner or air-jet.
The cleaning of internal and external optical lenses and/or mirrors must be carried out periodically to
optimizelight output. Cleaning frequency depends on theenvironment inwhich the fixtureoperates:damp,
smoky or particularly dirty surroundingscan cause greater accumulationof dirt on the unit’soptics.
Clean with a soft cloth using normal glass cleaning products.
Always dry the parts carefully.
Clean the external optics at least once every 30 days.
Clean the internal optics at least every 90 days.
Attention: We strongly recommend internal cleaningto be carried out by qualified personnel!
SPECIFICATIONS
Mains Input: AC 100V ~ 240V, 50/60Hz
Fuse: 250V 2A slow blow (20mmglass)
SoundControl: Internalmicrophone
DMX connections: 3pin XLR male / female
DMX channels used: 2 channels
Lamp: 1xLED 3Watt
Size: 194 x 202 x 141 mm
Weight: 1kg
You can download the latest versionof this user manual on our website: www.beglec.com
Every information is subject to change without prior notice
FRANÇAIS MODE D’EMPLOI
Merci d’avoir choisi ce produit JB Systems®. Pour votre sécurité et pour une utilisation optimalede toutes les
possibilités de l’appareil, lisezattentivement cette notice avant utilisation.
EN VOUS INSCRIVANT POUR LA LETTRE D’INFORMATION VOUS SEREZ TOUJOURS
TENU AU COURANT DES DERNIERES NOUVELLES CONCERNANT NOS PRODUITS:
NOUVEAUTES,ACTIONS SPECIALES,JOURNEES PORTES OUVERTES, ETC.
SURFEZ SUR: WWW.BEGLEC.COM
CARACTERISTIQUES
Cet appareil ne produit pas d’interférences radio. Il répond aux exigences nationales et européennes. La
conformité a été établie et les déclarations et documentscorrespondants ont été déposéspar le fabricant.
Cet appareil a été conçu pour la production de jeux de lumières décoratifs et est utilisé dans des
spectacleslumineux.
Moonflower à LED,puissante et contrôlée via DMX.
Conçuesur base d'une LED blanche très puissantede 3 watts :
Faisceaux extrêmementpuissants, blancspour l'AstroWhite, et colorés pour l'Astro Color
Puissancelumineusecomparableà celle des lampes à décharge
Pas de lampes à remplacer !
Duréede vieextrêmementlongue !
Pratiquement aucuneproduction dechaleur
Consommation de courant très faible
Poids plume (aucun transfopour lampes n'est nécessaire).
Fonction gradateur allantde 0 à 100 % et fonctionstroboscope ultrarapide.
Excellents programmesintégrés donnantlieu à de splendides light shows:
Contrôlevia DMX : 2 canaux
Mode autonome : activation sonore via micro interne
Mode maître/esclave: magnifiques showssynchronisés
En option, une télécommandeCA-8 estdisponible
Equipé de lentillesde grandesdimensions en vue d'obtenir une puissance lumineuse maximale
AVANT UTILISATION
Avant d’utiliser cet appareil, assurez-vous de l’absence de dommages liés au transport. En cas de
dommages,n’utilisez pasl’appareil et contactez le vendeur.
Important:
l’utilisateur suive les instructions de sécurité et avertissements inclus dans ce manuel. La garantie ne
s’applique pas en cas de dommage lié à une utilisation incorrecte. Le vendeur ne prend pas la
responsabilité des défauts ou de tout problème résultant du fait de n’avoir pas tenu compte des mises en
garde de ce manuel.
Conservez ce manuel dans un endroit sûr pour toute consultation future. Si vous vendez l’appareil,
assurez-vous d’yjoindre ce manuel également.
Afin de protéger l’environnement, merci de recycler les emballages autant que possible.
Vérifiez le contenu:
Vérifiezsi l’emballage contient bien les articles suivants:
Astro White ou Astro Color
Mode d'emploi
Attelle de suspension avec sa molette de blocage
Cet appareil a quitté notre usine en parfaite condition et bien emballé. Il est primordial que
JB SYSTEMS
®
5/35 ASTRO WHITE/COLOR
JB SYSTEMS
®
6/35 ASTRO WHITE/COLOR
Page 6

FRANÇAIS MODE D’EMPLOI
ATTENTION
:
afin de réduire le risque d’él
ectrocution,
FRANÇAIS MODE D’EMPLOI
INSTRUCTIONS DE SECURITE:
CAUTION
La flèche dans un triangle met l'utilisateur en garde contre la présence de haute tension sans
isolationdans l'appareil, ce qui peut causer un risque d'électrocution.
Un point d'exclamation dans un triangle prévient de la présence d'instructions relatives au
fonctionnement et à la maintenancese trouvantdans le manuel fourni avec l'appareil.
Ce symbole signifie:uniquement pour usage à l'intérieur.
Ce symbole signifie : Lire le mode d’emploi.
Afin de protéger l’environnement, mercide recycler les emballages autant quepossible.
Afin d’éviter tout risque d’incendie ou de décharge électrique, ne pas exposer cet appareil à la pluie ou à
l’humidité.
Pour éviterla formation decondensation à l’intérieur de l’appareil, patientez quelquesminutes pour laisser
l’appareil s’adapter à la température ambiante lorsqu’il arrive dans une pièce chauffée après le transport.
La condensation empêche l'appareil de fonctionner manière optimale, et elle peut même causer des
dommages.
Cetappareil est destiné à uneutilisationà l’intérieur uniquement.
Nepas insérer d’objet métallique ou renverser de liquide dans l’appareil. Aucun objet contenantun liquide,
tels que des vases, ne peut être placé sur cet appareil. Cela risquerait de provoquer une décharge
électrique ou un dysfonctionnement. Si un corps étranger est introduit dans l’appareil, déconnectez
immédiatement de la source d’alimentation.
Aucune source de flammenue, telle quedes bougies allumées,ne peut être placée surl'appareil.
Placez l’appareil dans un endroit bien ventilé, éloigné de tout matériau ou liquide inflammable. L’appareil
doit êtrefixé à 50cm minimum des murs.
Nepas couvrirles orifices de ventilation, un risque de surchauffe en résulterait.
Nepas utiliser l'appareil dans un environnement poussiéreux et le nettoyerrégulièrement.
Nepas laisser l'appareil à portée des enfants.
Lespersonnes non expérimentéesne doivent pas utiliser cet appareil.
Latempérature ambiantemaximale d’utilisation de l’appareil est de 45°C. Ne pas l’utiliser au-delà de cette
température.
Assurez-vous que la zone au-dessous du lieu d’installation ne comporte pas de personnes non
concernées pendant le montage,le démontageet les opérations de maintenance.
Débranchez toujours l’appareil si vous ne l’utilisez pas de manière prolongée avant d’entreprendre des
réparations.
Les installations électriques ne peuvent être faites que par du personnel qualifié et conformément aux
règlements de sécurité électrique et mécaniqueen vigueur dans votre pays.
Assurez-vous quela tension d’alimentation de la source d’alimentation de la zone dans laquelle vous vous
trouveznedépasse pas celle indiquéeà l’arrière de l’appareil.
Le cordon d’alimentation doit toujours être en parfait état. Mettez immédiatementl’unité hors tension si le
cordon devait êtreécrasé ou endommagé. Pour éviter tout risque de choc électrique, lecordon doit être
remplacé par le constructeur, son agent ou un technicien qualifié.
Nelaissez jamais lecordon d’alimentation entrer en contactavec d’autres câbles !
L’appareil doit êtreà lamasseselon les règlesde sécurité.
Nepas connecter l’unité à un variateur de lumière.
Utilisez toujours des câbles appropriés et certifiés lorsque vous installez l'appareil.
Pour éviter toute déchargeélectrique,ne pas ouvrir l’appareil.
Nejamais
un fusible de même type etayant lesmêmes spécificationsélectriques !
En cas de problèmes de fonctionnement sérieux, arrêtez toute utilisation de l’appareil et contactez votre
revendeurimmédiatement.
réparer ou court-circuiter un fusible. Remplacez
n’enlevez jamais le couverclede l’appareil. Il n’y a aucune
pièce à l’intérieur de l’appareil que vous puissiez
remplacer vous-même. Confiez l’entretien uniquement à
destechniciens qualifiés.
systématiquement
un fusibleendommagépar
Lacarrosserieet les lentilles doivent être remplacées si elles sont visiblementendommagées.
Utilisez l’emballage d’origine si l’appareildoit être transporté.
Pour des raisons de sécurité, il est interdit d’apporter une quelconque modification à l’unité non
spécifiquement autoriséepar lesparties responsables.
Important:
personnessouffrantd’épilepsie.
Ne jamais fixer directement la source de lumière! Ne pas utiliser d’effets en présence de
DESCRIPTION
1. Porte fusible.
2. Jack d'1/4" destiné à connecter le contrôleur
optionnel CA-8.
3. Entrée DMX : connecteurXLR mâle à 3 broches
utilisé pour connecter des câbles DMX
universels. Cette entrée reçoit ses instructions
d'un contrôleur DMX ou d'un autre Astro
White/Color quand c'est le mode maître/esclave
qui a été choisi.
4. Sortie DMX : connecteur XLR femelle à 3
broches utilisé pour connecter l'Astro
White/Color soit à l'appareil qui suit dans la
chaîne DMX, soit à un autre Astro White/Color
quand c'est le mode maître/esclave qui a été
choisi.
5. Micro interne.
6. Connexion à laterre.
7. Câble d'alimentation secteur.
8. Attelle de suspension avec sa molette pour bloquer l'appareil en position. L'attelle dispose d'un trou qui
permet de recevoir un crochet de montage.
9. InterrupteursDIP utilisés pour régler l'adresse DMX de départ de l'appareil.
INSTALLATION EN HAUTEUR
Important: L’installation doit être faite par du personnel qualifié uniquement. Une installation
incorrecte peut causer des blessures sévères et/ou endommager l’appareil. L’installation en
hauteurexige de l’expérience ! Les limites de charge doivent être scrupuleusement respectées,du
matériel d’installation certifié doit être utilisé, et l’appareil installé doit subir des inspections de
sécuritérégulièrement.
Assurez-vous que la zone au-dessous du lieu d’installation ne comporte pas de personnes non
concernéeslors de l’installation, ladésinstallation ou la maintenance.
Placez l’appareil dans un endroit bien ventilé, éloigné de tout matériau ou liquide inflammable. L’appareil
doit être fixé à
L’appareil doit être hors de portée du public et en dehors des zones de passage de personnes ou des
zonesoù le public est installé.
Avant l’installation, assurez-vous que la zone d’installation pourra supporter, en son point de fixation, un
minimumde 10 fois le poids de l’appareil.
Utilisez systématiquement un câble de sécurité qui peut supporter 12 fois le poids de l’appareil lors de
l’installation. Ce câble de sécurité secondaire doit être installé de manière à ce qu’aucune partie de
l’appareilne puisse descendrede plusde 20 cm si le support principal tombe.
L’appareil doit être bien fixé, un montage à balancement est dangereux et ne devrait pas être pris en
considération !
Nepas couvrirles orifices de ventilationpour éviter tout risquede surchauffe.
L’utilisateur doit s’assurer que les installations techniques et de sécurité sont bien approuvées par un
expert avant la première utilisation. Les installations doivent être inspectées chaque année par du
personnelqualifié pourassurerune sécurité optimale.
50cm minimum
des murs situés à proximité.
JB SYSTEMS
®
7/35 ASTRO WHITE/COLOR
JB SYSTEMS
®
8/35 ASTRO WHITE/COLOR
Page 7

FRANÇAIS MODE D’EMPLOI
FRANÇAIS MODE D’EMPLOI
INSTALLATION ELECTRIQUE + ADRESSAGE
Important: L’installation électrique doit uniquement être effectué par du personnel qualifié,
selon la législationconcernant les mesures de sécurité électriques et mécaniques en vigueur
dans votre pays.
Installationélectrique en mode DMX :
Le protocole DMX est un signal à haute vitesse très utilisé pour contrôler des équipements lumineux
intelligents.Vous devezconnecter en guirlande votre contrôleur DMX ettous les appareils avecun câble
balancé de bonne qualité.
Les deuxtypes de connecteurs XLR, ceux à 3 broches comme ceux à 5 broches, peuvent être utilisés ;
cependant, les connecteurs à 3 broches se rencontrent plus fréquemment car ilssont compatibles avec
les câblesaudiosymétriques.
Plan de câblage des XLR à 3 broches : Broche 1 = prise de terre ~ broche 2 = signal négatif (-) ~
broche3 = signalpositif(+)
Plan de câblage des XLR à 5 broches : Broche 1 = prise de terre ~ broche 2 = signal négatif (-) ~
broche 3 = signal positif (+) ~ broches 4 et 5 : non utilisées.
Pour éviter des comportements étranges des effets de lumières dus aux interférences, vous devez
utiliser une résistance de bouclage de 90Ω à 120Ω au bout de la guirlande. Ne jamais utiliser de
séparateur de câbles en forme « Y », cela ne fonctionnera pas!
Assurez-vous queles appareilssont tous branchéssur le secteur.
Chaque effet de lumière dans la guirlande doit avoir sa propre adresse de départ
afin de savoir quelle est la commande du contrôleur il doit décoder. Dans la
prochainesection, vousapprendrezà réglerl’adresseDMX.
2. Deux appareils ou plus, en mode'maître/esclave' :
Connectez deux appareils ou plus entre eux.A cette fin, utilisez des câbles pour micros, de bonne qualité et
pourvusde prisesXLR symétriques. L'appareil qui n'a pas decâble raccordé à son entrée se comporteraen
'master', les autres réagirontdonc comme des appareils 'slaves'.
Important : sur l'appareil 'master', l'adresse DMX doit être réglée sur 001. (Premier switch DIP sur ON,
tous les autres sur OFF). Les appareils 'slaves' peuvent avoir n'importe quelle adresse DMX, sauf le
001 !
On peut inverser les réactions d'un ou de plusieurs'slaves' en changeant la positiondu switch DIPN° 10 sur
les 'slaves' en question. Il suffit d'essayer et de voir si cela améliorel'effet. Si vous changez le switch DIP N°
10 sur le 'master',cela n'aura aucun effet.
3. Pourdisposer de plus de contrôle, connectez le contrôleur optionnel CA-8 :
Le contrôleur CA-8 ne peut être utilisé qu'avec deuxmodes : autonome et maître/esclave.
Connectez le contrôleur au jack d'entrée du premier appareil (maître). Vous pouvez
maintenant contrôlertous les appareils connectés.
Stand by
Fonction
Mode
4. Mode DMX :
Quand les appareils sont connectés en mode DMX, ils peuvent être contrôlés en suivant les instructions du
tableau DMX ci-dessous :
L'appareil esttotalementéteint.
3. Stroboscopesynchrone
4. Stroboscopealterné
Son (LED éteinte)
3. Rotationdans lesensdes
aiguilles d'unemontre
4. Rotationdans lesens
INVERSEdes aiguilles
d'une montre
Mouvementlent ~ pas de son
(LED ON)
Commentrégler les interrupteurs DIP pourcréer une adresse de départcorrecte :
DIP #1 #2 #3 #4 #5 #6 #7 #8 #9 #10
Valeur 1 2 4 8 16 32 64 128 256
On peut combiner les valeurs de ces interrupteurs de manière à obtenir n'importe quelle adresse de départ
entre 1 et512 :
Réglage adresse = 01 int. 1 = ON valeur = 1
Réglage adresse = 05 int. 1+3 = ON valeur = 1+4 = 5
Réglage adresse = 09 int. 1+4 = ON valeur = 1+8 = 9
Réglage adresse = 13 int. 1+3+4= ON valeur= 1+4+8 = 13
…
Réglage adresse = 62 int.2+3+4+5+6= ON valeur= 2+4+8+16+32 = 62
Chacun des 9 premiers interrupteurs DIP correspond à une certaine valeur DMX.
L'inversiondes
appareilsesclaves
n'est pas utilisée en
mode DMX
FONCTIONNEMMENT DE L'APPAREIL
1. Un seul appareil en mode autonome :
Important : L'appareil DOIT être réglé à l'adresse DMX 001 (Premier switch DIP sur ON, tous les autres
sur OFF). Connectez simplement l'appareil au secteur et mettez de la musique. L'appareil commencera à
fonctionnerautomatiquementen suivant le rythme de la musique.
JB SYSTEMS
®
9/35 ASTRO WHITE/COLOR
JB SYSTEMS
®
10/35 ASTRO WHITE/COLOR
Page 8
FRANÇAIS MODE D’EMPLOI
MAINTENANCE
Assurez-vous que la zone au-dessous du lieu d’installation ne comporte pas de personnes non
concernées lors de la maintenance
Mettez l'appareil hors tension, débranchez le cordon d’alimentation et attendez que l’appareil ait refroidi.
Pendantl’inspection,les points suivants doivent êtrevérifiés :
Toutes les vis utilisées pour l’installation de l’appareil ou de chacune de ses pièces doivent être bien
fixéeset non corrodées.
Les niches, fixations et structures de support (plafond, poutres, suspensions) doivent être totalement
intactes,sans aucune déformation.
Lorsqu’une lentille optique est visiblement endommagée (fissure ou éraflures profondes), elle doit être
remplacée.
Les câbles doivent êtreen parfait état et doivent être remplacés immédiatement en cas de détection d’un
problème,mêmebénin.
Pour protéger l’appareil de toute surchauffe, les ventilateurs (le cas échéant) et les orifices de ventilation
doiventêtre nettoyés tous les mois.
L’intérieurde l’appareil doit être nettoyéchaque annéeà l’aide d’unaspirateur ou d'un pistolet à air.
Lenettoyagedes lentilles optiques internes et externes et/ou des miroirs doit être effectué périodiquement
pour optimiser la production de lumière. La fréquence de nettoyage dépend de l’environnement dans
lequel l’appareil fonctionne: des environnements humides, enfumés ou particulièrement sales peuvent
entraînerune accumulationde saletés plusimportantesur les parties optiques de l’appareil.
Nettoyezà l’aide d’un chiffon doux avec des produits de nettoyage pour verres normaux.
Séchez toujours les parties soigneusement.
Nettoyezles optiques externesau moins unefois tous les 30 jours.
Nettoyezles optiques internes au moins une fois tous les 90 jours.
Attention: Nous vous recommandons fortement de faire exécuter le nettoyage interne par du
personnel qualifié !
SPECIFICATIONS
Alimentation: CA100V ~ 240V,50/60Hz
Fusible: 250V .2Alente (20mm verre)
Contrôle du son: microphoneinterne
ConnexionsDMX: connecteurs XLR mâle / femelle à 3 broches
Canaux DMX utilisés : 2 canaux
Ampoules: 1xLED 3Watt
Dimensions: 194 x 202 x 141 mm
Poids: 1kg
Chacune de ces informationspeutêtre modifiée sans avertissementpréalable. Vous pouvez
télécharger la dernièreversion de ce mode d’emploi de notre site Web: www.beglec.com
NEDERLANDS HANDLEIDING
Hartelijk dank voor de aankoop van dit JB Systems®product. Om ten volle te kunnen profiteren van alle
mogelijkheden en voor uw eigen veiligheid, gelieve de aanwijzingen zeer zorgvuldig te lezen voor U begint
het apparaat te gebruiken.
DOOR U OP ONZE MAILINGLIJST IN TE SCHRIJVEN ONTVANGT U STEEDS DE
LAATSTE INFORMATIE OVER ONZE PRODUKTEN: NIEUWIGHEDEN, SPECIALE
ACTIES, OPENDEURDAGEN, ENZ.
SURF NAAR: WWW.BEGLEC.COM
KARAKTERISTIEKEN
In dit apparaat is radio-interferentieonderdrukt. Dit product voldoet aan de gangbare Europese en nationale
voorschriften. Het is vastgesteld dat het apparaat er zich aan houdt en de desbetreffende verklaringen en
documenten zijn door de fabrikant afgegeven.
Het toestel is ontworpen om decoratieve lichteffecten te produceren en kan eventueel worden gebruikt in
lichtshows.
Krachtige DMX gestuurde LED moonflower.
Gebaseerd op een zeer krachtige witte LED van 3 watt
Zeer krachtige witte (Astro White) of kleurrijke lichtbundels (Astro Color)
Lichtopbrengstvergelijkbaarmetontladingslampen
Geen lampen te vervangen!
Extreme langelevensduur!
Bijna geen warmteontwikkeling
Zeer laag verbruik
Lichtgewicht (geen zware lamptransformatoren)
Dimmer 0-100% en uiterst snelle strobe functie
Ingebouwde programma’s voorprachtigelichtshows
2 DMX kanalen
Standalone: werkt op het ritme van de muziek dank zij de ingebouwde microfoon
Master/slave:prachtigegesynchroniseerdeshows
CA-8 remote controller verkrijgbaar in optie
Uitgerustmet een grote optische lens voor een maximalelichtopbrengst
VOOR DE IN GEBRUIKNAME
Controleer voor het eerste gebruik van het apparaat of het tijdens het transport beschadigd werd. Mocht er
schade zijn,gebruik het dan niet, maar raadpleeg eerst uw dealer.
Belangrijk: Dit apparaat verliet de fabriek in uitstekende staat en goed verpakt. Hetis erg belangrijk dat de
gebruiker de veiligheidsaanwijzingen en raadgevingen in deze gebruiksaanwijzing uiterst nauwkeurig volgt.
Elke schade veroorzaakt door verkeerd gebruik van het apparaat valt niet onder de garantie. De dealer
aanvaardt geen verantwoordelijkheidvoor mankementenen problemen die komen door hetveronachtzamen
van deze gebruiksaanwijzing.
Bewaardeze brochure op een veilige plaats om hem in de toekomstnogmaals te kunnenraadplegen. Indien
U het apparaatverkoopt, denkt U er wel aan om de gebruiksaanwijzing bij te voegen.
Controleer de inhoud:
Controleerof de doos volgende onderdelen bevat:
Handleiding
Astro White of Astro Color
Ophangbeugelmetvijsknoppen
JB SYSTEMS
®
11/35 ASTRO WHITE/COLOR
JB SYSTEMS
®
12/35 ASTRO WHITE / COLOR
Page 9

NEDERLANDS HANDLEIDING
WAARSCHUWING:
Om het risico op elektrocutie zoveel
NEDERLANDS HANDLEIDING
VEILIGHEIDSVOORSCHRIFTEN:
CAUTION
De bliksempijl die zich in een gelijkbenige driehoek bevindt is bedoeld om u te wijzen op het
gebruik of de aanwezigheid van niet-geïsoleerde onderdelen met een “gevaarlijke spanning” in
het toestel die voldoendekracht heeft om een risico van elektrocutiein te houden.
Het uitroepteken binnen de gelijkbenige driehoekis bedoeld om de gebruikererop te wijzen dat
er in de meegeleverde literatuur belangrijke gebruik en onderhoudsinstructies vermeld staan
betreffendedit onderdeel.
Dit symbool betekent:het apparaat magenkel binnenhuis worden gebruikt.
Dit symbool betekent: Lees de handleiding!
Om hetmilieu te beschermen, probeer zoveel mogelijkhet verpakkingsmateriaal te recycleren.
Stel dit apparaat niet bloot aan regen of vocht, dit om het risico op brand en elektrische schokken te
voorkomen.
Om de vorming van condensatie binnenin te voorkomen,laat het apparaat aan de omgevingstemperatuur
wennen wanneer het, na het transport, naar een warm vertrek is overgebracht. Condensatie kan het
toestel soms verhinderen perfect te functioneren. Het kan soms zelfs schade aan het apparaat
toebrengen.
Gebruik ditapparaatuitsluitendbinnenshuis.
Plaats geen stukken metaal en mors geen vocht binnen in het toestel om elektrische schokken of storing
te vermijden. Indien een vreemd voorwerp in het apparaat geraakt, moet U het direct van het lichtnet
afkoppelen.
Plaats de installatie op een plaats met goede ventilatie, ver van brandbare materialen en/of vloeistoffen.
De installatie moetop minstens50 cm van de muren rondom geplaatst worden.
Bedek geen enkeleventilatieopening om oververhitting te vermijden.
Zorg dat het toestelniet in een stoffige omgeving wordt gebruikt en maak het regelmatig schoon.
Houdhet apparaatuit de buurtvan kinderen.
Ditapparaatmag niet door onervaren personen bediend worden.
De maximum veilige omgevingstemperatuur is 40°C. Gebruik het apparaat dus niet bij hogere
temperaturen.
Verzeker er U van dat er zich onder de plaats waar het toestel wordt geïnstalleerd geen ongewenste
personenbevinden tijdens het bevestigenen losmaken alsookbij het onderhoud.
Trek altijd de stekker uit wanneer het apparaat gedurende langere tijd niet wordt gebruikt of alvorens te
beginnen met de onderhoudsbeurt.
De elektrische installatie behoort uitsluitend uitgevoerd te worden door bevoegd personeel, volgens de in
uw land geldende regels betreffendeelektrische en mechanische veiligheid.
Controleer dat de beschikbare spanning niet hoger is dan die aangegeven op de achterzijde van het
toestel.
Deelektrischekabel behoort altijd in uitstekendestaat te zijn. Zet hetapparaatonmiddellijkaf als de
elektrischekabel gekneusd of beschadigd is. De kabel moet vervangen worden door de fabrikant zelf, zijn
dealerof vergelijkbarebekwame personen om een brand te voorkomen.
Laat de elektrische draad nooit in contact komen met andere draden.
Volgens de veiligheidsvoorschriften moet deze installatie geaard worden.
Sluithet apparaatniet aan op een elektronische dimmer.
Gebruik altijd een geschikte en gekeurde veiligheidskabel bij het installeren van het toestel.
Om elektrische schokken te voorkomen, moet U de behuizingniet openen.
Herstel
In geval van ernstige problemen met het bedienen van hettoestel, stopt U onmiddellijk het gebruik ervan.
Debehuizing en de lenzen moetenvervangen worden als ze zichtbaarbeschadigd zijn.
nooit
steeds
Contacteeruw dealer voor een eventuele reparatie.
een zekering en overbrug de zekeringhouder nooit. Vervang een beschadigde zekering
door een zekering van hetzelfdetype en met dezelfde elektrischekenmerken.
mogelijk te vermijden mag u nooit de behuizing
verwijderen. Er bevinden zich geen onderdelen in het
toestel die u zelf kan herstellen. Laat de herstellingen
enkeluitvoeren door een bevoegde technicus.
Gebruik best de originele verpakking als het toestelvervoerdmoet worden.
Om veiligheidsredenen ishet verboden om modificaties aan het toestelaan te brengen.
Belangrijk: Kijk nooit rechtstreeks in de lichtbron. Gebruik het lichteffect niet in de aanwezigheid van
personen die lijden aan epilepsie.
BESCHRIJVING:
1. Zekeringhouder
2. ¼” jack connector voor het verbinden van de
optioneleCA-8 controller.
3. DMX ingang: mannelijke 3pins XLR-connector
voor het aansluiten van universele DMX-cables.
Deze ingang kan instructies krijgen van een
DMX-controller of van een andere Astro
White/Colorin master/slave modus.
4. DMX uitgang: vrouwelijke 3pins XLR-connector
om de Astro White/Color met het volgende
toestel in de DMX keten te verbinden of om een
andere Astro white/color aan te sluiten in
master/slavemodus.
5. Ingebouwdemicrofoon
6. Aarding
7. Voedingskabel
8. Ophangbeugelmet een vijsknop.
9. DIP schakelaars voor het instellen van het DMX
startadres van hettoestel.
OPHANGEN VAN HET APPARAAT
Belangrijk: De installatie van het toestel mag uitsluitend door bekwaam onderhoudspersoneel
uitgevoerd worden. Onjuiste plaatsing kan ernstige letsels en/of schade aan eigendommen tot
gevolg hebben. Het ophangen vergt veel ervaring. U behoort de grenzen te respecteren aan de
werklast; erkende installeringmaterialen moeten worden gebruikt; de veiligheid van het
geïnstalleerde toestel moet regelmatigworden gecontroleerd.
Overtuig U ervan dat het gebied onder installatieplaats vrij is van ongewenste personen tijdens het
plaatsen,het weghalenen het onderhoud.
Installeer het toestel op een goed geventileerde plaats, ver van brandbare stoffen en/of vloeistoffen. Het
toestelmoet worden bevestigd op
Hettoestel moet worden geïnstalleerd buiten het bereik van iedereen en weg van plaatsen waar men mag
lopen en zitten.
Alvorens tot het plaatsen over te gaan, moet men controleren dat de minimum puntbelasting van de
installatieplaats 10 keer het gewicht van het toestel bedraagt.
Gebruik bij het installeren van het toestel altijd een gewaarmerkteveiligheidskabel die 12 keer hetgewicht
van het toestel kan dragen. Deze bijkomende veiligheidsbevestiging moet zo worden aangebracht dat
geen deel van het toestel meer dan 20 cm vallen kan als de hoofdbeveiliging faalt.
Het apparaat moet goed worden vastgezet; aan een vrij zwaaiende montage mag zelfs niet gedacht
worden.
Bedek geen ventilatieopeningen, anders zou dit oververhittingtot gevolg kunnenhebben.
De gebruiker moet er zich van verzekeren dat de installaties met betrekking tot de veiligheid en de
technische mechaniek door een expert zijn goedgekeurd alvorens ze voor de eerstekeer te gebruiken. Elk
jaar moeten de installaties worden gekeurd door een vakmanom te controleren of de veiligheid nog steeds
perfectis.
minstens 50 cm
van deomringende muren.
JB SYSTEMS
®
13/35 ASTRO WHITE / COLOR
JB SYSTEMS
®
14/35 ASTRO WHITE / COLOR
Page 10
NEDERLANDS HANDLEIDING
NEDERLANDS HANDLEIDING
ELEKTRISCHE INSTALLATIE + ADRESSERING
Belangrijk: De elektrische installatie zou alleen uitgevoerd moeten worden door een bekwaam
persoonvolgens de voorschriften voor elektrische en mechanische veiligheidin uw land.
DMX INSTALLATIE
Het DMX-protocol is een veel gebruikt hogesnelheidssignaal om lichtuitrustingen te bedienen. U moet
uw DMX bediening en alle units met een gebalanceerdekabel van goede kwaliteit doorverbinden.
Zowel de 3pins-XLR als de 5pins-XLR connector worden gebruikt, de 3pins-XLR is echter meer populair
wantdeze kabels zijn compatibel met symmetrische microfoonkabels.
Pin layoutXLR-3pin: Pin1 = GND ~ Pin2 = Negatief signaal (-) ~ Pin3 = Positief signaal (+)
Pin layout XLR-5pin: Pin1 = GND ~ Pin2 = Negatief signaal (-) ~ Pin3 = Positief signaal (+) ~
Pins4+5 niet in gebruik.
Om vreemd gedrag van de lichteffecten, veroorzaakt door storing, te voorkomen, moet u een
afsluitweerstand van 90Ω tot 120Ω aan het eind van de keten gebruiken.Gebruik nooit een Y-splitkabel,
dit zal eenvoudig weg niet werken!
Weet zeker dat alle units op hetlichtnet zijn aangesloten.
Elk lichteffect in de keten heeft een eigen DMX startadres nodig zodat het weet
welke commando’s van de bediening het moet ontcijferen. In de volgende sectie
zal u leren hoe hetDMX adres in te stellen.
Hoe de DIP-schakelaarsgebruiken om het gewensteDMX startadresinte stellen:
Elk vande eerste 9 DIP-schakelaarsstemt overeen met een bepaalde DMX-waarde:
DIP #1 #2 #3 #4 #5 #6 #7 #8 #9 #10
Waarde 1 2 4 8 16 32 64 128 256
Slave inversie, niet
gebruikt inDMX-mode
001. U kan het gedrag van één of meerdere van de slave toestellen omkeren door de positievan DIP-switch
n°10 op deze toestellen te veranderen. Probeer het gewoon eens en kijk of het effect beter tot zijn recht
komt. De DIP-switchn°10 veranderen op het master toestel heeft geen effect.
3. Een beterecontrole dank zij de CA-8 controller:
De CA-8 controller kan enkel gebruikt worden in standalone (autonoom) of master/slave
modus. Sluit de controller via de jack ingang aan op het eerste toestel (master). Nukunt u
alle toestellen controleren:
Stand by
Function
Mode
4. DMX-modus:
In DMX modus kunt u detoestellen besturen via2 kanalen:
Blackout
5. SynchronousStrobe
6. Alternating Strobe
Geluid (LEDUIT)
5. rotatiein wijzerzin
6. rotatiein tegenwijzerzin
Traag~ geen geluid (LEDAAN)
U kunt de waardenvan deze schakelaars combineren om zo om het even welk startadres tussen 1 en 512 te
bekomen:
Startadres= 01 schakelaar 1=ON waarde: 1
Startadres= 05 schakelaar1+3=ON waarde:1+4 = 5
Startadres= 09 schakelaar1+4=ON waarde:1+8 = 9
Startadres= 13 schakelaar1+3+4=ON waarde:1+4+8 = 13
…
Startadres= 62 schakelaar 2+3+4+5+6=ON waarde:2+4+8+16+32 = 62
BEDIENING VAN HET TOESTEL
1. 1 autonoomtoestel:
Belangrijk:het DMXadres MOET ingesteld wordenop 001 (eerste DIP switch = ON, all de andere staan
op OFF).Sluit het toestel gewoon aan op het net en laat muziek afspelen. Het toestel zal automatisch
beginnenwerken op hetritme vande muziek.
2. Twee of meer toestellenin master/slave opstelling:
Verbindt 2 of meer toestellen met mekaar via gebalanceerde XLR microfoonkabels van goede kwaliteit. Het
toestelwaar geen kabel aangesloten is in zijn ingang zal reageren als master, de andere toestellen zijn slave
toestellen.
Belangrijk: Op het master toestel MOET het DMX adres ingesteld worden op 001 (eerste DIP switch =
ON, all de andere staan op OFF). De slave toestellen kunnen elke DMX adres aannemen maar NIET
JB SYSTEMS
®
15/35 ASTRO WHITE / COLOR
JB SYSTEMS
®
16/35 ASTRO WHITE / COLOR
Page 11
NEDERLANDS HANDLEIDING
ONDERHOUD
Overtuig U ervan dat de zone onder de installatieplaats vrij is van ongewenste personen tijdens het
onderhoud.
Zet het toestel uit, trek de netstekkeruit het stopcontact en wacht tot het toestel is afgekoeld.
Bij inspectie moetende volgendepuntenworden gecontroleerd.
Alle schroeven en onderdelen die gebruikt worden om het te toestel te installeren moeten goed
vastgedraaid worden en mogen niet verroestzijn.
Behuizingen, vastzetstukken, installeringplaatsen (plafond, spanten, schokbrekers) mogen absoluut niet
verwrongenzijn.
Wanneer een optische lens klaarblijkelijk beschadigd is door barsten of diepe krassen, dan moet deze
vervangenworden.
De stroomkabels moeten steeds in perfecte verkeren en dienen vervangen te worden wanneer er zelfs
maareen klein probleem ontdekt word.
Om het toestel te beschermen tegen oververhitting, behoren de ventilatoren (als die er zijn) en de
ventilatieopeningenelke maand gereinigd te worden.
Debinnenkant van het toestel behoort elk jaar gereinigd te wordenmet een stofzuiger of een luchtspuit.
Het schoonmaken van inwendige en uitwendige optische lenzen en/of spiegels moet regelmatig worden
uitgevoerd om een zo goed mogelijke lichtuitstraling te verkrijgen. Hoe vaak ze schoon moeten worden
gemaakt hangt af van de omgeving waar het toestel wordt gebruikt: een klamme, rokerige of bijzonder
vuile omgevingkan een grotere opeenhoping van vuil veroorzakenop de optische uitrusting.
Reinig meteen zachtedoek en gebruiknormaleglasreinigendeproducten.
Droog de onderdelen altijd zorgvuldig af,
Reinig de uitwendigeoptische uitrusting minstens één keerper maand.
Reinig de inwendige optische uitrusting minstens om de3 maanden.
Let op: We bevelen sterk aan dat het schoonmaken van de binnenkant wordt uitgevoerd door
vakbekwaampersoneel!!
TECHNISCHE KENMERKEN
Netvoeding: AC100V ~ 240V,50/60Hz
Zekering: 250 V/ 2A trage zekering (20 mm glas)
Geluidscontrole: Inwendigemicrofoon
DMX verbinding: 3 pins XLR mannelijk/vrouwelijk
Aantal DMX kanalen: 2 kanalen
Lamp: 1xLED 3Watt
Afmetingen: 194 x 202 x141 mm
Gewicht: 1kg
Elke informatiekan zonder voorafgaandewaarschuwinggewijzigdworden
U kande laatste versievan deze handleidingdownloaden via Onze website: www.beglec.com
DEUTSCH BEDIENUNGSANLEITUNG
Vielen Dank, dass Sie sich für den Erwerb dieses JBSystems®-Produkt entschieden haben. Bitte lesen Sie
diese Bedienungsanleitung sorgfältig vor der Inbetriebnahme durch, zur vollen Ausschöpfung der
Möglichkeiten,die dieses Gerät bietet, sowie zu Ihrer eigenen Sicherheit.
EIGENSCHAFTEN
Das Gerät ist funkentstört und erfüllt die Anforderungen der europäischen und nationalen Bestimmungen.
EntsprechendeDokumentationliegt beimHerstellervor.
DasGerätist zur Erzeugung vondekorativemLicht sowiezur Verwendungin Lightshows bestimmt.
LeistungsstarkerDMX-gesteuerterLED-Moonflower.
Ausgestattet mit einer sehr leistungsfähigenweißen 3 Watt LED:
Extrem starke weißeStrahlen (AstroWhite) oder bunteStrahlen (Astro Color),
Lichtausbeutevergleichbar mitEntladungslampen
Kein Lampenaustausch erforderlich!
Extrem langeLebensdauer!
Praktisch keineWärmeentwicklung
Sehr geringeLeistungsaufnahme
Geringes Gewicht (keine Lampen-Trafos erforderlich)
0-100%Dimmerund ultra schnelle Strobe-Funktion
AusgezeichnetevoreingestellteProgrammefürwunderschöneLightshows:
DMX-Steuerung:2 Kanäle
Standalone: musikgesteuertmit eingebautemMikrofon
Master/Slave:wunderbar synchronisierteShows
Wahlweise CA-8-Fernsteuerung erhältlich
Ausgestattet mit großen optischen Linsen für eine maximaleLichtausbeute
VOR DER ERSTBENUTZUNG
Vor der Erstbenutzung bitte das Gerät zuerst auf Transportschäden überprüfen. Sollte das Gerät einen
Schaden aufweisen, Gerät bitte nicht benutzen, sondern setzen Sie sich unverzüglich mit Ihrem Händlerin
Verbindung.
Wichtiger Hinweis:
dass der Benutzer sich streng an die Sicherheitshinweise und Warnungen in der Bedienungsanleitung
hält. Schäden durch unsachgemäße Handhabung sind von der Garantie ausgeschlossen. Der Händler
übernimmt keine Verantwortung für Schäden, die durch Nichtbeachtung der Bedienungsanleitung
hervorgerufen wurden.
Die Bedienungsanleitung zum zukünftigen Nachschlagen bitte aufbewahren. Bei Verkauf oder sonstiger
WeitergabedesGeräts bitte Bedienungsanleitungbeifügen.
Packungsinhaltprüfen:
Bitte überprüfenSie, dass die Packung folgende Einzelteileenthält:
Bedienungsanleitung
Astro White oder Astro Color
BefestigungsbügelmitKnopf
Das Gerät hat das Werk unbeschädigt und gut verpackt verlassen. Es ist wichtig,
JB SYSTEMS
®
17/35 ASTRO WHITE / COLOR
JB SYSTEMS
®
18/35 ASTRO WHITE/COLOR
Page 12
DEUTSCH BEDIENUNGSANLEITUNG
ACHTUNG:
Um sich nicht der Gefahr eines elektrischen
DEUTSCH BEDIENUNGSANLEITUNG
SICHERHEITSHINWEISE
CAUTION
Das Blitzsymbol im Dreieck weist den Benutzer darauf hin, dass eine Berührungsgefahr mit
nicht isolierten Teilen im Geräteinneren, die eine gefährliche Spannung führen, besteht. Die
Spannung ist so hoch, das hier die GefahreineselektrischenSchlages besteht.
Das Ausrufezeichen im Dreieck weist den Benutzer auf wichtige Bedienungs- und
Wartungshinweiseinden Dokumenten hin, die dem Gerät beiliegen.
DiesesSymbol bedeutet:Nur innerhalbvon Räumen verwenden.
DiesesSymbol bedeutet: Achtung! Bedienungsanleitung lesen!
Aus Umweltschutzgründen Verpackung bittewiederverwenden oder richtig trennen.
Zur Vermeidung von Stromschlag oderFeuer, Gerät bitte nicht Regen oder Feuchtigkeit aussetzen.
Zur Vermeidung von Kondensation im Inneren des Geräts bitte nach dem Transport in eine warme
Umgebung einige Zeit zum Temperaturausgleich ausgeschaltet stehen lassen. Kondensation kann zu
Leistungsverlustdes Geräts odergar Beschädigungführen.
Gerät nicht im Freien undin feuchten Räumen und Umgebungen verwenden.
Keine Metallgegenstände oder Flüssigkeiten ins Innere des Geräts gelangen lassen, Kurzschluss oder
Fehlfunktion können die Folge sein. Falls es doch einmal vorkommen sollte, bitte sofort Netzstecker
ziehen und vom Stromkreis trennen.
Gerät nur in gut belüfteter Position und entfernt von entflammbaren Materialien oder Flüssigkeiten
betreiben.Mindestabstand an allen Seitensoll mindestens 50 cm betragen.
Ventilationsöffnungen nichtabdecken, da Überhitzungsgefahr!
Nichtinstaubiger Umgebung verwendenund regelmäßig reinigen.
Für Kinder unerreichbar aufbewahren.
Unerfahrene Personen sollen dasGerät nicht bedienen.
Umgebungstemperatur darf 40ºCnichtüberschreiten.
Sicherstellen, dass sich während des Auf- und Abbaus keine unbefugten Personen unterhalb des Geräts
befinden.
Stets Netzsteckerziehen, wenn Gerät für längeren Zeitraum nichtgenutzt oder es gewartetwird.
Elektrische Anschlüsse nurdurchqualifiziertesFachpersonalüberprüfen lassen.
Sicherstellen,dass Netzspannung mit Geräteaufkleber übereinstimmt.
Gerät nicht mit beschädigtem Netzkabel betreiben. Ist die Zugangsleitung beschädigt, muss diese durch
den Hersteller, seinen Vertrieb oder durch eine qualifiziertePerson ersetzt werden.
Netzkabel nicht mit anderen Kabeln in Berührung kommen lassen!
Zur Einhaltung der Sicherheitsbestimmungen mussdas Gerät geerdetsein.
Gerät nicht an einen Dimmeranschließen.
Ausschließlich vorschriftsmäßigeKabel zur Installationverwenden.
Gerät nicht öffnen.
Sicherungniemals reparieren oder überbrücken,sondern immer durchgleichartigeSicherungersetzen!
Bei FehlfunktionGerät nichtbenutzenund sichmit Händler in Verbindung setzen.
Bei sichtbaren Beschädigungenmüssen Gehäuse und Optik ersetzt werden.
Bei Transport bitte Originalverpackung verwenden,um Schäden am Gerätzu vermeiden.
Aus Sicherheitsgründen dürfen an dem Gerätkeine unbefugten Veränderungenvorgenommenwerden.
WichtigerHinweis:
Raum befinden, die unterEpilepsie leiden.
Nicht direkt in die Lichtquelle blicken! Gerät nicht verwenden, wenn sich Personen im
Schlags auszusetzen, entfernen Sie keines der
Gehäuseteile. Im Geräteinneren befinden sich keine vom
Benutzer reparierbaren Teile. Überlassen Sie
ReparaturendemqualifiziertenKundendienst.
BESCHREIBUNG
1. Sicherungsfassung
2. ¼” Buchse zum Anschließen der als Option
erhältlichen CA-8-Steuerung.
3. DMX-Eingang: 3-poliger XLR-Stecker zum
Anschließen von gängigen DMX-Kabeln. Dieser
Eingang erhält Befehle von einem DMX-
Controller oder im Master/Slave-Modus von
einem anderen Astro White/Color.
4. DMX-Ausgang: 3-polige XLR-Buchse zum
Anschließen des Astro White/Color an das
nachfolgende Gerät in der DMX-Kette oder im
Master/Slave-Modus an einen anderen Astro
White/Color.
5. EingebautesMikrofon
6. Erdung
7. Netzkabel
8. Befestigungsbügel mit 1 Knopf zum Festdrehen
des Geräts und einer Aussparung, um einen
Befestigungshakenanzubringen.
9. DIP-Schalter zur Einstellung derDMX-Startadressedes Geräts.
ÜBERKOPF-MONTAGE
Wichtig: Montage ausschließlich durch qualifiziertes Fachpersonal durchführen lassen.
Unvorschriftsmäßiger Einbau kann erhebliche Verletzungen und/oder Schäden verursachen.
Überkopf-Montage verlangt entsprechende Erfahrung! Belastungsgrenzen müssen beachtet
werden, geeignetes Installationsmaterial muss verwendet werden und das installierte Gerät muss
in regelmäßigenAbständen überprüft werden.
Sicherstellen, dasssich keine unbefugten Personen unterhalb des Geräts befinden, während es installiert
oder gewartet wird.
Gerät in gut belüfteter Position installieren, weit entfernt von entflammbaren Materialien und/oder
Flüssigkeiten. Einen Seitenabstand von mindestens50cm einhalten.
Gerät außerhalb der Reichweite von Personen und nicht in niedrigen Durchgängen oder in der Nähevon
Sitzgelegenheiteninstallieren.
Vor Montage sicherstellen, dass die gewählte Position wenigstens das 10-fache Gerätegewicht
aufnehmenkann.
Zur Aufhängung stets geeignetes Befestigungsmaterial verwenden, das das 12-fache Gerätegewicht
aushalten kann. Eine zweite Sicherungsaufhängung muss angebracht werden, die ein Absacken des
Geräts von mehr als 20 cmverhindert, solltedie Befestigungbrechen.
Gerät gut befestigen. Eine freischwingende Aufhängung ist gefährlich und sollte auf gar keinen Fall in
Betrachtgezogen werden!
Ventilationsöffnungen nichtabdecken, da Überhitzungsgefahr!
Betreiber muss sicherstellen,dass die sicherheitsrelevantenund technischen Installationen vor Erstbetrieb
fachmännischvorgenommenwordensind.
Installationen sollten jährlich durch qualifiziertes Fachpersonal inspiziert werden, um jederzeit einen
sicherenBetrieb zu gewährleisten.
ELEKTROINSTALLATION + ADDRESSIERUNG
Wichtig: Die Elektroinstallation sollte nur von Fachleuten in Übereinstimmung mit den in Ihrem
Land geltenden Bestimmungenfürelektrische und mechanische Sicherheit ausgeführtwerden.
Elektroinstallationim DMX-Modus:
Das DMX-Protokoll ist ein gängiges Hochgeschwindigkeitssignal, um intelligente Lichtsysteme zu
steuern. Sie müssen Ihren DMX-Controller und alle angeschlossenen Geräte mit einem hochwertigen
symmetrischenKabel hintereinanderschalten (daisy chain).
• Es werden sowohl XLR-3pin als auch XLR-5pin-Stecker benutzt, allerdings ist der XLR-3pin
gängiger, da diese Kabel mit symmetrischenAudiokabelkompatibel sind.
Stiftanordnung XLR-3pin: Pin1 = GND ~ Pin2 = Negatives Signal (-) ~ Pin3= Positives Signal(+)
JB SYSTEMS
®
19/35 ASTRO WHITE/COLOR
JB SYSTEMS
®
20/35 ASTRO WHITE/COLOR
Page 13

DEUTSCH BEDIENUNGSANLEITUNG
DEUTSCH BEDIENUNGSANLEITUNG
Stiftanordnung XLR-5pin: Pin1 = GND ~ Pin2 = Negatives Signal (-) ~ Pin3 = Positives Signal (+) ~ Pins4+5
werdennichtverwendet
T• Um durch Interferenzen verursachte Fehlfunktionen der Lichteffekte zu
vermeiden, müssen Sie einen 90Ω bis 120Ω Abschlusswiderstand am Ende der
Ketteeinsetzen. VerwendenSie niemals Y-SplitterKabel, das funktioniertnicht!
StellenSie sicher,dass alle Geräte ans Netzangeschlossen sind.
Jeder Lichteffekt in der Kette muss seine eigene Startadresse haben, damit er
erkennt,welche Befehle des Controllerser entschlüsseln muss.Im folgenden Abschnitt erhalten Sie eine
Anleitung zum Einstellen der DMX-Adressen.
Einstellen der DIP-Schalter, um dierichtigeStartadresse zu erhalten:
DIP #1 #2 #3 #4 #5 #6 #7 #8 #9 #10
Wert 1 2 4 8 16 32 64 128 256
Sie können die Werte dieser Schalter kombinieren, um gleich welche Startadresse zwischen 1 und 512 zu
erhalten:
Anfangsadresse=01 Schalter1=ON Werte: 1
Anfangsadresse=05 Schalter1+3=ON Werte:1+4 = 5
Anfangsadresse=09 Schalter1+4=ON Werte:1+8 = 9
Anfangsadresse=13 Schalter1+3+4=ON Werte:1+4+8= 13
…
Anfangsadresse= 62 Schalter2+3+4+5+6=ON Werte:2+4+8+16+32 =62
Jeder der ersten 9 DIP-Schalterentspricht einem bestimmten DMX-Wert:
Slave-Umkehrung
wird im DMX-Modus
nicht benutzt
3. Schließen Sie den optionalen CA-8-Controller für mehr Steuerfunktionen an:
Der CA-8-Controller kann nur im Standalone oder Master/Slave-Modus verwendet werden.
Schließen Sie den Controller an den Buchseneingang des ersten Geräts (Master) an. Jetzt
können Siealleangeschlossenen Geräte steuern:
Stand by Blackout des Geräts
Function
Mode
4. DMX-Modus:
Wenn die Geräteim DMX-Modusangeschlossen sind, könnensiegemäß dem folgenden DMX-Diagramm
7. SynchronerStrobe
8. Alternierender Strobe
Musik (LED OFF)
7. Drehung imUhrzeigersinn
8. Drehung entgegendem
Uhrzeigersinn
Langsam ~ keine Musik (LED
ON)
gesteuertwerden:
BEDIENUNG DES GERÄTS
1. Standalone1 Gerät:
Wichtig: die DMX-Adresse MUSS auf 001 eingestellt sein. (erster DIP-Schalter = ON, alle anderen sind
OFF) Schließen Sie die Einheit einfach ans Netz und schalten Sie Musik ein. Die Einheit beginnt
automatischim Takt der Musik zu arbeiten.
2. Zwei oder mehr Geräte in der Master/Slave-Einstellung:
Verbinden Sie 2 odermehr Einheiten miteinander und verwenden Sie dabei hochwertigesymmetrische XLR
Mikrofonkabel. Die Einheit, die kein Kabel an ihrem Eingang angeschlossen hat, funktioniert als Master, die
anderensind die Slave-Einheiten.
Wichtig: An der Master-Einheit MUSS die DMX-Adresse auf 001 eingestelltsein. (erster DIP-Schalter=
ON, alle anderen sind OFF) Die Slave-Einheiten können gleich welchen DMX-Adress-Wert haben, aber
NICHT 001!
Sie können das Verhalten eines oder mehrerer Slave-Einheiten umkehren, indem Sie diePosition des DIPSchalters Nr. 10 auf diesen Slaves ändern. Versuchen Sie es einfach und schauen Sie, ob ein besserer
Effekterreichtwird. Eine Positionsänderung des DIP-Schalters Nr.10 auf dem Master hat keine Wirkung.
JB SYSTEMS
®
21/35 ASTRO WHITE/COLOR
WARTUNG UND INSTANDHALTUNG
Sicherstellen, dasssich keine unbefugten Personen unterhalb des Geräts befinden, während es gewartet
wird.
Gerät ausschalten, Netzsteckerziehen und warten,bis es sich abgekühlthat.
Während der WartungsindfolgendePunkteganz besonders zubeachten:
Sämtliche Schrauben zur Installation und Befestigung jeglicher Teile müssen fest angezogen und rostfrei
sein.
Gehäuse, Befestigungsmaterialien und Aufhängungen (Decke, Balken, abgehängteDecken) dürfen keine
Anzeichen vonVerformung aufweisen.
Ist die Optik sichtbar beschädigt (Sprünge oder tiefe Kratzer), dann müssen die entsprechenden Teile
ausgewechseltwerden.
Netzkabel muss stets in einwandfreiem Zustand sein und selbst bei kleinsten Beschädigungen erneuert
werden.
Zur Vermeidung von Überhitzung müssen die Ventilatoren (sofern vorhanden) und Lüftungsschlitze
monatlichgereinigt werden.
Gerät innen mindestens einmal pro Jahr mit Staubsauger oder Airjet reinigen.
Reinigung der inneren und äußeren optischen Linsen und/oder Spiegel müssen in regelmäßigen
Abständen zur Beibehaltung einer optimalen Lichtausbeute vorgenommen werden. Reinigungsintervalle
hängen stark von der Umgebung ab: feuchte, verrauchte und besonders verschmutzteUmgebung führen
zu größerer Verschmutzung auf denLinsen.
JB SYSTEMS
®
22/35 ASTRO WHITE/COLOR
Page 14

DEUTSCH BEDIENUNGSANLEITUNG
Mit weichem Tuch und gewöhnlichem Glasreinigersäubern.
Alle Teile stets gut abtrocknen.
ÄußereOptikmindestens alle 30 Tage säubern.
InnereOptik mindestens alle 90 Tagesäubern.
Achtung: Wir empfehlen dringend, Reinigung im Innern des Geräts nur von qualifiziertem Personal
durchführen zu lassen!
ESPAÑOL MANUAL DE INSTRUCCIONES
Gracias por comprar este producto JB Systems®. Para sacar el máximo rendimiento a sus posibilidades y
por su propia seguridad, lea estas instrucciones de funcionamiento detenidamente antes de comenzar a
utilizaresta unidad.
TECHNISCHE EINZELHEITEN
Netzspannung: ≈ 100V~240V,50/60Hz
Sicherung: 250V/ 2A langsame Sicherung (20mm Glas)
Klangregler: EingebautesMikrofon
DMXAnschlüsse: 3-pinXLR Stecker/Buchse
BenutzteDMX-Kanäle: 2 Kanäle
Lichtquelle: 1xLED 3Watt
Abmessungen: 194x 202 x 141 mm
Gewicht: 1kg
Sie können sich die neuesteVersion diesesBenutzerhandbuches von unserer Websiteherunterladen: www.beglec.com
Technische Änderungen könnenauch ohn eVorankündigung vorgenommenwerden!
CARACTERÍSTICAS
Esta unidad está a prueba de interferencias de radio. Este productocumple los requisitos de las directrices
nacionales y europeas actuales. Se ha establecido la conformidad y las instrucciones y documentos
correspondienteshan sido depositados por el fabricante.
Este dispositivo ha sido diseñado para producir efectos luminosos decorativos y se utiliza en sistemas de
espectáculosde luces.
Potente LED controlado por DMX de efecto"moonflower".
Se basa en un potente LED decolor blanco de 3 vatios:
Haces blancos muy potentes (Astro White) o de color (Astro Color),
Emisión luminosa comparablea lámparas de descarga.
Nohayque sustituir la lámparas
Vida útil muy larga.
Casino producecalor
Consumode energía muy bajo.
Peso ligero (no necesita transformadores delámpara)
Regulacióndeintensidad luminosa0-100% yfunción estroboscópicaultrarápida
Excelentes programasincorporados para espectáculosde luces maravillosos:
Control DMX: Canales2
Independiente: se activa por sonido con micrófono interno
Maestro/esclavo:espectáculos perfectamentesincronizados
Controlador remotoCA-8 opcionaldisponible
Equipadocon una gran lente ópticapara máxima emisión luminosa.
ANTES DE UTILIZAR EL APARATO
Antes de comenzar a utilizar esta unidad, compruebeque no haya habido daños durante el transporte. Si
observaalgún daño, no utilice el dispositivo y consulte primero a su distribuidor.
Importante:
absolutamente necesario que el usuario siga estrictamente estas instrucciones y advertencias de
seguridad que aparecen en este manual de usuario.Cualquierdaño producido por un manejo innecesario
queda excluido de lagarantía. El distribuidor no asumirá ninguna responsabilidad por cualquier defecto o
problemaque surja por nohaber seguido el manual de usuario.
Guarde este folleto en un lugar seguro para consultarloen el futuro. Si vende este aparato más adelante,
asegúresede incluir este manual de usuario.
Compruebeel contenido:
Compruebeque la caja contienelos siguientes elementos:
Instrucciones de funcionamiento
Astro White o Astro Color
Soporte colgante con perillas
Este dispositivo ha salido de nuestras instalaciones en perfecto estado y bien embalado. Es
JB SYSTEMS
®
23/35 ASTRO WHITE/COLOR
JB SYSTEMS
®
24/35 ASTRO WHITE/COLOR
Page 15

ESPAÑOL MANUAL DE INSTRUCCIONES
PRECAUCI
ÓN:Para reducir el riesgo de electrocución
,
ESPAÑOL MANUAL DE INSTRUCCIONES
INSTRUCCIONES DE SEGURIDAD:
CAUTION
El simbolo de un rayo en el interior de un triangulo alerta sobre la presencia o el uso de
elementos no isolados donde un voltajepeligroso constituye un riesgo grande para causar una
eventual electrocución.
El punto de exclamación en el interior de un triangulo alerta al usuario sobre la presencia de
importantesinstrucciones de operación y de mantenimiento tenidas en cuenta en el manual de
uso.
Este símbolo significa : uso parael interior solamente.
Este símbolo significa : Lea lasinstrucciones.
Para proteger el medio ambiente, recicleel material de embalaje en la medida de lo posible.
Para evitar incendios o riesgos de descarga, no expongala unidad a la lluvia o a la humedad.
Para evitar que se forme condensación en el interior, deje que la unidad se adapte a la temperatura
exterior cuando la lleve a una habitación cálida después del transporte. A veces la condensación impide
que la unidadfuncionea pleno rendimiento y puedeincluso provocar daños.
Esta unidad sólo se puede usar en el interior.
Nocoloque objetos metálicos ni derramelíquidos dentro del reproductor de la unidad. Se pueden producir
descargas eléctricas o fallos de funcionamiento. Si algún objeto extraño entra en la unidad, desconecte
inmediatamenteelsuministro eléctrico.
Coloque el aparato en un lugar bien ventilado, lejos de materiales y/o líquidos inflamables. El aparato
debe colocarse a al menos50 cm de las paredes.
No cubra ninguna abertura de ventilación puesto que podría producirse un sobrecalentamiento de la
unidad.
Evite el uso en ambientescon polvo y limpie la unidadregularmente.
Mantenga la unidad lejos de los niños.
Laspersonas sinexperiencia no deben utilizareste aparato.
La máxima temperatura ambiente para un funcionamiento seguro es de 40°C. No utilice la unidad a
temperaturasambientesuperiores.
Asegúrese de que debajo del área del lugar de instalación no hay personas durante el montaje,
desmontajeo mantenimiento.
Desenchufe siempre la unidad cuando novaya a ser utilizada duranteun largo periodo de tiempo o antes
de comenzarel mantenimiento.
La instalación eléctrica sólo debe ser llevada a cabo por personal cualificado, de acuerdo con la
regulacionessobre seguridad eléctricay mecánica de su país.
Compruebequeel voltajedisponible no supera el que se indica en el panel trasero de la unidad.
El cable de alimentación siempre debe estar en perfecto estado. Apague la unidad inmediatamente
cuando observe daños o desperfectos en el cable de alimentación. Debe ser reemplazado por el
fabricante,su agente de servicio o personas cualificadaspara evitar cualquierpeligro.
¡Nunca deje que el cable de alimentación entre en contacto con otros cables!
Este aparato debe conectarsea tierra paracumplir con las regulacionessobre seguridad.
Noconectela unidad a ningúnregulador de voltaje.
Utilice siempre un cable de seguridad apropiado y homologado cuando instale la unidad.
Para evitar descargas eléctricas,no abra la cubierta.
Nunca
En caso de que ocurran problemas de funcionamiento serios, deje de utilizar el aparato y póngase en
Lacarcasa y la lente deben reemplazarsesi presentan daños visibles.
Utilice el embalaje original cuando tenga que transportar el dispositivo.
Por razones deseguridad se prohibe realizarmodificaciones noautorizadas en la unidad.
Importante:
epilépticas.
repare un fusible ni derive el soporte del fusible. ¡Reemplace
fusible delmismo tipo y especificación eléctrica!
contactocon su distribuidor inmediatamente.
¡Nunca mire directamente a la fuente de luz! No utilice el efecto en presencia de personas
no quite la cubierta superior . Ninguna pieza usable
adentro para el utilizador. Dirijase unicamente a personal
cualificado.
siempre
el fusible dañado por un
DESCRIPCIÓN:
1. Soportedel fusible
2. Jack ¼” se utiliza para conectar el controlador
CA-8 opcional.
3. Entrada DMX: El conector macho XLR de 3
clavijas se utiliza para conectar cables DMX
universales. Esta entrada recibe instrucciones
de un controlador DMX o de otro Astro
White/Color cuando se utiliza en modo
maestro/esclavo.
4. Salida DMX: Se utiliza un conector XLR hembra
de 3 pines para conectar el Astro White/Color
con el siguiente aparato DMX en la cadena o
con otro Astro White/Color cuando se utiliza en
modo maestro/esclavo.
5. Micrófonointerno
6. CONEXIÓNA TIERRA
7. Cable de red
8. Soporte de suspensión con 1 perilla parafijar la
unidad y un agujero demontajepara fijar un gancho de montaje.
9. Interruptores dip se utilizan para establecer la dirección de inicio DMX de la unidad.
MONTAJE SUPERIOR
Importante: La instalación sólo debe llevarse a cabo por personal técnico cualificado. Una
instalación incorrecta puede provocar lesiones graves y/o daños en la propiedad. ¡El montaje
superior requiere mucha experiencia! Deben respetarse los límites de carga de funcionamiento,
deben utilizarse materiales de instalación homologados, el dispositivo instalado debe
inspeccionarse regularmente porsu seguridad.
Asegúrese de que debajo del área del lugar de instalación no hay personas durante el montaje,
desmontajeo mantenimiento.
Coloque el aparato en un lugar bien ventilado, lejos de materiales y/o líquidos inflamables. El aparato
debecolocarse
El dispositivo debe instalarse lejos del alcance de las personas y de las áreas exteriores donde éstas
puedan andar o sentarse.
Antes del montaje asegúrese de que el área de la instalación puede soportar una carga mínima de 10
veces el peso de la unidad.
Utilice siempre un cable de seguridad homologado que pueda soportar 12 veces el peso del dispositivo
cuando instale la unidad. Este accesorio de seguridad secundario debe instalarse de forma que ninguna
piezade la instalación pueda caerse más 20 cm si falla el accesorioprincipal.
El dispositivodebe fijarse correctamente;¡un montajecon girolibre es peligrosoy no debe considerarse!
No cubra ninguna abertura de ventilación puesto que podría producirse un sobrecalentamiento de la
unidad.
El operariodebe asegurarse de que las instalaciones relacionadascon la seguridad son aprobadas por un
experto antes de utilizarlas por primera vez. Las instalaciones deberán inspeccionarse anualmente por
una persona cualificadapara asegurar que la seguridad es óptima.
a al menos 50 cm
de lasparedes.
INSTALACIÓN ELÉCTRICA + DIRECCIONAMIENTO
Importante: La instalación eléctrica sólo debe ser llevada a cabo por personal cualificado, de
acuerdo con la regulaciones sobreseguridadeléctrica y mecánica de su país.
Instalación eléctrica en modo DMX:
El protocolo DMX es una señal de alta velocidad muy utilizada para controlar equipo de iluminación
inteligente. Necesita conectar en cadena tipo margarita su controlador DMX y todas las unidades
conectadascon un cable equilibrado de buenacalidad.
Se utilizan conectores XLR de 3 pines y conectores XLR de 5 pines, no obstante,el conector XLR de 3
pines es más popular porque estos cables son compatiblescon los cables de audio equilibrados.
Disposición de pines en el conector XLR de 3 pines: Pin1 = GND ~ Pin2 = Señal negativa (-) ~ Pin3 = Señal
positiva (+)
JB SYSTEMS
®
25/35 ASTRO WHITE/COLOR
JB SYSTEMS
®
26/35 ASTRO WHITE/COLOR
Page 16

ESPAÑOL MANUAL DE INSTRUCCIONES
ESPAÑOL MANUAL DE INSTRUCCIONES
Disposición de pines en el conectorXLR de 5 pines: Pin1 = GND ~ Pin2 = Señal negativa (-) ~ Pin3 = Señal
positiva (+) ~ Pines4+5 no se utilizan.
Para evitar un comportamiento anómalo de los efectos luminosos, debido a
interferencias, debe utilizar un terminador de 90Ω a 120Ω al final de la cadena.
Nunca utilice cables divisores en Y, ¡Nofuncionarán!
Asegúresede que todas las unidadesestán conectadas a la red eléctrica.
Cada efecto luminoso en la cadena necesita disponer de su propia dirección de
inicio de forma que sepa qué comando del controlador debe descodificar. En la siguiente sección
obtendrá informaciónsobre cómoestablecer las direccionesDMX.
Ajuste de los interruptores DIP para que puedan obtener la dirección de inicio correcta:
DIP #1 #2 #3 #4 #5 #6 #7 #8 #9 #10
Valor 1 2 4 8 16 32 64 128 256
Puede combinar los valores de estos interruptores para que se conviertan en cualquier dirección de inicio
entre 1 y 512:
Dirección de inicio = 01 interruptor1=ON valores: 1
Dirección de inicio = 05 interruptor1+3=ON valores:1+4 = 5
Dirección de inicio = 09 interruptor1+4=ON valores:1+8 = 9
Dirección de inicio = 13 interruptor1+3+4=ON valores:1+4+8=13
…
Dirección de inicio = 62 interruptor2+3+4+5+6=ON valores:2+4+8+16+32 =62
Cada unode los9 interruptores DIP corresponden a cierto valor DMX
Lainversión esclava
no se utiliza en modo
DMX
MANEJO DE LA UNIDAD
1. 1 unidadindependiente:
Importante: la dirección DMX DEBEestablecerse en 001. (primer interruptor DIP= ON (CONECTADO),
todos los demás están OFF Conecte la unidad a la red eléctrica y ponga algo de música. La unidad
comenzará a funcionar automáticamente al ritmo de la música.
2. Dos o más unidades en configuraciónmaestra/esclava:
Conecte 2 o más unidades juntas mediante cables de micrófono XLR equilibrados de buena calidad. La
unidad que no disponga de cable conectado a su entrada actuará como “maestra”,las otras serán unidades
esclavas.
Importante: En la unidad maestra la dirección DMX DEBE establecerse en 001. (primer interruptor DIP
= ON (CONECTADO), todos los demás están OFF (DESCONECTADOS) Las unidades esclavas pueden
tener cualquier valor de dirección DMX EXCEPTO 001
Puede invertir el comportamiento de una o más unidades esclavas cambiando la posición del interruptor DIP
núm. 10 en estas unidades esclavas. Inténtelo y compruebe si el efecto mejora. Cambiar el núm. 10 en el
interruptorDIP en la unidadmaestra no tiene ningún efecto.
3. Conexión del controladorCA-8para obtener más control:
El controlador CA-8 sólo puede utilizarse en modalidad independiente, maestra/esclava. Conecte el
controlador a la entrada jack de la primera unidad (maestra). Ahora puede controlar todas las unidades
conectadas:
Stand by Oscurecela unidad
Función
Modalidad Sonido (LEDapagado)
4. Modo DMX:
Cuando las unidades están conectadas en modo DMX, pueden controlarse mediante la siguiente tabla
DMX:
9. Estroboscópica
sincronizada
10. Estroboscópica
alternativa
9. Rotación ala derecha
10. Rotación a la izquierda
Lenta~ sin sonido(LED
CONECTADO)
MANTENIMIENTO
Asegúrese de que debajo de la zona del lugar de instalación no haya personas durante el mantenimiento.
Apague la unidad, desenchufe el cable de red y espere hasta que la unidad se haya enfriado.
Durante la inspección deberácomprobarlos siguientes puntos:
Todos los tornillos utilizados para instalar el dispositivo y cualquiera de sus piezas deberán apretarse
firmementey no corroerse.
Las carcasas, las fijaciones y los puntos de instalación (techo, suspensiones) no deberán presentar
ningunadeformidad.
Cuando una lente óptica esté visiblemente dañada por grietas o rasguños profundos, deberá ser
reemplazada.
Los cables de red deberán estar en perfectoestado y deberán reemplazarse inmediatamenteincluso si el
problema detectadoes pequeño.
Para proteger al aparato delsobrecalentamiento, las aletas de refrigeración (si las hubiera) y las aberturas
de ventilacióndeberán limpiarsemensualmente.
El interior deldispositivo deberá limpiarse anualmente mediante una aspiradora o chorro deaire.
La limpieza de las lentes internas y externas y/o espejos deberá llevarse a cabo periódicamente para
optimizar la emisión luminosa. La frecuencia de limpieza depende del entorno en el que funcione el
aparato: los ambientes húmedos, con humo o especialmente sucios pueden provocar una mayor
acumulación de suciedad en los elementos ópticos del aparato.
Limpie con un paño suave utilizando productos de limpiezade cristalesnormales.
Sequesiempre las piezas con cuidado.
Limpie los elementos ópticosexternosal menos una vez cada 30 días.
Limpie los elementos ópticosinternos al menos una vez cada90 días.
Atención: ¡Le recomendamos encarecidamente que la limpieza interna sea llevada a cabo por
personal cualificado!
JB SYSTEMS
®
27/35 ASTRO WHITE/COLOR
JB SYSTEMS
®
28/35 ASTRO WHITE/COLOR
Page 17

ESPAÑOL MANUAL DE INSTRUCCIONES
ESPECIFICACIONES
Entrada de red: CA100V~240V,50/60Hz
Fusible: 250V 2A lento (20 mm cristal)
Control de sonido: Micrófonointerno
Conexiones DMX: 3 clavijas XLR macho / hembra
Canales DMX utilizados: Canales2
Lámpara: 1xLED 3 vatios
Tamaño: 194 x 202 x 141 mm
Peso: 1kg
Puede descargarla últimaversión de este manual de usuario en nuestra página Web:
Toda la información está sujeta a cambios sin previo aviso
www.beglec.com
PORTUGUÊS MANUAL DO UTILIZADOR
Obrigado por ter adquirido este produto da JB Systems®. De modo a tirar total proveito das possibilidades
deste produto, por favor leiaeste manual com atenção.
CARACTERÍSTICAS
Esta unidade está protegida contra interferências rádio.Este produto cumpre as exigências impostas pelas
presentes directivas nacionais e europeias. A conformidade deste produto foi comprovada e as declarações
e documentos relevantesforam efectuados pelo fabricante.
Esta unidade destina-se a produzir efeitos luminosos decorativos e é utilizada em sistemas de
espectáculosde luz.
Moonflower potente controlada por DMX.
Baseado em LED branco muito potente de3 watt
Feixes brancos extremamente potentes (Astro White)ou feixes coloridos (Astro Color),
Saída de luz comparável ás lâmpadas dedescarga
Sem substituiçãode lâmpadas!
Utiliza LEDs com uma duração de vidaextremamentelonga!
Virtualmentesem produção de calor
Consumode energia muito baixo
Muitoleve (sem necessidade de transformadores paraa lâmpada)
Regulaçãodeintensidade0-100%e funçãode strobe ultrarápida
Excelentes programasincorporados para espectáculosde luz maravilhosos:
Controlo DMX: 2 canais
Autónomo: activadopor som com microfone interno
Master/slave:espectáculosmaravilhosos sincronizados
Comando opcionalCA-8disponível
Equipado com grandes lentes ópticas paraumasaída de luz máxima
ANTES DE UTILIZAR
Antes de utilizar esta unidadeverifique se existem danos provocados durante o transporte. Casoexistam
danos aparentes,não utilize a unidade e contacte o seu revendedor.
Importante:
imprescindível que o utilizador siga as instruções de segurança e avisos descritos neste manual.
Quaisquer danos provocados por utilização incorrecta não serão cobertos pela garantia. O revendedor
não será responsável por quaisquer danos ou problemas causados pelo incumprimento das instruções
deste manual.
Guarde este manual num local seguro para consulta futura. Caso venda esta unidade, forneça este
manual.
Verifiqueo conteúdo:
Certifique-seque a caixacontémos seguintes artigos:
Manual doutilizador
Astro White ou Astro Color
Braçadeira desuspensãoe apertos
Esta unidade deixou a nossa fábrica em perfeitas condições e devidamente embalada. É
JB SYSTEMS
®
29/35 ASTRO WHITE/COLOR
JB SYSTEMS
®
30/35 ASTRO WHITE/COLOR
Page 18

PORTUGUÊS MANUAL DO UTILIZADOR
PORTUGUÊS MANUAL DO UTILIZADOR
INSTRUÇÕES DE SEGURANÇA:
CAUTION
O símbolo composto por um triângulo equilátero com um relâmpago no interior alerta para a
presença de voltagem perigosa não isolada no interior do produto que poderá constituir risco
de choque eléctrico.
O símbolo composto por um triângulo equilátero com um ponto de exclamação alerta o
utilizadorpara a presença de instruções importantesde utilização e manutenção do produto.
Estesímbolo significa: utilização unicamente em espaços fechados
Estesímbolo significa:Leia instruções
Proteja o ambiente. Recicleo material desta embalagem.
Demodo a evitar risco de fogo ou choque eléctrico, não exponhaeste produto a chuva ou humidade.
De forma a evitar a formação de condensação no interior da unidade, ao transportá-la para ambiente
quente aguarde algum tempo de modo a que haja uma ambientação à temperatura. A condensação
poderá afectar o desempenhoda unidade ou até danificá-la.
Esta unidade destina-se unicamente a utilização em espaços fechados.
Não introduza objectos de metal nem verta líquidos no interior do produto, correrá risco de choque
eléctrico ou poderá danificar o produto. Caso algum objecto estranho entre em contacto com o interior da
unidade,desligue-a de imediato da corrente.
Coloque esta unidade num local arejado, afastado de materiais inflamáveis e/ou líquidos. Esta unidade
deveráser instalada a pelos menos 50cm dedistância deparedescircundantes.
Nãocubra os orifícios de ventilação ou a unidade poderá sobreaquecer.
Evite locais com poeiras. Limpe a unidaderegularmente.
Mantenha esta unidadefora do alcance das crianças.
Esta unidade deverá ser operada unicamente porpessoas experientes.
Temperatura ambiente de funcionamento máxima é de 40ºC. Não utilize esta unidade a temperaturas
ambientesmais elevadas.
Certifique-se de quenão irão passar pessoas sob a áreade instalação da unidade durante a instalação e
manutenção.
Desligue sempre a unidade da corrente quandonão a utilizardurante longos períodos de tempo, antes de
efectuar manutenção.
A instalação eléctrica deveser efectuada unicamente por pessoal qualificado, cumprindo os regulamentos
de segurançaem instalações eléctricas e mecânicas do seu país.
Certifique-se que a voltagema utilizar não é superior à voltagem indicada nopainel traseiroda unidade.
O cabo de alimentação deverá estar sempre em perfeitas condições. Desligue a unidade e substitua
imediatamente o cabo caso este apresente algum dano. Deverá ser substituído pelo fabricante, pelo
agenteautorizado ou pessoal qualificado de modo a evitar um acidente.
Nuncapermita que este cabo entre em contactocom outros cabos!
Esta unidadedeverá estar ligada à Terra de formaa respeitar as regras de segurança.
Nãoligue a unidade a reguladoresde intensidade.
Utilize sempre um cabo de segurança aprovado aoinstalar a unidade.
Deformaa não correr risco de choque eléctrico nãoabra a cobertura da unidade.
Nunca
Em caso de problemas sérios de funcionamento, interrompa a utilização da unidade e contacte
A cobertura e as lentesdeverão ser substituídas caso apresentem danos visíveis.
Casoseja necessário transportara unidade utilizea embalagem original.
Por motivos de segurança,são proibidasquaisquer alterações não autorizadasà unidade.
Importante: Nunca olhe directamente para a luz! Não utilize este efeito luminoso na presença de pessoas
epilépticas.
repare um fusível nemtente operar a unidadesem fusível. Substitua
por outro com as mesmas características!
imediatamente oseu revendedor.
ATENÇÃO: De forma a evitar o risco de choque eléctrico,
não remova peças da unidade. Não tente fazer
reparações.Contactepessoal qualificado
sempre
umfusível danificado
DESCRIÇÃO:
1. Suporte de fusível
2. Jack ¼” usado para conectar o comando
opcional CA-8
3. Entrada DMX: Conector XLR macho de 3 pinos
usado para ligar cabos DMX universais. Esta
entrada recebe instruções de um controlador
DMX ou de outro Astro White/Colorquando está
em modo master/slave
4. Saída DMX: Conector XLRfêmea3 pinosusada
para conectar o Astro White/Color com a
próxima unidade na cadeia DMX ou com outro
Astro White/Color quando usado em modo
master/slave
5. Microfoneinterno
6. Ligação á Terra
7. Cabo alimentação
8. Suporte de suspensão com 1 aperto para
apertar a unidade e um orifício de montagem
para fixarum gancho de montagem.
9. Interruptores DIP, usados para definir o endereçoinicial daunidade.
INSTALAÇÃO EM SUSPENSÃO
Importante: A instalação deve ser efectuada unicamente por pessoal qualificado. Uma instalação
incorrecta pode resultar em ferimentos graves e/ou danos na sua propriedade.Para efectuar uma
instalação em suspensão é necessária muita experiência! Respeite os limites de carga, utilize
materiais de instalação aprovados e inspeccione a unidade instalada regularmente de forma a
assegurar asegurança.
Certifique-se que sob a área de instalação da unidade não irão passar pessoas durante a instalação e
manutenção.
Coloque esta unidade num local arejado, afastada de materiais inflamáveis e/ou líquidos. Esta unidade
deverá ser instalada a pelos menos 50cm de distânciade paredescircundantes.
A unidade deve ser instalada fora do alcance das pessoas; afastada de áreas onde as pessoas possam
passar ou sentar-se.
Antes de proceder à instalaçãocertifique-se que a área seleccionada pode suportar umacarga mínimade
10 vezes o peso daunidade.
Na instalação, utilize sempre um cabo de segurança aprovado com capacidade parasuportar 12 vezes o
peso da unidade. Esta medida de segurança secundária deverá ser instalada de forma a que nenhuma
parte da instalação possa cair mais de 20cm caso o ponto de apoio principal ceda.
A unidade deverá ser fixa firmemente. Uma instalação oscilante pode ser perigosa e não deverá ser
efectuada!
Nãocubra os orifícios de ventilação ou a unidade poderá sobreaquecer.
O utilizador da unidade deverá certificar-se que a instalação é aprovada em termos de segurança e em
termos técnicos por uma pessoa qualificada antes de efectuar a primeira utilização. A instalação deverá
ser inspeccionadatodos os anos por um técnico qualificado de forma a certificar-seque a segurança está
assegurada.
JB SYSTEMS
®
31/35 ASTRO WHITE/COLOR
JB SYSTEMS
®
32/35 ASTRO WHITE/COLOR
Page 19
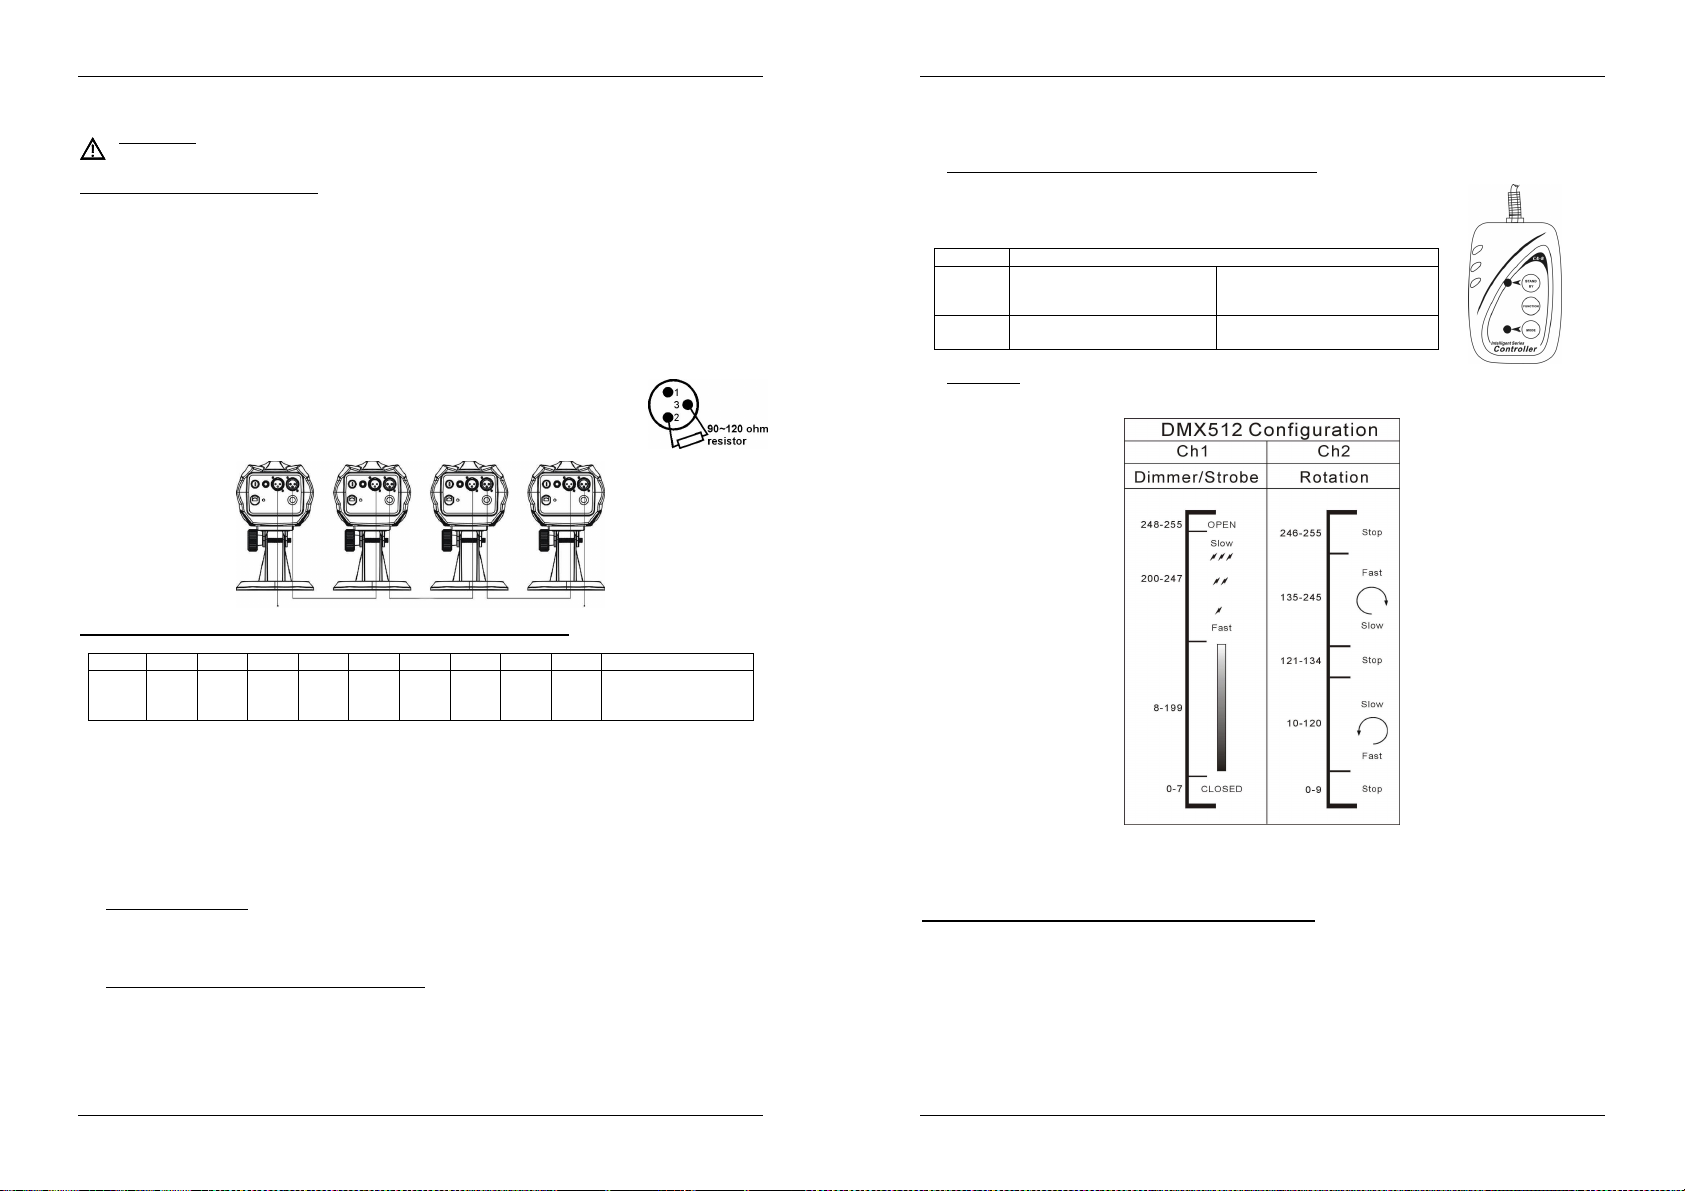
PORTUGUÊS MANUAL DO UTILIZADOR
PORTUGUÊS MANUAL DO UTILIZADOR
INSTALAÇÃO ELÉCTRICA + CONFIGURAÇÃO
Importante: A instalação eléctrica deve ser feita apenas por pessoal qualificado, de acordo
com os regulamentos para segurança eléctrica e mecânica no vosso país.
Instalação eléctricaem modo DMX:
O protocolo DMX é um sinal de alta velocidade usado para controlar equipamento inteligente de luz. É
necessário ligar em série o vosso controlador DMX a todas as unidades conectadas com um cabo
balanceadode boaqualidade
Ambos os conectoresXLR 3 pinos e XLR 5 pinos são usados, mas os XLR 3 pinos são mais populares
porque estes cabos sãocompatíveis com cabosde áudio balanceados.
ConfiguraçãoXLR 3 pinos: Pino 1 = Terra ~ Pino 2 = Sinal negativo (-) ~ Pino 3 = Sinal positivo (+)
Configuração XLR 5 pinos: Pino 1 = Terra ~ Pino 2 = Sinal negativo (-) ~ Pino 3 = Sinal positivo (+) ~ Pinos
4+5 não sãousados.
Para prevenir comportamento estranho dos efeitos de luz, devido a interferências, deverá usar uma
resistência de 90Ω a 120Ω no final da série. Nunca utilize divisor de cabo Y, isto simplesmente não
funciona!
Verifiquese todas as unidades estão ligadas á corrente.
Cada efeito de luz na série precisa de ter o seu próprio endereço inicial para saber
quais os comandos do controlador que tem de descodificar. Na próximasecção irá
aprender como configurar os endereços DMX.
Como definir os interruptores DIPpara obter o endereço inicialcorrecto:
DIP #1 #2 #3 #4 #5 #6 #7 #8 #9 #10
Valor 1 2 4 8 16 32 64 128 256
Podecombinar os valores destes interruptores para tornar qualquer endereçoinicial entre 1 e 512:
Endereço Inicial= 01 Interruptor1=ON valor: 1
Endereço Inicial= 05 Interruptor1+3=ON valor:1+4 = 5
Endereço Inicial= 09 Interruptor1+4=ON valor:1+8 = 9
Endereço Inicial= 13 Interruptor1+3+4=ON valor:1+4+8 = 13
…
Endereço Inicial= 62 Interruptor2+3+4+5+6=ON valor:2+4+8+16+32=62
Cada umdos primeiros 9 interruptores DIP corresponde a um certo valor DMX:
InversãoSlave, não
usada em modo
DMX
COMO CONTROLAR A UNIDADE
1. 1 unidade autónoma:
Importante: Na unidade Individual o endereço DMX TEM de ser definido para 001. (primeirointerruptor
DIP = ON, todos os outros em OFF). Simplesmente conecte a unidade á corrente e ponha alguma música.
A unidadeirá começar a funcionar automaticamenteao ritmo da música.
2. Duas ou mais unidades em modomaster/slave:
Conecte 2 ou mais unidades juntas usando cabos de microfone balanceados de boa qualidade. A unidade
que não tem cabo conectado á suaentrada irá reagir comoMaster, as outras serão as unidades Slave.
Importante:Na unidadeMaster o endereço DMX TEM de ser definido para 001. (primeirointerruptor DIP
= ON, todos os outros em OFF). As unidades Slave podem ter qualquer valor DMX mas NÂO o 001!
Pode inverter o comportamento de uma ou mais unidades slave alterando a posição do interruptor DIP n. 10
nas unidades Slave. Experimente e veja se o efeito se torna melhor. Alterando o interruptor DIP n.10 na
unidade Master nãoterá efeito.
3. Conecte o comando opcionalCA-8 para mais controlo:
O comando CA-8 pode ser usado apenas em modo autónomo ou master/slave.
Conecte o comando á entrada jack da primeira unidade (master). Agora pode
controlartodasas unidades que estiveremconectadas:
Stand by
Function
Mode
4. Modo DMX
Quando as unidades estão ligadas em modo DMX, podem ser controladas usando a seguinte tabela
DMX:
Coloca a unidadeem Blackout
11. Strobe Sincronizado
12. Strobe alternando
Som(LED apagado)
11. Rotaçãosentido dorelógio
12. Rotaçãosentido inversodo
relógio
Devagar~ sem som (LED
aceso)
MANUTENÇÃO
Certifique-se que sob a áreade instalação da unidadenão irão passar pessoas durante a manutenção.
Desligueo cabo de alimentação da correntee aguarde que a unidade arrefeça.
Durante a inspecçãodeverá verificar os seguintes pontos:
Todosos parafusos utilizados nas peças da unidadee na instalação deverão estar apertados firmemente
e nãopoderão estar corroídos.
A cobertura da unidade,os pontos de fixação e as áreas de instalação (tecto,armação, etc.) nãodeverão
apresentarqualquer deformação.
Caso uma lente apresente danos visíveis como fendas ou riscos profundos, deverá ser substituída
imediatamente.
O cabo de alimentação deverá estar em perfeitas condições e deverá ser substituído assim que for
detectadoo mais pequeno dano.
JB SYSTEMS
®
33/35 ASTRO WHITE/COLOR
JB SYSTEMS
®
34/35 ASTRO WHITE/COLOR
Page 20

PORTUGUÊS MANUAL DO UTILIZADOR
As ventoinhas de arrefecimento (caso existam) e os orifícios de ventilação deverão ser limpos todos os
meses de modo a evitar queunidade sobreaqueça.
Utilize um aspirador ou um compressor de ar para limpar o interior daunidade uma vez por ano.
De forma a optimizar a projecção de luz, limpe as lentes ópticas internas e externas e/ou espelhos
periodicamente.A regularidade das limpezas depende do ambiente em que está instalada a unidade:um
ambiente húmido, com fumo ou poeirento dará origem a uma maior acumulação de impurezas nas
ópticasda unidade.
Utilize um pano macio e um limpa-vidros normalna limpezada unidade.
Seque sempre as peças cuidadosamente.
Limpe as ópticas externas pelo menos umavez em cada 30 dias.
Limpe as ópticas internas pelo menosuma vez em cada 90 dias.
Atenção:Recomendamos vivamente que a limpeza do interior da unidade seja efectuada por pessoal
qualificado!
ESPECIFICAÇÕES
Fonte de Alimentação: AC 100V ~ 240V,50/60Hz
Fusível: 250V 2A Fusão Lenta (20mm vidro)
LigaçõesDMX: XLR 3 pinos macho / fêmea
Canais DMX usados: 2canais
Controlo de som: Microfoneinterno
Lâmpada: 1xLED 3Watt
Dimensões: 194 x 202 x141 mm
Peso: 1kg
Estas informações estão sujeitas a alterações sem aviso prévio
Pode fazer downloaddaversãomaisrecentedestemanual no nosso site: www.beglec.com
JB SYSTEMS
®
35/35 ASTRO WHITE/COLOR
 Loading...