

Page 1
H E X M I X S Y S T E M
U S E R M A N U A L
Page 2
H E X M I X S Y S T E M
H E X M I X S Y S T E M I N T R O
U S E R M A N U A L
I N T R O D U C T I O N
S I X C H A N N E L P E R F O R M A N C E M I X E R D E S I G N E D F O R
E U R O R A C K
Hexmix System is a six channel performance
mixer specially designed for Eurorack.
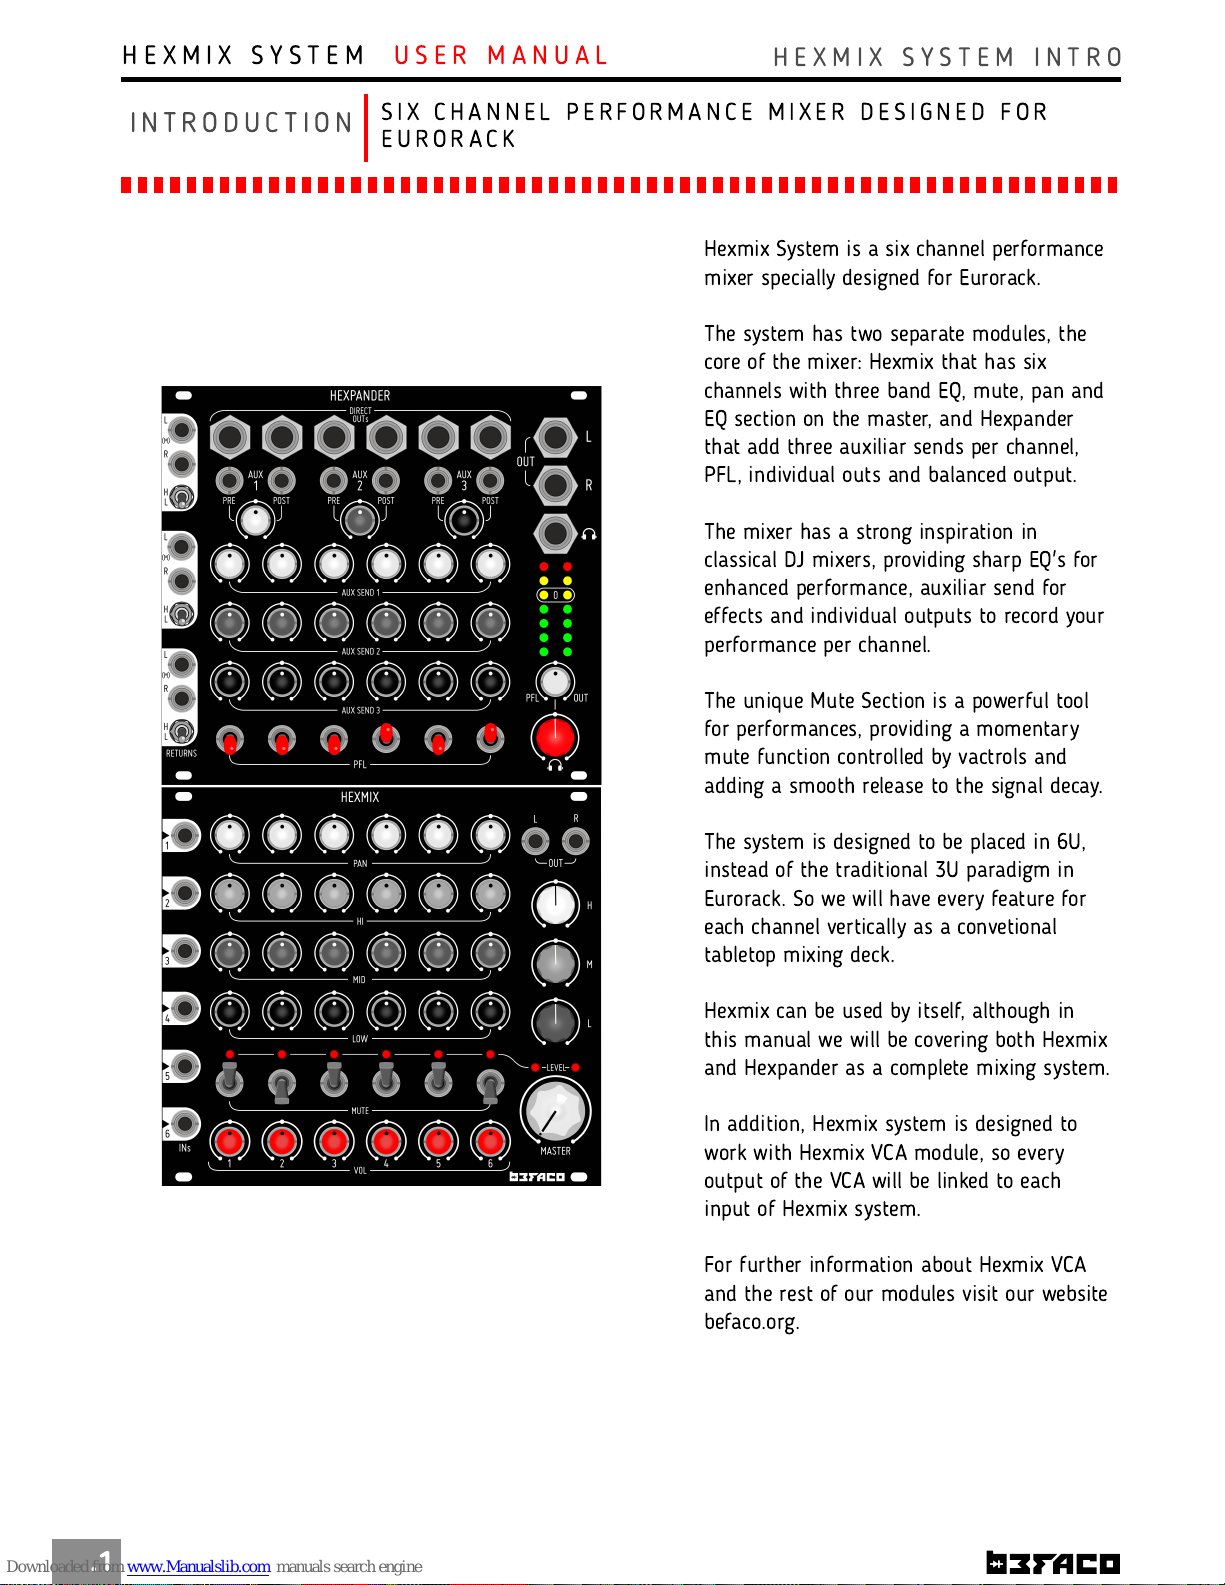
The system has two separate modules, the
core of the mixer: Hexmix that has six
channels with three band EQ, mute, pan and
EQ section on the master, and Hexpander
that add three auxiliar sends per channel,
PFL, individual outs and balanced output.
The mixer has a strong inspiration in
classical DJ mixers, providing sharp EQ's for
enhanced performance, auxiliar send for
effects and individual outputs to record your
performance per channel.
The unique Mute Section is a powerful tool
for performances, providing a momentary
mute function controlled by vactrols and
adding a smooth release to the signal decay.
The system is designed to be placed in 6U,
instead of the traditional 3U paradigm in
Eurorack. So we will have every feature for
each channel vertically as a convetional
tabletop mixing deck.
Hexmix can be used by itself, although in
this manual we will be covering both Hexmix
and Hexpander as a complete mixing system.
In addition, Hexmix system is designed to
work with Hexmix VCA module, so every
output of the VCA will be linked to each
input of Hexmix system.
For further information about Hexmix VCA
and the rest of our modules visit our website
befaco.org.
.1
Page 3
H E X M I X S Y S T E M
H E X M I X
U S E R M A N U A L
H E X M I X
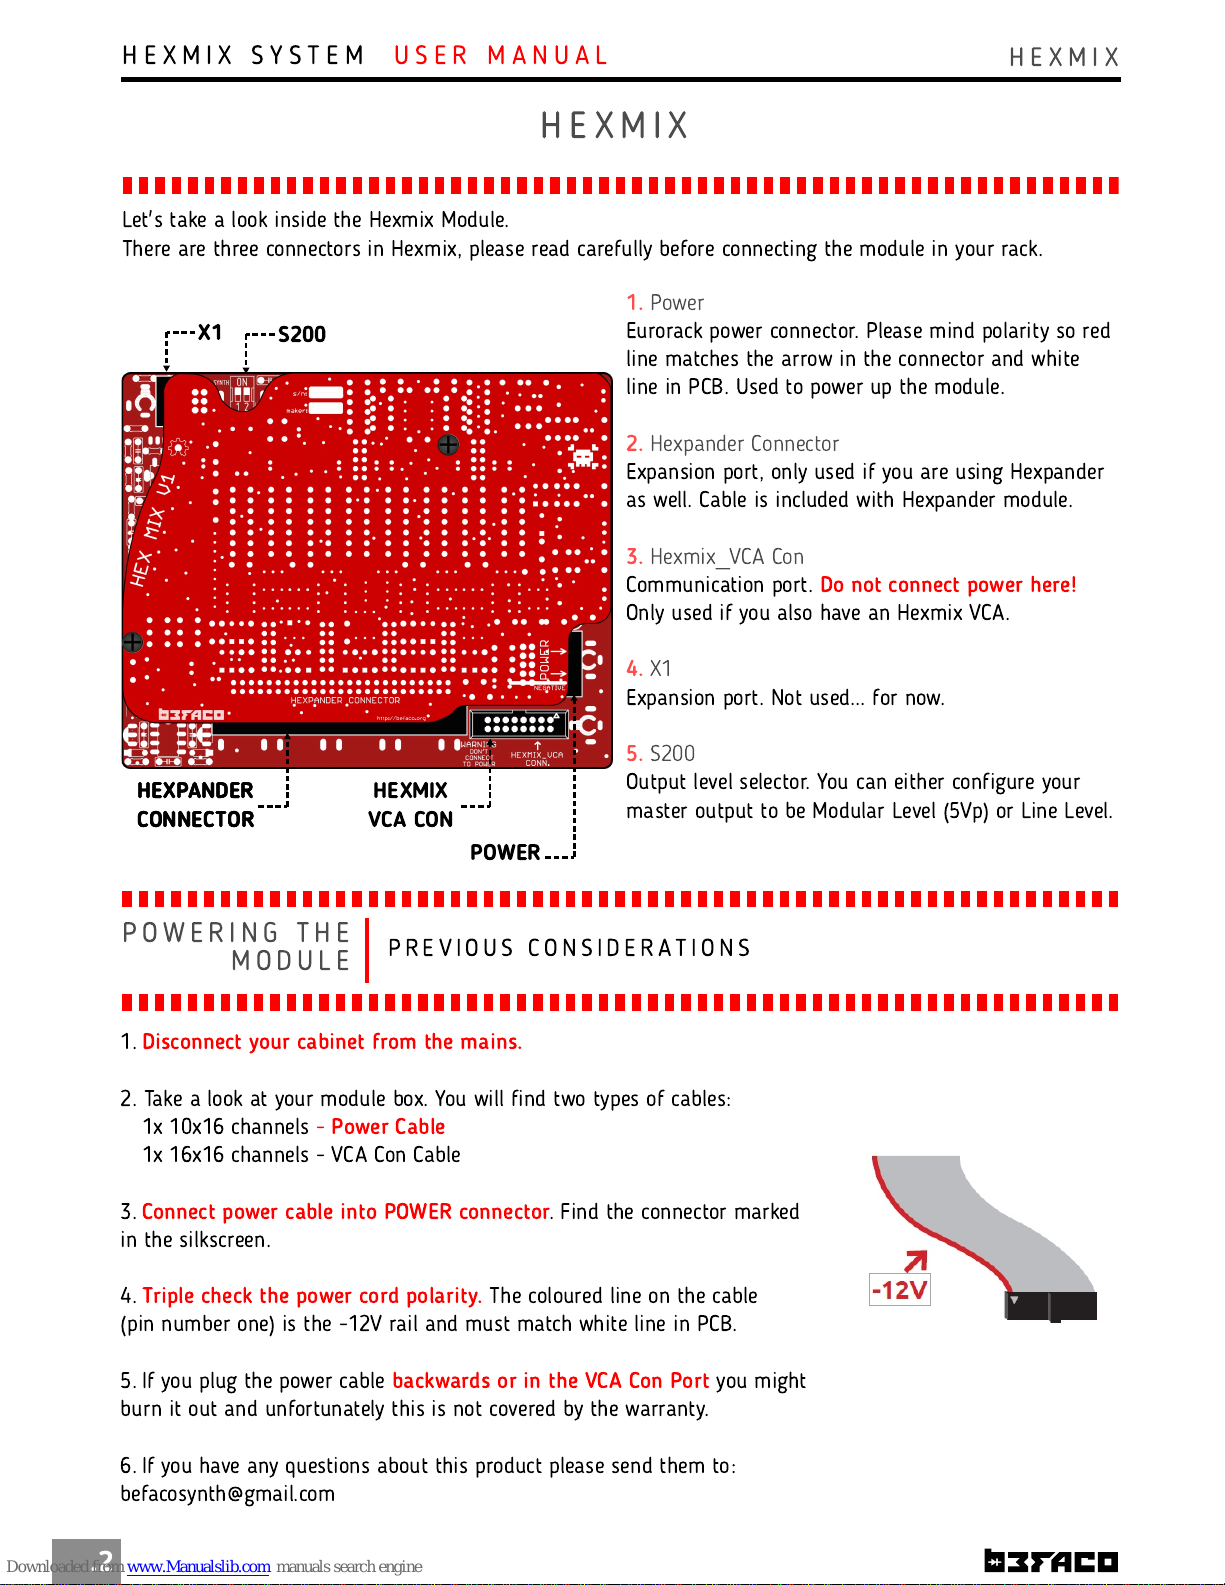
1.
Power
Eurorack power connector. Please mind polarity so red
line matches the arrow in the connector and white
line in PCB. Used to power up the module.
2.
Hexpander Connector
Expansion port, only used if you are using Hexpander
as well. Cable is included with Hexpander module.
3.
Hexmix_VCA Con
Communication port.
Do not connect power here!
Only used if you also have an Hexmix VCA.
4.
X1
Expansion port. Not used... for now.
5.
S200
Output level selector. You can either configure your
master output to be Modular Level (5Vp) or Line Level.
.2
Let's take a look inside the Hexmix Module.
There are three connectors in Hexmix, please read carefully before connecting the module in your rack.
P O W E R I N G T H E
M O D U L E
P R E V I O U S C O N S I D E R A T I O N S
1.
Disconnect your cabinet from the mains.
2. Take a look at your module box. You will find two types of cables:
1x 10x16 channels -
Power Cable
1x 16x16 channels - VCA Con Cable
3.
Connect power cable into POWER connector
. Find the connector marked
in the silkscreen.
4.
Triple check the power cord polarity.
The coloured line on the cable
(pin number one) is the -1 2V rail and must match white line in PCB.
5. If you plug the power cable
backwards or in the VCA Con Port
you might
burn it out and unfortunately this is not covered by the warranty.
6. If you have any questions about this product please send them to:
befacosynth@gmail.com
X1
S200
HEXPANDER
CONNECTOR
HEXMIX
VCA CON
POWER
HEXPANDER
CONNECTOR
Page 4
H E X M I X S Y S T E M
H E X M I X
U S E R M A N U A L
M O D U L E
R E F E R E N C E
F R O N T P A N E L C O N T R O L S
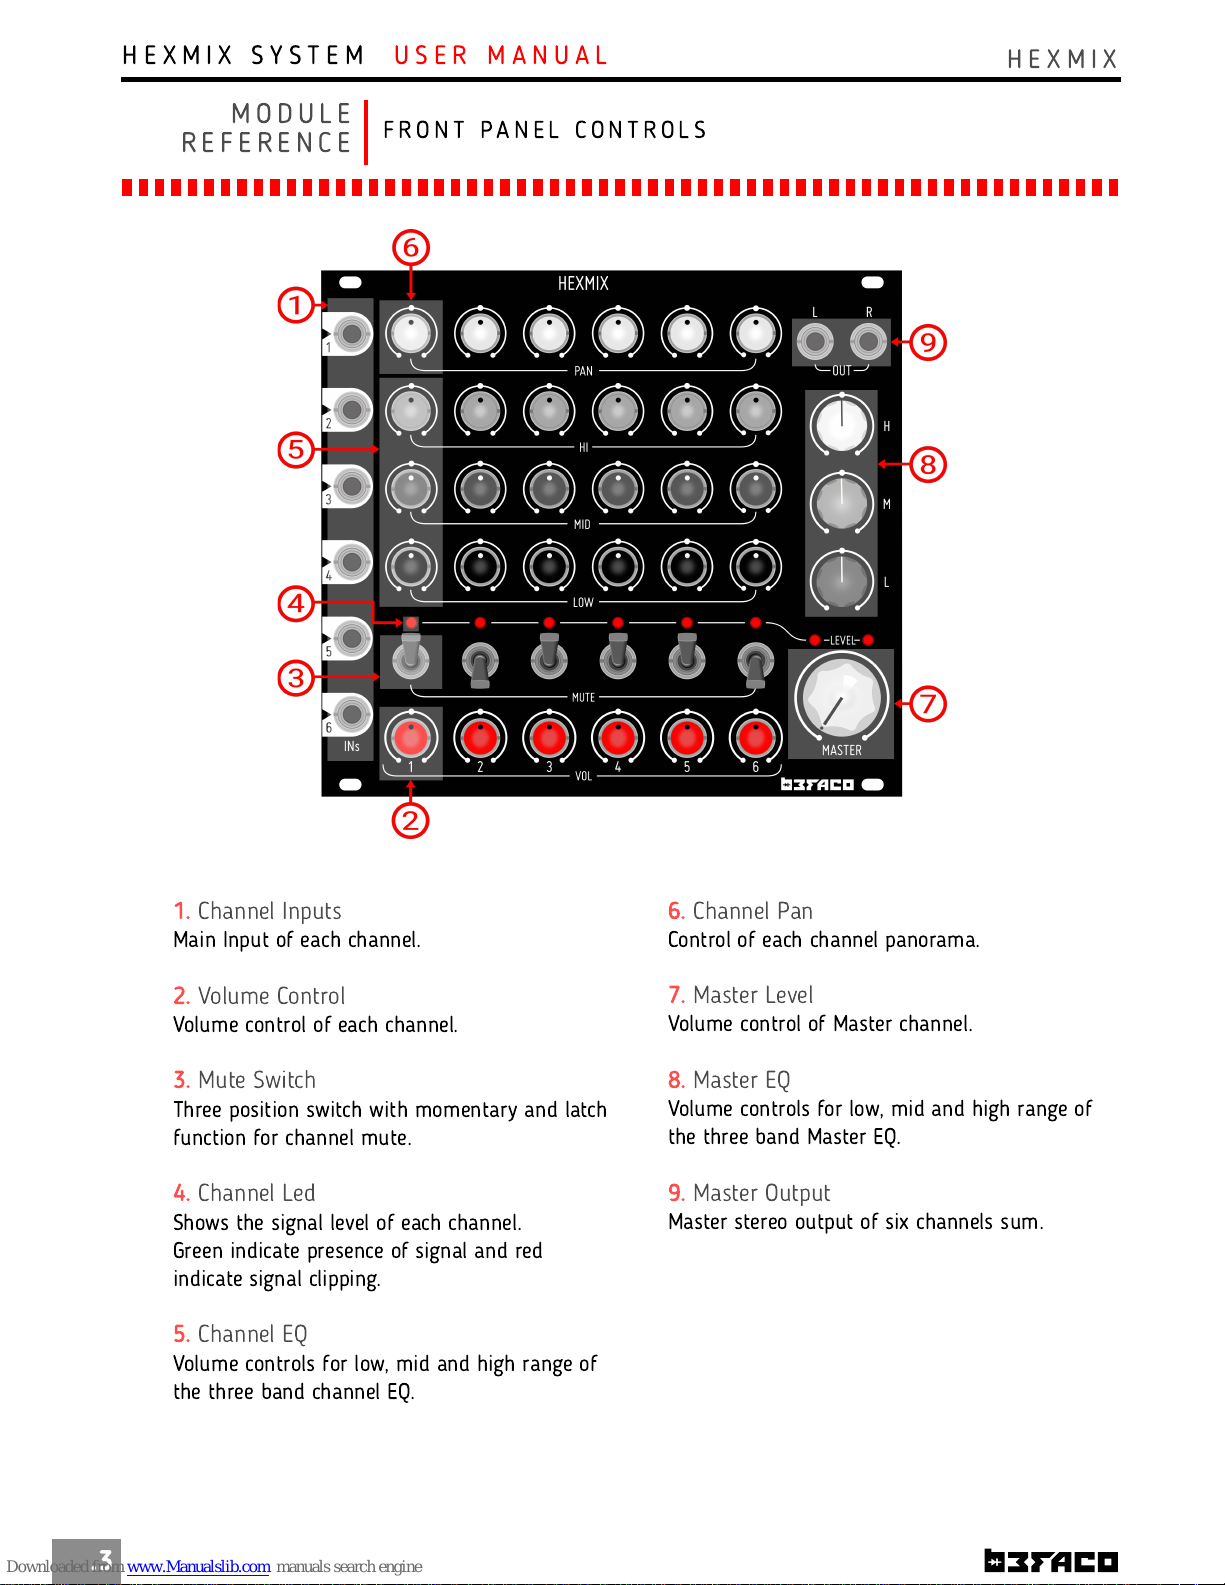
1.
Channel Inputs
Main Input of each channel.
2.
Volume Control
Volume control of each channel.
3.
Mute Switch
Three position switch with momentary and latch
function for channel mute.
4.
Channel Led
Shows the signal level of each channel.
Green indicate presence of signal and red
indicate signal clipping.
5.
Channel EQ
Volume controls for low, mid and high range of
the three band channel EQ.
.3
6.
Channel Pan
Control of each channel panorama.
7.
Master Level
Volume control of Master channel.
8.
Master EQ
Volume controls for low, mid and high range of
the three band Master EQ.
9.
Master Output
Master stereo output of six channels sum.
Page 5
H E X M I X S Y S T E M
H E X M I X
U S E R M A N U A L
E X T E N D E D
R E F E R E N C E
T H E C H A N N E L S T R I P
.4
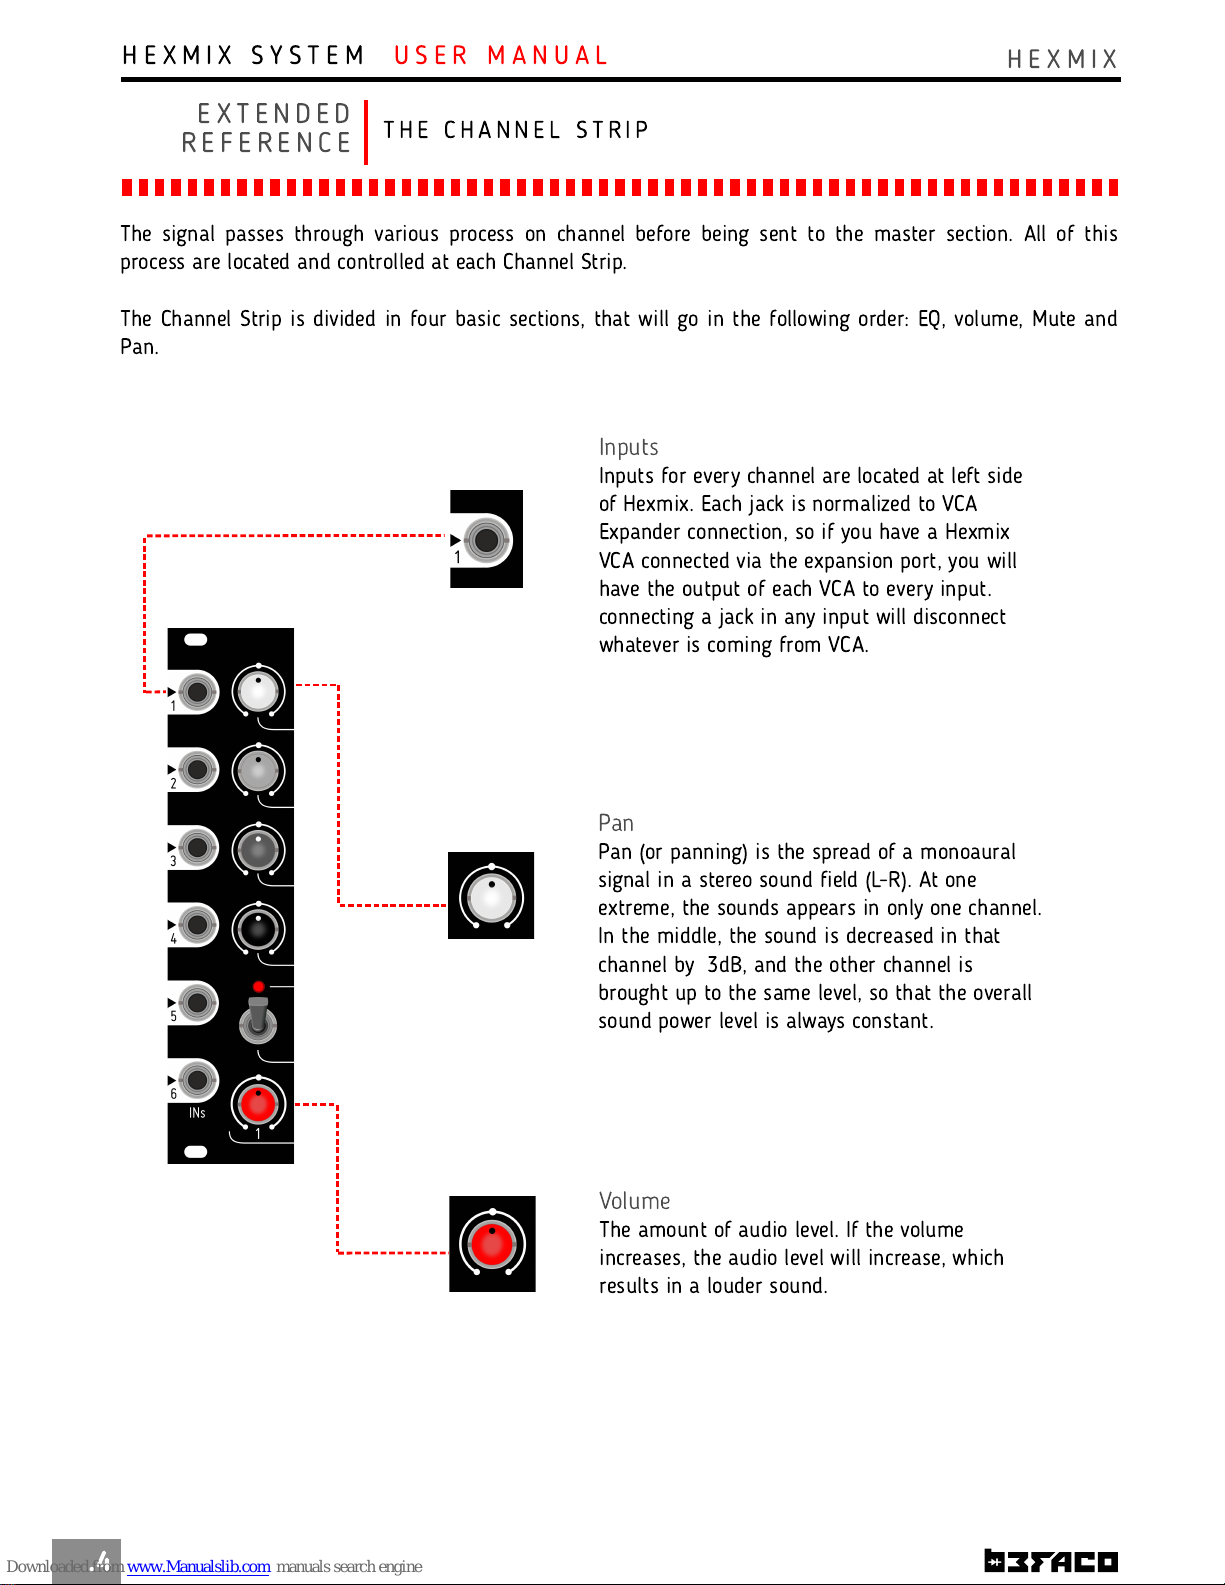
Inputs
Inputs for every channel are located at left side
of Hexmix. Each jack is normalized to VCA
Expander connection, so if you have a Hexmix
VCA connected via the expansion port, you will
have the output of each VCA to every input.
connecting a jack in any input will disconnect
whatever is coming from VCA.
The signal passes through various process on channel before being sent to the master section. All of this
process are located and controlled at each Channel Strip.
The Channel Strip is divided in four basic sections, that will go in the following order: EQ, volume, Mute and
Pan.
Volume
The amount of audio level. If the volume
increases, the audio level will increase, which
results in a louder sound.
Pan
Pan (or panning) is the spread of a monoaural
signal in a stereo sound field (L-R). At one
extreme, the sounds appears in only one channel.
In the middle, the sound is decreased in that
channel by 3dB, and the other channel is
brought up to the same level, so that the overall
sound power level is always constant.
Page 6
H E X M I X S Y S T E M
H E X M I X
U S E R M A N U A L
E X T E N D E D
R E F E R E N C E
T H E C H A N N E L S T R I P
.5
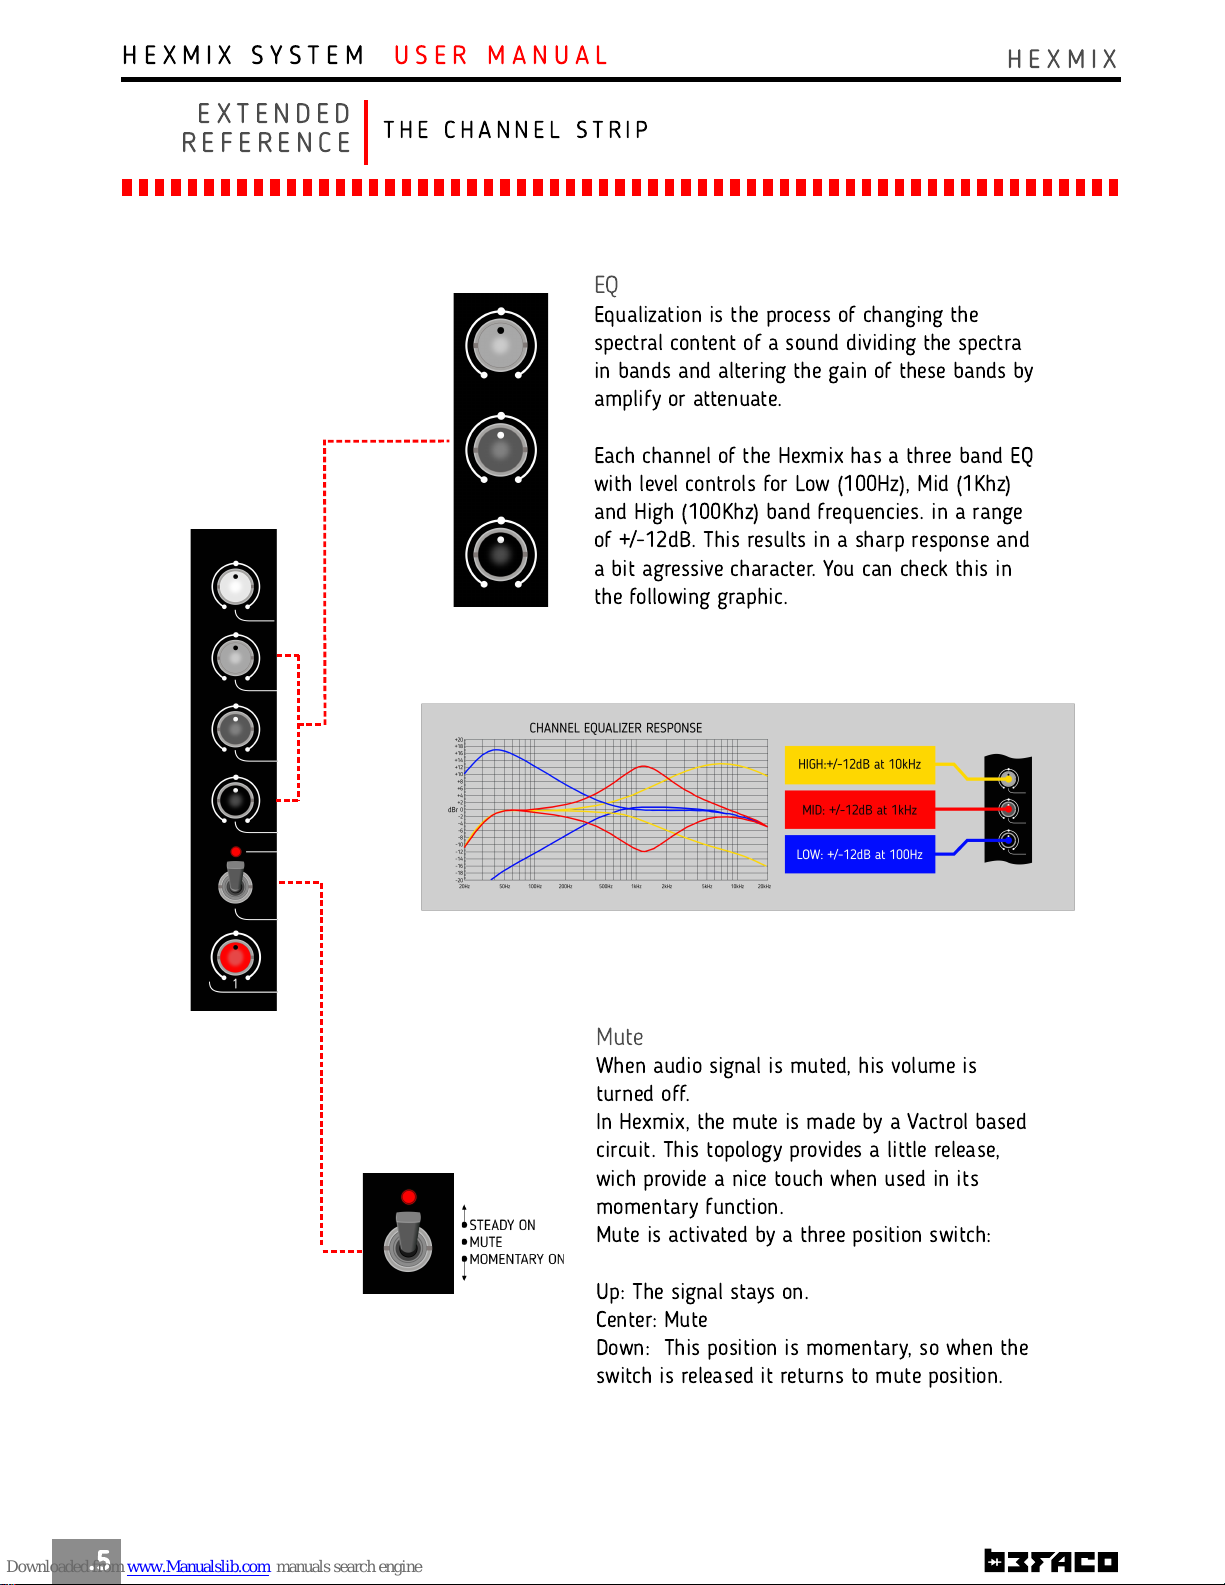
EQ
Equalization is the process of changing the
spectral content of a sound dividing the spectra
in bands and altering the gain of these bands by
amplify or attenuate.
Each channel of the Hexmix has a three band EQ
with level controls for Low (100Hz), Mid (1Khz)
and High (100Khz) band frequencies. in a range
of +/-12dB. This results in a sharp response and
a bit agressive character. You can check this in
the following graphic.
Mute
When audio signal is muted, his volume is
turned off.
In Hexmix, the mute is made by a Vactrol based
circuit. This topology provides a little release,
wich provide a nice touch when used in its
momentary function.
Mute is activated by a three position switch:
Up: The signal stays on.
Center: Mute
Down: This position is momentary, so when the
switch is released it returns to mute position.
Page 7
H E X M I X S Y S T E M
H E X M I X
U S E R M A N U A L
E X T E N D E D
R E F E R E N C E
M A S T E R S E C T I O N
.6
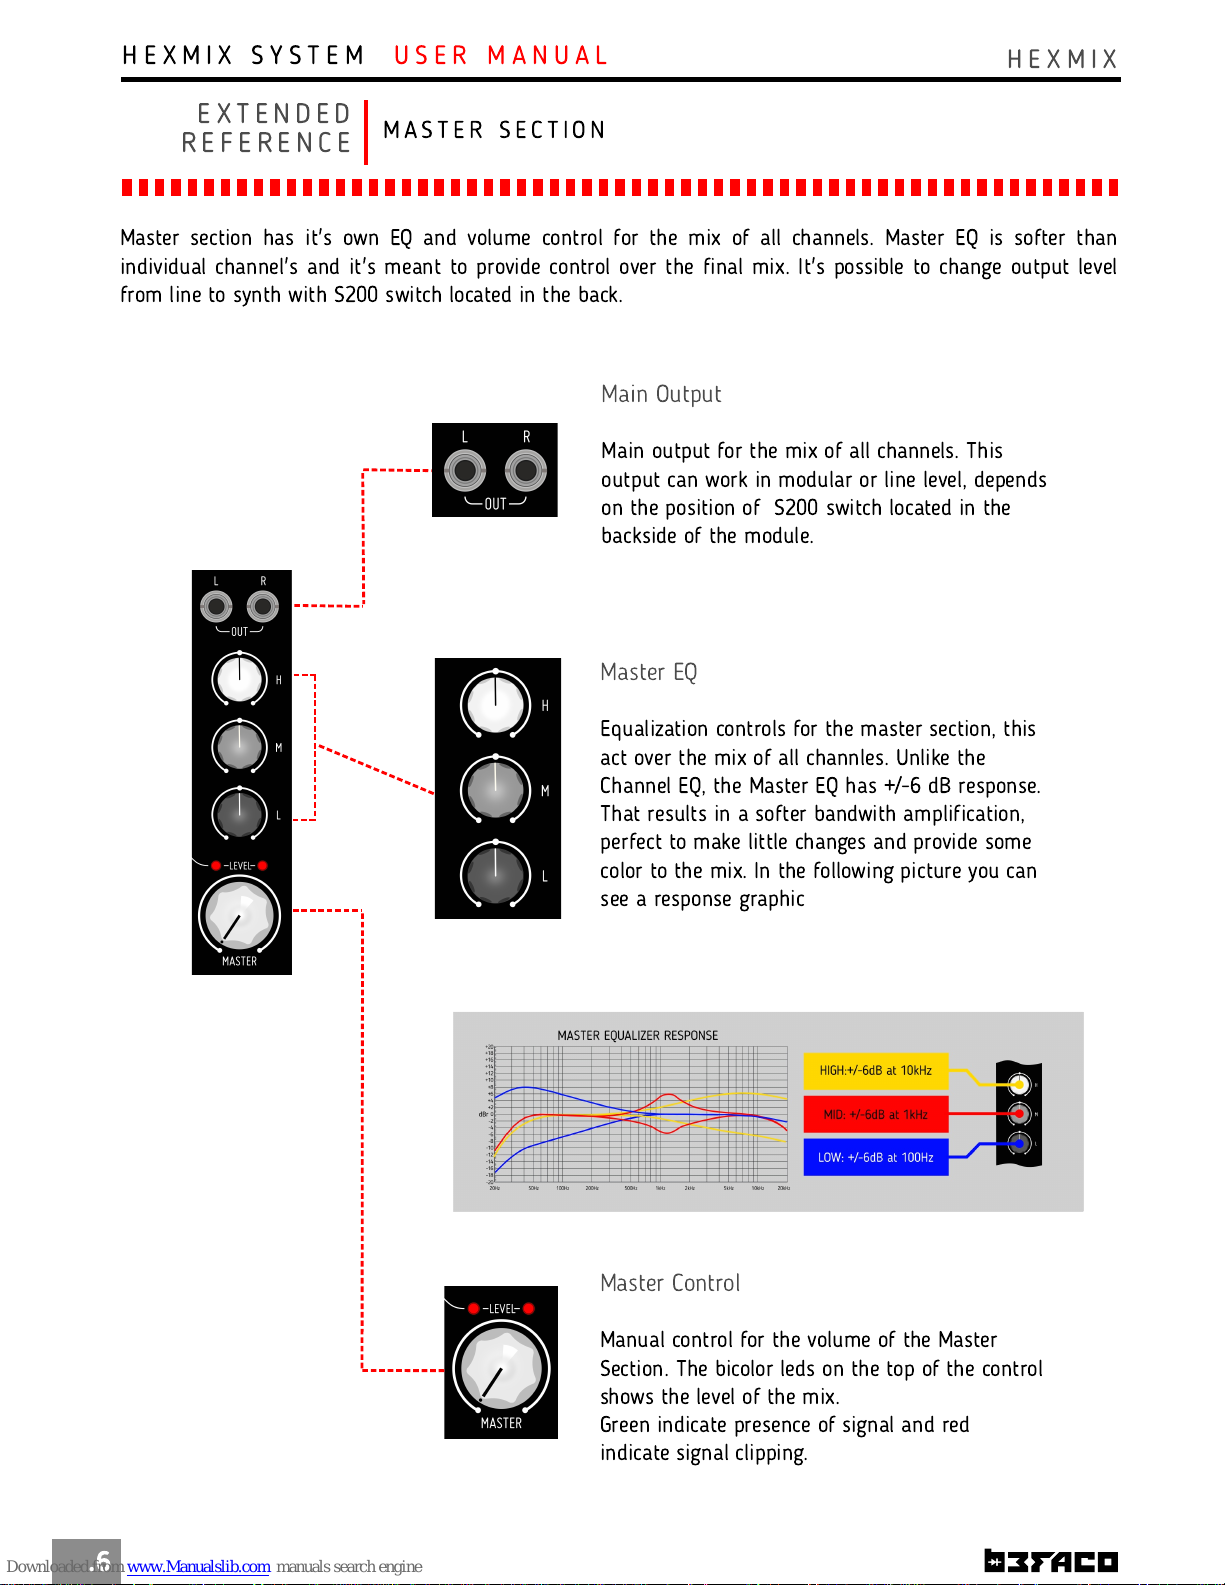
Master section has it's own EQ and volume control for the mix of all channels. Master EQ is softer than
individual channel's and it's meant to provide control over the final mix. It's possible to change output level
from line to synth with S200 switch located in the back.
Main Output
Main output for the mix of all channels. This
output can work in modular or line level, depends
on the position of S200 switch located in the
backside of the module.
Master EQ
Equalization controls for the master section, this
act over the mix of all channles. Unlike the
Channel EQ, the Master EQ has +/-6 dB response.
That results in a softer bandwith amplification,
perfect to make little changes and provide some
color to the mix. In the following picture you can
see a response graphic
Master Control
Manual control for the volume of the Master
Section. The bicolor leds on the top of the control
shows the level of the mix.
Green indicate presence of signal and red
indicate signal clipping.
Page 8
H E X M I X S Y S T E M
H E X P A N D E R
U S E R M A N U A L
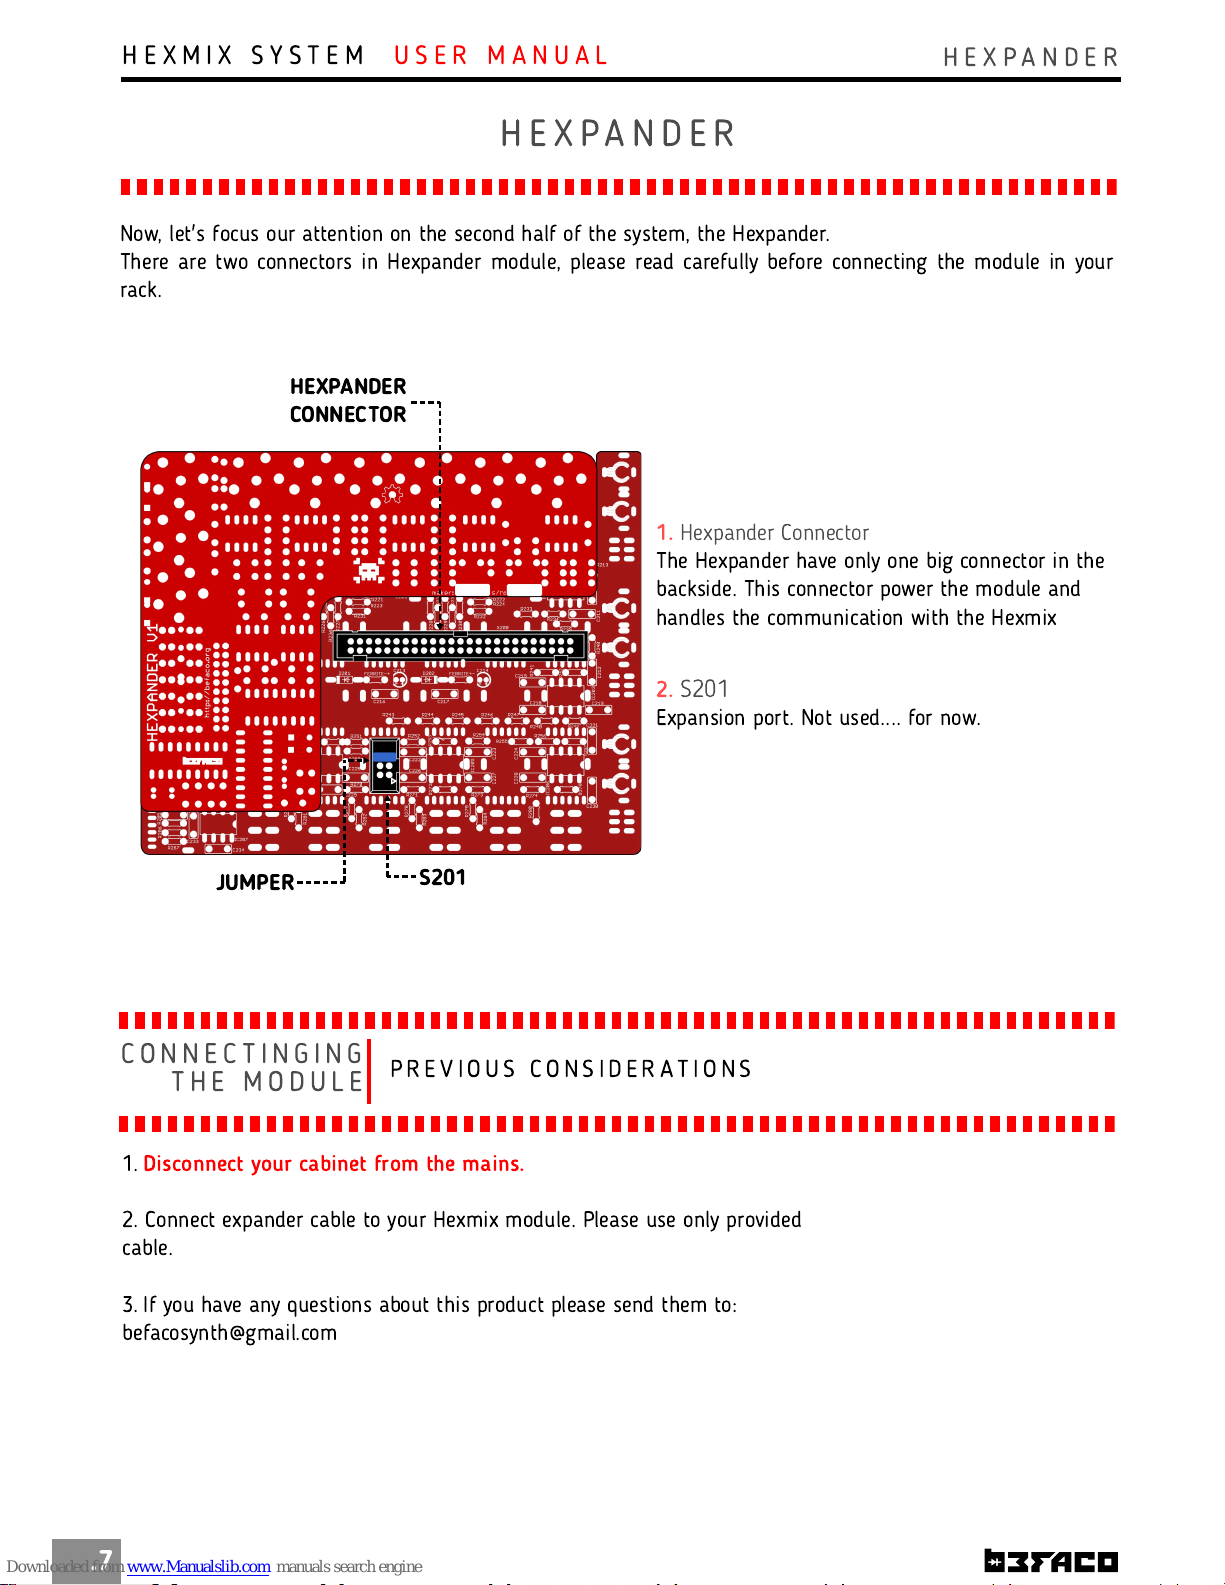
1.
Hexpander Connector
The Hexpander have only one big connector in the
backside. This connector power the module and
handles the communication with the Hexmix
.7
Now, let's focus our attention on the second half of the system, the Hexpander.
There are two connectors in Hexpander module, please read carefully before connecting the module in your
rack.
C O N N E C T I N G I N G
T H E M O D U L E
P R E V I O U S C O N S I D E R A T I O N S
1.
Disconnect your cabinet from the mains.
2. Connect expander cable to your Hexmix module. Please use only provided
cable.
3. If you have any questions about this product please send them to:
befacosynth@gmail.com
2.
S201
Expansion port. Not used.... for now.
HEXPANDER
CONNECTOR
S201
H E X P A N D E R
JUMPER
Page 9
H E X M I X S Y S T E M
H E X P A N D E R
U S E R M A N U A L
M O D U L E
R E F E R E N C E
F R O N T P A N E L C O N T R O L S
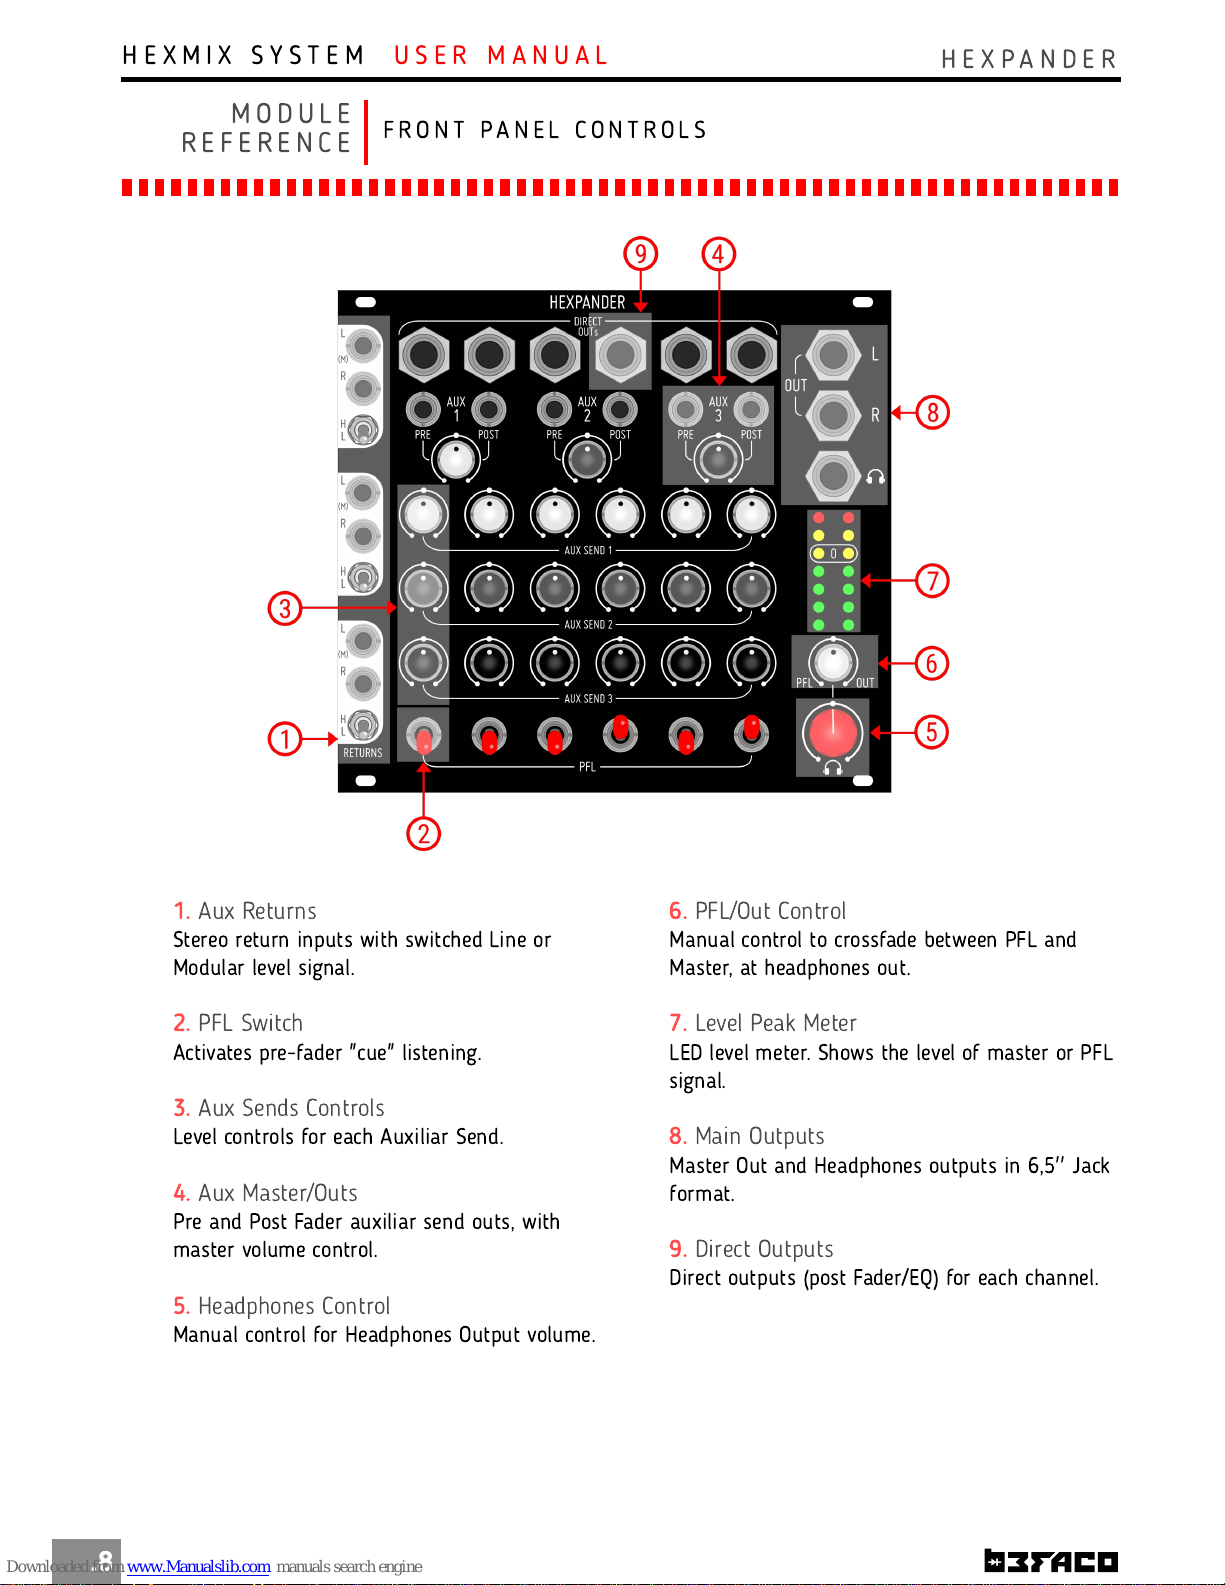
1.
Aux Returns
Stereo return inputs with switched Line or
Modular level signal.
2.
PFL Switch
Activates pre-fader "cue" listening.
3.
Aux Sends Controls
Level controls for each Auxiliar Send.
4.
Aux Master/Outs
Pre and Post Fader auxiliar send outs, with
master volume control.
5.
Headphones Control
Manual control for Headphones Output volume.
.8
6.
PFL/Out Control
Manual control to crossfade between PFL and
Master, at headphones out.
7.
Level Peak Meter
LED level meter. Shows the level of master or PFL
signal.
8.
Main Outputs
Master Out and Headphones outputs in 6,5'' Jack
format.
9.
Direct Outputs
Direct outputs (post Fader/EQ) for each channel.
Page 10
H E X M I X S Y S T E M
H E X P A N D E R
U S E R M A N U A L
E X T E N D E D
R E F E R E N C E
S E N D S & R E T U R N S
.9
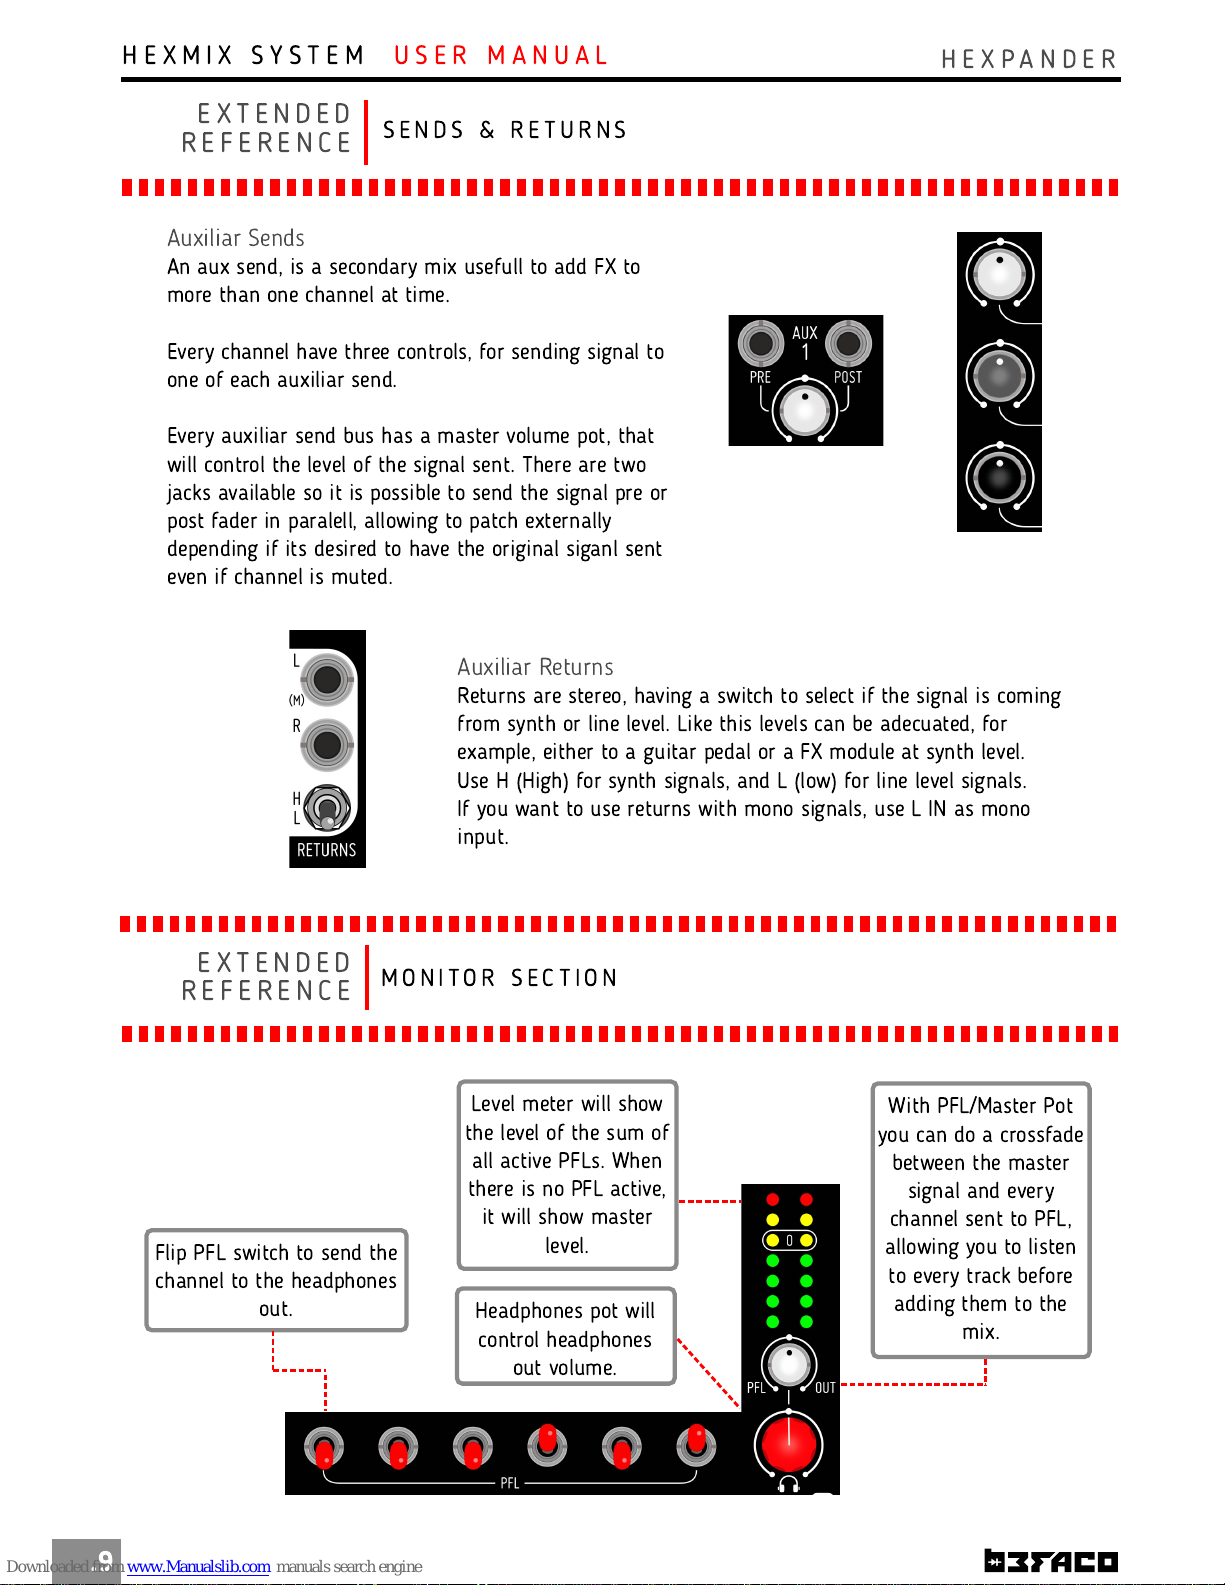
Auxiliar Returns
Returns are stereo, having a switch to select if the signal is coming
from synth or line level. Like this levels can be adecuated, for
example, either to a guitar pedal or a FX module at synth level.
Use H (High) for synth signals, and L (low) for line level signals.
If you want to use returns with mono signals, use L IN as mono
input.
Auxiliar Sends
An aux send, is a secondary mix usefull to add FX to
more than one channel at time.
Every channel have three controls, for sending signal to
one of each auxiliar send.
Every auxiliar send bus has a master volume pot, that
will control the level of the signal sent. There are two
jacks available so it is possible to send the signal pre or
post fader in paralell, allowing to patch externally
depending if its desired to have the original siganl sent
even if channel is muted.
Flip PFL switch to send the
channel to the headphones
out.
E X T E N D E D
R E F E R E N C E
M O N I T O R S E C T I O N
With PFL/Master Pot
you can do a crossfade
between the master
signal and every
channel sent to PFL,
allowing you to listen
to every track before
adding them to the
mix.
Level meter will show
the level of the sum of
all active PFLs. When
there is no PFL active,
it will show master
level.
Headphones pot will
control headphones
out volume.
Page 11
H E X M I X S Y S T E M
H E X P A N D E R
U S E R M A N U A L
E X T E N D E D
R E F E R E N C E
O U T P U T S E C T I O N
.10
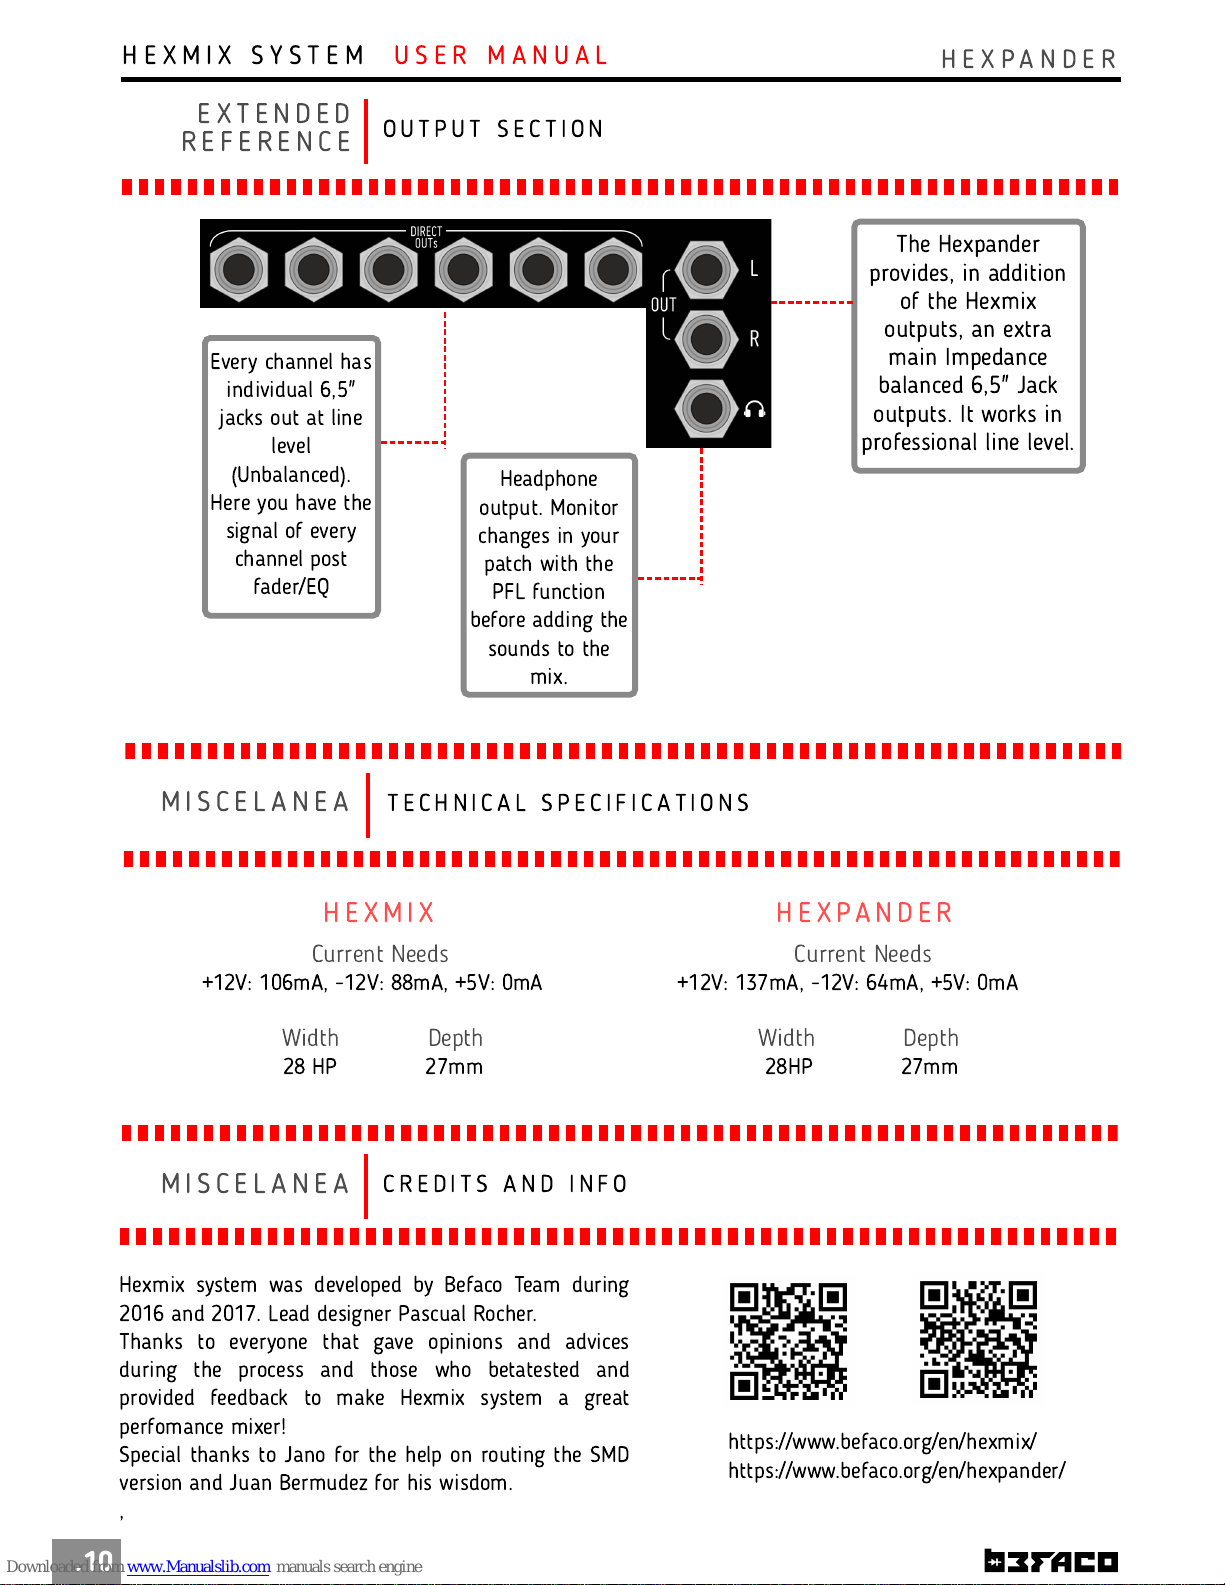
The Hexpander
provides, in addition
of the Hexmix
outputs, an extra
main Impedance
balanced 6,5" Jack
outputs. It works in
professional line level.
Every channel has
individual 6,5"
jacks out at line
level
(Unbalanced).
Here you have the
signal of every
channel post
fader/EQ
M I S C E L A N E A
T E C H N I C A L S P E C I F I C A T I O N S
Current Needs
+12V: 1 06mA, -1 2V: 88mA, +5V: 0mA
Width Depth
28 HP 27mm
H E X M I X
Current Needs
+12V: 1 37mA, -12V: 64mA, +5V: 0mA
Width Depth
28HP 27mm
H E X P A N D E R
M I S C E L A N E A
C R E D I T S A N D I N F O
Headphone
output. Monitor
changes in your
patch with the
PFL function
before adding the
sounds to the
mix.
Hexmix system was developed by Befaco Team during
201 6 and 2017. Lead designer Pascual Rocher.
Thanks to everyone that gave opinions and advices
during the process and those who betatested and
provided feedback to make Hexmix system a great
perfomance mixer!
Special thanks to Jano for the help on routing the SMD
version and Juan Bermudez for his wisdom.
,
https://www.befaco.org/en/hexmix/
https://www.befaco.org/en/hexpander/
 Loading...