

Page 1

EN - PT - DE - FR - IT
Page 2

Page 3

FRANÇAIS
BEEWELCOME!
V.18.11.2015
You can find updated versions of this guide on our website, at
www.beeverycreative.com. Here you can also get in touch with our
Customer Service Team if you have any questions.
This is the Quick Start Guide for using your BEETHEFIRST.
41
DEUTSCH
23
PORTUGUÊS
5
ENGLISH
Languages
59
77
ITALIANO
Page 4

Page 5

QUICK START
GUIDE FOR USING
BEETHEFIRST
ENGLISH
Page 6

6
The current state of 3D desktop Art technology
Even though the only real limit is your own creativity, current 3D printing technology also
has its limits. You can find out what they are by reading our 3D Modelling Guidelines
document (https://www.beeverycreative.com/modelling-guidelines/)
The most relevant aspect to guarantee print quality is calibrating BEETHEFIRST.
Proper calibration is essential to performance and to ensure the desired results.
Poor calibration may keep you from printing the object you wish to make.
High resolution printing requires an even more demanding calibration. For this reason,
we advise you to print in low resolution until you’re a more experienced user.
Low resolution printing is also recommended whenever object resolution isn’t the main
concern, since this is quicker, more economical and more ecological.
Page 7

20
TECHNICAL SPECIFICATIONS
10
UNPACKING AND INSTALLING BEETHEFIRST
8
SAFETY INFORMATION
INDEX
Page 8

1. SAFETY INFORMATION
Page 9

9
1. SAFETY INFORMATION
Even though the BEETHEFIRST 3D printer was designed to be as safe as possible,
we would like to remind you it was conceived for use by adults. Still, there are
safety concerns you must keep in mind:
1 - Adult supervision: because we can’t stress this enough, BEETHEFIRST was
developed to be used by adults. Should you wish that children also use it, you
must supervise them at all times while they do so. You must also take great care
with small printed objects, because children might try to swallow them, which
poses a danger of them choking.
2 - Extruder: whenever BEETHEFIRST is functioning, the extruder nozzle can
reach temperatures as high as 250º C (480º F), which can cause serious burns if
touched. For that reason, even though the extruder nozzle is shielded, you must
always be careful not to touch it.
3 - Moving parts: whenever it’s functioning, BEETHEFIRST has moving parts.
For that reason, you should always keep a safe distance from the printer while
it’s operating.
4 - Filament: BEETHEFIRST has been developed and tested to work best with
BEESUPPLIES, our brand of filament. You may use filament from other sources
but we recommend BEESUPPLIES for the best results.
5 - Cool and well-ventilated environment: BEETHEFIRST works best in cool
environments with some ventilation, just like any other electrical item. It is also
recommended to maintain an acceptable level of air quality around the printer.
6 - BEETHEFIRST integrity: never use BEETHEFIRST without it being fully
assembled. Using it without all of its components voids the warranty and can be
dangerous. For the same reasons, avoid spilling any liquid on the printer.
7 - Modifications to BEETHEFIRST: if you modify BEETHEFIRST in any way, this
will immediately void the warranty. If you still wish to modify it, get in touch with
us, explain your project and we might be able to provide you with useful information.
Page 10

2. UNPACKING AND INSTALLING
BEETHEFIRST
Page 11
11
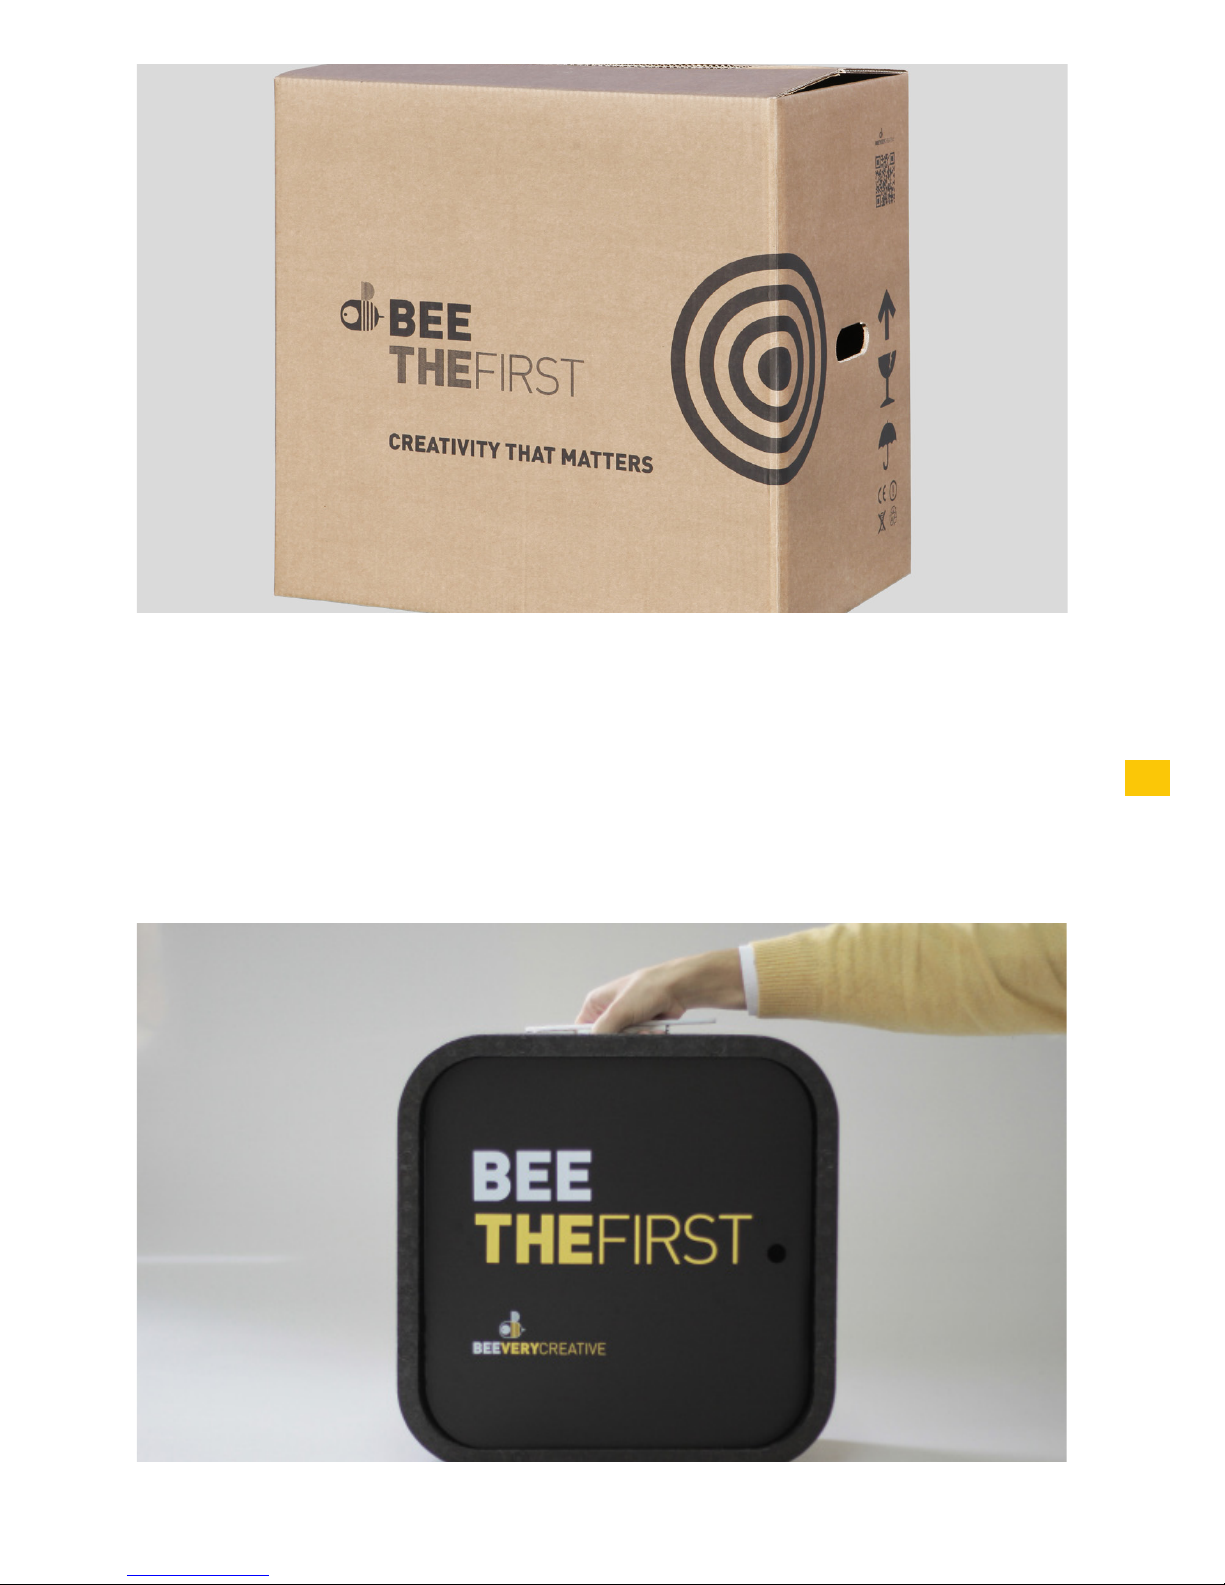
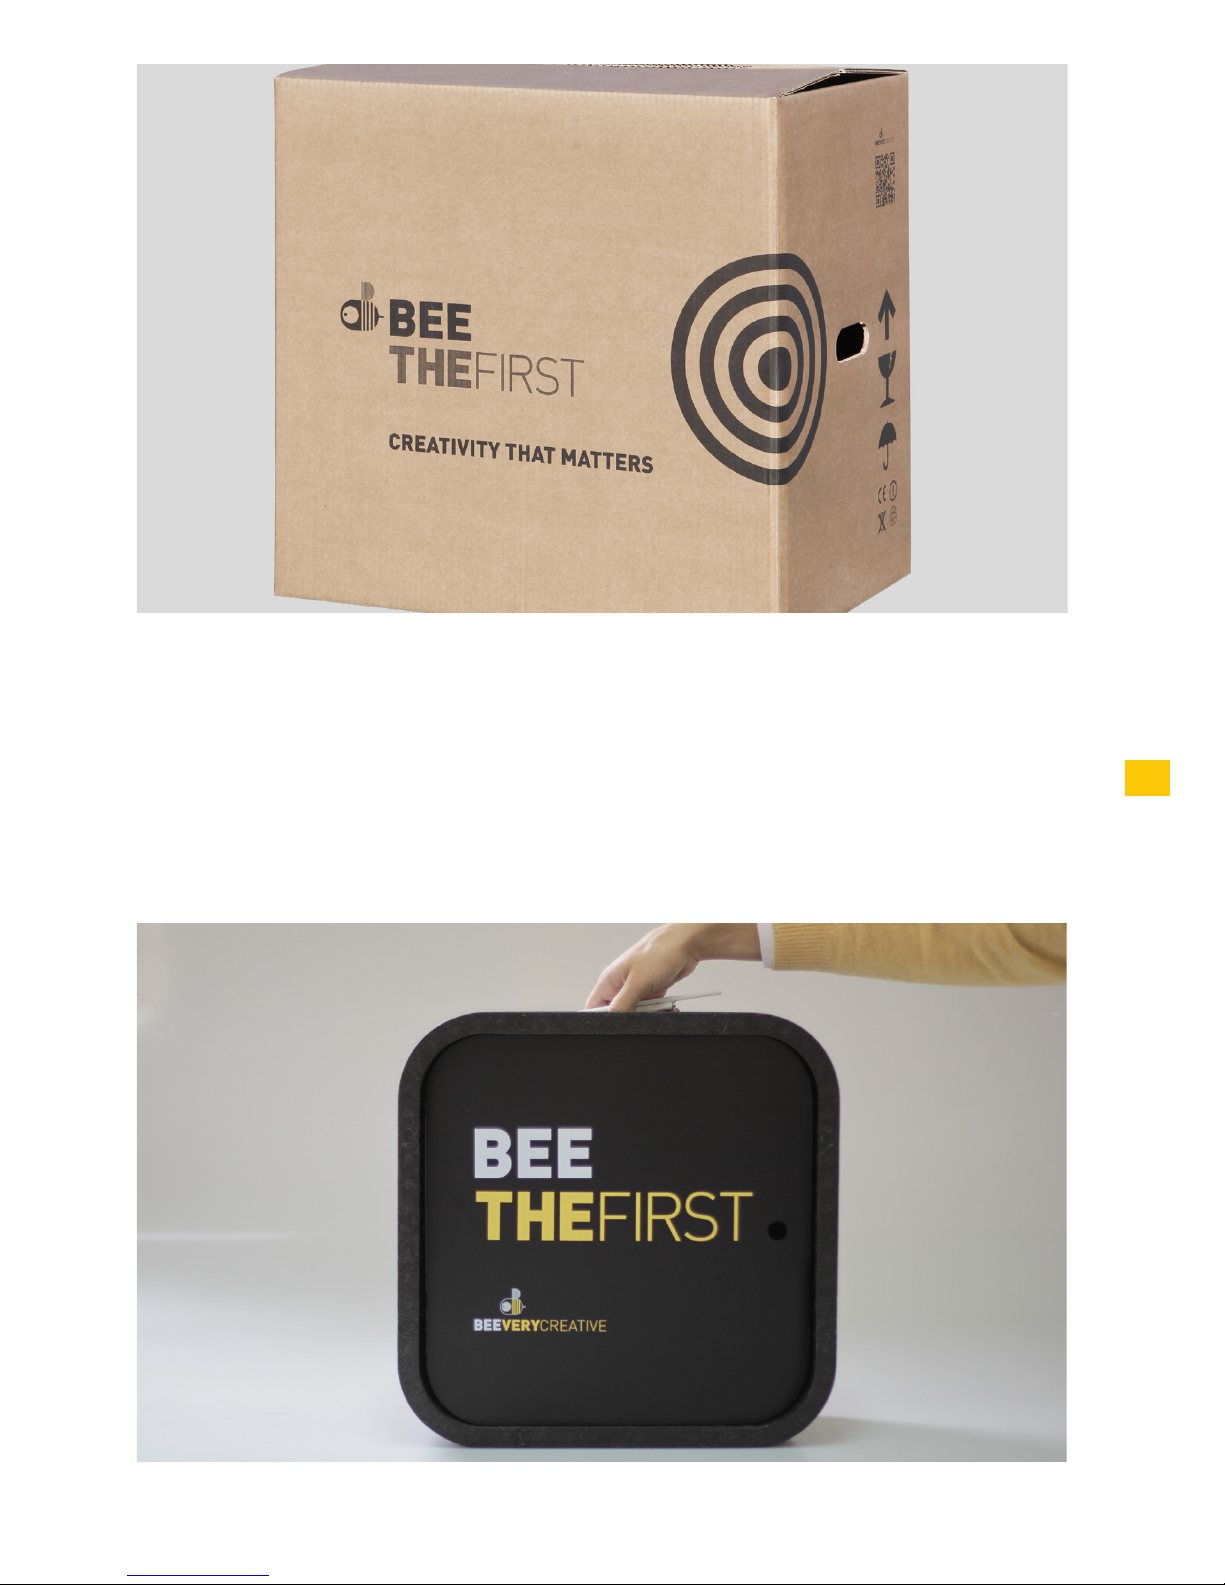
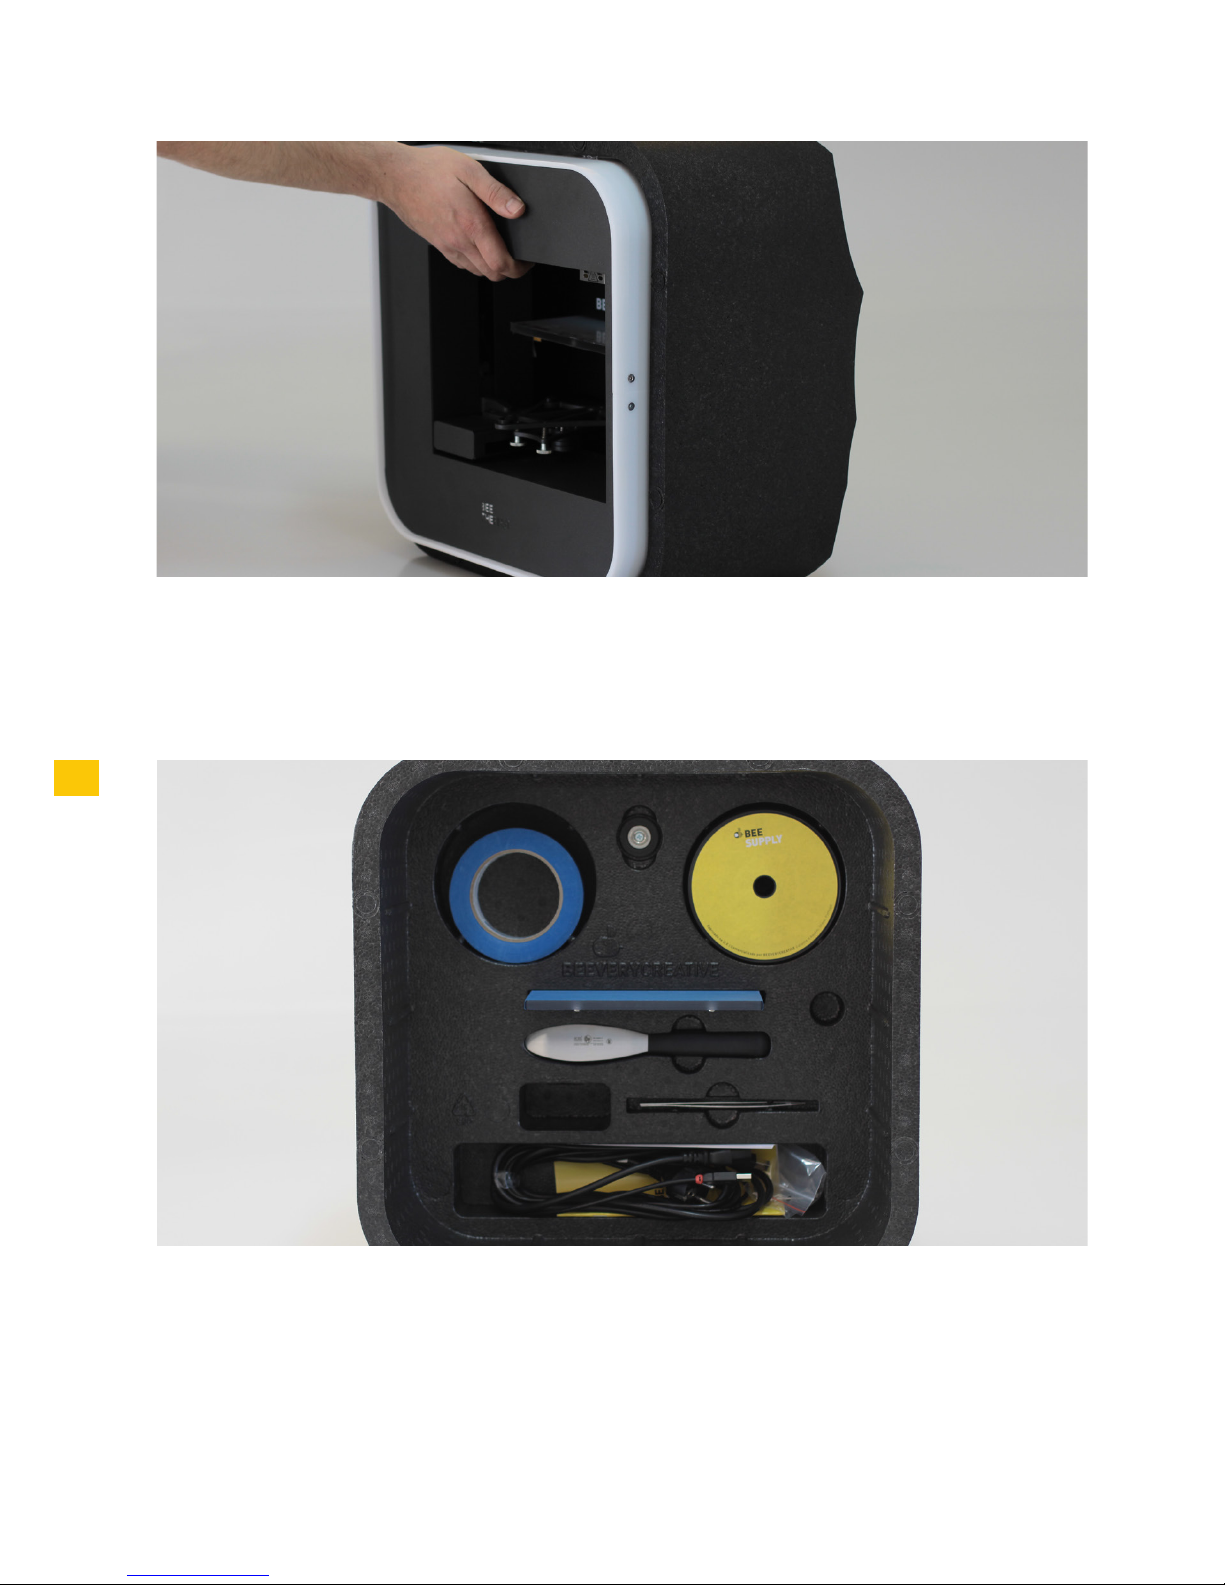
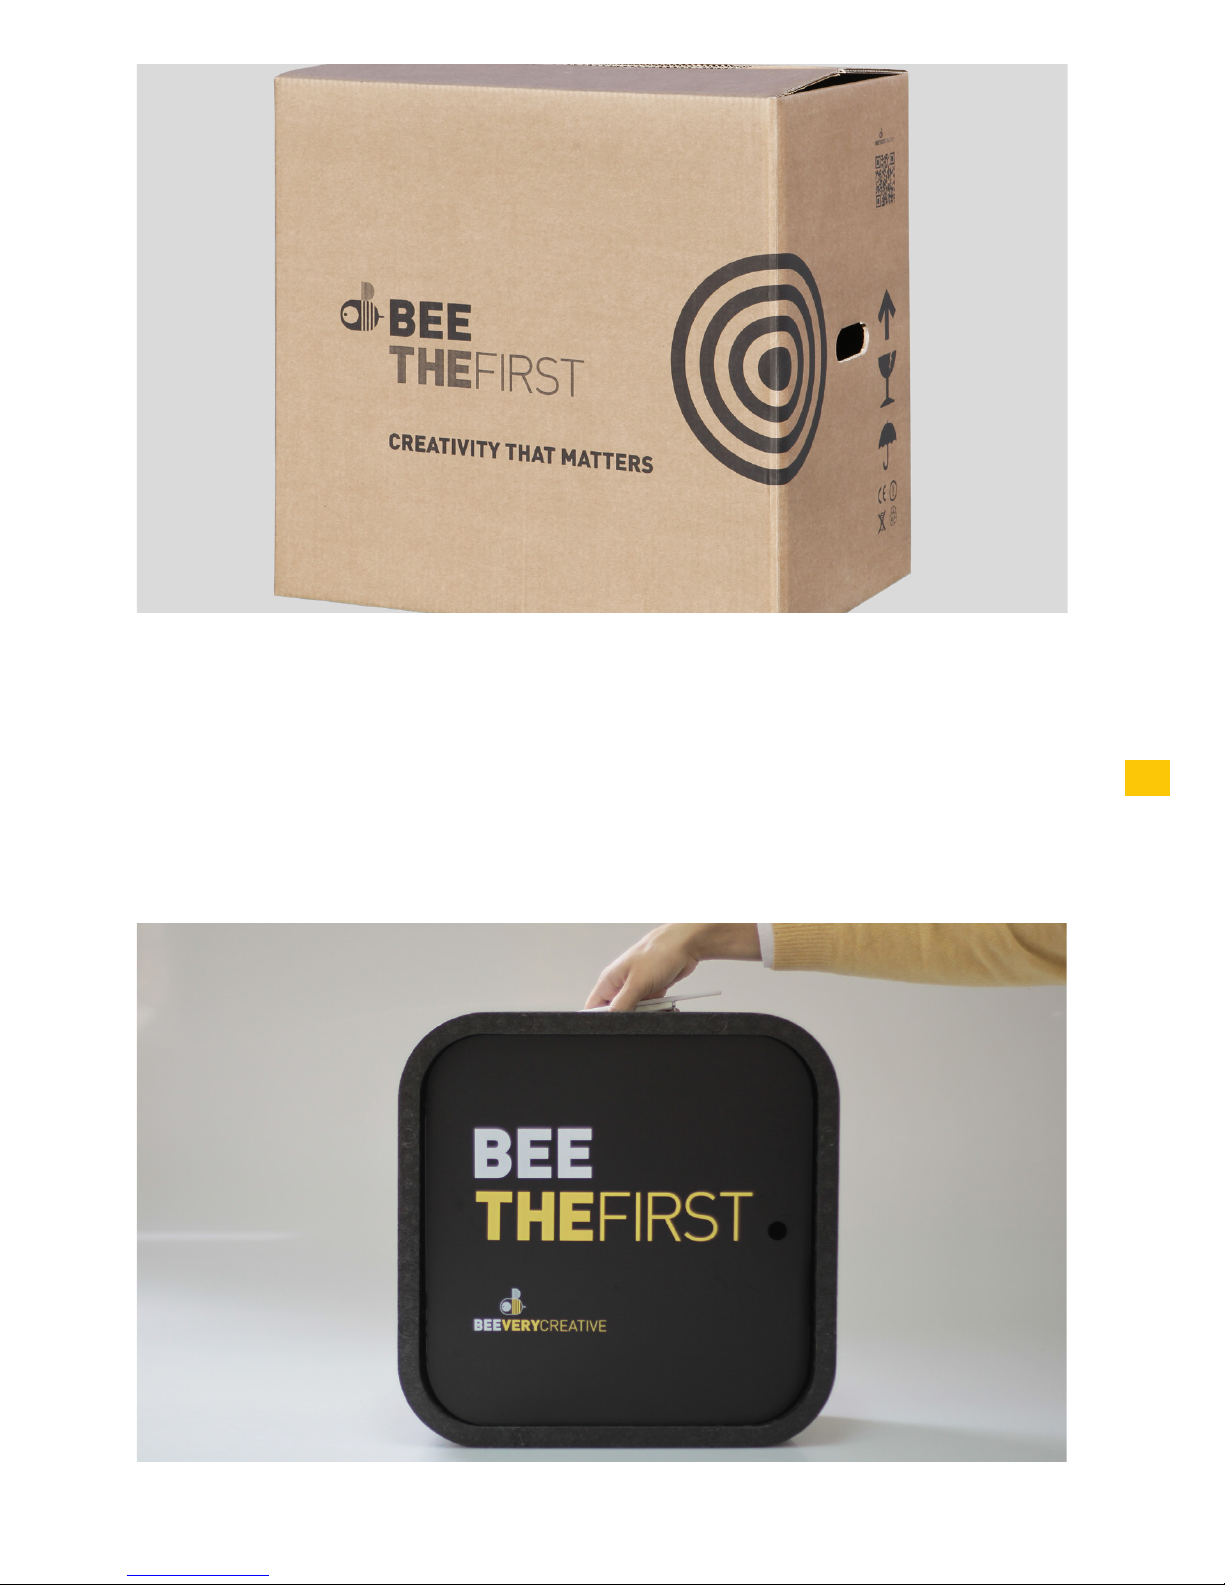
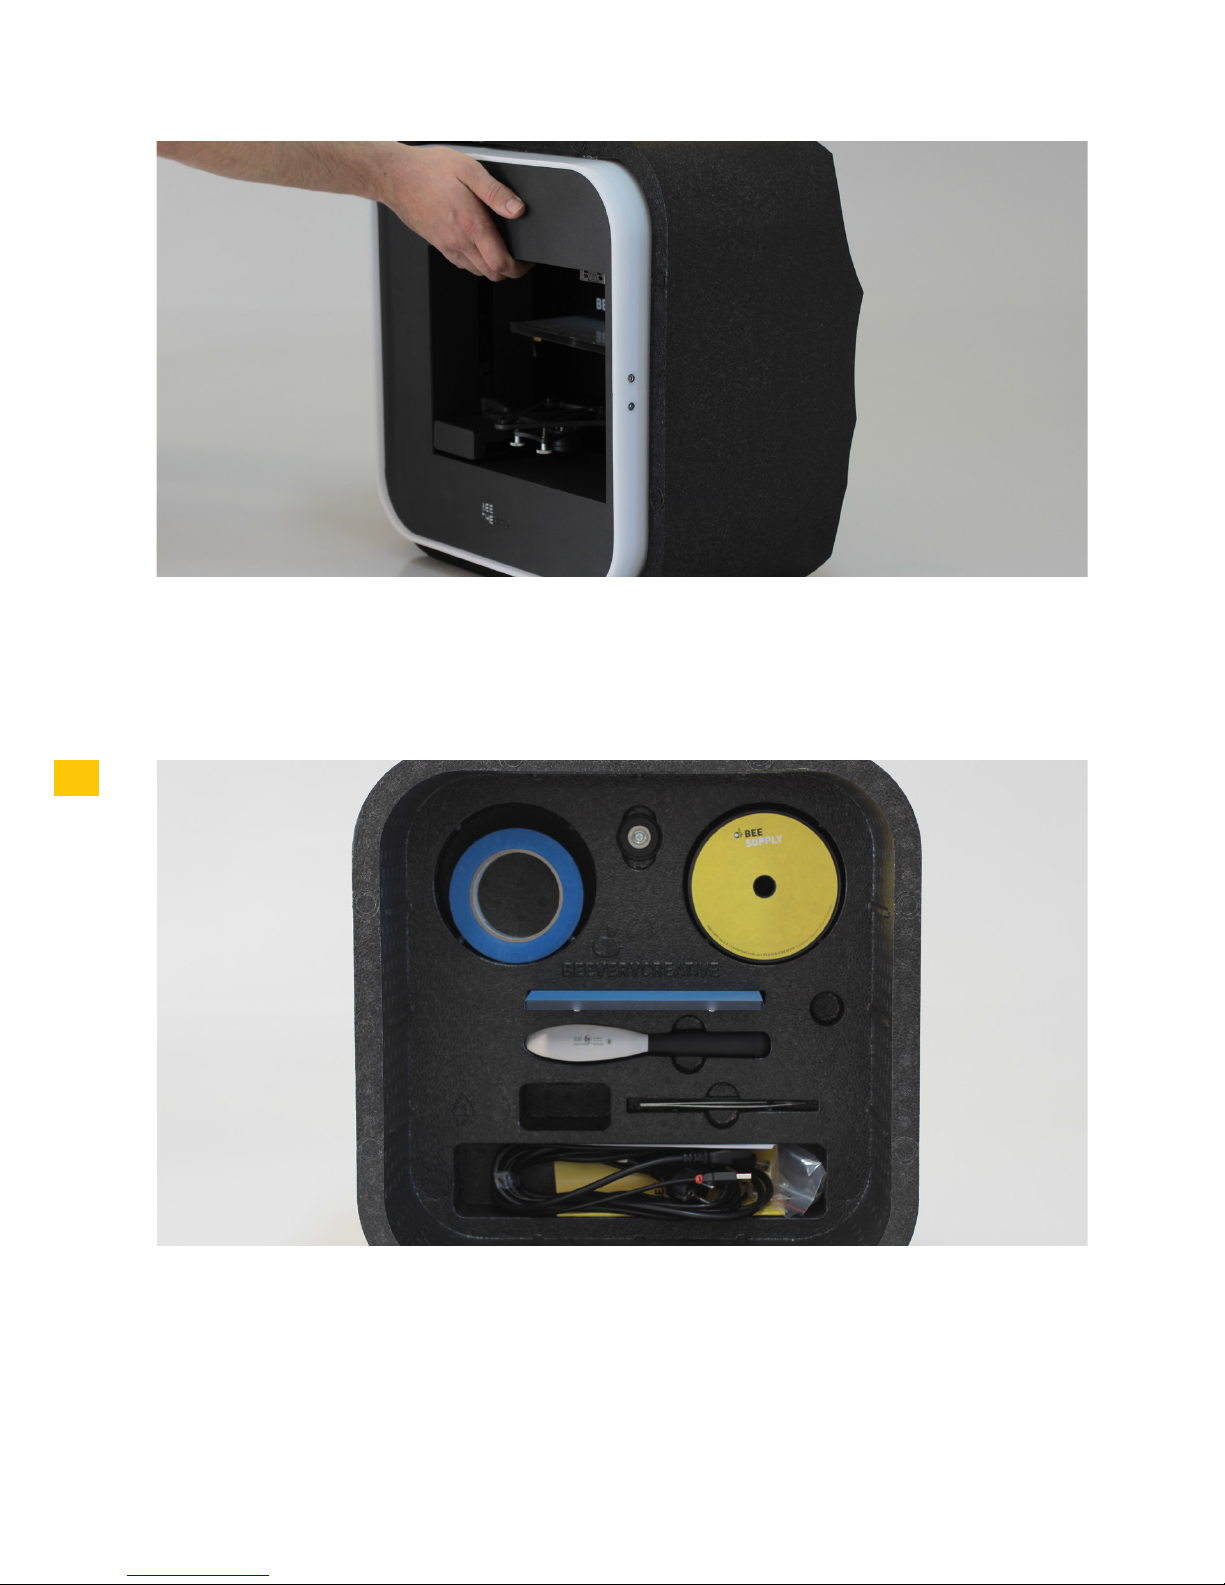
1. Open the box and remove the printer’s protective foam.
2. Open the plastic bag removing the tape by pulling the tag, as shown in the
illustration on the outside of the bag
3. Remove the printer by the handle, NOT by pulling the foam casing, or you will
damage it. The handle comes out by pressing it on one side, then lifting it out.
Page 12
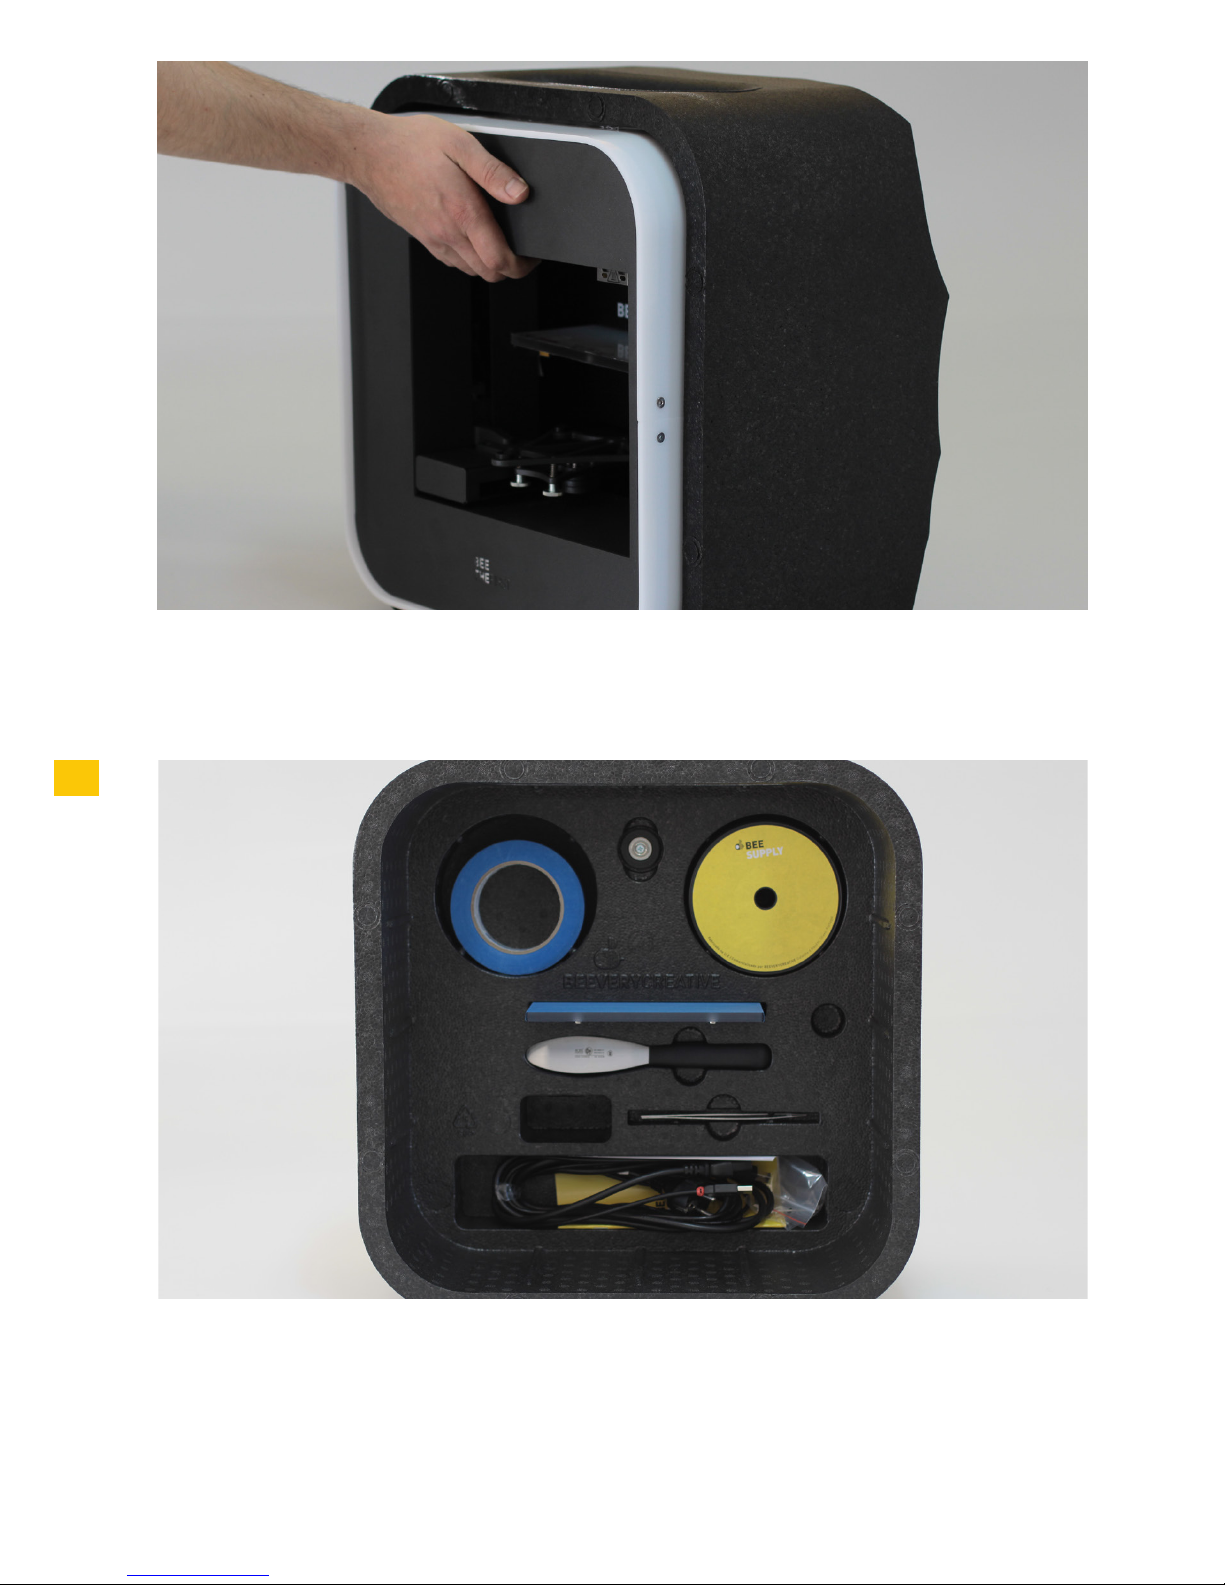
12
4. Remove the packaging material as indicated by the numerical references.
5. Once you’ve unpacked everything, use the handle located on the top of the
printer to transport your BEETHEFIRST. If you wish to carry BEETHEFIRST
for longer trips, we recommend you use the BEEPACK.
Page 13
13
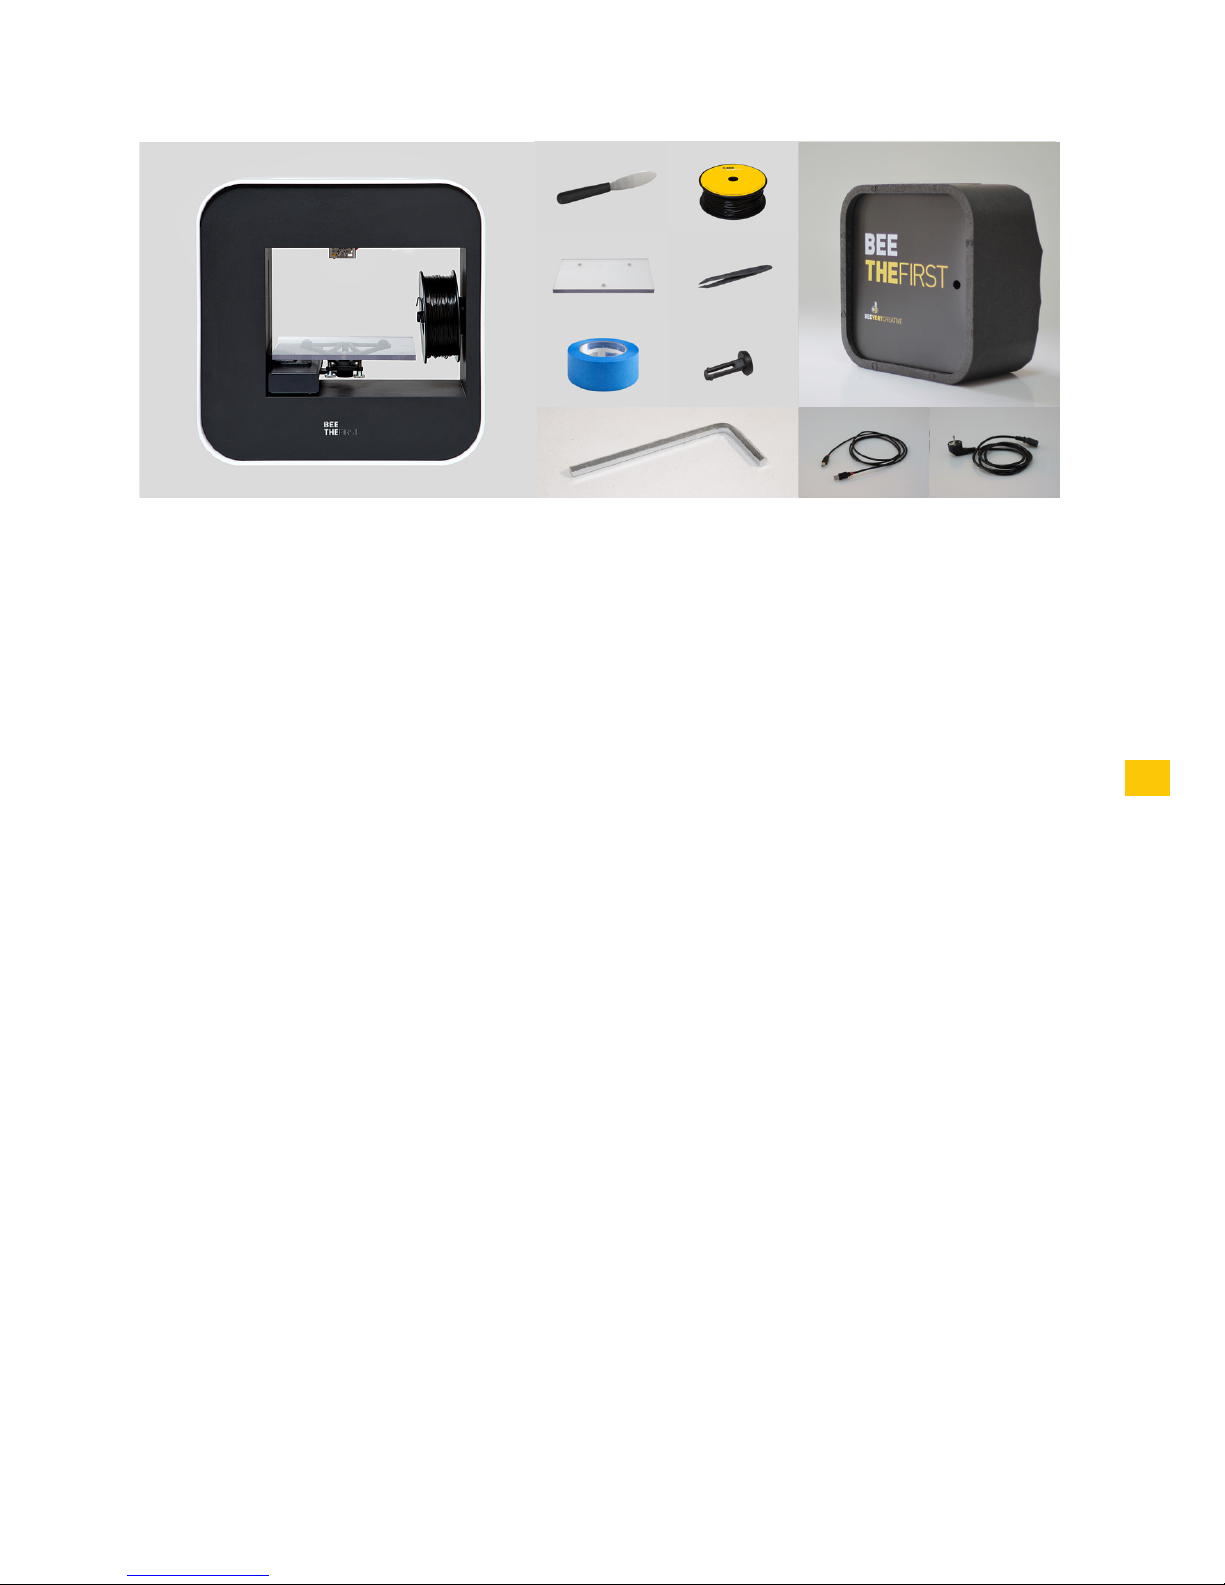
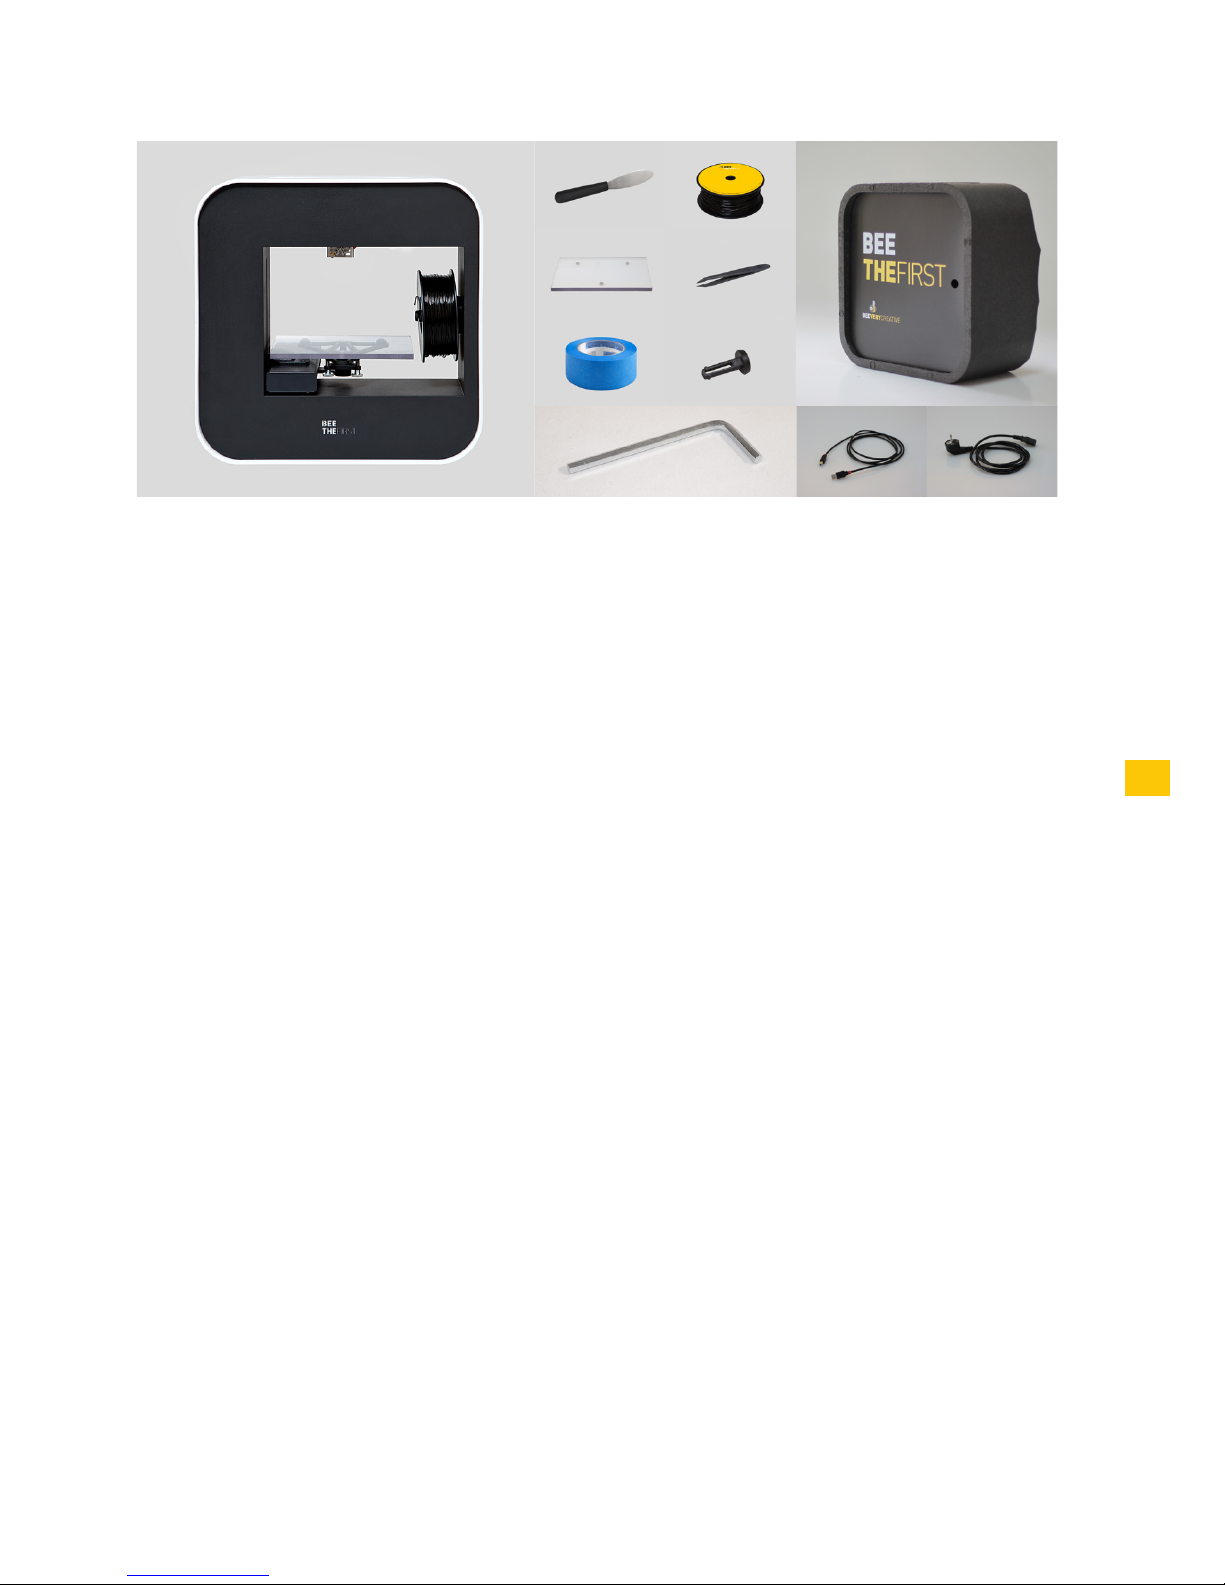
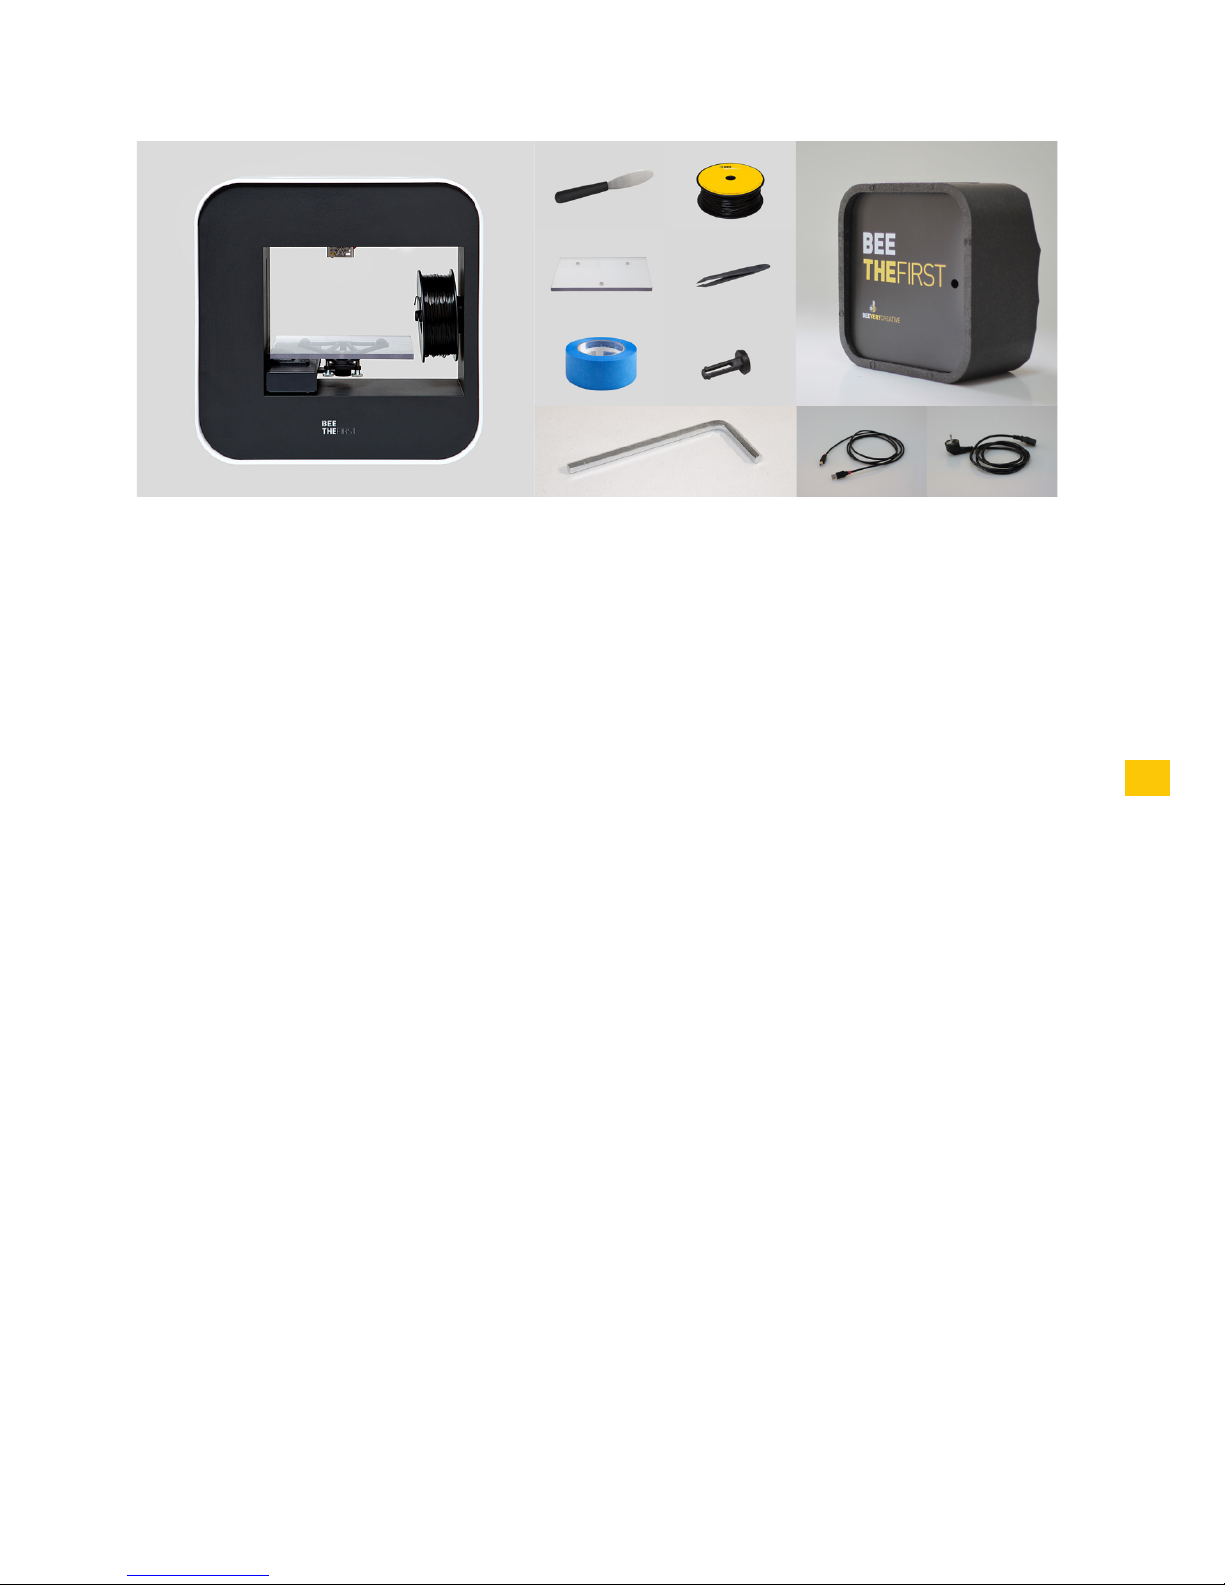
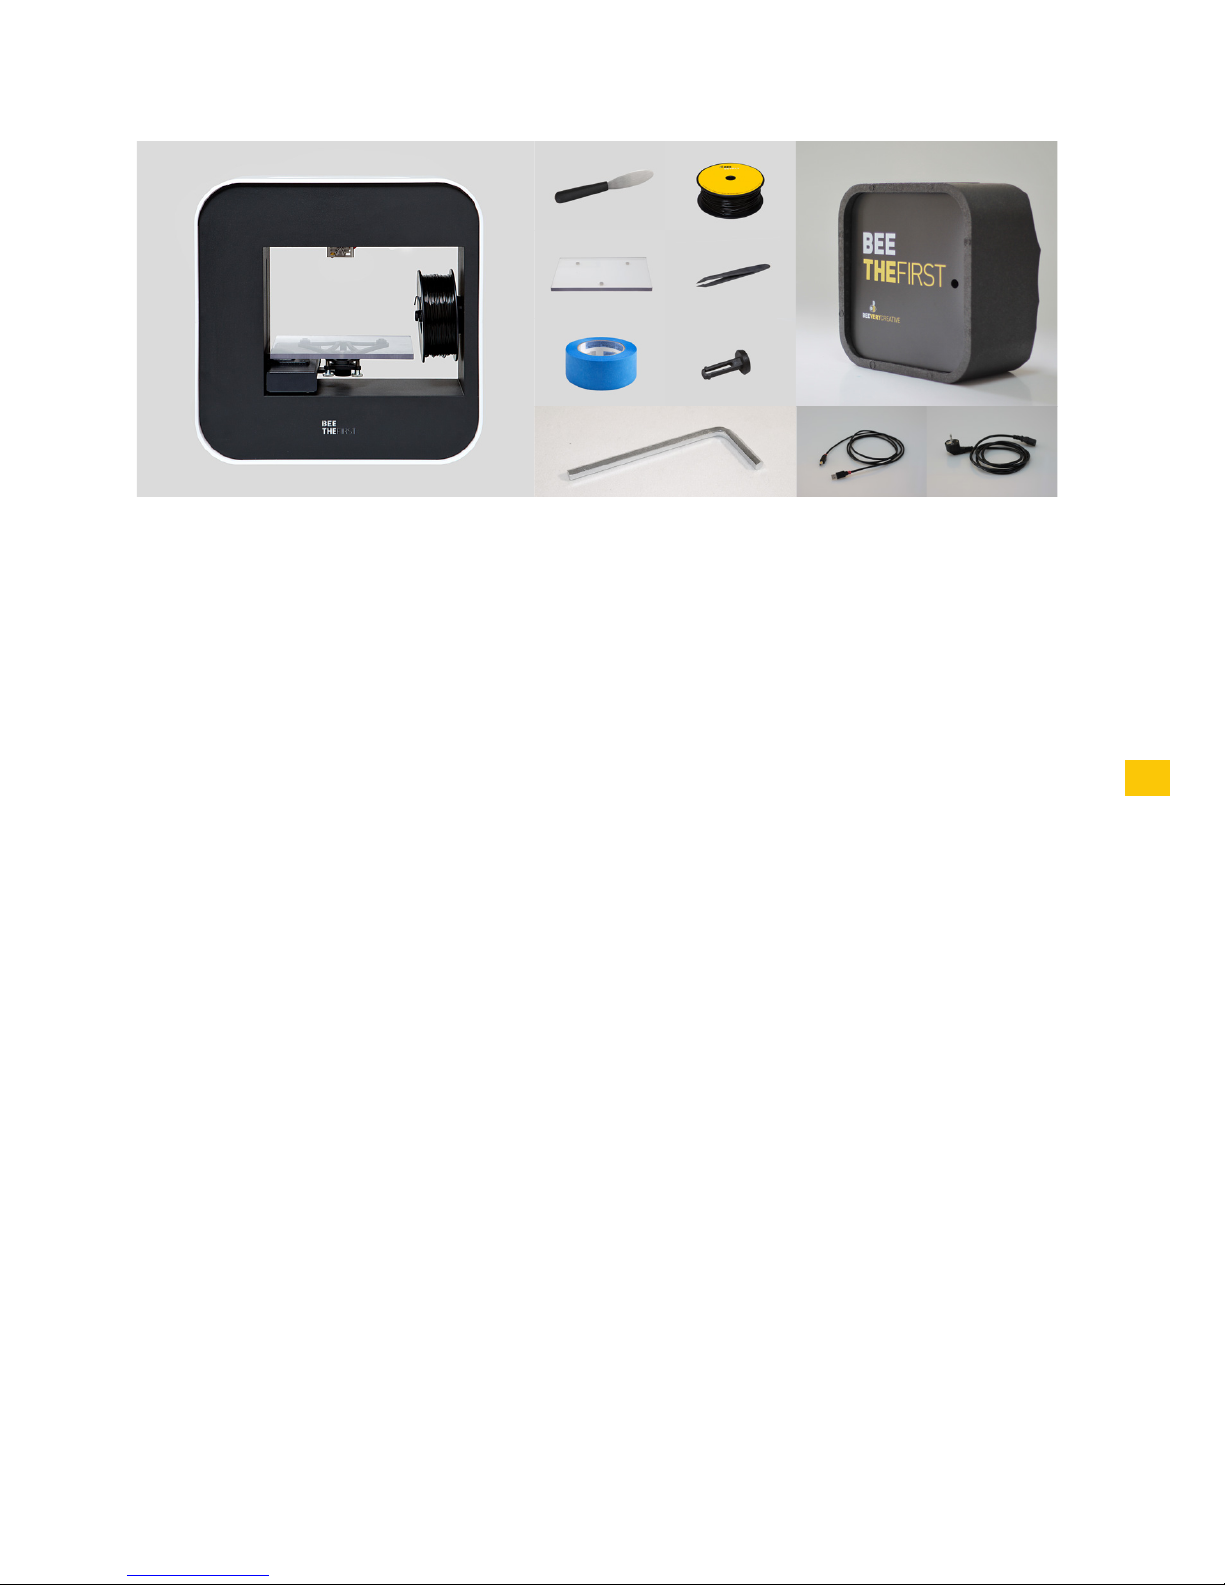
6. Make sure the box contains the following items:
1 BEETHEFIRST
1 Printing table
1 Pair of Tweezers
1 Spatula
1 Allen Key
1 BEEPACK
1 Roll of blue tape
1 Power cable
1 USB connection cable
1 Filament spool
1 Spool holder
Page 14
11
12
13
9
10
13
11
12
8
5
4
3
2
1
7
6
14
1
2
3
4
5
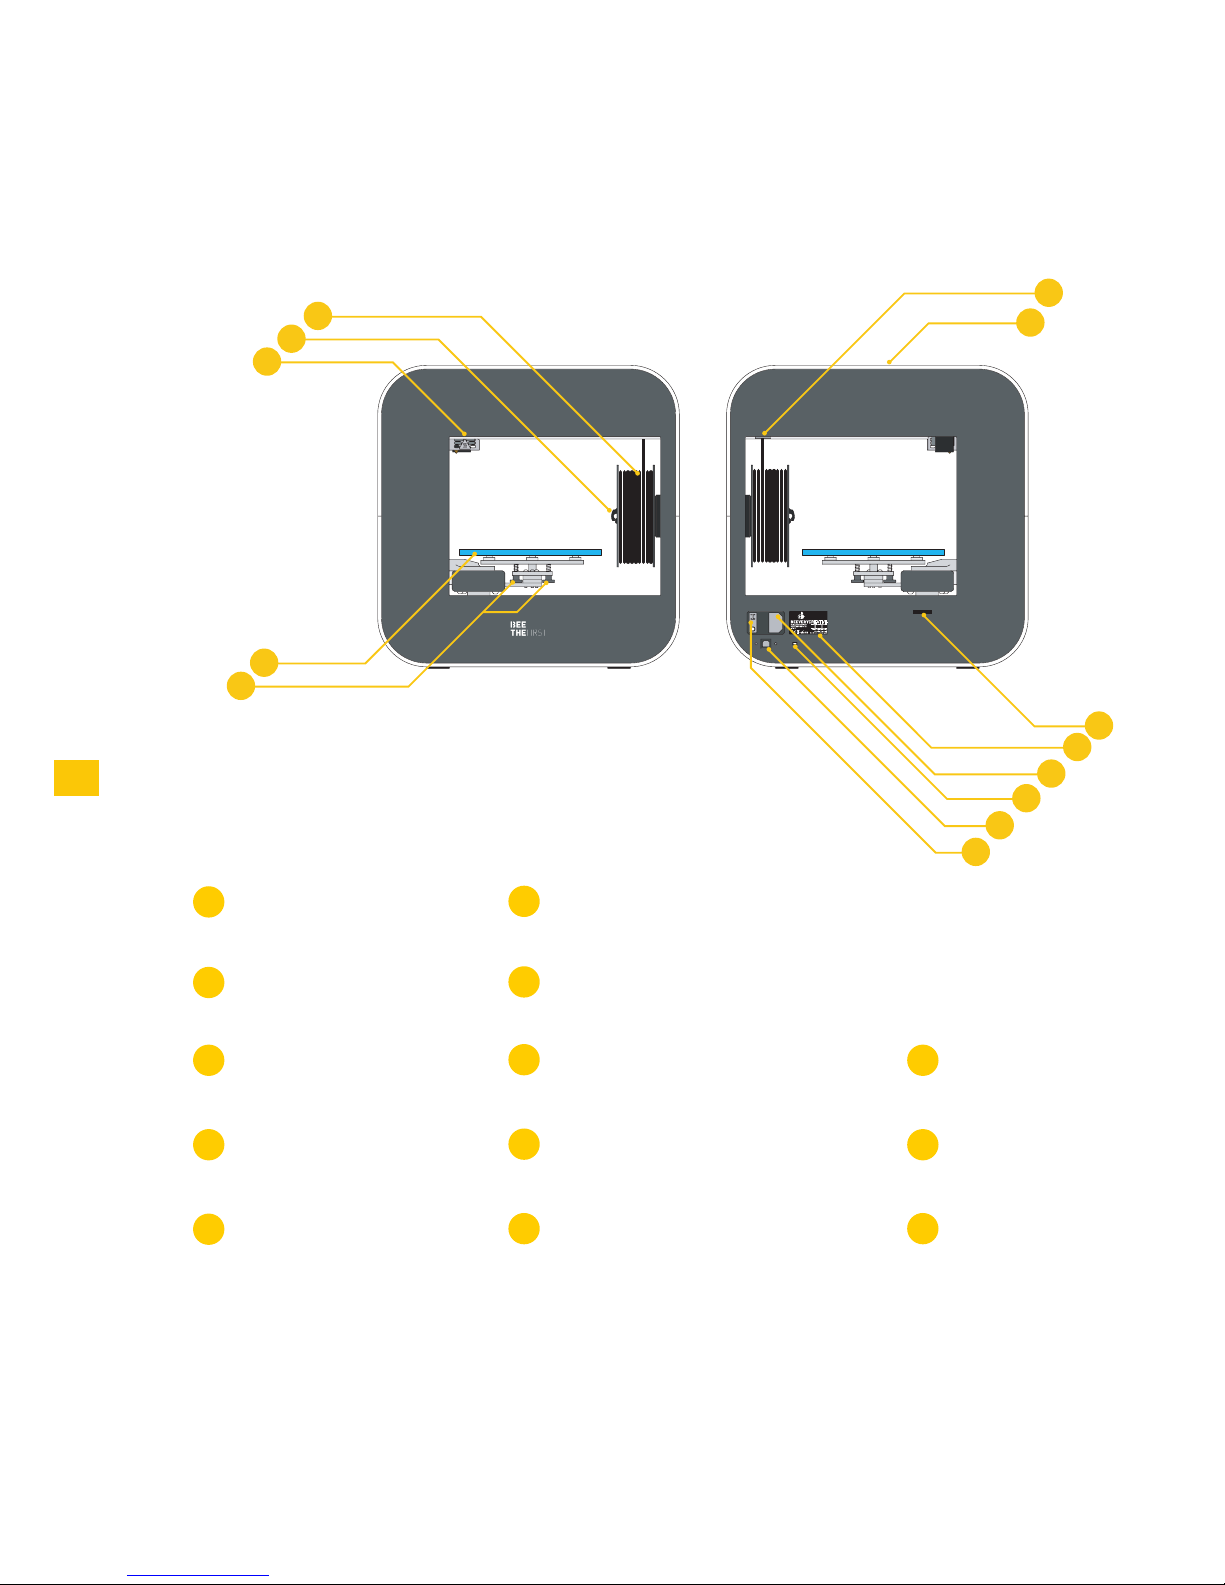
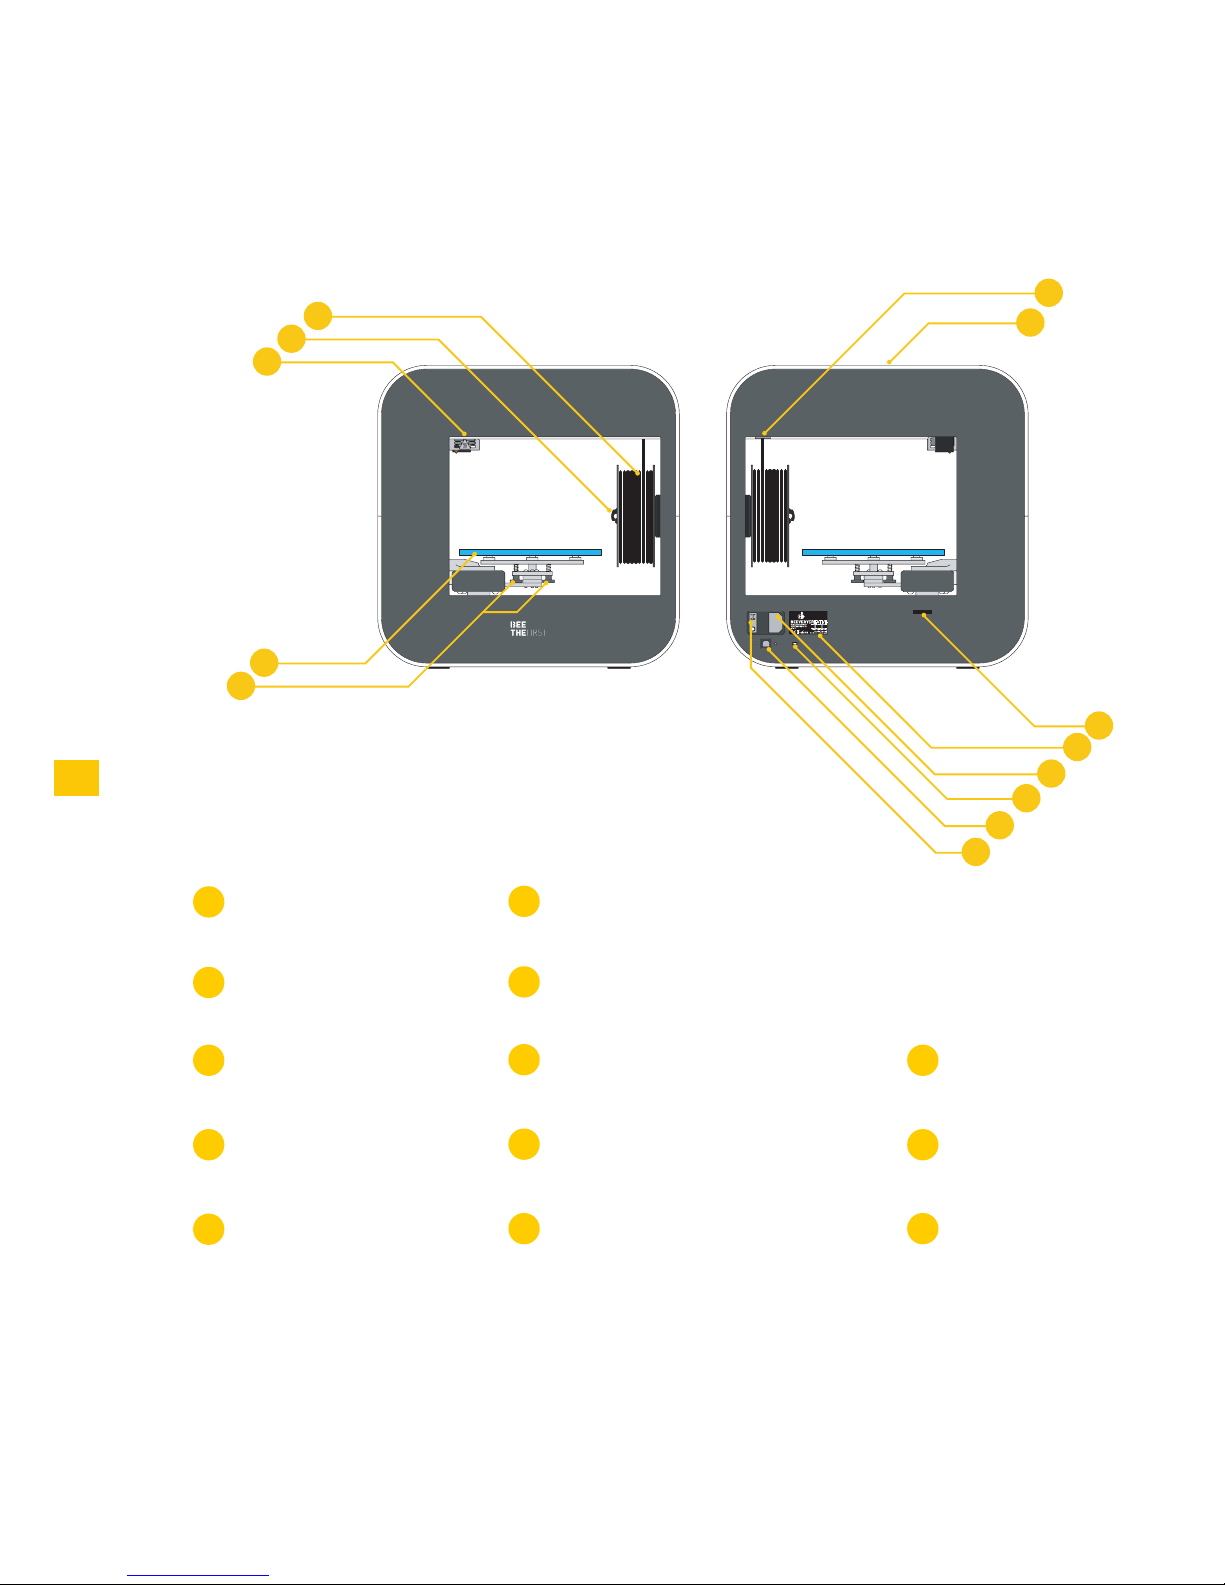
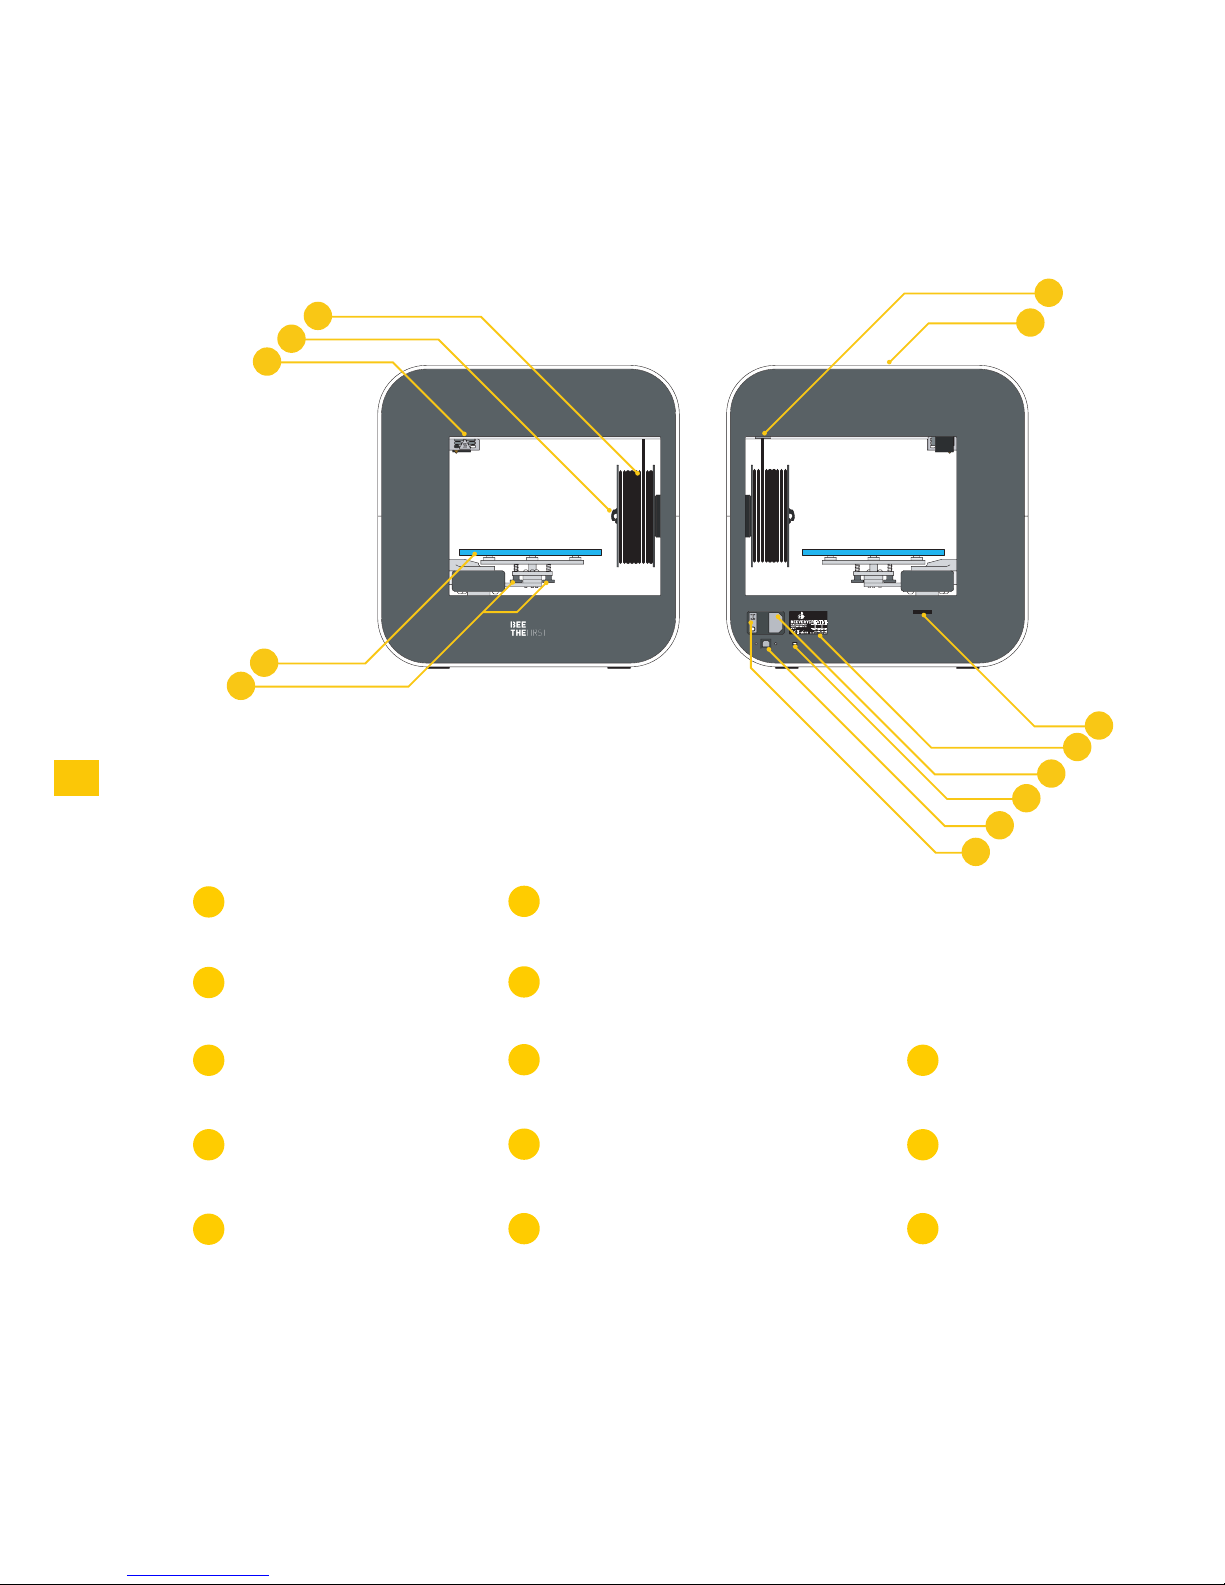
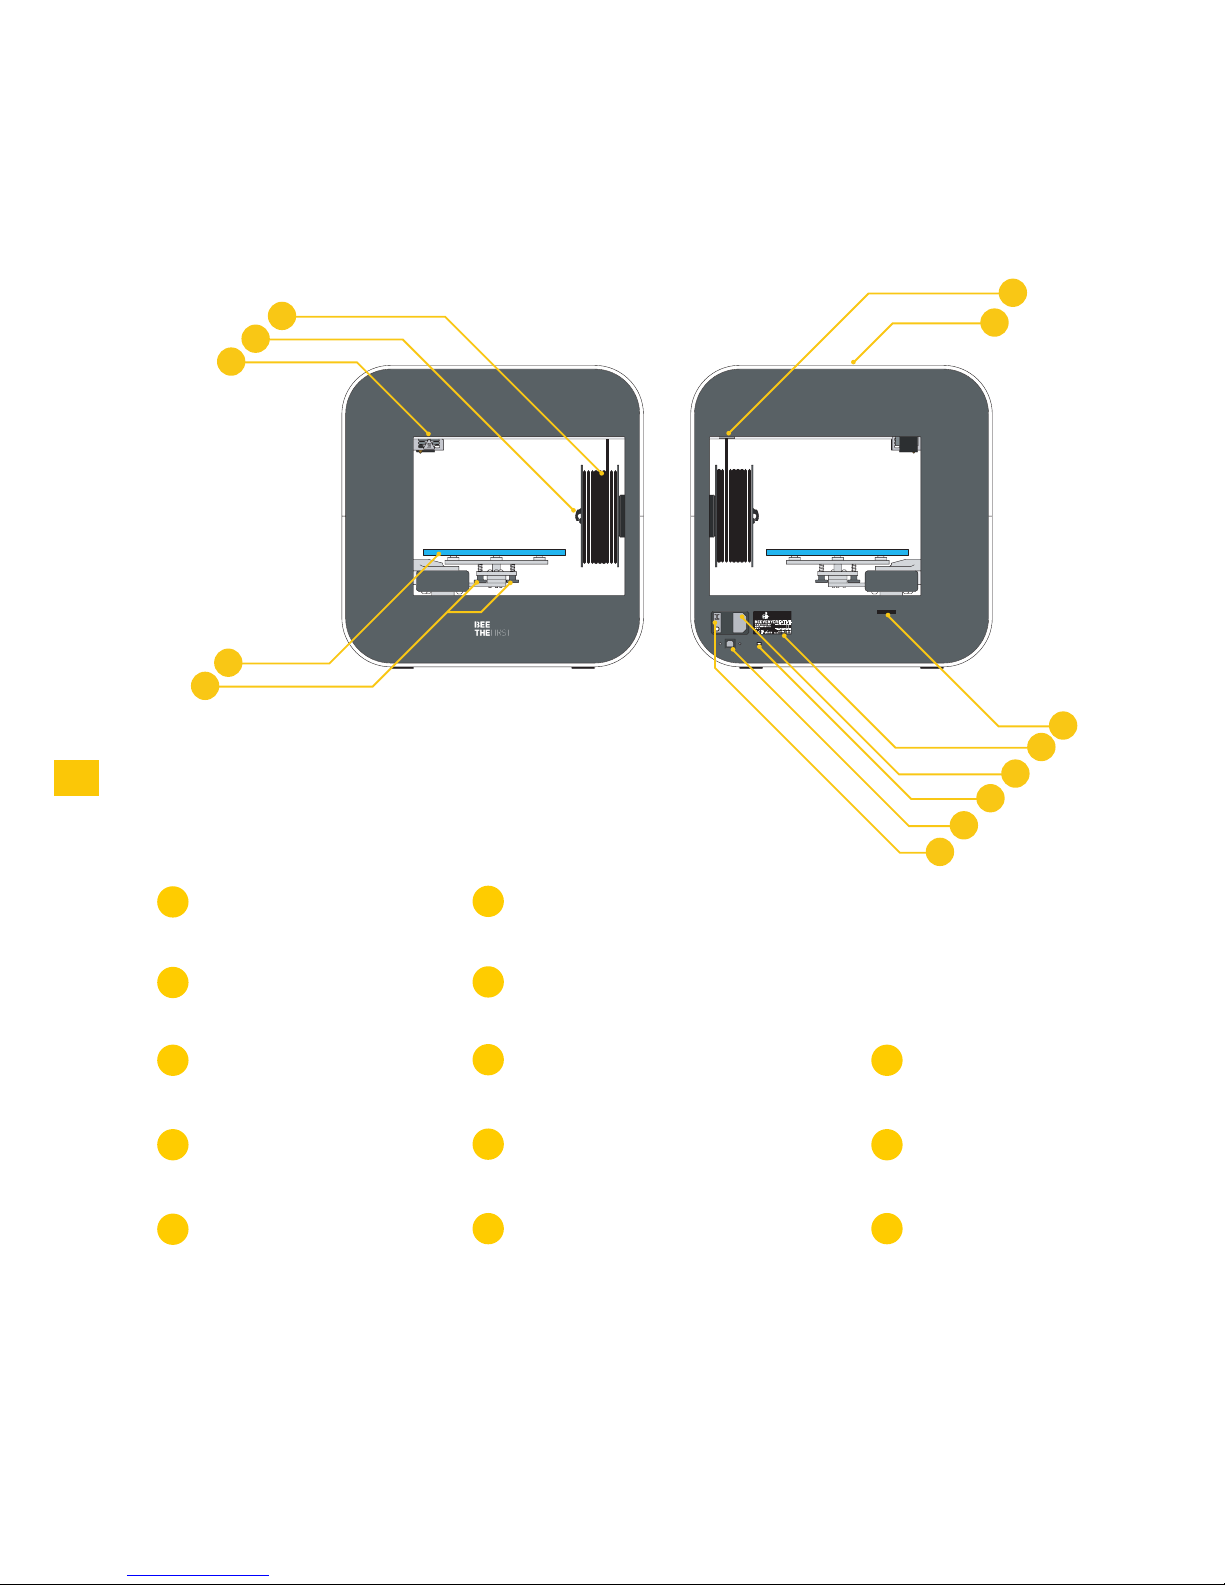
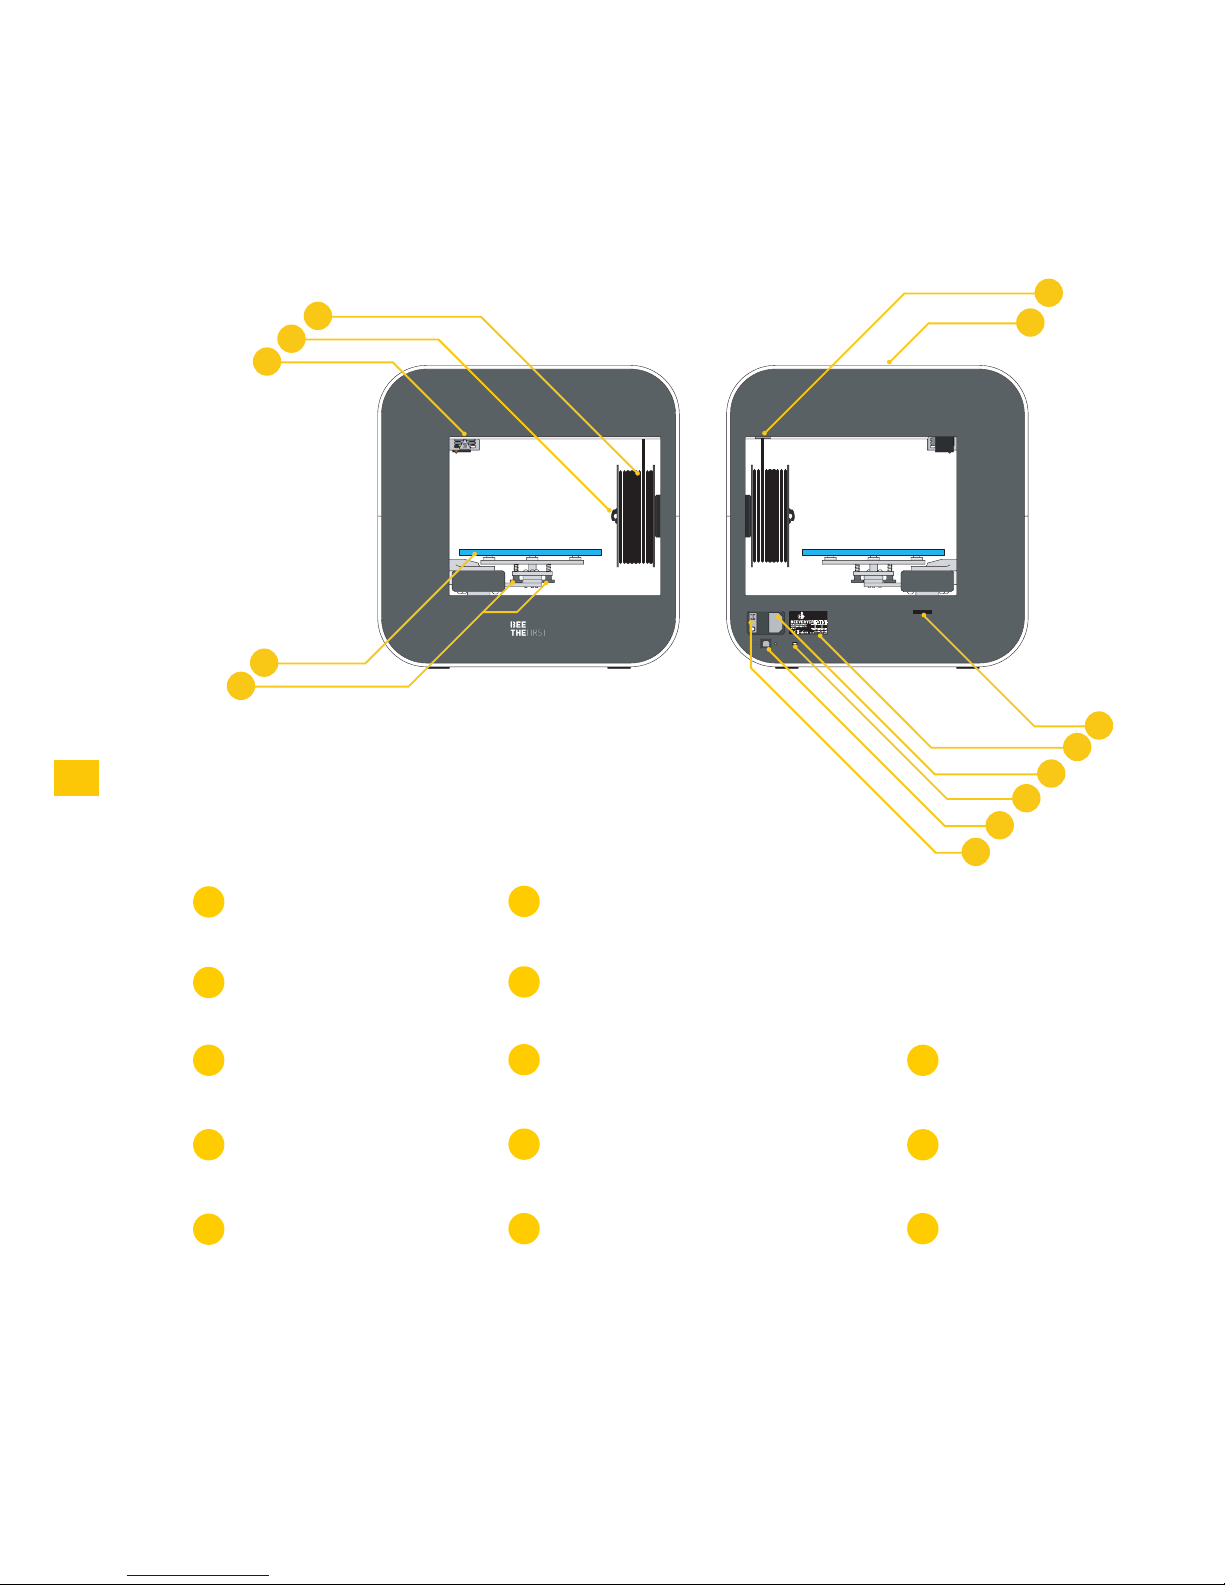
BEETHEFIRST DIAGRAM
Filament spool Filament entry
USB port
Spool holder
Extruder nozzle
Printing table
Calibration screws
6
7
8
9
10
Transport handle
Port for bootloader upgrade
Label with serial number
Power socket
ON/OFF switch
Cable Lock
Page 15

15
INSTALLING BEESOFT
1. Before you begin, make sure your computer has a working internet connection
and that it’s connected to an electrical socket or has enough charge left in its
battery.
2. Next, log on to www.beeverycreative.com and download the most recent version of BEESOFT for your particular operating system.
3. After BEESOFT has finished downloading, go to the download folder and run
the installation file.
4. Follow the installation instructions to the end, selecting the desired options.
5. Run BEESOFT by clicking on the shortcut on your Desktop or Applications
menu.
After installing BEESOFT, follow the steps in the maintenance wizard to calibrate
your BEETHEFIRST.
Page 16
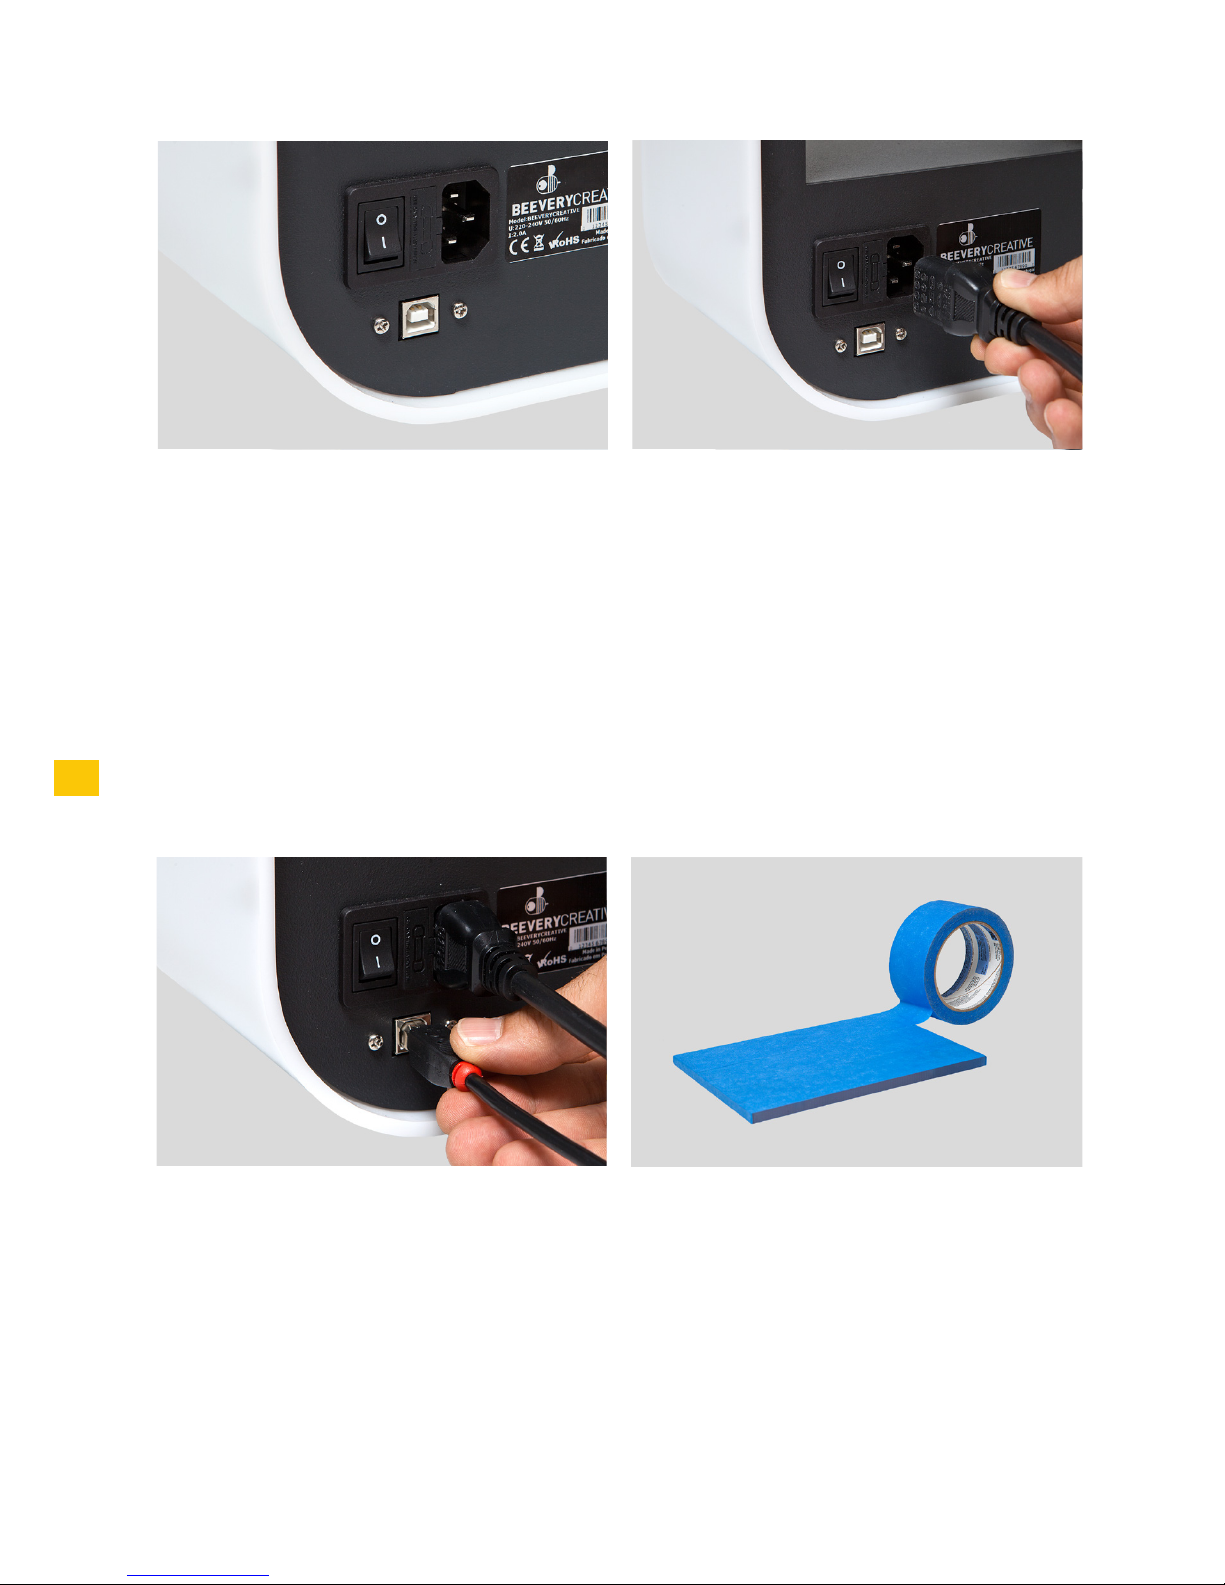
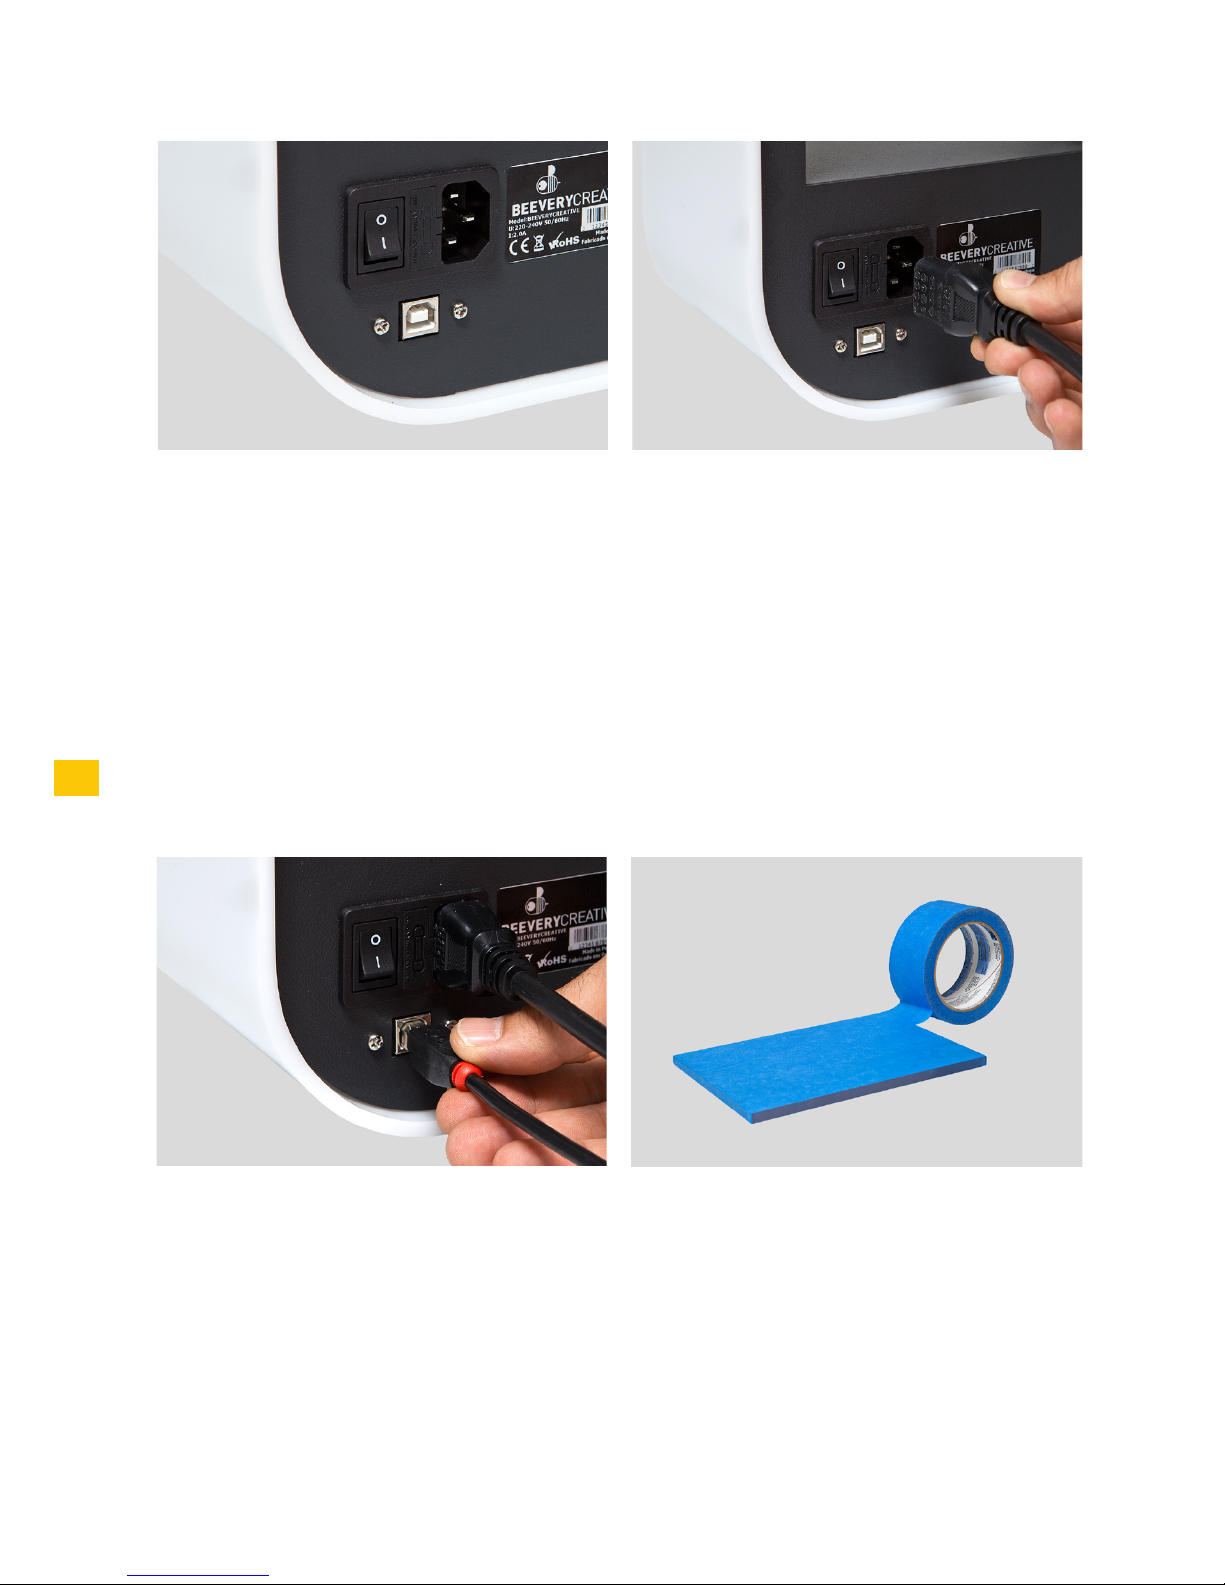
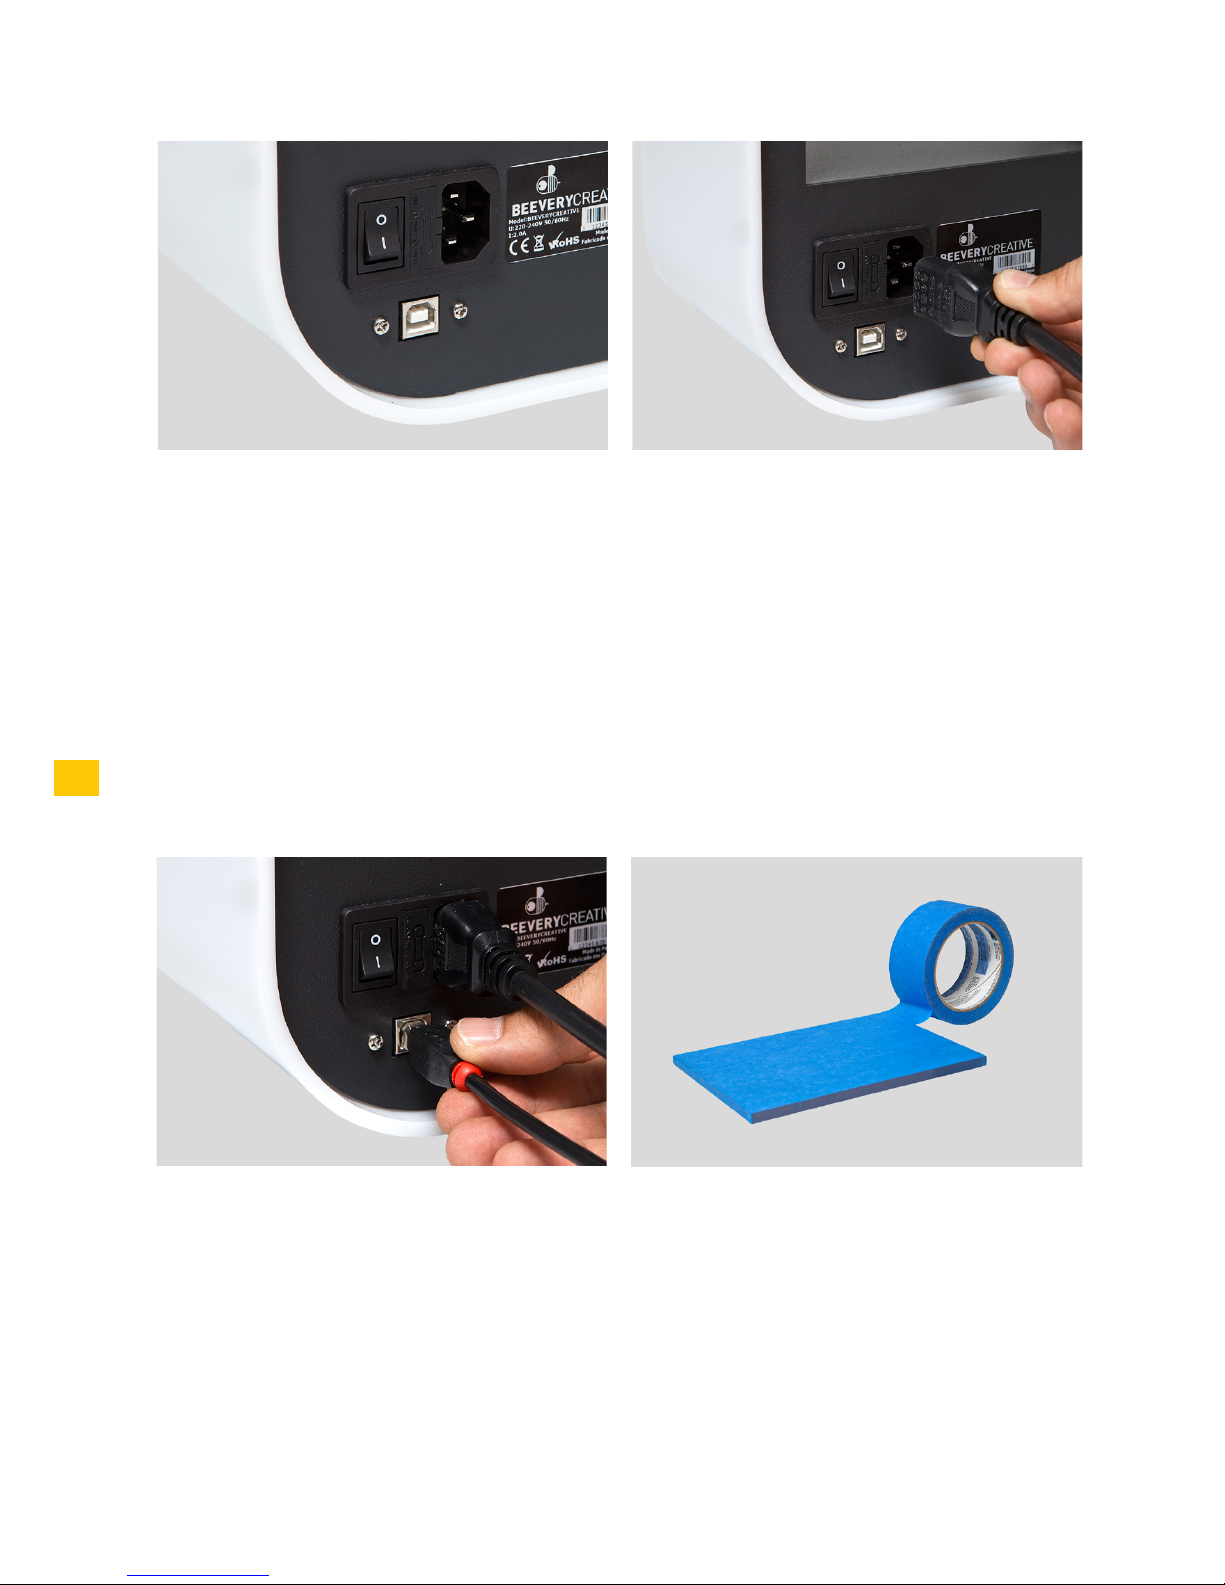
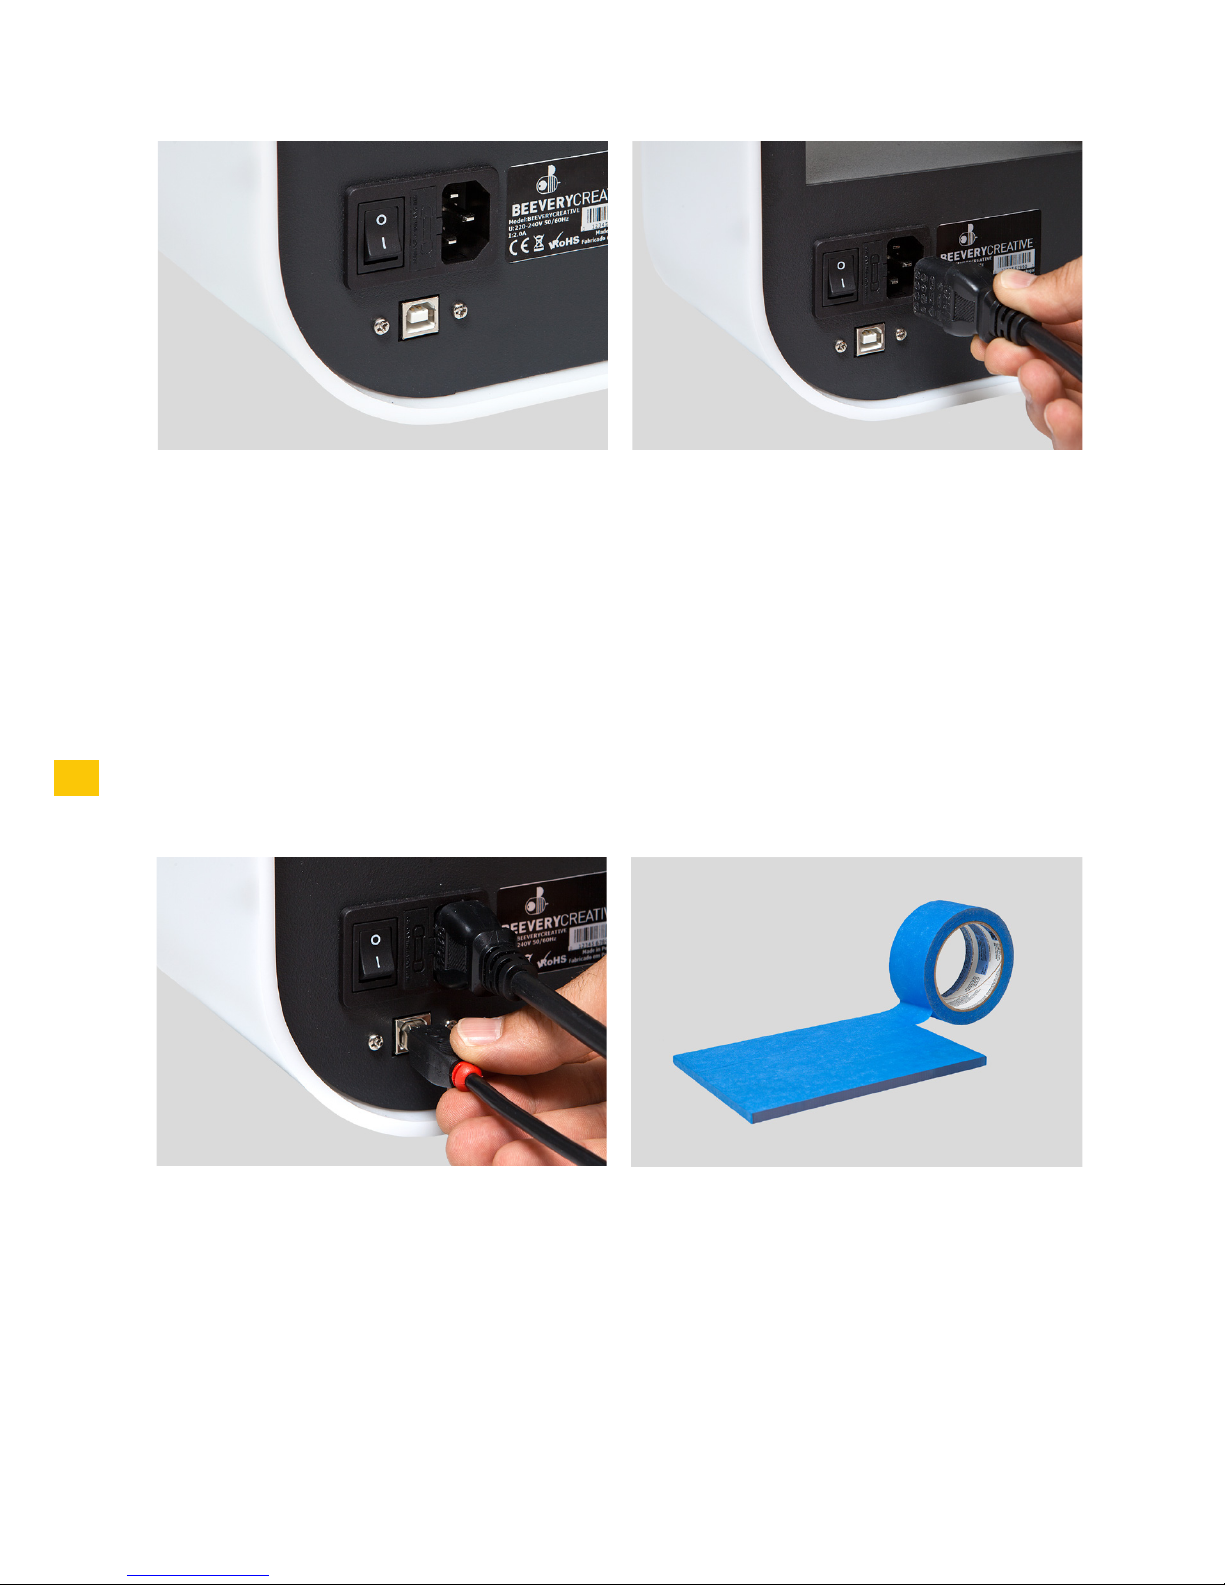
1. Make sure you’ve removed all the printer’s packaging material and check if the main
switch is in the “off” position.
2. Attach the power cable, connecting it first to BEETHEFIRST and then to an electrical
socket.
3. Connect the USB cable to BEETHEFIRST and to the computer.
4. Place one, and only one, layer of blue tape on the printer table, carefully to avoid any
overlapping.
1
2
3
4
16
Page 17
17
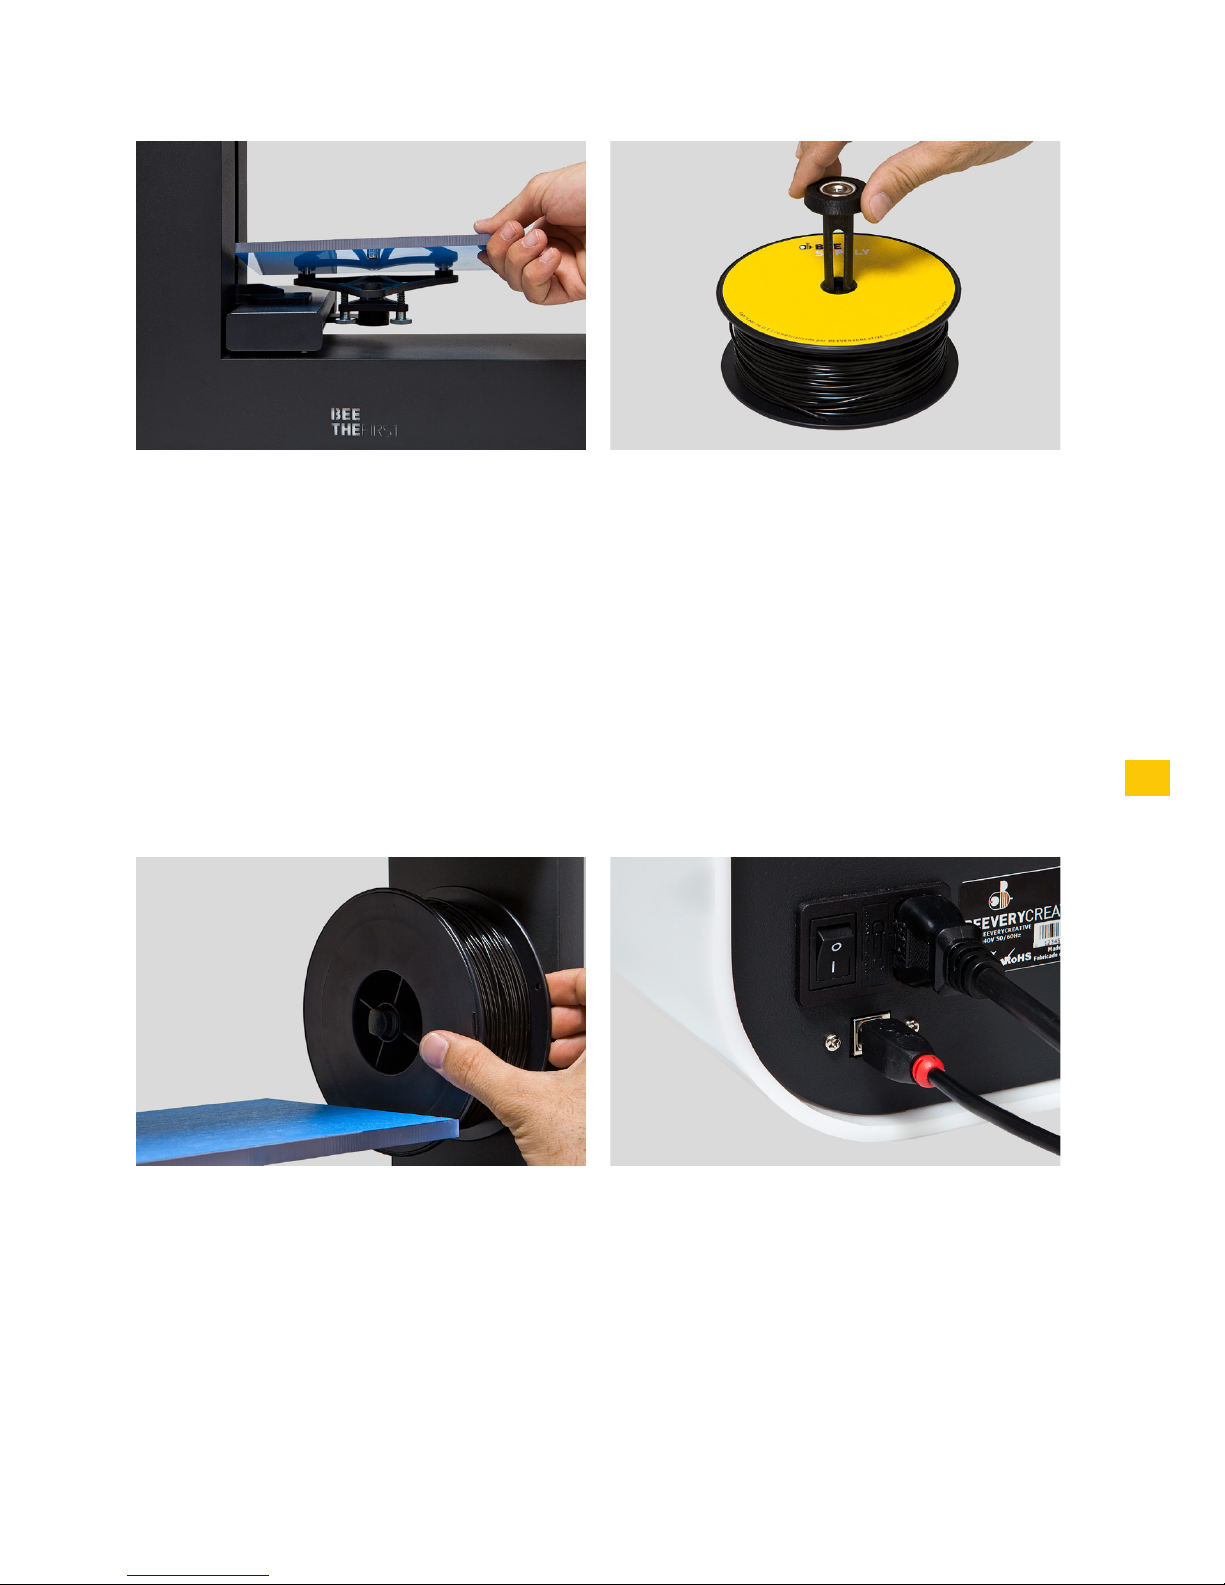
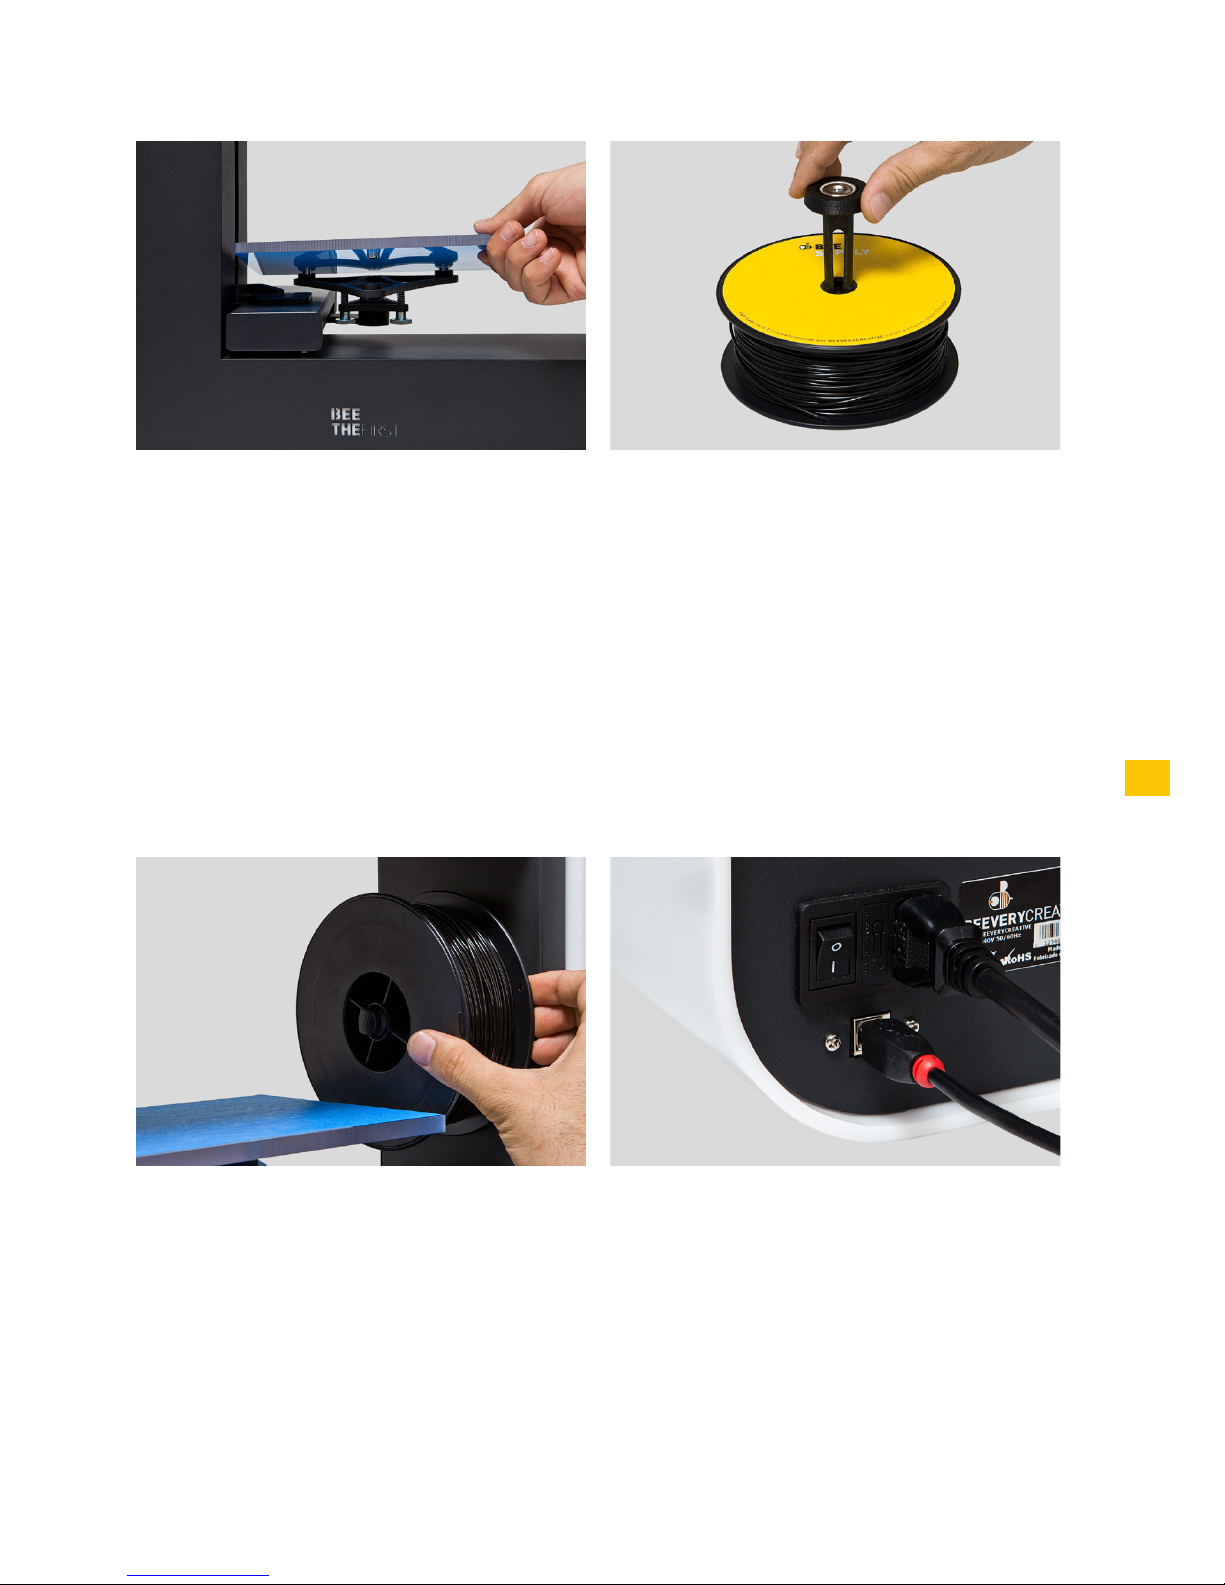
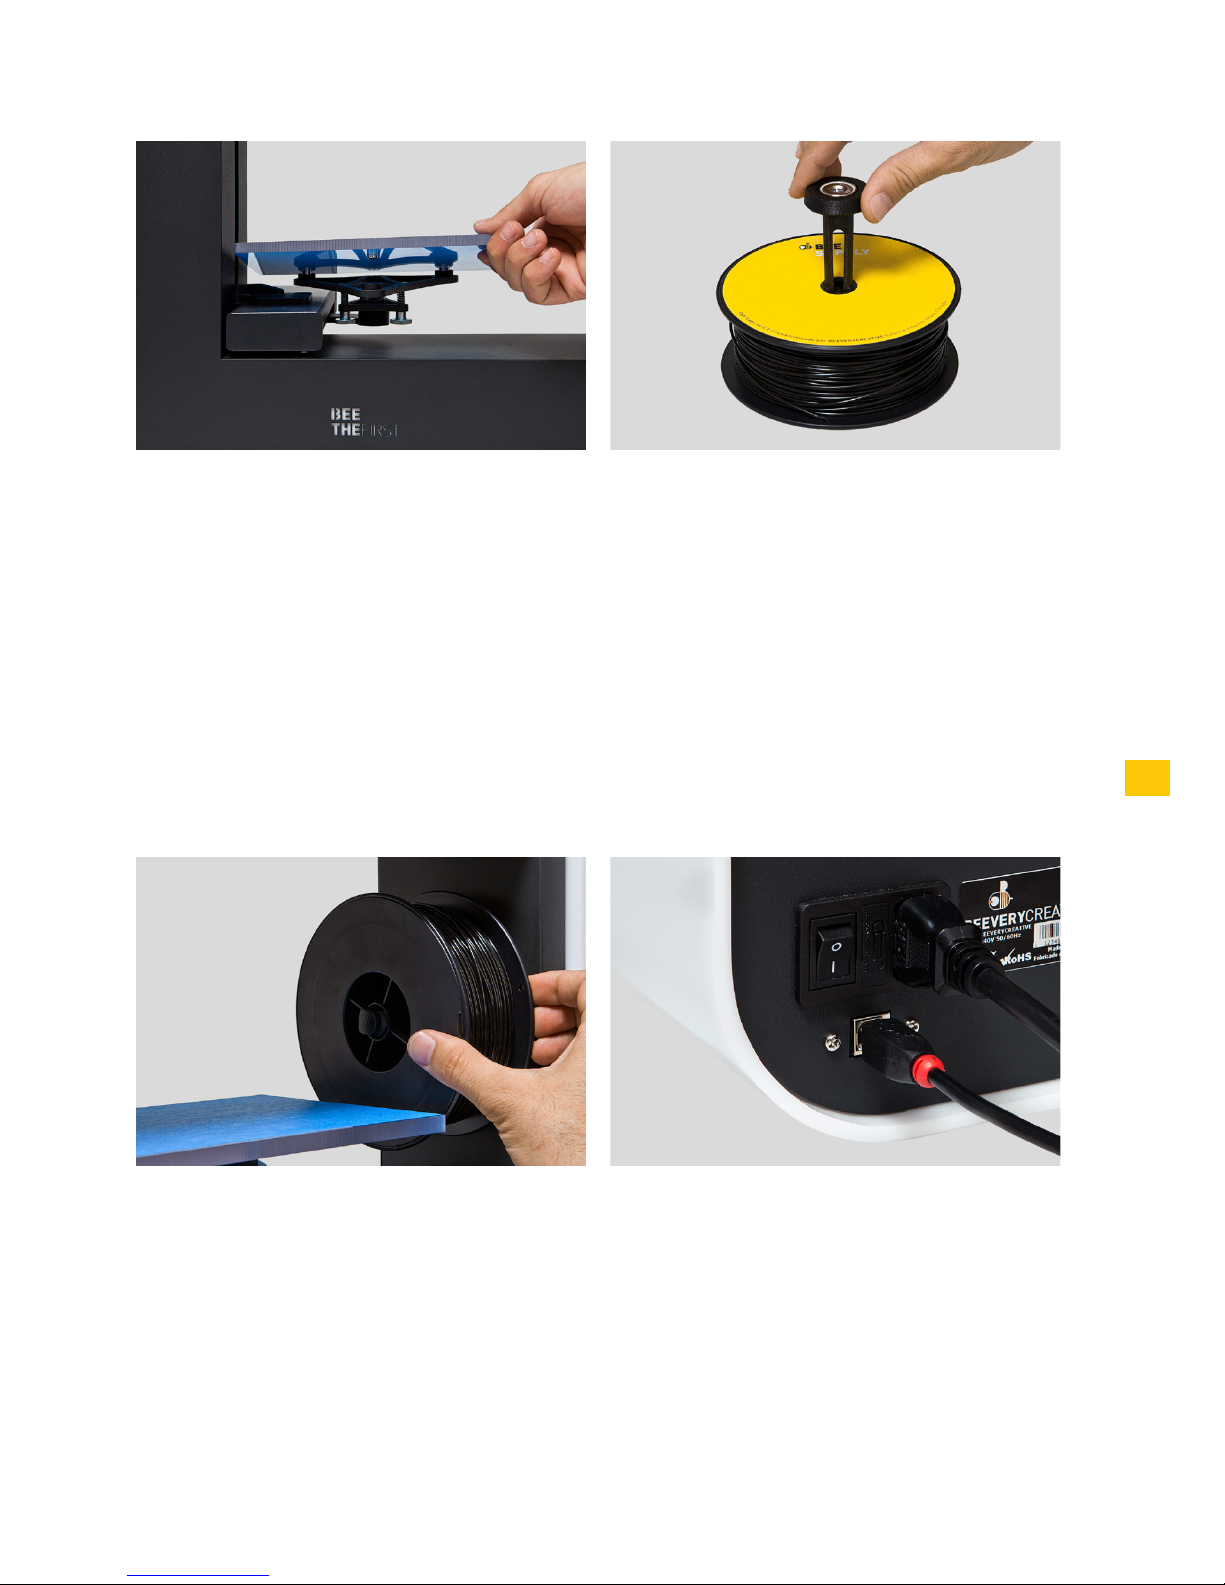
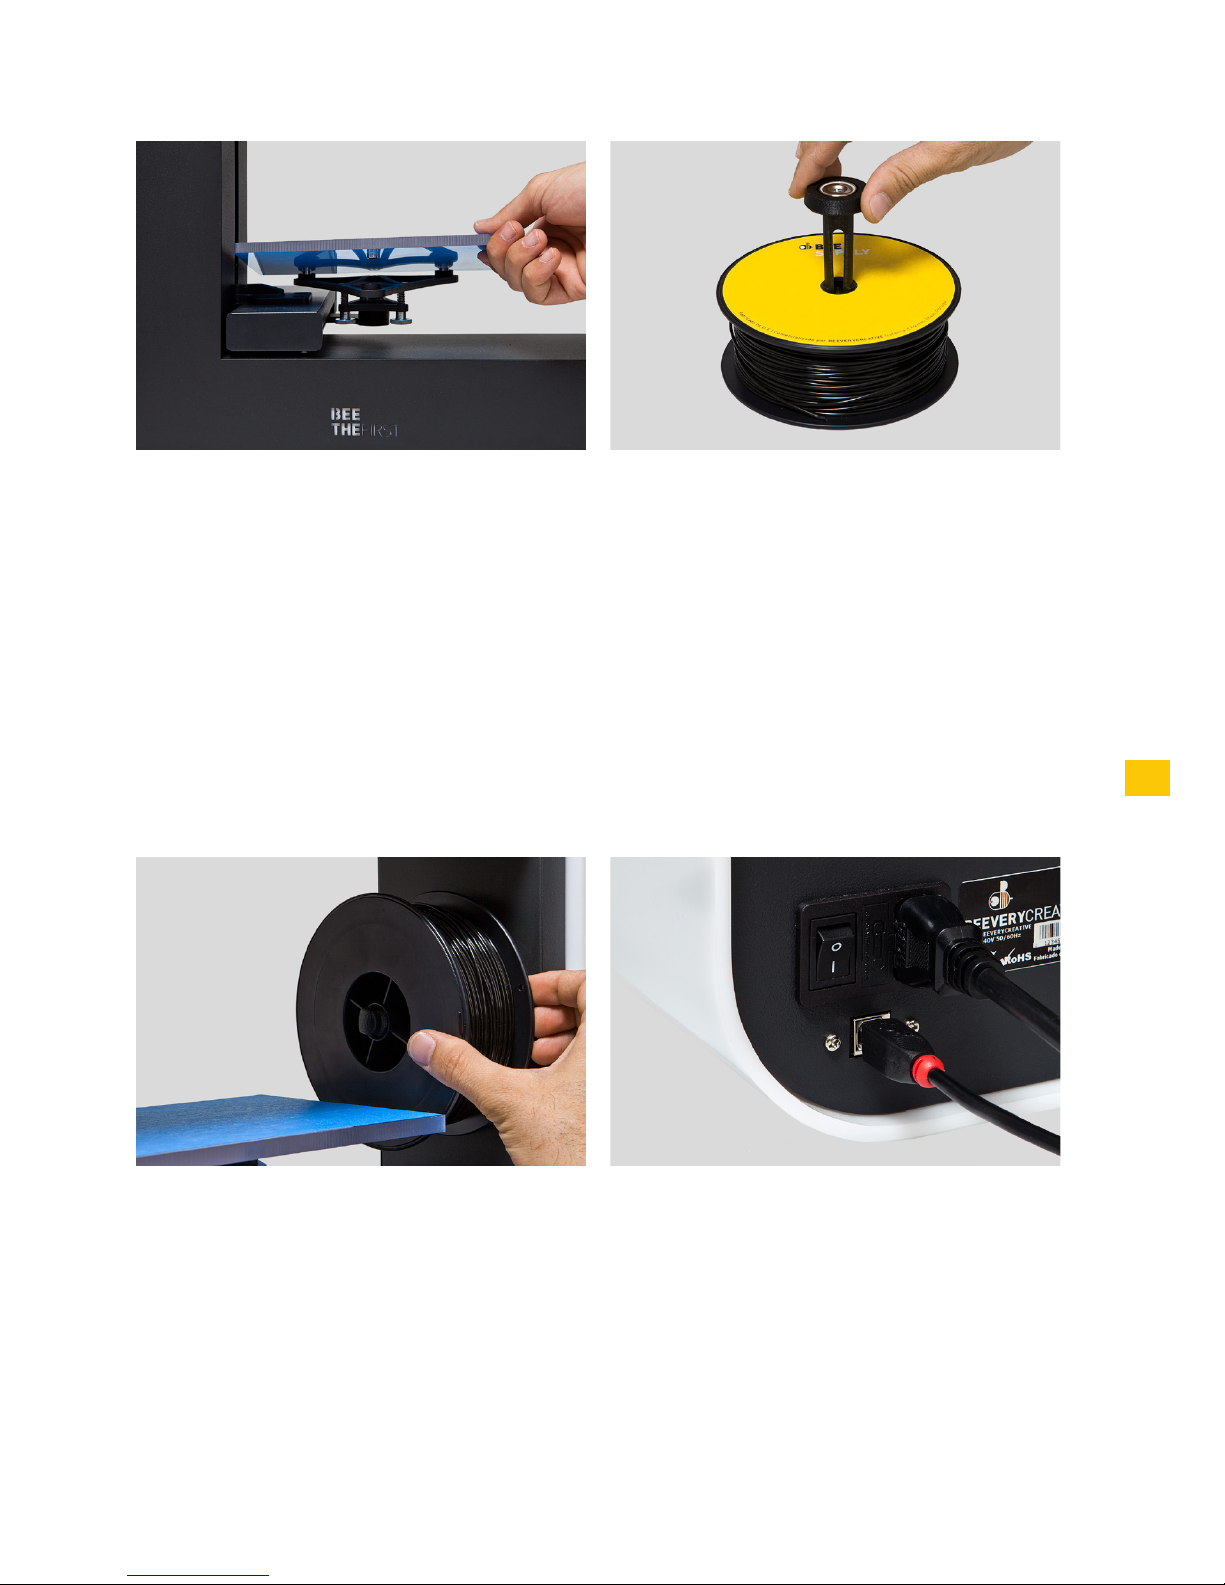
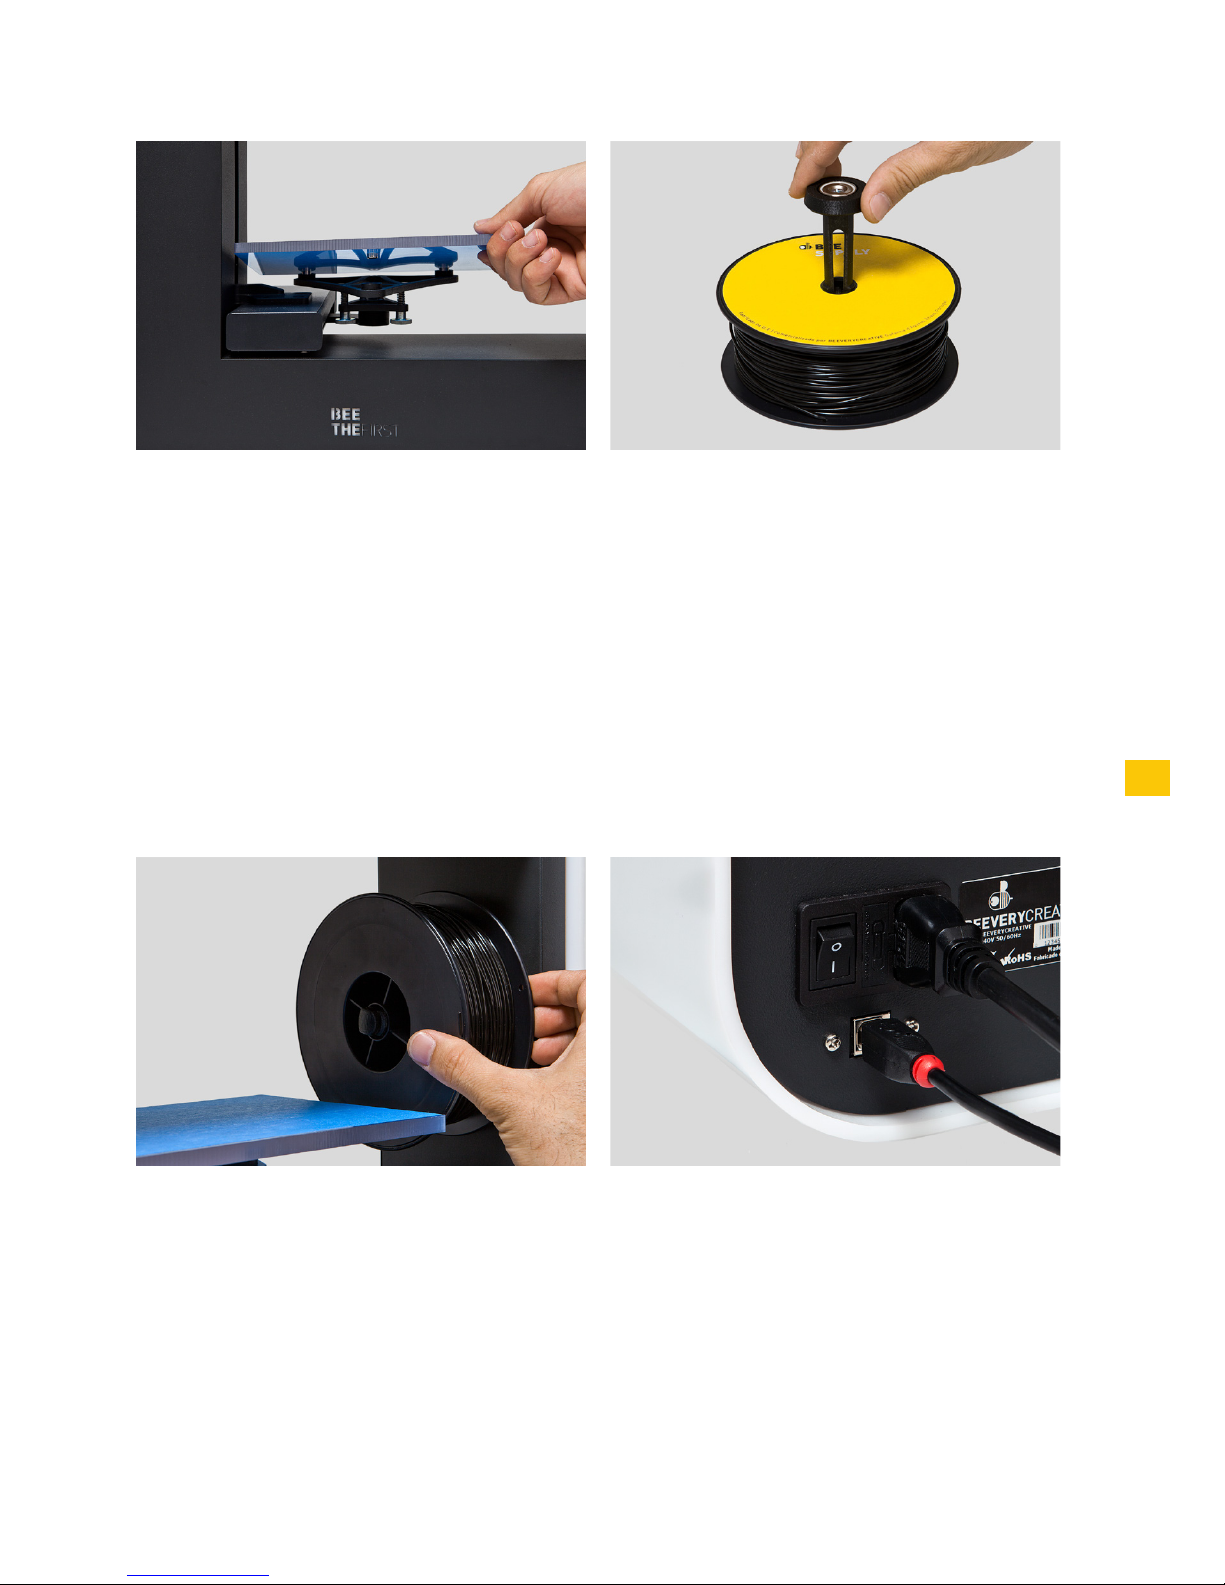
7. Place assembled items (spool + spool holder) in BEETHEFIRST.
8. Flip the main switch to the “on” position.
5 6
7 8
5. Place the printer table on the magnetic supports
6. Place the spool holder inside the spool. Make sure to keep the filament wound tight,
because any looseness might cause kinks or knots to appear in the filament, which
makes printing impossible.
Page 18

18
HOW TO PRINT
1. Make sure the blue tape is in an acceptable condition. If it’s damaged, it should be
replaced as described in point 4 of ‘Installing BEETHEFIRST’.
2. Make sure that no objects or filament debris are on the printer table.
3. Import the 3D model you wish to print. You can find a range of 3D models online, or
you can create your own 3D model by using modelling software (not included).
4. Make sure you’ve followed the steps laid out in BEESOFT’s printer calibration wizard.
5. Click on the “Import Model” button in BEESOFT and select the file you imported.
6. Click on the “Print” button and select the desired printing options.
7. BEESOFT will prepare the selected file for printing (a process called “slicing”), which
may take a few minutes. Once it’s ready, the printing process will begin.
Page 19
19
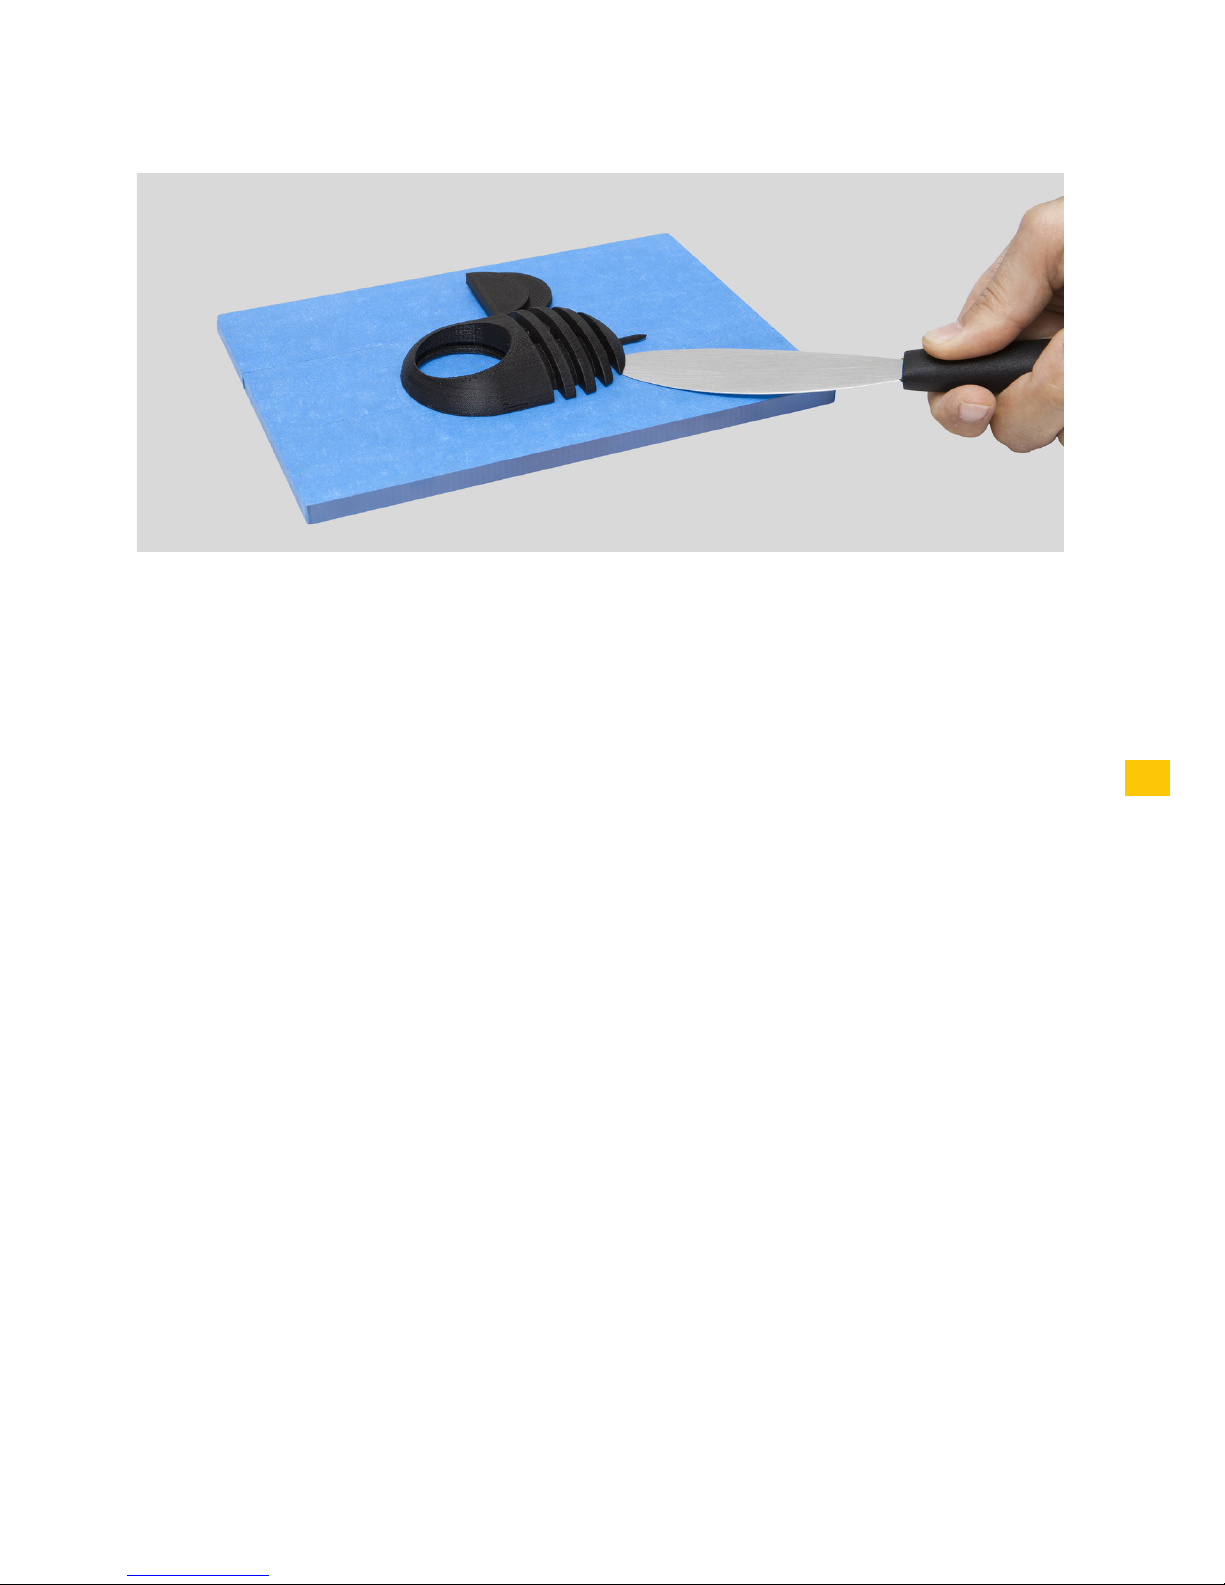
AFTER PRINTING
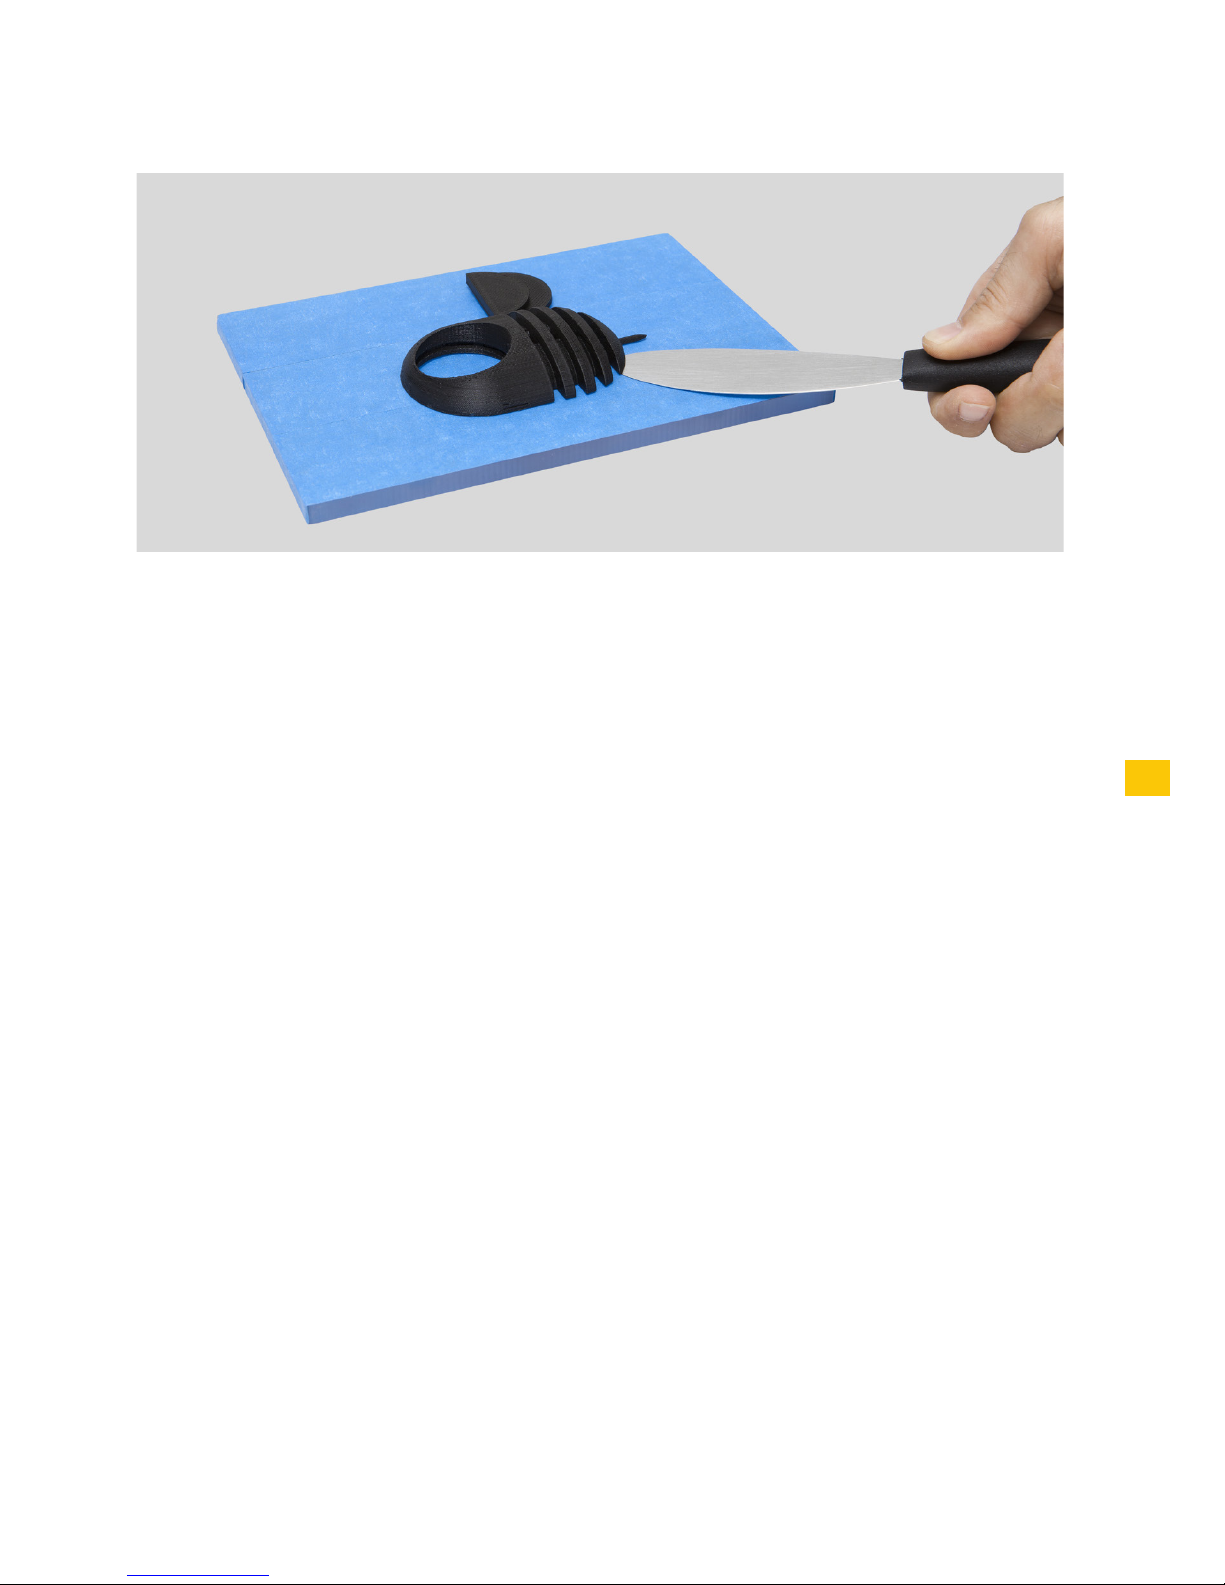
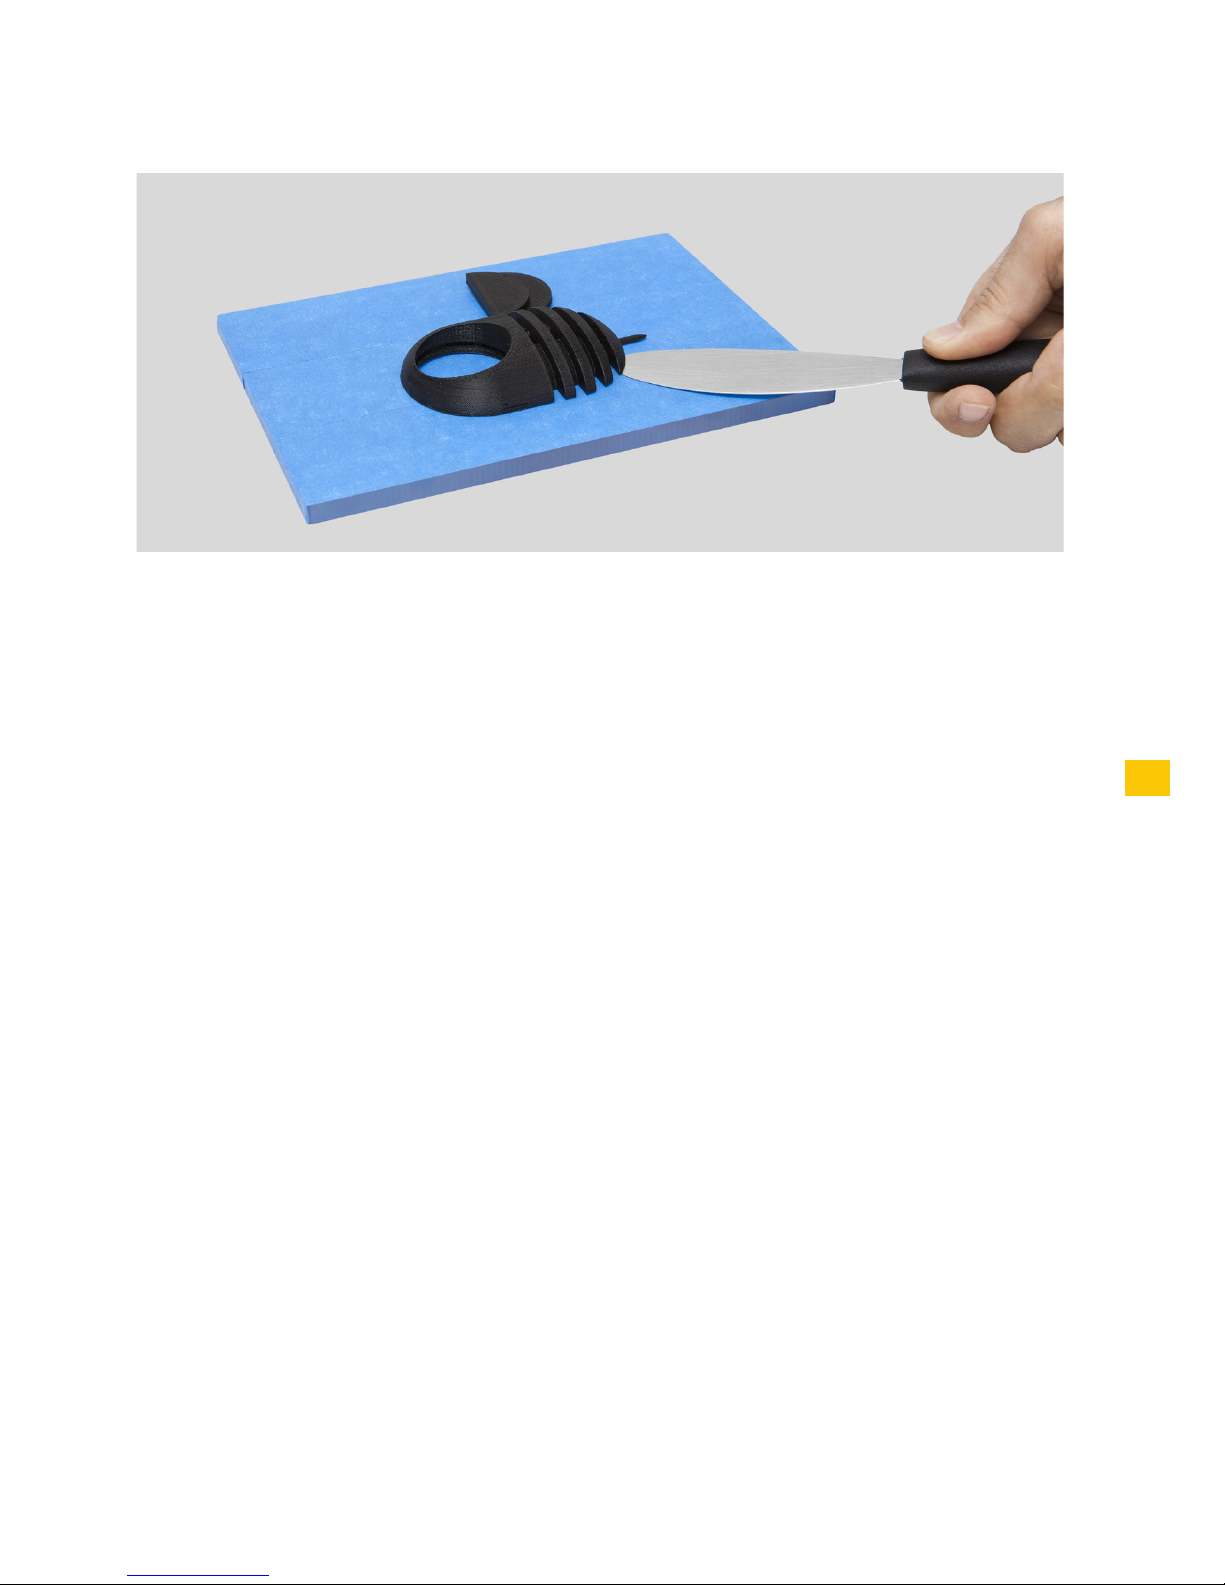
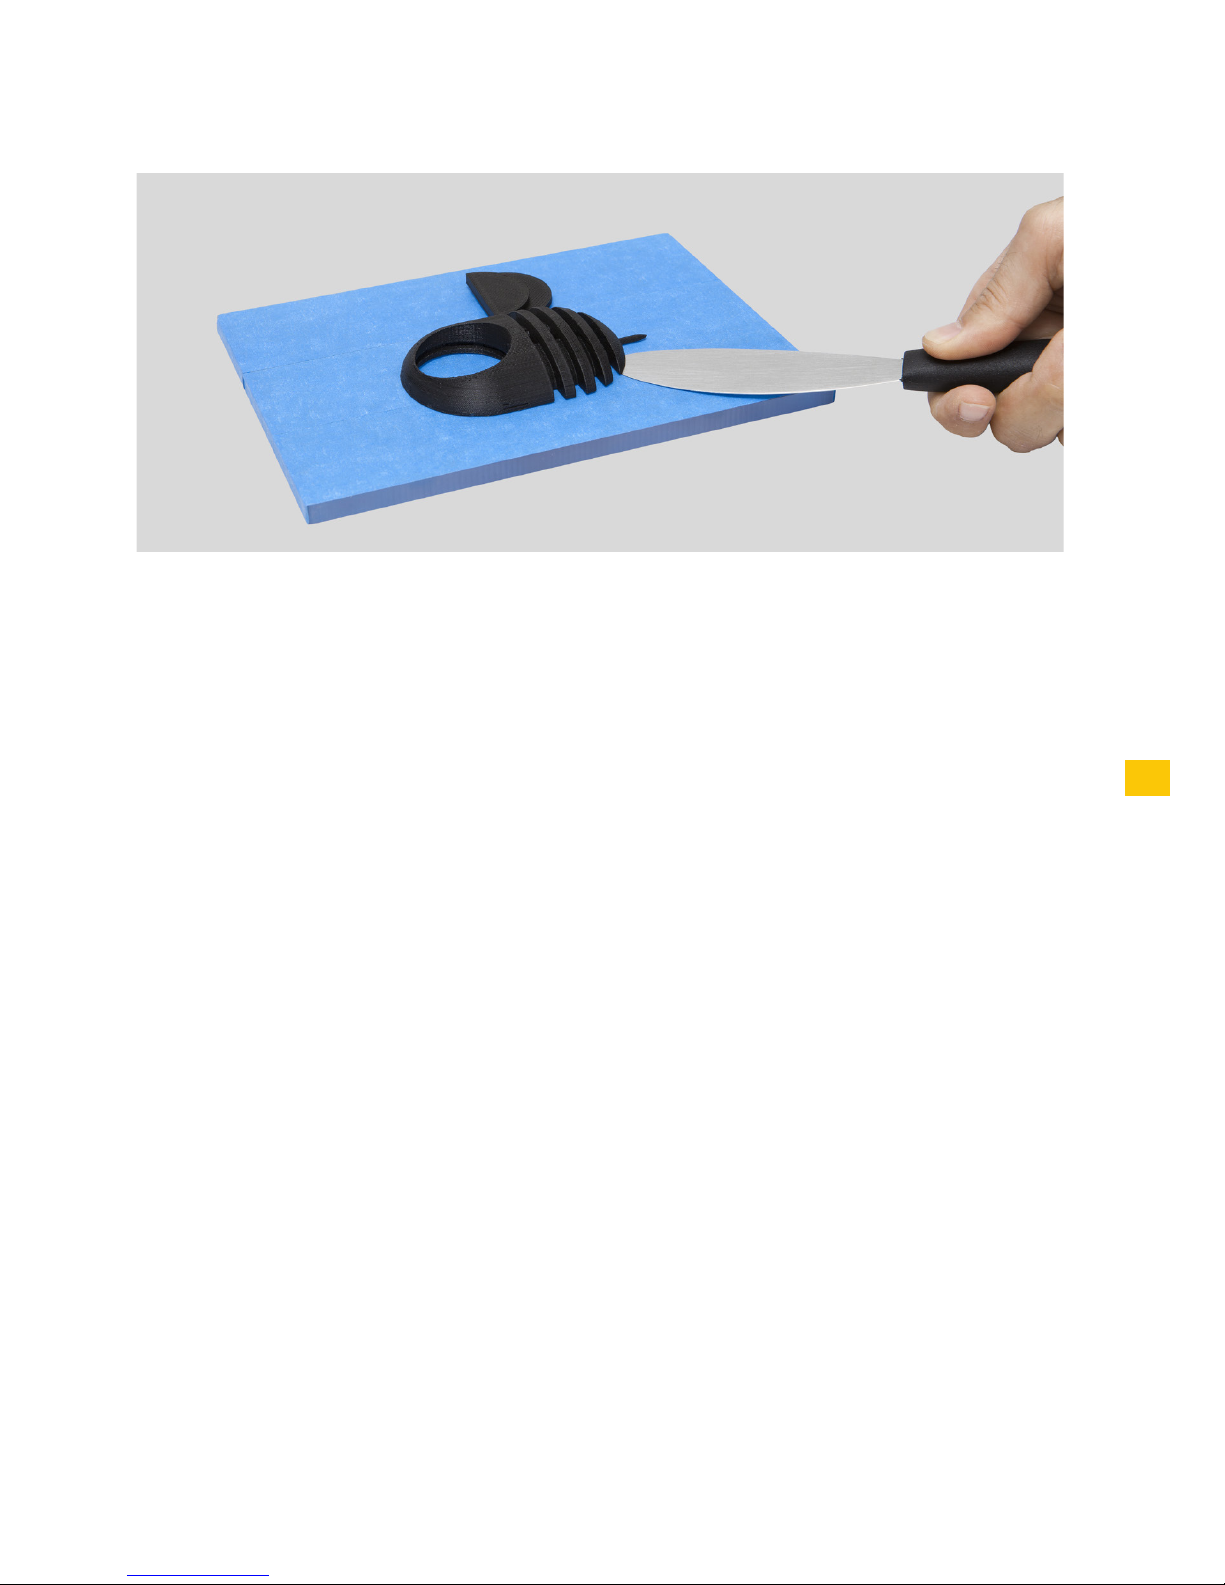
After your print is over, you have to remove the object from the table. Try to do it first gently by hand without damaging it. If you are not able to do it, use the spatula parallel to the
table. If none of these techniques work, remove the blue tape. Don’t forget to replace the
blue tape before printing again.
To fully disconnect your BEETHEFIRST, you should always unplug it from the electrical
socket.
TROUBLESHOOTING
We recommend you read our FAQ and Troubleshooting pages available on the website
www.beeverycreative.com. If you can’t find the solution to a given problem, please contact
our Customer Service Team by using the form available on our website.
Page 20

3. TECHNICAL SPECIFICATIONS
Page 21

21
Layer resolution 50 | 100 | 200 | 300 microns
Print technology FFF
Printing material PLA (ø1.75mm)
Max. Build Volume 190 x 135 x 125mm (7.48 x 5.32 x 4.92 in)
HEATED BUILD PLATE Not necessary for PLA technology
Nozzle diameter 0.4mm
structure Materials High-quality powder-coated steel frame
White acrylic casing with glossy finish
High-grade steel linear guides
Removable polycarbonate build plate
printer Size
(w/ & w/o spool) 400 x 140 x 400mm (15.75 x 5.51 x 15.75 in)
Weight 9.5kg (21 lb)
Ambient Operating Temperature 15-30ºC (59º - 86º F)
Storage Temperature 0-30ºC (32º - 86º F)
AC Input 100-120VAC | 3.0A | 50-60 Hz
200-240VAC | 2.0A | 50-60Hz
Power Consumption Low (Approx. 90W)
Certifications CE | GS | UL | ISTA (1A)
Connectivity USB
Included accessories BEEPACK Transport case | Spool of black filament
Roll of blue tape | Region-specific power cable | USB cable
Spatula | Tweezers | Hex key
Supported OS Windows (7+)
Linux (12.04+)
Mac OS X (10.8 | 10.9+)
Supported File Types .stl
Calibration 3-point semi-automatic with software support
Hardware requirements for PC Core i3 | AMD Phenom II | AMD Athlon
2GB RAM
500MB free disk space
512 MB dedicated graphics card (GPU)
Hardware requirements for Mac late 2008+
Page 22

Page 23

GUIA RÁPIDO
PARA UTILIZAÇÃO DA
BEETHEFIRST
PORTUGUÊS
Page 24

24
Estado da arte da tecnologia 3D desktop
Ainda que a verdadeira limitação seja a tua criatividade, a actual tecnologia de
impressão 3D tem também ainda algumas limitações, que podem ser
consultadas no documento Directrizes de Impressão 3D.
(https://www.beeverycreative.com/modelling-guidelines/)
A questão mais relevante para a qualidade das tuas impressões é a calibração da
BEETHEFIRST.
A adequada calibração é essencial para o desempenho e resultado pretendidos,
podendo uma calibração deficiente impedir a impressão do objecto que
pretendes.
A impressão em alta resolução requer uma calibração ainda mais rigorosa.
Por essa razão, aconselhamos-te a imprimir em baixa resolução enquanto não
fores um utilizador experiente.
A impressão em baixa resolução é também recomendada sempre que a
resolução do objecto não seja um factor relevante, visto que é mais ecológica,
mais rápida e mais económica.
Page 25

38
ESPECIFICAÇÕES TÉCNICAS
28
DESEMBALAR E INSTALAR A BEETHEFIRST
26
INFORMAÇÕES DE SEGURANÇA
ÍNDICE
Page 26

1. INFORMAÇÕES DE
SEGURANÇA
Page 27

27
1. INFORMAÇÕES DE SEGURANÇA
Apesar da impressora BEETHEFIRST ser um equipamento seguro, recordamos
que ela foi desenvolvida para ser utilizada por adultos, mesmo assim, existem
alguns perigos para os quais te queremos alertar:
1 - Supervisão de adultos: porque nunca é demais referir, a BEETHEFIRST foi
desenvolvida para ser utilizada por adultos. Caso queiras que crianças a usem,
será necessário que os acompanhes. Deverás ter o mesmo cuidado com os
objectos impressos mais pequenos, pois as crianças poderão tentar engoli-los,
correndo o risco de sufocar.
2 - Extrusor: durante o funcionamento da BEETHEFIRST a temperatura do bico
do extrusor pode chegar aos 250º C, o que provocará uma queimadura grave se
lhe tocares. Por essa razão, apesar de estar protegido, deves ter sempre cuidado
para não tocar no extrusor.
3 - Partes em movimento: durante o funcionamento a BEETHEFIRST terá partes
em movimento. Por essa razão, deverás manter uma distância de segurança da
impressora enquanto esta opera.
4 - Filamento: a BEETHEFIRST foi desenvolvida e testada para funcionamento
com o filamento disponível no portal da BEEVERYCREATIVE. A utilização de
outros filamentos poderá resultar em impressões de pouca qualidade e danificar
a impressora, sem que a garantia possa ser accionada.
5 - Ambiente fresco e ventilado: a BEETHEFIRST funciona melhor em ambientes frescos e com alguma ventilação, o que, como com outros equipamentos
eléctricos, é também recomendável para evitar a degradação da qualidade do
ar da zona em que está a impressora.
6 - Integridade da BEETHEFIRST: nunca utilizes a BEETHEFIRST sem ela estar
completa. A utilização sem alguma das peças anula a garantia e pode ser
perigosa. Pelas mesmas razões, não derrames líquidos sobre a impressora.
7 - Alterações à BEETHEFIRST: caso faças alguma alteração à BEETHEFIRST
a garantia deixará de ser válida. Caso, ainda assim, o queiras fazer, entra em
contacto connosco, explica-nos o teu projecto e poderemos enviar-te informação
útil.
Page 28

2. DESEMBALAR E INSTALAR
BEETHEFIRST
Page 29
29
1. Abre a caixa e retira as espumas de protecção da impressora.
2. Abre o saco de plástico puxando a etiqueta, conforme a ilustração colada no
exterior do saco.
3. Tira a impressora pela pega, NÃO pela embalagem de espuma, pois assim
podes danificá-la. A pega sai ao carregar de um lado, e levantar do outro.
Page 30
30
4. Tira o material de embalagem conforme numeração indicada na impressora.
5. Após a desembalagem, utiliza a pega superior para transportares a
BEETHEFIRST. Para deslocações mais longas, recomendamos-te que utilizes o
BEEPACK.
Page 31
31
6. Verifica se a caixa contém os seguintes artigos:
1 BEETHEFIRST
1 Mesa de Impressão
1 Pinça
1 Espátula
1 Chave sextavada
1 BEEPACK
1 Fita azul
1 Cabo de alimentação
1 Cabo de ligação USB
1 Bobine de filamento
1 Suporte de bobine
Page 32
11
12
13
9
10
13
11
12
8
5
4
3
2
1
7
6
32
1
2
3
4
5
DIAGRAMA DA BEETHEFIRST
Bobine de filamento Entrada de filamento
Porta USB
Suporte de bobine
Bico do extrusor
Mesa de impressão
Parafusos de calibração
6
7
8
9
10
Pega de transporte
Porta para upgrade de
bootloader
Etiqueta com nº de série
Tomada de alimentação
Botão ON/OFF
Cabo anti-roubo
Page 33

33
INSTALAÇÃO DO BEESOFT
1. Antes de começares, confirma que o computador está com acesso à internet
e ligado à corrente eléctrica ou com bateria suficiente.
2. De seguida acede a www.beeverycreative.com e descarrega a versão mais
recente do BEESOFT adequada para o teu sistema operativo.
3. Depois de concluído o download do BEESOFT, acede ao directório de descarga
do instalador e executa o ficheiro de instalação.
4. Segue os passos do instalador até ao fim seleccionando as opções desejadas.
5. Executa o BEESOFT através do ícone localizado no Ambiente de Trabalho ou
nas Aplicações.
Após a instalação do BEESOFT, deverás seguir o assistente de manutenção do
próprio software para calibrares a BEETHEFIRST.
Page 34
1. Confirma se retiraste todo o material usado para embalar a impressora e
verifica se o interruptor na posição “off”.
2. Coloca a ficha de alimentação, ligando primeiro à BEETHEFIRST e
posteriormente à tomada.
3. Liga o cabo USB à BEETHEFIRST e ao computador.
4. Coloca uma, e apenas uma, camada de fita azul na mesa.
1
2
3
4
34
Page 35
35
7. Coloca o conjunto (bobine + suporte) na BEETHEFIRST.
8. Passa o interruptor para “on”.
5 6
7 8
5. Coloca a mesa de impressão na base respectiva.
6. Coloca a bobine no suporte. Tem sempre o cuidado de manter o enrolamento
do filamento sem folgas, pois doutro modo poderá criar nós que bloquearão a
impressão.
Page 36

36
COMO IMPRIMIR
1. Confirma se a mesa tem fita azul em bom estado. Se estiver danificada,
substitui-a, tal como apresentado no ponto 4 da ‘Instalação da BEETHEFIRST’.
2. Confirma que não está nenhum objecto ou restos de filamento na mesa de
impressão.
3. Importa o modelo 3D que pretendes imprimir. Podes encontrar modelos 3D
online ou criar o teu próprio modelo 3D recorrendo a um software de modelação
(não incluído).
4. Confirma que seguiste os passos do assistente do BEESOFT para calibração
da impressora.
5. Clica no botão “Gallery Menu” no BEESOFT e escolhe o ficheiro que
importaste.
6. Clica no botão “Imprimir” e selecciona as opções de impressão desejadas.
7. O BEESOFT vai preparar o ficheiro para impressão (processo denominado
“slicing”), o que poderá demorar alguns minutos. Quando estiver concluído, a
impressão irá iniciar-se.
Page 37
37
APÓS A IMPRESSÃO
Quando a impressão terminar, tens de tirar objecto da mesa de impressão. Tenta
fazê-lo à mão, suavemente, sem o danificar. Se não conseguires, usa a espátula
de forma tangente à mesa e de modo a não danificar a mesa de impressão. Se
nenhum dos métodos anteriores resultar, retira a fita azul para assim remover
o objecto. Não te esqueças de a voltar a colocar antes da próxima impressão.
Para desligares completamente a tua BEETHEFIRST, deves sempre desligá-la da
tomada.
RESOLUÇÃO DE PROBLEMAS
Recomendamos-te a leitura das FAQs e da Resolução de Problemas que constam
no portal www.beeverycreative.com. Caso não consigas encontrar solução para
o problema, por favor contacta o nosso Apoio ao Cliente através do formulário
disponível no referido portal.
Page 38

3. ESPECIFICAÇÕES
TÉCNICAS
Page 39

39
RESOLUÇÃO DE CAMADA
TECNOLOGIA DE IMPRESSÃO
MATERIAL DE IMPRESSÃO
VOLUME DE IMPRESSÃO
MESA AQUECIDA
DIÂMETRO DO BICO DO EXTRUSOR
MATERIAIS DA ESTRUTURA
DIMENSÕES (c/ e s/ bobine)
PESO
TEMP. AMBIENTE DE FUNCIONAMENTO
TEMP. DE ARMAZENAMENTO
ALIMENTAÇÃO AC
POWER CONSUMPTION
CERTIFICAÇÕES
CONECTIVIDADE
ACESSÓRIOS
SISTEMAS OPERATIVOS SUPORTADOS
TIPO DE FICHEIRO
CALIBRAÇÃO
REQUISITOS MÍNIMOS HARDWARE (PC)
REQUISITOS MÍNIMOS HARDWARE (MAC)
50 | 100 | 200 | 300 microns
FFF
PLA (ø1.75mm)
190 x 135 x 125mm
Não necessário para impressão com PLA
0.4mm
Corpo metálico pintado com pó de alta
qualidade | Acabamento exterior em acrílico branco | Guias lineares de aço | Mesa de
impressão de policarbonato removível
400 x 140 x 400mm
9,5 Kg
15-30ºC
0-30ºC
100-120VAC | 3.0A | 50-60Hz
200-240VAC | 2.0A | 50-60Hz
Baixo (Aprox. 90W)
CE | GS | UL | ISTA (1A)
USB
Mala de transporte BEEPACK | Bobine de
filamento preto | Rolo de fita azul | Cabo
de alimentação específico da região | Cabo
USB Espátula | Pinça | Chave sextavada
Windows (7+)
Linux (12.04+)
Mac OS X (10.8 | 10.9+)
.stl
Semi-automático c/ apoio deSoftware
Core i3 | AMD Phenom II |AMD Athlon X2
2GB RAM | 500MB espaço livre em disco
512 MB placa gráfica dedicada (GPU)
fim 2008+
Page 40

Page 41

KURZANLEITUNG ZUR
BEETHEFIRST
DEUTSCH
Page 42

42
Der aktuelle Stand der 3D Desktop Art Technik
Ihre Kreativität ist grenzenlos. Die heutige 3D Drucktechnik ist leider noch nicht
ganz so weit.
Die Grenzen der Machbarkeit können Sie in unserem Dokument über 3D Modellierungsrichtlinien nachlesen.
(https://beeverycreative.com/modelling-guidelines/)
Die wichtigste Voraussetzung für eine optimale Druckqualität ist das richtige
Kalibrieren des BEETHEFIRST.
Richtige Kalibrierung ist die Voraussetzung, um die gewünschte Leistung und
Ergebnisse zu erhalten.
Bei schlechter Kalibrierung kann das gewünschte Objekt möglicherweise gar
nicht gedruckt werden.
Drucke mit hoher Auflösung stellen einen noch höheren Anspruch an die Kalibrierung. Aus diesem Grund empfehlen wir, anfangs in niedriger Auflösung zu
drucken, bis Sie mehr Erfahrungen gesammelt haben.
Wenn die Qualität des Ausdrucks nicht oberste Priorität besitzt, empfehlen wir,
mit niedriger Auflösung zu drucken.
So kann man viel schneller, günstiger und ökologischer drucken.
Page 43

56
TECHNISCHE DATEN
46
BEETHEFIRST: AUSPACKEN UND INSTALLIEREN
44
SICHERHEITSVERZEICHNIS
INHALTSVERZEICHNIS
Page 44

1. SICHERHEITSVERZEICHNIS
Page 45

45
1. SICHERHEITSVERZEICHNIS
Unser BEETHEFIRST 3D Drucker bietet die größtmögliche Sicherheit. Wir möchten Sie jedoch daran erinnern, dass er für Erwachsene hergestellt wurde. Bitte
beachten Sie die folgenden Sicherheitshinweise:
1.Aufsicht durch einen Erwachsenen: Wir können es nicht genug betonen, dass
der BEETHEFIRST für Erwachsene entwickelt wurde. Wenn daher ein Kind das
Gerät benutzt, muss immer ein Erwachsener dabei sein. Bitte besonders bei
kleinen Objekten aufpassen, da ein Kind diese schlucken und daran ersticken kann.
2.Extruder Düse: Wenn der BEETHEFIRST in Betrieb ist, kann die Düse hohe
Temperaturen von bis zu 250º , erreichen. Dies kann bei Berührung schwere
Verbrennungen verursachen. Deshalb ist die Düse sicherheitshalber abgeschirmt
und sollte auf keinen Fall berührt werden.
3.Bewegliche Teile: Wenn der BEETHEFIRST in Betrieb ist, sind auch einige
seiner Bauelemente in Bewegung. Deshalb sollte man im Betrieb immer einen
sicheren Abstand zur Maschine einhalten.
4.Das Filament: Der BEETHEFIRST wurde entwickelt und getestet um optimal
mit unseren eigenen BEESUPPLIES Filamenten zusammenzuarbeiten. Der Einsatz anderer Filamente kann zu schlechterer Druckqualität führen oder sogar
den Drucker beschädigen und zum Verlust der Gewährleistung führen.
5. Kühle und gut belüftete Umgebung: Wie die meisten anderen Elektrogeräte
auch, funktioniert der BEETHEFIRST am besten in einer kühlen und gut
belüfteten Umgebung.
6. BEETHEFIRST Integrität: Der BEETHEFIRST sollte nie benutzt werden, wenn
er nicht komplett montiert ist. Der Gebrauch ohne alle vorgeschriebenen Bauteile kann gefährlich sein und zum Erlöschender der Garantie führen. Aus dem
gleichen Grund dürfen auch keine Flüssigkeiten über das Gerät geschüttet werden.
7. Modifikation des BEETHEFIRST: Wenn der BEETHEFIRST in irgendeiner Weise
verändert wird, erlischt die Garantie sofort. Falls Sie trotzdem Änderungen
an dem Gerät vornehmen wollen, setzen Sie sich bitte mit uns in Verbindung.
Erklären Sie uns Ihr Projekt und wir werden uns bemühen, Ihnen dabei zu helfen
und Sie zu unterstützen.
Page 46

2. BEETHEFIRST: AUSPACKEN
UND INSTALLIEREN
Page 47
47
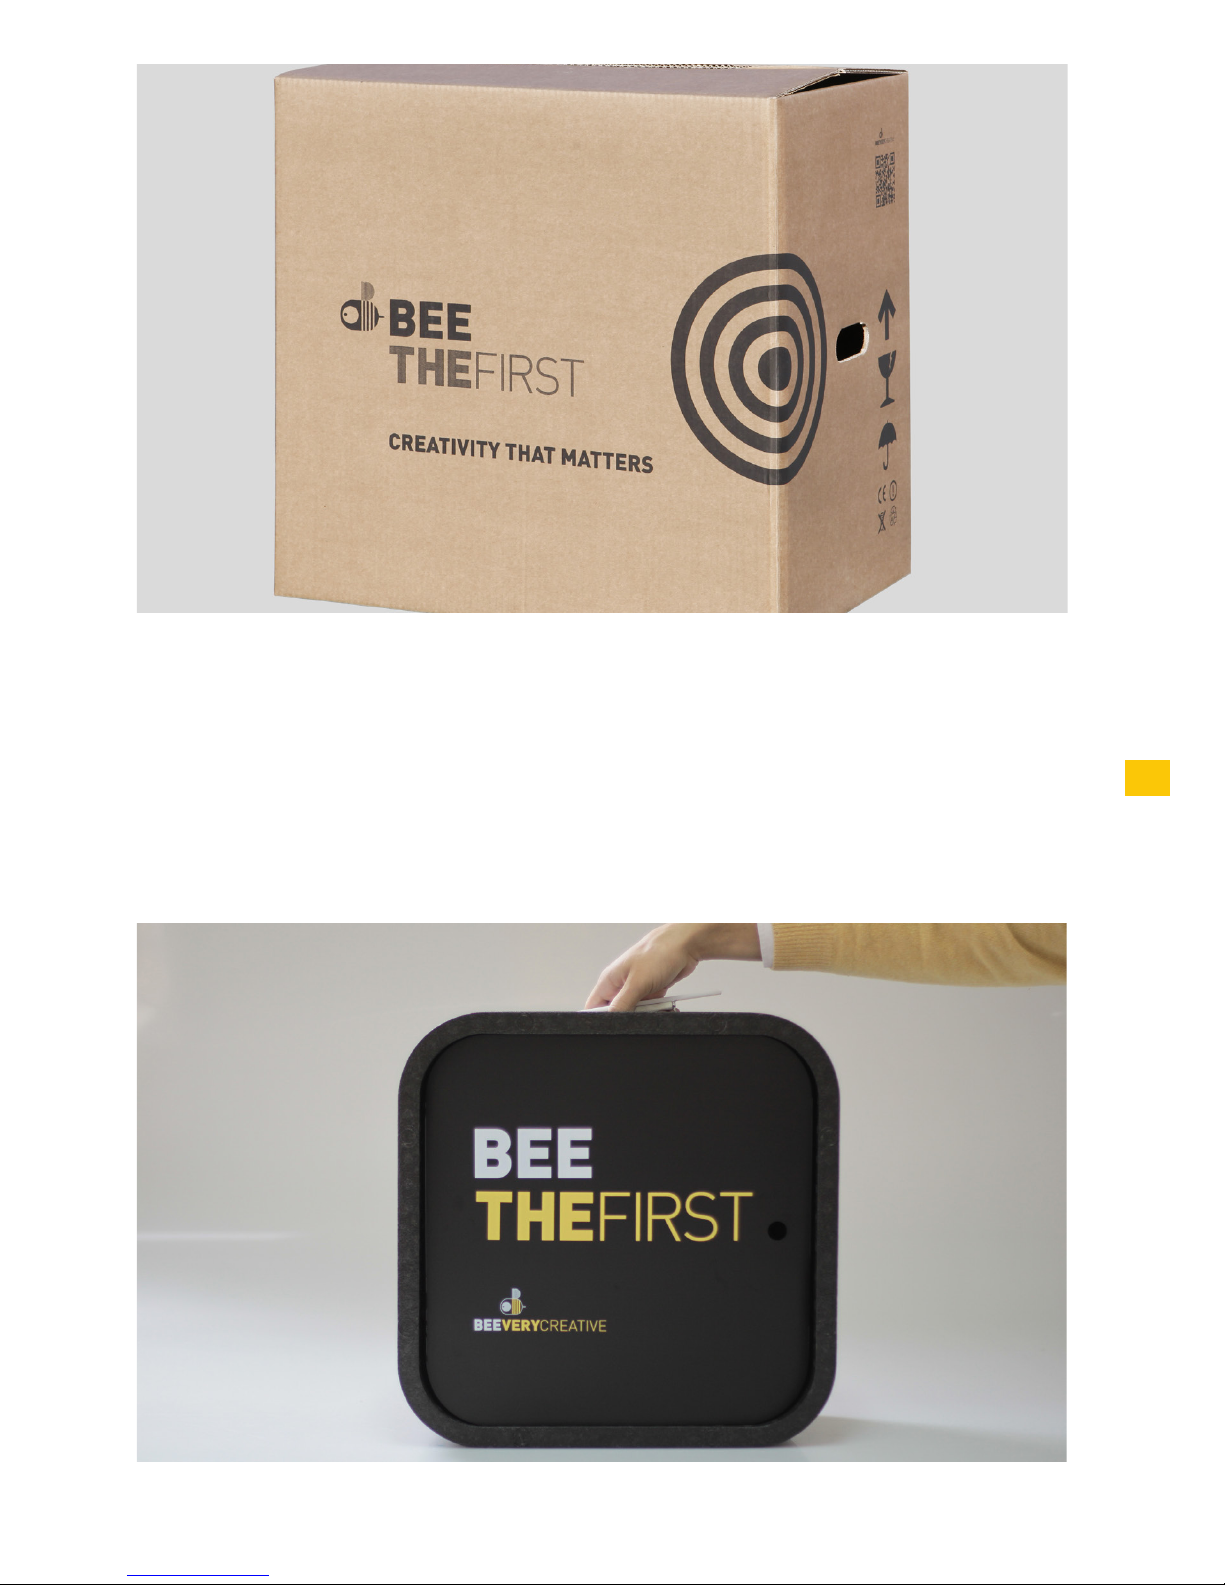
1. Öffnen Sie den Karton und entfernen Sie die Schaumstoffeinsätze.
2. Öffnen Sie die Plastikhülle durch Ziehen des Anhängers, wie auf der Aussen-
seite der Hülle beschrieben.
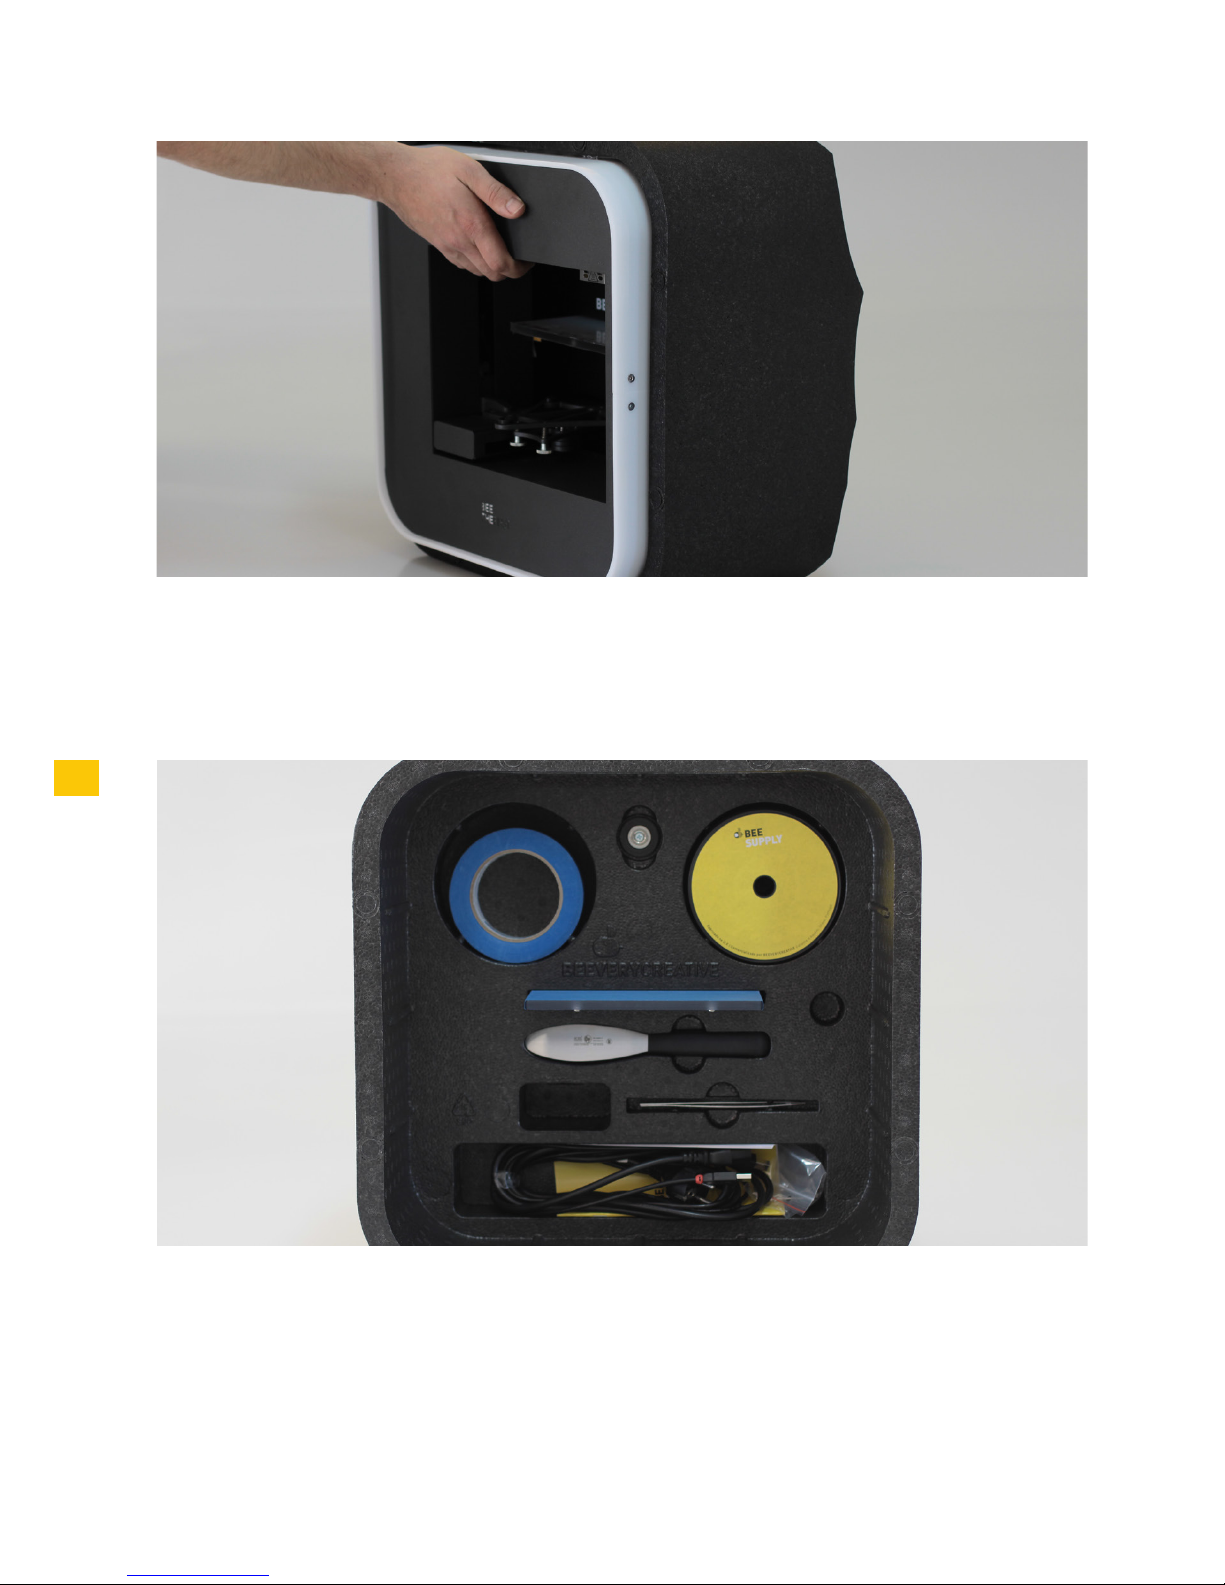
3. 3. Um den Drucker aus der Verpackung zu heben, bitte nur den eingebauten
Tragegriff und nicht die Schaumstoffeinsätze benutzen, da dies den Drucker
beschädigen kann. Der Griff wird sichtbar, indem man ihn auf einer Seite leicht
andrückt.
Page 48
48
4. Entfernen Sie das Verpackungsmaterial so wie auf der nummerierten Anleitung auf dem Drucker angegeben.
5. Nachdem der Drucker ausgepackt ist, sollten Sie zum Transport des BEETHEFIRST immer den Griff benutzen. Wenn der BEETHEFIRST über längere Strecken
transportiert werden soll, raten wir, auf jeden Fall das BEEPACK zu benutzen.
Page 49
49
6. Bitte überprüfen Sie den Lieferumfang auf Vollständigkeit:
1 BEETHEFIRST
1 Druckplatte
1 Pinzette
1 Spachtel
1 Inbusschlüssel
1 BEEPACK
1 Rolle Blaues Klebeband
1 Netzkabel
1 USB Verbindungskabel
1 Filament Spule
1 Spulenhalter
Page 50
11
12
13
9
10
13
11
12
8
5
4
3
2
1
7
6
50
1
2
3
4
5
BEETHEFIRST GRAFIK
Filament Spule Filament Eingang
USB
Spulhalter
Extruder Düse
Druckplatte
Kalibration Schrauben
6
7
8
9
10
Transportgriff
Anschluss mit Bootloader
Upgrades
Seriennummernschild
Netzstecker
An/Aus Schalter
Diebstahlsicherer
Kabel
Page 51

51
BEESOFT INSTALLATIONSANLEITUNG
1. Stellen Sie zunächst bitte sicher, dass Ihr Computer über eine funktionsfähige
Internetverbindung verfügt, der Drucker am Stromnetz angeschlossen oder die
Batterie geladen ist.
2. Dann loggen Sie sich bei uns ein: www.beeverycreative.com und laden die
neueste BEESOFT-Version, passend zu ihrem Betriebssystem, herunter.
3. Sobald der Download der BEESOFT beendet ist, starten Sie die Installationsdatei aus dem Download-Ordner.
4. Bitte folgen Sie den Anweisungen und wählen die für Sie relevanten Optionen aus.
5. Die Software kann mit einem Doppelklick auf das BEESOFT Symbol auf Ihrem
Desktop oder aus dem Programmmenü gestartet werden.
Nachdem Sie BEESOFT installiert haben, folgen Sie den Anweisungen im Maintenance Wizard, um den BEETHEFIRST zu kalibrieren.
Page 52
1. Bitte achten Sie darauf, dass die gesamte Verpackung entfernt ist und vergewissern Sie sich, dass der Hauptschalter auf “AUS” steht.
2. Danach das Netzkabel anschließen: Zuerst am BEETHEFIRST und erst dann
an der Steckdose.
3. Schliessen Sie das USB-Kabel am BEETHEFIRST und danach am Computer an.
4. Bitte nur jeweils 1 Schicht des blauen Klebebands auf der Druckplatte auf-
bringen. Vermeiden Sie Überschneidungen
1
2
3
4
52
Page 53
53
7. Die Filamenteinheit (Spule und Spulenhalter) in den BEETHEFIRST
einsetzen.
8. Mit dem Geräteschalter auf „EIN“ einschalten.
5 6
7 8
5. Die Druckplatte auf den magnetischen Halter auflegen.
6. Den Spulenhalter in die Spule einsetzen. Bitte geben Sie acht, dass das
Filament fest gewickelt bleibt. Zu lockeres oder zerknicktes Filament kann zu
Druckstörungen führen.
Page 54

54
TIPPS ZUM DRUCKEN?
1. Bitte stellen Sie sicher, dass sich das blaue Klebeband immer in einem akzept-
ablen Zustand befindet: Wenn es zerknittert oder beschädigt ist, sollte es sofort
ersetzt werden (siehe Punkt 4 – Installation BEETHEFIRST).
2. Bitte stellen Sie sicher, dass sich keine Objekte oder Filamentreste auf der
Druckplatte befinden
3. Importieren Sie das zu druckende 3D Modell. Sie finden eine riesige Anzahl von 3D
Modellen online, oder Sie entwerfen selbst ein eigenes 3D Modell mit Hilfe von 3D
Designprogrammen (nicht im Lieferumfang).
4. Stellen Sie sicher, dass Sie die Schritte im Druckerkalibrierungsassistenten
(Calibration Wizard) von BeeSoft befolgt haben.
5. Klicken Sie In BEESOFT auf “Gallery Menu“ und wählen dann die Datei aus, die im-
portiert werden soll .
6. Klicken Sie auf “PRINT“ und wählen Sie die gewünschten Einstellungen aus.
7. BEESOFT bereitet die ausgewählte Datei vor (der Vorgang heißt “Slicing“). Dies
kann einige Minuten dauern und dann beginnt gleich das Drucken.
Page 55
55
NACH DEM DRUCKEN
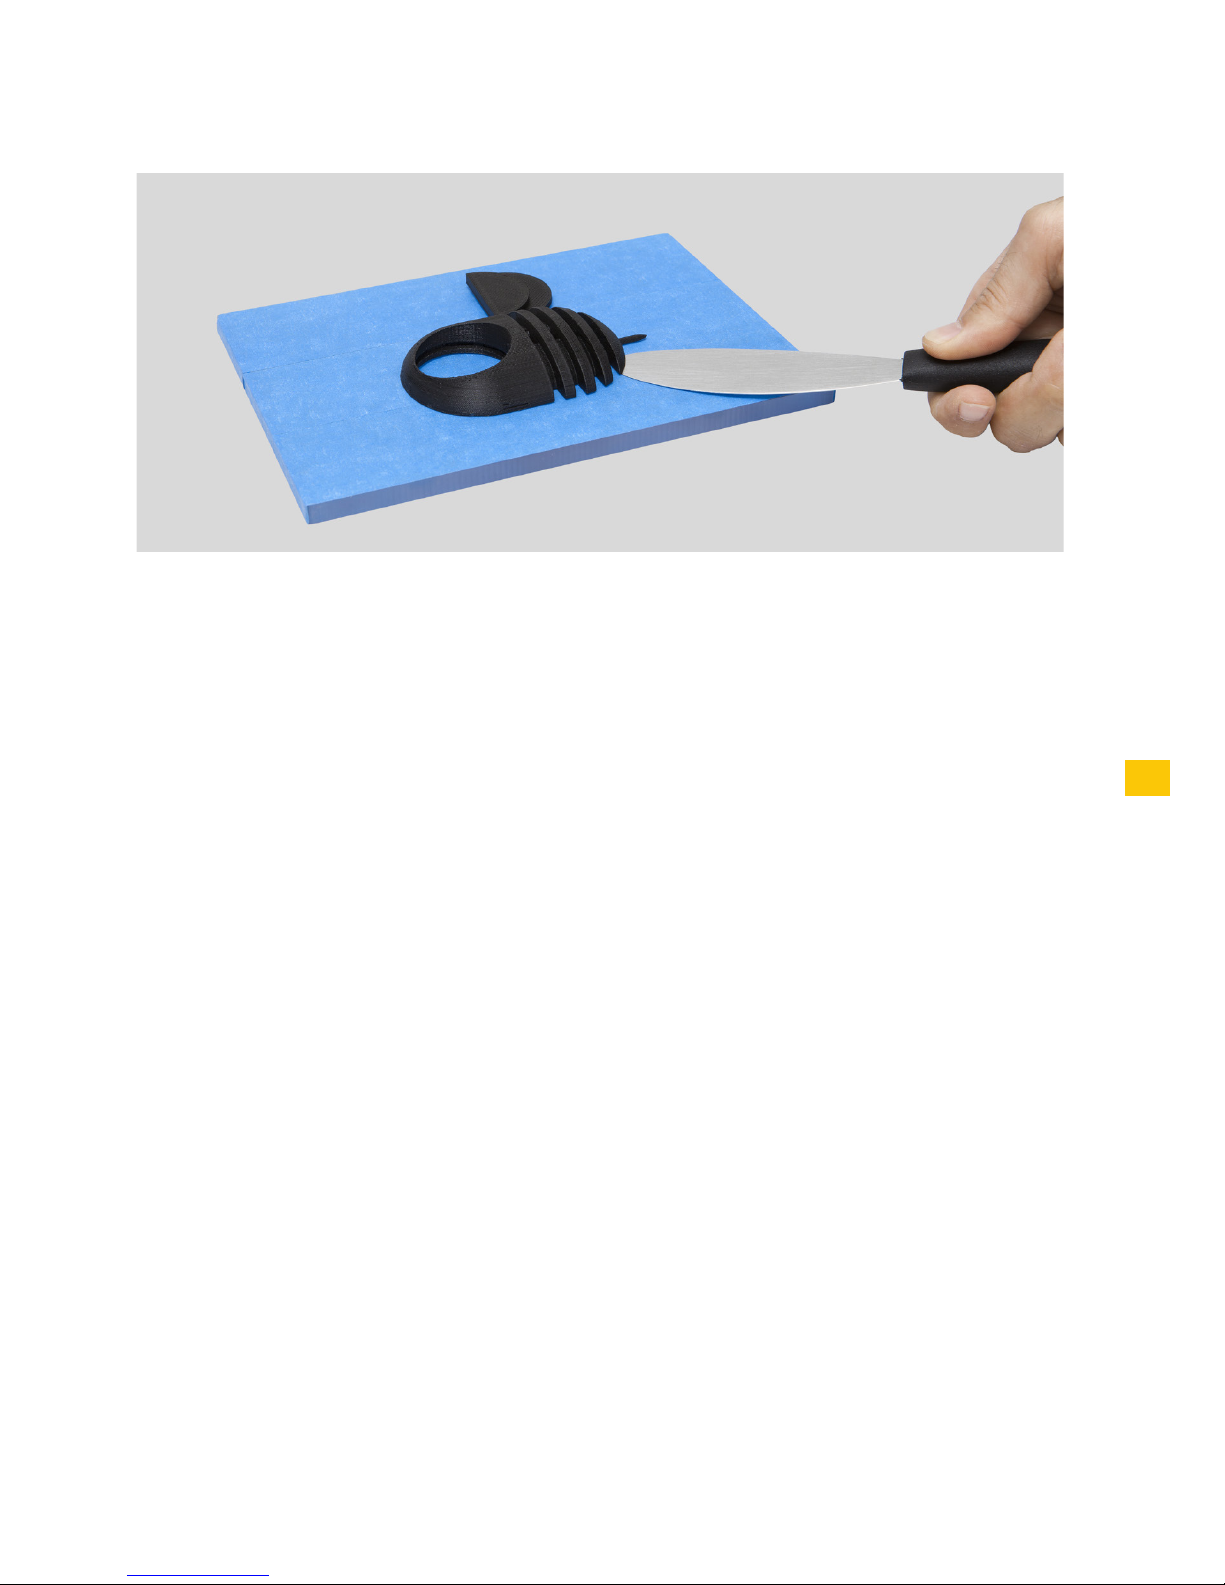
Nach dem Ende des Druckvorgangs sollte das Objekt gleich von der Druckplatte
entfernt werden. Dies sollte vorsichtig von Hand geschehen, ohne die Oberfläche zu
beschädigen. Wenn sich das Modell nicht von Hand entfernen lässt, benutzen Sie bitte
den beiliegenden Spachtel, parallel zur Druckplatte geführt. Falls auch dieses nicht
funktionieren sollte, entfernen Sie bitte die blauen Klebestreifen. Bitte vergessen Sie
nicht, vor dem nächsten Druckvorgang wieder einen neuen Streifen aufzukleben.
Um den BEETHEFIRST ganz abzuschalten, sollte das Netzkabel immer komplett aus
der Steckdose gezogen werden.
FEHLERBEHEBUNG
Auch wenn Sie bereits Erfahrung mit 3D Druckern wie dem BEETHEFIRST haben, empfehlen wir eine sorgfältige Lektüre unserer Anweisungen, damit Sie sich mit unserem
Produkt rundum vertraut machen können. Antworten auf Ihre Fragen und Tipps zur Fehlerbehebung finden Sie auf unserer Internetseite: www.beeverycreative.com. Falls Sie
auch dort keine Lösung für Ihr Problem finden, können Sie sich jederzeit mit unserem
Kundenservice in Verbindung setzen: Nutzen Sie dazu einfach das Kontaktformular auf
unserer Internetseite.
Page 56

3. TECHNISCHE DATEN
Page 57

57
SCHICHTAUFLÖSUNG
DRUCKTECHNIK
DRUCKMATERIAL
DRUCKVOLUMEN
HEIZTISCH
DURCHMESSER EXTRUDERDÜSE
STRUKTURMATERIALIEN
GRÖSSE DES DRUCKERS (mit/ohne spule)
GEWICHT
UMGEBUNGSTEMP. IN BETRIEB
LAGERTEMP.
AC-EINGANG
ENERGIEVERBRAUCH
ZERTIFIZIERUNGEN
DATENVERBINDUNG
ENTHALTENES ZUBEHÖR BEEPACK
MINDESTANFORDERUNGEN SYSTEM
DATEIART
KALIBRIERUNG
MINDESTANFORDERUNGEN PC-HARDWARE
MINDESTANFORDERUNGEN MAC-HARDWARE
50 | 100 | 200 | 300 Mikron
FFF
PLA (ø1.75mm)
190 x 135 x 125mm
Non-applicable to PLA technology
0.4mm
Hochwertig pulverlackierter Metallkörper
Oberflächenbehandlung mit weißen Acryl
Lineare Stahlschienen | Drucktisch aus
Polykarbonat abnehmbar
400 x 140 x 400mm
9.5 Kg
15-30ºC
0-30ºC
100-120VAC | 3.0A | 50-60Hz
200-240VAC | 2.0A | 50-60Hz
Niedrig (ca. 90 W)
CE | GS | UL | ISTA (1A)
USB
Transporttasche | Filamentspule schwarz
Bandrolle blau | Stromkabel spezifisch für
die Region | USB-Kabel | Spachtel | Zange |
Sechstankschlüssel
Windows (7+)
Linux (12.04+)
Mac OS X (10.8 | 10.9+)
.stl
Halbautomatisch mit Softwareunterstützung
Core i3 | AMD Phenom II |AMD Athlon X2
2GB RAM | 500 MB freier Festplattenspeicher | 512 MB eigenständige Graphikkarte (GPU)
Ende 2008+
Page 58

Page 59

GUIDE D’UTILISATION
RAPIDE
DE BEETHEFIRST
FRANÇAIS
Page 60

60
État des lieux de la technologie 3D de bureau
Même si la vraie limite est votre créativité, l’actuelle technologie d’impression 3D a, elle
aussi, encore quelques limitations dont vous pouvez prendre connaissance sur le document Directives d’Impression 3D
(https://www.beeverycreative.com/modelling-guidelines/).
Pour assurer la qualité de vos impressions, le point le plus important est l’étalonnage de
BEETHEFIRST.
L’étalonnage correct est essentiel pour obtenir la performance et le résultat visés. Un
mauvais étalonnage peut empêcher l’impression de l’objet que vous souhaitez.
L’impression haute résolution exige un étalonnage encore plus rigoureux.
Ainsi, nous vous conseillons l’impression basse résolution tant que vous n’êtes pas un
utilisateur expérimenté.
L’impression basse résolution est également recommandée chaque fois que la résolution de l’objet n’est pas un facteur pertinent, car elle est plus verte, plus rapide et moins
chère.
Page 61

74
SPECIFICATIONS TÉCHNIQUES
64
DÉBALLAGE ET MISE EN SERVICE DE L’IMPRIMANTE BEETHEFIRST
62
INFORMATIONS DE SÉCURITÉ
SOMMAIRE
Page 62

1. INFORMATIONS DE SÉCURITÉ
Page 63

63
1. INFORMATIONS DE SÉCURITÉ
L’imprimante BEETHEFIRST est un équipement qui peut être utilisé en toute
sécurité, n’oubliez pas qu’elle a été conçue pour être utilisée par des adultes.
Cependant, elle peut, et malgré tout, présenter les risques suivants :
1 - Surveillance par les adultes : on n’insistera jamais assez sur le fait que l’imprimante BEETHEFIRST a été conçue pour être utilisée par des adultes. En cas
d’utilisation par des enfants, celle-ci ne doit jamais avoir lieu sans surveillance.
Il faut également faire attention aux objets imprimés plus petits, car les enfants
peuvent essayer de les avaler, représentant un risque d’étouffement.
2 - Extrudeur : pendant le fonctionnement de l’imprimante, la température de
la buse de l’extrudeur peut atteindre 250° C, ce qui peut provoquer des brûlures
graves en cas de contact. Par conséquent, malgré sa protection, vous devez toujours être prudent et ne pas toucher l’extrudeur.
3 - Pièces en mouvement : pendant son fonctionnement, l’imprimante BEETHEFIRST a des pièces en mouvement. Vous devez donc maintenir une distance de
sécurité suffisante de l’imprimante pendant son fonctionnement.
4 - Filament : l’imprimante BEETHEFIRST a été développée et testée pour
fonctionner avec le filament disponible sur le site de BEEVERYCREATIVE. L’utilisation d’autres filaments peut entraîner des impressions de mauvaise qualité et
endommager l’imprimante, sans recours à la garantie.
5 - Environnement frais et aéré : l’imprimante BEETHEFIRST fonctionne mieux
dans des environnements frais et aérés. Comme pour tout autre appareil électrique, il est également recommandé d’éviter la dégradation de la qualité de l’air
de la zone où l’imprimante est installée.
6 - Intégrité de l’imprimante BEETHEFIRST : n’utilisez jamais l’imprimante
lorsqu’elle n’est pas complète. Son utilisation sans certaines pièces annule la
garantie et peut être dangereuse. Pour les mêmes raisons, ne versez pas de
liquides sur l’imprimante.
7 - Modifications à l’imprimante BEETHEFIRST : en cas de modifications
apportées à l’imprimante, la garantie n’est plus valable. Si, malgré tout, vous
souhaitez le faire, contactez-nous, expliquez-nous votre projet et nous pourrons
vous faire parvenir des informations utiles.
Page 64

2. DÉBALLAGE ET MISE EN
SERVICE DE L’IMPRIMANTE
BEETHEFIRST
Page 65
65
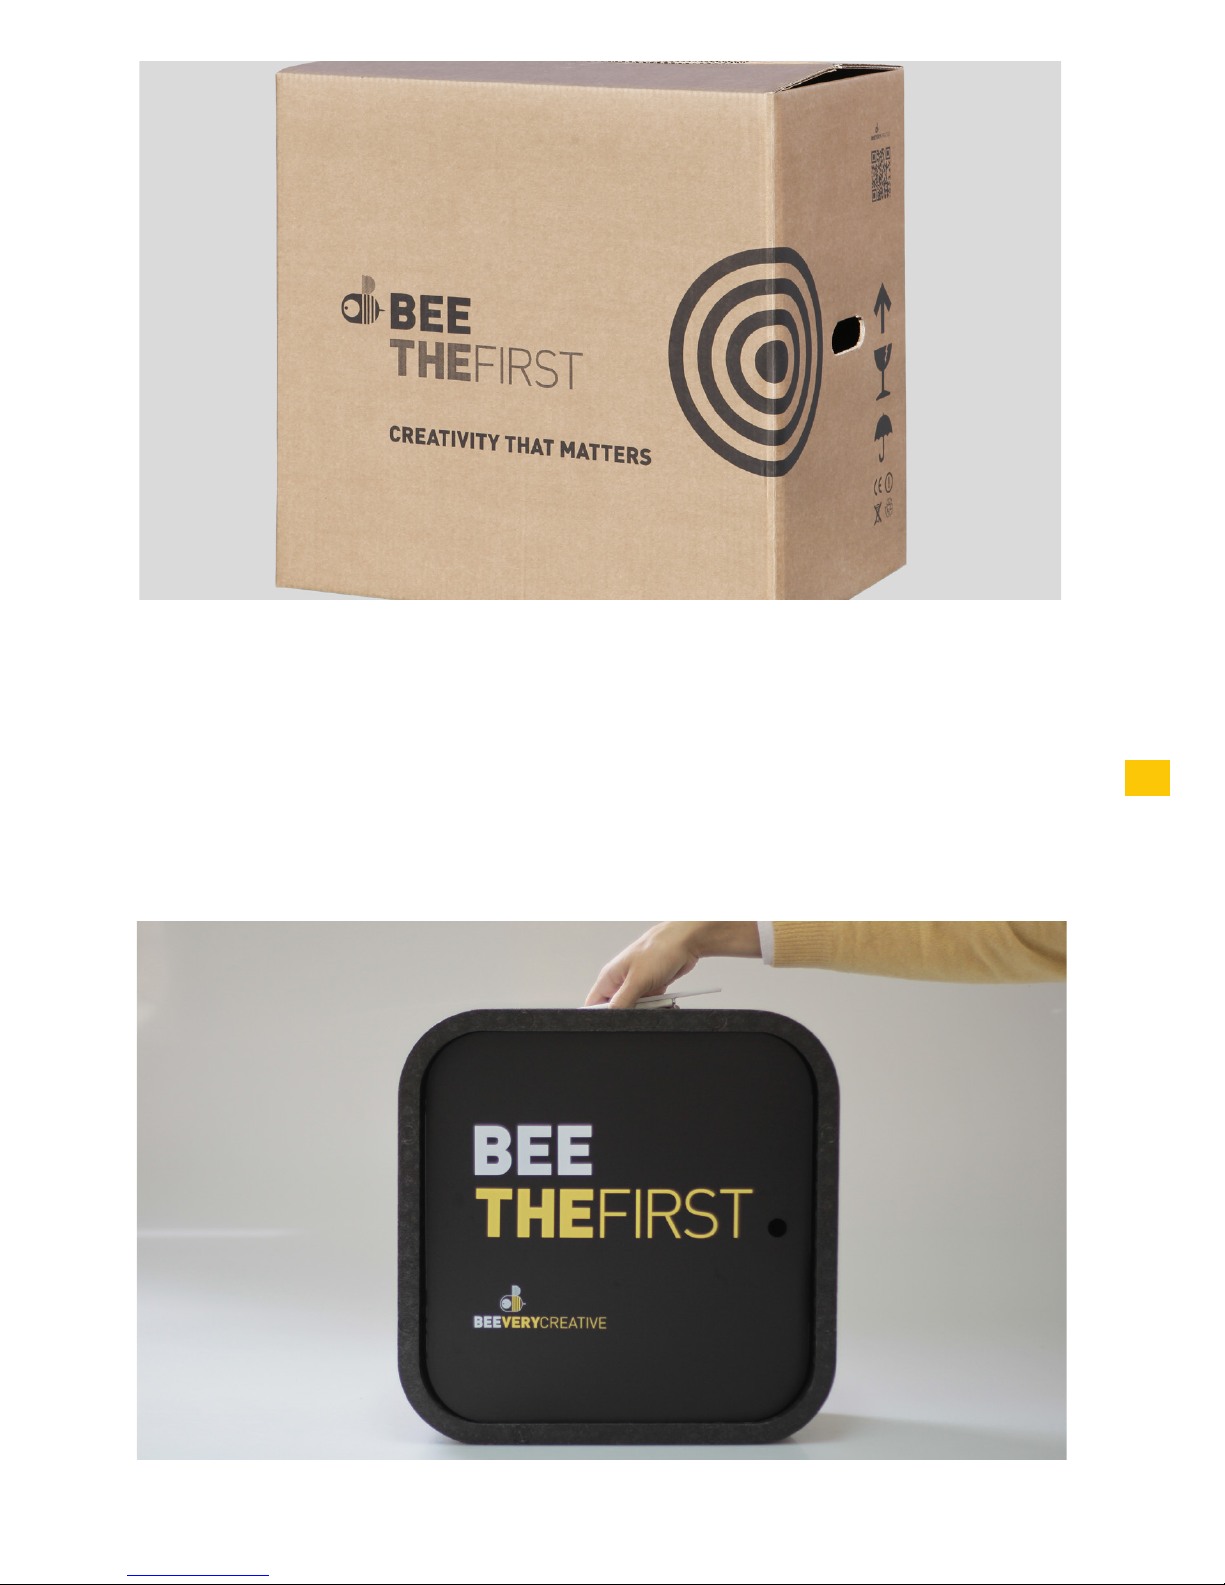
1. Ouvrez la boîte et enlevez les mousses de protection de l’imprimante.
2. Ouvrez le sac en plastique en tirant l’étiquette, comme illustré sur la figure
collée à l’extérieur du sac.
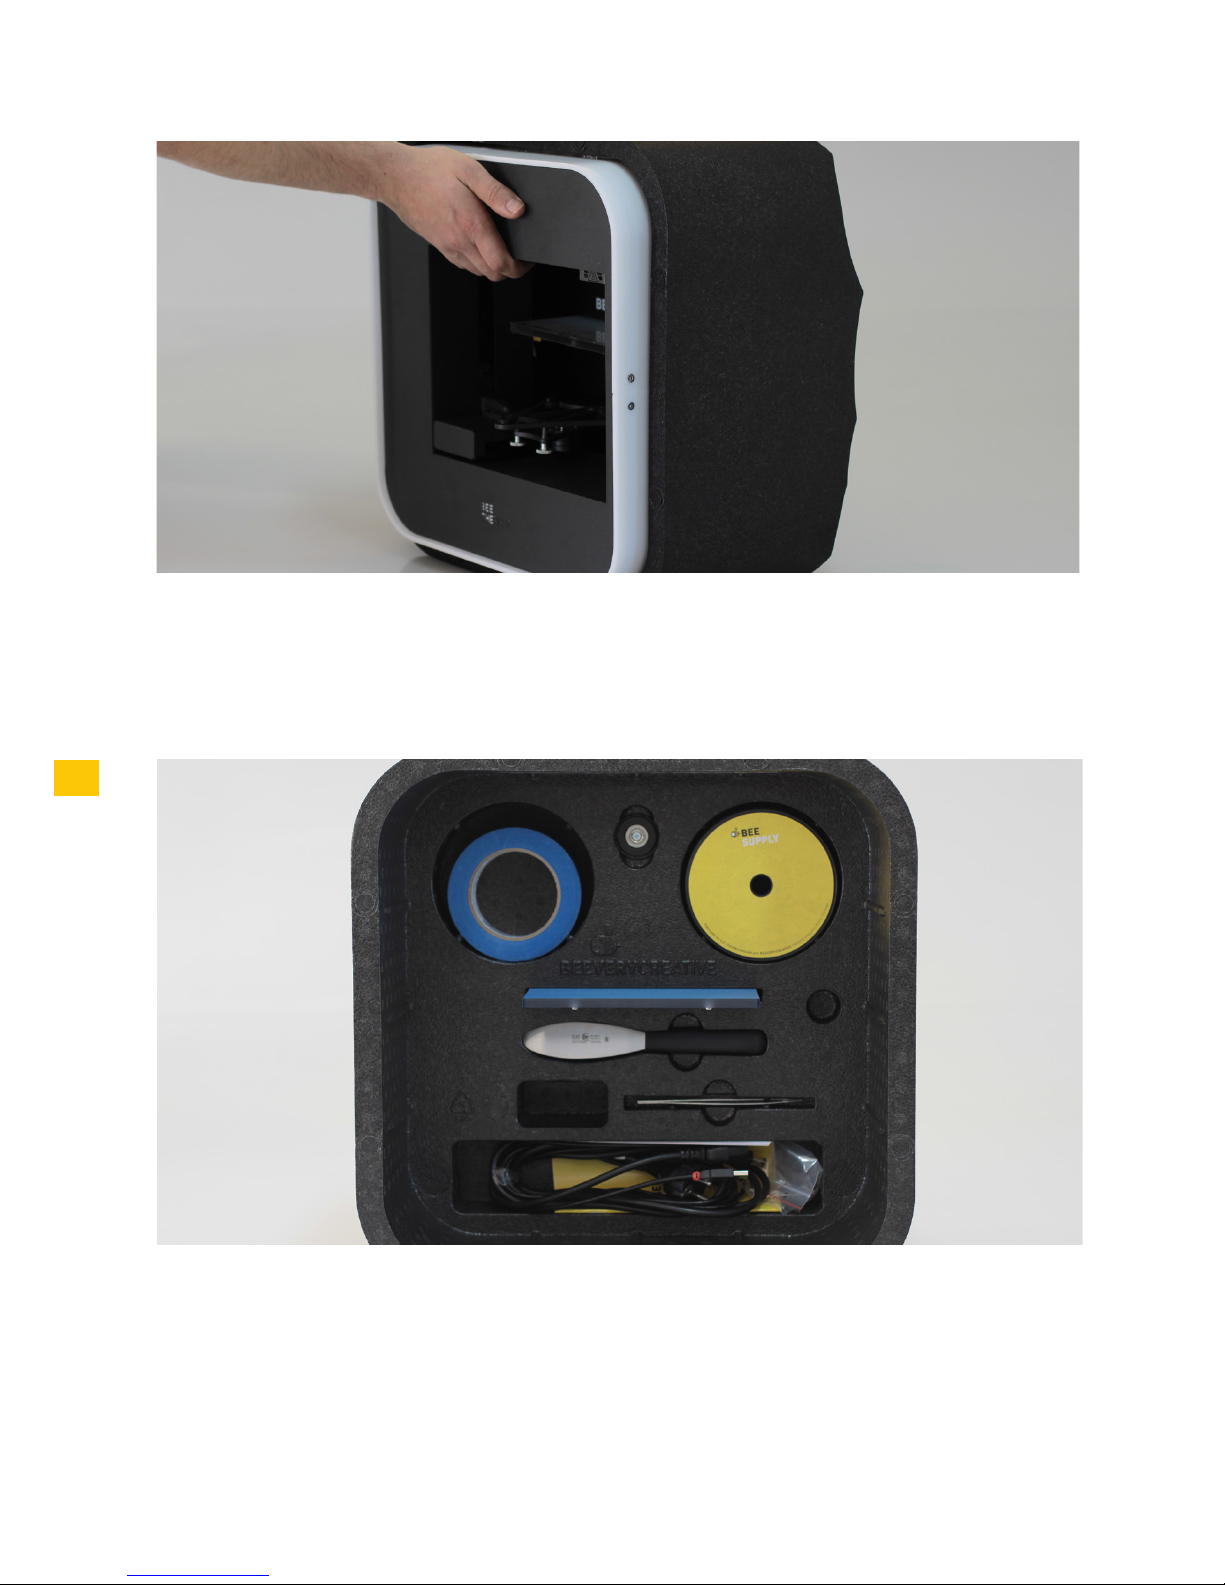
3. Prenez l’imprimante par la poignée, et PAS par l’emballage en mousse, car
vous pouvez l’endommager. La poignée sort en appuyant d’un côté et en la soulevant de l’autre.
Page 66
66
4. Enlevez le matériel de l’emballage, en suivant la numérotation indiquée sur
l’imprimante.
5. Après le déballage, utilisez la poignée supérieure pour transporter l’imprimante
BEETHEFIRST. Pour des trajets plus longs, nous vous recommandons l’utilisation
de BEEPACK.
Page 67
67
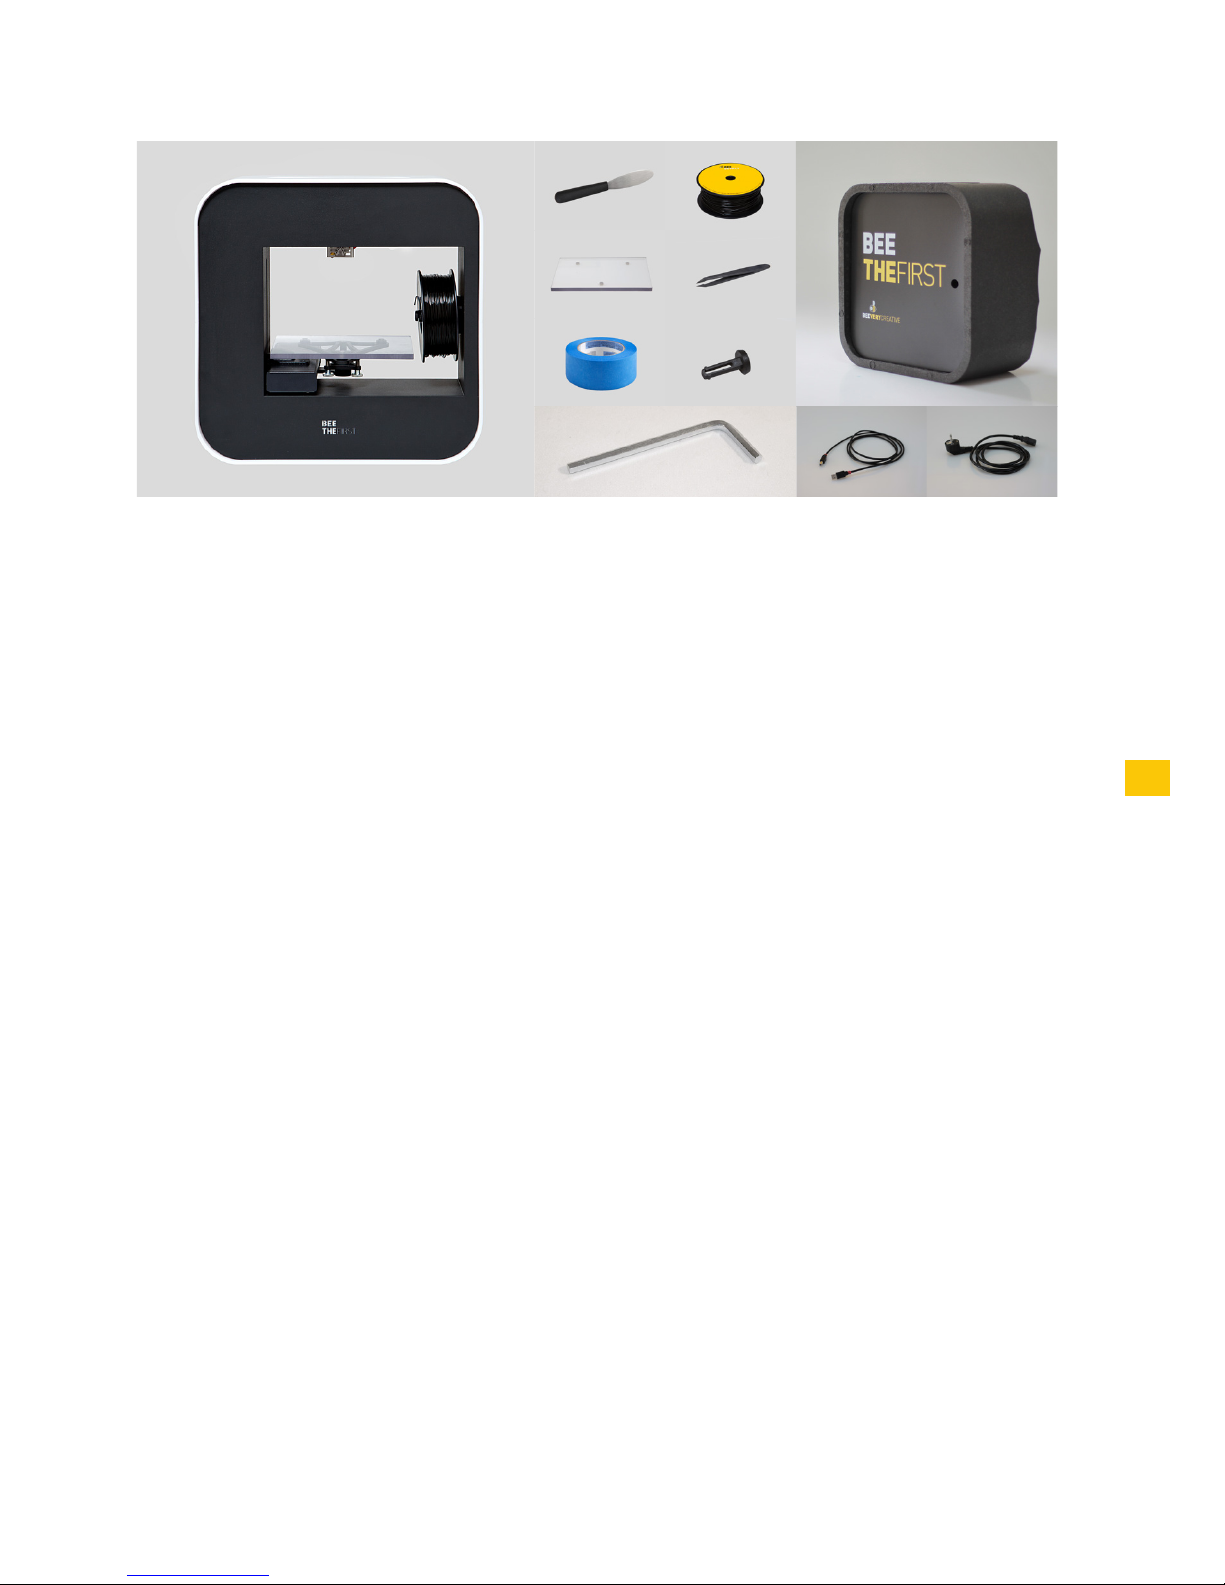
6. Vérifiez si la boîte contient les éléments suivants :
1 imprimante BEETHEFIRST
1 plateau d’impression
1 pince
1 spatule
1 clé à six pans
1 BEEPACK
1 ruban bleu
1 câble d’alimentation
1 câble de connexion USB
1 bobine de filament
1 support de bobine
Page 68
11
12
13
9
10
13
11
12
8
5
4
3
2
1
7
6
68
1
2
3
4
5
DIAGRAMME DE BEETHEFIRST
Bobine de filament Entrée du filament
Prise USB
Support de bobine
Buse de l’extrudeur
Plateau d’impression
Vis d’étalonnage
6
7
8
9
10
Poignée de transport
Porte de mise à niveau du
bootloader
Étiquette avec le nºde série
Prise d’alimentation
Bouton ON/OFF
Câble antivol
Page 69

69
INSTALLATION DE BEESOFT
1. Avant de commencer, vérifiez si l’ordinateur est connecté à Internet et au cou-
rant électrique ou si la batterie est suffisante.
2. Ensuite, visitez le site www.beeverycreative.com et téléchargez la dernière
version de BEESOFT, adaptée à votre système d’exploitation.
3. Une fois le téléchargement terminé, accédez au répertoire de
téléchargement du programme d’installation et exécutez le fichier d’installation.
4. Suivez les étapes d’installation jusqu’à la fin, en sélectionnant les options
souhaitées.
5. Exécutez BEESOFT à partir de l’icône situé sur le Bureau ou sur les
Applications.
Après l’installation de BEESOFT, vous devez suivre l’assistant de maintenance du
logiciel pour faire l’étalonnage de BEETHEFIRST.
Page 70
70
1. Vérifiez si tout le matériel d’emballage de l’imprimante a été enlevé et si l’interrupteur est en position Arrêt.
2. Branchez le câble d’alimentation, d’abord à l’imprimante BEETHEFIRST et ensuite à
la prise de courant.
3. Branchez le câble USB à l’imprimante BEETHEFIRST et à l’ordinateur.
4. Posez une, et seulement une, couche de ruban bleu sur le plateau.
1
2
3
4
Page 71
71
7. Placez l’ensemble (bobine + support) sur l’imprimante BEETHEFIRST.
8. Mettez l’interrupteur en position Marche
5 6
7 8
5. Placez le plateau d’impression sur sa base.
6. Placez la bobine sur le support. Veillez à toujours maintenir l’enroulement du fila-
ment bien ajusté afin de ne pas provoquer de nœuds pouvant bloquer l’impression.
Page 72

72
COMMENT IMPRIMER
1. Vérifiez si le ruban bleu sur le plateau est en bon état. S’il est endommagé, rem-
placez-le, comme indiqué au point 4 de l’ «Installation de BEETHEFIRST ».
2. Vérifiez s’il n’y a aucun objet ou des restes de filament sur le plateau d’impression.
3. Importez le modèle 3D que vous souhaitez imprimer. Vous pouvez trouver des modèles
3D en ligne ou créer votre propre modèle 3D en utilisant un logiciel de modélisation (non
inclus).
4. Vérifiez si vous avez suivi les étapes de l’assistant de BEESOFT pour l’étalonnage de
l’imprimante.
5. Cliquez sur le bouton « Gallery Menu » de BEESOFT et choisissez le fichier que vous
avez importé.
6. Cliquez sur le bouton « Imprimer » et sélectionnez les options d’impression souhaitées.
7. BEESOFT préparera le fichier pour l’impression (processus appelé « slicing »), ce qui
peut prendre quelques minutes. Une fois ce processus terminé, l’impression commencera.
Page 73
73
APRÈS L’IMPRESSION
Lorsque l’impression est terminée, vous devez retirer l’objet du plateau d’impression.
Essayez de le faire à la main, délicatement, sans l’endommager. Si vous n’y arrivez pas,
utilisez la spatule pour soulever l’objet, de manière à ne pas endommager le plateau
d’impression. Si aucune des méthodes mentionnées ci-dessus ne fonctionne, enlevez le
ruban bleu pour ainsi retirer l’objet. N’oubliez pas de remettre du ruban sur le plateau
avant la prochaine impression.
Pour débrancher complètement votre imprimante BEETHEFIRST, il faut la débrancher
de la prise électrique.
RÉSOLUTION DE PROBLÈMES
Nous vous recommandons de lire les FAQ et le chapitre Résolution de problèmes sur le
site www.beeverycreative.com. Si vous n’arrivez pas à trouver une solution au problème,
veuillez contacter notre Service à la clientèle, en utilisant le formulaire disponible sur le
site susmentionné.
Page 74

SPÉCIFICATIONS
TECHNIQUES
Page 75

75
RÉSOLUTION DE COUCHE
TECHNOLOGIE D’IMPRESSION
MATÉRIEL D’IMPRESSION
VOLUME D’IMPRESSION
LIT CHAUFFANT
DIAMÈTRE DE LA BUSE DE L’EXTRUDEUR
MATÉRIAUX DU CHÂSSIS
TAILLE DE L’IMPRIMANTE (avec/sans bobine)
POIDS
TEMP. AMBIANTE DE FONCTIONNEMENT
TEMP. DE STOCKAGE
ENTRÉE AC
CONSOMMATION D’ÉNERGIE
CERTIFICATIONS
CONNECTIVITÉ
ACCESSOIRES INCLUS BEEPACK
EXIGENCES MINIMALES DU SYSTÈME
TYPE DE FICHIER
ÉTALONNAGE
EXIGENCES MIN. DU MAT. INFORMATIQUE (PC)
EXIGENCES MIN. DU MAT. INFORMATIQUE (MAC)
50 | 100 | 200 | 300 microns
FFF
PLA (ø1.75mm)
190 x 135 x 125mm (7.48 x 5.31 x 4.92 in)
Non applicable à la technologie PLA
0.4mm
Châssis métallique peint avec de la poudre de
haute qualité | Finition extérieure en acrylique
blanc Guides linéaires en acier | Plateau
d’impression en polycarbonate amovible
400 x 140 x 400mm
9,5 Kg
15-30ºC
0-30ºC
100-120VAC | 3.0A | 50-60Hz
200-240VAC | 2.0A | 50-60Hz
Basse (env. 90W)
CE | GS | UL | ISTA (1A)
USB
Mallette de transport | Bobine de filament noir
Bobine de ruban bleu | Câble d’alimentation
adapté aux différents pays | Câble USB |
Spatule | Pince | Clé à six pans
Windows (7+)
Linux (12.04+)
Mac OS X (10.8 | 10.9+)
.stl
Semi-automatique avec le soutien du logiciel
Core i3 | AMD Phenom II |AMD Athlon X2
2Go RAM | 500Mo d’espace libre du disque |
512 Mo carte graphique dediée (GPU)
fin 2008+
Page 76

Page 77

GUIDA RAPIDA
ALL’USO
DELLA BEETHEFIRST
ITALIANO
Page 78

78
Stato dell’arte della tecnologia 3D desktop
Anche se l’unico limite è la tua creatività, la tecnologia attuale di stampa in 3D ha
ancora dei limiti, che possono essere consultati nel documento Linee guida per
la stampa 3D.
(https://www.beeverycreative.com/modelling-guidelines/)
La questione più rilevante per le tue stampe è la taratura della BEETHEFIRST.
Un’idonea taratura è essenziale per ottenere i risultati e le prestazioni desiderate; infatti una taratura incorretta potrebbe impedire la stampa dell’oggetto
desiderato.
La stampa in alta risoluzione richiede una taratura ancora più rigorosa.
Per questo motivo ti consigliamo di stampare in bassa definizione fino a quando
non avrai acquisito esperienza nell’uso.
La stampa in bassa risoluzione è inoltre raccomandata ogni qualvolta la risoluzione dell’oggetto non è un fattore rilevante, dato che è più ecologica, più rapida ed
economica.
Page 79

92
SPECIFICHE TECNICHE
82
DISIMBALLARE E INSTALLARE LA BEETHEFIRST
80
INFORMAZIONI DI SICUREZZA
INDICE
Page 80

1. INFORMAZIONI DI
SICUREZZA
Page 81

81
1. INFORMAZIONI DI SICUREZZA
Nonostante la stampante BEETHEFIRST sia un apparecchio sicuro, ricordiamo
che è stata sviluppata per essere usata da adulti. Comunque, ci sono alcuni pericoli che vogliamo ricordarti:
1 - Supervisione degli adulti: dobbiamo ricordarlo sempre, la BEETHEFIRST
è stata sviluppata per essere usata da adulti. Se vuoi che venga usata da bambini, occorrerà la tua supervisione. Dovrai fare particolare attenzione agli oggetti
stampati più piccoli, dato che i bambini potranno cercare di inghiottirli e correranno il rischio di soffocare.
2 - Estrusore: durante il funzionamento della BEETHEFIRST la temperatura
della punta dell’estrusore può raggiungere i 250º C, per cui se viene toccata può
provocare gravi ustioni. Per questo motivo, anche se risulta protetto, fai sempre
attenzione a non toccare l’estrusore.
3 - Parti in movimento: durante il funzionamento la BEETHEFIRST avrà parti
in movimento. Per questo motivo dovrai tenere una distanza di sicurezza dalla
stampante mentre è operativa.
4 - Filamento: la BEETHEFIRST è stata sviluppata e testata per il funziona-
mento con il filamento disponibile sul portale di BEEVERYCREATIVE. L’uso di altri
filamenti potrebbe causare una stampa di scarsa qualità e danneggiare la
stampante, oltre ad escludere la possibilità di beneficiare della garanzia.
5 - Ambiente fresco e areato: la BEETHEFIRST funziona meglio in ambienti
freschi e ben areati, cosa consigliata anche per altri apparecchi elettrici, per cui
si raccomanda di fare attenzione alla qualità dell’aria nella zona in cui si trova la
stampante.
6 - Integrità della BEETHEFIRST: non usare mai la BEETHEFIRST se è in-
completa. L’uso della stampante in mancanza di un pezzo annulla la garanzia e
può essere pericoloso. Per gli stessi motivi, non spargere liquidi sulla
stampante.
7 - Modifiche alla BEETHEFIRST: se fai delle modifiche alla BEETHEFIRST
la garanzia perderà la validità. Se comunque vuoi fare delle modifiche, entra in
contatto con noi, spiegaci il tuo progetto e saremo in grado di inviarti
informazioni utili.
Page 82

2. DISIMBALLARE E INSTALLARE
LA BEETHEFIRST
Page 83
83
1. Apri la scatola e togli il materiale protettivo della stampante.
2. Apri il sacchetto di plastica tirando l’etichetta, guidandoti con l’illustrazione
incollata all’esterno del sacchetto.
3. Prendi la stampante dalla maniglia, NON dal materiale di imballaggio perché
potresti danneggiarla. La maniglia fuoriesce premendo da un lato e sollevando
dall’altro.
Page 84
84
4. Togli il materiale dall’imballaggio seguendo la numerazione indicata sulla
stampante.
5. Dopo aver rimosso l’imballaggio, usa la maniglia superiore per trasportare la
BEETHEFIRST. Per percorsi più lunghi, ti raccomandiamo di usare BEEPACK.
Page 85
85
6. Verifica se la scatola contiene i seguenti articoli:
1 BEETHEFIRST
1 Piano di stampa
1 Pinza
1 Spatola
1 Chiave esagonale
1 BEEPACK
1 Nastro blu
1 Cavo di alimentazione
1 Cavo di collegamento USB
1 Bobina a filamento
1 Supporto per bobina
Page 86
11
12
13
9
10
13
11
12
8
5
4
3
2
1
7
6
86
1
2
3
4
5
DIAGRAMMA BEETHEFIRST
Bobina a filamento Ingresso del filamento
Spina USB
Supporto per bobina
Punta dell’estrusore
Piano di stampa
Viti per taratura
6
7
8
9
10
Maniglia per trasporto
Porta per bootloader upgrade
Etichetta con n. di serie
Spina di alimentazione
Pulsante ON/OFF
Cavo antifurto
Page 87

87
INSTALLAZIONE DI BEESOFT
1. Prima di iniziare, conferma che il computer abbia accesso a internet e sia col-
legato alla rete elettrica o abbia batteria sufficiente.
2. Accedi ora a www.beeverycreative.com e scarica la versione più recente di
BEESOFT adatta al tuo sistema operativo.
3. Dopo aver concluso il download di BEESOFT, accedi alla directory per scaricare l’installatore ed esegui il file di installazione.
4. Segui i passi dell’installatore fino alla fine selezionando le opzioni desiderate.
5. Esegui BEESOFT tramite l’icona che si trova nel desktop o nelle applicazioni.
Dopo l’installazione di BEESOFT, dovrai seguire l’assistente di manutenzione del
software per eseguire la taratura di BEETHEFIRST.
Page 88
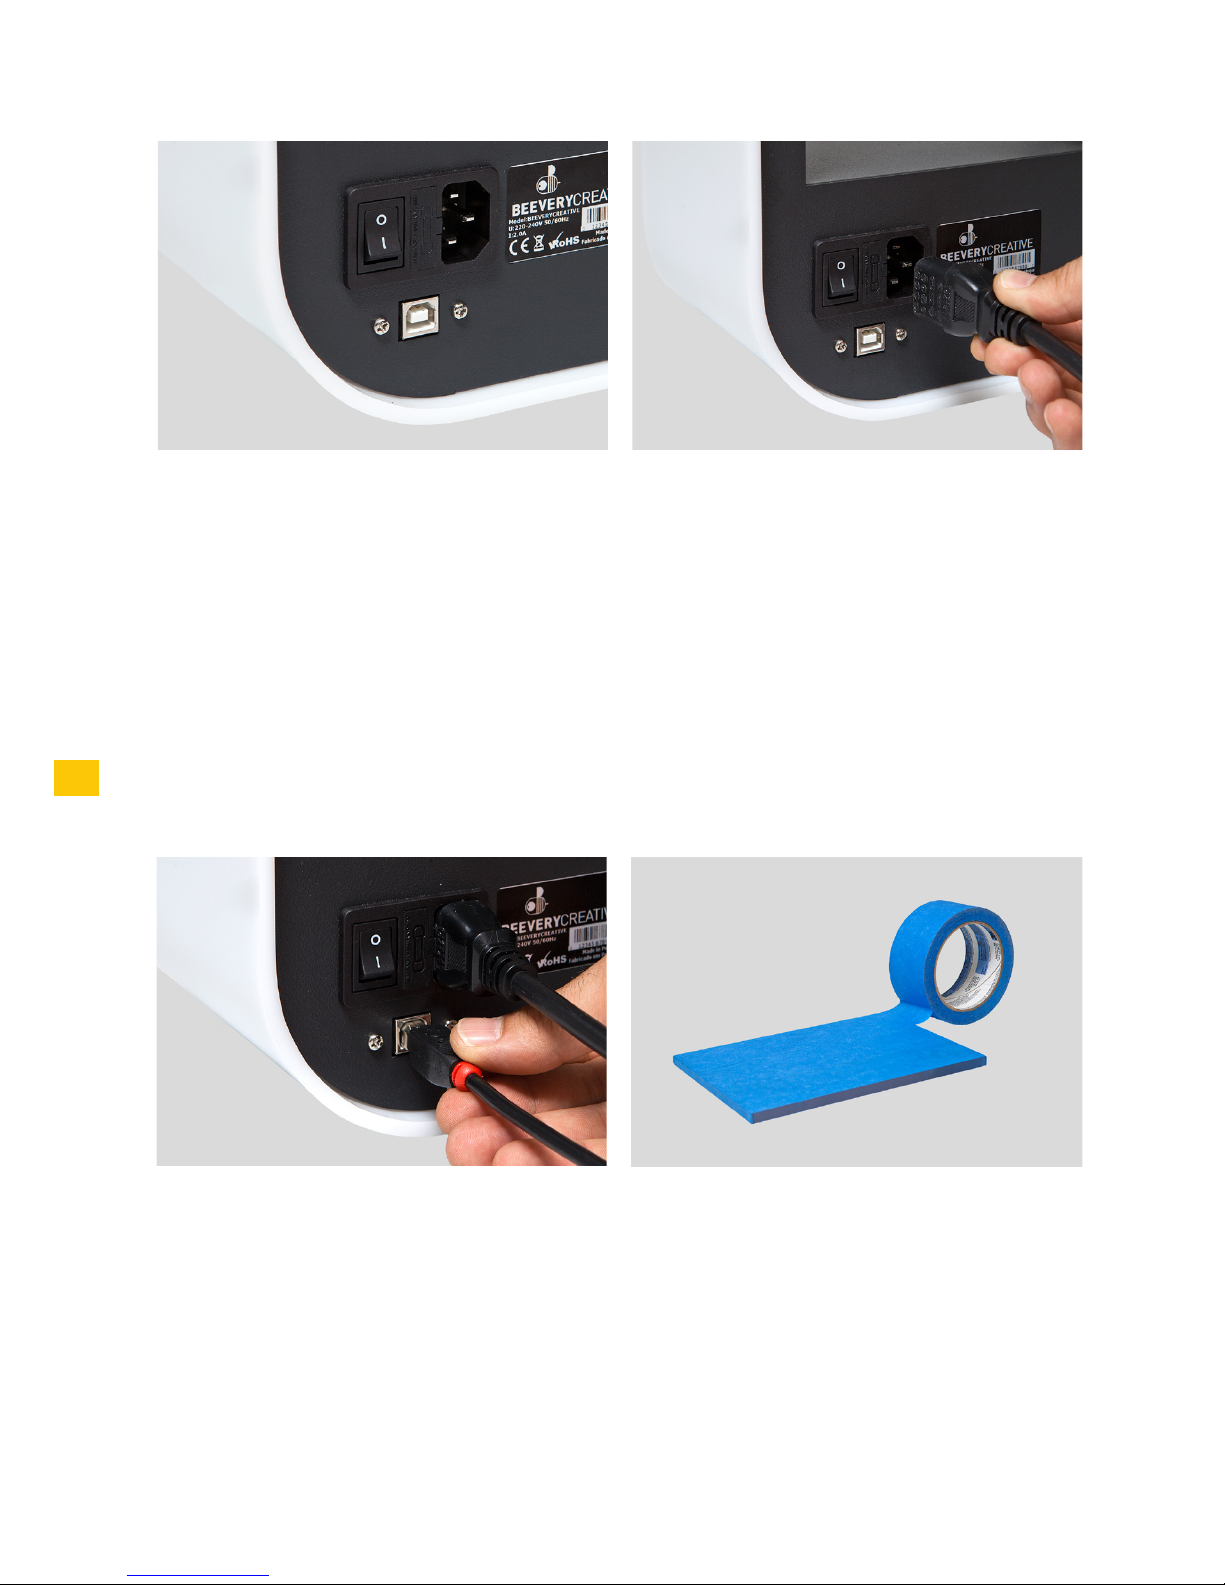
1. Conferma di aver rimosso tutto il materiale usato per imballare la stampante
e verifica che l’interruttore sia in posizione “off”.
2. Inserisci la spina di alimentazione, collegandola prima a BEETHEFIRST e poi
alla presa elettrica.
3. Collega il cavo USB alla BEETHEFIRST e al computer.
4. Metti uno strato, ma solo uno, di nastro blu sul piano di stampa.
1
2
3
4
88
Page 89
89
7. Metti l’insieme (bobina + supporto) nella BEETHEFIRST.
8. Metti l’interruttore su “on”.
5 6
7 8
5. Metti il piano di stampa nella sua base.
6. Metti la bobina sul supporto. Fai attenzione a tenere sempre senza gioco
l’avvolgimento del filamento, altrimenti potrebbe creare dei nodi e bloccare la
stampa.
Page 90

90
COME STAMPARE
1. Conferma che il piano di stampa abbia il nastro blu in buono stato. Se è
danneggiato sostituiscilo, così come spiegato nel punto 4 di ‘Installazione della
BEETHEFIRST’.
2. Conferma che non vi siano oggetti o resti di filamento sul piano di stampa.
3. Importa il modello 3D che desideri stampare. Puoi trovare dei modelli 3D on-
line o creare il tuo modello 3D ricorrendo a un software di modeling (non incluso).
4. Conferma di aver seguito i passi dell’assistente di BEESOFT per la taratura
della stampante.
5. Clicca sul pulsante “Gallery Menu” su BEESOFT e scegli il file che hai importa-
to.
6. Clicca sul pulsante “Stampa” e seleziona le opzioni di stampa desiderate.
7. BEESOFT preparerà il file per la stampa (processo chiamato “slicing”), che
potrà durare alcuni minuti. Quando sarà terminato, avrà inizio la stampa.
Page 91
91
DOPO LA STAMPA
Quando la stampa è terminata, togli l’oggetto dal piano di stampa. Prova a farlo a
mano, delicatamente, senza provocare danni. Se non riesci usa la spatola tangenzialmente al piano in modo da non danneggiare il piano di stampa. Se nessuno dei
metodi precedenti funziona, togli il nastro blu per rimuovere l’oggetto. Non dimenticarti di rimetterlo prima della stampa successiva.
Per spegnere completamente la tua BEETHEFIRST, occorre sempre staccare il filo
dalla presa.
RISOLUZIONE DI PROBLEMI
Ti consigliamo di leggere le FAQ e la Risoluzione di Problemi che troverai sul
portale www.beeverycreative.com. Se non riesci a trovare una soluzione al problema, ti preghiamo di contattare la nostra Assistenza al Cliente tramite il formulario
disponibile sul portale di cui sopra.
Page 92

3. SPECIFICHE TECNICHE
Page 93

93
RISOLUZIONE DI STRATO
TECNOLOGIA DI STAMPA
MATERIALE DI STAMPA
VOLUME DI STAMPA
VOLUME DI STAMPA
DIAMETRO DELL’EROGATORE DELL’ESTRUSORE
MATERIALI DELLA STRUTTURA
DIMENSIONE DELLA STAMPANTE (c/ s/ bobina)
PESO
TEMP.
TEMP. DI STOCCAGGIO
INGRESSO AC
CONSUMO ENERGETICO
CERTIFICAZIONI
CONNETTIVITÀ
ACCESSORI INCLUSI BEEPACK
REQUISITI MINIMI DEL SISTEMA
TIPO DI FILE
TARATURA
REQUISITI MINIMI DI HARDWARE (PC)
REQUISITI MINIMI DI HARDWARE (MAC)
50 | 100 | 200 | 300 micron
FFF
PLA (ø1.75mm)
190 x 135 x 125mm
Non applicabile alla tecnologia del PLA
0.4mm
Corpo metallico verniciato con polvere ad
alta qualità | Finitura esterna in acrilico
bianco | Guide lineari in acciaio | Piano di
stampa in policarbonato rimovibile
400 x 140 x 400mm
9,5 Kg
15-30ºC
0-30ºC
100-120VAC | 3.0A | 50-60Hz
200-240VAC | 2.0A | 50-60Hz
Basso (circa 90W)
CE | GS | UL | ISTA (1A)
USB
Borsa per trasporto | Bobina a filamento
nero Rullo di nastro blu | Cavo di alimentazione specifico per la zona | Cavo USB |
Spatola | Pinza | Chiave esagonale
Windows (7+)
Linux (12.04+)
Mac OS X (10.8 | 10.9+)
.stl
Semiautomatica con supporto del Software
Core i3 | AMD Phenom II |AMD Athlon X2
2GB RAM | 500MB spazio libero nel disco |
512 MB scheda grafica dedicata (GPU)
fine 2008+
Page 94

©2015 BEEVERYCREATIVE
www.beeverycreative.com
All rights reserved.
 Loading...