

Page 1

BEETLE /iPOS
Compact POS System
User Manual
Edition October 2005
Page 2

Co py right© Win cor Nix dorf In ter na tio nal GmbH, 2005
The re pro duc ti on, trans mis si on or use of this do cu ment or its con tents is not
per mit ted wit hout ex press aut ho ri ty.
Of fen ders will be li ab le for da ma ges.
All rights, in clu ding rights crea ted by pa tent grant or re gi stra ti on of a uti li ty mo del or
de sign, are re ser ved.
De li very sub ject to avai la bi li ty; tech ni cal mo di fi ca tions pos si ble.
Li nux™ is a re gis te red tra de mark of Li nus Tor valds
Pen ti um™ is a re gis te red tra de mark of the In tel Cor po ra ti on
MS-DOS™, Wind ows 95™, Wind ows 98™, Wind ows NT™, Wind ows 2000™,
Wind ows XP™ and Wind ows CE™ are re gis te red tra de marks of the Mi cro soft Cor po ra ti on
Pa nel Link™ is a re gis te red tra de mark of the In tel Cor po ra ti on
BEET LE™ is a re gis te red tra de mark of Win cor Nix dorf In ter na tio nal GmbH
Page 3

Contents
Ma nu fac tu rers Cer ti fi ca ti on................................................1
Tes ted Sa fe ty..............................................................................................1
Note on the la ser ........................................................................................1
FCC-Class A De cla ra ti on ............................................................................1
Im por tant no tes ...........................................................................................2
In tro duc ti on..........................................................................4
About this ma nu al .......................................................................................4
Care of the BEET LE /iPOS .........................................................................5
Re cy cling the BEET LE /iPOS .....................................................................5
War ran ty .....................................................................................................6
BEET LE /iPOS .....................................................................8
Ad van ta ges at a Glan ce..............................................................................8
BEET LE /iPOS Pe ri phe rals.........................................................................9
BEET LE /iPOS in a Net work.....................................................................10
Be fo re swit ching on the Sys tem ................................................................11
Un pa cking and che cking the Sys tem....................................................11
Set ting up the de vi ce ............................................................................12
Cab ling of the BEET LE /iPOS ..............................................................12
Dis con nec ting ca bles............................................................................15
Moun ting the Ca ble Co ver....................................................................16
Po wer Supp ly (212W)...........................................................................17
Con nec ting to the mains po wer supp ly .................................................18
Ba sic set tings .......................................................................................19
Ad ju sting the System’s Loud spea ker....................................................19
Light emit ting di ode (LED) ....................................................................19
Con nec ting pe ri phe rals .............................................................................19
Key bo ard (KYBD) .................................................................................20
COM1* and COM2*..............................................................................20
COM3 and COM4.................................................................................21
Dual Mo ni tor ........................................................................................21
Net work ................................................................................................21
Cash Dra wer ........................................................................................21
Mo du lar prin ters ..................................................................................22
USB (Uni ver sal Se ri al Bus) ..................................................................22
Page 4

In stal ling Wind ows Ope ra ting Sys tems ..........................24
Wind ows XP..............................................................................................25
BEET LE /iPOS - the com po nents .....................................26
Over view...................................................................................................26
Ca pa ca ti ve Touch Screen (Op ti on) ...........................................................29
Ge ne ral ................................................................................................29
Touch Screen and Sleep Mode ............................................................30
How to Ope ra te ....................................................................................30
Clea ning In struc tions ............................................................................31
Re sis ti ve Touch Screen (Op ti on) ..............................................................32
Ge ne ral ................................................................................................32
How to Ope ra te ....................................................................................33
Clea ning In struc tions ............................................................................33
Swi pe Card Rea der (op tio nal)...................................................................34
How to Ope ra te ....................................................................................34
Clea ning In struc tions ............................................................................34
Wai ter Lock (op tio nal) ...............................................................................35
Bar co de Scan ner (op tio nal) ......................................................................36
Con fi gu ra ti on va riants ......................................................37
Avai la bi li ty of In ter fa ces ............................................................................37
Sub mo du les for the CPU ..........................................................................38
POS Board (COM 3, COM 4, Cash Dra wer) ........................................38
LAN Adap ter 10/100 MBit .....................................................................38
PCI/ Mini PCI Adap ter with WLAN Mo dul .............................................38
PCI CRT Con trol ler (Dual Screen) .......................................................38
In stal ling the Sub mo du les.........................................................................39
In ser ting a POS Board ..............................................................................41
In ser ting a CRT Con trol ler (wit hout POS Board).......................................44
In ser ting a CRT Con trol ler (POS Board exi sting) ......................................44
Chan ge of the Hard Disk Dri ve .................................................................45
Start and ru nup be ha vi our................................................46
Re tail Soft wa re...................................................................48
Win cor Nix dorf Sto re So lu tions .................................................................48
Plat forms and Pro ducts.............................................................................49
Tra ding Post .........................................................................................49
TP.net...................................................................................................50
Page 5

TPLi nux ................................................................................................50
Tech no lo gy eva lua ti on..........................................................................50
Ap pen dix ............................................................................51
Tech ni cal Data for the BEET LE /iPOS......................................................51
Di men sions ...............................................................................................54
BEET LE /iPOS with a 12.1” screen ......................................................54
BEET LE /iPOS with a 15” screen .........................................................55
Glos sa ry....................................................................................................56
Ab bre via tions ............................................................................................58
Page 6

Manufacturers Certification
The de vi ce com plies with the re qui re ments of the EEC
di rec ti ve 89/336/EEC with re gard to ‘Elec tro mag ne tic
com pa ti bi li ty" and 73/23/ECC “Low Vol ta ge Di rec ti ve”.
The re fo re, you will find the CE mark on the de vi ce or pa cka ging.
Tested Safety
The POS sys tem has been pro vi ded with the sym bol
for “Tes ted Sa fe ty”.
In addition, the BEETLE has received the UL symbol
and cUL symbol.
Note on the la ser
FCC-Class A Declaration
This equip ment has been tes ted and found to com ply with the li mits for a
Class A di gi tal de vi ce, pur su ant to part 15 of the FCC Ru les. The se li mits
are de sig ned to pro vi de rea so na ble pro tec ti on against harm ful in ter fe ren ce
when the equip ment is ope ra ted in a com mer ci al en vi ron ment. This equip ment ge ne ra tes, uses, and can ra di ate ra dio fre quen cy ener gy and, if not in stal led and used in ac cor dan ce with the in struc ti on ma nu al, may cau se
harm ful in ter fe ren ce to ra dio com mu ni ca tions.
Ope ra ti on of this equip ment in a re si denti al area is li ke ly to cau se harm ful
in ter fe ren ce in which case the user will be re qui red to cor rect the in ter fe ren ce at his own ex pen se.
1
TESTED SAFETY
geprüfte geprüfte
SicherheitSicherheit
Page 7

Mo di fi ca tions not aut ho ri zed by the ma nu fac tu rer may void users aut ho ri ty
to ope ra te this de vi ce.
This class A di gi tal ap pa ra tus com plies with Ca na di an ICES-003.
Cet ap pa reil nu méri que de la clas se A est con for me à la nor me NMB-003
du Ca na da.
Important notes
The com pact POS sys tem BEETLE /iPOS con forms to the cur rent sa fe ty
stan dards for data pro ces sing equip ment.
n If this de vi ce is ta ken from a cold en vi ron ment into the ope ra ting room,
moi stu re con den sa ti on may form. The de vi ce must be ab so lu te ly dry
be fo re being put into ser vi ce; an ac cli ma ti za ti on pe ri od of at least two
hours must the re fo re be ob ser ved.
n This device is equipped with a safety-tested power cable and may be
connected only to a prescribed grounded-contact power socket.
n When setting up the device, ensure that the power socket on the device
and the grounded-contact power socket are easily accessible.
n To disconnect the device from the supply voltage completely, switch off
the device and disconnect the power plug.
n Whenever work of any kind is done on the device, as well as when data
cables are plugged and unplugged, the device must be completely
disconnected from the line voltage. To do so, turn the device off and
unplug the power cord.
n Ensure that no foreign objects (c.g. office clips) find their way into the
device, as this may lead to electric shocks or short-circuits.
n Never plug in or unplug data communication lines during thunderstorms.
n Protect devices from vibrations, dust, moisture and heat.
n If liquids were spilled over your BEETLE /iPOS switch off the system and
disconnect the power plug. Dry the device with a cloth and leave it
switched off for a while.
2
IMPORTANT NOTES
Page 8

n Always dispose of used parts, such as batteries, in an environmentally
safe manner.
n The lithium battery must be disposed of in accordance with local
regulations for special waste.
n In emergencies (e.g. damaged housing or damaged power cable,
penetration by liquids or foreign bodies), the device must be switched off
immediately, the power plug disconnected and the Customer Service of
Wincor Nixdorf (WN) or your dealer must be notified.
n The device may only be repaired by authorized qualified personnel.
Unauthorized opening of the device and inexpertly carried-out repairs may
not only seriously jeopardize the safety of the user, but also cancel all
warranty and liability agreements.
n If the dis play ele ment is da ma ged and the li quid crys tal so lu ti on le aks out
onto your hands or clot hing, plea se wash your hands or clot hing
im me di ate ly un der run ning wa ter for at least 15 mi nu tes, using soap or
al co hol.
If the li quid co mes into con tact with your eyes, con sult a me di cal
doc tor im me di ate ly.
n You should connect your BEETLE or other IT-devices only to power
supply systems with separately guided protective earth conductor (PE).
This kind of electricity system is known as TN-S network. Do not use PEN
conductors!
Please also observe the recommendations of the norm DIN VDE 0100,
Part 540, Appendix C2 as well as EN50174-2, §5.4.3. Thus, you can help
to avoid possible malfunctions.
3
IMPORTANT NOTES
Page 9

Introduction
With the BEETLE /iPOS Win cor Nix dorf meets the gro wing de mands of the
re tail mar ket for so phis ti ca ted Point-of-Ser vi ce and Ki osk sys tem so lu tions.
De sig ned for food and ho spi ta li ty ser vi ces, the BEETLE /iPOS of fers an in te gra ted touch ter mi nal with foot print. The in no va ti ve con cept of the
BEETLE /iPOS in te gra tes the dis play, the cen tral pro ces sing unit and the
po wer supp ly unit in one hou sing. A va rie ty of op tions such as the use as
stand or wall moun ting sys tem, in te gra ted loud spea kers, in te gra ted scan ner
and prin ter en ab le the per for man ce of a com pre hen si ve ran ge of fea tu res.
About this manual
This ma nu al des cri bes the com pact POS sys tem BEETLE /iPOS.
This do cu men ta ti on is in ten ded to help you to work with the POS sys tem
and to ser ve as a re fe ren ce work. The de tai led tab le of con tents helps you
find the de si red in for ma ti on quick ly and ea si ly.
The first sec ti on des cri bes
n everything you need to do before switching on the POS system and
how to connect peripherals to the BEETLE /iPOS.
The se cond sec ti on con tains
n the in stal la ti on of Windows operating systems.
The third sec ti on pro vi des
n a brief overview of the Power Managementsystem.
The fourth sec ti on con tains
n a brief overview of the components of your BEETLE system.
The five sec ti on pro vi des
n the pos si ble con fi gu ra ti on va riants of your BEETLE /iPOS
Sec ti on six
n a brief overview of the Wincor Nixdorf Retail Software.
ABOUT THIS MANUAL
4
Page 10

The Ap pen dix
n contains the most important technical data, a glossary and a list of
abbreviations.
No tes in the ma nu al are mar ked by this sym bol.
This sym bol is used for war nings.
The type and sco pe of ap pli ca ti on pro grams de pend on the cus to mer’s own
se lec ti on; the re fo re, soft wa re will not be dis cus sed furt her in this ma nu al.
Se pa ra te ma nu als are in clu ded in the sco pe of the con nec tab le pe ri phe rals.
For this rea son, a more de tai led des crip ti on of the se de vi ces will not be pro vi ded here. For more in for ma ti on see the re le vant ma nu als.
Care of the BEETLE /iPOS
Cle an your BEETLE /iPOS at re gu lar in ter vals with a suit ab le plas tic-sur fa ce
clea ner.
Make sure that the po wer plug is dis con nec ted, con nec tor ca bles are un plug ged and that no li quid finds its way into the de vi ce.
The glass sur fa ce of your Touch Screen should be clea ned with a mild,
com mer ci al ly avai la ble glass clea ning pro duct. All pH neut ral ma te ri als
(pH 6 to 8) are good for clea ning.
Recycling the BEETLE /iPOS
En vi ron men tal pro tec ti on does not be gin when
time co mes to dis po se of the BEETLE; it
be gins with the ma nu fac tu rer. This pro duct was
de sig ned ac cor ding to our in ter nal norm
“En vi ron men tal cons ci ous pro duct de sign and
de ve lop ment”.
The com pact BEETLE /iPOS sys tem is ma nu fac tur ed wit hout the use of
CFCs and CCHS and is pro du ced main ly from reu sa ble com po nents and
ma te ri als.
5
CARE OF THE BEETLE /IPOS
Page 11

6
The pro ces sed plas tics can, for the most part, be re cy cled. Even the pre ci ous me tals can be re co ver ed, thus sa ving ener gy and cost ly raw ma te ri als.
Plea se do not stick la bels onto plas tic case parts. This would help us to
re-use com po nents and ma te ri al.
You can pro tect our en vi ron ment by swit ching on your equip ment only when
it is ac tu al ly nee ded. If pos si ble, even avoid the stand-by-mode as this was tes ener gy, too. Also switch your equip ment off when you take a lon ger
bre ak or fi nish your work.
The re are still some parts that are not reu sa ble. Win cor Nix dorf gua ran tees
the en vi ron men tal ly safe dis po sal of the se parts in a Re cy cling Cen ter,
which is cer ti fied pur su ant to ISO 9001 and ISO 14001.
So don’t sim ply throw your BEETLE sys tem on the scrap heap when it has
ser ved its time, but take ad van ta ge of the en vi ron men tal ly smart, up-to-date
re cy cling me thods!
Plea se con tact your com pe tent branch or the Re cy cling Cen ter Pa der born
(for Eu ro pe an coun tries) for in for ma ti on on how to re turn and re-use de vi ces
and dis po sa ble ma ter ials un der the fol lo wing mail ad dress:
Email: info@win cor-nix dorf.com
We look for ward to your mail.
Warranty
Win cor Nix dorf gua ran tees ge ne ral ly a war ran ty en ga ge ment for 12 months
be gin ning with the date of de li very resp. the date of acceptance. This war ran ty en ga ge ment co vers all tho se da ma ges which oc cur de spi te a nor mal
use of the pro duct.
Da ma ges be cau se of
n improper or insufficient maintenance,
n improper use of the product or unauthorized modifications of the product,
n inadequate location or surroundings
will not be co ver ed by the war ran ty.
RECYCLING THE BEETLE /IPOS
Page 12

For de tails plea se con sult your con tract do cu ments.
All parts of the pro duct which are sub ject to wear and tear are not in clu ded
in the war ran ty en ga ge ment.
Plea se or der spa re parts at the Win cor Nix dorf cus to mer ser vi ce.
7
WARRANTY
Page 13

BEETLE /iPOS
Advantages at a Glance
n Ergonomic Terminal Workplace
n Designed for Touch Operation
n 12.1”/15” TFT Flat Screen (Capacative or Resistive Touch Technology)
n Splash proof Design
n Multimedia Capabilities
n Magnetic/ Smart Card Reader
n User Identification with waiter lock
n Motion and Proximity Sensor
n Stand or Wall Mounting Options
n Hard Disk or Flash Disk
n Intel Processor Pentium 4 mobile Technologie
As the re is this great deal of sco pe for im ple men ting the BEETLE /iPOS, it
can be ap plied in all tra de mar ket seg ments like spe cia list re tai lers, de part ment sto res, self-ser vi ce sto res or in res tau rants and pubs.
The il lu stra tions be low show you how your com pact POS sys tem can grow from a scan ner to in te gra ti on in a net work.
ADVANTAGES AT A GLANCE
8
Page 14
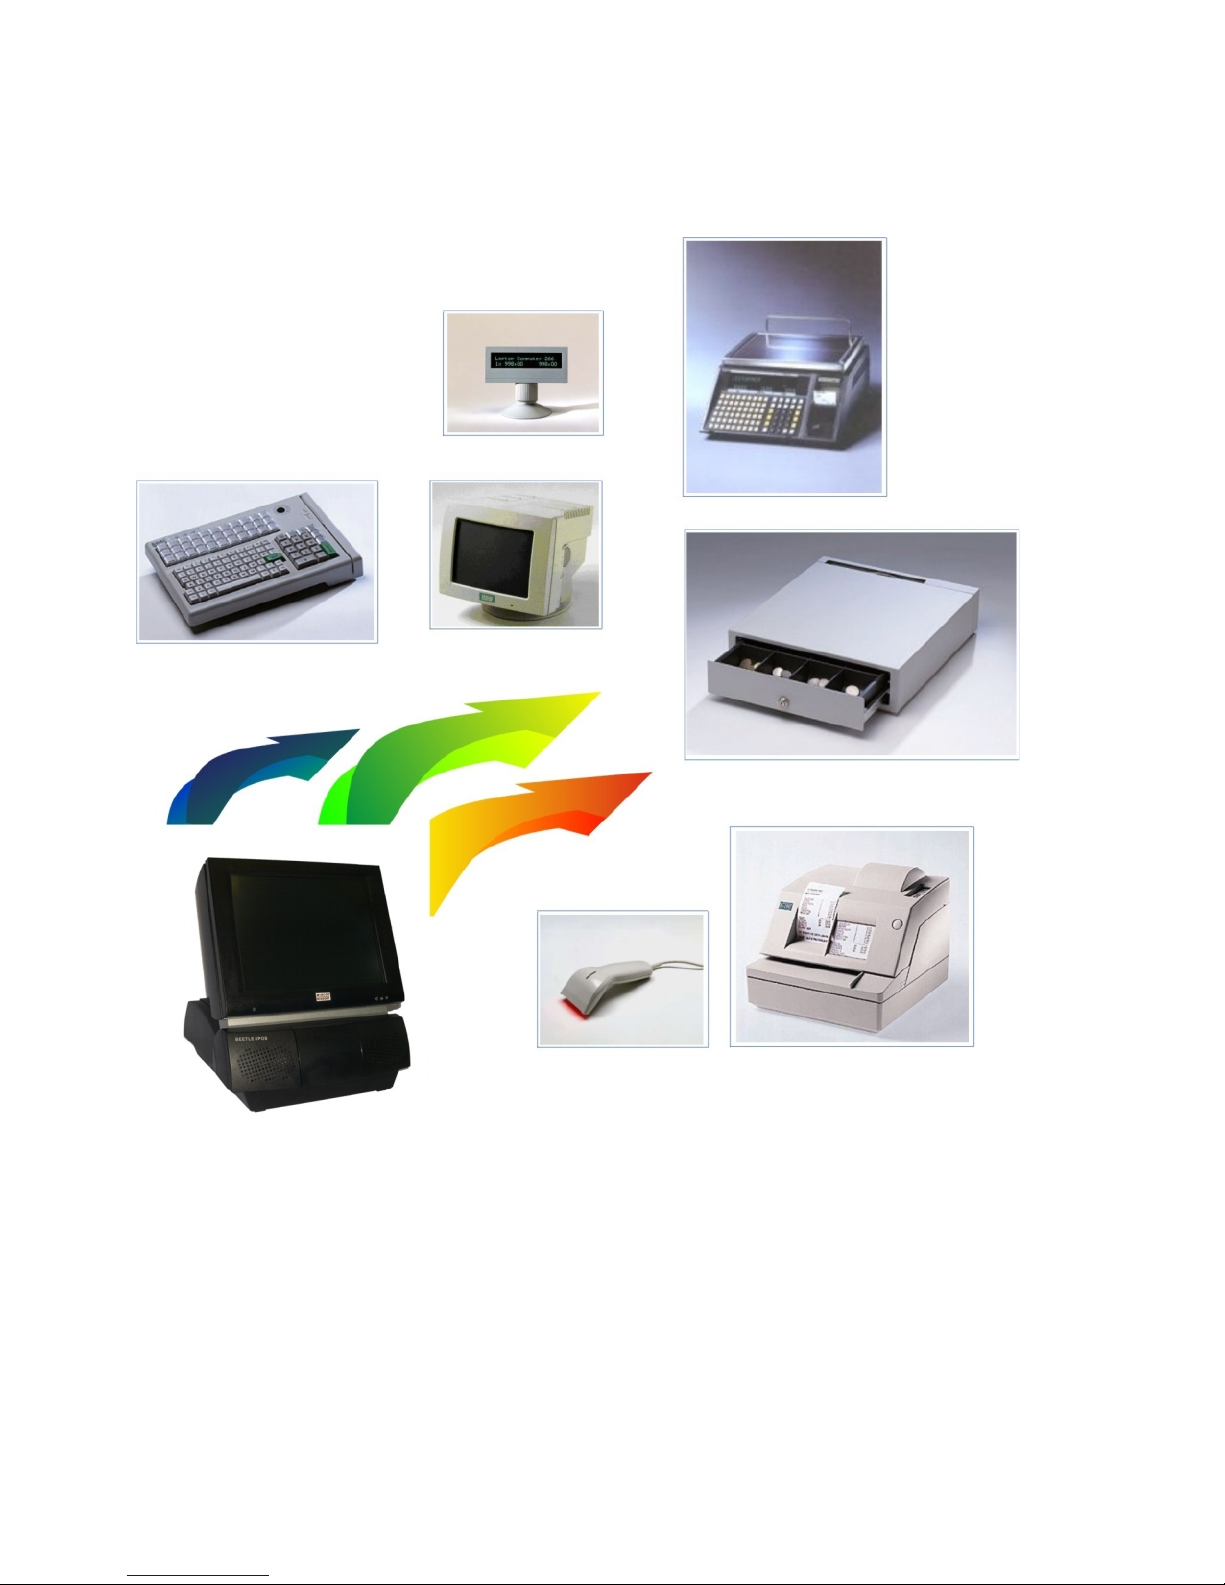
BEET LE /iPOS Pe ri phe rals
9
BEET LE /IPOS PE RI PHE RALS
Printer
Scanner
Cash Drawer
Scale
Keyboard
Cus to mer Display
Monitor
Page 15
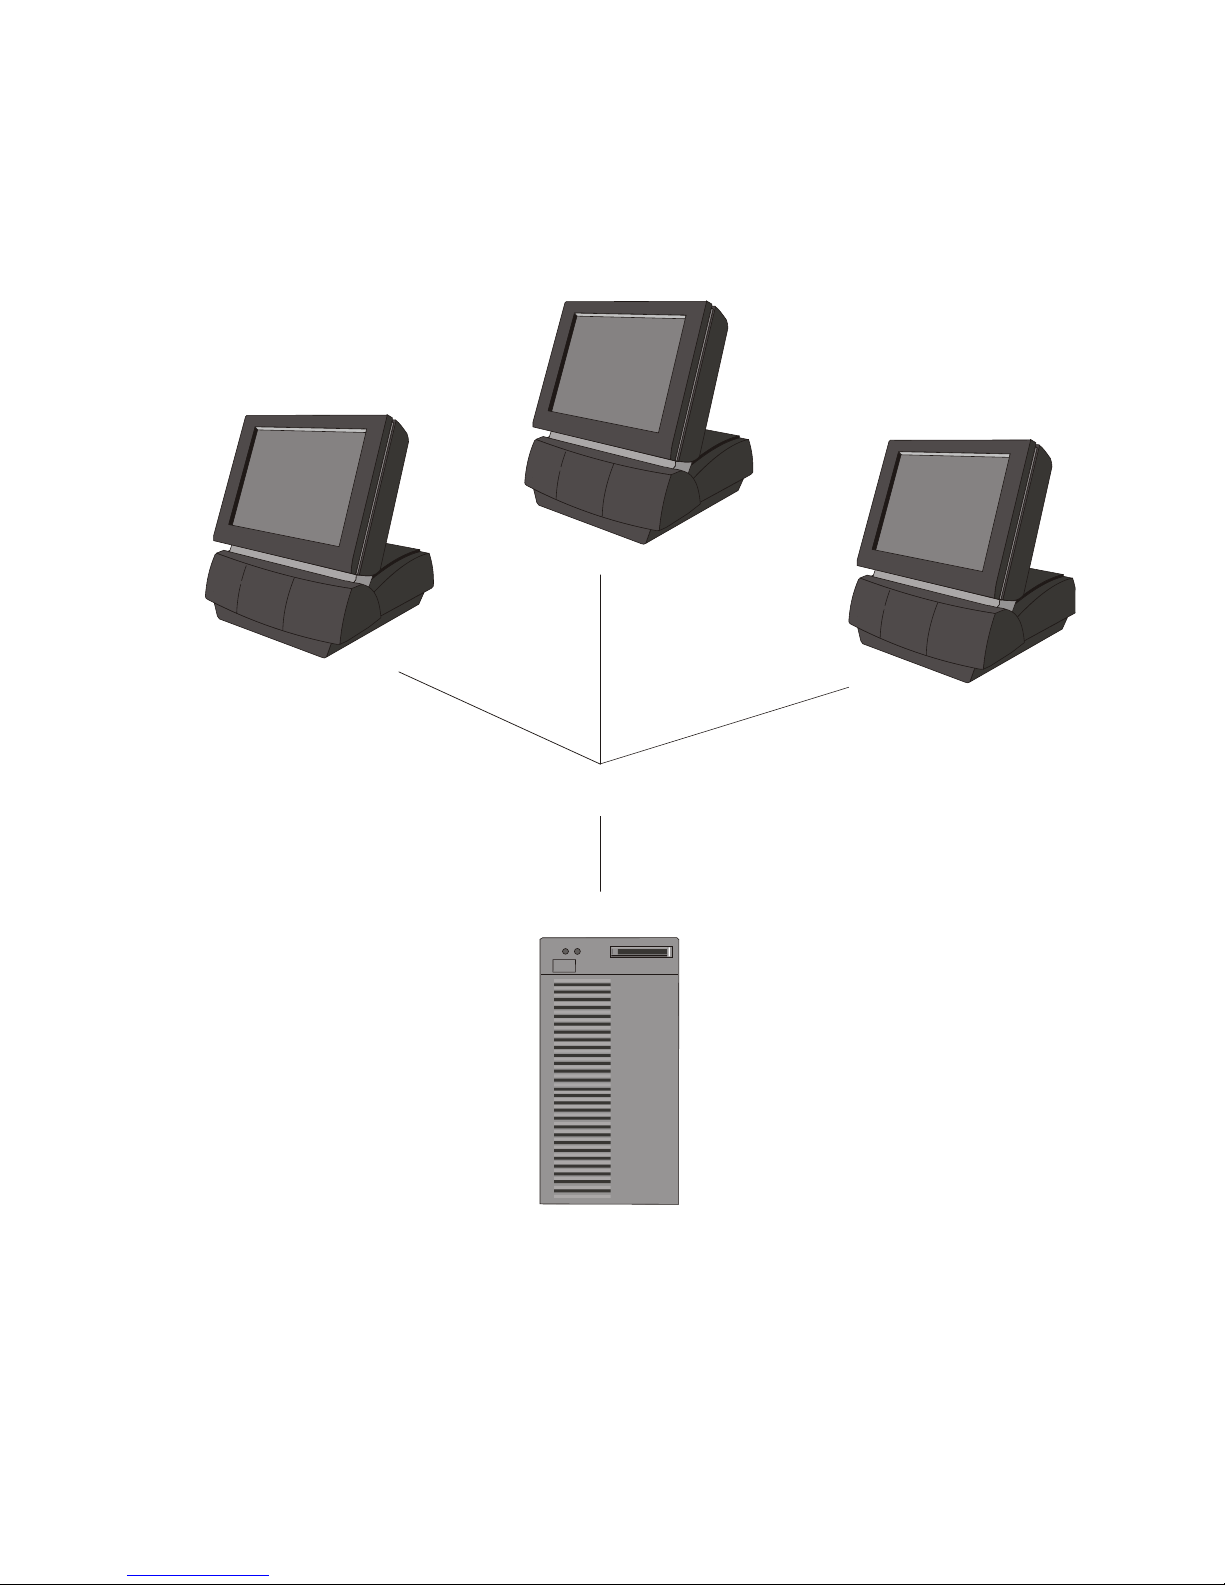
BEET LE /iPOS in a Network
BEET LE /IPOS IN A NETWORK
10
Server
Ethernet 10/100 Base T
Page 16
Before switching on the System
Un pac king and chec king the Sys tem
Un pack the parts and check to see whet her the de li very mat ches the in for ma ti on on the de li very note.
The car ton con tains the ba sic unit and a coun try-spe ci fic ac ces so ries kit.
Some or de red com po si ti on may be in stal led.
If da ma ge has oc cur red du ring ship ping or if the pa cka ge con tents do not
match the de li very note, prompt ly in form your Win cor Nix dorf sa les out let.
Plea se in di ca te the num ber of your de li very ti cket and de li very ti cket po si ti on
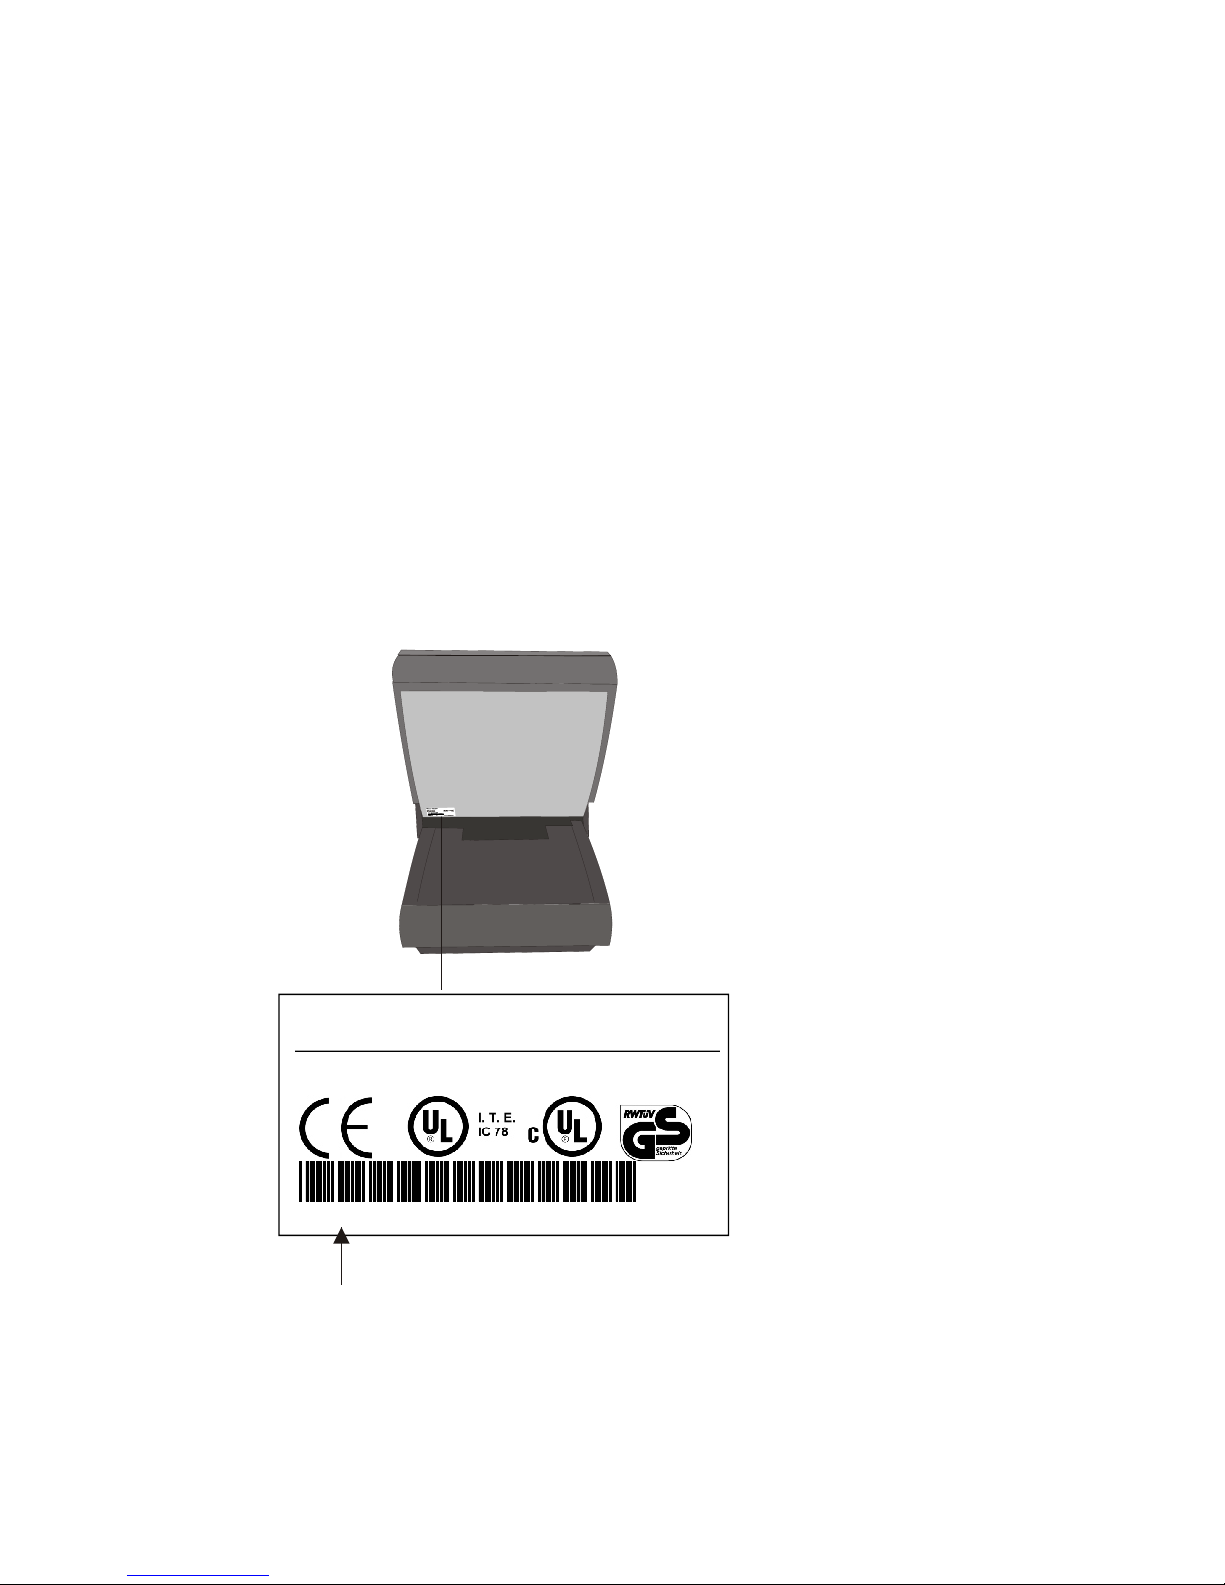
and se ri al num ber of the re spec ti ve de vi ce. The se ri al num ber can be found
on the la bel il lu stra ted be low which is lo ca ted at the rear of the hou sing; it
may be necessary to remove the cable cover.
The se ri al num ber is lo ca ted on the la bel be low the bar code.
CAB LING OF THE BEET LE /IPOS
11
Wincor Nixdorf
Made in Singapore
WN0199901107
BEETLE /iPOS P4m
017500 000000
100-120V / 200-240V
50/60 Hz 5/3 A
Page 17
It is ab so lu te ly ne ces sa ry to check the functi on of the ori gi nal equip ment be fo re you per form any chan ges (e.g. by in stal ling an ex pan si on card). Only
then is it pos si ble to ac cept a functio nal defect as a claim.
Trans port the de vi ce only in its ori gi nal pa cka ging (to pro tect it against im pact and shock).
Set ting up the de vi ce
Set up the BEETLE sys tem whe re it will not be ex po sed to ex tre me en vi ron men tal con di tions. Pro tect the de vi ce from vi brat ions, dust, moi stu re, heat
and strong mag ne tic fields.
If the equip ment is to be fit ted, you must en su re that the spe ci fied mi ni mum
dis tan ces are main tai ned and cons tant ven ti la ti on is pro vi ded. The mi ni mum
dis tan ce up wards is 10 mm. The im me di ate am bient tem pe ra tu re of the sys tem must not ex ceed 40° C/104 °F. The se re qui re ments are met, for ex am ple, if the equip ment is not built into an en clo sed pie ce of fur ni tu re.
Cab ling of the BEET LE /iPOS
Al ways make sure that the sys tem is swit ched off when you do cab ling
works.
In stall the sys tem by fol lo wing the steps des cri bed be low:
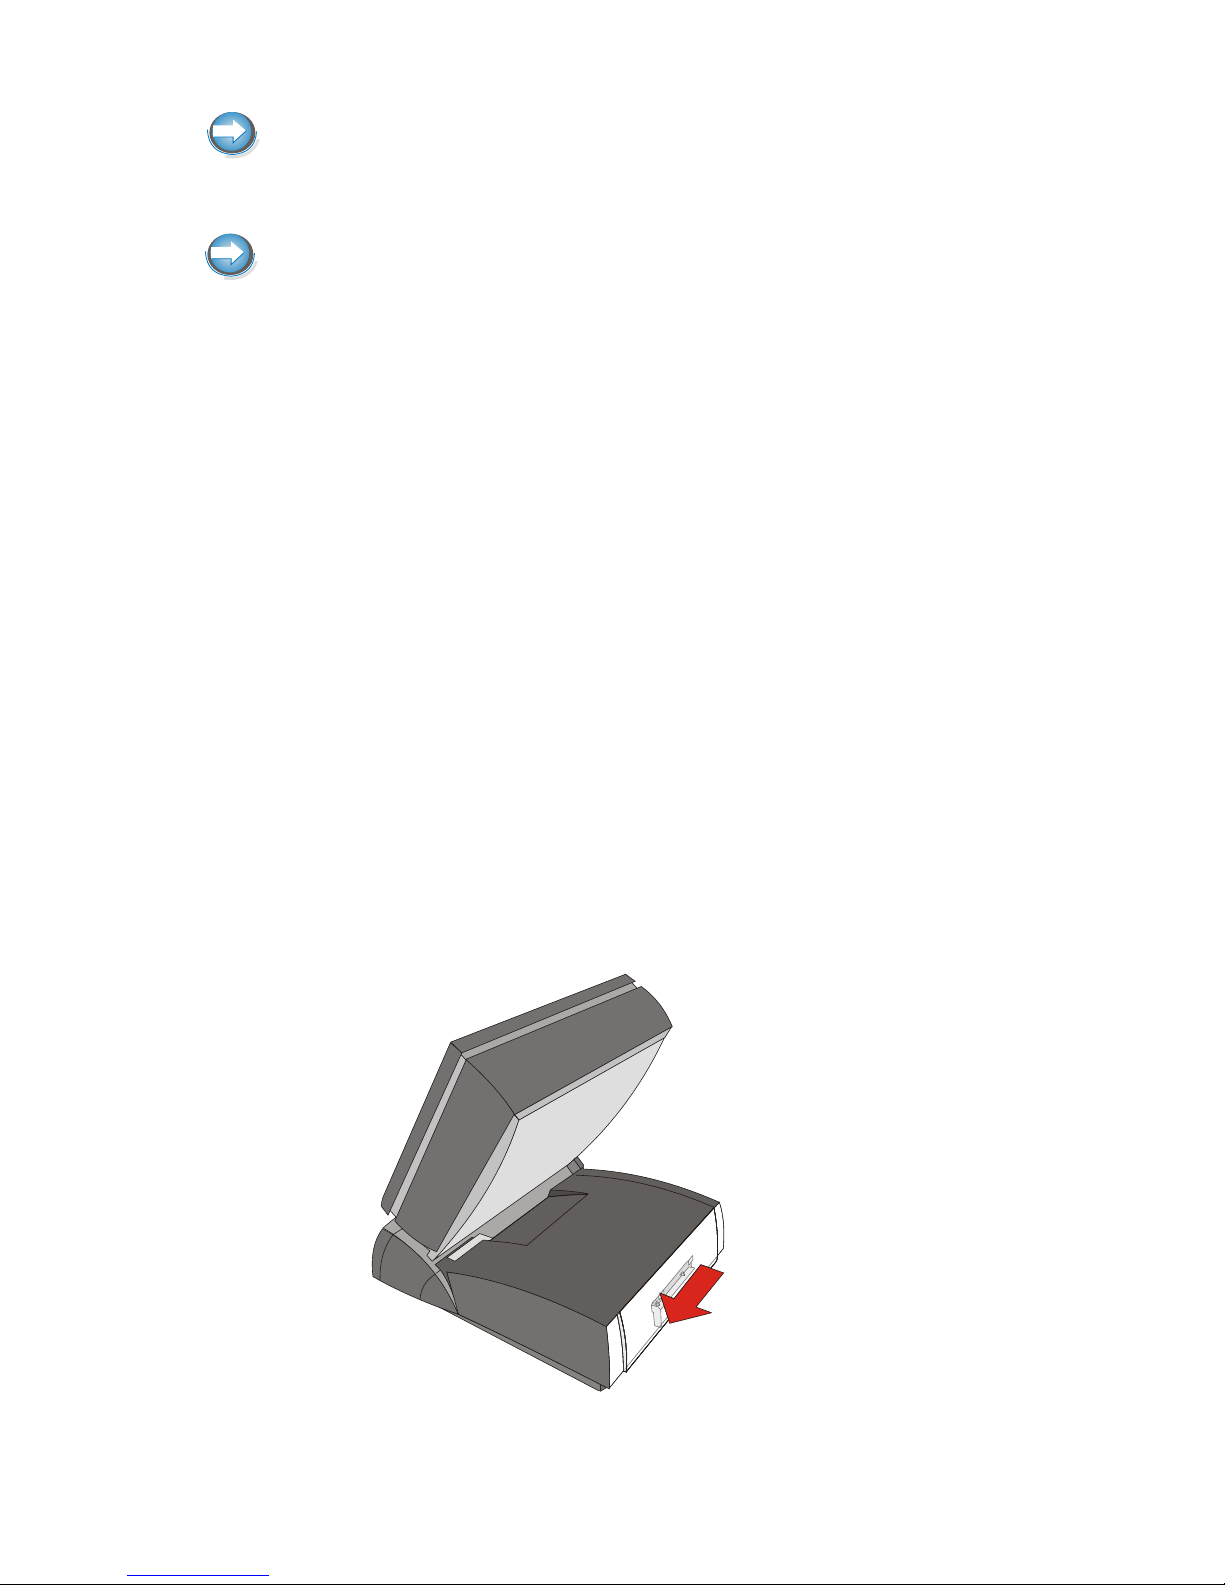
n The cable cover must be removed, if present.
Un lock the ca ble
co ver.
12
CAB LING OF THE BEET LE /IPOS
Page 18
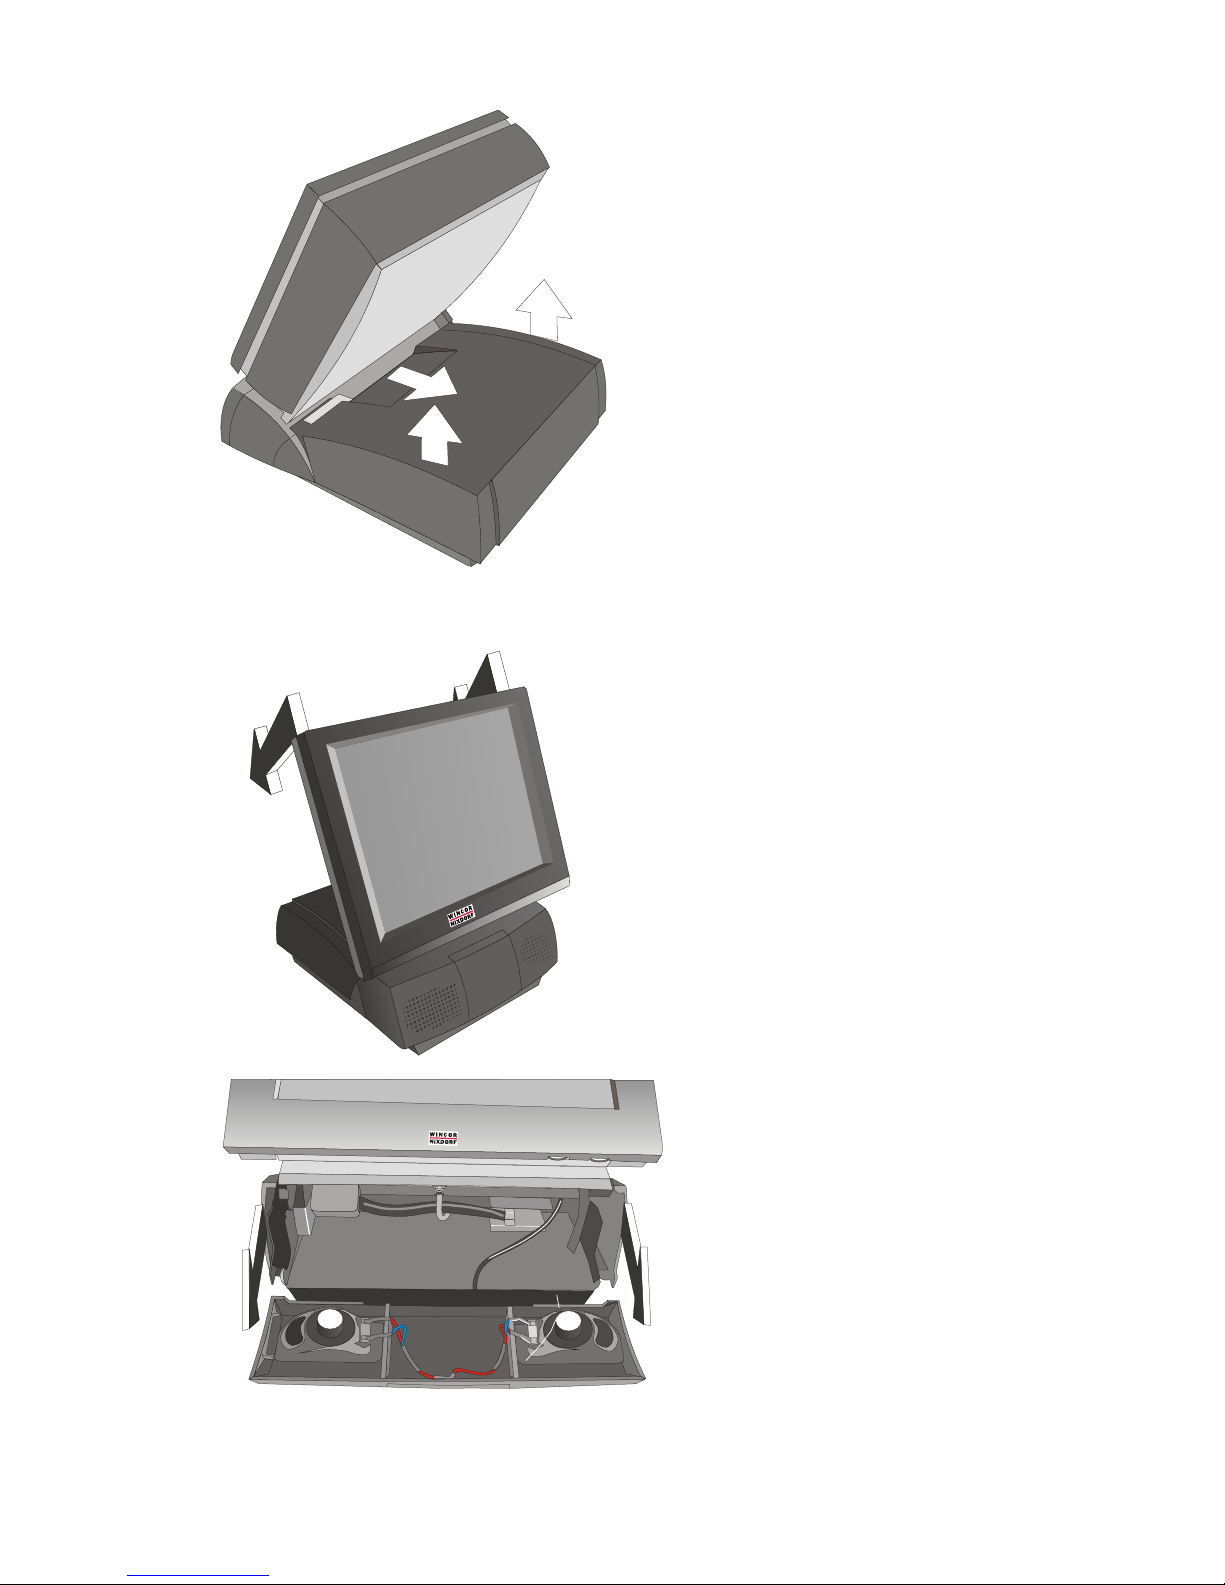
Press on the
cen ter of the ca ble
co ver and push it
bac kwards (1).
Take off the co ver
(2).
Re mo ve the port co ver on the bot tom side of the BEETLE sys tem:
Tilt the screen
bac kwards.
First re mo ve the
co ver of the loud spea ker. Now you
can ea si ly re ach
the ports.
13
CAB LING OF THE BEET LE /IPOS
Page 19
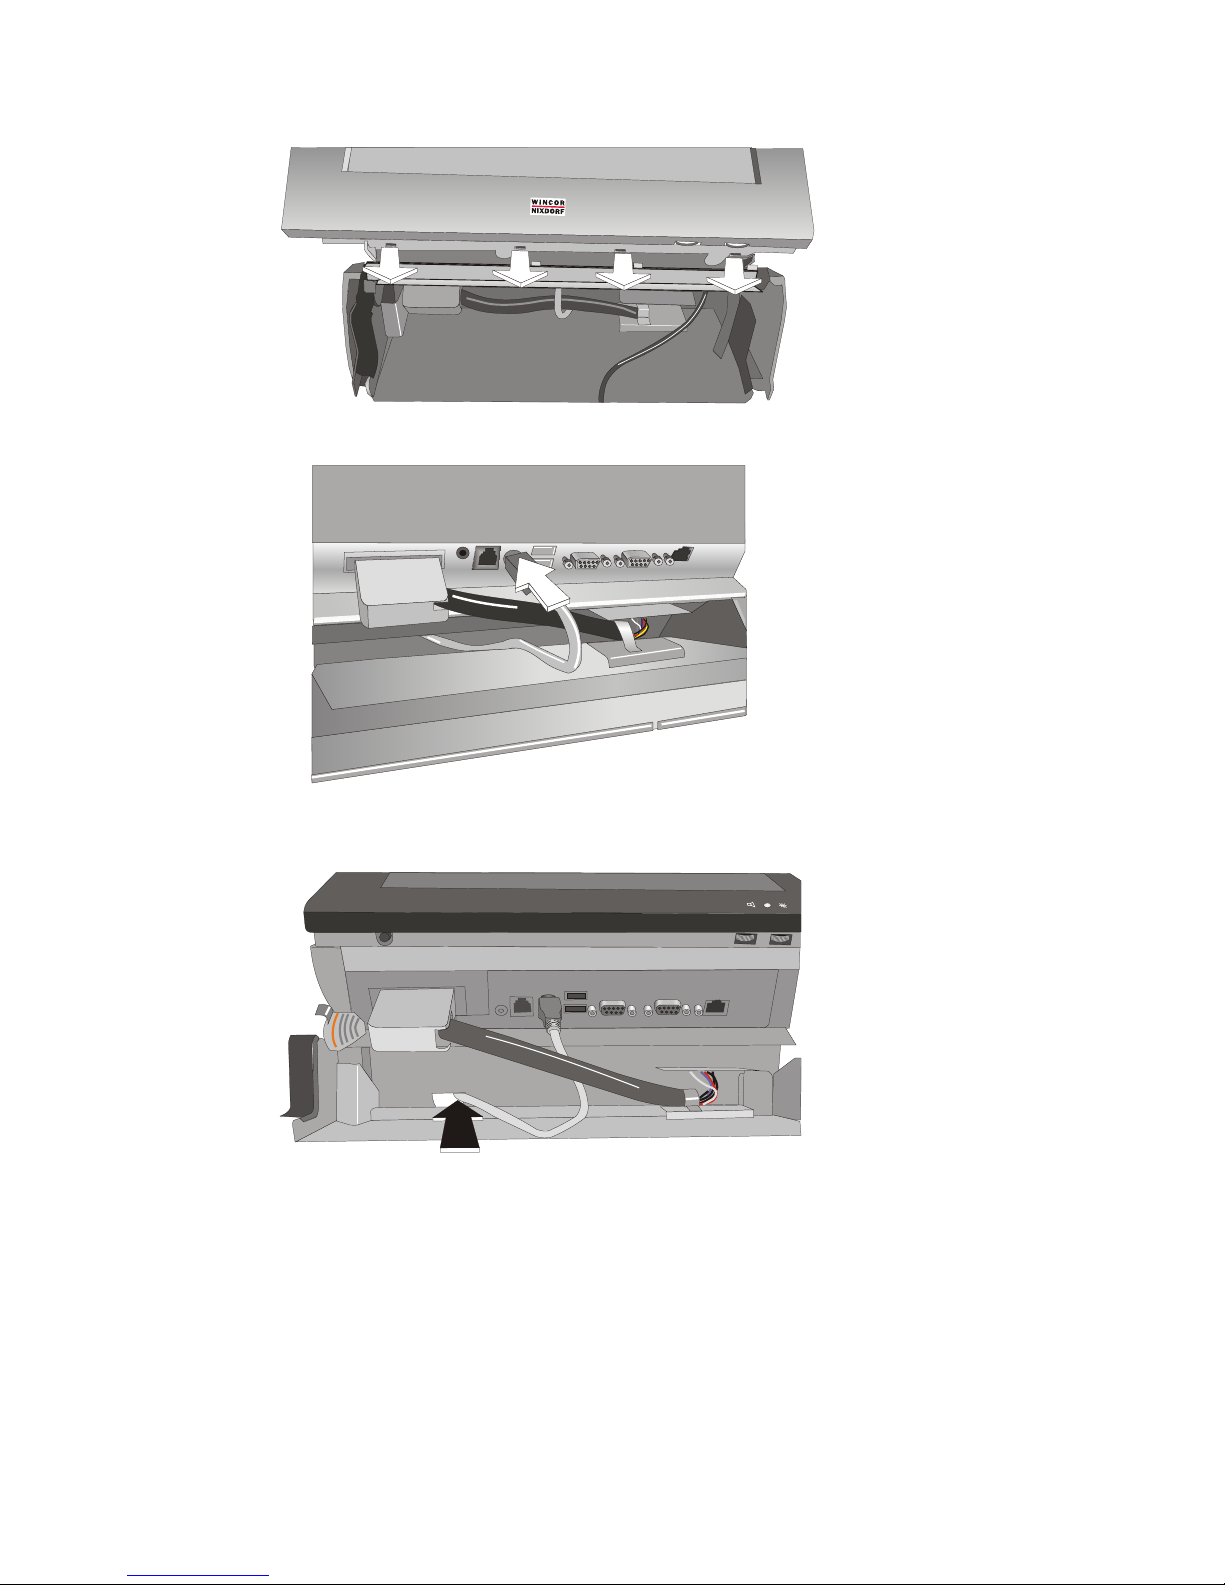
Pull the co ver in
your di rec ti on and
take it off.
Plug the ca bles.
In this case: the
key bo ard ca ble.
Lead the ca ble
through the back
cen ter so that af ter
com ple ting the
con nec ti on of the
ca bles all can fit
un der the ca ble
co ver.
Plug one end of the po wer ca ble into the so cket of the BEETLE /iPOS.
Clo se the ca ble co ver.
14
CAB LING OF THE BEET LE /IPOS
Page 20
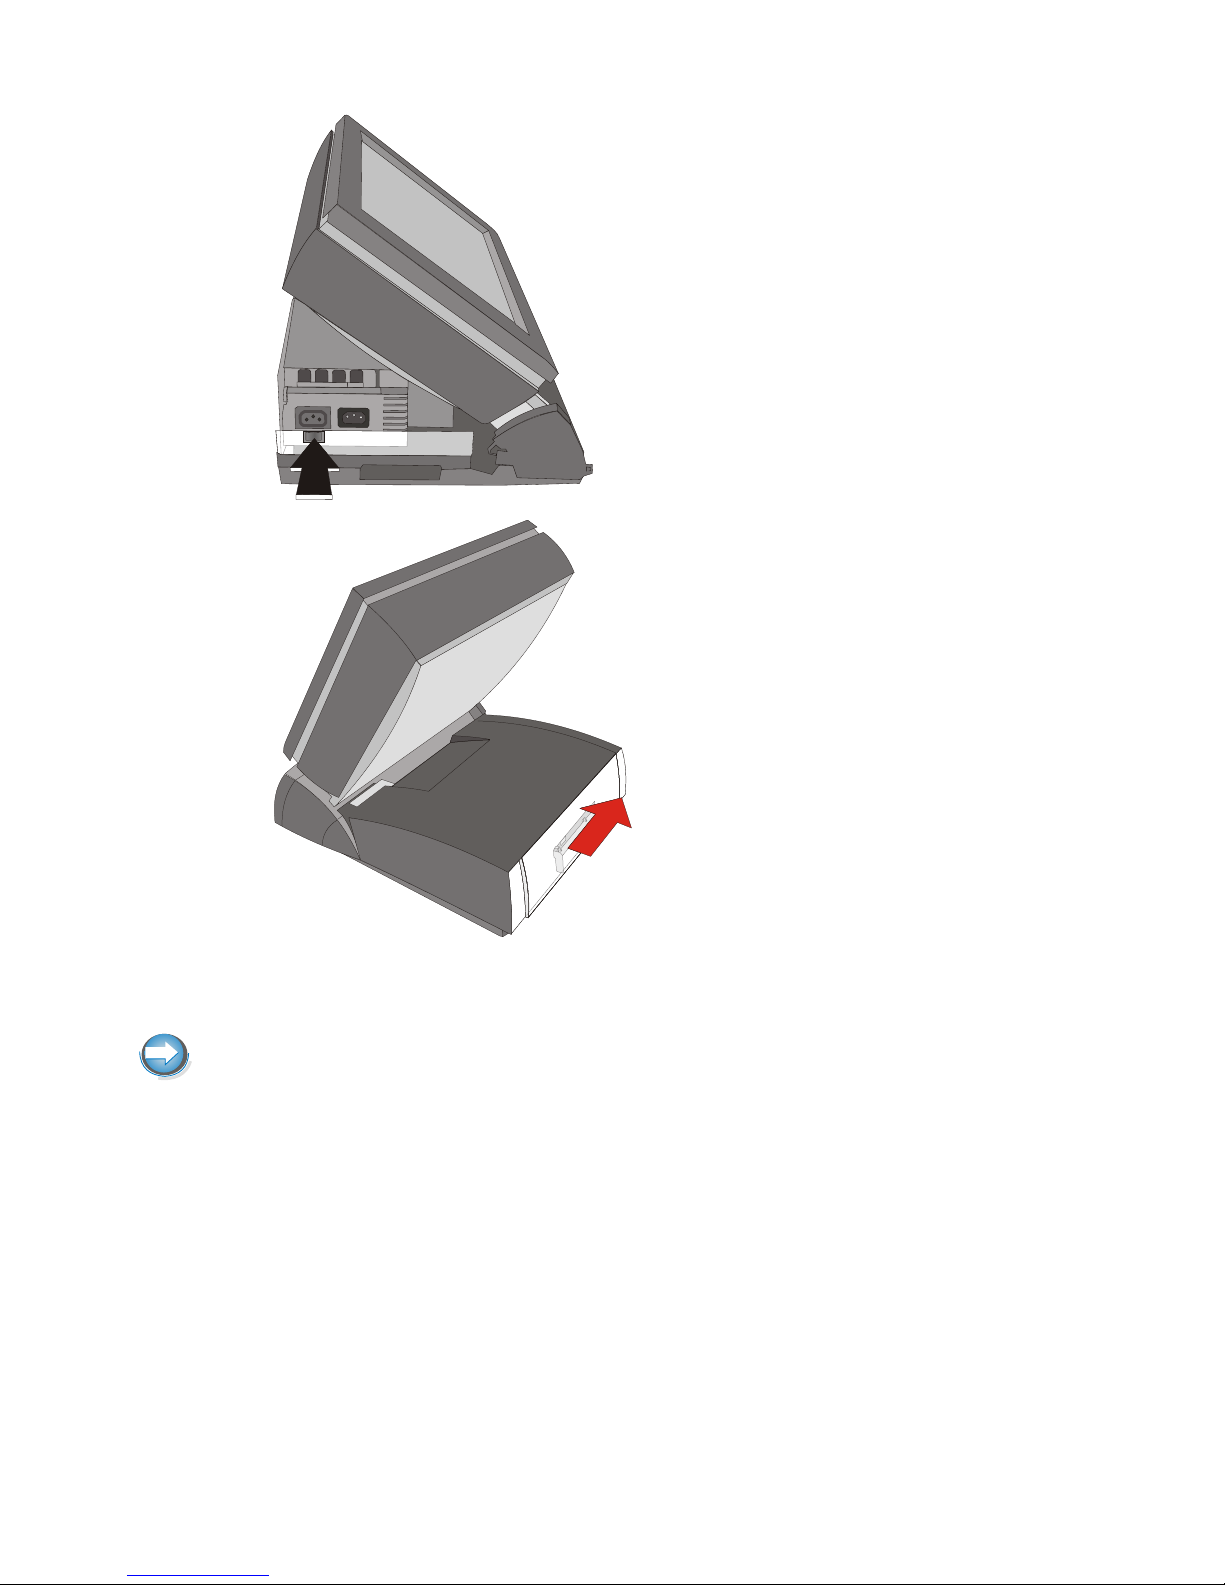
Switch on the
po wer supp ly.
Clo se the ca ble
co ver and mo ve it
from the rear to the
front side.
Lock the ca ble
co ver.
Con nect the ot her end of the po wer ca ble to the main po wer supp ly.
Ne ver con nect data ca bles or po wer supp ly ca bles with the sys tem swit ched
on (ex cep ti on: USB ca bles)!
Dis con nec ting ca bles
Ne ver un plug a ca ble by pul ling the ca ble but take hold of the ac tu al plug it self. Fol low the pro ce du re be low when dis con nec ting ca bles:
n Turn off all power and equipment switches.
n Remove the cable cover.
n Unplug all data communication cables from the sockets of the data
networks.
15
DIS CON NEC TING CA BLES
1
0
1
0
Page 21
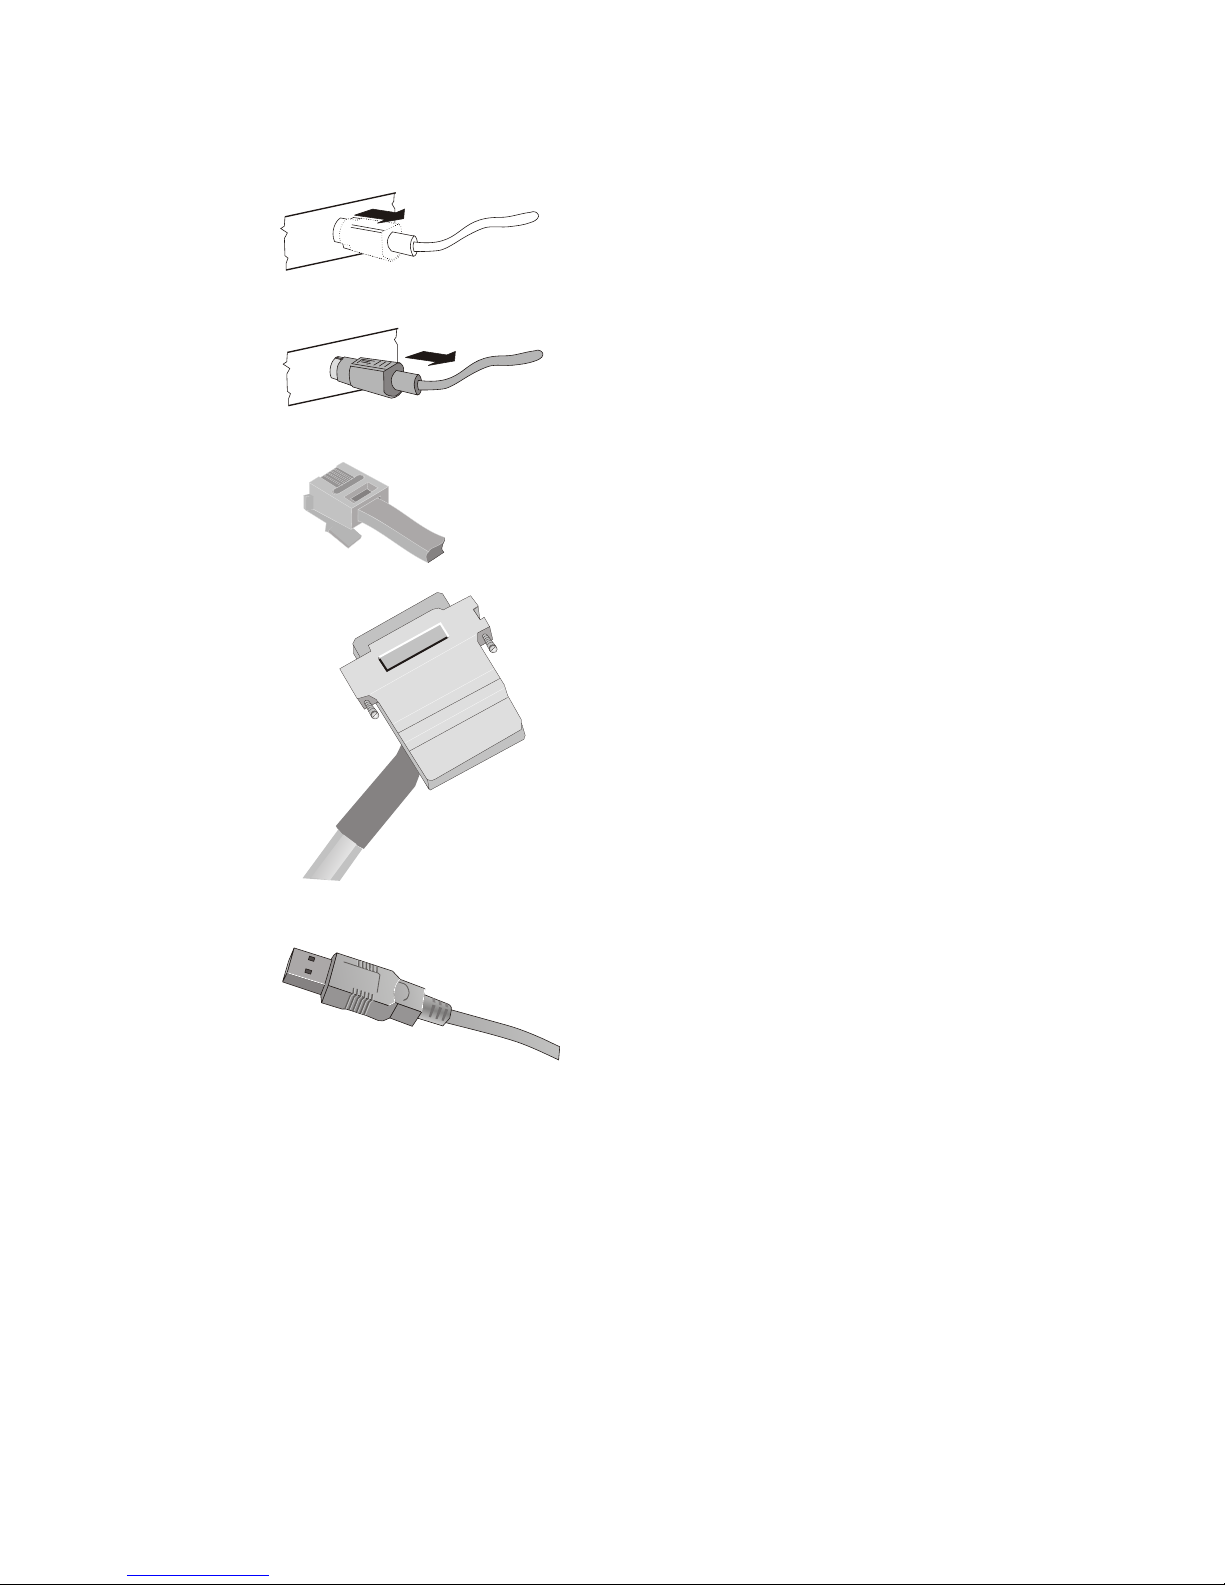
n Unplug all power plugs from the grounded-contact power sockets.
n Unplug all cables from the devices.
With MINI-DIN plugs, the plug re mains in ser ted
un til re lea sed.
Pull the plas tic co ve ring from the con nec ting
so cket with your thumb. The lock is re lea sed.
The me tal of the plug is vi si ble.
RJ12 and RJ45 plugs lock in when you in sert
them. To re lea se them push the latch un der the
plug to the top.
The D-sub typ con nec tor is used for par al lel or
se ri al in ter fa ces. Re lea se the con nec tor by
loo se ning the two screws.
Take hold of the USB con nec tor hou sing and
re lea se the con nec ti on.
Moun ting the Ca ble Co ver
BEETLE /iPOS is de li ver ed with a ca ble co ver. You should have laid the ca bles be fo re ap ply ing this ca ble co ver on the back of the de vi ce.
No tools are re qui red, the co ver can be re lea sed ma nu al ly.
16
MOUN TING THE CA BLE CO VER
Page 22
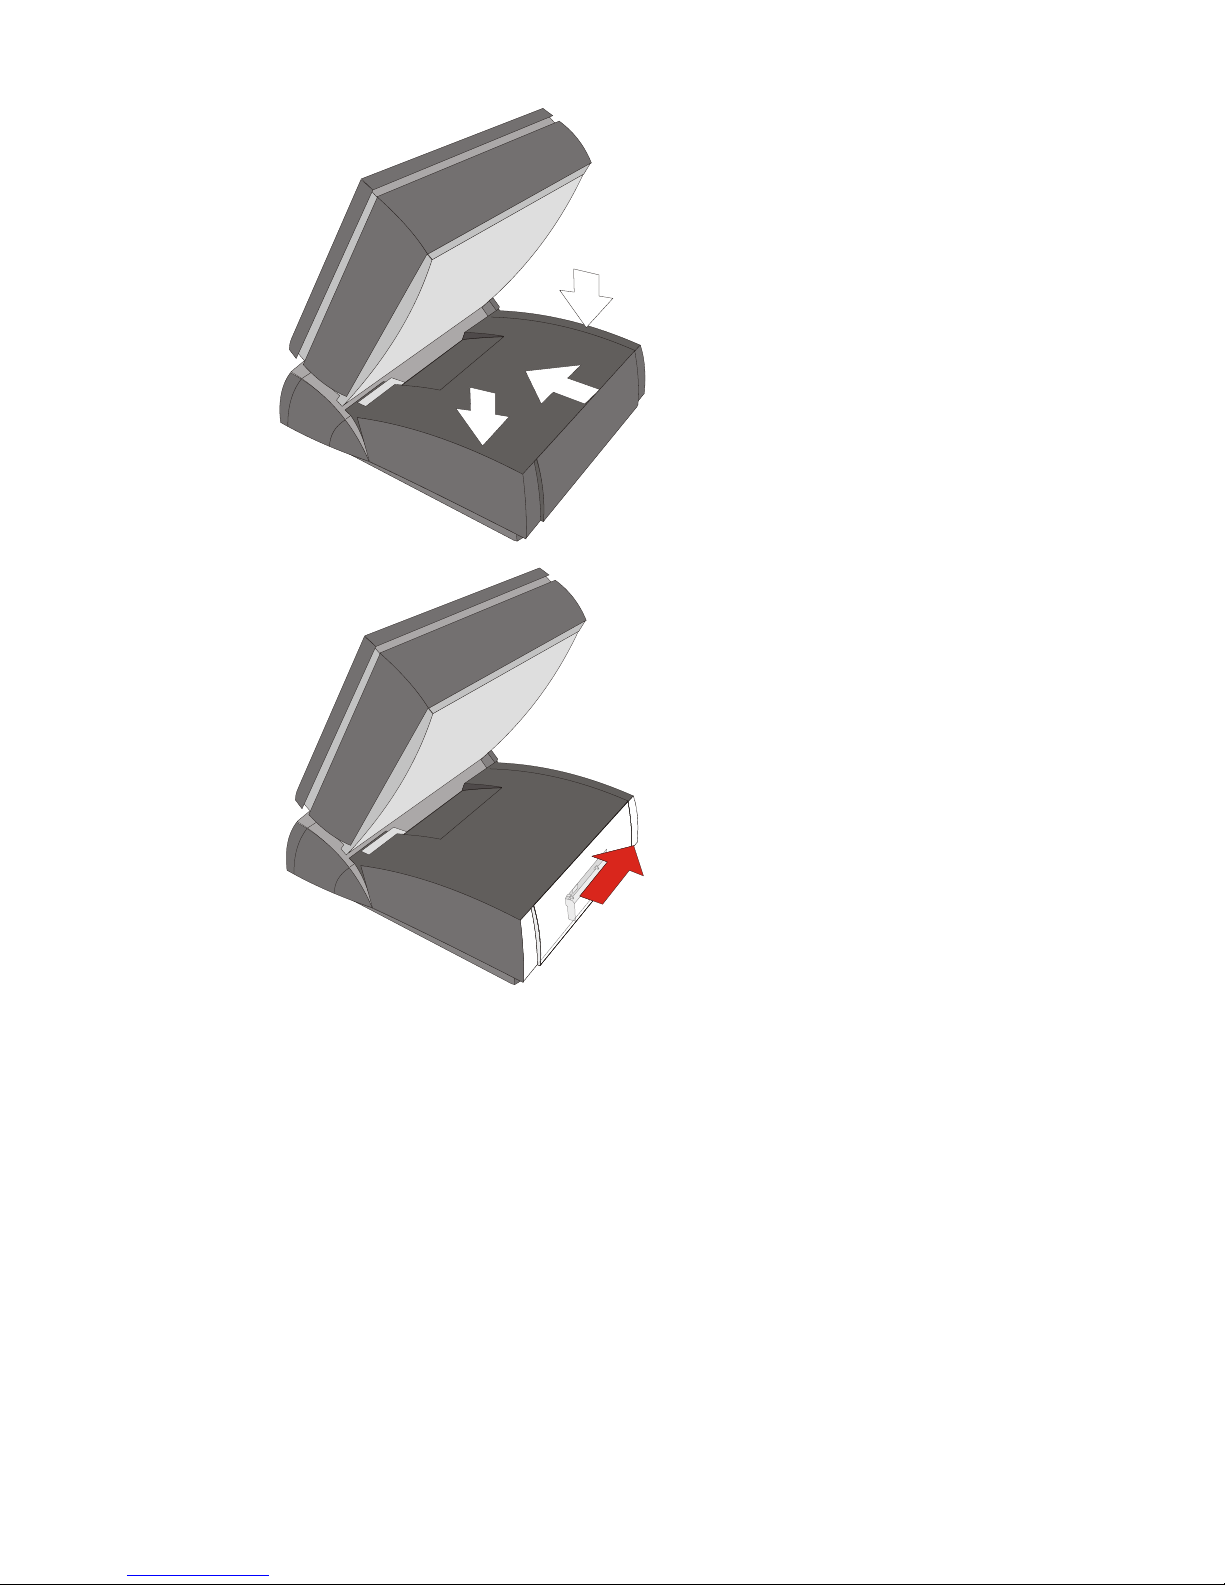
Pla ce the ca ble
co ver on the
foo ted stand (1).
Clo se the ca ble
co ver by mo ving it
from the rear to the
front (2) side.
Lock the ca ble
co ver.
Po wer Supp ly (212W)
De pen ding on the con struc ti on le vel the BEETLE /iPOS is de li ver ed with a
212 W po wer supp ly unit. The po wer supp ly unit au to ma ti cal ly ad justs it self
to the par ti cu lar vol ta ge (115/230V), the re fo re the dispatcher is missing.
At the front side of your BEETLE sys tem you will find the ON but ton which
will turn on the sys tem. Pus hing the ON but ton (ap prox. 5 sec.) again will
turn the sys tem into the stand by mode.
17
BA SIC SET TINGS
Page 23
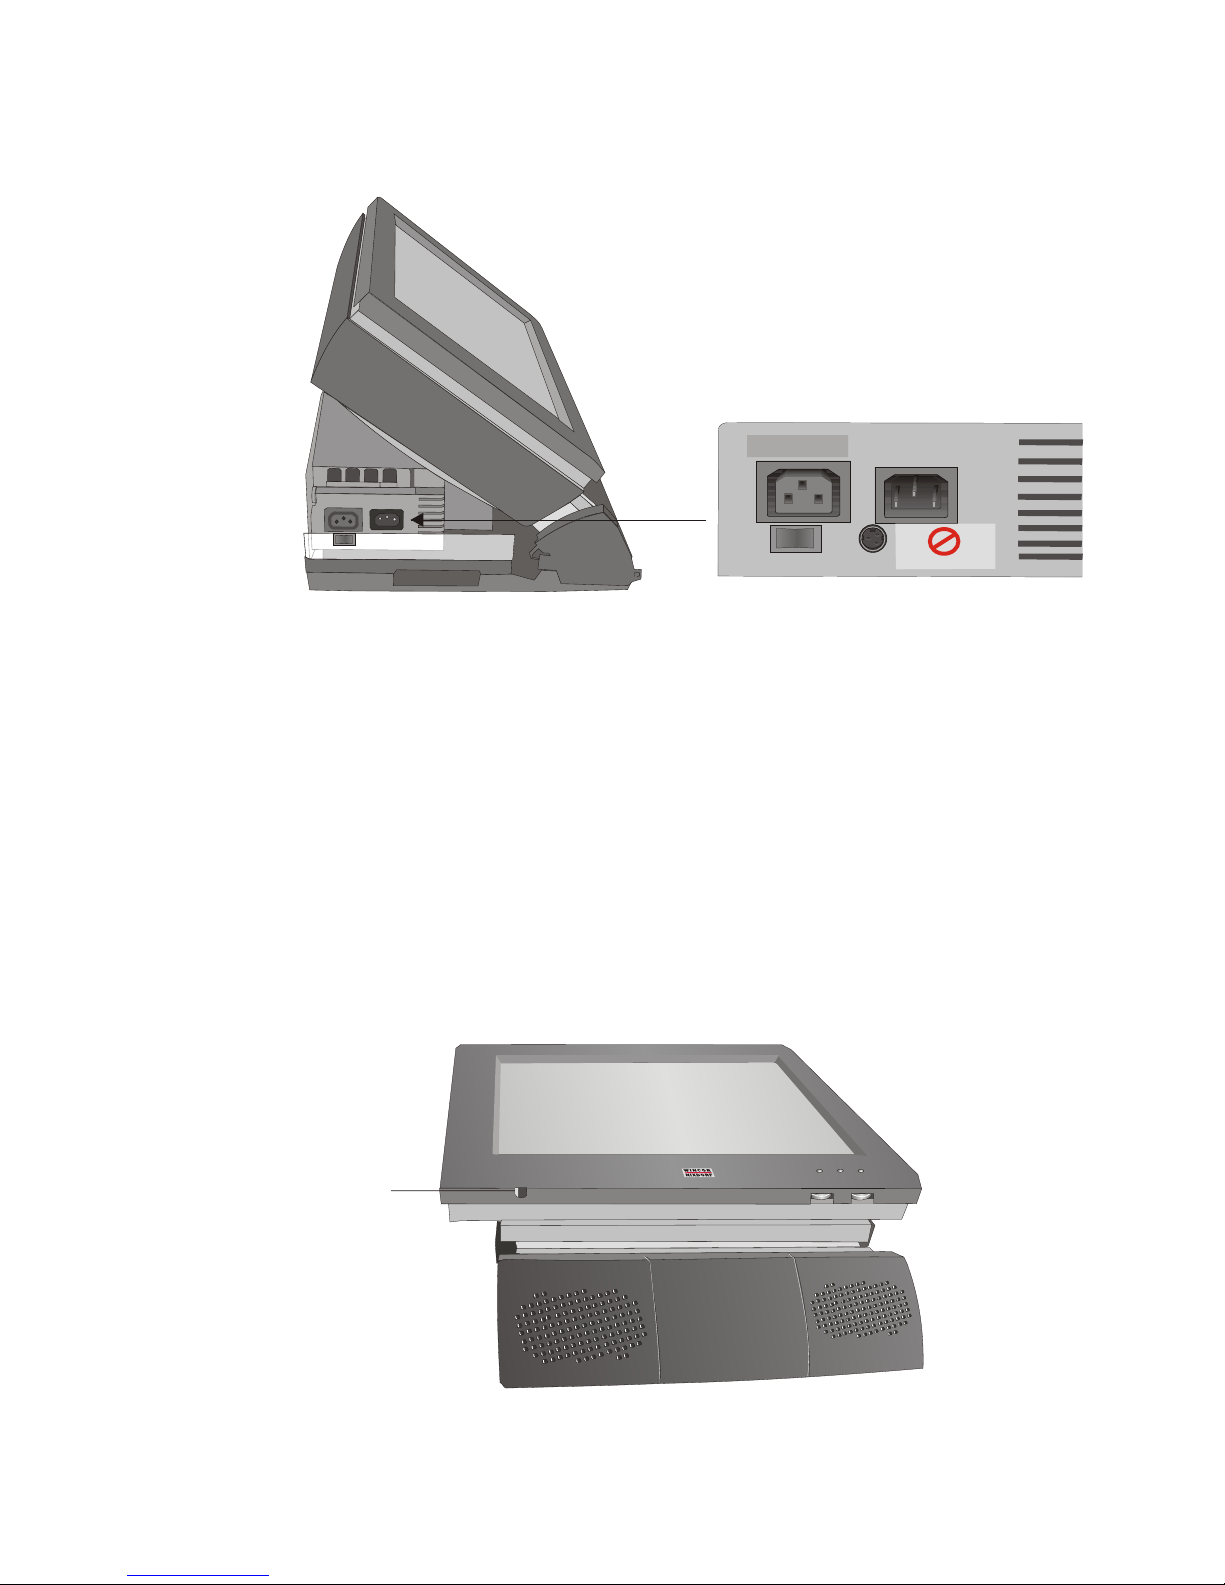
The po wer cord re cep ta cle, the po wer out put so cket for the mo ni tor and the
po wer so cket for the prin ter are lo ca ted on the back of the BEETLE /iPOS.
Con nec ting to the mains po wer supp ly
All de vi ces be lon ging to the com pact BEETLE /iPOS sys tem that have a
se pa ra te po wer ca ble must be con nec ted to the same elec tric cir cuit.
n Make sure that all data cables on the system unit and peripherals are
connected correctly.
n Plug all power cables belonging to the BEETLE and the peripherals into
the grounded-contact power sockets.
n Switch on the power supply under the cable cover.
You can now switch on the BEETLE /iPOS by pus hing the ON-but ton at the
front of the box.
18
CONNECTING PERIPHERALS
On Button
1
0
1
0
1
0
No Cash Drawer!
100 - 120 V/ 2A max.
200 - 240 V/ 1A max.
Page 24
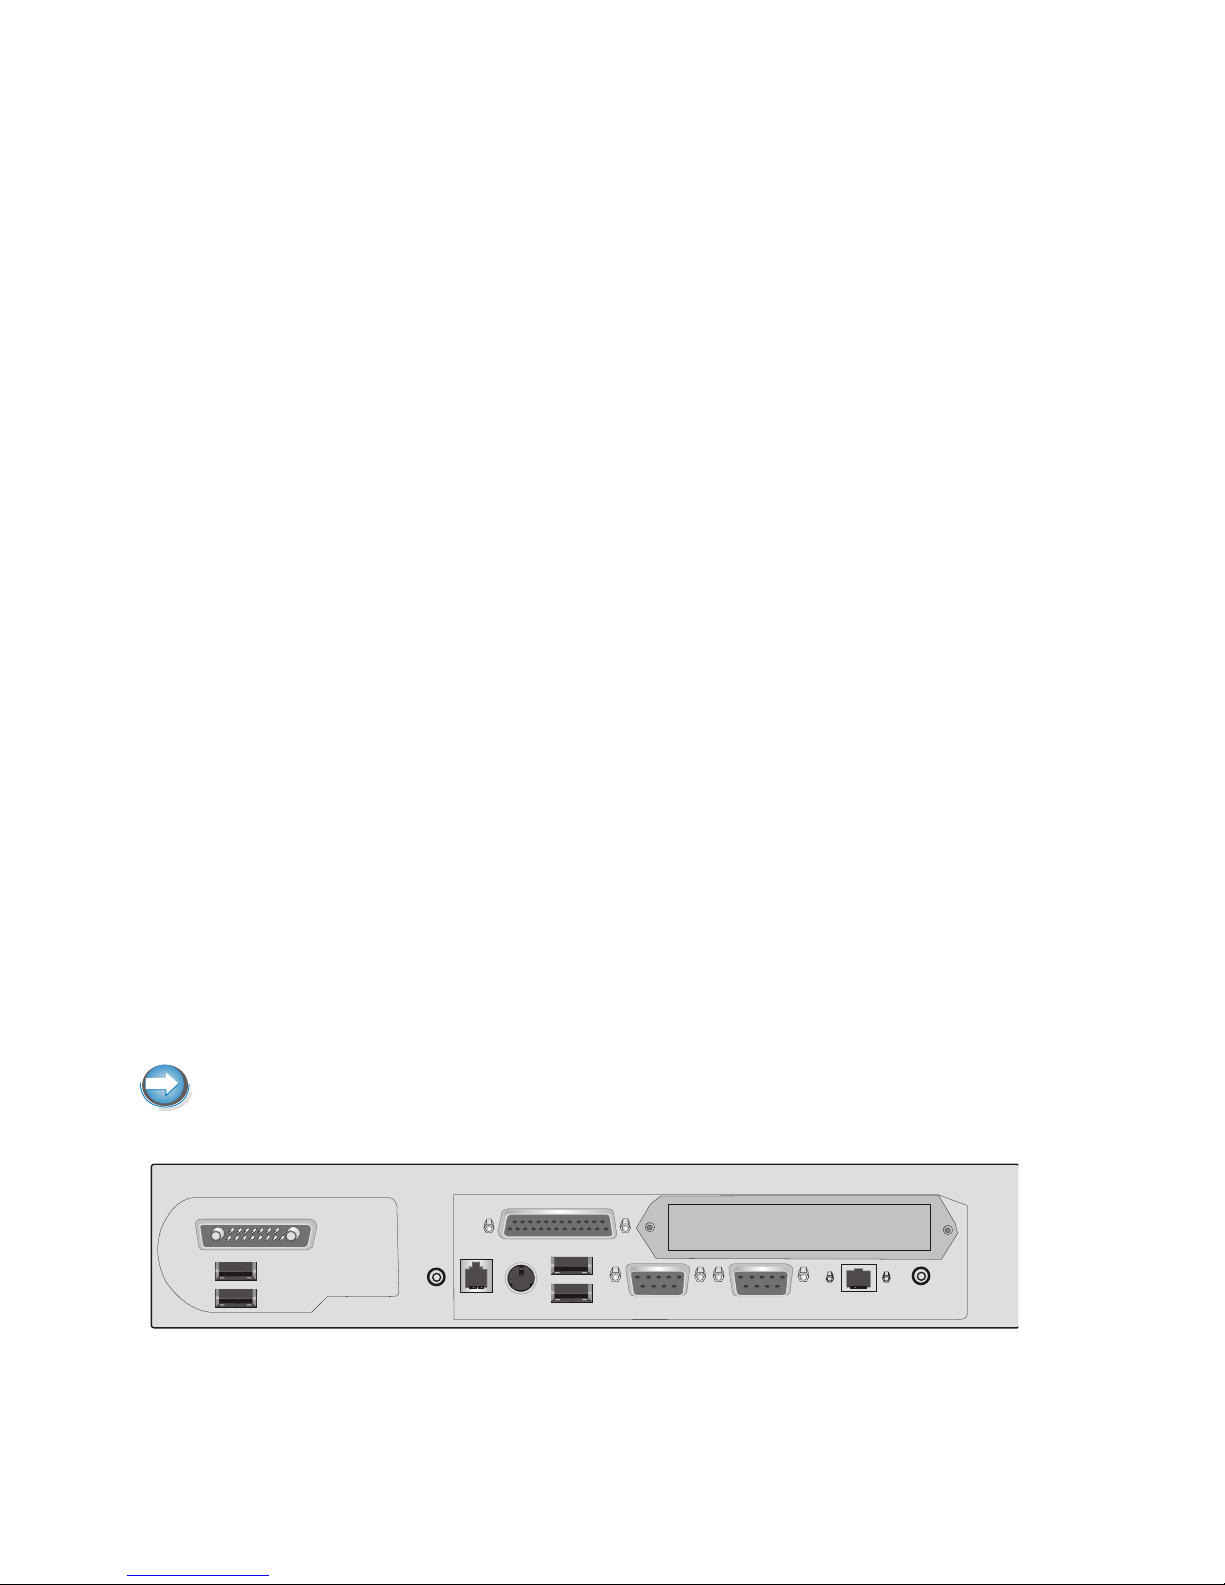
Pus hing (ap prox. 5 sec.) the but ton again will lead to a stand by mode. To
dis con nect the de vi ce from the supp ly vol ta ge com ple te ly, dis con nect the
po wer plug.
Ba sic set tings
Ex works, the BEETLE /iPOS is con fi gu red to your or der. Your con fi gu ra ti on
must be sub se quent ly adap ted to sup port supp le men ta ry de vi ces such as
scan ners. For more in for ma ti on, con tact the WN branch office re spon si ble
for your area.
Ad ju sting the Sys tem’s Loud spea ker
You can set the vo lu me as de si red by me ans of a menu des cri bed in the
ma nu al “BEETLE POS Mot her bo ard”, chap ter “BIOS Se tup”.
Light emit ting di ode (LED)
The LED green (POWER) lights when the BEETLE /iPOS is swit ched on
and chan ges to yel low in stand by mode.
Connecting peripherals
The pe ri phe rals men tio ned here are avai la ble as op tions and are not part of
the ba sic con fi gu ra ti on. A se pa ra te ma nu al is pro vi ded for each of the con nec tab le com po nents. For more de tai led in for ma ti on, plea se con sult the re le vant do cu men ta ti on.
The fi gu re shows the back pa nel of the BEETLE /iPOS with the lo ca tions of
the con nec ting so ckets and con nec ting plugs. If you wish to con nect a mo ni tor, ho we ver, you must also have a vi deo board.
You must not con nect pe ri phe rals with the sys tem swit ched on. (Ex cept for
pe ri phe rals with USB-con nec tors).
19
CONNECTING PERIPHERALS
KYBD
COM2*
COM1*
LAN/ASYN
LPT1
SPK
MIC
USB
USB
DC Power In
CASH
DRAW
Page 25

Key bo ard (KYBD)
The BEETLE /iPOS has a 6-pin mini-DIN jack for con nec ting a key bo ard.
Make sure that the con nec tor is plug ged firm ly into the so cket to pre vent
mal functio ning. Po wer is supp lied to the key bo ard via this so cket. If you
wish to con nect an ol der stan dard PC key bo ard with DIN con nec tor, you
must use a spe ci al adap ter ca ble, ob tai na ble from the WN branch office
re spon si ble for your area.
You can con nect a mou se in par al lel via a Y-ca ble.
COM1* and COM2*
De vi ces wit hout an in de pen dent po wer supp ly are con nec ted to the COM1*
or COM2* se ri al in ter fa ce, de pen ding on the sys tems con fi gu ra ti on. COM1*
and COM2* are de sig ned as 9-pin D-sub jacks.
Fol lo wing de vi ces can be con nec ted:
Scan ner
Cus to mer dis play
Cas hier dis play
Hyb rid card rea der
Each port will pro vi de 12V with max. 600mA, 5V with max. 300mA.
When an on bo ard TFT adap ter with Touch Screen functi on is in stal led, one
of the COM in ter fa ces for ex ter nal con nec tions is wit hout ef fect. If a POS
board is in stal led, the four COM in ter fa ces are usa ble.
Make sure that the con nec tors are plug ged se cu re ly into the so ckets to
pre vent pos si ble mal functio ning.
CONNECTING PERIPHERALS
20
Page 26
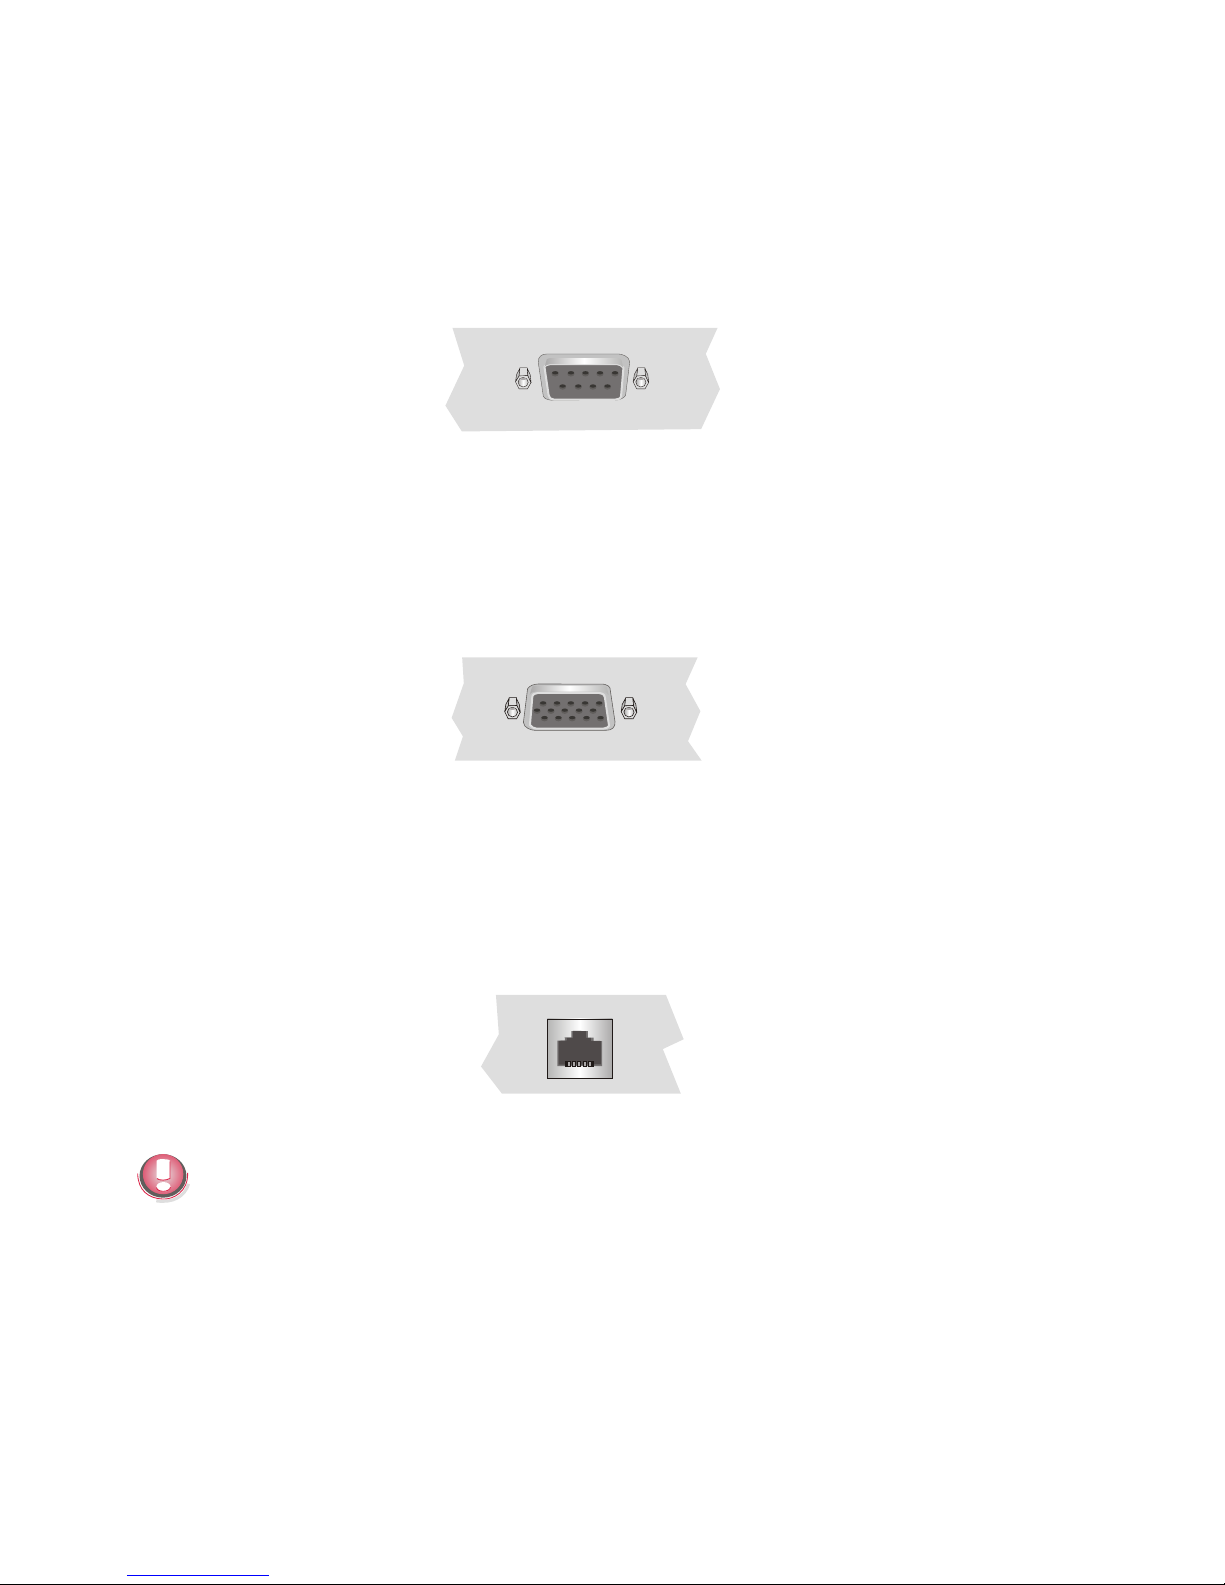
COM3 and COM4
The op tio nal POS-Board pro vi des a COM3 and a COM4 in ter fa ce, wit hout
po wer supp ly. It is pos si ble to in stall stan dard pe ri phe rals with se pa ra te
po wer supp ly, like a sca le, a prin ter or a mo dem.
Dual Mo ni tor
If a CRT adap ter is in stal led, you can con nect a mo ni tor to the sys tem via
the 15-pin D-sub jack on the CRT adap ter. The po wer of the mo ni tor is
supp lied by a se pa ra te po wer cord.
Net work
If a 10/100 Ba seT net work board is in stal led, the sys tem can be con nec ted
to a net work (LAN) at the POS ter mi nal back pa nel. You can in stall
al ter na ti vel ly a wi re less LAN (IEEE802.11b).
You must only use shiel ded twis ted pair ca bles.
Cash Dra wer
The BEETLE /iPOS has one RJ12 so cket at the POS-Board, when this
board is in stal led.
21
CONNECTING PERIPHERALS
Page 27
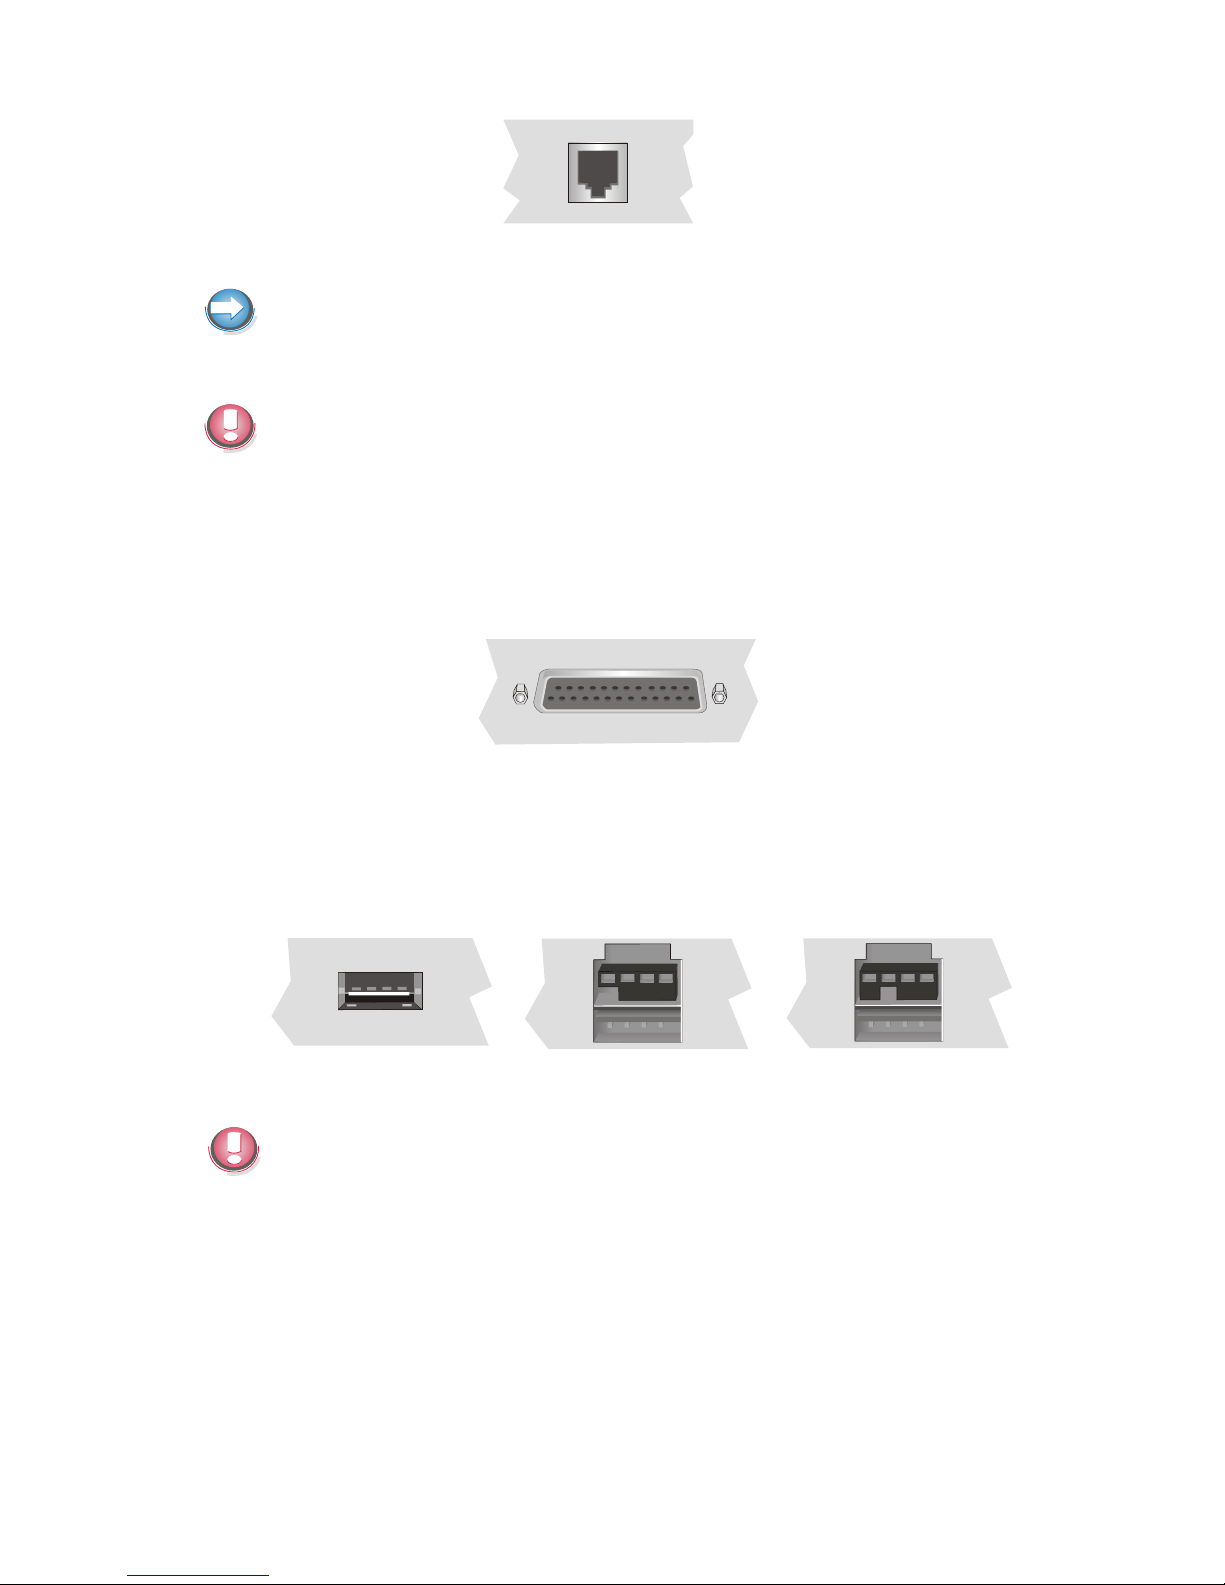
Make sure that the con nec tor is plug ged firm ly into the so cket to pre vent
mal functio ning. RJ12 plugs lock in when you in sert them. Po wer is supp lied
to the cash dra wer via this so cket, +24V +5% / -10%.
Con nec ting dai sy chai ned cash dra wers and 12V OEM-dra wers is
pro hi bi ted!
Mo du lar prin ters
The stan dard par al lel in ter fa ce LPT1 is in ten ded for con nec ting a prin ter.
USB (Uni ver sal Se ri al Bus)
To this USB in ter fa ce you can con nect a va rie ty of USB-pe ri phe rals, e.g.
scan ners, sca les and mou ses.
12V 24V
Only con nect de vi ces equip ped with a shiel ded ca ble to the USB in ter fa ce.
IN STAL LING WIND OWS OPE RA TING SYS TEMS
22
Page 28
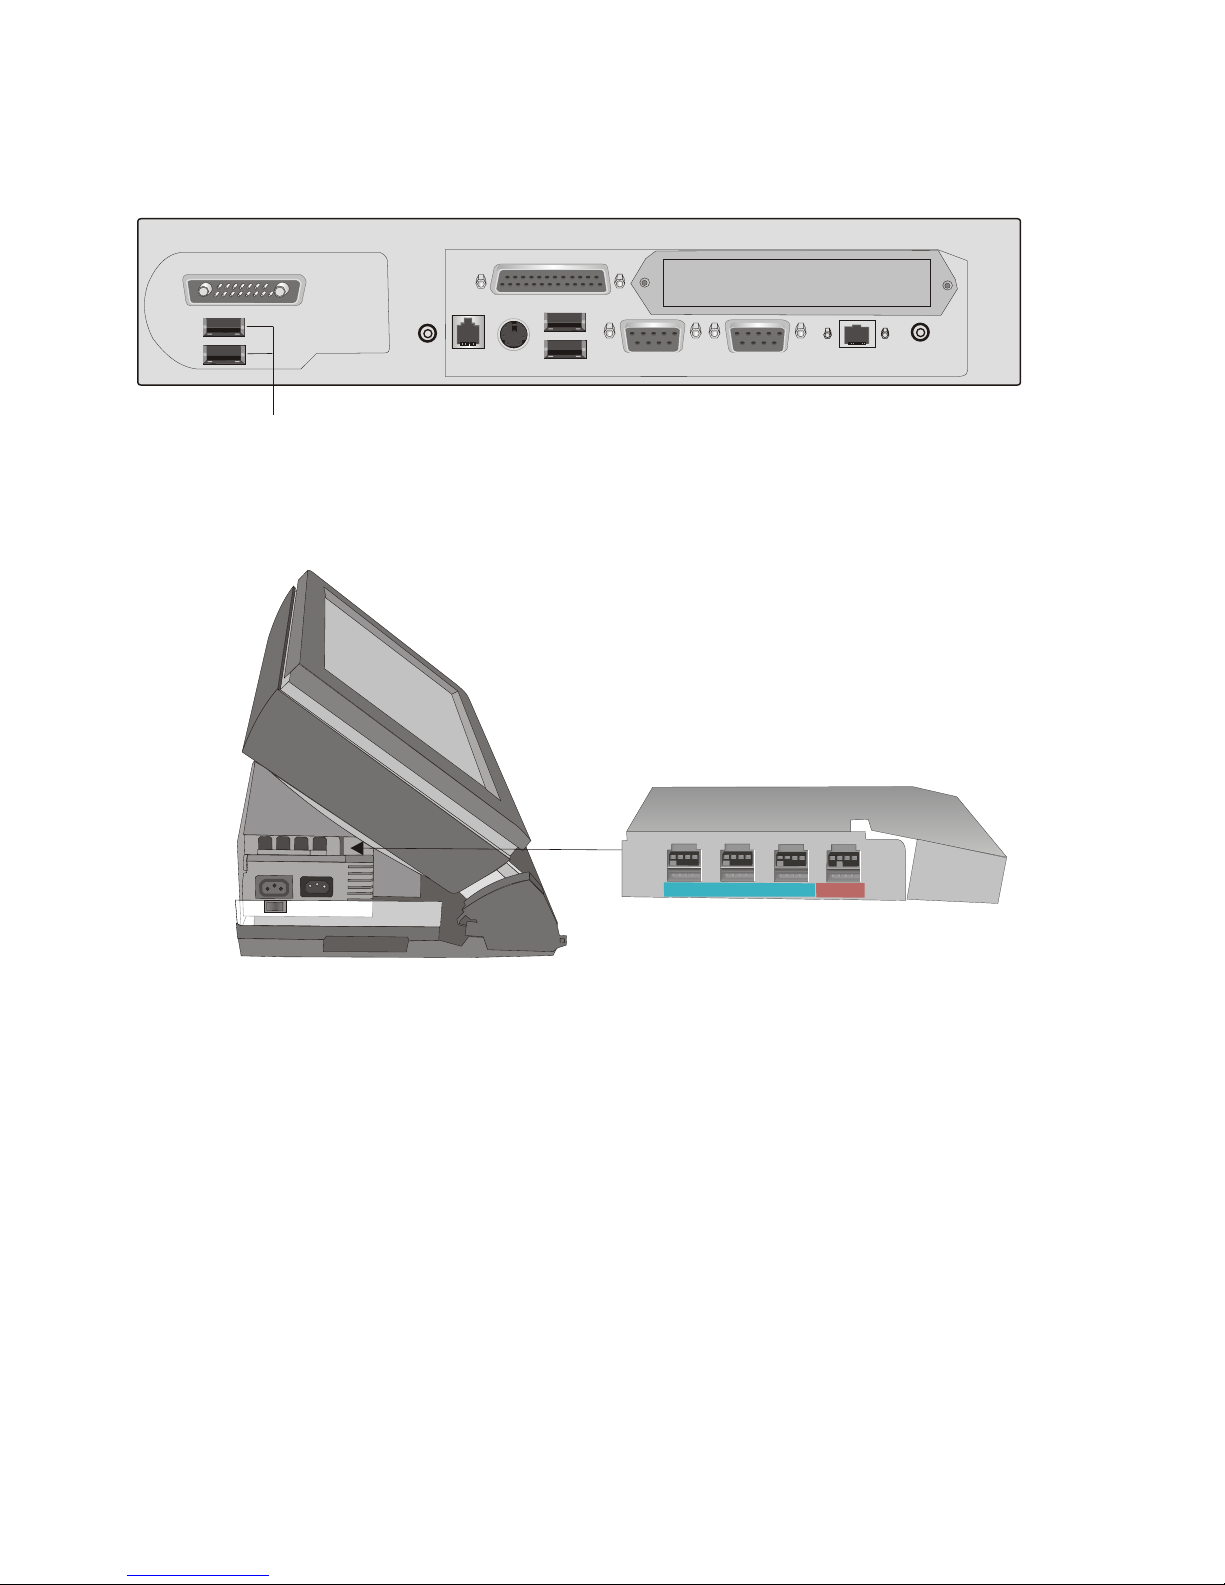
The re are four USB in ter fa ces pro vi ded at the bot tom side of the
BEETLE /iPOS. Two of them are re ser ved ones, one ser ves for the USB
hub and one is for a DVD dri ve.
Con nec tor so cket for a DVD drive and for an USB hub
Four more USB in ter fa ces are pro vi ded abo ve the po wer supp ly unit un der ne ath the ca ble co ver in the foot.
23
IN STAL LING WIND OWS OPE RA TING SYS TEMS
KYBD
COM2*
COM1*
LAN/ASYN
LPT1
SPK
MIC
USB
USB
DC Power In
CASH
DRAW
1
0
1
0
24V
12V
12V
12V
Page 29

In stal ling Wind ows Ope ra ting Sys tems
To in stall the Re tail ver si on of Wind ows from USB CD-ROM dri ve you need
eit her a boo tab le flop py with USB-CD-ROM dri ver or a boo tab le CD-ROM
with USB-CD-ROM dri ver.
Ge ne ra te a Win98 BOOT flop py with
SYS A:
with an exi sting Win98 sys tem.
Copy the fol lo wing fi les to the flop py (in ge ne ral C:\Wind ows):
HIMEM.SYS
MSCDEX.EXE
SMARTDRV.EXE
Copy the fol lo wing dri ver for the USB CD ROM dri ve
USB_CD.SYS
The dri ver is de li ver ed with the CD ROM dri ve.
Fi les also nee ded are CONFIG.SYS and AUTOEXEC.BAT with fol lo wing
en tries:
n CONFIG.SYS
DEVICE=HIMEM.SYS /TESTMEM:OFF
DEVICE=USB_CD.SYS
n AUTOEXEC.BAT
SMARTDRV.EXE
MSCDEX.EXE /D:TEAC-CDI
BIOS set tings:
USB Le ga cy Sup port= en ab led
BOOT se quen ce:
1. Re mo va ble de vi ce
2. CD-ROM
3. HDD
IN STAL LING WIND OWS OPE RA TING SYS TEMS
24
Page 30

25
PO WER MANAGEMENT
Wind ows XP
Af ter you have fi nis hed the ac ti vi ties as des cri bed abo ve, the fol lo wing pro ce du re in stalls the ope ra ting sys tem
n BOOT from the prepared DOS-BOOT-CD or flop py dri ve
n If a boo tab le CD is used, re mo ve CD and in sert Win XP installation CD
n Chan ge prompt to CD (e.g. D:)
n Chan ge to fol der i386
n Run WINNT.EXE to start in stal la ti on
Page 31
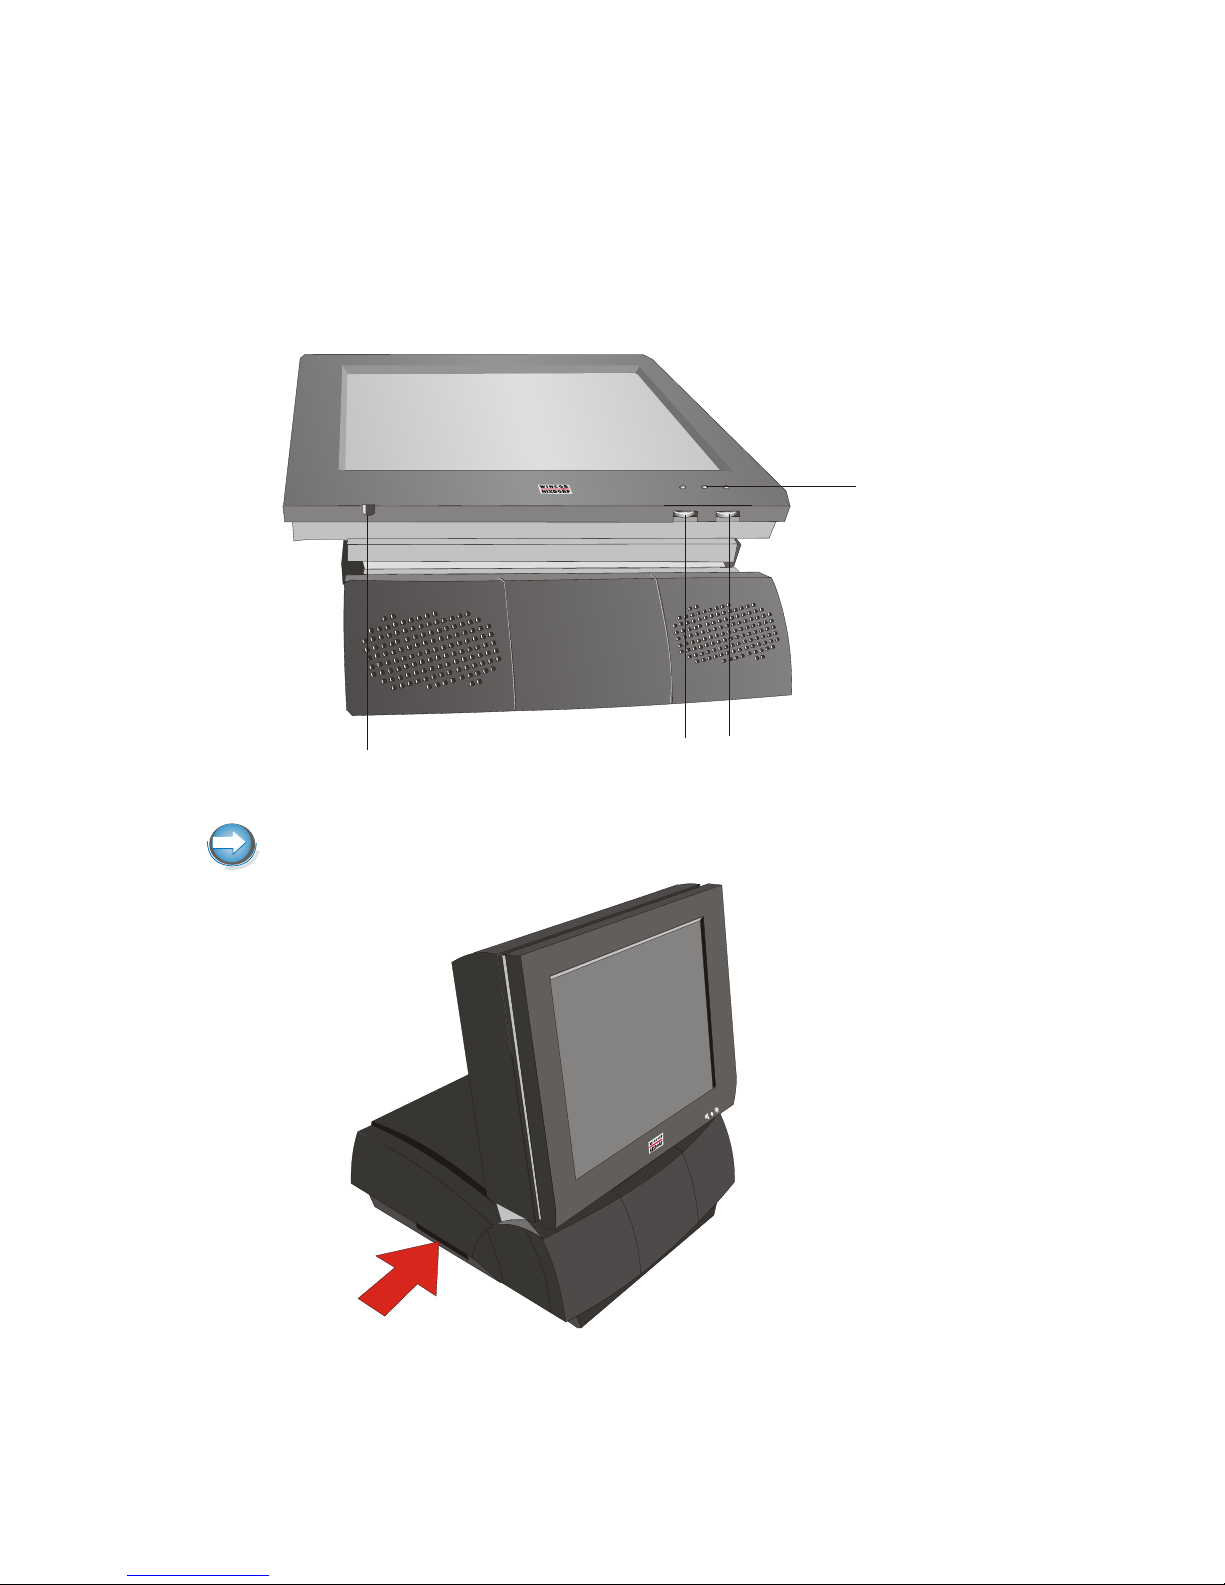
BEETLE /iPOS - the components
Overview
The fol lo wing fi gu res show the BEETLE /iPOS, 15”.
Re ver se or der of bright ness and vo lu me thumb wheels with the 12.1” mo ni tor.
Hand hold at both si des of the BEETLE /iPOS
PO WER MANAGEMENT
26
Soft On Button
LED (PO WER)
Volume (Loudspeaker)
Brightness
Page 32
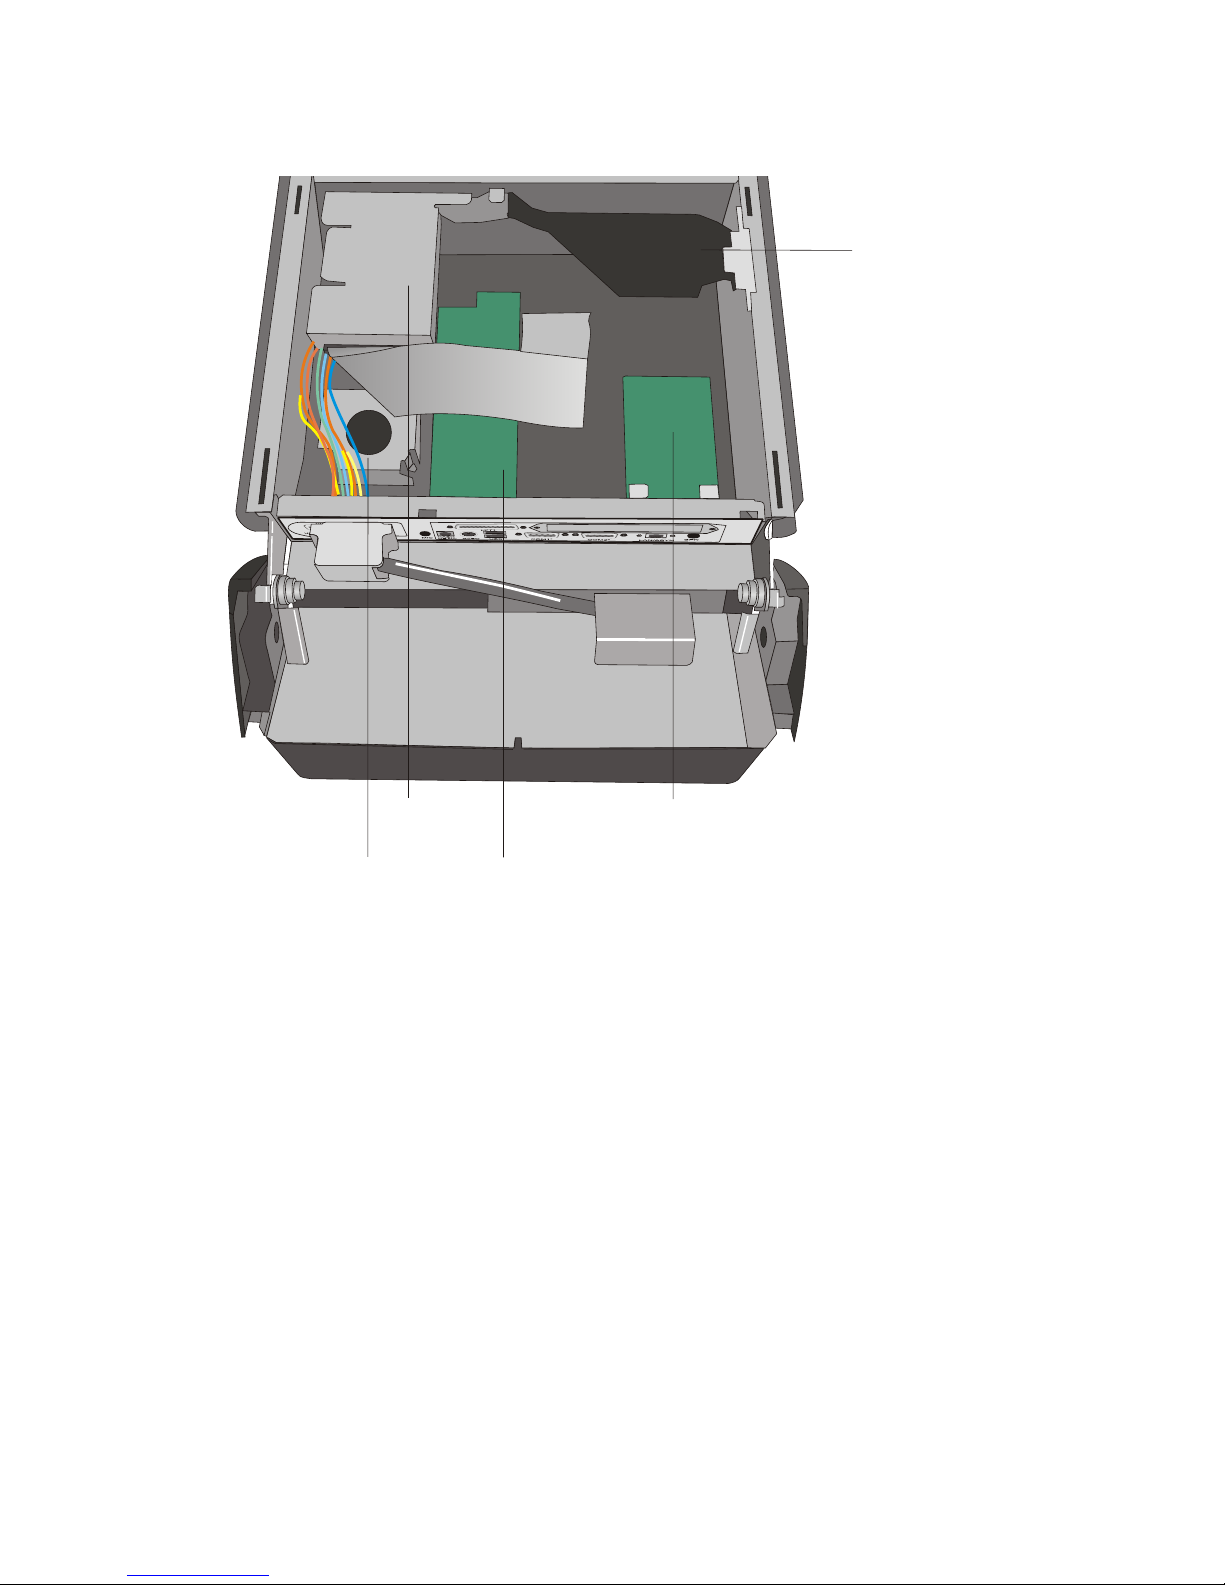
The fi gu re be low shows the in si de of the BEETLE /iPOS.
27
OVERVIEW
Hard Disk
TFT Adap ter (in ternal)
POS Board
Loudspeaker
Air Duct
Page 33
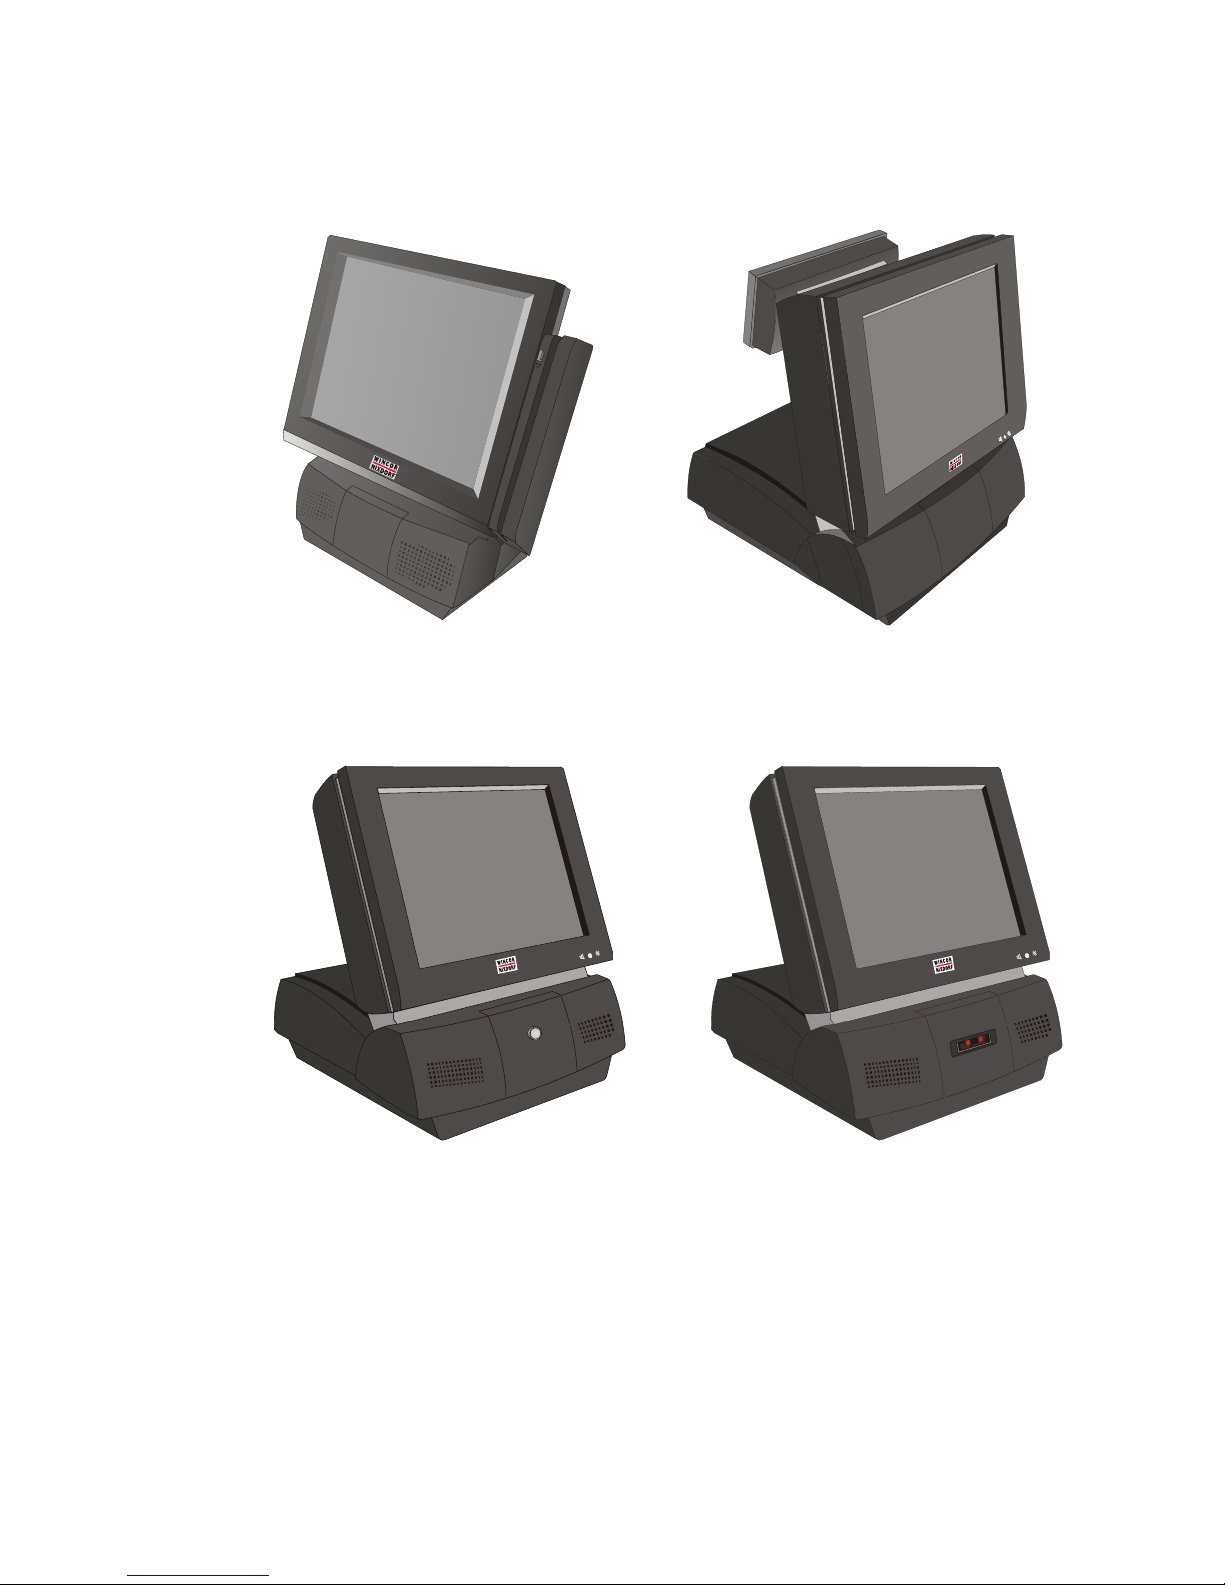
In the fol lo wing plea se find some add-ons to your BEETLE /iPOS
BEET LE /iPOS with swi pe card rea der ... with cus to mer dis play w/o loudspeaker
BEET LE /iPOS with wai ter lock ... with bar co de scan ner
OVERVIEW
28
Page 34

Capacative Touch Screen (Option)
Ge ne ral
The TFT Touch Screen works ac cor ding to the prin ci ple of a chan ge in
ana log ca pa ci tan ce. It has a glass screen with a trans pa rent, thin-film over lay on the sur fa ce. This is ful ly sea led and pro tec ted by a furt her lay er of cle ar glass. Elec tro des on the ed ges of the screen pro vi de a uni form
low-vol ta ge field. As soon as you touch the screen with your fin ger the
con tact point is “re cog ni zed” by the chan ge in ca pa ci tan ce.
Be cau se this ta kes pla ce very quick ly - 15 mil li se conds af ter being tou ched the Touch Screen is op ti mal ly equip ped for a num ber of dif fe rent re qui re ments and ap pli ca tions.
29
CAPACATIVE TOUCH SCREEN (OPTION)
Page 35

The pro gram ming in ter fa ce of the screen is iden ti cal to the mou se in ter fa ce.
Touch Screen and Sleep Mode
Using the Touch Screen with a BEETLE Pen ti um CPU, an en try via touch
du ring sleep mode may lead to a faul ty in put. Du ring sleep mode not hing
can be read from the LCD flat screen. En tries via tou ching the screen will
still be pro ces sed by the sys tem, but wit hout the sys tem “wa king up”.
For the se rea sons it is not re com men ded to set the sleep mode. For de tails
plea se read the chap ter “BIOS Se tup” in the user gui de “POS Mot her bo ard”.
How to Ope ra te
The Touch Screen re sponds to the slightest con tact, the re fo re you do not
have to ap ply much pres su re when wor king with the screen. This does not
only safe time, but is also kind to your joints!
Tou ching the touch glass has the same ef fect as clic king the left mou se but ton. You only need to ap ply a litt le pres su re with the fin ger tip. In this ca pa ci ti ve pro cess only fin ger tip con tact is re cog ni zed. The screen does not re act
in any way if tou ched, for ex am ple, with a pen cil or a glo ve.
30
CAPACATIVE TOUCH SCREEN (OPTION)
Pro tec ti ve Noi se Shield
Con duc ti ve Coa ting
Cle ar Tek Glass Over co at
Anti Re flec ti ve Et ched Sur fa ce and pro tec ti on
Page 36

Be fo re ad ju sting the screen an gle switch off the sys tem!
Clea ning In struc tions
Al ways turn off the sys tem be fo re clea ning.
The glass sur fa ce of your Touch Screen should be clea ned with a mild,
com mer ci al ly avai la ble glass clea ning pro duct. All pH neut ral ma te ri als (pH
6 to 8) are good for clea ning. Clea ners with pH va lu es 9 to 10 are not re com men ded. Clea ning with wa ter and iso pro pyl al co hol is pos si ble as well.
Do not use sol vents con tai ning ace tic acid.
Use a soft, fine-mes hed cloth to cle an the sur fa ce. Dam pen the cloth slight ly
and then cle an the screen.
31
CAPACATIVE TOUCH SCREEN (OPTION)
Page 37

Resistive Touch Screen (Option)
Ge ne ral
The re sis ti ve TFT Touch Screen is con struc ted of a hard-coa ted po ly es ter
tops heet that is over laid on a con duc ti ve ly-coa ted glass lay er. Vol ta ge is ap plied to the tops heet. As the user tou ches the screen, the tops heet com pres ses into con tact with the glass lay er, and cur rent flows to the four
cor ners in pro por ti on to the dis tan ce from the edge. The con trol ler then cal cu la tes the po si ti on of the fin ger or sty lus, ba sed on the cur rent flow. Be cau se the con trol ler de ri ves both the “X” and “Y” touch coor di na tes from the
sta ble glass lay er, the ac cu ra cy and ope ra ti on of the touchs creen is unaf fec ted by da ma ge to the tops heet cau sed by ex ten ded use or ne glect.
RESISTIVE TOUCH SCREEN (OPTION)
32
Page 38

Con struc ti on of the re sis ti ve Touch Screen:
Hard-coa ted po ly es ter tops heet
Ad he si ve
Glass sub stra te with spa cer Dots
How to Ope ra te
Tou ching the touch screen has the same ef fect as clic king the left mou se
but ton. You only need to ap ply a litt le pres su re with the fin ger tip. In this re sis ti ve pro cess not only fin ger tip con tact is re cog ni zed. The screen does re act in any way if tou ched, for ex am ple, with a sty lus. The re com men ded
ma te ri al for a sty lus is po ly ace tat. The sty lus should have a mi ni mum sphe ri cal ra di us of 0.8 mm and con tain no sharp ed ges or burrs that may cau se
da ma ge to the tops heet.
Be fo re ad ju sting the screen an gle switch off the sys tem!
Clea ning In struc tions
Al ways turn off the sys tem be fo re clea ning.
The sur fa ce of your Touch Screen should be clea ned with a wa ter-ba sed
sol vent or a non-ab ra si ve clea ner.
Do not use sol vents con tai ning ace tic acid or me thy le ne chlo ri de.
Use a soft, fine-mes hed cloth to cle an the sur fa ce. Dam pen the cloth slight ly
and then cle an the screen.
33
RESISTIVE TOUCH SCREEN (OPTION)
Page 39

Swi pe Card Rea der (optional)
The swi pe card rea der can read three ISO tracks si mul ta ne ous ly in one
sing le swi pe.
The MSR mo du le is fit ted on the right-hand side of the screen mo du le. The
con nec ti on is made via the key bo ard in ter fa ce (see ma nu al swi pe card rea der).
How to Ope ra te
Run the swi pe card through the slit of the swi pe card rea der from top to
bot tom in a quick and stea dy mo ve ment. Make sure that the mag ne tic strip
is to the right.
When using swi pe cards, the fol lo wing should be ob ser ved:
n swi pe cards should ne ver be al lo wed to come into con tact with li quids.
n swi pe cards should not be bent or fol ded in any way.
n swi pe cards should not be al lo wed to come into clo se con tact with a
mag ne tic field.
Swi pe cards should only be in ser ted in the top of the spe ci al ly de sig ned slit
of the rea ding de vi ce. If the card is in ser ted in anot her pla ce, the rea ding
head could be da ma ged.
Clea ning In struc tions
In or der to gua ran tee good rea ding re sults over a lon ger pe ri od of time, the
swi pe card rea der should be clea ned once a week. This is car ried out by
using a spe ci al clea ning card that can be pur cha sed from Win cor Nix dorf
International GmbH.
Cle an the sur fa ce of the swi pe card rea der with a suit ab le com mer ci al ly
avai la ble sur fa ce clea ner.
Make sure that the po wer plug is dis con nec ted, con nec tor ca bles are un plug ged and that no li quid finds its way into the de vi ce.
SWI PE CARD REA DER (OPTIONAL)
34
Page 40
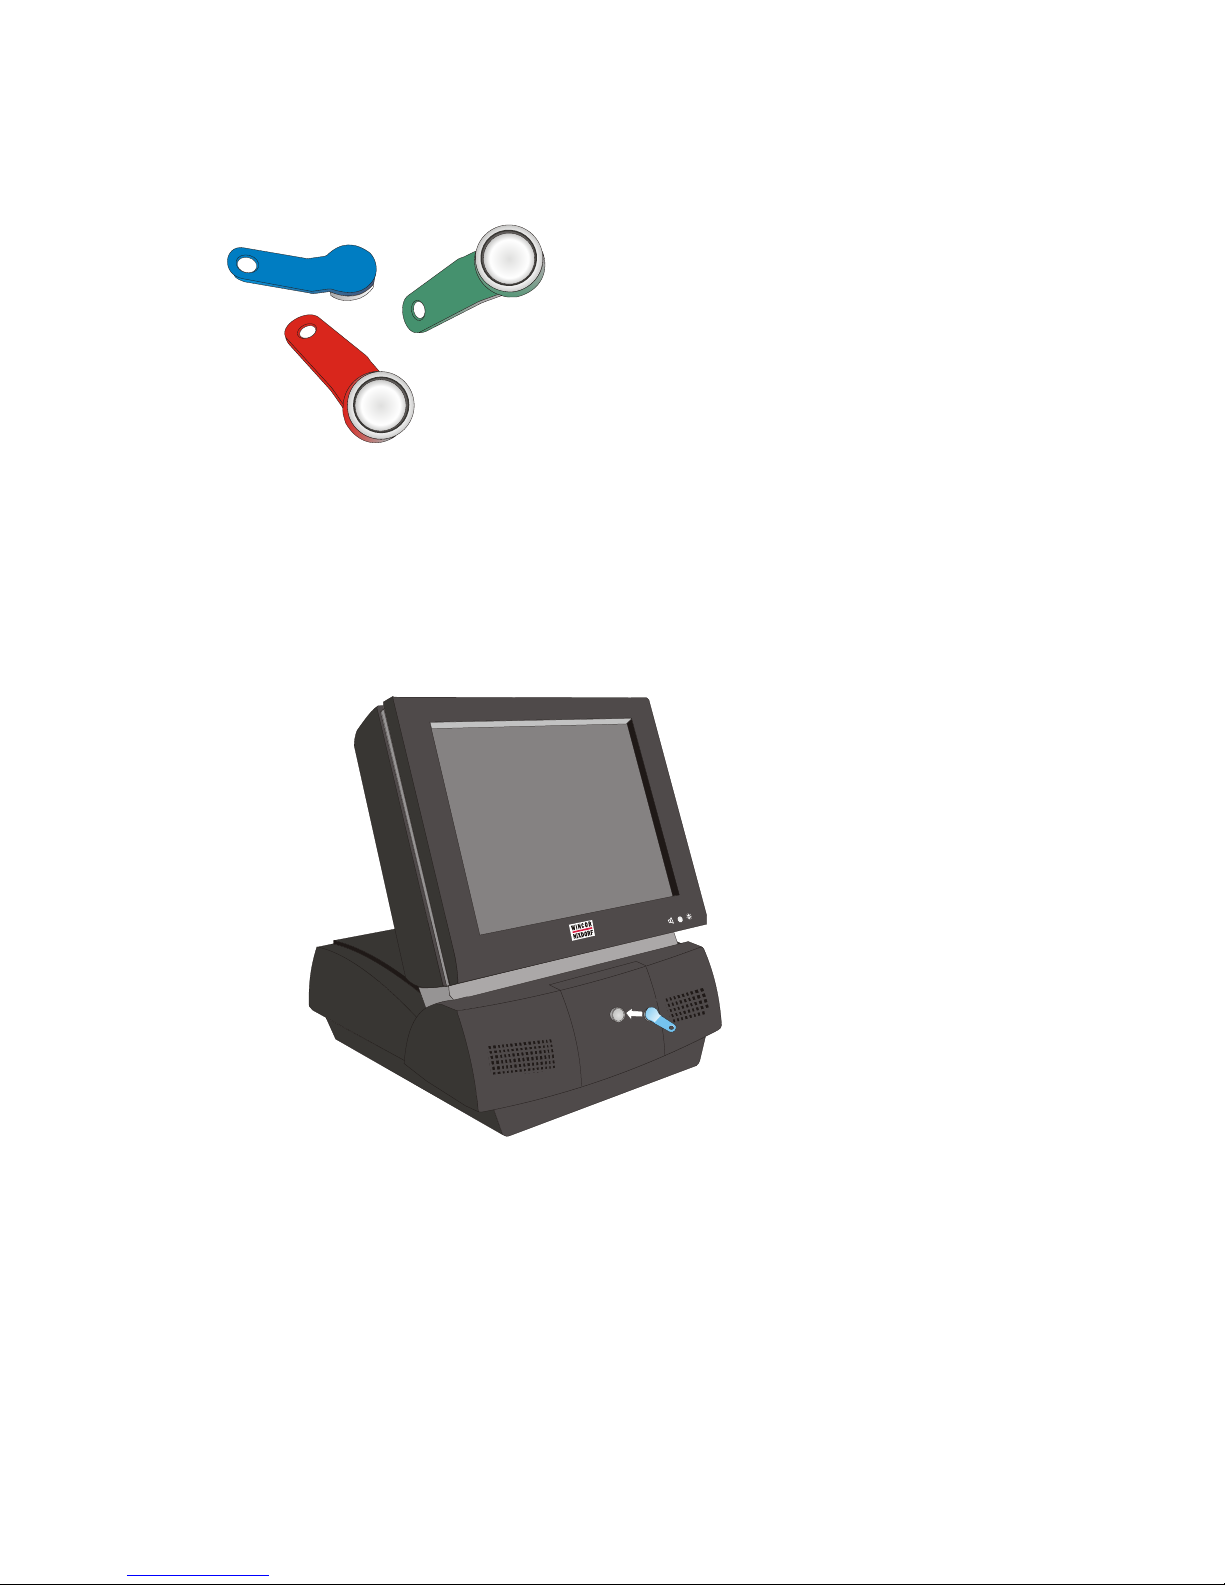
Wai ter Lock (optional)
Each transaction is cor rect ly as signed
to the personell by using the mag ne tic
key. The mag ne tic keys are avai la ble
in 10 different co lors.
The mag net keys are wa ter pro of,
shat ter pro of and by the 16-digit key
num ber also safe for cle ar
iden ti fi ca ti on.
The ope ra ti on of the sys tem is very simp le, the key is pla ced onto the
mag ne tic probe (see fi gu re).
The key is held mag ne ti cal ly to the pro be and trans mits the data by an
elec tri cal RS232 in ter fa ce.
The readout of the data may be in te gra ted easily in a soft wa re ap pli ca ti on.
35
WAI TER LOCK (OPTIONAL)
Page 41
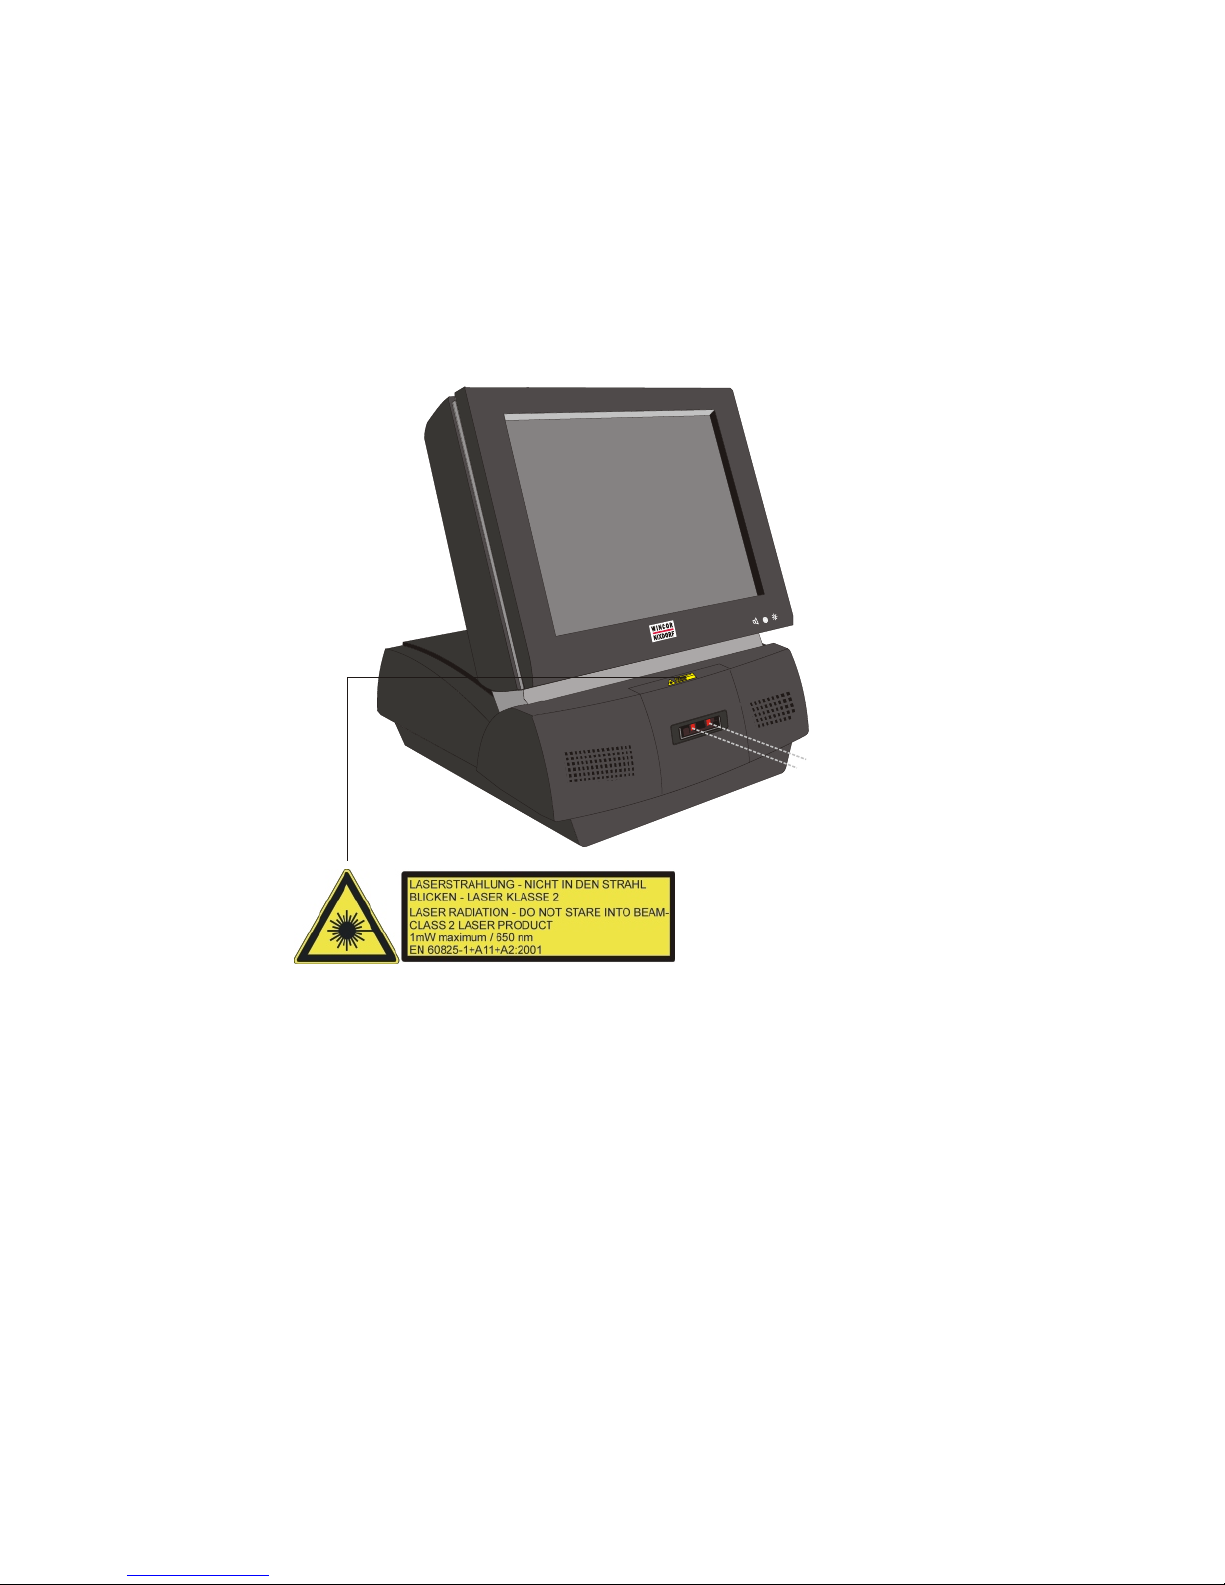
Barcode Scan ner (op tio nal)
The bar co de scan ner is as sem bled in the front side of the BEETLE /iPOS.
The in no va ti ve, sta te of the art scan en gi ne in cor po ra tes two scan mo tors,
that de li ver the po wer to ge ne ra te 3 dif fe rent scan pat tern: 1-D-li ne ar, 2-D
ras ter and omni-di rec tio nal.
As om ni di rec tio nal la ser scan ner which di rect the la ser beam in all di rec tions
by me ans of a ro ta ting mir ror, the scan ner is used whe re ver the per for man ce of a hand-held scan ner needs to be ex cee ded and the “point of sale” only
of fers re stric ted and litt le room for scan ning.
Bar co des are read sim ply by being gui ded to the scan ner wind ow.
BARCODE SCAN NER (OP TIO NAL)
36
La ser be ams
Page 42

Configuration variants
Availability of Interfaces
The first line con tains the stan dard BEETLE/ iPOS sys tem with the avai la ble
ports, each fol lo wing line the stan dard sys tem (S) with add-on mo du les.
The in ter fa ces mar ked with a dot in di ca te the avai la bi li ty.
iPOS Configurations
Standard (S)
S+ Touch
S+ POS Board
S+ POS Board+ Touch
S+ CRT
S+ TFT
S+ CRT+ Touch
S+ TFT+ Touch
S+ POS+ CRT
S+ POS+ TFT
S+ POS+ CRT+ Touch
S+ POS+ TFT+ Touch
S+ WLAN
S+ WLAN+ Touch
S+ POS+ RF
S+ POS+ RF+ Touch
37
AVAILABILITY OF INTERFACES
*
1
M
O
C
*
2
M
O
C
3
M
O
C
4
M
O
C
1
T
P
L
2
/
S
P
B
+
A
B
S
U
d
h
s
a
c
N
A
L
T
R
C
K
P
S
C
I
M
T
F
T
Dual
Screen
Page 43

Submodules for the CPU
Va ri ous con trol lers can be plug ged in on the CPU. In the fol lo wing plea se
find a brief des crip ti on of the avai la ble op tions.
POS Board (COM 3, COM 4, Cash Dra wer)
The POS board pos ses ses two more in ter fa ces, COM 3 and COM 4, which
are not po wer supp lied. Fur ther mo re it pro vi des a RJ12 so cket as cash dra wer in ter fa ce.
The COM2* in ter fa ce is use ab le in case of a con fi gu ra ti on with touch screen
functions and POS board as in ter nal ly anot her COM in ter fa ce for the touch
screen is made avai la ble.
LAN Adap ter 10/100 MBit
Ex works the BEETLE /iPOS is equip ped with the LAN adap ter 10/100 Mbit
for wor king in an Ether net Net work.
PCI/ Mini PCI Adap ter with WLAN Modul
The adap ter is an al ter na ti ve of the LAN adap ter 10/100 Mbit.
PCI CRT Con trol ler (Dual Screen)
The PCI CRT Con trol ler is anot her screen con trol ler. A se cond mo ni tor can
be con nec ted to this board. All kind of flat screen or CRT mo ni tors can be
con nec ted to this con trol ler, if they have a stan dard CRT in ter fa ce (ana log
in ter fa ce). The ot her mo ni tor works in de pen dent ly, sup por ted by the ope ra ting sys tem, for ex am ple Wind ows 98, Wind ows 2000, Wind ows XP and Li nux.
AVAILABILITY OF INTERFACES
38
Page 44
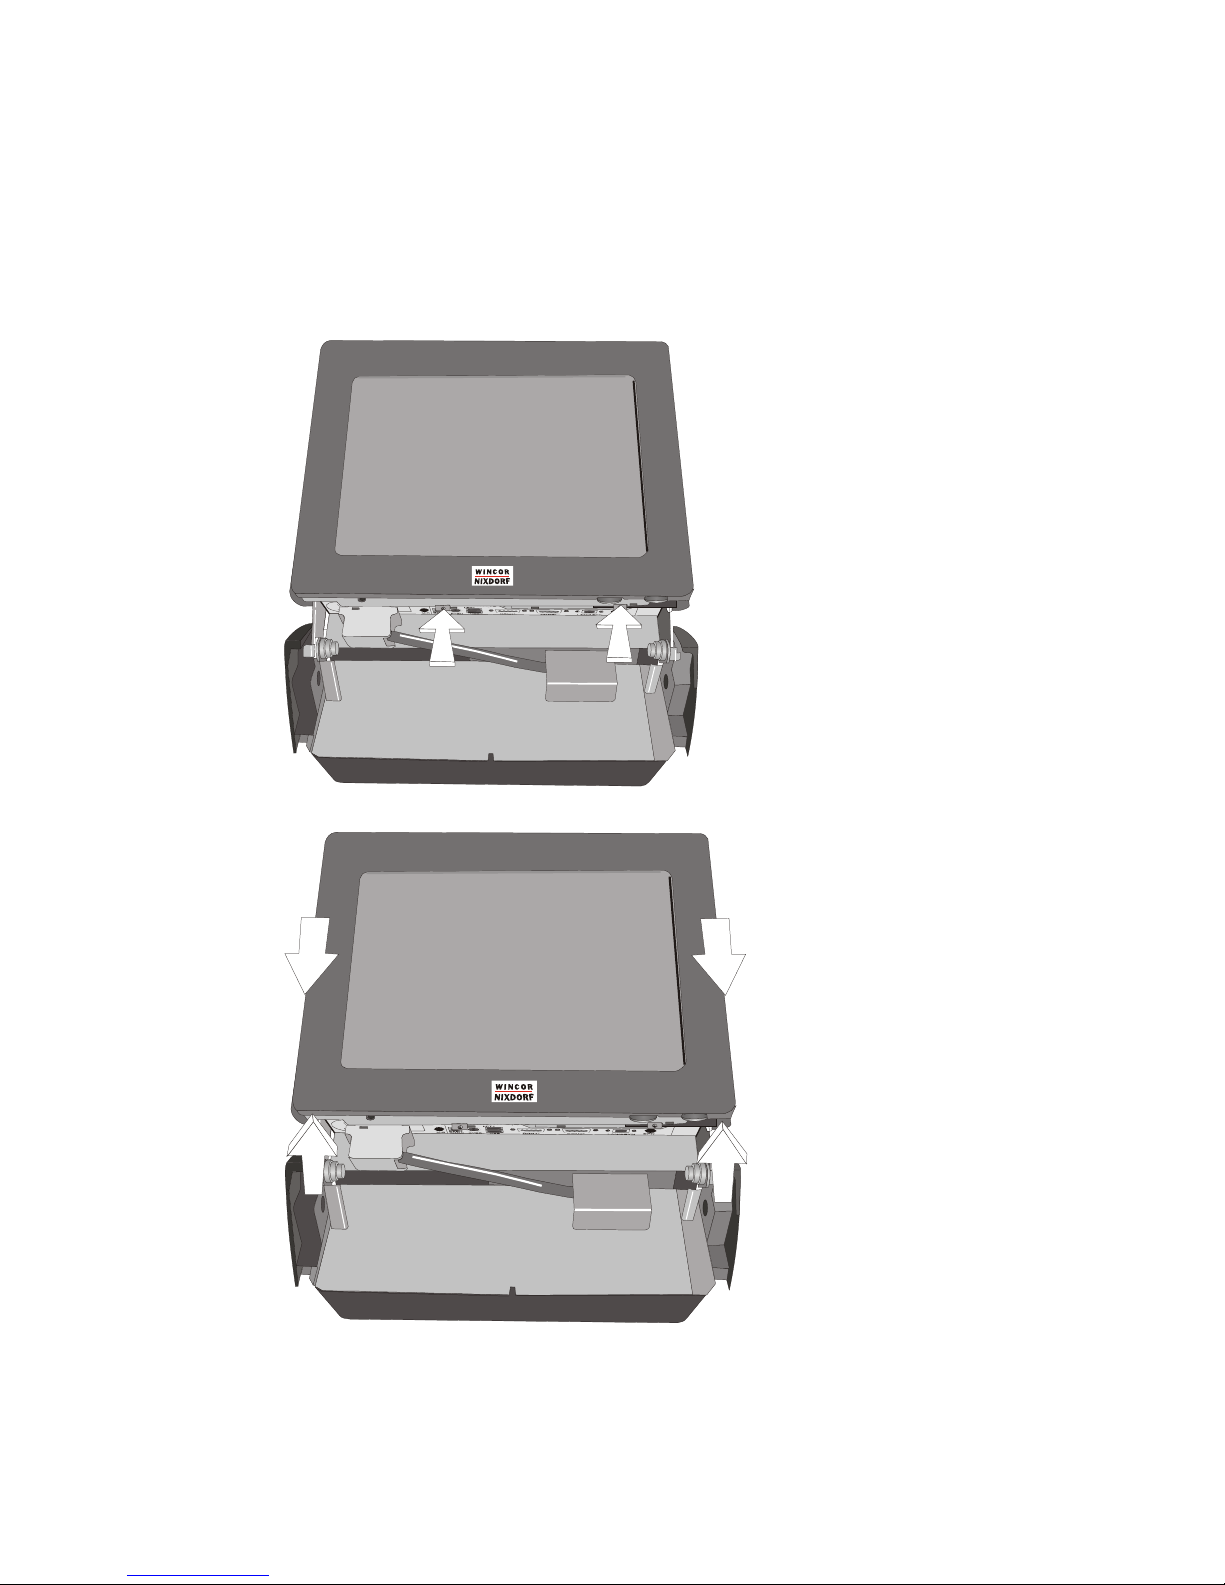
In stal ling the Sub mo du les
First en su re that the sys tem is swit ched off and that the po wer con nec tor is
dis con nec ted.
Re mo ve the co ver of the loud spea ker and the co ver of the ports.
Loo sen the screws
(see ar rows) at the
bot tom side of the
screen.
Push against the
rear side of the
screen (1) and pull
it to the bot tom (2).
Tilt it to the front.
Now you re ach the
ca ble con nec tors
in si de.
39
SUBMODULES FOR THE CPU
Page 45
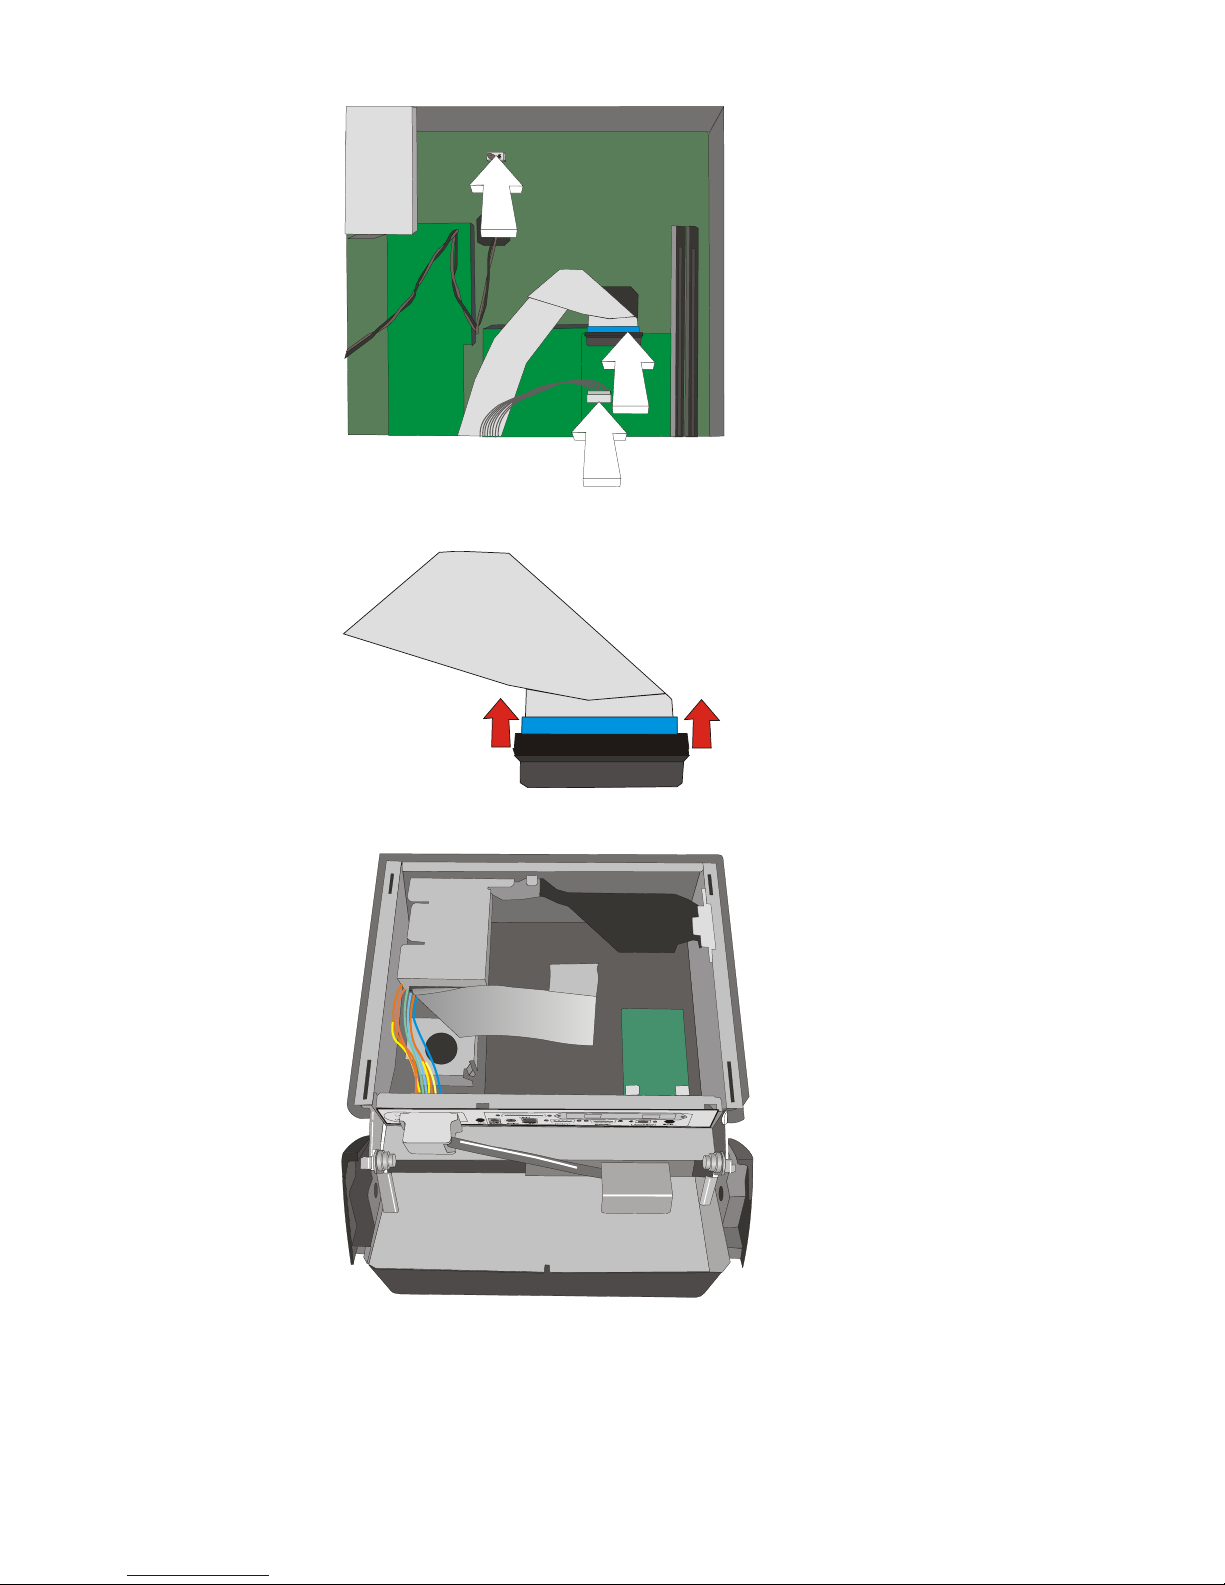
Re mo ve the three
ca ble con nec tors.
At first the dis play
data ca ble (1).
Push the plug
so cket a litt le to
the front (see
ar rows) and pull
the ca ble out of the
so cket.
Re mo ve the ot her
ca bles (2+3).
Lift the screen
mo du le out of the
gui dan ce.
IN STAL LING THE SUB MO DU LES
40
Page 46
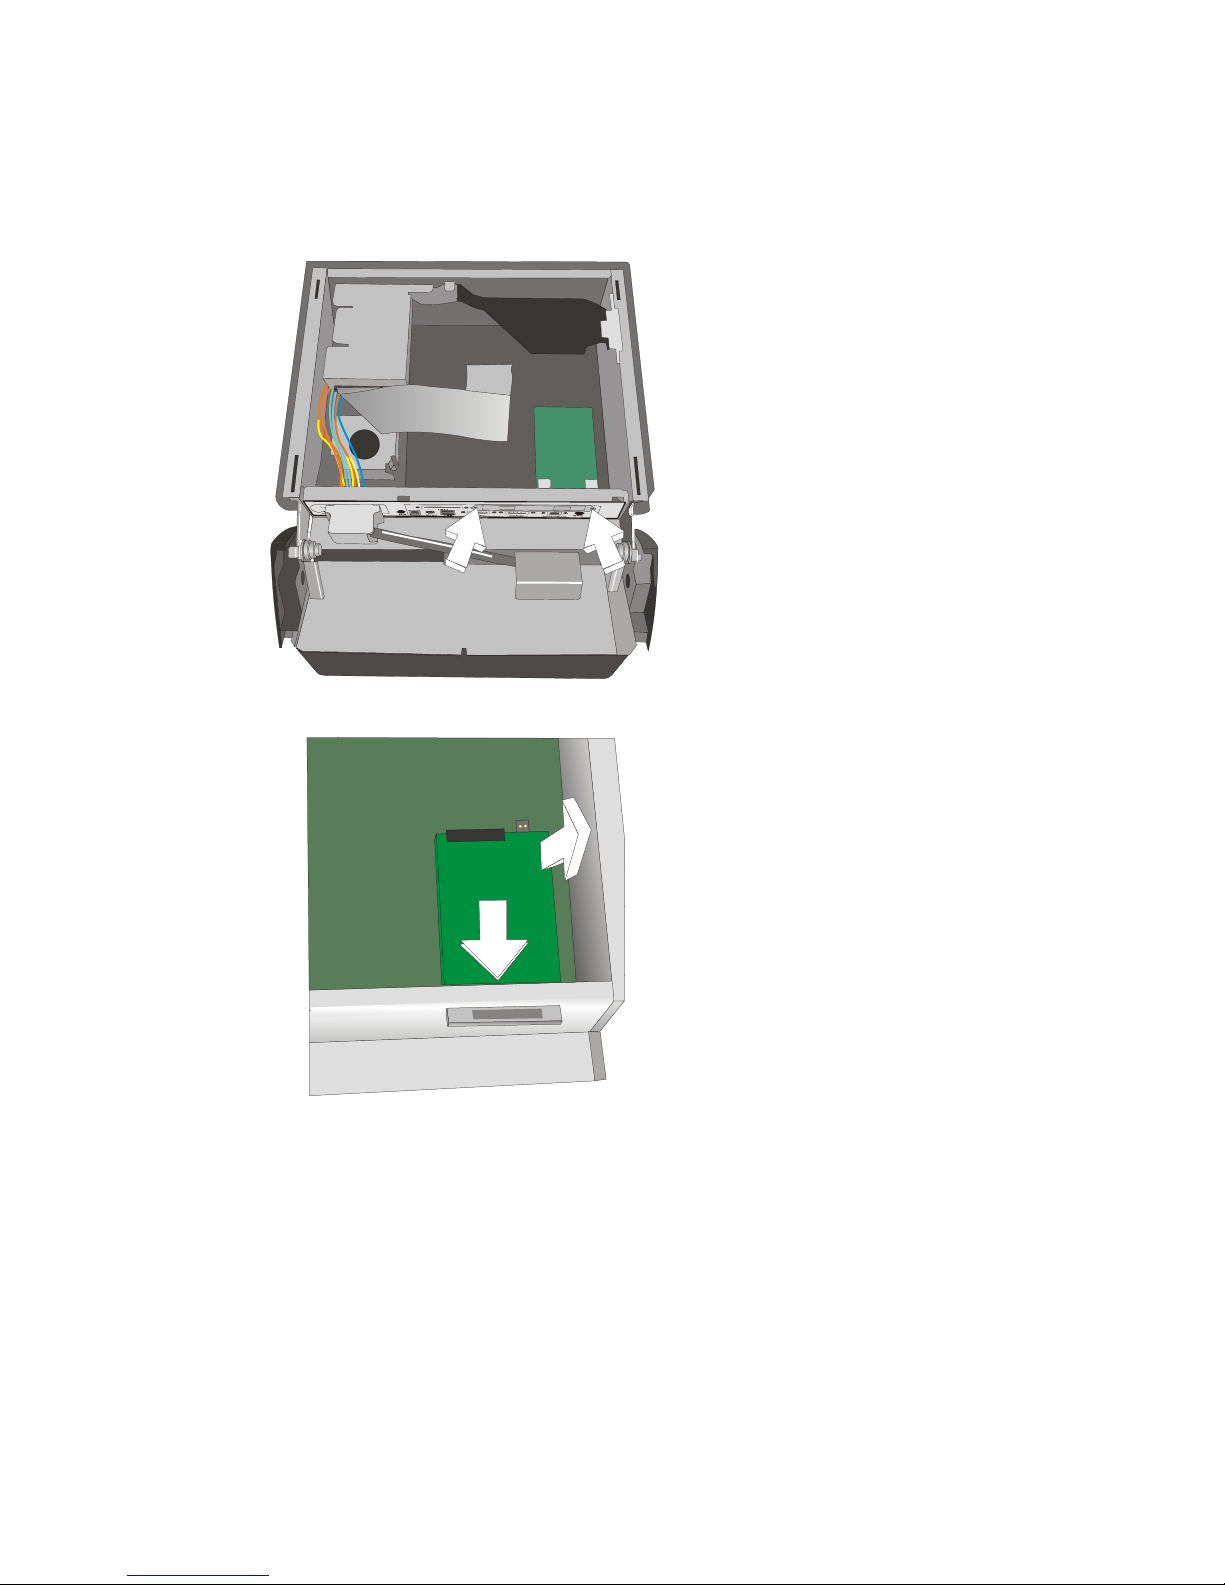
In ser ting a POS Board
Be fo re in stal ling a POS board the hard disks have to be re mo ved!
Loo sen the screws
of the co ver pla te
on which the TFT
Dis play adap ter is
moun ted.
Dis con nect the
adap ter from the
mot her bo ard (1).
Push the adap ter
through the slot
(2).
Bre ak away the me tal pla te that co vers the con nec ti on.
Push the COM3 and COM4 con nec tions through the brea kouts.
41
IN STAL LING THE SUB MO DU LES
Page 47
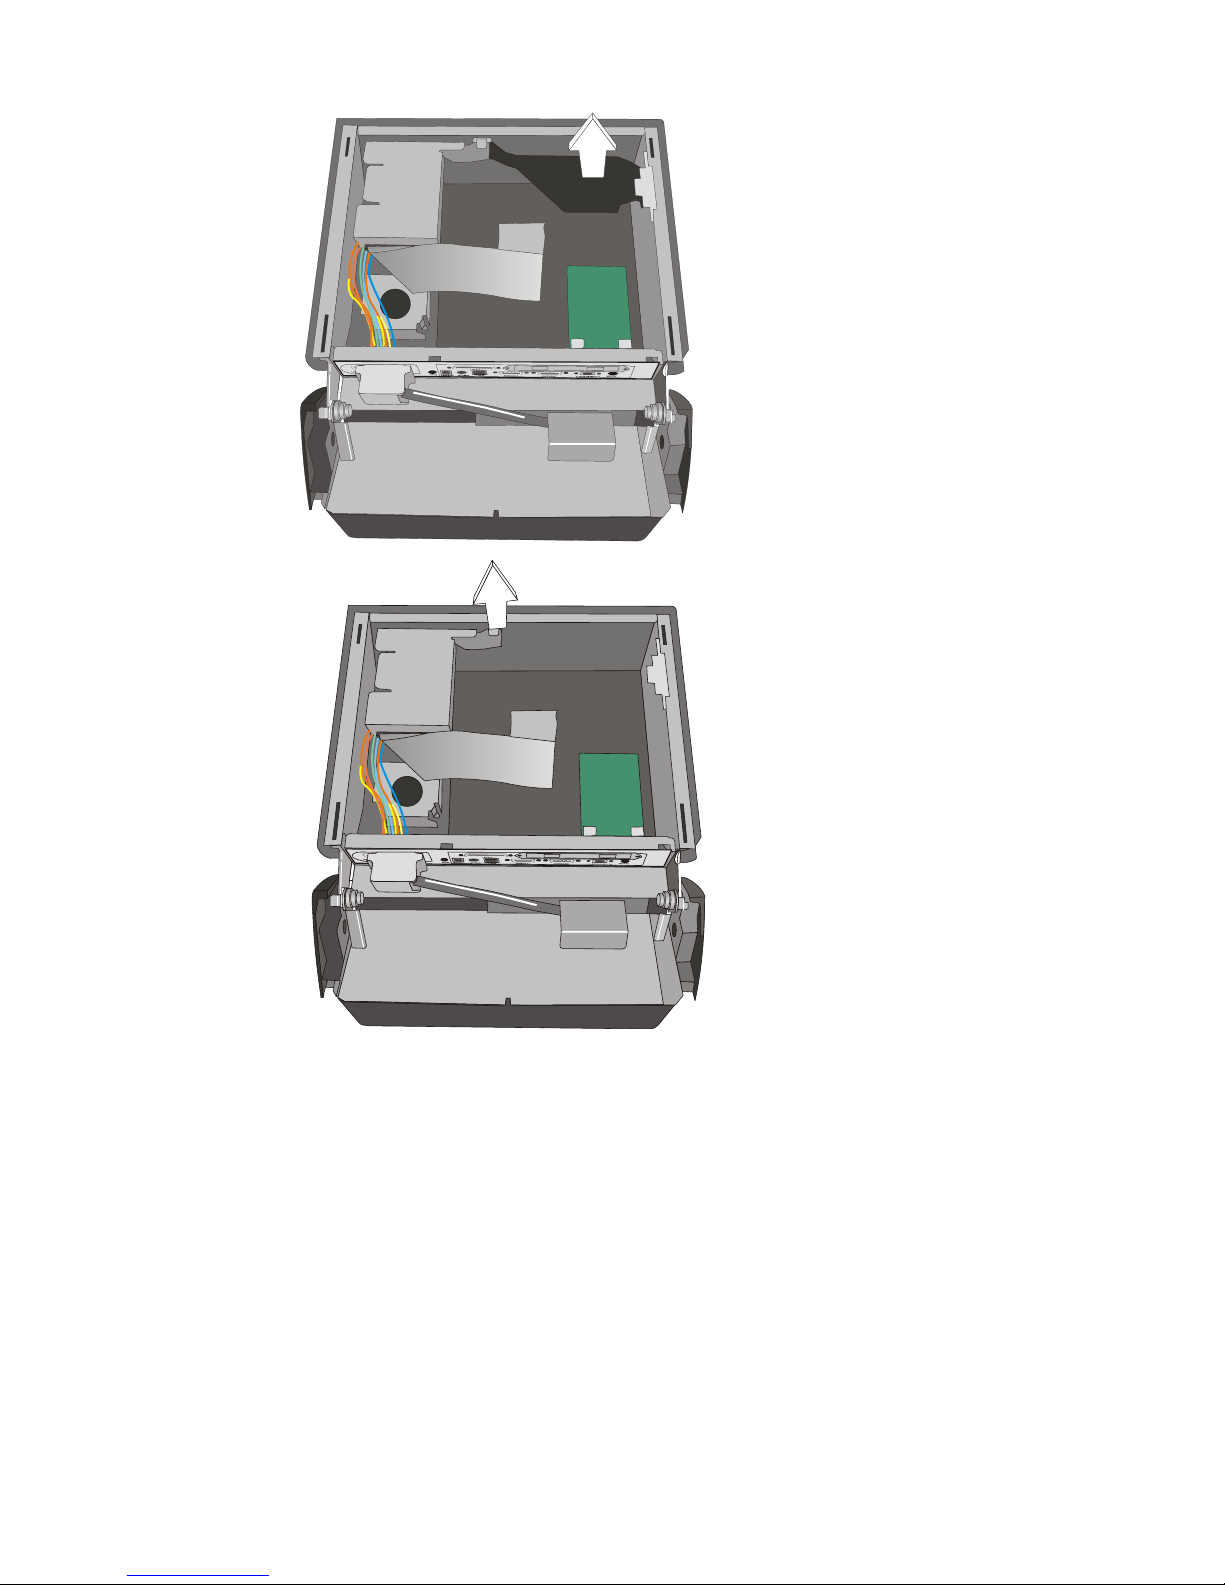
Pull the air duct
up ward (3).
Tilt the me tal cage
and the hard disk
up ward (4). Remo ve them and put
them asi de.
Dis con nect the
ca ble.
Re mo ve the me tal pla te for the cash dra wer con nec ti on. Then in sert the
POS board and con nect it with the mot her bo ard. You can now see the
connecti on for the cash dra wer.
IN SER TING A POS BOARD
42
Page 48
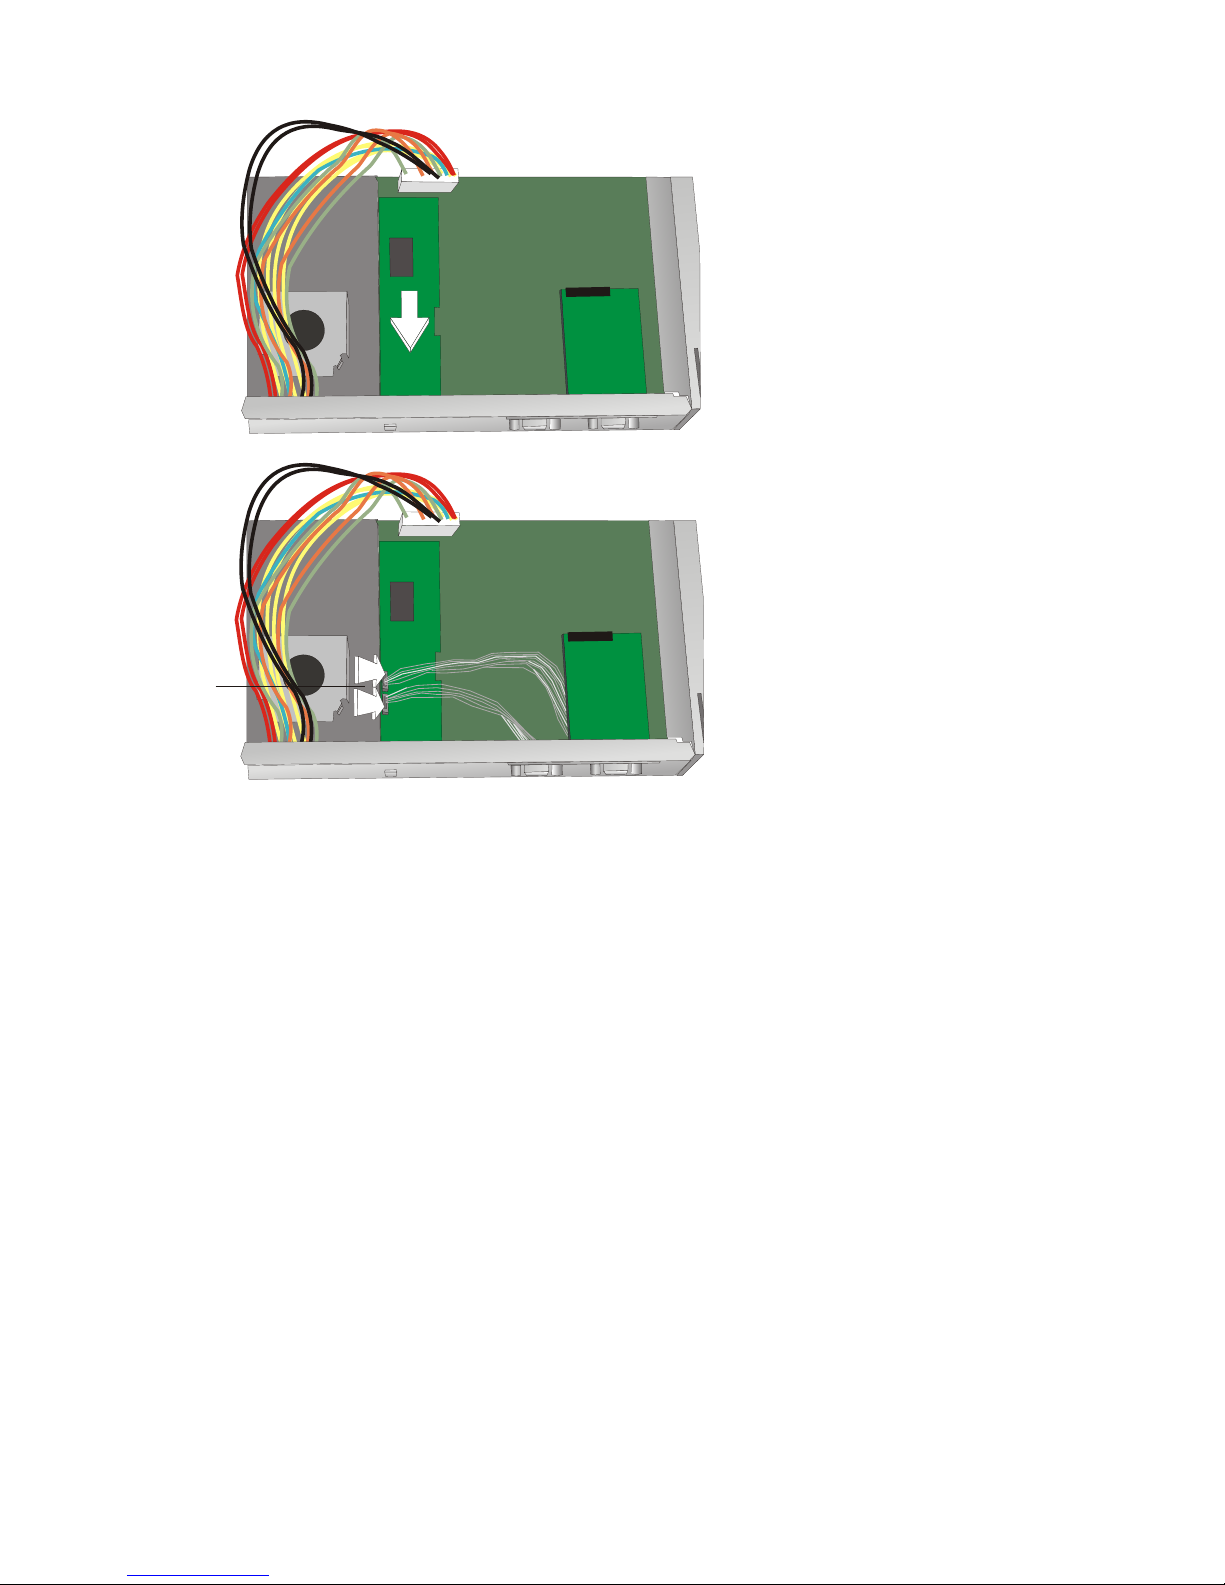
Push the adap ter
back through the
slot again and
con nect it to the
mot her bo ard.
Con nect it to the
COM3 and COM4
port on the POS
board
43
IN SER TING A POS BOARD
COM3
COM4
Page 49
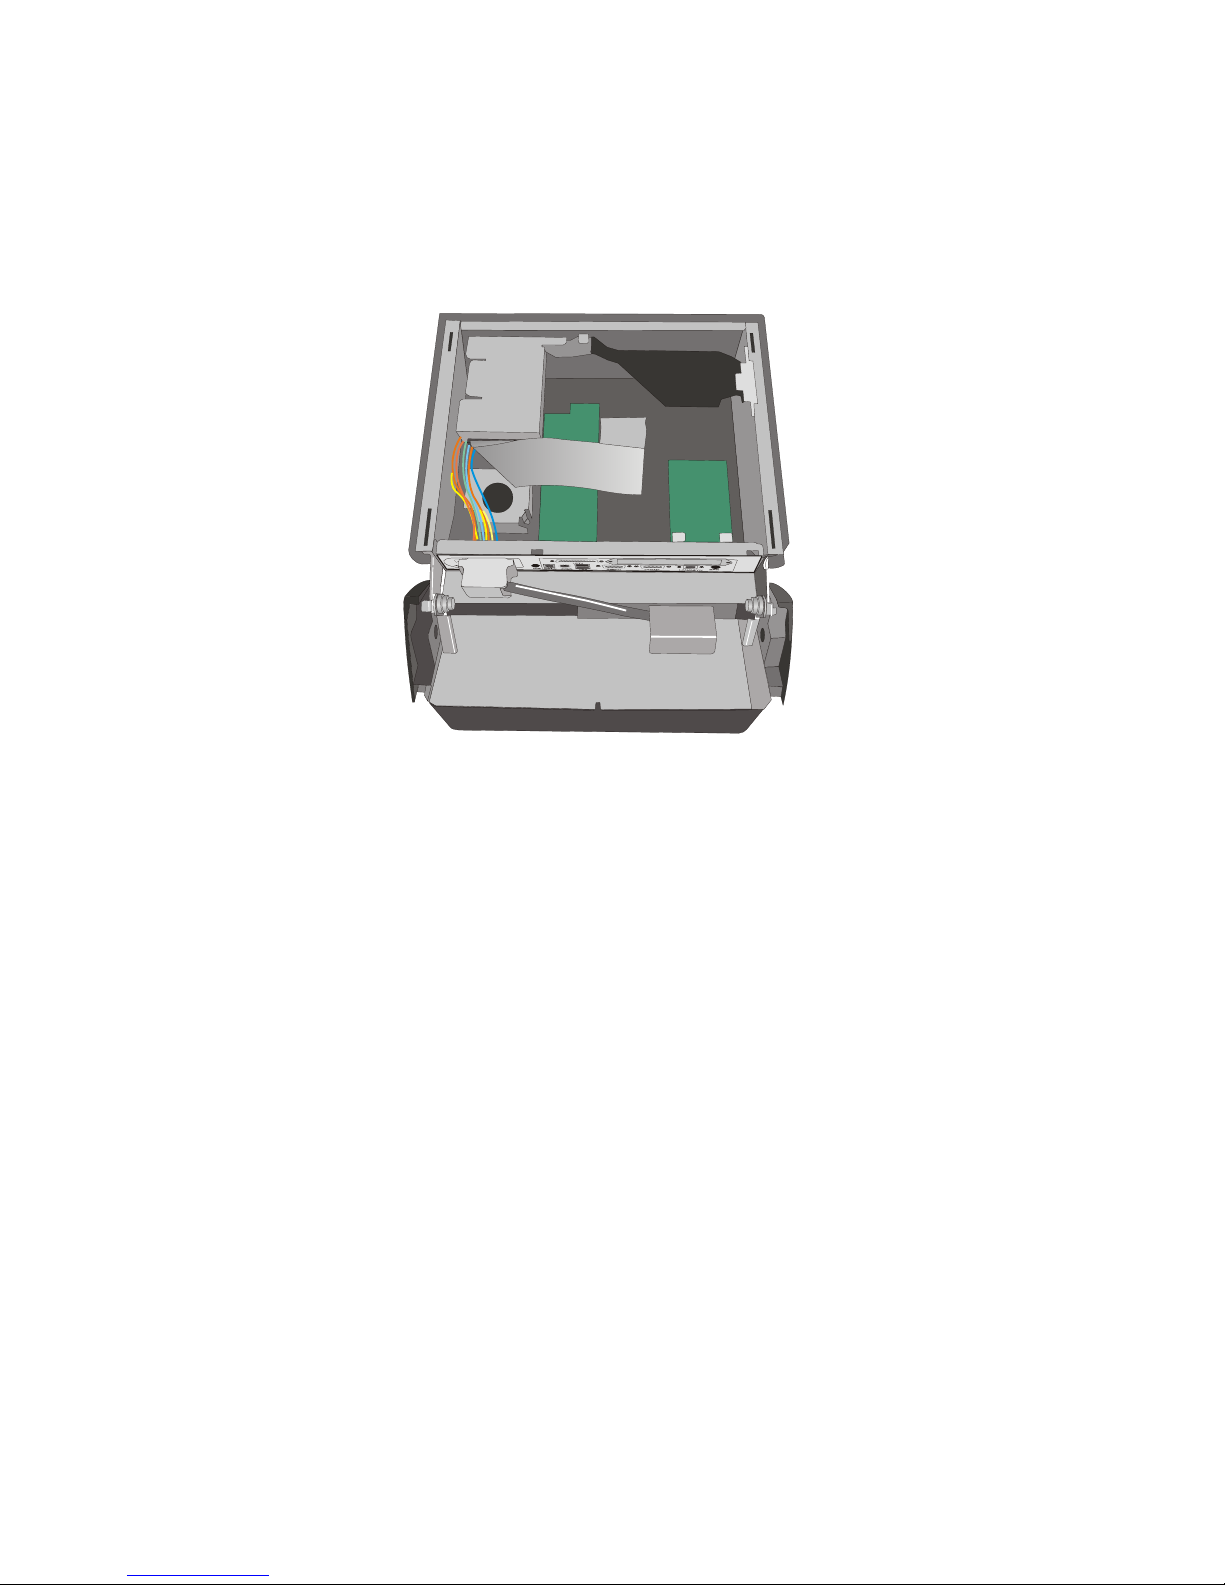
In ser ting a CRT Con trol ler (wit hout POS Board)
n Re mo ve the me tal pla te co ve ring the con nec ti on for the con trol ler.
n Insert the CRT controller and pin it to the motherboard.
In ser ting a CRT Con trol ler (POS Board exi sting)
n Loosen the TFT adapter from the motherboard
n Disconnect the COM3 and COM4 port
n Push the TFT adapter, the COM ports and the cables through the slot.
n Remove the COM4 interface.
n Re-insert the cable connection and the adapter.
n Push the CRT controller from inside into position and connect it to the
motherboard.
n Tighten the controller connection.
IN SER TING A POS BOARD
44
Page 50
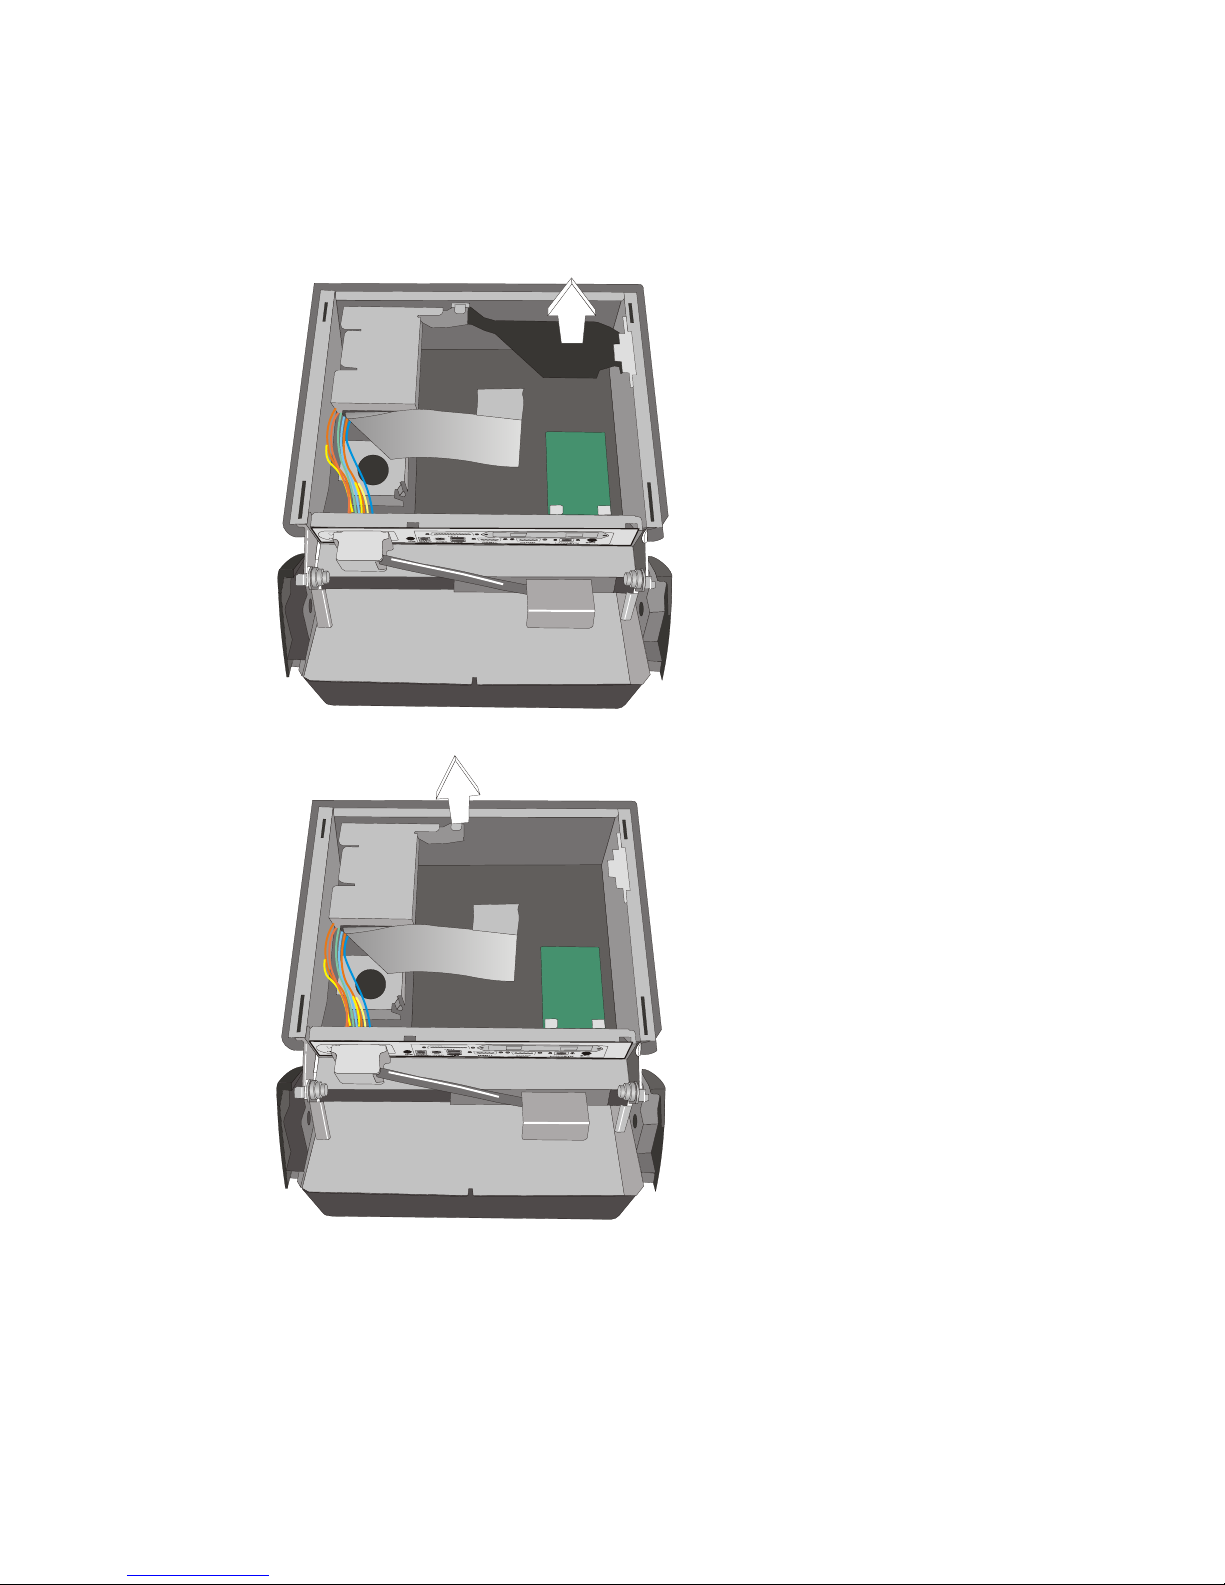
Chan ge of the Hard Disk Dri ve
To chan ge the hard disk dri ve open your BEETLE /iPOS as des cri bed
abo ve.
Pull the air duct
up ward (1).
Tilt the me tal cage
and the hard disk
up ward (2). Re mo ve them.
Dis con nect the
ca ble.
Re mo ve the ca ble
con nec ti on of the
hard disk. and put
it asi de.
Ex chan ge the unit and in sert the me tal cage and the air duct at the cor rect
po si ti ons.
45
IN SER TING A CRT CON TROL LER
Page 51

Start and runup behaviour
Af ter in stal ling the BEETLE /iPOS, plug in the mains po wer cord and switch
on the POS sys tem using the ON/OFF but ton on the front pa nel.
The sys tem first per forms an au to ma tic self-test to test its ba sic functions.
For ex am ple, you may see the fol lo wing mes sa ge (ir re spec ti ve of pro ces sor
type) on the four-line cas hier dis play or on the mo ni tor:
xx/xx is the pla ce hol der of the BIOS ver si on num ber
The sys tem then de ter mi nes the me di um from which the ope ra ting sys tem
and POS ap pli ca ti on are to be boo ted. Each me di um is as sig ned a lo gi cal
dri ve ac cor ding to the con fi gu ra ti on of your BEETLE /iPOS.
The fol lo wing me dia can be as sig ned a dri ve:
n Disk
n Network
n Hard disk
n CD ROM
The lo gi cal dri ves are de sig na ted A:, B:, C: and D:.
If the sys tem is to be boo ted from disk, this me di um must al ways be as sig ned dri ve A:. The net work is al ways as sig ned to the C: dri ve du ring the ru nup pro ce du re. The hard disk can be as sig ned to the C: or D: dri ve. The
sys tem can only be start ed from the hard disk if the disk has been con fi gu red as the C: dri ve.
Cor re spon ding to the BIOS Se tup con fi gu ra ti on the com pact BEETLE /iPOS
can be boo ted from the fol lo wing dri ves:
n Floppy disk via USB
n Hard disk in drive C:
n Network adapter C:
n USB-CD-ROM
CHAN GE OF THE HARD DISK DRI VE
46
WN BAS xx/xx Date
Page 52

Plea se mind that the sto ra ge me di um must be sys tem-boot-ca pa ble.
The prio ri ties can be set in the BIOS:
n Net work (C:)
n Hard disk (C:)
n USB-CD-ROM / FD disk
De pen ding on the set ting in the BIOS the POS sys tem ac ces ses from the
hard disk or from the flop py.
Au to ma ti cal ly con ti nu es the loa ding pro cess from dri ve C:.
If dri ve A: con tains a disk on which no ope ra ting sys tem is sto red, the POS
sys tem can not be boo ted. In this case, eit her re pla ce the disk with one that
is sys tem-boot-ca pa ble or re mo ve the disk al to get her.
If the ope ra ting sys tem has start ed up wit hout er ror, the POS ap pli ca ti on
soft wa re is au to ma ti cal ly boo ted if ne ces sa ry.
A mes sa ge is dis play ed as soon as the BEETLE /iPOS is rea dy for ope ra ti on. For more de tai led in for ma ti on, see the des crip ti on of your ap pli ca ti on
pro gram.
47
START AND RUNUP BEHAVIOUR
Page 53

Retail Software
The mar ket for re tail sto re so lu tions pre sents a bro ad ar ray of re qui re ments
for the functions in the se so lu tions as well as for the soft wa re tech no lo gies
used. Mo reo ver, the soft wa re and hard wa re is used in ter na tio nal ly, and
must meet a wide ran ge of re gio nal re qui re ments. This me ans, for ex am ple,
that so lu tions that ful fill the re gio nal re qui re ments of Cen tral Eu ro pe may
turn out to be ina de qua te for Asia or La tin Ame ri ca. Win cor Nix dorf pro vi des
cus to mers world wi de with stan dard pro ducts ap pro pria te to the com mer ci al
and tech ni cal com ple xi ty of their or gani za tions. In kee ping with this stra te gy,
Win cor Nix dorf has de fi ned a port fo lio of in-sto re so lu tions that ac com mo da tes this va rie ty of re qui re ments. The port fo lio of fers in-sto re so lu tions for the
dif fe rent ope ra ting sys tem plat forms that are pro mi nent ly used world wi de
(Mi cro soft and Li nux), and also of fers va ry ing de grees of so lu ti on com ple xi ty. Be si des de man ding pro ducts that will re main vi ab le in the fu tu re, to day’s
re tail cus to mers also re qui re that a so lu ti on pro vi der of fer ot her ser vi ces,
such as pro ject ma na ge ment, cus to mi za ti on and in te gra ti on ser vi ces, as
well as ad vi ce in the se lec ti on of ba sic core tech no lo gies.
Wincor Nixdorf Store Solutions
As an in ter na tio nal pro duct pro vi der, we are orient ed to mar ket de ve lop ments and stan dards that are avai la ble world wi de, al lo wing us to of fer our
cus to mers open so lu tions and ser vi ces with gua ran teed via bi li ty into the fu tu re.
Soft wa re must of cour se meet the cus to mers’ needs, and the se can of ten
vary gre at ly. But for the soft wa re to be a long-term suc cess, its de sign and
im ple men ta ti on must also take into ac count the fun da men tal trends and
stan dards that are emer ging in the mar ket. Only if you stay open to the dy na mics of re tail, it can be en su red that new com mer ci al trends will be re flec ted wit hin the sco pe of the so lu tions pro vi ded. To ac com mo da te the se
dy na mics, Win cor Nix dorf must have the ap pro pria te tech ni cal ex per ti se.
When wor king on pro duct de ve lop ment, pro jects or con sul ting, this ex per ti se
is ess en ti al to ef fec ti ve ly meet cur rent as well as fu tu re re qui re ments.
START AND RUNUP BEHAVIOUR
48
Page 54

Platforms and Products
So lu ti on plat forms to day are ex pec ted to uti li ze sta te-of-the-art, stan dardi zed ope ra ting sys tems. Some of the de ci si ve fac tors in se lec ting an ope ra ting sys tem in the re tail tra de in clu de:
n An operating system should provide software administration mechanisms
to help minimize the total cost of ownership
n The flexibility of an operating system for use with different hardware and
peripherals
n Global availability to ensure complete coverage, as well as
n Scalability with regard to user requirements.
In light of the se cri te ria, the Mi cro soft ope ra ting sys tems have estab lis hed
them sel ves in the mar ket, and the Mi cro soft Wind ows plat form is now po si tio ned as an im por tant tech no lo gi cal fac tor.
Ho we ver, the gro wing dis cus si on of ope ra ting sys tem sca la bi li ty, as well as
the de mand for con ti nu ed re duc ti on of the to tal cost of owners hip, have led
to the emer gen ce of ot her ope ra ting sys tems. The stron gest trend has been
to Li nux. Re gard less of the in du stry in vol ved, Li nux of fers it self as an in ter esting supp le ment to the world of Mi cro soft.
In view of this trend, Win cor Nix dorf has de fi ned a soft wa re stra te gy that ac com mo da tes both Li nux and the po pu lar Mi cro soft plat form:
Tra ding Post
Tra ding Post pre sents it self as an ob ject-ba sed POS so lu ti on which uses
the Mi cro soft Wind ows ope ra ting sys tem throug hout. With stan dardi za ti on
con cepts for in ter fa cing POS pe ri phe rals (OPOS), an in no va ti ve, mo du lar
cus to mi zing con cept and a gra phi cal user in ter fa ce at the POS ter mi nal,
Tra ding Post is po si tio ned in mar kets with de man ding re qui re ments for
system architecture and application versatility.
Mi cro soft plat forms and tech no lo gies are used in the de ve lop ment of Tra ding Post. With its ba sic stan dards and tech no lo gies - such as the ARTS
data mo del, the XML In ter net stan dard, the OPOS pe ri phe ral con trol con cept and the Tra ding Post ar chi tec tu re - Tra ding Post is a soft wa re so lu ti on
that sa tis fies the needs of in ter na tio nal re tail com pa nies orient ed to ward
tech no lo gy and ar chi tec tu re. Tra ding Post pro vi des plug-ins for the Cash &
Carry and General Merchandise segments.
49
RETAIL SOFTWARE
Page 55

TP.net
TP.net com bi nes Tra ding Post’s ba sic tech no lo gies and con cepts (e.g. Mi cro soft ope ra ting sys tems, ARTS, Mi cro soft da ta ba ses, XML or OPOS) with
Mi cro soft .NET tech no lo gies and ex ten si ve functio na li ty. This functio na li ty
can ea si ly be ex ten ded with the aid of so phis ti ca ted cus to mi zing and tai lo ring me cha nisms. Plug-in com po nents meet na tio nal or cus tom re qui re ments wit hout ha ving to re lin quish the ad van ta ges that a stan dard pro duct
has to of fer. This fea tu re en ab les Win cor Nixdorf’s of fi ces and soft wa re de ve lop ment part ners to hand le soft wa re pro jects on their own. In the me di um
term, Mi cro soft .NET technology will make it possible to run the same
application on mobile devices.
TPLi nux
CALYPSO/TPLi nux runs un der the Li nux ope ra ting sys tem both on the sto re
ser ver and on the POS sys tem. This ho mo ge ne ous ope ra ting sys tem en vi ron ment me ans that the ap pli ca ti on can be de ploy ed in a client/ser ver en vi ron ment at hy per mar kets or on a stand-alo ne sys tem. In ad di ti on, using
Li nux on POS sys tems not only supp orts in ter na tio nal retailers’ IT mi gra ti on
stra te gies but is also ideal for pro vi ding de di ca ted add-ons such as a
POS-touch-GUI and ex ten ding the pro duct on the ba sis of sta te-of-the-art
tech no lo gies. Win cor Nix dorf has de mon stra ted this with TPLi nux which is
the di rect suc ces sor to CALYPSO. Fea tu ring new tech no lo gies (XML in ter fa ces, Java, Web GUI for the back sto re, and re la tio nal da ta ba ses), this pro duct is the foun da ti on for a new ge ner ati on of Li nux front sto re soft wa re that
uni tes in no va ti ve tech no lo gies, CALYPSO’s in ter na tio nal ly pro ven
functionality, and great flexibility in communicating with other systems in a
given retail IT infrastructure.
Tech no lo gy eva lua ti on
The furt her de ve lop ment of Win cor Nix dorf re tail so lu tions ta kes pla ce in di alog with its cus to mers. Be fo re being in clu ded in exi sting pro ducts, new
trends and tech no lo gies are ca re ful ly exa mi ned with re gard to their rea di ness for the mar ket. To en su re mar ket ac cep tan ce and mar ket orien ta ti on in
the se lec ti on of tech no lo gies, Win cor Nix dorf con ducts tech no lo gy eva lua ti on pro jects with its cus to mers and partners. This significantly reduces
technological risks.
RETAIL SOFTWARE
50
Page 56

Appendix
Technical Data for the BEETLE /iPOS
51
RETAIL SOFTWARE
Box
12” Width, Depth, Height 318 x 345 x 379 mm
15” Width, Depth, Height 390 x 345 x 438 mm
Weight
12” approx. 12 kg
15” approx. 14 kg
Cli ma tic ca te go ry
Ope ra ting IEC 721-3-3 Class 3K3 +5°C to +40°C
Trans port IEC 721-3-2 Class 2K2 -25°C to +60°C
Sto ra ge IEC 721-3-1 Class 1K2 +5° C to +40°C
In put vol ta ge 100 - 120 VAC
200 - 240 VAC
Current Consumption 3A/5A
Max. po wer con sump ti on max. 1A: 200 - 240V
max. 2A: 100 - 120V
Noise Development Acc. to GPSGV 70 dB(A) or less
Page 57

TECHNICAL DATA
52
E1 Basic Motherboard
Architecture PC compatible and POS specific units
Chip Set Intel 845GV
Microprocessor Intel Pentium 4- M with 400 MHz host bus
speed,
Mobile Intel Celeron processor with 400 MHz
host bus speed
RAM bus frequency 266 MHz
BIOS 512 MB Flash Memory, Phoenix BIOS 4.06,
PnP Rev. 1.0A, DMI Rev. 2.3
Interface
Parallel 1 x IEEE1284 compatible
COM COM1*, 2* (mit Spannungsversorgung)
+ 12V/900mA (max. in Summe),
600 mA max. pro COM
+ 5V/500mA (max. in Summe)
USB (Universal Serial Bus) 6 x USB 2.0
PS/2 -keyboard or PC compatible (6pin Mini DIN plug)
keyboard and mouse signales
PS/2 - mouse via a Y cable connected with the keyboard
PCI PCI Rev. 2.1
100 pin connector for the Retail specific
POS Board
80 Pin connector for Plug in Moduls
MIC, Speaker ports for microphone and loudspeaker
2 x 1.25 Watt/8 Ohm
volume adjustable via system software
E-IDIE for internal 2.5” hard disk
Page 58

53
TECHNICAL DATA
Screen
12.1” (SVGA) 15” (XGA)
Re so lu tions Ho ri zon tal 800 1024
Ver ti cal 600 768
LCD Technology TFT, 18 Bit
Surface
w/o touchscreen Glass
capacitive touchscreen anti-reflection,
resistive touchscreen Polyester topsheet
Data trans fer Bi-di rec tio nal,
(Touch Screen) asyn chro nous,
Xon-Xoff pro to col,
RS232, COM5/COM2,
2400 Bd, 8bit
(Screen) Pa nel Link In ter fa ce
Frequencies 12.1” (SVGA) 15” (XGA)
horizontal (Khz) 29 48.3
vertical (Khz) 47 60
Brightness (with/ w/o Touch) approx. 190/230 cd/m²
(center LCD)
Page 59
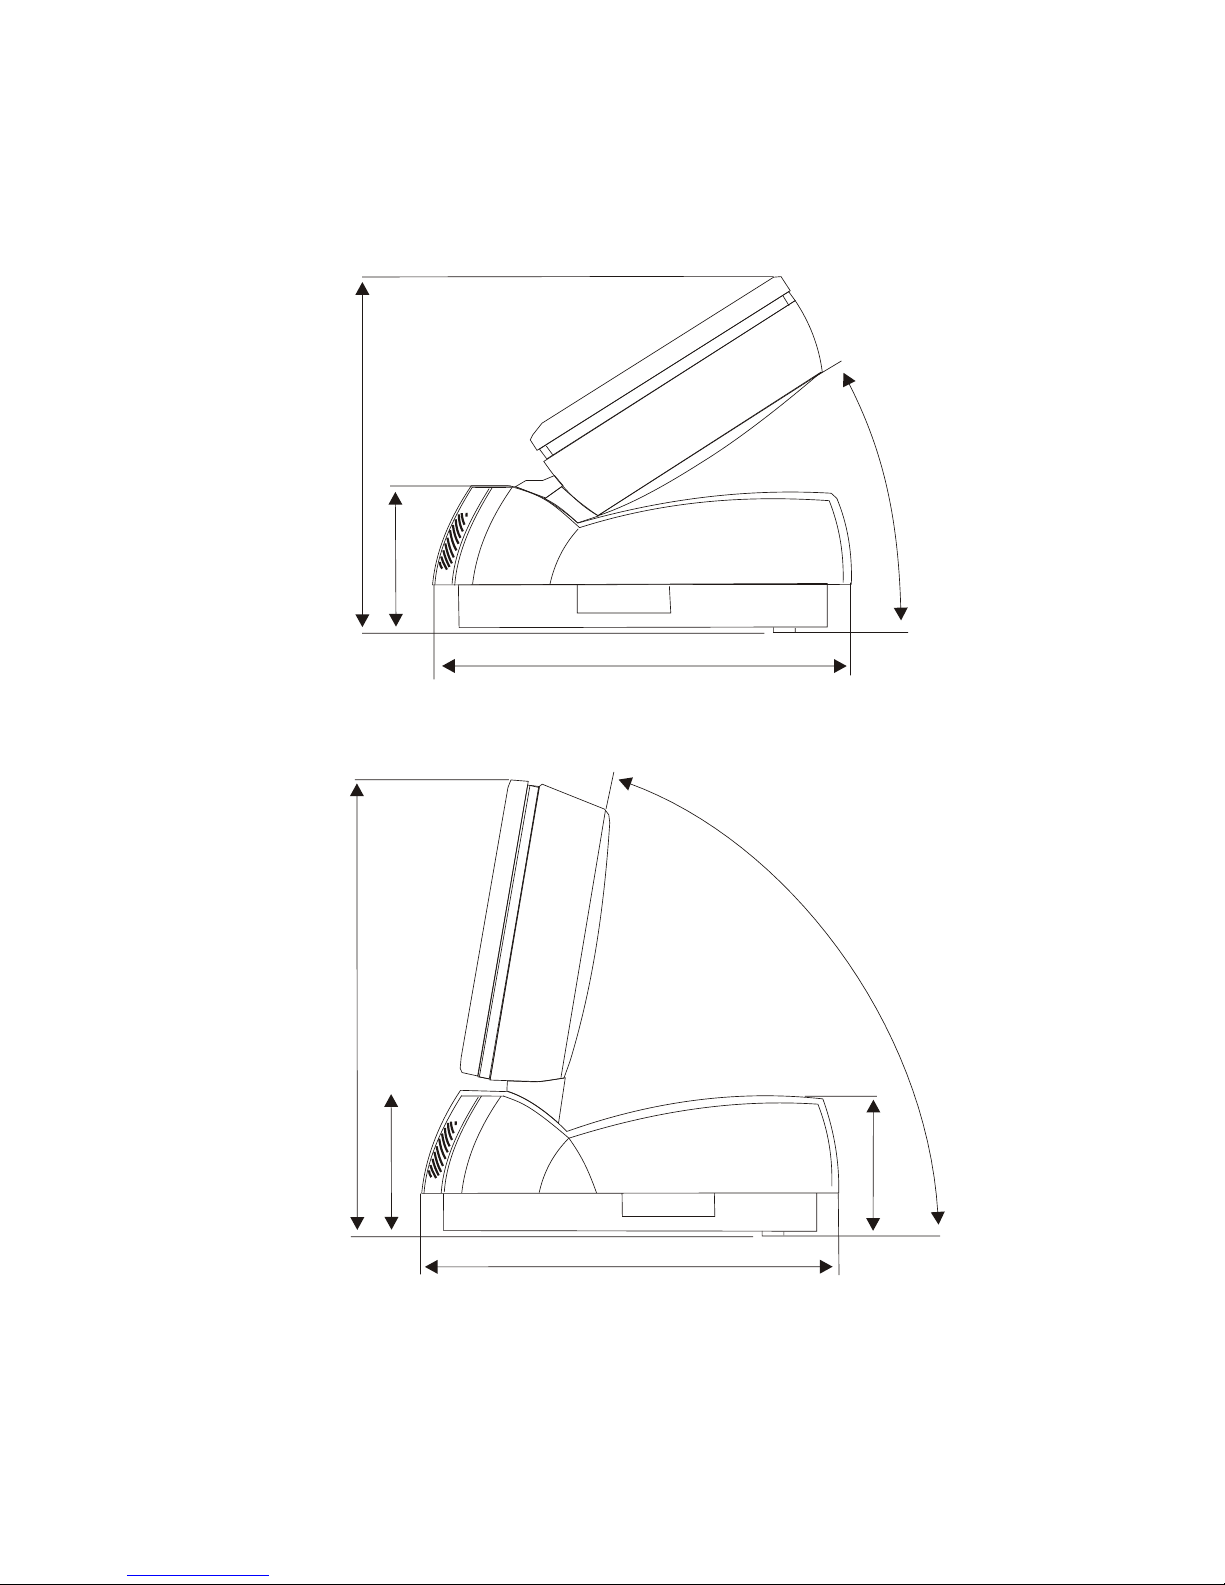
Dimensions
BEET LE /iPOS with a 12.1” screen
TECHNICAL DATA
54
80°
379 mm
32°
294 mm
345,4 mm
121,5 mm
121,5 mm
345,4 mm
116 mm
Page 60
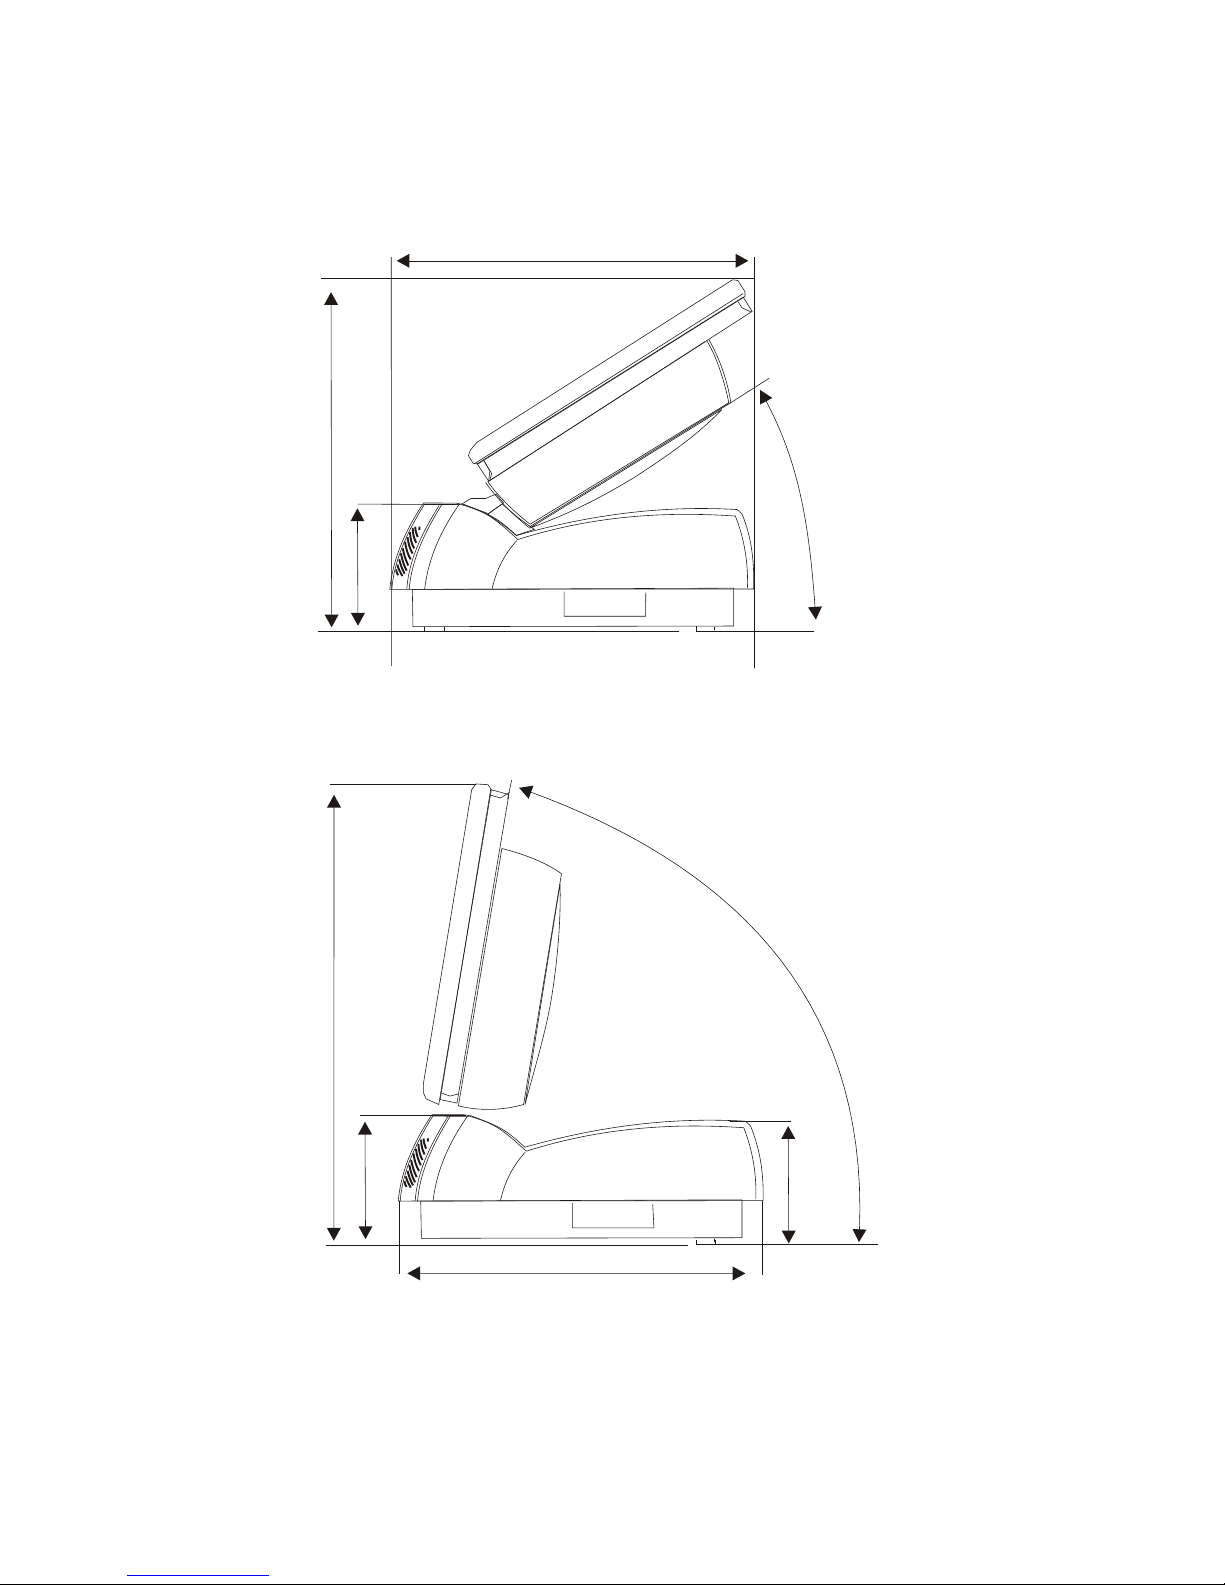
BEET LE /iPOS with a 15” screen
55
DIMENSIONS
32°
333 mm
121,5 mm
345,4 mm
80°
438 mm
345,4 mm
121,5 mm
116 mm
Page 61

Glossary
Bit
A bit is a bi na ry di git (0 or 1). It is the smal lest unit used in data Ser ves to
con trol data in put and out put in a data pro ces sing sys tem or bet ween a
com pu ter and the con nec ted pe ri phe rals.
CPU
Ab bre via ti on of cen tral pro ces sing unit. It in clu des the main com po nents of
a data pro ces sing sys tem. The CPU mo ni tors all ope ra tions and pro vi des
data and pro grams. It com pri ses the con trol unit for in put and out put, the
com pu ter and the main me mo ry, di vi ded into ROM and im me di ate ac cess
sto ra ge.
In ter fa ce
De sig na tes the tran si ti on point bet ween dif fe rent hard wa re units and soft wa re units or bet ween hard wa re and soft wa re units of com pu ters or their pe ri phe rals.
JEIDA
Ab bre via ti on of Ja pan Elec tro nic In du stry De ve lop ment As so cia ti on. In du stry stan dard for me mo ry cards.
Ope ra ting sys tem
Re fers to all pro grams that are a com po nent of a com pu ter and are re qui red
for ope ra ting the sys tem and exe cu ting ap pli ca ti on pro grams.
PCMCIA
Ab bre via ti on for Per so nal Com pu ter Me mo ry Card In ter na tio nal As so cia ti on.
In du stry stan dard for me mo ry cards.
Plug and Play (PnP)
PnP me ans the au to ma tic re co gni ti on of hard wa re com po nents by the sys tem. Thus the in stal la ti on, in te gra ti on and con fi gu ra ti on of new com po nents
is made sub stan ti al ly ea sier.
Pe ri phe rals
De vi ces ser ving as an in put/out put de vi ce or sto ra ge for a com pu ter. This
in clu des, for ex am ple, do cu ment rea ders, key bo ards, prin ters and disk sto ra ge.
GLOSSARY
56
Page 62

Ser ver
This is a com pu ter con nec ted to a lo cal net work and who se ser vi ces are
avai la ble to all of the net work sub scri bers, e.g. a print ser ver for prin ting the
data from all of the net work sub scri bers on the prin ter con nec ted to the ser ver.
VGA
Stands for Vi deo Gra phics Ar ray and is the in ter fa ce for con nec ting co lour
mo ni tors.
57
GLOSSARY
Page 63

Abbreviations
AT Advanced Technology
ATA AT-Attachment
BIOS Basic Input Output System
COM Communication Port
CPU Central Processing Unit
CRT Cathode Ray Tube
cUL canada Underwriters Laboratories
DIMM Dual Inline Memory Module
ECP Extended Capability Port
EPP Enhanced Parallel Port
EPROM Erasable Programmable Read Only Memory
FD Floppy Disk
GS “Geprüfte Sicherheit” (Tested Safety)
HDD Hard Disk Drive
HFT High Frequency Table
HSF Hash File Access Method
IDE Integrated Drive Electronic
ISA Industrial Standard Architecture
ISO International Standardization Organization
JEIDA Japan Electronic Industry Development Association
LAN Local Area Network
LBA Logical Block Addressing
LED Light Emitting Diode
LPT Line Printer
OEM Original Equipment Manufactures
PCI Peripheral Component Interconnect
PCMCIA Personal Computer Memory Card Intern. Association
PnP Plug and Play
RAM Random Access Memory
ROM Read Only Memory
SCSI Small Computer Systems Interface
SD RAM Synchronous Dynamic Random Access Memory
SIMM Single In Line Memory Module
SRAM Static Random Access Memory
SVGA Super Video Graphics Array
TFT Thin Film Transistor
UPS Uninteruptable Power Supply
UL Underwriters Laboratories
USB Universal Serial Bus
ABBREVIATIONS
58
 Loading...