

Page 1

QUICK START
GUIDE FOR USING
BEETHEFIRST
GUIA RÁPIDO PARA UTILIZAÇÃO
DA BEETHEFIRST
EN - PT
Page 2

Page 3

BEEWELCOME!
This the Quick Start Guide for using your BEETHEFIRST.
You can find updated versions of this guide on our website, at
www.beeverycreative.com, where you can get in touch with
Customer Service if you have any questions.
Este é o guia rápido para utilização da tua BEETHEFIRST.
Poderás procurar versões actualizadas deste documento no site
www.beeverycreative.com e recorrer também ao Apoio ao Cliente
para colocares as tuas dúvidas.
Page 4

Page 5

INDEX (ÍNDICE)
1 . SAFETY INFORMATION
(Informações de segurança)
2 . TECHNICAL SPECIFICATIONS
(Características técnicas)
3 . UNPACKING AND INSTALLING BEETHEFIRST
(Desembalar e instalar a BEETHEFIRST)
V.12.03.2014
Page 6

The current state of 3D desktop Art technology
Even though the only real limit is your own creativity, current 3D printing technology
also has its limits. You can find out what they are by reading our 3D Modeling Directives
document
(https://www.beeverycreative.com/en/beegallery/directrizes-de-modelacao)
The most relevant aspect to guarantee print quality is calibrating BEETHEFIRST.
Proper calibration is essential to performance and to ensure the desired results.
Poor calibration may keep you from printing the object you wish to make.
High resolution printing requires an even more demanding calibration. For this reason,
we advise you to print in low resolution until you’re a more experienced user.
Low resolution printing is also recommended whenever object resolution isn’t the main
concern, since this is quicker, more economical and more ecological.
Estado da arte da tecnologia 3D desktop
Ainda que a verdadeira limitação seja a tua criatividade, a actual tecnologia de impressão
3D tem também ainda algumas limitações, que podem ser consultadas no documento
Directrizes de Impressão 3D
(https://www.beeverycreative.com/pt/beegallery/directrizes-de-modelacao)
A questão mais relevante para a qualidade das tuas impressões é a calibração
da BEETHEFIRST.
A adequada calibração é essencial para o desempenho e resultado pretendidos, podendo
uma calibração deficiente impedir a impressão do objecto que pretendes.
A impressão em alta resolução requer uma calibração ainda mais rigorosa.
Por essa razão, aconselhamos-te a imprimir em baixa resolução enquanto não fores um
utilizador experiente.
A impressão em baixa resolução é também recomendada sempre que a resolução do
objecto não seja um factor relevante, visto que é mais ecológica, mais rápida e mais
económica.
Page 7

1. SAFETY INFORMATION
INFORMAÇÃO DE SEGURANÇA
Page 8

1. SAFETY INFORMATION (INFORMAÇÃO DE SEGURANÇA)
Even though the BEETHEFIRST printer was designed to be as safe a piece of
equipment as possible, we wish to remind you it was conceived for use by adults.
Still, there are safety concerns you must keep in mind:
Apesar de a impressora BEETHEFIRST ser um equipamento seguro, recordamos que ela
foi desenvolvida para ser utilizada por adultos, mesmo assim, existem alguns perigos
para os quais te queremos alertar:
1 - Adult supervision: because we can never stress this enough, BEETHEFIRST
was developed to be used by adults. Should you wish that your children also use
it, you must supervise them at all times while they do so. You must also take
great care with small printed objects, because children might try to swallow
them, which poses a danger of them choking.
1 - Supervisão de adultos: porque nunca é demais referir, a BEETHEFIRST
foi desenvolvida para ser utilizada por adultos. Caso queiras que os teus filhos a usem,
será necessário que os acompanhes. Deverás ter o mesmo cuidado com os objectos
impressos mais pequenos, pois as crianças poderão tentar engoli-los, correndo o risco
de sufocar.
2 - Extruder: whenever BEETHEFIRST is functioning, the extruder nozzle can
reach temperatures as high as 250º C (480º F), which can cause serious burns
if touched. For that reason, even though the it’s shielded, you must always be
careful not to touch the extruder.
2 - Extrusor: durante o funcionamento da BEETHEFIRST a temperatura do bico do
extrusor pode chegar aos 250º C, o que provocará uma queimadura grave se lhe tocares.
Por essa razão, apesar de estar protegido, deves ter sempre cuidado para não tocar no
extrusor.
3 - Moving parts: whenever it’s functioning, BEETHEFIRST has moving parts.
For that reason, you should always keep a safe distance from the printer while
it’s operating.
3 - Partes em movimento: durante o funcionamento a BEETHEFIRST terá partes em
movimento. Por essa razão, deverás manter uma distância de segurança da impressora
enquanto esta opera.
Page 9

4 - Filament: BEETHEFIRST has been developed and tested to function with the
specific filament sold on the BEEVERYCREATIVE website. Using filament from
other sources may result in poor-quality printing and even damage the printer
itself, voiding the warranty.
4 - Filamento: a BEETHEFIRST foi desenvolvida e testada para funcionamento com
o filamento vendido no portal da BEEVERYCREATIVE. A utilização de outros filamentos
poderá resultar em impressões de pouca qualidade e danificar a impressora, sem que a
garantia possa ser accionada.
5 - Cool and well-ventilated environment: BEETHEFIRST works best in cool
environments with some ventilation, which, just like any other electrical item,
is also recommended to maintain an acceptable level of air quality around the
printer.
5 - Ambiente fresco e ventilado: a BEETHEFIRST funciona melhor em ambientes
frescos e com alguma ventilação, o que, como com outros equipamentos eléctricos, é
também recomendável para evitar a degradação da qualidade do ar da zona em que está
a impressora.
6 - BEETHEFIRST integrity: never use BEETHEFIRST without it being fully assembled.
Using it without all of its components voids the warranty and can be dangerous. For the
same reasons, avoid spilling any liquid on the printer.
6 - Integridade da BEETHEFIRST: nunca utilizes a BEETHEFIRST sem ela estar completa.
A utilização sem alguma das peças anula a garantia e pode ser perigosa. Pelas mesmas
razões, não derrames líquidos sobre a impressora.
7 - Modifications to BEETHEFIRST: if you modify BEETHEFIRST in any way, this
will immediately void the warranty. If you still wish to modify it, get in touch
with us, explain your project and we might be able to provide you with useful
information.
7 - Alterações à BEETHEFIRST: caso faças alguma alteração à BEETHEFIRST a garantia
deixará de ser válida. Caso, ainda assim, o queiras fazer, entra em contacto connosco,
explica-nos o teu projecto e poderemos enviar-te informação útil.
Page 10

2. TECHNICAL SPECIFICATIONS
CARACTERÍSTICAS TÉCNICAS
Page 11

Printing technology
Tecnologia de impressão
Max. printing volume
Volume de impressão
Layer resolution
Resolução da camada
Filament diameter
Diâmetro do filamento
Volume
Volume
Approx. Weight
Peso aprox.
Working ambient temperature
Temperatura ambiente em funcionamento
Storage temperature
Temperatura de armzenamento
Humidity
Humidade
AC Input
Entrada AC
Connectivity
Ligação
Exterior
Exterior
Printing table
Mesa de Impressão
Software name
Nome do Software
File type
Tipo de Ficheiro
Minimum system requirements
Requisitos mínimos do sistema
FFF
190mm x 135mm x 125mm
(7.48 x 5.31 x 4.92 x in)
High - 100 microns
Low - 300 microns
1.75 mm
40 x 40 x 14 cm
(15.75 x 15.75 x 5.51 in)
9.5 kg (21 lb)
15º - 30º C
(59º - 86º F)
0º - 30º C
(32º - 86º F)
Low
100 - 120 VAC 3.0A 50 - 60 Hz
200 - 240 VAC 2.0A 50 - 60 Hz
USB
Metal / Acrylic
Polycarbonate
BEESOFT (Open Source)
.stl
Windows (7 / 8) | Linux (12.04 +)
Core i3 | AMD Phenom II | AMD Atlhon X2
RAM: 2GB
Free disk space: 500 MB
Graphics card (GPU): 512 MB dedicated
Mac OS X (10.7/10.8+)
Mac hardware: late-2008+
Page 12

3. UNPACKING AND INSTALLING
BEETHEFIRST
DESEMBALAR E INSTALAR
A BEETHEFIRST
Page 13
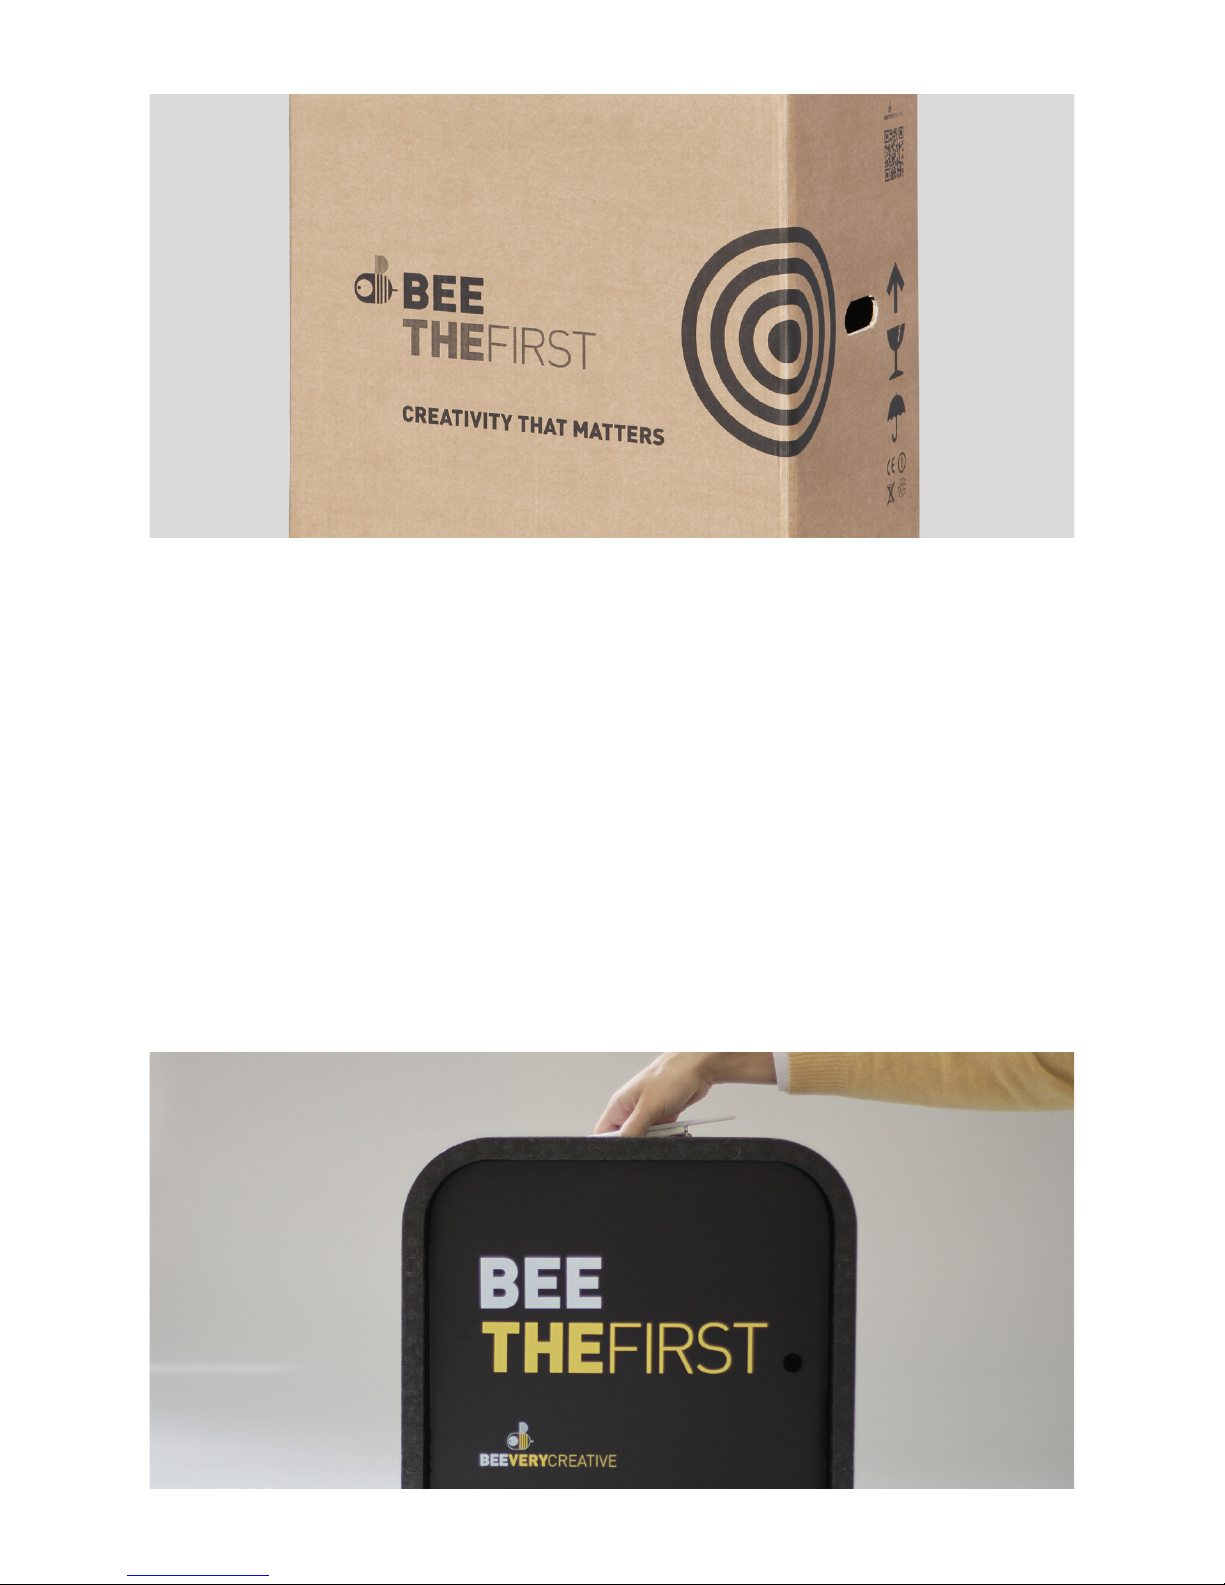
1. Open the box and remove the printer’s protective foam.
1. Abre a caixa e retira as espumas de protecção da impressora.
2. Open the plastic bag by removing the tape by pulling the tag, as shown in
the illustration on the outside of the bag.
2. Abre o saco de plastico puxando a etiqueta, conforme a ilustração colada no exterior do saco.
3. Remove the printer by the handle, NOT by pulling the foam casing, or you will
damage it. The handle comes out by pressing it on one side, then lifting it out.
3. Tira a impressora pela pega, NÃO pela embalagem de espuma, pois assim podes
danificá-la. A pega sai ao carregar de um lado, e levantar do outro.
Page 14
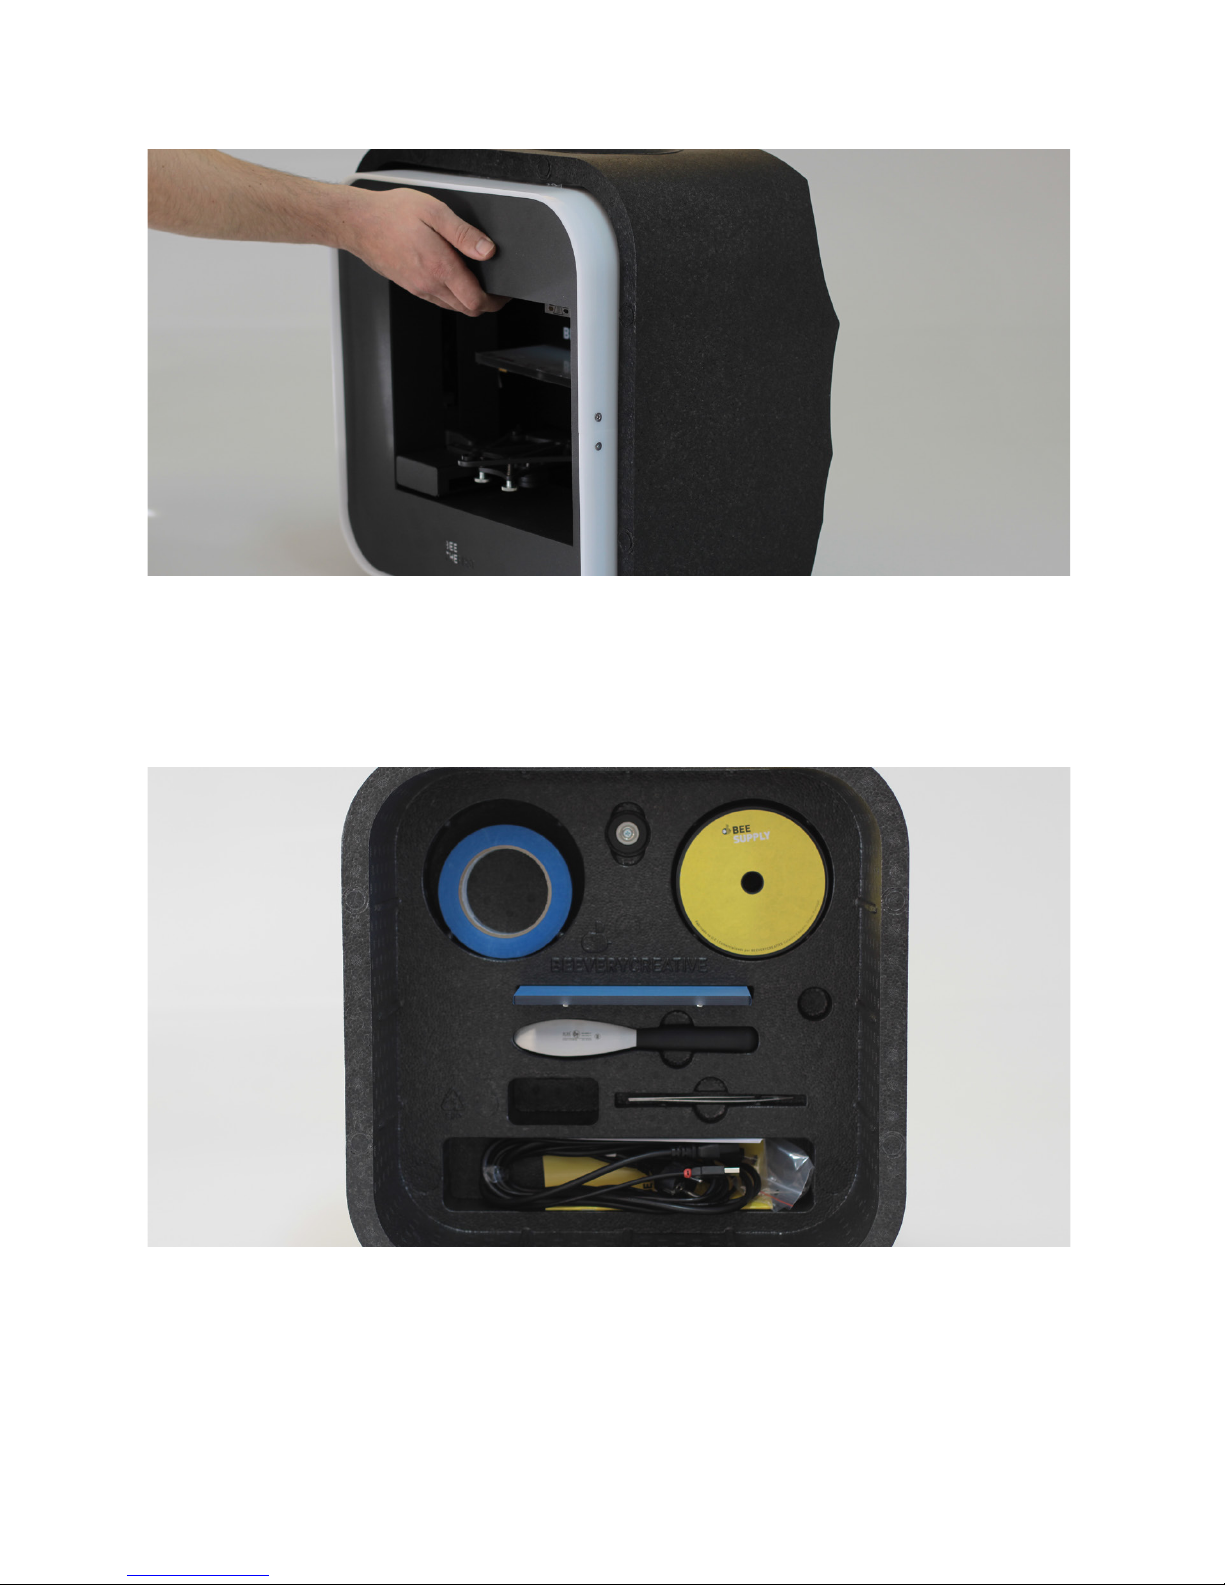
4. Remove the packaging material as indicated by the numerical references
shown on the printer.
4. Tira o material de embalagem conforme numeração indicada na impressora.
5. Once you’ve unpacked everything, use the handle located on the top of the
printer to transport your BEETHEFIRST. If you wish to carry BEETHEFIRST
for longer trips, we recommend you use the BEEPACK.
5. Após a desembalagem, utiliza a pega superior para transportares a BEETHEFIRST.
Para deslocações mais longas, recomendamos-te que utilizes o BEEPACK.
Page 15
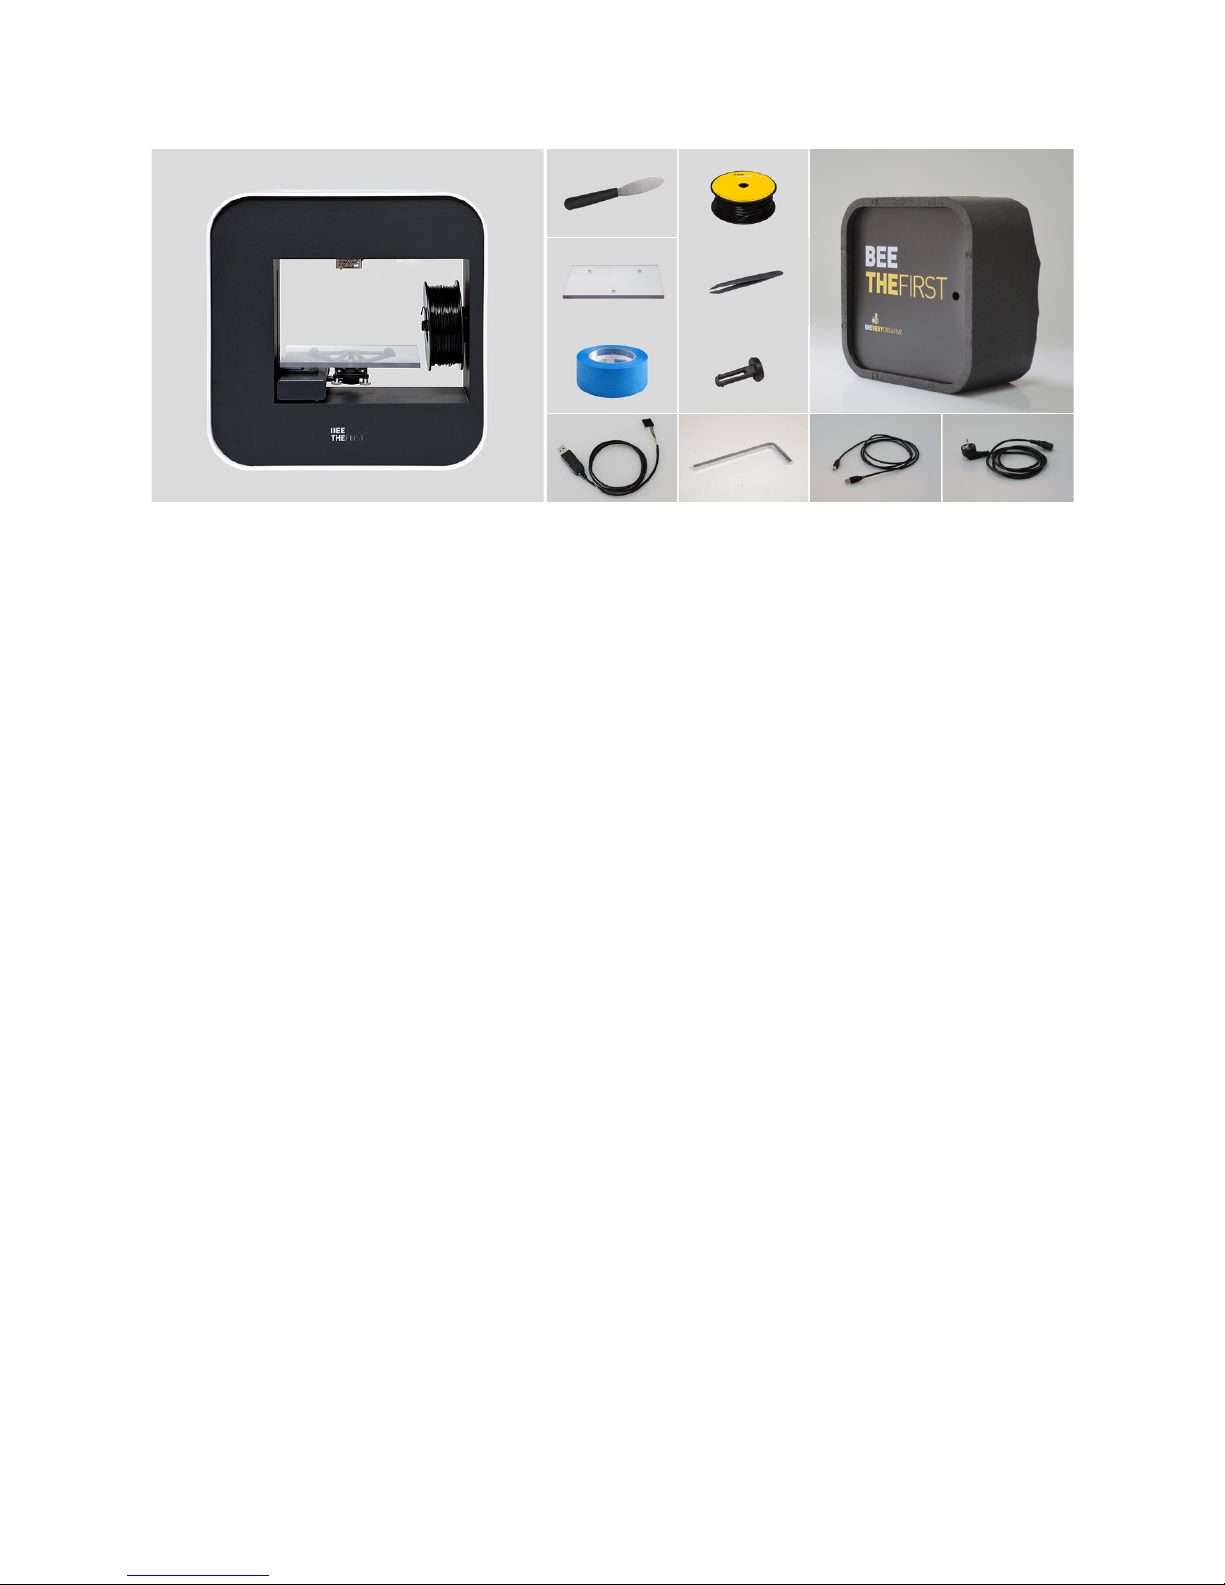
6. Verifica se a caixa contém os seguintes artigos:
1 BEETHEFIRST
1 Mesa de impressão
1 Pinça
1 Espátula
1 Chave sextavada
1 BEEPACK
6. Check to make sure the box contains the following items:
1 BEETHEFIRST
1 Printing tabel
1 Pair of tweezers
1 Spatula
1 Allen key
1 BEEPACK
1 Roll of blue tape
1 Power cable
1 USB connection cable
1 Filament coil and respective mounting
1 Upgrade cable*
1 Fita azul
1 Cabo de alimentação
1 Cabo de ligação USB
1 Bobine de filamento e respectivo suporte
1 Cabo de actualização *
* We’ve included this cable that allows you to update your BEETHEFIRST, so as to keep up with operating systems as they evolve and ensure you are always at the forefront of technology. Stay tuned
to our website and social network sites for news on updates. And if you have any questions on how
to use this cable, get in touch with us.
* Incluímos este cabo que te permite actualizar a tua BEETHEFIRST, acompanhando a evolução
da tecnologia. Fica atento ao nosso site e redes sociais para indicações sobre as actualizações. Se
tiveres dúvidas sobre a utilização deste cabo contacta-nos.
Page 16
13
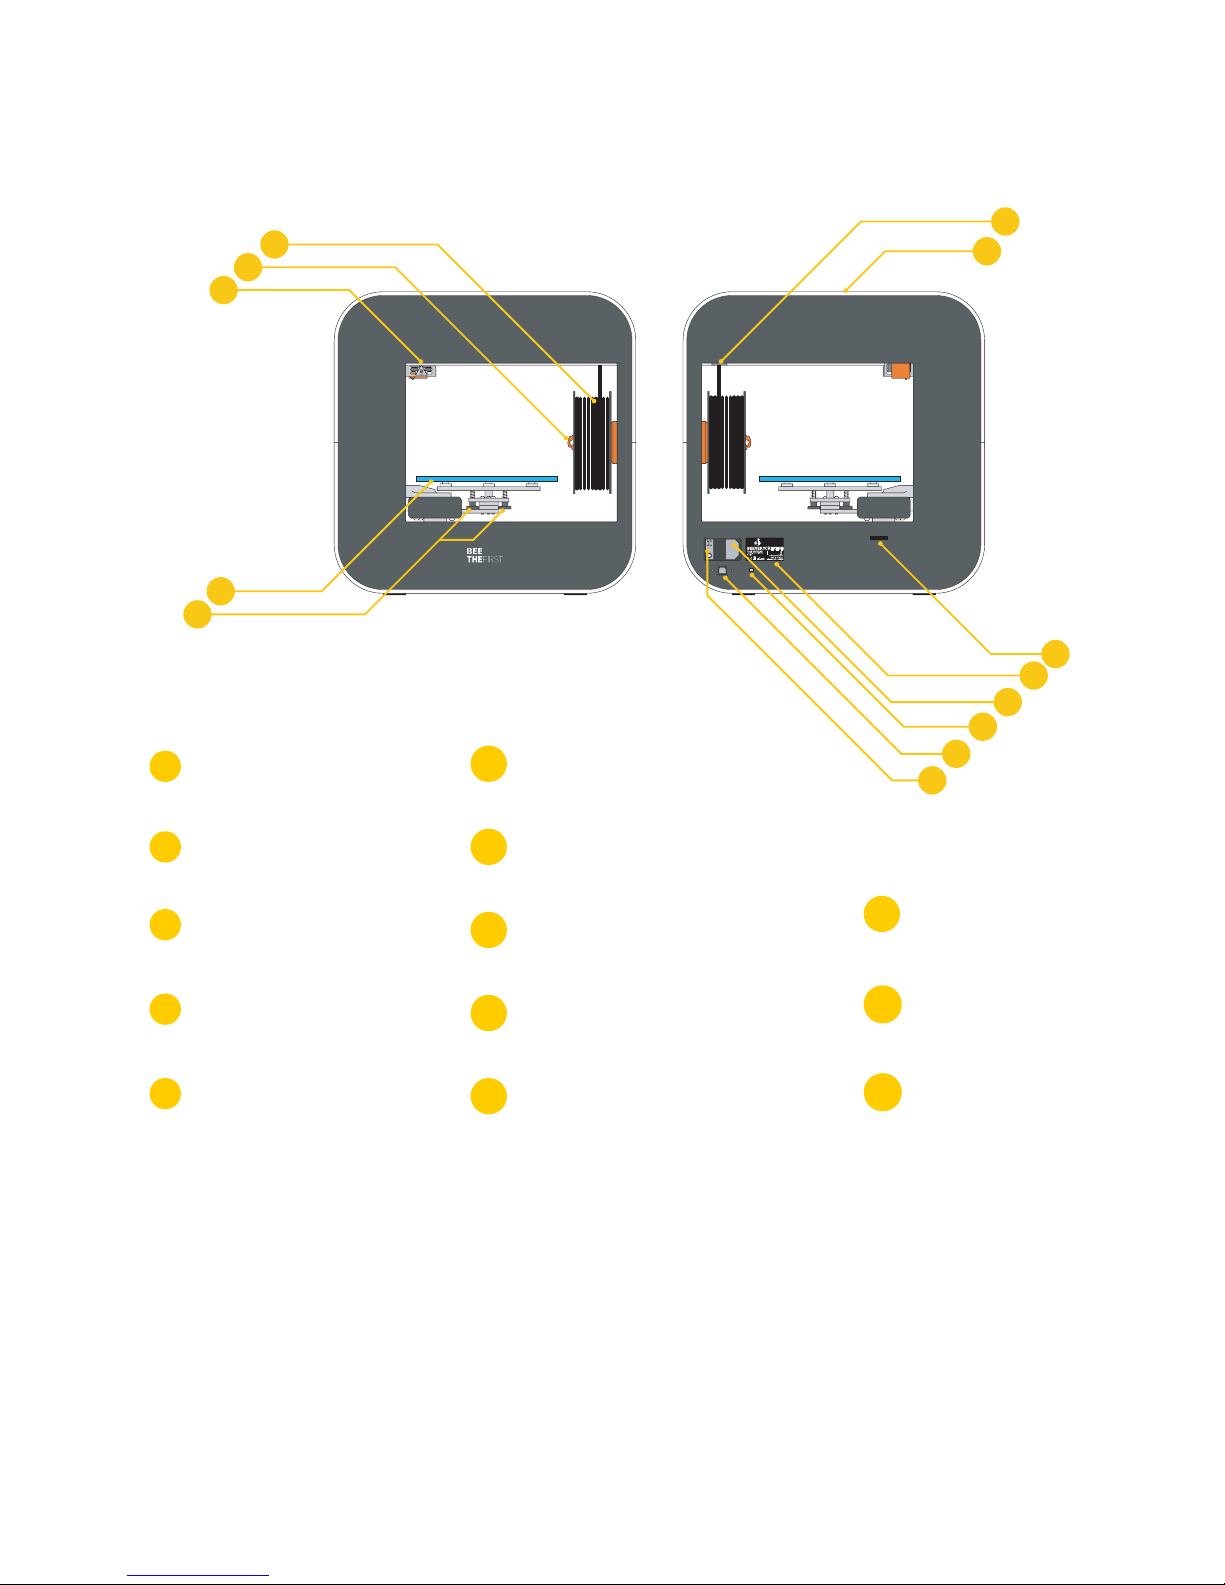
BEETHEFIRST DIAGRAM (DIAGRAMA DA BEETHEFIRST)
Parafusos de calibração
Filament spool
Spool mounting
Extruder nozzle
Printing table
Calibration screws
USB port
ON/OFF switch
Cable Lock
Bobine de filamento
Suporte de bobine
Bico de extrusão
Mesa de impressão
1
2
3
4
5
9
9
10
11
12
Ficha USB
Botão ON/OFF
Cabo anti-roubo
Entrada de filamento
Pega de transporte
Porta para upgrade de bootloader
Filament entry
Transport handle
Port for bootloader upgrade
6
7
8
Label with serial number
Power socket
Etiqueta com nº de série
Ficha de alimentação
1
6
9
8
11
12
2
3
4
5
7
10
13
Page 17

INSTALAÇÃO DO BEESOFT (INSTALLING BEESOFT)
1. Before you begin, make sure your computer has a working internet connection
and that it’s connected to the mains or has enough charge left in its battery.
1. Antes de começares, confirma que o computador está com acesso à internet e ligado
à corrente eléctrica ou com bateria suficiente.
2. Next, log on to www.beeverycreative.com and download the most recent
version of BEESOFT for your particular operating system.
2. De seguida acede a www.beeverycreative.com e descarrega a versão mais recente do
BEESOFT adequada para o teu sistema operativo.
3. After BEESOFT has finished downloading, go to the download folder and run
the installation file.
3. Depois de concluído o download do BEESOFT, acede ao directório de descarga do
instalador e executa o ficheiro de instação.
4. Follow the installation instructions to the end, selecting the desired options.
4. Segue os passos do instalador até ao fim seleccionando as opções desejadas.
5. Run BEESOFT by clicking on the shortcut on your Desktop or Applications menu.
5. Executa o BEESOFT através do ícone localizado no Ambiente de Trabalho ou nas
Aplicações.
After installing BEESOFT, follow the steps in the maintenance wizard to calibrate
your BEETHEFIRST.
Após a instalação do BEESOFT, deverás seguir o assistente de manutenção do próprio
software para calibrares a BEETHEFIRST.
Page 18
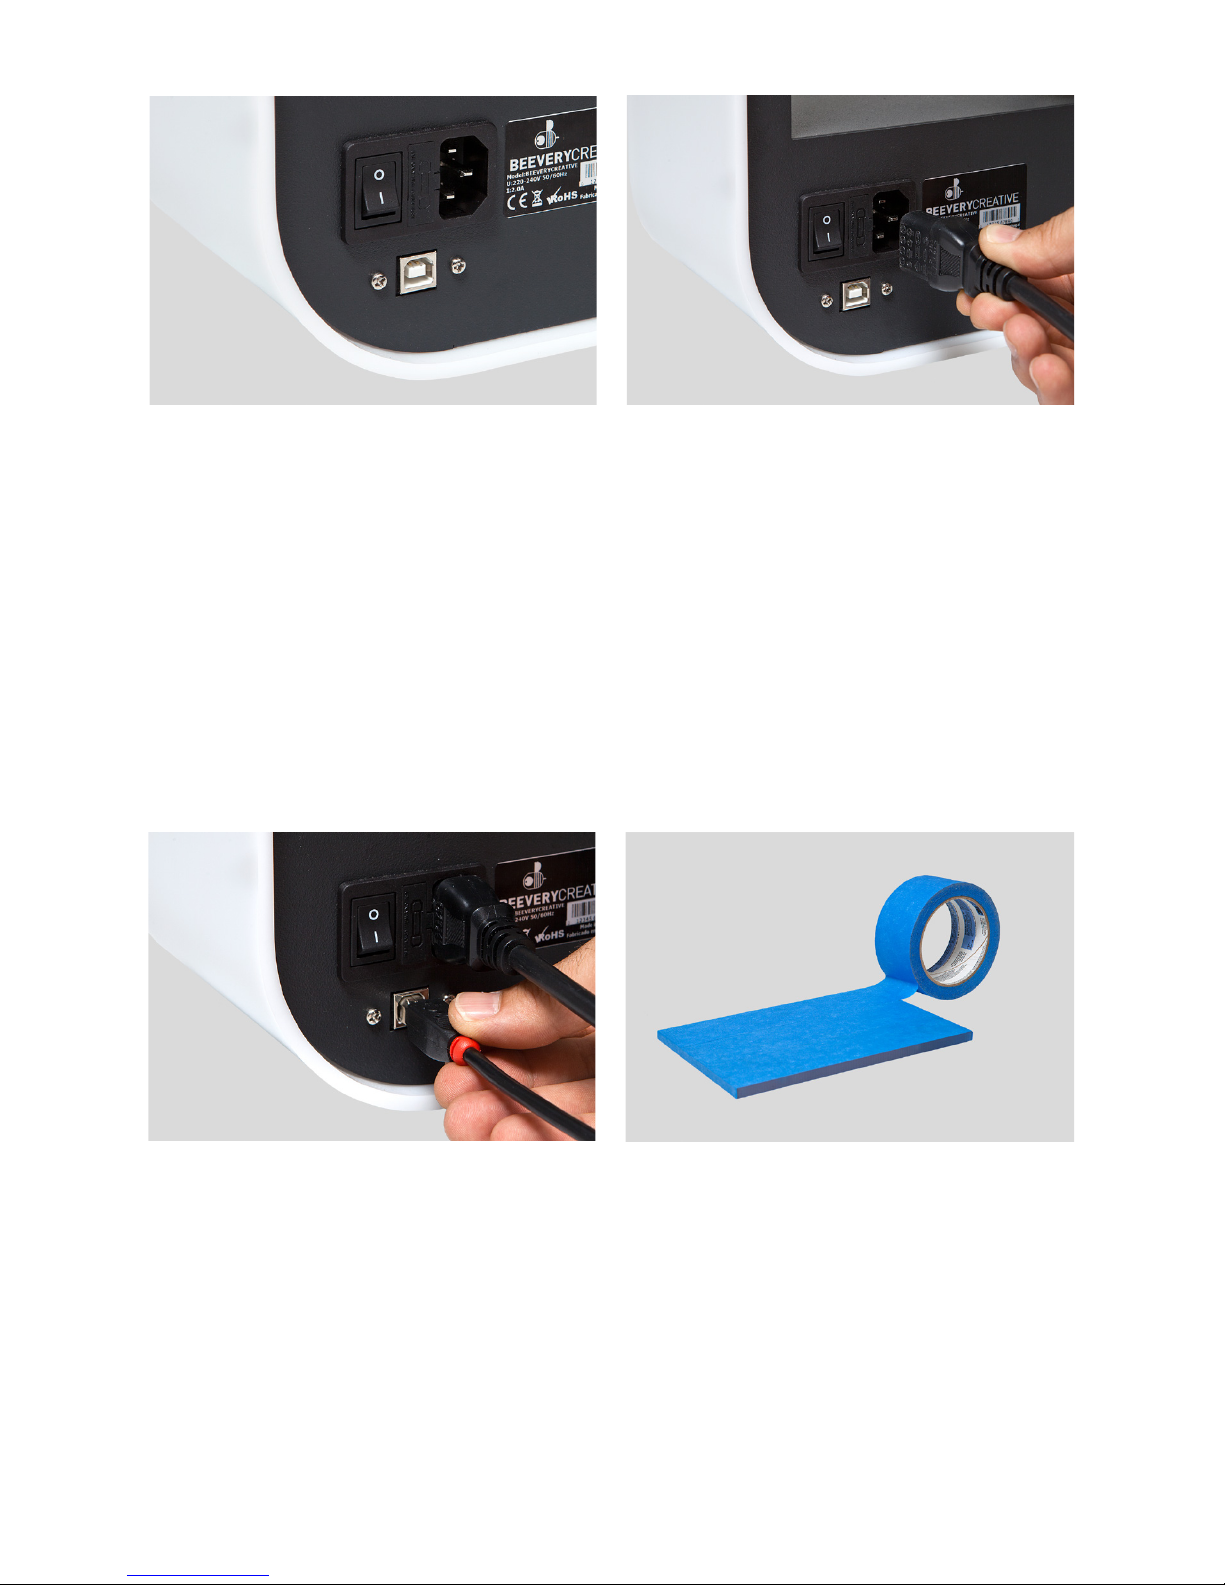
1 2
3 4
1. Make sure you’ve removed all the printer’s packaging material and check to
see if the main switch is in the “off” position.
1. Confirma se retiraste todo o material usado para embalar a impressora e verifica se o
interruptor na posição “off”.
2. Attach the power cable, connecting it first to the BEETHEFIRST printer, and
next, to the socket.
2. Coloca a ficha de alimentação, ligando primeiro à BEETHEFIRST e posteriormente à tomada.
3. Connect the USB cable to BEETHEFIRST and to the computer.
3. Liga o cabo USB à BEETHEFIRST e ao computador.
4. Place one, and only one, layer of blue tape on the printer table, carefully to
avoid any overlapping.
4. Coloca uma, e apenas uma, camada de fita azul na mesa.
Page 19
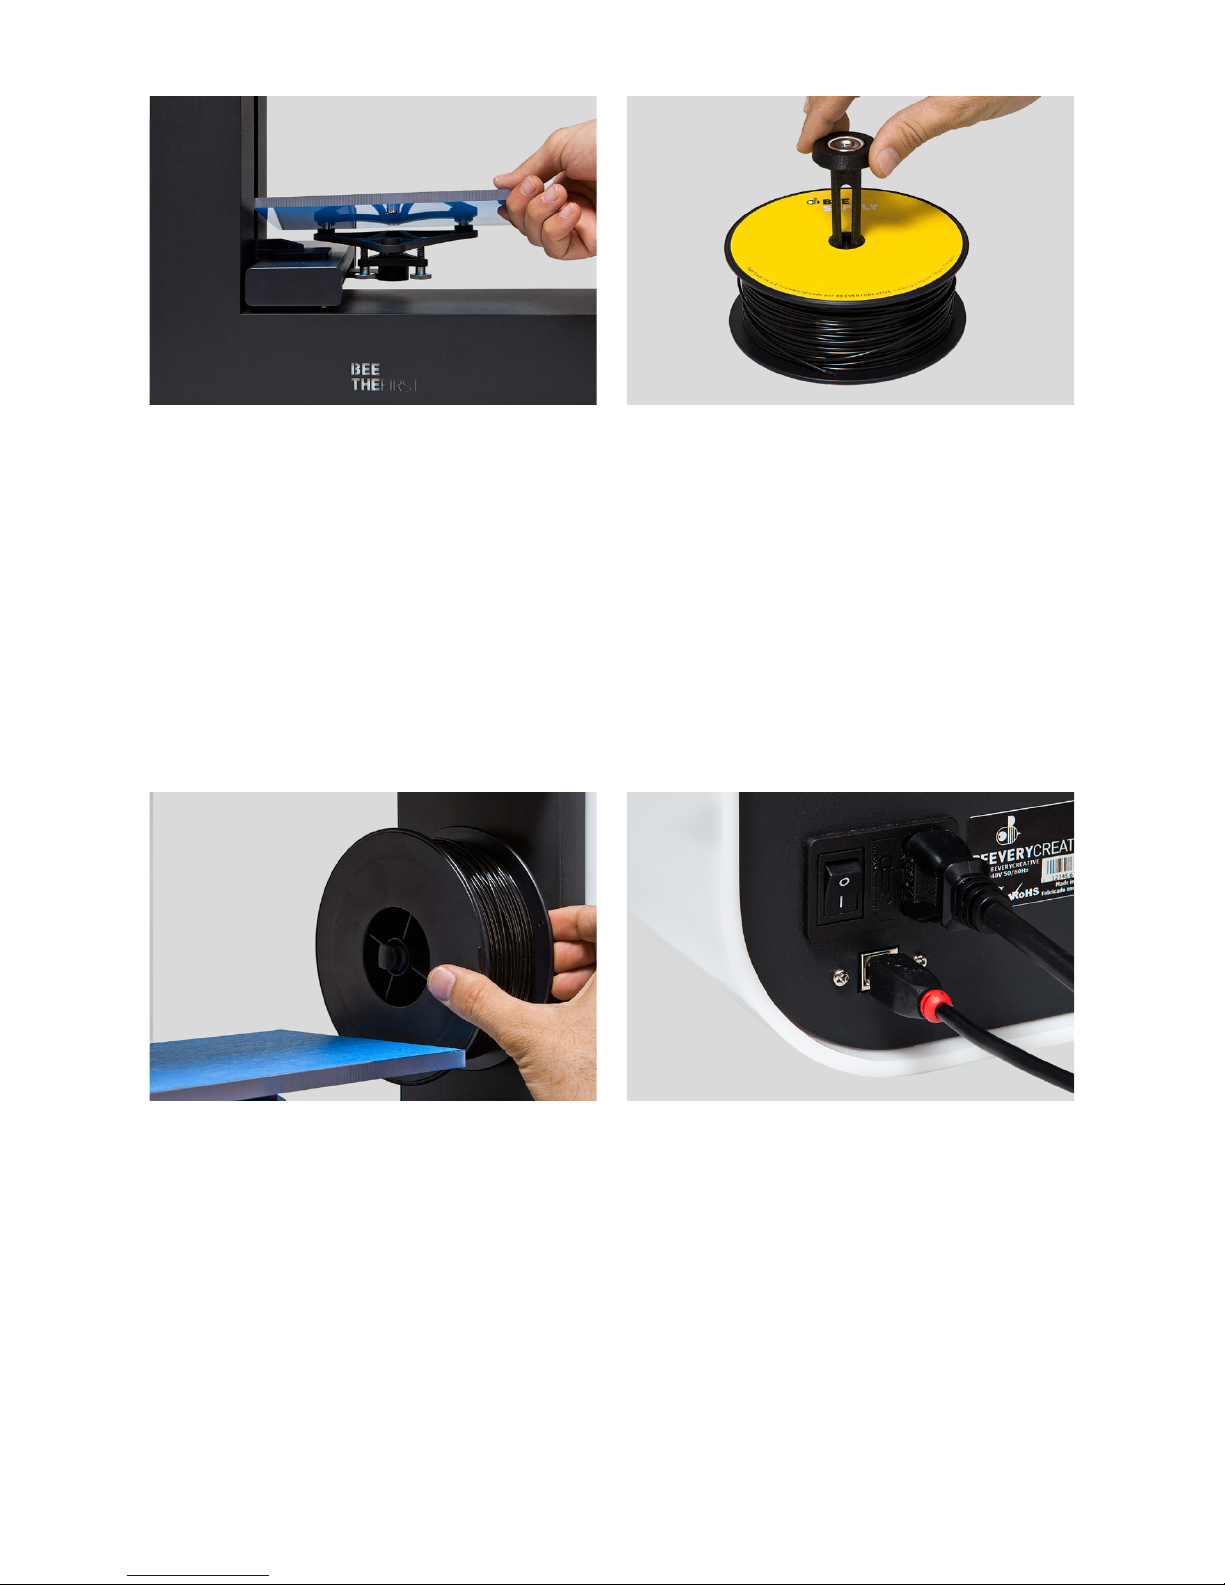
5. Place the printer table on the magnetic supports.
5. Coloca a mesa de impressão na base respectiva.
6. Place the mounting inside the spool. Take care to keep the filament wound
tight, because any looseness might cause kinks or knots to appear in the
filament, which makes printing impossible.*
6. Coloca a bobine no suporte. Tem sempre o cuidado de manter o enrolamento do filamento sem
folgas, pois doutro modo poderá criar nós que bloquearão a impressão.*
7. Place assembled items (spool + mounting) in BEETHEFIRST.*
7. Coloca o conjunto (bobine + suporte) na BEETHEFIRST.*
8. Flip the main switch to the “on” position.
8. Passa o interruptor para “on”.
* Note: BEETHEFIRST is delivered with this step already performed. However, this is the procedure to follow when
the spool has to be replaced.
* Nota: em alguns casos, a BEETHEFIRST é entregue com esta operação já efectuada. Deverás, no
entanto, seguir este passo quando trocares a bobine.
5 6
7 8
Page 20

HOW TO PRINT (COMO IMPRIMIR)
1. Make sure you have disabled your computer’s hibernation or suspend to disk
function. If the computer goes into hibernation or suspend to disk state while
something is being printed, you will be unable to resume this task and you will
have to start again.
1. Confirma que desactivaste o modo de suspensão do teu computador. Se o computador
entrar em hibernação com a impressora em funcionamento, a impressão irá parar.
2. Make sure the blue tape is in an acceptable state. If it’s damaged, it should be
replaced as described in point 4 of ‘Installing BEETHEFIRST’.
2. Confirma se a mesa tem fita azul em bom estado. Se estiver danificada, substitui-a,
tal como apresentado no ponto 4 da ‘Instalação da BEETHEFIRST’.
3. Check to see if no kind of object or filament debris is on the printer table.
3. Confirma que não está nenhum objecto ou restos de filamento na mesa impressão.
4. Import the 3D model you wish to print. You can find a range of 3D models online,
or you can create your own 3D model by using modeling software (not included).
4. Importa o modelo 3D que pretendes imprimir. Podes encontrar modelos 3D online ou
criar o teu próprio modelo 3D recorrendo a um software de modelação (não incluído).
5. Make sure you’ve followed the steps laid out in BEESOFT’s printer calibration wizard.
5. Confirma que seguiste os passos do assistente do BEESOFT para calibração da impressora.
6. Click on the “Open” button in BEESOFT and select the file you imported.
6. Clica no botão “Abrir” no BEESOFT e escolhe o ficheiro que importaste.
7. Click on the “Print” button and select the desired printing options.
7. Clica no botão “Imprimir” e selecciona as opções de impressão desejadas.
8. BEESOFT will prepare the selected file for printing (a process called “slicing”),
which may take a few minutes. Once it’s ready, the printing process will begin.
8. O BEESOFT vai preparar o ficheiro para impressão (processo denominado “slicing”), o
que poderá demorar alguns minutos. Quando estiver concluído, a impressão irá iniciar-se.
Page 21
AFTER PRINTING (APÓS A IMPRESSÃO)
TROUBLESHOOTING (RESOLUÇÃO DE PROBLEMAS)
We recommend you read our FAQ and Troubleshooting pages available on
the website www.beeverycreative.com. If you can’t find the solution to a given
problem, please contact Cusomer Support by using the form available on the
aforementioned website.
Recomendamos-te a leitura das FAQs e da Resolução de Problemas que constam no
portal www.beeverycreative.com. Caso não consigas encontrar solução para o problema,
por favor contacta o nosso Apoio ao Cliente através do formulário disponível no referido
portal.
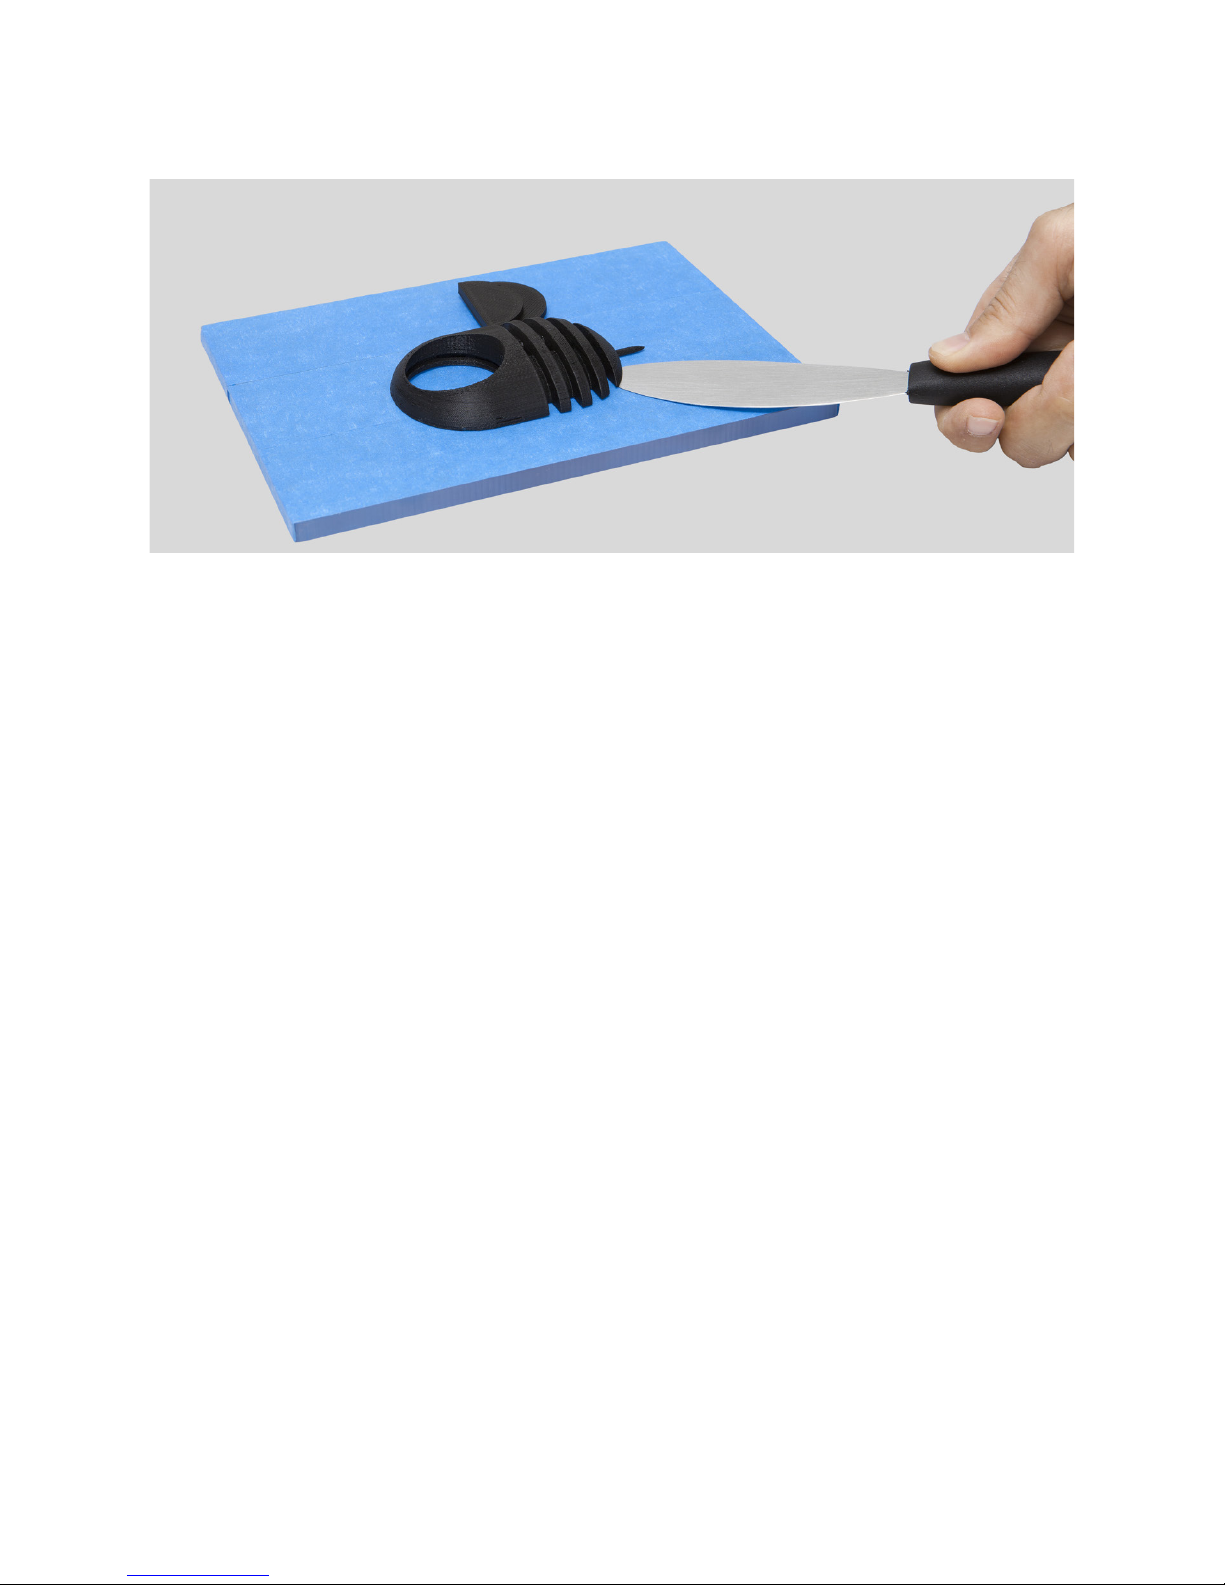
After your print is over, you have to remove the object from the table. Try to do
it first gently by hand without damaging it. If you are not able to do it, use the
spatula parallel to the table. If none of these techniques work, remove the blue
tape. Don’t forget to replace the blue tape before printing again.
Quando a impressão terminar, tens de tirar objecto da mesa de impressão. Tenta fazê-lo à
mão, suavemente, sem o danificar. Se não conseguires, usa a espátula de forma tangente à
mesa e de modo a não danificar a mesa de impressão. Se nenhum dos métodos anteriores
resultar, retira a fita azul para assim remover o objecto. Não te esqueças de a voltar a
colocar antes da próxima impressão.
Page 22
Page 23
Page 24

© BEEVERYCREATIVE.
www.beeverycreative.com
All rights reserved. Todos os direitos reservados.
 Loading...