

Page 1

http://midi-overdrive-switcher.becosfx.com
1
Table of Content
Table of Content .....................................................................................................................................1
About This Manual.................................................................................................................................2
Safety Instructions ..................................................................................................................................2
Warranty .................................................................................................................................................2
TS8-MS Features....................................................................................................................................3
Technical Specifications.........................................................................................................................3
Feedback.................................................................................................................................................3
BECOS TS8-MS Analog Overdrive with External Relay Switching and MIDI Functions...................4
Settings ...............................................................................................................................................5
MIDI Receive and MIDI Transmit Sockets ...................................................................................5
Multi Function Switch ....................................................................................................................5
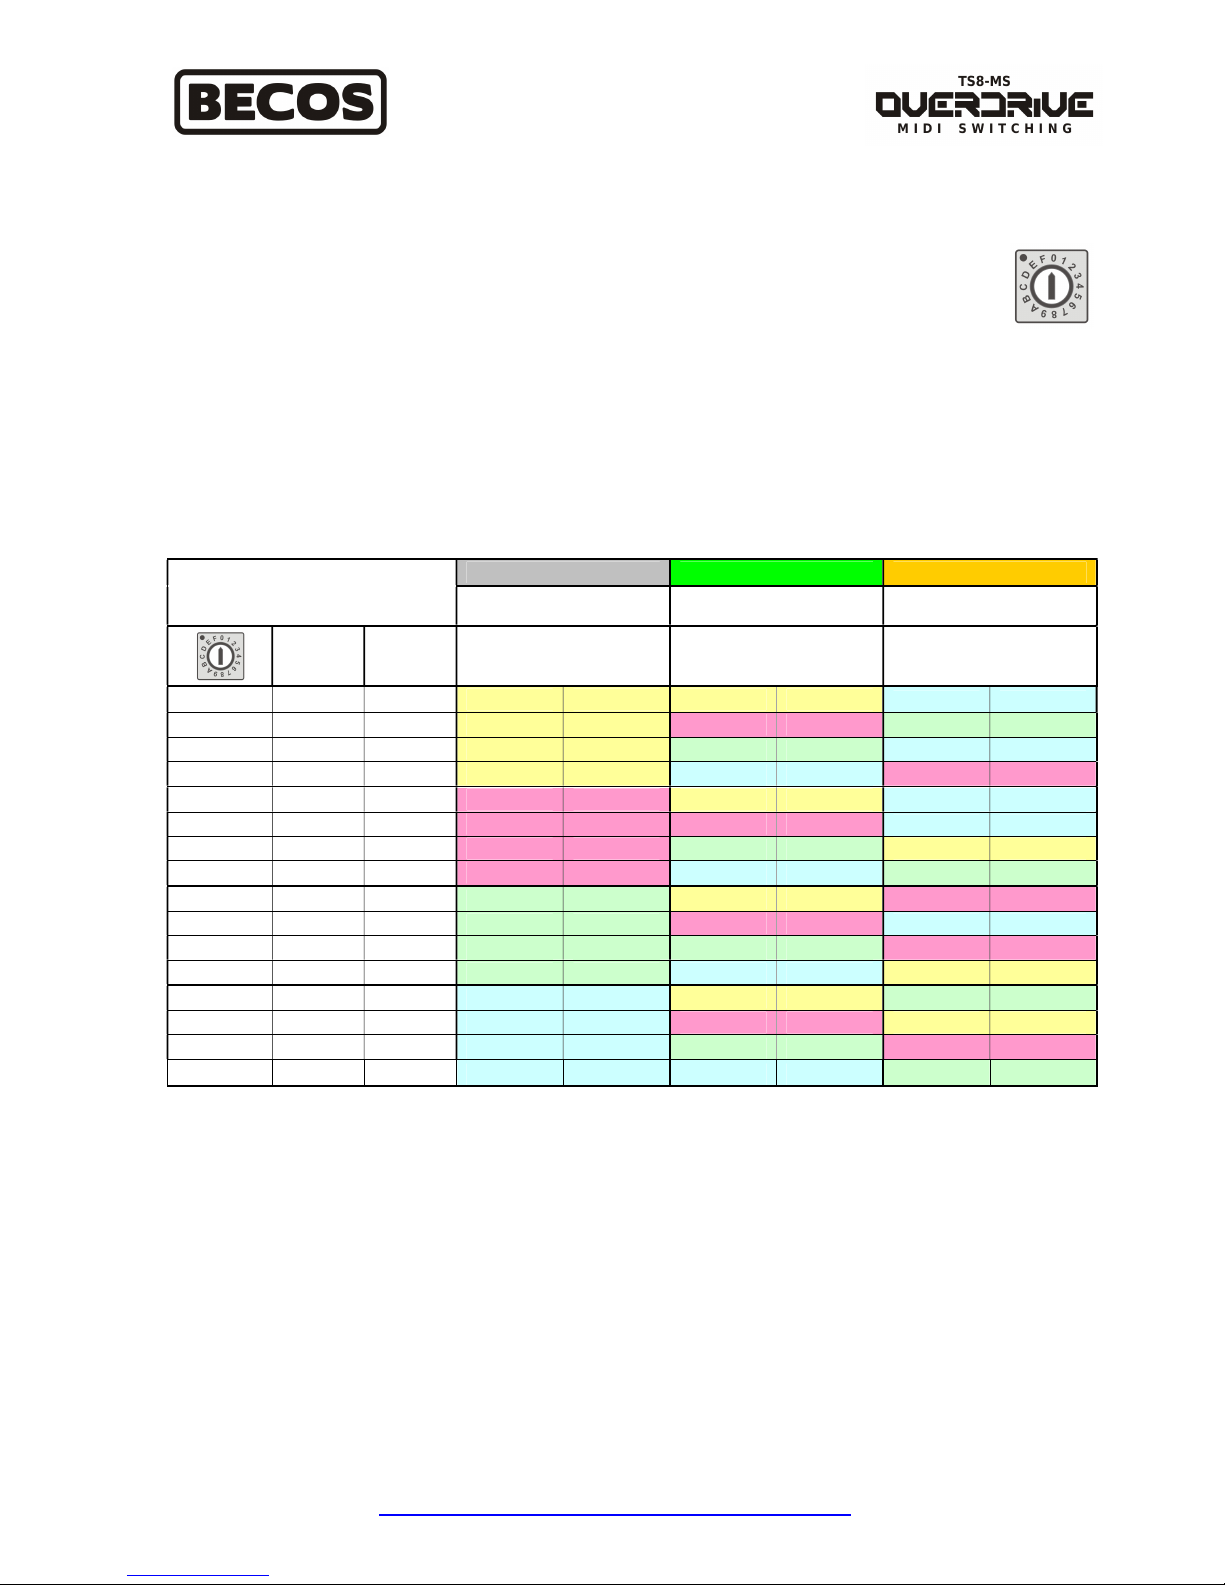
Setting External Switching Relays pattern on footswitch action ...................................................8
Reset to Factory Defaults .............................................................................................................10
In Operation..........................................................................................................................................11
TS8-MS Controls..............................................................................................................................11
Clipping Mode..............................................................................................................................11
Gain Control .................................................................................................................................11
Tone Control.................................................................................................................................12
Output Level Control....................................................................................................................12
LED Indicators .............................................................................................................................12
Footswitch Action.........................................................................................................................12
DC Power Supply .........................................................................................................................14
Ways to Use TS8-MS MIDI Overdrive Effect Pedal ...........................................................................14
Using TS8-MS as analog overdrive and amplifier channel switcher on footswitch action..............15
Using an external MIDI Controller to control TS8-MS analog overdrive and switch amplifier's
channels ............................................................................................................................................16
Receiving Program Change MIDI messages................................................................................17
Receiving Control Change MIDI messages .................................................................................18
Using TS8-MS as analog overdrive, amplifier channel switcher and simple MIDI Controller
(transmitter) on footswitch action.....................................................................................................19
TS8-MS Customizations...................................................................................................................20
Swapping IC's...............................................................................................................................20
Changing Clipping Semiconductors.............................................................................................20
Change Indication LED's Color....................................................................................................21
Troubleshooting................................................................................................................................21
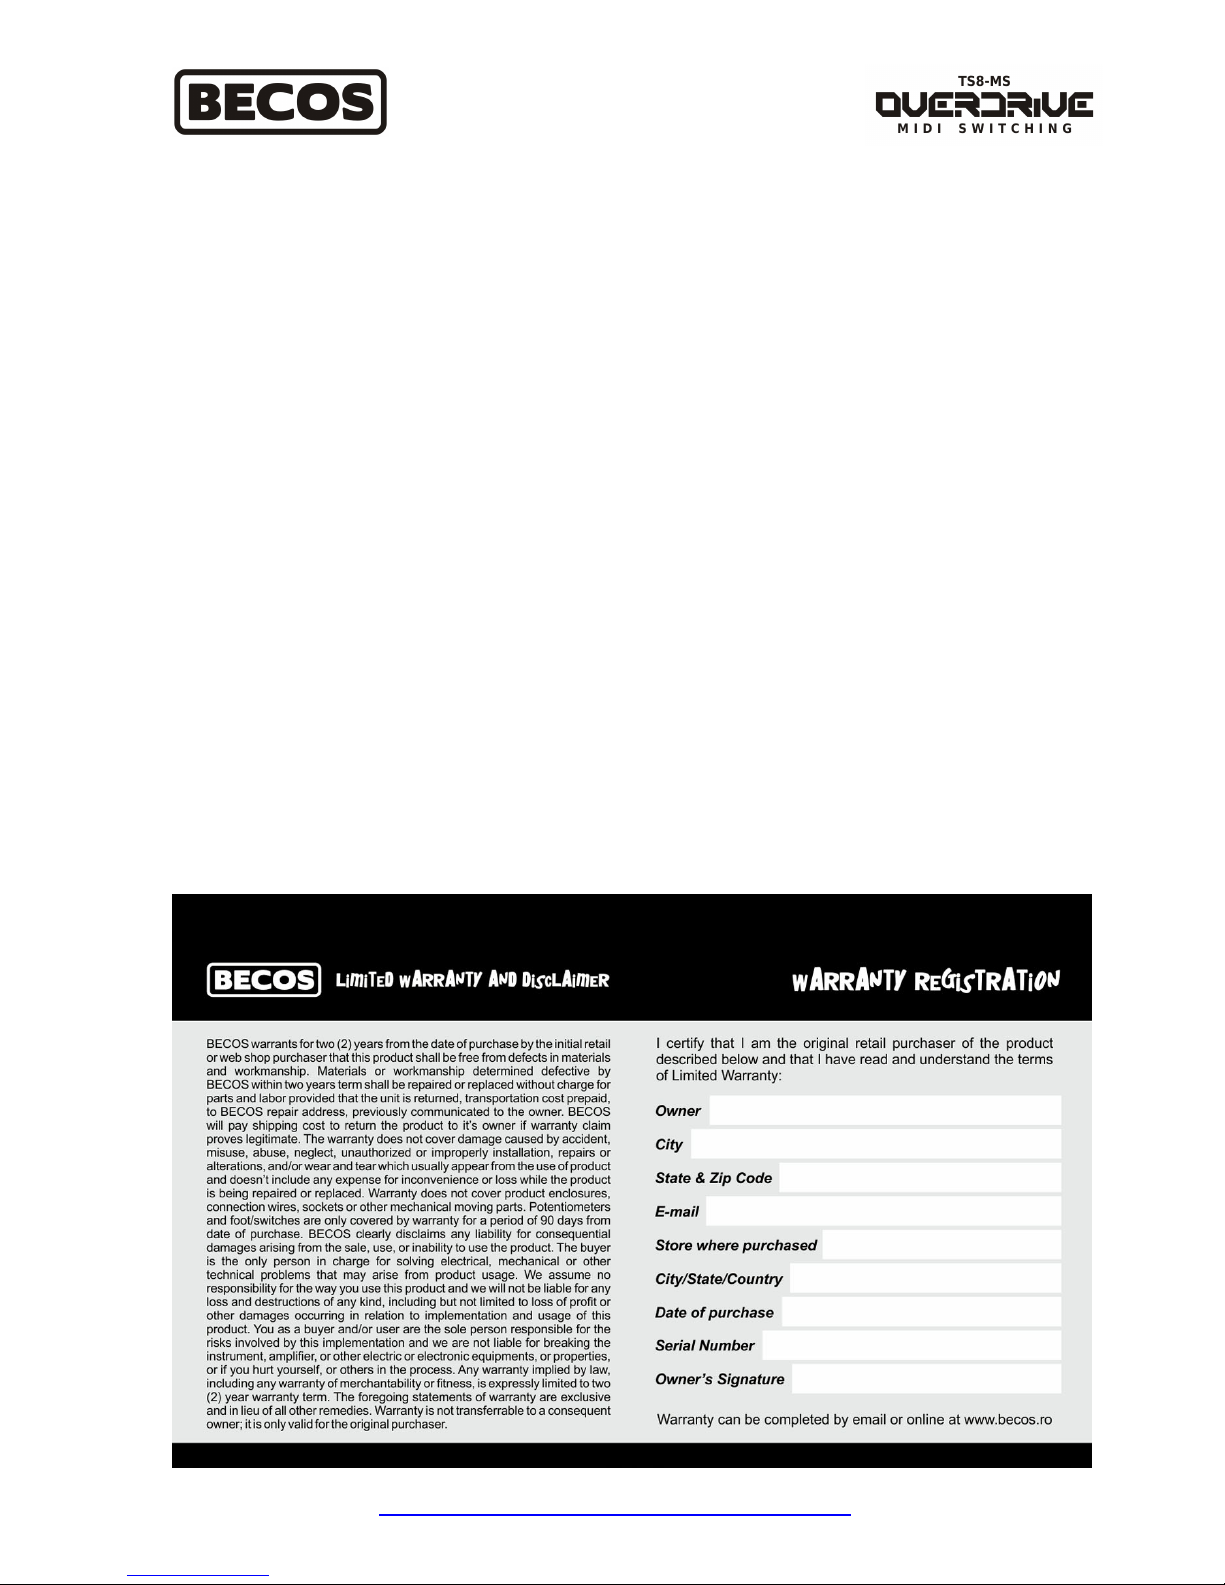
Warranty Card ..................................................................................................................................22
Page 2

http://midi-overdrive-switcher.becosfx.com
2
About This Manual
Read this manual first. To get the most from this manual please read it from start to finish or you
may miss important information! For questions regarding technical support please send us an email
to [email protected] or fill the contact form on product's website.
This manual is only available as a PDF download from product's website:
http://midi-overdrive-switcher.becos.ro/#support
Last updated: 26-Jun-2017
Safety Instructions
Read the manual before starting to use the product.
Keep this manual for further referrence.
Avoid using the product under extreme conditions (in confined space without heat ventilation,
under direct sunlight, in the rain, on wet surfaces, near radiators or direct fire or other heat
sources, etc.).
Clean only with a soft dry cloth.
Respect power voltage and battery polarity as indicated in the manual or on the product
markings.
Technical servicing must be carried by qualified service personnel only.
Warranty
The product is covered by 2 years direct manufacturer limited warranty for electronic circuits and 90
days for footswitch & potentiometers. Cosmetic issues arising from normal product usage are not
covered. Warranty period starts from the date of initial purchase. Warranty is lost if product
ownership is transferred from original buyer. Read product's specific Warranty Card and Product
Page for detailed terms & conditions that may apply. If you think your product is deffective and is
within warranty period, send it to us for investigation. We will decide if the product can be repaired
or if it is going to be replaced. Shipping costs both ways* must be prepaid by the buyer. A trackable
shipping service must be used when sending the product for repair. We will ship it back to with a
tracking number, as well. Please contact us first, to give you the shipping & tracking instructions.
Don't forget to register your product after purchase!
* If warranty claim proves to be valid, we will support the cost for shipping back the serviced or
replaced product.
Page 3

http://midi-overdrive-switcher.becosfx.com
3
TS8-MS Features
Classic 808 sounding analog overdrive, made with highest quality components, in a compact,
low profile design;
3-clipping options: Symmetrical, Asymmetrical (Silicon diodes), Custom (LED's or your
choice);
Responds to MIDI Program Change and Control Change messages for pedal Bypass/Effect
switching and External Switching Relays switching, which function simultaneously;
Footswitch performs multiple functions simultaneously: Effect/Bypass/Extended switching,
External Switching Relays action and MIDI Program Change transmit;
Bypass setting: chosse between Buffered Bypass or Relay True Bypass;
Switching mode for External Switching Relays: Latching or Momentary;
Gold plated fully sealed relays used for pedal True Bypass and External Switching (2 relays
linked to a stereo 1/4 TRS connector can be used to switch guitar amplifier's channels);
Customization friendly: swap IC, clipping semiconductors and indicator LED's;
Technical Specifications
Input impedance: 500KΩ
Output impedance: 10KΩ
Battery optimal working voltage: 8-10 VDC (9 V alkaline battery recommended)
DC Power connector polarity: center negative [ - ]
External DC power supply: 9 VDC
Operation time on alcaline battery: 4 to 8 hours
Current consumption: 28 mAh - 40 mAh
Product size: Length: 120 mm, Width: 61 mm, Height: 31 mm
Product weight: 276 gr. (including battery)
Packed weight: 335 gr.
RoHS Compliance: Partial. All components are RoHS but most solder joints are lead based.
Product web page: http://midi-overdrive-switcher.becos.ro
Feedback
We appreciate feedback and suggestions regarding our products. If you wish to share them, send us
an email at [email protected]
Page 4
http://midi-overdrive-switcher.becosfx.com
4
BECOS TS8-MS Analog Overdrive with External Relay
Switching and MIDI Functions
Thank you for using BECOS products!
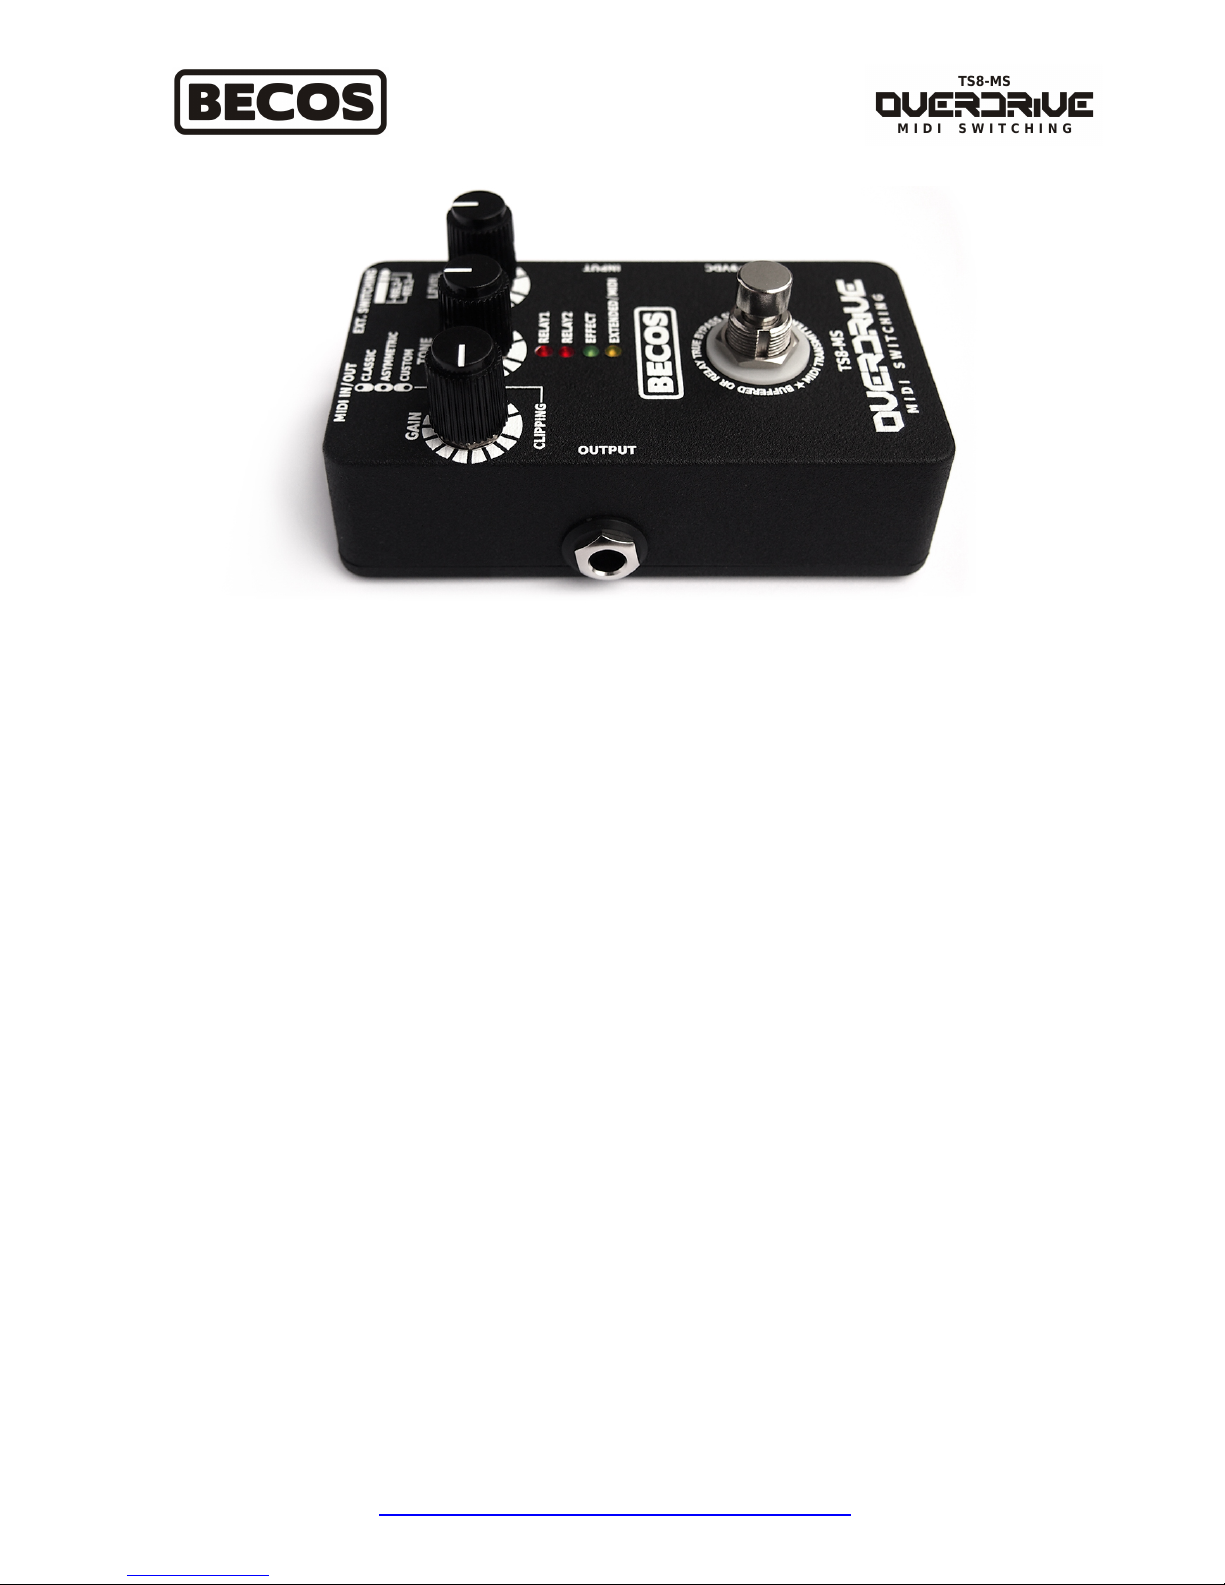
TS8-MS is an analog overdrive guitar effect with classic 808 sounds, which combines MIDI
functionalities and external switching relay capabilities that can be used to switch guitar amplifier
channels or other available features (EQ, boost, reverb, etc.), making it a reliable, one-of-a-kind tool
for guitarists. We call it the Swiss Army Knife of Tone.
It can be used concomitantly as classic tubescreamer guitar effect pedal and guitar amplifier
channel switcher. It responds to MIDI Program Change and MIDI Control Change messages
for all it's switching capabilities - Bypass and external switching -, which perform
simultaneously in both MIDI Receive or MIDI Transmit mode. Yes, it can be used even as a
very simple MIDI Controller! On footswitch action, TS8-MS transmits three MIDI Program
Change numbers, one for each pedal state: Bypass, Effect and Extended.
With TS8-MS you have a quality tubescreamer guitar effect and a guitar amplifier channel switcher
(with 2 independent relays), both functions being MIDI or Footswitch controlled. This pedal can sit
not only under your foot, but also in a rack drawer.
The analog overdrive sound can be adjusted through classic analog controls: gain, tone and output
pots. A tri-option clipping switch sets the drive structure from smooth to near hi-gain drive, covering
a large area of usability and distortion tone shaping.
Despite it's multiple functions, we designed the circuitry with power eficiency in mind. TS8-MS can
run for hours on a regular 9V alkaline battery. When battery gets low, audio signal is automatically
put in Bypass and LED's will flash to inform that battery must be changed.
TS8-MS has sockets for most customizable components: use your own clipping semiconductors,
experiment with different Op-Amp IC's or change indication LED colors, for your particular taste.
Page 5
http://midi-overdrive-switcher.becosfx.com
5
Settings
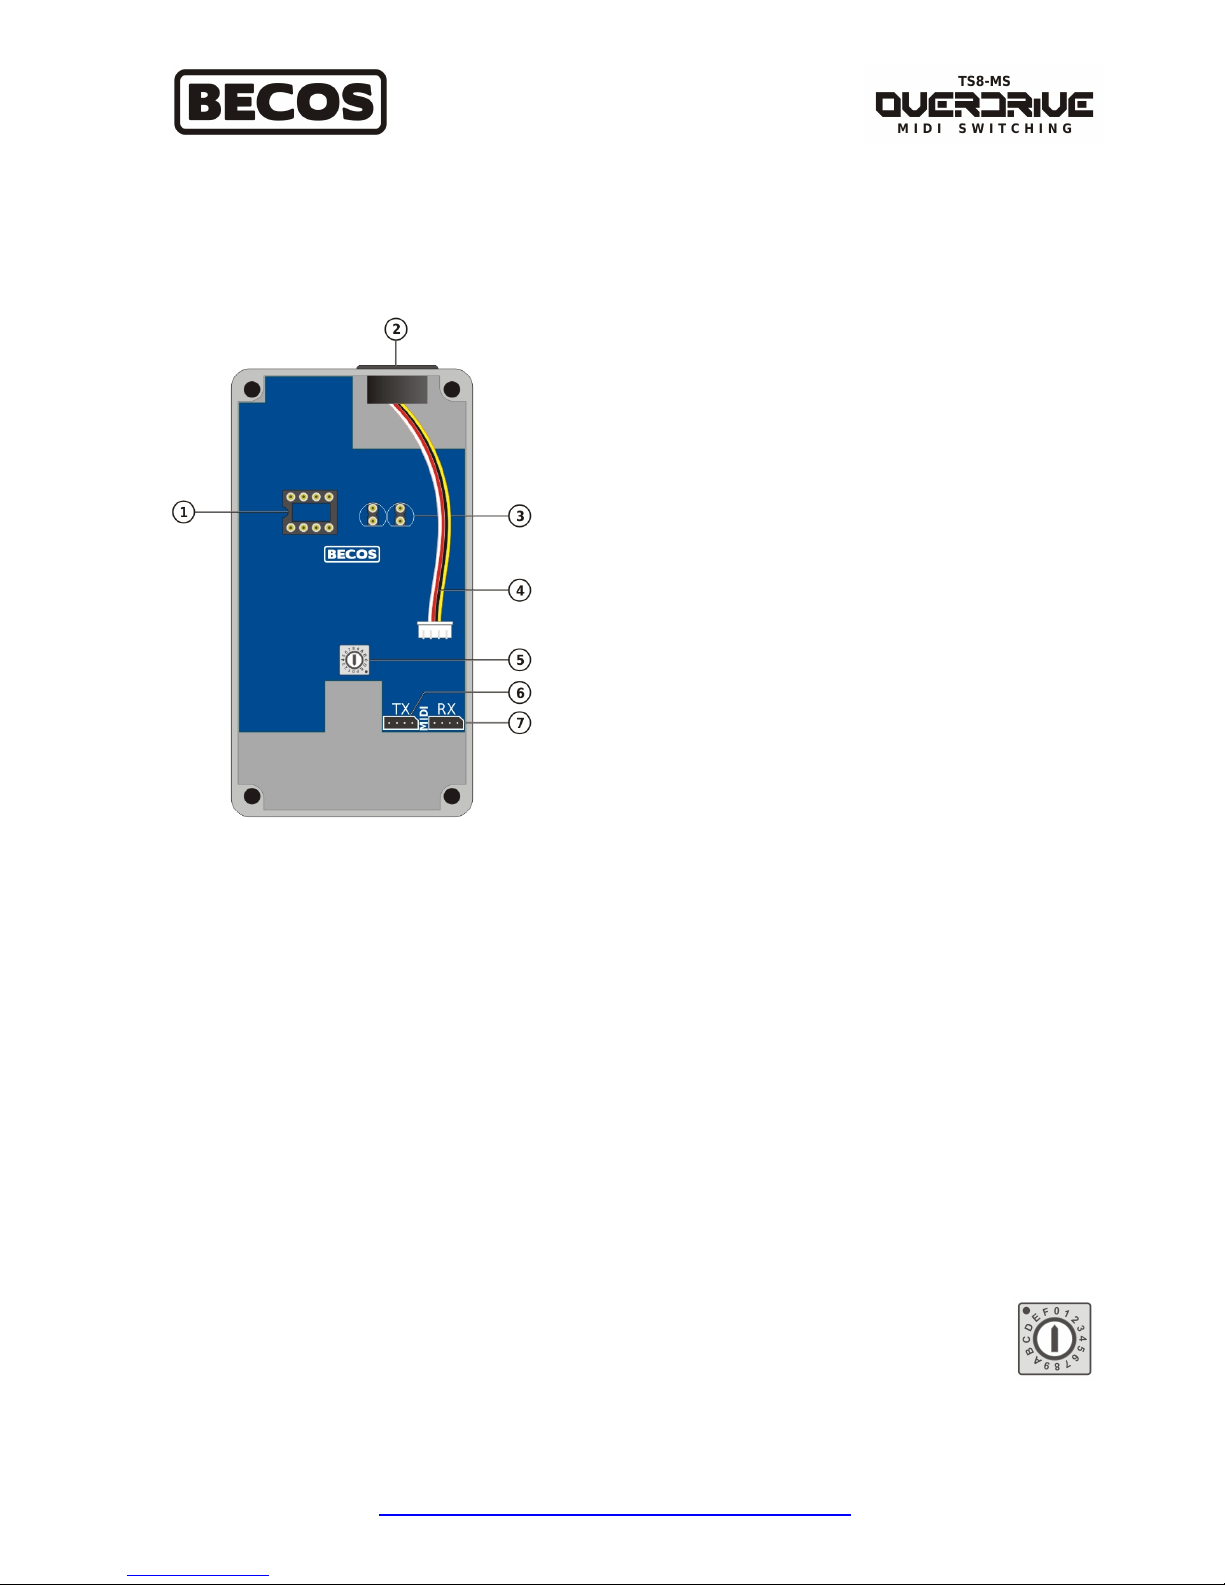
Several settings can be made from inside the pedal. Open the back lid and you will have easy access
to hardware settings (and customization options such IC or clipping diodes replacement).
MIDI Receive and MIDI Transmit Sockets
Inside the pedal there are two small 4-pin sockets: one socket is for MIDI Receive function (factory
default) and another for MIDI Transmit function. The external 5-pin MIDI connector is connected to
the circuit board on one socket or the other, through a 4-wire jumper cable. Only one function can be
used at a time. You may use a standard MIDI cable to connect to your other MIDI devices externally,
for either function: transmit or receive.
Note: Because TS8-MS is not configured with a second external MIDI connector for MIDI Through
function, you will have to place it last in your chain of MIDI devices that needs to be MIDI
controlled. Be sure the MIDI signal inside pedal goes from/to the appropriate socket on the circuit
board.
Multi Function Switch
This rotating switch has 16 positions and performs multiple functions:
1. It sets the Receive/Transmit MIDI Channel and maps a particular switching
pattern to Effect/Bypass/Extended pedal states, for the two isolated relays
performing external switching, when footswitch is pushed.
1. Audio Op-Amp IC socket
2. External MIDI connector - used for MIDI Receive or
MIDI Transmit
3. Custom Clipping sockets - default with LED's
4. MIDI Jumper Cable - couples to MIDI RX or TX
sockets, setting the MIDI Receive or Transmit function
of the pedal
5. Multi Function switch, which is used to set:
- MIDI Channel for Receive or Transmit functions
- Switching Pattern for External Switching Relays
- Setup
6. MIDI Transmit socket
7. MIDI Receive socket (default connected)
Page 6
http://midi-overdrive-switcher.becosfx.com
6
2. It is temporarely used in a setup procedure to configure:
- Bypass type (Buffered or True Bypass),
- External Switching type (Latching or Momentary)
- Reset to factory defaults.
Note: It is advisable to always set the Multi Function switch with power off. After power on, the last
pedal state or last MIDI command is recalled. The new switching pattern will be activated after first
push of the footswitch.
Set MIDI Channel
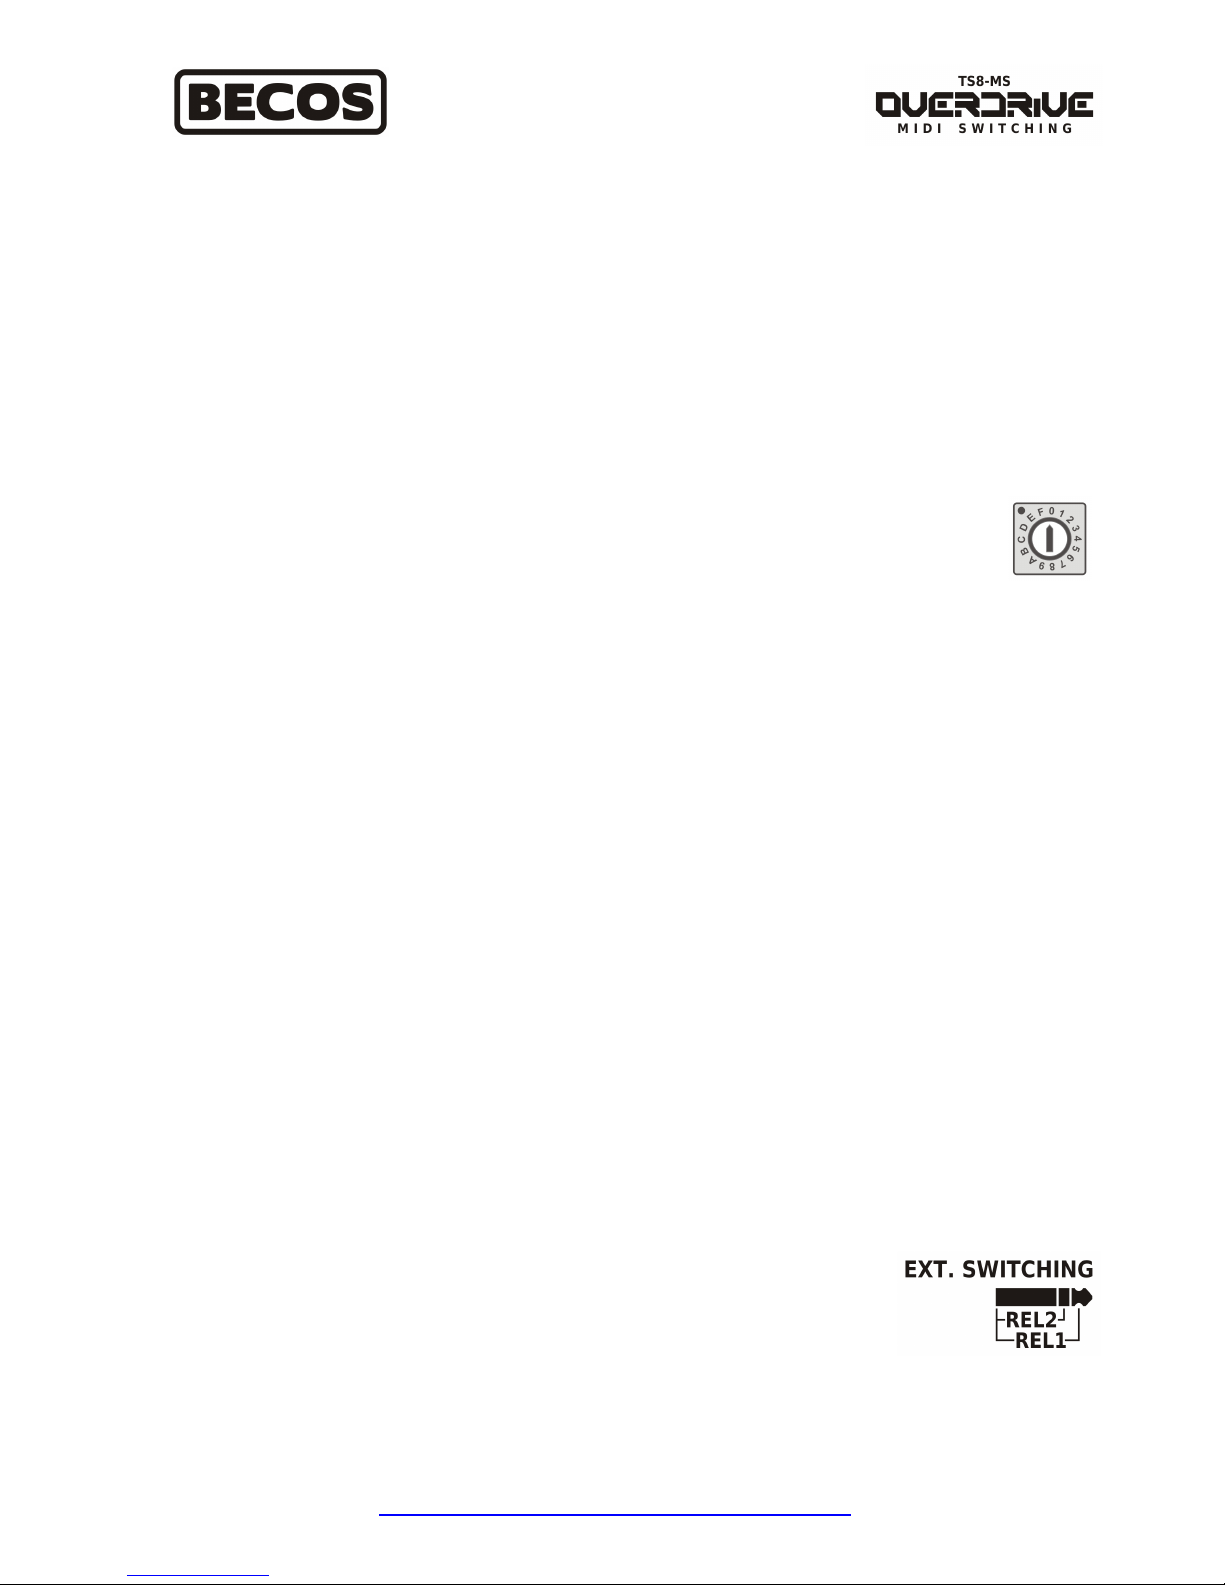
Use a small screw driver to rotate the knob of the Multi Function switch inside the pedal
and set the MIDI Channel, which will be the same set for both, Receive and Transmit
functions. You cannot use both functions at the same time, since the pedal is fitted with
only one external 5-pin MIDI connector. You may set the MIDI Receive Channel from 1
to 15 or OMNI (0 = OMNI; default set). For MIDI Transmit function, position 0 means MIDI
Channel 16, the rest of positions being Channel 1 to 15. If you set the MIDI Channel for Transmit
function be sure the short jumper cable inside the pedal is properly coupled with the corresponding
MIDI socket for transmit (TX) on the circuit board; and likewise for Receive function (RX socket,
default set).
Important! Please note that once you set a MIDI Channel, you also have chosen a certain pattern
of switching for the relays performing external switching uppon footswitch action.
Usually, when controlling pedal with an external MIDI Controller, you won't care for what switching
relays the footswitch would control. The same accounts for MIDI Receive or transmit: since you
cannot use both functions at the same time, you only pick the MIDI Channel for whatever function
(trannsmit or receive) you need to use with TS8-MS in your rig. If you whant to control it with MIDI,
then you will couple the MIDI jumper cable inside the pedal to the MIDI Receive socket (RX) on the
circuit board; and most likely, you won't use pedal footswitch at all, although you can.
External Switching Relays
When using TS8-MS overdrive footswitch to cycle through Effect/Bypass/Extended you can
simultaneously switch guitar amplifier channels through the use of two integrated and independent
External Switching Relays. Also, Bypass/Effect pedal states and External Switching Relays can be
fully controlled with MIDI commands. The switching type can be set to Momentary or Latching
(factory default).
The External Switching Relays are connected to an 1/4 TRS connector
usually used for this kind of task in almost any guitar gear. Relay 1 is Tip-
To-Ground and Relay 2 is Ring-To-Ground in this connector. They both
share connector's ground point, which in turn relates to amplifier's circuitry
and not to our pedal's. These relays are controlled through pedal's footswitch or through MIDI
commands, from an external MIDI Controller capable to send Program Change and/or Control
Change messages.
Page 7
http://midi-overdrive-switcher.becosfx.com
7
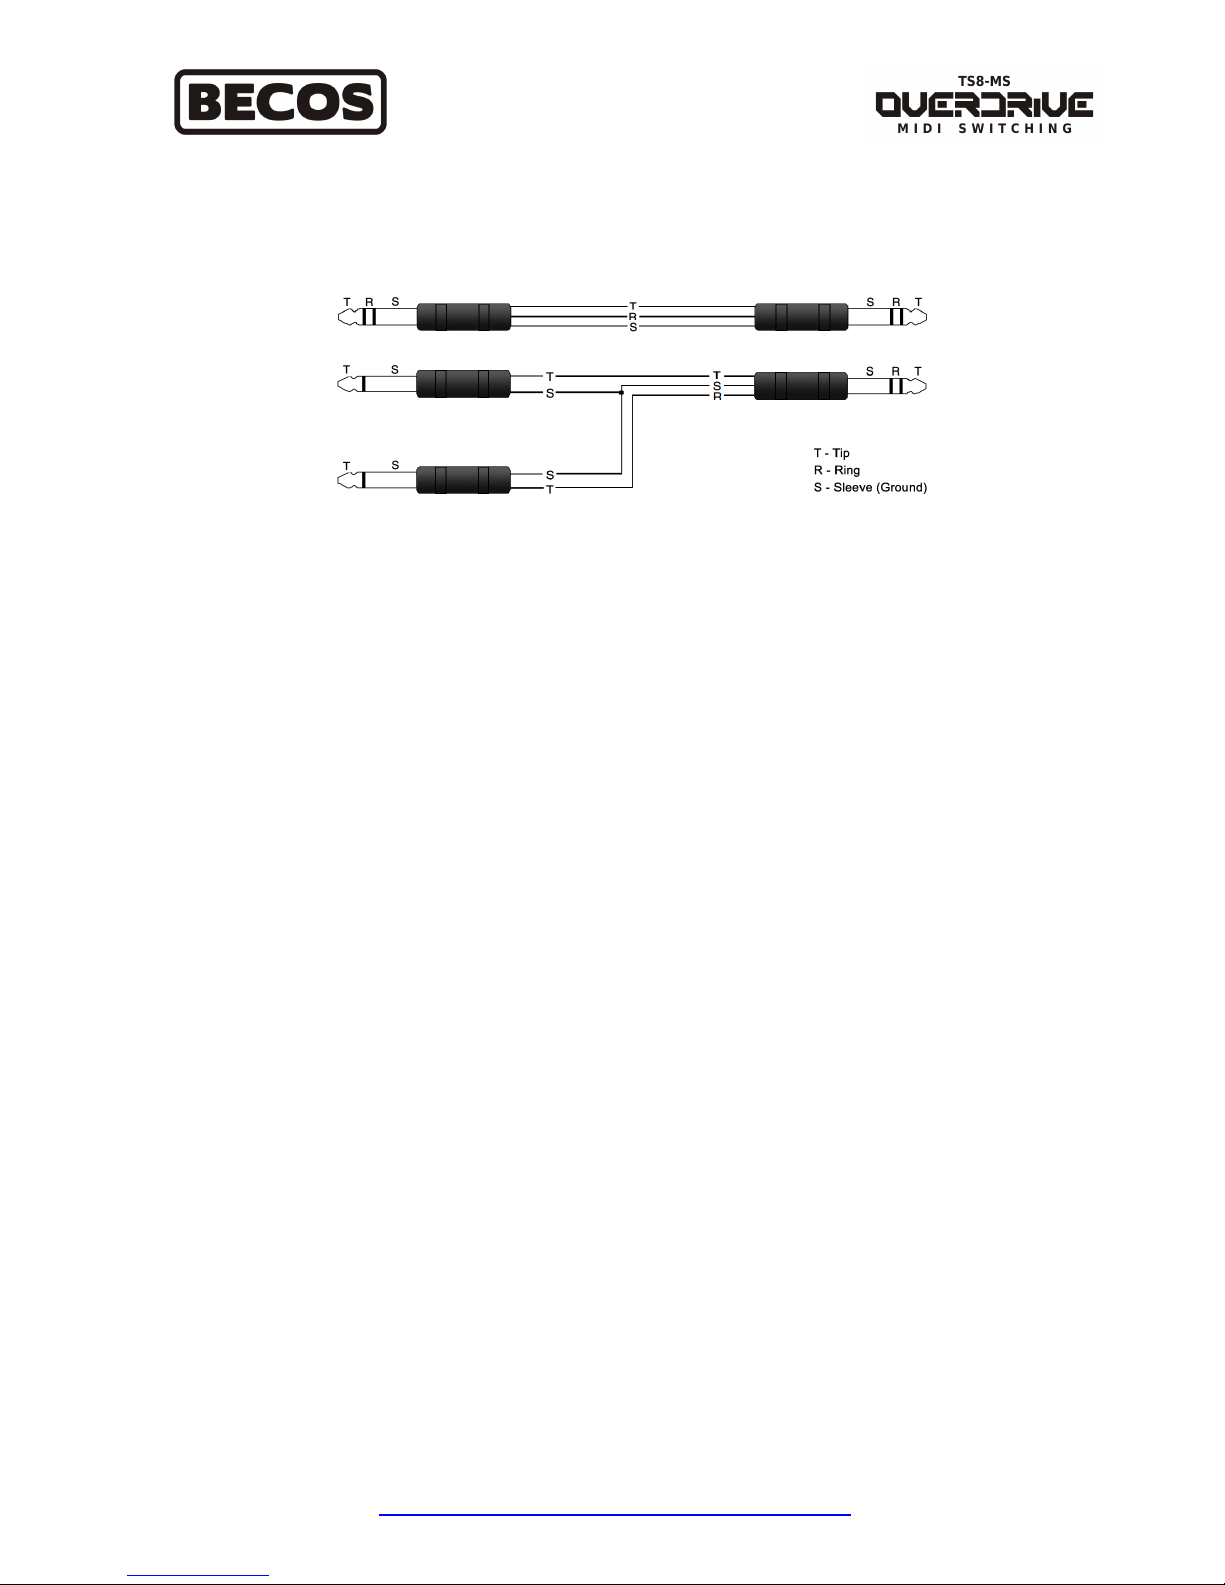
To switch amplifier channels, you will need a dedicated cable from TS8-MS external switching
connector to the amplifier's external switching connector. It may be a stereo-to-stereo cable or an Y-
cable configured at one end with a stereo jack and at the other with two mono jacks.
So, if you need a particular amplifier Channel to be switched on when you put the pedal into Bypass
state and another amplifier Channel when pedal is in Effect state, you can do this by selecting a
particular switching relay pattern through the same Multi Function switch that is used for setting the
MIDI Channel for MIDI operation. Please consult Table 1 bellow for available options and chose
your suitable switching pattern uppon footswitch usage. Keep in mind that these two switching relays
are independent and interchangeable, so you don't need to lock your mind on Relay 1 if you need to
switch Channel 1 in an amplifier.
Very important! TS8-MS was primarely designed to have all it's switching features controled with
MIDI. With MIDI, you get full control over switching, using Program Change and/or Control
Change MIDI commands. When using the Footswitch to pass from Bypass to Effect pedal state,
there are 16 patterns of External Switching Relay switching combinations to chose from, settable
through the 16-position Multi Function switch. All switching patterns are covered for these two
pedal states and you can pass from any External Switching Relay combination to another External
Switching Relay combination. For Extended Mode pedal state, however, only 16 complementary
External Switching Relay combinations are possible in relation to Bypass/Effect states, and this is
a limitation imposed by the number of positions on the Multi Function switch.
Several things can still be done to further accomodate external switching needs in the complementary
Extended Mode pedal state:
- Modify the cable (Tip and Ring may be reversed in the other jack);
- If using a Y-cable, simply swap the mono cables in the amplifier's switching connectors;
- Swap switching patterns which end differently in Extended Mode (and swap relays too);
As a general rule: observe the switching pattern you would need for Extended, compare with what is
available within the 16 options, and pick one that allows you to eliminate (not using) a switching
relay, even though it is switched inside the pedal. Use only what you need from what is available,
when you cannot add.
If you need to combine pedal's Effect/Bypass switching, amplifier's Channel switching, and MIDI
Transmit function, you may also be limited in the options you have for chosing a particular
transmitting MIDI Channel, because there is only one Multi Function hex switch. If that is the case,
please set a different MIDI Channel in your other MIDI devices, which may be more configurable.
Page 8
http://midi-overdrive-switcher.becosfx.com
8
Setting External Switching Relays pattern on footswitch action
You need to choose the desired External Switching Relay combination when overdrive is
Off (Bypass) or On (Effect), and set the Multi Function switch on the circuit board inside
accordingly. The state of these relays will decide what amplifier Channel is switched. For
example, if Multi Function hex switch is set to position 2 it means that, in Bypass pedal
state, the External Swithcing Relays are Off, only Relay 2 is On in Effect state and both relays are On
in Extended Mode. Concomitantly, the pedal responds to MIDI messages on MIDI Channel 2, or, if
the pedal is used to transmit MIDI, it will transmit Program Change numbers PC#1, PC#2 and PC#3
on MIDI Channel 2, these numbers corresponding to pedal Bypass, Effect and Extended states.
The table bellow shows all available options for footswitch action depending on how the Multi
Function hex switch is set inside the pedal.
BYPASS EFFECT EXTENDED
MULTI FUNCTION SWITCH
MIDI Transmit = PC# 1 MIDI Transmit = PC# 2 MIDI Transmit = PC# 3
MIDI Ch.
Transmit
MIDI Ch.
Receive
External
Switching
Relay 1
External
Switching
Relay 2
External
Switching
Relay 1
External
Switching
Relay 2
External
Switching
Relay 1
External
Switching
Relay 2
0 16 OMNI Off Off Off Off
On On
1 1 1 Off Off On Off
Off On
2 2 2 Off Off
Off On On On
3 3 3 Off Off
On On
On Off
4 4 4 On Off Off Off
On On
5 5 5 On Off On Off
On On
6 6 6 On Off
Off On
Off Off
7 7 7 On Off
On On Off On
8 8 8
Off On
Off Off On Off
9 9 9
Off On
On Off
On On
A 10 10
Off On Off On
On Off
B 11 11
Off On On On
Off Off
C 12 12
On On
Off Off
Off On
D 13 13
On On
On Off Off Off
E 14 14
On On Off On
On Off
F 15 15
On On On On Off On
Table 1 - Footswitch Action - External Switching Relays switching pattern and MIDI Channel select
based on Multi Function switch position set (and MIDI Socket used on circuit board: TX or RX)
Note: External Switching Relay 1 = Tip-To-Ground, External Switching Relay 2 = Ring-To-Ground
Set Buffered Bypass
Buffered Bypass (factory default) uses the high input inpedance of a buffer circuit and lowers the
impedance of the signal at the output. That prevents signal loss, which is useful especially with long
run cables following on the output. When the audio signal is Bypassed, only the overdrive circuit is
taken out, and the signal is silently switched through these buffers. To set Buffered Bypass mode of
operation follow this procedure:
Page 9

http://midi-overdrive-switcher.becosfx.com
9
power off pedal (battery or external power adapter),
set the Multi Function switch to position "A",
press down and hold the footswitch,
power on the pedal (from battery or external power adapter),
hold the footswitch for 3 more seconds, until the LED's are lit as indicated,
release to footswitch to save this setting,
power off pedal.
The pedal is now set to Buffered Bypass. With power off, set the Multi Function switch to another
desired position/function then close the pedal, power it on and start using it.
Set Relay True Bypass
This switching mode is made with relays. In Bypass, audio signal is routed from the input connector
straight to the output, even when pedal is not powered. To set True Bypass mode of operation follow
this procedure:
power off pedal (battery or external power adapter),
set the Multi Function switch to position "B",
press down and hold the footswitch,
power up the pedal (from battery or external power adapter),
hold the footswitch for 3 more seconds, until the LED's are lit as indicated,
release the footswitch to save this setting,
power off pedal.
The pedal is now set to True Bypass. With power off, set the Multi Function switch to another
desired position/function then close the pedal, power it on again and start using it.
Set Latching Switching for External Switching Relays
To configure the External Switching Relays to act with latching (factory default), preserving closed
contact in the relay for as long the relay is "On", follow this procedure:
power off pedal (battery or external power adapter),
set the Multi Function switch to position "0" - zero,
press down and hold the footswitch,
power up the pedal (from battery or external power adapter),
hold the footswitch for 3 more seconds, until the LED's are lit as indicated,
release the footswitch to save this setting,
power off pedal.
The External Switching Relays will now act with Latching. With power off, set the Multi
Function switch to the other desired function then close the pedal, power it on again and start using it.
Page 10

http://midi-overdrive-switcher.becosfx.com
10
Set Momentary Switching for External Switching Relays
To configure the External Switching Relays to act Momentary ON - which shorts the switching
circuit for 100 miliseconds when the relay is pulse-commanded to be "On" or "Off", and
automatically reverting to open circuit afterwards -, follow this procedure:
power off pedal (battery or external power adapter),
set the Multi Function switch to position "1",
press down and hold the footswitch,
power up the pedal (from battery or external power adapter),
hold the footswitch for 3 more seconds, until the LED's are lit as indicated,
release to footswitch to save this setting
power off pedal.
The External Switching Relays will now act Momentary. With power off, set the Multi Function
switch to the other desired function then close the pedal and start using it.
Very Important! Please note that for switching relays in the state "On" or "Off", the same 100
miliseconds of "momentary closed contact" will occur within the relay, which means you will have to
sync visual indication on the pedal with the desired Channel on the amp. If switching relay's state is
preserved when passing from one pedal state to another, i.e. Relay 1 was commanded "On" when
pedal was in Bypass and must be "On" again when pedal passes to Effect, a new momentary
command CANNOT be logically executed, NOR seen by the amp! This is because for either one of
the "On" or "Off" switching relay state execution, the same "100ms momentary ON" command is
issued in this mode of switching, so, inevitably, the relay logic state in TS8-MS is always alternating
on the next execution. As a consequence, it is up to the amp to acknoledge, interpret and respond to
these external momentary commands. It may be needed to go through a pedal power off before being
able to sync relay's state with amp's channel, for those patterns where relays preserve their "On" or
"Off" state when passing from Bypass to Effect.
Reset to Factory Defaults
If for any reason you would like to revert the pedal to all factory settings, follow this procedure:
power off pedal (battery or external power adapter),
set the Multi Function switch to position "F",
press down and hold the footswitch,
power up the pedal (from battery or external power adapter),
hold the footswitch for at least 3 more seconds, until all LED's are blinking,
release to footswitch to save this setting; power off pedal.
The pedal is now reset to Factory Default settings. With power off, set the Multi Function switch
to the other desired function then close the pedal, power it on again and start using it.
Page 11
http://midi-overdrive-switcher.becosfx.com
11
In Operation
TS8-MS Controls
Clipping Mode
Use the small tri-toggle switch to select clipping type:
Classic - symmetric clipping with Silicon diodes used for classic tube
screamer feel, where more saturated compression is needed;
Asymmetric - also using Silicon diodes, provides a bit of air into the
clipping and adds a little more gain; it really helps with higher gain
amplifiers,
Custom - by default it comes with our selection of LED's and this mode is better for (clean)
boost or wilder distortion in higher gain setting, or when you want to drive hard a crunch
Channel in an amplifier (we provided sockets for customization, so you can swap LED's or
use other type of diodes here).
Gain Control
This knob controls the amount of gain added to the input signal. It's control is logarithmic, which
means you will have to dial it further for higher gain, but provides a very fine control in the lower
setting, where it exhibits a cleaner sound. Depending on the chosen clipping mode, a range of
dynamic and smooth driven tones may be obtained. Higher settings reveal more clipping,
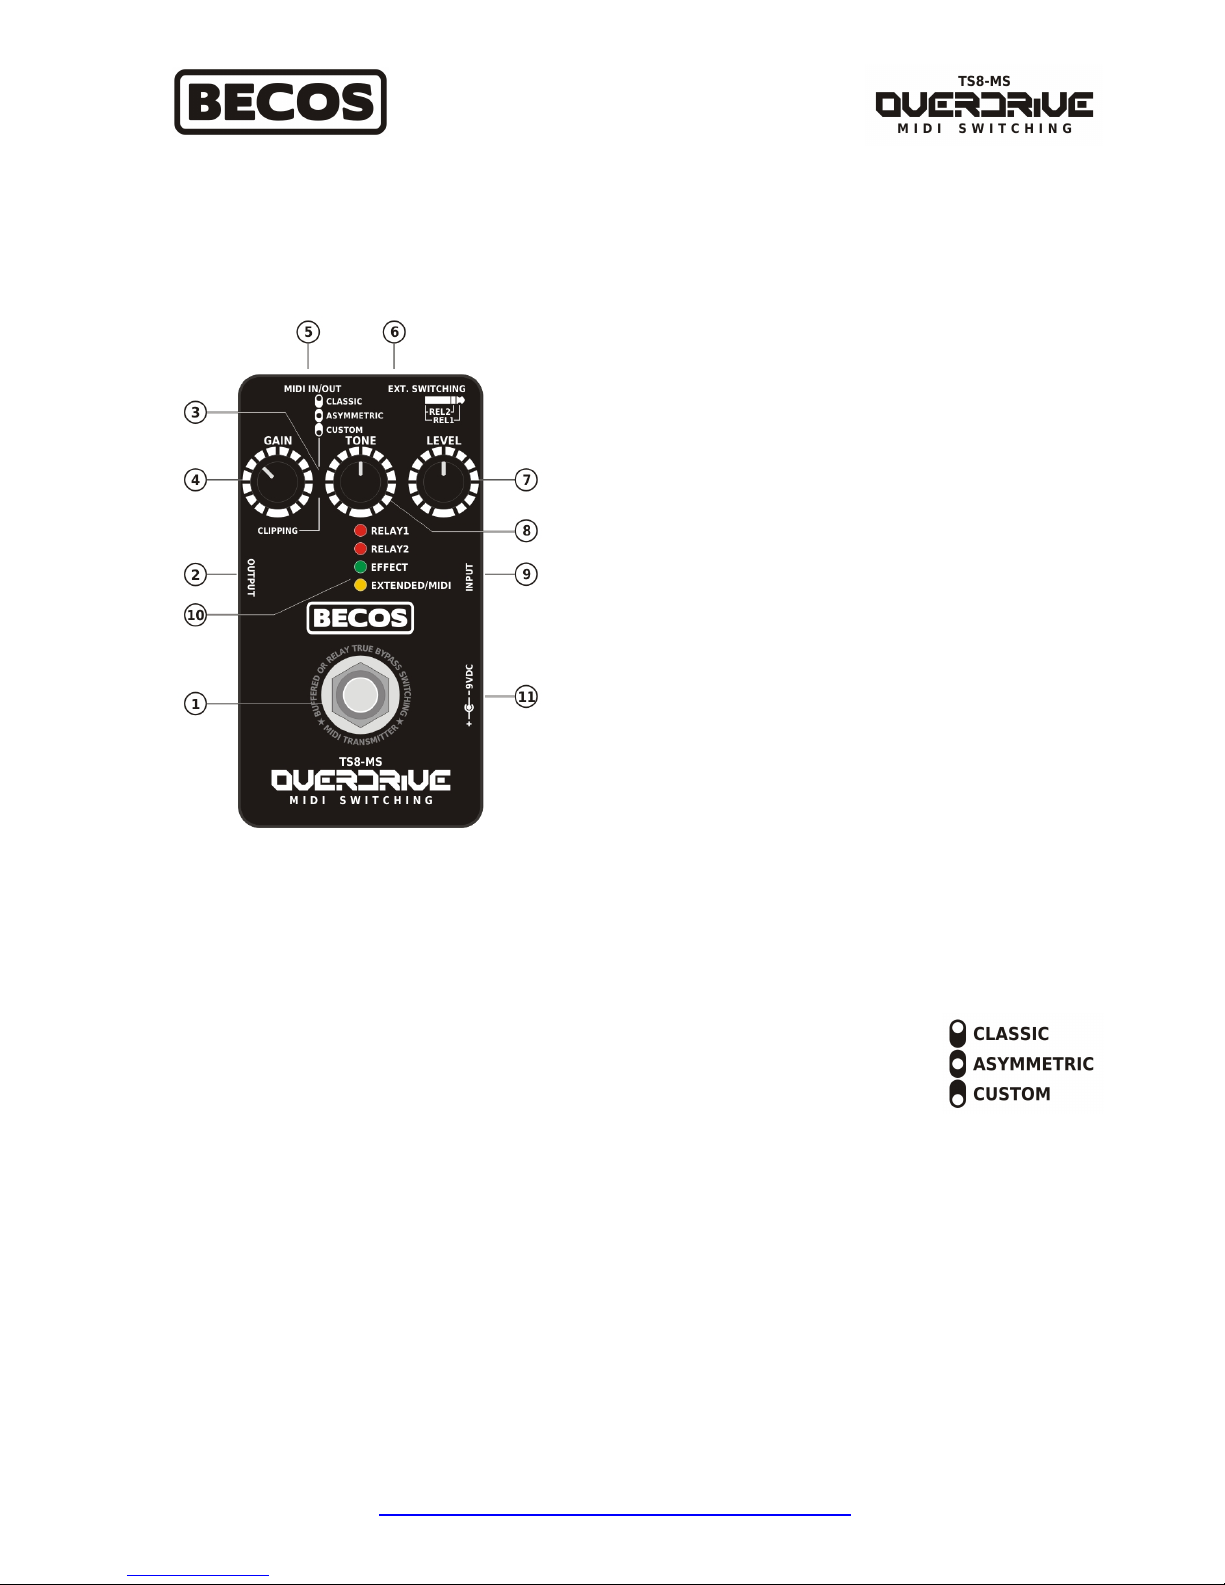
1. Momentary footswitch for Effect/Bypass/Extended
switching, External Switching Relay action and MIDI
transmit function
2. Audio Output Connector
3. Clipping Mode Selector
4. Gain Control (Logarithmic, Less/More Gain Mod)
5. MIDI Input/Output Connector
6. 1/4 TRS Connector for External Switching - 2 relays
7. Output Level Control
8. Tone Control
9. Audio Input Connector and Battery Power Switch
(when jack is inserted)
10. Status LED Indicators
11. External 9VDC Power Connector (center minus)
Page 12

http://midi-overdrive-switcher.becosfx.com
12
compression and singing sustain, especially with Classic and Assymetric clipping, while Custom
(LED's) behaves more like a distortion effect. Playing dynamics is gracefully complemented by tubelike musical distortion. Higher output humbucker guitar pickups attain faster clipping than lower
power single coils, but they all recover softly and musically from each clipping mode. Lowering
guitar volume and/or using guitar tone also contributes to playing dynamics. If you intend to use
pedal as a (clean) booster or as a wilder overdrive, close to distortion, choose custom clipping mode
(LED's) and dial the gain in and adjust output as needed. For a mix of harmonic distortion, select
Asymetric clipping mode - this setting is also best to push hard a crunch or high gain Channel in a
guitar amplifier (preferably a tube amp). Settings with creamy overdrive sustain based on higher gain
are best in front of clean or chrunch amplifier channels. Gain control should always be used in
conjunction with the Output control, to compensate each other's influence.
Tone Control
This knob controls the perceived tone of the audio signal. It is not intended to be used as a precision
EQ shaping tool. It merely acts like a low/high cut filter, yet it has a strong impact on the distortion
structure, especially on the higher frequency side, when dialed clockwise. Turned counterclockwise,
it will cut the higher frequencies, revealing more lows. Around the middle, signal is untouched. The
best corrections will compensate for different guitar pickup and amp characteristics in between ten
and two o'clock.
Output Level Control
This knob controls signal level at the output. It should be used in conjunction with the other controls
for better balancing between gain and clipping mode, as well as matching Bypassed audio signal
level.
LED Indicators
RELAY 1 and RELAY 2 LED's are lit Red when relays are set to "On" and
shut down when relays are set to" Off".
EFFECT LED is lit Green when signal passes through overdrive. No light
means signal is Bypassed. In Extended mode (latter described) this LED can
be either on or off.
EXTEDNDED/MIDI LED is steadily lit Yellow to indicate entering Extended mode, or
briefly pulsates indicating successfuly received MIDI commands.
All LED's are used for visual indication while in Setup mode.
Footswitch Action
The footswitch used in TS8-MS is momentary (NO - normal open) type of switch, supporting both
short and long pushes (during which time the switch contact is momentarely closed), each action type
having different results. The feel of the push action is with a small mechanical detent. A certain push
Page 13
http://midi-overdrive-switcher.becosfx.com
13
presure is required to perform it's switching action and a "click" is generated by the switch - this is
normal. We've chosen this type of switch to provide a ferm tactile feedback, that can be "felt through
the shoes" on succesful push.
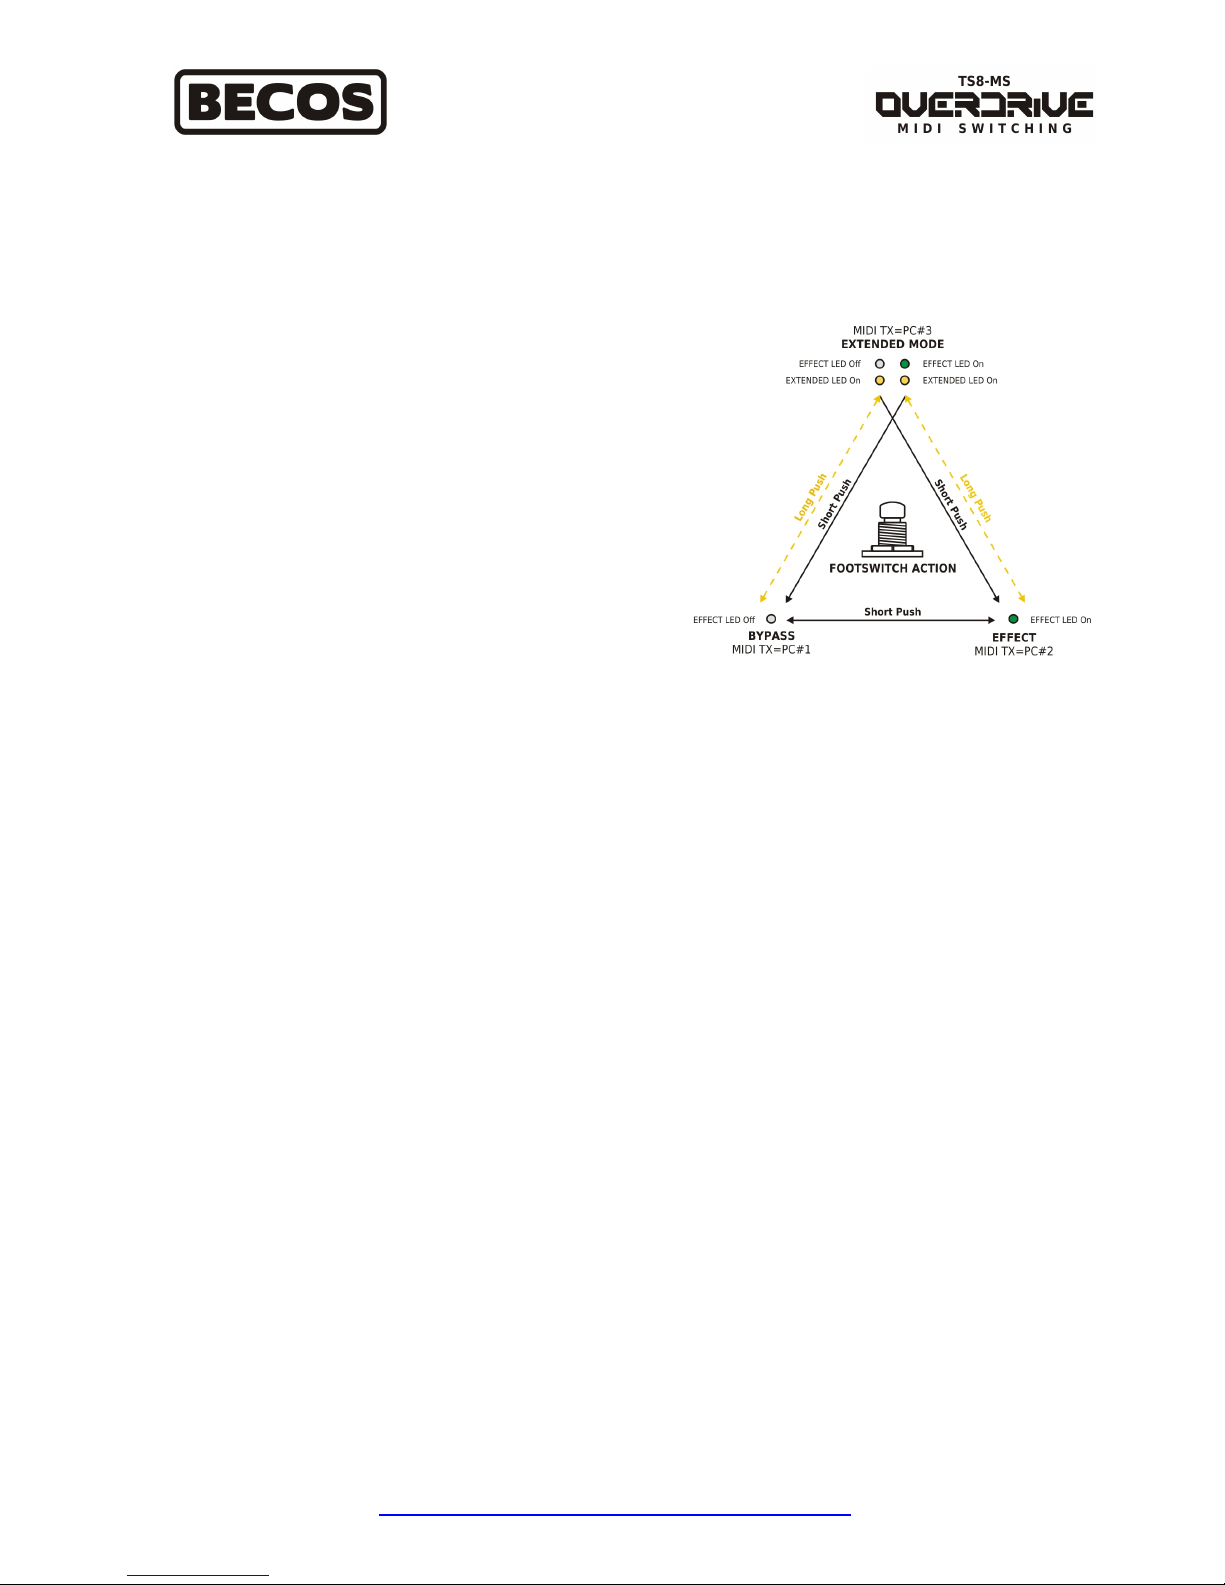
The footswitch on TS8-MS is used to perform more
functions at once: Bypass/Effect/Extended switching,
External Switching Relay action and MIDI
Transmit function. See image on the right to better
understand footswitch action.
Short Push the footswitch to alternately switch the
audio signal through Effect or Bypass it from input to
output. With any position of the Multi Function switch
inside the pedal, a pattern of switching is activated for
the External Switching Relays, which are switched
simultaneously (see Table 1). Also, if pedal's MIDI
jumper cable inside pedal is coupled to MIDI Transmit
(TX) socket on the circuit board, a MIDI Program
Change number is transmitted at once with all other
relay switchings.
Long Push the footswitch to enter Extended Mode. This mode is intended to provide even more
flexibility in externaly switching guitar amplifier channels and also to transmit one more MIDI
Program Change preset number, which is useful if you want to control MIDI devices. For example,
you may want a clean tone without overdrive in front of the amp's clean Channel, but then engage the
overdrive and simultaneously switch amp channel to crunch; ultimately, you may switch to a third
amp's Channel for a lead solo while either preserve the overdrive, or not, depending on what
switching pattern you have selected through the Multi Function switch.
Previous pedal state is preserved in Extended mode! When switching to Extended mode, only the
External Switching Relays are switched (and a MIDI message transmitted, if the MIDI cable inside
the pedal is coupled to MIDI Transmit socket). Pedal state (Bypass or Effect) will be preserved in
Extended mode. Visual indication will show Extended and Effect LED's on, which means you
entered Extended mode from Effect state. If you enter Extended mode from Bypass state, the visual
indication will show Extended LED on, and Effect LED off.
Exit from Extended mode either by long-push or short-push the footswitch, each having different
results. Long-push gets you back to previous state (Effect or Bypass). Short-push takes you to the
alternating state (see the drawing above to better understand the foot-switching).
If you only need to switch between two amp's channels and don't need the Extended mode at
all, simply don't push the footswitch longer than one second.
Note: If you power off pedal and then power it on again, TS8-MS will remember last command/state
before power off.
Page 14

http://midi-overdrive-switcher.becosfx.com
14
DC Power Supply
TS8-MS pedal can be powered using a 9 Volt alkaline battery or a 9 Volt DC Power Adapter with
a barrel of 5.5 mm and a hole of 2.1 mm with minus polarity on the center
Instrument cable jack must be inserted into the input connector for the circuit to power on, if battery
is the power source. When powered by the external DC adapter, internal battery is switched off and
the circuit is powered regardless if input jack cable is inserted or not.
Note: When pedal is powered on, last pedal state or command is recalled. Last pedal state means
what was last set on footswitch action or last received MIDI command, before powering off pedal. Be
advised that MIDI commands may in fact contain a packet of commands, and because of the way
MIDI serial protocol works, they will be executed fast, in series, as they come in; for example, a
Program Change command may come along with several Control Change commands, and, if these
commands are dedicated to more than one relay, TS8-MS will be able to recall only "that last
command", for that one relay it was issued to. So, when power on guitar rig is best to send a checkup MIDI command from your MIDI Controller, to fully activate the pedal.
Low Battery Indication and Battery Change
All switching circuits inside TS8-MS require a certain voltage to operate properly. If battery or DC
power gets bellow 7V during pedal usage, a brown-out procedure is initiated, with the following
actions and consequences:
relay's Red LED's will start flashing to indicate relay switching is no longer possible because
battery has low voltage and it needs to be changed;
audio signal is switched and locked in Bypass until battery voltage is detected high again;
if pedal is powered on with low battery, no LED's will be lit, but audio signal will pass
through only as Bypassed (Buffered or True Bypass - depending on pedal settings);
no MIDI commands received will be executed;
no switching commands will be initiated with the footswitch;
no MIDI commands will be transmitted.
Alcaline batteries are recommended for longer operation time. To change battery, open the back lid
of the pedal and replace it. To avoid battery depletion, remove plug from the input connector when
pedal is not used. Remove battery if the pedal is not going to be used a long time. Do not set batteries
of fire for risk of injuries. Please do not throw very batteries into garbage - dispose them in a
convenience store or other dedicated facility for recycling.
Ways to Use TS8-MS MIDI Overdrive Effect Pedal
Out of the box, you can use the pedal just like any other guitar effect pedal. Simply place it in your
desired audio signal chain, power it up and use the footswitch to alternately switch between Effect
and Bypass. However, if you want to use it's extended features, you can:
Page 15
http://midi-overdrive-switcher.becosfx.com
15
concomitantly use it as analog overdrive pedal and amplifier channel switcher through the
integrated and isolated External Switching Relays,
use it as an overdrive pedal, switch amplifier's channels and transmit a MIDI Program Change
preset number to other MIDI devices, all at once (three pre-programmed PC numbers can be
transmited, each associated to pedal's states: Effect, Bypass, Extended)
externally control TS8-MS overdrive effect through MIDI Program Change and Control
Change messages, so you can integrate an analog overdrive in your MIDI rig,
on top of MIDI controlling the overdrive effect, you may also use two integrated External
Switching Relays to switch amplifier channels with MIDI Program Change and Control
Change, which means you can add MIDI Channel Switching to any guitar amplifier that
supports external channel switching.
Using TS8-MS as analog overdrive and amplifier channel switcher on
footswitch action
The Multi Function switch inside the pedal sets the External Switching Relays pattern when
overdrive effect is enabled or Bypassed using the main footswitch. Of course, if other features can be
switched externally in an amplifier, you can use the relays for switching these features (ex. reverb,
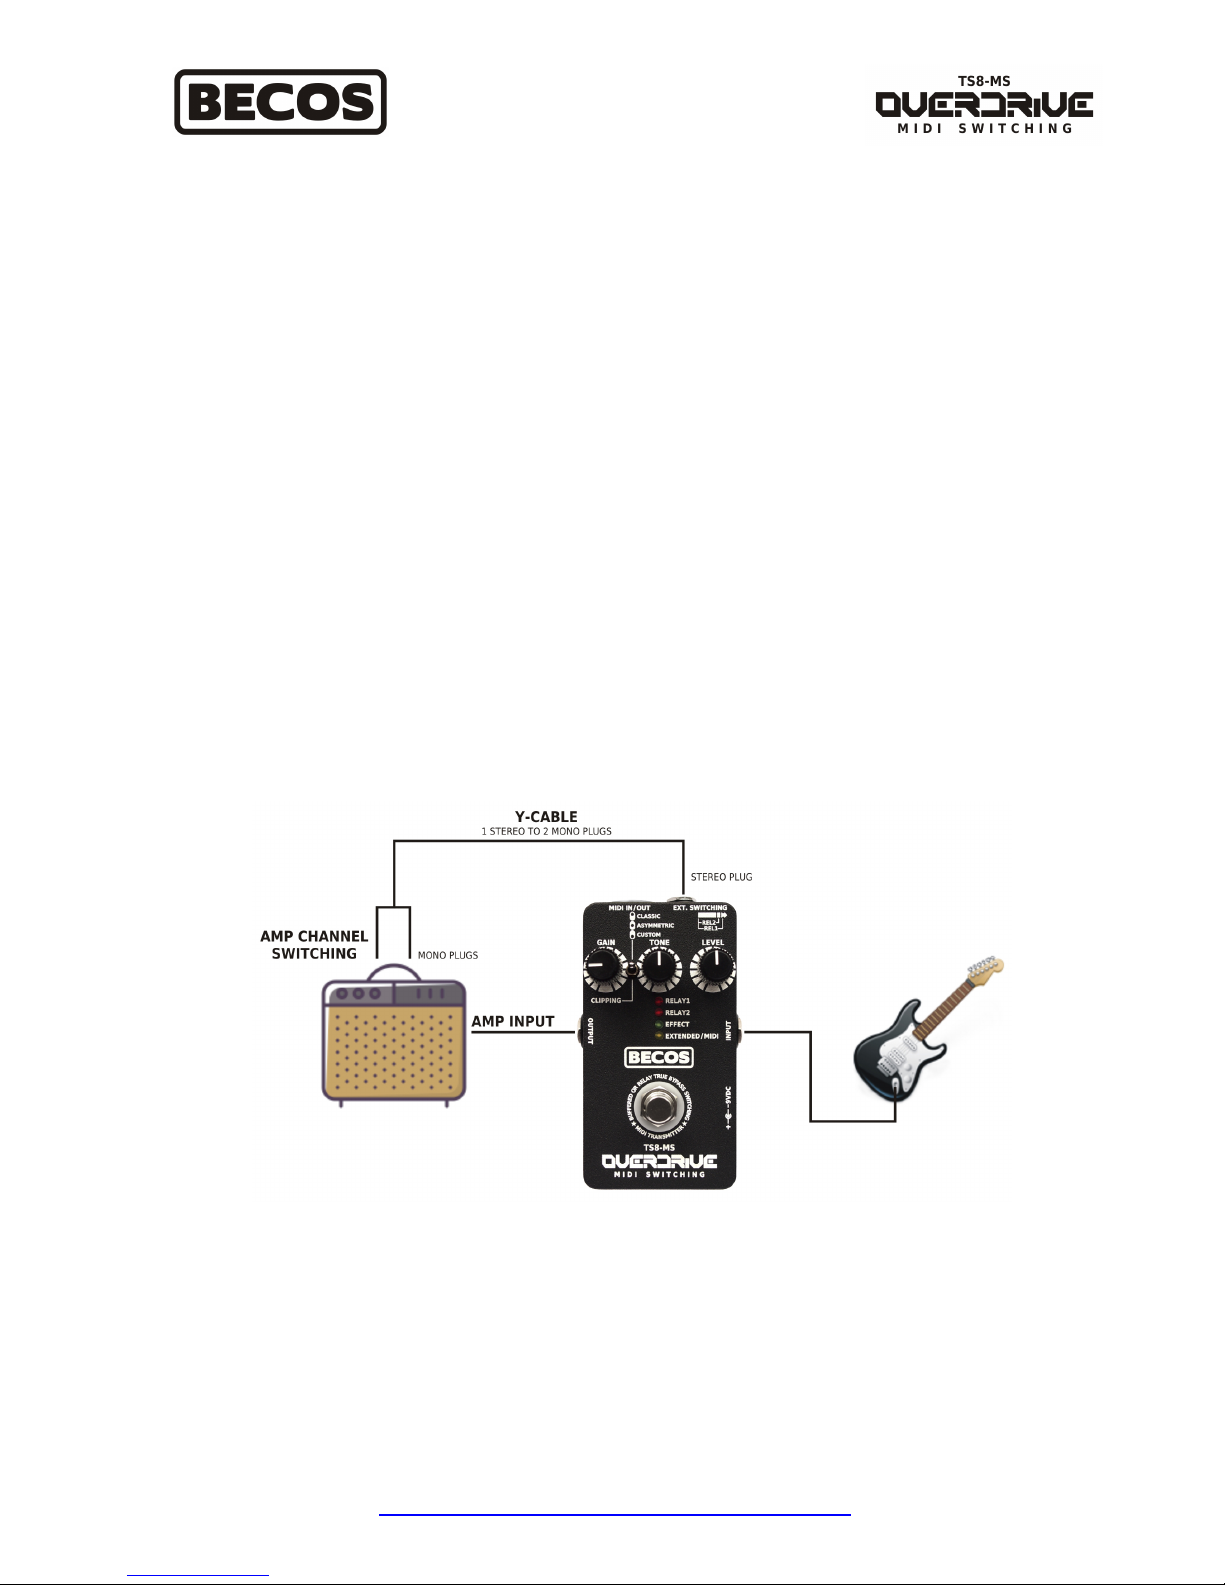
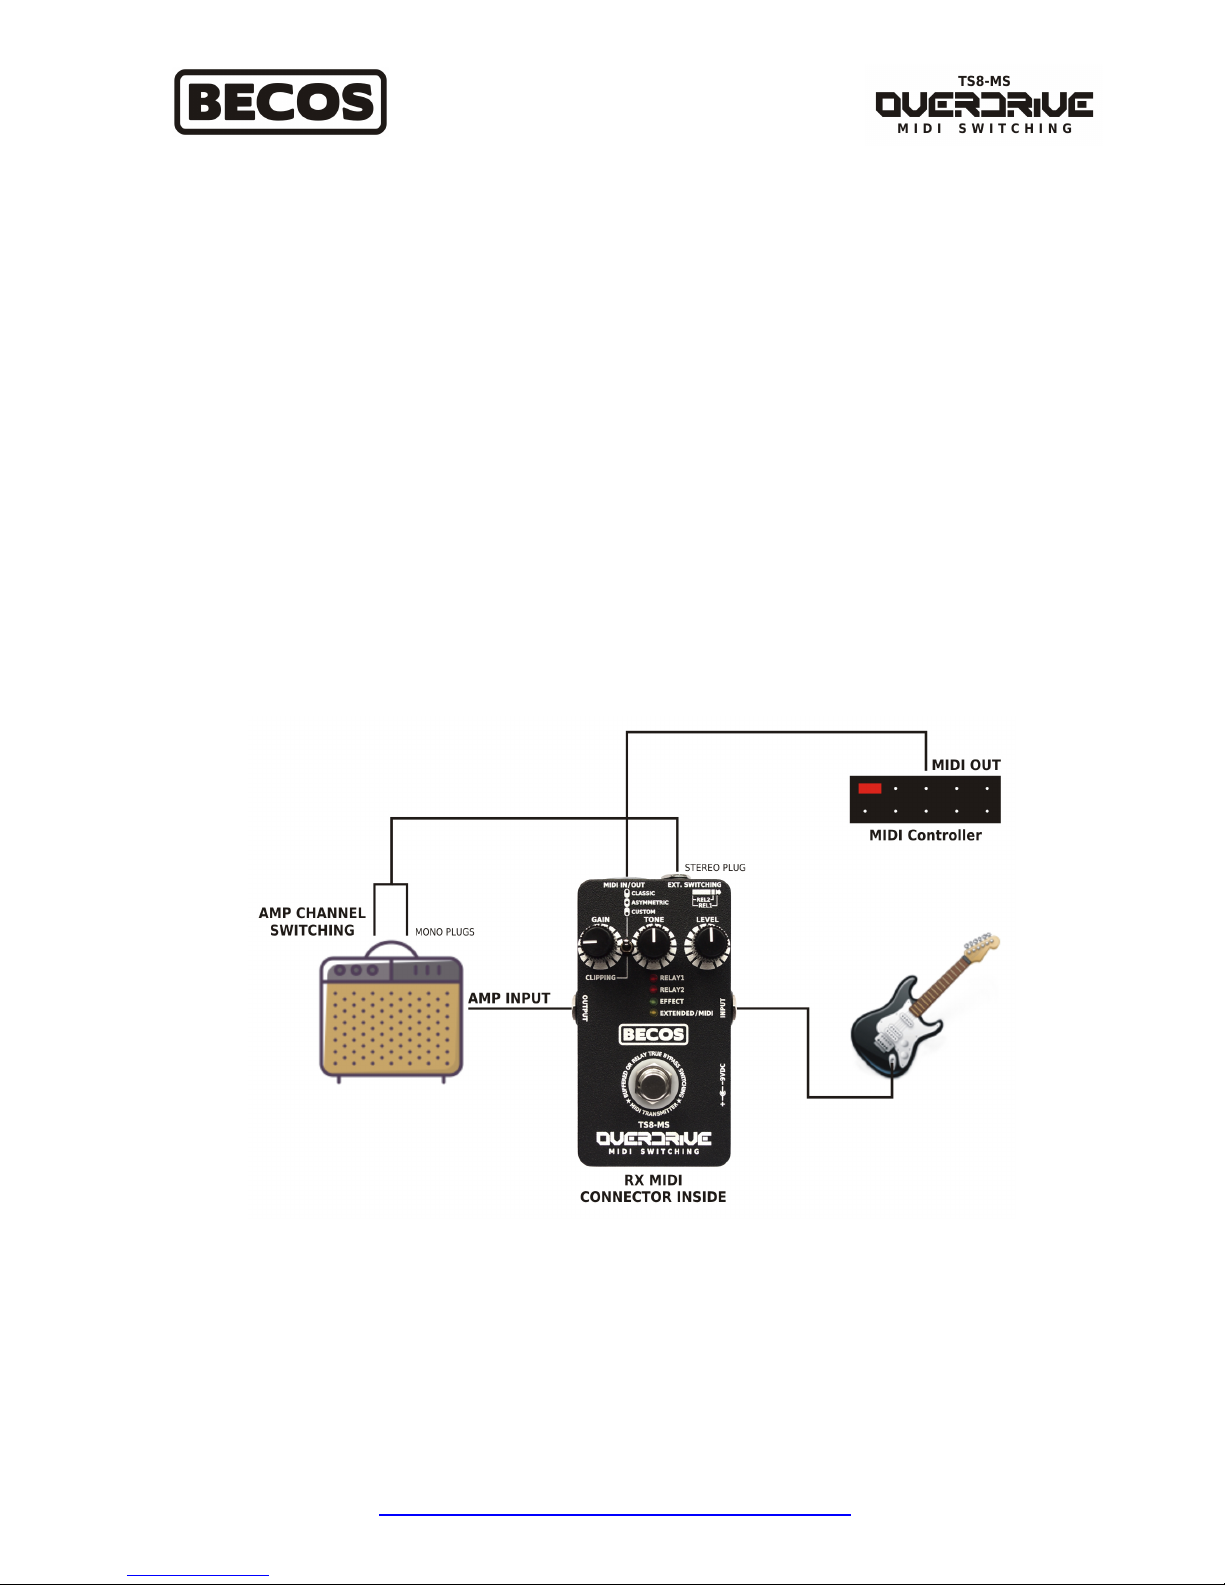
EQ stage, solo, boost, etc). In the picture bellow, TS8-MS Overdrive pedal is used to also switch
amp's channels but you can use the switching relays in the pedal to switch an amp feature.
Footswitch Action - use TS8-MS as analog overdrive and amp channel switcher
To use the switching feature of the pedal, a stereo cable or an "Y" split cable is needed, as described
earlier in the manual. A TRS stereo plug will be inserted into the AMP SWITCH connector in our
pedal, while the other mono plugs (or corresponding stereo plug, if you're using a single cable with
two stereo plugs) will be inserted into your amp's switching connectors.
Why would you need this? Let's analyse a practical situation. Say you want to play a guitar part on a
clean amp channel, where you don't need the overdrive push. During the song, you want to engage
Page 16
http://midi-overdrive-switcher.becosfx.com
16
the overdrive for a guitar solo, but you would also want it in front of a different amp channel. So, you
need to switch amp's Channel and engage the overdrive at the same time. TS8-MS does just that and
you can do this with only one footswitch push!
The External Switching Relays are completely isolated from pedal audio circuit. When the relays are
ON, the Tip and/or Ring in the connector are shorted to connector's Ground. When in OFF state, the
short is lifted. When we say Ground, we reffer to the "ground" or sleeve of the stereo plug inserted
into the switching connector, which is actually part of the amp's switching circuit. When relays are in
ON setting, the corresponding LED's will lit to indicate relay state.
Using an external MIDI Controller to control TS8-MS analog overdrive
and switch amplifier's channels
Program Change (PC) and Control Change (CC) messages are supported by TS8-MS. An external
MIDI Controller like Rocktron Midi Mate or Vodoo Lab Ground Control Pro or any other
programable MIDI Controller can control the TS8-MS Overdrive Effect/Bypass, along with it's
External Switching Relays.
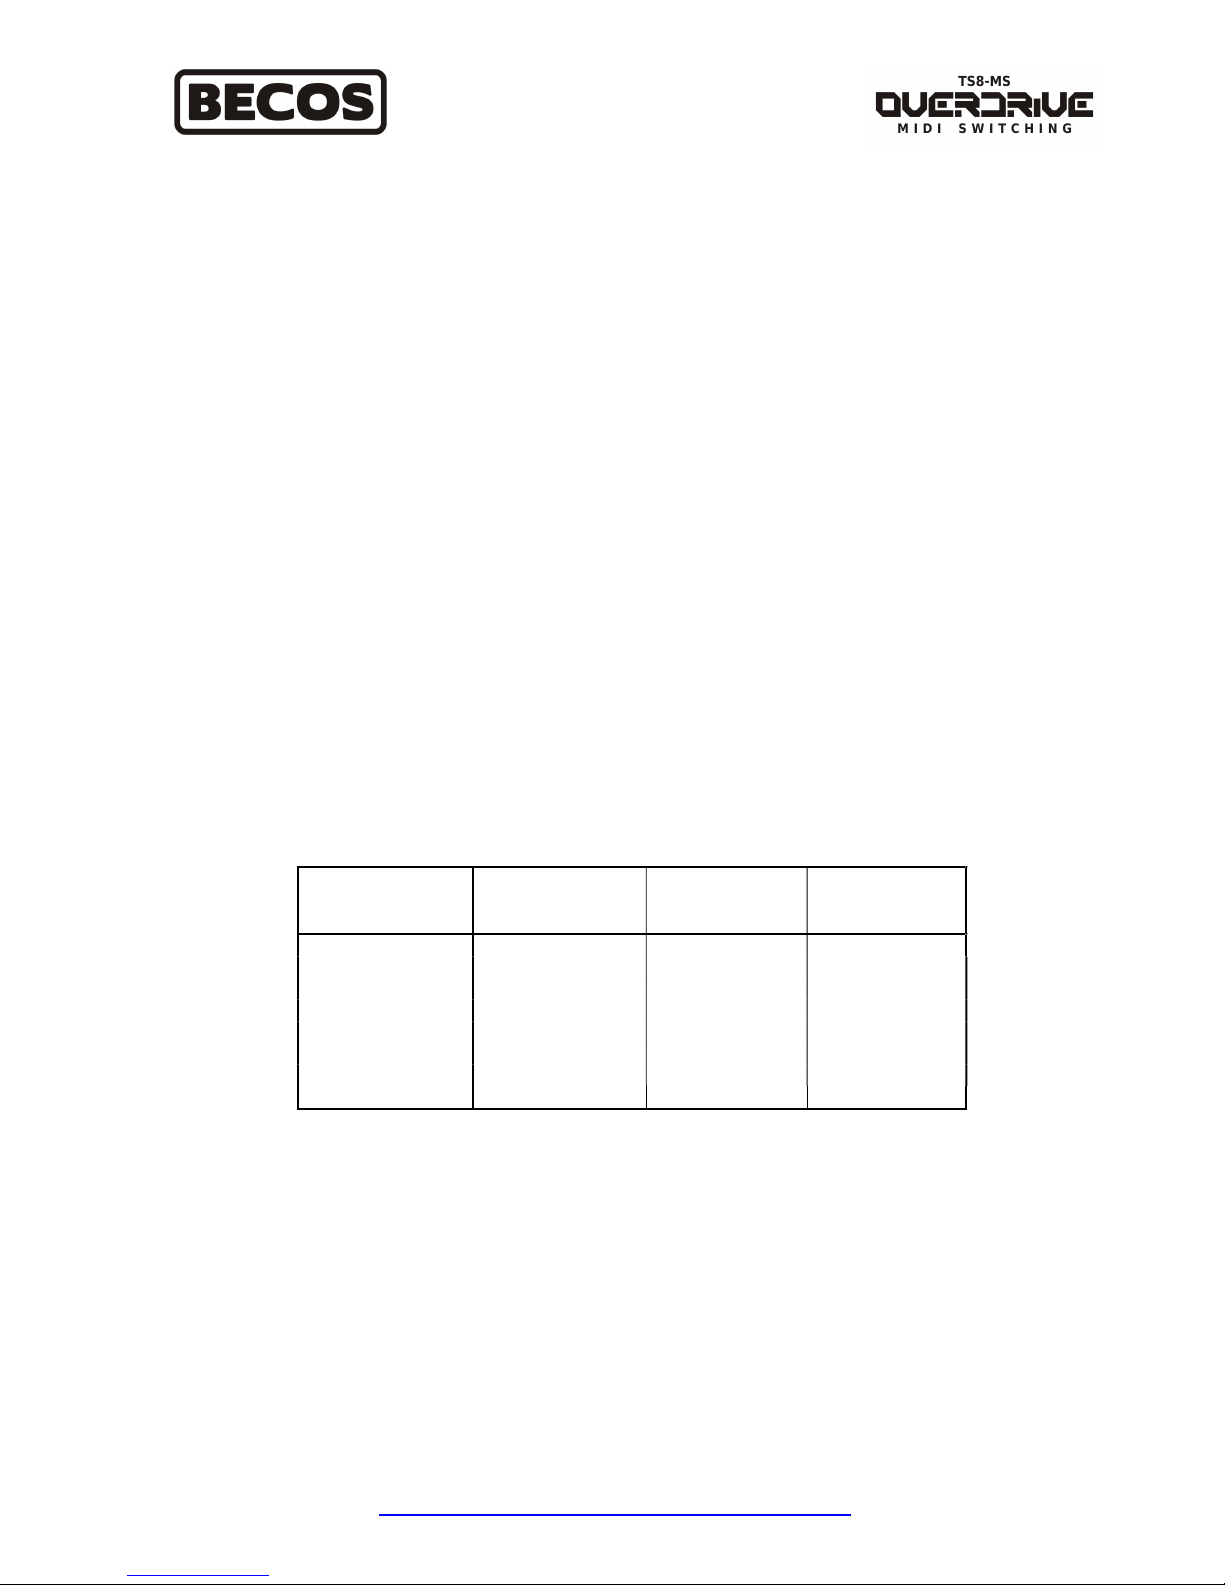
External MIDI Control - switch TS8-MS analog overdrive and amp channels
with an external MIDI Controller
With TS8-MS pedal you can not only add an overdrive in front of a gutar amplifier and switch
it remotely, but you can also switch amplifier's channels (or other switchable feature - i.e.
boost, eq, reverb, etc. -, if available) with MIDI commands.
Page 17
http://midi-overdrive-switcher.becosfx.com
17
Each MIDI command accepted and executed by TS8-MS will be visually signaled with a short blink
on the EXTENDED/MIDI Yellow LED. Commands that cannot be executed will not be signalled in
any way - they will be ignorred.
Note: TS8-MS does NOT store presets, where each relay state is recorded/recalled. It simply
executes fast all MIDI commands received, be these simple and solitary MIDI commands, or a group
of MIDI commands in series - as is the case when a preset change occurs.
Receiving Program Change MIDI messages
Program Change (PC) MIDI messages may be sent from an external MIDI Controller programmed
by the user to transmit a preset number corresponding to pedal's features that you want enabled or
disabled.
When you use Program Change to control TS8-MS it is advisable to use PC messages alone, without
accompanying with conflicting Control Change (CC) messages. However, you may use both type of
commands, at once, to control everything in your MIDI rig - they just need to be programed
correctly.
Each of the Program Change numbers TS8-MS can respond to has multiple action results, meaning
all relays are switched on and/or off with each command received. All commands are executed fast,
one by one, in series, in order they came in.
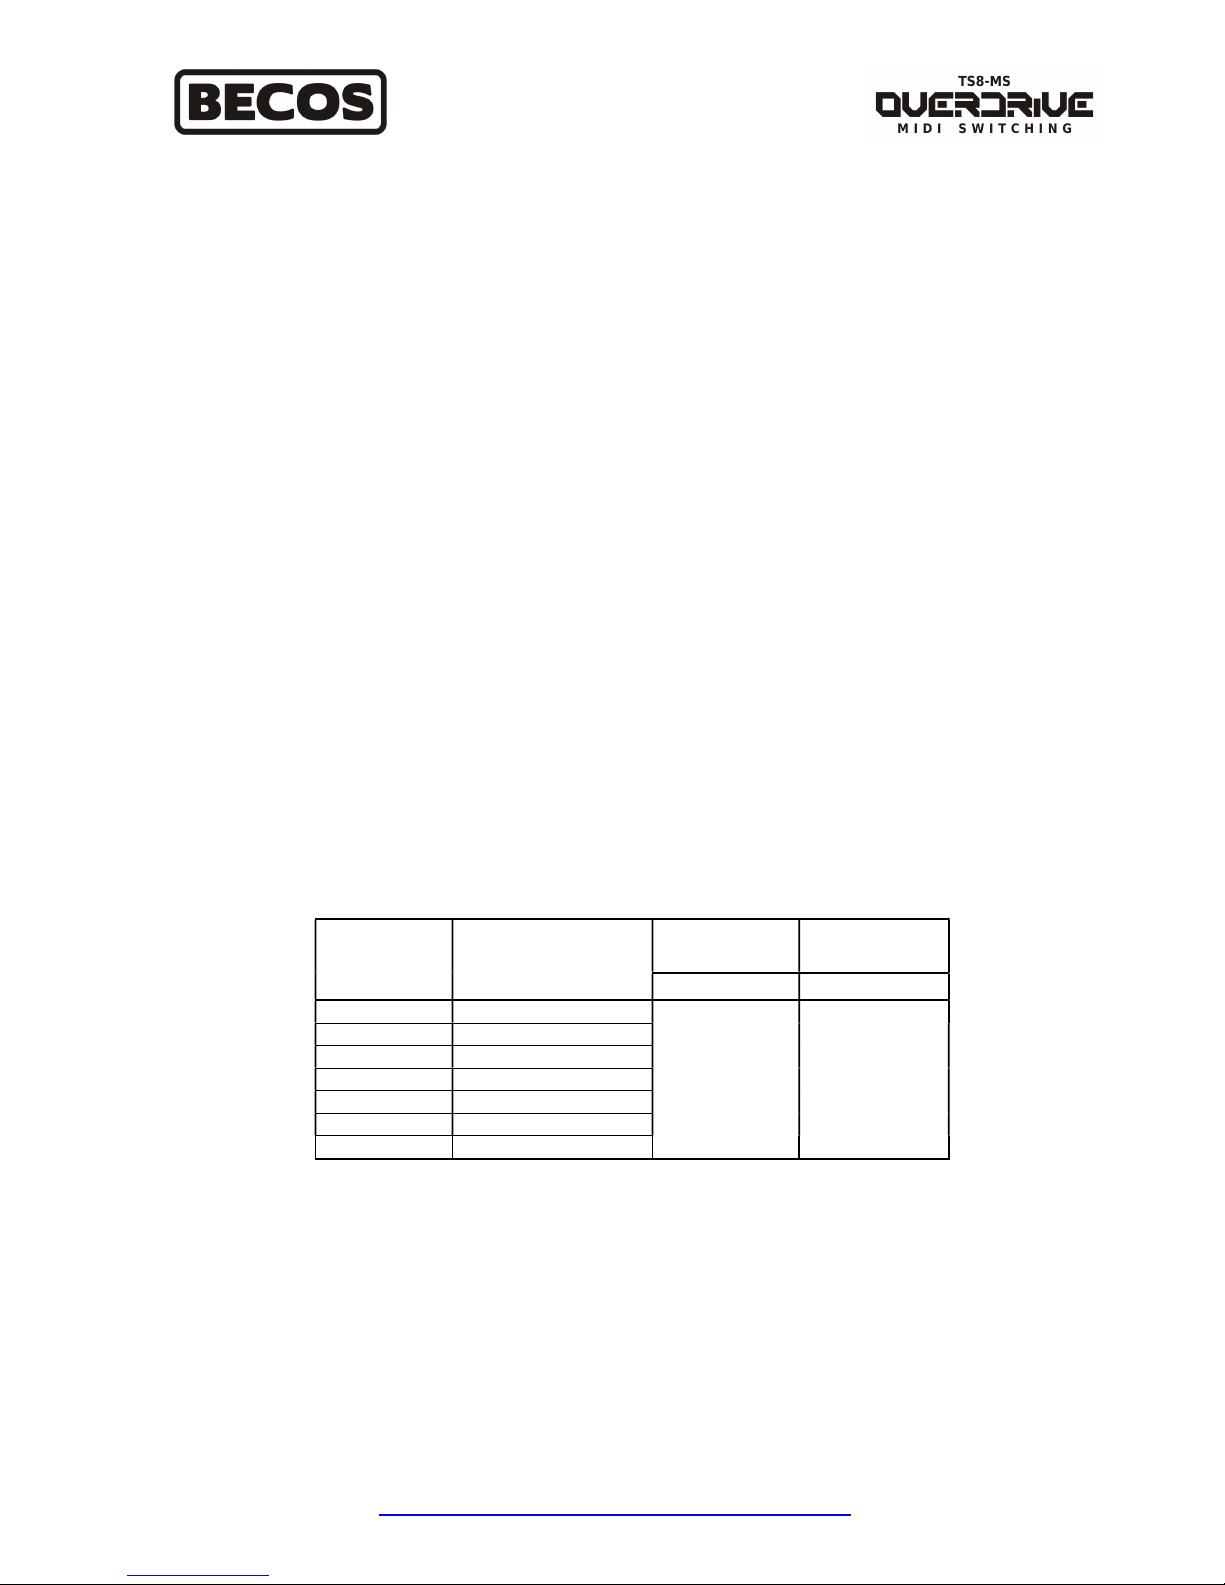
TS8-MS pedal is pre-programmed to respond to the following Program Change numbers:
Program Change
Number
Bypass / Effect
Relay
Switching
Relay 1
Tip-To-Gnd
Switching
Relay 2
Ring-To-Gnd
#50 Bypass Off Off
#51 Bypass On On
#52 Bypass Off On
#53 Bypass On Off
#54 Effect Off Off
#55 Effect On On
#56 Effect Off On
#57 Effect On Off
Table 2 - MIDI Program Change switching options in TS8-MS
If you have multiple MIDI devices you need to control using Program Change messages, dedicate
each one a separate MIDI Channel and then you may transmit the same Program Change number on
different channels, each device then executing what it is suppoesd to.
For instance, if you want to transmit PC#55 to load a reverb effect in a processor for a clean sound,
this one Program Change number, if transmitted on the same MIDI Channel for all MIDI devices
including TS8-MS, would turn overdrive effect on and may switch an amp channel when executed,
which may not be what you desire for your clean sound reverb preset. Likewise, if you transmit
PC#55 along with a CC number that can be executed - like CC 81 -, the results might conflict with
each other and the switching could seem erratic.
Page 18
http://midi-overdrive-switcher.becosfx.com
18
Note: The MIDI protocol has a total of 128 Program Change numbers, from 0 to 127. Most MIDI
Controllers transmit Program Change number 0 while displaying PC#1 or "Preset 1" as transmitted.
Other advanced MIDI Controllers allow the user to set if MIDI Controller will send Program
Change 0 or Program Change 1 for "Preset 1". TS8-MS is programmed to respond like this: when
receiving Program Change number 49 it will respond as PC#50 in the table above.
Receiving Control Change MIDI messages
TS8-MS can respond to Continuous Controllers or Control Change (CC) MIDI messages that may
be sent along with Program Change messages by an external MIDI Controller, programmed by the
user to transmit a particular value for the CC number transmitted, corresponding to TS8-MS
relays/features that you want enabled or disabled. This way of controlling MIDI devices, including
TS8-MS, allow for complete control over your switching needs.
Some MIDI Controllers have a physical button alocated for switching a feature on/off within a MIDI
Program Change preset, using a general purpose Control Change command. When that button is
pressed repeatedly, the alocated CC number is sent accompanied by an on/off value (usually
alternately switched). However, other simpler MIDI Controllers do not have assignable momentary
on/off physical buttons, yet they can be programmed to send MIDI Control Change messages along
with Program Change messages.
In our case, when TS8-MS receives a certain CC number with a value between 0-63, it switches one
or more relays OFF; the same CC number with a value between 64-127 will switch one or more
relays ON.
TS8-MS pedal is pre-programmed to respond to the following MIDI Control Change numbers:
Relay/LED
OFF
Relay/LED
ON
Control
Change
Number
Relays Controlled
CC Value CC Value
80 Bypass
81 R1
82 R2
83 Bypass, R1, R2
84 Bypass, R1
85 R1, R2
86 Bypass, R2
0-63 64-127
Table 3 - MIDI Control Change switching options in TS8-MS
Note: Bypass = Effect/Bypass Relay. R1 = External Switching Relay 1 (Tip-to-Ground). R2 =
External Switching Relay 2 (Ring-to-Ground).
When working with Control Change commands CC 83, CC 84, CC 85 and CC 86 - which control
more relays at once in TS8-MS -, you must program your MIDI Controller in such a way that when a
preset (Program Change command) is transmitted, only one of these CC numbers will be transmitted.
Otherwise, if more of these numbers are transmitted at once, moreover, if sent along with a Program
Change number that does the same thing, they will be all executed in cascade and result in an erratic
behavior of TS8-MS and the controlling amp's channels.
Page 19
http://midi-overdrive-switcher.becosfx.com
19
If you have a simple MIDI Controller with little options for transmitting Control Change on/off
commands, these multiple action CC numbers may come in handy. You can program one CC number
per PC preset which may controls some other device, and this CC number could switch all relays in
TS8-MS, in any available configuration.
However, if you have an advanced MIDI Controller, is best to program it to transmit Program
Change message with all of the following CC numbers allocated, each controlling only one relay in
TS8-MS: CC 80 - Bypass Relay, CC 81 - External Switching Relay 1, CC 82 - External Switching
Relay 2. This way you can control these relays within one Program Change preset, even after the
preset is transmitted to your other MIDI devices, using dedicated on/off physical buttons.
Note: TS8-MS does NOT store presets where each relay state is recorded/recalled. It simply executes
fast all MIDI commands received, be these simple and solitary MIDI commands, or a group of MIDI
commands in series - as is the case when a preset change occurs. When multiple CC commands are
transmitted (as a series of MIDI commands) within a preset change, which puts the TS8-MS in a
certain state, where each relay has a position (on or off), please note that if you power off pedal and
then on again, only the very last MIDI command will be recalled - of the many commands received in
series for that preset change. This means that it may be necessary to re-transmit the preset command
from your MIDI Controller, in order to put TS8-MS relays in the position they need to be.
Using TS8-MS as analog overdrive, amplifier channel switcher and
simple MIDI Controller (transmitter) on footswitch action
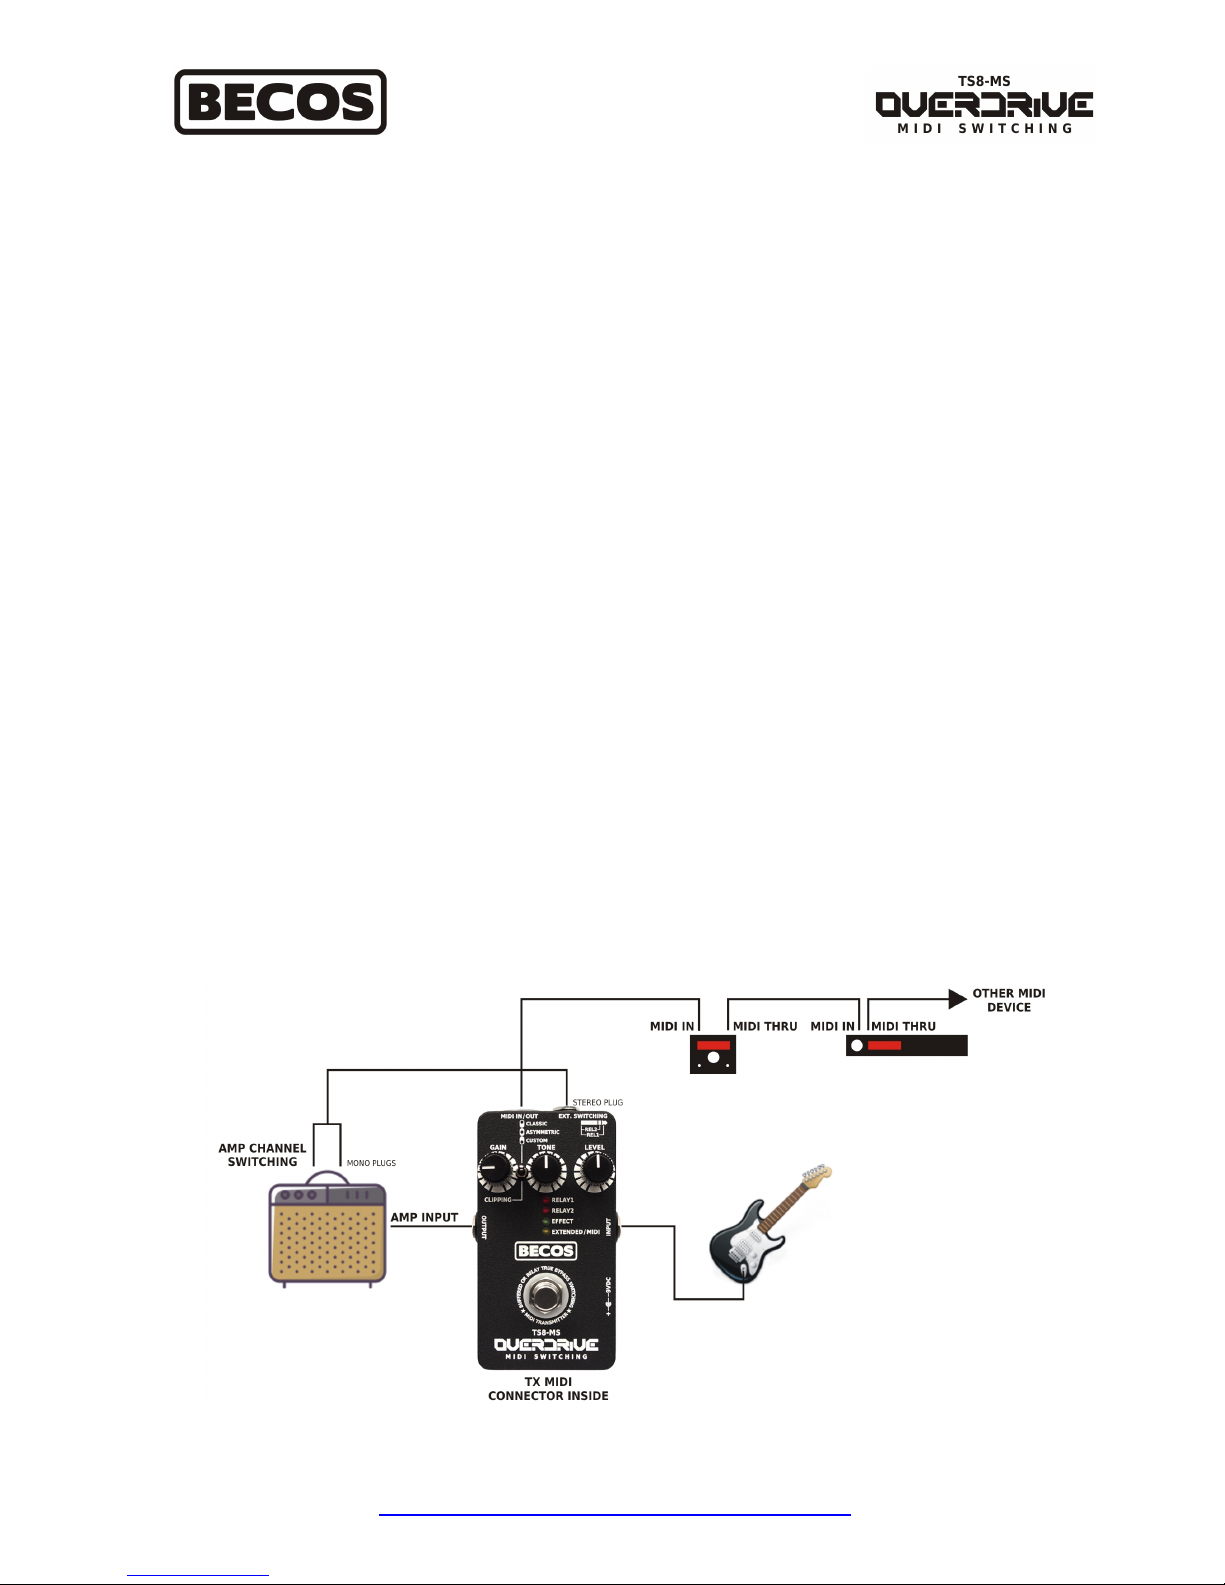
TS8-MS can also function as a very simple MIDI Transmitter. You need to set the MIDI jumper
cable inside the pedal to the Transmit (TX) socket and set the Multi Function switch to a desired
transmitting Channel (which simultaneusly sets External Relays switching pattern; see Table 1).
Footswitch Action - use TS8-MS as analog overdrive, switch amplifier channels
and transmit MIDI Program Change messages, all at once
Page 20

http://midi-overdrive-switcher.becosfx.com
20
For example, if Multi Function hex switch is set to 2, it means that in pedal Bypass the External
Swithcing Relays are Off, in effect only Relay 2 is On and in extended mode, both relays are On (see
Table 1 above). Concomitantly, the pedal sends MIDI messages on MIDI Channel 2:
PC# 1 when pedal is in Bypass,
PC# 2 when pedal is in Effect,
PC# 3 when pedal is in Extended mode.
With TS8-MS as "MIDI Controller", you can cycle through three MIDI presets on your other MIDI
devices and switch amplifier channels at the same time. Of course, to do so, you also need to connect
the External Switching Relays to the amp's external switching connector using either a stereo or an
"Y" stereo to 2-mono cable, as previously explained.
TS8-MS Customizations
Swapping IC's
There is a whole debate around the "sound & feel" of IC's used in overdrive circuits! The differences
are more felt in the "playing hand" than heard by the ear. Sometime they have an influence in
conjunction with guitar pickups and amplifier's channel/setting used, for a cumulative, more obvious
effect.
You can swap IC's with ease, without taking apart anything but the back cover of the pedal, so we
encourage you to experiment. Here are some IC's to try:
RC4558D/P - warm saturation, classic tubescreamer sound, used by most manufacturers
TLC2272 - low noise, gentle musical clipping, good for hi-gain crunch
OP275 - very "clean", low noise with nice recovery from clipping
OPA2604 - low distortion, quiet, gentle clipping, a bit darker sounding
Other: TL072, NE5532, LM833, OPA2134PA, LT1214
Changing Clipping Semiconductors
Why change diodes in overdrive circuits? Diodes all have different forward voltages from around
0.2V for Germanium and 0.6V for Silicon diodes and going up to and over 3V in some LED's. Guitar
pickup signal level can reach something above 0.2V depending on magnet's strength, so, when pedal
gain is set low with the Gain Control, the signal is almost untouched, but as the gain increases or
when you hit strings harder, the amplified signal is limited by these diodes sooner or later,
depending on type of diode used and their configuration. This is what causes the
clipping/distortion. You can succesfully use any diodes with forward voltages in between 0.2V to
2.0V for overdrive applications.
In TS8-MS overdrive, Symmetric and Assymetric settings are hardwired with Silicon diodes which
clip arround 0.55V each, while Custom is configured with sockets where we placed our selection of
Page 21

http://midi-overdrive-switcher.becosfx.com
21
Red LED's - clipping around 1.6V, for a wilder distortion in higher gain setting or an Almost Clean
boost in lower gain setting.
Note: If you aim for the smoothest clipping, we recommend you try some 1N34 Germanium diodes
which nicely complement single coil pickups. However, they might sound "too compressed" with
humbucker pickups. A mix of Germanium and Silicon diodes yelds creamy distortion which sounds
really good, especially with crunchy amp channels.
Here are some hints on what effect semiconductors have on the clipping in overdrive circuits:
White or Blue LED's are good to obtain cleanest boost effect; or, remove LED's altogether;
Yellow and Green LED's start to break earlier than Blue but later than Red;
Red and Infra Red LED's are getting closer to Silicon diode clipping;
Use different Silicon or germanium diodes for classic tubescreamer sound & feel.
Change Indication LED's Color
If you want different colors for visible LED's used for MIDI activity, Bypass and external switching
relay's state indication, you can change them easily. We provided sockets, but you will have to take
the circuit board apart to swap the LED's. Please note that some LED's might be brighter or fainter
than other, and you may need to set the brightness to match them altoghether by adjusting the
corresponding current limiting resistors:
R210 for Relay 1 LED (default Red),
R211 for Relay 2 LED (default Red),
R212 for Effect/Bypass LED (default Green)
R213 for the Midi/Function LED (default Yellow).
Important! When changing visual indication LED's, do not to exceed 16 mAh current consumption
for all LED's altogether. They draw current from a linear voltage regulator with limited amount of
current availability, which also powers everything else onboard. Check LED datasheets first and
adjust current for each LED to match light intensity and current consumption.
Troubleshooting
No LED lights at power up and no sound - Change battery.
Not working when powered with a DC adapter - Verify polarity (center minus). Verify voltage
(9V). If you powered pedal with reverse voltage, the protection diode might be blown and needs to be
replaced (this issue is not covered by warranty). If over voltage was used, the electronics inside could
be damaged (this issue is not covered by warranty).
Not switching amp channels - Verify custom made switching cables and signal compatibility with
you amp. Review Table 1 in the manual for External Switching Relays pattern used.
Page 22
http://midi-overdrive-switcher.becosfx.com
22
Not responding to MIDI commands - Set MIDI Channel to the same one used by transmitting
controller. Restart pedal. Restore to factory defaults.
Not sending MIDI commands - Verify pedal MIDI Channel to be the same as the one used by the
receiving device.
MIDI commands are conflicting - Verify if you use MIDI PC and CC commands, that are
conflicting. Be sure to not send more than one CC number from the supported ones (review Table 3
in the manual). Try to set a dedicated MIDI Channel for each MIDI device (do not use 0=OMNI
because commands intended to other devices might be interpreted by the pedal).
MIDI response has some latency - Set a dedicated receiving MIDI Channel for pedal. Try to
program transmitted presets with less MIDI messages. For example, if you only intend to use three
CC commands within a preset, be sure your controller does not transmit more of them; deactivate the
ones not used.
MIDI commands are bursting - If you send commands from controller too fast, this is possible. Try
to leave at leaset one second betwin the commands sent..
Last state (issued with MIDI) is not recalled on power up - MIDI commands may contain in fact a
packets of commands and the pedal only recalls the very last MIDI command from that series. Resend the MIDI command (preset) from the controller to put the pedal in the desired state.
Warranty Card
 Loading...