

Page 1
80-1103-00
Rev. 01.1
MODELS
R
INSTRUCTION MANUAL
11-1_9
11-2_9
11-3_9
11-4_9
ELECTRIC ACTUATORS FOR INDUSTRIAL PROCESS CONTROL
1
Page 2
INTRODUCTION TO THE MANUAL
This manual contains the information needed to
install, operate and maintain Beck Model Group 11
Electronic Control Drives equipped with the Digital
Control Module (DCM-2), manufactured by Harold
Beck & Sons, Inc. of Newtown, Pennsylvania.
IMPORT ANT : This manual contains information
that will make installation simple, efficient and
trouble-free. Please read and understand the
appropriate sections in this manual before
attempting to install or operate your drive.
This manual also applies to Group 11 & 11E
hazardous location drives and, with such
orders, is provided along with Beck Manual
Supplement 80-1100-14.
The Beck Group 11 fills an industry need for
a reliable electronic control drive. Exceptionally
stable and trouble-free, these rotary drives are
in use throughout the world in valve and damper
applications.
The Group 11 drive is a powerful control
package designed to provide precise position
control of dampers, valves, fluid couplings and
other devices requiring up to 1,800 lb-ft (2 440 N•m)
of drive torque.
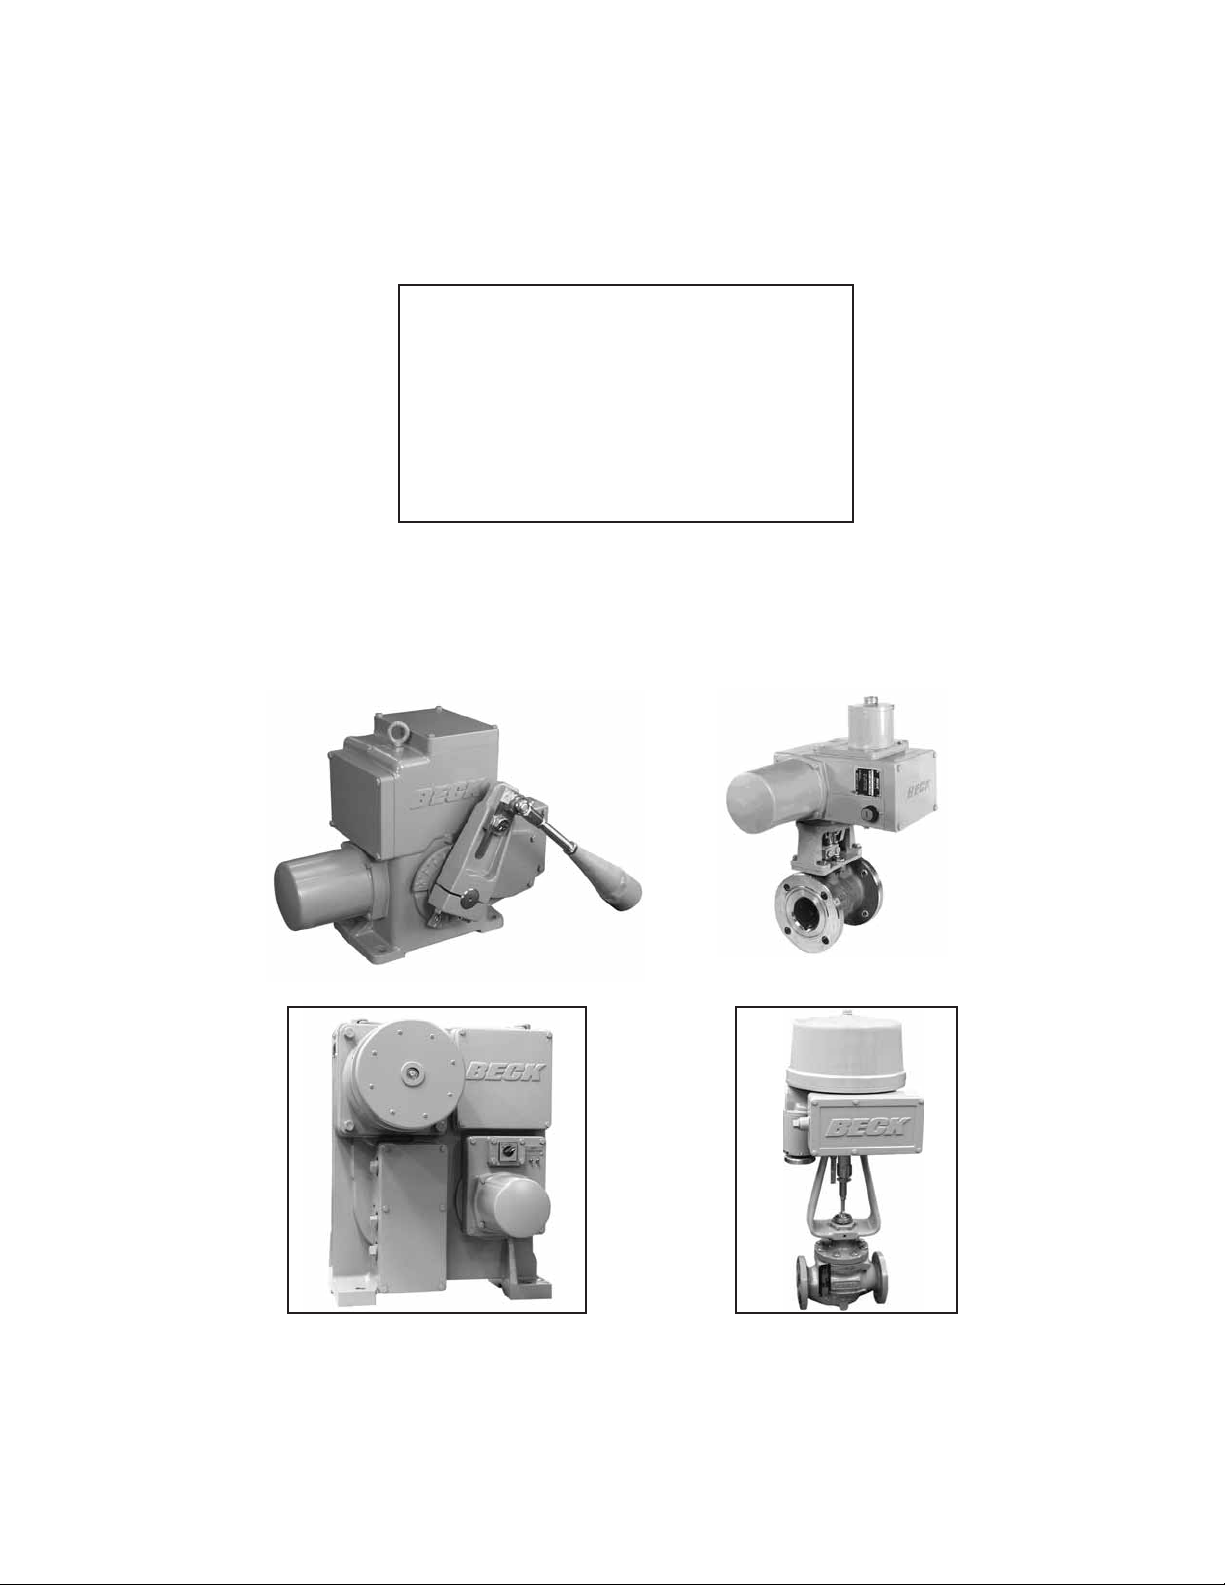
Group 22 digital control drives
... are designed for accurate,
reliable, digital control in high torque
applications. The drive is ideal for
use in large boiler applications, such
as ID/FD fan dampers.
Group 14 linear drives ...
are ideally suited for globe
valves from 1” to 8” (25 to
203 mm) diameter. Beck’s
unique “Tight-Seater™”
coupling provides positive
seating of valves.
2
Page 3

CONTENTS
Product Description ................................................................................................................................... 4
General Specifications ............................................................................................................................. 6
Outline Dimension Drawings .................................................................................................................... 8
Installation ................................................................................................................................................. 15
Signal Wiring .......................................................................................................................................... 17
Start-up .................................................................................................................................................. 18
Operation ................................................................................................................................................... 20
Digital Control Module (DCM-2) ............................................................................................................... 22
DCM-2 Local Interface
Operation ............................................................................................................................................ 23
Calibration ........................................................................................................................................... 25
Switches .......................................................................................................................................... 26
Demand ........................................................................................................................................... 28
Position ............................................................................................................................................ 30
Direction Change ............................................................................................................................. 31
Troubleshooting .................................................................................................................................. 32
®
DCM-2 HART
Communication ................................................................................................................................... 34
Configuration and Setup ..................................................................................................................... 44
Calibration ........................................................................................................................................... 50
Switches .......................................................................................................................................... 52
Position ............................................................................................................................................ 54
Feedback ......................................................................................................................................... 56
Demand ........................................................................................................................................... 57
Torque Measurement ....................................................................................................................... 58
Maintenance
Alarm Messages .............................................................................................................................. 59
Troubleshooting ............................................................................................................................... 62
DCM-2 Serial Interface
Setup .................................................................................................................................................. 66
Commands ......................................................................................................................................... 67
Command Error Codes ....................................................................................................................... 73
Interface
Maintenance
Routine ................................................................................................................................................... 74
Component Replacement ...................................................................................................................... 75
Appendix
Spare Parts ............................................................................................................................................ 79
Components ........................................................................................................................................... 80
Index ........................................................................................................................................................... 86
Services ...................................................................................................................................................... 87
HART® is a registered trademark of the Hart Communication Foundation.
3
Page 4
PRODUCT DESCRIPTION
Beck control drives are engineered for precise,
reliable operation of dampers, quarter-turn valves
and fluid drives. The cool, stable operation of
Beck’s control motors coupled with the powerful
gear train provide the tight, responsive control
required by modern control loops to optimize output
while keeping operating costs low.
The unique all spur gear construction used in
the Beck control drive is designed for long term
durability. Gear modules and motors can be
interchanged in the field to alter the torque and
timing as needed if the application requirements
change. Mechanical stops in the gear train prevent
overtravel.
An easy to turn, spoke-free Handwheel is
incorporated into the design to allow manual
operation during installation or power outages.
The Handwheel can be used to move dampers and
valves to any position smoothly and easily under
full load conditions.
Dampers and valves may also be operated
at their individual locations with built-in electric
Handswitches.
The heavy-duty crank arm (if applicable) of
these control drives can be field-adjusted to travel
anywhere in the 360° range. The forged rod end
fitting may be field-adjusted to any point in the cast
slot of the crank arm. Special linkage arrangements
allow total application versatility for connection
directly on or remote from the driven load.
Beck’s Digital Control Module (DCM-2)
provides precise drive control in response to a
modulating Demand input signal. It also provides
intelligent calibration, easy drive setup changes,
and diagnostic information. A local interface
provides quick pushbutton setup and diagnostics
without the need for a handheld or remote device.
A HART
remote access of all features and information. A
serial interface also allows for drive configuration
changes, drive information reporting and to assist
in troubleshooting.
Beck’s CPS-2 Contactless Position Sensor
provides accurate position measurement in
demanding environmental conditions, with
no contacting or wiping surfaces to wear or
intermittently lose contact. The CPS-2 provides
infinite resolution with linearity error of less than
±1% of span over full control drive travel.
Beck electronic control drives are designed
with individual weatherproof enclosures to protect
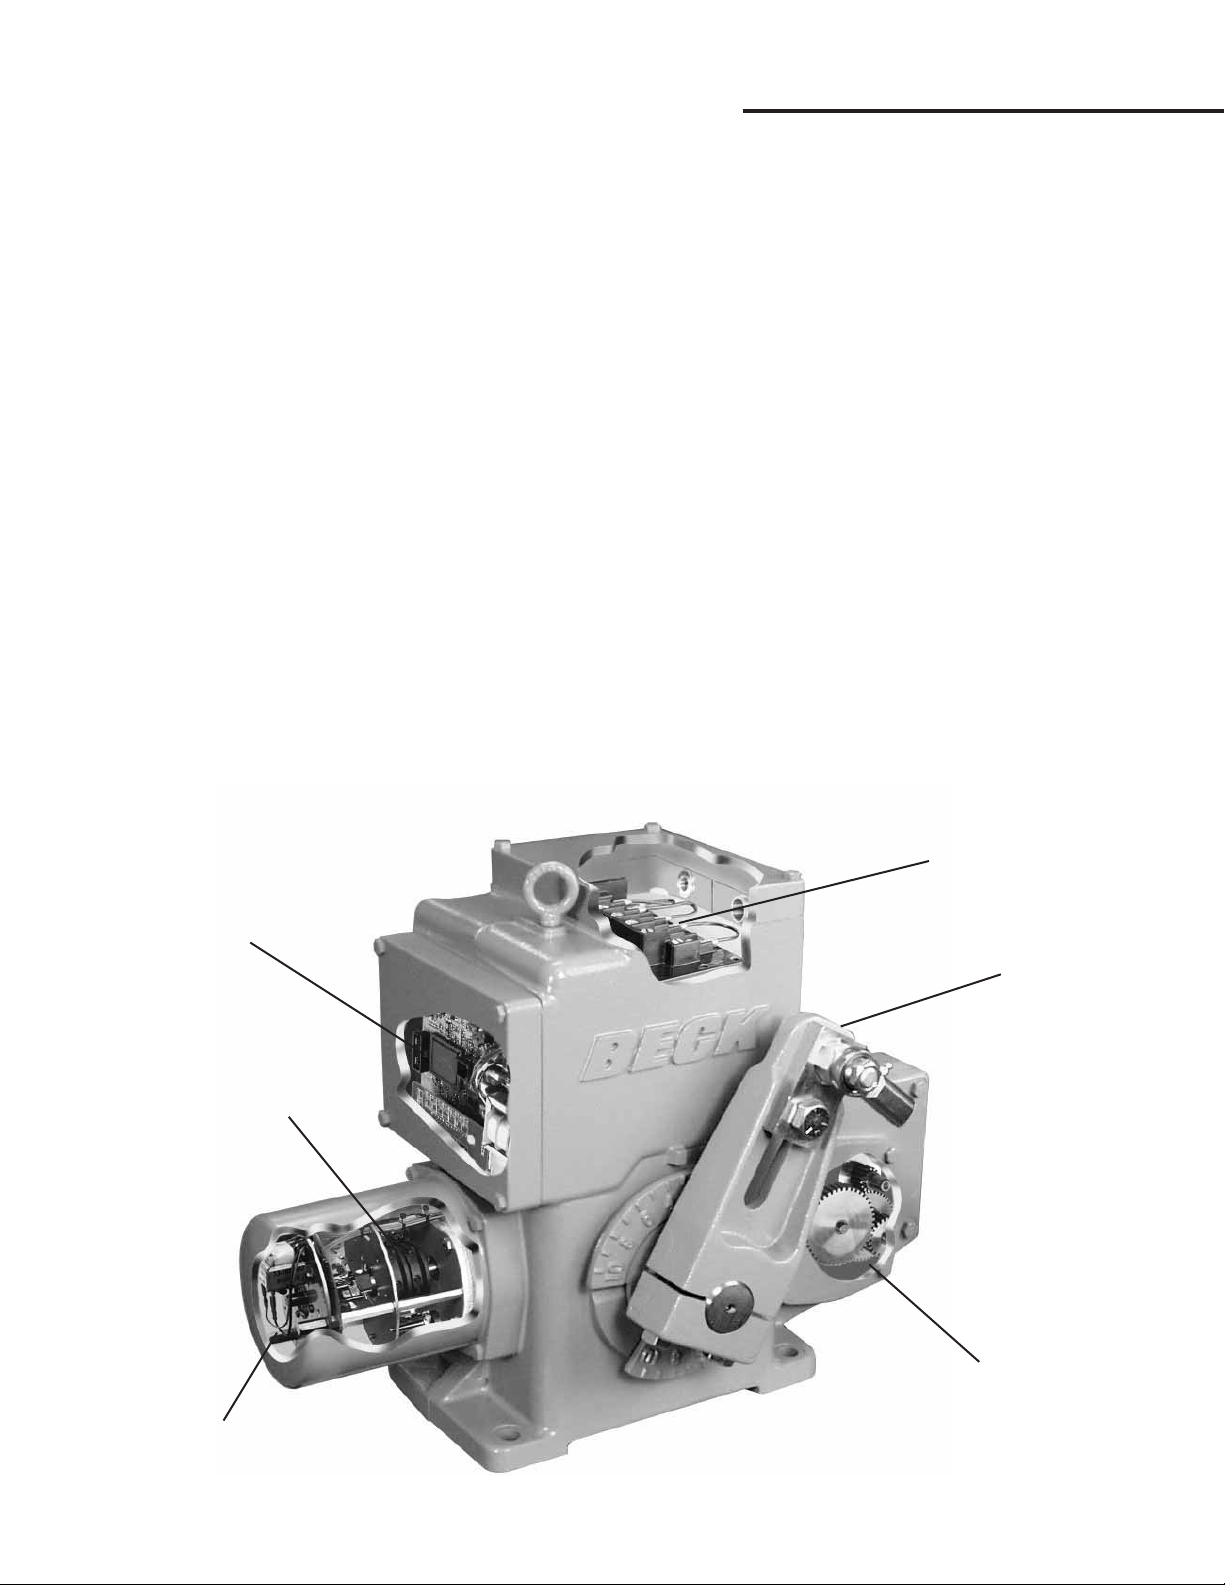
the main components. The cutaway illustration
below is intended to provide the user with a basic
orientation to the product.
®
communications interface allows
DIGITAL CONTROL MODULE
(DCM-2)
OVER-TRAVEL
LIMIT AND AUXILIARY
SWITCHES
WIRING TERMINAL BLOCK
CRANK ARM / LINKAGE
GEAR TRAIN AND
MOTOR HOUSINGS
POSITION SENSING
DEVICE
4
Page 5
TYPICAL APPLICATIONS
Beck control drives are ideally suited for use on
ball, plug and butterfly valves, as well as dampers
and fluid drives. When equipped with a sheave
and multi-turn option (consult your Beck Sales
Engineer for details), the drive can be used to raise
and lower a weight-balanced damper.
DCM-2 equipped Beck drives are designed for
precise position control in modulating applications.
The drive is best utilized when its full travel is
employed to achieve its greatest sensitivity and
resolution, although the driven device may operate
through a considerably smaller range. Beck drives
can be configured with special linkage to deliver
greater torque where needed, so that drive size
and resultant cost can be minimized.
Valves can be furnished by Beck as unitized
assemblies with control drives mounted and
tested in the factory. Depending on the valve
and application, valves can be mounted directly
or using a bracket and linkage. Also, drives may
be installed in the field with mounting hardware
furnished by Beck or the customer. Drives for
dampers are generally installed at the site on a
mounting platform separate from the damper.
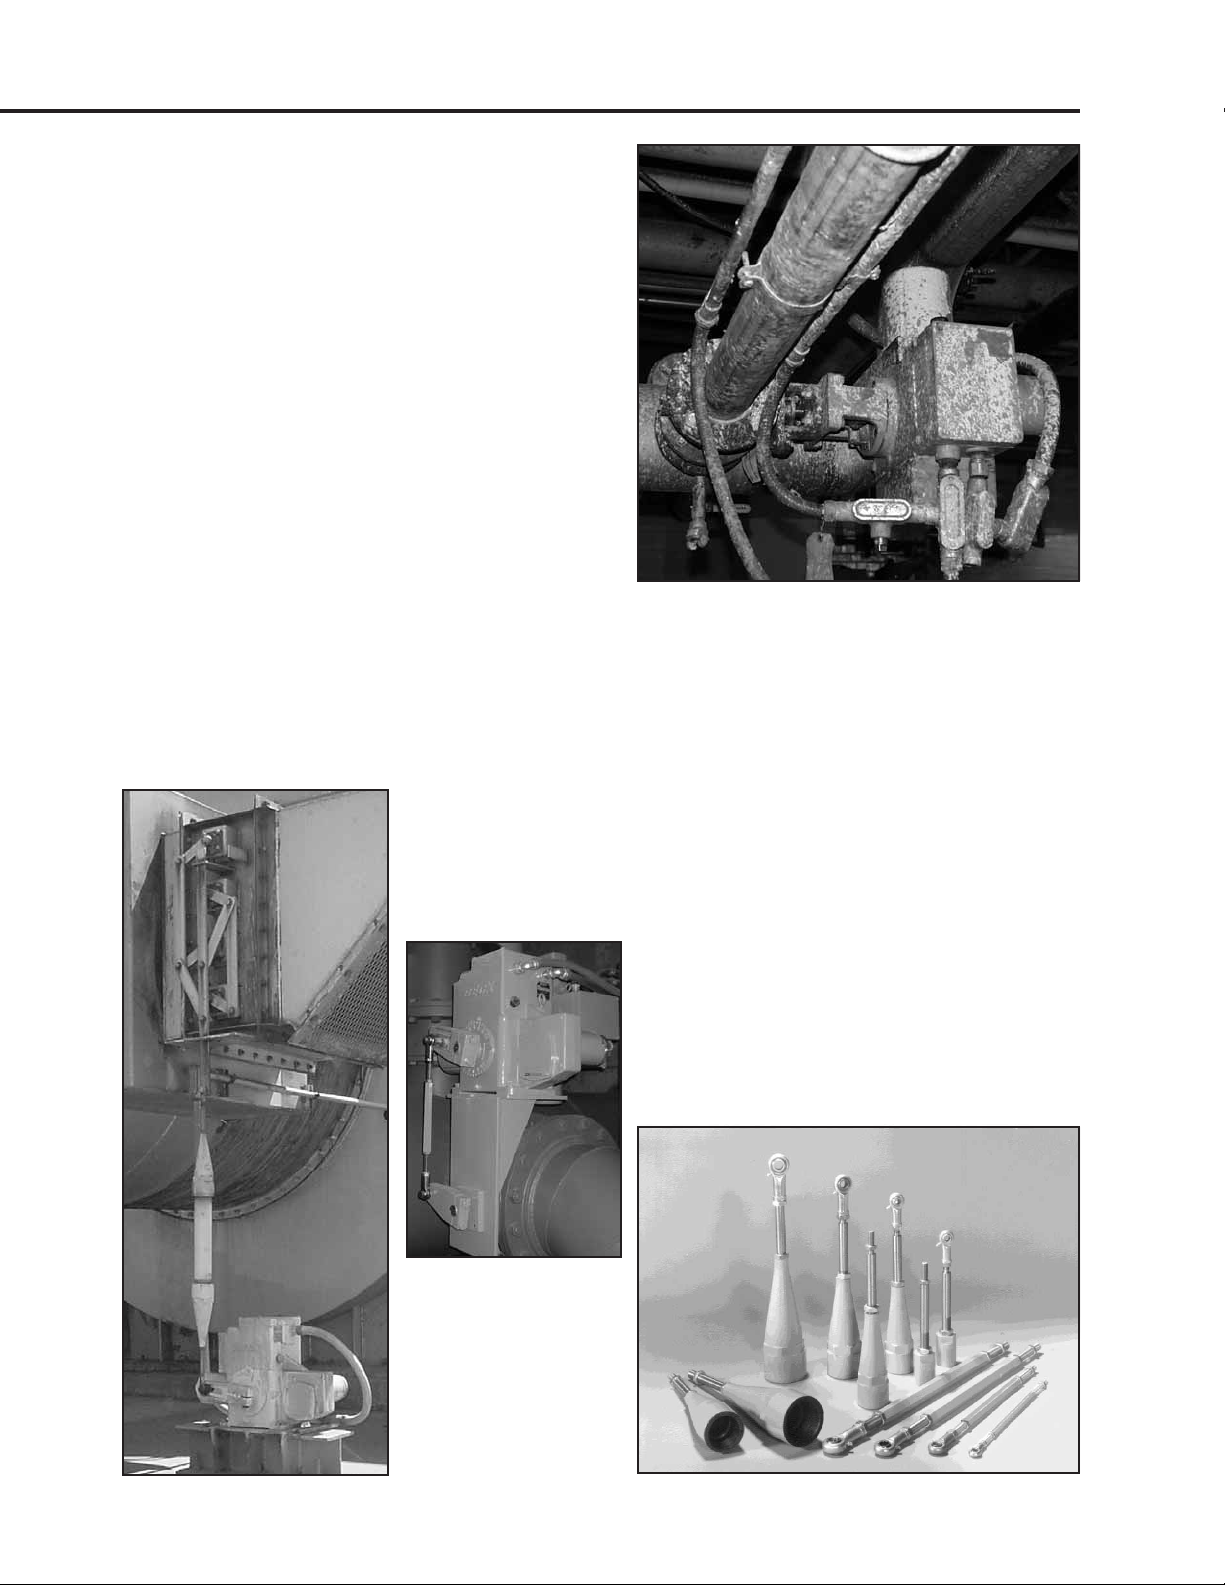
BECK LINKAGE KITS
Beck hex and pipe linkage kits are available
for completing the mechanical connection from the
drive crank arm to the load. Through the use of a
standardized selection, the linkage can be ordered
even if the exact length is not determined until the
drive and driven device are installed.
All Beck foot-mounted drives are furnished
with a crank arm and rod end (see pages 8, 10
and 13 for dimensions). All rod ends furnished
by Beck incorporate bearings to accommodate
some lateral misalignment. Once the connection
is made, linkage kits can be adjusted ±1 1/2”
(38 mm) without removal of the crank arm or load
lever, making final mechanical calibration simple.
5
Page 6
PRODUCT DESCRIPTION
GENERAL SPECIFICATIONS—ALL MODELS
Drive Power 120 V ac single-phase 50 or 60 Hz Allowable Tolerance +10%
240 V ac single-phase 50 or 60 Hz -15%
Max. Current and Power
Model 120 V ac 240 V ac
11-159, -169 .40 A 48 W .20 A 48 W
11-209, -269 .65 A 78 W .33 A 78 W
11-309, -369 .65 A 78 W .33 A 78 W
11-409, -469 3.10 A 400 W 1.55 A 400 W
Operating Conditions -40° to 185°F (-40° to 85°C)
0 to 100% relative humidity
Communication Interface HART protocol (Rev. 5 -- burst mode is not supported), local pushbutton/
LED panel and RS-232 Serial commands.
Demand input Signal Options 4–20 mA (1–5 V dc input is possible with the removal of the "R11"
(DCM-2) resistor located on the DCM-2 board (see diagram on page 78).
Adjustability for Split Range 0%: 0.1 V to 4 V dc
Operation 100%: 0% + 1 V min. to 5 V max.
Step Size 0.15% typical (configurable).
Linearity ±1% of span, max. independent error
Hysteresis 0.25% of span at any point
Demand input Signal Linear: Drive output shaft moves proportionally to the input signal.
Characterization Square: Drive output shaft moves proportionally to the square of the
input signal.
Custom: Drive output shaft moves according to the custom demand
response curve.
Position Feedback Signal 4–20 mA
for Remote Indication
Isolation Demand input and position Feedback signals are isolated from ground
and the ac power line. Signal buffering provides 24 V dc isolation
between the Demand and Feedback signals.
Action on Loss of Power Stays in place
Action on Loss of Input Stays in place or drives to any preset position (configurable).
Signal (Power On)
Stall Protection If the motor tries to run in one direction for more than 300 seconds
(Optional) (configurable from 30 to 300 seconds), the DCM-2 will shut off power
to the motor (feature can be enabled/disabled).
6
Page 7

GENERAL SPECIFICATIONS—ALL MODELS (cont’d)
Overtorque Protection If the output torque of the drive exceeds 150% (adjustable from 70%
(Optional) to 150%) of the drive rating, the motor will shut off (feature can be
enabled/disabled).
Alarm Annunciation Available at terminal E.
Temperature Indication Measures the internal temperature of the drive and triggers an alarm
when the temperature exceeds the rating range.
Over-travel Limit Switches Two SPDT (CW and CCW) provide over-travel protection.
Auxiliary Switches Up to four 6 A, 120 V ac switches available.
Switches are labeled S1 to S4 and are cam-operated, field-adjustable.
Unless otherwise specified, auxiliary switches are factory set:
S1 and S4 are set to operate just before reaching the CCW travel limit.
S2 and S3 are set to operate just before reaching the CW travel limit.
Handswitch Permits local electrical operation, independent of controller signal.
Standard on all units. An auxiliary contact is available for auto
indication (rated 2.5 A at 120 V ac).
Handwheel Provides manual operation without electrical power.
Motor 120 V ac, single-phase, no-burnout, non-coasting motor has instant
magnetic braking. Requires no contacts or moving parts.
Gear Train High-efficiency, precision-cut, heat-treated alloy steel and ductile iron
spur gears. Interchangeable gear modules permit field change of
timing.
Mechanical Stops Prevent overtravel during automatic or manual operation.
Enclosure Precision-machined, aluminum alloy castings painted with corrosion-
resistant polyurethane paint provide a rugged, dust-tight, weatherproof
enclosure. Drives designed for hazardous classified locations are also
available. NEMA 4X; IP68, 3 meters/48 hours*.
*Internal water damage is not covered by warranty.
Mounting Orientation Any orientation—no limitations.
Standards* UL Listed
CSA Listed
CE Compliant
*NOTE: For standards not specifically listed, please call Beck for more information at 215-968-4600.
7
Page 8
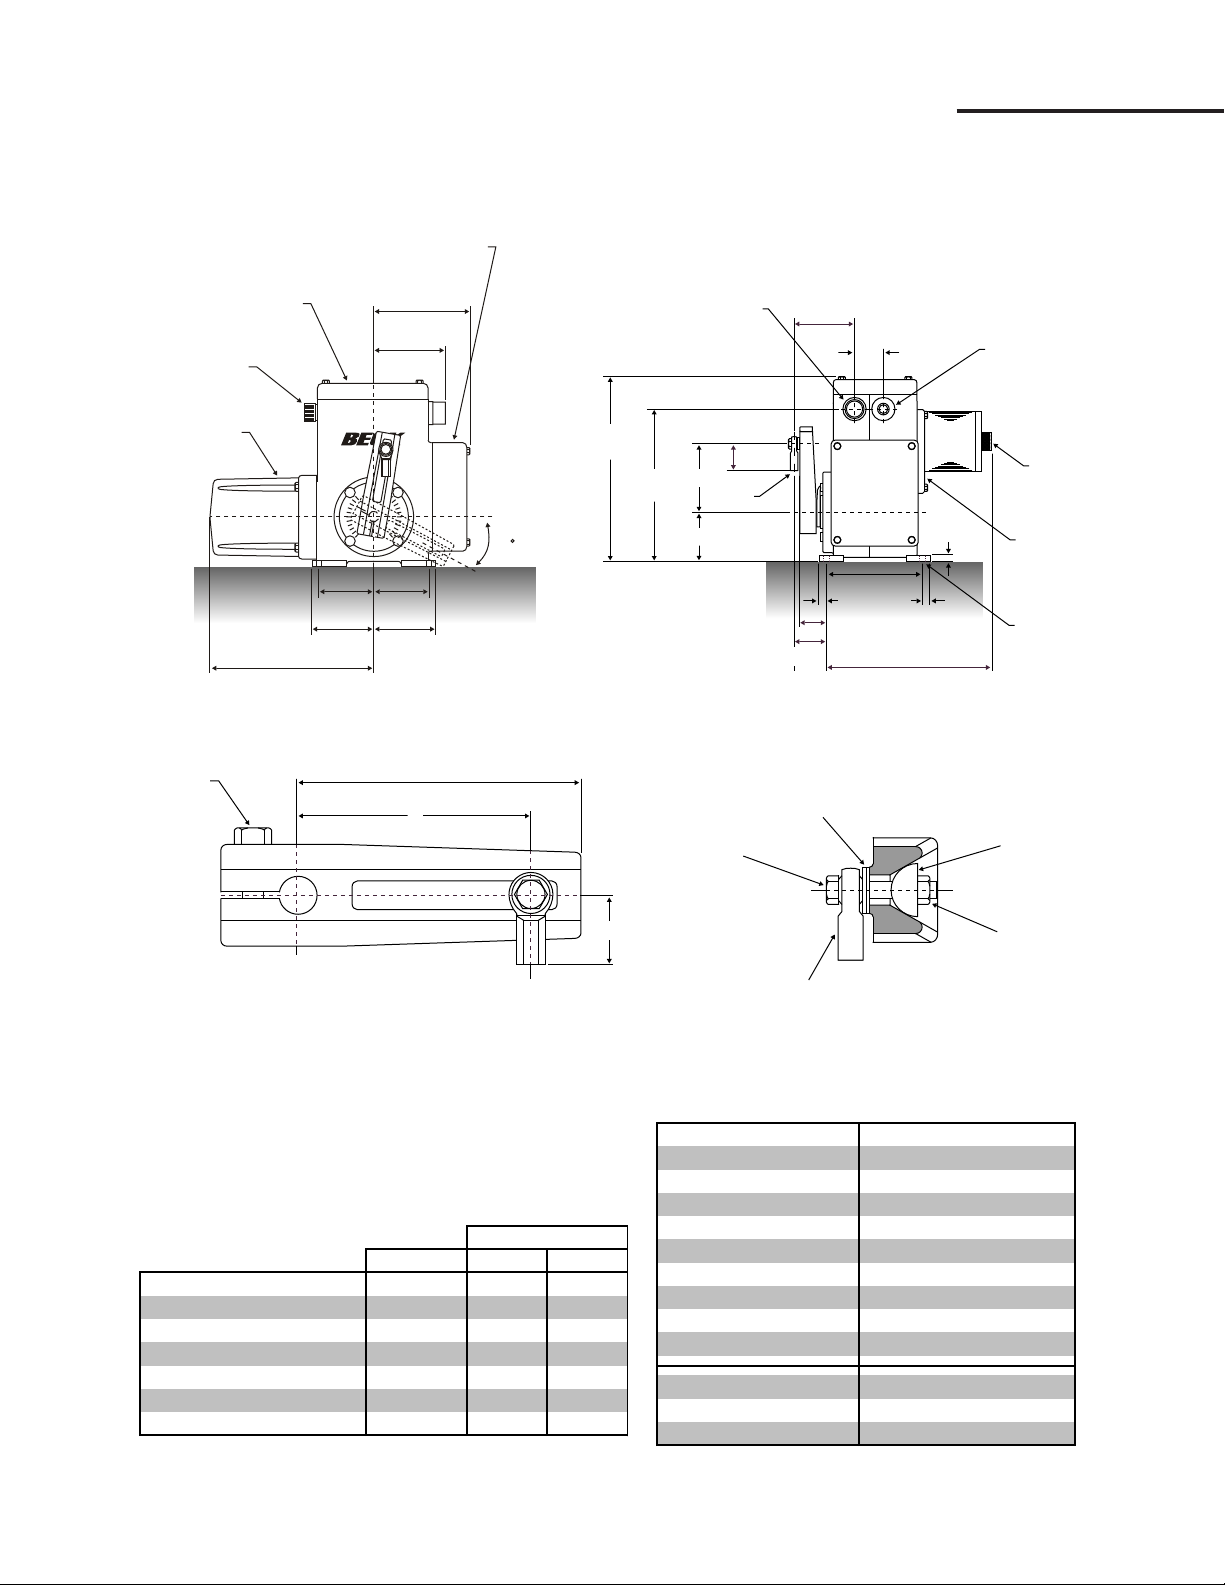
OUTLINE DIMENSION DRAWINGS
6
8
10
4
2
0
1
0
8
6
4
2
0
51/4"
(133 mm)
67/8"
(175 mm)
4"
(102 mm)
34
COVER, DIGITAL
CONTROL MODULE
(ALLOW 4" (102 mm)
FOR REMOVAL)
COVER,
TERMINAL BLOCK
EXTERNAL WIRING
COVER, POSITION
SENSING DEVICES
41/2"
(114 mm)
41/2"
(114 mm)
4"
(102 mm)
11 1/2" (292 mm) MAX.
(ALLOW 6" (152 mm)
FOR REMOVAL)
HANDSWITCH
41/4"
(108 mm)
1" N.P.T.
CONDUIT,
POWER
CONNECTION
2 3/16"
(56 mm)
1/2" N.P.T.
CONDUIT,
SIGNAL
CONNECTION
HANDWHEEL
GEAR MODULE /
MOTOR ASSEMBLY
1/2"
(13 mm)
13/32" (10 mm) DIA.
(4) HOLES
1/2" (13 mm)
7"
(178 mm)
1 3/4" (45 mm)
2 1/4" (57 mm)
LINKAGE C
L
11 3/4" (298 mm) MAX.
(ALLOW 4" (102 mm)
FOR REMOVAL)
3 9/16" (90 mm)
R
L
T
13 1/2"
(343 mm)
11 1/16"
(281 mm)
Crank Arm Assembly 10-3491-05
Crank Arm 10-3491-02
Crank Arm Bolt 30-0306-56
Washers (2) 30-0313-03
Wedge 11-8060-02
Rod End Bolt 30-0306-56
Rod End Lock Nut 30-0309-11
Rod End 12-2840-02
Dim. "L" (Length) 2.125" (54 mm)
Dim. "T" (Thread) 1/2-20 x 1-1/8" (29 mm)
Output Shaft Dia. 3/4" (19 mm)
Approx. Weight 50 lbs (23 kgs)
Max. Overhung Load 750 lbs (340 kgs)
Torque
Size (in.) (lb-ft) (N•m)
Crank Arm Bolt 1/2-13 75 102
Rod End Bolt 1/2-13 35 47
Rod End Lock Nut 1/2-13 55 75
Cover Bolts 5/16-18 10 14
Motor/Gear Module Bolts 1/4-20 6 8
Body Bolts 5/16-18 10 14
Body Bolts 3/8-16 20 27
MODEL 11-159 SPECIFICATIONS
CRANK ARM
BOLT
ADJUSTABLE RADIUS "R" 1 1/2" (38 mm) TO 5 1/8" (130 mm)
Recommended Bolt Torques
6"
(152 mm)
R
8
NOTE: All dimensions subject to change.
Crank Arm
L
Model 11-159 Linkage Part Numbers &
ROD END BOLT
Model Information
WASHERS (2)
WEDGE
ROD END
LOCK NUT
ROD END
Page 9
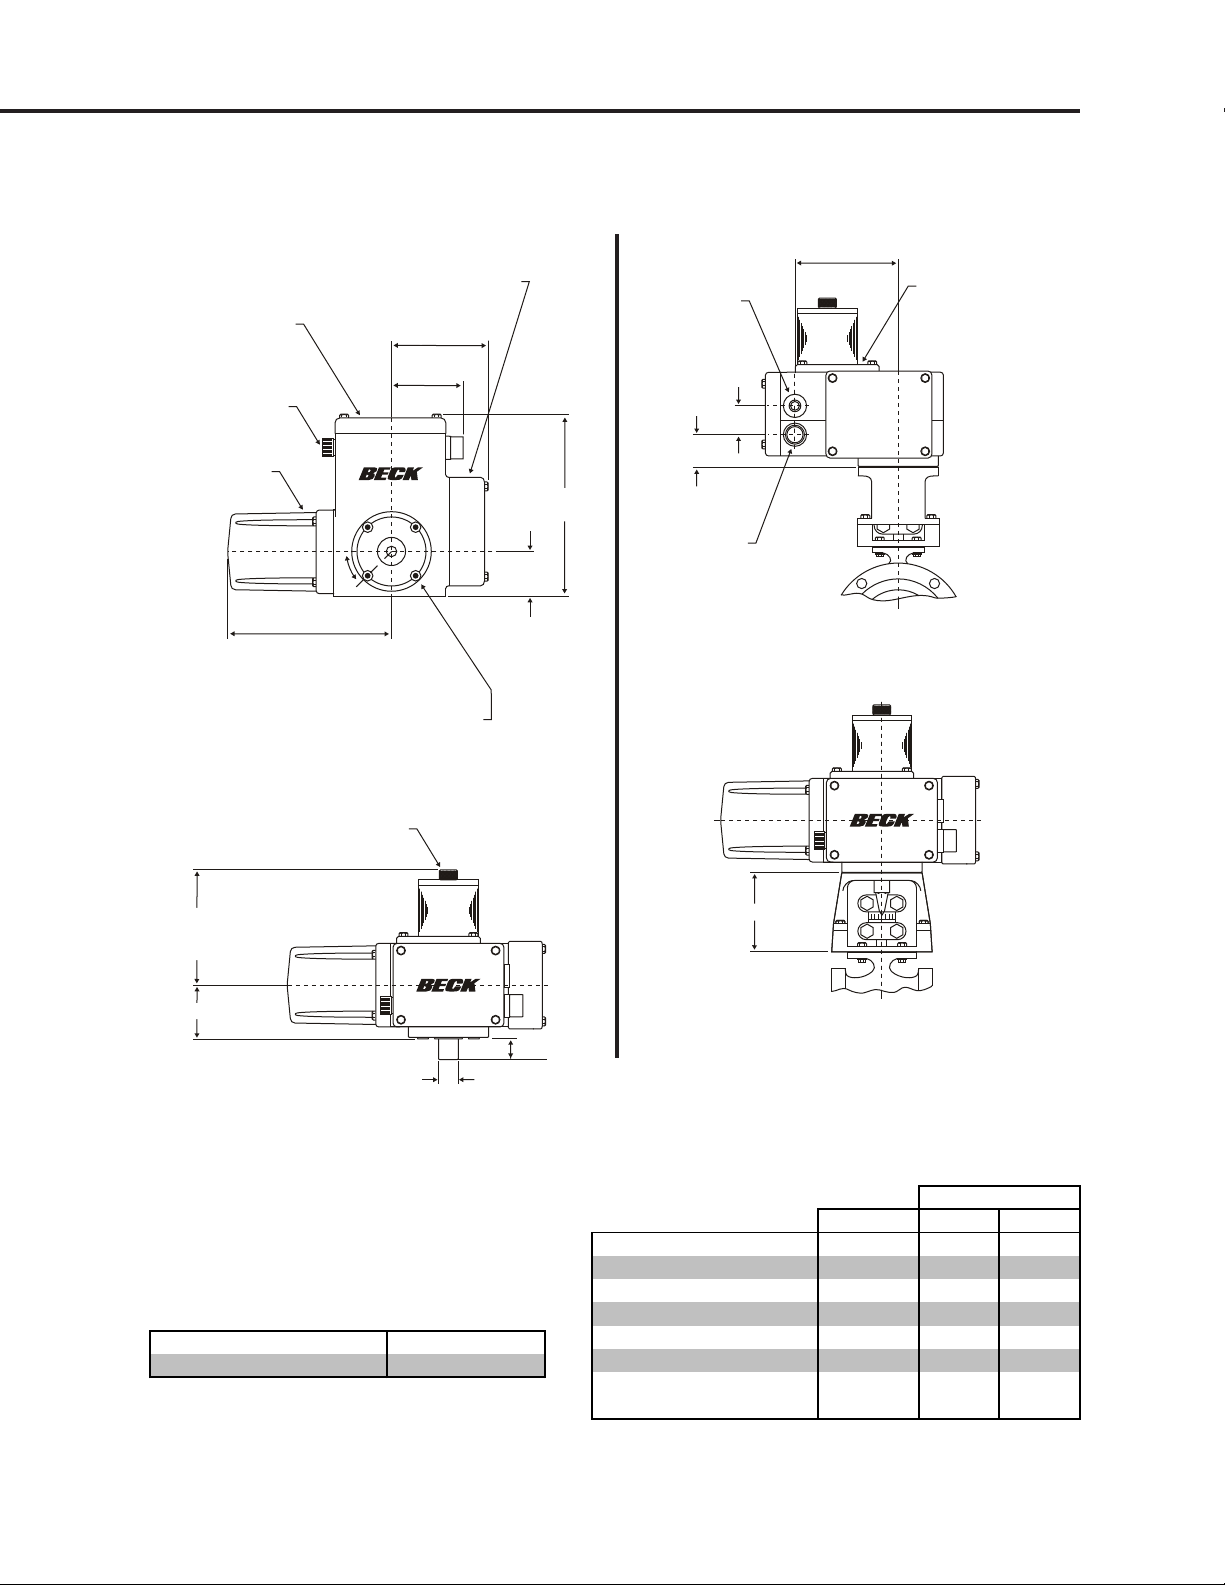
MODEL 11-169 SPECIFICATIONS
Approximate Weight 56 lbs. (25 kg)
Maximum Overhung Load 750 lbs. (340 kg)
Torque
Size (in.) (lb-ft) (N•m)
Cover Bolts 5/16-18 10 14
Motor/Gear Module Bolts 1/4-20 6 8
Body Bolts 5/16-18 10 14
Body Bolts 3/8-16 20 27
Control End Cover Bolts 5/16-18 10 14
Coupling Bolts 3/8-24 50* 68*
Mounting Bracket Screws 3/8-16 25 34
(Flat Head)
TERMINAL BLOCK
COVER,
EXTERNAL WIRING
HANDSWITCH
COVER, POSITION
SENSING DEVICES
11 1/2" (292 mm) MAX.
(ALLOW 6" (152 mm)
COVER, DIGITAL
CONTROL MODULE
(ALLOW 4" (102 mm)
FOR REMOVAL
67/8"
(175 mm)
51/4"
(133 mm)
45°
FOR REMOVAL)
MOUNTING HOLES
3/8-16 UNC-2B x 1/2" (13 mm) DEEP
(4) HOLES EQUALLY SPACED
ON A 5" (127 mm) DIA. B.C.
HANDWHEEL
(337 mm)
31/4"
(83 mm)
13 1/4"
1/2" N.P.T.
CONDUIT,
SIGNAL
CONNECTION
23/16"
(56 mm)
27/16"
(62 mm)
1" N.P.T.
CONDUIT,
POWER
CONNECTION
71/2"
(191 mm)
GEAR MODULE /
MOTOR ASSEMBLY
8 1/4" (210 mm) MAX.
(ALLOW 4" (102 mm)
FOR REMOVAL)
3 7/8" (98 mm)
3/4" (19 mm) OR 1 1/2" (38 mm) DIA.
+.001" (.03 mm)
–.000
BASIC CONTROL DRIVE
Model Information
NOTE: All dimensions subject to change.
1 15/32
(37 mm)
4 7/16" (113 mm)
TYPICAL VALVE MOUNTING
Recommended Bolt Torques
*May vary per application. Refer to valve mounting specification
sheet shipped with your drive.
9
Page 10
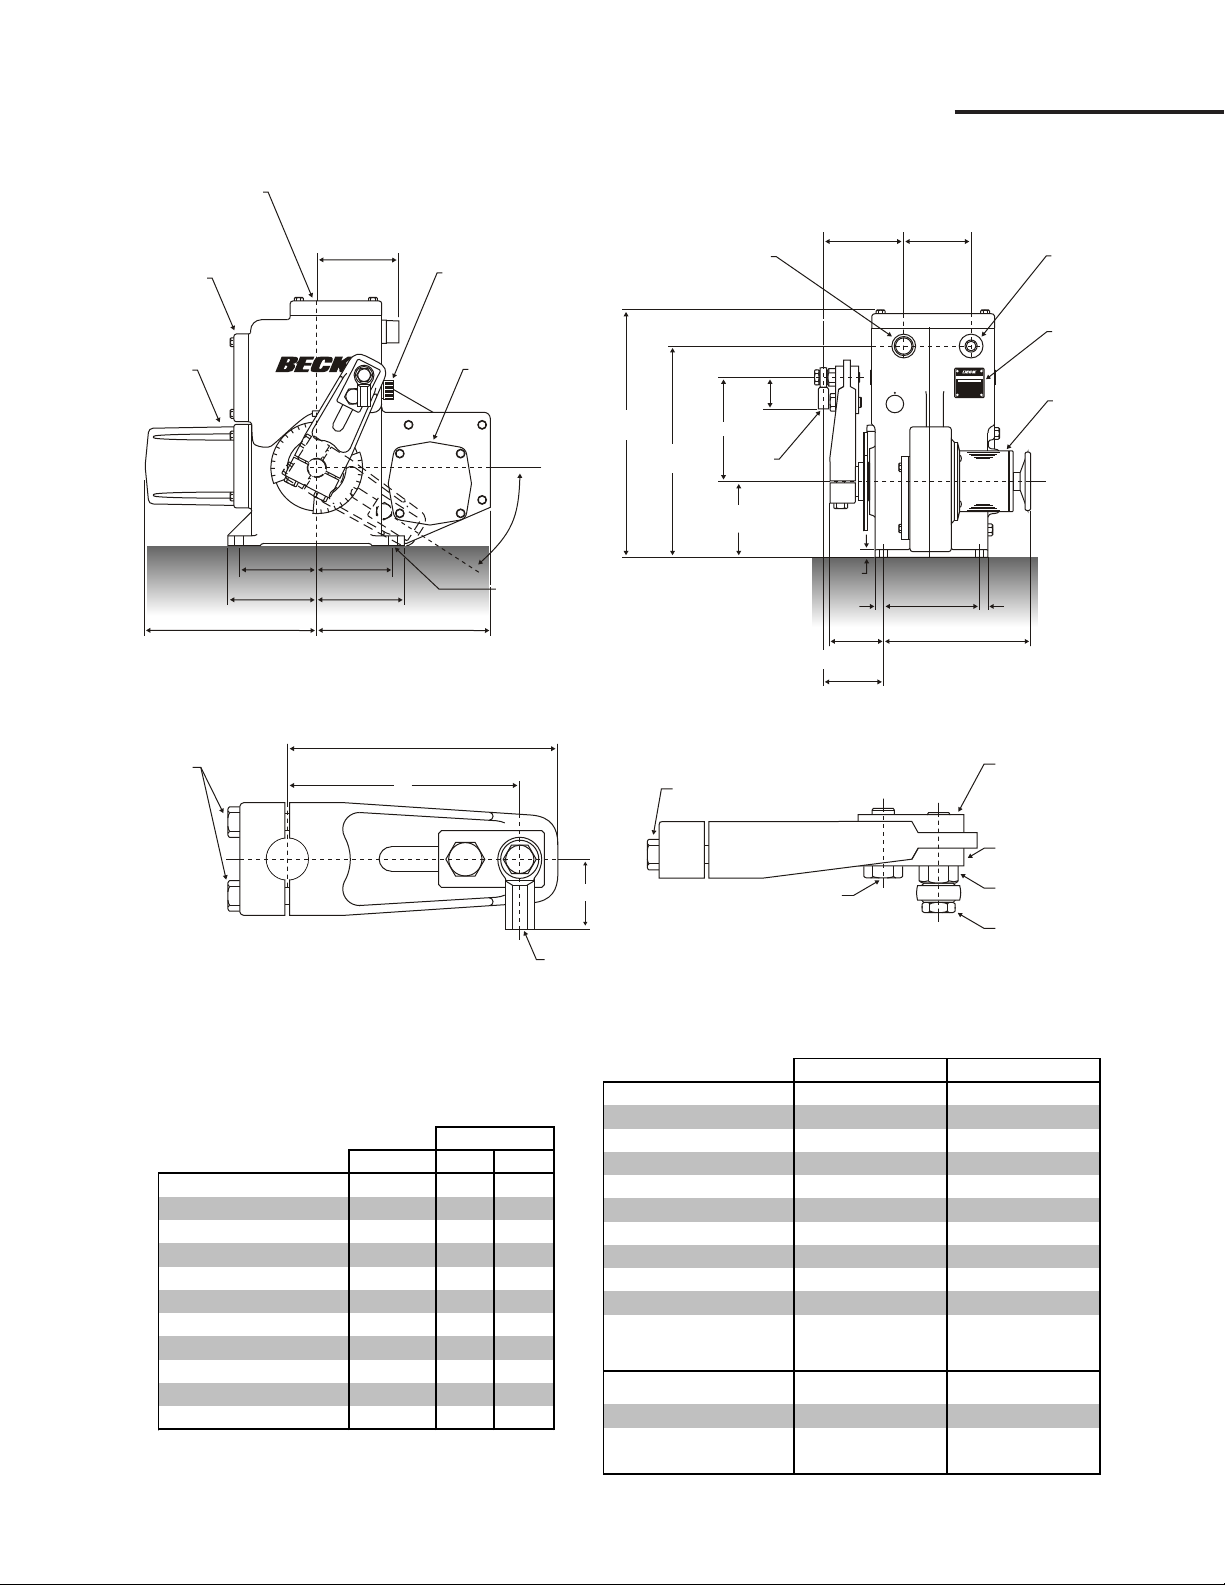
OUTLINE DIMENSION DRAWINGS
NUT PLATE
CLAMP PLATE
CRANK PIN / STUD
ROD END LOCK NUT
CRANK PIN BOLT
CRANK ARM BOLT (2)
AUX.SWITCHRATING:
10A240 Vac
1" N.P.T.
CODUIT,
POWER
CONNECTION
6 7/32"
(158 mm)
4 25/32"
(121 mm)
1/2" N.P.T.
CONDUIT,
SIGNAL
CONNECTION
NAMEPLATE
MOTOR
T
18"
(457 mm)
15 1/2"
(394 mm)
L
R
55/8"
(143 mm)
61/2"
(165 mm)
3/4"
(19 mm)
3/4"
(19 mm)
7/8"
(22 mm)
41/4"
(108 mm)
11 1/4" (286 mm) MAX.
(ALLOW 3" (76 mm)
FOR REMOVAL)
43/4"
(121 mm)
LINKAGE C
L
10
1
0
2
2
4
4
6
6
8
8
0
0
COVER,
TERMINAL BLOCK
EXTERNAL WIRING
COVER,
DIGITAL
CONTROL
MODULE
COVER,
POSITION
SENSING
DEVICES
HANDSWITCH
GEAR MODULE
ASSEMBLY
61/16"
(154 mm)
34°
51/2"
(140 mm)
63/8"
(162 mm)
63/8"
(162 mm)
51/2"
(140 mm)
12 3/4"
(324 mm)
12 1/8" (308 mm) MAX.
(ALLOW 6 " (152 mm)
FOR REMOVAL)
11/16" (17 mm) DIA.
(4) HOLES
91/4"
(235 mm)
R
L
ADJUSTABLE RADIUS "R"
3 1/2" (89 mm) TO 8" (203 mm)
ROD END
CRANK
ARM
BOLT (2)
Torque
Size (in.) (lb-ft) (N•m)
Crank Arm Bolt 5/8-18 240 325
Crank Pin Bolt / Stud 3/4-16 300 407
Crank Pin Bolt / Stud 3/4-16 300 407
Rod End lock nut:
(11-209) 1/2-20 35 47
(11-309) 5/8-18 65 88
Body Bolts 3/8-16 20 27
Body Bolts 1/2-13 50 68
Cover Bolts 5/16-18 10 14
Motor Bolts 1/4-20 6 8
Gear Module Bolts 5/16-18 10 14
11-209 11-309
Crank Arm Assembly 14-7330-26 14-8010-34
Crank Arm 14-8008-02 14-8008-01
Crank Arm Bolt (2) 30-0308-75 30-0308-75
Clamp Plate 14-9883-01 14-9883-01
Crank Pin / Stud 14-9920-06 14-9920-07
Crank Pin Bolt 30-0308-61 30-0308-61
Nut Plate 14-9883-02 14-9883-02
Rod End Lock Nut 30-0309-19 30-0309-23
Rod End 12-2840-02 12-2840-03
Dim. "L" (Length) 2 1/8" (54 mm) 2 1/2" (64 mm)
Dim. "T" (Thread) 1/2-20 x 5/8-18 x
1-3/16" (30 mm) 1-1/2" (38 mm)
Output Shaft Dia. 1 1/2" (38 mm) 1 3/4" (44 mm)
Approx. Weight 120 lbs (54 kgs) 125 lbs (57 kgs)
Max. Overhung Load 3,000 lbs 4,500 lbs
(1,361 kgs) (2,041 kgs)
MODEL 11-209 & 11-309 SPECIFICATIONS
Recommended Bolt Torques
10
NOTE: All dimensions subject to change.
Crank Arm
Model 11-209 / -309 Linkage Part Numbers &
Model Information
Page 11
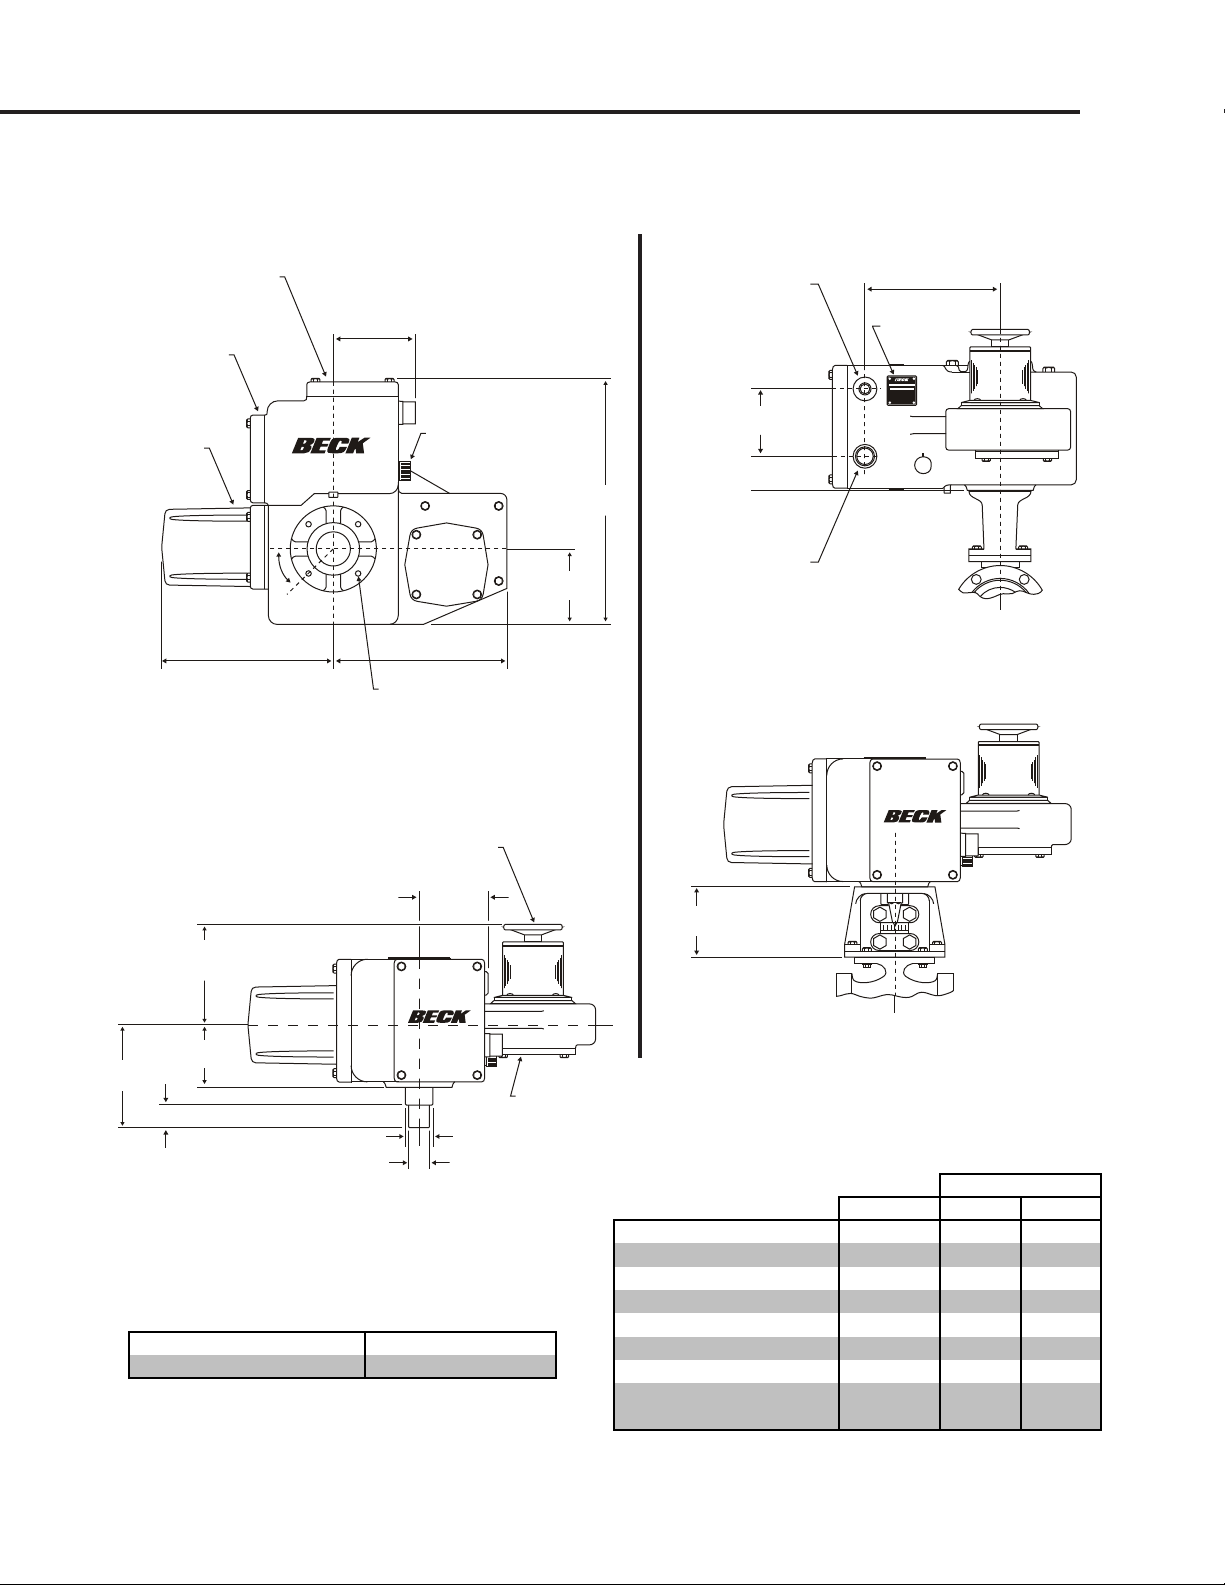
MODEL 11-269 SPECIFICATIONS
Approximate Weight 115 lbs. (52 kg)
Maximum Overhung Load 3,000 lbs. (1 361 kg)
TERMINAL BLOCK
EXTERNAL WIRING
COVER,
DIGITAL
CONTROL
MODULE
COVER,
POSITION
SENSING
DEVICES
12 1/8" (308 mm) MAX.
(ALLOW 6" (152 mm)
FOR REMOVAL)
COVER,
45°
6 1/16"
(154 mm)
HANDSWITCH
12 3/4"
(324 mm)
MOUNTING HOLES
3/8-16 UNC-2B x 3/4" (19 mm) DEEP
(4) HOLES EQUALLY SPACED
ON A 5" (127 mm) DIA. B.C.
(454 mm)
51/2"
(140 mm)
17 7/8"
1/2" N.P.T.
CONDUIT,
SIGNAL
CONNECTION
4 25/32"
(121 mm)
2 21/32"
(67 mm)
1" N.P.T.
CONDUIT,
POWER
CONNECTION
97/8"
(251 mm)
NAMEPLATE
AUX.SWITCHRATING:
10A240 Vac
8" (203 mm) MAX.
(ALLOW 3" (76 mm)
FOR REMOVAL)
47/16"
73/8"
(187 mm)
(113 mm)
1 5/8" (41 mm)
1 1/2" (38 mm) DIA.
+.001" (.03 mm)
–.000
BASIC CONTROL DRIVE
Model Information
NOTE: All dimensions subject to change.
HANDWHEEL
5 1/16"
(129 mm)
GEAR MODULE
ASSEMBLY
1.956" (50 mm) DIA.
+.004" (.1 mm)
–.000
4 7/16" MIN.
(113 mm)
TYPICAL VALVE MOUNTING
Recommended Bolt Torques
Torque
Size (in.) (lb-ft) (N•m)
Cover Bolts 5/16-18 10 14
Gear Module Bolts 5/16-18 10 14
Motor Bolts 1/4-20 6 8
Body Bolts 3/8-16 20 27
Body Bolts 1/2-13 50 68
Control End Cover Bolts 5/16-18 10 14
Coupling Bolts 5/8-18 170* 230*
Mounting Bracket Screws 3/8-16 25 34
(Flat Head)
*May vary per application. Refer to Valve Mounting Specification
sheet shipped with your drive.
11
Page 12
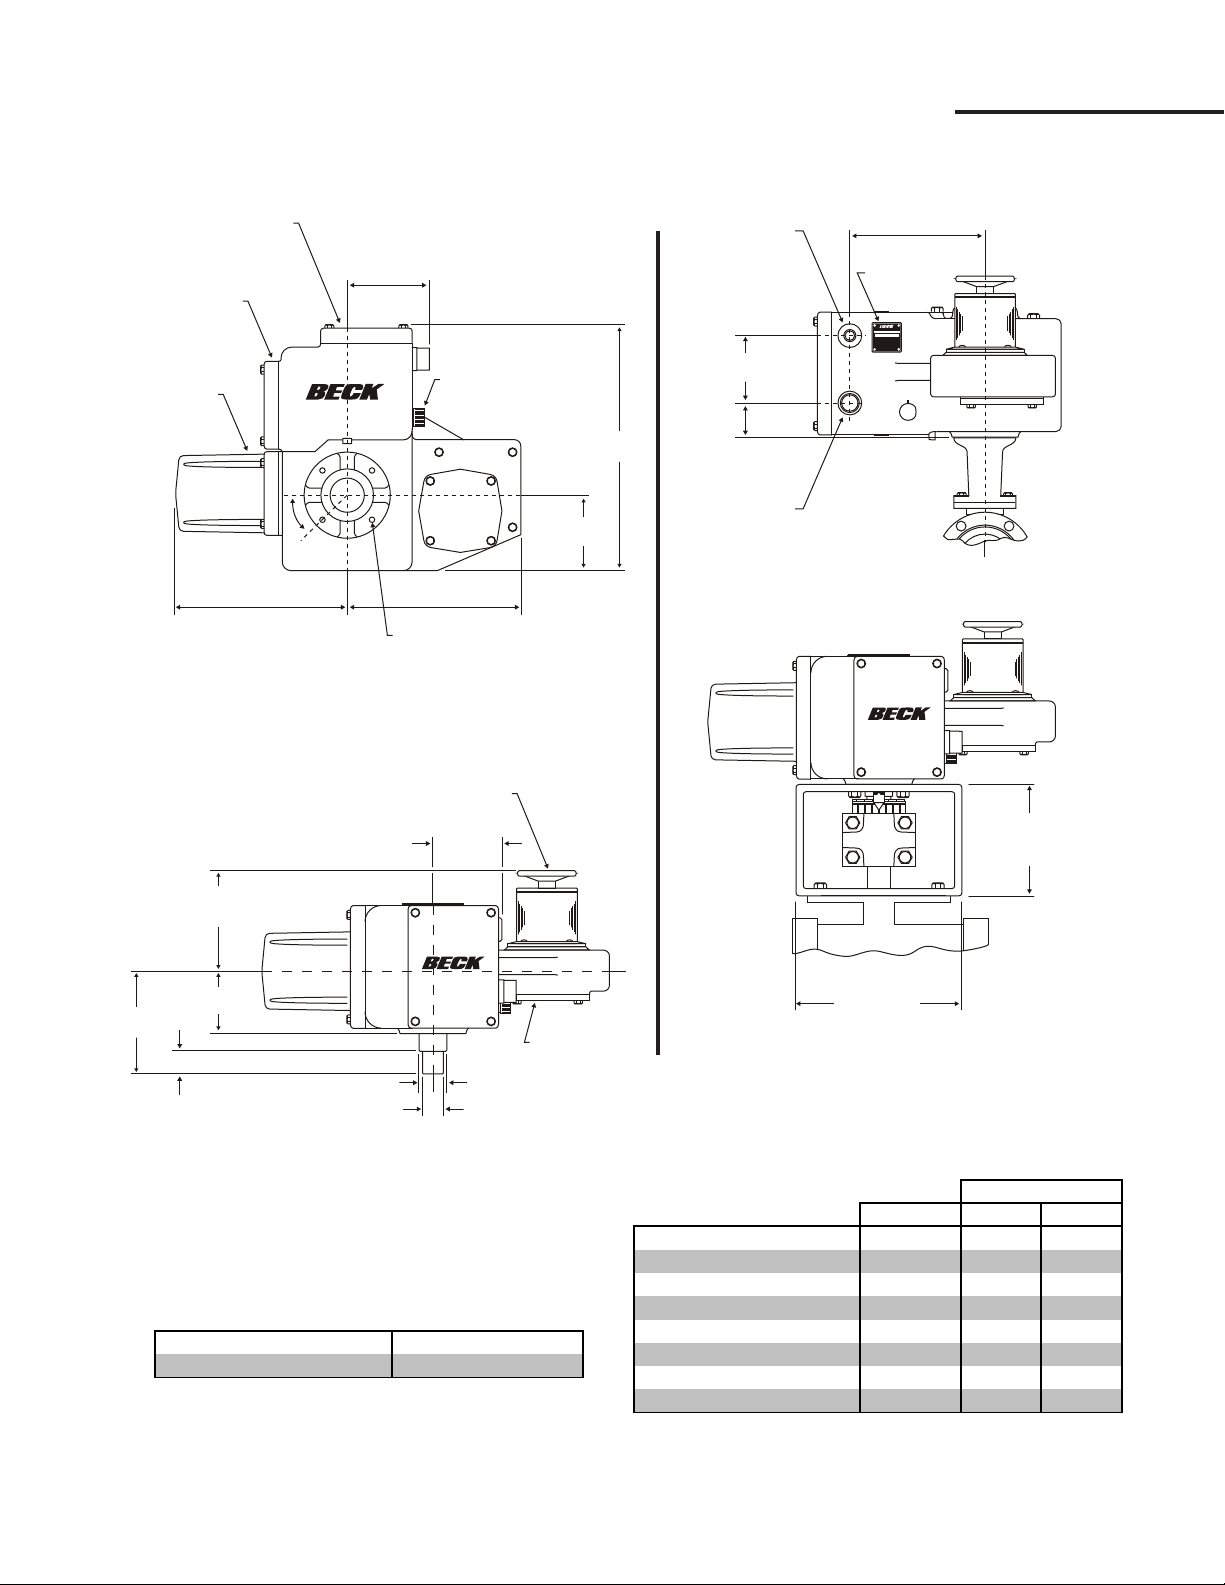
OUTLINE DIMENSION DRAWINGS
Torque
Size (in.) (lb-ft) (N•m)
Cover Bolts 5/16-18 10 14
Gear Module Bolts 5/16-18 10 14
Motor Bolts 1/4-20 6 8
Body Bolts 3/8-16 20 27
Body Bolts 1/2-13 50 68
Control End Cover Bolts 5/16-18 10 14
Coupling Bolts 5/8-18 170* 230*
Mounting Bracket Screws 1/2-13 50 68
Approximate Weight 115 lbs. (52 kg)
Maximum Overhung Load 4,500 lbs. (2 041 kg)
MODEL 11-369 SPECIFICATIONS
TERMINAL BLOCK
EXTERNAL WIRING
COVER,
DIGITAL
CONTROL
MODULE
COVER,
POSITION
SENSING
DEVICES
12 1/8" (308 mm) MAX.
(ALLOW 6" (152 mm)
FOR REMOVAL)
COVER,
45°
6 1/16"
(154 mm)
HANDSWITCH
12 3/4"
(324 mm)
MOUNTING HOLES
1/2-13 UNC-2B x 3/4" (19 mm) DEEP
(4) HOLES EQUALLY SPACED
ON A 5" (127 mm) DIA. B.C.
(454 mm)
51/2"
(140 mm)
17 7/8"
1/2" N.P.T.
CONDUIT,
SIGNAL
CONNECTION
4 25/32"
(121 mm)
221/32"
(67 mm)
1" N.P.T.
CONDUIT,
POWER
CONNECTION
97/8"
(251 mm)
NAMEPLATE
AUX.SWITCHRATING:
10A240 Vac
HANDWHEEL
51/16"
(129 mm)
8" (203 mm) MAX.
(ALLOW 3" (76 mm)
FOR REMOVAL)
4 7/16"
73/8"
(187 mm)
(113 mm)
2 1/8" (54 mm)
1 3/4" (44.45 mm) DIA.
+.001" (.03 mm)
–.000
BASIC CONTROL DRIVE
Model Information
12
NOTE: All dimensions subject to change.
GEAR MODULE
ASSEMBLY
1.956" (50 mm) DIA.
+.004" (.1 mm)
–.000
*May vary per application. Refer to Valve Mounting Specification
sheet shipped with your drive.
DIMENSION
DEPENDENT
ON VALVE SIZE
DIMENSION
DEPENDENT
ON VALVE SIZE
TYPICAL VALVE MOUNTING
Recommended Bolt Torques
Page 13
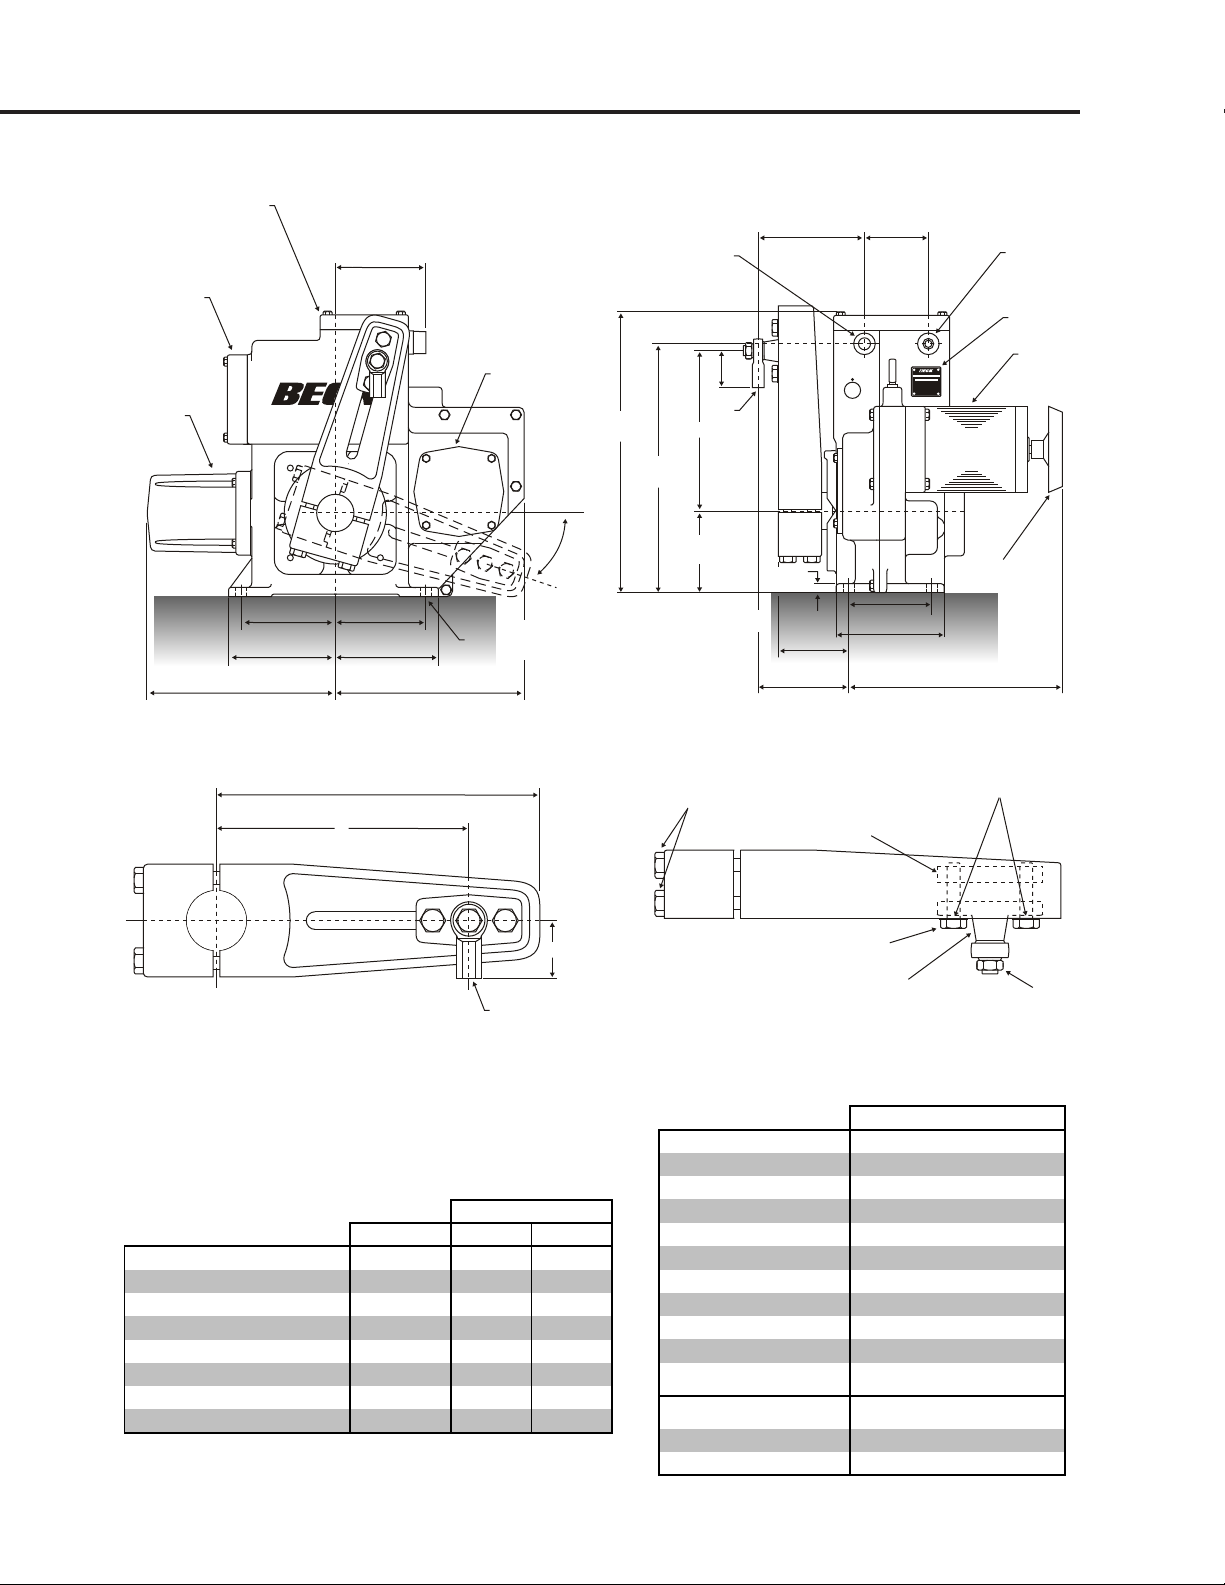
MODEL 11-409 SPECIFICATIONS
CRANK ARM BOLT (4)
WASHER (2)
NUT PLATE
CRANK PIN BOLT (2)
CRANK PIN
ROD END
LOCK NUT
Torque
Size (in.) (lb-ft) (N•m)
Crank Arm Bolts 5/8-18 170 230
Crank Pin Bolt 3/4-16 300 407
Rod End Lock Nut 3/4-16 120 163
Body Bolts 3/8-16 20 27
Body Bolts 1/2-13 50 68
Cover Bolts 5/16-18 10 14
Motor Bolts 3/8-16 16 22
Gear Module Bolts 5/16-18 10 14
COVER,
TERMINAL BLOCK
EXTERNAL WIRING
COVER,
DIGITAL
CONTROL
MODULE
COVER,
POSITION
SENSING
DEVICES
6 25/32"
(172 mm)
GEAR MODULE
ASSEMBLY
18°
7"
(178 mm)
63/4"
(172 mm)
77/8"
(200 mm)
75/8"
(194 mm)
14 1/4"
(362 mm)
13 5/8" (346 mm) MAX.
(ALLOW6"(152mm)
FOR REMOVAL)
13/16" (21 mm) DIA.
(4) HOLES
AUX.SWITCHRATING:
10A240 Vac
1" N.P.T.
CODUIT,
POWER
CONNECTION
7 27/32"
(199 mm)
43/4"
(121 mm)
1/2" N.P.T.
CONDUIT,
SIGNAL
CONNECTION
NAMEPLATE
MOTOR
T
21 1/4"
(540 mm)
18 13/16"
(478 mm)
61/4"
(159 mm)
L
R
51/4"
(133 mm)
63/8"
(162 mm)
81/8"
(206 mm)
15 7/8" (403 mm) MAX.
(ALLOW 4" (102 mm)
FOR REMOVAL)
61/2"
(165 mm)
LINKAGE C
L
3/4"
(19 mm)
HANDWHEEL
11-409
Crank Arm Assembly 14-8018-02
Crank Arm 14-8018-01
Crank Arm Bolt (4) 30-0308-07
Washer (2) 30-0313-27
Crank Pin 14-9882-01
Crank Pin Nut Plate 20-2641-01
Crank Pin Bolt (2) 30-0308-03
Rod End Lock Nut 30-0309-24
Rod End 12-2840-04
Dim. "L" (Length) 2 7/8" (73 mm)
Dim. "T" (Thread) 3/4-16 x 1 3/4" (44 mm)
Output Shaft Dia. 2 3/4" (70 mm)
Approx. Weight 270 lbs (122 kgs)
Max. Overhung Load 9,000 lbs (4 082 kgs)
15 1/4"
(387 mm)
R
ADJUSTABLE RADIUS "R" 6" (152 mm) TO 12" (305 mm)
NOTE: All dimensions subject to change.
Recommended Bolt Torques
Crank Arm
L
ROD END
Model 11-409 Linkage Part Numbers &
Model Information
13
Page 14
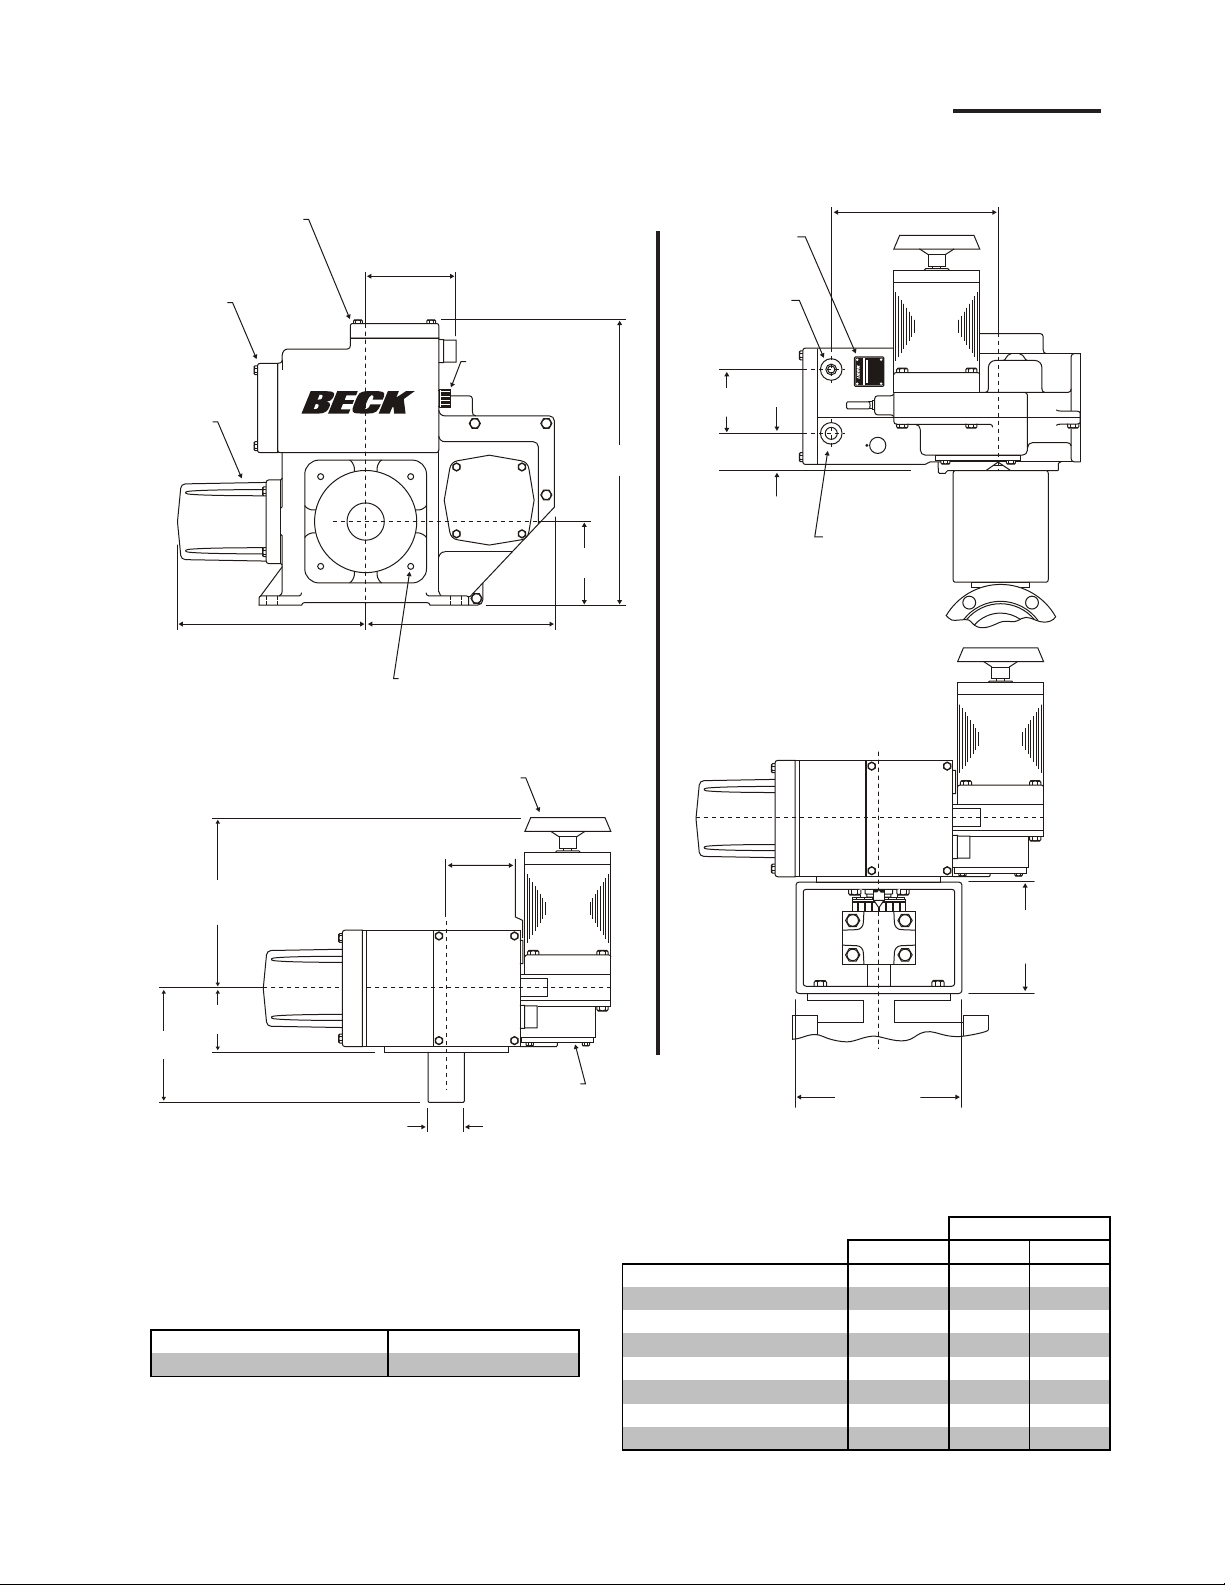
OUTLINE DIMENSION DRAWINGS
Torque
Size (in.) (lb-ft) (N•m)
Cover Bolts 5/16-18 10 14
Gear Module Bolts 5/16-18 10 14
Motor Bolts 3/8-16 16 22
Body Bolts 3/8-16 20 27
Body Bolts 1/2-13 50 68
Control End Cover Bolts 5/16-18 10 14
Coupling Bolts 5/8-18 170* 230*
Mounting Bracket Bolts 5/8-11 100 135
Approximate Weight 216 lbs. (98 kg)
Maximum Overhung Load 9,000 lbs. (4 082 kg)
MODEL 11-469 SPECIFICATIONS
TERMINAL BLOCK
EXTERNAL WIRING
COVER,
DIGITAL
CONTROL
MODULE
COVER,
POSITION
SENSING
DEVICES
13 5/8" (346 mm) MAX.
(ALLOW 6" (152 mm)
COVER,
FOR REMOVAL)
6 25/32"
(172 mm)
HANDSWITCH
61/4"
(159 mm)
14 1/4"
(362 mm)
MOUNTING HOLES
5/8-11 UNC-2B x 1.63" (41.4 mm) DEEP
(4) HOLES EQUALLY SPACED
ON A 9.75" (248 mm) DIA. B.C.
HANDWHEEL
21 1/4"
(540 mm)
NAMEPLATE
1/2" N.P.T.
CONDUIT,
SIGNAL
CONNECTION
43/4"
(121 mm)
219/32
(66 mm)
12 9/16"
(319 mm)
10A240 Vac
AUX.SWITCHRATING:
1" N.P.T.
CONDUIT,
POWER
CONNECTION
5 13/16"
13 3/8" (340 mm) MAX.
(ALLOW 4" (102 mm)
FOR REMOVAL)
33/4"
(95 mm)
73/4"
(197 mm)
2 3/4" (69.85 mm) DIA.
+.001" (.03 mm)
–.000
(148 mm)
BASIC CONTROL DRIVE
Model Information
14
NOTE: All dimensions subject to change.
GEAR MODULE
ASSEMBLY
DIMENSION
DEPENDENT
ON VALVE SIZE
DIMENSION
DEPENDENT
ON VALVE SIZE
TYPICAL VALVE MOUNTING
Recommended Bolt Torques
*May vary per application. Refer to Valve Mounting Specification
sheet shipped with your drive.
Page 15

INSTALLATION
SAFETY PRECAUTIONS
WARNING
Installation and service instructions are for
use by qualified personnel only. To avoid
injury and electric shock, do not perform any
servicing other than that contained in this
manual.
STORAGE INFORMATION
The drive should be stored in its shipping carton
in a clean, dry area.
If it is necessary to store the drive outdoors for
a long period of time, it should be removed from
its shipping carton and stored above ground. A
waterproof cover should be securely fastened
over it. Do not stack drives on top of one another.
Stored drives should be periodically checked to
make sure no condensation has formed in the
control compartments. Damage due to moisture
while in storage is not covered by warranty.
UNPACKING
Beck drives are packed in standardized
cardboard shipping containers. Drives mounted
on valves are strapped to a skid and crated. After
unpacking, the wooden platform may be used to
transport the drive to the installation site.
15
Page 16

INSTALLATION
INSTALLATION—MECHANICAL
Beck Group 11 drives may be installed in
any convenient orientation, because the gearing
does not require an oil bath. Refer to the outline
dimension drawings on pages 8–14 for physical
dimensions and required clearances.
Installing a Drive with Linkage
When installing a Beck drive in a location
remote from the damper or valve, be sure it is firmly
bolted to a flat mounting surface that will not yield
to the stresses created from operating the device.
A rigid, vibration-free surface will generally prolong
the life of the drive’s components.
The output shaft of the drive should be parallel
to the damper or valve shaft, and the linkage
should be in a plane perpendicular to that of the
two shafts. Small misalignments can be tolerated
if a rod end fitting is used on the driven lever similar
to that on the Beck crank arm. The drive’s crank
arm can be positioned at any angle on the shaft.
Beck drives can be furnished with valves
mounted as unitized assemblies ready for pipeline
installation. Beck linkage kits are available for
convenient field installation (see page 5).
Installing a Direct-coupled Drive
CAUTION
Whenever a control drive is being mounted on
a valve, it is good practice to remove the valve
from service and observe these precautions:
• Know what fluid is in the line.
• Wear proper protective equipment.
• Disconnect electrical power.
• Depressurize the pipeline.
• Refer to the valve maintenance manual for
specific instructions.
• Consult the Beck Valve Mounting
Specification sheet shipped with the drive
for instructions.
Installing a Unitized Valve/Drive
Assembly on a Pipeline
Inspect the valve and pipe flanges to ensure
they are clean. Be certain that other pipelines in
the area are free from pipe scale or welding slag
that could damage the gasket surfaces.
Carefully lift the assembly and position the
valve in the pipeline. Install and tighten the
flange bolts according to the valve and/or gasket
manufacturer’s instructions.
NOTE: The valve may have undergone
temperature variations in shipment. This
could result in seepage past the stem seals.
Refer to the valve manufacturer’s maintenance
instructions for packing adjustments.
INSTALLATION—ELECTRICAL
NOTE: All Beck drives are shipped from the
factory ready for installation; no electrical
adjustments are required before placing
them in operation. Each drive is set up and
calibrated to the customer’s specifications that
were written into the equipment order.
Two N.P.T. conduit connections are provided
for power and signal wiring to the drive. The 1/2"
conduit is provided for signal wiring connections, and
the 1" conduit is provided for power and auxiliary
switch connections. A sealant must be used on
threaded conduit connections to keep moisture out.
Conduits should be routed from below the drive so
that condensation and other contaminants entering
the conduit cannot enter the drive.
Power and signal wires must be routed to the
drive separately and be either shielded cables or
installed in conductive conduit and/or cable trays.
A large, clearly labeled terminal block on the
top of the drive is enclosed in a separate, gasketed
metal enclosure. Terminals will accommodate up
to 12 AWG (3.31 mm2) wiring. See page 4 for
location of the terminal block.
CAUTION
Always close covers immediately after
installation or service to prevent moisture or
other foreign matter from entering the drive.
Refer to the wiring diagram furnished with
your Beck drive for proper AC power and signal
connections. It is advisable to provide normal short
circuit protection on the AC power line. A copy of
the wiring diagram is shipped with each drive and
is fastened to the inside of the terminal block cover.
If there is no wiring diagram available, you may
obtain a copy from Beck by providing the serial
number of your drive.
Your Beck drive has been supplied to match
the signal source in your control loop. If it does not
match, a 250 ohm input resistor may be added or
removed to obtain the proper match. Consult the
factory for details.
For maximum safety, the Beck drive body
should be grounded. Use the grounding terminal
in the wiring compartment of the drive.
16
Page 17
INSTALLATION SIGNAL WIRING
Each Beck drive is custom built to match the
control requirements of your system specified
at the time of order. Each drive has a specific
wiring diagram attached to the inside of the wiring
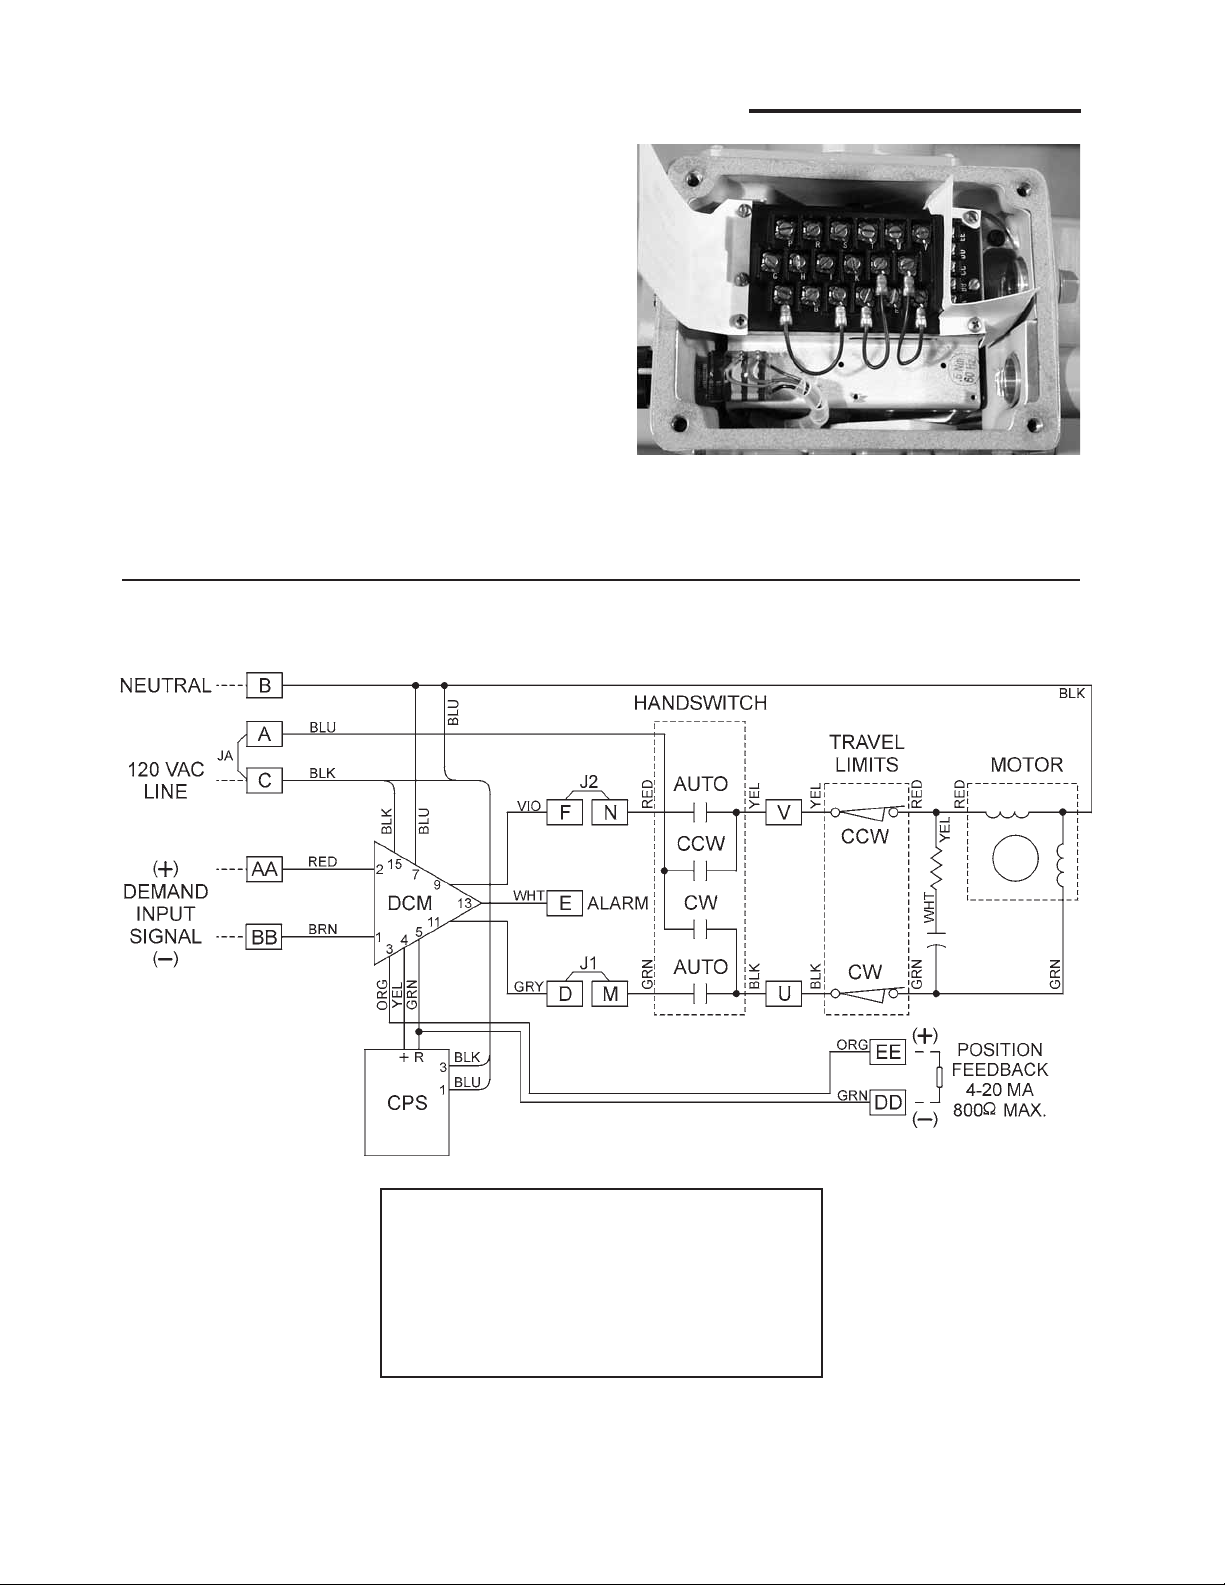
terminal cover. Typical wiring connections are
described below.
A drive can be ordered with up to four optional
auxiliary switches. Wiring connections for these
are described on page 26.
To prevent Handswitch initiated motion,
remove the jumper between terminals A and C.
CAUTION: AC power to the drive must be
turned off before removing the jumper.
Typical Wiring Connections
POWER AND DEMAND
INPUT CONNECTIONS
Customer must supply 120 V ac to power the
drive and control circuitry. 120 V ac line connects
to terminal C and neutral to terminal B. Input signal
wires connect to terminals AA (+) and BB (–).
17
Page 18

INSTALLATION START-UP
LINKAGE REQUIREMENTS
(If Applicable)
In most applications, the best control will result
when the linkage is adjusted so that the full 100°
angular travel of the Beck drive output shaft is
used, even though the valve or damper may travel
less than 100°.
The general requirements for a good linkage
are:
1. It must be rigid enough to carry the link thrust
without bending or deforming.
2. It must have a built-in means of adjustment so
that the length of the connecting link can be
changed a small amount.
3. Rod end bearings, similar to those furnished
on the Beck crank arm, should be used at both
ends of the connecting link. This type of device
permits small angular misalignments and helps
prevent binding of the linkage.
4. The radius of the Beck crank arm must be
calculated so that it will move the valve or
damper lever through the correct arc as the
lever travels from 0° to 100°.
5. The drive and valve / damper shafts must be
parallel and the linkage should be in a plane
perpendicular to the shafts.
The following procedure is recommended to
couple the linkage between the Beck drive and
the driven shaft (this procedure assumes that the
Beck drive will open the damper/valve in response
to an increasing signal) :
1. Position the driven shaft to the closed
position.
2. Set the driven shaft lever to its predetermined
starting angle in relation to the driven shaft and
output shaft centerline.
3. Remove the rod end from the Beck crank arm.
Attach to the connecting link.
4. Adjust the connecting link to the predetermined
length.
5. Connect the connecting link to the driven lever
at the predetermined radius.
6. Loosen the Beck crank arm clamping bolts.
7. Position the drive’s output shaft to correspond
with the driven shaft's fully closed position.
8. Set the crank pin on the Beck crank arm to the
predetermined radius.
9. Swing the crank arm into position to assemble
the rod end to the crank arm crank pin.
10. Tighten the crank arm clamp bolts to the torque
recommended on pages 8, 10 and 13.
11. Tighten the coupling and rod end jam nuts.
12. Lubricate rod end bearings.
13. Carefully move the drive’s output shaft to
correspond with the driven shaft's fully open
position. Check that no binding occurs between
the linkage, crank arm, driven shaft lever, and
surrounding obstructions. Also, observe that
the driven shaft rotates the proper amount.
Ensure that the drive reaches the proper limit
and shuts off. If binding in the linkage occurs
due to too much travel of the driven lever,
reduce the crank arm radius on the Beck drive
rather than adjusting the connecting link length.
Return to step 5 and repeat adjustments.
To adjust the linkage length, alter the thread
engagement in the couplings. The couplings have
right- and left-hand threads, so it is not necessary to
disconnect the ends to make a length adjustment.
The stud threads must be engaged 1.2 diameters
deep into the rod ends. Make adjustments by
altering thread engagement in couplings only. Be
careful not to expose more than 7” (178 mm) of
stud between rod end and coupling.
Once again, check operation to determine that
no binding occurs between linkage and crank arm
or valve / damper lever arm. Surrounding objects
must not interfere.
Do not change limit switch settings to obtain
desired valve or damper travel. This shortens
the travel of the feedback device and reduces the
control resolution, repeatability, accuracy of the
drive, and available torque.
For an input control signal change, do not
adjust the linkage. Refer to the Calibration section
of this manual.
Link-Assist™
The Beck Link-Assist™ computer program
optimizes the linkage configuration for your load’s
torque characteristics to help you select the
minimum drive size for your application. Contact
your Beck Sales Engineer to take advantage of
Beck’s Link-Assist™ program.
Linkage Kits Available
Standard Beck linkage kits are made to
accommodate a wide variation in linkage lengths
without requiring modification of end fittings. This
adaptability makes it possible to order the essential
linkage end connections even though the exact
linkage length may not be known until the valve /
damper and drive are mounted in place.
Each linkage kit includes the essential
pipe linkage end connections, rod end, and all
necessary hardware. Schedule 40 pipe is not
included and must be cut to length and threaded
18
Page 19
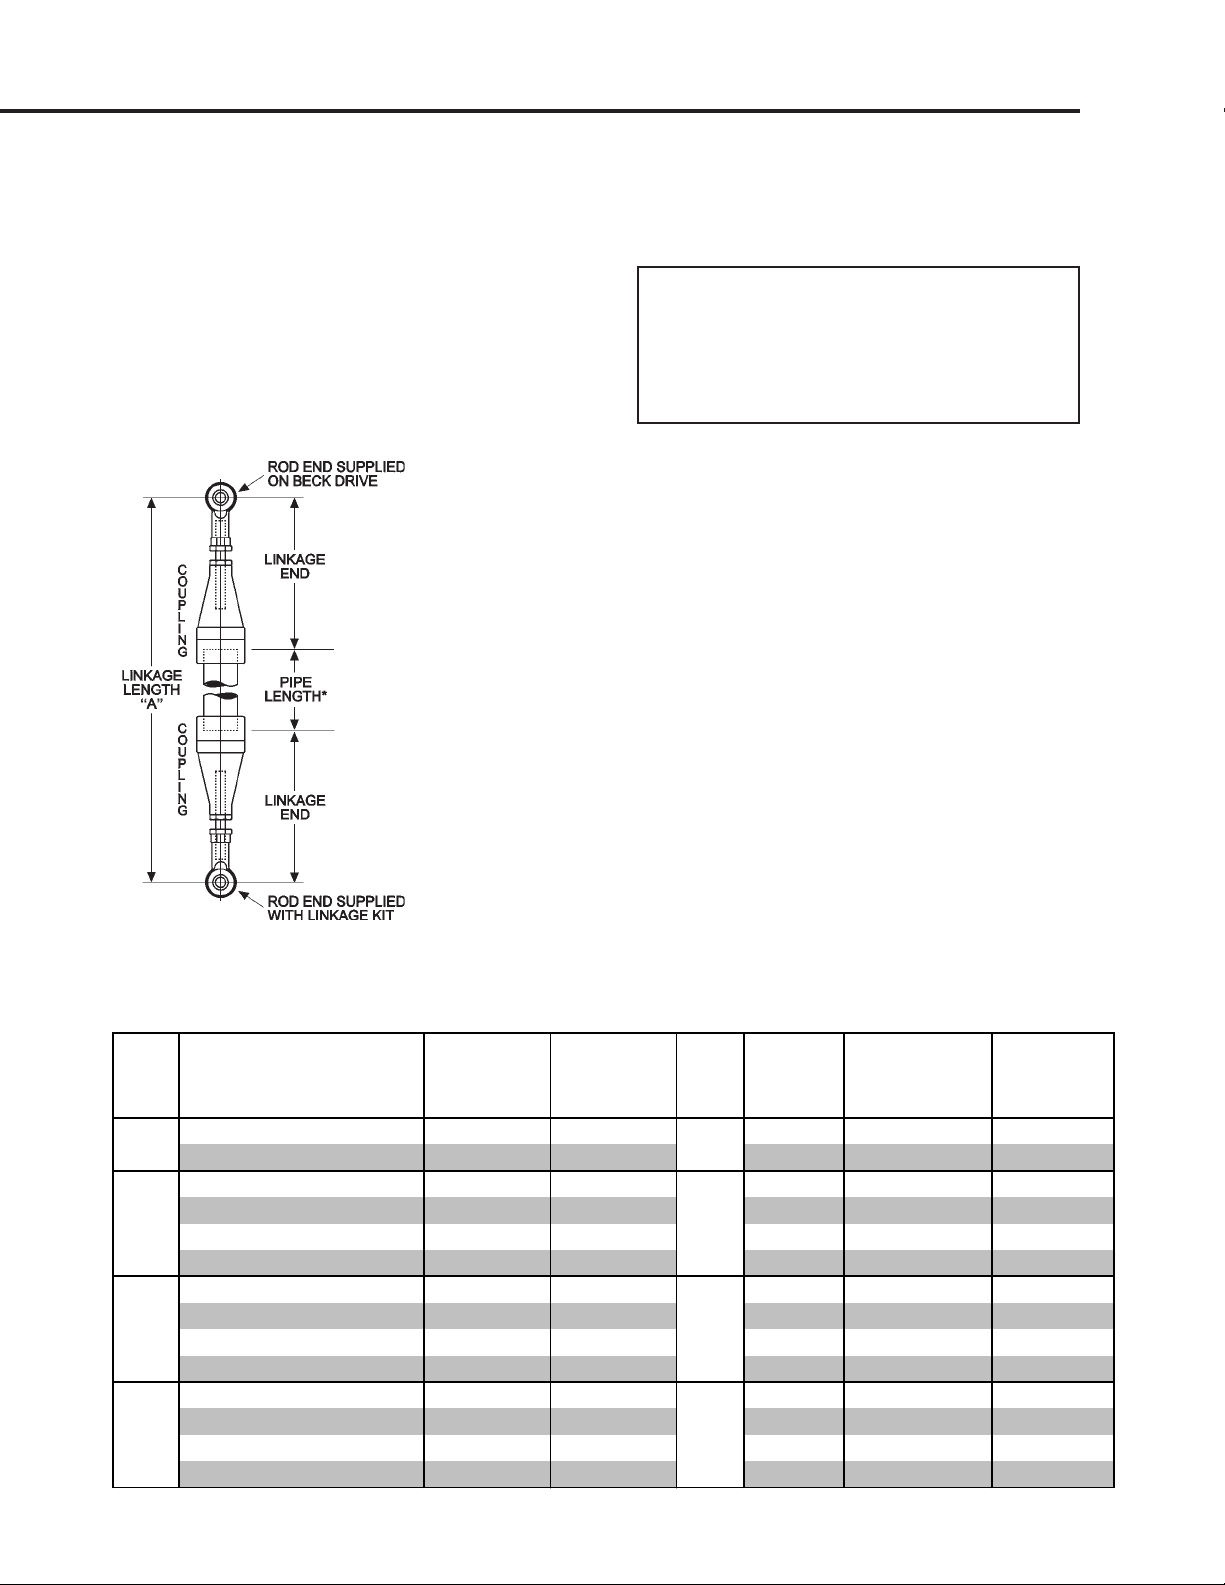
in the field (see Table 1, below, for instructions to
calculate pipe length). To simplify installation of the
pipe link, the kit accepts NPT right-hand threads
on both ends of the pipe. Left-hand threads are
internal to the linkage kit assembly, making final
length adjustments quick and easy.
To order pipe linkage kits, first obtain the
approximate overall linkage length “A” in the figure
below. Select the kit part number from Table 1,
below. For lengths beyond those listed in the table,
contact your Beck sales engineer.
*NOTE: To calculate
length of pipe required,
subtract “Length
of 2 Linkage Ends”
(shown in Table 1)
from Linkage Length
“A” (shown at left).
START-UP INSTRUCTIONS
After the drive is mounted and its wiring
connections are made, it is ready to be tested for
proper operation.
NOTE: All Beck drives are shipped from the
factory ready for installation; no electrical
adjustments are required before placing
them in operation. Each drive is set up and
calibrated to the customer’s specifications that
were written into the equipment order.
Turn on the power supply. Operate the drive
with the Handswitch and run it through its full stroke,
both directions. Observe that the driven device
travels through its desired stroke. If satisfactory,
set Handswitch to the “AUTO” position.
Turn on the controller and operate the drive by
varying the control signal. Check that the damper
or valve strokes in the proper direction for a change
in control signal. If it does not, first check for proper
wiring connections and verify control signal at the
drive. If the wiring is correct, then change the
direction of output shaft rotation (see applicable
instructions on page 31, 51 or 69).
TABLE 1:
PIPE LINKAGE KITS
Beck Rod Length of 2
Drive Linkage Min. Pipe End Beck Pipe Linkage Ends
Model Length Pipe Nipple Thread Linkage Kit (Total Adj. Approx.
No. Range "A" Size Length (UNF) Part No. ±1 1/2"(38 mm)) Weight
11-159
11-209
11-309
11-409
22–84" (559–2 134 mm) 1" (25 mm) 1 1/2" (38 mm)
31–120" (787–3 048 mm) 1 1/2" (38 mm) 1 3/4" (44 mm) 20-1740-06 29 1/4" (743 mm) 9 lbs (4 kg)
22–45" (559–1 143 mm) 1" (25 mm) 1 1/2" (38 mm)
31–84" (787–2 134 mm) 1 1/2" (38 mm) 1 3/4" (44 mm) 20-1740-06 29 1/4" (743 mm) 9 lbs (4 kg)
33 1/4–120" (845–3 048 mm) 2" (51 mm) 2" (51 mm) 20-1750-05 31 1/4" (794 mm) 13 lbs (6 kg)
37–120" (940–3 048 mm) 2 1/2" (64 mm) 2 1/2" (64 mm) 20-1760-05 34 1/2" (876 mm) 22 lbs (10 kg)
22 1/2–36" (572–914 mm) 1" (25 mm) 1 1/2" (38 mm)
31 1/2–72" (800–1 829 mm) 1 1/2" (38 mm) 1 3/4" (44 mm) 20-1740-07 29 3/4" (756 mm) 9 lbs (4 kg)
33 3/4–96" (857–2 438 mm) 2" (51 mm) 2" (51 mm) 20-1750-06 31 3/4" (806 mm) 13 lbs (6 kg)
37 1/2–120" (953–3 048 mm) 2 1/2" (64 mm) 2 1/2" (64 mm) 20-1760-06 35" (889 mm) 22 lbs (10 kg)
23 1/4–34" (590–864 mm) 1" (25 mm) 1 1/2" (38 mm)
32 1/4–48" (819–1 219 mm) 1 1/2" (38 mm) 1 3/4" (44 mm) 20-1740-08 30 1/2" (775 mm) 9 lbs (4 kg)
34 1/2–72" (876–1 829 mm) 2" (51 mm) 2" (51 mm) 20-1750-07 32 1/2" (826 mm) 13 lbs (6 kg)
38 1/4–120" (972–3 048 mm) 2 1/2" (64 mm) 2 1/2" (64 mm) 20-1760-07 35 3/4" (908 mm) 22 lbs (10 kg)
1/2-20
1/2-20
5/8-18
3/4-16
20-1730-05 20 1/2" (521 mm) 5 lbs (2 kg)
20-1730-05 20 1/2" (521 mm) 5 lbs (2 kg)
20-1730-06 21" (533 mm) 5 lbs (2 kg)
20-1730-07 21 3/4" (552 mm) 5 lbs (2 kg)
19
Page 20

OPERATION
HOUSING
Beck electronic control drives have individual
cast aluminum compartments for each of the
five main components: The control motor, wiring
terminal block, drive train, digital control module,
and control end. Gasketed covers and sealed
shafts make the drives ideally suited to outdoor
and high humidity environments.
Heavy cast mechanical stops built into the
housing are designed to prevent accidental overtravel damage during manual cycling, and ensure
that proper orientation is maintained between
the output shaft and the feedback system. Drive
travel is centered between the mechanical stops
unless otherwise specified at time of order.
CONTROL MOTOR
The Beck control motor is a synchronous
inductor motor which operates at a constant
speed of 72 RPM or 120 RPM in synchronism
with the line frequency.
Motors are able to reach full speed within 25
milliseconds and stop within 20 milliseconds;
actual starting and stopping times will vary with
load.
Beck motors have double grease-sealed
bearings and require no maintenance for the life
of the motor.
GEAR TRAIN
The gear train is a four-stage reduction, spur
gear drive constructed with only heat-treated alloy
steel and ductile iron gears for durability and long
life.
The drive train consists of the control motor and
Handwheel, reduction gears, main gear, output
shaft, and crank arm. The main gear / output shaft
and third stage gears are common to all units of
a particular drive model. The second and first
stage gears are part of the field-interchangeable
gear module. Different combinations of gear
modules and drive motors determine the drive’s
output torque and timing. See Table 9, page 83
for details.
On all models except the 11-169, the output
shaft is limited by mechanical stops to 108° of
rotation. On model 11-169 drives, the output shaft
is limited by mechanical stops to 98° of rotation.
Optional main gear / output shaft assemblies are
available that permit multi-revolution output rotation.
Mechanical stops are not included on these models.
Mechanical transmission of output shaft position to
the control end is provided by a right angle gear set
driven directly by the output shaft.
SELF-LOCKING
MECHANISM (SLM)
An integral part of every control motor is the
self-locking mechanism. This mechanical device
couples the motor to the gear train and transmits
full motor torque when rotated in either direction.
When the motor is de-energized, the SLM
instantaneously locks and holds the output shaft
in position.
HANDWHEEL
Every Beck control drive is furnished with a
Handwheel to permit manual operation of the valve or
damper without electrical power. Its solid construction
design includes no spokes or projections, and turns at
a safe, slow speed. The Handwheel is located at the
rear of the control motor housing. The Handwheel is
coupled directly to the motor shaft and rotates when
the motor runs. Manual operation of the Handwheel
(with electric Handswitch in “STOP” position) turns
the motor and the rest of the drive train without
incorporating a clutch.
HANDSWITCH
A local electric Handswitch is provided on Beck
drives to permit operation at the valve or damper,
independent of the controller. As a safety feature,
the Handswitch is designed so that the controller can
operate the drive only when it is in the “AUTO” position.
The sequence of the Handswitch is: “AUTO”, “STOP”,
“CW”, “STOP”, “CCW”. When the Handswitch
is turned fully clockwise, “AUTO” should be
indicated.
In the “AUTO” position, two contacts are closed
and the DCM-2 completes the control circuit.
In the “CW” or “CCW” positions, contacts are
closed to operate the drive independently of the
controller.
In the “STOP” position, all contacts remain open.
To prevent Handswitch initiated motion, remove
the jumper between terminals A and C. CAUTION:
AC power to the drive must be turned off before
removing the jumper.
SWITCHES
Two over-travel limit switches and up to
four optional auxiliary switches are provided on
Beck drives. Switch cams are clamped onto
the control shaft which rotates in relation to the
output shaft. Cam position is field-adjustable.
Switches are rated 6 A, 120 V ac. All auxiliary
switch connections are made on the terminal
block.
20
Page 21

LOSS OF DEMAND INPUT
SIGNAL (L.O.S.)
When the Demand input signal drops to
approximately –5%, the DCM-2 considers the
Demand input signal to be invalid. DCM-2s are
typically configured to stop the drive during L.O.S.
conditions, but may be configured by the factory
or by using the HART or Serial interface to run the
drive to a predetermined position. Under the L.O.S.
condition, the “STAT” and “DEMAND” LEDs will
light. When the input signal is corrected, the drive
will automatically resume normal operation. The
value for LOS activation is configurable using the
HART (see page 47) or Serial interface (see page
70). Alarm indication is available at terminal E.
POSITION:
CONTACTLESS POSITION
SENSOR (CPS)
The CPS provides the DCM-2 with a continuous
feedback signal proportional to the position of the
drive’s output shaft.
The position sensing function of the CPS is
provided by a ferrite magnetic sensing element.
An electronic circuit translates the signal from the
ferrite magnetic sensor into a position signal used by
the DCM-2 to control the drive. The typical output
voltage of the CPS ranges from 1.0 V at the CCW
end of travel, to 5.0 V at the CW end of travel. A
4–20 mA position feedback signal is available for
remote position indication (see page 17). If the CPS
Position signal to the DCM-2 is out of the calibrated
range limits, the "STAT" and "POSITION" LEDs will
light and the drive will not operate until the limits are
adjusted or the CPS is corrected. Alarm indication
is available at terminal E.
TORQUE PROTECTION (FOR
DRIVES EQUIPPED WITH THIS
OPTION)
DCM-2s are equipped with a torque sensing
module that will light the “STAT” and “TRQ/
THRUST” LEDs in the event excessive torque is
detected. This alarm is normally set to activate
when torque exceeds 105% of the drive rating.
Torques above 150% of the drive rating will cause
the DCM-2 to stop trying to run in the direction of
the high torque. When the over torque condition
is corrected, the drive will automatically resume
normal operation. The torque sensing module
also provides a number of torque related features
using the HART interface (see page 48). Torque
alarm may be enabled or disabled using the
HART (see page 48) or Serial interface (see page
71). Torque alarm levels may be adjusted using
the HART or Serial interfaces. Alarm indication is
available at terminal E.
STALL PROTECTION AND
ANNUNCIATION
If the drive output shaft cannot reach a desired
position within approximately 300 seconds, the
DCM-2 shuts off power to the motor and the “STAT”
and “STALL” LEDs will light. The stall condition
timing is factory configurable (or configurable using
the HART or Serial interface) from 300 seconds to
as low as 30 seconds and is initially set according
to the specification at time of order.
A sensed stall condition is cleared by either
reversing the Demand input signal from the
controller (such that the drive tries to run in
the direction opposite the blocked direction),
performing a "Reset Stall" or "Board Reset" using
the HART interface (see page 42), or by switching
the drive power off and on. Alarm indication is
available at terminal E.
TEMPERATURE
DCM-2s are equipped with a temperature
sensing circuit. The “STAT” and “TEMP
°F” LEDs will light when the drive’s ambient
temperature exceeds the rating of the drive.
Specific temperature readings are available using
the HART (see page 40) or Serial (see page
72) interface. Alarm indication is available at
terminal E.
FEEDBACK SIGNAL
The feedback sourcing module provides a
4–20 mA analog output signal that represents the
drive output shaft position in terms of 0–100% of
full rotational travel (configurable via the HART
(see page 56) or Serial (see page 75) interface).
This signal can be remotely monitored or used
by a controller or indicator. The “STAT” and “FB
OPEN” LEDs will light if the function is enabled
and there is no current in the loop. The Feedback
signal can be factory configured as disabled, or
disabled using the HART (see page 46) or Serial
(see page 71) interface. Alarm indication is
available at terminal E.
STOP/LIMIT INDICATION
The “STAT” and “STOP/LIMIT” LEDs will
light if the Handswitch is in the “STOP” position.
These LEDs will also light if the drive is at a
limit and is not in balance. Alarm indication is
available at terminal E.
21
Page 22
DIGITAL CONTROL MODULE (DCM-2)
INPUT: DIGITAL CONTROL
MODULE (DCM-2)
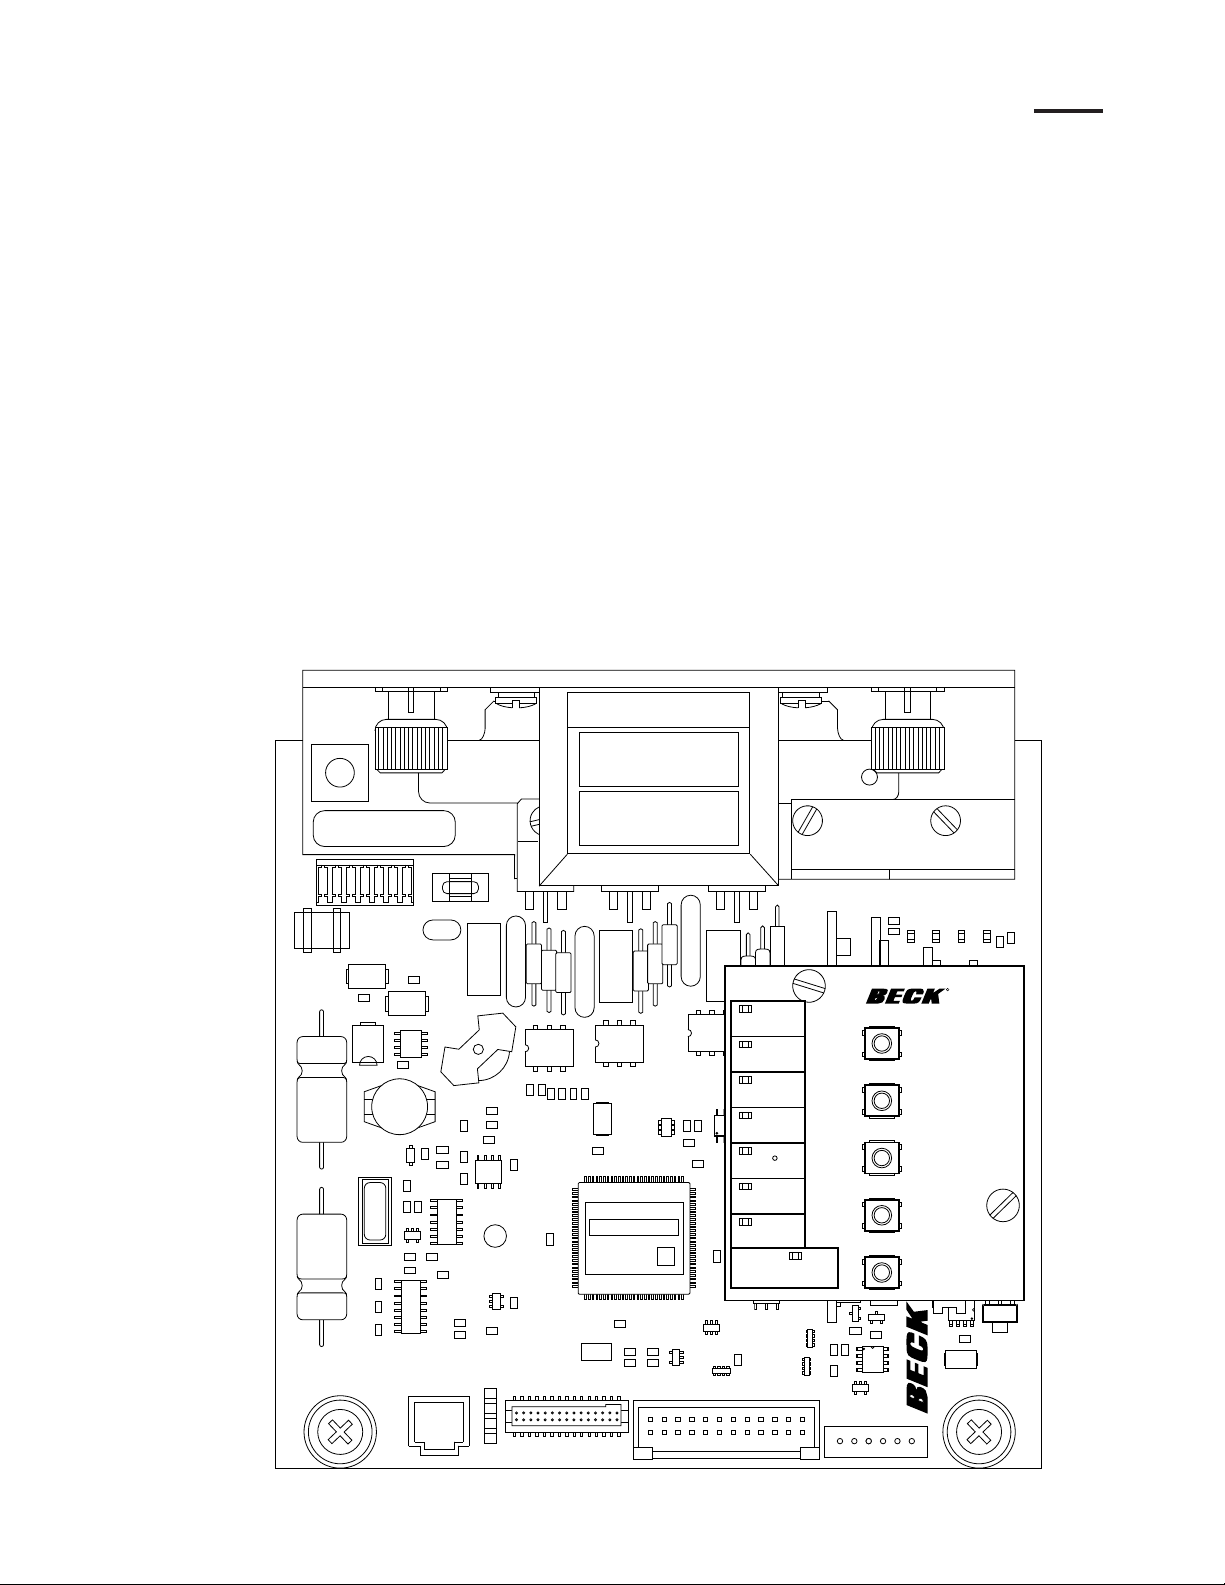
Beck modulating drives are equipped with a
precision, digital control module (DCM-2) designed
to receive conventional 4–20 mA or 1–5 V dc
control signals directly—eliminating the need for
contact protection devices, relays, switches and
reversing starters.
The DCM-2 modulates the drive output shaft in
response to an analog Demand input signal and is
designed to operate continuously in temperatures
up to 185°F (85ºC).
The DCM-2 provides intelligent calibration,
easy drive setup changes, and diagnostic
information. A Local interface provides quick
pushbutton setup and diagnostics without the
need for a handheld or remote device (see page
23). A HART communications interface allows
remote access of all features and information (see
page 36). A Serial interface also allows for drive
configuration changes, drive information reporting
and to assist in troubleshooting (see page 66).
The DCM-2 permits two or more Beck drives to
be operated by a single signal source. See pages
29 and 57 for details on split range operation.
A square function is available to position the
drive’s output shaft proportionally to the square
of the input signal. This function is factory
configurable (specify at time of order) or may be
configured using the HART interface (see page
46) or Serial interface (see page 70).
DEMAND
POSITION
TRQ/THRUST
STALL
TEMP F
FB OPEN
STOP/LIMIT
ACKNOWLEDGE
STAT
FWD
REV
R
CALIBRATE
SET POS
100%
SET POS
0%
SET DEM
100%
SET DEM
0%
PWR
22
Page 23
DCM-2 LOCAL INTERFACE Operation
OVERVIEW
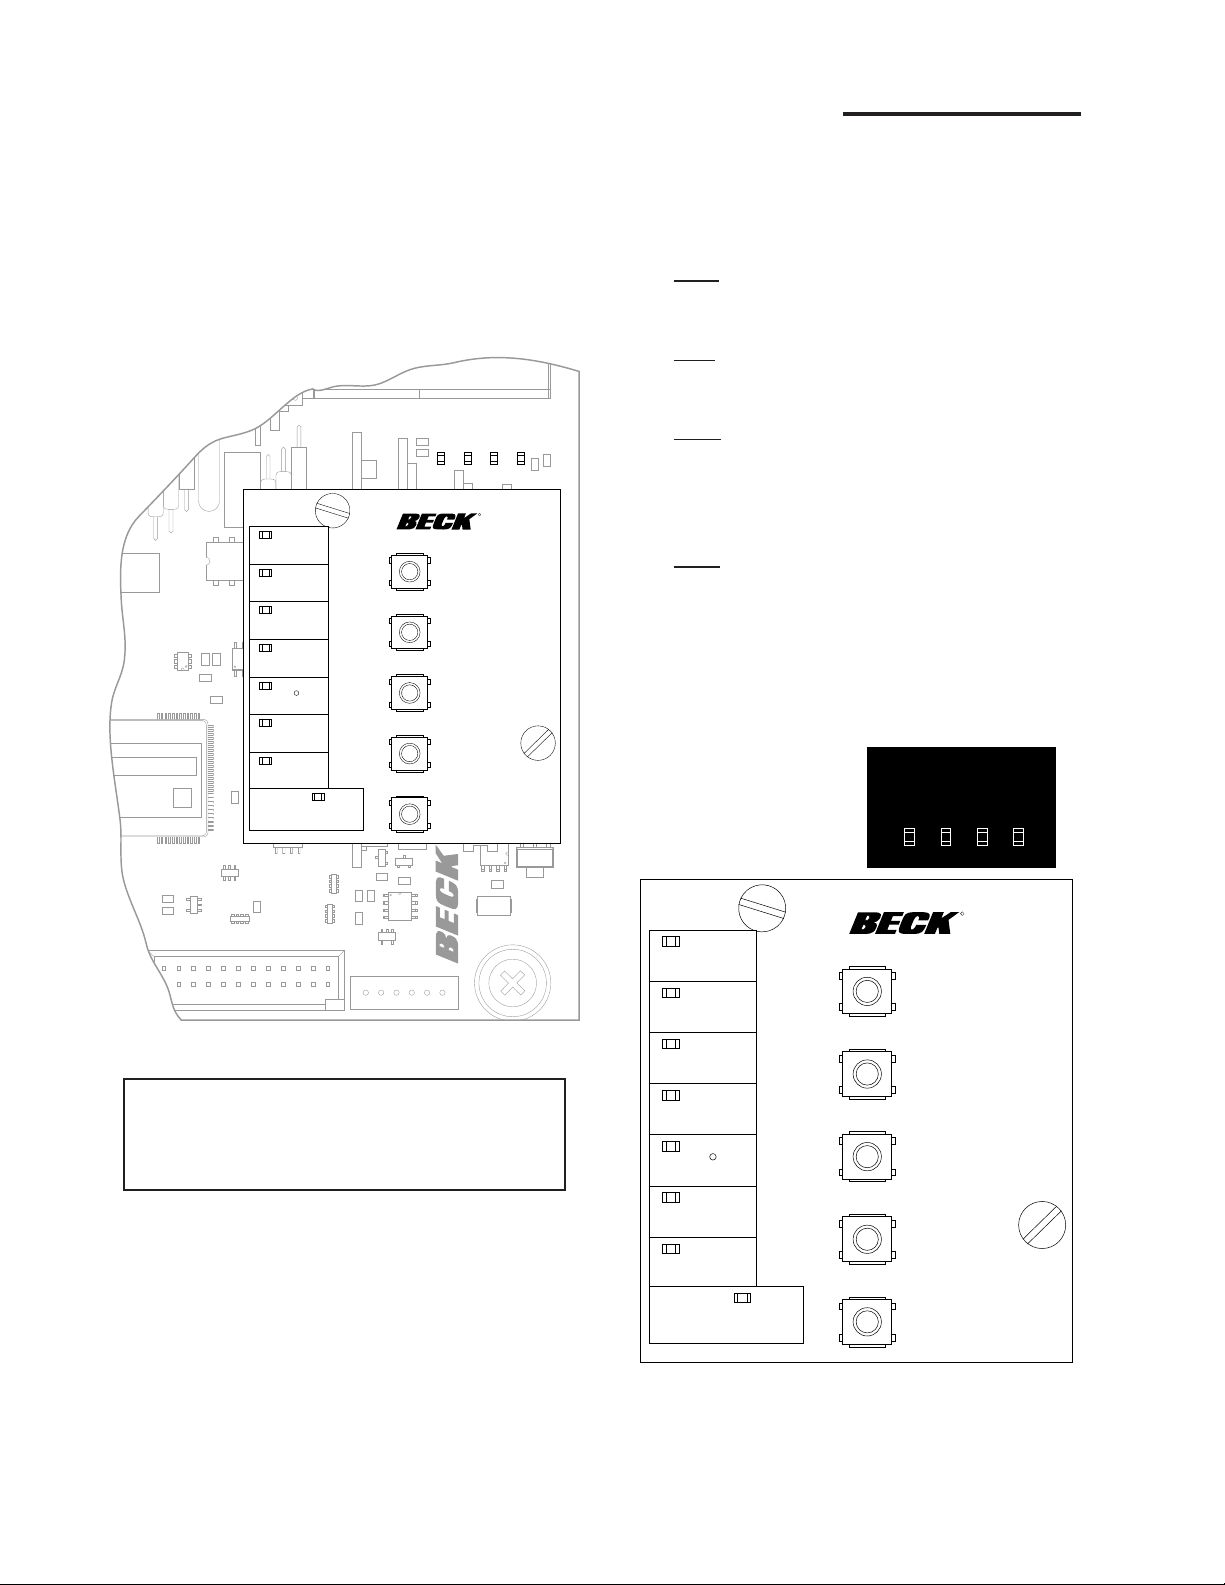
The DCM-2 customer interface panel (pictured
below) allows the user to easily calibrate the
drive and troubleshoot conditions. The following
information provides an overview of the DCM-2
customer interface panel features.
STAT
REV
R
PWR
DEMAND
POSITION
TRQ/THRUST
STALL
TEMP F
FWD
CALIBRATE
SET POS
100%
SET POS
0%
Overview LEDs
The four LEDs, as highlighted below, indicate
the present state of the drive.
FWD
This LED is lit when the drive is receiving a
Demand signal greater than its position.
REV
This LED is lit when the drive is receiving a
Demand signal smaller than its position.
STAT
This LED is lit when additional status is
available. For details regarding possible
conditions, see “Status Indication LEDs”
on page 24.
PWR
This LED is lit when power is applied to the
drive. This LED pulses from bright to dim
indicating the DCM-2 is fully operational.
FB OPEN
STOP/LIMIT
ACKNOWLEDGE
NOTE: Beck drives are shipped from the
factory set up and calibrated to customer
specifications placed at the time of order and
are ready for installation.
SET DEM
100%
SET DEM
0%
DEMAND
POSITION
TRQ/THRUST
STALL
TEMP F
FB OPEN
STOP/LIMIT
ACKNOWLEDGE
FWD
STAT
REV
R
CALIBRATE
SET POS
100%
SET POS
0%
SET DEM
100%
SET DEM
0%
PWR
23
Page 24

DCM-2 LOCAL INTERFACE Operation
Status Indication LEDs
When the “STAT” LED is lit, the applicable status
indication LED(s) (pictured below) will light to reveal
the condition(s) as described below. An alarm is
also available at terminal E. When the condition is
corrected, the status will automatically reset. Each
status LED is described below, with a more detailed
explanation of the function provided on page 21.
DEMAND
Loss of the Demand input signal.
POSITION
The CPS Position signal to the DCM-2 is
out of the calibrated range limits. The lower
limit is –5% and the upper limit is 105% of
the calibrated range. This LED may also
indicate a CPS or internal wiring failure.
TRQ/THRUST
This LED indicates that excessive torque
is present (over 105% of the drive rating).
This LED is functional only when the drive
is equipped with optional torque sensing.
STALL
The drive is in a stall condition and stall
protection has been activated.
TEMP °F.
Drive’s internal temperature is outside of
rating.
FB OPEN
External position Feedback signal is
enabled, but not wired to an external load
or the wiring has failed between the drive
and the monitoring device.
STOP/LIMIT
Handswitch is in “STOP” position or the
drive is at a limit and is not in balance.
Pushbutton Controls
The five pushbuttons (pictured below) on the
DCM-2 customer interface panel are used for
calibration. When pressing a pushbutton, pressure
should be maintained until the “ACKNOWLEDGE”
LED lights; this confirms receipt of the pushbutton
command. See the Calibration section, beginning
on page 25, for further explanation of the
calibration procedures. Pushbutton functions are
as follows:
CALIBRATE
A safety feature, this button must be
pressed and held while pressing the
pushbuttons described below to set the
Position and Demand signal limits.
CAUTION
Pressing the following buttons may change
calibration and cause the drive to reposition.
SET POS 100%
Press to set the desired 100% position for
drive movement (this will correspond to a
100% Demand signal).
SET POS 0%
Press to set the desired 0% position for
drive movement (this will correspond to a
0% Demand signal).
SET DEM 100%
Press to set the Demand input signal that
corresponds to 100% Demand.
SET DEM 0%
Press to set the Demand input signal that
corresponds to 0% Demand.
24
Status
Indication
LEDs
DEMAND
POSITION
TQ/THRST
STALL
TEMP F
FB OPEN
STOP/LIMIT
ACKNOWLEDGE
STAT
FWD
REV
R
CALIBRATE
SET POS
100%
SET POS
0%
SET DEM
100%
SET DEM
0%
PWR
DEMAND
POSITION
TRQ/THRUST
STALL
TEMP F
FB OPEN
STOP/LIMIT
ACKNOWLEDGE
STAT
FWD
REV
R
CALIBRATE
SET POS
100%
SET POS
0%
SET DEM
100%
SET DEM
0%
PWR
Pushbutton
Controls
Page 25

DCM-2 LOCAL INTERFACE Calibration
All Beck drives are shipped completely
calibrated to the customer’s specifications that
were written into the equipment order and are
ready to be installed. If the need arises to change
the drive calibration, first confirm that the drive is
installed as specified and operating properly before
proceeding with the change.
Position reference and demand calibration are
performed using the DCM-2 customer interface
panel, but may also be configured using the HART
or Serial interface. Calibration of over-travel limit
and auxiliary switches must be performed using
the procedure beginning on page 26.
CALIBRATION PRIORITY
Models 11-159, -209, -309 & -409
Standard Group 11 drives are equipped with
fixed, non-adjustable, built-in mechanical stops.
All output shaft rotation must occur within these
stops, which are approximately 108° apart.
The over-travel limit switches are used to limit
the electrical control range of the drive. These
switches are cam operated and are set slightly
wider apart then the drive’s intended full range
of electronic operation (typically 100°). The limit
switches are positioned to provide an electrical
overtravel protection (typically 101°).
If the drive is short-stroked—i.e., the full travel
rotation from 0–100% is reduced to less than the
standard 100° rotation (see page 30)—it may be
desirable to reset the over-travel limit switches
(see page 26). If the limit switches are not reset,
Handswitch operation of the drive (CW, CCW)
will still result in the original full range of travel.
It is best to calibrate the drive and then set the
limit switches when short-stroking the drive. The
switches should be set just outside the calibrated
range to avoid tripping the switch at the 0% and
100% positions.
The auxiliary switches are also cam operated,
but have no affect on drive and DCM-2 operation.
Therefore, the auxiliary switches can be adjusted
at any time without affecting performance or
calibration.
Models 11-169, -269, -369 & -469
Standard Group 11 drives are equipped with
fixed, non-adjustable, built-in mechanical stops.
All output shaft rotation must occur within these
stops, which are approximately 108° apart; except
for the 11-169 stops, which are 98° apart.
The over-travel limit switches are used to limit
the electrical control range of the drive. These
switches are cam operated and are set slightly
wider apart then the drive’s intended full range
of electronic operation (typically 90°). The limit
switches are positioned to provide an electrical
overtravel protection (typically 91°).
If the drive is short-stroked—i.e., the full travel
rotation from 0–100% is reduced to less than the
standard 90° rotation (see page 30)—it may be
desirable to reset the over-travel limit switches
(see page 26). If the limit switches are not reset,
Handswitch operation of the drive (CW, CCW) will
still result in the original full range of travel. Because
the over-travel limit switches define the maximum
electrical drive range, if they are to be reset, they
should be adjusted before performing DCM-2
(demand and position) calibration procedures.
The auxiliary switches are also cam operated,
but have no affect on drive and DCM-2 operation.
Therefore, the auxiliary switches can be adjusted
at any time without affecting performance or
calibration.
25
Page 26
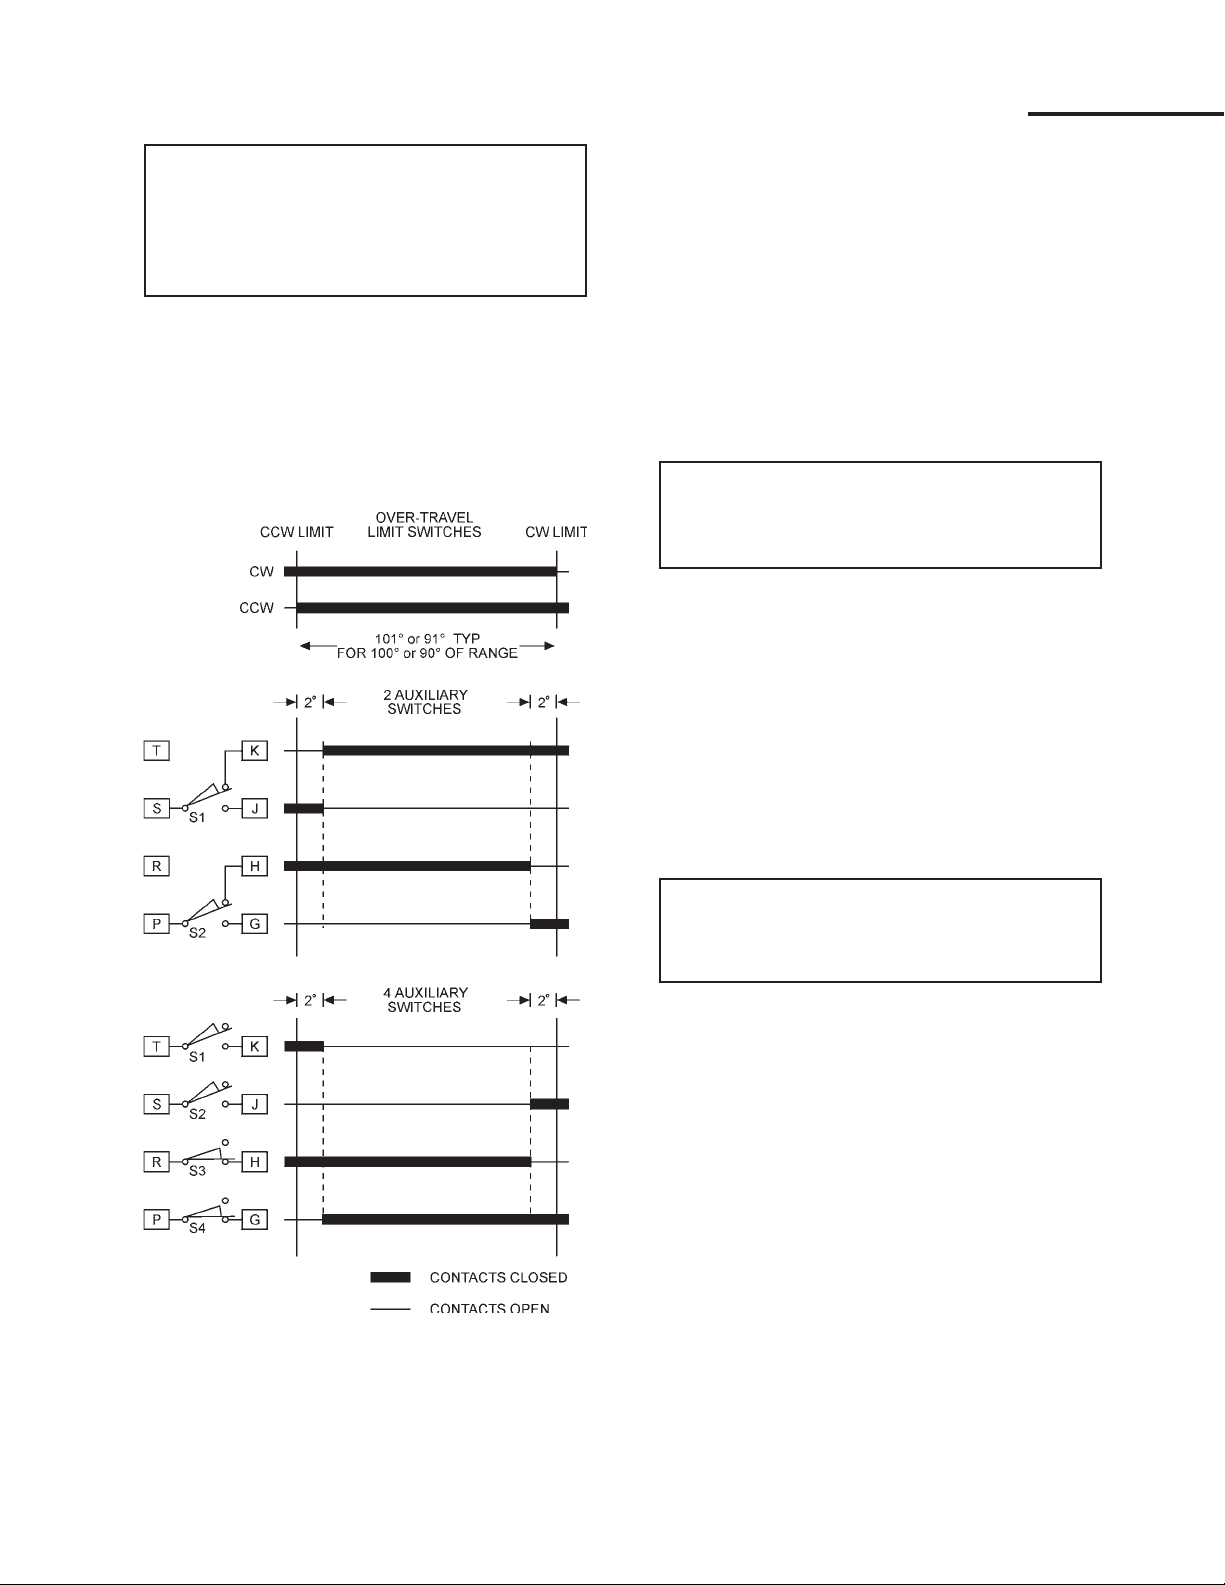
DCM-2 LOCAL INTERFACE Calibration - Switches
NOTE: Y our Beck drive was shipped from the
factory ready for installation; no electrical
adjustments are required before placing it in
operation. Each drive is set up and calibrated
to the specifications that were written into
the equipment order.
Under normal operating conditions there is no
need to recalibrate the control drive. However,
if the application requirements change or are
different than specified on the equipment order,
the drive should be recalibrated according to the
following procedures.
SWITCH ADJUSTMENTS
Control drives are shipped with over-travel
limit switches factory-set for either 101° (11-159,
-209, -309, -409) or 91° (11-169, -269, -369,
-469) of travel unless otherwise specified at time
of order. Limit switches must be set inside the
range of the built-in, non-adjustable mechanical
stops to prevent stalling of the motor. Limit
switches can be reset to limit travel of the output
shaft to any angle down to a minimum of 60°.
Auxiliary switches are set as shown in the figure
at left unless otherwise specified at time of order.
NOTE: The over-travel limit switches are the
switches closest to the drive body. To adjust
the over-travel limit switches, it is necessary
to remove the control end cover.
Switches are operated by cams which are
clamped onto the control shaft. Setting a switch
involves loosening the cam, moving the output
shaft to the desired position, and positioning the
cam so that it just operates the switch at that point.
In the following procedure, the use of a continuity
meter is recommended to determine when the
switch opens or closes. If such a meter is not
available, it is possible to hear the switch click as
the contacts open and close.
Standard Over-travel Limit and
Auxiliary Switch Settings
CAUTION
Do not attach the meter or attempt to move the
switch cams until the drive is disconnected
from the line voltage and auxiliary switches are
disconnected from external power sources.
Setting Over-travel Limit
Switches CW and CCW
This procedure should be used if the factory
over-travel limit switch settings must be changed
in the field. It is advisable to operate the drive fully
in each direction, using the electric Handswitch to
check switch settings before attempting to change
them. Follow these instructions if they require
adjustment:
26
Page 27
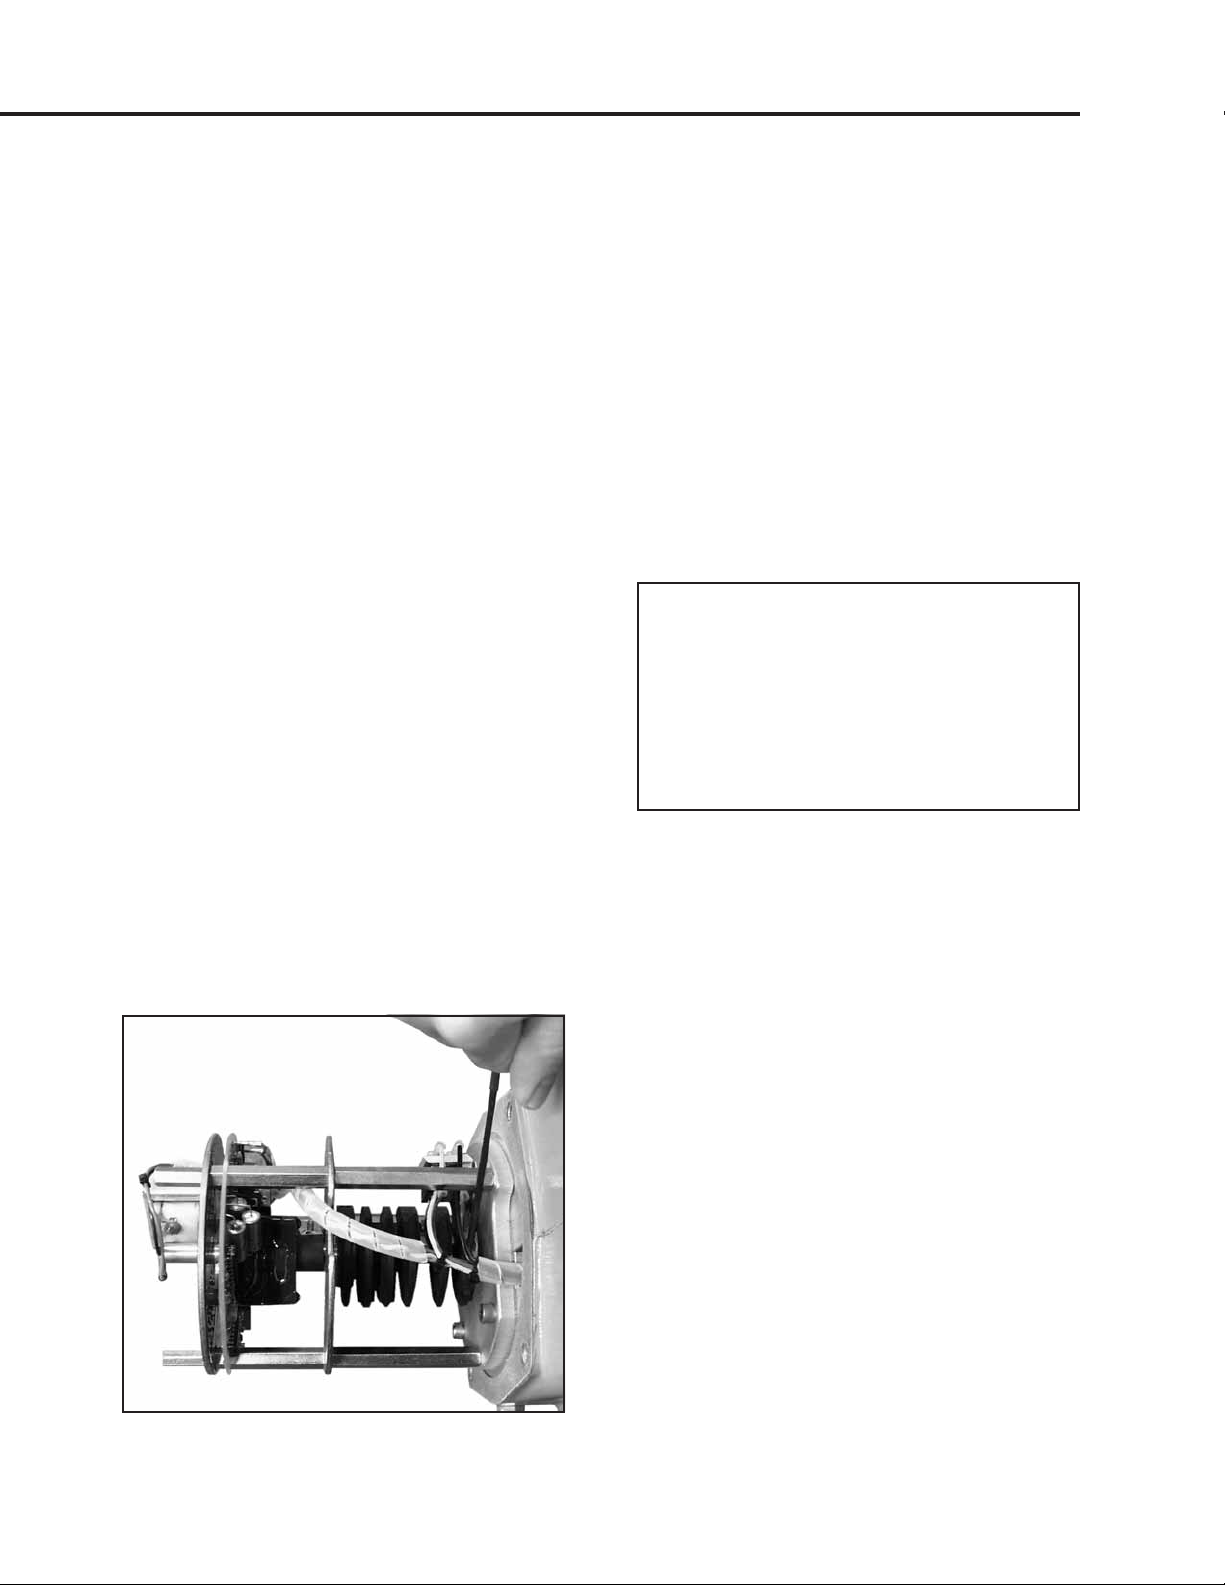
1. Remove the control end cover and terminal
block cover (1/2" bolt heads).
2. Use the electric Handswitch to drive the control
shaft so that the CW switch cam screw is
accessible. Using a 7/64" hex wrench, loosen
the screw so that the cam is just snug on the
shaft (see illustration below).
3. Move the output shaft clockwise to the desired
CW limit.
4. Turn the Handswitch to the “STOP” position.
5. Disconnect power from the drive.
6. Turn the Handswitch to the "AUTO" position.
7. Connect the continuity meter across terminals
B and M. Rotate the cam until the meter shows
no continuity (switch contacts open, switch
clicks).
8. Tighten the cam locking screw to 5 Ib-in
(.56 N•m) torque.
9. Disconnect meter and turn the Handswitch to
the "STOP" position.
10. Reconnect drive power.
11. Rotate the drive’s output shaft in the CCW
direction away from the CW travel limit. Note
the direction of rotation of the lobe of the cam.
The correct cam lobe motion is away from the
switch lever with the switch lever on the lower
part of the cam. If not correct, return to step 2
and reset the cam to the proper orientation.
12. Rotate the output shaft again to the desired CW
travel limit. If the stopping point is reached, the
switch is properly set.
Loosening Switch Cam
13. Repeat instructions for setting CCW travel limit
switch (noting that referenced directions of
rotation should be opposite of those used for
CW switch setting). Connect continuity meter
across terminals B and N.
14. Replace covers and tighten cover bolts to
10 Ib-ft (14 N•m) torque.
15. Rotate index (or index pointer on models
11-159 or -169) to correspond with output shaft
rotation.
Setting Auxiliary Switches
Standard switch settings for drives with 2 or 4
auxiliary switches are shown on the diagram on
page 26. The heavy line indicates a closed circuit.
Follow these instructions to change the operating
point of auxiliary switches:
NOTE: In the following procedure, it is
assumed that switch settings are to be
adjusted so that contacts are open when the
desired position is achieved. If they are to
be adjusted to close, it may be necessary to
reverse the operating mode of the switch by
moving the wire lead to the other terminal on
the switch itself. Be sure to disconnect power
from the switch terminals first.
1. Remove the control end cover and the terminal
block cover (1/2" bolt heads).
2. Use the electric Handswitch to drive the shaft
so that the switch cam is accessible. Using a
7/64" hex wrench, loosen the screw so that the
cam is just snug on the shaft.
3. Move the output shaft to the desired position.
4. Turn the Handswitch to the “STOP” position.
5. Disconnect power from the drive and switch
terminals.
6. Connect the continuity meter across the
appropriate terminals. See the diagram on
page 26 or the drive wiring diagram. Rotate
the cam to operate the switch.
7. Tighten the cam locking screw to 5 Ib-in
(.56 N•m) torque.
8. Disconnect the meter and reconnect power.
9. Move the drive’s output shaft in the desired
direction to verify that the cam lobe moves
away from the switch lever. If not correct,
return to step 2 and reset the cam to the proper
orientation.
10. Replace covers and tighten cover bolts to
10 Ib-ft (14 N•m) torque.
27
Page 28

DCM-2 LOCAL INTERFACE Calibration - Demand
DEMAND CALIBRATION
DCM-2 boards are designed to accept a
4–20 mA (or 1–5 V dc) analog demand signal.
Narrower spans within this range can also be
accommodated for split range operation (see page
29). The input comes calibrated from the factory
for the full range unless otherwise specified by
the customer. It is not necessary to calibrate the
Demand input when the drive is installed; however,
it can be easily accomplished using the DCM-2
pushbutton controls (or HART or Serial interface)
and a signal source. Following this procedure
is only necessary to compensate for slight
differences between the signal source calibration
and the DCM-2 factory calibration, or if reduced
range calibration is desired for special operating
scenarios such as split ranging.
Calibration Procedure
1. Remove the DCM-2 cover (1/2” bolt heads).
2. Ensure the Handswitch is in the “STOP”
position. This will prevent the drive from
repositioning during this procedure.
3. Apply the desired 0% Demand input signal to
the drive (e.g., 4 mA for 4–20 mA input). If the
drive has not been wired, the Demand input
signal is connected at terminals AA (+) and BB
(–) as shown in the diagram on page 17.
4. Press and hold the “CALIBRATE” pushbutton
on the DCM-2 customer interface panel, then
press the “SET DEM 0%” pushbutton until the
“ACKNOWLEDGE” LED is lit.*
5. Apply the desired 100% Demand input signal
to the drive (e.g., 20 mA for 4–20 mA input).
6. Press and hold the “CALIBRATE” pushbutton
on the DCM-2 customer interface panel, then
press the “SET DEM 100%” pushbutton until
the “ACKNOWLEDGE” LED is lit.*
7. Turn the Handswitch to the “AUTO” position.
NOTE: The drive may reposition.
8. Run the drive through its full operating range to
ensure proper response to the Demand input
signal.
9. Replace the compartment covers and tighten
the cover bolts to 10 lb-ft (14 N•m) torque.
* If the “ACKNOWLEDGE” LED does not light, but
the “DEMAND” LED does light, the signal is out
of acceptable range and was not accepted by
the DCM-2. This is typically caused by trying to
set 0% and 100% values too close together (i.e.,
less than 4 mA difference).
28
Page 29
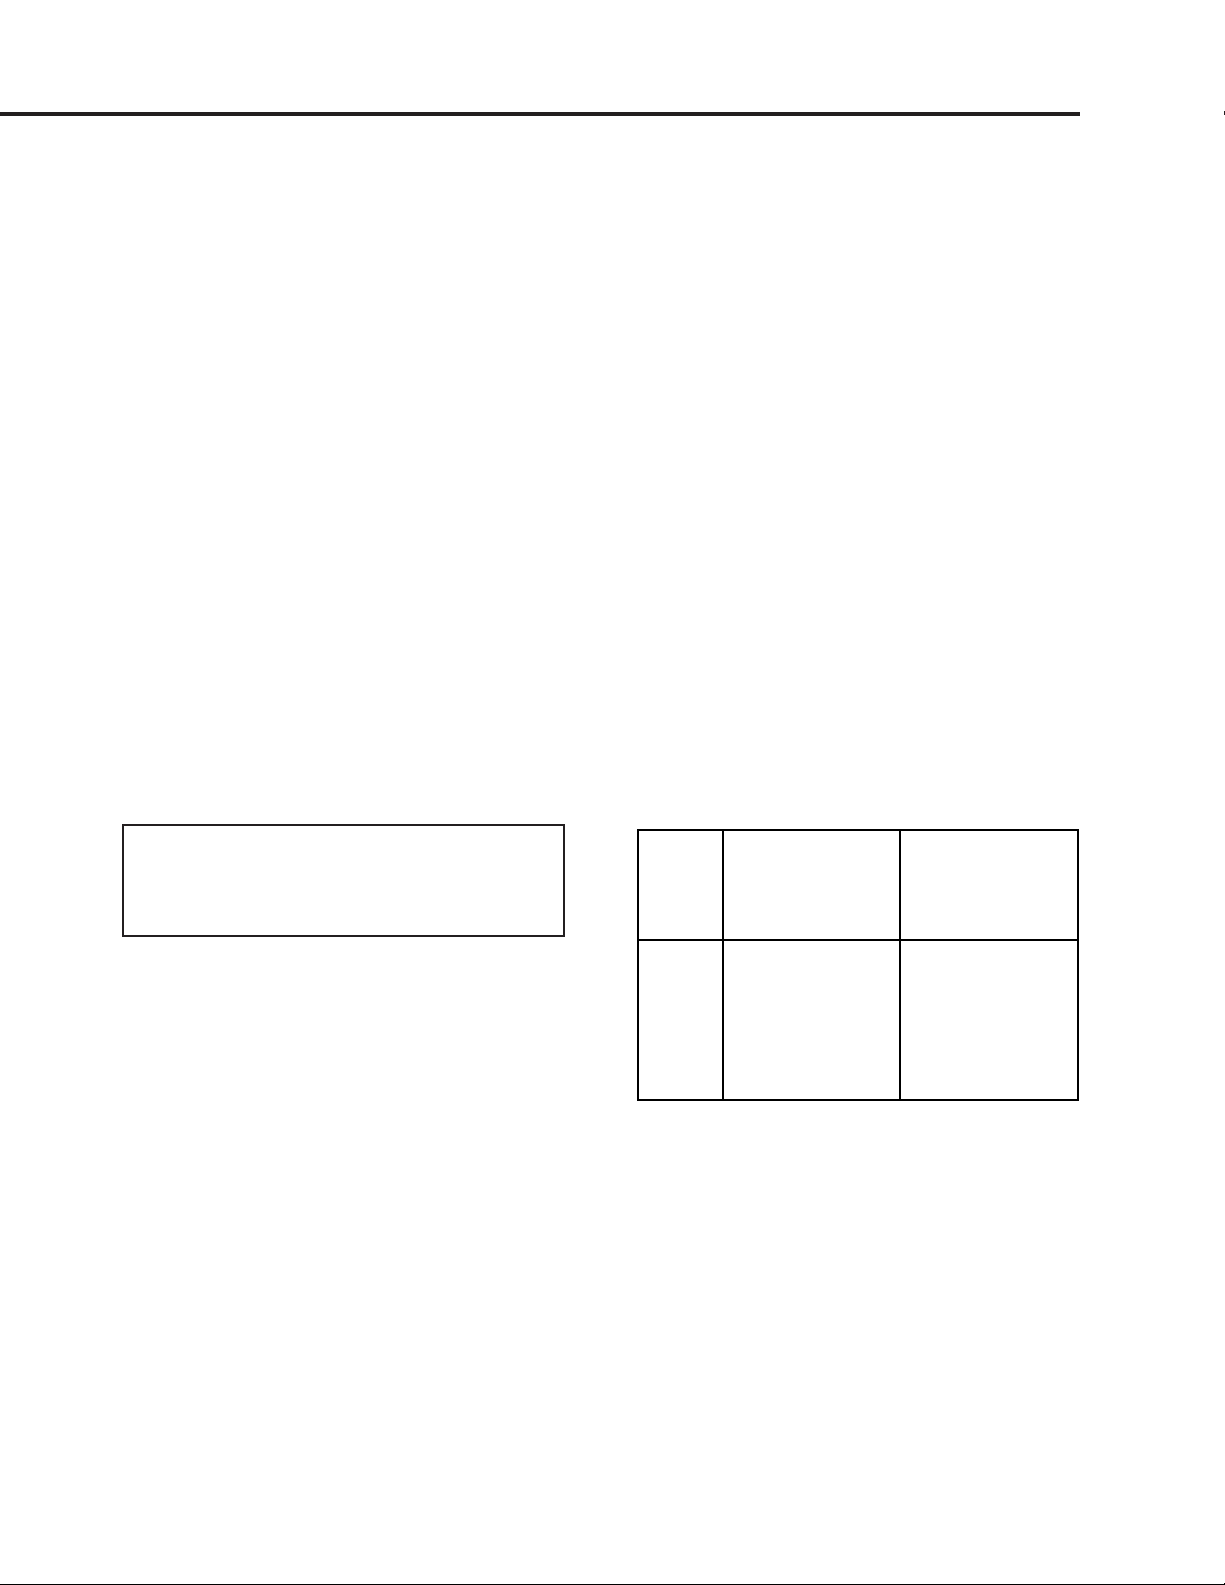
Split Range Operation
Demand Square Function
Input Actual Output
Signal Standard Output Position
(mA) (% of Span) (% of Span)
4.0 0 0
5.6 10 1
12.0 50 25
15.2 70 49
18.4 90 81
20.0 100 100
It is sometimes desirable or necessary to have
more than one final control element controlling a
single process. Often, this type of control strategy
requires that two to four Beck drives each respond
to different portions of one 4–20 mA Demand signal
from the control system.
This type of operation is called split range
operation. For example, consider the most
common split range scenario—two drives split
ranged for 50% of the 4–20 mA Demand signal
input. Both drives are wired in parallel to receive
the same 4-20 mA signal (note that the 250 Ohm
resistor (see DCM-2 illustration on page
R11
78) must be removed from one of the two drive
DCM-2 boards to allow HART® communications.
If more than two drives are split ranged, the R11
resistor must be removed from all the DCM-2
boards but one), but each drive’s interpretation
of the signal must be different. One drive must
interpret 4–12 mA as 0–100% Demand, and
one drive must interpret 12–20 mA as 0–100%
Demand. This requires that the drives have
different Demand signal calibrations.
To set up a split range operation, follow the
steps listed below (see page 24 for location of
pushbutton controls).
6. Press and hold the “CALIBRATE” pushbutton
on the DCM-2 customer interface panel, then
press the “SET DEM 100%” pushbutton until
the “ACKNOWLEDGE” LED is lit.*
7. Repeat this process for the remaining drives
to be split-ranged.
8. Run the drive through its full operating range to
ensure proper response to the Demand input
signal.
9. Replace the DCM-2 cover. Tighten the cover
bolts to 10 lb-ft (14 N•m) torque.
* If the “ACKNOWLEDGE” LED does not light, but
the “DEMAND” LED does light, the signal is out
of acceptable range and was not accepted by
the DCM-2. This is typically caused by trying to
set 0% and 100% values too close together (i.e.,
less than 4 mA difference).
Square Function
Beck drives can be set up to position the output
shaft proportionally to the square of the Demand
input signal (see table below). This function is
factory configurable, or may be configured using
the HART or Serial interface.
NOTE: Ensure that the L.O.S. (Loss of
Demand input signal) settings of the drives are
appropriate for the configuration. See page 21
for information on changing L.O.S. settings.
1. Remove the DCM-2 cover (1/2” bolt heads).
2. Ensure the Handswitch is in the “STOP”
position. This will prevent the drive from
repositioning during this procedure.
3. Apply the desired 0% Demand input signal to
the drive. (Following the example above, the
minimum signal for the first drive would be 4
mA. The second drive’s minimum signal would
be 12 mA). If the drive has not been wired, the
Demand input signal is connected at terminals
AA (+) and BB (–) as shown in the diagram on
page 17.
4. Press and hold the “CALIBRATE” pushbutton
on the DCM-2 customer interface panel, then
press the “SET DEM 0%” pushbutton until the
“ACKNOWLEDGE” LED is lit.*
5. Apply the desired 100% Demand input signal
to the drive. (Following the example above,
the maximum signal for the first drive would be
12 mA. The second drive’s maximum signal
would be 20 mA).
29
Page 30
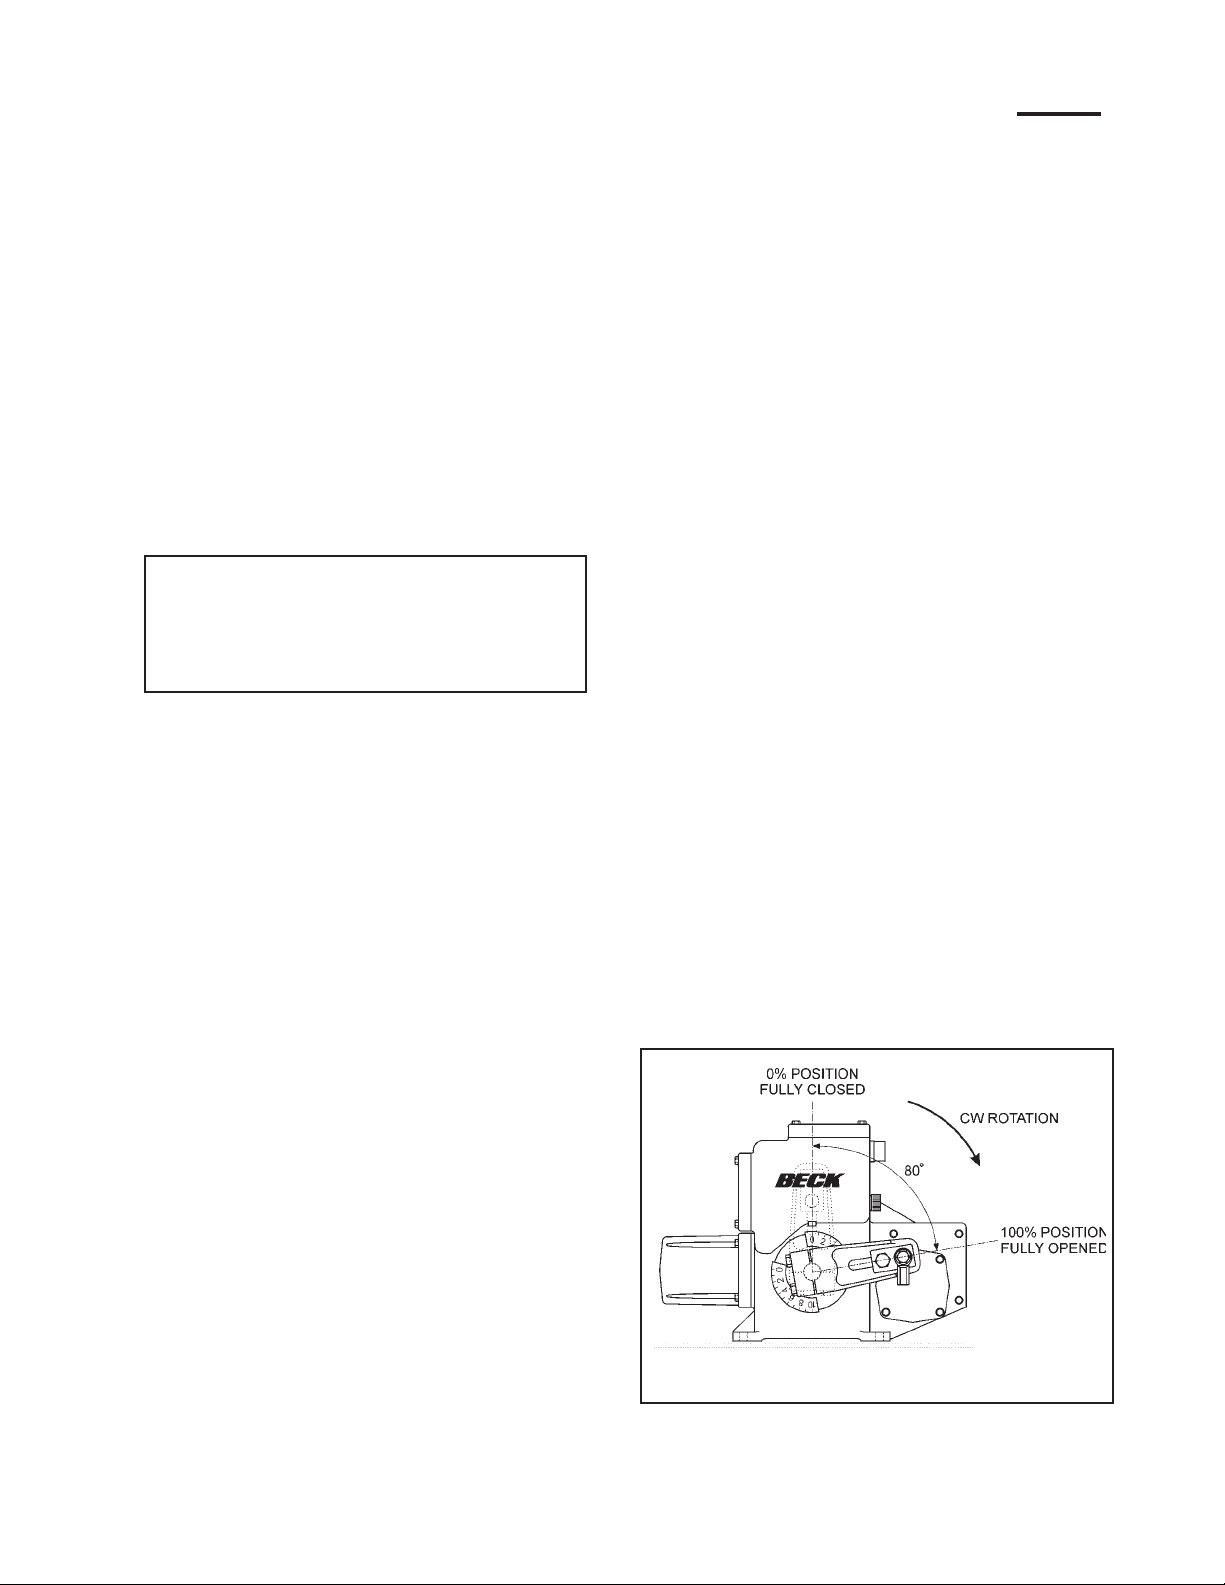
DCM-2 LOCAL INTERFACE Calibration - Position
POSITION CALIBRATION
In order to correctly position the drive output
shaft in response to the Demand input signal, the
DCM-2 receives a position signal from the drive’s
position sensor and compares this actual position
to the Demand input. This process requires that the
DCM-2 interprets the position signal appropriately
for the full range of desired travel. This procedure
will calibrate the DCM-2 to accept the position signal
and interpret the appropriate 0–100% range. Note
that all drives come factory calibrated and there is
no need to recalibrate unless changes in operation
are desired.
It is also possible to calibrate the position signal
using the HART or Serial interface.
Calibration Procedure
NOTE: Prior to adjusting the travel range
electronically (using the DCM-2), it is
recommended that the over-travel protection
switches be reset just outside the intended
travel range (see page 26).
1. Remove the DCM-2 cover (1/2” bolt heads).
2. Position the drive at the desired minimum
position (i.e., the desired physical position of
the drive’s output shaft corresponding to the
0% Demand input signal).
3. Ensure the Handswitch is in the “STOP”
position. This will prevent the drive from
repositioning during this procedure.
4. Press and hold the “CALIBRATE” pushbutton
on the DCM-2 customer interface panel, then
press the “SET POS 0%” pushbutton until the
“ACKNOWLEDGE” LED is lit.*
5. Position the drive at the desired maximum
position (i.e., the desired physical position of
the drive’s output shaft corresponding to the
100% Demand input signal).
6. Ensure the Handswitch is in the “STOP”
position. This will prevent the drive from
repositioning during this procedure.
7. Press and hold the “CALIBRATE” pushbutton
on the DCM-2 customer interface panel, then
press the “SET POS 100%” pushbutton until
the “ACKNOWLEDGE” LED is lit.*
8. Optional: Adjust the over-travel limit switches (see
page 26) just outside the 0% and 100% limits.
9. Verify that the drive’s 0% and 100% positions
are correct. If not, repeat this procedure.
10. Replace the compartment cover and tighten
the cover bolts to 10 lb-ft (14 N•m) torque.
* If the “ACKNOWLEDGE” LED does not light, but
the “POSITION” LED does light, the signal is out
of acceptable range and was not accepted by the
DCM-2.
Short-stroke Operation
(Reducing Full Rotation)
Typically, it is best to use the full 100° (or 90°
for quarter-turn valve drives) rotation of the drive
in response to the 0–100% Demand input signal—
this allows full flexibility in arranging the drive’s
torque to be distributed for the best mechanical
advantage relative to the driven load.
In certain applications, as a last resort, it may
become necessary to reduce the full rotation of
the drive. In these applications, the DCM-2 can be
calibrated to accommodate reduced stroke. The
recommended minimum full stroke rotation is 60°
(although it is advisable to make the range as close
to 100° (or 90°) as possible for the highest position
resolution attainable with the CPS and to avoid
reduction in torque (linkage connected drives); if
the driven element stroke rotation is less than 100°
(where applicable), a linkage can be used to allow
the driven element to move the correct rotation
while still allowing the drive to rotate 100°).
To reduce the full rotation of the drive (shortstroke), use the customer interface panel and
follow the "position calibration" instructions (this
page). Short-stroking can also be accomplished
by using the HART (see page 55) or Serial (see
page 71) interface.
The illustration below represents a Beck drive
with linkage requiring an 80° full stroke rotation.
(Please note that the crank arm may be adjusted
to any start angle orientation).
NOTE:
Crank arm may be adjusted to any start angle orientation.
The orientation shown above has been randomly
selected for the purpose of this example.
30
Page 31
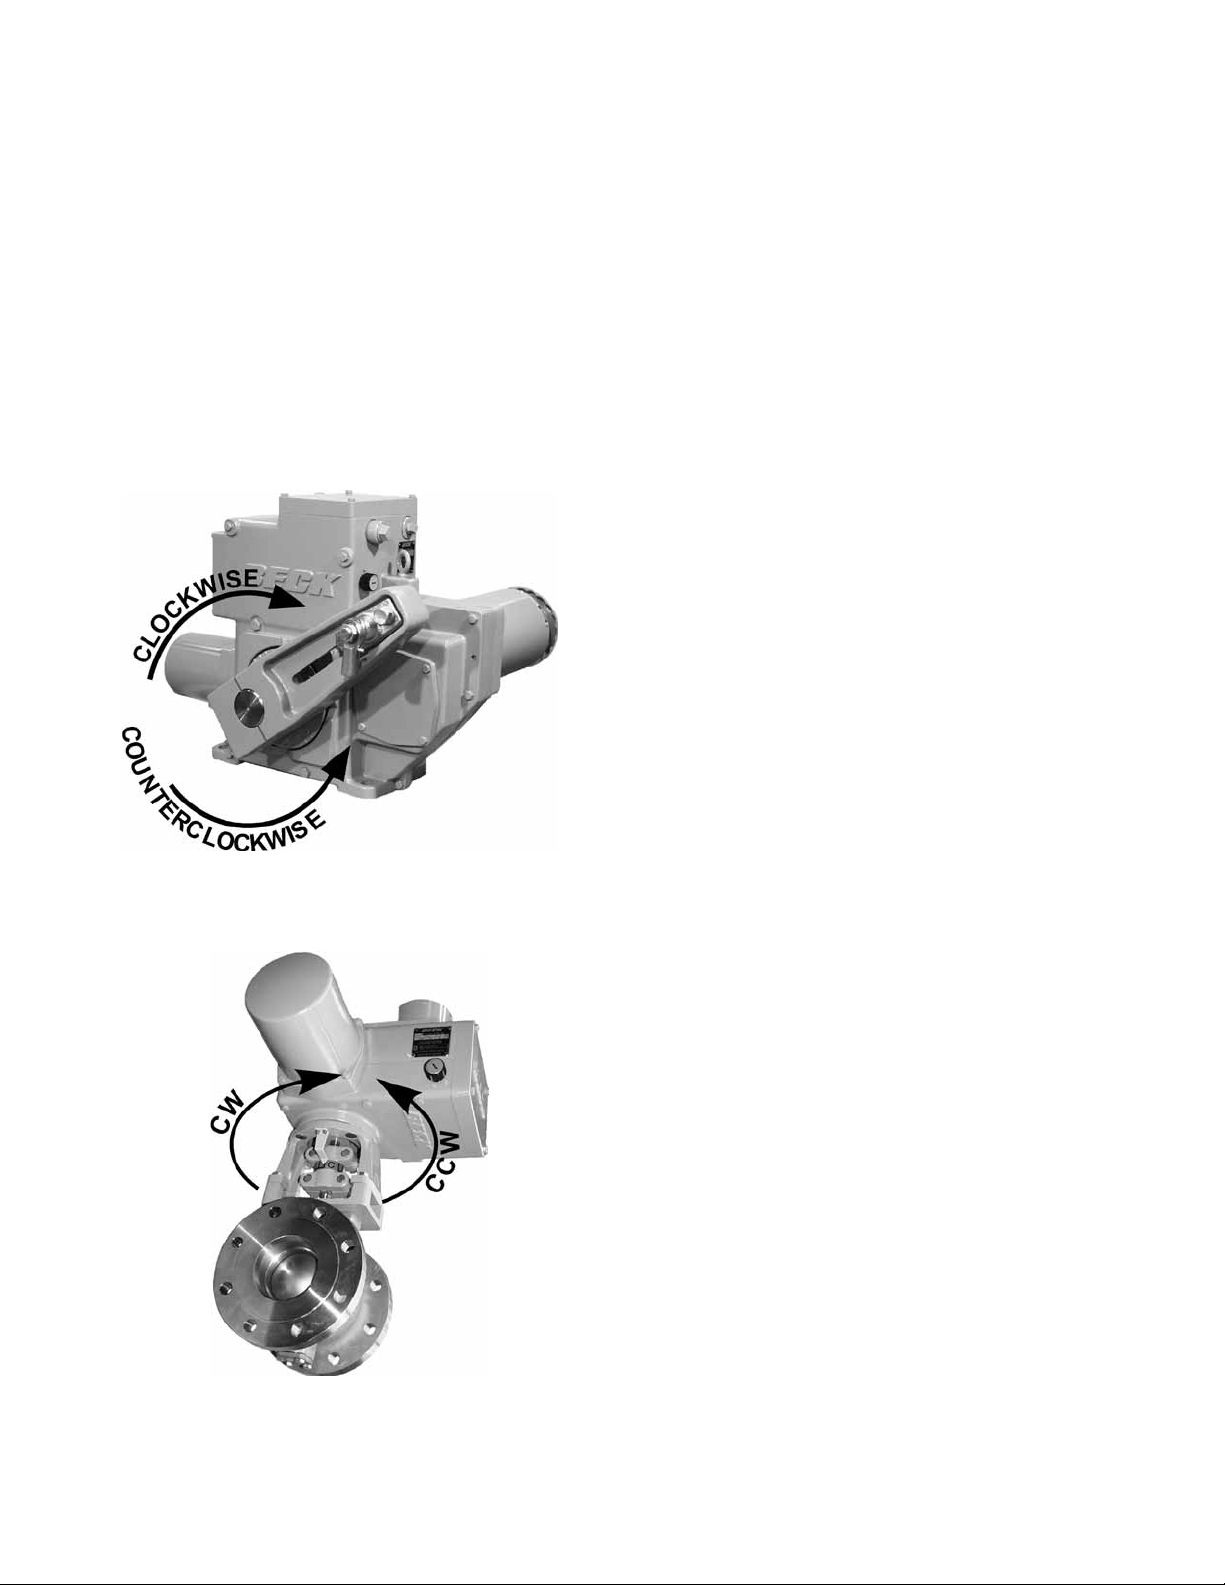
DCM-2 LOCAL INTERFACE Calibration - Direction Change
DIRECTION OF OUTPUT SHAFT
ROTATION (CW vs. CCW)
Direction of output shaft rotation is determined
by observing the end of the output shaft (see
illustrations below). Direction of rotation is defined
as the direction of output shaft rotation produced
by an increasing Demand signal. Unless otherwise
specified at the time of order, the output shaft is
factory set to rotate clockwise in response to an
increasing signal.
Changing the direction of output shaft rotation
is easily accomplished using the DCM-2 customer
interface panel (see page 23 for location of
pushbutton controls) or the HART or Serial
interface. Follow the steps below.
1. Remove the DCM-2 cover (1/2” bolt heads).
2. Position the drive at the present 0% position.
3. Press and hold the “CALIBRATE” pushbutton
on the DCM-2 customer interface panel, then
press the “SET POS 100%” pushbutton until
the “ACKNOWLEDGE” LED is lit.*
—OR—
2. Position the drive at the present 100%
position.
3. Press and hold the “CALIBRATE” pushbutton
on the DCM-2 customer interface panel, then
press the “SET POS 0%” pushbutton until the
“ACKNOWLEDGE” LED is lit.*
4. Ensure the drive operates as desired.
5. Replace the DCM-2 cover and tighten the
cover bolts to 10 lb-ft (14 N•m) torque. Reset
travel index.
* If the “ACKNOWLEDGE” LED does not light, but
the “POSITION” LED does light, the signal is out
of acceptable range and was not accepted by the
DCM-2.
NOTE: When either of the above procedures is
performed, both the 0% and 100% positions are
automatically set.
31
Page 32
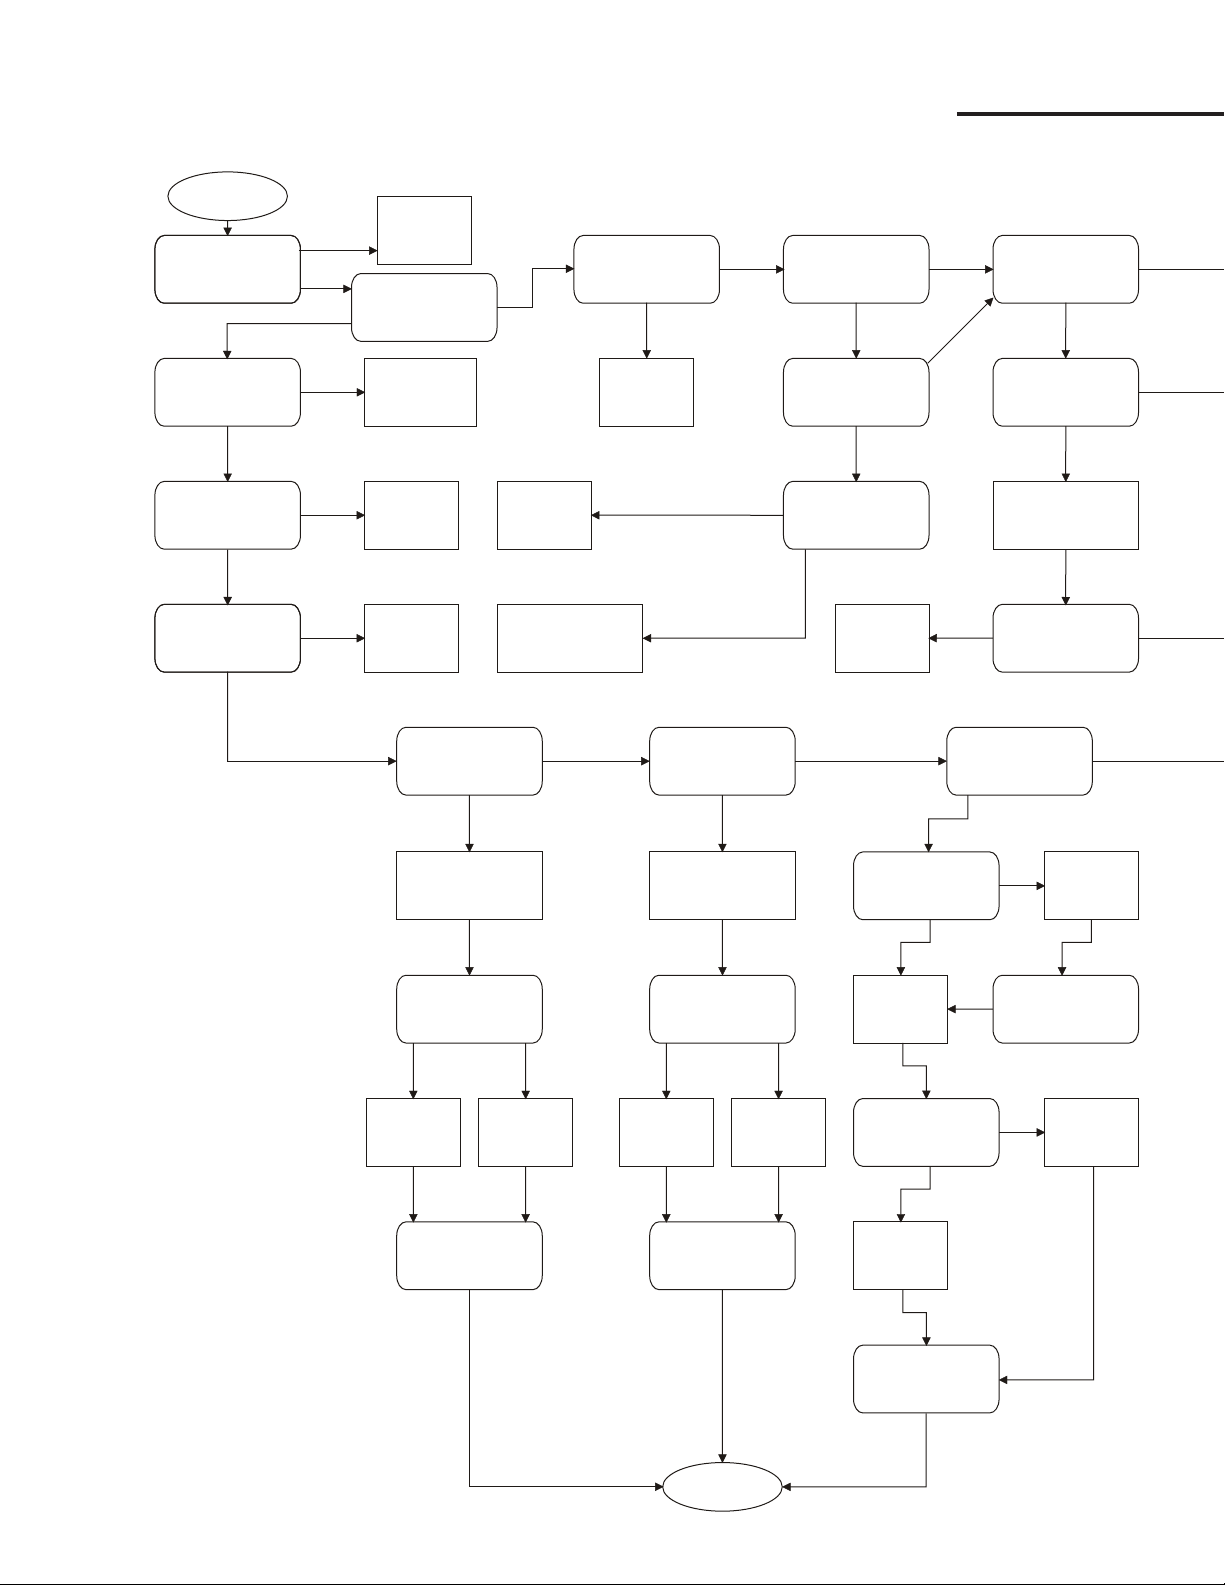
START
Is there a jumper
from terminal A
to terminal C?
Does drive work
with Handswitch?
Does drive
work properly
CW?
Does drive
work properly
CCW?
Does output shaft
move with Hand-
switch in “STOP”?
Does motor
appear to
energize?
Does drive run
randomly and/or
erratically?
Is the R/C
network correct?
Is there 0 volts
across fuse “F1”
of the DCM?
Is the DCM
"PWR" LED lit?
Is the “STAT” LED
on the DCM lit?
Is AC voltage at
terminals B & C
between 102 &
132 V ac?
Replace the fuse,
see diagram on
p. 78 for location
Connect
proper
power
Install
jumper
Replace
the
DCM
Check
drive
calibration
Go back
to
start
Check for correct
R/C network,
see p. 79
Check SLM for
wear; rebuild or re-
place as necessary
Replace
faulty
components
Is the “DEMAND”
LED lit?
Is the “POSITION”
LED lit?
Is the “TRQ/THRUST”
LED lit?
Check the voltage
across test points
TP2 & TP3 (R11)
Check the voltage
across test points
TP1&TP4
Is the torque sensing
cable connected
to the DCM?
Is the “TRQ/THRUST”
LED still on?
Is the “TRQ/THRUST”
LED still on?
Is the “TRQ/THRUST”
LED still on?
Is the signal out-
side the expected
calibration range by
>5% of span?
Is the signal
greater than the
LOS threshold?
Is the “DEMAND”
LED still on?
Is the “POSITION”
LED still on?
Connect
the
cable
Correct the
over-torque
condition
Remove
load from
crank arm
Replace
the
DCM
Replace
the
DCM
Apply
correct demand
signal
Recalibrate
drive,
see p. 24
Replace
the
DCM
Consult
Factory
YES
YES
YES
YES
YES
NO
NO
YES
YES
YES
YES
YES
YES
YES
YES YES
YES
YES YES
YES
YES
YES
YES
NO
NO
NO
YES
NO
NO
NO
NO
NO
NO
NO
NONO
NO
NO
NO
NO
NO
DCM-2 LOCAL INTERFACE Troubleshooting
32
Page 33
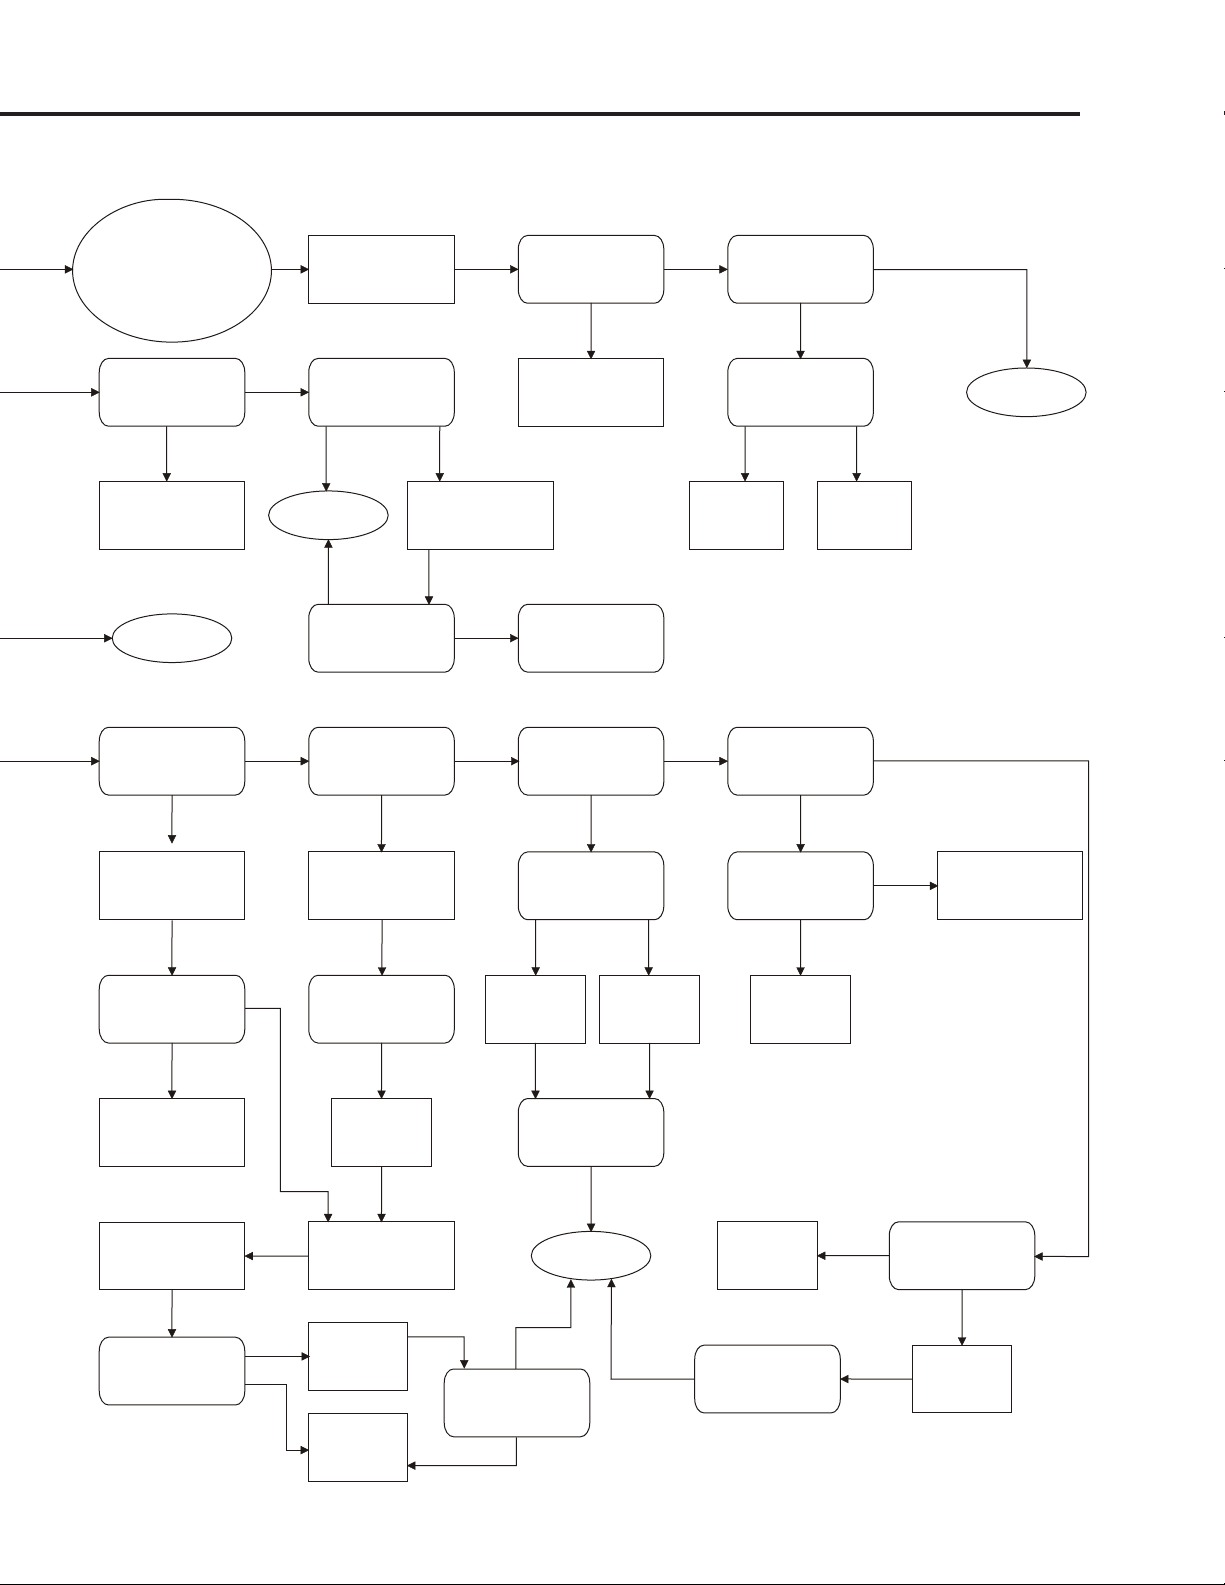
Does Handwheel
shudder about
one position?
Is the “TEMP °F”
LED lit?
Is the “STALL”
LED lit?
Is the “TEMP °F”
LED still lit?
Is binding or an
obstruction
present?
Clear
obstruction
Move Handswitch
to CW/CCW per
direction drive does
not move
Check SLM for damage;
rebuild or replace
as necessary.
Check linkage and
driven element
Replace
Handswitch,
see p. 77
Is the “FB OPEN”
LED lit?
Does the voltage
across terminals
B–U/B–V = line
voltage?
Is green/red wire
connected to NC
switch contact?
Is the “STOP/LIMIT”
LED lit?
Does voltage from
CW/CCW switch
green/red to term.
B = line voltage?
Does Handwheel
turn freely without
repositioning drive?
Does drive respond
correctly and is
“STALL” LED out?
Does drive respond
correctly and is
“STALL” LED out?
Is binding or
an obstruction
present?
Place Handswitch in
“STOP” - check
linkage and driven
element
Clear
obstruction
Place Handswitch
in “AUTO”-modulate
control signal
both ways
Replace
limit switch,
see p. 76
Connect
wire
properly
Apply correct
loop
resistance
Replace the
DCM
Replace the
DCM
Confirm
proper operation
of drive
Replace
the
DCM
Replace
the
DCM
Confirm
proper operation
of drive
Consult
Factory
Consult
Factory
Consult
Factory
Consult
Factory
YES
YES YES
YES
YES YES YES
YES
YES
YES
YES
YES
YES
YES
YES
NO
YES
YES
YES
YES
NO
NO
NO
NO NO
NO
NO
NO
NO
NO
NO NO
NO NO
NO
Is a feedback loop
of 800 ohms or less
connected to the
terminal board?
Is the “FB OPEN”
LED still on?
Is the Handswitch
in “AUTO”?
Is the “STAT”
LED still on?
Is the “STAT”
LED still on?
Restore ambient
temperature to
drive’s rated range
Cycle drive
power
off and on
Place drive
in “AUTO”
Check limit switch
wiring & setting,
see p. 26
Note: Choose
the side of the slash
corresponding with the
direction of travel in which
the drive is not working;
i.e., CW/CCW or
green/red
33
Page 34
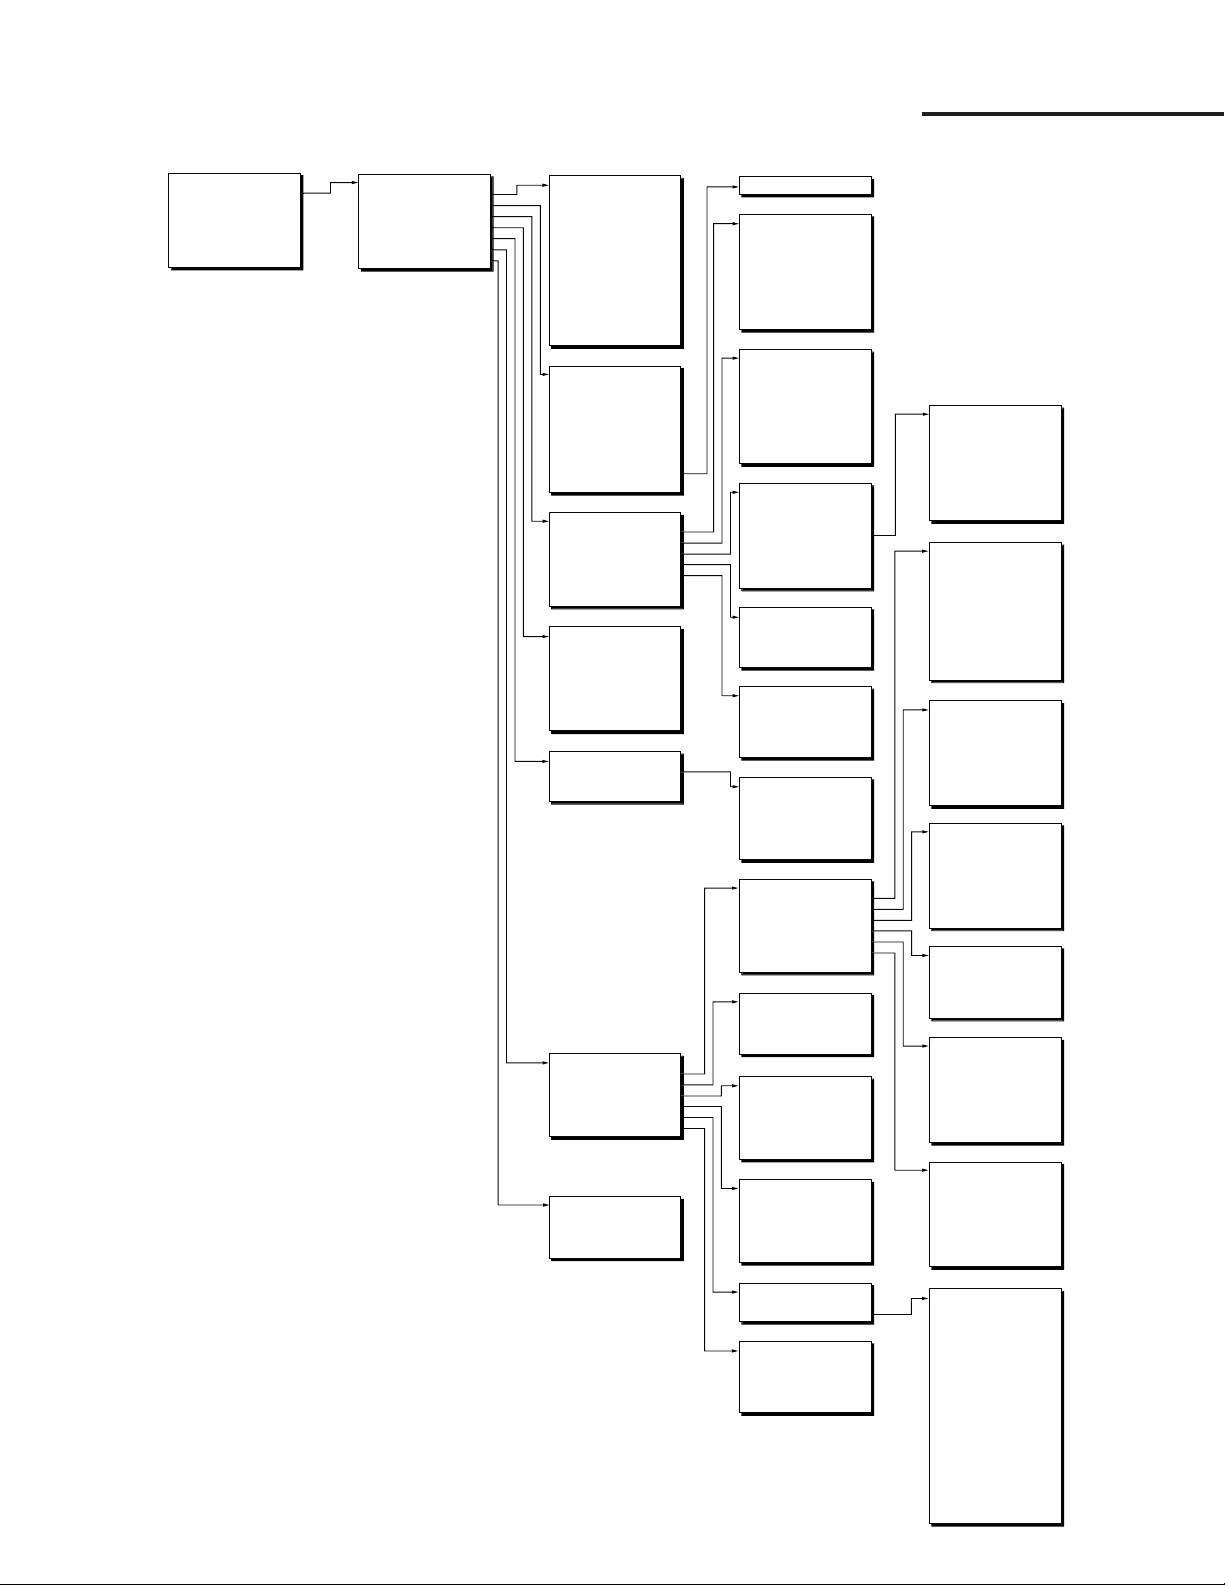
DCM-2 HART INTERFACE Communication
* THIS VALUE CAN BE EDITED
** INDICATES AN ACTION RATHER THAN THE VIEWING OR EDITING
OF A PARAMETER
THIS IS THE MENU DISPLAYED BY THE HART COMMUNICATOR
AT POWER UP IF COMMUNICATION IS ESTABLISHED
THIS AND OTHER OFFLINE MENUS ARE COMMON TO ALL
HART COMMUNICATOR APPLICATIONS - MANY SUBMENUS EXIST
(1)
(2)
1
BLOCK REFERENCE NUMBERS APPEAR AT THE
UPPER RIGHT CORNER OF EACH BLOCK.
Online (1)
1 Functions
2 Position 45.4%
3 Demand 45.4%
4 Loop(Dem) 11.29 mA
5 Trq/Thrust 3%
6 Temp 73 degF
7 Feedback 11.30 mA
2
Functions
1 Setup Checklist
2 Device Information
3 Configuration
4 Statistics
5 Manual Operation
6 Diagnostics
7 Calibration Trim
3A
Setup Checklist
1 Drive S/N*
2 Drive Dir* CW Incr
3 Feedback* Enabled
4 CPS Zero%* 1.000 v
5 PositionUnit* deg
6 MaxTravel* 100 deg
7 Travel* 100 deg
8 DemRngLwr* 4.00 mA
9 DemRngUpr* 20.00 mA
Dem Curve* Linear
•
•
•
Alarm Mask 0xffffffff
4B
General Setup
1 Drive Dir* CW Incr
2 MaxTravel* 100 deg
3 Travel* 100 deg
4 StepSize* 0.100%
5 Stall Time* 300 S
6 StallProt* Enabled
7 LimitSwitch* Accept
8 PositionUnit* deg
9 Temperature Unit* degF
4C
PositionSensrSetup
1 Set Pos 0%**
2 Set Pos 100%**
3 PresCPS V 2.816 v
4 CPS Zero%* 1.000 v
5 CPS Span 4.000 v
6 CPS RngLwr 1.000 v
7 CPS RngUpr 5.000 v
8 Pos S/N* 454
9 Snsr Dir CW Incr
4D
Demand Setup
1 DemRngLwr * 4.00 mA
2 DemRngUpr * 20.00 mA
3 Dem Curve* Linear
4 Dem Curve Spcl
5 LOS Mode* Stay
6 LOS Pos* 50.00 %
7 DemLimLwr* 3.20 mA
8 DemLimUpr 22.00 mA
4E
Feedback Setup
1 FB RngLwr* 4.00 mA
2 FB RngUpr* 20.00 mA
3 Feedback* Enabled
4 FB Curve* Linear
4F
Torque Setup
1 Trq/Thrust* Enabled
2 Ovt Prot* Enabled
3 ShutDwnTrq* 150
4 Trq Null* 163 TK
5 Trq Const* 279 TK
4G
Op Mode
Follow*
Hold*
RunCW*
RunCCW*
Stay
Stop*
4H
Status
1 LED Status
2 Operating Status
3 Switch Status
4 Local Cntrl Status
5 Line Freq
6 CW Inhibitors
7 CCW Inhibitors
4I
4J
CW Torque
1 Segment 1 0 %
2 Segment 2 12 %
•
•
•
Segment 10 66 %
4K
CCW Torque
1 Segment 1 5 %
2 Segment 2 6 %
•
•
•
Segment 10 62 %
4L
Alarm Setup
1 AlarmPol* Drops Out
2 Alarm Mask*
4M
RealTimeClock
1 RTC Day* 8
2 RTC Month* 1
3 RTC Year* 2006
4 Hour (24)* 8
5 Minute* 5
4A
Review (3)
3B
Device Information
1 Tag* BECK2006
2 Descriptor*
3 Message*
4 Model# 11-159
5 Drive S/N*
6 Instld* 23/05/2006
7 Setup* 23/05/2006
8 Calbrtd* 28/05/2006
9 Review
Poll addr* 0
3C
3D
Statistics
1 Starts 485213
2 Reversals 242606
3 Stalls 0
4 OverTorques 14
5 Pk Torque 127%
6 TotRunTm 53268 S
7 High Temp 155 degF
8 Low Temp 23 degF
3E
3F
Diagnostics
1 Status
2 Tests
3 CW Torque
4 CCW Torque
5 Alarm Setup
6 RealTimeClock
3G
Calibration Trim
1 PresCPS V* 2.816 v
2 Loop(Dem)* 11.29 mA
3 Feedback* 11.29 mA
4 Trq/Thrust* 3 %
5A
Dem Curve Spcl
1 DemNode1X 0 %
2 DemNode1Y 0 %
3 DemNode2X 5 %
4 DemNode2Y 5 %
•
•
•
DemNode21X 100 %
DemNode21Y 100 %
5B
LED Status
Status OFF
Reverse OFF
Forward OFF
Demand OFF
Position OFF
Trq/Thrust OFF
Stall OFF
Temperature OFF
FB Open OFF
Limit OFF
Acknowledge OFF
5C
Operating Status
Dem <> Limits OFF
Pos <> Limits OFF
Temp <> Limits OFF
Torq <> Limits OFF
Over Torq Stop OFF
Stalled OFF
Feedback Open OFF
Switch Block OFF
5D
Switch Status
LV Lim CCW OFF
LV Lim CW OFF
OvrRd CCW OFF
OvrRd CW OFF
OvrRd Stop OFF
HndSw CCW OFF
HndSw CW OFF
HndSw AUTO OFF
5E
Local Cntrl Status
Calibrate OFF
Set Pos 100% OFF
Set Pos 0% OFF
Set Dem 100% OFF
Set Dem 0% OFF
5F
CW Inhibitors
Balance ON
Supervisory OFF
Stall OFF
OverTrq/Thr OFF
Switch Block OFF
Bad Pos Sig OFF
Bad Dem Sig OFF
Local Cal OFF
5G
CCW Inhibitors
Balance ON
Supervisory OFF
Stall OFF
OverTrq/Thr OFF
Switch Block OFF
Bad Pos Sig OFF
Bad Dem Sig OFF
Local Cal OFF
5H
Alarm Mask
DemandLOS ON
Trq/Thrust High ON
Stall ON
Trq/Thrust Stop ON
Stop/Limit ON
FeedbackLOS ON
Temperature ON
PositionLOS ON
RTC Fail ON
Torq/Thrust/MeasFail
PositionA/D Error
DemandMeasFail ON
Reserved 1 ON
PositionLOS ON
TemperatureMeasFail
MemoryFail ON
InvalButtonPress ON
DemandTooHigh ON
DemUnderHART/FF Ctl ON
DemUnderPAT Ctl ON
(3) PROVIDES AN EXTENDED LIST OF DRIVE PARAMETERS
Tests
1 FB Out Test**
2 Board Self-Test**
3 Identify Device**
4 Board Reset**
Configuration
1 General Setup
2 PositionSensrSetup
3 Demand Setup
4 Feedback Setup
5 Torque Setup
6 Restore to Factory**
7 Use Default Setup**
Manual Operation
1 Op Mode* Follow
2 Demand* 45.3%
3 Reset Stall**
BECK-MK2 HART COMMUNICATOR MENUS FOR THE DCM-2
34
Figure 1
Page 35
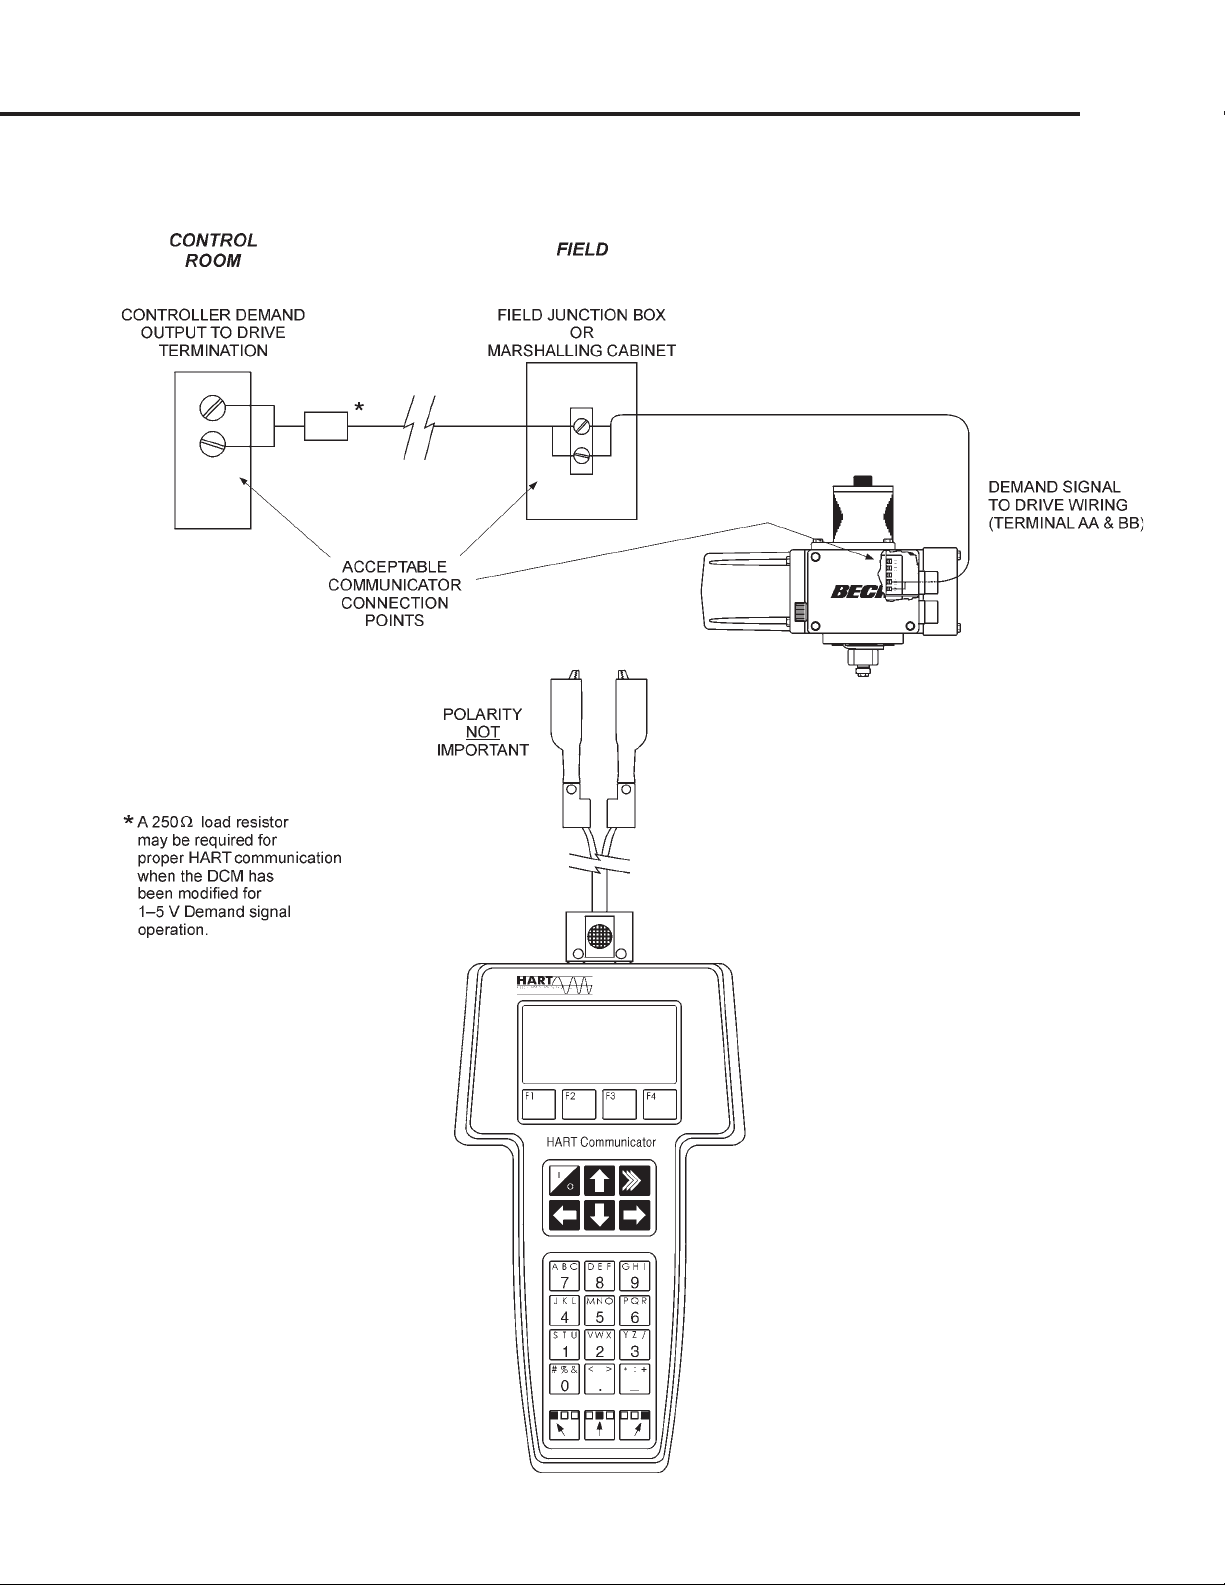
HANDHELD COMMUNICATOR WIRING CONNECTIONS
35
Page 36

DCM-2 HART INTERFACE Communication
The DCM-2 board is the control center of the
drive. Drive configuration and calibration are
accessed and set through the DCM-2 board. Using
the HART interface requires a HART
communicator. Typically, a universal model 275/375
HART® communicator is used, but any device,
computer or controller capable of communicating
with HART® devices and supporting the Beck DCM-
2 device description can be used. This instruction
supports drives built after 12/1/06 equipped
with a DCM-2 (p/n 22-5012-59). The DCM-2 is
designed to interface using a new universal
device description (BECK-MK2) but the firmware
can be set to closely emulate older revisions
thus allowing a HART communicator to interface
with the new DCM-2 using an earlier revision
device description. This is an emergency
feature for when HART communications are
necessary , but the user does not have a new DD.
To access all DCM-2 features and ensure that
all engineering units are correctly displayed,
the user must load the BECK-MK2 device
description to the communicator. See page
69 for the serial command required to set the
firmware “HART type”. Please contact the
factory for instructions regarding setting the
HART type using a handheld communicator.
®
compatible
HART® INTERF ACE
Figure 1, page 34, displays the interface menu
tree for communicating with a DCM-2 using the
BECK-MK2 Device Description. This menu tree
summarizes possible setup options, features and
available information.
HART® COMMUNICATORS FOR
BECK-MK2
The BECK-MK2 Device Description requires a
HART® Communicator that is fully HART 5 capable
and has the ability to import Device Description
Language Files (DDL) that are certified by the
HART® Communications Foundation.
USING THE HART
®
COMMUNICATOR
The HART® Communicator leads should be
connected in parallel with the analog Demand
signal wiring (see Figure on page 35). This allows
the communicator to simultaneously communicate
over the analog input wires. This does not disturb
the analog command signal, or disrupt the DCM-2
functions. However, any program changes to the
DCM-2 will momentarily suspend the operation of
the board (maintains last state) while the change is
implemented. Typically, this is only for a second or
two.
With the communicator connected in parallel
anywhere across the analog Demand wires, it is
ready to communicate. Turn on the communicator
and wait for communications to be established.
Once communicating, the “Online” display (Figure
1, menu block #1) will appear in the communicator
window. If the drive is multidropped with other
devices on a single HART® network, the first
display screen will list all devices and require a
selection before the “Online” display is shown.
The “Online” display provides online information
about the present drive operating conditions.
Entering any of the menus shown in Figure 1 is
accomplished by following the display and using the
communicator’s arrow keys. If the communicator
is unable to communicate with the DCM-2, it will
display the message, “No Device Found”. If
this occurs, check to make sure the leads are
securely connected to the Demand wiring and
retry. If communications still do not occur, the
communicator polling setup may be improperly
set. Check the “utility” menu and make sure
communications polling is set to “always poll”.
A communicator keypad and display is shown on
page 35. There are four sections: 1) the liquid crystal
message display, 2) four function keys beneath the
LCD display, 3) six navigational keys in the center
section, 4) alphanumeric entry keys at the bottom.
For a complete description of the communicator ,
please see the HART® Communicator manual that
is shipped with the communicator.
The alphanumeric keys are used to type in
entries. Whenever a selected menu or method
requires a value or description to be entered,
this key pad is used. Since each key represents
four different characters, three shift keys are
provided at the bottom of the pad. A particular
alphanumeric character is selected by pushing the
shift key then pushing the alphanumeric key.
36
Page 37

MENU DESCRIPTIONS
(See Figure 1, Page 34)
Online Menu
(Block 1)
When communications are established with
the communicator, the Online menu is displayed.
This is the gateway to all the other menus and it
also provides current information about the drive.
Numbered items 2 through 7 provide live, dynamic
values of the drive’s output position in percent,
the Demand signal to the drive in percent, the
Demand signal in milliamps, the torque output of
the drive in percent, the drive temperature, and
the external position feedback signal in milliamps.
Select the first menu item, “Functions”, to gain
access to the Functions menu. Backing out of
the Online menu (using the left arrow key) results
in selection of the Offline menu.
Functions Menu
(Block 2)
From the Functions menu, any of the DCM-2
functional menus can be selected and accessed.
There are seven functional areas: Setup
Checklist, Device Information, Configuration,
Statistics, Manual Operation, Diagnostics, and
Calibration Trim.
The Setup Checklist (Block 3A) is a menu
that allows the user to setup the most important
items necessary for basic drive operation. After
completing the setup checklist, further setup can
be accomplished using the configuration menu.
The other six functional areas and menus are
described in more detail as follows.
Device Information Menu
(Block 3B)
The Device Information menu is strictly an
informational page. By entering this menu, a
selection of useful information can be viewed
and/or edited. There are a total of ten information
entries:
1. Tag - This 8 character entry can be used as
a unique label that correlates to a field device
label.
2. Descriptor - This entry is a 16 digit field
that can be used to provide any description
desired.
3. Message - This entry is a 32 digit field that can
be used to provide any message desired.
4. Model - This entry displays the model number
of the drive in which the DCM-2 board is
installed. It normally is set at the factory if the
board is installed in a drive. The user can edit
the field if desired.
5. Drive S/N - This entry displays the serial
number of the drive in which the DCM-2 board
is installed. It normally is set at the factory if
the board is shipped in a drive. If the DCM-2
is shipped as a spare or replacement part, the
“Drive S/N” field will be blank. The user can
edit the field if desired.
6. Installed - This is a date entry that is normally
used to indicate the date that the drive or
DCM-2 board was installed. The date format
is mm/dd/yyyy and it can be edited.
7. Setup - This is a date entry that is normally
used to indicate the date that the DCM-2/drive
setup was performed. Although this entry
is viewed and can be edited in the “Device
Information” menu, the user is prompted at the
end of performing a “Setup” to enter a date.
Entering the date at the prompt automatically
updates the date displayed. The date format
is mm/dd/yyyy, and it can be edited.
8. Calibrated - This is a date entry that is
normally used to indicate the date that the
DCM-2/drive was last calibrated. Although
this entry is viewed and can be edited in
the “Device Information” menu, the user
is prompted at the end of performing any
“Calibration” method to enter a date. Entering
the date at the prompt, automatically updates
the date displayed here. The date format is
mm/dd/yyyy, and it can be fully edited.
9. Review - Scrolls through all device information
items, as well as all the other DCM-2 settings,
without accessing each item individually. This
is an excellent tool for quickly determining
how a particular drive is setup. To edit
individual entries, the user must exit "Review"
and proceed to the appropriate menu and
item.
10. Poll Address - This entry can be edited;
however, it is normally set to 0. A polling
address from 1 to 15 can be entered if the
drive resides on a common HART® network
with other HART® devices.
37
Page 38

DCM-2 HART INTERFACE Communication
38
Configuration Menu
(Block 3C)
The Configuration menu serves as the
gateway to all of the drive operating setup
parameters. The user can select any of five
different setup submenus that can be used
to configure the drive based on the physical
layout and the desired operation. The five setup
submenus are described below. In addition
to these five setup menus, there is a "Restore
to Factory" selection which resets the drive
configuration to its as-shipped settings. There is
also a "User Default Setup" setting which resets
the drive configuration to the settings typical of
the applicable drive model type.
General Setup Submenu
(Block 4B)
This menu sets drive operating parameters.
The nine parameter entries are as follows:
1. Drive dir - Defines the rotation of the drive
output shaft, given an increasing Demand
signal, looking into the output shaft.
Options available are clockwise (CW) or
counterclockwise (CCW).
When the drive direction parameter is
changed, the DCM-2 automatically reverses
the analog position feedback signal such that
it is 4 mA at the 0% input signal position and
20 mA at the 100% position. No recalibration
of the CPS is required. This parameter is
normally set to CW on an increasing Demand
signal unless the user specified CCW prior to
shipment of the drive.
2. MaxTravel - The maximum available travel
distance of the output shaft in degrees.
This value is entered manually, and must
correspond to the actuator design.
3. Travel - The number of degrees of output
shaft travel for 100% span. Edit this value
to use a span shorter than the allowable
"MaxTravel".
4. StepSize - The typical change in Demand
signal that can occur before the output shaft
will reposition (expressed in percent of span).
5. Stall time - The DCM-2 provides stall
protection to the entire drive by shutting off
power to the motor and providing a HART®
alarm. This entry configures the stall time
required to trigger the stall protection. At
the factory, stall time is normally set to 300
seconds, but can be edited and set for any
value between 30 and 300 seconds. This
value should be longer than the timing for full
drive travel.
6. StallProt - This entry is set as either “Enabled”
or “Disabled". It is used to remove motor
power if "Stall time" is reached.
7. LimitSwitch - This entry is set as either
"Accept" or "Alert" and is used to define
whether contacting a limit switch outside of
the normal travel range (0% to 100%) will
cause an error condition.
8. PositionUnit - Sets the numeric unit of
measure for the output shaft position in
degrees ("deg").
9. Temperature Unit - The unit of measure
for temperature. May be set for Fahrenheit
("degF") or Celsius ("degC").
PositionSensrSetup Submenu
(Block 4C)
This menu is where all position sensor
and external position feedback signal setup is
performed. The eight parameter entries are as
follows:
1. Set Pos 0% - Selecting this parameter sets
the present position of the drive to the
minimum travel position. Equivalent to
pushing the SET POS 100% pushbutton.
2. Set Pos 100% - Selecting this item sets the
present position of the drive to the maximum
travel position. Equivalent to pushing the
SET POS 100% pushbutton.
3. PresCPS V - Displays the present value of
the internal Position Sensor voltage, which
may also be measured at TP4(+) and TP1(–)
on the DCM-2 board. May be edited in
the Calibration Trim menu for trimming the
Position Sensor A/D converter.
4. CPS Zero% - Displays the CPS voltage at
the zero percent output shaft position. May
be edited to define the CPS voltage at the
lowest operating point of travel.
5. CPS Span - Displays the CPS voltage span
for the maximum allowable output shaft
travel.
6. CPS RngLwr - Displays the CPS voltage at
the lowest available point of travel. Normally
set by the factory.
7. CPS RngUpr - Displays the CPS voltage
at the highest available point of travel.
Normally set by the factory.
8. Pos S/N - A number which uniquely identifies
the position sensor. May be edited.
9. Snsr Dir - Displays which direction of output
shaft movement will yield an increasing
internal Position Sensor signal. Normally set
at factory to "CW Incr" (signal increases as
the output shaft rotates CW).
Page 39

Demand Setup Submenu
(Block 4D)
This menu is where all the Demand input
signal related drive parameters are set. The eight
parameter entries are as follows:
1. DemRngLwr - The value of the Demand
signal (in mA) that corresponds to 0%.
Normally set to "4.00 mA", this value should
be set above the "DemLimLwr" value.
2. DemRngUpr - The value of the Demand
signal (in mA) that corresponds to 100%.
Normally set to "20.00 mA", this value should
be set below the "DemLimUpr" value.
3. Dem Curve - Allows a choice in the relationship
between the applied Demand signal and the
desired position of the output shaft. Choices
are: Linear, Square Root, Dem Curve Special,
& Square.
4. Dem Curve Spcl - When "Dem Curve" above
is set to "Special", this command allows
access to a submenu to setup the preferred
Demand curve.
5. Los Mode - Sets the output shaft response
to a loss of Demand signal condition. Can be
set to "Stay" or "Go-to-Pos".
6. Los Pos - If "Los Mode" has been set to "Go-
to-Pos", this parameter allows the user to
define the position (in percentage of travel) to
where the output shaft will move during Loss
of Signal conditions. May be set between
-5.00% and 105.00%.
7. DemLimLwr - Sets the minimum usable
value of Demand. Below this value, the
Loss of Signal condition will be set. Values
between 0 mA and 12 mA may be selected.
This value should be set lower than the low
Demand Range ("DemRngLwr").
8. DemLimUpr - Sets the maximum usable
value of Demand. This value should be
set higher than the upper Demand Range
("DemRngUpr").
3. Feedback - Enables or Disables the Feedback
signal.
4. FB Curve - Allows a choice in the relationship
between the applied Feedback signal and
the actual position of the drive. Choices are:
Linear & Inverted Demand ("InvDem").
Torque Setup Submenu
(Block 4F)
This menu is where all the Torque related
drive parameters are set. The five parameter
entries are as follows:
1. Trq/Thrust - Enables or Disables torque
related functions.
2. Ovt Prot - Enables or Disables over-torque
protection, which will remove power from the
motor if excessive torque is detected.
3. AlarmLevel - Sets the value that, if exceeded,
will cause the Torque Alarm to activate.
4. ShutDwnTrq - Sets the value that, if exceeded,
will cause the power to be removed from the
motor (if "Ovt Prot" is enabled; see above).
This will cause a shutdown alarm.
5. Trq Null - Sets the torque value that
corresponds to 0% torque applied. This
number is represented in "TK" units, and is
noted on the label inside the DCM-2 cover
(also referred to as "Torque Zero").
6. Trq Const - Sets the torque value that
corresponds to 100% torque applied. This
number is represented in "TK" units, and is
noted on the label inside the DCM-2 cover.
Feedback Setup Submenu
(Block 4E)
This menu is where all the Feedback signal
related drive parameters are set. The four
parameter entries are as follows:
1. FBRngLwr - The value of the Feedback
signal (in mA) that corresponds to a 0%
output shaft position. This value can range
between 3.0 mA and 16.0 mA.
2. FBRngUpr - The value of the Feedback
signal (in mA) that corresponds to a 100%
output shaft position. This value can range
between 7.0 mA and 21.0 mA.
39
Page 40

DCM-2 HART INTERFACE Communication
Statistics Menu
(Block 3D)
This menu is where all the drive’s stored
operating statistics are available. There are eight
different statistics available:
1. Starts - Logs and displays the total number of
starts the drive motor has made.
2. Reversals - Logs and displays the total
number of times the motor started in a
direction opposite to the previous start.
3. Stalls - Logs and displays the total number of
stalled conditions the drive has experienced.
For the drive to register a stall, the DCM-2
board must be unable to balance the drive
position against the Demand input signal for
a period exceeding the Stall Time set in the
General Setup menu.
4. OverTorques - Logs and displays the total
number of times that excessive torque was
detected at the output shaft.
5. Pk Torque - Logs and displays the maximum
torque sensed at the output shaft.
6. TotRunTm - Logs and displays the total run
time of the drive motor in seconds.
7. High temp - Logs and displays the highest
temperature in degrees Fahrenheit measured
by a temperature sensor resident on the
DCM-2 board.
8. Low temp - Logs and displays the lowest
temperature in degrees Fahrenheit measured
by a temperature sensor resident on the
DCM-2 board.
Manual Operation Menu
(Block 3E)
This menu is used to allow manual drive
operation with the HART® communicator.
There are three manual operation procedures
available:
1. Op mode (Block 4G) - This procedure allows
the user to select the operating mode of the
DCM-2. There are four possible choices:
“Follow”, “Hold”, “Stay” and “Stop”. The
“Follow” mode is the normal state of operation
and allows the DCM-2 to control the drive
operation by responding to the analog input
Demand signal when the drive Handswitch is
in the automatic position. The “Hold” mode
causes positioning according to the HART
Interface Demand Value. The “Stay" mode
causes the output shaft to remain stationary
and maintain its present position. Note that
in "Stay" mode, the Handwheel cannot be
freely turned. The "Stop" mode removes
power from the motor. Note that in "Stop"
mode the Handwheel can be freely turned.
All operating modes can be overridden by the
drive Handswitch.
2. Demand - This procedure sets the effective
Demand signal. If Op mode is set to "Hold",
entering a valid value (-5% to 105%) will
control the motor. If Op mode is set to
"Follow", the value will follow the Demand
analog signal (unless an alarm condition
exists).
3. Reset Stall - This procedure resets normal
drive operation after a stall condition has
caused the drive to shut down. Selecting this
option and following the prompts will restore
operation. Note that stall conditions can
also be reset by simply reversing the input
Demand signal or cycling the drive ac power.
40
Page 41
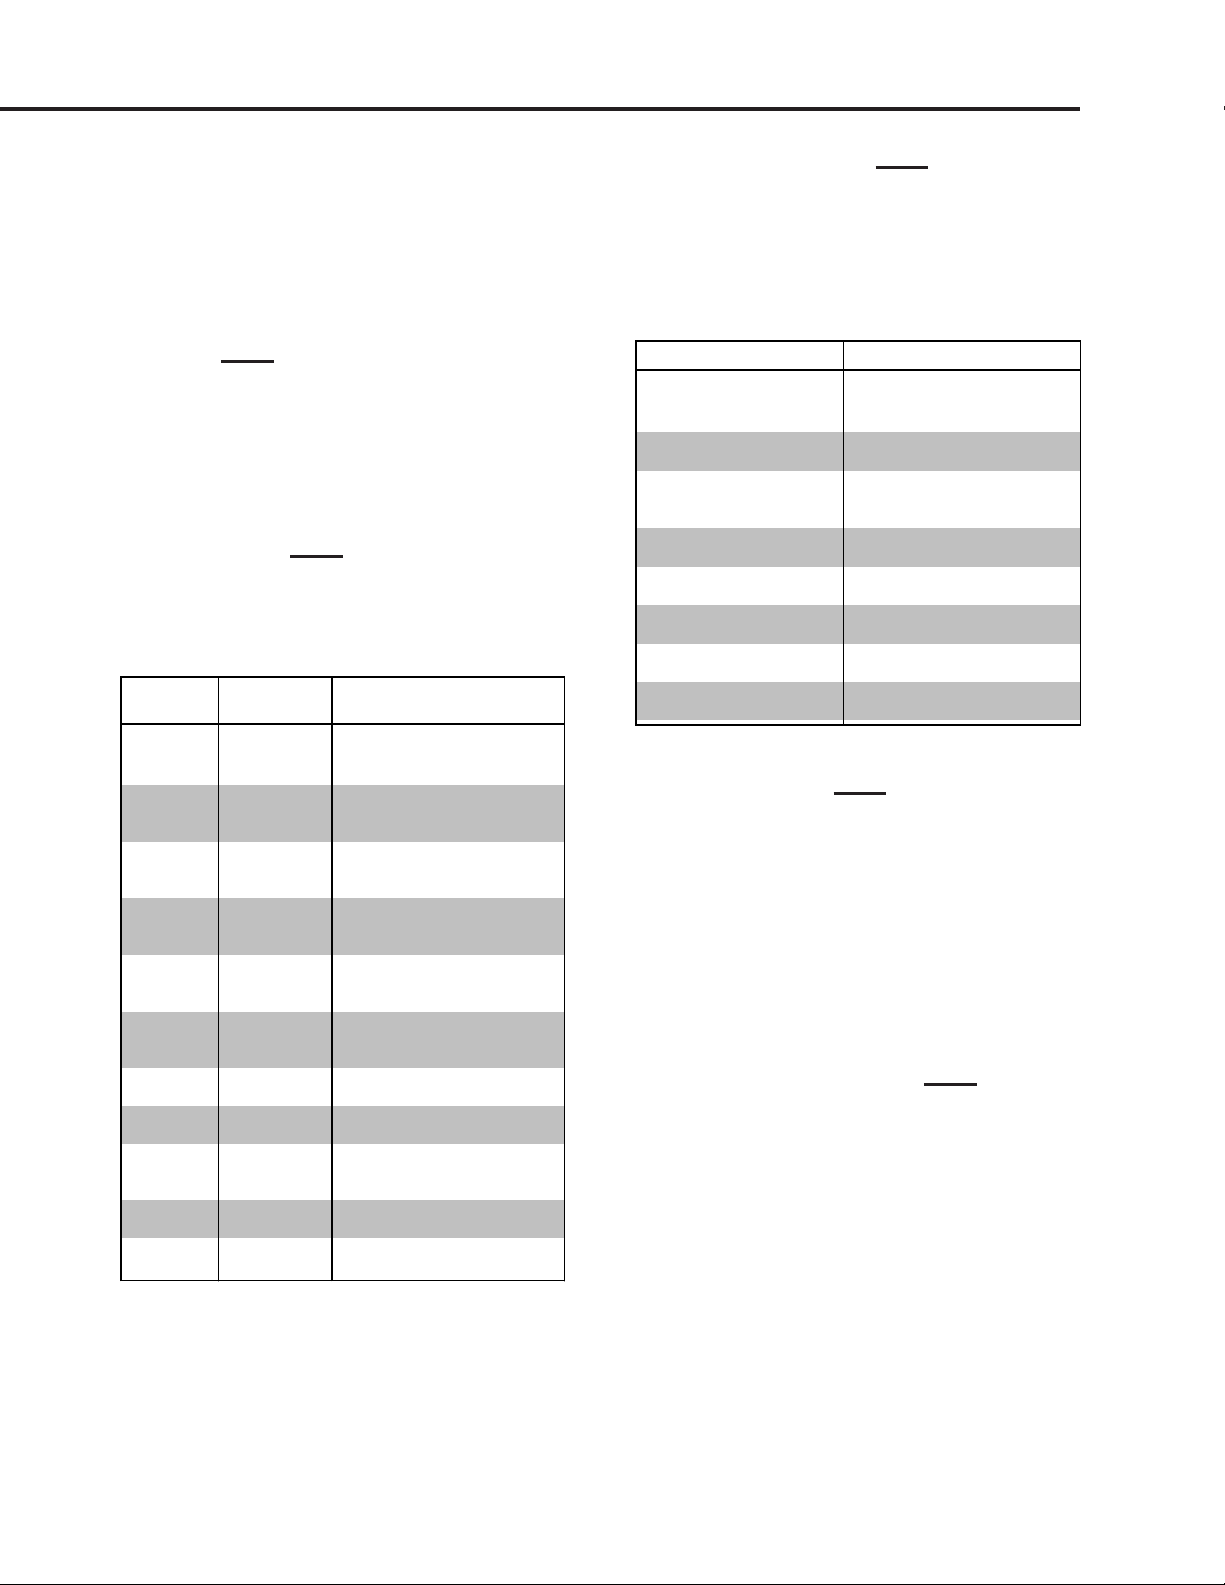
Diagnostics Menu
(Block 3F)
This menu provides access to all the DCM-2
stored online diagnostic information about drive
operation. The menu provides six submenus
accessing drive statistics and online drive status.
Operating Status Submenu
(Block 5C)
This menu displays the ON or OFF status of
eight drive parameters: Dem Limits, Pos Limits,
Temp Limits, Torq Limits, Over-Torq Stop, Stalled,
Feedback Open, and Switch Block. See below.
Status Submenu
(Block 4H)
This menu provides access to six submenus
displaying various drive status settings: LED
Status, Operating Status, Switch Status, Local
Cntrl Status, CW Inhibitors, and CCW Inhibitors.
LED Status Submenu
(Block 5B)
This menu displays the ON or OFF status of
each of the LEDs on the DCM-2. See below.
LED HART
NAME NAME DESCRIPTION
STAT "Status" "ON indicates that an operating
condition is inappropriate see
Operating Status menu'"
REV "Reverse" "ON indicates that the Demand
signal is less than the Position
signal"
FWD "Forward" "ON indicates that the Demand
signal is greater than the
Position signal"
DEM_ERR "Demand" "ON indicates that a Demand
error condition exists check the
operating mode settings"
POS_ERR "Position" "ON indicates that the Position
signal may be out of range or
saturated"
TORQ_ERR "Trq/Thrust" "ON indicates that the Torque
or Thrust sensor signal may
be out of range or saturated"
STALL_ERR "Stall" "ON indicates that the motor
may be stalled"
TEMP_ERR "Temperature" "ON indicates that a
temperature fault exists"
FB_ERR "FB Open" "ON indicates that the
feedback loop is open or
out of range"
STOP_ERR "Limit" "ON indicates that a limit
switch has been triggered"
ACKN_ERR "Acknowledge" "Acknowledge indicator is
active"
CONDITION DESCRIPTION
DEMAND_LOS "The Demand Signal is outside
of the intended limits (see
Demand Setup menu)"
TRQ_THRUST_OVERRANGE "The Torque/Thrust is greater
than the output rating"
STALL "Stall condition has been
detected (see General Setup
menu)"
OVERTRQ_THRUST_ "Motor power has been removed
PROTECTION due to excessive output thrust"
STOP_OR_LIMIT "Motor power is blocked check
switches"
FEEDBACK_ "The Feedback signal is
DISCONNECTED enabled but the loop is open"
TEMPERATURE_ "The temperature is outside of
OVERRANGE –40F to 185F"
POSITION_OVERRANGE "The Position signal is less
than –5% or greater than 105%"
Switch Status Submenu
(Block 5D)
This menu displays the ON or OFF status
of the eight switch parameters: LV Lim CCW,
LV Lim CW, OvrRd CCW, OvrRd CW, OvrRd
Stop, HndSw CCW, HndSw CW, and HndSw
AUTO. The Switch Status menu displays the
status of the CW/CCW control override input, the
STOP control override or if the Handswitch is in
the CW/CCW or AUTO position.
Local Control Status Submenu
(Block 5E)
This menu displays the ON or OFF status of
five local interface drive parameters: Calibrate,
Set Pos 100%, Set Pos 0%, Set Dem 100%, and
Set Dem 0%. The Local Control Status submenu
indicates which buttons on the Local Control
board are pressed.
41
Page 42
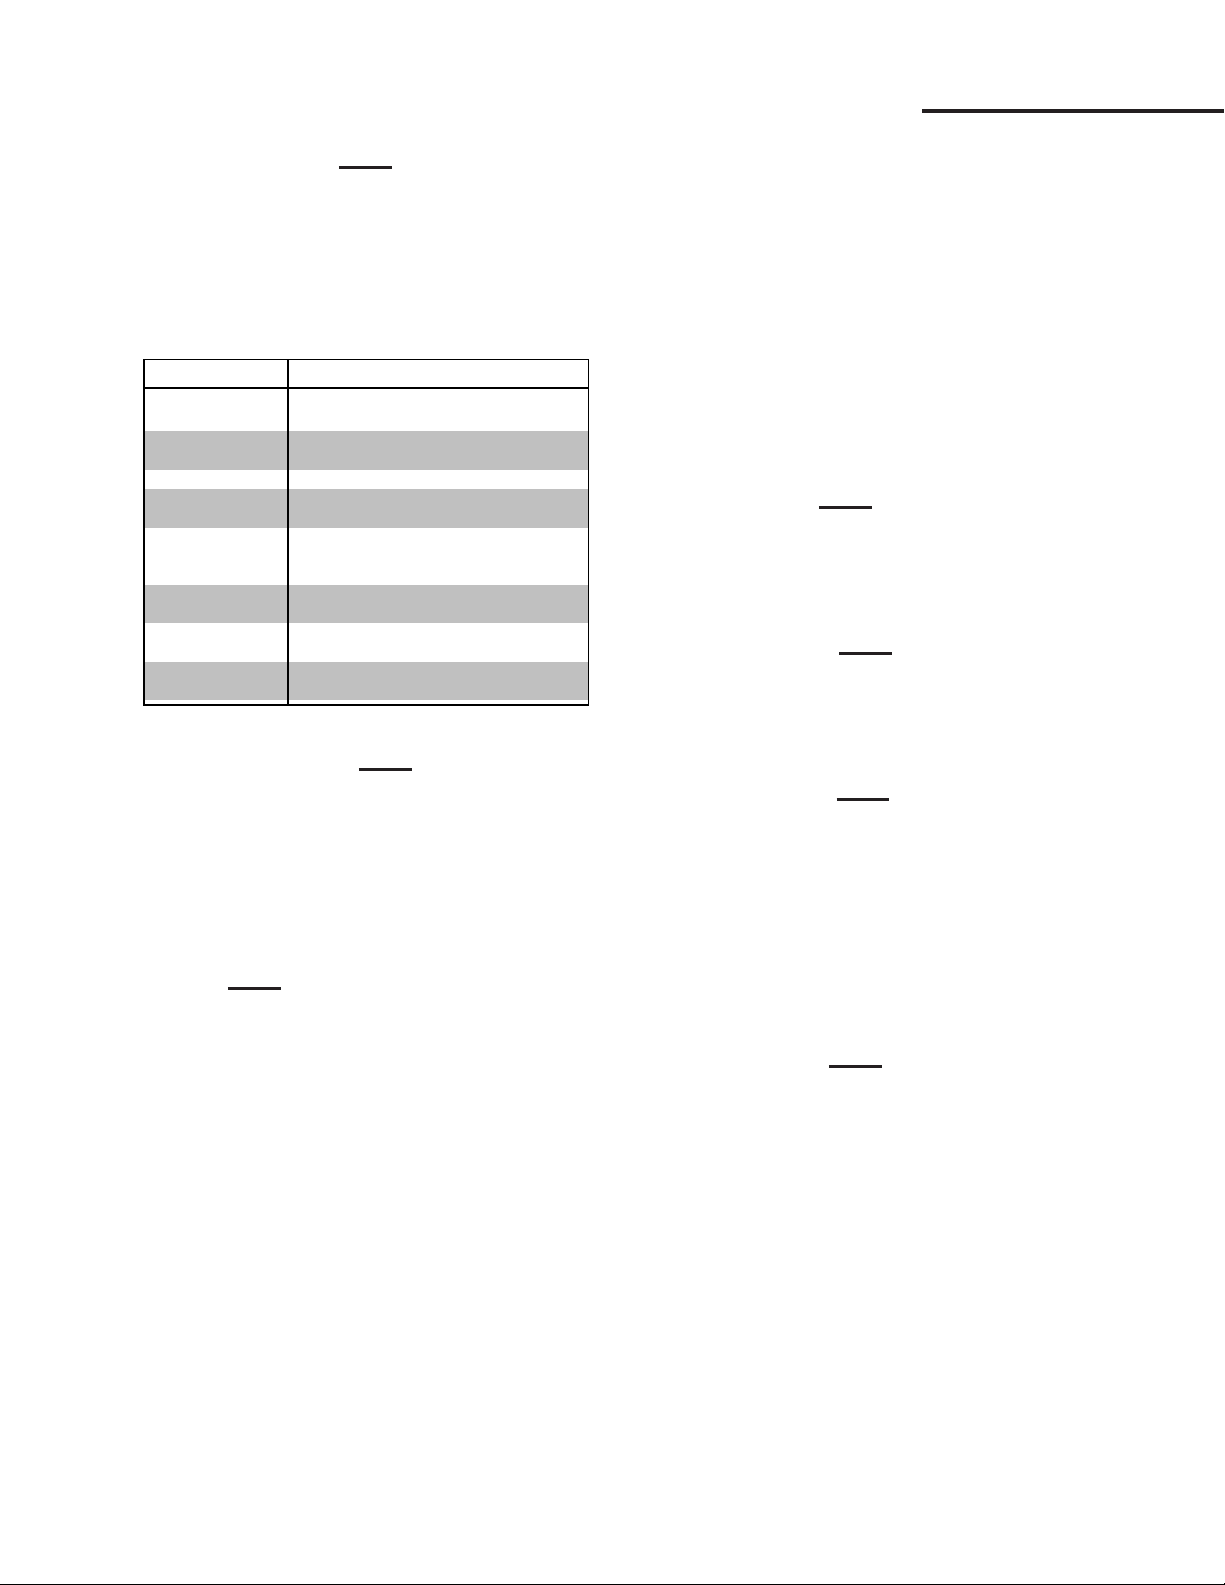
DCM-2 HART INTERFACE Communication
42
CW Inhibitors Submenu
(Block 5F)
This menu displays the ON or OFF status of the
contributing sources of retract movement inhibitors
of motor operation: Balance, Supervisory, Stall,
OverTrq/Thr, Switch Block, Bad Pos Sig, Bad Dem
Sig, Local Cal. See below.
CONDITION DESCRIPTION
Balance "ON indicates that the Demand and
Position are at balance"
Supervisory "ON indicates that the DCM is
initializing"
Stall "ON indicates a Stall condition"
OverTrq/Thr "ON indicates that the motor is stopped
due to excessive torque or thrust"
Switch Block "ON indicates that the Handswitch,
Override, or Limit Switch is inhibiting
movement"
Bad Pos Sig "ON indicates that the Position signal
is out of range"
Bad Dem Sig "ON indicates that the Demand signal
is out of range"
Local Cal "ON indicates that a Local Calibration
button is pressed"
CCW Inhibitors Submenu
(Block 5G)
This menu displays the ON or OFF status of the
contributing sources of extend movement inhibitors
of motor operation: Balance, Supervisory, Stall,
OverTrq/Thr, Switch Block, Bad Pos Sig, Bad Dem
Sig, Local Cal. See table above.
Tests Submenu
(Block 4I)
This menu provides procedures that allow the
user to test, identify and reset the DCM-2 board.
They are as follows:
1. FB out test - This procedure allows the user
to test the 4–20 mA position feedback output
signal. Following the prompts through this
procedure allows the user to physically verify
the output signal value at 4 mA, 20 mA, and
anywhere in between.
2. Board self-test - This procedure runs an
automatic board test that verifies the health of
the DCM-2 control board. It runs a checksum
memory test and checks for the proper
installation of the position sensor (CPS rotor).
Running the test causes the drive to reposition
temporarily, so it should only be run offline.
The CPS test runs automatically as part of
some calibration and setup procedures. This
test should be implemented only if a DCM-2
problem is suspected.
3. Identify Device - This command will cause the
Acknowledge LED to blink for two seconds.
Used to verify proper HART communications
as well as an aid in identifying which drive is
being addressed when configuring multiple
drives for split range operation.
4. Board reset - This procedure resets the
board without powering down the drive. There
are many communicator procedures that
implement the reset procedure automatically
to ensure the proper initialization of the DCM2 board; however, manually implementing the
reset procedure is not typically necessary.
CW Torque Submenu
(Block 4J)
This menu displays the torque applied over
ten segments of travel of the drive shaft.
CCW Torque Submenu
(Block 4K)
This menu displays the torque applied over
ten segments of travel of the drive shaft.
Alarm Setup Submenu
(Block 4L)
This menu allows customization of alarm
indication:
1. AlarmPol - This determines whether the alarm
relay "Drops Out" or "Pulls In" to indicate an
alarm.
2. Alarm Mask - This leads to a submenu where
alarm conditions may be set.
Alarm Mask Submenu
(Block 5H)
This menu allows alarm conditions
to be ignored; such as DemandLOS, Stall
FeedbackLOS, or other conditions which may
occur under normal operation and that may prove
a nuisance during normal HART operation.
Page 43

RealTimeClock Submenu
(Block 4M)
This menu allows the date and time to be set.
The settings are as follows:
1. RTC Day - Numerical entry sets the day of the
month.
2. RTC Month - Numerical entry sets the
month.
3. RTC Year - Numerical (4 digit) entry sets the
year.
4. Hour (24) - Numerical entry sets the hour of
the day (1–24).
5. Minute - Numerical entry sets the minute of
the hour.
Calibration Trim Menu
(Block 3G)
This menu displays/sets drive calibration
values:
1. PresCPS V - Displays the present value of
the internal Position Sensor voltage. This
value can also be measured at TP4(+) and
TP1(–) on the DCM-2 board. This value can
be edited to trim the Position Sensor.
2. Loop(Dem) - Displays the Demand signal
as measured at the field wiring terminals.
When the Demand control loop signal is being
overridden by a special mode of operation,
the effective Demand will not correspond to
the mA value. This value can be edited to trim
the Demand to ensure accurate measurement
of the analog signal. Demand can only be
trimmed at 4.0 mA and 20.0 mA.
3. Feedback - Displays the mA signal
representing the output shaft position as
measured at the field wiring terminals. This
value can be edited.
4. Trq/Thrust - Displays the load measured at
the output shaft as a percentage. This value
can be edited.
43
Page 44
DCM-2 HART INTERFACE Configuration and Setup
44
All drives are shipped completely configured
to the customer’s specifications and are ready
to be installed. If the need arises to change
the configuration of the drive (i.e., change
one or more of the setup parameters that
define how the drive operates), this may be
accomplished utilizing the HART
and a communications tool (model 275 or 375
HART® Communicator) as described in the
Communications section of this manual. This
section of the manual covers how the drive is
configured and gives instructions for changing
each particular setup parameter available. It
is intended to build upon the Communications
Section, which provides a detailed description
of the HART® Menu Tree and defines all the
parameters and commands. If unfamiliar with
the HART® communicator and Beck drives,
please review the Communications section
before proceeding.
There are a number of configuration setup
parameters that can be changed to custom tailor
the drive’s operation to the application needs. The
remainder of this section provides instructions
for changing each of these parameters. The
instructions below assume that the user has a
model 275 HART® Communicator attached to the
Demand wiring (at drive terminals AA and BB or
anywhere across the wires all the way back to the
source of the Demand signal), has established
communications with a particular drive, and has
a copy of the HART® Menu Tree (Figure 1, page
34) available.
®
interface
DRIVE SHAFT TRAVEL
Drive shaft travel refers to the direction the
output shaft of the drive moves in response to
an increasing Demand input signal. The travel
is either clockwise (CW) or counterclockwise
(CCW). The control loop operation and physical
design of the final control element determine
the drive travel suitable for an application. If
the drive travel needs to be changed, this is
easily accomplished by changing the DCM-2
configuration.
Changing Drive Shaft Travel
STEP 1 - From the HART
“Online” menu, move to the “General Setup”
menu and select the “Drive Dir” parameter. This
is accomplished by using the up and down arrow
keys to select the appropriate item in each menu
and then moving forward by pressing the right
arrow key. Follow the Menu Tree (Figure 1, page
34) to navigate.
®
communicator
STEP 2 - With the “Drive Dir” parameter
selected, press the right arrow key to display the
two entry choices: “CW incr” and “CCW incr”.
Use the up and down arrow keys to select the
desired parameter.
STEP 3 - With desired parameter selected,
push the F4 function key, which is defined as the
ENTER key at the bottom of the display. Pushing
this key enters the value and reverts the display
back to the “General Setup” main menu.
STEP 4 - At the bottom of the “General Setup”
menu, the F2 function key should now be defined
as the SEND key. Push this key to execute the
change.
WARNING
Carefully follow the on-screen warnings
and messages when proceeding, because
changing this parameter will cause the drive
to reposition. This can adversely affect the
process and cause potentially dangerous
conditions.
STEP SIZE
The step size is the incremental movement
of the drive shaft in response to signal changes.
The step size is factory set at 0.15% unless
otherwise specified at the time of order. The step
size is adjustable from 0.1% to 2.5%. To adjust
the step size, please follow the steps below.
Changing the Step Size
STEP 1 - From the HART
“Online” menu, move to the “General Setup”
menu and select the “StepSize” parameter. This
is accomplished by using the up and down arrow
keys to select the appropriate item in each menu
and then moving forward by pressing the right
arrow key. Follow the Menu Tree (Figure 1, page
34) to navigate.
STEP 2 - With the “StepSize” parameter
selected, press the right arrow key to display the
modifiable entry box, and using the alphanumeric
keypad, type in the desired dead band value.
Values between 0.1% and 2.5% are valid.
STEP 3 - With the desired value correctly
typed into the entry box, push the F4 function key
which is defined as the ENTER key at the bottom
of the display. Pushing this key enters the value
and reverts the display back to the “General
Setup” main menu.
STEP 4 - At the bottom of the “General Setup”
menu, the F2 function key should now be defined
as the SEND key. Push this key to execute the
change.
®
communicator
Page 45
WARNING
Carefully follow the on-screen warnings
and messages when proceeding, because
changing drive setup parameters can cause
the drive to reposition. This can adversely
affect the process and cause potentially
dangerous conditions.
STALL PROTECTION
The DCM-2 board provides protection of the
drive motor and gearing in the event of a stalled
condition. The board accomplishes this by
sensing that the drive is unable to balance for a
set period of time known as the “stall time”. If the
DCM-2 is unable to balance the drive for a period
greater than the stall time, it shuts off power to the
motor and prevents the drive from continuing to
operate against the stall. Resetting the drive and
restoring normal operation is achieved in several
ways: Reversing the Demand signal to the drive,
performing a stall reset procedure (see Manual
Operation Menu, Figure 1, page 34), performing
a board reset procedure (see Diagnostics Menu,
Figure 1, page 34), or cycling the drive ac power.
Changing Stall Time
STEP 1 - From the HART
“Online” menu, move to the “General Setup”
menu and select the “Stall Time” parameter. This
is accomplished by using the up and down arrow
keys to select the appropriate item in each menu
and then moving forward by pressing the right
arrow key. Follow the Menu Tree (Figure 1, page
34) to navigate.
STEP 2 - With the “Stall Time” parameter
selected, again press the right arrow key to
display the modifiable entry box, and using
the alphanumeric keypad, type in the desired
stall trigger time value. It is normally set to a
maximum of 300 seconds, but can be changed to
a minimum of 30 seconds.
WARNING
It is possible that the stall time can be set
to a value less than the full travel time of
some drives. This could lead to false stall
conditions when making very large changes.
Typically, this would only occur during startup, shut down or some other condition that
might require a large change in Demand from
the controller.
®
communicator
STEP 3 - With the desired value correctly
typed into the entry box, push the F4 function key
which is defined as the ENTER key at the bottom
of the display. Pushing this key enters the value
and reverts the display back to the “General
Setup” main menu.
STEP 4 - At the bottom of the “General Setup”
menu, the F2 function key should now be defined
as the SEND key. Push this key to execute the
change.
WARNING
Carefully follow the on-screen warnings
and messages when proceeding, because
changing drive setup parameters can cause
the drive to reposition. This can adversely
affect the process and cause potentially
dangerous conditions.
OVERTRA VEL ANNUNCIATION
When communicating with the DCM-2 via the
275 HART® Communicator, a number of different
informational messages may be displayed for
certain conditions that may exist. One such
message is “H/S in STOP or drive at limit sw”.
This is displayed anytime the DCM-2 is attempting
to reposition the output shaft, but is unable to due
to a break in the electrical power to the motor.
This can happen if the Handswitch is put in
STOP or if an over-travel limit switch is open.
Normally, this is a useful message that should
be displayed; however, in certain situations like
split range operation (see split ranging, page
57), it can become a nuisance. For example, in
a split range operation one or more of the drives
will be interpreting the Demand input signal as
out of range (i.e., either above 100% Demand or
below 0% Demand) and will be against an overtravel limit switch at any given time. Since this is
normal for split range operation, the message will
be a nuisance rather than informational.
Setting the “Overtravel Annunciate” feature
to “Ignore” will eliminate the message, but only
when the Demand signal is above 100% or below
Continued
45
Page 46

DCM-2 HART INTERFACE Configuration and Setup
46
OVERTRAVEL ANNUNCIATION, CONT’D.
0% and an over-travel limit switch is open. This
eliminates the nuisance message, but does not
eliminate the message for other scenarios like
the Handswitch being in the STOP position.
Changing Overtravel
Annunciation
STEP 1 - From the HART
“Online” menu, move to the “General Setup”
menu and select the “LimitSwitch” parameter.
This is accomplished by using the up and down
arrow keys to select the appropriate item in each
menu and then moving forward by pressing the
right arrow key. Follow the Menu Tree (Figure 1,
page 34) to navigate.
STEP 2 - With the “LimitSwitch” parameter
selected, again press the right arrow key to
display the modifiable entry box, select either
"Accept" to turn off the HART warning or "Alert" to
ensure the HART warning is transmitted.
STEP 3 - With the desired selection
highlighted, push the F4 function key (which is
defined as the ENTER key at the bottom of the
display). Pushing this key enters the value and
reverts the display back to the "General Setup"
main menu.
STEP 4 - At the bottom of the "General Setup"
menu, the F2 function key should now be defined
as the SEND key. Push this key to execute the
change.
®
communicator
POSITION FEEDBACK SIGNAL
DCM-2 boards are equipped with a Feedback
Sourcing module that provides a 4–20 mA analog
output signal that represents the drive output
shaft position in terms of 0–100% of full directional
travel. This signal can be remotely monitored or
used by a controller or indicator. The user has
the option of enabling or disabling the signal.
Normally, the signal should be enabled , but in
a situation where the feedback is present, but
unused (i.e., not wired to a load) a HART
message will be present while communicating
using the 275/375 Communicator. This message
is helpful in alerting the user to open feedback
wiring, but it is a nuisance when the feedback
is purposely disconnected or unused. Disabling
the feedback signal turns off the output and
eliminates the message.
®
alarm
Enabling / Disabling Position
Feedback Signal
STEP 1 - From the HART
“Online” menu, move to the “Setup Checklist”
menu and select the “Feedback” parameter. This
is accomplished by using the up and down arrow
keys to select the appropriate item in each menu
and then moving forward by pressing the right
arrow key. Follow the Menu Tree (Figure 1, page
34) to navigate.
STEP 2 - With the “Feedback” parameter
selected, press the right arrow key to display the
two entry choices: “Enabled” or “Disabled”. Use
the up and down arrow keys to select the desired
parameter. “Enabled” enables the output signal,
while “Disabled” disables the output.
STEP 3 - With desired choice selected,
push the F4 function key which is defined as the
ENTER key at the bottom of the display. Pushing
this key enters the selected parameter and
reverts the display back to the “Setup Checklist”
main menu.
STEP 4 - At the bottom of the “Setup Checklist”
menu, the F2 function key should now be defined
as the SEND key. Push this key to execute the
change. This change should not effect drive
positioning but, as with all configuration changes,
carefully follow the on-screen warnings and
messages when proceeding.
®
communicator
DEMAND SIGNAL
CHARACTERIZATION
The Beck DCM-2 is designed to receive a
4–20 mA (1–5 V dc) input Demand signal and
respond by repositioning the drive output shaft
in proportion to the signal. There are four ways
in which the DCM-2 can interpret the Demand
signal: Linear, Square Root, Dem Curve Special
and Square. The Linear interpretation, which is
most commonly employed, simply causes the
drive to position the output shaft in a one-to-one
relationship with the Demand. For example,
a 1% change in Demand always causes a 1%
position response. The Square Root relationship
produces a response proportional to the square
root of the Demand Signal. The Dem Curve
Special relationship allows a customized Demand
curve to be setup through a special submenu.
The Square relationship produces a non-linear
drive response proportional to the square of
the Demand signal. For example, a 25% input
Demand is interpreted as 0.252 or 0.0625
(6.25%). The square relationship helps to
linearize flow response of final control elements
that have quick opening characteristics.
Page 47
Changing Characterization
STEP 1 - From the HART
“Online” menu, move to the “Demand Setup”
menu and select the “Dem Curve” parameter.
This is accomplished by using the up and down
arrow keys to select the appropriate item in each
menu and then moving forward by pressing the
right arrow key. Follow the Menu Tree (Figure 1,
page 34) to navigate.
STEP 2 - With the “Dem Curve” parameter
selected, press the right arrow key to display
the four entry choices: “Linear”, "Square Root",
"Dem Curve Special" or “Square”. Use the
up and down arrow keys to select the desired
parameter.
STEP 3 - With desired choice selected,
push the F4 function key which is defined as the
ENTER key at the bottom of the display. Pushing
this key enters the selected parameter and
reverts the display back to the “Demand Setup”
main menu. If "Dem Curve Special" is selected,
proceed to the "Dem Curve Special" sub-menu to
setup the desired curve.
STEP 4 - At the bottom of the “Demand Setup”
menu, the F2 function key should now be defined
as the SEND key. Push this key to execute the
change.
WARNING
Carefully follow the on-screen warnings
and messages when proceeding, because
changing this parameter online will cause the
drive to reposition. This can adversely affect
the process and cause potentially dangerous
conditions.
®
communicator
LOSS OF DEMAND INPUT
SIGNAL
The DCM-2 board has the capability of
determining when the Demand input signal to the
drive is lost, and then responding in the method
most appropriate for the application. There are
three setup parameters that must be configured
in order to define this capability: “LOS Mode”,
“LOS Pos” and “DemLimLwr”. The “LOS Mode”
parameter determines how the drive should
respond to the loss of the Demand input signal.
It can be configured as “STAY” (which means the
drive holds its current position when the signal is
lost) or “GO-TO-POSITION” (which means the
drive moves to a predetermined position). If the
“Go-to-Pos” option is selected, the “LOS Pos”
parameter is used to determine what output shaft
position the drive must achieve when the input
is lost. Finally, a loss of signal is sensed by the
DCM-2 when the signal drops below the value
set by the “DemLimLwr” parameter. This value
is represented in mA of the Demand input signal
range. Therefore, the standard 3.2 mA value
normally used for this parameter suggests that
when the Demand input signal drops 5% below
the calibrated 0% value, the DCM-2 senses a lost
Demand input and executes the configured lossof-signal action.
Changing Loss (LOS) of Signal
Action
STEP 1 - From the HART
“Online” menu, move to the “Demand Setup”
menu and select the “LOS Mode” parameter.
This is accomplished by using the up and down
arrow keys to select the appropriate item in each
menu and then moving forward by pressing the
right arrow key. Follow the Menu Tree (Figure 1,
page 34) to navigate.
STEP 2 - With the “LOS Mode” parameter
selected, press the right arrow key to display the
two entry choices: “Stay” or “Go-to-Pos”. Use
the up and down arrow keys to select the desired
parameter.
STEP 3 - With desired choice selected,
push the F4 function key which is defined as the
ENTER key at the bottom of the display. Pushing
this key enters the selected parameter and reverts
the display back to the “Demand setup” main
menu. If the “Go-to-Pos” choice was selected, go
to STEP 4, if “Stay” was selected, go to STEP 6.
STEP 4 - After entering “Go-to-Pos”, select
the “LOS Pos” parameter and use the right arrow
key to display the modifiable entry block. Unless
otherwise specified, this value is set to 50% at
the factory. Using the alphanumeric keypad,
enter the desired loss of signal position as a
percentage of full output shaft travel. Values
from -5% to 105% are valid.
STEP 5 - With desired value correctly typed
into the entry box, push the F4 function key which
is defined as the ENTER key at the bottom of the
display. Pushing this key enters the value and
reverts the display back to the “Demand Setup”
main menu.
STEP 6 - At the bottom of the “Demand Setup”
menu, the F2 function key should now be defined
as the SEND key. Push this key to execute the
change.
®
communicator
47
Page 48
DCM-2 HART INTERFACE Configuration and Setup
WARNING
Carefully follow the on-screen warnings
and messages when proceeding, because
changing this parameter online could cause
the drive to reposition. This can adversely
affect the process and cause potentially
dangerous conditions.
Changing LOS Trip Point
STEP 1 - From the HART
“Online” menu, move to the “Demand Setup”
menu and select the “DemLimLwr” parameter.
This is accomplished by using the up and down
arrow keys to select the appropriate item in each
menu and then moving forward by pressing the
right arrow key. Follow the Menu Tree (Figure 1,
page 34) to navigate.
STEP 2 - With the “DemLimLwr” parameter
selected, press the right arrow key to display the
modifiable entry block. Using the alphanumeric
keypad, enter the desired Demand signal lower
limit value in mA outside of the Demand signal
range.
STEP 3 - With desired value correctly typed
into the entry box, push the F4 function key which
is defined as the ENTER key at the bottom of the
display. Pushing this key enters the value and
reverts the display back to the “Demand Setup”
main menu.
®
communicator
TORQUE OPTIONS
DCM-2 boards have the capability to measure
the drive’s torque output. This, in turn, makes
it possible to provide several torque-related
features. The features include a live display
of the torque output on the 275/375 HART
Communicator display or any other device
capable of communicating and displaying HART®
transmitted variables. Included is the ability to
store peak torque values within the DCM-2 and
view them by accessing the device information
menu. To protect the drive gearing and related
equipment, the drive can be configured to shut
off if the torque exceeds 150% of the drive torque
rating. And finally, the DCM-2 will provide a high
torque alarm, via HART® communications, that
alerts the user to a high torque condition when
the torque output exceeds a set value (normally
set at 105% of the drive rating).
®
STEP 4 - At the bottom of the “Demand Setup”
menu, the F2 function key should now be defined
as the SEND key. Push this key to execute the
change.
WARNING
Carefully follow the on-screen warnings
and messages when proceeding, because
changing this parameter online could cause
the drive to reposition. This can adversely
affect the process and cause potentially
dangerous conditions.
48
Page 49

Enabling Torque Functions
STEP 1 - From the HART
“Online” menu, move to the “Torque Setup” menu
and select the “Trq/Thrust” parameter. This is
accomplished by using the up and down arrow
keys to select the appropriate item in each menu
and then moving forward by pressing the right
arrow key. Follow the Menu Tree (Figure 1, page
34) to navigate.
STEP 2 - With the “Trq/Thrust” parameter
selected, press the right arrow key to display the
two entry choices: “Enabled” or “Disabled”. Use
the up and down arrow keys to select the desired
parameter. Enabling this parameter will activate
the torque measurement features and displays,
while disabling the parameter will turn them off.
STEP 3 - With the desired choice selected,
push the F4 function key, which is defined as
the ENTER key at the bottom of the display.
Pushing this key enters the selected parameter
and reverts the display back to the “Torque setup”
main menu. Carefully follow the on-screen
warnings and messages to return to normal
operation.
®
communicator
Enabling Over-torque
Protection
STEP 1 - From the HART
“Online” menu, move to the “Torque Setup”
menu, make sure that the “Trq/Thrust” parameter
is enabled (if not, enable it using the prior
procedure) and select the “Ovt Prot” parameter.
This is accomplished by using the up and down
arrow keys to select the appropriate item in each
menu and then moving forward by pressing the
right arrow key. Follow the Menu Tree (Figure 1,
page 34) to navigate.
STEP 2 - With the “Ovt Prot” parameter
selected, press the right arrow key to display the
two entry choices: “Enabled” or “Disabled”. Use
the up and down arrow keys to select the desired
parameter. Enabling this parameter will activate
the over-torque protection, while disabling the
parameter will turn it off.
STEP 3 - With the desired choice selected,
push the F4 function key, which is defined as the
ENTER key at the bottom of the display. Pushing
this key enters the selected parameter and
reverts the display back to the “Torque Setup”
main menu.
STEP 4 - At the bottom of the “Torque Setup”
menu, the F2 function key should now be defined
as the SEND key. Push this key to execute the
change. This change should not effect drive
positioning but as with all configuration changes,
carefully follow the on-screen warnings and
messages when proceeding.
®
communicator
49
Page 50

DCM-2 HART INTERFACE Calibration
All Beck drives are shipped completely
calibrated to the customer specifications, and
are ready to be installed. If the need arises to
change the drive calibration, confirm that the
drive is installed as specified and operating
properly before proceeding with the change. It
is also helpful to verify the drive configuration.
This can be done by reviewing the settings in the
Configuration menu.
With the exception of the settings for the overtravel limit switches, auxiliary limit switches and
CPS, all calibration is performed using the HART
interface and a communications tool (model
275/375 HART
the Communications section of this manual. If
unfamiliar with the HART communicator and
Beck drives, please review the Communications
section of this manual before continuing.
The DCM-2 can be calibrated by using the
"Position Setup" and "Demand Setup" menus.
Normally, calibration should not require
adjustment; however, if the Position or Demand
requires minor adjustment, the "Calibration Trim"
menu may be used.
Any calibration changes that are made
using any of the above described methods, can
be reversed by using the “Restore to Factory”
feature in the "Configuration" menu. Note that
implementing the “Restore to Factory” feature
returns all settings to the as-shipped factory
settings.
Communicator), as described in
50
Page 51
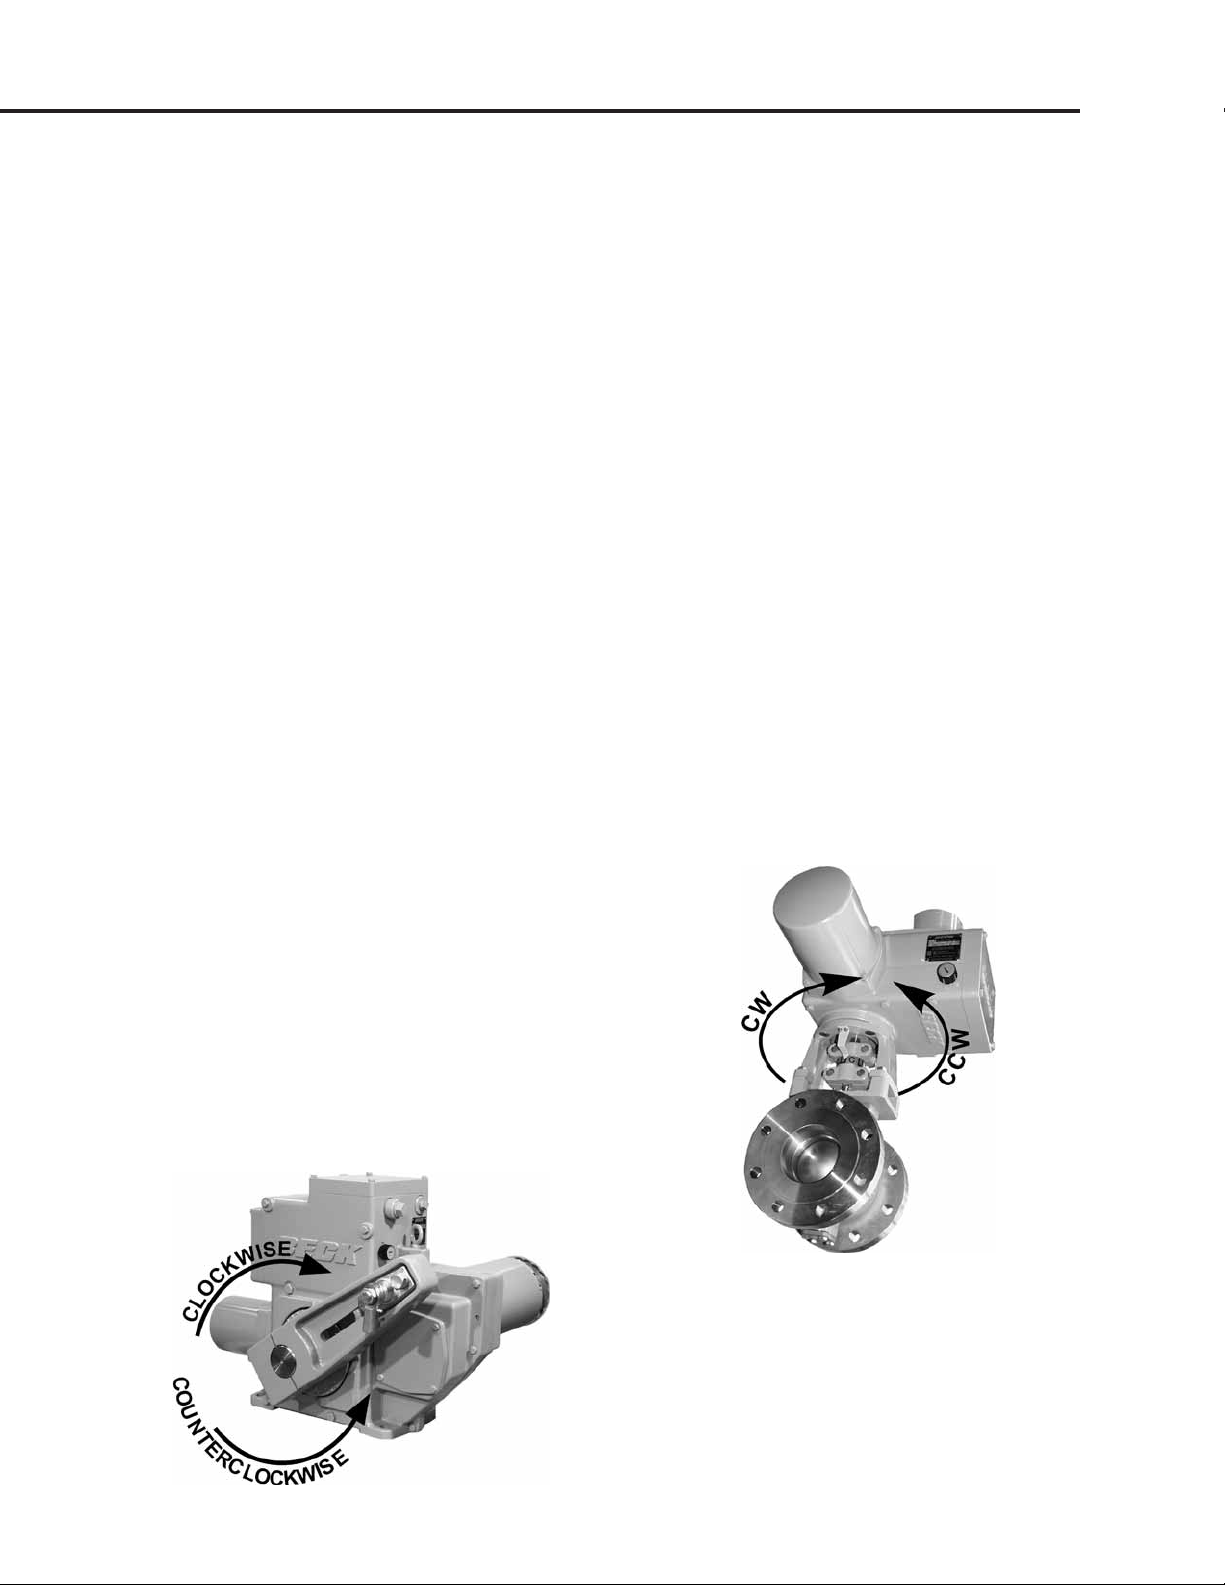
DIRECTION OF SHAFT
ROTATION (CW VERSUS CCW)
Direction of shaft rotation is determined when
looking at the end of the output shaft (see figures
below). Direction of rotation is defined as the
direction of output shaft rotation produced by
an increasing demand signal. Unless otherwise
specified at the time of order, the output shaft is
factory-set to rotate clockwise in response to an
increasing signal.
CALIBRATION PRIORITY
Models 11-159, -209, -309 & -409
Standard Group 11 drives are equipped with
fixed, non-adjustable, built-in mechanical stops.
All output shaft rotation must occur within these
stops, which are approximately 108° apart.
The over-travel limit switches are used to limit
the electrical control range of the drive. These
switches are cam operated and are set slightly
wider apart then the drive’s intended full range
of electronic operation (typically 100°). The limit
switches are positioned to provide an electrical
overtravel protection (typically 101°).
If the drive is short-stroked—i.e., the full travel
rotation from 0–100% is reduced to less than the
standard 100° rotation (see page 55)—it may be
desirable to reset the over-travel limit switches
(see page 52). If the limit switches are not reset,
Handswitch operation of the drive (CW, CCW)
will still result in the original full range of travel.
It is best to calibrate the drive and then set the
limit switches when short-stroking the drive. The
switches should be set just outside the calibrated
range to avoid tripping the switch at the 0% and
100% positions.
The auxiliary switches are also cam operated,
but have no affect on drive and DCM-2 operation.
Therefore, the auxiliary switches can be adjusted
at any time without affecting performance or
calibration.
Models 11-169, -269, -369 & -469
Standard Group 11 drives are equipped with
fixed, non-adjustable, built-in mechanical stops.
All output shaft rotation must occur within these
stops, which are approximately 108° apart; except
for the 11-169 stops, which are 98° apart.
The over-travel limit switches are used to limit
the electrical control range of the drive. These
switches are cam operated and are set slightly
wider apart then the drive’s intended full range
of electronic operation (typically 90°). The limit
switches are positioned to provide an electrical
overtravel protection (typically 91°).
If the drive is short-stroked—i.e., the full travel
rotation from 0–100% is reduced to less than the
standard 90° rotation (see page 55)—it may be
desirable to reset the over-travel limit switches
(see page 52). If the limit switches are not reset,
Handswitch operation of the drive (CW, CCW) will
still result in the original full range of travel. Because
the over-travel limit switches define the maximum
electrical drive range, if they are to be reset, they
should be adjusted before performing DCM-2
(demand and position) calibration procedures.
The auxiliary switches are also cam operated,
but have no affect on drive and DCM-2 operation.
Therefore, the auxiliary switches can be adjusted
at any time without affecting performance or
calibration.
51
Page 52
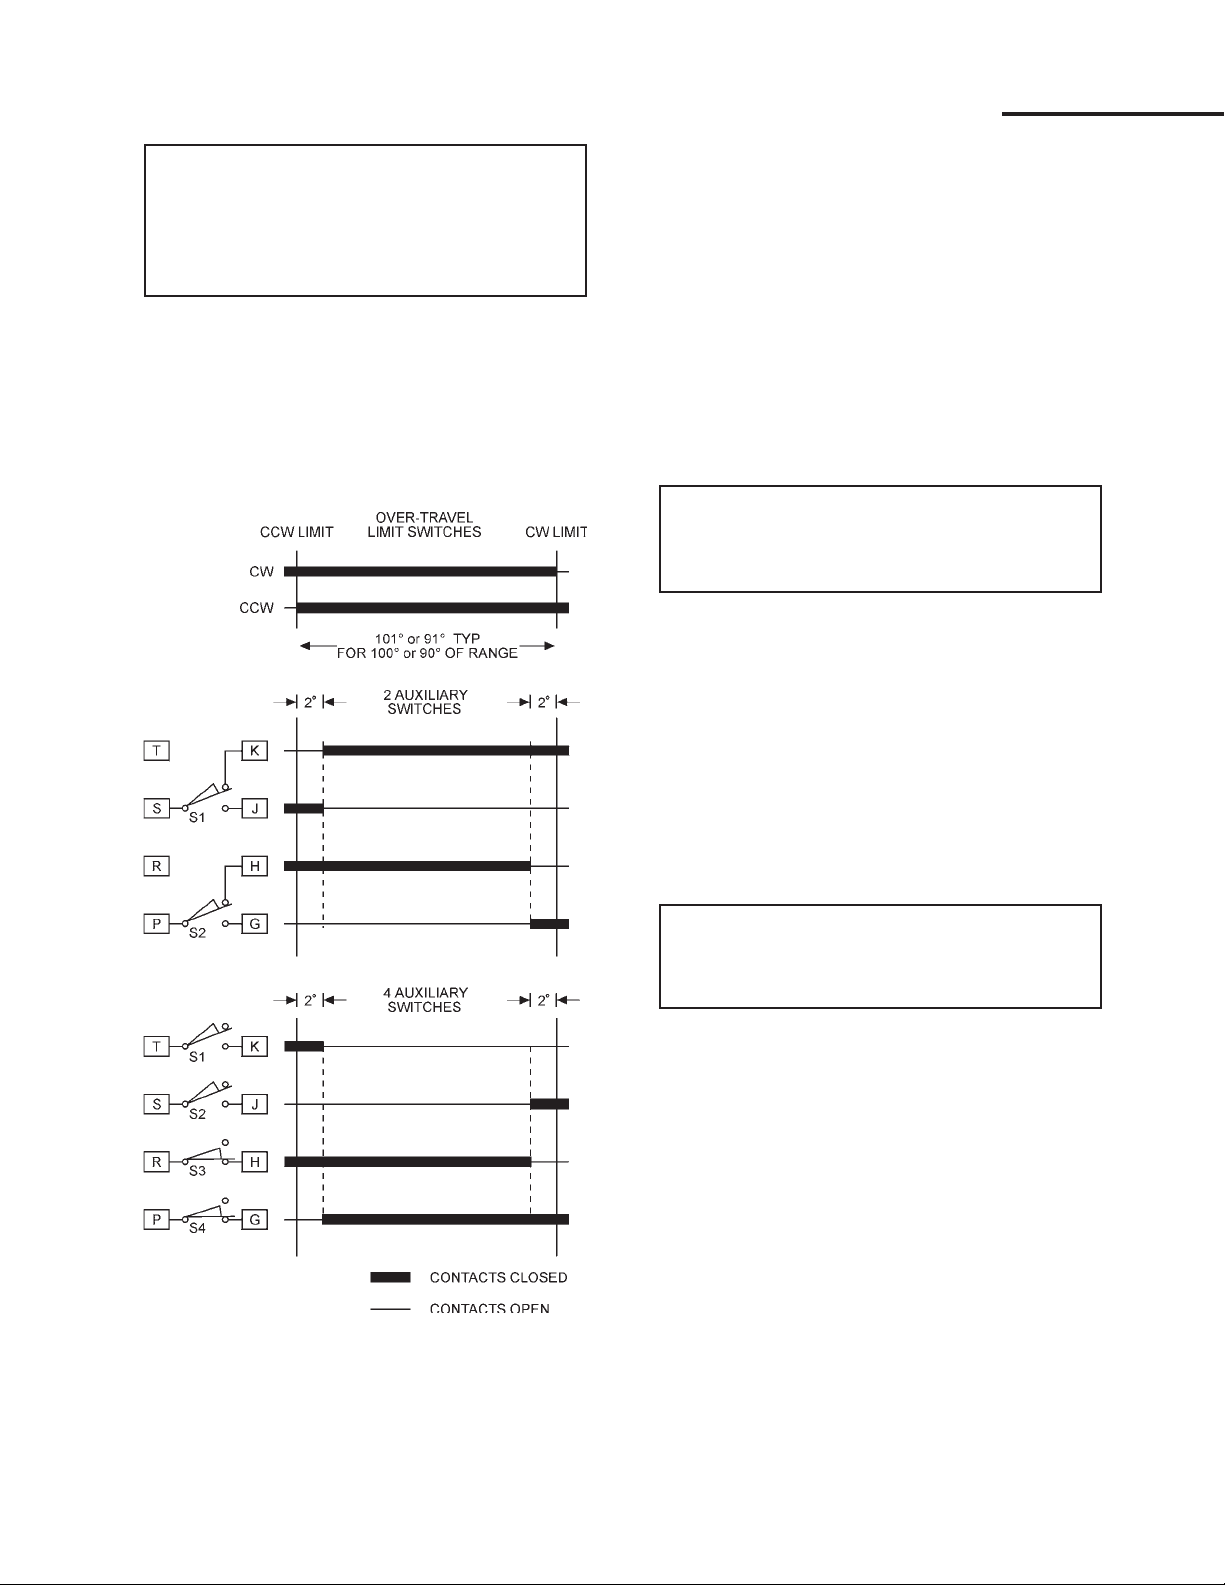
DCM-2 HART INTERFACE Calibration - Switches
NOTE: Y our Beck drive was shipped from the
factory ready for installation; no electrical
adjustments are required before placing it in
operation. Each drive is set up and calibrated
to the specifications that were written into
the equipment order.
Under normal operating conditions there is no
need to recalibrate the control drive. However,
if the application requirements change or are
different than specified on the equipment order,
the drive should be recalibrated according to the
following procedures.
SWITCH ADJUSTMENTS
Control drives are shipped with over-travel
limit switches factory-set for either 101° (11-159,
-209, -309, -409) or 91° (11-169, -269, -369,
-469) of travel unless otherwise specified at
time of order. Limit switches must be set inside
the range of the fixed, non-adjustable, built-in
mechanical stops to prevent stalling of the motor.
Limit switches can be reset to limit travel of the
output shaft to any angle down to a minimum of
60°. Auxiliary switches are set as shown in the
figure at left unless otherwise specified at time of
order.
NOTE: The over-travel limit switches are the
switches located closest to the drive body.
To adjust the over-travel limit switches, it is
necessary to remove the control end cover.
Switches are operated by cams which are
clamped onto the control shaft. Setting a switch
involves loosening the cam, moving the output
shaft to the desired position, and positioning the
cam so that it just operates the switch at that point.
In the following procedure, the use of a continuity
meter is recommended to determine when the
switch opens or closes. If such a meter is not
available, it is possible to hear the switch click as
the contacts open and close.
Standard Over-travel Limit and
Auxiliary Switch Settings
CAUTION
Do not attach the meter or attempt to move the
switch cams until the drive is disconnected
from the line voltage and auxiliary switches are
disconnected from external power sources.
Setting Over-travel Limit
Switches CW and CCW
This procedure should be used if the factory
over-travel limit switch settings must be changed
in the field. It is advisable to operate the drive fully
in each direction, using the electric Handswitch to
check switch settings before attempting to change
them. Follow these instructions if they require
adjustment:
52
Page 53
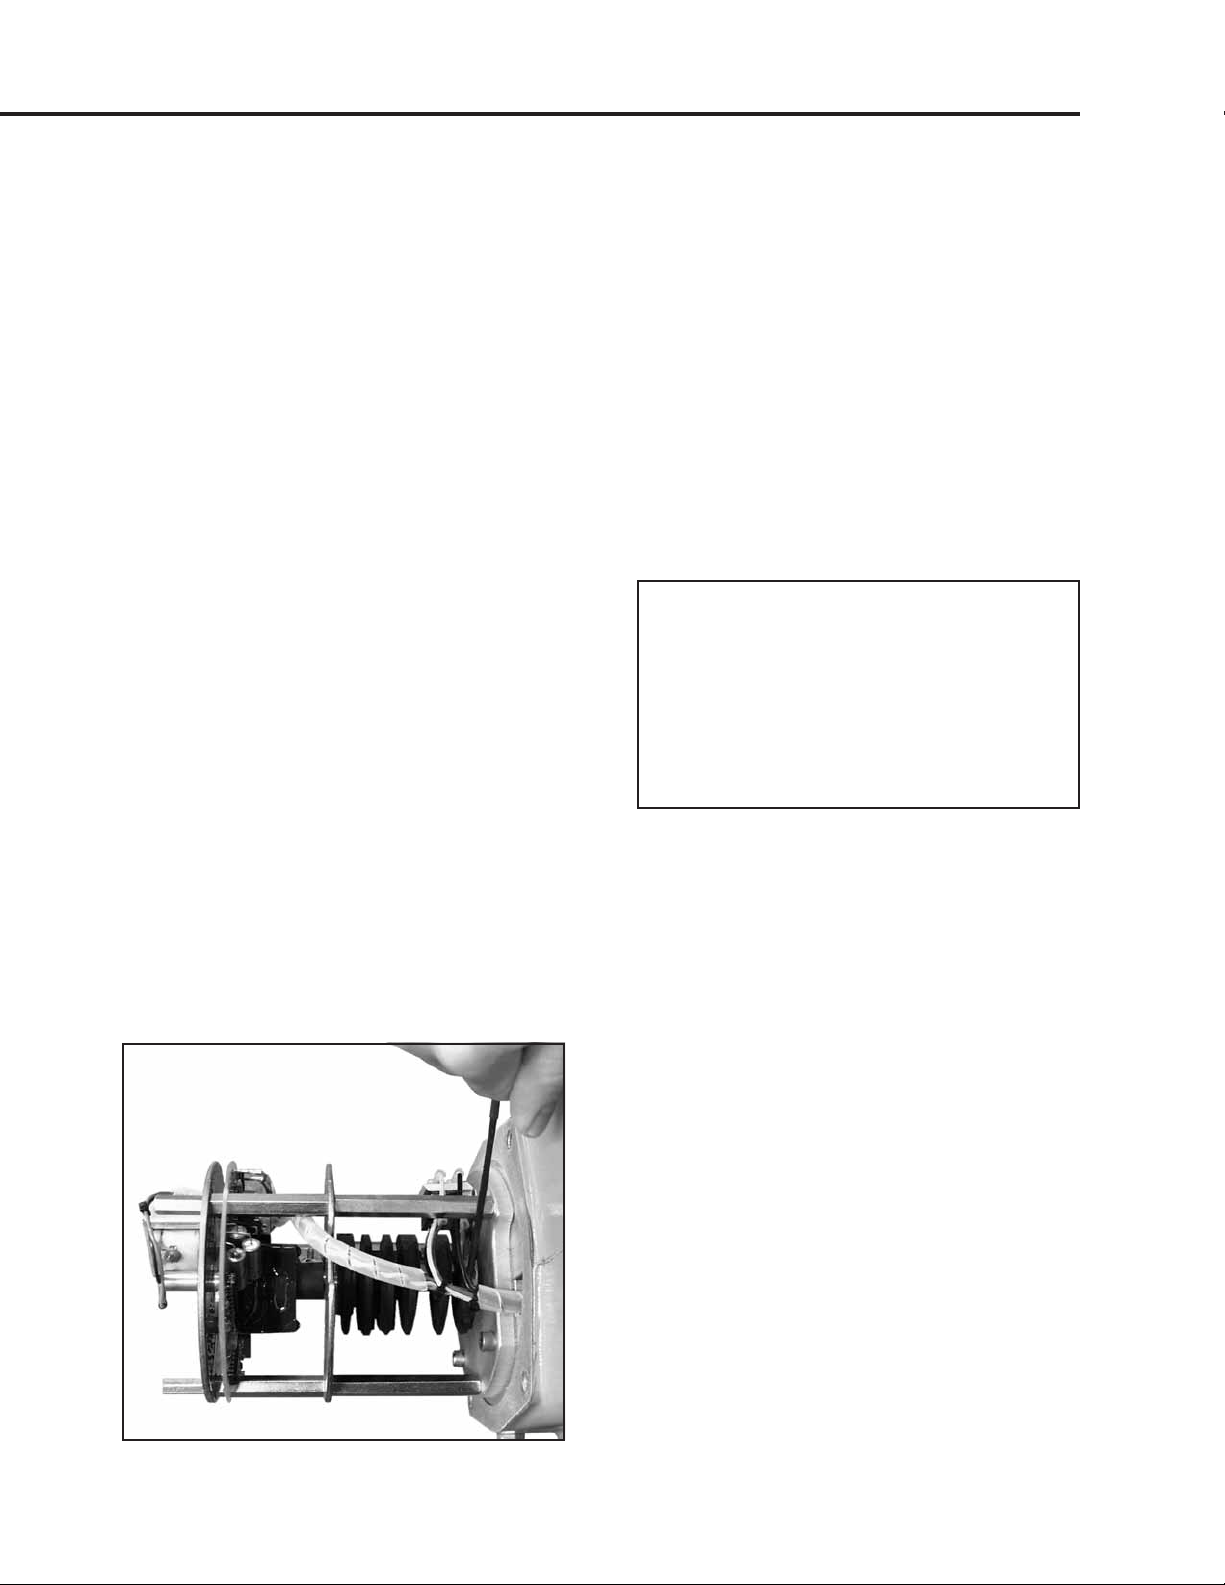
1. Remove the control end cover and terminal
block cover (1/2" bolt heads).
2. Use the electric Handswitch to drive the control
shaft so that the CW switch cam screw is
accessible. Using a 7/64" hex wrench, loosen
the screw so that the cam is just snug on the
shaft (see illustration below).
3. Move the output shaft clockwise to the desired
CW limit.
4. Turn the Handswitch to the “STOP” position.
5. Disconnect power from the drive.
6. Turn the Handswitch to the "AUTO" position.
7. Connect the continuity meter across terminals
B and M. Rotate the cam until the meter shows
no continuity (switch contacts open, switch
clicks).
8. Tighten the cam locking screw to 5 Ib-in
(.56 N•m) torque.
9. Disconnect meter and turn the Handswitch to
the "STOP" position.
10. Reconnect drive power.
11. Rotate the drive’s output shaft in the CCW
direction away from the CW travel limit. Note
the direction of rotation of the lobe of the cam.
The correct cam lobe motion is away from the
switch lever with the switch lever on the lower
part of the cam. If not correct, return to step 2
and reset the cam to the proper orientation.
12. Rotate the output shaft again to the desired CW
travel limit. If the stopping point is reached, the
switch is properly set.
Loosening Switch Cam
13. Repeat instructions for setting CCW travel limit
switch (noting that referenced directions of
rotation should be opposite of those used for
CW switch setting). Connect continuity meter
across terminals B and N.
14. Replace covers and tighten cover bolts to
10 Ib-ft (14 N•m) torque.
15. Rotate index (or index pointer on models
11-159 or -169) to correspond with output shaft
rotation.
Setting Auxiliary Switches
Standard switch settings for drives with 2 or 4
auxiliary switches are shown on the diagram on
page 54. The heavy line indicates a closed circuit.
Follow these instructions to change the operating
point of auxiliary switches:
NOTE: In the following procedure, it is
assumed that switch settings are to be
adjusted so that contacts are open when the
desired position is achieved. If they are to
be adjusted to close, it may be necessary to
reverse the operating mode of the switch by
moving the wire lead to the other terminal on
the switch itself. Be sure to disconnect power
from the switch terminals first.
1. Remove the control end cover and the terminal
block cover (1/2" bolt heads).
2. Use the electric Handswitch to drive the shaft
so that the switch cam is accessible. Using a
7/64" hex wrench, loosen the screw so that the
cam is just snug on the shaft.
3. Move the output shaft to the desired position.
4. Turn the Handswitch to the “STOP” position.
5. Disconnect power from the drive and switch
terminals.
6. Connect the continuity meter across the
appropriate terminals. See the diagram on
page 17 or the drive wiring diagram. Rotate
the cam to operate the switch.
7. Tighten the cam locking screw to 5 Ib-in
(.56 N•m) torque.
8. Disconnect the meter and reconnect power.
9. Move the drive’s output shaft in the desired
direction so that the cam lobe moves away from
the switch lever. If not correct, return to step 2
and reset the cam to the proper orientation.
10. Replace covers and tighten cover bolts to
10 Ib-ft (14 N•m) torque.
53
Page 54

DCM-2 HART INTERFACE Calibration - Position
POSITION SENSOR SETUP
In order to correctly position the drive output
shaft in response to the input Demand signal,
the DCM-2 board receives a position signal from
the drive’s position sensor (CPS) and compares
this actual position to the desired Demand input.
This process requires that the DCM-2 interprets
the CPS signal appropriately for the full range
of desired travel. The "PositionSensrSetup"
submenu is used to set the DCM-2 to accept the
CPS position signal and interpret the appropriate
0–100% range.
All Beck drives are shipped completely set
and calibrated to the customer specifications
and are ready for installation. Normally, no
adjustments are necessary.
If, however, the position calibration needs to
be changed, the "PositionSensrSetup" submenu
must be used. The "PositionSensrSetup" is
accessible through the "Configuration" menu.
The "PositionSensrSetup" submenu will allow
resetting of the minimum travel position of the
drive (Set Pos 0%) and the CPS voltage at the
minimum travel position (CPS Zero%). Online
help is available through the communication
device.
54
Page 55

Short-stroke Operation
(Reducing Full Travel)
Typically, it is best to use the full 100% travel
of the drive in response to the 0–100% Demand
input signal.
In certain applications, as a last resort, it may
become necessary to reduce the full travel of the
drive. In these applications, the DCM-2 can be
calibrated to accommodate reduced stroke. The
recommended minimum full travel is 60%, although
it is advisable to make the range as close to 100%
as possible for the highest position resolution
attainable with the CPS and to avoid possible
reduction in torque.
Reducing the full travel is referred to as
“short-stroking” the drive. This can be easily
accomplished by using a HART communication
device.
First, navigate to the Configuration menu.
Select the General Setup submenu. Select the
Travel parameter. Reduce the stroke by entering
a percentage of full travel (not less than 60%) of
the maximum travel of the drive.
55
Page 56

DCM-2 HART INTERFACE Calibration - Feedback
FEEDBACK SIGNAL
CALIBRATION
DCM-2 boards have the capability of providing
a 4–20 mA output signal so that the drive’s true
output shaft travel can be monitored remotely.
The signal comes calibrated from the factory to
provide a precise 4–20 mA signal corresponding
to 0–100% drive travel. Normally, calibration
is not required even if the position reference
calibration or direction of travel are changed,
because the DCM-2 automatically compensates
for these changes and appropriately scales the
position feedback signal.
If the Feedback must be changed, it is
accomplished by using a Hart communication
device. First, navigate to the Configuration menu.
Next, select the Feedback Setup submenu.
Through this submenu, the Feedback range may
be changed, as well as the curve. Online help is
available through the communication device.
56
Page 57
DCM-2 HART INTERFACE Calibration - Demand
DEMAND SIGNAL
CALIBRATION
DCM-2 boards are designed to accept a
4–20 mA (or 1–5 V dc) analog Demand signal.
Narrower spans within this range can also
be accommodated for split range operation
(see explanation following). The input comes
calibrated from the factory for the full range
unless otherwise specified. It is not necessary
to calibrate the Demand input when the drive is
installed.
If the Demand must be changed, it is
accomplished using a HART comunication
device.
First, navigate to the Configuration menu.
Select the Demand Setup submenu. Through
this submenu, the Demand range limits and
curve specifications may be changed. Online
help is available through the communication
device.
Split Range Operation
It is sometimes desirable or necessary to have
more than one final control element controlling
a single process. Often, this type of control
strategy requires that two to four Beck drives
each respond to different portions of one 4–20
mA Demand signal from the control system.
This type of operation is called split range
operation. For example, consider the most
common split range scenario—two drives split
ranged for 50% of the 4–20 mA Demand signal
input. Both drives are wired in parallel to receive
the same 4-20 mA signal (note that the total loop
resistance should be 250 Ohms as specified by
the HART
Ohm R11 resistor (see DCM-2 illustration on page
78) must be removed from one of the two drive
DCM-2 boards to allow HART® communications.
If more than two drives are split ranged, the R11
resistor must be removed from all the DCM-2
boards but one), but each drive’s interpretation
of the signal must be different. One drive must
interpret 4–12 mA as 0–100% Demand, and
one drive must interpret 12–20 mA as 0–100%
Demand. This requires that the drives have
different Demand signal calibrations.
Split-ranging is easily accomplished by
determining the break points (12 mA in the
example above) and using a HART communication
device.
First, navigate to the Configuration menu.
Next, select the Demand Setup submenu.
Change appropriate Demand range limit
accordingly. In the example above, one drive's
upper Demand range (DemRngUpr) would be
changed from 20.00 mA to 12.00 mA; and the
other drive's lower Demand range (DemRngLwr)
would be changed from 4.00 mA to 12.00 mA.
®
communications protocol. The 250
NOTE: Ensure that the L.O.S. (Loss of
Demand input signal) settings of the drives
are appropriate for the new configuration.
This would involve changing the appropriate
Demand LOS limits (DemLimLwr or
DemLimUpr). T ypically , these settings are -5%
and 105% of the Demand range. See page 21
for a description of the LOS function.
57
Page 58

DCM-2 HART INTERFACE Calibration - Torque Measurement
TORQUE MEASUREMENT
CALIBRATION
DCM-2 boards have the capability of
measuring the drive output torque and providing
several torque-related features. The torque
measurement is calibrated to the drive’s rated
output at the factory. There is normally no reason
to recalibrate this feature in the field, unless a
new DCM-2 board has been installed.
In the event that calibration is required,
it is easily accomplished by using a HART
communication device.
First, navigate to the Configuration menu.
Next, select the Torque Setup submenu. Select
the Trq Null parameter, which will allow the 0%
torque value to be edited. Enter the number
corresponding to the 0% torque value that is
shown on the inside of the DCM-2 cover. Next,
select the Trq Const parameter, and enter the
number corresponding to the 100% torque
value that is shown on the inside of the DCM2 cover. Online help is available through the
communication device.
58
Page 59
DCM-2 HART INTERFACE Maintenance - Alarm Messages
COMMON HART
HART® protocol maintains both standard and
device specific informational messages that are
displayed on the 275/375 Handheld Communicator
when various conditions occur. They can also
be used to trigger alarms and messages in other
®
MESSAGES
Handswitch and Limit Switch Messages
Message
“Motor power is blocked, check switches”
This message will appear if a condition prevents current flow to
the motor. Some of the most common conditions are: The drive
Handswitch is put in the STOP position; either of the drive overtravel limit switches are open; or the motor control triacs fail.
Demand Signal and Process Variable Messages
®
HART
messages alert the user to various alarm conditions
and make it much easier to diagnose problems.
Below is a table of typical Beck drive messages
and message sequences. It does not include all
possible messages, only the most common.
compatible monitoring systems. These
Description
Message
“Process applied to the non-primary
variable is outside the operating limits of
the field device”
“The Demand Signal is outside of the
intended limits (see Demand Setup
menu)”
“Demand out of accurate measurement
range”
Description
This is a standard HART®-defined message that appears whenever
one of the three HART® non-primary variables (Demand signal,
Torque, Temperature) are outside their design or calibrated ranges.
The Demand input signal to the drive is typically the problem
source; however, the message can also appear if either the torque
measurement (optional) or temperature measurement is outside
the design or calibrated ranges. The Beck specific messages
below provide more descriptive information.
This is a Beck-specific message that can appear after the HART®defined message above. It specifically pinpoints the Demand input
signal to the DCM-2 as the problem source, and indicates that
the signal is outside the calibrated range limits. The lower limit
is configurable as a percentage of the calibrated range (default
is -5%). The upper range is the highest readable input voltage
(5.5 VDC) expressed as a percentage of the calibrated range
(e.g., approximately 112% for a 4–20 mA* or 1–5 V dc standard
input range).
This is a Beck-specific message that can appear after the “Demand
signal out of range” message above. It further defines the demand
signal problem by indicating that the signal is not only out of the
calibrated range, but also out of the design range of the drive. The
lower and upper limits are 0.1 V dc and 5.55 V dc respectively.*
*Note that current input DCM-2 boards utilize a 250 Ohm input resistor to convert the current signal to voltage.
59
Page 60
DCM-2 HART INTERFACE Maintenance - Alarm Messages
Demand Signal and Process Variable Messages (con't)
Message
“The Torque/Thrust is greater than the
output rating”
“Motor power has been removed due to
excessive output torque”
“The temperature is outside of –40F to
185F”
"Demand Signal is out of limit"
Description
This is a Beck-specific message that can appear after the HART®defined (“Process applied to the non-primary variable is outside
the operating limits of the field device”) message mentioned
previously. It serves to further define the condition, and indicates
that the drive’s torque output is exceeding 105% of the calibrated
torque range of the drive.
This Beck-specific message appears after the “Torque is excessive”
message if the torque measurement has exceeded 150% of the
calibrated range and thus gone into a protective mode of operation
to prevent excessive torque in the event of an obstruction or
other problem. The drive ceases driving against the load until the
condition is reset. Although unlikely, it is possible to also get a “Drive
in stall” message (see misc. messages) with this message.
This is a Beck-specific message that can appear after the HART®defined (“Process applied to the non-primary variable is outside
the operating limits of the field device”) message mentioned
previously. It serves to further define the condition, and indicates
that the drive’s internal temperature is outside the -40° to 195°F
(-40º to 91ºC) range.
The Demand Signal has exceeded its measurable limits and has
entered saturation. The value reported for Demand does not
reflect the actual value.
"Loop Current Detected while under
HART/FF Control"
"Loop Current Detected while set for LOS
PAT"
This is a Beck specific alarm message that alerts the user
that analog current is present on the Demand terminals while
operating the drive using the HART configurator Manual Operation
menu. It is used to avoid confusion when a board is left in one
of the manual operation modes and is not properly restored to
"FOLLOW" mode.
PAT mode (Proportional mode) is a special Demand mode where
discrete logic inputs are used in place of the Analog Demand
signal. When operating in PAT mode, no Demand current should
be present. If current is detected, this alarm will be asserted.
Position Signal Messages
(The position signal is defined as the signal from the position sensor (CPS) to the DCM-2)
Message
“Process applied to the primary variable
is outside the operating limits of the field
device”
This is a standard HART®-defined message that appears
whenever the HART® primary variable (Position signal) is outside
the design or calibrated range. The DCM-2 is designed to accept
a maximum position signal range of 0.25 to 5.35 V dc, and can be
calibrated anywhere within this range depending on the type of
CPS and desired stroke of the drive. Normally, new drives would
be calibrated for a 1–5 V dc position signal. Retrofit applications
are typically calibrated for a 0.45–2.6 V dc range.
Description
60
Page 61
Message
“Analog output 1 and its digital
representation are outside the operating
range limits, and not responding to input”
Description
®
This is an additional standard HART
®
appears whenever the HART
primary variable (Position signal)
is outside the design or calibrated range. It accompanies the
message above.
-defined message that
“The Position Signal is less than –5% or
greater than 105%”
“Position signal in LOS”
“Position out of accurate measurement
range”
Miscellaneous Messages
This is a Beck-specific message that appears after the HART®defined messages above. It specifically pinpoints the position
signal to the DCM-2 as the problem source, and indicates that the
signal is outside the calibrated range limits. The upper and lower
limits are -5% and 105% of the calibrated range respectively.
This is a Beck-specific message that appears after the HART®defined messages above. It specifically pinpoints the position
signal to the DCM-2 as the problem source, and is intended to
indicate a CPS or wiring failure. The message is triggered when
the position signal is outside the minimum and maximum limits
of 0.25 V dc and 5.35 V dc respectively. In this case, the LOS
message above will also be present.
This is a Beck-specific message that appears after the HART®defined messages previously mentioned. It specifically pinpoints
the position signal to the DCM-2 as the problem source, and
indicates that the signal is outside the 0.25–5.35 V dc design
range. The LOS message above will also be present when this
message is present.
Message
“The Feedback Signal is enabled but the
loop is open”
“Stall condition has been detected (see
'Stall Time' in the 'General Setup' menu)”
"Feedback is in fixed mode"
Description
This is a Beck-specific alarm message that alerts the user that
external position feedback signal is installed and enabled, but
not wired to an external load. If the signal is wired to an external
load and this message appears, it implies that a wiring failure
somewhere between the drive and the monitoring device has
occurred. If the DCM-2 board is equipped with the feedback
module, but the signal is not being used, this message can be
eliminated by disabling the feedback in the configuration.
This is a Beck-specific alarm message alerting the user that the
drive is in a stalled condition and is no longer trying to fight the
load. This condition occurs if the drive cannot reach the demand
position in the ime allotted by the stall time setting (configurable
from 30–300 seconds, default 300 sec.). In drives equipped with
optional torque measurement, this message may not occur due
to the pre-emptive action of overtorque protection.
The "FB Out Test" diagnostic allows the user to set Feedback to
a fixed value, rather than the normal mode of having Feedback
follow the Position value. If the Feedback value is left in the "fixed"
mode, this error will be reported to alert the user that Feedback
is not following the Position value.
61
Page 62

DCM-2 HART INTERFACE Maintenance - Troubleshooting
CHECK DRIVE
R / C NETWORK
PER TABLE 5,
PG. 79
CHECK SLM
FOR
WEAR
FROM
PAGE 65
GO TO
PAGE 63
GO TO
PAGE 63
DOES DRIVE
WORK PROPERLY
WITH THE
HANDSWITCH?
IS PROPER AC
POWER VOLTAGE
CONNECTED
ACROSS TERMI-
NAL C+ AND B-?
IS JUMPER FROM
TERMINAL A TO C
PRESENT AND
INTACT?
DOES IT WORK
PROPERLY CW?
DOES IT WORK
PROPERLY CCW?
GO BACK
TO
START
DOES MOTOR
APPEAR TO
ENERGIZE?
DOES MOTOR
APPEAR TO
ENERGIZE?
ARE THE R / C
COMPONENTS &
CONNECTIONS
OK?
DOES OUTPUT
SHAFT MOVE WITH
HANDSWITCH IN
“STOP”?
DOES DRIVE RUN
RANDOMLY AND/
OR ERRATICALLY?
DOES HAND-
WHEEL RUN
FREELY BUT DRIVE
WILL NOT
REPOSITION?
DOES HAND-
WHEEL SHUDDER
ABOUT ONE
POSITION?
IS BINDING OR
AN OBSTRUCTION
PRESENT?
CONSULT
FACTORY FOR
ASSISTANCE
REPLACE
AS
NECESSARY
REPAIR OR
REMOVE
OBSTRUCTION
REPLACE SLM
AS
NECESSARY
CONSULT
FACTORY
INSTALL
JUMPER
CONNECT
PROPER
POWER
START
CHECK
LINKAGE &
DRIVEN
ELEMENT
CHECK
SLM &
PINION
CALL
FACTORY
FOR
ASSIS-
TANCE
REPLACE
FAULTY
COMPO-
NENTS
NO
NO
NO
NONO
NO
NO
NO
NO
NO
YES
NO
NO
NO
YES
YES
YES
YES
YES
YES
YES
YES
YES
YES
YES
YES
B1
C1
A1
ELECTRO / MECHANICAL -- CHART 1
62
Page 63
CONNECT
WIRE
CORRECTLY
CONNECT
WIRE
CORRECTLY
REPLACE
FUSE
REPLACE
DCM BOARD
WITH POWER
ON, IS THE AC
VOLTAGE ACROSS
DCM-H FUSE “F1”
ABOUT 0 V (SEE
FIG., PG.78)?
ARE JUMPERS
INSTALLED FROM
FTON&DTOM?
ARE EITHER OF
THESE LEDs
LIT?
GO TO
CHART 2,
PG. 64
INSTALL
JUMPERS
DOES DRIVE RUN
AT ALL IN AUTO?
PLACE HAND-
SWITCH IN AUTO &
MODULATE
CONTROL SIGNAL
TO DRIVE
REMOVE
DCM COMPART-
MENT COVER AND
VIEW FWD & REV
LEDs (SEE FIG.,
PG.66)
REMOVE
CONTROL END
COVER TO CHECK
CW LIMIT
SWITCH
FROM
PAGE 62
FROM
PAGE 62
IS PROPER AC
POWER VOLTAGE
PRESENT ON CCW
LIMIT SWITCH RED
WIRE & TERM. B?
IS SUPPLY VOLT-
AGE ACROSS
TERMINAL C & B
BETWEEN
102 & 132 V AC?
IS PROPER AC
POWER VOLTAGE
PRESENT ON CW
LIMIT SWITCH GRN
WIRE & TERM. B?
IS RED WIRE
CONNECTED TO
THE CCW LIMIT
SWITCH NC
CONTACT?
IS GRN WIRE
CONNECTED TO
THE CW LIMIT
SWITCH NC
CONTACT?
CONSULT
FACTORY FOR
ASSISTANCE
CONSULT
FACTORY FOR
ASSISTANCE
CONSULT
FACTORY FOR
ASSISTANCE
REPLACE
HANDSWITCH,
SEE PG. 77
REPLACE
HANDSWITCH,
CHECK WIRING
APPLY
CORRECT
POWER
REPLACE CW
LIMIT SWITCH,
SEE PG. 76
REPLACE CCW
LIMIT SWITCH,
SEE PG. 76
MOVE
HANDSWITCH
TO THE CCW
POSITION
MOVE
HANDSWITCH
TO THE CW
POSITION
NO
YES
YESYES
YES YES
YES
YES
YESYES
YES
YES
YES
YES
NO
NO
NO
NO
NO
NO
NO
NO
NONO
NO NO
IS PROPER AC
POWER VOLTAGE
ACROSS
TERMINAL A & V?
IS PROPER AC
POWER VOLTAGE
ACROSS
TERMINAL A & U?
IS PROPER AC
VOLTAGE
PRESENT FROM
NTOB&MTOB?
IS PROPER AC
VOLTAGE
PRESENT FROM
VTOB&UTOB?
REMOVE
CONTROL END
COVER TO CHECK
CCW LIMIT
SWITCH
B1 C1
63
Page 64
DCM-2 HART INTERFACE Maintenance - Troubleshooting
WILL BOARD
COMMUNICATE?
IS POWER (”PWR”)
LED LIT?
WILL DCM BOARD
COMMUNICATE?
HAS ERROR BEEN
ELIMINATED?
ARE ANY HART
ERROR MESSAGES
DISPLAYEDONTHE
COMMUNICATOR?
DOES THE DISPLAY-
ED “DEMAND” IN %
CORRESPOND TO
EXPECTED VALUE?
IS PROPER DC SIG-
NAL VOLTAGE PRES-
SENT ACROSS TER-
MINAL AA+, BB-?
IS PROPER DC
VOLTAGE
PRESENT?
DOES THE “RAW
POS” VOLTAGE
CORRESPOND TO
THE DRIVE POS?
DOES THE DRIVE
APPEAR TO
OSCILLATE ABOUT
A FIXED POINT?
DOES “LOOP (DEM)”
IN mA CORRESPOND
TO THE EXPECTED
DRIVE DEMAND
INPUT SIGNAL?
DOES THE DISPLAY-
ED “POSITION” IN %
CORRESPOND TO
EXPECTED DRIVE
POSITION IN %?
DOES COMMUNI-
CATOR DISPLAY
“NO DEVICE FOUND”
MESSAGE?
DO LEDs LIGHT
ALTERNATELY
WITH DRIVE
CYCLE?
IS PROPER
VOLTAGE PRESENT
(0-100% = 1-5 V)?
VIEW ALL
DYNAMIC INFOR-
MATION DISPLAYED
IN THE “ONLINE”
MENU
REMOVE
DCM COMPART-
MENT COVER TO
VIEW LEDs
CONNECT
HART COMMUNI-
CATOR & ESTABLISH
COMMUNICATIONS
GO TO THE
“DETAILED STATUS”
MENU UNDER DIAGNOSTICS AND VIEW
THE “RAW POS”
PARAMETER
GO TO THE
“DETAILED STATUS”
MENU AND VIEW
THE CW & CCW
“MOVEMENT
INHIBITORS"
PUT CON-
TROLLER IN
MANUAL MODE AND
CHECK THE HART
COMMUNICATOR
PER FIG, P.35
INDICATES THAT
THE DEMAND SIGNAL TO THE DRIVE
IS OUTSIDE THE
CALIBRATED RANGE
OR LOST
-- VERIFY SIGNAL
-- CHECK DEMAND
CAL
-- RECAL. DEMAND
IF NECESSARY
ANY PARAMETERS
THAT DISPLAY “ON”
STATUS INDICATE
THAT IT IS PREVENTING THE DRIVE
FROM MOVING -READ PARAMETERS
AND ACT ACCORDINGLY
CALL FACTORY FOR
ASSISTANCE
SET TO “ALWAYS
POLL” SEE PG.36
CHECK DRIVE DE-
MAND CALIBRATION
& RECALIBRATE IF
NECESSARY
REMOVE
COMPART-
MENT COVER AND
VIEW “FWD” &
“REV” LEDs
DCM
CHECK FOR
SOURCES OF
SIGNAL NOISE
AND CORRECT
REPLACE
SLM
CHECK POSITION
CALIBRATION AND
RECALIBRATE IF
NECESSARY
REPLACE CPS
CALL FACTORY
FOR ASSISTANCE
CHECK/REPAIR CON-
TROLLER OR SIGNAL
SOURCE & WIRING
CHECK VOLTAGE AT
TEST POINTS
TP2(+) & TP1(-)
SEE FIG, P.78
DCM
CHECK VOLTAGE AT
DCM TEST POINTS
TP4(+) & TP1(-)
SEE FIG, P.78
CALL FACTORY
REPLACE DCM
CONSULT
FACTORY
REPLACE DCM
BOARD
DEMAND SIGNAL
OUT OF RANGE
NEXT
PREV
DISPLAY
A2
A2
B2
YES
YES
YES
YES
YES
YES
YES
YES NO
YES
YES
YES
YES
YES
YES
NO
NO
NO
NO
NO
NO
NO
NO
NO
NO
NO
NO
YES
NO
NO
FROM
PAGE 65
ELECTRONICS DIAGNOSTICS -- CHART 2
64
Page 65
HAS ERROR BEEN
ELMINATED?
IS “BAD POS SIG”
PARAMETER “ON”?
HAS ERROR BEEN
ELIMINATED?
REVIEW THE
MESSAGES
PRESS
NEXT
USING
THE NEXT KEY
PAGE THROUGH
ADDITIONAL
MESSAGES
GO TO THE
“DETAILED STATUS”
MENU AND VIEW
THE CW & CCW
“MOVEMENT
INHIBITORS"
THIS MESSAGE INDICATES THE DRIVE
HAS SHUT DOWN
AS A RESULT OF A
STALL CONDITION
OF DURATION
LONGER THAN THE
SET STALL TIME
PARAMETER. IF A
STALLING PROBLEM
EXISTS, IT SHOULD
HAVE BEEN FOUND
ON CHART 1.
A NUMBER OF ADDITIONAL MESSAGES
WILL BE PRESENT
THAT INDICATE AN
OUT OF RANGE OR
ABSENT POSITION
SIGNALFROMTHE
CPS TO THE DCM.
THE LIKELY CAUSE
IS A CPS FAILURE.
THIS MESSAGE INDICATES THAT AN
OPEN CIRCUIT IS
PREVENTING CURRENT FROM DRIVING
THE MOTOR. THE
HANDSWITCH IN
STOP-OR AN OPEN
LIMIT SWITCH-WILL
CAUSE THIS MSG,
BUTSOWILLAN
DCM TRIAC FAILURE.
-- VERIFY HANDSWITCH IN AUTO
-- VERIFY LIMIT
SWITCHES ARE
CLOSED
INDICATES THAT
DRIVE TORQUE OUTPUT IS GREATER
THAN 150% OF THE
DRIVE RATING AND
OVERTORQUE PROTECTION IS
ENABLED.
-- CHECK FOR BINDING OR EXCESSIVE
LOADS
-- CHECK LINKAGE
SETUP
-- CORRECT AS
NECESSARY
-- CHECK TORQUE
CAL.
-- RECAL. IF NEC.
DRIVE IS IN STALL
CALL FACTORY IF
DRIVE STILL DOES
NOT OPERATE
CORRECTLY
CALL FACTORY IF
DRIVE STILL DOES
NOT OPERATE
CORRECTLY
CALL FACTORY
PERFORM BOARD
RESET
REPLACE DCM
OR
OR
REPLACE DCM
BOARD
REPLACE
CPS-2
NEXT
PROCESS APPLIED
TO THE PRIMARY
VARIABLE IS OUTSIDE THE OPERATING LIMITS OF
THE FIELD DEVICE
NEXT
DISPLAY
PROCESS APPLIED
TO THE NON-PRIMARY VARIABLE IS
OUTSIDE THE OPERATING LIMITS OF
THE FIELD DEVICE
NEXT
DISPLAY DISPLAY
H/S IN STOP OR
DRIVE IS AT LIMIT
NEXT
DISPLAY
TORQUE IS EXCESSIVE
NEXT
PREV
DISPLAY
A1
B2
GO TO
PAGE 62
GO TO
PAGE 64
YES
NO
YES
NO
NO
YES
ADDITIONAL ERROR MESSAGES AND WARNINGS MAY BE DISPLAYED
ON THE HART COMMUNICATOR. THOSE NOT MENTIONED HERE
ARE EITHER REDUNDANT OR NOT RELATED TO ERRORS THAT PREVENT
THE DRIVE FROM RESPONDING & POSITIONING CORRECTLY; MOST ARE
DESCRIPTIVE AND ARE DISCUSSED UNDER THE APPROPRIATE SECTION
ELSEWHERE IN THIS MANUAL.
NOTE:
65
Page 66
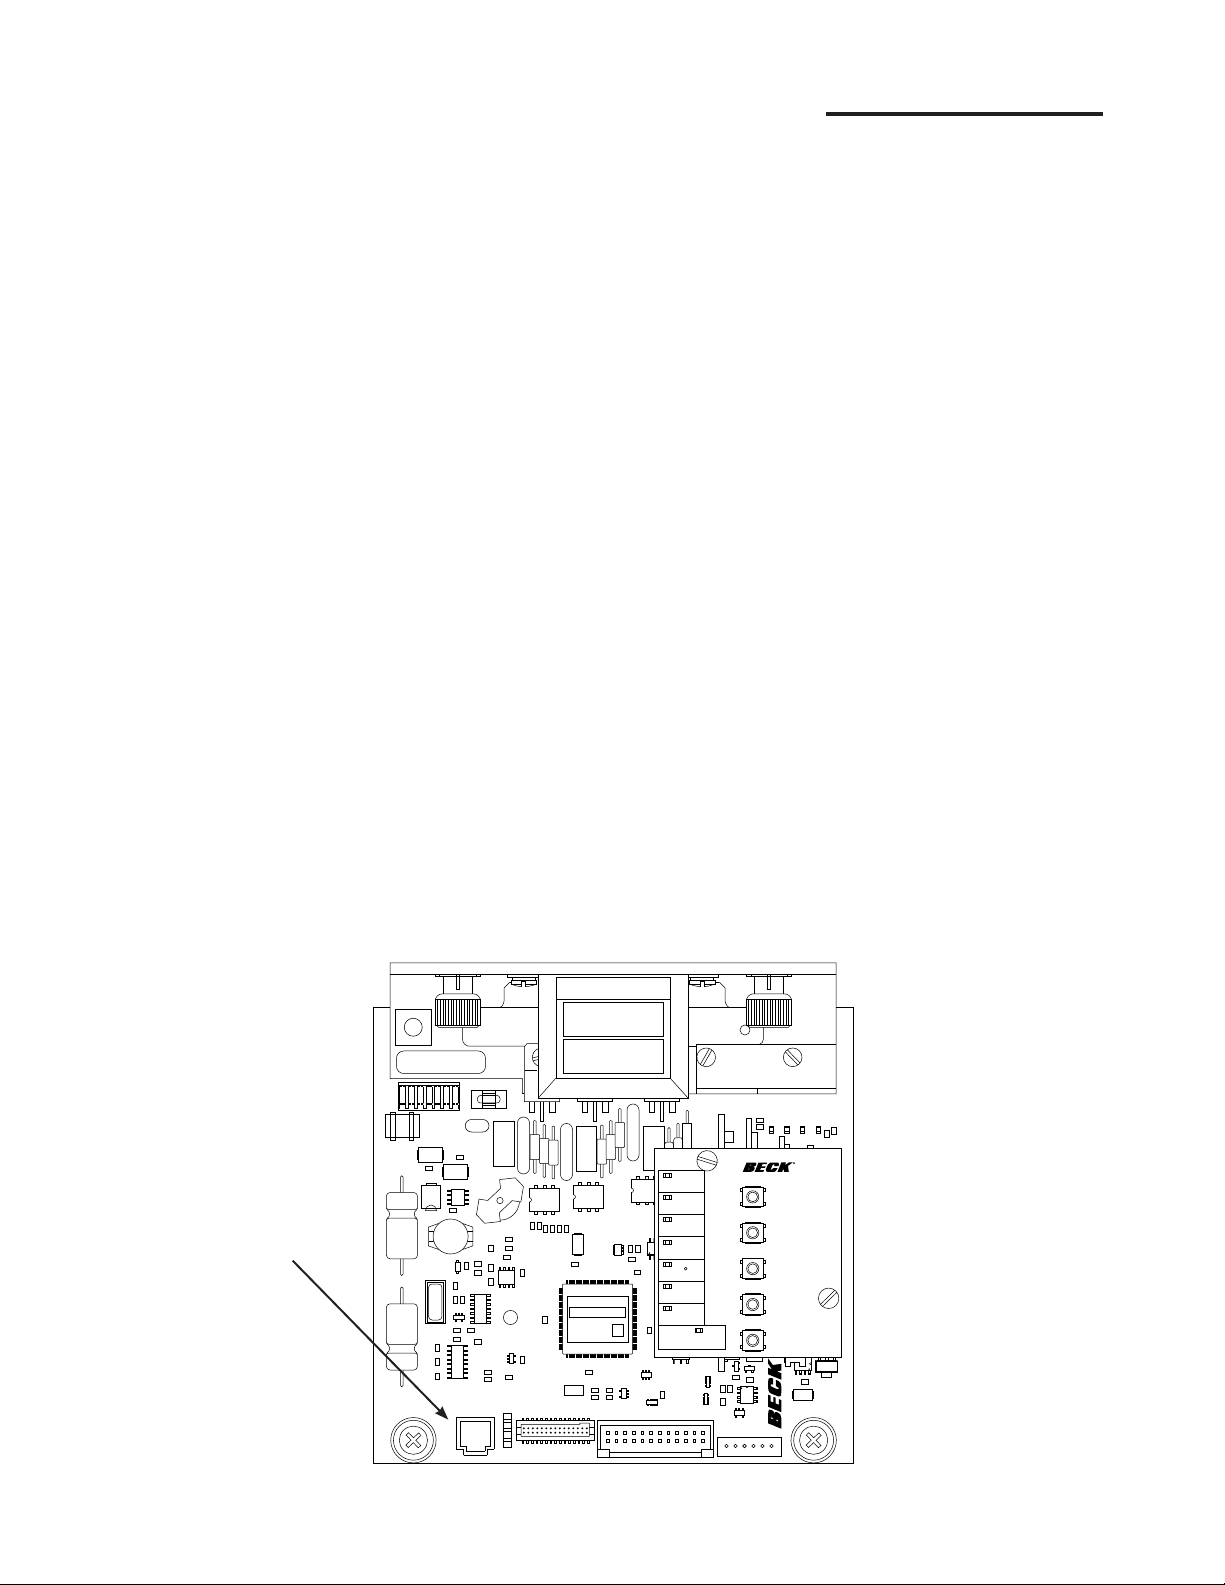
DCM-2 SERIAL INTERFACE Setup
COMMUNICATIONS
The Beck Digital Control Module (DCM-2) is
equipped with a serial interface which allows for
direct communication with a computer. Using
a communication cable, connect the DCM-2 to
the computer using the DCM-2’s RS-232 (J20)
connector (see illustration on this page) and the
computer’s COM port. Ensure that the COM port
on the computer is active, and that the cable is
plugged into the proper COM port if more than one
is present (e.g., COM1, COM2, etc.). Note that a
plug end adapter may be necessary for connection
to the computer’s COM port.
Once connected, communication can be
established between the DCM-2 and the computer
using a terminal emulation program, such as
®
HyperTerminal
. This method of communication
will allow for configuration, calibration and
verification of drive DCM-2 settings without the
use of custom software applications.
HyperTerminal® Software
HyperTerminal is the standard ASCII terminal
emulation software provided with Microsoft®
Windows®. If using HyperTerminal®, the following
instructions will assist in setup. Note that some
variation to these instructions may be necessary
depending on the version of HyperTerminal® being
used.
Once the computer has been connected to the
DCM-2, access HyperTerminal
®
by clicking first on
"Start", then "Programs", then "Accessories", then
"Communications", then "HyperTerminal".
Double-click on the "Hypertrm.exe" icon to start
®
the program. Once HyperTerminal
is running, it is
necessary to set up a file with the proper settings
to communicate with the DCM-2. Proceed as
follows:
1. If prompted to install a modem, answer "no".
Proceed to enter a name (e.g., "DCM-2")
and select an icon (any will suffice) in the
"Connection Description" box. Click the "OK"
button.
2. The "Connect to" box should open next. At
the bottom of the box, set the "Connect using"
selection to the computer COM port that has
been connected to the DCM-2. Click the "OK"
button.
3. The COM port properties box should open next.
This is where the communication settings are
established. The correct settings are:
a. Bits per second = "1200"
b. Data bits = "8"
c. Parity = "none"
d. Stop bits = "1"
e. Flow control = "none"
4. With the appropriate settings entered from Step
3, above, click "OK". Communications should
now be enabled.
5. Press the "Enter" key twice. "Ok" should be
displayed indicating that HyperTerminal® is
66
RS-232
CONNECTOR
Hyperterminal® is a product of Hilgraeve, Inc.
DEMAND
POSITION
TRQ/THRUST
STALL
TEMP F
FB OPEN
STOP/LIMIT
ACKNOWLEDGE
FWD
REV
R
CALIBRATE
SET POS
100%
SET POS
0%
SET DEM
100%
SET DEM
0%
STAT
PWR
Page 67

DCM-2 SERIAL INTERFACE Commands
COMMANDS AND ARGUMENTS
Commands can be used for a variety of functions
including changing the operating configuration of
the drive, verifying operation settings, calibration
and accessing diagnostic information. There are
essentially four different types of commands:
1. Dual-purpose commands. These
commands can be used to either modify
drive configuration settings or display the
settings already set in the drive. In order
to set or make a change to the settings,
the command requires an argument (n). If
the command is used for display purposes
only, the argument is omitted. Examples of
these commands include "dead band" and
"demlos".
2. Display only commands. These commands
are used to display diagnostic or operating
information like present signal values. No
arguments are required. Examples include
the "stat" command and the "signals"
command.
3. Set only commands. These commands
serve only to make a parameter change.
Typically, they apply to the drive calibration.
This type of command requires an argument,
but unlike dual-purpose commands, they
return an error message when entered
without an argument. Examples include the
"demis" and "posis" commands.
4. Execute action commands. These
commands serve to reset, enable or disable
features and do not require an argument.
Entering these commands produces an
immediate action. Examples include the
"revert" and "torqen" command.
The available commands are listed on page 68
and each is described in more detail on pages 69
through 72. The command description explains the
use or uses of the command, while the argument
column describes the applicable arguments
for those commands that require them. In the
command tables, arguments are denoted as n.
Note that the commands described as "sets and/or
displays" signify dual purpose commands that can
be used with or without an argument for setting or
verifying configuration settings.
67
Page 68

DCM-2 SERIAL INTERFACE Commands
SERIAL COMMANDS
The following is a list of serial commands available through the RS-232 interface. Error codes
associated with these commands are listed on page 73.
General Configuration Commands (p. 69)
stepsize
drvdir
stalltime
sernum
Reset Factory Settings Commands (p. 69)
restoremodes
harttype
Demand Signal Commands (p. 69 & 70)
dem0pctma
dem100pctma
trimdem4ma
trimdem20ma
demfunc
demlos
demlosgtp
Position & Feedback Signal Commands (p. 71)
posisd
psisp
fdbk0pctma
fdbk100pctma
trimfdbk4ma
trimfdbk20ma
fdbkfunc
travel
Torque Sensing Commands (p. 71 & 72)
torq0k
torqconst
torq0pct
torq100oct
torqenable
Diagnostic and Information Commands (p. 72)
signals
stat
tempf
torque
68
Page 69
Note: For specific information on the following functions, see the HART interface section of the manual.
General Configuration Commands
Command
stepsize n
drvdir n
stalltime n
sernum n
Description
Sets and/or displays the size (in
degrees) of one incremental movement
of the output shaft.
Sets and/or displays the drive output
shaft direction resulting from an
increasing Demand signal.
Sets and/or displays the time allowed
for the drive to reach its Demand target.
If the drive cannot reach the target in
the allotted time, a stall condition is
initiated.
Sets the serial number of the drive in
which the DCM-2 is installed. Model
number information is derived from the
serial number.
Argument n and Information
n = stepsize in degrees. The minimum
value that can be entered is "0.10";
which is also the standard value. The
maximum value is "2.50".
n = "0" (indicates Extend); or
n = "1" (indicates Retract).
n = time in seconds. Time to stall is
configurable from 30 to 300 seconds.
The default value is 300 seconds.
n = serial number.
Reset Factory Settings Commands
Command
restoremodes 1
harttype n
Description
Resets the drive configuration back to
the original factory settings.
Sets and/or displays the DCM-2 HART
device type.
Demand Signal Commands
Command
dem0pctma n
Description
Sets the Demand signal value that
corresponds to 0% drive position.
Argument n and Information
No additional argument required.
n = "1" (ESR-D);
n = "10" (DCM-2); or
n = "239" (BECK-MK2)
Argument n and Information
n = the Demand signal as a
decimal in milliamps. The minimum
acceptable value is 0.50 mA. The
maximum acceptable value is 100%
Demand less 4.00 mA. For example,
if the 100% Demand signal is 20.00
mA, then the 0% Demand signal
must be 16.00 mA or less.
69
Page 70

DCM-2 SERIAL INTERFACE Commands
Note: For specific information on the following functions, see the HART interface section of the manual.
Demand Signal Commands (con't)
Command
dem100pctma n
trimdem4ma 4
trimdem20ma 20
Description
Sets the Demand signal value that
corresponds to 100% drive position.
Calibrates the Demand signal at 4 mA. This
command should only be used when the
Demand signal at the drive is 4 mA. If the
Demand signal at the drive is greater or less
than 4 mA, an error will be returned. Note:
This parameter is factory configured and
normally does not require recalibration.
Calibrates the Demand signal at 20 mA.
This command should only be used when
the Demand signal at the drive is 20 mA. If
the Demand signal at the drive is greater or
less than 20 mA, an error will be returned.
Note: This parameter is factory configured
and normally does not require recalibration.
Argument n and Information
n = the Demand signal as a
decimal in milliamps. The minimum
acceptable value is the Demand at
0% plus 4.00 mA. For example, if the
0% Demand signal is 4.00 mA, then
the 100% Demand signal must be
8.00 mA or greater. The maximum
acceptable value is 21.00 mA.
A 4 mA Demand signal must be
present at drive terminals 14 & 15.
A 20 mA Demand signal must be
present at drive terminals 14 & 15.
70
demfunc n
demlos n
demlosgtp n
Sets and/or displays the Demand signal
input characterization function. The DCM-2
provides linear, square root, special curve or
square function characterization.
Sets and/or displays the Demand signal
threshold below which the DCM-2 recognizes
that the signal is lost. The threshold is
entered as a value in mA. This command
also sets and/or displays the action initiated
by the drive during LOS (Loss Of Signal).
LOS action options are "sip" (stay in place) or
"gtp" (go to position). Note that the command
always reports both settings, but only sets
one argument at a time. The command must
be used twice to set the threshold and action.
If the action is "gtp", then the command
demlosgtp (see below) must also be set.
The option "pat" is also available to prevent
error messages if the DCM-2 is not being
used with a Demand signal.
Sets and/or displays the position to which
the drive will run upon loss of the Demand
signal (LOS). This command has no effect if
the drive is set to "sip" (stay in place).
n = "0" (linear)
n = "1" (square root)
n = "4" (special curve)
n = "5" (square).
n = the Demand signal in mA below
which LOS occurs. For example, in a
4–20 mA drive, if the desired LOS is
5% below the minimum signal, then
n = "3.20" mA.
— OR —
n = "sip", "gtp" or "pat".
Note: n values must be set
separately.
n = the desired position of the drive
expressed as a percentage of drive
travel (e.g., if the desired LOS
position is 50%, then n = "50.00").
Page 71
Position and Feedback Signal Commands
Command
travel n
fdbk0pctma n
fdbk100pctma n
fdbkfunc n
posis n
Description
Sets and/or displays the value that
represents 100% travel.
Sets and/or displays the mA value of the
Feedback signal that represents the 0%
drive position.
Sets and/or displays the mA value of
the Feedback signal that represents the
100% drive position.
Sets and/or displays whether or not the
drive Feedback signal is enabled.
Sets the point of drive travel in relation
to the drive's current position. This
command should only be used when the
drive is at a known position of travel.
Argument n and Information
n = the desired length of travel in
degrees.
n = the desired Feedback signal for
0% drive position in mA. The minimum
value is 3 mA ("3.00") and the maximum
value is at least 4 mA less than the
Feedback signal value for the 100%
drive position.
n = the desired Feeback signal for 100%
drive position in mA. The minimum
value must be at least 4 mA greater
than the Feedback signal value for the
0% drive position. The maximum value
is 21mA ("21.00").
n = "0" (no feedback) or "1" (feedback).
n = the present drive position as a
degree of full drive travel to establish
where the 0% point of travel should be.
trimfdbk4ma n
trimfdbk20ma n
Trims the Feedback signal at 4 mA. If the
Feedback signal is not within 1 mA of 4
mA, an error will be returned. Note: The
Feeback sourcing circuit is factory calibrated
and normally does not require recalibration.
Trims the Feedback signal at 20 mA. If the
Feedback signal is not within 1 mA of 20
mA, an error will be returned. Note: The
Feeback sourcing circuit is factory calibrated
and normally does not require recalibration.
Torque Sensing Commands
Command
torq0k n
Description
Assigns the count value to be
associated with 0 torque. This number
is unique to each drive.
n = the present Feedback signal
from the drive as measured in mA at
terminals 16 & 17. The minimum value
is 3 mA ("3.000") and the maximum
value is 5 mA ("5.000").
n = the present Feedback signal
from the drive as measured in mA at
terminals 16 & 17. The minimum value
is 19 mA ("19.000") and the maximum
value is 21 mA ("21.000").
Argument n and Information
n = the zero torque value in counts.
This number is determined during
manufacture and is noted on a tag
affixed to the drive body within the
electronics compartment.
71
Page 72
DCM-2 SERIAL INTERFACE Commands
Note: For specific information on the following functions, see the HART interface section of the manual.
Torque Sensing Commands (con't)
Command
torqconst n
torqenable n
Description
Assigns the count value to be
associated with the torque span. This
number is unique to each drive.
Enables or disables the torque
measurement feature of the drive.
Diagnostic and Information Commands
Command
signals
stat
Description
Displays the present Position signal
of the drive in volts and the Demand
signal in milliamps.
Displays information on the status of
the drive, including:
Time / Date
Demand (% and settings)
Position (% / inches)
Error (%)
Stepsize (inches / %)
Deadband (inches / %)
Motor Status
Run Time
Line Frequency
Starts (ext./ret./total)
Reversals/Stalls
Overloads
Positive & Negative Peak Load (%)
Positive & Negative Peak Torque
(% / inches)
Extend and Retract Inhibit Setting
Alarms
Argument n and Information
n = the torque span value in counts.
This number is determined during
manufacture and is noted on a tag
affixed to the drive body within the
electronics compartment.
n = "0" (disabled) or "1" (enabled).
Argument n and Information
No argument.
No argument.
72
tempf
torq
Displays measured temperatures in the
drive (°F.):
Low extreme
Present temperature
High extreme
Displays the drive's present torque
measurement as a percentage of rated
torque.
No argument.
No argument.
Page 73

DCM-2 SERIAL INTERFACE Command Error Codes
Command Error Codes
When an error is encountered using the serial commands, an "ERROR XX" message is returned. The
table below provides a description of the error codes ("XX").
Code
2
3
4
5
6
9
10
Description
Invalid selection
Value too big
Value too small
Data length error
General error
Process too high
Process too low
Information
Displayed when an unknown command
has been entered.
Displayed when an entered numeric
value exceeds expected parameters.
Displayed when an entered numeric
value is less than expected parameters.
Displayed when the wrong number of
arguments is entered.
Displayed when a combination of
circumstances prevents a better
description of the error.
Displayed when the entered value
exceeds acceptable parameters when
calibrating a 0% value.
Displayed when the entered value is
less than acceptable parameters when
calibrating a 100% value.
14
32
64
Span too small
Busy
Not implemented
Displayed when entered values for a 0%
point and a 100% point are too close.
Displayed when a memory store is
requested and another memory store is
already in process.
Displayed when an entered command is
defined, but cannot be implemented.
73
Page 74
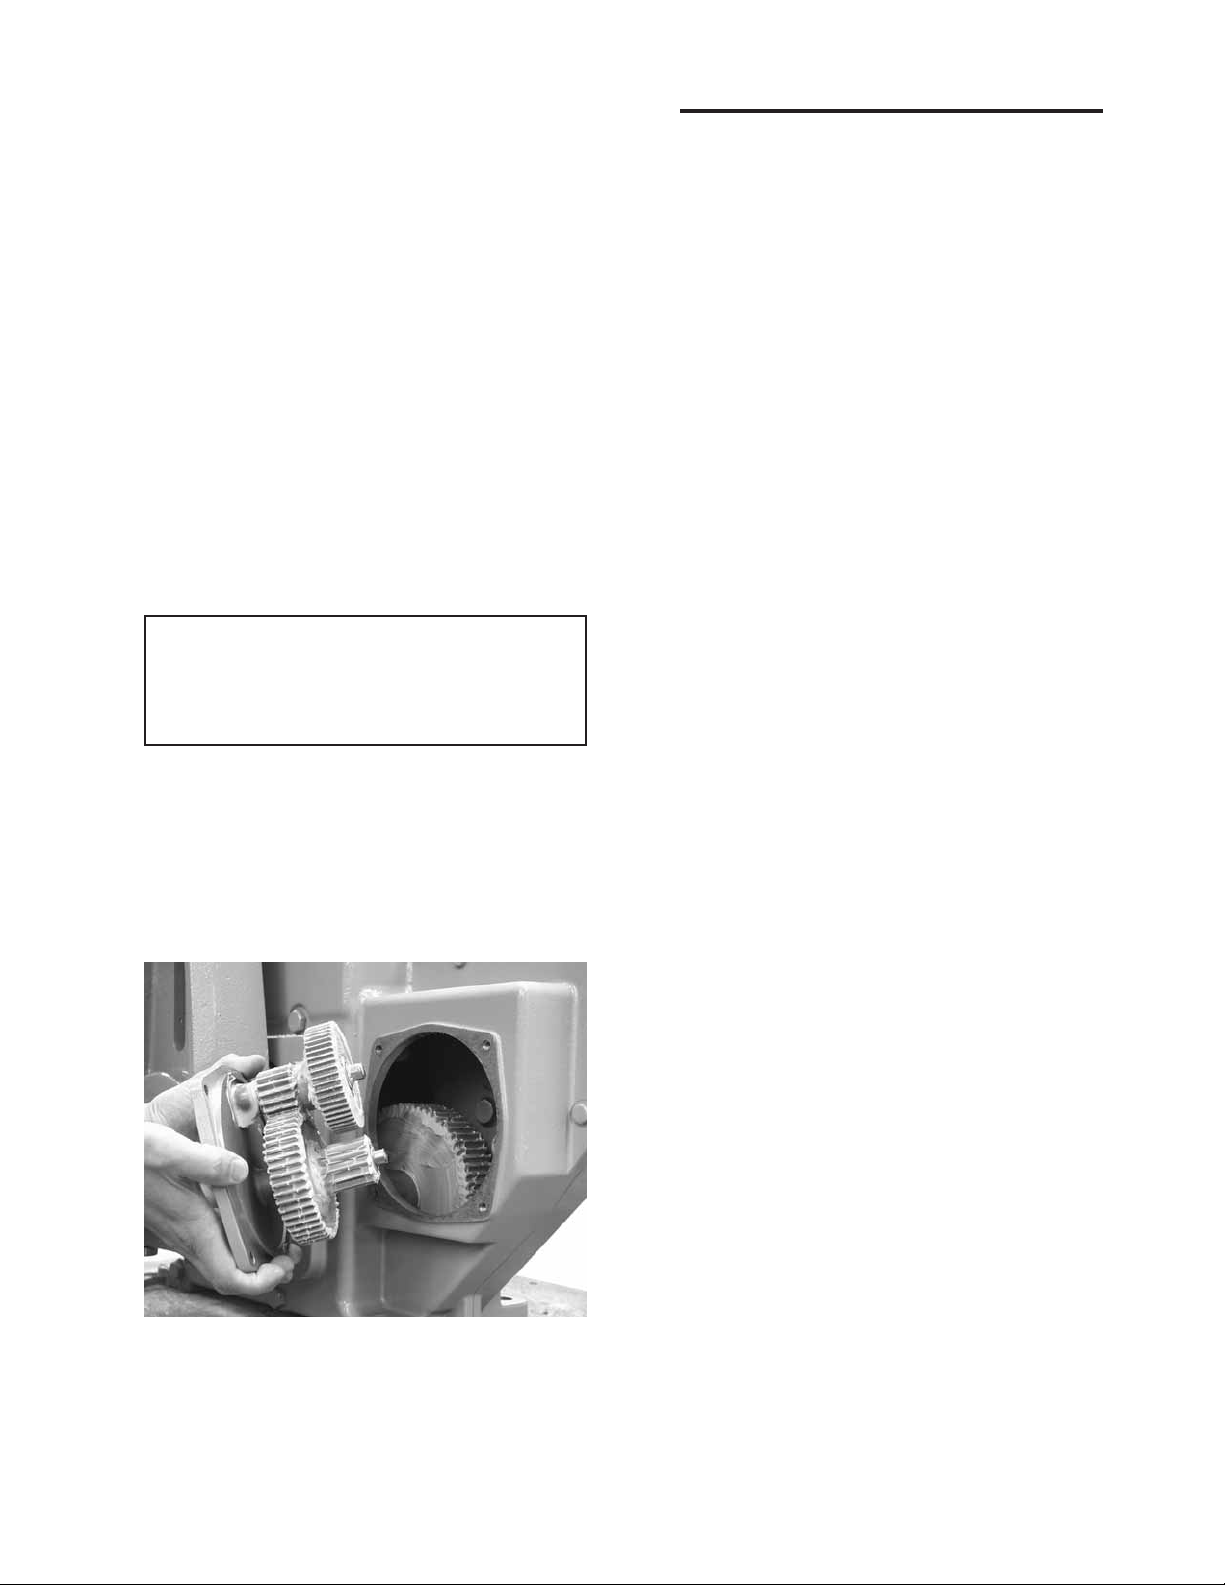
MAINTENANCE ROUTINE
Beck drives require only a minimum of routine
maintenance. A visual inspection is in order
to verify that the connection to the final control
element is intact and operating normally. If
vibration is present, check the electrical terminal
connections and other hardware for tightness.
LUBRICATION
Periodic lubrication is not required on Beck
control drives. However, it is recommended that
during major shutdowns or outages, the drives
in the most severe applications be inspected to
determine the need to relubricate the drive gear
train.
If your drive has a linkage, to extend the life of
the linkage rod ends, they should be included in
your scheduled lubrication program.
CAUTION
If your drive has a linkage, before removing
the gear module assembly, block the control
drive crank arm to prevent the crank arm and
the gear train from moving when the change
module is removed.
Examine the gear teeth, shaft bore, and
gear shafts for signs of excessive wear, scoring,
or other damage. If evidence of this damage
is present, the drive should be returned to the
factory for a detailed examination of the main
gear, which requires complete disassembly of
the drive. See "HOW TO OBTAIN SERVICE" on
page 87.
If there is no evidence of damage to the
gearing, recoat the teeth and shaft bores of all
gears with a heavy layer of Fiske Lubriplate GR132 or equivalent (GR-132 is an E.P. grease with
polymer additives). The ball bearing on the output
shaft and crown gear shaft have added double
grease seals and require no maintenance for the
life of the bearings. Inspect all grease seals and
replace any that show wear. Reassemble the
drive, referencing pages 8–14 for appropriate
bolt torques.
To inspect the gears, remove the gear module
assembly on the 11-209/-269, -309/-369 and
-409/-469. On Model 11-159/-169, the motor
must be removed to access the gears. Clean the
gears thoroughly, removing all old lubrication.
11-409 Gear Module
74
Page 75

MAINTENANCE COMPONENT REPLACEMENT
This section covers replacement of many
components of the drive. Note that some
components are not field-repairable. Refer to
the drive outline dimension drawings on pages
8–14 and to the cutaway illustration on page 4 for
location of components on the drive.
If it should ever be necessary to replace the
output gear, shaft, or output shaft bearings, a
major overhaul is required and the drive should be
returned to the factory. During a major overhaul,
the factory repair department will update the drive
to include all possible engineering improvements.
See "HOW TO OBTAIN SERVICE" on page 87.
GASKETS
During routine service, inspect the cover,
motor, and change gear plate gaskets for wear or
damage. In order to protect internal components,
worn or damaged gaskets and O-rings should be
replaced.
To remove, scrape all of the old adhesive and
gasket material from the body housing and cover.
Cement the new gasket to the drive body using
a gasket cement such as 3M #847 Rubber and
Gasket Adhesive, or equivalent.
SEALS
Worn or damaged output shaft, control end
shaft, and motor shaft seals should be replaced
to prevent damage to internal bearings and drive
train parts.
To remove the shaft seal, push the blade of a
small screwdriver along the shaft and under the
seal lip. CAUTION: The seal is approximately
1/4" (6 mm) wide. Do not force the screwdriver
blade beyond the width of the seal; damage to
the shaft bearing could result. Pry up on the seal
and force it out of the housing. Clean the shaft
and housing then press in the replacement seal
with the closed side facing outward.
BEARINGS
The Beck control drive contains ball bearings
on the output shaft, control end shaft, and motor
shaft. Bushings and thrust washers are used on
combination gears. Field replacement of these
components is not recommended.
Motor shaft bushings in the body of the
11-159/-169 and 11-409/-469 can be replaced.
TIP: To remove, fill the bushing with a heavy
grease. Select a drive pin that slip fits into the
bushing. Insert the pin into the bushing and tap
with a mallet. This will force the bushing out of
the body casting.
MOTOR
The control motor is not field-repairable.
Disassembly of the motor will result in a loss of
torque that can only be restored by returning the
motor to the factory for re-magnetizing.
CAUTION
If your drive has a linkage, before removing
the control motor, block the control drive crank
arm to prevent the crank arm and the gear train
from moving when the motor is removed.
To remove the motor, first disconnect the
motor wires in the terminal compartment of the
control drive.
In the 11-159/-169 drives, the Handswitch must
first be removed from the body before removing
the terminal block and plate as an assembly.
Follow the instructions in the paragraphs below.
In the 11-209/-269, -309/-369, and -409/-469
drives, remove the terminal block and plate as
an assembly. Remove the black wire from the
terminal post, cut the red motor wire near the
red-yellow-red butt joint and disconnect the
green wire from the motor capacitor. Remove
the mounting bolts and motor. Carefully slide the
motor out of the drive body.
To install the motor, insert the three-wire sleeve
through the wire hole in the motor mount and into
the terminal compartment. Carefully slide the
motor into the drive body. Rotate the motor shaft,
if necessary, to engage the pinion with the first
combination gear. Install motor mounting bolts
and torque to recommended values. See pages
8–14 for torque values. Reconnect the motor
wires. See the following section for reinstalling the
terminal plate.
Motor Resistor and Capacitor
The motor resistor and capacitor are located
under the terminals in the terminal compartment. To
replace a resistor or capacitor, remove the terminal
cover.
In the 11-159/-169 drives, the Handswitch must
first be removed from the body before removing the
terminal block and plate as an assembly. Follow the
instructions in the following paragraph.
In the 11-209/-269, -309/-369, and -409/-469,
remove the terminal plate. Remove the existing
part and transfer the wires one at a time to the
replacement part. Inspect the terminal plate gasket
and replace if necessary. To ensure a watertight
seal between the plate and gasket, coat the gasket
with a thin film of grease before replacing the
terminal plate. Torque the screws to 3 Ib-ft (4 N•m).
75
Page 76
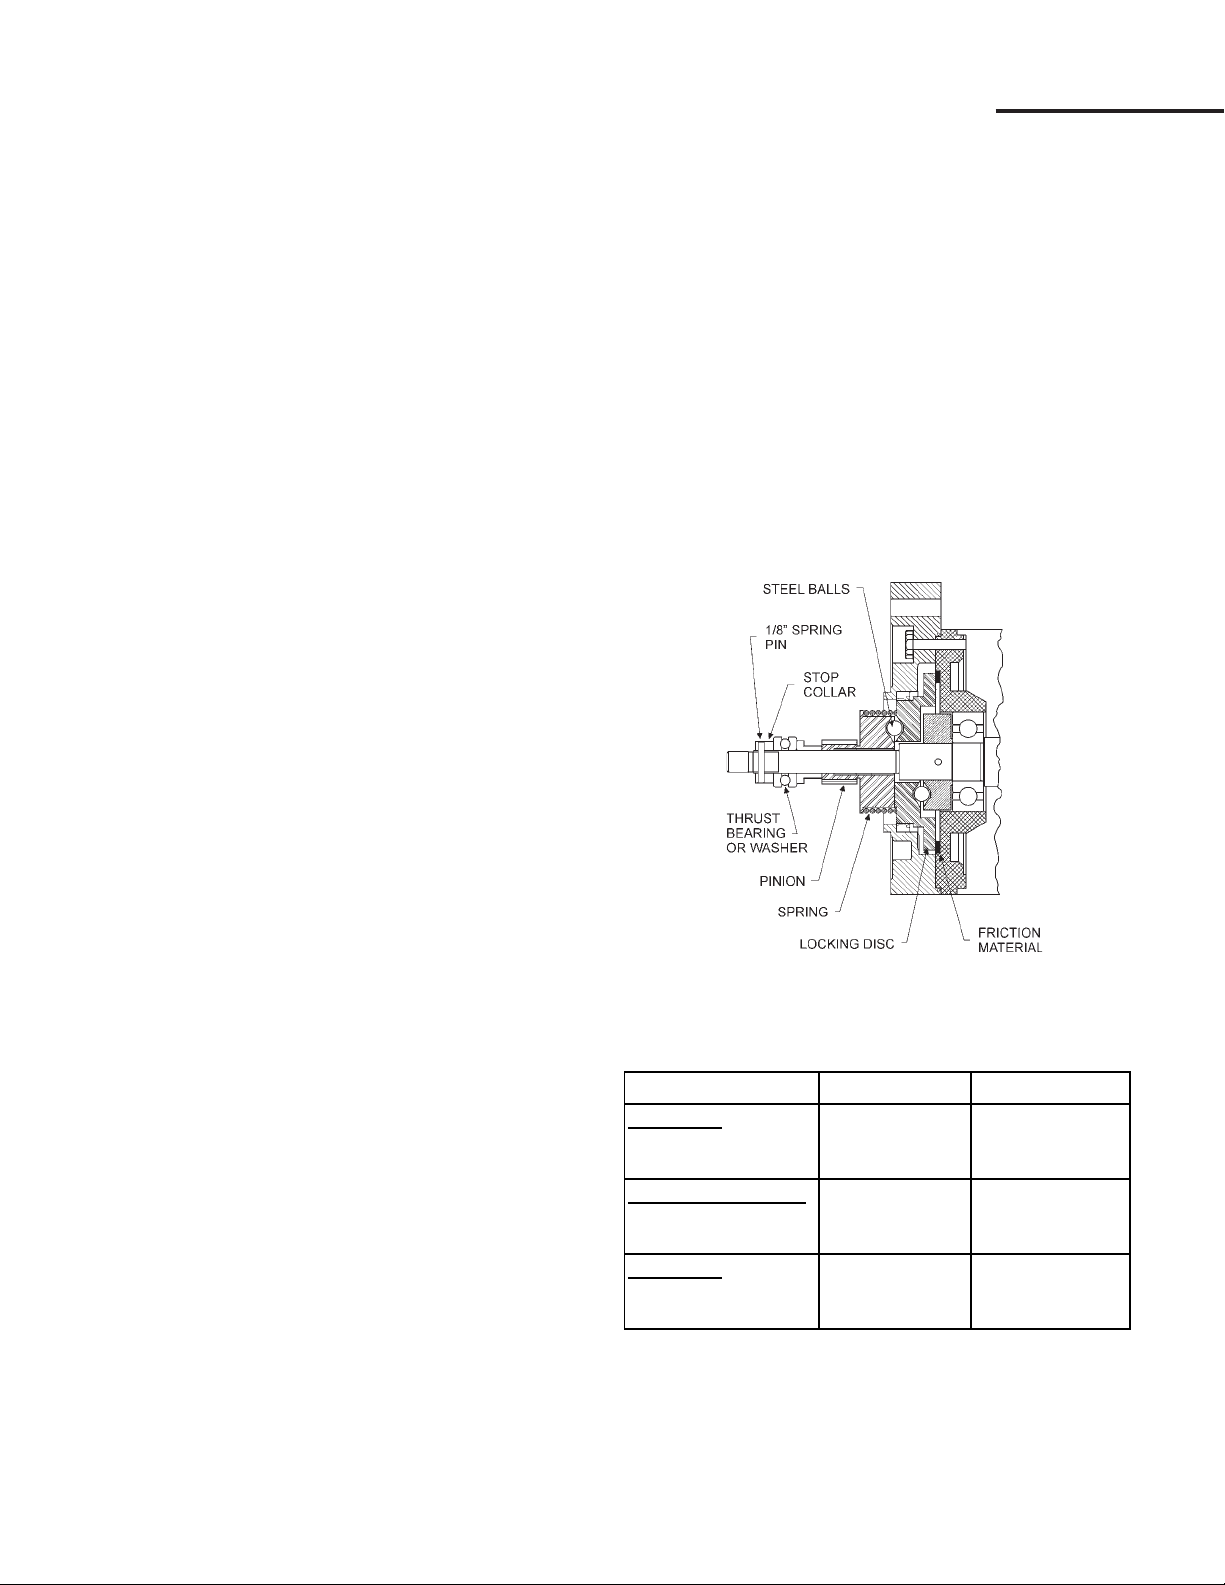
MAINTENANCE COMPONENT REPLACEMENT
OVER-TRAVEL LIMIT AND
AUXILIARY SWITCHES
Complete switch assemblies may be replaced.
It is not possible to replace individual switches.
To replace switch assemblies, remove the control
end cover (1/2" bolt heads) and extensions, if
applicable. Remove the screws holding the
switch assembly to the plate and slide it out to the
side.
Transfer the wires one at a time to the
replacement assembly using the push-on lugs
provided. Install the replacement assembly and
note that it rotates around one screw to permit
an adjustment of the cam-to-switch lever spacing
and switch operating point. To set the switch,
place a .030" (.75 mm) shim between the cam
and switch lever. The switch lever should be
on the low or minimum radius portion of the cam
when setting the switches. Position the switch
assembly so that the switch is just actuated. DO
NOT overstress the switch lever. Tighten both
screws to 10 Ib-in (14 N•m) torque and remove
the shim. When properly adjusted, the switch
lever should remain in contact with the cam
throughout the control drive travel.
SELF-LOCKING MECHANISM
(SLM)
In normal service, the SLM friction surface
should not require replacement; however, a
combination of excessive modulation and load
can cause wear to the SLM mechanism. If
the SLM has been damaged, rebuild kits are
available (see Table below).
SLM Rebuild Kits typically consist of friction
material, spring, spring pin, thrust washer, pinion,
steel balls, locking disc, steel shims, control
motor gasket, terminal joints, slip-on terminal and
instruction sheet.
See the illustration below for component
identification.
Adding Switches
It is usually possible to add switches to a
control drive in the field. Remove the control
end cover (1/2" bolt heads). If the drive has
no auxiliary switches, it is possible to add up to
four switches. See Table 4, page 79, for switch
assembly part numbers.
Install wiring onto the switch push-on lugs
and route the wires into the control drive terminal
area. Remove the terminal cover and solder
wires to the underside of the terminal assembly
according to the wiring diagram included with
the new switch assembly. Install the new switch
assembly and adjust according to the preceding
instructions.
TABLE 3:
SLM PART NUMBERS
Motor Part Number SLM Rebuild Kit Instruction Sheet
11-159/-169
20-2700-20 12-8060-15 80-0016-05
20-2701-20 12-8060-16 80-0016-05
11-209/-269, -309/-369
20-2704-21 12-8060-17 80-0016-07
20-2705-21 12-8060-18 80-0016-07
11-409/-469
20-2201-21, -22, -23 12-8060-11 80-0016-01
20-2201-31, -32, -33 12-8060-13 80-0016-02
76
Page 77
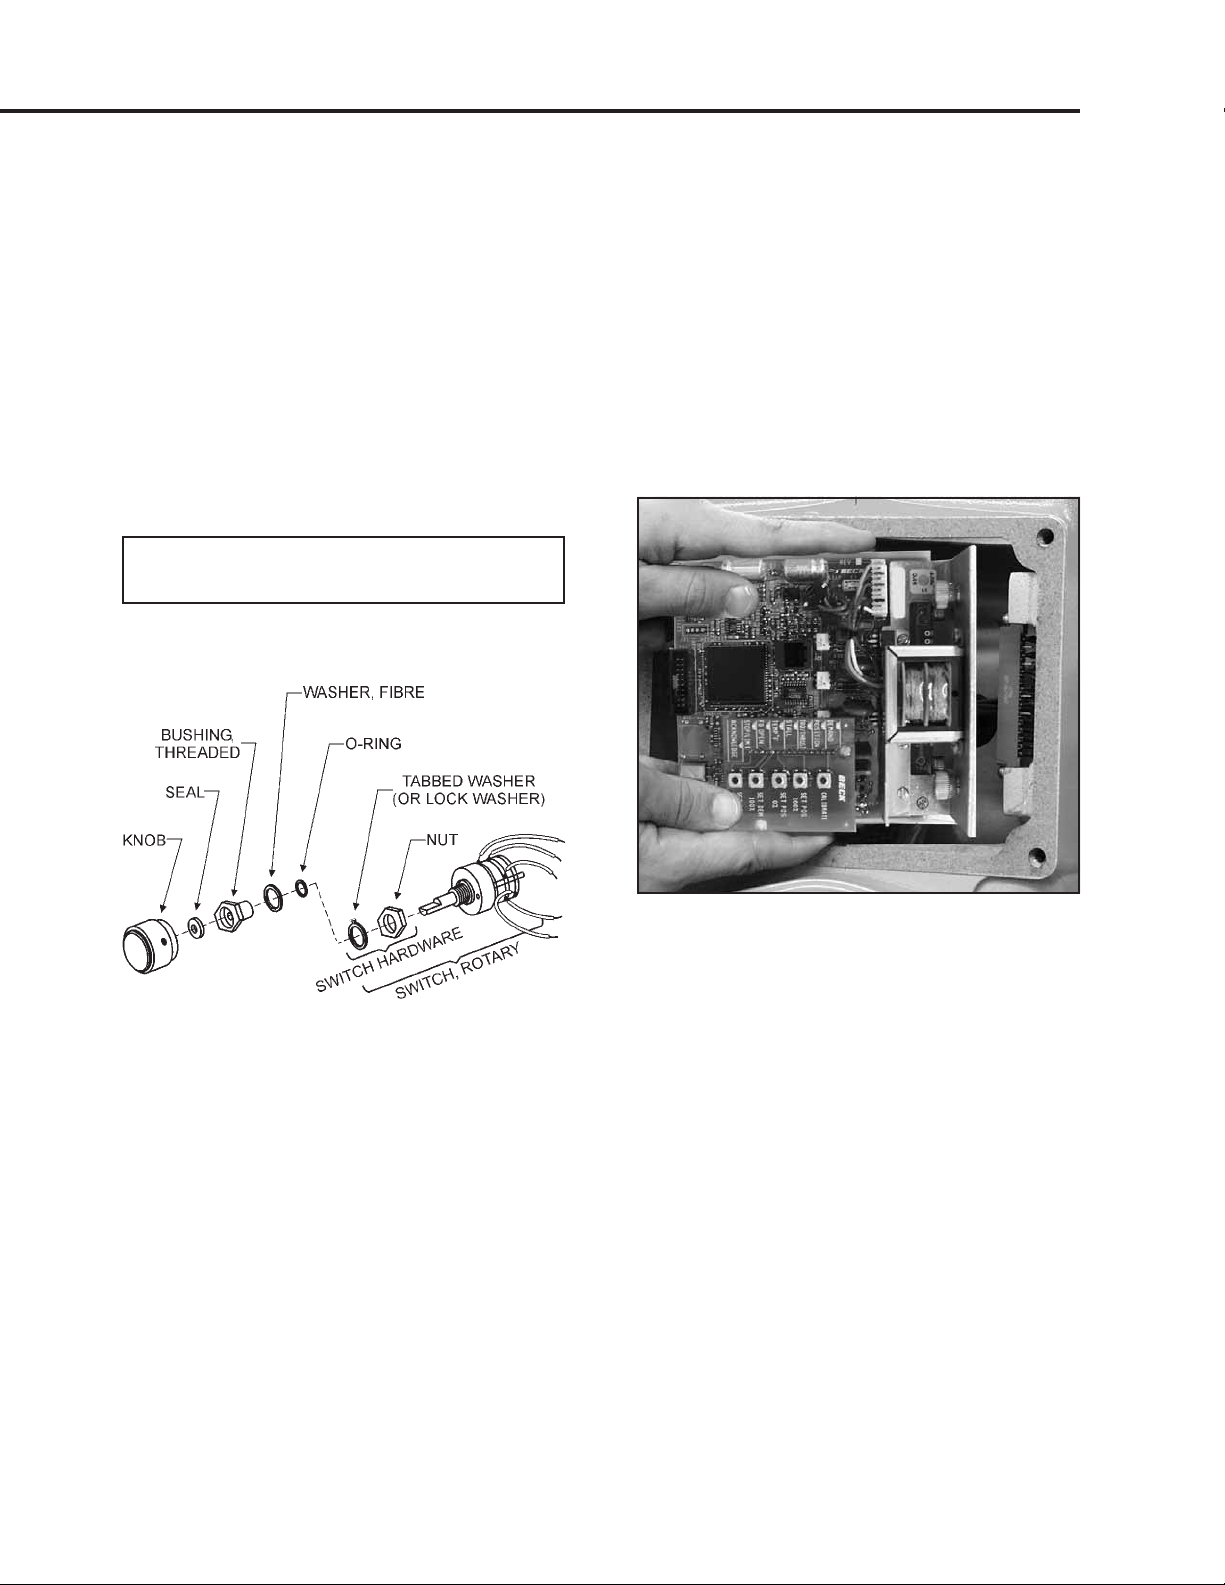
HANDSWITCH
To replace the Handswitch, remove the
terminal cover, and then remove the terminal
plate (11-209/-269, -309/-369, and -409/-469
only). Clip the five wires from the old Handswitch.
Remove the knob and the nut under the knob to
remove the switch. Install the new Handswitch
as shown below. Splice the wires color for color.
Inspect the terminal plate gasket and replace if
necessary. To ensure a watertight seal between
the plate and the gasket, coat the gasket with a
thin film of grease before replacing the terminal
plate. Torque the screws to 3 Ib-ft (4 N•m). Do
not over-torque. Replace the terminal cover.
Torque bolts to 10 Ib-ft (14 N•m).
NOTE: When the Handswitch is turned fully
clockwise, “AUTO” should be indicated.
DCM-2 BOARD
Field service of the DCM-2 board is not
recommended. The factory maintains a stock
of replacement boards for immediate shipment.
To replace the DCM-2 board, remove the Digital
Control Module compartment cover (1/2" bolt
heads). If applicable, disconnect the torque
sensing wires from the bottom of the customer
interface panel by gently pulling on the connector.
Loosen the four captive screws holding the
board to its mounting pads. Note the “L” shaped
mounting bracket on the end of the board. To
remove the board, pull the mounting bracket away
from its mating surface. See illustration below.
To install a DCM-2 board, lightly press the board
connector into its receptacle until the mounting
bracket is flush with its mating surface. Tighten the
four captive screws to 8 lb-in (.9 N•m). If applicable,
connect the torque sensing wires to the bottom of
the customer interface panel by gently pressing
the connector into its receptacle. Replace the
compartment cover. Torque cover bolts to 10 lb-ft
(14 N•m).
CPS-2
Field repair of the CPS-2 assembly is not
recommended. The factory maintains a stock of
replacement assemblies for immediate shipment.
If it is necessary to replace the CPS-2, replace
both the rotor and stator / circuit board assembly.
When returning the CPS-2 to the factory for
service, include the rotor and stator / circuit
board assembly. Do not separate the stator or
circuit boards from their mounting plates. The
rotor should be held inside the stator with rubber
bands for protection during shipment.
77
Page 78
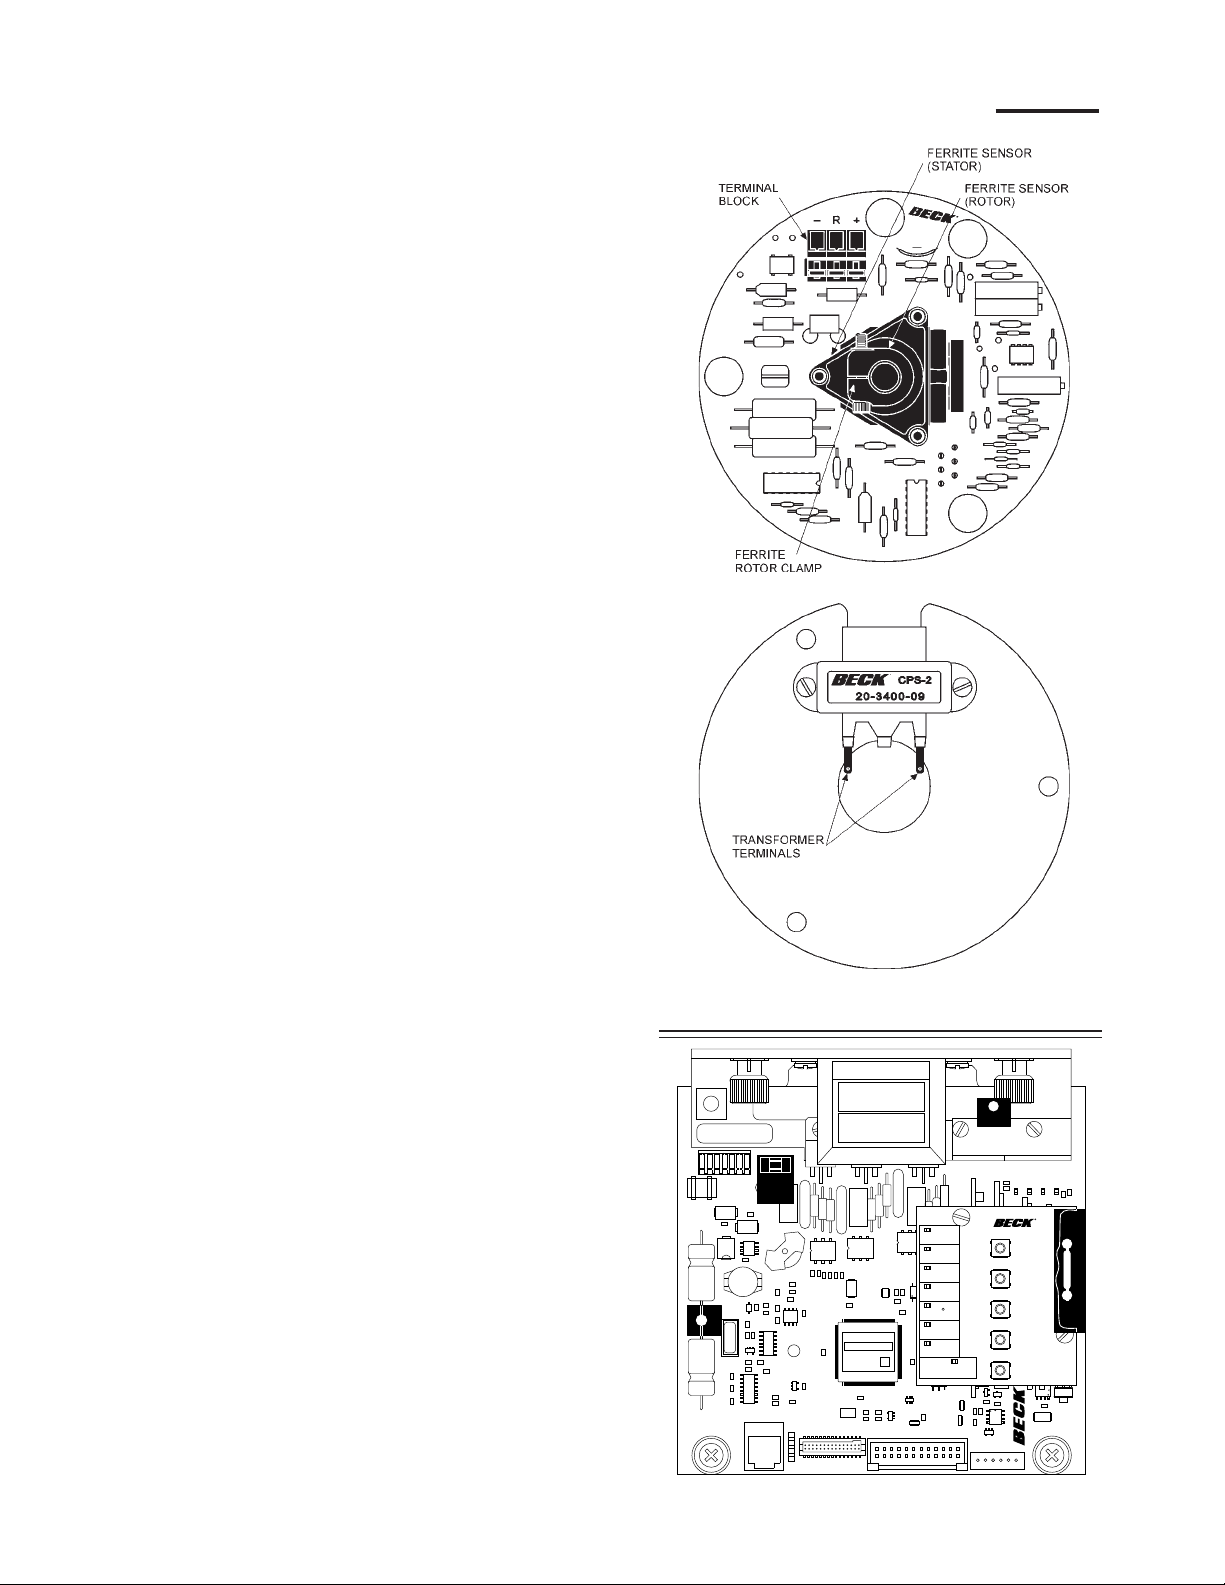
78
MAINTENANCE COMPONENT REPLACEMENT
To remove the CPS-2:
1. Run the control drive to its midpoint of travel
with the local Handswitch. (If the standard
rotation of 100° has been reduced to 80°, the
midpoint of travel is 40°.)
2. Disconnect 120 V ac power to the drive.
Remove the terminal, DCM-2 compartment
and control end covers (1/2" bolt heads).
3. Record the wire colors on the terminal block
of the CPS-2 (see illustration at right), then
disconnect the wires. The terminals are
spring-loaded. To remove a wire, press the
tip of a small screwdriver into the slot at the
top of the small lever. Push down to open the
spring-loaded contact and release the wire.
4. Pull the wires from the transformer (see
illustration at right) back through the wire hole
in the CPS-2.
5. Loosen and remove the 3 hex studs that
clamp the CPS-2 in place. Ensure that the
inboard hex stud is not loosened as the
outboard stud is loosened.
6. Slide the CPS-2 stator assembly off the three
mounting bolts.
7. Note the position of the rotor clamp, then
loosen the rotor clamp screw and remove the
rotor from the shaft.
To install the new CPS-2:
1. Remove the rotor from the replacement
CPS-2 assembly. Slide the rotor, clamp end
first, onto the control shaft as close to the
mounting plate as possible. Leave the clamp
loose. Position the clamp in the same general
location as the one removed previously.
2. Slide the new CPS-2 assembly over the studs
and rotor. Replace the hex nuts but do not
tighten. Carefully slide the rotor back into the
CPS-2 assembly. Twist the rotor while sliding
to prevent damage to the assembly. Tighten
hex nuts to 5 Ib-ft (7 N•m).
3. Thread the wires through the wire holes in the
CPS-2 and reconnect them to the transformer
and terminal block.
4. Restore 120 V ac power to the drive and
connect a meter to the output.
5. Insert a 0.031" (.80 mm) feeler gauge between
the rotor clamp and stator. Position the clamp
0.031" (.80 mm) from the stator.
6. Rotate the rotor (only a minor adjustment
should be necessary) on the control shaft
until the output voltage measured across TP4
and TP1 (see illustration at right) reads 50%
(approx. 3 volts) of the signal span. Tighten
clamp to 5 lb-in (.6 N•m) torque.
7. Perform a position calibration procedure as
described on page 30 or page 54.
FUSE
F1
TP1
Location of DCM-2 Test Points and Resistor
CPS-2 Components
DEMAND
POSITION
TRQ/THRUST
STALL
TEMP F
FB OPEN
STOP/LIMIT
ACKNOWLEDGE
TP4
FWD
REV
R
CALIBRATE
SET POS
100%
SET POS
0%
SET DEM
100%
SET DEM
0%
STAT
PWR
TP3TP2
R11
Page 79
APPENDIX SPARE PARTS
y
A
y
(
)
(
)
R
V
V
μ
μ
μ
μ
μ
μ
μ
μf
μf
μ
μf
μf
:
μ
:
μf
μf
μ
μf
μ
μ
RECOMMENDED SPARE PARTS
It is recommended that certain replacement
parts be stocked for quick availability in the event
that service of your Beck control drive is required.
The types of parts are listed in Table 4, below.
HOW TO ORDER SPARE PARTS
Select the needed parts from the spare parts
list given below. Specify the drive’s model / serial
number (e.g., 11-309-031891-01-02) given on the
nameplate to allow the factory to verify the part
selection. Parts may be ordered by mail, telephone
or fax, with the confirming order sent to the factory
(see back cover).
TABLE 4: RECOMMENDED SPARE PARTS
DESCRIPTION PART NO. DESCRIPTION PART NO.
Limit switch assembl
uxiliary switch assembl
2 switches
4 switches
Gasket set: DCM Board 22-5012-59
Model 11-159, -169 20-3110-01
Model 11-209, -269 20-3110-02 Fuse, 7A, 125V 11-1373-01
Model 11-309, -369 20-3110-02
Model 11-409, -469 20-3110-03 CPS-2 20-3400-09
20-3202-10 Control motor See Table 5, below
Motor resistor See Table 5, below
20-3202-11
20-3202-12 Motor capacitor See Table 5, below
TABLE 5: MOTORS, CAPACITORS AND RESISTORS
USED ON MOTOR CAPACITO
MODEL NO. PART NO.
20-2700-20 120 60 .17 14-2840-02 2
11-159/-169
11-209/-269
and
11-309/-369
11-409/-469
20-2701-20 120 60 .32 14-2844-11 4
20-2704-21 120 60 .35 14-2844-16 5
20-2705-21 120 60 .56 14-2844-05 8
20-2201-31 120 60 1.25 14-2844-17 15
20-2201-32 120 60 2.20 14-2844-15 25
20-2201-33 120 60 3.00 14-2844-15 25
OLTAGE HERTZAMP. PART NO.
50 .17 14-2844-13 3
50 .32 14-2840-11 4
50 .35 14-2844-19 7
50 .56 14-2844-06 10
50 1.25 14-2844-16 5
14-2844-17 15
50 2.20 14-2844-05 8
14-2844-15 25
14-2844-09 6
50 3.00 14-2844-15 25
14-2844-05 8
14-2844-09 6
RESISTOR
ALUE PART NO.VALUE
f 11-5802-03
f 11-5802-03
f 11-5802-02
f 11-5802-02
f 20-1971-13
f 20-1971-13
f 20-1971-12
20-1971-12
20-1971-03
f 20-1971-03
20-1971-04
f 20-1971-04
20-1971-06
f
20-1971-10
f
f
500:
500:
475:
475:
220
220
110
110
75:*
75:*
37.5
37.5
18:*
24:*
:*
:*
:*
:*
*
*
*This is a resistor assembly.
79
Page 80
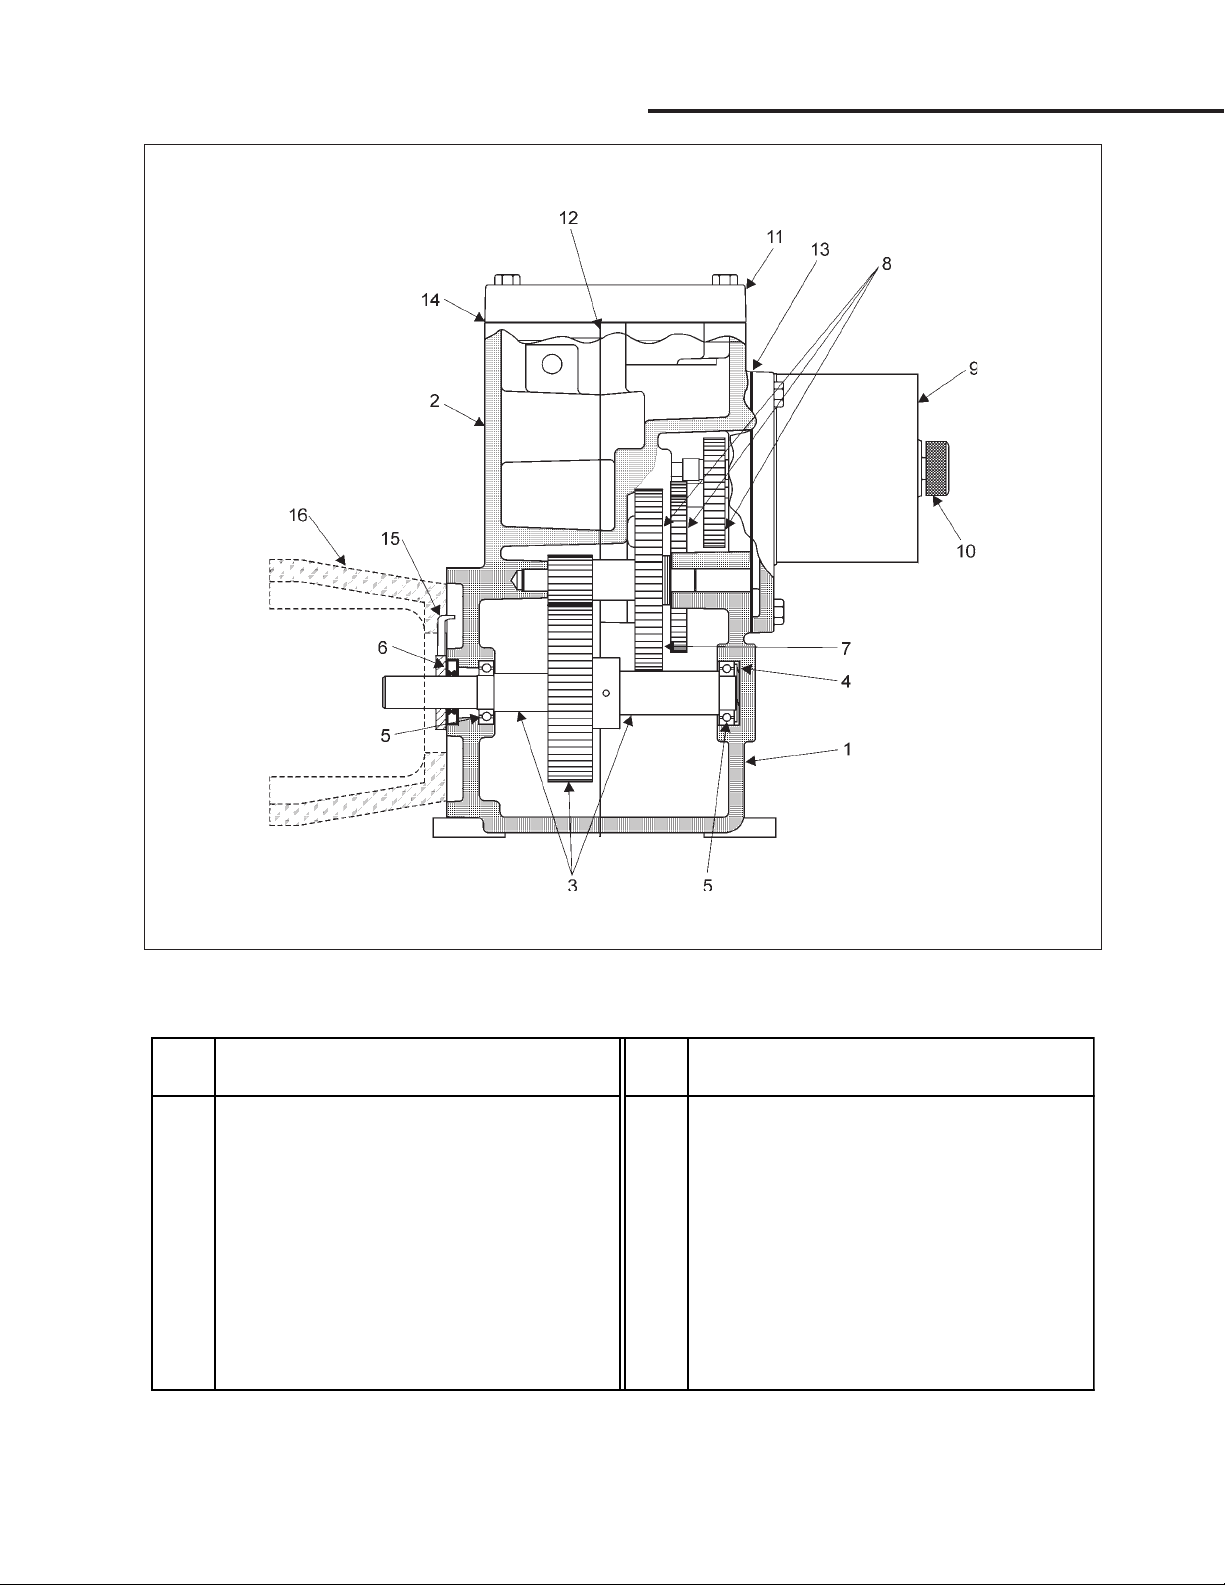
APPENDIX COMPONENTS
80
TABLE 6:
DRIVE COMPONENTS FOR MODEL 11-159 / -169
ITEM ITEM
NO. DESCRIPTION NO. DESCRIPTION
1 Body rear 11 Terminal / DCM compartment cover
2 Body front 12 Gasket, body
3 Output shaft assembly and main gear 13 Gasket, control motor
4 Spring washer 14 Gasket, terminal cover
5 Ball bearing, output shaft Gasket, DCM cover
6 Seal, output shaft Gasket, control end cover
7 Gear, 3rd combination Control end cover
8 Gear module assembly, see Table 9,
page 88, for part number
9 Control motor, see Table 5, page 84, for
part number 15 Index pointer (-159 only)
10 Handwheel 16 Bracket (-169 only)
Note: To ensure exact replacement parts, include all nameplate data of the Beck drive with the order.
Control end cover extension
Terminal block
Barrier, insulator, terminal compartment
Page 81
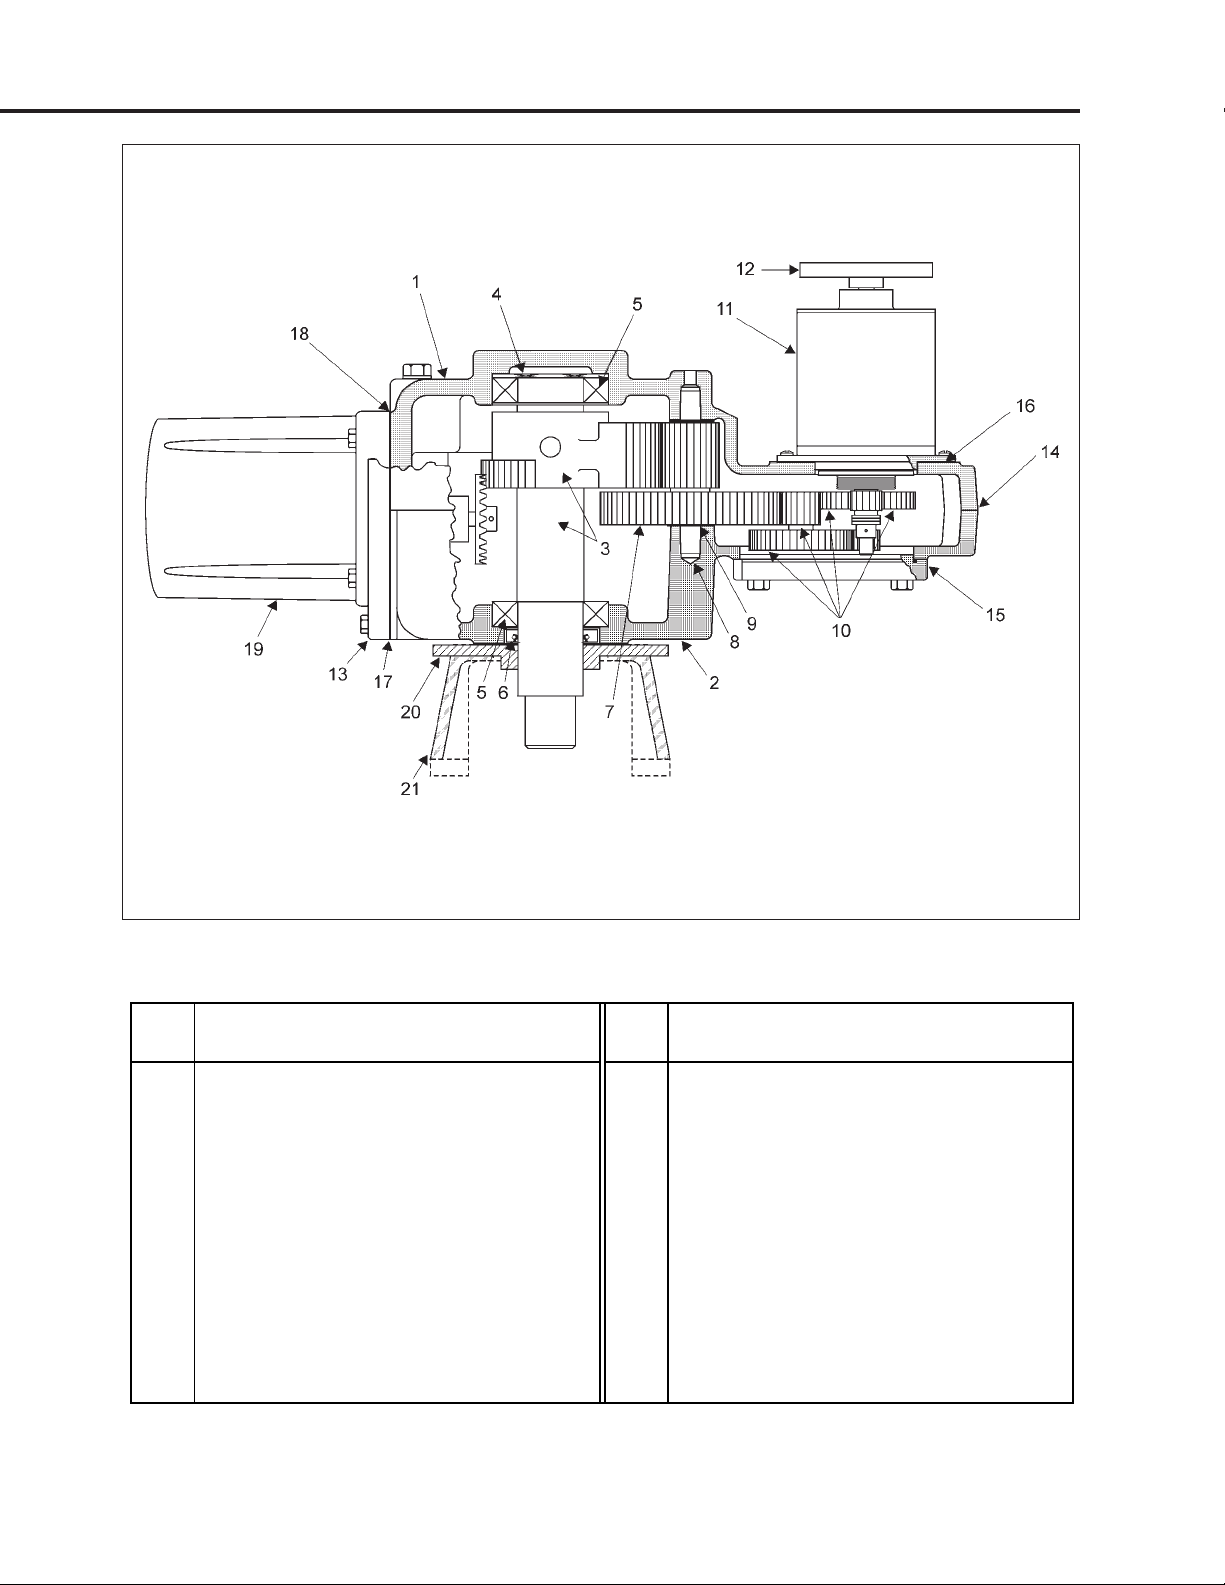
TABLE 7:
DRIVE COMPONENTS FOR MODEL 11-209 / -269 / -309 / -369
ITEM ITEM
NO. DESCRIPTION NO. DESCRIPTION
1 Body rear 13 Terminal / DCM compartment cover
2 Body front 14 Gasket, body
3 Output shaft assembly and main gear 15 Gasket, gear module
4 Spring washer 16 Gasket, control motor
5 Ball bearing, output shaft 17 Gasket, DCM & terminal cover
6 Seal, output shaft 18 Gasket, control end cover
7 Gear, 3rd combination 19 Control end cover
8 Pin, 3rd combination gear Control end cover extension
9 Thrust washer
10 Gear module assembly, see Table 9,
page 88, for part number
11 Control motor, see Table 5, page 84, for
part number 20 Index (-209 / -309 only)
12 Handwheel 21 Bracket (-269 / -369 only)
Note: To ensure exact replacement parts, include all nameplate data of the Beck drive with the order.
Terminal block
Barrier, insulator, terminal compartment
Barrier plate
Gasket, barrier plate
81
Page 82
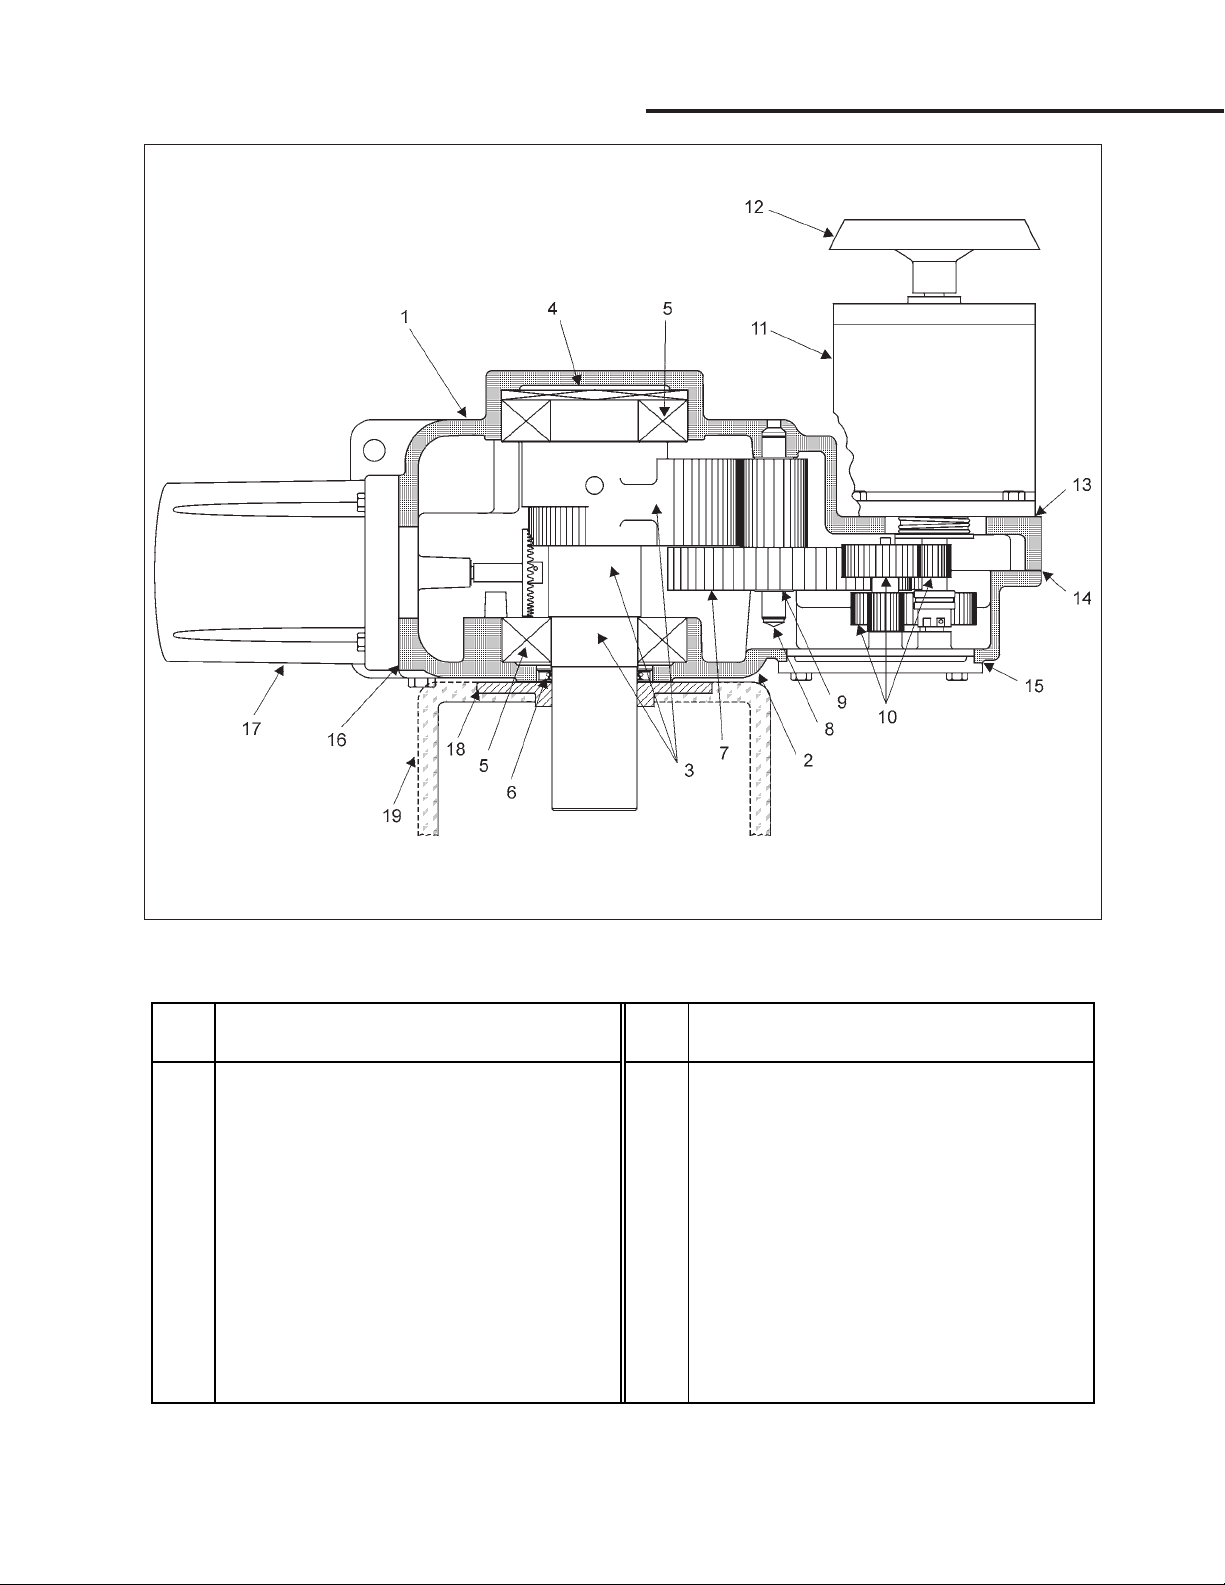
APPENDIX COMPONENTS
82
TABLE 8:
DRIVE COMPONENTS FOR MODEL 11-409 / -469
ITEM ITEM
NO. DESCRIPTION NO. DESCRIPTION
1 Body rear 12 Handwheel
2 Body front 13 Gasket, control motor
3 Output shaft assembly and main gear 14 Gasket, body
4 Spring washer 15 Gasket, gear module
5 Ball bearing, output shaft 16 Gasket, control end cover
6 Seal, output shaft 17 Control end cover
7 Gear, 3rd combination Control end cover extension
8 Pin, 3rd combination gear Terminal block & barrier plate
9 Thrust washer
10 Gear module assembly, see Table 9,
page 88, for part number
11 Control motor, see Table 5, page 84, for
part number 18 Index (-459 only)
Note: To ensure exact replacement parts, include all nameplate data of the Beck drive with the order.
Gasket, barrier plate
DCM & terminal compartment cover
Gasket, DCM & terminal cover
Barrier, insulator, terminal compartment
19 Bracket (-469 only)
Page 83
TABLE 9:
GEARS, TORQUE AND TIMING OPTIONS
Models Models
Motor -159 & -_09 -_69
Drive Maximum Current @ Gear Timing Timing
Model Approx. Overhung Motor Part 120 V ac, Module (sec/100°) @ (sec/90°) @
Number Weight Load Number 60 Hz* Number Torque 60 Hz** 60 Hz**
11-159
11-169
11-209
11-269
11-309
11-369
11-409
11-469
50 lbs
(23 kgs) 14-9733-02 60 lb-ft (81 N·m) 60 54
56 lbs 14-9733-03 40 lb-ft (54 N·m) 40 36
(25 kgs) 14-9733-04 20 lb-ft (27 N·m) 20 18
120 lbs
(54 kgs) 14-9730-05 175 lb-ft (237 N·m) 60 54
115 lbs 14-9730-08 250 lb-ft (339 N·m) 75 68
(52 kgs)
125 lbs
(57 kgs)
115 lbs 14-9730-05 400 lb-ft (542 N·m) 60 54
(52 kgs) 14-9730-08 550 lb-ft (746 N·m) 75 68
270 lbs
(122 kgs) 14-9732-03 1,500 lb-ft (2 034 N·m) 100 90
216 lbs 14-9732-04 1,000 lb-ft (1 356 N·m) 75 68
(98 kgs) 14-9732-05 350 lb-ft (475 N·m) 24 22
750 lbs (340
kgs)
3,000 lbs (1
361 kgs)
4,500 lbs (2
041 kgs)
9,000 lbs (4
082 kgs)
20-2700-20 .17
20-2701-20 .32
20-2704-21 .35
20-2705-21 .56
20-2704-21 .35 14-9730-09 300 lb-ft (407 N·m) 100 90
20-2705-21 .56
20-2201-21, -31 1.25
20-2201-22, -32 2.20
20-2201-23, -33 3.00
14-9733-01 80 lb-ft (108 N·m) 90 81
14-9733-03 80 lb-ft (108 N·m) 40 36
14-9733-04 40 lb-ft (54 N·m) 20 18
14-9733-05 15 lb-ft (20 N·m) 11 10
14-9730-04 125 lb-ft (169 N·m) 40 36
14-9730-02 125 lb-ft (169 N·m) 20 18
14-9730-04 250 lb-ft (339 N·m) 40 36
14-9730-04 300 lb-ft (407 N·m) 40 36
14-9730-09 650 lb-ft (881 N·m) 100 90
14-9732-02 800 lb-ft (1 085 N·m) 60 54
14-9732-07 550 lb-ft (746 N·m) 40 36
14-9732-02 1,800 lb-ft (2 440 N·m) 60 54
14-9732-05 650 lb-ft (881 N·m) 24 22
14-9732-07 1,000 lb-ft (1 356 N·m) 40 36
14-9732-02 1,800 lb-ft (2 440 N·m) 36 32
14-9732-07 1,000 lb-ft (1 356 N·m) 24 22
CAUTION: Use only the motor and gear housing combinations listed above; other combinations may cause internal damage to the drive
and/or damage to external equipment.
50 Hz motor currents do not exceed 110% of 60 Hz levels.
*
50 Hz timing = 1.2 x 60 Hz timing.
**
83
Page 84

NOTES
84
Page 85

85
Page 86

INDEX
Application reviews .......................................... 87
Beck linkage kits .......................................... 5, 18
Components .............................................. 80–82
Component replacement ........................... 75–78
Contactless Position Sensor ............................ 21
Control motor ............................................. 20, 79
®
DCM-2 HART
Alarm messages .................................... 59–61
Calibration ............................................. 50–58
Communication ...................................... 34–43
Communication menu, Figure 1 .................. 34
Configuration and setup ........................ 44–49
Troubleshooting ..................................... 62–65
DCM-2 Local interface ............................... 23–33
Calibration ............................................. 25–31
Operation ............................................... 23–24
Troubleshooting ..................................... 32–33
DCM-2 Serial interface .............................. 66–73
Commands ............................................ 67–72
Error codes .................................................. 73
Setup ........................................................... 66
Digital Control Module (DCM-2), Introduction .. 22
Feedback signal .............................................. 21
Gear train ......................................................... 20
Gears, torque and timing options .................... 83
Handswitch ...................................................... 20
Handwheel ....................................................... 20
Housing ........................................................... 20
Installation, Electrical ....................................... 16
Installation, Mechanical ................................... 16
Linkage requirements ...................................... 18
Link-Assist™ .................................................... 18
Loss of Demand input signal ........................... 21
Maintenance, Routine ...................................... 74
Motors, capacitors and resistors table ............. 79
Outline dimension drawings ........................ 8–14
Product demonstrations ................................... 87
Product description ............................................ 4
Repairs - how to obtain service ....................... 87
Safety precautions ....................................... 2, 15
interface ............................ 34–65
Service ............................................................. 87
Site surveys ..................................................... 87
SLM ........................................................... 20, 76
Spare parts, recommended ............................. 79
Specifications, general ...................................... 6
Specification writing ......................................... 87
Stall protection and annunciation .................... 21
Start-up instructions ......................................... 19
Stop/Limit indication ........................................ 21
Storage information ......................................... 15
Switches .......................................................... 20
Table of contents ............................................... 3
Temperature .................................................... 21
Torque protection and information ................... 21
Unpacking ........................................................ 15
Warranty .......................................................... 87
Wiring .............................................................. 17
86
Page 87

SERVICES
PRODUCT DEMONSTRATIONS
Each of Beck’s Sales Engineers has access
to a complete set of drive models so that he can
demonstrate virtually any of their features at
your location. In order to arrange to see a Beck
drive in your plant or office, contact Beck’s Sales
Department.
SITE SURVEYS
Beck Sales Engineers are available to discuss
your process control requirements. Often a visit
to your location is the best way to gain a thorough
understanding of your needs, in order to meet
them most accurately and completely.
Mounting hardware, torque requirements,
linkage, control signal information, and optional
equipment can be analyzed most effectively at
the work site. Beck’s analysis at the job site can
help ensure that specifications are accurate,
especially in the case of complex applications.
APPLICATION REVIEWS
By sharing your needs with a Beck Sales
Engineer you can take advantage of the best
application advice for the type of control you need.
This review will yield a better understanding of
the versatility of Beck drives for your installations,
as well as complete details on options and
accessories to make the process as effective as
possible.
SPECIFICATION WRITING
Beck provides specification writing assistance
in order to help you specify and order the
right drives for your applications. Beck Sales
Engineers will work with you to make it easier for
you to obtain the proper equipment and give you
confidence that no details are overlooked.
HOW TO OBTAIN SERVICE
Factory repair of drives or subassemblies is
available for both normal and emergency service.
To assure prompt processing, contact the factory
to receive a Returned Material Authorization
(RMA) number. If a repair estimation is desired,
please send the name and phone number of your
contact for service authorization. It is helpful to
include a description of the work desired with
the shipment or, in the event of a problem, the
malfunction being experienced.
THREE YEAR LIMITED WARRANTY STATEMENT*
Harold Beck & Sons, Inc. (Beck) warrants that our equipment shall conform to Beck’s standard specifications. Beck warrants said
equipment to be free from defects in materials and workmanship. This warranty applies to normal recommended use and service for
three years from the date on which the equipment is shipped. Improper installation, misuse, improper maintenance, and normal wear
and tear are not covered.
The Buyer must notify Beck of any warranty issues within 37 months of original shipment date and return the goods in question,
at Buyer’s expense, to Beck for evaluation. If the product fails to conform to the warranty, Beck’s sole obligation and the Buyer’s
exclusive remedy will be: 1) the repair or replacement, without charge, at Beck’s factory, of any defective equipment covered by this
warranty, or 2) at Beck’s option, a full refund of the purchase price. In no event will Beck’s liability exceed the contract price for the
goods claimed to be defective.
THIS WARRANTY IS EXPRESSLY IN LIEU OF ANY OTHER EXPRESS OR IMPLIED WARRANTY, INCLUDING IMPLIED
WARRANTIES OF MERCHANTABILITY AND FITNESS FOR A PARTICULAR PURPOSE, AND ALL OTHER OBLIGATIONS OR
LIABILITIES OF BECK. In no case shall Beck be liable for any special, incidental or consequential damages based upon breach
of warranty, breach of contract, negligence, strict tort, or any other legal theory. Such damages include, but are not limited to,
loss of profits, loss of revenue, loss of use of the equipment or any associated equipment, cost of capital, cost of any substitute
equipment, facilities or service, downtime, the claims of third parties including customers and injury to property.
Buyer acknowledges its responsibilities under OSHA, related laws and regulations, and other safety laws, regulations, standards,
practices or recommendations that are principally directed to the use of equipment in its operating environment. Buyer acknowledges
that the conditions under which the equipment will be used, its use or combination with, or proximity to, other equipment, and other
circumstances of the operation of such equipment are matters beyond Beck’s control. Buyer hereby agrees to indemnify Beck
against all claims, damages, costs or liabilities (including but not limited to, attorney’s fees and other legal expenses),
whether on account of negligence or otherwise, except those claims based solely upon the negligence of Beck and those
claims asserted by Beck’s employees which arise out of or result from the operation or use of the equipment by Beck’s
employees.
*Note: Internal water damage is not covered by warranty.
© Copyright 2006 by Harold Beck & Sons, Inc.
Beck Control Drives are covered by the following patents: 3,667,578; 4,690,168; 6,563,412 B2; 6,639,375 B2
and 6,769,527 B1 with other patents pending.
87
Page 88

Serving the
Process
Industries
since
1936 ...
88
R
HAROLD BECK & SONS, INC.
11 TERRY DRIVE NEWTOWN, PENNSYLVANIA 18940 USA
PHONE: 215-968-4600 FAX: 215-860-6383 www.haroldbeck.com
12/06
 Loading...