

Page 1

HIGH PERFORMANCE
FURNITURE FOR YOUR
HOME THEATER
4/2007
TM
Avion
8528A
Assembly Instructions
Page 2
Avion™ Home Theater Furniture
www.bdiusa.com
customerservice@bdiusa.com
Your Avion
™
Home Theater Furniture
is engineered for easy assembly.
Carefully follow this procedure to prevent any damage.
Placement and Maintenance
Avion™ Home Theater Furniture is
designed for indoor use on level
floors. Clean glass with glass cleaner,
and steel parts and wood veneer with
a moist cloth.
Designed by BDI Design Studio.
‘Avion’ is a trademark of Becker
Designed, Inc. All rights reserved.
©2007 Becker Designed, Inc.
Avion Cabinet x 1
Adjustable Shelf x 2
Large/Small Hex Wrench
Sliding Back Panel x 2
Handle Screw x 8
Machine Screw x 8
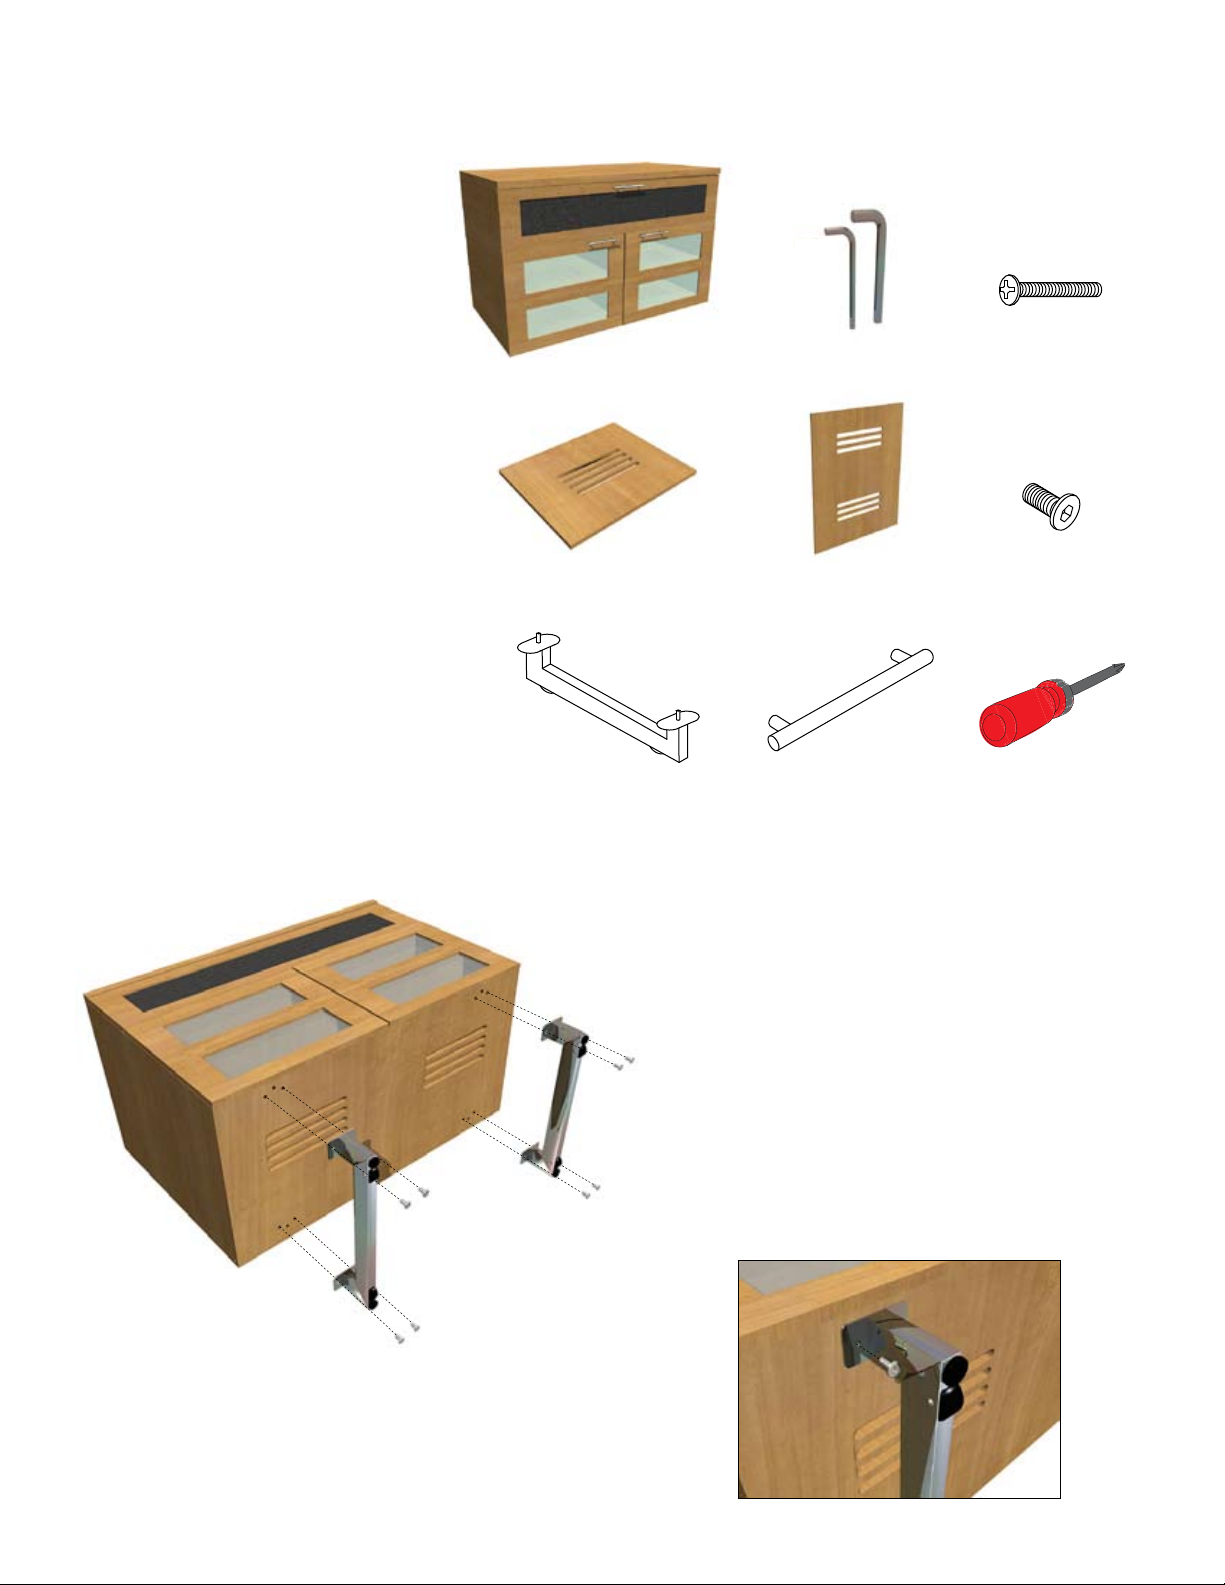
Step 1
Metal Leg x 2
Handle x 3
Unpack and identify the parts listed above.
The assembly workspace should be a non-marring surface such
as carpet. For missing hardware pieces, please contact BDI
Customer Service at: customerservice@bdiusa.com
For all other concerns please contact your local BDI Retailer.
Install legs.
First, remove all internal components from the
cabinet including shelves, hardware box, legs and extra glass
insert. Carefully tip cabinet onto its back (Step 1). Install
metal legs to the bottom of the cabinet using the flat head
screw and large allen wrench.
*Note: Each of the metal legs have adjustable
levelers that can be adjusted from inside the cabinet.
For more information about the adjustable levelers and troubleshooting
assembly, be sure to check out “Fine tuning your new BDI Avion Home
Theater Furniture” at the end of these instructions.
Phillips Screwdriver
2
Page 3

Step 2
Adjustable shelf pins are pre-installed inside the
cabinet. Depending on the height of your component,
you may raise or lower the shelf to a desired level.
Install adjustable shelf inside the left and right
cabinet area. Note: In order to place the adjustable
shelf inside the cabinet, the shelf must be tilted sideways to clear the door.
Step 3
Install handles on the doors and drawer using the handle screw and a
Philips screw driver.
Optional glass insert panel is available. Contact BDI
Customer Service at: customerservice@bdiusa.com
Step 4
Install both rear panels to the backside of the cabinet.
Detail: rear view of the door.
3
Page 4

Step 5
Optional fabric speaker or glass insert panel - Depending on your
level of customization, you may want to subsitute the center channel speaker
panel with the glass panel. You may also want to change the top glass
insert panel on the left and right cabinet doors with the speaker insert panel.
Contact BDI Customer Service at: customerservice@bdiusa.com
*Remove rubber trim and glass panel.
*Replace insert panel
Step 6
Center channel speaker wire management.
If you have decided to use your top/center drawer to house a center channel speaker, there is a slot on the
drawer bottom that allows you to guide the speaker wires through and out the bottom side of the drawer
bottom using the installed plastic wire clips. *Note: The center divider is adjustable. Velcro straps are
supplied, and can be used for organizing cable management.
Wire Clip/Screw x 2
4
Page 5

Fine tuning your new BDI Avion Home Theater Furniture
These steps are to be followed after you have unpackaged and completed the simple assembly instructions for your Avion or
Avion Noir stand. Due to jostling in freight or perhaps an uneven floor, the doors and drawers on your Avion stand may not
appear to be in perfect alignment. Making a few minor adjustments can rectify this situation. Be aware that depending on
your situation, patience and a bit of trial and error are required. The high-quality European hinge hardware is infinitely
adjustable, but changing one element can cause the need for further adjustments. Through a little adjustment, you can
modify the orientation of the cabinet doors to make sure that they are sitting perfectly on your Avion unit.
INCORRECT! Door is
out of alignment with
the rest of the unit.
STEP 1 - Level your Avion unit (if needed)
The levelers which are concealed within the legs can be adjusted from inside the
Avion cabinet to compensate for an uneven floor or to secure your cabinet so that it
does not roll. If you are having difficulty with misaligned doors, it is recommended
that you first retract all levelers and make sure that the unit is resting on it’s wheels.
If the center section on a three-legged unit appears to be sagging (center doors
hangs below the side doors) raise the levelers on the center leg to compensate for
this.
STEP 2 - Adjust Door Hinges (if needed)
The doors on your Avion stand should be perfectly spaced
and the doors should open and close freely without
rubbing against the door frame. Adjustments may be
made to the Avion door hinges with the use of a Phillips
head screwdriver. The hinge hardware has three
adjustment screws.
CORRECT! Door is
sitting squarely and
evenly spaced on tops
and sides.
Step 1: Level your Avion unit.
• By adjusting Screw 1, the door will move left and right
within the frame. For best results, make minor adjustments
to top and bottom hinge for best results.
• If adjusting Screw 1 has not achieved the desired result,
you can adjust Screw 2 and the door will move up and
down within the frame (the top and bottom hinges need to
be adjusted the same amount).
• Adjusting Screw 3 will cause the entire door to move
in and out, opening and closing the gap between the door
frame and cabinet. This screw rarely needs adjustment.
Step 2: Adjust Door Hinges.
HIGH PERFORMANCE FURNITURE
5
 Loading...