

Page 1

Contents
Safety Instructions 94
Information regarding general
road safety 95
Arrangement of controls 96
Anti-theft device 97
Entering the code number 97
Entering the Telephone PIN 97
Removing the portable panel 98
Attaching the portable panel 98
General Operation 99
Switching on the unit 99
Adjusting the volume 99
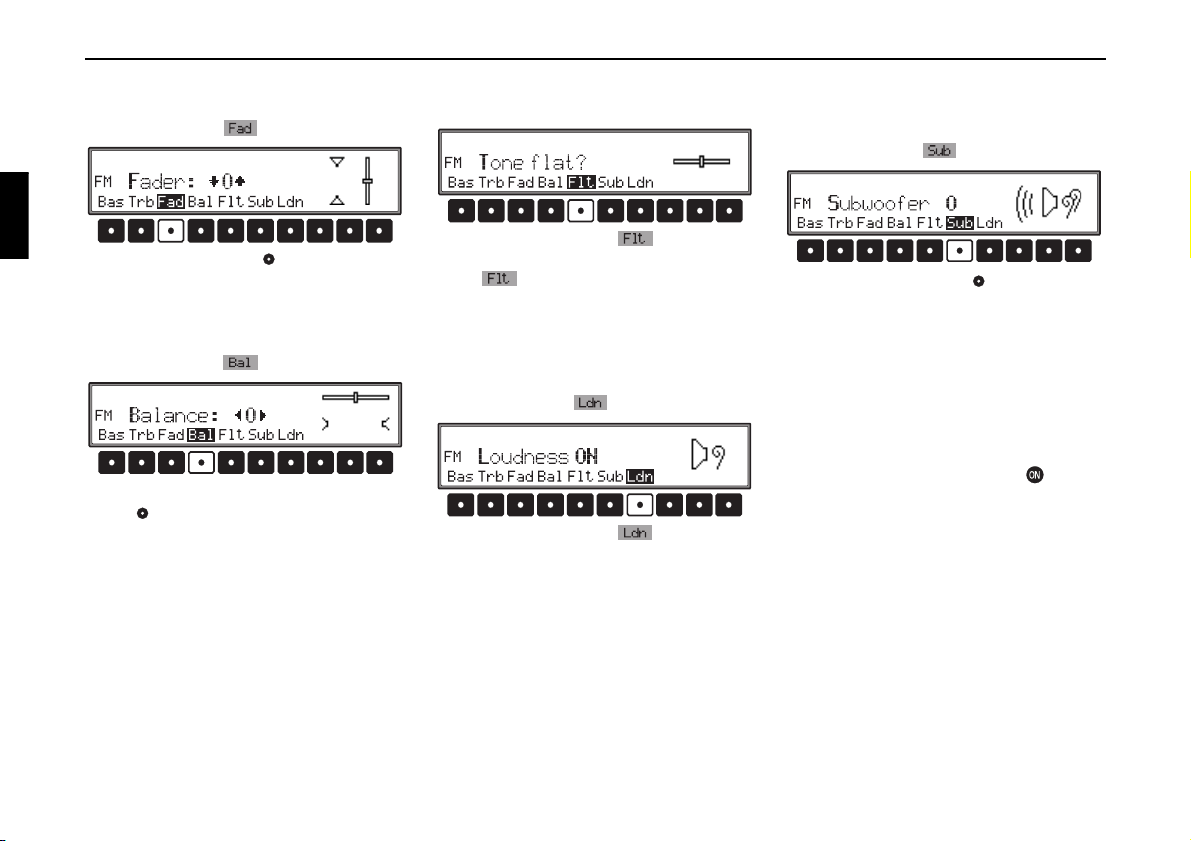
Activating the tone control menu 99
Adjusting the bass 99
Adjusting the treble 99
Fader 100
Adjusting the balance 100
Linear adjustment 100
Loudness on or off 100
Adjust volume of subwoofer or
centre speaker 100
Triggering reset 100
Navigation operation 101
What is navigation? 101
Safety Instructions 101
Navigation CDs 101
Navigation with two European
CDs 101
General instructions 102
Selecting navigation 103
Main Navigation Menu 103
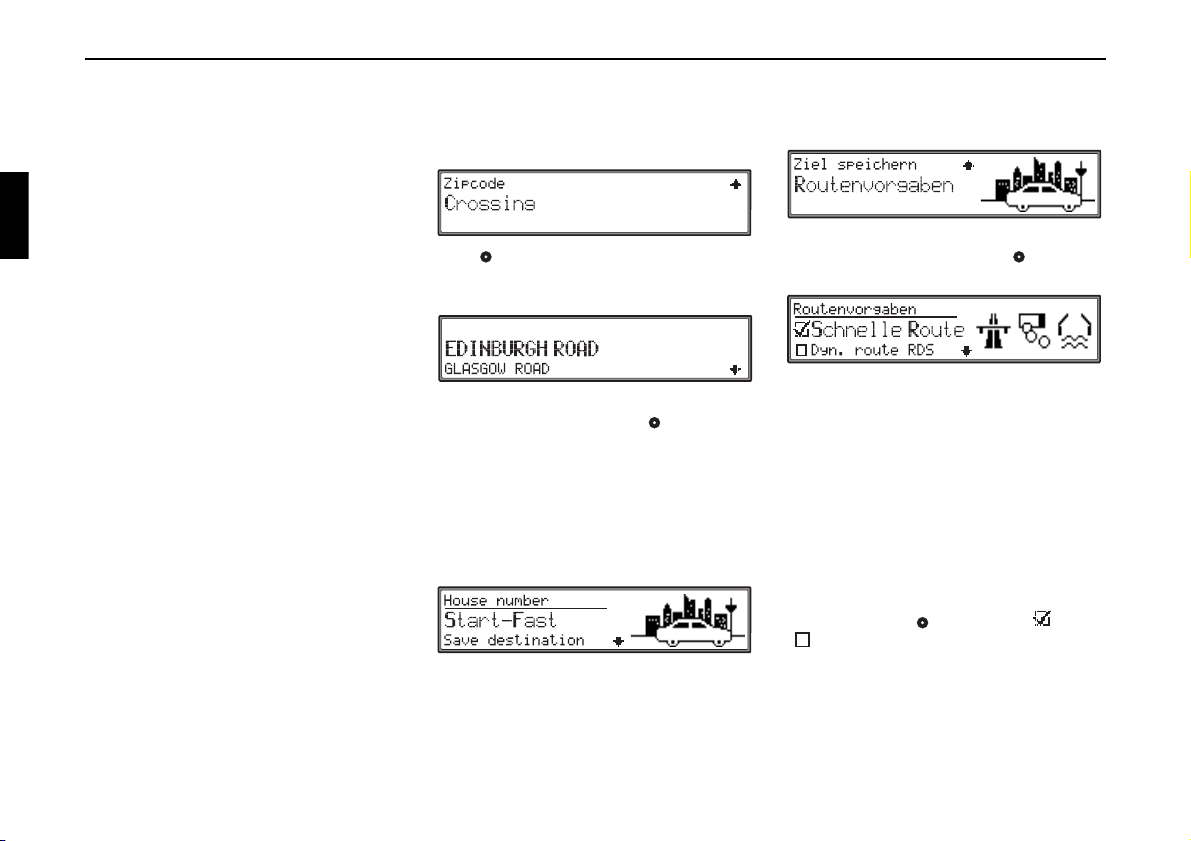
Destination 104
Selecting country 104
Entering destination 105
Entering destination town postal
code 105
Entering destination street 106
Entering the destination town
centre 106
Entering street number for
destination road 107
Selecting intersection for
destination road 108
Starting the route calculation 108
Route options 108
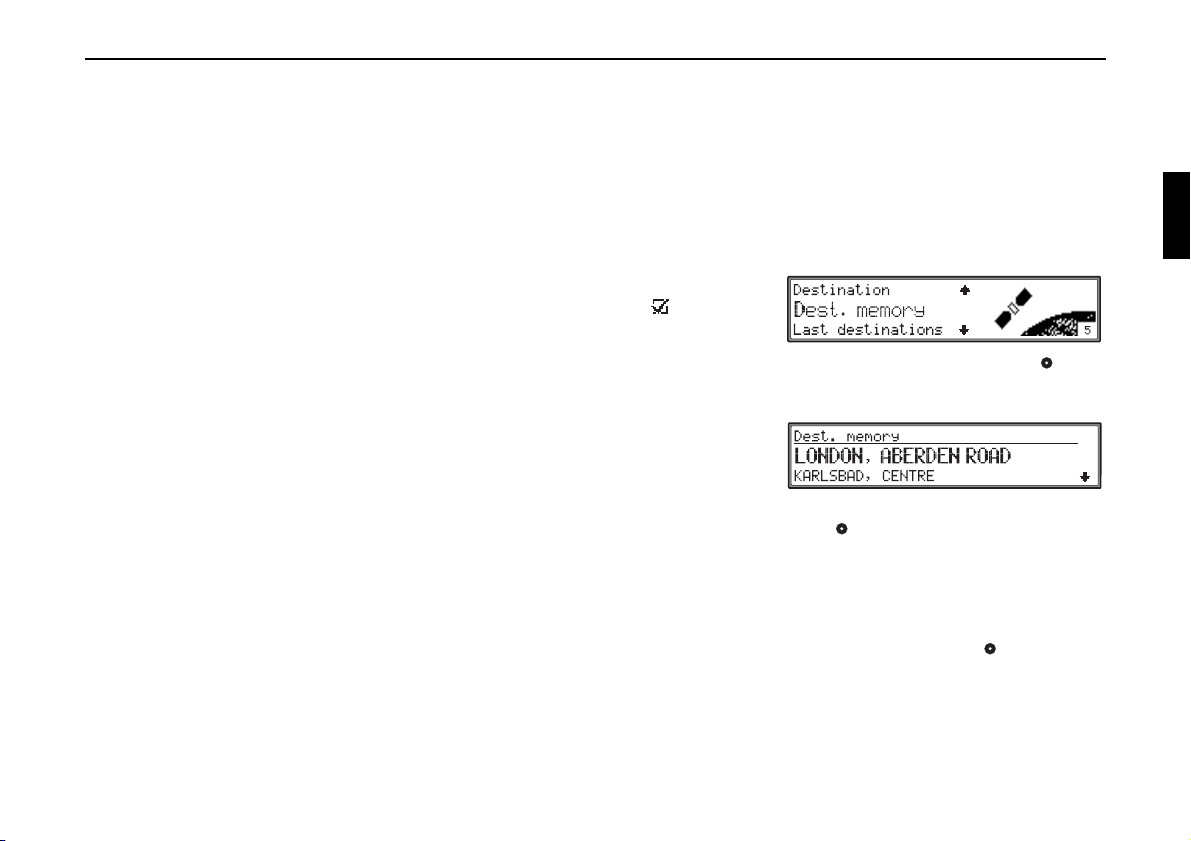
Destination memory 109
Calling up a destination stored in
the destination memory 109
Storing a destination in the
destination memory 110
Deleting a destination from the
destination memory 110
Sorting destination memory 111
Renaming a destination in the
destination memory 111
Destination memory full 111
Accessing @ Destinations 112
Saving and Deleting
"@ Destinations" 112
@ Route Mode 113
Last destinations 113
Driving to one of the
”Last Destinations” 113
Saving and Deleting
”Last Destination” destinations 113
Coordinate entry 114
Route guidance calculation 114
Recalculating route 114
Stopover 115
Entering a stopover 115
Start route guidance to stopover 115
Deleting a stopover 115
Stopover reached 115
Traffic jam function 116
Entering length of traffic jam 116
Delete block 116
Cancelling route guidance 116
Notes on route guidance 117
Dynamic Route Guidance 118
Information during route guidance 119
Requesting journey duration and
kilometres travelled 119
Displaying/changing route settings 119
Requesting current time 119
Requesting current position 120
Calling up traffic announcements 120
Call up route list 121
Information during non-active
route guidance 121
P.O.I. 121
System settings 123
Setting the language 124
Setting time 124
91
Page 2

Contents
Setting voice output 125
Setting the vocal announcement
of traffic reports 125
Settings 126
Selecting the units 126
Influencing the calculation of ETA 127
Telephone mode 128
Activate telephone mode 128
Calling up the Communications
menu 128
Calling 128
Dial the number 128
Terminating a call 129
Accepting a call 129
Rejecting a call 129
During a call 129
Toggling – second call 129
Conference 130
Telephone book 130
Calling up the telephone book 130
Dialling a telephone book entry 131
Editing / Adding / Deleting
telephone book entries 131
Call list 132
Saving entry from call list 133
Deleting Telephone List 133
Emergency call 133
Emergency call via voice
connection 133
Emergency Call Via GDV Call
Centre 134
Making an emergency call 134
Emergency call settings 135
Settings 136
Call settings 136
Telephone Settings 137
Selecting a network 137
GSM Band Settings 138
PIN Settings 139
Call Rerouting 140
Blocking phone 141
SMS Messaging 142
New Message display 142
Reading messages 142
Processing messages 143
Delete message 143
Answer message 143
Writing messages 143
Deleting All Messages 145
Settings 145
Internet (WAP) Functions 146
Calling up WAP menu 146
Connecting / terminating WAP
connection 146
Navigation in WAP pages 146
Browser Menu 147
Calling up Browser Menu 147
Entering WAP address 147
Call up Browser-dependent menu 148
Call up/ Add/ Delete Favourites 148
Pages visited (History) 149
Back to previous page 149
@ WAP Favourites 149
Call up Configuration 150
Settings 150
Profiles 150
Create new profile 151
Activating access profile 152
Copying access profile 152
Deleting access profile 152
Loading Access Profiles 153
URL Setting 153
Specifying browser start settings 153
BeckerClub 154
E-Mail Function 155
Receiving E-Mail 155
Checking E-Mail 155
E-mail settings 155
Service settings 157
URL for …. 157
Radio mode 158
Switching on radio mode 158
Turn on Radio Menu Mode 158
Set FM waveband 158
Selecting the AM waveband 158
Settings for station selection 158
Dynamic Autostore (FM-DAS) 158
Station search FM - DAS 159
Station search MW, LW, SW 159
Scan search 159
Programme filtering for FM DAS 159
Programme Type selection (PTY) 159
Turning PTY display on or off 160
92
Page 3

Contents
Calling up/ Storing FM stations 160
Calling up/storing MW, LW, SW
stations 160
Manual FM tuning 160
Manual tuning MW, LW, SW 160
Regionalisation 161
Turning Regionalisation on or off 161
Turning frequency display on or off 161
Switching radio text display on / off 161
Traffic Programme (TP) 162
Activating/quitting the TP menu 162
Turning TP on or off 162
Selecting automatic tracking 162
Selecting / deleting direct
programming 163
Switching mute function on or off 163
Interrupting TP announcements 163
TP announcement volume 163
Display for TMC stations 163
CD, MP3, CDC operation 164
Selecting the audio source 164
Notes for the Compact Disc (CD) 164
Inserting/Ejecting CDs 165
Skipping a title forward/backward 165
Scan search 165
Fast forward/rewind 165
Random Play 165
Title Repeat 166
Number of tracks and total
playing time 166
Temperature protection circuit for
CD and MP3 CD 166
Notes on CD-R and CD-RWs 166
Notes on copy-protected CDs 166
MP3 CD in built-in drive 167
General instructions for MP3 167
Creating an MP3 data medium 167
Notes on playing MP3 CDs 168
Track number, total playing time
and track title 168
MMC™ (MultiMediaCard™) 168
Which MMC™ can be played? 168
Recording to an MMC™ 168
Insertion / removal of a
recorded MMC™ 169
Notes on playing 169
CD Changer 169
Operational readiness of
CD changer 169
Loading/ Ejecting the
CD Magazine 169
Playing CDs 170
User menu 171
Call up / quit User Settings menu 171
Setting the GAL (Gal) 171
Display colour setting (Col) 171
Display setting (Lcd) 172
LED setting (Led) 172
Display brightness setting (Lum) 172
Setting reception optimisation
(M/S) 172
Activating AUX/telephone input
(Aux) 173
Signal tone volume (BeV) 173
Turning direction of the rotary
control (Inc) 173
Volume display (Vol) 174
Hands-free microphone setting
(Mic) 174
Telephone receiver volume setting
(HsV) 174
Limiting the volume level (Lim) 174
Adjusting the volume difference
between digital audio sources (Lvl) 174
Calling up reset function (Rst) 175
General instructions 176
RDS SYSTEM 176
DAS seek quality level 176
DAS seek name level 176
RDS Stations level 176
Stations Fix Level 176
PTY (Programme Type) 176
Keyword directory 177
Technical data 178
NOTICE 179
93
Page 4

Safety Instructions
G
Operation of the unit is permitted only if traffic conditions are suitable and you are absolutely sure that you, your passengers or other motorists are not endangered, obstructed or inconvenienced.
In all cases, all applicable road traffic regulations must be obeyed. Destinations may only be entered when the vehicle is
stationary.
The country-specific regulations apply for telephone operations.
The navigation system is intended to serve as a navigation aid only. It neither releases the driver from his/her duty to exercise utmost care in road traffic, nor replace his/her own ability to judge. Due to continuous changes in traffic routing
or changing data, imprecise or erroneous information may, on occasion, be given. Therefore, actual road signs and traffic
regulations must always be observed. In particular, the navigation system cannot be used as an orientation aid at times
of poor visibility.
The unit may only be used for its intended purpose. The volume of the radio, navigation system and telephone should be
adjusted so that noises external to the vehicle are still audible.
Do not activate the telephone near petrol stations, fuel depots, chemical plants or blasting areas.
In case of a malfunction (i.e. smoke or noticeable odours) immediately turn off the unit.
Due to the variety of functions and the corresponding high processing capacity of the microprocessor, the unit will warm
up during operation. The installed components are equipped to handle these temperatures.
For safety reasons, the unit is to be opened only by a trained technician. Please refer to your dealer for repair.
94
Page 5

Information regarding general road safety
This car radio device is intended and approved for installation and operation in passenger cars, commercial vehicles and
buses (vehicle classes M, N and O) whose electric system has a rated voltage of 12V.
Installation and maintenance should only be carried out by specialists. Faulty installation or maintenance can result in
the malfunctioning of the motor vehicle’s electronic systems. The vehicle manufacturer’s safety instructions must be observed.
The vehicle’s electronics (e.g. speedometer signal) must only be worked on by an authorised service garage. We assume no
liability for any impairment of the vehicle’s electronics.
This device is only intended for installation in the area provided for this purpose by the vehicle manufacturer.
The method of attachment used must ensure that the device will remain properly attached, should the vehicle be involved
in a crash.
The power supply must be properly fused.
Using mobile phones without an external antenna in the proximity of the radio unit may cause interference.
Familiarise yourself with the device and how it works before embarking on your journey. Whilst on the move, only operate the device in appropriate traffic conditions. The volume of the device should be set at a level that enables external
noises (e.g. police sirens) to be easily heard.
95
Page 6
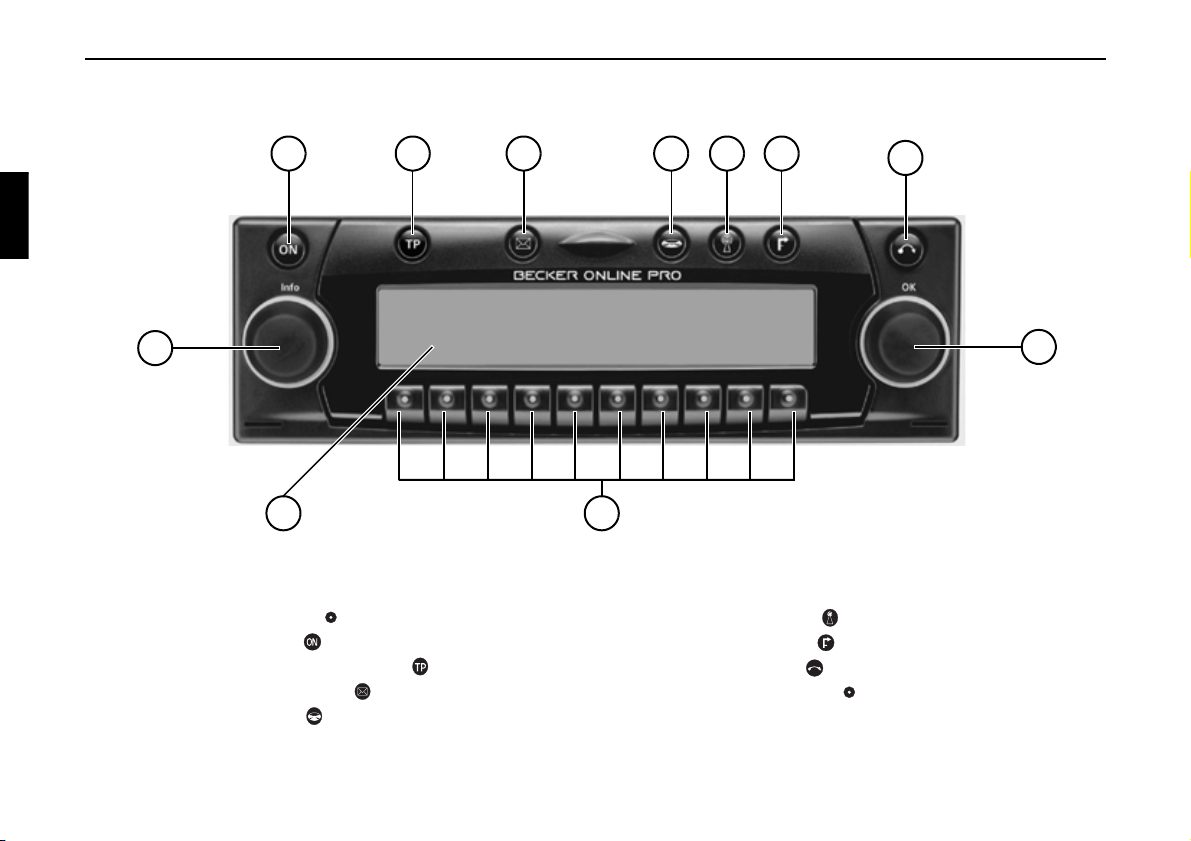
Arrangement of controls
Arrangement of controls
1 Left rotary control (Info)
2 On / off switch ( )
3 TP (Traffic programme) key ( )
4 Communications key ( )
5 Source key CD ( )
6 Source key Radio ( )
7 Select navigation ( )
8 CD eject button ( )
9 Right Rotary Control (OK)
10 Multifunction keys
11 Display
96
Page 7
Anti-theft device
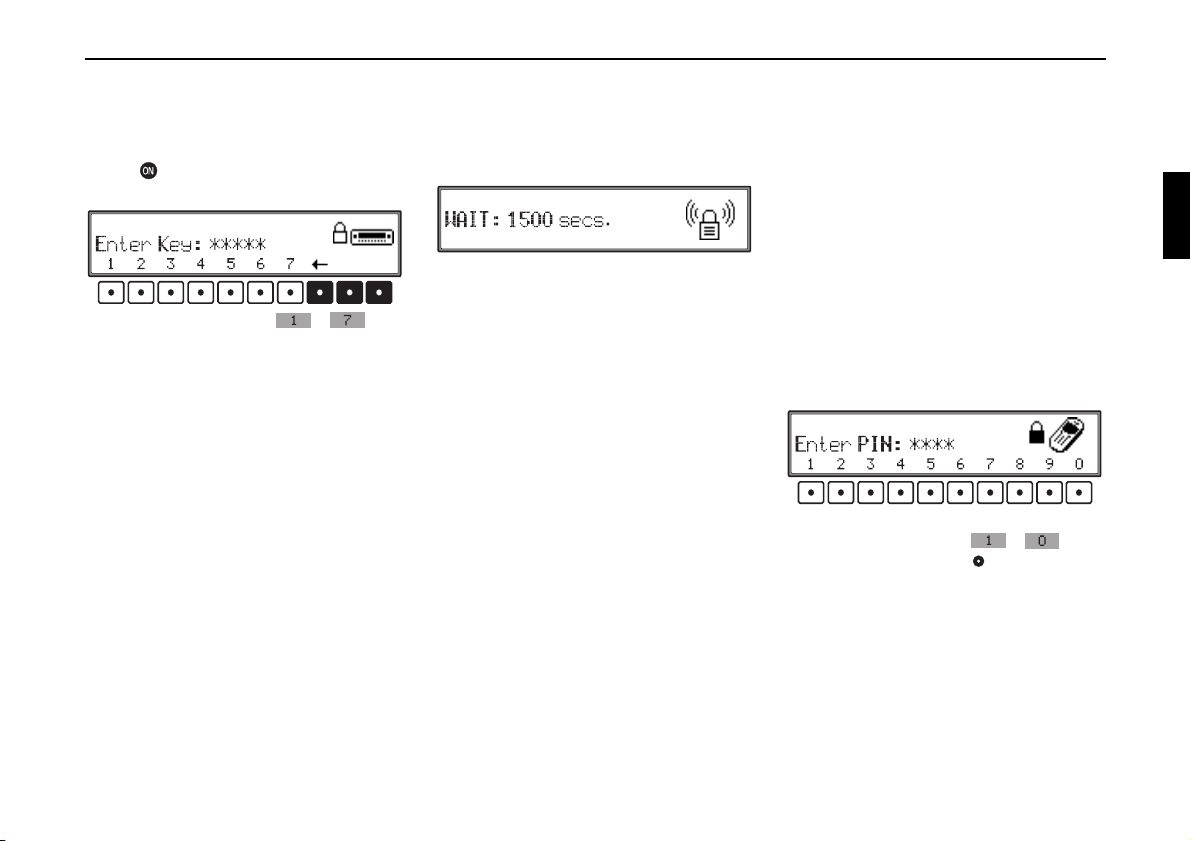
Entering the code number
If the auto radio is disconnected from the electrical
supply source, the anti-theft device prevents it
from being reconnected. After turning on the unit
via the button, the prompt
Enter Key, is
displayed.
Using multifunction buttons - , enter
the five-digit code number.
Example:
Code number 15372 (the code number can be
found on the enclosed CODE CARD).
Enter code number using the multifunction
buttons.
The unit automatically switches on when the fifth
digit is entered and all other digits were entered
correctly.
Note:
It is important to store the CODE CARD in a safe
place outside of the vehicle. This will prevent
unauthorised use. The scheck marker provided
should be attached to the inside of the vehicle
windscreen/window.
In an incorrect code number is entered, the prompt
Enter key will be displayed once again. If an
incorrect code number is entered three times in a
row, the unit will display
Wait, and it will be
blocked for approximately 60 minutes.
Three further incorrect entries block the unit for
another 60 minutes.
Note:
The unit and the vehicle ignition must remain
switched on during the 60-minute waiting period.
If the ignition does not remain switched on, the
waiting period will begin again.
Anti-theft device
Entering the Telephone PIN
Your telephone module and SIM card are
protected against unauthorized use by a 4- to 8digit PIN number.
Note:
Depending upon the provider, the SIM card may
be delivered without the PIN number request
activated. In this case, the PIN number will not be
requested.
You have already received the PIN number to be
entered from your provider. The PIN number can
be changed, however, as described in ”PIN
Settings” on page 139.
After entering the unit code number, a request for
the telephone PIN number will follow.
The 4- to 8-digit PIN number must be entered
using multifunction buttons - . Then,
press the right rotary control .
Depending upon the reception, connection to the
telephone network may take some time.
Note:
If an incorrect PIN number is entered three times
in a row, the SIM card is blocked.
You can lift the SIM card block by entering the
PUK number you received (together with the SIM
card) from the provider. Enter the PUK number in
exactly the same manner as the PIN number.
97
Page 8
Anti-theft device
The PIN number does not have to be entered
immediately. By pressing one of the source keys
, and , you can select one of the available
audio sources.
No telephone-related functions, however, are
available in such a case.
This condition is indicated by on the display.
To enter the PIN number, first, you need to press
the source key .
A new request for the PIN number appears.
Note:
If the unit or the ignition is shut off, the PIN
number will be requested again when the unit or
ignition is turned back on. To operate the
telephone, re-enter your PIN number as described
above.
The PIN number can also be stored as described
under ”PIN Settings” on page 139. It is then no
longer necessary to enter the PIN every time you
switch on the unit.
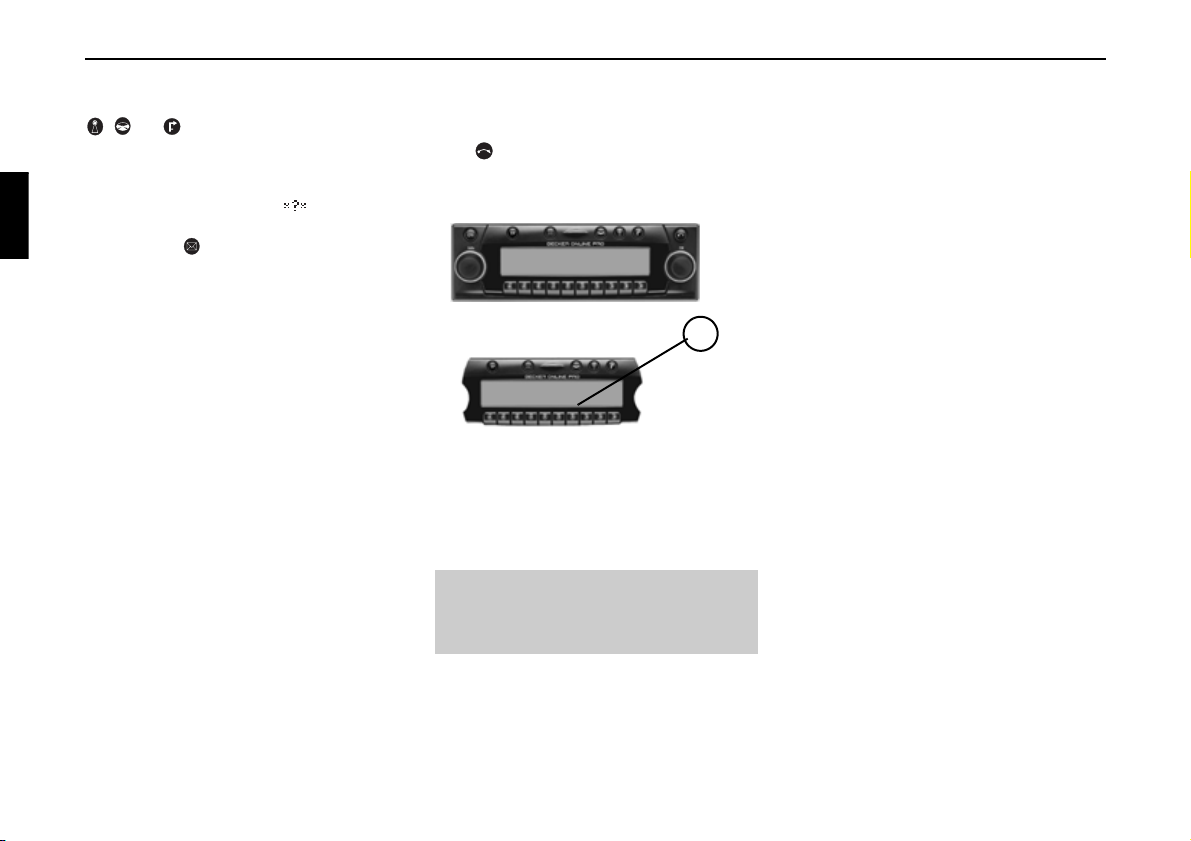
Removing the portable panel
As effective anti-theft device, the portable panel
(A) may be removed from the unit.
Press briefly (storage medium remains in the
unit). The display folds forwards. The portable
component can then be pulled out.
A
The volume is limited to a maximum level after the
display has been folded down. After 20 seconds,
an audible signal indicates that the control
component is folded down. The unit then switches
itself off.
Danger
G
Injury hazard
For safety reasons, the portable panel may not be
left open while driving.
Attaching the portable panel
Insert the portable panel into the lower left catch
and then engage it in the lower right catch. Then
fold up the portable panel and engage it in the
upper catches.
The portable panel can also be placed flat against
the unit and pushed into place.
To ensure correct function, be sure that the
portable panel is completely seated in all four
catches.
If a new portable panel or one from another unit is
used, the code number must be entered as
described above to activate the unit.
98
Note:
After removal, please insert the portable panel in
the accompanying protective cover.
Do not touch the metal contacts on the portable
panel or on the radio.
Page 9
General Operation
Switching on the unit
Press button.
Additional options for switching on / off: Via
ignition. In order to switch on via the ignition, the
unit must have been switched off previously via
the ignition. After switching off the ignition, the
unit can be prevented from switching off by
pressing the button within 3 seconds.
Note:
With the ignition switched off, the unit can also be
switched on via the button. The unit switches
off automatically after 1 hour.
Adjusting the volume
Turn the left rotary control . The volume
increases or decreases.
The volume change is graphically shown on the
display.
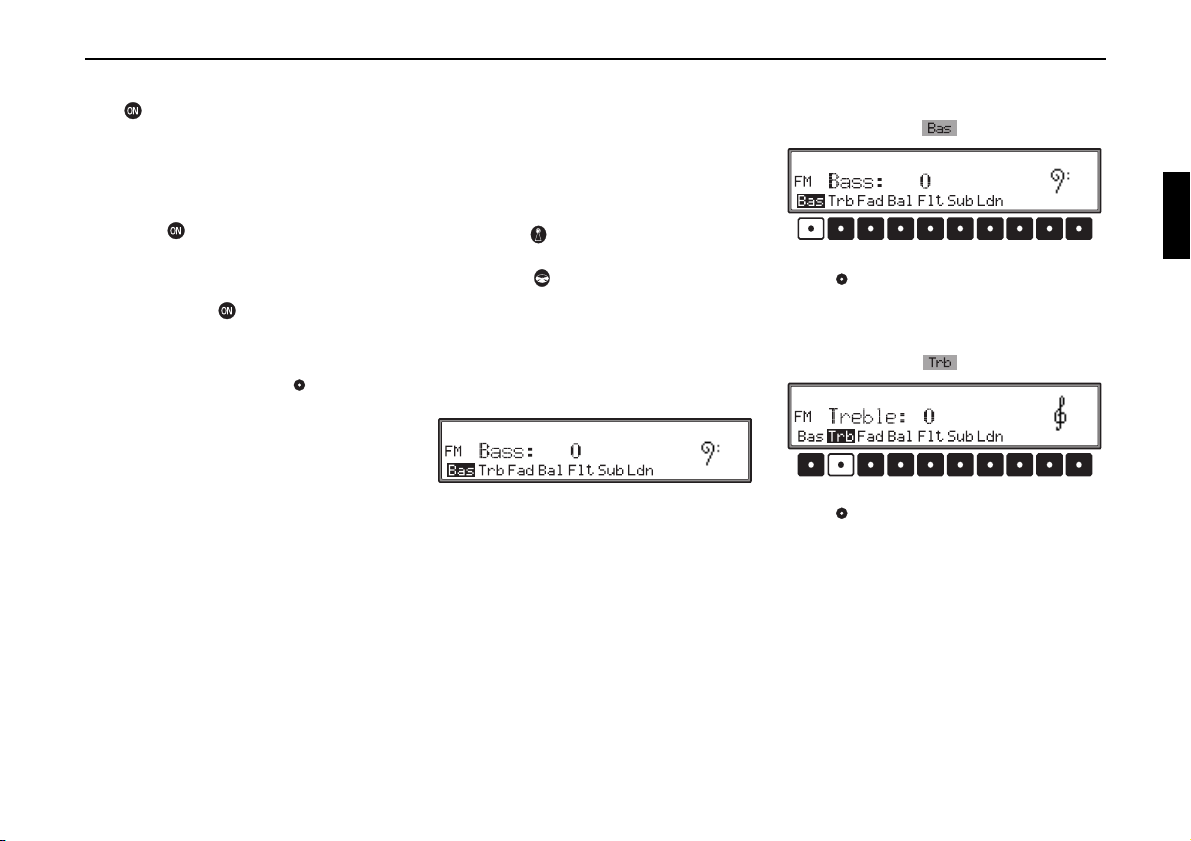
Activating the tone control menu
Settings for bass, treble, balance and fader are
stored separately for the audio sources: radio, CD,
MP3 and CDC/AUX mode.
The loudness settings affect all the sources.
The Tone menu can be called up by pressing one
of the source buttons for more than 2 seconds.
• Source key for the currently set wavebands
(FM or AM)
• Source key for the currently active media
sources (CD, MP3, CDC/AUX)
The following functions can be called up:
(Bass), Trb (Treble), Fad (Fader), Bal (Balance),
Flt (Linear adjustment), Sub (Subwoofer) and
Ldn (Loudness).
Bas
General Operation
Adjusting the bass
Press the source key for more than 2 seconds. Press
multifunction button .
Set the desired bass level using the right rotary
control .
Adjusting the treble
Press the source key for more than 2 seconds. Press
multifunction button .
The source is always shown at the left in the
display (i.e. FM in the illustration).
Set the desired treble level using the right rotary
control .
99
Page 10
General operation
Fader
Press the source key for more than 2 seconds. Press
multifunction button .
Use the right rotary control for the desired fader
setting.
Adjusting the balance
Press the source key for more than 2 seconds. Press
multifunction button .
Set the desired balance level using the right rotary
control .
Linear adjustment
Press the source key for more than 2 seconds.
Press multifunction button briefly -
flat
will appear. By pressing multifunction
button once again, the tone adjustments for
the current signal source (i.e. FM) will be reset to
mid-level.
Tone
Loudness on or off
Press the source key for more than 2 seconds. Press
multifunction button .
With multifunction button you can select
either Loudness on (
ON) or Loudness off (OFF).
Adjust volume of subwoofer or centre speaker
Press the source key for more than 2 seconds. Press
multifunction button .
Use the right rotary control to set the desired
subwoofer volume level.
If
Off is set for the volume setting, the subwoofer
output is switched off.
Triggering reset
If a malfunction of the unit should occur, such that
it becomes inoperable or defective in some other
way, a restart of the internal unit software (reset)
can be triggered.
To trigger the reset, press the button for more
than 20 seconds.
After the unit software is reset, you need to enter
the code number and re-insert the Navigations CD.
100
Page 11
Navigation operation
G
What is navigation?
The term ”navigation” (lat. navigare = to travel by
sea) is generally understood to mean the determination of a vehicle’s location, the determination of
its direction and its distance from the desired destination and the required route. As navigation aids,
stars, prominent landmarks, compass and satellites
are used.
With OnlinePro, location is determined with the
GPS receiver (GPS = Global Positioning System).
The direction and distance from the destination are
determined using a digital street map, a navigation
computer and sensors. A speedometer and reverse
signal are additionally used to calculate the route.
For safety reasons, route guidance is predominantly in spoken form supported by a direction indicator on the display.
Safety Instructions
Navigation CDs
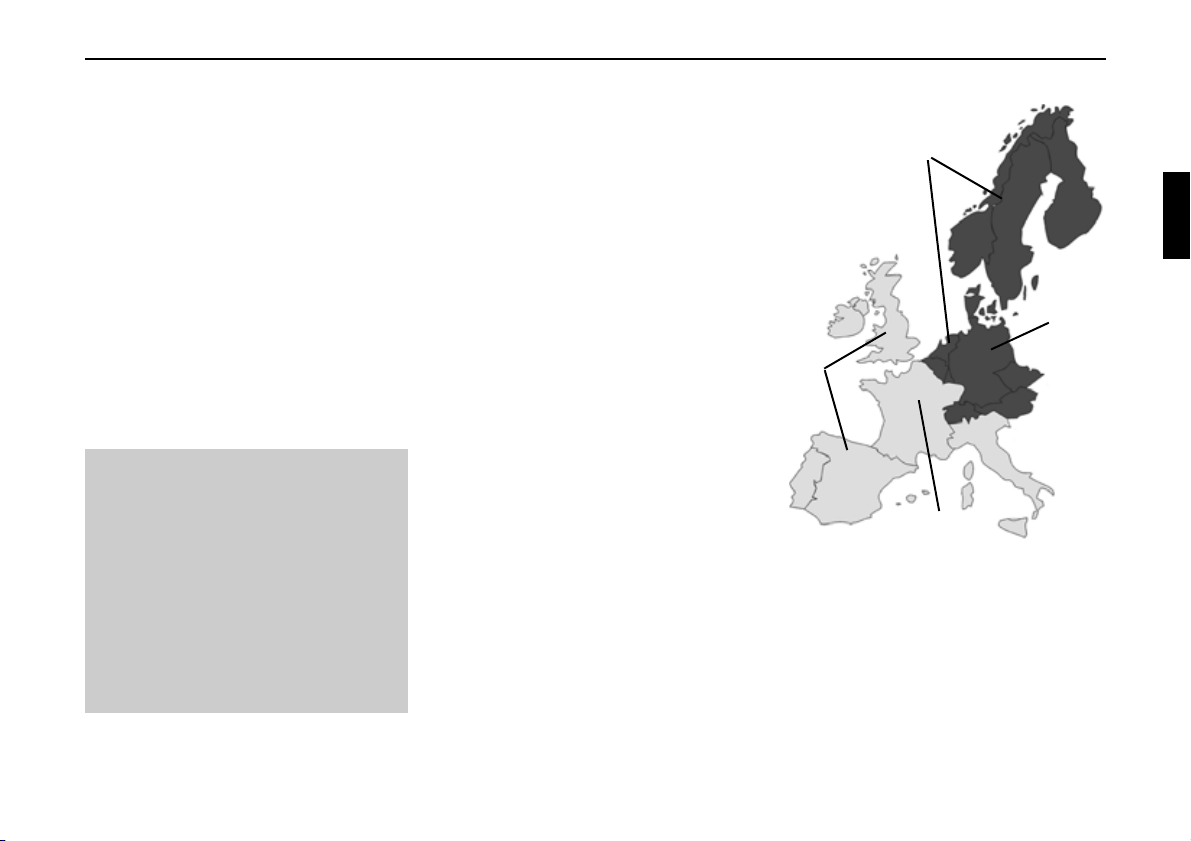
Two navigation CDs are supplied with the
navigation unit.
These CDs contain a digitised street map. One CD
for Northern Europe (CD no. 1) and one CD for
Southern Europe (CD no. 2) are supplied.
The complete trunk road network and all
destination centres in the digitised area of Northern
and Southern Europe are available on the CDs.
All digitised roads of the northern countries are
also included on the Northern Europe CD. All
digitised roads of the southern countries are also
included on the Southern Europe CD.
In these detailed areas of the Northern or Southern
Europe CD road map, motorways, regional roads
and unclassified roads as well as country roads are
stored. Larger cities and communities are
comprehensively covered. For smaller towns and
communities, the regional and unclassified roads
or access roads and the town centres are included.
Using Navigation
Navigation with two European CDs
A
B
C
• The rules of the Road Traffic Regulations
(RTR) apply.
• Observation of traffic signs and local traffic
regulations must always take priority.
• Traffic guidance is restricted to passenger vehicles. Special driving recommendations and
regulations for other vehicles (e.g. commercial
vehicles) are not included.
• The destination can only be entered when the
vehicle is stationary.
One-way streets, pedestrian zones, turning bans
and other traffic regulations are taken into account
as far as possible.
There may be discrepancies between the data on
the navigation CD and the actual local situation,
due to permanent changes to road systems and
their traffic regulations.
D
A Area of Northern Europe CD with all
digitised roads.
B For example, a town or an address in
Germany (on the Northern Europe CD).
C Area of Southern Europe CD with all
digitised roads.
D For example, a town or an address in
France (on the Southern Europe CD).
101
Page 12
Using Navigation
For example, if you wish to navigate from a town
on the Southern Europe CD (D) to a town on the
Northern Europe CD (B), enter your destination
address as usual. After entering the town, you will
be prompted to insert navigation CD No. 1 by the
Please insert navigation CD #1.
display
After inserting the relevant CD, enter the road and,
if required, the house number or the town centre.
The required map data is loaded and stored internally after route calculation has started.
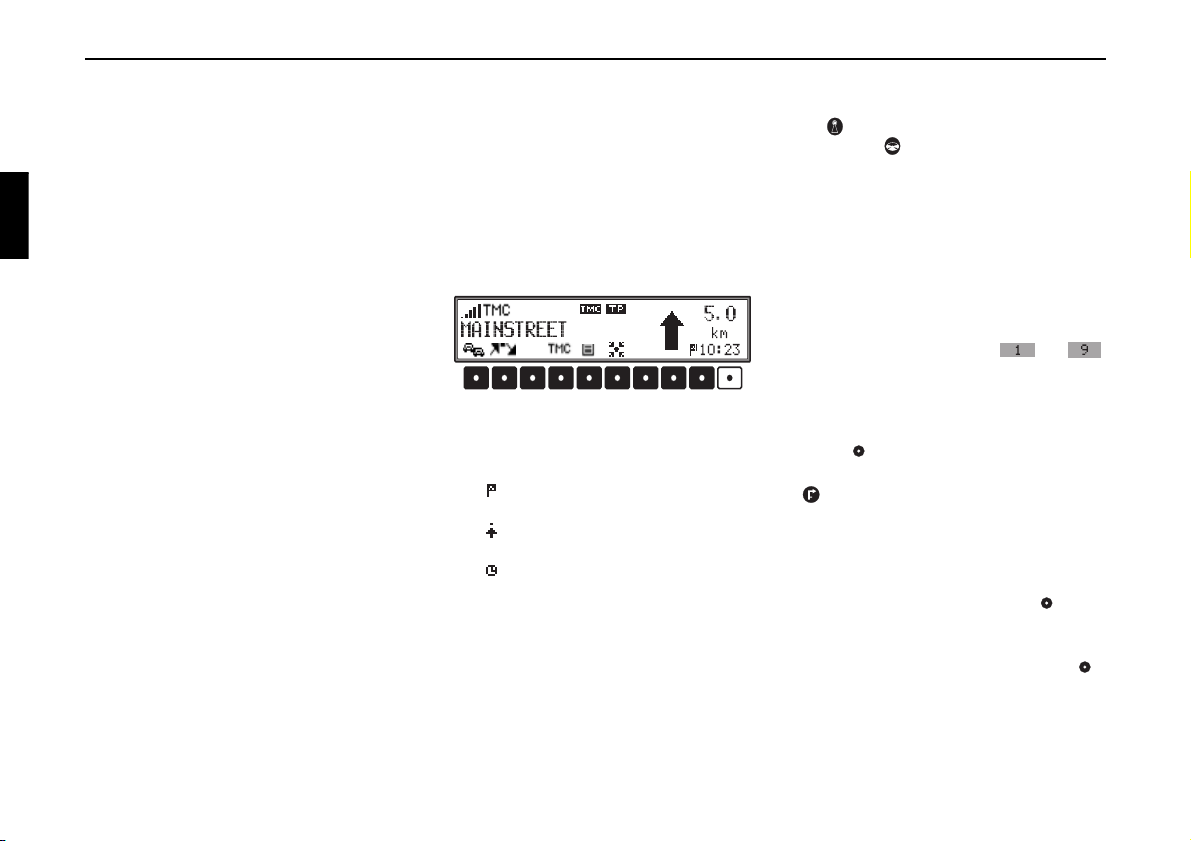
General instructions
• During route navigation, you can still listen to
the radio, CD or MP3
The distance to the next announcement and the
estimated time of arrival, the current time or the
journey time to the destination are indicated on
the right side of the display.
You can set whether the current time, the
journey time, or the estimated time of arrival is
displayed.
The display mode can be selected by pressing
the last multifunction button. The mode currently set can be seen from the symbol which appears before the displayed time.
The symbol represents the estimated time of
arrival.
The symbol represents the remaining journey time.
The symbol represents the current time.
• During route navigation, you can still use the radio, CD or MP3.
Distance to the next message and estimated time
of arrival are shown on the right side of the display.
• The unit can be switched to radio mode when
route guidance is in operation by pressing
the button. You can switch to CD mode by
pressing the button.
The Navigation menu automatically displays
when navigation announcements are given.
• When entering the address, only those letters,
digits and symbols which are relevant for the
address are displayed.
The entries are automatically completed.
A space (i.e. in Bad Abbach) is entered as an underscore.
Letter, numbers and symbols can be selected using the multifunction buttons to .
The individual symbols can be selected by
pressing the appropriate multifunction buttons
repeatedly.
Selection can also be made using the right rotary
control , which will be used in the remainder
of this guide.
• exits the current menu and switches to either
the route guidance display or main Navigation
menu.
• The system recalculates the route if a deviation
is made from the route.
• Briefly press the left rotary control to hear
the current navigation message.
• During a navigation announcement, the volume
can be adjusted with the left rotary control .
102
Page 13
Using Navigation
• By briefly pressing the left rotary control , additional information can be requested during
route guidance or the current position can be requested when route guidance is not active. See
”Information during route guidance” on
page 119 and ”Information during non-active
route guidance” on page 121.
• The current navigation announcement is interrupted by pressing the left rotary control .
• If the left rotary control is held for more than
2 seconds during a navigation message, the navigation messages are turned off and route guidance will only be shown on the display.
Quickly pressing the left rotary control returns to the navigation messages.
• The scroll marks and indicate a selection
list which can be scrolled through using the
right rotary control .
Each entry in the list shown in capital letters can
be selected by pressing the right rotary
control .
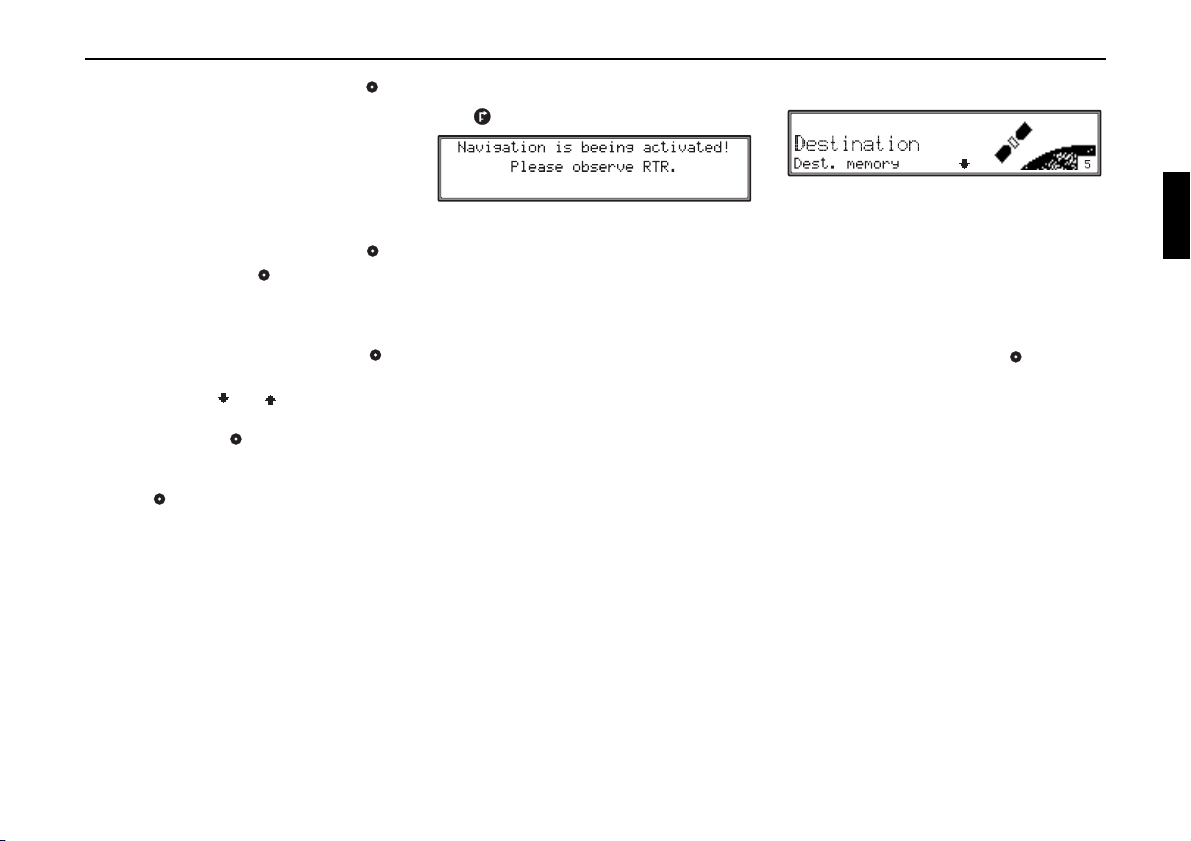
Selecting navigation
Press .
The main navigation menu appears after this display.
Note:
The navigation CD must be loaded when starting
navigation mode for the first time.
If calibration of the navigation system has not yet
been completed, the system will prompt you to
take a drive for calibration (see Installation Guide).
A navigation CD containing the data for the target
country is required for navigation operations.
The navigation CD must be inserted to start the
calculation of a route. During calculation, the
CD will blink on the display. Once calcula-
prompt
tion is completed, the prompt
the navigation CD can be removed and an audio
CD may be inserted.
When entering destinations, you should wait until
the prompt
CD disappears, before departing.
CD will disappear,
Main Navigation Menu
Select
Destination,
Dest. memory,
Last destinations,
P.O.I,
@ Destinations,
Coordinates,
Save position
by turning the right rotary control and confirm
your choice by pressing it.
Destination
•
Accesses the entry menu for the destination.
See ”Destination” on page 104.
Dest. Memory
•
Contains previously stored destinations.
See ”Destination memory” on page 109.
Note:
If the destination memory does not contain any
destinations,
@ Destinations
•
The navigation destinations in the Homepage
can be called up. See ”Accessing @ Destinations” on page 112.
Dest. memory is not displayed.
103
Page 14
Using Navigation
• P.O.I.
Menu for selecting regional and interregional
destinations of special interest and local points
of interest. Points of interest include petrol stations, airports or hospitals, for example. See
”P.O.I.” on page 121.
Last destinations
•
A list of the last 50 destinations is displayed.
Stopovers are not stored as final destinations.
See ”Last destinations” on page 113.
Note:
If no destinations are contained in the Last Destinations list,
Last destinations is not dis-
played.
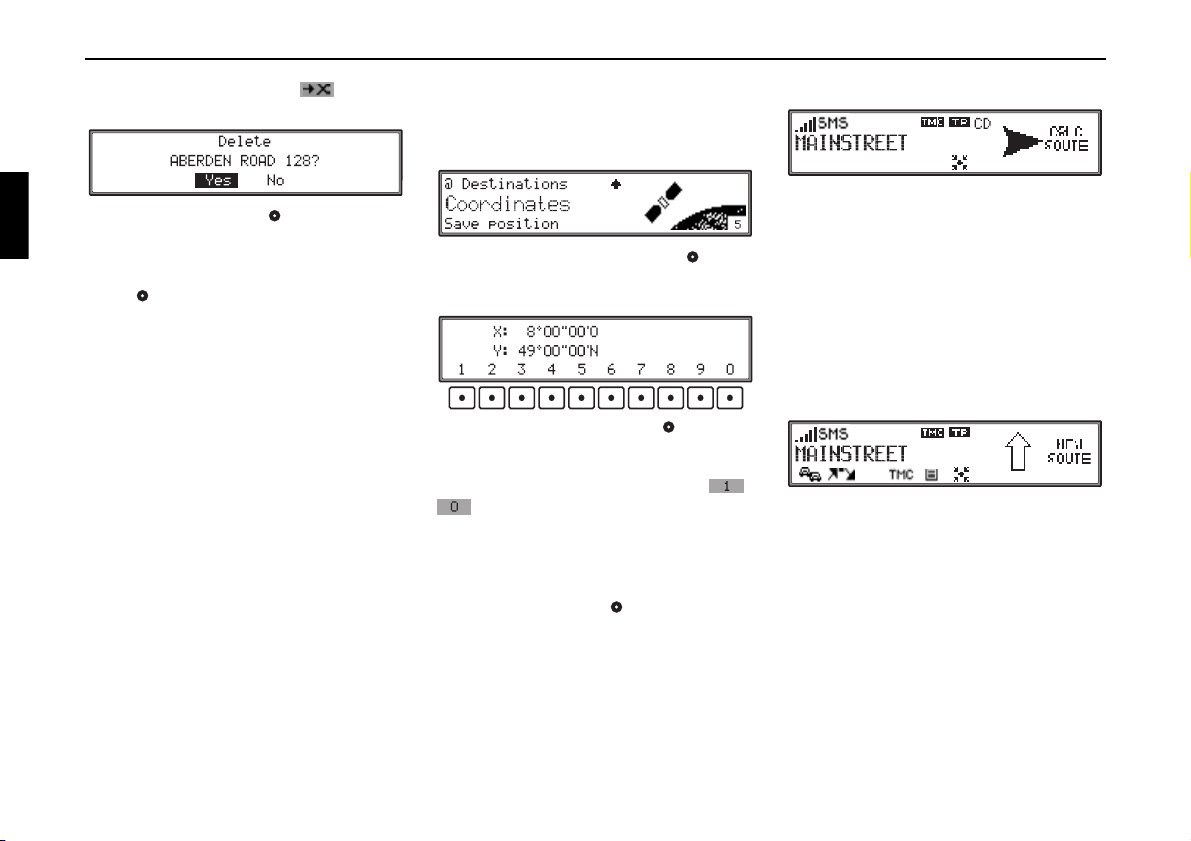
Coordinates
•
You can start navigation with the aid of geographical coordinates
See ”Coordinate entry” on page 114.
Save position
•
The current position is stored. The position is
stored in the destination memory.
See ”Storing a destination in the destination
memory” on page 110.
Destination
I Select the main Navigation menu with the right
rotary control
control to confirm.
The country last selected is displayed. When the
destination is first entered, the unit will switch
automatically to the country selection.
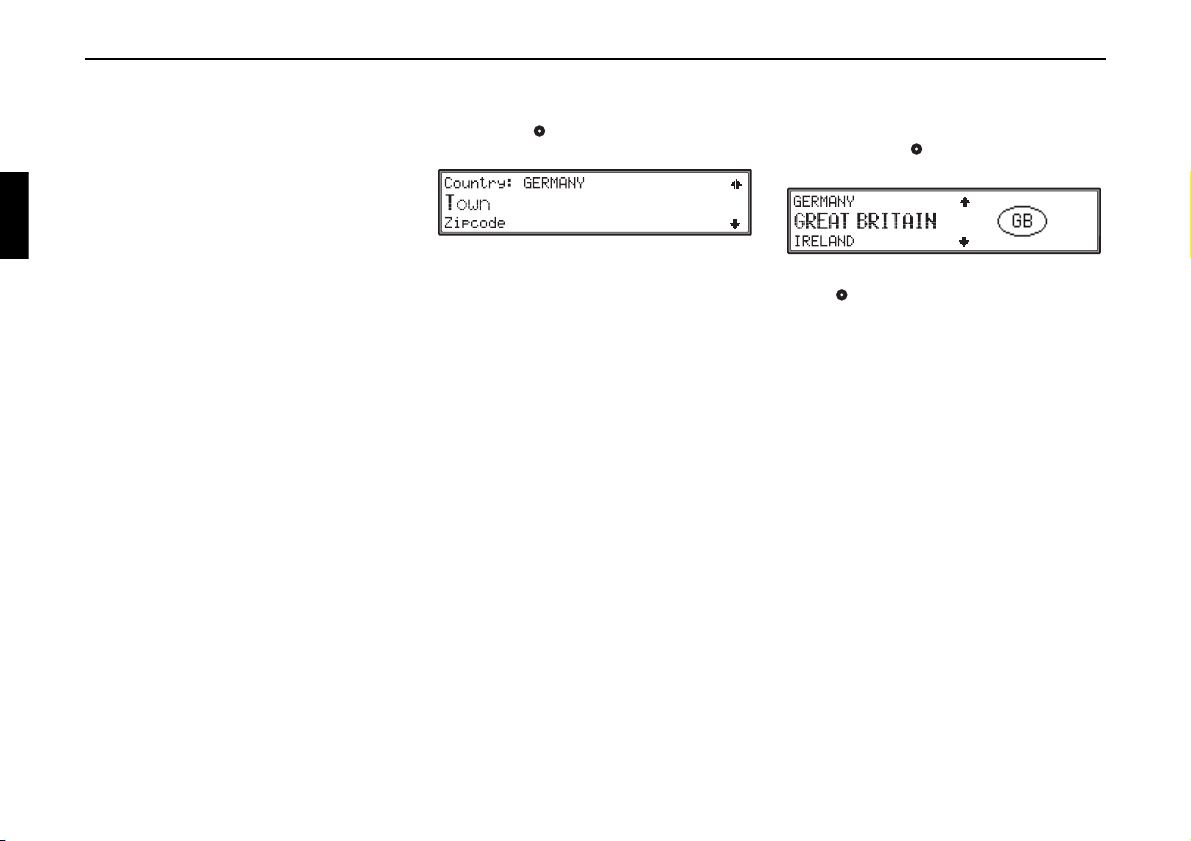
The entries
Country,
Town and
Zipcode
are available.
•
Country
If your destination is in a country different from
the one displayed, you can select the destination
country after selecting
See ”Selecting country” on page 104.
Town
•
By selecting Town you can switch to town
entry.
See ”Entering destination” on page 105.
Zipcode
•
By selecting Zipcode you can enter the postal
code of the destination town.
See ”Entering destination town postal code” on
page 105.
Destination and press the
Country.
Selecting country
If your destination is in a country other than the
one currently shown, select
right rotary control and press the control to confirm.
Select the desired country with the right rotary
control and press the control to confirm.
Note:
When selecting a distant destination, we recommend selecting a stopover (Page 115) halfway.
Country: with the
104
Page 15
Using Navigation
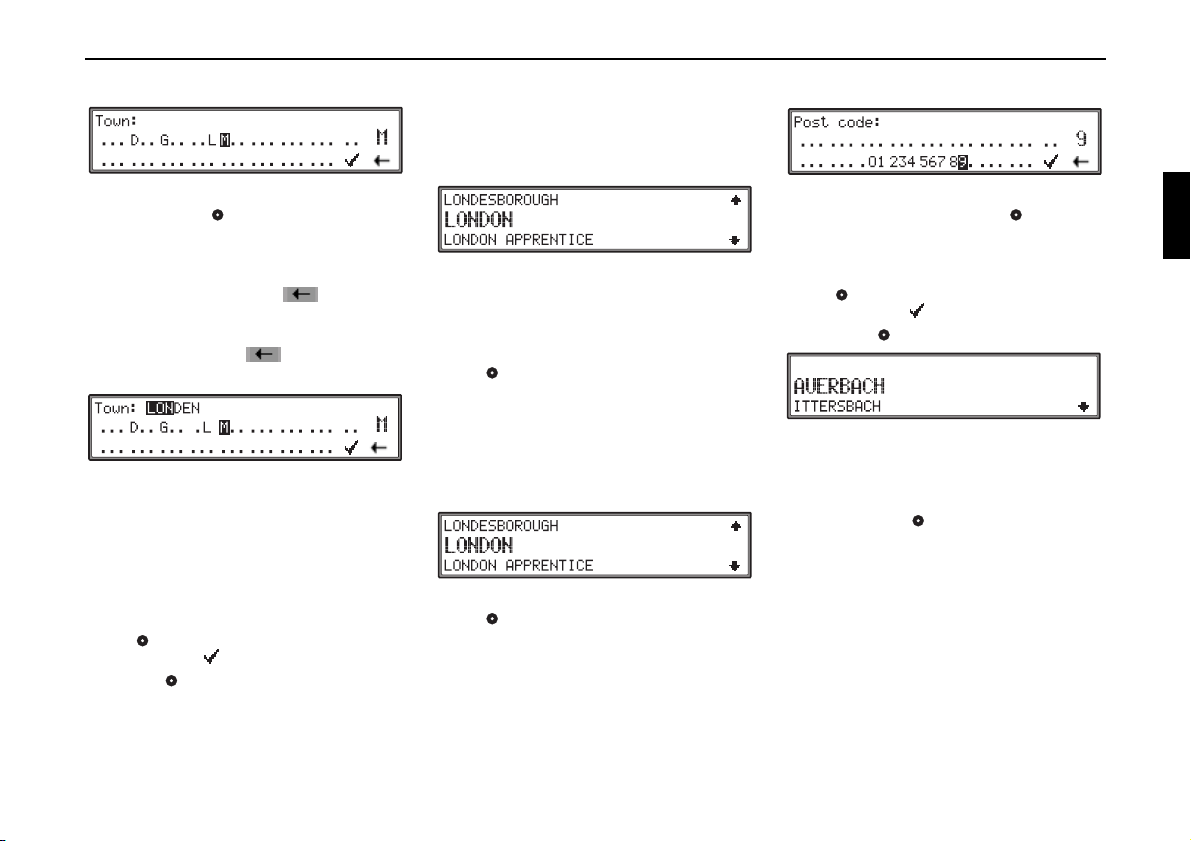
Entering destination
Select the letters one after the other by turning the
right rotary control and press the control to confirm. The selected letter appears enlarged at the
right of the display.
Use the multifunction button to delete the
last confirmed letter.
The complete entry can be deleted by pressing
multifunction button for more than
2 seconds.
Already entered letters are displayed inversely. To
help, the name of the location closest to the previous entry is displayed. The unit offers only the possible remaining letters for selection. If no other
entries are available, the unit completes the place
name automatically.
To accept the entry, press and hold the right rotary
control for more than 2 seconds or select the
small check mark and briefly press the right rotary control .
If the complete location name was entered or completed automatically and the location name is
unique in the country of destination, the location is
accepted.
The programme will return to the destination entry.
If an incomplete location entry was confirmed, the
location selection list is displayed.
The location name most similar to the entry appears in capital letters in the location selection list.
The scroll marks indicate that other locations, sorted in alphabetical order, can be selected.
To make your selection turn the right rotary
control and press the control to confirm. (See
”General instructions” on page 102.)
If a definite entry is given, the programme returns
to the destination entry.
The location distinguishing list is displayed if the
selection is ambiguous.
Select the required location using the right rotary
control and press the control to confirm.
The programme returns to the destination entry.
Entering destination town postal code
Select the postal code numbers one after another
by turning the right rotary control and press to
confirm. The selected number appears enlarged at
the right of the display.
To accept the entry, press and hold the right rotary
control for more than 2 seconds or select the
small check mark and briefly press the right
rotary control .
The display then shows either the destination corresponding to the postal code or, if the postal code
is shared among several towns, a list containing
these towns.Select the required location using the
right rotary control and press to confirm.
If more than 20 locations share the same post code,
the display will show the Location Input menu instead of the above-mentioned list. In that case, the
town name is to be entered as described in ”Entering destination” on page 105.
105
Page 16
Using Navigation
Entering destination street
Select Road: with the right rotary control and
press the control to confirm.
If the
Road entry is not available, no streets are se-
lectable in the selected town. If you select
tre
, the programme switches to the town centre.
Select the letters in sequence by turning the right
rotary control and press the control to confirm.
The selected letter appears enlarged at the right of
the display.
Use multifunction button , to delete the last
confirmed letter.
The complete entry can be deleted by pressing
multifunction button for more than
2 seconds.
Letters which are already entered are displayed inversely. To help, the street name most similar to
the entry so far is displayed. The unit offers only
the possible remaining letters for selection.
If no other entries are available, the unit completes
the street name.
Cen-
To accept the entry, press and hold the right rotary
control for more than 2 seconds or select the
small check mark and briefly press the right rotary control .
If the street name was entered completely or automatically completed, the programme switches either to the road differentiation list (the same street
name exists more than once in the location selected) or returns to the destination entry.
If an incomplete location entry was confirmed, the
street selection list is displayed.
The street name most similar to the entry appears
in capital letters in the road selection list.
The scroll marks indicate that other streets, sorted
in alphabetical order, can be selected.
Select the street by turning the right rotary
control and press the control to confirm.
If a unique entry is entered, the programme returns
to the destination entry.
If the entry is not unique (the same street exists
more than once in the same location), the street differentiation list is shown.
Select the required part of town using the right rotary control and press the control to confirm.
The programme returns to the destination entry.
If available, you may select a street number or intersection. Select
lation.
Start... to start the route calcu-
Entering the destination town centre
Use the right rotary control to select Centre
and press the control to confirm.
If the previously selected location has only one
centre, the programme immediately returns to the
destination entry.
If the number of centres is less than 10, the centre
list is displayed.
Select the centre by turning the right rotary
control and press the control to confirm.
If the number of centres is greater than 9, the programme switches to centre entry.
106
Page 17
Using Navigation
Select the letters one after the other by turning the
right rotary control and press the control to confirm. The selected letter appears enlarged at the
right of the display.
Use multifunction button to delete the last
confirmed letter.
The complete entry can be deleted by pressing
multifunction button for more than
2 seconds.
Already entered letters are displayed inversely.
For your help, the centre most similar to the entry
so far is displayed. The unit offers only the possible remaining letters for selection. If no other entries are available, the unit completes the centrename.
To accept the entry, press and hold the right rotary
control for more than 2 seconds or select the
small check mark and briefly press the right rotary control .
Once the complete centre name is entered or automatically completed, the programme returns to the
destination entry.
The programme switches to the centre list if the selection is ambiguous.
The centre most similar to the entry appears in capital letters in the centre list.
The scroll marks indicate that other centres, sorted
in alphabetical order, can be selected.
Select the centre by turning the right rotary
control and press the control to confirm.
The programme returns to the Destination Entry
menu.
If you select
started.
Note:
By pressing the right rotary control for longer
than 2 seconds without previously entering a letter,
a list of the possible location centres will immediately appear.
Start... the route calculation is
Entering street number for destination road
This function can only be selected if this information is contained in the navigation CD.
Select
menu with the right rotary control, and press the
control to confirm.
The street numbers are compiled into street
number ranges. If there are fewer than 10 street
number ranges, the street number range list is displayed.
Select your street number range by turning the
right rotary control and press the control to confirm. The programme returns to the Destination
Entry menu.
If the number of street number ranges is over 9, the
programme switches to the street number entry.
Enter the street number of the street destination
with the right rotary control or with multifunction buttons to and confirm the entry
by pressing the right rotary control for more than
2 seconds. The possible street number range is
House number in the Destination Entry
107
Page 18
Using Navigation
shown in parentheses.
If the street number entered is available, the programme returns to the Destination Entry menu.
If the street number entered is not available, the
street number range list is displayed. A street
number range can now be selected.
Start... to start route calculation.
Select
Note:
Due to system configurations, route guidance will
only be given up to the range of the entered street
number.
Selecting intersection for destination road
This function can only be selected if this information is contained in the navigation CD.
Select
Crossing in the Destination Entry
menu with the right rotary control, and press the
control to confirm.
Select the intersection for the destination road by
turning the right rotary control and press the
control to confirm.
The programme will return to the Destination Entry menu.
If you select
Start... the route calculation is
started.
Starting the route calculation
Once the destination is completely entered in the
Destination Entry menu, select
right rotary control.
Route calculation begins, using the route option
settings (fastest, shortest or dynamic route).
Start with the
Route options
With the route options, the calculation of the route
can be influenced.
Route settings in the Destination Entry
Select
menu using the right rotary control and press to
confirm.
Select from
Fast route,
Dyn. route R DS,
Dyn. route T DS,
Short route,
Avoid Ferry,
Avoid Motorway,
Avoid Toll,
Avoid Tunnel
Private route
Bussiness route
by turning, and change the settings by pressing the
right rotary control to select On ( ) or Off
().
Press the control for more than 2 seconds to accept
all settings and exit the menu. The route calculation is started.
Only one of the settings,
route RDS
route
, can be activated at once. The restriction
and
Fast route, Dyn.
, Dyn. route TDS or Short
108
Page 19
Using Navigation
options can be combined freely.
Fast route
•
With this setting, the shortest possible travel
time to the destination is calculated.
Dyn. route R DS
•
The route is calculated taking into account the
traffic announcements received.
Note:
Dynamic route guidance is not currently
possible in all countries.
When new route calculations are made with
dynamic route guidance activated, the
navigation system may request the Navigation
CD (if the Navigation CD is not already
inserted).
If dynamic route guidance is active, the routes
are calculated using the "Fast Route" setting.
Further information on Dynamic Route can be
found in section ”Dynamic Route Guidance” on
page 118.
Dyn. route T DS
•
TDS is an additional dynamic navigation option.
At the time of going to press, this function was
still undergoing the release/certification process. You will be notified separately once this
process has been completed.
•
Short route
With this setting, the shortest possible route to
the destination is calculated.
Note:
For larger cities or urban areas, the setting
"
Short route" is recommended.
Avoid Ferry, Avoid Motorway, Avoid
•
Toll
and Avoid Tunnel
provides options for avoiding bridges, ferries,
tunnels or toll roads.
This means that when the ( ) function is
active, the route will be calculated e.g. without
tunnels where possible.
Note:
In the case of long journeys, motorways are included in route calculation even where
Motorway
Private route and Bussiness route
•
is activated.
This function deals with settings for a driver's
log.
At the time of going to press, this function was
still undergoing the release/certification process. You will be notified separately once this
process has been completed.
Avoid
Destination memory
The destination memory contains personally
stored destinations. It is not mandatory to store any
destinations in the destination memory. However,
it saves repeated manual entry if the destination is
required again at a later date.
Calling up a destination stored in the destination memory
Using the right rotary control, select Dest.
memory
in the main Navigation menu or in anoth-
er entry menu and press the control to confirm.
Select the desired destination using the right rotary
control and press the control to confirm.
Route calculation begins.
Additional information about the destination can
be called up before confirming the selection by
pressing the left rotary control .
109
Page 20

Using Navigation
Storing a destination in the destination memory
Select Save detination in the Destination Entry menu and press the right rotary control to
confirm. In some menus, the destination memory
can also be called up for storage of a new destination by pressing multifunction button .
A selection from
Update entry or
New entry
can be made by turning, and confirmed by pressing, the right rotary control .
• Selection
A new entry is made for the entered destination.
A name of your choice, consisting of up to
14 characters, can be entered for the specified
destination. It is stored automatically in the destination memory when you press the right rotary
control for longer than 2 seconds.
To store, you can also select the small check
mark and briefly press the right rotary
control . Should you not wish to enter a name,
New entry
press and hold the right rotary control for
more than 2 seconds and the destination will be
processed without entering a name.
The destination entered can be filed into any position in the destination memory by turning the
right rotary control . The memory position is
confirmed by briefly pressing the right rotary
control . The destination to be filed is identified with .
A total of 50 destinations can be stored.
• Selection
Update entry
An existing entry can be completed or updated
with the entered destination.
Select the entry to be updated by turning the
right rotary control, and press the control to confirm.
The current destination to be stored will now be
attached to the entry.
Deleting a destination from the destination memory
Select destination memory (see page 109).
Select the destination to be deleted with the right
rotary control and press the left rotary
control to display the additional information on
the stored destination.
Press multifunction button .
Select either
control . The selected element will be displayed
inverted.
Confirm your selection by pressing the right rotary
control .
Selecting
then returns to the destination memory.
Selecting
without change.
Yes or No with the right rotary
Yes deletes the entry. The programme
No will return to the destination memory
110
Page 21
Using Navigation
Sorting destination memory
Select destination memory (see page 109).
Select the destination to be sorted with the right rotary control and press the left rotary control
to display the additional information on the stored
destination.
Press multifunction button .
The selected destination can now be filed into any
position desired by turning the right rotary
control . By quickly pressing the right rotary
control the new storage position is confirmed.
Renaming a destination in the destination memory
Select destination memory (see page 109).
Select destination to be renamed with the right rotary control and press the left rotary control
to display the additional information on the stored
destination.
Press multifunction button .
A new name of your choice, consisting of up to
14 characters, can be entered, and is applied by
pressing the right rotary control for more than
2 seconds.
To store, the small check mark can also be selected and the right rotary control briefly
pressed.
Destination memory full
Occurs when the destination memory is full.
By turning the right rotary control select either
Delete (to jump to destination memory to delete
a destination, see ”Deleting a destination from the
destination memory” on page 110) and
(Cancel Save). Press to confirm your selection.
Cancel
111
Page 22

Using Navigation
Accessing @ Destinations
You can use the @ Destinations menu item in
the main navigation menu to download and navigate to destinations you have saved on the BeckerClub homepage. Please see ”BeckerClub” on
page 154 for a description of how to access the
BeckerClub.
In the Main Navigation Menu, select
@ Destinations with the right rotary control
and press the control to confirm.
By selecting
pressing the right rotary control , a WAP connection to the homepage will be established and
the relevant data will be loaded.
The WAP Browser is displayed. The dial-up process can be observed and any error messages will be
displayed.
After the loading process, the connection will be
terminated and a list of the downloaded destinations will be shown.
Note:
If the telephone mode is not available
destinations
not be selected.
Update @ destinations and
Update @
is displayed in brackets and can-
The destinations downloaded using "@ Destinations" are handled in the same way as the destination memory. Destinations can be selected and
navigated to directly.
Select the desired destination using the right rotary
control . Select by briefly pressing the right
rotary control.
Selecting
Start... initiates the route calculation.
Saving and Deleting "@ Destinations"
Select @ Destinations in the main navigation menu using the right rotary control and press
to confirm.
Select the destination to be saved or deleted with
the right rotary control and confirm by pressing
the left rotary control .
Pressing multifunction button will call up
the destination memory and save the destination.
See ”Destination memory” on page 109.
By pressing the multifunction button the selected entry can be deleted.
With the right rotary control select either
No. The selected element will be displayed invert-
Yes or
ed .
Confirm your selection by pressing the right rotary
control .
Yes to delete the entry. Afterward, the pro-
Select
gramme returns to the list of loaded destinations.
Select
No to return to the list of the loaded destina-
tions.
112
Page 23
Using Navigation
@ Route Mode
By selecting Activate @ route mode and
pressing the right rotary control route calculation to the destinations loaded from the homepage
is started automatically.
Once you have reached the first destination, route
calculation to the next destination is started automatically.
Note:
If no destinations have been loaded from the
homepage,
played between brackets and cannot be selected.
Activate @ route mode is dis-
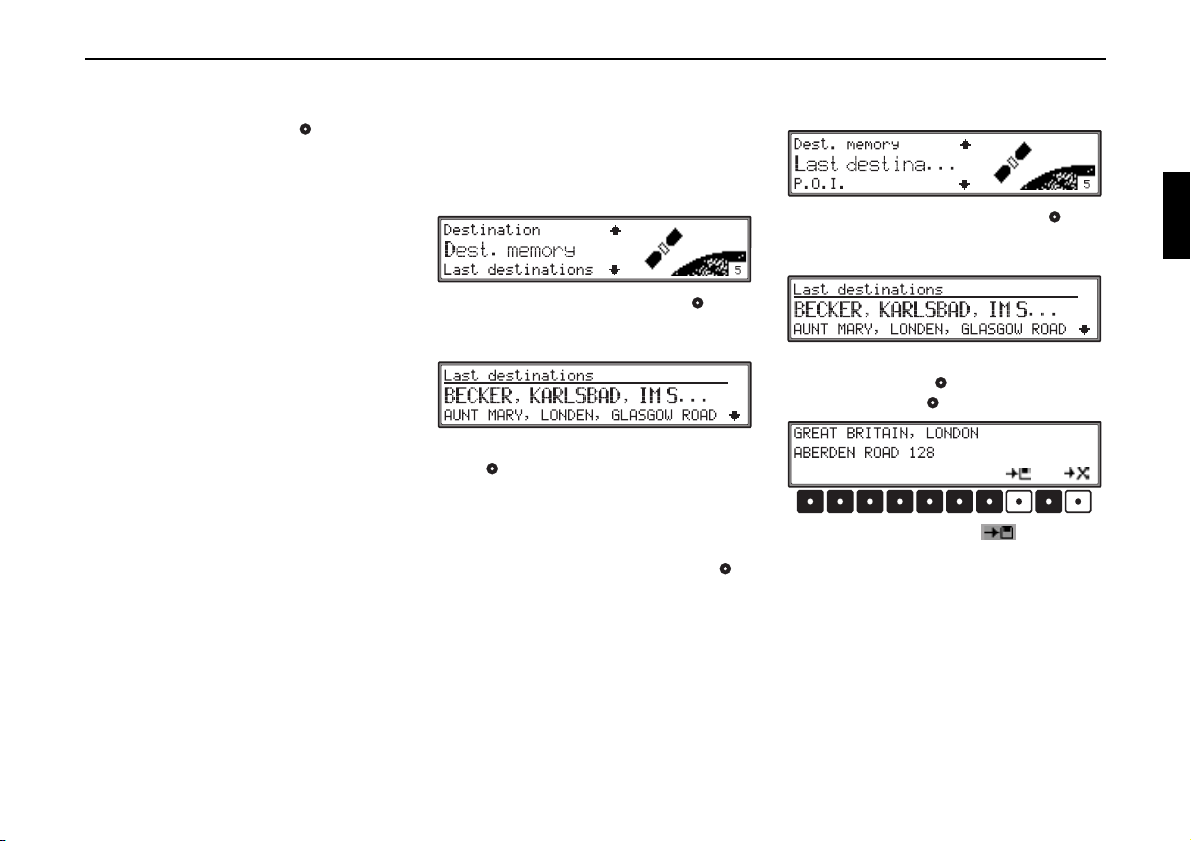
Last destinations
A list of the last 50 destinations is displayed. Stopovers are not stored as last destinations.
Driving to one of the ”Last Destinations”
In the Main Navigation Menu, select Dest.
Memory
with the right rotary control and press the
control to confirm.
Select the desired destination with the right rotary
control and press the control to confirm.
Then start route guidance.
Additional information on the destination can be
called up by pressing the left rotary controls before confirming selection.
Saving and Deleting ”Last Destination” destinations
In the Main Navigation Menu, select L ast
destinations
press the control to confirm.
Select the destination to be saved or deleted with
the right rotary control and confirm by pressing
the left rotary control .
Press the multifunction button , to call up the
destination memory and save the destination. See
”Destination memory” on page 109.
with the right rotary control and
113
Page 24
Using Navigation
By pressing multifunction button , the selected entry can be deleted.
With the right rotary control select either
No. The selected element will be displayed invert-
Yes or
ed .
Confirm your selection by pressing the right rotary
control .
Selecting
Yes will delete the entry. Afterward the
programme will return to the list of last destinations.
Selecting
No will return you to the list of last des-
tinations without change.
Coordinate entry
If the coordinates for a destination are known,
these can be entered and route guidance to the
destination started.
With the right rotary control select
Coordinates in the main Navigation menu and
press to confirm.
By turning the right rotary control the position
to be entered can be selected. Entry of degrees,
minutes and seconds can be selected individually.
After pressing the multifunction buttons -
the required coordinates can be entered.
In the case of an incorrect entry, the individual values must be overwritten.
When the desired coordinates have been entered,
route guidance can be started by pressing and holding the right rotary control .
Route guidance calculation
The message ”Calculating route” indicates that the
distance is being calculated, which may take several seconds.
After the first route guidance announcement, the
prompt
CD will continue to blink on the display un-
til the route has been completely calculated. When
a distant destination is entered, it is recommend
that you wait until
departing.
Recalculating route
If the current route is not followed due to road
blocks, diversions, unintentionally driving in the
wrong direction or failing to observe the recommendations, the system immediately calculates a
new route. During this re-calculation,
is displayed.
CD has stopped blinking before
NEW ROUTE
114
Page 25
Stopover
Stopover offers the possibility of entering a stopover destination during the active route guidance.
Entering a stopover
Press multifunction button .
Using the right rotary control , make a selection
and press the control to confirm.
Destination
•
(see page 104) allows the entry of a stopover
with the precise specification of the address.
Dest. memory
•
(see page 109) Selecting a stopover from the
destination memory.
Last destinations
•
(see page 113) Selecting a stopover from the
”Last Destination” memory.
P.O.I.
•
(see page 121) allows the selection of special
destinations, such as petrol stations or airports,
as stopovers via
tional
and Country/town.
Surrounding area, Na-
•
@ destinations
(see page 112) for selection of one of the downloaded destinations as an intermediate destination.
Coordinates
•
(see page 114) enables entry of a stopover via
geographic coordinates.
Start route guidance to stopover
Starting route calculation to the stopover is only
necessary following the entry of a destination. In
all other situations, route calculation is started automatically following selection of a destination or
after confirmation of the coordinates.
To start route guidance to the stopover, press the
right rotary control .
The route is calculated and route guidance begins.
Note:
During route guidance to a stopover, is displayed inversely.
Using Navigation
Deleting a stopover
Press multifunction button .
With the right rotary control , select either
or No. The selected element will be displayed inverted.
Confirm your selection by pressing the right rotary
control .
Selecting
Yes will cancel route guidance to the
stopover, and the route to the main destination will
be calculated.
If you select
No the stopover will not be cancelled.
Stopover reached
After the message „You have reached your stopover“, route guidance to the main destination begins
automatically.
Yes
115
Page 26
Using Navigation
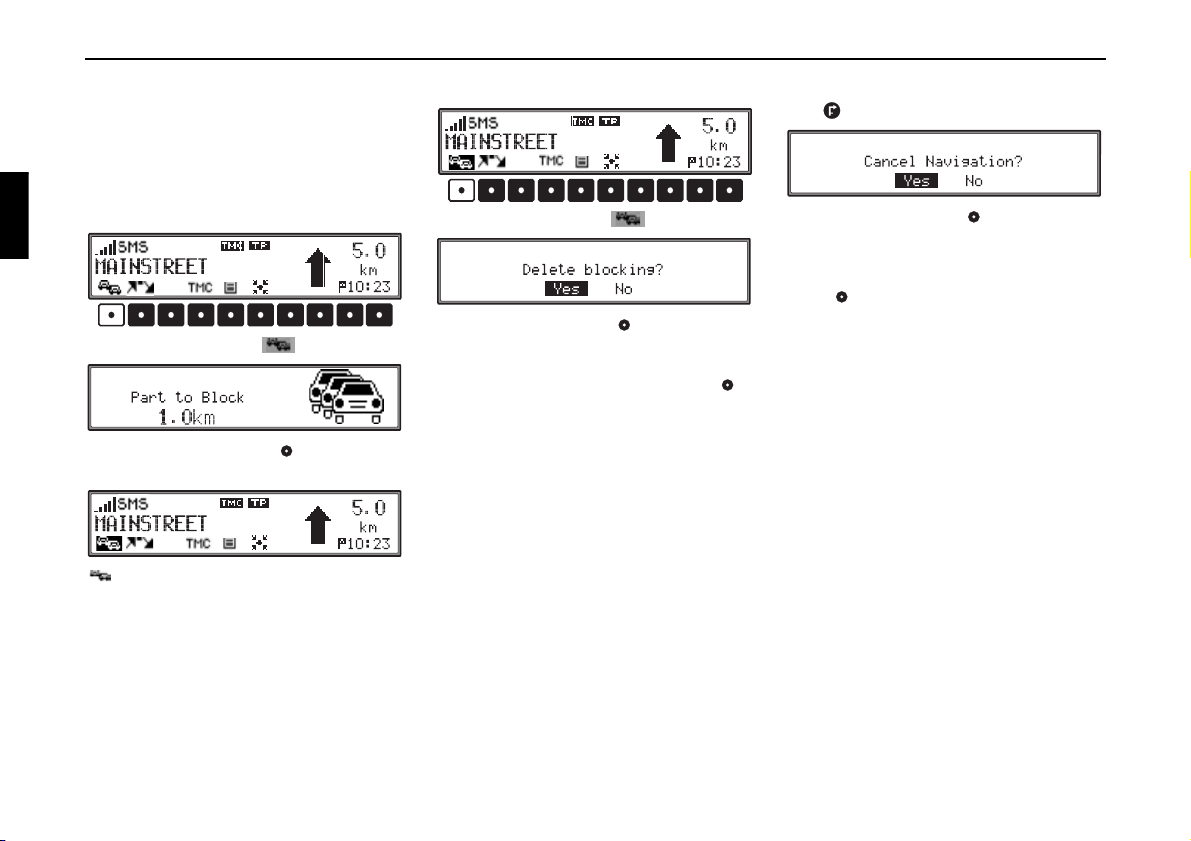
Traffic jam function
This function allows you to block route sections
ahead from the nearest junction and to calculate a
detour route when a traffic jam or road block is directly ahead.
Entering length of traffic jam
Press multifunction button .
Using the right rotary control , select the length
of the traffic jam and press the control to confirm.
is displayed inversely and the route is recal-
culated.
Delete block
Press multifunction button .
With the right rotary control select either
No. The selected element will be displayed invert-
ed.
Confirm by pressing the right rotary control .
Selecting
Selecting
Yes will cancel the block.
No will not cancel the block.
Yes or
Cancelling route guidance
Press .
With the right rotary control select either
No. The selected element will be displayed invert-
ed.
Confirm your selection by pressing the right rotary
control .
Selecting
If you select
Yes cancels route guidance.
No route guidance will continue.
Yes or
116
Page 27
Using Navigation
G
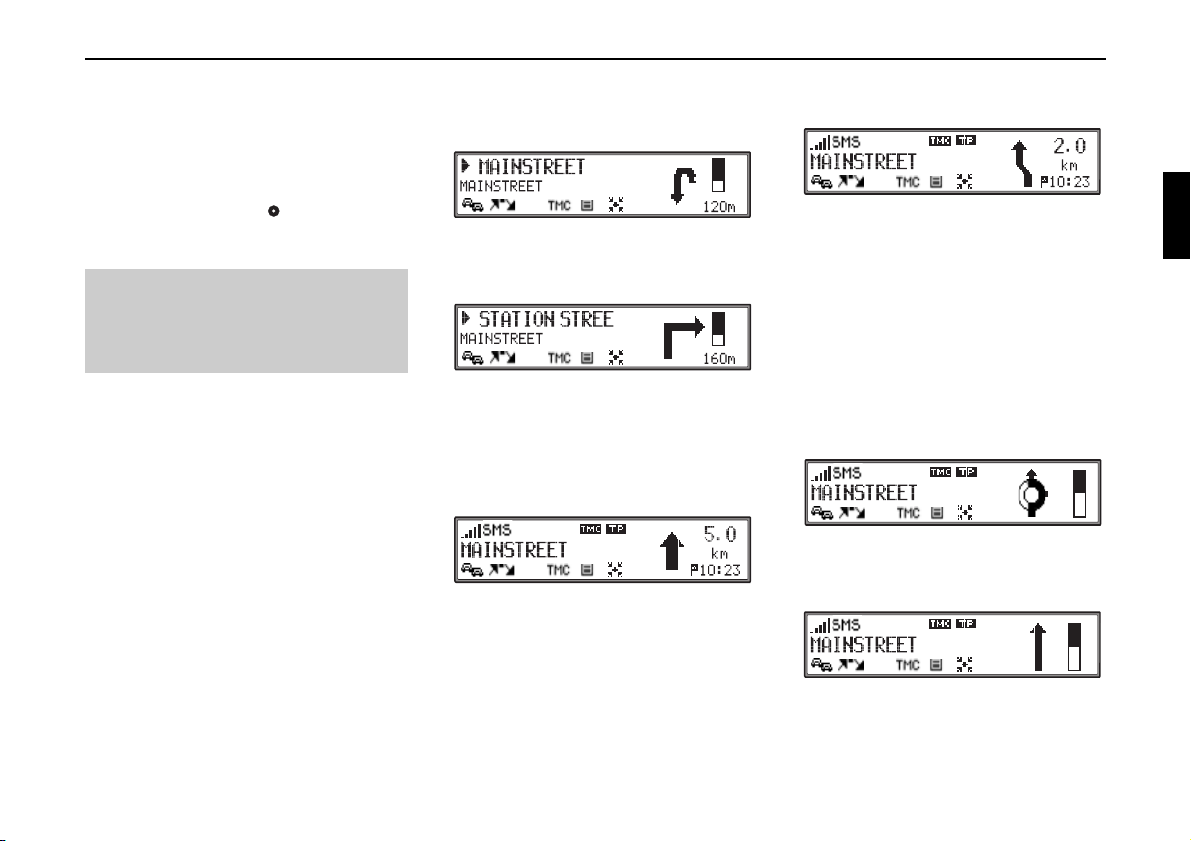
Notes on route guidance
After entering the destination (address), the system
calculates the route and announces:
”Ready to drive off”.
You will receive the navigation recommendations
by voice messages and screen displays.
Press the left rotary control to have the current
recommendation repeated.
Danger
Accident hazard
If a driving recommendation contradicts the applicable Road Traffic Regulations (RTR), the
RTR are always valid!
For clarification, the following contains some examples of possible driving recommendations:
• ”Please perform a U-turn if possible”.
You are driving in the wrong direction and
should turn around at the earliest opportunity.
• ”Please turn right after 300 metres”.
The arrow indicator
into which you should turn.
The progress bar on the right illustrates the distance and the black part decreases as you approach the intersection.
• ”Please follow the road”.
This display tells you that you should continue
to follow the road you are on.
points to the next street
"
• ”Prepare to turn left” or
”Please merge into left lane”.
This recommendation prepares you for the next
turn to be taken.
”Please merge into left lane” does not mean
however that you should immediately get into
the left turn lane!
Note:
At intersections and roundabouts, only the ends
of the roads to be passed are displayed.
• ”Please leave the roundabout at the third exit on
the right”.
This display shows you which exit (marked
with the arrow) you must take at the roundabout.
• ”Now drive straight ahead”.
At this point, you must drive straight ahead.
117
Page 28

Using Navigation
• ”Please follow the arrows”.
This display tells you that you are currently on a
non-digitised street (i.e. parking lot, garage,
parking deck) which is not contained in the digitised road map. The arrow indicates the direction of the destination as the crow flies.
• ”Keep right after 2 kilometres”.
Keep right means that the street will split and
that you should follow the corresponding direction of travel.
• ”You have reached your destination”.
The specified destination has been reached and
route guidance is terminated.
Dynamic Route Guidance
Note:
Dynamic route guidance is not possible in all
countries.
Dynamic route guidance is used to calculate the
route, taking current traffic announcements into
account.
The traffic announcements are transmitted by a
TMC radio station in addition to the radio programme and are received and analysed by the navigation system. The reception of traffic
announcements is free of charge.
Note:
Traffic announcements are transmitted by radio
stations, therefore we cannot accept any responsibility for the completeness and correctness of the
announcements
If dynamic route guidance has been activated, a
continuous check is made for the presence of relevant announcements for the selected route. The
route is then calculated using the ”fast route” option, while taking into account current traffic announcements. If it is determined during these
continuous checks that a traffic announcement is
of relevance for the route guidance, the unit will
automatically re-calculate a new route to the destination.
NEW ROUTE is shown on the display. In addition,
there is a voice announcement ”The route is being
recalculated due to current traffic announcements”.
Note:
If no TMC station can be found, the display will
show
Currently TMC reception is not
possible
. The unit will switch back to the route
guidance display after a short time.
If no TMC stations can be found within
10 minutes,
not possible
Currently TMC reception is
will appear on the display again
and a short signal tone will sound.
Your navigation system can receive TMC information, whether a TMC station is selected or not.
However, in order to guarantee optimal reception
of TMC information, we recommend the selection
of a TMC station. You can recognise a TMC station during FM reception by the abbreviation
TMC.
See ”Display for TMC stations” on page 163.
Note:
Austria: The location and event code was made
available by ASFINAG and BMVIT.
118
Page 29

Using Navigation
Information during route guidance
Press the left rotary control .
The destination, the distance and the estimated
time of arrival are displayed.
The complete list can be displayed by turning the
right rotary control .
To return to route guidance, press the left rotary
control again or wait for 8 seconds.
If route guidance to a stopover is active, the stopover can be displayed by pressing the multifunction
button .
Requesting journey duration and kilometres travelled
During route guidance, press the left rotary
control .
Press multifunction button .
The journey duration, kilometres travelled and the
average speed are displayed.
By pressing the right rotary control , the display
is cancelled.
The display can be reset to "zero" by pressing and
holding the right rotary control .
Displaying/changing route settings
During navigation, press the left rotary control .
Press the multifunction button .
The route settings are displayed.
The settings can be changed as described under
”Route options” on page 108. After confirming the
change, the route is re-calculated with the altered
route settings.
After 8 seconds without operation, the system returns to the route guidance display.
Requesting current time
During route guidance, press the left rotary
control .
Press multifunction button .
119
Page 30

Using Navigation
To display the entire text of the traffic announcements, select the desired entry with the right rotary
control .
The current time is displayed. After 8 seconds, the
system returns to the route guidance display.
The clock settings can be accessed by pressing and
holding the right rotary control . See ”Setting
time” on page 124.
Requesting current position
During route guidance, the current position can be
requested.
Press multifunction button .
The current position, with street name (if available), latitude and longitude, elevation above sea
level (in 50 m increments) and the number of satellites received will be displayed.
Pressing the right rotary control will return you
to the route guidance display.
Press multifunction button , to store the current position in the ”last destination” memory.
Return to the route guidance display by pressing
the right rotary control or waiting a short time.
Calling up traffic announcements
All the traffic announcements received or those
relevant for the route can be called up.
Press the multifunction button . All received
traffic announcements will be displayed.
Press the multifunction button . The traffic
announcements relevant for the route are displayed.
If no traffic announcements are available, the multifunction buttons and are not displayed.
The list is sorted. The list displays warning messages (e.g. wrong-way drivers) first, followed by
traffic problems (e.g. accidents) and lastly traffic
problems due to road construction.
If more than one traffic problem exists on a road,
the number of problems is shown by
etc.
2x..., 3x...
Traffic announcements will be shown for the selected road.
If several announcements (e.g. 3) have been received, the individual announcements are indi-cat-
1/3, 2/3 and 3/3. The announcements
ed by
displayed can be scrolled through by turning the
right rotary control .
The announcements can also be read out. For this
purpose, press the right rotary control for more
than 2 seconds.
Pressing the right rotary control returns to the
list of traffic announcements.
Note:
If the reception of traffic announcements is not
possible for technical reasons, or will
be shown in the display.
120
Page 31

Using Navigation
Call up route list
During route guidance, the planned route can be
called up via the route list, and the relevant traffic
announcements for the route can be displayed.
Press multifunction button .
The current road and the road names up to the destination are displayed. Scroll through the route list
by turning the right rotary control .
Note:
After entering the destination, it will take some
time until the route list is compiled.
If the vehicle is currently in an "off road" area
when the destination is entered, no route list can be
compiled until a stored road is reached. If no route
list is yet available, the multifunction button
is not displayed.
Information during non-active route guidance
Press the left rotary control .
If possible, the current position with location and
street is displayed.
• By pressing the multifunction button the
journey duration, kilometres travelled and the
average speed of the last navigation route can be
displayed. See ”Requesting journey duration
and kilometres travelled” on page 119.
• By pressing the multifunction button a list
of received traffic announcements is displayed
(see page 120).
• The time is displayed by pressing the
multifunction button . See ”Requesting
current time” on page 119.
• The current position can be called up or stored
by pressing the multifunction button . See
”Requesting current position” on page 120.
P.O.I.
Menu for selecting points of interest from a predetermined list or points of interest that are stored on
the Beckerclub homepage. Points of interest include petrol stations, airports or hospitals, for example.
With the right rotary control, select
the Main Navigation Menu and press the control to
confirm.
The items
National,
Surrounding area,
Country/town and
@ P.O.I.
become available.
With the right rotary control , make and confirm
a selection.
P.O.I. in
121
Page 32

Using Navigation
• Selection National
Using the right rotary control , select a category and press the control to confirm.
A list of points of interest is displayed or, if
there are more than 9 entries in the list, you will
be prompted to enter the text.
Enter the point of interest and confirm. Confirm
the special destination in the displayed list by
pressing the right rotary control .
The system jumps to the route menu.
Note:
A list of possible points of interest is displayed
immediately when you press the right rotary
control for more than 2 seconds without having selected any letters.
• Special destinations
Special destinations within the current vicinity
of the vehicle can be selected.
Using the right rotary control , select a category and press the control to confirm.
Destinations are listed according to proximity.
The figures in kilometres relate to the direct distance (as the crow flies) between the point of interest and the current location.
The arrows following the distance information
indicate the direction of the relevant point of interest (e.g. point of interest lies in the direction of travel, point of interest lies in the
opposite direction to that of travel).
Select the desired destination using the right rotary control .
By pressing the left rotary control , information about the selected destination is listed (i.e.
for a hospital).
By pressing multifunction button, a telephone number for the special destination can be
Surrounding area
dialled directly. You will find detailed instructions for the use of the telephone in section
”Calling” on page 128.
Confirm your selection with the right rotary
control . The system jumps to the route menu.
• Points of interest
Select the desired country as described under
”Selecting country” on page 104. Enter the
destination as described under ”Entering
destination” on page 105 or enter the postal
code of the destination as described under
”Entering destination town postal code” on
page 105.
After confirming the destination the points of
interest of the selected location are displayed.
Using the right rotary control , select a category and press the control to confirm.
A list with special destinations is displayed or,
if there are more than 9 entries in the list, you
will be prompted to enter text.
Enter the point of interest and confirm. Confirm
the special destination in the displayed list by
pressing the right rotary control .
The system jumps to the route menu.
Country/town
122
Page 33

Using Navigation
Note:
A list of possible points of interest is displayed
immediately when you press the right rotary
control for more than 2 seconds without having selected any letters.
• Points of interest via
@ P.O.I.
A point of interest can be called up from the
points of interest stored on the Beckerclub
homepage via a WAP connection.
The items
National,
Surrounding area and
Country/town
are available.
With the right rotary control , make and confirm a selection.
• Select:
National
Then, only national points of interest in various
categories will be offered for selection.
• Select:
Surrounding area
Points of interest in the current vicinity of the
vehicle will be offered for selection.
• Select:
Country/town
After selecting the country and the town, the
categories and the points of interest are displayed for the given location.
Once a selection has been made a WAP connection will be established to the Beckerclub
homepage. You can select the desired category
(e.g. restaurant etc.).
After selecting the category, the points of interest corresponding to the category are displayed
and can be selected.
System settings
Press the key in the Main Navigations Menu.
The system settings menu is requested.
Select one of the following;
Language,
Clock settings,
Voice announcement,
Traffic news,
Settings,
Measuring unit or
Adapt ETA
by turning the right rotary control and confirm the
selection by pressing, .
Language
•
The language of the text display and voice announcements can be selected.
Clock settings
•
The system’s internal clock can be set to the local time.
Traffic news
•
Voice announcements for the traffic warnings
or traffic announcements can be turned on or
off.
Settings
•
The Animation display can be turned on or off.
Announcement of the estimated time of arrival
can be turned on or off.
123
Page 34

Using Navigation
• Measuring untit
The unit display can be set from metres to yards.
Language
•
The language of the text display and voice announcements can be selected.
Adapt ETA
•
Calculation of the ETA can be influenced.
Setting the language
Set and confirm Language in the System Settings
menu.
Select the language using the right rotary
control . The language selection is applied when
the control is pressed, and the language is installed.
You can choose either a male or a female voice for
certain languages.
Select the voice using the right rotary control .
The voice is applied and installed by pressing the
control.
After installation, the unit will return to the previously selected mode (Radio, CD etc.).
Setting time
In order to achieve correct navigation on routes
with time-sensitive guidance and to calculate the
estimated time of arrival, it is necessary to set the
GMT time transmitted from satellites to the current
time zone.
Set and confirm
Settings menu.
With multifunction button , the time can be
changed from 24- to 12-hour display.
With the multifunction buttons or , the
time will be changed every half-hour.
By pressing the right rotary control or multifunction button , the set time is accepted.
The programme jumps back to the System Settings
menu.
Clock settings in the System
124
Page 35

Using Navigation
Setting voice output
Here you can set whether the voice output of
navigation announcements are mixed with the
current audio source, the current audio source is
muted during navigation announcements, or
whether the volume of the navigation
announcements can be set independently of the
volume of the current audio source.
Select and confirm
System Settings menu.
Turn the right rotary control to select the
desired setting. A setting can be activated ( ) by
pressing the right rotary control .
Confirm your selection by pressing and holding
the right rotary control .
•
Mix with audio
Navigation announcements are mixed with the
current audio source.
Switch audio to mute
•
The current audio source is muted when a
navigation announcement is made.
Set volume freely
•
The volume of navigation announcements can
be set independently of the audio source during
a navigation announcement.
Voice announcement in the
Setting the vocal announcement of traffic reports
You may choose the type(s) of traffic announcements to be read aloud.
Traffic announcements are given depending upon
route calculation and receipt of new announcements.
Set and confirm
Settings menu.
The items
Traffic announcement update,
Warning announcement and
Only on rout e
are available for selection
• Turning voice announcement of all traffic announcements on or off: Set
nouncement update
By pressing the right rotary control , you can
choose between Voice Warning Announcements On ( ) or Off ( ). Confirm your selection by pressing and holding the right rotary
control .
Traffic news in the System
Traffic an-
.
• Turning all warning announcements on or off:
Traffic announcement update
Activate
as described above.
Set
Warning announcement.
Press the right rotary control to choose between All Warning Announcements On ( )
or Off ( ). Confirm your selection by pressing and holding the right rotary control .
• Turning Voice Announcement of route-relevant
traffic announcements on or off:
Activate
Traffic announcement update
as described above, and it set to Only on
route
.
Press the right rotary control to choose between Voice Announcement of route-relevant
traffic announcements On ( ) or Off ( ).
Confirm your selection by pressing and holding
the right rotary control .
125
Page 36

Using Navigation
• Turning route-relevant traffic announcements
on or off:
Traffic announcement update,
Activate
Warning announcement and Only on
route
as described above.
If all entries are active, only the warning announcements relevant for the route will be issued.
Exit the traffic announcements Set-up menu by
pressing the right rotary control for more than
2 seconds.
Settings
Set and confirm Settings in the System Settings
menu.
The entries
Announcement ETA and
Animation in menus
are available for selection
• Turning announcement of Arrival Time on or
off:
Announcement ETA.
Set
By pressing the right rotary control , you can
choose between Arrival Time On ( ) and
Off ( ). Confirm your selection by pressing
and holding the right rotary control .
• Turning Menu Animation on or off:
Animation in menus.
Set
Exit the Setting menu by pressing the right rotary
control for more than 2 seconds.
Selecting the units
Set and confirm Measuring unit in the System
Settings menu.
Select the preferred unit of measurement. Pressing
the right rotary control then selects either
On ( ) or Off ( ).
Exit the Measurement unit setting menu by pressing the right rotary control for more than
2 seconds.
Note:
Metric stands for calculation in metres. Imperial
stands for calculation in yards.
126
By pressing the right rotary control , you can
choose between Menu Animation On ( ) and
Off ( ). Confirm your selection by pressing
and holding the right rotary control .
Page 37

Influencing the calculation of ETA
Select and confirm Adapt ETA in the System
Settings menu.
ETA stands for Estimated Time of Arrival.
Goods vehicle
•
With this setting the unit adjusts for drivers who
may take longer for the planned journey. This
setting could be selected, for example, for a
slower vehicle or in dense traffic areas.
User-defined
•
Calculation of the ETA can be adapted as required.
Using Navigation
Select from
Sports car,
Car,
Goods vehicle and
User-defined
by turning the right rotary control and press to
confirm.
•
Sports car
With this setting the unit adjusts ETA for faster
drivers. An earlier ETA is calculated.
•
Car
This is the default setting. It offers sufficiently
accurate calculation of the ETA for most drivers.
By turning the right rotary control select the
change, as a percentage, with respect to the default setting and press the right rotary control
to confirm.
127
Page 38

Telephone mode
Telephone mode
Activate telephone mode
In order to activate the telephone mode, the Communications menu must be called up. If the vehicle
ignition has been turned off since the last entry of
the telephone PIN number, the PIN number must
first be re-entered as described in section ”Entering
the Telephone PIN” on page 97.
In the upper left corner of the display, the strength
of the signal reception is displayed. The more bars
are visible, the better the telephone reception.
Note:
A weak signal impairs voice and transmission
quality, and can lead to loss of the connection.
GPRS operation is not yet possible with the current
telephone modules.
Calling up the Communications menu
The Communications menu is called up by pressing the key.
Calling
The telephone must be activated to make a call.
Dial the number
Call up the Communications menu.
Press multifunction button .
Press the multifunction buttons through
, to enter the desired number with the area
code (and, if necessary with international dialling
prefix).
Enter special characters (+, # or *), if necessary:
• Press and hold the plus (+) multifunction button
.
• Press and hold the star (*) multifunction button
.
• Press and hold the pound sign (#) multifunction
button .
Numbers or characters already entered can be deleted by turning the right rotary control to the
left.
Note:
During number entry, the menu for the telephone
list can be called up by turning the right rotary
control to the right (see also page 132).
Connection with the desired party will by made.
By pressing multifunction button , dialling
can be cancelled.
128
To dial a completely entered number, briefly press
the right rotary control or remove the handset
(optional accessory) from its cradle.
Page 39

Telephone mode
Terminating a call
An ongoing call or dialling can be terminated.
To do this, briefly press the right rotary control
or the multifunction button in the Call menu.
The call or dialling will be terminated.
Accepting a call
To accept an incoming call, briefly press the right
rotary control , press multifunction button
or remove the handset (optional accessory) from
its cradle.
Instead of
the person calling can be displayed if available.
Note:
Incoming calls will only be signalled when the telephone is turned on and activated (PIN number entered).
Phone call!, the name or number of
Rejecting a call
To reject an incoming call, press multifunction
button . The person calling will hear a busy
signal.
During a call
It may be necessary to enter numbers or characters
during a call. This may be required to control an
available voice mailbox, depending on the
network provider.
Press the multifunction button or turn the
right rotary control .
A number can be entered during a call by pressing
the multifunction buttons through .
This may be necessary for example, depending
upon the provider, to control an available voice
mailbox.
The call is transferred to the handset by removing
the handset from its cradle (optional accessory).
The unit will then return to the previously active
audio source.
Toggling – second call
If the call waiting function is activated (see ”Call
settings” on page 136.), a further call is signalled
during an ongoing call.
• The new call is accepted by pressing the
multifunction button , the current call is
put on hold in the background. You can then
toggle between these two calls.
• The new call is accepted by pressing the
multifunction button . The current call is
ended.
• By pressing the multifunction button the
new incoming call is rejected. The caller hears a
busy tone.
During two concurrent calls, you can toggle
between the two calls or end a call.
129
Page 40

Telephone mode
• Press the multifunction button to toggle
between the two calls.
• Pressing the multifunction button ends
the call to the current party. The call on hold
automatically becomes the active call.
Note:
Not all of the functions described may be
supported by the network provider.
Conference
If you have accepted two calls (toggling), you can
combine these into a conference call, i.e. all three
parties can speak with one another.
The two calls are combined into a conference call
by pressing the multifunction button .
• Both calls can be ended by pressing the
multifunction button .
• The two calls in the conference call can be
separated into two individual calls by pressing
the multifunction button . The functions
described under ”Toggling – second call” on
page 129 are available to you again.
Note:
Not all of the functions described may be supported by the network provider.
Telephone book
The telephone book will display the entries stored
on the SIM card.
Telephone book entries can be dialled directly
from the telephone book.
Telephone book entries can be edited and inserted.
Calling up the telephone book
In the Communications menu, press multifunction
button .
The telephone book is displayed.
An existing conference can be separated again, or
it can be ended completely.
130
Page 41

Telephone mode
Dialling a telephone book entry
Call up telephone book.
There are two possibilities for dialling an entry:
• By turning the right rotary control .
• By repeatedly pushing one of the multifunction
buttons - .
If an entry to be dialled begins with the letter
”F” for example, multifunction button
must be pressed 3 times.
In the telephone book, the first entry beginning
with the letter ”F” is displayed. By turning the
right rotary control , the desired name can be
selected.
After pressing multifunction button , special
characters can also be selected via the multifunction buttons.
To dial the selected telephone book entry, briefly
press the right rotary control .
Connection will be made with the desired person.
Editing / Adding / Deleting telephone book entries
Call up the telephone book.
Select the entry to be edited or deleted as described
above or, to add an entry, select any entry.
By pressing and holding the right rotary control ,
the Telephone Book Entry menu will be displayed.
By turning the right rotary control , you can
choose between
New,
Modify and
Delete.
Confirm your selection by pressing the right rotary
control .
Adding an entry:
After selecting
new entry must be entered first.
New, the telephone number of the
(and international dialling prefix if necessary).
Briefly press the right rotary control to apply
the number entered.
Next, the name for the new entry must be entered.
You may now enter a name. There are two possibilities:
• Select the letter or character with the right rotary
control and press the control to confirm. The
selected letter is displayed inversely.
• Select characters or letters by repeatedly pushing the multifunction button below the desired
character; i.e. to enter a C, the multifunction
button below ABC must be pressed 3 times.
Further entry and formatting possibilities:
Press the multifunction buttons through
, to enter the desired number with area code
131
Page 42

Telephone mode
• Upper / lower case letters
With multifunction button , you can
choose between upper and lower case letters.
• Special characters / Numbers
With multifunction button , you can
choose between special characters and numbers.
• Moving the cursor
Press multifunction button .
By repeatedly pressing the multifunction button, the cursor can be moved to the left.
If multifunction button is held for more
than 2 seconds, the display will move above the
multifunction button, and the cursor can be
moved to the right by repeatedly pressing the
multifunction button.
By pressing and holding the right rotary control ,
the name entered is accepted.
The new entry will be stored in the telephone book.
Editing:
After selecting
Modify, the previous telephone
number of the entry to be edited must first be
changed or confirmed.
Afterward, the previous name of the entry will be
shown to be changed or confirmed.
Note:
The menus for entering the telephone number or
name are operated as described above in ”Adding
an Entry”.
Löschen:
After selecting
Delete, the following menu is
shown for safety reasons:
By turning the right rotary control , select either
Yes or No (the inverted entry is active) and press
the control to confirm.
Selecting
Yes deletes the entry from the telephone
book.
Selecting
No will return to the telephone book
without change.
Call list
The unit stores numbers and names (if known from
the telephone book) of phone numbers dialled as
well as answered and unanswered calls, in a list.
Numbers and names can be only stored if the
number of the caller was transmitted.
Note:
The call list can only be selected when numbers or
names have been saved in the list. If nothing is
stored in the list, multifunction button will
not be displayed.
Open the Communications menu to call up the call
list.
Press multifunction button .
The displayed list can be scrolled through by turning the right rotary control .
The type of entry is indicated by various symbols
in front of the corresponding entry.
• Symbol stands for an answered call.
• Symbol stands for an unanswered or rejected call.
• Symbol stands for dialled numbers.
132
Page 43

Telephone mode
The entries in the list can be selected by turning
the right rotary control .
By briefly pressing the right rotary control ,
details on the entry can be displayed.
The call date, the call time (last call), the number
of calls and the phone number and, if available, the
name are displayed.
By briefly pressing the right rotary control
again, a connection is made to the corresponding
caller.
Saving entry from call list
You can edit the numbers saved in the call list and
add them to the telephone book.
For this purpose, select the number you wish to
save from the call list by turning the right rotary
control . Afterward, press and hold the right
rotary control for more than 2 seconds.
By turning the right rotary control select either
Yes or No (the inverted entry is active) and press
to confirm.
Selecting
A name can be entered or the numbers changed as
described under ”Editing / Adding / Deleting telephone book entries” on page 131.
Selecting
Yes opens the menu for saving a name.
No will return without change.
Deleting Telephone List
All telephone lists can be deleted.
Call up the Communications menu.
Press multifunction button .
By turning the right rotary control , select
lete all call lists?
to confirm.
All numbers and names in the list are deleted.
and press the control
Emergency call
Note:
Harman/Becker cannot generally be held liable
for the emergency call function.
Emergency call via voice connection
An emergency call can be made regardless of the
telephone status. However, various procedures can
be used. There are three possible modes:
Telephone is activated:
When the telephone is activated, press multifunction button in the Communications menu.
De-
Then, dial 112 using the multifunction buttons.
Confirm the number by pressing the right rotary
control .
PIN Number not entered:
Press .
Then, dial 112 with the multifunction buttons.
133
Page 44

Telephone mode
No SIM card inserted:
Press .
Then, press one of the multifunction buttons.
In all three situations, a prompt will appear before
the emergency number is actually dialled.
Turn the right rotary control to select either
Yes
or No (the inverted entry is active), and press the
control to confirm.
Selecting
Selecting
Yes will trigger the emergency call.
No will return to the previous menu with-
out change.
Emergency Call Via GDV Call Centre
In the event of an emergency, you can press
and to send an emergency call in Germany to
the GDV Online Call Centre (Gesellschaft
Deutscher Versicherter).
After starting the emergency call, all emergencyrelevant information such as data regarding the
position of the vehicle (determined via GPS), the
vehicle licence number etc. are transmitted.
In addition to the data transmission, a voice
connection to the emergency call centre is
established; further information can then be
communicated to the call centre where possible.
Prerequisites for placing an emergency call
with the call centre:
• Entry of the relevant data in the emergency call
settings. See section ”Emergency call settings”
on page 135.
• An valid contract with a telephone network
operator must exist.
• The Online Pro must be switched on.
• The telephone must be activated and the
relevant mobile communications network must
be available.
Making an emergency call
Note:
Note the previously mentioned prerequisites for
making an emergency call.
Press and simultaneously.
The emergency call will be started after
10 seconds. The time is counted down on the right
side of the display.
By turning the right rotary control select either
Ja or Nein (the inverted entry is active) and press
to confirm.
Selecting
emergency call.
Selecting
Yes immediately initiates the
No cancels the emergency call.
134
Page 45

Telephone mode
Emergency call settings
In order to make an emergency call via the
emergency call button, some settings must be
made in the emergency call settings.
To call up the Emergency Call Settings menu
within the Communications menu, press the
button.
With the right rotary control, select
and press to confirm.
Setup
Select the emergency call settings
ECALL Disabled or ECALL Enabled,
Voice Number,
Telephone SIM Number,
URL,
Car License Plate and
Car registration country
by turning the right rotary control and press to
confirm.
ECALL
ECALL Disabled or ECALL Enabled
•
Emergency call must be activated in order to use
the emergency call function. Select
Disabled
by turning and pressing the right
rotary control The display changes to
Enabled
Voice Number
•
.
After selection, a preset telephone number is
displayed.
The factory-set telephone number should not be
changed. You will receive a message in case of
any necessary updates.
Note:
Customers outside Germany may enter a
telephone number containing a maximum of
five digits. This number will be dialled when
an emergency call is activated. Other data
such as the position of the vehicle or the
vehicle licence number is not transmitted.
If you enter a number containing more than
five digits we cannot guarantee that the
connection will be made.
ECALL
ECALL
•
Telephone SIM Number
After the number has been dialled, enter your
own mobile number.
Enter the number by pressing the multifunction
buttons to . Individual characters
can be deleted by turning the right rotary
control . The number is accepted by pressing
the right rotary control .
URL
•
After the selection, a preset URL is displayed.
The factory-set URL should not be changed.
You will receive a message in case of any necessary updates.
135
Page 46

Telephone mode
• Car License Plate
After the number has been dialled, enter your
vehicle licence number.
Enter your vehicle licence number. Entry is the
same as for entering a new name for a new
telephone book entry (Seite 131).
When you have entered the complete licence
number, store your entry by pressing and
holding the right rotary control .
Car registration country
•
Next, select the country in which your vehicle is
registered.
Turn the right rotary control to select the
country of registration. The country is selected
and stored by pressing the right rotary control.
Settings
In the Telephone Settings menu, telephone-specific settings can be made.
Note:
Not all of the function described may be supported
by the network provider.
To call up the Telephone Settings menu, press
the key in the Communications menu.
Select
and press the control to confirm.
For telephone-specific settings, selection of
can be made by turning, and confirmed by pressing, the right rotary control .
Telephone with the right rotary control
Call settings,
Telephone settings,
PIN settings,
Call forwarding,
SMS (see also page 145) and
Block
Call settings
In the Telephone Settings menu, select Call-
settings
press the control to confirm.
A selection from
can be made by turning, and confirmed by pressing, the right rotary control .
Briefly press the right rotary control to select
On ( ) or Off ( ).
Pressing the right rotary control for more than
2 seconds accepts all settings and exits the menu.
•
•
with the right rotary control and
Automatic redial,
Transmit own number and
Accept call automatic.
Automatic redial (Automatic redial)
If a dialled number is busy, the number will be
redialled automatically 3 times in intervals of
1 minute if function ( ) is active.
If another number is dialled or accepted within
that period, the automatic redial is cancelled.
Transmit own number
When the function is active ( ) your number
will be sent to the person you are calling.
136
Page 47

Telephone mode
• Accept call automatic. (Automatic Call
Answering)
When the function is active ( ) incoming
calls will be answered after the 3rd ring.
Call waiting
•
When the function ( ) is active, an optical
and acoustic signal will alert you during an
ongoing call that a new call is coming in. The
caller hears the telephone ringing.
When the function ( ) is inactivated, the
caller hears a busy signal.
Note:
Not all of the functions described may be supported by the network provider.
Telephone Settings
In the Telephone Settings menu, select Telphone
settings
press the control to confirm.
Selection
by turning the right rotary control . Press to confirm your selection.
•
•
•
with the right rotary control and
Select network,
GSM band settings,
Factory settings,
Serial number or
Software version
Select network
You can set whether an available mobile phone
network is selected automatically or specified
by you.
GSM band settings
You can choose between GSM Bandwidths
900/1800 MHz and 1900 MHz (USA).
Factory settings
After selection, all settings that pertain to the
telephone will be returned to their factory settings.
•
Serial number
After selection, the serial number of the telephone will be displayed.
Software version
•
After selection, the software version of the telephone module is displayed.
Selecting a network
In the Telephone Settings menu, select Telephone
settings with the right rotary control and press
to confirm.
By turning the right rotary control , select
Select network and press to confirm.
Select from
Automatic,
Manual and
Cancel
by turning the right rotary control . Press to
confirm your selection.
137
Page 48

Telephone mode
Automatic selects a network corresponding to
your location and the SIM card used.
Manual is selected, a list of available
When
mobile phone networks is displayed following
interrogation of the network status.
Turn the right rotary control to select the
desired mobile phone network. Press to confirm
your selection.
Note:
If you have selected a mobile phone network manually, a new mobile phone network cannot be selected automatically when you leave the
transmission range of that network.
GSM Band Settings
In the Telephone Settings menu, select Tele-
phone settings
and press the control to confirm.
By turning the right rotary control select
band settings
A selection from
900/1800 MHz and
1900 MHz
can be made by turning, and the setting changed by
pressing, the right rotary control .
By briefly pressing the right rotary control , you
can choose between On ( ) and Off ( ).
After the change, a prompt will appear asking if
you really wish to change the bandwidth.
with the right rotary control
GSM
and press the control to confirm.
Turn the right rotary control to select either
or
No (the inverted entry is active), and press the
control to confirm.
Selecting
Selecting
Yes changes the GSM band.
No will return to the Telephone Settings
menu without change.
Yes
138
Page 49

Telephone mode
PIN Settings
In the Telephone Settings menu, select PIN set-
tings
with the right rotary control and press
the control to confirm.
Select
Set PIN a utom. or
Change PIN
by turning the right rotary control . Press to confirm your selection.
Set PIN a utom.
•
The PIN number can be stored; i.e. you will not
have to enter the PIN each time the unit is turned
on.
Change PIN
•
With this selection, the PIN number can be
changed.
Automatically set PIN
Select and confirm
Set PIN autom..
By turning the right rotary control select be-
On, Off and Cancel (the inverted entry is
tween
active) and press the control to confirm.
Selecting
If you select
On saves the entered PIN number.
Off, any stored PIN number will be
deleted and the programme will return to the Telephone Settings.
Selecting
Cancel will return to the Telephone
Settings menu without changing status.
Note:
On is selected and the SIM card (with another
If
PIN) is changed while the unit is turned off, you
will be requested to enter the new PIN number.
There are only 2 possibilities, however, to enter the
correct PIN number.
Change PIN
After selecting
Change PIN, a request for the cur-
rent PIN number will appear first.
Enter the number.
Then, you will be requested to enter the new PIN
number.
Enter the new number and confirm it by pressing
the right rotary control .
Note:
The PIN number must be a 4 to 8 digit number.
After confirming the new PIN number, you will be
requested to enter the new PIN number once again
for confirmation.
Enter the new number once again and confirm entry by pressing the right rotary control .
139
Page 50

Telephone mode
Call Rerouting
This function directs calls to your mailbox or to another telephone number depending upon settings.
In the Telephone Settings menu, select
forwarding
with the right rotary control and
press the control to confirm.
Select
All voice calls,
If engaged,
Without call acceptance,
Unavailable or
Rest all
by turning the right rotary control . Press to confirm your selection.
All voice calls
•
If you select this function, all calls will be rerouted.
If engaged
•
If you select this function, calls that come in
while you are currently on the phone will be rerouted.
Without call acceptance
•
If you select this feature, calls that come in
while the telephone is turned on, but which are
not accepted, will be rerouted.
Unavailable
•
Call
With this selection, all calls will be rerouted
when the telephone is turned off.
Rest all
•
This selection cancels all active call rerouting
functions.
For all call rerouting functions, the following display will be shown after selection (for example rerouting of all calls):
By turning the right rotary control select be-
On, Off and Status (the inverted entry is
tween
active) and press the control to confirm.
Note:
Call Rerouting is a network-dependent function.
Therefore, it is advisable to check the status before
making changes by turning call rerouting on or off.
Proceed as follows:
Please ensure also that Call Rerouting is stored in
the network, not in the unit (for example when
SIM card is changed).
Selection
Status:
The status of Call Rerouting can be displayed.
After selecting
response
Status, Wait for net
will briefly appear.
Afterward, the current status of Call Rerouting will
be shown.
Selection
On:
You will be prompted to enter the telephone
number to which the calls should be rerouted.
By pressing the multifunction buttons
through , enter the desired telephone number
with area code (and international dialling prefix if
necessary).
By briefly pressing the right rotary control , the
number entered is accepted.
You can also turn the right rotary control to the
right. The telephone book will then be called up.
You can now select a name or number as described
under ”Dialling a telephone book entry” on
page 131. By briefly pressing the right rotary
control , the selected entry is confirmed.
140
Page 51

The display will briefly show Wait for net
response
.
Telephone mode
All Call Rerouting functions are now turned off.
Call Rerouting is now turned on.
Note:
If Call Rerouting was already on, an error message
will appear.
Selection
Off:
Call Rerouting that may have been on will now be
turned off.
The display will briefly show
response
.
Wait for net
Call Rerouting is now off.
Note:
If Call Rerouting was already off, an error message
will appear.
Selection
Reset all:
All Call Rerouting functions can be turned off.
After selecting
show
Reset all the display will briefly
Wait for net response.
Blocking phone
With this function, the telephone can be turned off.
In the Telephone Settings menu, select
phone
with the right rotary control and press
the control to confirm.
The telephone will be turned off.
When the telephone is reactivated, the PIN number
must be re-entered as described in section ”Entering the Telephone PIN” on page 97.
Block
141
Page 52

SMS messages
SMS Messaging
Text messages (SMS) may be received, answered
and written. To ensure proper function, the SMS
central network number you received from the provider must be entered at ”Settings” on page 145.
In order to receive or send messages, telephone operation must be activated.
New Message display
If a new message is received, this is indicated by a
blinking
SMS in the display. The New Message dis-
play works in other operation modes as well (radio,
navigation, etc.).
If SMS is displayed without blinking, the memory
contains only previously read SMS messages.
Reading messages
Call up the Communications menu by pressing
the button.
Press multifunction button .
By turning the right rotary control , select
all SMS
and press to confirm.
A list of received SMS messages will be displayed.
Messages that have not yet been read are identified
by the symbol .
Messages that have already been read are identified by the symbol .
Read
By turning the right rotary control , select the
desired SMS message. By pressing, the text of the
SMS message is displayed.
The entire message can be scrolled through by
turning the right rotary control .
By pressing the right rotary control , the SMS
message will be read aloud.
Note:
SMS messages are only read out in German.
At the end of the message, the date and time sent,
the telephone number and name of the sender (if
available) are displayed.
By continuing to turn the right rotary control
after the sender information has been displayed, a
menu for further processing of the message will be
displayed.
142
Note:
If no messages are saved, the display will show
<No SMS in memory>. After a short time, the
Communication menu appears again.
Page 53

SMS messages
Processing messages
Once the sender information has been displayed,
continue to turn the right rotary control to display a menu for further processing of the message.
Select
Answer,
Delete SMS?,
Read out,
by turning the right rotary control , and confirming it by pressing it.
Answer
•
You can write and send message to the sender.
Delete SMS?
•
Message will be deleted.
Read out
•
Message will be read aloud.
Note:
SMS messages are only read out in German.
Delete message
After selecting the menu entry Delete SMS, you
can delete the current message.
Turning the right rotary controls , select either
Yes or No. Press to confirm your selection.
The selection
No cancels this menu without
change.
After confirmation
Yes the SMS is deleted and the
next SMS message is displayed.
If no other messages are available,
memory>
is displayed. After a short time, the
<No SMS in
Communication menu appears again.
Answer message
After selecting the menu entry Answer the Text
Entry menu is displayed.
A reply can now be entered as described in ”Writing messages” on page 143.
Press and hold the right rotary control , to send
the entered reply back to the sender.
Writing messages
Call up the Communications menu by pressing
the button.
Press multifunction button .
Write by turning the right rotary control
Select
and press the control to confirm.
The number to call (with international dialling prefix if necessary) must be entered for the message.
143
Page 54

SMS messages
There are two possibilities:
• Enter the number with the multifunction buttons
to . To delete incorrect numbers,
turn the right rotary control to the left. To
confirm the number entered, briefly press the
right rotary control .
• Turn the right rotary control to the right. The
telephone book is called up. You can select a
number or name from the telephone book as described under ”Dialling a telephone book entry”
on page 131. Briefly press the right rotary
control to confirm the selected entry.
Note:
If the SMS central network number has not been
entered, you will be prompted to do so now (see
also page 145).
The Text Entry menu is displayed.
You can now enter text. There are two possibilities
to do this:
• Selecting letters or characters with the right rotary control and pressing to confirm. The selected letters are displayed inversely.
• Select characters or letters by pushing the multifunction button under the desired character repeatedly; i.e. to select a C, the multifunction
button under ABC must be pressed 3 times.
Other entry or formatting possibilities:
• Upper/Lower-Case Letters
With multifunction button , you can
choose between upper and lower case letters.
• Special characters/ Numbers
By pressing multifunction button , you can
choose between entry of special characters and
numbers.
• Return (New Line)
Press and hold multifunction button , to
get to the next line.
• Moving the cursor
Press multifunction button . Repeatedly
press multifunction button to select one of
two modes for moving the cursor. Each mode is
indicated by a change in the display above the
multifunction button.
If is displayed above the multifunction button, the cursor can be moved from line to line by
turning the right rotary control .
If is displayed above the multifunction
button, the cursor can be moved left or right in
the current line by turning the right rotary
control .
Then, the right rotary control must be pressed
repeatedly until the multifunction button is displayed as described at the beginning. Text can
then be entered once again.
• Deleting characters
Characters entered individually can be deleted
by briefly pressing multifunction button .
By pressing and holding multifunction
button , all generated text will be deleted.
By pressing the right rotary control for more than
2 seconds, the written message is confirmed.
By turning the right rotary control , select be-
Yes, No and Cancel (the inverted entry is
tween
active) and press the control to confirm.
Select
Yes to send your message. Sending SMS
indicates that the SMS is being sent. If the SMS
transmission is successful,
No to return to the previous menu without
Select
SMS sent is displayed.
sending the message.
Select
Cancel to return to the Text Entry menu
and the message can be edited further.
144
Page 55

SMS messages
Deleting All Messages
Call up the Communications menu by pressing
the button.
Press multifunction button .
Turn the right rotary control , select
all SMS?
and press the control to confirm.
Turn the right rotary control , select either
or No (the inverted entry is active) and press the
control to confirm.
Select
Yes to delete all existing messages.
No to return to the previous menu without
Select
change.
Delete
Yes
Settings
You can enter the number for the SMS central network in the SMS Settings menu.
To call up the SMS Settings menu, press the
button in the Communications menu.
With the right rotary control select
and press to confirm.
With the right rotary control select
press to confirm.
Press the multifunction buttons to , to
enter the number for the SMS central network. The
number should contain the international dialling
prefix.
Numbers already entered can be deleted by turning
the right rotary control .
Telephone
SMS and
Note:
If no number or an incorrect number is entered for
the SMS central network, it will not be possible to
send the SMS.
The number for the SMS central network can be
obtained from your network provider.
To save the complete number entered, briefly press
the right rotary control .
145
Page 56

Internet (WAP) Functions
Internet (WAP) Functions
With WAP, you can view current information
from the Internet. This information is shown in a
specific format, depending upon the display capabilities of the unit.
Connecting / terminating WAP connection
Note:
Internet access may require registration with a network operator or provider.
We cannot guarantee the accessibility of WAP
pages.
Before the first connection, an access profile must
be created or activated. Instructions on how to do
this can be found in section ”Settings” on
page 150.
Calling up WAP menu
Call up the Communications menu by pressing
the key.
Press multifunction button .
After a short time, the start page specified in the
profile (”Settings” on page 150) will be displayed.
By pressing the multifunction button , the
WAP connection can be terminated at any time.
Navigation in WAP pages
Note:
Navigation in WAP pages can differ from page to
page. This depends on the page content and thus
the programmer of the page.
The general rules are described below.
By turning the right rotary control , you can
scroll through the page content. On the right side
of the display, there is a half-circle upon which a
small ring moves. This small ring shows your current position on the WAP page, and it changes its
position when you turn the right rotary control .
There are 3 different keys, and the pressing of the
right rotary control through which the various
functions can be applied, depending upon programming of the WAP page.
If a function is assigned to pressing the right rotary
control, the function text will be shown in front of
the half-circle in the display. For example,
OK can be displayed.
By pressing the right rotary control , this function is then executed.
A function can also be assigned to multifunction
buttons 7 - 9.
The function text will be displayed above the corresponding multifunction button.
By pressing one of the multifunction buttons, the
corresponding function will be executed.
With some WAP pages it may be necessary to enter text. To enter text, proceed as described in ”Entering WAP address” on page 147.
Link or
146
Page 57

Internet (WAP) Functions
Browser Menu
In the Browser Menu, a WAP address can be entered directly, the address entered in the start profile can be called up, favourite pages can be
managed and a list of the pages visited can be displayed.
Calling up Browser Menu
In the active WAP menu, press multifunction button .
Entering WAP address
In the active Browser menu, press multifunction
button .
Select from
the URL entered last,
Edit URL and
New URL.
by turning the right rotary control . Press to confirm your selection.
•Last URL
After selecting, the corresponding homepage is
opened.
•
Edit URL
The last URL can be altered as described below.
New URL
•
A new URL can be entered as described below.
A WAP address can now be entered. There are two
possibilities:
• Selecting the letter or character with the right
rotary control and pressing afterward. The
selected letter will be displayed inversely.
• Select characters or letters by repeatedly pushing the multifunction button under the desired
character; i.e. to enter a C, the multifunction
button below ABC must be pressed 3 times.
Other entry or formatting possibilities:
• Upper/ Lower case
With multifunction button , you can
choose between upper and lower case letters.
• Special characters
By briefly pressing multifunction button ,
special characters can be selected.
• Return (New Line)
By pressing and holding multifunction
button , a line return is made.
• Moving the cursor
After pressing multifunction button , the
cursor can be moved to any desired position
within the entered text by turning the right rotary control . Afterward, the right rotary
control must be pressed. Afterward, text can
be entered again.
• Deleting characters
Text entered can be deleted by pressing multifunction button .
By pressing the right rotary control for more than
2 seconds, the address entered is confirmed.
The WAP Browser then displays the corresponding page.
147
Page 58

Internet (WAP) Functions
Call up Browser-dependent menu
In the active Browser menu, press multifunction
button .
After a short time, the browser-dependent menu
will be displayed.
Call up/ Add/ Delete Favourites
In the active Browser menu, press multifunction
button .
Call up:
By turning the right rotary control , a previously
set favourite address can be called up and confirmed by pressing the control. The WAP Browser
shows the corresponding page.
Add:
By turning the right rotary control select
Add favourite and press the control to confirm.
A WAP address can now be entered as described
under ”Entering WAP address” on page 147.
By pressing the right rotary control for more
than 2 seconds, the address entered is confirmed. A
prompt to enter a name follows. You can choose a
name of your own or accept the recommended
name. By pressing the right rotary control for
more than 2 seconds, the name entered is confirmed and saved to the Favourites list.
Editing:
By turning the right rotary control select
Edit favourite and press the control to con-
firm.
A list of the stored favourites will be displayed. By
turning the right rotary control , select the Favourite to be edited and press the control to confirm.
The name given when added to the list or the URL
of the Favourite can be changed.
Deleting:
By turning the right rotary control select
Delete favourite and press the control to
confirm.
A list of the stored favourites will be displayed. By
turning the right rotary control , select the Favourite to be deleted and press the control to confirm.
The address will be deleted from the Favourites
list.
Delete All Favourites:
If you select
vourites will be deleted.
Delete all the complete list of Fa-
148
Page 59

Internet (WAP) Functions
Pages visited (History)
In the active Browser menu, press multifunction
button .
A list of the last visited WAP addresses will be displayed.
By turning the right rotary control , one of the
addresses can be selected and confirmed by pressing. The WAP Browser will display the corresponding page.
Saving entry as Favourite:
By turning the right rotary control , select
Favorit speichern
and press the control to
confirm.
A list of the addresses stored in History will be displayed.
By turning the right rotary control , select the
URL to be saved and press to confirm.
The URL can be saved in the Favourites list under
any freely selectable name.
Als
Delete entry:
By turning the right rotary control , select
lete URL
and press the control to confirm.
De-
A list of the addresses stored in the History will be
displayed.
By turning the right rotary control , select the
URL to be deleted and press the control to confirm.
The URL will be deleted from the History list.
Delete list:
By turning the right rotary control , select
lete all
and press the control to confirm.
De-
The complete list of the pages visited will be deleted.
Back to previous page
In the active Browser menu, press multifunction
button .
The last page visited will be displayed.
@ WAP Favourites
In the WAP Browser, up to 6 keys above the BeckerClub homepage (http://beckerclub.com) can also
be configured in accordance with your requirements. Each of these keys saves one address (link)
of your choice.
For example, you can configure a key so that the
current weather or sports news are displayed when
called up.
A description of how to configure these keys can
be found on the Becker Homepage.
To call up these freely configurable keys, start the
WAP Browser.
To do this, call up the Communications menu by
pressing the key.
Press multifunction button .
Press one of the multifunction buttons
through .
149
Page 60

Internet (WAP) Functions
The configurable keys will be displayed for about
5 seconds.
By pressing one of the keys, the WAP page for
which the key was configured will be called up.
Call up Configuration
To call up one of the pages configured in the Internet, press the key in the Communications
menu.
Settings
In the Browser Settings menu, browser-specific
settings can be made.
In order to use this unit to access the Internet, you
must make a number of settings. OnlinePro will
then use these settings to log onto the Internet.
These special settings (profiles) differ for each network provider.
OnlinePro is supplied with the profiles for the four
largest network providers in Germany already set.
Please see ”Activating access profile” on page 152
for a description of how to activate them. Please
see ”Loading Access Profiles” on page 153 for a
description of how to load settings for other providers and other countries. You can also obtain
these settings from network providers in your own
country.
Select
Profile,
URL settings or
Browser start settings
by turning the right rotary control . Selection is
confirmed by pressing the control.
Profiles
Select Profile in the browser settings using the
right rotary control and press to confirm.
The profile settings are called up.
With the right rotary control select
figuration
and press the control to confirm.
Using the right rotary control select
favourites
and press to confirm.
@WAP con-
Load @
By turning the right rotary control select either
Yes or No (the inverted entry is active) and press
to confirm.
Yes is selected, a connection will be made to the
If
Beckerclub Homepage and the configuration for
the freely configurable buttons will be saved.
150
Note:
Not all of the functions described may be supported by the network provider.
To call up the Browser Settings menu, press
the key in the Communications menu.
With the right rotary control select
Browser
and press the control to confirm.
You can now select either
or the existing profiles by turning the right
file?
Create new pro-
rotary control.
Page 61

Internet (WAP) Functions
Create new profile
To create a new profile, select Create new pro-
with the right rotary control and press the
file?
control to confirm.
For browser-specific settings, select
Profilename,
Dial-in number,
Type of conn ection,
User name,
Password,
IP adress,
IP port,
Home page,
Timer
by turning the right rotary control, and confirm by
pressing the control .
Note:
Your provider can inform you which entries need
to be made for the following menu items.
Profile name:
For the max. ... Access profiles, a name of your
choice can be assigned.
With the right rotary control select
Profilename and press the control to confirm.
A recommendation will be made. This recommendation can be accepted or rejected by pressing
Yes
or No.
No is selected, a name can be entered for the new
If
profile.
By pressing and holding the right rotary control,
the name will be accepted.
Login number:
With the right rotary control select
and press the control to confirm.
number
Dial-in
A recommendation will be made. This recommendation can be accepted or rejected by pressing
Yes
or No.
No is selected, a login number can be entered for
If
the new profile.
By pressing and holding the right rotary control,
the login number is accepted.
Type of connection:
With the right rotary control select
connection
and press the control to confirm.
Type of
By turning the right rotary control , select the
type of connection desired and press the control to
confirm.
User name:
With the right rotary control select
User name
and press the control to confirm.
A recommendation will be made. This recommendation can be accepted or rejected by pressing
Yes
or No.
No is selected, the user name for the new profile
If
can be entered.
By pressing and holding the right rotary control,
the user name is accepted.
Password:
With the right rotary control select
Password
and press the control to confirm.
A recommendation will be made. This recommendation can be accepted or rejected by pressing
Yes
or No.
No is selected, the password for the new profile
If
can be entered.
By pressing and holding the right rotary control,
the password is accepted.
151
Page 62

Internet (WAP) Functions
IP Address:
With the right rotary control select
adresse
and press the control to confirm.
IP
A recommendation will be made. This recommendation can be accepted or rejected by pressing
Yes
or No.
No is selected, the IP address for the new profile
If
can be entered.
By pressing and holding the right rotary control,
the IP Address is applied.
IP Port:
With the right rotary control select
IP p ort
and press the control to confirm.
A recommendation will be made. This recommendation can be accepted or rejected by pressing
Yes
or No.
No is selected, the IP Port for the new profile can
If
be entered.
By pressing and holding the right rotary control,
the IP Port is applied.
Start page:
With the right rotary control select
Home page
and press the control to confirm.
A recommendation will be made. This recommendation can be accepted or rejected by pressing
Yes
or No.
No is selected, the start page for the new profile
If
can be selected.
By pressing and holding the right rotary control,
the start page is applied.
Time-out:
With the right rotary control select
Timer and
press the control to confirm.
A recommendation will be made. This recommendation can be accepted or rejected by pressing
Yes
or No.
No is selected, the time-out for the new profile
If
can be entered.
By pressing and holding the right rotary control,
the time-out will be applied.
Note:
Termination of the connection will occur only if no
entry is made within the specified time period.
Saving a profile
Once all the necessary details have been entered,
save the profile by pressing and holding the right
rotary control .
Activating access profile
In the profile settings, select the desired profile
with the right rotary control and press to
confirm.
Using the right rotary control, select
Activate? and press to confirm.
The new profile will be set.
By selecting
control , and pressing to confirm, you can
change the set values again as described above.
Settings? using the right rotary
Copying access profile
In the profile settings, select the profile to be
copied with the right rotary control and press to
confirm.
Using the right rotary control, select
Copy? and
press to confirm.
The profile is copied and can be modified as
described under ”Create new profile” on page 151
Deleting access profile
In the profile settings, select the profile to be
deleted with the right rotary control and press to
confirm.
Using the right rotary control, select
and press to confirm.
The new profile will be deleted.
Delete?
152
Page 63

Internet (WAP) Functions
Loading Access Profiles
The default access profile is the one for the
German mobile telephone network T-D1. If you do
not use T-D1, please see ”Create new profile” on
page 151 for a description of how to set up a
profile for your network provider. You can also
upload other access profiles to your unit directly
from the BeckerClub:
Call up the Communications menu by pressing
the button.
Press the multifunction button.
A WAP connection will be made to the
BeckerClub homepage.
Select
the right rotary control.
Next, select
pressing the right rotary control.
Now follow the instructions on the WAP page.
Profiles can be selected and loaded for different
countries.
[BeckerClub] by turning and pressing
[Provisioning] by turning and
URL Setting
This is where you set up the information to be
called up when entering URLs, to simplify entries.
In the Browser Settings, select
with the right rotary control.
Select
Select URL beginning or
Select URL ending
by turning the right rotary control . Selection is
confirmed by pressing the control.
Selecting URL prefix:
By turning the right rotary control , select
lect URL beginning
confirm.
A list of the possible URL prefixes will be displayed.
By turning the right rotary control , select the
desired URL prefix and press the control to confirm.
No is selected, no URL prefix will appear when
If
an URL is entered. You must then enter the prefix
yourself.
URL settings
Se-
and press the control to
Selecting URL suffix:
By turning the right rotary control , select
lect URL ending
and press the control to con-
Se-
firm.
A list of the possible URL suffixes will be displayed.
By turning the right rotary control select the desired URL suffix and press the control to confirm.
No is selected, no URL suffix will appear when
If
URL is to be entered. You must then enter the suffix yourself.
Specifying browser start settings
When you activate your WAP access function,
some network providers will take you to their own
Internet pages before the page you have actually
selected. You can disable this by activating the
"Browser start settings" function.
In the Browser Settings, select
settings
with the right rotary control.
By turning the right rotary control select either
Yes or No (the inverted entry is active) and press
to confirm.
Browser st art
153
Page 64

Internet (WAP) Functions
BeckerClub
Access to the BeckerClub is included when you
purchase Online Pro. The BeckerClub provides a
number of services which you can use online via
OnlinePro. These include "Download @
destinations" (see also page 112) and "Load @
POIs" (see also page 123). Other services are also
available.
You can visit the BeckerClub at:
http://www.beckerclub.com
You can use the BeckerClub card, which is also
included in the scope of supply, to log onto the
BeckerClub. The BeckerClub Internet pages
contain additional information about the services
and a separate operating guide for the BeckerClub.
Accessing the BeckerClub in OnlinePro
Call up the Communications menu by pressing
the button.
Press the multifunction button.
154
Page 65

E-Mail Function
Receiving E-Mail
Web.de has set up an E-mail mailbox for you.
E-Mail can be sent directly to the unit.
E-mail function and other services
Checking E-Mail
Using the E-Mail function, you can directly call up
an existing E-Mail account.
E-mail settings
Special settings can be made to the e-mail function
in the E-mail Settings menu.
In order to send an E-Mail to the unit, the address
of the unit must be entered.
The E-Mail address of the unit consists of the
Beckerclub User ID-Number (written on the Beckerclub card) and the suffix ”@web.de”. An example of an E-Mail address would be
7800H011234567@web.de.
Note:
The page to be called up is set up in the profile (see
also page 150).
Call up the Communications menu by pressing
the key.
Press multifunction button .
The start page for the E-Mail account entered in
the profile will be called up.
Further operation is dependent upon the E-Mail
provider.
In most cases, you will be prompted for a password
and user name.
If you use the mailbox set up for you by WEB.DE,
you can change the settings as per ”E-mail settings” on page 155.
To call up the E-mail settings Menu within the
Communications menu, press the button.
With the right rotary control select
E-Mail and
press to confirm.
Select
E-mail home page,
Send access data automatically?
or
Send access data Manually?,
User name and
Password
by turning the right rotary control . Selection is
confirmed by pressing the control.
155
Page 66

E-mail function and other services
E-mail home page
Here, you can set the WAP start page to be used for
the e-mail function.
With the right rotary control select
home page
and press to confirm.
E-mail
A recommendation will be made. This
recommendation can be accepted or rejected by
Yes or No.
pressing
If
No is selected, the desired address can then be
entered.
Press and hold the right rotary control to accept the
address.
Send access data automatically? or
Send access data Manually?
Here you can determine whether your access data
should be sent automatically when you check your
e-mail.
With the right rotary control select
cess data automatically?
cess data Manually?
Send access data automatically? is
If
and press to confirm.
Send ac-
or Send ac-
selected, you must also enter the user name and
password as described in the following.
If
Send access data Manually?, is selected,
you must also enter the user name and password
manually when logging into the e-mail mailbox.
User name:
Select
User name with the right rotary control
and press the control to confirm.
A recommendation will be made. This recommendation can be accepted or rejected by pressing
Yes
or No.
If you select
No you can then enter the user name
for your E-Mail mailbox.
Press and hold the right rotary control to accept the
user name.
Password:
Select
Password with the right rotary control
and press the control to confirm.
A recommendation will be made. This recommendation can be accepted or rejected by pressing
Yes
or No.
If you select
No, you can then enter the password
for your E-Mail mailbox.
Press and hold the right rotary control to accept the
password.
156
Page 67

E-mail function and other services
Service settings
In the Service Settings menu, special settings can
be made for the services.
To call up the Service Settings menu within the
Communications menu, press .
With the right rotary control select
BeckerClub and press to confirm.
Select
URL for @ navigation destinations,
URL for @ provisioning
URL for @ POI environment
URL for @ POI City,
URL for @ WAP bookmarks or
Load @ fa vourites
by turning the right rotary control . Selection is
confirmed by pressing the control.
Note:
For a description of
Load @ favourites, please
refer to ”@ WAP Favourites” on page 149.
,
URL for ….
Here, you can set the Internet pages from which
settings are to be loaded.
Note:
The factory-set addresses should not be changed.
You will receive a message in case of any
necessary updates.
In the service settings, select
navigation destinations
provisioning
environment
for @ WAP bookmarks
, URL for @ POI
, URL for @ POI City or URL
control . Selection is confirmed by pressing the
control.
A recommendation will be made. This
recommendation can be accepted or rejected by
pressing
Yes or No.
If you select
No, you can then enter the address for
the configuration.
Press and hold the right rotary control to accept the
address.
URL for @
, URL for @
using the right rotary
157
Page 68

Radio mode
Radio mode
Switching on radio mode
Press button.
The last selected waveband is called up.
Turn on Radio Menu Mode
Press in radio mode.
The radio menu mode is activated and displayed.
The unit switches back to radio mode if no button
is pressed within the next 8 seconds.
Set FM waveband
In the Radio Menu Mode, press multifunction button .
The last selected transmitter and level are displayed.
By pressing repeatedly, you can choose between
the levels
name
•
•
•
•
DAS seek quality, DAS seek
, Stations RDS and Stations Fix.
DAS seek quality (see also page 176).
DAS seek name (see also page 176)
Stations RDS (see also page 176)
Stations fix (see also page 176)
Selecting the AM waveband
In the Radio Menu Mode, press multifunction button .
The last selected waveband and transmitter are set.
To select the MW (
wave
) and SW (Short Wave) wavebands, repeat-
Medium wave), LW (Long
edly press multifunction button until the desired waveband is set.
Settings for station selection
The desired station can be selected via dynamic
autostore (FM), station search, scan search, manual tuning, and station buttons.
Dynamic Autostore (FM-DAS)
In the Radio Menu Mode, press multifunction button repeatedly until
DAS seek name is displayed.
In
FM DAS mode, the receivable stations are dis-
played via the multifunction buttons depending on
the settings.
Set the desired station by pressing the button directly below the abbreviated station designation. If
the selected station broadcasts several programmes/regional programmes (e.g.
submenu is automatically displayed to select the
desired programme.
DAS seek quality or
1, 2, 3 , 4 ), a
158
Page 69

Radio mode
Multifunction button indicates that, by pushing the button, other stations can be displayed and
selected.
If station names are being misused to send advertisements or messages, this station is indicated
L_1... L_Z (L = Local) instead of the abbrevi-
with
ated station name. This prevents constant switching in the lower display line. When a station is
selected, it is identified by a star (i.e.
L*1).
The first time the unit is operated, or when the
electrical supply has been interrupted, it may take
the radio some time to evaluate the station signals.
The display will appear incrementally as the evaluation progresses.
Station search FM - DAS
Turn the right rotary control to the left or right.
The radio displays the receivable and identified
transmitters in descending/ascending order.
Station search MW, LW, SW
On the desired waveband (MW, LW, SW) turn the
right rotary control to the left or right. The radio
searches for reception frequencies in descending
or ascending order, respectively, of frequency.
Scan search
On the desired waveband (FM, MW, LW, SW) press
the right rotary control ,
An automatic transmitter search begins. The first
run is performed on an insensitive plane, all further
runs on a sensitive plane. Receivable stations can
be heard for 8 seconds. Press the right rotary
control if the received programme should be retained.
Note:
FM DAS, Scan Search is conducted in alpha-
With
betical order.
SCAN will be displayed.
Programme filtering for FM DAS
You have the option of filtering various stations
from the FM DAS transmitter list.
In the Radio Menu Mode, press multifunction button .
The individual programmes can be selected using
the right rotary control . By pressing the right rotary control , you can choose between
(Programme unfiltered) and Skip (Programme filtered out).
Play
To turn the filter function on or off, press the mul-
tifunction button repeatedly to turn the filter
function on (
Fil on) or off (No Fil).
Programme Type selection (PTY)
In the Radio Menu Mode, press multifunction button .
Afterward, select the desired PTY (see also
page 176) using multifunction button .
Note:
Only the currently available PTYs may be selected.
If a PTY is selected in
tions with this particular PTY can be selected.
If you select
tions will once again be displayed.
FM DAS mode, only the sta-
NO PTY in FM-DAS mode, all sta-
159
Page 70

Radio mode
Turning PTY display on or off
Select radio menu mode.
With multifunction button , select either
PTY
(PTY Display On) or Frequency (PTY Display
Off).
Calling up/ Storing FM stations
In the Radio Menu Mode, select level Stations
RDS
or Stations fix using multifunction
button .
Stations RDS (see also page 176)
•
Stations fix (see also page 176)
•
Storing: 12 frequencies or programmes can be
stored per waveband.
To store the desired station or program, press the
multifunction buttons - or -
until you hear a signal tone.
To reach memory slots 7 – 12, press multifunction
button .
Request: Press multifunction button -
or - . The stored station is requested.
Calling up/storing MW, LW, SW stations
Store: Up to 12 stations can be stored under the
station buttons. Search for the desired station and
press the desired multifunction button until you
hear a signal tone.
To reach memory slots 7 – 12, press multifunction
button .
Request: press multifunction button or - . The stored transmitter is requested.
Manual FM tuning
In the Radio Menu Mode, select the level Sta-
tions fix
with multifunction button .
Press multifunction button twice.
Next, turn the right rotary control .
Tuning will take place in increments of 100 kHz.
The display will show that manual tuning iscurrently active with
control is not turned after a short time,
MAN. If the right rotary
MAN will
disappear from the display and manual tuning is
turned off.
Manual tuning MW, LW, SW
Press the button on the desired waveband.
Press multifunction button 2 times.
Then turn the right rotary control .
Tuning will be in increments of 9kHz (MW), 3kHz
(LW) or 5kHz (SW).
The display will show that manual tuning iscurrently active with
control is not turned after a short time,
disappear from the display and manual tuning is
turned off.
MAN. If the right rotary
MAN will
160
Page 71

Radio mode
Regionalisation
The RDS diversity function is independent of region. In this mode it is possible that, the RDS diversity function may cause the radio to switch
between various regional programmes with differing programme formats. In such a case, the special
regional programming must be selected directly.
If several regional programmes are transmitted by
one station, this can only be seen when the station
is selected.
Stations with additional regional transmitters are
indicated with a star (i.e.
Upon selection of one of these stations (e.g.
all receivable regional sub-programmes for this
station will be displayed.
Afterward, select the desired regional sub-programme (i.e. ).
4*).
4*),
If the signal quality of a regional sub-programme
drifts despite the RDS Diversity function, it may
mean that regional sub-programming is only transmitted on a few frequencies. Therefore, the unit
has to fewer frequencies with stronger signals to
switch to.
Turning Regionalisation on or off
Select radio menu mode.
Use multifunction button , to turn Regionalisation on (
On) or off (Off).
Turning frequency display on or off
Select radio menu mode.
Use multifunction button , to select either
Frequency (Frequency display on) or PTY (Fre-
quency display off).
Switching radio text display on / off
Select FM radio menu mode. Press multifunction
button to switch on the radio text.
The car radio filters data transmitted by the radio
station and displays it in the form of radio text.
Radio text cannot be displayed unless the selected
station also transmits radio text.
During poor reception situations or interference,
the display of the radio text may be garbled or not
possible at all.
In order to quit the radio text level, press the
button.
Danger
G
Accident hazard
Since information transmitted via radio text varies constantly, we recommend displaying the radio text only when the vehicle is stationary to
avoid unnecessary distraction for the driver. This
is a necessary precaution for accident prevention.
161
Page 72

Radio mode
Traffic Programme (TP)
If an RDS Diversity station broadcasts TP announcements, it is possible to interrupt CD, MP3,
CDC/AUX, MW, LW, SW play or the mute mode
and to switch to the TP announcements. Moreover,
you can listen to one FM station while receiving
TP announcements transmitted by another FM station.
• There are two ways to select a TP transmitter:
- automatic tracking
- direct programming
With the automatic tracking function , the FM
station currently being listened to is used as the
TP station. If the selected FM station has poor
signal quality or cannot function as a TP transmitter, the unit applies specified criteria to
search for a new TP transmitter.
With direct programming, a TP station other
than the one being listened to can be programmed. For example, one FM station and TP
announcements transmitted by another FM station can be received simultaneously.
If the programmed TP transmitter reception is
poor, the unit switches to automatic tracking until the programmed TP transmitter is receivable.
If an RDS station is equipped with traffic programming, this is indicated by
TP in the display.
An inverse TP appears on the display to indicate that the traffic programme is active.
Activating/quitting the TP menu
Activating: Press the button (traffic an-
nouncements cannot be transmitted).
Quitting: Press and hold the button; otherwise,
the TP menu will automatically disappear after 8
seconds if no further operations are performed.
Turning TP on or off
Switching on: To turn on TP in the TP Menu, re-
peatedly press multifunction button until
on
appears.
Switching off: To turn off TP in the TP Menu, repeatedly press multifunction button until
off
appears.
TP
TP
TP is switched off after returning to normal display.
Selecting automatic tracking
To turn on automatic tracking in the TP Menu, repeatedly press multifunction button until
appears.
on
Note:
If a TP transmitter has already been programmed
directly, it will once again be selected as the TP
transmitter.
TP
162
Page 73

Radio mode
Selecting / deleting direct programming
Activate the TP menu.
Selecting: Press multifunction button .
Using the right rotary control , select the desired
TP transmitter and press the control to confirm.
After a short delay and without actuation, the selected transmitter is accepted.
Deleting:Press multifunction button .
Select
Autoselect with the right rotary
control and press the control to confirm. After a
short delay and without actuation, direct programming is deleted.
Quit the TP menu.
Switching mute function on or off
After selection of a TP or EON transmitter, the
mute function can be activated by pressing the
button briefly.
Thereafter, only traffic announcements and navigation announcements will be passed through. The
mute function is cancelled by pressing the
button again.
Interrupting TP announcements
Briefly press the button during the TP announcement.
The announcement currently being broadcast will
be interrupted and the system will automatically
return to the previously selected mode.
TP announcement volume
Activate the TP menu. Press multifunction
button .
• Setting
• Setting
• Setting
0 - no increase
+1 - slight increase
+3 - strong increase
Display for TMC stations
If a radio station broadcasts TMC information in
addition to radio programming, this is indicated by
the abbreviation
tion is received and analysed by the navigation
system. The reception of traffic announcements is
free of charge.
TMC in the display. TMC informa-
With the right rotary control , four different set-
0 - +3) can be selected. This means that the
tings (
volume can be raised to a fixed value according to
the setting.
163
Page 74

CD, MP3 or CDC operation
CD, MP3, CDC operation
Selecting the audio source
Provided they are available, the following sources
• CD (Title of a CD in the built-in drive)
• MP3 (MP3 Title of a CD in the built-in drive)
• MP3 (MP3 Title of an MMC™)
• CDC (CDs and Title of the CD changer unit) if
installed
may be selected.
After pressing the last selected audio source is
set if possible.
Basic display for an MP3 CD in the built-in drive:
Basic display for an inserted MMC (Multi Media
Card):
Basic display for the CD changer:
Notes for the Compact Disc (CD)
Sound interruptions may occur if the CD is soiled.
In order to ensure the highest tone quality, please
note the following:
• Always touch the CD at the edges only. Keep
the disc clean and never touch the surface.
• Never stick anything on the CD.
• Protect the CDs against direct sunlight and from
heat sources such as heaters etc.
• Before playing the CD, you should clean it with
a special, commercially available cleaning
cloth, wiping from the centre outwards. Solvents such as petrol, thinners or other commercially available cleaners and anti-static sprays
must not be used.
By pressing the first multifunction button, the unit
will switch to the next audio source. The next selectable audio source is always displayed above
the multifunction button.
Basic display for the CD in the built-in drive:
164
Operation of the individual audio sources is essentially identical with only a few exceptions. Thus,
the basic functions are only described here once.
In the example, the audio source CD (CD in builtin drive) is shown.
See the following sections for special operating instructions or notes for each of the individual audio
sources:
• ”MP3 CD in built-in drive” on page 167
• ”MMC™ (MultiMediaCard™)” on page 168
• ”CD Changer” on page 169
Correct
Incorrect
Incorrect
Correct
Page 75

CD, MP3 or CDC operation
G
Inserting/Ejecting CDs
Inserting the CD:
Press and briefly hold , the display will fold
down and the CD slot becomes visible. Insert the
CD into the CD slot with the printed side up. The
unit will automatically pull the CD into the unit.
Then fold the display up again. The CD will begin
to play from the first track.
Once the last track is played, the unit will start
playing the CD again from the first track.
Ejecting the CD:
To eject a CD, press and hold the key or push
it twice quickly. The display folds down and the
CD is ejected. Remove the CD. Then fold the display up again.
Please note:
When the unit is turned off, the CD will not be
ejected, but will remain in the CD slot.
Danger
Injury hazard
For safety reasons, the portable panel may not be
left open while driving.
Skipping a title forward/backward
Press multifunction button (forwards) or
(backwards) or turn the right rotary
control .
By pressing the multifunction button repeatedly,
you can skip several tracks forward or reverse. The
unit switches to the first track when the last track
has been reached. Analogously, it switches from
the first track to the last track.
If a title has been playing for more than 10 seconds
when the skip button is pressed, the unit will skip
back to the beginning of the current track.
Scan search
Press right rotary control , SCAN will appear in
the display.
All following CD tracks are played for 10 seconds
each. Press the right rotary control again to terminate the scan search.
Fast forward/rewind
By holding multifunction button depressed
for a longer period of time, the fast forward (audible) is activated. By holding multifunction button
depressed for a longer period of time, the
fast rewind (audible) is activated.
The search is not audible for the MP3 sources.
Fast forward / rewind terminates when the multifunction button is released.
Random Play
Pressing multifunction button activates the
random play function. Afterward, the titles from
the current audio source (with CD changer, only
from the current CD) will be played in random order. The prompt
By pressing multifunction button once
again, the ”Random Play” function is deleted.
Rnd is displayed inversely.
165
Page 76

CD, MP3 or CDC operation
Title Repeat
Pressing multifunction button turns on the
”Title Repeat.” The prompt
versely.
Pressing multifunction button once again,
deactivates the ”Title Repeat” function.
Rpt is displayed in-
Number of tracks and total playing time
Press the button in CD mode. By pressing multifunction button , the total playing time for
the current track will be displayed briefly.
By pressing multifunction button , the
number of tracks and the total playing time for the
current CD are displayed briefly.
Note:
In CD-changer mode, the track playing time is displayed after pressing multifunction button
with CD-changer 7860 only. In other CD-changers
0:00 is displayed as the track playing time.
Temperature protection circuit for CD and MP3 CD
A temperature protection circuit protects the laser
diode from excessive heat.
When the protection circuit is activated
is displayed, and playback is stopped.
Fehler
With an MP3-CD, the system switches to radio or
another source.
After a cool down period, single CD operation or
CD changer operation may be called up again. If
the temperature is still too high, the unit will once
again switch back to radio or another audio source.
Temp.
Notes on CD-R and CD-RWs
CD-Rs (recordable CDs) can be played with this
unit. Please comply with legal restrictions. These
restrictions can differ from country to country.
Depending upon the recording device used to
record the CD-R and/ or the CD-R itself, some
CD-Rs may not be playable in this unit.
CD-Rs must be manufactured according to the
”Red Book” standard (not applicable for MP3CD’s).
CD-RWs (rewritable CDs) cannot be played with
this unit.
Notes on copy-protected CDs
In some cases, the playback of copy-protected CDs
may cause problems, such as long reading times or
playing is not possible.
166
Page 77

CD, MP3 or CDC operation
MP3 CD in built-in drive
To operate an MP3 CD in the built-in drive, please
read the following instructions:
• ”Selecting the audio source” on page 164
• ”Notes for the Compact Disc (CD)” on
page 164
• ”Inserting/Ejecting CDs” on page 165
• ”Skipping a title forward/backward” on
page 165
• ”Scan search” on page 165
• ”Fast forward/rewind” on page 165
• ”Random Play” on page 165
• ”Title Repeat” on page 166
• ”Number of tracks and total playing time” on
page 166
• ”Temperature protection circuit for CD and
MP3 CD” on page 166
• ”Notes on CD-R and CD-RWs” on page 166
General instructions for MP3
The music that can be played in your unit’s MP3
mode is generally copyright-protected under applicable international and national laws. In several
countries, it is not permitted to reproduce copyrighted material, not even for personal use, without
the express prior consent of the copyright holder.
Please check the current copyright laws for your
country and comply with them. These restrictions
naturally do not apply for your own compositions
and recordings, or for recordings for which authorization has been obtained from the copyright holder.
Creating an MP3 data medium
• The maximum number of files per medium is
500.
• Only MP3 music files stored on a CD in compliance with ISO 9660 can be played.
• If there are more than 99 files in a directory (e.g.
on an MMC), a virtual directory is created for
every 99 subsequent files. This means that these
files can be accessed by changing directories.
• If the artist’s name and track title are to be displayed, an ID3 tag must be added to the MP3
file. This unit supports versions ID3v1 and
ID3v2 with a maximum acceptable tag length of
4 KB.
• The display of artist’s name and track title is restricted to a total maximum length of 50 characters.
• The MP3 formats MPEG1, MPEG2 and
MPEG2.5 Layer3 are supported by the unit.
Fixed and variable bit rates of 8 - 320 kbit/s and
scan rates of 8-48 kHz are supported.
• We recommend a bit rate of at least 160 kbit/s
for compressing MP3 files. It should be noted
that with MP3 files having a variable bit rate,
the display of the elapsed playing time may deviate from real time.
For further information about creating MP3 files
and ID3 tags, please consult your dealer or check
on the internet.
167
Page 78

CD, MP3 or CDC operation
Notes on playing MP3 CDs
If the files on the MP3 CD are arranged in several
folders, the folders will be handled in a manner
similar to different CDs in the CD changer.
The individual directories can be selected by pressing multifunction buttons and . The
number shown in front of
rent directory.
Track indicates the cur-
Track number, total playing time and track title
Press the button in MP3 mode.
When you press multifunction button , the
current track number and the total playing time of
the track are displayed briefly.
When you press multifunction button , the
track number and total playing time for the current
directory are displayed.
After pressing multifunction button , the
artist name and track name are displayed in the
format “Artist - Name”. However, this is only displayed if an ID3 tag with the corresponding
content is provided.
If no ID3 tag or an ID3 tag without the corresponding information is provided, the file name and
its path will be displayed in 8.3 format.
Text exceeding the length of the display will be
presented as moving text (from right to left). If,
during the display of an ID3 tag, the next track is
played, the display is automatically updated.
The display of the ID3 tag is retained until, after
pressing the button, one of the multifunction
buttons or is pressed.
MMC™ (MultiMediaCard™)
To operate an inserted MMC™, please read the
following instructions:
• ”Selecting the audio source” on page 164
• ”Skipping a title forward/backward” on
page 165
• ”Scan search” on page 165
• ”Fast forward/rewind” on page 165
• ”Random Play” on page 165
• ”Title Repeat” on page 166
• ”Number of tracks and total playing time” on
page 166
Which MMC™ can be played?
There are a number of MultiMediaCard™ manufacturers as well as cards of differing storage capacities.
We have tested various cards and manufacturers
and could not determine any limitations.
Should any problems be encountered with other
manufacturers or new manufacturers, we will post
this information on our homepage (http://beckerclub.com).
Recording to an MMC™
MMCs™ are recorded using special devices.
Consult a specialist dealer for more information.
The DOS-FAT process must be used for formatting the MMC™.
We recommend a bit rate of at least 160 kbit/s for
compressing MP3 files. It should be noted that
with MP3 files having a variable bit rate, the display of the elapsed playing time may deviate from
168
Page 79

CD, MP3 or CDC operation
real time.
Otherwise, the particular features described under
”Creating an MP3 data medium” on page 167 apply.
Insertion / removal of a recorded MMC™
Insertion:
Briefly press the key, the display will fold
down.
Remove the display.
The opening for inserting the MMC™ can be
found in the lower left corner of the now-visible
opening.
Insert the MMC™ into the slot with the printed
side up.
The MMC™ will snap into place with a slight
click.
Afterward, replace the display and fold it back up.
The MMC™ is now ready to play.
Note:
Insert the MMC(tm) only in the slot in the lower
left-hand corner intended for this purpose. If the
MMC™ is inserted e.g. in the CD slot, the device
may be damaged.
Removal:
Briefly press the key, the display will fold
down.
Remove the display.
Remove the MMC™ by pulling lightly on the
card.
Afterward, replace the display and fold it back up.
Danger
G
Injury hazard
For safety reasons, the portable panel may not be
left open while driving.
Notes on playing
If the files on the MMC™ are arranged in several
folders, the folders will be handled in a manner
similar to that of the CD changer.
The individual directories can be selected by pressing multifunction buttons and . The
number shown in front of
rent directory.
Track indicates the cur-
CD Changer
To operate a CD changer, please read the following instructions:
• ”Selecting the audio source” on page 164
• ”Notes for the Compact Disc (CD)” on
page 164
• ”Skipping a title forward/backward” on
page 165
• ”Scan search” on page 165
• ”Fast forward/rewind” on page 165
• ”Random Play” on page 165
• ”Title Repeat” on page 166
• ”Number of tracks and total playing time” on
page 166
• ”Temperature protection circuit for CD and
MP3 CD” on page 166
Operational readiness of CD changer
If a CD changer is connected to the unit, it is ready
for operationg as soon as the filled CD magazine is
loaded. Close the sliding tray after loading. All further control is performed from the car radio control
panel.
Loading/ Ejecting the CD Magazine
To remove the CD magazine, open the sliding cover on the changer and press the eject button. The
magazine is ejected and can be removed.
When inserting CDs into the magazine, please note
the instructions printed on the magazine.
169
Page 80

CD, MP3 or CDC operation
Note:
Incorrectly inserted CDs will not be played.
Note:
To allow for the fastest possible changing of CDs,
the magazine should be loaded successively, beginning with Compartment 1.
Playing CDs
Activate CD changer mode (see ”Selecting the audio source” on page 164).
Playback begins with the last CD played, at the
track playing before switching off.
Loaded CDs can be selected by pressing multifunction buttons and . The magazine
compartment number and the number of the current track for the selected CD are then displayed.
If no CD is inserted in the selected magazine compartment (e.g. compartment 2), the next magazine
compartment is selected automatically.
Once the last track of a CD has played, the next CD
will automatically be selected and played.
170
Page 81

User menu
Call up / quit User Settings menu
After opening the User Settings menu, the following Basic Settings can be set in three menu levels
according to your personal preference.
First level:
Gal - Speed dependent volume control (GAL)
•
Col - Setting for display colour
•
Lcd - Display setting
•
Led - LED setting
•
Lum - Setting for display brightness
•
M/S - Setting for reception optimisation
•
Second level:
Aux - Setting for the AUX input
•
BeV - Setting for signal tone volume
•
Inc - Setting for turning direction of rotary
•
control
Vol - Setting for volume display
•
Mic - Hands-free microphone setting
•
Third level:
HsV - Volume setting for optional handset
•
Lim - Limits the maximum audio volume level
•
Lvl - Adjusts the digital audio source (CD etc.)
•
volume
Rst - Call up reset function
•
To call up the User Settings menu, press the
button for more than 2 seconds.
Press multifunction button to reach the
second and third level of the User Settings menu.
To exit the User Settings menu, press one of the
buttons , , or .
Setting the GAL (Gal)
The GAL is a control circuit within the car radio
which adapts the radio volume to the vehicle
speed. This functions as a compensation for
driving noises resulting from higher speeds.
Call up the General Settings menu. Press multifunction button . With the right rotary
control select either
With the GAL setting, the amount of volume control can be specified according to vehicle speed.
The setting is stored automatically.
The settings are from:
0 or +15.
User settings
•
0 - no volume increase
+1 - slight volume increase (low noise levels in
•
interior - low-noise vehicle).
+15 - high volume increase (high interior noise
•
levels - noisy vehicle).
Display colour setting (Col)
This setting is used to choose between two illumination colours (not available for all models).
To set, call up the General Settings menu. By
pressing multifunction button , select either
red or yellow.
The setting is stored automatically.
171
Page 82

User settings
Display setting (Lcd)
The display setting allows you to select from three
different display versions.
• Negative Display Setting (
• Positive Display Setting (
• Automatic Display Setting (
negative)
positive)
Automatic) - this
means that the display setting will be positive or
negative depending upon the vehicle illumina-
tion.
To set, call up the General Settings menu. By
pressing multifunction button , select
, positive or automatic.
tive
nega-
The setting is stored automatically.
LED setting (Led)
With this function, the LED function (blinking
when the unit is switched off) can be switched on
and off.
Call up the General Settings menu. By pressing
multifunction button , select either
blinking (LED on) or on (LED off).
Display brightness setting (Lum)
With this function, the display brightness can be
set to the preferred value.
To set, call up the General Settings menu. Press
multifunction button . With the right rotary
control , select between
The setting is stored automatically.
The settings are from:
0 - no change in display brightness
•
10 - highest possible display brightness
•
-10 - lowest possible display brightness
•
10 and -10.
Setting reception optimisation (M/S)
Two different reception optimisation settings can
be selected in order to suppress reception-dependent interference and reflections.
To set, call up the General Settings menu.
By pressing multifunction button , select
Stereo, Mono or Auto.
Auto: Setting for normal operation - i.e. the unit
•
switches from stereo to mono reception and
back, depending on the reception conditions
(for nearly all reception areas, this is the optimal
setting).
Stereo: Setting for exceptional reception con-
•
ditions - i.e. the unit is constantly set to stereo.
Mono: Setting for reception conditions with
•
constant reflection - i.e. the unit is constantly set
to mono.
The setting is effective immediately and is also retained after power is turned off.
The setting is stored automatically.
172
Page 83

Activating AUX/telephone input (Aux)
This can be used to switch on the CD changer AF
connections if no CD changer is connected. An external unit (Discman, Walkman, etc.) can then be
connected.
In addition, the mute function lead for an external
telephone can be activated.
To set, call up the General Settings menu. By
pressing multifunction button , call up the
2nd level of the User menu.
CD changer
•
With this function activated ( ), a CD changer can be connected. The function
is then suppressed in the menu.
source
Ext. audio s ource
•
Ext. audio
With this function activated ( ), an external
unit (Discman, Walkman, etc.) can be connected. The function
CD changer is then sup-
pressed in the menu.
The setting is stored automatically.
In CD mode, multifunction button must be
pressed to select AUX mode.
User settings
Signal tone volume (BeV)
The volume of signal tones (e.g. storage confirmation) can be set using this function.
To set, call up the General Settings menu. Press
multifunction button to call up the 2nd level
of the General Settings menu. Press multifunction
button . With the right rotary control
select between
The setting is stored automatically.
Off and +5 (loud).
Press multifunction button .
Select from
Ext. phone m ute,
CD changer and
Ext. audio s ource
by turning.
Briefly pressing the right rotary control , selects
between On ( ) and Off ( ).
Ext. phone m ute
•
With this function activated ( ), an externally
connected telephone can switch the active audio
source to mute via the mute function lead.
Turning direction of the rotary control (Inc)
With this function, the turning direction of the rotary control can be changed.
To set, call up the General Settings menu. Press
multifunction button to call up the 2nd level
of the General Settings menu. Press multifunction
button . With the right rotary control select either
Leftoriented or Rightoriented.
The setting is stored automatically.
173
Page 84

User settings
Volume display (Vol)
With this function, the volume display can be
turned on or off.
To set, call up the General Settings menu. Press
multifunction button to call up the 2nd level
of the General Settings menu. Press multifunction
button . With the right rotary control
select either
Indic. Off
Volume Indic. On or Volume
.
The setting is stored automatically.
Hands-free microphone setting (Mic)
With this function, the sensitivity of the hands-free
microphone can be set.
To set, call up the User Settings menu. By pressing
multifunction button , call up the 2nd level
of the User Settings menu. Press multifunction
button . With the right rotary control select between
sitivity).
-5 (low sensitivity) and 5 (high sen-
Telephone receiver volume setting (HsV)
With this function, the volume of the optional telephone receiver can be set.
To set, call up the General Settings menu. Press
multifunction button to call up the 3rd level
of the General Settings menu. Press multifunction
button . With the right rotary control select between
0 (low volume) and 7 (high volume).
The setting is stored automatically.
Limiting the volume level (Lim)
With this function, the maximum volume of the
audio signal is limited via a limiter.
Overmodulation and distortion are prevented.
To set, call up the General Settings menu. Press
multifunction button to call up the 3rd level
of the General Settings menu. By pressing
multifunction button , select either
on
or Limiter off.
Limiter
Adjusting the volume difference between digital audio sources (Lvl)
Music CDs are produced with differing volume
levels. This can lead to extreme differences in
volume when switching from radio and e.g. CD
modes.
In order to minimise this effect, you can adjust the
volume difference between the digital audio
sources (CD in built-in drive and MP3) with
respect to the radio source volume (does not apply
to CD changer).
To set, call up the General Settings menu. Press
multifunction button to call up the 3rd level
of the General Settings menu. Press the
multifunction button . Use the right rotary
control to select
(source louder).
The setting is stored automatically.
-10 (source quieter) or +10
The setting is stored automatically.
174
The setting is stored automatically.
Page 85

Calling up reset function (Rst)
With this function, the unit can be reset to the factory settings. Parts of the unit can also be reset.
To set, call up the General Settings menu. Press
multifunction button to call up the 3rd level
of the General Settings menu. Press multifunction
button twice.
The individual entries for which a reset option is
available are displayed.
By turning the right rotary control , the desired
entry can be selected from the list.
By pressing the rotary control, the area associated
with the corresponding entry is reset. Input data is
lost by resetting.
With
User settings the settings made by the
user are reset to the factory settings.
Reset all the entire unit is reset to the fac-
With
tory settings.
Pressing
Cancel returns to the user menu without
any area being reset.
User settings
175
Page 86

General instructions
General instructions
RDS SYSTEM
This car radio is capable of receiving RDS signals
(RDS = Radio Data System) on the VHF bands.
RDS is a technique that enables the transmission of
inaudible additional information in the VHF
broadcasting range. This means that the broadcaster sends information to be analysed by the auto radio.
DAS seek quality level
At the level DAS seek quality, all receivable
and identifiable RDS programmes are stored in a
list sorted by quality. The dynamic auto-store,
search and scan search functions make use of this
list.
DAS seek name level
At the level DAS seek name all receivable and
identifiable RDS programmes are stored in a list
sorted alphabetically by name. The dynamic autostore, search and scan search functions make use of
this list.
RDS Stations level
At the level Stations RDS only identified RDS
stations can be stored. The unit constantly switches
to the best receivable transmission frequency for
the station.
During search for
Stations RDS the unit will
stop only at identifiable stations.
Stations Fix Level
At the level Stations fix frequencies can be
assigned to the station buttons. There is no RDS
evaluation. The search for
Stations fix is
equivalent to manual FM tuning (Page 160).
PTY (Programme Type)
Specific types of programme s, such as e.g. sports,
pop music, classical music etc., can be selected using the PTY function.
The PTY is transmitted by the RDS station, provided this function is installed at the broadcaster.
The selected transmitter programme type can be
displayed or a search for a specific PTY transmitter can be performed.
Examples of Programme Types:
News News
Pop M Pop music
Curr Aff Politics and current events
Rock M Rock music
Service Service programmes
Science Science
Educ Education
L class Light classical music
Dra+Lit Radio plays and literature
S class Serious classical music
Culture Culture, Religion, Society
L music Musical entertainment
Entert. Humor
Sport Sports
Weather Weather reports
Business Business/ financial information
Kids Children’s programming
Soc Aff Social reports
Religion Religious reports
Phone-in Interviews
Travel Travel reports
Leisure Leisure reports
Jazz Jazz music
Country Country music
Oldies Oldies
Folklore Folk music
Feature Documentaries
No PTY No PTY
176
Page 87

Keyword directory
E-Mail
Electronic post that can be received or sent via the
Internet.
GMT
Greenwich Meridian Time
International time, based on average daylight
hours at zero degrees longitude, the basis for the
world’s time zones.
GPS
Global Positioning System
System for determinating a vehicle’s location via
satellites.
GSM
Global System for Mobile Communication
Standard for mobile communication networks.
MMC™
MultiMediaCard™
Memory card for storing data (i.e. music data, etc).
MP3
Special process for compressing audio data
(i.e. music).
PIN
Personal Identification Number
A secret number that must be entered to activate
the telephone.
PUK
Pin Unblocking Key
Number required to unblock the telephone in the
event that an incorrect PIN is entered 3 times in a
row.
SIM Card
Subscriber Identification Module
The card received from your provider containing
all relevant data for your telephone service.
SMS
Short Message Service
Service for transmitting short text messages or other information.
TMC
Traffic Message Channel
Traffic messages that are sent via the RDS data (inaudible).
URL
Uniform Resource Locater
Address information required by WAP-service applications in order to connect to a specific service.
URLs generally begin with http://. Often referred
to as ”Internet Address” or ”Web Address”.
Keyword directory
WAP
Wireless Application Protocol
The Wireless Application Protocol was developed
to provide Internet access to users of mobile telephones and other compact mobile communications
devices. WAP services use the Wireless Markup
Language (WML) as the language for displaying
content. This is similar to the Hypertext Markup
Language (HTML) used in the Internet and World
Wide Web (WWW).
177
Page 88

Technical Data
Technical data
• Wavebands:
FM 87,5 MHz - 108 MHz
MW 531 kHz - 1620 kHz
LW 153 kHz - 282 kHz
SW 5800 kHz - 6250 kHz
• Frequency range:
20 Hz - 20 kHz for CD operations
30 Hz - 15 kHz for FM
50 Hz - 2,5 kHz for MW, LW, SW
• Output :
4 x 18 Watt
• Line cross section:
0,75 mm² min.
• Loudspeaker impedance:
min. 4 Ω
• Line out:
4 x analog Line Out (Va max 3Veff at 10 kΩ)
• GAL:
in order to utilise the GAL, a square wave voltage with a mass-related amplitude of +4 V to
+12 V must be provided by the vehivcle’s electronic speedometer. Volume is increased in 7 increments of 2.5 dB each.
• Antenna:
Impedance 50 Ω
• AUX Input:
16 KΩ Input resistance, max. input voltage
1,7 Veff
• Telephone Mute:
Low active level < 2 Volt
• Supply voltage:
12 Volt
• CD Connection:
• Becker Silverstone 7860 and Silverstone 2660
CD changers can be connected.
• Playable CDs:
Only CDs which comply with DIN EN 60908
can be used. The use of 8 cm CDs with adapter
is not recommended.
178
Page 89

127,&(
Dear Listener,
In conformance with current EC guidelines, any person may operate this radio receiver.
This unit conforms to the current valid European or harmonised national standards. This designation
is your guarantee that the unit conforms to the applicable specifications concerning electromagnetic
compatibility. This means that interference with other electrical/electronic devices caused by the unit,
or interference with this unit caused by other electrical/electronic devices is largely prevented.
• The EC type-approval mark (e1) issued by the Federal Office
for Transport (KBA) in accordance with European Directive
95/54/EC governing the EMC of motor vehicles authorises
installation and operation of the unit in motor vehicles
(classes M, N and O).
• With regard to the following European standards, the EMC
requirements that apply specifically to this unit have been met:
- EN 55013
- EN 55020
179
 Loading...