

BEATS TOUR HD User Manual [nl]

USER GUIDE

Table of Contents
EN Important Safety Information 3
Eartips/Secure Fit Wingtips and Maintenance 6
Using the Remote Mic 11
Care and Storage 13
Select, Connect, Listen 13
FR Informations de sécurité importantes 15
Maintenance des embouts et des pièces de maintien 18
Utilisation du microphone à distance 23
Entretien et stockage 25
Sélectionner, connecter, écouter 25
ES Información de seguridad importante 27
Mantenimiento de almohadillas y ganchos para
la oreja de ajuste seguro 30
Uso del micrófono con control remoto 35
Cuidado y almacenamiento 37
Seleccionar, conectar, escuchar 37
IT Importanti informazioni per la sicurezza 39
Copri-auricolari/Alette di ssaggio e manutenzione 42
Uso del microfono con telecomando 47
Manutenzione e conservazione 49
Selezionare, Collegare, Ascoltare 49

DE Wichtige Sicherheitsinformationen 51
Ohrstöpsel/Secure Fit-Ohrbügel und Wartung 54
Verwendung des Remote-Mikrofons 59
Pege und Aufbewahrung 61
Auswählen, Verbinden, Hören 61
NL Belangrijke veiligheidsinformatie 63
Onderhoud van de oordopjes en paszekere vleugeltips 66
De externe microfoon gebruiken 71
Onderhoud en bewaren 73
Selecteren, aansluiten, luisteren 73
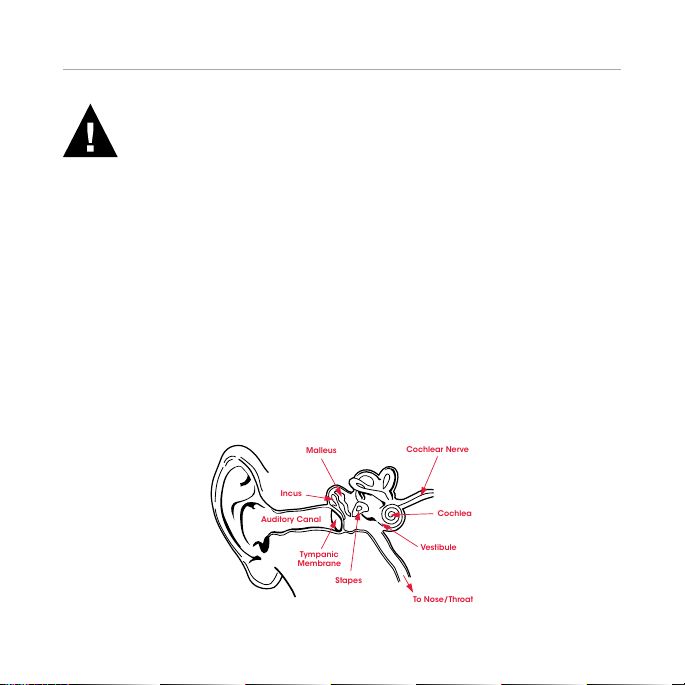
Malleus
Cochlear Nerve
Stapes
Tympanic
Membrane
Auditory Canal
Cochlea
Incus
Vestibule
To Nose/Throat
UK English
Important Safety Information
Listen Responsibly
To avoid hearing damage, make sure that the volume on your music player is
turned down before connecting your headphones. After placing headphones
in your ears, gradually turn up the volume until you reach a comfortable
listening level. Noise levels are measured in decibels (dB); exposure to any
noise at or above 85 dB can cause gradual hearing loss. Monitor your use;
hearing loss is a function of loudness versus time. The louder it is, the less time
you can be exposed to it. The softer it is, the more time you can listen to it.
Physiology of the Ear
3

UK English
This decibel (dB) table compares some common sounds and shows how they
rank in potential harm to hearing.
SOUND NOISE LEVEL
Whisper 30 Very quiet
Quiet Ofce 50-60 Comfortable hearing levels
Vacuum Cleaner,
Hair Dryer
Food Blender 85-90 85dB is the level at which hearing
Dustbin Lorry,
Cement Mixer
Power Saw,
Drill/Jackhammer
Rock Concert (varies) 110 - 14 0 Threshold of pain begins
* Chart information from http://www.nidcd.nih.gov/health/education/teachers/pages/common _sounds.aspx
(dB)
70 Intrusive; interferes with
100 No more than 15 minutes
110 Regular exposure to sound over
EFFECT
are under60 dB
telephone conversations
damage (8 hr) begins
of unprotected exposure
recommended for sounds between
90-100dB
100dB of more than 1minute risks
permanent hearing loss
around 125dB
4

UK English
“…. a typical person can safely listen to an iPod® for 4.6 hours per day at 70%
volu me.”
“…. knowing the levels one is listening to music at, and for how long, is
extremely important.”
From http://www.cbc.ca/health/story/2006/10/19/music-earphones.html
Get the most out of your equipment and enjoy great audio performance even
at safe levels. Our headphones will allow you to hear more details at lower
volume levels than ever before.
Use Responsibly
Do not use headphones when it’s unsafe to do so – while operating a vehicle,
crossing streets, or during any activity or in an environment where your full
attention to your surroundings is required. It is dangerous to drive while
wearing headphones, and in many places illegal because it decreases
your chances of hearing life-saving sounds outside of your vehicle, such as
another car’s horn and emergency vehicle sirens. Please avoid wearing your
headphones while driving. Use an FM transmitter to listen to your mobile media
devices instead. Learn how to establish a safe listening level and review other
important safety guidelines from the Consumer Electronics Association at
www.ce.org and the Deafness Research Foundation at www.drf.org.
5
UK English
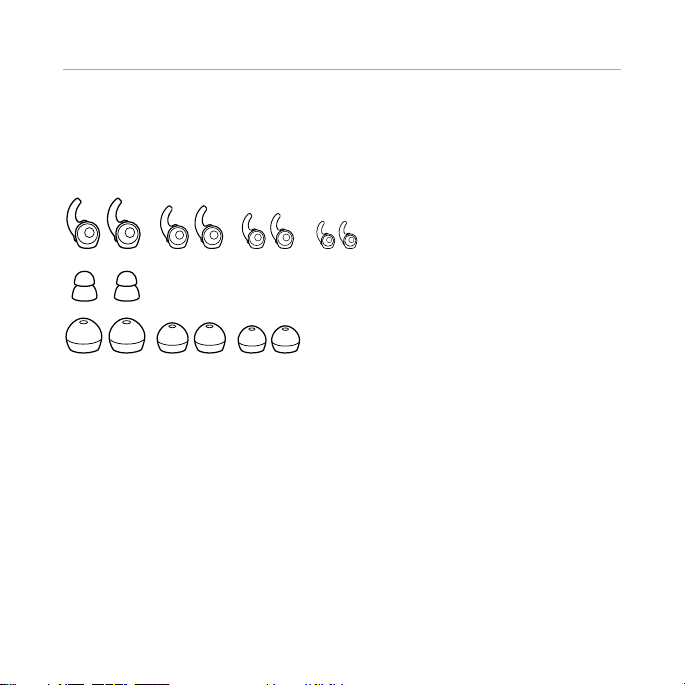
Eartips and Secure Fit Wingtips Maintenance
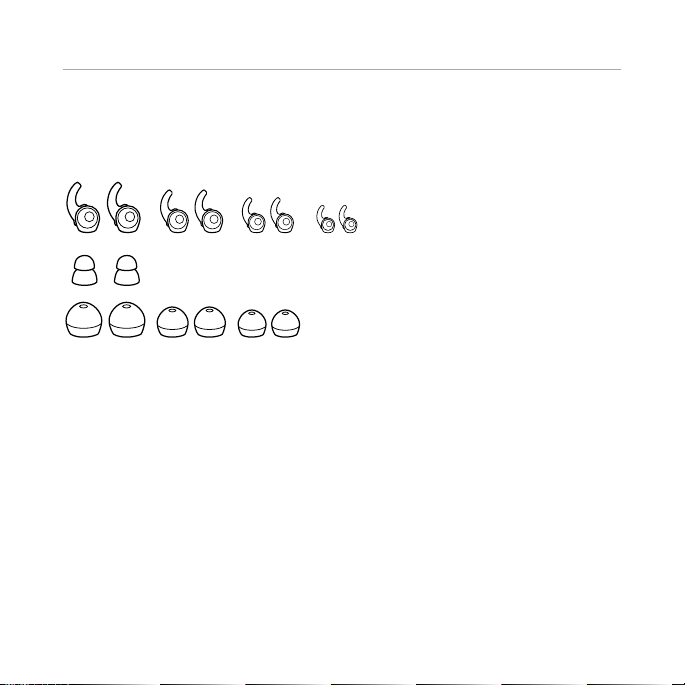
Eartip/Secure Fit Wingtips Selection
The tips on the ends of your TourTM headphones make the difference between
good sound and great sound. With the right t, you’ll receive better isolation
from unwanted outside noise, increased bass response, better tonal balance
and the headphones will stay in your ears better. Of course, the right t will also
feel more comfortable. Because everyone’s ears are unique, Beats
several sizes and designs of eartips. Finding the perfect t with the correct tip
is a matter of experimentation. Try out all the eartips included with your Tour
headphones to nd the best t for the size and shape of your ear canal. We
recommend that you try the smallest tip rst and work upwards in size until you
nd a comfortable t which has a good seal and also stays in your ears without
falling out. Also try different style tips to see which works best for you.
®
supplies
TM
6

UK English
Eartip Fit Testing
A good way to gauge whether or not the eartip is sealing properly in your ear
canal is by snapping your ngers right next to your ear. If the seal is correct,
your ear will not feel “plugged”, yet the snapping of your ngers will sound dull
and distant. If you hear your nger snaps distinctly, the seal is probably not
adequate. If the sound of your nger snapping is dull and distant, but your ear
feels plugged up, like you’re on an airplane preparing to land, then you’ve
over-inserted the eartip.
7

UK English
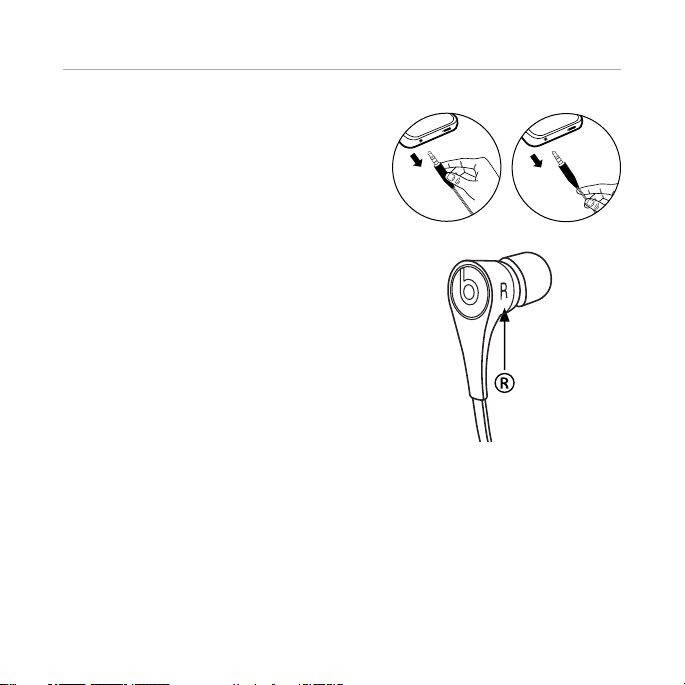
Proper Insertion and Removal of Eartips
1. You may wish to lightly moisten your eartips for easier insertion.
2. Using your right hand, grasp the right headphone.
3. With your left hand, pull up and back on your right ear to straighten your
ear canal.
4. Carefully insert your right
headphone, rubber eartip rst, so that
it seals completely and comfortably
in your ear. DO NOT insert the eartip
so deeply that your ear canal feels
completely “plugged”.
5. Repeat this procedure for your left
ear.
6. When you’ve nished your
listening session, remove your in-ear
headphones slowly with a twisting
motion to gradually break the seal.
8
UK English
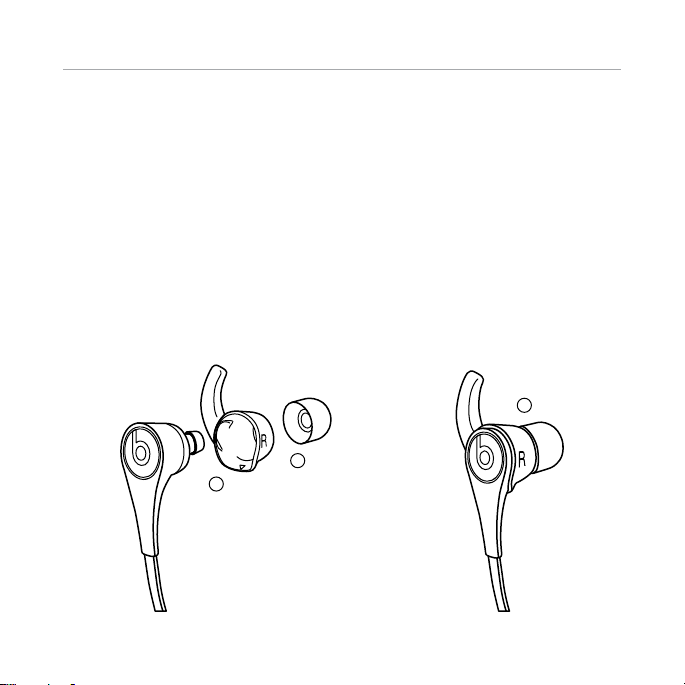
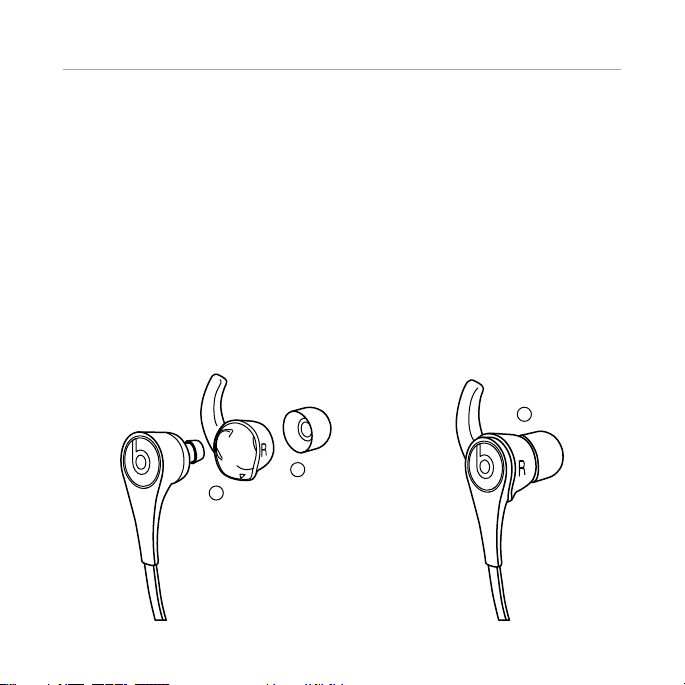
Proper Application of Secure Fit Wingtips
1. Remove the rubber eartip from the base of the headphone.
2. Apply Secure Fit Wingtips to base of the headphone being careful to use
the right (R) wingtip with the right (R) headphone and the left (L) wingtip with
the left (L) headphone.
3. Make certain the wingtip is pointed up (as shown in the attached diagram).
4. Reapply the properly sized eartip.
5. The wingtip should rest up against the concha of your ear for a secure,
comfortable t.
3
1
2
9

UK English
Eartip and Secure Fit Wingtips Cleaning
Keeping your TourTM eartips clean is essential for safe, hygienic use. IMPORTANT:
DO NOT attempt to clean the eartips without rst removing them from the
headphones. Getting the delicate circuitry inside your Tour
may cause permanent damage.
1. Firmly grip the eartip with one hand and the headphone with the other.
Carefully remove the eartip from the ear tube.
2. Use warm water and mild soap on a damp cloth to remove dirt and earwax
from the eartip. Do NOT use harsh cleaning agents.
3. Rinse and completely dry your eartips before placing them back on your
headphones.
4. Carefully push the eartips back onto the Tour
TM
headphones, making sure
they are on the ear tube completely.
TM
headphones wet
10
UK English
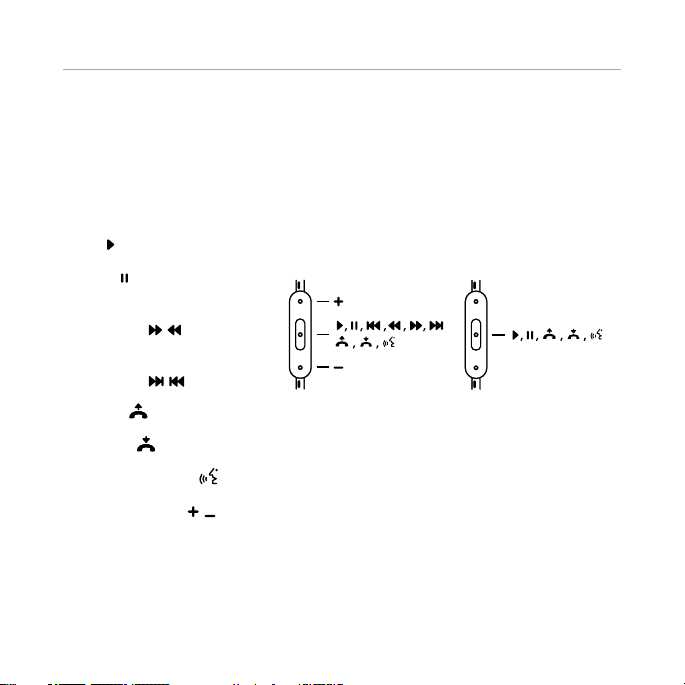
Using the Remote Mic
TourTM has a built-in remote mic feature for use with phones and music players.
Functions include:
• Play
• Pause
• Skip Forward/
Backward
• Scan Forward/
Backward
• Answer
• End Call
• Voice Command
• Volume Control
iPod, iPhone® & iPad
®
HTCTM, Blackberry® & Android
TM
Note: Functionality varies by device.
11

UK English
Play or pause a song or video: Press and release the centre button. Repeat
to resume.
Skip track forward or backward to next song or video: Press and release
the centre button twice quickly to skip forward. Press and release three times
quickly to skip back.
Scan forward or backward through a song or video: In quick motion, press
the centre button twice, hold on the second press to scan forward. Release
when you want to stop scanning. To scan back, press the centre button three
times, holding on the third press.
Answer or end a call: Press and release the centre button once to answer.
Repeat to end the call.
Decline an incoming call: Press and hold the centre button for two seconds,
then release. There will be two beeps when you let go to indicate successful
operation.
Voice Command: Press and hold the centre button until voice activation starts
up. Functionality will vary by device.
Control volume: Press the (+) button to increase volume. Press the (–) button to
decrease volume. Functionality will vary by device.
12

UK English
Care and Storage
• Keeping TourTM headphones clean is essential for safe, hygienic use.
• Never wear in-ear headphones if they appear dirty.
• When not in use, always store your TourTM headphones in the protective
case provided.
• Keep case closed, and store in a clean, dry environment.
• Do not store other items in the case, as this may result in contamination.
• Avoid storage in extreme heat or cold.
• Avoid exposure to liquids, temperature extremes and high humidity.
• Never pull on the cable to disconnect Tour
player. Grasp the plug at the end of the cable and pull to disconnect.
Select, Connect, Listen
Select
Beats® in-ear headphones feature multiple pairs of ear tips, designed to
t securely and block out external sound. Choose the pair which ts most
comfortably and best seals out noise.
TM
headphones from your music
13
UK English
Connect
Plug the TourTM cable into the 1/8” (3.5 mm)
stereo plug on your music player.
Listen
Turn down the volume on your music
player before inserting Tour
IMPORTANT: Left and Right Headphone:
Having the correct headphone side in
the correct ear does affect the listening
experience. Note the “L” and “R” markings
on the side of each headphone. “L” is for
the left ear. “R” is for the right ear. Excessive
listening levels can cause permanent
hearing damage. Avoid loud listening,
especially for extended periods of time.
Register Your Beats® Today
www.beatsbydre.com/register
TM
headphones.
Yes
No
14

Marteau
Nerf cochléaire
Étrier
Membrane
tympanique
Canal auditif
Cochlée
Enclume
Vestibule
Vers le nez/la gorge
Français
Informations de sécurité importantes
Écoutez en toute sécurité
Pour éviter des dommages auditifs, assurez-vous de baisser le volume du
lecteur de musique avant de connecter vos écouteurs. Après avoir placé
vos écouteurs dans les oreilles, augmentez le volume graduellement jusqu’à
ce que vous atteigniez un niveau d’écoute confortable Les niveaux sonores
sont mesurés en décibels (dB) ; l’exposition à des sons de 85 dB ou plus peut
conduire à une perte auditive graduelle. Surveillez votre utilisation ; la perte
auditive est liée au niveau sonore et à la durée d’écoute. Plus le niveau sonore
est élevé, moins l’exposition doit être longue. Moins le volume est fort, plus
l’écoute peut être longue.
Physiologie de l’oreille

Français
Ce tableau des décibels (dB) compare des sons courants avec leurs risques
potentiels de dommage auditif.
SON NIVEAU
Murmure 30 Très silencieux
Bureau calme 50-60 Les niveaux sonores confortables
Aspirateur,
sèche-cheveux
Mixeur de cuisine 85-90 85dB est le niveau auquel les
Camion de ramassage
des ordures ménagères,
bétonnière
Tronçonneuse, perceuse/
marteau-perforateur
Concert de rock (varie) 110 - 14 0 Le seuil de douleur commence
* Tableau provenant de http://www.nidcd.nih.gov/health/education/teachers/pages/common_sounds.aspx
SONORE (dB)
70 Intrusif ; interfère avec les
100 Il est recommandé de ne pas
110 Une exposition régulière à des
EFFET
sont inférieurs à60 dB
conversations téléphoniques
dommages auditifs (8 heures)
commencent
s’exposer plus de 15 minutes sans
protection à des sons entre
90 et 100dB
niveaux sonores supérieurs à 100dB
pendant plus d’1minute risque
d’entraîner une perte auditive
permanente
autour de 125dB
16

Français
« …. En général, une personne peut écouter un iPod sans problème pendant
4,6 heures par jour à 70 % du volume. »
« …. il est extrêmement important de connaître les niveaux sonores et la durée
d’écoute. »
D’après http://www.cbc.ca/health/story/2006/10/19/music-earphones.html
Protez au maximum de votre appareil et protez d’une écoute exceptionnelle
à des niveaux sûrs. Nos écouteurs vous permettent d’entendre plus de détails à
des niveaux sonores plus bas que jamais.
Utilisation en toute sécurité
N’utilisez pas vos écouteurs lorsque c’est dangereux, par exemple en
conduisant, en traversant la rue, lorsque vous êtes occupé à autre chose
ou dans un environnement où vous devez faire attention à ce qui se passe
autour de vous. Il est dangereux et même illégal, dans la plupart des cas, de
conduire avec des écouteurs, car cela diminue votre capacité d’entendre
les sons à l’extérieur du véhicule, comme le klaxon d’une voiture ou les
sirènes des véhicules de secours. Évitez d’utiliser vos écouteurs lorsque vous
conduisez. Utilisez plutôt un transmetteur FM pour écouter vos appareils
mobiles. Apprenez à ajuster un niveau d’écoute sûr et découvrez d’autres
directives de sécurité importantes de la Consumer Electronics Association
sur www.ce.org et de la Deafness Research Foundation sur www.drf.org.
17
Français
Maintenance des embouts et des pièces
de maintien
Sélection des embouts et des pièces de maintien
Les embouts situés à l’extrémité des écouteurs TourTM font toute la différence
entre un bon son et un son exceptionnel. Avec l’ajustement adéquat, vous
obtenez une meilleure isolation des bruits extérieurs, des basses plus riches,
des tonalités mieux équilibrées et un meilleur maintien des écouteurs dans vos
oreilles. Bien sûr, grâce à cet ajustement adéquat, vous obtenez également
un plus grand confort. Comme les oreilles de chaque personne sont uniques,
®
offre plusieurs tailles et modèles d’embouts. Vous devrez tester tous
Beats
les embouts pour trouver celui qui vous convient le mieux. Essayez tous les
embouts fournis avec vos écouteurs Tour
s’adapte le mieux à la taille et à la forme de votre conduit auditif. Nous vous
recommandons de passer du plus petit au plus grand embout jusqu’à ce
que vous trouviez le modèle le plus confortable qui puisse assurer une bonne
étanchéité et un bon maintien dans les oreilles. Essayez également différents
types d’embouts pour trouver celui qui vous convient le mieux.
TM
an de trouver le modèle qui
18

Français
Tester l’ajustement des embouts
Une bonne façon de juger si l’embout est bien logé dans votre conduit auditif
est de claquer des doigts à côté de vos oreilles. Si l’étanchéité est bonne, vous
n’aurez pas l’impression d’avoir les oreilles bouchées et le son du claquage des
doigts vous semblera faible et lointain. Si vous entendez le son distinctement,
l’étanchéité n’est pas adéquate. Si le son de vos doigts qui claquent paraît
faible et lointain mais que vous avez une sensation d’oreilles «bouchées»,
comme si vous étiez dans un avion en train d’atterrir, vous avez inséré l’embout
trop profondément.
19

Français
Insertion et retrait des embouts
1. Vous pouvez humidier légèrement les embouts pour les insérer plus
facilement.
2. Prenez l’écouteur droit de votre main droite.
3. Avec la main gauche, tirez votre oreille droite en arrière et vers le haut pour
redresser votre conduit auditif.
4. Insérez avec soin votre écouteur
droit, en commençant par l’embout en
plastique, pour le loger complètement
et confortablement dans votre
oreille. N’insérez PAS l’embout trop
profondément pour éviter la sensation
d’oreille «bouchée».
5. Procédez de la même manière pour
l’oreille gauche.
6. Lorsque vous avez terminé
votre session d’écoute, retirez vos
écouteurs lentement avec un léger
mouvement de torsion pour les libérer
graduellement.
20
Français
Application correcte des pièces de maintien
1. Enlevez l’embout en caoutchouc de la base de l’écouteur.
2. Appliquez les pièces de maintien sur les bases des écouteurs en veillant à
utiliser la pièce de maintien droite (R) avec l’écouteur droit (R) et la pièce de
maintien gauche (L) avec l’écouteur gauche (L).
3. Assurez-vous que la pièce de maintien est dirigée vers le haut
(comme indiqué sur le schéma ci-joint).
4. Appliquez de nouveau l’embout de taille adéquate.
5. La pièce de maintien doit reposer contre la conque de votre oreille pour
assurer un confort sufsant et une bonne xation.
3
1
2
21

Français
Nettoyage des embouts et des pièces de maintien
Il est essentiel de garder vos embouts TourTM propres pour des questions
d’hygiène et de sûreté d’utilisation. IMPORTANT : N’essayez PAS de nettoyer les
embouts sans les avoir retirés des écouteurs au préalable. Le circuit à l’intérieur
des écouteurs Tour
permanents.
1. Saisissez fermement l’embout d’une main et l’écouteur de l’autre. Retirez
l’embout avec soin.
2. Avec de l’eau chaude et un détergent doux sur un chiffon mouillé, retirez la
poussière et le cérumen sur l’embout. N’utilisez PAS de détergents puissants.
3. Rincez et séchez vos embouts complètement avant de les remettre sur vos
écouteurs.
4. Remettez avec soin les embouts sur les écouteurs Tour
qu’ils recouvrent complètement le tube auriculaire.
TM
est délicat et le mouiller pourrait créer des dommages
TM
, en vous assurant
22

Français
Utilisation du microphone à distance
TourTM dispose d’une fonction intégrée de microphone à distance pour les
téléphones et les lecteurs de musique.
Les fonctions incluent :
• Lecture
• Pause
• Saut avant/
arrière
• Balayage avant/
arrière
• Répondre
• Terminer un appel
• Commande vocale
• Contrôle du volume
iPod, iPhone & iPad
HTCTM, Blackberry® & Android
TM
Remarque : Les fonctionnalités varient selon les appareils.
23
 Loading...