


USER GUIDE

Table of Contents
EN Important Safety Information 3
Features and Benets 7
Setting up your Beatbox
Connecting Audio Devices 9
Connecting Devices using 3.5 mm mini-jack 12
Volume 13
Using the Remote Control 13
Speaker Placement 16
Troubleshooting 17
FR Renseignements de sécurité importants 21
Fonctionnalités et avantages 25
Conguration de votre Beatbox
Connexion aux appareils audio 27
Connexion d’un appareil à l’aide de la mini prise stéréo de 3,5 mm 30
Volume 31
Utilisation de la télécommande 31
Positionnement des haut-parleurs 34
Dépannage 35
ES Información importante sobre la seguridad 39
Características y Benecios 43
Conguración de su Beatbox
Conexión de dispositivos de audio 45
Conexión de dispositivos usando entrada de miniconector de 3,5 mm 48
Volumen 49
Uso del control remoto 49
Colocación del parlante 52
Localización y solución de problemas 53
TM
8
TM
26
TM
44

PT Informações Importantes de Segurança 57
Recursos e Benefícios 61
Como congurar seu Beatbox
TM
62
Conexão dos Dispositivos de Áudio 63
Conexão dos Dispositivos utilizando mini conector de 3,5mm 66
Volum e 67
Utilização do Controle Remoto 67
Posicionamento do Alto-Falante 70
Resolução de Problemas 71

English
Important Safety Information
• Read, follow, and keep these instructions.
• Pay attention to all warnings.
• Do not use this apparatus near water.
• Clean only with dry cloth.
• Do not block any ventilation openings. Install in accordance with the
manufacturer’s instructions.
• Do not install near any heat sources such as radiators, heat registers, stoves,
or other apparatus (including ampliers) that produce heat.
• Do not defeat the safety purpose of the polarized plug. A polarized plug has
two blades with one wider than the other. The wider blade is provided for your
safety. If the provided plug does not t into your outlet, consult an electrician
for replacement of the obsolete outlet.
3

English
• Protect the power cord from being walked on or pinched, particularly at the
plugs and the point where it exits from the apparatus.
• Only use attachments/accessories specied by the manufacturer.
• Unplug this apparatus during lightning storms or when unused for long
periods of time.
• Do not expose this apparatus to dripping or splashing and ensure that no
objects lled with liquids, such as vases, are placed on the apparatus.
• To completely disconnect this apparatus from the AC mains, disconnect the
power supply cord plug from The AC receptacle.
• The mains plug of the power supply cord shall remain readily operable.
WARNING: To reduce the risk of re or electrical shock, do not expose this
apparatus to rain or moisture.
WARNING: No naked ame sources — such as candles — should be placed on
the product.
Place the equipment near a main power supply outlet and make sure that you
can easily access the power breaker switch.
4

English
WARNING: This product is intended to be operated ONLY from the AC voltages
listed on the back panel. Operation from voltages other than those indicated
may cause irreversible damage to the product and void the product’s
warranty. The use of AC plug adapters is cautioned because it can allow the
product to be plugged into voltages in which the product was not designed
to operate. Use only the type provided with your product. If you are unsure of
the correct operational voltage, please contact your local distributor and/or
retail er.
5
English
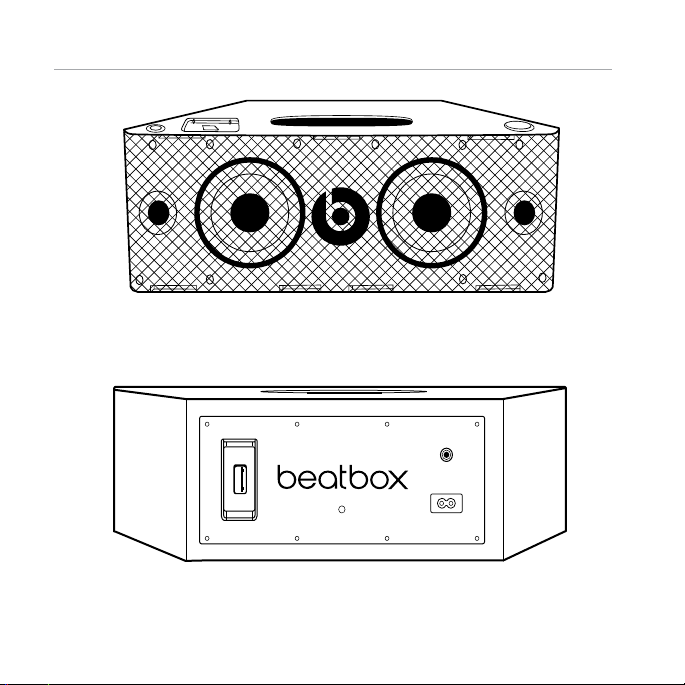
Wireless
Module
Front view
Back view
LINE IN
AC-IN
100-110V
50-60HZ
6

English
Features and Benets
Digital power amp
For powerful, room lling sound
®
iPod
/iPhone® dock
Just set your iPod
3.5 mm stereo mini jack input
Connect any music player with a standard headphone output
Advanced 5.25-inch long throw bass drivers
Deliver powerful, punchy bass without distortion
Two optimized concave 2-inch high frequency drivers
Deliver crisp mids and highs and precise sound staging
Remote control
Control iPod
®
or iPhone® in the integrated dock and start listening
®
/iPhone® playback and volume
7
English
Setting up your Beatbox
Tilting Feet
TM
Beatbox
if you’d rather it rest on a slightly back-tilting angle. This is ideal if you’re going
to be placing Beatbox
upward. To install, simply push the pegs on the feet into the holes on the front
corners of Beatbox
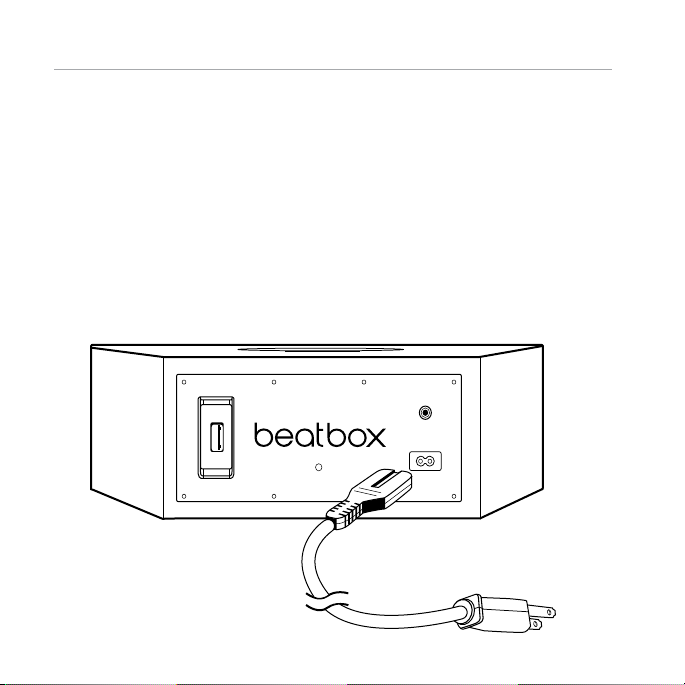
Power
Plug the AC power cord into the back of Beatbox
is designed to rest level. However, BeatboxTM comes with two tilting feet
TM
in a low position and you want sound to be projected
TM
.
TM
TM
, as shown. Plug the two-
pronged plug end into a 120-volt power outlet.
LINE IN
AC-IN
Wireless
Module
100-110V
50-60HZ
8
English
Connecting Audio Devices
Connecting to iPod®/iPhone
BeatboxTM features a built-in dock for iPod® and iPhone® for an easy, direct
connection. This will also give you the ability to control playback with the
included remote control.
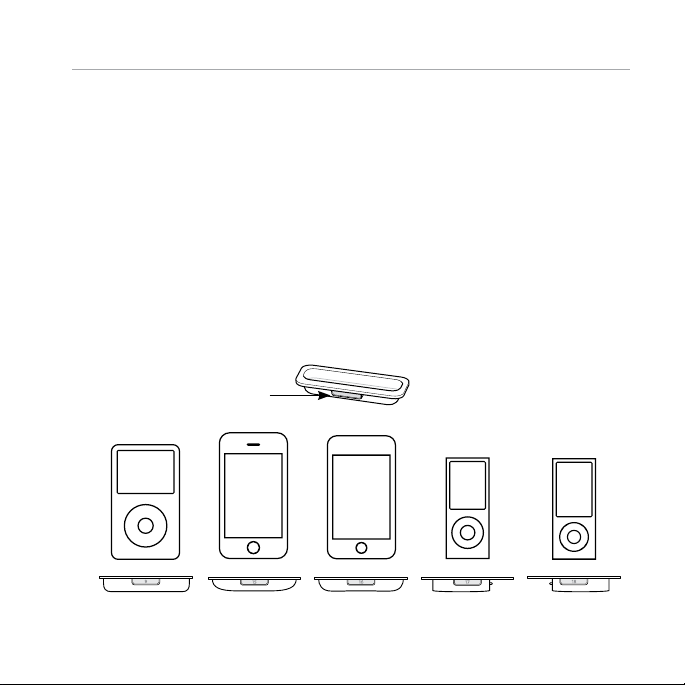
Using iPod
Beatbox
5th generations), iPod
120GB/160GB), iPod
To install, simply push the adaptor plate that ts your model into the iPod®/
iPhone
®
/iPhone® Dock Adaptors
TM
includes multiple Dock Adaptors that t iPod® Nano (4th and
®
®
dock.
Number for which iPod®/
iPod® and
®
classic
iPod
®
®
touch (2nd generation), iPod® classic (80GB and
with video (30GB) and iPhone® 3G and 3GS.
®
iPhone
fits
iPhone
®
iPod
®
touch
iPod® nano
iPod
®
nano
9
5th generation (30GB),
®
classic 80GB
iPod
and 120/160GB
iPhone® 3G
and 3GS
15
2nd generation
16
4th generation
17
5th generation
18
9

English
NOTE: If a dock adaptor for your model of iPod® or iPhone® isn’t included
with Beatbox
dock adaptors do not come in black, but the Beatbox
TM
, you can purchase one at www.apple.com/store. Apple’s
TM
’s dock is made to be
compatible with Apple Dock Adaptors.
Docking iPod
®
After installing the proper dock adaptor, set your iPod® or iPhone® onto the
dock on the top of Beatbox
/iPhone
®
TM
, being sure the dock port on your player and the
dock plug are aligned properly. Your player should connect easily and remain
upright in the port, with no forcing necessary.
Important: Make sure the “Shake to Shufe” setting is turned off on your iPod
®
iPhone
. The bass of the speaker may activate it and interfere with playback.
®
10
or

English
iPod®/iPhone
iPod®/iPhone®
dock adaptor
®
iPod
/iPhone® dock
®
11

English
Connecting Devices using 3.5 mm
(1/8-inch) mini jack input
You can connect and listen to any music player that has a standard 3.5 mm
headphone port using a mini-to-mini stereo cable (not included).
To connect, plug one end of the cable into the 3.5 mm headphone output of
your player and the other end into the 3.5 mm input on the back of Beatbox
Important: The iPod®/iPhone® dock will override and disable the 3.5 mm mini
jack input when an iPod
®
iPhone
from the dock before using the 3.5 mm input.
Listen
Be sure a music player is securely connected, as described in the previous
sections. Turn on Beatbox
surface of Beatbox
®
or iPhone® is docked. Be sure to remove your iPod®/
TM
by pushing the power button on the left side of top
TM
or with the remote control. Start your player.
TM
.
12

English
Volume
Volume can be controlled with the volume control on the right side of the top
surface of Beatbox
TM
or with the remote control.
Using the Remote Control to Control Beatbox
Make sure the CR2025 battery used by the remote is installed correctly. If it is
old, replace it.
Power on and off: Push
Volume: Push
reached. Push
is reached.
Mute: Push
and hold to increase volume. Release when desired volume is
and hold to decrease volume. Release when desired volume
and release. To resume sound, push again.
and release.
TM
13
English
Using the Remote Control to Control iPod®/iPhone
The included remote control can be used control playback of a docked iPod®
or iPhone
®
. It cannot control playback of other connected devices.
®
Using the Remote Control for iPod® or iPhone® Playback
Play: Push
Pause: Push
Skip forward to next track: Push
Skip back to previous track: Push
Scan forward through a track: Push
and release.
and release. Push again to resume play.
and release.
and release.
and hold. Release to stop scanning
and resume normal play.
Scan backward through a track: Push
and hold. Release to stop scanning
and resume normal play.
14
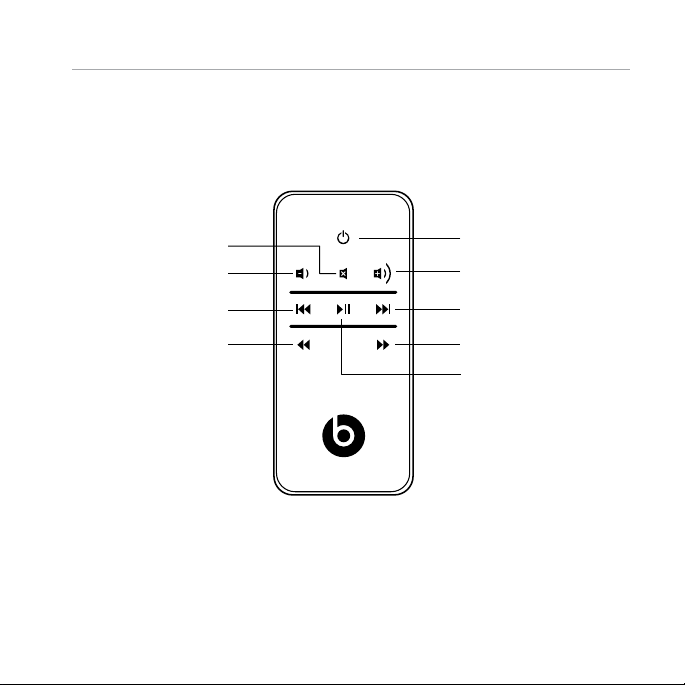
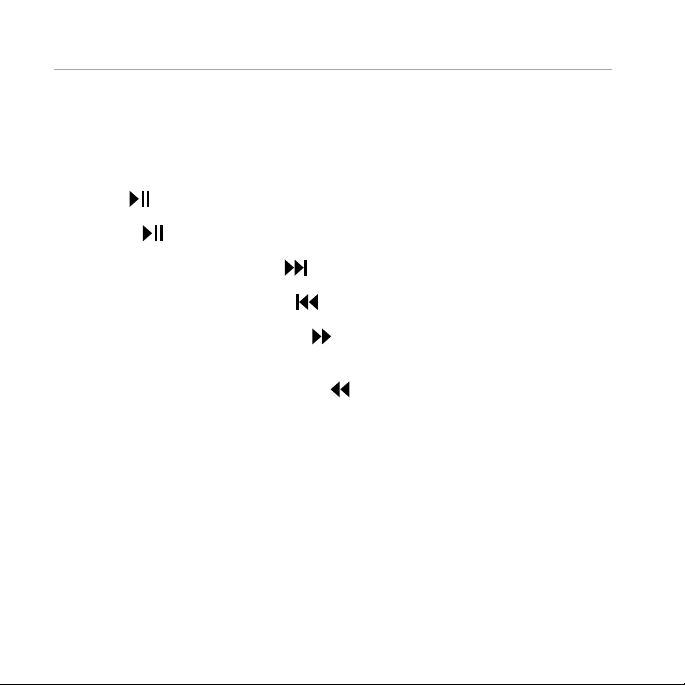
English
Mute
Volume down
Skip back
Scan back
Power
Volume up
Skip forw ard
Scan forward
Play/pause
15

English
Speaker Placement
Some helpful guidelines that will help you achieve the best performance from
your Beatbox
Your BeatboxTM is designed and engineered to sound great anywhere you place
it. However, realizing that every space is different, there are placements that
will maximize the performance of your Beatbox
present a challenge in choosing the best location for your Beatbox
is to place the Beatbox
properties of your room and give you the best overall balance of sound.
Distance to the sidewalls, back wall and corners can have the biggest impact
on the sound of your Beatbox
ceiling the more bass reinforcement you will get. Maximum bass comes when
it’s placed in a corner.
The shape of Beatbox
a great combo of space saving and deep bass. The surface you place your
Beatbox
Beatbox
The height of your BeatboxTM in relation to your listening position can also affect
the sound quality. Ideally, your Beatbox
possible and at least four feet away from your listening position for the best
performance.
TM
.
TM
. The home environment can
TM
in a location that will take advantage of the acoustic
TM
. The closer the BeatboxTM is to a wall, oor, or
TM
allows you to place it perfectly into a corner, giving you
TM
on can also signicantly impact the sound. Make sure you place your
TM
on a solid surface to avoid unwanted distortion to the sound.
TM
should be as close to ear level as
TM
. The trick
16

English
We encourage you to spend the time to experiment with the location of your
TM
Beatbox
in your environment. Take your time to nd the ideal location to ensure you
experience the best sound quality your Beatbox
Troubleshooting
The table can help solve most operating problems with your BeatboxTM. First,
follow these precautions:
• Remove your iPod
• Reseat it in the dock rmly.
• Make sure your iPod® / iPhone® has the latest software installed.
. Trial and error is the best way to hear how your BeatboxTM reacts
TM
can offer.
®
/iPhone® from the dock completely.
17

English
Problem What to do
I hear no
sound
coming
from my
Beatbox
18
• Make sure you have your iPod
• Make sure your iPod
is playing.
TM
• Make sure you have the power cord properly
.
connected on the back of your Beatbox
and that it is plugged into a working AC outlet.
• Make sure you press the power button and verify
the power LED is lit.
• If you’re trying to listen to a device connected to your
Beatbox
be sure to remove your iPod
• On the remote control, press the Play/Pause button.
• Raise the volume.
• Remove your iPod
Wait 5 seconds. Then reseat your iPod
• Reset the system. First, unplug the power cable
for 60 seconds. Next, plug it back in and push
the power button - verify the power LED is lit.
• If you are listening to a device connected via AUX IN,
make sure the device is turned on and music is playing.
Raise that device’s volume.
®
/iPhone® docked securely.
®
/iPhone® is turned on and music
TM
TM
via the mini jack input and cannot hear it,
®
/iPhone® from the dock.
®
/iPhone® from the dock.
®
/iPhone®.

English
Problem What to do
My
Beatbox
suddenly
stopped
working
and the
red LED is
ashing.
My iPod
iPhone
does not
charge up.
• Carefully check if the back plate of the amplier is
TM
hot. If the Beatbox
power output for an extended period, the amplier may
have overheated and the protection circuitry has
shut down the Beatbox
provides maximum protection from, amplier
overdrive, and overheating. Switch off the Beatbox
and wait 30 minutes to let the back plate cool down.
Switch the power back on.
• Raise the volume to check they are operating normally.
• If the Beatbox
the dealer you purchased them from, or Monster.
®
• Make sure you have the power cord properly
/
®
connected on the back of the unit.
• Make sure you have the power cord plugged
into a working AC outlet.
• Remove your iPod
Wait 5 seconds. Then reseat your iPod
TM
has been running at it’s highest
TM
temporarily. Your BeatboxTM
TM
is still not responding, contact
®
/iPhone® from the dock.
®
/iPhone®.
TM
19

English
Problem What to do
My iPod®/
iPhone
does not
respond to
the remote
control.
The system
won’t
respond
to any
controls.
Register Your Beats® Today
www.beatsbydre.com/register
• Make sure there’s a clear path between the remote
®
and the system with no obstructions.
• Wipe the small lens on the front end of the remote
using a clean, dry cloth.
• Bright room lights or sunlight can cause interference.
Try using the remote from another location.
• Remove your iPod
®
/iPhone® from the dock.
Wait 5 seconds. Then reseat your iPod
• Make certain the remote battery is installed correctly.
If it is old, replace it.
• Reset the system. First, unplug the power cable for 60
seconds. Next, plug it back in.
• Contact your dealer or Beats
www.beatsbydre.com.
®
/iPhone®.
®
Customer Service at
20

Français
Renseignements de sécurité importants
• Lisez, suivez et conservez ces instructions.
• Portez attention à toutes les mises en garde.
• N’utilisez pas cet appareil près de l’eau.
• Nettoyez l’appareil uniquement avec un chiffon sec.
• N’obstruez pas les orices de ventilation. Installez l’appareil conformément
aux instructions du fabricant.
• N’installez pas l’appareil près d'une source de chaleur, comme un radiateur,
un calorifère, un poêle ou tout autre dispositif (incluant les amplicateurs) qui
produit de la chaleur.
• Ne contournez pas le dispositif de sécurité de la che polarisée. Une che
polarisée possède deux lames dont l'une est plus large que l'autre. La lame
large est conçue pour assurer pour votre sécurité. Si la che fournie ne
s'insère pas dans la prise murale, consultez un électricien pour remplacer la
prise obsolète.
21

Français
• Protégez le câble d’alimentation pour éviter qu'on ne marche dessus, ou
qu'il ne soit pincé, en particulier au niveau des prises et au point où il sort de
l'appareil.
• Utilisez uniquement les accessoires autorisés par le fabricant.
• Débranchez l’appareil durant les orages électriques ou lorsqu'il est inutilisé
pendant de longues périodes.
• N’exposez pas l’appareil aux égouttements ou aux éclaboussures. Assurezvous qu’aucun objet rempli de liquide, comme un vase, n’est placé sur
l’appareil.
• Pour déconnecter entièrement l’appareil de l'alimentation électrique,
débranchez le câble d’alimentation de la prise c.a.
• La che du câble d’alimentation doit rester fonctionnelle.
AVERTISSEMENT: Pour réduire le risque d’incendie ou de choc électrique,
n’exposez pas cet appareil à la pluie ou à l’humidité.
AVERTISSEMENT: Aucune source de amme nue, comme un chandelle, ne
devrait être placée sur le produit.
Placez l’équipement près d’une prise de courant et assurez-vous que vous
pouvez accéder facilement au disjoncteur d’alimentation.
22

Français
AVERTISSEMENT: Ce produit doit être utilisé UNIQUEMENT avec les tensions
c.a. indiquées sur le panneau arrière. Le fonctionnement avec une autre
tension que celles indiquées risque d’endommager le produit de façon
irrémédiable, ce qui annule aussi la garantie. L’utilisation d’adaptateurs de
prise c.a. est déconseillée puisqu’elle permet de brancher l’appareil dans
une prise de tension différente de celle pour laquelle le produit a été conçu.
Utilisez uniquement le type d’adaptateur fourni avec votre produit. Si vous
êtes incertain quant à la tension de fonctionnement appropriée, veuillez
communiquer avec votre distributeur ou votre détaillant.
23

Français
Wireless
Module
Vue avant
Vue arrière
LINE IN
AC-IN
100-110V
50-60HZ
24

Français
Fonctionnalités et avantages
Amplicateur numérique
Pour un son puissant qui remplit la pièce
Station d’accueil pour iPod
Pour votre plaisir musical, il suft de déposer votre iPod
station d’accueil intégrée
Port d'entrée stéréo pour mini-che de 3,5mm
Connectez n’importe quel lecteur multimédia doté d’une sortie standard pour
écouteurs
Haut-parleurs de basses fréquences avancés de 5,25pouces
Reproduit des basses puissantes et profondes sans distorsion
Deuxhaut-parleurs de hautes fréquences optimisés de forme concave de
2pouces
Reproduit des moyennes et hautes fréquences avec précision et clarté
Télécommande
Contrôle de la lecture et du volume pour iPod
®
/iPhone®
®
/iPhone
®
ou iPhone® dans la
®
25

Français
Conguration de votre Beatbox
Pieds inclinables
La Beatbox
Toutefois, la Beatbox
d'incliner légèrement votre Beatbox
si vous souhaitez placer votre Beatbox
projeter le son vers le haut. Pour utiliser les pieds inclinables, il suft d'enfoncer
les chevilles des pieds dans les trous des coins avant de la Beatbox
Alimentation
Branchez le câble d’alimentation à l’arrière de la Beatbox
TM
est conçue pour être posée à niveau sur une surface plane.
TM
comprend deuxpieds inclinables qui vous permettent
TM
vers l’arrière. Cette fonctionnalité est idéale
TM
plus bas que votre position d’écoute et
TM
TM
, comme illustré.
TM
.
Branchez la che à deuxlames dans une prise de 120volts.
LINE IN
AC-IN
Wireless
Module
100-110V
50-60HZ
26

Français
Connexion aux appareils audio
Connexion d'un iPod®/iPhone
La BeatboxTM comprend une station d’accueil pour iPod® et iPhone®, vous
offrant ainsi une connexion directe et facile. La station d’accueil vous
permet également de commander la lecture de l’appareil à l’aide de la
télécommande (incluse).
Utilisation des adaptateurs de station d’accueil pour iPod
La BeatboxTM comprend plusieurs adaptateurs pour station d’accueil, adaptés au
®
iPod
Nano (4e et 5egénération), au iPod®touch (2egénération), au iPod®classic
(80Go et 120/160Go), au iPod
Pour utiliser un adaptateur, il suft d’insérer l’adaptateur correspondant à votre
modèle d’appareil dans la fente de la station d’accueil pour iPod
Numéro de l 'adaptateur
correspondant au
modèle d'iPod
iPod® et
®
classic
iPod
®
®
vidéo (30Go) et au iPhone®3G et 3GS.
®
®
/iPhone
iPhone
®
iPod
®
touch
iPod® nano
®
/iPhone
®
®
/iPhone®.
®
iPod
nano
9
5e génération (30 Go),
®
classic 80 Go
iPod
et 120/160 Go
iPhone® 3G
et 3GS
15
2e génération
16
4e génération
17
5e génération
18
27

Français
REMARQUE: Si un adaptateur de station d’accueil n'est pas fourni pour votre
modèle d’iPod
®
ou d’iPhone® avec la BeatboxTM, vous pouvez en acheter un
dans la boutique Apple à l'adresse suivante: www.apple.com/store. Les
adaptateurs de station d’accueil fabriqués par Apple ne se déclinent pas
en noir, mais la station d’accueil de la Beatbox
TM
est compatible avec les
adaptateurs de station d’accueil d’Apple.
Connexion d'un iPod
Après avoir inséré le bon adaptateur de station d’accueil, insérez votre iPod
®
iPhone
dans la station d’accueil sur le dessus de la BeatboxTM, en vous assurant
que le port de station d’accueil de votre appareil et la prise pour station
d’accueil de la Beatbox
®
/iPhone® dans la station d’accueil
TM
sont alignés. Votre appareil devrait se connecter
®
ou
facilement et demeurer en position verticale dans la station d’accueil sans que
vous ayez à forcer.
Important: Assurez-vous que la fonction «Secouer et mélanger» est
désactivée sur votre iPod
®
ou iPhone®. Les vibrations des basses fréquences du
haut-parleur pourraient l’activer et nuire à la lecture.
28

Français
®
iPod®/iPhone
Adaptateur d e
station d’accueil
pour iPod®/iPhone
Station d’accueil
pour iPod®/iPhone
®
®
29

Français
Connexion d’un appareil à l’aide de la mini
prise stéréo de 3,5mm (1/8po)
Vous pouvez écouter de la musique provenant de n’importe quel lecteur
multimédia doté d’une sortie d’écouteurs standard de 3,5mm en le branchant
à l’aide d’un câble équipé de mini prises stéréo (non fourni).
Pour établir la connexion, insérez une extrémité du câble dans la sortie pour
écouteurs 3,5mm du lecteur et l’autre extrémité dans le port d’entrée de
3,5mm situé à l'arrière de la Beatbox
Important: La station d’accueil pour iPod®/iPhone® a priorité sur l’entrée
mini prise de 3,5mm quand un iPod
d’accueil. Assurez-vous de retirer votre iPod
avant d’utiliser l’entrée stéréo de 3,5mm.
Écoute
Assurez-vous que le lecteur multimédia est connecté à la Beatbox
décrit dans les sections précédentes. Allumez la Beatbox
bouton d’alimentation, situé à gauche, sur le dessus de la Beatbox
de la télécommande. Allumez votre lecteur multimédia.
TM
.
®
ou un iPhone® est inséré dans la station
®
/iPhone® de la station d’accueil
TM
TM
en appuyant sur le
, comme
TM
, ou à l’aide
30

Français
Volume
Vous pouvez ajuster le volume en appuyant sur les commandes de volume,
situées à droite, sur le dessus de la Beatbox
TM
, ou à l’aide de la télécommande.
Utilisation de la télécommande de la Beatbox
Assurez-vous que la pile CR2025 est correctement installée dans la
télécommande. Si la pile est usée, remplacez-la.
Mise en marche/arrêt: Appuyez sur le bouton
Volume: Appuyez sur le bouton
volume. Relâchez-le quand vous avez atteint le volume désiré. Appuyez sur le
bouton
vous avez atteint le volume désiré.
Sourdine: Appuyez sur le bouton
à nouveau sur le bouton.
et maintenez-le enfoncé pour réduire le volume. Relâchez-le quand
et maintenez-le enfoncé pour augmenter le
et relâchez-le. Pour rétablir le son, appuyez
et relâchez-le.
TM
31

Français
Utilisation de la télécommande avec le iPod®/iPhone
Il est possible d'utiliser la télécommande fournie avec la BeatboxTM pour
commander la lecture d’un iPod
®
ou iPhone® installé dans la station d’accueil.
®
Il est toutefois impossible de commander la lecture de tout autre appareil
branché.
Utilisation de la télécommande pour commander la lecture d’un iPod
ou iPhone
®
®
Lecture: Appuyez sur le bouton et relâchez-le.
Pause: Appuyez sur le bouton
et relâchez-le. Appuyez à nouveau sur le
bouton pour reprendre la lecture.
Passer à la piste suivante: Appuyez sur le bouton
Passer à la piste précédente: Appuyez sur le bouton
Balayer la piste en avance rapide: Appuyez sur le bouton
et relâchez-le.
et relâchez-le.
et maintenez-le
enfoncé. Relâchez le bouton pour arrêter le balayage et reprendre la lecture
normale.
Balayer la piste vers l'arrière: Appuyez sur le bouton
et maintenez-le
enfoncé. Relâchez le bouton pour arrêter le balayage et reprendre la
lecture normale.
32

Français
Sourdine
Réduction
du volume
Piste précéde nte
Balayage arrière
Alimentation
Augmentation du volume
Piste suivante
Balayag e en
avance rapid e
Lec ture/pa use
33

Français
Positionnement des haut-parleurs
Voici quelques directives utiles pour vous aider à obtenir les meilleures
performances possibles de votre Beatbox
Votre Beatbox
TM
est conçue et mise au point pour offrir une qualité audio
exceptionnelle, peu importe où elle est installée. Toutefois, comme chaque
espace est différent, certains emplacements vous permettront de maximiser
les performances de votre Beatbox
représenter un dé pour choisir le meilleur emplacement pour votre Beatbox
truc consiste à placer la Beatbox
TM
propriétés acoustiques de la pièce et qui vous offre le meilleur équilibre sonore.
La distance entre la Beatbox
peuvent avoir une incidence sur la qualité sonore de votre Beatbox
votre Beatbox
fréquences seront fortes. Vous pouvez obtenir de meilleures basses en plaçant
votre Beatbox
TM
est près d’un mur, du plancher ou du plafond, plus les basses
TM
dans un coin.
La forme de la Beatbox
TM
et les murs latéraux, le mur arrière et les coins
TM
vous permet de la placer parfaitement dans un coin.
Vous pouvez ainsi gagner de l’espace et obtenir des basses profondes. La
surface sur laquelle vous placez votre Beatbox
incidence sur la qualité sonore. Assurez-vous de placer votre Beatbox
surface solide pour éviter toute distorsion du son.
La hauteur à laquelle se trouve votre Beatbox
d’écoute peut également avoir une incidence sur la qualité sonore.
Idéalement, vous devriez placer votre Beatbox
une distance minimum de 1,21m (4pi) de votre position d’écoute pour obtenir
les meilleures performances.
34
TM
.
TM
. L’environnement d’une maison peut
TM
. Le
dans un emplacement qui tire avantage des
TM
. Plus
TM
peut également avoir une
TM
par rapport à votre point
TM
à hauteur de vos oreilles et à
TM
sur une

Français
Nous vous encourageons à prendre le temps de tester le positionnement de
votre BeatboxTM. Le meilleur moyen de découvrir comment votre BeatboxTM réagit
à votre environnement d’écoute est la méthode d’essais et d’erreurs. Prenez
le temps de trouver l’emplacement idéal pour vous assurer de la meilleure
expérience d’écoute possible que votre Beatbox
Dépannage
Le tableau suivant peut vous aider à résoudre la plupart des problèmes
de fonctionnement de votre Beatbox
précautions suivantes:
• Retirez complètement votre iPod
• Replacez l’appareil fermement dans la station d’accueil.
• Assurez-vous que la dernière version du logiciel est installée sur votre
®
iPod
/iPhone®.
TM
. Tout d’abord, veuillez observer les
®
/iPhone® de la station d’accueil.
TM
peut vous offrir.
35

Français
Problème Marche à suivre
Ma
Beatbox
ne produit
aucun son.
36
• Assurez-vous que votre iPod
TM
station d’accueil.
• Assurez-vous que votre iPod®/iPhone® est allumé et que la
musique joue.
• Assurez-vous que le câble d’alimentation est correctement inséré
à l’arrière de votre Beatbox
murale fonctionnelle.
• Assurez-vous d'avoir appuyé sur le bouton d’alimentation, puis
vériez que le voyant d’alimentation est allumé.
• Si vous essayez d’écouter de la musique à partir d’un appareil
connecté à votre Beatbox
n’entendez pas la musique, assurez-vous de retirer votre iPod
®
de la station d’accueil.
iPhone
• Sur la télécommande, appuyez sur le bouton de Lecture/Pause.
• Augmentez le volume.
• Retirez votre iPod
5secondes. Réinsérez votre iPod
• Réinitialisez le système. Commencez par débrancher le câble
d’alimentation pendant 60secondes. Ensuite, rebranchez-le et
appuyez sur le bouton de mise sous tension du système. Assurezvous que le voyant d’alimentation est allumé.
• Si vous souhaitez écouter de la musique à partir d'un appareil
connecté par l’entrée auxiliaire, assurez-vous que l’appareil
est allumé et que la musique joue. Augmentez le volume de
l’appareil.
®
/iPhone® est bien inséré dans la
TM
et qu’il est branché dans une prise
TM
par la mini prise stéréo et que vous
®
/iPhone® de la station d’accueil. Attendez
®
/iPhone® dans la station d’accueil.
®
/

Français
Problème Marche à suivre
Ma
Beatbox
soudainement
arrêté de
fonctionner et le
voyant DEL
rouge
clignote.
Mon iPod
iPhone
ne se
recharge
pas.
• Vériez si le panneau arrière de l’amplicateur est chaud. Si
TM
la Beatbox
a
TM
a fonctionné à pleine puissance pendant une
période prolongée, l’amplicateur peut avoir surchauffé et
le circuit de protection a temporairement éteint la Beatbox
par mesure de sécurité. Votre Beatbox
protection maximale contre la surcharge et la surchauffe de
l’amplicateur. Éteignez la Beatbox
pour laisser le panneau arrière refroidir. Allumez la Beatbox
• Augmentez le volume pour vériez que le système fonctionne
normalement.
• Si la Beatbox
le détaillant auprès de qui vous avez acheté la Beatbox
avec Monster.
®
• Assurez-vous que le câble d’alimentation est correctement
/
®
branché à l’arrière de l’appareil.
• Assurez-vous que le câble d’alimentation est branché dans
une prise murale fonctionnelle.
• Retirez votre iPod
5secondes. Réinsérez votre iPod
d’accueil.
TM
vous offre une
TM
et attendez 30minutes
TM
ne répond toujours pas, communiquez avec
®
/iPhone® de la station d’accueil. Attendez
®
/iPhone® dans la station
TM
ou
TM
TM
.
37

Français
Problème Marche à suivre
Mon iPod®/
iPhone
répond
pas à la
télécommande.
Le système
ne répond
à aucune
commande.
Enregistrez vos écouteurs Beats® dès aujourd’hui
www.beatsbydre.com/register
• Assurez-vous que rien n'obstrue le signal entre la
®
télécommande et le système.
ne
• Nettoyez la lentille située à l’avant de la télécommande à
l’aide d’un linge sec.
• Une lumière forte peut causer une interférence avec la
télécommande. Essayez d’utiliser la télécommande d'un
autre endroit.
• Retirez votre iPod
5secondes. Réinsérez votre iPod
®
/iPhone® de la station d’accueil. Attendez
®
/iPhone® dans la station
d’accueil.
• Assurez-vous que la pile de la télécommande est installée
correctement. Si la pile est usée, remplacez-la.
• Réinitialisez le système. Commencez par débrancher le câble
d’alimentation pendant 60secondes. Ensuite, rebranchez le
système.
• Communiquez avec votre détaillant ou avec le service à la
clientèle de Beats
®
à l’adresse www.beatsbydre.com.
38

Español
Información importante sobre la seguridad
• Lea, cumpla y guarde estas instrucciones.
• Preste atención a todas las advertencias.
• No use este aparato cerca del agua.
• Limpie sólo con un paño seco.
• No obstruya ninguna apertura de ventilación. Instale de acuerdo con las
instrucciones del fabricante.
• No instale cerca de fuentes de calor, como radiadores, registros de calor,
estufas u otros aparatos (incluso amplicadores) que producen calor.
• No interera con el objetivo de seguridad del enchufe polarizado. Un
enchufe polarizado tiene dos clavijas, una más ancha que la otra. La clavija
más ancha se proporciona para su seguridad. Si el enchufe proporcionado
no se ajusta a su tomacorriente, consulte a un electricista para el reemplazo
del toma obsoleto.
39

Español
• Proteja el cable eléctrico de ser pisado o pinchado, en especial en los
enchufes y el punto donde sale del aparato.
• Sólo use ajustes y accesorios especicados por el fabricante.
• Desenchufe este aparato durante las tormentas eléctricas o cuando no se
utiliza durante largos períodos de tiempo.
• No exponga este aparato a gotas o salpicaduras y asegúrese de que ningún
objeto lleno de líquidos, como oreros, se coloquen en el aparato.
• Para desconectar por completo este aparato de la red eléctrica de CA,
desconecte el cable de suministro eléctrico del receptáculo CA.
• El enchufe de la red eléctrica del cable del suministro eléctrico debe
permanecer fácilmente en funcionamiento.
ADVERTENCIA: A n de reducir el riesgo de incendio o cortocircuito, no
exponga este aparato a la lluvia ni a la humedad.
ADVERTENCIA: No se deben colocar fuentes de llamas sin protección, como
velas, en el producto.
Coloque el equipo cerca del tomacorriente de suministro eléctrico principal y
asegúrese de acceder fácilmente al interruptor de corriente eléctrica.
40

Español
ADVERTENCIA: Este producto SÓLO debe funcionar con los voltajes CA
enumerados en el panel posterior. El funcionamiento con los voltajes diferente
a los indicados pueden ocasionar un daño irreversible al producto y anular la
garantía de producto. El uso de adaptadores de enchufes CA está protegido
porque puede permitir que el producto se enchufe en voltajes donde el
producto no está diseñado para funcionar. Use sólo el tipo ofrecido con el
producto. Si no está seguro del voltaje operativo adecuado, comuníquese con
su distribuidor y/o minorista local.
41

Español
Wireless
Module
Vista frontal
Vista posterior
LINE IN
AC-IN
100-110V
50-60HZ
42

Español
Características y Benecios
Amplicador de potencia digital
Para un sonido potente y envolvente
Plataforma para iPod
Sólo congure su iPod
escuchar
Entrada de miniconector estéreo de 3,5 mm
Conecte cualquier reproductor de música con una salida estándar para
auriculares
Controladores de graves de largo alcance avanzados de 5,25 pulgadas
Presenta graves potentes, briosos y sin distorsión
Dos unidades de alta frecuencia cóncavas optimizadas de 2 pulgadas
Presenta medios y agudos nítidos y una puesta en escena precisa
Control remoto
Controle la reproducción y el volumen del iPod
®
/iPhone®
®
o iPhone® en la plataforma integrada y empiece a
®
®
/iPhone
43

Español
Conguración de su Beatbox
Pies basculantes
El Beatbox
presenta con dos pies basculantes si preere hacerlo reposar sobre un
ángulo basculante posterior. Esto es ideal si va a colocar el Beatbox
TM
está diseñado a nivel de reposo. Sin embargo, el BeatboxTM se
TM
TM
en una
posición baja y desea que el sonido se proyecte hacia arriba. Para instalarlo,
simplemente presione las clavijas en los pies en los agujeros en los extremos
frontales del Beatbox
Potencia
Enchufe el cable eléctrico CA en la parte posterior del Beatbox
TM
.
TM
, como
se muestra. Enchufe el extremo del enchufe dual en un tomacorriente de
potencia de 120 voltios.
LINE IN
AC-IN
Wireless
Module
100-110V
50-60HZ
44

Español
Conexión de dispositivos de audio
Conexión a iPod®/iPhone
BeatboxTM presenta una plataforma incorporada para iPod® y iPhone® para una
conexión fácil y directa. Esto también le ofrecerá la posibilidad de controlar la
reproducción con el control remoto incluido.
Uso de los adaptadores para plataformas de iPod
BeatboxTM incluye múltiples Adaptadores de plataformas que se ajustan a
®
iPod
Nano (4ta y 5ta generación), iPod® touch (2da generación), iPod® clásico
(80GB y 120GB/160GB), iPod
Para instalar, simplemente presione la placa del adaptador que se ajusta a su
modelo en el puerto de iPod
®
®
/iPhone
®
con video (30GB) y iPhone® 3G y 3GS.
®
/iPhone®.
®
Número al cu al se adapta
el iPod
iPod® y
®
classic
iPod
9
5ta generación (30GB),
®
clásico 80GB
iPod
y 120GB/160GB
®
/iPhone®.
iPhone
iPhone® 3G
y 3GS
®
15
®
touch
iPod
2da generación
iPod® nano
16
4ta generación
iPod
17
5ta generación
®
nano
18
45

Español
NOTA: Si no está incluido un adaptador de plataforma para su modelo
®
de iPod
o iPhone® con BeatboxTM, puede adquirir uno en www.apple.com/
store. Los adaptadores de plataforma de Apple no vienen en negro, pero
la plataforma de Beatbox
adaptadores de la plataforma de Apple.
Colocación de iPod
Después de instalar el adaptador de plataforma adecuado, coloque su iPod
®
iPhone
en la plataforma en la parte superior del BeatboxTM, asegurándose que
el puerto de la plataforma en su reproductor y el enchufe de la plataforma estén
alineados de forma adecuada. Su reproductor debería conectarse fácilmente y
permanecer en posición vertical en el puerto, sin necesidad de forzar.
Importante: Asegúrese de que la conguración ”Agitar para reproducción
aleatoria” esté apagada en su iPod
activarlo e interferir con la reproducción.
TM
está preparada para ser compatible con los
®
/iPhone® en la plataforma
®
o iPhone®. El grave del parlante puede
®
o
46

Español
®
iPod®/iPhone
iPod®/iPhone®
adaptador de
plataforma
Plataforma para
iPod®/iPhone®
47

Español
Conexión de dispositivos usando entrada de
miniconector de 3,5 mm (1/8 pulgadas)
Puede conectarse y escuchar cualquier reproductor de música que tenga un
puerto para auricular estándar de 3,5 mm usando un cable mini estéreo (no
incluido).
Para conectarse, enchufe un extremo del cable en la salida del auricular de
3,5 mm de su reproductor y el otro extremo en la entrada de 3,5 mm en la
parte posterior del Beatbox
Importante: La plataforma de iPod®/iPhone® anulará y desactivará la entrada
del miniconector de 3,5 mm cuando se acople un iPod
eliminar su iPod
®
/iPhone® de la plataforma antes de usar la entrada de 3,5 mm.
Escuchar
Asegúrese de que el reproductor de música esté conectado en forma segura,
como se describe en las secciones anteriores. Encienda el Beatbox
presionar el botón de encendido en la parte izquierda de la supercie superior
del Beatbox
TM
o con el control remoto. Inicie su reproductor.
TM
.
®
o iPhone®. Asegúrese de
TM
al
48

Español
Volumen
El volumen puede ser controlado con el control de volumen a la derecha en la
supercie superior del Beatbox
TM
o con el control remoto.
Uso del control remoto para el Control
de Beatbox
Asegúrese de que la batería CR2025 usada por el remoto está instalada en
forma correcta. Si es antigua, reemplácela.
Encendido y apagado: Presione
Volumen: Presione
Suelte cuando alcanza el volumen deseado. Presione
presionado para disminuir el volumen. Suelte cuando alcanza el volumen
deseado.
Silencio: Presione
TM
y suelte.
y mantenga presionado para aumentar el volumen.
y mantenga
y suelte. Para reanudar el sonido, presione de nuevo.
49

Español
Uso del control remoto para controlar iPod®/iPhone
El control remoto incluido puede usarse para controlar la reproducción de
®
un iPod
o iPhone® acoplado. No se puede controlar la reproducción de los
®
demás dispositivos conectados.
Uso del control remoto para reproducción de iPod
®
o iPhone
®
Reproducción: Presione y suelte.
Pausa: Presione
Saltar hacia delante a la próxima pista: Presione
Saltar hacia atrás a la pista anterior: Presione
Buscar hacia delante mediante una pista: Presione
y suelte. Presione de nuevo para reanudar la reproducción.
y suelte.
y suelte.
y mantenga
presionado. Suelte para detener la búsqueda y reanudar la reproducción
normal.
Busque hacia atrás mediante una pista: Presione
y mantenga presionado.
Suelte para detener la búsqueda y reanudar la reproducción normal.
50

Español
Silencio
Bajar volumen
Saltar hacia atrás
Buscar hacia atrás
Potencia
Subir volumen
Saltar hacia adelante
Buscar hacia adelante
Reproducir/pausar
51

Español
Colocación del parlante
Estas pautas útiles lo ayudarán a obtener el mejor rendimiento de su BeatboxTM.
Su BeatboxTM está diseñado y preparado para tener mejor sonido donde sea
lo coloque. Sin embargo, si se da cuenta de que cada espacio es diferente,
hay colocaciones que optimizarán el desempeño de su Beatbox
en el hogar puede presentar un desafío al elegir la mejor ubicación para su
TM
Beatbox
. La clave consiste en colocar el BeatboxTM en una ubicación que
optimizará las propiedades acústicas de su habitación y le ofrecerá el mejor
balance general de sonido.
La distancia a las paredes laterales, pared posterior y esquinas pueden tener
un mayor impacto en el sonido de su Beatbox
el Beatbox
TM
a una pared, suelo o cielo raso, obtendrá un mayor refuerzo
TM
. Cuanto más cercana está
de sonidos graves. Los graves máximos aparecen cuando se ubica en una
esquina.
La forma de Beatbox
ofreciéndole un combo mayor de ahorro de espacio y graves profundos.
La supercie donde coloca su Beatbox
TM
le permite colocarlo perfectamente en una esquina,
TM
también puede inuir en forma
signicativa sobre el sonido. Asegúrese de colocar su Beatbox
supercie sólida, a n de evitar una distorsión no deseada al sonido.
La altura de su Beatbox
TM
en relación con su posición de escucha también
puede afectar la calidad de sonido. Idealmente, su Beatbox
lo más cerca posible el nivel del oído posible y al menos cuatro pies de su
posición de escucha para un mejor rendimiento.
TM
. El entorno
TM
sobre una
TM
debería estar
52

Español
Lo alentamos a que invierta tiempo para probar la ubicación de su Beatbox
Prueba y error es la mejor manera de escuchar cómo reacciona su Beatbox
en el ambiente. Tómese su tiempo para encontrar la ubicación ideal, a n de
garantizar que experimenta la mejor calidad de sonido que puede ofrecerle
su Beatbox
TM
.
Localización y solución de problemas
El cuadro puede ayudarlo a resolver la mayoría de los problemas operativos
con su Beatbox
• Quite su iPod®/iPhone® de la plataforma por completo.
• Vuelva a colocarlo en la plataforma con rmeza.
• Asegúrese de que su iPod®/iPhone® tenga el último software instalado.
TM
. Primero, siga estas advertencias:
TM
.
TM
53

Español
Problema Qué hacer
No
escucho
sonidos
de mi
Beatbox
• Asegúrese de que su iPod
• Asegúrese de que su iPod®/iPhone® está encendido y que se
reproduce música.
TM
• Asegúrese de tener el cable eléctrico adecuadamente
.
conectado en la parte posterior de su Beatbox
enchufado en un tomacorriente CA en funcionamiento.
• Asegúrese de presionar el botón de encendido y vericar que el
LED de potencia esté encendido.
• Si intenta escuchar un dispositivo conectado a su Beatbox
entrada del miniconector y no puedo escucharlo, asegúrese de
retirar su iPod
• En el control remoto, presione el botón de Reproducir
y Pausa.
• Suba el volumen.
• Retire su iPod
vuelva a colocar su iPod
• Restaure el sistema. En primer lugar, desenchufe el cable eléctrico
durante 60 segundos. Luego, vuelva a enchufarlo y presione el
botón de encendido (verique que esté encendido el LED de
potencia).
• Si escucha un dispositivo conectado vía AUX IN, asegúrese de que
el dispositivo esté encendido y que se reproduzca la música. Suba
el volumen de ese dispositivo.
®
/iPhone® se acopla en forma segura.
TM
y que esté
TM
vía la
®
/iPhone® de la plataforma.
®
/iPhone® de la plataforma. Espere 5 segundos. Luego,
®
/iPhone®.
54

Español
Problema Qué hacer
Mi
Beatbox
dejó de
funcionar
de repente
y el LED
rojo titila.
Mi iPod
iPhone
se carga.
• Revise con cuidado si la placa posterior del amplicador
TM
está caliente. Si Beatbox
a su máxima potencia de producción durante un
período prolongado, el amplicador se puede haber
sobrecalentado y el circuito de protección puede haber
cerrado el Beatbox
provee la máxima protección de sobrecarga de
amplicador y sobrecalentamiento. Apague el Beatbox
y espere 30 minutos para que la placa posterior se enfríe.
Enciéndalo nuevamente.
• Suba el volumen para controlar que está funcionando de
forma normal.
• Si el Beatbox
distribuidor donde lo compró o con Monster.
®
• Asegúrese de tener el cable eléctrico conectado de forma
/
®
adecuada en la parte posterior de la unidad.
no
• Asegúrese de tener el cable eléctrico enchufado en un
tomacorriente CA en funcionamiento.
• Retire su iPod
segundos. Después, vuelva a colocar su iPod
TM
ha estado en funcionamiento
TM
de forma temporal. Su BeatboxTM
TM
todavía no responde, comuníquese con el
®
/iPhone® de la plataforma. Espere 5
®
/iPhone®.
TM
55

Español
Problema Qué hacer
Mi iPod®/
iPhone
responde
al control
remoto.
El sistema
no
responderá a
ningún
control.
Registre sus Beats® hoy
www.beatsbydre.com/register
• Asegúrese de que existe un camino despejado entre el
®
control remoto y el sistema sin obstrucciones.
no
• Limpie los lentes pequeños en la parte frontal del control
remoto con un paño seco y limpio.
• Las luces brillantes de la habitación o la luz solar pueden
causar interferencia. Intente utilizar el control remoto desde
otra ubicación.
• Retire su iPod
®
/iPhone® de la plataforma. Espere 5 segundos.
Luego, restablezca su iPod
• Asegúrese de que la batería del control remoto está
instalada correctamente. Si es antigua, reemplácela.
• Restablezca el sistema. En primer lugar, desenchufe el cable
eléctrico durante 60 segundos. Luego, vuelva a enchufarlo.
• Comuníquese con su distribuidor o con el Centro de
Atención al Cliente de Beats
®
/iPhone®.
®
en www.beatsbydre.com.
56

Português
Informações Importantes de Segurança
• Leia, siga e guarde estas instruções
• Preste atenção a todos os avisos
• Não utilize este equipamento próximo à água.
• Limpe apenas com pano seco.
• Não bloqueie aberturas para ventilação. Instale-o de acordo com as
instruções do fabricante.
• Não o instale perto de quaisquer fontes de calor, como radiadores,
aquecedores, fogões ou outros aparelhos (incluindo amplicadores) que
produzam calor.
• Não anule o objetivo de segurança do conector polarizado. Um conector
polarizado possui duas lâminas, sendo uma mais larga que a outra.
A lâmina mais larga serve para a sua segurança. Se o conector fornecido
não se encaixar na sua tomada, consulte um eletricista para substituir a
tomada obsoleta.
57

Português
• Cuidado para não pisar ou apertar o cabo de alimentação, principalmente
nos conectores, na parte em que sai do aparelho.
• Utilize apenas conexões/acessórios especicados pelo fabricante.
• Desconecte este dispositivo durante tempestades ou quando não estiver
sendo utilizado por longos períodos de tempo.
• Não exponha este aparelho a gotejamento ou respingos e certique-se de
que nenhum objeto contendo líquidos, como vasos, seja colocado sobre o
aparelho.
• Para desconectar completamente o aparelho da rede CA, desconecte o
conector do cabo de alimentação da tomada CA.
• O conector do cabo de alimentação deve estar sempre acessível.
ALERTA: Para reduzir o risco de incêndio ou choque elétrico, não exponha este
aparelho à chuva ou umidade.
ALERTA: Fontes de chama — como velas — não devem ser colocadas sobre
o produto.
Coloque o equipamento próximo a uma saída de fonte de alimentação
principal e certique-se de que você possa acessar facilmente o interruptor
do disjuntor.
58

Português
ALERTA: Este produto deve ser operado APENAS com as voltagens CA listadas
no painel traseiro. Operação com voltagens diferentes daquelas indicadas
pode causar danos irreversíveis ao produto e anular a sua garantia. O uso
de adaptadores de conector CA deve ser advertido porque permite que o
produto seja conectado em voltagens nas quais o produto não foi projetado
para operar. Utilize apenas o tipo fornecido com seu produto. Caso não
tenha certeza da voltagem operacional correta, entre em contato com seu
distribuidor local e/ou varejista.
59

Português
Wireless
Module
Visão frontal
Visão traseira
LINE IN
AC-IN
100-110V
50-60HZ
60

Português
Recursos e Benefícios
Amplicador de Potência Digital
Para um som potente e abrangente
®
Dock para iPod
Basta conectar o seu iPod
Entrada do mini conector estéreo de 3,5mm
Conecte qualquer leitor de música a uma saída padrão do fone de ouvido
Drivers avançados de grave de longo alcance de 5,25 polegadas
Grave potente e impactante sem distorções
Dois drivers de alta frequência côncavos otimizados de 2 polegadas
Frequências médias e agudas e plataforma de som preciso
Controle remoto
Controle a reprodução e o volume do iPod
/iPhone®
®
ou iPhone® no dock integrado e começar a ouvir
®
®
/iPhone
61

Português
Como congurar seu Beatbox
Suportes de inclinação
O Beatbox
TM
foi desenvolvido para permanecer na posição de descanso. No
TM
entanto, o produto vem com dois suportes de inclinação caso queira que
ele que levemente inclinado para trás. Essa posição é ideal caso coloque
o Beatbox
cima. Para instalá-los, simplesmente empurre os pinos dos suportes nas
aberturas dos cantos dianteiros do Beatbox
Alimentação
Conecte o cabo de alimentação CA na parte traseira do Beatbox
TM
em uma posição baixa e queira que o som seja projetado para
TM
.
TM
, conforme
mostrado. Conecte a extremidade do conector de dois pinos em uma tomada
de 120 volts.
LINE IN
AC-IN
Wireless
Module
100-110V
50-60HZ
62

Português
Conexão dos Dispositivos de Áudio
Conectando ao iPod®/iPhone
O BeatboxTM possui um dock integrado para iPod® e iPhone® para possibilitar
uma conexão fácil e direta. Assim, você também poderá controlar a
reprodução com o controle remoto incluso.
Utilizando Adaptadores de Dock para iPod
O BeatboxTM inclui vários Adaptadores de Dock que se encaixam ao iPod®
Nano (4ª e 5ª geração), iPod
120GB/160GB), iPod
®
com vídeo (30GB) e iPhone® 3G e 3GS.
Para instalá-los, simplesmente empurre a placa do adaptador que se encaixa
em seu modelo no dock para iPod®/iPhone®.
®
®
®
touch (2ª geração), iPod® classic (80GB e
/iPhone
®
Número de e ncaixe para
iPod® e
®
classic
iPod
5ª geração (30GB),
®
classic 80GB
iPod
e 120/160GB
iPod
9
®
®
/iPhone
iPhone
iPhone® 3G
e 3GS
15
®
touch
iPod
2ª geração
16
iPod® nano
4ª geração
17
®
nano
iPod
5ª geração
18
®
63

Português
OBSERVAÇÃO: Se um adaptador de dock para seu iPod® ou iPhone® não
estiver incluso com o Beatbox
TM
, é possível adquiri-lo em www.apple.com/store.
Adaptadores de dock da Apple não vêm em preto, mas o dock do Beatbox
foi feito para ser compatível com os Adaptadores de Dock da Apple.
Encaixe do Dock para iPod®/iPhone
Depois de instalar o adaptador de dock adequado, coloque o seu iPod®
ou iPhone
®
no dock na parte superior do BeatboxTM, certicando-se de que
®
a entrada para dock do seu leitor e o conector do dock estejam alinhados
corretamente. Seu leitor deve se conectar com facilidade e permanecer na
vertical na entrada, sem precisar forçar.
Importante: Verique se a conguração "Shake to Shufe" está desativada
em seu iPod
®
ou iPhone®. O grave do alto-falante pode ativá-la e interferir na
reprodução.
64
TM

Português
®
iPod®/iPhone
Adaptador de dock
para iPod®/iPhone
Dock para i Pod®/iPhone
®
®
65

Português
Conexão dos Dispositivos utilizando entrada
de mini conector de 3,5 mm (1/8 polegada)
É possível conectar e ouvir a qualquer leitor de música que possua uma
entrada padrão de 3,5 mm no fone de ouvido utilizando um cabo estéreo
mini-para-mini (não incluído).
Para conectar, plugue uma extremidade do cabo na saída de 3,5 mm do fone
de ouvido de seu leitor e a outra extremidade na entrada de 3,5 mm na parte
traseira do Beatbox
Importante: O dock para iPod
mini conector de 3,5 mm quando um iPod
se de remover seu iPod
Ouça
Certique-se de um leitor de música esteja bem conectado, conforme descrito
nas seções anteriores. Ligue o Beatbox
lado esquerdo da superfície superior do Beatbox
Inicie seu leitor.
TM
.
®
/iPhone® irá substituir e desativar a entrada do
®
/iPhone® do dock antes de utilizar a entrada de 3,5 mm.
®
ou iPhone® for encaixado. Certique-
TM
pressionando o botão de energia no
TM
ou com o controle remoto.
66

Português
Volume
O volume pode ser controlado com o controle de volume no lado direito da
superfície superior do Beatbox
TM
ou com o controle remoto.
Utilizando o Controle Remoto para Controlar
o Beatbox
Certique-se de que a bateria CR2025 utilizada pelo controle remoto esteja
instalada corretamente. Caso seja antiga, substitua-a.
Ligar e desligar: Pressione
Volume: Pressione
volume desejado for alcançado. Pressione
Solte quando o volume desejado for alcançado.
Mudo: Pressione
TM
e solte.
e segure para aumentar o volume. Solte quando o
e segure para diminuir o volume.
e solte. Para retomar o som, pressione novamente.
67

Português
Utilizando o Controle Remoto para Controlar o iPod®/iPhone
O controle remoto incluído pode ser utilizado para controlar a reprodução de
®
um iPod
ou iPhone® no dock. O controle não pode controlar a reprodução de
®
outros dispositivos conectados.
Utilizando o Controle Remoto para a Reprodução do iPod® ou iPhone
®
Reproduzir: Pressione e solte.
Pausar: Pressione
Salte para a próxima faixa: Pressione
Volte para a faixa anterior: Pressione
Avance em uma faixa: Pressione
e solte. Pressione novamente para retomar a reprodução.
e solte.
e solte.
e segure. Solte para parar de avançar e
retome a reprodução normal.
Volte em uma faixa: Pressione
e segure. Solte para parar de avançar e
retome a reprodução normal.
68

Português
Mudo
Diminuir volume
Voltar
Retroceder
Alimentação
Aumentar volume
Avançar
Saltar
Reproduzir/pausar
69

Português
Posicionamento do Alto-Falante
Algumas orientações úteis que irão ajudá-lo a obter o melhor desempenho do
seu Beatbox
Seu Beatbox
excelente qualidade em qualquer lugar onde for colocado. No entanto,
como cada espaço é diferente, existem posicionamentos que potencializam
o desempenho do seu Beatbox
na escolha da melhor localização para o seu Beatbox
o Beatbox
espaço e que lhe dará o melhor equilíbrio geral de som.
A distância das paredes laterais, parede de fundo e cantos pode causar
maior impacto sobre o som de seu Beatbox
estiver da parede, piso ou teto, maior será o reforço do grave. O reforço do
grave será maior quando o aparelho for posicionado em um canto.
O formato do Beatbox
oferecendo-lhe uma grande combinação de economia de espaço e graves
intensos. A superfície sobre a qual você coloca o seu Beatbox
impactar signicativamente o som. Certique-se de colocar o seu Beatbox
sobre uma superfície sólida para evitar distorção indesejável do som.
A altura do seu BeatboxTM em relação ao seu posicionamento também pode
afetar a qualidade do som. Preferencialmente, o Beatbox
próximo possível do nível do ouvido e, pelo menos, a 1,2 metros de distância
de seu posicionamento para o melhor desempenho.
TM
.
TM
foi desenvolvido e projetado para oferecer um som de
TM
. O ambiente doméstico pode ser um desao
TM
em um local que aproveitará as propriedades acústicas do seu
TM
. Quanto mais próximo o BeatboxTM
TM
permite-lhe posicioná-lo perfeitamente em um canto,
TM
. O truque é colocar
TM
também pode
TM
deve estar o mais
TM
70

Português
Nós o incentivamos a levar um tempo para testar a melhor localização para
seu Beatbox
reage em seu ambiente. Leve um tempo para encontrar o local ideal para
garantir a melhor qualidade de som que o seu Beatbox
TM
. Tentar e errar é a melhor maneira de saber como o seu BeatboxTM
TM
pode oferecer.
Resolução de problemas
A tabela pode ajudar a resolver a maioria dos problemas com seu BeatboxTM.
Primeiro, tome estas precauções:
• Remova totalmente seu iPod®/iPhone® do dock.
• Reencaixe-o rmemente no dock.
• Certique-se de que seu iPod
®
/ iPhone® possua o último software instalado.
71

Português
Problema O que fazer
Não ouço
nada vindo
do meu
Beatbox
72
• Certique-se de que seu iPod
encaixado .
• Certique-se de que seu iPod
TM
.
esteja reproduzindo música.
• Certique-se de que o cabo de alimentação esteja
adequadamente conectado na parte traseira de seu
Beatbox
• Pressione o botão de energia e verique se o LED
está aceso.
• Caso esteja tentando ouvir a um dispositivo conectado ao seu
Beatbox
conseguindo, remova o seu iPod
• No controle remoto, pressione o botão Reproduzir/Pausar.
• Aumente o volume.
• Remova seu iPod
Em seguida, reencaixe seu iPod
• Reinicie o sistema. Primeiro, desconecte o cabo de
alimentação por 60 segundos. Em seguida, conecte-o de
volta e pressione o botão de energia - verique se o LED
está aceso.
• Caso esteja ouvindo a um dispositivo conectado via AUX
IN, verique se o dispositivo está ligado e se a música está
sendo reproduzida. Aumente o volume desse dispositivo.
®
/iPhone® esteja rmemente
®
/iPhone® esteja ligado e
TM
e que esteja conectado a uma tomada CA.
TM
por meio da entrada do mini conector e não estiver
®
/iPhone® do dock. Espere 5 segundos.
®
/iPhone® do dock.
®
/iPhone®.

Português
Problema O que fazer
Meu
Beatbox
parou de
funcionar
de repente
e o LED
está
piscando
em
vermelho.
Meu iPod
iPhone
não
carrega.
• Verique cuidadosamente se a placa traseira do
TM
amplicador está quente. Se o Beatbox
em sua máxima potência por um longo período, o
amplicador pode ter superaquecido e, portanto, o
circuito de proteção desligou-o temporariamente. Seu
Beatbox
amplicador e superaquecimento. Desligue o Beatbox
aguarde 30 minutos para deixar a placa traseira esfriar.
Ligue-o de volta.
• Aumente o volume para vericar se está funcionado
normalmente.
• Se o Beatbox
contato com o seu revendedor ou com a Monster.
®
/
• Verique se o cabo de alimentação está conectado
®
corretamente na parte traseira da unidade.
• Verique se o cabo de alimentação está conectado a
uma tomada CA que esteja funcionando.
• Remova seu iPod
Em seguida, reencaixe seu iPod
TM
tem funcionado
TM
oferece proteção máxima contra sobrecarga do
TM
ainda não estiver respondendo, entre em
®
/iPhone® do dock. Espere 5 segundos.
®
/iPhone®.
TM
e
73

Português
Problema O que fazer
Meu iPod®/
iPhone
não
responde
ao controle
remoto.
O sistema
não
responde
a nenhum
controle.
Cadastre seu Beats® Hoje
www.beatsbydre.com/register
• Verique se o caminho está livre entre o controle remoto e
®
o sistema, sem obstruções.
• Limpe as lentes pequenas da extremidade frontal do
controle utilizando um pano limpo e seco.
• Luzes intensas da sala ou a luz do sol pode causar
interferência. Tente utilizar o controle em outro local.
®
• Remova seu iPod
/iPhone® do dock. Espere 5 segundos.
Em seguida, reencaixe seu iPod
• Verique se a bateria do controle está instalada
corretamente. Caso seja antiga, substitua-a.
• Reinicie o sistema. Primeiro, desconecte o cabo de
alimentação por 60 segundos. Em seguida, conecte-o
de volta.
• Entre em contato com o Atendimento ao Cliente da Beats
em www.beatsbydre.com.
®
/iPhone®.
®
74

www.beatsbydre.com
facebook.com/beatsbydre
twitter: @beatsbydre
Beats Electronics, LLC
1601 Clovereld Blvd
Suite 5000N
Santa Monica
CA 90404
©2012 Beats Electronics LLC

771-00003-01-C
 Loading...