

Beats Beatbox User Guide [ml]

Beatbox
User Guide


Table of Contents
EN Important Safety Information 3
FR Informations de sécurité importantes 21
ES Información de seguridad importante 39
Features and Benets 7
Setting up your Beatbox 8
Connecting Audio Devices 9
Connecting Devices using 3.5 mm mini -jack 12
Volume 13
Using the Remote Control 13
Speaker Placement 16
Troubleshooting 17
Fonctions et avantages 25
Installation de votre Beatbox 26
Connexion des appareils audio 27
Connexion d’appareils avec un mini-jack 3,5 mm 30
Volume 31
Utilisation de la télécommande 31
Positionnement des haut-parleurs 34
Dépannage 35
Características y ventajas 43
Conguración de Beatbox 44
Conexión de dispositivos de audio 45
Conexión de dispositivos con un conector “mini-jack”
de 3,5 mm 48
Volumen 49
Uso del mando a distancia 49
Ubicación del altavoz 52
Resolución de problemas 53

IT Importanti informazioni per la sicurezza 57
Caratteristiche e vantaggi 61
Congurazione della Beatbox 62
Collegamento dei dispositivi audio 63
Collegamento di dispositivi che usano mini jack da 3,5 mm 66
Volume 67
Uso del telecomando 67
Posizionamento degli altoparlanti 70
Risoluzione dei problemi 71
DE Wichtige Sicherheitsinformationen 75
NL Belangrijke veiligheidsinformatie 93
Funktionen und Vorteile 79
Einrichten der Beatbox 80
Anschließen von Audio-Geräten 81
Anschließen von Geräten mittels 3,5 mm-Miniklinke 84
Lautstärke 85
Verwendung der Fernbedienung 85
Lautsprecheranordnung 88
Fehlerbehebung 89
Functies en voordelen 97
Uw Beatbox installeren 98
Audio-apparatuur aansluiten 99
Apparatuur aansluiten met de 3,5 mm mini-jack 102
Volume 103
De afstandsbediening gebruiken 103
Luidspreker plaatsen 10 6
Problemen oplossen 107

UK English
Important Safety Information
• Read, follow, and keep these instructions.
• Pay attention to all warnings.
• Do not use this apparatus near water.
• Clean only with dry cloth.
• Do not block any ventilation openings. Install in accordance with the
manufacturer’s instructions.
• Do not install near any heat sources such as radiators, heat registers, stoves or
other apparatus (including ampliers) which produce heat.
• Do not defeat the safety purpose of the polarised plug. A polarised plug has
two blades with one wider than the other. The wider blade is provided for your
safety. If the provided plug does not t into your outlet, consult an electrician
for replacement of the obsolete outlet.
3

UK English
• Protect the power cord from being walked on or pinched, par ticularly at the
plugs and the point where it exits from the apparatus.
• Only use attachments/accessories speciåed by the manufacturer.
• Unplug this apparatus during lightning storms or when unused for long
periods of time.
• Do not expose this apparatus to dripping or splashing and ensure that no
objects lled with liquids, such as vases, are placed on the apparatus.
• To completely disconnect this apparatus from the AC mains, disconnect the
power supply cord plug from the AC receptacle.
• The mains plug of the power supply cord shall remain readily operable.
WARNING: To reduce the risk of re or electrical shock, do not expose this
apparatus to rain or moisture.
WARNING: No naked ame sources — such as candles — should be placed on
the product.
Place the equipment near a main power supply outlet and make sure that you
can easily access the power breaker switch.
4

UK English
WARNING: This product is intended to be operated ONLY from the AC voltages
listed on the back panel. Operation from voltages other than those indicated
may cause irreversible damage to the product and void the product’s
warranty. The use of AC plug adapters is cautioned because it can allow the
product to be plugged into voltages in which the product was not designed
to operate. Use only the t ype provided with your product. If you are unsure of
the correct operational voltage, please contact your local distributor and/or
retai ler.
5
UK English
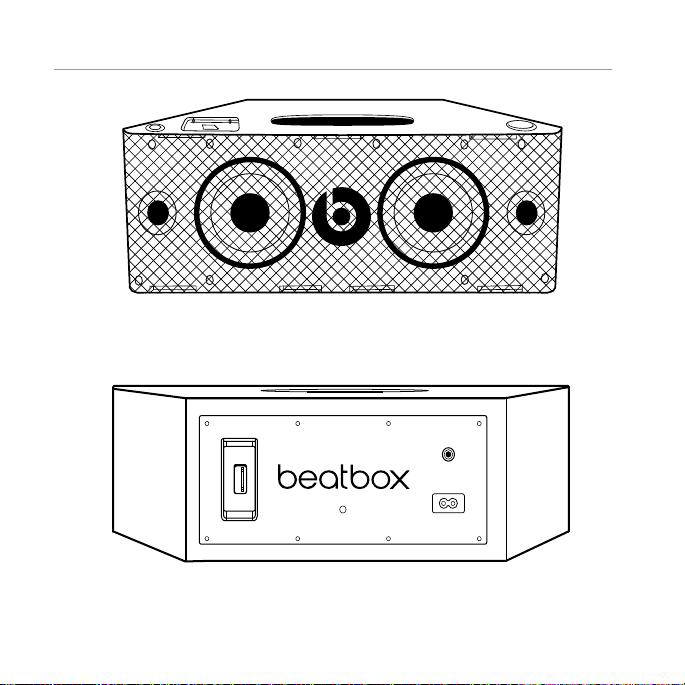
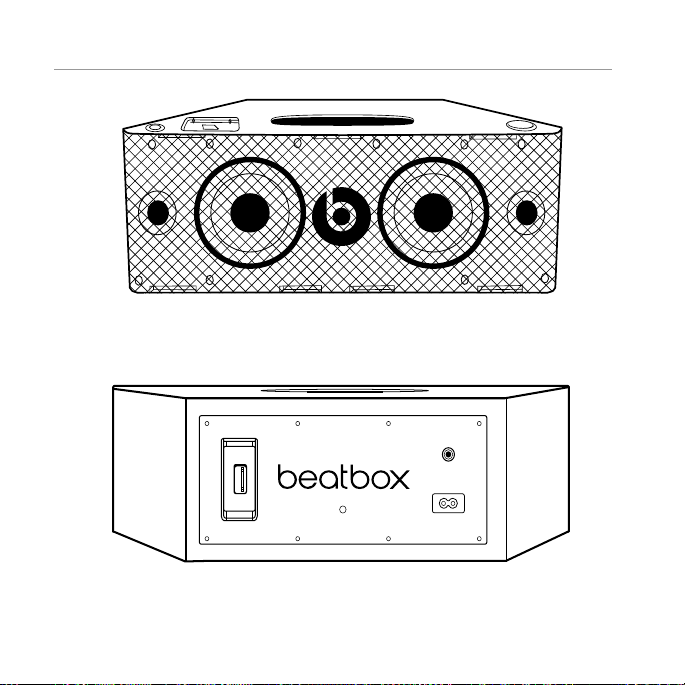
Front view
LINE IN
Wireless
Module
AC-IN
Back view
6

UK English
Features and Benefts
Digital power amp
For powerful, room-lling sound
iPod®/iPhone® dock
Just set your iPod or iPhone in the integrated dock and start listening
3.5 mm stereo mini-jack input
Connect any music player with a standard headphone output
Advanced 5.25-inch long throw bass drivers
Deliver powerful, punchy bass without distortion
Two optimised concave 2-inch high frequency drivers
Deliver crisp mids and highs and precise sound staging
Remote control
Control iPod/iPhone playback and volume
7

UK English
Setting up your Beatbox
Tilting Feet
Beatbox is designed to rest level. However, Beatbox comes with two tilting feet
if you would rather it rest on a slightly back-tilting angle. This is ideal if you’re
going to be placing Beatbox in a low position and you want sound to be
projected upwards. To install, simply push the pegs on the feet into the holes on
the front corners of Beatbox.
Power
Plug the AC power cord into the back of Beatbox, as shown. Plug the pronged
plug end into a power outlet.
LINE IN
Wireless
Module
AC-IN
8
UK English
Connecting Audio Devices
Connecting to iPod®/iPhone®
Beatbox™ features a built-in dock for iPod and iPhone for an easy, direct
connection. This will also give you the ability to control playback with the
included remote control.
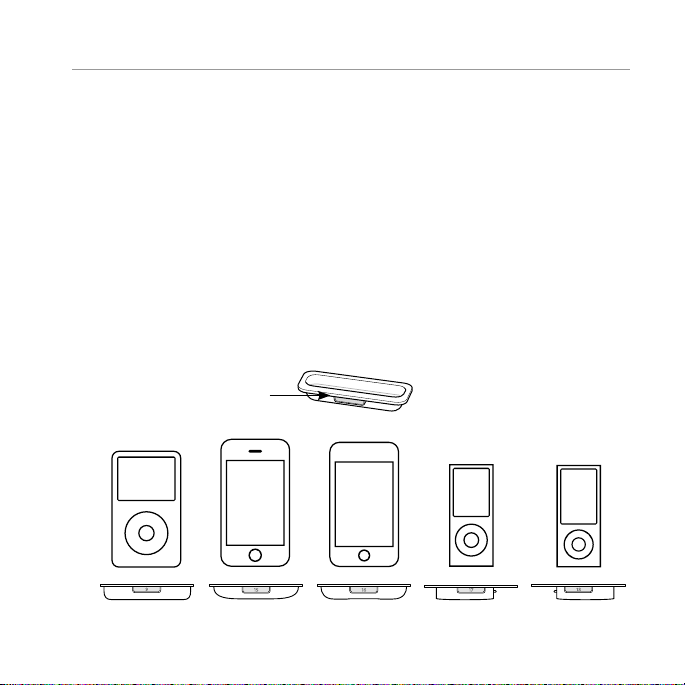
Using iPod/iPhone Dock Adaptors
Beatbox includes multiple Dock Adaptors which t iPod Nano (4th and
5th generations), iPod touch (2nd generation), iPod classic (80GB and
120GB/160GB), iPod with video (30GB) and iPhone 3G and 3GS.
To install, simply push the adaptor plate which åts your model into the iPod/
iPhone dock.
Number fo r which iPod/
iPhone fits
iPod and
iPod classic
9
5th generation (30GB),
iPod classic 80GB
and 120/160GB
iPhone
iPhone 3G
and 3GS
iPod touch
15
2nd generation
iPod nano
16
4th generation
iPod nano
17
5th generation
18
9

UK English
NOTE: If a dock adaptor for your model of iPod® or iPhone® is not included
with Beatbox, you can purchase one at w ww.apple.com/store. Apple’s
dock adaptors do not come in black, but the Beatbox’s dock is made to be
compatible with Apple Dock Adaptors.
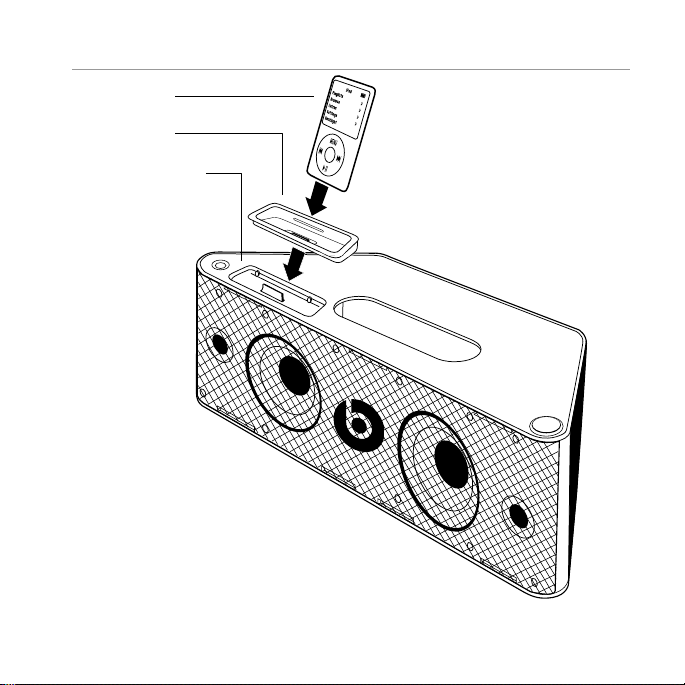
Docking iPod/iPhone
After installing the proper dock adaptor, set your iPod or iPhone onto the dock
on the top of Beatbox, being sure the dock port on your player and the dock
plug are aligned properly. Your player should connect easily and remain
upright in the por t, with no forcing necessary.
Important: Make sure the “Shake to Shuf e” setting is turned off on your iPod or
iPhone. The bass of the speaker may activate it and inter fere with playback.
10
UK English
iPod/iPhone
iPod/iPhone
dock adaptor
iPod/iPhon e dock
11

UK English
Connecting Devices using 3.5 mm
(1/8 inch) mini-jack input
You can connect and listen to any music player which has a standard 3.5 mm
headphone por t using a mini-to-mini stereo cable (not included).
To connect, plug one end of the cable into the 3.5 mm headphone output of
your player and the other end into the 3.5 mm input on the back of Beatbox.
Importa nt: The iPod®/iPhone® dock will override and disable the 3.5 mm
mini-jack input when an iPod or iPhone is docked. Be sure to remove your iPod/
iPhone from the dock before using the 3.5 mm input.
Listen
Be sure a music player is securely connected, as described in the previous
sections. Turn on Beatbox by pushing the power button on the lef t side of the
top surface of Beatbox or with the remote control. Start your player.
12

UK English
Volume
Volume can be controlled with the volume control on the right side of the top
surface of Beatbox or with the remote control.
Using the Remote Control to Control Beatbox
Make sure the CR2025 battery used by the remote is installed correctly. If it is
old, replace it.
Power on an d off: Push
Volume: Push
reached. Push
is reached.
Mute: Push
and hold to increase volume. Release when desired volume is
and hold to decrease volume. Release when desired volume
and release. To resume sound, push again.
and release.
13

UK English
Using the Remote Control to Control iPod®/iPhone®
The included remote control can be used to control playback of a docked iPod
or iPhone. It cannot control playback of other connected devices.
Using the Remote Control for iPod or iPhone Playback
Play: Push
and release.
Pause: Push
Skip forward to next track: Push
Skip back to previous track: Push
Scan forward through a track: Push
and resume normal play.
Scan back through a track: Push
resume normal play.
14
and release. Push again to resume play.
and release.
and release.
and hold. Release to stop scanning
and hold. Release to stop scanning and
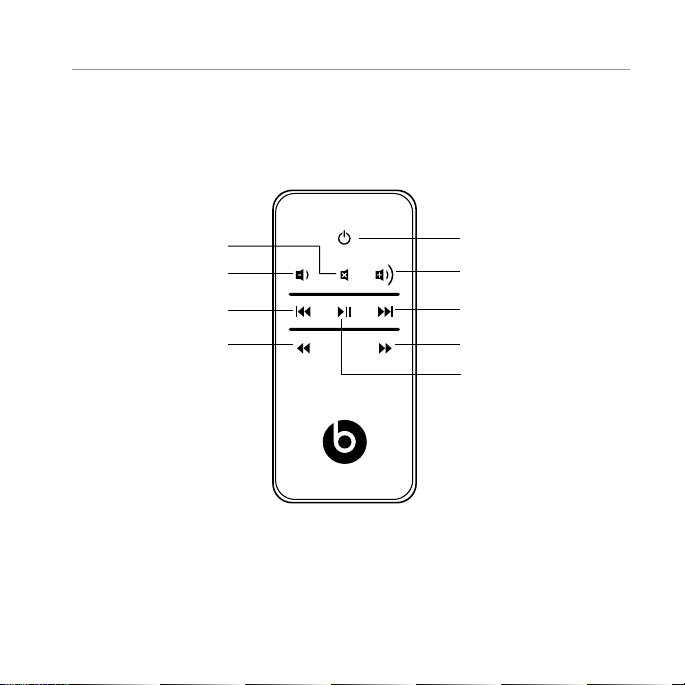
UK English
Mute
Volume down
Skip back
Scan back
Power
Volume up
Skip forward
Scan forward
Play/pause
15

UK English
Speaker Placement
Some helpful guidelines which will help you achieve the best performance from
your Beatbox.
Your Beatbox is designed and engineered to sound great anywhere you place
it. However, realising that every space is dif ferent, there are placements which
will maximise the performance of your Beatbox. The home environment can
present a challenge in choosing the best location for your Beatbox. The trick is
to place the Beatbox in a location which will take advantage of the acoustic
proper ties of your room and give you the best overall balance of sound.
Distance to the side walls, back wall and corners can have the biggest impact
on the sound of your Beatbox. The closer the Beatbox is to a wall, oor or ceiling
the more bass reinforcement you will receive. Maximum bass comes when it is
placed in a corner.
The shape of Beatbox allows you to place it perfectly into a corner, giving you
a great combo of space saving and deep bass. The surface you place your
Beatbox on can also signicantly impact the sound. Make sure you place your
Beatbox on a solid surface to avoid unwanted distortion to the sound.
The height of your Beatbox in relation to your listening position can also affect
the sound qualit y. Ideally, your Beatbox should be as close to ear level as
possible and at least four feet away from your listening position for the best
performance.
16

UK English
We encourage you to spend the time to experiment with the location of your
Beatbox. Trial and error is the best way to hear how your Beatbox reacts in your
environment. Take your time to nd the ideal location to ensure you experience
the best sound quality your Beatbox can offer.
Troubleshooting
The table can help solve most operating problems with your Beatbox. First,
follow these precautions:
• Remove your iPod®/iPhone® from the dock completely.
• Reseat it in the dock årmly.
• Make sure your iPod/iPhone has the latest software installed.
17

UK English
Problem What to do
I hear no
sound
coming
from my
Beatbox.
• Make sure you have your iPod/iPhone docked securely.
• Make sure your iPod/iPhone is turned on and music
is playing.
• Make sure you have the power cord properly
connected on the back of your Beatbox
and that it is plugged into a working AC outlet.
• Make sure you press the power button and verif y
the power LED is lit.
• If you’re trying to listen to a device connected to your
Beatbox via the mini-jack input and cannot hear it,
be sure to remove your iPod/iPhone from the dock.
• On the remote control, press the Play/Pause button.
• Raise the volume.
• Remove your iPod/iPhone from the dock.
Wait 5 seconds. Then reseat your iPod/iPhone.
• Reset the system. First, unplug the power cable
for 60 seconds. Nex t, plug it back in and push
the power button – verify the power LED is lit.
• If you are listening to a device connected via AUX IN,
make sure the device is turned on and music is playing.
Raise that device’s volume.
18

UK English
Problem What to do
My
Beatbox™
suddenly
stopped
working
and the
red LED is
ashing.
My iPod
iPhone
does not
charge up.
• Carefully check if the back plate of the ampliåer is
hot. If the Beatbox has been running at its highest
power output for an extended period, the amplier may
have overheated and the protection circuitry has
shut down the Beatbox temporarily. Your Beatbox
provides maximum protection from amplier
overdrive and overheating. Switch off the Beatbox
and wait 30 minutes to let the back plate cool down.
Switch the power back on.
• Raise the volume to check that it is operating normally.
• If the Beatbox is still not responding, contact
the dealer you purchased it from, or Beats.
®
• Make sure you have the power cord properly
/
®
connected on the back of the unit.
• Make sure you have the power cord plugged
into a working AC outlet.
• Remove your iPod/iPhone from the dock.
Wait 5 seconds. Then reseat your iPod/iPhone.
19

UK English
Problem What to do
My iPod/
iPhone
does not
respond to
the remote
control.
The system
won’t
respond
to any
controls.
Register Your Beats Today
www.beatsbydre.com/register
• Make sure there’s a clear path between the remote
and the system with no obstructions.
• Wipe the small lens on the front end of the remote
using a clean, dr y cloth.
• Bright room lights or sunlight can cause interference.
Try using the remote from another location.
• Remove your iPod/iPhone from the dock.
Wait 5 seconds. Then reseat your iPod/iPhone.
• Make cer tain the remote battery is installed correctly.
If it is old, replace it.
• Reset the system. First, unplug the power cable for 60
seconds. Next, plug it back in.
• Contact your dealer or Beats Customer Service at
www.beatsbydre.com.
20

Français
Informations de sécurité importantes
• Lisez, suivez et gardez ces instructions.
• Prêtez attention à tous les avertissements.
• N’utilisez pas cet appareil dans un environnement humide.
• Nettoyez uniquement avec un chiffon sec.
• Ne bloquez pas les ouvertures de ventilation. Installez en suivant les
instructions du fabricant.
• N’installez pas près de sources de chaleur telles que des radiateurs,
des grilles de chauffage, des fours ou d’autres appareils (y compris des
amplicateurs) qui produisent de la chaleur.
• Respectez le dispositif de sécurité de la prise polarisée. Une prise polarisée
comprend deux broches, une plus large que l’autre. La grande broche
est fournie à titre de sécurité. Si la prise fournie ne correspond pas à votre
installation électrique, consultez un électricien pour remplacer l’installation
obsolète.
21

Français
• Protégez le câble d’alimentation pour éviter de marcher dessus ou de le
pincer, particulièrement au niveau des prises et de la sortie de l’appareil.
• Utilisez uniquement les åxations ou accessoires spéciåés par le fabricant.
• Débranchez cet appareil pendant un orage ou lors de longues périodes
d’inutilisation.
• N’exposez pas cet appareil à des gouttes ou à des éclaboussures et assurez-
vous qu’aucun objet rempli de liquide, comme un vase, n’est placé sur
l’appareil.
• Pour déconnecter complètement cet appareil du secteur, débranchez le
câble d’alimentation de la prise secteur.
• La prise secteur du câble d’alimentation doit rester en bon état de
fonctionnement.
AVERTISSEMENT : Pour réduire le risque d’incendie ou de choc électrique,
n’exposez pas cet appareil à la pluie ou l’humidité.
AVERTISSEMENT : Aucune source de amme nue telle qu’une bougie ne doit
être placée sur le produit.
Placez l’équipement près d’une prise électrique principale et assurez-vous que
vous pouvez accéder facilement au commutateur d’alimentation.
22

Français
AVERTISSEMENT : Ce produit est conçu pour être utilisé UNIQUEMENT avec les
tensions électriques correspondant aux valeurs indiquées au dos de l’appareil.
L’utilisation avec des tensions autres que celles indiquées pourrait entraîner
des dommages irréversibles au produit et annuler la garantie du produit. Il
est recommandé de ne pas utiliser d’adaptateurs secteur car ils pourraient
permet tre de brancher l’appareil sur un système électrique pour lequel il
n’est pas conçu. Utilisez uniquement le modèle fourni avec votre appareil. Si
vous n’êtes pas sûr de la tension électrique adaptée, veuillez contacter votre
distributeur et/ou détaillant local.
23
Français
Module
sans fl
Vue avant
Vue arriè re
Entrée
ligne
Alimentation
secteur
24

Français
Fonctions et avantages
Ampli de puissance numérique
Pour un son puissant, qui remplit tout l’espace
Station iPod®/iPhone®
Mettez simplement votre iPod ou votre iPhone dans la station intégrée et
commencez votre session d’écoute
Entrée mini-jack stéréo 3,5 mm
Connectez n’importe quel lecteur de musique avec une sortie écouteur
standard
Caissons de basses dernier cri longue portée 5,25 pouces
Obtenez des basses riches et percutantes sans distorsion
Deux caissons de basses 2 pouces ampliés avec haut-parleurs hautes
fréquences concaves
Pour des médiums et des aigus limpides, avec un enregistrement sonore précis
Télécommande
Contrôlez la lecture et le volume de votre iPod/iPhone
25

Français
Installation de votre Beatbox
Supports orientables
Votre Beatbox est conçue pour être posée à plat. Cependant, elle est équipée
de deux supports orientables vous permettant de l’incliner légèrement vers
l’arrière. La solution idéale si vous placez la Beatbox en position basse et que
vous souhaitez projeter le son vers le haut. Pour l’installer, poussez les pinces
des supports dans les ouvertures placées aux coins avant de la Beatbox.
Alimentation
Branchez le câble d’alimentation secteur au dos de la Beatbox, comme illustré.
Branchez la prise sur l’alimentation secteur.
Entrée
ligne
Alimentation
Module
sans fl
secteur
26

Français
Connexion des appareils audio
Connexion à un iPod®/iPhone®
La Beatbox™ comprend une station intégrée pour l’iPod et l’iPhone pour
une connexion directe facile. Cela vous donne également la possibilité de
contrôler la lecture avec la télécommande fournie.
Utilisation des adaptateurs de station iPod/iPhone
La Beatbox comprend plusieurs adaptateurs de station qui conviennent pour
l’iPod Nano (4ème et 5ème générations), l’iPod touch (2ème génération), l’iPod
classic (80Go et 120Go/160Go), l’iPod vidéo (30Go) et les iPhone 3G et 3GS.
Pour l’installer, insérez l’adaptateur correspondant à votre modèle dans la
station iPod/iPhone.
Numéro correspondant à
l’iPod/iPhone
iPod et
iPod classic
9
5ème génération (30GB),
iPod classis 80GB
et 120/160GB
iPhone
iPhone 3G
et 3GS
iPod touch
15
2ème génération
iPod nano
16
4ème génération
iPod nano
17
5ème génération
18
27

Français
REMARQUE : Si l’adaptateur de station pour votre modèle d’iPod® ou
d’iPhone® n’est pas inclus dans votre Beatbox, vous pouvez l’acheter sur
www.apple.com/store. Il n’existe pas d’adaptateurs Apple noirs, mais ils sont
compatibles avec la station de la Beatbox.
Placez votre iPod/iPhone sur la station
Après avoir installé l’adaptateur approprié, installez votre iPod ou iPhone sur
la station au-dessus de la Beatbox, en vous assurant que les connecteurs de
votre lecteur et de la station sont connectés correctement. Votre lecteur doit se
connecter facilement et rester droit dans le port, sans avoir à forcer.
Impor tant : Assurez-vous que le paramètre « Shake to Shufýe » est désactivé sur
votre iPod/iPhone. Les basses du haut-parleur pourraient l’activer et interférer
avec la lecture.
28
 Loading...