

Page 1

Page 2

1
Band
Band tuner
APS/ST
Warnings and Precautions...........................................2
Electric Connection .... 4........................................... .....
Installation.................................................................5
General Features........................................................6
System setting.....................................................12
Radio Operation..............................................16
Remote Control..........................................................7
Accessories....................................................17
Specifications.................................................23
Video
Audio
System
Contents
Reception collection
Speaker collection
Install the unit
Remove the unit
Loading and Replacing the battery
Basic operation
USB/SD operation.......................................................11
USB/SD PLAYER
Blue Tooth........................................................14
TV tuner...................................................................13
Play Operation............................................................9
.
Troubleshooting.............................................18
Familiar characters and their meanings
General problems
TFT Monitor
Radio Tuner
Mp3 playback
DVD player
.
Page 3
2
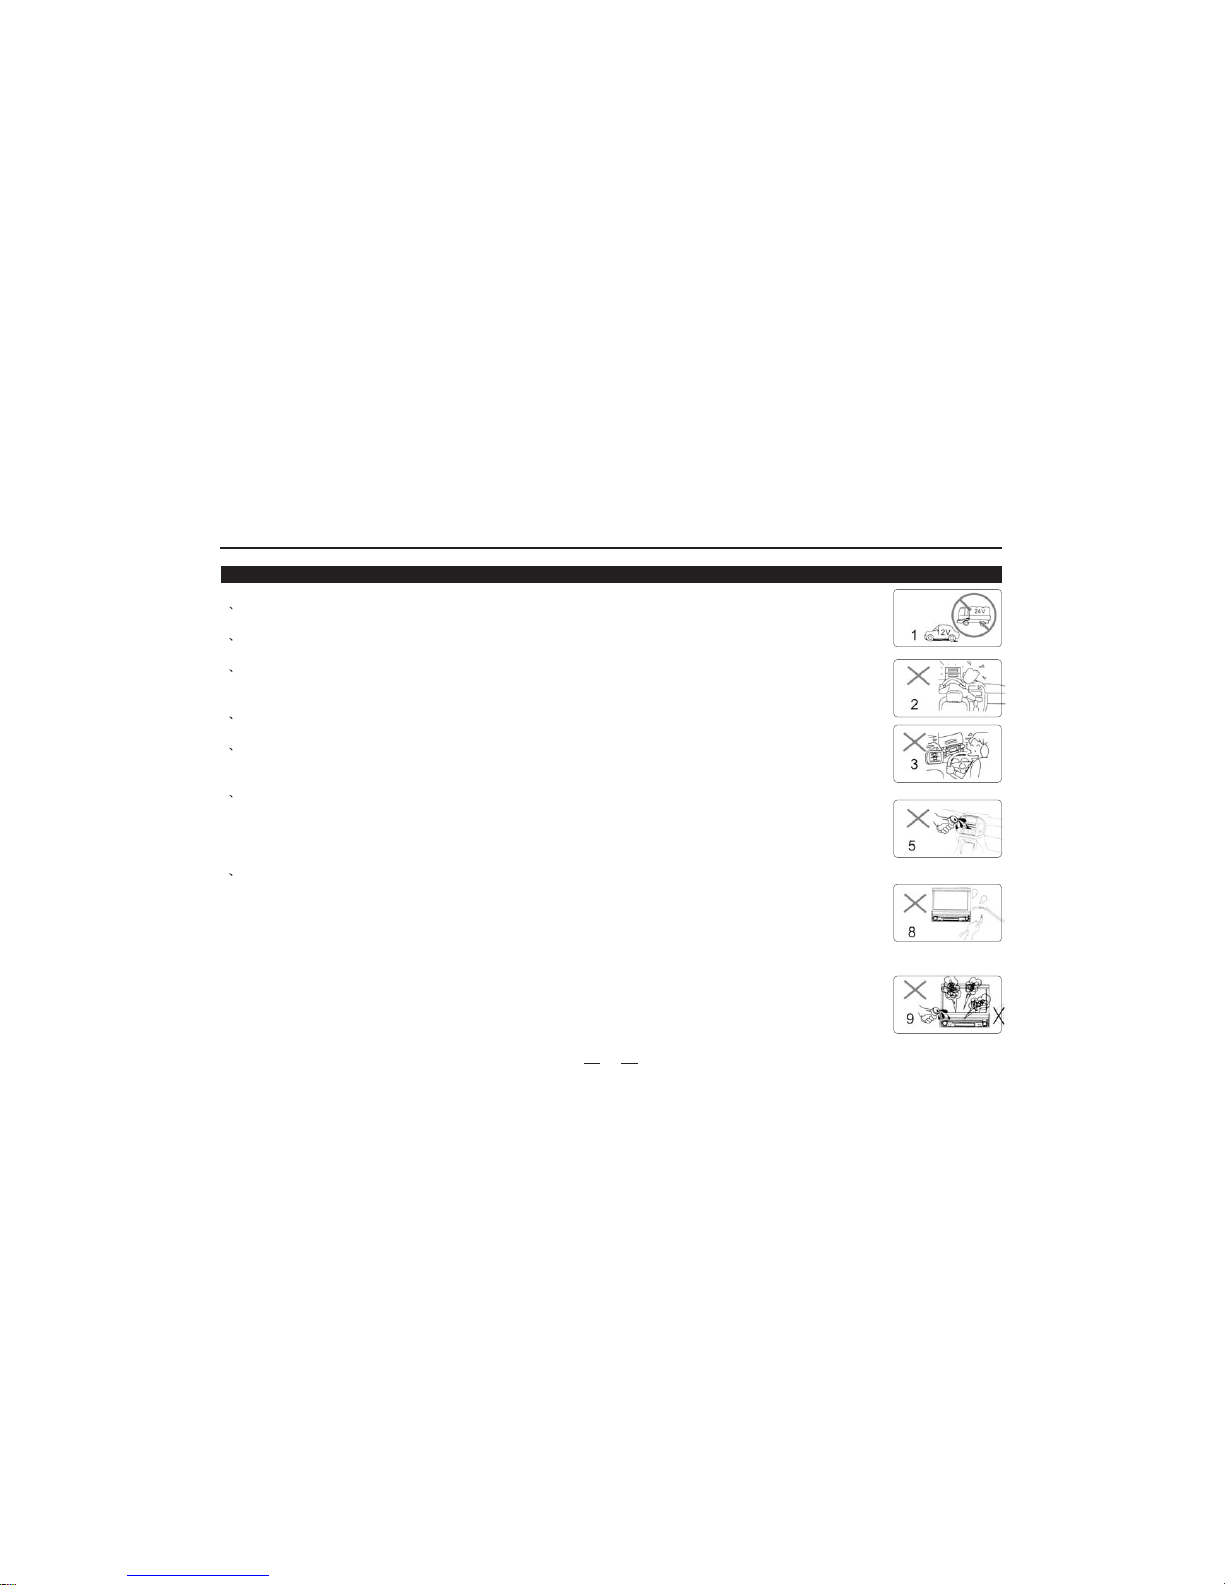
Warnings and Precautions
1 Only connect the unit to a 12V power supply with negative grounding.
Never install the unit where the operation for safety driving is restrained.
Never use the video display function in the front when driving to prevent the violation of laws
regulations and also to reduce the risk of traffic accident except using for rear view video camera.
Never expose the unit, amplifier,speakerstomoistureorwatertopreventelectronicsparksorfires.
Please don't change the fuse in the power cord without professional guidance, improper fuse may
cause damage to this using unit or even cause fire.
Please power off the unit at once and send it back to the after-sales service center or the dealer/
distributor you purchased from if one of the following symptoms is found:
(a)NO audio output; (b)NO image output;(c)Water or other obstacle enters the unit; (d)Smoking;
(e)Peculiar smell.
To ensure safe driving, please adjust the volume to a safe and comfort level in case of emergency
situations.
2
3
4
5
6
7
Warnings
Page 4

3
1
2
3
4
5
6
7
8
9
10
11
Never disassemble or adjust the unit without any professional guide. For details, please consult any professional car shop/
dealer for inquiry.
If the front panel or the TFT monitor is squalid, please use a clean silicone cloth and neutral detergent to wipe off the spot.
Using a rough cloth and non-neutral detergent such as alcohol for cleaning may result in scratching or decoloration to the
applicant.
If any abnormal behavior of the unit is found, please refer to trouble shooting guide of this manual. If no relevant information is
found , please press the [RESET] key on the front panel to resume factory default.
If you have parked the car in hot or cold weather for a long time, please wait until the temperature in the car becomes normal
before operating the unit.
Using in-car heater in low temperature environment may result in beads coagulate inside the unit, DO NOT use the unit in this
situation, eject the disc and wipe off the bead on the disc. If the unit still doesn
No fierce impact to the LCD monitor when it is in open position for preventing the damage to any mechanisms inside.
To prevent the damage to the screen, avoid touching it with sharp objects.
The monitor employs auto motorizing mechanism, please do
To provide a clear demonstration and an alternative for easy understanding to the operation of this unit, graphic illustrations
are used. However,theseillustrationsaresomedifferentfromtheactualimagesdisplayedintheunit.
During operation the unit," "is displayed if the particular operation is not available or illegal.
Operate the unit correctly according to this manual to prevent unnecessary problem. The guarantee won
't work after a few hours, please contact with
after-sales service center.
n't push, pull, or swivel the monitor manually to prevent damage
to any mechanisms inside.
't be valid if the
problem is caused by inappropriate operation.
Precautions
Warnings and Precautions
Page 5
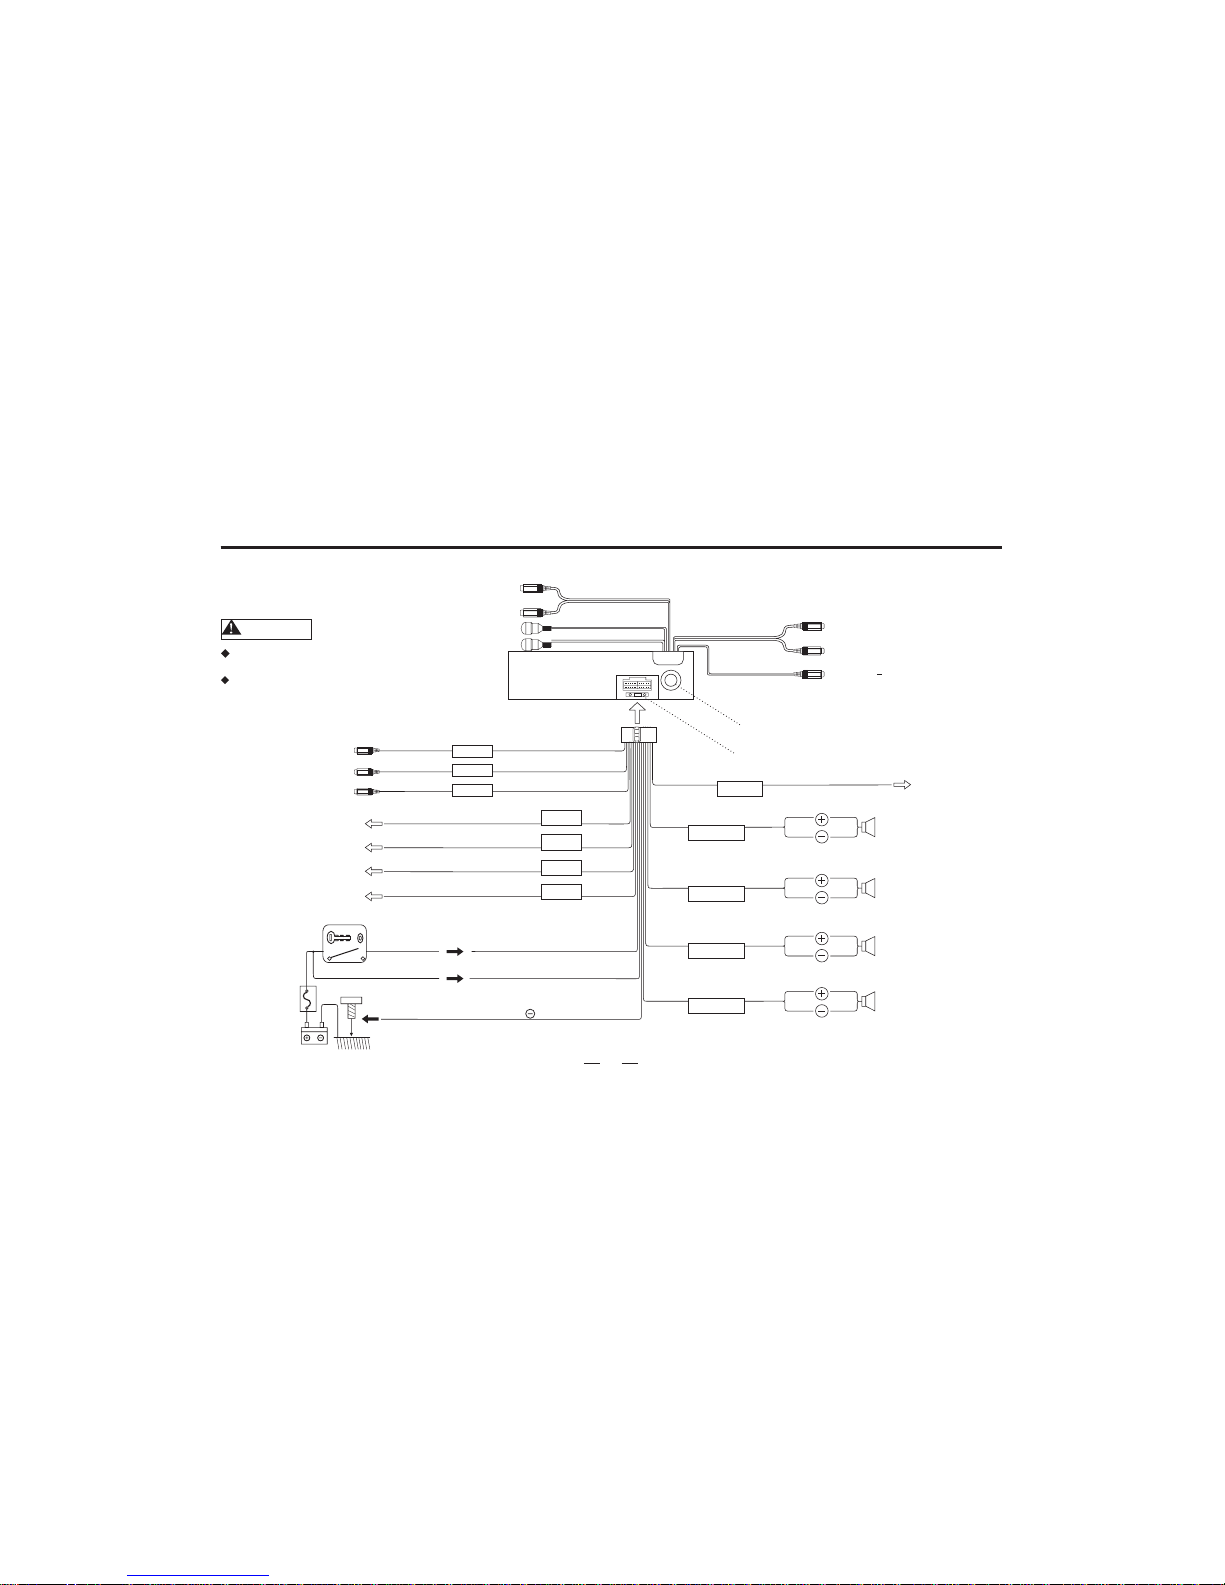
Electric Connection
White/Black
Gray
To front left speaker
To frontright speaker
To rear left speaker
To rearright speaker
Green
Ignition wire(Red)
Battery wire(Yellow)
Ground wire(Black) (To carchassis)
Fuse(10A)
Battery
Car fusebox
(Main fuse)
Ignition key
sw tchi
White
Gray/Black
Green/Black
Purple
Purple/Black
10
(RED)
(WHITE)
Light wire
Gray
Gray
BROWN
SUBWOOFER
AUXLEFTIN
AUX RIGHTIN
VIDEO IN
(YELLOW)
BACK ACAR VIDEO IN
()YELLOW
Connect controlfor antenna
Back cardetecting wire
Brake detectingwire
Remote controlfor amplifier.
FRONT RIGHTRCA OUT
FRONT LEFTRCA OUT
(WHITE)
(RED)
VIDEO OUT
(YELLOW)
Gray
Gray
Brown
Pink
Blue
Orange
Front.L
Front.R
Rear.L
Rear.R
FM/AM antennainput
Warning
Before installation,pls make
conference tothe chart.
Breaking wire:The unit willwithout display
if notconnect with thebreaking wire.
4
TV ANTENNA PLUG
(
)
Without TVtuner,
without thiswire.
Page 6
5
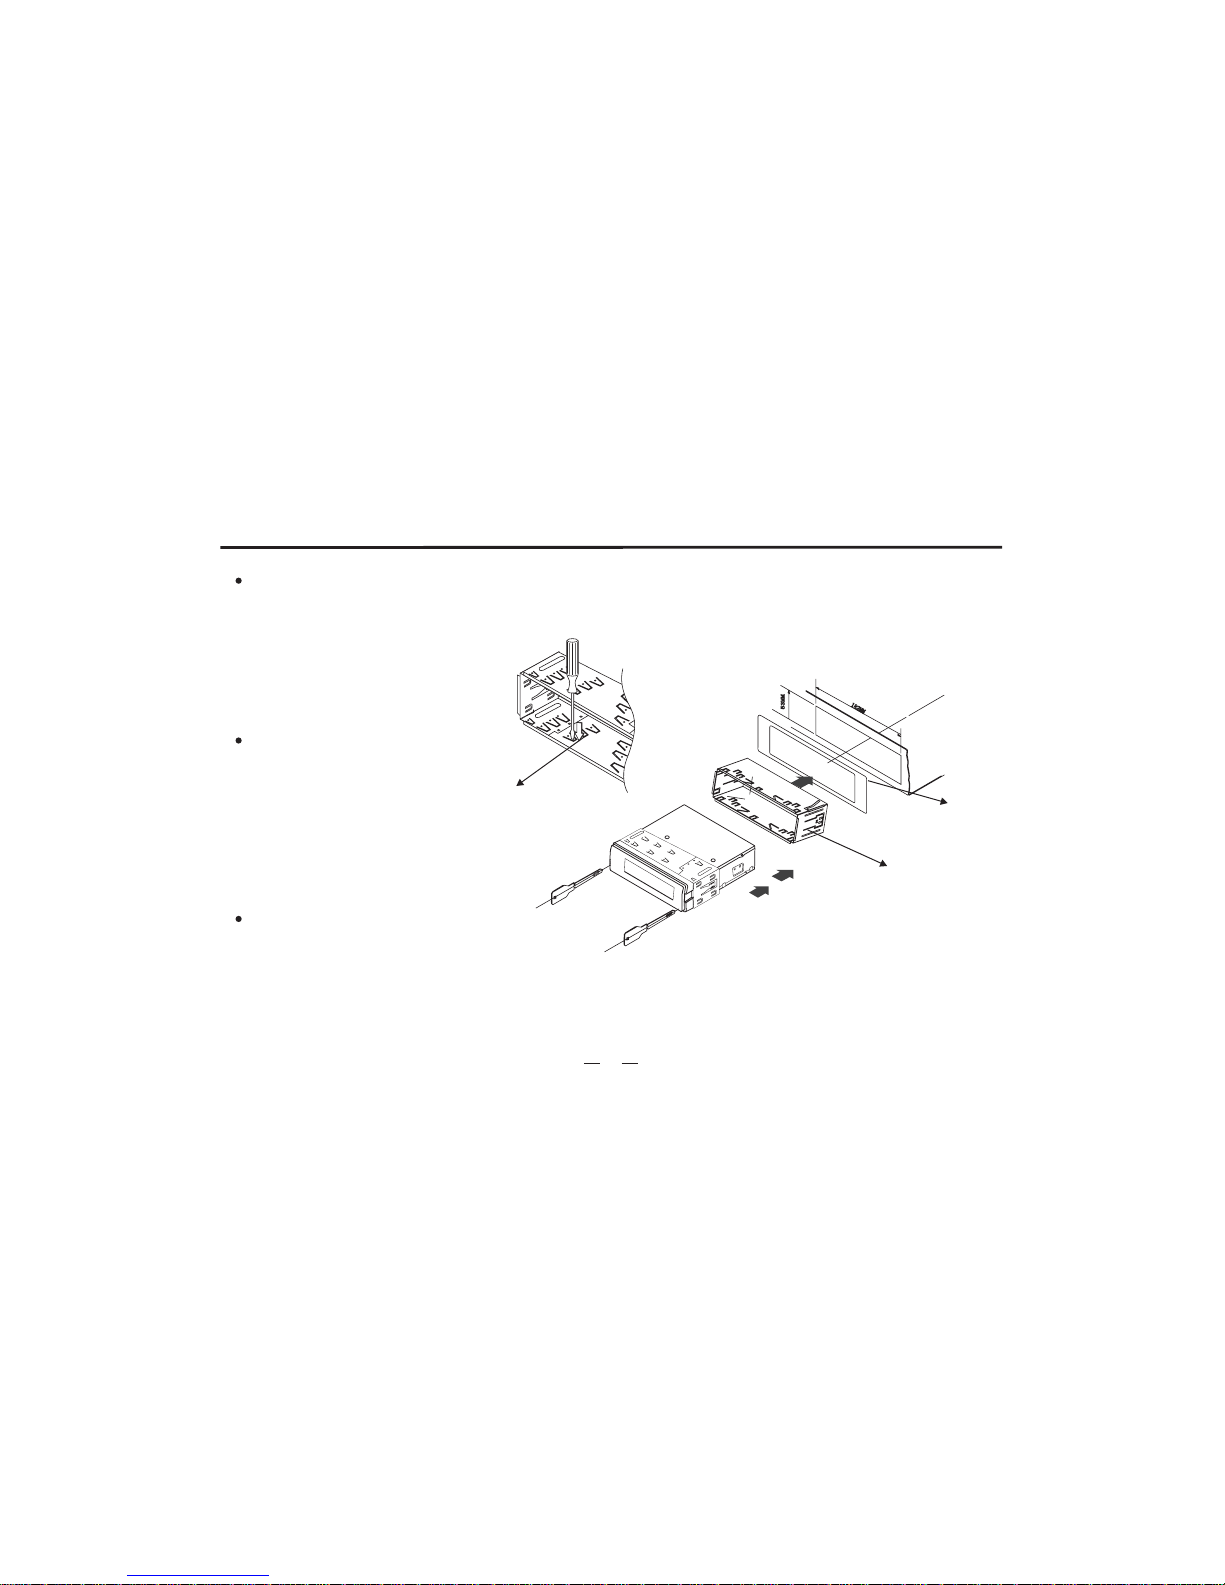
Before installing the receiver, fit it in the suitable place of
your car.Thenconnectthecorrespondingspeakersand
electrical connections. When your system is operated properly,
follow the instructions installation
1) Adapter
(not supplied)
2)Bend over the slices
(supplied)
Slices
(supplied)
3) Two keys for releasing
the unit (supplied)
INSTALL THE UNIT
1)Install the bracket
2)Bend over some slices to secure the
installation of bracket inside of dash.
3)To avoid shake of the receiver, make
sure to install the fixation strap behind
the receiver.
Insert the keys into the small gaps in
the right and left sides of the unit at
the same time. Link the keys to the
slices and then pull out the unit lightly
to remove it from your car,andthen
pull out the connection plugs.
REMOVE THE UNIT
Installation
Page 7
General Features
10
1
2
11
13
12
6
9
6
4
3
8
5
7
15 1614
Note: This unit doesn't haveRDS function,
AF/TA/PTY neither.
MENU
VOL
MIC
SOURCE
BAND
APS/
IR
ST/RPT/TA
MUTE
/PTY
CLK/
/AF
Page 8
7
General Features
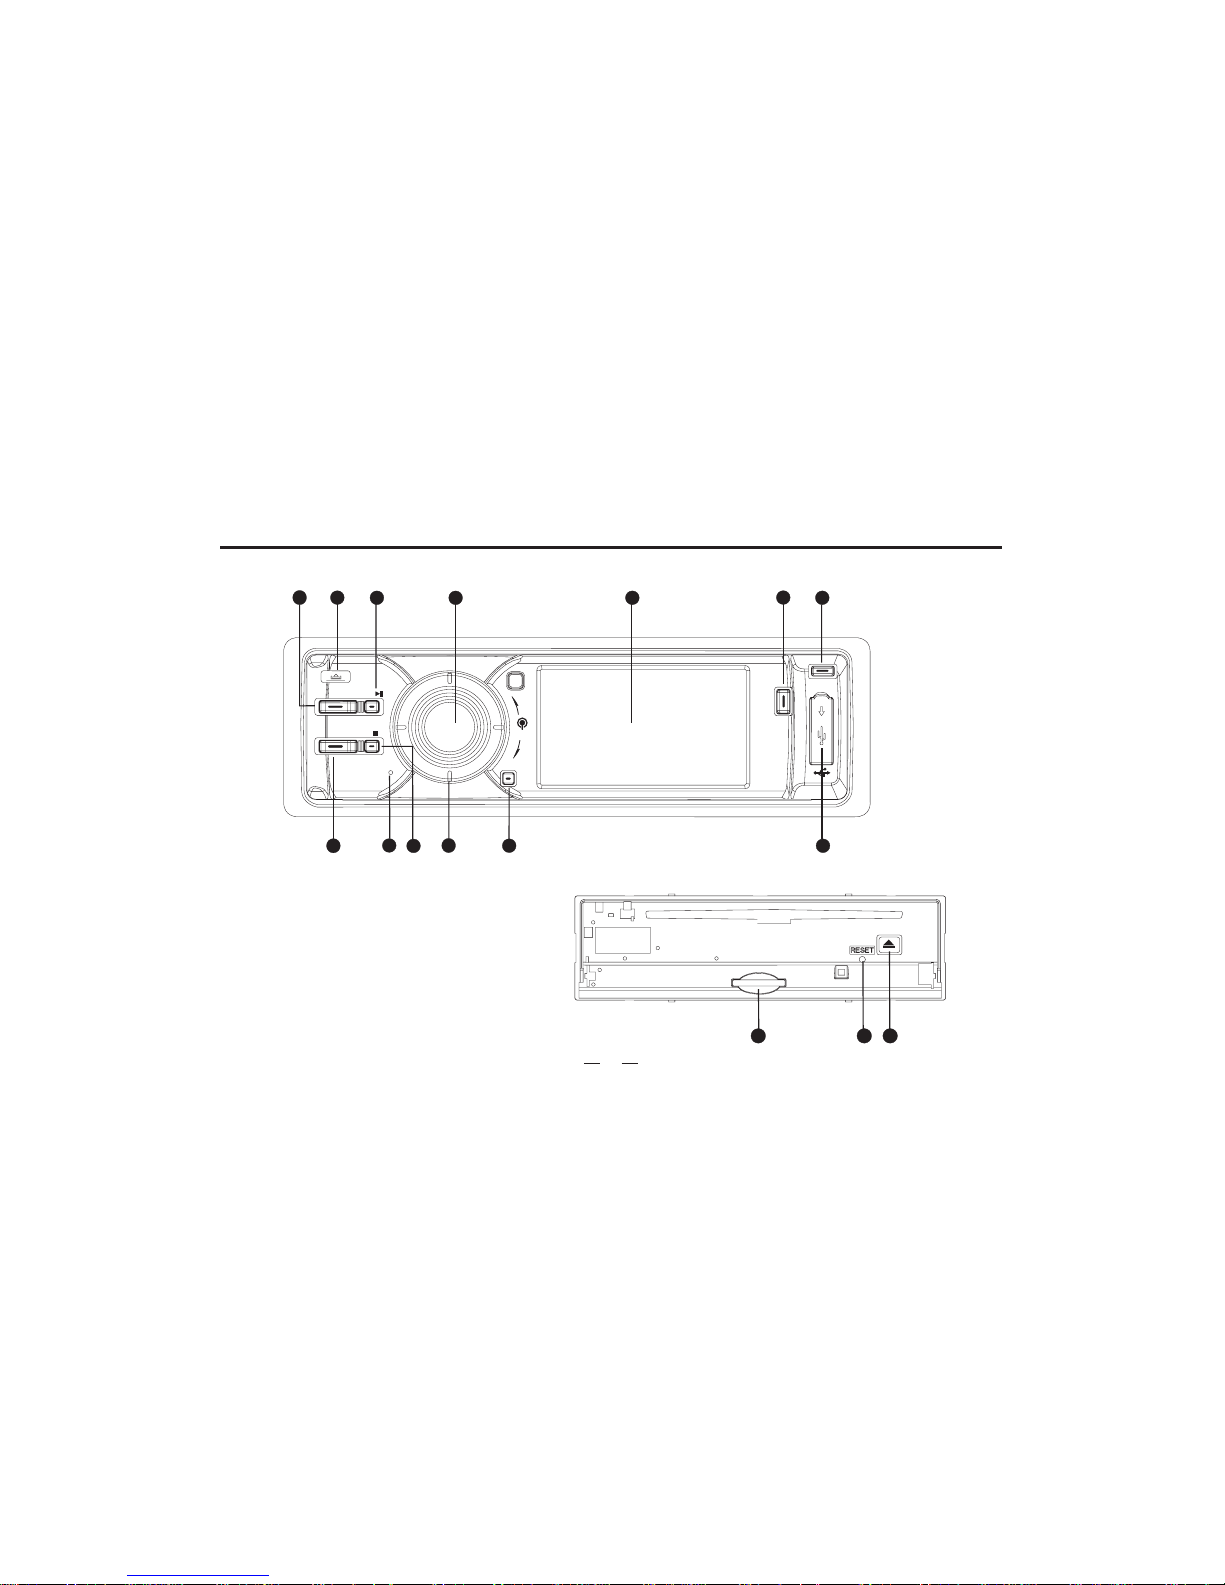
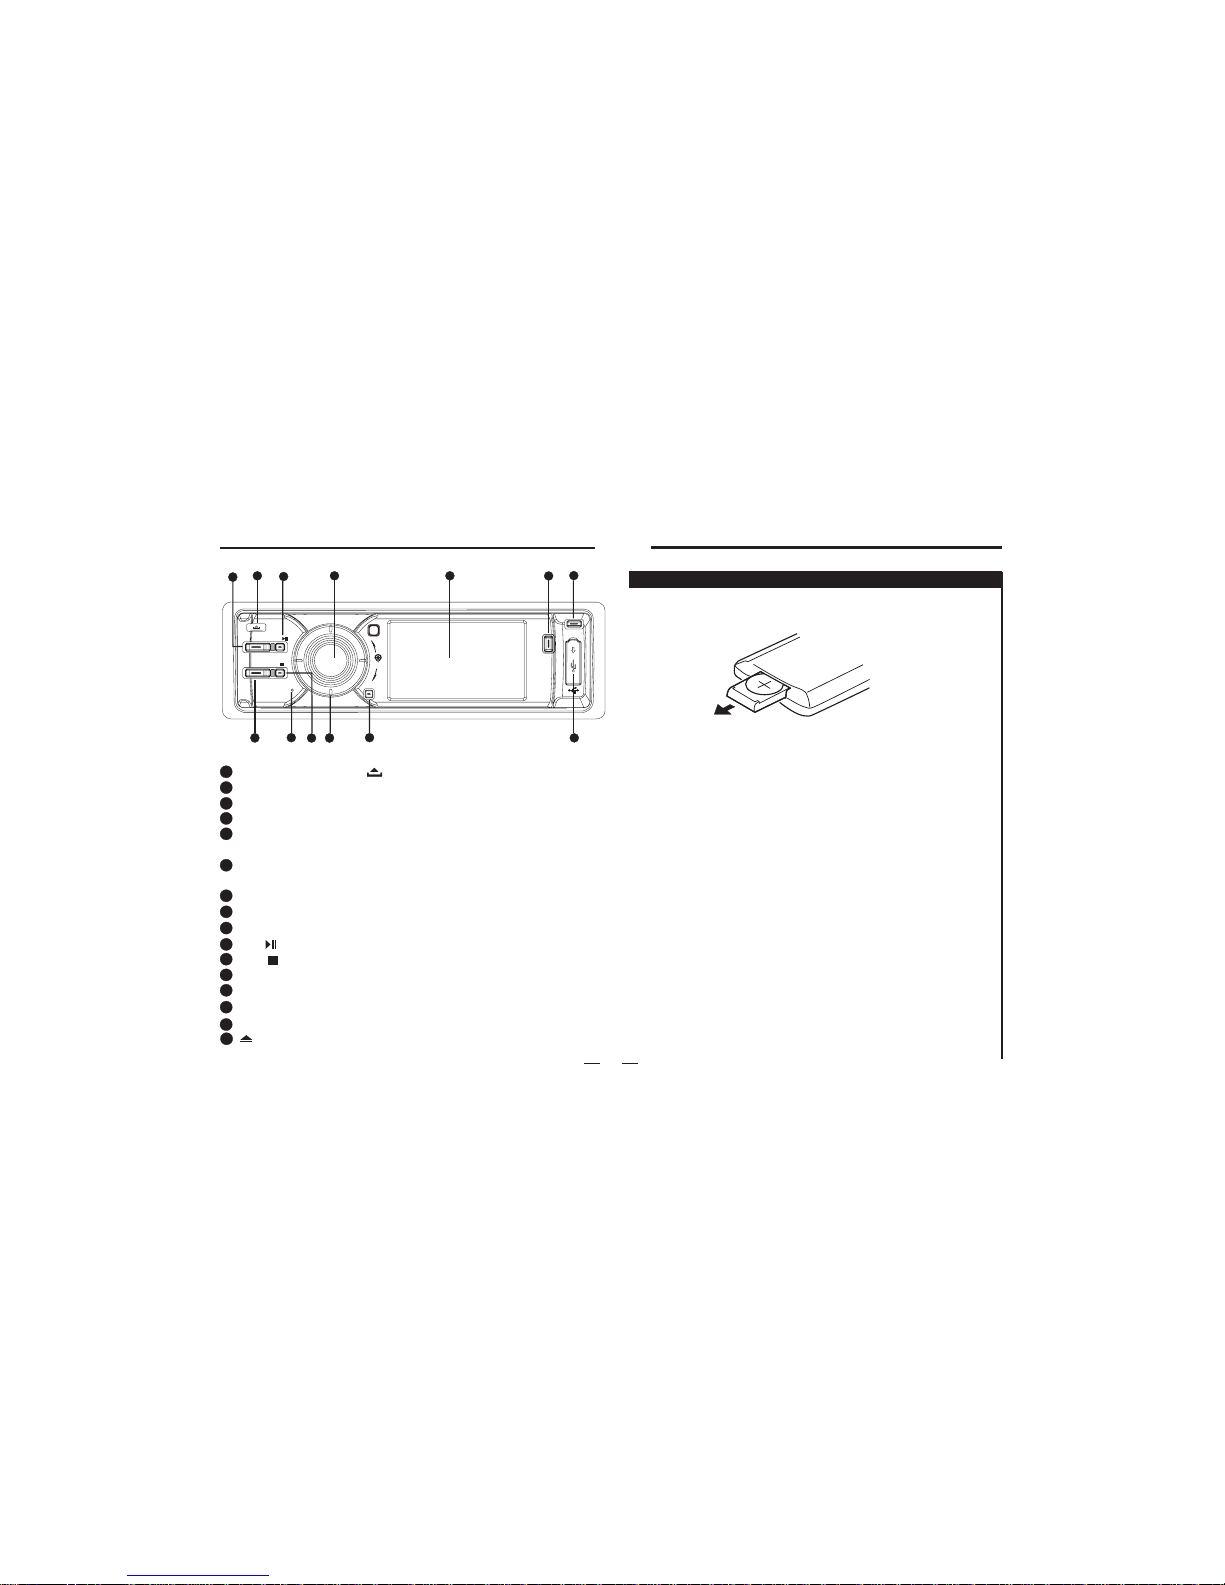
Remove Panel: Press[ ]to remove the panel.
MENU Button: System setting.
BAND Button: Band switch.
SOURCE Button : Play source switch.
Four Directions Button: Select the menu through up/down/
left/right direction.
ST/RPT/TA Button: Sound track switch/Repeat/
TrafficBroadcast.
MIC.
MUTE/PTY Button: Mute/Program style.
USB Port.
APS/ Button: Play/Pause/Reception Scan.
CLK/ /AF Button: Clock/Stop/Reception Scan.
TFT-LCD screen.
VOL Button.
SD Slot.
Reset Button.
[ ]Button: To eject the DISC.
Pull out
Loading and replacing the battery
Remote Control
Notes of remote control using:
Aim the remote controller at the remote sensor on the unit.
Remove the battery from the remote control or insert a
battery insulator if the battery has not been used for a
month or longer.
DO NOT store the remote control under direct sunlight
or in high temperature environment, or it may not function
properly.
The battery can work for 6 months under normal condition.
If the remote control can't work, please change the battery.
Use(button shaped) lithium battery(CR-2025)only.
DO NOT recharge, disassemble, heat or expose the battery
in fire.
Insert the battery in proper direction according to the
1)
2)
3)
4)
5)
6)
7) (+)
and(-)poles.
Store the battery in a place where children cannot reach to
avoid risk of accident.
8)
10
1
2
3
4
5
6
7
8
9
12
15
13
11
16
14
10
1
2
11
13
12
9
6
4
3
8
5
7
MENU
VOL
MIC
SOURCE
BAND
APS/
IR
ST/RPT/TA
MUTE
/PTY
CLK/
/AF
10
Page 9
Remote Control
MUTE
Sub-T
BAND
APS
EQ ST
S T
DI- DI+
SOURCE
PWR
1 2
3
4
5
6 7 8
9 0 10
+
GOTO
ENTER
SEL
CLK
Title
Setup
OSD
N/P
R/L
AF TA PTY
RDM
PRG
RPT
ANGLE
LANGUAGE
PBC
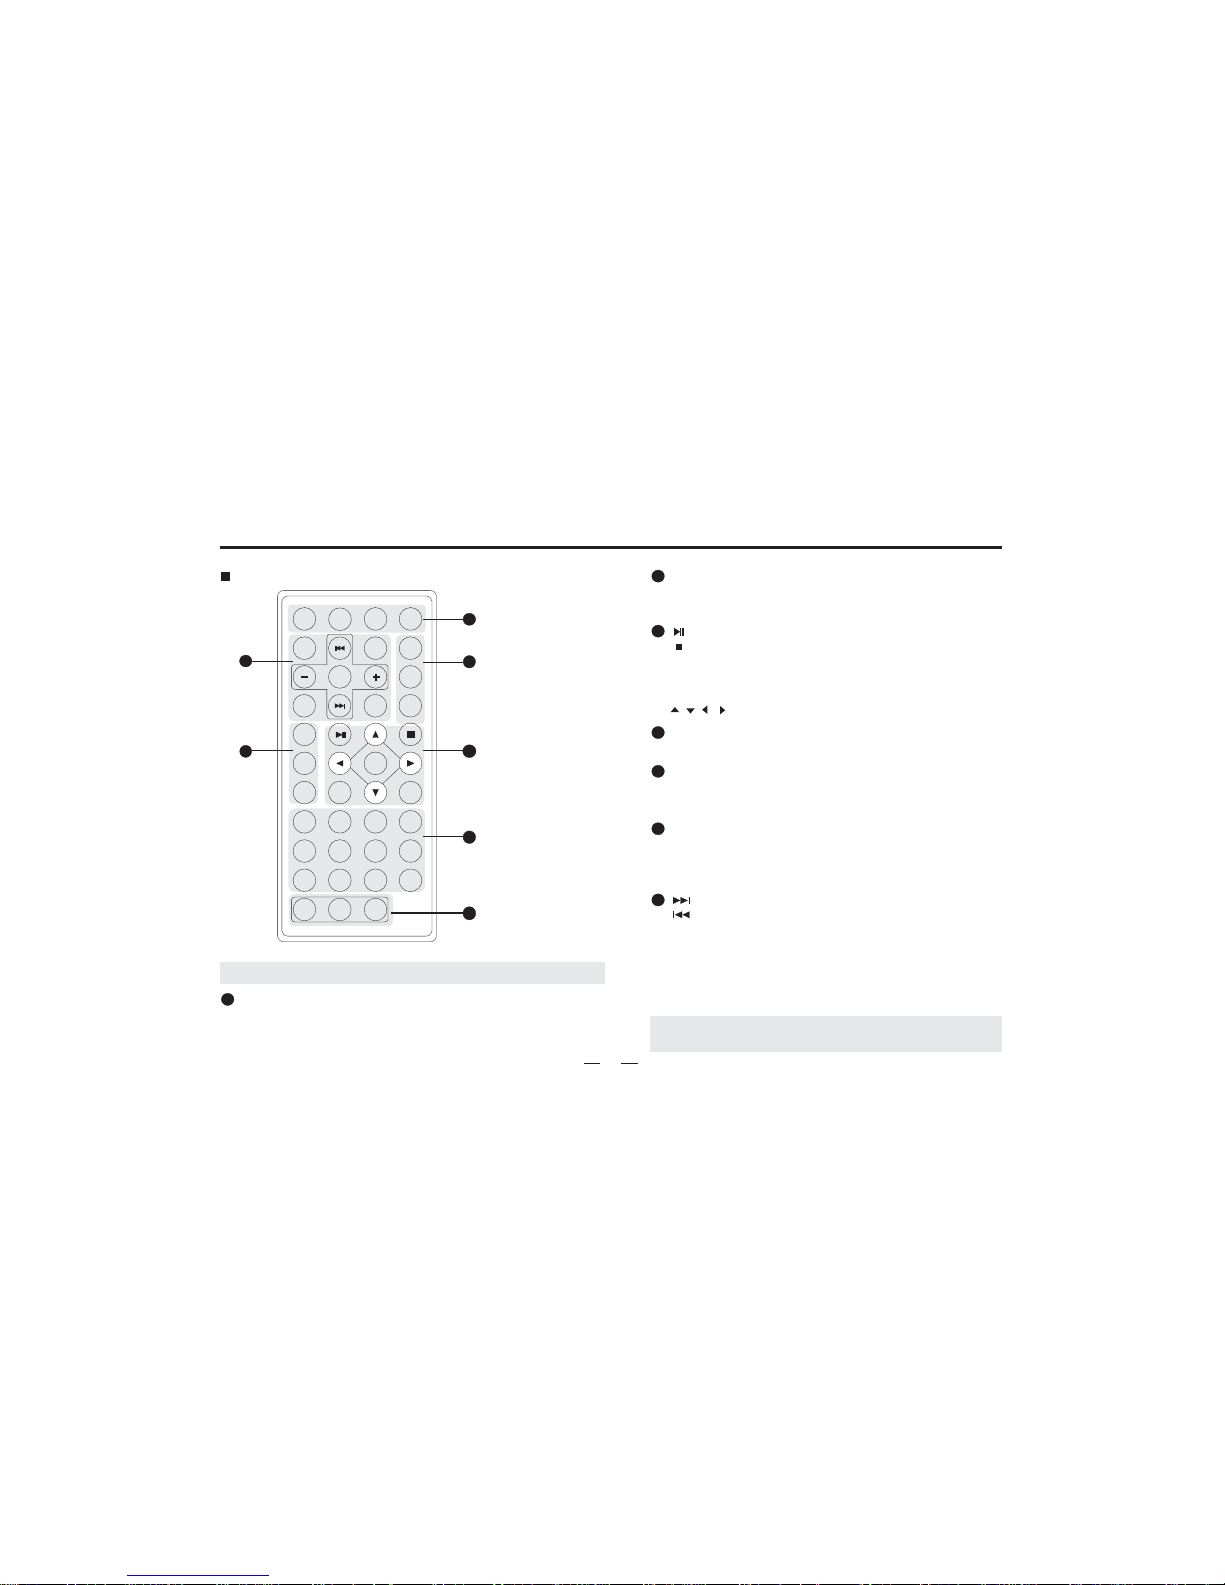
Button an Function
[BAND/RDM] Button: Band switch/Play randomly
[APS/PRG] Button: Scan/Program
[ST/RPT] Button: Stereo switch/Repeat
[ ]Button: Play/Pause
[ ]Button: Stop
[Setup] Button: Menu setting
[Title] Button: Title Menu
[ENTER] Button: Play/Confirm
[ ][ ][ ][ ]Button: Up/down/left/right button
[0~9]Button:0~9
[GOTO] Button: GOTO search
[AF] Button: Search stations automatically
[TA] Button: Traffic broadcast
[PTY] Button: Program style
[N.P/ANGLE] Button: Video switch/Angel Adjustment
[R.L/LANGUAGE] Button: Left/right sound track switch
dialogue language.
[OSD] Button: Screen Display
[ ]Button: Forward/Next chapter
[ ]Button: Rewind/Last chapter
[DI+]Button: Next disc
[DI-]Button:Last disc
[+/-]Button: Increase/recluce volume
[SEL] Button: System setting
[CLK] Button: Clock display
[EQ] Button: Sound effect
[PWR] Button:Power
[Sub-T]Button: Language switch
[MUTE] Button: Mute
[SOURCE] Button: Play source switch
8
Note: Remote picture just forconfernce.
Note: This unit doesn't haveRDS function, AF/TA/PTY neither.
This unitdoesn't have CDCfunction, DI-/DI+ neither.
5
1
3
4
2
7
6
1
2
3
4
5
6
7
Page 10
SRC/PWR
Press[ ] to eject the disc.
Eject
EJECT:
About 10seconds after thedisc ejected ,ifnot
taken out,the disc willbe absorbed inagain.
NOTE:
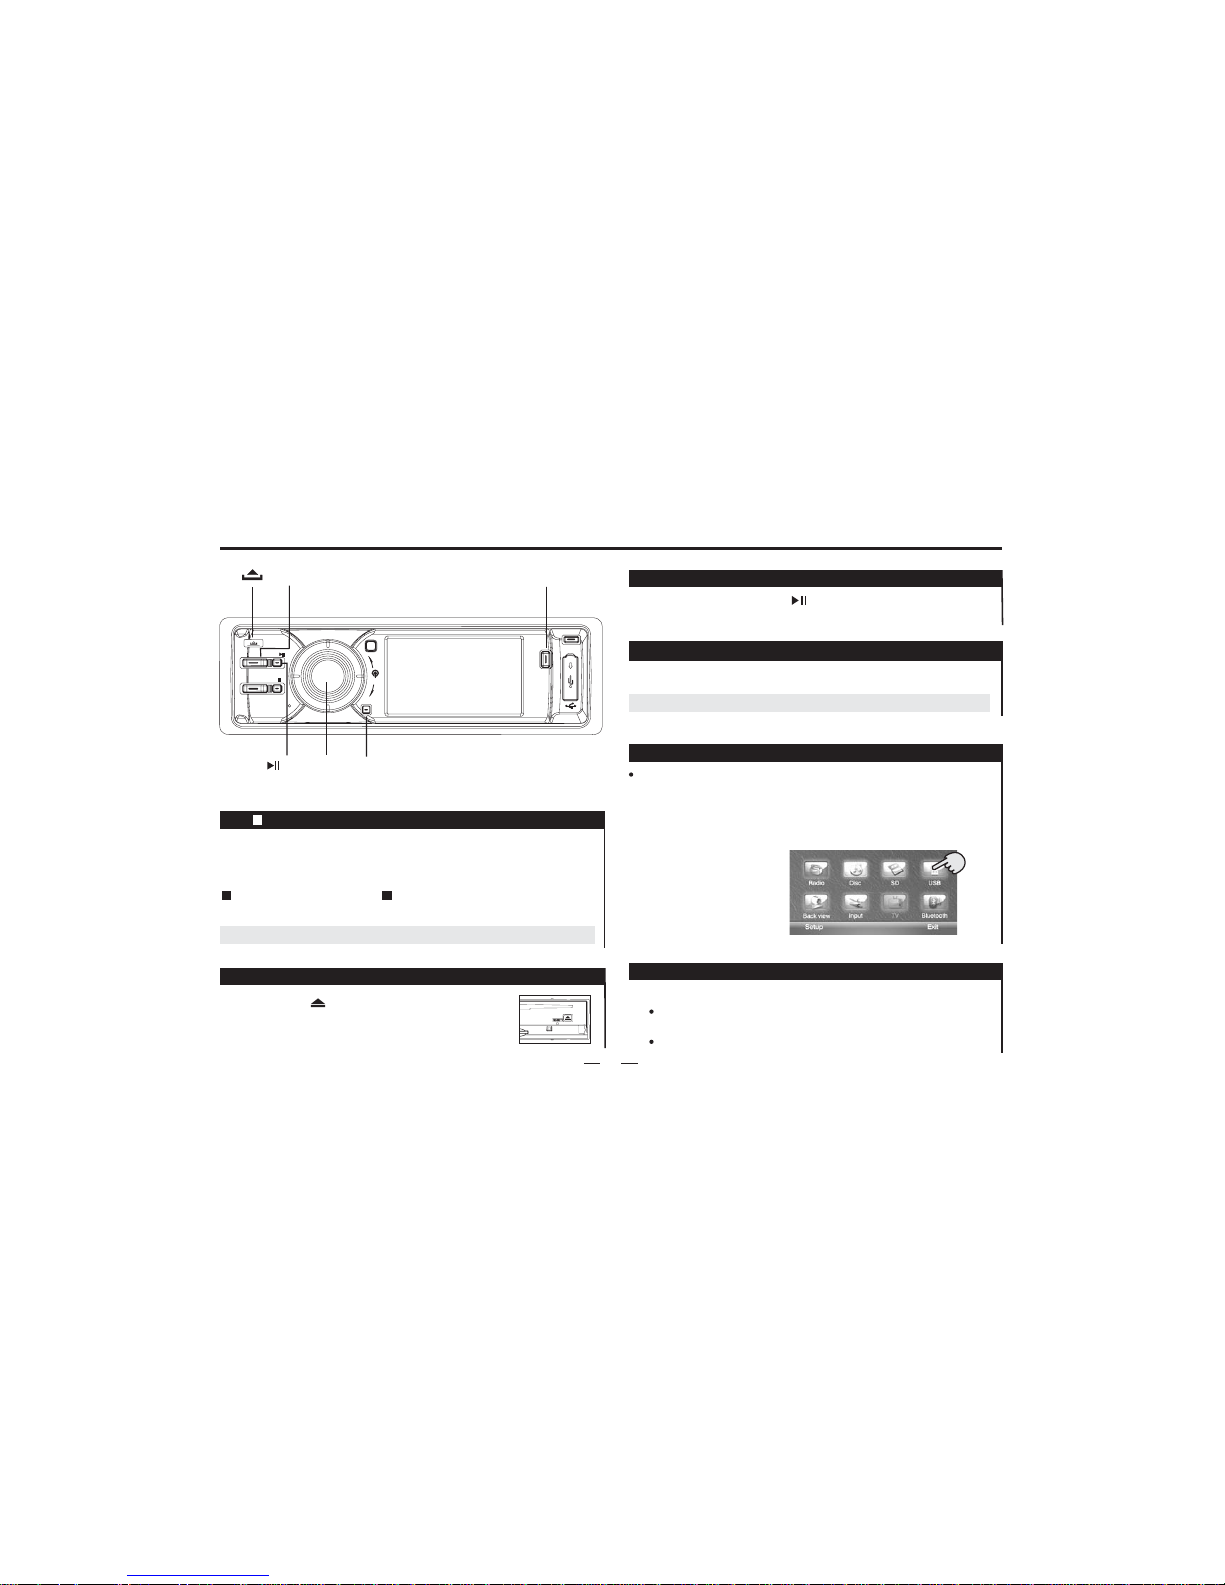
Press [SRC] button shortly will turn the unit on. Hold [SRC]
button down will turn the unit off.
Volume
Increasing Volume:
Decreasing Volume:
Rotate the VOL button in .counterclockwise direction
NOTE: When the power is on, press [SRC] button will show
the following picture, touch the certain icon to select the exact
function needed.
Rotate the VOL button in anticlockwise direction.
Press [APS/ ] button to play or pause.
Play/pause:
PLAY/PAUSE
NOTE:
Press [VOLUME] button can play too.
Gray iconcan not use.
NOTE:
:
CLK/
VOL
SRC/PWR
/APS
MENU
MUTE/PTY
CLK: In reception state, press this button will display the time,
but can not adjust the time.(Time adjust, turn to P12,
system setting.)
Note: If the unit doesnot have thisfunction, please skipit.
MUTE
Press this button to turn off volume and again to resume.
Note: If the unit doesnot have thisfunction, please skipit.
9
Play operation
In the play mode, press[ ]button once to pause, press it
again to stop.
MENU
VOL
MIC
SOURCE
BAND
APS/
IR
ST/RPT/TA
MUTE
/PTY
CLK/
/AF
Page 11
REP ONE
REP DIR REP ALL REP OFF
10
Play operation
Hold [ ] button down;
Select chapter or section:
In theDVD mode,
press[ ]to
choose thelast chapter; press[ ] to choose the nextchapter.
Forward:
Rewind: Hold [ ] button down.
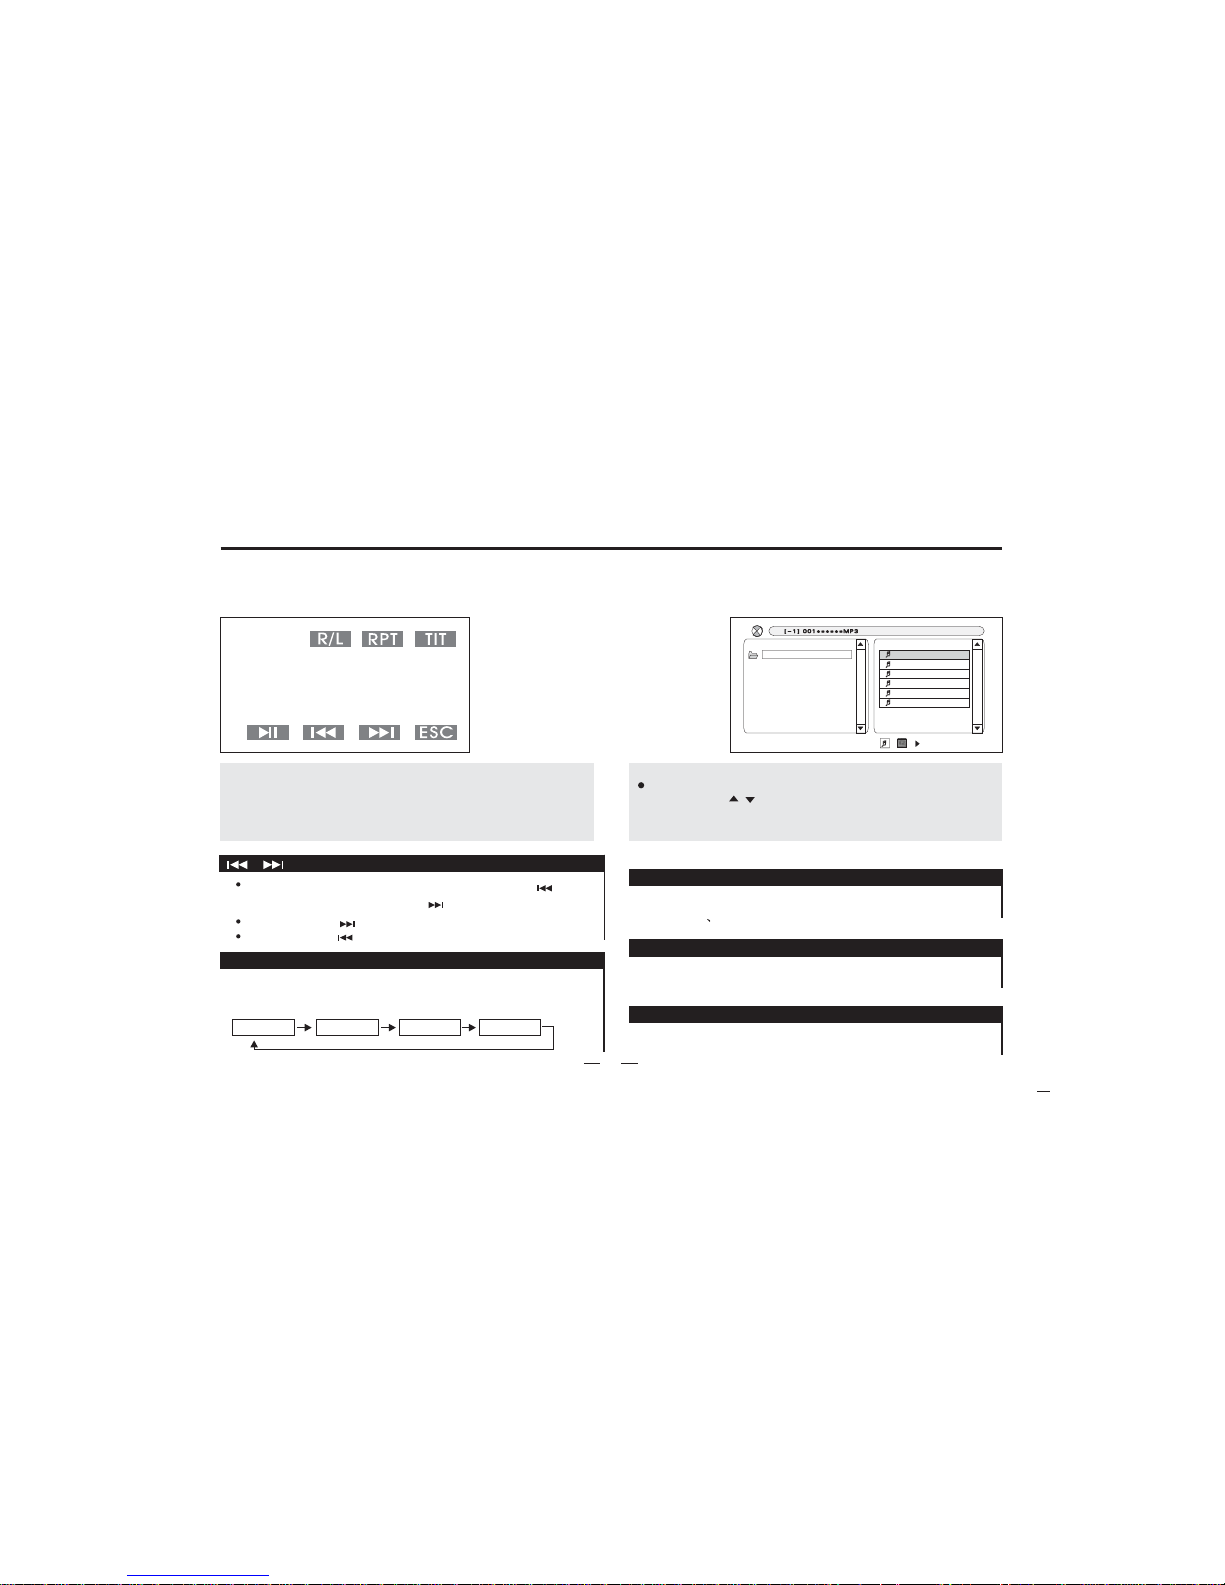
In the play mode, press[ RPT]buttonto
transit among the following status.
Repeat
Repeat:
TIT
Title:
In play mode, press this icon to return to
the title menu, and re-select the items.
R/L
R/L:
In play mode, press this icon to return and switch among
mono L mono R or stereo.
ESC
Esc:
In play mode, press this button to exit the playing.
Insert MP3disc, and TFT will showthe menu asfollows:
In thismenu, the menuon the rightside is thesub-menu.
Youcanpress tubuttontoselectthefileanditems
you like.
[]
[]
1-001_______MP3
2-002_______MP3
3-004_______MP3
01
XXXXX_______XXX
XXXXX_______XXX
XXXXX_______XXX
Insert DVD/VCD/CDdisc, touchscreen willshow menu
as follows:
Note:
Because thedifferent situation ofDisc REC, someof the CD-R,
CD-RW,DVD-R,DVD-RW,DVD+R,DVD+RW Discmay can notbe readed.
And theDisc without finaltreatment can notbe readed too.Regarding the
final treatment,please make conferenceto the guideof REC setor
REC manual.
Page 12
USB/SD operation
11
USB
UnderUSBorSDplaymode,press[ ]buttontoselect
tracks.
press [ST/RPT]button to repeat the playing.
Play operation
Press [ ] button toplay orpause.
,
REP ONE
REP DIR REP ALL
Press button toplay the discrandomly.[BAND]
RDM OFF RDM ON
PLAY/PAUSE:
Select:
REPEAT:
BAND:
REP OFF
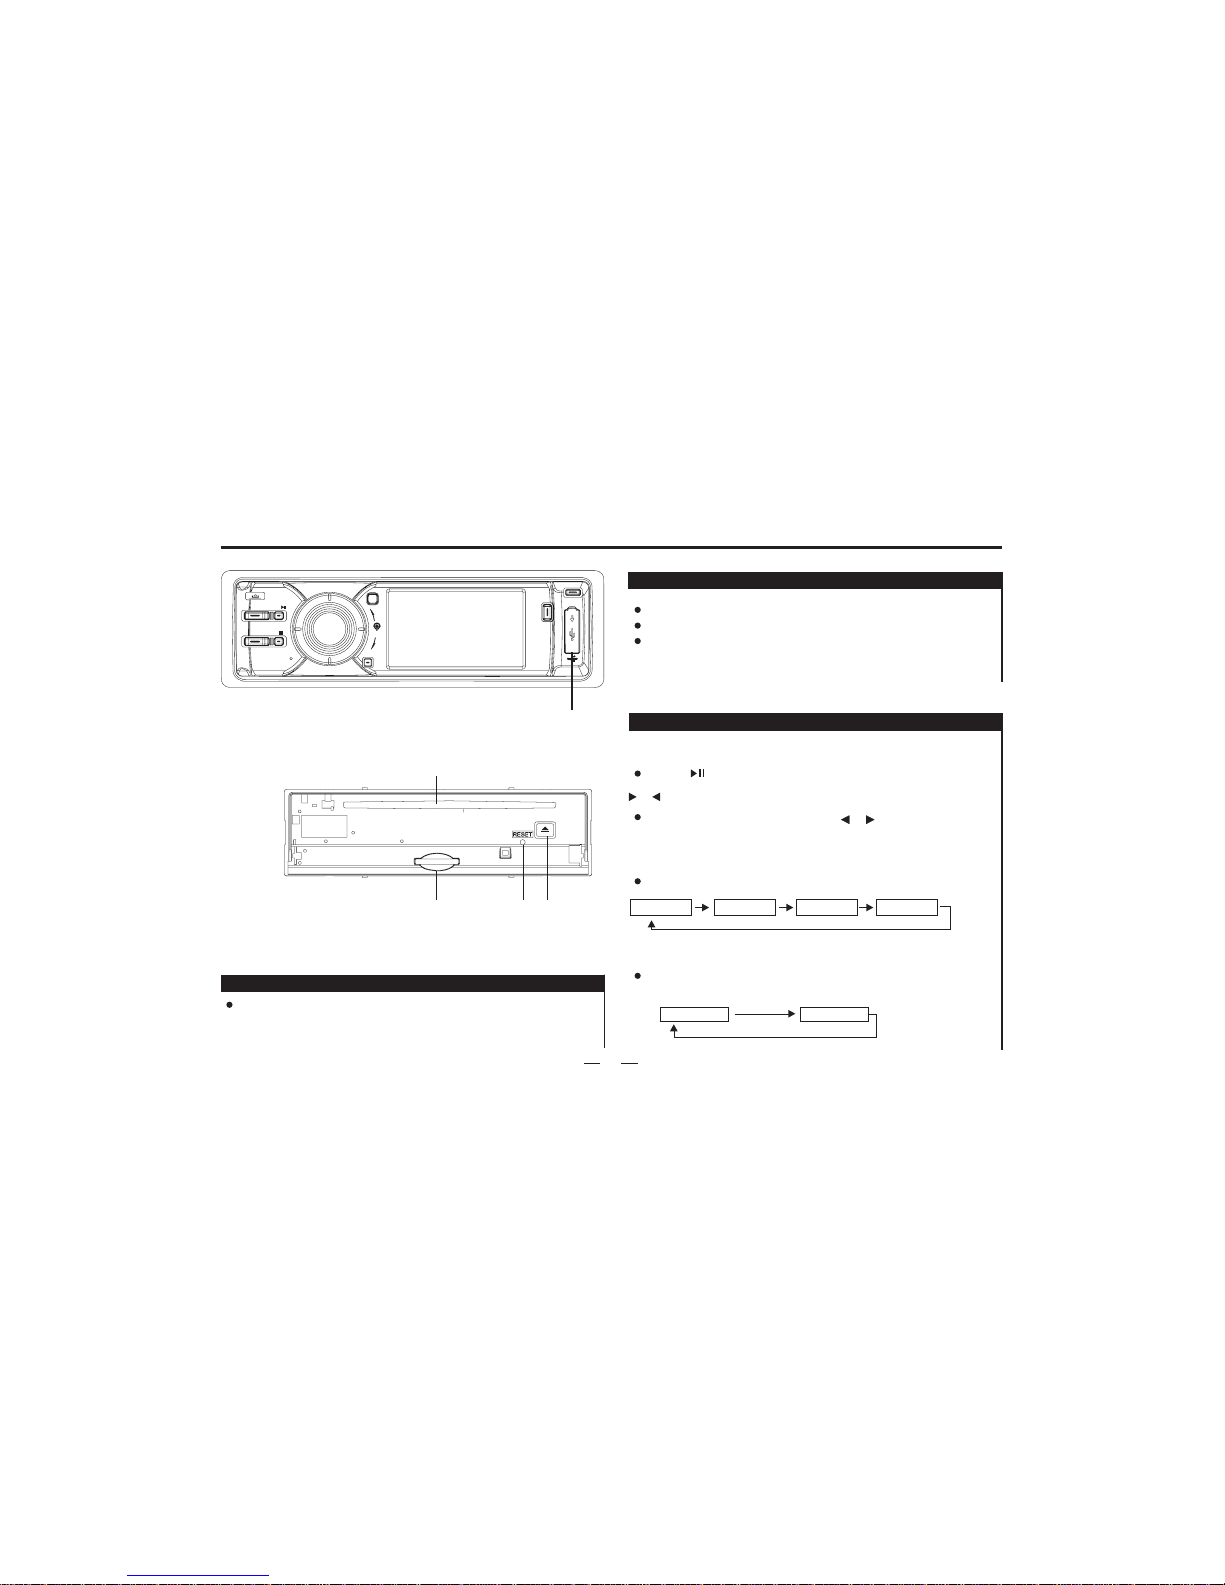
Inserting the USB device
Press theOPEN button onthe panel.
Remove thepanel.
Insert theSD/MMC card intoSD/MMC compartment onthe inner
side. Thenthe playing modewill be changedinto SD mode
automatically. The firstcard trackplayback will start.
Insert theUSB device intothe USB sloton the frontpanel.
Then theplaying mode willbe changed intoUSB mode
automatically. The firstUSB devicetrack playback willstart.
3
Inserting the SD/ MMC card
1
2
4
Disc slot
Eject button
SD cardslot
RESET button
1.
2.
3.
4.
Inner panel:
press theopen button onthe front panelto flip itdown.
MENU
VOL
MIC
SOURCE
BAND
APS/
IR
ST/RPT/TA
MUTE
/PTY
CLK/
/AF
Page 13
12
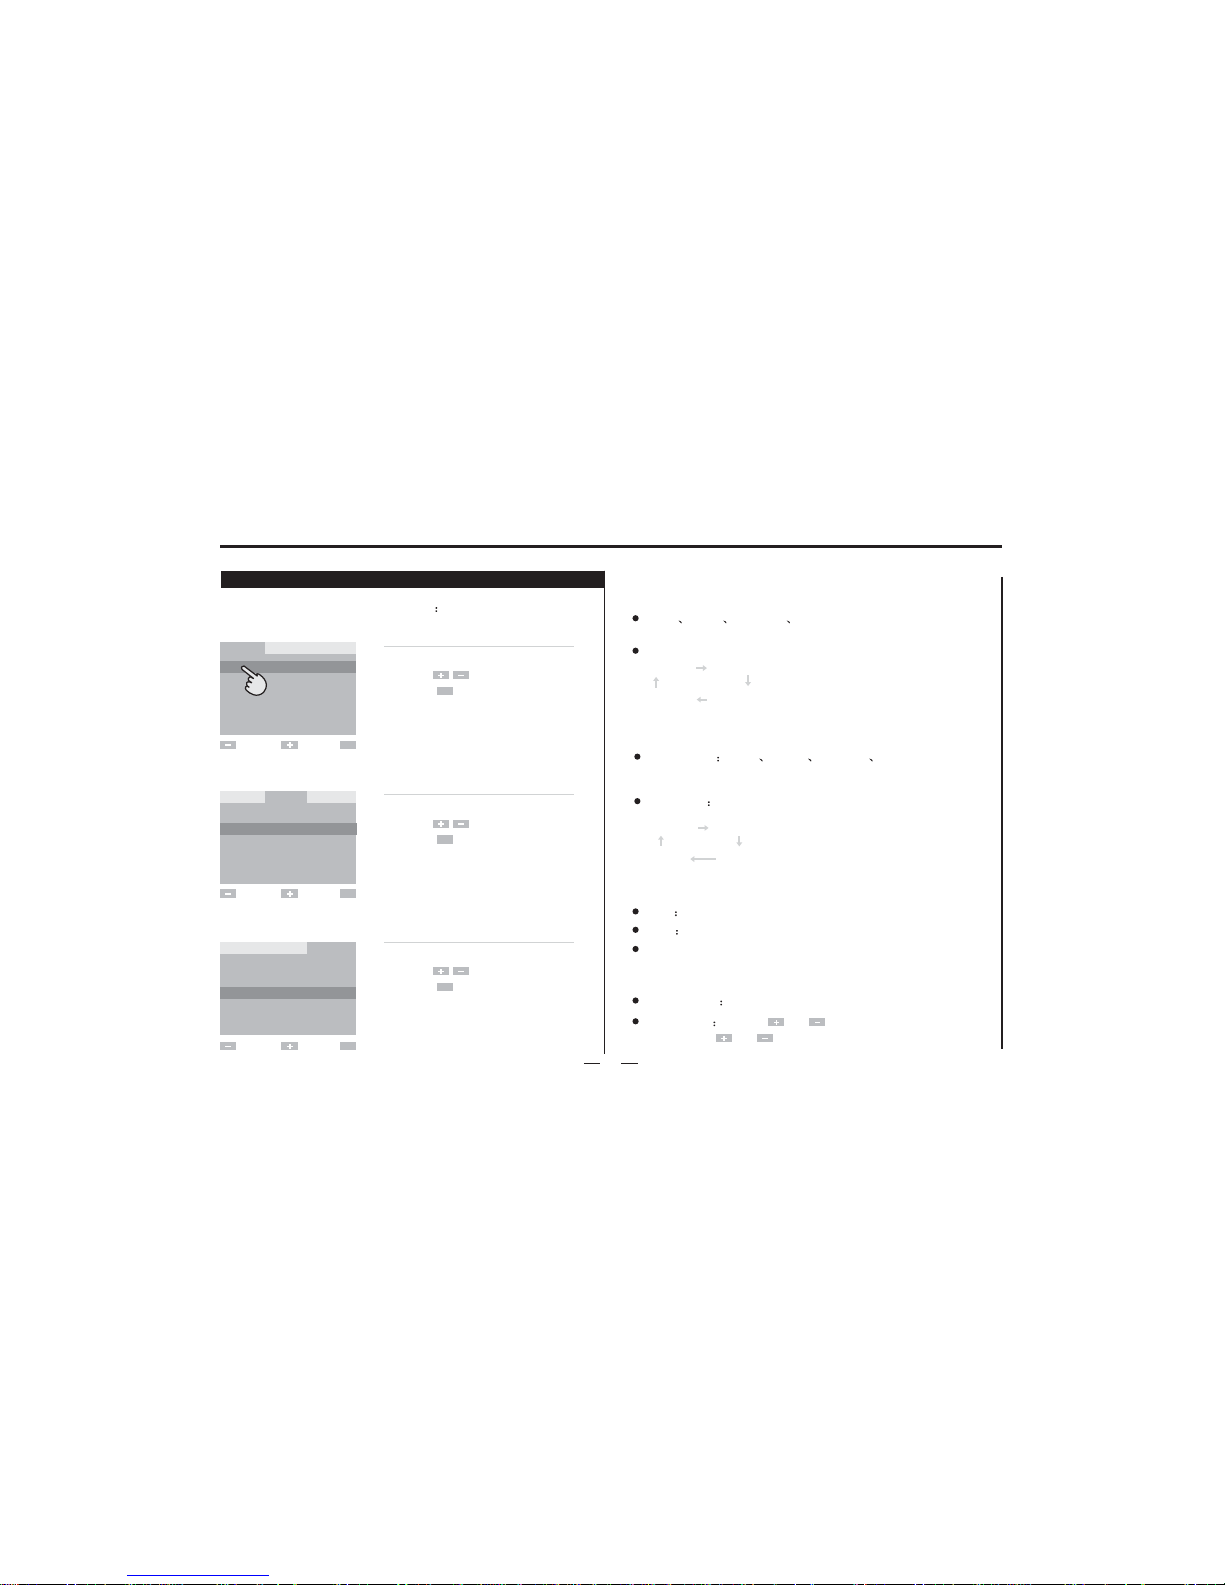
Press[ MENU ]button
MENU
V d o mode:ie
Menu operation
Audio mode:
System mode:
Vd osetupie
Bright Color Contrast Tint
Vmode
STAN USER
BRIG SOFT
Audio setup
Audio setup Bass Treble Balance Fader
setup between 0~14.
EQ setting
NORM ROCK
CLAS POP
System setup
Loud ON and OFF
Beep ON and OFF
TOPIC: can set the receive topicas RED/YELLOW
BLUE /GREEN .
Time Display ON and OFF
Time Adjust press [ ] or[ ] button to select hour/minute
then press [ ]or [ ]button to setup.
System setting
ENTER MENU:
Menu operation
Menu operation
15
VIDEO AUDIO SYSTEM
BRIGHT
COLOR
CONTRAST
TINT
VMODE
13
14
14
15
STAN
ESC
Vd oie Audio System
0
0
0
0
NORM
ESC
Vd oie Audio System
ESC
Press[ ] to adjust.
Press to confirm and exit.[]
Clicks on the menu option
ESC
Press[ ] to adjust.
Press to confirm and exit.[]
Clicks on the menu option
ESC
Press[ ] to adjust.
Press to confirm and exit.[]
Clicks on the menu option
ESC
BASS
TREBLE
BALANCE
FADE R
EQ
LOUD
BEEP
TOPIC
TIME DISP
TIME ADJ
OFF
ON
GREEN
OFF
00:00
Page 14
13
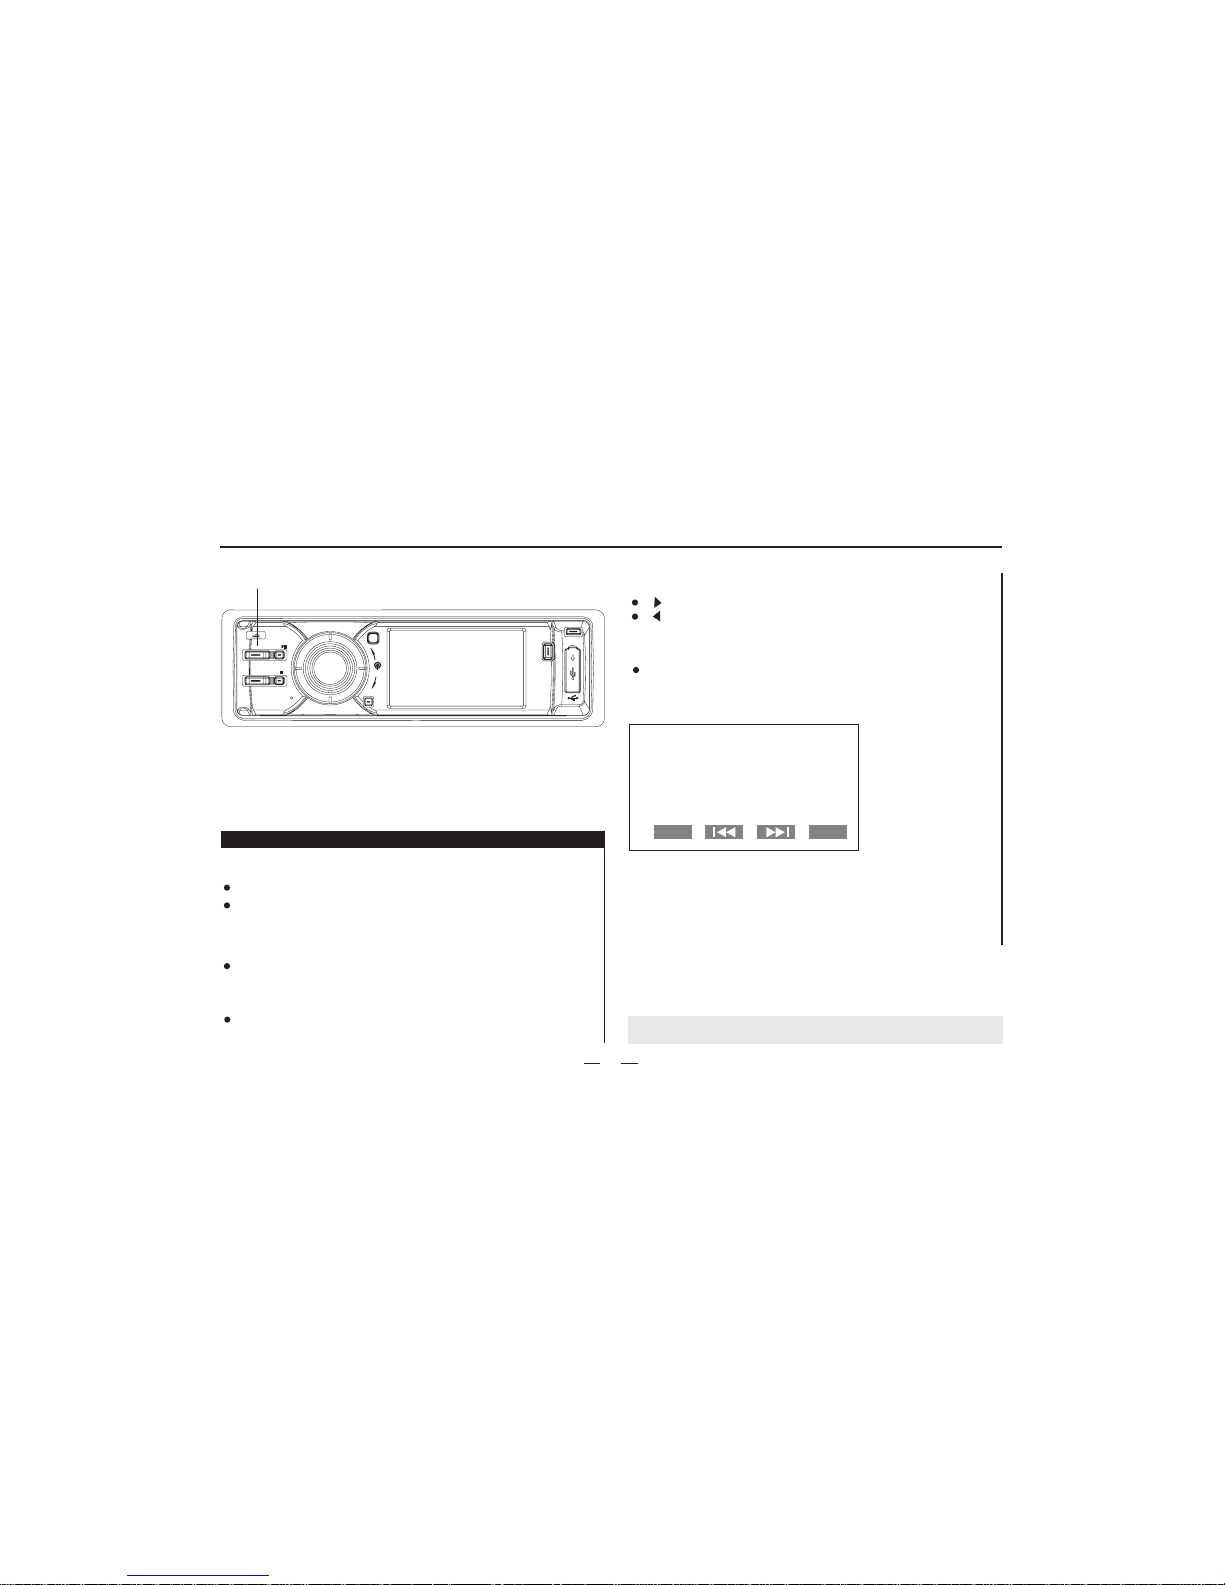
[ ](CHANNEL):up
[ ](CHANNEL):down
TV tuner
Preparation:
TV tuner
To receive TV broadcasts, install the TV antenna.
For receiving TV broadcasts, stop your car where there is no
obstacle to broadcast reception around.
Press [SRC] button or touch [AMS] can scan and store TV
program automatically.
TV Scanning:
Channel Selection
Direct Channel Selection
(Only for remote control)
Enter a channel number by pressing [0]to[9].
Channel Search
Press the [ APS ] button can search and store TV station
automatically.
ESC
TV
AMS
Note: Ifthe unit doesnot have thisfunction, pls skipthis page.
SOURCE
MENU
VOL
MIC
SOURCE
BAND
APS/
IR
ST/RPT/TA
MUTE
/PTY
CLK/
/AF
Page 15
Blue Tooth
Method :
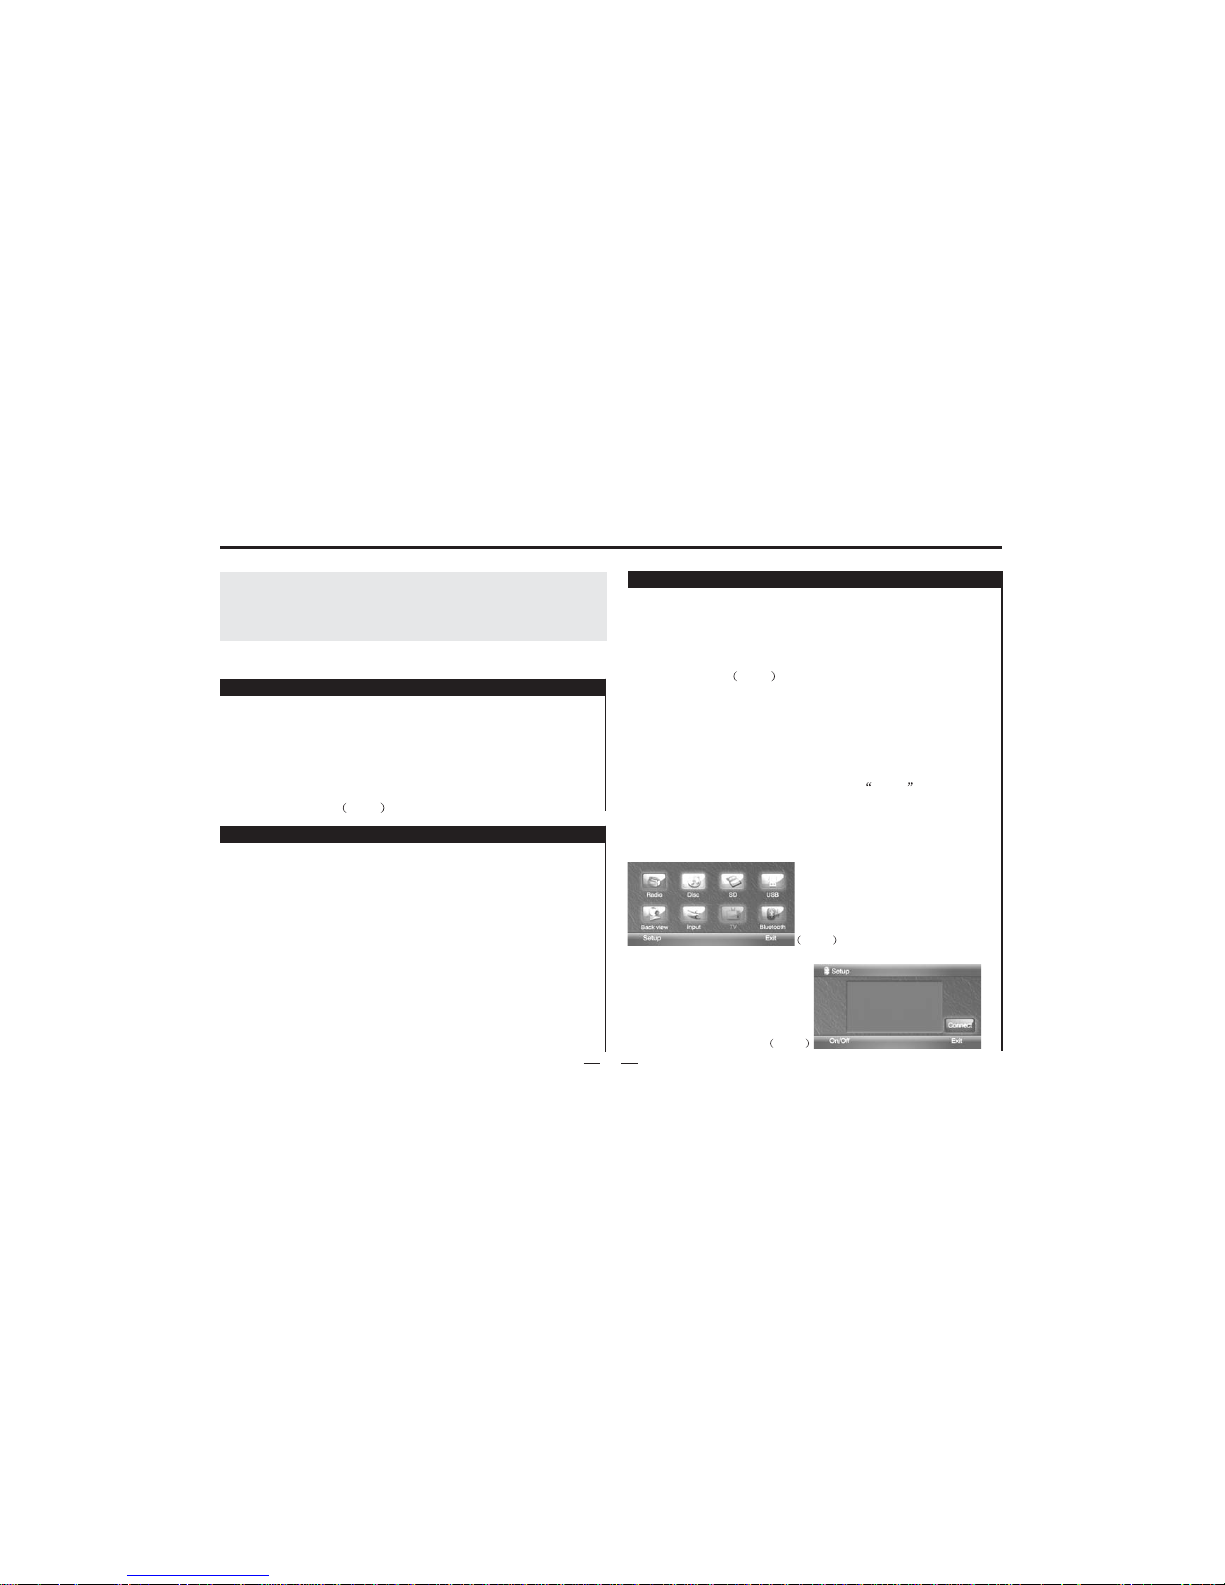
Press the [SOURCE] button, to
return to main menu..
A:
B:Exhales the main menu, choose
theBlueToothtoenterthe
Blue Tooth mode.
Choose the Blue Tooth Mode
Paring
14
BLUETOOTH-ON
PASSWORD-0000
CONNECTTING...
Phone set pairing step as follows:
Turn on Blue Tooth, then
touch On/Off icon to turn
on this function.
Turn on Blue Tooth
function .
When the mobile phone
set finds the signal, input
pairing number.Initial Pairing Code No, 0000
After pairing, TFT screen shows pairing succeed and
quit the pairing.
A:
B:
C:
D:
handsets
'
Working mode of Blue Tooth
Blue Tooth has the following functions:
Paring
Make DVD Blue Tooth function as handset s
facility through pairing.
Connecting
After connecting with the handset,
you can operate the mobile phone through DVD unit
(such as H, F, call, call record etc.)
A:
B:
'
NO.2
NO.1
NO.1
NO.2
The Blue Tooth is wireless mode of transmission in short distance.
Through Blue Tooth function, the DVD unit establishes connection
with Blue Tooth handset. And then, these units can realize mutually
contrdling and file transfering.
Page 16
Blue Tooth
Making phone call
1357846****
1357846****
15
After connecting, you can make phone call through remote
control, touch screen or phone numbers record.
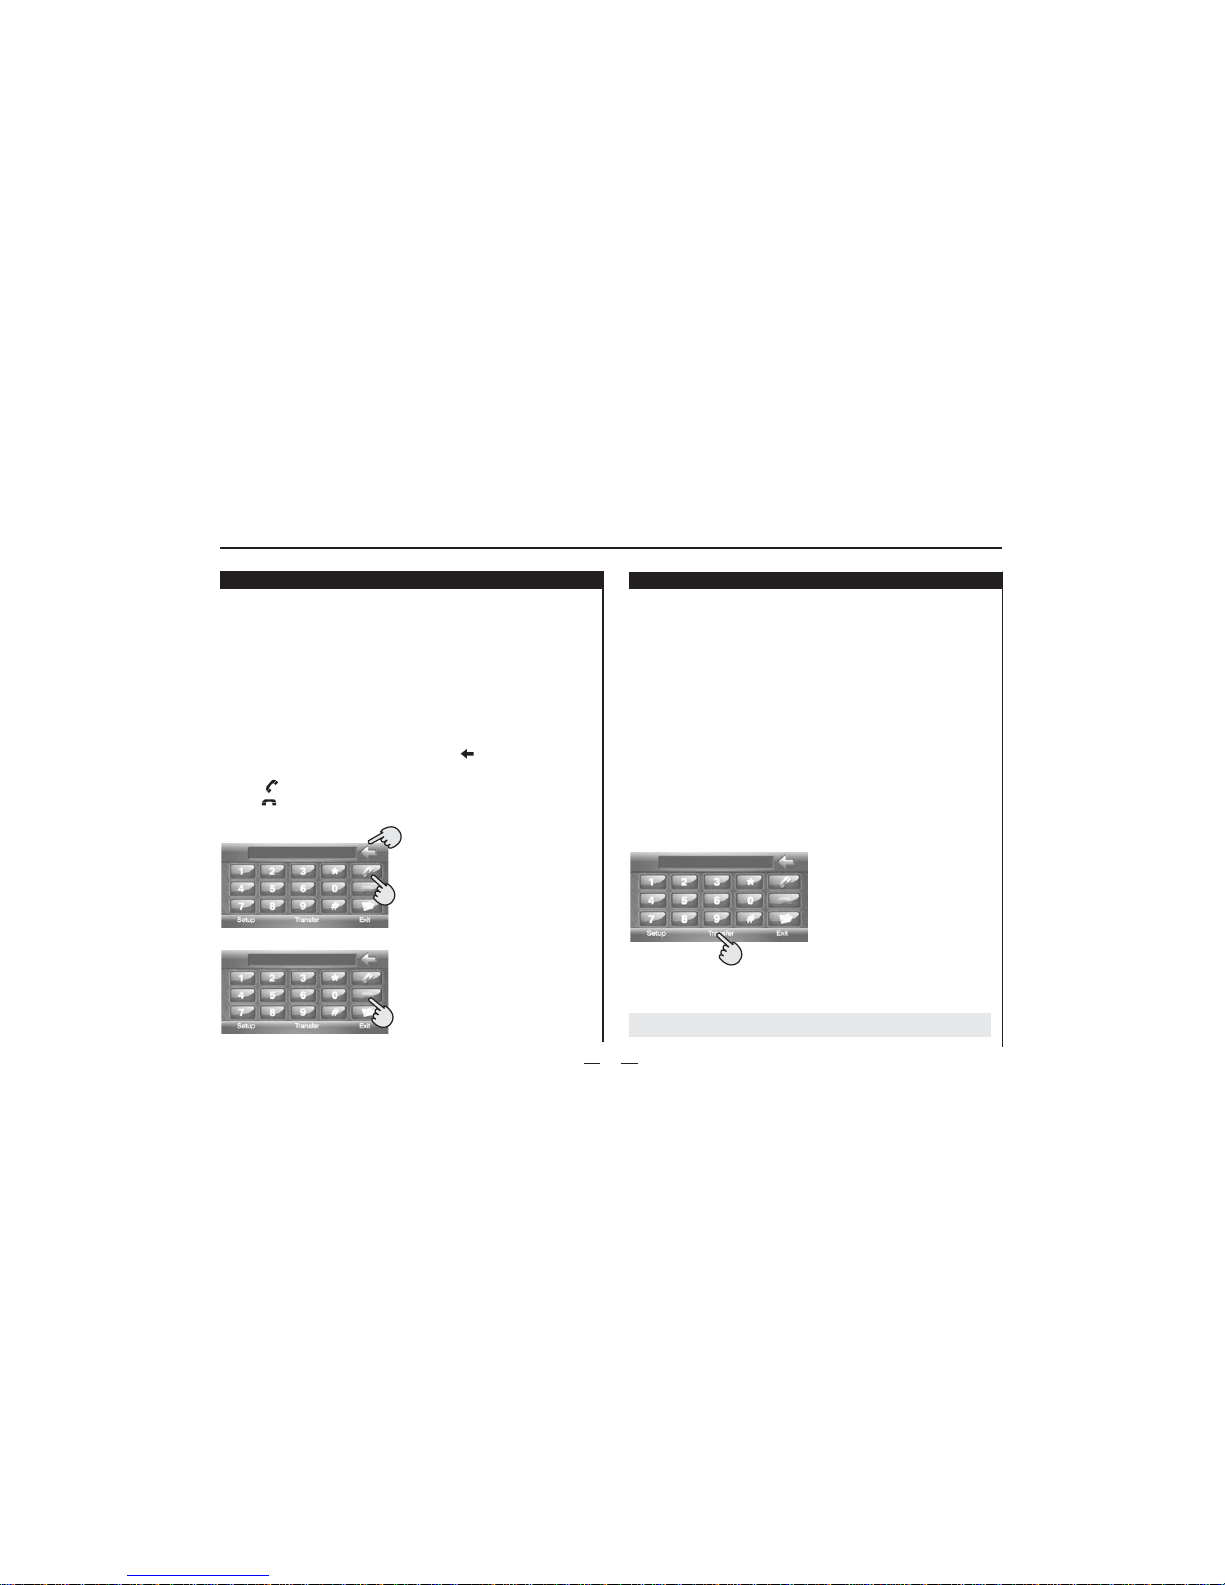
A: Making mobile phone call
After making phone call, the screen will display
making phone call.
B: Making touch screen call
Input the numbers on the screen, press [ ] icon can correct
the numbers;
Press [ ] icon to make phone call;
Press[ ] icon to cancel or hang up.
Answering
1357846****
Answering function operate as follows:
After connecting, the unit
can use the telephone function.
When there is a phone call,
the Blue Tooth will switch to
phone function and display the
calling number.
Touch Transfer icon can
switch to phone answer mode.
Touch it again can return to
Blue Tooth function of the unit.
A:
B:
C:
Note: Ifthe unit doesnot have thisfunction, pls skipthis page.
Page 17
16
FM 01 FM02
AM 01AM 02
FM 03
BAND
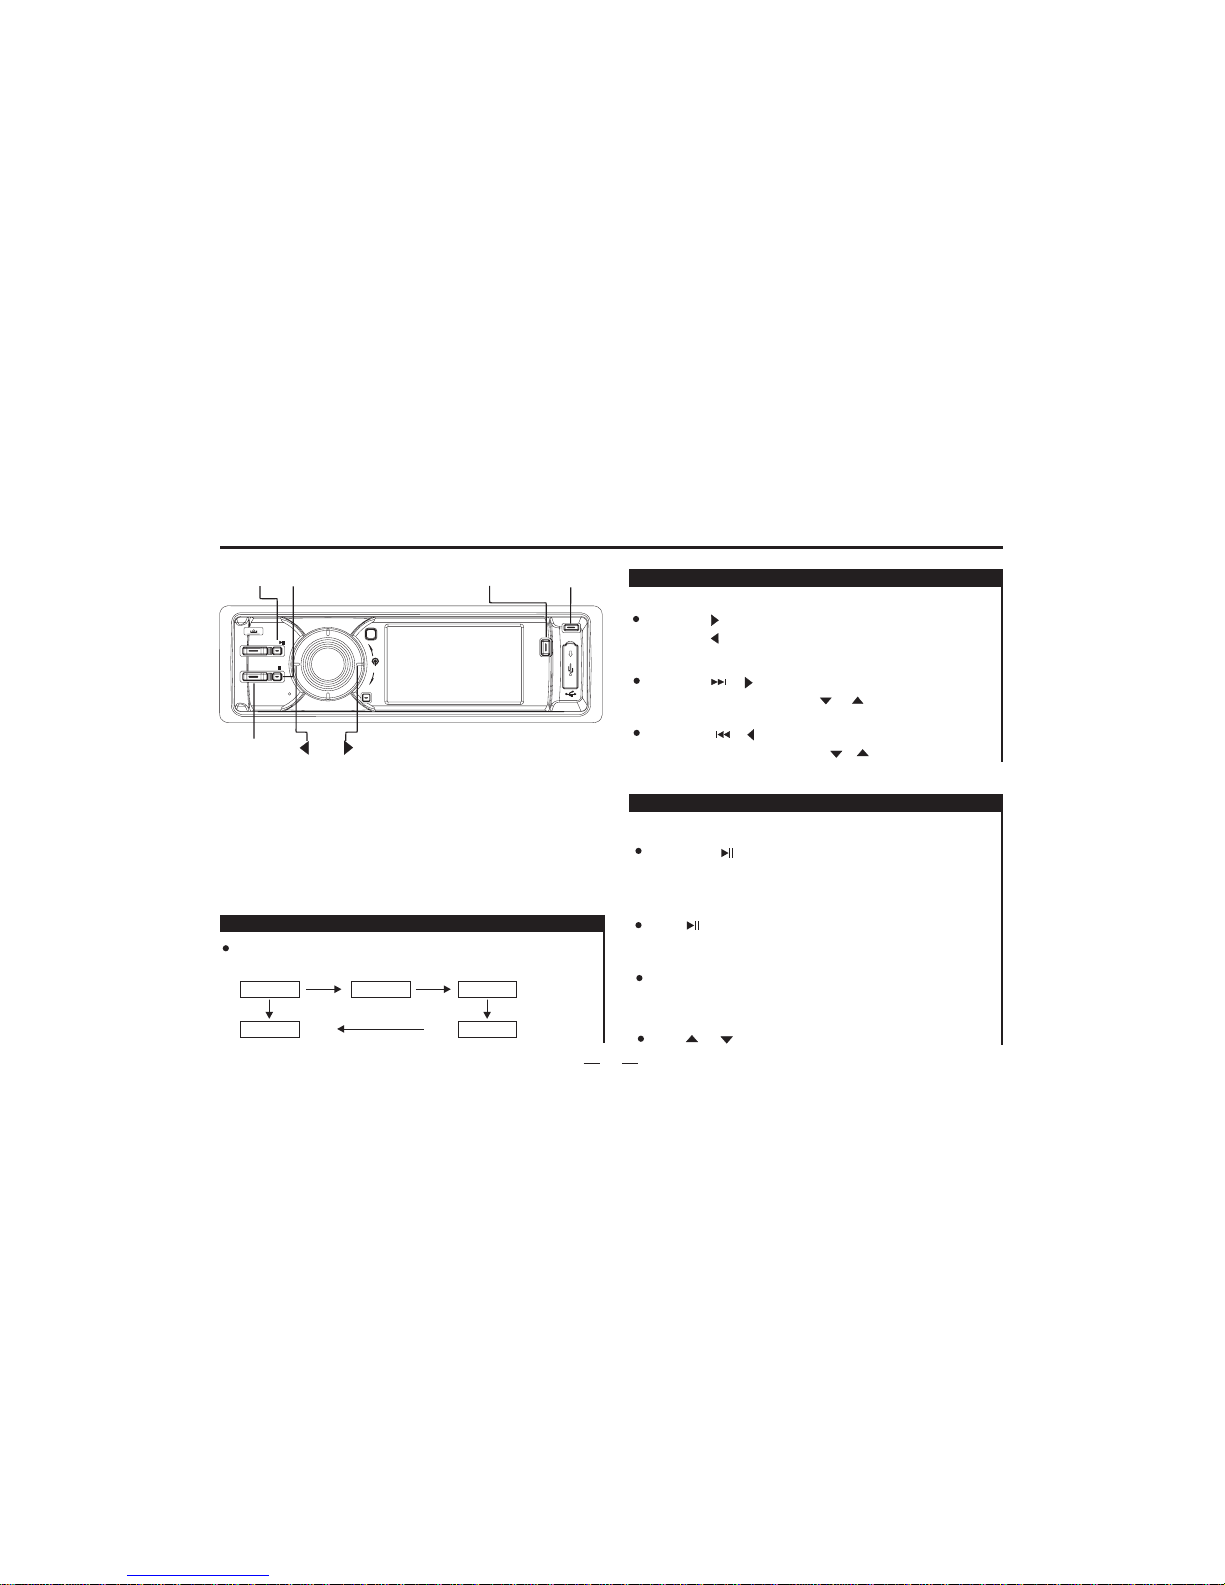
Press BANDbutton to selectamong three FMor two AMbands.
(FM1-FM2-FM3-AM1-AM2)
Radio Operation
APS
BAND
MUTE/PTY
AF
ST/RPT/TA
MENU
VOL
MIC
SOURCE
BAND
APS/
IR
ST/RPT/TA
MUTE
/PTY
CLK/
/AF
Long press[ ] button for more than 3 seconds can
search stationsand store themin 1-6,FM1,FM2,FM3 andAm1
,Am2 automatically.
Short press[ ]/[ ]button cansearch higherfrequency and
stop whenget one ,longPress[ ]/[ ] button can store the
station.
Search Stations
Long
Long
press[ ]button can adust to higher frequency.
press[ ]button can adjustto lower frequency.
Manual tune:
Automatically tune:
Band tuner
AS/PS
Short press[ ]/[ ]button can search lower frequency and
stop when get one , long press[ ]/[ ]button can store the
station.
Scan Stations
Select Stations
Press [ ] buttoncan scan andplay every storedstation
for aboutthree seconds, ifyou want tolisten to therecently
station, plspress the buttonto stop scanning.
6 stationscan be storedin each FM1,FM2,FM3
andAM1,AM2atmost.
Press[ ]or[ ] button can select 1-6 stations.
/APS
/APS
Page 18
17
1
3
............
1
............1
............2
2
Accessories
External view
........ Numberof items
External view
........ Numberof items
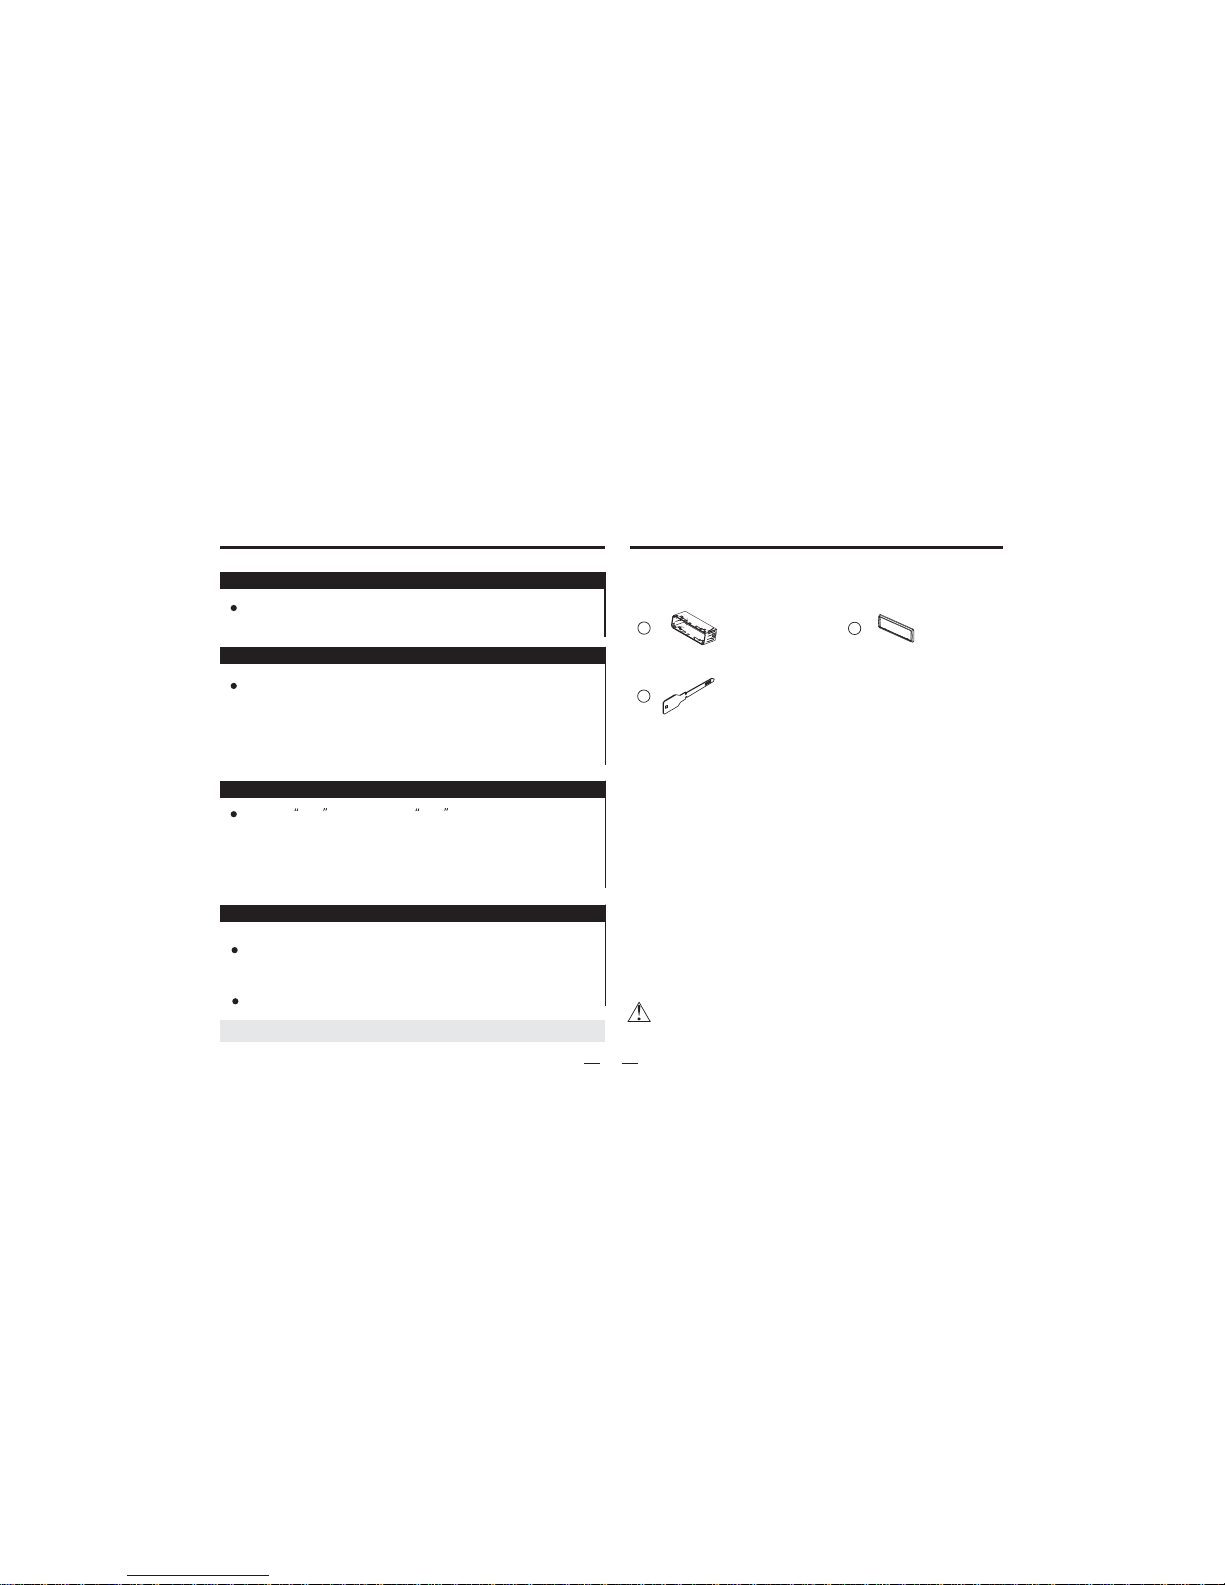
The useof any accessoriesexcept of thoseprovided might result
in damageto the unit.Make sure onlyto use theaccessories
shipped withthe unit ,asshown above.
Radio Operation
AF(Alternative Frequency)
TA(Traffic announcement)
Press TA, the unit will prior to seek the traffic information. If the
machine receives the traffic information, it will choose this
signal and quit other radio signal or CD program. If press TA
again, other program will recover and the traffic information
program will quit.
PTY(Program type)
Turn on PTY , thenpress PTY and 1-6 buttons to
choose one certain program style . After this, the unit will scan
the same style programs automatically. Such as select News
programs. The unit will only scan News programs.
Among AF, TA and PTY, TA has the absolute priority tobe chosen.
Turn "AF",the unit will switch to the stronger signal of the
same station automatically.
Press [ST] switch between[ MO]and [ST].While
receiving the signal,[ST] back light turns blue.
button,
Long press [ST], switch between LOC and DX.
ST
Stereo
Loc/DX
Note: Ifthe unit iswithout RDS function,pls skip thispage.
Page 19
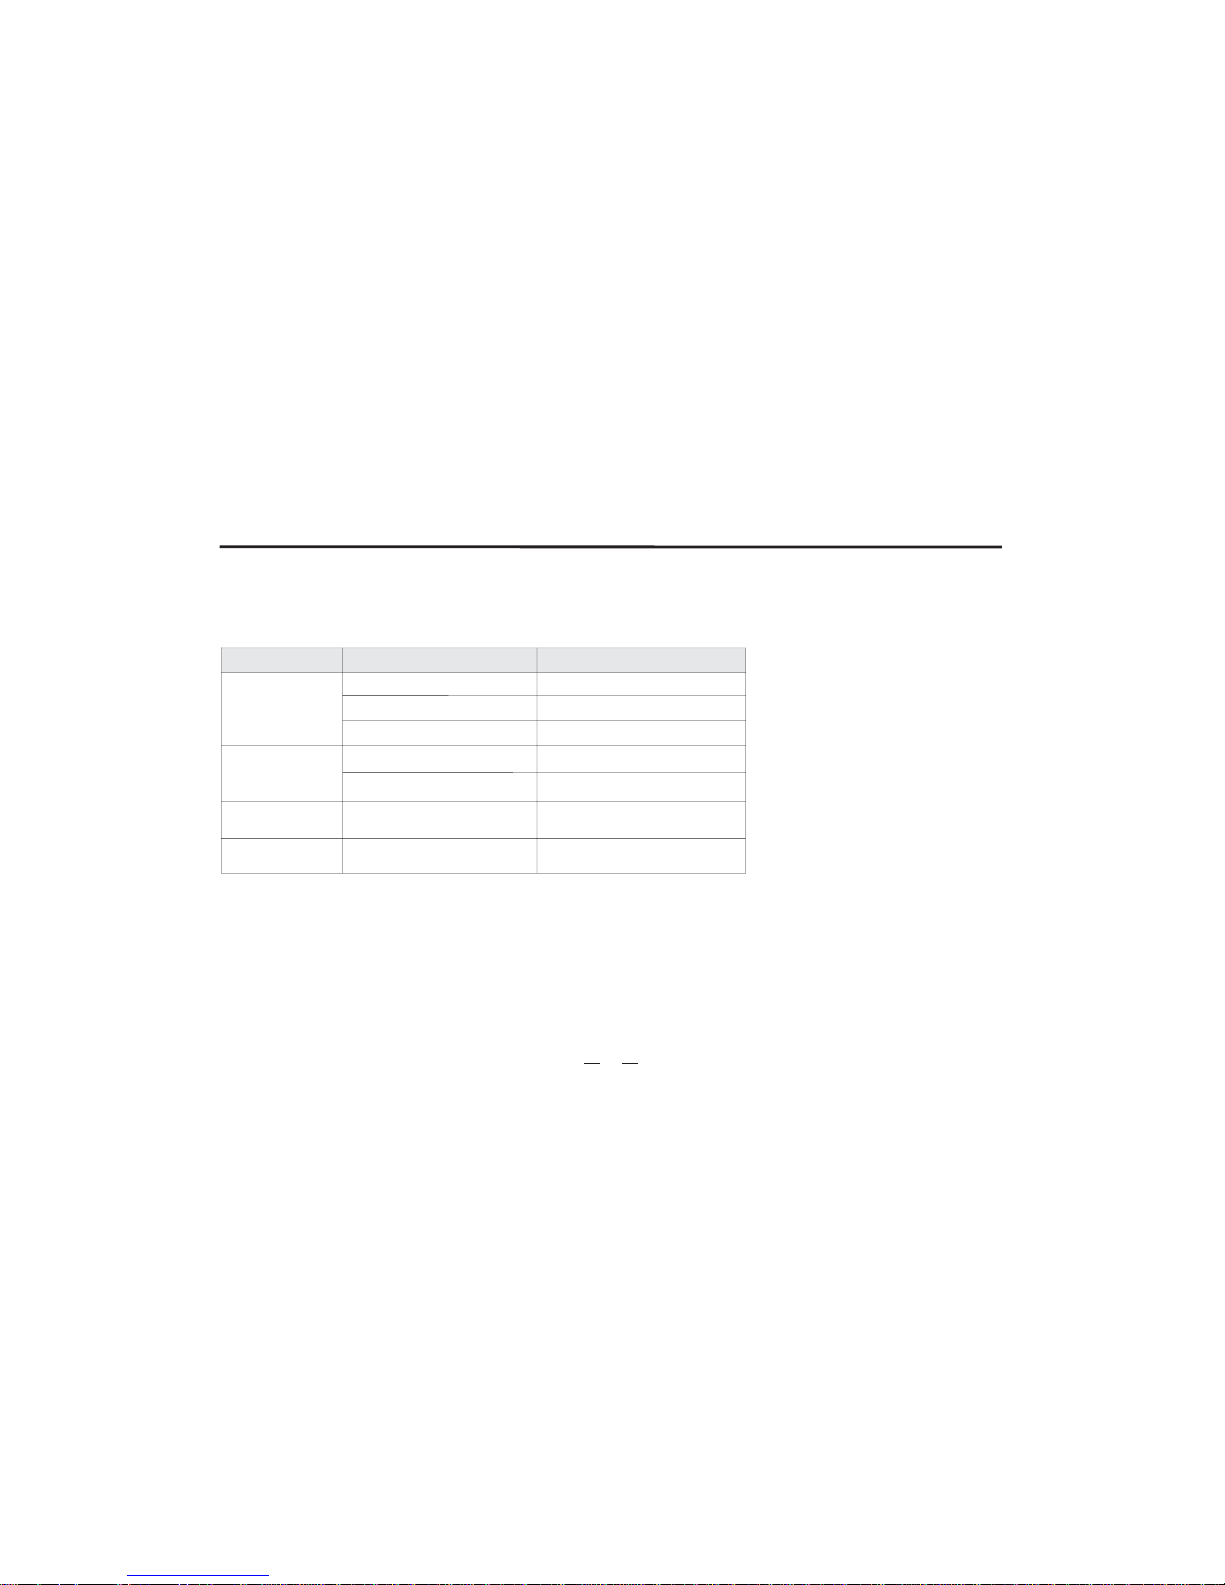
What appears to be trouble is not always serious. Please check the following points before calling a service center.
Troubleshooting
Familiar characters and their meanings
18
Characters
Causes
Remedies
NO Disc
Bad Disc
Unkown Disc
Region Error
Disc istoo dirty.
Disc isinserted upside down.
No discin the unit.
Disc isextreme dirty.
Disc isinserted upside down.
The discis not compatiblewith
the unit.
Thedisc'sregioncodeisnotthe
same asthe unit's.
Clean thedisc or changethe disc.
Insert thedisc correctly.
Insert adisc.
Clean thedisc or changethe disc.
Insert thedisc correctly.
Clean thedisc.
Clean thedisc.
Page 20

Troubleshooting
19
General problems
The fuseof the unithas been broken.
Remedies
Symptoms
The unitcannot be
powered on.
Remote controllerdoes
not work.
No soundcomes out or
it's hardto hear.
Poor sound quality or
sound distortion.
User presetinformation is
lost whenACC is off.
False operations and etc.
The fuseof car batteryhas been broken.
Battery hasbeen exhausted.
Battery isnot installed correctly.
Causes
Audio outputconnection is notcorrect.
The volumelevel is setto the minimumlevel.
The audiochannel outputs arenot balanced.
The speakercord is contactedwith the
bodywork.
Piraticdiscisused.
The speakerspower rating doesnot fit into
the unitoutput power.
The speakersare connected incorrectly.,
The speakercord is contactedwith the
bodywork.
ACC andBATT are connected incorrectly.
The speakershave been damagedl.
Install anew fuse withcorrect rating.
Install anew fuse withcorrect rating.
Reset theunit.
Change thebattery.
Install thebattery correctly.
Correct theconnection according to(Electrical
Connections OverallDiagram).
Adjust thevolume to theoptimum level.
Use insulatingcord for connection.
Use originalcopy disc.
Change thespeakers.
Correct theconnection according to(Electrical
Connections OverallDiagram).
Use insulatingcord for connection.
Check thespeakers.
Adjust thebalance of audiochannel outputs. Please
refer to(Audio control).
Correct theconnection according to(Electrical
Connections OverallDiagram).
Page 21
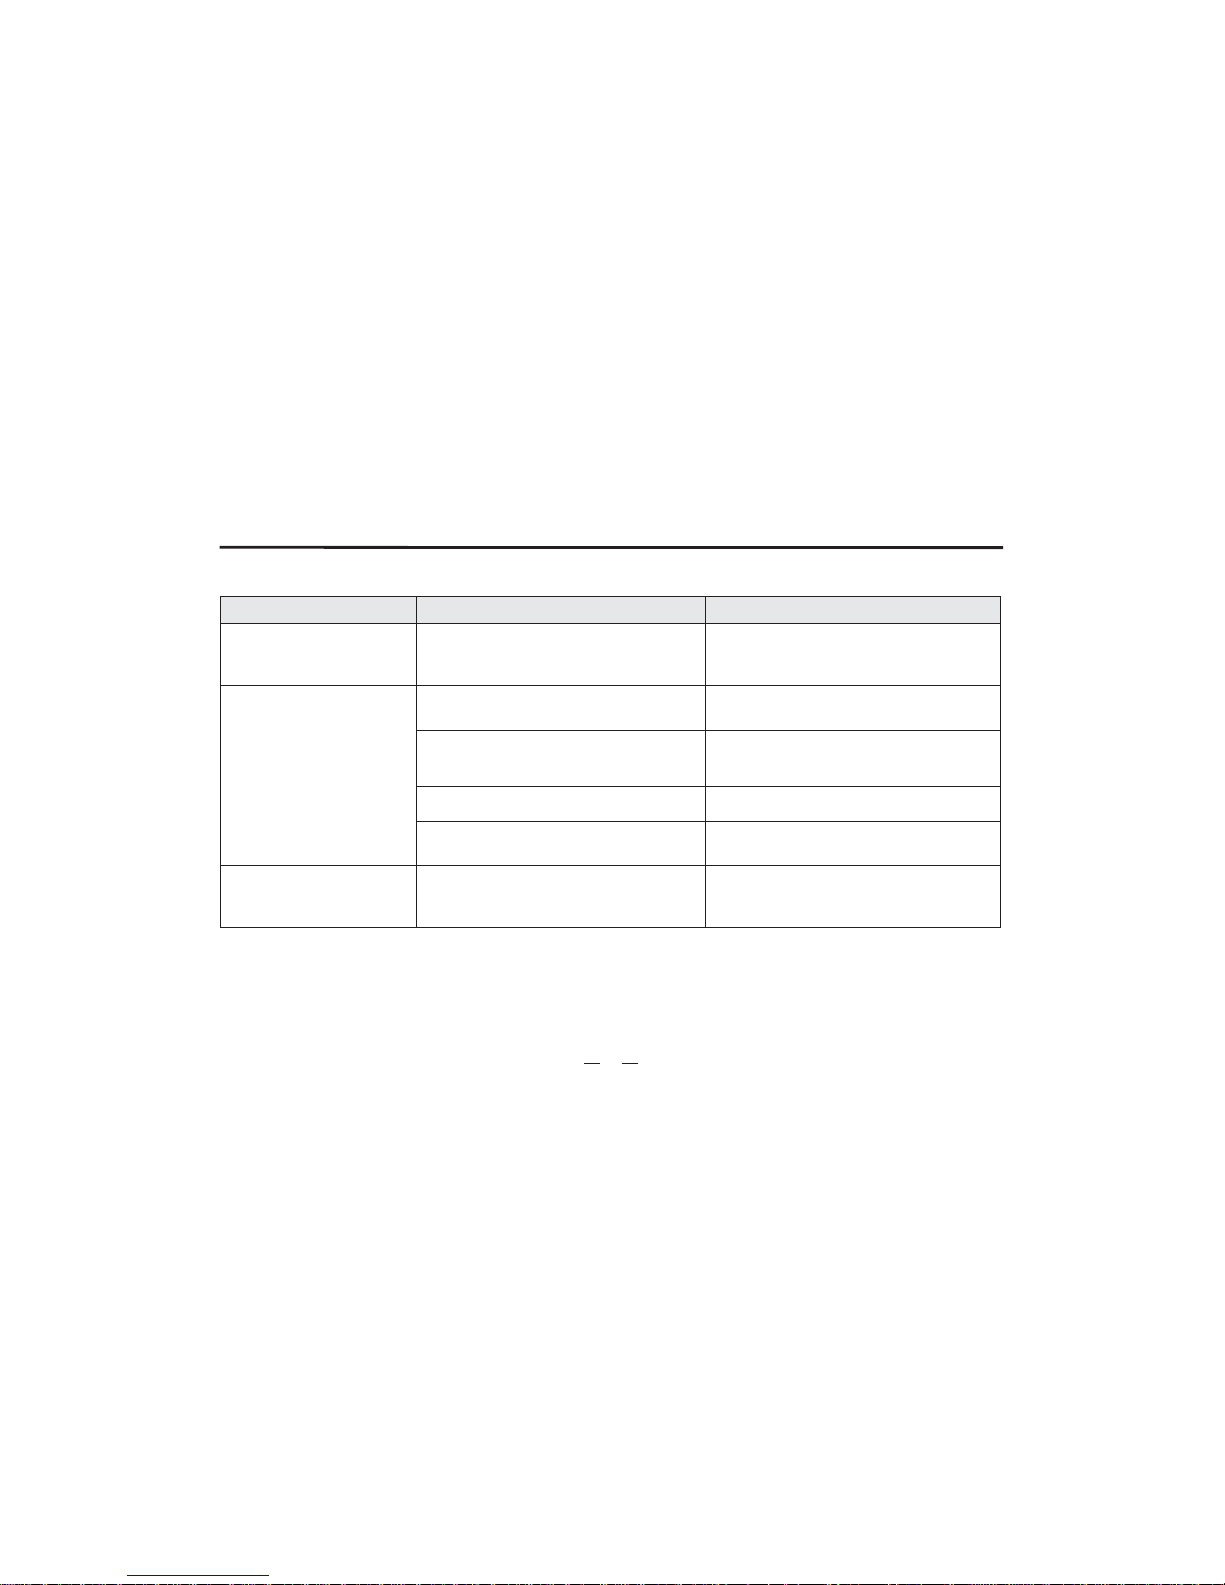
Troubleshooting
20
TFT Monitor
Remedies
Characters are
abnormal.
Causes
Abnormal displaylike
as pulsatilestripes on
the imageand on.
No imageappears on the
monitor andwarning
information isshown at
all times.
Symptoms
The colorsystem of DVDdisc is not
suited withthe monitor.
The actualcolor system isnot the same
as themarked color systemon the label
for somepiratic discs.
The videocord is broken.
The videocord is notconnected correctly.
False operations.
Correct theconnection according to
(Electrical ConnectionsOverall Diagram).
Adjust thecolor system ofthe DVD disc
or the monitor.
Use originalcopy disc.
Change thevideo cord.
Connect thevideo cord correctly.
Turn offthe power andthen turn onthe
power again,or change toother playing
source andthen go back.
Incorrect connectionof Breaking wire.
Page 22
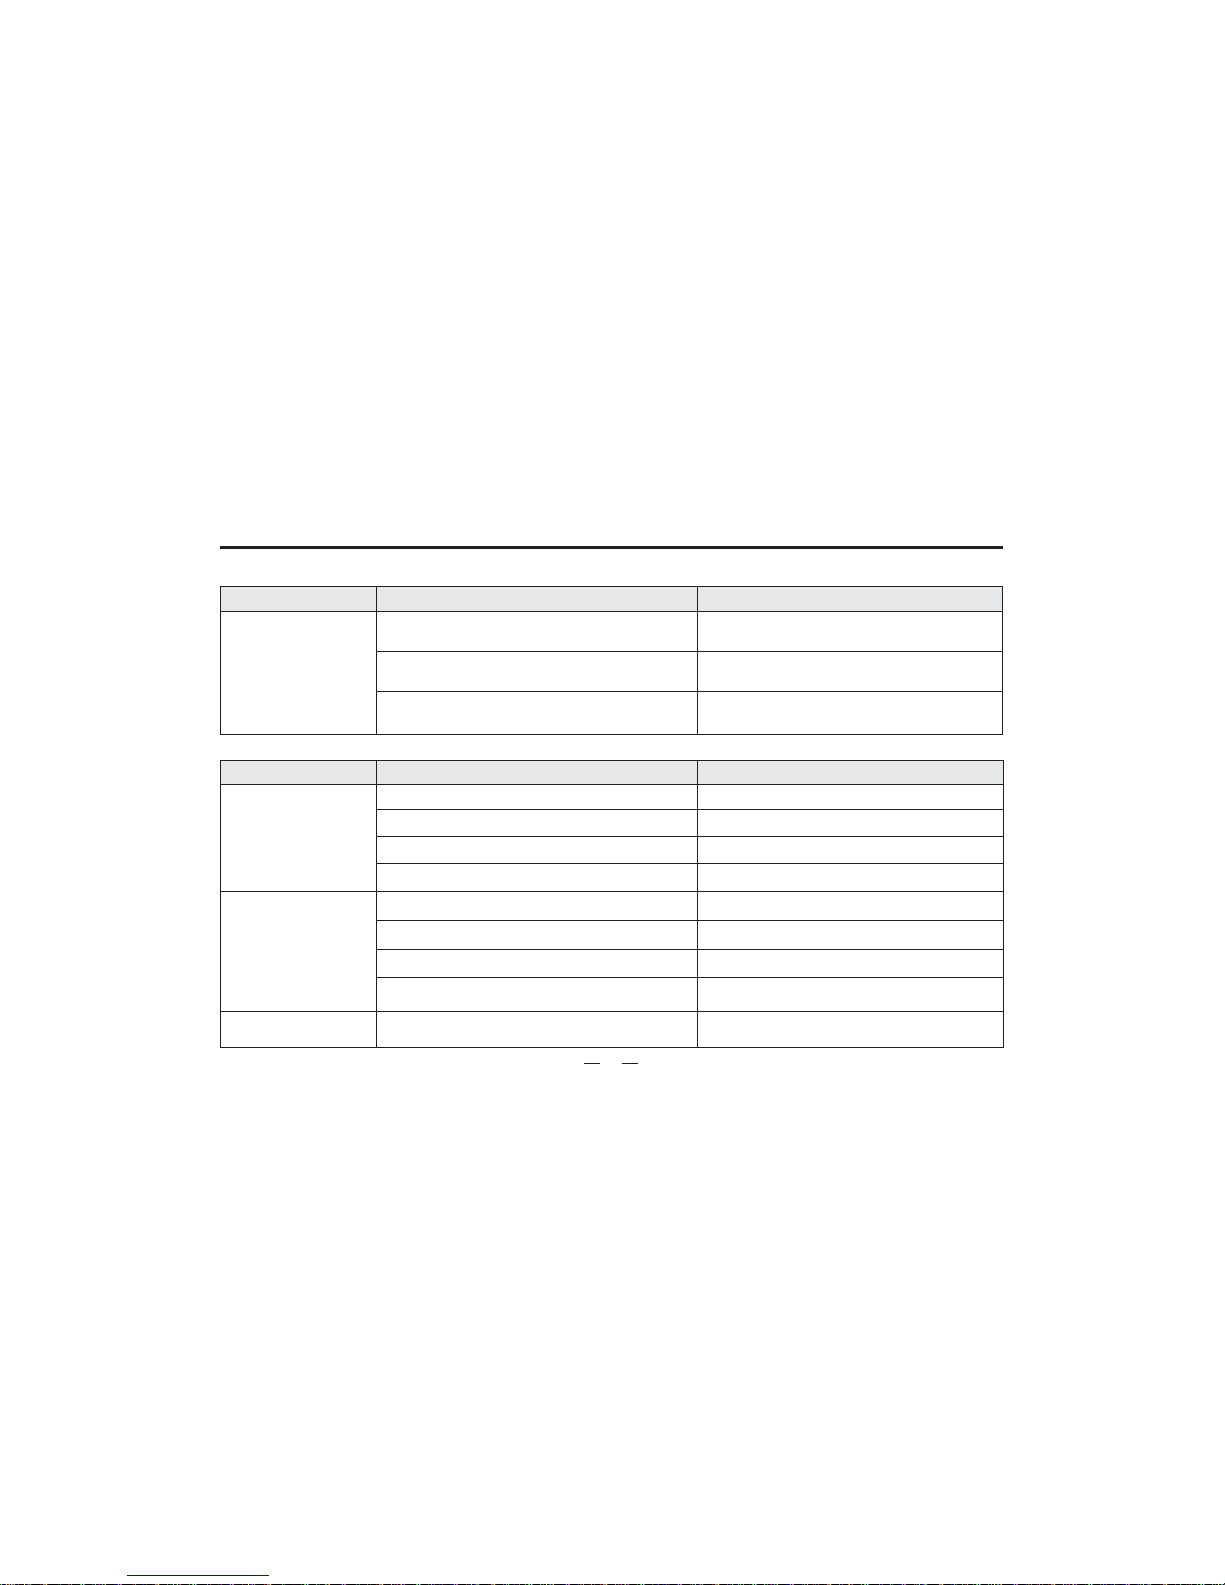
Troubleshooting
21
Radio Tuner
Mp3 playback
Remedies
Causes
Symptoms
Remedies
Causes
Symptoms
It's hardto receive
stations.
Auto antennais not extendedcompletely.
Auto antennais not connectedwith the unitfirmly.
LOCAL function is on.
Correct theconnection according to
(Electrical ConnectionsOverall Diagram).
Correct theconnection according to
(Electrical ConnectionsOverall Diagram).
Close theLOCAL function.
Disc cannotbe played
back.
Interruption occurredduring
playback.
Disc isscratched.
Disc istoo dirty orwet.
The pickupis dirty.
Disc isscratched.
Disc isinserted upside down.
Disc istoo dirty orwet.
Disc isnot recorded correctly.
Some contentsare damaged.
MP3's namecannot
be displayedcorrectly.
The nameof Mp3 isnot regular.
Change thedisc.
Clean thedisc.
Clean thepickup with cleaningdisc.
Insert thedisc correctly.
Change thedisc.
Clean thedisc.
Change thedisc.
Record thedisc again.
Use theregular characters.
Page 23

Troubleshooting
22
DVD player
Remedies
Causes
Symptoms
Disc cannotbe inserted.
There isa disc inthe unit already.
Eject thedisc then insertanother one.
Disc cannotbe played back.
Disc isscratched.
Change thedisc.
Disc istoo dirty orwet.
The pickupis dirty.
Disc isnot compatible withthe unit.
Parental lock class is too high.
Disc isinserted up sidedown..
The disc's region codeis not thesame
as theunit 's.
Clean thedisc.
Change thedisc.
Clean thepickup with cleaningdisc.
Change theparental lock class.
Change thedisc.
Insert thedisc correctly.
Subtitle cannotbe shown.
There isno subtitle filein the disc.
Change anotherdisc containing subtitlefiles.
Audio language/subtitle
cannot bechanged.
There isonly one audiolanguage/subtitle
in thedisc.
Change anotherdisc containing multi-language
audio orsubtitle.
View anglecannot be
changed.
There isjust one viewangle in thedisc.
Multi-angle viewis not availablefor the
segment playingback now.
Change anotherdisc containing multi-angle.
Select anothersegment to playback.
Image distortion.
The discis protected bythe copyright.
The unitis compatible withcopy system; hence
some discscontained the informationofcopying
prohibited cannotbe played back.
PBC is invalid whenplaying
back VCD.
The discdoes not supportPB C.
Change anotherdisc with PBC function.
Repeat playbackor GOTO search
is invalidwhen playing backVCD.
PBCison..
Close PBC function.
Page 24
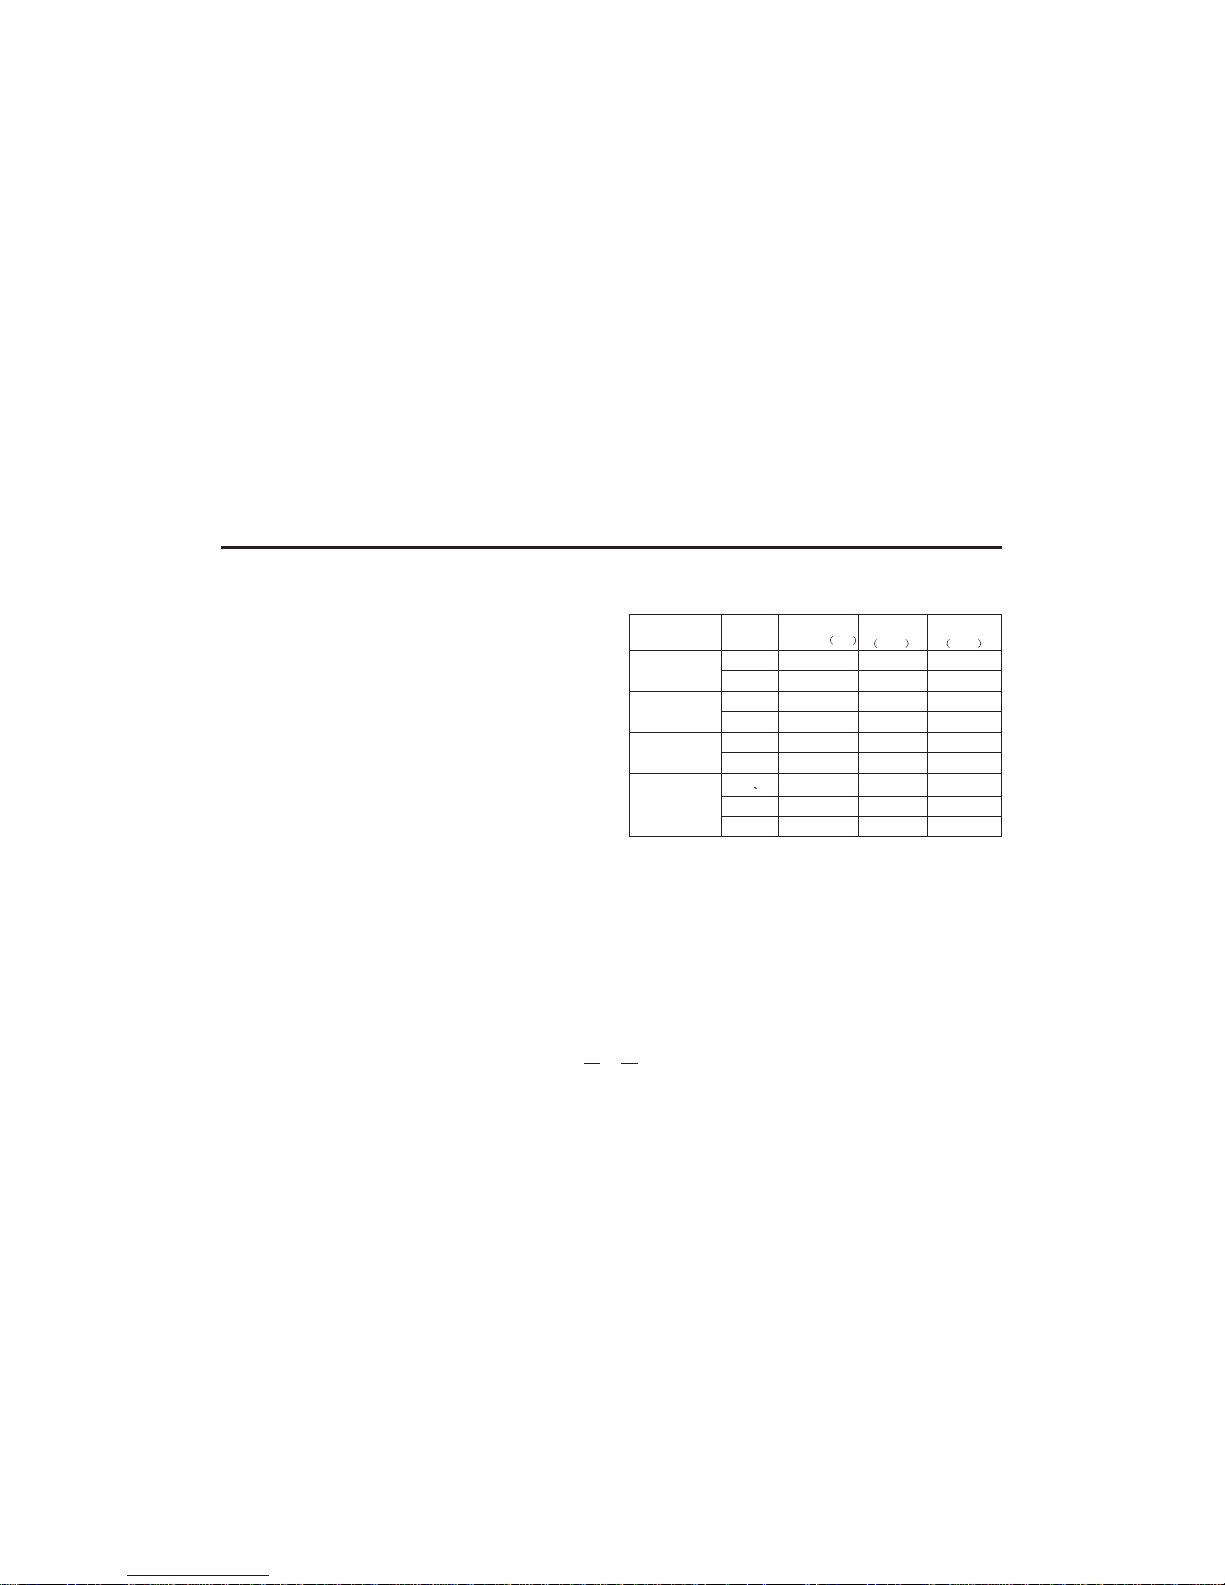
Liquid crystal panel..............................................3.0 inches
Panel weight ..............................................................157g
Number of pixels............................................ pixels
Display method........................Transparentcolor filterformat
Drive method.........................................................
Light source.....................................................internal light
(built-in small fluorescent lamp)
22,4640
LTPSTFT
DISPLAY UNIT
Specifications subject to change without notice.
Specifications
Operating power...................................12 Volts DC, negative
ground
%10THD output wiring.........................Designed for using four
speakers only front and rear
channels cannot be combined
in use with 2speakers.
Load impedance..................................compatible 4 to 8 ohm
speakers
Fuses............................................................ ..........10 amp
Dimensions......................... 187mm(L)x170mm(W)x50mm(H)
Weight.....................................................................1.92Kgs
GENERAL
RECEIVING FREQUENCY FIGURE
AREA
BAND
FREQUENCY
RANGE HZ
EUROPE
AMERICA
SOUTHA MERICA
RUSSIA
AM
530-1710K
100
9
50
9
FM
AM
87.5-107.9M
200
10
522-1620K
200
10
FM
AM
87.5-108.0M
520-1620K
100
10 10
100
FM
12
FM
3
FM
AM
87.5-108.0M
65.0-74.0M
522-1620K
100
10
9
50
10
9
87.5-108.0M
23
Auto
Stepping
KHZ
Tiny
Stepping
KHZ
Page 25

OWNER'S MANUAL
Before installation and operating the unit please read
this manual thoroughly and retain
it for future reference
 Loading...