

Page 1

SNOW 500
160.756 V1.0
Page 2
SAFETY INSTRUCTIONS ....................................................................................................................................................................................................................................................................................... 3
UNPACKING INSTRUCTION ................................................................................................................................................................................................................................................................................. 4
POWERSUPPLY ........................................................................................................................................................................................................................................................................................................ 4
INSTALLATION ........................................................................................................................................................................................................................................................................................................... 4
OPERATION ................................................................................................................................................................................................................................................................................................................. 4
WIRELESS REMOTE ......................................................................................................................................................................................................................................................................................... 4
WIRED REMOTE ................................................................................................................................................................................................................................................................................................. 4
DMX512 CONTROL .................................................................................................................................................................................................................................................................................................... 5
DMX CHANNELS ................................................................................................................................................................................................................................................................................................. 5
CLEANING .................................................................................................................................................................................................................................................................................................................... 5
REPLACING THE FUSE .......................................................................................................................................................................................................................................................................................... 5
VEILIGHEIDSINSTRUCTIES ................................................................................................................................................................................................................................................................................. 6
UITPAKKEN ................................................................................................................................................................................................................................................................................................................. 7
AANSLUITSPANNING ............................................................................................................................................................................................................................................................................................. 7
INSTALLATIE .............................................................................................................................................................................................................................................................................................................. 7
BEDIENING ................................................................................................................................................................................................................................................................................................................... 7
DRAADLOZE AFSTANDSBEDIENING ...................................................................................................................................................................................................................................................... 7
BEDRAADE AFSTANDSBEDIENING ......................................................................................................................................................................................................................................................... 7
DMX BEDIENING ....................................................................................................................................................................................................................................................................................................... 8
DMX KANALEN .................................................................................................................................................................................................................................................................................................... 8
REINIGEN ...................................................................................................................................................................................................................................................................................................................... 8
VERVANGEN ZEKERING ....................................................................................................................................................................................................................................................................................... 8
SICHERHEITSHINWEISE....................................................................................................................................................................................................................................................................................... 9
AUSPACKEN ............................................................................................................................................................................................................................................................................................................. 10
NETZANSCHLUSS .................................................................................................................................................................................................................................................................................................. 10
INSTALLATION ......................................................................................................................................................................................................................................................................................................... 10
BEDIENUNG ............................................................................................................................................................................................................................................................................................................... 10
FUNKFERNBEDIENUNG ............................................................................................................................................................................................................................................................................... 10
KABELFERNBEDIENUNG............................................................................................................................................................................................................................................................................. 10
DMX BEDIENUNG ..................................................................................................................................................................................................................................................................................................... 11
DMX-KANÄLE ...................................................................................................................................................................................................................................................................................................... 11
REINIGUNG .................................................................................................................................................................................................................................................................................................................. 11
SICHERUNGWECHSEL .......................................................................................................................................................................................................................................................................................... 11
Page 3

INSTRUCCIONES DE SEGURIDAD ...................................................................................................................................................................................................................................................................12
INSTRUCCIONES DE DESEMBALAJE .......................................................................................................................................................................................................................................................... 13
FUENTE DE ALIMENTACIÓN ............................................................................................................................................................................................................................................................................ 13
INSTALACIÓN ........................................................................................................................................................................................................................................................................................................... 13
OPERACIÓN ............................................................................................................................................................................................................................................................................................................... 13
MANDO A DISTANCIA .................................................................................................................................................................................................................................................................................... 13
REMOTO CABLEADO...................................................................................................................................................................................................................................................................................... 13
CONTROL DMX512 ................................................................................................................................................................................................................................................................................................... 14
CANALES DMX ................................................................................................................................................................................................................................................................................................... 14
LIMPIEZA ..................................................................................................................................................................................................................................................................................................................... 14
CAMBIANDO EL FUSIBLE .................................................................................................................................................................................................................................................................................... 14
INSTRUCTIONS DE SECURITE ..........................................................................................................................................................................................................................................................................15
INSTRUCTIONS DE DEBALLAGE .................................................................................................................................................................................................................................................................... 16
ALIMENTATION ....................................................................................................................................................................................................................................................................................................... 16
INSTALLATION ......................................................................................................................................................................................................................................................................................................... 16
FONCTIONNEMENT ............................................................................................................................................................................................................................................................................................... 16
TELECOMMANDE INFRAROUGE .............................................................................................................................................................................................................................................................. 16
TÉLÉCOMMANDE CÂBLE ............................................................................................................................................................................................................................................................................ 16
GESTION DMX512 .................................................................................................................................................................................................................................................................................................... 17
CANAUX DMX ..................................................................................................................................................................................................................................................................................................... 17
NETTOYAGE ............................................................................................................................................................................................................................................................................................................... 17
REMPLACEMENT DU FUSIBLE ........................................................................................................................................................................................................................................................................ 17
INSTRUKCJA BEZPIECZEŃSTWA ................................................................................................................................................................................................................................................................. 18
ROZPAKOWYWANIE INSTRUKCJI ................................................................................................................................................................................................................................................................ 19
ZASILACZ ................................................................................................................................................................................................................................................................................................................... 19
INSTALACJA ............................................................................................................................................................................................................................................................................................................. 19
DZIALANIE ................................................................................................................................................................................................................................................................................................................. 19
PILOT BEZPRZEWODOWY ......................................................................................................................................................................................................................................................................... 19
PILOT PRZEWODOWY .................................................................................................................................................................................................................................................................................. 19
KONTROLA DMX512.............................................................................................................................................................................................................................................................................................. 20
KANAŁY DMX .................................................................................................................................................................................................................................................................................................... 20
CZYSZCZENIE ......................................................................................................................................................................................................................................................................................................... 20
WYMIANA BEZPIECZNIKA ............................................................................................................................................................................................................................................................................... 20
TECHNICAL SPECIFICATIONS ..........................................................................................................................................................................................................................................................................21
Page 4
Before carrying out any operations with the unit, carefully read this instruction manual and keep it with c are for future reference. It
contains important information about the installation, usage and maintenance of the unit.
• Unpack and check carefully that there is no transportation damage before using the unit.
• Please read these instructions carefully and follow the instructions.
• Observe all safety warnings. Never remove safety warnings or other information from the equipment.
• Be sure that no ventilation slots are blocked; otherwise the unit will overheated.
Before connecting the equipment to the power outlet, first verify that the mains voltage and frequency match the values specified
on the equipment. If the equipment has a voltage selection switch, connect the equipment to the power outlet only if the equipment values and
the mains power values match. If the included power cord or power adapter does not fit in your wall outlet, contact your electrician.
• After connecting the unit, check all cables in order to prevent damage or accidents, e.g., due to tripping hazards.
• Make sure that the power cord is never crimped or damaged. Check the unit and the power cord from time to time.
• Always disconnect power from the mains, when unit is not used or before cleaning! Only handle the power cord by the plug. Never pull out
the plug by tugging the power cord.
• Unplug the power cord and power adapter from the power outlet if there is a risk of a lightning strike or before extended periods of disuse.
• Do not switch the unit on and off in short intervals.
• Do not connect the unit to a dimmerpack.
• Always allow free air space of at least 50 cm around the unit for ventilation.
• This unit is not designed for permanent operation. Consistent operation breaks will ensure that the unit will serve you for a long time without
defects.
• Thus never aim at persons or animals directly and keep a minimum distance of 3 m (9.8 ft) to the nozzle.
• The location for the unit must be non-flammable, non-combustible and not sensitive to heat.
• Keep a minimum distance of 1 meter (3.28 ft) to all flammable, combustible objects and objects sensitive to heat.
• Never point the snow at strong sources of ignition like fire or pyrotechnic effects.
• Do not swallow the fluid. In case of eye contact, rinse with a lot of water. Consult a doctor should you have accidentally swallowed some fluid.
• Spilled fluid or splashed fluid droplets can cause slip hazard. Mop up the fluid and dispose of it according to regulations.
If the power cord of the unit is equipped with an earthing contact, then it must be connected to an outlet with a protective ground.
Never deactivate the protective ground of a power cord.
• Make sure that the unit is not exposed to extreme heat, moisture or dust.
• Clean the unit using a dry cloth.
• Do not touch the unit bare-handed during its operation (housing becomes very hot). After switching off, the unit can remain warm for a few
hours.
• This unit is designed exclusively for indoor use, do not use this equipment in the immediate vicinity of fluid (does not apply to special outdoor
equipment - in this case, observe the special instructions noted below). Do not expose this unit to flammable materials, fluids or gases.
• If the unit has been exposed to drastic temperature fluctuation (e.g. after transportation), do not switch it on immediately. The arising
condensation water might damage your unit. Leave the unit switched off until it has reached room temperature.
• Never attempt to bypass the thermostatic switch or fuses.
• Do not dismantle or modify the unit.
• For replacement use fuses/bulb of same type and rating only.
• Repairs, servicing and electric connection must be carried out by a qualified technician.
• The ambient temperature must always be between -5° C and +45° C.
• If this unit is operated in any other way, than the one described in this manual, the product may suffer damages and the warranty becomes
void.
• Plastic bags must be kept out of reach of children.
• Unit must be installed out of the reach of children. Never leave the unit running una ttended when connected to a power supply.
This symbol on the product or on its packaging indicates that this product shall not be treated as household waste. Instead it shall be
handed over to the applicable collection point for the recycling of electrical and electronic equipment.
By ensuring this product is disposed of correctly, you will help prevent potential negative consequences for the environment and human health,
which could otherwise be caused by inappropriate waste handling of this product. The recycling of materials will help to conserve natural
resources. For more detailed information about recycling of this product, please contact your local Civic Office, your household waste disposal
service or the shop where you purchased the product.
Page 5
Immediately upon receiving the product, carefully unpack the carton, check the contents to ensure that all parts are present, and have
been received in good condition. Notify the shipper immediately and retain packing materi al for inspection if any parts appear damage from shipping or
the package itself shows signs of mishandling. Save the package and all packing materials. In the event that the product must be returned to the
factory, it is important that the product be returned in the original factory box and packing.
If the unit has been exposed to drastic temperature fluctuation (e.g. after transportation), do not switch i t on immediately. The arising condensation
water might damage your unit. Leave the unit switched off until it has reached room temperature.
On the label on the backside of the unit is indicated on this type of power supply must be connected. Check that the mains voltage corresponds to this,
all other voltages than specified, the light effect can be irreparably damaged. The product must also be directly connected to the mains and may be
used. No dimmer or adjustable power supply.
Always connect the unit to a protected circuit (circuit breaker or fuse). Make sure the unit has an appropriate electrical ground to
avoid the risk of electrocution or fire.
Step 1: Place the unit on a flat surface and in a suitably large area with at least 50 cm of open space around the unit.
Step 2: Fill the fluid tank with Beamz snow fluid.
Step 3: Plug the power cord into the outlet and turn on the unit, put the power switch to the “ON” position. The LCD display will show “WARMING UP”.
After few seconds the LCD display will shows “READY”.
Step 4: Using the LCD display panel, set the unit to the desired operating mode.
Step 5: Turn off the unit, put the power switch to the “OFF” position and pull out the power cord from the outlet.
Use only original Beamz snow fluid. Warranty will be voided if any other type of liquid is used, improper use of liquid may lead to
machine failure and malfunction.
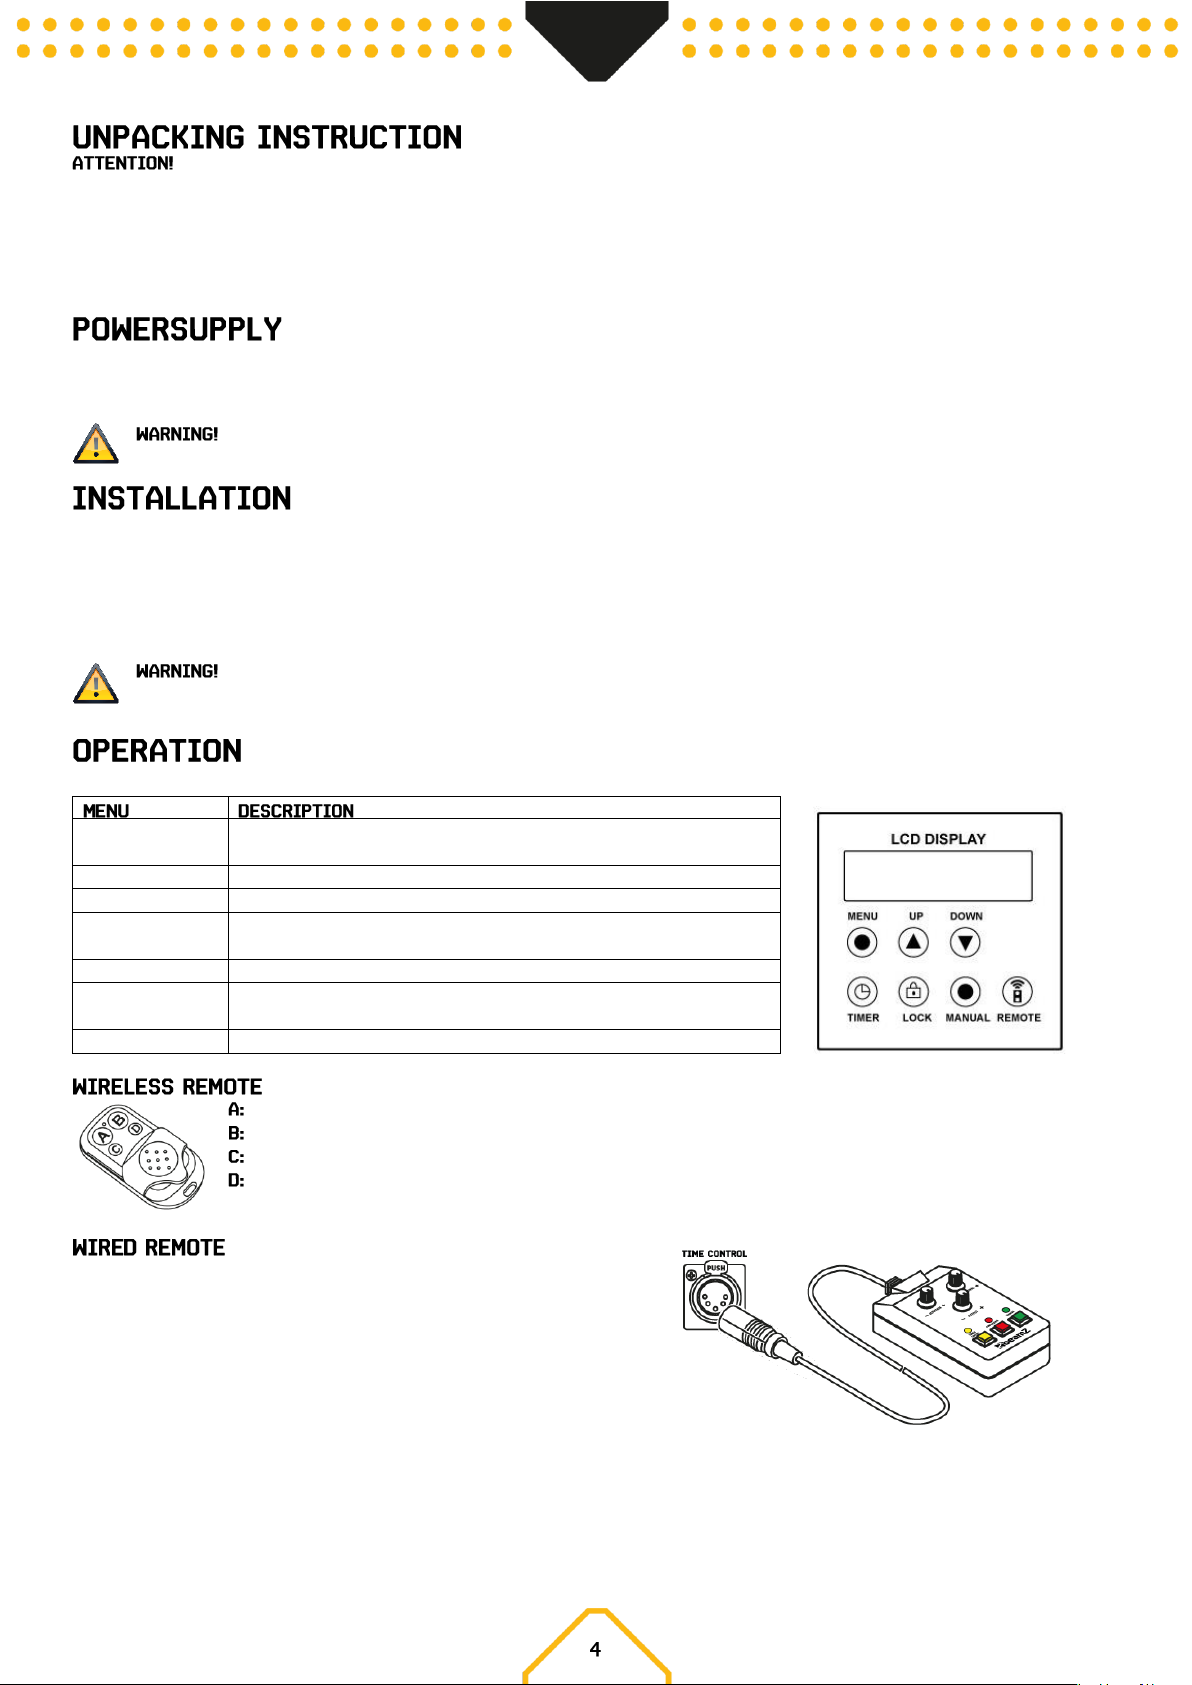
When display shows “READY”, you can start producing haze and adjust the settings via LCD display panel.
Man Vol Out xxx%
Adjust the manual volume output within the range of 0% to 100 % by means
of the Up/Down keys.
Interval Set xxxS
Adjust the interval between 1 to 100S by means of the Up-/Down keys.
Duration Set xxxS
Adjust the duration between 1 to 100S by means of the Up-/Down keys..
Volume Out xxx%
Adjust the volume output within the range of 0- 100% by means of the Up/Down keys.
DMX 512 #xxx
Adjust the DMX address for DMX control by means of the Up-/Down keys.
Wind For Class xx
Adjust the wind output during the function within the range of 0- 100% by
means of the Up-/Down keys.
Wireless
Turn on/off wireless remote
ON / OFF
ON / OFF
Increase output level
Decrease output level
INTERVAL rotary knob: Set the power of the pump.
OUTPUT rotary knob: Set the maximum power of the pump and fan.
DURATION rotary knob: Set the fan power.
YELLOW button: Timer function ON/OFF
RED button: Continuous snow production
GREEN button: Manual snow production
Page 6
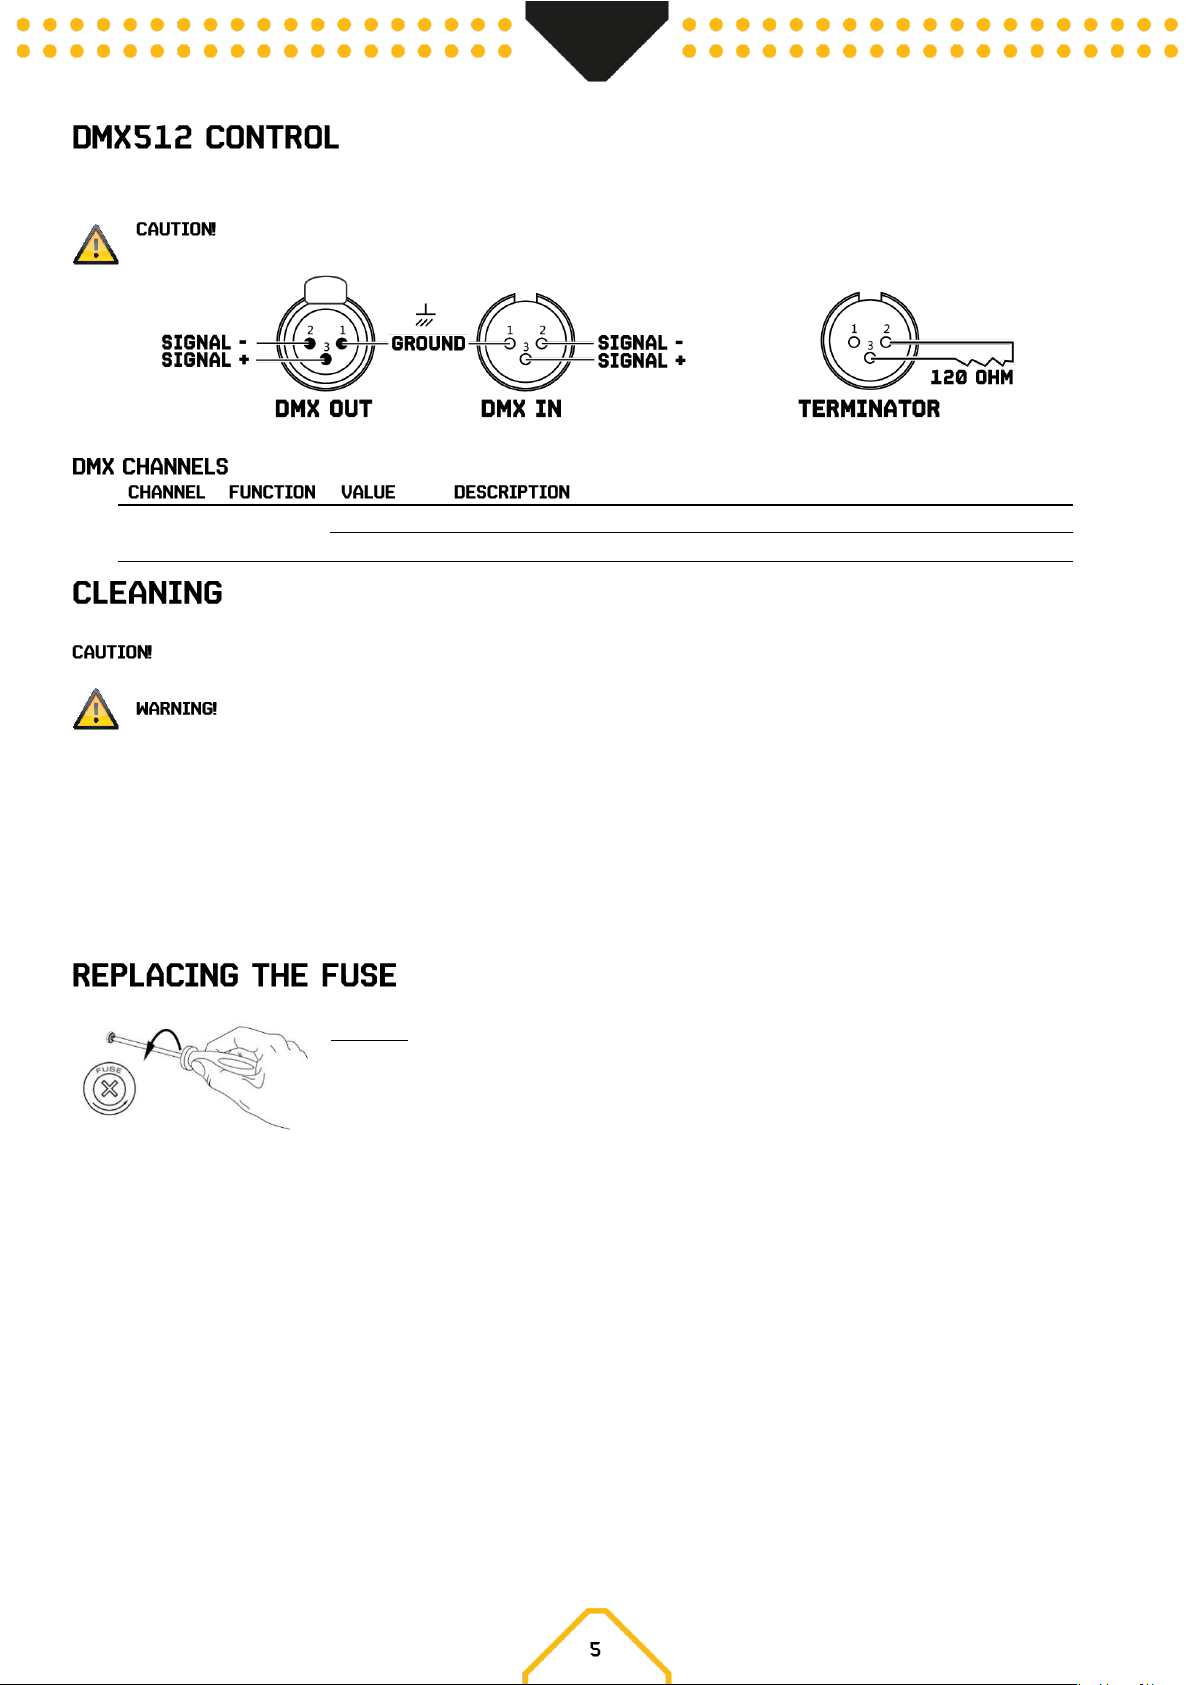
If you are using a standard DMX controller, you can connect the DMX output of the controller directly to the DMX input of the first unit in a DMX chain.
Always connect the output of one unit with the input of the next unit until all units are connected.
At the last unit, you must close the DMX line with a terminating resistor. Take an XLR connector and solder a 120 Ohm resistor
between signal (-) and signal (+) and connect it to the DMX output of the last unit in the line.
1
Snow
000-005
No function
006-255
Snow output from 0-100%
We recommend a frequent cleaning of the unit, in particular the output nozzle.
There are no serviceable parts inside the unit except for the fuse. Repairs and service operations are only to be carried out by authorized
dealers.
Disconnect from mains before starting maintenance operation!
• Ensure the fluid do not become contaminated.
• Ensure the air vents are not clogged by dust. If necessary remove the dust.
• Ensure that the unit can not get overheated.
• Do not run the unit without any fluid, as the pump will run dry.
• Wipe up spilled fluid immediately. Moisture and fluid can permanently damage the electrical components of the unit.
• For cleaning the surface of the unit use a suitable, solvent-free cleaner.
• It is recommended to run the unit on a monthly basis in order to achieve best performance and output condition.
• Before storing, run distilled water through the system. This will help clean out the remaining snow fluid and prevent pump from malfunction
on next usage.
If the fuse is defective, replace the fuse with a fuse of the same type and value. Before replacing the fuse, unplug mains lead.
Procedure:
Step 1: Open the fuse holder on the rear panel with a fitting screwdriver.
Step 2: Remove the old fuse from the fuse holder.
Step 3: Install the new fuse in the fuse holder.
Step 4: Replace the fuse holder in the housing.
Page 7
Lees deze gebruiksaanwijzing zorgvuldig door voordat u met het apparaat gaat werken en bewaar deze handleiding voor
toekomstig gebruik. Het bevat belangrijke informatie over de installatie, het gebruik en het onderhoud van het apparaat.
• Uitpakken en zorgvuldig controleren of er geen transportschade is voordat u het apparaat gebruikt.
• Lees deze instructies aandachtig door en volg de instructies op.
• Neem alle veiligheidswaarschuwingen in acht. Verwijder nooit veiligheidswaarschuwingen of andere informatie van het apparaat.
• Zorg ervoor dat er geen ventilatiesleuven geblokkeerd zijn, anders zal het apparaat oververhit raken.
Voordat u het apparaat verbind met een contactdoos, moet u eerst controleren of de netspanning en -frequentie
overeenkomen met de op de apparatuur aangegeven waarden. Als de apparatuur een spanningsselectieschakelaar heeft, sluit het apparaat alleen
aan op het stopcontact als de waarden van het apparaat en de waarden van de netspanning overeenkomen. Als het bijgeleverde netsnoer of de
voedingsadapter niet in uw stopcontact past, neem dan contact op met uw elektricien.
• Controleer na het aansluiten van het apparaat alle kabels om schade of ongevallen, bijv. door struikelgevaar, te voorkomen.
• Zorg ervoor dat het netsnoer nooit gekrompen of beschadigd raakt. Controleer het apparaat en het netsnoer van tijd tot tijd.
• Trek altijd de stekker uit het stopcontact wanneer het apparaat niet wordt gebruikt of voordat u het apparaat schoonmaakt! Pak het
netsnoer alleen bij de stekker vast en trek nooit aan het netsnoer.
• Haal de stekker van het netsnoer en de voedingsadapter uit het stopcontact als er gevaar bestaat voor blikseminslag of voor langere
perioden van buitengebruikstelling.
• Schakel het apparaat niet snel achter elkaar in en uit.
• Sluit het apparaat niet aan op een dimmerpack.
• Zorg altijd voor een vrije luchtruimte van minstens 50 cm rondom het apparaat voor ventilatie.
• Dit apparaat is niet ontworpen voor permanent gebruik. Consistente bedieningspauzes zullen ervoor zorgen dat het apparaat lang zonder
defecten van dienst zal zijn.
• Richt het apparaat nooit op personen of dieren en houd een minimale afstand van 3 meter tot het mondstuk aan.
• De locatie van het apparaat moet onbrandbaar en niet gevoelig voor warmte zijn.
• Houd een minimumafstand van 1 meter tot alle ontvlambare, brandbare voorwerpen en voorwerpen die gevoelig zijn voor hitte.
• Richt de sneeuw nooit op sterke ontstekingsbronnen zoals vuur of pyrotechnische effecten.
• Slik de vloeistof niet in. Houd het apparaat uit de buurt van kinderen. In geval van oogcontact, de ogen spoelen met veel water. Raadpleeg
een arts als u per ongeluk vloeistof heeft ingeslikt.
• Gemorste vloeistof of spattende vloeistofdruppels kunnen slipgevaar veroorzaken. Dweil de vloeistof op en voer deze af volgens de
voorschriften.
Als het netsnoer van het apparaat is voorzien van een aardingscontact, moet het worden aangesloten op een stopcontact met
een beschermende aarding. Deactiveer nooit de beschermende aarding van een netsnoer.
• Zorg ervoor dat het apparaat niet wordt blootgesteld aan extreme hitte, vocht of stof.
• Reinig het apparaat met een droge doek.
• Raak het apparaat tijdens de werking ervan niet met blote handen aan (de behuizing kan zeer heet worden). Na het uitschakelen kan het
apparaat enkele uren warm blijven.
• Dit apparaat is uitsluitend ontworpen voor gebruik binnenshuis, gebruik deze apparatuur niet in de onmiddellijke nabijheid van vloeistof (niet
van toepassing op speciale buitenapparatuur - in dit geval, neem de speciale instructies hieronder in acht). Stel dit apparaat niet bloot aan
brandbare materialen, vloeistoffen of gassen.
• Als het apparaat is blootgesteld aan drastische temperatuurschommelingen (bijv. na transport), schakel het dan niet o nmiddellijk in. Het
ontstane condenswater kan uw apparaat beschadigen. Laat het apparaat uitgeschakeld tot het op kamertemperatuur is.
• Probeer nooit de thermostaatschakelaar of zekeringen te omzeilen.
• Demonteer of wijzig het apparaat niet.
• Gebruik voor vervanging alleen zekeringen/lampen van hetzelfde type en vermogen.
• Reparaties, onderhoud en elektrische aansluiting moeten worden uitgevoerd door een gekwalificeerde technicus.
• De omgevingstemperatuur moet altijd tussen -5° C en +45° C liggen.
• Als dit apparaat op een andere manier wordt gebruikt dan beschreven in deze handleiding, kan het product beschadigd raken en vervalt de
garantie.
• Plastic zakken moeten buiten het bereik van kinderen worden gehouden.
• Het apparaat moet buiten het bereik van kinderen worden geïnstalleerd en laat het apparaat nooit onbeheerd achter wanneer het op een
stroomvoorziening is aangesloten.
Dit symbool op het product of op de verpakking g eeft aan dat dit product niet al s huishoudelijk afval mag worden behandeld. In plaats daarva n moet het worden overhandigd aan
het toepasselijke inzamelpunt voor de recycling van elektrische en elektronische a pparatuur.
Door ervoor te zorgen dat dit product op de juiste wijze wordt afgevoerd, helpt u mogelijke negatieve gevolgen voor het mi lieu en de menselijke gezondheid te voorkomen, die anders
zouden kunnen worden veroorzaakt door ongepaste afvalverwerking van dit product. Het recyclen van materialen draagt bij tot het behoud van natuurlijke hulpbronne n. Voor meer
gedetaill eerde informatie over het recyclen van dit product kunt u contact op nemen met uw plaatsel ijke gemeente, uw huisv uildienst of de winkel wa ar u het product heb t gekocht.
Page 8
Onmiddellijk na ontvangst, zorgvuldig uitpakken van de doos, controleer de inhoud om ervo or te zorgen dat alle onderdelen aanwezig zijn en
zijn in goede staat zijn ontvangen. Bij transportschade of ontbreken van onderdelen onmiddellijk de verkopende partij inlichten. Bewaar de verpakking
en het verpakkingsmateriaal. Indien het product moet worden teruggestuurd, is het belangrijk dat het product in originele verpakking wordt
geretourneerd.
Als het apparaat is blootgesteld aan drastische temperatuurverschillen (bv. na het transport), schakel het apparaat niet onmiddellijk in. De ontstane
condensatie kan het apparaat beschadigen. Zorg ervoor dat het apparaat op kamertemperatuur komt en steek vervolgens de voeding stekker in het
stopcontact.
Op achterzijde van het apparaat staat aangegeven op welke netspanning deze moet worden aan gesloten. Controleer of de netspanning hiermee
overeenkomt, bij alle andere netspanningen dan aangegeven kan het apparaat onherstelbaar worden beschadigd. Tevens moet het apparaat direct op
de netspanning worden aangesloten en mag géén dimmer of regelbare voeding worden gebruikt.
Sluit het apparaat altijd aan op een beschermd circuit (aardlekschakelaar of zekering). Zorg ervoor dat het apparaat
voldoende elektrisch is geaard om het risico op elektrocutie of brand te vermijden.
Stap 1: Plaats het apparaat op een vlakke ondergrond en op een geschikt groot oppervlak met ten minste 50 cm open ruimte rondom het apparaat.
Stap 2: Vul de vloeistoftank met Beamz sneeuwvloeistof.
Stap 3: Steek de stekker van het netsnoer in het stopcontact en zet het apparaat aan, zet de aan/uit-schakelaar in de stand "ON". Op het LCD-display
verschijnt "WARMING UP". Na enkele seconden toont het LCD-display "READY".
Stap 4: Stel het toestel in op de gewenste bedrijfsmodus met behulp van het LCD-scherm.
Stap 5: Schakel het apparaat uit, zet de aan/uit-schakelaar in de stand "OFF" en trek het netsnoer uit het stopcontact.
Gebruik alleen originele Beamz sneeuwvloeistof. Bij gebruik van een ander type vloeistof vervalt de garantie, onjuist
gebruik van vloeistof kan leiden tot defecten en storingen aan de machine.
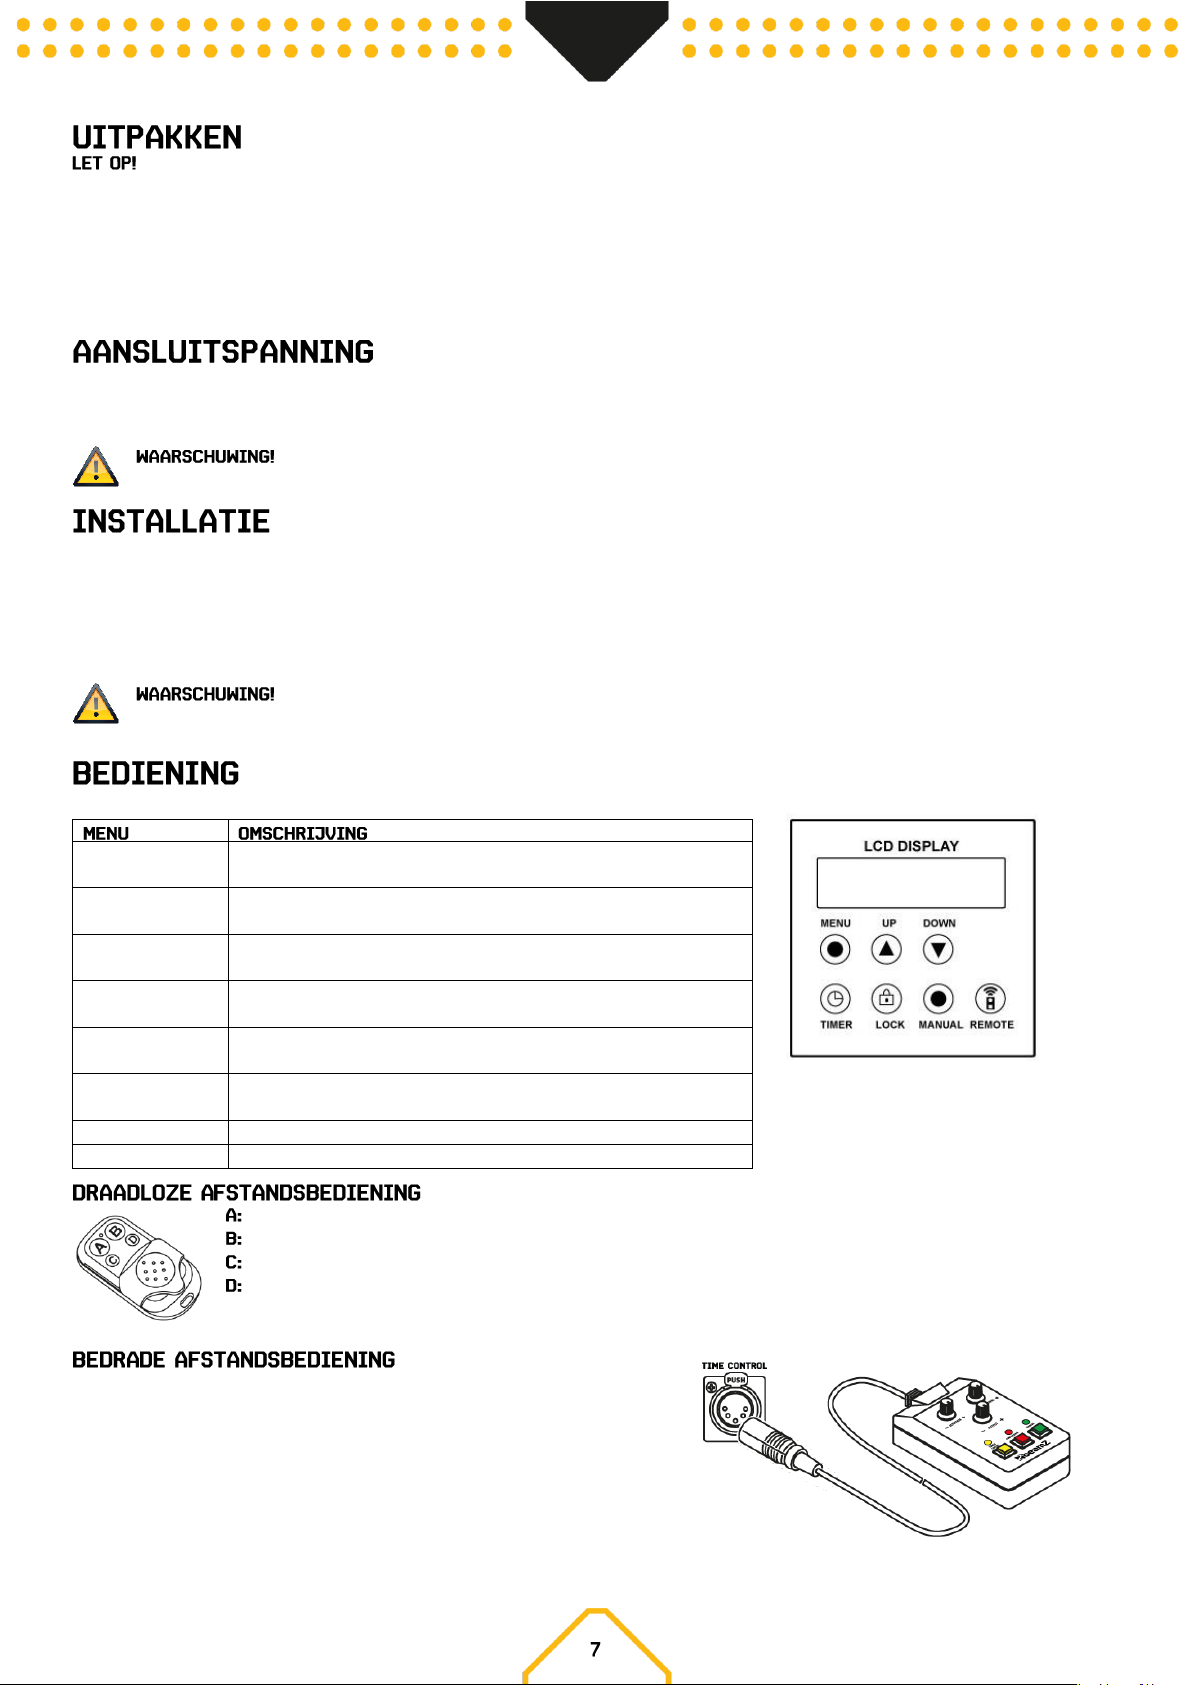
Wanneer het display "READY" weergeeft, kunt u starten met het produceren van nevel en de instellingen aanpassen via het LCD-display.
Man Vol Out xxx%
Stel de handmatige volume-uitgang in binnen een bereik van 0% tot
100% met behulp van de toetsen Up/Down.
Interval Set xxxS
Stel het interval in tussen 1 tot 100S in met behulp van de Up-/Downtoetsen.
Duration Set xxxS
Stel de tijdsduur in tussen 1 tot 100S met behulp van de Up-/Downtoetsen.
Volume Out xxx%
Stel de volume-uitstoot in binnen het bereik van 0- 100% met behulp
van de Up-/Down-toetsen..
DMX 512 #xxx
Pas het DMX-adres voor DMX-besturing aan met behulp van de Up/Down-toetsen..
Wind For Class xx
Pas de ventilatorsnelheid aan binnen het bereik van 0- 100% met
behulp van de Up-/Down-toetsen.
Angel Set xx%
Geen functie voor dit model.
Wireless
Zet draadloze afstandsbediening aan/uit
AAN / UIT
AAN / UIT
Uitstoot volume omhoog
Uitstoot volume omlaag
INTERVAL draaiknop: Stel het vermogen van de pomp in.
OUTPUT draaiknop: Stel het maximale vermogen van de pomp en de ventilator in.
DURATIE draaiknop: Stel het vermogen van de ventilator in.
GELE knop: Timerfunctie AAN/UIT
RODE knop: Ononderbroken sneeuwproductie
GROENE knop: Handmatige sneeuwproductie
Page 9
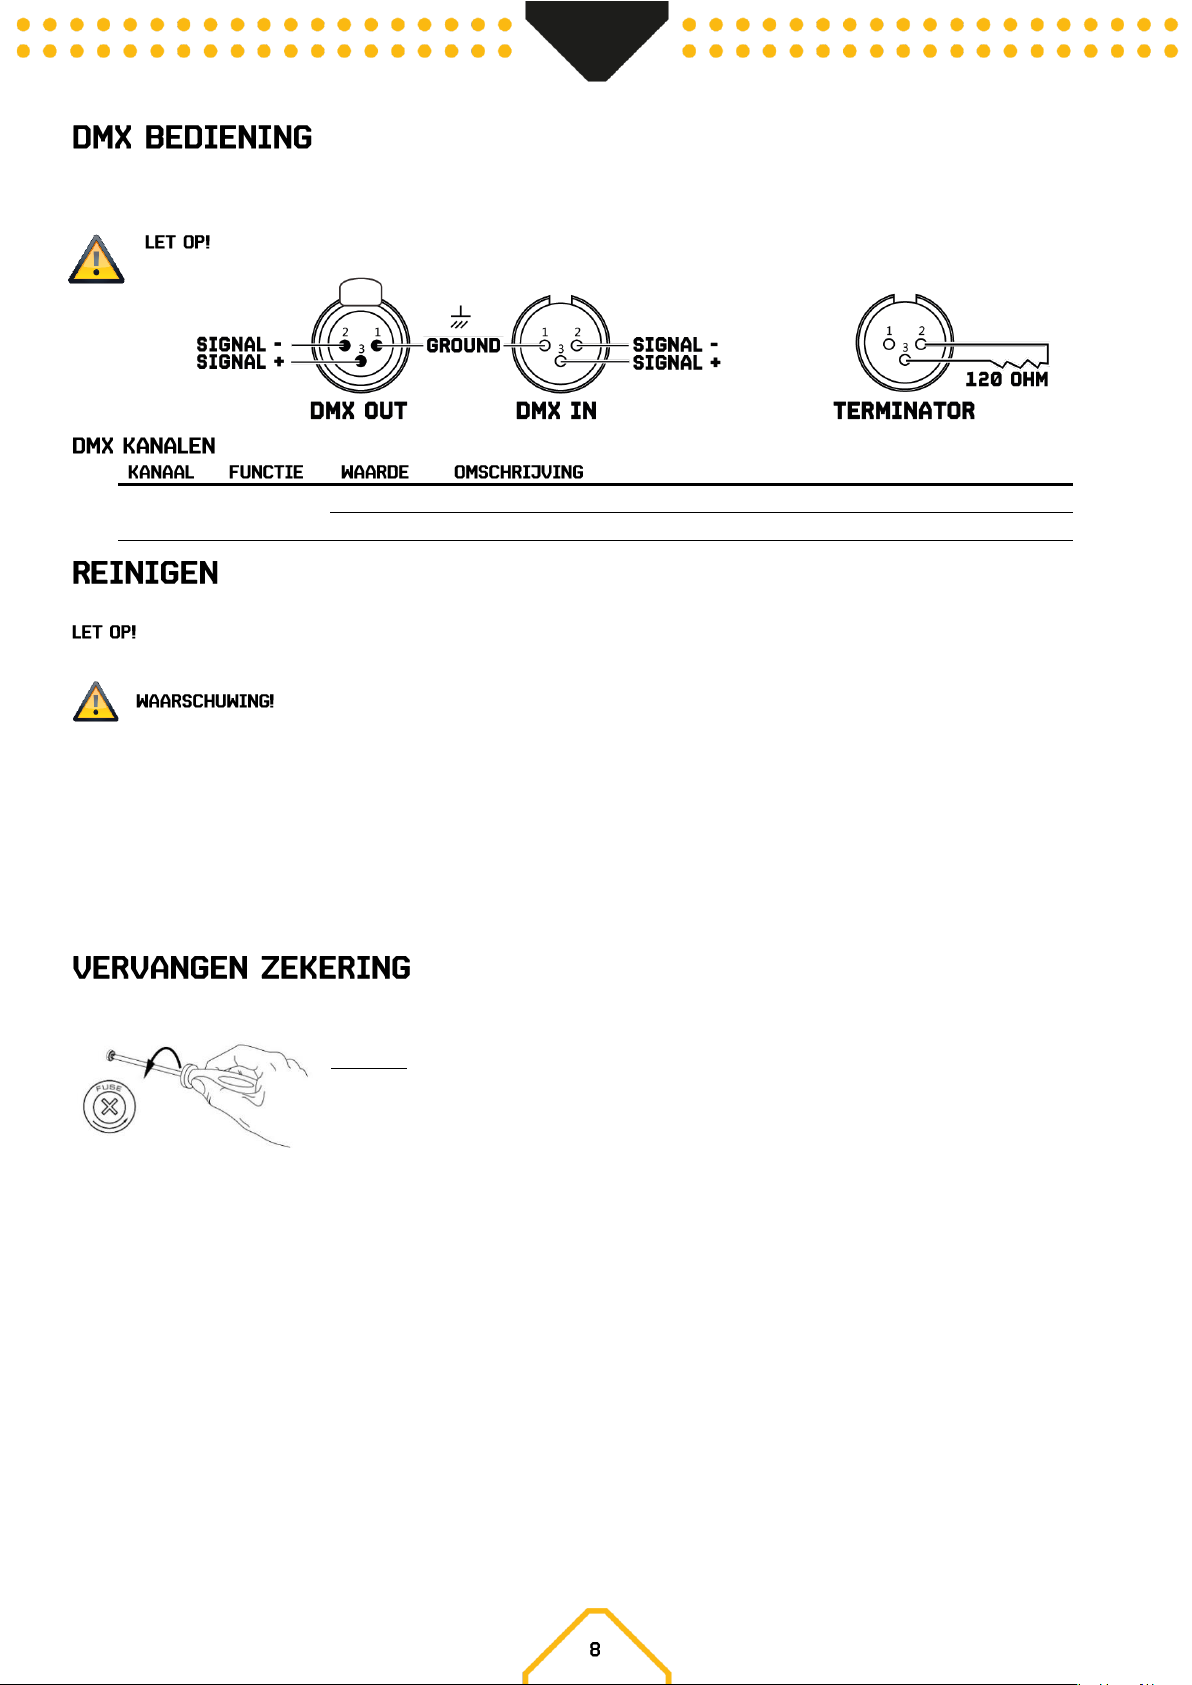
Als u gebruik maakt van een standaard DMX -lichtstuurtafel, kunt u de DMX uitgang van de lichtstuurtafel rechtstreeks aansluiten op de DMX ingang
van het eerste apparaat. Sluit altijd de DMX uitgang aan op de eerst volgende DMX ingang van het volgende armatuur totdat alle apparaten zijn
aangesloten.
Bij het laatste apparaat, dient u de DMX-lijn af te sluiten met een eindweerstand. Neem een XLR connector en soldeer een 120 Ohm
weerstand tussen signaal (-) en signaal (+)en steek deze in de DMX uitgang van het laatste apparaat in de lijn.
1
Sneeuw
000-005
Geen functie
006-255
Sneeuw volume van 0-100%
Wij raden aan om het apparaat, in het bijzonder het mondstuk, regelmatig te reinigen.
Er bevinden zich geen onderdelen in het apparaat, behalve de zekering. Reparaties en servicewerkzaamheden mogen alleen worden
uitgevoerd door geautoriseerde dealers.
Schakel de netspanning uit voordat u met het onderhoud begint!
• Zorg ervoor dat de vloeistof niet verontreinigd raakt.
• Zorg ervoor dat de ventilatieroosters niet verstopt raken door stof. Verwijder waar nodig het stof.
• Zorg ervoor dat het apparaat niet oververhit kan raken.
• Laat het apparaat niet zonder vloeistof draaien, omdat de pomp dan droogloopt.
• Veeg gemorste vloeistof onmiddellijk af. Vocht en vloeistof, kan de elektrische onderdelen van het apparaat permanent beschadigen.
• Gebruik voor het reinigen van het oppervlak van het apparaat een geschikte, oplosmiddelvrije reiniger.
• Het is aan te raden om het apparaat maandelijks te laten draaien om de beste prestaties en outputconditie te bereiken.
• Laat gedestilleerd water door het systeem lopen voordat u het apparaat opbergt. Dit helpt bij het reinigen van de resterende sneeuwvloeistof
en voorkomt storingen van de pomp bij het volgende gebruik.
Indien de zekering defect is, dient u de zekering te vervangen door een zekering van hetzelfde type en waarde. Voor het vervangen van de zekering,
schakel eerst de stroom uit en volg de onderstaande stappen.
Procedure:
Stap 1: Open de zekeringhouder op het achterpaneel met een passende platte schroevendraaier.
Stap 2: Verwijder de oude zekering uit de zekeringhouder.
Stap 3: Installeer de nieuwe zekering in de zekeringhouder.
Stap 4: Plaats de zekeringhouder in de behuizing.
Page 10
Lesen Sie diese Anleitung sorgfältig durch, bevor Sie das Gerät in Betrieb nehmen, und bewahren Sie sie zum späteren Gebrauch auf.
Sie enthält wichtige Informationen über die Installation, den Gebrauch und die Wartung des Geräte s.
• Vor der Inbetriebnahme des Gerätes auspacken und sorgfältig auf Transportschäden prüfen.
• Lesen Sie diese Anleitung sorgfältig durch und befolgen Sie sie.
• Beachten Sie alle Sicherheitshinweise. Entfernen Sie niemals Sicherheitshinweise oder andere Informationen vom Gerät.
• Achten Sie darauf, dass keine Lüftungsschlitze blockiert sind, da das Gerät sonst überhitzt.
Bevor Sie das Gerät an eine Steckdose anschließen, überprüfen Sie, ob die Netzspannung und -frequenz mit den auf dem Gerät
angegebenen Werten übereinstimmen. Wenn das Gerät über einen Spannungswahlschalter verfügt, schließen Sie das Gerät nur dann an das Netz
an, wenn die Gerätewerte und die Netzspannungswerte übereinstimmen. Wenn das mitgelieferte Netzkabel oder -adapter nicht in Ihre Steckdose
passt, wenden Sie sich an Ihren Elektriker.
• Überprüfen Sie nach dem Anschluss des Gerätes alle Kabel, um Schäden oder Unfälle, z.B. durch Stolperfallen, zu vermeiden.
• Das Netzkabel darf niemals geschrumpft oder beschädigt werden. Überprüfen Sie das Gerät und das Netzkabel von Zeit zu Zeit.
• Ziehen Sie immer den Netzstecker, wenn Sie das Gerät nicht benutzen oder vor der Reinigung! Fassen Sie das Netzkabel nur am Stecker und
ziehen Sie niemals am Netzkabel.
• Ziehen Sie das Netzkabel und das Netzteil aus der Steckdose, wenn die Gefahr von Blitzschlag oder längerer Inaktivität besteht.
• Schalten Sie die Maschine nicht in schneller Folge ein und aus.
• Schließen Sie das Gerät nicht an ein Dimmerpack an.
• Achten Sie immer auf einen Freiraum von mindestens 50 cm um das Gerät, um eine Belüftung zu gewährleisten.
• Dieses Gerät ist nicht für den Dauerbetrieb ausgelegt. Durch konsequente Betriebspausen wird sichergestellt, dass das Gerät lange Zeit
störungsfrei arbeitet.
• Richten Sie das Gerät niemals auf Personen oder Tiere und halten Sie einen Mindestabstand von 3 Metern zum Mundstück ein.
• Der Standort muß eine nicht entflammbare, nicht brennbar und wärmeunempfindlich sein.
• Einen Mindestabstand von 1 meter zu entflammbaren, brennbaren und wärmeempflindlichen Gegenständen einhalten.
• Richten Sie den Schnee niemals auf starke Zündquellen wie Feuer oder pyrotechnische Effekte.
• Fluid nicht einnehmen. Bei Augenkontakt mit viel Wasser ausspülen. Bei versehentlicher Einnahme Arzt aufsuchen
• Verschüttetes Fluid oder verspritzte Fluid-Tröpfchen können Rutschgefahr auslösen. Fluid aufnehmen und vorschriftsmäßig entsorgen.
Wenn das Netzkabel des Geräts mit einer Erdungsklemme ausgestattet ist, schließen Sie es an eine Steckdose mit einer
Schutzerdungsklemme an. Deaktivieren Sie niemals die Schutzerdung eines Netzkabels.
• Achten Sie darauf, dass das Gerät keiner extremen Hitze, Feuchtigkeit oder Staub ausgesetzt ist.
• Reinigen Sie das Gerät mit einem trockenen Tuch.
• Berühren Sie das Gerät während des Betriebs nicht mit bloßen Händen (das Gehäuse kann sehr heiß werden). Nach dem Ausschalten kann
das Gerät einige Stunden lang warm bleiben.
• Dieses Gerät ist nur für den Innenbereich bestimmt, verwenden Sie es nicht in unmittelbarer Nähe von Flüssigkeiten (gilt nicht für spezielle
Außengeräte - in diesem Fall befolgen Sie die folgenden besonderen Anweisungen). Setzen Sie dieses Gerät keinen brennbaren Stoffen,
Flüssigkeiten oder Gasen aus.
• Wenn das Gerät starken Temperaturschwankungen ausgesetzt war (z.B. nach dem Transport), schalten Sie es nicht sofort ein. Die dabei
entstehende Kondensation kann Ihr Gerät beschädigen. Lassen Sie das Gerät ausgeschaltet, bis es Raumtemperatur erreicht hat.
• Versuchen Sie niemals, den Thermostatschalter oder die Sicherungen zu umgehen.
• Demontieren oder modifizieren Sie das Gerät nicht.
• Verwenden Sie für den Austausch nur Sicherungen/Leuchten gleichen Typs und gleicher Leistung.
• Reparaturen, Wartungen und der elektrische Anschluss dürfen nur von einem qualifizierten Techniker durchgeführt werden.
• Die Umgebungstemperatur muss immer zwischen -5°C und +45°C liegen.
• Wenn dieses Gerät auf eine andere Weise als in dieser Anleitung beschrieben verwendet wird, kann das Produkt beschädigt werden und die
Garantie erlischt.
• Plastiktüten sollten außerhalb der Reichweite von Kindern aufbewahrt werden.
• Das Gerät muss außerhalb der Reichweite von Kindern installiert werden. Betreiben Sie das Gerät niemals unbeaufsichtigt, wenn es an ein
Stromnetz angeschlossen ist.
Dieses Symb ol auf dem Produkt oder der Verpackung weist darauf hin, dass dieses Produkt nicht als norm aler Haushaltsabfall behandelt werden darf. Es muss stattdessen an die
entsprechende Sammelstelle für das Recycling von elektrischen u nd elektronischen Geräten abg egeben werden.
Indem Sie si cherstellen, dass dieses Gerät ordnungsgemäß entsorgt wird, tragen Sie d azu bei, mögliche negati ve Auswirkungen auf di e Umwelt und die menschliche Gesundh eit zu
vermeiden, die sonst durch eine unsachgemäß e Entsorgung dieses Produkts verursacht werden könnten. Re cycling-Materialien trag en zur Schonung der natür lichen Ressourcen bei. Für
weitere Informatione n zur Wiederverwertung dieses Produk ts wenden Sie sich bitte an Ihre Gemeinde, Ihren Hausmüllentsorger oder an den Lade n, in dem Sie das Produkt gekauft haben.
Tronios B V Registrierungsnummer : DE51181017 (ElektroG) / 21003000 (BatterieG)
Page 11
Packen Sie den Karton sofort nach Erhalt sorgfältig aus, überprüfen Sie seinen Inhalt, um sicherzustellen, dass alle Teile vo rhanden sind
und in gutem Zustand erhalten wurden. Bei Transportschäden oder fehlenden Teilen ist der Verkäufer unverzüglich zu informieren. Lagern Sie die
Verpackung und das Verpackungsmaterial. Wenn das Produkt zurückgegeben werden muss, ist es wichtig, dass das Produkt in der O riginalverpackung
zurückgegeben wird.
Wenn das Gerät drastischen Temperaturunterschieden ausgesetzt war (z.B. nach dem Transport), schalten Sie es nicht sofort ein. Die dabei
entstehende Kondensation kann das Gerät beschädigen. Vergewissern Sie sich, dass das Gerät Raumtemperatur hat, und stecken Sie dann den
Netzstecker in die Steckdose.
Auf der Rückseite von das Gerät wird angezeigt, an welche Netzspannung es angeschlossen werden muss. Prüfen Sie, ob die Netzspannung mit dieser
übereinstimmt. Wenn die Netzspannung von der angegebenen abweicht, kann das Gerät irreparabel beschädigt werden. Das Gerät muss auch direkt an
die Netzspannung angeschlossen werden. Es darf kein Dimmer oder eine einstellbare Stromversorgung verwendet werden.
Schließen Sie das Gerät immer an einen geschützten Stromkreis an (Fehlerstromschutzschalter oder Sicherung). Vergewissern
Sie sich, dass das Gerät ausreichend elektrisch geerdet ist, um die Gefahr eines Stromschlags oder Brandes zu vermeiden.
Schrit t 1: Stellen Sie das Gerät auf eine ebene Fläche und in eine entsprechend große Fläche mit mindestens 50 cm freier Fläche um das Gerät herum.
Schrit t 2: Füllen Sie den Flüssigkeitstank mit Beamz Schneeflüssigkeit.
Schrit t 3: Stecken Sie das Netzkabel in die Steckdose und schalten Sie das Gerät ein, stellen Sie den Netzschalter auf die Position "ON". Auf der LCDAnzeige erscheint "WARMING UP". Nach einigen Sekunden zeigt das LCD-Display "READY" an.
Schrit t 4: Stellen Sie das Gerät über das LCD-Display auf die gewünschte Betriebsart ein.
Schrit t 5: Schalten Sie das Gerät aus, stellen Sie den Netzschalter auf die Position "OFF" und ziehen Sie das Netzkabel aus der Steckdose.
Verwenden Sie nur Original Beamz Schneeflüssigkeit. Die Garantie erlischt, wenn eine andere Art von Flüssigkeit verwendet wird.
Eine unsachgemäße Verwendung von Flüssigkeit kann zu Maschinenausfällen und Fehlfunktionen führen.
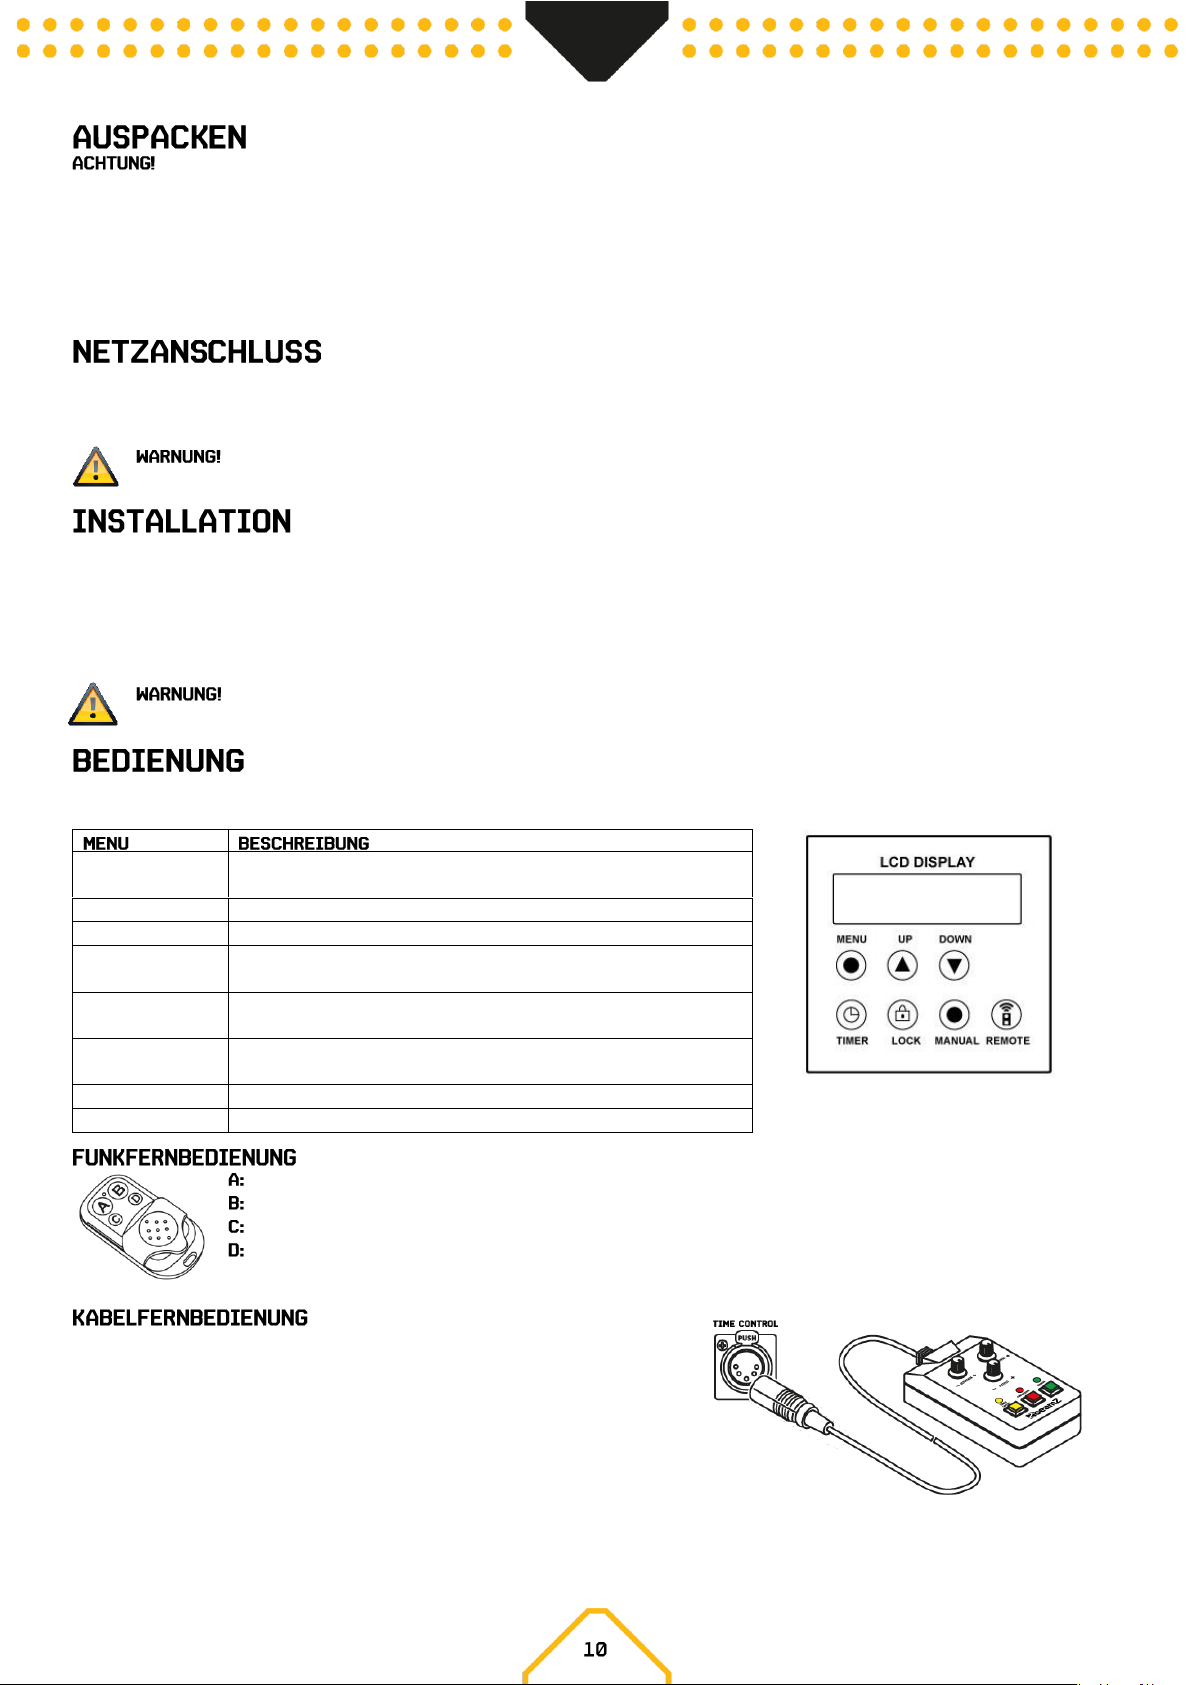
Wenn auf dem Display "READY" angezeigt wird, können Sie mit der Erzeugung von Dunst beginnen und die Einst ellungen über das LCD-Display
vornehmen
Man Vol Out xxx%
Stellen Sie die manuelle Volumenausgabe im Bereich von 0% bis 100%
mit den Auf/Ab-Tasten ein.
Interval Set xxxS
Stellen Sie das Intervall zwischen 1 und 100S mit den Auf/Ab-Tasten ein.
Duration Set xxxS
Stellen Sie die Dauer zwischen 1 und 100S mit den Auf/Ab-Tasten ein.
Volume Out xxx%
Stellen Sie die Volumenausgabe während der Timerfunktion mit den
Auf/Ab-Tasten im Bereich von 0- 100% ein.
DMX 512 #xxx
Stellen Sie die DMX-Adresse für die DMX-Steuerung mit den Up/Down-Tasten ein.
Wind For Class xx
Stellen Sie die Windstärke während der Funktion mit den Up-/DownTasten im Bereich von 0- 100% ein.
Angel Set xx%
Keine Funktion für dieses Modell.
Wireless
Ein- und Ausschalten der Funkfernbedienung
EIN / AUS
EIN / AUS
Ausstoßmenge erhöhen
Ausstoßmenge verringern
INTERVALER Drehknopf: Stellen Sie die Leistung der Pumpe ein.
OUTPUT Drehknopf: Stellen Sie die maximale Leistung von Pumpe und Ventilator ein.
DURATION Drehknopf: Stellen Sie die Ventilatorleistung ein.
GELBE Taste: Timerfunktion EIN/AUS
ROTER Taster: Kontinuierliche Schneeproduktion
GRÜNE Taste: Manuelle Schneeproduktion
Page 12
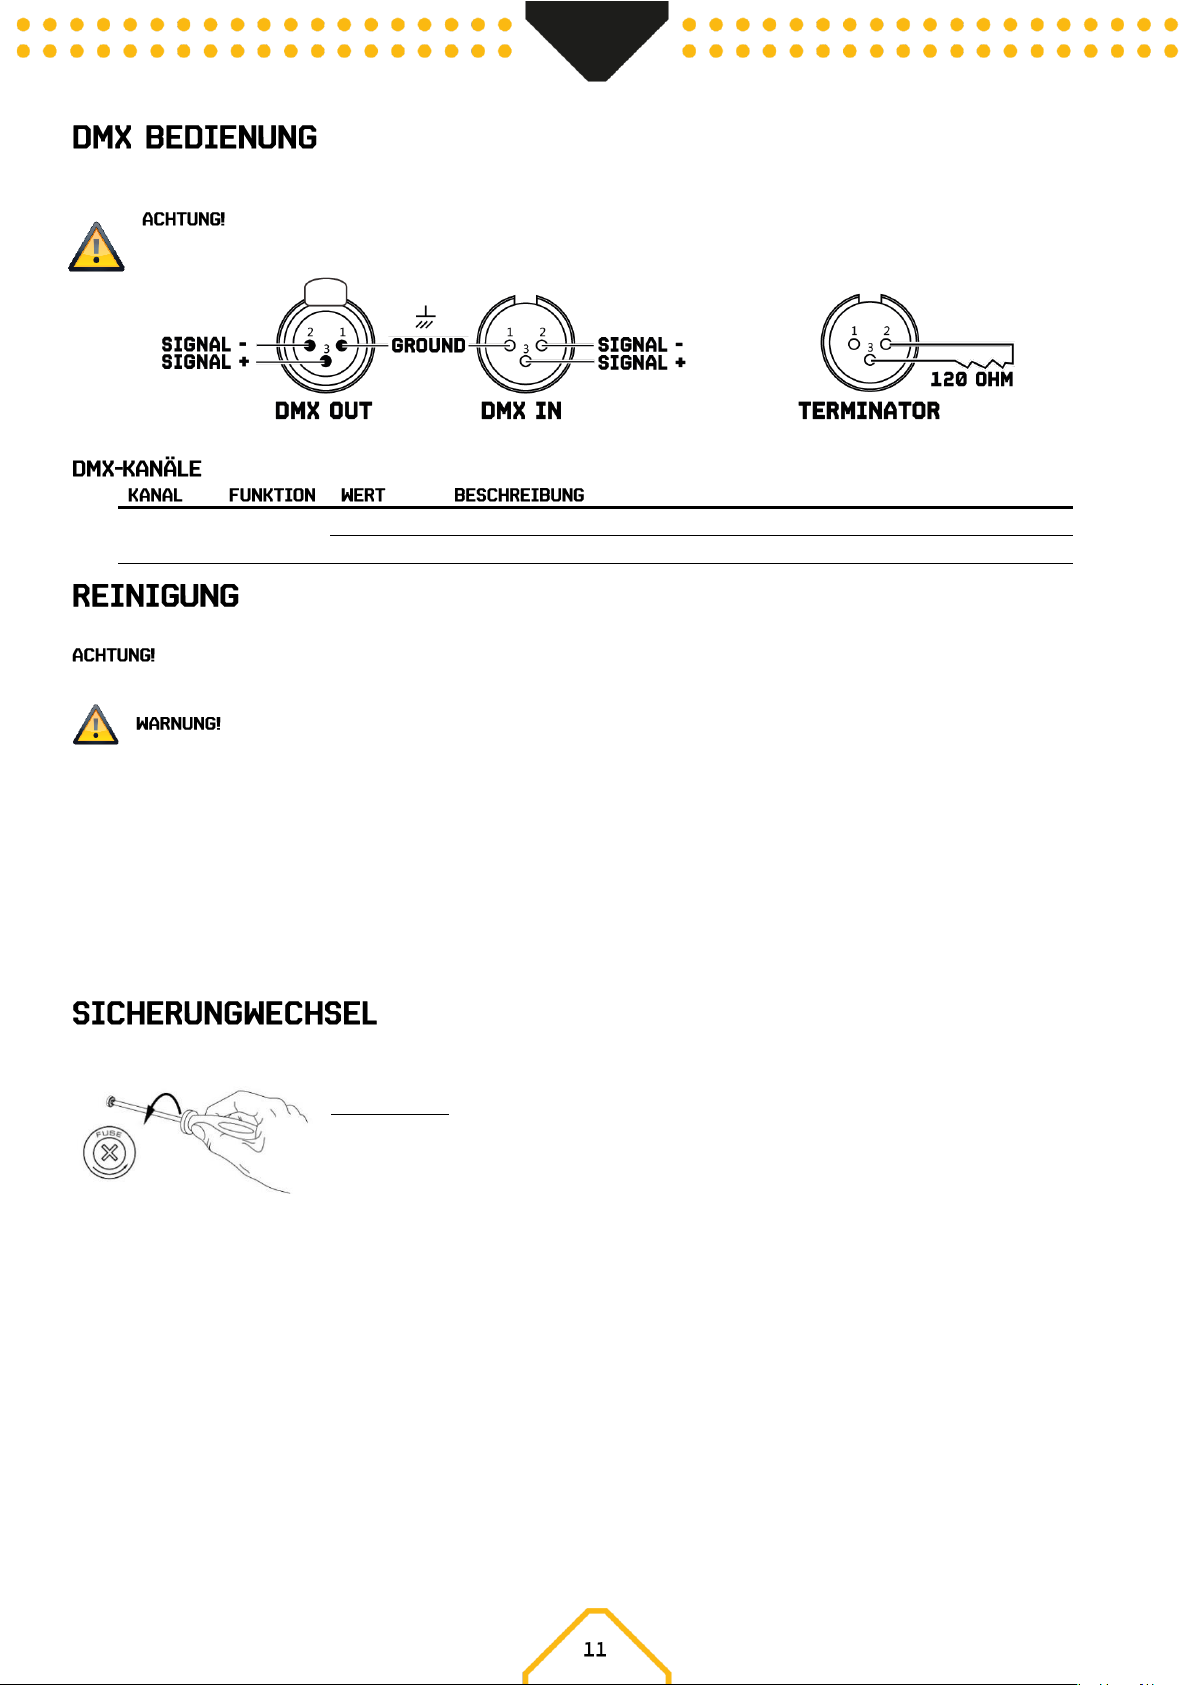
Wenn Sie einen Standard-DMX-Controller verwenden, können Sie den DMX-Ausgang des Controller direkt mit dem DMX-Eingang des ersten Geräts
verbinden. Verbinden Sie den DMX-Ausgang immer mit dem nächsten DMX-Eingang des nächsten Geräts, bis alle Geräte angeschlossen sind.
Bei der letzten Gerät müssen Sie die DMX-Leitung mit einem Abschlusswiderstand schließen. Nehmen Sie einen XLR-Stecker und
löten Sie einen 120-Ohm-Widerstand zwischen Signal (-) und Signal (+) und stecken Sie diesen in den DMX-Ausgang der letzten Gerät in der
Leitung.
1
Schnee
000-005
Keine Funktion
006-255
Schneeabgabe von 0-100%
Wir empfehlen eine regelmäßige Reinigung des Gerätes, insbesondere des Nebelaustrittsöffnung.
Es befinden sich keine Teile im Inneren des Gerätes, außer der Sicherung. Reparaturen und Servicearbeiten dürfen nur von autorisierten
Fachhändlern durchgeführt werden.
Vor Wartungsarbeiten unbedingt allpolig vom Netz trennen!
• Stellen Sie sicher, dass die Flüssigkeit nicht verunreinigt wird.
• Stellen Sie sicher, dass die Lüftungsöffnungen nicht durch Staub verstopft sind. Bei Bedarf den Staub entfernen.
• Stellen Sie sicher, dass das Gerät nicht überhitzt werden kann.
• Betreiben Sie das Gerät nicht ohne Flüssigkeit, da die Pumpe sonst trocken läuft.
• Wischen Sie alle Verschüttungen sofort ab. Feuchtigkeit und Flüssigkeit können die elektrischen Komponenten des Gerätes dauerhaft
beschädigen.
• Verwenden Sie einen geeigneten, lösungsmittelfreien Reiniger, um die Oberfläche des Gerätes zu reinigen.
• Es wird empfohlen, das Gerät monatlich zu betreiben, um die beste Leistung und Ausgangsbedingung zu erreichen.
• Lassen Sie destilliertes Wasser durch das System laufen, bevor Sie das Gerät lagern. Dies hilft, die verbleibende Schneeflüss igkeit zu reinigen
und verhindert den Ausfall der Pumpe bei der späteren Verwendung.
Wenn die Sicherung defekt ist, ersetzen Sie sie durch eine Sicherung gleichen Typs und gleicher Leistung. Um die Sicherung auszutauschen, schalten
Sie zuerst die Stromversorgung aus und führen Sie die folgenden Schritte aus.
Vorgehensweise:
Schritt 1: Öffnen Sie den Sicherungshalter auf der Rückseite mit einem geeigneten flachen Schraubendreher.
Schritt 2: Entfernen Sie die alte Sicherung aus dem Sicherungshalter.
Schritt 3: Setzen Sie die neue Sicherung in den Sicherungshalter ein.
Schritt 4: Setzen Sie den Sicherungshalter in das Gehäuse ein.
Page 13
Antes de realizar cualquier operación con la unidad, lea atentamente este manual de instrucciones y guárdelo con cura para
futuras consultas. Contiene información importante sobre la instalación, uso y mantenimiento de la unidad.
• Desembale y compruebe cuidadosamente que no haya daños de transporte antes de usar la unidad
• Lea atentamente estas instrucciones y siga las instrucciones.
• Observe todas las advertencias de seguridad. Nunca elimine las advertencias de seguridad u otra información del equipo.
• Asegúrese de que no haya ranuras de ventilación bloqueadas; de lo contrario la unidad se sobrecalentará.
Antes de conectar el equipo a la toma de corriente, primero verifique que la tensión y la frecuencia de la red coincidan con los
valores especificados en el equipo. Si el equipo tiene un interruptor de selección de voltaje, conecte el equipo a la toma de corriente solo si los
valores del equipo y los valores de la red eléctrica coinciden. Si el cable de alimentación incluido o el adaptador de corriente no encaja en el
tomacorriente de pared, comuníquese con su electricista.
• Después de conectar la unidad, verifique todos los cables para evitar daños o accidentes debido a peligros de tropiezos.
• Asegúrese de que el cable de alimentación nunca esté rizado o dañado. Compruebe el dispositivo y el cable de alimentación de vez en
cuando.
• ¡Desconecte siempre la alimentación de la red eléctrica, cuando no se utilice el dispositivo o antes de limpiarlo! Sólo manipule el cable de
alimentación por el enchufe. Nunca desenchufe el cable tirando del cable de alimentación.
• Desenchufe el cable de alimentación y el adaptador de alimentación de la toma de corriente si existe riesgo de que se caiga un rayo o antes
de períodos prolongados de desuso.
• No encienda y apague la unidad en intervalos cortos.
• No conecte la unidad a un dimmerpack.
• Instale la unidad en un lugar bien ventilado.
• Esta unidad no está diseñada para una operación permanente. Las interrupciones constantes de la operación garantizarán que el dispositivo
le servirá durante mucho tiempo sin defectos.
• Nunca coloque a personas o animals a menos de 3 metro de la boquilla.
• La unidad debe colocarse en una zona no inflamable, no combustible y no sensible al calor.
• Mantenga una distancia de seguridad de 1 metro a cualquier objeto inflamable, combustible o sensibles al calor.
• Nunca apunte la nieve hacia fuentes de ignición como fuego o efectos pirotécnicos.
• Nunca abra la unidad o la deje desatendida mientras esté conectada a la alimentación.
• No ingeste el líquido. En caso de contacto con los ojos, lávelos abundantemente con agua. Consulte a su medico en caso de ingesta accidental.
• Las salpicaduras de líquido pueden provocar corta circuitos. Limpie y seque la unidad siguiendo las instrucciones.
Si el cable de alimentación del dispositivo está equipado con un contacto de conexión a tierra, debe conect arse a una toma de
corriente con una conexión a tierra de protección. Nunca desactive la conexión a tierra protectora de un cable de alimentación.
• Asegúrese de que la unidad no esté expuesta a calor extremo, humedad o polvo.
• Limpie la unidad con un paño seco.
• No toque el aparato con las manos descubiertas durante su funcionamiento (la carcasa se calienta mucho). Después de la desconexión, la
unidad puede permanecer caliente durante unas horas.
• Esta unidad está diseñada exclusivamente para uso en interiores, no use este equipo en las inmediaciones del fluido (no se aplica a equipos
especiales para exteriores, en este caso, siga las instrucciones especiales que se indican a continuación). No exponga esta u nidad a
materiales, líquidos o gases inflamables.
• Si la unidad ha estado expuesta a una fluctuación drástica de la temperatura (por ejemplo, después del transporte), no la encienda de
inmediato. El agua de condensación que surge puede dañar su unidad. Deje la unidad apagada hasta que alcance la temperatura ambiente.
• Nunca intente pasar por alto el interruptor termostático o los fusibles.
• No desmonte ni modifique la unidad.
• Para reemplazo, use fusibles / bombilla del mismo tipo y clasificación solamente.
• Las reparaciones, el servicio y la conexión eléctrica deben ser llevados a cabo por un técnico calificado.
• La temperatura ambiente siempre debe estar entre -5 ° C y + 45 ° C.
• Si esta unidad se opera de una manera diferente a la descrita en este manual, el producto podría sufrir daños y la garantía q uedará anulada.
• Las bolsas de plástico deben mantenerse fuera del alcance de los niños.
• La unidad debe instalarse fuera del alcance de los niños. Nunca deje la unidad funcionando sin supervisión cuando esté conectada a una
fuente de alimentación.
Este símbolo en el pr oducto o en su empaque indica que este producto no debe ser tratado como basura doméstica. En su lugar, se entregará al punto de recolección
correspond iente para el reciclaje de equipos eléctri cos y electrónicos.
Al garantizar que este product o se elimine correctam ente, ayudará a evitar posibles consecuenci as negativas para el medio ambiente y la salud humana, que de otr o modo podrían ser causadas
por el manejo inadecuad o de los desechos de este producto. El recicl aje de materiales ayudará a conservar los recursos naturales. Par a obtener info rmación más detallada sobre el reciclaje de
este producto, comuníq uese con su Oficina Cívi ca local, el servicio de eliminación de des echos domésticos o la tienda donde a dquirió el producto.
Page 14
Inmediatamente después de recibir el producto, desembale la caja con cuidado, verifique el contenido para asegurarse de que todas las
partes estén presentes y se hayan recibido en buenas condiciones. Notifique al remitente de inmediato y guarde el material de empaque para
inspeccionarlo si aparecen piezas dañadas por el envío o si el propio paquete muestra signos de mal manejo. Guarde el paquete y todos los materiales
de embalaje. En el caso de que el producto deba devolverse a la fábrica, es importante que el producto se devuelva en la caja y empaque originales de
fábrica.
Si el dispositivo ha estado expuesto a una drástica fluctuación de la temperatura (por ejemplo, después del transporte), no lo encienda de inmediato. El
agua de condensación que surge podría dañar su dispositivo. Deje el dispositivo apagado hasta que alcance la temperatura ambiente.
En la etiqueta que se encuentra en la parte posterior del producto, se indica que este tipo de fuente de alimentación debe estar conectada. Verifique
que la tensión de la red corresponda a esto, todos los demás voltajes que los especificados, el efecto de la luz puede dañarse irreparablemente. El
producto también debe estar conectado directamente a la red eléctrica y se puede utilizar.
Siempre conecte el dispositivo a un circuito protegido (disyuntor o fusible). Asegúrese de que el dispositivo tenga una toma
de tierra eléctrica adecuada para evitar el riesgo de electrocución o i ncendio.
Paso 1: Coloque la unidad en una superficie plana y en un área adecuadamente grande con al menos 50 cm de espacio abierto alrededor de la unidad.
Paso 2: Llene el tanque de fluido con líquido de nieve Beamz.
Paso 3: Conecte el cable de alimentación en la toma de corriente y encienda la unidad, coloque el inte rruptor de alimentación en la posición "ON". La
pantalla LCD mostrará "WARMING UP". Después de unos segundos, la pantalla LCD mostrará "READY”.
Paso 4: Usando el panel de la pantalla LCD, configure la unidad en el modo de funcionamiento deseado.
Paso 5: Apague la unidad, coloque el interruptor en la posición "OFF" y saque el cable de alimentación de la toma de corriente.
Utilice únicamente líquido de nieve Beamz original. La garantía se anulará si se utiliza cualquier otro tipo de líquido, el u so
incorrecto del líquido puede provocar el fallo de la máquina y su funcionamiento incorrecto.
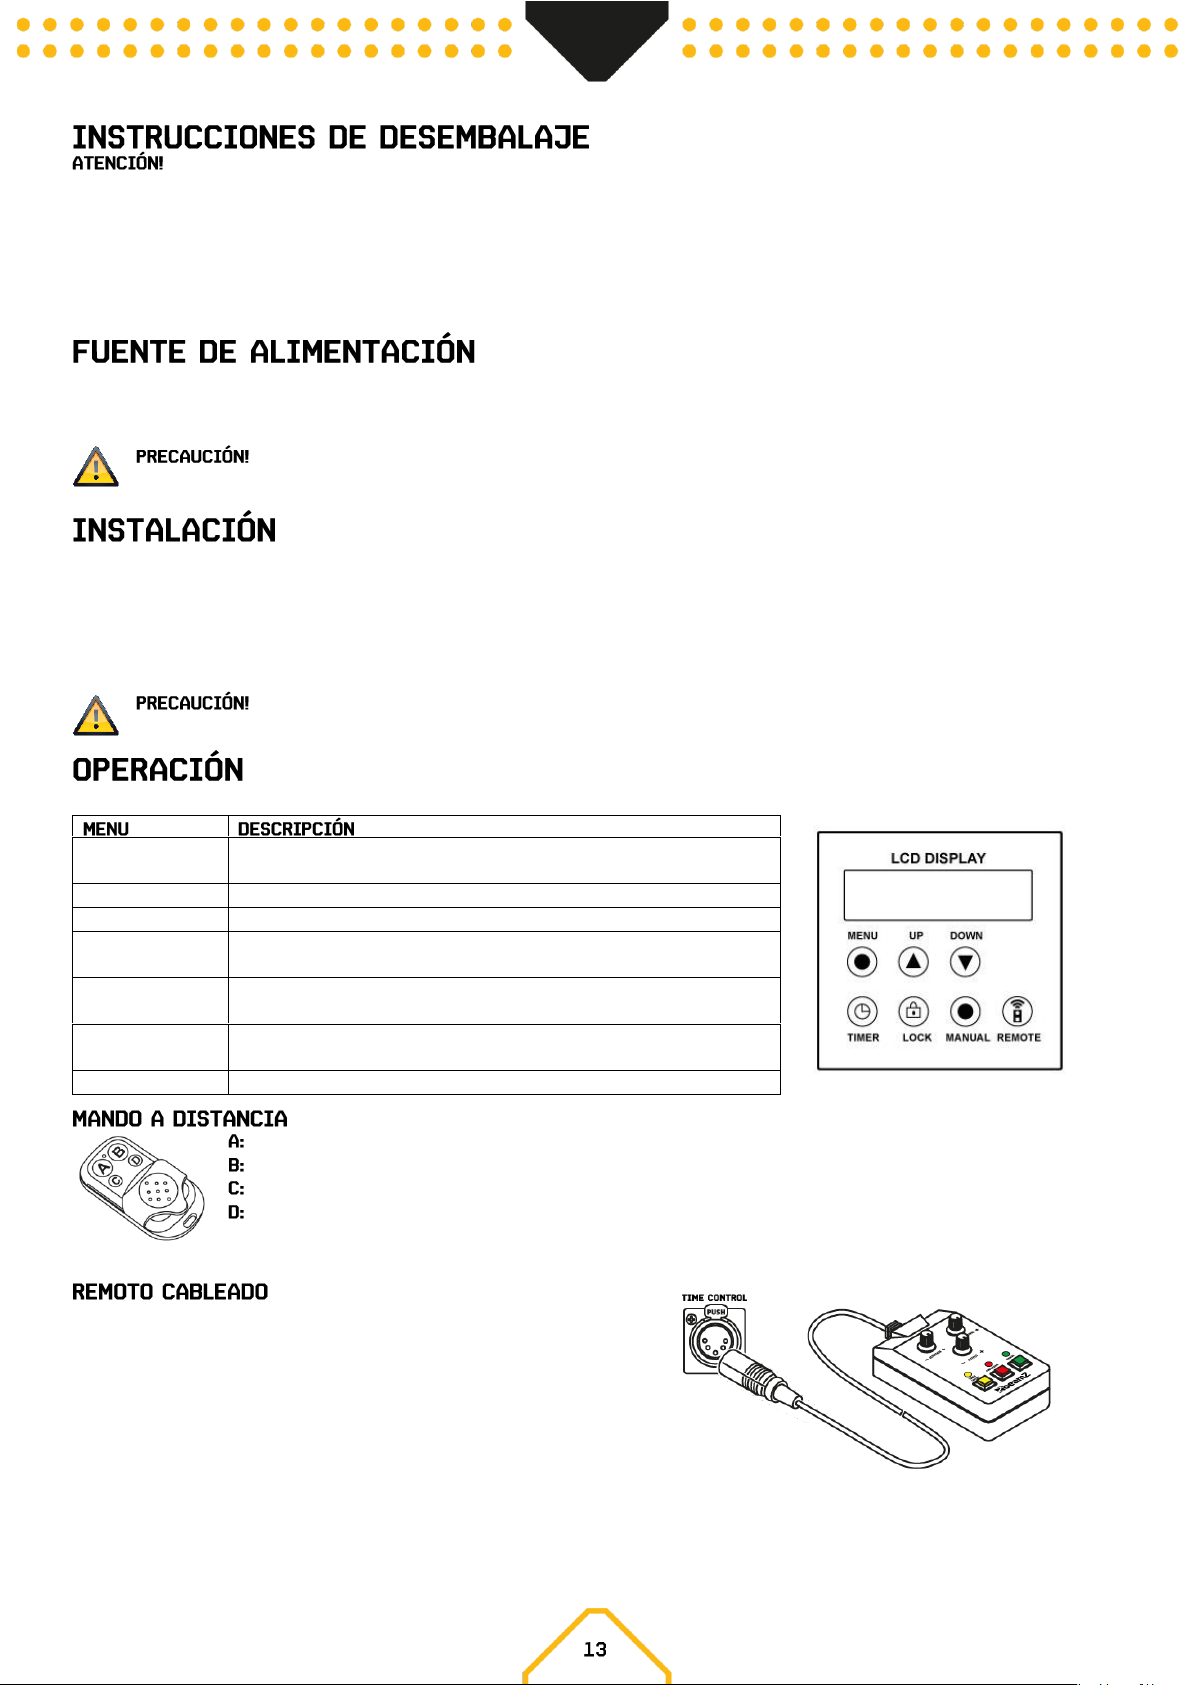
Cuando la pantalla muestra "READY", puede comenzar a producir niebla y ajustar la configuración a través del panel de pantalla LCD.
Man Vol Out xxx%
Ajuste la salida de volumen manual dentro del rango de 0% a 100%
mediante las teclas Arriba / Abajo.
Interval Set xxxS
Ajuste el intervalo entre 1 y 100S mediante las teclas Arriba / Abajo.
Duration Set xxxS
Ajuste la duración entre 1 a 100S mediante las teclas Arriba / Abajo.
Volume Out xxx%
Ajuste la salida de volumen dentro del rango de 0- 100% mediante las teclas
Arriba / Abajo.
DMX 512 #xxx
Ajuste de la salida del volumen dentro del rango de 0- 100% mediante las
teclas Arriba / Abajo.
Wind For Class xx
Ajuste la salida del viento durante la función dentro del rango de 0- 100%
mediante las teclas Arriba / Abajo.
Wireless
Encender / apagar el control remoto inalámbrico
ON / OFF
ON / OFF
Aumentar el nivel de salida
Disminuir el nivel de salida
Pomo giratorio INTERVAL: Ajuste la potencia de la bomba.
Perilla giratoria OUTPUT: Ajuste la potencia máxima de la bomba y el ventilador.
DURACIÓN Perilla giratoria: Ajuste la potencia del ventilador.
Botón AMARILLO: Función de temporizador ON/OFF
Botón ROJO: Producción continua de nieve
Botón VERDE: Producción manual de nieve
Page 15
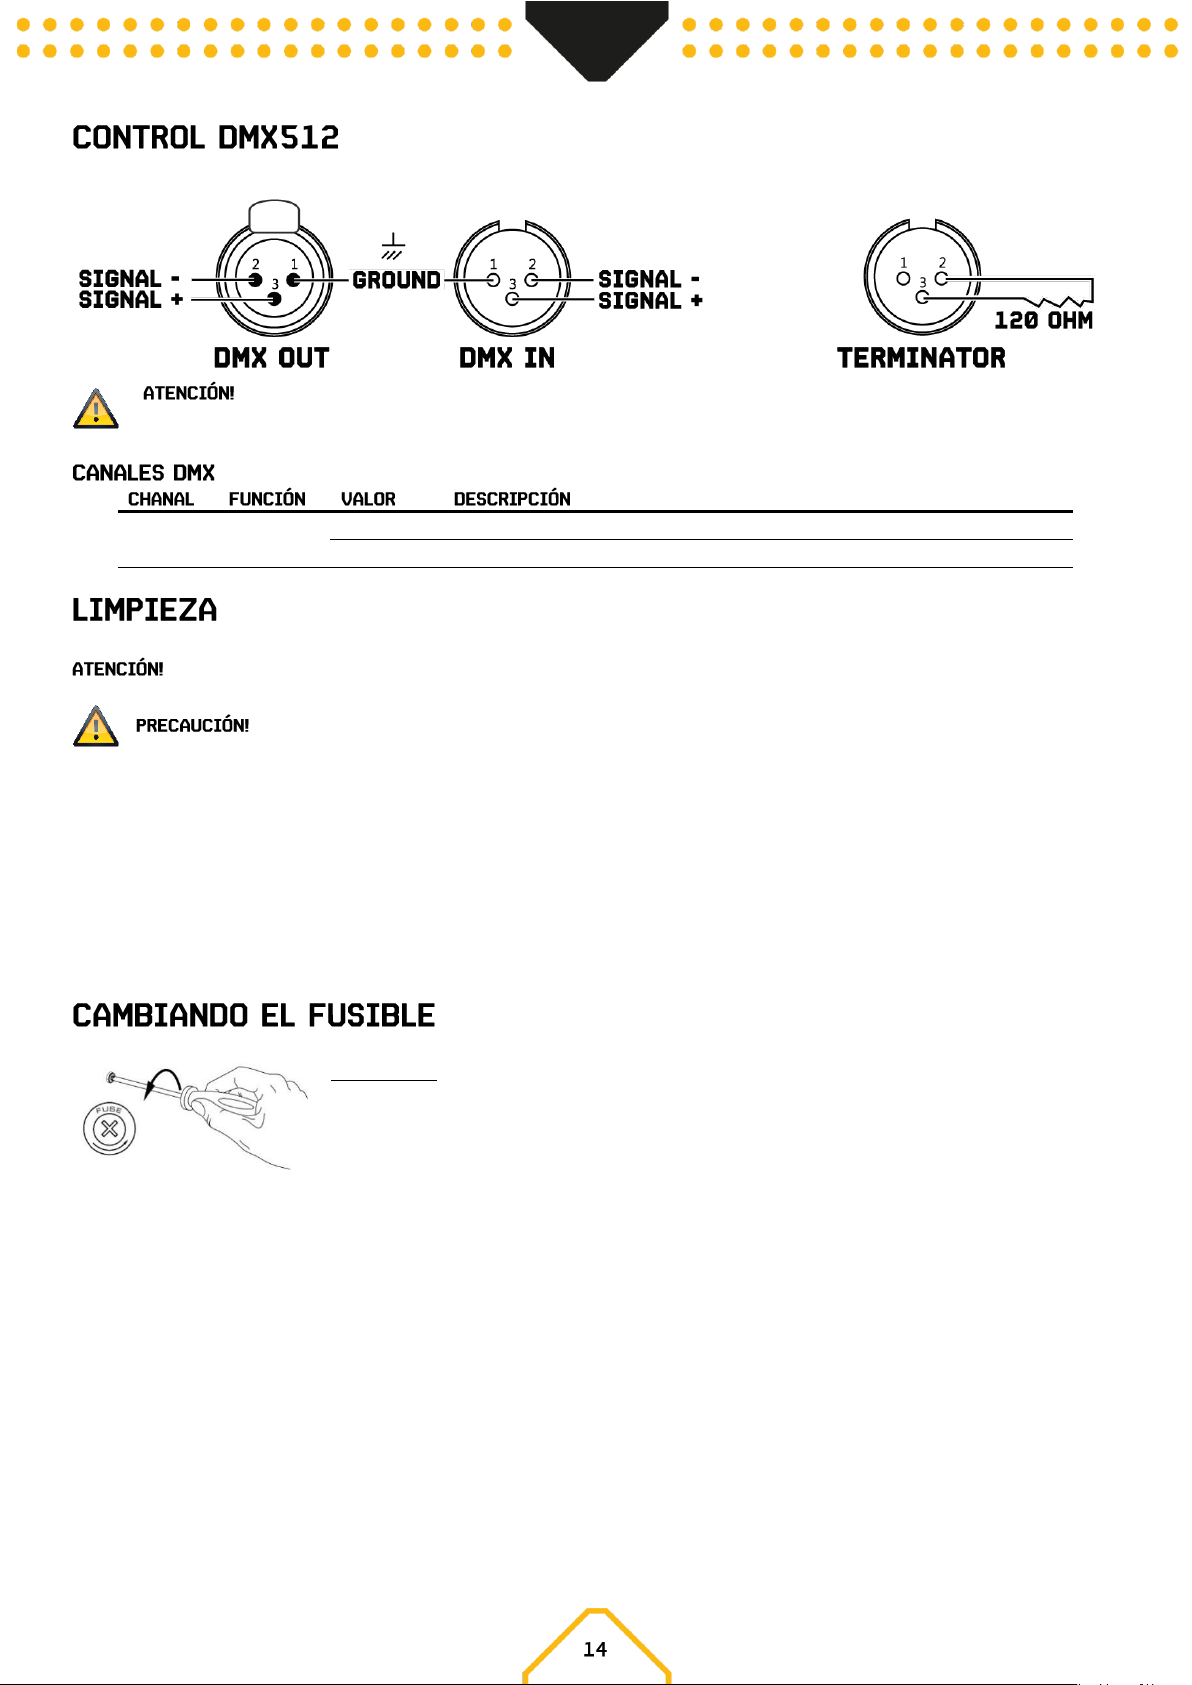
Si está utilizando un controlador DMX estándar, puede conectar la salida DMX del controlador directamente a la entrada DMX del primer dispositivo en
una cadena DMX. Siempre conecte la salida de una unidad con la entrada del siguiente dispositivo hasta que todos los dispositivos estén conectados.
En el último aparato, debe cerrar la línea DMX con una resistencia de terminación. Tome un conector XLR y suelde una
resistencia de 120 Ohm entre la señal (-) y la señal (+) y conéctela a la salida DMX del último dispositivo en la línea.
1
Nieve
000-005
Sin función
006-255
Salida de nieve desde 0-100%
Recomendamos una limpieza frecuente de la unidad, en particular la boquilla de salida.
No hay piezas reparables dentro de la unidad, excepto el fusible. Las reparaciones y las operaciones de s ervicio solo deben ser realizadas
por distribuidores autorizados.
Desconecte de la red eléctrica antes de iniciar el mantenimiento!
• Asegúrese de que el fluido no se contamine.
• Asegúrese de que las rejillas de ventilación no estén obstruidas por el polvo. Si es necesario quitar el polvo.
• Asegúrese de que la unidad no pueda sobrecalentarse.
• No haga funcionar la unidad sin ningún líquido, ya que la bomba funcionará en seco.
• Limpie el líquido derramado inmediatamente. La humedad y el fluido pueden dañar permanentemente los componentes eléctricos de la
unidad.
• Para limpiar la superficie de la unidad, use un limpiador adecuado y sin disolventes.
• Se recomienda ejecutar la unidad mensualmente para lograr el mejor rendimiento y condición de salida.
• Antes de almacenar, haga correr agua destilada a través del sistema. Esto ayudará a limpiar el líquido de nieve restante y evitará el
funcionamiento incorrecto de la bomba en el próximo uso.
Si el fusible está defectuoso, sustitúyalo por un fusible del mismo tipo y valor. Antes de cambiar el fusible, desenchufe el cable de alimentación.
Procedimiento:
Paso 1: Abra el portafusibles en el panel trasero con un destornillador adecuado.
Paso 2: Retire el fusible viejo del portafusibles.
Paso 3: Instale el nuevo fusible en el portafusibles.
Paso 4: Reemplace el portafusibles en la carcasa.
Page 16
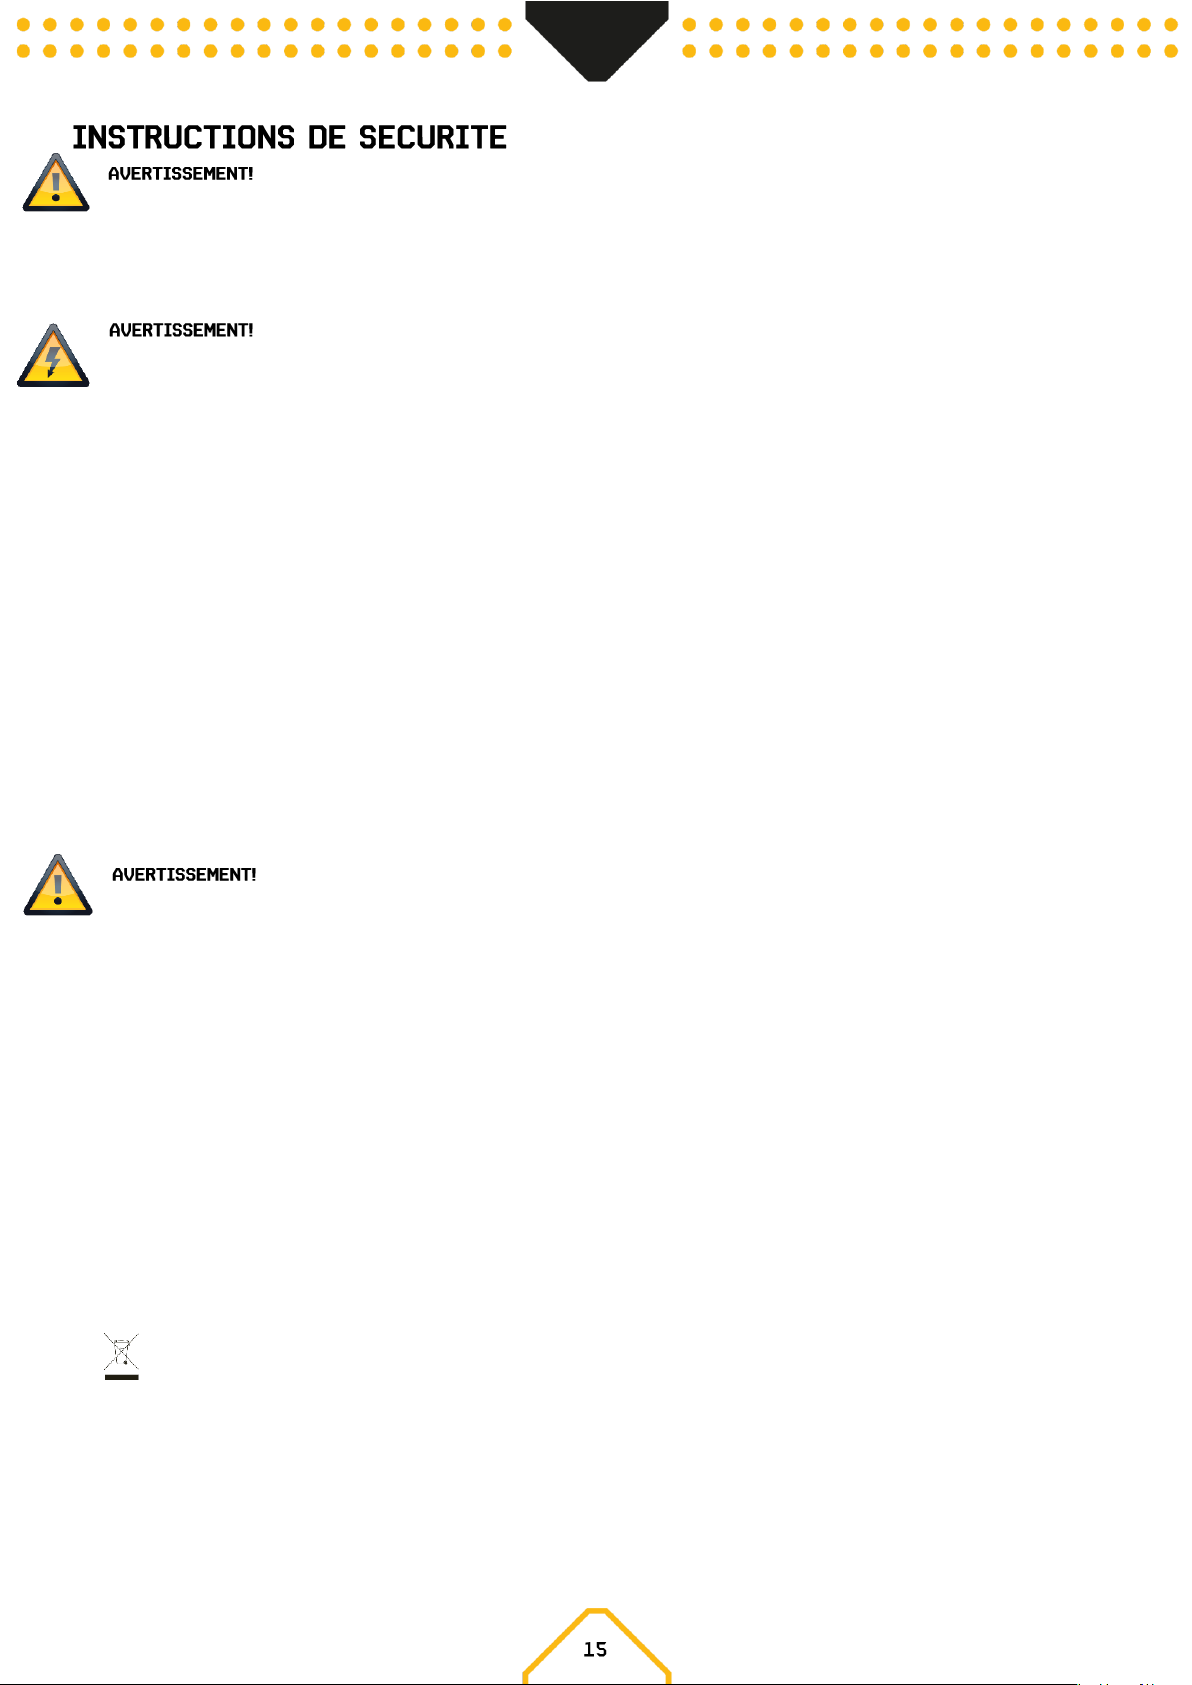
Avant d'effectuer toute manipulation sur l'appareil, lisez avec attention la présente notice et conservez-la pour pouvoir vous
y reporter ultérieurement. Elle contient des informations importantes sur l’installation, l’utilisation et l’entretien de l’appareil.
• Déballez l'appareil, vérifiez soigneusement qu'il n'y a pas de dommages dus au transport avant de l'u tiliser.
• Veuillez lire attentivement ces instructions et les suivre.
• Respectez tous les avertissements de sécurité. Ne retirez jamais les avertissements de sécurité ou autres informations figurant sur l’appareil.
• Assurez-vous qu'aucune ouïe d'aération n'est obstruée, sinon il y a risque de surchauffe de l’appareil.
Avant de brancher l’appareil à une prise d’alimentation, assurez-vous tout d’abord que la tension et la fréquence du secteur
correspondent aux valeurs spécifiées sur l’appareil. S’il est équipé d'un sélecteur de tension, ne branchez l'appareil à la prise de courant que si les
valeurs de l'appareil et celles de l'alimentation secteur correspondent. Si le cordon d'alimentation ou l'adaptateur secteur fourni ne s' adapte pas à
votre prise murale, contactez votre électricien.
• Après avoir branché l'appareil, vérifiez tous les câbles afin d'éviter tout dommage ou accident, par exemple pour ne pas trébucher.
• Assurez-vous que le cordon d'alimentation n'est jamais serti ou endommagé. Vérifiez régulièrement l'appareil et le cordon d'alimentation.
• Débranchez toujours le cordon d'alimentation du secteur lorsque l'appareil n'est pas utilisé ou avant de le nettoyer ! Ne manipulez le cordon
d'alimentation que par la fiche. Ne débranchez jamais la fiche en tirant sur le cordon d'alimentation.
• Débranchez le cordon d'alimentation et l'adaptateur secteur de la prise de courant s'il y a un risque de foudre ou avant une longue période
d'inutilisation.
• N'allumez et n'éteignez pas l'appareil à intervalles rapprochés.
• Ne connectez pas l'appareil à un gradateur.
• Installez l'appareil dans un endroit bien ventilé.
• Cet appareil n'est pas conçu pour fonctionner en permanence. Des pauses d'utilisation régulières assureront un fonctionnement s ans
problème sur le long terme.
• Ne visez donc jamais directement des personnes ou des animaux et gardez une distance minimale de 3 m avec la buse.
• L’appareil doit être placé dans un endroit non inflammable, non combustible et insensible à la chaleur.
• Maintenez une distance minimale d'un mètre de tous les objets inflammables, combustibles et sensibles à la chaleur.
• Ne dirigez jamais le brouillard vers des sources inflammables importantes telle un feu ou des effets pyrotechniques.
• N'avalez pas le liquide. En cas de contact avec les yeux, rincez abondamment à l'eau. Consultez un médecin si vous avez avalé
accidentellement du liquide.
• Le produit déversé ou les gouttelettes de produit éclaboussé peuvent provoquer un risque de glissade. Épongez le liquide et jetez-le
conformément à la réglementation.
Si le cordon d'alimentation de l'appareil est équipé d'un contact de mise à la terre, il doit être connecté à une prise de
courant avec une terre de protection. Ne jamais désactiver la terre de protection d'un cordon d'alim entation.
• Assurez-vous que l'appareil n'est pas exposé à une chaleur extrême, à l'humidité ou à la poussière.
• Nettoyez l'appareil à l'aide d'un chiffon sec.
• Ne touchez pas le projecteur à mains nues pendant son fonctionnement (le boîtier devient très chaud). Après la mise hors tension, l'appareil
peut rester au chaud pendant quelques heures.
• Cet appareil est conçu exclusivement pour une utilisation à l'intérieur, n'utilisez pas cet appareil à proximité immédiate d'un liquide (ne
s'applique pas aux équipements extérieurs spéciaux - dans ce cas, respectez les instructions spéciales indiquées ci-dessous). N'exposez pas
cet appareil à des matériaux, liquides ou gaz inflammables.
• Si l'appareil a été exposé à des variations de température importantes (par ex. après un transport), ne l’allumez pas immédiatement. La
condensation pourrait endommager votre appareil. Laissez l'appareil éteint jusqu'à ce qu'il atteigne la température ambiante.
• N'essayez jamais de bridger l'interrupteur thermostatique ou les fusibles.
• Ne démontez pas ou ne modifiez pas l'appareil.
• Pour le remplacement, utilisez uniquement des fusibles/ampoules de même type et de même puissance.
• Les réparations, l'entretien et le raccordement électrique ne doivent être effectués que par un technicien qualifié.
• La température ambiante doit toujours être comprise entre -5° C et +45° C.
• Si cet appareil est utilisé dans un but autre que celui décrit dans ce manuel, il peut subir des dommages, dans ce cas, la garantie est caduque.
• Les sacs en plastique doivent être gardés hors de portée des enfants.
• L'appareil doit être installé hors de portée des enfants. Ne laissez jamais l'appareil en marche sans surveillance lorsqu'il est connecté à une
alimentation électrique.
Ce symbole sur le pr oduit ou sur son emball age indique que ce produit ne doit pas être traité comm e un déchet ménager. Il doit être d éposé au point de col lecte appropri é pour le
recyclage des équipements électriques et él ectroniques.
En vous assur ant que ce produit est éliminé correctement, vous c ontribuerez à prévenir les conséquences négativ es potentielles pour l'envi ronnement et la santé humaine, qui pourraient
autrement être causées par une mani pulation inappropriée des déchets de ce produit. Le recyclage des matériaux contribuera à préserver les ressources naturelles. Pour de pl us amples
informati ons sur le recyclage d e ce produit, veuillez contacter votr e bureau municipal l ocal, votre service d 'élimination des déchets ménagers ou le mag asin où vous avez acheté l e produit.
Page 17
Dès réception du produit, déballez soigneusement le carton, vérifiez son contenu pour vous assurer que toutes les pièces sont présentes
et qu'elles ont été reçues en bon état. Avisez immédiatement l'expéditeur et conservez le matériel d 'emballage ; contrôlez si des pièces semblent
endommagées lors de l'expédition ou si le colis lui-même montre des signes de mauvaise manipulation. Conservez l'emballage et tout le matériel
d'emballage. Dans le cas où le produit doit être retourné à l'usine, il est important que le produit soit retourné dans son emballage d'origine.
Si l'appareil a été exposé à des variations de température importantes (par ex. après un transport), ne l’allumez pas immédiatement. La condensation
pourrait endommager votre appareil. Laissez l'appareil éteint jusqu'à ce qu'il atteigne la température ambiante.
Le type d'alimentation auquel le produit doit être connecté est indiqué sur l'étiquette à l'arrière du produit. Vérifiez que la tension se cteur corresponde
à cette tension, toutes les autres tensions que celles spécifiées peuvent endommager l’appareil. Le produit doit également être branché directement
sur le secteur et peut être utilisé. Pas de gradateur ni d'alimentation réglable.
Reliez toujours l'appareil à un circuit protégé (disjoncteur ou fusible). Assurez-vous que l'appareil dispose d'une mise à la
terre électrique appropriée pour éviter tout risque d'électrocution ou d'incendie.
Etape 1 : Placez l’appareil sur une surface plane et dans une zone suffisamment large avec 50 cm d’espace au moins autour de l’appareil.
Etape 2 : Remplissez le réservoir avec du liquide Beamz.
Etape 3 : Reliez le cordon secteur à la prise et allumez l’appareil, mettez l’interrupteur sur la position “ON”. L’affichage LCD indique “WARMING UP”.
Après quelques secondes, l’affichage indique “READY”.
Etape 4 : Via le panneau d’affichage LCD, réglez l’appareil sur le mode de fonctionnement souhaité.
Etape 5 : Eteignez l’appareil en mettant l’interrupteur secteur sur la position “OFF” et débranchez le cordon secteur de la prise.
Utilisez du liquide BeamZ d’origine. La garantie devient caduque si un autre type de liquide est utilisé, une utilisation
inadéquate du liquide peut engendrer un défaut de l’appareil et un dysfonctionnement.
Lorsque l’affichage indique “READY”, vous pouvez démarrer la production de fumée et effectuer les réglages via le panneau d’affichage.
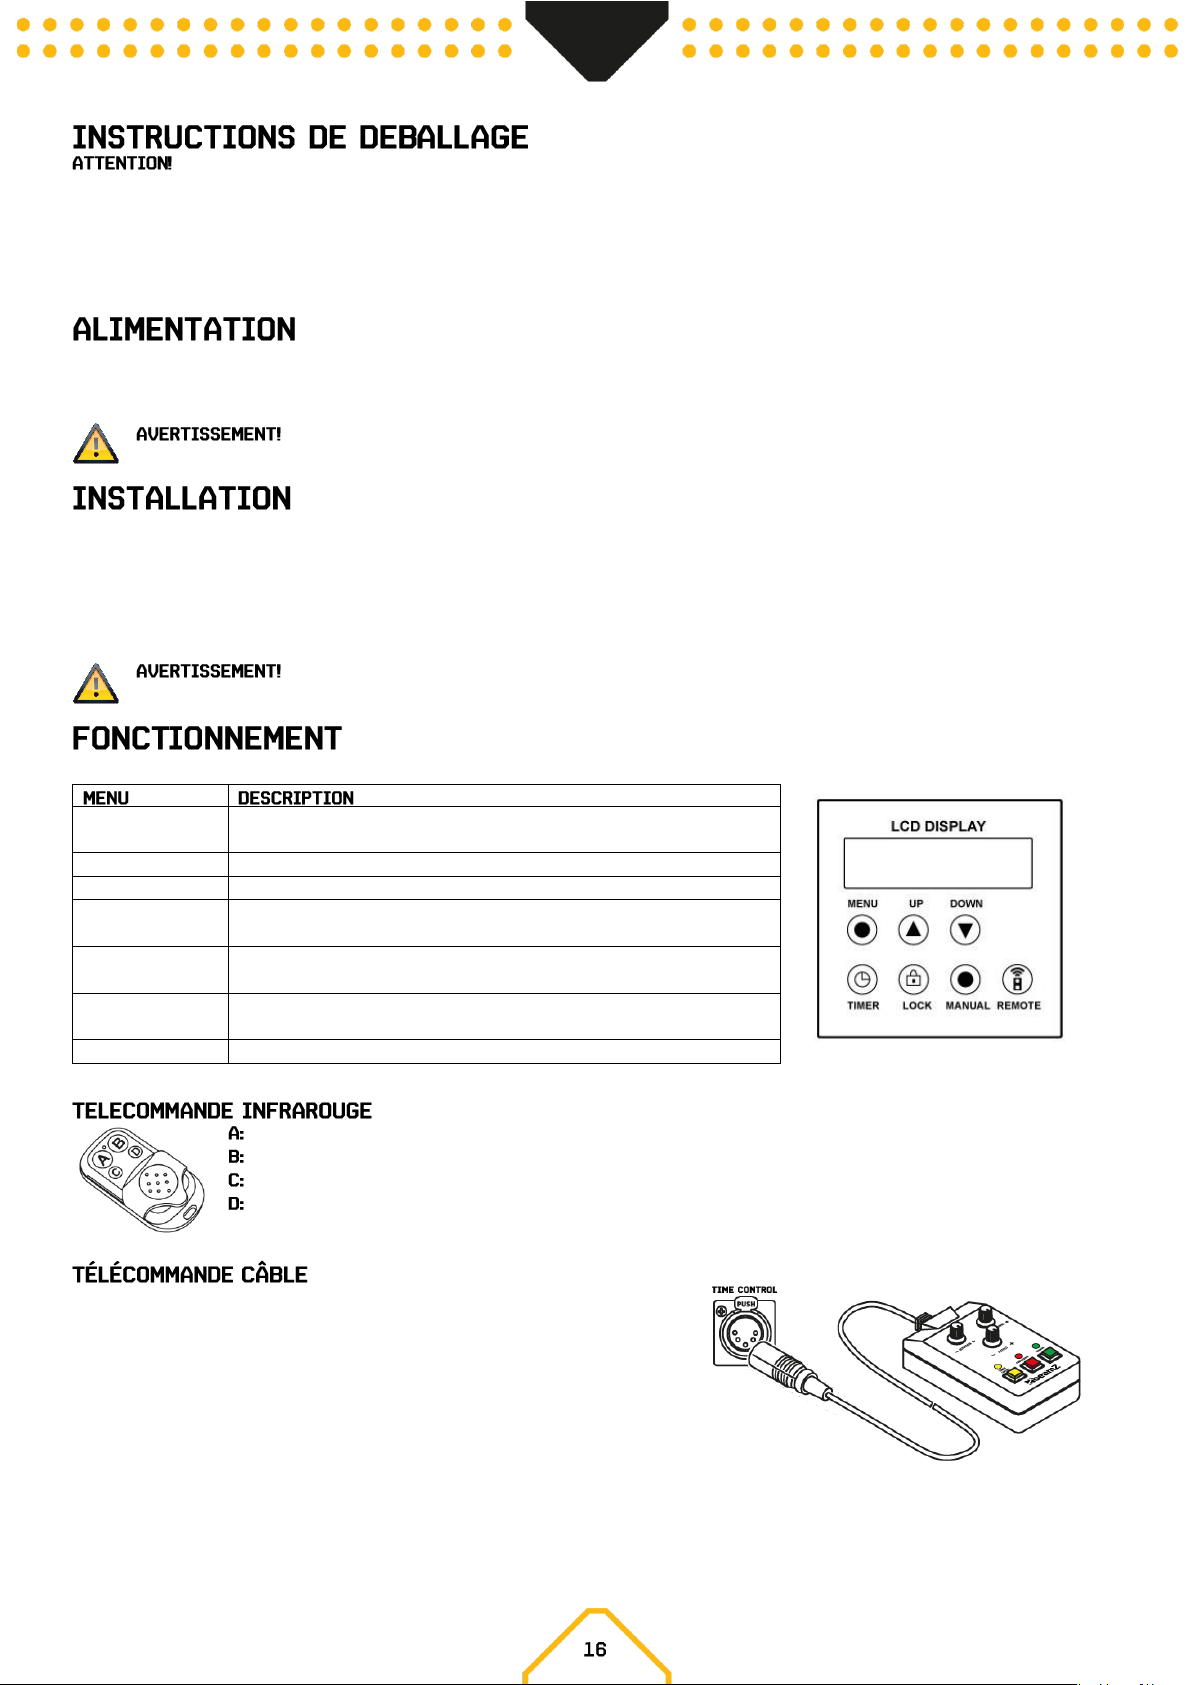
Man Vol Out xxx%
Réglage du volume de sortie dans la plage de 0% à 100% via les touches
Up/Down.
Interval Set xxxS
Réglage de l’intervalle entre 1 à 100S via les touches Up/Down.
Duration Set xxxS
Réglage de la durée entre 1 à 100S via les touches Up/Down.
Volume Out xxx%
Réglage du volume de sortie dans la plage 0- 100% via les touches
Up/Down.
DMX 512 #xxx
Réglage de l’adresse de démarrage DMX pour la gestion DMX via les touches
Up/Down.
Wind For Class xx
Réglage de la puissance pendant le fonctionnement dans la plage 0- 100%
via les touches Up/Down.
Wireless
Activation / Désactivation gestion sans fil
ON / OFF
ON / OFF
Augmentation du niveau de sortie
Diminution du niveau de sortie
Bouton rotatif INTERVAL : Régler la puissance de la pompe.
Bouton rotatif OUTPUT : Réglez la puissance maximale de la pompe et du ventilateur.
Bouton rotatif DURATION : Régler la puissance du ventilateur.
Bouton JAUNE : Fonction minuterie ON/OFF
Bouton ROUGE : Production de neige en continu
Bouton VERT : Production manuelle de neige
Page 18
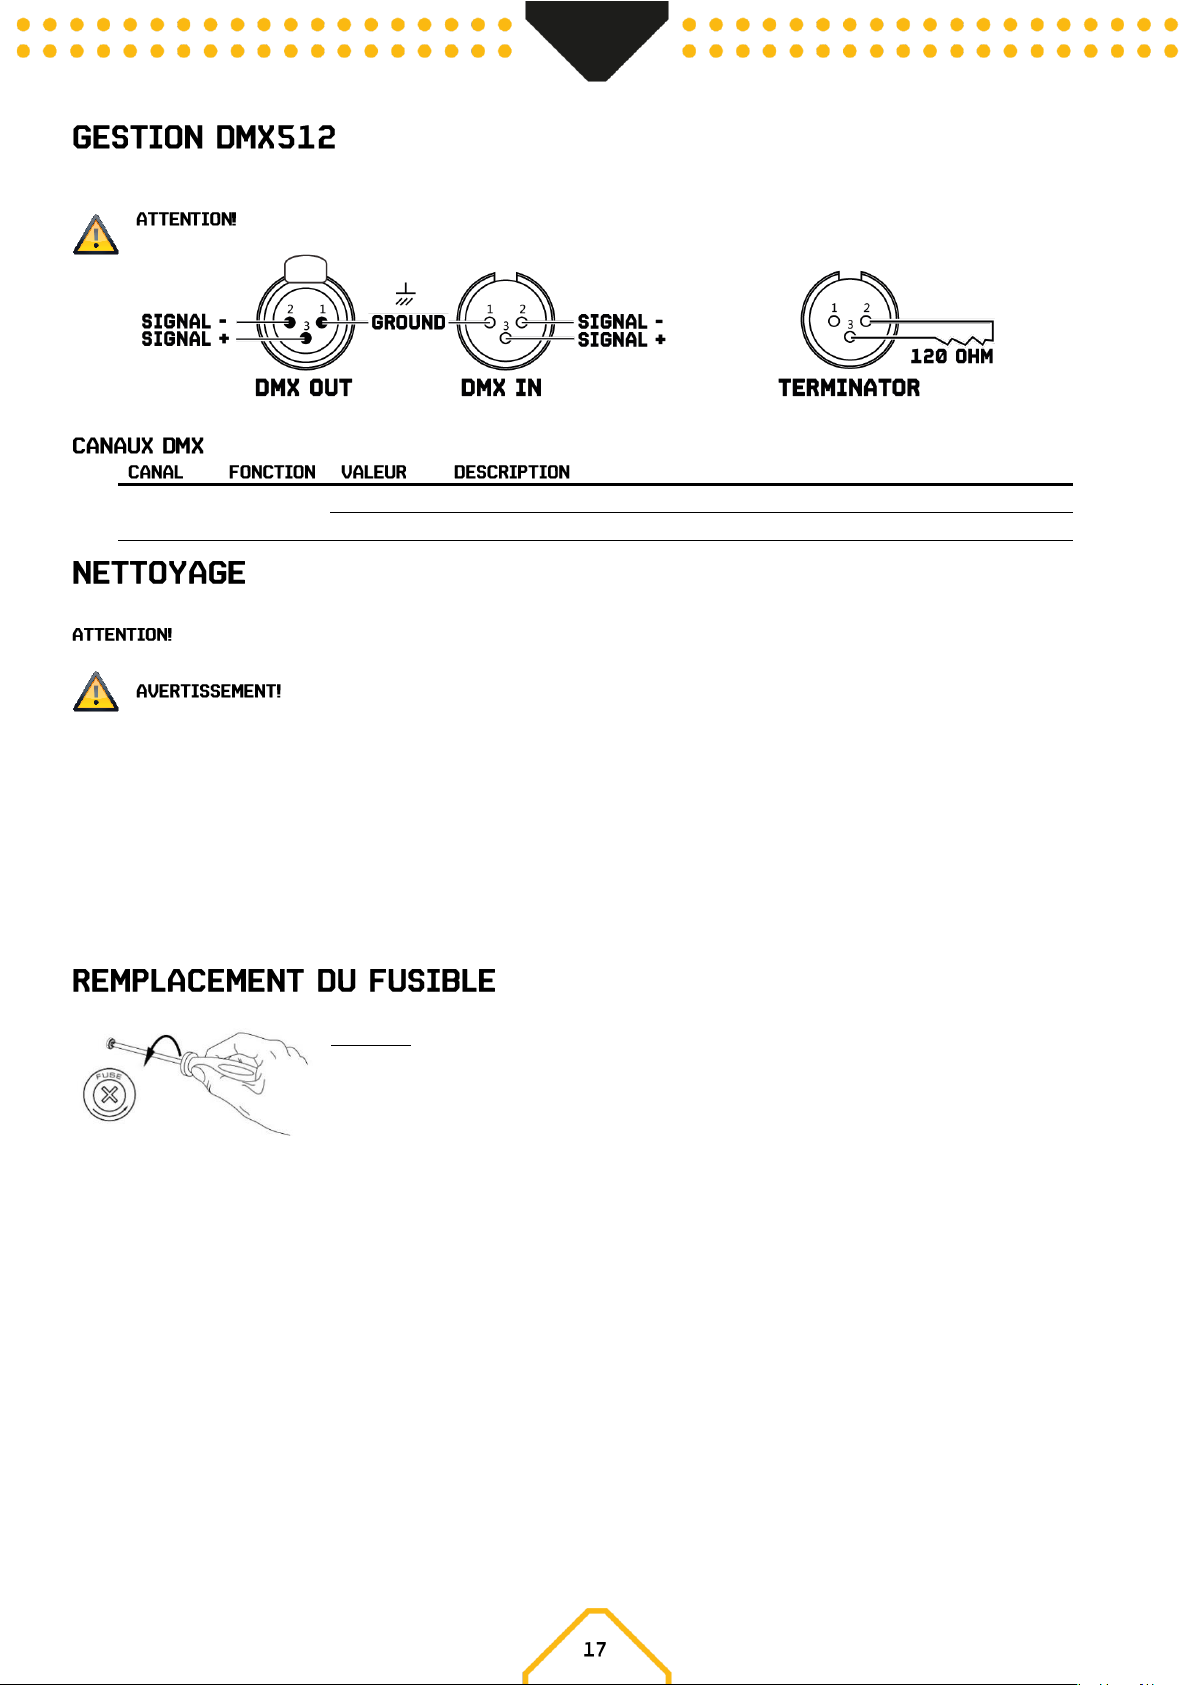
Si vous utilisez un contrôleur DMX standard, vous pouvez connecter la sortie DMX du contrôleur directement à l'entrée DMX du premier appareil dans
une chaîne DMX. Connectez toujours la sortie d'un appareil à l'entrée de l'appareil suivant jusqu'à ce que tous les appareils soient connectés entre eux.
sur le dernier appareil, vous devez terminer la ligne DMX avec une résistance. Prenez un connecteur XLR et soudez une
résistance de 120 ohms entre le signal (-) et le signal (+) et connectez-la à la sortie DMX du dernier appareil sur la ligne.
1
Snow
000-005
Emission de neige désactivée
006-255
Emission de neige de 0-100%
Nous recommandons un nettoyage fréquent de l’appareil, en particulier de la buse.
Mis à part le fusible, aucun composant dans l’appareil ne demande une intervention extérieure. Les réparations ou opérations de
maintenance ne doivent être effectuées que par un réparateur agréé.
Débranchez impérativement l’appareil du secteur avant toute opération de maintenance !
• Assurez-vous que le liquide ne soit pas contaminé.
• Assurez-vous que les ouïes de ventilation ne soient pas obturées par de la poussière. Au besoin, nettoyez-les.
• Assurez-vous que l’appareil n’est pas en surchauffe.
• N’utilisez pas l’appareil sans liquide sinon la pompe fonctionnera à vide et à sec.
• Essuyez immédiatement tout liquide qui serait tombé. De l’humidité ou du liquide peut endommager durablement les composants
électriques de l’appareil.
• Pour nettoyer l’appareil, utilisez un produit nettoyant adapté et sans solvant.
• Il est recommandé de faire fonctionner l’appareil une fois par mois pour garantir un fonctionnement optimal de l’appareil.
• Avant de stocker l’appareil, utilisez le liquide de nettoyage Beamz pour nettoyer le système et éviter toute condensation dans la pompe ou le
corps de chauffe.
Si le fusible est défectueux, remplacez-le par un fusible de même type et valeur. Avant de remplacer le fusible, débranchez le cordon secteur.
Procédure :
Etape 1 : Ouvrez le porte-fusible sur la face arrière avec un tournevis.
Etape 2 : Retirez l’ancien fusible du porte-fusible.
Etape 3 : Installez le nouveau fusible dans le porte-fusible.
Etape 4 : Replacez le porte-fusible dans le boîtier.
Page 19
Ń
Przed przystąpieniem do jakichkolwiek czynności związanych z urządzeniem, należy uważnie przeczytać niniejszą instrukcję i
zachować ją z lekarstwem na przyszłość. Zawiera ważne informacje dotyczące instalacji, użytkowania i konserwacji urządzenia.
• Rozpakuj i sprawdź dokładnie, czy nie ma żadnych uszkodzeń transportowych przed użyciem urządzenia
• Przeczytaj uważnie te instrukcje i postępuj zgodnie z instrukcjami.
• Przestrzegaj wszystkich ostrzeżeń dotyczących bezpieczeństwa.
• Upewnij się, że żadne otwory wentylacyjne nie są zablokowane; w przeciwnym razie urządzenie się przegrzeje.
Przed podłączeniem urządzenia do gniazdka sieciowego należy najpierw sprawdzić, czy napięcie i częstotliwość sieci są zgodne
z wartościami podanymi na urządzeniu. Jeśli urządzenie ma przełącznik wyboru napięcia, podłącz urządzenie do gniazdka sieciowego tylko
wtedy, gdy wartości urządzeń i wartości sieciowe są zgodne. Jeśli dołączony przewód zasilający lub zasilacz nie pasują do gni azdka ściennego,
skontaktuj się z elektrykiem.
• Po podłączeniu urządzenia sprawdź wszystkie kable, aby zapobiec uszkodzeniom lub wypadkom, na przykład z powodu potknięć.
• Upewnij się, że przewód zasilający nie jest zaciśnięty ani uszkodzony. Od czasu do czasu sprawdzaj urządzen ie i przewód zasilający.
• Zawsze odłączaj zasilanie z sieci, gdy urządzenie nie jest używane lub przed czyszczeniem! Obsługuj przewód zasilający tylko za wtyczkę.
Nigdy nie wyciągaj wtyczki, ciągnąc za przewód zasilający.
• Odłącz przewód zasilający i zasilacz od gniazdka, jeśli istnieje ryzyko uderzenia pioruna lub przed dłuższymi przerwami w pracy.
• Nie włączaj i wyłączaj urządzenia w krótkich odstępach czasu.
• Nie podłączaj urządzenia do dimmerpada.
• Zainstaluj urządzenie w dobrze wentylowanym miejscu.
• To urządzenie nie jest przeznaczone do ciągłej pracy. Spójne przerwy w działaniu zapewnią, że urządzenie będzie służyć przez długi cz as bez
wad.
• Dlatego nigdy nie celuj bezpośrednio w osoby lub zwierzęta i zachowaj minimalną odległość 3 metra od dyszy.
• Lokalizacja urządzenia musi być niepalna i niewrażliwa na ciepło.
• Zachowaj minimalną odległość 1 metra od wszystkich łatwopalnych przedmiotów i przedmiotów wrażliwych na ciepło.
• Nie połykać płynu mgły. Trzymaj z dala od dzieci. W przypadku kontaktu z oczami spłukać dużą ilością wody. Skonsultuj się z lekarzem, jeśli
przypadkowo połknąłeś jakiś płyn.
• Rozlany płyn lub spryskane krople płynu mogą spowodować niebezpieczeństwo poślizgu. Zebrać płyn i zutylizować zgodnie z przep isami.
Jeśli przewód zasilający urządzenia jest wyposażony w styk uziemiający, należy go podłączyć do gniazda z uziemieniem
ochronnym. Nigdy nie należy dezaktywować uziemienia ochronnego przewodu zasilającego.
• Upewnij się, że urządzenie nie jest narażone na działanie wysokich temperatur, wilgoci lub kurzu.
• Wyczyść urządzenie za pomocą suchej szmatki.
• Nie należy dotykać urządzenia gołymi rękoma podczas pracy (obudowa staje się bardzo gorąca). Po wyłączeniu urządzenie może pozostać
ciepłe przez kilka godzin.
• To urządzenie jest przeznaczone wyłącznie do użytku w pomieszczeniach, nie należy używać tego sprzętu w bezpośrednim sąsiedztwie
płynu (nie dotyczy specjalnych urządzeń zewnętrznych - w takim przypadku należy przestrzegać specjalnych instrukcji podanych poniżej).
Nie należy wystawiać tego urządzenia na łatwopalne materiały, płyny lub gazy.
• Jeśli urządzenie zostało narażone na drastyczne wahania temperatury (np. Po transporcie), nie włączaj go natychmiast. Powstaj ąca woda
kondensacyjna może uszkodzić urządzenie. Pozostaw urządzenie wyłączone, aż osiągnie temperaturę pokojową.
• Nigdy nie próbuj ominąć przełącznika termostatycznego ani bezpieczników.
• Nie demontuj ani nie modyfikuj urządzenia.
• Do wymiany używać bezpieczników / żarówek tego samego typu i tylko tego samego typu.
• Naprawy, serwisowanie i podłączenie elektryczne muszą być wykonywane przez wykwalifikowanego technika.
• Temperatura otoczenia musi zawsze wynosić od -5 ° C do + 45 ° C.
• Jeśli urządzenie jest eksploatowane w inny sposób niż opisany w niniejszej instrukcji, produkt może ulec uszkodzeniu, a gwarancja traci
ważność.
• Plastikowe torby muszą być przechowywane w miejscu niedostępnym dla dzieci.
• Urządzenie musi być zainstalowane w miejscu niedostępnym dla dzieci. Nigdy nie pozostawiaj urządzenia bez nadzoru.
Ten symbol umieszczony na produkcie lub jego opakowaniu oznacza, że produkt ten nie może być traktowany jako odpad komunalny. Zamiast tego należy przekazać go do
odpowiedniego punktu z biórki w celu recyklingu sprz ętu elektrycznego i elektronicznego.
Zapewniając prawidłową utylizację tego produkt u, pomagasz zapobiegać pot encjalnym negatywnym konsekwencjom dla śr odowiska i zdrowia ludzkiego, k tóre mogłyby zostać
spowodowane przez niewłaściwe po stępowanie z odpadami tego produktu. Recykling materiałów po może chronić zasoby naturalne. A by uzyskać bardziej szczeg ółowe informacje na t emat
recyklingu tego prod uktu, należy skontaktować się z lokalnym biurem obywatelskim, służbami oczyszcz ania miasta lub sklepem, w którym produkt został zakupiony.
Page 20
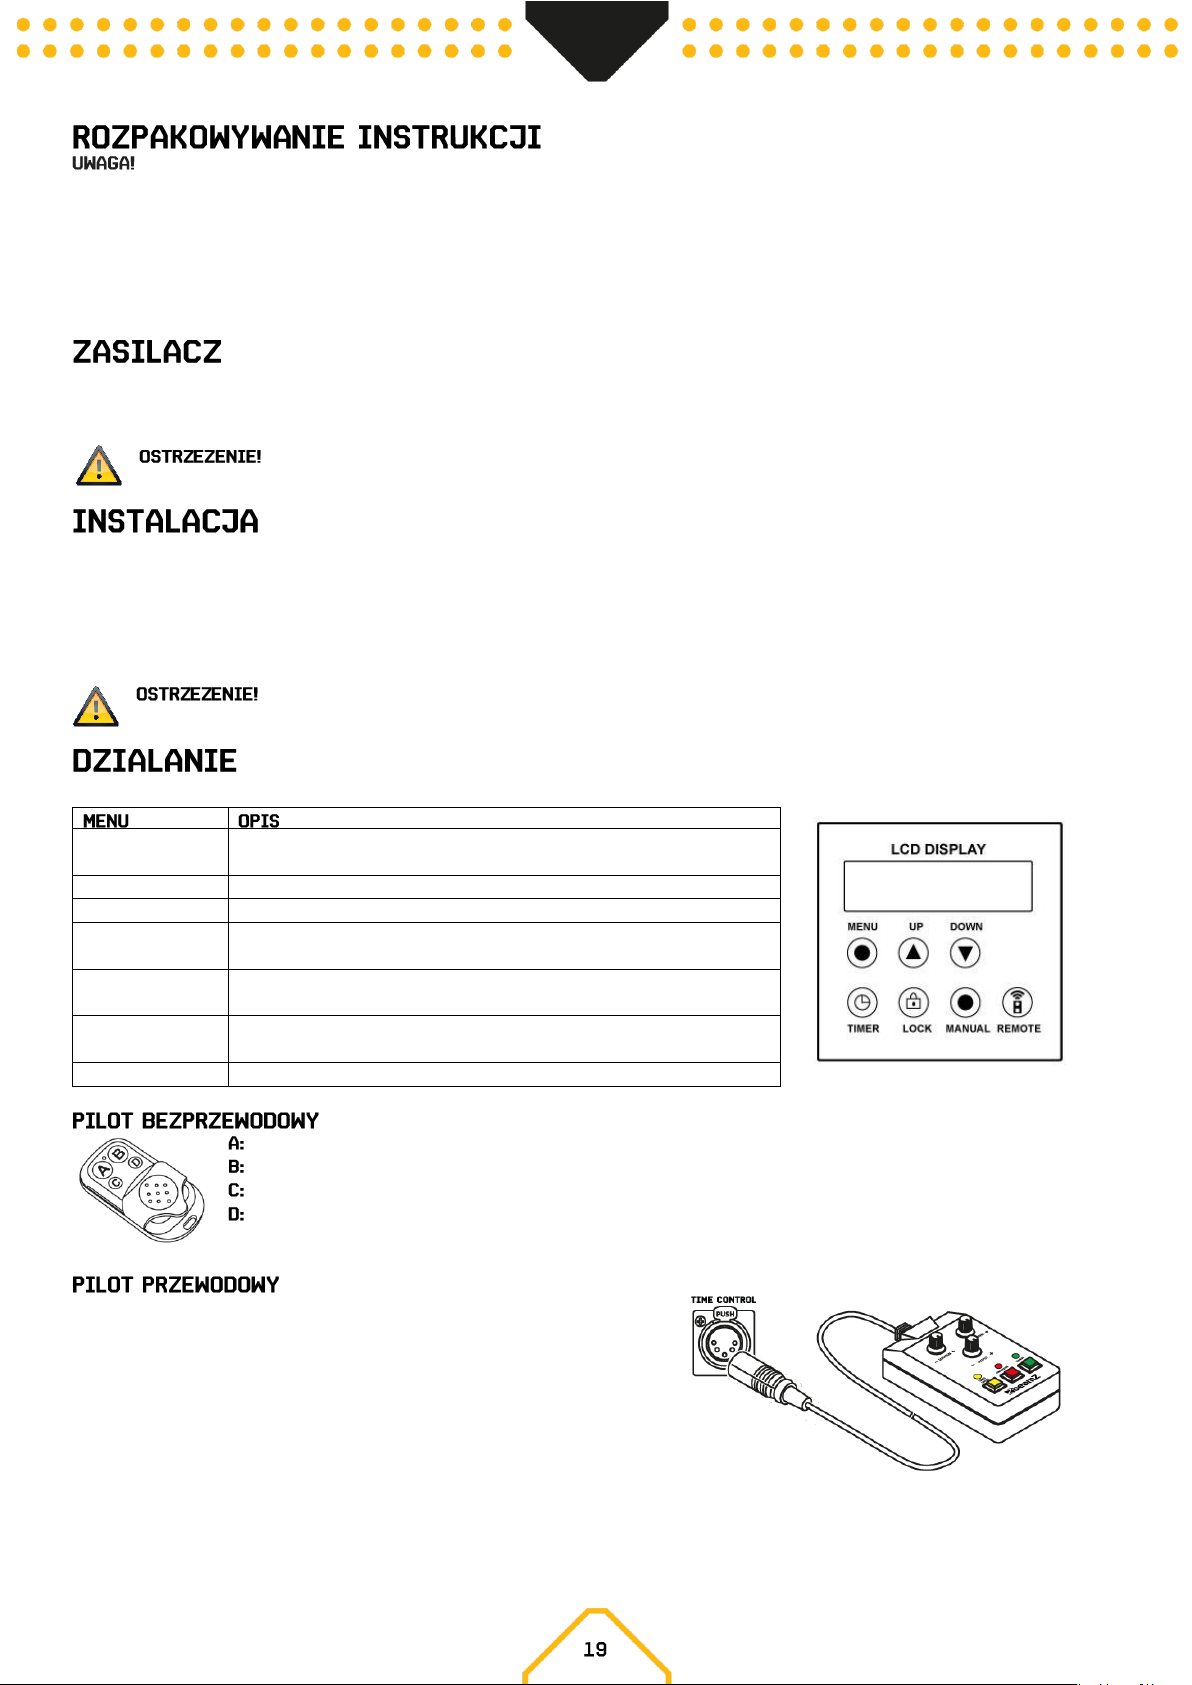
Natychmiast po otrzymaniu produktu ostrożnie rozpakuj karton, sprawdź zawartość, aby upewnić się, że wszystkie części są obecne i zo stały
odebrane w dobrym stanie. Natychmiast powiadomić dostawcę i zachować materiał do pakowania w celu sprawdzenia, czy jakakolwiek część wygląda
na uszkodzoną przez przesyłkę lub samo opakowanie wykazuje oznaki niewłaściwego postępowania. Zapisz pakiet i wszystkie mater iały do pakowania.
W przypadku, gdy produkt musi zostać zwrócony do fabryki, ważne jest, aby produkt został zwrócony w oryginalnym opakowaniu fabrycznym i
opakowaniu.
Jeśli urządzenie zostało wystawione na drastyczne wahania temperatury (np. Po transporcie), nie włączaj go natychmiast. Powst ająca woda
kondensacyjna może uszkodzić twoje urządzenie. Pozostaw urządzenie wyłączone, aż osiągnie temperaturę pokojową.
Na etykiecie z tyłu produktu jest wskazany jakiego typu zasilacz musi być podłączony. Sprawdź, czy napięcie w sieci jest właściwe do użytego zasilacza.
Każde inne napięcie niż podane, może sprawić nieodwracalne uszkodzenie oświetlenia. Produkt musi być również bezpośrednio podłączony do sieci
zasilającej i wtedy dopiero może być używany. Brak ściemniacza lub regulowany zasilacz.
Zawsze podłączaj urządzenie do zabezpieczonego obwodu (wyłącznik lub bezpiecznik). Upewnij się, że urządzenie ma
odpowiednie uziemienie elektryczne, aby uniknąć ryzyka porażenia prądem lub pożaru.
Krok 1: Umieść urządzenie na płaskiej powierzchni i na odpowiednio dużym obszarze z co najmniej 50 cm wolnej przestrzeni wokół urządzenia.
Krok 2: Napełnij zbiornik płynu płynem do śniegu Beamz.
Krok 3: Podłącz przewód zasilający do gniazdka i włącz urządzenie, ustaw przełącznik zasilania w pozycji „ON”. Na wyświetlaczu LCD pojawi się
komunikat „WARMING UP”. Po kilku sekundach na wyświetlaczu LCD pojawi się „READY”.
Krok 4: Korzystając z panelu wyświetlacza LCD, ustaw urządzenie na żądany tryb pracy.
Krok 5: Wyłącz urządzenie, ustaw przełącznik zasilania w pozycji „OFF” i wyciągnij przewód zasilający z gniazdka.
Używaj tylko oryginalnego płynu śniegowego Beamz. Gwarancja zostanie unieważniona, jeśli zastosowany zostanie
jakikolwiek inny rodzaj cieczy, niewłaściwe użycie płynu może doprowadzić do awarii urządzenia i awarii.
Gdy na wyświetlaczu pojawi się „READY”, możesz rozpocząć wytwarzanie zamglenia i dostosować ustawienia za pomocą panelu wyświetlacza LCD.
Man Vol Out xxx%
Ustaw wyrzut w zakresie od 0% do 100% za pomocą przycisków W górę / W
dół.
Interval Set xxxS
Ustaw interwał od 1 do 100S za pomocą przycisków W górę / W dół.
Duration Set xxxS
Ustaw czas trwania od 1 do 100S za pomocą przycisków Up / Down
Volume Out xxx%
Ustaw głośność w zakresie od 0 do 100% za pomocą przycisków W górę / W
dół.
DMX 512 #xxx
Dostosuj adres DMX do sterowania DMX za pomocą przycisków W górę / W
dół.
Wind For Class xx
Dostosuj moc wiatru podczas funkcji w zakresie 0–100% za pomocą
przycisków W górę / W dół.
Angel Set xx%
Włącz / wyłącz bezprzewodowy pilot
WŁĄCZ / WYŁĄCZ
WŁĄCZ / WYŁĄCZ
Zwiększ poziom wyjściowy
Zmniejsz poziom wyjściowy
INTERVAL pokrętło obrotowe: Ustawić moc pompy.
WYJŚCIE pokrętło obrotowe: Ustawić maksymalną moc pompy i wentylatora.
DURATION pokrętło obrotowe: Ustawić moc wentylatora.
ŻÓŁTY przycisk: Funkcja wyłącznika czasowego WŁ
CZERWONY przycisk: Ciągła produkcja śniegu
ZIELONY przycisk: Ręczna produkcja śniegu
Page 21
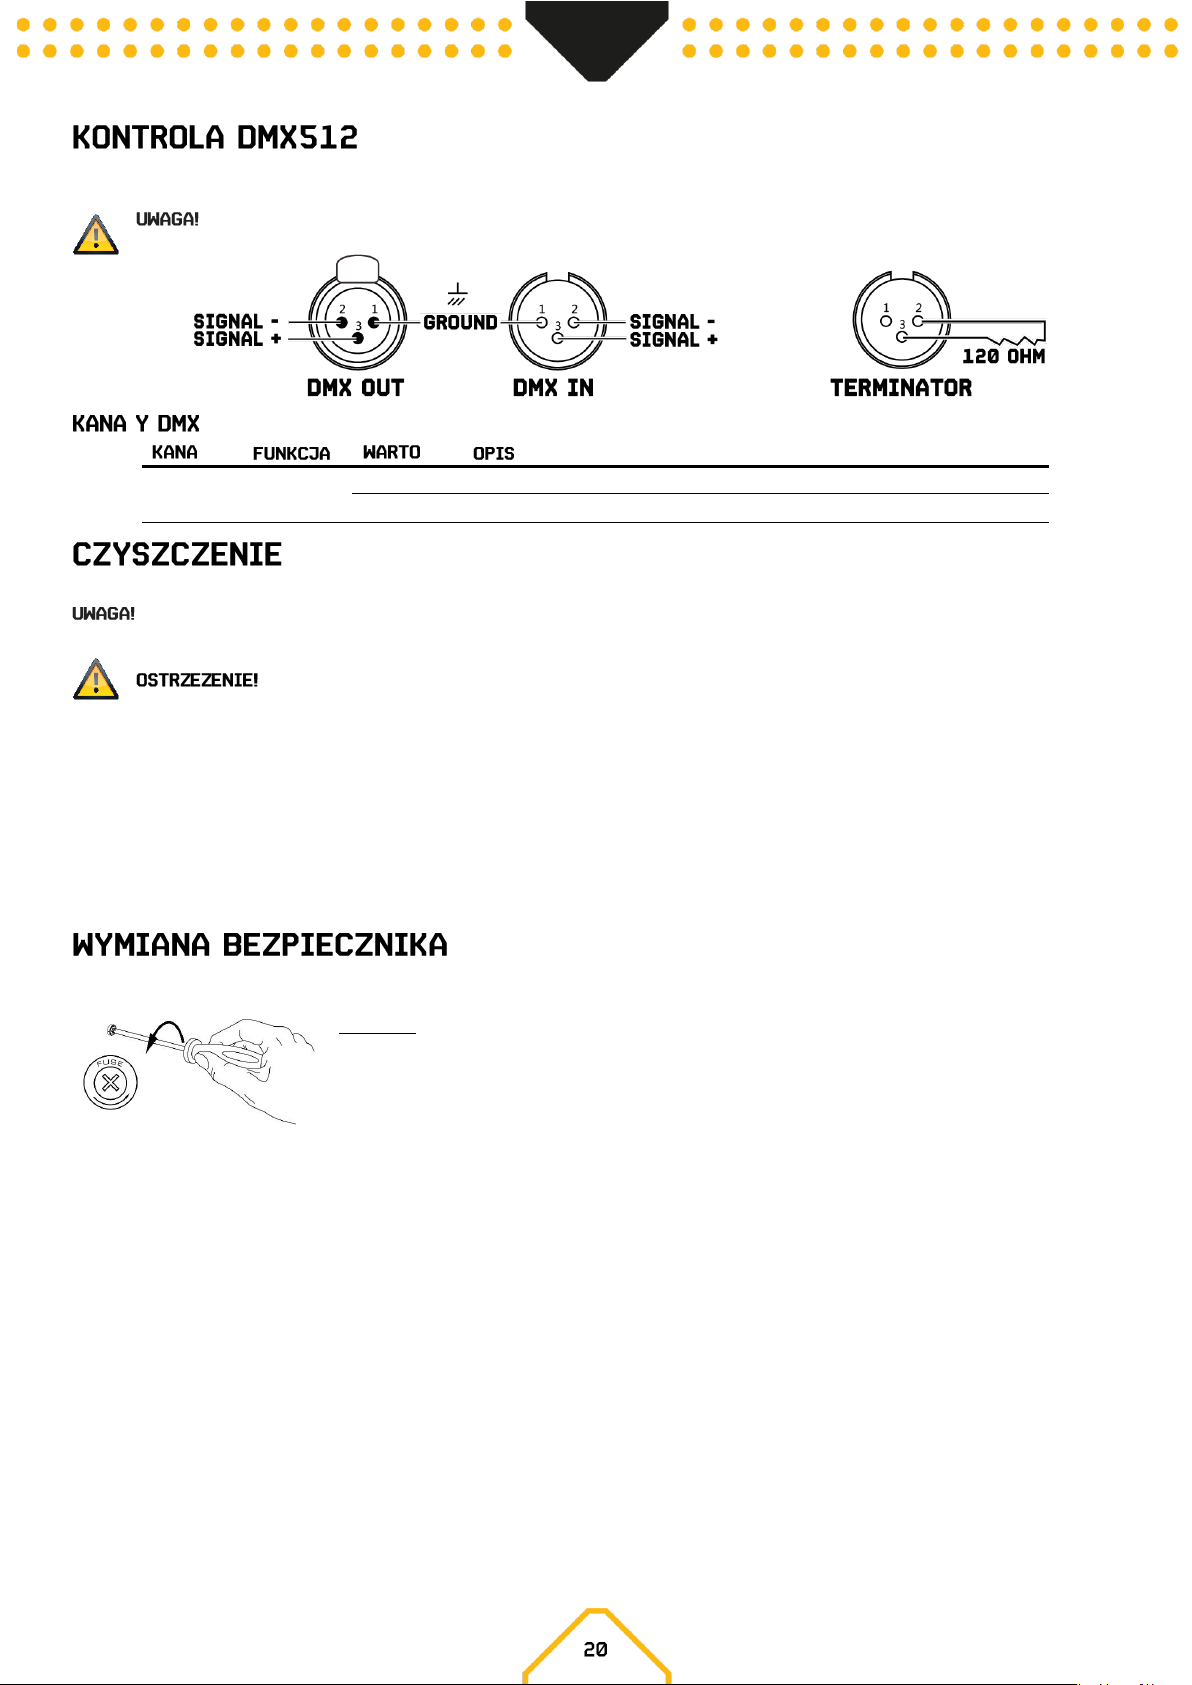
Jeśli używasz standardowego kontrolera DMX, możesz podłączyć wyjście DMX kontrolera bezpośrednio do wejścia DMX pierwszego urządzenia w
łańcuchu DMX. Zawsze podłącz wyjście jednego urządzenia do wejścia następnego urządzenia, aż wszystkie urządzenia zostaną podłączone.
Na ostatnim urządzeniu musisz mieć linię DMX z rezystorem końcowym. Weź złącze XLR i przylutuj rezystor 120 Ohm między
sygnałem (-) a sygnałem (+) i podłącz go do wyjścia DMX ostatniego urządzenia w linii.
Ł
Ł
ŚĆ
1
Snow
000-005
Wyrzut śniegu wyłączony
006-255
Wyrzut śniegu w 0-100%
Zalecamy częste czyszczenie urządzenia, w szczególności dyszy wyjściowej.
Wewnątrz urządzenia nie ma żadnych części wymagających serwisowania, z wyjątkiem bezpiecznika. Naprawy i czynności serwisowe mogą
być wykonywane wyłącznie przez autoryzowanych sprzedawców.
Odłączyć od zasilania przed rozpoczęciem czynności konserwacyjnych!
• Upewnij się, że płyn nie jest zanieczyszczony.
• Upewnij się, że otwory wentylacyjne nie są zatkane przez kurz. W razie potrzeby usuń kurz.
• Upewnij się, że urządzenie nie może się przegrzać.
• Nie uruchamiaj urządzenia bez płynu, ponieważ pompa będzie pracować na sucho.
• Natychmiast wytrzyj rozlany płyn. Wilgoć i płyn mogą trwale uszkodzić elektryczne elementy urządzenia.
• Do czyszczenia powierzchni urządzenia użyj odpowiedniego, bezrozpuszczalnikowego środka czyszczącego.
• Zaleca się uruchamianie urządzenia co miesiąc, aby uzyskać najlepszą wydajność i warunki wyjściowe.
• Przed przechowywaniem przepuścić wodę destylowaną przez system. Pomoże to oczyścić pozostały płyn i zapobiec awarii pompy przy
następnym użyciu.
Jeśli bezpiecznik jest uszkodzony, należy wymienić bezpiecznik tego samego rodzaju i wartości. Przed wymianą bezpiecznika odłącz przewód
zasilający.
Procedura:
Krok 1: Otwórz uchwyt bezpiecznika na tylnym panelu za pomocą śrubokręta montażowego.
Krok 2: Usuń stary bezpiecznik z uchwytu bezpiecznika.
Krok 3: Zainstaluj nowy bezpiecznik w uchwycie bezpiecznika.
Krok 4: Wymień uchwyt bezpiecznika w obudowie.
Page 22

Rated voltage : 240VAC, 50Hz, 6.4A
Tank capacity : 20L
DMX Channels : 1
Functions : DMX, wireless remote, manual and timer
Dimensions per unit : 590 x 550 x 615mm
Weight (per unit) : 30,5 kg
Design and product specifications are subject to change without prior notice.
The products referred to in this manual conform to the European Community Directives to which they are subject:
• Low Voltage (LVD) 2014/35/EU
• Electromagnetic Compatibility (EMC) 2014/30/EU
• Restriction of Hazardous Substances (RoHS) 2011/65/EU
Page 23

. . . . . . . . . . . . . . . . . . . . . . . . . . . . . . . . . . . . . . . . . . . . . . . . . . . . . . . . . . . . . . . . . . . . . . . . . . . . . . . . . . . . . . . . . . . . . . . . . . . . . . . . . . . . . . . . . . . . . . . . . . . . . . . . . . . . . . . . . . . . . . . . . . . . . . . . . . .
. . . . . . . . . . . . . . . . . . . . . . . . . . . . . . . . . . . . . . . . . . . . . . . . . . . . . . . . . . . . . . . . . . . . . . . . . . . . . . . . . . . . . . . . . . . . . . . . . . . . . . . . . . . . . . . . . . . . . . . . . . . . . . . . . . . . . . . . . . . . . . . . . . . . . . . . . . .
. . . . . . . . . . . . . . . . . . . . . . . . . . . . . . . . . . . . . . . . . . . . . . . . . . . . . . . . . . . . . . . . . . . . . . . . . . . . . . . . . . . . . . . . . . . . . . . . . . . . . . . . . . . . . . . . . . . . . . . . . . . . . . . . . . . . . . . . . . . . . . . . . . . . . . . . . . .
. . . . . . . . . . . . . . . . . . . . . . . . . . . . . . . . . . . . . . . . . . . . . . . . . . . . . . . . . . . . . . . . . . . . . . . . . . . . . . . . . . . . . . . . . . . . . . . . . . . . . . . . . . . . . . . . . . . . . . . . . . . . . . . . . . . . . . . . . . . . . . . . . . . . . . . . . . .
. . . . . . . . . . . . . . . . . . . . . . . . . . . . . . . . . . . . . . . . . . . . . . . . . . . . . . . . . . . . . . . . . . . . . . . . . . . . . . . . . . . . . . . . . . . . . . . . . . . . . . . . . . . . . . . . . . . . . . . . . . . . . . . . . . . . . . . . . . . . . . . . . . . . . . . . . . .
. . . . . . . . . . . . . . . . . . . . . . . . . . . . . . . . . . . . . . . . . . . . . . . . . . . . . . . . . . . . . . . . . . . . . . . . . . . . . . . . . . . . . . . . . . . . . . . . . . . . . . . . . . . . . . . . . . . . . . . . . . . . . . . . . . . . . . . . . . . . . . . . . . . . . . . . . . .
. . . . . . . . . . . . . . . . . . . . . . . . . . . . . . . . . . . . . . . . . . . . . . . . . . . . . . . . . . . . . . . . . . . . . . . . . . . . . . . . . . . . . . . . . . . . . . . . . . . . . . . . . . . . . . . . . . . . . . . . . . . . . . . . . . . . . . . . . . . . . . . . . . . . . . . . . . .
. . . . . . . . . . . . . . . . . . . . . . . . . . . . . . . . . . . . . . . . . . . . . . . . . . . . . . . . . . . . . . . . . . . . . . . . . . . . . . . . . . . . . . . . . . . . . . . . . . . . . . . . . . . . . . . . . . . . . . . . . . . . . . . . . . . . . . . . . . . . . . . . . . . . . . . . . . .
. . . . . . . . . . . . . . . . . . . . . . . . . . . . . . . . . . . . . . . . . . . . . . . . . . . . . . . . . . . . . . . . . . . . . . . . . . . . . . . . . . . . . . . . . . . . . . . . . . . . . . . . . . . . . . . . . . . . . . . . . . . . . . . . . . . . . . . . . . . . . . . . . . . . . . . . . . .
. . . . . . . . . . . . . . . . . . . . . . . . . . . . . . . . . . . . . . . . . . . . . . . . . . . . . . . . . . . . . . . . . . . . . . . . . . . . . . . . . . . . . . . . . . . . . . . . . . . . . . . . . . . . . . . . . . . . . . . . . . . . . . . . . . . . . . . . . . . . . . . . . . . . . . . . . . .
. . . . . . . . . . . . . . . . . . . . . . . . . . . . . . . . . . . . . . . . . . . . . . . . . . . . . . . . . . . . . . . . . . . . . . . . . . . . . . . . . . . . . . . . . . . . . . . . . . . . . . . . . . . . . . . . . . . . . . . . . . . . . . . . . . . . . . . . . . . . . . . . . . . . . . . . . . .
. . . . . . . . . . . . . . . . . . . . . . . . . . . . . . . . . . . . . . . . . . . . . . . . . . . . . . . . . . . . . . . . . . . . . . . . . . . . . . . . . . . . . . . . . . . . . . . . . . . . . . . . . . . . . . . . . . . . . . . . . . . . . . . . . . . . . . . . . . . . . . . . . . . . . . . . . . .
. . . . . . . . . . . . . . . . . . . . . . . . . . . . . . . . . . . . . . . . . . . . . . . . . . . . . . . . . . . . . . . . . . . . . . . . . . . . . . . . . . . . . . . . . . . . . . . . . . . . . . . . . . . . . . . . . . . . . . . . . . . . . . . . . . . . . . . . . . . . . . . . . . . . . . . . . . .
. . . . . . . . . . . . . . . . . . . . . . . . . . . . . . . . . . . . . . . . . . . . . . . . . . . . . . . . . . . . . . . . . . . . . . . . . . . . . . . . . . . . . . . . . . . . . . . . . . . . . . . . . . . . . . . . . . . . . . . . . . . . . . . . . . . . . . . . . . . . . . . . . . . . . . . . . . .
. . . . . . . . . . . . . . . . . . . . . . . . . . . . . . . . . . . . . . . . . . . . . . . . . . . . . . . . . . . . . . . . . . . . . . . . . . . . . . . . . . . . . . . . . . . . . . . . . . . . . . . . . . . . . . . . . . . . . . . . . . . . . . . . . . . . . . . . . . . . . . . . . . . . . . . . . . .
. . . . . . . . . . . . . . . . . . . . . . . . . . . . . . . . . . . . . . . . . . . . . . . . . . . . . . . . . . . . . . . . . . . . . . . . . . . . . . . . . . . . . . . . . . . . . . . . . . . . . . . . . . . . . . . . . . . . . . . . . . . . . . . . . . . . . . . . . . . . . . . . . . . . . . . . . . .
. . . . . . . . . . . . . . . . . . . . . . . . . . . . . . . . . . . . . . . . . . . . . . . . . . . . . . . . . . . . . . . . . . . . . . . . . . . . . . . . . . . . . . . . . . . . . . . . . . . . . . . . . . . . . . . . . . . . . . . . . . . . . . . . . . . . . . . . . . . . . . . . . . . . . . . . . . .
. . . . . . . . . . . . . . . . . . . . . . . . . . . . . . . . . . . . . . . . . . . . . . . . . . . . . . . . . . . . . . . . . . . . . . . . . . . . . . . . . . . . . . . . . . . . . . . . . . . . . . . . . . . . . . . . . . . . . . . . . . . . . . . . . . . . . . . . . . . . . . . . . . . . . . . . . . .
. . . . . . . . . . . . . . . . . . . . . . . . . . . . . . . . . . . . . . . . . . . . . . . . . . . . . . . . . . . . . . . . . . . . . . . . . . . . . . . . . . . . . . . . . . . . . . . . . . . . . . . . . . . . . . . . . . . . . . . . . . . . . . . . . . . . . . . . . . . . . . . . . . . . . . . . . . .
. . . . . . . . . . . . . . . . . . . . . . . . . . . . . . . . . . . . . . . . . . . . . . . . . . . . . . . . . . . . . . . . . . . . . . . . . . . . . . . . . . . . . . . . . . . . . . . . . . . . . . . . . . . . . . . . . . . . . . . . . . . . . . . . . . . . . . . . . . . . . . . . . . . . . . . . . . .
. . . . . . . . . . . . . . . . . . . . . . . . . . . . . . . . . . . . . . . . . . . . . . . . . . . . . . . . . . . . . . . . . . . . . . . . . . . . . . . . . . . . . . . . . . . . . . . . . . . . . . . . . . . . . . . . . . . . . . . . . . . . . . . . . . . . . . . . . . . . . . . . . . . . . . . . . . .
. . . . . . . . . . . . . . . . . . . . . . . . . . . . . . . . . . . . . . . . . . . . . . . . . . . . . . . . . . . . . . . . . . . . . . . . . . . . . . . . . . . . . . . . . . . . . . . . . . . . . . . . . . . . . . . . . . . . . . . . . . . . . . . . . . . . . . . . . . . . . . . . . . . . . . . . . . .
. . . . . . . . . . . . . . . . . . . . . . . . . . . . . . . . . . . . . . . . . . . . . . . . . . . . . . . . . . . . . . . . . . . . . . . . . . . . . . . . . . . . . . . . . . . . . . . . . . . . . . . . . . . . . . . . . . . . . . . . . . . . . . . . . . . . . . . . . . . . . . . . . . . . . . . . . . .
. . . . . . . . . . . . . . . . . . . . . . . . . . . . . . . . . . . . . . . . . . . . . . . . . . . . . . . . . . . . . . . . . . . . . . . . . . . . . . . . . . . . . . . . . . . . . . . . . . . . . . . . . . . . . . . . . . . . . . . . . . . . . . . . . . . . . . . . . . . . . . . . . . . . . . . . . . .
. . . . . . . . . . . . . . . . . . . . . . . . . . . . . . . . . . . . . . . . . . . . . . . . . . . . . . . . . . . . . . . . . . . . . . . . . . . . . . . . . . . . . . . . . . . . . . . . . . . . . . . . . . . . . . . . . . . . . . . . . . . . . . . . . . . . . . . . . . . . . . . . . . . . . . . . . . .
. . . . . . . . . . . . . . . . . . . . . . . . . . . . . . . . . . . . . . . . . . . . . . . . . . . . . . . . . . . . . . . . . . . . . . . . . . . . . . . . . . . . . . . . . . . . . . . . . . . . . . . . . . . . . . . . . . . . . . . . . . . . . . . . . . . . . . . . . . . . . . . . . . . . . . . . . . .
. . . . . . . . . . . . . . . . . . . . . . . . . . . . . . . . . . . . . . . . . . . . . . . . . . . . . . . . . . . . . . . . . . . . . . . . . . . . . . . . . . . . . . . . . . . . . . . . . . . . . . . . . . . . . . . . . . . . . . . . . . . . . . . . . . . . . . . . . . . . . . . . . . . . . . . . . . .
. . . . . . . . . . . . . . . . . . . . . . . . . . . . . . . . . . . . . . . . . . . . . . . . . . . . . . . . . . . . . . . . . . . . . . . . . . . . . . . . . . . . . . . . . . . . . . . . . . . . . . . . . . . . . . . . . . . . . . . . . . . . . . . . . . . . . . . . . . . . . . . . . . . . . . . . . . .
. . . . . . . . . . . . . . . . . . . . . . . . . . . . . . . . . . . . . . . . . . . . . . . . . . . . . . . . . . . . . . . . . . . . . . . . . . . . . . . . . . . . . . . . . . . . . . . . . . . . . . . . . . . . . . . . . . . . . . . . . . . . . . . . . . . . . . . . . . . . . . . . . . . . . . . . . . .
. . . . . . . . . . . . . . . . . . . . . . . . . . . . . . . . . . . . . . . . . . . . . . . . . . . . . . . . . . . . . . . . . . . . . . . . . . . . . . . . . . . . . . . . . . . . . . . . . . . . . . . . . . . . . . . . . . . . . . . . . . . . . . . . . . . . . . . . . . . . . . . . . . . . . . . . . . .
. . . . . . . . . . . . . . . . . . . . . . . . . . . . . . . . . . . . . . . . . . . . . . . . . . . . . . . . . . . . . . . . . . . . . . . . . . . . . . . . . . . . . . . . . . . . . . . . . . . . . . . . . . . . . . . . . . . . . . . . . . . . . . . . . . . . . . . . . . . . . . . . . . . . . . . . . . .
. . . . . . . . . . . . . . . . . . . . . . . . . . . . . . . . . . . . . . . . . . . . . . . . . . . . . . . . . . . . . . . . . . . . . . . . . . . . . . . . . . . . . . . . . . . . . . . . . . . . . . . . . . . . . . . . . . . . . . . . . . . . . . . . . . . . . . . . . . . . . . . . . . . . . . . . . . .
. . . . . . . . . . . . . . . . . . . . . . . . . . . . . . . . . . . . . . . . . . . . . . . . . . . . . . . . . . . . . . . . . . . . . . . . . . . . . . . . . . . . . . . . . . . . . . . . . . . . . . . . . . . . . . . . . . . . . . . . . . . . . . . . . . . . . . . . . . . . . . . . . . . . . . . . . . .
Page 24

. . . . . . . . . . . . . . . . . . . . . . . . . . . . . . . . . . . . . . . . . . . . . . . . . . . . . . . . . . . . . . . . . . . . . . . . . . . . . . . . . . . . . . . . . . . . . . . . . . . . . . . . . . . . . . . . . . . . . . . . . . . . . . . . . . . . . . . . . . . . . . . . . . . . . . . . . . .
. . . . . . . . . . . . . . . . . . . . . . . . . . . . . . . . . . . . . . . . . . . . . . . . . . . . . . . . . . . . . . . . . . . . . . . . . . . . . . . . . . . . . . . . . . . . . . . . . . . . . . . . . . . . . . . . . . . . . . . . . . . . . . . . . . . . . . . . . . . . . . . . . . . . . . . . . . .
. . . . . . . . . . . . . . . . . . . . . . . . . . . . . . . . . . . . . . . . . . . . . . . . . . . . . . . . . . . . . . . . . . . . . . . . . . . . . . . . . . . . . . . . . . . . . . . . . . . . . . . . . . . . . . . . . . . . . . . . . . . . . . . . . . . . . . . . . . . . . . . . . . . . . . . . . . .
. . . . . . . . . . . . . . . . . . . . . . . . . . . . . . . . . . . . . . . . . . . . . . . . . . . . . . . . . . . . . . . . . . . . . . . . . . . . . . . . . . . . . . . . . . . . . . . . . . . . . . . . . . . . . . . . . . . . . . . . . . . . . . . . . . . . . . . . . . . . . . . . . . . . . . . . . . .
. . . . . . . . . . . . . . . . . . . . . . . . . . . . . . . . . . . . . . . . . . . . . . . . . . . . . . . . . . . . . . . . . . . . . . . . . . . . . . . . . . . . . . . . . . . . . . . . . . . . . . . . . . . . . . . . . . . . . . . . . . . . . . . . . . . . . . . . . . . . . . . . . . . . . . . . . . .
. . . . . . . . . . . . . . . . . . . . . . . . . . . . . . . . . . . . . . . . . . . . . . . . . . . . . . . . . . . . . . . . . . . . . . . . . . . . . . . . . . . . . . . . . . . . . . . . . . . . . . . . . . . . . . . . . . . . . . . . . . . . . . . . . . . . . . . . . . . . . . . . . . . . . . . . . . .
. . . . . . . . . . . . . . . . . . . . . . . . . . . . . . . . . . . . . . . . . . . . . . . . . . . . . . . . . . . . . . . . . . . . . . . . . . . . . . . . . . . . . . . . . . . . . . . . . . . . . . . . . . . . . . . . . . . . . . . . . . . . . . . . . . . . . . . . . . . . . . . . . . . . . . . . . . .
. . . . . . . . . . . . . . . . . . . . . . . . . . . . . . . . . . . . . . . . . . . . . . . . . . . . . . . . . . . . . . . . . . . . . . . . . . . . . . . . . . . . . . . . . . . . . . . . . . . . . . . . . . . . . . . . . . . . . . . . . . . . . . . . . . . . . . . . . . . . . . . . . . . . . . . . . . .
. . . . . . . . . . . . . . . . . . . . . . . . . . . . . . . . . . . . . . . . . . . . . . . . . . . . . . . . . . . . . . . . . . . . . . . . . . . . . . . . . . . . . . . . . . . . . . . . . . . . . . . . . . . . . . . . . . . . . . . . . . . . . . . . . . . . . . . . . . . . . . . . . . . . . . . . . . .
. . . . . . . . . . . . . . . . . . . . . . . . . . . . . . . . . . . . . . . . . . . . . . . . . . . . . . . . . . . . . . . . . . . . . . . . . . . . . . . . . . . . . . . . . . . . . . . . . . . . . . . . . . . . . . . . . . . . . . . . . . . . . . . . . . . . . . . . . . . . . . . . . . . . . . . . . . .
. . . . . . . . . . . . . . . . . . . . . . . . . . . . . . . . . . . . . . . . . . . . . . . . . . . . . . . . . . . . . . . . . . . . . . . . . . . . . . . . . . . . . . . . . . . . . . . . . . . . . . . . . . . . . . . . . . . . . . . . . . . . . . . . . . . . . . . . . . . . . . . . . . . . . . . . . . .
. . . . . . . . . . . . . . . . . . . . . . . . . . . . . . . . . . . . . . . . . . . . . . . . . . . . . . . . . . . . . . . . . . . . . . . . . . . . . . . . . . . . . . . . . . . . . . . . . . . . . . . . . . . . . . . . . . . . . . . . . . . . . . . . . . . . . . . . . . . . . . . . . . . . . . . . . . .
. . . . . . . . . . . . . . . . . . . . . . . . . . . . . . . . . . . . . . . . . . . . . . . . . . . . . . . . . . . . . . . . . . . . . . . . . . . . . . . . . . . . . . . . . . . . . . . . . . . . . . . . . . . . . . . . . . . . . . . . . . . . . . . . . . . . . . . . . . . . . . . . . . . . . . . . . . .
. . . . . . . . . . . . . . . . . . . . . . . . . . . . . . . . . . . . . . . . . . . . . . . . . . . . . . . . . . . . . . . . . . . . . . . . . . . . . . . . . . . . . . . . . . . . . . . . . . . . . . . . . . . . . . . . . . . . . . . . . . . . . . . . . . . . . . . . . . . . . . . . . . . . . . . . . . .
. . . . . . . . . . . . . . . . . . . . . . . . . . . . . . . . . . . . . . . . . . . . . . . . . . . . . . . . . . . . . . . . . . . . . . . . . . . . . . . . . . . . . . . . . . . . . . . . . . . . . . . . . . . . . . . . . . . . . . . . . . . . . . . . . . . . . . . . . . . . . . . . . . . . . . . . . . .
. . . . . . . . . . . . . . . . . . . . . . . . . . . . . . . . . . . . . . . . . . . . . . . . . . . . . . . . . . . . . . . . . . . . . . . . . . . . . . . . . . . . . . . . . . . . . . . . . . . . . . . . . . . . . . . . . . . . . . . . . . . . . . . . . . . . . . . . . . . . . . . . . . . . . . . . . . .
. . . . . . . . . . . . . . . . . . . . . . . . . . . . . . . . . . . . . . . . . . . . . . . . . . . . . . . . . . . . . . . . . . . . . . . . . . . . . . . . . . . . . . . . . . . . . . . . . . . . . . . . . . . . . . . . . . . . . . . . . . . . . . . . . . . . . . . . . . . . . . . . . . . . . . . . . . .
. . . . . . . . . . . . . . . . . . . . . . . . . . . . . . . . . . . . . . . . . . . . . . . . . . . . . . . . . . . . . . . . . . . . . . . . . . . . . . . . . . . . . . . . . . . . . . . . . . . . . . . . . . . . . . . . . . . . . . . . . . . . . . . . . . . . . . . . . . . . . . . . . . . . . . . . . . .
. . . . . . . . . . . . . . . . . . . . . . . . . . . . . . . . . . . . . . . . . . . . . . . . . . . . . . . . . . . . . . . . . . . . . . . . . . . . . . . . . . . . . . . . . . . . . . . . . . . . . . . . . . . . . . . . . . . . . . . . . . . . . . . . . . . . . . . . . . . . . . . . . . . . . . . . . . .
. . . . . . . . . . . . . . . . . . . . . . . . . . . . . . . . . . . . . . . . . . . . . . . . . . . . . . . . . . . . . . . . . . . . . . . . . . . . . . . . . . . . . . . . . . . . . . . . . . . . . . . . . . . . . . . . . . . . . . . . . . . . . . . . . . . . . . . . . . . . . . . . . . . . . . . . . . .
. . . . . . . . . . . . . . . . . . . . . . . . . . . . . . . . . . . . . . . . . . . . . . . . . . . . . . . . . . . . . . . . . . . . . . . . . . . . . . . . . . . . . . . . . . . . . . . . . . . . . . . . . . . . . . . . . . . . . . . . . . . . . . . . . . . . . . . . . . . . . . . . . . . . . . . . . . .
. . . . . . . . . . . . . . . . . . . . . . . . . . . . . . . . . . . . . . . . . . . . . . . . . . . . . . . . . . . . . . . . . . . . . . . . . . . . . . . . . . . . . . . . . . . . . . . . . . . . . . . . . . . . . . . . . . . . . . . . . . . . . . . . . . . . . . . . . . . . . . . . . . . . . . . . . . .
. . . . . . . . . . . . . . . . . . . . . . . . . . . . . . . . . . . . . . . . . . . . . . . . . . . . . . . . . . . . . . . . . . . . . . . . . . . . . . . . . . . . . . . . . . . . . . . . . . . . . . . . . . . . . . . . . . . . . . . . . . . . . . . . . . . . . . . . . . . . . . . . . . . . . . . . . . .
. . . . . . . . . . . . . . . . . . . . . . . . . . . . . . . . . . . . . . . . . . . . . . . . . . . . . . . . . . . . . . . . . . . . . . . . . . . . . . . . . . . . . . . . . . . . . . . . . . . . . . . . . . . . . . . . . . . . . . . . . . . . . . . . . . . . . . . . . . . . . . . . . . . . . . . . . . .
. . . . . . . . . . . . . . . . . . . . . . . . . . . . . . . . . . . . . . . . . . . . . . . . . . . . . . . . . . . . . . . . . . . . . . . . . . . . . . . . . . . . . . . . . . . . . . . . . . . . . . . . . . . . . . . . . . . . . . . . . . . . . . . . . . . . . . . . . . . . . . . . . . . . . . . . . . .
. . . . . . . . . . . . . . . . . . . . . . . . . . . . . . . . . . . . . . . . . . . . . . . . . . . . . . . . . . . . . . . . . . . . . . . . . . . . . . . . . . . . . . . . . . . . . . . . . . . . . . . . . . . . . . . . . . . . . . . . . . . . . . . . . . . . . . . . . . . . . . . . . . . . . . . . . . .
. . . . . . . . . . . . . . . . . . . . . . . . . . . . . . . . . . . . . . . . . . . . . . . . . . . . . . . . . . . . . . . . . . . . . . . . . . . . . . . . . . . . . . . . . . . . . . . . . . . . . . . . . . . . . . . . . . . . . . . . . . . . . . . . . . . . . . . . . . . . . . . . . . . . . . . . . . .
. . . . . . . . . . . . . . . . . . . . . . . . . . . . . . . . . . . . . . . . . . . . . . . . . . . . . . . . . . . . . . . . . . . . . . . . . . . . . . . . . . . . . . . . . . . . . . . . . . . . . . . . . . . . . . . . . . . . . . . . . . . . . . . . . . . . . . . . . . . . . . . . . . . . . . . . . . .
. . . . . . . . . . . . . . . . . . . . . . . . . . . . . . . . . . . . . . . . . . . . . . . . . . . . . . . . . . . . . . . . . . . . . . . . . . . . . . . . . . . . . . . . . . . . . . . . . . . . . . . . . . . . . . . . . . . . . . . . . . . . . . . . . . . . . . . . . . . . . . . . . . . . . . . . . . .
. . . . . . . . . . . . . . . . . . . . . . . . . . . . . . . . . . . . . . . . . . . . . . . . . . . . . . . . . . . . . . . . . . . . . . . . . . . . . . . . . . . . . . . . . . . . . . . . . . . . . . . . . . . . . . . . . . . . . . . . . . . . . . . . . . . . . . . . . . . . . . . . . . . . . . . . . . .
. . . . . . . . . . . . . . . . . . . . . . . . . . . . . . . . . . . . . . . . . . . . . . . . . . . . . . . . . . . . . . . . . . . . . . . . . . . . . . . . . . . . . . . . . . . . . . . . . . . . . . . . . . . . . . . . . . . . . . . . . . . . . . . . . . . . . . . . . . . . . . . . . . . . . . . . . . .
. . . . . . . . . . . . . . . . . . . . . . . . . . . . . . . . . . . . . . . . . . . . . . . . . . . . . . . . . . . . . . . . . . . . . . . . . . . . . . . . . . . . . . . . . . . . . . . . . . . . . . . . . . . . . . . . . . . . . . . . . . . . . . . . . . . . . . . . . . . . . . . . . . . . . . . . . . .
. . . . . . . . . . . . . . . . . . . . . . . . . . . . . . . . . . . . . . . . . . . . . . . . . . . . . . . . . . . . . . . . . . . . . . . . . . . . . . . . . . . . . . . . . . . . . . . . . . . . . . . . . . . . . . . . . . . . . . . . . . . . . . . . . . . . . . . . . . . . . . . . . . . . . . . . . . .
Page 25

. . . . . . . . . . . . . . . . . . . . . . . . . . . . . . . . . . . . . . . . . . . . . . . . . . . . . . . . . . . . . . . . . . . . . . . . . . . . . . . . . . . . . . . . . . . . . . . . . . . . . . . . . . . . . . . . . . . . . . . . . . . . . . . . . . . . . . . . . . . . . . . . . . . . . . . . . . .
. . . . . . . . . . . . . . . . . . . . . . . . . . . . . . . . . . . . . . . . . . . . . . . . . . . . . . . . . . . . . . . . . . . . . . . . . . . . . . . . . . . . . . . . . . . . . . . . . . . . . . . . . . . . . . . . . . . . . . . . . . . . . . . . . . . . . . . . . . . . . . . . . . . . . . . . . . .
. . . . . . . . . . . . . . . . . . . . . . . . . . . . . . . . . . . . . . . . . . . . . . . . . . . . . . . . . . . . . . . . . . . . . . . . . . . . . . . . . . . . . . . . . . . . . . . . . . . . . . . . . . . . . . . . . . . . . . . . . . . . . . . . . . . . . . . . . . . . . . . . . . . . . . . . . . .
. . . . . . . . . . . . . . . . . . . . . . . . . . . . . . . . . . . . . . . . . . . . . . . . . . . . . . . . . . . . . . . . . . . . . . . . . . . . . . . . . . . . . . . . . . . . . . . . . . . . . . . . . . . . . . . . . . . . . . . . . . . . . . . . . . . . . . . . . . . . . . . . . . . . . . . . . . .
. . . . . . . . . . . . . . . . . . . . . . . . . . . . . . . . . . . . . . . . . . . . . . . . . . . . . . . . . . . . . . . . . . . . . . . . . . . . . . . . . . . . . . . . . . . . . . . . . . . . . . . . . . . . . . . . . . . . . . . . . . . . . . . . . . . . . . . . . . . . . . . . . . . . . . . . . . .
. . . . . . . . . . . . . . . . . . . . . . . . . . . . . . . . . . . . . . . . . . . . . . . . . . . . . . . . . . . . . . . . . . . . . . . . . . . . . . . . . . . . . . . . . . . . . . . . . . . . . . . . . . . . . . . . . . . . . . . . . . . . . . . . . . . . . . . . . . . . . . . . . . . . . . . . . . .
. . . . . . . . . . . . . . . . . . . . . . . . . . . . . . . . . . . . . . . . . . . . . . . . . . . . . . . . . . . . . . . . . . . . . . . . . . . . . . . . . . . . . . . . . . . . . . . . . . . . . . . . . . . . . . . . . . . . . . . . . . . . . . . . . . . . . . . . . . . . . . . . . . . . . . . . . . .
. . . . . . . . . . . . . . . . . . . . . . . . . . . . . . . . . . . . . . . . . . . . . . . . . . . . . . . . . . . . . . . . . . . . . . . . . . . . . . . . . . . . . . . . . . . . . . . . . . . . . . . . . . . . . . . . . . . . . . . . . . . . . . . . . . . . . . . . . . . . . . . . . . . . . . . . . . .
. . . . . . . . . . . . . . . . . . . . . . . . . . . . . . . . . . . . . . . . . . . . . . . . . . . . . . . . . . . . . . . . . . . . . . . . . . . . . . . . . . . . . . . . . . . . . . . . . . . . . . . . . . . . . . . . . . . . . . . . . . . . . . . . . . . . . . . . . . . . . . . . . . . . . . . . . . .
. . . . . . . . . . . . . . . . . . . . . . . . . . . . . . . . . . . . . . . . . . . . . . . . . . . . . . . . . . . . . . . . . . . . . . . . . . . . . . . . . . . . . . . . . . . . . . . . . . . . . . . . . . . . . . . . . . . . . . . . . . . . . . . . . . . . . . . . . . . . . . . . . . . . . . . . . . .
. . . . . . . . . . . . . . . . . . . . . . . . . . . . . . . . . . . . . . . . . . . . . . . . . . . . . . . . . . . . . . . . . . . . . . . . . . . . . . . . . . . . . . . . . . . . . . . . . . . . . . . . . . . . . . . . . . . . . . . . . . . . . . . . . . . . . . . . . . . . . . . . . . . . . . . . . . .
. . . . . . . . . . . . . . . . . . . . . . . . . . . . . . . . . . . . . . . . . . . . . . . . . . . . . . . . . . . . . . . . . . . . . . . . . . . . . . . . . . . . . . . . . . . . . . . . . . . . . . . . . . . . . . . . . . . . . . . . . . . . . . . . . . . . . . . . . . . . . . . . . . . . . . . . . . .
. . . . . . . . . . . . . . . . . . . . . . . . . . . . . . . . . . . . . . . . . . . . . . . . . . . . . . . . . . . . . . . . . . . . . . . . . . . . . . . . . . . . . . . . . . . . . . . . . . . . . . . . . . . . . . . . . . . . . . . . . . . . . . . . . . . . . . . . . . . . . . . . . . . . . . . . . . .
. . . . . . . . . . . . . . . . . . . . . . . . . . . . . . . . . . . . . . . . . . . . . . . . . . . . . . . . . . . . . . . . . . . . . . . . . . . . . . . . . . . . . . . . . . . . . . . . . . . . . . . . . . . . . . . . . . . . . . . . . . . . . . . . . . . . . . . . . . . . . . . . . . . . . . . . . . .
. . . . . . . . . . . . . . . . . . . . . . . . . . . . . . . . . . . . . . . . . . . . . . . . . . . . . . . . . . . . . . . . . . . . . . . . . . . . . . . . . . . . . . . . . . . . . . . . . . . . . . . . . . . . . . . . . . . . . . . . . . . . . . . . . . . . . . . . . . . . . . . . . . . . . . . . . . .
. . . . . . . . . . . . . . . . . . . . . . . . . . . . . . . . . . . . . . . . . . . . . . . . . . . . . . . . . . . . . . . . . . . . . . . . . . . . . . . . . . . . . . . . . . . . . . . . . . . . . . . . . . . . . . . . . . . . . . . . . . . . . . . . . . . . . . . . . . . . . . . . . . . . . . . . . . .
. . . . . . . . . . . . . . . . . . . . . . . . . . . . . . . . . . . . . . . . . . . . . . . . . . . . . . . . . . . . . . . . . . . . . . . . . . . . . . . . . . . . . . . . . . . . . . . . . . . . . . . . . . . . . . . . . . . . . . . . . . . . . . . . . . . . . . . . . . . . . . . . . . . . . . . . . . .
. . . . . . . . . . . . . . . . . . . . . . . . . . . . . . . . . . . . . . . . . . . . . . . . . . . . . . . . . . . . . . . . . . . . . . . . . . . . . . . . . . . . . . . . . . . . . . . . . . . . . . . . . . . . . . . . . . . . . . . . . . . . . . . . . . . . . . . . . . . . . . . . . . . . . . . . . . .
. . . . . . . . . . . . . . . . . . . . . . . . . . . . . . . . . . . . . . . . . . . . . . . . . . . . . . . . . . . . . . . . . . . . . . . . . . . . . . . . . . . . . . . . . . . . . . . . . . . . . . . . . . . . . . . . . . . . . . . . . . . . . . . . . . . . . . . . . . . . . . . . . . . . . . . . . . .
. . . . . . . . . . . . . . . . . . . . . . . . . . . . . . . . . . . . . . . . . . . . . . . . . . . . . . . . . . . . . . . . . . . . . . . . . . . . . . . . . . . . . . . . . . . . . . . . . . . . . . . . . . . . . . . . . . . . . . . . . . . . . . . . . . . . . . . . . . . . . . . . . . . . . . . . . . .
. . . . . . . . . . . . . . . . . . . . . . . . . . . . . . . . . . . . . . . . . . . . . . . . . . . . . . . . . . . . . . . . . . . . . . . . . . . . . . . . . . . . . . . . . . . . . . . . . . . . . . . . . . . . . . . . . . . . . . . . . . . . . . . . . . . . . . . . . . . . . . . . . . . . . . . . . . .
. . . . . . . . . . . . . . . . . . . . . . . . . . . . . . . . . . . . . . . . . . . . . . . . . . . . . . . . . . . . . . . . . . . . . . . . . . . . . . . . . . . . . . . . . . . . . . . . . . . . . . . . . . . . . . . . . . . . . . . . . . . . . . . . . . . . . . . . . . . . . . . . . . . . . . . . . . .
. . . . . . . . . . . . . . . . . . . . . . . . . . . . . . . . . . . . . . . . . . . . . . . . . . . . . . . . . . . . . . . . . . . . . . . . . . . . . . . . . . . . . . . . . . . . . . . . . . . . . . . . . . . . . . . . . . . . . . . . . . . . . . . . . . . . . . . . . . . . . . . . . . . . . . . . . . .
. . . . . . . . . . . . . . . . . . . . . . . . . . . . . . . . . . . . . . . . . . . . . . . . . . . . . . . . . . . . . . . . . . . . . . . . . . . . . . . . . . . . . . . . . . . . . . . . . . . . . . . . . . . . . . . . . . . . . . . . . . . . . . . . . . . . . . . . . . . . . . . . . . . . . . . . . . .
. . . . . . . . . . . . . . . . . . . . . . . . . . . . . . . . . . . . . . . . . . . . . . . . . . . . . . . . . . . . . . . . . . . . . . . . . . . . . . . . . . . . . . . . . . . . . . . . . . . . . . . . . . . . . . . . . . . . . . . . . . . . . . . . . . . . . . . . . . . . . . . . . . . . . . . . . . .
. . . . . . . . . . . . . . . . . . . . . . . . . . . . . . . . . . . . . . . . . . . . . . . . . . . . . . . . . . . . . . . . . . . . . . . . . . . . . . . . . . . . . . . . . . . . . . . . . . . . . . . . . . . . . . . . . . . . . . . . . . . . . . . . . . . . . . . . . . . . . . . . . . . . . . . . . . .
. . . . . . . . . . . . . . . . . . . . . . . . . . . . . . . . . . . . . . . . . . . . . . . . . . . . . . . . . . . . . . . . . . . . . . . . . . . . . . . . . . . . . . . . . . . . . . . . . . . . . . . . . . . . . . . . . . . . . . . . . . . . . . . . . . . . . . . . . . . . . . . . . . . . . . . . . . .
. . . . . . . . . . . . . . . . . . . . . . . . . . . . . . . . . . . . . . . . . . . . . . . . . . . . . . . . . . . . . . . . . . . . . . . . . . . . . . . . . . . . . . . . . . . . . . . . . . . . . . . . . . . . . . . . . . . . . . . . . . . . . . . . . . . . . . . . . . . . . . . . . . . . . . . . . . .
. . . . . . . . . . . . . . . . . . . . . . . . . . . . . . . . . . . . . . . . . . . . . . . . . . . . . . . . . . . . . . . . . . . . . . . . . . . . . . . . . . . . . . . . . . . . . . . . . . . . . . . . . . . . . . . . . . . . . . . . . . . . . . . . . . . . . . . . . . . . . . . . . . . . . . . . . . .
. . . . . . . . . . . . . . . . . . . . . . . . . . . . . . . . . . . . . . . . . . . . . . . . . . . . . . . . . . . . . . . . . . . . . . . . . . . . . . . . . . . . . . . . . . . . . . . . . . . . . . . . . . . . . . . . . . . . . . . . . . . . . . . . . . . . . . . . . . . . . . . . . . . . . . . . . . .
. . . . . . . . . . . . . . . . . . . . . . . . . . . . . . . . . . . . . . . . . . . . . . . . . . . . . . . . . . . . . . . . . . . . . . . . . . . . . . . . . . . . . . . . . . . . . . . . . . . . . . . . . . . . . . . . . . . . . . . . . . . . . . . . . . . . . . . . . . . . . . . . . . . . . . . . . . .
. . . . . . . . . . . . . . . . . . . . . . . . . . . . . . . . . . . . . . . . . . . . . . . . . . . . . . . . . . . . . . . . . . . . . . . . . . . . . . . . . . . . . . . . . . . . . . . . . . . . . . . . . . . . . . . . . . . . . . . . . . . . . . . . . . . . . . . . . . . . . . . . . . . . . . . . . . .
. . . . . . . . . . . . . . . . . . . . . . . . . . . . . . . . . . . . . . . . . . . . . . . . . . . . . . . . . . . . . . . . . . . . . . . . . . . . . . . . . . . . . . . . . . . . . . . . . . . . . . . . . . . . . . . . . . . . . . . . . . . . . . . . . . . . . . . . . . . . . . . . . . . . . . . . . . .
Page 26

offers a wide range of high performance lighting
equipment and related accessories for the rental, entertainment
and architectural lighting markets. BeamZ Pro stands for performance,
innovation and value pricing!
 Loading...