

Page 1
Ref. Nr. 150.666
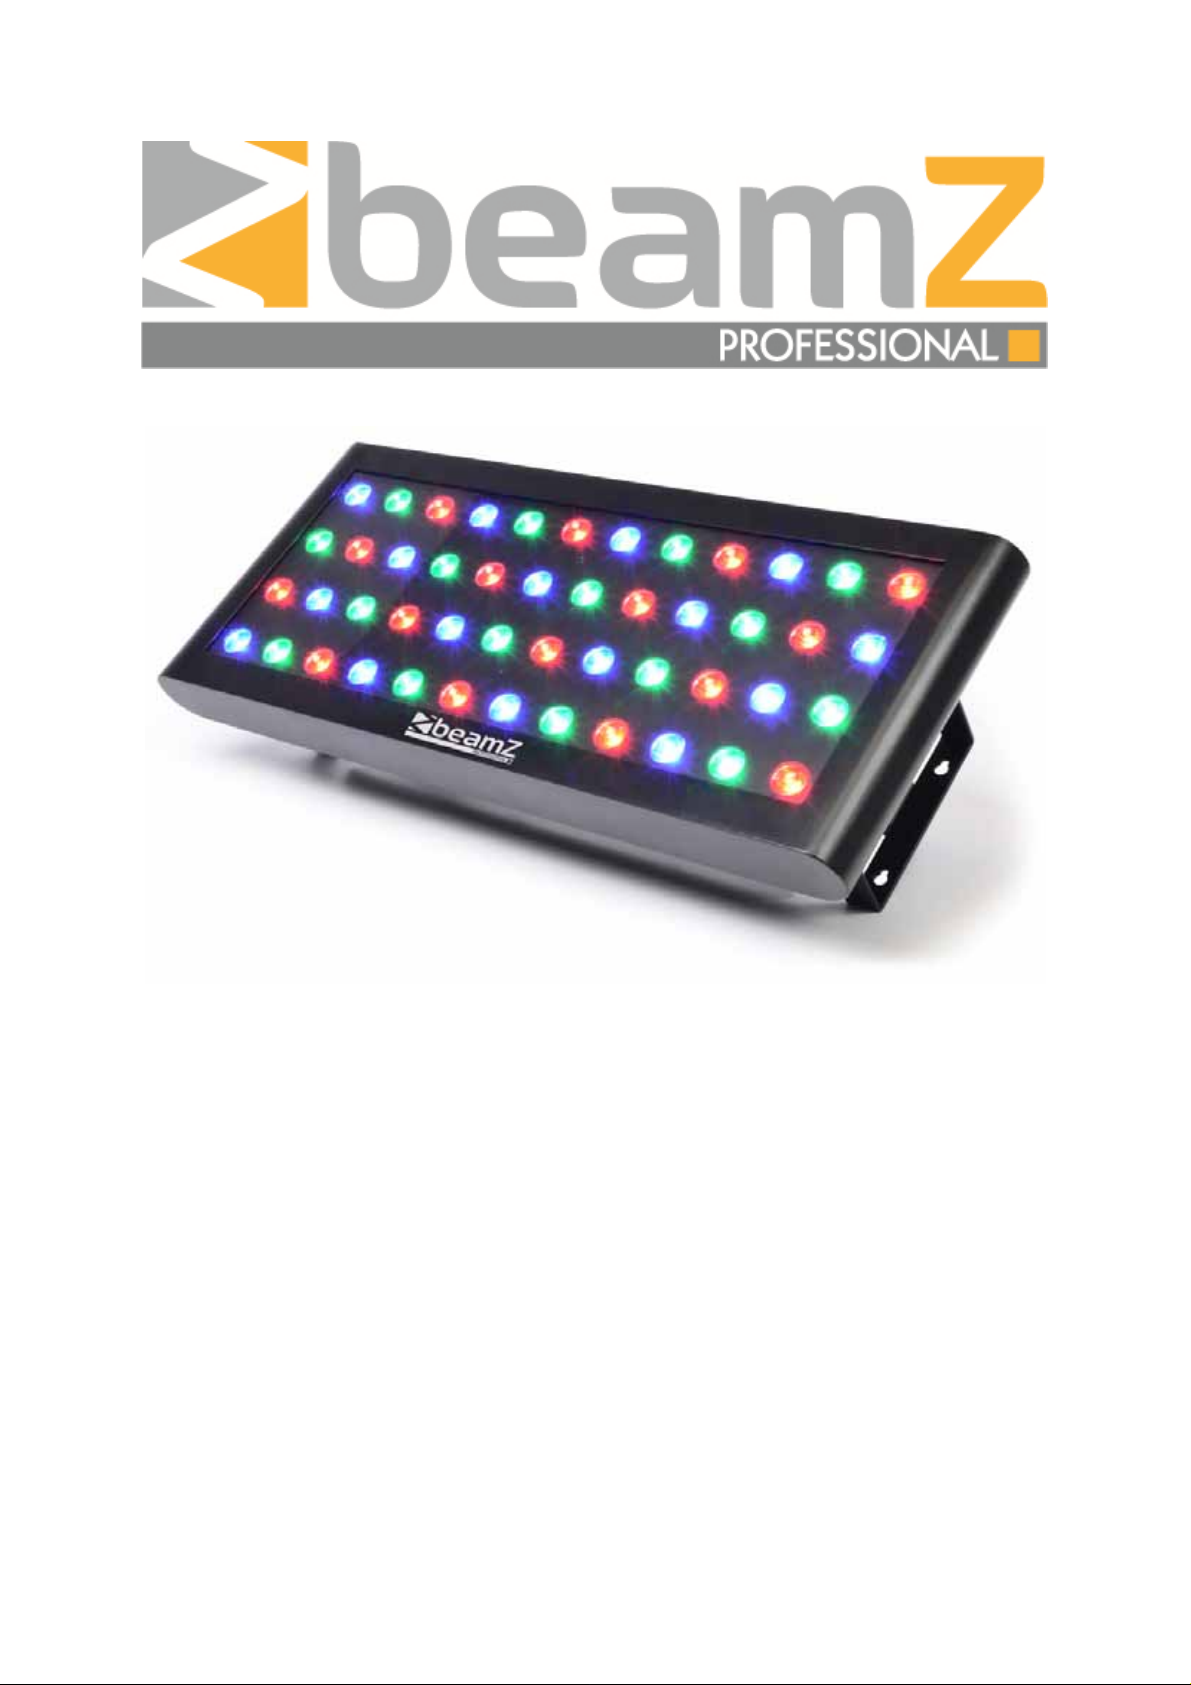
LCP-48 LED COLOR PANEL
48X 1W RGB
MANUAL
Page 2

Thank you for purchasing our company products. Please read these instructions carefully to enjoy
optimum performance and a longer service life before you start to use.
CONTENTS
CONTENTS ............................................................................................................................................. 2
Unpacking Inspections ............................................................................................................................ 3
Unpacking instructions ........................................................................................................................ 3
Checking the contents of the carton: ................................................................................................... 3
Safety Instructions ................................................................................................................................... 3
Product Overview .................................................................................................................................... 4
Functions Introductions ........................................................................................................................... 4
Main Functions .................................................................................................................................... 4
Operation Instructions ............................................................................................................................. 5
Functions for control panel .............................................................................................................. 5
Master/Slave mode .............................................................................................................................. 6
Master/Slave connection ................................................................................................................. 6
Sound Active Mode ............................................................................................................................. 6
Automatic Mode ................................................................................................................................... 6
Controlled by DMX512 ........................................................................................................................ 7
DMX Value Functions .......................................................................................................................... 8
27 Channel mode ............................................................................................................................ 8
15 Channel mode ............................................................................................................................ 9
9 Channel mode .............................................................................................................................. 9
6 Channel mode .............................................................................................................................. 9
3 Channel mode ............................................................................................................................ 10
Maintenance .......................................................................................................................................... 10
Specification .......................................................................................................................................... 10
CE & R&TTE Declaration of Conformity ................................................................................................ 11
- 2 -
Page 3
UNPACKING INSPECTIONS
Unpacking instructions
Please unpack the carton and check the goods carefully when you receive it , if discover
packing damage, shortage or quality problem, please notify the shipper and reject the goods.
Before using this product, please read the instructions carefully and keep it in a safe place for
future reference.
Checking the contents of the carton:
The product, Power cord, Instruction Manual
SAFETY INSTRUCTIONS
Safety and regulatory power socket with high quality output should be used .
Always connect the product to a grounded circuit to avoid the risk of electrocution.
Never put tiny metal objects such as a screwdriver, iron wire and coins, etc. into the internal or
stretch into the machine in case of short circuit .
Please make sure to connect the proper voltage and do not higher or lower than that stated on
the decal or rear panel of the product .
Avoid hitting, crashing or squeezing with other objects in transportation. Never carry the
product from the power cord or any moving part . Always use the hanging / mounting bracket
or the handles.
The product is used in door only .
Never pull or tug on the cord and change it for another one , stop using it when it is damaged
or becomes hot .
Stop using the product once there is sparks when connecting with the power plug .
Can not operate product with wet hands and never place it near the water or other liquid.
Make sure there are no flammable materials close to the fixture while operating . Always install
it in a location with adequate ventilation.
Never replace the lighting source with different specification and rating when the origin al one
is damaged.
Make sure to power off before replacing the light source or the fuse. Never do it while it is on.
The ambient temperature is no more than 40°C(104°F) .
Never clean the fixture by water, thinner or other dissolved agent .
Stop using the product in case of a serious operating problem and send it to our maintenance
agent immediately. Never repair by non-professional workers .
Avoid direct eye exposure to the light source while the product is on.
- 3 -
Page 4
PRODUCT OVERVIEW
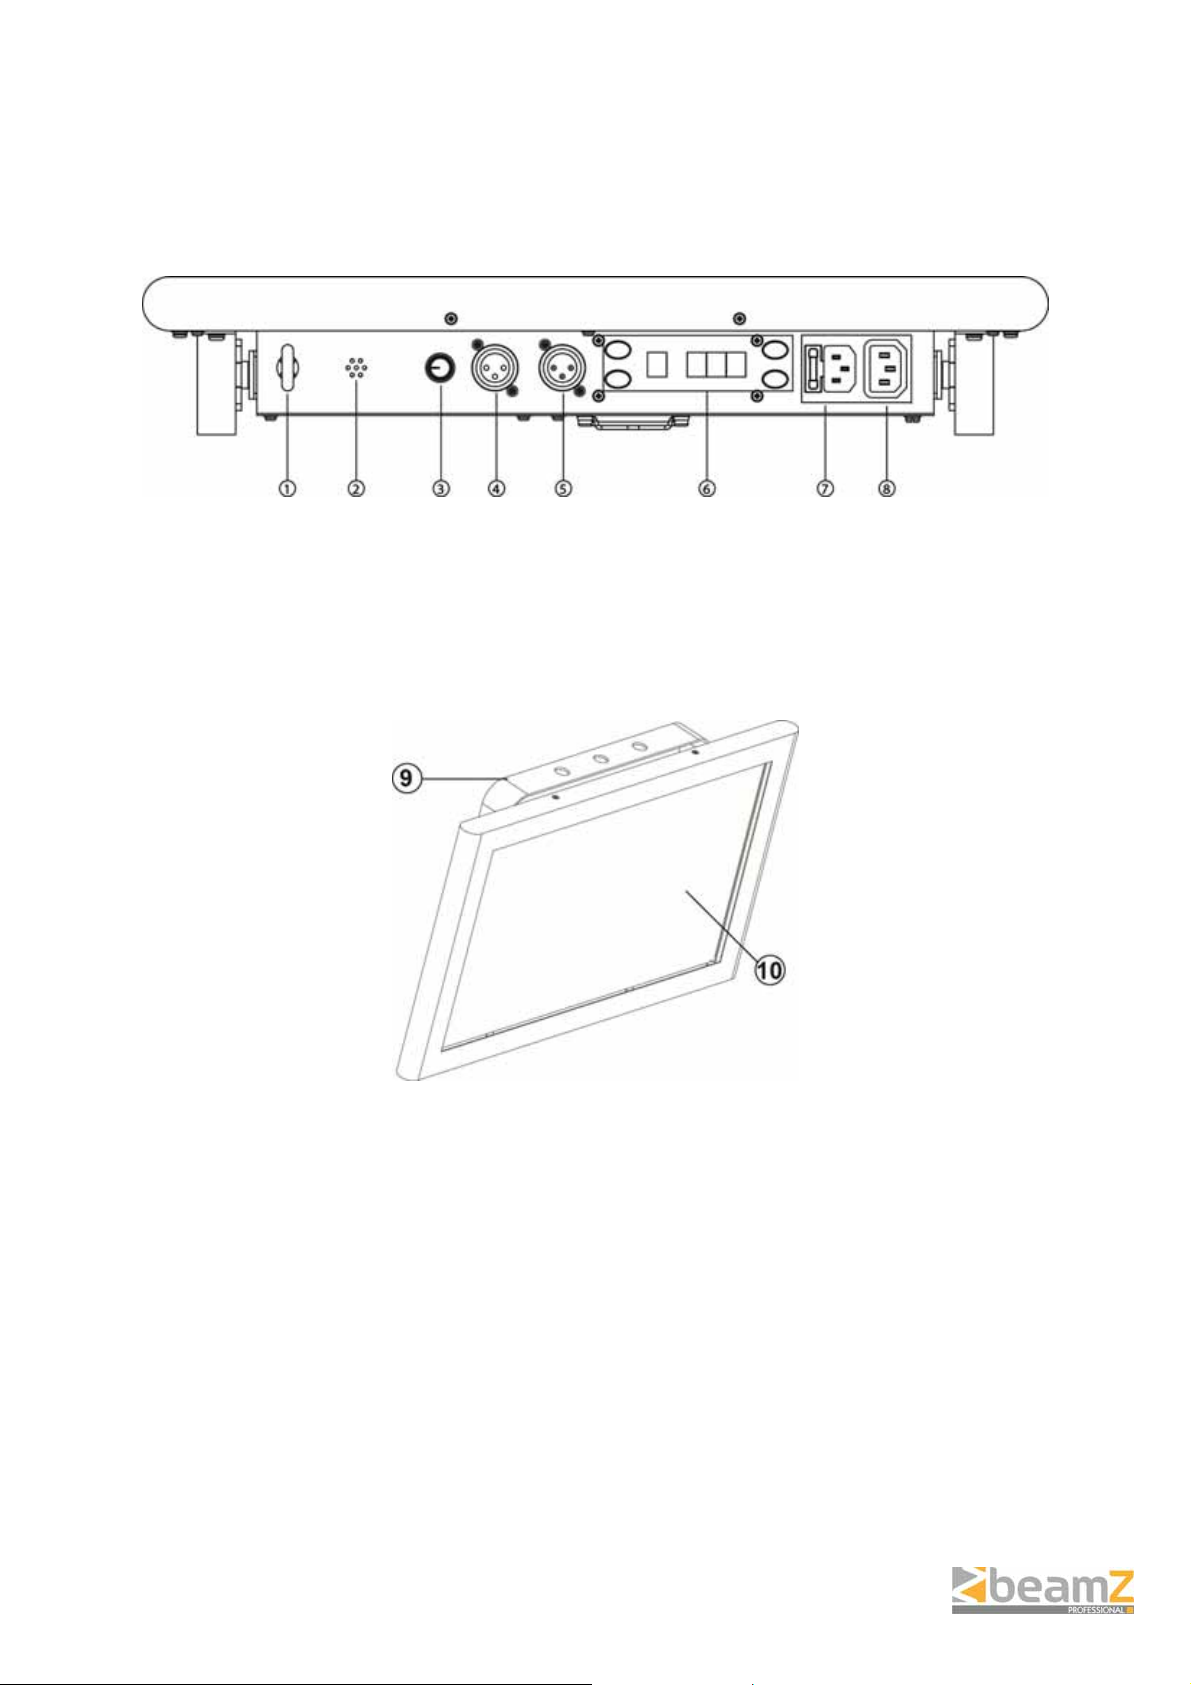
1. Safety eyebolt
2. Microphone
3. Sound sensitivity adjustment
4. DMX signal output
5. DMX signal input
6. Control panel
7. Power input
8. Power output
9. Hanging bracket
10. LEDs
FUNCTIONS INTRODUCTIONS
Main Functions
3,6,9,15 & 27 DMX channels
Automatic, sound active and master/slave mode
Built-in 24 actions,individual control of RGB LEDs. running and strobe speed can be adjusted.
With static colors,strobe,color mixing,chasing and fade effect.
- 4 -
Page 5
OPERATION INSTRUCTIONS
Operation instructions for control panel
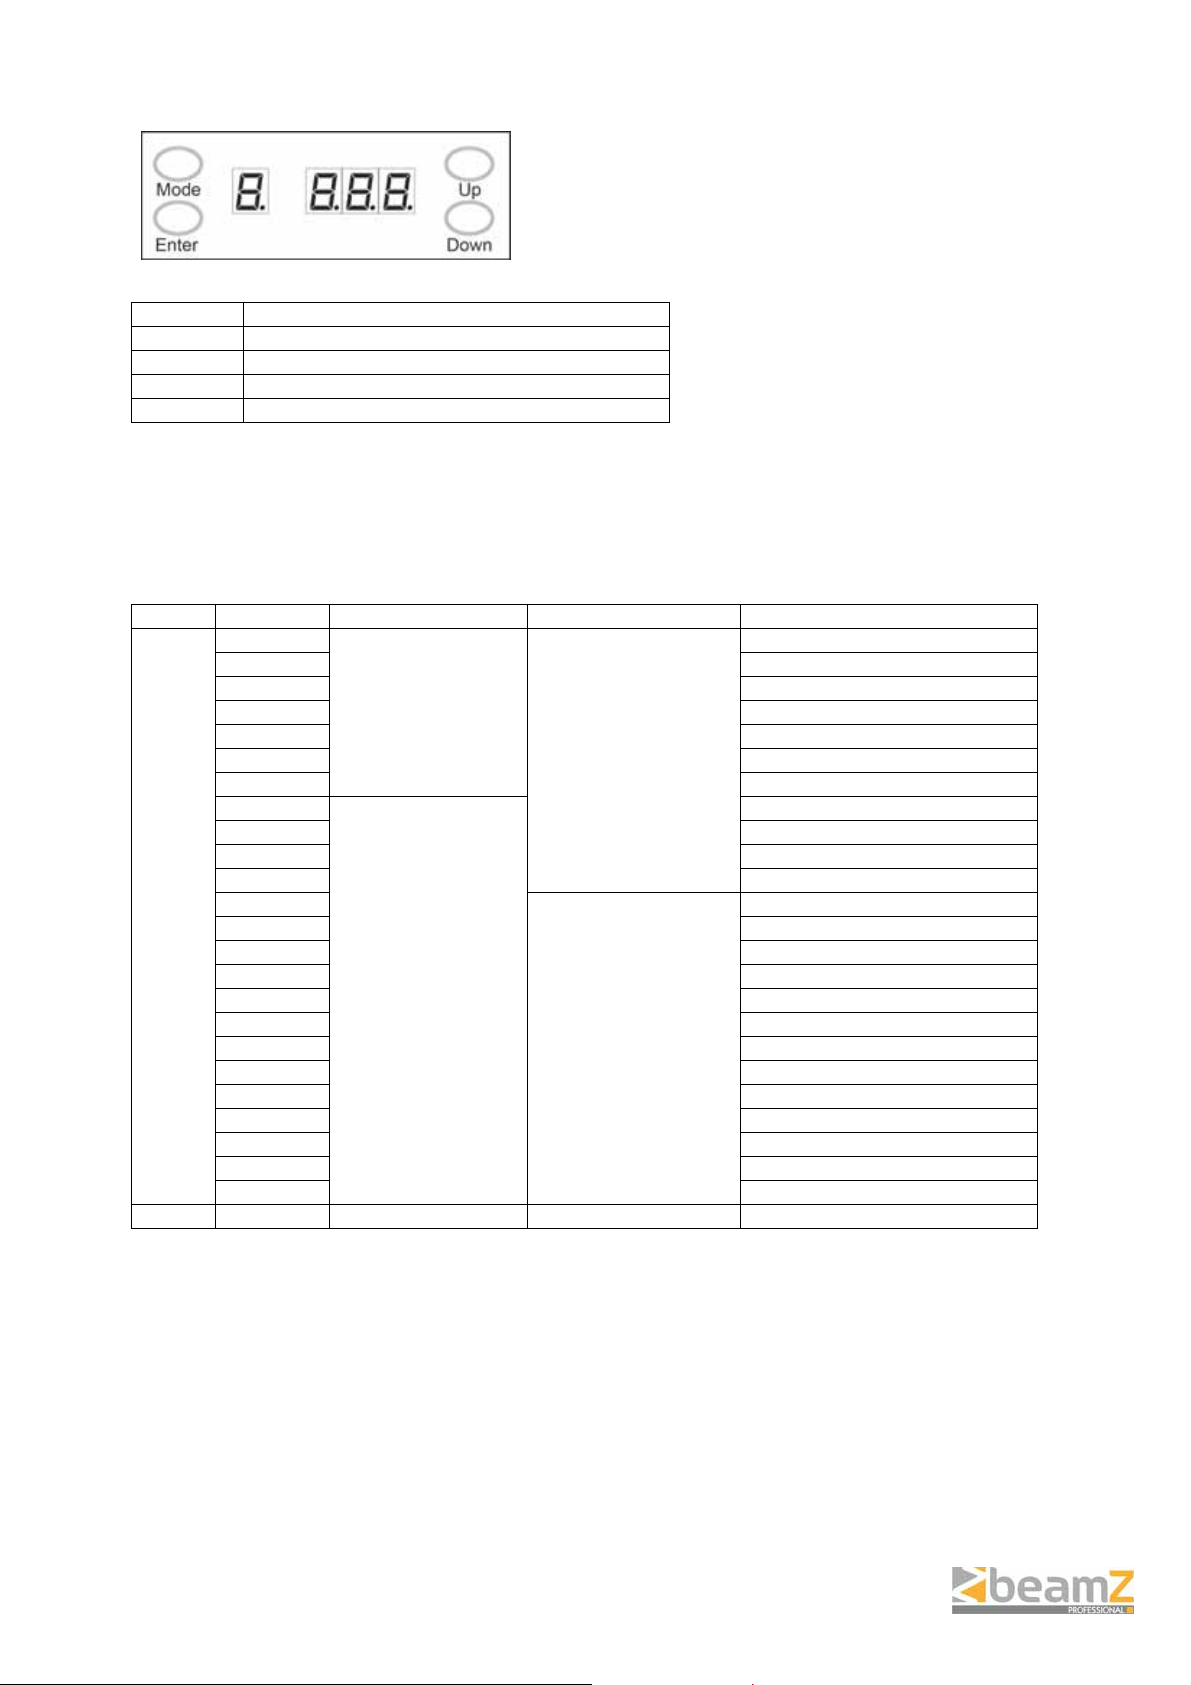
BUTTON FUNCTION
Mode Select a function of mode
Enter Confirm a function of mode and save
Up Select increasing advancement in the value
Down Select decreasing advancement in the value
The Control Panel shows the current state of the unit, it is used to select the operating mode ,as well
as the sub-features. For a detailed layout of the control panel functions, please see the “menu map”
section below.
Functions for control panel
Menu Program Run Speed (P) Strobe Speed (F) Description
001
002 Green (static)
003 Blue (static)
004 Yellow (static)
005 Magenta (static)
006 Cyan (static)
007 White (static)
008
009 Auto/Sound Mode 2
010 Auto/Sound Mode 3
011 Auto/Sound Mode 4
012
A
013 Auto/Sound Mode 6
014 Auto/Sound Mode 7
015 Auto/Sound Mode 8
016 Auto/Sound Mode 9
017 Auto/Sound Mode 10
018 Auto/Sound Mode 11
019 Auto/Sound Mode 12
020 Auto/Sound Mode 13
021 Auto/Sound Mode 14
022 Auto/Sound Mode 15
023 Auto/Sound Mode 16
024 Color Fade
d 001 - 485 DMX address
Only sound-active
000
001 – 009
Run Speed
Slow->Fast
100
No Delay
Sound-active strobe
000
No Strobe
001 – 099
Strobe
Slow->Fast
100
Red (static)
Auto/Sound Mode 1
Auto/Sound Mode 5
- 5 -
Page 6
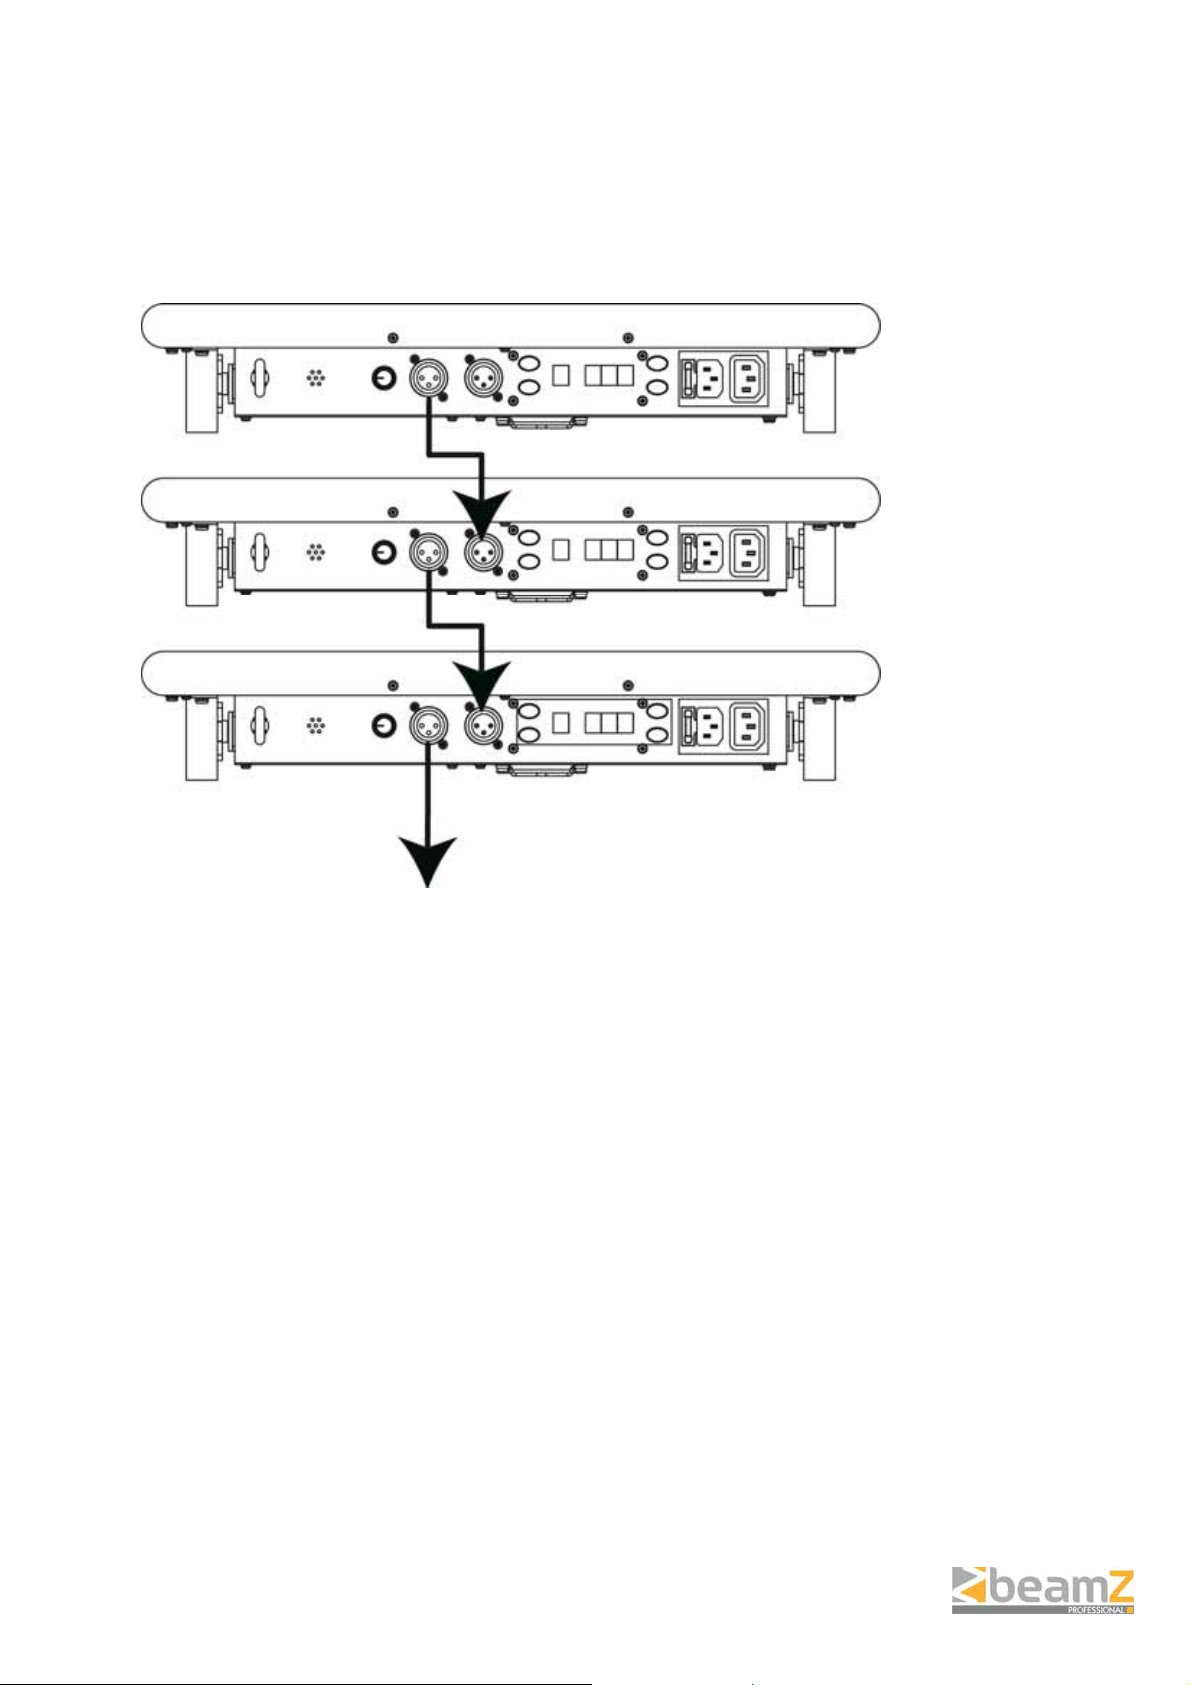
Master/Slave mode
The first unit is master without signal of DMX ,the others connected are slave units and follow the
actions of Master.
Master/Slave connection
Master
Slave
Slave
Continue
Sound Active Mode
It is sound active with music, without sound controlling when running speed is zero, it stops. Running;
when strobe speed is zero, no strobe; when strobe speed is one hundred, strobe by sound.
Automatic Mode
Turn off the sound sensitivity adjustment knob or music, the product displays current actions
automatically.
- 6 -
Page 7
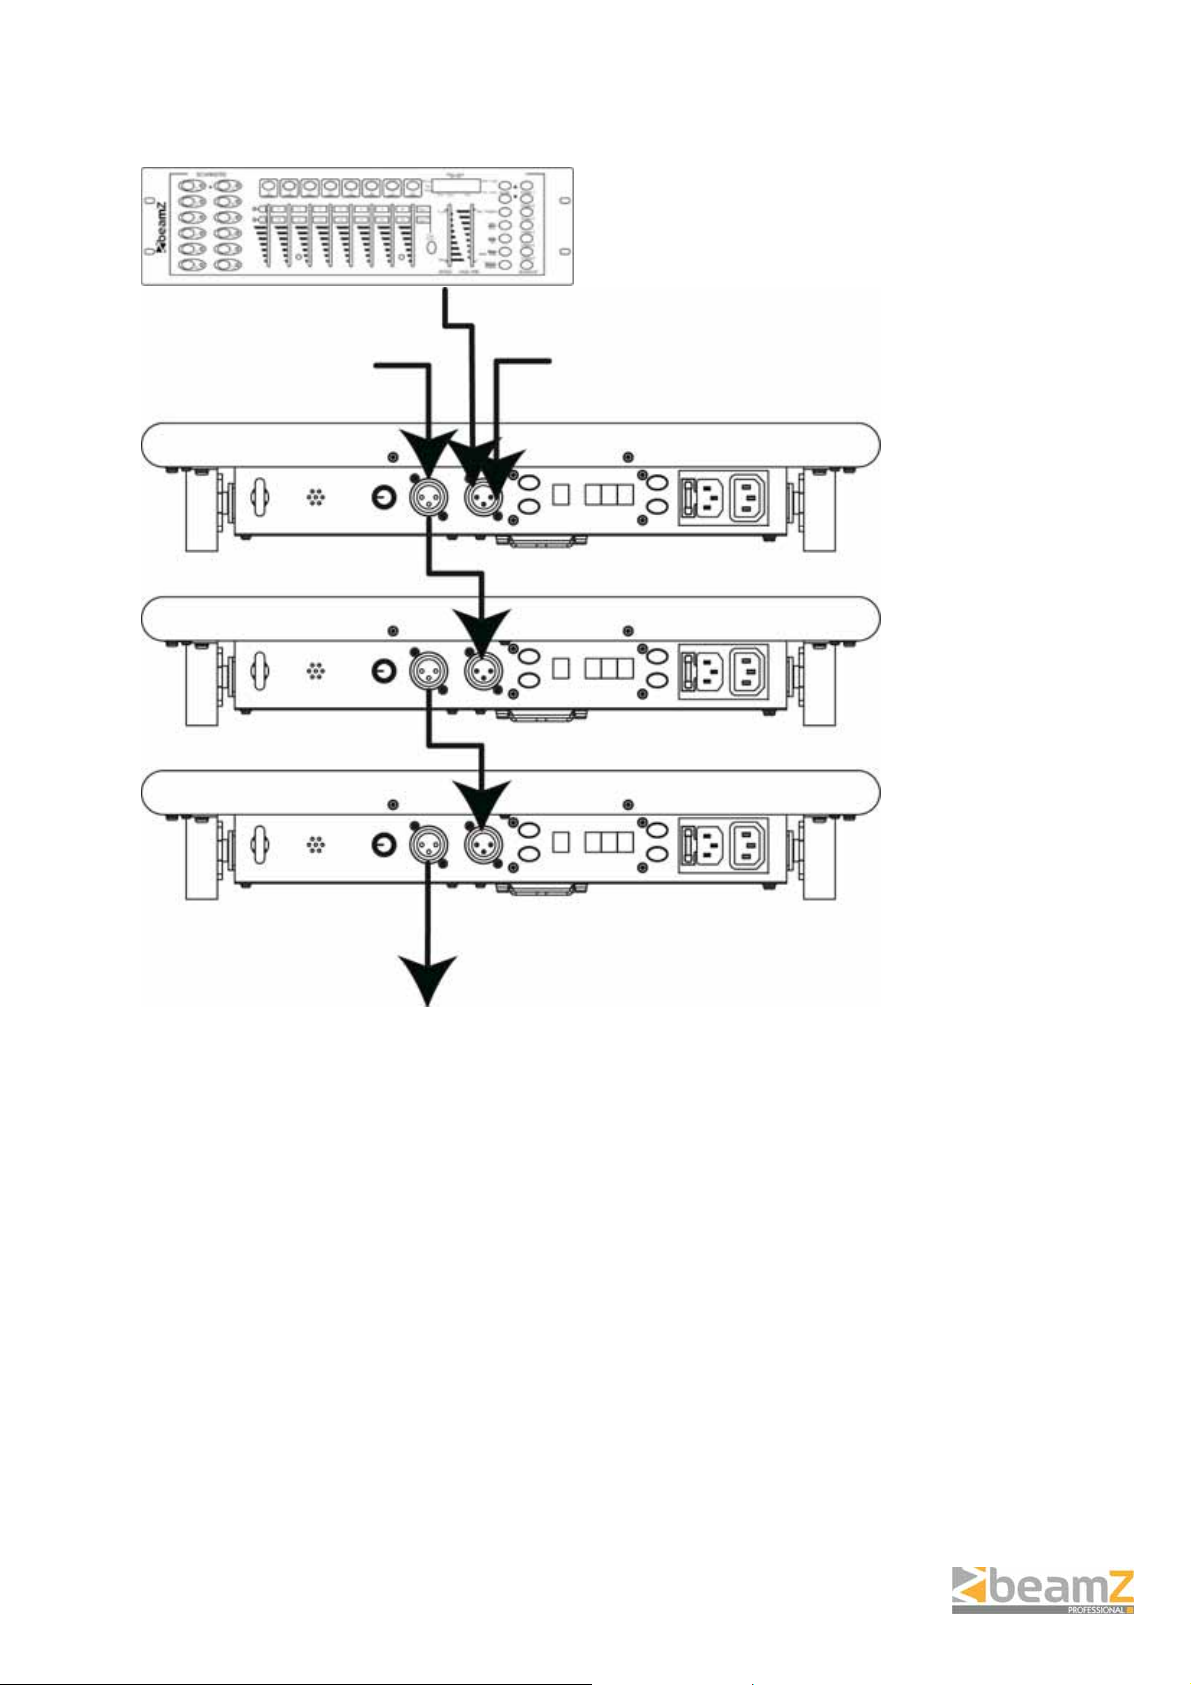
Controlled by DMX512
Follow below picture and power on all connected at the same time. The products will be controlled
once the address is set up.
DMX output
DMX input
Continue
- 7 -
Page 8
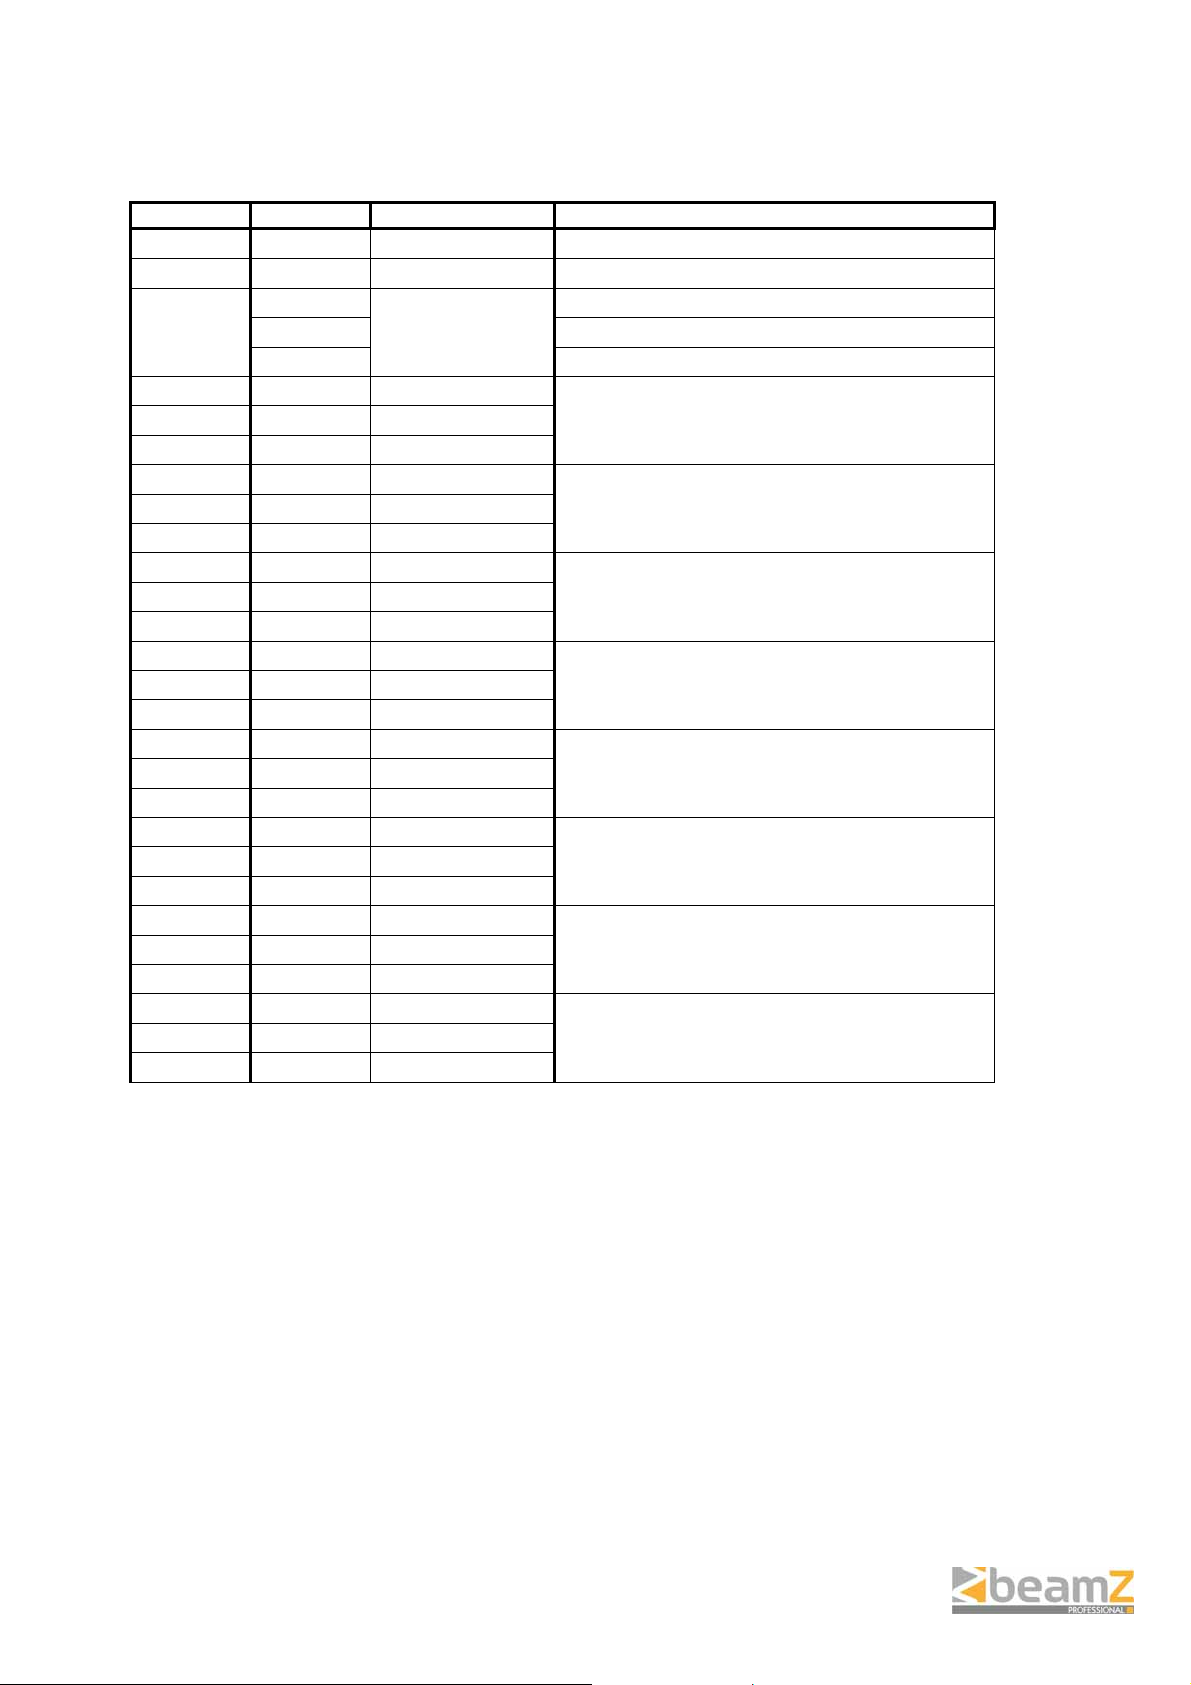
DMX Value Functions
27 Channel mode
CHANNEL VALUE FUNCTION SECTION / NOTES
1
2
3
4
5
6
7
8
9
10
11
12
13
14
15
16
17
18
19
20
21
22
23
24
25
26
27
000 – 019 27 Channel Mode Set this channel between these values for this mode
This Channel is not used for this mode
000 – 002
003 – 249 Slow -> Fast
250 – 255 Sound-Active (static color only)
000 – 255 Red
000 – 255 Green
000 – 255 Blue
000 – 255 Red
000 – 255 Green
000 – 255 Blue
000 – 255 Red
000 – 255 Green
000 – 255 Blue
000 – 255 Red
000 – 255 Green
000 – 255 Blue
000 – 255 Red
000 – 255 Green
000 – 255 Blue
000 – 255 Red
000 – 255 Green
000 – 255 Blue
000 – 255 Red
000 – 255 Green
000 – 255 Blue
000 – 255 Red
000 – 255 Green
000 – 255 Blue
Strobe
No Strobe
Section 1
Section 2
Section 3
Section 4
Section 5
Section 6
Section 7
Section 8
- 8 -
Page 9
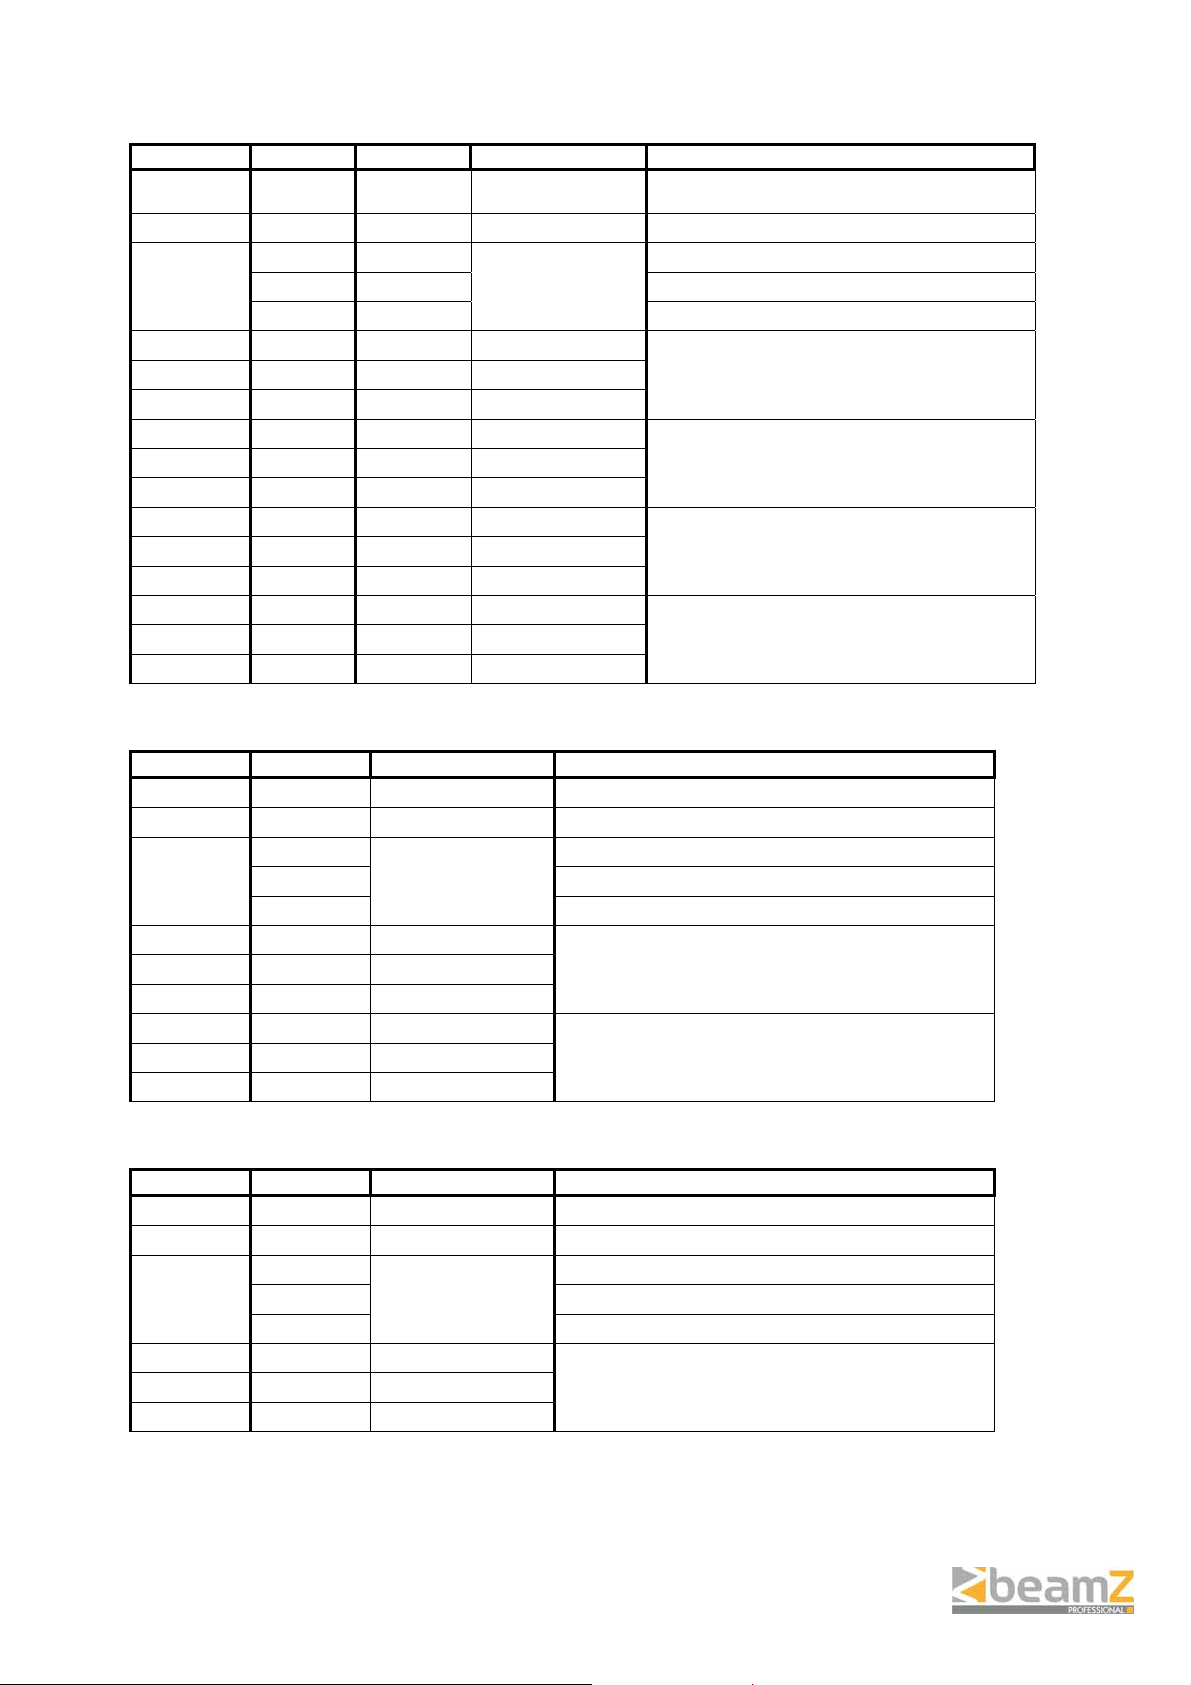
15 Channel mode
CHANNEL VALUE FUNCTION SECTION / NOTES
1
2
3
4
5
6
7
8
9
10
11
12
13
14
15
020 – 039 15 Channel Mode
This Channel is not used for this mode
000 – 002
003 – 249 Slow -> Fast
250 – 255 Sound-Active (static color only)
000 – 255 Red
000 – 255 Green
000 – 255 Blue
000 – 255 Red
000 – 255 Green
000 – 255 Blue
000 – 255 Red
000 – 255 Green
000 – 255 Blue
000 – 255 Red
000 – 255 Green
000 – 255 Blue
Strobe
Set this channel between these values for this
mode
No Strobe
Section 1
Section 2
Section 3
Section 4
9 Channel mode
CHANNEL VALUE FUNCTION SECTION / NOTES
1
2
3
4
5
6
7
8
9
040 – 059 9 Channel Mode Set this channel between these values for this mode
This Channel is not used for this mode
000 – 002
003 – 249 Slow -> Fast
250 – 255 Sound-Active (static color only)
000 – 255 Red
000 – 255 Green
000 – 255 Blue
000 – 255 Red
000 – 255 Green
000 – 255 Blue
Strobe
No Strobe
Section 1
Section 2
6 Channel mode
CHANNEL VALUE FUNCTION SECTION / NOTES
1
2
3
4
5
6
060 – 079 6 Channel Mode Set this channel between these values for this mode
This Channel is not used for this mode
000 – 002
003 – 249 Slow -> Fast
250 – 255 Sound-Active (static color only)
000 – 255 Red
000 – 255 Green
000 – 255 Blue
Strobe
No Strobe
Section 1
- 9 -
Page 10
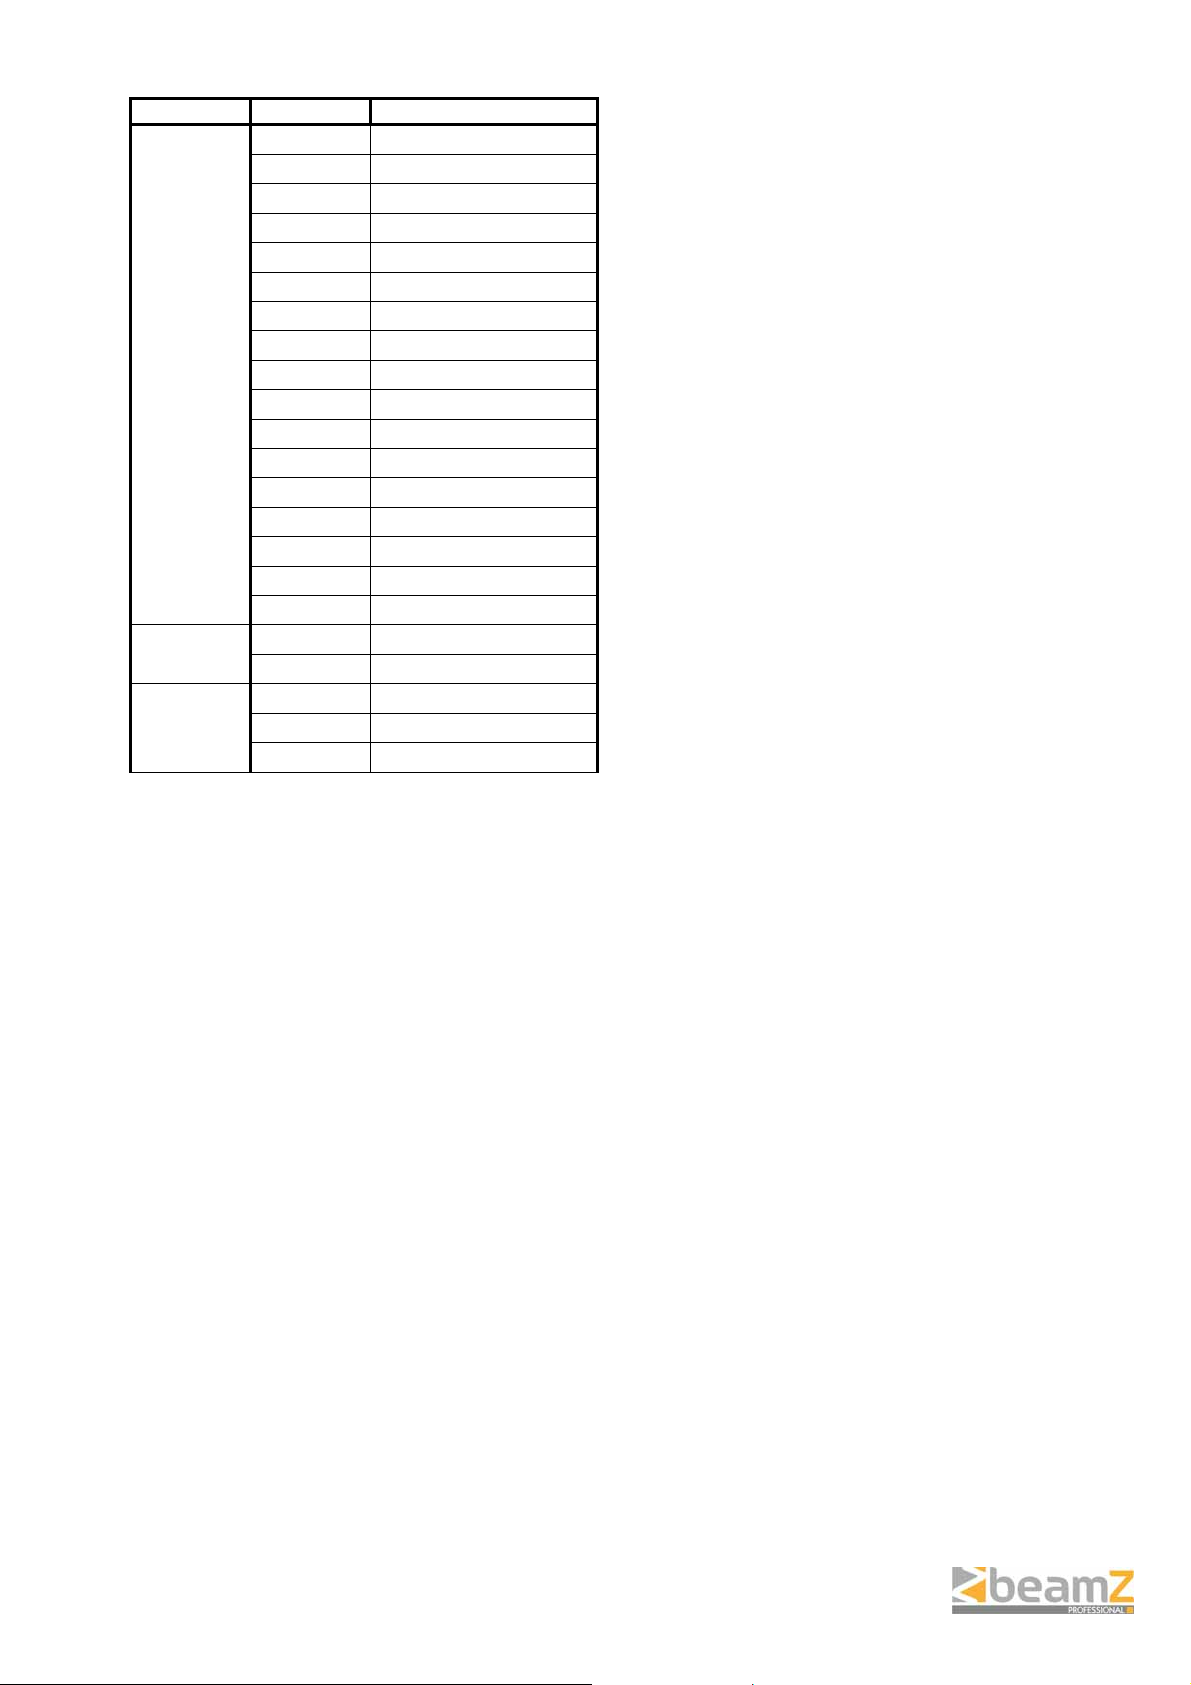
3 Channel mode
CHANNEL VALUE FUNCTION
080 – 089 Auto Sound Mode 1
090 – 099 Auto Sound Mode 2
100 – 109 Auto Sound Mode 3
110 – 119 Auto Sound Mode 4
120 – 129 Auto Sound Mode 5
130 – 139 Auto Sound Mode 6
140 – 149 Auto Sound Mode 7
1
2
3
150 – 159 Auto Sound Mode 8
160 – 169 Auto Sound Mode 9
170 – 179 Auto Sound Mode 10
180 – 189 Auto Sound Mode 11
190 – 199 Auto Sound Mode 12
200 – 209 Auto Sound Mode 13
210 – 219 Auto Sound Mode 14
220 – 229 Auto Sound Mode 15
230 – 239 Auto Sound Mode 16
240 – 255 Auto Mode 1
000 – 249 Speed Fast -> Slow
250 – 255 Speed stop
000 – 002 No strobe
003 – 249 Strobe Slow -> Fast
250 – 255 Strobe Sound Active
MAINTENANCE
The unit should be cleaned periodically to ensure the optimum performance, the smudginess can
decrease the life of light and the output of light is affected by the dust which can make the machine
overheating. In general, make the maintenance at least two times a month. Be sure to power off the
unit before cleaning .
Do not clean until the unit recovers normal temperature since high temperature for using, use the lens
tissue or soft cotton cloth with alcohol to wipe gently.
Cleaning frequency depends on the environment in which the fixture operates, damp, smoky or dirty
surrounding can cause greater accumulation of dirt on the optics. Never rub or press strongly on the
panel.
SPECIFICATION
Voltage ...................................... 100-240V AC 50/60Hz
Input current ............................................................. 2A
Power ..................................................................... 87W
Fuse ............................................................ 3.15A 250V
Light source ...................................................... 48x 1W
........................................................................ 16x Red
..................................................................... 16x Green
....................................................................... 16x Blue
Weight ................................................................... 3.7kg
Size .......................................... L470 x W82 x H190mm
- 10 -
Page 11
CE & R&TTE DECLARATION OF CONFORMITY
Importer: TRONIOS BV
Bedrijvenpark Twente 415
7602 KM - ALMELO
Tel : 0031546589299
Fax : 0031546589298
The Netherlands
Product number: 150.666
Product Description: Beamz,
Regulatory Requirement: EN 60598-1/-2-17:2009
EN 62031:2008
EN 61347-2-13:2007
EN 62479:2010
EN 55015:2006/A2:2009
EN61547:2009
The product meets the requirements stated in the above mentioned Standards. T his certificate does not
cover the aspects that may be relevant such as performance and fitness for purpose.
LCP-48 LED Color Panel 48x 1W RGB
Almelo,
10-03-2012
Signature:
- 11 -
Page 12

Specifications and design are subject to change without prior notice..
www.tronios.com
Copyright © 2013 by TRONIOS the Netherlands
 Loading...