

Page 1

Page 2
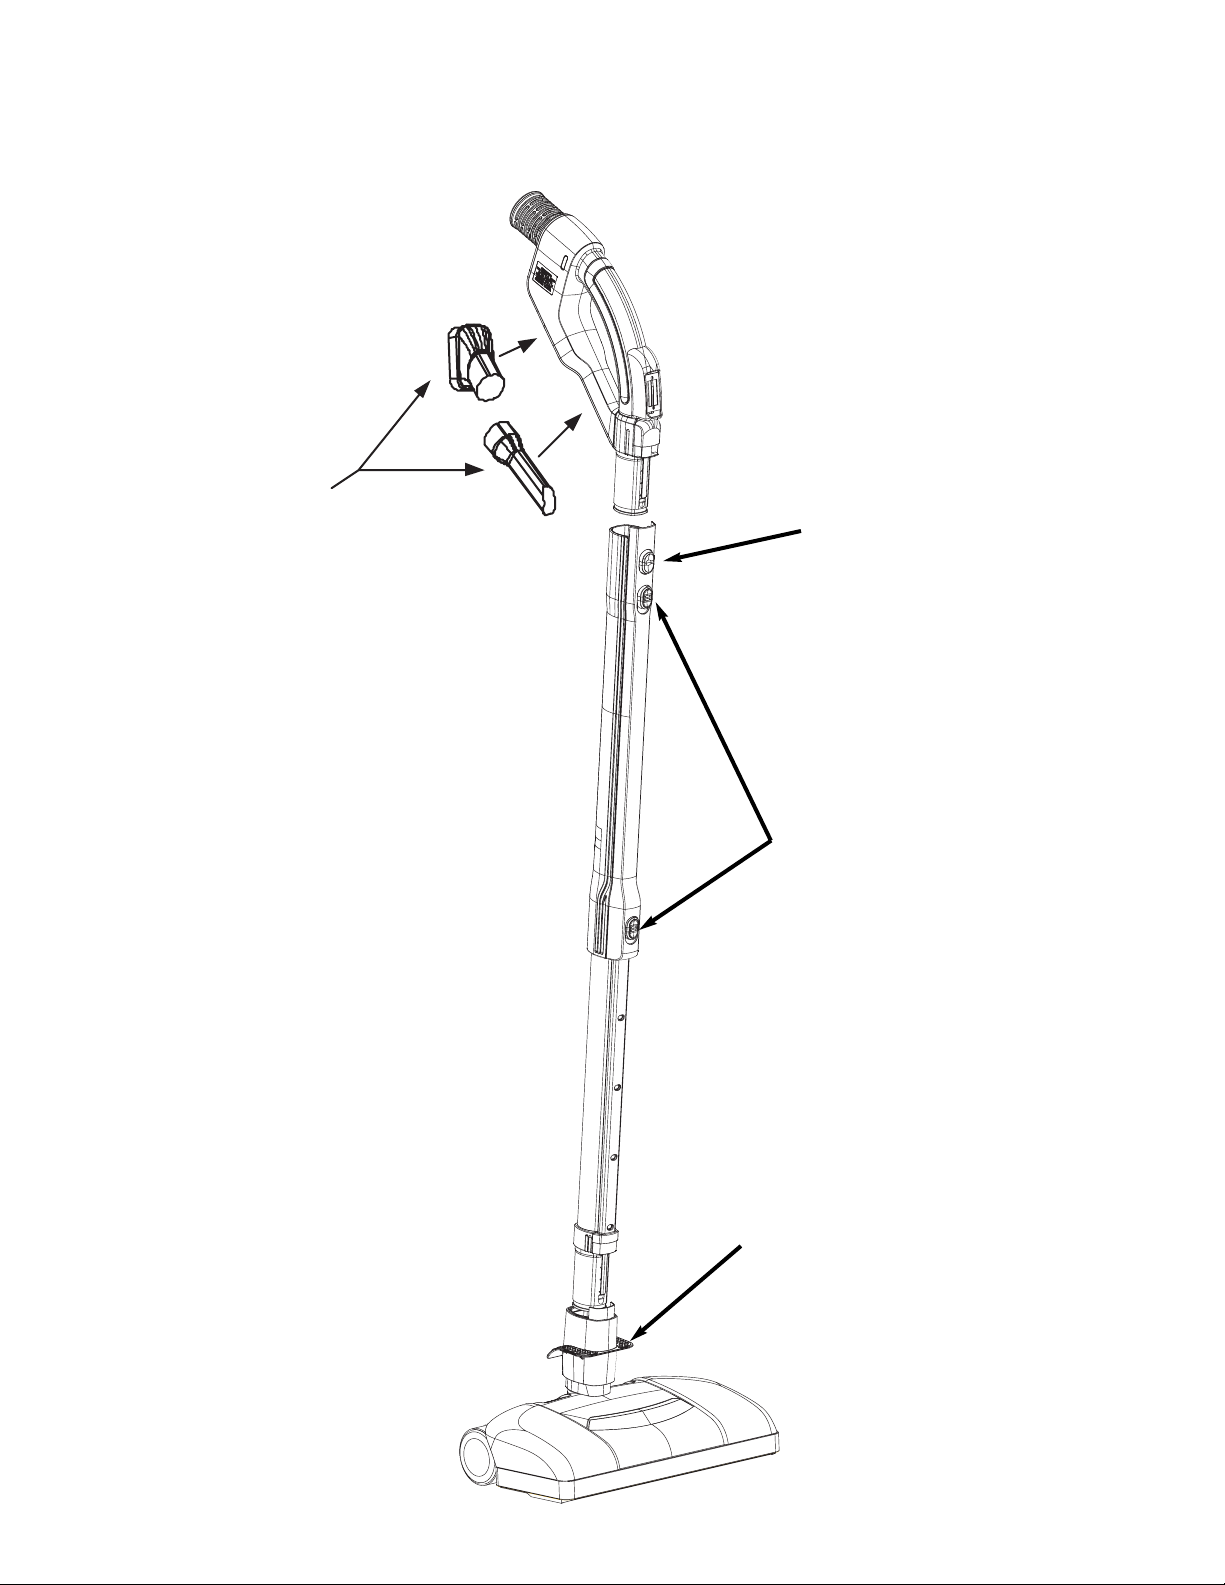
• Telescopic wand slide adjustment
• Boutons de réglage du tube
télescopique
• Ajuste de la varita telescopio
• Depress foot pedal to release wand
• Appuyez sur la pédale pour dégager
le tube
• Oprime el pedal de pie para liberar
la varita
ON-BOARD TOOLS AND TELESCOPIC WAND FEATURES
• “On-board” storage for dusting
brush and crevice tool
• Rangement sur l’appareil pour
la brosse à épousseter et le
suceur plat
• El compartimiento para guardar
el cepillo para polvo y la
herramienta de grieta
• Handle release button
•Bouton de dégagement de la
poignée
• El botón de liberación de la
empuñadura
Page 3

IMPORTANT SAFETY INSTRUCTIONS
Your Powerbrush combines power cleaning with ease of maintenance and represents the very best design and manufacturing.
However, as with any powerful appliance, caution must be exercised while using this Powerbrush. You will find the safety precautions
and maintenance instructions outlined in this manual useful. When using an electrical appliance, the following basic precautions
should always be followed:
READ ALL INSTRUCTIONS BEFORE USING THIS POWERBRUSH.
WARNING: To reduce the risk of fire, electric shock or possible personal injury, or damage to the
product, the following precautions should be followed:
1. Keep loose clothing, hair , fingers and other parts of the body away from openings and moving parts
(brush roller) when the Powerbrush is connected to an electrical outlet.
2. Turn off all controls before unplugging.
3. Disconnect the Powerbrush from the electrical outlet prior to any servicing.
4. Do not handle the Powerbrush, its electrical cord or plug with wet hands.
5. Do not use with damaged cord or plug. If the appliance is not working as it should, has been dropped,
damaged, left outdoors, or dropped into water, return it to an authorized service center for servicing/repair.
6. Do not use the Powerbrush in areas where flammable or combustible liquids, such as gasoline, are present.
7. Do not allow to be used as a toy. Close attention is necessary when used by or near children.
8. Electric shock could occur if the Powerbrush is used outdoors or on wet surfaces.
9. Always turn off the Powerbrush before connecting and disconnecting the hose.
10. The hose contains electrical wires. Do not use when damaged, cut or punctured.
11. Do not pull or carry by the cord, use the cord as a handle, close a door on the cord or pull the cord around
sharp edges or corners. Keep the cord away from heated surfaces. Do not run the appliance over the cord.
12. Do not attempt to pick up anything that is burning or smoking, such as cigarettes, matches, or hot ashes
with the Powerbrush.
13. Do not put any object into openings. Do not use with any opening blocked; keep free of dust, lint, hair,
and anything that may reduce air flow.
14. Use extra care when cleaning on stairs.
15. Do not unplug by pulling on the cord. To unplug, grasp the plug, not the cord.
16. Do not leave the appliance unattended when plugged in. Unplug from the outlet when not in use.
17. Use only as described in this manual. Use only manufacturer’s recommended attachments.
SAVE THESE INSTRUCTIONS
H
OUSEHOLD USE ONLY
To reduce the risk of electric shock, this appliance has a polarized plug (one blade is wider than the
other). This plug will fit in a polarized outlet only one way. If the plug does not fit fully in the
outlet, reverse the plug. If it still does not fit, contact a qualified electrician to install the proper
outlet. Do not change the plug in any way.
Congratulations on your purchase of the Beam central vacuum system, the ultimate cleaning solution. The Beam central vacuum
system is designed to help you efficiently clean and maintain your home. While vacuuming may never be truly pleasurable, you can
have a cleaner, healthier home. . .and more time to do the things you really enjoy.
To achieve the maximum benefits from your Beam central vacuum system, please read this manual carefully.
For more information regarding Beam and other innovative products from Beam, visit www.beam.com.
3
Page 4
POWERBRUSH FEATURES
1. Cogged Belt – The cogged belt is designed for positive drive, and it will not stretch
or slip. The long life of the sturdy cogged belt also reduces the need for frequent
replacement to enhance cleaning efficiently.
2. LED Lamp – The super bright light of the LED (Light Emitting Diode) lamp
allows for better vision in poorly lit areas for more thorough cleaning. It is also
much more durable than incandescent or halogen bulbs.
3. Automatic Carpet Height Adjustment – The Powerbrush is equipped with two
small roller wheels at the front which keep the Powerbrush at the correct distance
from the carpet for optimal cleaning.
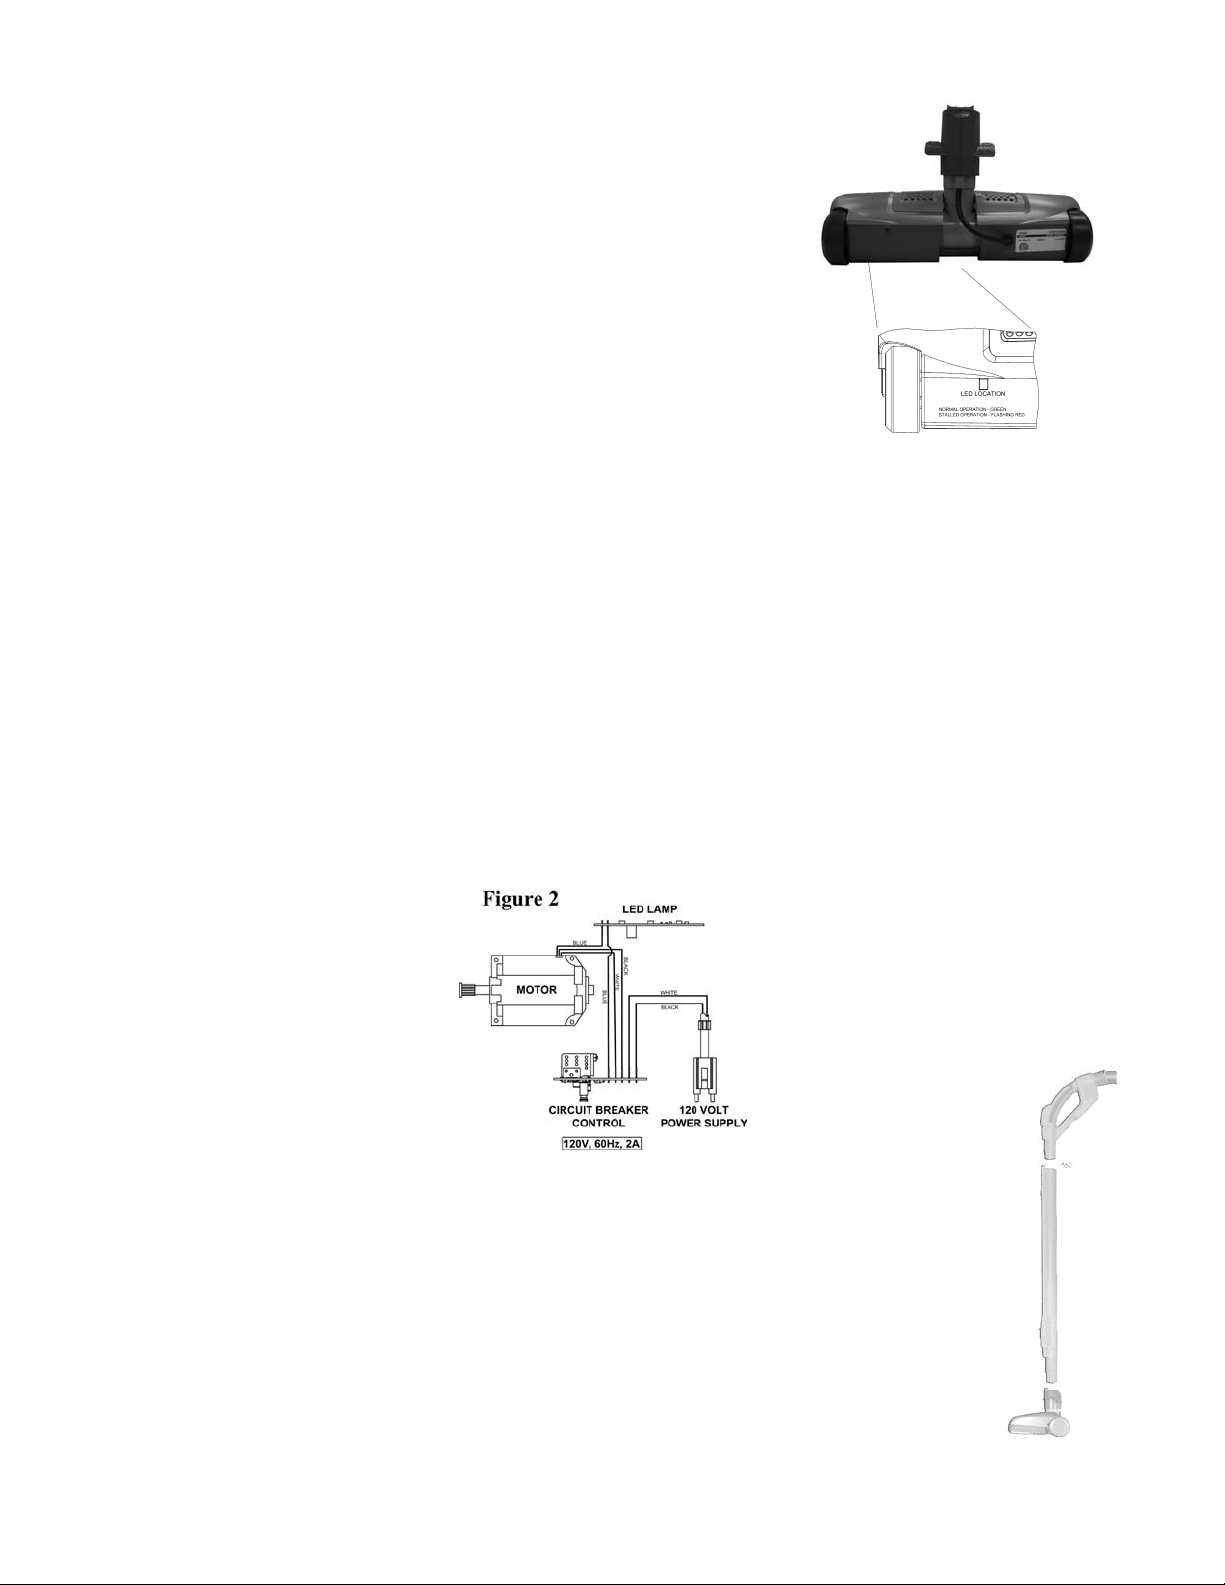
4. Circuit Breaker – The electronic circuit breaker protects the motor and the
cogged belt from damage should a motor stall occur due to accidental pick up of
a larger object. The LED light located on the back of the powerbrush (see Figure
1) will glow green in color for normal operation and flashing red in color for a
stalled or jammed condition.
CAUTION! TO REDUCE THE RISK OF INJURY, BRUSHROLL COULD SUDDENLY
RESTART, UNPLUG BEFORE SERVICING.
When brushroll jam has been cleared, circuit breaker can be reset by switching hose handle switch “off” then “on”. Your
Powerbrush must be serviced by an authorized service center if it continues to trip the circuit breaker.
5. Isolated Brush Compartment – The electrical compartment is totally separated from the sweeping area. This provides
user safety and shields the electric motor from dust and dirt to enhance motor life.
6. Dual Ball Bearing Brush Roller – The rotating brush mechanism utilizes precision ball bearings for extra smooth run-
ning and durability.
7. Chevron Brushroll – Pulls dirt to main airchannel.
8. Wheel Bearings - The rear wheels are equipped with sealed ball bearings providing a quiet long lasting assembly.
POWERBRUSH WIRING DIAGRAM
ASSEMBLY & OPERATING INSTRUCTIONS FOR THE POWERBRUSH
When using the powerbrush, the basic precautions outlined under “IMPORTANT SAFETY
INSTRUCTIONS” should always be followed.
1. Push the wand into the powerbrush socket until it locks in place. The wand socket is designed with a positive stop.
Therefore, the wand will not jam in the wand socket. (figure 3)
2. Make sure the hose handle switch is in the OFF position.
Note: The handle is in the off position when the slide switch is in the “O” position. (O I II)
Figure 3
(See page 2 for details)
4
Figure 1
Page 5
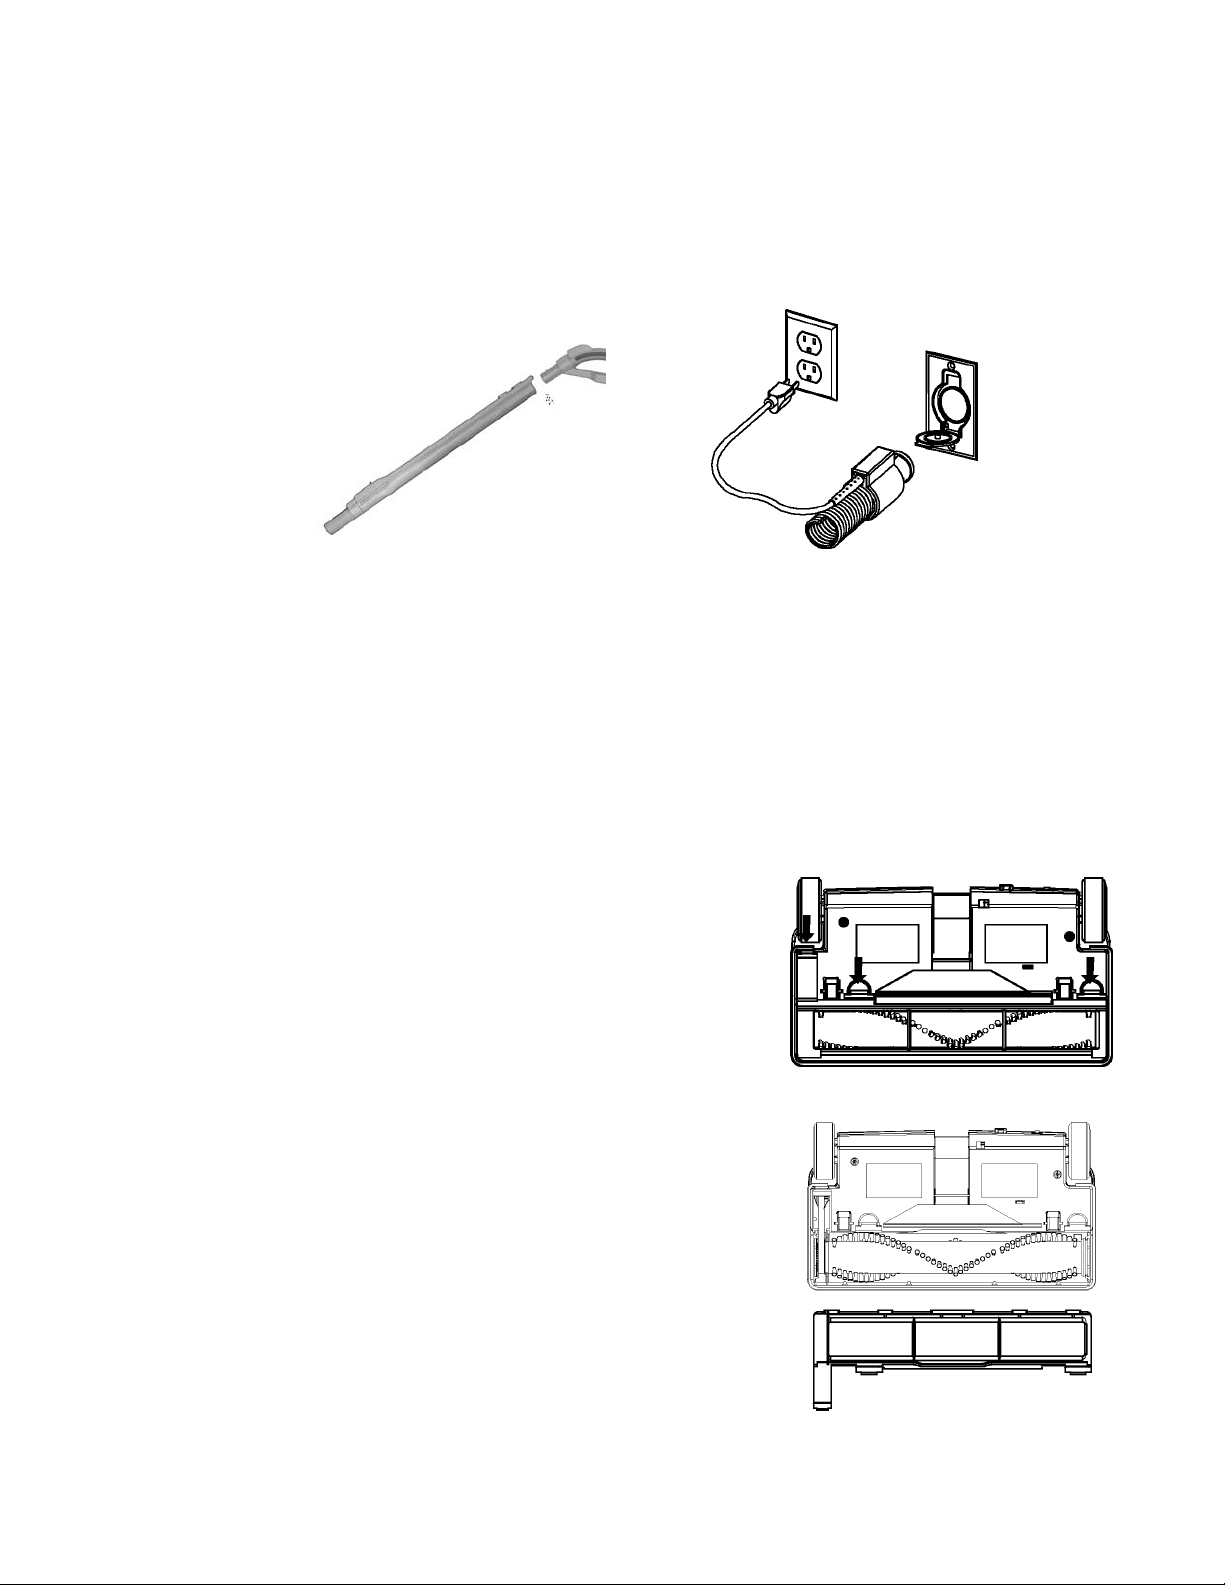
3. Insert hose end into the powerbrush wand on the assembled powerbrush until is locks in place. (figure 5a)
4. Insert the hose into the wall vacuum valve (faceplate), and plug the cord into the electrical outlet. (figure 5b)
5. You may secure the powerbrush by placing your foot on top of the hood. Lower the wand from the upright position.
6. Switch the powerbrush to the ON position. (“II”)
7. The wand can be telescoped by pushing the button closest to the powerbrush and pulling up.
8. To turn off the powerbrush, slide the switch to the OFF position. (“O”) Disconnect the handle from the wand by pushing the button on the wand that is closest to the handle, and pulling the handle out of the wand socket.
9. Release the wand from the powerhead by depressing the foot pedal and pulling the wand out of the powerbrush socket.
Helpful Hint: To prevent possible damage to the Powerbrush, do not pick up hard or sharp objects. Articles of clothing,
towels, loose carpet edges, etc., should also be avoided. If an article does become entangled in the brush roller, switch off the
Powerbrush. Disconnect the hose cord from electrical outlet and the hose from the faceplate and then remove the object
carefully without using excessive force.
WARNING: Always switch off the Powerbrush and disconnect plug from wall electrical outlet and disconnect hose before servicing the Powerbrush.
General Cleaning
The Powerbrush can be wiped with a cloth dampened with warm water and a mild detergent.
1. Do not use abrasive substances.
2. Do not use any solvents.
3. Do not immerse in water or allow water to enter the Powerbrush.
Brush Roller Cleaning
For top cleaning performance, it is recommended that the brush roller and the
brush roller compartment be cleaned on an occasional basis.
WARNING: Always switch off the Powerhead and
disconnect plug from wall outlet and disconnect hose
before servicing the Powerbrush.
1. Turn the Powerbrush upside down.
2. Press the 3 snap release clips (as shown in Figure 6) and remove brush cover.
3. The brush roller is now exposed for removal of fibers, hair, etc. from the bristles and around the brush roller.
4. To remove fibers or hair entangled around the brush roller, cut parallel to brush
roller.
5. You may further clean the brush compartment with your central vacuum system.
6. Replace the brush cover by inserting the tabs on the front of the cover into the
appropriate slots in the Powerbrush base (as shown in Figure 7) and press down
on the three clips until they snap-lock into place.
Figure 5a
Figure 5b
Figure 6
Figure 7
5
Page 6

POWERBRUSH MAINTENANCE
How to Change Cogged Belt
WARNING: Always switch off the Powerbrush and
disconnect plug from wall electrical outlet and disconnect
the hose before servicing the Powerbrush.
1. Remove the brush cover as described in “Brush Roller Cleaning” steps 1 and 2.
2. Insert a string around the brush roller close to the cogged belt. Pull both
ends of the string upwards so that the brush roller disengages from the base
(as shown in Figure 8). Similarly, disengage the other end.
3. Remove and clean the bearing shaft from the brush roller ends. Notice the
bearing shafts are not symmetrical. The slanted one belongs to the Brush
gear (cogged belt side) (as shown in Figure 9).
4. Remove the old belt. (You may also cut the old belt with scissors to quickly remove it).
5. Slip the new cogged belt over the gear on the motor shaft (as shown in
Figure 10).
6. Now slip the belt onto the brush gear of the brush roller.
7. Slide the bearing housing in the corresponding slots on the base. Make sure
both are completely pushed into place; the tab on the slanted bearing housing must fit into the slot at the bottom of the brush compartment.
8. Replace the Brush cover as described in item 6 under Brush Roller
Cleaning.
POWERBRUSH WARRANTY
Only the superb quality of our Powerbrush makes a warranty like this possible!
• 3 Year Warranty
Within three years from the date of first purchase, should our Powerbrush, including the cogged belt and LED lamp,
fail to function due to faulty workmanship or material, simply bring it back to your authorized Dealer where they will
replace or repair it (our option).
Figure 8
Figure 9
Figure 10
6
Page 7

IMPORTANTES CONSIGNES DE SÉCURITÉ
Votre brosse motorisée électrique combine puissance de nettoyage et facilité d’entretien et elle représente ce qui se fait de mieux en termes
de conception et de fabrication. Cependant, comme plusieurs appareils électriques, des précautions doivent être prises lorsque vous utilisez
cette brosse. Vous trouverez pratiques les consignes de sécurité et la notice d’entretien contenues dans ce manuel. Lorsque vous utilisez un
appareil électrique, les consignes de base suivantes devraient toujours être suivies :
LISEZ TOUTES LES CONSIGNES AVANT D’UTILISER CETTE BROSSE
MOTORISÉE ÉLECTRIQUE.
MISE EN GARDE: Afin de réduire les risques d’incendie, de décharge électrique, de blessure corporelle et
de bris du produit, les précautions suivantes doivent être prises :
1. Une fois que la brosse est branchée dans une prise de courant, tenez les vêtements amples, les cheveux, les
doigts et autres parties du corps loin des ouvertures et des pièces mobiles (rouleau-brosseur).
2. Mettez tous les interrupteurs en position arrêt avant de débrancher.
3. Débranchez la brosse motorisée électrique avant de procéder à son entretien.
4. Ne touchez pas à la brosse motorisée électrique, au fil ou à la prise avec des mains mouillées.
5. N’utilisez pas la brosse motorisée électrique si le fil ou la prise sont endommagés. Si l’appareil ne fonctionne
pas comme il le devrait, s’il a été échappé, endommagé, laissé dehors ou immergé dans l’eau, apportez-le
dans un centre de service autorisé pour le faire vérifier et réparer si nécessaire.
6. N’utilisez pas la brosse motorisée électrique dans des endroits où il y a des liquides inflammables ou combustibles, comme de l’essence.
7. La brosse motorisée électrique n’est pas un jouet. Une surveillance étroite est nécessaire lorsqu’elle est utilisée par des enfants ou près d’eux.
8. Il y a risque de décharge électrique si la brosse motorisée électrique est utilisée à l’extérieur ou sur des surfaces mouillées.
9. Arrêtez toujours la brosse motorisée électrique avant de brancher ou débrancher le boyau.
10. Le boyau contient des fils électriques. Ne l’utilisez pas s’ils sont endommagés, coupés ou perforés.
11. Ne tirez pas ou ne transportez pas la brosse par le cordon électrique, n’utilisez pas le cordon comme poignée,
ne fermez pas de porte sur le cordon et ne tirez pas le cordon autour des meubles ou murs à bords ou arêtes
vives. Gardez le cordon loin des surfaces chauffantes. Ne faites pas passer la brosse sur le cordon.
12. Ne ramassez pas avec la brosse motorisée électrique de matières brûlantes ou fumantes, comme les cigarettes, allumettes ou cendres chaudes.
13. N’insérez aucun objet dans les ouvertures. N’utilisez pas l’appareil si l’une des ouvertures est bloquée ; retirez
poussière, charpie, cheveux ou toutes autres choses qui pourraient réduire le débit d’air.
14. Redoublez de prudence lorsque vous nettoyez les escaliers.
15. Ne débranchez pas l’appareil en tirant sur le cordon. Pour débrancher, agrippez la fiche et sur le cordon.
16. Ne laissez pas l’appareil sans surveillance lorsqu’il est branché. Débranchez-le de la prise de courant lorsque
vous ne l’utilisez pas.
17. Utilisez cet appareil de la façon décrite dans ce livret seulement. Utilisez seulement les accessoires recommandés par le fabricant.
CONSERVEZ CES DIRECTIVES
POUR USAGE DOMESTIQUE SEULEMENT
Afin de réduire le risque de décharge électrique, cet appareil est muni d’une fiche polarisée (une broche est plus large que
l’autre). Il n’y a qu’une seule façon d’insérer cette fiche dans une prise polarisée. Si la fiche ne s’insère pas complètement dans la
prise, retournez-la. Si elle ne s’insère toujours pas, communiquez avec un électricien qualifié pour fair installer une prise de
courant adéquate. Ne modifiez pas la fiche de quelque façon que ce soit.
Félicitations pour votre achat d’un système central d’aspiration Beam, la solution ultime pour nettoyer. Le système central d’aspiration
est conçu pour vous aider à entretenir et à nettoyer efficacement votre maison. Bien que passer l’aspirateur ne sera jamais une tâche
vraiment plaisante, vous pouvez avoir, avec ce système, une maison plus propre et plus saine... tout en ayant plus de temps pour faire les
choses que vous aimez réellement.
Pour retirer le maximum de bénéfices de votre système central d’aspiration Beam, veuillez lire attentivement ce manuel.
Pour plus d’information concernant les produits Beam et les autres produits innovateurs Beam, visitez notre site www
.beam.com.
7
Page 8

CARACTÉRISTIQUES DE LA BROSSE MOTORISÉE ÉLECTRIQUE
1. Courroie dentée - La courroie dentée est conçue pour un entraînement forcé. Elle
ne s’étirera pas et ne glissera pas. La durabilité de cette robuste courroie dentée
réduit le besoin de la remplacer fréquemment pour maintenir une efficacité de nettoyage.
2. LED Lumière - La lumière super brillante de la lampe LED offre une meilleure visibilité dans les endroits peu éclairés permettant ainsi de faire un nettoyage plus en
profondeur. Cette ampoule est aussi beaucoup plus durable que les ampoules incandescentes.
3. Réglage automatique de la hauteur pour le nettoyage des tapis - La brosse motorisée
électrique est dotée de deux petits galets de roulement à l’avant qui lui permettent
de maintenir la bonne distance entre elle et le tapis pour un nettoyage optimal.
4. Disjoncteur - Le disjoncteur électronique afin de protéger le moteur et la courroie
dentée advenant le cas où le moteur calerait à la suite du ramassage accidentel d’un
gros objet. L’indicateur à DEL placé à l’arrière de la brosse motorisée électrique (voir
Figure 1) s’allumera en vert lors d’un fonctionnement normal et en rouge s’il y a
calage du moteur ou blocage.
AVERTISSEMENT: POUR EMPECHER QUE LE ROULEAU-BROSSEUR REDEMARRE SOUDAINEMENT ET
REDUIRE LES RISQUES DE BLESSURE
, DEBRANCHEZ TOUJOURS LA BROSSE MOTORISSÉE ELECTRIQUE
AVANT D
’EN FAIRE L’ENTRETIEN.
Lorsque le problème de blocage du rouleau-brosseur a été réglé, le disjoncteur peut être réenclencher en plaçant l’interrupteur placé sur la poignée du boyau en position «arrêt» puis en position «marche». Si le disjoncteur continue à se
déclencher, vous devez apporter votre brosse motorisée électrique dans un centre de service autorisé pour réparation.
5. Compartiment isolé de la brosse - Le compartiment électrique est complètement séparé de la zone de balayage. Ceci
est plus sécuritaire pour l’utilisateur et protège le moteur électrique de la poussière et de la saleté pour en prolonger la
durée de vie.
6. Rouleau-brosseur monté sur un double roulement à billes - Le mécanisme de la brosse rotative utilise des roulements
à billes de précision pour un fonctionnement plus doux et une durabilité accrue.
7. Rouleau-brosseur en chevron - Attire la saleté dans le conduit d’air principal.
8. Roulements de roues - Les roues arrière sont équipées de
roulements à billes scellés donnant un montage doux de longue durée.
SCHÉMA DE CÂBLAGE DE LA BROSSE MOTORISÉE ÉLECTRIQUE
INSTRUCTIONS D’ASSEMBLAGE ET D’UTILISATION POUR LA
BROSSE MOTORISÉE ÉLECTRIQUE
Lorsque vous utilisez la brosse motorisée électrique, les consignes de base indiquées à la section
« IMPORTANTES CONSIGNES DE SÉCURITÉ » devraient toujours être suivies.
1. Insérez le tube dans l’embout de la brosse motorisée électrique jusqu’à ce qu’il se verrouille en place. Ainsi,
le tube ne pourra pas se coincer dans l’embout. (figure 3)
2. Assurez-vous que l’interrupteur placé sur la poignée du boyau est en position ARRÊT.
Note : L’interrupteur de la poignée est en position ARRÊT lorsqu’il est en position « O ».
(O I II)
DIRECTIVES D’UTILISATION
8
Figure 1
Figure 3
(See page 2 for details)
Page 9

3. Insérez l’extrémité du boyau dans le tube de la brosse motorisée électrique assemblée jusqu’à ce qu’il se verrouille en place. (figure 5a)
4. Insérez le boyau dans la prise d’aspiration murale (plaque murale) et branchez le cordon d’alimentation dans une prise de courant.
(Figure 5b)
5. Vous pouvez fixer fermement la brosse motorisée électrique en plaçant votre pied sur le dessus du capot. Abaissez le tube pour qu’il
ne soit plus en position verticale.
6. Placez l’interrupteur de la brosse motorisée électrique en position MARCHE. (« II »)
7. La longueur du tube peut être réglée en poussant sur les 2 boutons les plus près de la brosse motorisée électrique et en le tirant.
8. Pour arrêter la brosse motorisée électrique, placez l’interrupteur en position arrêt. (« O ») Pour retirer la poignée du tube, poussez sur
le bouton du tube qui est le plus près de la poignée et tirez la poignée hors de l’embout du tube.
9. Pour dégager le tube de la brosse motorisée électrique, appuyez sur la pédale et retirez le tube de l’embout de la brosse motorisée
électrique.
Trucs pratiques : Pour éviter les dommages possibles à la brosse motorisée électrique, ne ramassez pas d’objets durs ou pointus. Les articles comme les vêtements, serviettes, bordures de tapis non fixées, etc. doivent également être évités. Si un article vient s’enrouler autour du rouleau-brosseur, éteignez la brosse motorisée électrique. Débranchez le cordon d’alimentation
du boyau de la prise de courant et le boyau de la plaque murale ; retirez ensuite délicatement l’article sans utiliser de force
excessive.
AVERTISSEMENT: Toujours éteindre la brosse motorisée électrique, débrancher la fiche de la
prise de courant et débrancher le boyau avant de faire l’entretien de la brosse motorisée électrique.
Nettoyage général
L’brosse motorisée électrique peut être essuyée avec un chiffon trempé dans de l’eau tiède et un détergent doux.
1. N’utilisez pas de substances abrasives.
2. N’utilisez pas de dissolvants.
3. N’immergez pas la brosse motorisée électrique et ne laissez pas d’eau y pénétrer.
Nettoyage du rouleau-brosseur
Pour maintenir une performance optimale de nettoyage, il est recommandé de nettoyer occasionnellement le rouleau-brosseur et le compartiment du rouleaubrosseur.
AVERTISSEMENT: Toujours éteindre la brosse motorisée
électrique, débrancher la fiche de la prise de courant et
débrancher le boyau avant de faire l’entretien de la brosse
motorisée électrique.
1. Placez la brosse motorisée électrique à l’envers.
2. Pressez les 3 agrafes à ressort (comme montré à la figure 6) et retirez le couvercle de la brosse.
3. Le rouleau-brosseur est maintenant accessible pour vous permettre de retirer
les fibres, cheveux, etc. qui se trouvent sur les poils et autour du rouleau.
4. Pour retirer les fibres ou cheveux enroulés autour du rouleau-brosseur, coupezles parallèlement au rouleau-brosseur.
5. Vous pouvez ensuite nettoyer le compartiment de la brosse avec votre système
central d’aspiration.
6. Replacez le couvercle en insérant les languettes placées à l’avant du couvercle
dans les fentes appropriées de la base de la brosse motorisée électrique (comme
montré à la figure 7) et appuyez sur les 3 agrafes à ressort jusqu’à ce qu’elles se
verrouillent en place.
Figure 5a
Figure 5b
Figure 6
Figure 7
9
Page 10

ENTRETIEN DE L’BROSSE MOTORISÉE ÉLECTRIQUE
Comment changer la courroie dentée
AVERTISSEMENT: Toujours éteindre la brosse motorisée
électrique, débrancher la fiche de la prise de courant et
débrancher le boyau avant de faire l’entretien de la brosse
motorisée électrique.
1. Retirez le couvercle de la brosse comme décrit aux étapes 1 et 2 de la
rubrique « Nettoyage du rouleau-brosseur ».
2. Insérez une ficelle autour du rouleau-brosseur, près de la courroie dentée.
Tirez les deux extrémités de la ficelle vers le haut jusqu’à ce que le
rouleau-brosseur se désengage de la base (comme montré à la figure 8).
Répétez la procédure pour désengager l’autre côté.
3. Retirez les paliers d’arbre des extrémités du rouleau-brosseur et net
toyez-les. Notez que les paliers d’arbre ne sont pas symétriques.
Celui qui est incliné appartient à l’engrenage de la brosse (du côté de
la courroie dentée) (comme montré à la figure 9).
4. Retirez la vieille courroie. (Vous pouvez également couper la vieille courroie avec des ciseaux pour la retirer plus rapidement).
5. Glissez la nouvelle courroie dentée par-dessus l’engrenage sur l’arbre de
moteur (comme montré à la figure 10).
6. Glissez maintenant la courroie sur le porte-balais du rouleau-brosseur.
7. Glissez les logements de paliers dans les fentes correspondantes de la base.
Assurez-vous que les deux sont bien en place ; la languette du logement
de palier incliné doit s’ajuster dans la fente située au bas du boîtier de la
brosse.
8. Replacez le couvercle de la brosse comme décrit à l’étape 6 de la rubrique
« Nettoyage du rouleau-brosseur.
GARANTIE DE LA BROSSE MOTORISÉE ÉLECTRIQUE
Seule la qualité exceptionnelle de notre brosse motorisée électrique nous donne la possibilité d’offrir une garantie comme
celle-ci !
• Garantie de 3 ans
Si, au cours de 3 années suivant la date d’achat initial, votre brosse motorisée électrique, incluant la courroie dentée et
la lumière LED, cessait de fonctionner à cause d’un défaut de matériau ou de fabrication, vous n’avez qu’à la rapporter à
votre détaillant autorisé où elle sera réparée ou remplacée (à notre choix).
Figure 8
Figure 9
Figure 10
10
Page 11

INSTRUCCIONES IMPORTANTES DE SEGURIDAD
Su aspiradora eléctrica con cepillo combina una limpieza de gran potencia con un mantenimiento de gran facilidad, y representa lo mejor
en diseño y fabricación. Sin embargo, como con cualquier otro aparato de alta potencia, debe tener sumo cuidado durante el uso de esta
aspiradora. Encontrará que las precauciones de seguridad y las instrucciones de mantenimiento que aparecen en este manual son de gran
utilidad. Cuando utilice un aparato eléctrico, siga siempre las precauciones básicas siguientes:
LEA TODAS LAS INSTRUCCIONES ANTES DE UTILIZAR
LA ASPIRADORA CON CEPILLO.
ADVERTENCIA: Para reducir el riesgo de incendio, descarga eléctrica o posibles lesiones personales, o daño
al producto, siga las precauciones siguientes:
1. Mantenga la ropa suelta, el cabello, los dedos y otras partes del cuerpo alejados de las aberturas y piezas giratorias (cepillo) cuando la aspiradora está conectada a un tomacorriente eléctrico.
2. Apague todos los controles antes de desenchufar el aparato.
3. Desconecte la aspiradora del tomacorriente antes de efectuar cualquier tipo de mantenimiento.
4. No manipule la aspiradora, el cordón eléctrico o el enchufe con las manos mojadas.
5. No utilice la aspiradora con el cordón o enchufe dañado. Si el aparato no funciona de la manera debida, se ha
caído, dañado, dejado a la intemperie, o se ha caído al agua, devuélvalo a un centro de servicio autorizado para
su reparación.
6. No utilice la aspiradora en zonas donde haya líquidos inflamables o combustibles (como gasolina, por ejemplo).
7. No permita que se utilice como un juguete. Se debe poner mucha atención cuando se utiliza cerca de niños o si
es utilizada por niños.
8. Puede ocurrir una descarga eléctrica si la aspiradora se utiliza al aire libre o sobre superficies mojadas.
9. Siempre apague la aspiradora antes de conectar y desconectar la manguera.
10. La manguera contiene alambres eléctricos. No la utilice si están dañados, cortados o perforados.
11. No transporte la aspiradora tirándola del cordón; no use el cordón como una manija ni cierre una puerta si el
cordón está en su trayectoria; no tire del cordón alrededor de bordes o esquinas filosos. Mantenga el cordón
alejado de superficies calientes. No pase el aparato por encima del cordón.
12. No intente recoger con la aspiradora nada que parezca estar quemándose o que despida humo, como cigarrillos, cerillos o cenizas calientes.
13. No ponga ningún objeto en las aberturas. No utilice la aspiradora con cualquier abertura obstruida; manténgala
libre de polvo, pelusa, cabello y cualquier cosa que pudiera reducir el flujo de aire.
14. Tenga cuidado adicional cuando limpie escaleras.
15. No desconecte la aspiradora tirando del cordón. Para desenchufar, tome el enchufe, no el cordón.
16. No deje la aspiradora sin supervisión cuando esté enchufada; desenchúfela del tomacorriente cuando no esté
en uso.
17. Utilícela sólo como se describe en este manual. Utilice sólo los accesorios recomendados por el fabricante.
GUARDE ESTAS INSTRUCCIONES
SOLO PARA USO DOMESTICO
Para reducir el riesgo de una descarga eléctrica, este aparato tiene un enchufe polarizado (una clavija es más ancha que la
otra). Este enchufe encajará en un tomacorriente polarizado en un solo sentido. Si el enchufe no entra completamente en el
tomacorriente, invierta el enchufe. Si aun así no entra, póngase en contacto con un electricista calificado para que instale un
tomacorriente adecuado. No modifique el enchufe de ninguna manera.
Felicitaciones por la compra del sistema de aspiración central Beam, lo máximo en limpieza. El sistema de aspiración central Beam ha sido
diseñado para ayudarle a limpiar y mantener eficazmente su casa. A pesar de que el uso de una aspiradora probablemente nunca será una experiencia genuinamente agradable, usted puede tener una casa con un ambiente más limpio y más salubre. . .y más tiempo para hacer las cosas
que usted realmente disfruta.
Para lograr el máximo de ventajas del sistema de aspiración central Beam, lea detenidamente este manual.
Para más información relativa al sistema Beam y a otros productos novedosos de Beam, visite www.beam.com.
11
Page 12

CARACTERÍSTICAS DE LA ASPIRADORA
CON CEPILLO DE ALTA POTENCIA
1. Correa dentada – La correa dentada ha sido diseñada para un impulso positivo y no se
estirará ni patinará. La larga duración de la correa también reduce la necesidad de un
cambio frecuente para una limpieza más eficiente.
2. LED Luz – La luz extremadamente brillante de la LED permite una mejor visión en
áreas de poca iluminación para una limpieza más minuciosa. También es mucho más
duradera que las bombillas incandescentes.
3. Ajuste automático de altura de alfombra – La aspiradora está equipada con dos
ruedecillas cilíndricas en la parte delantera que mantienen la aspiradora a la distancia
correcta de la alfombra para una limpieza óptima.
4. Disyuntor – De circuito electrónico. Esto es para impedir que el motor y la correa den-
tada se dañen en caso de que el motor se pare debido a la recogida accidental de un
objeto grande. El diodo fotoemisor indicador ubicado en la parte posterior de la aspiradora (vea la Figura 1) se iluminará de color verde durante el funcionamiento normal
y de color rojo en condición de atasco o parada del motor.
¡PRECAUCIÓN! PARA REDUCIR EL RIESGO DE LESIONES CAU-
SADAS POR EL ARRANQUE INESPERADA DE LA ASPIRADORA, DES-
ENCHUFE LA ASPIRADORA ANTES DE DAR MANTENIMIENTO.
Cuando se haya despejado el atasco del cepillo, se puede reposicionar el disyuntor apagando y luego volviendo a encender el interruptor del mango de la manguera. Su aspiradora debe ser reparada por un centro de servicio autorizado si continúa disparándose el disyuntor.
5. Compartimiento de cepillo aislado – El compartimiento eléctrico está totalmente separado del área de barrido. Esto pro-
porciona al usuario seguridad y protege el motor eléctrico del polvo y la tierra para aumentar la duración del motor.
6. Rodillo con cojinetes de bola dobles – El mecanismo giratorio del cepillo utiliza cojinetes de bola de precisión para un
funcionamiento muy suave y mayor durabilidad.
7. Cepillo en forma de V– Tira de la suciedad hacia el canal de aire principal.
8. Cojinetes de la rueda - Las ruedas traseras estan equipadas con cojinetes sellados que proporcionan una asamblea
callada y durable.
DIAGRAMA DE ALAMBRADO DE LA ASPIRADORA
INSTRUCCIONES DE ENSAMBLADO & OPERANDO LA
BOQUILLA MOTORIZADA
Cuando se usa la boquilla motorizada, las precauciones básicas se resumen abajo de
"LAS INSTRUCCIONES IMPORTANTES DE LA SEGURIDAD"
1. Empuje la varita en el enchufe de la boquilla motorizada hasta que se encierre. El enchufe de la varita está
diseñado con una parada positiva. Por lo tanto, no se debe introducir con fuerza. (Figura 3)
2. Asegure que el interruptor del la empuñadura está en la posición OFF.
Nota: La empuñadura está en la posición OFF cuando el interruptor resbaladero está en la
posición "O". (O I II)
12
Figure 3
(See page 2 for details)
Figura 1
Page 13

3. Meta el fin de la empuñadura en la varita de la boquilla motorizada hasta que las cerraduras llegan a su lugar. (Figura 5a)
4. Enchufe la manguera en la válvula de entrada, y enchufe el cordón en el tomacorriente. (Figura 5b)
5. Usted puede fijar la boquilla motorizada colocando el pie encima de la capucha. Baje la varita de la posición vertical.
6. Cambie la empuñadura a la posición ON. ("II")
7. La varita puede ser plegada como un telescopio empujando el botón más cercano a la boquilla motorizada y tirándola.
8. Para apagar la boquilla motorizada, deslice el interruptor de la empuñadura a la posición OFF. ("O") Desconecta la
empuñadura de la varita empujando el botón en la varita que es más cercana a la empuñadura y a tirar la empuñadura
fuera del enchufe de varita.
9. Libere la varita de la boquilla motorizada oprimiendo el pedal de pie y tirar la varita fuera del enchufe de la boquilla
motorizada.
Consejo útil: Para evitar un posible daño a la aspiradora, no recoja objetos duros o filosos. Evite pasar la aspiradora por encima de prendas de vestir, toallas, bordes de alfombra sueltos, etc. Si un artículo se llegara a enredar en el cepillo, apague la
aspiradora. Desconecte el cordón de la manguera del tomacorriente y la manguera de la placa de pared, y luego retire el objeto cuidadosamente sin utilizar fuerza excesiva.
ADVERTENCIA: Siempre apague la aspiradora, desconecte el enchufe del tomacorriente y
desconecte la manguera antes de intervenir en la aspiradora.
Limpieza general
La aspiradora se puede limpiar con un paño humedecido con agua tibia y un detergente suave.
1. No use sustancias abrasivas.
2. No use ningún tipo de disolvente.
3. No sumerja la aspiradora en agua ni permita que le entre agua.
Limpieza del cepillo
Para una limpieza óptima, se recomienda que el cepillo y el compartimiento del
cepillo se limpien regularmente.
ADVERTENCIA: Siempre apague la aspiradora, desconecte el
enchufe del tomacorriente y desconecte la manguera antes de
intervenir en la aspiradora.
1. Voltee la aspiradora.
2. Presione las tres pinzas (como se ilustra en la Figura 6) y quite la cubierta del
cepillo.
3. El cepillo ahora queda al descubierto para el retiro de fibras, cabellos, etc. de
las cerdas y alrededor del rodillo.
4. Para quitar las fibras o cabellos enredados alrededor del cepillo, corte en forma
paralela al rodillo.
5. Puede limpiar adicionalmente el compartimiento del cepillo con el sistema de
aspiración central.
6. Vuelva a colocar la cubierta del cepillo insertando las lengüetas de la parte
delantera de la cubierta en las ranuras correspondientes en la base de la aspiradora (como se ilustra en la Figura 7) y presione las tres pinzas hasta que se
traben en su lugar.
Figura 5a
Figura 5b
Figura 6
Figura 7
13
Page 14

MANTENIMIENTO DE LA ASPIRADORA
CON CEPILLO DE ALTA POTENCIA
Cómo cambiar la correa dentada
ADVERTENCIA: Siempre apague la aspiradora,
desconecte el enchufe del tomacorriente y desconecte la
manguera antes de intervenir en la aspiradora.
1. Retire la cubierta del cepillo como se describe en los pasos 1 y 2 de
“Limpieza del cepillo”.
2. Inserte una cuerda alrededor del cepillo cerca de la correa dentada. Tire
de ambos extremos de la cuerda hacia arriba de manera que el cepillo se
desenganche de la base (como se ilustra en la Figura 8). Desenganche el
otro extremo de la misma manera.
3. Quite los ejes con cojinetes de cada extremo del cepillo y límpielos.
Observe que los ejes no son simétricos. El inclinado pertenece al engrana
je del cepillo (lado de correa dentada) (como se ilustra en la Figura 9).
4. Retire la correa vieja. (También puede cortar la correa vieja con tijeras
para quitarla rápidamente.)
5. Deslice la correa dentada nueva por el engranaje en el eje del motor
(como se ilustra en la Figura 10).
6. Ahora deslice la correa sobre el engranaje del cepillo.
7. Deslice la caja de cojinetes en las ranuras correspondientes en la base.
Asegúrese que ambas estén bien encajadas en su lugar; la lengüeta en la
caja de cojinetes inclinada debe encajar en la ranura de la parte inferior
del compartimiento del cepillo.
8. Retire la cubierta del cepillo como se describe en el punto 6 de “Limpieza
del cepillo”.
Figura 8
Figura 9
Figura 10
GARANTÍA DE LA ASPIRADORA CON CEPILLO DE ALTA POTENCIA
¡Sólo la excelente calidad de nuestra aspiradora hace posible una garantía como ésta!
• Garantía de 3 años
Si en un plazo de 3 años a partir de la fecha de la primera compra, su aspiradora, incluyendo la correa dentada y la luz LED, falla
debido a defectos de fabricación o de los materiales, simplemente llévela a su distribuidor autorizado donde le será cambiada o
reparada (a nuestro criterio).
14
Page 15

Notes / Notes / Notas
Page 16

 Loading...