

Page 1
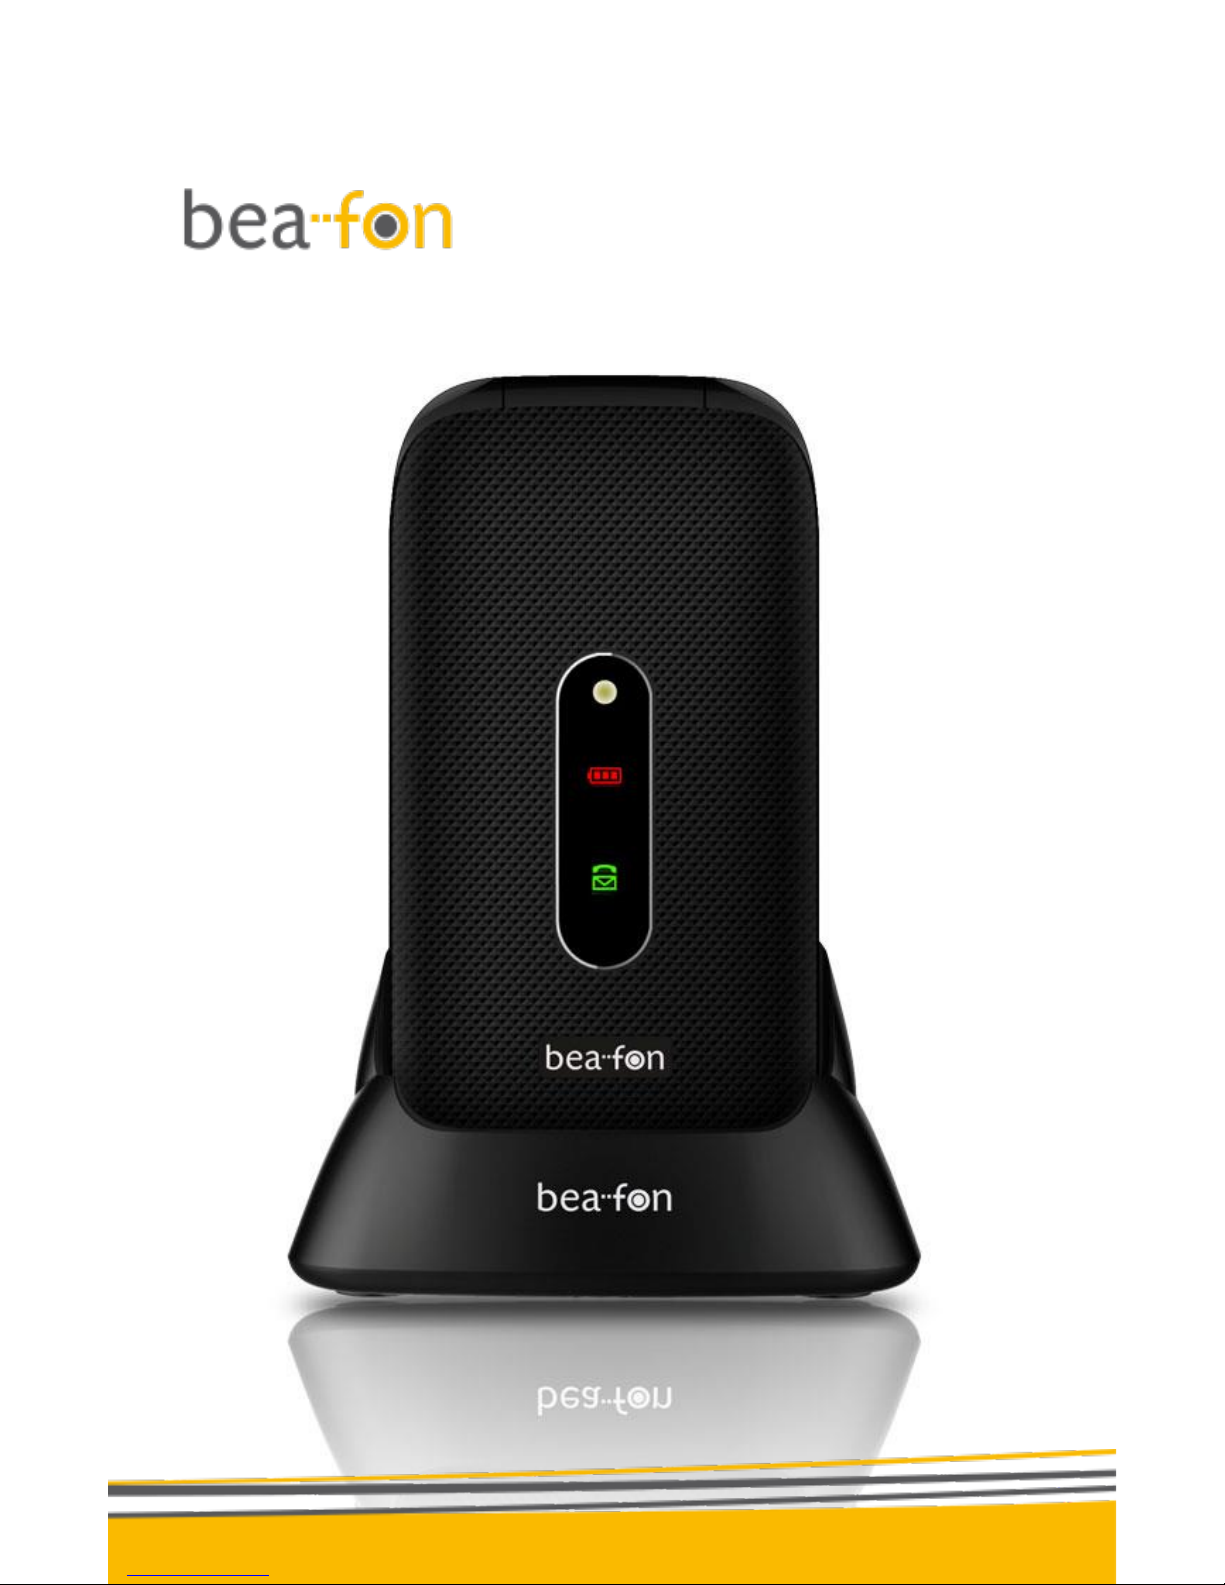
User Manual EN
SL470
Page 2

2
General Information
Congratulations on the purchase of your
Bea-fon SL470!
Please read this information before using
the phone to make a better use of your
phone. We are not responsible for any
damage due to your misunderstanding of
this information and misacting.
We are endeavouring to improve our
products and services. We reserve all the
rights to revise and change the
description of this product and its
software as well as this user’s manual
without obligation to notify any person of
such revisions and changes.
This user manual is for your better use of
this phone not an approval of any
accessories. All the pictures in this
manual are for reference only. There may
be slight difference between the
appearance of phone/ keys/ contents of
display used in this manual and those of
your phone. Please refer to your phone
for actuality. Some features introduced in
this manual are network or subscription-
Page 3

3
supported features. Please contact your
network operator for further information.
Please check the package contents to
ensure that all components listed below
are included. If the product is defective or
if there is a component missing,
immediately contact the retailer where
you purchased this handset.
Page 4

4
General Information
Your Bea-fon SL470 box contains:
• 1 mobile phone (SL470)
• 1 desktop charger (SL470)
• 1 travel charger (SL470)
• 1 battery (SL470)
• 1 USB cable (SL470)
• User manuals (SL470)
If you find the size of the script not easily
readable for you, you can also find this
manual on our website, where you will be
able to adjust the size of the script.
Go to: www.beafon.com/Products
Device Code:
This device code ensures that
unauthorized persons will not be able to
use your phone. The default code is 0000
PIN-Code:
The PIN-code was supplied to you by
your network operator together with your
SIM card and/or adjusted/set up by
yourself.
Page 5

5
Directory
General Information ............................ 4
Device Code: ................................... 4
PIN-Code: ....................................... 4
Directory ............................................ 5
Your Phone ......................................... 8
Getting started ................................. 10
What is a SIM card? ....................... 10
Insert the SIM card and Micro SD card
................................................... 10
Insert the battery as follows ............ 12
Charging the battery ...................... 13
Switching the telephone on or off ..... 15
Display (Standby mode) .................. 16
LED describtion .............................. 16
Screen icons:................................. 16
Menu Operation ............................. 19
Torch ............................................ 19
Connect an optional headset ............ 20
Call function ..................................... 21
Make a call .................................... 21
Make a call using the phone book ..... 21
Answering a call ............................. 22
Operations during a call .................. 22
Hands Free .................................... 23
Menu ............................................... 23
Shortcut key functions .................... 24
Phonebook ....................................... 25
Page 6

6
To access the phonebook ................ 25
Add new contact: ........................... 25
To edit a Phone Book entry: ............ 26
To delete all entries from the phone or
SIM card ....................................... 26
To copy all entries from the phone or
SIM card ....................................... 26
Store a Phonebook entry to a Speed
dial key (2-9) ................................ 27
Direct Number: .............................. 27
Favorite contacts ............................ 28
Create favorite contact ................... 28
Messages ......................................... 29
Inbox: .......................................... 30
Drafts: .......................................... 30
Outbox: ........................................ 31
Sent messages .............................. 31
Voicemail server ............................ 31
SMS settings ................................. 32
Call history ....................................... 33
Missed Dialled and Received ............ 33
Delete call logs .............................. 33
Organizer ......................................... 34
Alarm ........................................... 34
Tasks ............................................ 34
Calculator ..................................... 35
Multimedia ....................................... 37
Image viewer ................................ 37
FM-radio ....................................... 37
Page 7

7
File Manager .................................. 39
Settings ........................................... 40
Profiles (Tone settings) ................... 40
Silent mode ................................... 40
SOS settings ................................. 41
Phone settings ............................... 44
Time and date: .............................. 44
Language: ..................................... 44
Pref. Input method: ........................ 44
Display: ........................................ 44
LED Mode: .................................... 44
Night mode: .................................. 45
Call settings .................................. 45
Answer Mode: ................................ 46
Advanced settings .......................... 47
Black list: ...................................... 47
Network settings ............................ 47
Network selection: ......................... 47
Set automatic or manual mode ........ 47
Security settings ............................ 48
Connectivity: ................................. 48
Bluetooth: ..................................... 48
Restore factory settings .................. 50
Basic Specifications: ....................... 50
Page 8
8
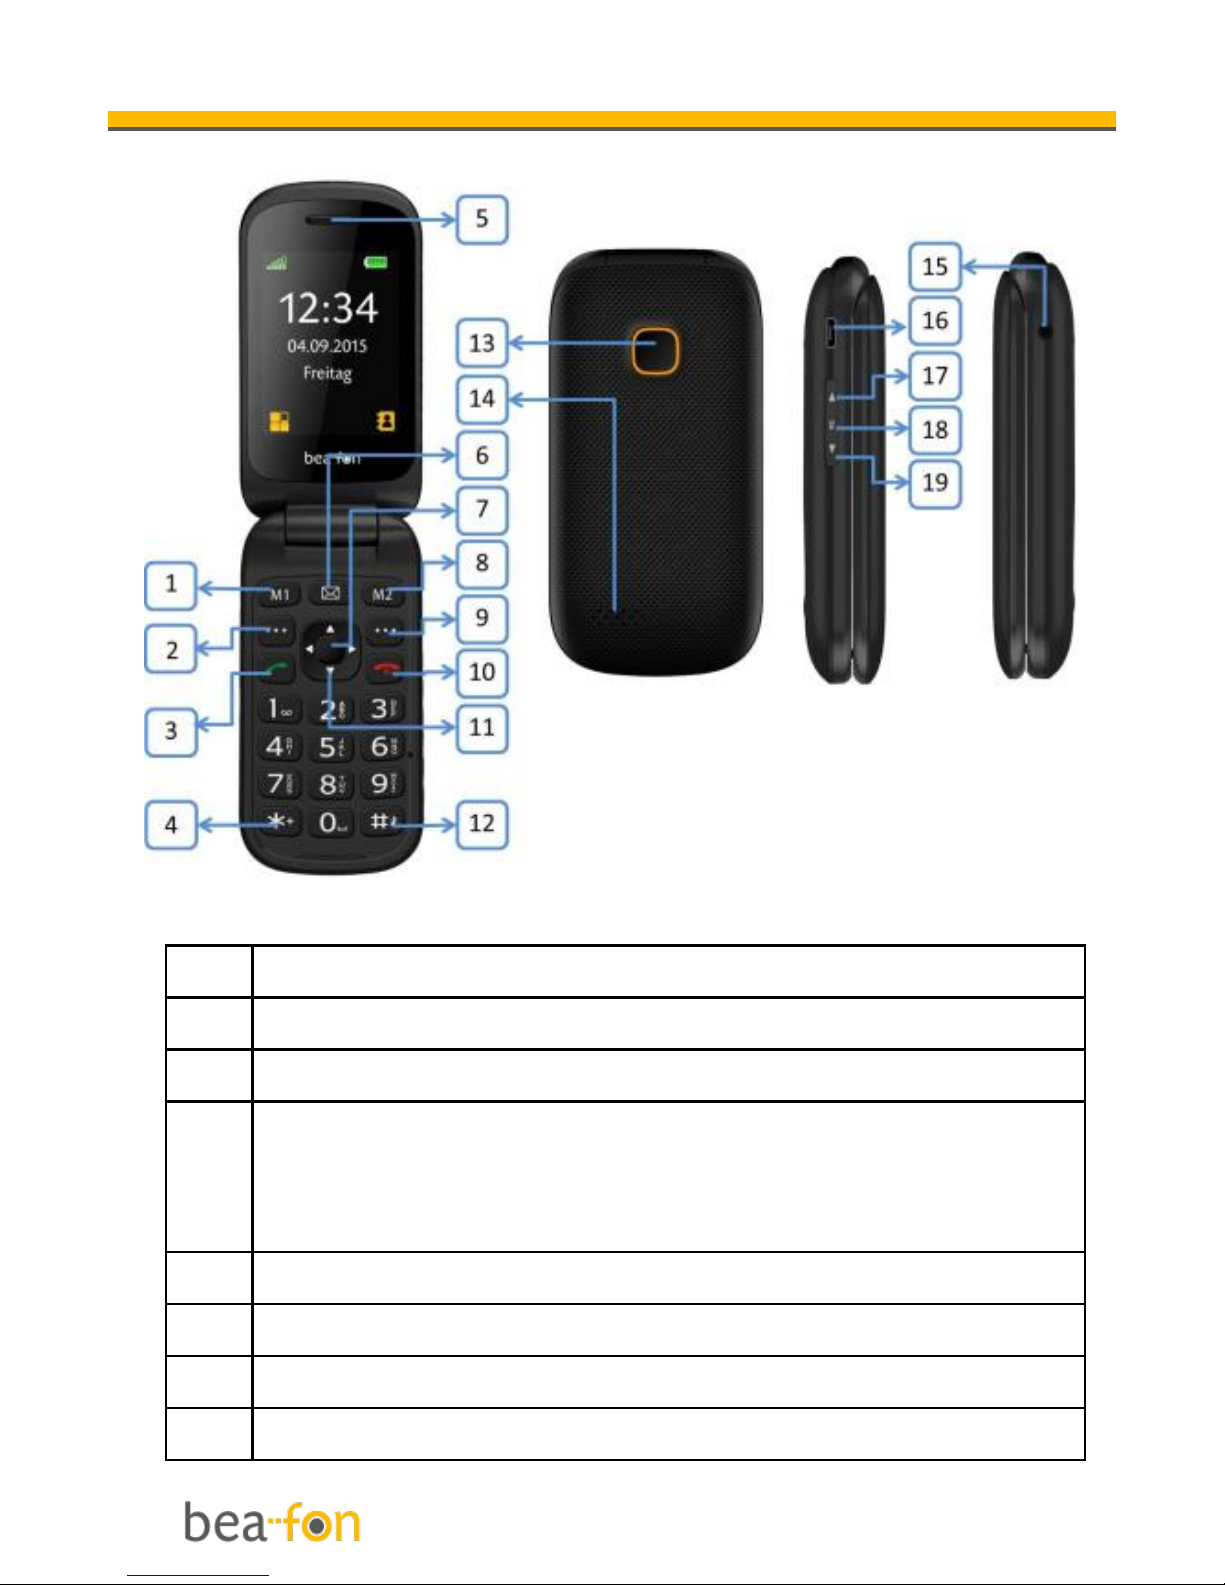
Your Phone
1
Direct dialing numbers M1
2
Left menu key / Main menu key
3
Dialing / History Calls
4
* Key, Press this button on the idle
screen to enter the following symbols :
* /+ /P / W.
5
Receiver
6
Message Key
7
OK key
8
Direct dialing numbers M2
Page 9
9
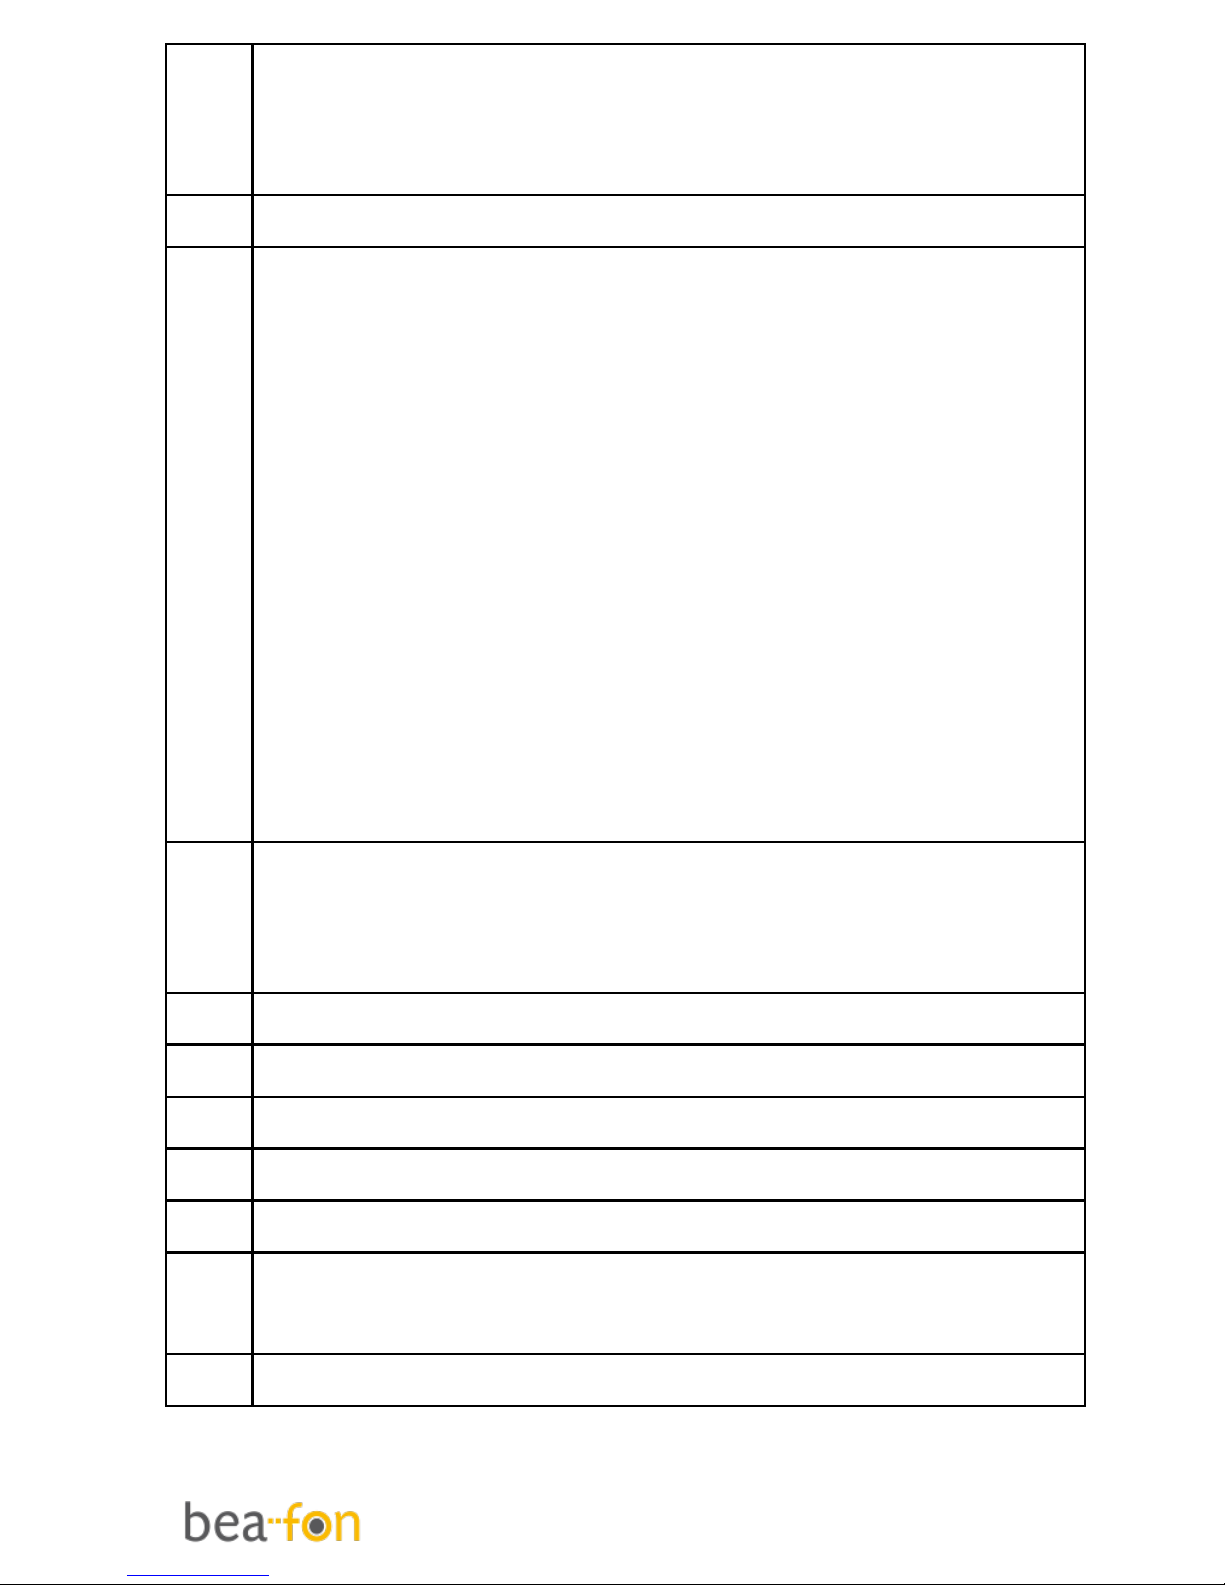
9
Right menu key, On the idle screen
this button takes you to the
Phonebook menu.
10
Power on/off /End key
11
Navi key:
Key up: On the idle screen this button
takes you to the Messages menu.
Key down:
On the idle screen this button takes
you to the favorite contacts.
Key left:
On the idle screen this button takes
you to the Calendar
Key right:
On the idle screen this button takes
you to the Alarm
12
# Key, Long press can switch between
in silent mode with general modes; In
edit mode, change the input method.
13
SOS button
14
Polyphone loudspeaker
15
Headset , Jack 3.5mm
16
Micro USB charger port
17
Volume key +
18
Volume key 17/18 - Torch key, Long
press the flashlight
19
Volume key -
Page 10

10
Getting started
What is a SIM card?
Every mobile phone has a SIM card
(Subscriber Identity Module). This is a
micro-chip that holds your personal
information such as names and phone
numbers. Your phone won’t work without
it. If you already have contacts on your
SIM card, they can be transferred in most
cases.
Keep the SIM card away from children.
The SIM card can easily be damaged or
bent. You should therefore handle the
SIM card with care during installation
and/or removal.
Insert the SIM card and Micro SD
card
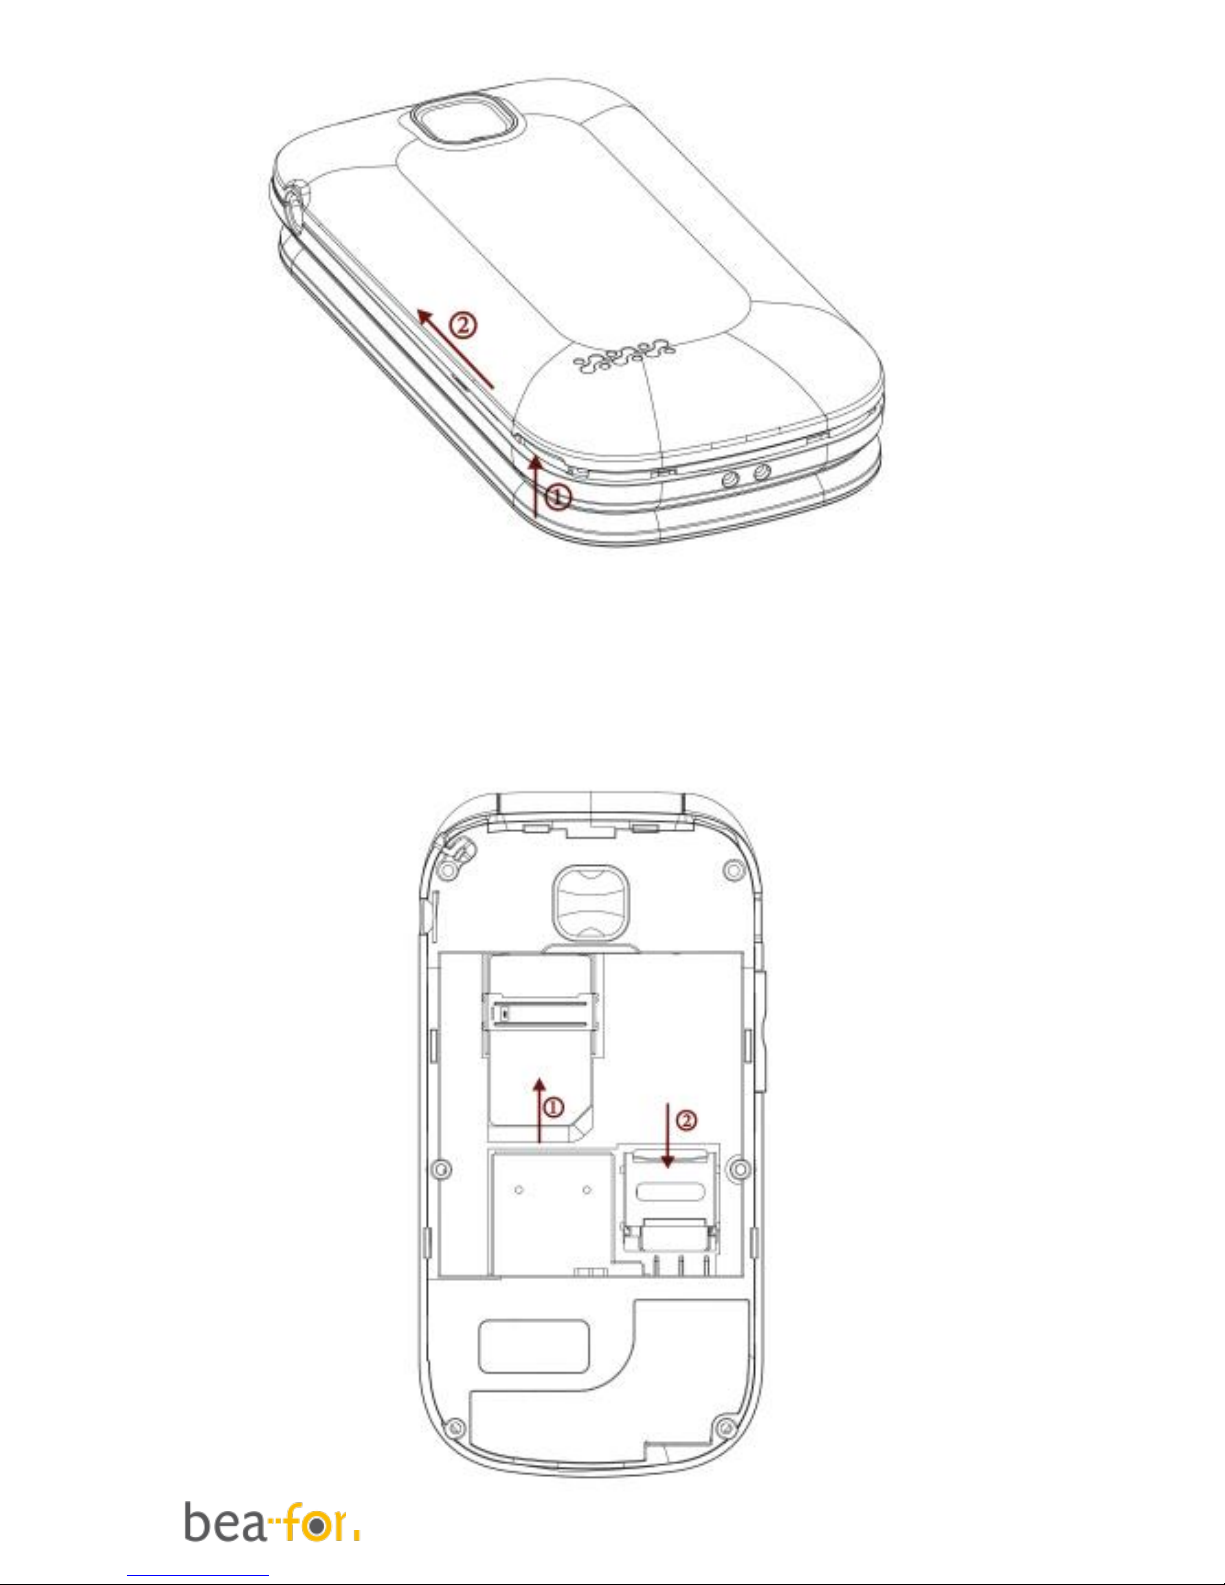
1. Make sure that the phone is switched
off and the charger is disconnected
from the phone.
2. Turn the phone over and remove the
battery cover.
Page 11
11
3. If the battery is already inside,
remove it.
Page 12
12
4. You can see two card slots (left side:
SIM, right side: Micro SD).
5. Slide the SIM card carefully into the
SIM card slot. Make sure that the
gold-coloured connectors on the SIM
card are facing downwards and that
the bevelled corner is on the right.
6. Memory Card: Slide the Micro SD card
into the Micro SD card slot. Make sure
that the gold-coloured connectors on
the micro SD card are facing
downwards.
Page 13
13
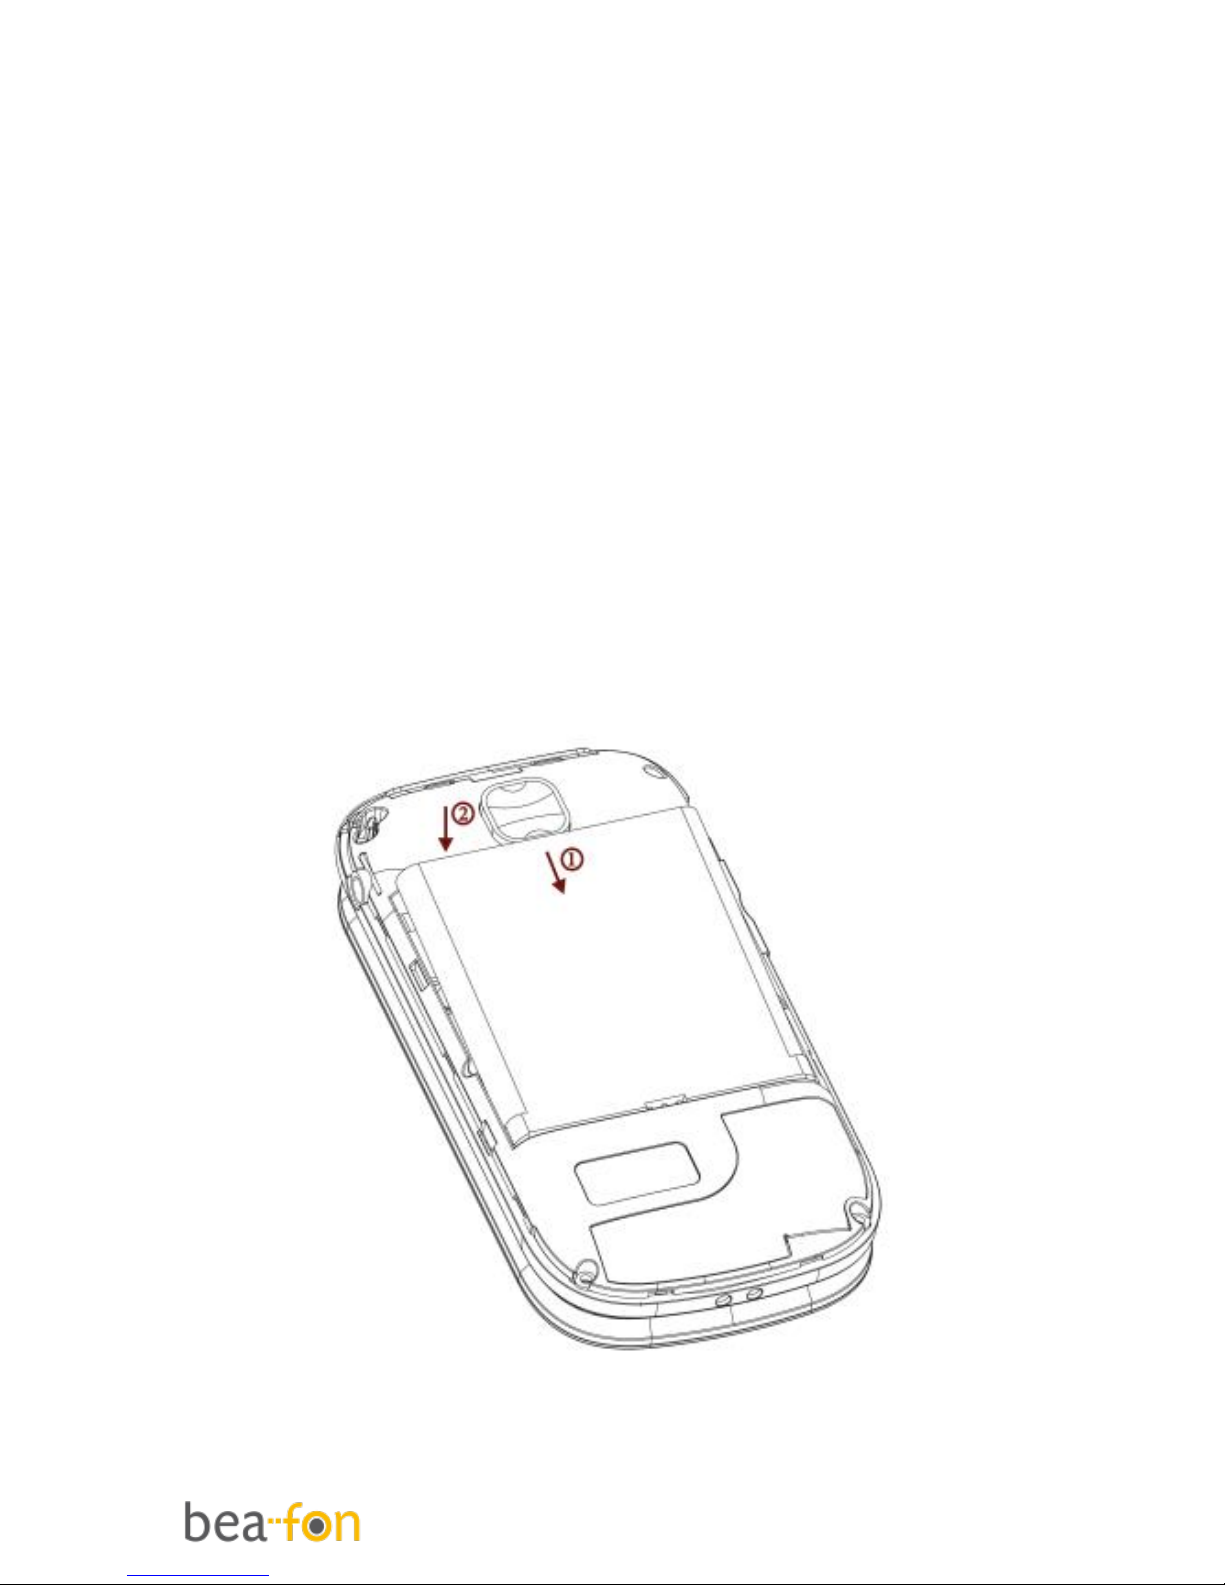
Insert the battery as follows
1. Insert the battery by aligning the gold
contacts in the battery compartment
on the phone.
2. Push down on the upper section of the
battery until it 'clicks' into place.
3. Close the battery compartment by
sliding the cover closed until you hear
a ‘click’.
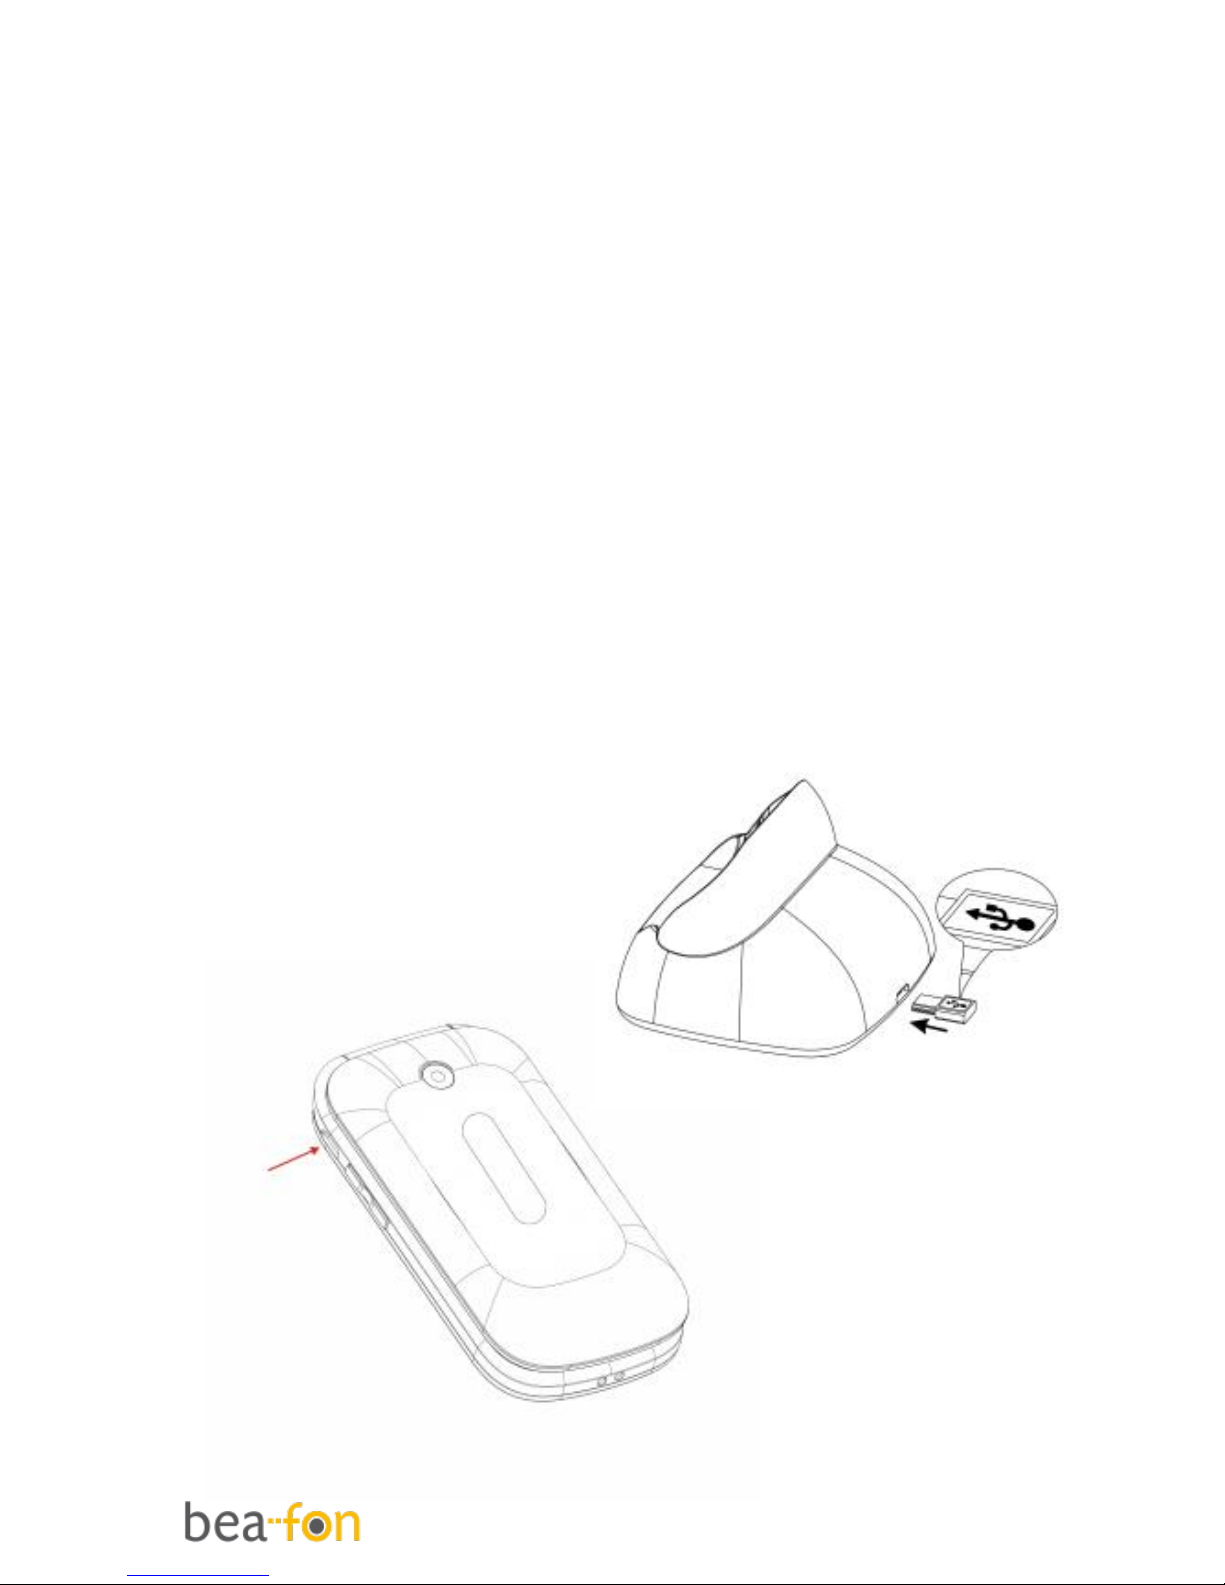
Charging the battery
There are two ways of SL470 battery
charging:
A. Desktop
charging
B. Handset
charging
Page 14

14
The lithium battery of the mobile phone
can be immediately used after unpacking.
A new battery, is not fully charged, and
performs best after performing a full
charge/discharge 3 times:
1. Plug the charger into the charger
connector.
2. Plug the other end into an electrical
outlet.
3. The phone may need several hours for
reaching a fully charge.
When your phone is power off, it
might take a few seconds to show
charging display and it shows charge
complete when finished.
When your phone is power on, the
battery icon flickers when it starting
charging and become still with full
bars in battery icon when finished.
4. The battery is fully charged when the
red LED is off. Disconnect the charger
from the phone and the AC outlet.
Note: Charge the battery for at least 12
hours before using the phone for the first
time.
Page 15

15
Switching the telephone on or off
Make sure that you SIM card is in your
mobile phone and that the battery is
charged.
1. Press the red key to switch the phone
on.
2. If prompted, choose your language
and press OK.
3. If you have entered a PIN-code
before, the phone will ask for the code
now. Enter the PIN-code and confirm
by pressing OK.
4. To turn off your phone, press and hold
the red key for two seconds.
If you don’t insert a SIM card, your phone
shows Insert SIM. None of the functions
related to SIM card can be used. You can
make an emergency call only.
Note: If you enter an incorrect PIN-code
3 times in succession, the phone will
require you to enter the PUK-code. You
have received this PUK-code together
with your SIM card.
Page 16
16
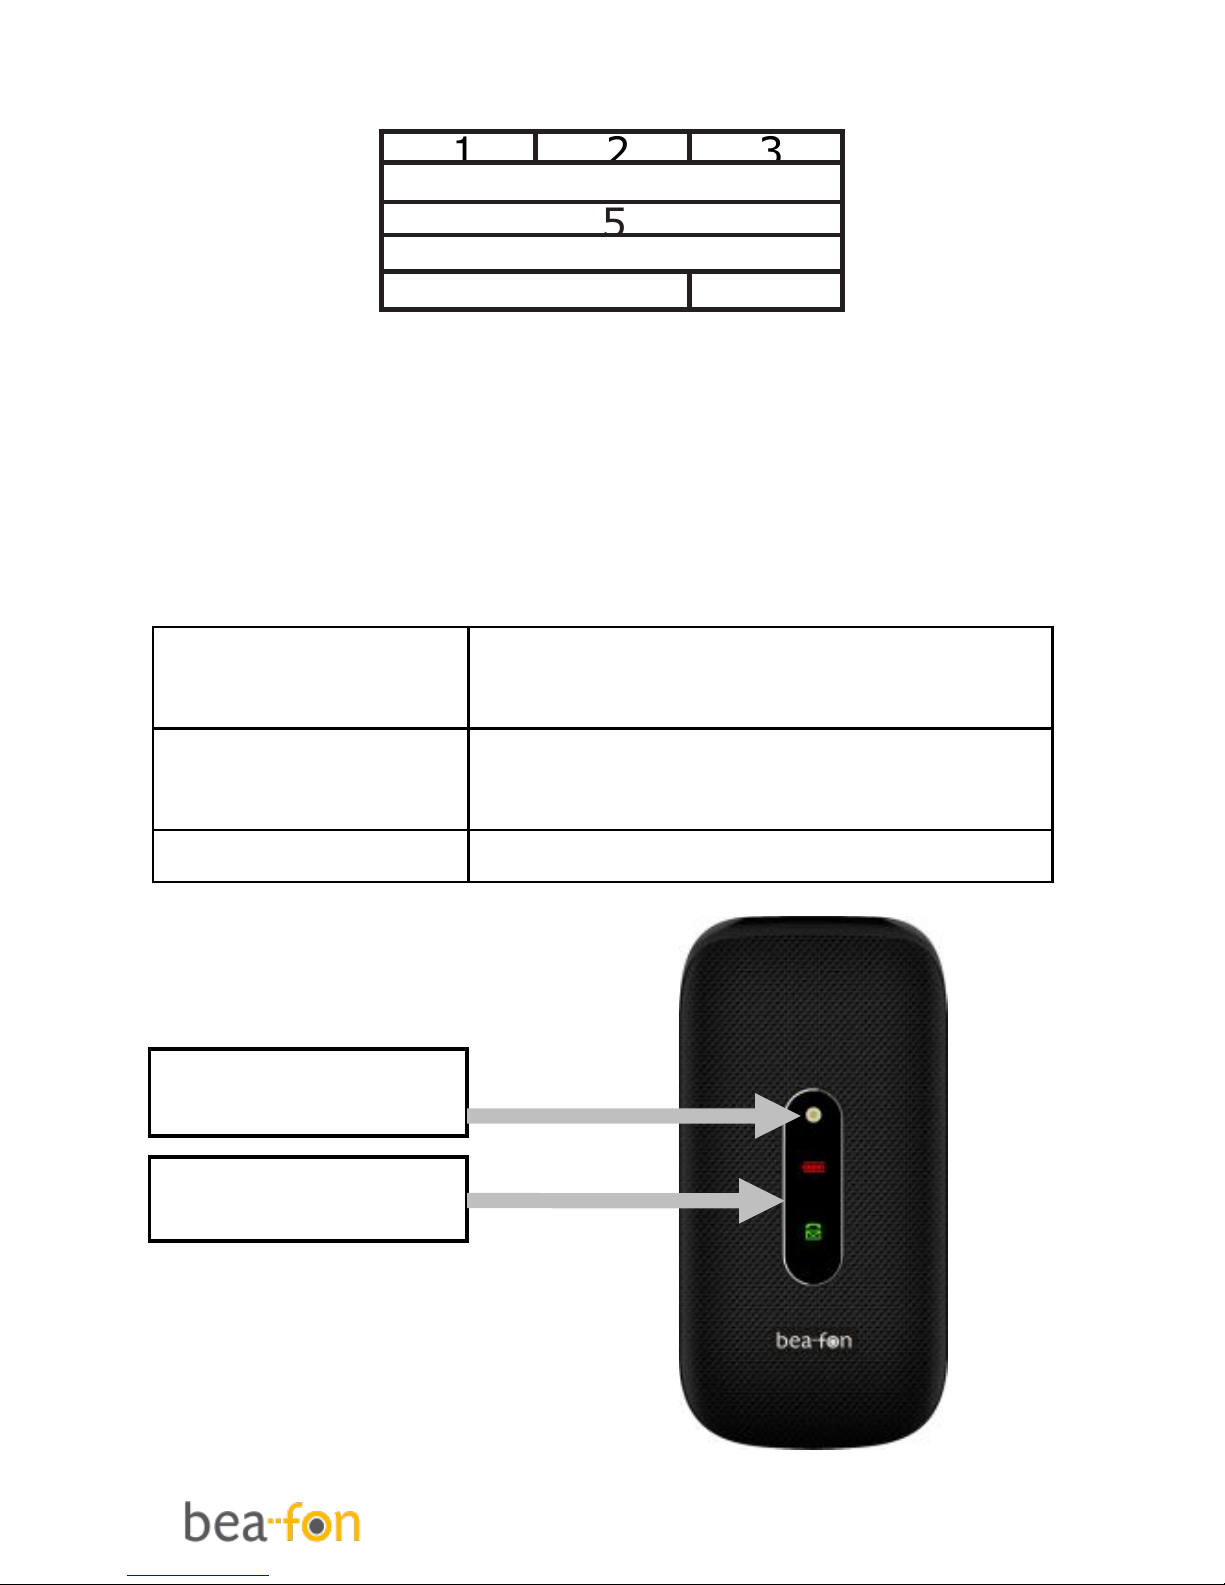
Display (Standby mode)
4
1. Signal status 5. Time
2. Pictograms 6. Date and day
3. Battery status 7. Menu
4. Network operator 8. Names
LED describtion
Green LED
Incoming call, missed call
or unread message
Red LED
Battery low (flash),
Battery charging (light)
White LED
Torch
Torch
LEDs
Page 17
17
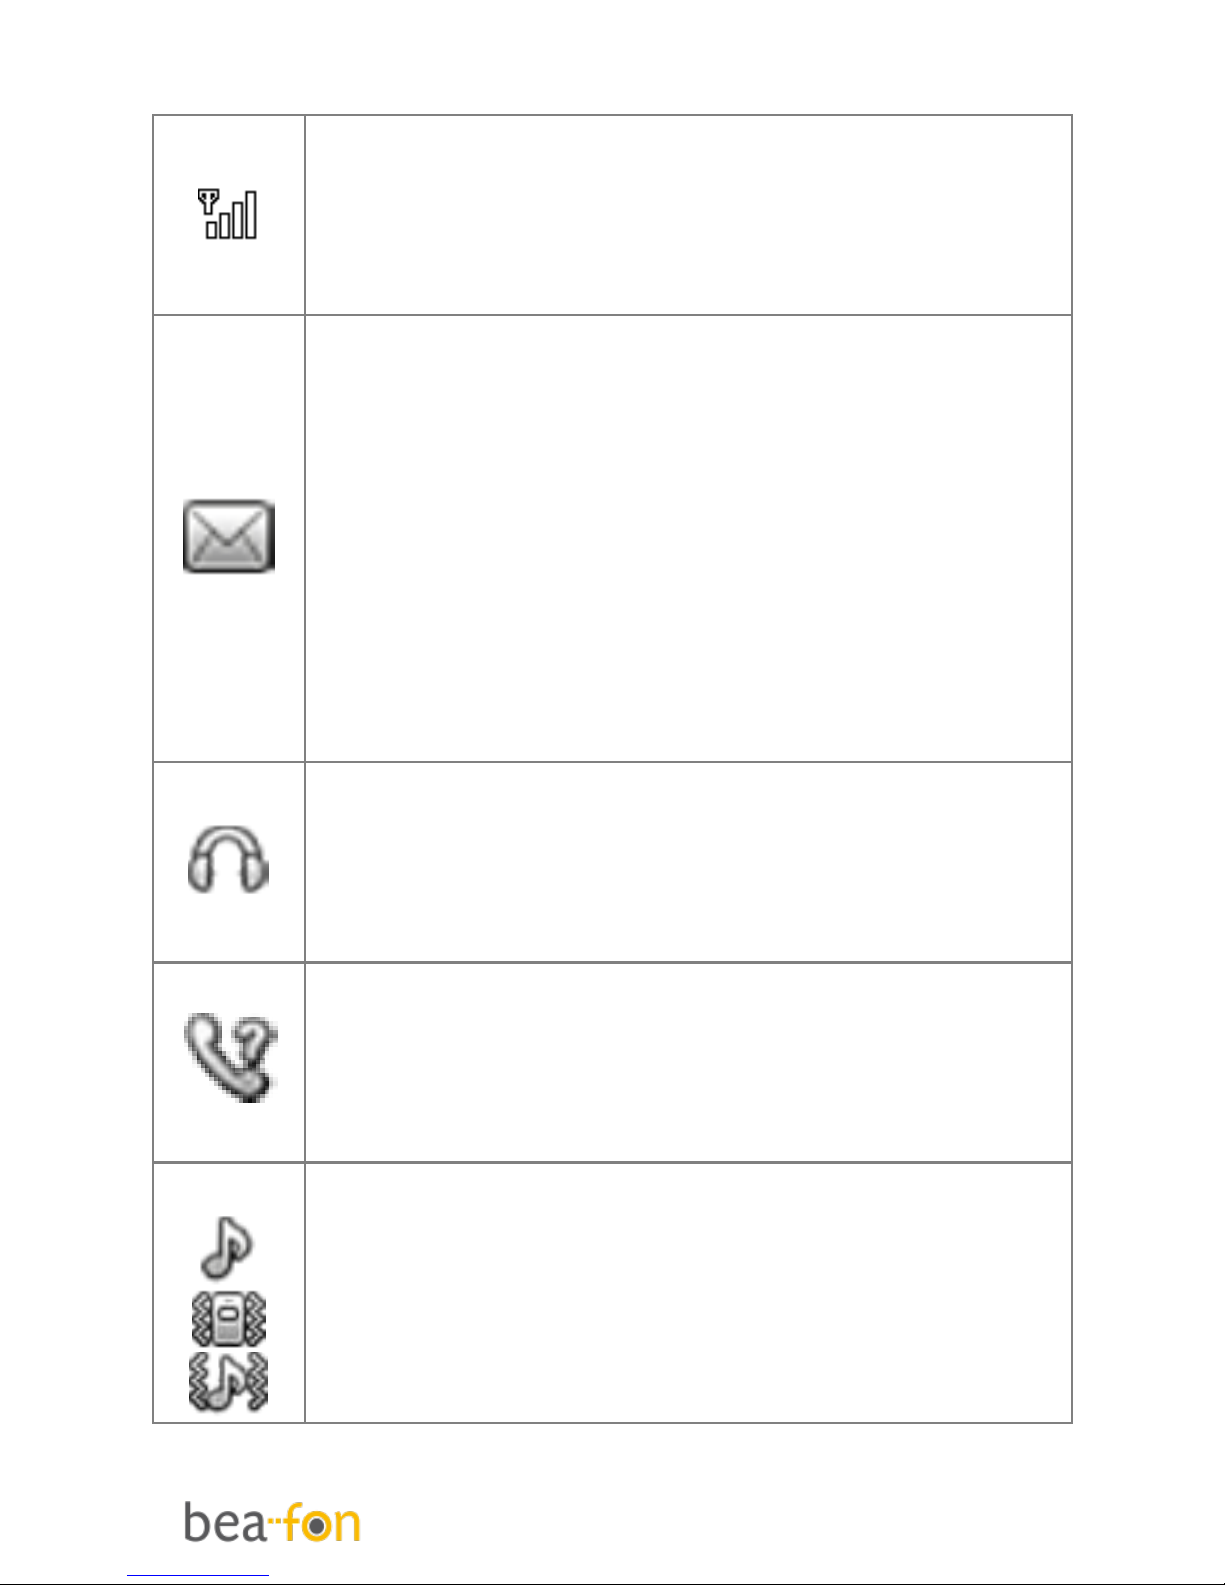
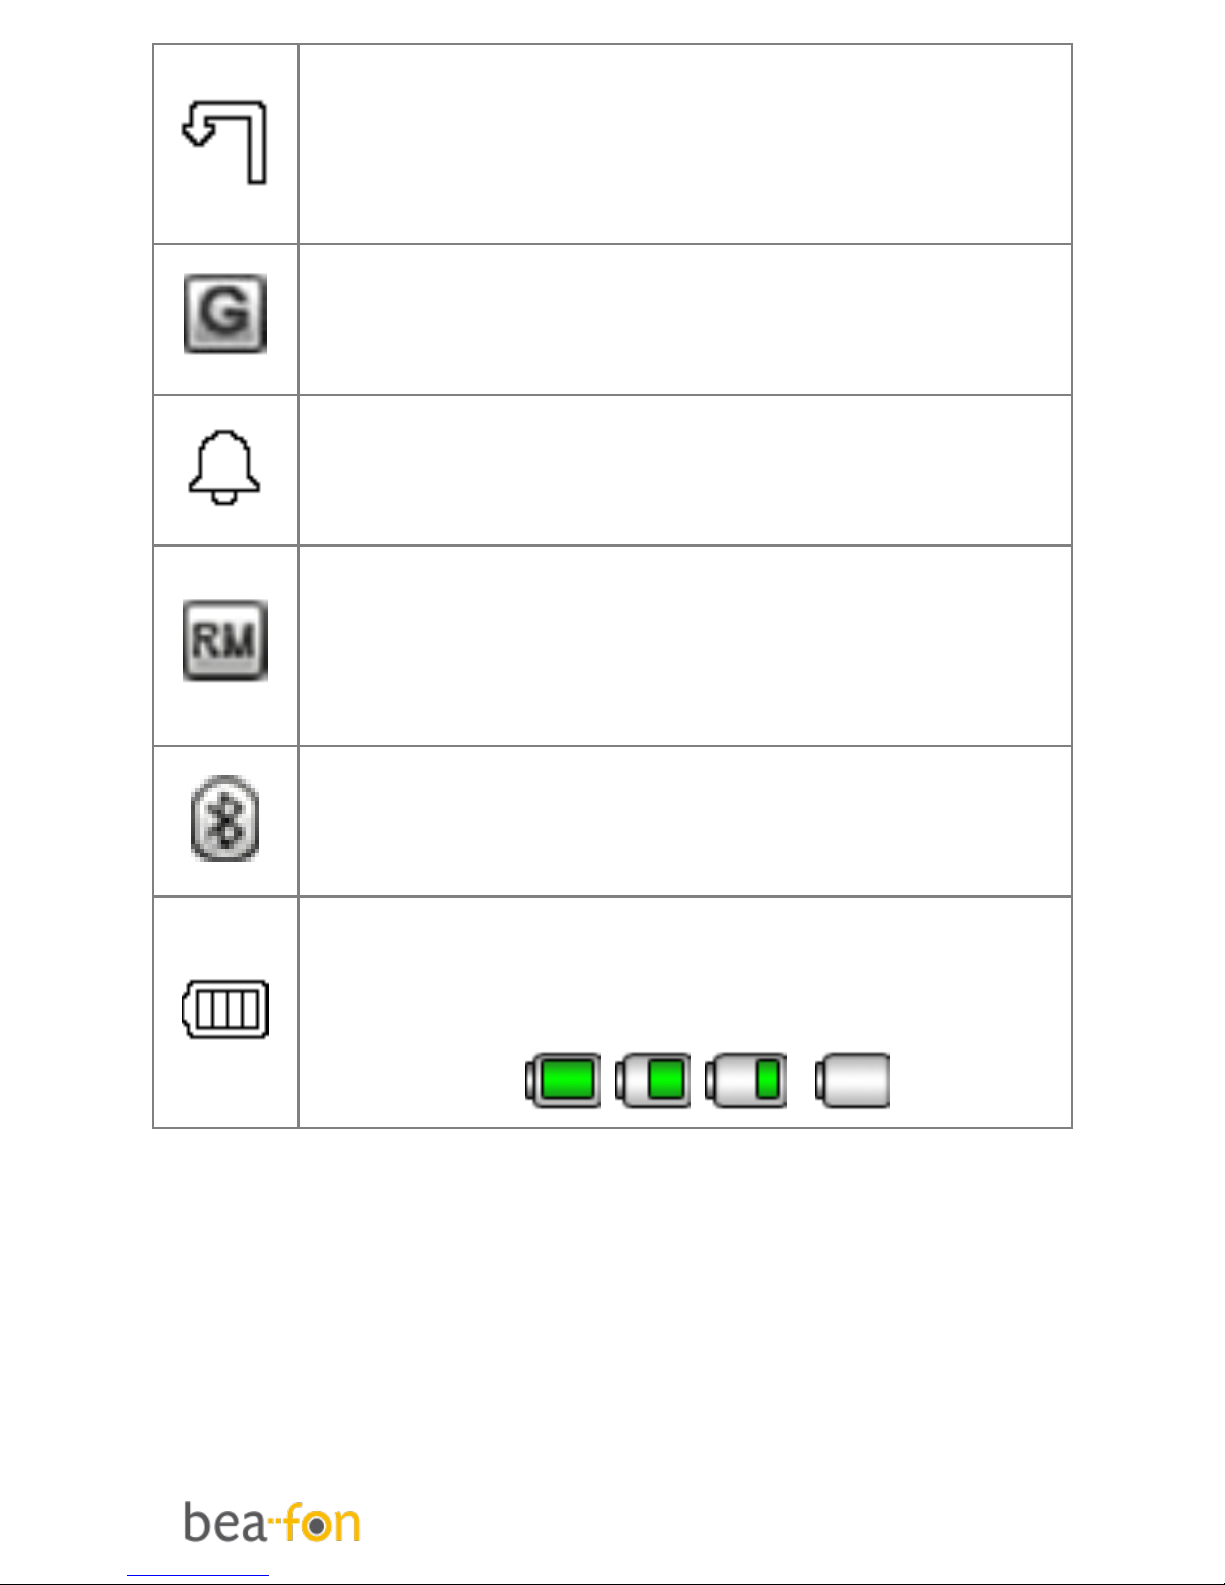
Screen icons:
Signal Strength
The vertical bars show the
network connection strength. SIM
card has signals.
New messages
This icon shows when you receive
a new message.
SIM Card has an unread message
The inbox is full.
This icon flickers when the inbox
is full and you need to delete
messages to receive new
messages.
Earphone
This icon shows when you plug
the earphone in. Voice will be
heard from the earphone.
Missed Calls
This icon shows when you are
viewing the missed call. SIM card
has a missed call.
Alert Type
Ring
Silent mode on and Vibration only
Vibrate and ring
Page 18
18
Call Divert
This icon shows when you divert
all calls unconditionally. SIM card
has been set up call divert.
GPRS
This icon shows when the GPRS
connection is available or active.
Turn alarm on
This icon shows when you turn
alarm on.
Roaming
This icon shows when your phone
is in roaming state. SIM card is
roaming.
Bluetooth
This icon shows when the
Bluetooth is active.
Battery capacity
This icon’s colour changes
according to the status of battery
capacity: , , ,
Page 19

19
Menu Operation
Menu lists are used for set up and
operation.
The left and right menu keys initially are
Menu ( ) and Phonebook ( ).
Press Menu ( ) and the display changes
and the soft keys become OK and Back.
Use Up or Down to move up or down
menu lists, and OK or Back for the next
or previous display.
Torch
Press and hold on the side volume keys
of the phone to switch the built-in torch
on/off.
Page 20

20
Connect an optional headset
You can use a headset (not supplied) with
the 3.5 mm type, plugged into the
Headset socket on the top side of the
handset.
When using headsets, including Binatone
approved ones, pay attention to volume
levels and read its user guide for safety
instructions. Do not connect incompatible
products.
When correctly inserted the headset icon
is shown.
Headset Connector:
Plug in headset accessory for headset
use. (3,5mm Audio Jack)
Page 21

21
Call function
Make a call
1. To make a call, enter the phone
number with the prefix and press the
green key. For international calls,
enter ‘+’ by pressing for 2 sec.
Then enter the country code followed
by the telephone number, in which
the 0 of the prefix must be dropped.
2. If you have entered a wrong number,
press the soft key ‘right’ Clear to
remove the number to the left of the
blinking cursor.
3. Press the green key to call the
number.
4. Press the red key to end the call or to
cancel the call attempt.
Make a call using the phone book
If you have saved a name and number in
the phone book, you can also use the
phonebook to make a call.
In standby mode, press the soft key
‘right’ to go to Phonebook.
1. Scroll with the up and down arrow key
to the name you want to call.
Page 22

22
2. Press the green key to call the
number.
3. Press the red key to end the call or to
cancel the call attempt.
Answering a call
When there is an incoming call, the
phone rings and/or vibrates and shows
the number or the corresponding name.
1. Press the green key or Answer if you
would like to answer a call.
2. Press the red key or silent if you
would like to reject a call, or for
ending the connection after the call.
Earphone/Bluetooth Mode): When
plugging the earphone (including
Bluetooth earphone), you can answer a
call by pressing the key on the earphone.
Operations during a call
Press the right Menu key for Hands free
Press left menu key “Options” to perform
following operation during a call:
Mute: de/activate the microphone
Phonebook: To go to Phonebook.
Hold: Hold this call.
Message: To go to Messages.
Page 23

23
New Call: To dial the number
End: End this Call.
Hands Free
During a call you can turn the hands free
equipment on (Loudspeaker on).or off
with the right Menu key.
Menu
Press the up arrow key to go to the
Menu. Scroll through the menu using the
arrow keys.
1. Phonebook
1. Contacts
2. Add new
contact
3. Speed dial
4. Direct
Number
5. Phonebook
settings
2. Message
1. Write SMS
2. Inbox
3. Drafts
4. Organizer
1. Alarm
2. Tasks
3. Calculator
4. Calendar
5. Services
5. Multimedia
1. Image viewer
2. FM Radio
3. File Manager
6. Settings
1. Profiles
2. SOS settings
Page 24

24
4. Outbox
5. Sent
messages
6. Delete
messages
7. SMS
settings
3. Call history
1. Missed call
2. Dialled calls
3. Received
calls
4. Delete call
logs
3. Phone
settings
4. Call settings
5. Network
settings
6. Security
settings
7. Connectivity
8. Restore
factory
setting
Shortcut key functions
With helping the 5 key navigation, you
have for quick access in idle mode
following functions:
Taste
Funktion
Arrow key up
Messages
Arrow key down
Favorite contacts
Arrow key left
Tasks
Arrow key right
Alarm
OK key
Main Menu
Page 25

25
Phonebook
You can store names and phone numbers
in the Internal phone book (up to200)
and in the SIM phone book (SIM
dependent, but a maximum of 250).
To access the phonebook
In idle mode, press Right menu key.
In idle mode, press Left menu key,
Phonebook and press OK
Note: Indicates entries in SIM phone
book, Indicates entries in the internal
phone book.
Add new contact:
1. Select Menu, Phonebook and press
OK.
2. Select Add new contact and press OK.
3. Select Preferred storage, To SIM or To
Phone, if you choose To phone: you
can edit Name, Number and Caller
ringtone. Press Options and Save if
you want to save the contact.
Page 26

26
To edit a Phone Book entry:
1. Press right menu key to phone book
search which one You want to change,
press left menu key select Edit then
modify the name, press Down modify
the number.
2. Press Option and OK to save the
change(s).
To delete all entries from the phone
or SIM card
1. Select Menu, Phonebook and press
OK..
2. Select Phonebook settings and press
OK.
3. Select Delete all Contacts and press
OK.
4. Select From Phone or From SIM
Delete all
5. Press OK again to confirm
To copy all entries from the phone or
SIM card
1. Select Menu, Phonebook and press
OK.
2. Select Phonebook settings and press
OK.
Page 27

27
3. Select Copy all and press OK
4. Select To Phone or To SIM From
SIM/Phone
5. Press OK again to confirm
Store a Phonebook entry to a Speed
dial key (2-9)
1. Select Menu, Phonebook and press
OK.
2. Select Speed dial and Press OK
3. Set Status to On, press down to Set
numbers.
4. Press OK the display shows ,2-9
5. Press Up or Down to choose the key
to save to
6. Press OK to confirm the memory
entry.
Direct Number:
1. Select Menu, Phonebook and press
OK.
2. Select Direct Number and press OK.
Add M1 and M2 dial numbers.
Press in Standby mode M1 or M2 for call
Page 28

28
Making calls using the favorite
contacts
In the default screen, press the
downwards arrow key.
Here you can select up to 8 contacts.
Scroll with the Arrow keys to the desired
photo contact and then press the Call key
(green key).
Create favorite contact
1. In the default screen, press the Arrow
key (downwards) in order to go to the
favorite contact menu .
2. Use the arrow keys to scroll.
3. To edit a favorite contact, press “Edit”
(left menu key),
4. Select From Phonebook and press OK
5. Select an Contact and press OK.
Page 29

29
Messages
Write messages
1. Select Menu, Messages and press OK
2. Press Write SMS
In this menu, you can compose
messages.
The number of letters used can be seen
at the upper right edge of the display.
Text input:
The following functions are available:
Press 0 to add a space.
Press the * key to add special
characters; using the “Arrow keys”,
you can navigate to the desired
symbols.
Press the arrow key to move the
position indicator to the left or right.
Press Delete to delete a letter; to
delete the entire text, press and hold
Delete.
Press the # key to switch between
upper and lower case and word
recognition: ABC, abc, 123 and pay
attention to the symbol in the top left
of the display.
Page 30

30
Inbox:
The Inbox is for storing received SMS
messages. Depending on the selected
mode, the phone vibrates or rings when
you receive a new message. And in the
standby mode you see this icon until
you have read the new SMS message.
You can choose the following options
while reading your received SMS:
View, Reply by SMS, Call sender,
Forward, Delete, Delete all, Save to
Phonebook* In the Advanced option:
Copy to Phone* Move to Phone*, Copy all
and Move all.
*These options may not appear according
to the storage location.
Note: The new message icon keeps
flickering in the standby mode when your
inbox is full. Please delete some
messages for receiving new messages.
Drafts:
By Drafts you can view the draft SMS
messages you have saved.
You can choose the following options
while reading your draft:
Page 31

31
View, Send, Edit, Delete, Delete all and
Advanced.
Outbox:
The Outbox to view the messages you
don’t sent but saved.
You can choose the following options
while reading your sent SMS:
Send, Edit, Delete and Delete all.
Sent messages
The Sent messages to view the messages
you sent.
You can choose the following options
while reading your sent SMS:
View, Forward, Delete, Delete all and
Advanced.
In the Advanced option: Copy to Phone*
Move to Phone*, Copy all and Move all
*These options may not appear according
to the storage location.
Voicemail server
Voicemail is a service supplied by your
network operator. For more information
and for the voice mailbox number,
contact your network operator. When you
have a new voice mail message, your
phone will receive a message.
Page 32

32
1. Select Menu, Messages and press OK
2. Select SIM and press OK
3. Select Voice mail and press OK
4. Press Option and choose Call or Edit.
5. If you choose Edit, edit the name and
number of the voice mail. After enter
the number press OK.
In standby mode:
Press and hold key number 1 for directly
calling the Voice mail. Only the number
saved under voice mail address 1 is
called.
SMS settings
You can define the SMS settings. The
following functions are available:
SIM (Profile settings):
Here you can set, among others, the
message service centre number (SMSC)
(dependent on the network operator) and
other SMS settings.
Memory status:
With this option, the SMS memory status
from your SIM card and your telephone
are displayed.
Sent messages:
Page 33

33
Switch on/off the storage of sent
messages
Preferred storage:
Select the storage location for the SMS
Telephone or SIM
Call history
Missed Dialled and Received
The phone registers the phone numbers
of Missed, Received, Dialled and All calls.
When you press OK by Missed, Dialled or
Received, you can view the calls you
Missed, Dialled or Received. If you press
Option you can choose the following
options:
View, Call, Sent text message, Save to
Phonebook Add to Blacklist and Delete.
Delete call logs
You can delete all the records of the
Dialled, Missed and Received calls, you
can also choose delete All calls to delete
all the records of the above-mentioned
calls logs.
Page 34

34
Organizer
Alarm
1. Select Menu, Organizer and press OK.
2. Select Alarm and press OK.
You can set a maximum of 5 different
alarms.
To set an alarm clock:
1. Select one alarm and press Edit.
2. Edit alarm: set On or Off, Time,
Repeat and Alert type.
3. Press Save to save the Alarm.
When alarm sounds, you can stop the
alarm by pressing Stop. If you press
Snooze, the alarm stops and rings after 5
minutes again.
Tasks
1. Select Menu, Organizer and press OK.
2. Select Tasks and press OK
Press Options and select Add.
Enter the desired details.
To save the event, press Options and
Save.
If there are some existed event in the
task list, press the up / down key to
Page 35
35
select an event to get into the options:
View, Add, Edit, Delete, Delete overdue,
Delete all and View uncompleted
Calculator
1. Select Menu, Organizer and press left
menu key.
2. Select Calculator and press left menu
key
The phone is provided with a calculator.
This calculator has limited accuracy and
rounding errors may occur, especially in
long divisions.
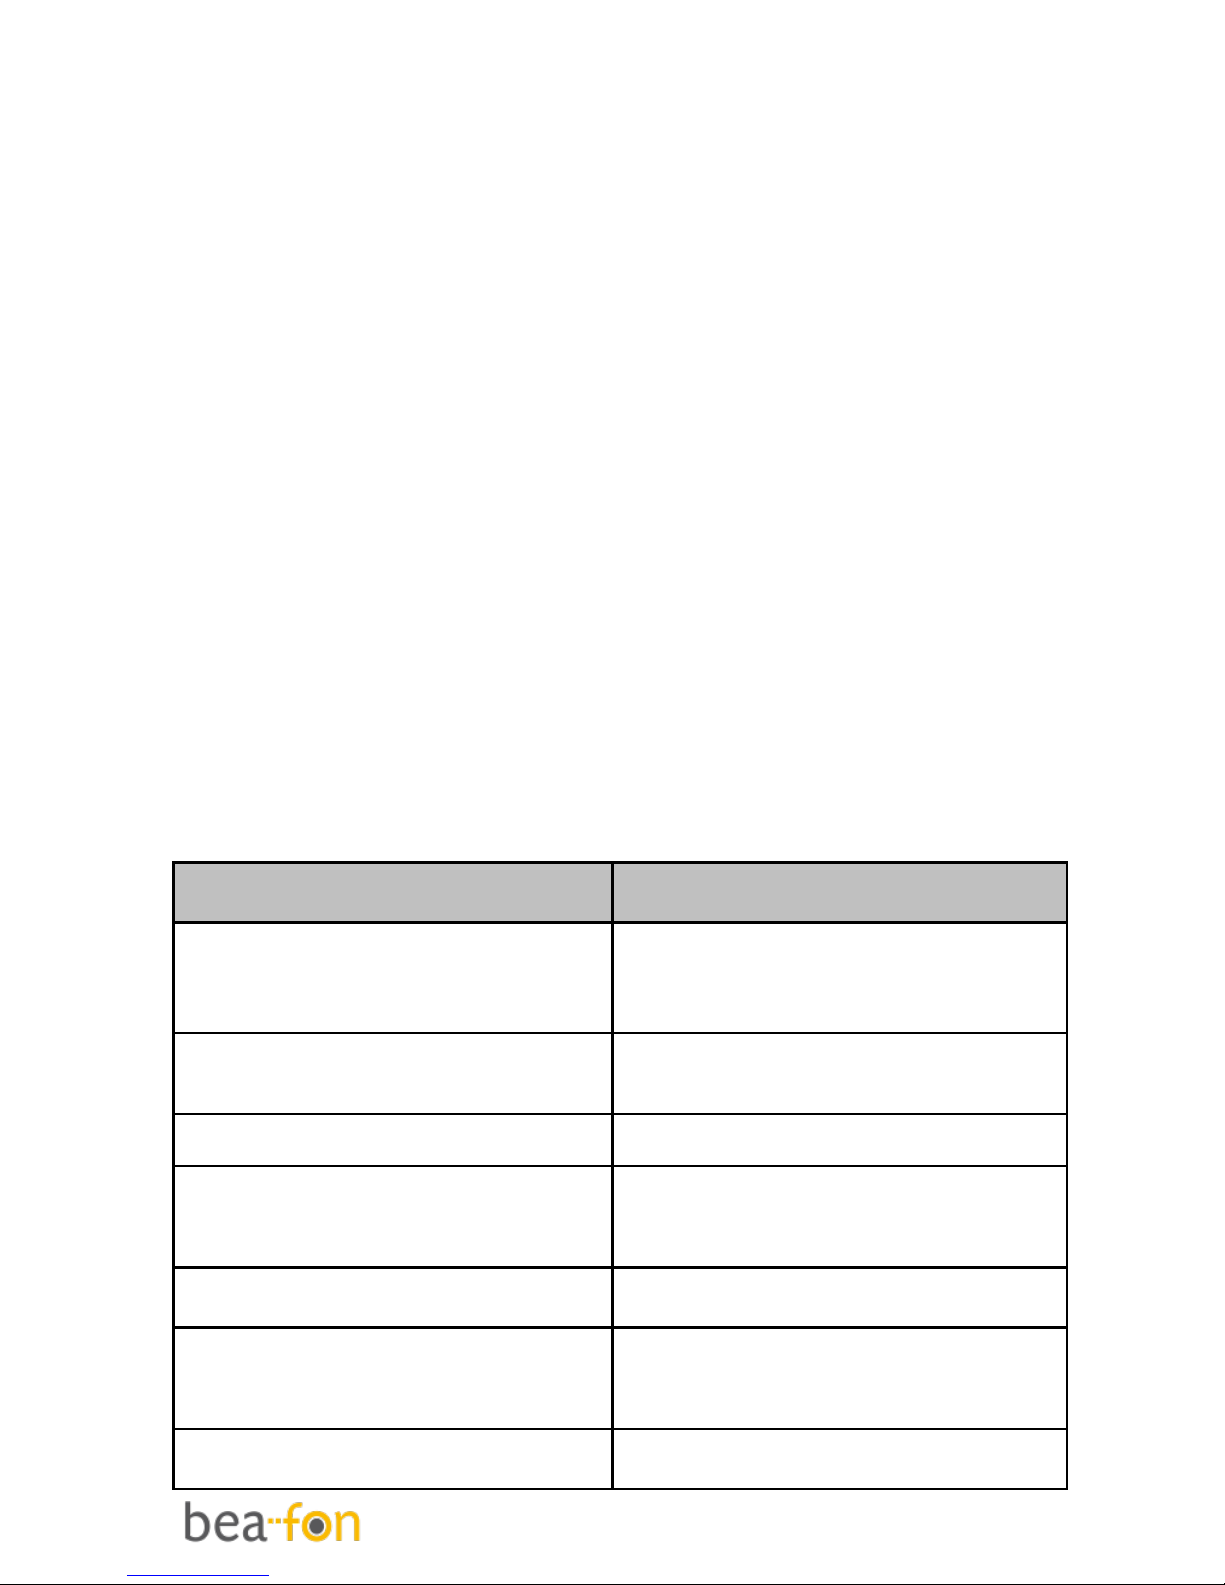
In Calculator mode, the following
functions are available to you:
Key
Function
1-0
The keys 1 to 0
insert a digit.
#
To insert a decimal
Arrow key up
+
Arrow key
down
-
Arrow key left
x
Arrow key
right
÷
Ok key
=
Page 36

36
The keys 1 to 0 insert a digit.
To insert a decimal, press #.
Press the up and down arrow key for
+, -
Press M1 and M2 key for x and ÷.
Press Camera key for =.
To get the result, press Equal. Press and
hold Clear to clear the display for a new
calculation.
Calendar
1. Select Menu, Extras and press OK
2. Select Calendar and press OK
3. Add events:
4. Press Options and select Add event.
5. Enter the desired details.
6. To save the event, press Options and
Save.
7. If there are some existed event in the
task list, press the up / down key to
select an event to get into the
options: View, Add, Edit, Search and
Delete.
On the calendar interface, press the Navi
keys to browse through different days.
Page 37

37
Multimedia
Image viewer
1. Select Menu, Multimedia and press OK
2. Select Image viewer and press OK
View the saved photos (in .jpg format). You
can send and also receive the photos via
Bluetooth.
The following functions are available to
your under Options: View, Send, Use as,
Rename, Delete, Storage and Image
information.
FM-radio
1. Select Menu, Multimedia and press OK
2. Select FM-Radio and press OK
The tuned frequency is displayed.
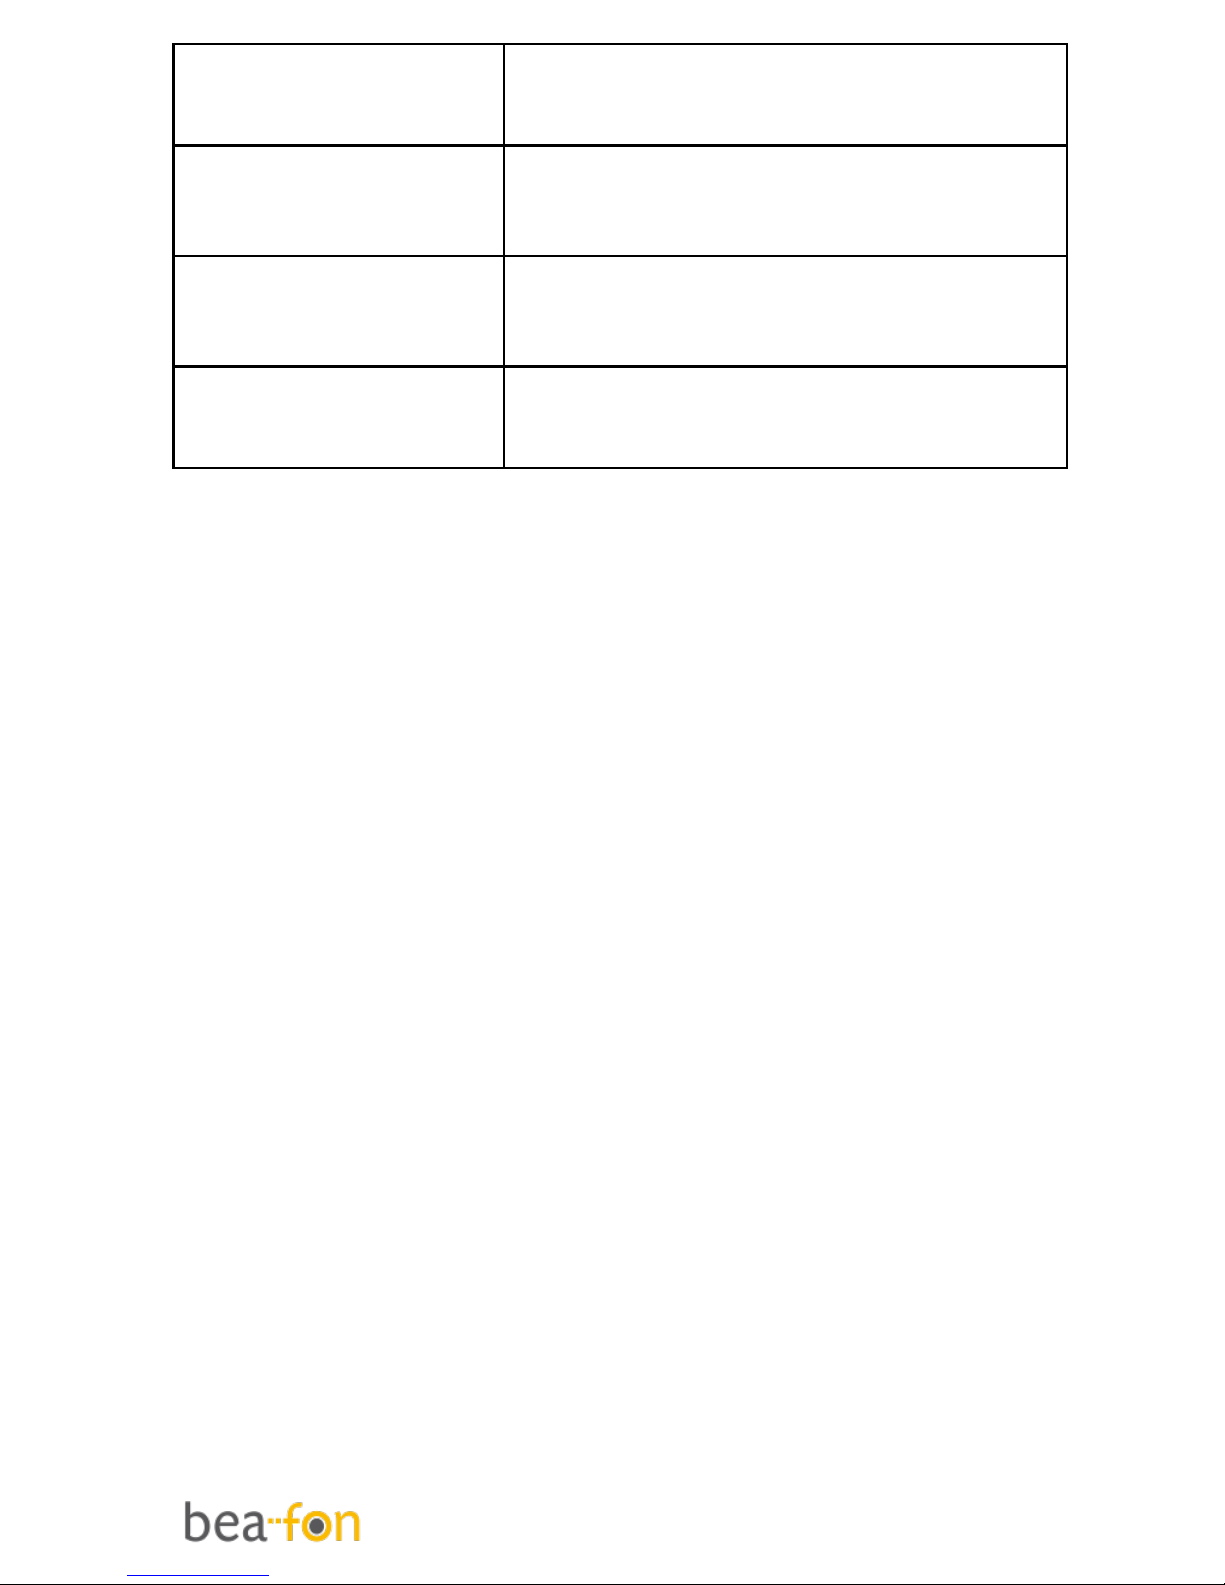
In FM-Radio mode, the following
functions are available to you:
Key
Function
Arrow left
Search previous channel
Page 38
38
Arrow
right
Search next channel
Arrow key
up
volume up
Arrow key
down
volume down
OK key
On/off the radio
function
Enter Options, you can make the
following operations:
Channel List:
There are 30 channels for you to store.
Manual Input:
Inputs the FM frequency you prefer.
Auto search:
Scan the stations and save the stations
found in the channel list.
Current channel save:
When a station has been found, select
Current channel save and press OK
Note: Auto search needs some time, so
please be patient.
For better radio reception connect a
headset to the headset socket.
Page 39

39
File Manager
1. Select Menu, Multimedia and press OK
2. Select File Manager and press OK
Select Memory card and then press the
left menu key to access the submenus.
If you press Option by a file or folder you
can choose the following options:
Open:
To display the content of the selected
folder.
Send:
Send a file via Bluetooth.
New folder:
To create a new folder.
Rename
To rename a folder.
Delete:
To delete a folder.
Copy:
To copy a folder.
Delete:
To move a folder to another place.
Details:
Date and size about the file.
Page 40

40
Settings
Profiles (Tone settings)
Enter in the function; display the profile
mode list including General, Silent,
Meeting, Outdoor.
Select one mode and enter the option
menu:
Activate: Activate the profile mode.
Customize: Customize the profile mode
as following:
Alert type, Ring type, Ring tone,
Ringtone volume, Message tone, Message
volume, Keypad, Keytone volume, Power
on, Power off, Cover open, Cover Close
and System alert.
Reset: Reset the setting to the default.
Silent mode
Silent is a fixed profile with ring tone,
keypad tone and message tone disabled.
The alarm signals even if the phone is set
to silent. Press and hold # to
activate/deactivate Silent mode.
Page 41

41
SOS settings
The SOS function is a simple function
which can save lives at the deciding
moment. In all, you can save 5 SOS
numbers (relatives, neighbours, friends
and rescue). These numbers, previously
saved in order of sequence, will be
automatically dialled in an SOS by
pressing the SOS button on the back of
the mobile phone. During the SOS call, a
warning tone sounds so the person that
you rang knows that it is an emergency!
If you cannot get through on the first
number, the second number will be called
automatically. If you cannot get through
on the second number, the third number
will be called etc.
If no emergency number is saved or your
phone card has run out, or you are not
allowed under a foreign network (e.g.
Roaming not activated), you can dial 112
or another emergency number on the
numerical keypad.
SOS description
Press the SOS button on the back of the
mobile phone for 3 seconds. If you want
Page 42

42
to stop or cancel the SOS call, press the
SOS button again.
Functionality:
By pressing the SOS button, the phone
will send an SOS SMS person (in case
mobile number or telephones with SMS
function is available for emergency
contact) to the emergency numbers you
have previously saved and will be
automatically dialled in the given
sequence. (The emergency button also
functions when the phone is closed). The
mobile phone switches on the hands free
function at full volume and at the same
time, if the SOS call is not answered
within 25 seconds the next number is
dialled etc.
Note:
If you want to stop or cancel the SOS
call, press the right menu key or SOS
Key.
As a rule, the international emergency
call 112 can still be called outside of
the regional network of your network
operator.
Page 43

43
When changing a phone card: Always
make sure that there is sufficient
credit on your phone card because
private emergency numbers cannot be
dialled without sufficient credit.
Attention: If the SOS call is forwarded to
the voicemail, the SOS mode will end.
If you want to save SOS numbers such as
the ambulance service, the police, fire
brigade etc. as an SOS number, you must
gain permission from each of these
institutions beforehand. There will be no
liability for possible costs arising from
calling them by accident.
SOS settings
Set SOS:
Set On or Off the SOS alarm tone
function.
Set SOS numbers:
There you can edit and save at most five
SOS number in your phone.
SOS message:
Page 44

44
Edit the content of the SOS message
which will be sent out automatically when
the SOS function is using.
Phone settings
Time and date:
Set Home city and time and date
Language:
Here you can choose the language you
want in your display.
Pref. Input method:
Here you can choose the Input method
you want for write.
Display:
Wallpaper
Select your favourite picture as the
wallpaper of the standby window.
Display
In this menu, you can show/hide the time
and date display in default mode.
LED Mode:
On:
Set LED model for open, when there is a
missed call and unread message, mobile
Page 45

45
phone green tip LED lights flashing. The
red light glows when connecting the
charger is connected the charger is
charging tips.
Off:
The LED function is off
Night mode:
Night mode for activating/deactivating
the operation of the LED of the front
cover. When set to "Night mode", light
time is from 8.00 till 20.00.
LCD backlight:
LCD backlight for setting up the duration
(sec) of backlight and brightness.
Call settings
Depending on network operator support
and subscription, you can choose the
following options:
Caller ID:
Set the function of caller ID
Call waiting:
When this network service is activated,
the network notifies you of a new
incoming call while you have a call in
progress. Press OK to answer the waiting
Page 46

46
call. The first call is put on hold or press
the red key to reject the call.
Call divert:
To divert your incoming calls to your
voice mailbox or some other phone
number (network service). Select the
divert option you want. Several divert
options may be active at the same time.
Call barring:
With this network service you can restrict
the making and receiving of calls with
your phone.
Call time reminder:
Choose to remind you Periodic (30-60
seconds) or select Single (1-3000
Seconds) or select Off.
Answer Mode:
Cover answer
Open the phone to answer the incoming
call.
Any Key
You can press any key to answer a call.
Auto answer when headset mode
The phone answer the call automatically.
Page 47

47
Advanced settings
Black list:
With this function you can block incoming
phone numbers.
Network settings
This menu has connection with the
network suppliers, so please get in touch
with them when you use this function. If
you want to get into one network which
doesn’t have the roaming protocol with
the original network you have been in,
the phone will display the content that
you can make an emergency call.
Network selection:
Depending on network operator support,
you can choose the following options:
Selection mode
Set automatic or manual mode
Page 48

48
Security settings
You can choose the following options:
SIM security: To turn your SIM PIN
code On or Off, change PIN and change
PIN2.
Phone security: To lock your phone with
a password. The default password is:
0000.
Change password: Here you can
change your password of: Phone
password.
Connectivity:
You can connect wirelessly to other
Bluetooth compatible devices.
Bluetooth:
In standby mode: Press the down arrow
key to go directly to Bluetooth.
You can choose the following options:
Power:
Here you can choose to turn Bluetooth On
or Off.
Visibility:
Page 49

49
you can set the visibility on or off.
My device:
List of saved devices and enables you to
add new devices; Search new device.
Search audio device:
Search for available Bluetooth audio
devices. If Bluetooth is not enabled you
can enable it now by pressing Yes.
Search audio device descripton:
1. Press OK, the phone is going to
search for new devices.
2. Select the devices you want to
connect with and press Pair.
3. When connecting with another
Bluetooth device you need a shared
passcode. Enter the passcode and
press OK.
4. Select the device from the list and
press Option. Can choose the
following options: Connect, Rename,
Delete and Delete all.
My Name:
Here you can set the Bluetooth device
Name.
Page 50
50
Advanced:
Here you can set your: Audio path,
Storage and check the My address.
Restore factory settings
To reset some of the menu settings to
their original values. The password is:
0000
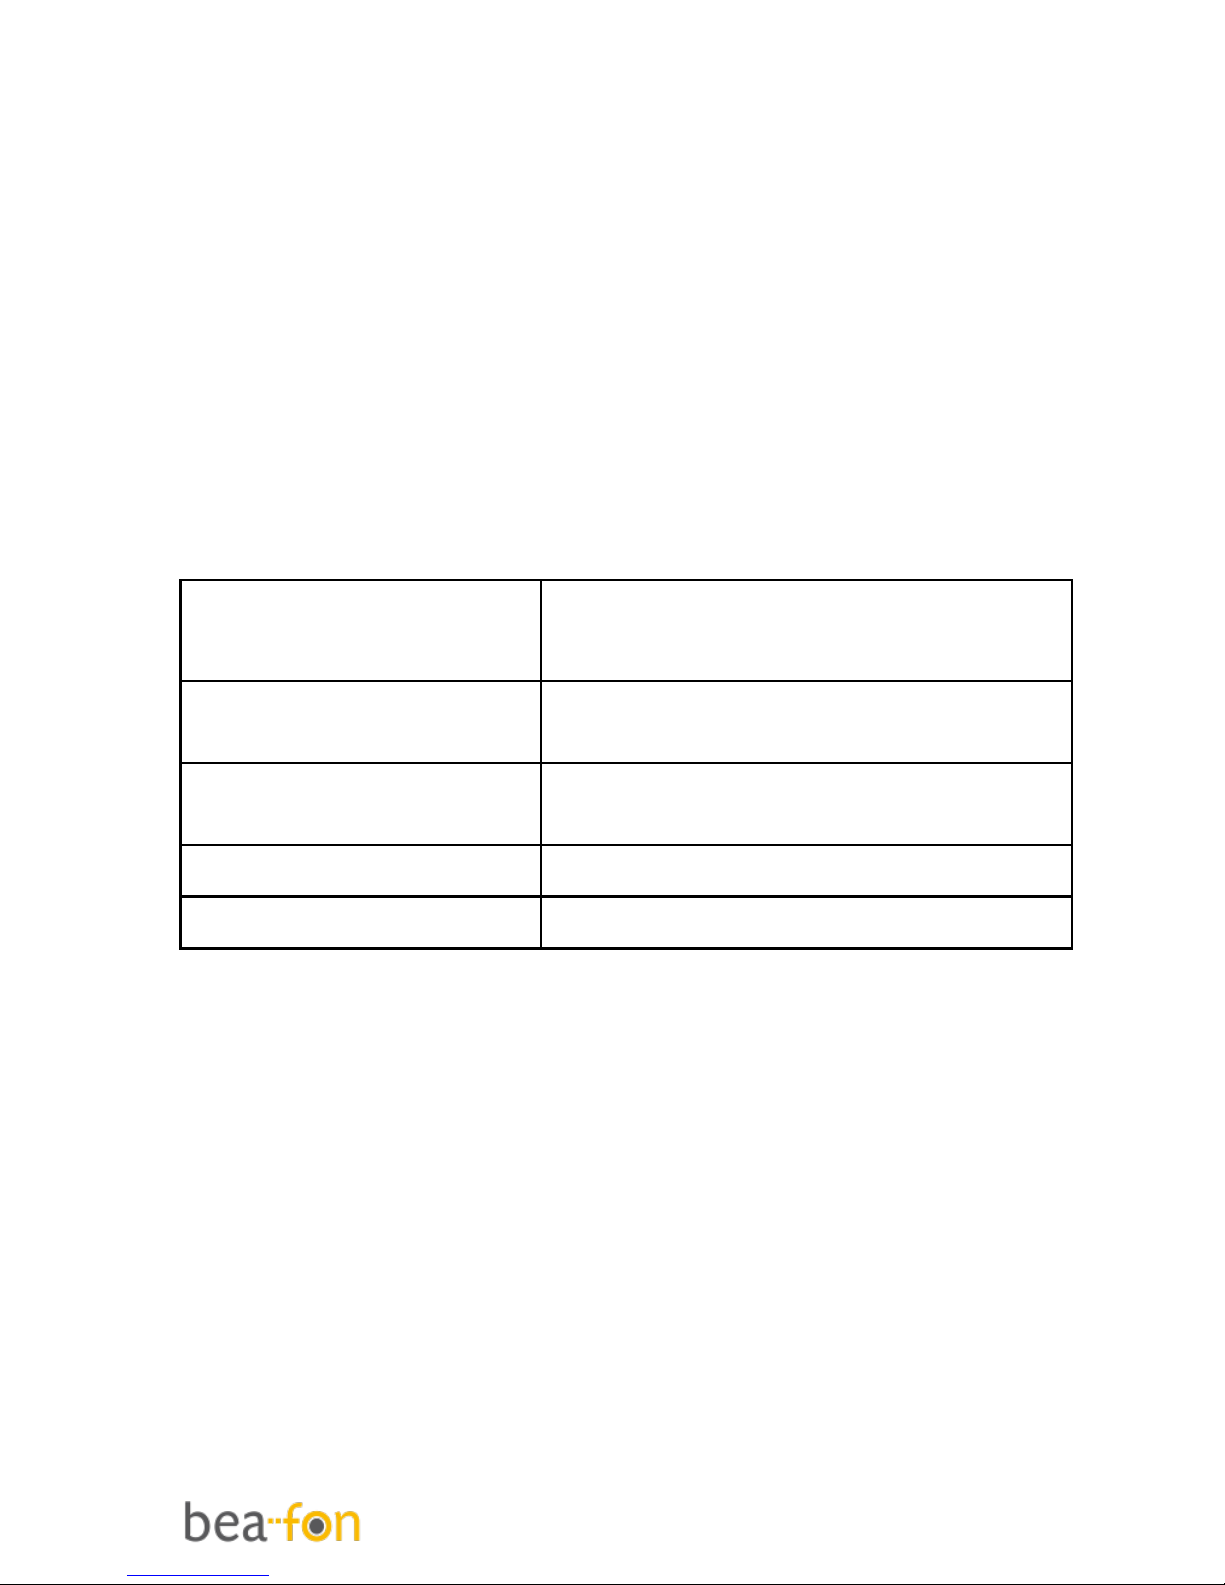
Basic Specifications:
Network–
Dual-Band
GSM 900/DCS1800
Dimension:
101x50.5x19.5mm
Battery:
Li-ion 3.7V - 800mAh
Standby time:
up to 250 hours*
Talk time:
Up to 480 minutes*
*Variation in operation times may occur
depending on SIM card, network, and
usage settings, usage style and
environments.
Page 51
51
V1.0
 Loading...