

Page 1
User Manual EN
SL240
Page 2

2
General Information
Congratulations on the purchase of your
Bea-fon SL240!
Please read this information before using
the phone to make a better use of your
phone. We are not responsible for any
damage due to your misunderstanding of
this information and misacting.
We are endeavouring to improve our
products and services. We reserve all the
rights to revise and change the
description of this product and its
software as well as this user’s manual
without obligation to notify any person of
such revisions and changes.
This user manual is for your better use of
this phone not an approval of any
accessories. All the pictures in this
manual are for reference only. There may
be slight difference between the
appearance of phone/ keys/ contents of
display used in this manual and those of
your phone. Please refer to your phone
for actuality. Some features introduced in
this manual are network or subscription-
Page 3

3
supported features. Please contact your
network operator for further information.
Please check the package contents to
ensure that all components listed below
are included. If the product is defective or
if there is a component missing,
immediately contact the retailer where
you purchased this handset.
Page 4

4
General Information
Your Bea-fon SL240 box contains:
• 1 mobile phone (SL240)
• 1 desktop charger (SL240)
• 1 travel charger (SL240)
• 1 battery (SL240)
• User manuals (SL240)
If you find the size of the script not easily
readable for you, you can also find this
manual on our website, where you will be
able to adjust the size of the script.
Go to: www.beafon.com/Products
Device Code:
This device code ensures that
unauthorized persons will not be able to
use your phone. The default code is 0000
PIN-Code:
The PIN-code was supplied to you by
your network operator together with your
SIM card and/or adjusted/set up by
yourself.
Page 5

5
Directory
General Information ............................ 4
Device Code: ................................... 4
PIN-Code: ....................................... 4
Directory ............................................ 5
Your Phone ......................................... 9
Getting started.................................. 11
What is a SIM card? ....................... 11
Insert the SIM card and menory card 11
Insert the battery as follows ............ 12
Charging the battery ...................... 13
Switching the telephone on or off ..... 15
Display (Standby mode) .................. 16
Screen icons .................................. 17
Menu Operation ............................. 18
Connect an optional headset ............ 19
Call function ..................................... 20
Make a call .................................... 20
Answering a call ............................. 21
Operations during a call .................. 21
Hands Free: .................................. 22
Menu ............................................... 22
Phonebook ....................................... 24
To access the phonebook: ............... 24
Add new contact: ........................... 24
To edit (change) a Phone Book entry:
................................................... 25
Page 6

6
To delete all entries from the phone or
SIM card ....................................... 25
Store a Phonebook entry to a Speed
dial key (2-9) ................................ 26
Direct Number: .............................. 26
Making calls using the Photo Contacts
................................................... 26
Create photo contact ...................... 27
Messages ......................................... 28
Write message ............................... 28
Inbox: .......................................... 29
Outbox: ........................................ 30
Drafts: .......................................... 30
Sent messages .............................. 30
Settings ........................................ 30
SMS Settings ................................. 31
Voice mail: .................................... 31
Call history ....................................... 33
Missed Dialled and Received or All calls
................................................... 33
Delete call logs: ............................. 33
Organizer ......................................... 34
Alarm ........................................... 34
Tasks ............................................ 35
Calculator: .................................... 35
Multimedia ....................................... 36
Camera ......................................... 36
Take a picture: .............................. 36
Image viewer ................................ 37
Page 7

7
FM-Radio....................................... 37
File Manager .................................. 39
Settings ........................................... 40
Tone settings: ............................... 40
SOS ............................................. 40
SOS description: ............................ 41
SOS setting: .................................. 43
Phone settings: .............................. 43
Time and date: .............................. 43
Language: ..................................... 43
Pref. Input method: ........................ 43
Wallpaper: .................................... 44
Brightness: ................................... 44
Call settings .................................. 44
Caller ID: ...................................... 44
Call waiting: .................................. 44
Call divert: .................................... 45
Call barring: .................................. 45
Call time reminder: ........................ 45
Network settings ............................ 45
Network selection: ......................... 46
Set automatic or manual mode ........ 46
Security settings ............................ 46
Connectivity: ................................. 47
Bluetooth: ..................................... 47
Visibility: ....................................... 47
My device: .................................... 47
Search audio device: ...................... 47
My Name: ..................................... 48
Page 8

8
Restore factory settings .................. 48
Basic Specifications ........................ 49
FAQ ................................................. 50
Battery ............................................ 53
Phone .............................................. 55
For your safety ................................. 57
Operating environment: .................. 58
Electronic devices: ......................... 59
Pacemakers: ................................. 59
Hearing aids: ................................. 60
Other medical devices: ................... 60
Posted facilities: ............................. 60
Vehicles: ....................................... 61
For your safety ................................. 63
Certification information (SAR): ....... 63
Information ...................................... 64
Liability Disclaimer: ........................ 64
Information: .................................. 65
Address: ....................................... 65
Page 9
9
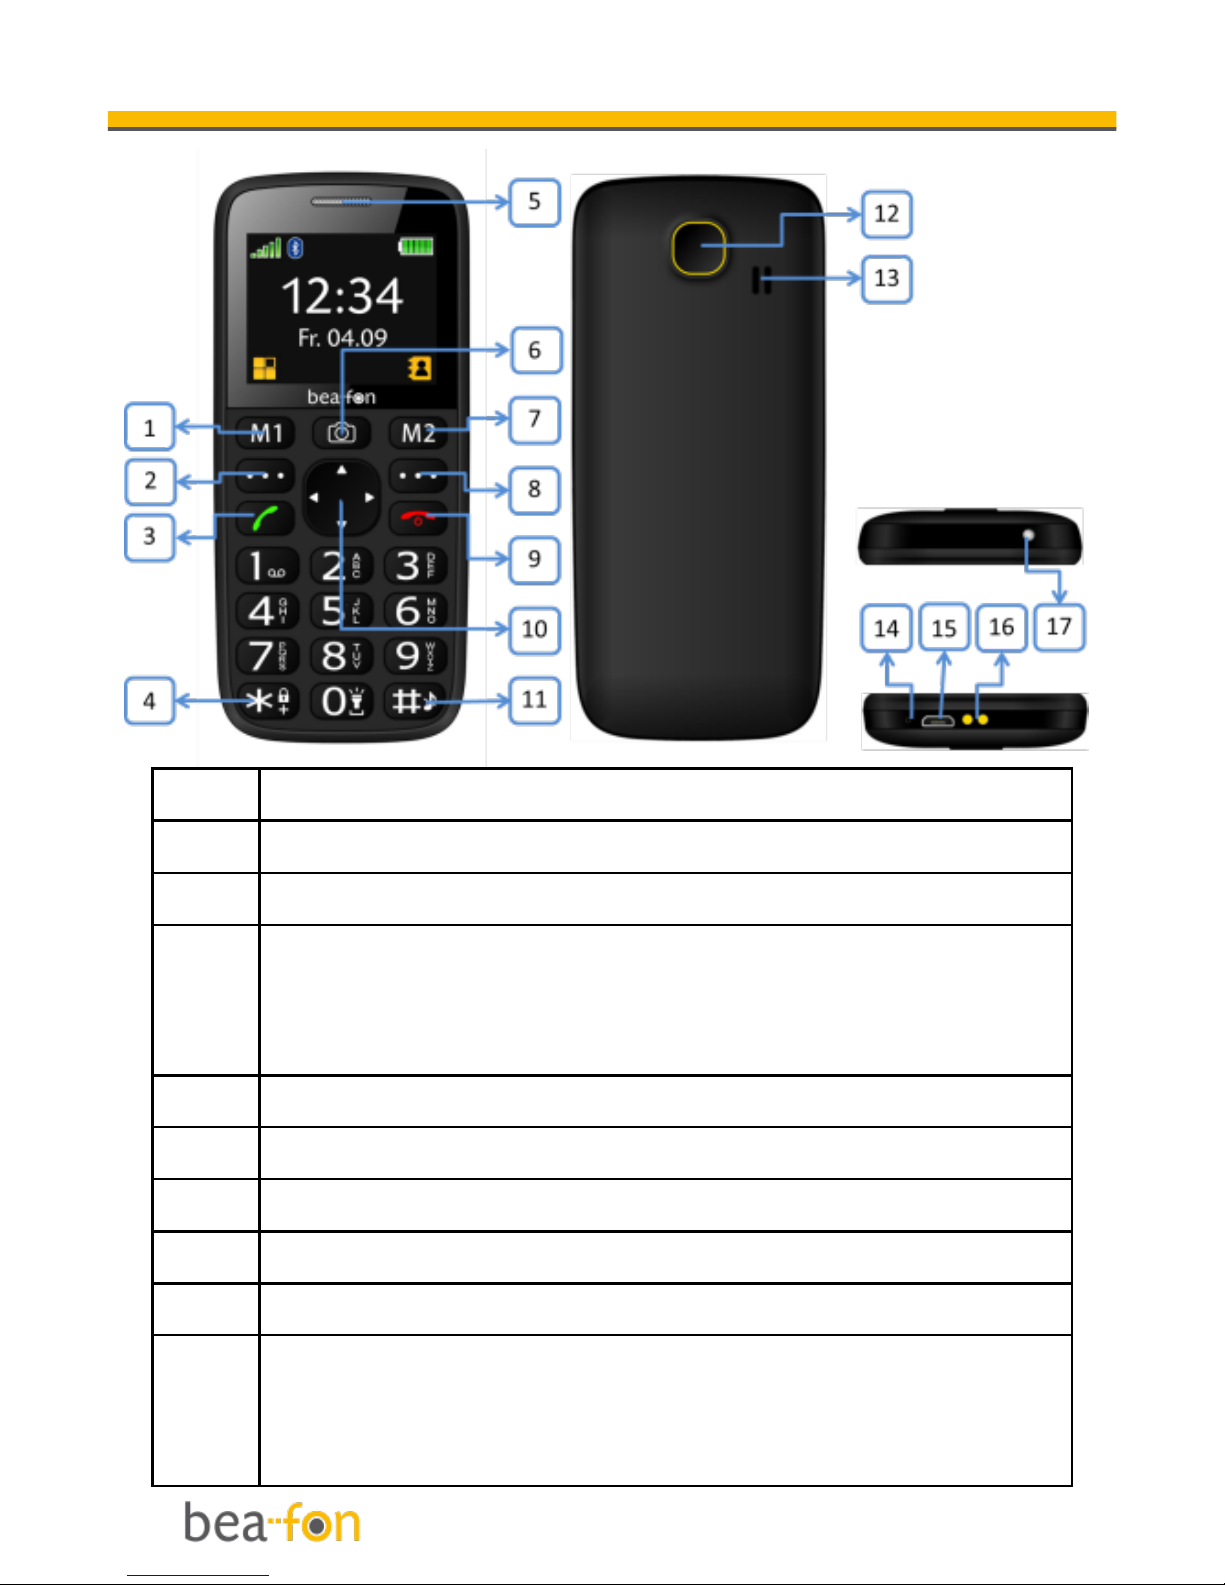
Your Phone
1
Direct dialing number M1
2
Main menu key | left menu key
3
Dialing | History Calls
4
* Key, Press this button on the idle
screen to enter the following
symbols : * /+ /P / W.
5
Loudspeaker
6
Camera key
7
Direct dialing number M2
8
Contact menu key | right menu key
9
Power on/off | End key
10
4 Navi key navigation:
Arrow key up: On the idle screen
this button takes you to the
Page 10
10
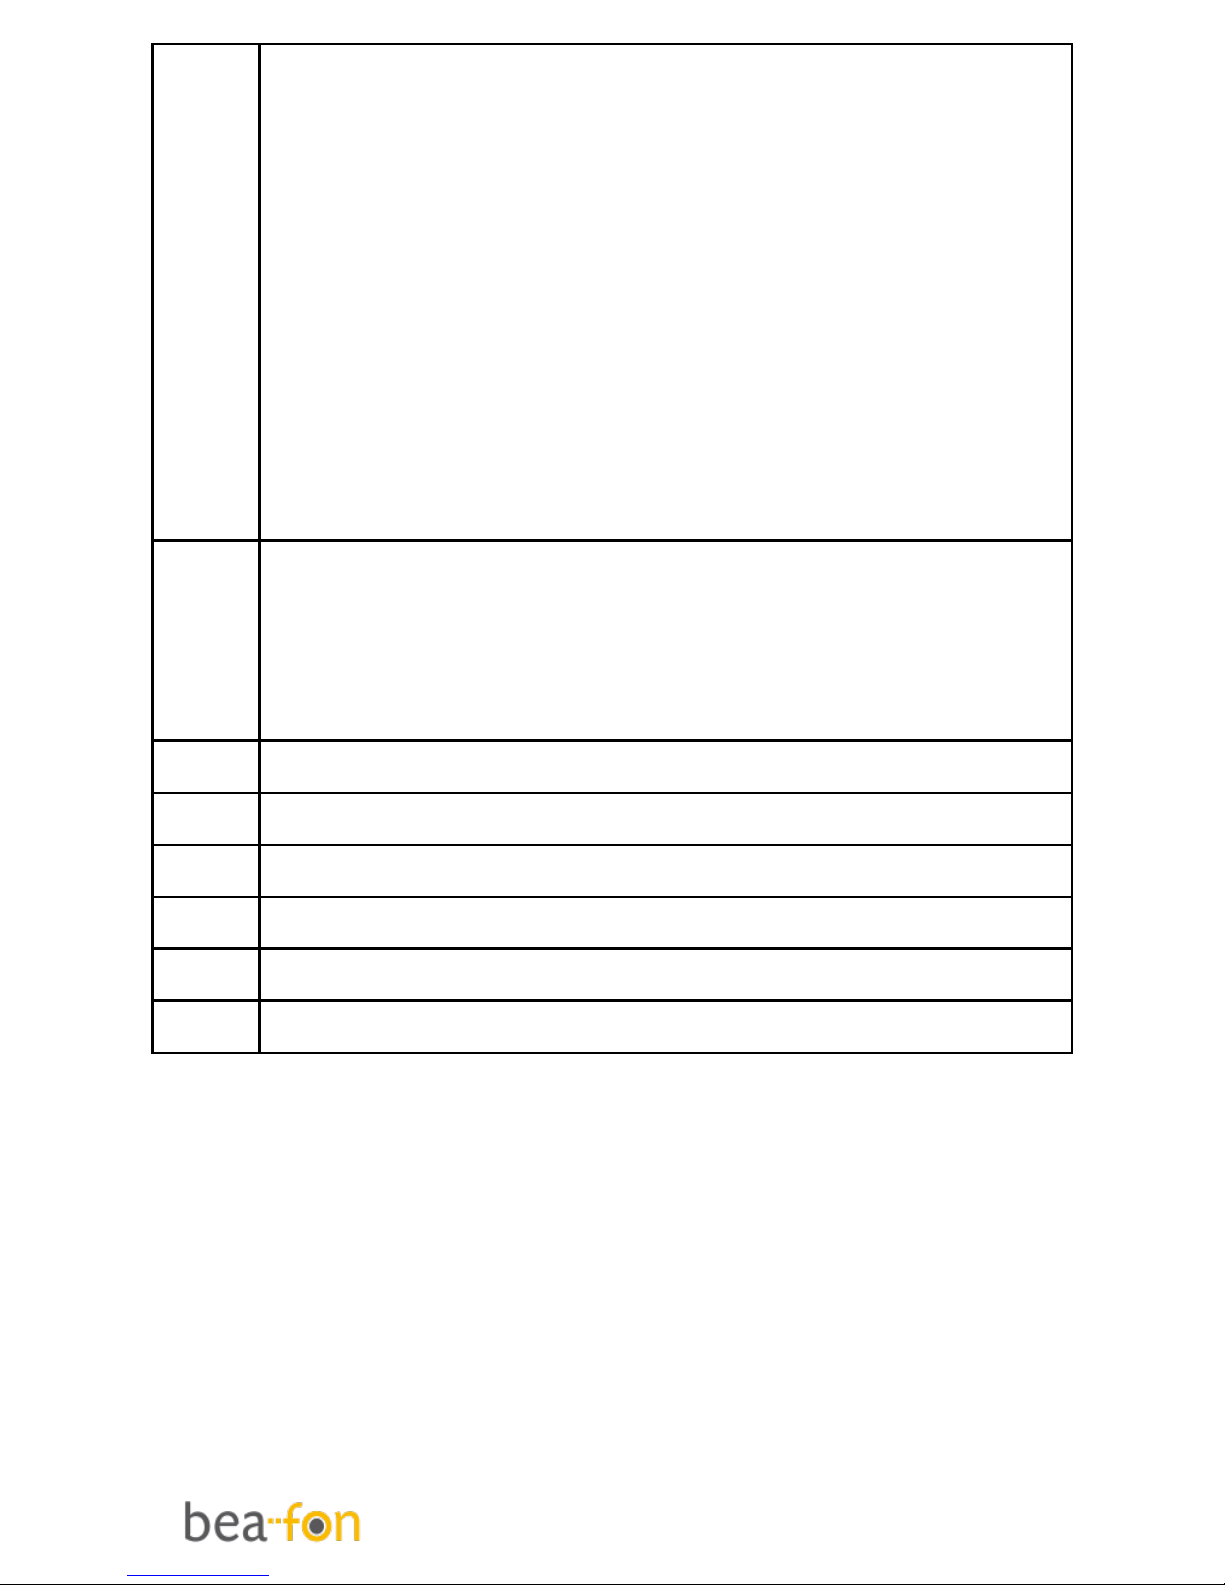
Messages menu.
Arrow key right:
On the idle screen this button takes
you to the Alarm menu.
Arrow key down:
On the idle screen this button takes
you to the photo contacts.
Arrow key left:
On the idle screen this button takes
you to the Calendar menu.
11
# Key, Long press can switch
between in silent mode with general
modes; In edit mode, change the
input method.
12
SOS button
13
Polyphone loudspeaker
14
Microphon
15
Charger port
16
PIN Connection to Cradle charger
17
LED Flashlight
Page 11

11
Getting started
What is a SIM card?
Every mobile phone has a SIM card
(Subscriber Identity Module). This is a
micro-chip that holds your personal
information such as names and phone
numbers. Your phone won’t work without
it. If you already have contacts on your
SIM card, they can be transferred in most
cases.
Keep the SIM card away from children.
The SIM card can easily be damaged or
bent. You should therefore handle the
SIM card with care during installation
and/or removal.
Insert the SIM card and menory
card
1. Make sure that the phone is switched
off and the charger is disconnected
from the phone.
2. Turn the phone over and remove the
battery cover.
Page 12
12
3. If the battery is already inside,
remove it.
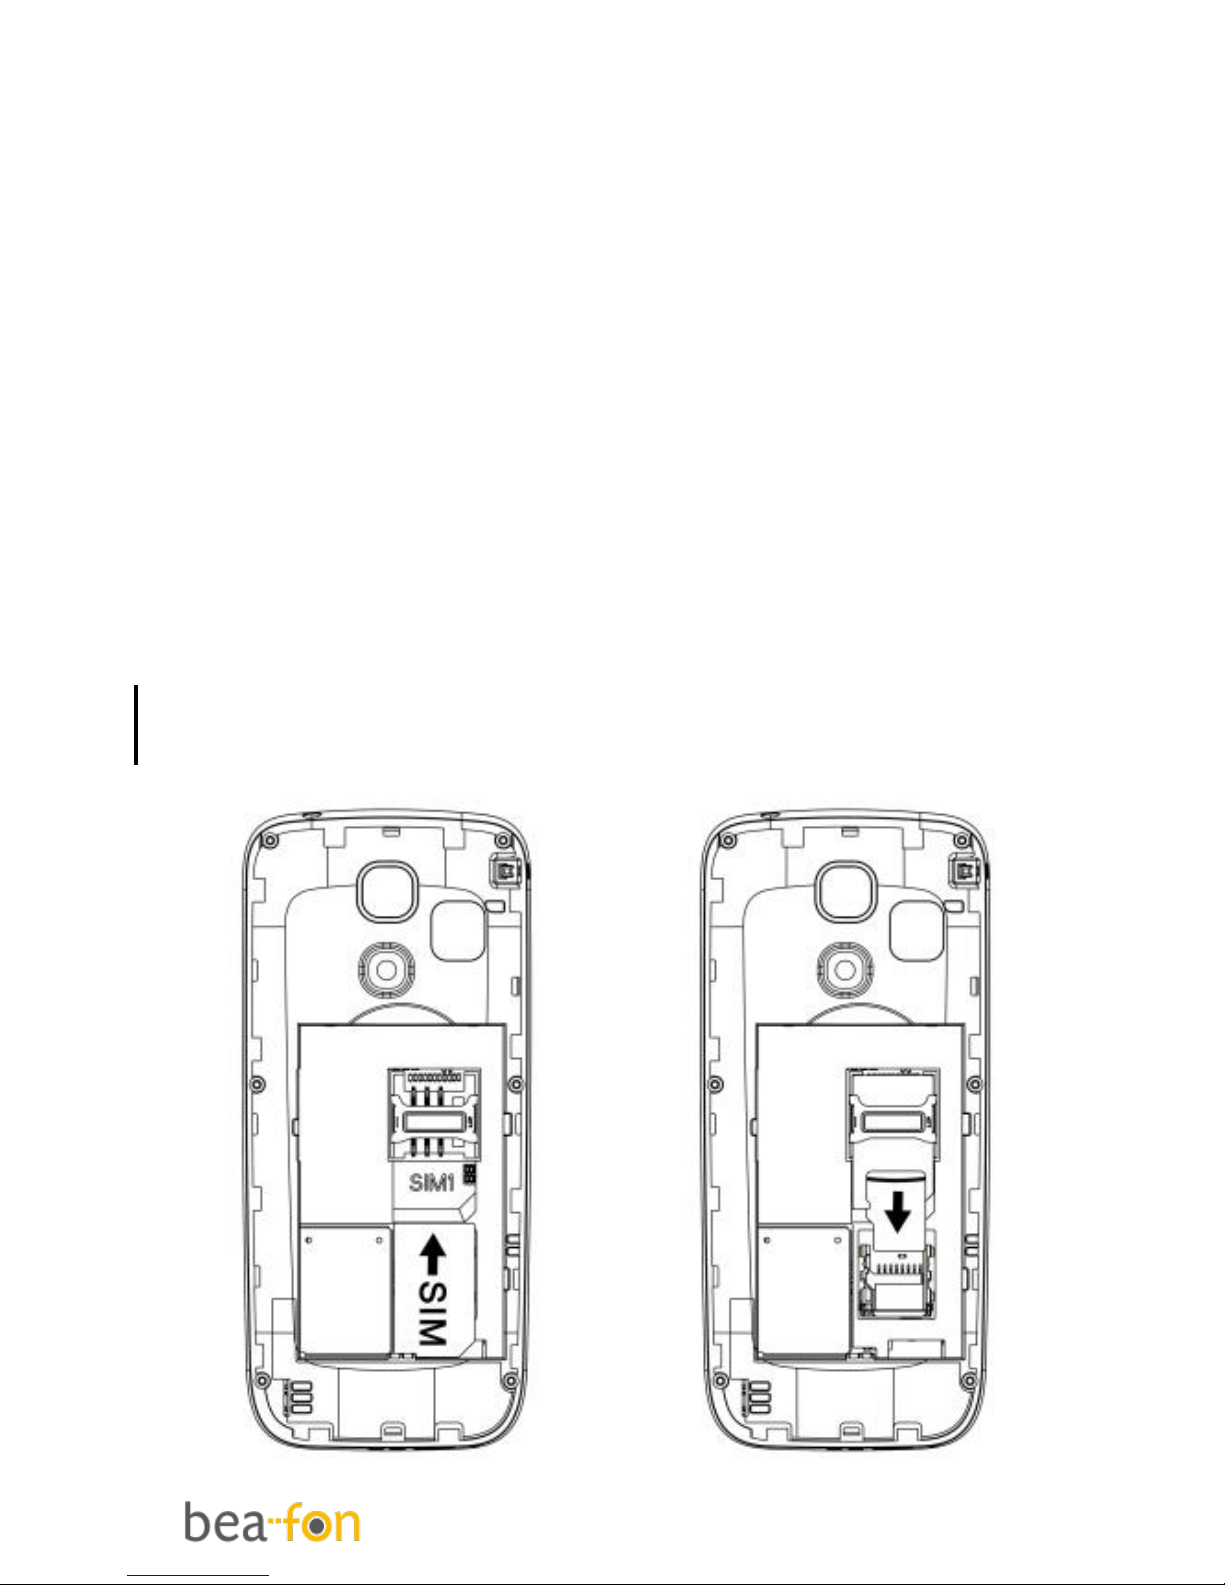
4. 1. SIM: Slide the SIM card carefully
into the SIM card slot. Make sure that
the gold-coloured connectors on the
SIM card are facing downwards and
that the bevelled corner is on the
right.
5. 2. Memory Card: Slide the Micro SD
card into the Micro SD card slot. Make
sure that the gold-coloured
connectors on the micro SD card are
facing downwards.
1 2
Page 13
13
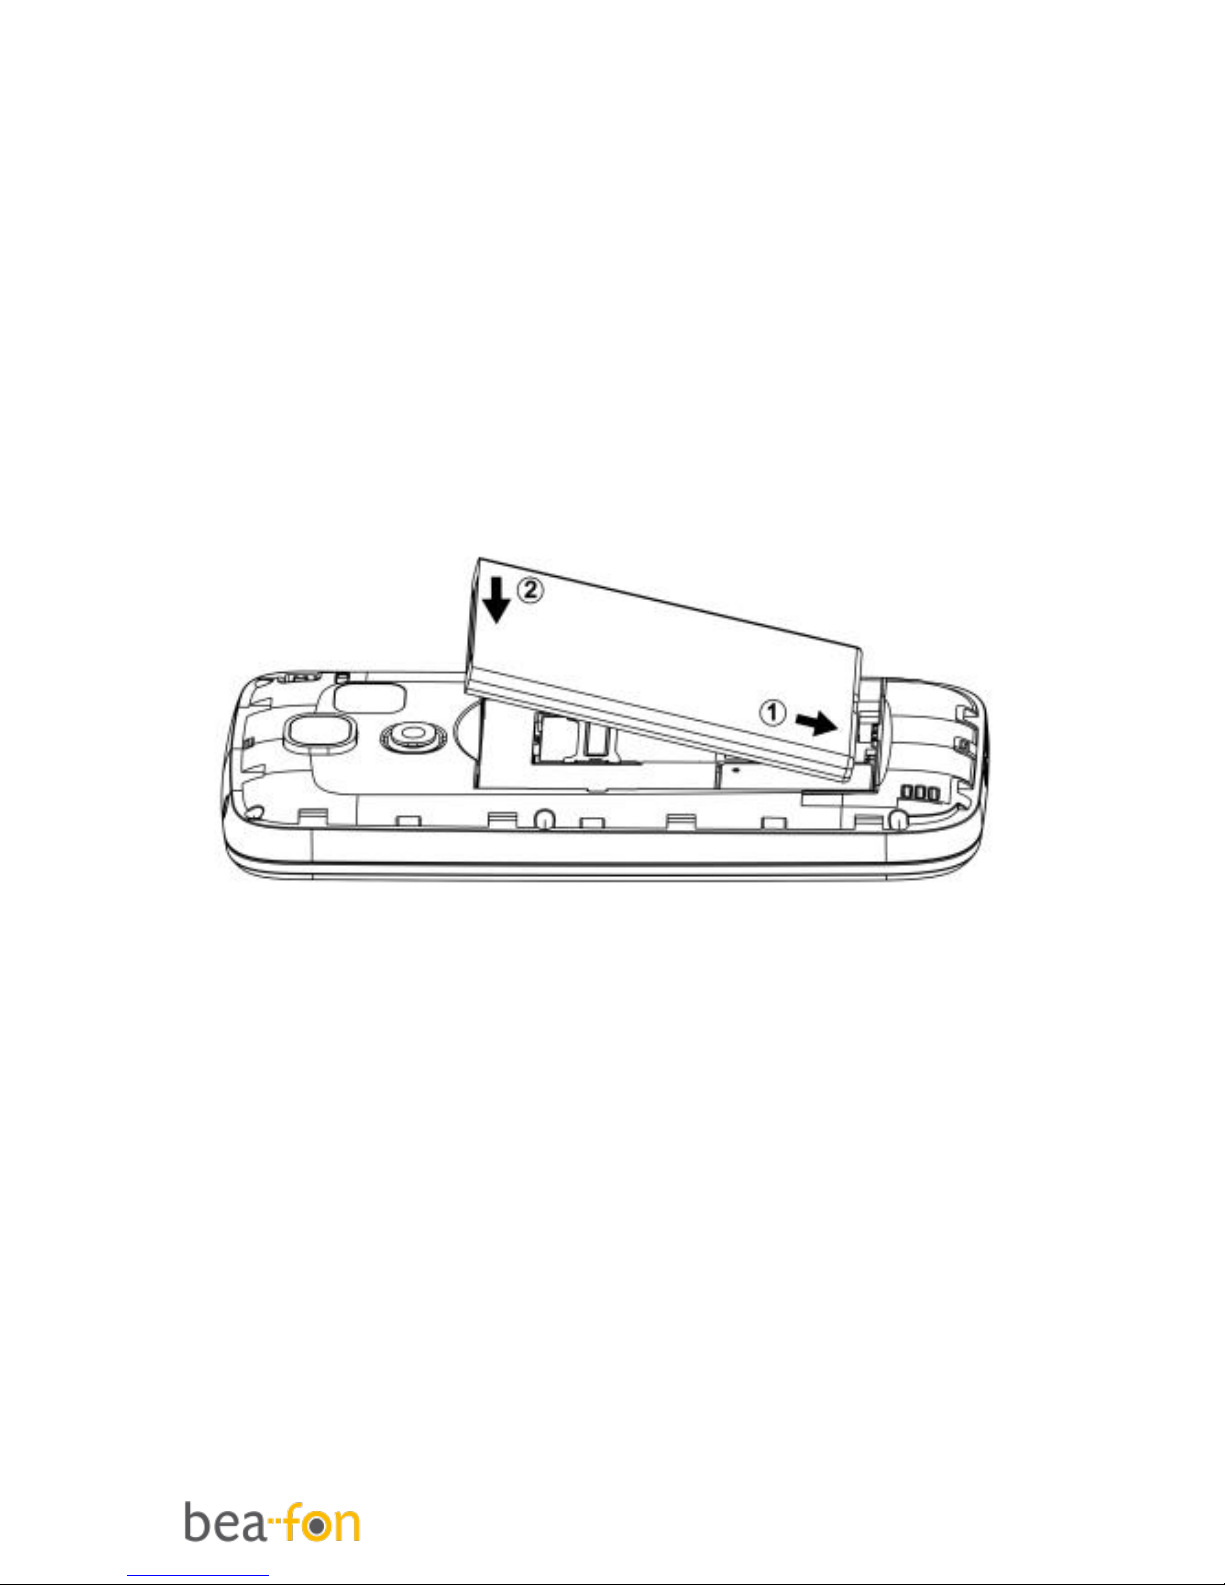
Insert the battery as follows
1. Insert the battery by aligning the gold
contacts in the battery compartment
on the phone.
2. Push down on the upper section of the
battery until it 'clicks' into place.
3. Close the battery compartment by
sliding the cover closed until you hear
a ‘click’.
Charging the battery
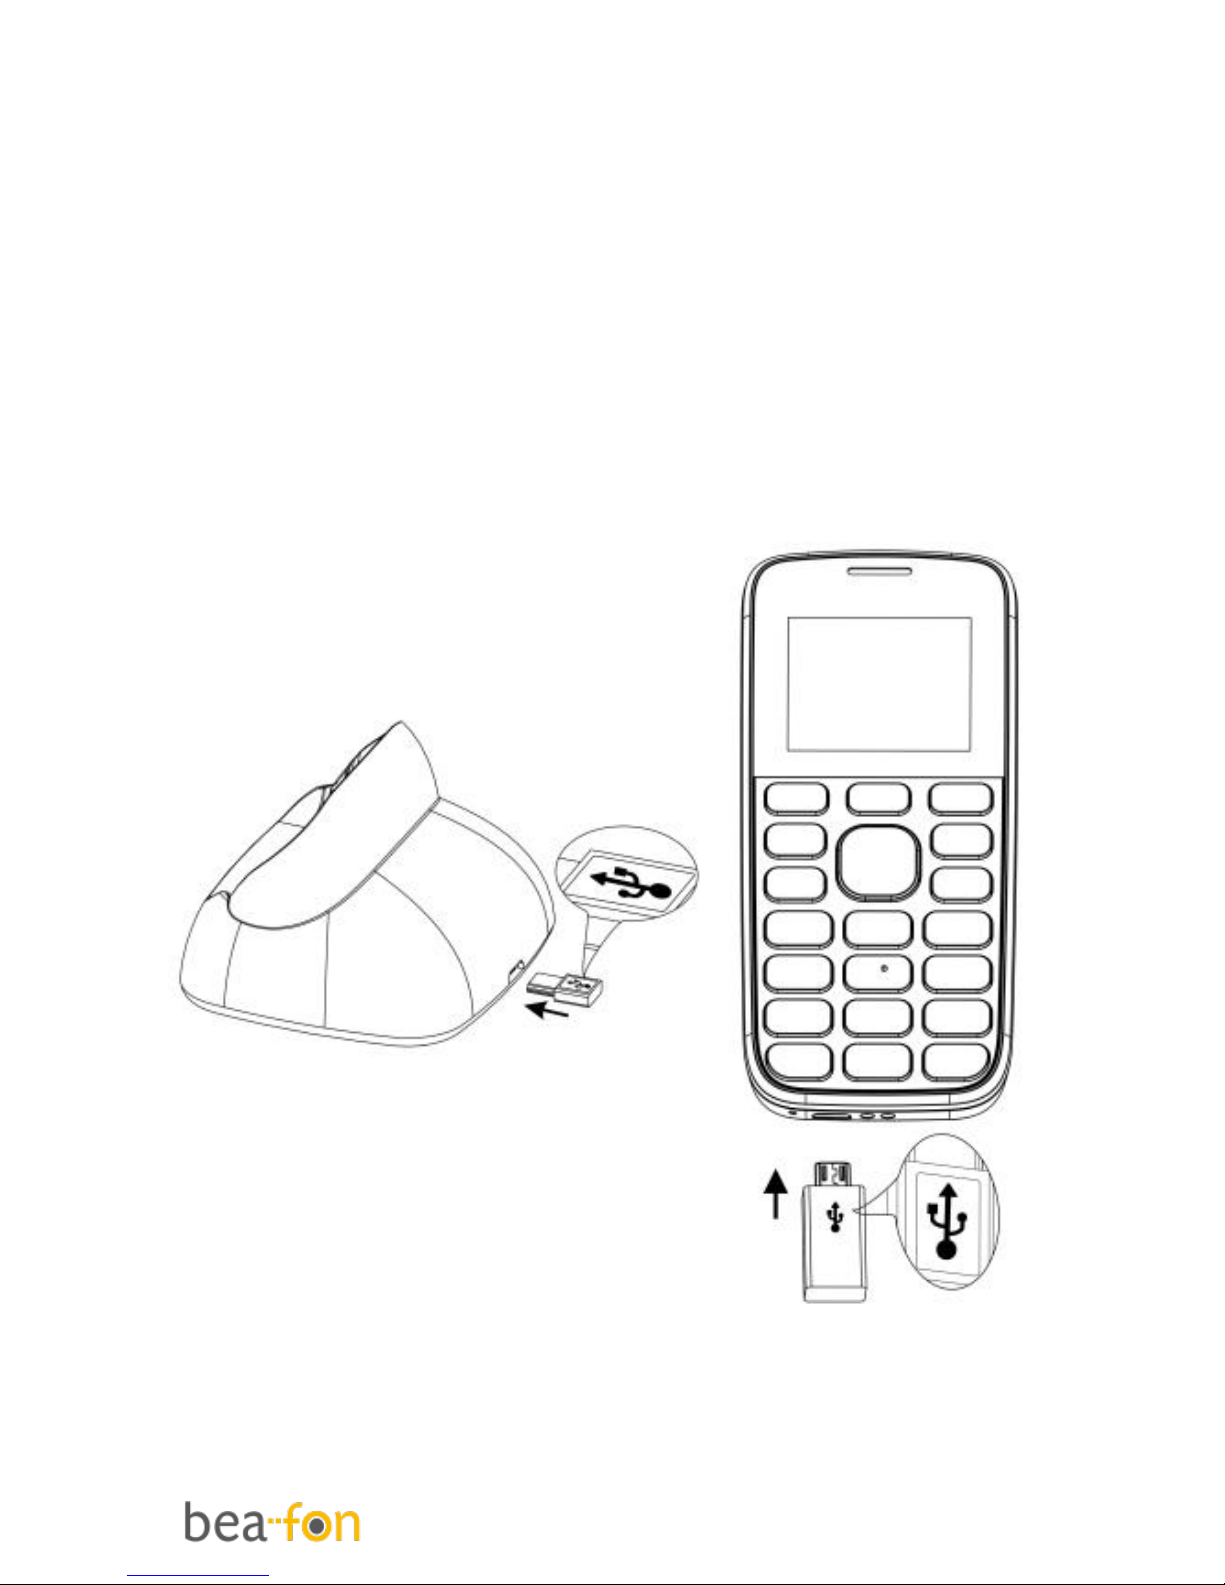
There are two ways of SL240 battery
charging:
A. Desktop charging
B. Travel charging
The lithium battery of the mobile phone
can be immediately used after unpacking.
Page 14
14
A new battery, is not fully charged, and
performs best after performing a full
charge/discharge 3 times.
1. Plug the charger into the charger
connector.
2. Plug the other end into an electrical
outlet.
3. The phone may need several hours for
reaching a fully charge.
Page 15

15
When your phone is power off, it
might take a few seconds to show
charging display and it shows charge
complete when finished.
When your phone is power on, the
battery icon flickers when it starting
charging and become still with full
bars in battery icon when finished.
4. The battery is fully charged when the
Battery Symbol is fully. Disconnect
the charger from the phone and the
AC outlet.
Note: Charge the battery for at least 12
hours before using the phone for the first
time.
Switching the telephone on or off
Make sure that you SIM card is in your
mobile phone and that the battery is
charged.
1. Press the red key to switch the phone
on.
2. If prompted, choose your language
and press OK.
3. If you have entered a PIN-code
before, the phone will ask for the code
now. Enter the PIN-code and confirm
by pressing OK.
Page 16
16
4. To turn off your phone, press and hold
the red key for two seconds.
If you don’t insert a SIM card, your phone
shows Insert SIM. None of the functions
related to SIM
card can be used. You can make an
emergency call only.
Note: If you enter an incorrect PIN-code
3 times in succession, the phone will
require you to enter the PUK-code. You
received this PUK-code together with
your SIM card.
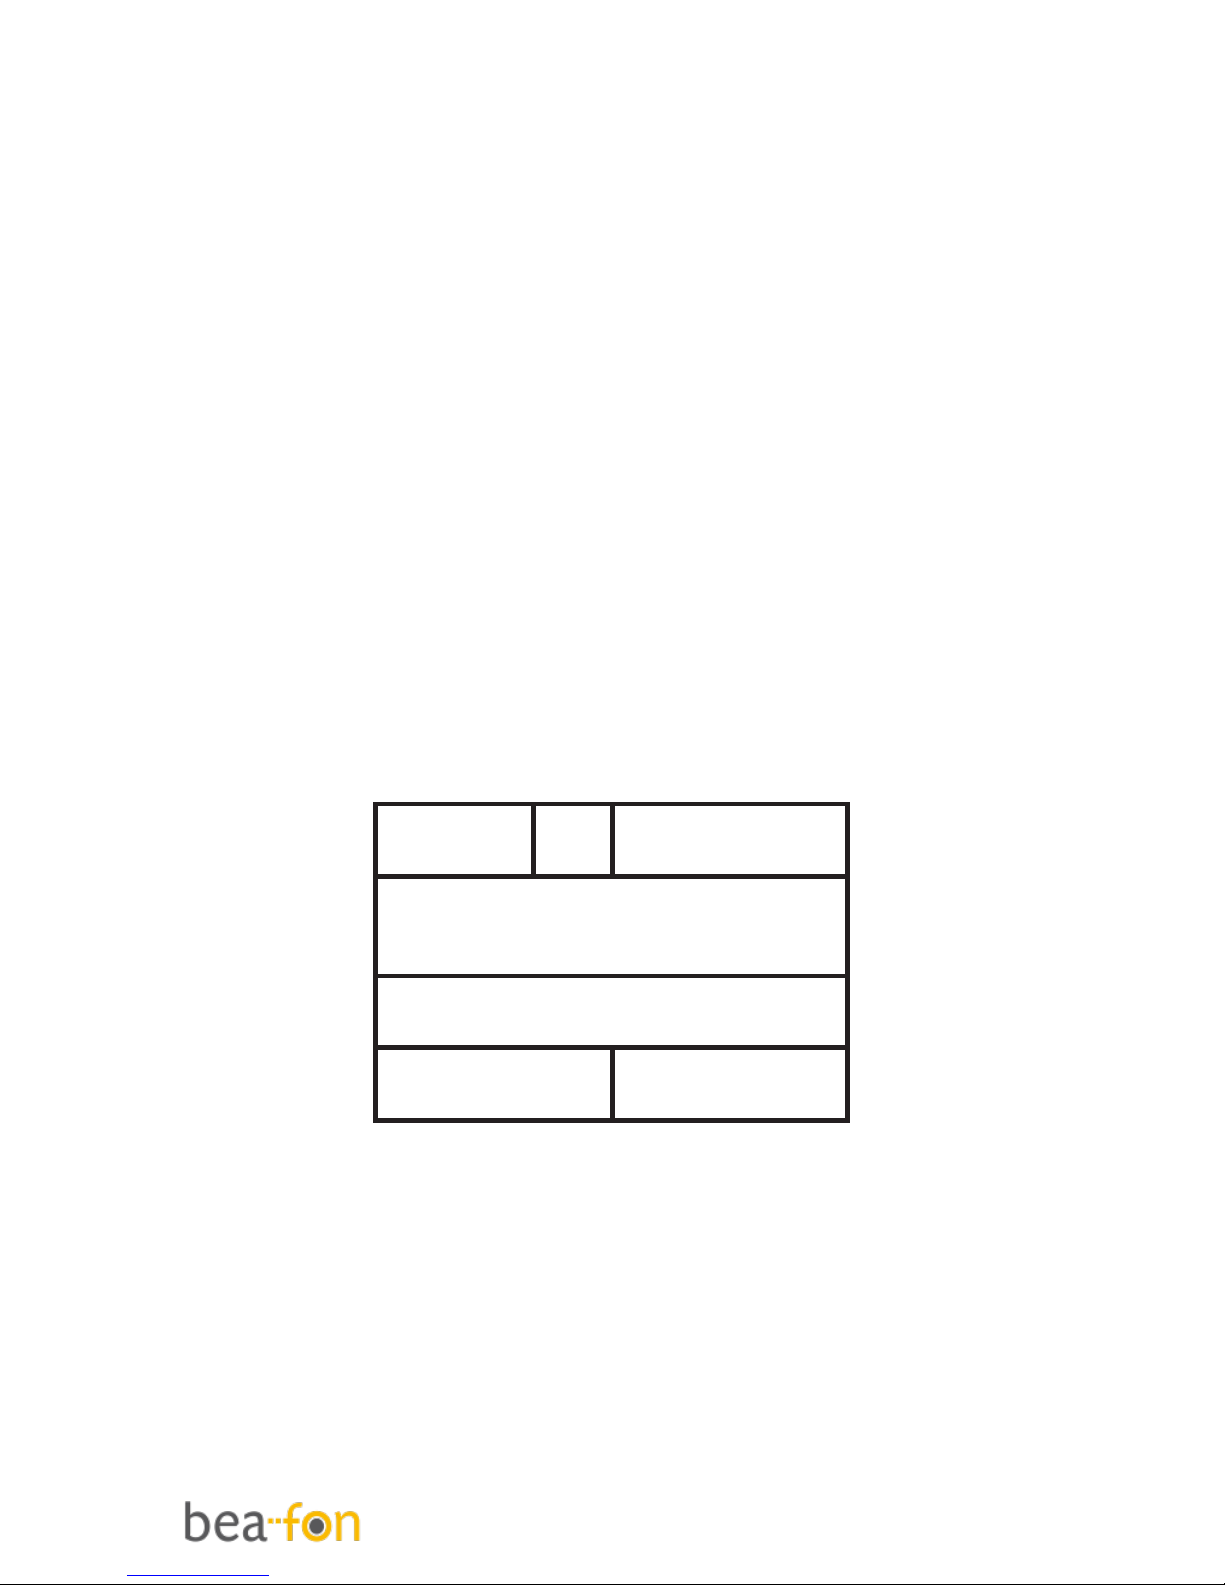
Display (Standby mode)
1 2 3
4
5
6
7
1. Signal status 5. Date and day
2. Pictograms 6. Menu
3. Battery status 7. Names
4. Time
Page 17
17
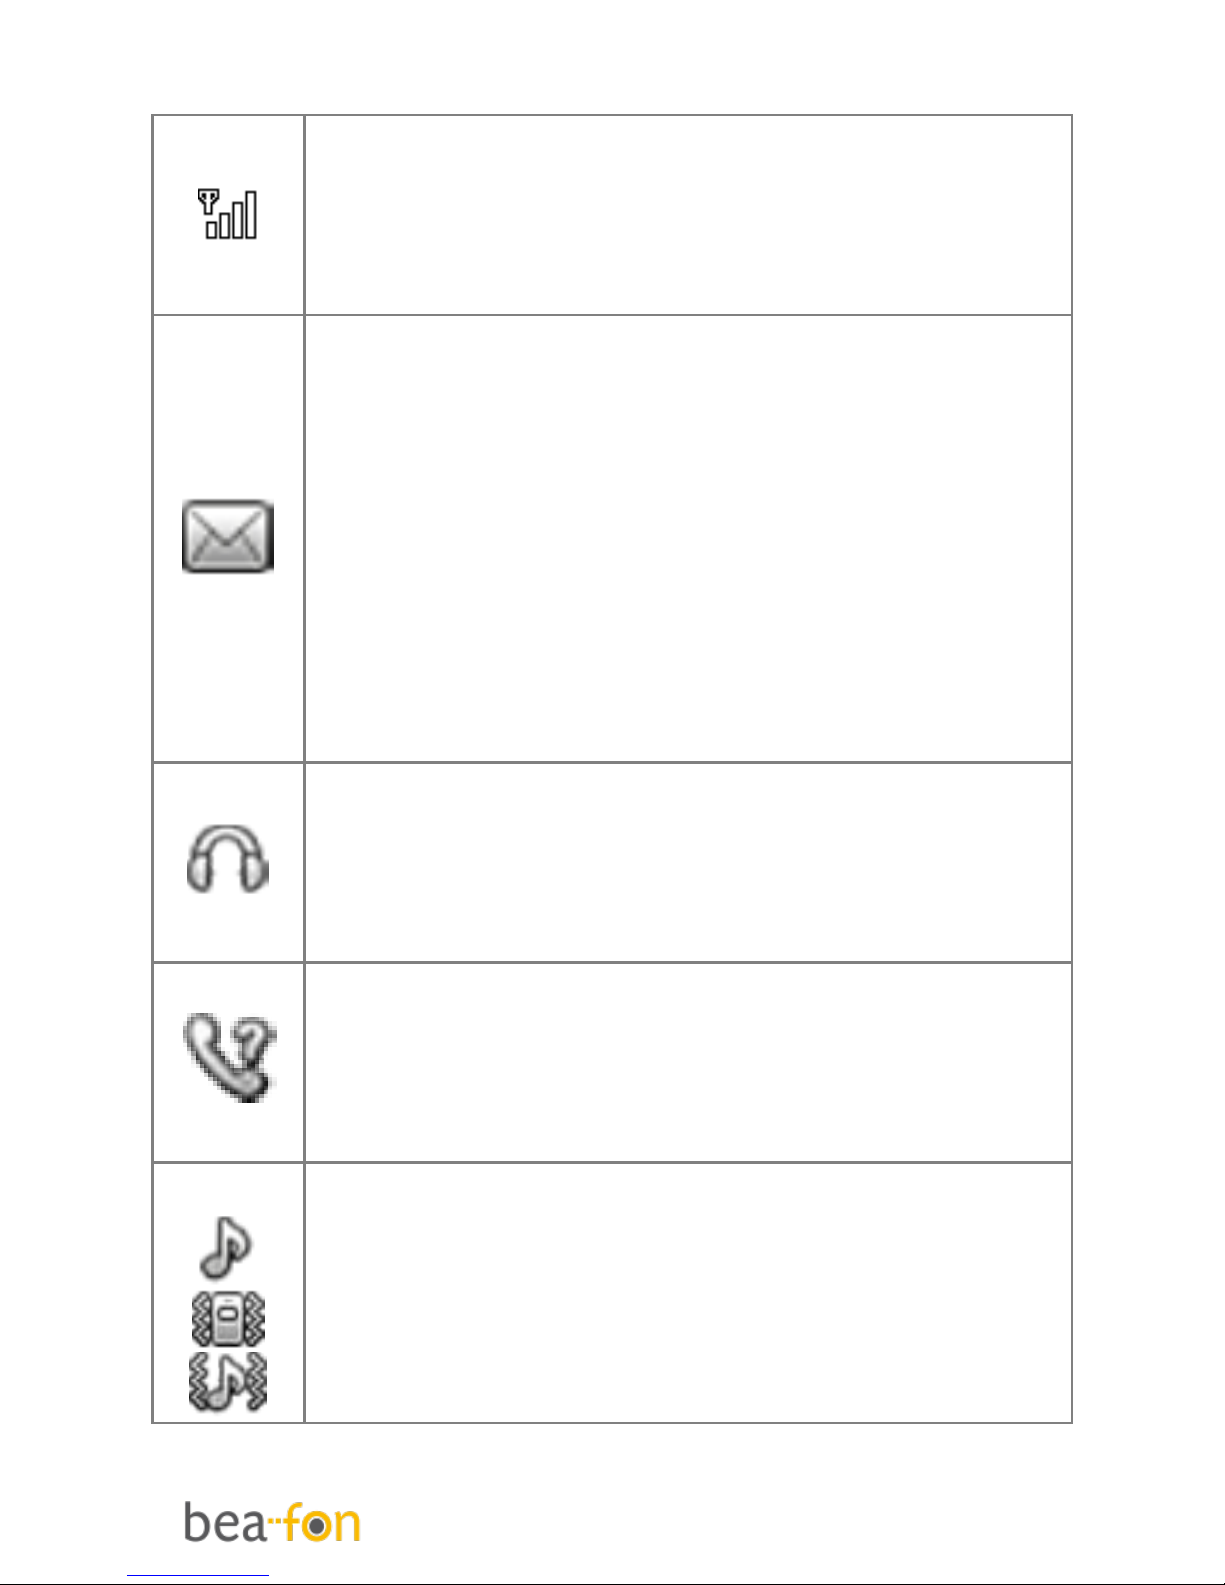
Screen icons
Signal Strength
The vertical bars show the
network connection strength. SIM
card has signals.
New messages
This icon shows when you receive
a new message.
SIM Card has an unread message
The inbox is full.
This icon flickers when the inbox
is full and you need to delete
messages to receive new
messages.
Earphone
This icon shows when you plug
the earphone in. Voice will be
heard from the earphone.
Missed Calls
This icon shows when you are
viewing the missed call. SIM card
has a missed call.
Alert Type
Ring
Silent mode on and Vibration only
Vibrate and ring
Page 18
18
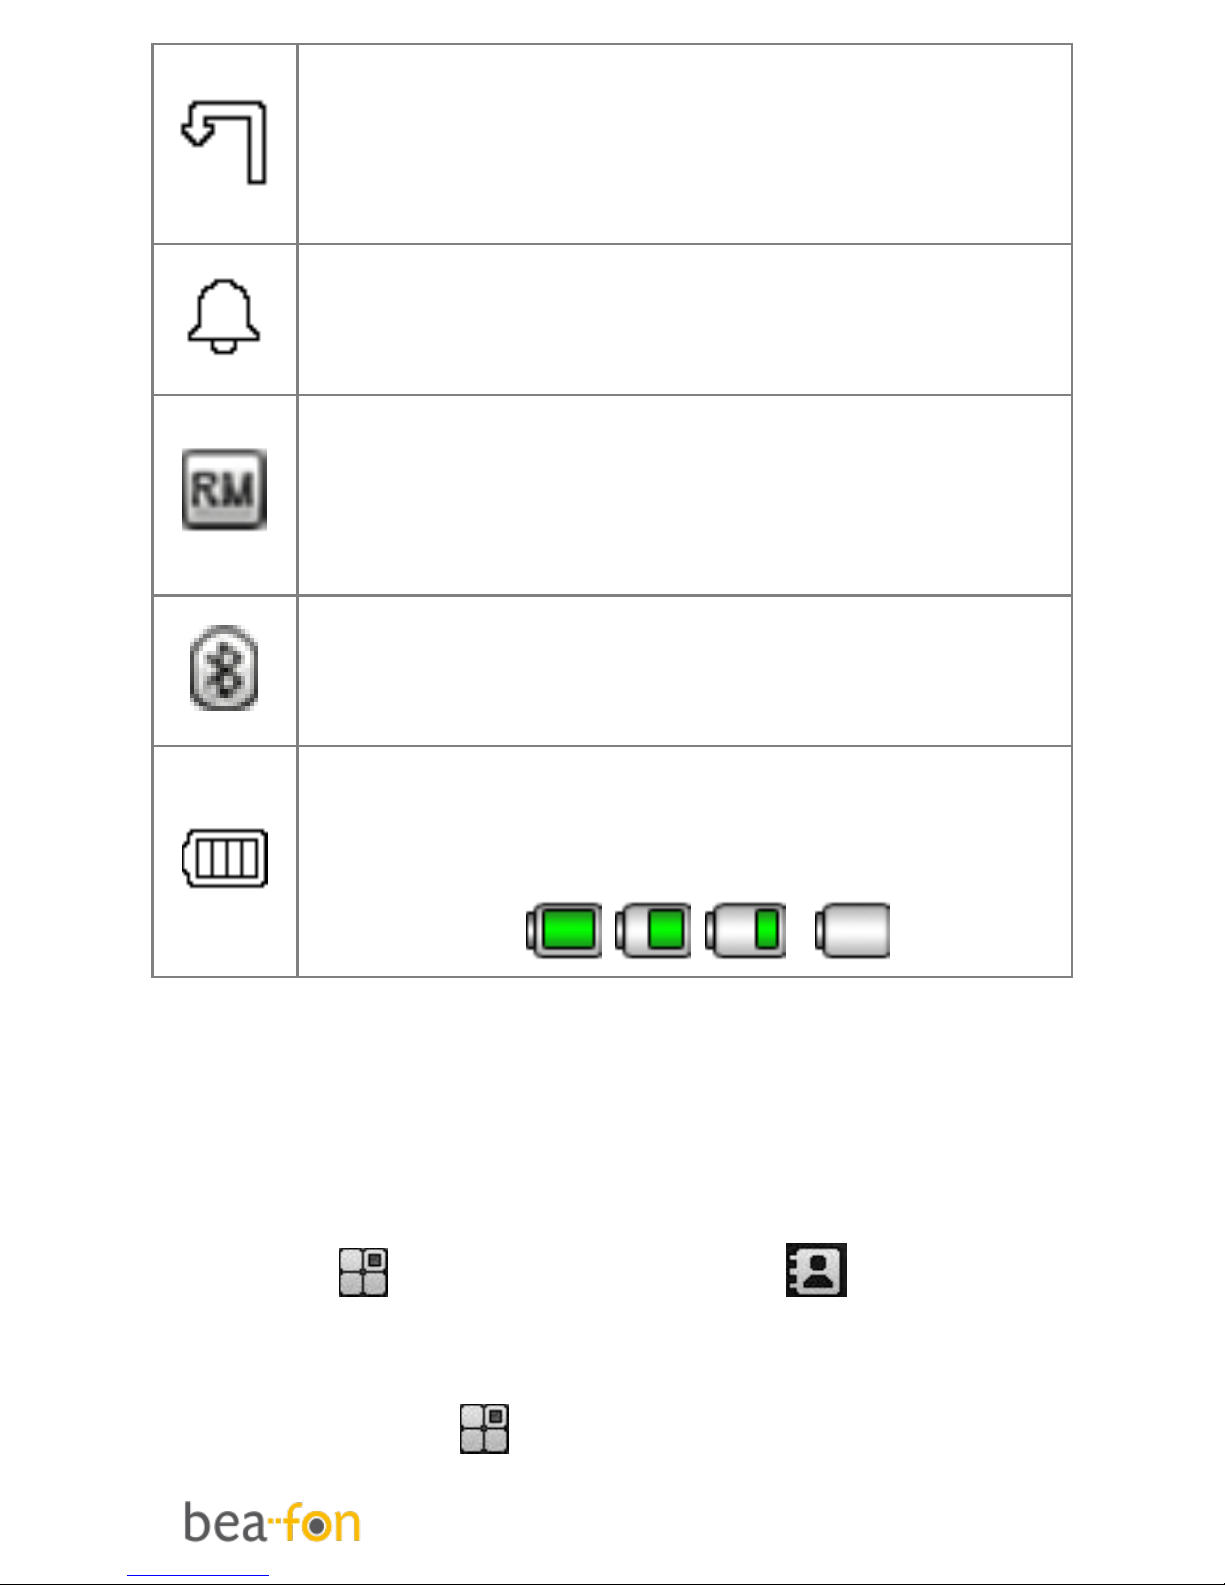
Call Divert
This icon shows when you divert
all calls unconditionally. SIM card
has been set up call divert.
Turn alarm on
This icon shows when you turn
alarm on.
Roaming
This icon shows when your phone
is in roaming state. SIM card is
roaming.
Bluetooth
This icon shows when the
Bluetooth is active.
Battery capacity
This icon’s colour changes
according to the status of battery
capacity: , , ,
Menu Operation
Menu lists are used for set up and
operation.
The left and right soft keys initially are
Menu ( ) and Phonebook( ). (Note:
symbols not displayed if the analogue
style clock is set for idle mode.)
Press Menu ( )and the display changes
and the soft keys become OK and Back.
Page 19

19
Use Up or Down to move up or down
menu lists, and OK or Back for the next
or previous display.
When writing text, use the # key to
switch cases:
Upper case (ABC), Lower case (abc) or
Numerals (123). Use Up or Down to move
the cursor,
Clear to delete letters and the * key for
symbols/punctuation.
Connect an optional headset
You can use a headset (not supplied) with
the micro USB type, plugged into the
Headset socket on the bottom side of the
handset.
When using headsets, including Beafon
approved ones, pay attention to volume
levels and read its user guide for safety
instructions.
Page 20

20
Call function
Make a call
1. To make a call, enter the phone
number with the prefix and press the
green key. For international calls,
enter ‘+’ by pressing for 2 sec.
Then enter the country code followed
by the telephone number, in which
the 0 of the prefix must be dropped.
2. If you have entered a wrong number,
press the soft key ‘right’ Clear to
remove the number to the left of the
blinking cursor.
3. Press the green key to call the
number.
4. Press the red key to end the call or to
cancel the call attempt.
Make a call using the phone book
If you have saved a name and number in
the phone book, you can also use the
phonebook to make a call.
In standby mode, press the soft key
‘right’ to go to Phonebook.
1. Scroll with the up and down arrow key
to the name you want to call.
Page 21

21
2. Press the green key to call the
number.
3. Press the red key to end the call or to
cancel the call attempt.
Answering a call
When there is an incoming call, the
phone rings and/or vibrates and shows
the number or the corresponding name.
1. Press the green key or Answer if you
would like to answer a call.
2. Press the red key or silent if you
would like to reject a call, or for
ending the connection after the call.
Earphone/Bluetooth Mode): When
plugging the earphone (including
Bluetooth earphone), you can answer a
call by pressing the key on the earphone.
Operations during a call
Press the right Menu key for Hands free
Press left Menu key “Options” to perform
following operation during a call:
End: End this Call.
Hold: Hold this call.
Phonebook: To go to Phonebook.
History calls: To go to History calls
Page 22

22
Message: To go to Messages.
Mute: de/activate the microphone
Hands Free:
During a call you can turn the hands free
equipment on (Loudspeaker on).or off
with the right Menu key.
Menu
Press the up arrow key to go to the
Menu. Scroll through the menu using the
arrow keys.
1. Phonebook
1. Contacts
2. Add new
contact
3. Speed dial
4. Direct Number
5. Photo contacts
6. Phonebook
settings
2. Message
1. Write SMS
4. Multimedia
1. Camera
2. Picture viewer
3. FM- radio
4. File manager
5. Organizer
5. Alarm
6. Calendar
7. Tasks
8. Calculator
9. Torch
Page 23

23
2. Inbox
3. Outbox
4. Drafts
5. Sent messages
6. Delete
messages
7. Settings
3. Call history
1. Missed call
2. Dialled calls
3. Received calls
4. All calls
5. Delete call logs
10. Services
6. Settings
1. Tone settings
2. SOS settings
3. Phone settings
4. Call settings
5. Network
settings
6. Security
settings
7. Connectivity
8. Restore factory
setting
Page 24

24
Phonebook
You can store names and phone numbers
in the Internal phone book (up to200)
and in the SIM phone book (SIM
dependent, but a maximum of 250).
To access the phonebook:
In idle mode, press Right soft key.
In idle mode, press Left soft key,
Phonebook and press OK
Note: Indicates entries in SIM phone
book, Indicates entries in the
Internal phone book.
Add new contact:
1. Press left soft key next press Down to
open the phonebook and select Add
new contact.
2. Select Preferred storage, To SIM or To
Phone, If you choose To phone: you
can edit Name and Number. Press
Options and Save if you want to save
the contact.
Page 25

25
To edit (change) a Phone Book
entry:
1. Press Right soft key to phone book
search which one You want to change,
press Left soft key select Edit then
modify the name, press Down modify
the number.
2. Press Option and OK to save the
change(s).
To delete all entries from the phone
or SIM card
1. Select Menu, Phonebook and press
Left soft key.
2. Select a Contact and press Left soft
key
3. Select Mark several and press Left
soft key
4. Select Delete marked and press Left
soft key
5. Select the contacts
6. Press Left soft key and select Delete
marked
7. Press Left soft key (Yes) to confirm
Page 26

26
Store a Phonebook entry to a Speed
dial key (2-9)
1. Select Menu, Phonebook and press
Left soft key.
2. Select Speed dial and Press OK
3. Set Status to On, press down to Set
numbers.
4. Press OK the display shows ,2-9
5. Press Up or Down to choose the key
to save to
6. Press OK to confirm the memory
entry.
Direct Number:
1. Select Menu, Phonebook and press
Left soft key.
2. Select Direct Number and press Left
soft key.
Add M1 and M2 dial numbers.
Press in Standby mode M1 or M2 for call
Making calls using the Photo
Contacts
In the default screen, press the
downwards arrow key.
Page 27

27
Here you can select up to 8 photo
contacts. Scroll with the Arrow keys to
the desired photo contact and then press
the Call key (green key).
The selected photo appears in the photo
contact directory. Carry out the following
steps in order to assign a photo to this
contact:
Create photo contact
1. In the default screen, press the Arrow
key (downwards) in order to go to the
photo contact menu.
2. Use the arrow keys to scroll.
3. To edit a photo contact, press
“Options” (left menu key), select Edit
and confirm with the “OK” (left menu
key).
4. Enter the name, telephone number
and add a caller picture and optional
you can select a ringtone.
5. You have the option to take a picture
directly with the camera (from
Camera) or to select an already saved
photo (from a folder) using the file
manager.
6. Add the photo and confirm with “OK”
(left menu key)
Page 28

28
7. After you have finished editing the
contact, to save it press “Back” (right
menu key), and press “Yes” (left
menu key).
Note: To save pictures, you need a Micro
SD memory card. (Not included in the
accessories)
Messages
You can receive and send Messages.
Here you can also choose Voice Mail.
These services are net-based services.
Please contact your network operator
before using.
1. Select Menu, Messages and press OK
Write message
You can write and send text messages.
Invoicing is based upon how many
ordinary messages are needed for any
multi-part message.
Press the key marked with the letter that
you want repeatedly until the letter
appears.
1. Select Write message and press left
Page 29

29
soft key.
2. Enter contents and press left soft key
to enter Options. (You can select Send
and Save.
3. Press left soft key, select Send and
press left soft key again.
4. Select Enter recipient or Contacts
(from Phonebook).
5. Select telephone numbers.
6. Press left soft key to enter Options
and press left soft key to Send
Inbox:
The Inbox is for storing received SMS
messages. Depending on the selected
mode, the phone vibrates or rings when
you receive a new message. And in the
standby mode you see this icon until
you have read the new SMS message.
You can choose the following options
while reading your received SMS:
Delete, Reply, Forward and Advanced.
In the Advanced option: Call sender and
Use Number.
Note: The new message icon keeps
flickering in the standby mode when your
Page 30

30
inbox is full. Please delete some
messages for receiving new messages.
Outbox:
The Outbox to view the messages you
don’t sent but saved.
Drafts:
By Drafts you can view the draft SMS
messages you have saved.
Sent messages
The Sent messages to view the
messages you sent.
You can choose the following options
while reading your sent SMS:
Forward, Delete and Advanced.
In the Advanced option: Call sender and
Use Number.
Settings
1. Select Menu, Messages and press OK
2. Select Settings and press OK
You can choose the following options:
Page 31

31
SMS Settings
You can choose the following options:
Profile settings:
This setting is needed to use the SMS
function. The SMSC number can be
obtained.
Common settings:
Set on/off the Delivery report, Reply path
and Save Sent messages.
Preferred storage:
Select SIM or Phone to store messages
Memory Status:
Check the capacity of messages storages.
Voice mail:
Voicemail is a service supplied by your
network operator. For more information
and for the voice mailbox number,
contact your network operator. When you
have a new voice mail message, your
phone will receive a message.
1. Select Menu, Messages and press OK
2. Select Settings and press OK
3. Select Voice mail and press OK
4. Select <Empty> and press Option.
Page 32

32
5. Select Call or Edit
6. If you select Edit, enter a name and
the number of your voice mailbox
number.
7. On the default screen: Press and hold
the number 1 and your telephone will
call the corresponding number saved
in the Voicemail server.
Note: This service must be supported by
the network operator.
In standby mode:
Press and hold key number 1 for directly
calling the Voice mail. Only the number
saved under voice mail address 1 is
called.
Page 33

33
Call history
Missed Dialled and Received or
All calls
1. Select Menu, Call history and press
OK
The phone registers the phone numbers
of Missed, Received, Dialled and All calls.
When you press OK by Missed, Dialled or
Received, you can view the calls you
Missed, Dialled, Received or All Calls. If
you press Option you can choose the
following options:
Call, View, Send message, Save and
Delete.
Delete call logs:
You can delete all the records of the
Dialled, Missed and Received calls, you
can also choose delete All calls to delete
all the records of the above-mentioned
calls logs.
Page 34

34
Organizer
Alarm
1. Select Menu, Extras and press OK
2. Select Alarm and press OK
You can set a maximum of 5 different
alarms.
To set an alarm clock:
1. Select one alarm and press Edit.
2. Edit alarm: set On or Off, Time,
Snooze, Repeat, Alarm volume, Alarm
tone and Alert type.
3. Press Save to save the Alarm.
When alarm sounds, you can stop the
alarm by pressing Stop. If you press
Snooze, the alarm stops and rings after
10 minutes again.
Calendar
1. Select Menu, Extras and press OK
2. Select Calendar and press OK
On the calendar interface, press the Navi
keys to browse through different days.
Page 35

35
Tasks
1. Select Menu, Extras and press OK
2. Select Task and press OK
If there are some existed event in the
task list, press the up / down key to
select a event to get into the options:
View, Add, Edit, Delete, Delete overdue,
Delete all and View uncompleted
Calculator:
3. Select Menu, Extras and press OK
4. Select Calendar and press OK
The phone is provided with a calculator.
This calculator has limited accuracy and
rounding errors may occur, especially in
long divisions.
Function:
The keys 1 to 0 insert a digit.
To insert a decimal, press #.
Press the up and down arrow key for
+, -
Press let and right key for x and ÷.
To get the result, press left menu key.
Press and hold right menu key to clear
the display for a new calculation.
Page 36

36
Multimedia
Camera
1. Press the Camera key
or
2. Select Menu, Multimedia and press OK
3. Select Camera and press OK
Take a picture:
Aim the camera lens at the place/object,
and press key “camera”, to take a
picture. Keep the camera lens steady for
a while for a better image quality.
Important: To save several photos,
please use a memory card (Micro SD
card up to 16 GB).
Press in Camera mode the left menu key
and you will have access to the following
functions:
Image viewer:
Here you can view the saved pictures.
Also the pictures you received by
Bluetooth. The pictures that the camera
makes are saved as a .jpg file. If you
press Option by a picture you can choose
Page 37

37
the following options: View, Browser
style, Send, Use as, Rename, Delete and
Image information.
Camera settings:
Here you can set the Anti-flicker, Scene
mode, White balance and Delay timer.
Image settings:
Here you can adjust the image size and
image quality.
Image viewer
Here you can view the saved pictures.
Also the pictures you received by
Bluetooth. The pictures that the camera
makes are saved as a .jpg file. If you
press Option by a picture you can choose
the following options: View, Browser
style, Send, Use as, Rename, Delete and
Image information.
FM-Radio
4. Select Menu, Multimedia and press OK
5. Select FM-Radio and press OK
Page 38
38
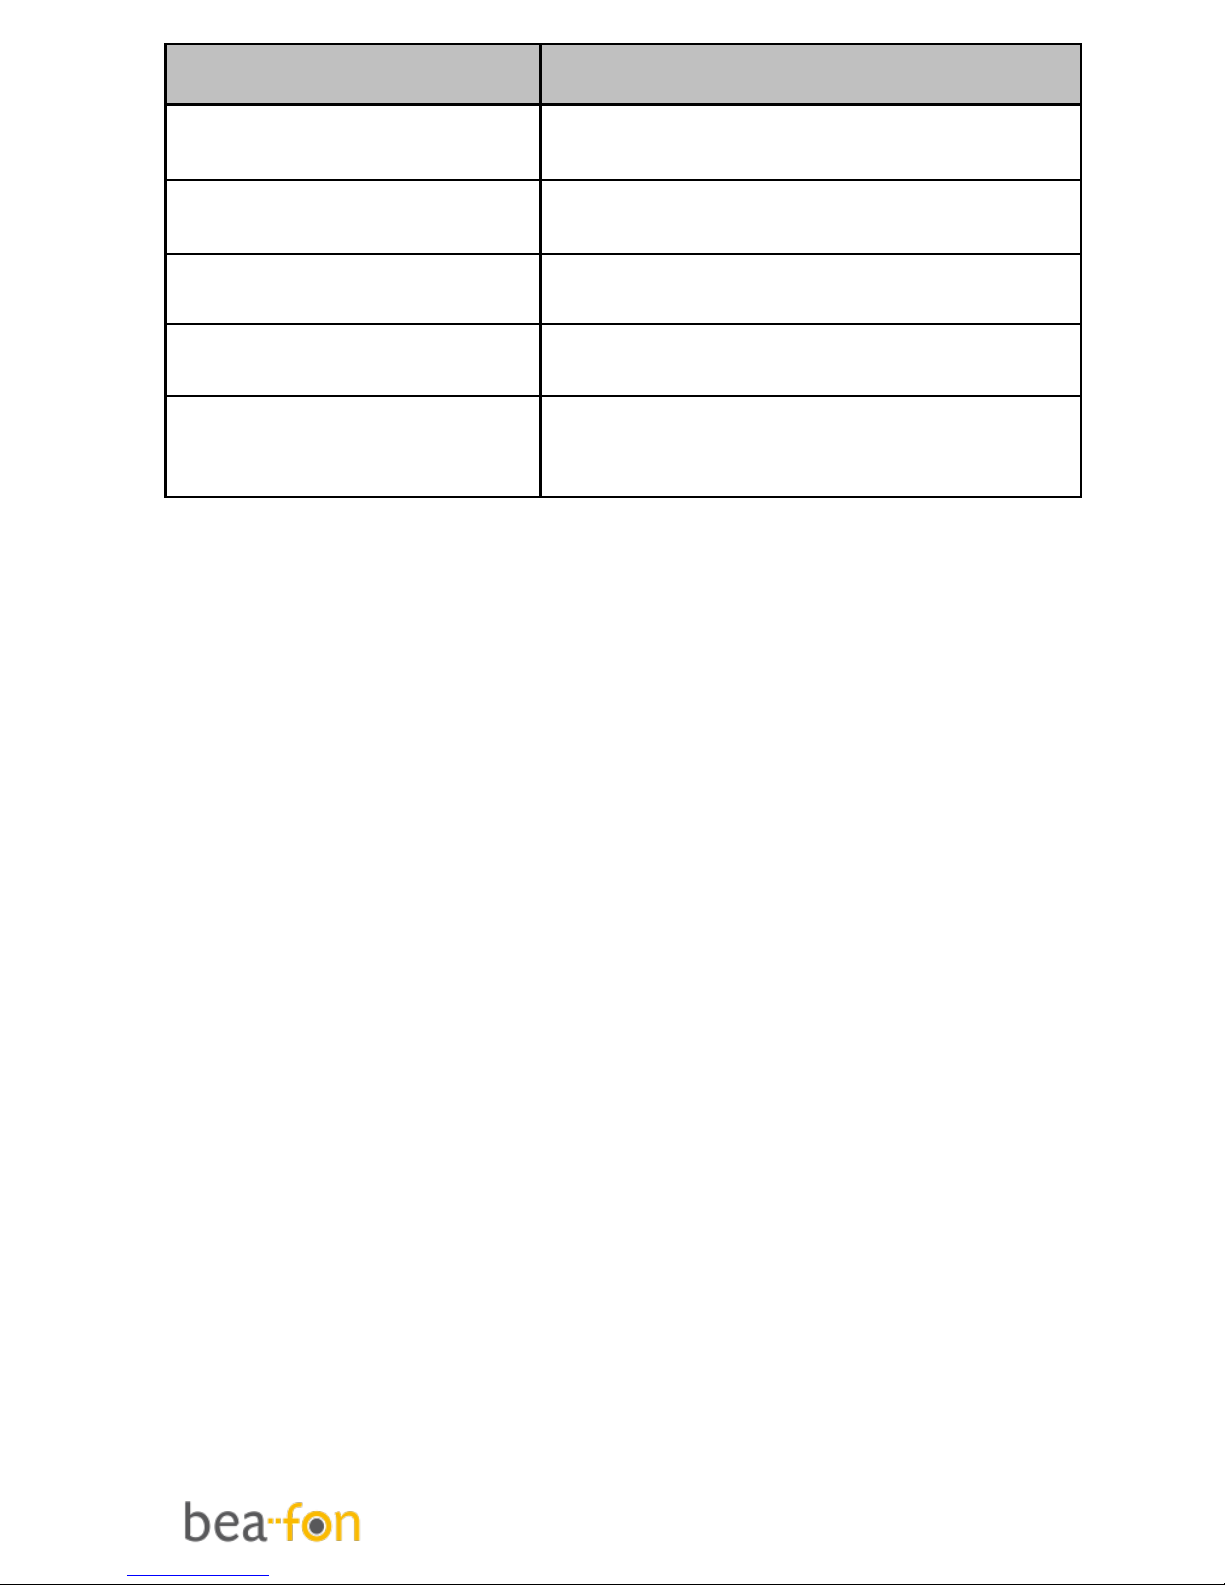
Key
Function
Arrow key right
0,1 frequency forward
Arrow key left
0,1 frequency back
Arrow key up
Volume high
Arrow key down
Volume low
Number keys
Recalling the memorized
channels
Enter Options, you can make the
following operations:
Exit:
End the Radio mode
Channel List:
There are 30 channels for you to store.
Preset Auto Search:
Makes auto search for channels available
and add them into the channel list for you
to select.
Tune (Manual Input):
Inputs the FM frequency you prefer.
Settings:
Turn on Background Play and
Loudspeaker.
Note: Auto search needs some time, so
please be patient.
Page 39

39
For better radio reception, connect a
micro USB headset to the headset socket.
File Manager
1. Select Menu, Multimedia and press OK
2. Select File Manager and press OK
Press the left menu key to enter File
manager. After inserting the memory
card, there are two options you can
choose: Phone and Memory card. Select
one of them and you can see the
contents as follows:
Enter Phone or Memory card and then
press the left menu key to access the
submenus.
If you press Option by a file or folder you
can choose the following options:
Open:
To display the content of the selected
folder.
New folder:
To create a new folder.
Rename
To rename a folder.
Delete:
To delete a folder..
Page 40

40
Settings
Tone settings:
1. Select Menu, Settings and press OK
2. Select Tone Settings and press OK
You can choose the following options:
Ring tone, Alert type, Ringtone volume,
Ring type, Message tone, Message
volume, Keypad tone and Keypad
volume.
SOS
1. Select Menu, Settings and press OK
2. Select SOS settings and press OK
The SOS function is a simple function
which can save lives at the deciding
moment. In all, you can save 5 SOS
numbers (relatives, neighbours, friends
and rescue). These numbers, previously
saved in order of sequence, will be
automatically dialled in an SOS by
pressing the SOS button on the back of
the mobile phone. During the SOS call, a
warning tone sounds so the person that
you rang knows that it is an emergency!
If you cannot get through on the first
Page 41

41
number, the second number will be called
automatically. If you cannot get through
on the second number, the third number
will be called etc.
If no emergency number is saved or your
phone card has run out, or you are not
allowed under a foreign network (e.g.
Roaming not activated), you can dial 112
or another emergency number on the
numerical keypad.
SOS description:
Press the SOS button on the back of the
mobile phone for 3 seconds. If you want
to stop or cancel the SOS call, press the
SOS button again.
Functionality:
By pressing the SOS button, the phone
will send an SOS SMS person (in case
mobile number or telephones with SMS
function is available for emergency
contact) to the emergency numbers you
have previously saved and will be
automatically dialled in the given
sequence. (The emergency button also
functions when the phone is closed). The
mobile phone switches on the hands free
function at full volume and at the same
Page 42

42
time, if the SOS call is not answered
within 25 seconds the next number is
dialled etc.
Note:
If you want to stop or cancel the SOS
call, press the right menu key or SOS
Key.
As a rule, the international emergency
call 112 can still be called outside of
the regional network of your network
operator.
When changing a phone card: Always
make sure that there is sufficient
credit on your phone card because
private emergency numbers cannot be
dialled without sufficient credit.
Attention: If the SOS call is forwarded to
the voicemail, the SOS mode will end.
Attention: If you want to save SOS
numbers such as the ambulance service,
the police, fire brigade etc. as an SOS
number, you must gain permission from
each of these institutions beforehand.
There will be no liability for possible costs
arising from calling them by accident.
Page 43

43
SOS setting:
SOS alarm: Set On or Off the
SOS alarm tone function.
SOS numbers:
There you can edit and save at most five
SOS number in your phone.
SOS message:
Edit the content of the SOS message
which will be sent out automatically when
the SOS function is using.
Phone settings:
1. Select Menu, Settings and press OK
2. Select SOS Settings and press OK
The following menu items are available:
Time and date:
Set Home city and time and date
Language:
Here you can choose the language you
want in your display.
Pref. Input method:
Here you can choose the Input method
you want for write.
Page 44

44
Auto. Keypad lock
You can set the telephone such that the
keypad automatically locks after a
present time period.
Wallpaper:
Select your favourite picture as the
wallpaper of the standby window.
Brightness:
LCD backlight for setting up the
brightness
Call settings
1. Select Menu, Settings and press OK
2. Select Call settings and press OK
Depending on the network operator, you
can use the following services:
Caller ID:
Set the function of caller ID:
Set by network
Hide ID
Send ID
Call waiting:
When this network service is activated,
the network notifies you of a new
Page 45

45
incoming call while you have a call in
progress. Press OK to answer the waiting
call. The first call is put on hold or press
the red key to reject the call.
Call divert:
To divert your incoming calls to your
voice mailbox or some other phone
number (network service). Select the
divert option you want. Several divert
options may be active at the same time.
Call barring:
With this network service you can restrict
the making and receiving of calls with
your phone.
Call time reminder:
Choose to remind you Periodic (30-60
seconds) or select Single (1-3000
Seconds) or select Off.
Network settings
1. Select Menu, Settings and press OK
2. Select Network settings and press OK
This menu has connection with the
network suppliers, so please get in touch
with them when you use this function. If
Page 46

46
you want to get into one network which
doesn’t have the roaming protocol with
the original network you have been in,
the phone will display the content that
you can make an emergency call.
Network selection:
Depending on network operator support ,
you can choose the following options:
Set automatic or manual mode
Security settings
1. Select Menu, Settings and press OK
2. Select Security settings and press OK.
You can choose the following options:
SIM security:
To turn your SIM PIN code On or Off,
change PIN and change PIN2.
Phone security:
To lock your phone with a password. The
default password is: 0000.
Change password:
Here you can change your password.
Page 47

47
Connectivity:
1. Select Menu, Settings and press OK
2. Select Connectivity and press OK
You can connect wirelessly to other
Bluetooth compatible devices.
Bluetooth:
You can choose the following options:
Power:
Here you can choose to turn Bluetooth On
or Off.
Visibility:
you can set the visibility on or off.
My device:
List of saved devices and enables you to
add new devices; Search new device.
Search audio device:
Search for available Bluetooth audio
devices. If Bluetooth is not enabled you
can enable it now by pressing Yes.
Search audio device:
Page 48

48
1. Press OK, the phone is going to
search for new devices.
2. Select the devices you want to
connect with and press Pair.
3. When connecting with another
Bluetooth device you need a shared
passcode. Enter the passcode and
press OK.
4. Select the device from the list and
press Option. Can choose the
following options: Connect, Rename,
Delete and Delete all.
My Name:
Here you can set the Bluetooth device
Name.
Advanced:
Here you can set your: Audio path,
Storage and check the My address.
Restore factory settings
1. Select Menu, Settings and press OK
2. Select Restore factory settings and
press OK
To reset some of the menu settings to
their original values. The password is:
0000
Page 49
49
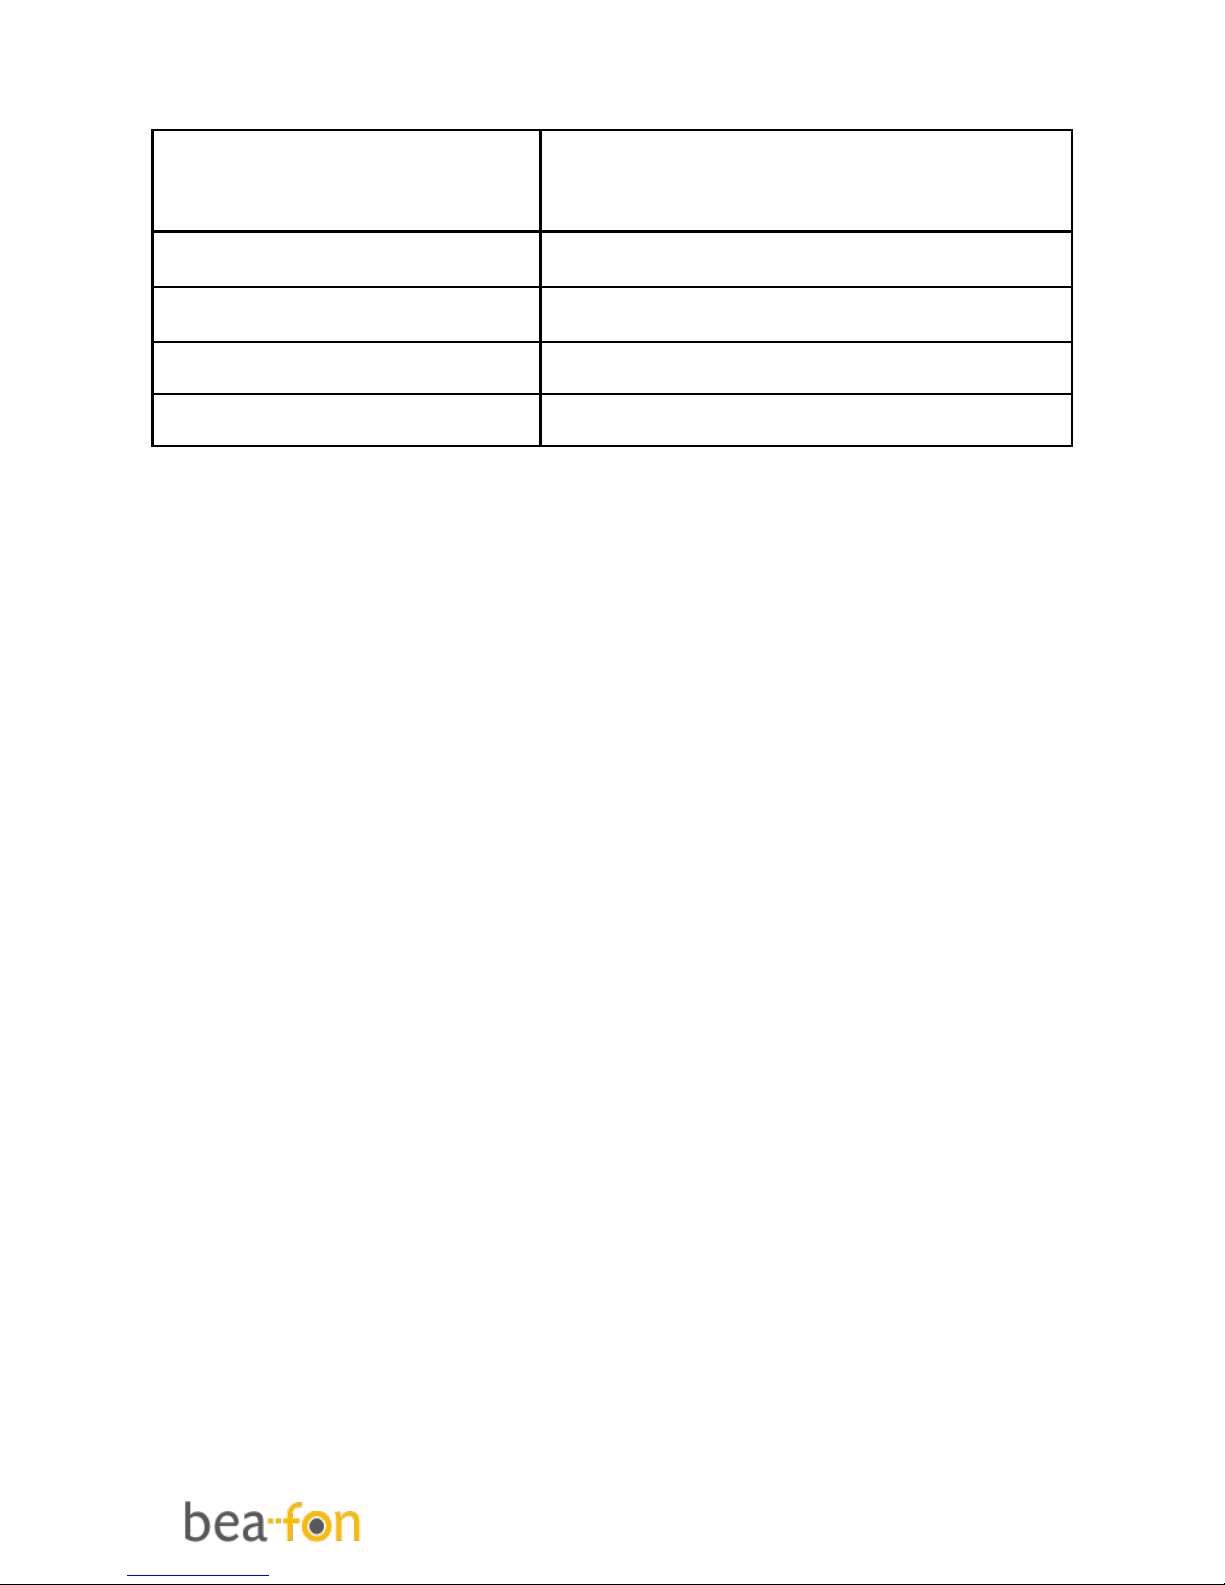
Basic Specifications
Network–DualBand
GSM 900/DCS1800
Dimension:
120 x 54 x 12,9 mm
Battery:
Li-ion 3.7V – 800mAh
Standby time:
up to 250 hours*
Talk time:
Up to 480 minutes*
*Variation in operation times may occur
depending on SIM card, network, and
usage settings, usage style and
environments.
Page 50

50
FAQ
If your phone appears the questions
frequently, please refer to the answers as
follows. After that, you cannot solve the
questions, please contact with the mobile
phone dealers or network operator.
Can’t turn the phone on:
Check battery installation, please
install battery correctly.
Check if battery level is low, try to
charging the battery 24h.
Change the battery (6 Month
warranty)
Check if entered incorrect PIN code 3
times in a row.
If yes, the phone is locked, then you
should enter your PUK code (please
contact your network operator for
your PUK code).
SIM error:
Is the SIM card dirty? Please clean it.
Try and reinstall the SIM card.
Is the SIM card damaged? Please
contact your network operator.
Weak signal or no signal:
Page 51

51
You may be in a location where the
reception is bad, such as tunnel or
cellar, please relocate and try again.
You can try turning around slightly or
get near the window if you are in a
room.
Please contact your network operator,
if you still have a weak signal or no
signal.
Bad talking quality:
Weak signal? See: Weak signal or no
signal.
Check if battery if battery is low.
Charge the battery or change the
battery.
Use the up volume key to adjust the
microphone volume during a call.
Can’t make a call:
Check if you enter the correct number
and press green key.
Check if you set call barring, if yes,
please cancel it.
Check if the SIM card is registered in
the network.
If your SIM card is a prepaid card,
please make sure there is enough
money on the card.
Can’t receive calls:
Page 52

52
Is the SIM card registered in the
network?
Check if your phone is turned on.
Check if screens shows no signal, if
yes, see: Weak signal or no signal.
Check if you set call barring, if yes,
please cancel it.
Screen is dark:
Check if battery if battery is low.
Charge the battery or change the
battery.
Adjust the wallpaper.
Your phone may be affected with
damp, keep it dry.
PIN locked:
Check if entered incorrect PIN code 3
times in a row.
If yes, the phone is locked, then you
should enter your PUK code (please
contact your network operator for
your PUK code).
Tips: if all suggests and solutions can’t
solve your problem, please check
Customer Service on www.beafon.com.
Please do not disassembly or repair your
phone without professional guide.
Page 53

53
Battery
Your phone is powered by a
rechargeable battery.
Note that a new battery's full
performance is achieved only after
two or three complete charge and
discharge cycles! The battery can be
charged and discharged hundreds of
times but it will eventually wear out.
When the operating time (talk-time
and standby time) is noticeably
shorter than normal, it is time to buy
a new battery. Use only batteries
approved by the phone manufacturer
and recharge your battery only with
the chargers approved by the
manufacturer.
Unplug the charger when not in use.
Do not leave the battery connected to
a charger for longer than 10 days,
since overcharging may shorten its
lifetime. If left unused a fully charged
battery will discharge itself over time.
Temperature extremes can affect the
ability of your battery to charge.
Use the battery only for its intended
purpose.
Page 54

54
Never use any charger or battery
which is damaged.
Do not short-circuit the battery.
Accidental short-circuiting can occur
when a metallic object (coin, clip or
pen) causes direct connection of the +
and - terminals of the battery (metal
strips on the battery) for example
when you carry a spare battery in
your pocket or purse. Short-circuiting
the terminals may damage the
battery or the connecting object.
Leaving the battery in hot or cold
places, such as in a closed car in
summer or winter conditions, will
reduce the capacity and lifetime of the
battery. Always try to keep the
battery between 15°C and 25°C. A
phone with a hot or cold battery may
temporarily not work, even when the
battery is fully charged. Batteries
performance is particularly limited in
temperatures well below freezing.
Do not dispose of batteries in a fire!
Dispose of batteries according to local
regulations (e.g. recycling).
Do not dispose as household waste.
Do not charge your mobile phone if
the battery is not installed.
Page 55

55
Phone
Your phone is a product of superior
design and craftsmanship and should be
treated with care.
The suggestions below will help you to
fulfil any warranty obligations and to
enjoy this product for many years.
Keep the phone and all its parts and
accessories out of the reach of small
children.
Keep the phone dry. Precipitation,
humidity and all types of liquids or
moisture can contain minerals that
will corrode electronic circuits.
Do not use or store the phone in
dusty, dirty areas. Its moving parts
can be damaged.
Do not store the phone in hot areas.
High temperatures can shorten the
life of electronic devices, damage
batteries, and warp or melt certain
plastics.
Do not store the phone in cold areas.
When it warms up (to its normal
temperature), moisture can form
Page 56

56
inside, which may damage electronic
circuit boards.
Do not attempt to open the phone.
Non-expert handling may damage it.
Do not drop, knock or shake the
phone. Rough handling can break
internal circuit boards.
Do not use harsh chemicals, cleaning
solvents, or strong detergents to
clean the phone. Do not paint the
phone. Paint can clog the moving
parts and prevent proper operation.
Use only the supplied or an approved
replacement antenna. Unauthorised
antennas, modifications or
attachments could damage the
phone and may violate regulations
governing radio devices.
All of the above suggestions apply equally
to your phone, battery, charger or any
accessory. If any of them is not working
properly, take it to your nearest qualified
service facility.
Page 57
57
For your safety
Read these simple guidelines. Breaking
the rules may be dangerous or illegal.
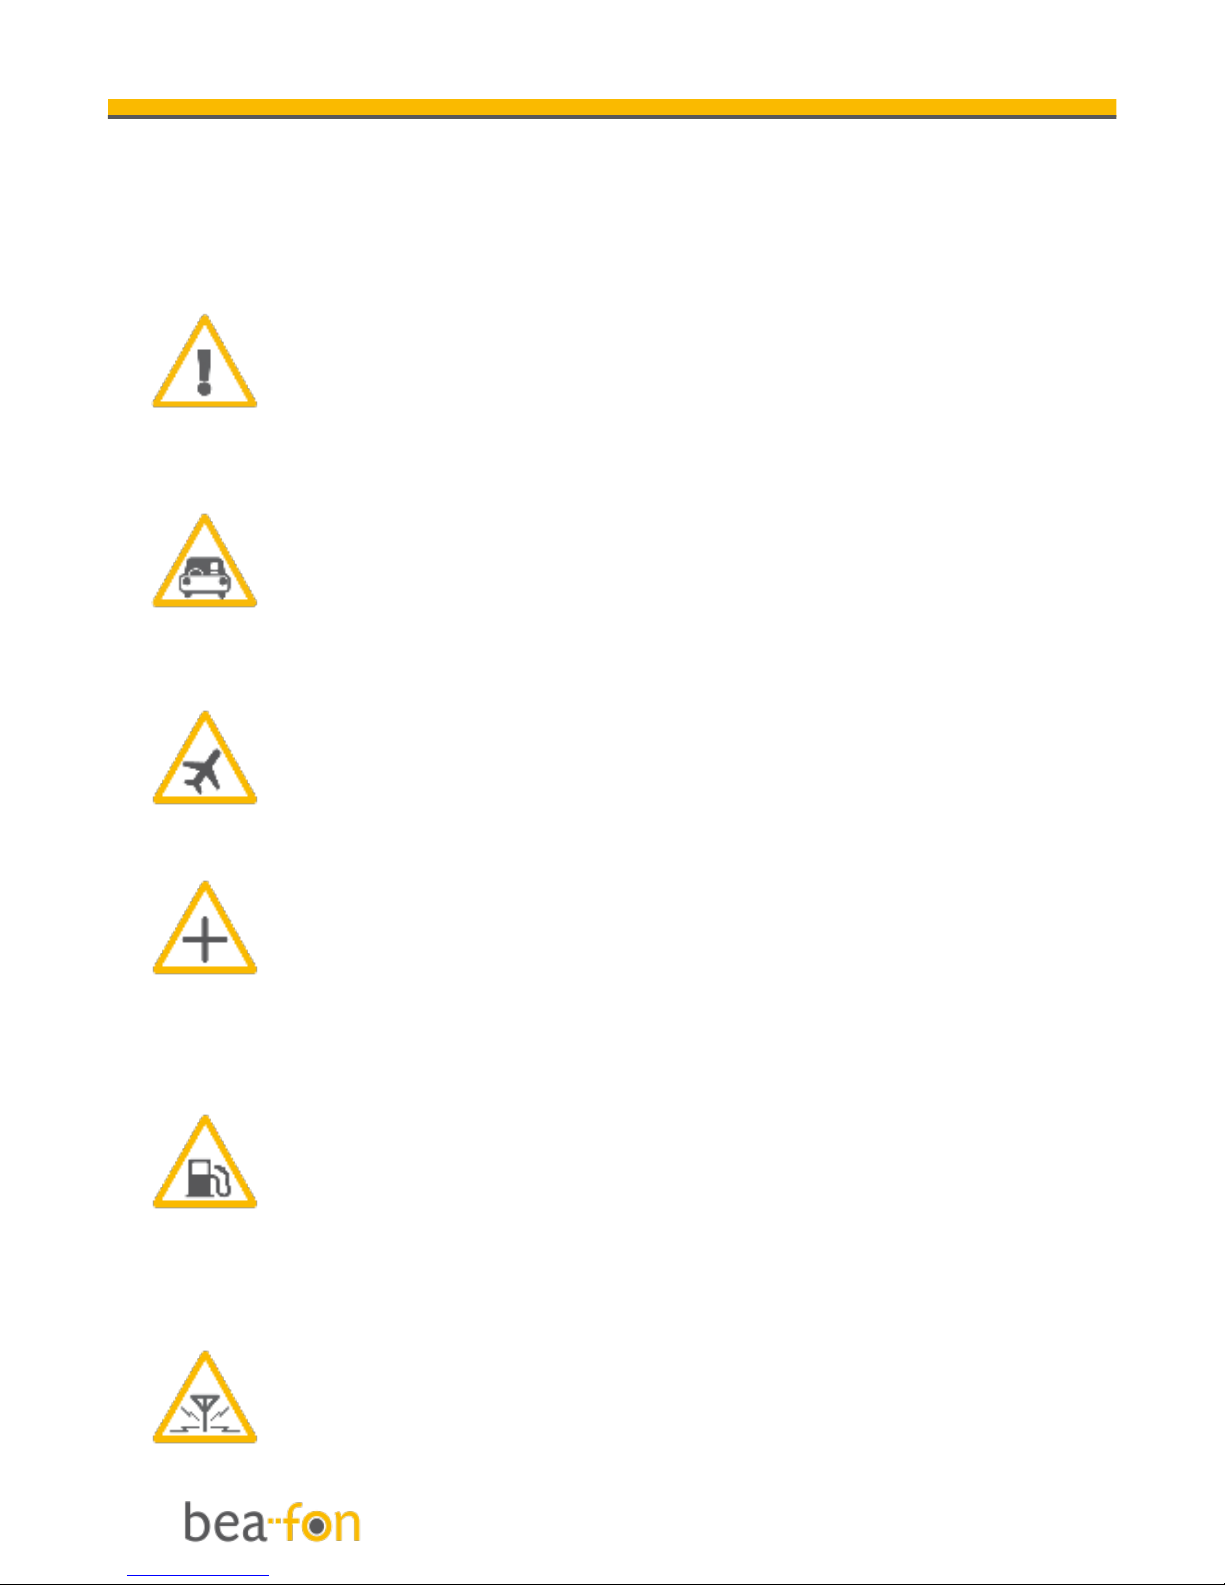
Do not switch on the phone when
wireless phone use is prohibited or
when it may cause interference or
danger.
Road safety comes first
Do not use a hand-held phone
while driving.
Switch off in aircraft
Wireless devices can cause
interference in aircraft.
Switch off in hospitals
Follow any regulations or rules.
Switch the phone off near medical
equipment.
Switch off when refuelling
Do not use the phone at a
refuelling point. Do not use near
fuel or chemicals.
Interference
All wireless phones may get
interference, which could affect
performance.
Page 58

58
Traffic Safety:
Do not use a hand-held telephone while
driving a vehicle. Always secure the
phone in its holder; do not place the
phone on the passenger seat or where it
can break loose in a collision or sudden
stop. Remember road safety always
comes first!
Operating environment:
Remember to follow any special
regulations in force in any area and
always switch off your phone whenever it
is forbidden to use it, or when it may
cause interference or danger.
Use the phone only in its normal
operating positions.
Parts of the phone are magnetic. Metallic
materials may be attracted to the phone,
and persons with a hearing aid should not
hold the phone to the ear with the
hearing aid. Always secure the phone in
its holder, because metallic materials
may be attracted by the earpiece.
Do not place credit cards or other
magnetic storage media near the phone,
because information stored on them may
be erased.
Page 59

59
Electronic devices:
Most modern electronic equipment is
shielded from radio frequency (RF)
signals. However, certain electronic
equipment may not be shielded against
the RF signals from your wireless phone.
Pacemakers:
Pacemaker manufacturers recommend
that a minimum separation of 20 cm (6
inches) be maintained between a
handheld wireless phone and a
pacemaker to avoid potential interference
with the pacemaker. These
recommendations are consistent with the
independent research by and
recommendations of Wireless Technology
Research.
Persons with pacemakers:
Should always keep the phone more
than 20 cm (6 inches) from their
pacemaker when the phone is
switched on.
Should not carry the phone in a
breast pocket.
Should use the ear opposite the
pacemaker to minimise the potential
for interference.
Page 60

60
If you have any reason to suspect
that interference is taking place,
switch off your phone immediately.
Hearing aids:
Some digital wireless phones may
interfere with some hearing aids. In the
event of such interference, you may want
to consult your network operator.
Other medical devices:
Operation of any radio transmitting
equipment, including cellular phones,
may interfere with the functionality of
inadequately protected medical devices.
Consult a physician or the manufacturer
of the medical device to determine if they
are adequately shielded from external RF
energy or if you have any questions.
Switch off your phone in health care
facilities when any regulations posted in
these areas instruct you to do so.
Hospitals or health care facilities may be
using equipment that could be sensitive
to external RF energy.
Posted facilities:
Switch your phone off in any facility
where posted notices so require.
Page 61

61
Potentially explosive atmospheres:
Switch off your phone when in any area
with a potentially explosive atmosphere
and obey all signs and instructions.
Sparks in such areas could cause an
explosion or fire resulting in bodily injury
or even death.
Users are advised to switch off the phone
when at a refuelling point (service
station). Users are reminded of the need
to observe restrictions on the use of radio
equipment in fuel depots (fuel storage
and distribution areas), chemical plants
or where blasting operations are in
progress.
Areas with a potentially explosive
atmosphere are often but not always
clearly marked. They include below deck
on boats; chemical transfer or storage
facilities; vehicles using liquefied
petroleum gas (such as propane or
butane); areas where the air contains
chemicals or particles, such as grain, dust
or metal powders; and any other area
where you would normally be advised to
turn off your vehicle engine.
Vehicles:
Page 62

62
RF signals may affect improperly installed
or inadequately shielded electronic
systems in motor vehicles (e.g. electronic
fuel injection systems, electronic anti-skid
(anti-lock) braking systems, electronic
speed control systems, air bag systems).
Check with the manufacturer or its
representative regarding your vehicle.
You should also consult the manufacturer
of any equipment that has been added to
your vehicle.
Crossed-out wheeled-bin
symbol
The crossed-out wheeled-bin symbol on
your product, battery, literature, or
packaging reminds you that all electrical
and electronic products and batteries
must be taken to separate collection at
the end of their working life. Do not
dispose of these products as unsorted
municipal waste.
Page 63

63
For your safety
Certification information (SAR):
This model phone meets the EU
requirements for exposure to radio
waves.
The exposure standard for mobile phones
employs a unit of measurement known as
the Specific Absorption Rate, or SAR. The
SAR limit recommended by The Council of
the European Union is 2.0 W/kg. Tests for
SAR have been conducted using standard
operating positions with the phone
transmitting at its highest certified power
level in all tested frequency bands.
The highest SAR value for this device
when tested at the ear was 0,598 W/Kg.
If you want a copy of the Declaration of
Conformity, please contact us:
While there may be differences between
the SAR levels of various phones and at
various positions, they all meet the EU
requirements for RF exposure.
Page 64

64
Information
Liability Disclaimer:
Bea-fon Mobile GmbH shall not bear
any liability for any relevant, indirect,
special, incidental, or inevitable
injuries caused by using of this
product, including injuries which have
been considered, or unconsidered,
likely to happen.
For any losses caused by natural
disasters (such as earthquake, flood,
etc.) or any acts or accidents
(including deliberate or accidental
misuses by the user under these
accidents or other unusual
circumstances) which are beyond our
liability scope, non-responsibility
should be accounted on us.
Page 65

65
Information:
SL240 distributed by Beafon
For more Information, please visit the
Bea-fon Homepage: www.beafon.com or
contact us: [email protected]
Address:
BEAFON MOBILE GmbH
4722 Peuerbach
Enzing 4
Austria
 Loading...