

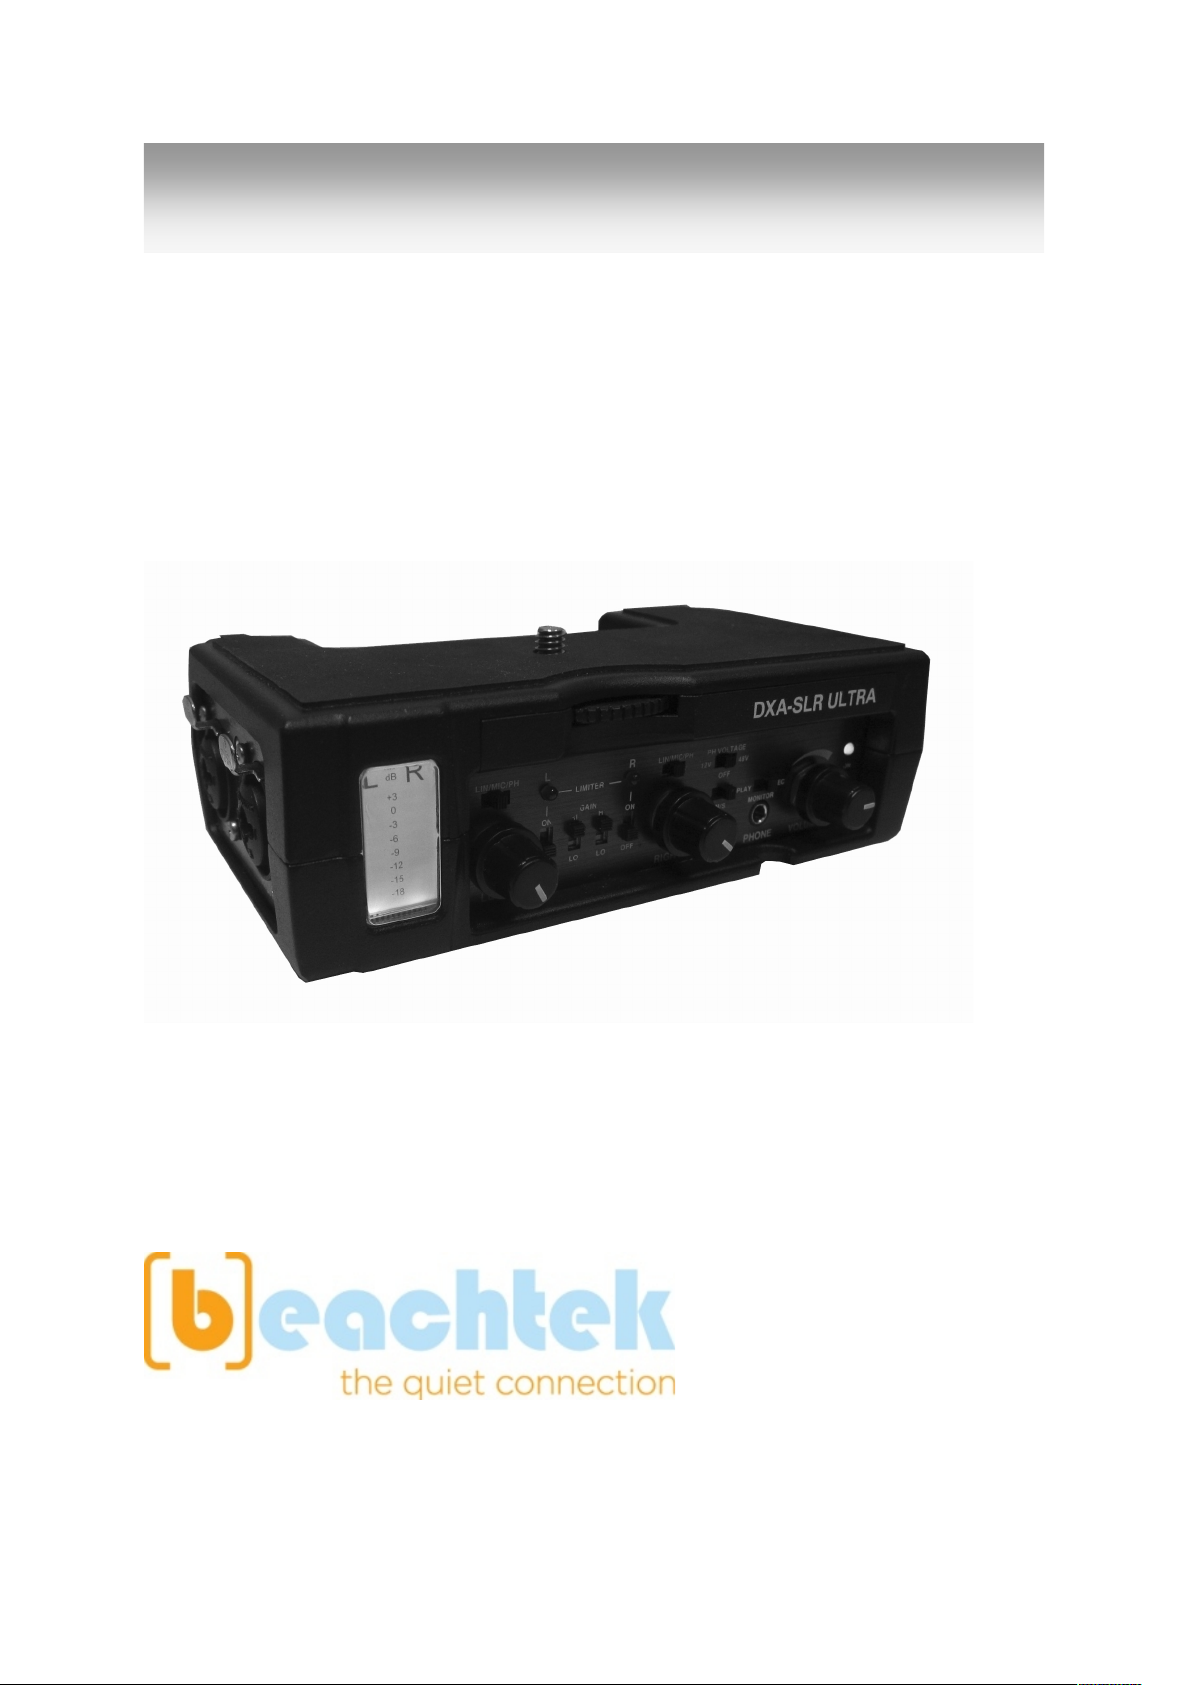
DXA-SLR ULTRA
Professional XLR Adapter for DSLR Cameras
This operating manual explains the adapter function settings
and how to use the adapter to record audio into the camera.
©Beachtek Inc. 2014
Operating Manual


Thank You for Purchasing a BeachTek Product
Congratulations on purchasing the DXA-SLR ULTRA from the makers of
the world’s most popular audio adapters for DSLR cameras. This
adapter is packed with features to enable you to record professional
audio directly to your camera.
Before using this high quality device, please read this guide
thoroughly to obtain the highest performance.
Please contact us if you have any problems or questions.

Description
The BeachTek DXA-SLR ULTRA is a two-channel, active XLR adapter
with built-in preamplifiers for attaching external microphones and other
audio gear to any DSLR camera that has a built-in mic jack. It can also
be used with any camcorder or other audio recording device that has a
mic jack.
The DXA-SLR ULTRA uses exceptionally low noise, wide bandwidth
preamplifiers for superb audio. This allows you to record high quality
audio directly to the camera which will always be in sync with the video.
Direct audio recording eliminates the need to have a separate audio
recording device and syncing the audio in post editing.
The DXA-SLR ULTRA is very easy to set up and use. It allows you to
connect a wide variety of audio devices including wireless systems,
mixers, sound boards and professional condenser microphones that
require phantom power to operate.
The inputs are transformer balanced for isolation and enhanced circuit
protection. Built-in VU meters makes it easy to verify the proper input
levels at a glance, while the level controls allow you to adjust the output
signal for optimum recording. Built-in fast acting limiters prevent
distortion from overly hot inputs for worry free operation. The phone jack
lets you monitor the audio from the adapter during recording, or camera
during playback.
A unique feature of the DXA-SLR ULTRA is the detachable rod support
base to easily attach a matte box, follow focus and other gear to a rod
support rig.
The adapter mounts to the bottom of the camera and can also be
mounted to any standard tripod.

Warnings
Ensure that the VOLUME control is set low to avoid excessively loud
audio from damaging your hearing.
Always do a test recording and play back the audio to ensure it is
acceptable.
DO NOT activate phantom power for dynamic microphones, condenser
microphones that do not operate on phantom power, wireless receivers,
mixing boards or any unbalanced device as it may cause damage to
both the adapter and connecting device.
Turn off power to adapter before plugging or unplugging any
microphones or equipment to or from the adapter.

Contents
Before You Begin………………………………………………………..
1
Supplied Accessories…………………………………………………...
1
Quick Setup Guide………………………………………………………
2
Adapter Connectors and Controls……………………………………..
4
Setup Guide……………………………………………………………...
7
Basic Operation………………………………………………………….
10
Playback Monitoring…………………………………………………….
12
Advanced Operation…………………………………………………….
13
Features………………………………………………………………….
14
Specifications……………………………………………………………
15
Warranty Information……………………………………………………
16

Before You Begin
1) These instructions refer to the use of this adapter with Canon
DSLR cameras unless otherwise noted.
2) Do a few test recordings and check playback on the camera to
ensure that the audio is captured as expected. Most cameras do
not have a headphone jack to monitor what is being recorded.
3) Some early model Nikon cameras have a very sensitive
microphone input and require a special 25dB padded output cable
from the adapter. Please contact us for details.
4) Panasonic Lumix GH1 and GH2 require a special 2.5mm mic
cable which is available from us.
Supplied Accessories
3.5mm to 3.5mm output cable
AV Cable for playback monitoring
Rod support base
Two 3” threaded rods
1

Quick Setup Guide
1) Ensure the POWER switch is set to OFF before you begin.
2) Install a fresh alkaline or lithium battery in the adapter.
3) Mount the DXA-SLR ULTRA adapter to the camera.
4) Connect the supplied output cable from the OUT jack on the
adapter to the MIC input jack on the camera.
5) Connect your microphones or other audio sources to the adapter
XLR inputs.
6) Set the GAIN switches to HI.
7) Set the LIMITER switches to ON.
8) Set the MONITOR switch to REC.
9) Set the LIN/MIC/PH switches to:
a) MIC for self powered microphones or wireless systems
b) PH for microphones that require phantom power
c) LIN for mixers
DO NOT activate phantom power when attaching wireless
microphones!
10) Set the PH VOLTAGE switch as follows:
a) OFF if phantom power is not required on either channel
b) 48V if mics on either channel require 48 volt phantom power
c) 12V if the mics can operate on 12 volts to save on battery
power
11) Set the M/S switch to M for mono when using one channel or to S
for stereo when using two channels.
12) Turn the adapter PWR switch on. The power LED should indicate
green.
2
 Loading...