

Page 1
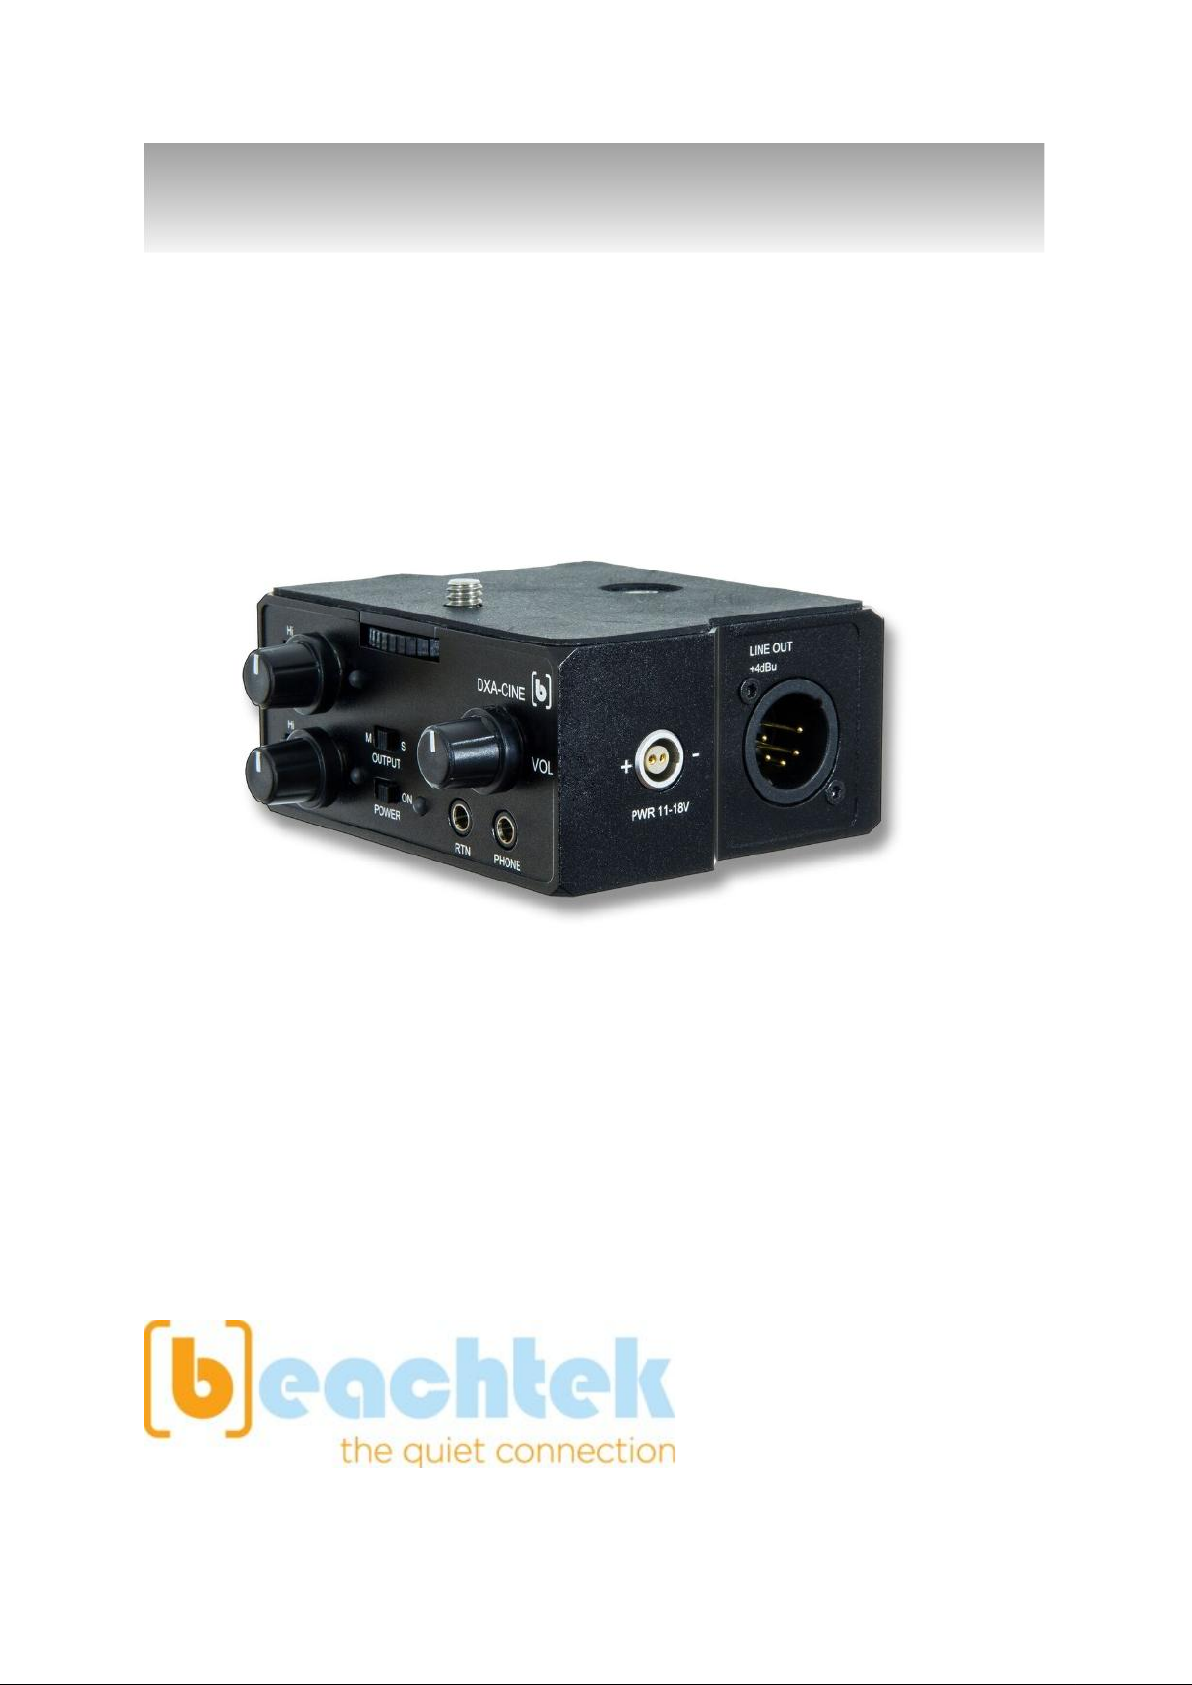
DXA-CINE
Mini-plug Audio Adapter for Cinema Cameras
This operating manual explains the adapter function settings
and how to use the adapter to record audio into the camera.
©Beachtek Inc. 2017
Operating Manual
Page 2

Thank You for Purchasing a Beachtek Product
Congratulations on purchasing the DXA-CINE from the makers of the
world’s most popular audio adapters for DSLR cameras and
camcorders.
Before using this high quality device, please read this guide
thoroughly to obtain the highest performance.
Please contact us if you have any problems or questions.
Description
The Beachtek DXA-CINE is a compact two-channel, active audio
adapter with built-in preamplifiers for attaching external mini-plug
microphones and wireless gear to the popular cinema cameras like the
ARRI ALEXA Mini and RED DSCM2 cameras.
The DXA-CINE uses exceptionally low noise, wide bandwidth
preamplifiers for superb audio. This allows you to record high quality
audio directly to the camera which will always be in sync with the video.
The inputs are two mono and one stereo unbalanced mini-jack inputs
with 3.5 volt plug-in power.
Tri-color level indicators make it easy to verify the proper signal levels at
a glance, while the level controls allow you to adjust the output signal for
optimum recording. The phone jack lets you monitor the audio from the
adapter during recording, or camera during playback.
The adapter can be mounted in various ways to the camera cage via the
¼” / 20 threaded inserts or the brass mounting foot.
Page 3

Contents
Supplied Accessories………………………………………………......
1
Quick Setup Guide………………………………………………..........
2
Adapter Controls and Connectors…………………………………….
3
Playback Monitoring…………………………………………………....
6
Audio Bracketing………………………………………………….........
6
Features………….………………………………………………………
7
Specifications……………………………………………………………
8
Warranty Information……………………………………………………
9
Page 4

Supplied Accessories
One 3.5mm to 3.5mm SC35 cables
Brass mounting foot with knurled wheel and attachment bolt
Allen key
1
Page 5

Quick Setup Guide
1) Ensure the POWER switch is set to OFF before you begin.
2) Mount the DXA-CINE to an appropriate place on your rig via the
¼”/20 threaded inserts or the included shoe mount.
3) Connect external 11-18 volt power to the 2-pin Lemo connector.
4) For use on the RED DSCM2 camera, connect the supplied SC35
cable from the 3.5mm OUT jack on the adapter to the mic input
jack on the DSCM2 module of the camera.
For use with the ARRI ALEXA Mini, connect the Beachtek
BT-LEMO cable (not supplied) from the 5-pin balanced XLR LINE
OUT on the DXA-CINE to the balanced 5-pin Lemo mic input on
the camera.
5) Connect your microphones to the adapter inputs.
6) Set the GAIN switches to HI for 60dB gain or LO for 40dB gain.
7) Set the MONITOR switch to OUT.
8) Set the M/S switch to M for mono when using one channel or to S
for stereo when using two channels.
9) Turn the adapter PWR switch on. The power LED should be green.
10) Set the camera audio to 0dB gain.
11) Adjust the LEFT and RIGHT level controls for each channel so the
level indicators flash yellow when capturing audio. You may have
to fine tune the recording level on the camera so that the yellow
LED activates with a -20dB reading on the cameras VU meter.
12) Plug your headphones into the PHONE jack on the adapter and
adjust the VOLUME control to a comfortable level. Ensure that you
hear audio on both channels from the connected microphones.
Do a test recording and playback on the camera to ensure that the
captured audio is satisfactory.
2
Page 6

Adapter Connectors and Controls
Front Panel
POWER Switch
Main power switch for adapter
POWER LED
Green indicates power on and good battery condition
Red indicates low battery voltage
MONITOR Switch
OUT selects headphone monitoring from either the microphones
during recording, or RTN for playback audio from the camera
PHONE
Headphone jack to monitor the audio from microphones or camera
RTN Jack
Input jack for connecting the loopback audio from the camera
Vol Control
Adjusts the headphone volume level
OUTPUT Switch
Selects mono or stereo output mode
LEFT and RIGHT Controls
Individual trim controls to adjust output levels on each channel
3
1
2
3
4
5
6
7
8
Page 7
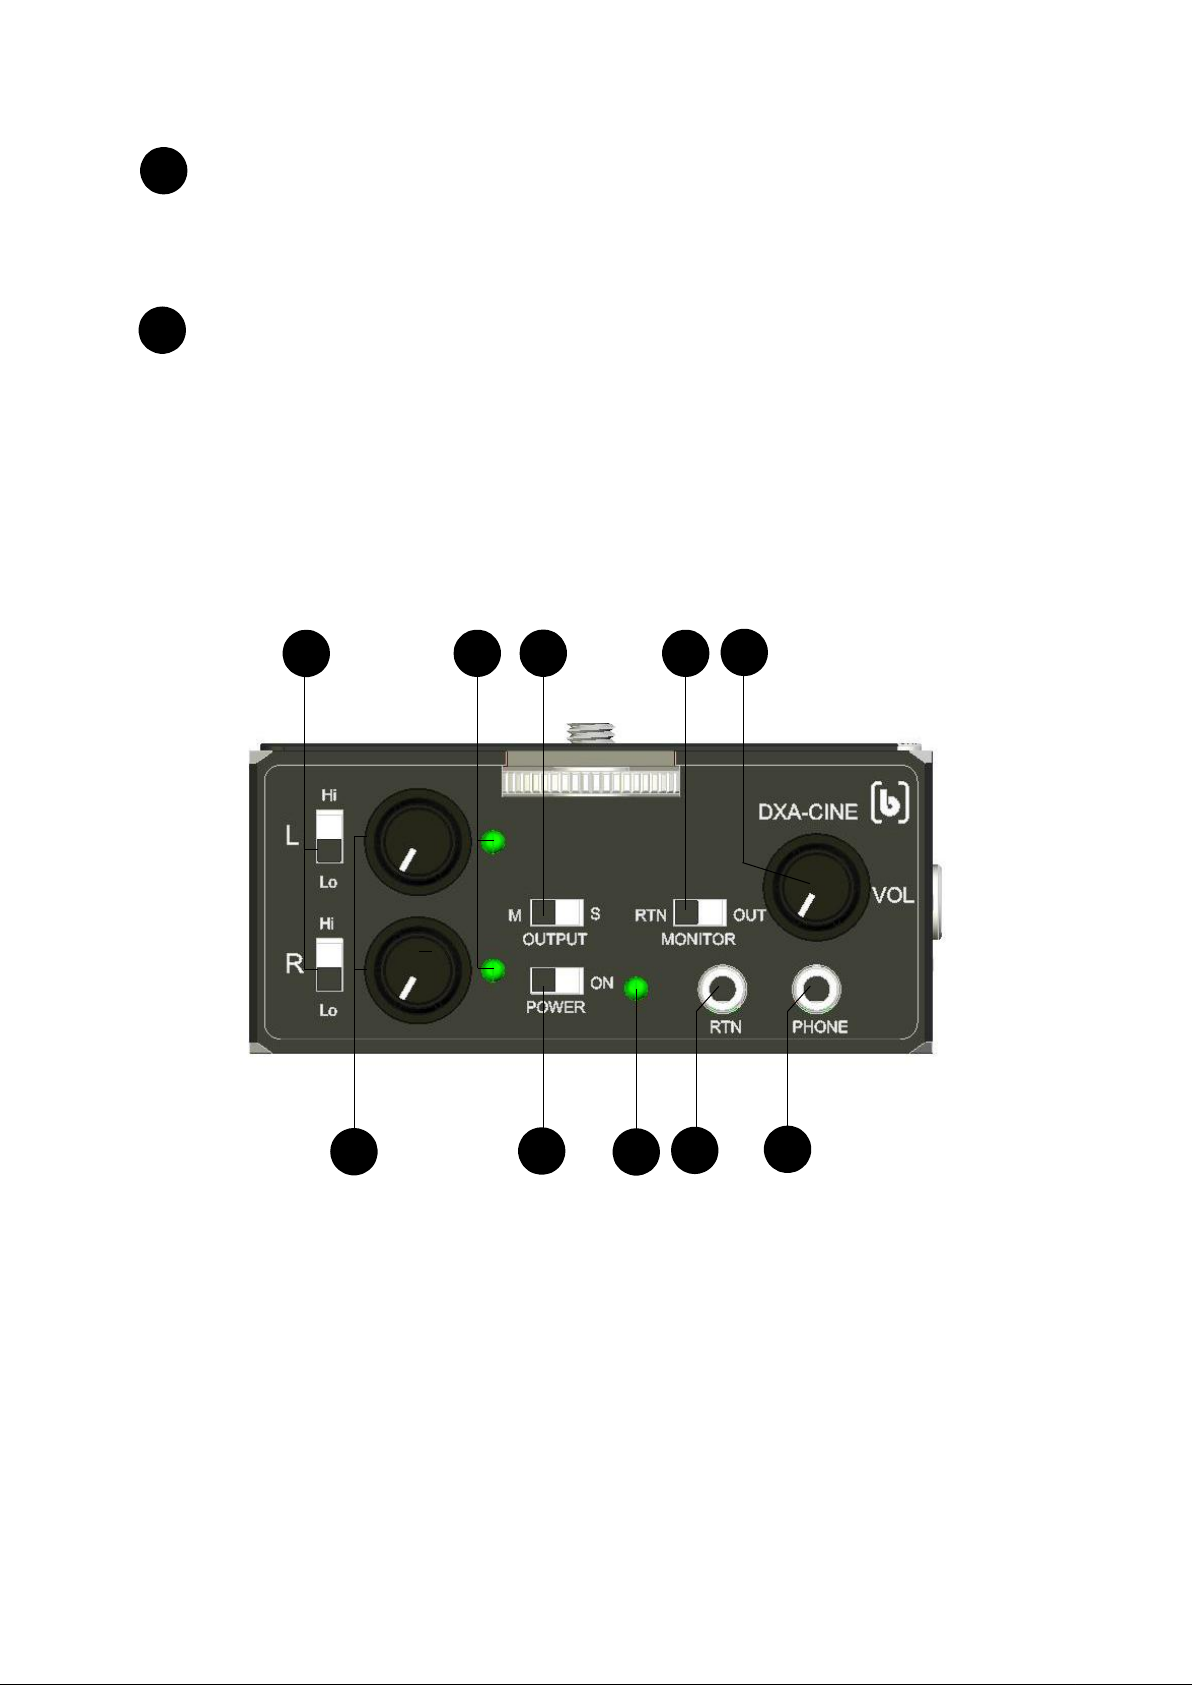
Level Indicator LEDs
Green -40dBu to -16dBu (low)
Yellow -16dBu to +4dBu (normal)
Red +4dBu (over)
Gain Switch
Selects LO for +40dB or HI for +60dB gain
Front Control Panel
4
1
2
2
5
11
3
7
9
9
10
6
9
10
4
8
Page 8
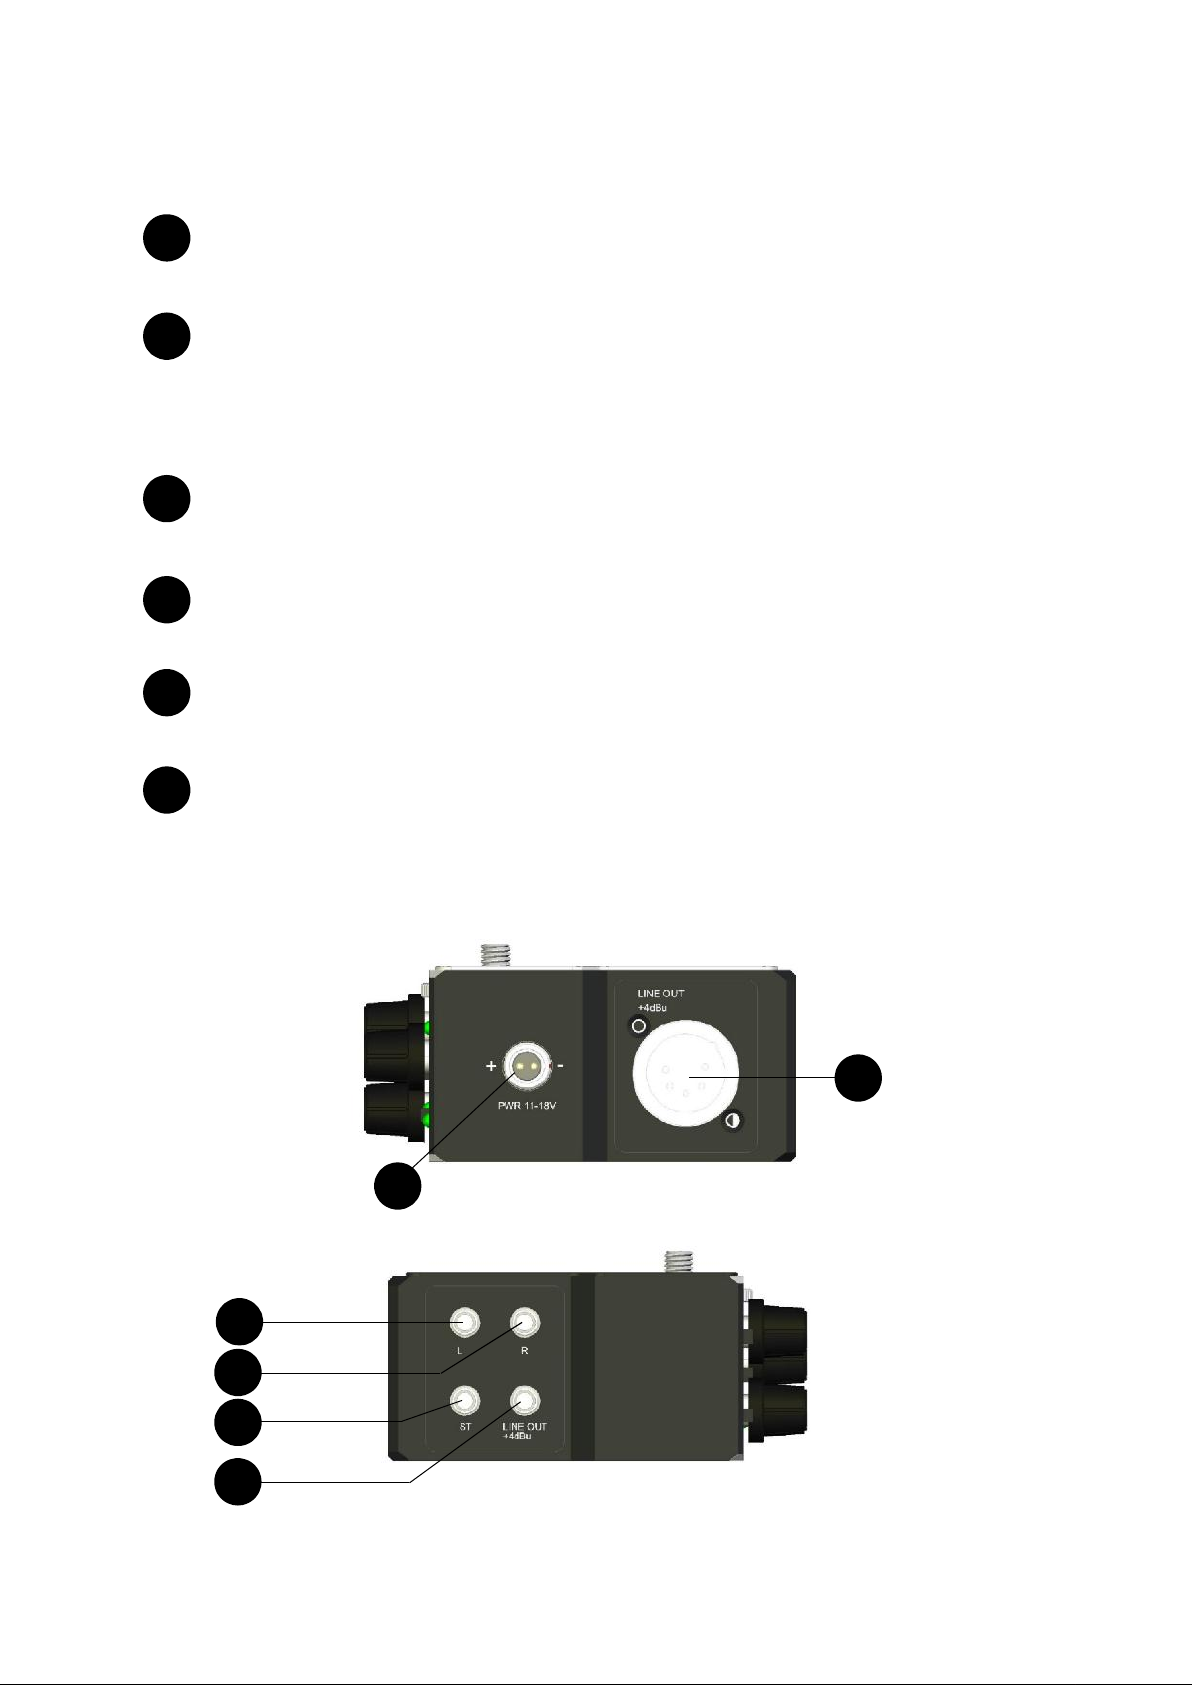
Side XLR Panel
LINE OUT
+4dBu balanced 5-pin XLR Output
PWR 11-18V
2-pin Lemo for external power in
Side Mini-Jack Panel
LINE OUT
+4dBu stereo 3.5mm unbalanced output
L
Left unbalanced 3.5mm mic input. Provides 3.5 volt plug-in power
R
Right unbalanced 3.5mm mic input. Provides 3.5 volt plug-in power
ST
Stereo unbalanced 3.5mm mic input. Provides 3.5 volt plug-in
power
Side XLR Panel
Side Mini-Jack Panel
5
11
14
15
16
13
11
13
14
15
16
12
12
14
Page 9

Playback Monitoring
To monitor audio from the camera during playback you will need to use
another SC35 cable (not included). Connect this cable between the
phone out on the camera or external monitor (if it has this feature) and
the RTN Jack on the adapter. Set the MONITOR switch to RTN.
You can now play back the clip and hear the audio through your
headphones connected to PHONE output on the adapter.
Audio Bracketing
Audio Bracketing is a simply a technique of setting a secondary channel
at a lower level to use as a backup in case the primary channel gets
blown out from an overly hot signal. This can be used anytime a single
mono mic is being used with the adapter. It is very easy to do:
1) Plug the mic into any input which will be the primary channel.
2) Set the OUTPUT switch to M for MONO.
3) Adjust the primary channel level as usual.
4) Adjust the other secondary channel at a somewhat lower level
between 10 and 20dB.
6
Page 10

Features
Inputs
Two unbalanced 3.5mm jacks with plug-in power
One stereo unbalanced 3.5mm jack with plug-in power
RTN jack for playback monitoring
Output
+4dBu balanced 5-pin XLR
+4dBu unbalanced stereo 3.5mm jack
Headphone Monitor
Built-in headphone amplifier with volume control
3.5mm phone jack
Level Indicators
Low/Good/Over level indicators
Gain Switch
40dB or 60dB gain settings to match any microphone
Level Controls
Adjusts output level on each channel
Low Noise Preamplifiers
Exceptionally low-noise circuitry for superb audio
Wide-bandwidth for full rich sound
Playback Monitor
Provides an easy way to monitor audio on playback
Case
Sturdy extruded aluminum enclosure with three ¼” / 20 threaded inserts
for various mounting options.
7
Page 11

Specifications
Maximum Input Levels LO gain -15dBu
HI gain -35dBu
Output Level +4dBu when level indicators change to red
Output Clipping Level +25dBu (XLR), +21dBu (3.5mm)
Frequency Response 20Hz to 20kHz (+/- 0.5dB)
THD+N Lo Gain: 0.013% (+4dBu output, 1kHz)
Hi Gain: 0.08% (+4dBu output, 1kHz)
Dynamic Range 100dB
Gain LO +40dB
HI +60dB
Plug-in Power 3.5 volts on all mini-jack mic inputs
Level Indicators Green: -40dBu to -16dBu (low)
Yellow:-16dBu to +4dBu (normal)
Red: +4dBu (over)
External Power 11-18 volt via 2-pin Lemo
Pin 1 = (-), Pin 2 = (+)
Dimensions 3.54” x 3” x 1.57” (L x W x H)
(90 mm x 76 mm x 40 mm)
Weight 10.2 oz. (0.29 kg)
This device complies with the FCC Rules, Part 15, Class B
8
Page 12

Warranty Information
Limited Two Year Warranty
This warranty covers any defects or malfunction in your new BeachTek
adapter for two years from date of purchase.
BeachTek will replace or repair any defective or malfunctioning adapter,
within the warranty period, at no charge. The warranty does not cover
damage resulting from accident, alteration, misuse or abuse. The device
must be sent to our service center at your expense.
Should you require service please contact us first before returning the
unit to us. Return instructions can be found on our website at
www.beachtek.com on the Support page.
Upon receiving the returned adapter it will be inspected and replaced or
repaired if found defective. The unit will be shipped back to you within
five business days at our expense.
9
Page 13

Contact Information
Address
Beachtek Inc.
480 Osprey Avenue
Kelowna, British Columbia
Canada V1Y 5A5
Phone
778-478-9872
Email
Website
www.beachtek.com
 Loading...