

Page 1
BEACHCOMBER HOT TUBS
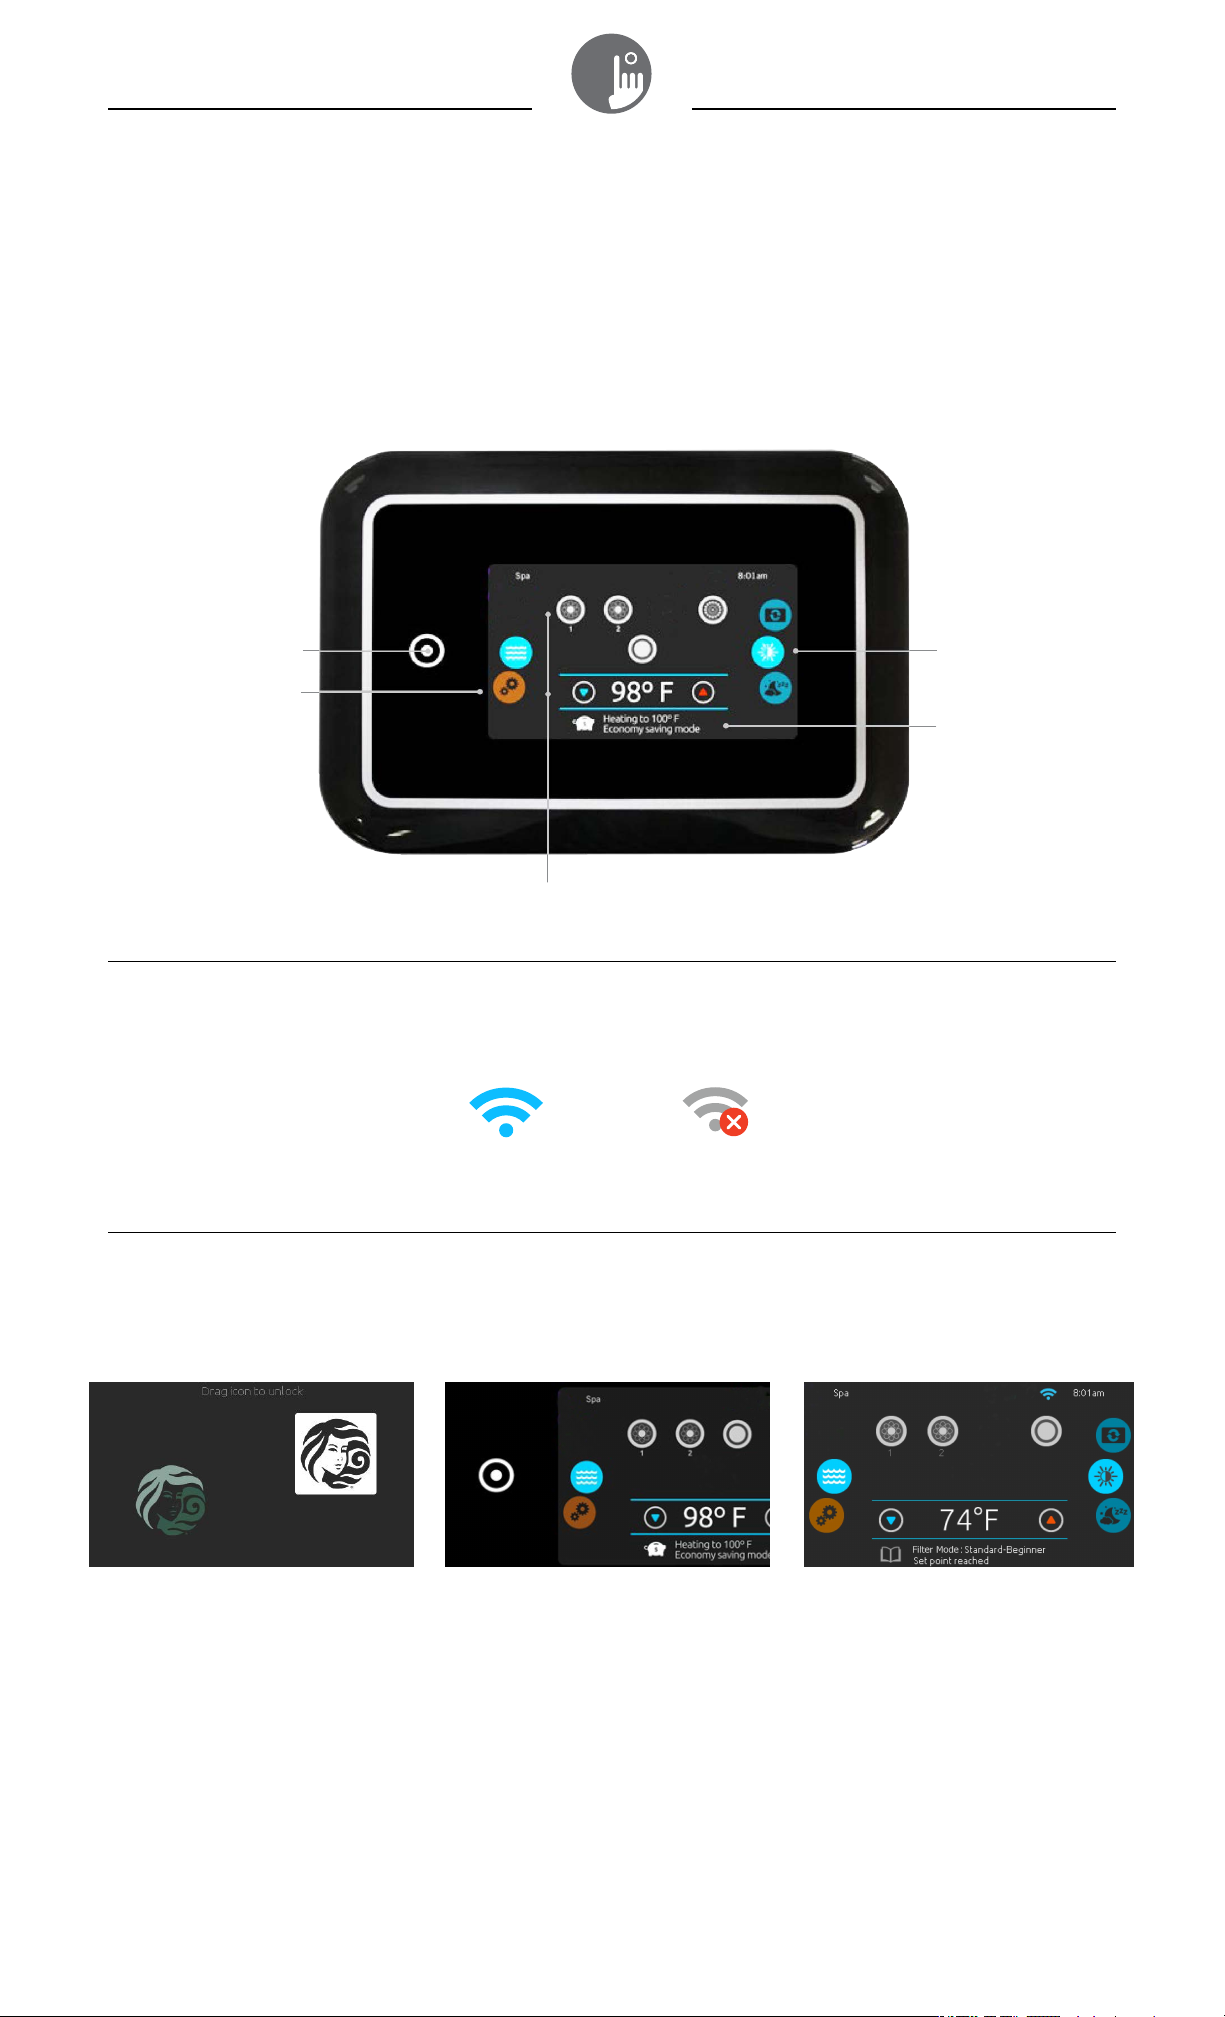
No buttons, keys and overlays! Mode and function selection wheels, all-on or all-off one touch
activation key of last used settings, interactive display icons and on-screen messages are all
elements of the ET-1000 user interface, designed to let hot tub users interact intuitively with their
hot tub and its value-added accessories.
All-on or all-off key
(one touch
activation)
TOUCH SCREEN KEYPAD
ET-1000
Reference Guide
direct to function
selection wheel
(settings and
additional options)
mode selection
wheel (settings &
accessories
interactive display icons
(main hot tub functions)
on-screen system
message and
reminders
notification icons
Notification icons at the top right-hand side of the screen show the status of connected value-added accessories.
system is
connected to wifi
system is not
connected to wifi
Quick and easy step-by-step instructions to control the main functions and to
configure system settings of your hot tub from its ET-1000 keypad.
turn keypad on
3 minutes after the last pump is
turned off, the screen will shut off if
there is no touch activity. Touch the
screen to turn on the keypad. Then
follow the instructions on the screen
to access the main screen.
hot tub functions
all-on, all-off target key
ET-1000 features an all-on or
all-off one touch activation key.
When pressed, it stops or starts
all working components and
accessories at once.
From the home screen,
you can access the
following modes:
• spa
• settings
To select a mode, slide the
left wheel up or down until
the desired icon menu is
highlighted in the middle.
Page 2
spa mode
spa mode
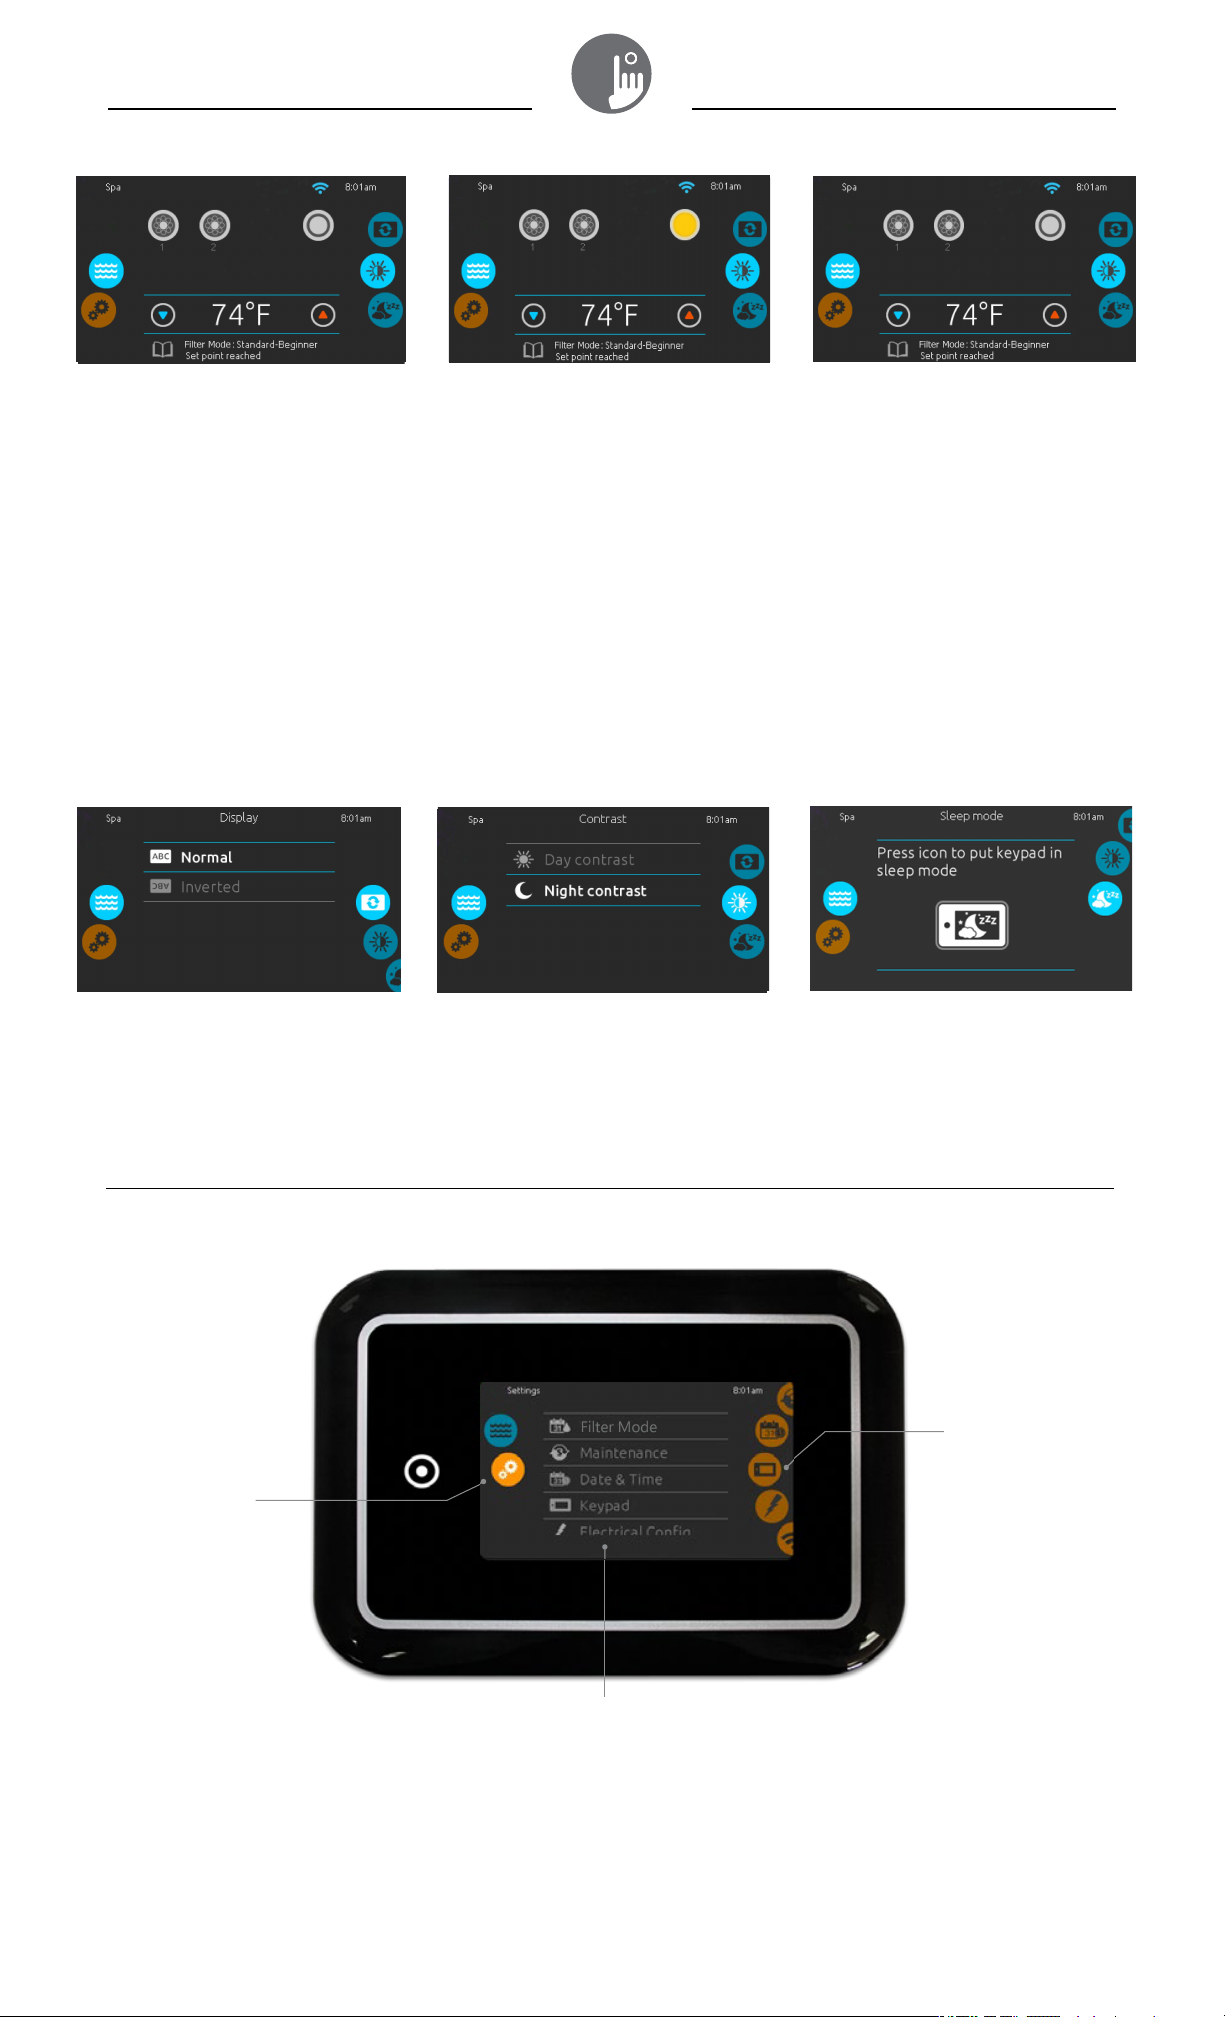
To select the spa mode, slide the
left wheel up or down until the spa
icon is highlighted in the middle.
The home screen will display its
equipment start or stop keys, up and
down buttons, water temperature,
messages and quick access to display
options:
• display orientation
• display contrast
To select an option, slide the right
wheel up or down until the desire
icon menu is highlighted in the
middle.
start or stop accessories
To start or stop an accessory
(pump, blower, light), touch the
associated icon. Icons will become
animated when their accessory is
turn on, and animation will stop
when turn off.
Icons on the screen will reflect the
speed or state of the devices
running on your spa. When an
accessory has more than one
speeds press the button until it
reaches the desired speed.
water temperature
The temperature at the bottom of the
screen shows the current water
temperature. Use the Up and Down icon
to set the desired temperature. The set
point will appear in blue. After 3 seconds
without any changes to the set
temperature value, the current water
temperature will reappear.
When the set value is lower than the
current temperature Cooling to xx.x will
appear below. When the set value is
higher than the current temperature,
Heating to xx.x will be indicated under
the value. Normally there is a short delay
before the heating starts, during which
Heating Suspended is indicated under
the value.
display orientation
To modify the display orientation
settings, slide the right wheel until
the display orientation icon is
highlighted in the middle.
Simply touch the line of the
orientation you want to select.
You can use the Settings mode to manage settings of your spa system.
mo
de selection
wheel:
display contrast
To modify the display contrast
settings, slide the right wheel until the
display contrast icon is highlighted in
the middle.
Simply touch the line of the contrast
you want to select.
settings
sleep
Press key to go directly into the sleep
mode. In sleep mode, water
splashing on the keypad can't
inadvertently start/stop a pump.
direct to function
selection wheel:
filter mode -
maintenance -
date & time -
keypad -
electrical config -
wifi -
about -
List of featured items
To select the settings mode, slide the left wheel up or down until the settings icon
menu is highlighted in the middle.
In the Settings screen you can access the following:
filter mode
•
ma
intenance
•
date & time
•
keypad
•
o select an item, slide the right wheel until the desired icon is highlighted in the middle or press on the menu name.
T
2
• electrical configuration
• wifi
• miscellaneous
• about
Page 3
Filter Mode
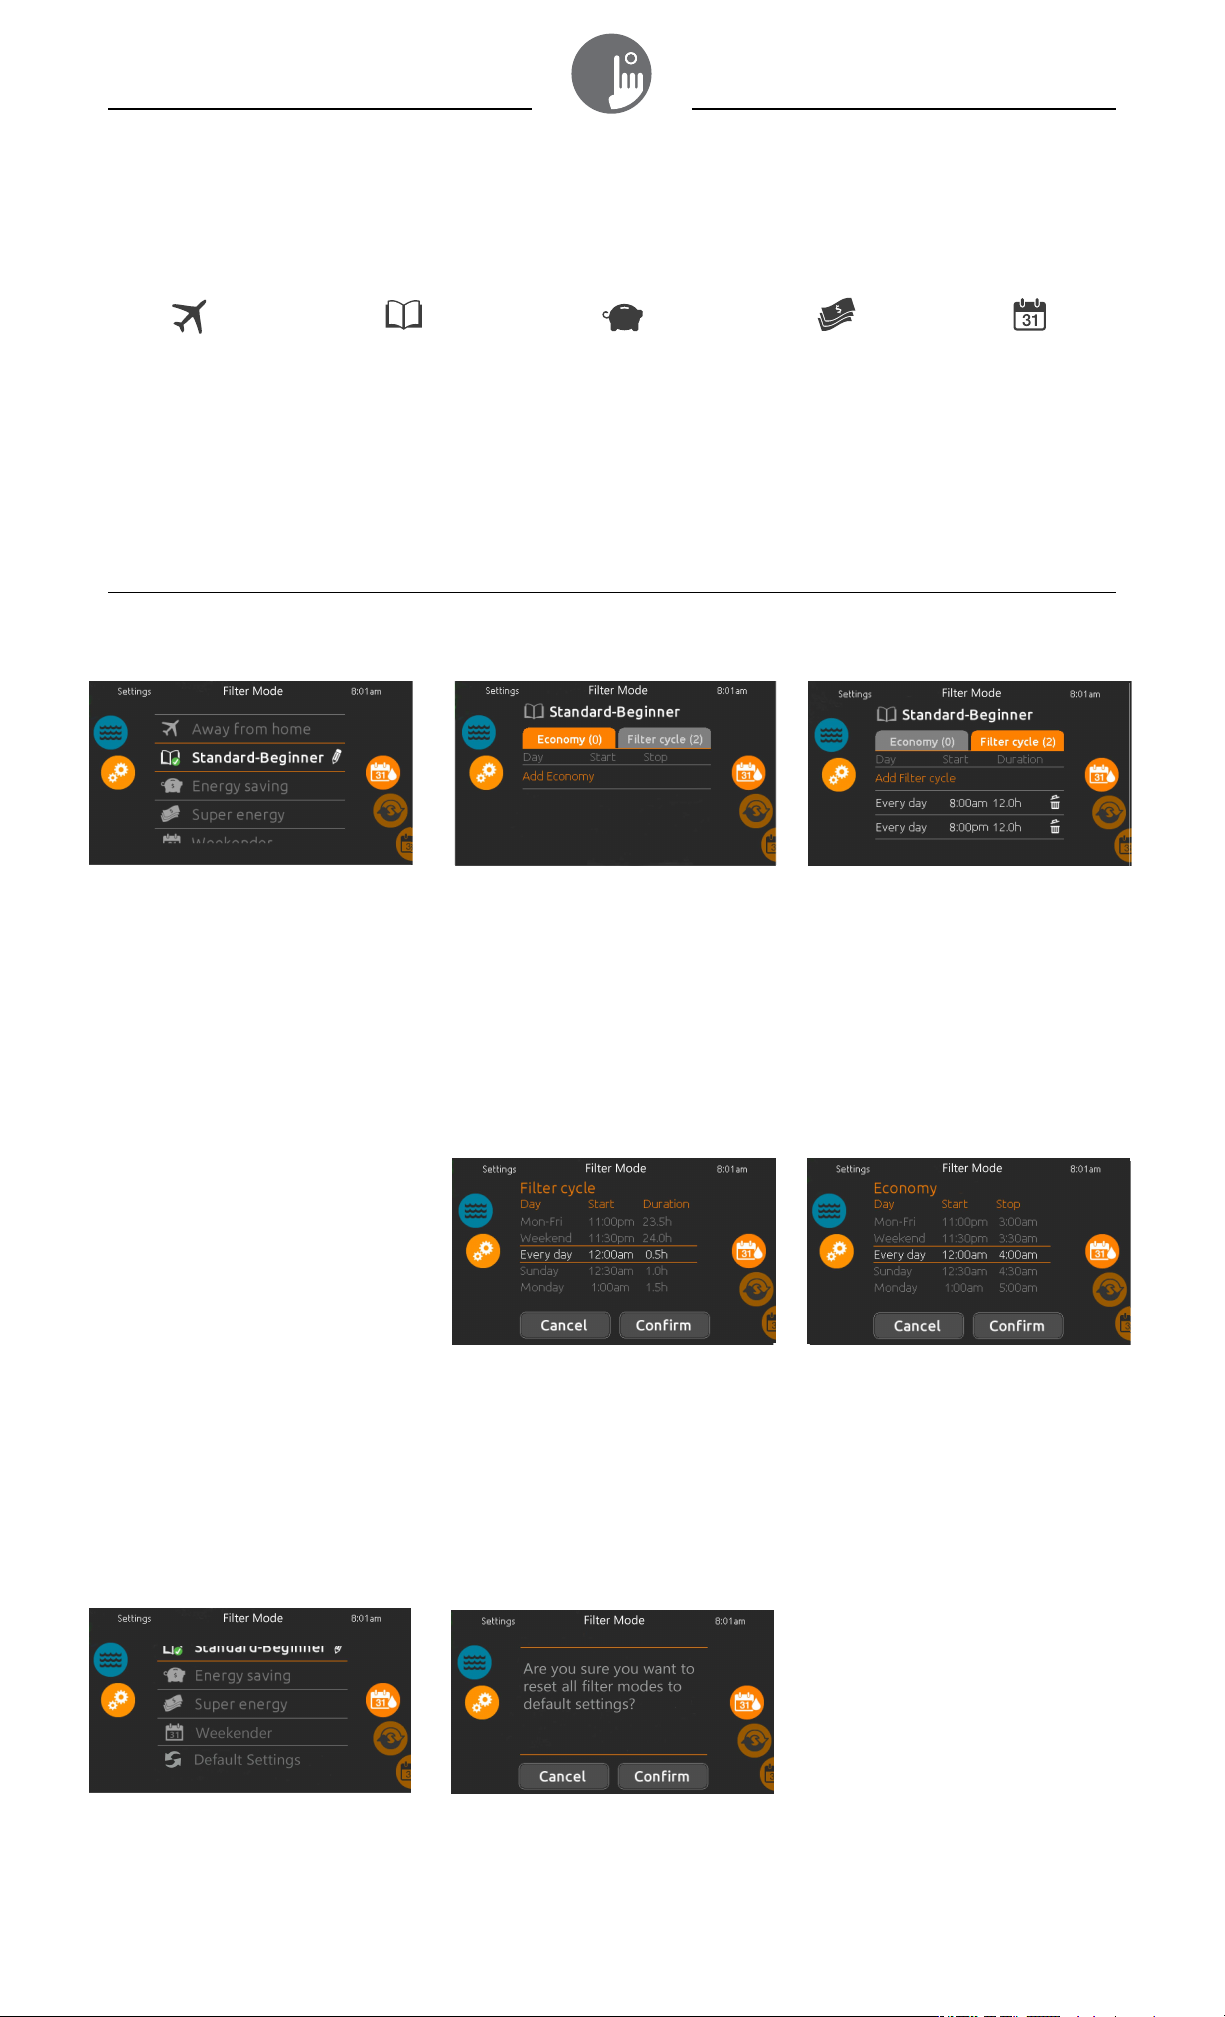
The filter mode screen will help you set up your ideal filtration and heating settings. Choose, set
or modify one of the 5 suggested modes depending on your needs at any given time.
Away from home
In this mode the
hot tub will
alwayssbe in
economy; the set
point will be
reduced by 20° F.
Standard-Beginner
(default filter mode)
The hot tub will never
be in economy mode
and will be filtering
according
to the management
system's low level
configuration.
modifying filter mode schedules
filter mode
To modify a Filter mode category, touch
the pen icon at the
desired water care to open the
selected Water Care menu.
Note: The default Filter Mode for Hot
tubs equipped with a Hush pump is
"Standard-Beginner" and is programmed
to filter 24 hours (2 x 12hr) per day.
• 1st filter cycle @ 8:00am
• 2nd filter cycle @ 8:00pm
right end of the
Energy Savings
The hot tub will be in
economy mode during
the peak hours of the
day and resume
normal mode on
the weekend.
*economy
Touch the Economy tab to change the
economy schedule. You can add
economy schedules by touching the
orange line labeled "Add Economy" .
To delete a schedule, touch the
garbage can icon at the right end of
the desired line.
Super Energy
The hot tub will
always be in
economy mode
during peak hours,
every day of the
week.
Weekender
The hot tub will
be in economy
mode from
Monday to Friday,
and will run
normally on the
weekend.
filter cycles
Touch the Filter cycle tab to change
the filter cycle schedules. You can add
filtration schedules by touching the
orange line labelled "Add filter cycle" .
To delete a schedule, touch the
garbage can icon at the right end of
the desired line.
*In economy mode, the set point
will be reduced by 20°F - which
means the
heating system will not
be engaged unless the temperature
falls to 20°F below the hot tub's set
temperature.
You can modify the programmed
schedules by selecting one and
adjusting the schedule.
You have several possibilities for the
schedule (Mon-Fri, weekend, every
day, or single days). The schedules
will be repeated every week. The
time and duration are set in 30
minute increments.
Once you have set the schedule,
p
ress "Confirm".
If you don't want to
keep any changes, press
"Cancel" or use the calendar icon to
go back.
Default Settings
You can reset all Filter Modes back
to original factory settings by
pressing "Default Settings".
Press "Confirm" to reset. Press
"Cancel" if you choose not to reset.
3
Page 4
maintenance
maintenance
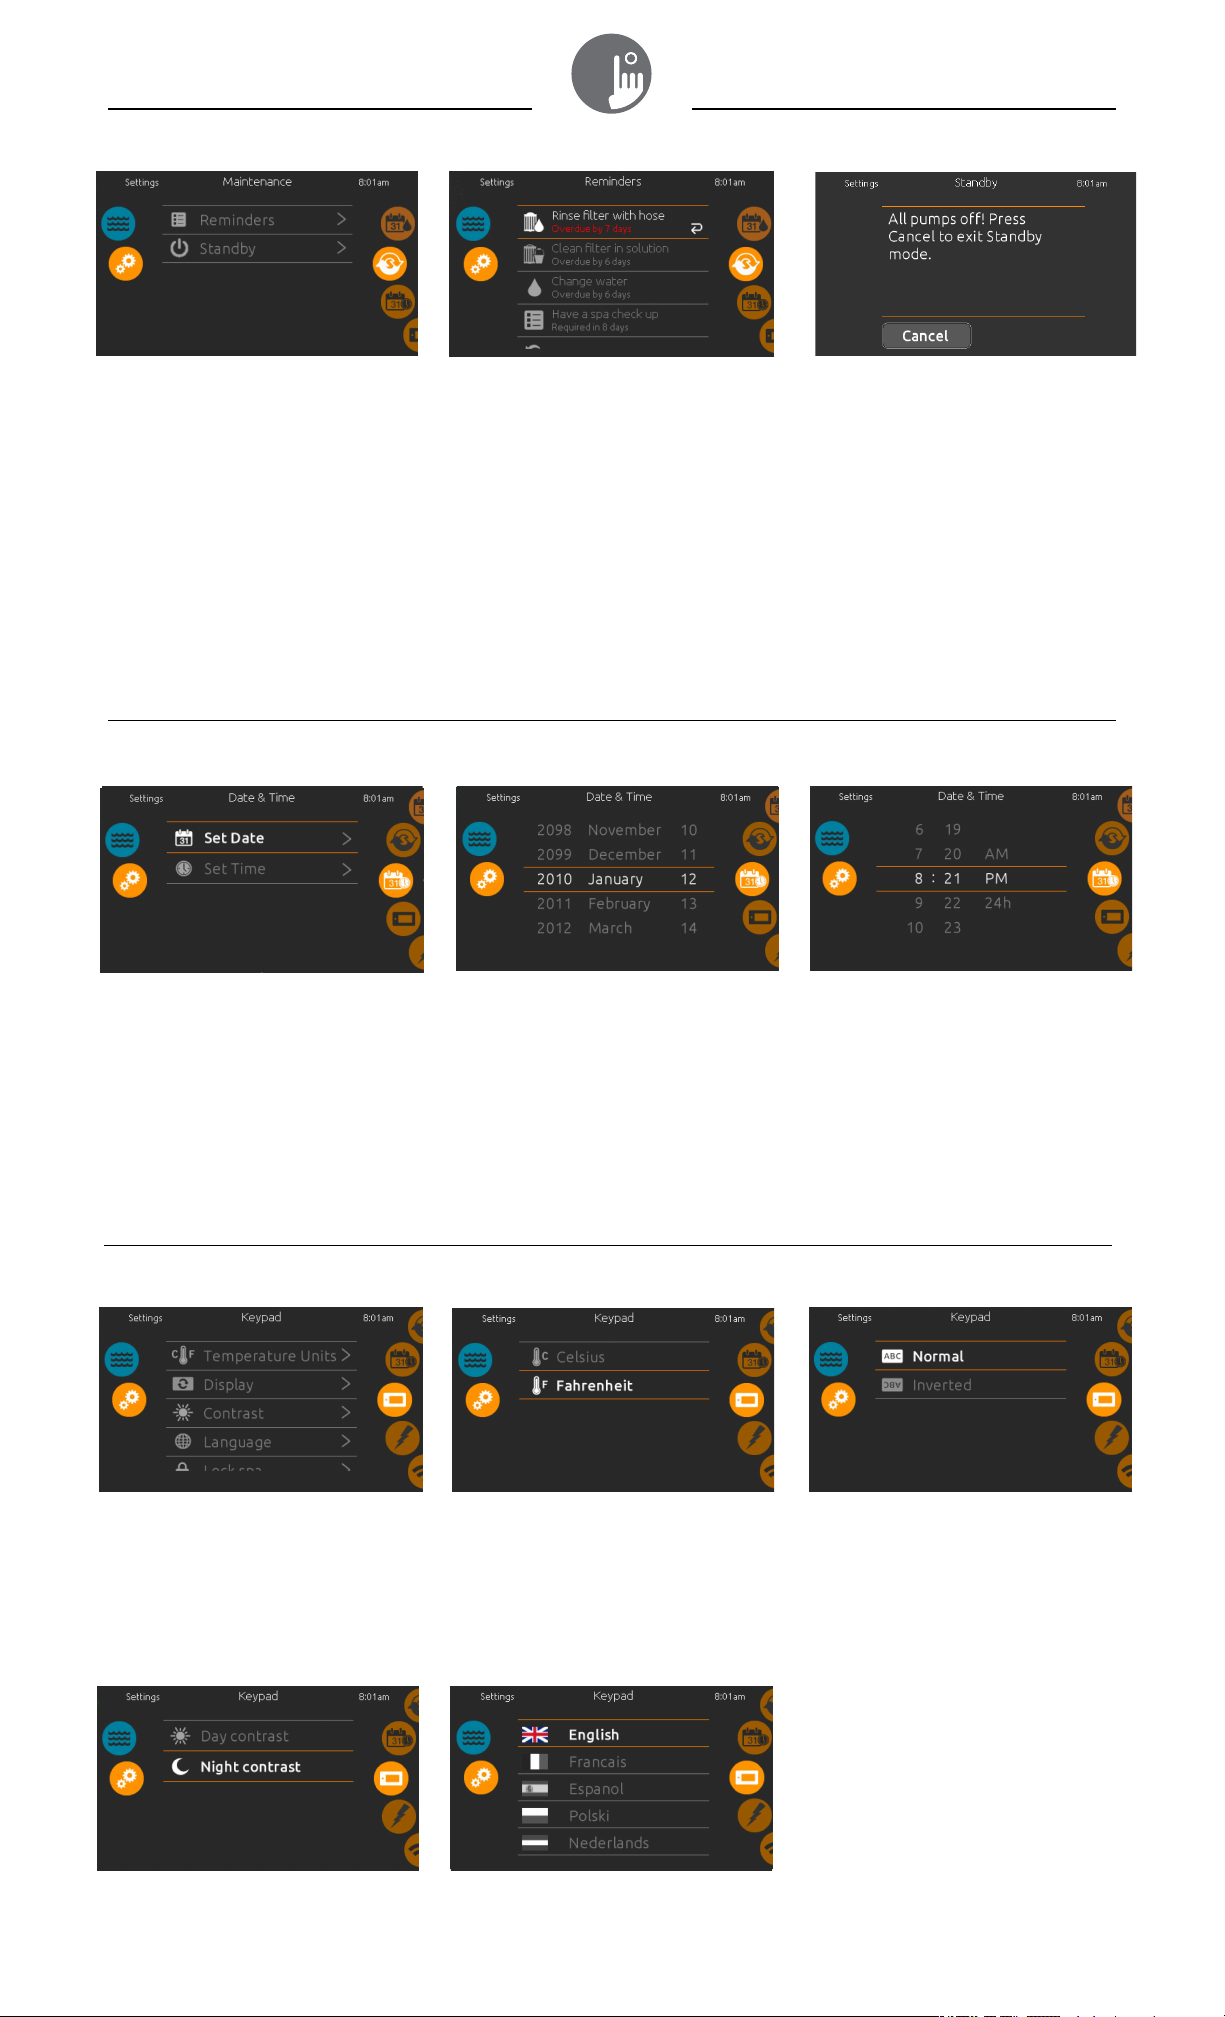
To modify maintenance settings,
slide the right wheel until the
maintenance icon is highlighted in
the middle.
From the Maintenance screen you
can access the following:
• Reminders
• Standby
Simply touch the line of the
item you want to change.
reminders
The
ET-1000 keypad will provide
reminders about maintenance required
on your spa, like rinsing
lter.
fi
based on normal use.
The reminders menu allows you to
che
ck the time le
is required, as well as to reset the time
once a task has been completed.
To reset a task, select it by pressing the
curved arrow, then confirm when
prompted. Once you have confirmed,
the task will be reset
Every
task
has its o
ft before maintenance
or
cleaning the
wn duration,
date and time
standby
The Standby mode allows you to
service your spa. Pumps will stop for
30 minutes and will automatically
restart after.
The normal screen will return at the
end, once the pumps will be
restarted.
*date and time
To modify date and time
settings, slide the right wheel until
the date and time icon is
highlighted in the middle.
Simply touch the line of the item you
want to change.
set date
Here you can adjust the year,
month and date. Simply swipe up
and down the column you want to
change, and select the desired
value. When done, touch the
calendar icon at the right of the
screen.
set time
Here you can change the hour,
minute and time format. Simply
swipe up and down the column
you want to change, and select the
desired value. When done, touch
the calendar icon at the right of the
screen
*Note: If connected to Wifi (see page 7) with BIC-e in.touch 2, date & time will automatically be set to local time zone.
keypad settings
keypad settings
To modify keypad settings, slide the
right wheel until the keypad icon is
highlighted in the middle.
Simply touch the line of the item you
want to change.
temperature units
Use this screen to set or change
the temperature in F˚ or C˚ units.
display orientation
Use this screen to set or change
the normal or inverted display
orientation.
display contrast
Use this screen to set or change
the display day or night contrast.
4
display language
Use this screen to set or
change the display language.
Page 5
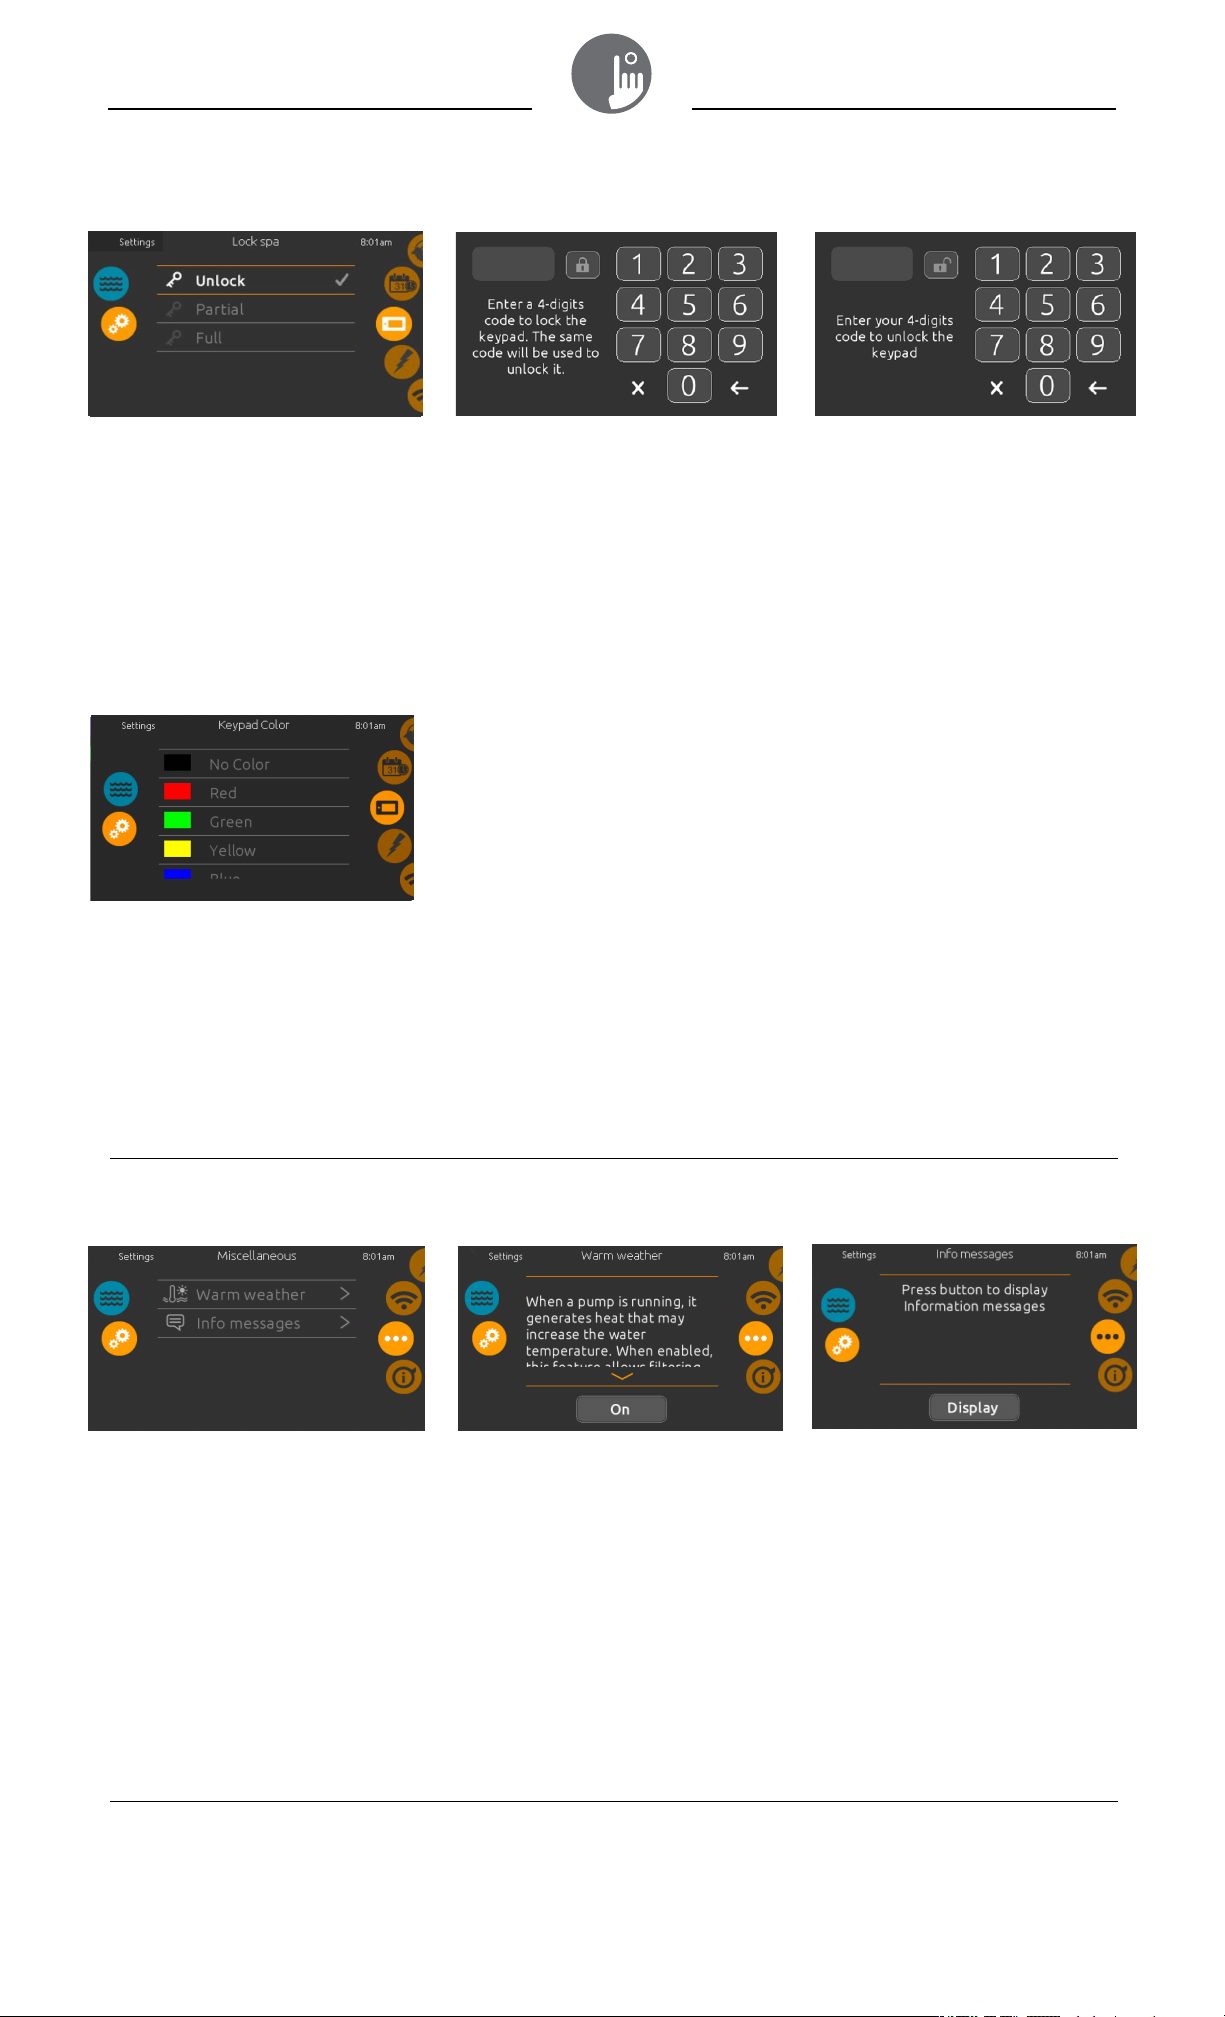
keypad settings
keypad lock/unlock (optional)
When this option is enabled, the user
can partially or completely lock the
keypad.
When Full Lock is selected, all
functions are locked.
In Partial Lock, you may only activate
accessories. Settings may not be
changed in this mode.
keypad color
With this feature the keypad rim
color can be changed.
8 pre-defined colors are available.
Note: Keypad colors are not tied to
other lighting features in the hot tub.
When the user wants to lock
the keypad he is asked to select a
4-digit code. The same code will
be needed to unlock the keypad.
Next time he wants to lock the keypad,
he will be prompted again to select a
4-digit code (same functionality as a
Safe in a hotel room).
The keypad can be unlocked with a
universal unlock code (3732) or by a
reset of the keypad.
miscellaneous
Th
is menu gives access to modify
the Warm Weather option and info
messages in the media center.
miscellaneous
warm weather
When a pump is running, it
generates heat that may increase
the water temperature above the
temperature set point.
If the set point is above 95°F and
the water goes 3°F above the set
temperature, the Warm Weather
option, if enabled (ON), will reduce
the filtering to 2 x 2 hours per day.
info messages
Press display/hide key to modify
message display:
If hide option is selected, smart
winter mode message will only
appear when a SWM purge is in
action. Otherwise the message will
always appear when the spa is in a
SWM condition.
If hide option is selected, heating
suspended and filtering suspended
messages will not appear.
5
Page 6
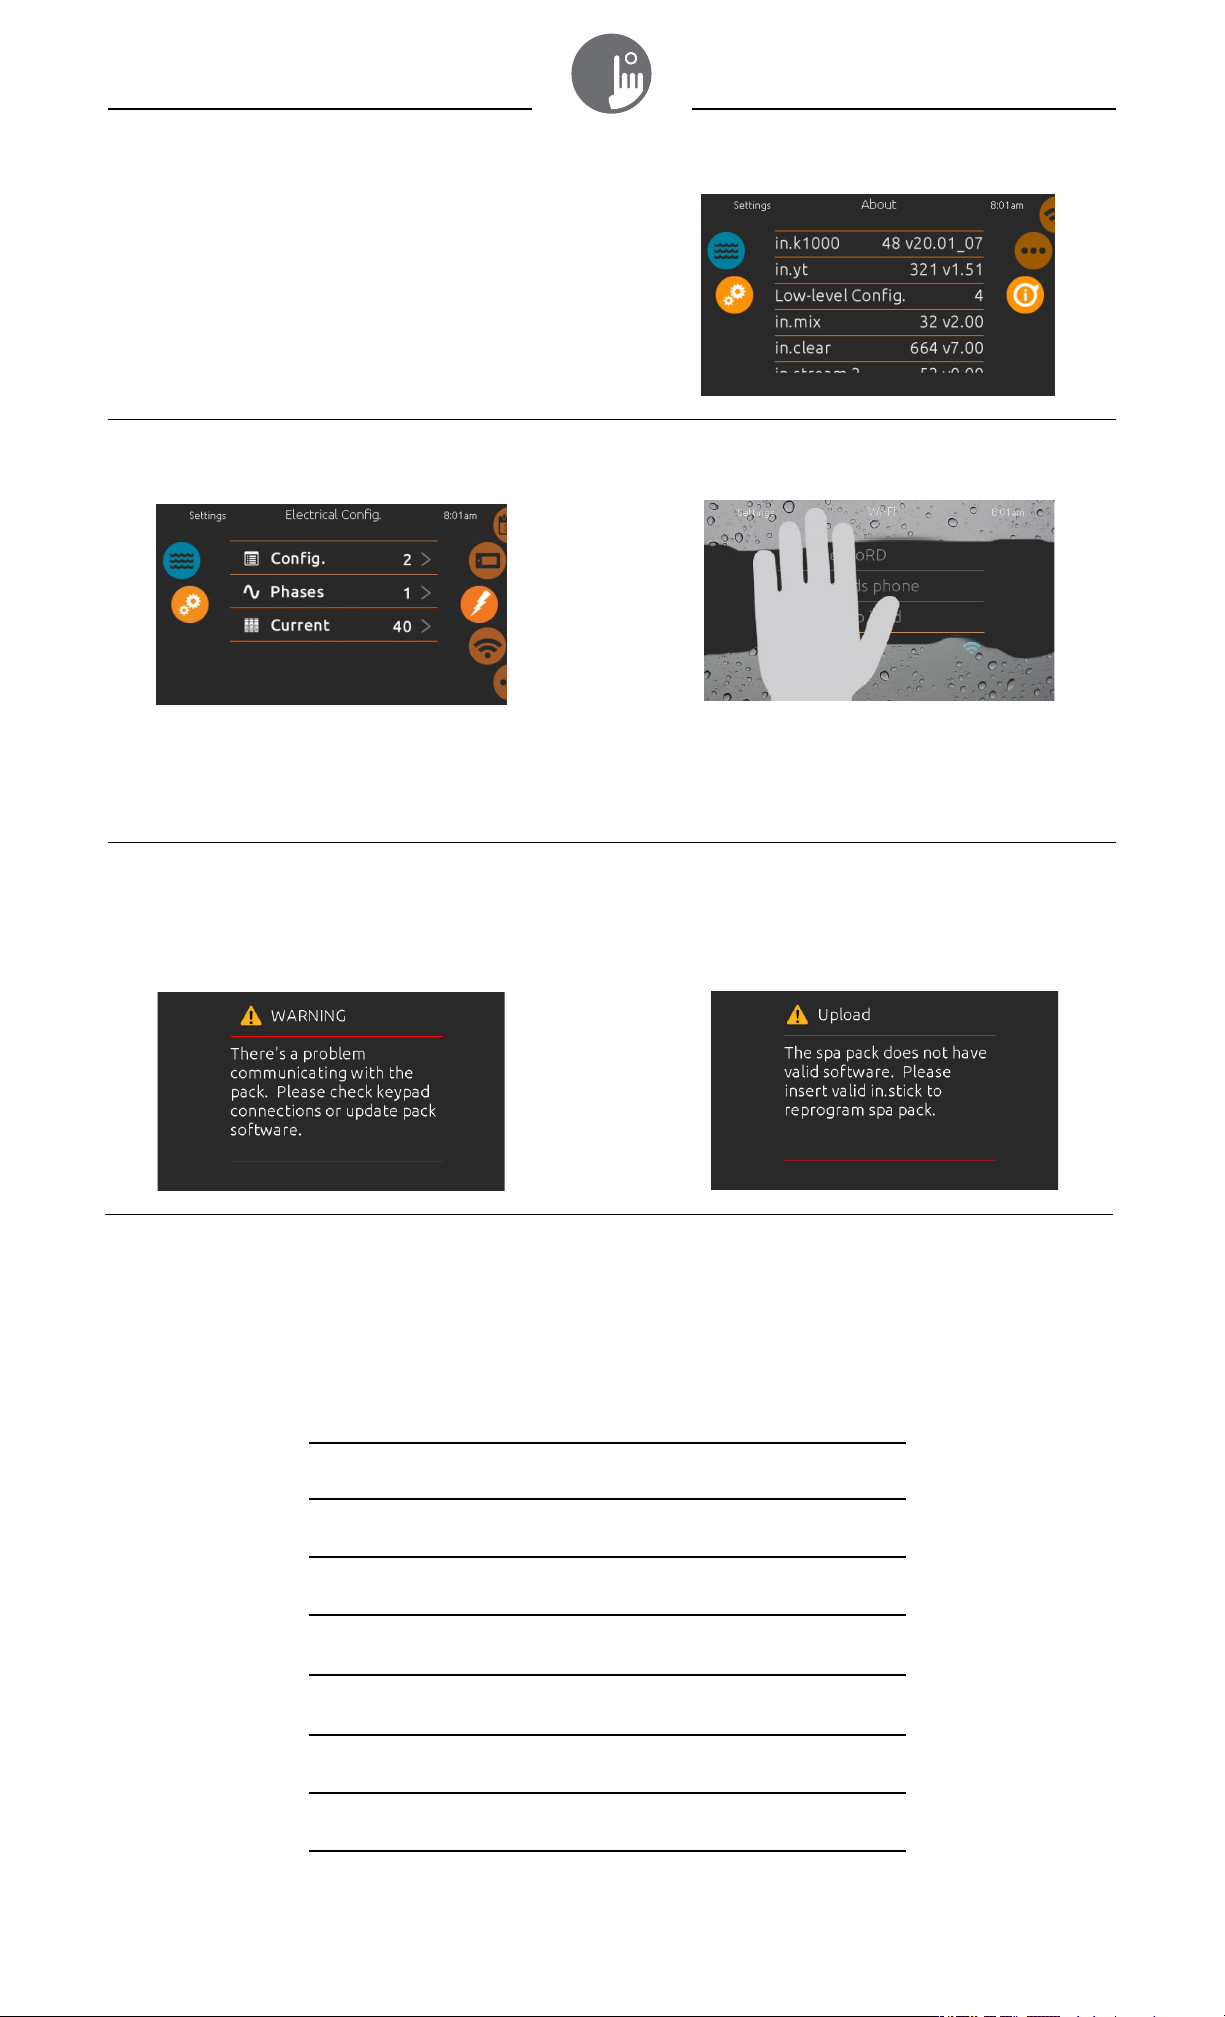
about your hot tub system
about
To get info about your hot tub system, slide
the right wheel until the about icon is
highlighted in the middle.
Information about the ET-1000 software
number and the revision numbers of the
components of your system will be
displayed.
electrical configuration
Please do not make changes in this
section unless you are a qualified
electrician.
installation er
Upon connecting the
the instructions in the message or contact your dealer
ET-
1000 to you
at 1-800-663-6557 (press
r spa system, you may see one of
too much water on display
wipe screen
This message appears when too much
water is detected on the touch screen.
Simply wipe away excess water.
ror messages
or c
ontact Beachcomber Technical Support
4 for tech support)
two error messages. Please follow
diagnostic error display messages
Please follow the instructions in the message or contact your dealer or contact Beachcomber Technical Support
code
HL
FLO - L01
FLO - L02 FLO
NO FLO
HR
OH
Prr
AOH
Hr
UPL
at 1-800-663-6557 (press 4 for tech support)
displayed error message
WARNING! DO NOT ENTER SPA
High Limit circuit has tripped!
FLO condition - Check filter,
pump, blockage, air lock and water level
Persistent NO FLO, all off - Check filter,
pump, blockage, air lock and water level
DANGER! DO NOT ENTER SPA
Hardware error detected (relay stuck)
WARNING! DO NOT ENTER SPA
Spa temperature is too high
WARNING! DO NOT ENTER SPA
Temp probes/detect. circuit defect.
ERROR
Elevated internal temperature
DANGER! DO NOT ENTER SPA
Hardware error detected (thermal fuse)
The spa pack does not have valid software.
Please insert valid in.stick to reprogram spa pack
6
Page 7
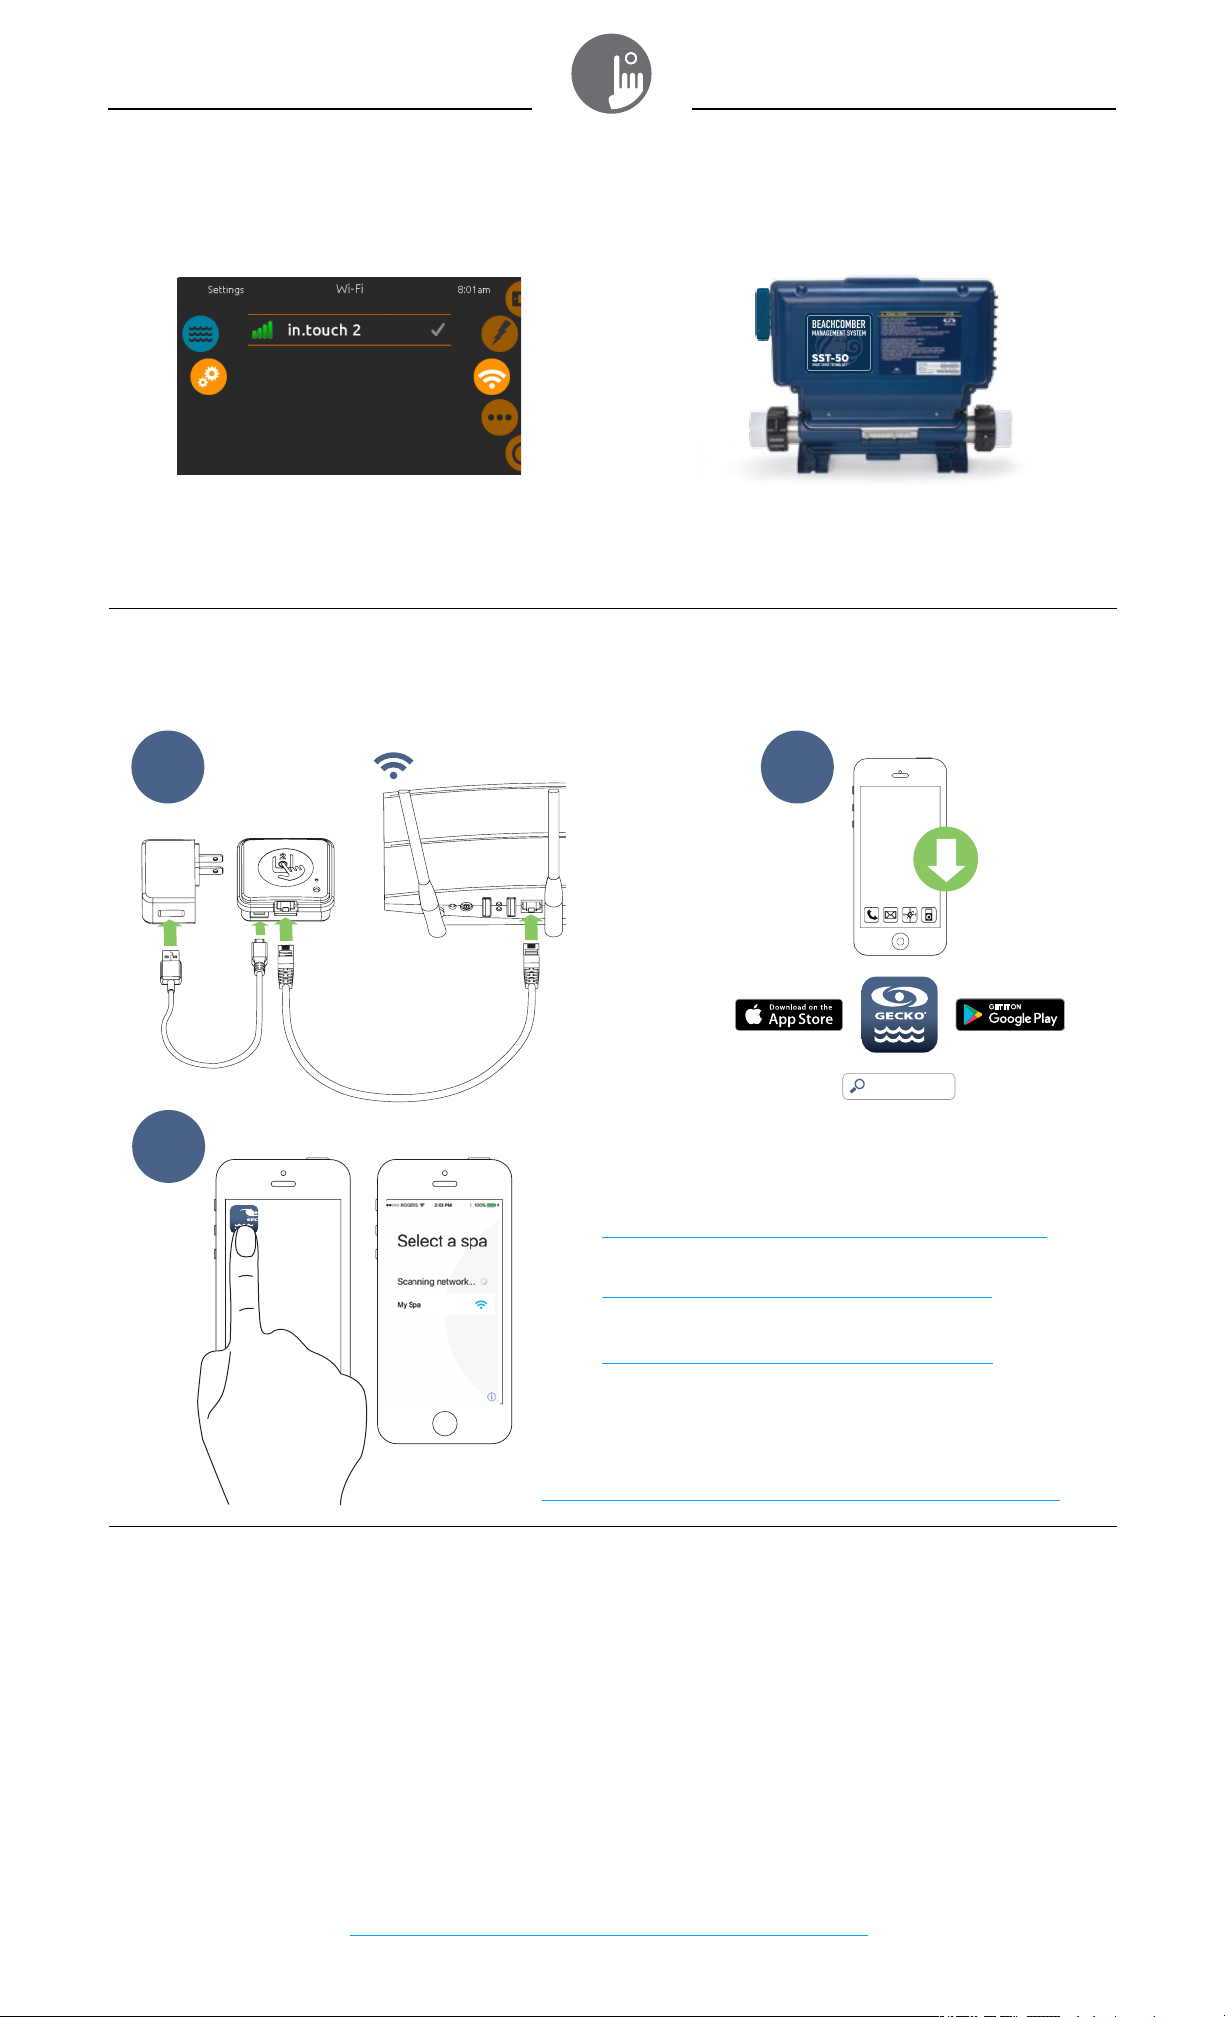
wifi
Note: This function is available only if a BIC-e in.touch 2 spa transmitter (CO module) is connected to the
hot tub's management system (as shown) and a BIC-e in.touch 2 home transmitter (EN module) is
connected to your home router (as shown below). See Quick Start Guide & "how-to" links below.
wifi (in.touch 2)
When an in.touch 2 is detected, this
network will appear.
See in.touch Quick Start Guide below.
1
BIC-e in.touch 2 Home
Transmitter (EN module)
BIC-e in.touch 2 Spa Transmitter (CO module)
Bic-e in.touch 2
Home
Quick Start Guide
2
3
Blinking LED
Modules may be out of range
Simply connect in.touch 2-home
outside, close to the spa (via an
extension cord for power). Router
connection not needed for this
test. If modules stop blinking,
moving them closer to each other
is the only solution.
in.touch 2 "how-to" videos:
in.touch 2 - Home installation
http://bit.ly/2UbY50htest-InTouch2-HomeInstallation
in.touch 2 - How to create an account
http://bit.ly/2uK6Rne-InTouch2-CreateAccount
in.touch 2 - Select your spa
http://bit.ly/2UrwAz7-InTouch2-SelectYourSpa
For additional setup information, refer to:
Bic-e in.touch 2 Techbook
www.beachcomberhottubs.com/owners/manuals-and-guides
Troubleshooting BIC-e in.touch 2
Modules may be Unpaired
If the previous test did not
work, proceed to pairing
according to instructions in
the Pairing section of the
in.touch 2 Techbook.
Port 10022 may be closed on your
router. If port 10022 is open, some
other configuration may be
blocking access to Internet. The
application will still be able to
connect to your spa on your local
network. Server may be temporarily
«off-line» for servicing/
maintenance. Try again later.
in.touch
Green color
2
For additional Troubleshooting information, refer to: Bic-e in.touch 2 Techbook
www.beachcomberhottubs.com/owners/manuals-and-guides
7
Page 8

Beachcomber Technical Support at 1-800-663-6557 (press 4 for tech support)
Beachcomber Hot Tubs
Rev. 01 2019
Printed in Canada
www.beachcomberhottubs.com
 Loading...