

Page 1

SWIFT Adapter
User’s Guide
Version 3.5
Page 2

SWIFT .......................................................................................................... 4
TERMINOLOGY ............................................................................................. 5
SWIFT CONFIGURATION .............................................................................. 6
SWIFT MESSAGE LIBRARY.......................................................................................................................... 6
CUSTOM SWIFT MESSAGES ........................................................................................................................ 7
CREATING A SWIFT FORMAT........................................................................ 9
CREATING A SWIFT FORMAT BASED ON AN EXISTING SWIFT MESSAGE FORMAT ................................. 10
CREATING A SWIFT FORMAT FROM AN EMPTY MESSAGE FORMAT........................................................... 16
ENTERING THE SWIFT SPECIFICATION...................................................... 19
SWIFT SEQUENCE.................................................................................................................................... 20
Sequence Without Delimiters................................................................................................................ 20
Sequence With Start and End Delimiters.............................................................................................. 21
Sequence With Start Delimiter ............................................................................................................. 22
ADDING A SWIFT SEQUENCE ................................................................................................................... 24
Adding a SWIFT Sequence without Delimiters..................................................................................... 24
Adding a SWIFT Sequence with Start and End Delimiters................................................................... 26
Adding a SWIFT Sequence with Start Delimiter .................................................................................. 28
ADDING A SWIFT FIELD........................................................................................................................... 29
Adding a New Generic Field................................................................................................................ 30
Adding Field Options....................................................................................................................... 32
Entering an Option Format............................................................................................................... 33
Entering an Option Specification...................................................................................................... 35
Removing Field Options................................................................................................................... 36
Adding Qualifiers and Associating them with Options.................................................................... 37
Specifying OR Option for a Qualifier............................................................................................... 40
Adding a Non-Generic Field ................................................................................................................ 41
Specifying Field Definition and Usage................................................................................................. 43
Mapping Formats with Specification (Sub-fields)................................................................................ 43
Representing Complex Formats in Designer........................................................................................ 47
ADDING COPY OF FIELDS .......................................................................................................................... 53
UPDATING A SWIFT FIELD....................................................................................................................... 55
CUSTOMIZE FIELD..................................................................................................................................... 58
REMOVING A SWIFT FIELD...................................................................................................................... 60
ADDING VALIDATIONS FOR A SUB-FIELD ................................................................................................... 61
Specifying properties common for all validations................................................................................ 63
Specifying Error Code.................................................................................................................. 64
Specifying Field Options.............................................................................................................. 64
Specifying Qualifiers.................................................................................................................... 64
Specifying Null Field.................................................................................................................... 64
Specifying Comment.................................................................................................................... 65
Adding Code validation........................................................................................................................ 65
Specifying Codes.......................................................................................................................... 65
Removing Codes .......................................................................................................................... 66
Adding T26 Validation ......................................................................................................................... 67
Adding T14 Validation ......................................................................................................................... 67
Adding Date Validation........................................................................................................................ 68
Specifying Date Format................................................................................................................ 68
Page 3

Adding Currency Code Validation ....................................................................................................... 69
Adding Country Code Validation......................................................................................................... 69
Adding Time Offset Validation............................................................................................................. 70
Adding BIC validation.......................................................................................................................... 70
Adding C05 validation.......................................................................................................................... 72
Adding Decimal Validation.................................................................................................................. 72
Adding Party Identification Validation ................................................................................................ 73
Specifying Party Identification Codes.......................................................................................... 73
REMOVING VALIDATIONS FROM A SUB FIELD........................................................................................... 74
SWIFT EXTERNAL MESSAGE UI................................................................... 74
SWIFT EXTERNAL FORMAT UI .................................................................... 76
EXTERNAL FORMAT - SWIFT (HEADER/TRAILER) ................................................................................... 76
SWIFT Input Header/Trailer................................................................................................................ 77
SWIFT Output Header/Trailer ............................................................................................................. 79
SWIFT Input/Output Header/Trailer.................................................................................................... 80
FISC Header......................................................................................................................................... 82
SWIFT FORMAT OPTIONS........................................................................................................................... 83
SWIFT USER MESSAGE (DATA) ................................................................................................................. 85
SWIFT Sequence Info........................................................................................................................... 87
SWIFT Field Info (Generic) ................................................................................................................. 88
SWIFT Field Qualifier Info .................................................................................................................. 89
SWIFT Field Info (Non-Generic).......................................................................................................... 90
SWIFT Sub Field Info........................................................................................................................... 91
SYSTEM/SERVICE MESSAGE...................................................................................................................... 92
Creating an empty Service/System message format.............................................................................. 92
Creating a SWIFT System/Service Format Based on an Existing SWIFT Message Format................ 94
Adding a System Field.......................................................................................................................... 96
Adding a Simple Field ...................................................................................................................... 96
Adding a Complex Field................................................................................................................... 99
Fields Separated by OR/AND ........................................................................................................ 100
Adding a Group.................................................................................................................................. 101
Deleting a Field/Group ...................................................................................................................... 102
System Field Dictionary..................................................................................................................... 102
Specifying Validations for a Field.................................................................................................. 103
Specifying Validations for a Sub-field........................................................................................... 103
EXPANDING/COLLAPSING SWIFT FIELDS............................................................................................... 104
Expanding Fields........................................................................................................................ 105
Collapsing Fields........................................................................................................................ 105
EXPORTING A SWIFT MESSAGE FORMAT TO LIBRARY.............................. 106
Exporting a SWIFT Message Format................................................................................................. 107
Importing a SWIFT Message Format................................................................................................. 109
Sample Exported HTML File.............................................................................................................. 110
Page 4

SWIFT
S.W.I.F.T. SCRL is the abbreviation for Society for Worldwide Interbank Financial
Telecommunication, Societé Coopérative à Responsibilité Limitée. SWIFT’s purpose is
to provide technology-based communication services across all financial markets
through member banks so that they can profitably meet their own and their
end-customers’ needs.
In a financial perspective, standards enable financial institutions to move from
manual to automated initiation and processing of financial transactions. The message
text standards have been developed to support the business transactions of
S.W.I.F.T. users. To ensure that the multitude of practices and conventions of users
are in harmony, financial messages transmitted via the S.W.I.F.T. network must
adhere to the message text standards.
There are important benefits because of standardization of messages. These include:
automation,
reduced risk of errors and misunderstandings,
reduced operating costs,
improved productivity,
increased efficiency in processing of messages (routing and preparation),
faster and more cost effective account reconciliation, and
the ability to maintain more comprehensive management information.
SWIFT messages are represented by a three-digit number, for example, MT 112.
The first digit defines the message category, indicating the general usage of
the message. Here, Category 1 refers to Customer Payments & Cheques.
The second digit of the message type indicates the message group. For
example, Message group 1 refers to Cheque Payments.
The third digit indicates the particular type of message, representing a specific
function of the message. In our example, Message type 2 refers to Status of a
Request for Stop Payment of a Cheque.
See Also:
Terminology
Creating a SWIFT Format
Entering the SWIFT Specification
SWIFT External Message UI
SWIFT External Format UI
Page 5

Export a SWIFT Message Format
Terminology
Sequence
Each message type contains zero, one or more sequences. A sequence is a group of
related information made up of one or more fields and/or sub-sequences. A sequence
may or may not be delimited. For delimiting a sequence use a start indicator and end
indicator or start indicator alone.
SubSequence
A subsequence is a sequence nested within another sequence. The fields contained
within each subsequence can be either discrete (non-generic) or generic.
Generic Field
A generic field is used to describe groups of business data that are common
throughout the messages. It is then made unique by the addition of a qualifier.
Generic fields allow for the consistent identification of data in a logical an d structured
way. Each generic field will always have the same meaning across all sensitive
messages.
Non-Generic Field
A non-generic field, unlike a generic field, is used for one purpose only.
Qualifier
A qualifier is one that gives a complete meaning about a generic field. Qu alifiers
allow the identification of the type of data.
See Also:
SWIFT
Creating a SWIFT Format
Page 6
SWIFT Configuration
SWIFT field dictionary and message library are stored under <installation
dir>\config\swift folder. This folder contains the following files and folders.
QualifierList.csv List SWIFT qualifiers with description.
SwiftField.xml Field dictionary for ISO15022 & ISO7754 user messages
SwiftSystemField.xml Field dictionary for system and service messages
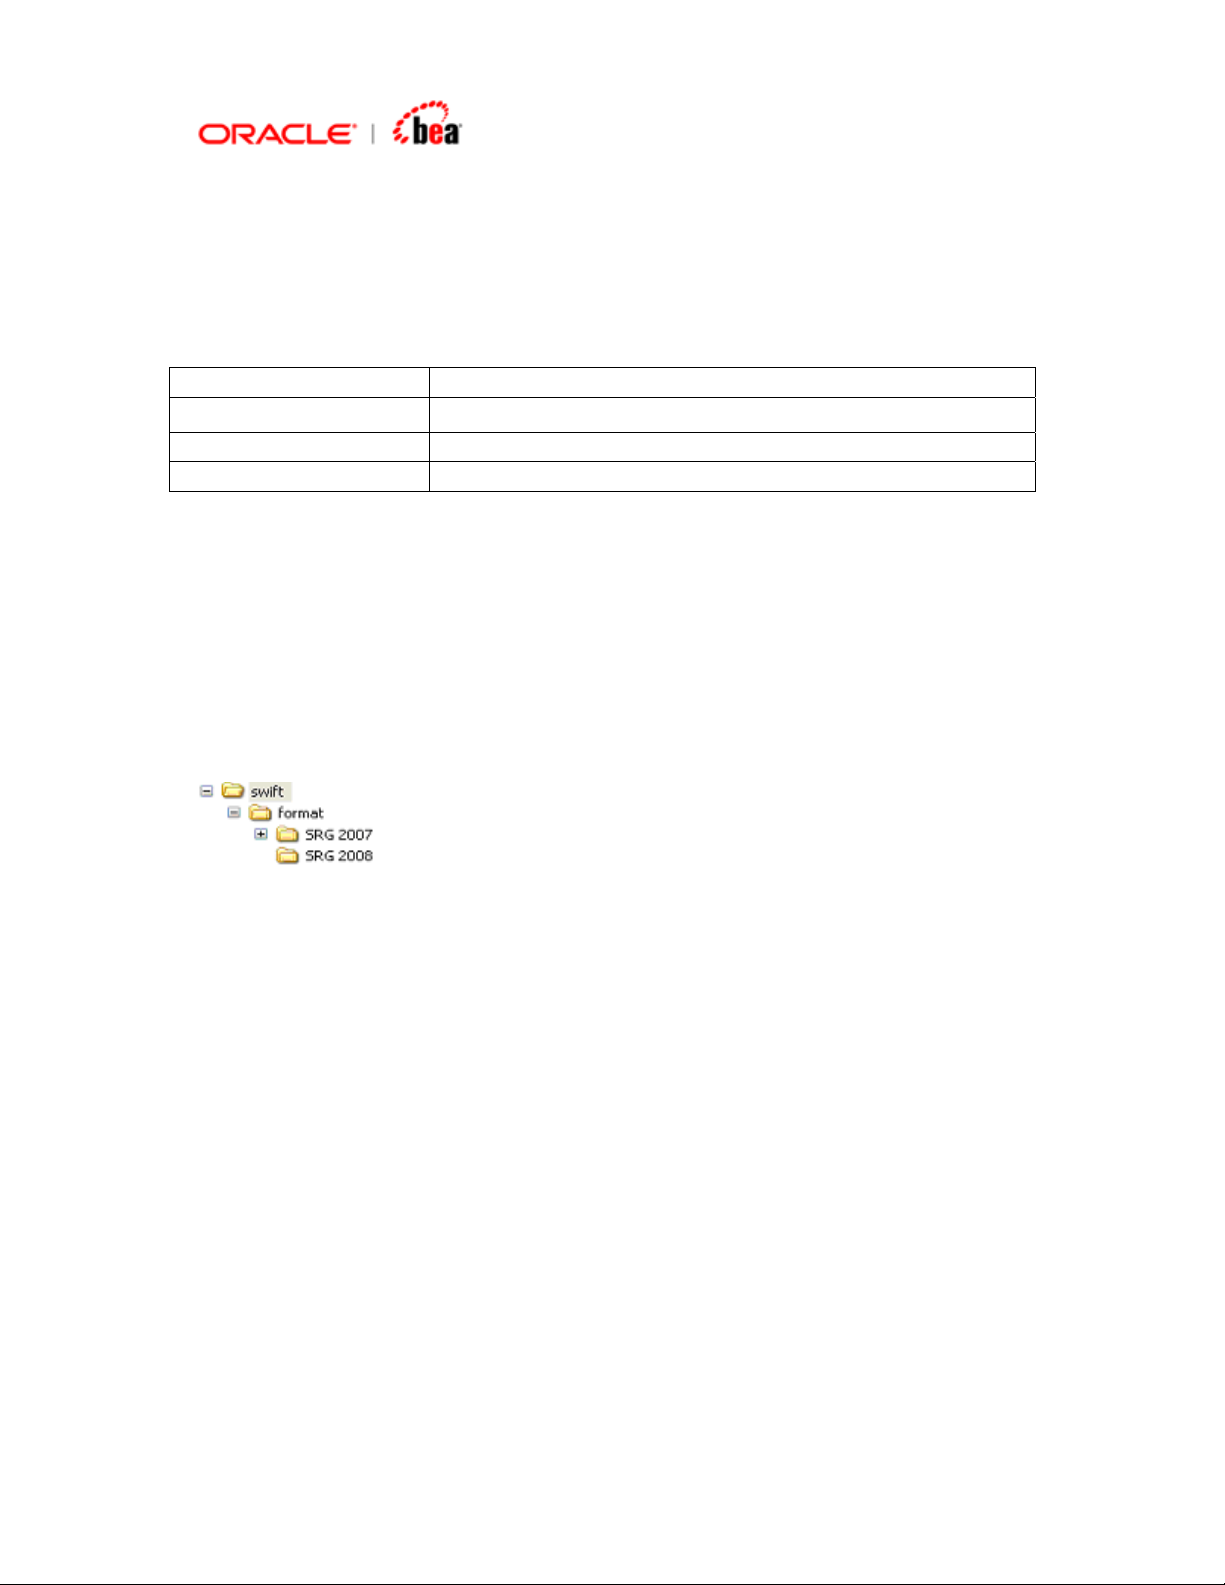
format Directory contains all SWIFT messages.
SWIFT message library
The format directory contains all the SWIFT messages and it is referred to as the
SWIFT message library. Messages of each version are stored as XML in a separate
directory with the same name as the version. For instance, SRG 2008 messages are
stored under the directory config/swift/format/ SRG 2008. This scheme allows you to
manage multiple versions of SWIFT messages side by side. For instance, you can
have MT101.xml under both SRG 2007 and SRG 2008 folders.
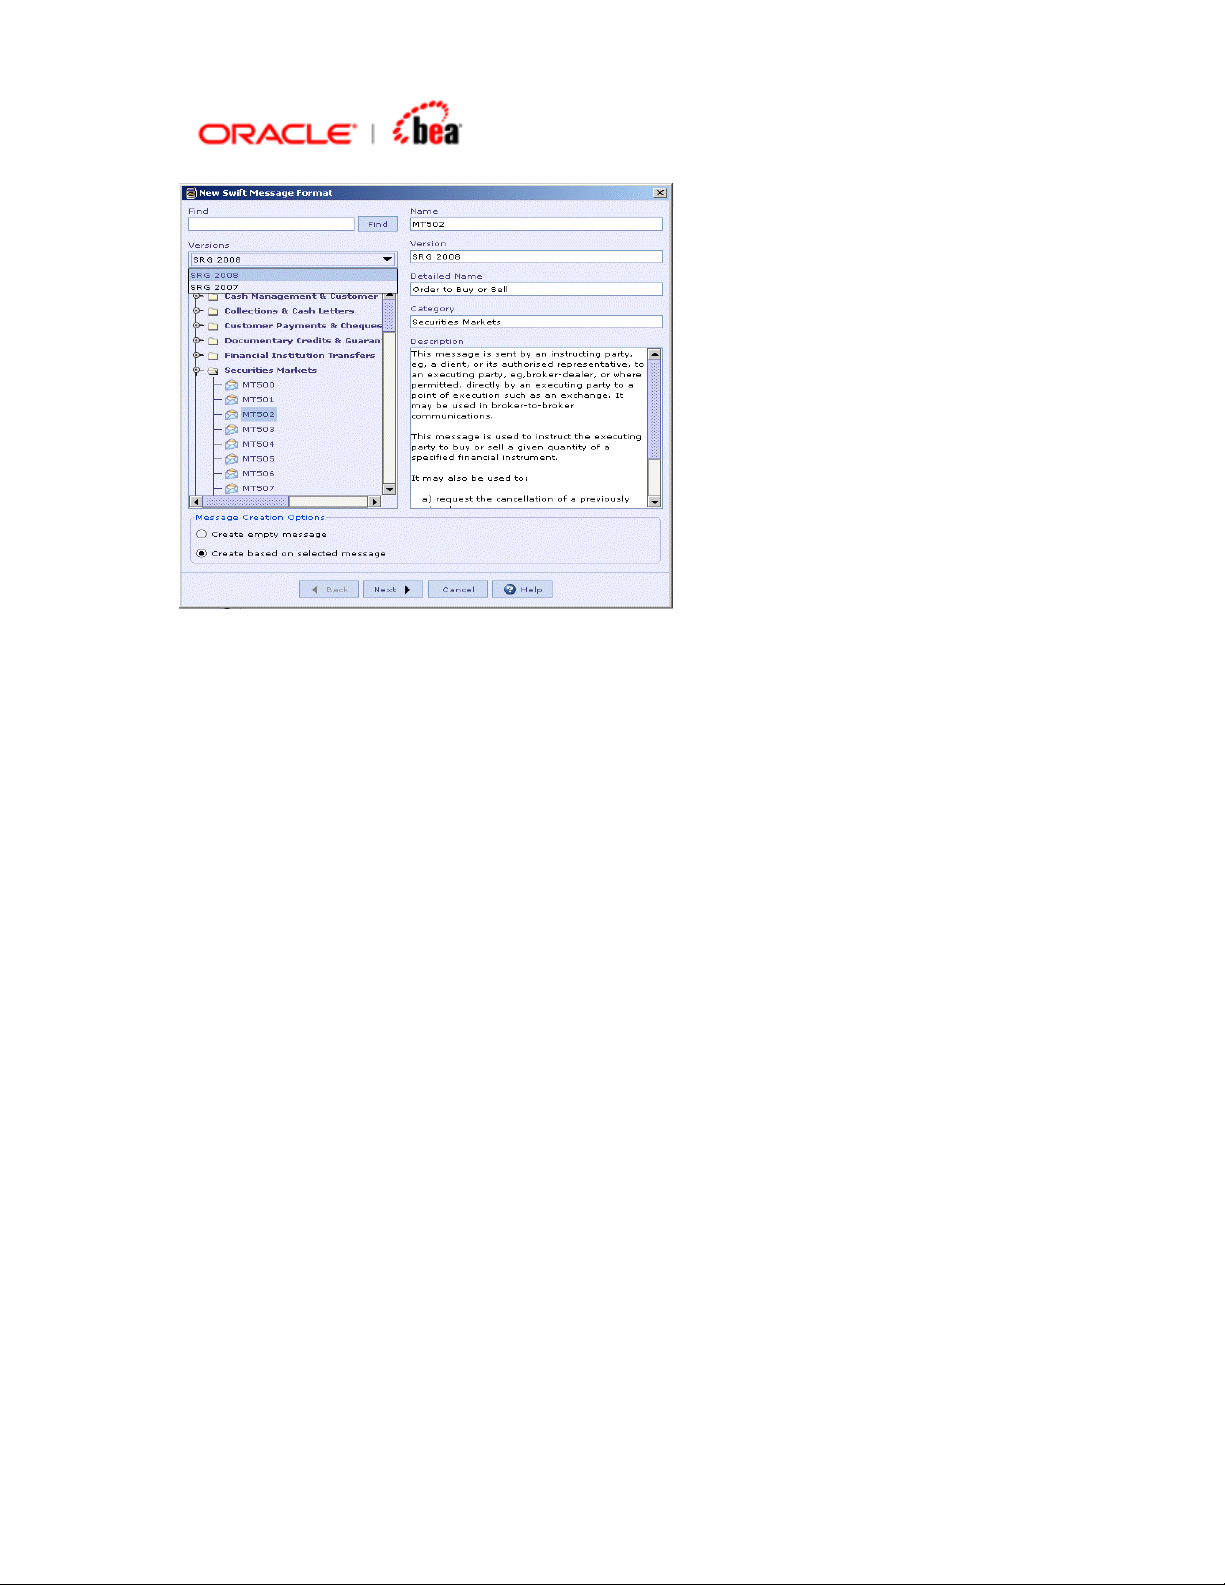
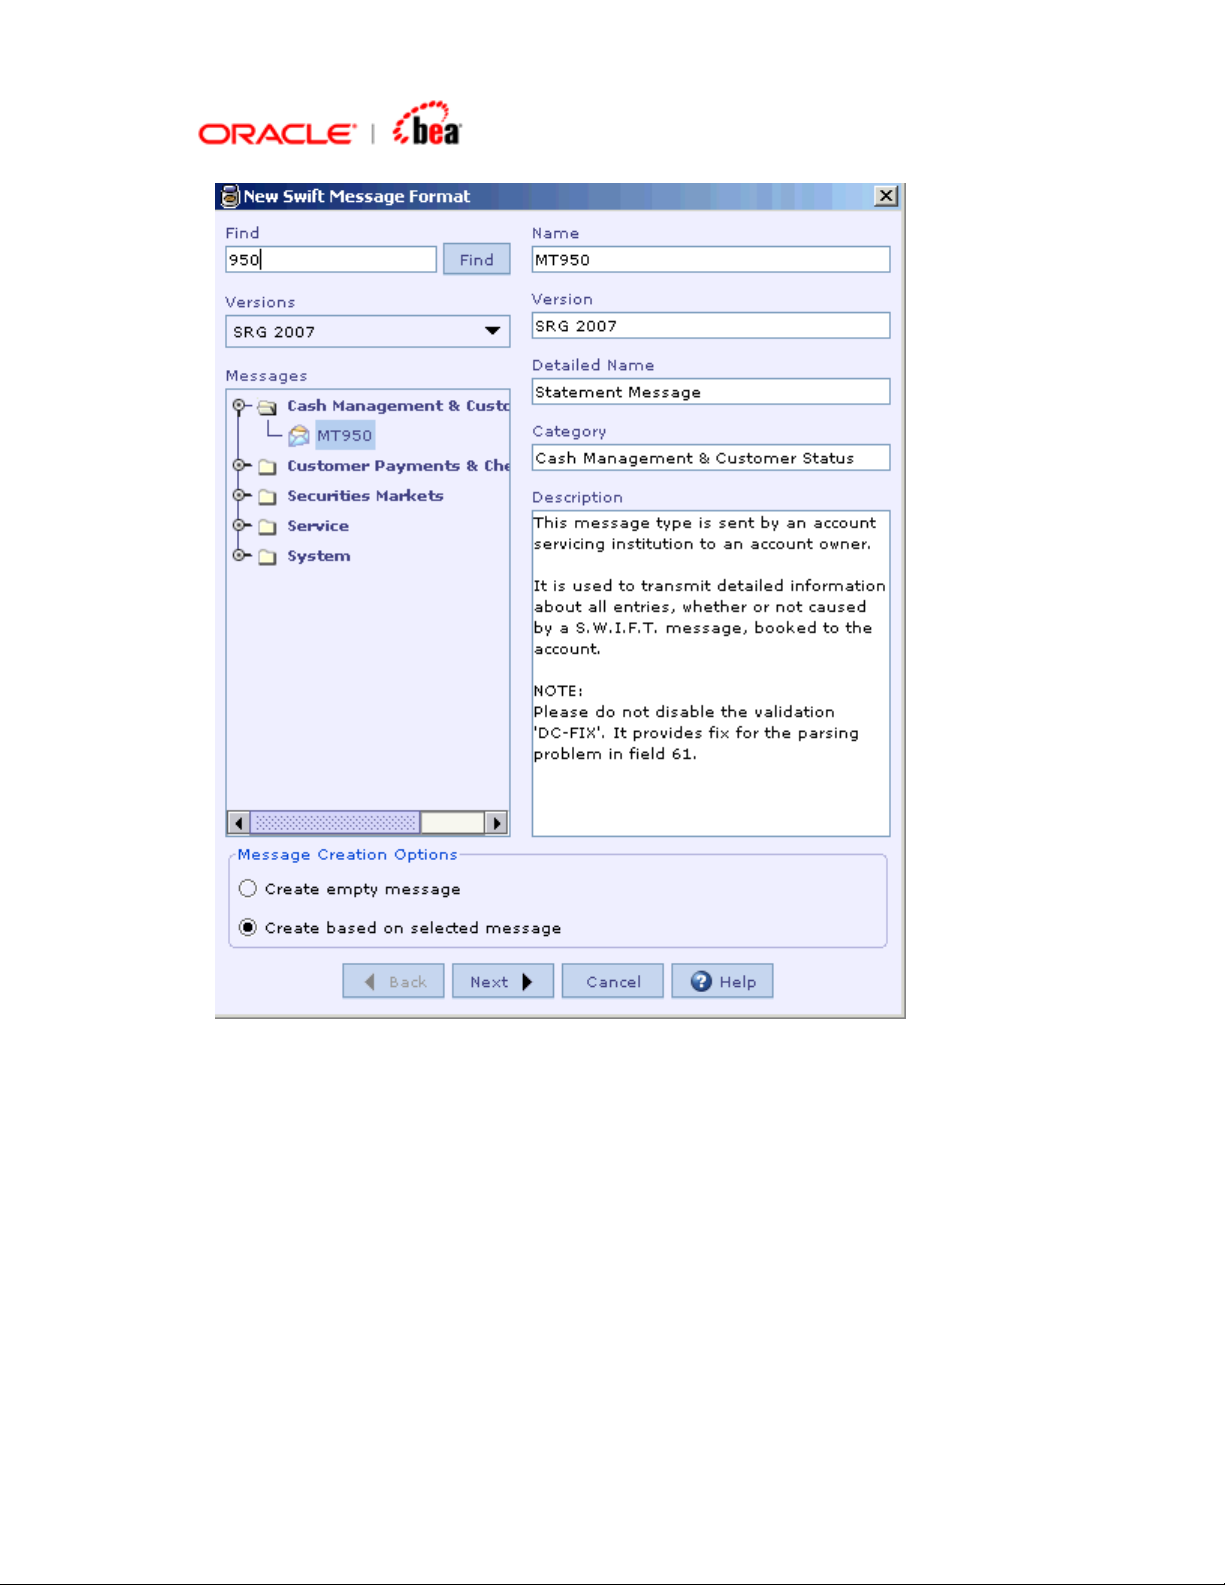
When you create a new SWIFT message in a cartridge from the message library the
following dialog is displayed. Note that the messages are grouped based on version
and only messages belonging to a particular version is displayed at a time. You can
switch to a different version by selecting it from the ‘version’ combo.
Page 7
Custom SWIFT messages
Depending on your requirement you may have to customize the SWIFT messages or
make minor modifications to it. One such case is GSCC SWIFT messages. If these
customized messages are used often or across the enterprise, you may want to
make use of the SWIFT message library feature to store the customized SWIFT
messages.
1. Since the customized messages are not the same as the original SRG messages
choose a different version name for them. For instance “GSCC SRG 2008” can be
used as the version name for SRG 2008 messages customized for GSCC.
2. When you export the modified messages using the “Save SWIFT Message
Format” option use this version name.
Page 8
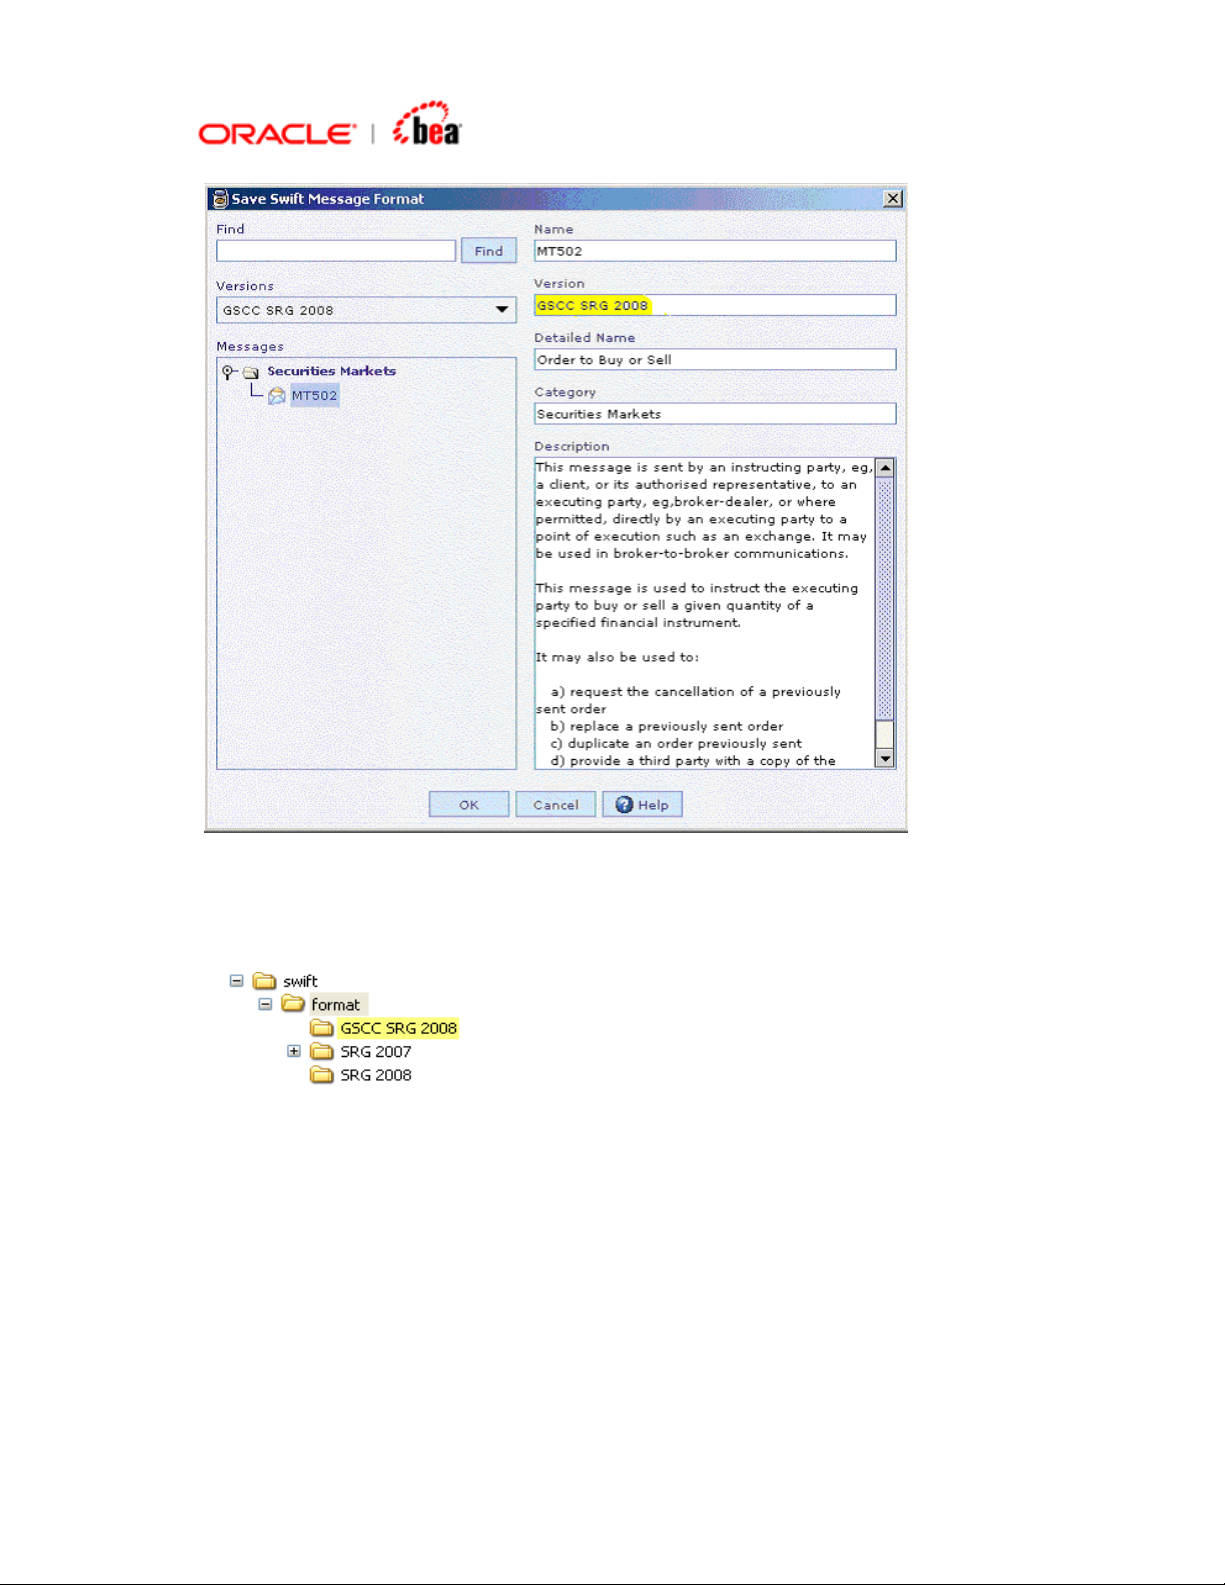
3. The exported message will be saved under a directory by the same name as the
version.
Once you have exported all the customized messages to this directory, you can
make of copy this directory to all Designer installations as required.
4. Note that the version name will also be included in the message definition (XML)
as shown below.
<?xml version="1.0" encoding="UTF-8" ?>
<SwiftMessageFormat name="MT502">
<standard-version>GSCC SRG 2008</standard-version>
Page 9

This detail is generally not important; but if you are manually editing the version (in
say messages you already have) in XML’s remember to update the standard-version
tag appropriately.
The advantage of the above is that you have the same message library support for
your customized SWIFT messages just like standard SWIFT messages.
See Also:
SWIFT Configuration
Creating a SWIFT Format
A SWIFT message format can be created in the designer either from
Existing SWIFT message format, or
Empty message format
When using an existing format, the same set of sequences and fields are available
for the newly created format. Though the mandatory elements cannot be changed,
the user has the option of enabling or disabling the optional sequences and fields as
per requirement. The existing SWIFT formats are availab le as XML files in the
location <installation dir>\config\swift\format.
When using an empty message format, the user has to add each sequence and field
as per the specification. This happens when the format has to be entered the first
time, after which the format can be saved and used to build other formats using the
first option.
See Also:
Creating a SWIFT Format based on an existing SWIFT message format
Creating a SWIFT Format from an empty message format
Exporting a SWIFT Message Format to Library
Page 10

Creating a SWIFT Format Based on an Existing SWIFT Message Format
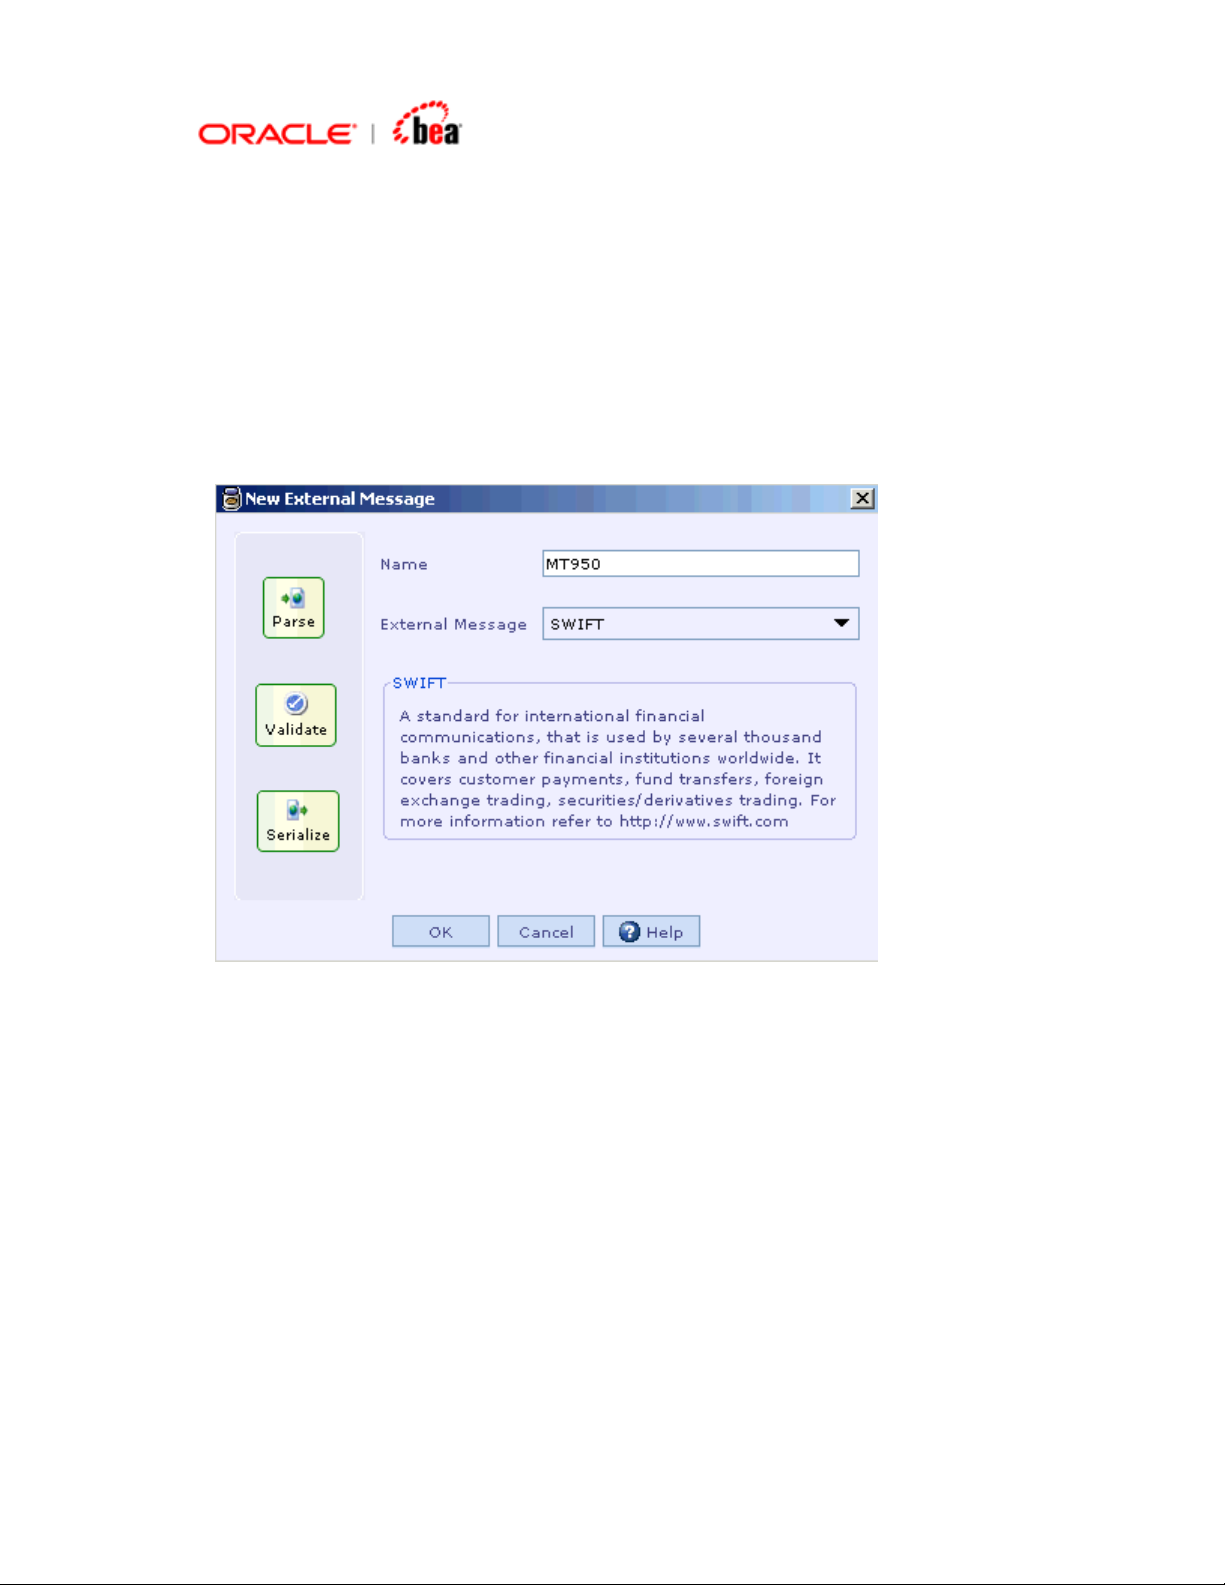
1. Right-click the Cartridge node in the Designer. Select the New External
Message menu item from the context menu to create a SWIFT external format.
2. In the New External Message dialog that appears enter the Transformation
Name and select SWIFT from the External Message listbox . Click OK.
3. In the New Swift Message Format dialog that appears, select an existing
format based on which the new format is to be created. Select Create based on
selected format radio button. Click Next.
Page 11
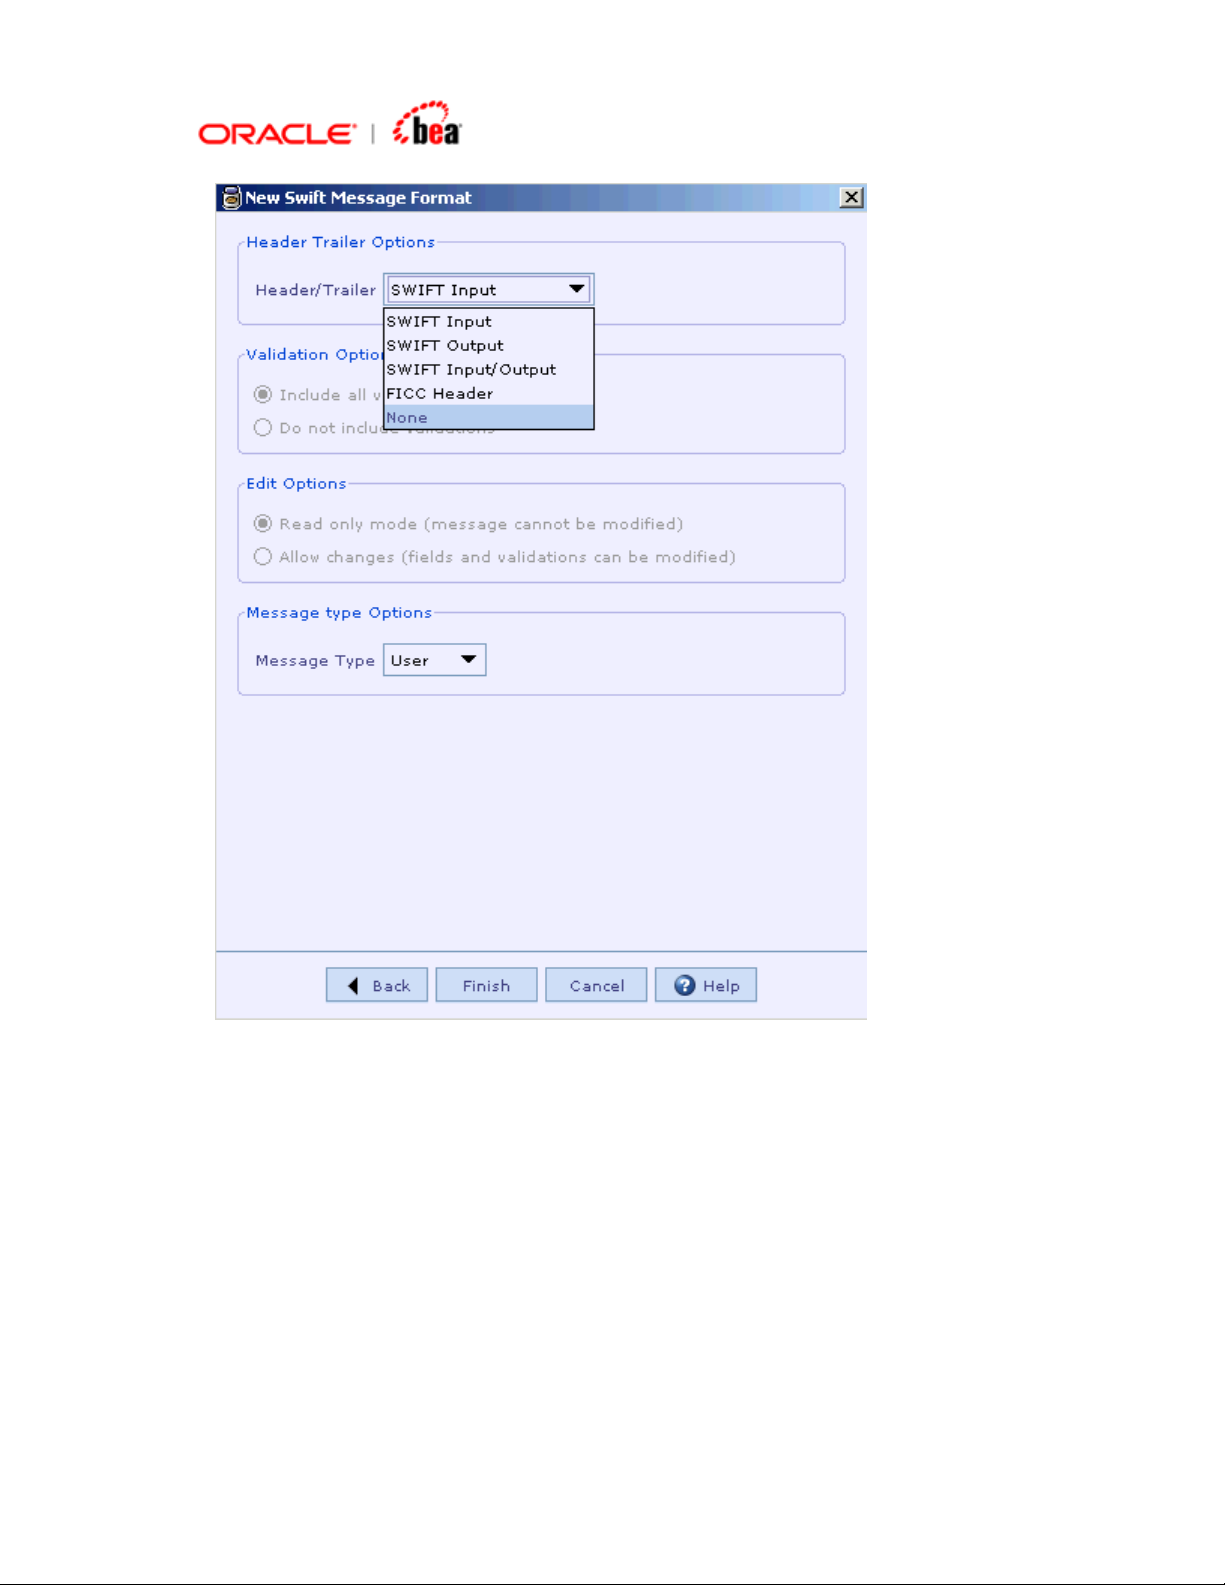
4. In the next dialog that appears you have various options to choose
Header/Trailer, Validation and Edit options as shown in the following picture:
Page 12
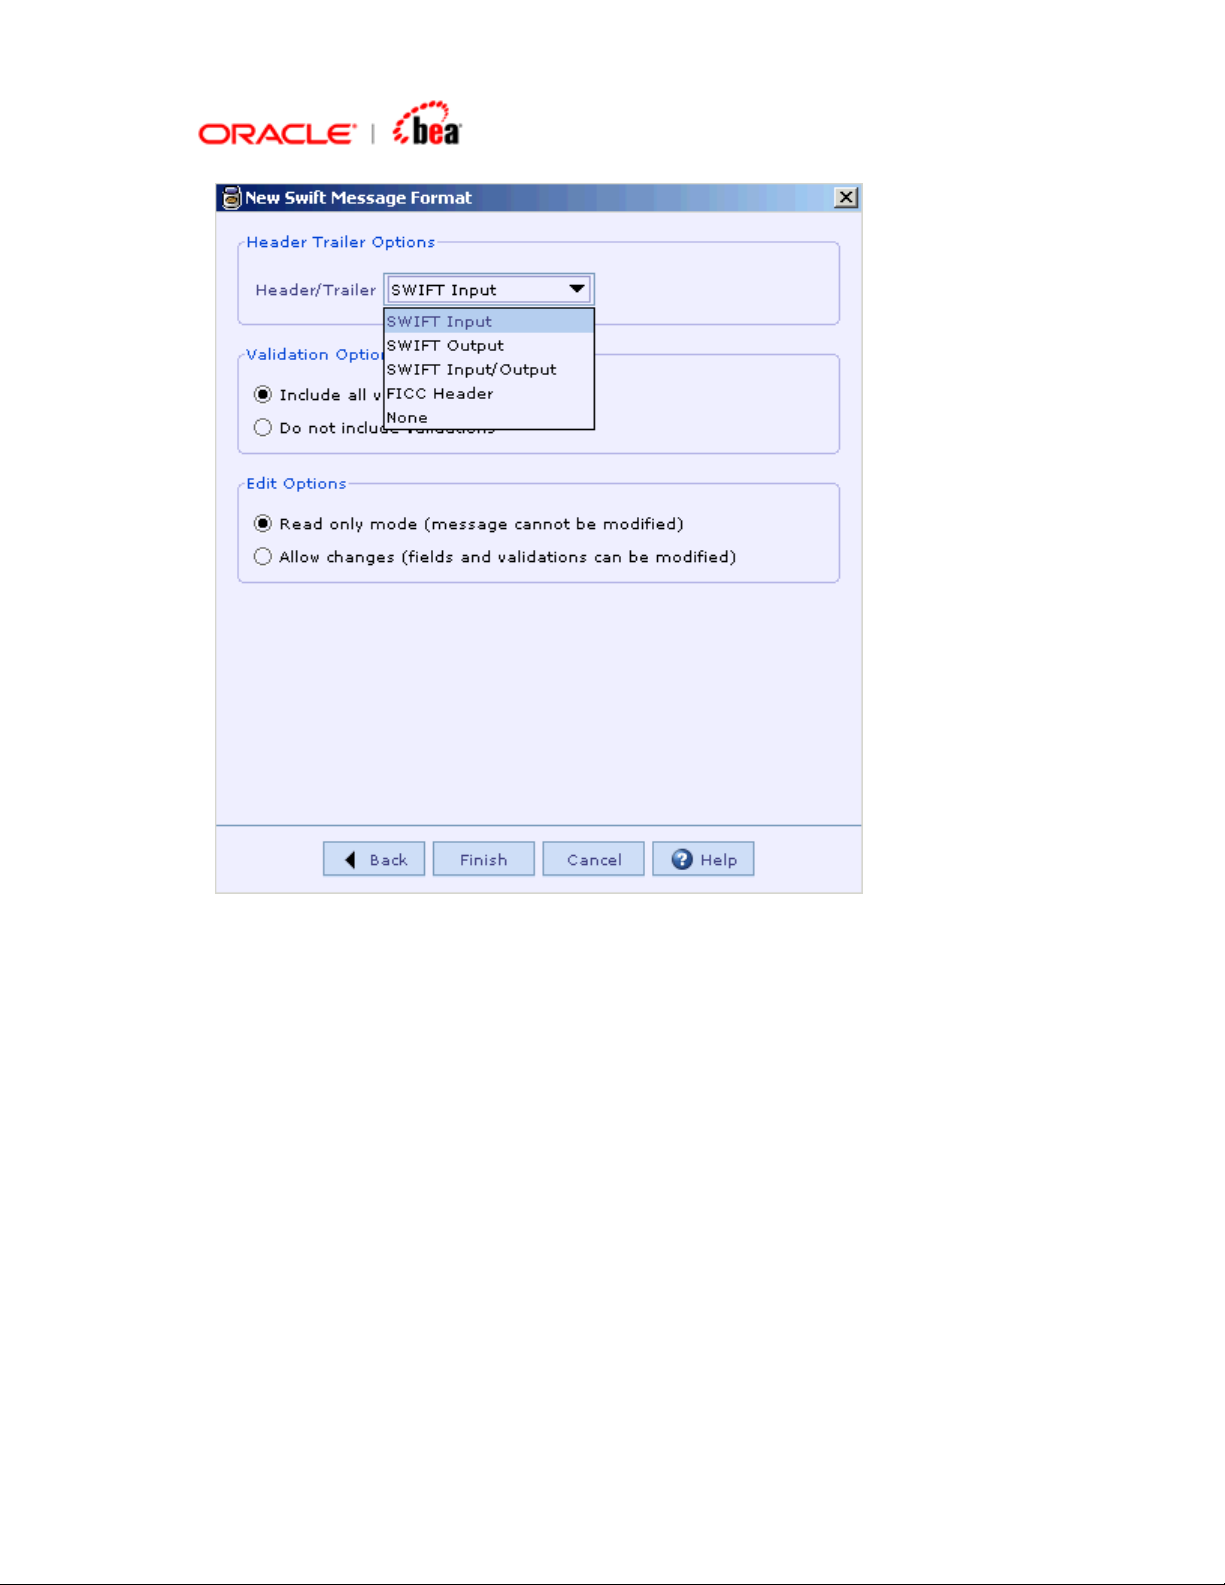
5. As seen in the above picture, you have the option to include specific
Header/Trailer (SWIFT Input/SWIFT Output/SWIFT Input Output/FICC
Header(custom) or no Header/Trailer) from the list box. (Note that if you choose
SWIFT Input or SWIFT Output, the Basic Header and Application Header
appearing in the Header section UI of the message are set as mandatory. The
Header/Trailer fields cannot be modified/removed from UI). You have the option
to include or not to include validations. You also have the option to create the
message format in Read Only mode or editable mode. After selecting the
required options, click Finish button.
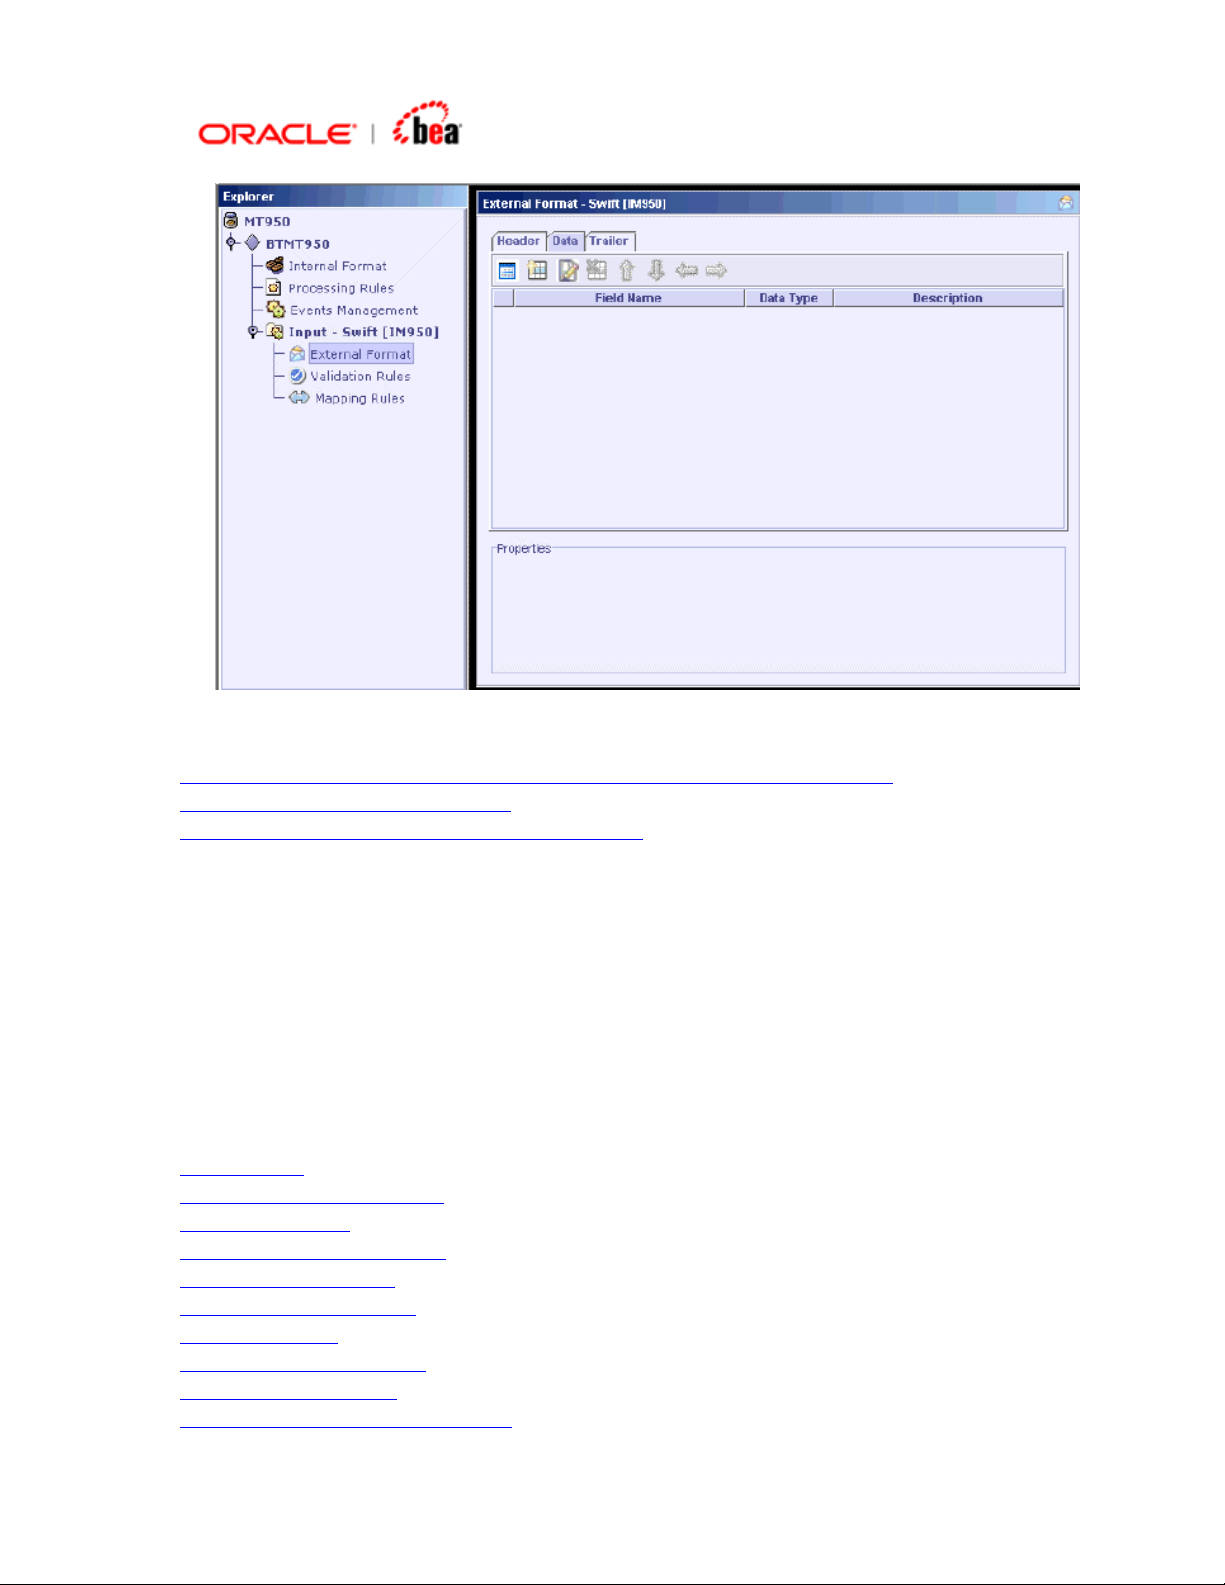
6. The new format is created in the Designer as shown below.
Page 13
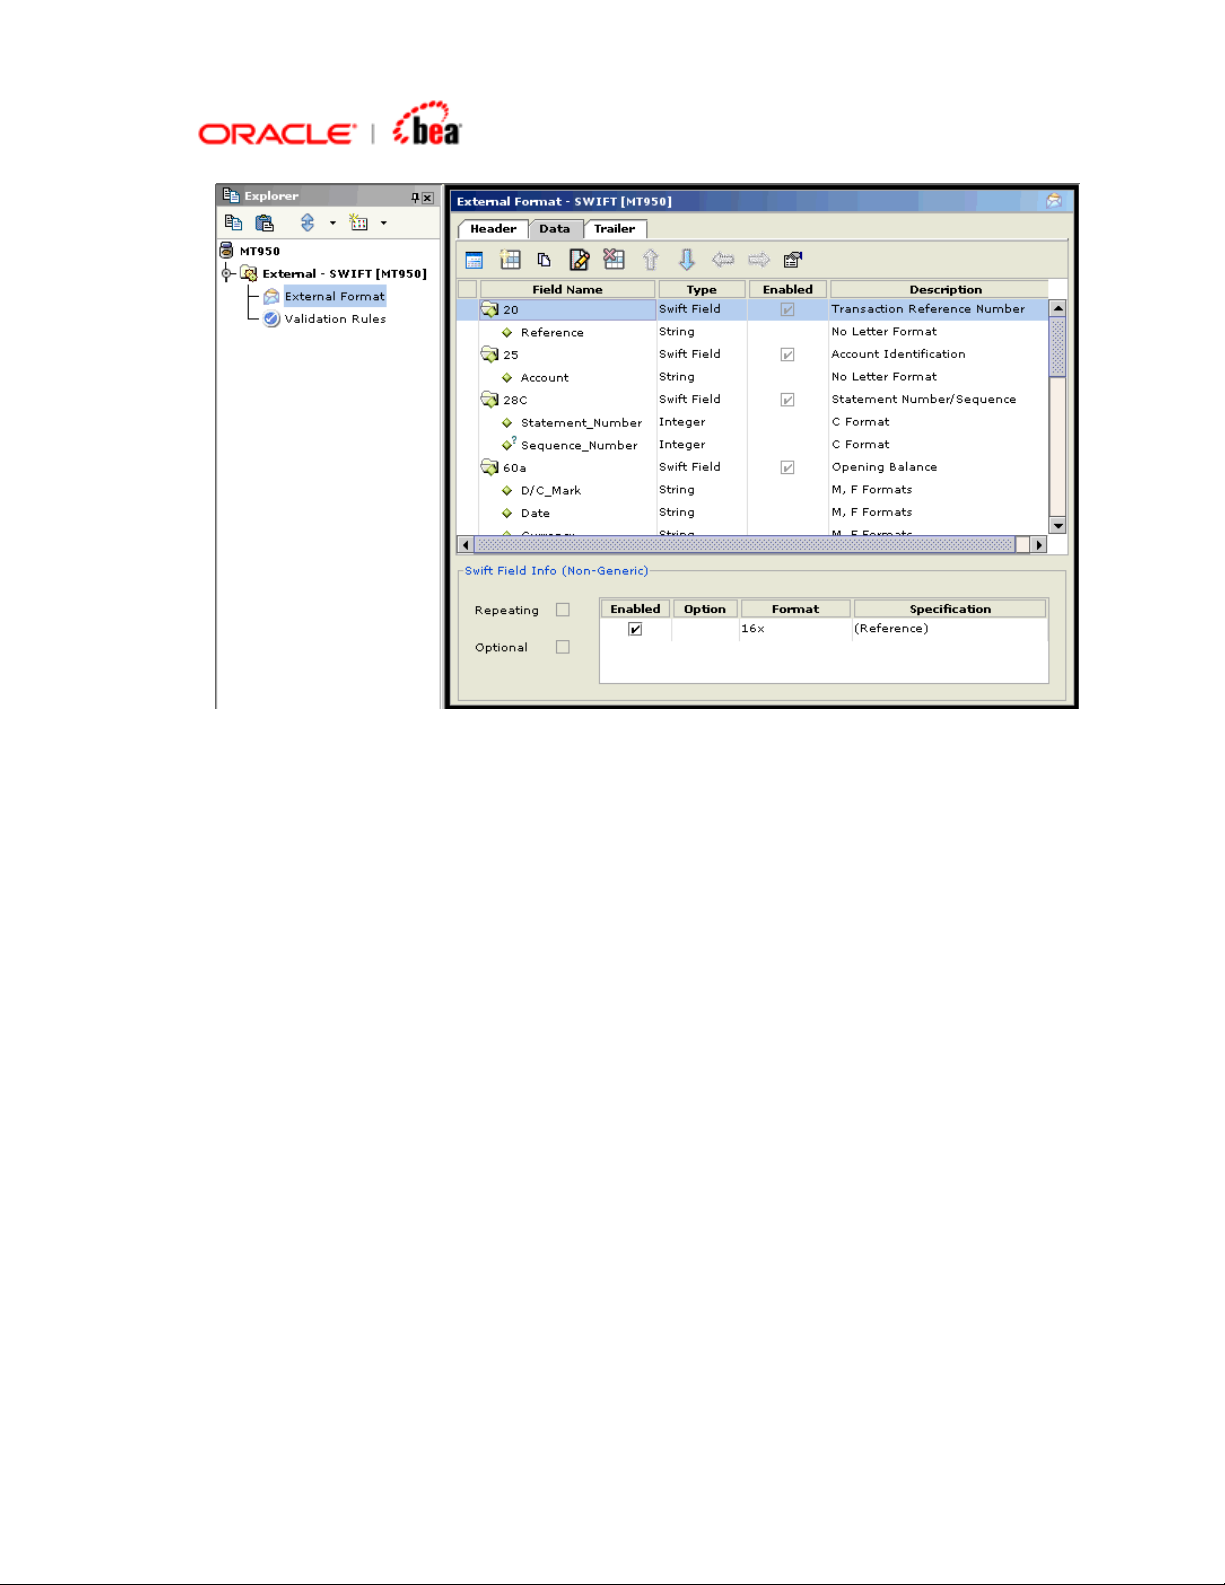
7. Note that the Design Element UI tool bar buttons in the figure are disabled
thereby not allowing the user to modify the format as we have chosen Read Only
mode in the Edit options.
8. The Enabled column of the format table allows the user to pick from the optional
fields, qualifiers and options for the format. By default all the optional entities are
enabled. To enable a qualifier, select the field in the format table and select or
deselect the check box in the Enabled column for the qualifiers displayed in the
SWIFT Field Info (Generic) panel below the table.
Page 14
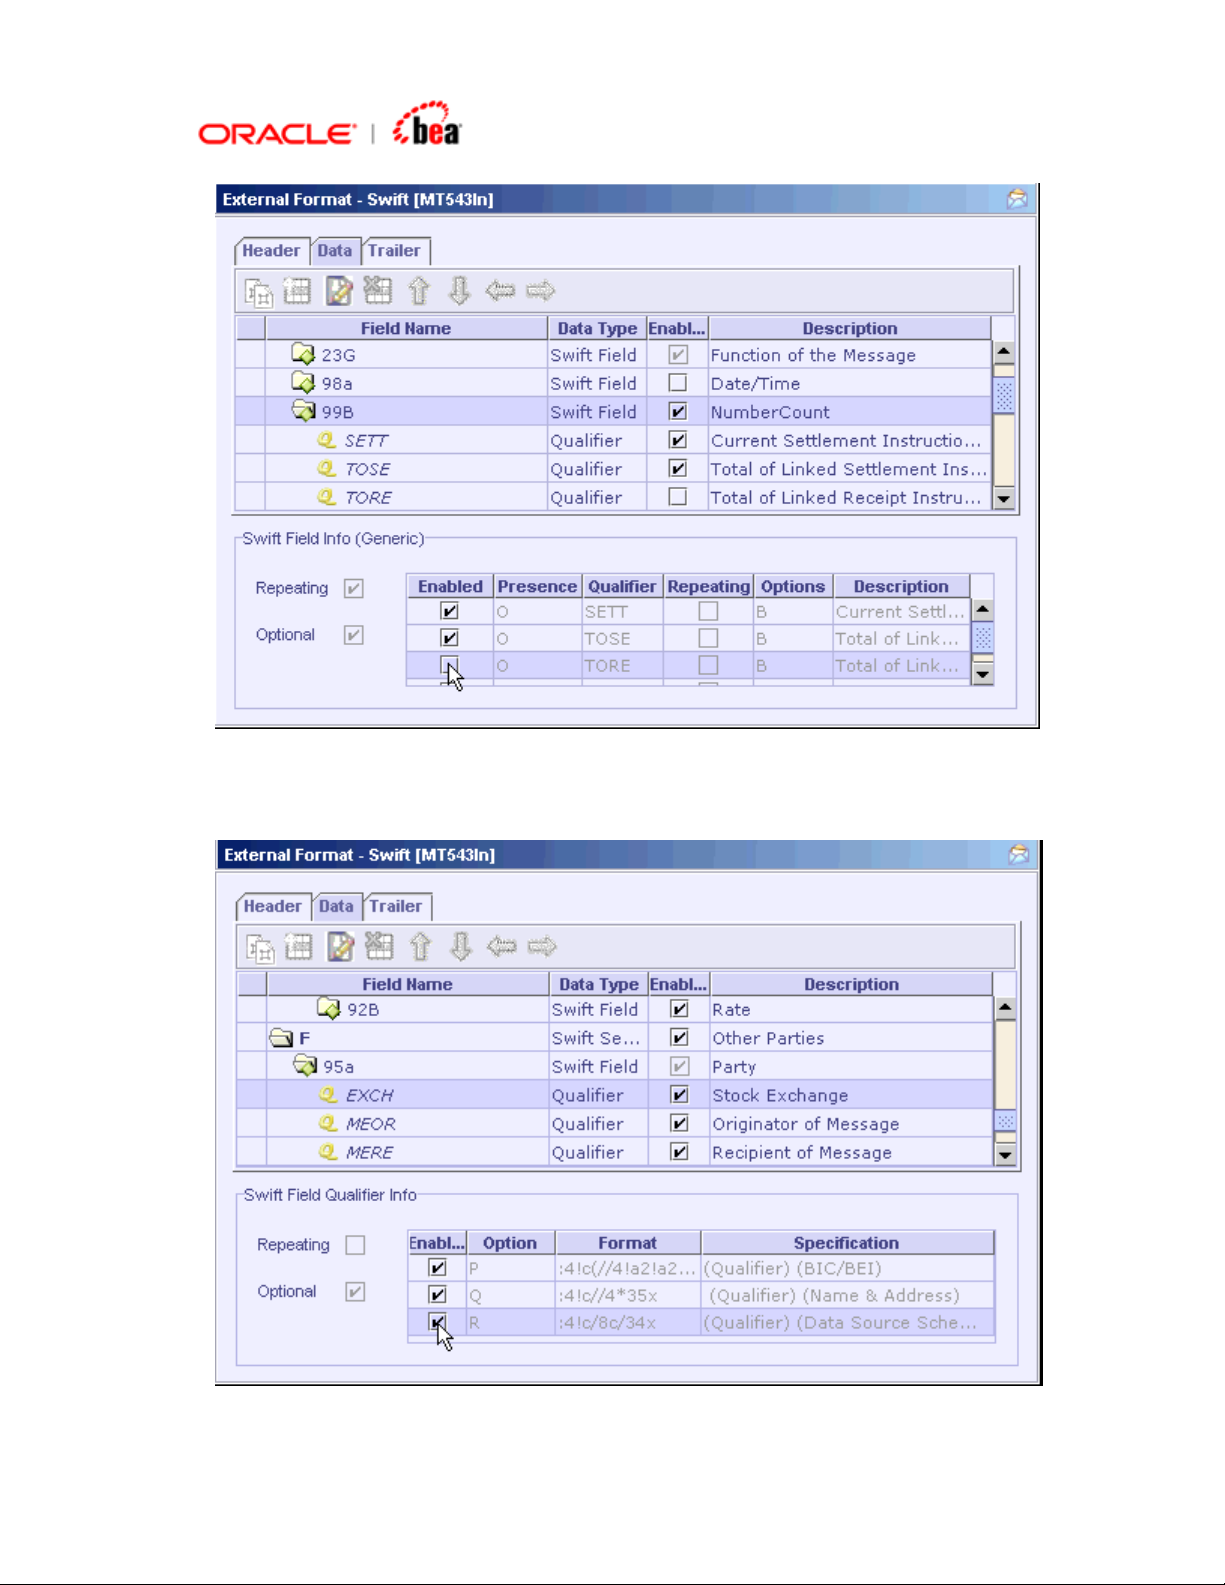
Similarly to pick the options for a qualifier, select the qualifier in the table and
select or deselect the check box in the SWIFT Field Qualifier Info panel below.
Page 15
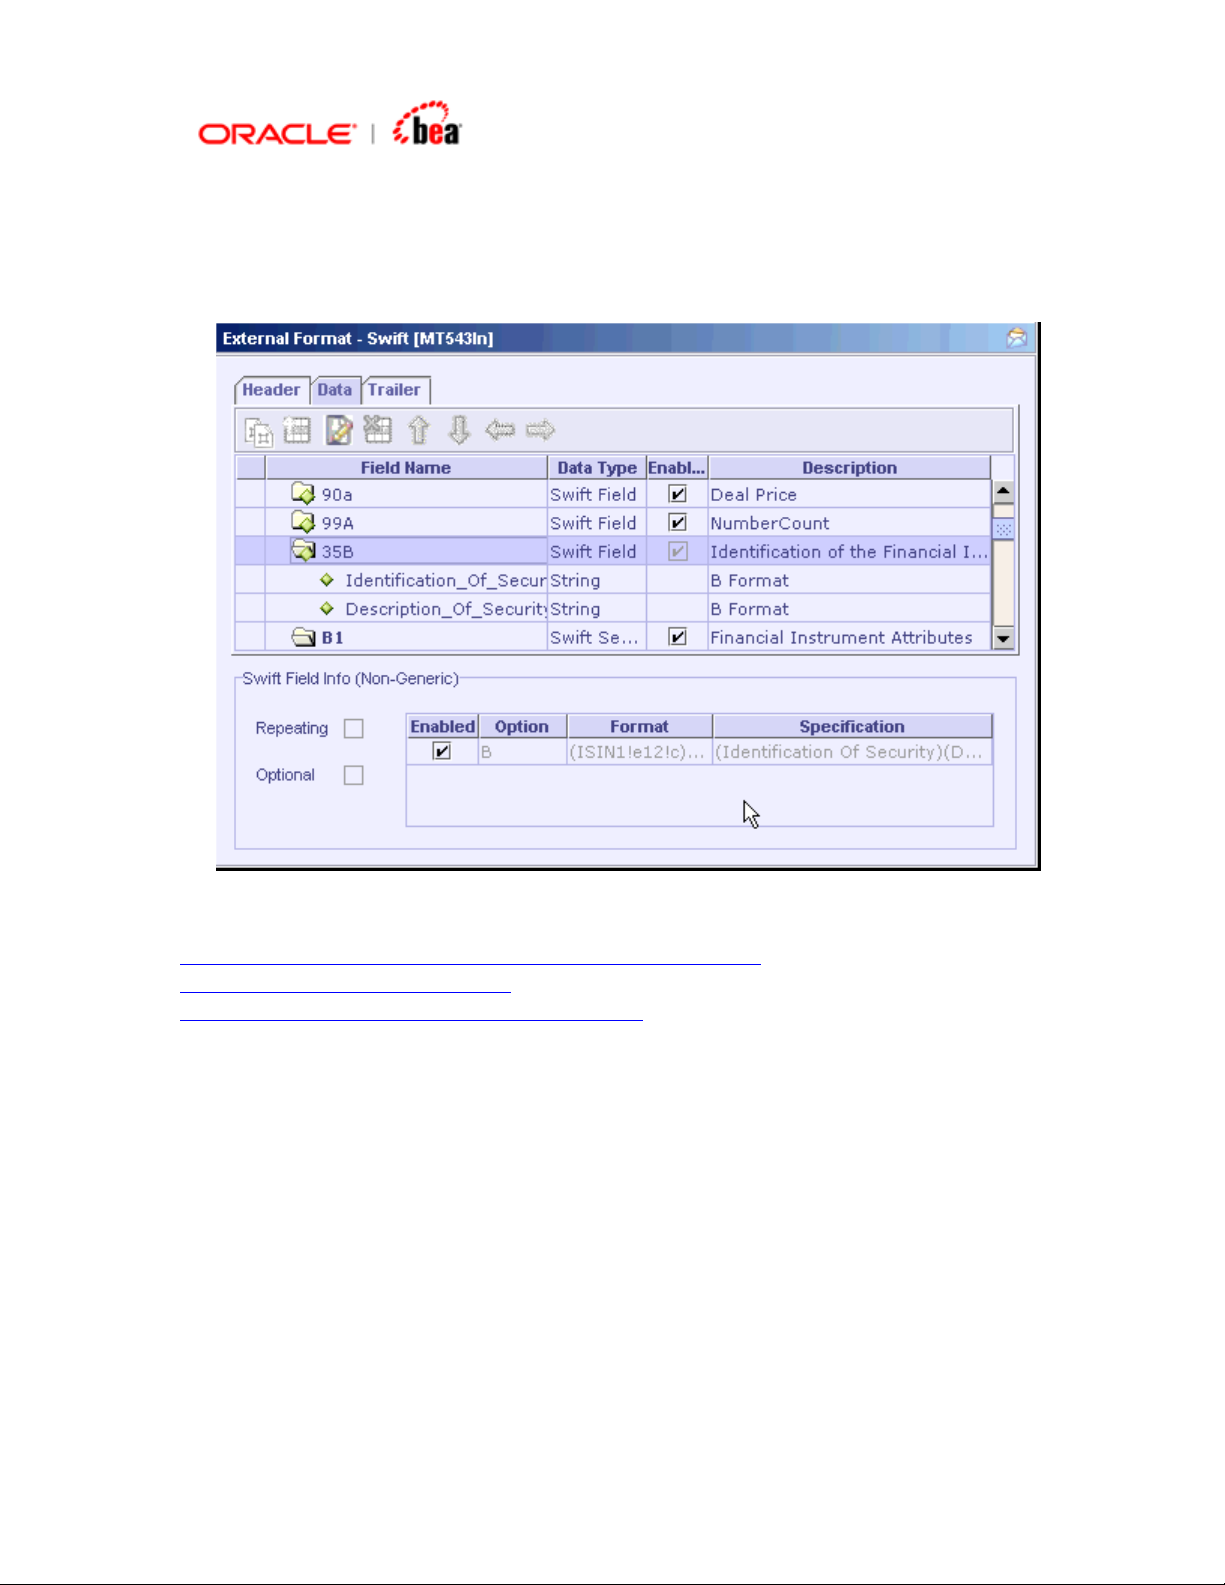
To pick the options for a non-generic field, select the field in the table and select
or deselect the check box in the Enabled column of the options displayed in the
SWIFT Field Info (Non-Generic) panel below the table.
See Also:
Creating a SWIFT Format from an empty message format
Entering the SWIFT Specification
Exporting a SWIFT Message Format to Library
Page 16
Creating a SWIFT Format from an empty message format
1. Right-click the Cartridge node in Designer and select the New External
Message menu item from the context menu to create a SWIFT external format.
2. In the New External Message dialog that appears, enter the Transformation
Name and select SWIFT from the External Message listbox. Click OK.
3. In the New Swift Message Format dialog that appears, select Create empty
message format radio button. Click Next.
Page 17

4. In the next dialog box that appears see that the “Validation Options” and “Edit
Options” pane are disabled as they are not applicable in this case. You have the
option to include specific Header/Trailer (SWIFT Input/SWIFT Output/SWIFt
Input/Output/FICC Header(custom) or no Header/Trailer as shown in the
following picture. (Note that if you choose SWIFT Input or SWIFT Output, the
Basic Header and Application Header appearing in the Header section UI of the
message are set as mandatory. The Header/Trailer fields cannot be
modified/removed from UI).
Page 18
5. After selecting the required Header/Trailer from the list box, click Finish button.
6. An empty message format is created as shown below.
Page 19
See Also:
Creating a SWIFT Format based on an existing SWIFT message format
Entering the SWIFT Specification
Exporting a SWIFT Message Format to Library
Entering the SWIFT Specification
A SWIFT message is composed of sequences and fields. A sequence is a group of
related information made up of one or more fields and/or sub-sequences. A field may
be either generic or non-generic.
The user can construct a SWIFT message in the External Format UI by adding
sequences/fields and specifying properties for them.
See Also:
Terminology
SWIFT External Format UI
SWIFT Sequence
Adding a SWIFT Sequence
Adding a SWIFT Field
Updating a SWIFT Field
Customize Field
Removing a SWIFT Field
Adding Copy of Fields
Adding validations for a sub-field
Page 20
Removing validations from a sub field
SWIFT Sequence
A Sequence is a group of related information, delimited in most of SWIFT message
formats. However, there are a few formats, which have sequences without
delimiters. The Designer provides for creating sequences with or without delimiters.
Furthermore, the sequences with delimiters either have only the start delimiter, or
both the start and end delimiters, depending on the format’s specification. An
example of each of the three cases is as follows.
See Also:
Sequence Without Delimiters
Sequence With Start and End Delimiters
Sequence With Start Delimiter
Sequence Without Delimiters
Consider the message MT101. An extract of the format is given below.
Status Tag Field Name Content/Options
Mandatory Sequence A General Information
M 20 Sender's Reference 16x
…….
…….
O 25 Authorisation 35x
----->Mandatory Repetitive Sequence B Transaction Details
M 21 Transaction Reference 16x
O 21F F/X Deal Reference 16x
……
……
O 36 Exchange Rate 12d
Page 21
-----|
Note sequences A and B of this format. They have neither the start delimiter nor the
end delimiter. To add such a sequence, see
Delimiters.
See Also:
Sequence With Start and End Delimiters
Sequence With Start Delimiter
Add a SWIFT Sequence without
Sequence With Start and End Delimiters
Consider the message MT543. An extract of the format is given below.
Status Tag Qual
ifier
Mandatory Sequence A General Information
M 16R Start of Block GENL
M 20C SEME Reference Sender's
……
……
……
-----> Repetitive Optional Subsequence A1 Linkages
M 16R Start of Block LINK
O 22F LINK Indicator Linkage Type
O 13A LINK Number Identification Linked Transaction :4!c//3!c
Generic Field
Name
Detailed Field
Name
Reference
Indicator
Content/Options
:4!c//16x
:4!c/[8c]/4!c
M 20C 4!c Reference (see qualifier
description)
M 16S End of Block LINK
:4!c//16x
Page 22
-----| End of Subsequence A1 Linkages
M 16S End of
Block
End of Sequence A General Information
Mandatory Sequence B Trade Details
M 16R Start
of
Block
O 94B TRAD Place Place
of
Trade
----->
……
……
……
Note that in the above format, the sequences A and A1 have the ‘Start of Block’ field
16R and the ‘End of Block’ field 16S to indicate a sequence. To add such a
sequence, see
See Also:
Adding a SWIFT Sequence with Start and End Delimiters.
GENL
TRADDET
:4!c/[8c]/4!c[/30x]
Sequence Without Delimiters
Sequence With Start Delimiter
Sequence With Start Delimiter
Consider the message MT300. An extract of the format is given below.
Status Tag Field Name Content/Options
Mandatory Sequence A General Information
M 15A New Sequence (CrLf)
M 20 Sender's Reference 16x
Page 23
Status Tag Field Name Content/Options
O 21 Related Reference 16x
……
……
……
Mandatory Sequence B Transaction Details
M 15B New Sequence (CrLf)
M 30T Trade Date 8!n
M 30V Value Date 8!n
M 36 Exchange Rate 12d
……
……
……
Optional Sequence C Optional General Information
M 15C New Sequence (CrLf)
O 29A Contact Information 4*35x
……
……
…..
Note that the above message has the start indicator field 15X – New Sequence for
the sequences A, B, C, etc. But there is no end indicator. To add such a sequence,
see
Adding a SWIFT Sequence with Start Delimiter.
See Also:
Sequence Without Delimiters
Sequence With Start and End Delimiters
Page 24

Adding a SWIFT Sequence
A sequence is a group of related information made up of one or more fields and/or
sub-sequences. A sequence may or may not be delimited. Three types of SWIFT
sequences can be added. They are
Sequence Without Delimiters
Sequence With Start and End Delimiters
Sequence With Start Delimiter
See Also:
Adding a SWIFT Sequence without Delimiters
Adding a SWIFT Sequence with Start and End Delimiters
Adding a SWIFT Sequence with Start Delimiter
Adding a SWIFT Field
Adding Copy of Fields
Adding a SWIFT Sequence without Delimiters
1. Click the Add New Sequence
- SWIFT UI.
2. The SWIFT Sequence dialog appears. Enter the Sequence Name and Description.
button in the toolbar of the External Format
Page 25

3. Select None in Sequence Delimiter. Select the Mandatory and Repeating
properties of the sequence as required.
4. For this case, the last section about the delimiters and their format is not
required and hence disabled. Click OK.
5. The new sequence is added to the format as shown below.
Page 26
See Also:
Sequence Without Delimiters
Adding a SWIFT Sequence with Start and End Delimiters
Adding a SWIFT Sequence with Start Delimiter
Adding a SWIFT Sequence with Start and End Delimiters
1. Click the Add New Sequence
- SWIFT UI.
2. The SWIFT Sequence dialog appears. Enter the Sequence Name and
Description.
button in the toolbar of the External Format
Page 27
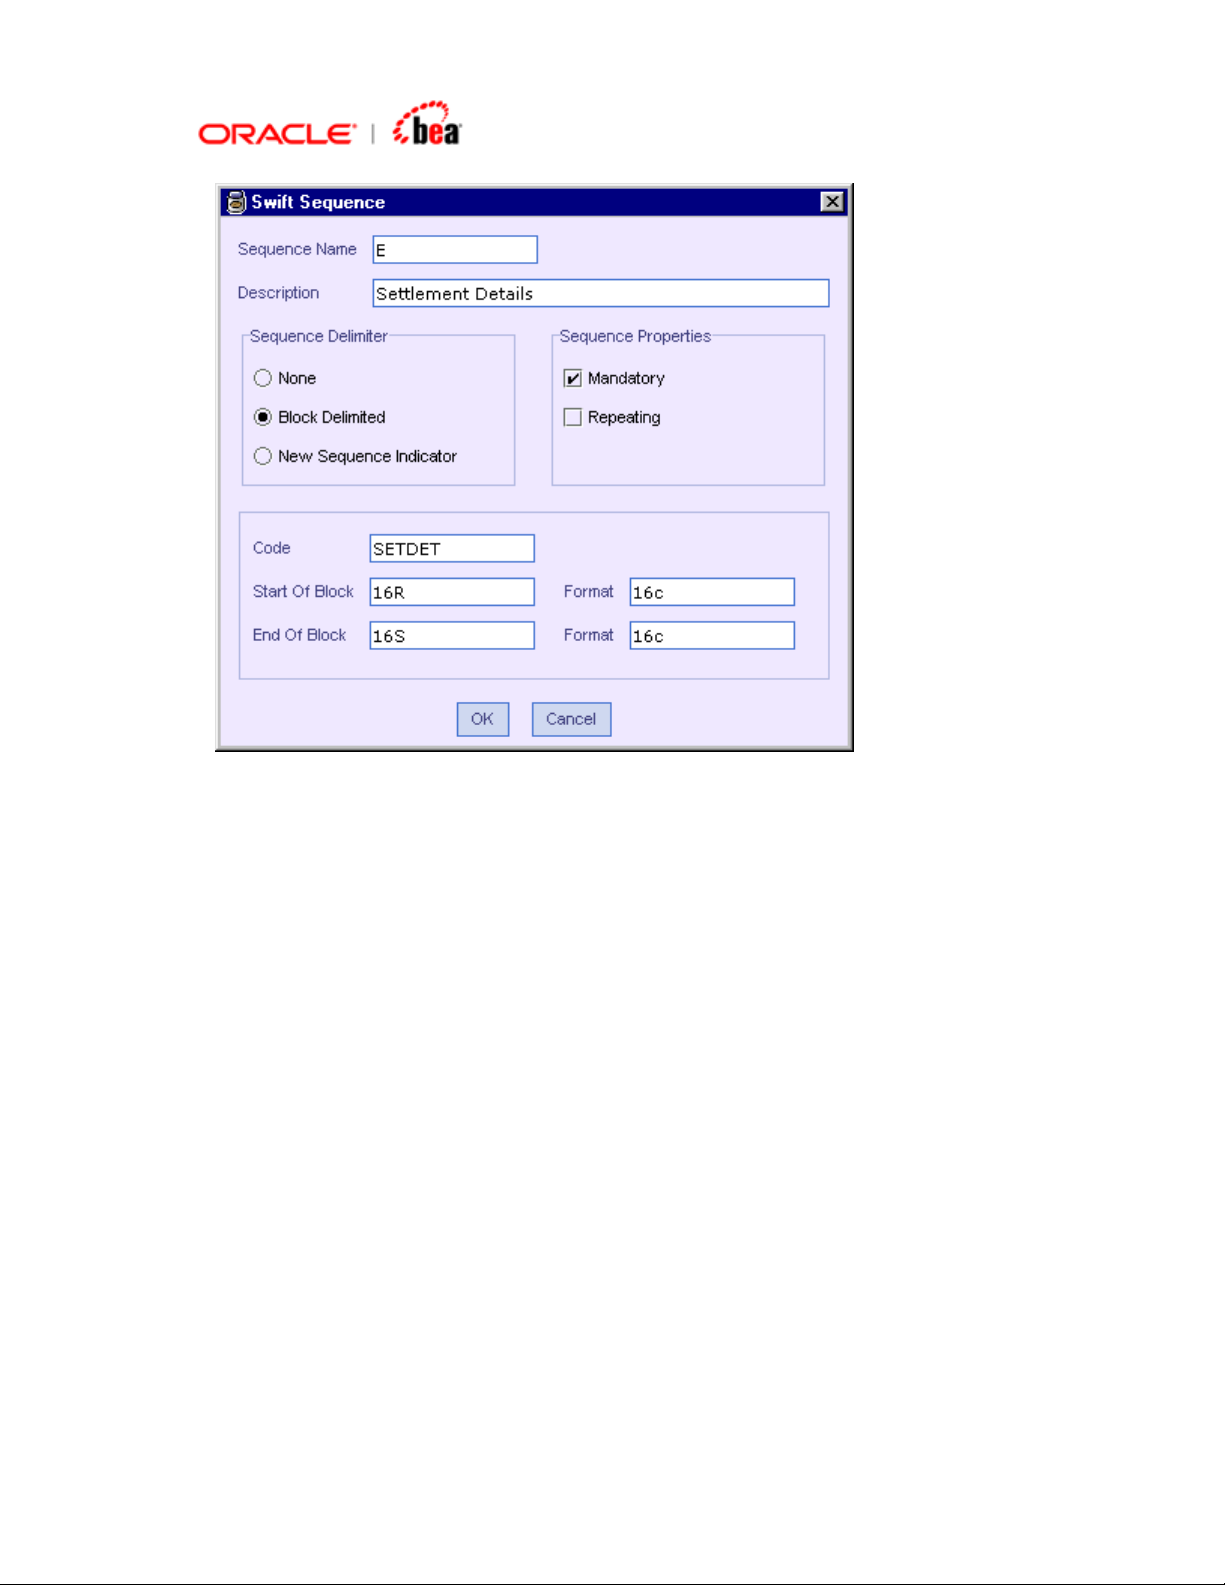
3. Select Block Delimited in Sequence Delimiter. Select the Mandatory and
Repeating properties of the sequence as per the specification.
4. The Start Of Block and End Of Block text fields are automatically populated
with values 16R and 16S and the corresponding formats are populated with value
16c when the Sequence Delimiter is specified in the step above. They can be
modified if required.
5. Enter the code (In case of block delimited sequence, only if you give Code you
will be able to add the sequence, so Code is mandatory not optional) in the Code
text field. Click OK.
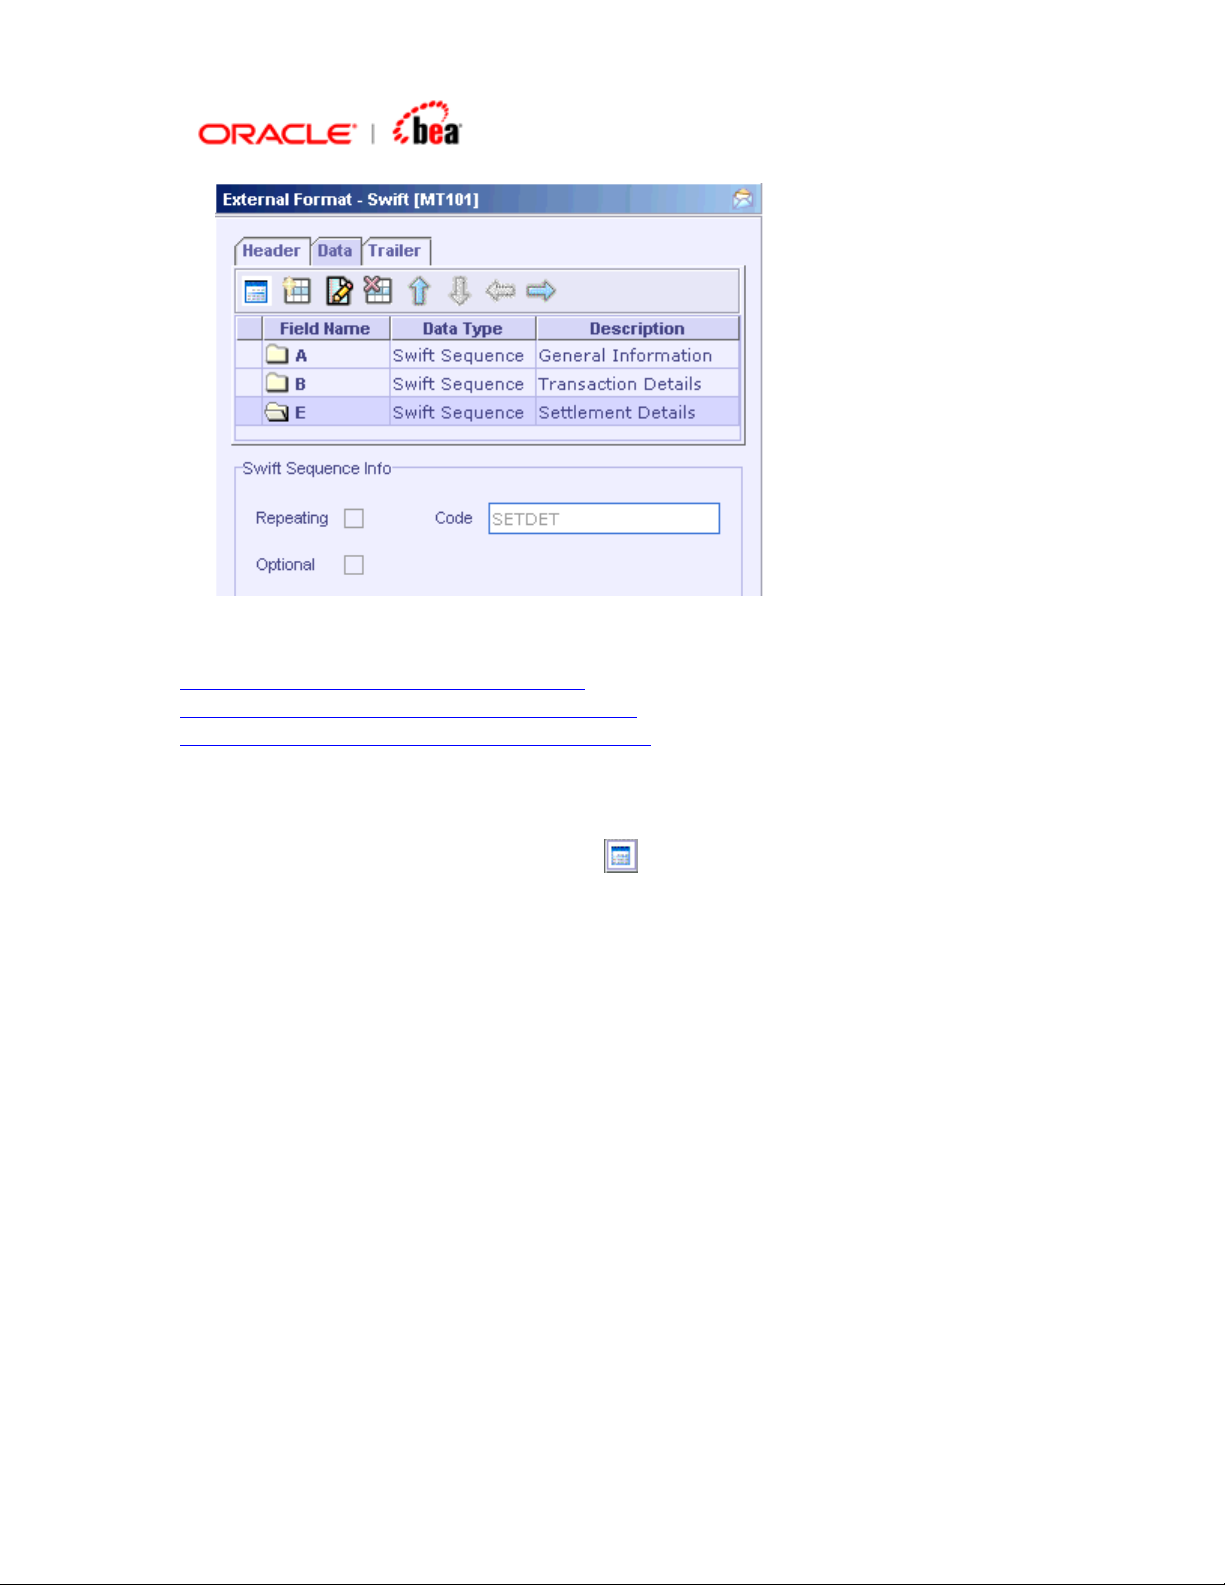
6. The sequence is added to the format as below.
Page 28
See Also:
Sequence With Start and End Delimiters
Adding a SWIFT Sequence without Delimiters
Adding a SWIFT Sequence with Start Delimiter
Adding a SWIFT Sequence with Start Delimiter
1. Click the Add New Sequence button
- SWIFT UI.
2. The SWIFT Sequence dialog appears. Enter the Sequence Name and
Description.
in the toolbar of the External Format
Page 29
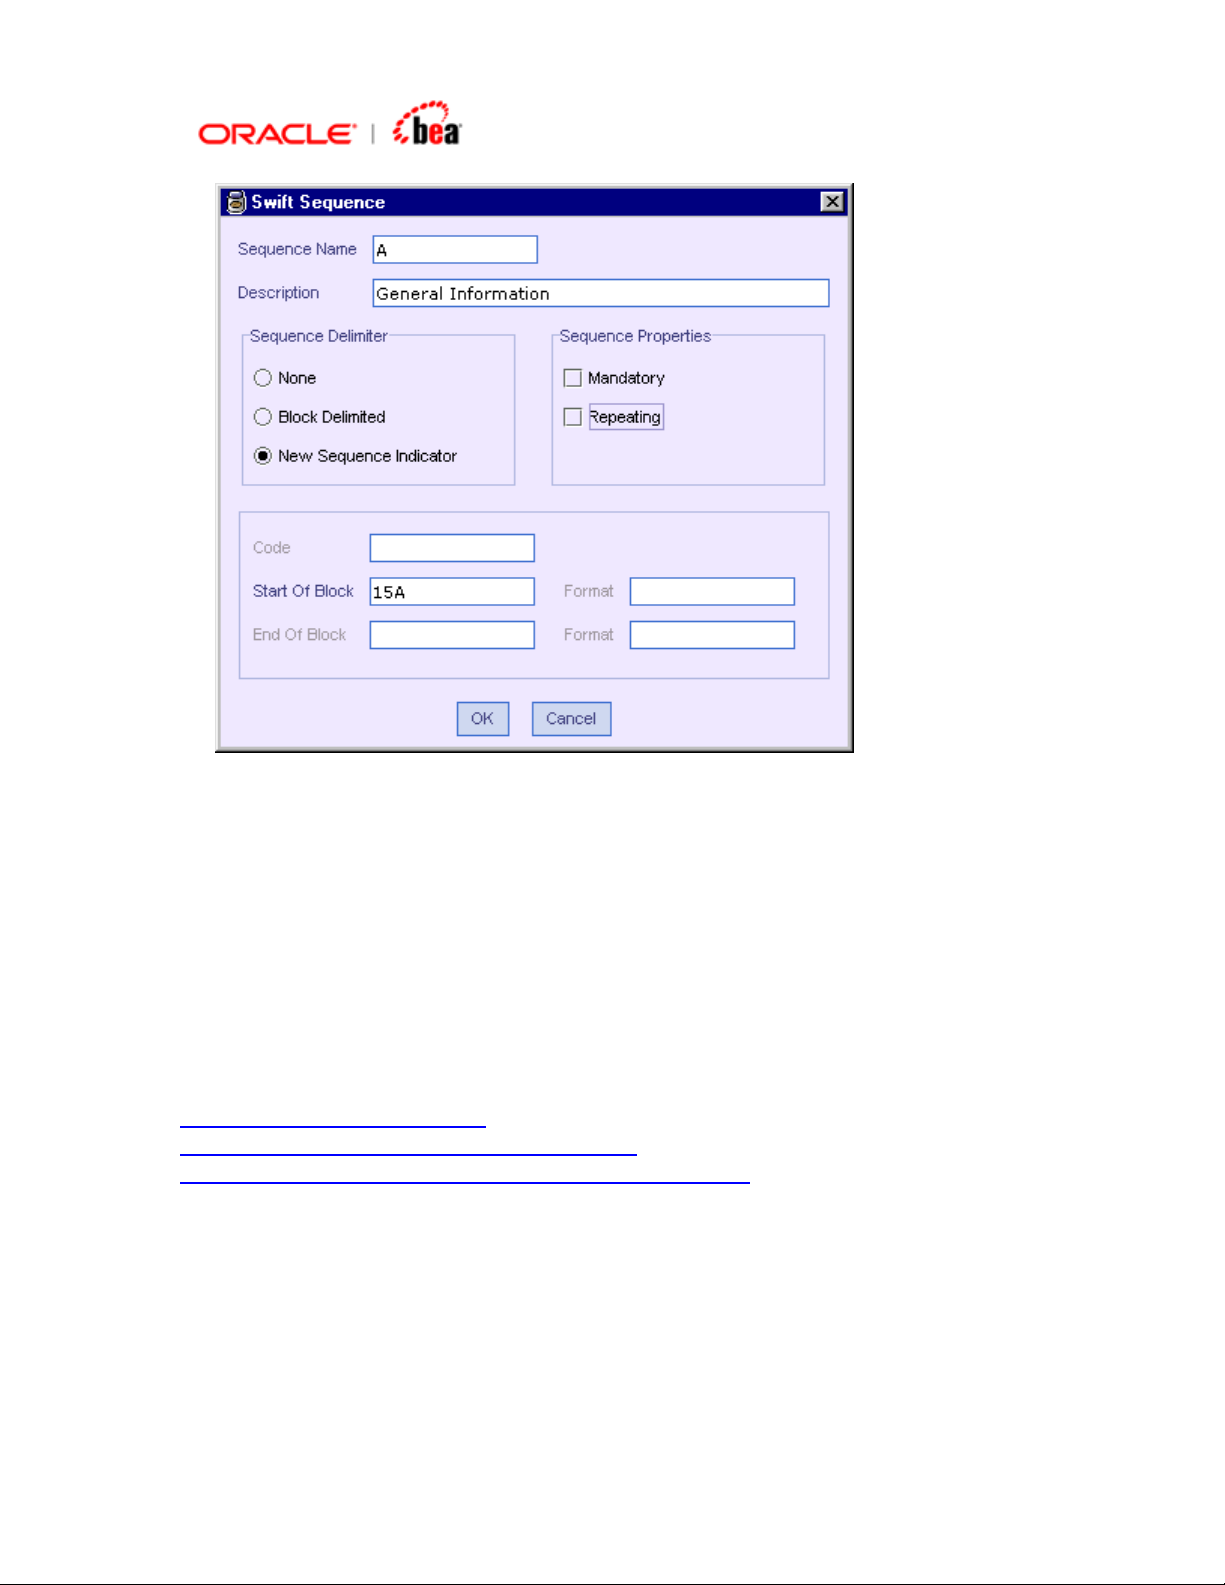
3. Select New Sequence Indicator in Sequence Delimiter. Select the Mandatory
and Repeating properties of the sequence as per the specification.
4. The Start Of Block text field is automatically populated with value 15A when the
Sequence Delimiter is specified in the step above. This can be changed to your
requirement. The End Of Block and Code are not relevant for this case and
hence disabled. Click OK.
5. The sequence is added to the format as in the previous cases.
See Also:
Sequence With Start Delimiter
Adding a SWIFT Sequence without Delimiters
Adding a SWIFT Sequence with Start and End Delimiters
Adding a SWIFT Field
Two types of SWIFT fields can be added in the SWIFT External Format UI.
Generic Field- It is used to describe group of business data that are common
throughout the messages. It is then made unique by the addition of a qualifier.
Page 30

Non Generic Field- Unlike a generic field, is used for one purpose only.
See Also:
Terminology
Adding a new Generic Field
Adding a Non-Generic Field
Updating a SWIFT Field
Removing a SWIFT Field
Customize Field
Adding validations for a sub-field
Removing validations from a sub field
Adding Copy of Fields
Adding a SWIFT Sequence
Adding a New Generic Field
Generic fields are used to describe the groups of business data that are common
throughout the messages. A generic field value always starts with a colon (:),
followed by a Qualifier (of format 4!c), followed by zero or more sub-fields. To add a
generic field to the format follow the steps given below.
1. Click the Add New SWIFT Field button
Format - SWIFT UI. The Create Field dialog appears.
2. Enter the field tag in the Tag combo box and press Enter. The toolbar buttons of
the options and qualifiers table are now enabled.
in the toolbar of the External
Page 31

3. Enter the description of the field in the Description text field.
4. For customizing a field, refer section
Customize Field.
5.
Add the Options for the field.
6. Make sure the Generic Field check box is selected.
7.
Add the Qualifiers and map them to the Options of the field.
8. For a field existing already, the description and Options are automatically
populated when the field is selected from the Tag list. But the Qualifiers have to
be added, each time a field is added to the message format.
9. Click OK. The field is added to the format as found in the External Format -
SWIFT UI. Note that the field shows a unique collection of subfields of the
options selected for a Qualifier.
Page 32

See Also:
Adding a Non-Generic Field
Adding Field Options
1. Click the Add New Options button
dialog.
2. A new row is added in the options table. Enter the Option, its format,
specification and description in the respective columns.
3. When a row is added, the option name by default is populated in the alphabetical
order, considering the option name of the last row. For the first time, it is
populated as A. This can be changed as required. To know how to enter the
format, refer the section
refer
Entering an Option Specification.
Entering an Option Format. To enter the specification,
in the Create Field or Modify Field
Page 33

4. For a generic field, the checkbox in the Selected column is not enabled at this
point, as qualifiers are not yet added. Only on adding the qualifie rs the column is
enabled, so as to allow the mapping of the qualifier with the Option. See
Qualifiers and Associating them with Options.
Adding
See Also:
Adding a New Generic Field
Entering an Option Format
1. The following table shows how to specify the length of a field and the characters
allowed while specifying the format for a field. A few examples are also given at
the end of the table.
Restrictions on Length Types of Characters Allowed
nn
nn-nn
Maximum length
Minimum and
n
Digits only
a
Alphabetic letters, upper case only
Page 34

e
maximum length
Alphabetic letters (upper case) and digits
c
only
Hexadecimal letters A through F (upper
h
case) and digits only
Nn! Fixed length x Any character of the permitted character set
upper and lower case
y Any character of the EDIFACT level A
character set as defined in ISO 9735
upper case only
z Any character as defined by the Information
Service
nn*nn Maximum number of
Blank space
lines times
maximum line length
d Decimal format
Examples
2n = up to 2 digits
3!a = always 3 letters upper case only
4*35x = up to 4 lines of up to 35 characters each
16-64h = at least 16 and up to 64 hexadecimal digits
2. Use of square brackets [ ] around the format of a particular subfield indicates
that the subfield is optional within that field. For example, in the following figure,
format of option S is specified as :4!c/[8c]/4!c/2!a/30x. Here, the format
corresponding to the sub-field Data Source Scheme is given as [8c], making the
sub-field optional.
Page 35

3. The formats within the brackets ( ) should be treated as a single unit. In the
following figure, note option P. The format is :4!c(//4!a2!a2!c[3!c]). The ( )
brackets separates :4!c from the rest, thus implying only two sub-fields with
formats 4!c and //4!a2!a2!c[3!c]. If the brackets were missed, the format
//4!a2!a2!c[3!c] would not apply for a single sub-field BIC/BEI as in the figure.
Instead it would imply four sub-fields with formats 4!a, 2!a, 2!c and 3!c.
4. Refer
the same using the designer.
5. A generic field always starts with a colon (:), followed by a Qualifier of format 4!c
followed by zero or more sub-fields. There is no such rule for a non-generic field.
See Also:
Mapping Formats with Specification (Sub-fields) to know how to perform
Adding a New Generic Field
Entering an Option Specification
The specification of a field should describe the field’s format, and is given as a list of
its constituent subfields. Ea ch sub-field is separated from the next by using the ( )
brackets. For example, the format of field 95C is :4!c//2!a. As per this format, there
are 2 subfields, one with format 4!c and the next with 2! a. The specification should
be entered to represent these two subfields namely, Qualifier and Country C ode as
(Qualifier)(Country Code).
Consider the following case.
Format Pattern [A] SEPERATOR [B] SEPERATOR [C] where A, B, C
represent formats of sub-fields.
Page 36

Specification (Sub-Field1) (Sub-Field2) (Sub-Field2)
In this format pattern, the specification for subfie lds B and C are the same. ie,
Sub-Field2. If this pattern is entered, only one instance of Sub-Field2 will be
created, though the format indicates 3 subfields, which is not correct. In order to
avoid this, the specification of the subfields should be made dist inct. (Here, the
specification for subfields B and C). This is shown in the following example.
Example
Field 69a OPTION A
Format :4!c//8!n/8!n
Specification (Qualifier)(Date)(Date)
Format in Designer :4!c//8!n/8!n
Specification in
Designer
Field 69a present in message format MT564 refers to Period. Its two subfield
specifications Date are changed to imply their meaning as Start Date and End Date.
See Also:
Adding a New Generic Field
(Qualifier)(Start Date)(End Date)
Removing Field Options
1. Select the Option to be removed in the options table of the Cre ate Field or
Modify Field dialog.
2. Click the Remove Selected Fields button.
Page 37

The option is removed from the options table. If there is any qualifier associated with
the removed option, in the case of a generic field, map it to the correct option or
remove it.
See Also:
Adding a New Generic Field
Adding Qualifiers and Associating them with Options
1. Click the Add New Qualifier button
2. A new row is added to the qualifiers table.
in the Create Field dialog.
Page 38

3. Select the required Qualifier from the drop-down list as shown above. The
Description is automatically populated on selecting the Qualifier.
4. Select the Presence of the Qualifier among O (Optional), M (Mandatory), OR
(OR). See
Repeating checkbox if the qualifier is repeating as per the specification .
Specifying OR option for a Qualifier to specify OR presence. Also select
Page 39

5. Map the options to the qualifier. To map, select the qualifier row. Select the
options that apply to this qualifier by selecting the checkb ox in the Selected
column of the required options, as shown below.
6. On selecting the options, they appear in the Options column in the qualifier
table.
See Also:
Adding a New Generic Field
Page 40

Specifying OR Option for a Qualifier
The OR option, allows grouping of qualifiers. This is u seful when one of the many
possible qualifiers can appear for a field option as per the specification. For example,
field 95a allows one among a group of qualifiers BUYR, DEAG, DECU, etc.
Follow the steps given below to specify the OR option,
1. Add a qualifier to the table as mentioned in the above section. Select one of the
allowed qualifiers (in the OR group) from the drop-dow n list. Say, BUYR in our
example. Specify its presence either as (M) Mandatory or (O) Optional as per the
specification.
2. Add the next qualifier in the group, here DEAG, and specify its presence as OR
from the drop-down list.
3. Repeat the above step until all the qualifiers in the group have been added.
4. As per the above figure, one among the qualifiers BUYR, DEAG, DECU is
mandatory, as specified for the first qualifier of the group.
5. Note that the qualifiers in the OR group are under the serial number 1 in the
figure. The OR qualifiers are not assigned serial number for each row. Only the
qualifier added outside the group, i.e., with an O or M presence is assigned the
next serial number.
See Also:
Adding a Non-Generic Field
Adding Copy of Fields
Adding a SWIFT Sequence
Adding validations for a sub-field
Page 41

Adding a Non-Generic Field
A Non-Generic field, unlike a generic field, is a discrete data item used for one
purpose only. To add a non-generic field to a message format, follow the steps given
below.
1. Click the Add New SWIFT Field button
Format - SWIFT UI. The Create Field dialog appears.
2. Enter the field tag in the Tag text field and press Enter. The toolbar buttons for
the options table are now enabled.
in the toolbar of the External
3. Enter the description of the field in the Description text field.
4.
Add the Options for the field.
5. Uncheck the Generic Field check box.
6. The lower panel having the field properties appears now. Select the Mandatory
check box if the field is mandatory and select the Repeating check box if the
field is repeating.
Page 42

7. Select the required options by selecting the check box in the Selected column of
the options table. Note that this column is enabled only on step 5.
8. For a field existing already, the description and Options are automatically
populated when the field is selected from the Tag list. Note that the required
options have to be selected and the properties (Mandatory and Repeating)
have to be set, each time a field is added to a message format.
9. Click OK. The field is added to the format as found in the External Format -
SWIFT UI. The field shows a unique collection of subfields of the options
selected.
See Also:
Specifying Field Definition and Usage
Mapping Formats with Specification (Sub-fields)
Representing Complex Formats in Designer
Adding a new Generic Field
Adding Copy of Fields
Adding a SWIFT Sequence
Page 43

Specifying Field Definition and Usage
A field’s definition and usage can be specified by clicking the
button in the Create Field or Modify Field dialog. For example field definition and
usage of field ‘23G’ in MT519 can be specified as shown below.
See Also:
Adding a new Generic Field
Adding a Non-Generic Field
Mapping Formats with Specification (Sub-fields)
There should be a one-to-one correspondence between the format and the
specification mentioned for a field. Only then, Designer wil l be able to interpret the
sub-fields and their individual formats. The following steps ensure that Designer
maps the format and specification of sub-fields correctly. If necessary, formats can
be merged or split-up as explained below.
1. Select the required row in the options table in the Cr eate Field or Modify Field
dialog and click the Map format with Specification button
Fields Format dialog.
to bring out the
Page 44

2. The selected row has a simple format and specification. Hence there is no
ambiguity for Designer in mapping the format with the specification. Designer
shows the correct mapping in this case
3. But in complex cases, where there is ambiguity in resolving t he format and
specification of sub-fields, Designer is clueless and the mapping needs to be done
by the user. Consider the following case.
4. The Field Formats dialog for this case shows
Page 45

5. Note that there is no one-to-one correspondence between the Format and the
Specification. In the above figure, all the formats that have no specification
actually belong to BIC/BEI sub-field. Hence in order to correct the mapping,
those formats have to be merged for the specification BIC/BEI.
6. Select the rows to be merged and click the Merge Sel ec t ed For mats button.
7. The mapping is now correct. Click OK.
Page 46

8. The format of option P in options table now looks like
9. Note the ( ) brackets added in the format after merging. These brackets can also
be entered in the format directly, without going through the Fields Format
dialog.
10. The reverse is also possible in the Fields Format dialog. i.e., formats can be
split up.
11. Note that the format is missing for Time.
12. Select the row to be split-up and click the Split Selected Format button.
Page 47

13. The format now looks correct as below. Click OK.
Use of brackets ( ) around a set of (two or more) formats indicates that they should
be treated as a single unit. Consider the format:4!c(//4!a2!a2!c[3!c]). The ( )
brackets separates :4!c from the rest, thus implying only two sub-fields with
formats 4!c and //4!a2!a2!c[3!c]. If the brackets were missed, the format
//4!a2!a2!c[3!c] would not apply for a single sub-field BIC/BEI as in the figure.
Instead it would imply four sub-fields with formats 4!a, 2!a, 2!c and 3!c.
See Also:
Adding a new Generic Field
Adding a Non-Generic Field
Representing Complex Formats in Designer
Representing Complex Formats in Designer
Some field formats mentioned in the SWIFT specification need to be changed to
represent them in Designer. Those formats are explained below. Note that while
Page 48

changing the format, the corresponding specification should also be changed to
reflect the format as shown in the following cases.
Conventions
A, B refer to independent sub-fields.
(e.g.) in the format ([ISIN1!e12!c])CRLF[4*35x]
A is [ISIN1!e12!c] and B is [4*35x]
A1, A2 refer to parts of a sub-field.
(e.g.) if A is [/1!a][/34x] then
A1 is [/1!a] and A2 is [/34x]
SEP means SEPERATOR.
Format Pattern [A] SEP [B]
Representation A [SEP B] | B
in Designer
This format implies that,
1. Either A and B are present or only A is present.
2. Only B is present.
Here the separator does not belong to (cannot be associated with) either of the two
formats (A and B). The separator appears only if both are present. In the grammar
[A] SEP [B] there is no way to represent such a requirement without ambiguity.
Consider the formats [A SEP][B] and [A][SEP B] – they do not represent the fact
that separator should appear only if both A and B are present.
Since the grammar cannot convey the meaning correctly, the SWIFT specification
provides additional information as part of the description or clarifies it elsewhere in
the document. Hence such information should be correctly correlated with the format
in Designer, so that the application interprets the format , the way it should.
Note
The parser tries out the first format and if it fails, tries the second (and so on).
Because of this, the order of the formats (that are ORed) is important and should
always be maintained. In general, the one with more number of fields should appear
first.
Example
Page 49

Field 35B
Format ([ISIN1!e12!c])CRLF[4*35x]
Specification (Identification Of Security)(Description Of Security)
Format in
Designer
Specification
in Designer
(ISIN1!e12!c)([CRLF4*35x]) | 4*35x
(Identification Of Security)(Description Of Security) |
(Description Of Security)
Note that the field specification is also changed to match the format.
Present in Message Formats: MT541, MT543, MT524, MT521, MT531, MT520, MT522,
MT523, and MT530
Format Pattern [A1] [A2] SEP [B]
Representation [A1 [A2] SEP] B | [A2 SEP] B
in Designer
This format implies that
1. Either A1, A2 and B are present, or A1 and B are present, or only B is present.
2. A2 and B are present, or only B is present.
In this format pattern the separator does not belong to either of the two formats (A
and B). Also format A is further divided into parts A1 and A2. The separator appears
only if A1 or A2 are present or both A1 and A2 are present. If only format B is
present the separator does not appear. The order of the formats is important and
should always be maintained.
Page 50

Example
Field 82a – OPTION A
Format [/1!a][/34x]CRLF4!a2!a2!c[3!c]
Specification (Party Identifier)(BIC)
Format in
Designer
Specification
in Designer
[/1!a[/34x]CRLF])(4!a2!a2!c[3!c]) |
([/34xCRLF])(4!a2!a2!c[3!c])
(Party Identifier)(BIC) | (Party Identifier)(BIC)
Present in Message Formats: MT521, MT531, MT520, MT522, MT523, MT530
Other Fields Having Similar Pattern:
82a - Options A, D
83a - Options A, D
88a - Options A, D
87a - Options A, D
85a - Options A, D
53a - Options A, D
54a - Options A, D
57a - Options A, D
58a - Options A, D
52a - Options A, D
56a - Options A, D
51a - Options A, D
42a - Options A, D
88D
Format Pattern [A1] [A2] [SEP B]
Representation [A1[A2]SEP]B | A1[A2] | [A2 SEP] B | A2
in Designer
This format implies that
A1, A2 and B are present, or A1 and B are present, or only B is present.
A1 and A2 are present, or only A1 is present.
A2 and B are present, or only B is present.
Only A2 is present.
Page 51

In this format pattern the separator does not belong to either of the two formats (A
and B). In this case, format A is further divided into two parts A1 and A2. The
separator appears only if either one or both of A1 and A2 is/are present and format
B is also present. Presence of format B is essential for the separator to appear. The
order of the formats is important and should always be maint a ined.
Example
Field 82a – OPTION B
Format ([/1!a][/34x])[CRLF35x]
Specification (Party Identifier)(Location)
Format in
Designer
Specification
in Designer
([/1!a[/34x]CRLF])35x | (/1!a[/34x])| ([/34xCRLF])35x | /34x
(Party Identifier) (Location) | (Party Identifier) |
(Party Identifier) (Location) | (Party Identifier)
Present in Message Formats: MT521, MT531, MT520, MT522, MT523, MT530
Other Fields Having Similar Pattern:
82a - Option B
88a - Option B
87a - Option B
53a - Option B
54a - Option B
57a - Option B
52a - Option B
Format Pattern A SEP B
where A is of the format nooflines*maxlinelength (Maximum number of lines times
maximum line length).
Representation (maxlinelength) SEP B |
in Designer (2*maxlinelength) SEP B |... |
(maxnooflines*maxlinelength) SEP B
This format implies that
A minimum of one line is present in format A along with format B.
Page 52

Number of lines that range between 1 and maximum number possible is present
in format A along with format B.
Maximum number of lines that is possible is present in format A along with
format B.
In this format pattern, format A can have multiple lines in its data, which are
separated by CRLF. Format A and Format B are also separated by CRLF. In order to
differentiate between the data for format A and data for format B we have followed
the above conversion pattern. In this case, format A is represented as a combination
of the number of possible lines and the maximum length per line. The order of the
formats is important and should always be maintained.
Example
Field 41a – OPTION D
Format (4*35x)CRLF14x
Specification (Name & Address)(Code)
Format in
Designer
Specification
in Designer
(35x)CRLF14x|(2*35x)CRLF14x|(3*35x)CRLF14x|
(4*35x)CRLF14x
(Name & Address)(Code) |(Name & Address)(Code) |
(Name & Address)(Code) |(Name & Address)(Code)
Present in Message Format: MT710
See Also:
Adding a new Generic Field
Adding a Non-Generic Field
Mapping Formats with Specification (Sub-fields)
Page 53

Adding Copy of Fields
In some SWIFT messages a set of fields need to be treated as single entity. For e.g.
in common group messages (MTnxx), a copy of the fields that occurred in the
original message may occur at the end. The entire set should be treated as a single
field. To support this we need to add a separate field ‘Copy of Fields’.
1. To add ‘Copy of Fields’ select the
2. The dialog shown below will be displayed.
3. Specify the properties for ‘Copy of Fields’ in the dialog. Select ‘OK’ to add it.
button in the toolbar.
Page 54

From the above diagram it can be seen that the ‘Copy of Fields’ gets added as the
last field in the message with the occurrence property.
Note:
The ‘Copy of Fields’ of fields should be the last field in the message.
It should be a top-level field. It should not be nested within a sequence.
See Also:
Adding a SWIFT Sequence
Adding a SWIFT Field
Updating a SWIFT Field
Removing a SWIFT Field
Page 55

Updating a SWIFT Field
1. Select the field to be modified in the External Format - SWIFT UI and click the
Modify SWIFT Field button in the toolbar.
2. The Modify Field dialog appears with the selected field in the Tag drop-down
box.
Page 56

3. The options available for the field are populated in the options table, with the apt
options selected. Add any missing option if needed, refer
Adding Field Options.
Select the required options.
4. For a generic field, the Generic Field check box appears checked and the
qualifiers are populated in the qualifiers table with the properties set. Add
qualifiers further if needed. Refer
Adding Qualifiers and Associating them to the
Options.
5. For a non-generic field, the dialog looks as below. The Generic Field check box
appears unchecked and the properties Mandatory and Repeating are checked
or unchecked as set previously. Modify the properties if necessary.
Page 57

6. Click the Remove button to remove the selected field from the Tag list,
subsequently from the External Format - SWIFT UI.
7. To change the suffix, refer the section
See Also:
Customize Field.
Adding a SWIFT Field
Adding a SWIFT Sequence
Removing a SWIFT Field
Page 58

Customize Field
Consider the message format MT101.
Status Tag Field Name Content/Options No.
Mandatory Sequence A General Information
M 20 Sender's Reference 16x 1
O 21R Customer Specified
Reference
M 28D Message Index/Total 5n/5n 3
O 50a Instructing Party C or L 4
O 50a Ordering Customer G or H 5
O 52a Account Servicing
Institution
…….
…….
…….
Note that the field 50a appears twice consequently. When such a data format is
entered in the designer and validated, the designer shows an error that the field is
duplicated. Hence in order to avoid this, the suffix a needs to be changed. Anyhow,
this will not affect the format of the field. To change the suffix:
16x 2
A or C 6
1. Click the Add New SWIFT Field
to bring the Create Field dialog. Or select the row to change the suffix (if the
field is already added) and click the Modify SWIFT Field button to bring the
Modify Field dialog.
button in the External Format - SWIFT UI
Page 59

2. In the Create Field/Modify Field dialog that appears, click the Customize
button.
3. In the Customize Field dialog that appears enter the suffix and click OK.
4. Click OK in the Create Field/Modify Field dialog. Now the External Format -
SWIFT UI shows the field with the suffix entered.
Page 60

See Also:
Adding a new Generic Field
Adding a Non-Generic Field
Removing a SWIFT Field
Removing a SWIFT Field
1. Select the fields to be removed in the External Format - SWIFT UI and click
the Remove Selected Fields button in the toolbar. The fields are removed from
the format.
2. Sequences can also be removed by clicking this button. But sub-fields cannot be
removed.
3. A field can also be removed by clicking the Remove button in the Create Field
or Modify Field dialog.
Page 61

This removes the field from the Tag list.
See Also:
Adding a SWIFT Field
Updating a SWIFT Field
Adding a SWIFT Sequence
Adding validations for a sub-field
While adding a swift field you can also add validations for the sub-fields of the swift
field. The validation types that are currently supported are
CODE
Time Offset
BIC
C05
DATE
T14
Decimal
T26
Currency Code
Country Code and
Party Identification
1. Select a swift sub field in Swift External Format UI. In the ‘Swift Sub Field Info’
properties panel click the ‘Validations’ button.
Page 62

2. The Swift Field Validations dialog will be displayed.
3. In the top tool bar select the
4. The default type will be ‘CODE’. Click the ‘Type’ column. The list of validation
types will be displayed. Select the appropriate validation type.
button to add a new validation.
Page 63

Note:
For the ‘Format Option’ sub field the validation button will not be enabled.
If a sub-field has validations the text of the validations button will be ‘Red’ in
color.
If a sub-field does not have validation the text will be in normal color.
You can click the ‘
See Also:
Specifying properties common for all validations
Removing validations from a sub field
Adding a SWIFT Field
’, ‘ ’ to move validation(s) up/down.
Specifying properties common for all validations
The properties that can be specified for a validation are
Type
Error Code
Field Options
Qualifiers (Applicable only for generic fields)
Null Field
Comment
Codes (Applicable only if ‘Type’ is ‘CODE’)
Date Format (Applicable only if ‘Type’ is ‘DAT E’)
Sign Field (Applicable only if ‘Type’ is T14)
Currency Field (Applicable only if ‘Type’ is Decima l)
Formula (Applicable only if ‘Type’ is Formula)
Party Identification Codes (Applicable only if ‘Type’ is Part y Identification)
Page 64

Specifying Error Code
Specify the error code in the ‘Error Code’ column.
Specifying Field Options
In the field options list only those options that are applicable to the selected sub field
will be displayed. By default all the displayed options will be selected when you add a
validation. You can deselect among the option(s) th at are not applicable for the
validation.
Please note that at least one field option must be selected for a validation.
Specifying Qualifiers
This property is applicable only in case of generic fields. Only t hose qualifiers that
contain the applicable field options will be displayed. Select the necessary qualifiers.
Please note that at least one qualifier must be selected for a validation.
Specifying Null Field
This property specifies the field that should be ‘null’ for the validation to be applied.
In the ‘Null Field’ combo box sub-fields of the swift field will be displayed. Note that
the current field (i.e.) sub field for which validation is being applied will not be
displayed. Similarly the ‘Format Option’ field will also not be displayed. You can
select the appropriate field from the list.
This is an optional property.
Page 65

Specifying Comment
Comment for the validation can be specified in the comment text area. This is an
optional property.
See Also:
Adding validations for a sub-field
Adding Code validation
Adding Code validation
Code validation is applicable in cases where a field’s value should be one of a set of
predefined values. The predefined values can be specified as codes.
1. Add a new validation.
2. Select ‘Type’ as ‘CODE’ in the ‘Type’ column.
3. Specify ‘Error Code’, ‘Field Options’, ‘Qualifiers’, ’Null Field’ and ‘Comment’
properties as specified earlier.
Specifying Codes
The list of codes for the sub field is to be added to the ‘Codes’ Table. Note that at
least one code should be added for a code validation.
Press the
Enter the detailed name and description under ‘Detail Name’ and ‘Description’
columns.
button to add a new code. Enter the actual code under ‘Code’ column.
Page 66

For example in MT519 sub-field ‘Function’ of field 23G must contain the following
codes
CANC and
NEWM
They can be added as shown below
Pasting Codes From Clipboard
You can also use the
codes along with their detail names and description from the swift standard
documentation to an application like Excel. Copy the text from there to clipboard.
Now click the
Note:
button. The codes will be pasted.
button to paste a set of codes from clipboard. Copy a set of
The code, detailed name and description should be separated either by spaces or
tabs. Only then the paste operation will paste the codes correctly. In cases where the
detailed name itself is of two words separated by space the second word will be
copied to the description column. In such cases you have to manually copy the
second word back to detail name column.
Removing Codes
You can use the ‘
Note:
You can use the ‘
See Also:
Specifying properties common for all validations
Adding validations for a sub-field
Removing validations from a sub field
’ button to remove an existing code.
’ and ‘ ’ buttons to move code(s) up/down.
Page 67

Adding T26 Validation
T26 validation is applicable in cases where a field’s value should not start or end with
a slash ‘/’ and not contain two consecutive slashes ‘//’.
1. Add a new validation.
2. Select ‘Type’ as ‘T26’ in the ‘Type’ column.
3. The error code will be automatically set as ‘T26’. You need not ch ange it.
4. Specify the qualifiers, field options, null field and comment properties as specified
earlier.
5. The description and usage for this validation type will be displayed at the bottom.
See Also:
Specifying properties common for all validations
Adding validations for a sub-field
Removing validations from a sub field
Adding T14 Validation
This validation is applicable for Amount\Rate\Balance\Number fields whose sign must
be present when their value is non-zero.
1. Add a new validation.
2. Select ‘Type’ as ‘T14’ in the ‘Type’ column.
3. The error code will be automatically set as ‘T14’. You need not ch ange it.
4. Specify the qualifiers, field options, null field and comment properties as specified
earlier.
5. From the Sign Field list-box displayed, select Sign.
Page 68

In MT514 sub-field ‘Rate’ in field 92A has a validation that when Sign is present,
Rate must not be zero. For this field, T14 validation can be added as shown below.
See Also:
Specifying properties common for all validations
Adding validations for a sub-field
Removing validations from a sub field
Adding Date Validation
Date validations are applicable for Date/Time fields, whose value should be
expressed, in a particular format (e.g. YYYYMMDD).
1. Add a new validation.
2. Select ‘Type’ as ‘DATE’ in the ‘Type’ column.
3. Specify the error code, qualifiers, field options, null field and comment properties
as specified earlier.
Specifying Date Format
Specify the date format for the validation in the ‘Format’ combo box. Please note
that this is a mandatory property.
In MT519 sub-field ‘Date’ in field 98a should be a valid date expressed as
‘YYYYMMDD’. For this field ‘DATE’ validation can be added and format specified as
shown below.
See Also:
Specifying properties common for all validations
Adding validations for a sub-field
Removing validations from a sub field
Page 69

Adding Currency Code Validation
This validation is to verify that the currency code specified for a field is a valid ISO
4217 currency code.
1. Add a new validation.
2. Select ‘Type’ as ‘Currency Code’ in the ‘Type’ column.
3. The error code will be automatically set as ‘T52’. You need not ch ange it.
4. Specify the qualifiers, field options, null field and comment properties as specified
earlier.
5. The description and usage for this validation type will be displayed at the bottom.
See Also:
Specifying properties common for all validations
Adding validations for a sub-field
Removing validations from a sub field
Adding Country Code Validation
This validation is to verify that the country code specified for a field is a valid ISO
country code.
1. Add a new validation.
2. Select ‘Type’ as ‘Country Code’ in the ‘Type’ column.
3. The error code will be automatically set as ‘T73’. You need not ch ange it.
4. Specify the qualifiers, field options, null field and comment properties as specified
earlier.
The description and usage for this validation type will be displayed at the bottom.
Page 70

See Also:
Specifying properties common for all validations
Adding validations for a sub-field
Removing validations from a sub field
Adding Time Offset Validation
Time Offset validations are applicable for Time fields, whose va lue should be
expressed, in a particular format HHMM and whose value should be within a
particular range.
1. Add a new validation.
2. Select ‘Type’ as ‘Time Offset’ in the ‘Type’ column.
3. The error code will be automatically set as ‘T16’. You need not ch ange it.
4. Specify the qualifiers, field options, null field and comment properties as specified
earlier.
The description and usage for this validation type will be displayed at the bottom.
See Also:
Specifying properties common for all validations
Adding validations for a sub-field
Removing validations from a sub field
Adding BIC validation
This validation is to verify that the BIC/BEI specified for a field is a SWIFT registered
address, either connected or not-connected.
1. Add a new validation.
2. Select ‘Type’ as ‘BIC’ in the ‘Type’ column.
Page 71

3. The error codes will be automatically set as ‘T27, T28, T29, T45’. You need not
change it.
4. Specify the qualifiers, field options, null field and comment properties as specified
earlier.
The description and usage for this validation type will be displayed at the bottom.
See Also:
Specifying properties common for all validations
Adding validations for a sub-field
Removing validations from a sub field
Page 72

Adding C05 validation
This validation is to verify that the BIC specified for a field is not a BEI, ie must not
be of subtype BEID, MCCO, TESP or TRCO
1. Add a new validation.
2. Select ‘Type’ as ‘C05’ in the ‘Type’ column.
3. The error code will be automatically set as ‘C05’. You need not change it.
4. Specify the qualifiers, field options, null field and comment properties as specified
earlier.
The description and usage for this validation type will be displayed at the bottom.
See Also:
Specifying properties common for all validations
Adding validations for a sub-field
Removing validations from a sub field
Adding Decimal Validation
This validation is applicable for ‘Amount’ field to validate that the number of digits
following the comma must not exceed the maximum allowed for the specified
currency.
1. Add a new validation.
2. Select ‘Type’ as ‘Decimal’ in the ‘Type’ column.
3. The error code will be automatically set as ‘C03’. You need not change it.
4. Specify the qualifiers, field options, null field and comment properties as specified
earlier.
5. From the Currency Field list-box displayed, select Currency_Code.
Page 73

In MT567, sub-field ‘Amount’ in field 19A has a validation that the number of digits
following the comma must not exceed the maximum allowed for the specified
currency. For this field, Decimal validation can be added as shown below.
See Also:
Specifying properties common for all validations
Adding validations for a sub-field
Removing validations from a sub field
Adding Party Identification Validation
Party Identification is applicable in cases where a party can be identified usin g a
set of predefined groups. The predefined groups can be specified as codes.
1. Add a new validation.
2. Select ‘Type’ as ‘Party Identification’ in the ‘Type’ column.
3. The error code will be automatically set as ‘T78’. You need not ch ange it.
4. Specify ‘Field Options’, ’Null Field’ and ‘Comment’ properties as specified earlier.
Specifying Party Identification Codes
The list of codes for the sub field is listed in the ‘Party Identification Codes’ Table.
You have the option to set a code as New Group and you can also make a code
Mandatory by checking the required check-box as shown below:
Page 74

Removing Codes
You can use the ‘
that atleast one code should be present for a Party Identification Code validation.
Note:
’ button to remove an existing Party Identification code. Note
You can use the ‘
See Also:
Specifying properties common for all validations
Adding validations for a sub-field
Removing validations from a sub field
’ and ‘ ’ buttons to move code(s) up/down.
Removing Validations from a Sub Field
1. Select the swift sub field and click the Validations button.
2. In the validations table of the Swift Field Validations dialog box, select the
validation(s) that are to be removed.
3. Click the ‘Remove Validation(s)’ button ‘
See Also:
Adding validations for a sub-field
’ to remove the selected validation(s).
SWIFT External Message UI
The following properties can be specified in the SWIFT External Message UI.
Format Name. This refers to name of the external format.
(MT543ExternalMessage)
Version.
Standard Name. This refers to the actual name of the SWIFT message. (MT543)
Standard Version. This refers to the SRG version based on which the message
was created. (SRG 2005)
Detailed Name. This refers to the detailed name of the SWIFT message. (Deliver
Against Payment)
Page 75

See Also:
SWIFT External Format UI
Creating a SWIFT Format
Entering the SWIFT Specification
Page 76

SWIFT External Format UI
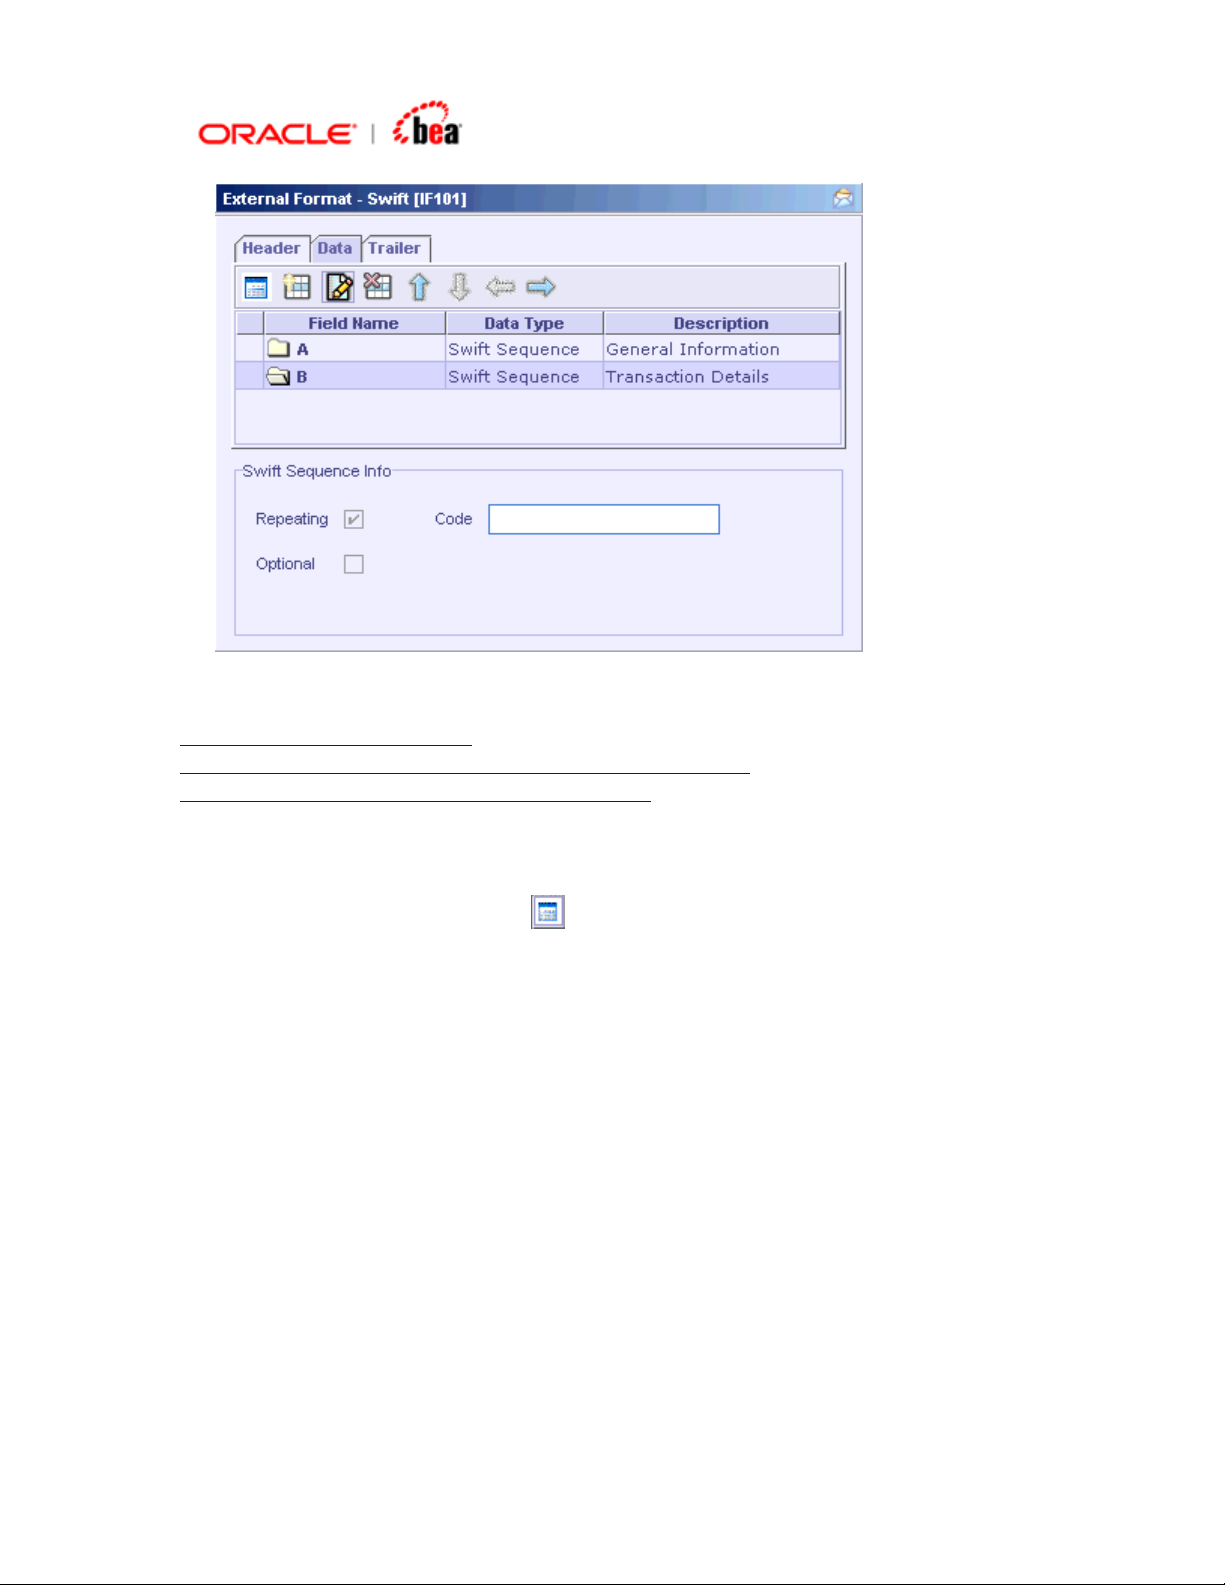
The External Format – SWIFT UI has 3 tabs – Header, Data and Trailer to
represent the header block, text block and trailer block of the SWIFT message. The
header and trailer types have to be specified while creating the external format. The
header/trailer fields cannot be modified or removed.
See Also:
External Format – SWIFT (Header/Trailer)
Swift User Message (Data)
System/Service Message
Format Options
Creating a SWIFT Format
Entering the SWIFT Specification
SWIFT External Message UI
Expanding/Collapsing SWIFT Fields
External Format - SWIFT (Header/Trailer)
The External Format - SWIFT (Header) UI shows the pre-defined fields as per the
Header/Trailer option chosen during creation. As noted earlier, you have the option
to choose SWIFT Input / SWIFT Output / SWIFT Input/Output / FICC Header
(Custom Header) / None, when creat ing the SWIFT ex ternal format.
See Also:
SWIFT Input Header/Trailer
SWIFT Output Header/Trailer
SWIFT Input/Output Header/Trailer
FISC Header
Format Options
Swift User Message (Data)
Page 77

SWIFT Input Header/Trailer
When you choose this option, the Header and Trailer panel has the following fields
for a SWIFT external message format.
Page 78

The Section Properties panel in the Header panel shows the properties of the header
block, such as whether it is Repeating and Optional. The Properties panel shows the
properties of a field (shown when a field is selected). It shows whether the field is
Optional and it’s Length. For fields of User Header block and Trailer, additionally the
Tag of the field is shown. The fields cannot be added, altered or removed for Header
and Trailer.
Page 79

The field and section properties displayed are not editable.
See Also:
SWIFT Output Header/Trailer
SWIFT Input/Output Header/Trailer
FISC Header
Format Options
Swift User Message (Data)
SWIFT Output Header/Trailer
When you choose this option, the Header and Trailer panel has similar fields as
that of a SWIFT Input Header/Trailer except for the Application Header block in
Header section which has different set of fields as shown below.
See Also:
SWIFT Input/Output Header/Trailer
FISC Header
Format Options
Page 80

Swift User Message (Data)
SWIFT Input/Output Header/Trailer
When you choose this option, the Header and Trailer panel has similar fields as
that of a SWIFT Input Header/Trailer except for the Application Header block in
Header section which is divided as Application Header Input and Application Header
Output as shown below.
Page 81

The Section Properties panel in the Header panel shows the properties of the header
block, such as whether it is Repeating and Optional.
The Properties panel shows the properties of a field (shown when a field is selected).
It shows whether the field is Optional and it’s Length. For fields of User Header block
and Trailer, additionally the Tag of the field is shown. The fields cannot be added,
altered or removed for Header and Trailer.
Page 82

The field and section properties displayed are not editable.
See Also:
FISC Header
Format Options
Swift User Message (Data)
FISC Header
When you choose this option, the Header and Trailer panel has the following fields
for a SWIFT input/output message format.
Page 83

The trailer has no fields and is blank in this case. Field properties Optional and
Length are displayed in the Properties panel for the header.
Note:
When you choose the option ‘None’, the Header and Trailer sections will be empty.
See Also:
SWIFT Input Header/Trailer
SWIFT Output Header/Trailer
Format Options
Swift User Message (Data)
Swift Format Options
You can change the Header/Trailer chosen during SWIFT Input/Output message
creation by using this feature. Click the
Format UI. The Swift Format Options dialog box appears as shown below:
‘Format Options’ button in the External
Page 84

The same set of Header/Trailer options that were available during message creation
is available here too. (Custom Header/Trailer corresponds to FICC Header).
You can set the maximum length for the message by entering the length value in the
‘Max Length’ text box. The value specified should be an integer value.
Max Length accepts values in the range ‘0 to 9999’ and ‘10000’. During runtime, if
the length of the input value exceeds the maximum length specified in format
options, it generates error as ‘Message Length exceeded’. For example, consider a
message with maximum length value 10000. If the input value exceeds the length
specified then error is thrown as “Message Length exceeded. Maximum length
allowed ‘10,000’, actual message length ‘10,115’.”.
See Also:
SWIFT Input Header/Trailer
SWIFT Output Header/Trailer
SWIFT Input/Output Header/Trailer
FISC Header
Swift User Message (Data)
Page 85

Swift User Message (Data)
The External Format - SWIFT User message (Data) UI looks as below. The
message format is shown in the table at the top, and a panel at the bottom shows
the properties of the row selected in the table. The properties panel dynamically
changes as the row selected in the table changes.
The message format (ie, the fields) is automatically populated when created from a
pre-defined format. Only the optional fields can be enabled or disabled in this case.
Whereas, the table is blank when created from an empty message format and the
tool bar buttons are enabled so as to add, modify and move the fields as required. In
this case, there is no need for the Enabled column in the table and the properties
panel, unlike the previous case, as the user adds the fields as and when required.
Page 86

The sub-fields displayed under the fields are a collection of sub-fields in the options
selected while creating or modifying the field (using the Create Field or Modify
Field dialog). ie, in the above figure the qualifier BUYR lists the sub-fields of the
selected options P, Q, R only though other options are also available (See figure
below).
Page 87

Note that the sub-fields of a generic field are displayed under the qualifier in the
External Format - SWIFT UI, similar to a sequence or field. This is because,
though the qualifier is also a sub-field, it distinguishes the generic field. Hence the
rest of the sub-fields are shown under it.
See Also:
SWIFT Sequence Info
SWIFT Field Info (Generic)
SWIFT Field Qualifier Info
SWIFT Field Info (Non-Generic)
SWIFT Sub Field Info
SWIFT Sequence Info
When a SWIFT sequence is selected in the External Format - SWIFT UI, the
bottom panel shows the properties of the sequence as shown below.
The panel shows whether the sequence is Repeating and it is Optional or not. The
Code of the sequence if available is also displayed. The panel just displays the
properties and the properties could not be edited here. To modify the properties,
refer
Updating a SWIFT Field section. This applies to sequences also.
Page 88

See Also:
SWIFT Field Info (Generic)
SWIFT Field Qualifier Info
SWIFT Field Info (Non-Generic)
SWIFT Sub Field Info
Adding a SWIFT Sequence
SWIFT Field Info (Generic)
When a generic field is selected in the External Format - SWIFT UI, the bottom
panel shows the properties of the field as below.
The check boxes Repeating and Optional show the field properties. For a generic
field, the qualifiers are displayed in a table, along with their properties – Presence
(O – Optional & M - Mandatory), Repeating, Description of the qualifier and the
Options mapped to it. If the format is created from an existing one, an additional
Enabled column is also shown, only which is editable. This is provided to allow the
user to select the Qualifiers applicable for the field at that occurrence. To modify the
field properties, refer
See Also:
SWIFT Sequence Info
SWIFT Field Qualifier Info
SWIFT Field Info (Non-Generic)
SWIFT Sub Field Info
Adding a new Generic Field
Updating a SWIFT Field section.
Page 89

SWIFT Field Qualifier Info
When a qualifier of a generic field is selected in the External Format - SWIFT UI,
the bottom panel shows the properties of the qualifier.
The check boxes Repeating and Optional show the qualifier properties. The
Options that are associated with the qualifier are shown in a table. The Format and
Specification of each option are shown in the table. For a format created from an
existing one, an additional Enabled column is also seen, only which is editable. This
is provided to allow the user to select the associated options of the qualifier for the
field at that occurrence. To modify the properties, refer
section.
See Also:
SWIFT Sequence Info
SWIFT Field Info (Generic)
SWIFT Field Info (Non-Generic)
SWIFT Sub Field Info
Adding a new Generic Field
Updating a SWIFT Field
Page 90

SWIFT Field Info (Non-Generic)
When a non-generic field is selected in the External Format - SWI FT UI, the
bottom panel shows the properties of the field as shown below.
The check boxes Repeating and Optional show the field properties. The Options
that are associated with the field are shown in a table along with their Format and
Specification. For a format created from an existing one, an additional Enabled
column is also seen, only which is editable. This is provided to allow the user to
select the required options for the field at that occurrence. To modify the properties,
refer
Updating a SWIFT Field section.
See Also:
SWIFT Sequence Info
SWIFT Field Info (Generic)
SWIFT Field Qualifier Info
SWIFT Sub Field Info
Adding a Non-Generic Field
Page 91

SWIFT Sub Field Info
For a sub-field of a field (generic or non-generic) selected in the External Format -
SWIFT UI, the bottom panel looks as shown below.
Sub-field Info (Generic Field)
Page 92

The SWIFT Sub Field Info panel shows the sub-field’s Format, whether it is
Optional and the Option in which it occurs. For each option (if the sub-field is
specified in more than one option), the sub-field details are shown in separate rows.
Validations can be added by clicking the ‘Validations ’ button.
See Also:
SWIFT Sequence Info
SWIFT Field Info (Generic)
SWIFT Field Qualifier Info
SWIFT Field Info (Non-Generic)
Adding a SWIFT Field
Adding validations for a sub-field
Sub-field Info (Non-Generic Field)
System/Service Message
A System/Service message can be created in designer either from
Existing SWIFT message format, or
Empty message format
The existing SWIFT formats are available as XML files in the location <installation
dir>\config\swift\format.
See Also:
System Field Dictionary
Creating an empty Service/System message format
1. Right-click the Cartridge node in Designer and select the New External
Message menu item from the context menu to create a SWIFT external format.
2. In the New External Message dialog that appears, enter the Transformation
Name and select SWIFT from the External Message listbox. Click OK.
3. In the New Swift Message Format dialog that appears, select Create empty
message format radio button. Click Next.
Page 93

4. Click ‘Next’. In the next dialog box select the header type required and the
message type. The ‘Message Type’ combo box lists the message types. The types
of messages are ‘User’, ‘System’ and ‘Service’. To create a System message
select the type as ‘System’. To create a Service message, select the type as
‘Service’.
Page 94

5. Click ‘Finish’ to create the System/Service message.
See Also:
Creating a SWIFT System/Service Format Based on an Existing SWIFT Message
Format
Adding a System Field
Adding a Group
Creating a SWIFT System/Service Format Based on an Existing SWIFT Message Format
1. Right-click the Cartridge node in the Designer. Select the New External
Message menu item from the context menu to create a SWIFT external format
2. In the New External Message dialog that appears enter the Transformation
Name and select SWIFT from the External Message listbox . Click OK.
Page 95

3. In the New Swift Message Format dialog that appears, select an existing
format based on which the new format is to be created. Select Create based on
selected format radio button. Click Next.
4. In the next dialog that appears you have various options to choose
Header/Trailer, Validation and Edit options. Click ‘Finish’ to create the message
after selecting the appropriate options.
Note:
The existing SWIFT system/service messages are under category ‘System’ and
‘Service’ respectively. When a format based on a message under these categories
is created the type of the message is automatically set as either System/Service.
Page 96

See Also:
Creating an empty Service/System message format
Adding a System Field
Adding a Group
Adding a System Field
A system field can be either
A simple field. A field that does not have any sub-fields. For e.g. field ‘swift-
address’ (tag 102). The format of the field is ‘4!a2!a2!c1!c3!c’.
A complex field. A field that consists of several sub-fields. For e.g. field ‘mir’ (tag
106) has the following format ‘(6!n)(4!a2!a2!c1!c)(3!c)(4!n)(6!n)’.
See Also:
Adding a Simple Field
Adding a Complex Field
Fields Separated by OR/AND
Adding a Group
System Field Dictionary
Adding a Simple Field
A simple field is a field that does not have any sub-fields. For e.g. field ‘swiftaddress’ (tag 102). The format of the field is ‘4!a2!a2!c1!c3!c’. To add the field the
following steps need to be performed.
1. In the SWIFT external format UI, click the
dialog will be displayed.
2. Select the field to be added (‘swift-address’) in the ‘Name’ combo box. Or else
you can type the field tag (102) in the ‘Tag’ combo box. The format details of the
field are displayed.
button. The ‘Add System Field’
Page 97

3. You can specify the min/max occurs of the field in this dialog. If the field is nonrepeating the field will be added as a simple field. In case a simple field is
repeating select the max occurs accordingly. In this case the field will be added
as a section. The format, tag and specification of the field cannot be changed. By
default, a simple field is added as mandatory and non-repeating.
4. Click ‘OK’ to add the field.
Page 98

5. You can change the optional property of the field in the ‘System Field Info’ panel.
In some cases the same field may be present twice in the message. The name of
the field can be changed in such cases. The description of the field can also be
changed. The type, tag and format of a field cannot be changed.
6. In case the simple field is repeating and the max occurs has been specified it will
be added as a section as shown below.
Page 99

7. The min/max Occurs, description and field name can be changed.
See Also:
Adding a Complex Field
Fields Separated by OR/AND
Adding a Group
Adding a Complex Field
A complex field consists of several sub-fields. For e.g. field ‘mir’ (tag 106) has the
following format ‘(6!n)(4!a2!a2!c1!c)(3!c)(4!n)(6!n)’ with the specification (date)(lt-
identifier)(branch-code)(session-number)(isn). To add this field the following steps
need to be done.
1. In the SWIFT external format UI, click the ‘
dialog will be displayed.
2. Select the field to be added (‘mir’) in the ‘Name’ combo box. Or else, you can
type the field tag (106) in the ‘Tag’ combo box. The format details of the field are
displayed. Specify the ‘min/max occurs’ for the field based on the message
specification. Click OK to add the field. The field is added as a section. By default
the field is optional and repeating.
’ button. The ‘Add System Field’
Page 100

3. The field can be set as optional/repeating by specifying values for ‘min/max
occurs’ in the ‘System Field Info Panel’. In case the same field is present twice in
the message, the name of the field can be changed in the ‘Field Name’ column.
Please note that the name of sub-fields cannot be changed.
See Also:
Adding a Simple Field
Fields Separated by OR/AND
Adding a Group
Fields Separated by OR/AND
In the specification for ‘System’ messages you occasionally see fields/groups
separated by ‘OR’ or ‘AND’. In such cases the following guidelines need to be
followed while adding the fields/groups.
1. If ‘OR’ is present between the fields in a table, the fields should be added as
optional. The validation for the presence of the fields has to be done separately.
2. If ‘AND’ is present between fields and if the first field is mandatory, then enter
the specification as it is. No additional validation needs to be done separately.
 Loading...