

Page 1

Installation and service
instructions, warranty
terms & conditions
DeeGreen
User Guide
Version 2.4
Page 2

DeeGreen User Guide
- 2 -
Page 3

DeeGreen User Guide
- 3 -
Contents
1. Contents ................................................................................................................... - 3 -
2. Technical parameters ............................................................................................. - 4 -
3. Safety instructions .................................................................................................. - 4 -
4. Package contents .................................................................................................... - 6 -
5. Parts description ..................................................................................................... - 7 -
6. Getting the printer ready for operation ............................................................. - 9 -
7. Printer menu scheme .......................................................................................... - 11 -
8. Cleaning and support .......................................................................................... - 11 -
9. Filaments and spare parts .................................................................................. - 11 -
10. Warranty terms and conditions ......................................................................... - 11 -
11. Authorized servicing ............................................................................................ - 13 -
12. Contact details ..................................................................................................... - 17 -
Page 4
DeeGreen User Guide
- 4 -
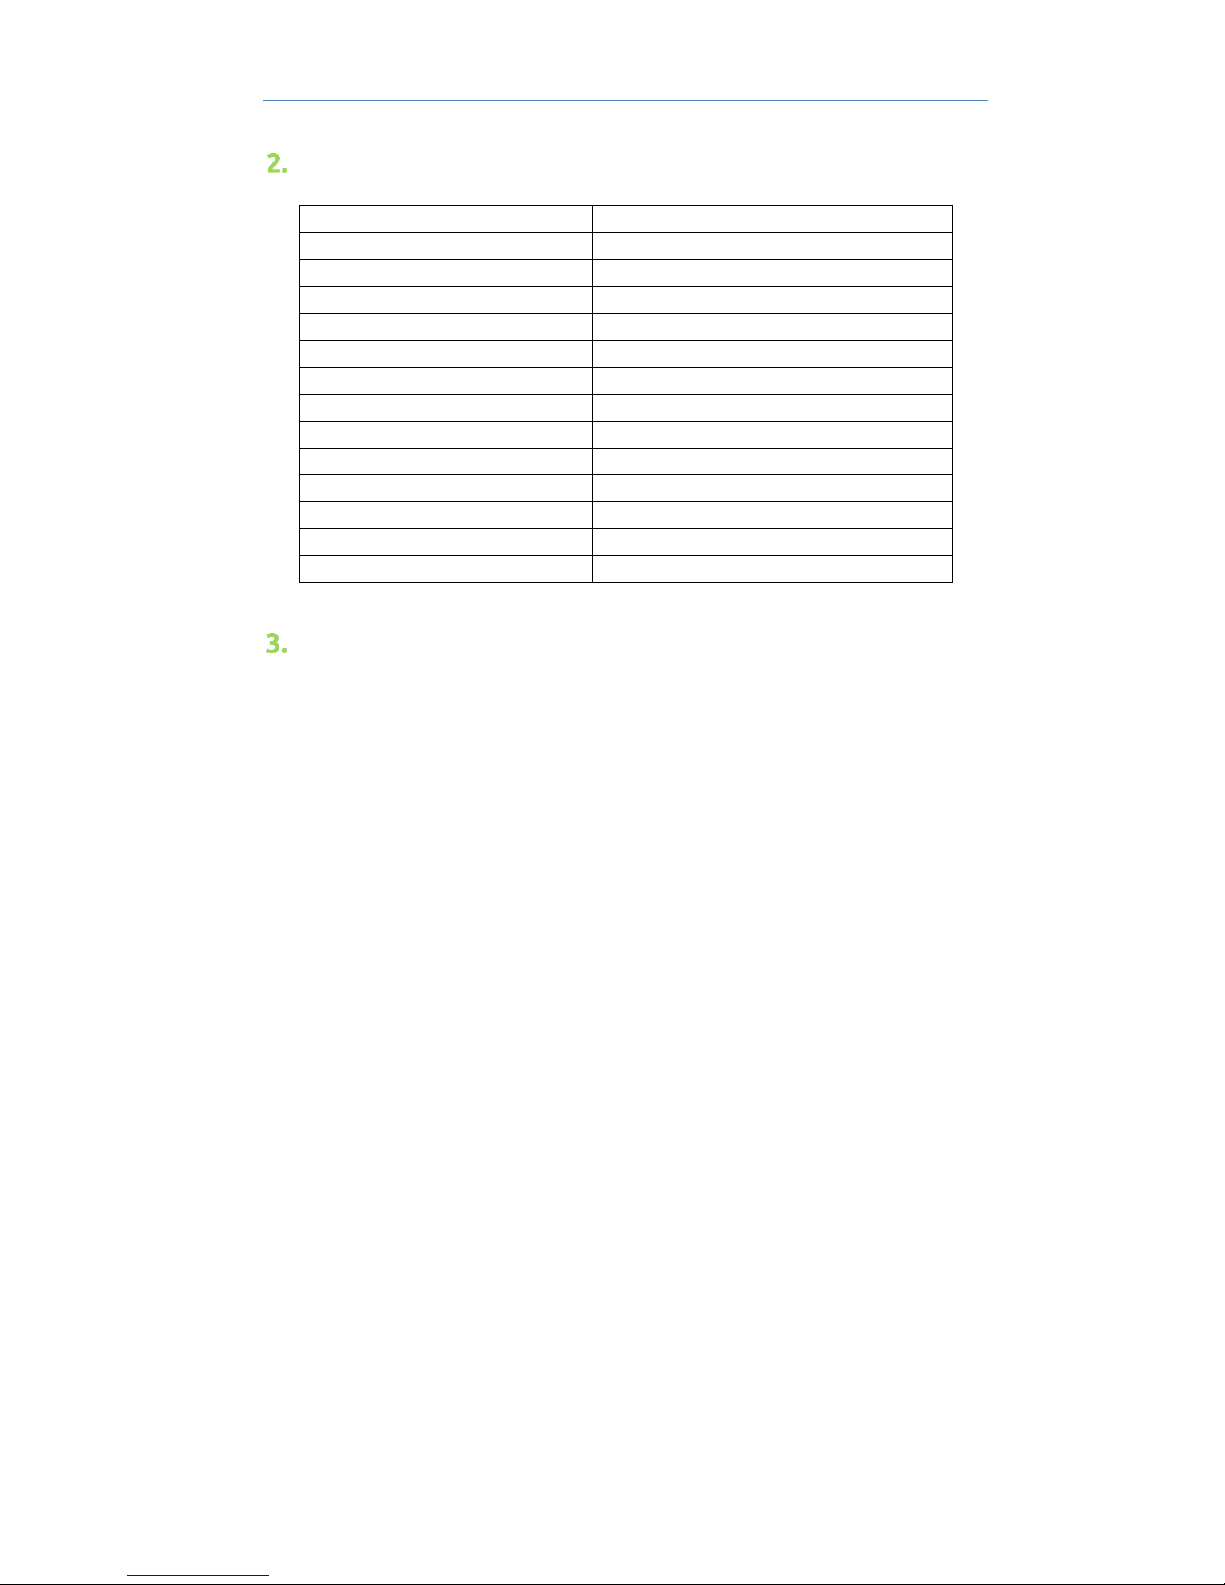
Technical parameters
Print technology
FFF (Fused Filament Fabrication)
Build volume
150 x 150 x 150 mm
Print accuracy
0.1 mm
Layer thickness
0.05 / 0.1 / 0.15 / 0.2 mm
Nozzle diameter
0.4 mm
Print speed
up to 90 mm / s
Printer control
Touchscreen
Interior lighting
LED
Supported material
PLA, Wood
Power source
230 V / 120 W
Noise level
70 dB
External dimensions
495 x 395 x 390 mm
Weight
22 kg
Inputs
USB, SD card
Safety instructions
Warranty void if damaged due to not following the instructions in this
User Guide
1. None of the printer components or accessories are suitable for
eating. Avoid eating anything delivered from be3D.
2. Spatula, which is part of the accessory box, is sharp. Beware of
cuts.
3. Mind the top lid limit switch. Its edges are sharp. Beware of cuts.
4. Damage caused by improper use, in contradiction with this User
Guide, or by violating the security instructions, is full
responsibility of the user.
5. This device is not suitable for children and must be operated by
persons over the age of 18, in all other instances, supervision of
an adult is required.
6. The device must not be left unattended whilst in operation.
7. Some parts of the printer operate at temperatures greater than
70°C! Danger of burns! Avoid any contact with hot parts.
8. Disabled people not able to fully operate the device must be
supervised by a technically qualified person.
9. Make sure the product is complete before use.
10. Danger of electric shock if not operated correctly.
Page 5
DeeGreen User Guide
- 5 -
11. The printer is a heavy device. In order to avoid injury, or damage
to the printer, do not let it fall.
12. Disposal of the device must be performed in accordance with
correct environmental directions.
13. Keep the printer away from any flammable substances.
14. Install the printer in a place that is:
Dry and free from dust
A stable environment (temperature, humidity)
Well ventilated
Close to an easily accessible electrical supply
At a sufficient distance from objects that could cover the
ventilation shafts of the printer
At a sufficient distance from objects susceptible to heat (e.g.
curtains and drapery), also from splash able liquids and organic
gases (e.g. ammonia)
Out of direct sunlight
Without sudden temperature changes
At a sufficient distance from heating vents, ventilation and air-
conditioning systems
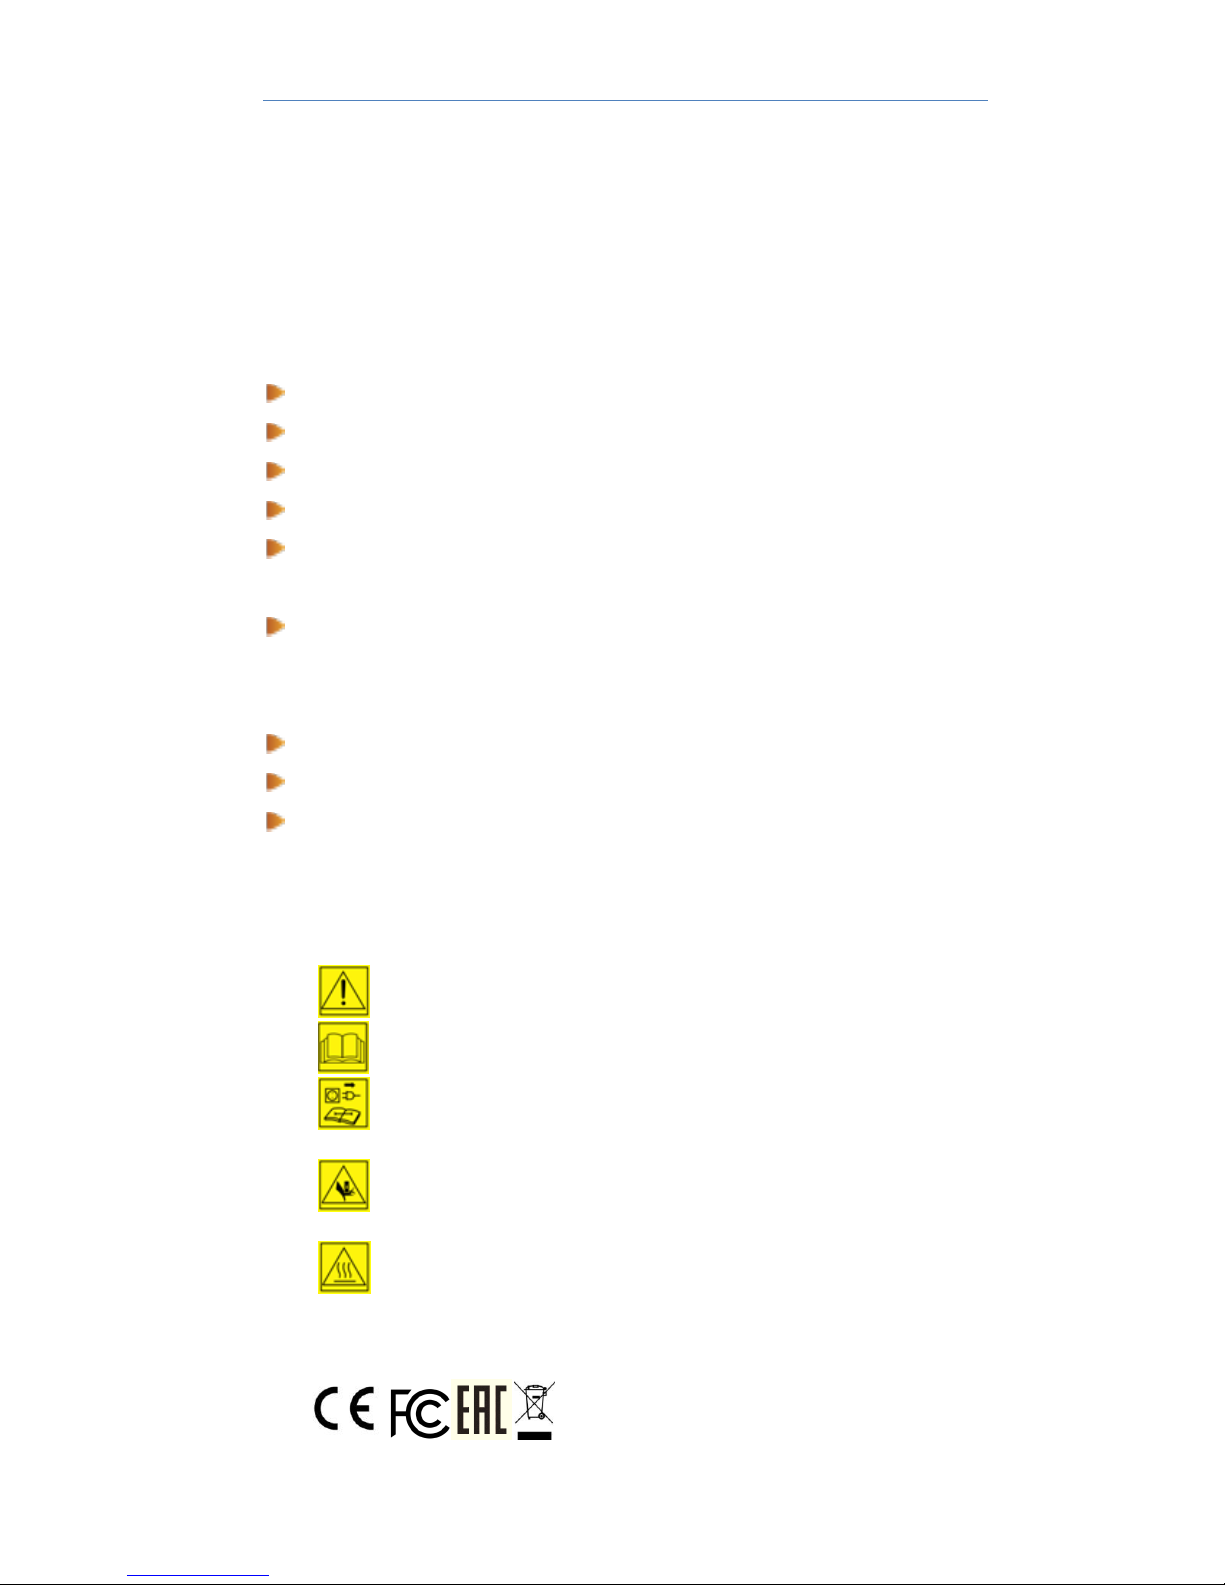
Attentions:
- Danger
- Read the instruction manual
- Before any manipulation, except of print task and print
preparation, pull the plug out of socket
- The device contains moving parts, it may cause crushing and
capturing
- Warning of hot surfaces, marked part of the product may
heat up dangerously
Certifications:
Page 6

DeeGreen User Guide
- 6 -
In order to avoid interruption of the print task due to an ESD event, the
DeeGreen M3D0100 3D printer should not be touched during the printing
process. If an ESD occurs, the printer will restart. After this situation, it is
recommended to use the "parking position" button.
§ 15.21 Information to user
Warning:
Changes or modifications not expressly approved by the party responsible
for compliance could void the user’s authority to operate the equipment.
§ 15.105 Information to user
NOTE: This equipment has been tested and found to comply with the
limits for a Class B digital device, pursuant to part 15 of the FCC Rules.
These limits are designed to provide reasonable protection against
harmful interference in a residential installation. This equipment
generates, uses and can radiate radio frequency energy and, if not
installed and used in accordance with the instructions, may cause harmful
interference to radio communications. However, there is no guarantee
that interference will not occur in a particular installation. If this
equipment does cause harmful interference to radio or television
reception, which can be determined by turning the equipment off and on,
the user is encouraged to try to correct the interference by one or more of
the following measures:
—Reorient or relocate the receiving antenna.
—Increase the separation between the equipment and receiver.
—Connect the equipment into an outlet on a circuit different from that to
which the receiver is connected.
—Consult the dealer or an experienced radio/ TV technician for help.
Package contents
1. 3D printer DeeGreen
2. Box with accessories
a. Power supply 24 V/5 A
b. USB cable
c. Printing material holder
d. Spatula for print bed cleaning and model removal
e. Glue-stick for print bed
f. CD with DeeControl software
g. User Manual DeeControl
h. User Guide DeeGreen
i. Set of 2 nozzles and nozzle tubes with service tool
3. SD card plugged into the printer slot
4. Speed Manual on the top of the printer
5. Power supply cable
Page 7
DeeGreen User Guide
- 7 -
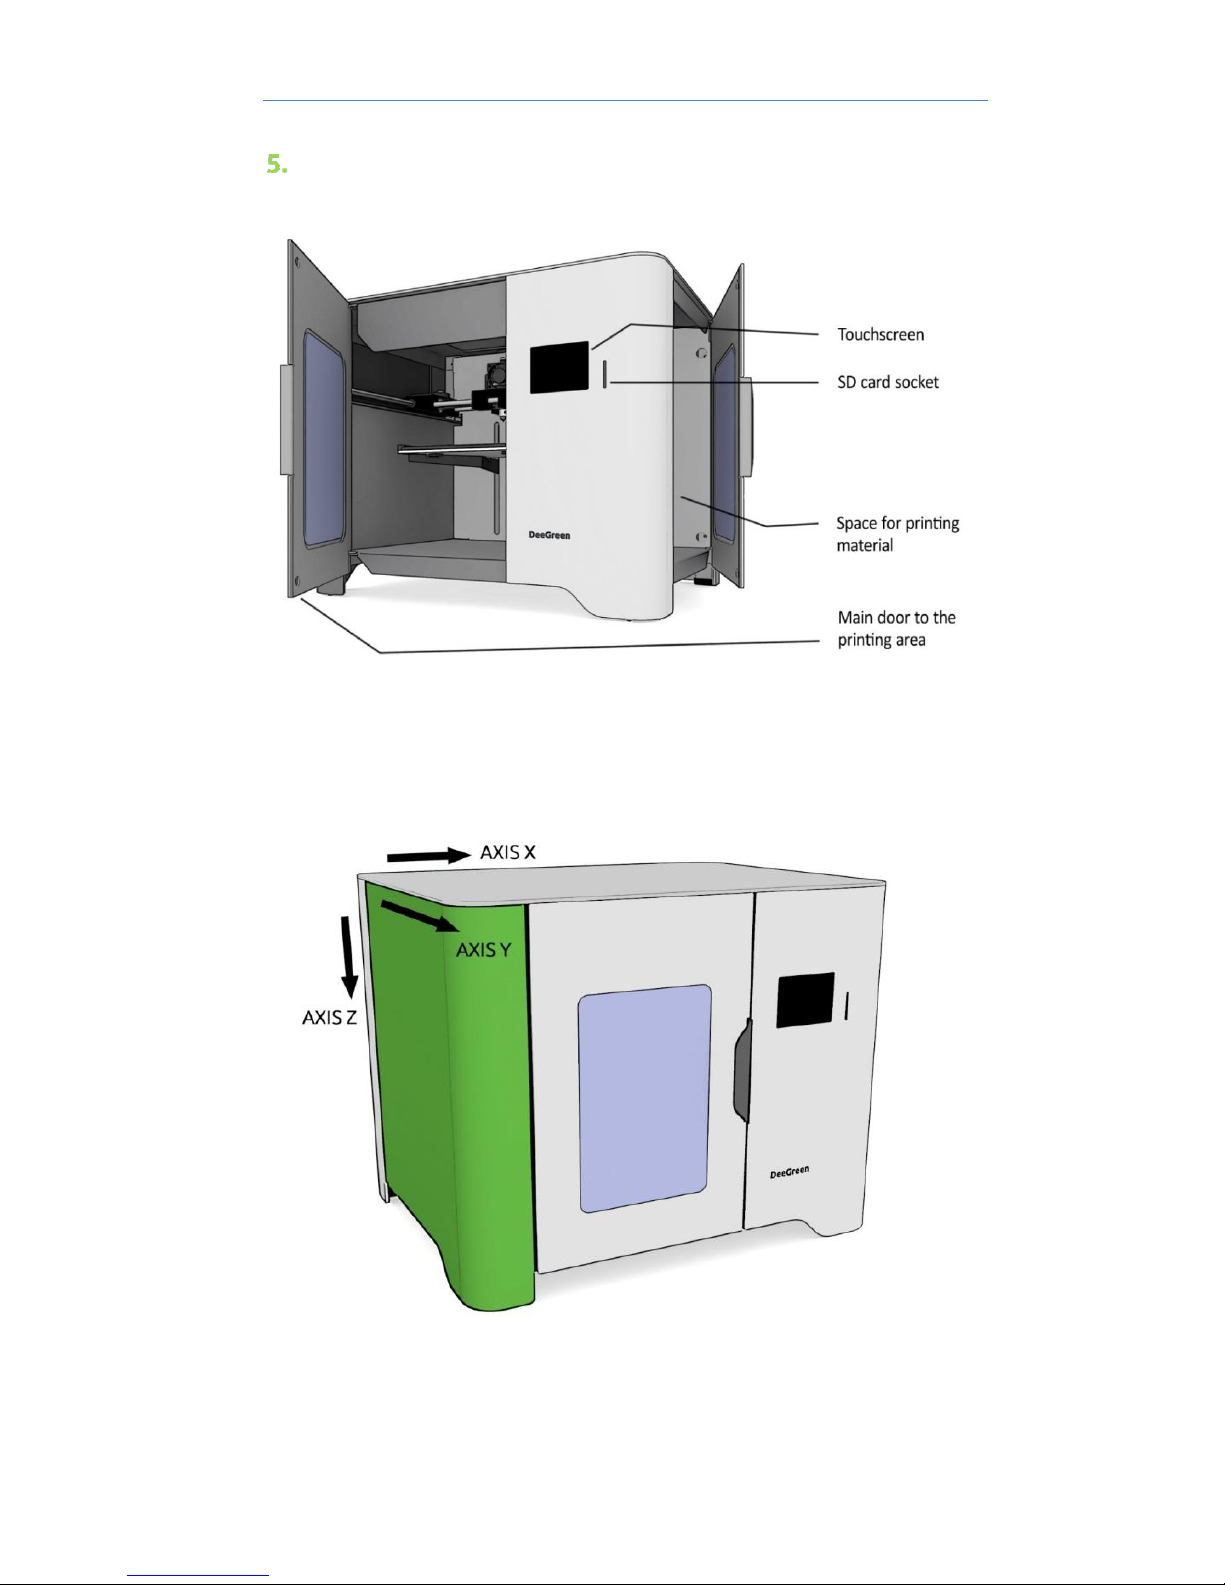
Parts description
Page 8
DeeGreen User Guide
- 8 -
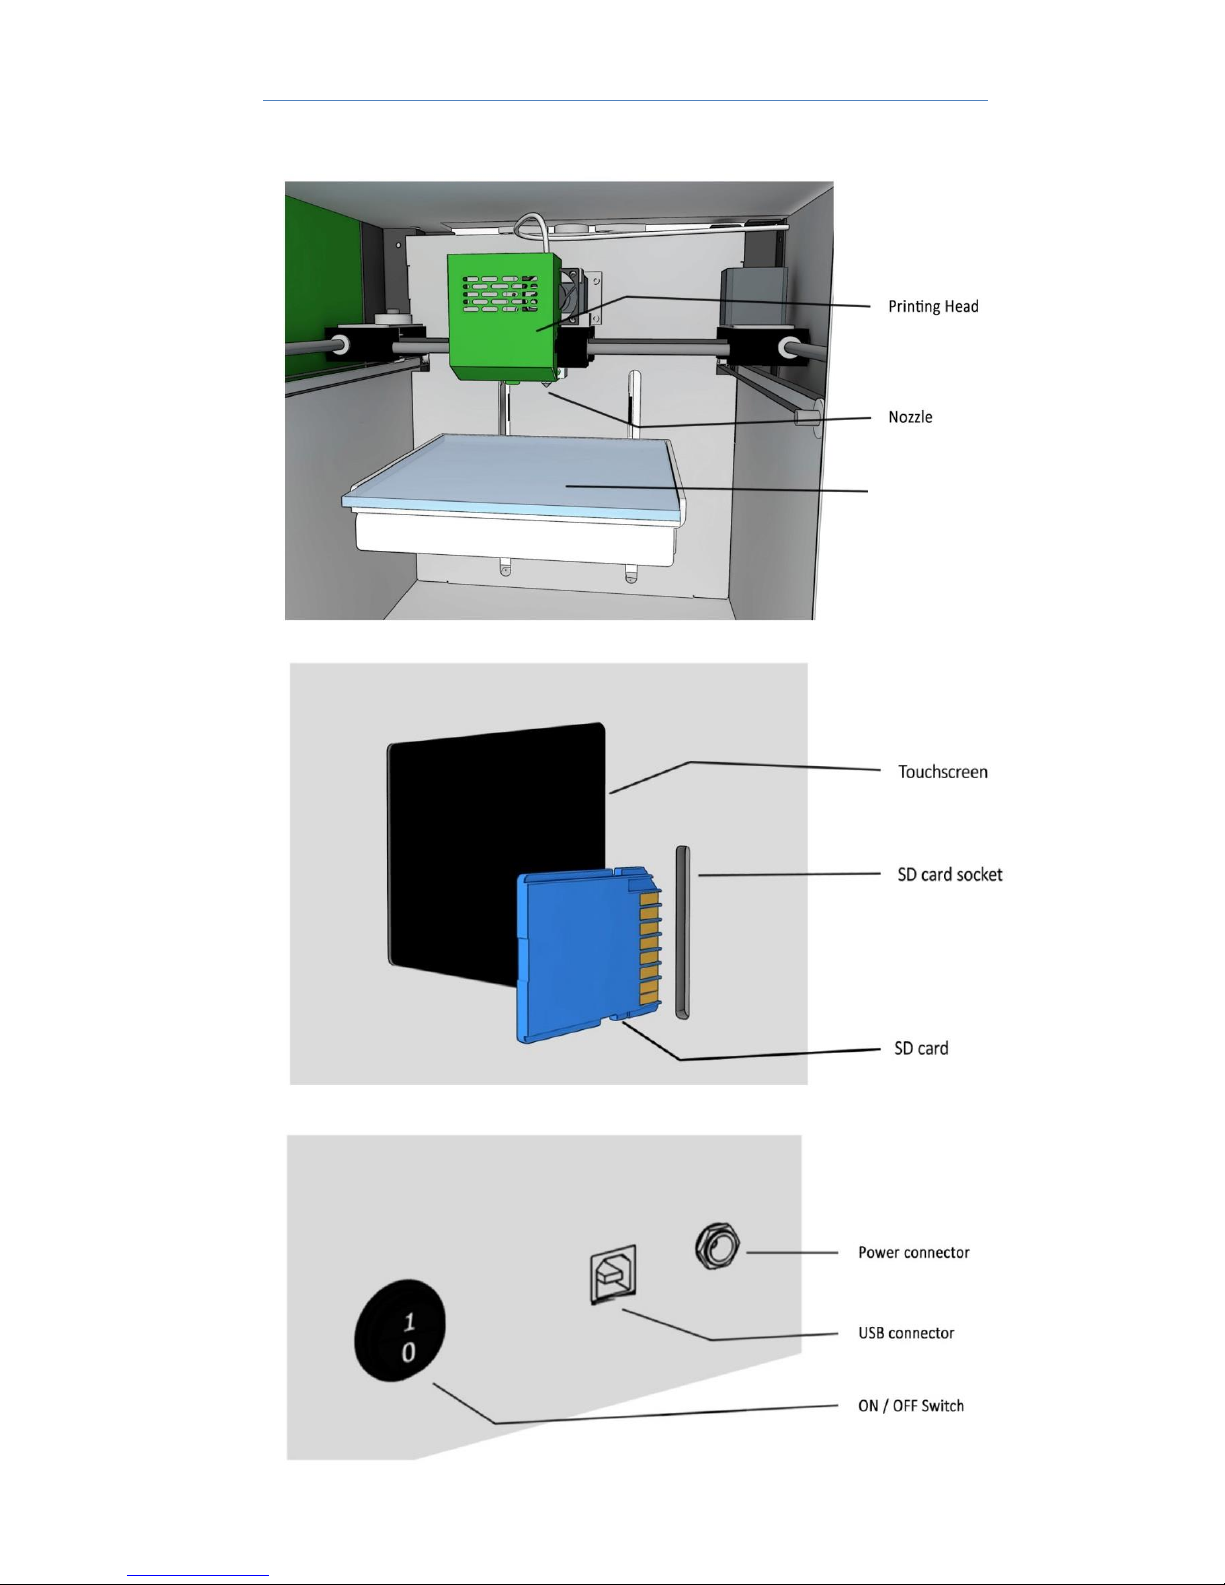
Print bed
Page 9

DeeGreen User Guide
- 9 -
Getting the printer ready for operation
Unboxing
1. Make sure the printer is standing on a solid platform and is not
upside down.
2. Stand the printer so the protective foam can be accessed. Remove
the protection.
3. Take the printer out of the box. Use extra caution while doing so.
First, stand in front of the box and bend down at your knees. Keep
your back straight. Grab the printer from both sides at the bottom to
take it out. Pull the printer out very carefully and put it on a solid
surface, e.g. a desk.
4. Remove the plastic using your hands only. Avoid using scissors or any
other sharp items.
5. Take the top lid off.
6. Carefully remove the protective foam.
7. Cover the printer with the top lid and make sure that the lid fits.
8. Open the spool chamber (side door) and take out the foam.
9. Hold the box with both hands and take it out. Mind your fingers.
10. Check the accessories.
11. Now, follow the print preparation chapter
Print preparation
1. Place the spool holder inside the filament chamber
2. Unpack the glass print bed.
3. Use the glue stick to make a thin even layer on the glass print bed.
Then make another one in a different direction and allow it to dry
for a couple of minutes. Check if the final layer is straight without
any bumps. If not, wash and follow this step again.
4. Put the bed into the printing chamber. The three magnets have to
fit together with the three pins on the table inside the chamber.
Check if the bed is immovable.
5. Connect the printer with a power source.
6. Turn on the printer
7. Now, follow the Preparing your filament chapter.
Preparing your filament
1. Unpack the spool of filament.
2. Find the end of the plastic string and release it from the holes. Hold
the string at all times.
3. Cut off the string’s end using either scissors or a knife at under a 45degree angle. Do not allow the string to go loose.
4. Straighten up the last 5 cm of the string.
Page 10

DeeGreen User Guide
- 10 -
5. Hang the spool on the spool holder. Do not let go of the end of the
string freed.
6. Now, follow the Filament installation chapter
Filament installation
1. Push the string end through the small box on the back of the spool
chamber, until it cannot go any further. You should use roughly 50
cm of the string to reach the print head.
2. Use the touch screen on the front of the printer to manage the
filament loading.
3. Go to Settings in the Main menu.
4. Choose Filament change.
5. Wait until the nozzle warms up and press Continue.
6. Select Feed in and press Continue and gently push the string in until
you notice that the extruder pulls it itself.
7. Wait to see if the nozzle extrudes the filament. If it does not, press
the Repeat button.
8. Clean the nozzle of the extruded plastic. MIND, THE NOZZLE IS
HOT!
9. Now, follow the Beginning printing chapter.
Beginning printing
1. Check the SD card is plugged in the SD card slot on the front of the
printer.
2. Check the print chamber door and top lid are closed.
3. Press the Print button in Main menu.
4. Choose a print task you would like to print.
5. Press the Print button.
6. Wait until the printer prints the first layer, check everything
worked.
After printing
1. Gently remove the glass print bed with the printout from the
printer.
2. Use the spatula to remove the printout from the glass. Take care of
the sharp edge of the spatula! Mind your hands!
3. Before the next printing, scrape the glass bed with the spatula to
achieve a flat surface of the glass without any bumps.
Page 11
DeeGreen User Guide
- 11 -
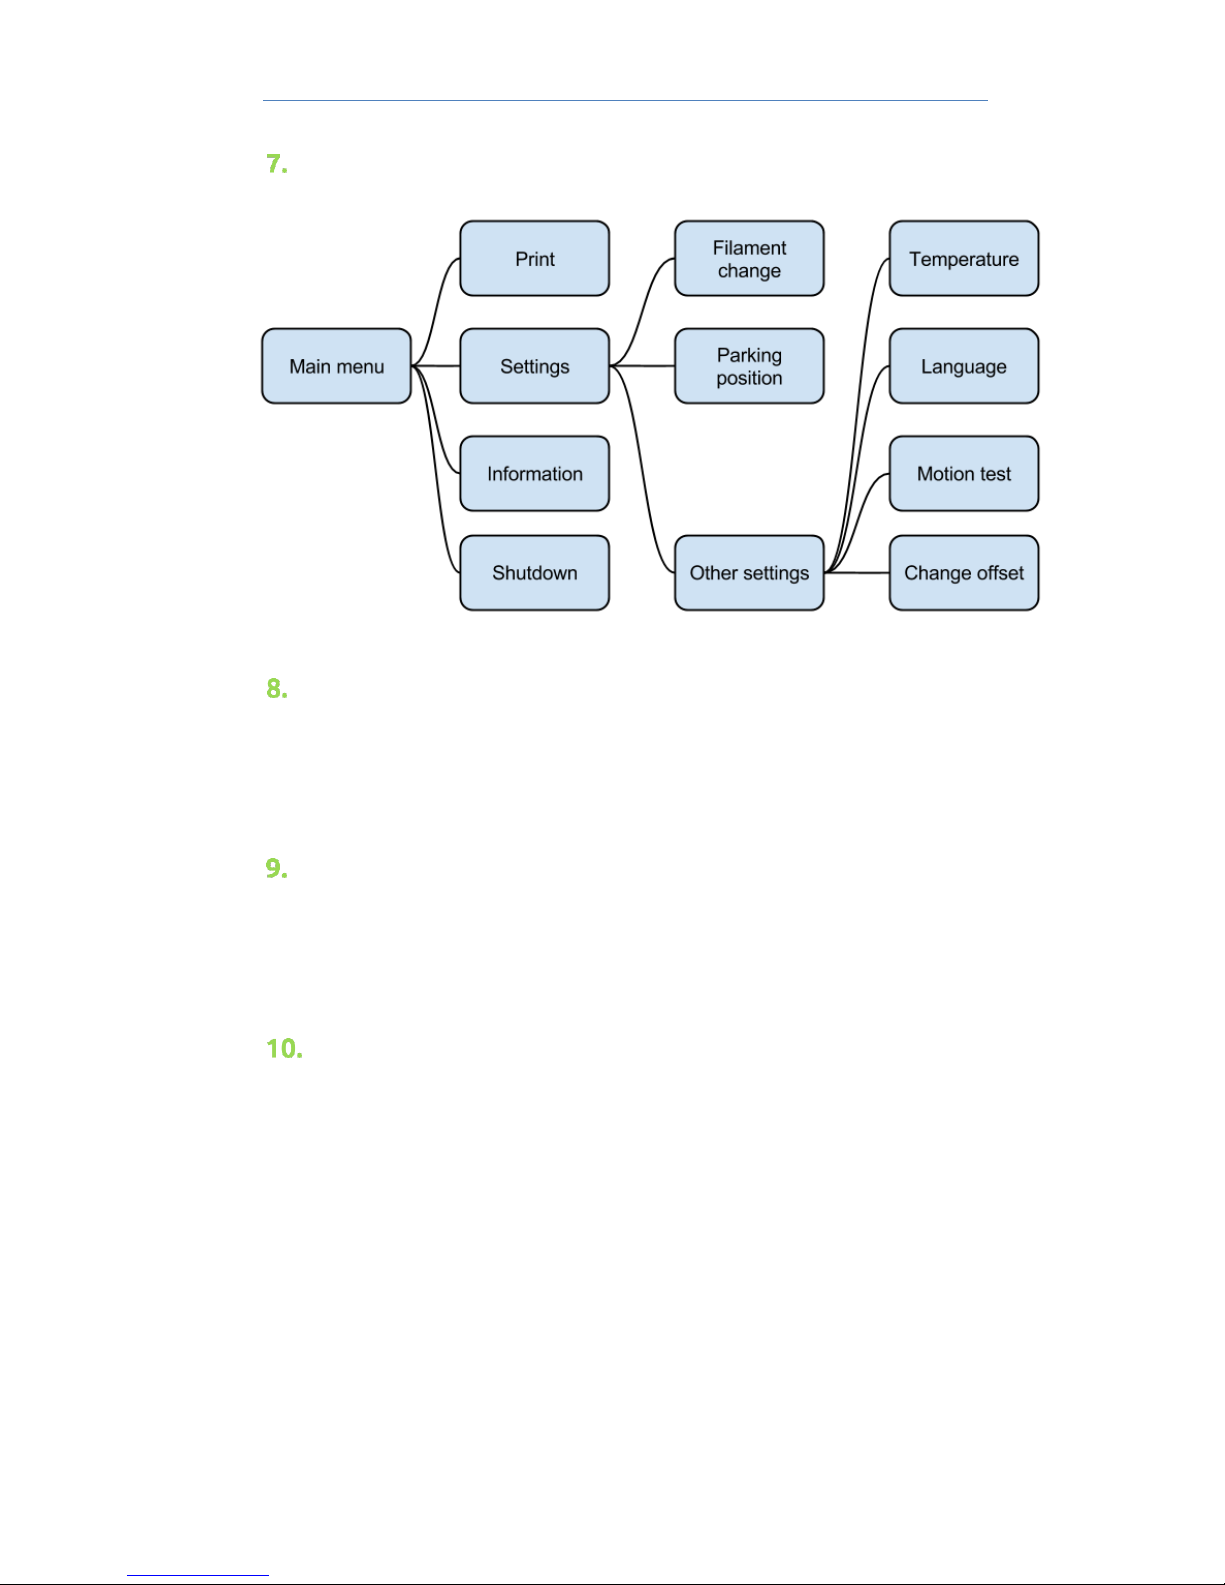
Printer menu scheme
Cleaning and support
Keep the print area clean and free of filament remnants. Clean the print
area after every print task
Filaments and spare parts
Filaments and selected spare parts can be ordered at your supplier or via
distributors of be3D printers.
Warranty terms and conditions
DeeGreen 3D printer warranty
Defect product liability law
The law is in accordance with the latest Czech laws regarding product
defect responsibility. The quality warranty is not covered by this law.
Mechanical parts are covered by the warranty for a term of 12 months
from purchase. This warranty covers any unintended mechanical
failures or malfunctions caused by either manufacturing procedures
or flaws that might have occurred during the assembly procedure. The
warranty does not cover misuse or inappropriate usage, inadequate
manipulation, usage and installation in conflict with this User Guide.
Page 12

DeeGreen User Guide
- 12 -
Terms & conditions:
The manufacturer is responsible for both the device and delivered
software to operate properly, all in accordance with this User
Guide.
All malfunctions and flaws caused by the manufacturing process or
the assembly are covered by the manufacturer within the limits of
the warranty.
The rightful printer owner is eligible for free repair should there be
a flaw within the manufacturer’s responsibilities. Flaws will be fixed
within 30 days from the day the flaw is reported.
The warranty does not cover malfunctions and/or interruptions
caused by:
Usage of other than recommended filaments
Installation in contradiction with this User Guide, valid laws and
norms.
Operation in inappropriate climate conditions.
Inappropriate use.
The user is obliged to pay for the work of and removal by
technician’s costs in case of an incorrect fault report or request to:
Fix a flaw caused by a user
Unauthorized alterations to the printer
Checking and cleaning the printer
Repairs caused by power supply blackouts
The warranty is void when:
The printer build is altered
Instructions stated in this User Guide were ignored
Other than recommended filaments were used
Printer electronics were interfered with
The user/owner has financial commitments to the seller or
manufacturer
The printer was damaged due to inappropriate usage or due to
inadequate movement during transportation or keeping the
printer in wrong climate conditions, especially inappropriate
temperature and humidity
Page 13
DeeGreen User Guide
- 13 -
The warranty is void when the printer’s electronics and control
units are damaged due to atmospheric events such as a
thunderstorm, a power network surge, pollution and damage of
a mechanical, chemical or heat character, as well as repairs,
alternations or modifications by an unauthorized service center
or user.
Authorized servicing
Authorized servicing is allowed only when it complies exactly with
either the instructions provided in this part of the User Guide or with
spare parts, if received:
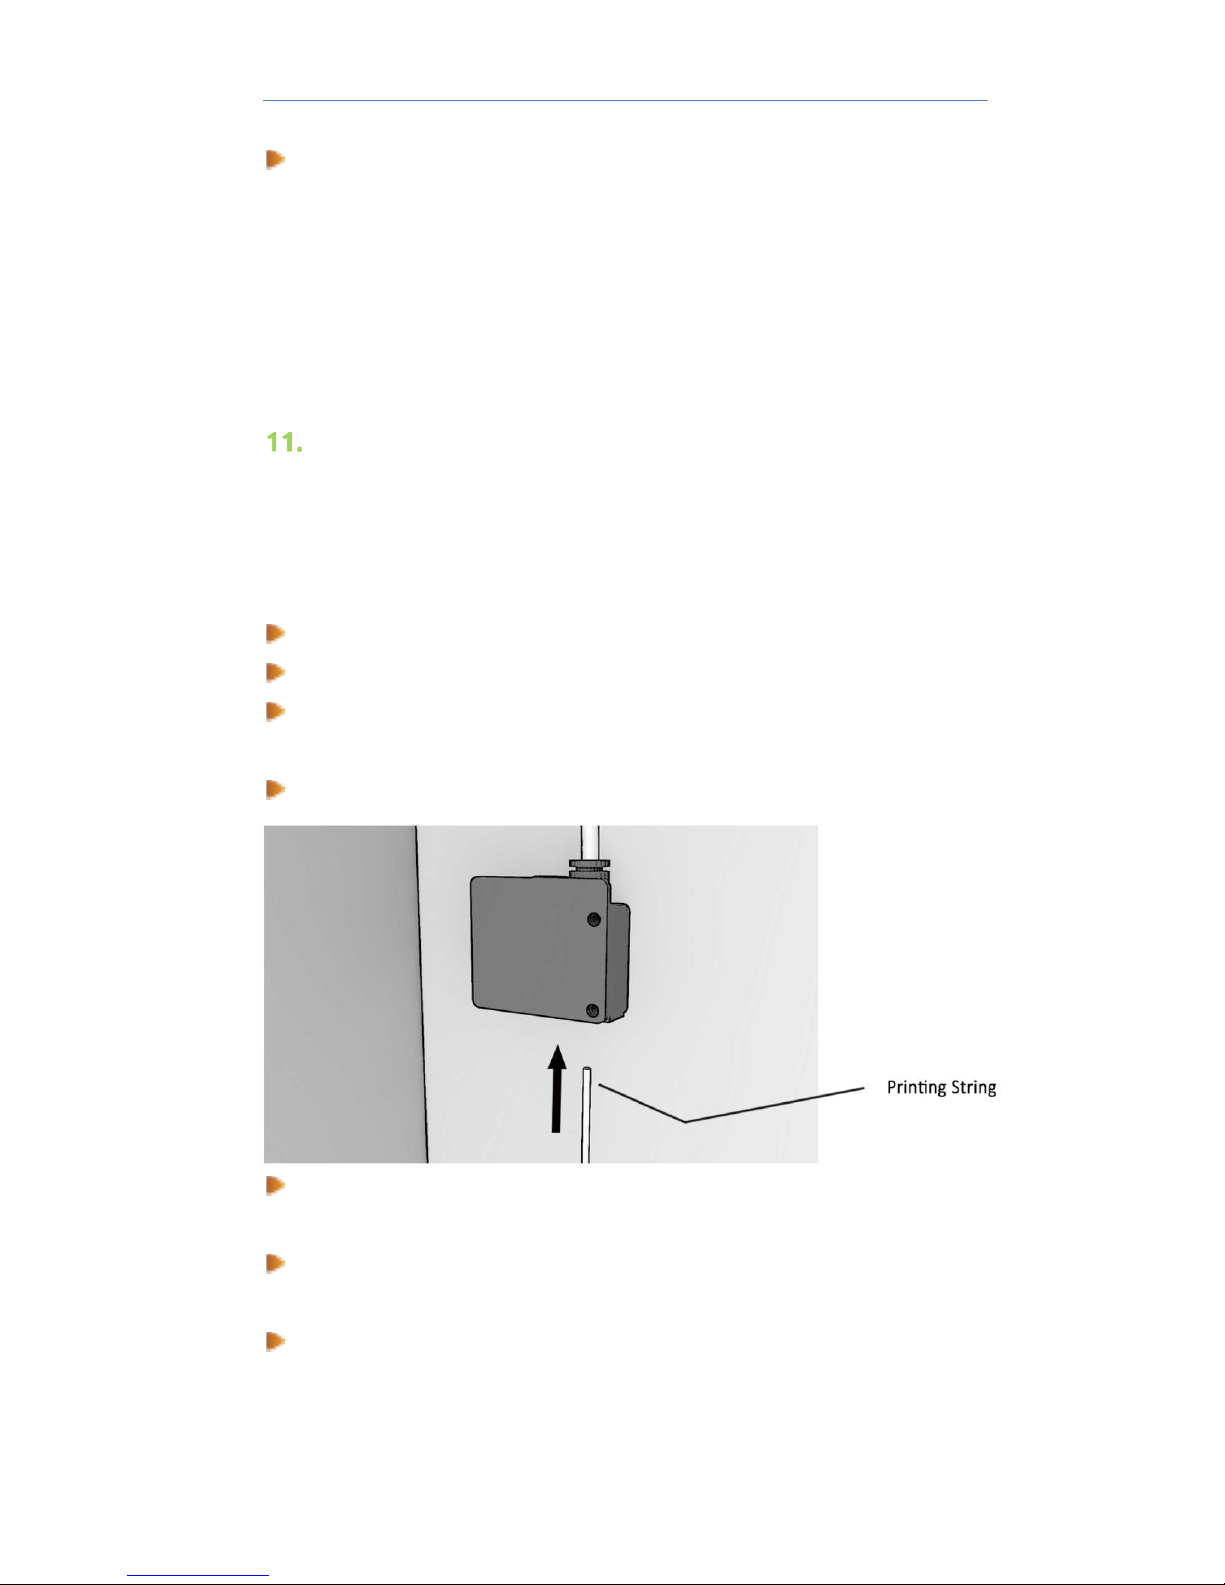
Placing a new filament string
Release the string following the instructions on the printer screen
Remove the released string manually
Cut off the string end and straighten the last 5 cm (2 inches). The
string must be straight
Put the string into the input hole
Push the string gently through the black limit switch. Apply a little
force if necessary
Pull the string through the transparent tube into the nozzle. Check
visually (remove the top lid)
Finish the procedure following the instructions on the printer
screen until the part when the automatic rolling is initiated; push
the string gently towards the printer until it is rolled on
automatically. Repeat the process if required
Page 14
DeeGreen User Guide
- 14 -
Visually check if the string is pulled in and complete the guide until
the melted filament is released off the nozzle. Remove the released
filament from the print bed and nozzle. Be extra cautious when
removing the filament from the extruder as it is hot and may cause
injury
Nozzle changing
Using touch screen remove filament from the printer. If the filament is
already removed, use same process to let nozzle heat up (It is easier to
change the nozzle while it is heated, but mind you do not burn
yourself).
Turn off the printer and pull the plug out of socket.
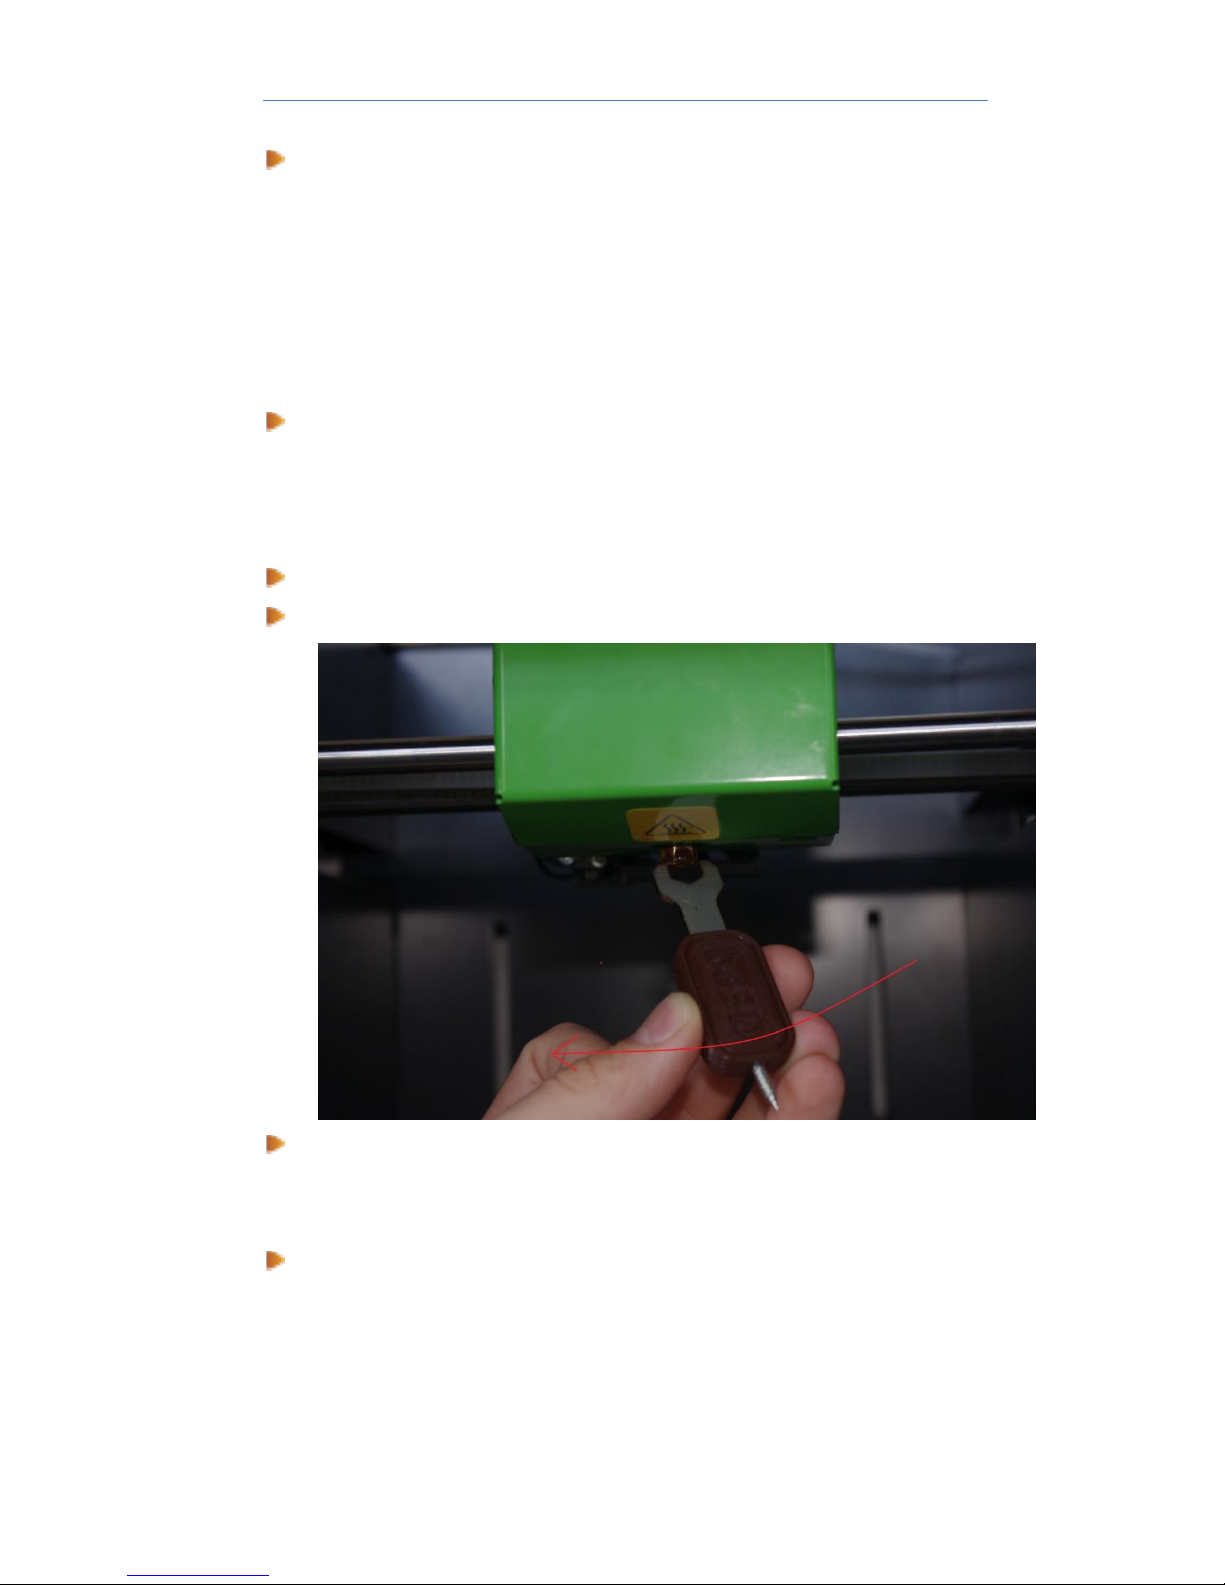
Using the wrench tool from accessory box unscrew the nozzle.
Put the pike of screw (which is included with the wrench) into the tube
placed above the nozzle. Turn the screw until you grab the tube and
pull it out.
Then wait about 15minutes to let the heated part of print head cool
down.
Page 15
DeeGreen User Guide
- 15 -
Using your finger place new tube to same position as removed old
one, then put and screw the new nozzle same way as you removed it.
After that setting the offset setting is necessary
Offset setting
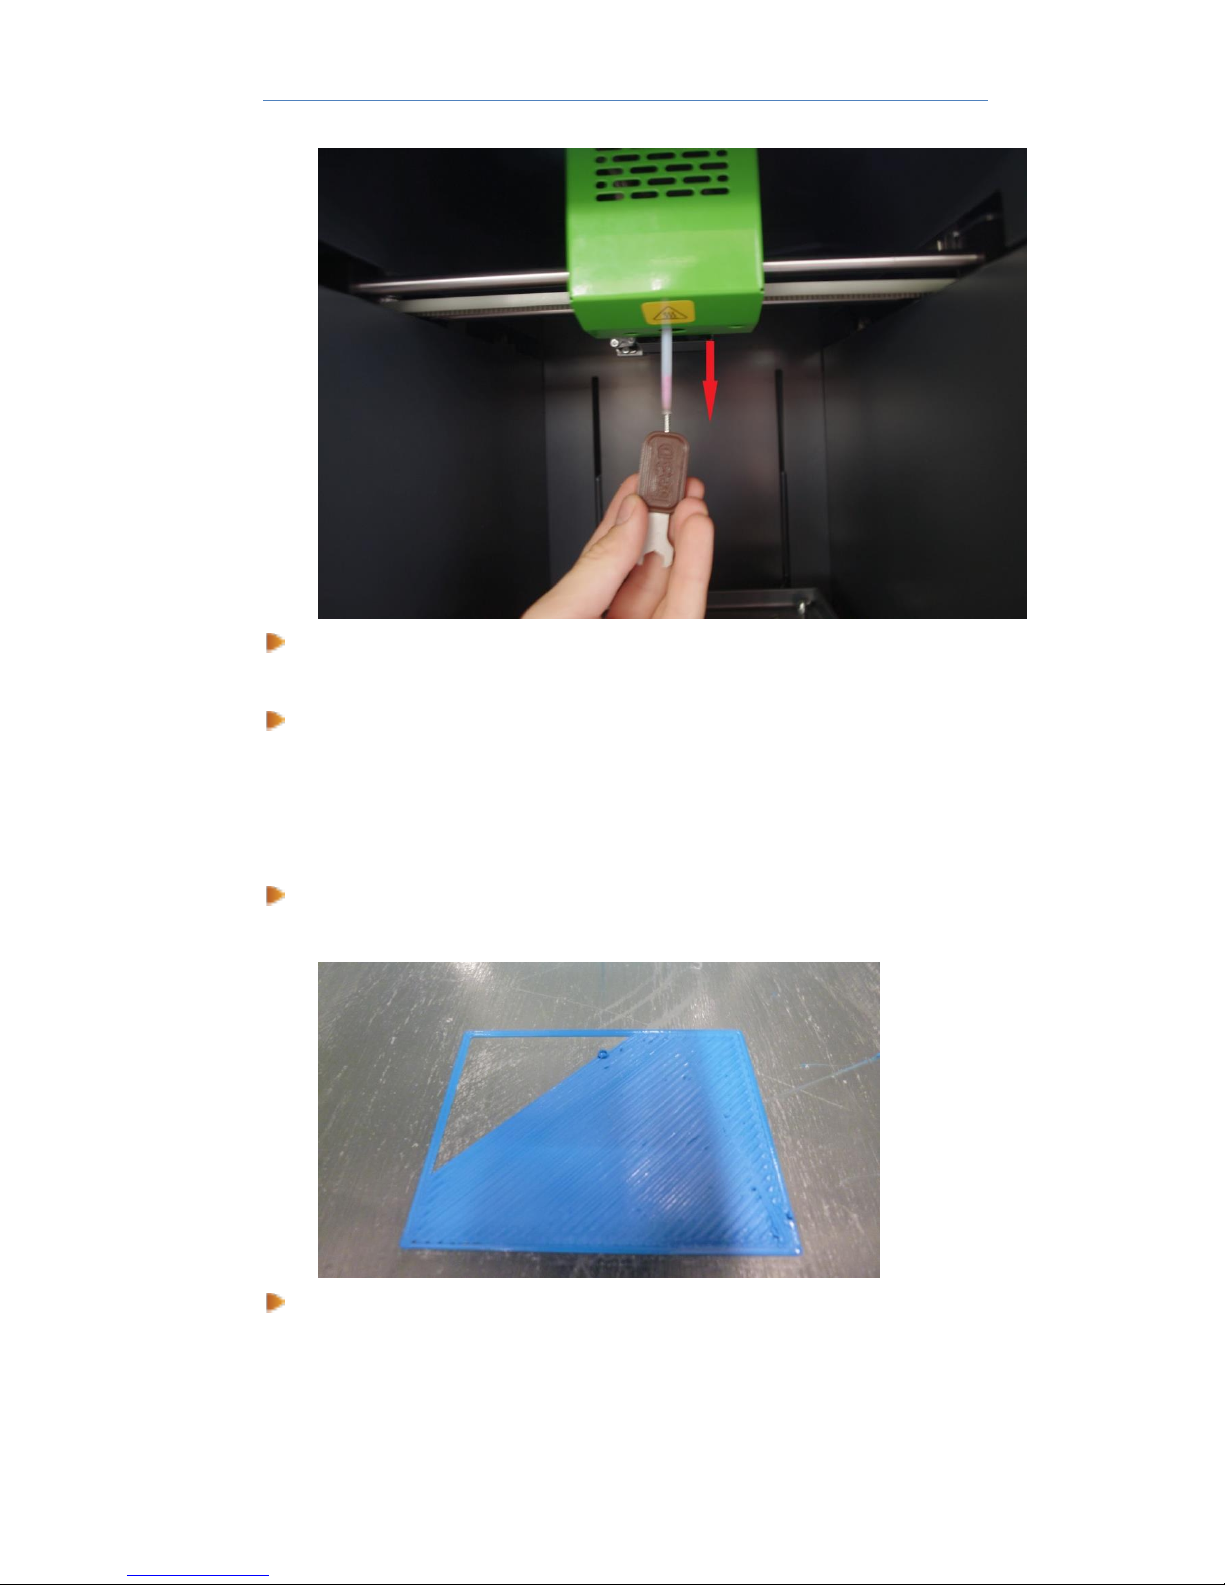
Offset is the distance between the nozzle and the print bed
This is what the model should look like when the offset is set
correctly. The surface is even and smooth.
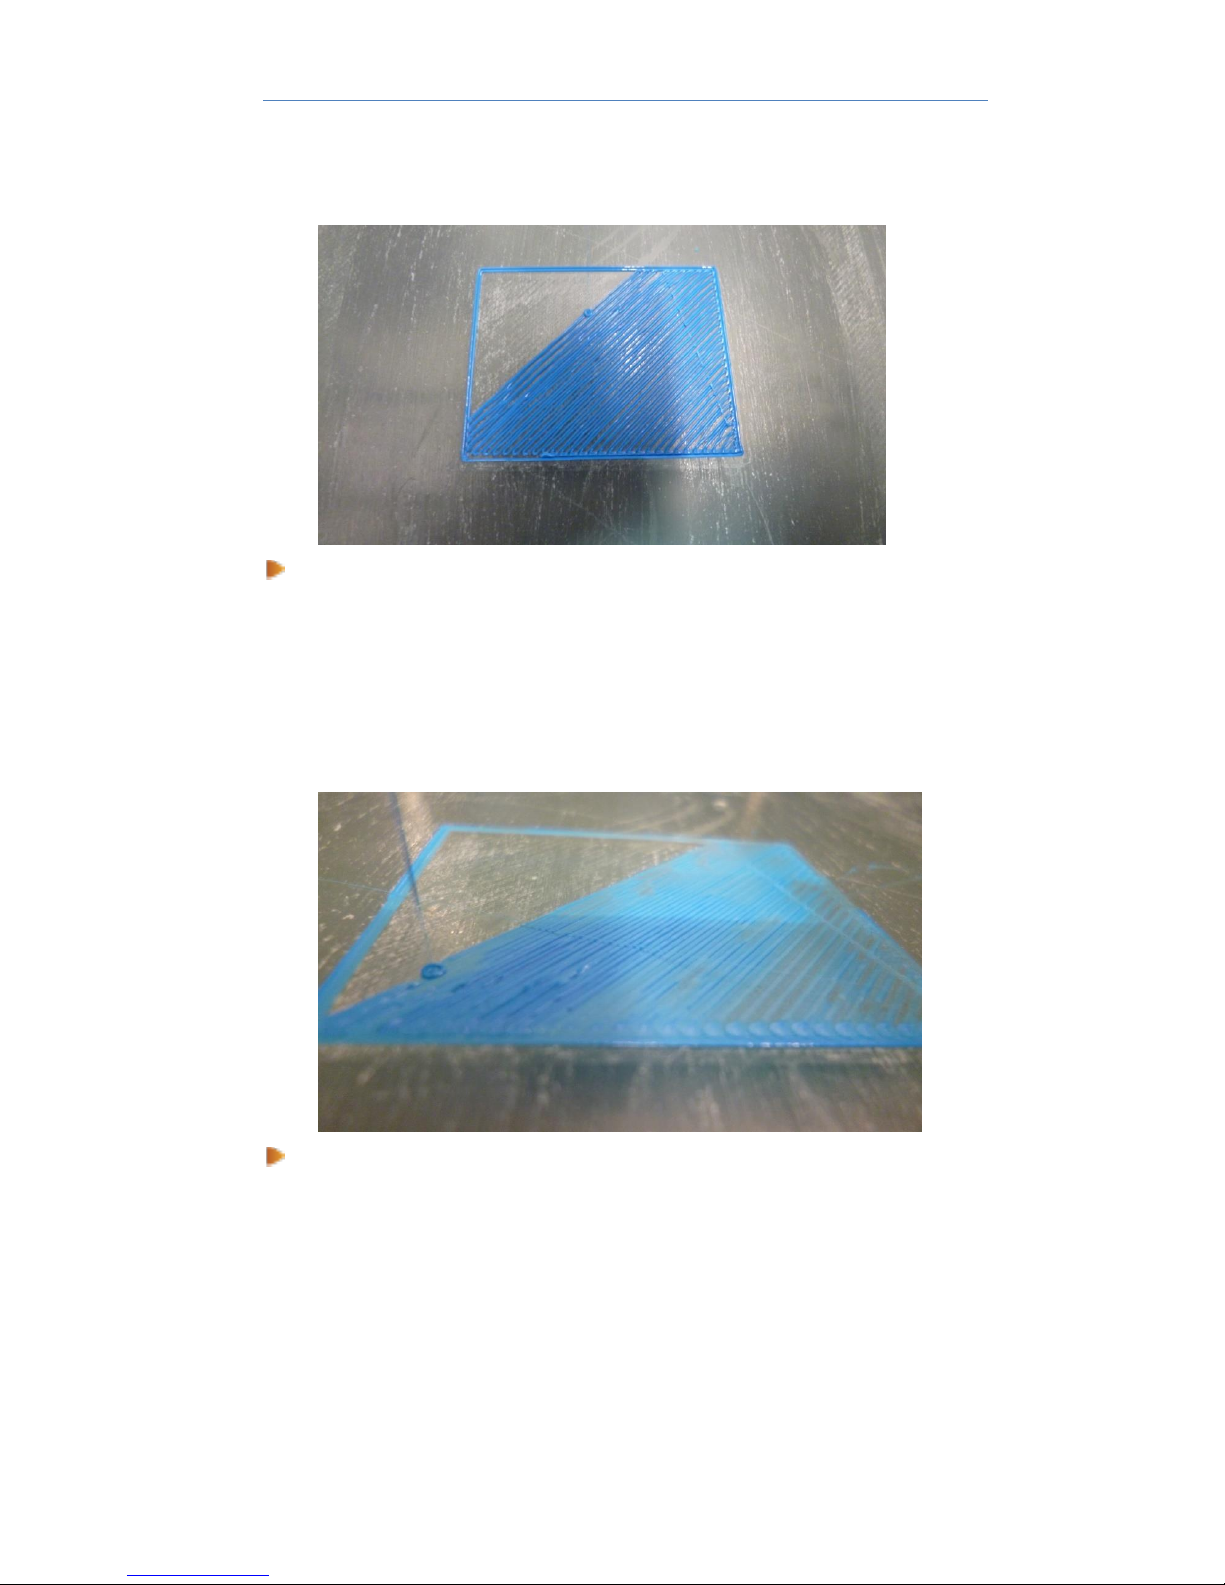
If there are gaps between lines in one layer, the offset is too high.
On the printer display, go to “Settings” → “Other Settings” → “Set
Offset” → “Reload” to see the current value. To adjust the settings,
press the minus button as many times as necessary. Do not forget
Page 16
DeeGreen User Guide
- 16 -
to save the value when you are done by clicking the “Save” button.
Then run the print.
If the print bed hits the nozzle, or if the layer is too thin and wavy,
the offset is too low. On the printer display, go to “Settings” →
“Other Settings” → “Set Offset” → “Reload” to see the current
value. To adjust the settings, press the plus button as many times as
necessary. Do not forget to save the value when you are done by
clicking the “Save” button. Then run the print.
If everything looks like the picture in paragraph 1, you have set
the offset correctly.
Page 17

DeeGreen User Guide
- 17 -
Contact details
Manufacturer:
be3D, s.r.o.
ID No.: 49356593
VAT No.: CZ49356593
Contact address:
Pod Hajkem 406/1a,
Prague 8, 180 00,
Czech Republic
Invoicing address:
Pod Hajkem 406/1a,
Prague 8, 180 00,
Czech Republic
Email: [email protected] / [email protected]
Web: www.be3d.cz
Changes and print errors rights are reserved.
 Loading...