

BE HK070F, HK125FW, HK175FW, HK215FW Operation Manual
WARNING
The engine exhaust from this product contains chemicals known to the State of California
to cause cancer and birth defects or other reproductive harm.
WARNING
This product contains chemicals known to the State of California to cause cancer and
birth defects or other reproductive harm.
WARNING
This product contains lead, a chemical known to the State of California to cause birth
defects or other reproductive harm. Wash your hands after handling this product.
Operation Manual
KAROSENE
FORCED AIR
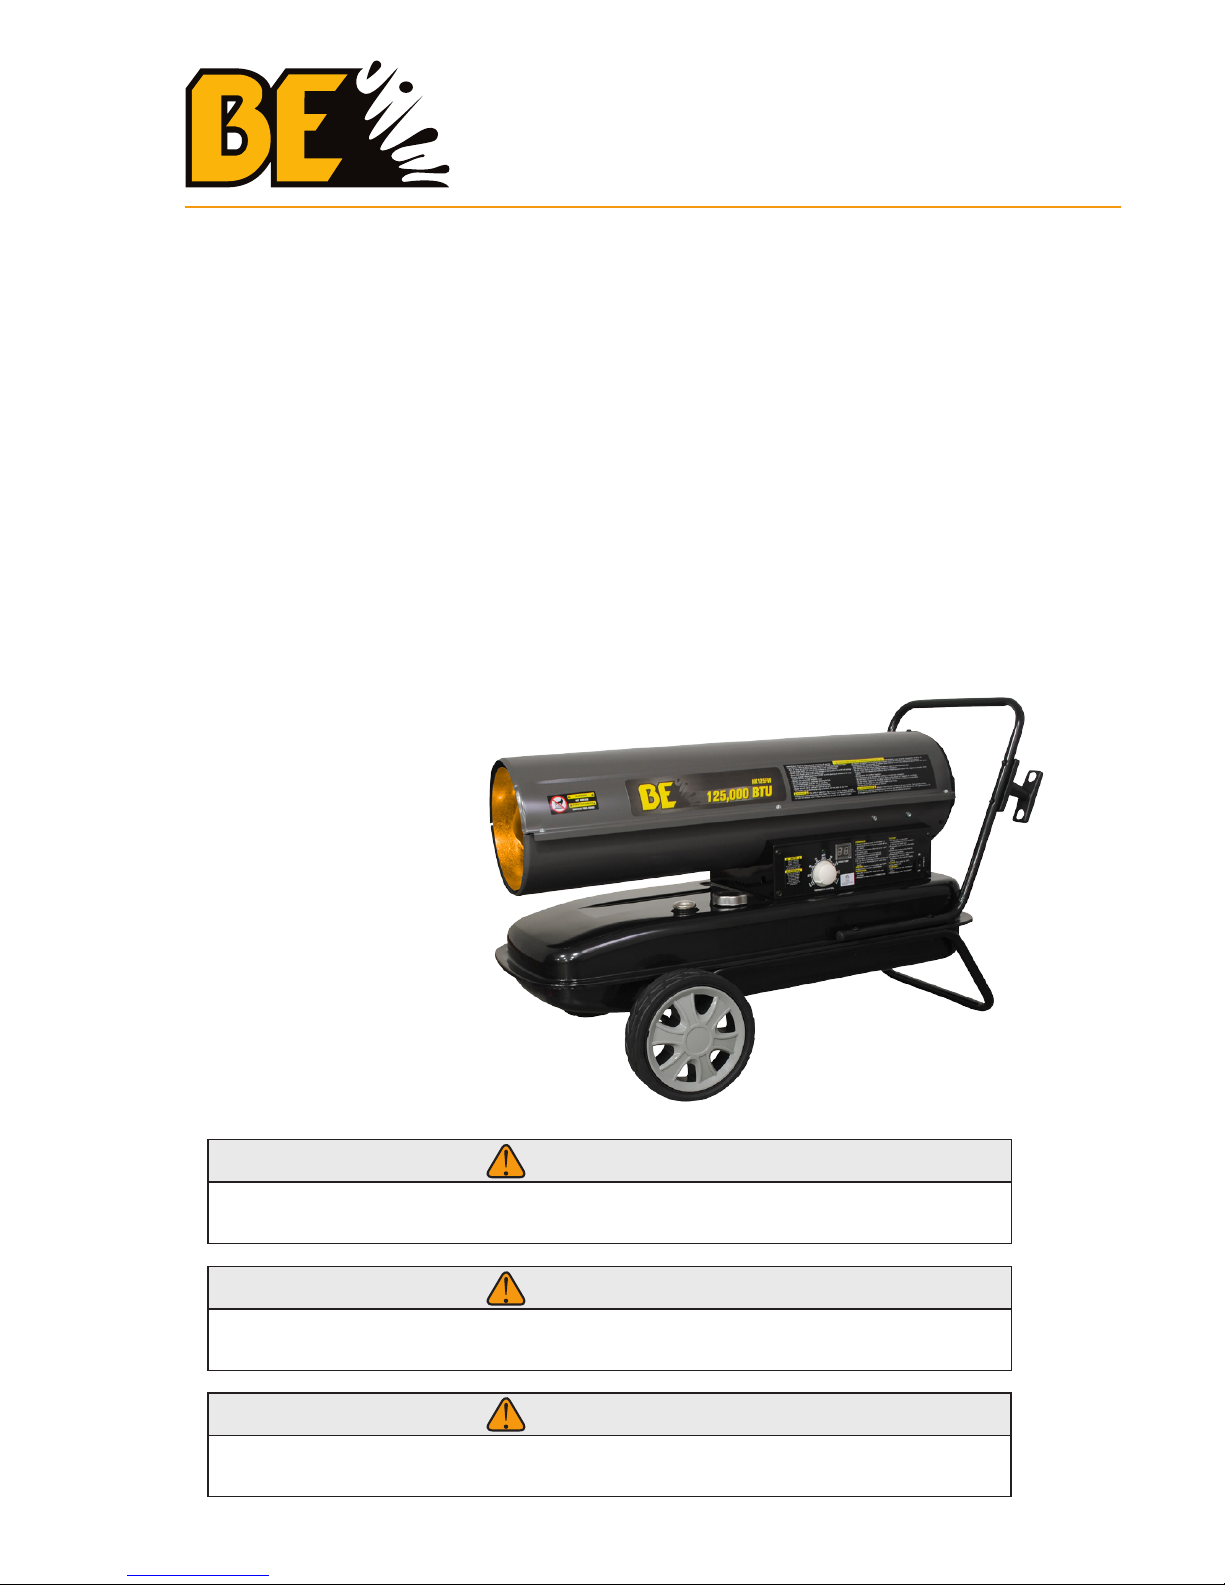
HK070F
HK125FW
HK175FW
HK215FW
HEATER

2
Safety
6 Safety Rules
7 Safety Warnings
9 Safety Precautions
10 Operating Precautions
Specifications
11 Specifications
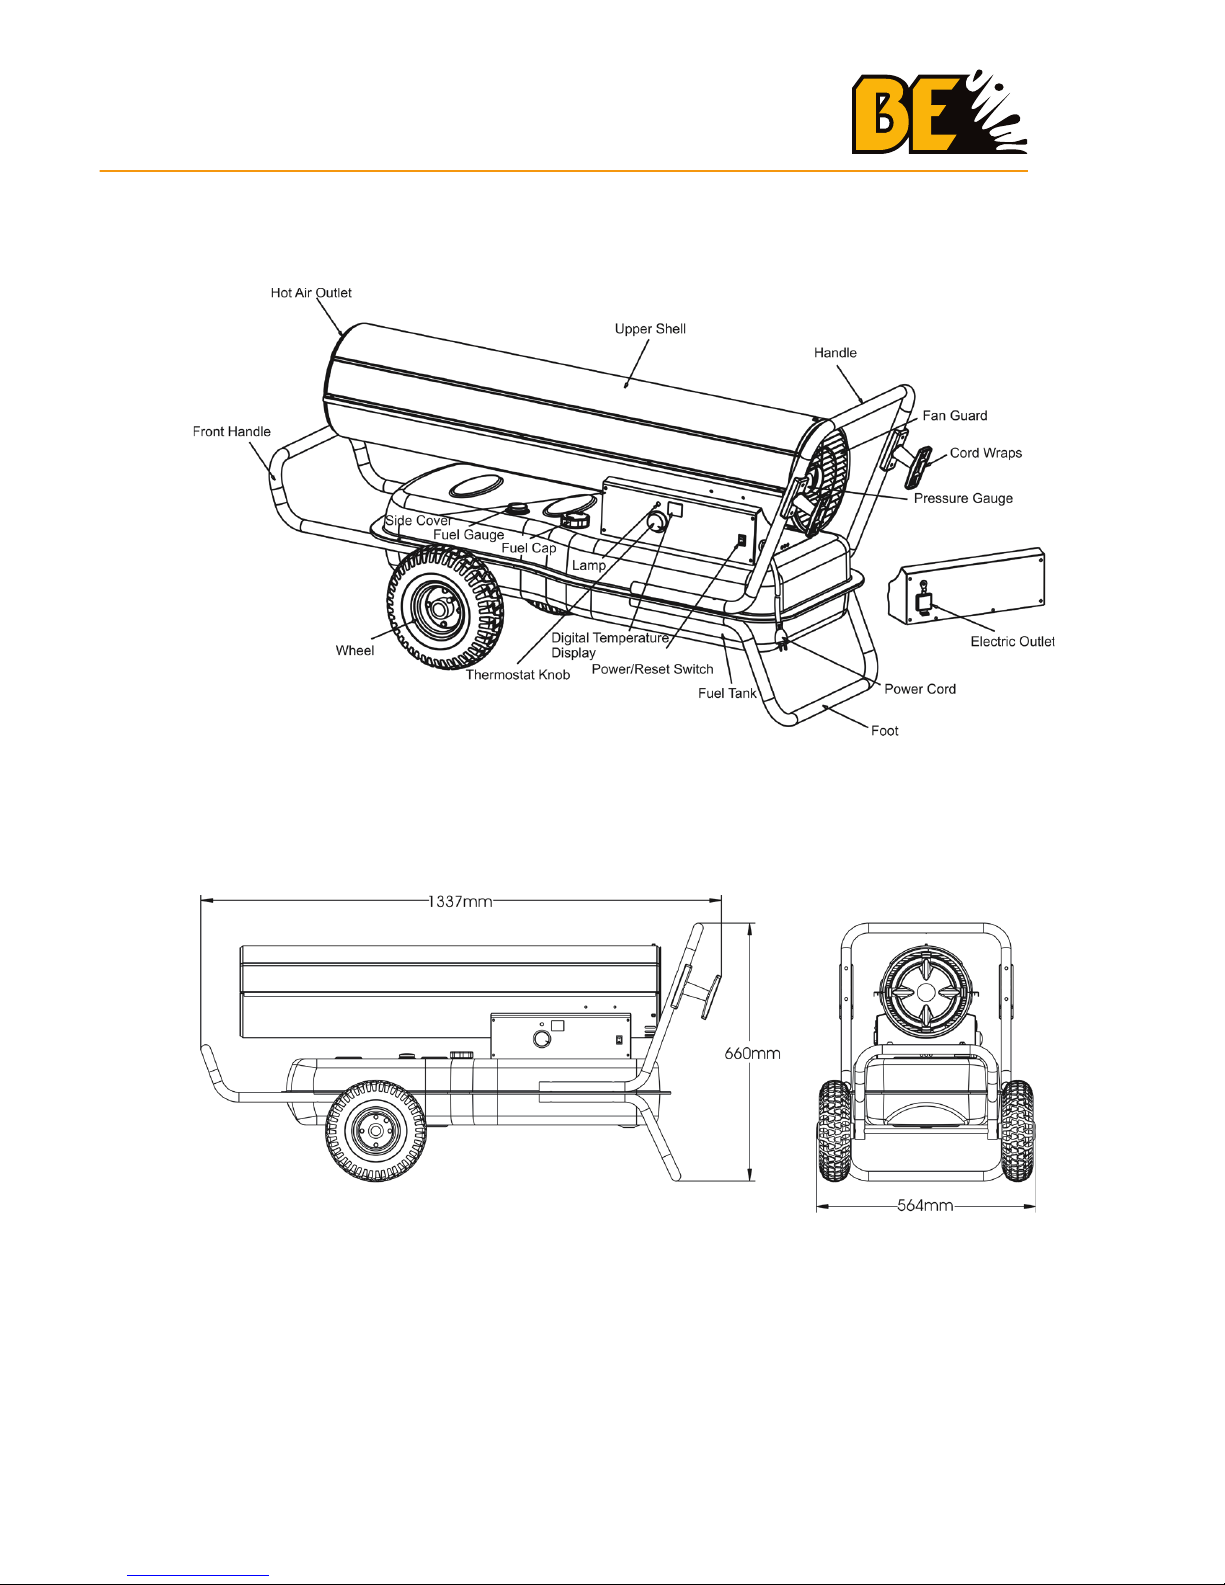
12 Features HK070F
12 Dimensions HK070F
13 Features HK125FW
13 Dimensions HK125FW
14 Features HK175FW
14 Dimensions HK175FW
15 Features HK215FW
15 Dimensions HK215FW
Pre-Operation
16 Unpacking HK070F
16 Assembly HK070F
17 Unpacking HK125FW
17 Assembly HK125FW
18 Unpacking HK175FW
18 Assembly HK175FW
19 Unpacking HK215FW
19 Assembly HK215FW
Operation
20 Theory of Operation
21 Fueling the Heating
22 Ventilation
22 Starting the Heating
23 Restarting the Heater
23 Long Term Storage
TABLE OF CONTENTS

3
Maintenance
24 Fuel Tank
24 Air Filters
25 Fan Blades
25 Nozzles
25 Ignition Electrode
26 Photocell
26 Fuel Filter
27 Pump Pressure Adjustment
Troubleshooting
28 Troubleshooting Chart
TABLE OF CONTENTS

4
Using the Operator’s manual
The operating manual is an important part of your Heater and should
be read thoroughly before initial use, and referred to often to make sure
adequate safety and service concerns are being addressed.
Reading the owner’s manual thoroughly will help avoid any personal injury
or damage to your pump. By knowing how best to operate this machine
you will be better positioned to show others who may also operate the unit.
You can refer back to the manual at any time to help troubleshoot any
specific operating functions, so store it with the machine at all times.
Attention: Read through the complete
manual prior to the initial use of your
Heater.
INTRODUCTION

5
Record Identification Numbers
Heater
If you need to contact an Authorized Dealer or Customer Service line
(1-866-850-6662) for information on servicing, always provide the
product model and identification numbers.
You will need to locate the model and serial number for the pump and
record the information in the places provided below.
Date of Purchase:
Dealer Name:
Dealer Phone:
Product Identification Numbers
Model Number:
Serial Number:
PRODUCT IDENTIFICATION
6
The safety alert symbol ( ) is used with a signal word (DANGER,
CAUTION, WARNING), a pictorial and/or a safety message to alert you
to hazards.
DANGER indicates a hazard which, if not avoided, will result in death or
serious injury.
WARNING indicates a hazard which, if not avoided, could result in death
or serious injury.
CAUTION indicates a hazard which, if not avoided, might result in minor
or moderate injury.
NOTICE indicates a situation that could result in equipment damage.
Follow safety messages to avoid or reduce the risk of injury or death.
Hazard Symbols and Meanings
Save these Instructions
SAFETY RULES
This is the safety alert symbol. It is used to
alert you to potential personal injury hazards.
Obey all safety messages that follow this
symbol to avoid possible injury or death.
explosion fire
toxic fumes
hot surface
flying objects
injection
moving parts
electric
shock
SAFETY
7
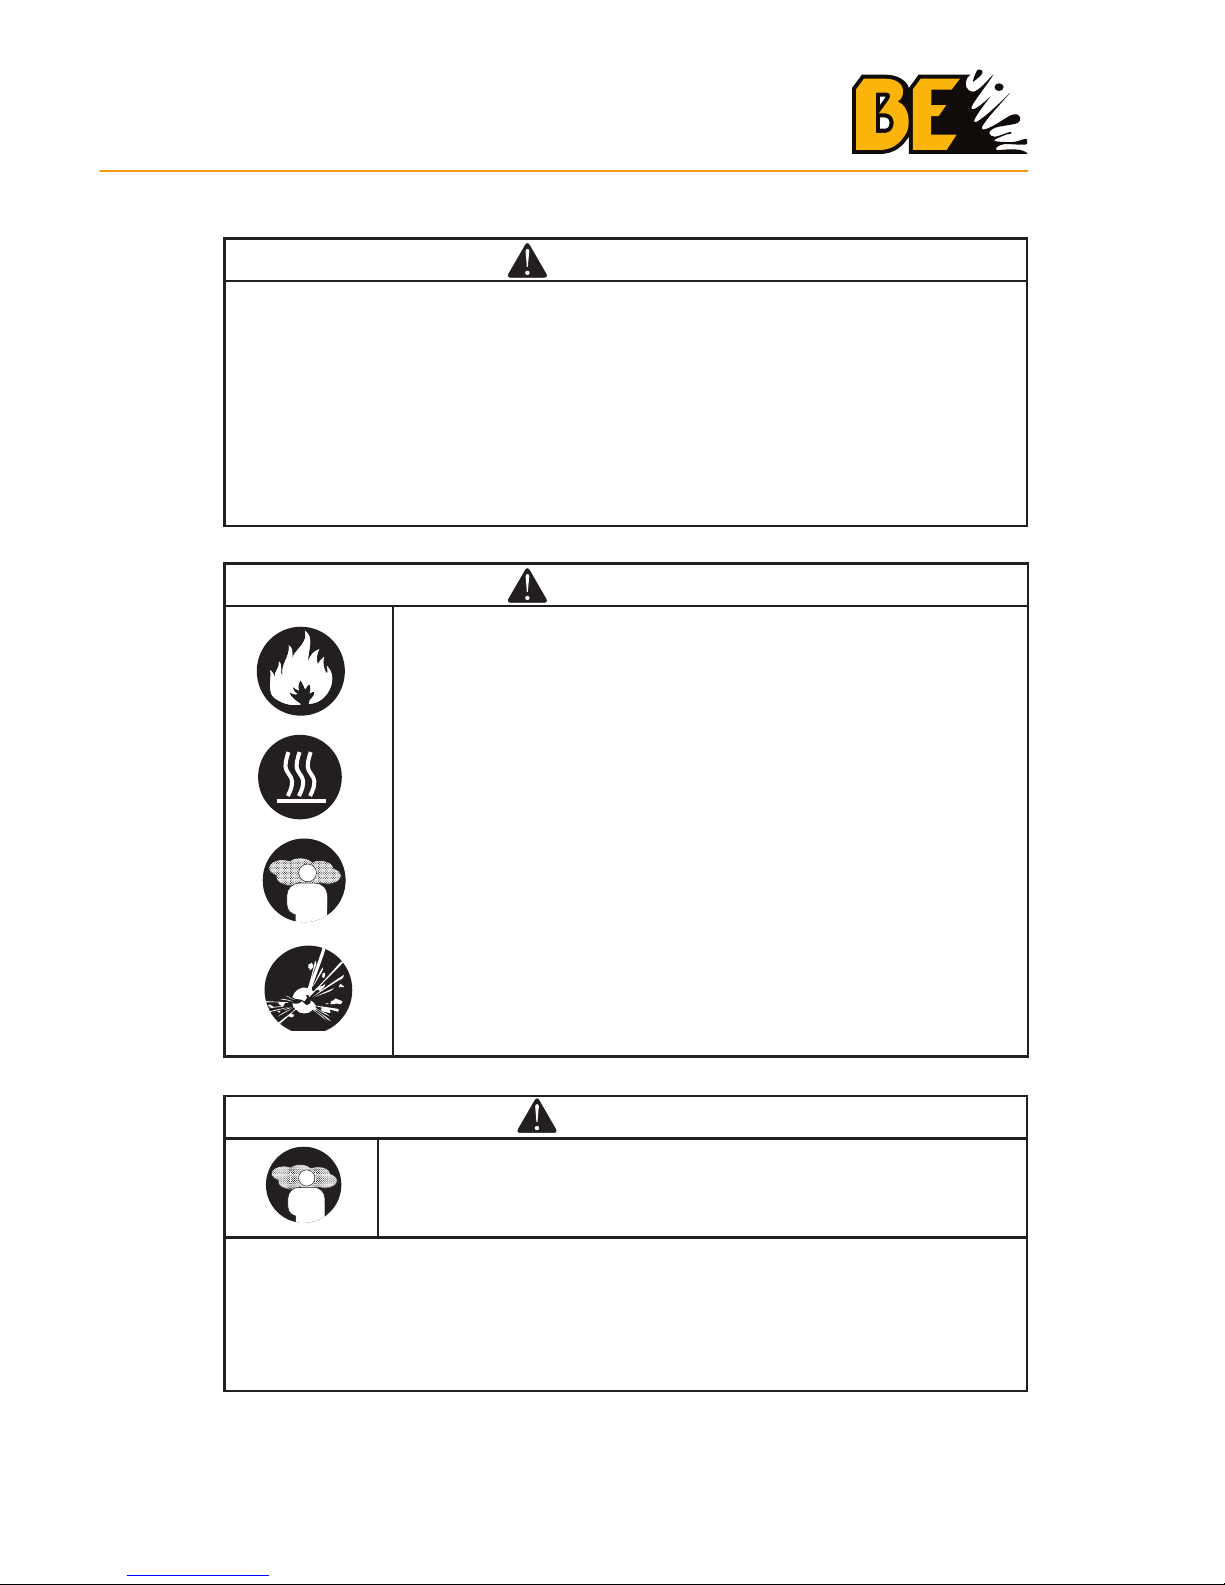
WARNING
• Keep solid combustibles, such as building materials,
paper or cardboard, a safe distance away from the
heater as recommended by the instructions.
• Never use the heater in spaces which do or may
contain volatile or airborne combustibles, or products
such as gasoline, solvents, paint thinner, dust particles
or unknown chemicals.
WARNING
• Failure to comply with the precautions and instructions provided with
this heater, can result in death, serious bodily injury and property loss
or damage from hazards of fire, explosion, burn,asphyxiation, carbon
monoxide poisoning, and/or electrical shock.
• Only persons who can understand and follow the instructions should
use or service this heater.
• If you need assistance or heater information such as an instructions
manual, labels, etc. contact the manufacturer.
WARNING
Carbon monoxide can kill you.
• Using a portable gas camping heater inside a tent, RV, camper,
vehicle, shelter or other enclosed area can produce
deadly carbon
monoxide.
• Not for use in residential living areas or in non-adequately ventilated
enclosed spaces.
SAFETY
8
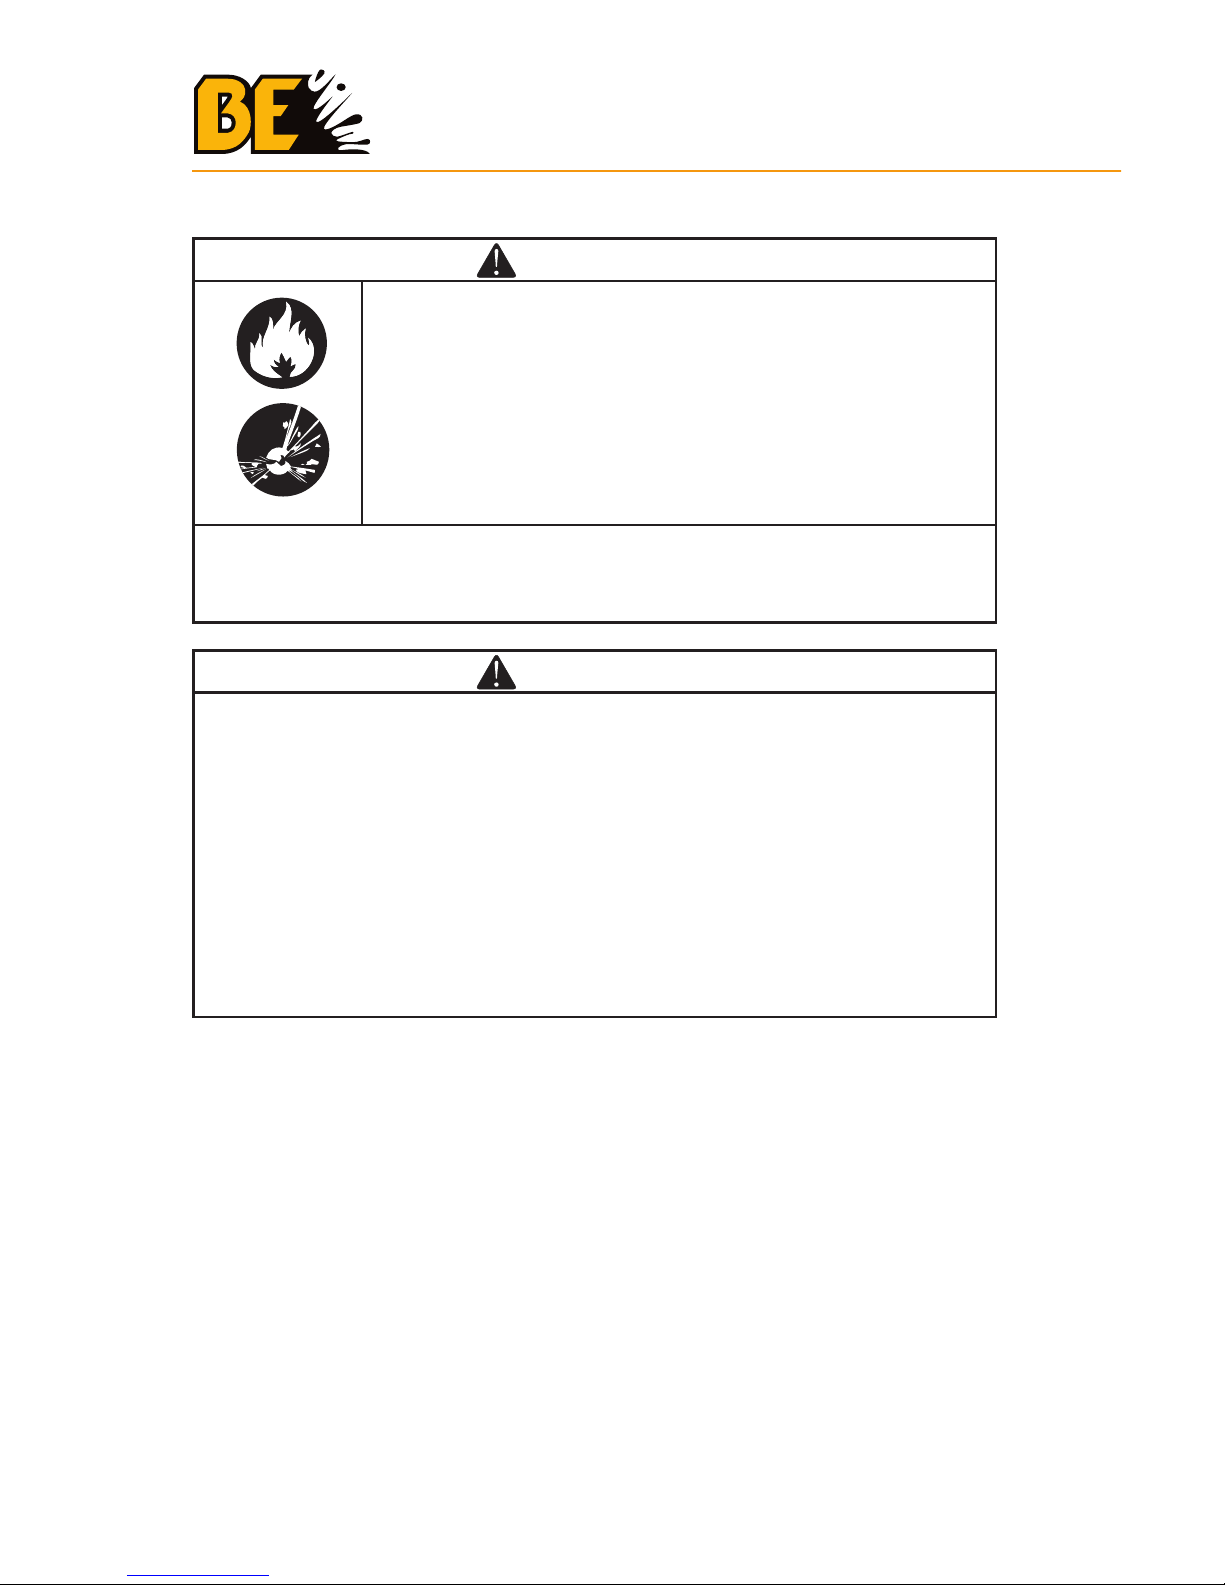
WARNING
Not suitable for use on wood floors or other
combustible materials.
•
When used the heater should rest on a suitable insulating material at
least 26MM thick and extending 1m or more beyond the heater in all
directions.
WARNING
• Do not use gasoline, naphtha or volatile fuels.
• Stop heater before adding fuels.
• Always fill outdoors away from open flame
• Do not use external fuel source.
• Do not operate heater where flammable liquids or vapors may be
present.
• Do not start heater when chamber is hot
• Do not start heater when excess fuel has accumulated in the
chamber.
• Do not place cooking utensils on top of the heater.
• Plug electrical cord into a properly grounded three-prong receptacle.
SAFETY

9
SAFETY PRECAUTIONS
1. Recommended for use with No.1-K kerosene No.1 Diesel fuel. Factory tested for use with No.2-K kerosene, No.1 or No.2 Diesel,No.1
or No.2 fuel oil or JP8 Jet A fuel and these fuels may be used as well.
Never use gasoline, oil drained from crank cases, naphtha, paint
thinners, alcohol or any other highly flammable fuels.
2. Check the heater thoroughly for damage. Do not operate a damaged
heater.
3. Do not modify the heater or operate a heater which has been modified
from its original condition.
4. For indoor use only. Not for use where exposed to weather.
5. Use in well ventilated areas, provide at least 2 sq. ft. (0.19sq. m.) of
opening near the floor and 2 sq. ft. (0.19 sq. m.)near the ceiling directly to outdoors. Increase air openings as marked for each additional
heater.
6. Always keep combustibles, like paper and wood at least 2.4 m from
the heater outlet and 1.2 m from the top, sides and inlet. Locate 1.2m
from canvas or plastic coverings and secure them to prevent flapping
movement.
7. Caution: Due to the high surface and exhaust temperatures, adults and
children must observe clearances to avoid burns or clothing ignition.
Do Not Touch. Keep children, clothing, and combustible away.
8. Install the heater such that it is not directly exposed to water spray, rain
and / or water.
9. Never use in areas normally for habitation and /or where children may
be present.
10. Operate only on a stable, level surface.
11. Do not use with duct work. Do not restrict inlet or exit.
12. Use only with electrical power specified.
13. Use only a properly grounded 3-prong receptacle or extension cord.
14. Do not move, handle, or service while hot or in operation.
SAFETY

10
OPERATING PRECAUTIONS
This is a oil/kerosene, direct-fired, forced air heater. It’s intended use is
primarily temporary heating of buildings under construction, alteration or
repair.
Direct-Fired means that all of the combustion products enter the
heated space. Even though this heater operates very close to 100
percent combustion efficiency, it still produces small amounts of carbon
monoxide. Carbon monoxide (called CO) is toxic. CO can build up in a
heated space and failure to provide adequate ventilation could result in
death.
The symptoms of inadequate ventilation are:
• headache
• dizziness
• burning eyes and nose
• nausea
• dry mouth or sore throat
Be sure to follow advice about ventilation in the Safety Precautions
section.
Forced Air means that a blower or fan pushes the air through the heater.
Proper combustion depends upon this air flow; therefore, the heater
must not be revised, modified or operated with parts removed or missing.
Likewise, safety systems must not be circumvented or modified in order
to operate the heater. When the heater is to be operated in the presence
of other people the user is responsible for properly acquainting those
present with the safety precautions and instructions, and of the hazards
involved.
SAFETY
11
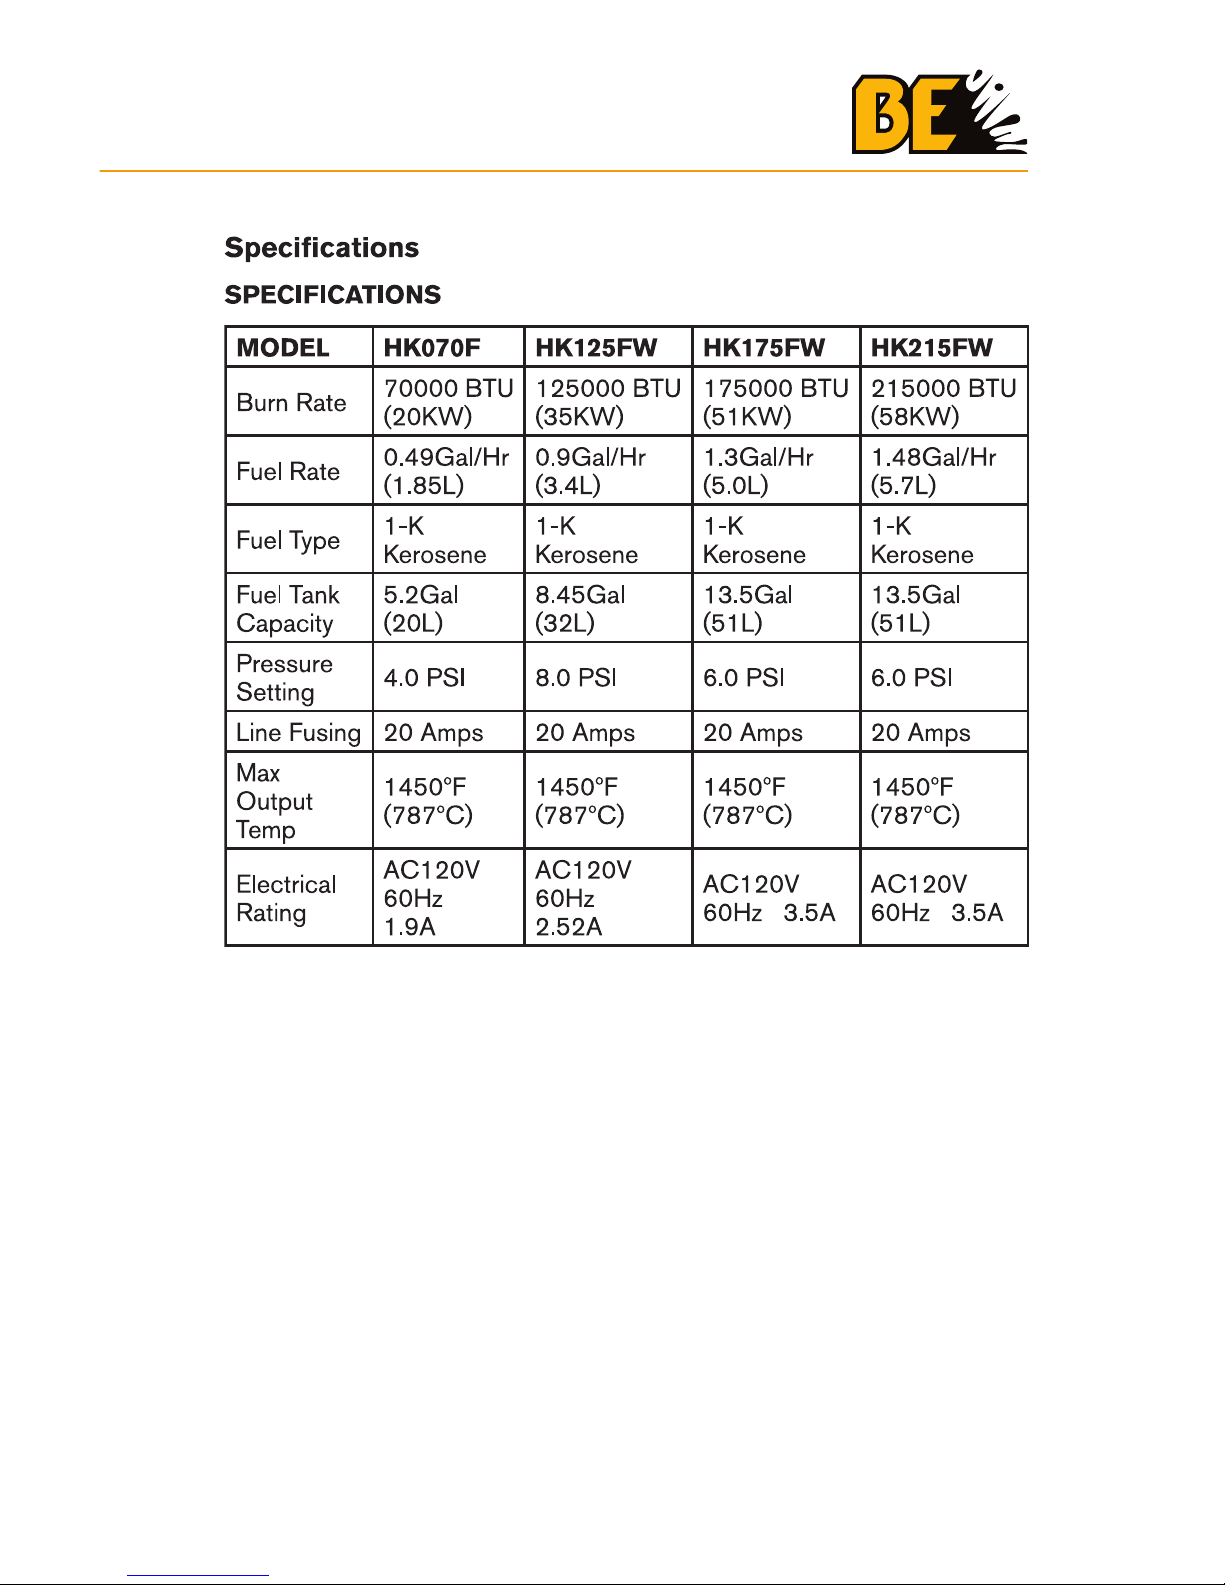
SPECIFICATIONS
12
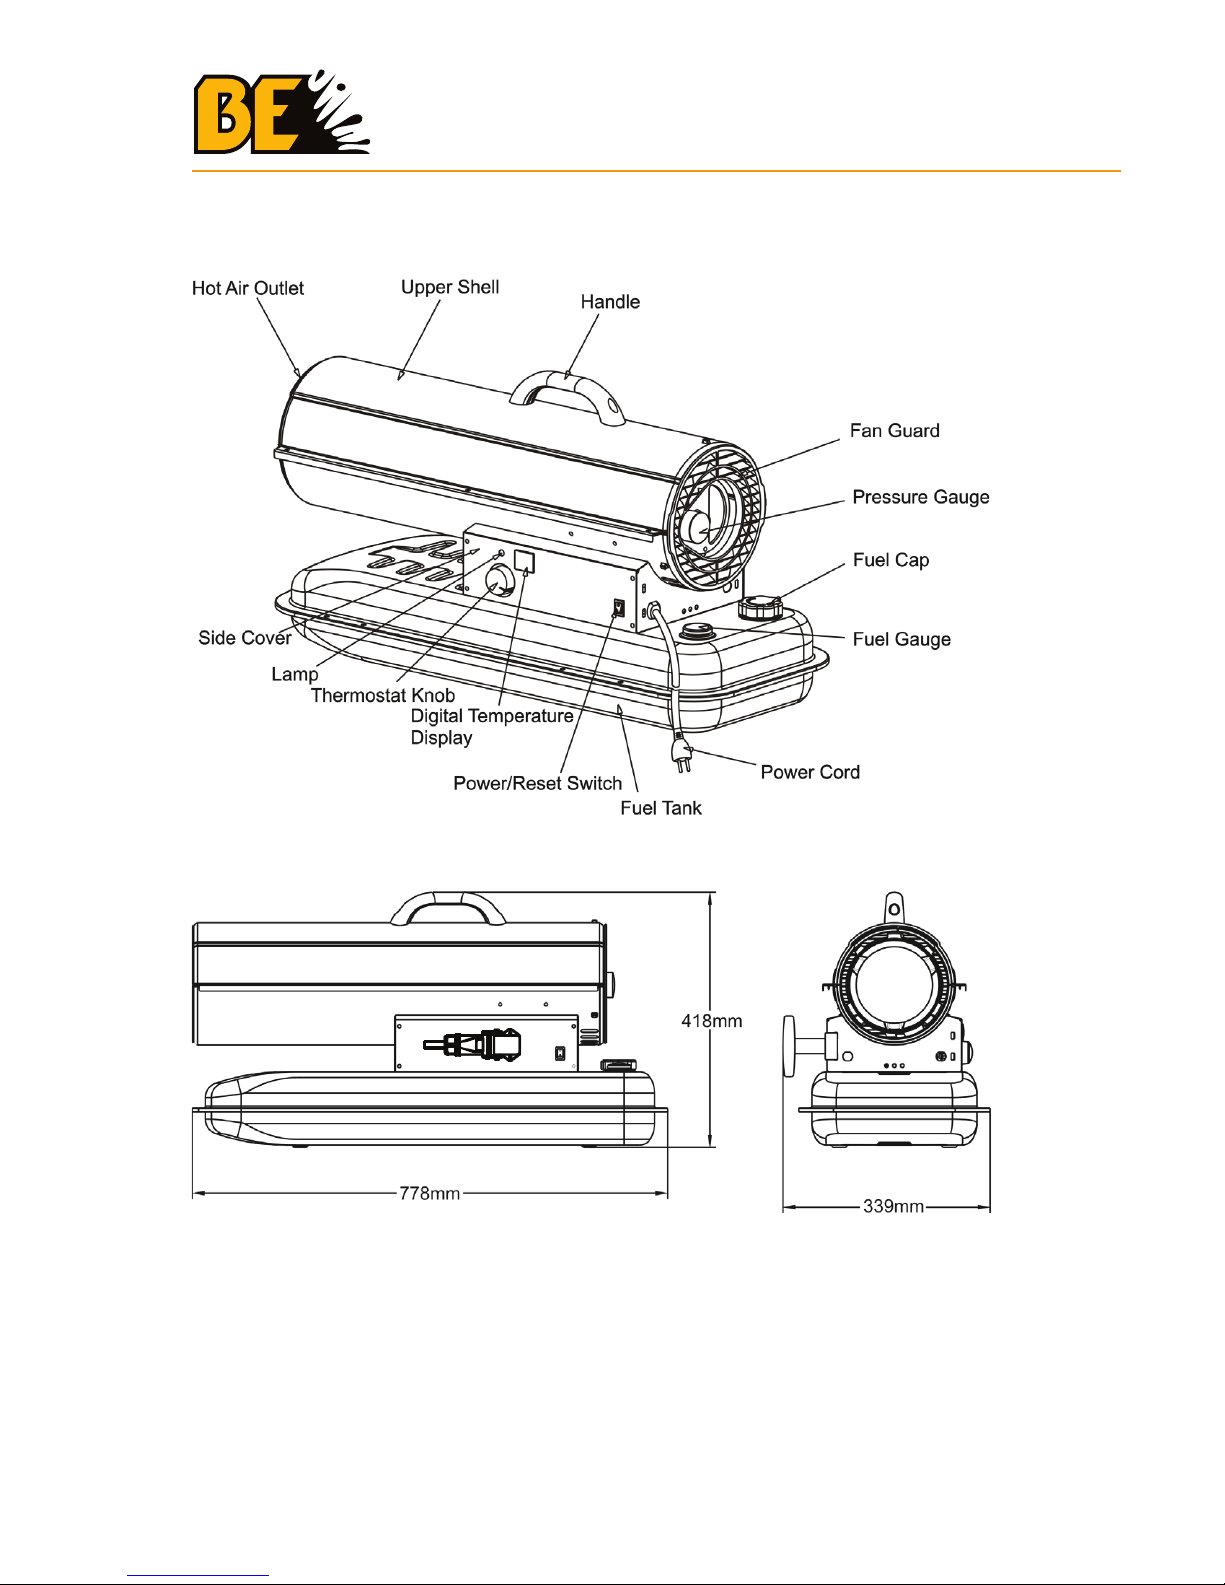
fEATURES HK070f
DIMENSIONS HK070f
specifications
SPECIFICATIONS
13
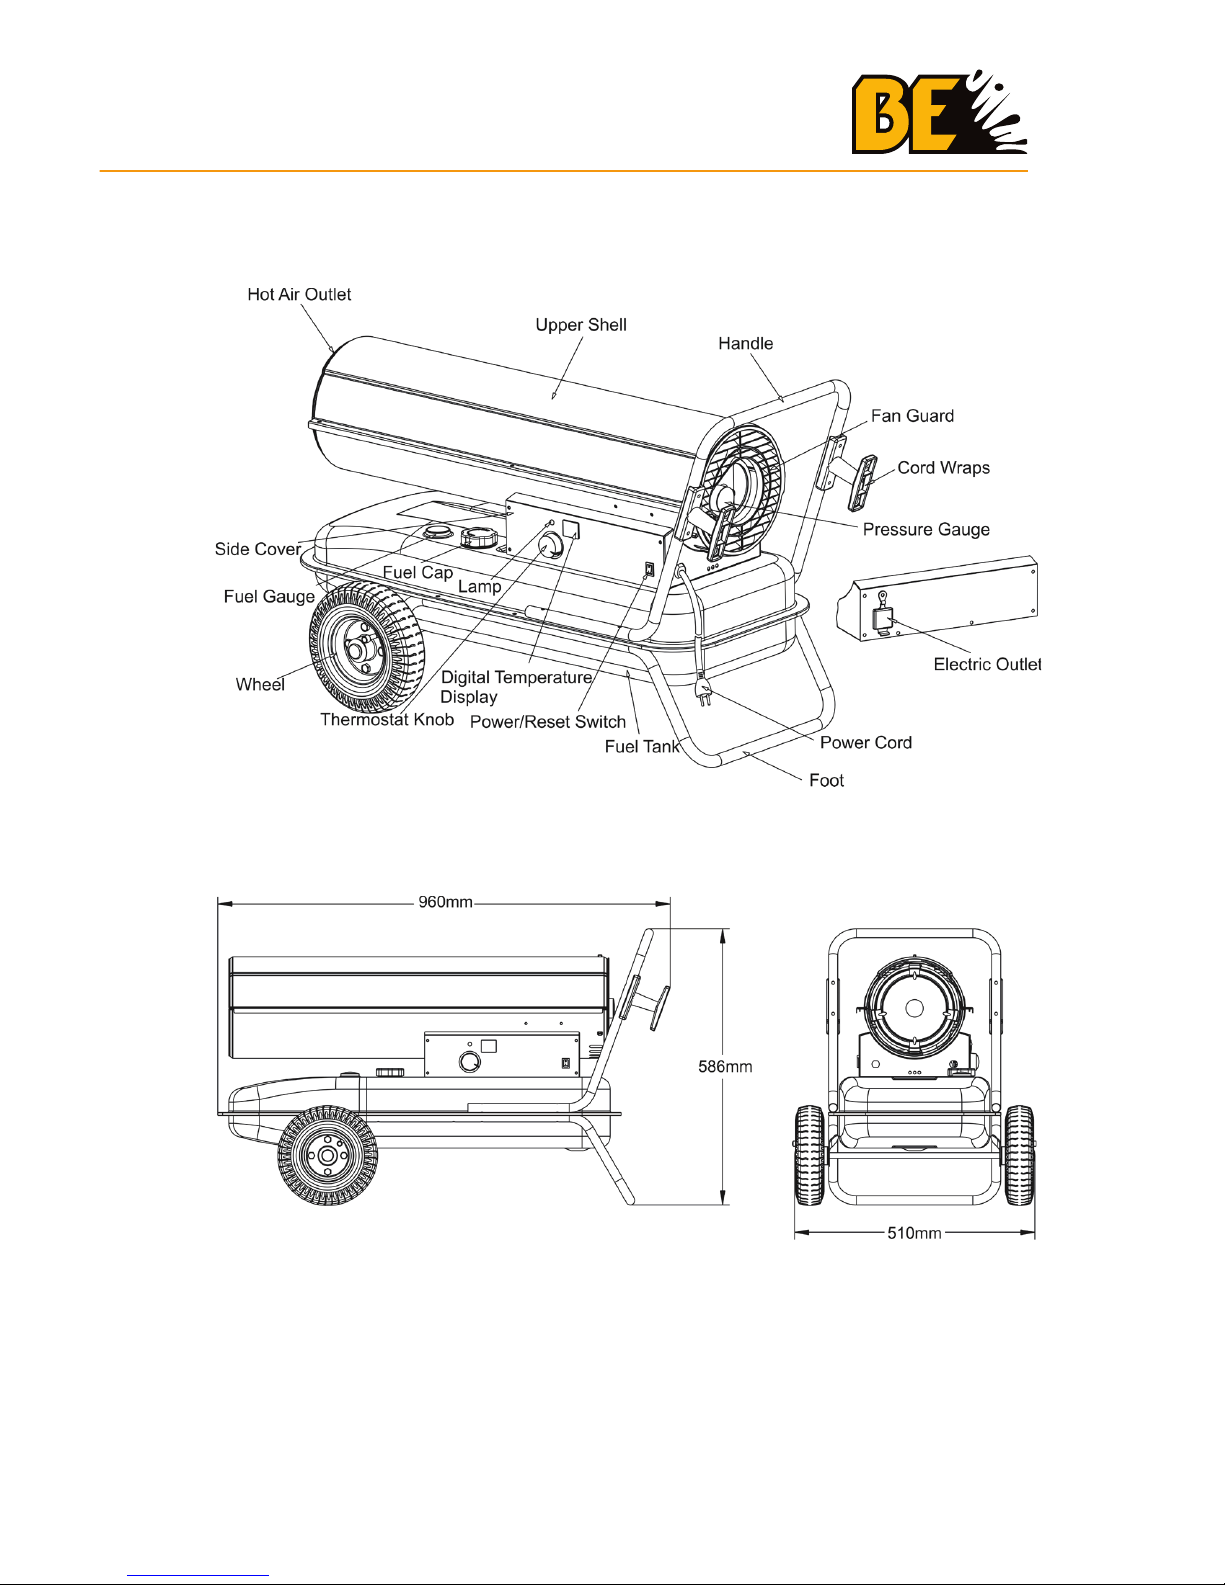
fEATURES HK125fW
DIMENSIONS HK125fW
specifications
SPECIFICATIONS
14
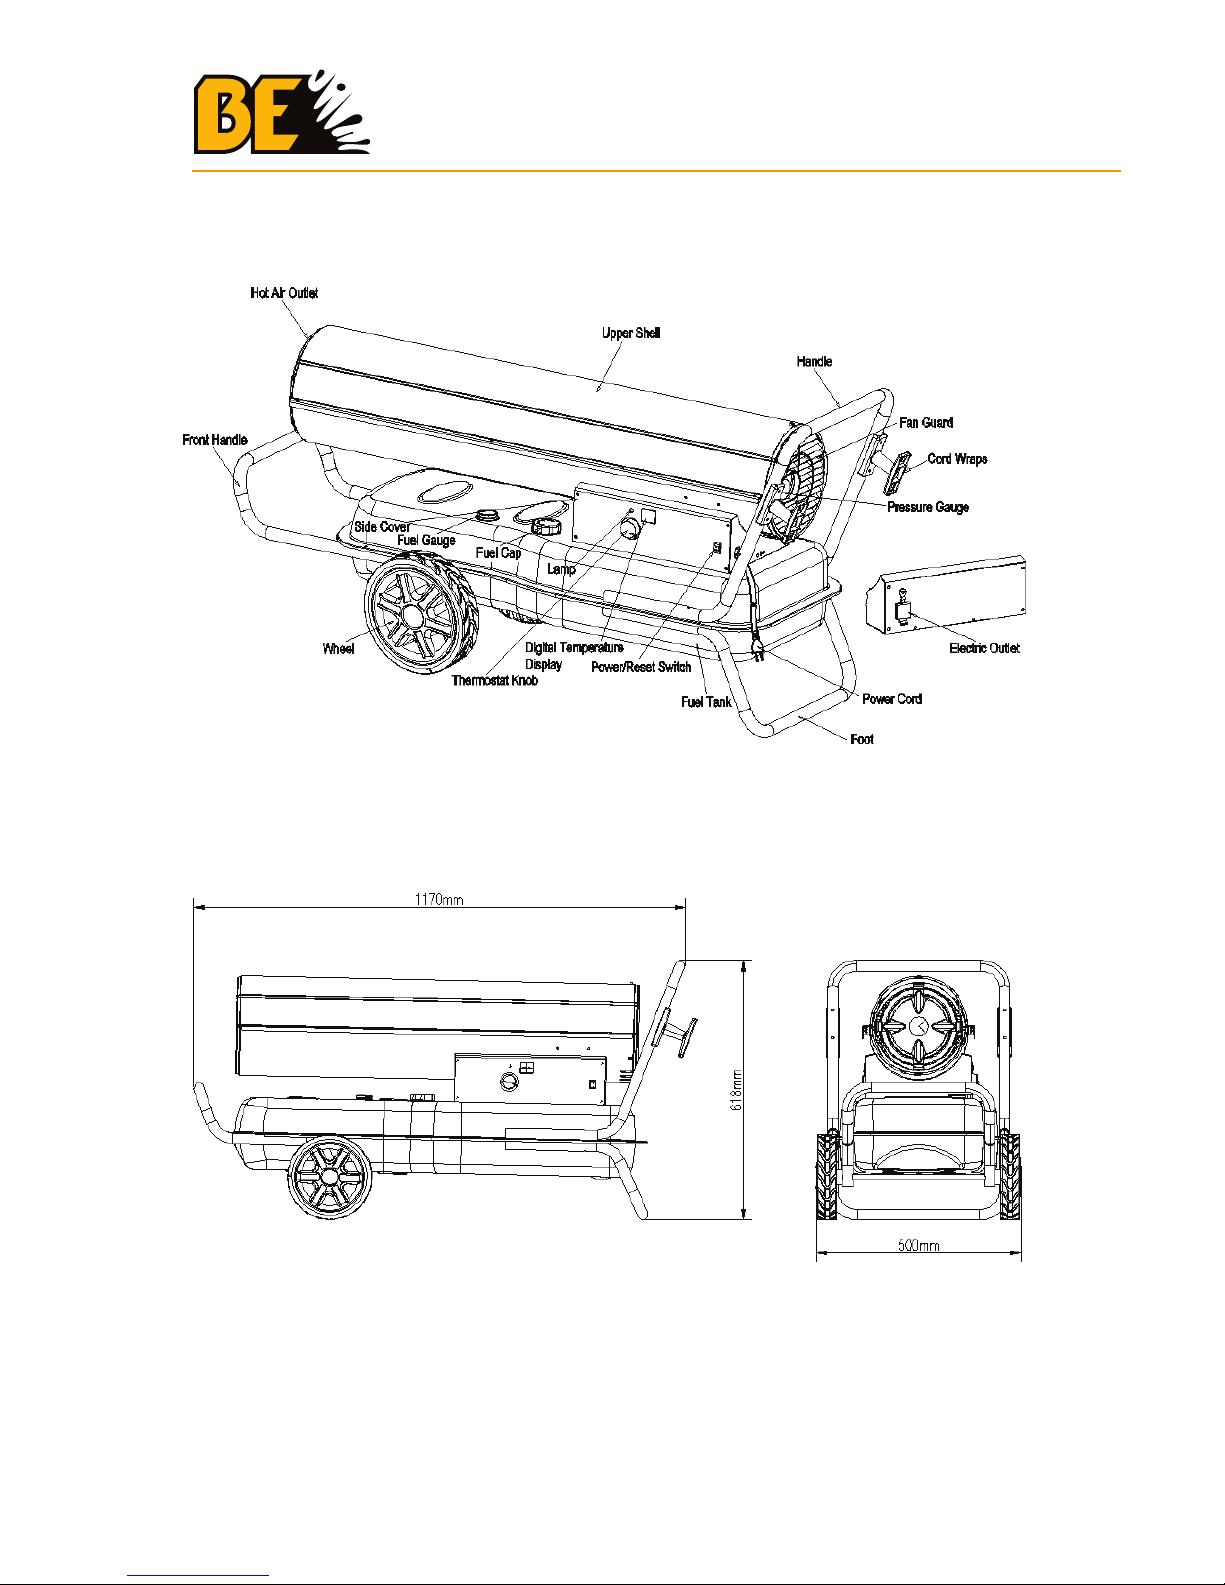
fEATURES HK175fW
DIMENSIONS HK175fW
specifications
SPECIFICATIONS
15
fEATURES HK215fW
DIMENSIONS HK215fW
specifications
SPECIFICATIONS
16
Pre-Operation
UNPACKING HK070f
ASSEMBly HK070f
1. Remove heater from carton.
2. Remove all protective material which may have been applied to the
heater for shipment.
3. Check the heater for possible shipping damage. If any damage is
found immediately contact the manufacturer.
NOTE: Save the box and packaging materials for future storage.
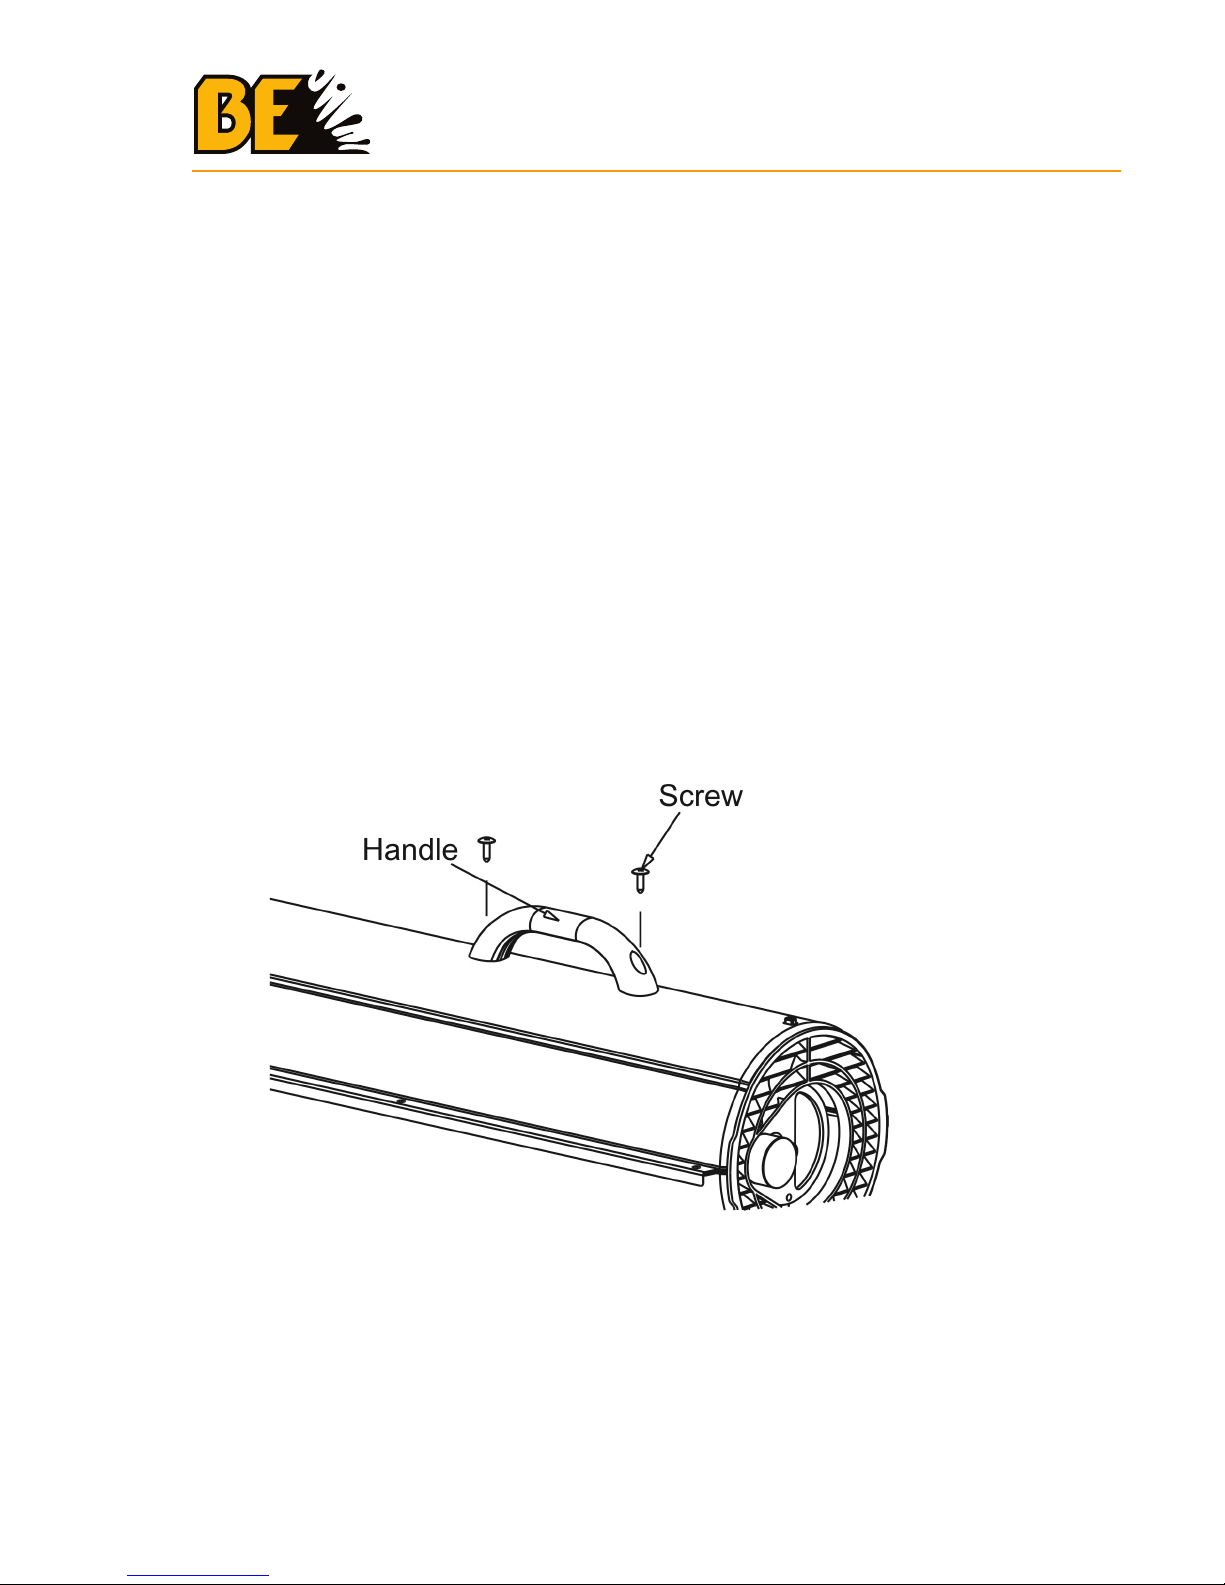
1. Align the holes in the upper housing with the 2 holes in the handle as
shown.
2. Insert and tighten screws securely with screw driver.
pre-operation
PRE-OPERATION
Pre-Operation
UNPACKING HK070F
ASSEMBLY HK070F
1. Remove heater from carton.
2. Remove all protective material which may have been applied to the
heater for shipment.
3. Check the heater for possible shipping damage. If any damage is
found immediately contact the manufacturer.
NOTE: Save the box and packaging materials for future storage.
1. Align the holes in the upper housing with the 2 holes in the handle as
shown.
2. Insert and tighten screws securely with screw driver.
17
pre-operation
UNPACKING HK125fW
ASSEMBly HK125fW
1. Remove heater from carton.
2. Remove all protective material which may have been applied to the
heater for shipment.
3. Check the heater for possible shipping damage. If any damage is
found immediately contact the manufacturer
NOTE: Save the box and packaging materials for future storage.
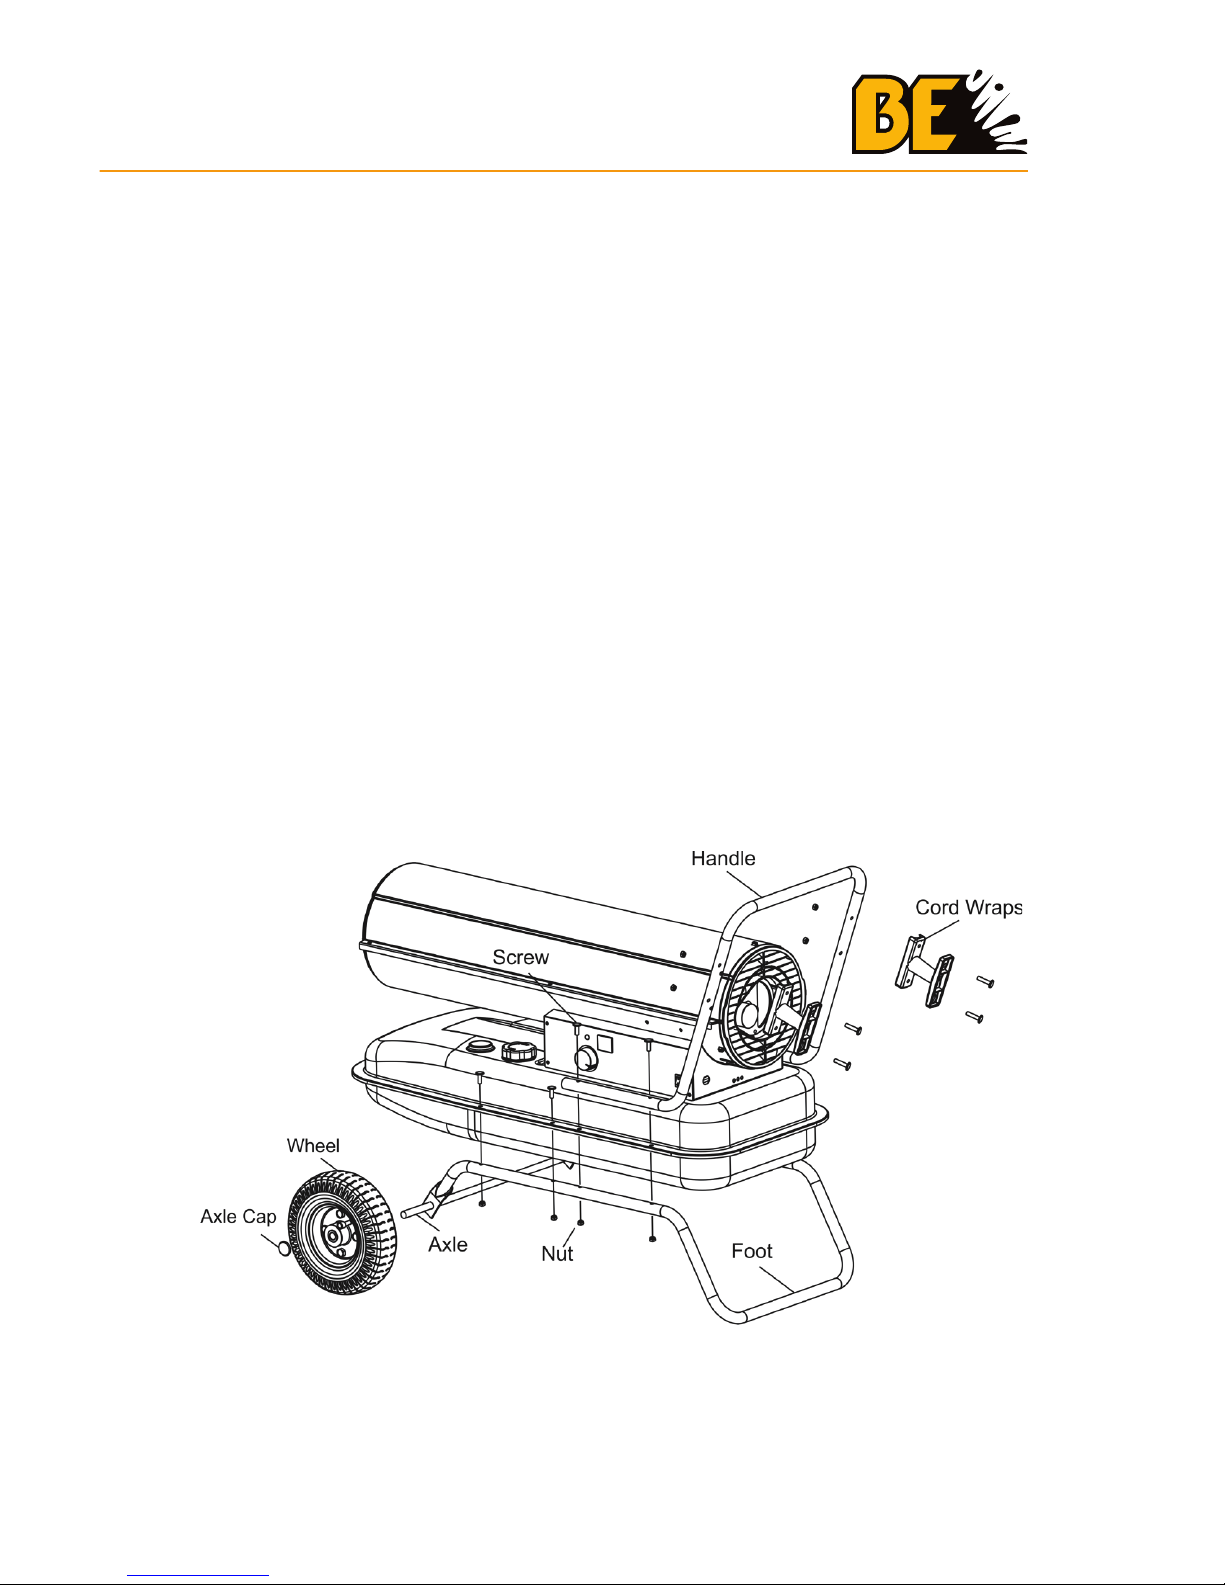
1. Put the foot to the fuel tank holes,Insert screws in the holes and
tighten screws securely with screw driver .
2. Insert the axle to the foot hole,insert wheels ,put on axle cap and
wheel cap.
3. Fix the cord wraps to the handle, Then put the handle and foot to the
fuel tank holes ,Insert screws in the holes and tighten screws securely
with screw driver.
PRE-OPERATION
UNPACKING HK125FW
ASSEMBLY HK125FW
1. Remove heater from carton.
2. Remove all protective material which may have been applied to the
heater for shipment.
3. Check the heater for possible shipping damage. If any damage is
found immediately contact the manufacturer.
NOTE: Save the box and packaging materials for future storage.
1. Put the foot to the fuel tank holes Insert screws in the holes and
tighten screws securely with screw driver.
2. Insert the axle to the foot hole insert wheels, put on axle cap and
wheel cap.
3. Fix the cord wraps to the handle, Then put the handle and foot to the
fuel tank holes ,Insert screws in the holes and tighten screws securely
with screw driver.
18
UNPACKING HK175fW
ASSEMBly HK175fW
1. Remove heater from carton.
2. Remove all protective material which may have been applied to the
heater for shipment.
3. Check the heater for possible shipping damage. If any damage is
found immediately contact the manufacturer
NOTE: Save the box and packaging materials for future storage.
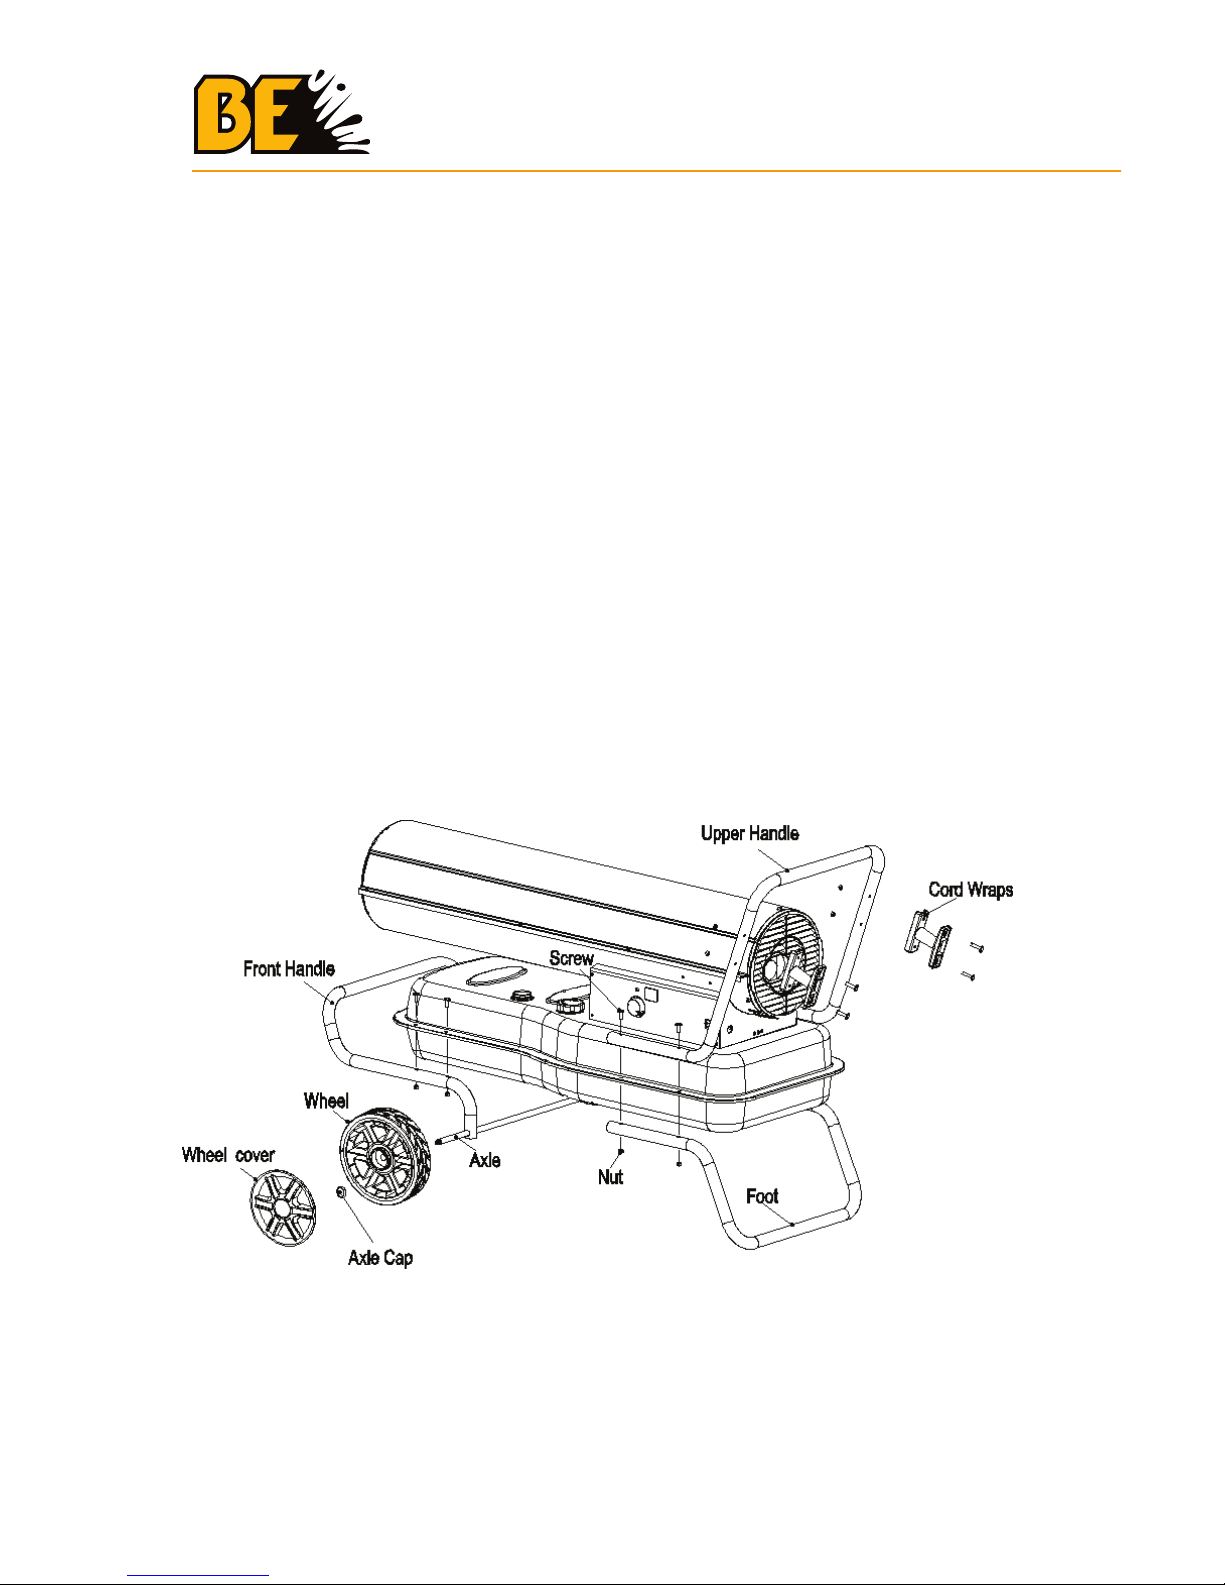
1. Insert the axle to the front handle hole, insert wheels to the axle and
put on axle cap.
2. Put the front handle to the fuel tank holes. Insert screws in the holes
and tighten screws securely with screw driver.
3. Fix the cord wraps to the handle, Then put the handle and foot to the
fuel tank holes ,Insert screws in the holes and tighten screws securely
with screw driver.
pre-operation
UNPACKING HK175FW
ASSEMBLY HK175FW
1. Remove heater from carton.
2. Remove all protective material which may have been applied to the
heater for shipment.
3. Check the heater for possible shipping damage. If any damage is
found immediately contact the manufacturer.
NOTE: Save the box and packaging materials for future storage.
1. Insert the axle to the front handle hole, insert wheels to the axle and
put on axle cap.
2. Put the front handle to the fuel tank holes. Insert screws in the holes
and tighten screws securely with screw driver.
3. Fix the cord wraps to the handle, Then put the handle and foot to the
fuel tank holes ,Insert screws in the holes and tighten screws securely
with screw driver.
PRE-OPERATION
 Loading...