

BE 4.75HP, 13HP, 6.5HP, 5HP Operation Manual
5
HP
4
.75
HP
6.5
HP
13
HP
MANUEL D’OPERATION DE LA LAVEUSE À PRESSION
MANUEL DE OPERACIÓN DE LA ARANDELA DE PRÉSIÓN
PRESSURE WASHER
OPERATION MANUAL

FOR SERVICE: 1-866-850-6662 & WWW.BEPRESSURE.COM
FOR SERVICE: 1-866-850-6662 & WWW.BEPRESSURE.COM
PARA INSTRUCCIONES EN ESPAÑOL, VAYA PARA PAGINAR 12
POUR LES INSTRUCTIONS EN FRANÇAIS, TOURNEZ À LA PAGE 24
BEFORE YOU BEGIN
Congratulations on the purchase of your new BE Pressure Washer.
Before you begin, read and understand all instructions
before operating your pressure washer. This manual explains how to use your high pressure spray equipment.
Be sure everyone who operates, maintains or repairs the
pressure washer has read this manual. Warnings and
precautions must be understood.
P
i
PRODUCT SPECIFICATIONS
Fuel Unleaded Gasoline Only
Engine Oil SAE 10-30W
Pump Oil Non-Detergent Mineral
YOUR NEW PRESSURE WASHER
4
.75
HP
6.5
HP
5
HP
13
HP
n
2,350 PSI
n
2.00 GPM
n
Briggs &Stratton
n
Sealed
Maintenance-Free
Pump
n
2,700 PSI
n
2.30 GPM
n
Honda GC160
n
Maintenance-
Free Pump
n
2,900 PSI
n
2.50 GPM
n
Honda GX200
n
Maintenance-
Free Pump
n
3,600 PSI
n
4.00 GPM
n
Honda GX390
n
Oil Alert Engine
5000 PSI Gauge
85.305.001
3 nozzle: 85.400.060
4 nozzle: 85.400.061
Coupler & Plug
85.400.201
High Pressure Hoses
25’-1/4”: 85.225.225
25’-5/16”: 85.256.126
50’-3/8”: 85.238.156

1
FOR SERVICE: 1-866-850-6662 & WWW.BEPRESSURE.COM
SAFETY INSTRUCTIONS
n
High pressure spray can cause serious injury. This product must be used ONLY by personnel
that have been instructed in the safe use of this machine. Observe all warnings when you
operate, maintain and repair the pressure washer.
n
Use this equipment only in well ventilated areas and free of combustible materials,
combustible fumes or dust. Failure to follow this warning may cause carbon monoxide build
up, re or explosion, and possible injury or death.
n
To prevent injury wear the following protective clothing: Gloves, Hard Hat, Mask, Work
Boots, Ear Plugs, Safety Goggles.
INJECTION HAZARD: Fluids under high pressure from spray or leaks can penetrate the skin
and cause extremely serious injury, including death or the need for amputation. You must
observe these precautions:
n
NEVER point the spray gun at people, plants or animals.
n
NEVER put your hand or ngers over the spray tip.
n
NEVER try to stop or deect leaks with your hand or body.
n
NEVER purchase and use chemicals or detergents that are toxic, ammable, or high in
acidic/alkaline base, and always request a material safety data sheet (MSDS) for the product
you are purchasing.
n
NEVER use a powder type detergent or chemical that is not manufactured for pressure
washer use; i.e. dish detergent, laundry soap.
Get emergency medical treatment at once if any uid
seems to penetrate your skin, even if the wound does not appear serious. Tell the doctor
exactly what uid was injected and give him the material safety data sheet for the detergent or
chemical product used.
n
Understand ALL the information in this section before you begin to use the pressure washer.
n
Be sure that all system components and accessory items are original equipment or
equivalent.
n
Be sure the machine is properly located for safe operation.
n
NEVER alter or modify the pressure washer as personal injury or death could result to
humans, plants, or animals, and voids any warranty offered by the manufacturer.
n
NEVER locate the equipment near combustible materials, combustible fumes, or dust, as
personal injury or death could result from re or explosion.
n
NEVER spray ammable liquids, toxic chemicals (such as incesticide or weed killer) as
personal injury or death could result from re, explosion, or poisoning while damaging the
environment.
n
NEVER allow children or untrained adults to operate the machine.
n
NEVER wear loose clothing and keep your body and clothing clear of moving parts when the
machine is running.
n
NEVER leave the pressure washer unattended once you have started it. If you must leave,
follow complete shut down instructions to prevent unauthorized and untrained personnel from
operating the machine. This can prevent possible pump damage.
n
NEVER move the machine by pulling the hose.
n
NEVER activate the gun with no nozzle in the wand. This will cause the “O” ring to become
dislodged from the coupling and the unit will not function properly without it.
n
NEVER put any type of trigger lock onto the gun.
n
NEVER place hands on motor or pump when unit is running. Keep away from moving parts
at all times.
n
NEVER allow children or animals around your working area.
n
ALWAYS face nozzle and wand to the ground when testing.
n
NEVER exceed the pressure rating of the unit’s recommended pressure.
n
NEVER change quick couple nozzles with the nozzle under pressure and without the gun
safety in the “on” or “lock” position.
n
NEVER clean the machine by using its own spray wand.
n
NEVER run the machine without water.
SAFETY INSTRUCTIONS
!
GENERAL WARNINGS

FOR SERVICE: 1-866-850-6662 & WWW.BEPRESSURE.COM
2
3
FOR SERVICE: 1-866-850-6662 & WWW.BEPRESSURE.COM
!
PUMP PRECAUTIONS
A re or explosion can occur resulting in personal injury if the following instructions
are not followed:
n
DO NOT ll gasoline tank while engine is running. Allow engine to cool for two minutes before
refueling.
n
DO NOT operate the engine when an odor of gasoline is present, or other explosive conditions
exist.
n
IF GASOLINE IS SPILLED, move the machine away from the area of the spill and avoid creating
any source of ignition until the gasoline has evaporated.
n
DO NOT store, spill, or use gasoline near an open ame, or devices such as a stove, furnace,
water heater which utilize a pilot light, or devices which can create a spark.
n
REFUEL OUTDOORS preferably, or in well ventilated areas with UNLEADED GAS ONLY.
n
DO NOT operate engine without mufer. Operating without a mufer, or with a mufer that leaks because
of rust or damage, can permit an increased exhaust noise level. Inspect mufer periodically and replace if
necessary.
n
DO NOT use this engine on any forest covered, brush covered or grass covered unimproved land unless a
spark arrestor is attached to the mufer.
n
DO NOT operate engine if air cleaner or cover directly over the carburetor air intake is removed.
n
DO NOT choke the carburetor to stop the engine.
n
DO NOT TAMPER WITH THE GOVERNOR SPRINGS, GOVERNOR LINKS OR OTHER PARTS WHICH
MAY INCREASE THE GOVERNED ENGINE SPEED.
n
DO NOT tamper with the engine speed selected by the original equipment manufacturer.
n
CAUTION - DO NOT RUN AT EXCESSIVE SPEEDS. Operating engine at excessive speeds increases the
danger of personal injury.
n
DO NOT TOUCH hot mufers, cylinders or ns, as contact may cause burns.
n
TO PREVENT HAND OR ARM INJURY, always pull starter chord rapidly to avoid kickback.
n
READ ENGINE OWNERS/OPERATORS MANUAL BEFORE USING OR ATTEMPTING TO SERVICE THIS
MACHINE.
n
NEVER allow the pump to run for more than a 2 minute period without opening the gun. (This
will cause pump damage due to excessive water temperature and void the warranty)
n
NEVER let the pump run when the machine is not connected to the water supply. This causes
cavitation and voids the warranty.
n
NEVER run acids or hard caustics (such as lye) through the pump.
n
NEVER use chemicals or agents which are not compatible with the Buna-N and PVC (polyvinyl)
or neoprene covering of the hose. (Always use citrus based detergents.)
n
NEVER use water with a temperature over 100 degrees F.
n
Check for leaks. Tighten connections if necessary.
n
Check for missing o-rings in the couplers.
!
GAS ENGINE PRECAUTIONS
SAFETY INSTRUCTIONS
!
LOCATION WARNINGS
n
The machine must be used at or near the working area and always under trained operator
supervision.
n
The machine should be located as close as possible to the water supply. We recommend using
a 50 ft garden hose.
n
Locate the machine on a solid and level surface so that engine and pump crankcase oil
lubricates components properly. Avoid areas where water can build up in the working area.
Possible injury can occur caused by the surface becoming slippery from water build up.
n
Locate the machine in a well ventilated area and away from ammable materials or fumes. Be
sure ventilation WARNINGS are observed. Keep pressure washer well clear of amable materials.
n
Locate the machine so the operator has easy access to the pressure washer and its controls.
n
Locate the machine so that it is protected from external damage.
n
To prevent damage and excessive hose wear, locate the pressure washer so that the hose does
not cross trafc areas.
3
FOR SERVICE: 1-866-850-6662 & WWW.BEPRESSURE.COM
COMPONENT LISTS
Engine Oil
Engine Fuel
Primer
Throttle
Starter Cord
8
6
7
2
1
5
Spray Gun
and Lance
High
Pressure
Hose
Vari-Nozzle
3
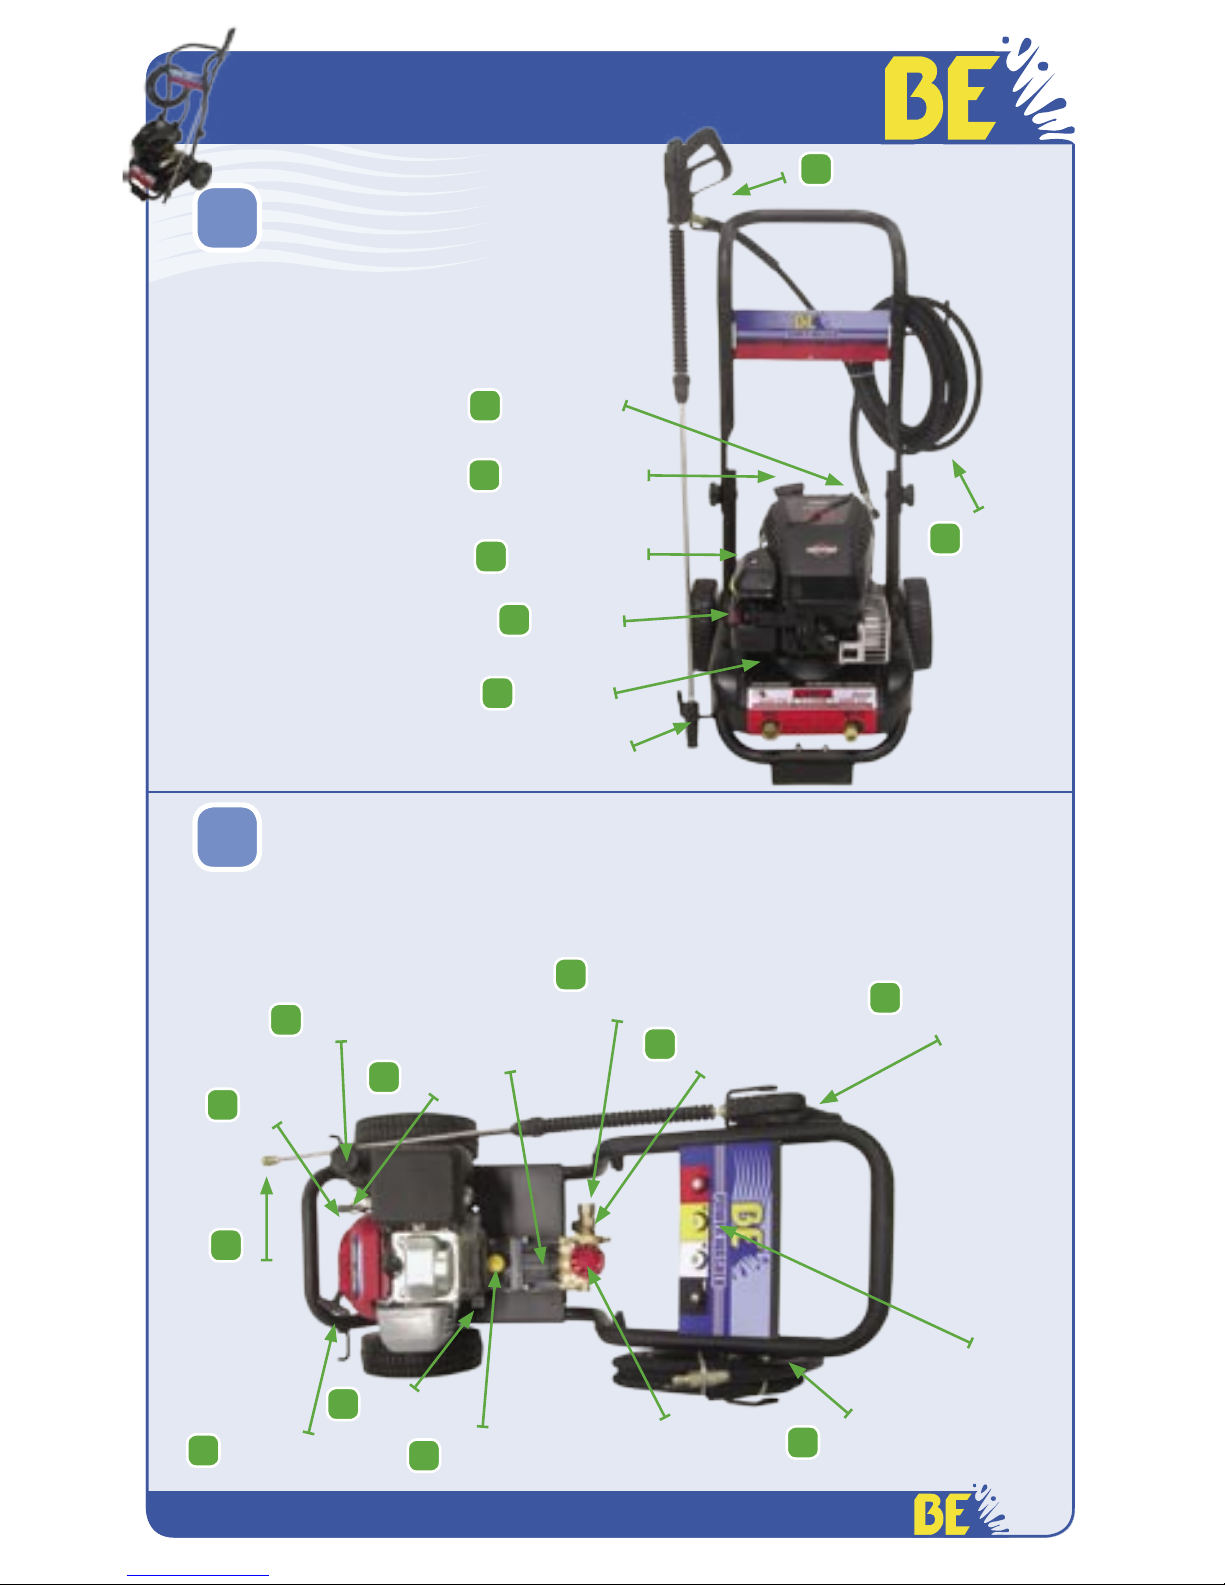
COMPONENT LIST 4.75HP
(ALSO USED FOR 3.75 to 6.75 HP VERTICAL ENGINES
)
Below is a Top View of your 4.75HP pres
sure washer. Numbered items correspond
to Start-Up steps for quick reference.
Engine Oil
1
Pump Oil*
2
Engine Fuel
3
High Pressure Hose
Quick-Connect
4
Garden Hose Inlet
6
Choke
9
Throttle
10
Starter Cord
11
8
Spray Gun
and Lance
High Pressure
Hose
Nozzles
Chemical
Injector
Pressure Adjustor
(Unloader)
COMPONENT LIST 5HP (USE FOR 5 & 6HP UNITS WITH GC ENGINES)
Below is a Top View of your 5HP pressure washer. Numbered items correspond
to Start-Up steps for quick reference.
Spray
Nozzle
Quick
Connect
7
5
5
HP
4
.75
HP
FOR SERVICE: 1-866-850-6662 & WWW.BEPRESSURE.COM
4
5
FOR SERVICE: 1-866-850-6662 & WWW.BEPRESSURE.COM
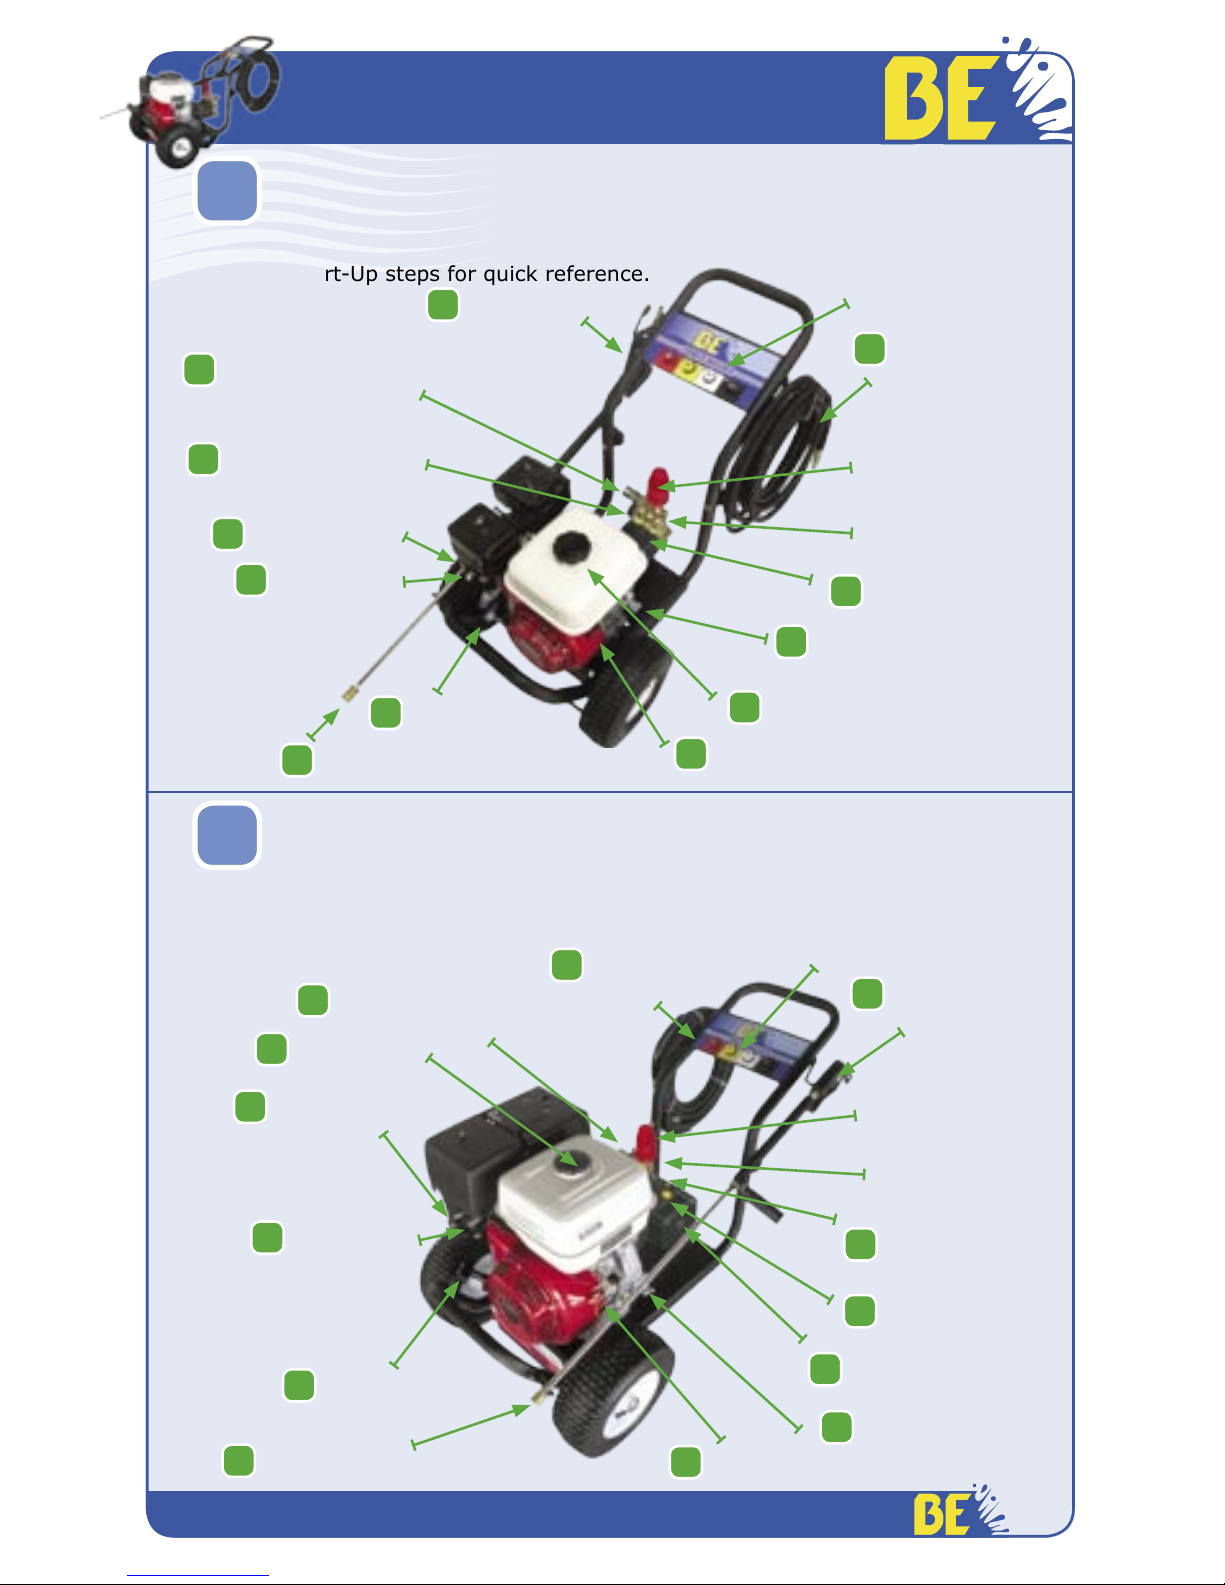
COMPONENT LIST 5.5 HP (ALSO USED FOR 5.5 & 6.5 HP UNITS, GX ENGINES)
Below is a Top View of your 6.5HP pressure washer. Numbered items correspond to Start-Up steps for quick reference.
COMPONENT LIST
Engine Oil
1
Engine Fuel
3
High Pressure Hose
Quick-Connect
4
Garden Hose Inlet
6
Fuel Switch
10
ON/OFF Switch
10
Starter Cord
11
8
Spray Gun
and Lance
Nozzles
Chemical Injector
Pressure Adjustor
(Unloader)
Pump Oil*
2
Spray Nozzle Quick Connect
7
High
Pressure
Hose
5
Choke Switch
9
5.5
HP
Engine Oil
1
Engine Fuel
3
High Pressure Hose
Quick-Connect
4
Garden Hose Inlet
6
Fuel Switch
10
ON/OFF Switch
10
Starter Cord
11
8
Spray Gun
and Lance
Nozzles
Chemical Injector
Pressure Adjustor
(Unloader)
Oil Sight Glass
2
COMPONENT LIST 13HP (ALSO USED FOR 9, 11, & 13 HP UNITS, GX ENGINES)
Below is a Top View of your 13HP pressure washer. Numbered items correspond
to Start-Up steps for quick reference.
Spray Nozzle Quick Connect
7
High
Pressure
Hose
5
Choke Switch
9
Pump Oil
1
13
HP
5
FOR SERVICE: 1-866-850-6662 & WWW.BEPRESSURE.COM
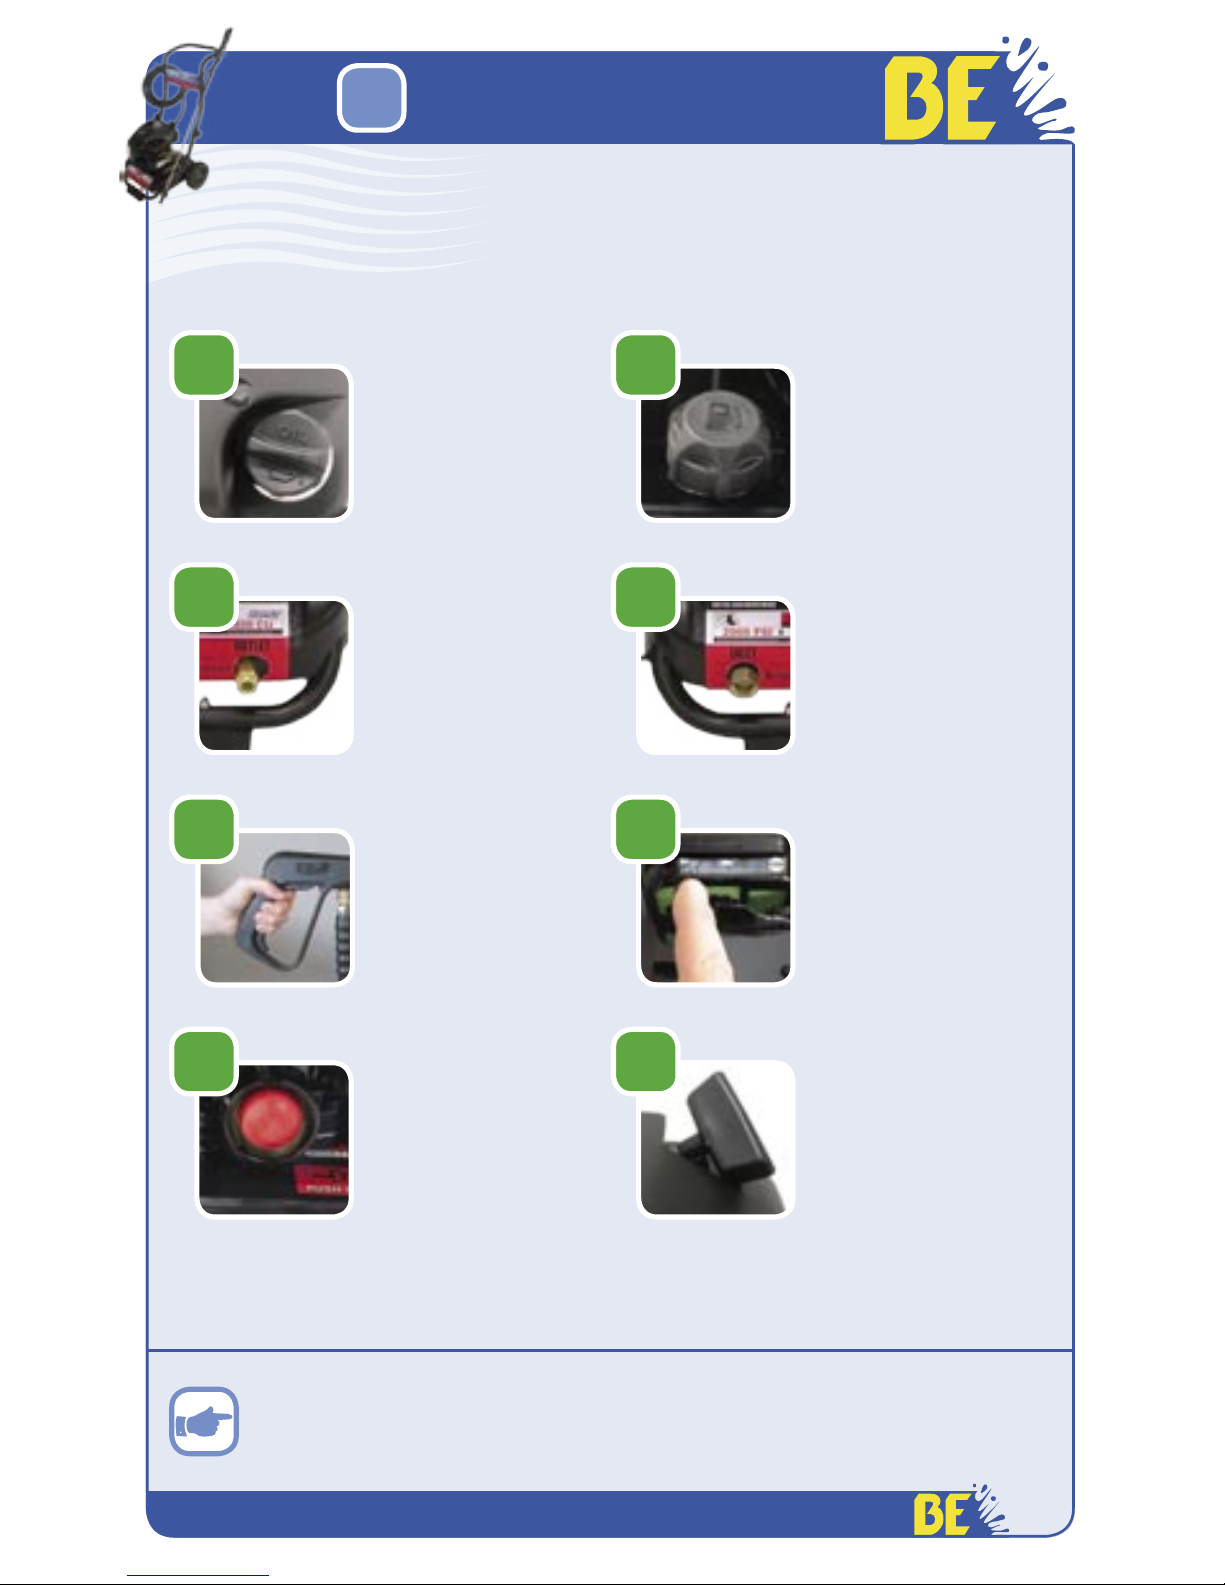
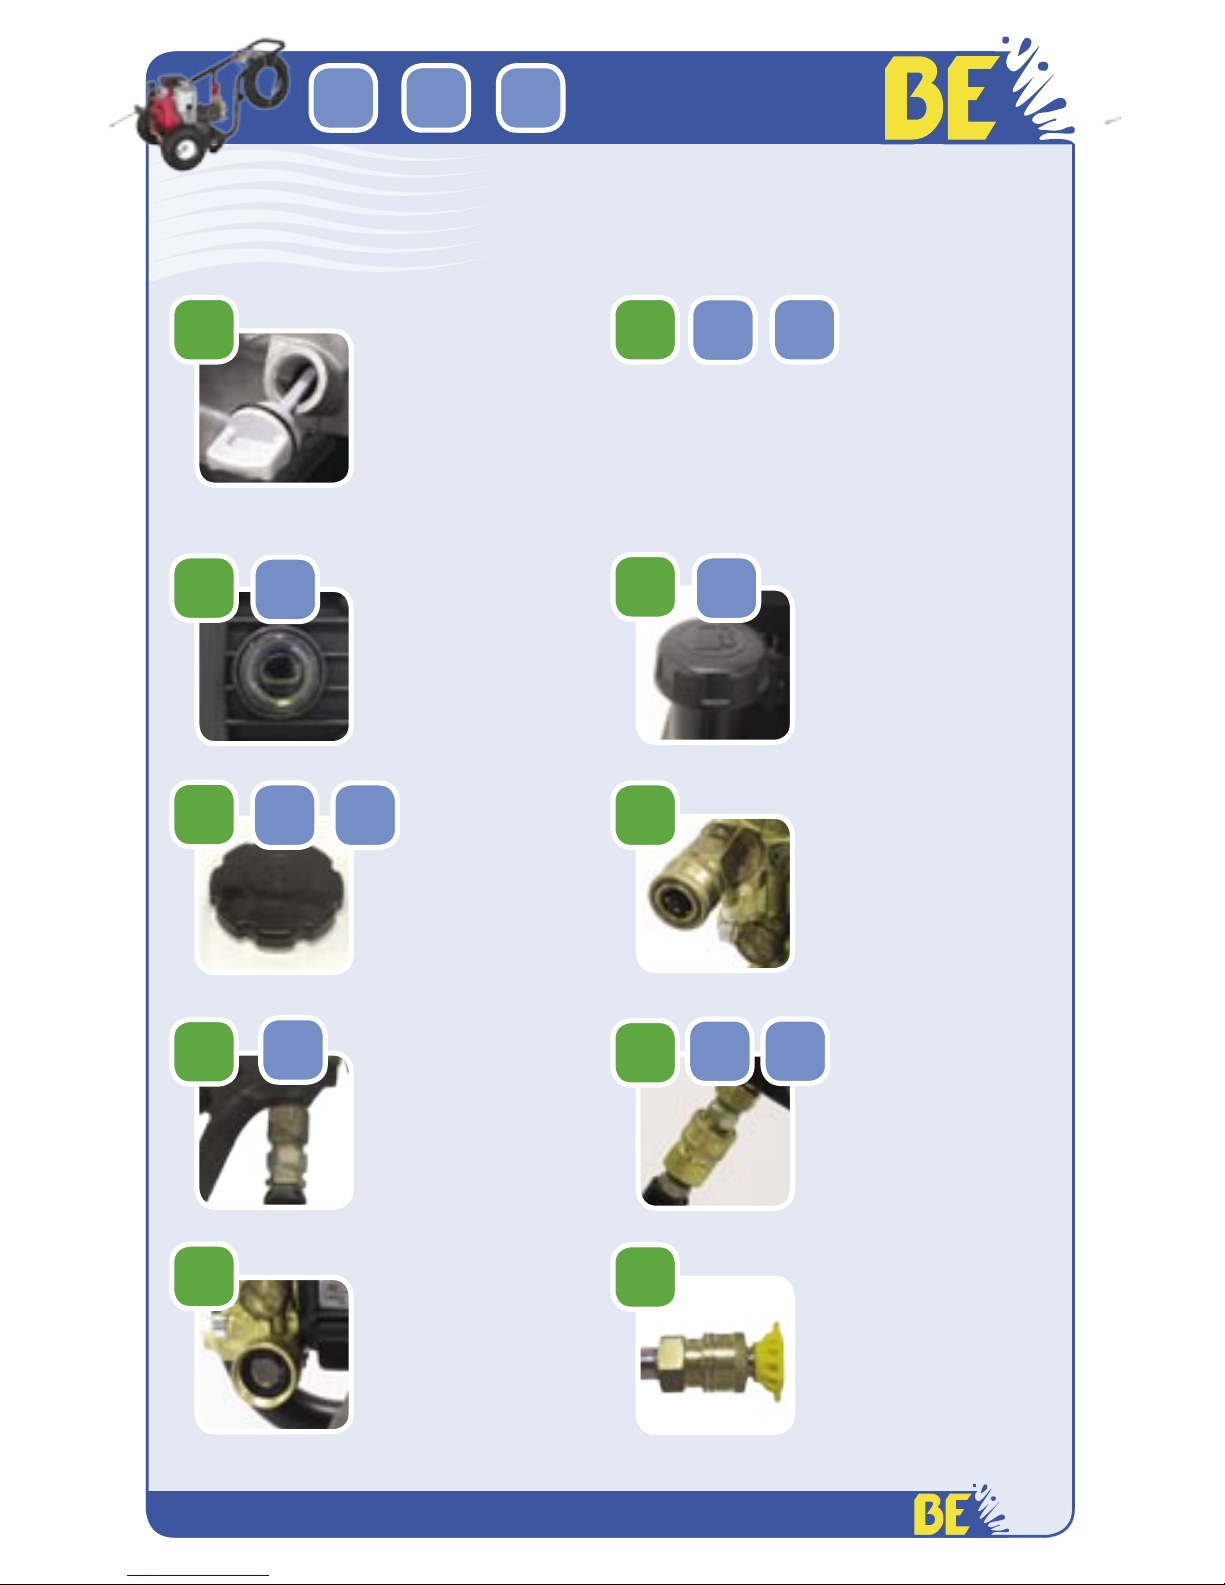
Check engine with
(SAE 30 weight)
engine oil. Oil Level
should read between
hash marks on dipstick.
1 2
Attach high pressure
hose to outlet M22
Quick-Connect tting
on frame.
3 4
Ensure the inlet lter
is clean.
Attach Garden hose to
inlet garden hose connector on frame, and
turn on water.
Fill gas tank on engine with unleaded
gasoline only.
6
Push primer bulb
rmly 3 times.
7 8
While holding gun
trigger open with one
hand, pull starter
cord on engine
Slide throttle control
left to “FAST” position.
Pull trigger on gun to
purge system of air
(until a steady stream
of water comes out
the nozzle).
5
If engine does not start after 3 pulls, push primer bulb 3 more times,
then pull starter cord again.
START-UP (4
.75
HP)
START-UP PROCEDURE (4.75 HP UNIT)
Observe the below steps, and take care to follow them exactly as shown.
4
.75
HP
FOR SERVICE: 1-866-850-6662 & WWW.BEPRESSURE.COM
6
7
FOR SERVICE: 1-866-850-6662 & WWW.BEPRESSURE.COM
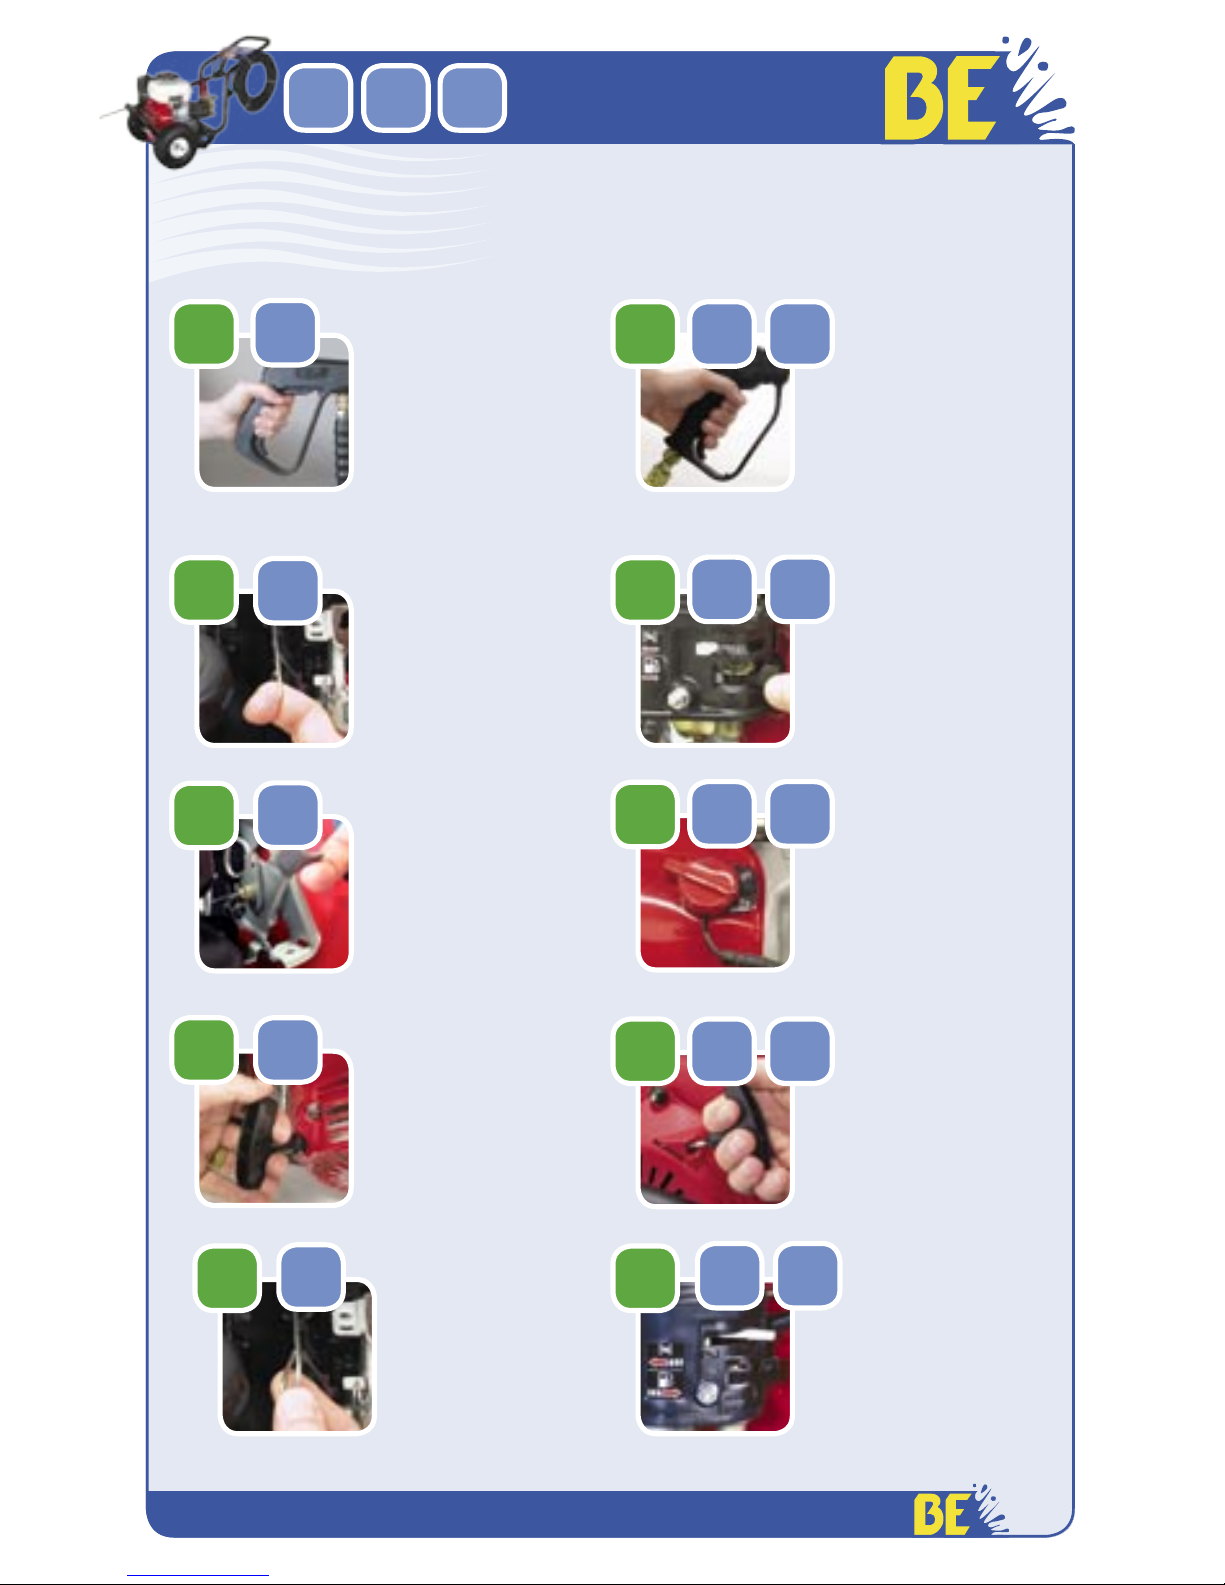
START-UP
3b
Fill gas tank on engine with unleaded
gasoline only.
Attach high pressure
hose to base of Spray
Gun.
5b
6.5
HP
3a
Fill gas tank on
engine with unleaded
gasoline only.
Attach high pressure
hose to outlet QuickConnect tting on
pump.
4
6
Ensure the inlet
lter is clean. Attach
Garden hose to
inlet garden hose
connector on pump,
and turn on water.
Attach high pressure
hose to front of Spray
Gun.
5a
7
Attach nozzle to tip of
Lance.
5
HP
13
HP
Check engine oil (SAE
10-30W). Oil Level
should read between
the hash marks on
dipstick.
2a1
START-UP PROCEDURE (5HP, 6.5HP, &13HP UNITS)
Each step listed below is numbered above to give you an exact location on the
unit.
Pump Oil does not need to be replaced. There is 4.5 ounces of oil in
the pump which will last the life of
the pump.*However, if the pump
has a site glass, the pump oil may
need replacing. Refer to Step 3 in
the troubleshooting guide.
5
HP
6.5
HP
Check pump oil (30W
non-detergent). Oil level should read on the
middle or just below on
the sight glass.
2b
13
HP
5
HP
6.5HP13
HP
5
HP
6.5HP13
HP
7
FOR SERVICE: 1-866-850-6662 & WWW.BEPRESSURE.COM
START-UP PROCEDURE CON’T (5HP, 6.5HP, &13HP UNITS)
9b
Slide fuel switch to
the Right and slide
choke switch to the
Left (CLOSED).
10b
Turn ON/OFF switch
to ON.
12b
Let engine warm up
for 20 seconds and
them slide choke to
“OPEN” (in) position.
11a
Pull starter cord on
engine.
8b
Pull trigger on gun to
purge system of air
(until a steady stream
of water comes out
the nozzle).
9a
Slide choke control to
“CLOSE” (out) position
10a
Slide throttle control
(up) to “FAST”
position
12a
Let engine warm up
for 20 seconds and
them slide choke to
“OPEN” (in) position.
11b
Pull starter cord on
engine.
8a
Pull trigger on gun to
purge system of air
(until a steady stream
of water comes out
the nozzle).
5
HP
6.5HP13
HP
5
HP
6.5HP13
HP
5
HP
6.5HP13
HP
5
HP
6.5HP13
HP
5
HP
6.5HP13
HP
6.5
HP
5
HP
13
HP

FOR SERVICE: 1-866-850-6662 & WWW.BEPRESSURE.COM
8
9
FOR SERVICE: 1-866-850-6662 & WWW.BEPRESSURE.COM
OPERATING THE UNIT
OPERATION PROCEDURES FOR ALL UNITS
Be sure to follow the appropriate Start-Up procedure for your pressure
washer before following the below Operation steps.
Grasping the gun and
lance with Both Hands,
hold spray nozzle 824 inches away from
cleaning surface.
1
Pull trigger to spray
water.
2
WARNING
Do not allow unit to run for more than 2 minutes without pulling the trigger. Letting the unit idle for too long can cause the pump to burn out. If
it is necessary to stop your work for more than 2 minutes, turn off the
engine (see Shut Down procedures).
i
NOZZLE USAGE (5, 6.5, 13HP UNITS)
Be sure to choose the correct Nozzle for the job you are performing.
Below are some examples of when to use each.
0
O
15
O
40
O
SOAPER
Thin and powerful
stream of water. Used
for difcult to remove
stains.
Uses a small angle
of spray for focused
cleaning.
Largest angle of spray
used for cleaning surfaces quickly.
Soaper nozzle is used
in conjunction with a
cleaning uid. This is
the only nozzle that
can be used with
cleaning solution. (On
5,6.5, & 13 HP Models)
i
i
VARIABLE NOZZLE ADJUSTMENTS (4.75HP UNITS)
Spray Pattern
Left: Shrink
Right: Widen
Pressure
Out: Decrease
In: Increase
Left Right
Out In
9
FOR SERVICE: 1-866-850-6662 & WWW.BEPRESSURE.COM
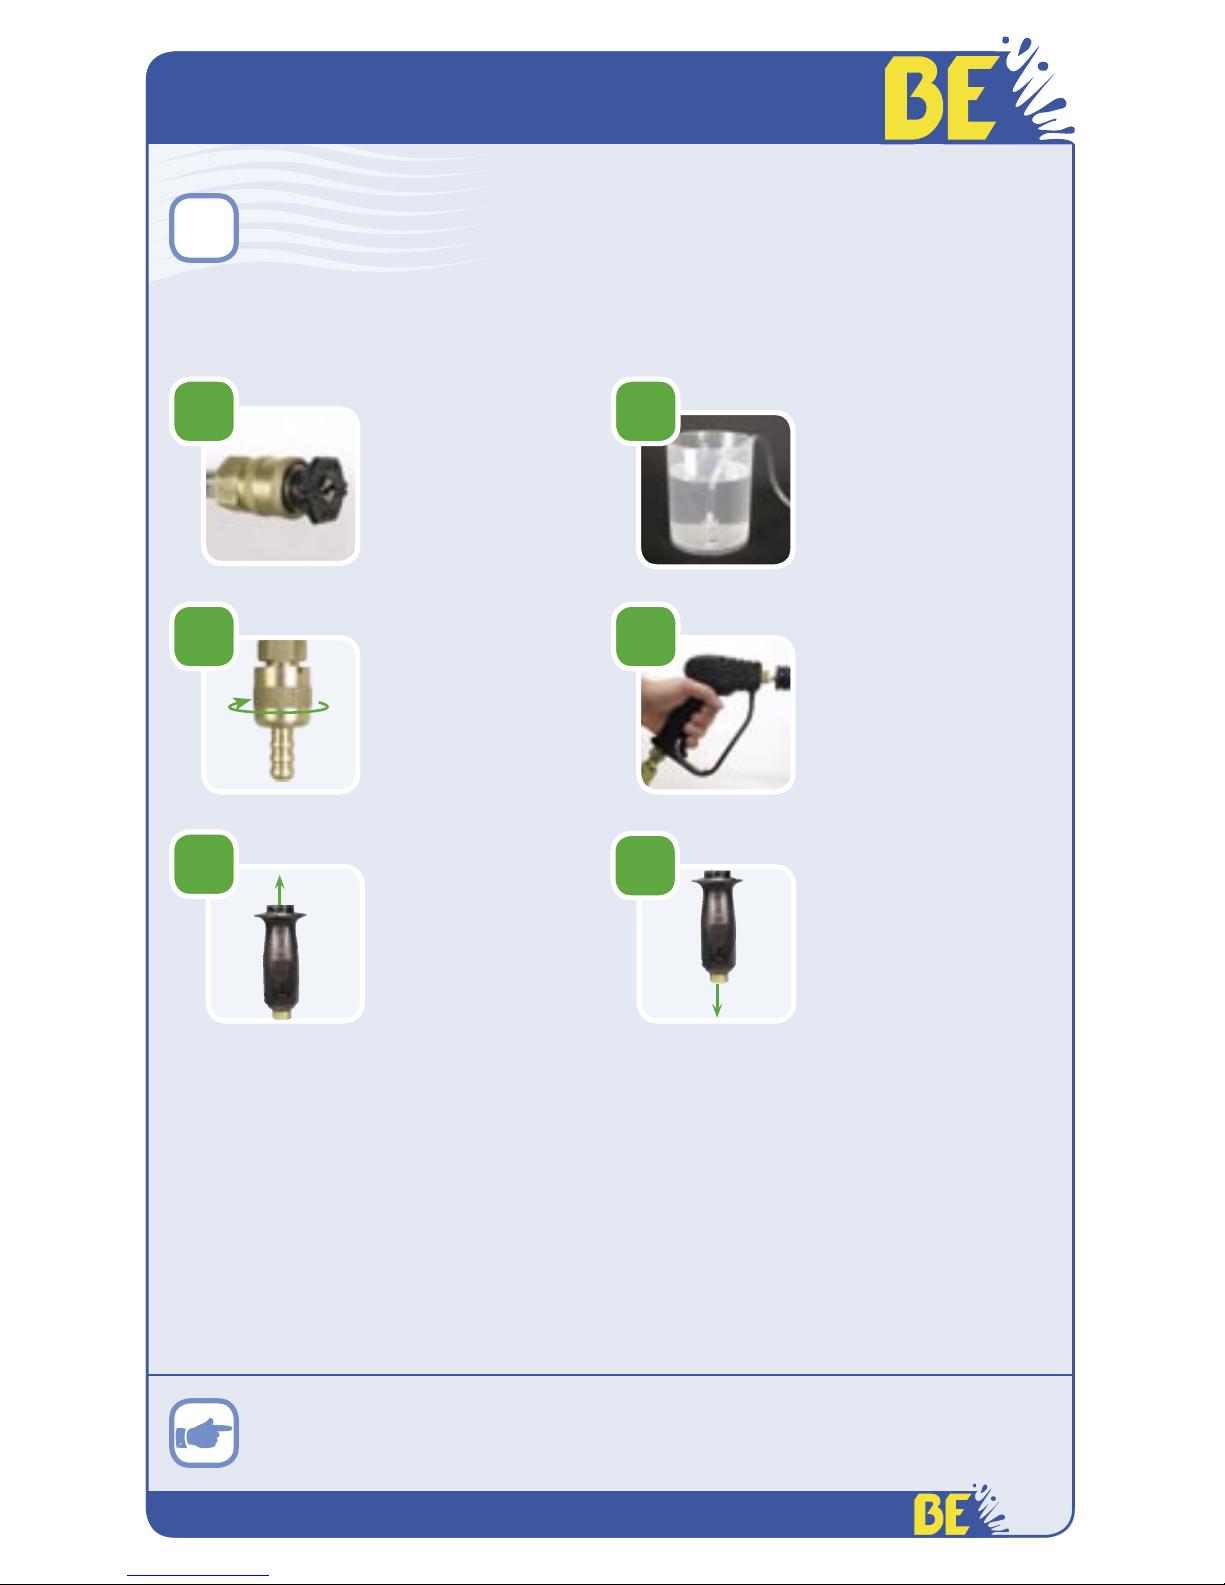
i
USING THE CHEMICAL INJECTOR
CHEMICAL INJECTOR OPERATIONS
The chemical injector is used in conjunction with the Soaper Nozzle and a
Cleaning Solution.
The PSI will be much lower in this application. The soap will only
draw with High Flow and Low Pressure.
2
Drop soap hose lter in
detergent container.
4
Spray with gun as
normal.
1
Attach soaper nozzle
to the tip of the Lance.
3
13HP ONLY:
Open valve on Chemical Injector to allow
Suction.
5
6
4.75HP ONLY:
Snap nozzle forward to
activate soap supply.
Chemical will only ow
in the low pressure
(forward) position.
4.75HP ONLY:
Snap nozzle back
to deactivate soap
supply and increase
pressure.
FOR SERVICE: 1-866-850-6662 & WWW.BEPRESSURE.COM
10
11
FOR SERVICE: 1-866-850-6662 & WWW.BEPRESSURE.COM
Follow the step below that corresponds with the unit that you are using:
4.75 HP, 5 HP, 6.5 HP, or 13 HP Unit.
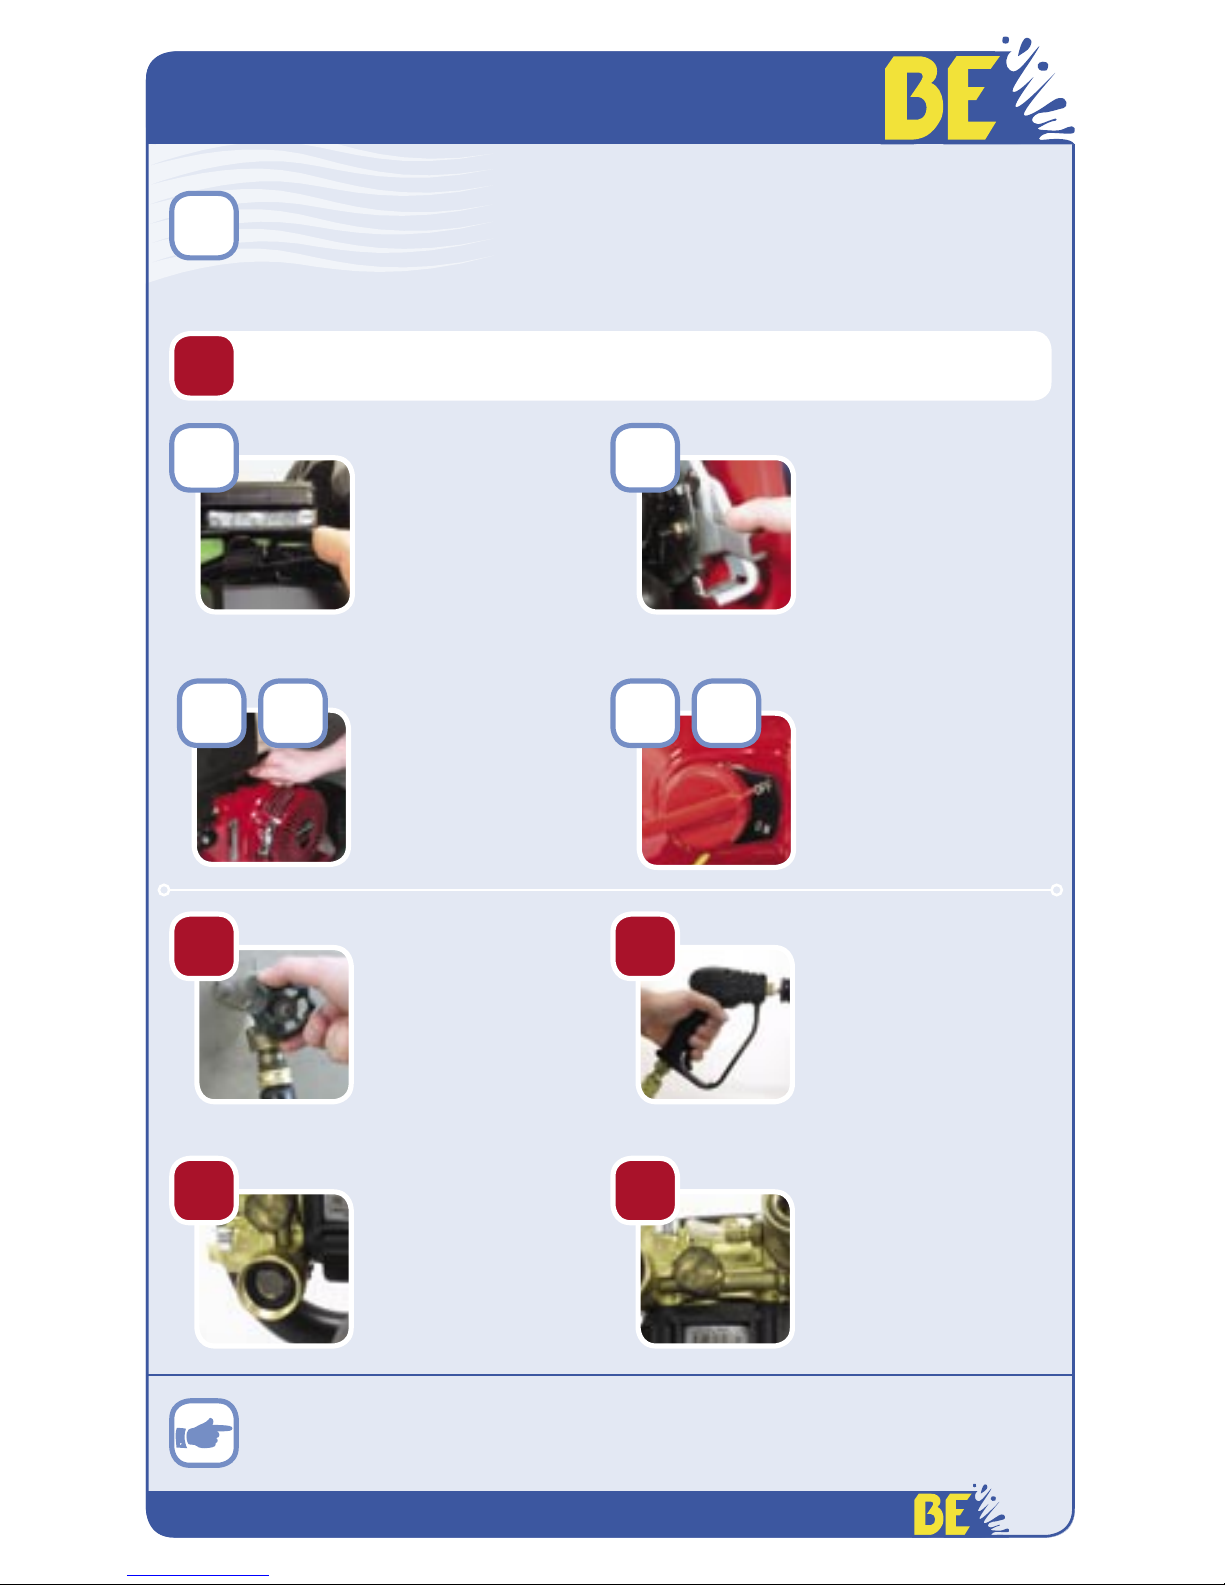
SHUTTING DOWN
SHUT DOWN PROCEDURE (ALL UNITS)
Observe the below steps, and take care to follow them exactly as shown.
Steps will become second nature after repeated use.
Disconnect garden
hose from Inlet Garden Hose attachment
on pump.
4 5
Disconnect high pressure hose from quick
connection on Outlet
of pump.
1
3
Pull gun trigger to release water pressure
from system.
2
Slide Throttle Control
(RIGHT) to “STOP”
position.
Slide Throttle Control
(DOWN) to “STOP”
position.
5
HP
4
.75
HP
6.5HP13
HP
Turn ON/OFF switch
to “OFF”.
Your pressure washer is now Shut Down. See “Winterizing your Pressure
Washer” for storage instructions.
Turn off Water
Source.
OFF
Slide Throttle Control
(RIGHT) to “STOP”
position.
6.5HP13
HP
 Loading...