

Page 1

Re v o
9980
a s s e m b l y i n s t r u c t i o n s
b d i u s a .c o m c u s t o m e r s e r v i c e @b d i u s a .c o m
Component List
A -
Glass Shelf x 2
B -
Shelf Pin x 8
Pre-installed
Retention Clip x 8
C -
Pre-installed
D - Phillips Screwdriver
x 1
E -
Allen Wrench x 1
Your Revo Home Theater Furniture is engineered for easy
assembly. Carefully follow this procedure to prevent any damage.
Placement and Maintenance
Revo Home Theater Furniture is designed for indoor use on level
floors. Clean glass with glass cleaner, and steel parts and wood
veneer with a moist cloth.
Step 1
Unpack and identify the parts listed above. The assembly
workspace should be a non-marring surface such as carpet. For
missing hardware pieces, please contact BDI Customer Service
at customerservice@bdiusa.com. For all other concerns, please
contact your BDI Retailer.
Step 2
Confirm that Shelf Pins (B) are pre-installed.
In order to adjust height, one must remove the glass retention clip
(secured by the shelf pin) that holds the glass shelves in place.
F - Grommet x 1
Loosen the 4 1. Shelf Pins (B) 1 turn with Phillips Screwdriver
(D).
Remove 2. Retention Clips (C) ( x 4 )
Unscrew 3. Shelf Pins (B) completely.
Reposition the 4. Shelf Pins (B) at desired height
Detail of Shelf Pin (B)
and Retention Clip
(C)
Retention clip (C)
Shelf pin (B)
Designed by Louis Lara.
These distinctive product configurations are protected by US and international
patents, trade dress, and/or copyright laws.
BDI are trademarks of Becker Designed, Inc. All Rights reserved. ©2009, BDI
9980REV092409v8
1
Page 2

1
1
44
Step 2 (continued)
Secure Glass Shelves
To secure the shelves on your Revo unit, it is necessary to use
Retention Clip (C), which is secured by the Shelf Pin (B).
the
Install 5. Glass Shelves (A x 2)
Install 6. Retention Clips (C)
as shown in “Pin Assembly
Diagram”
Secure by tightening the7.
Shelf Pin (B) with Phillips
Screwdriver (D).
Pin Assembly Diagram
1 : Retention clip (C)
2 : Glass Shelf (A)
3 : Shelf Pin (B)
4 : Cabinet wall
Step 5
Install Back Panel and Grommet
The back panel comes pre-installed. Follow illustrations below for
installation and removal. NOTE: Mouse hole is on bottom edge
of back panel.
It aligns with pre-installed Velcro strap for wire
management. Install Grommet (F).
F x 1
2
a s s e m b l y i n s t r u c t i o n s
b d i u s a .c o m c u s t o m e r s e r v i c e @b d i u s a .c o m
Page 3
Step 6
1.
2.
3.
3.
1.
2.*
2.*
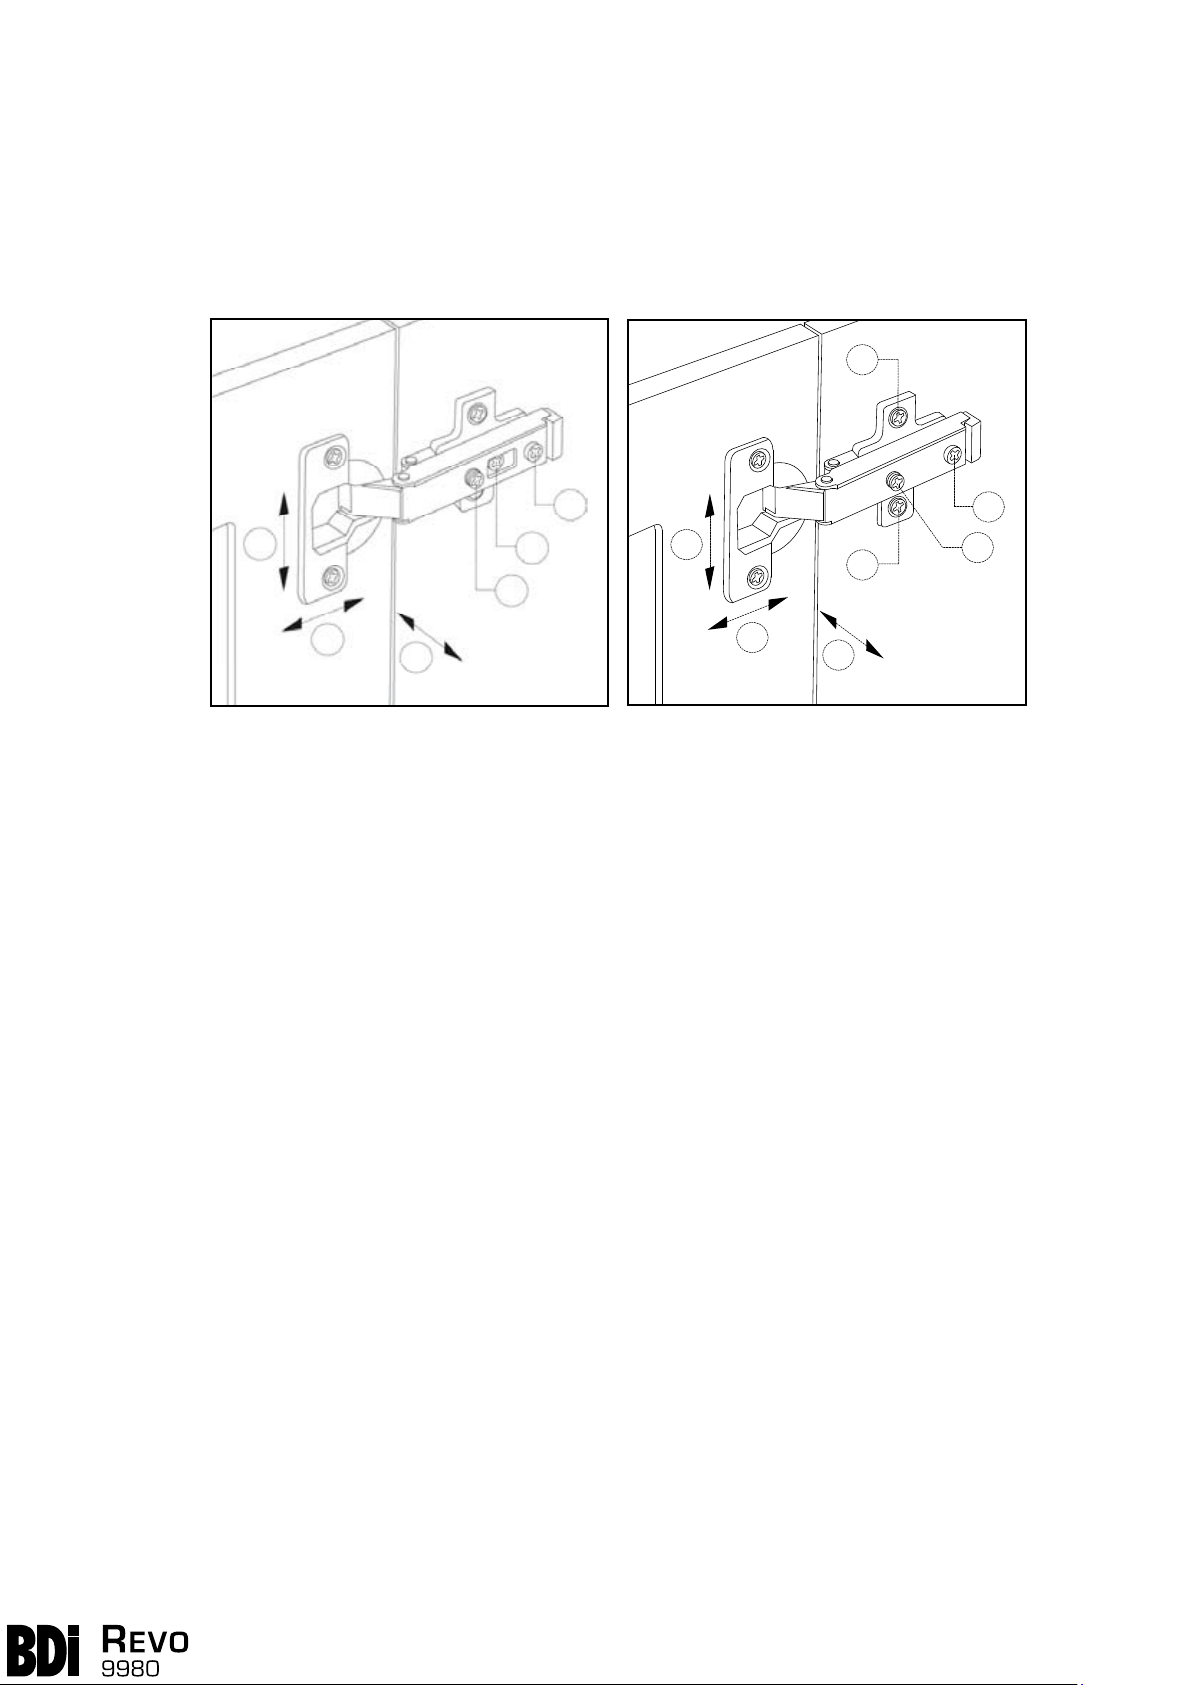
Adjust Door Hinges (if needed)
If the cabinet’s doors appear out of alignment, this condition can be corrected with minor adjustment
to the European hinges on each door.
Because these hinges are infinitely adjustable, adjusting one hinge element can sometimes cause the
need for adjustments to other elements. But with a few adjustments, you can modify the orientation of
the cabinet doors to make sure that they hang perfectly within your cabinet.
3.
2.
3.
1.
2.
1.
Figure 2Figure 1
Use a Phillips screwdriver to adjust Revo’s door hinges:
By adjusting • Screw 1,
the door will move LEFT or RIGHT within the frame. Make minor
adjustments at both top and bottom hinges for best results.
By adjusting • Screw(s) 2, the door will move UP or DOWN within the frame (the top and bottom
hinges must be adjusted the same degree).
NOTE: If your hinges have a Slotted Mounting Plate (as shown in Figure 2): Loosen Screws 2
one complete turn, raise or lower door, then hold in position while tightening Screws 2 (on both
hinges).
By adjusting • Screw 3 the entire door will move IN or OUT, opening or closing the gap between the
door frame and cabinet. (This screw rarely needs adjustment.)
3
a s s e m b l y i n s t r u c t i o n s
b d i u s a .c o m c u s t o m e r s e r v i c e @b d i u s a .c o m
 Loading...