

Page 1
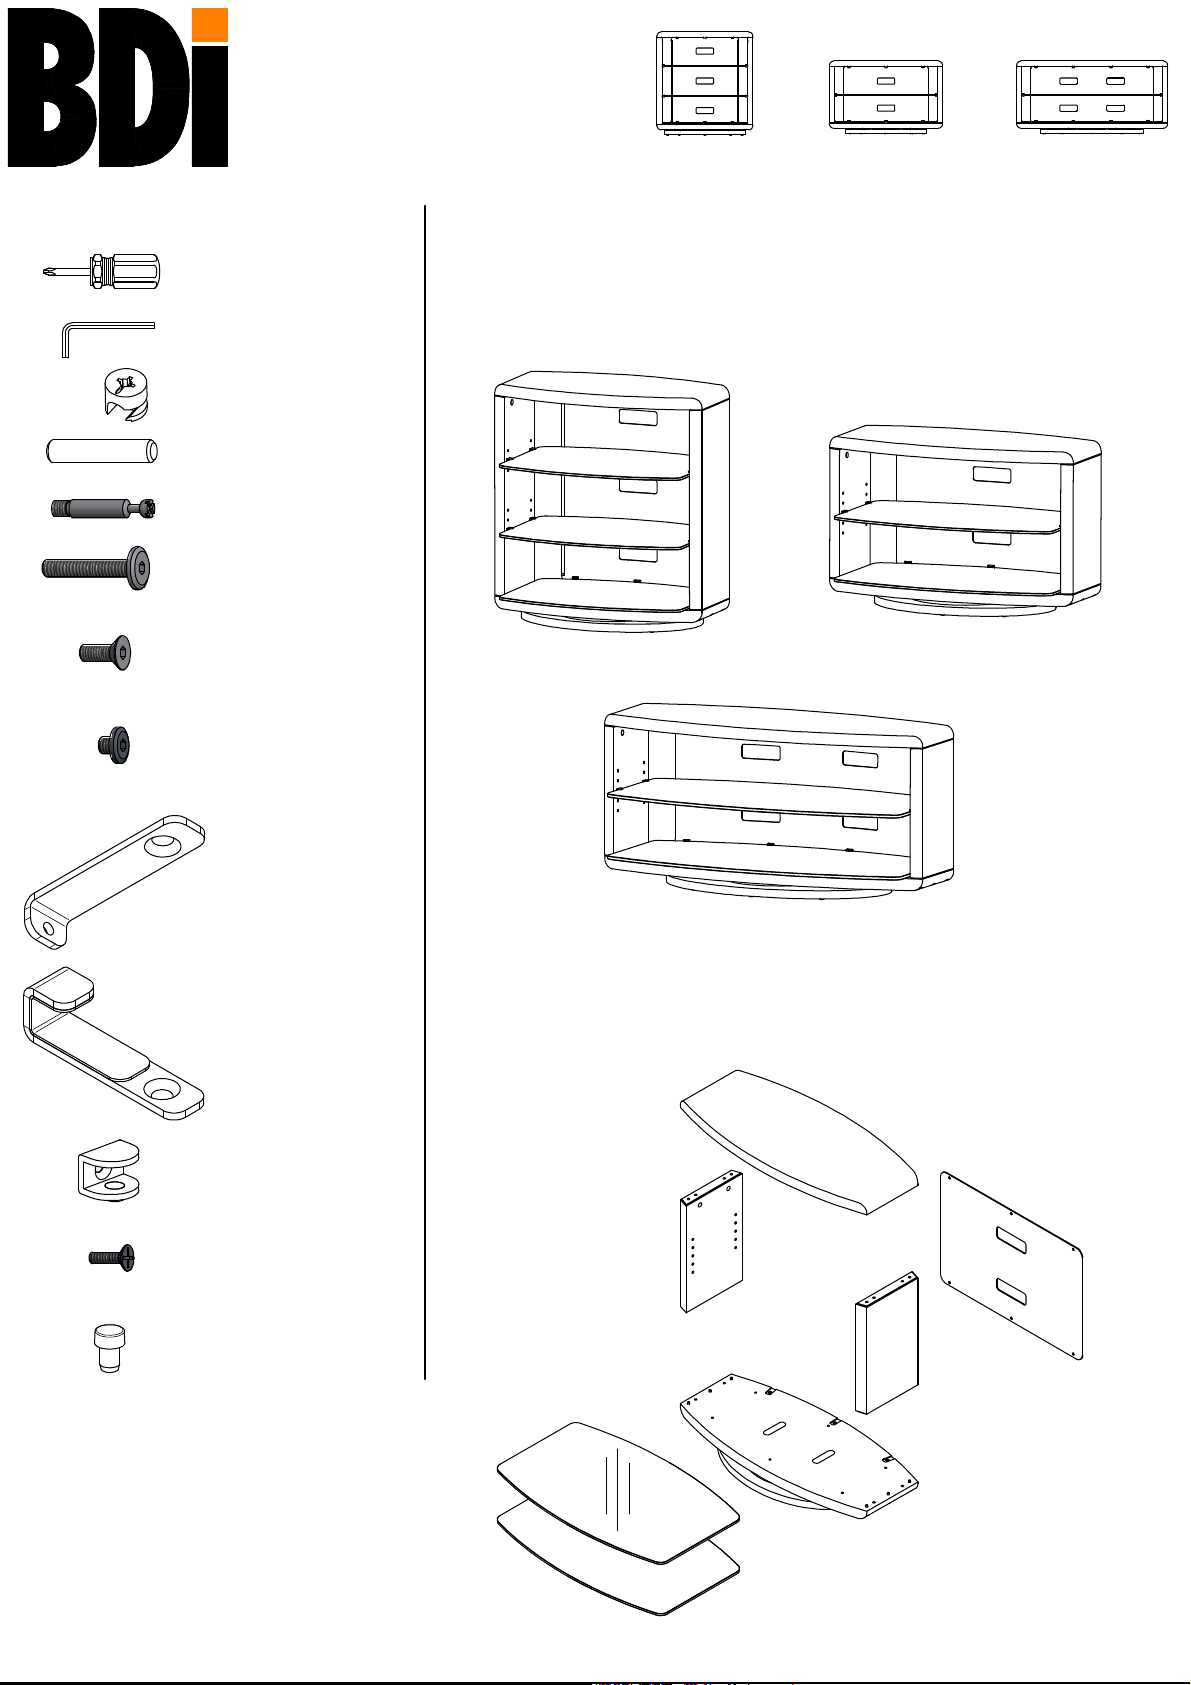
Component List
VALERA
9721 9723 9724
A - Phillips Screwdriver
(Not Provided)
B - 4mm Hex L-Wrench
C - Cam Fastener x 4
D - Dowel Pin x 8
E - Cam Bolt x 4
F - 1/4-20 x 38mm
Machine Screw x 6
ASSEMBLY INSTRUCTIONS
BDIUSA.COM CUSTOMERSERVICE@BDIUSA.COM
Valera is engineered for easy assembly. Carefully follow this procedure to
prevent any damage.
Placement and Maintenance
Valera is designed for indoor use on level floors. Clean glass with glass cleaner,
and wood veneer with a moist cloth.
G - M6 x 20mm
Machine Screw
9721, 9723 x 6
9724 x 8
H - M6 x 6mm
Machine Screw
9721, 9723 x 6
9724 x 8
I - Upper Bracket
9721, 9723 x 3
9724 x 4
J - Lower Bracket
9721, 9723 x 3
9724 x 4
K - Shelf Clip
9721 x 8
9723, 9724 x 4
9721
Step 1
Unpack and Identify
Unpack and identify the components at left. The assembly workspace should be
a non-marring surface such as carpet. For missing hardware pieces, please
contact BDI Customer Service at customerservice@bdiusa.com. For all other
concerns, please contact your BDI Retailer.
N
9723
9724
Q
L - 5/32 x 12mm
Machine Screw x 4
9721 x 8
9723, 9724 x 4
M - Rubber Stem Bumper
x 6
N - Top Panel x 1
O - Side Panels x 2
P - Base Assembly x 1
Q - Back Panel x 1
R - Glass Shelves
9721 x 3
9723, 9724 x 2
Designed by Louis A. Lara
These distinctive product configurations are protected by US and international
patents, trade dress, and/or copyright laws.
BDI are trademarks of Becker Designed, Inc.
All Rights reserved. © 2010 BDI
Made in Taiwan. 9721 9723 9724 Revision: 05-03-10
R
1
O
O
P
Page 2
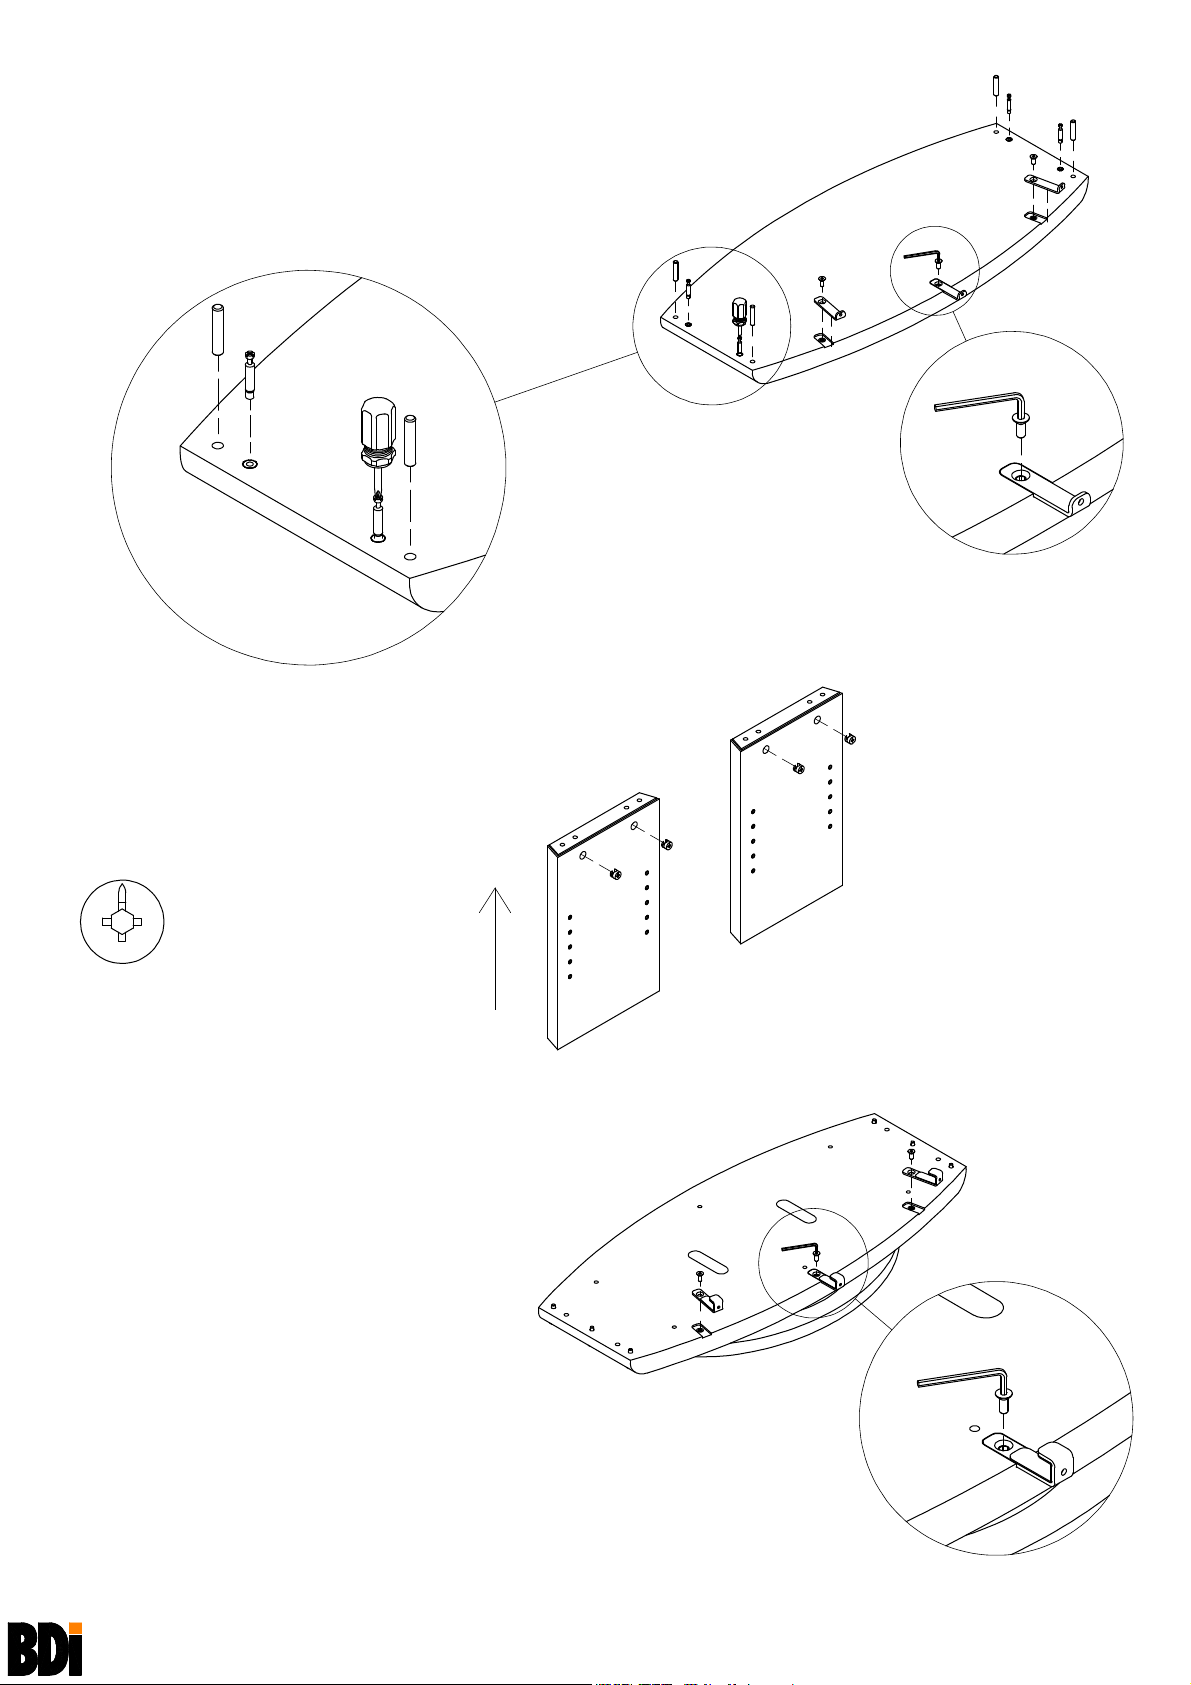
Step 2
Install Hardware onto Top Panel
Lay Top Panel (N) on its Top on a carpeted surface, with holes facing up.
Dowel Pins (D) and Cam Bolts (E) into Top Panel (N) using Phillips
Install
Screwdriver (A)
Upper Brackets (I) onto Top Panel (N) with Machine Screws (G)
Install
using
4mm Hex L-Wrench (B), do not fully tighten for ease of Back Panel
(Q)
installation.
.
N
D
E
Step 3
Install Hardware into Side Panels
Install Cam Fasteners (C) into Side Panels (O)
as shown, align arrow on
point up.
Cam Fastener (C) to
A
D
E
C
C
B
G
I
Cam Fastener (C)
Arrow to point up to start
UP
Step 4
Install Hardware into Bottom Panel
Install Lower Bracket (J) into Base Assembly
with Machine Screws (G) and tighten using
(P)
4mm Hex L-Wrench (B).
Do not fully tighten Brackets for ease of
Panel (Q)
installation.
Back
O
O
P
B
G
J
VALERA
9721 9723 9724
2
ASSEMBLY INSTRUCTIONS
BDIUSA.COM CUSTOMERSERVICE@BDIUSA.COM
Page 3
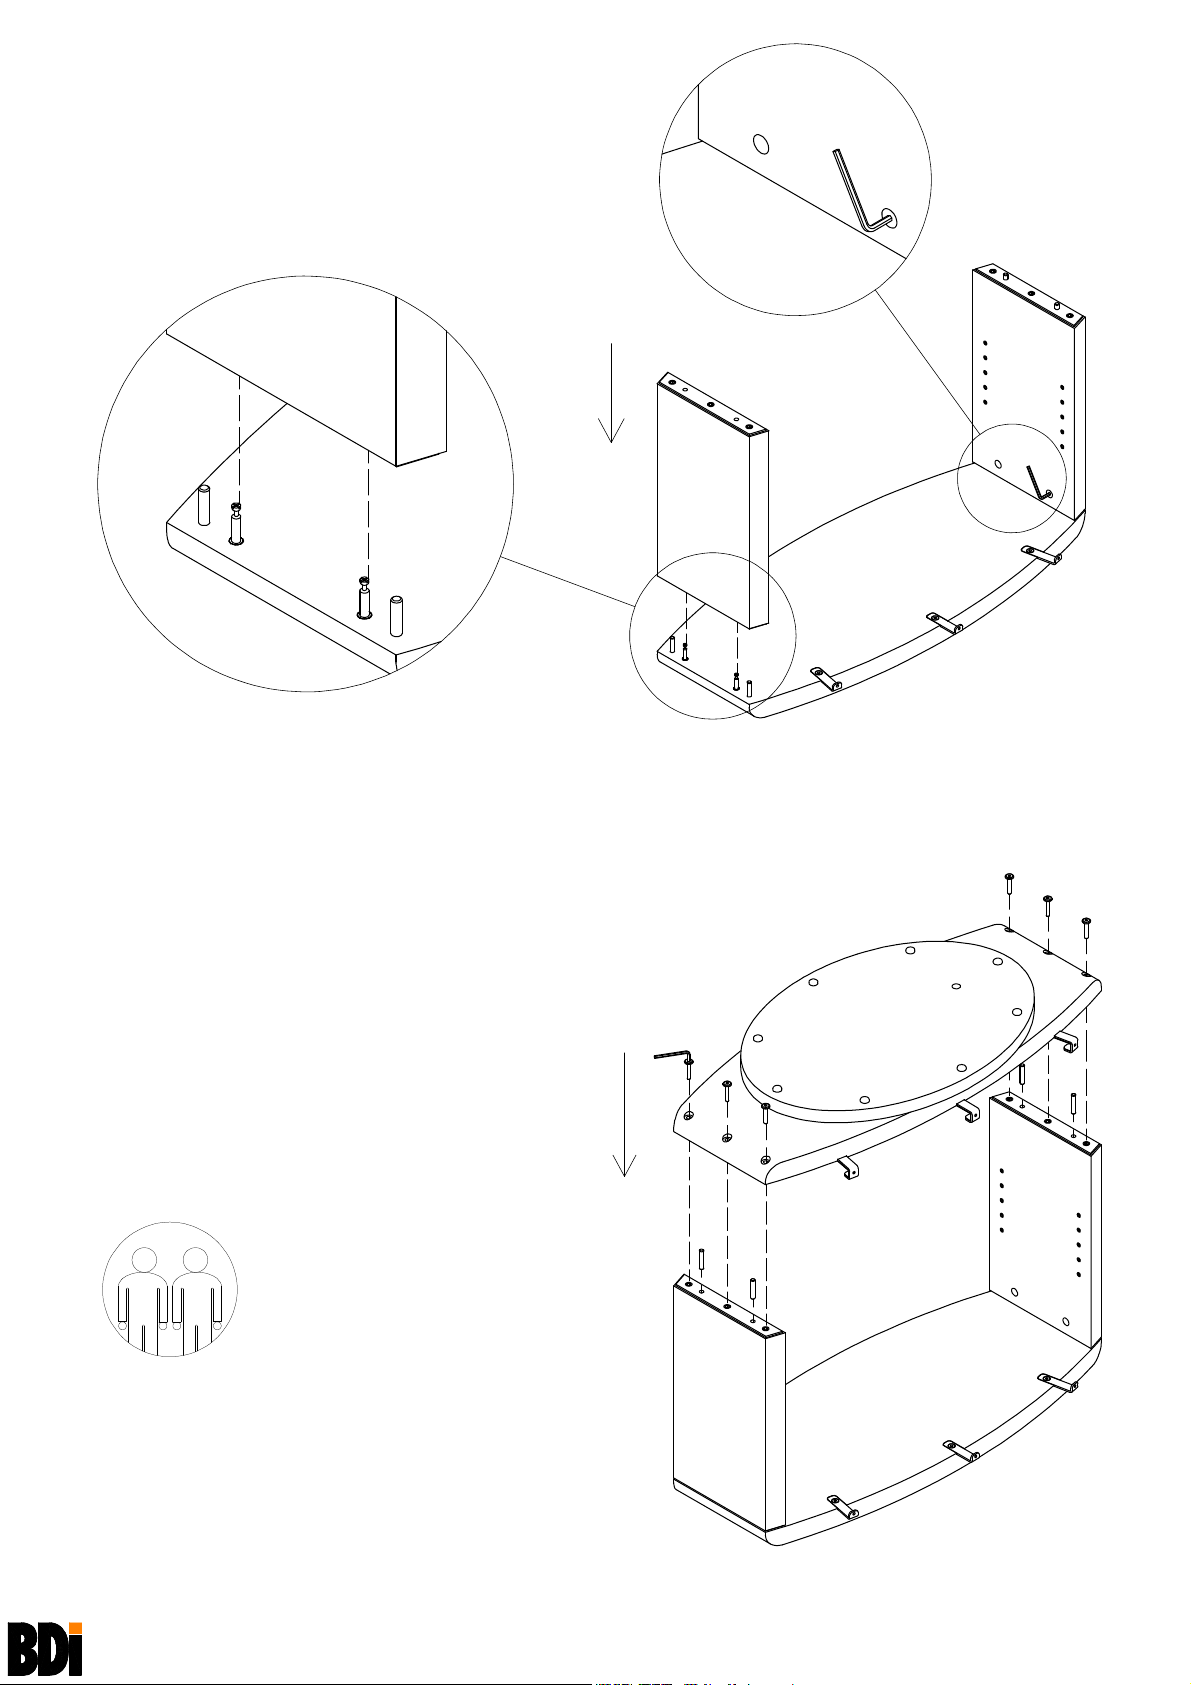
Step 5
Attach Side Panels to Top Panel
Attach Side Panels (O) to Top Panel (N) by lowering Side
Panels (O)
certain shelf pin holes face inward.
Tighten
onto Dowel Pins (D) and Cam Bolts (E). Make
Cam Fasteners (C) with 4mm Hex L-Wrench (B).
O
O
B
N
O
O
N
E
Step 6
Attach Base Assembly
Insert Dowel Pins (D) into Side Panels (O).
Attach
Dowel Pins (D) to align components. Make certain
Upper Brackets (I) and Lower Brackets (J) are on
same side.
Tighten
(B)
After
CAUTION: Do not turn unit over on Brackets.
Base Assembly (P) to Side Panels (O) using
Machine Screws (F) with 4mm Hex L-Wrench
.
Base Assembly (P) is attached turn Unit over.
D
N
P
B
F
F
F
F
D
Recommended
2-person Step
for easy
installation
VALERA
9721 9723 9724
D
D
O
N
ASSEMBLY INSTRUCTIONS
O
3 BDIUSA.COM CUSTOMERSERVICE@BDIUSA.COM
Page 4
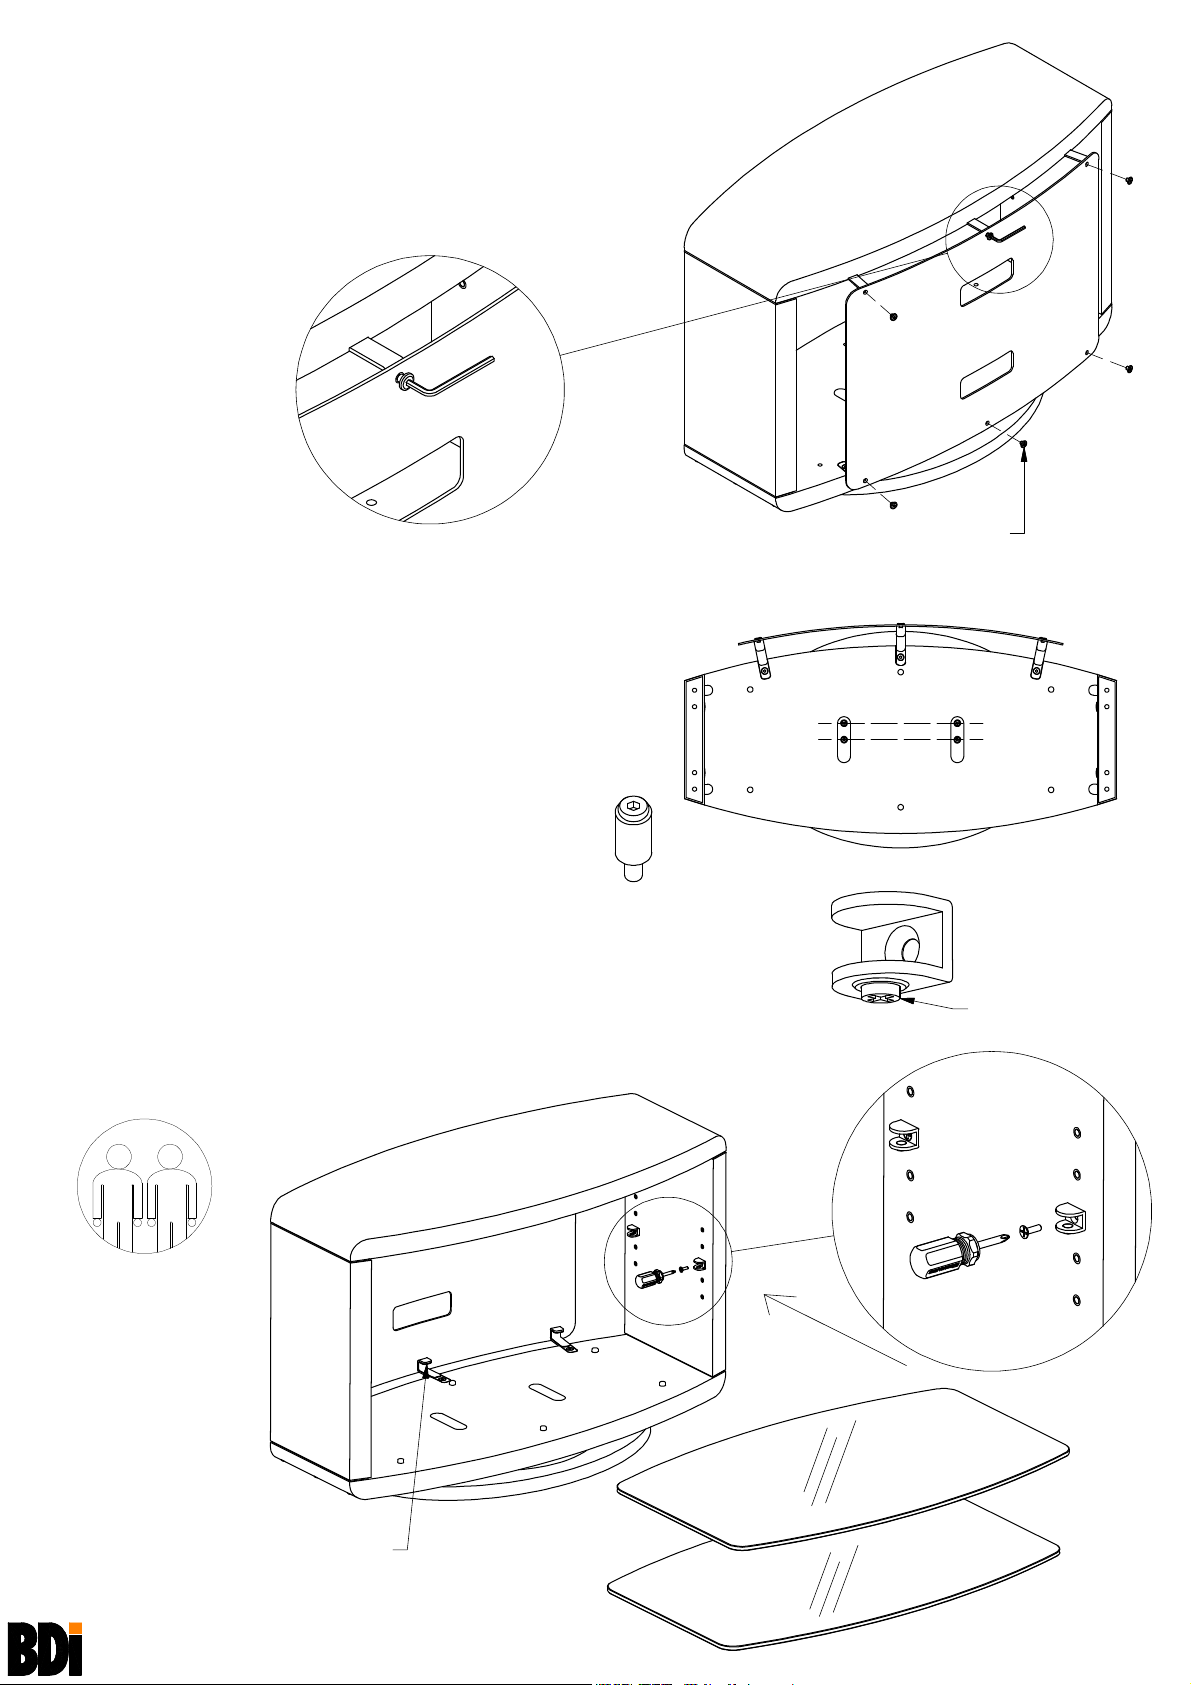
Step 7
Install Back Panel
Install Back Panel (Q) onto Upper Brackets (I) and Lower Brackets
(J)
with Machine Screws (H) using 4mm Hex L-Wrench (B).
Fasten the
and then fasten the outside
After
Lower Brackets (J).
Machine Screws (H) in the middle of the Back Panel (Q)
Machine Screws (H).
Back Panel (Q) is installed, then tighten Upper Brackets (I) and
H
H
H
Step 8
Set Swivel Position
Valera 9721, 9723 and 9724 feature a swiveling base. Note
Swivel-Lock Pins are factory-installed at Position 1
that
enabling the stand to swivel 15-degrees to left and
15-degrees to right.
To lock the stand in a fixed position, use
remove both
position)
To unlock the swivel for 360 degree rotation, remove
Swivel-Lock Pins.
Step 9
Install Glass Shelves
Note: Glass Shelves (R) are identical.
Install
Rubber Stem Bumpers (M) into Base Assembly (P).
Install Lower Glass Shelf (R) onto Base Assembly (P). Slowly slide Glass Shelf (R)
into place under Lower Brackets (J).
Install
Shelf Clips (K) into Side Panels (O) at desired height and tighten with
Phillips Screwdriver (A). Make certain set screw on Shelf Clips (K) faces down.
Install Middle
Clips (K) with Phillips Screwdriver (A).
Swivel-Lock Pins from Position 1 (factory
and re-install them at Position 2.
Glass Shelf (R) into Shelf Clips (K) and tighten set screws on Shelf
B
Hex Driver (B) to
Swivel-Lock Pins
Fasten the screws in the middle
fasten the outside screws.
Position 2
Position 1
H
of the panel and then
Shelf Clip (K)
Set screw faces down.
A
H
Fixed
Swivel
L
H
K
Recommended
2-person Step
for easy
installation
Carefully slide Glass Shelf (R)
under Lower Brackets (J).
VALERA
9721 9723 9724
4
R
R
ASSEMBLY INSTRUCTIONS
BDIUSA.COM CUSTOMERSERVICE@BDIUSA.COM
 Loading...